Community Brag Posts

Reclaimed Wood Outdoor Sofa

Submitted by Anonymous (not verified) on Sun, 07/30/2023 - 14:43

We had a small deck with many rotted boards. The contractor who demoed it, knowing my interest in diy projects, sorted out any usable boards. I loved the idea of an outdoor sofa, so altered your beautiful pattern to accommodate decking boards - I literally only had to purchase 2 boards for the entire project! I’m so thrilled with how it turned out! Thank you!!

Camey Brown

Built from Plan(s)

Simple Bed Twin

Submitted by GMWW on Mon, 05/28/2012 - 19:22

Total cost was under $200. The wood was a combination of select pine, Douglas fir. I used Minwax clear finish. Instead of slats I used plywood. This is going into the spare bedroom. We are quite pleased.

Built from Plan(s)
Estimated Cost
$200.
Estimated Time Investment
Weekend Project (10-20 Hours)
Finish Used
Minwax wood conditioner and Minwax clear Polyurethane fast drying.
Recommended Skill Level
Intermediate

Comments

GMWW

Fri, 06/01/2012 - 20:45

Yes it comes apart. A total of four pieces. Headboard, footboard, and the two sides. Also a fith piece if you count the plywood base for the mattress. The sides are screwed in at each of the corners of the head and footboards.

PSUlion01

Mon, 05/12/2014 - 19:01

Thinking of building this for my son as we move from crib to bed. Just curious how sturdy and strong the bed is? From the pictures it doesn't look like there's much wood where the rails attach to the head and footboard. Did you use pocket holes and screws? Any comments on how it's held up, what you might do differently? Also any idea if it'll hold a kid and parent for nightly story time?

Thanks...nice work!

GMWW

Wed, 05/14/2014 - 15:22

It is in our guest room and does not get much use. However, it is screwed in at the corners not with pocket screws because the rails were too close to the edges. I chose to screw them in starting farther back and at a 45 degree angle to send the screw deeper towards the center of the four posts. It is very strong. Another suggestion would to purchase bed hardware. Hardware can be found online or in a hardware stores for attaching rails to bed posts. I've used such hardware for fixing commercial beds I've purchased.

Hope this helps.

ShaunSmith

Sun, 11/02/2014 - 08:26

You did a beautiful job of making that bed. Any chance you could tell me where you put all the screws?  We have a Kreg Jig but are completely stuck on where to put the screws in without seeing them (because we'd like to stain).

GMWW

Tue, 01/20/2015 - 15:25

Sorry it took so long to answer. Where I put the screws depended on how the bed was going to be placed in the room. In our case, the headboard was going to up against a wall. Therefore the screws were on the wall side of the headboard. The footboard of the bed had the screws on the mattress side. Kreg sells pocket hole plugs that work very well. Glue them in after you screw the head and foot boards together and sand them before finishing.

The sides of the bed that are attached to the head and foot boards and screwed in too. I had to screw them in at a sharper angle to get enough sideboard material but deep enough into the head and foot boards in. Use the longest screws possible for strength without going all the way through the four corner posts.

GMWW

Tue, 01/20/2015 - 15:37

Sorry I had to take a look again at the underside of the bed. I actually used the pocket hole screws on the sideboard to attached to the foot and headboards cross pieces if that helps.

GMWW

Tue, 01/20/2015 - 15:50

Either way described above will work. See added photos of plugged finished pocket holes and underside attachment to foot-board.

Farmhouse Nightstand

Submitted by rendall28 on Sun, 05/31/2020 - 14:10

This was my first furniture piece that I have made. I made two night stands, one for each side of the bed in our master bedroom. I chose to modify the plan so I could have ball bearing drawer slides.

Built from Plan(s)
Estimated Time Investment
Week Long Project (20 Hours or More)
Finish Used
Briarsmoke Stain for table top...Special order white paint to match the white woodwork in our home.

Simple Outhouse

Submitted by Anonymous (not verified) on Thu, 06/18/2020 - 13:45

We used the plans from the Simple Outhouse to make a space to hold our porta potty. The door is a repurposed barn door and I think it looks amazing! These plans were perfect for us as we were able to build it in panels and reassemble on our property by the lake. Some screened windows to allow for ventilation and light were the finishing touches. Thanks Anna for the simple to follow plans!

Built from Plan(s)
Estimated Cost
$200 Canadian
Estimated Time Investment
Weekend Project (10-20 Hours)
Finish Used
We used pressure treated wood for the base and deck. For inside, we repurposed some scraps of composite decking. Painted with exterior latex "driftwood".

Cedar Planter for Pole Beans

Submitted by swhitead on Mon, 07/20/2020 - 10:41

Increased width of box to 46" by using 8 fence boards instead of 3. put base at 12" down, lined box with landscaping fabric to hold dirt. Created trellis with 1x2 boards with 10" long corner braces, spaced screws 6" apart around edges and weaved cotton thread to create the trellis. Used 12" scraps of 2x2 to create a "slot" inside the center of the planter to support the trellis. Added container mix and green pole beans started in egg cartons earlier in the spring.

Built from Plan(s)
Estimated Cost
$35
Estimated Time Investment
Day Project (6-9 Hours)
Finish Used
None
Recommended Skill Level
Intermediate
Seasonal And Holiday

Modified TV stand

Submitted by Sb1212 on Mon, 11/07/2016 - 22:49

This measures 70in wide. I added a second shelf as well. I used plexiglass in the doors. I really love how this turned out!

Built from Plan(s)
Estimated Cost
60
Estimated Time Investment
Weekend Project (10-20 Hours)
Finish Used
Valspar Olympic Black paint satin finish
Recommended Skill Level
Intermediate

Comments

John Deere Green Barn Shelf

Submitted by Veronica P on Wed, 07/30/2014 - 22:08

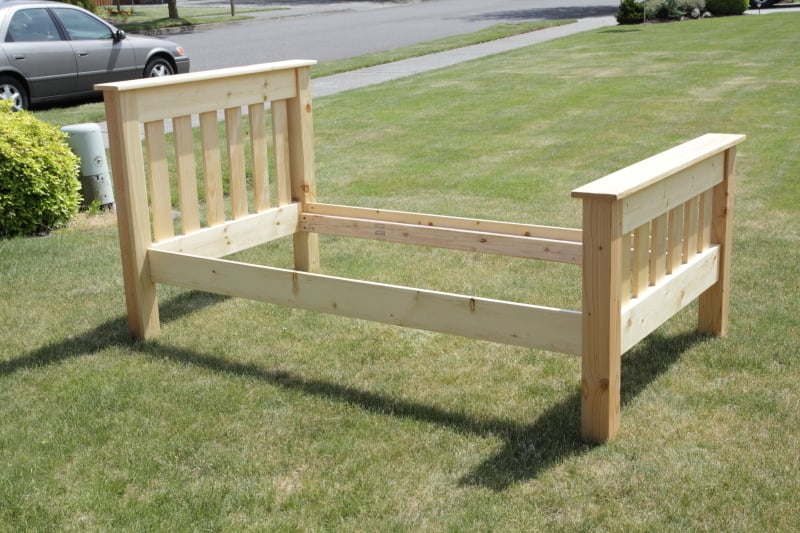
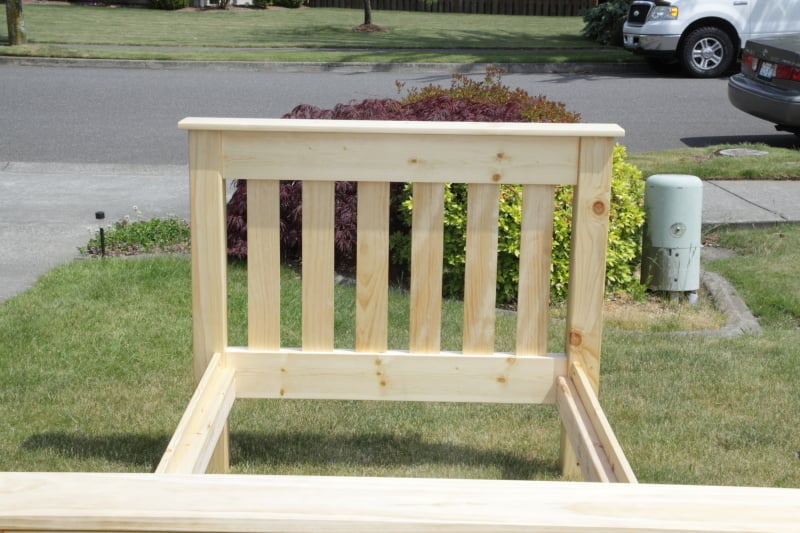
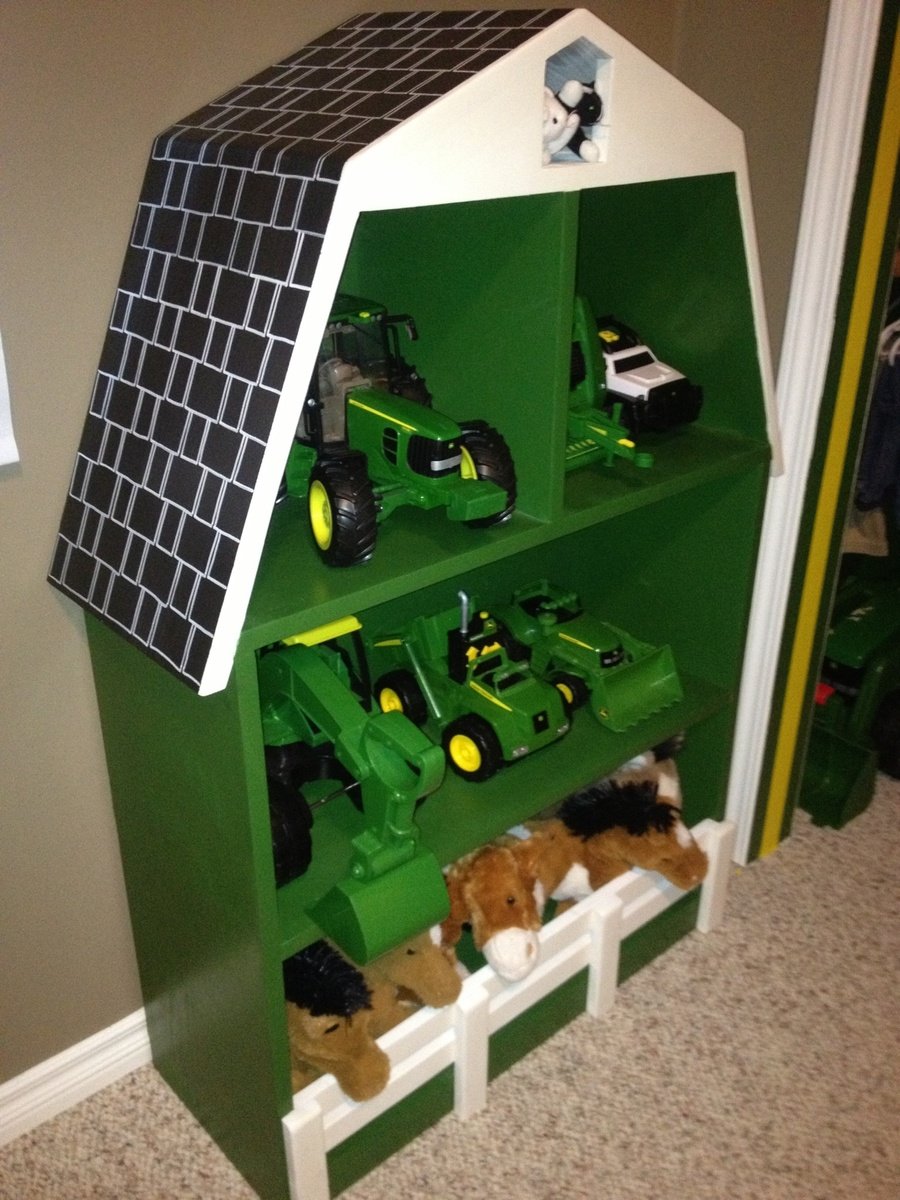
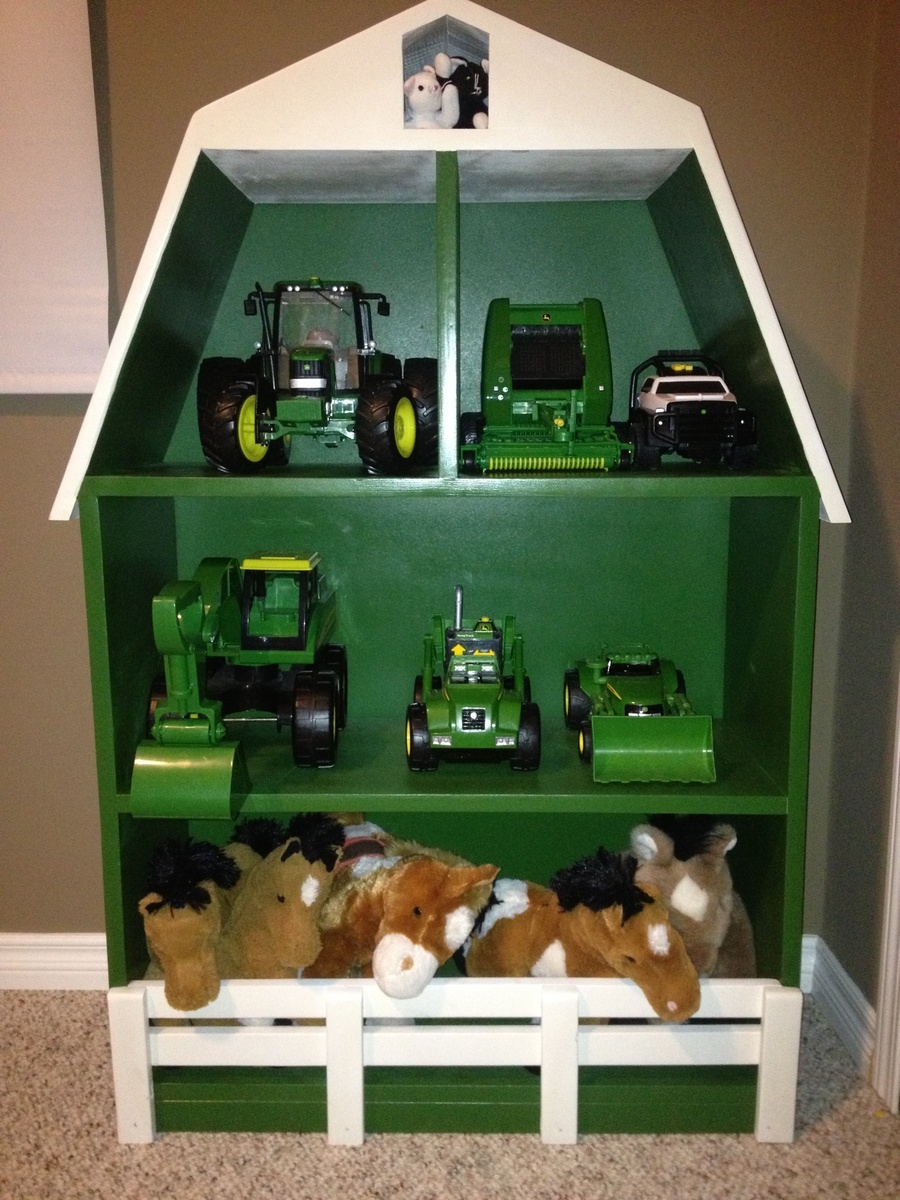
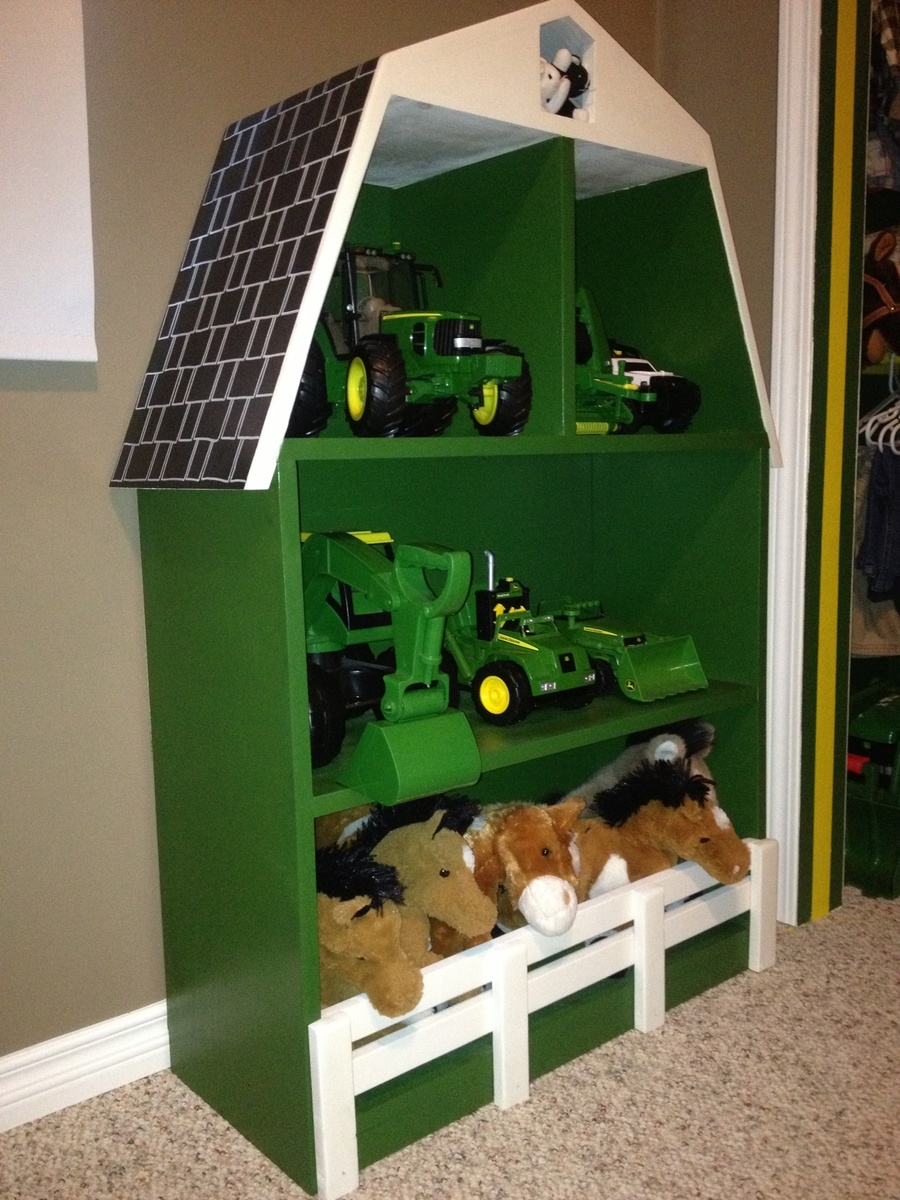
After finishing my boys' new John Deere room and tractor bunk bed (also posted), I saw this plan and thought it would be the perfect thing for some extra toy storage.

Yes, I know, barns are supposed to be red. Everything else in the room is John Deere green and I had paint leftover, which is not cheap. So green it is! I used my new paint sprayer for the first time on this project and am thrilled with it. I would recommend it to anyone who dislikes painting as much as I do. I bought the Wagner Flexio 590 which comes with a detail sprayer as well as the full size and I'm very happy with both.

Thanks to Ana for the well laid out, easy to follow plan and also for helping me create a big boy room that my boys love!

Built from Plan(s)
Estimated Cost
$60.00
Estimated Time Investment
Weekend Project (10-20 Hours)
Finish Used
John Deere green paint plus primer, black & white paints, white paint marker for the shingle detail and satin polyurethane.
Recommended Skill Level
Starter Project

Comments

Veronica P

Thu, 07/31/2014 - 09:38

Thanks so much for your comments. It's so nice to hear positive feedback since I'm very new to this! My 3yr old is quite particular about everything being in its place, I'll pass along that you liked his animal placement. Lol :)

Tilt Out Trash Bin

This was my first project using an Ana White plan....Modified it a bit...quite happy with how it came out...it was very low cost to make and a lot of fun.

Estimated Time Investment
Weekend Project (10-20 Hours)
Finish Used
Varathane Stain....Spring Oak
Recommended Skill Level
Beginner

Adirondack chair from Pallets

Submitted by Anonymous (not verified) on Fri, 03/24/2017 - 19:42

I decided to try and use the plans on Ana's site but with a twist. I wanted to limit myself to using only pallets. I think it turned out great! I can't upload all the photos because they exceed the maximum size limit. If I was able to you could see how each chair is slightly different and has a lot of character. I finished them with a waterproofing oil which I highly recommend over other finishes. 

Estimated Cost
$10 for screws.
Estimated Time Investment
Afternoon Project (3-6 Hours)
Finish Used
Cabot oil
Recommended Skill Level
Beginner

Comments

Barn Door Media Cabinet

This was a fun project. It took nearly 3 months to complete. Nights, weekends and a few finish redo's :). 

Built from Plan(s)
Estimated Cost
$700
Estimated Time Investment
Week Long Project (20 Hours or More)
Finish Used
Paint, stain and polyurethane
Recommended Skill Level
Intermediate

1x12 Wood Bulk Bins

Submitted by carongirls on Mon, 01/26/2015 - 05:42

I made my bins 36 incheg to fit my space.  My big box blue store has 1x12x8 utulity shelving boards for $13 compared to $27 for the 12 footers. 

Built from Plan(s)
Estimated Time Investment
Day Project (6-9 Hours)
Recommended Skill Level
Beginner

Comments

2x4 Outdoor Chairs and Side Table

I built the 2 chairs and side table using Ana's plans. Wood in the UK is perhaps not as cheap and ubiquitous, so I managed to get hold of some rough siberian larch to build them. After what seemed like a lot of sanding I started cutting. I've used stainless steel screws and have used a plug cutter on a mahogany board I had to plug the screw holes. I really liked the contrast and neatness that this has given the project. I also used some rubber feet to raise it off the ground and try and reduce any water damage. The side table is reduced in size from the 2 foot version in the plans, this was easy enough once I'd worked out the impact on all of the other measurements. My wife has commented that I should have used less wood in my next project as they are very heavy, they certainly aren't going anywhere! My wife did produce the lovely grey cushions that you see in the pictures.

Estimated Cost
120
Estimated Time Investment
Weekend Project (10-20 Hours)
Finish Used
Used a wood preserver followed by a coat of stain to obtain the light finish seen
Recommended Skill Level
Intermediate

Comments

Had to adjust the width to fit better / but I did it!!

Submitted by Anonymous (not verified) on Sun, 06/13/2021 - 13:09

I had to adjust the width to fit my much wider "Seat".
:P...Also that rear angle was a struggle...Otherwise plans were spot on!
Thanks Ana.

Estimated Cost
50
Estimated Time Investment
Afternoon Project (3-6 Hours)
Finish Used
Not decided Yet.
Recommended Skill Level
Intermediate

Comments

Back