Community Brag Posts

Small Planter Stand
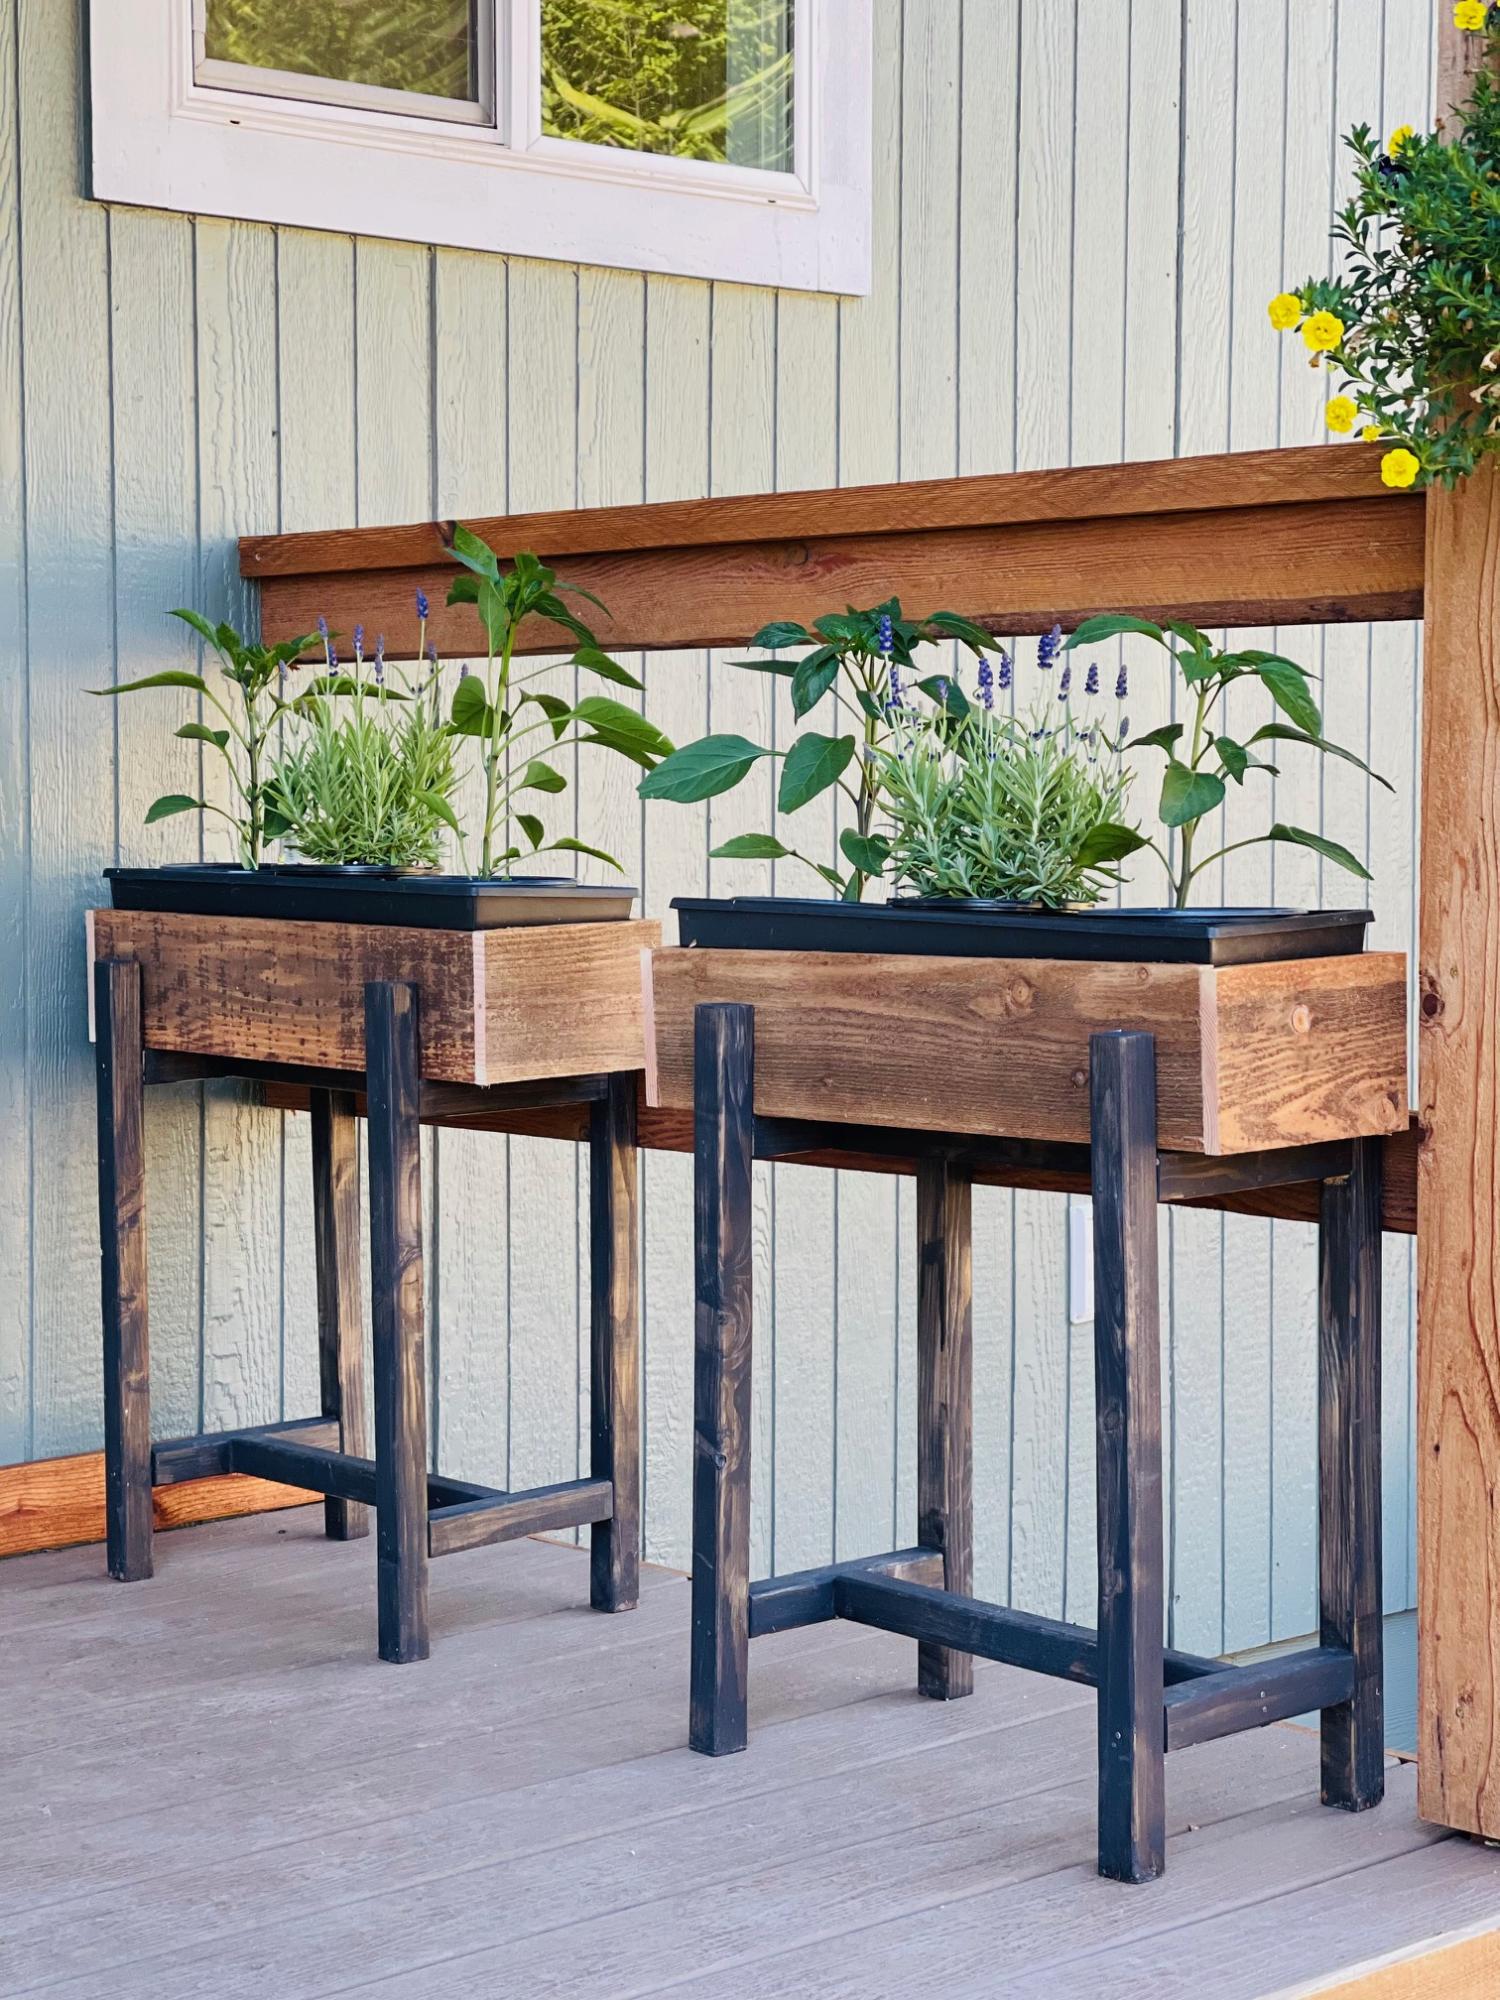
Easy build and I like how I can just set planters inside the top box and change out easily!
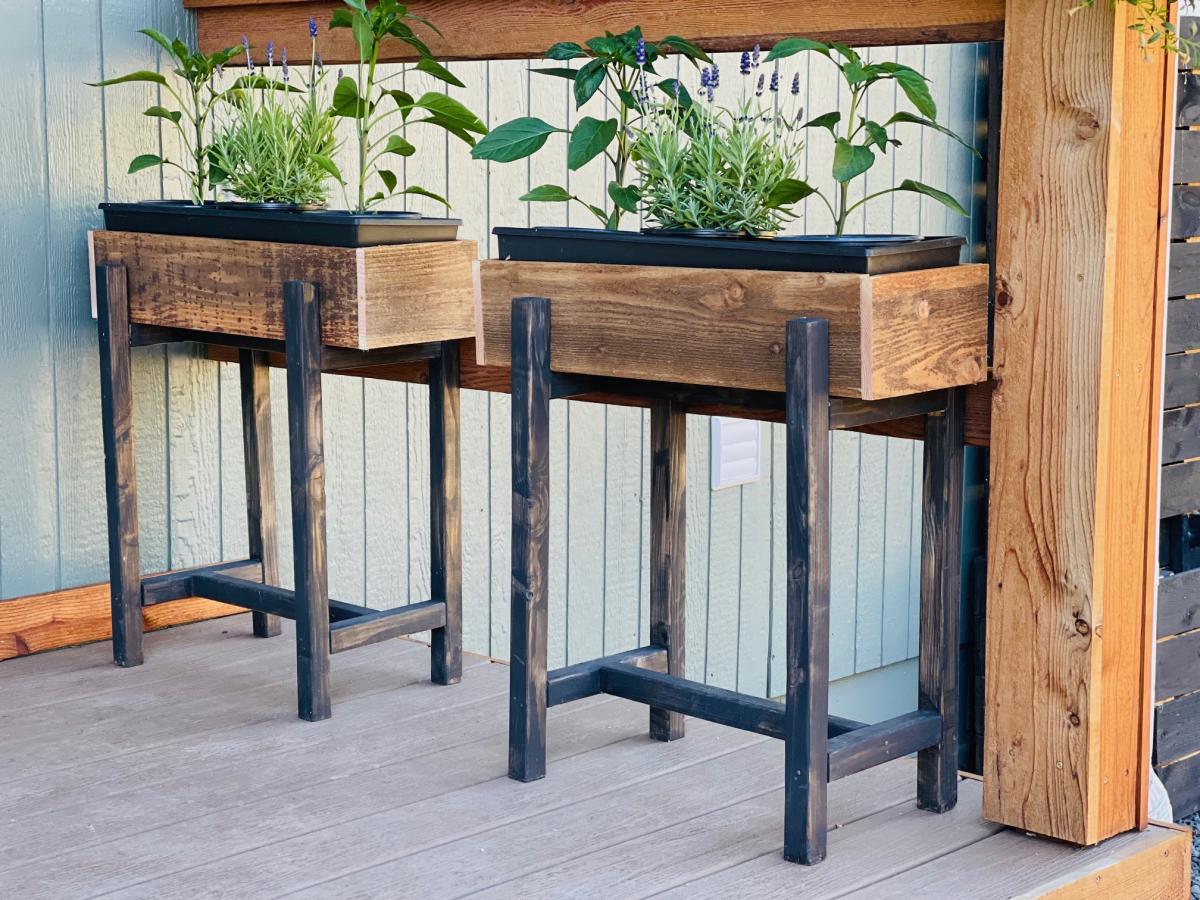
Built from Plan(s)
DIY Farmhouse TV Console
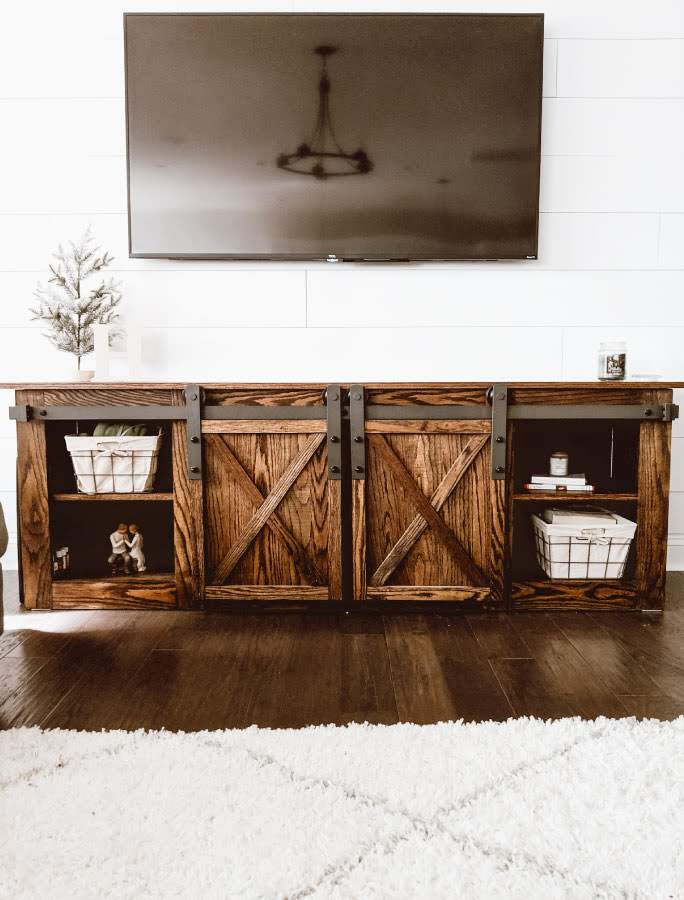
This was the second piece of furniture that my husband and I ever made. We had built a coffee table that had a lift up top so that we could eat dinner on the couch and store all of our board games. Once we tackled that, I thought we could conquer the world (even though the table was pretty basic). So when my now-husband was about to move into his first apartment without a roommate and I saw it as an opportunity to decorate my own place (even though I wasn’t living there). Luckily,he agreed it was time to get rid of his tiny Ikea TV stand that was probably 2ft off the ground and not a great height for a TV, and agreed to build this awesome TV console with me. To this day, it’s still my favorite piece of furniture in our house.
Comments
Sat, 11/09/2019 - 14:12
Love this, needing one in my…
Love this, needing one in my front entry way. How long did it take?
Cabinet Style Farmhouse Nightstand

Bedroom DIY Suite
Paul Burdine
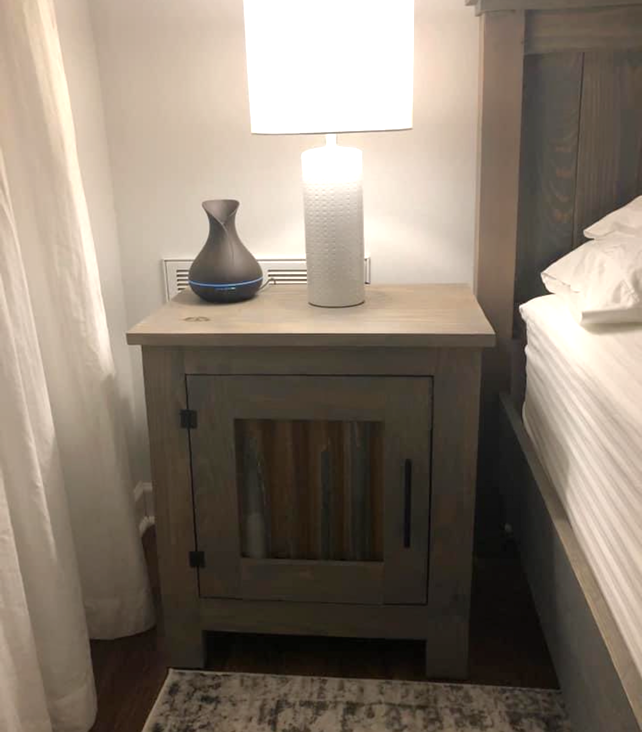
Built from Plan(s)
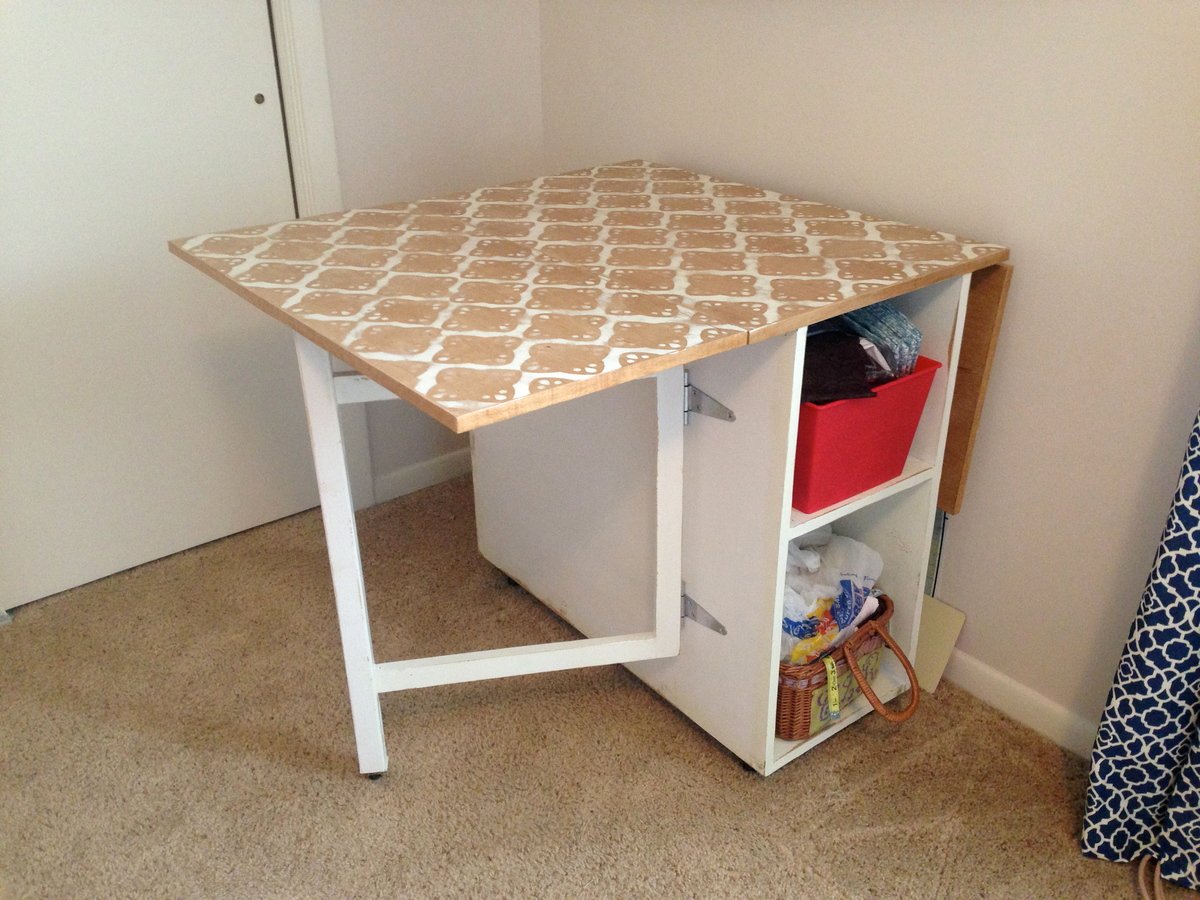
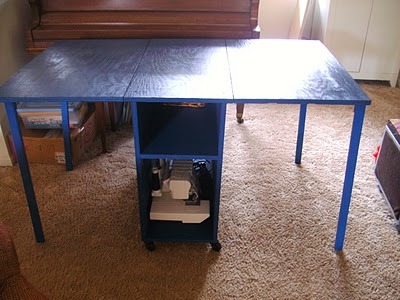
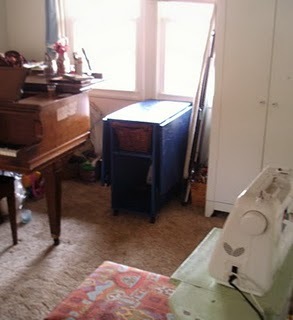
Gate-Leg Sewing Table
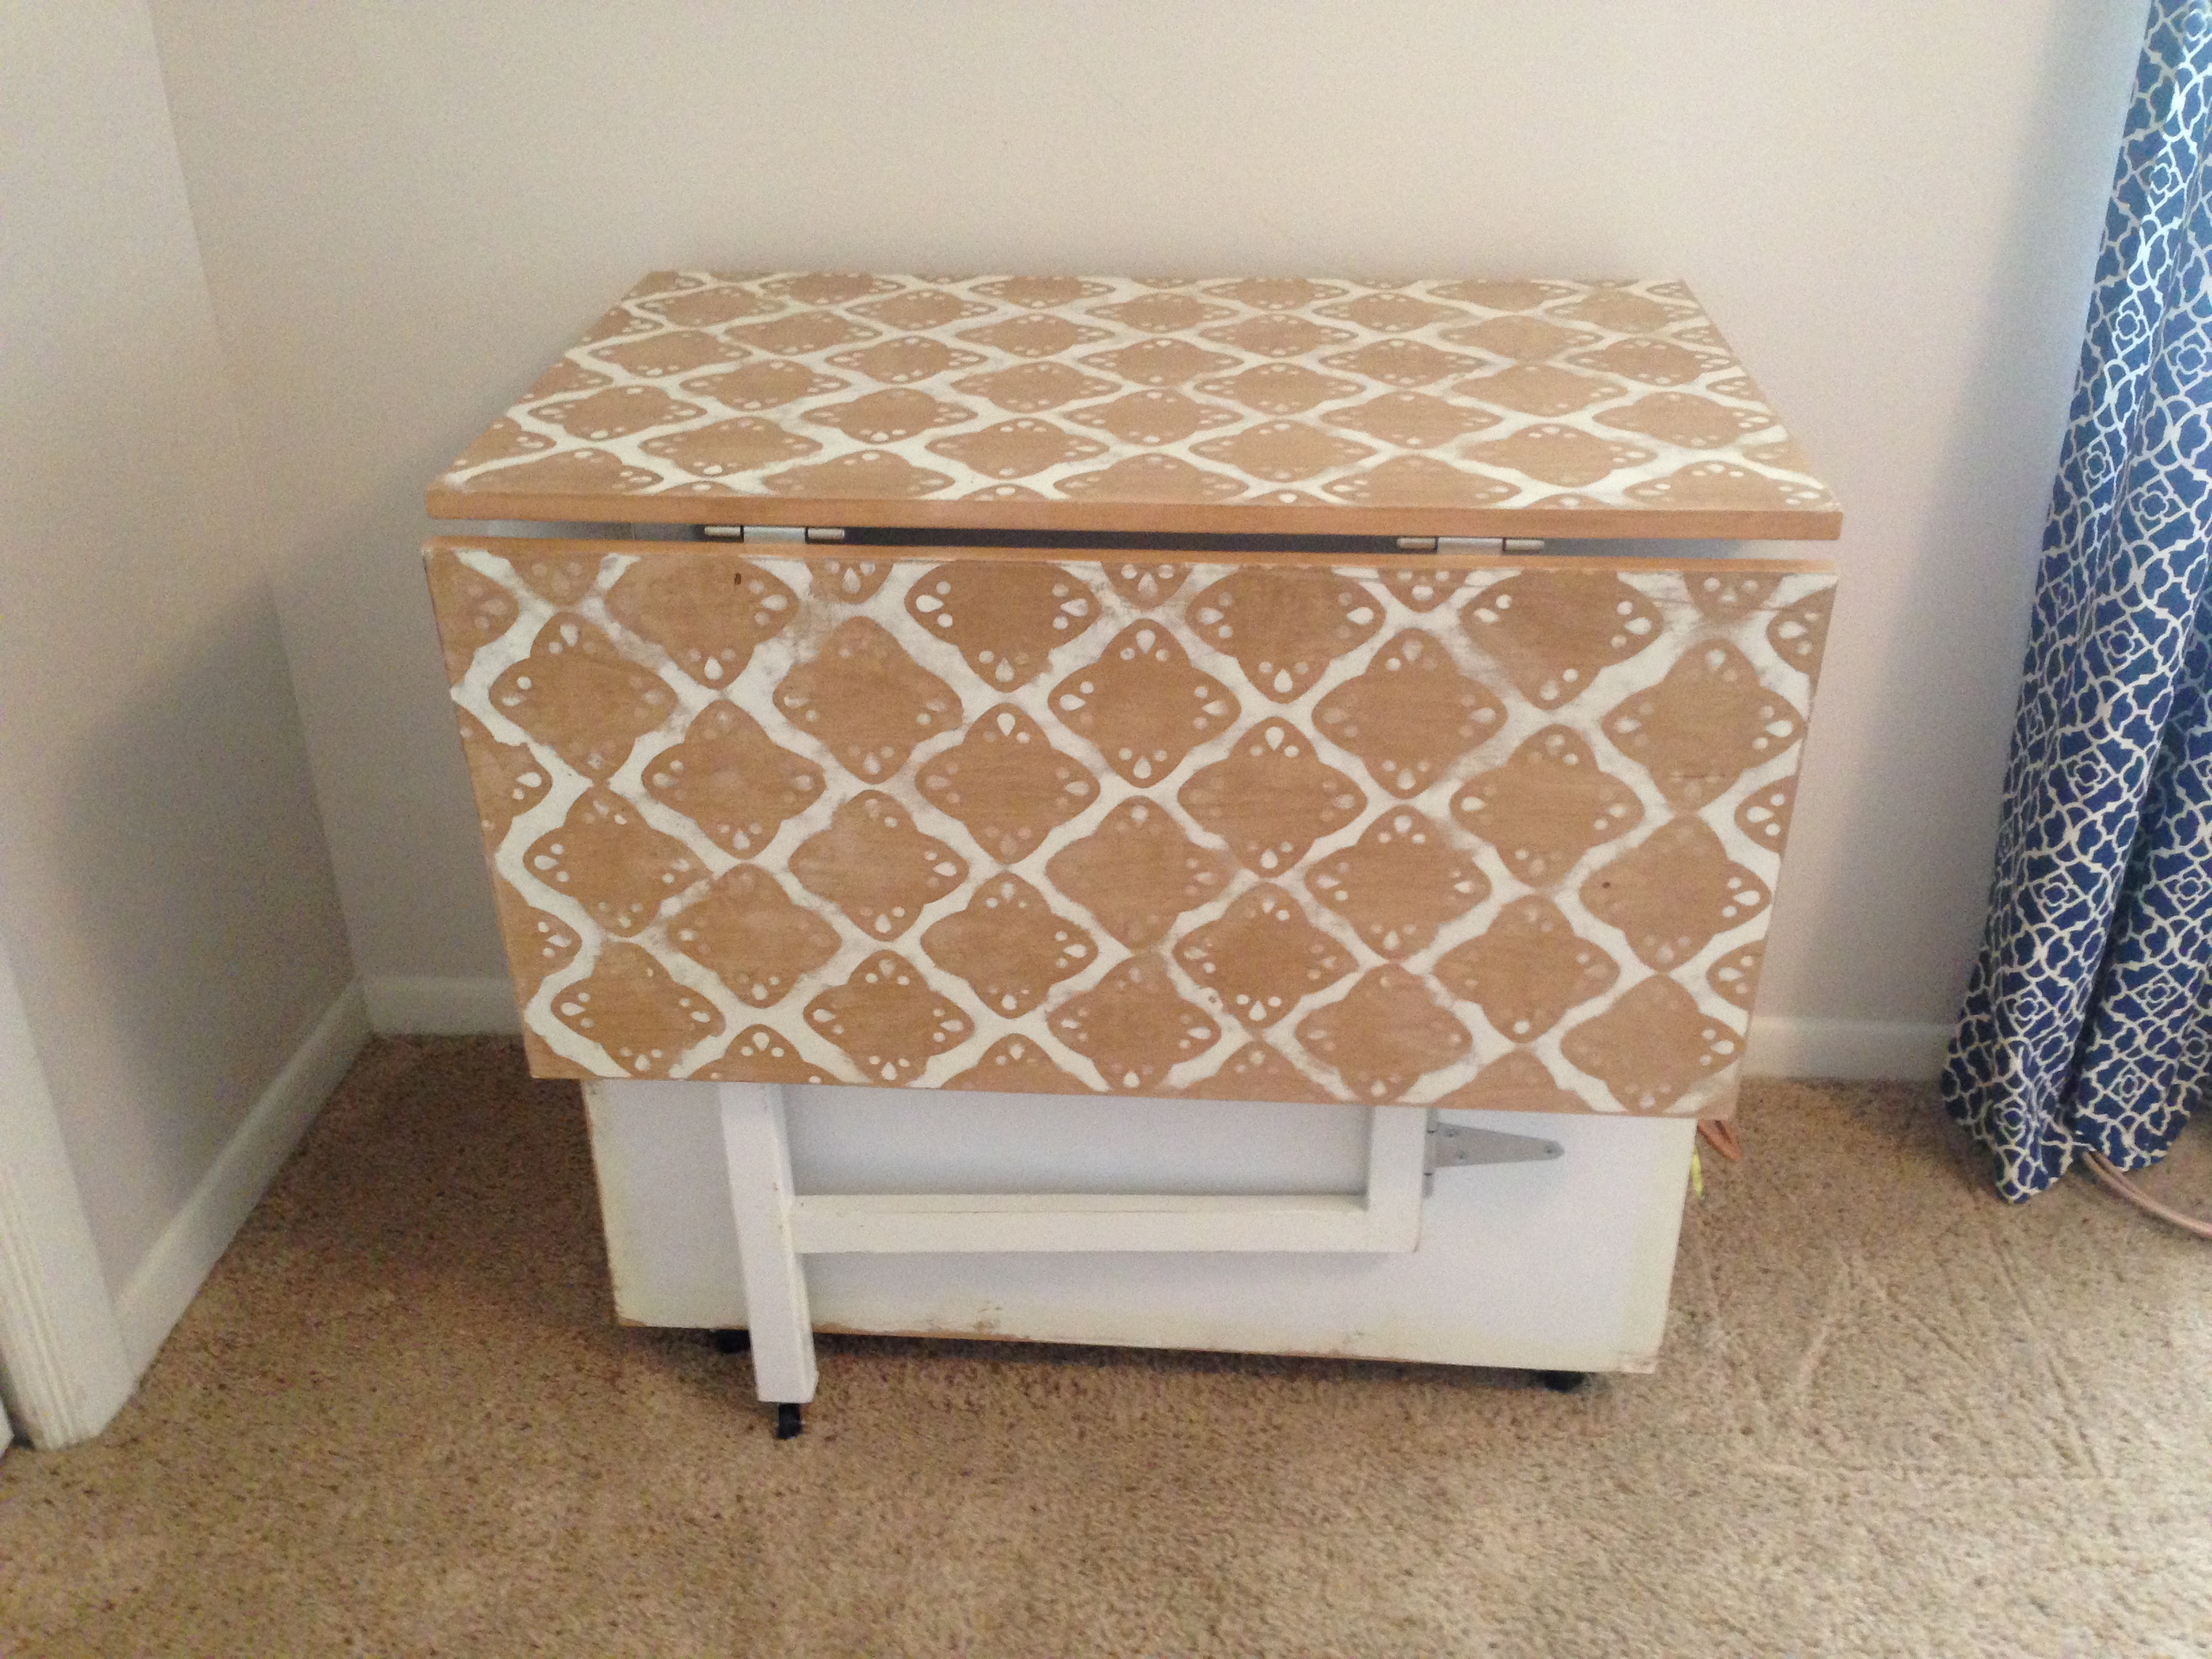
My husband and I built this table as our first project. We followed all of the dimensions from Ana's "Small Sewing Table" project here: http://ana-white.com/2010/10/plans/sewing-table-small-spaces?page=1 The only thing we changed was the size of the table top and the legs. We were worried about putting my heavy sewing machine on top of the leaf called for in the plan, so we created gate legs to support the leaves. Since the legs were going to be folded up in between the base and each leaf, we extended the center portion of the table top to accommodate the change. After it was assembled and stained, I decided that I didn't like the solid color, so I stenciled on a pattern with white latex enamel paint (what I had on hand) and continued to paint the base. After lightly scuffing it up with the sander, I layered 3 coats of poly on top. It has held up well, even after many large quilt projects! I just LOVE my sewing table!


Built from Plan(s)
Estimated Cost
$120
Estimated Time Investment
Weekend Project (10-20 Hours)
Finish Used
Golden Oak Minwax Stain
Polycrilic
Valspa Latex Enamel in Satin White
Polycrilic
Valspa Latex Enamel in Satin White
Recommended Skill Level
Beginner
Comments
Fri, 08/05/2016 - 13:41
Brackets for leg(s)
Hi there. Could you please tell me what the brackets are you used with the gateleg? Do you remember where you got them? Thank you!!!
Fri, 05/26/2023 - 16:59
Gate-Legs Construction
Hello I was wanting to know how to make the Gate-Legs for this project? Like the measurements and such. Thank you.
Sun, 05/12/2024 - 08:40
How much can it hold
How heavy of sewing machine can this hold? My machine is 32 lbs. Would it be able to sit and be used on the “leaf” side of the table ?
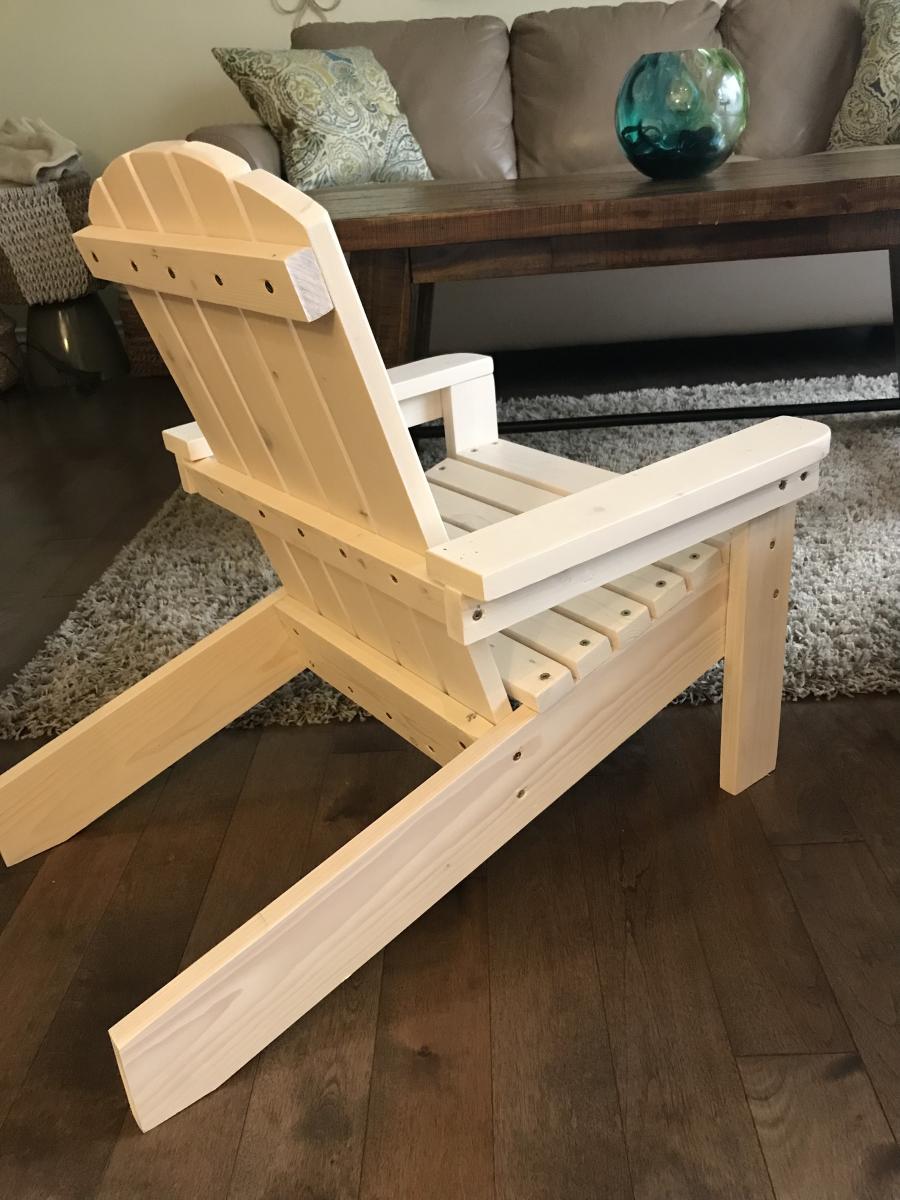
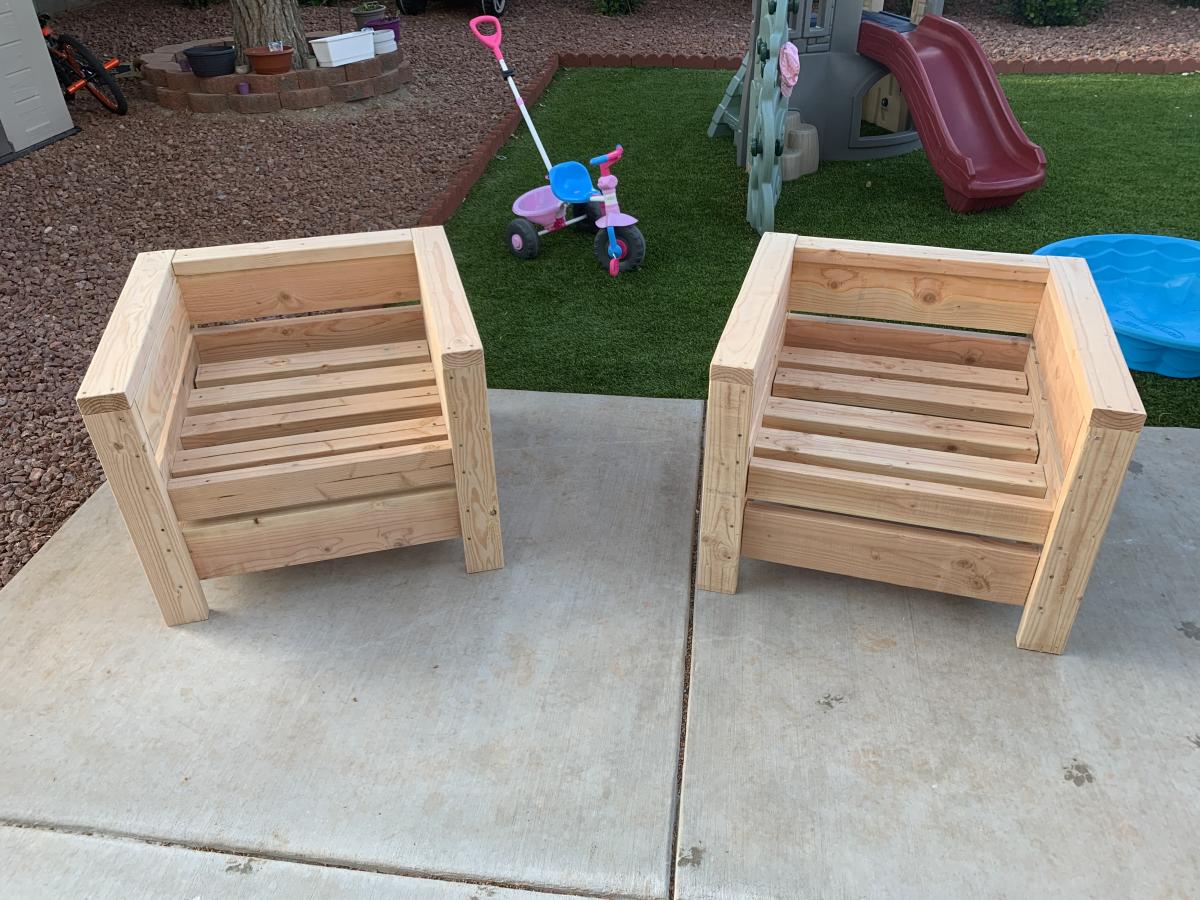
Kids Adirondack chairs
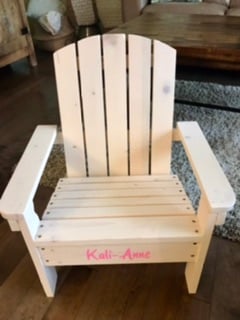
This was my first time building a chair. The plans were so easy to follow. The kids size fits an average child up to about age 5 or 6. If I were to build again I would add a bit of height to the backs so they could fit them even longer. My granddaughters aged 3 & 5 just loved them.
Built from Plan(s)
Sewing Table for small spaces
I loaded this project months ago, but somehow it was removed I believe during one of the websit updates. So far in my wife's crafting life she generally cuts things out on the floor. It's not so good. Our dining room table is usually covered in food or playdough so she generally just spreads things out on the floor. I realized how much she needed a table, and armed with new power tools from Christmas and my birthday, I set out to make me a crafting table. This was my first project.
Built from Plan(s)
Estimated Cost
$40
Estimated Time Investment
Afternoon Project (3-6 Hours)
Finish Used
Minwax blue rub on stain and sealer
Recommended Skill Level
Starter Project
Comments
Sun, 09/22/2019 - 11:13
Can you repost plans? This…
Can you repost plans? This is just what I'm looking for. Thanks!
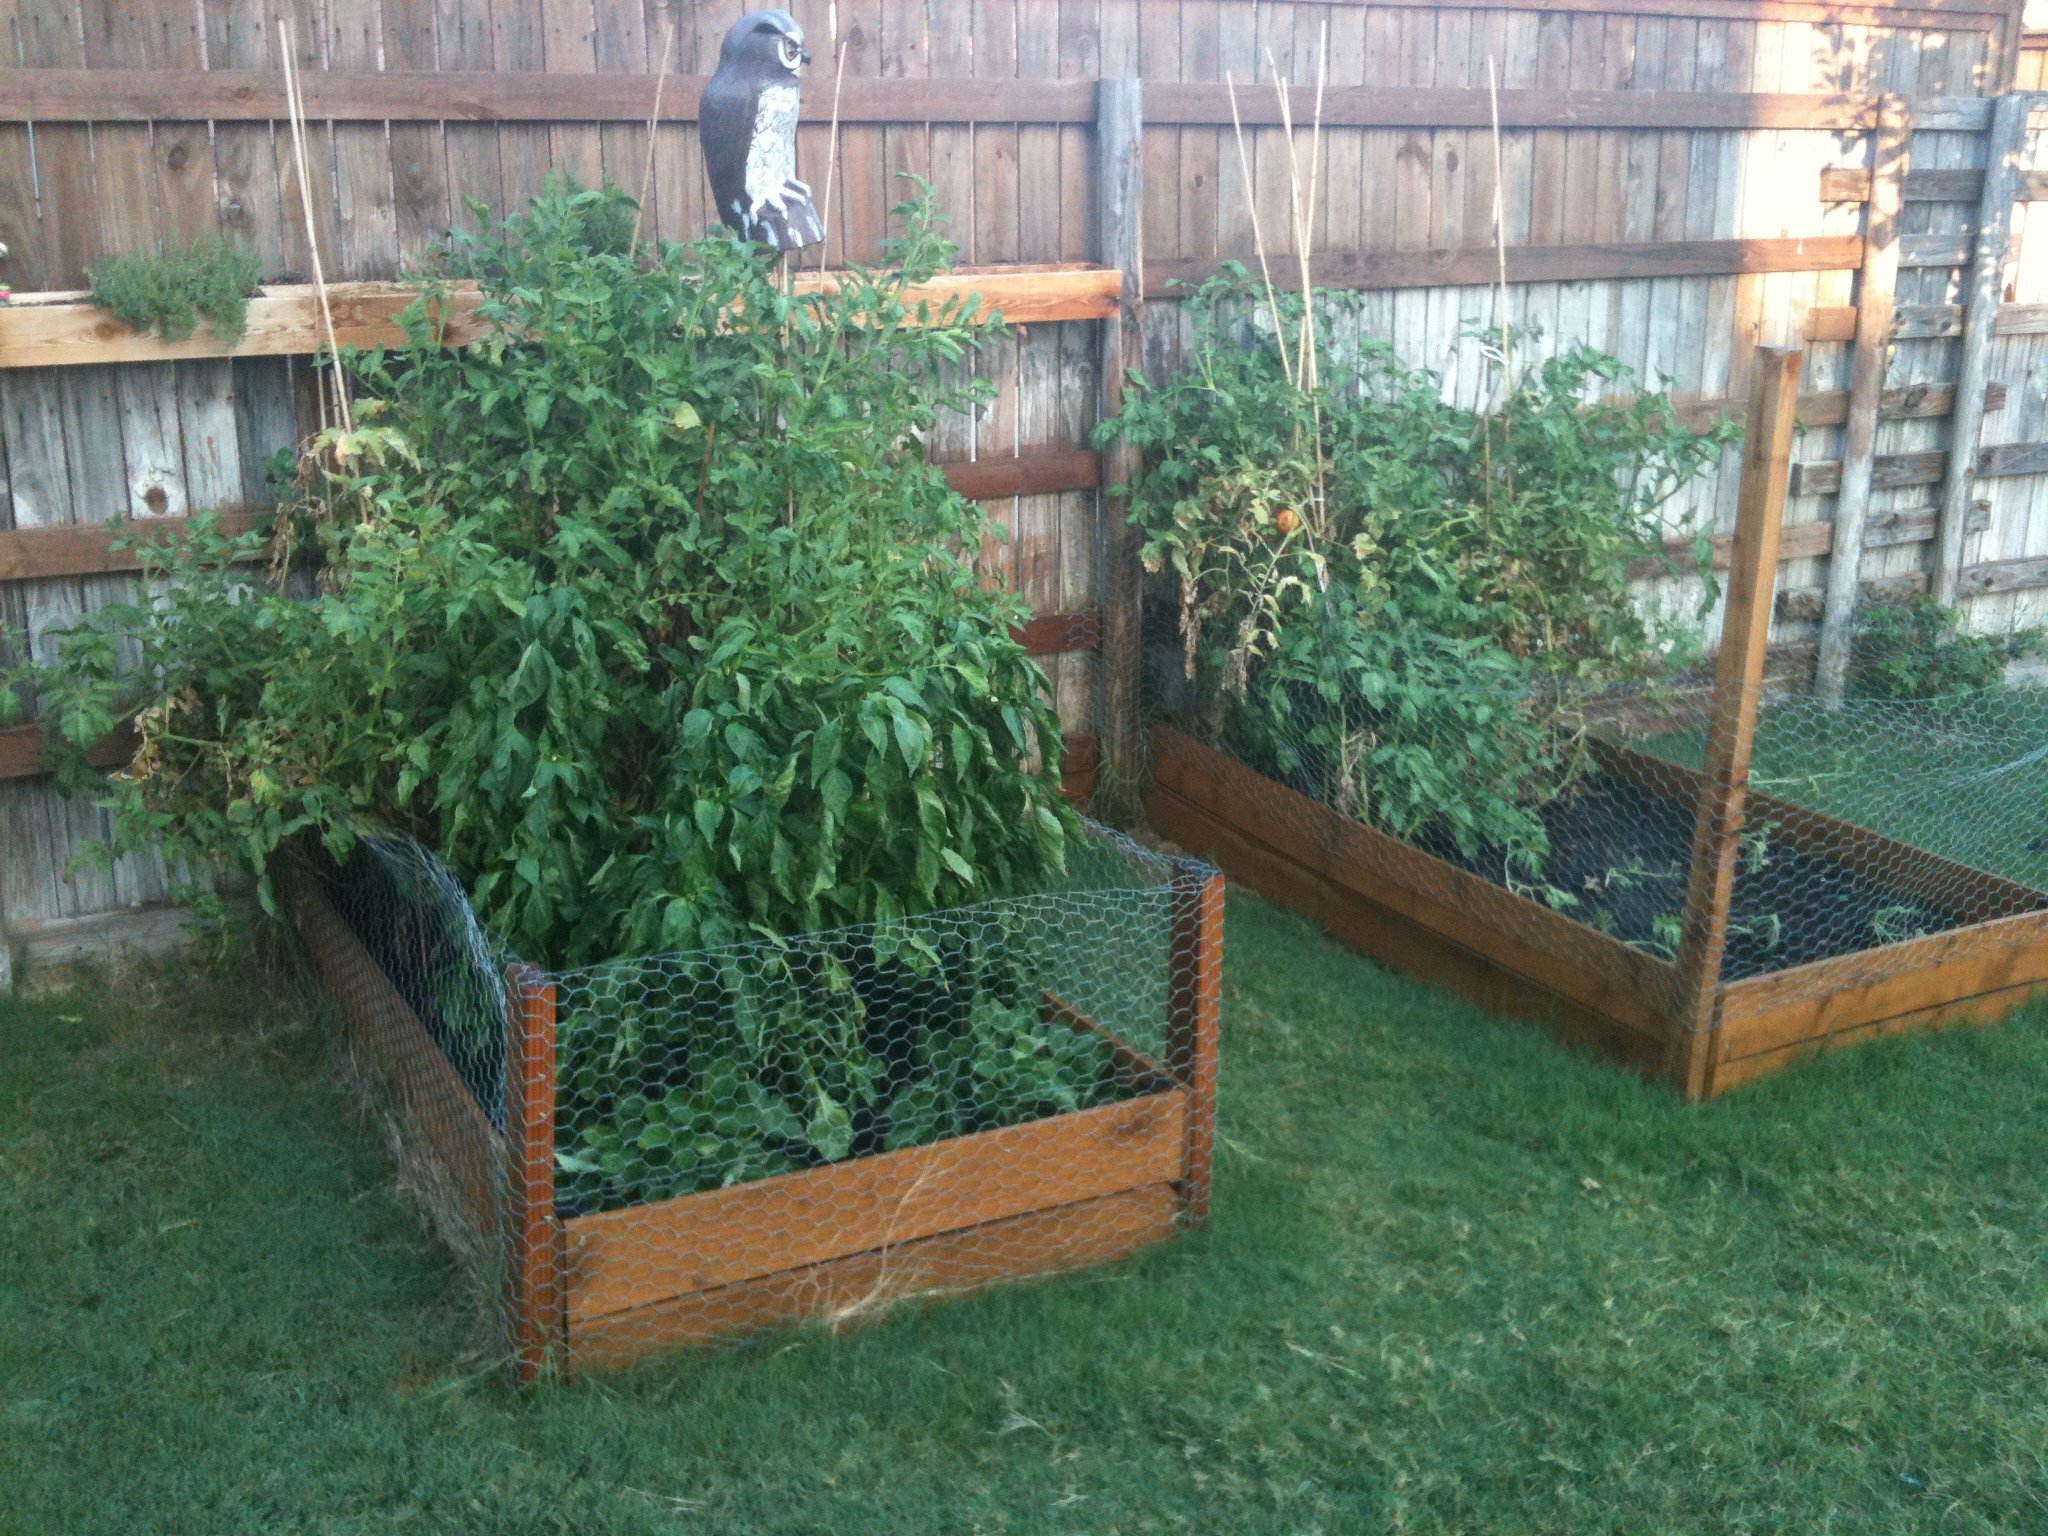
Cedar Boxes
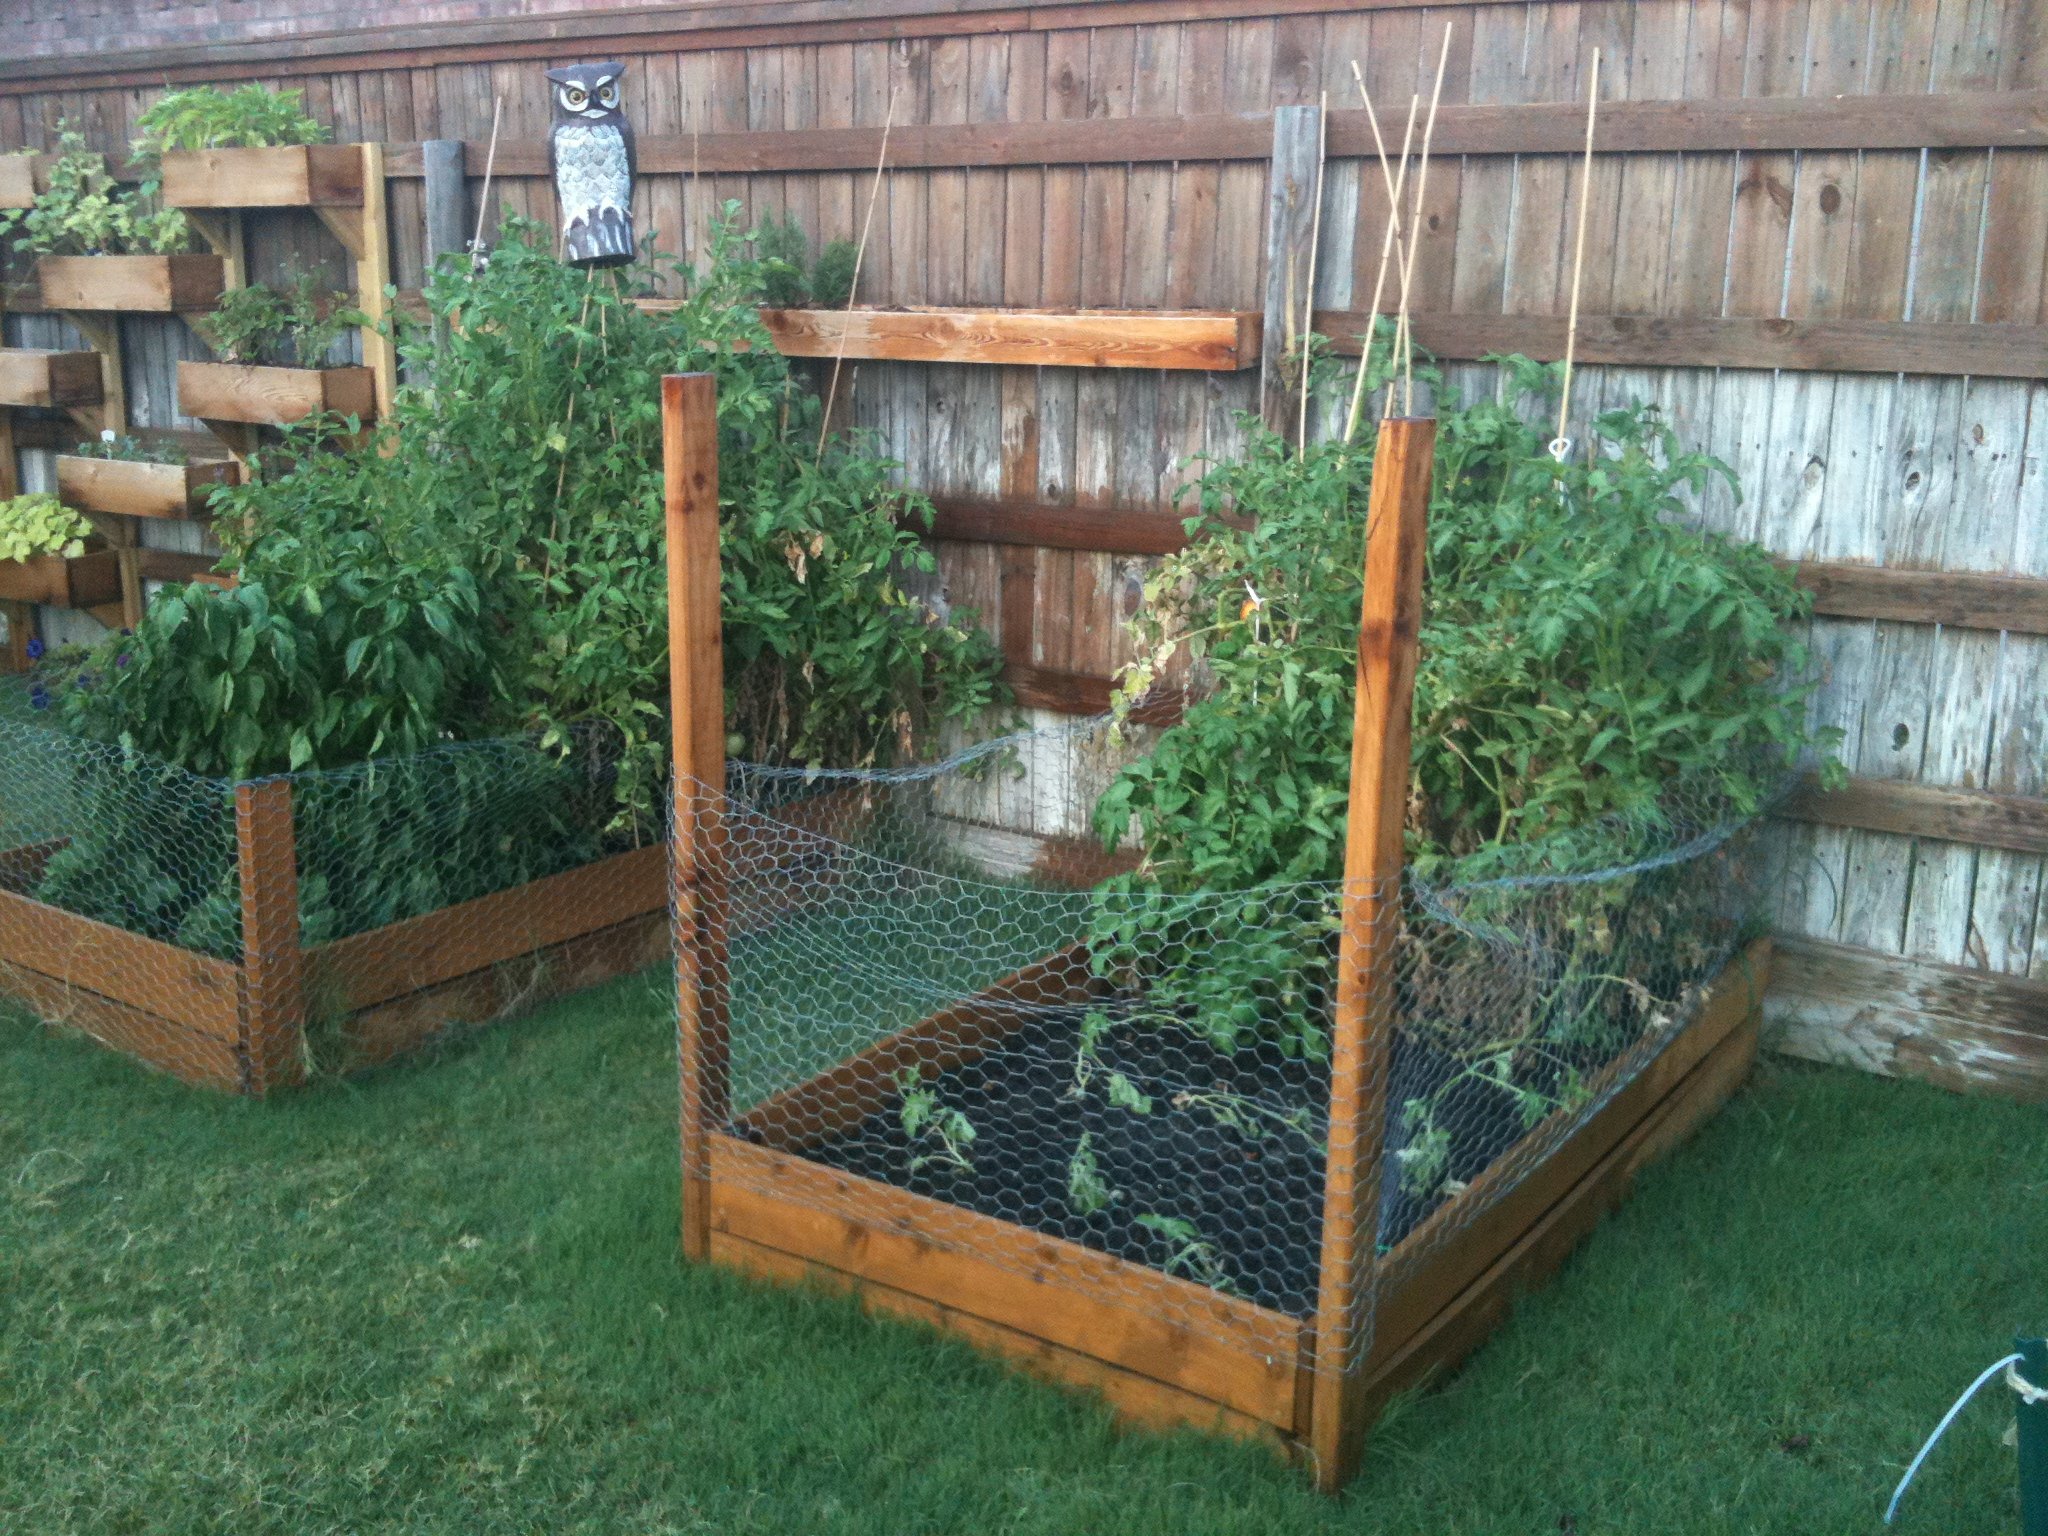
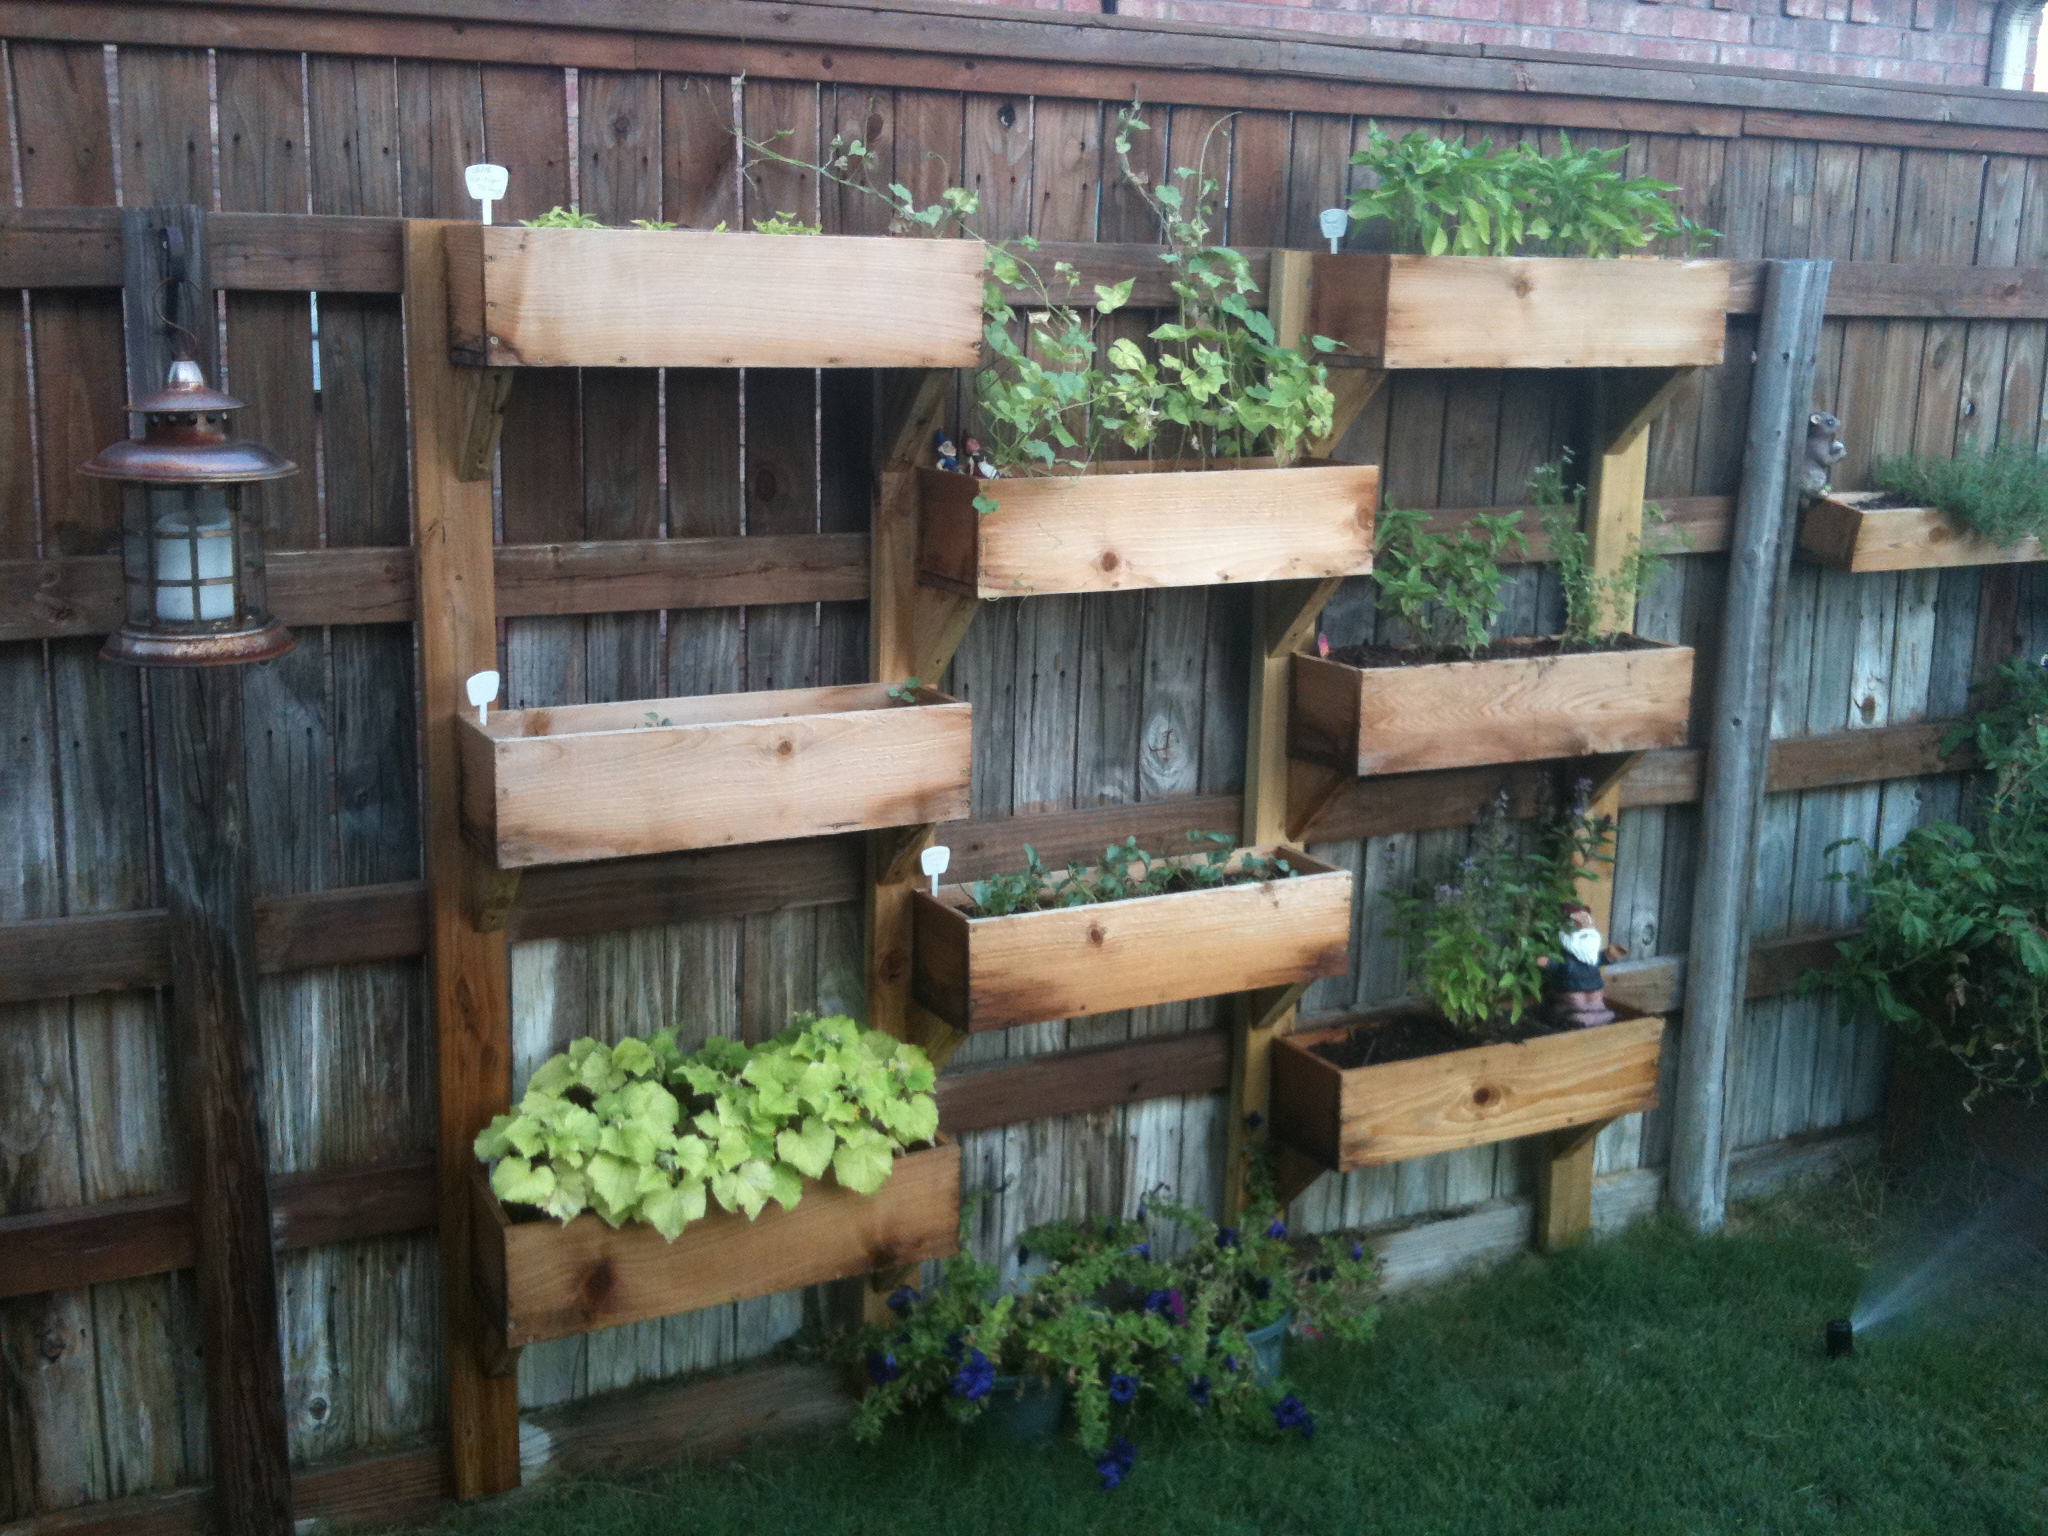
We built these before we saw these plans, but they are pretty much the same... We added the chicken wire to keep the rabbits (and our dog) out of the garden. We added the owl to keep the birds out. We've gotten a ton of tomatoes, onions, and bell peppers so far. Next year, we'll add a few more beds. We also added the verticle garden to take up less space, but its not deep enough. We'll make the next one deeper.
Built from Plan(s)
Estimated Cost
$30
Estimated Time Investment
An Hour or Two (0-2 Hours)
Finish Used
none
Recommended Skill Level
Starter Project
Comments
Sun, 07/10/2011 - 14:19
Love the vertical garden!
Love the vertical garden! What a wonderful idea! Did you line the boxes with plastic??
Thu, 11/17/2011 - 07:59
Success
We ended up getting a ton of tomoatoes and green peppers from the garden boxes. We've actually built a couple more. We'll probably double again before next spring. We're looking at adding more veggies.
We now have ton of stuff planted for the fall...
Tue, 04/03/2012 - 06:19
vertical box instructions?
i love the vertical boxes. I am just trying my hand at the world with a green thumb and could use as much advice as possible about how to make as well as to line the boxes or not to line them. All advice appreciated!
Fri, 11/23/2012 - 21:53
Hello there
Hi, my name is berman. I found you pin from my pinterest and your box garden is so great. I am a newbie in this field and so interested to build garden in my house. If i can ask you some question, could you please to answer that?
cheers,
berman
Tue, 03/10/2015 - 21:19
Vertical Box Instruction!
Hello! Do you mind sharing the Vertical Box Instructions? I absolutely love this idea!
Sun, 05/31/2015 - 21:00
Love the vertical boxes
Came across this beautiful design while searching for my next diy garden idea. Wondering if there are blueprints available
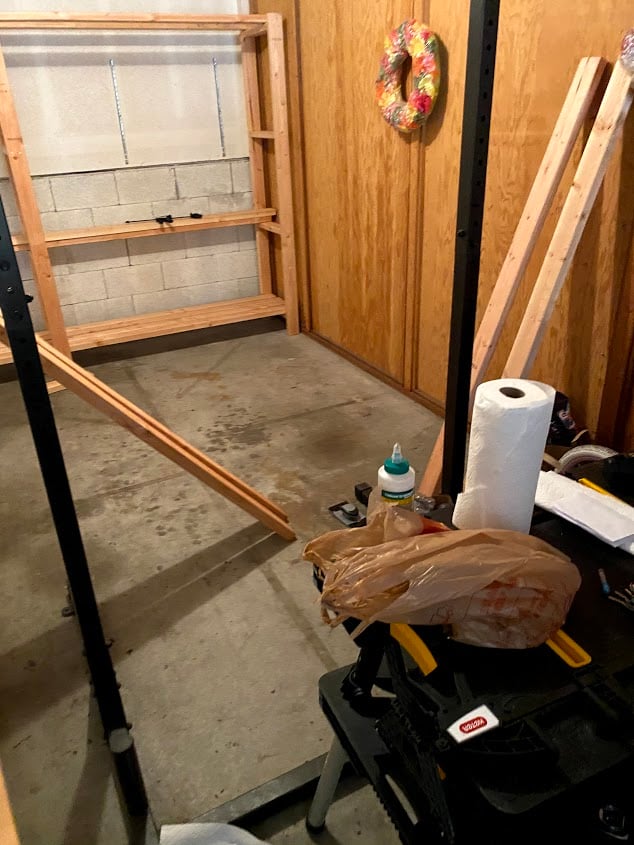
Garage shelving unit
We made this peace 12 feet long, the hardest part was to find straight boards at home depot and adjust the feet because of an uneven garage floor. It was my first big project and hubby helped so I can't take all the credits :)

Built from Plan(s)
Estimated Cost
$126
Estimated Time Investment
Afternoon Project (3-6 Hours)
Finish Used
Unfinished
Recommended Skill Level
Beginner
Outdoor Sectional
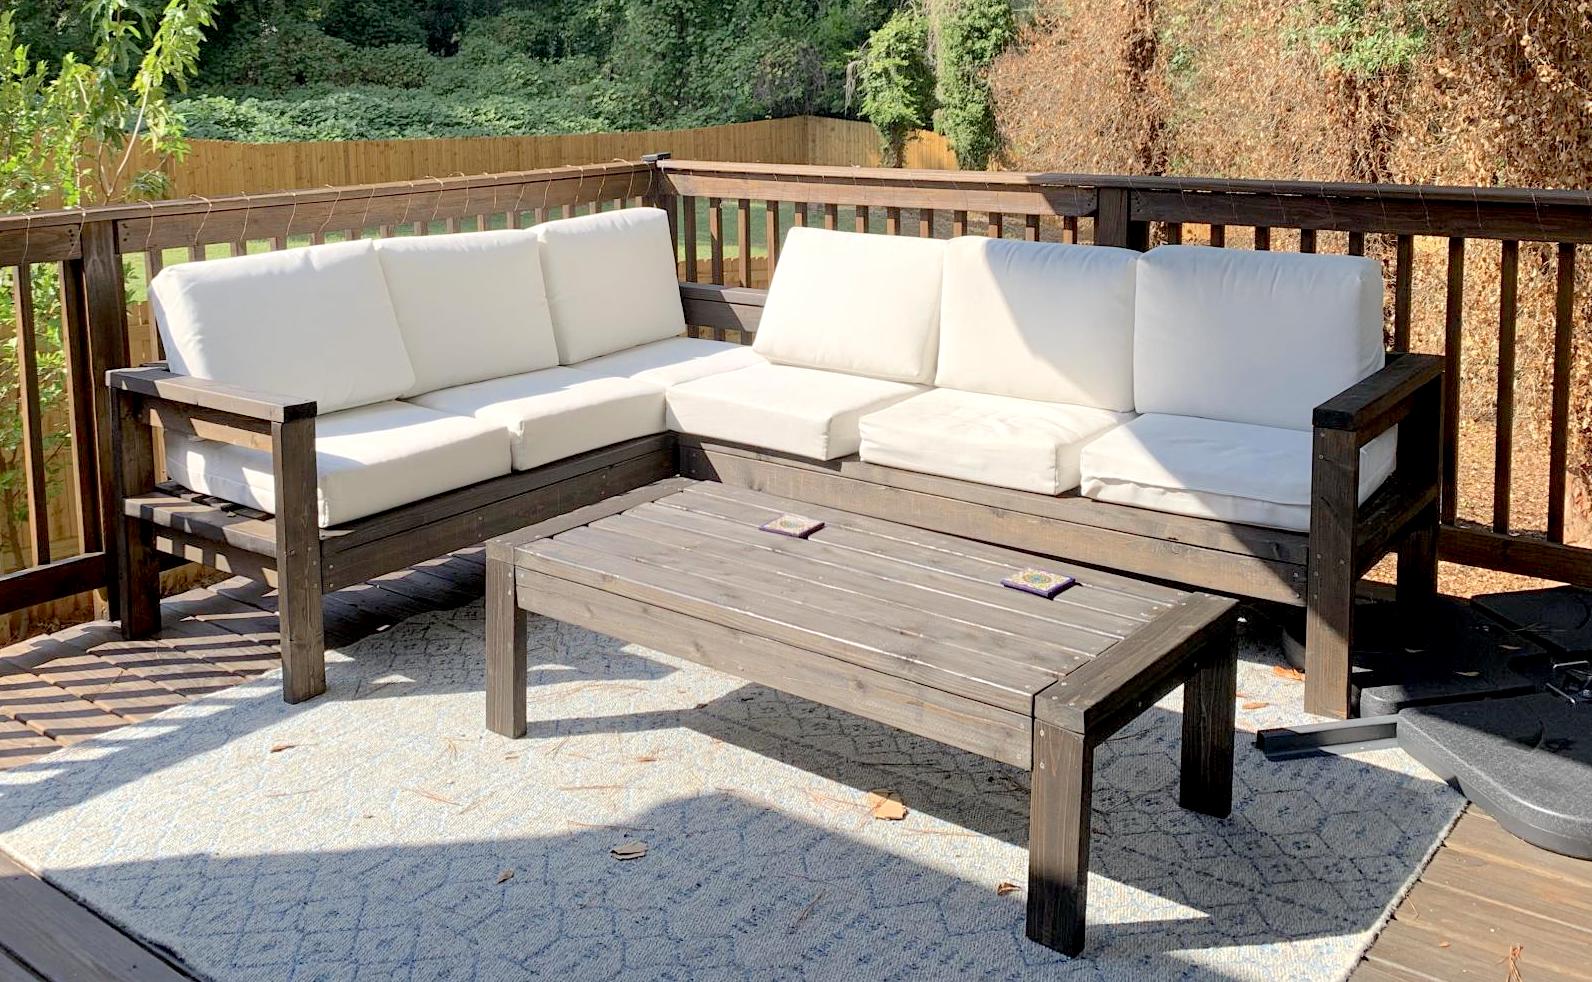
This was my first real woodworking project and was so much fun! I use my deck much more now and am excited to build more!
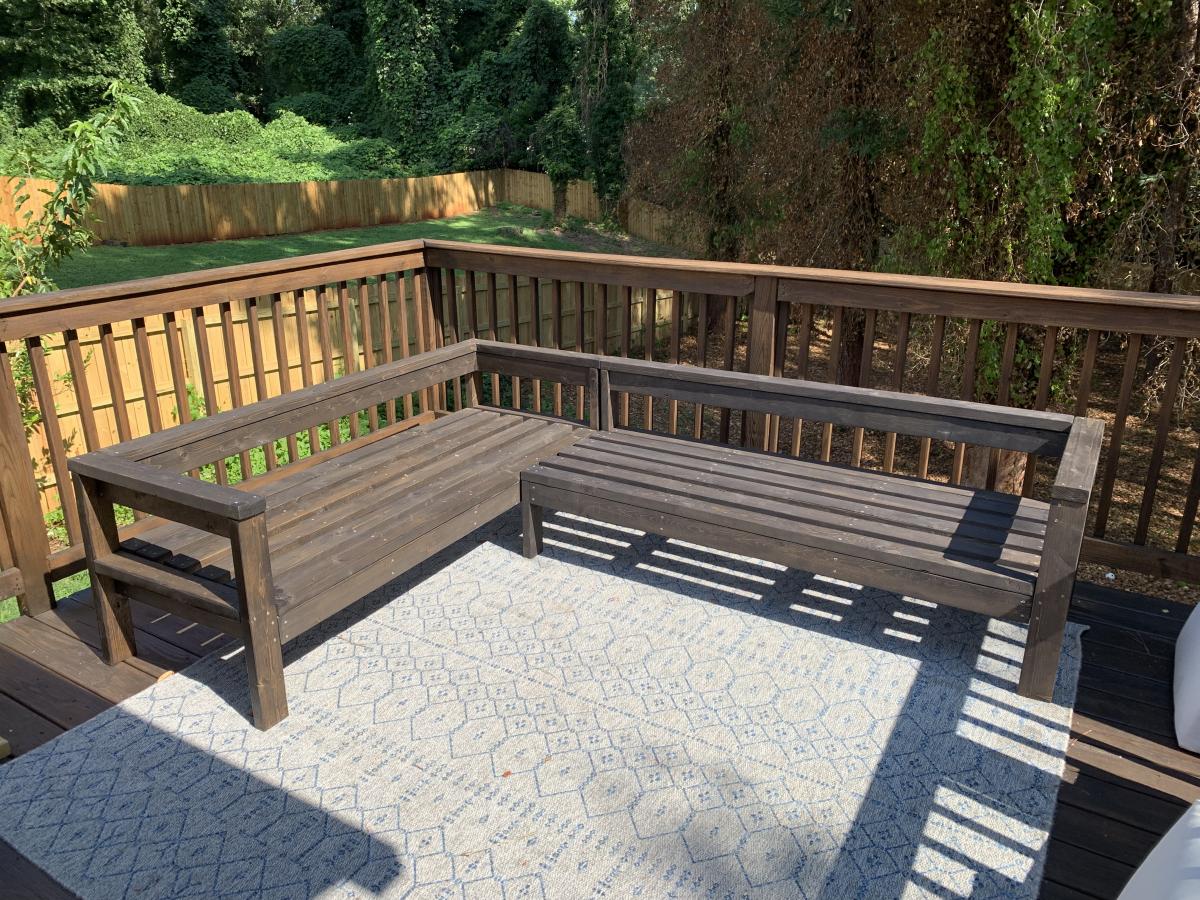
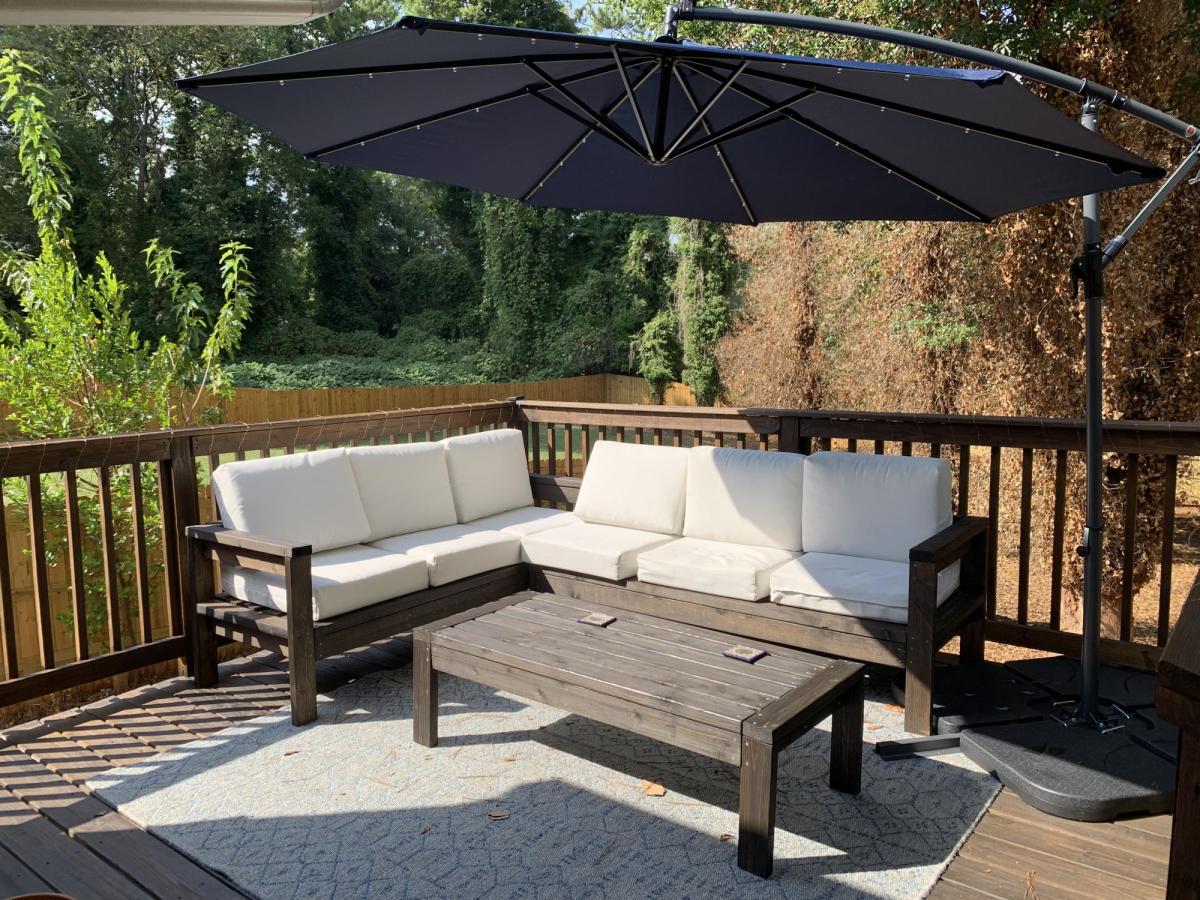
Built from Plan(s)
Estimated Cost
$500 (with cushions)
Estimated Time Investment
Week Long Project (20 Hours or More)
Finish Used
Varathane Jacobean stain
Recommended Skill Level
Beginner
Doggy Door or Baby Gate
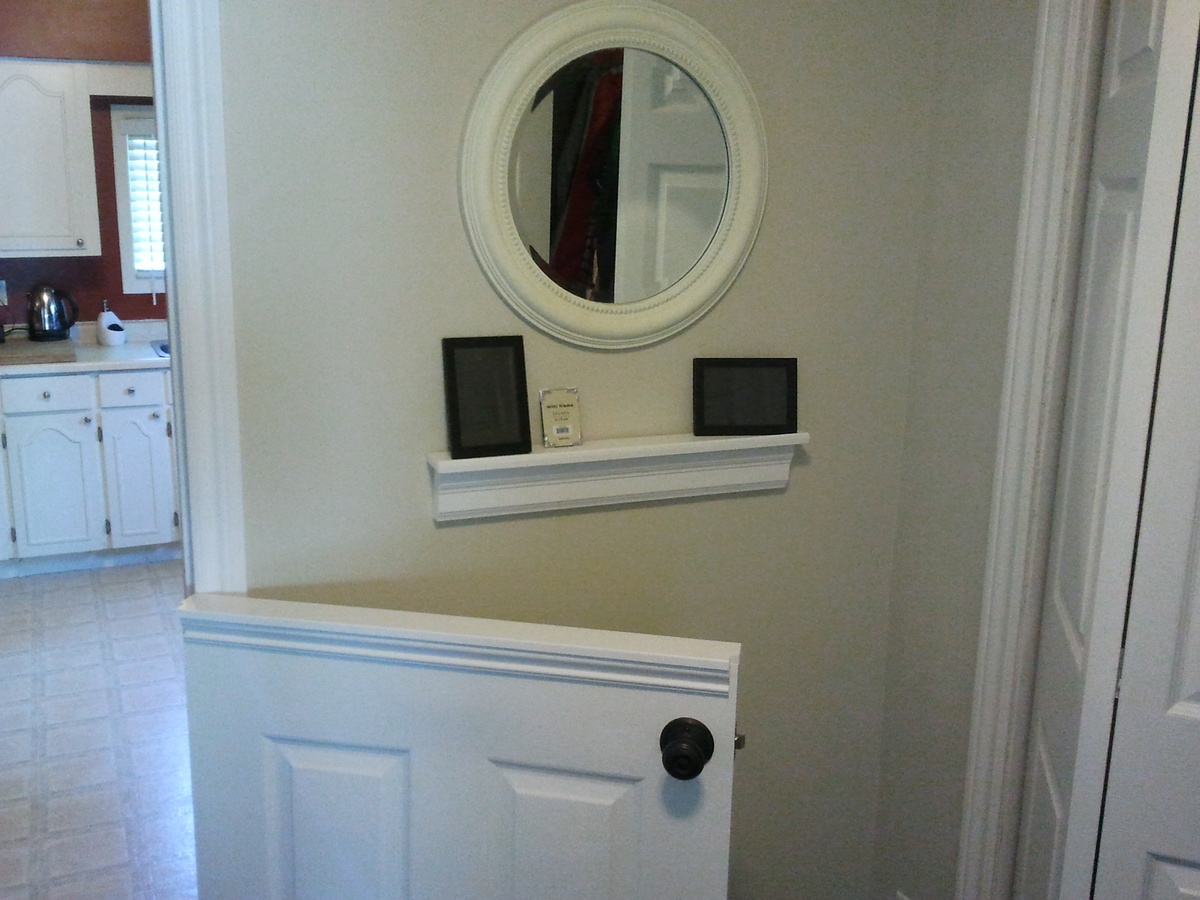
I installed a half door to isolate our dog from the laminate flooring when he sleeps at night.
It was only $25 for the hollow core 6 panel door from HD, which got cut in half.
$25 for the passage knob.
$10 for top plate and trim
Less than $5 for the hinges.
Not having to replace the laminate flooring priceless!
Some Tips:
The $25 door is not prehung. Buy the $14 dollar irwin door jig to install the door "http://www.homedepot.ca/product/door-lock-installation-kit-carbon/904157" It will come in handy if you are remodeling and installing new doors to replace those old flat panel doors. You will also have to chisel out the hinges.
When installing and marking the hinge locations in the door frame shim the door a 1/4" off the floor.
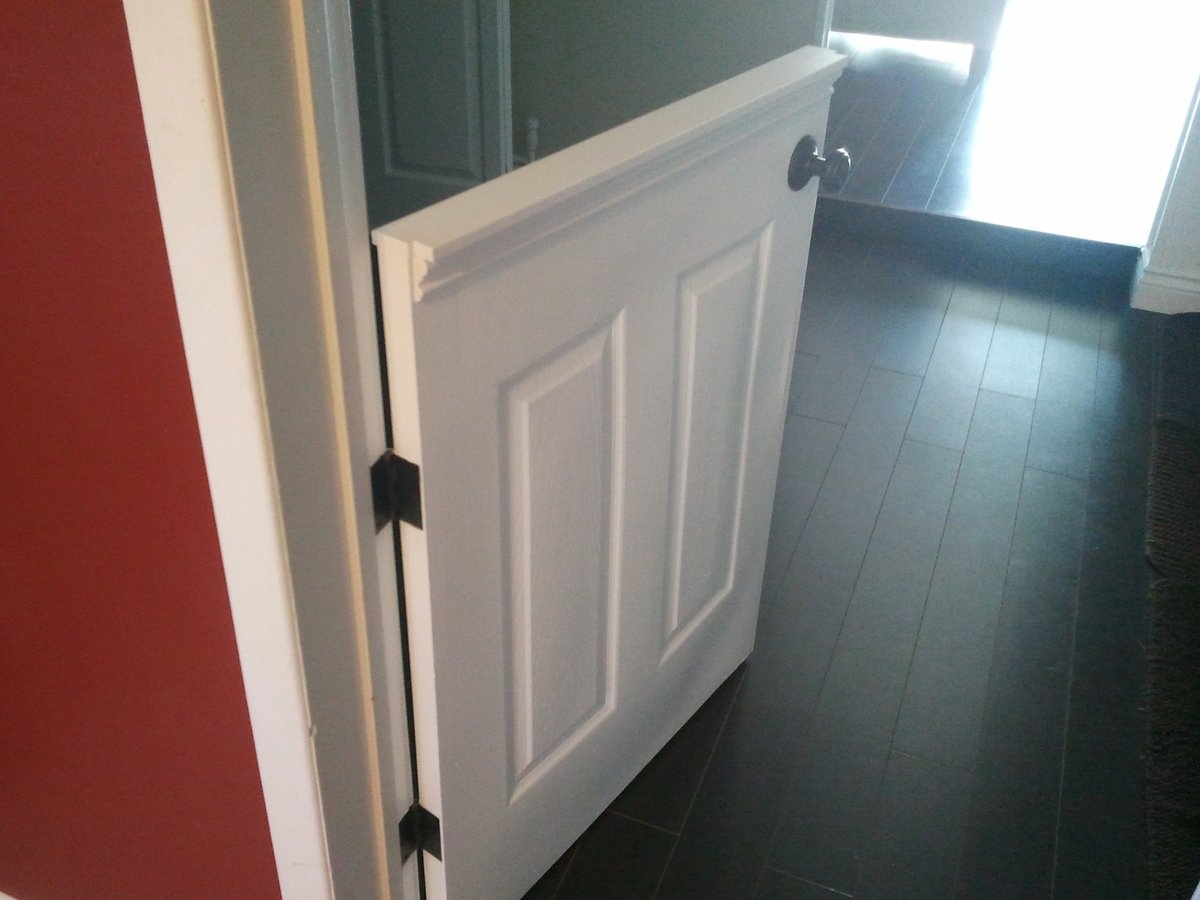
Estimated Cost
$65 materials + $15 jig = $80
Estimated Time Investment
Day Project (6-9 Hours)
Finish Used
White paint
Recommended Skill Level
Intermediate
Comments

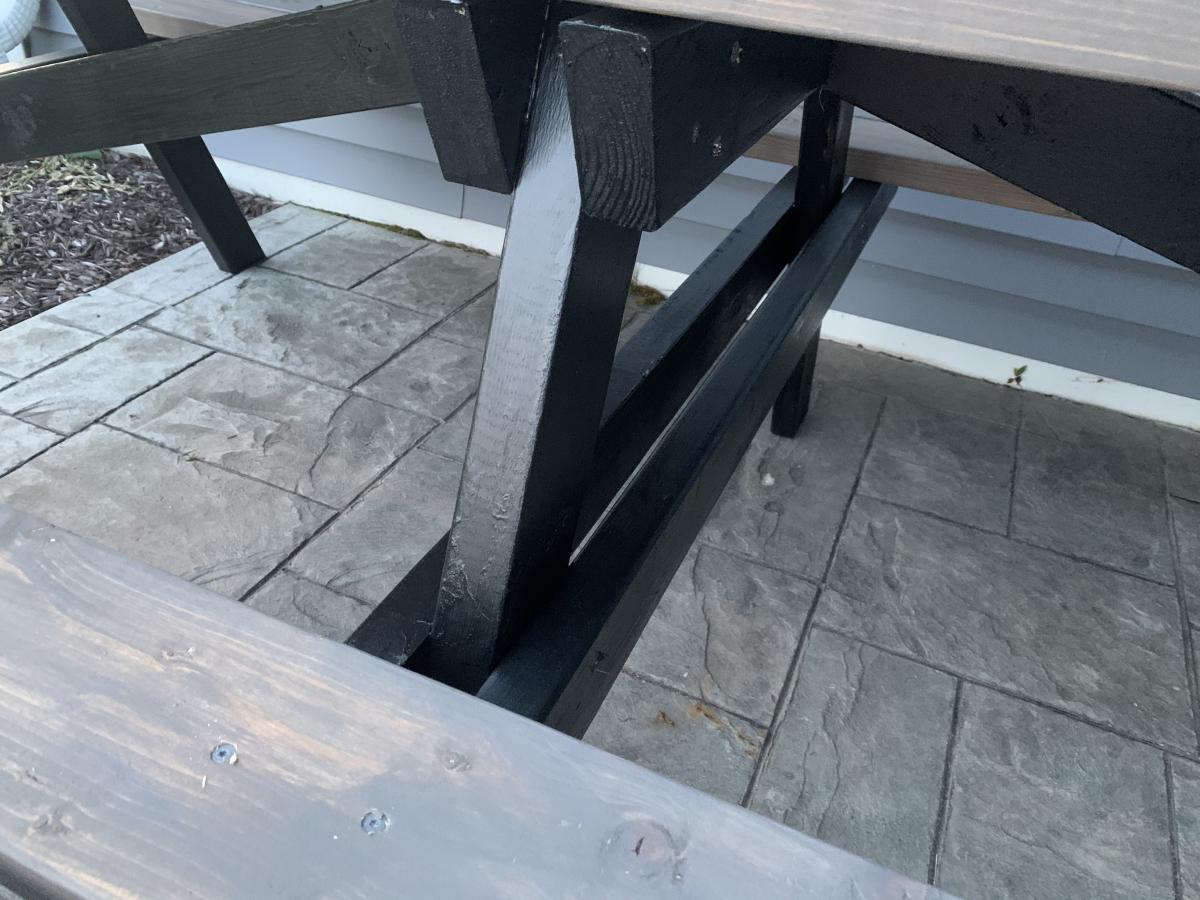
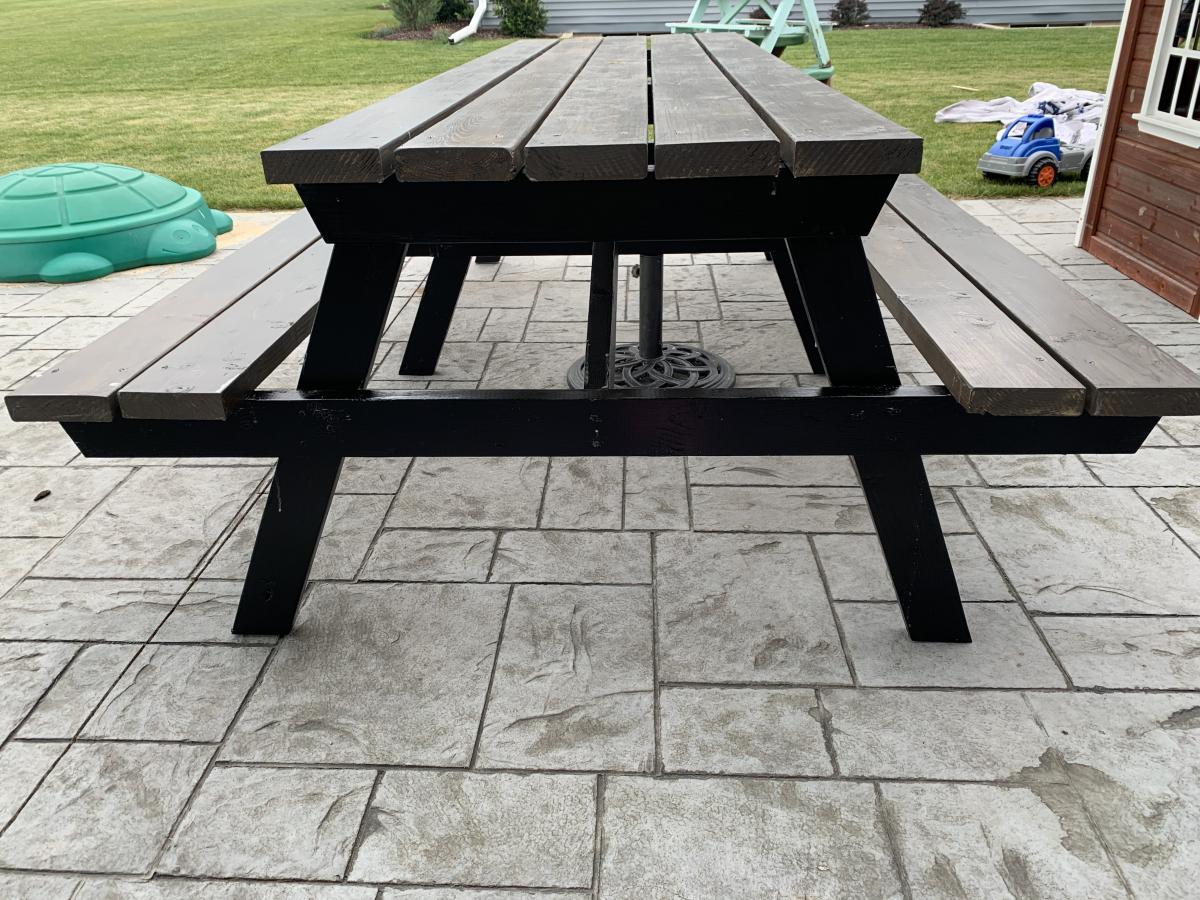
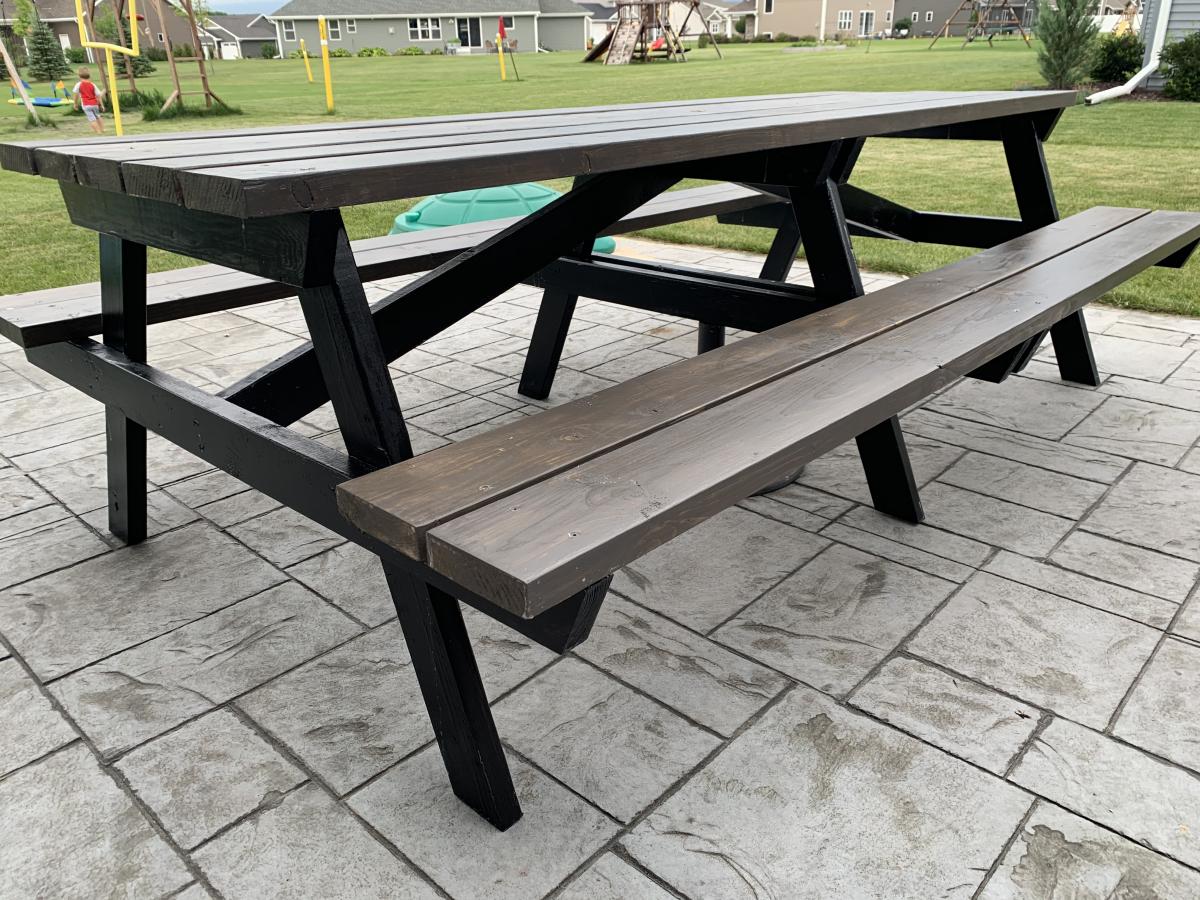
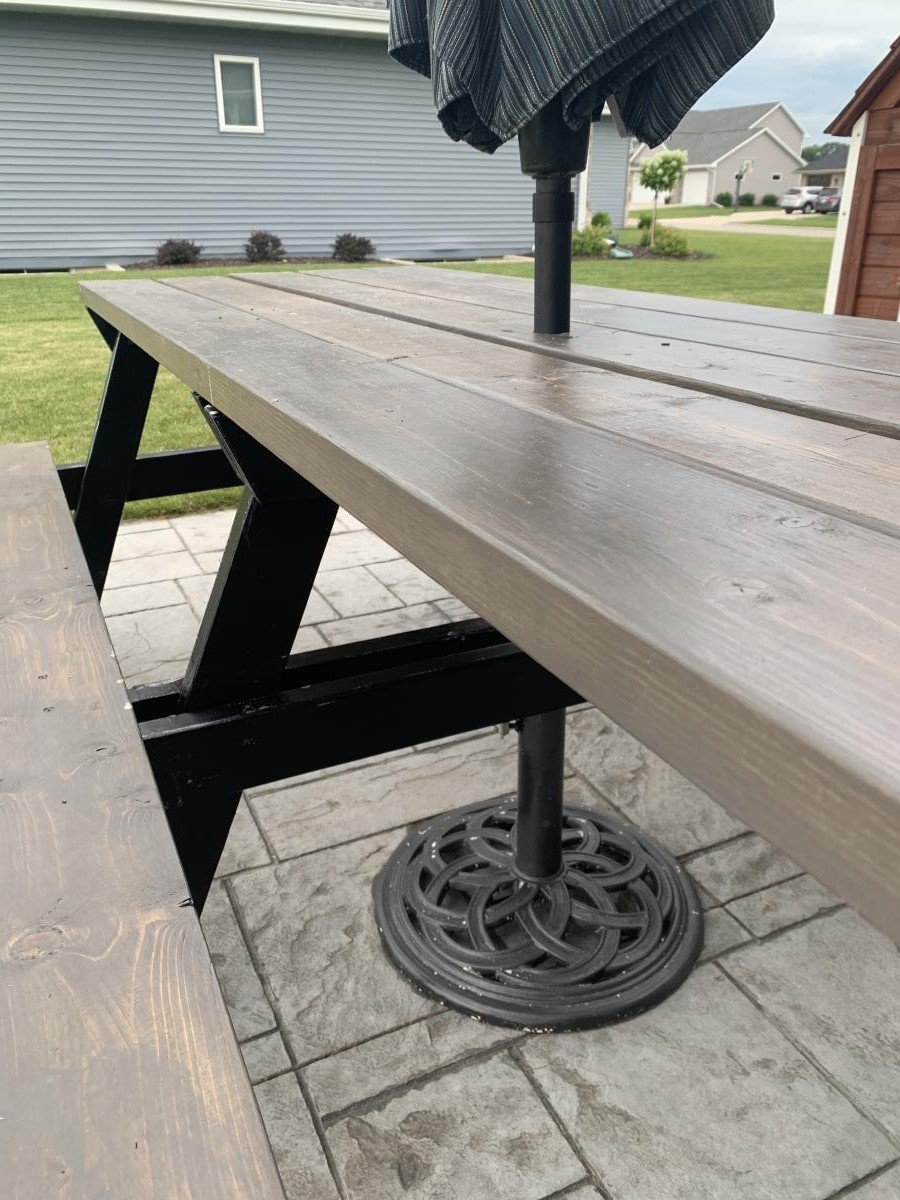
8 foot picnic table
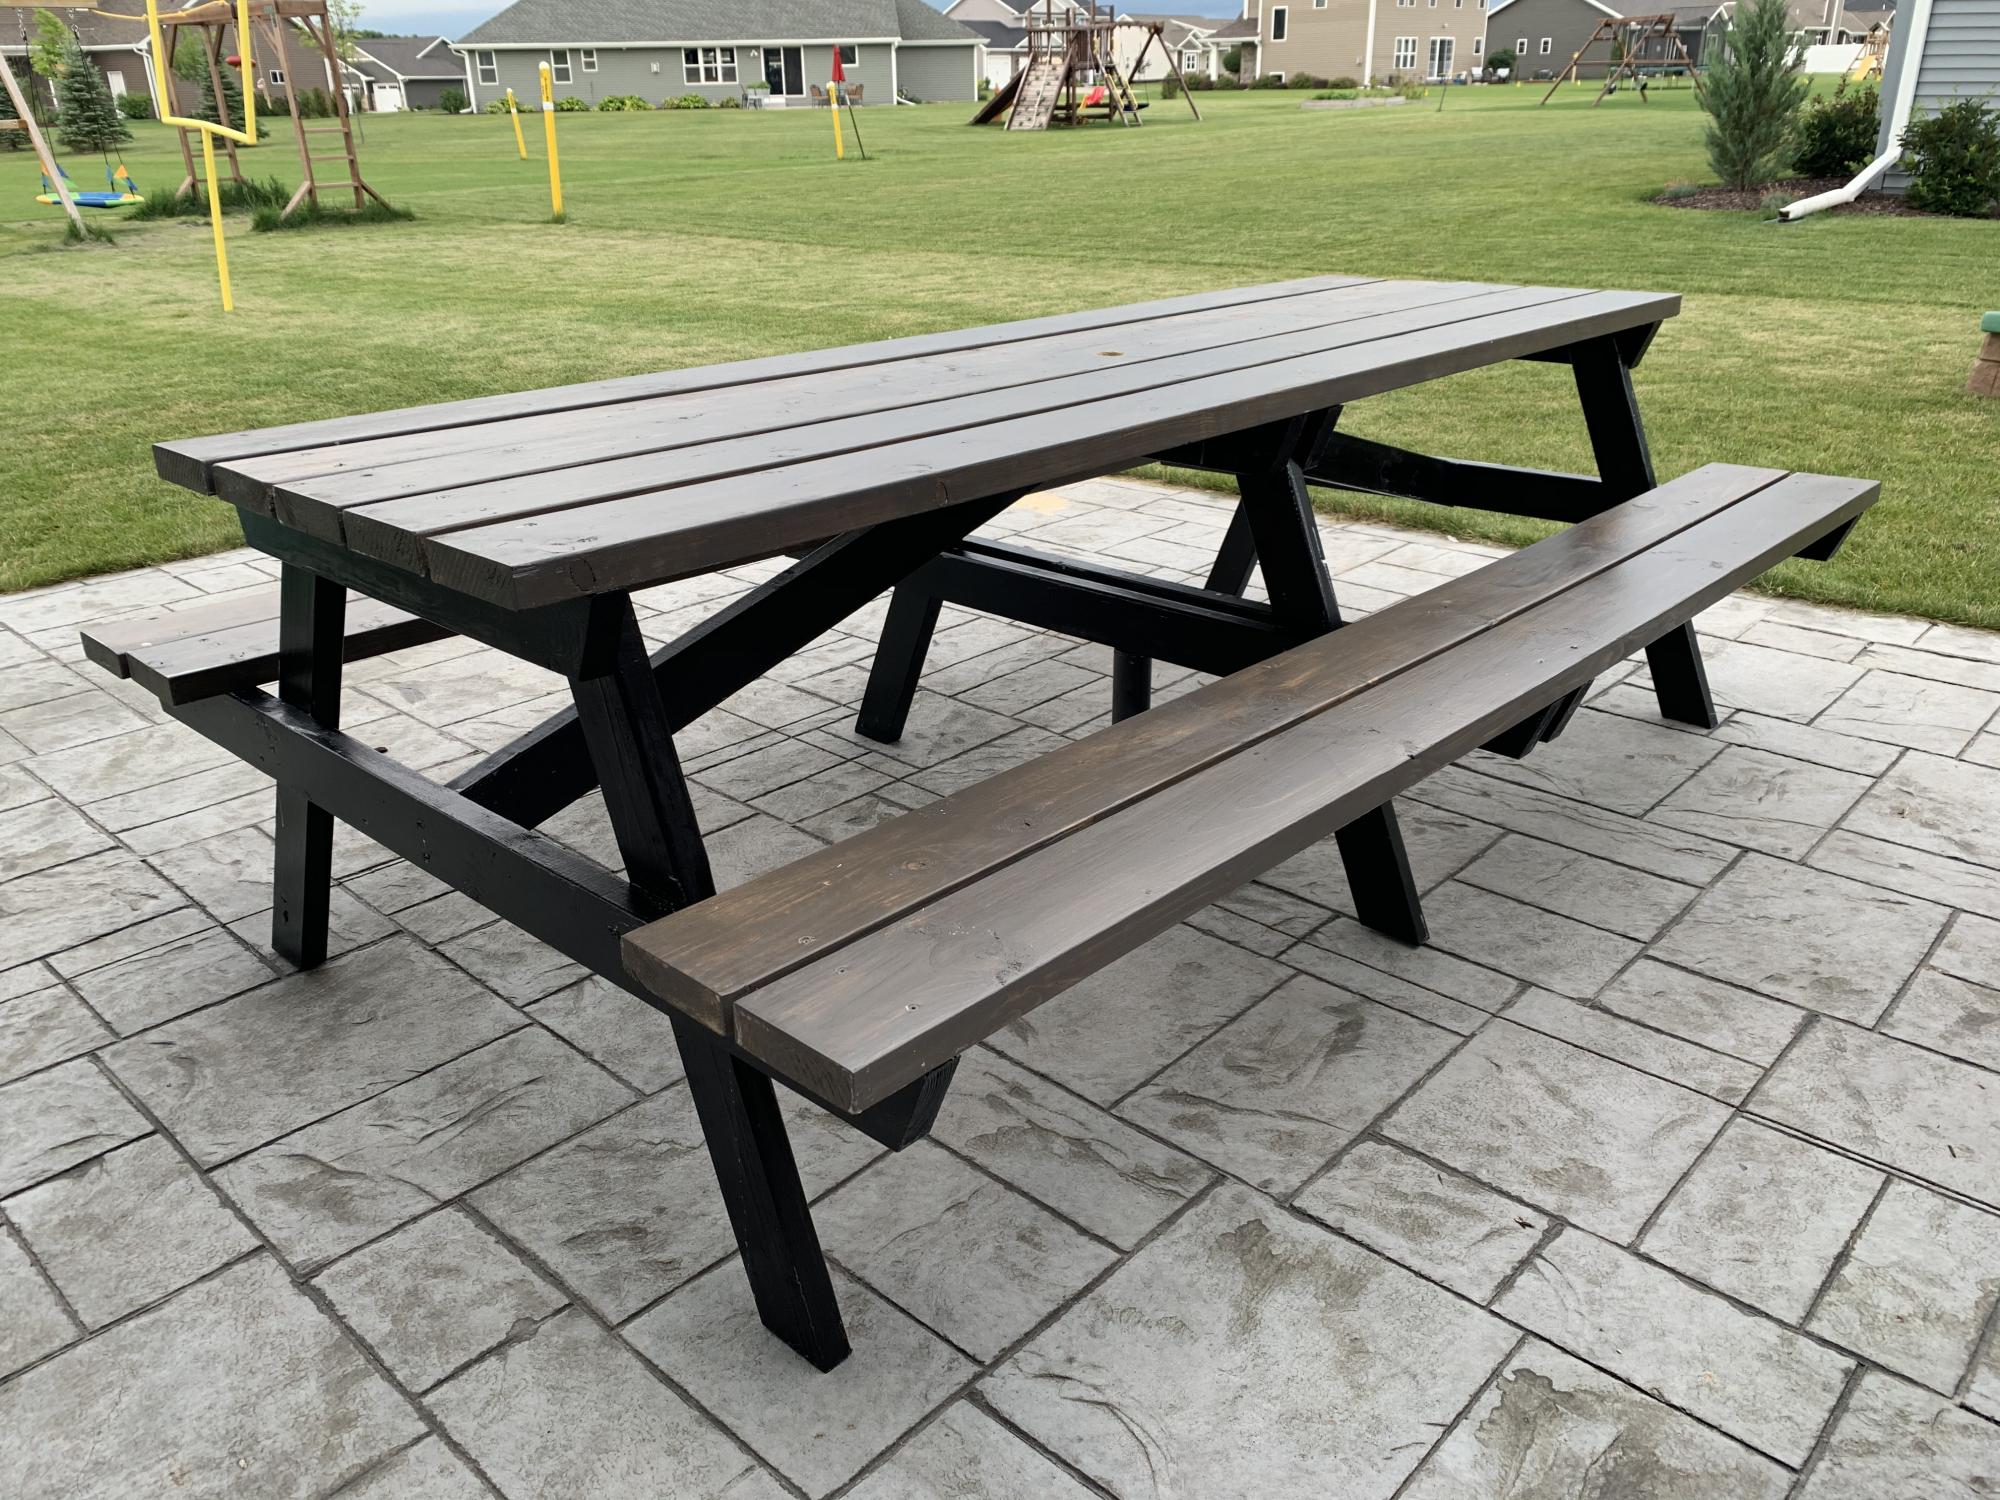
This picnic table was a quick build and turned out amazing. I modified the center base support by adding an extra table top support and seat support board to the opposite side of the center legs to give the table symmetry to accommodate an umbrella hole. I also shortened both cross supports by an inch to make sure the base wouldn’t be longer than the top boards. The space between the center table support boards and seat support boards is the perfect size to fit a standard umbrella. I used a 1 3/4” hole saw to make the umbrella hole. The build and stain/paint took me about 5 hours but additional time is needed to properly seal the table. I used untreated pine. Treated pine may give the table longevity but it would also add a lot of weight to an already heavy table. This was a relatively easy and quick build and is a great size to fit my whole family plus a couple guests! I’m happy with how it turned out and would recommend this build to anyone looking for a budget friendly and simple patio table.
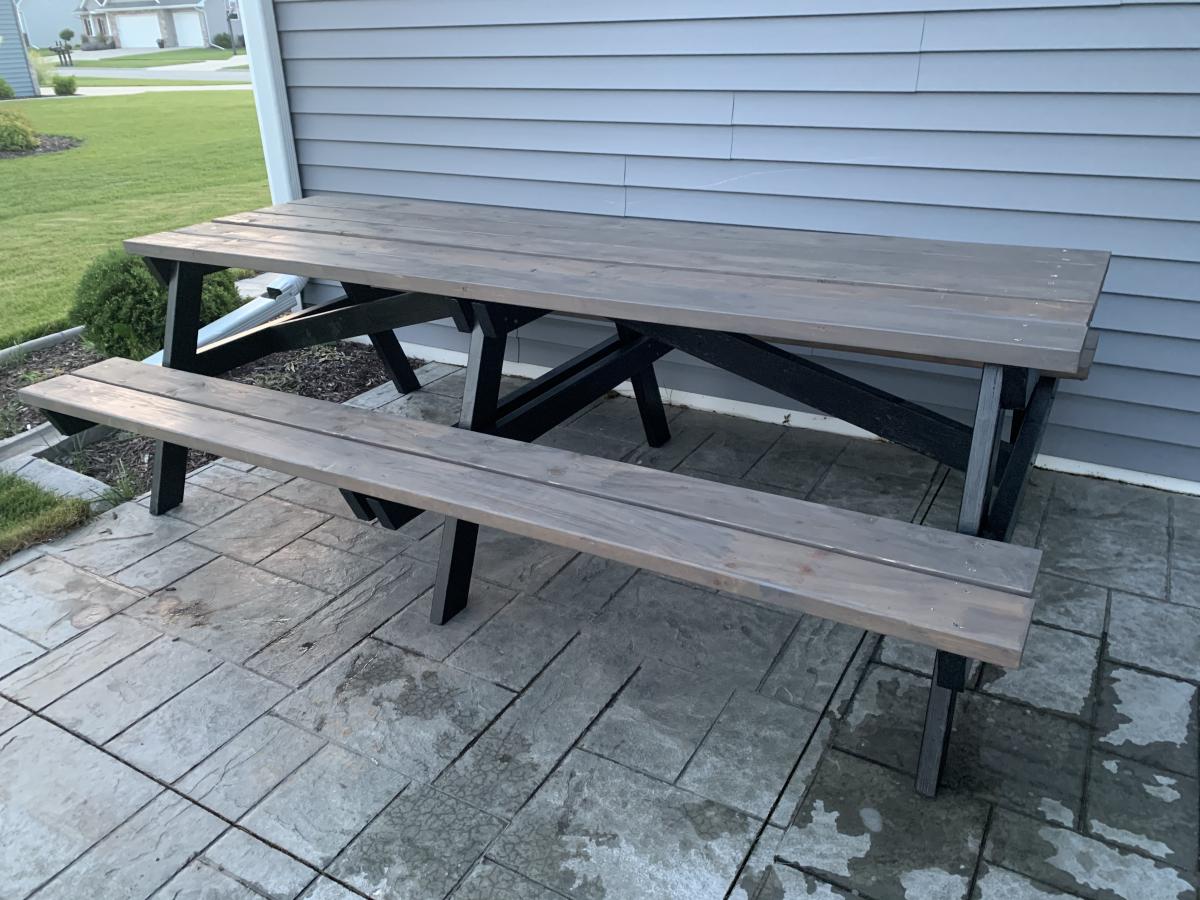
Built from Plan(s)
Estimated Cost
$75
Estimated Time Investment
Day Project (6-9 Hours)
Finish Used
Varathane Briarsmoke for the top and Rustoleum Canyon Black Satin for the base. Sealed with 2 coats of Varathane Helmsman Spar Urethane
Recommended Skill Level
Beginner
Comments

Sat, 07/18/2020 - 13:17
Thank you Abby!!! Your…
Thank you Abby!!! Your picnic table turned out amazing, I love the added umbrella modification!
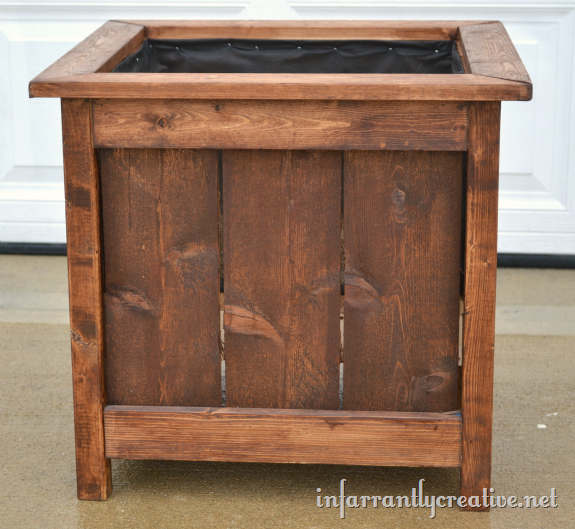
Cedar Planter with Mitered Top
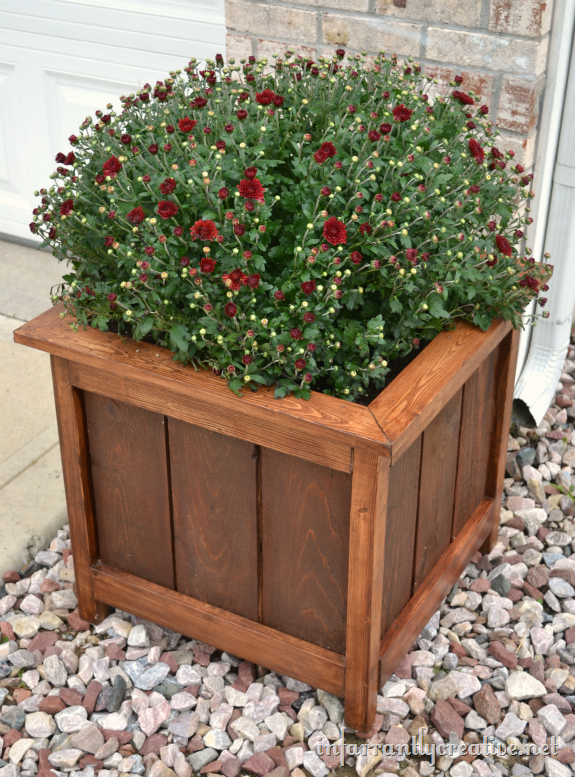
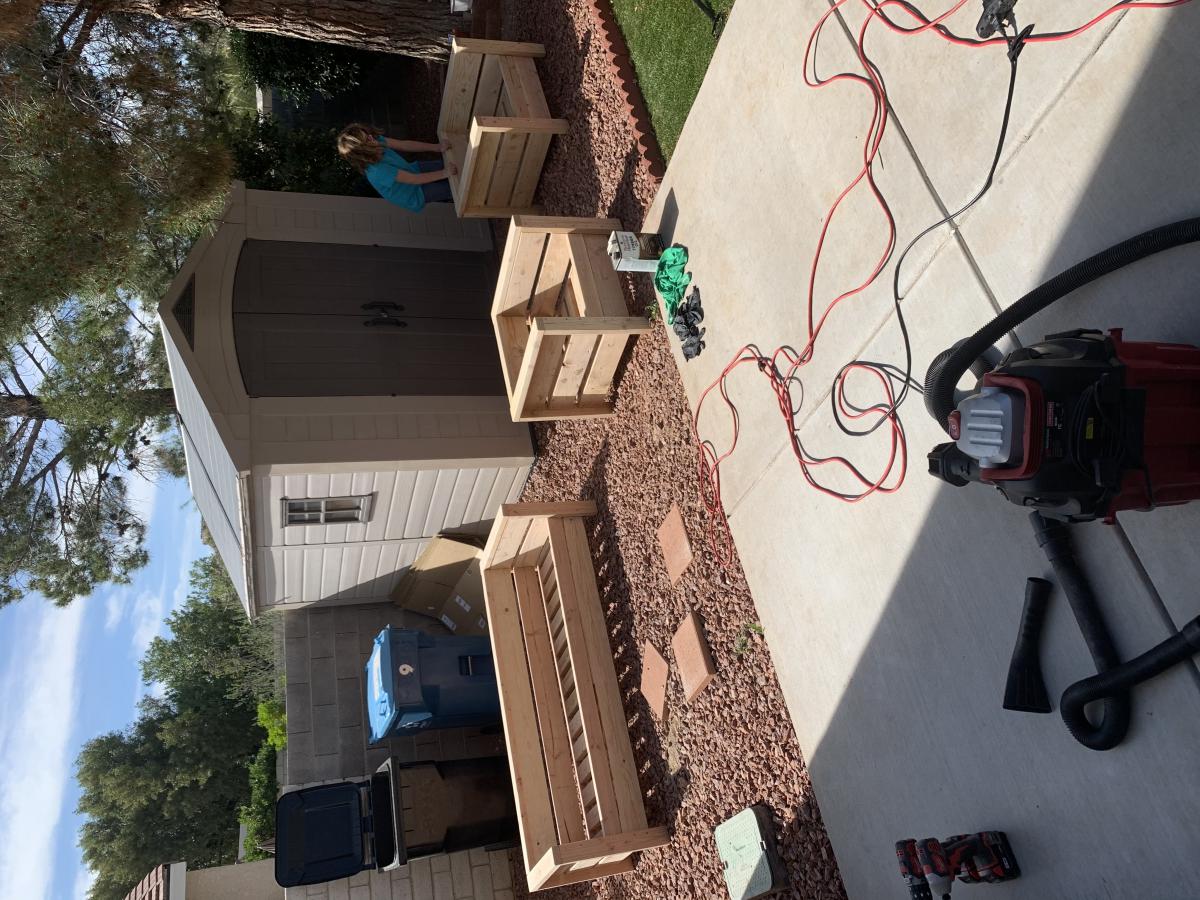
This was by far the easiest project. This planter is HUGE as well and makes a great focal point for your curb appeal. I didn't extend the sides but rather created a mitered edge for the top creating a nice clean finish.
Built from Plan(s)
Estimated Cost
$20
Estimated Time Investment
An Hour or Two (0-2 Hours)
Finish Used
Minwax English Chestnut with a Spar Varathane protective coat
Recommended Skill Level
Beginner
Comments
Mon, 10/29/2012 - 23:02
This looks beautiful! I just
This looks beautiful! I just made one too, I will have to do the top like yours it's pretty that way. I love how the stain too!
:) Valerie
Sun, 09/22/2013 - 20:25
about the top....
how exactly did you attach the mitered top?? Finish nails or is there a way to use the kreg jig to hide joinery? These are beautiful, BTW. Thanks :)
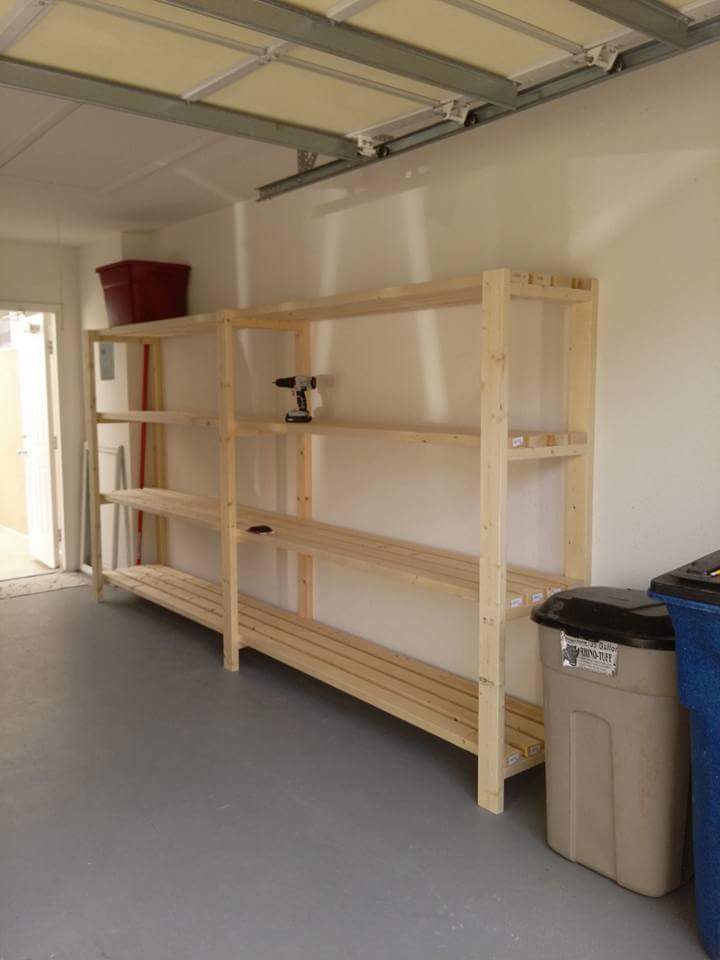
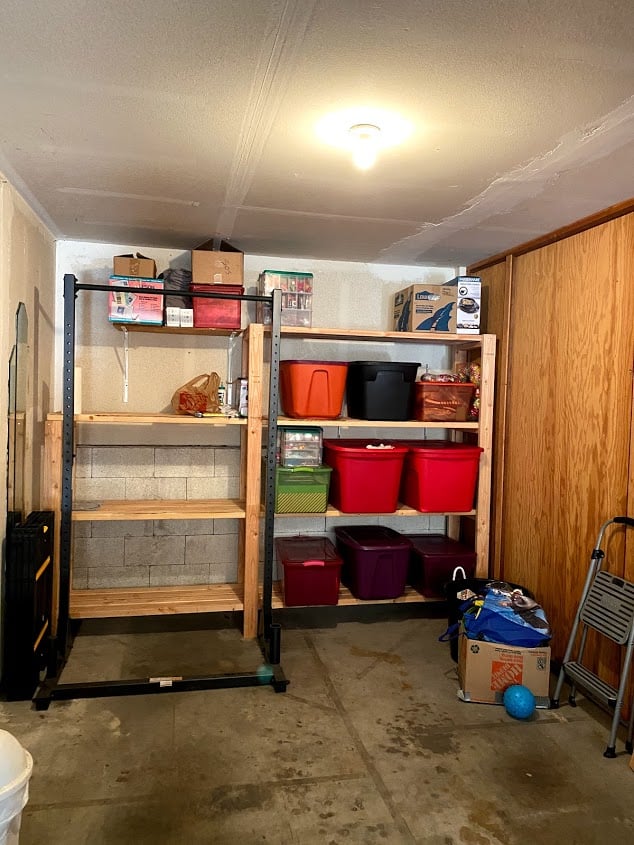
Garage Shelves - Freestanding (Modified)
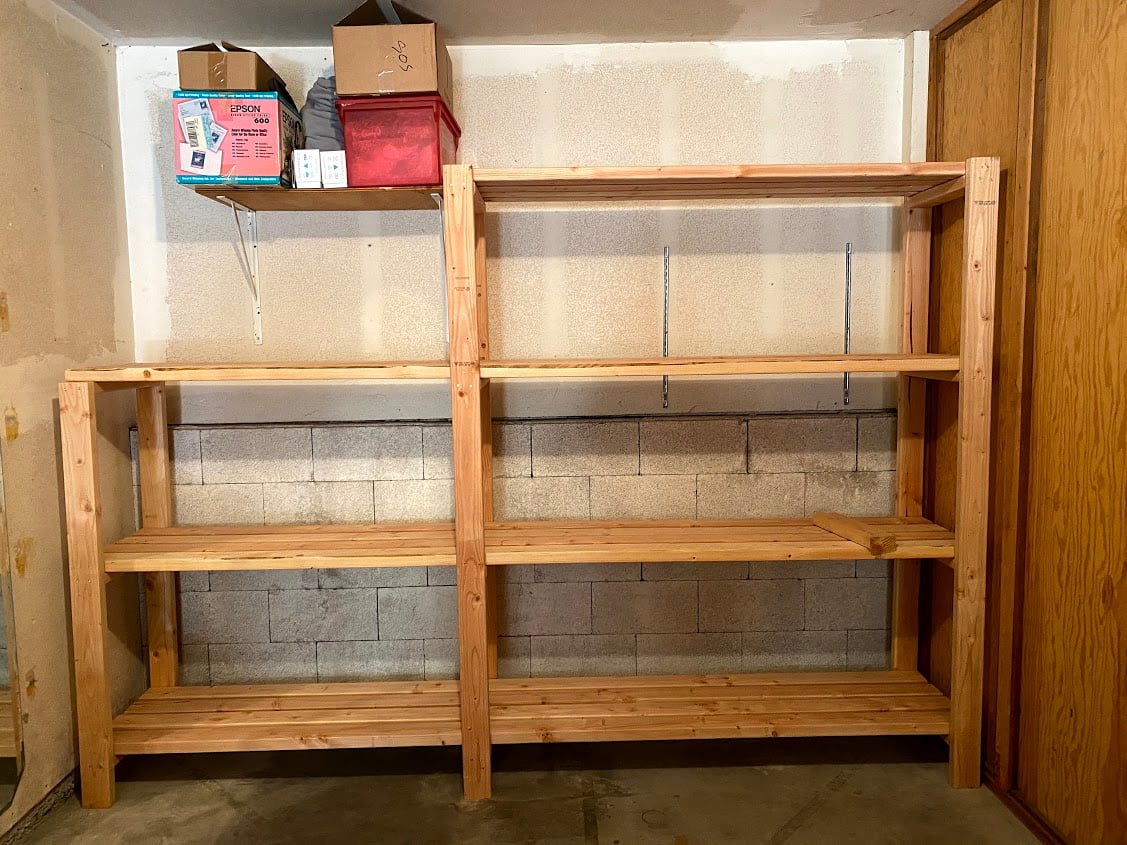
First project ever! I have been planning to build this for at least a year, and I finally did it! I had to modify the plan to fit my space, but it worked out well. They cut the wood for me at the store, so I did not make any cuts myself, just assembled all of the pieces together. I used all 2x4s, 8' and 10', cut down to my measurements. I did not finish the shelves since it is just for the garage, but I did sand rough board edges and some of the faces. I just used an palm sander and coarse sandpaper (80 grit). Please double check all measurements and lists because I forgot to add my shorter shelf supports to the list and had to go back to the store. I also forgot to add the width of the top shelf to those two shorter supports, so the shelf boards are resting on the top instead of nestled into the supports. It turned out not to be a functional problem, but a good lesson to learn. I also learned to make sure my driver battery is charged fully before starting - that took a large chunk out of my first day building and I had to finish the next day. My husband helped with some lifting and holding, but I mostly did this on my own in one weekend, so you CAN do it! Don't wait like I did - it is soooooooo useful and it looks great! All of my friends are really impressed and it feels so good to have made something like this! Thank you Ana!!
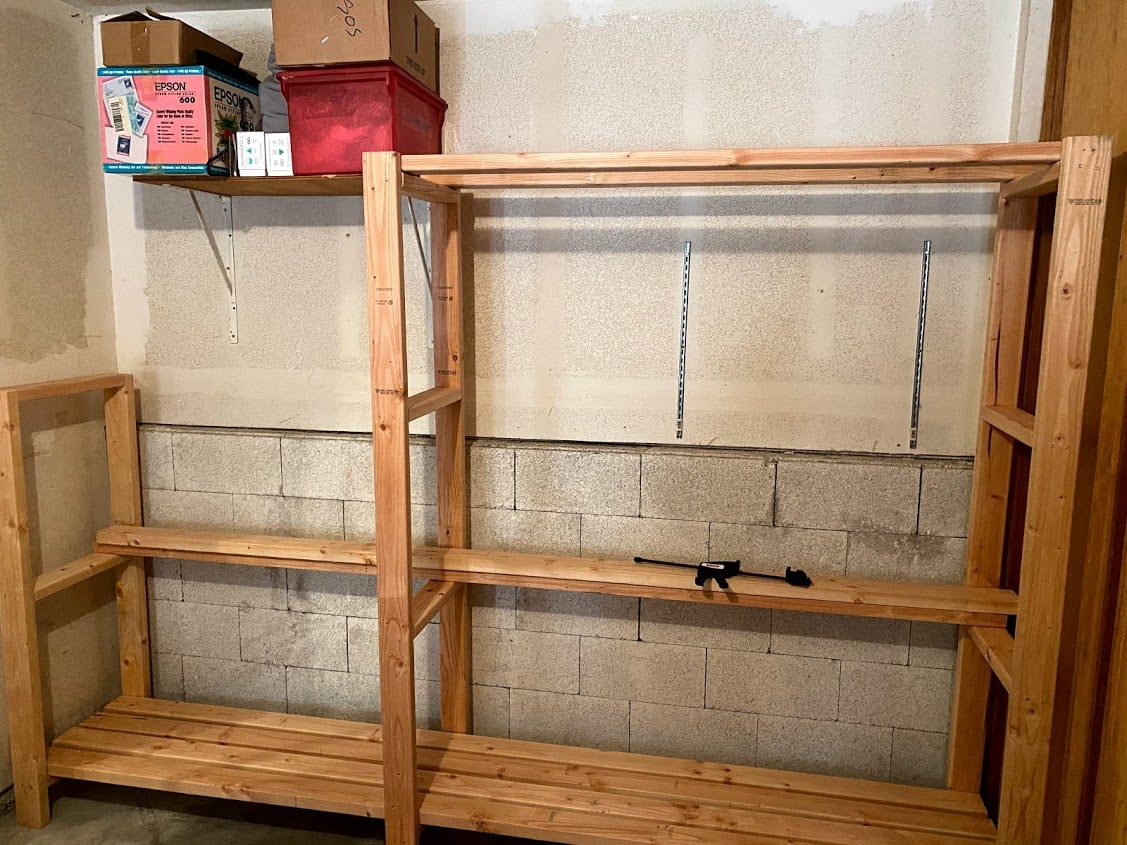
Built from Plan(s)
Estimated Cost
$180
Estimated Time Investment
Weekend Project (10-20 Hours)
Finish Used
N/A
Recommended Skill Level
Beginner
Comments
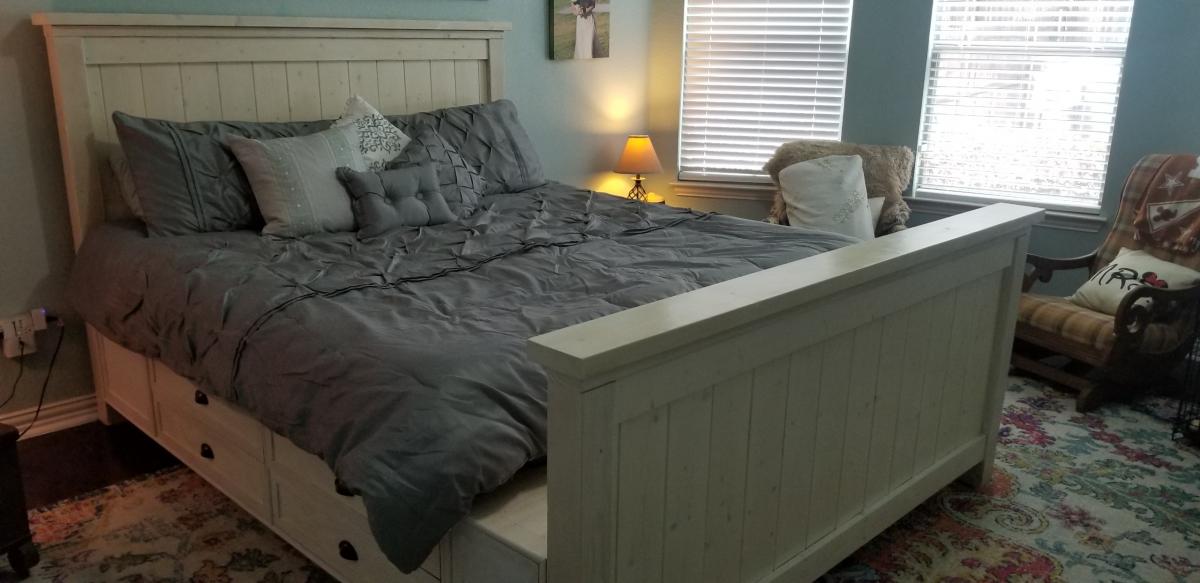
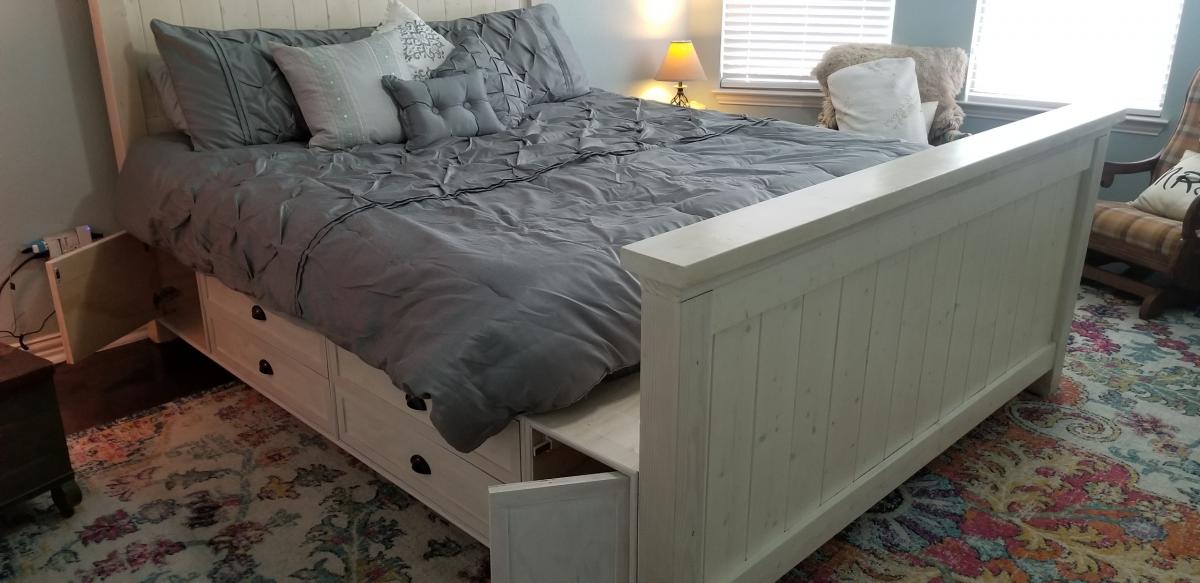
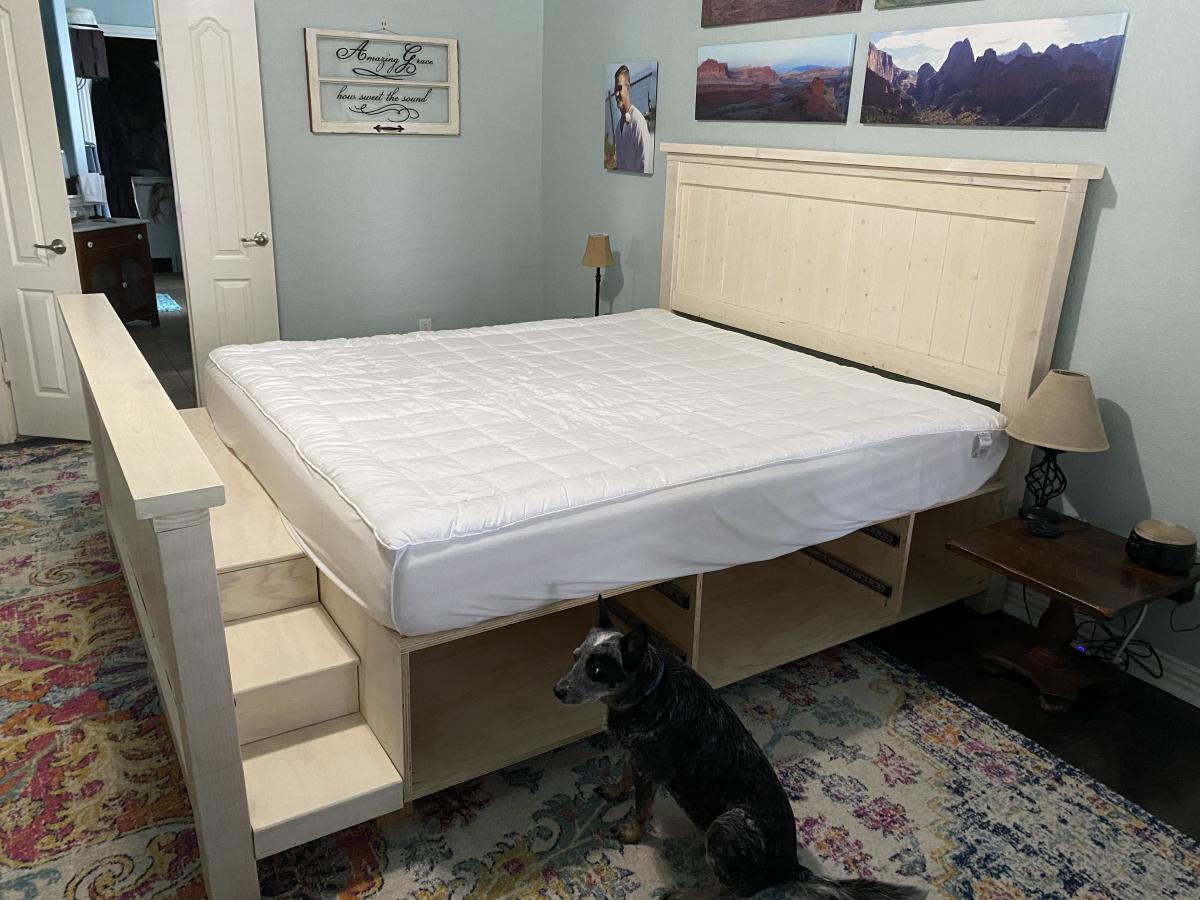
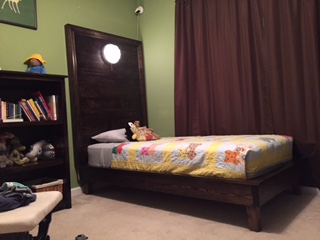
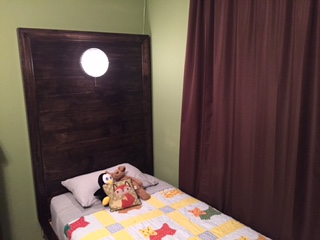
King Size Farmhouse Bed with Dog Stairs and Storage
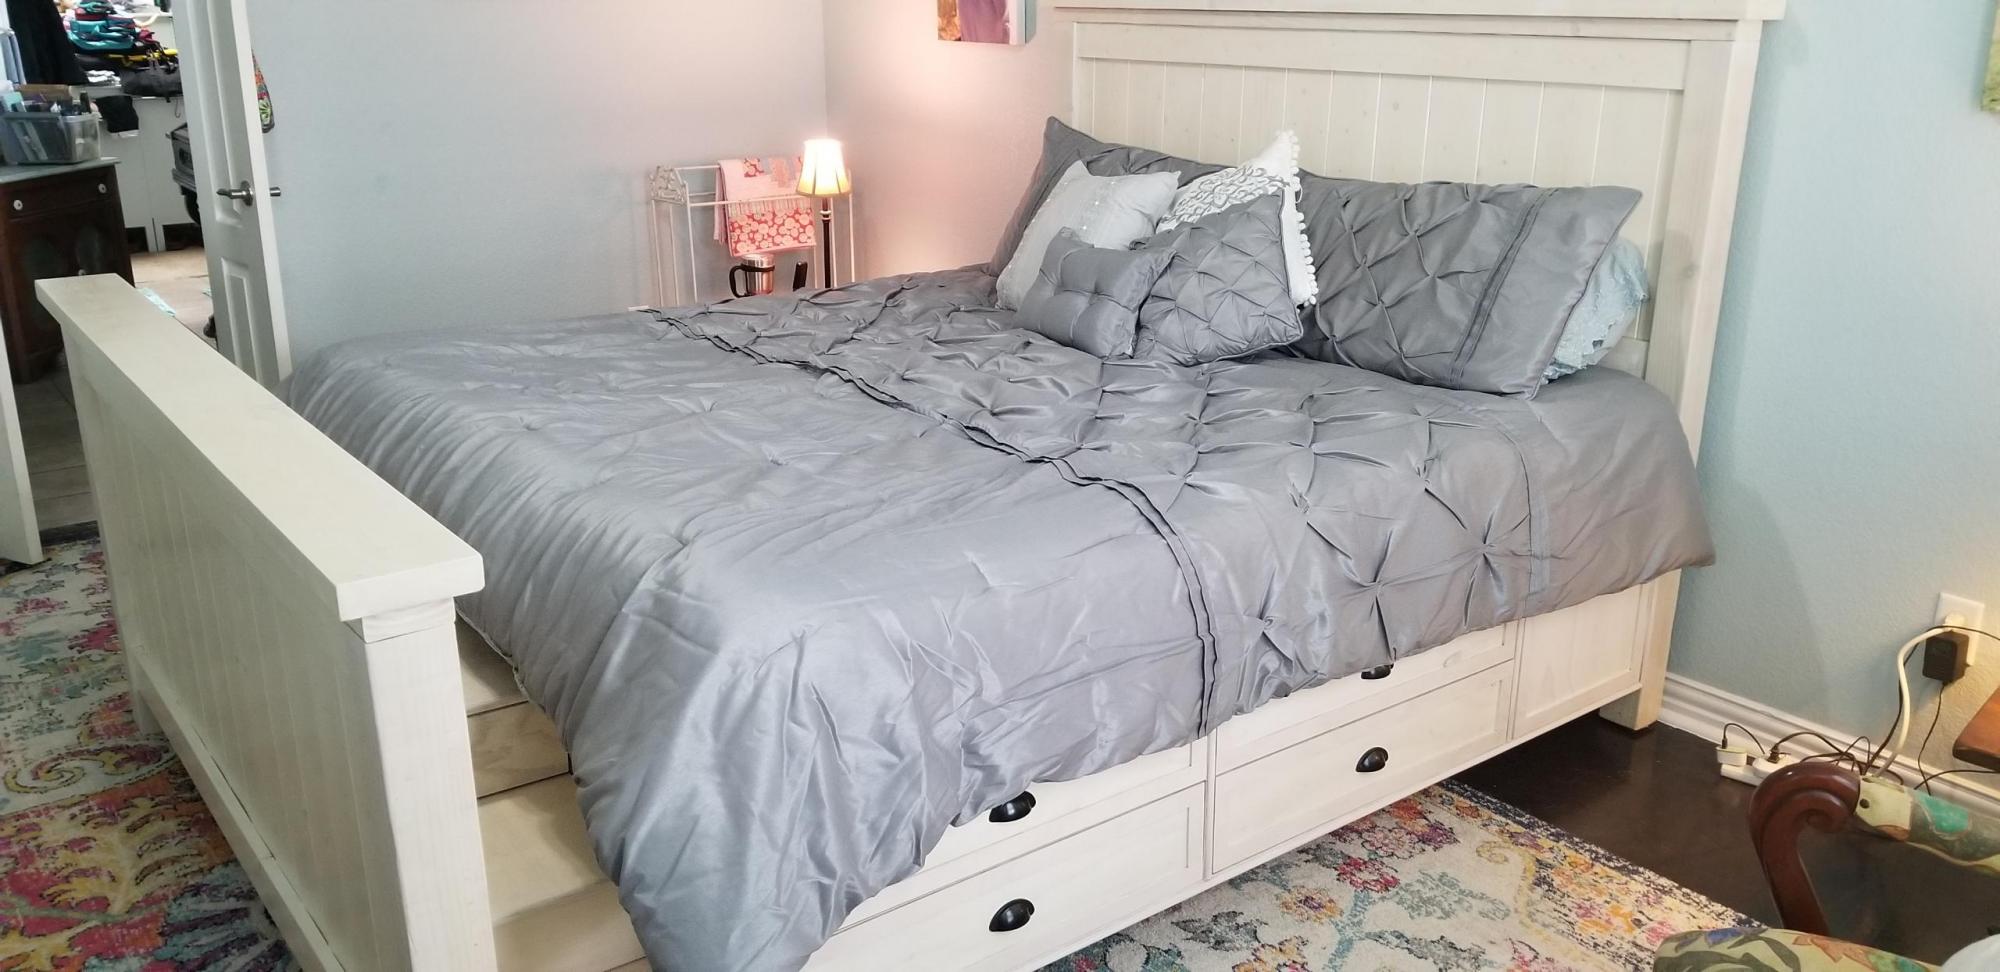
We have a frosty faced blind girl and an aging tri-pawed that we wanted to be able to continue snuggling with us so we adapted the Farmhouse Bed with Storage to make it a king size. We made the drawer boxes deeper which allowed us to get rid of our dresser to create more space in our room. And we added a flight of stairs for the pups.


Built from Plan(s)
Estimated Time Investment
Weekend Project (10-20 Hours)
Finish Used
General Finishes White Wash with Arm R Seal Oil Based Satin Finish top coat. (If you want the white wash to be more white and less amber, use water based.)
Recommended Skill Level
Intermediate
Comments
Fri, 12/30/2022 - 07:53
This is exactly what I’m…
This is exactly what I’m looking for! Perfect for our dogs. Although, I wonder if a ramp would work or if it would be too steep? Hmmm
DIY Modern Rustic Outdoor Chair
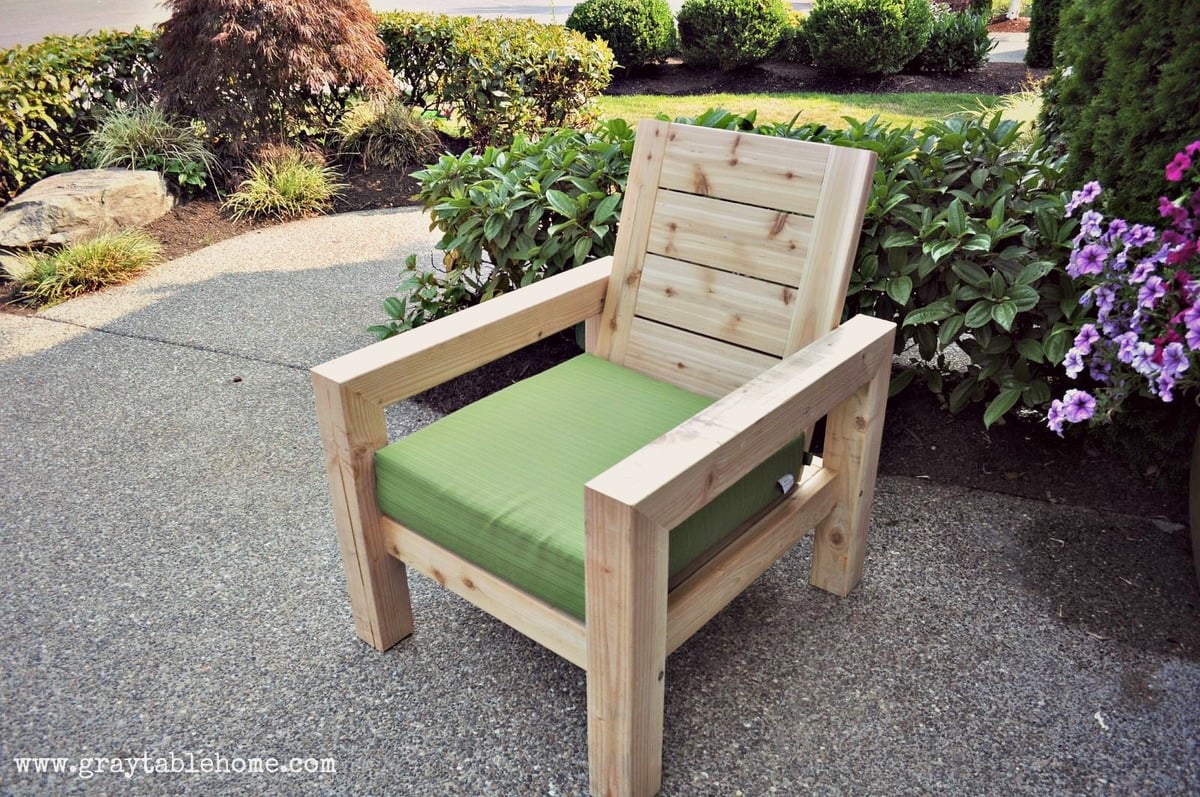
I made this outdoor chair by looking at a variety of plans and designs from Restoration Hardware and other stores. Check out more info on the project on my blog link. Thanks for looking!


Built from Plan(s)
Estimated Time Investment
Afternoon Project (3-6 Hours)
Recommended Skill Level
Beginner
Comments
Farmhouse Writing Desk with Turned Legs

I modified the Small Old English Style Farmhouse Dining Table plan to build a writing desk. I used five 1x6 boards for the top for a width of 27.5 inches. I made my desk 56 inches in length. I put the drawer on the long side like a pencil drawer. I did use the legs that Ana recommended in the plan. I love how it turned out. I used dark walnut danish oil and dark wax for the finish.


Built from Plan(s)
Estimated Cost
225
Estimated Time Investment
Day Project (6-9 Hours)
Finish Used
I used Watco dark walnut danish oil and Minwax dark paste wax.
Recommended Skill Level
Intermediate
Comments
Sat, 08/31/2019 - 05:18
Beautiful! What are the…
Beautiful! What are the brands of oil and wax that you used?
Fri, 10/04/2019 - 21:46
Thank you! I used Watco…
Thank you! I used Watco Danish oil and I used Minwax dark wax. I've tried alot of different wax brands and I always come back to Minwax. It dries the hardest in my opinion.
Little Boy's Platform Bed (w/ a twist)
So, I ended up altering the plans to fit a light. The light was originally an outdoor, hard-wired light, which I fitted with a cord and added a pull chain to. The legs were also changed...I doubled the width in order to have a more square appearance (2 2x4's planed and glued together).
Built from Plan(s)
Estimated Cost
$175
Estimated Time Investment
Week Long Project (20 Hours or More)
Finish Used
Minwax Jacobean Stain
Minwax Fast Drying Poly (Satin Finish)
Minwax Fast Drying Poly (Satin Finish)
Recommended Skill Level
Intermediate
Rustic Computer desk with Shou Sugi Ban and Epoxy Top

I slightly modified the Rustic X Desk plan to make my L shaped computer desk with a monitor platform! The desk surface is Shou Sugi Ban with an epoxy finish. All made from stock lumber and a lot of pocket hole screws. Thanks for posting your plan Ana to give me the idea! Construct for around $200.
Built from Plan(s)
Comments
Tue, 03/14/2023 - 18:34
Superb desk!!!
Love your modifications, additions and finish! Thank you for sharing.
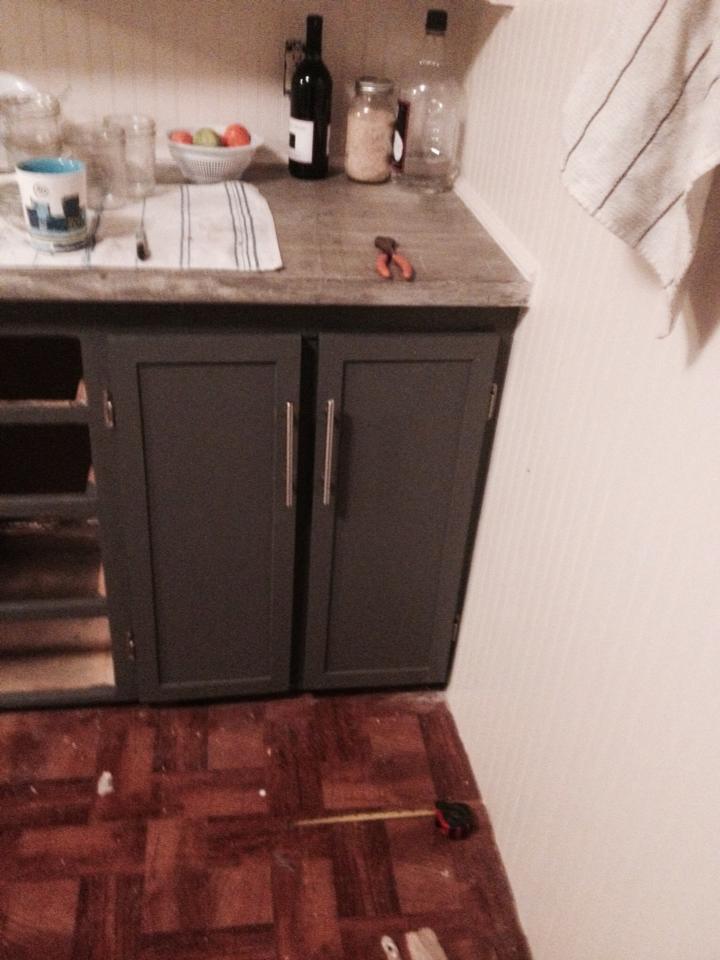
Shaker Style cabinet doors DIY style

Pleas excuse the mess in the pictures. It is too cold to work in the garage up here in the northwest, so this project took over our entire kitchen and dining room. We built these frame and panel-style doors using Ana's plans from the mom-plex bathroom vanity! We are so excited because we spent about $100 including paint and have plenty of leftover materials for the drawers next week!
These are the original cabinets in our 75 year old house and they were in serious need of rehab. We even contemplated ripping them out and using Ana's cabinet plans to build new ones but after we removed the shelves, the carcass of the cabinets were still in good shape. We filled, sanded, painted and built these new amazing doors that I'm seriously losing my mind over. They are so beautiful and I don't think I could have ordered something better. Maybe better made but how sweet is it to save all that money by building them yourselves?
We'll post drawer pictures after we get those finished up and hopefully have a clean kitchen at that point. :)
Thanks Ana! Our home is becoming truly special with the skills we learned from you!
Built from Plan(s)
Estimated Cost
$60
Estimated Time Investment
Weekend Project (10-20 Hours)
Finish Used
Benjamin Moore's Kendall Charcoal in Semi Gloss
Recommended Skill Level
Intermediate
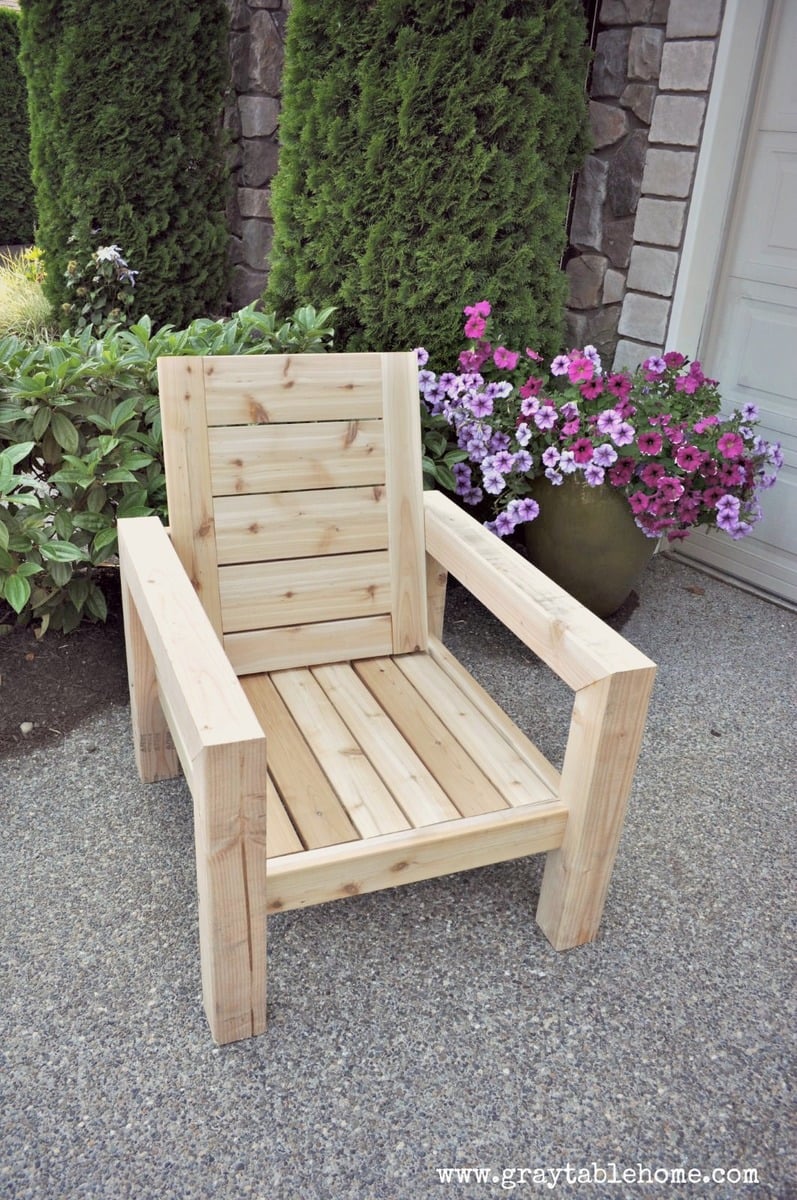
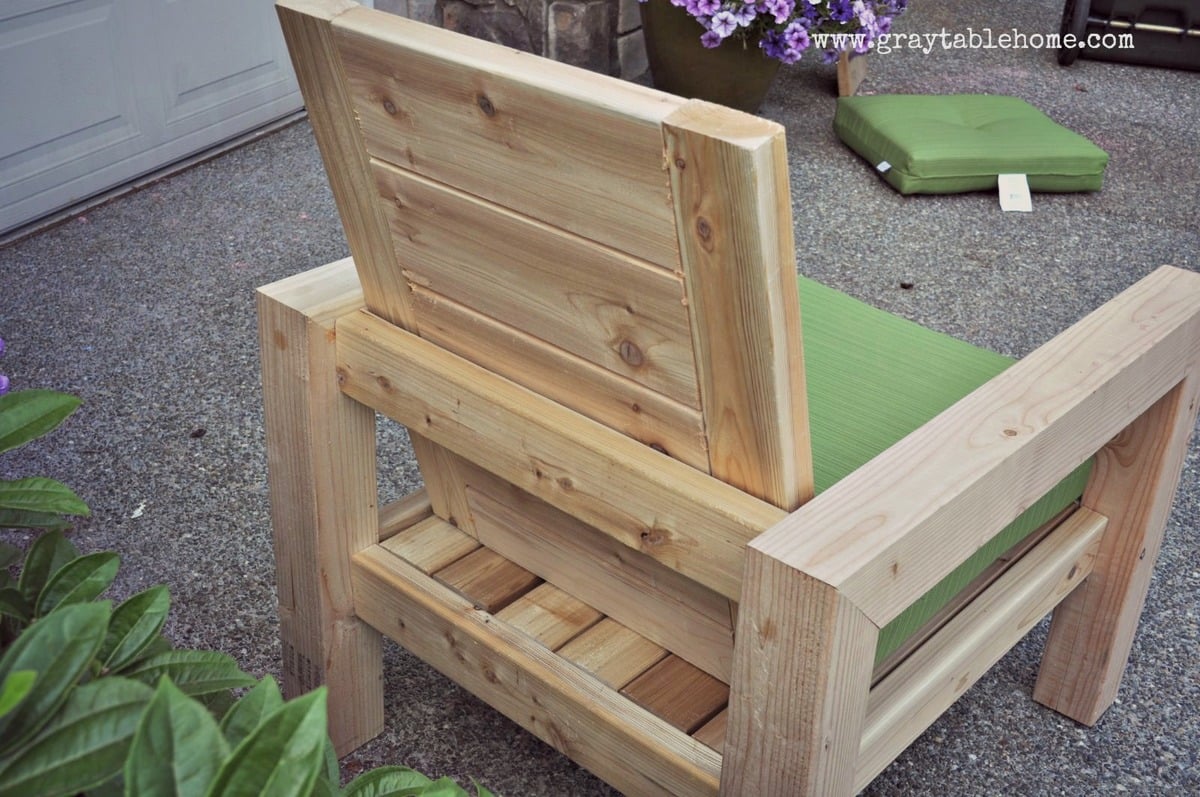
2x4 and 2x6 Chairs and Couch
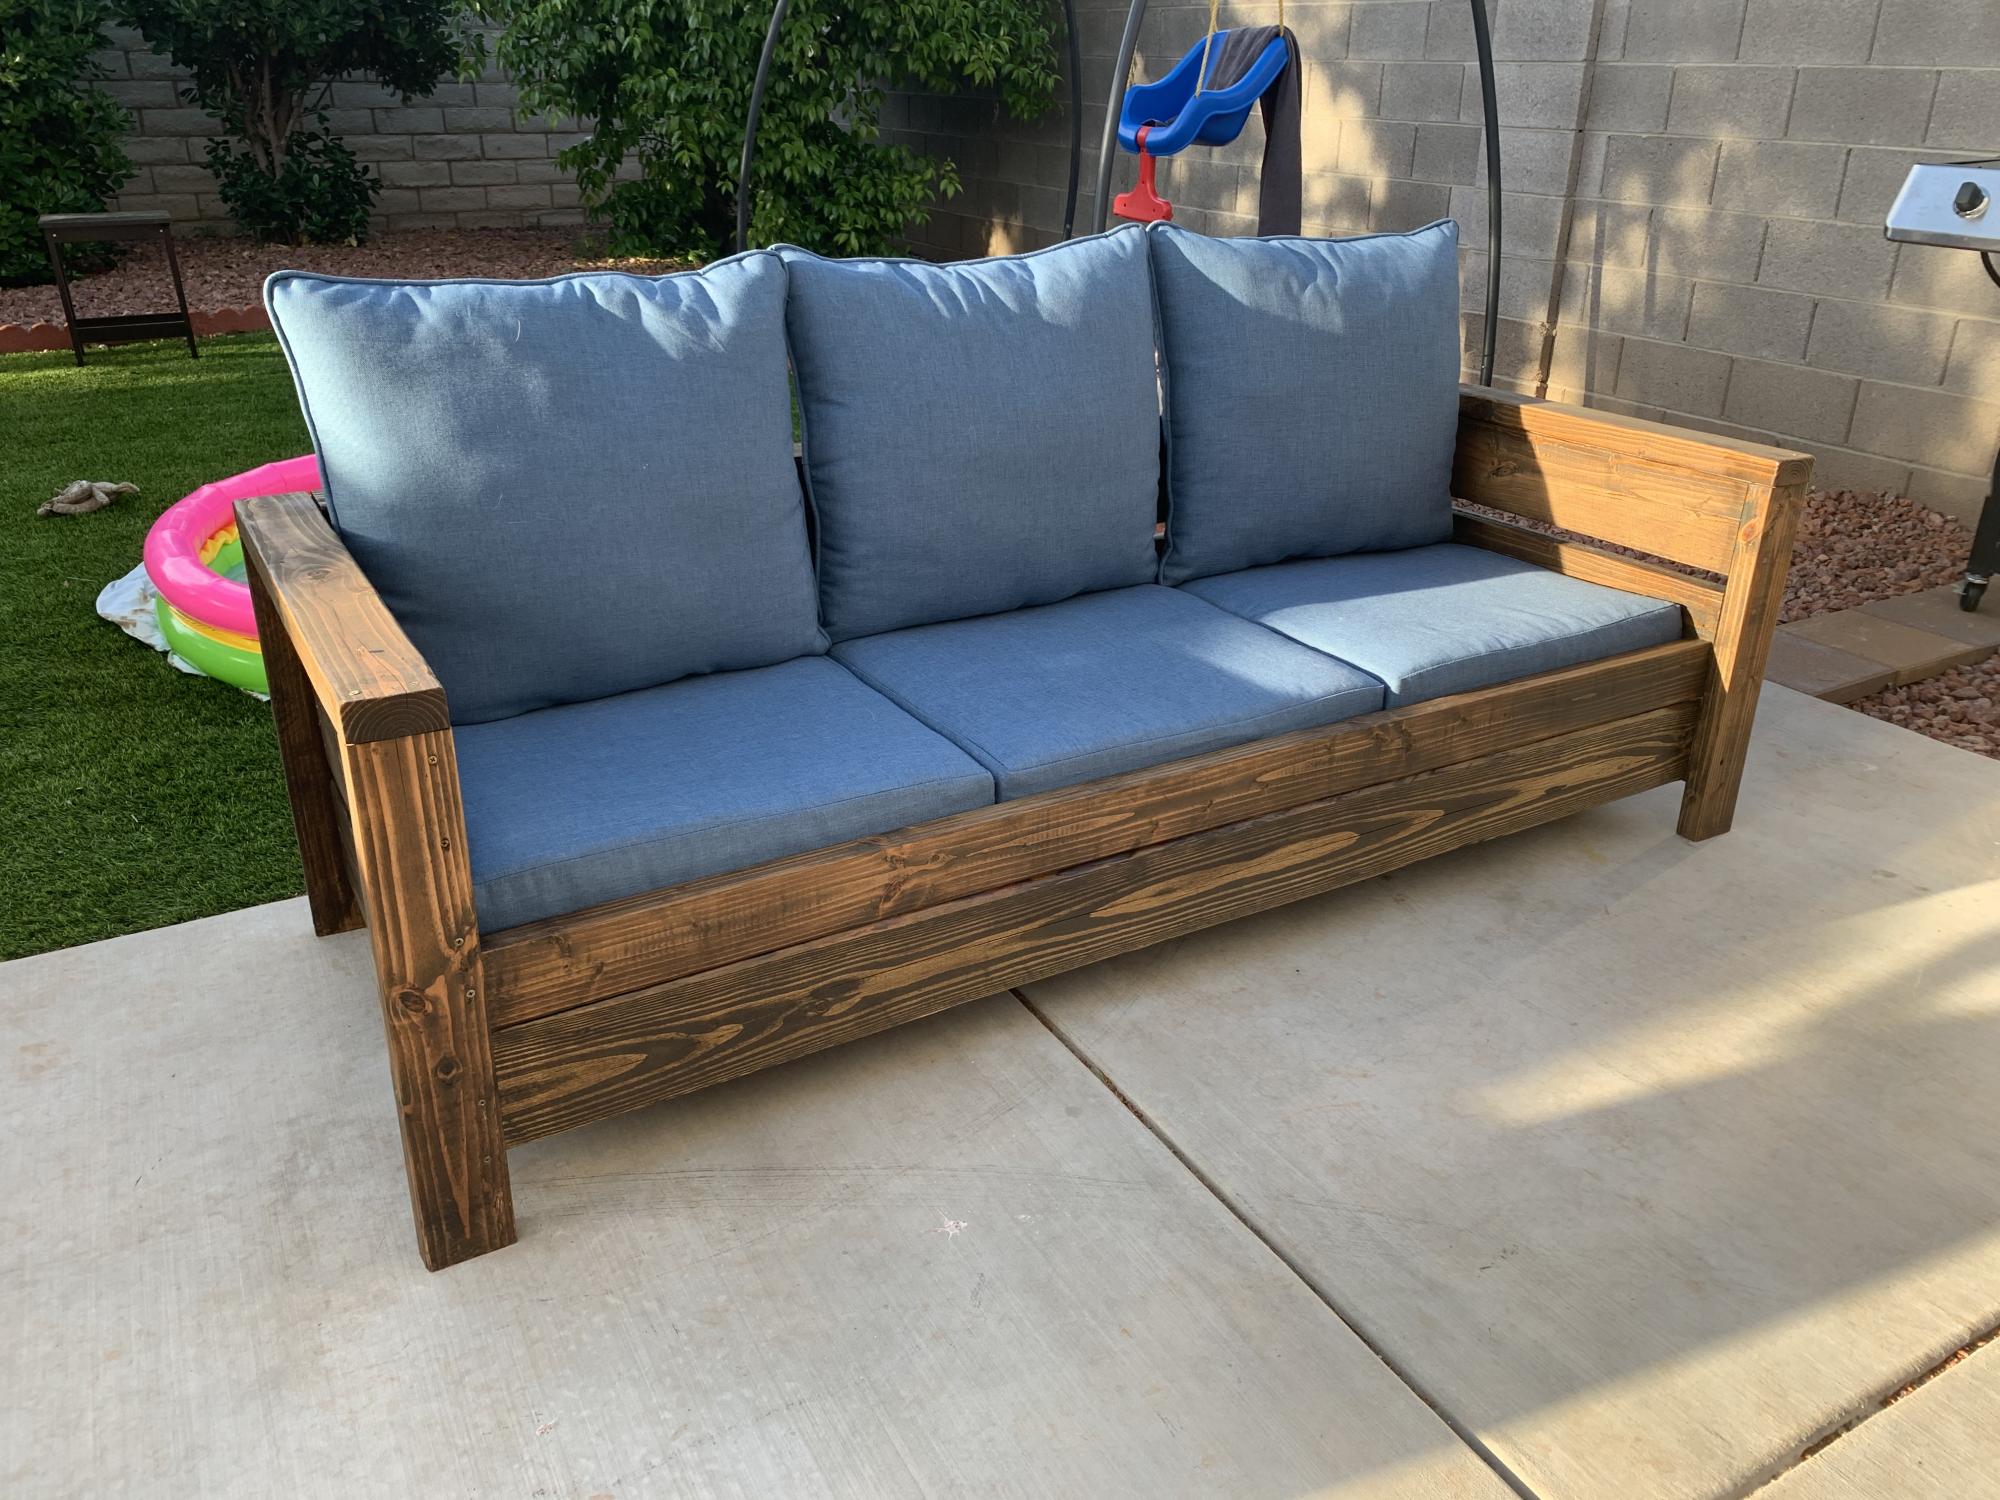
I used the Modern Outdoor Chair from 2x4s and 2x6s plans and slightly modified then to make a 3 seater couch. My cushions(most expensive part) were 24 in x 24 in and purchased from Lowes for $40 per seat. The couch is 79 inches in total length. I also dropped the seat down to the lower level to allow more room for my cushion backs to sit further down into the seat.

Built from Plan(s)
Estimated Cost
$400
Estimated Time Investment
Weekend Project (10-20 Hours)
Finish Used
Thompsons Waterseal Teak Oil Walnut Semi-Transparent
Recommended Skill Level
Beginner