Community Brag Posts

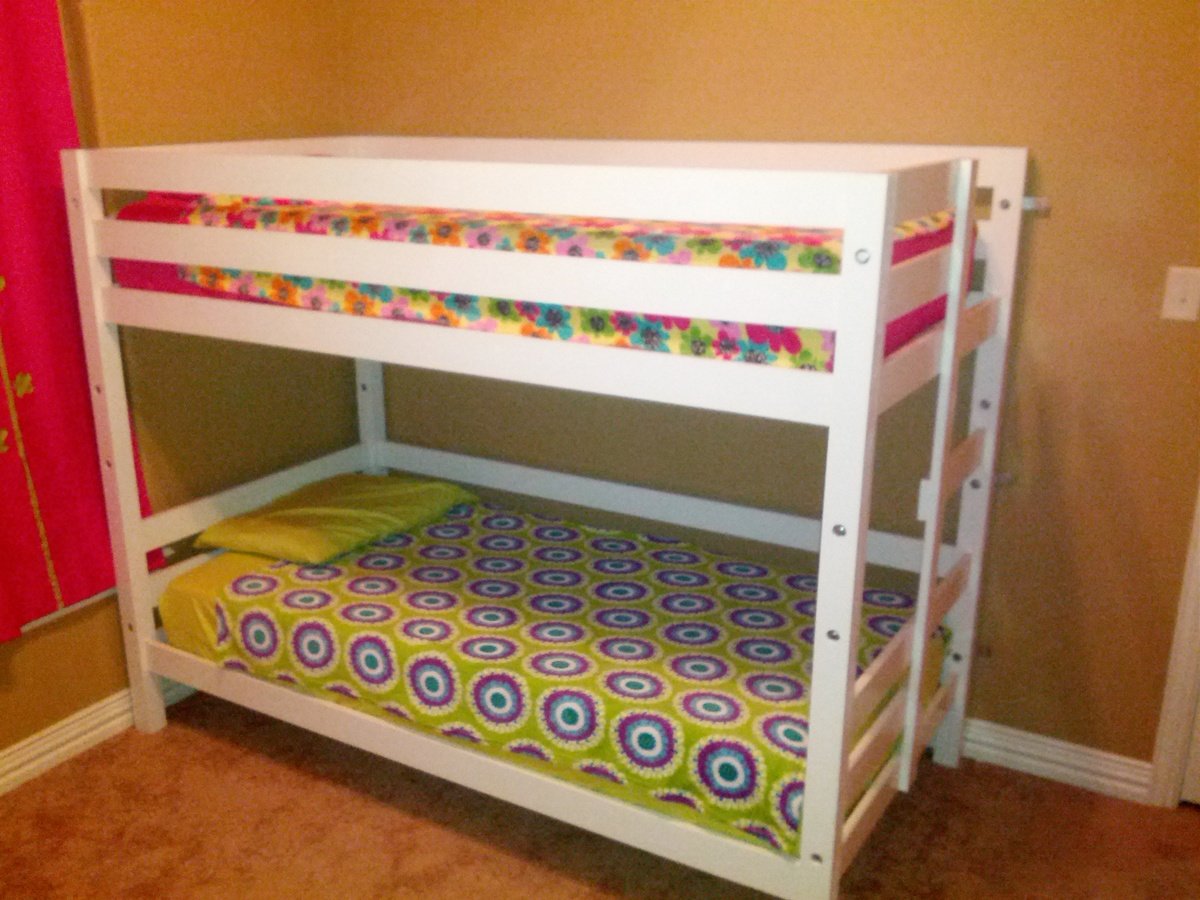
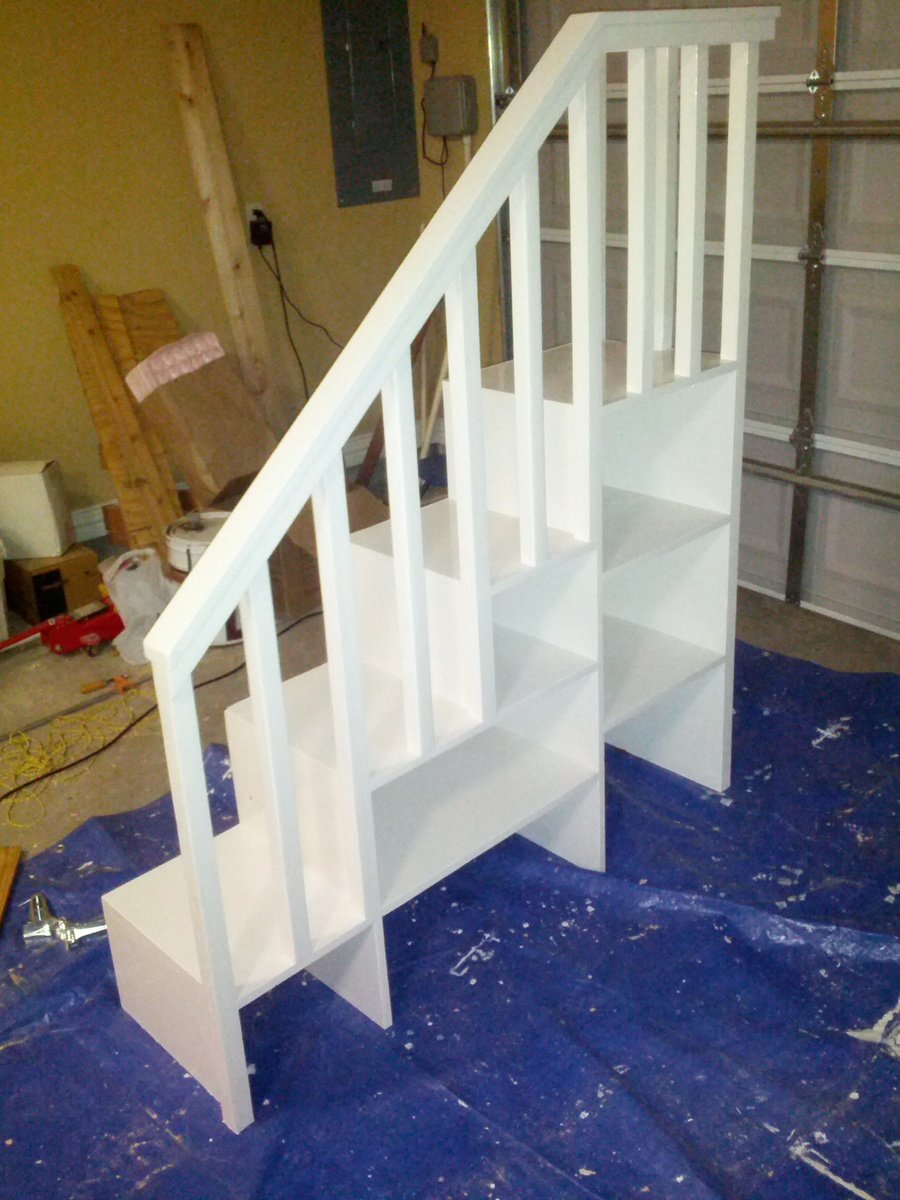
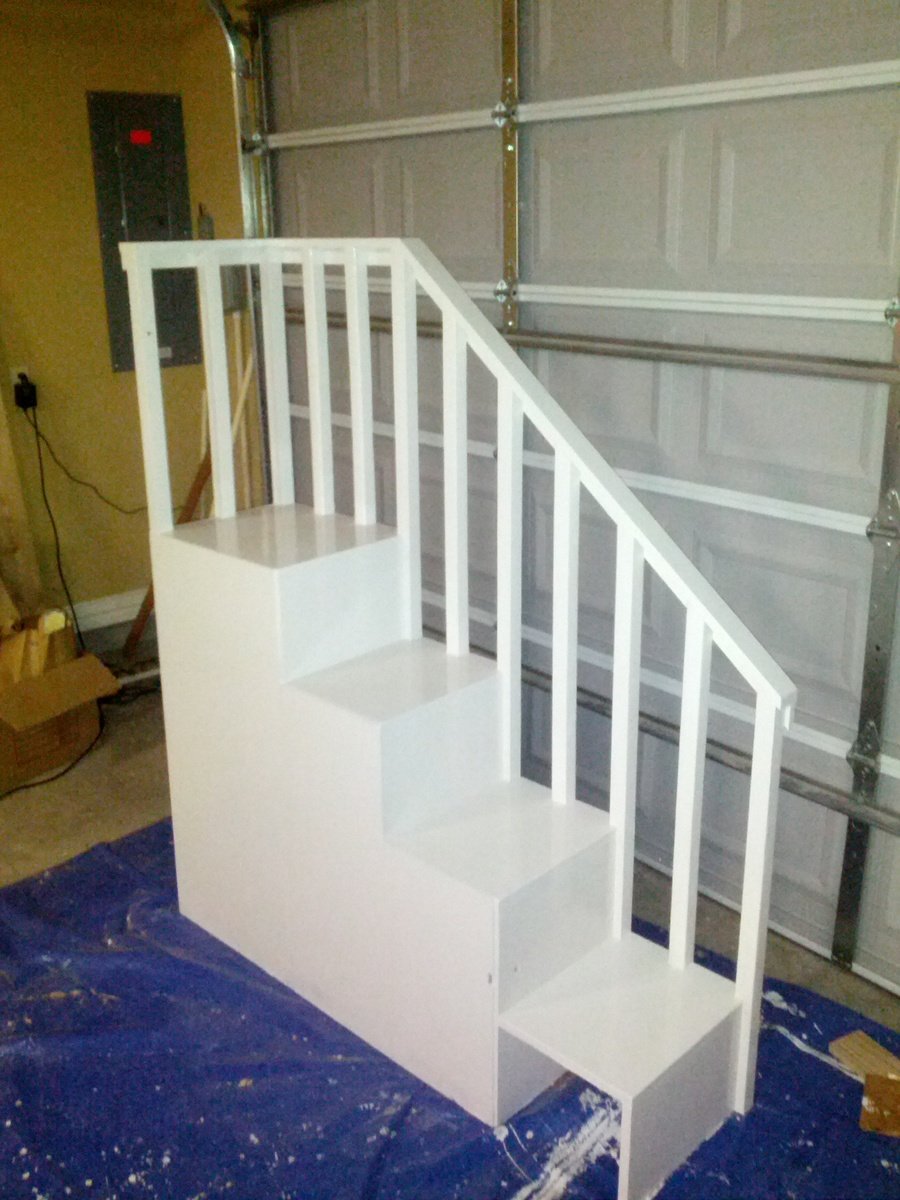
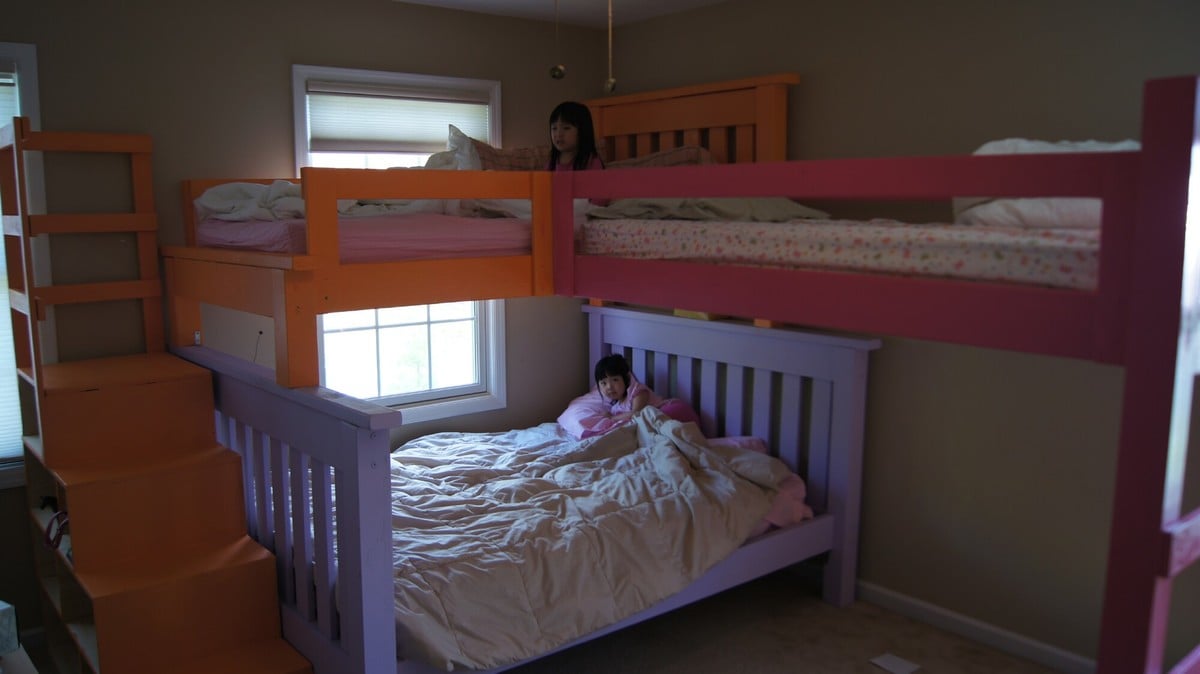
Classic Bunk Bed with Sweet Pea Stairs

Submitted by e_hutch on Fri, 01/17/2014 - 19:03

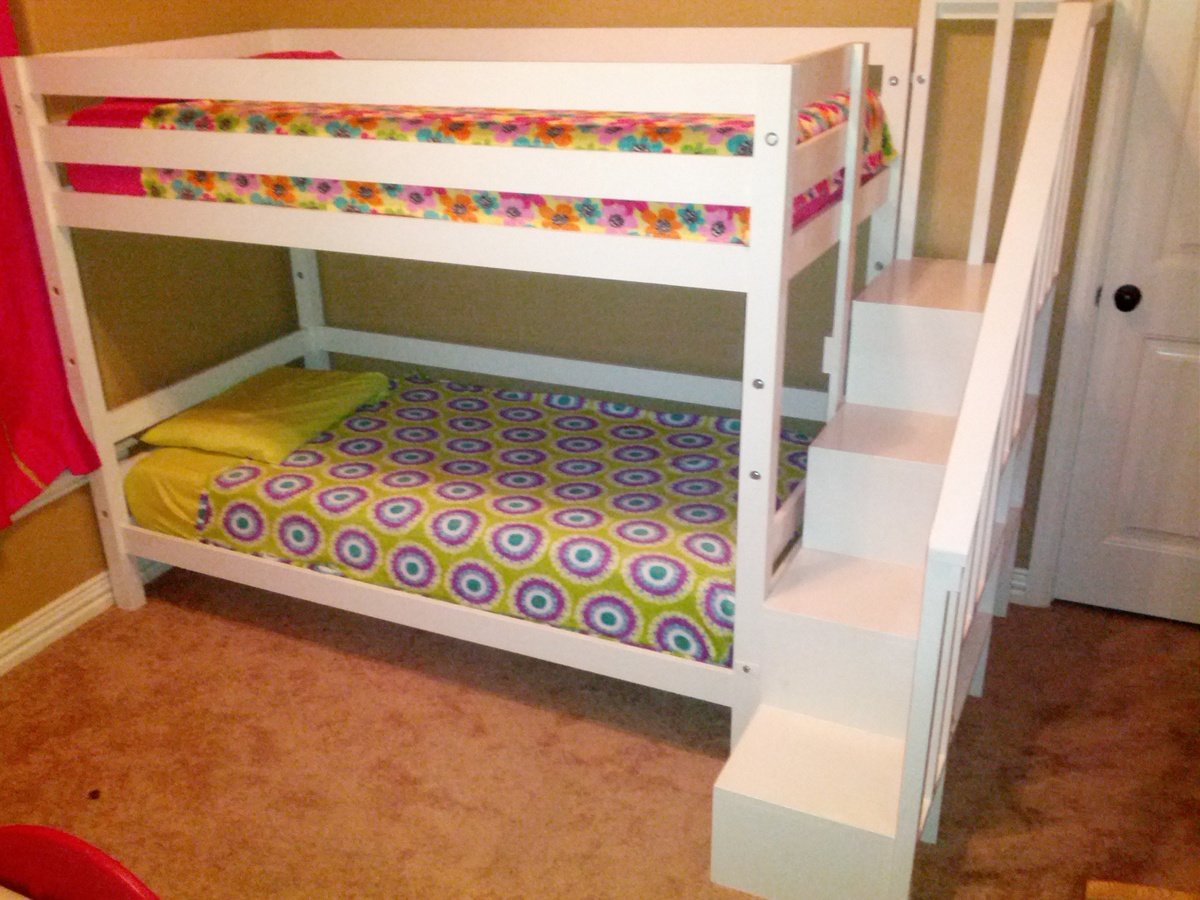
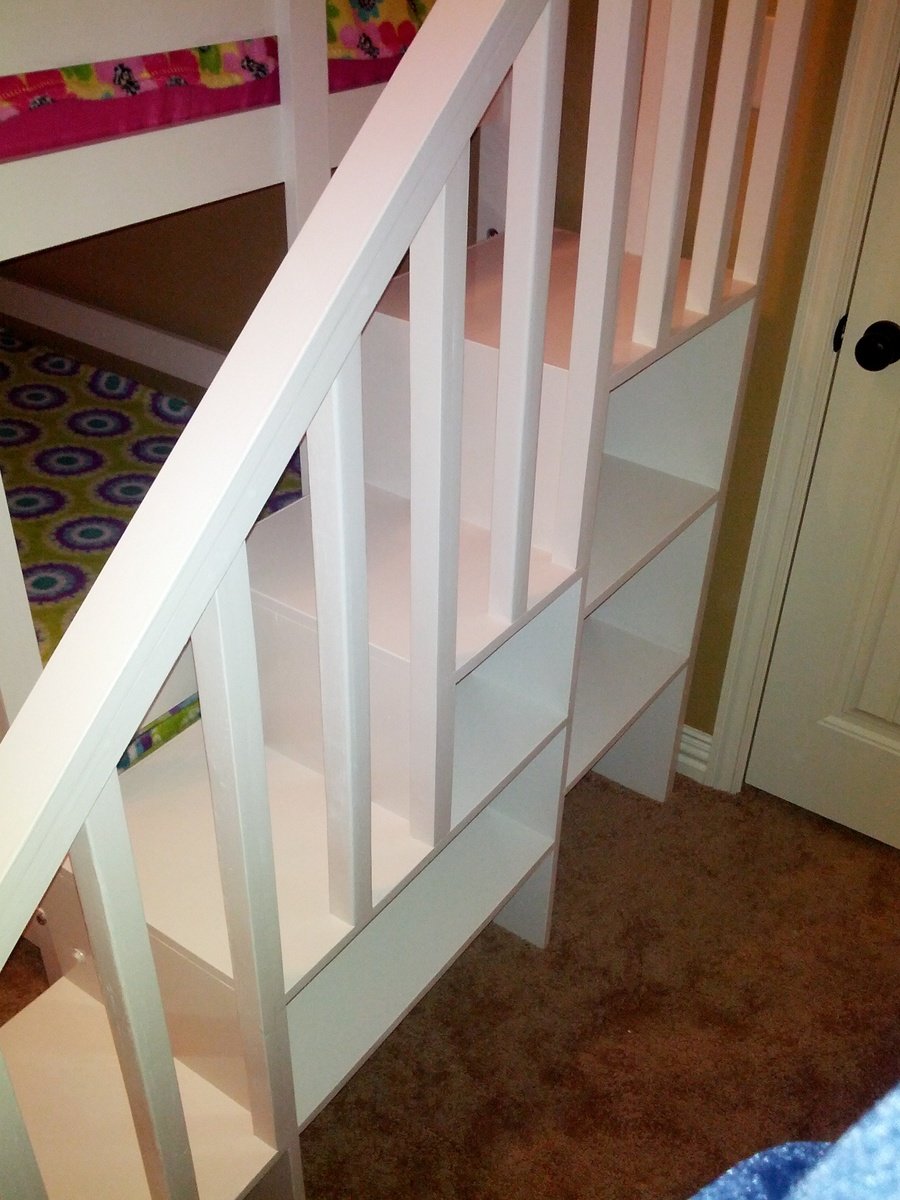
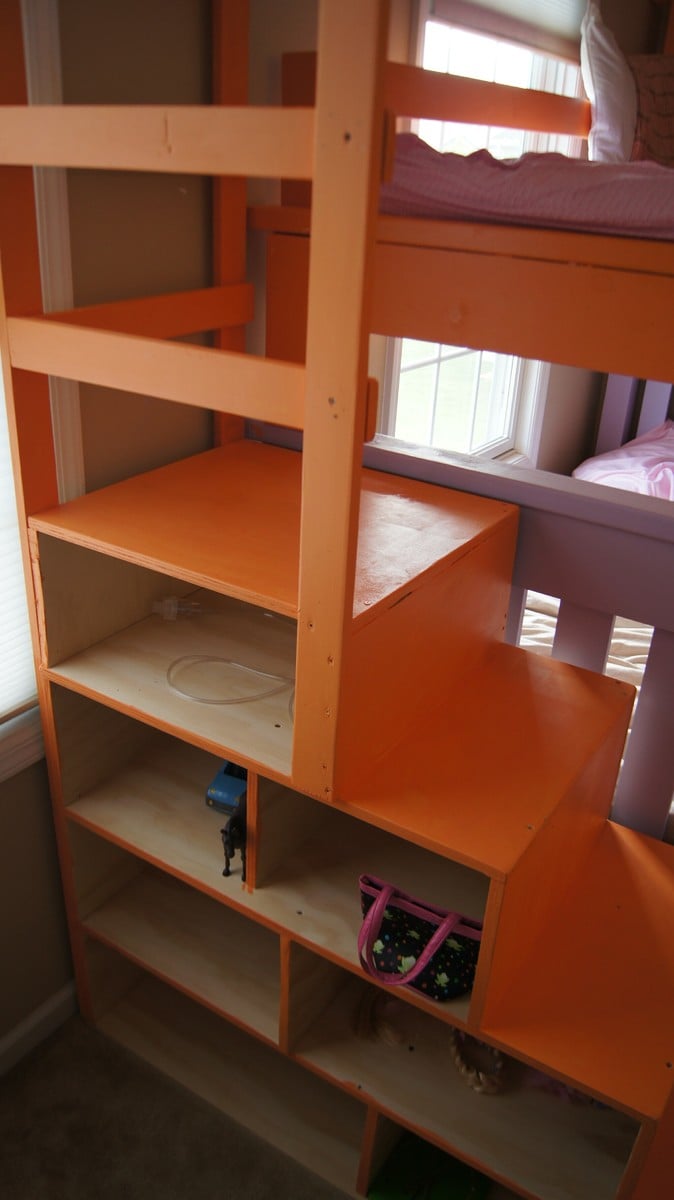
I wanted a bunk bed for our daughters, it needed to be easily moveable like the "classic bunk beds." I also wanted stairs like the "Sweet Pea Garden" bunk bed because we have toddlers in the house. I modified the classic bunk bed to put the ladder on the end, then built the Sweet Pea stairs to fit to the opening (I think the only difference in dimensions was a 20" top stair. I didn't want the unfinished ends of plywood so I got 4'x16"x3/4" pine boards from lowes which happens to be the width of the stairs in the plan. Instead of using the 1x2's as trim on the ends of the shelves I put two of them together, one all of the way down the front of each stair and one resting on the top of the stair (screwed together) so I wouldn't lose lateral stability. I then spaced 2x2's in between to keep it "simple" looking instead of the heart shaped decorations from the sweet pea bed. I used some 1/4" paintable composite board to provide a backing to the stairs. I bolted the stairs on to the bed with some flat bar stock cut to size and 3/8' in hex bolts cut to length. I used pocket hole joints wherever possible and countersunk all other screws and used 3/8" dots from lowes to fill the holes. I painted it with a coat of primer and a coat of Glidden Trim and Door paint in antique white from the Easy Vintage Step Stool project.

Estimated Cost
$400
Estimated Time Investment
Week Long Project (20 Hours or More)
Finish Used
Glidden Door and Trim, Antique White
Kilz Complete Primer
Recommended Skill Level
Beginner

Comments

zaphod

Mon, 06/23/2014 - 06:39

This is absolutely beautiful! Did you modify the size for toddler mattresses?
I would love to do the same for my kiddos - is there any way you could send me your version of the plans? [email protected]

Thanks so much!

Patio Table

Submitted by Rennie82 on Wed, 06/13/2012 - 17:42

Project took a lot more time and patience than the last few little ones that I have done. I like the simple outdoor table but wanted a little bit more. I used the basic concept and mixed it with a patio table from PB that I really enjoyed but didnt want to pay $800 for. The table looks fantastic and am still debating on what type of finish, if any, to use. Hoping to make the matching bench soon for one of the sides of the table.

Built from Plan(s)
Estimated Cost
Around $120 including the carriage bolts so I can take off the legs.
Estimated Time Investment
Weekend Project (10-20 Hours)
Finish Used
None as of yet, leaning towards Thompsons clear waterproofer
Recommended Skill Level
Intermediate

Comments

Modern Industrial Adjustable Work Stand

$120 for 2 bases, one top ... less if you have scrap lumber and pipe

The hard part of some woodworking is what to do with the stuff BEFORE and AFTER it goes through the tools.

We need an infeed and outfeed table for routers, drill press, and saws but have no room to install a permanent workbench with an adjustable tool lifter.

We saw the coffee table to desk height adjustment mechanism and lightbulbs went off! This adjusts! We can take the top off! It stores!

The first photo shows it adjusted to align with the miter saw's cutting area.

As built, there are a couple of changes:

1 - It's taller. Lowest table height is about 30" ... add 8 inches to each leg.

2 - We only used 1 leg brace, about half way down the leg. Cut it to fit after you get the legs screwed to the top.

3 - the wobble of the adjustable bar on the threaded rod is not good for precision woodworking ... the second picture shows the guide pipe that keeps the threaded rod straight up and down.

4 - No pocketholes (sorry Anna) because this is a workbench, not fine furniture.

5 - The tops are cut from one sheet of 4x8 3/4 in melamine coated MDF ... 2 are 2x6 and one is 2x4.

This could also make an adjustable craft table. Raise or lower it to handle fabric for your sewing machine.

Estimated Cost
$120 for 2 bases, one top ... less if you have scrap lumber and pipe
Estimated Time Investment
Day Project (6-9 Hours)
Finish Used
None
Recommended Skill Level
Intermediate

Comments

Outdoor living space inspired by Ana’s plans

Submitted by Anonymous (not verified) on Thu, 05/27/2021 - 17:49

I started this backyard project at the beginning of the Pandemic. I used Ana’s plans for the Adirondacks and the picnic table and the bench.

Thanks for your ideas ams inspiration!!!!

Sincerely
Spencer Friedlander

Estimated Cost
$700
Estimated Time Investment
Week Long Project (20 Hours or More)

Comments

Modern Patio Chairs/Love Sear

Submitted by Anonymous (not verified) on Sun, 09/25/2022 - 15:57

Super easy and fun project! We altered the original plans to build a loveseat and had zero issues. We did add some extra support below.
I did not find 25”x25” cushions within our price range so I settled for 25”x22.5” and they work but ultimately 25x25 works best.

L shaped triple x desk

Submitted by Anonymous (not verified) on Sun, 01/01/2023 - 13:24

We built this desk over Christmas break with my son for his bedroom.
Ran all wood through a planer and used pocket hole screws and Tite bond 3 glue. Black stain and satin polyurethane (3 coats) for the frame and my own stain concoction for the shelves and top treated with 2 coats of Odies oil.
He was very pleased and we enjoyed our time working on this project

Comments

Raised Wood Planters by Urban Wood Solutions

Planters build by Urban Wood Solutions

Comments

Simple Bunk bed with a triple twist and cubby steps.

Submitted by Jason_NJ on Fri, 05/11/2012 - 11:29

I'm a father of 4 girls ages 6,5,4, and 1. So a regular bunk wasn't enough so I decided to add the 3rd bunk. Each painted in my girls favorite colors. The paint was Martha Stewart signature paint which was on clearance on Lowes. Think it was 3 or 4 dollars a quart. The cubby steps are basically just 4 boxes stacked on top of each other and nailed together and made from 3/4" furniture grade plywood.

It didn't come out perfect but I'm pretty happy with the results. Let me know what you guys think. Thanks.

PS, Ana...my wife is a big fan of yours. She's the one who turned me onto your site.

Estimated Cost
$200-$250
Estimated Time Investment
Week Long Project (20 Hours or More)
Finish Used
Martha Stewart Signature Paint
Recommended Skill Level
Beginner

Comments

calisarah2005 (not verified)

Sat, 11/24/2012 - 09:06

Hi,
We are looking to build something very similar, but are needing more information. How did you attach the loft bed to the top bunk bed? What do you have at the foot of the loft bed to keep it up? Thanks so much for any information.

Large 6 X 8 Sandbox

We wanted to make a large sandbox for lots of kids. We love that it has an easy cover and two large benches to sit.

Supplies and Steps are shared at http://myhomedonemyway.blogspot.com/2013/07/building-6-x-8-sandbox.html

Built from Plan(s)
Estimated Cost
$250
Estimated Time Investment
Day Project (6-9 Hours)
Recommended Skill Level
Beginner

Comments

Mission Style Side Table

Submitted by Anonymous (not verified) on Mon, 04/29/2024 - 09:36

Red oak mission-style side table with deer footprint inlays, golden oak stain.

Bob Zink

Our Thanksgiving Family Project

Submitted by loniwolfe on Wed, 03/09/2011 - 16:50

My husband, step father and I built these Thanksgiving weekend (2010) and my mom got us a half bushel of oysters to snack on and made awesome steamed mussels with bread for dinner. This was a very fun family weekend.

I modifyed the plans a little to make the arms angle in a bit instead of being straight boards and also created the curved front. Then after building the first chair, Pat decided to make the second chair's back rest taller and cut angles to match the arms.

I picked intermediate because of needing a miter saw for all the different angles needed for getting the front right.
Also, It took one day for each chair

Built from Plan(s)
Estimated Time Investment
Weekend Project (10-20 Hours)
Finish Used
To my knowledge, Pat has not yet stained them, but once he does I will take more pics and find out what he used!
Recommended Skill Level
Intermediate

How to Build Simple Raised Garden Beds

Starting with Ana's simple $10 raised garden plans, we built ours to be part of our experiment: Growing Vegetables in Our Driveway. Because our boxes are visible from the street, we made them a bit fancier and sturdier than we would have if they were hidden away in the backyard. An easy, afternoon project - with delicious results!

Estimated Time Investment
An Hour or Two (0-2 Hours)
Finish Used
none
Recommended Skill Level
Starter Project
Seasonal And Holiday

Queen Murphy Bed

Submitted by Jenga on Sun, 12/06/2015 - 12:59

Not too bad of a project but had to a good bit of guess work so I could changed the plans for a queen size bed and flip in on its side.

Estimated Cost
$200 if you already have the bed
Estimated Time Investment
Week Long Project (20 Hours or More)
Finish Used
White Paint and laminate flooring left over from the floor.
Recommended Skill Level
Beginner

Comments

Arilie

Sun, 05/29/2016 - 18:50

Good evening!

I am new at wood working, and would be very interrested in knowing the different measurements you changed to get from a twin to queen murphy bed. If it is posted on this page, I tried but couldn't find it. Thank you for your help. Have a good day.

Marie-Julie

Outdoor end tables

I made these two Ana White outdoor end tables for my patio. Next up will be the matching coffee table

Built from Plan(s)

Comments

Farmhouse Toybox

Submitted by Anonymous (not verified) on Fri, 03/10/2023 - 05:56

I've wanted to build a toybox for our daughter as soon as she was born, and Ana's plan was my favorite. It took a couple of years to finally get the supplies and start building it, and I was able to build it last year. I used recycled wood (I believe it's pine) I had and used a couple of nice pieces of oak for the top. I ran into a few snags with the box itself, with the wood splitting easily in some spots (used a lot of wood filler!), but was able to get it looking the way I wanted keeping a distressed look . I rounded out the corners of the top by hand with a rasp plane and sandpaper. The box was lightly painted with Annie Sloan Chalk Pain (Antoinette/Pink) and finished with Annie Sloan Clear Wax. The top was finished with three coats of linseed oil (24 hours between coats). The slow closing hinge was found on Amazon after a long time spent searching; I ended up using just one which works great. I'm very happy with the end product and my 3-year old daughter loves it! I was very pleased with how simple the plan was to follow, thank you Ana!

Built from Plan(s)

Comments

Palette Mud Kitchen

Submitted by Anonymous (not verified) on Fri, 05/05/2023 - 03:16

Here's the Mud Kitchen I made for my son's kindergarten. All made from palettes. Unfortunately your plans came out just too late

Built from Plan(s)

Comments

Back