Community Brag Posts

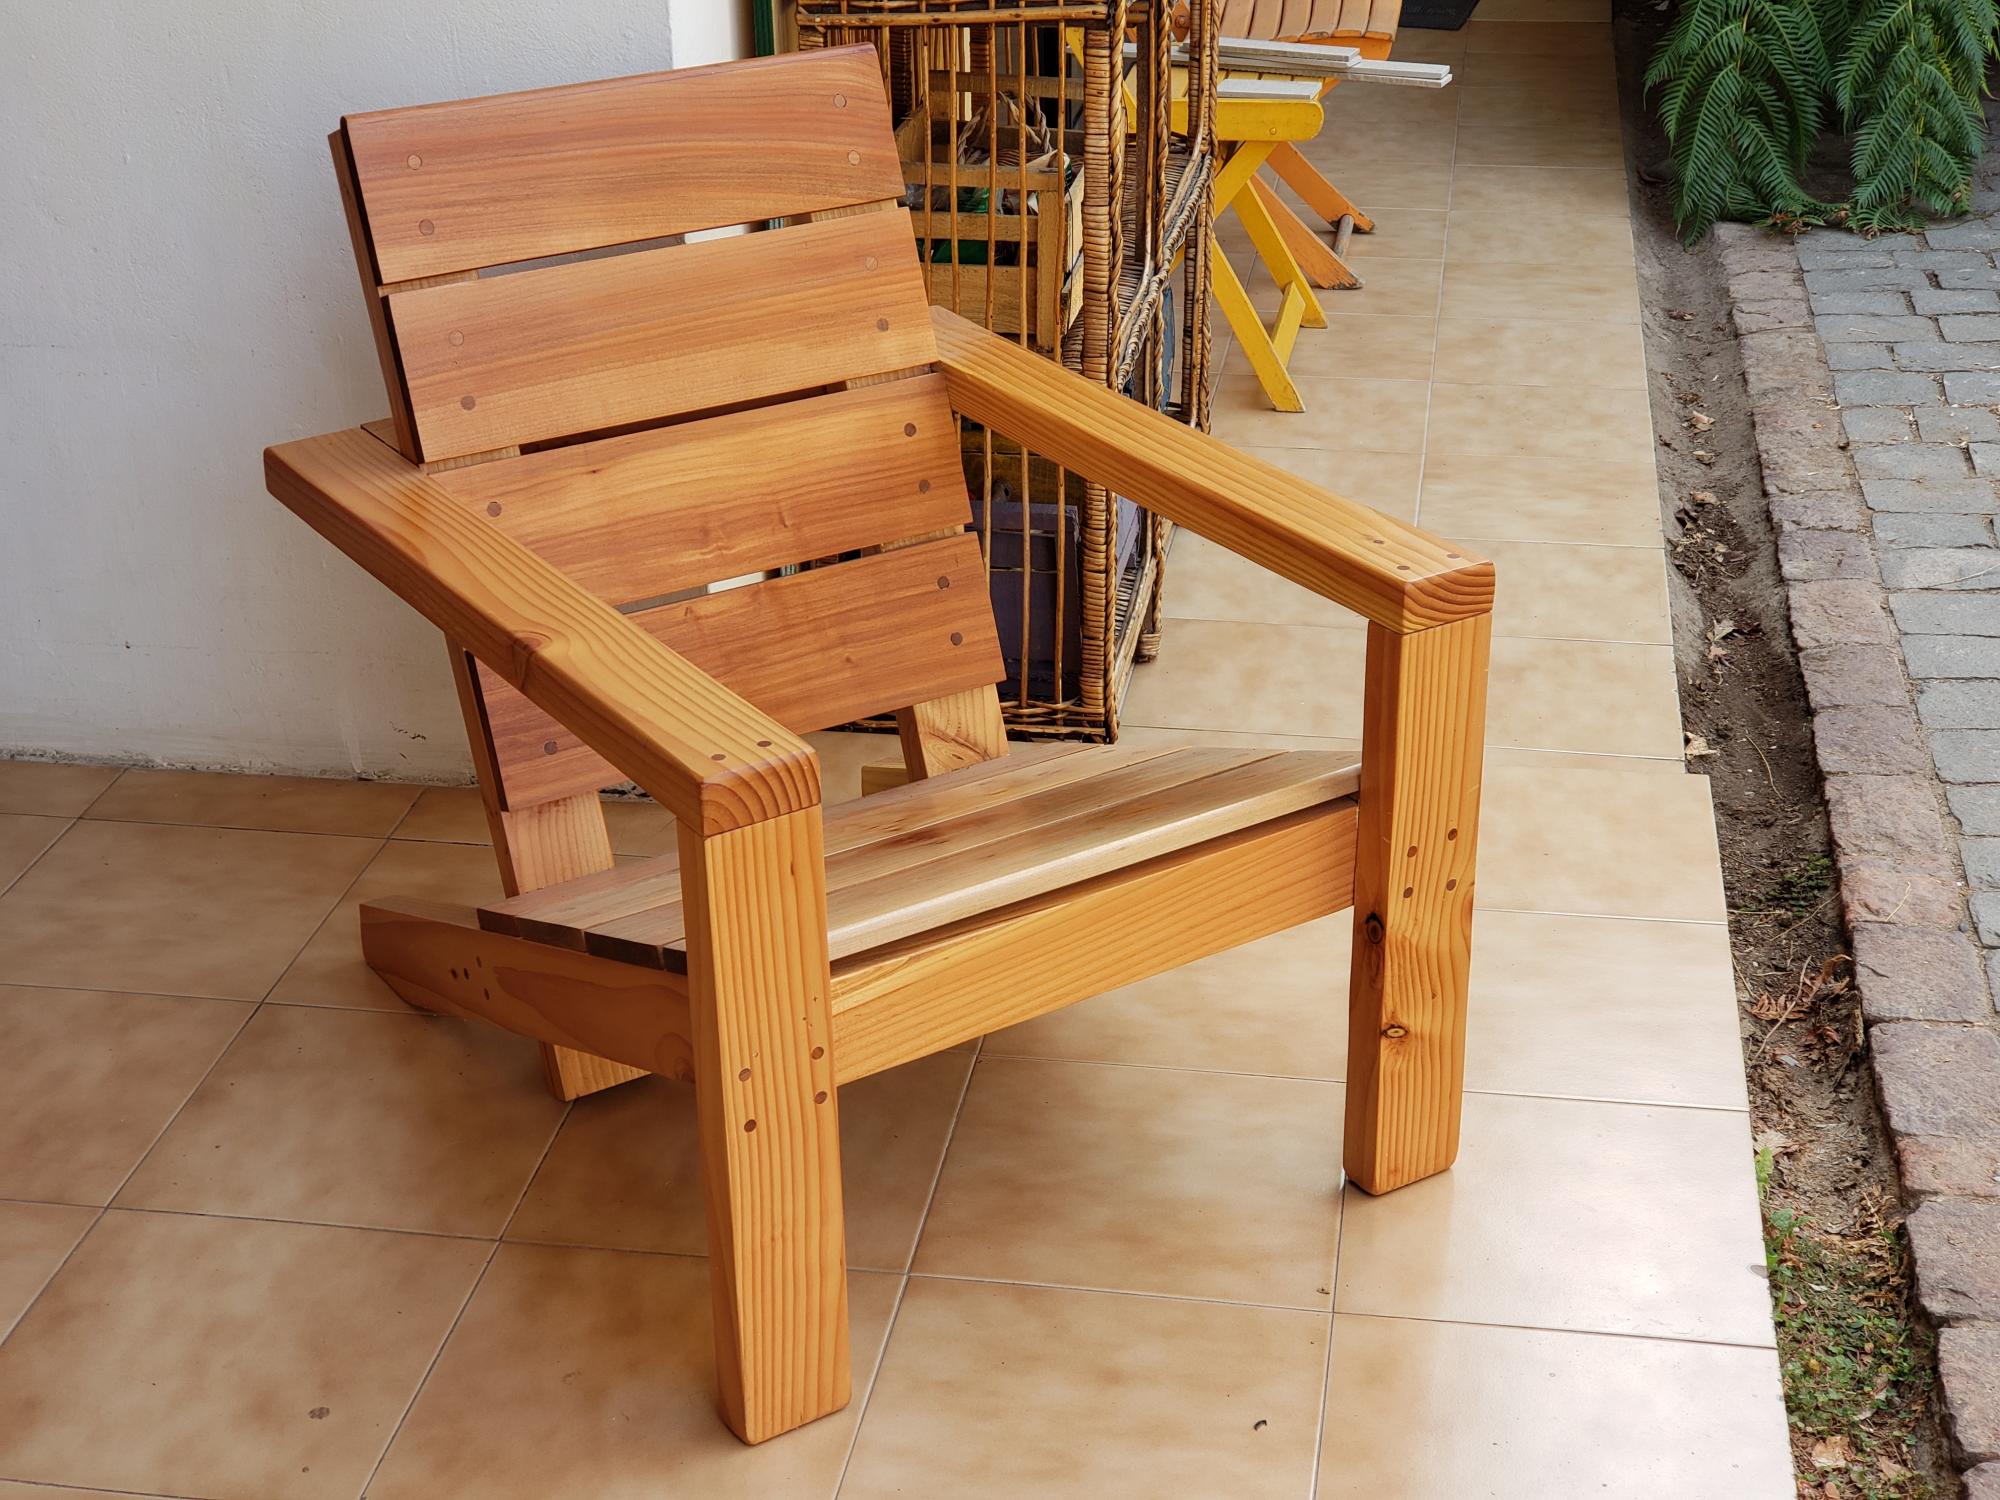
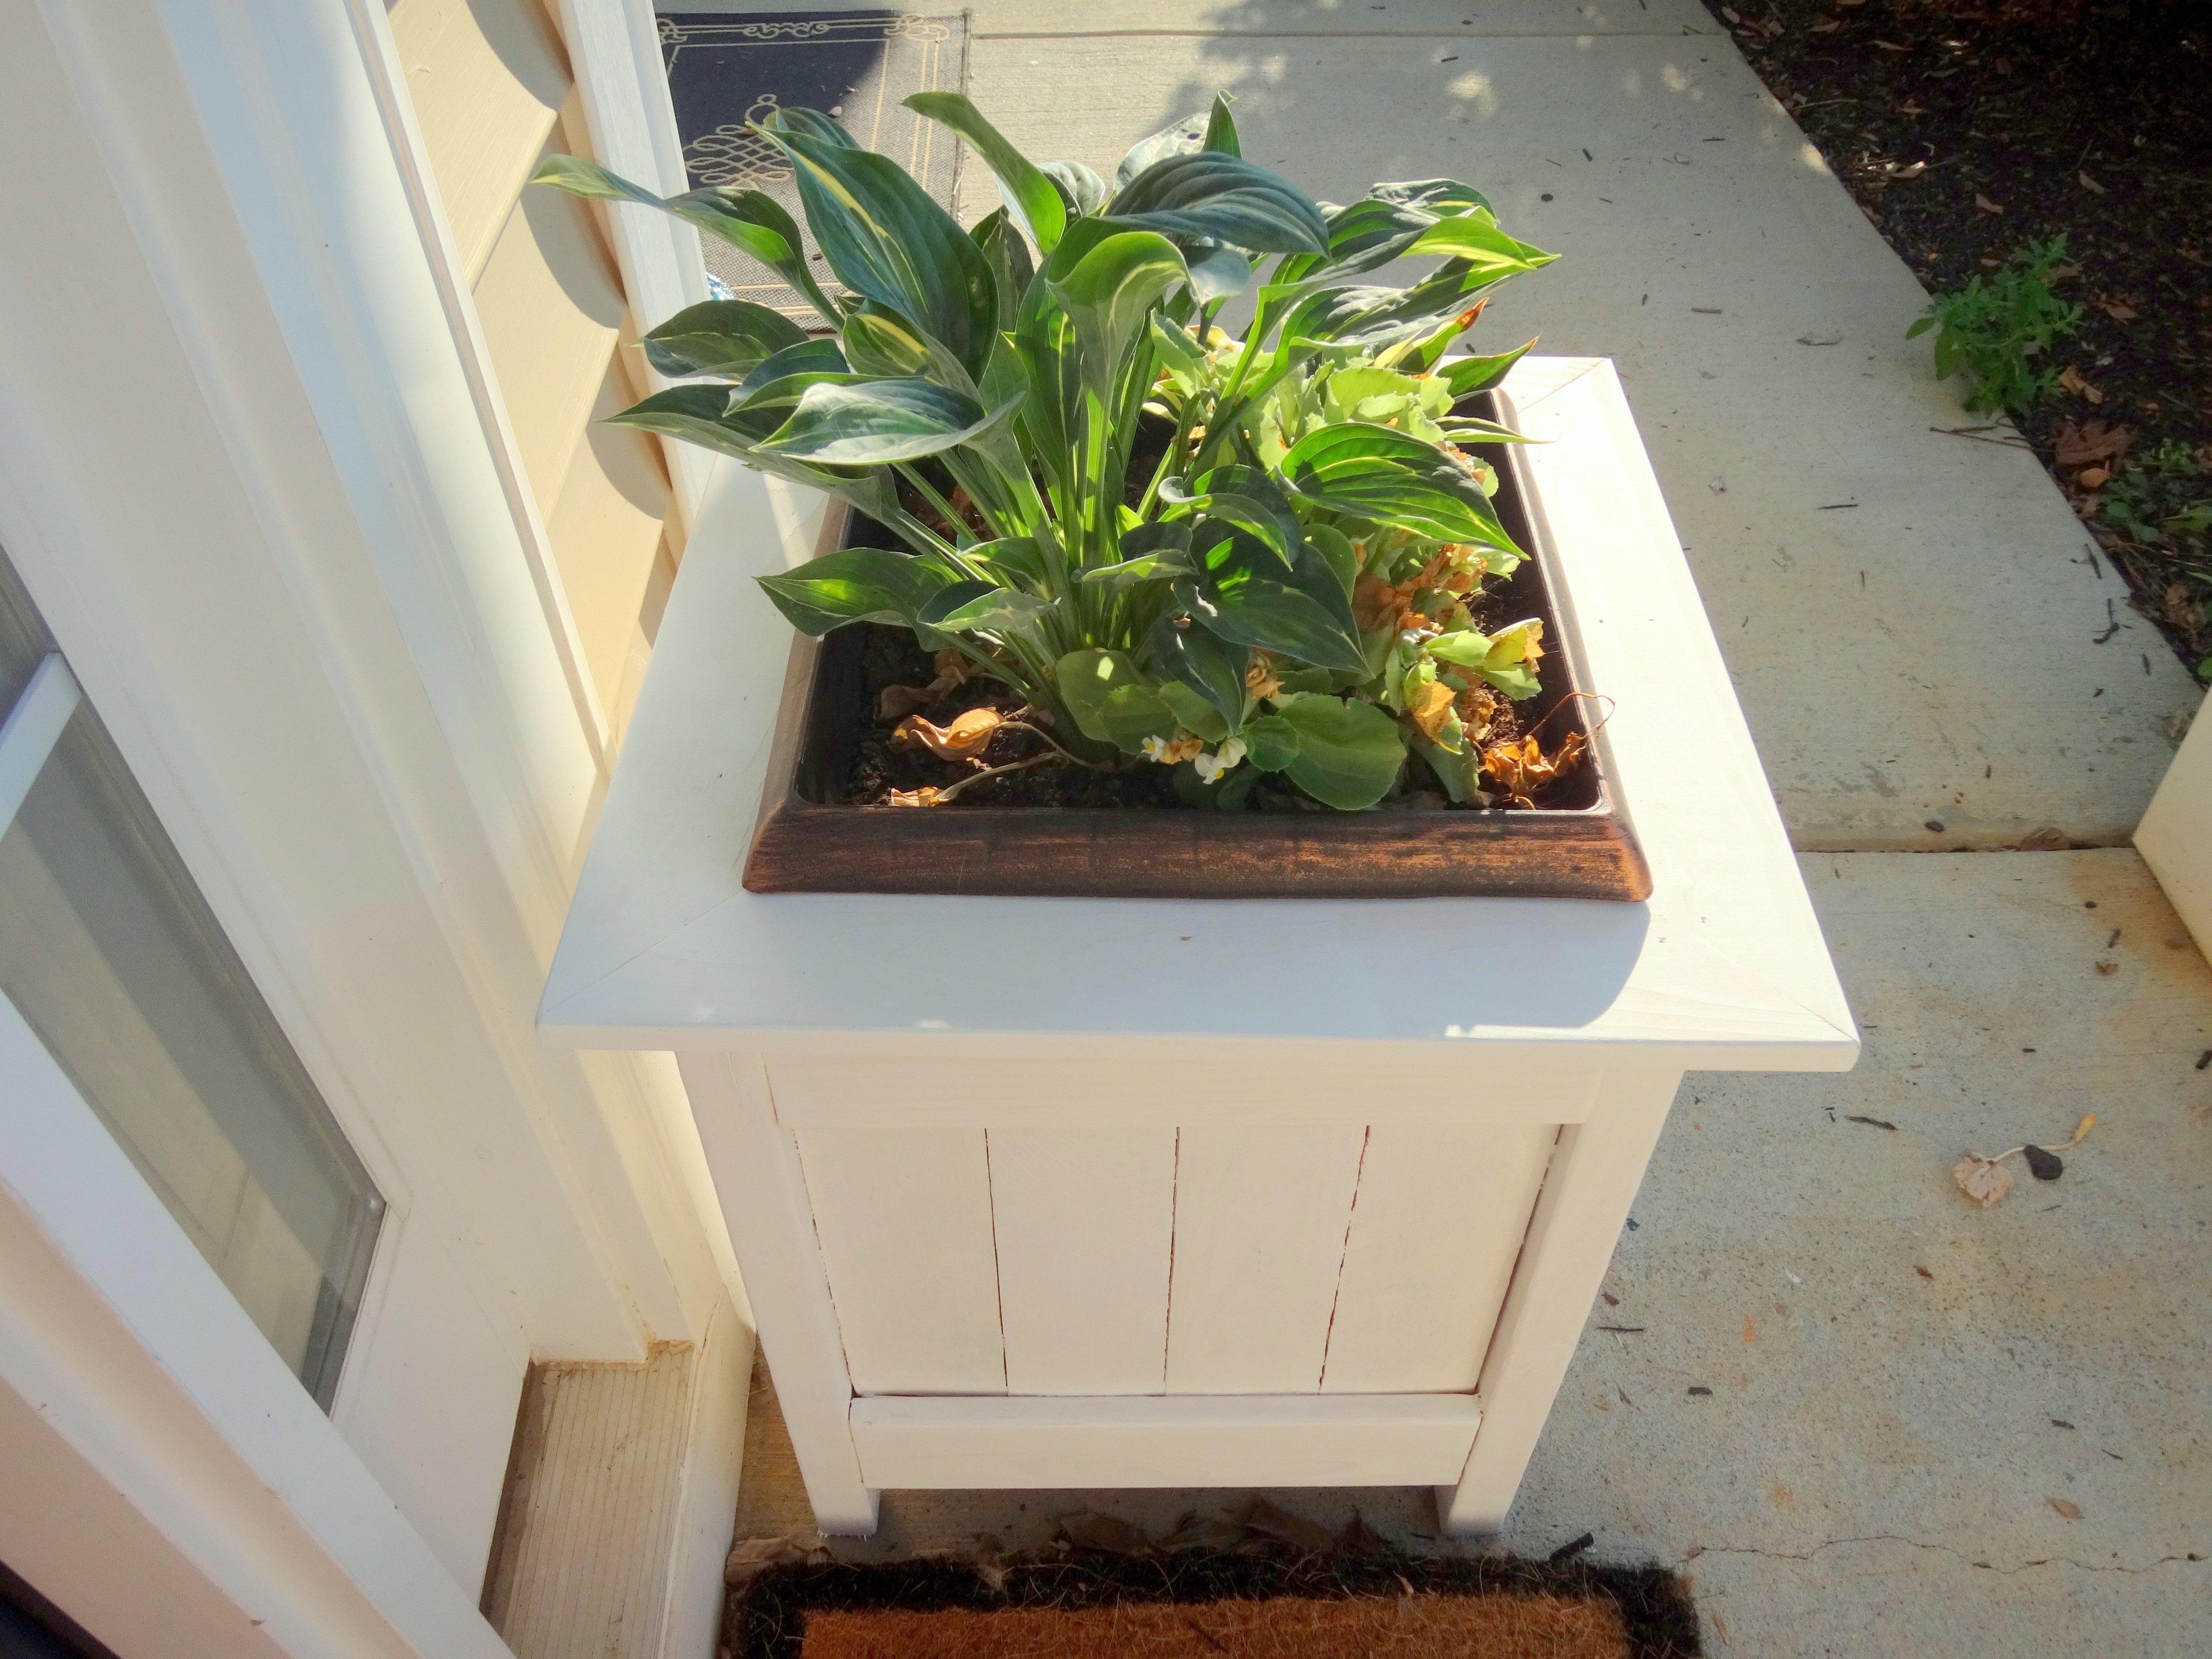
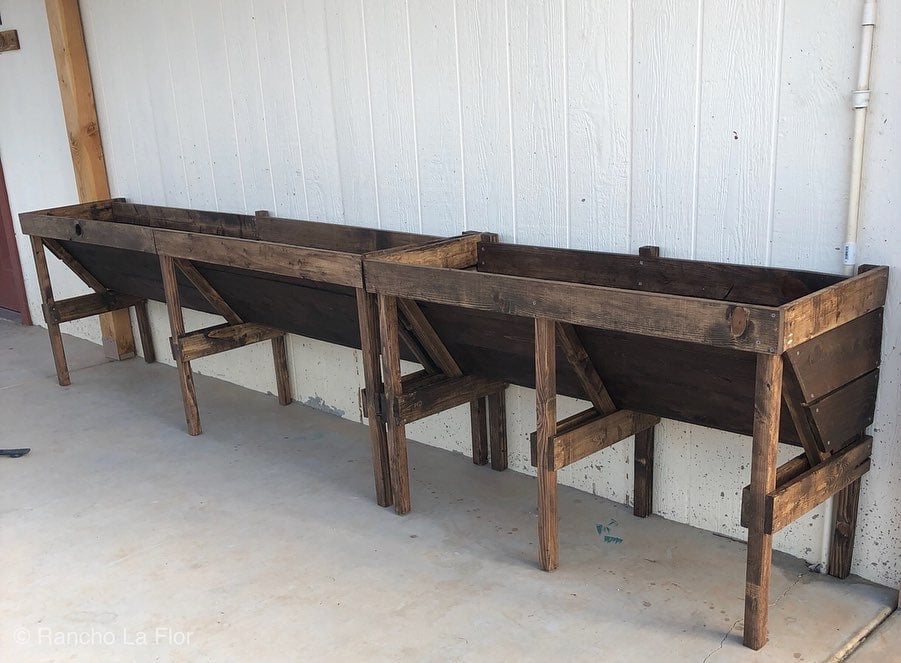
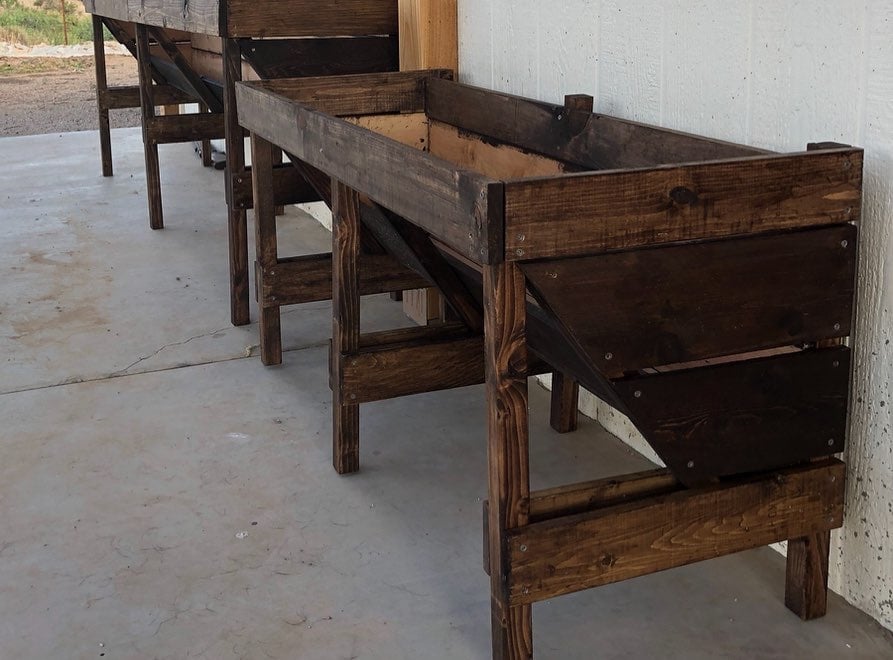
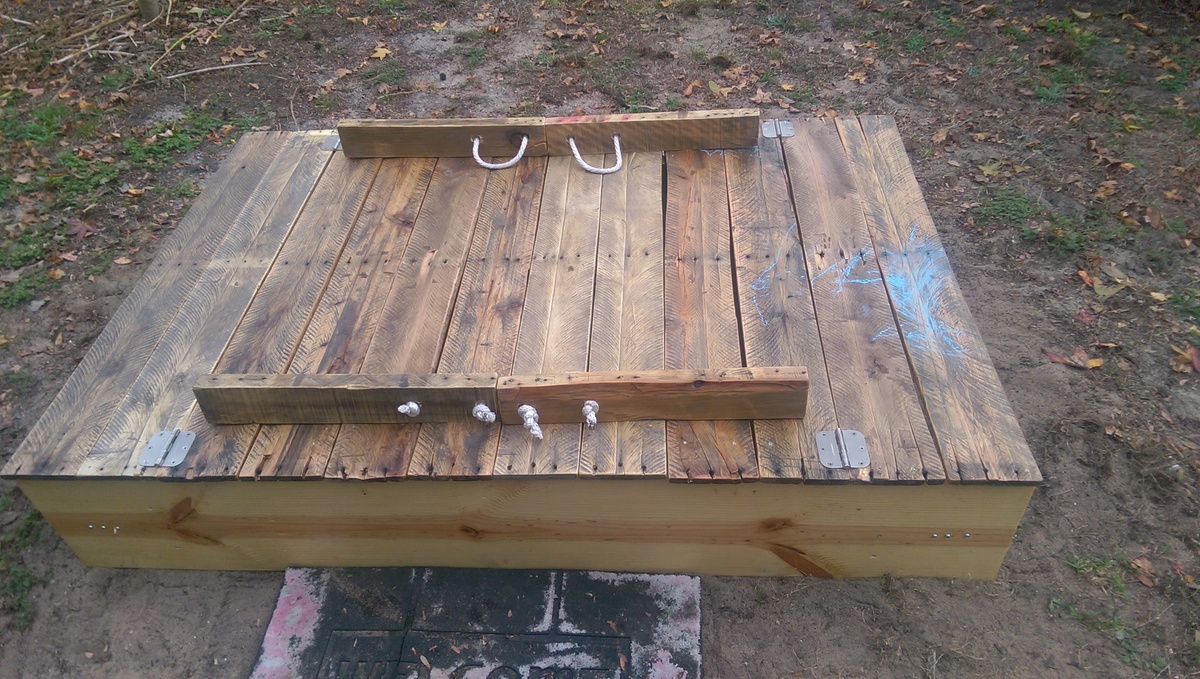
pallet wood covered sand box

Submitted by Anonymous (not verified) on Tue, 02/21/2017 - 12:29

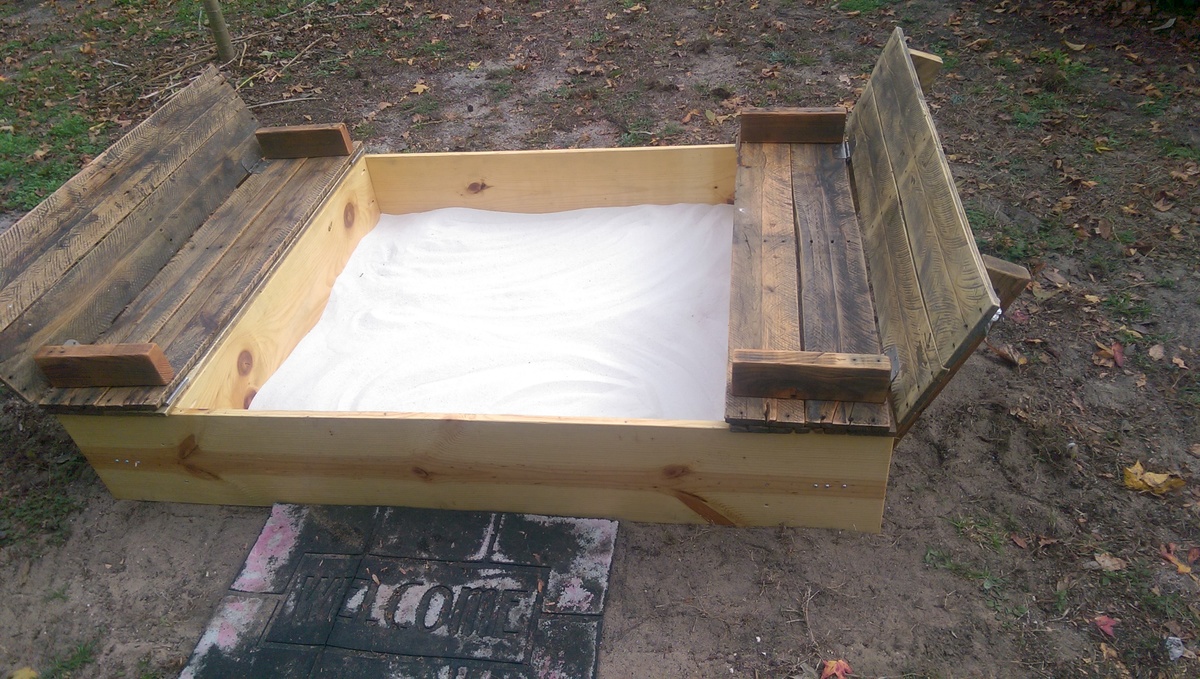
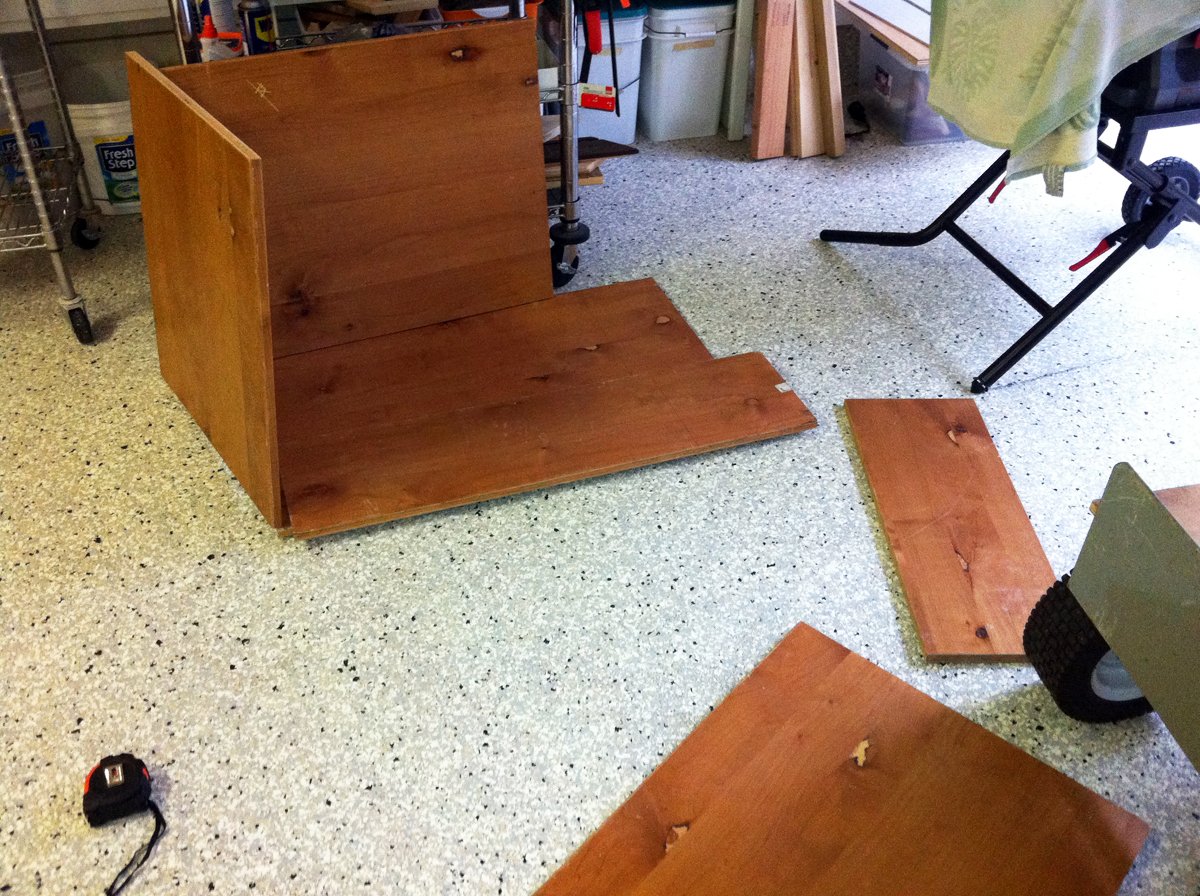
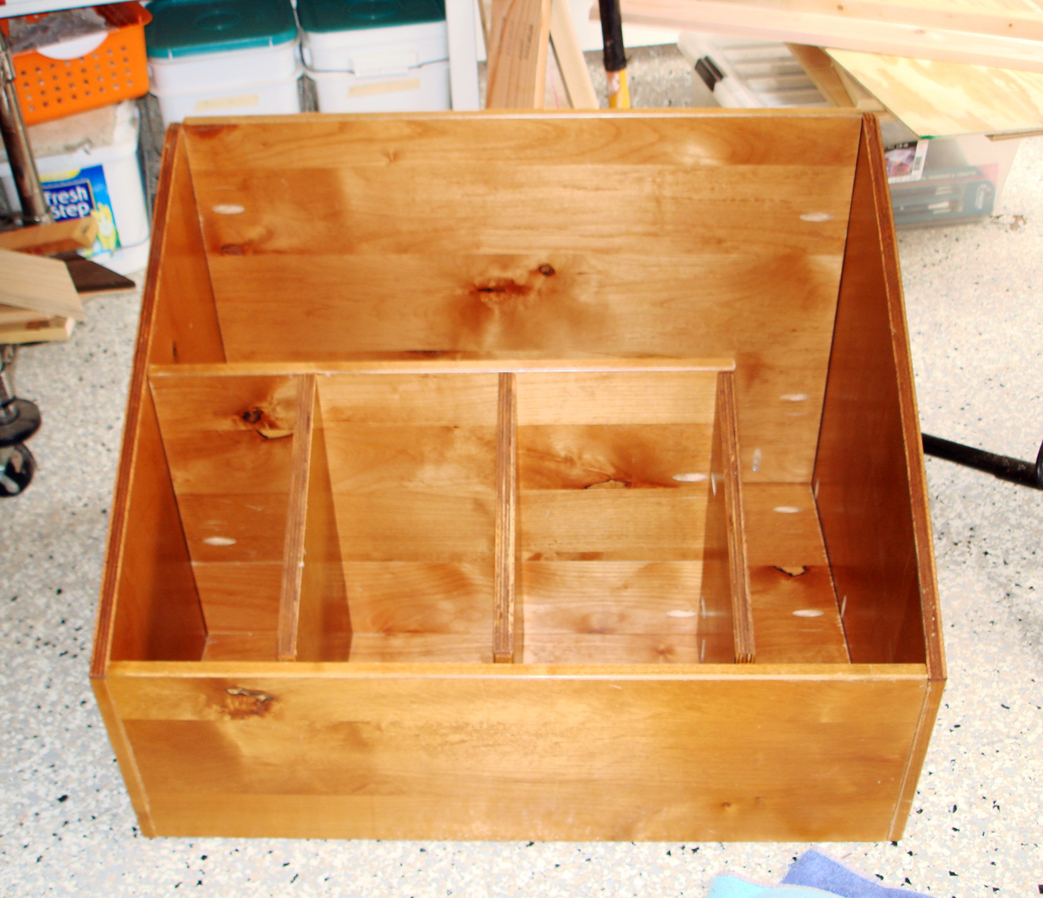
I used the same plans as posted but I tweaked them to work for the pallet wood that I ripped and sanded and stained with outdoor polyurethane. I also moved the short boards in so the box is smaller and added beams to support the bench separate. Because of Florida bugs and ants I also screwed a painting tarp to the bottom and punctured it several times for drainage to try and prevent bugs and weeds. The plans were so simple and I had so much fun making this.

Built from Plan(s)
Estimated Cost
50$
Estimated Time Investment
Week Long Project (20 Hours or More)
Finish Used
Just sanded and clear satin polyurethane outdoors coating. The product will look different depending on the pallet wood used.
Recommended Skill Level
Beginner

Play house bed with storage stairs

Submitted by Anonymous (not verified) on Thu, 03/16/2017 - 17:17

Made in 2014 from the playhouse bed plans with the storage stairs as well.

Estimated Cost
$200 for materials + paint +approximately $50 for the bottom bunk we added.
Estimated Time Investment
Weekend Project (10-20 Hours)
Finish Used
Primer + paint
Recommended Skill Level
Intermediate

Rustic X Coffee Table

My 1st coffee table and I'm in love with how this came out. Really proud of myself for this one!

Estimated Cost
92.26 in lumber
Estimated Time Investment
Weekend Project (10-20 Hours)
Finish Used
Used gunstock stain and tricorn peppercorn SW paint
Recommended Skill Level
Intermediate

Comments

Farmhouse toy box

Submitted by Jayna on Fri, 02/12/2021 - 13:34

Made a few adjustments to the farmhouse toy box. Made it a little bigger and added Xs out of 1x2s around it to give it a little extra something! I'm using it as a storage coffee table and I couldn't be happier with it! So in love!

Built from Plan(s)
Estimated Time Investment
Day Project (6-9 Hours)
Finish Used
Minwax dark walnut stain, three coats of Varathane clear gloss polyurethane, and painted with Valspar white paint.
Recommended Skill Level
Beginner

Adirondack Chair with a few modifications

Submitted by Anonymous (not verified) on Mon, 05/03/2021 - 09:45

I followed the instructions on the web site and on the you tube video. Overall, it was easy to build though I had to improvise and make my own 2x4s from 2x6s that I had available. I also changed the seat and back slats and used a local version of oak (1x6s). I made a mistake with the back supports and attached them flush with the floor and not with the stringers. Thus, the back rest is not as high, although I like it just the same. It is very sturdy and comfortable. I covered the screw heads, which I sunk with a deep countersink, with dowels.

Estimated Time Investment
Weekend Project (10-20 Hours)
Finish Used
Osmo Oil for exteriors, no pigment
Recommended Skill Level
Beginner

How to Build a DIY Garden Arbor with a Bench

Submitted by thediyplan on Fri, 06/18/2021 - 14:34

My brother-in-law planted a small grape plant in his backyard and wanted a trellis structure behind it for the grapes to climb on. He asked me to design and build it in the corner of his garden. After going through some designs, we decided to go with a corner arbor. When the project was complete, I created PDF plans on how to build a DIY Corner Arbor with a Bench that includes a trellis for the grapes to grow on.

See my website for additional pictures and how I've built it, TheDIYPlan.com

Estimated Cost
$850
Estimated Time Investment
Weekend Project (10-20 Hours)
Recommended Skill Level
Intermediate

My incredible chicken coop and run!

This was my first attempt at building anything....ever. It was so incredibly fun and I certainly learned a lot. My 8 little chickens are loving their new home and I can't wait to build my next project!

Estimated Time Investment
Week Long Project (20 Hours or More)
Recommended Skill Level
Intermediate

Comments

GreenLaLa

Wed, 06/19/2013 - 11:51

Hello! Could you repost the picture / info on your chicken run? I keep getting "page not available" and I've been trying for days :O) I think I want to build that chicken shed (too big for 3 hens?? It's just so cute!) and a run like that to go with it! Thanks! Have a great day!

Kids Desk

Submitted by goltus on Sun, 05/31/2015 - 17:05

I build the x-desk with drawer with slight change in length and height to fit it for Kids. I also took pictures as I was building the project and converted them into a time lapse video of 2 minutes. Hope you enjoy it. https://youtu.be/KcrF2zqKudQ

Built from Plan(s)
Estimated Time Investment
Week Long Project (20 Hours or More)
Recommended Skill Level
Beginner

Comments

Grazing board

Submitted by Anonymous (not verified) on Sun, 12/26/2021 - 17:27

Used your idea of a grazing board or charcuterie Board to build one for my daughter for Christmas. I have made some cutting boards for her in the past but now she has a charcuterie board for the specific purpose.

Comments

First big project.

Submitted by tderringer on Sun, 02/18/2018 - 05:54

I needed a new desk and found some plans on Ana's website.Made a little modification to it for a little more work space. Turned out great I thought. Had never used pocket holes before, I think I'm hooked now.

Built from Plan(s)
Estimated Time Investment
Weekend Project (10-20 Hours)
Finish Used
Dark walnut stain and 3 coats of polyurethane.
Recommended Skill Level
Beginner

DIY PLANTER BOXES WITH PALLET WOOD

We picked up a couple 14.9" square plastic garden planters from Home Depot and ended up creating some wood planter boxes from pallet wood for them to sit in. 

I didn't add up the cost of these boxes, because we had most of the wood and only needed a few pieces, but I'd say they were definitely less than $10 a box. 

We altered our dimensions to fit our HD planters so they would slip in for a snug fit and made the legs flush with the top of our sides. We build a simple frame for the top, which allowed the lip of our HD planters to sit firmly on top. 

Something I didn't do, but wish I did: fill in the cracks with wood filler.  There were a couple places that really could have used it, but I was in a rush and decided to skip it.  They turned out great, but could have been even better had I taken an extra 30 minutes.  On an off weekend, we are going to use wood filler in the seams, sand them down, and do a second coat of white paint. 

Can't wait to plant these with some mums for Fall! :)

Built from Plan(s)
Estimated Cost
$20 total for 2 boxes.
Estimated Time Investment
Day Project (6-9 Hours)
Finish Used
White Semi-Gloss outdoor paint
Recommended Skill Level
Beginner

Farmhouse Table

I love this table and bench set! Very easy to build and didn't take too much time. We made it a family build. My kids helped put together the benches and table. My wife and kids did all the staining.

Estimated Cost
$150 for lumber and supplies.
Estimated Time Investment
Weekend Project (10-20 Hours)
Finish Used
Minwax Early American used with a staining pad. We applied two coats for a darker finish.
Recommended Skill Level
Beginner

Farmhouse Bed

I built this bed as a modified farmhouse bed. I chose to have a solid wood headboard instead of having a slotted look as it fit better in the decor of our home. I purchased a bed rail kit from Rockler so that I could remove the rails without removing any screws. (http://www.rockler.com/product.cfm?page=5783) It was a relatively easy project considering my skill set was very low when starting! http://www.lifewithfingerprints.com/2010/09/labor-of-love.html

Built from Plan(s)
Estimated Cost
$110
Estimated Time Investment
Weekend Project (10-20 Hours)
Finish Used
I used a satin black paint finish with a polyacrylic coating.
Recommended Skill Level
Beginner

Comments

Rustic X Tall Bookshelf

Submitted by Anonymous (not verified) on Sun, 01/03/2016 - 18:26

easy to follow steps. Good weekend project for a beginner. I just got tools for Christmas and I tackled this without prior building experience. Excited for more projects

Built from Plan(s)
Estimated Cost
$75
Estimated Time Investment
Weekend Project (10-20 Hours)
Finish Used
Dark Walnut stain and Sage page with rustic finishing
Recommended Skill Level
Beginner

Apartment Perfect Dinng set

Submitted by Tbacks on Sat, 03/30/2019 - 19:17

We modified the farmhouse table and bench to make a table for our daughters apartment. We made the table 54” long which turned out to be the perfect size for the apartments dining room space.  You may also notice we built a dog bowl table to match the farmhouse table style.  Love the design!

Estimated Cost
$200
Estimated Time Investment
Weekend Project (10-20 Hours)
Finish Used
Off-white paint wash bases with a weathered wood treatment for table, bench and chair tops
Recommended Skill Level
Intermediate

Console entry table

Submitted by Anonymous (not verified) on Thu, 07/20/2023 - 12:07

This entry table I made from wood I got from a recycle center of wood products. It’s been in our entry now for several years. I have only basic tools-no planers and jointers, etc. I do have a fold up table saw that I use once in awhile. I enjoy working with natural /live edge and or construction grade materials. Always impressed with the items Ana has built. Good job Ana😁👍

Built from Plan(s)

Wood Storage Box

Submitted by Joni on Sun, 03/18/2012 - 10:42

My wood scraps were definitely getting out of control, and I needed something to store the wood vertically. I had some spare wood (free from Craigslist), so I put together a wood storage bin. All in all, the project cost me the price of some Kreg screws.

Estimated Cost
Free!
Estimated Time Investment
Afternoon Project (3-6 Hours)
Recommended Skill Level
Beginner

Comments

hoffer5353

Wed, 06/06/2012 - 13:21

I have been struggling to organize my space because my lumber is on one of my work spaces. I have the perfect space for that, thanks for the great post!

Cubby Shelf with Ironing Board Top

Submitted by PinnSB on Sun, 02/02/2014 - 11:56

Originally I wanted a cubby shelf for the empty space between the sliding door and window in our master bedroom. However, that is also where the ironing board always sat out and I got tired of looking at it. So this project evolved and I decided to add an ironing board to the top of it. I used a 41" 1x12 for the top and 2-11" scraps for the flaps on either side. I covered each piece with one layer of felt and one layer of fabric. Flaps were attached to main board with hinges. Under-mount drawer slides were used to both allow the board to shift left and right and to support the flaps in open position.

Built from Plan(s)
Estimated Cost
$85
Estimated Time Investment
Day Project (6-9 Hours)
Finish Used
Valspar Ultra White Satin Paint
Recommended Skill Level
Starter Project

Comments

rlmilam3

Wed, 02/03/2016 - 21:07

Are there more specific plans for building the ironing board part of this? The other builds are so specific, having everything laid out even the amount of screws needed. But this one is definitely lacking. Is there further directions elsewhere that I'm missing?

itzann

Thu, 02/04/2016 - 09:24

Hi, this particular project was submitted by a reader, who modified the plans of the cubby shelf to include the ironing board top. It is not part of Ana White's project plan, so that is why there are no specifics. Perhaps you could try contacting the person who posted, and he/she could tell you more details. 

-Ann

A First Planter Project

Submitted by Anonymous (not verified) on Mon, 09/18/2023 - 15:44

Cedar Planters, my first planter. Thanks Ana!

Caleb

Built from Plan(s)

Comments