Community Brag Posts

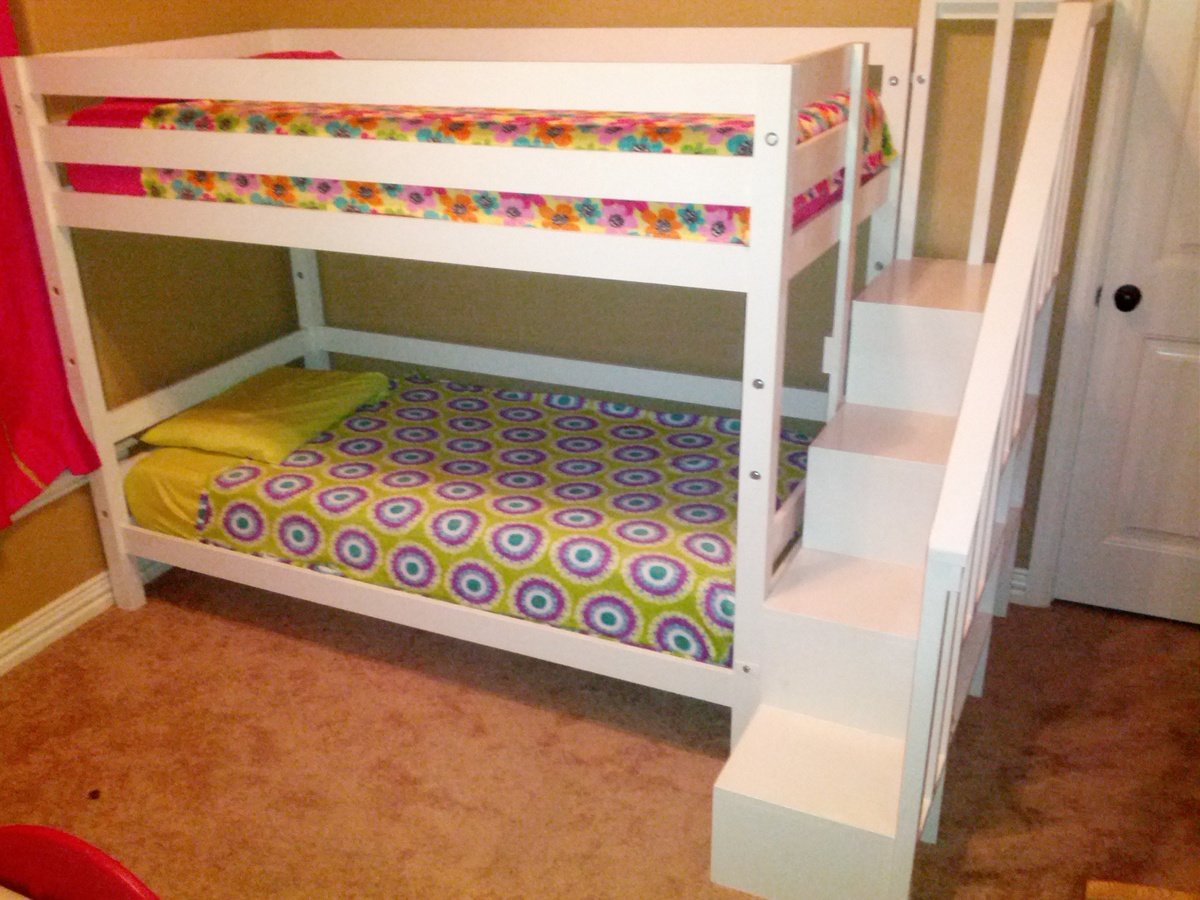
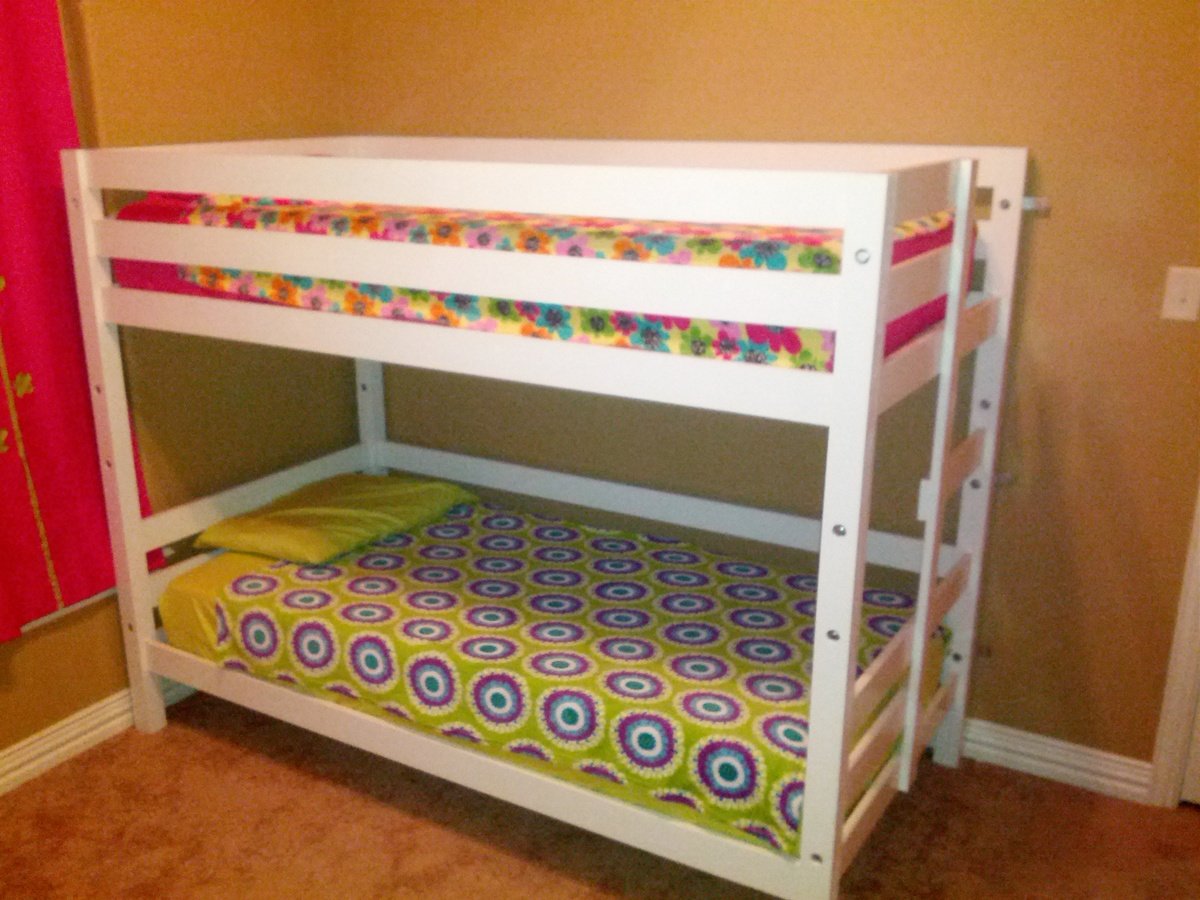
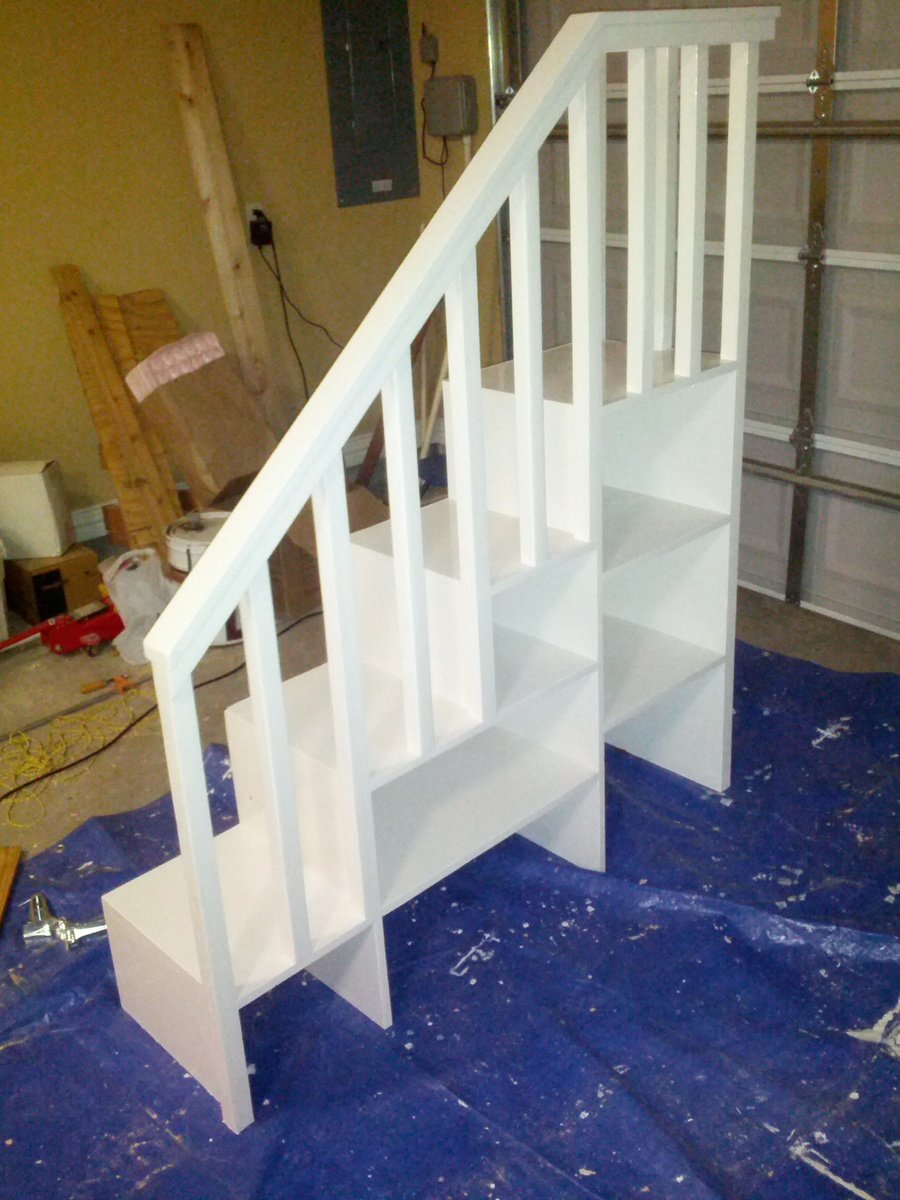
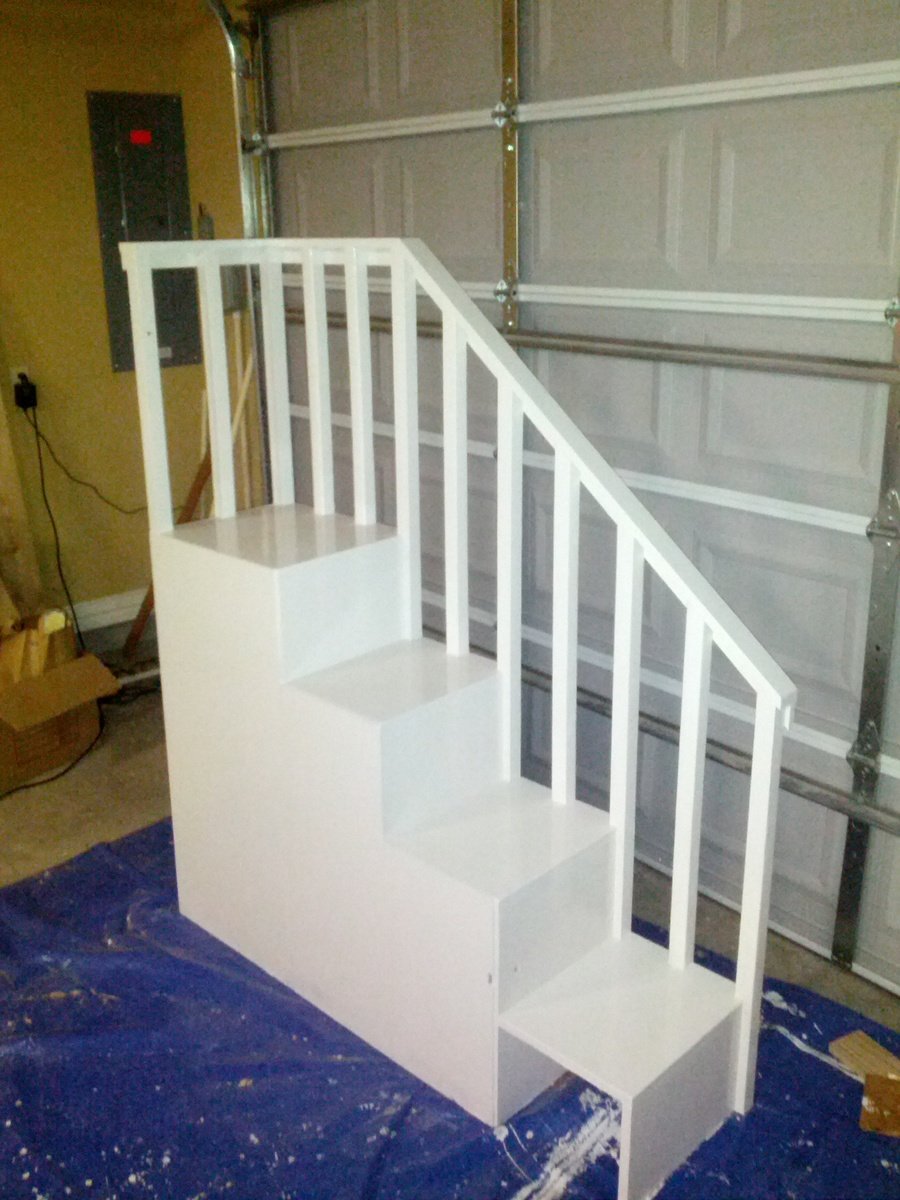
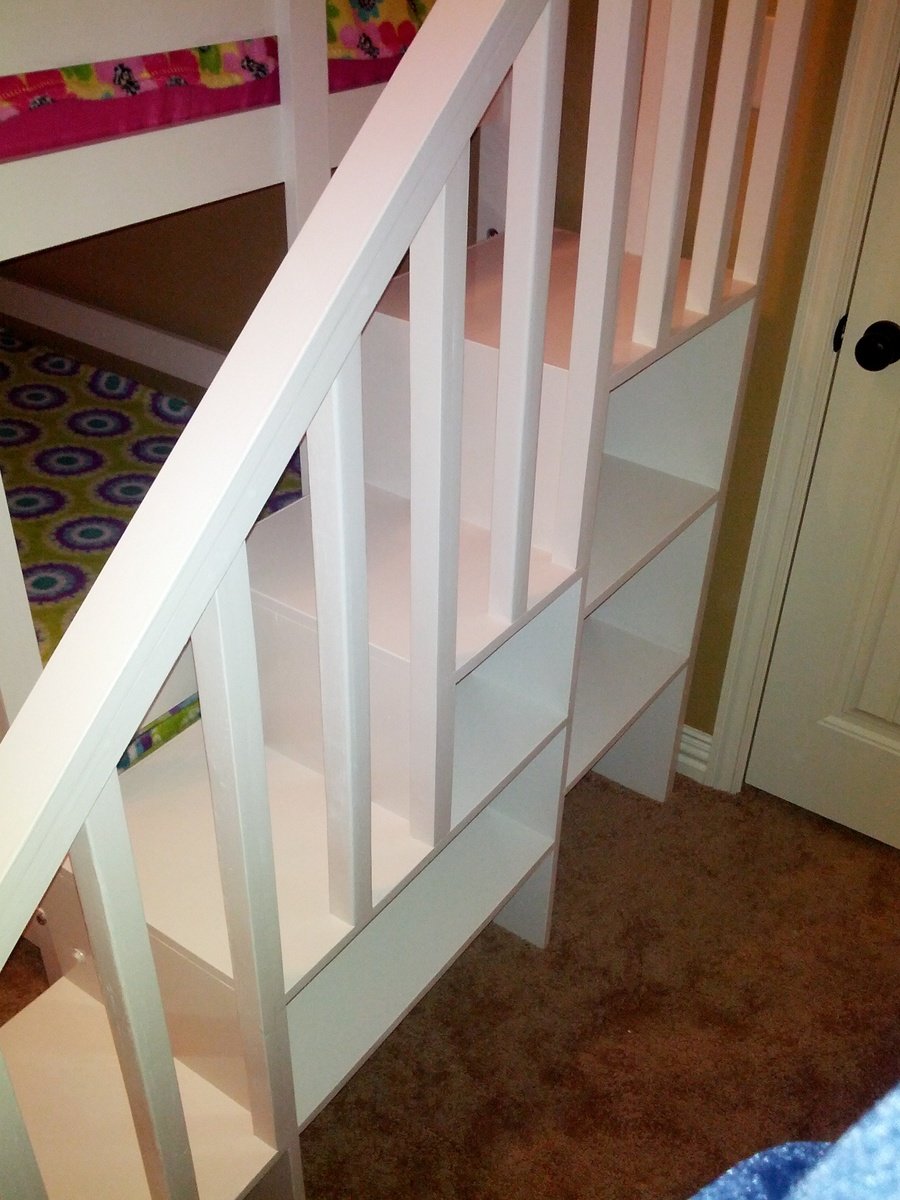
Twin over Full with Trundle, storage stairs

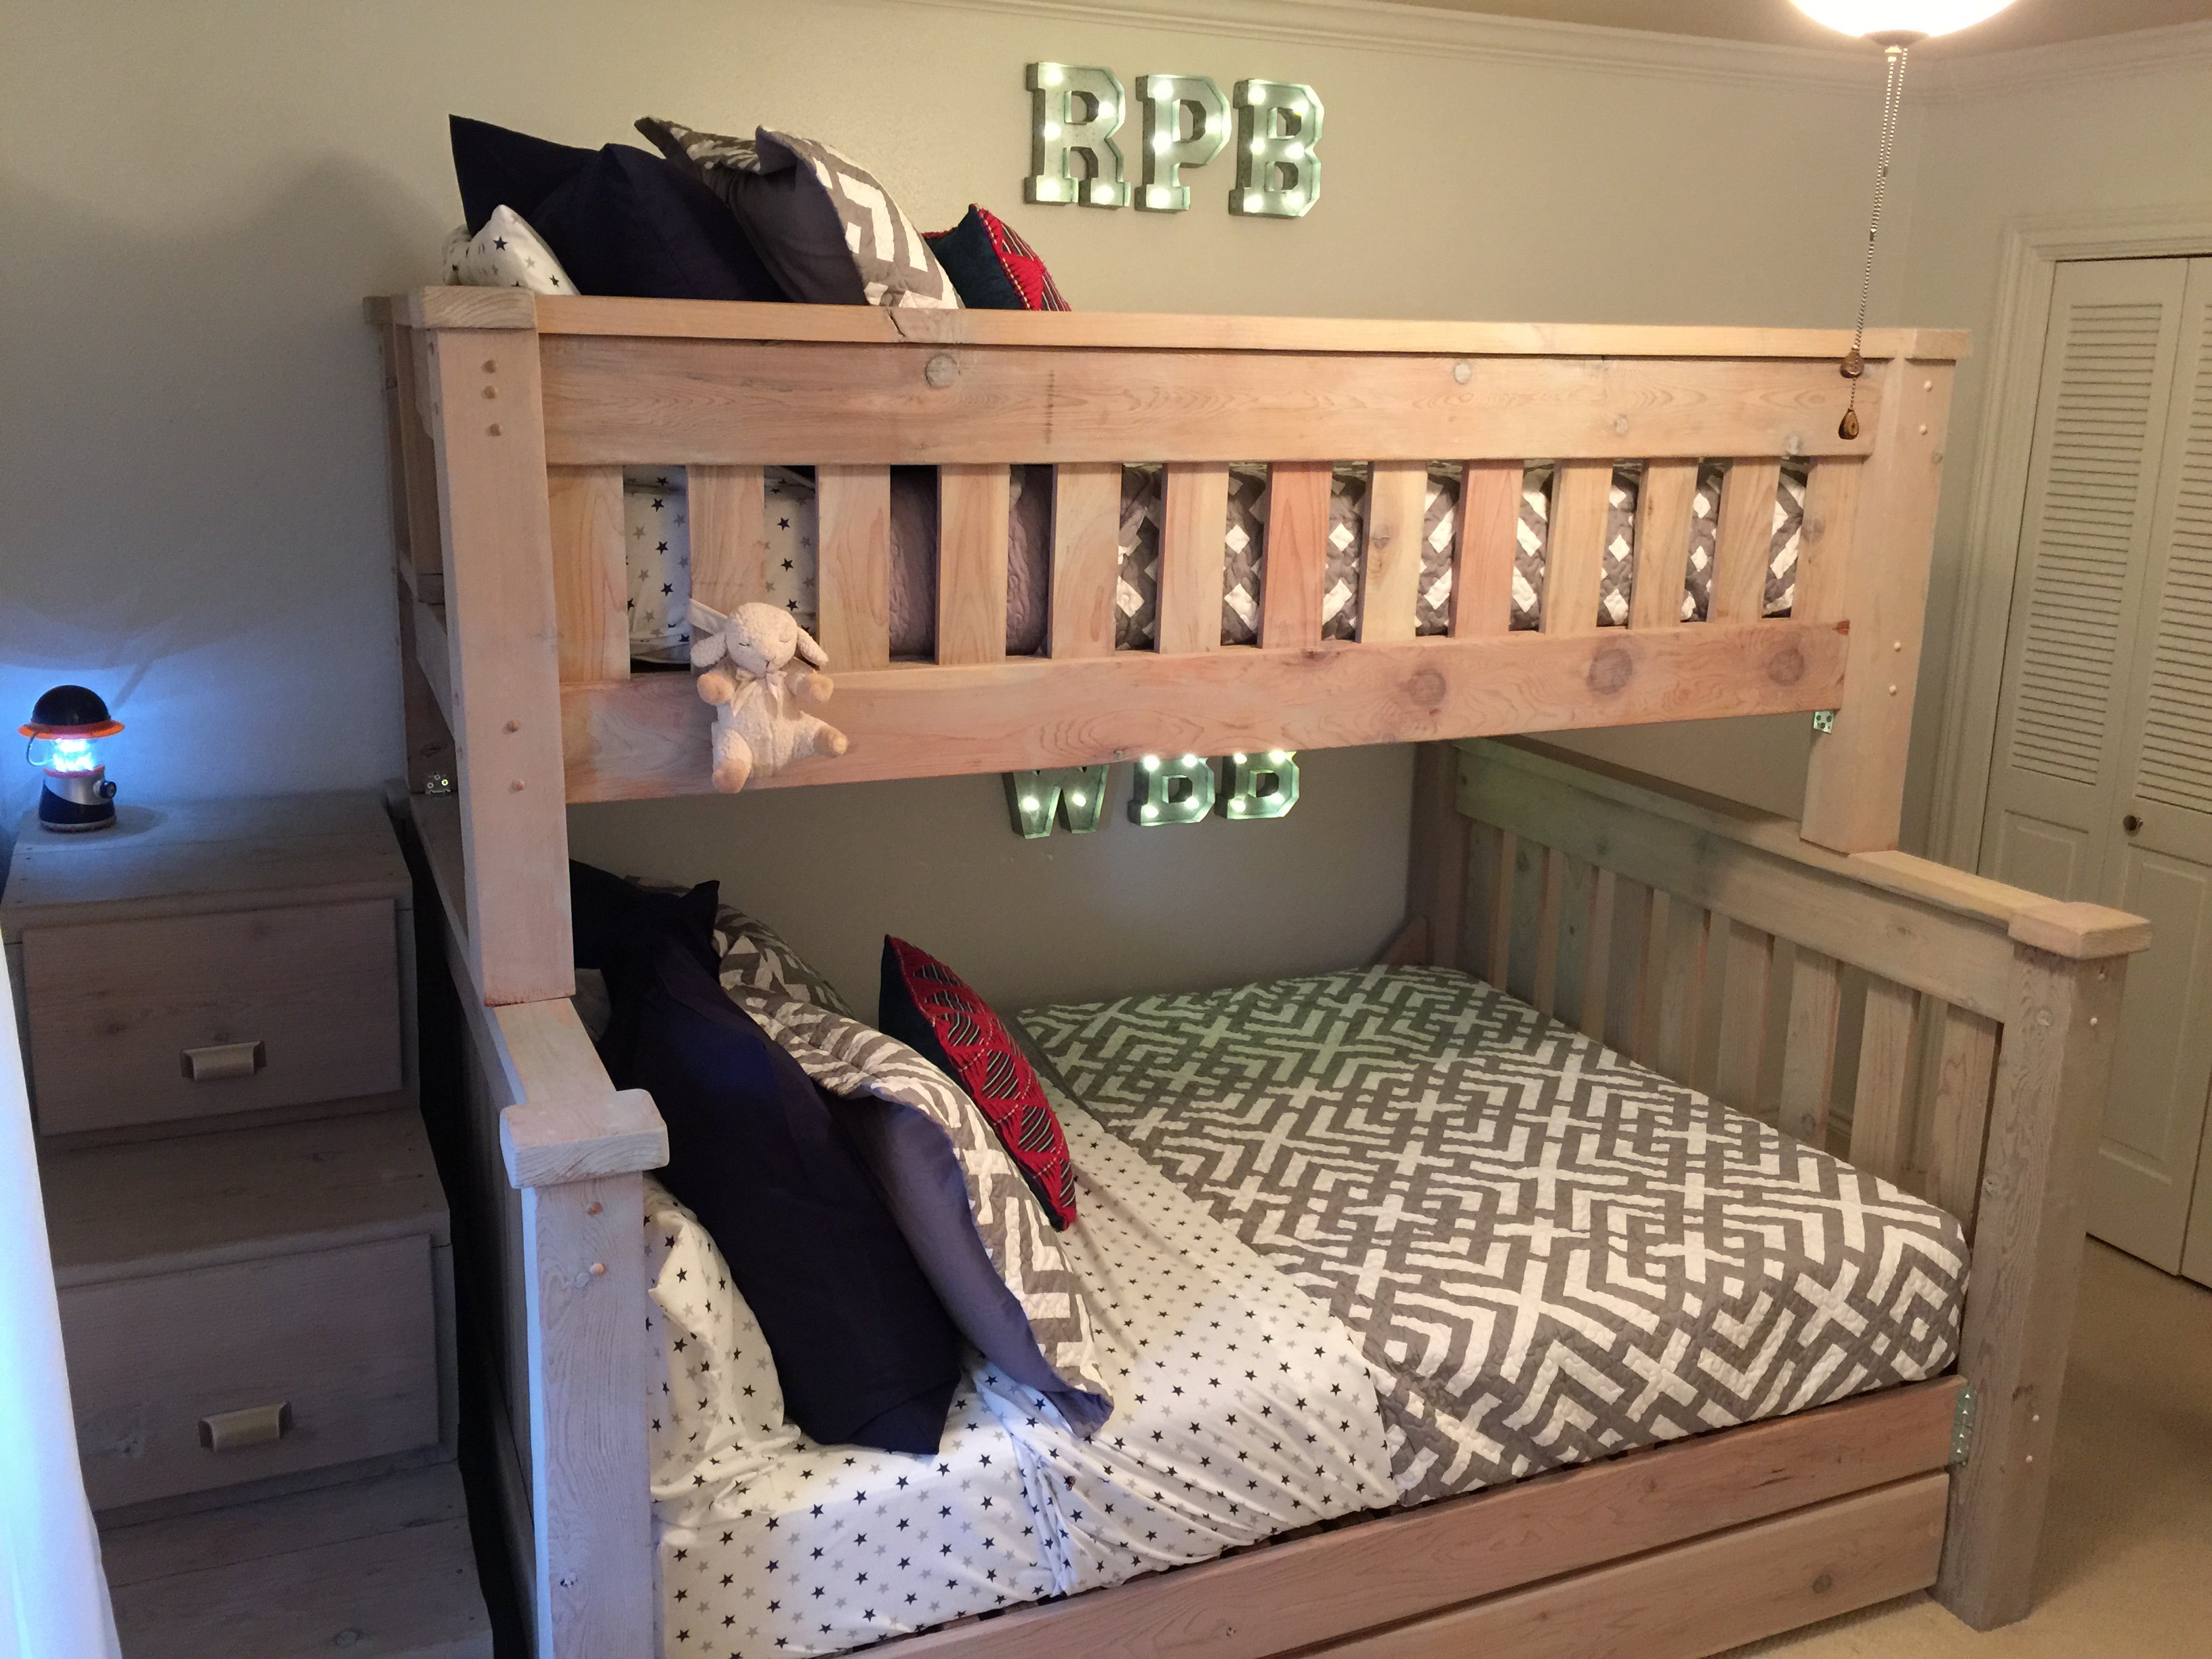
This project took a week to build.  Working during my boys' nap time and late nights, I was able to complete everything in about 7 days.  I used cedar, and sealed with Cabots Bleaching Oil.  The cost of wood for the beds and stairs and drawers came to about $700.  The extra cost came from the additional side rails on the top bunk and the stairs and drawers.  Still comes in about $500 less than if bought commercially.  The famiy loves the bed and as my kids are 2 and 3, I expect to get many years out of the bunk bed.  Side note:  I had to add quite a few brackets and angle joists to secure and minimize wobble due to the additional weight of the top bunk.  (2 2x4s from the 4x4 to the side of the cleat and side rail of the bottom bunk, on the back side only, made a world of difference)

Estimated Cost
$700
Estimated Time Investment
Week Long Project (20 Hours or More)
Finish Used
Cabots Bleaching Oil
Recommended Skill Level
Intermediate

Comments

Ms.Bungalungalow

Mon, 12/11/2017 - 14:28

Hey there, I absolutely love your bed. The $700 scares me a little but i will not be using cedar. I will be doing everything else just like you. Thanks for sharing.


Bows & Ribbon Holder with Jewelry Cabinet

Submitted by Bob C on Tue, 09/24/2013 - 09:59

My Niece is 13 and into homemade hair bows, ribbons and jewelry. When I asked her mom what I could make for Colleen for her birthday? We settled upon three of Anna's $10 buck shelves and as a surprise a Jewelry cabinet with Elastic ribbons across front for her bows to be place on.

It was a big hit!

Thank you for your inspiration!

Best Regards,

Work Safely
Bob C.

Estimated Cost
$25.00
Estimated Time Investment
Weekend Project (10-20 Hours)
Finish Used
Valspar Ultra white paint
Recommended Skill Level
Intermediate

Sliding Pet/Baby Gate

Submitted by Anonymous (not verified) on Mon, 02/27/2023 - 20:13

We desperately needed a gate to keep our pets from accessing the rooms, with carpet, in our new home. We originally thought about building a full barn door but, the security system was in the way and it wouldn’t have allowed the light to pass through to our dark entryway anyway. We definitely wanted to steer away from the “barn door looking” gate we did at our last home and wanted to try something more timeless with the sprayed, black caning. We have a very eclectic style. Very vintage industrial, MCM, with pops of RH glam and a touch of BOHO. Sounds confusing but, I needed this gate to take the pressure off of trends we didn’t quite fit in and be easy to use for my teenager. The gate leads to her bed/bath and the guest rooms. The mechanism is not my design but, it’s brilliant, especially for the industrial element to our home. Took me close to 4 days from start to finish. Lost my Kreg jig in our move and was so thankful to a stranger-neighbor that willingly let me borrow his on the curiosity of what exactly I was building. NGL, it felt pretty good when he said how impressed he was with the build. 💞

Comments

Outdoor Sofa and Chair with Slanted Back

Submitted by Anonymous (not verified) on Sun, 07/16/2023 - 10:22

OK, I think this build may be my biggest project yet! It is definitely the heaviest. With the strong winds we can get here in Florida we needed substantial outdoor furniture.
I did make some modifications along the way measurement-wise so the sofa would fit my front porch better. All in all, this took 2 full days. I built the sofa first, stained it the next day and then decided (due to trying to get stain in all the nooks and crannies) to stain the chair pieces first before putting it together.
I am so happy with the results and so far, almost a year later, this furniture looks great and hasn't moved an inch in any of the thunderstorms we've had! Thank you Ana!!

Classic Bunk Bed with Sweet Pea Stairs

Submitted by e_hutch on Fri, 01/17/2014 - 19:03

I wanted a bunk bed for our daughters, it needed to be easily moveable like the "classic bunk beds." I also wanted stairs like the "Sweet Pea Garden" bunk bed because we have toddlers in the house. I modified the classic bunk bed to put the ladder on the end, then built the Sweet Pea stairs to fit to the opening (I think the only difference in dimensions was a 20" top stair. I didn't want the unfinished ends of plywood so I got 4'x16"x3/4" pine boards from lowes which happens to be the width of the stairs in the plan. Instead of using the 1x2's as trim on the ends of the shelves I put two of them together, one all of the way down the front of each stair and one resting on the top of the stair (screwed together) so I wouldn't lose lateral stability. I then spaced 2x2's in between to keep it "simple" looking instead of the heart shaped decorations from the sweet pea bed. I used some 1/4" paintable composite board to provide a backing to the stairs. I bolted the stairs on to the bed with some flat bar stock cut to size and 3/8' in hex bolts cut to length. I used pocket hole joints wherever possible and countersunk all other screws and used 3/8" dots from lowes to fill the holes. I painted it with a coat of primer and a coat of Glidden Trim and Door paint in antique white from the Easy Vintage Step Stool project.

Estimated Cost
$400
Estimated Time Investment
Week Long Project (20 Hours or More)
Finish Used
Glidden Door and Trim, Antique White
Kilz Complete Primer
Recommended Skill Level
Beginner

Comments

zaphod

Mon, 06/23/2014 - 06:39

This is absolutely beautiful! Did you modify the size for toddler mattresses?
I would love to do the same for my kiddos - is there any way you could send me your version of the plans? [email protected]

Thanks so much!

Cornhole Boards

Submitted by SaraLodise on Fri, 09/23/2016 - 13:15

Cornhole boards for friends and family :)       Used 1x4s for framing and legs, 1/2" ply for top.


"R" set:  Birch plywood tops w/ (2) coats of Miniwax Weathered Oak oil stain. Red stripe is Behr 'Cherry Cola.'  (3) coats of Polycrylic finish.


"AW" set:  Regular plywood tops w/ (1) coat of Miniwax Special Walnut oil stain & Glidden 'Clemson Orange' stripe.   (3) coats of Polycrylic finish.

Estimated Cost
$100/set (2 boards)
Estimated Time Investment
Weekend Project (10-20 Hours)
Finish Used
(see description)
Recommended Skill Level
Intermediate

Comments

Seasonal And Holiday

Farmhouse Tables

Submitted by Anonymous (not verified) on Wed, 05/15/2024 - 08:28

I used red mahogany 225 minimax stain along with 3 coats of diamond wood finish I gave it a very quick sanding with 600 grit sand paper right before the last coat of the diamond finish and it came out silky smooth and the color really pops. I am just a beginner and I thought this project was gonna be quick and easy because I'm used to having to plain all my wood and get it all ready before putting it together I slapped this together in no time but finishing it without a spray gun after it was all together was a very lengthy process.

Drop down murphy bar

Submitted by nick_h on Tue, 12/06/2016 - 10:54

My attempt at the murphy bar featured on this site. Still have to add the sash locks. Added pallet crossmembers at the back, an x in the leg, and a french cleat to mount to the wall. 

Estimated Cost
$45
Estimated Time Investment
Day Project (6-9 Hours)
Finish Used
Special Walnut Minwax on the bar top and shelves, crisp linen matte latex and dry brushed casual gray for accents/aging. 2 coats of polycrylic for protection. If built again would pre stain and base coat all the wood before build time, then assemble, add accent brushing and spray the polycrylic.
Recommended Skill Level
Beginner

Comments

zannej

Tue, 12/31/2019 - 11:49

This looks awesome! I want to help my friend build this for his kitchen. I've looked at the plans in the link & I'm wondering what modifications you made for the X pattern-- how much did it alter the material & cut list?

Would you please share your material & cut list for this?

Mudroom Lockers

Submitted by rendall28 on Sun, 03/21/2021 - 11:03

I began by first making 3 cubes of shoe shelves out of 3/4 oak plywood. After assembling I coated with joint compound and sanded smooth to get rid of grooves and grain. The hutch was assembled in 2 sections. I used a router to slide the shelves in so there were no screws visible. I applied primer/paint/ poly in these 5 large sections. The sections were then but in place in my mudroom and connected for installation. The bench top was custom measured to fit as the walls were not perfectly square. The bench top was stained/poly before the hutch was set into place. Paneling was attached to the back of the hutch unit before lifting in place. Barnwood was also installed where the hooks were attached for an added detail. I used 3/4 x 1/4 trim to finish the sides of the plywood and trimmed down mulion for the 1.5 inch sections needed for the bench trim and sides connecting to the wall to hide gaps left from un square walls.

Estimated Cost
350
Estimated Time Investment
Week Long Project (20 Hours or More)
Finish Used
White: 2 coats of primer, 2 coats of paint, 2 coats of Minwax water based Polycrylic Clear Satin. Custom colormatch paint to match our woodwork for the color.

Bench top: stain Briarsmoke with 2 coats of Minwax water based Polyacrylic Clear Satin.
Recommended Skill Level
Intermediate

Spa Side Table

I completed this table with my 5 year old daughter as my assistant. My husband requested a table to put next to our new hot tub to set his drinks on and this is perfect. We only put one board on the top because I felt since it would be outside, I wanted a smooth top. I just screwed it in diagonally from the bottom. I also used spar varnish since it would be outside.

Estimated Time Investment
Afternoon Project (3-6 Hours)
Finish Used
Rust-o-Leum Ultimate Wood Stain in Kona
Semi-gloss Spar Varnish (3 coats)
Recommended Skill Level
Beginner

My Garden Shed

Submitted by jimavera on Tue, 03/13/2018 - 09:07

I used these plans of this project. Only differences are I used 2X3 studs. I also made the shed longer,, its 3ft X 8ft.. Also on the back I used two siding sheets since it wouldnt be seen. Did it over the weekend. Just needs shingles and stain. Anyway I love it. Had a spot behind the house where it fits perfectly. Thanks

Built from Plan(s)
Estimated Time Investment
Weekend Project (10-20 Hours)
Recommended Skill Level
Intermediate
Seasonal And Holiday

Modern Outdoor Chair & Love Seat

Submitted by Wilsjac1 on Wed, 06/26/2019 - 13:59

After building the first chair I decided I did not like the sizing, it felt like the arms were to low and the back cushion really did not have any support so I modified the chairs a bit and rebuilt the chair and also made a matching loveseat. 

I also decided to reverse the arms so the 2×6’s are on the outside instead of the inside, Originally I did this by mistake but I decided to keep it that way because it helped hold my cushion in place and I like it better that way. But most people I have asked say they prefer the arms the original way that Ana-White had them though.

I ended up making the legs 3" inches longer to raise the height. 

I made the side slats and the armrests 3" shorter to reduce the depth to make my cushions fit better

For the love seat the only thing I had to change was I made the back slats the front slats and the seat slats 48" and I added in a 2x4 for support under the seat slats that attached from the front slat to the back slats.

Overall I love the way they came out very sturdy and we use them everyday! 

Estimated Cost
$75
Estimated Time Investment
Afternoon Project (3-6 Hours)
Finish Used
I sanded all of the 2x4's and 2x6's with 80 grit & 220 grit, I then used minwax primer before applying the stain, I used the color "Honey"
Recommended Skill Level
Beginner

Custom Modern Chicken Coop

Submitted by Anonymous (not verified) on Wed, 08/30/2023 - 08:49

I made this coop twice as wide like Ana suggested since I have 4 chickens and wanted to make sure there was some extra wiggle room in case “chicken math” got the best of us. I made a nesting box to mount on the outside. I also used plywood for the sides like Ana did in the video. I installed a Run Chicken automatic door that opens at sunrise and closes at sunset. I added some hasps and clasps to make sure all my doors would close tightly. I put hardware cloth across the top before installing the roof panels. I stapled and buried hardware cloth around the perimeter for predator protection. I also spray painted the hardware cloth flat black so that it would be easier for us to see inside the coop. I stained the rest of the wood with Varathane Semi-Transparent stain, color “Carbon Gray.” I also added some roosts and cedar shingle siding for some extra protection during our New England winters at to match our house. Working 2-4 hours a day, off and on, with a bum shoulder and weak hands, this took me about a week! Thanks for the great plan, Ana!

Built from Plan(s)

Comments

Seasonal And Holiday

Outdoor sofa with table and matching chairs!

So, we decided after not finding any outdoor furniture, that why not make them! So this is the result, made a few changes to the size and measurements so the pillows from IKEA, would fit perfectly. Now we are waiting for them to be ready to oil/paint. We also made the chairs with the sofa plans, so happy we did that. Thank you so much for the plans! We are so happy! IKEA pillows name are: Sitting pillow - FRÖSÖN/DUVHOLMEN 62cm by 62 cm. Back pillows - FRÖSÖN/DUVHOLMEN 62cm by 44 cm.

Estimated Cost
$240
Estimated Time Investment
Day Project (6-9 Hours)
Recommended Skill Level
Starter Project
Seasonal And Holiday

Play Deck/Fort

Submitted by seeca13 on Sun, 06/01/2014 - 10:06

I wanted to build a structure for the kids to play in, but not include a playhouse. I used the playhouse deck design and made it slightly smaller (6 feet by 8 feet). The "roof" is removable to provide shade when it's sunny. It's just PVC and a tarp - pretty simple, but it does the job. I used treated posts and untreated lumber for the rest of it. I painted everything in my garage before assembling it. Once all of the wood at been painted, but came together pretty quickly!

Estimated Cost
$300 (including screws and paint)
Estimated Time Investment
Weekend Project (10-20 Hours)
Finish Used
Thompsons deck stain
Recommended Skill Level
Intermediate

Workbench with Drawers and Carts on Casters

Submitted by vendo on Tue, 03/19/2024 - 07:38

Using Ana's Ultimate Workbench Plan and her easy drawer method I built this. I decided to do storage carts that roll in and out for small scrap lumber storage. The Kreg Foreman got it's own cart, I made it so the deck of the machine was at the same height as the work surface. I added a drawer so all of my kreg bits and screws can be in one place. I had batteries and chargers laying all over my small shop, so I incorporated a battery charging drawer. I'm excited for the projects to come using my new set up!

My First Builds!

Submitted by DiyIsFun on Tue, 06/23/2020 - 09:33

Made the swing and two sets of planters since we were on stay Home orders. I’d never done anything like this...ever! My husband helped me hang the swing. We love, love the results. (Now to make a seat cushion😆) I couldn’t tag the plans for the modern square planter boxes. They are huge and I can hardly wait until Christmas to put trees in all four!

Comments

Seasonal And Holiday

Modern Outdoor Patio Set

Submitted by dlangford on Sat, 09/05/2020 - 16:08

Built this over the weekend for my girlfriends sister. It was a great project and the whole family was able to work together on it, sanding and waterproofing it before assembling. The loveseat plans need a little tweaking. We ran ran the slats the same direction as the chair plans call for so we added a middle support for extra stability. We also pitched the seating down towards the back by 5* to make a more natural sitting position.

Estimated Cost
$300
Estimated Time Investment
Weekend Project (10-20 Hours)
Finish Used
Behr Cedar Natural Tone Waterproofing Stain and Sealer
Recommended Skill Level
Beginner
Seasonal And Holiday