Community Brag Posts
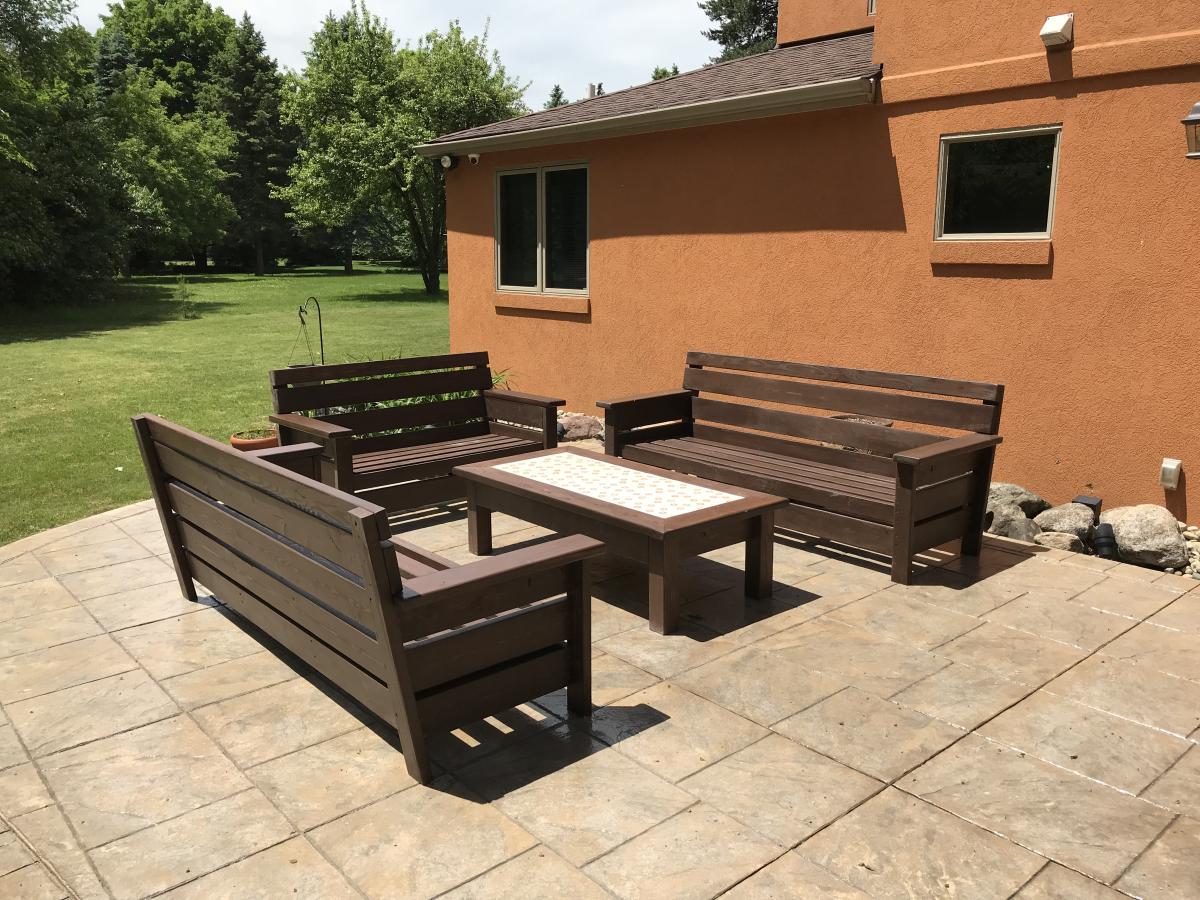
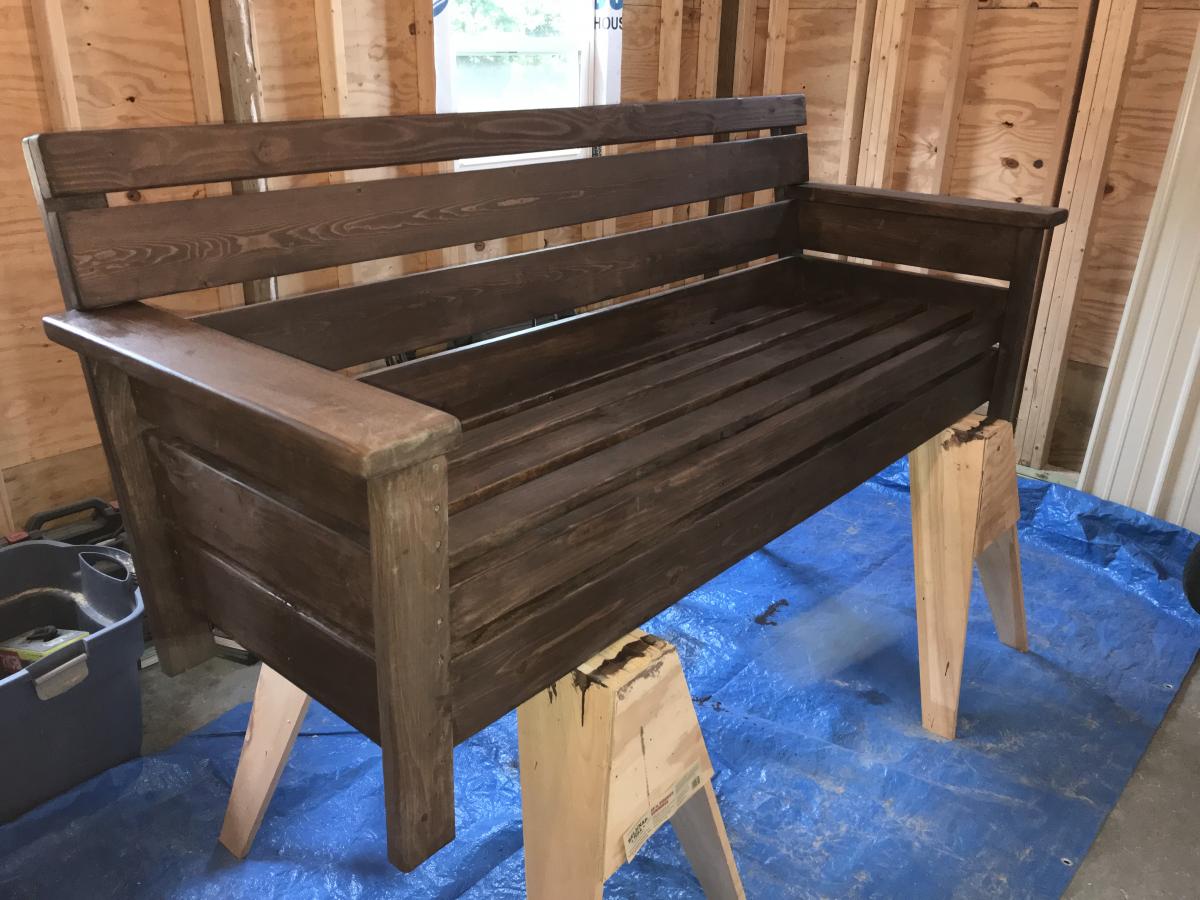
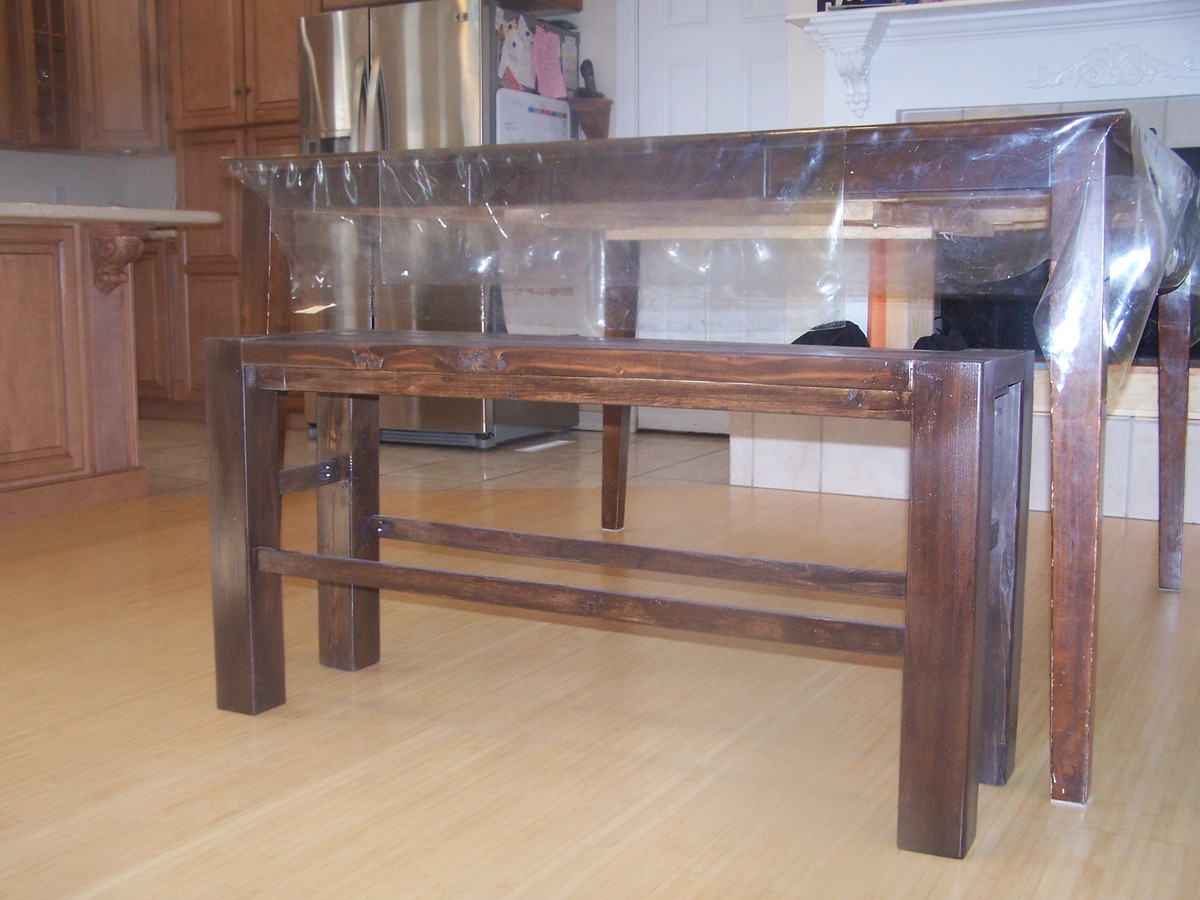
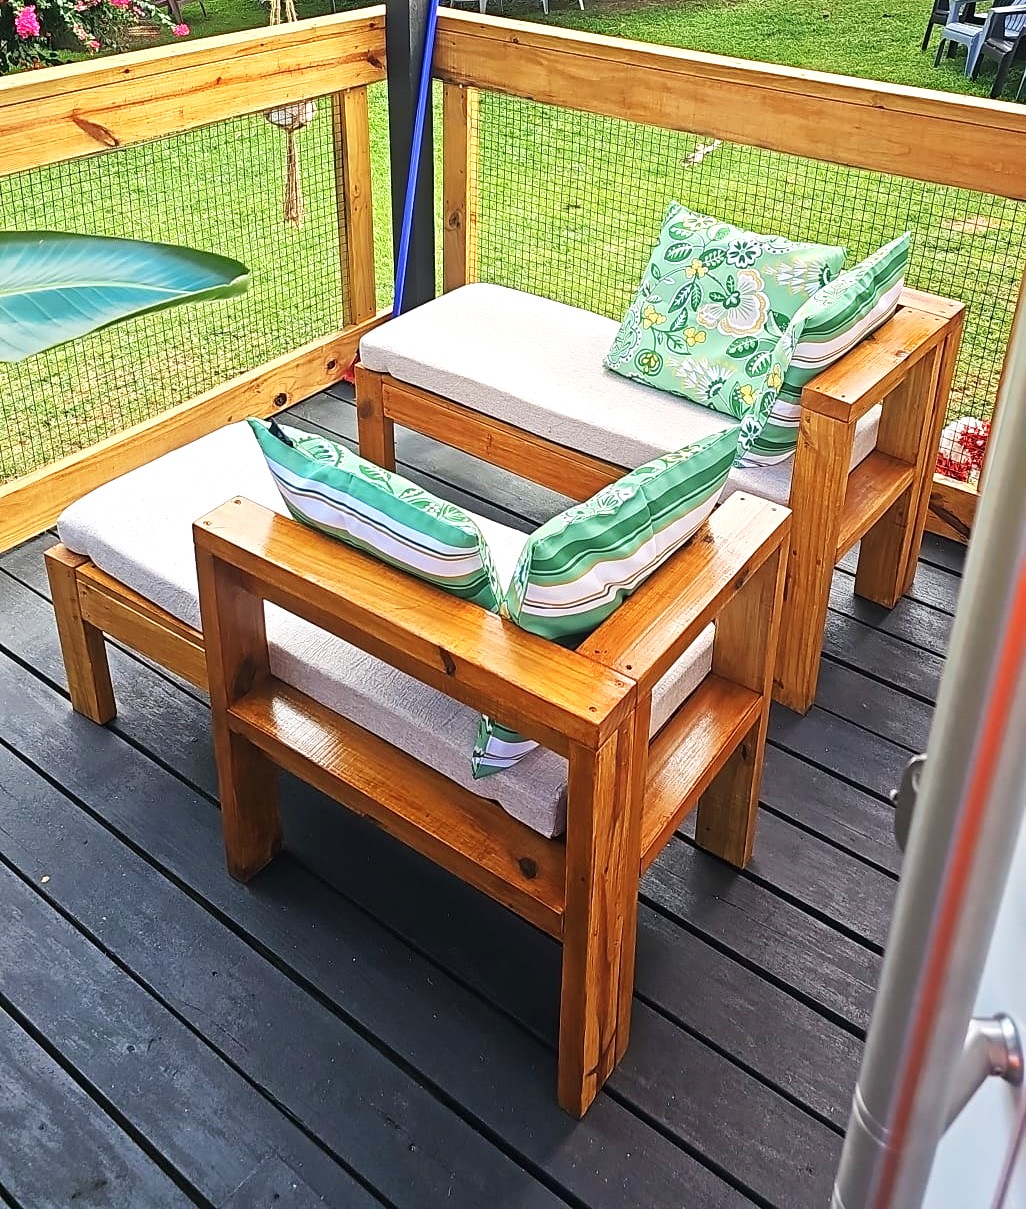
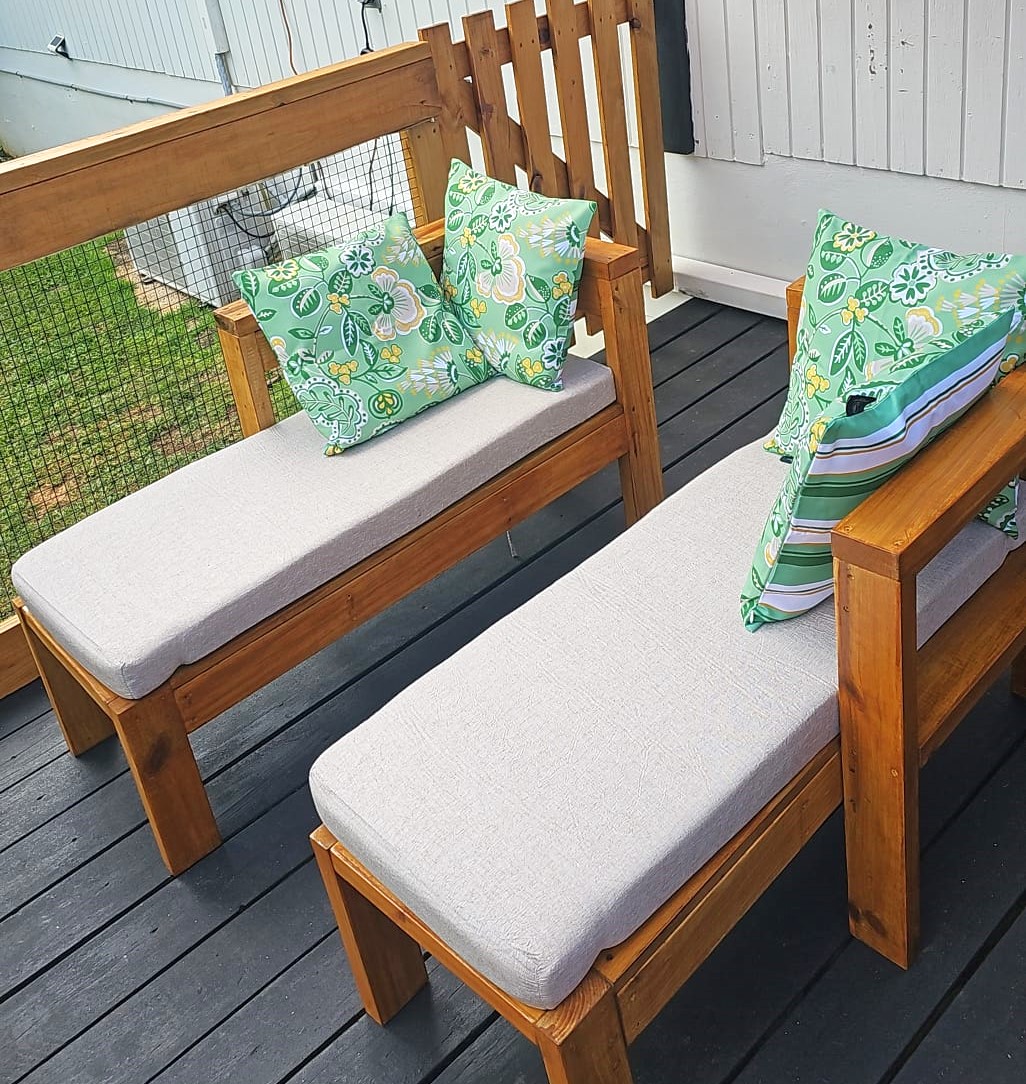
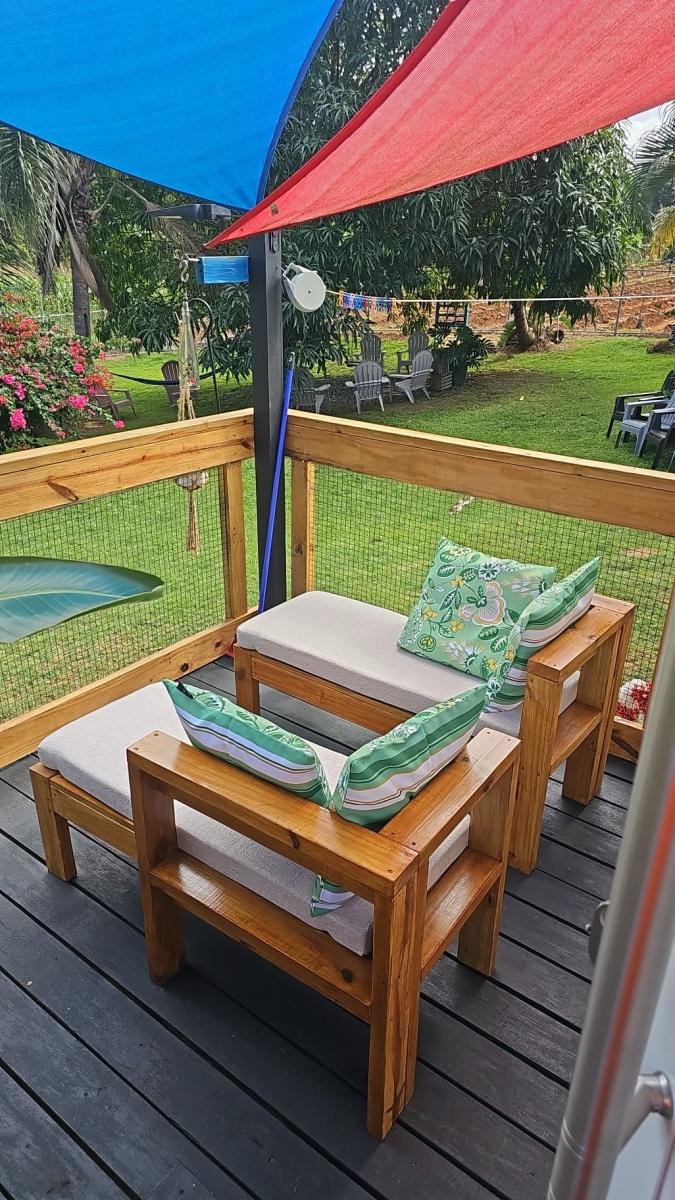
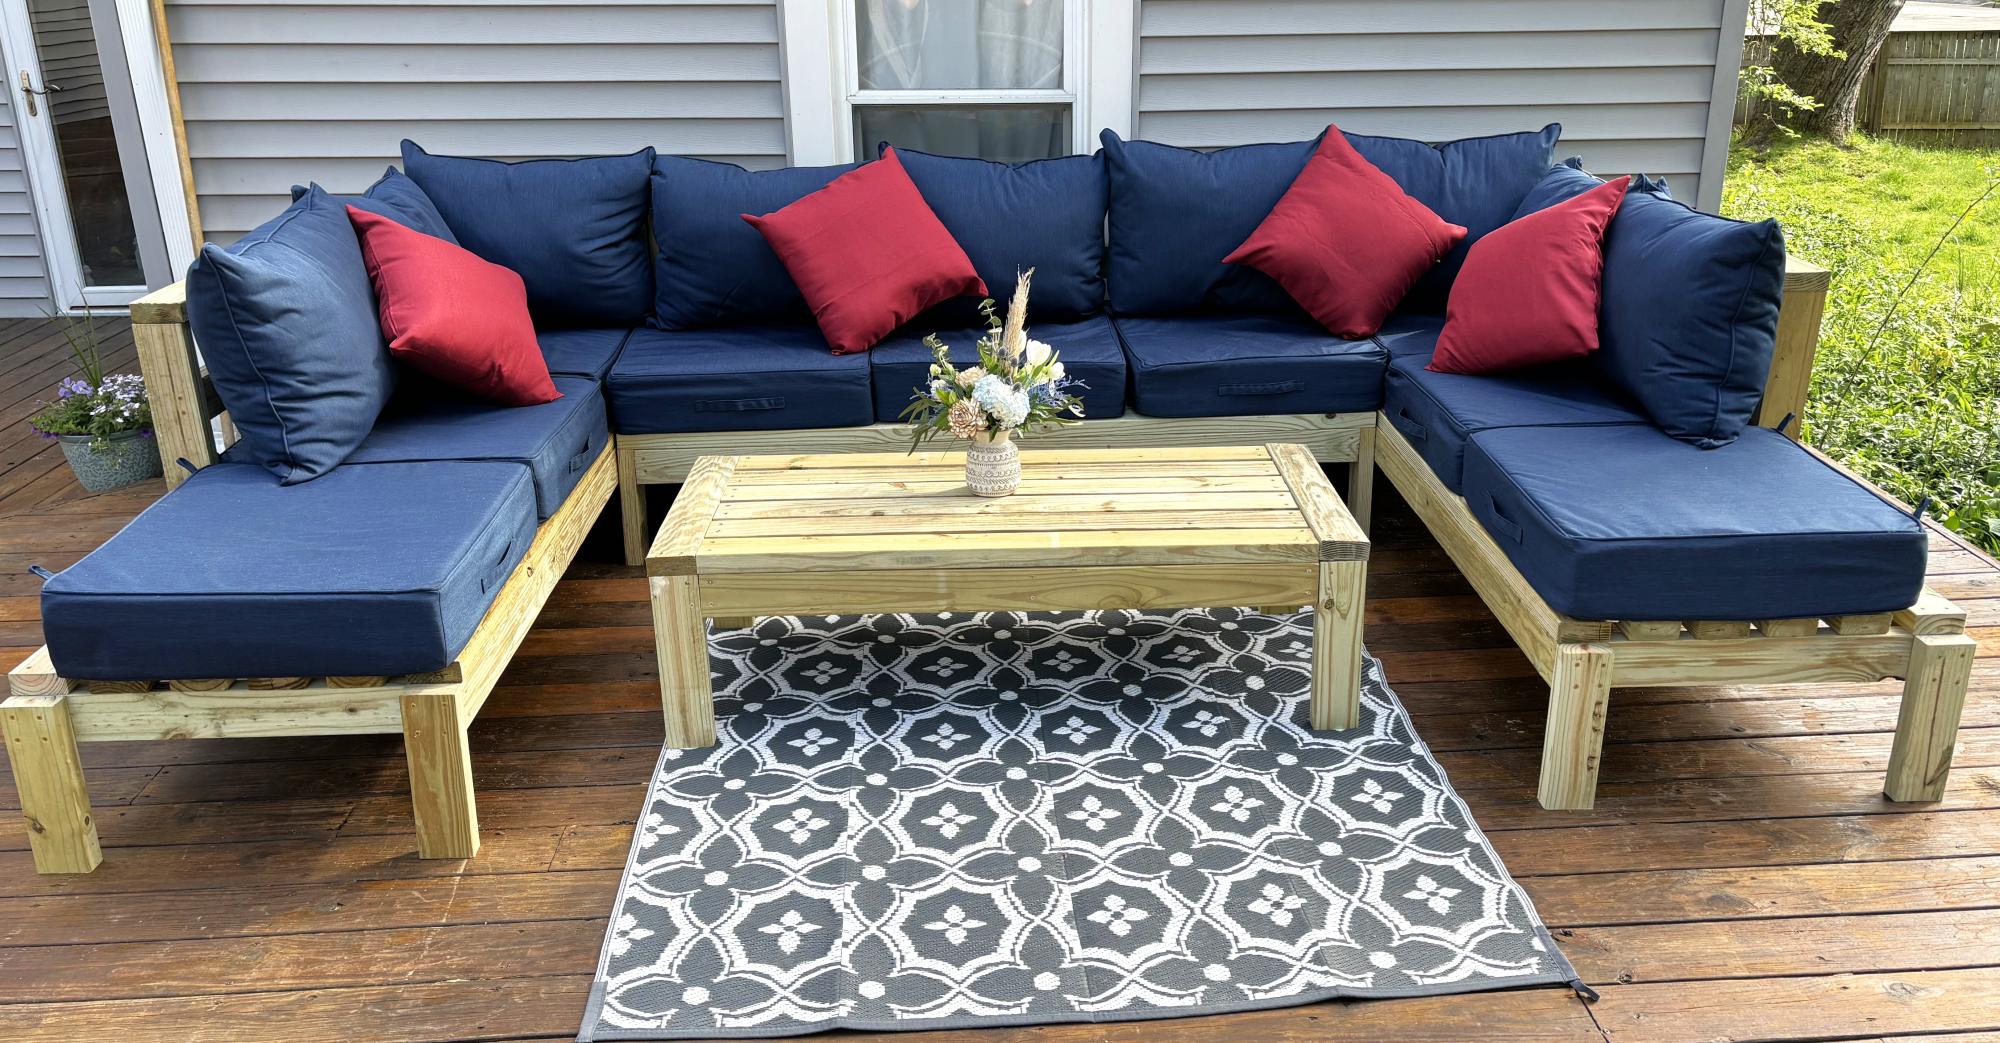
patio living room - modified from modern chair plan
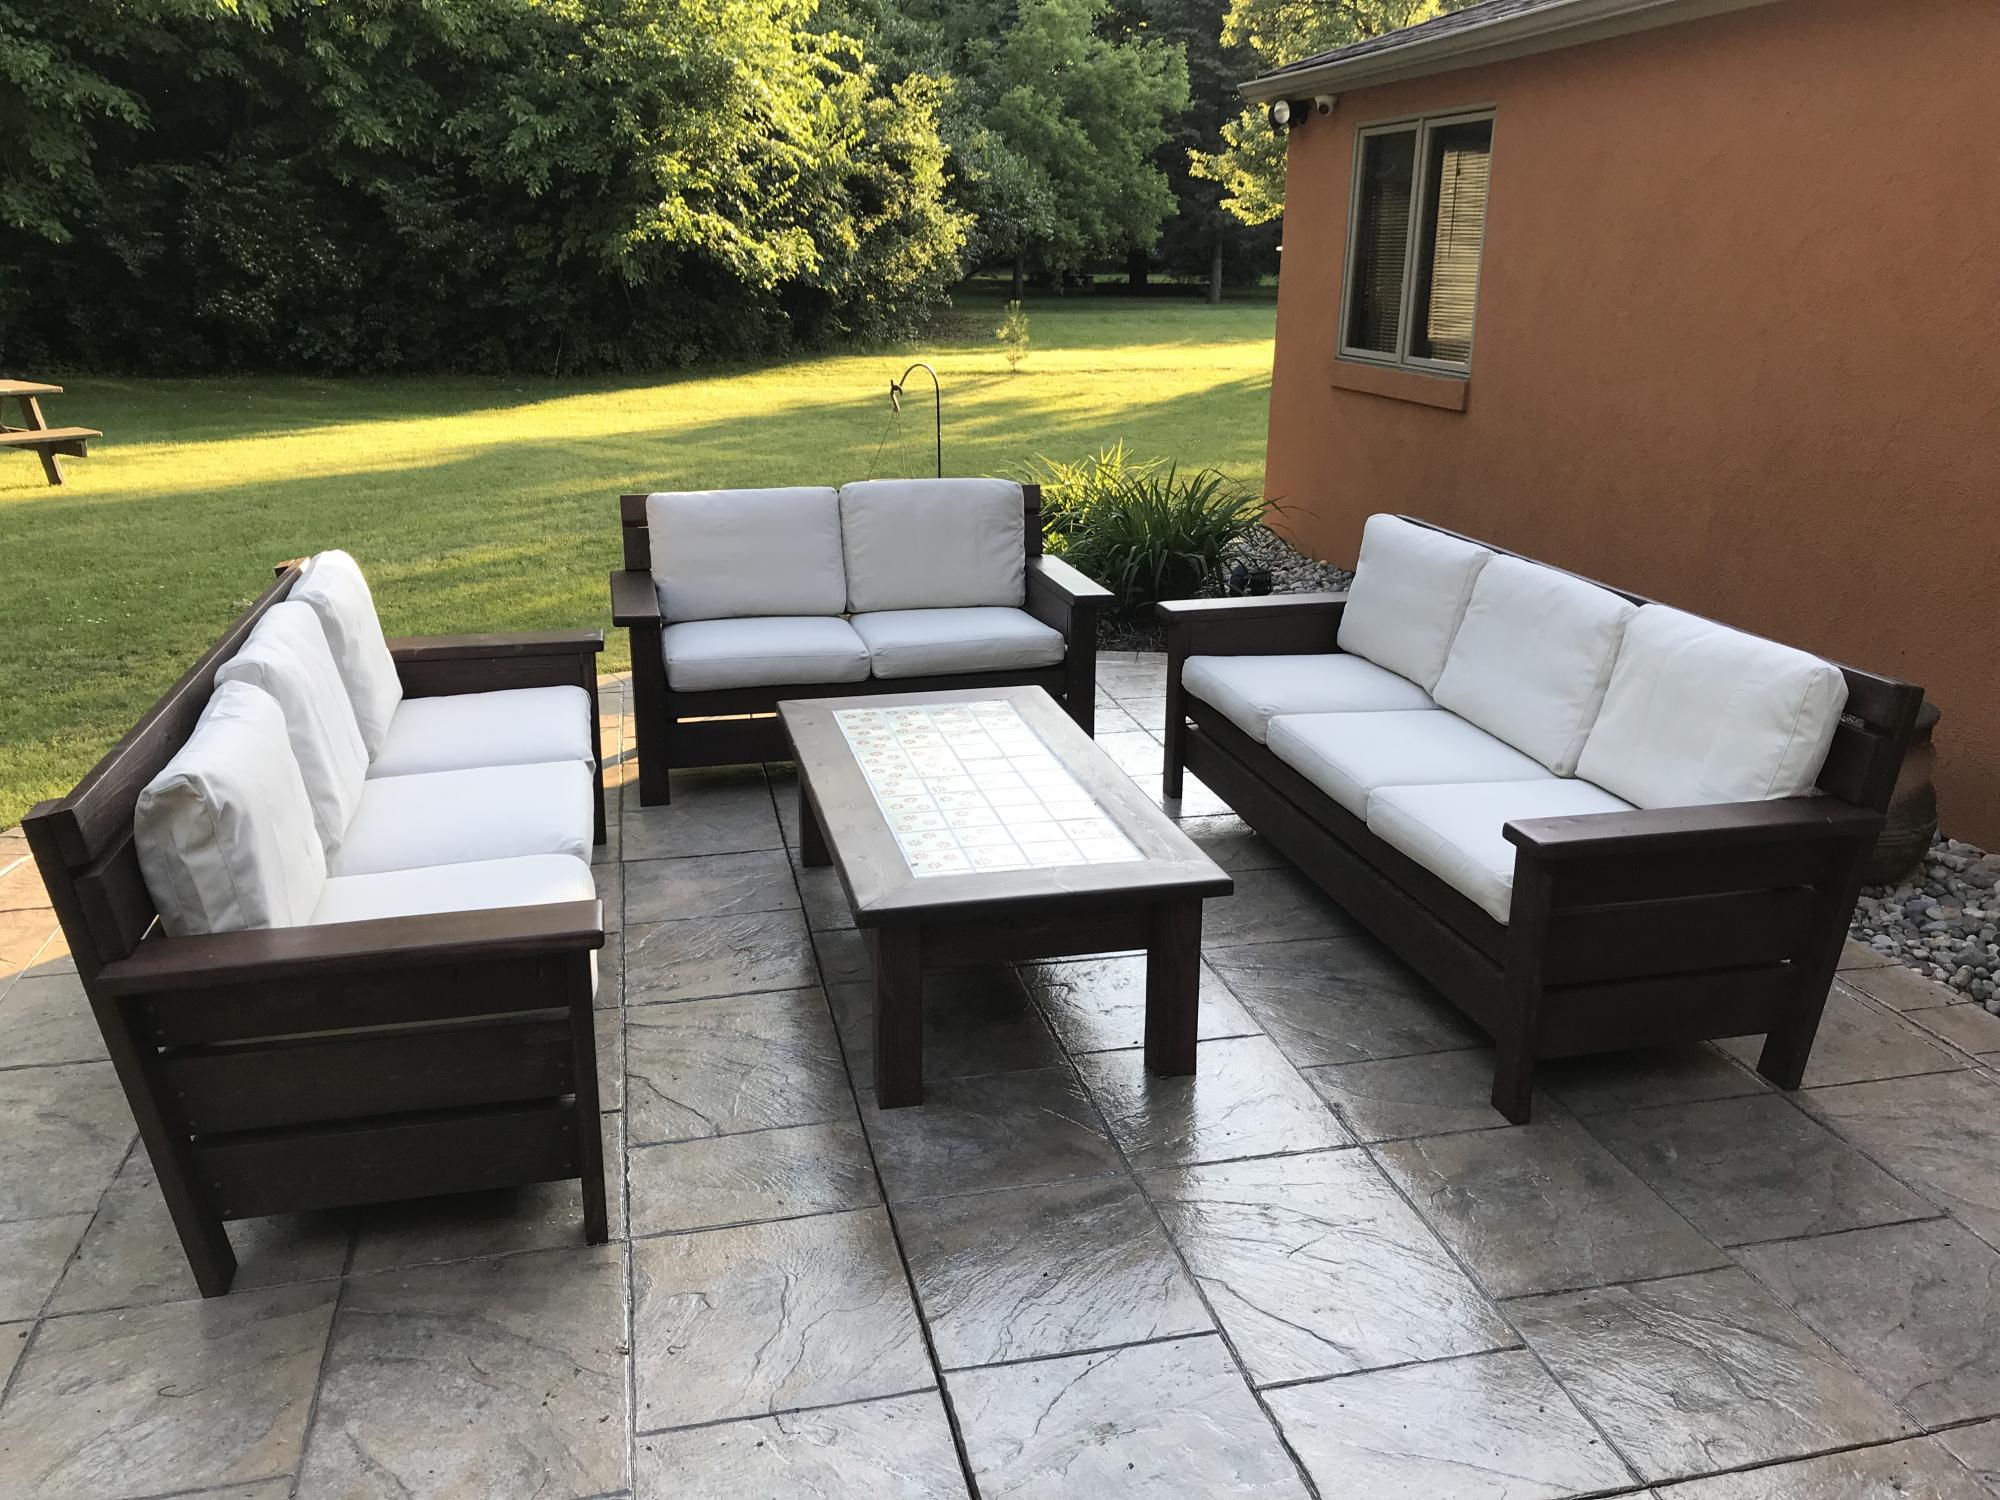
I created two sofas, a love seat and a table by modifying the modern chair. I added a back extension, tipped the back back 10 degrees, and angled the seat platform down a few degrees. Considered doing Adirondack arms, but my wife preferred the rectangular shape. The table is a variation of the 2x4 patio table (base construction similar), but we substituted pine 4x4 legs for the 2x4s, and implemented a 2x6 "picture frame" around Mexican tile on top.
I used pocket screws to attach the arms to the sides, and also to hide screws on the table "picture frame".
All-in-all, I would say this is an elegant-looking patio set that should last quite a while. Very solid, very heavy to move around (my only complaint).
We plan to add some colorful throw pillows.
Built from Plan(s)
Estimated Cost
This project was created from a Menard's metal siding trim "shipping crate" that they refused to take back on return - so the many 16 foot 2x6s came to me for free. With hardware, stain, sanding pads and the pocket screw jig, I would guess I have about $300 there. The cushions were somewhat expensive, but are built to last - got those from Ikea - "Duvholmen" and "Folsom" haha - 24 1/4" x 24 1/4" cushions, 24 1/4" x 16" back pillows. Those were about $65 (per SEAT) .. so 8 for this project ($520). The cushions only come in this light tan, or medium/dark grey.
Estimated Time Investment
Week Long Project (20 Hours or More)
Finish Used
Behr semi transparent outdoor stain (Padre Brown). First sofa was assembled then stained (mistake). The other pieces were cut, sanded 60/120 and stained. Arms were additionally sanded with a 320 grit prior to staining. Stained all pieces two coats with small roller, then brushed over. Assembly after staining produced a cleaner look on the stained finish.
Recommended Skill Level
Beginner
Comments

Wed, 05/13/2020 - 06:38
Angle of back?
Like the changes!
What is the angle of the chair/sofa back 110 degrees?
Thanks
In reply to Angle of back? by KeithMatthews
Wed, 05/13/2020 - 06:39
Angle of back?
Oops just saw it at the top, sorry.
Castle for my Niece
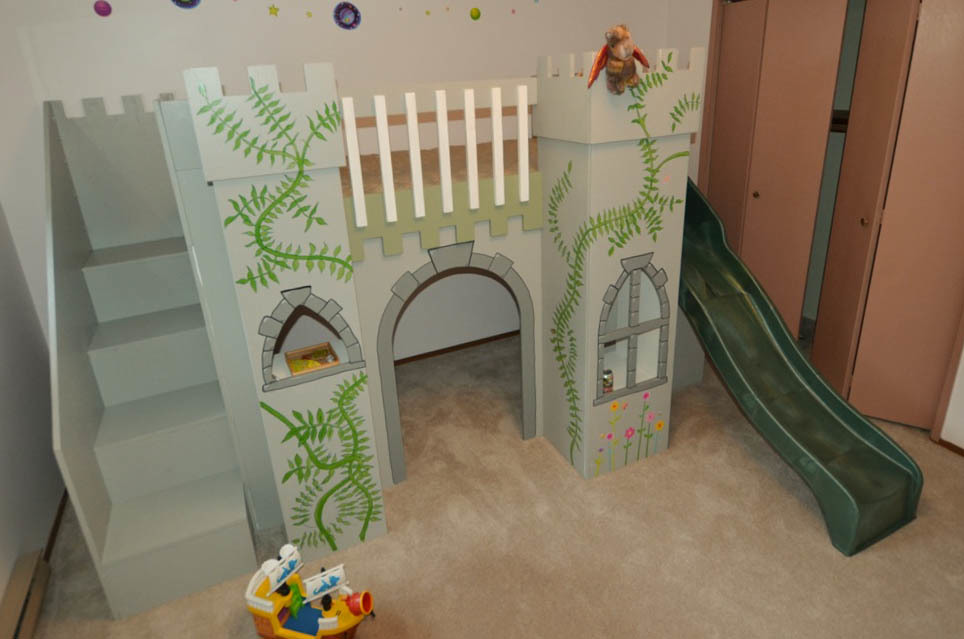
My sisters family was coming for a visit, all the way from england. I wanted to make it special for my niece so I built this bed from your plans. I made a few minor modifications, like adding an extra step (as she's quite small) and rather than making a wood slide, I found a plastic slide at my local hardware store and used that instead. I think that simplified the project, at least for myself. Thanks for the great idea and plans.
Built from Plan(s)
Estimated Time Investment
Week Long Project (20 Hours or More)
Recommended Skill Level
Intermediate
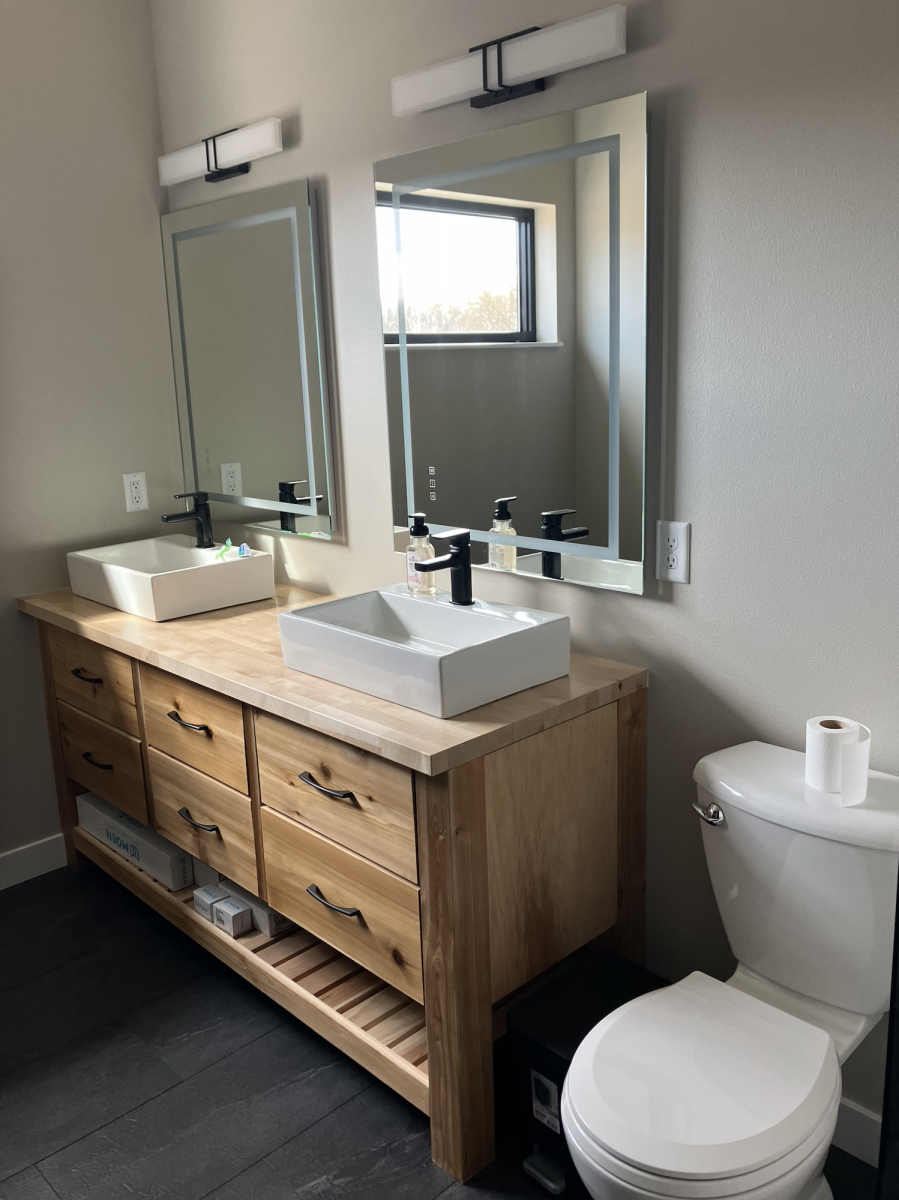
Mostly Cedar Vanity for the New House
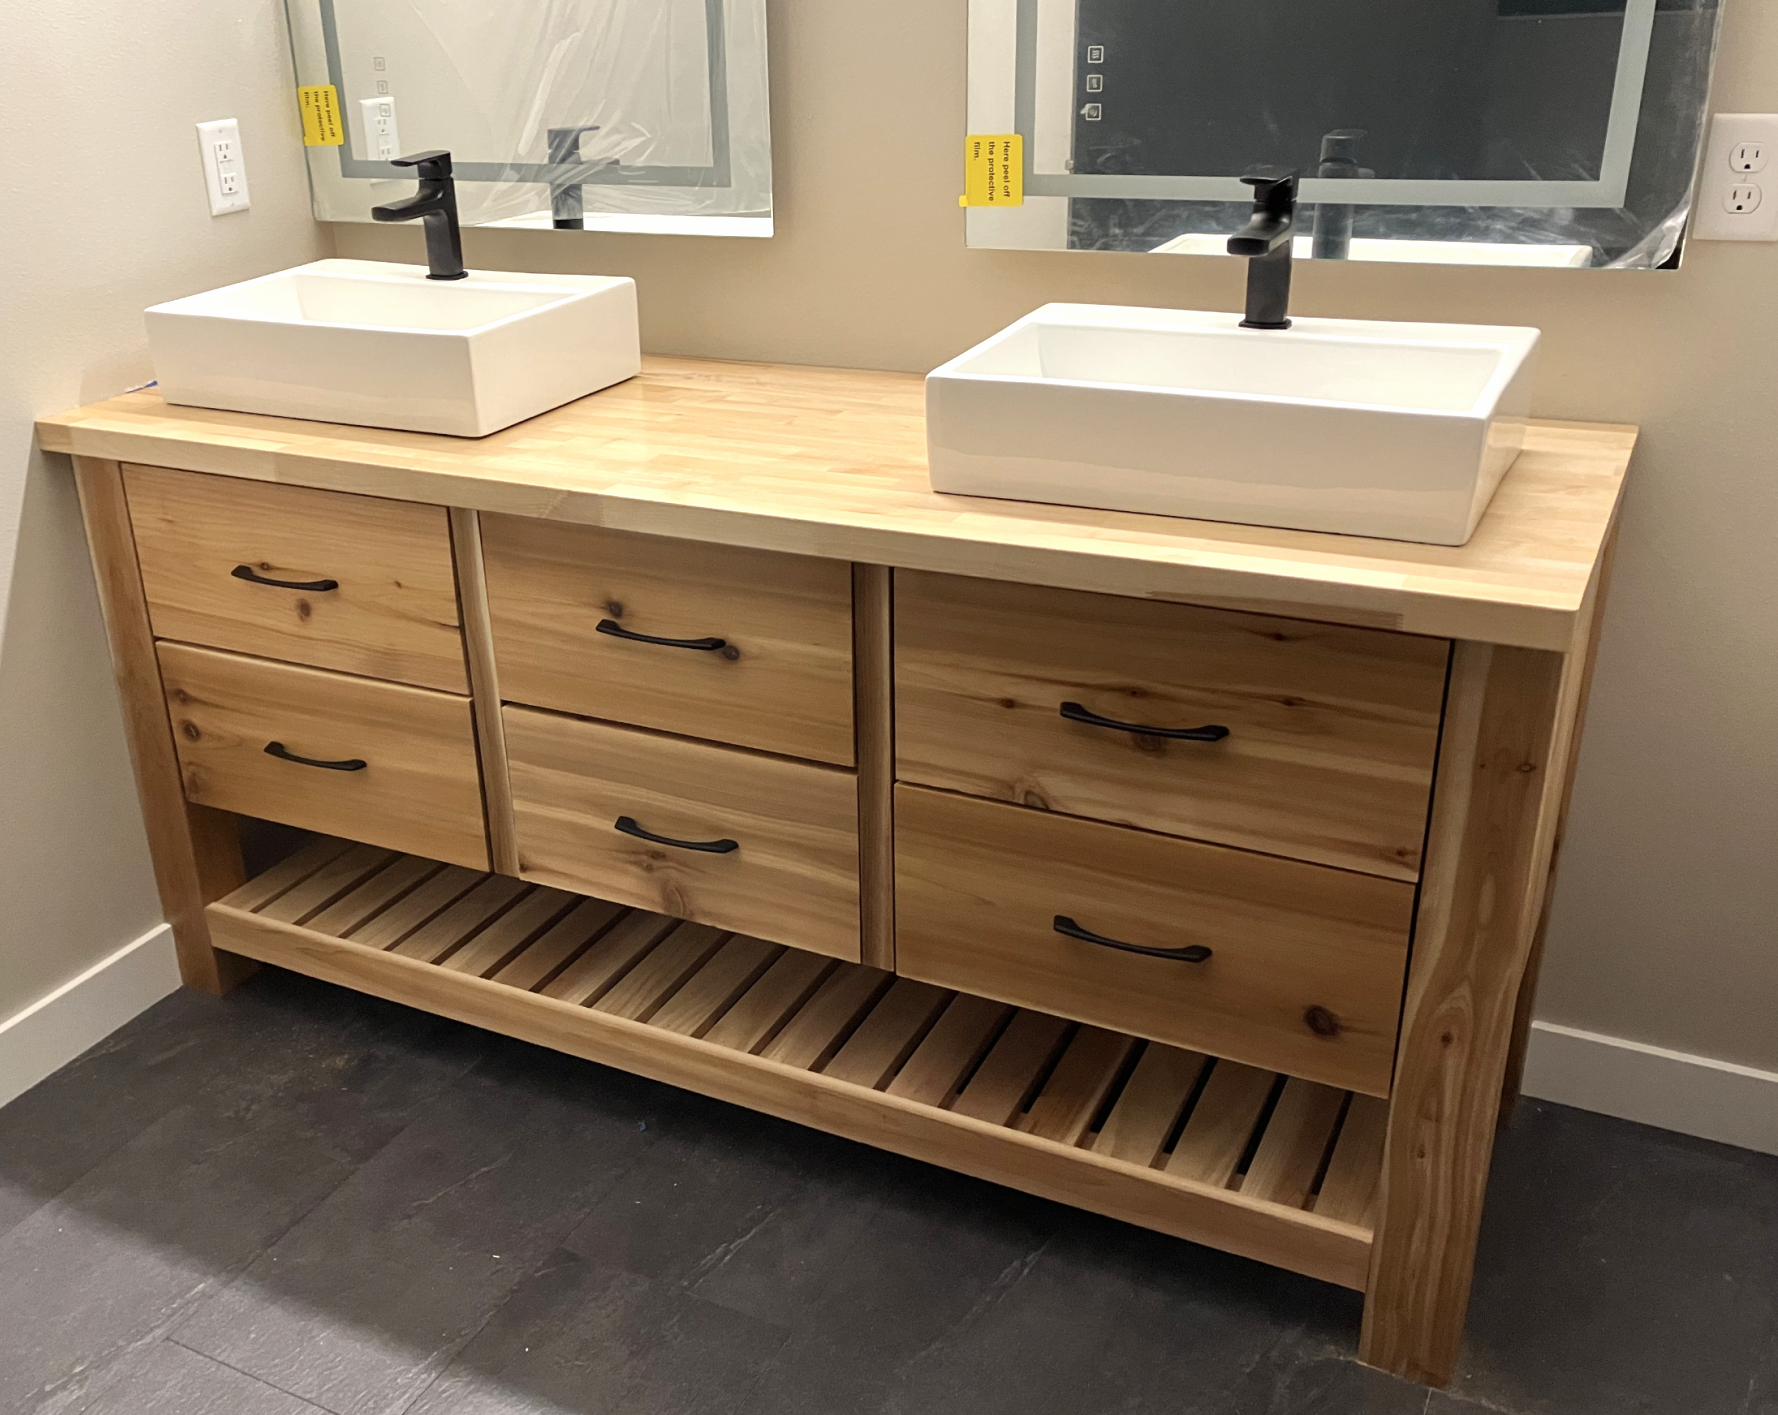
After looking at some terribly overpriced particle board vanities, I found the lovely Rustic Farmhouse Double Bath Vanity plans and decided to go for it. I think this vanity turned out much better than anything I could have bought with the same amount of money, and it will last much longer too!! Thanks Ana!!
Built from Plan(s)
Comments
Thu, 05/04/2023 - 10:26
WOW, what a vanity!
Absolutely stunning, thank you for sharing your beautiful createion!
Thank you!
Thank you for the plans! Love the shelves!
Built from Plan(s)
Estimated Cost
$150
Estimated Time Investment
An Hour or Two (0-2 Hours)
Recommended Skill Level
Starter Project
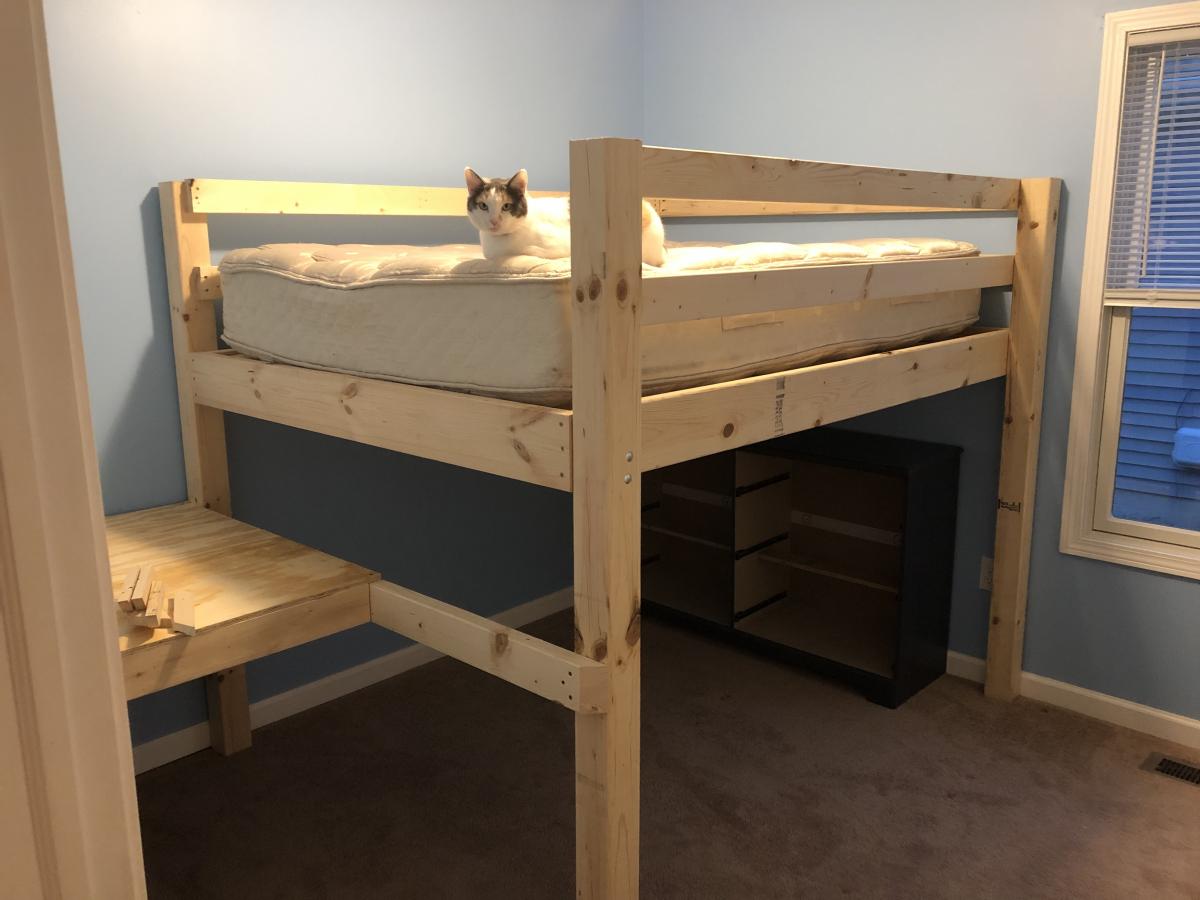
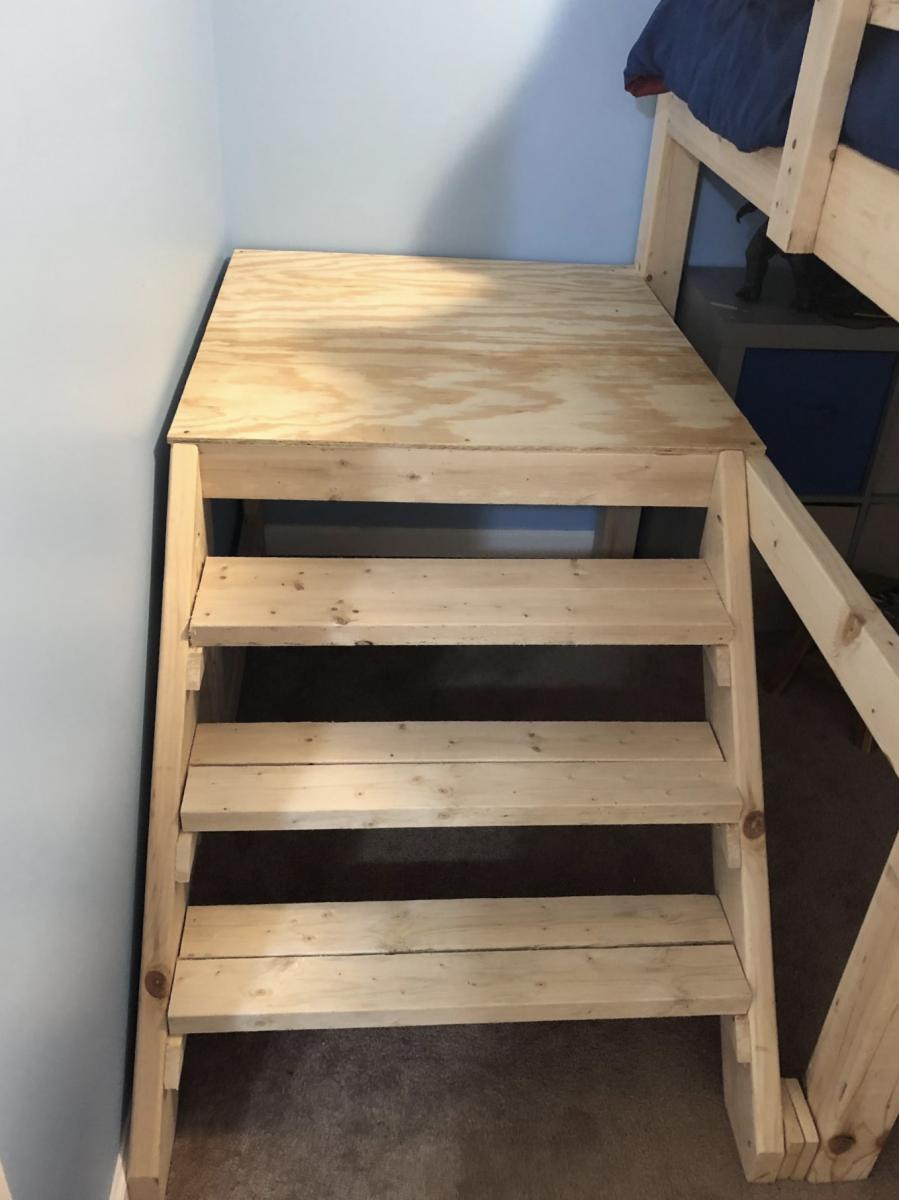
Full size loft
Built a full size loft bed for my kids but wanted something safer than having them climb up and down a ladder so used the Camp Loft Bed plans to add the platform and stairs. It is much easier for the kids. Going to finish by covering the platform and stairs with carpet.
Built from Plan(s)
Estimated Cost
180
Estimated Time Investment
Day Project (6-9 Hours)
Comments

Wed, 10/02/2019 - 09:51
I really like how the…
I really like how the platform is only half way so the stairs are inset, this is very smart and good use of space.
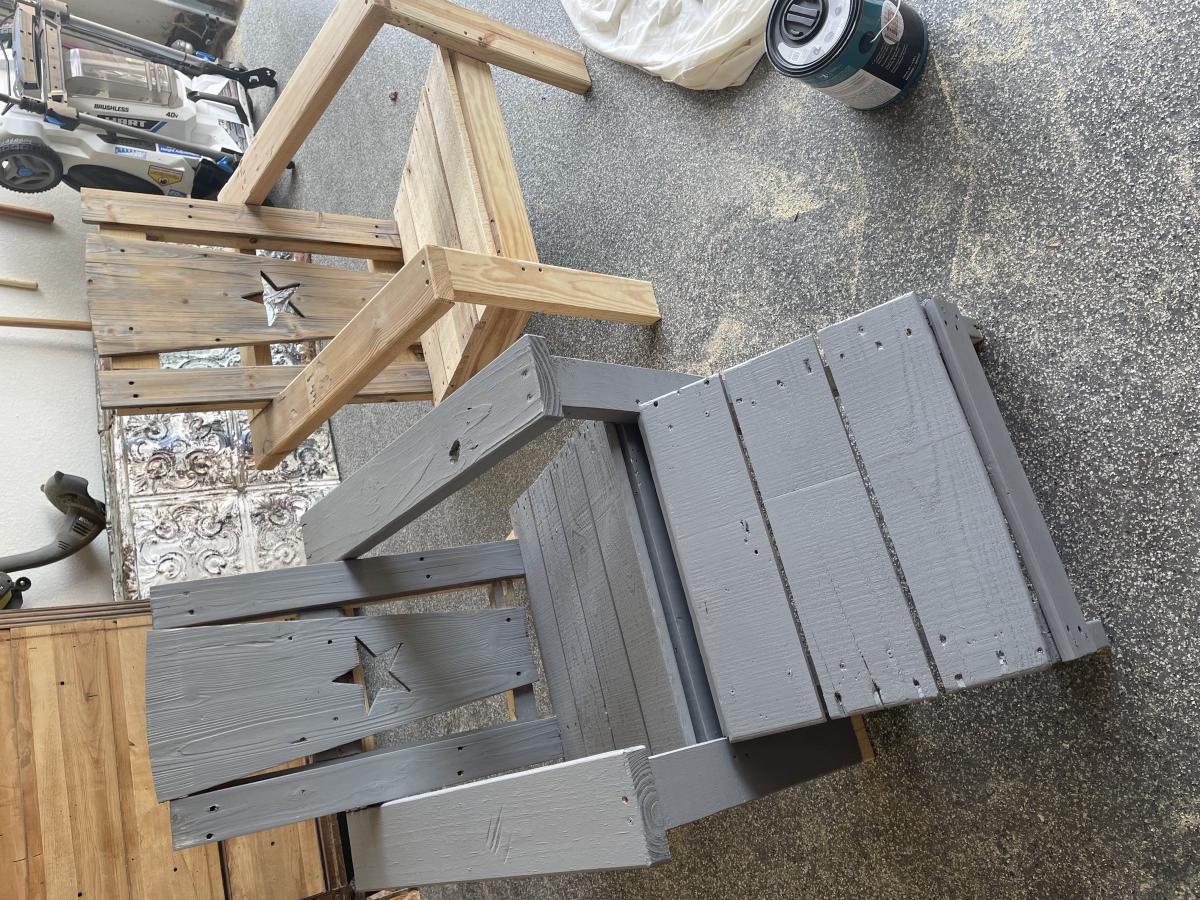
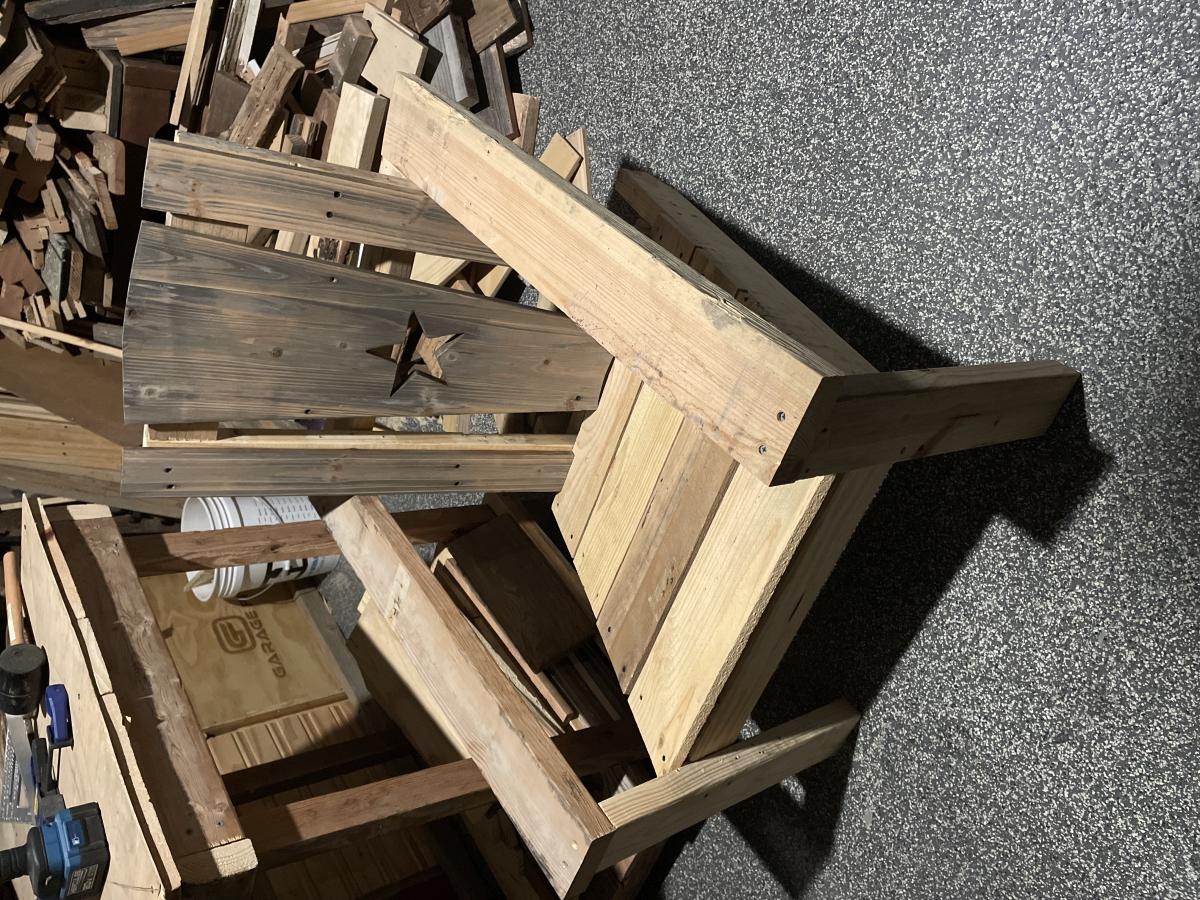
Repurposed Rocking Chairs to Adirondacks!
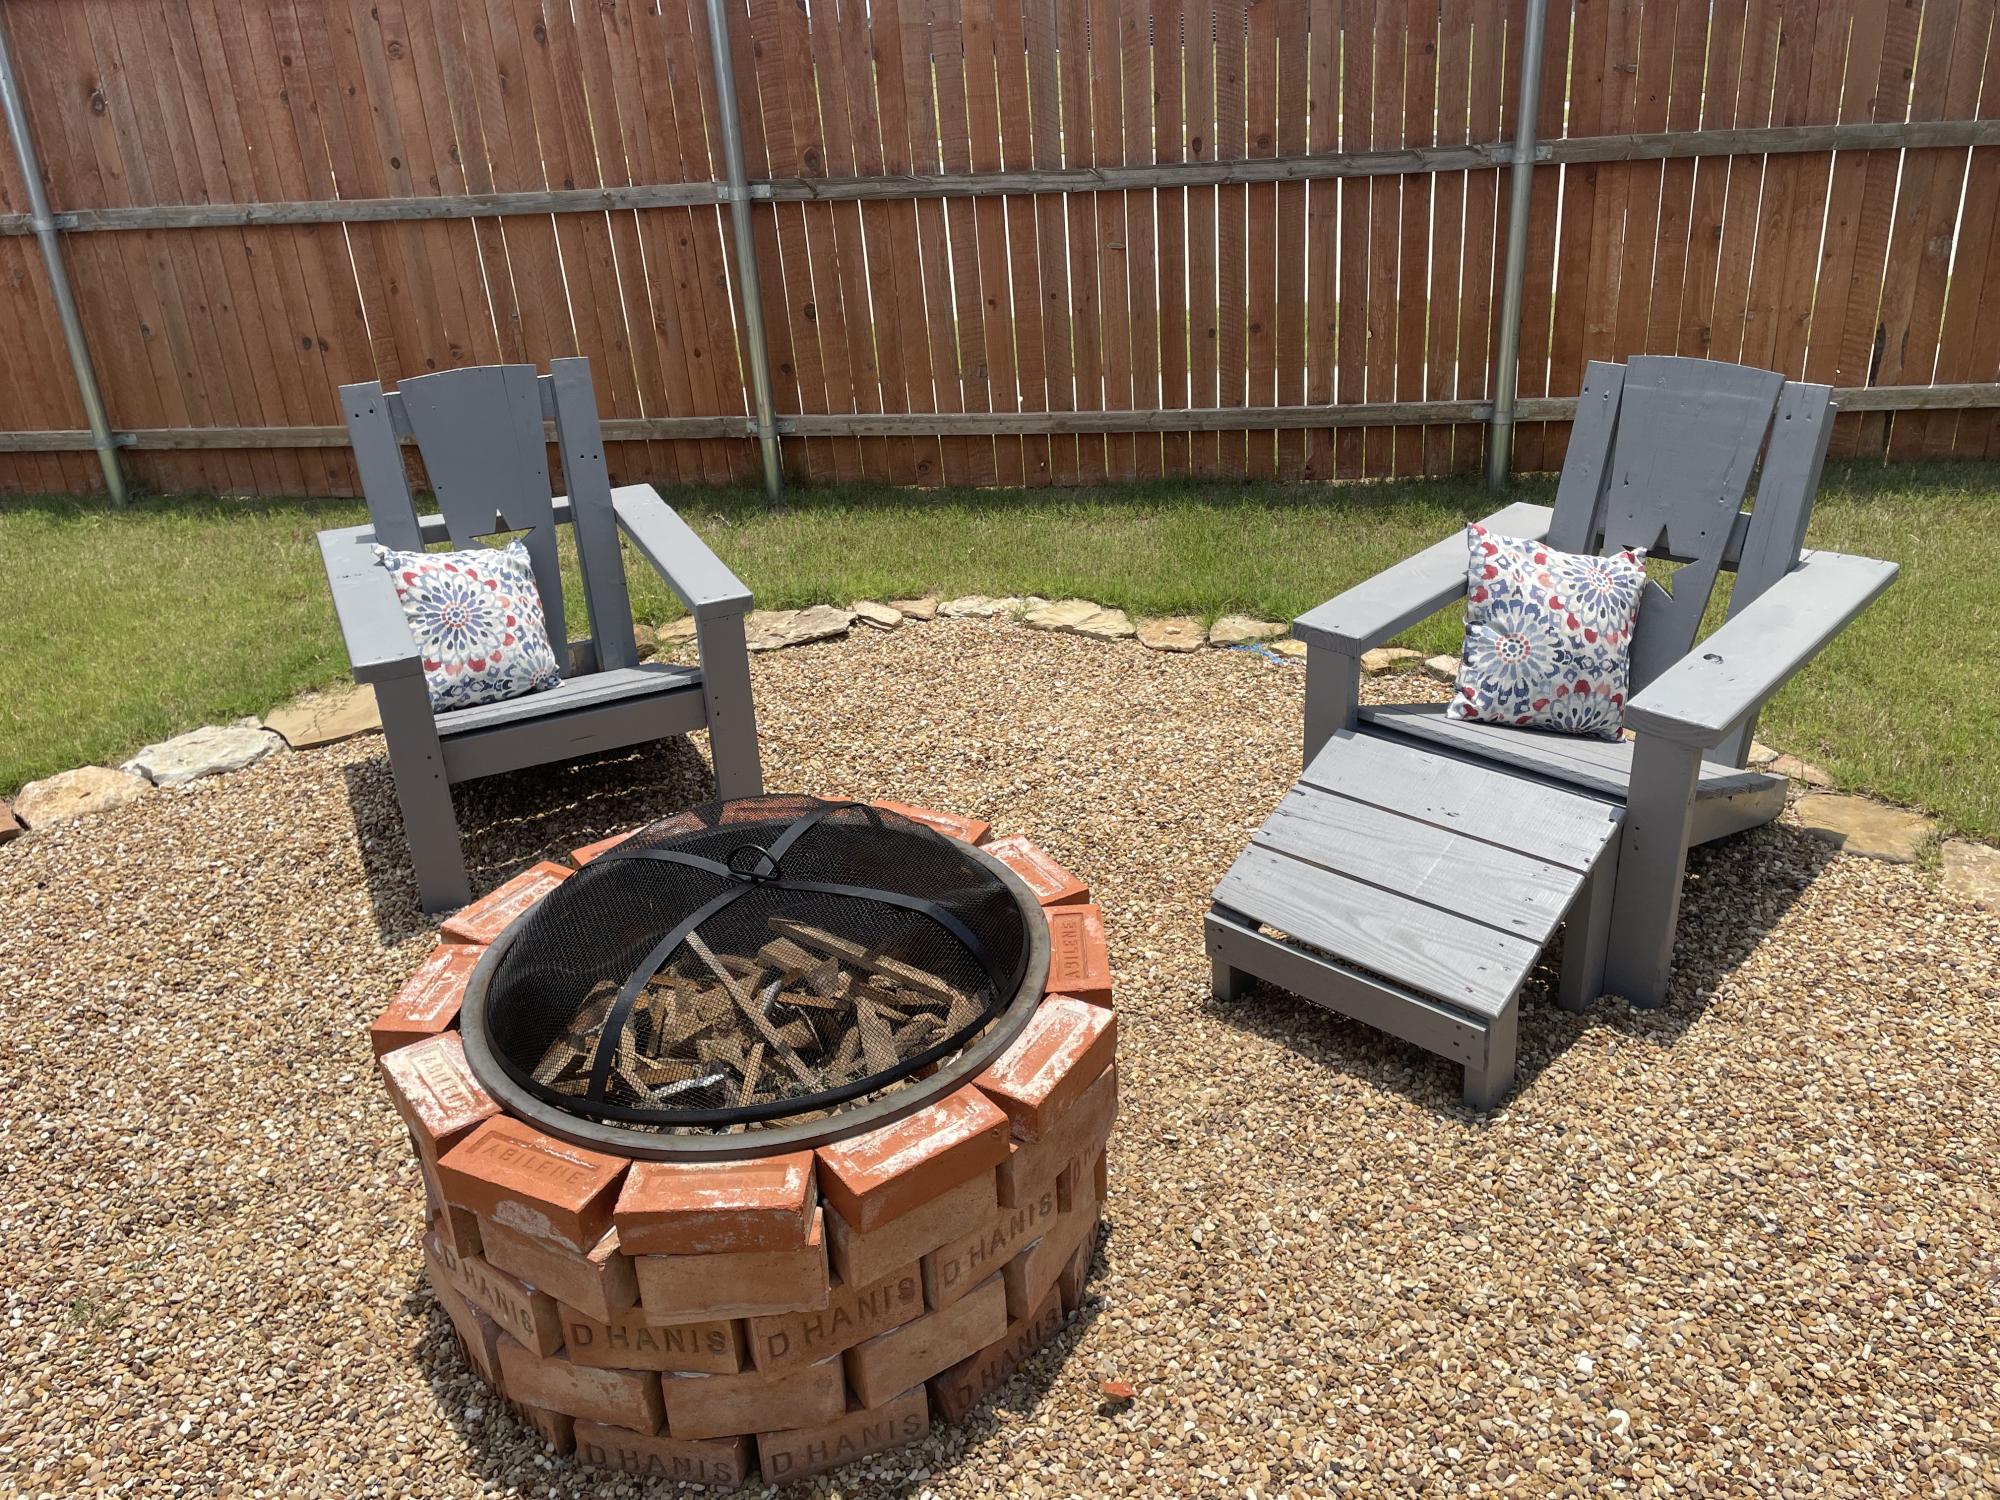
I've done a couple of things from plans on this site but this turned out awesome. We had some old weathered rocking chairs that I dismantled and was able to use some of the wood for these Adirondack chairs.
Could have gone with a dark stain but the gray really worked well on this. Pretty simple build and very sturdy chairs. I loved this project and will certainly be making more of these.
Built from Plan(s)
Comments
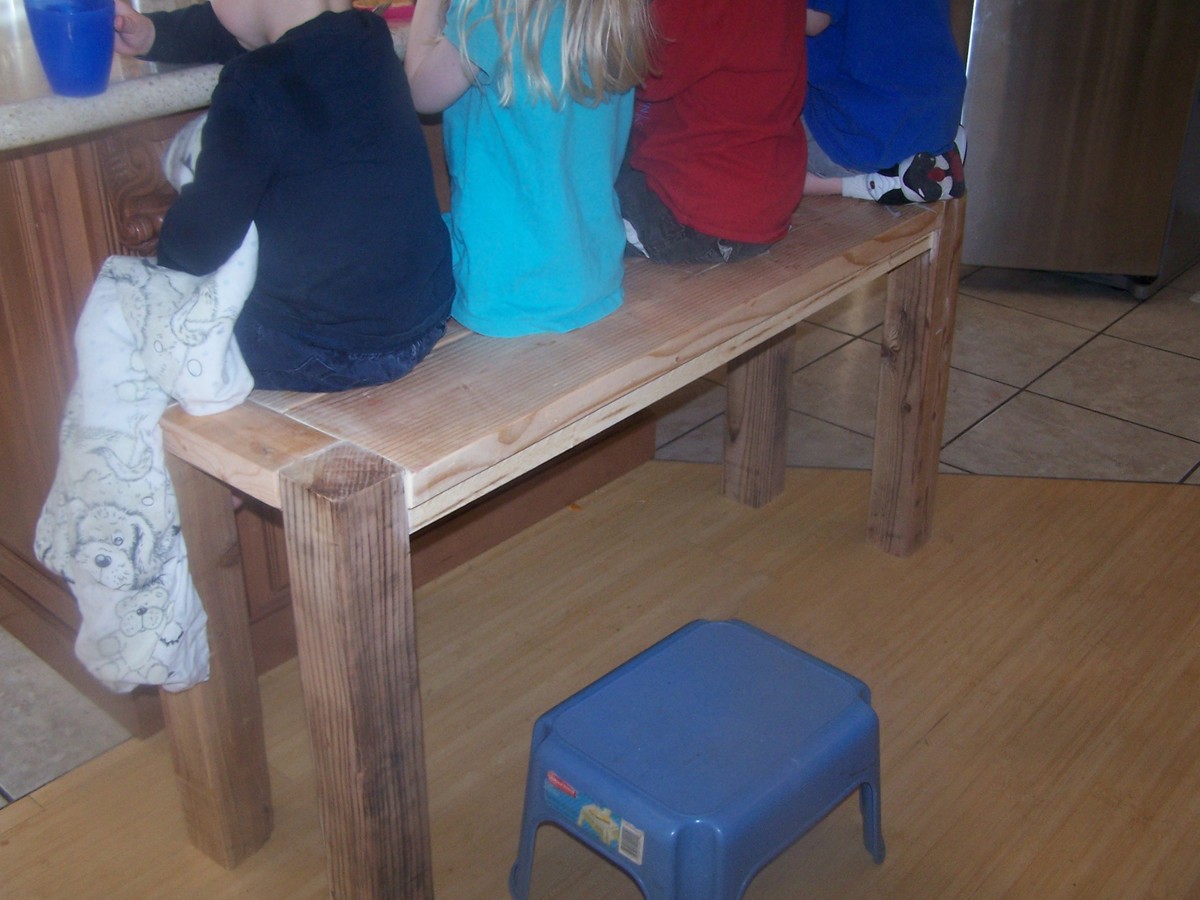
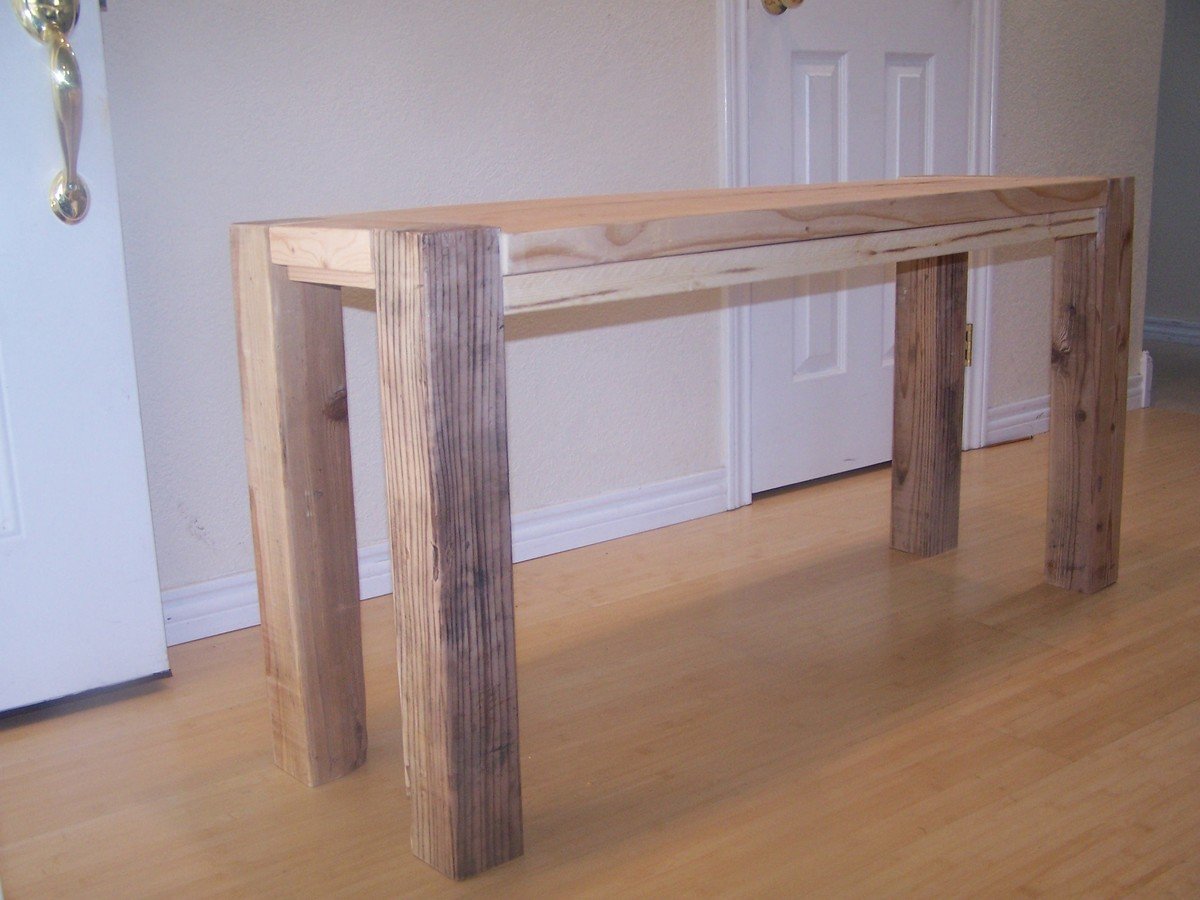
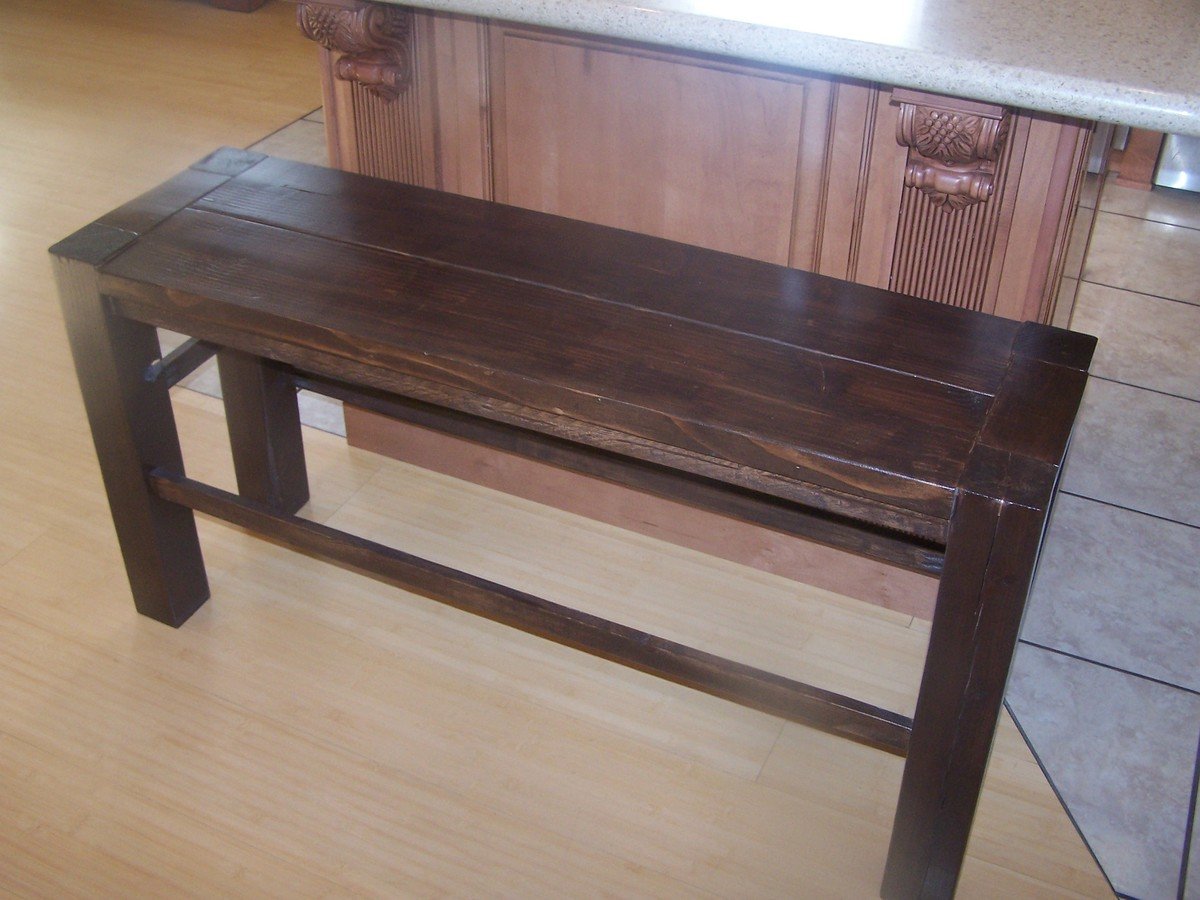
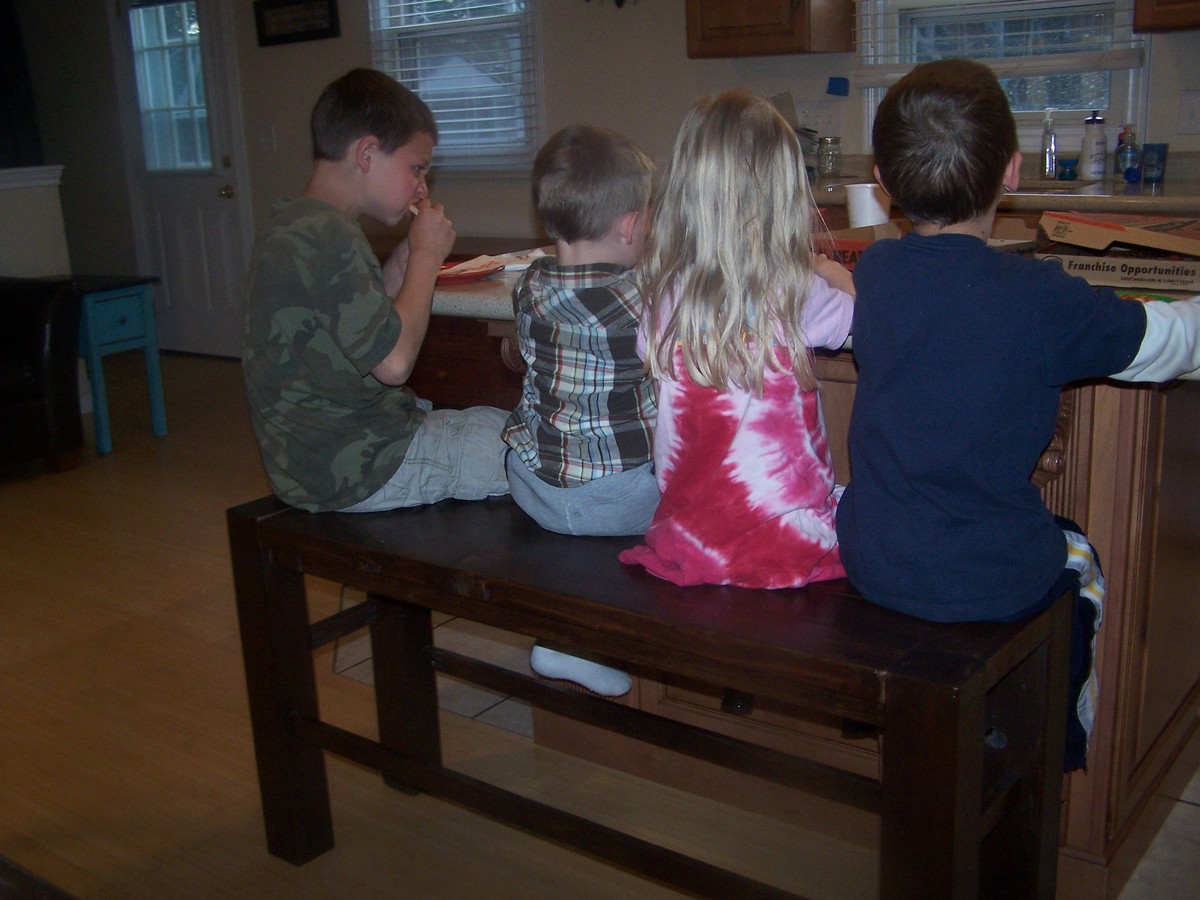
Big Ur Counter height bench
I have been wanting a bench for my counter for sooooo long! I loved the Big Ur bench and finally got up the nerve to adjust the plan to be a counter height bench.
Since I am so cheap, I like to collect wood from the free section on craigslist. And that is how this bench came about! I had these 4x4's (well actually they were a little small and had to adjust for that as well) And these great top boards, which were a little warped, I think it just adds a little character to the bench to not be totally perfect, like me! :) (that was a joke, I am FAR from perfect!)
I made it like the plan, and as you can see from the unfinished picture my little ones needed a stool to climb up on the bench. So I added some 1x2's to give them a ladder for climbing. I love how it turned out and the best part is that it fits at my table as well!
Now my husband thinks I should build a smaller one for the short side of the island. We have six kids and this bench only fits four....we'll see.....
Built from Plan(s)
Estimated Cost
Free! Scrap wood
Estimated Time Investment
Afternoon Project (3-6 Hours)
Finish Used
I used one coat of Rustoleum dark walnut. I gave a few coats of water based poly and and at least three or four on the top.
Recommended Skill Level
Beginner
Comments

In reply to Well.. by Bunnie1978
Thu, 04/12/2012 - 13:12
Ha ha!
Yeah, you could say I am crazy, in a good way! I do feel like a chicken with it's head cut off sometimes, but I am not sure I have a handle on things, does anyone? It's fun though! Thanks for the comment on the bench, and I am WAY impressed with your son's playhouse loft bed, I am still trying to find courage to tackle a project that impressive, great job!
Thu, 01/21/2016 - 09:44
Awesome Job!
You did an excellent job on this! I'd love to build something similar, but with upholstery on top.
BTW, I adore large families, and know that your six little ones must be a great blessing!
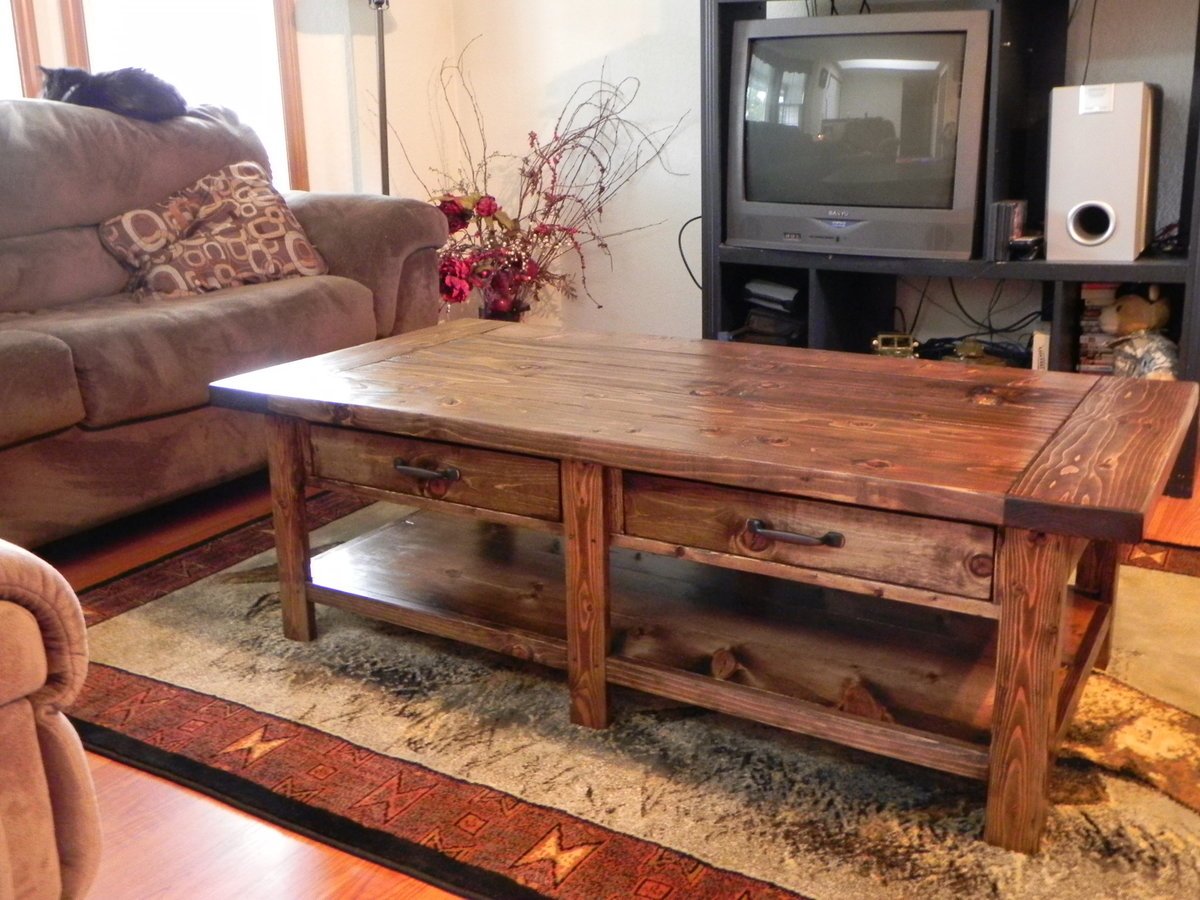
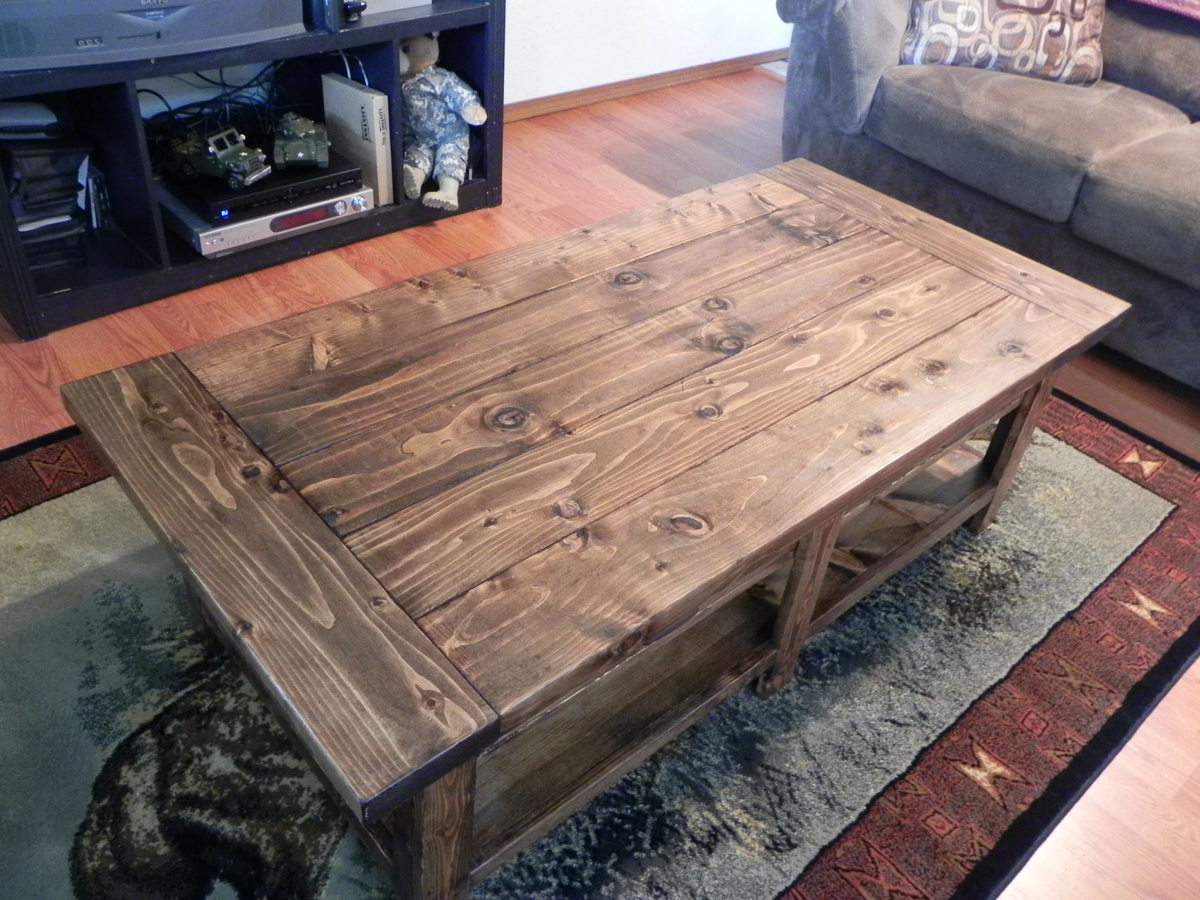
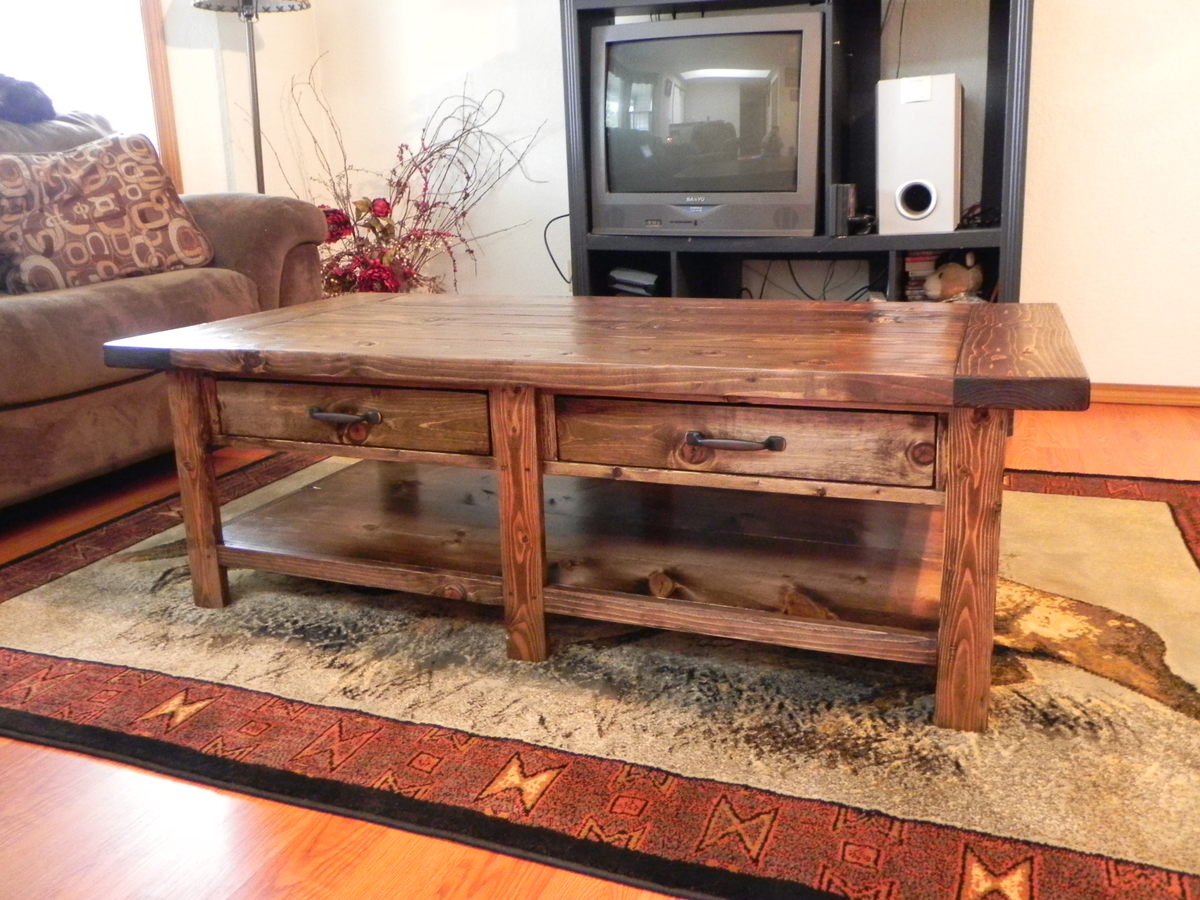
Benchright Coffee Table

Great fun Easy Project! I am in absolute love with this table and give it the rustic feel and look that we were going for. We tried to get the knottiest pine that we could find with also the different colors. We love that look of pine!
Built from Plan(s)
Estimated Cost
$65
Estimated Time Investment
Weekend Project (10-20 Hours)
Finish Used
Min-wax Dark Walnut, Min-wax wood conditioner, Min-wax Semi Gloss Polyurethane. We also wet/dry sandpapered the top of the table to give it the extra smooth feel without letting go of the rustic look.
Recommended Skill Level
Intermediate
Comments

Wed, 04/18/2012 - 13:26
It's good to know I'm not the
It's good to know I'm not the only one who likes the knots and swirls and different shades in the pine boards! The last time I was at the lumberyard, when I told the lumberyard-guy that I was building furniture he tried to direct me to the clear pine. I had to explain to him that I like the character that the knots and such give to a piece. He thought I was nuts, but he still helped me find the straightest boards in the rack.
Tue, 07/30/2013 - 08:17
building material questions
Hi I love your piece and think it came out great. I noticed on the original plans that 2 x6 pieces were listed. Did you use them in your project?
Thanks
Sat, 08/17/2013 - 10:42
Sorry it took me so long to
Sorry it took me so long to reply and thanks for the compliment. But, yes we did use 2x6's on this table.
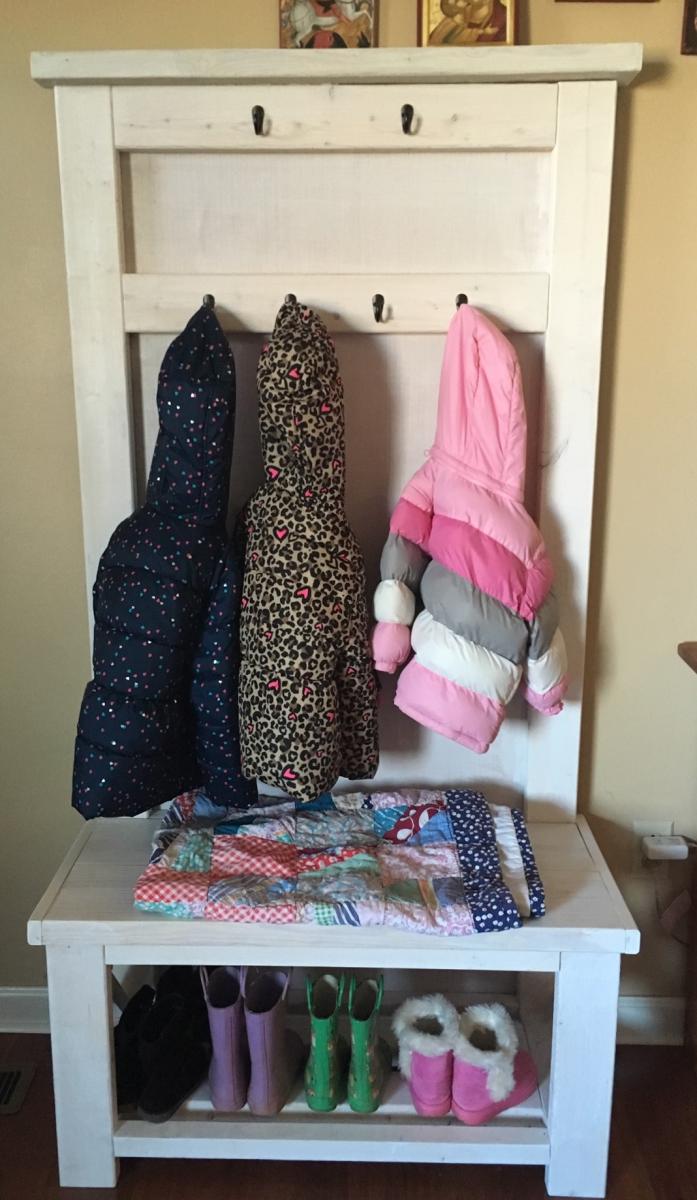
Rustic X Hall Tree
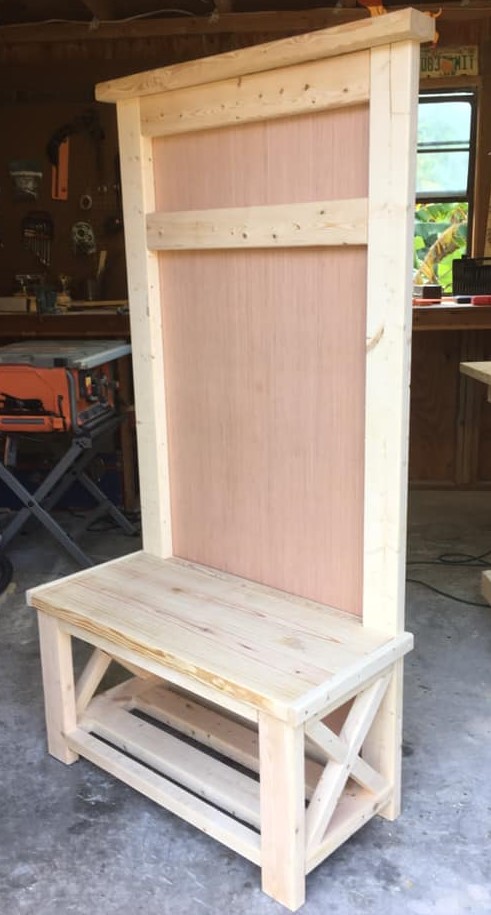
I built this scaled down version of Ana's Hall Tree to fit into a 3 foot wide space in my daughter's living room.
Built from Plan(s)
Estimated Cost
$55
Estimated Time Investment
Afternoon Project (3-6 Hours)
Finish Used
Whitewash
Recommended Skill Level
Starter Project
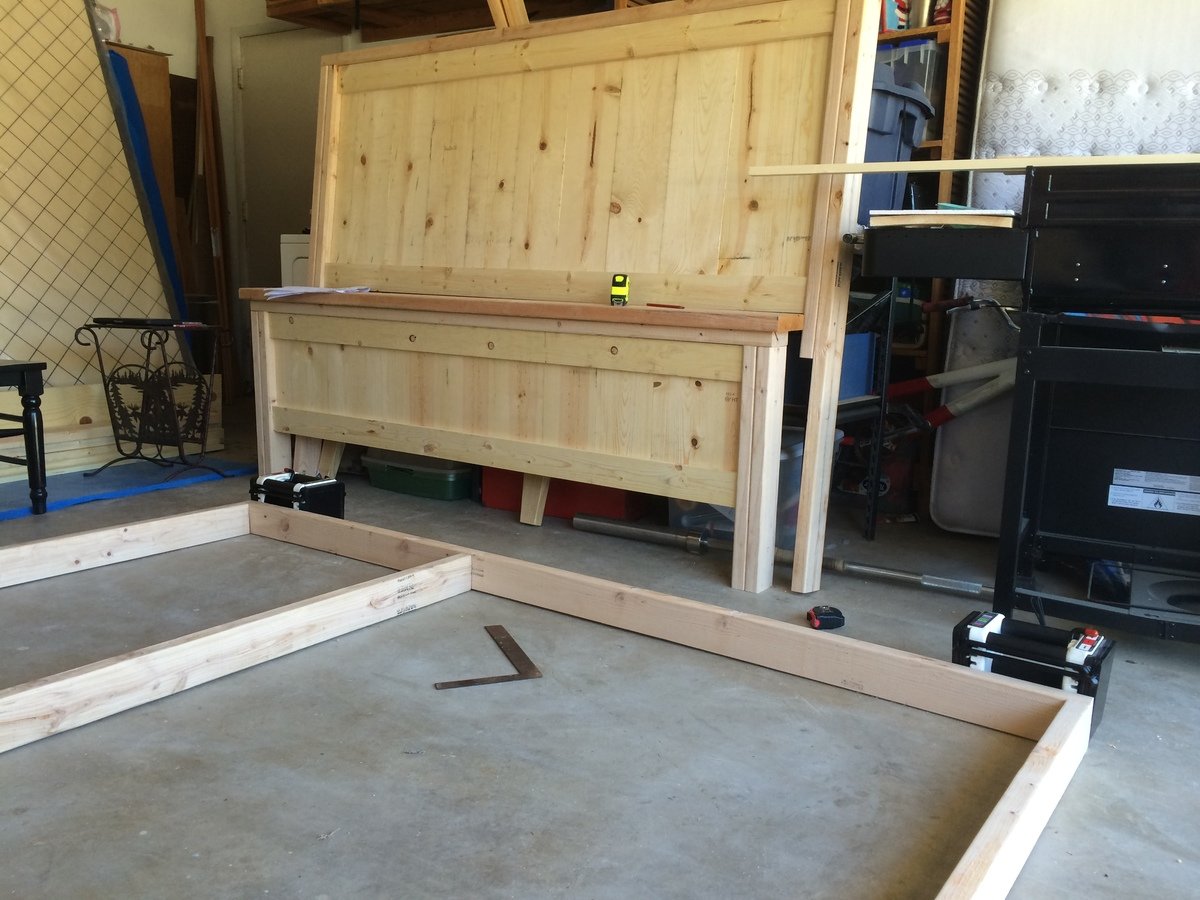
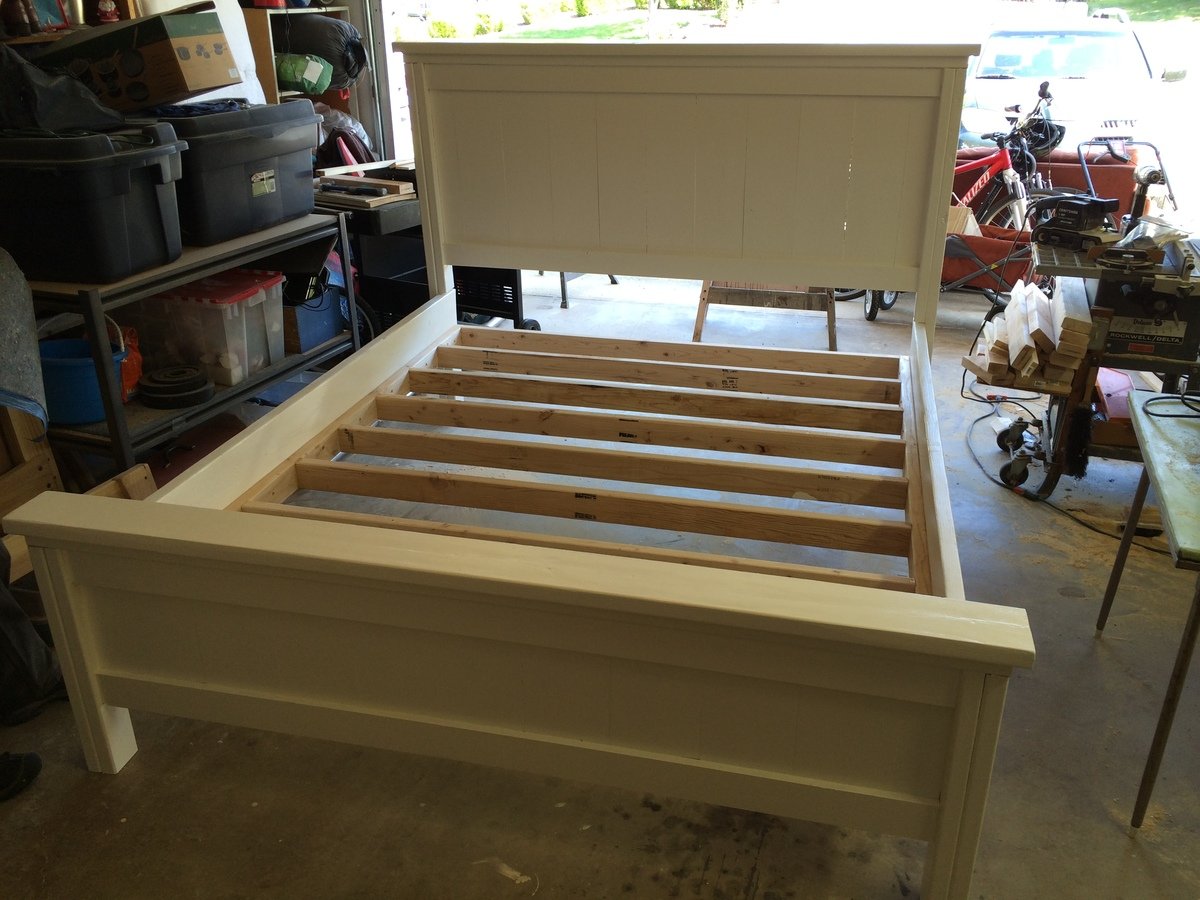
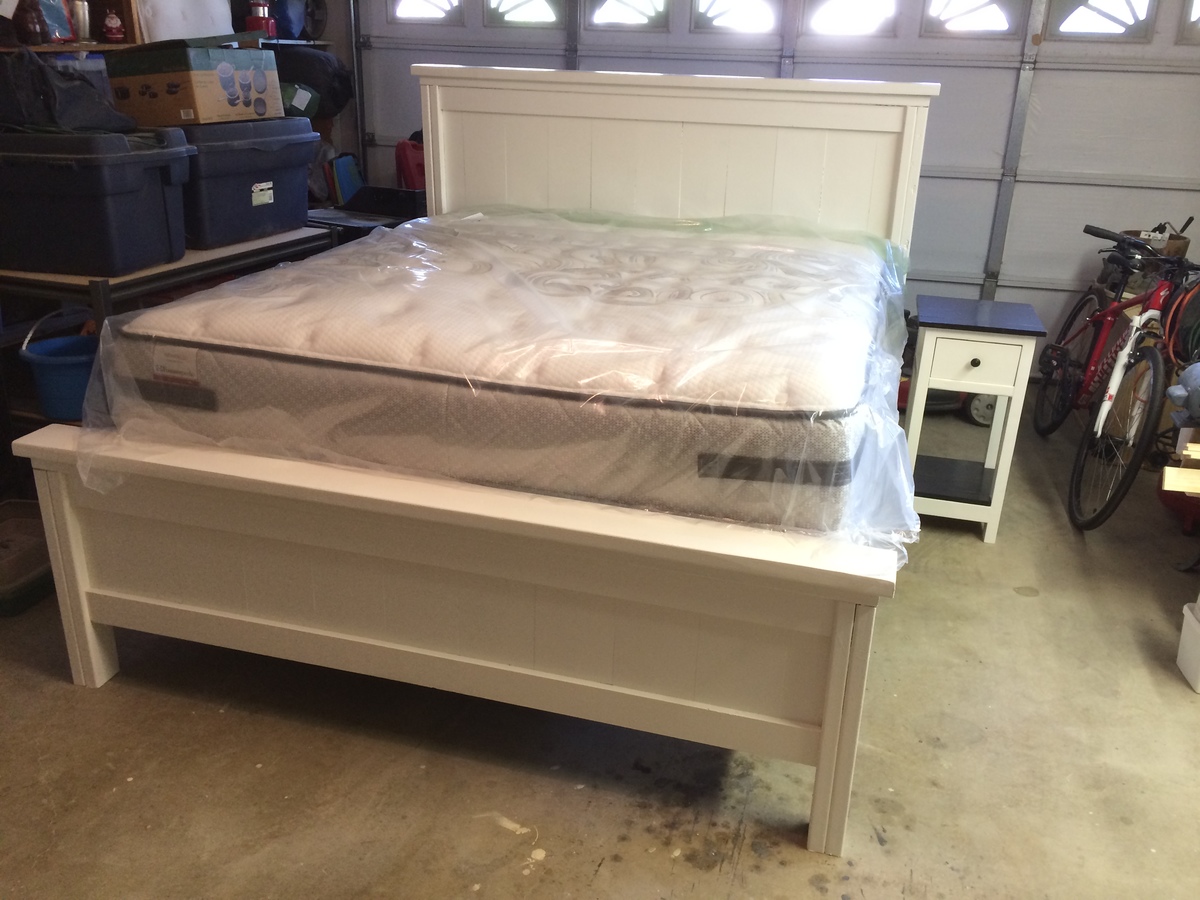
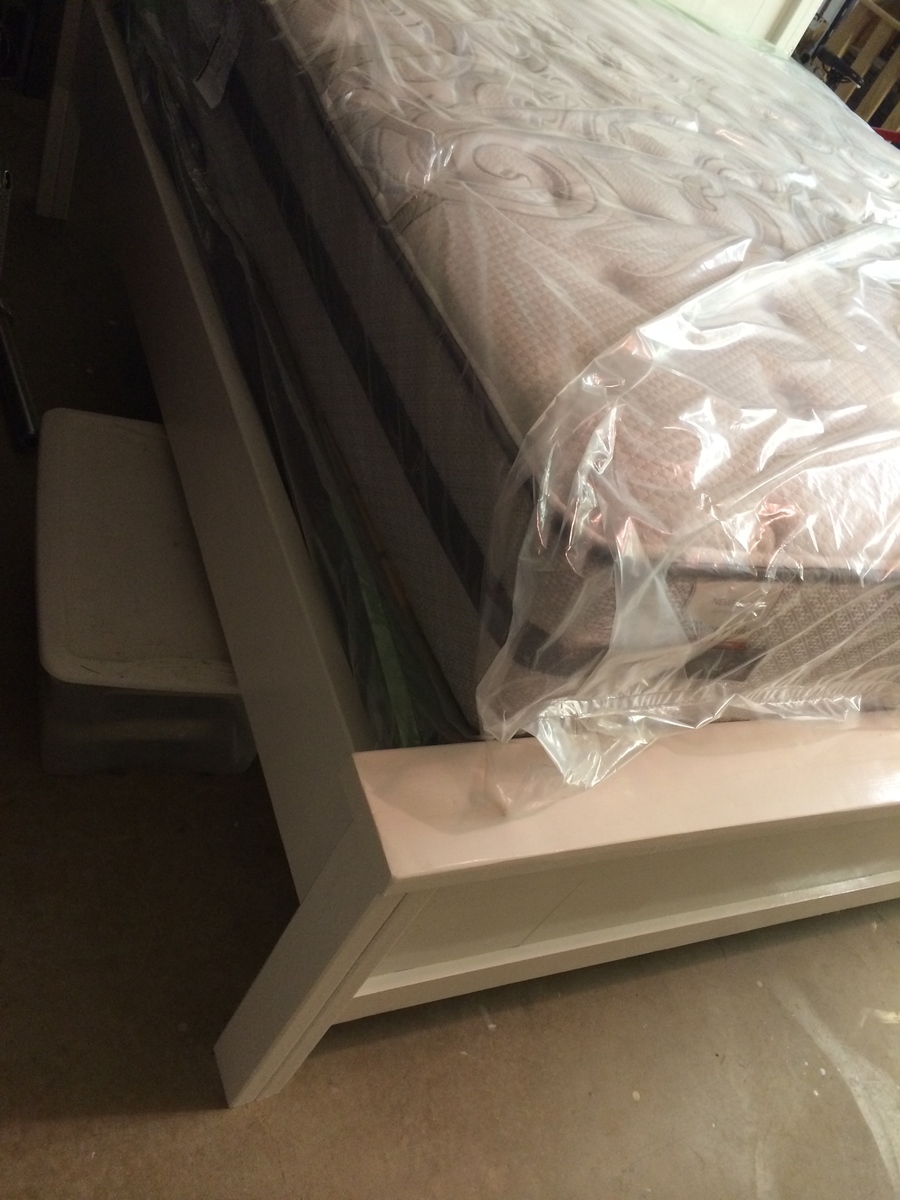
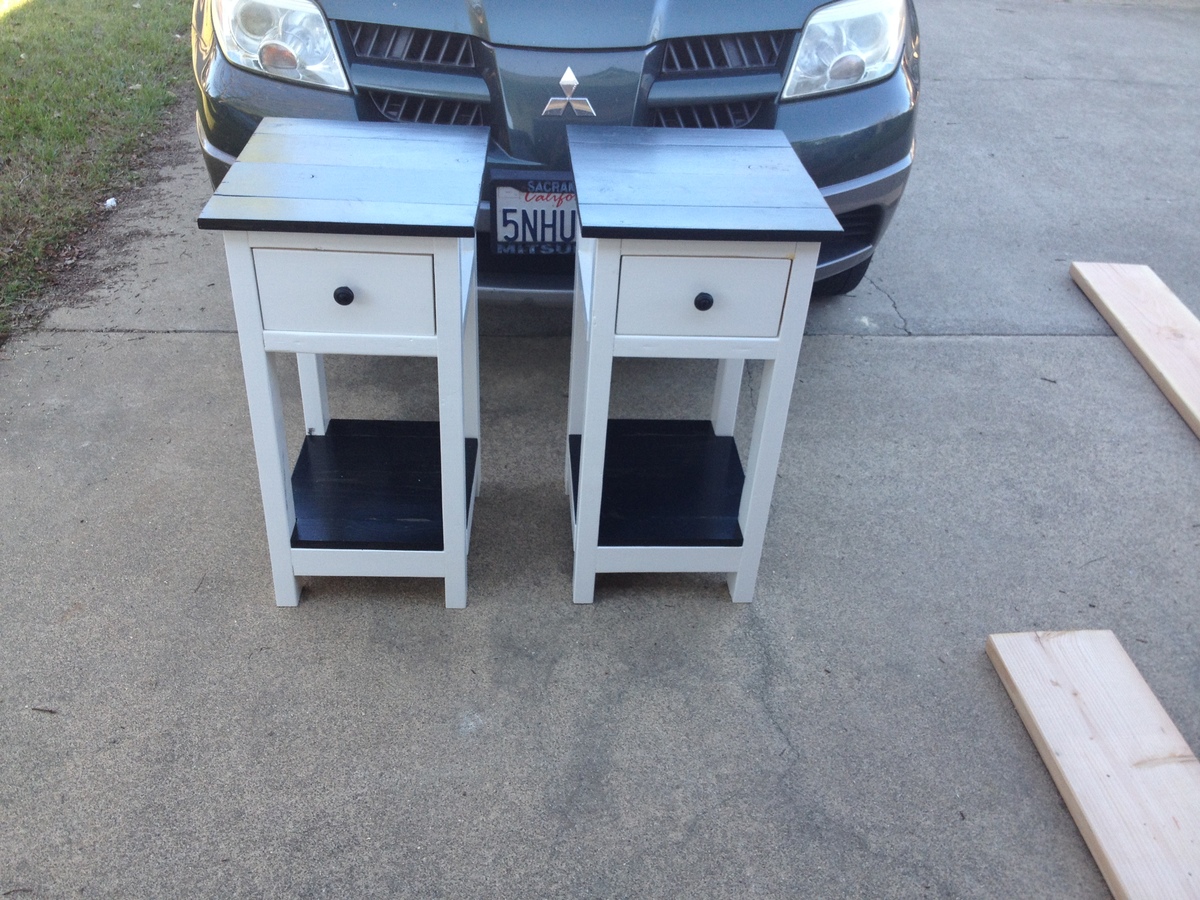
Calif King Bed with Matching Nightstands
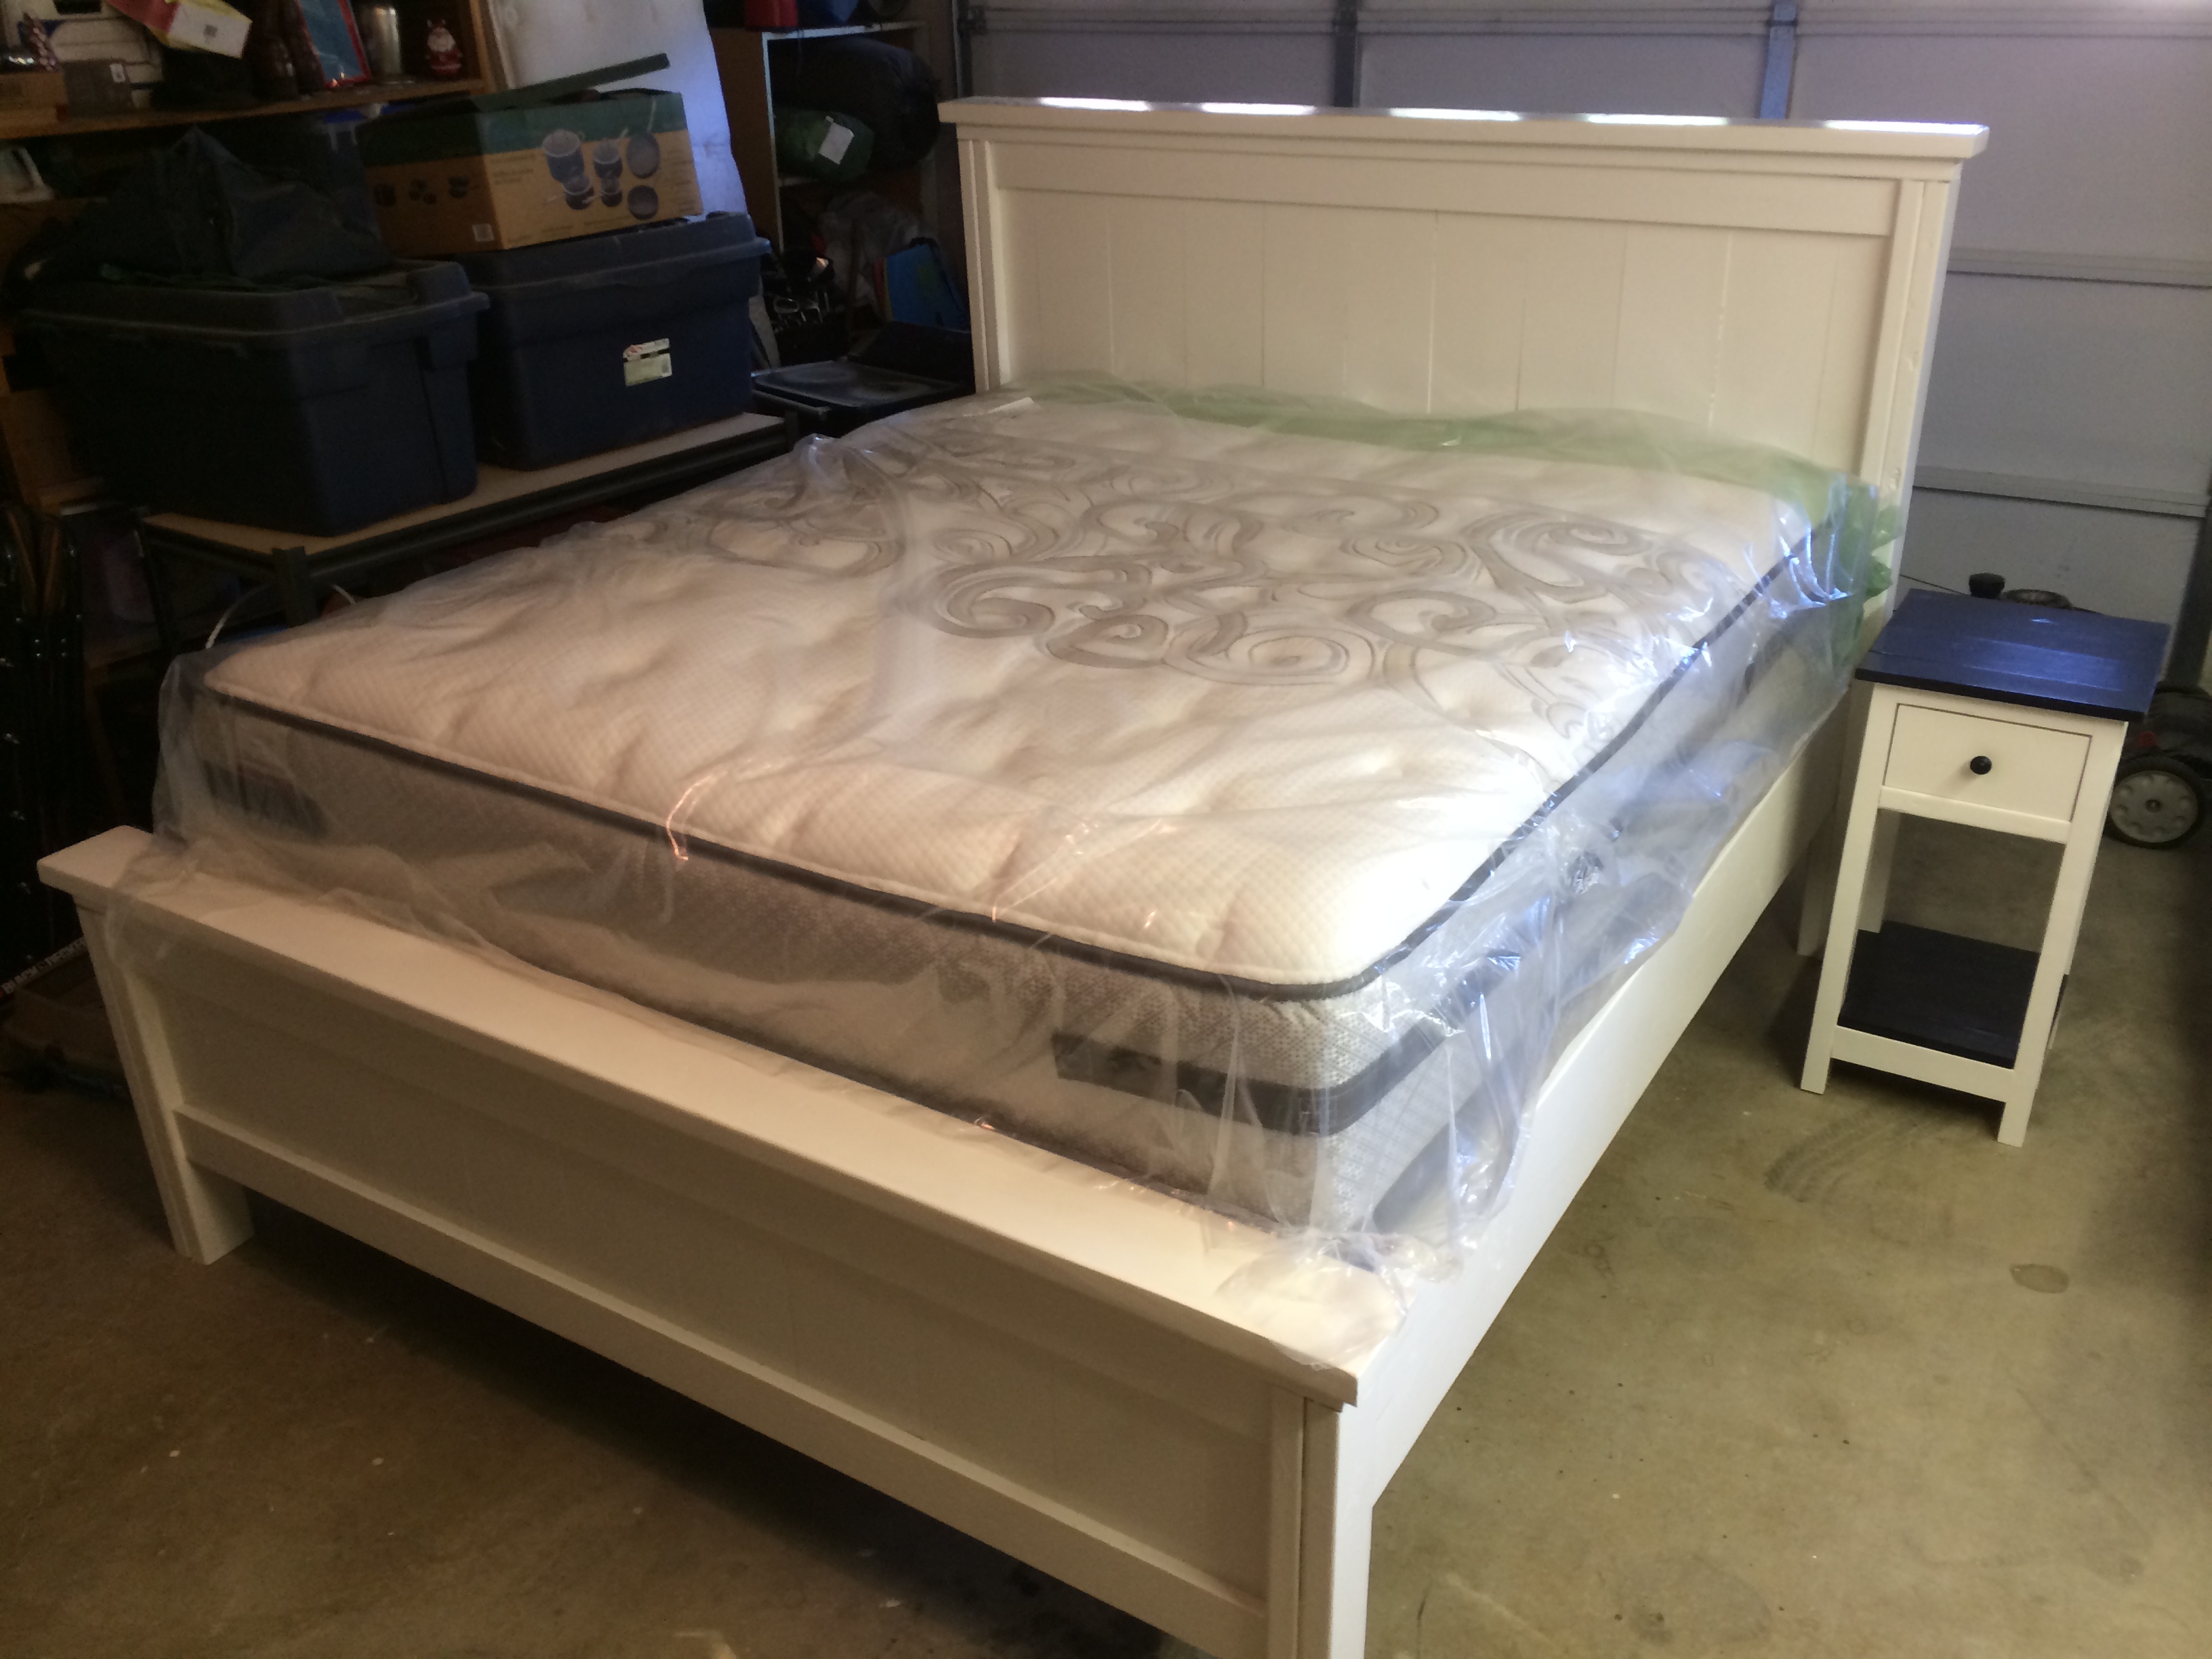
The next few months are going to be crazy! My fiancee and I will both be graduating in May. Our wedding will be be just over a month later in June. Sometime in the middle of all that craziness, we will be moving. I'll start a new job and she will be starting a graduate program.
With all this coming up, I had been looking forward to my last spring break as a college student to go "home" and relax by working on a couple Ana White projects that I had picked out. I ended up working from about 9 or 10 am to about 10 pm every day for 8 days to get everything finished! just sitting in the garage working and running back and forth to Lowes was so refreshing. The time flew by and I ended up with two great pieces that my fiancee and I will enjoy for a very ling time.
I spent a bit more than expected after ordering the cheapest ($20) kreg jig from Amazon and other small things like paint but the value for for what I created is still great!
Bedframe:
I love learning how to do new things but I had relatively little experience with wood before this project. I picked up a miter saw a year ago when it was on sale at Lowes and hadn't used it except for cutting laminate flooring so I was excited to be able to use it finally! I had a table saw that was picked up at a garage sale that hadn't been used either which came in handy! My uncle brought over some other tools that were indispensable like a belt sander and finish nailer.
Everything went pretty smooth. The only advice I have is to make sure that you measure EVERYTHING. For example, the slats used in the headboard and footboard need to be the correct width when glued together. Mine came out a little short due to the dimensions of the wood. It was an easy fix for me: use 1x4s on each end instead of 1x3s. I found that when I finished the main three pieces (footboard, frame, headboard), the frame was slightly too big to fit into the footboard and headboard. That's where the belt sander came in handy! Just be careful... the belt sander works FAST.
One change I made to the bedframe plan was that I added 3 inches to the legs. My fiancee and I are very tall so I thought this would be a good idea. I like how it came out but I will warn you... this bed is TALL. Especially with a mattress and box springs! One huge positive aspect of making the bed taller is that a 12" storage box fits perfectly under the bed (see picture). I didn't do this on purpose but it's going to be nice to have all that usable storage space!
My final note on the bedframe is that it is huge. I'm not looking forward to moving it (although I think it can be done). I used kiln dried wood from Lowes for everything which worked fine. The only pieces that are not dry are the two 2x10 side panels on the frame. These make the frame SUPER HEAVY. Just a warning.
Nightstands:
The nightstands were so much fun to make. I used the Kreg jig for everything on it and I highly recommend it. I would not even try to build these without a kreg jig. Besides, the Kreg jig is so awesome to use (I also highly recommend the Kreg screws and the Kreg brand clamp).
I used 2x3 instead of 2x2 for the legs (2x3 at lowes was like $1.50 in stud length compared to like $8 or something ridiculous for 2x2s). I had to be careful with the plans by using 2x3s and get creative in a couple areas but it worked pretty well and made it so much cheaper. I spent under $50 total for two nightstands!
Finish:
I know that these pieces are going to have to be moved so I wanted to finish them with protection being the number one priority. With that in mind, I used a semi-gloss Valspar paint + primer from Lowes and then several coats of semi-gloss poly. I could have done a better job finishing (for example, I only applied one coat to the back of the headboard where no one will ever see) but time was an issue as I only had a week to finish everything before heading back to school. I also probably should have waited a bit longer between coats of poly but whatever.
I stained the tops of the nightstands with an ebony stain and used the same Swiss Coffee Valspar Paint + Primer from Lowes as I used for the bedframe.
Built from Plan(s)
Estimated Cost
$200 - $250 for Bedframe, $50 for Nightstands (2)
Estimated Time Investment
Week Long Project (20 Hours or More)
Finish Used
Semi-Gloss Valspar Swiss Coffee Paint + Primer (1-2 coats, depending on whether or not it will be a visible part of the project)
Brush on Semi-Gloss Poly (3-4 coats)
Ebony Stain
One gallon of paint was plenty for all three pieces.
Brush on Semi-Gloss Poly (3-4 coats)
Ebony Stain
One gallon of paint was plenty for all three pieces.
Recommended Skill Level
Beginner
Comments

Sun, 04/06/2014 - 14:38
Congratulations!
What a tremendous first project(s)! Great, great job! Bet your fiance will be thrilled with them ;)
DIY Outdoor 2x4 Chaise Lounge
I had to really adjust the size due to not having enough space for the bigger one but I love how it came out. Your plans are amazing to follow.
Griselle from Puerto Rico
Built from Plan(s)
Camp Loft Bed with Rock Wall
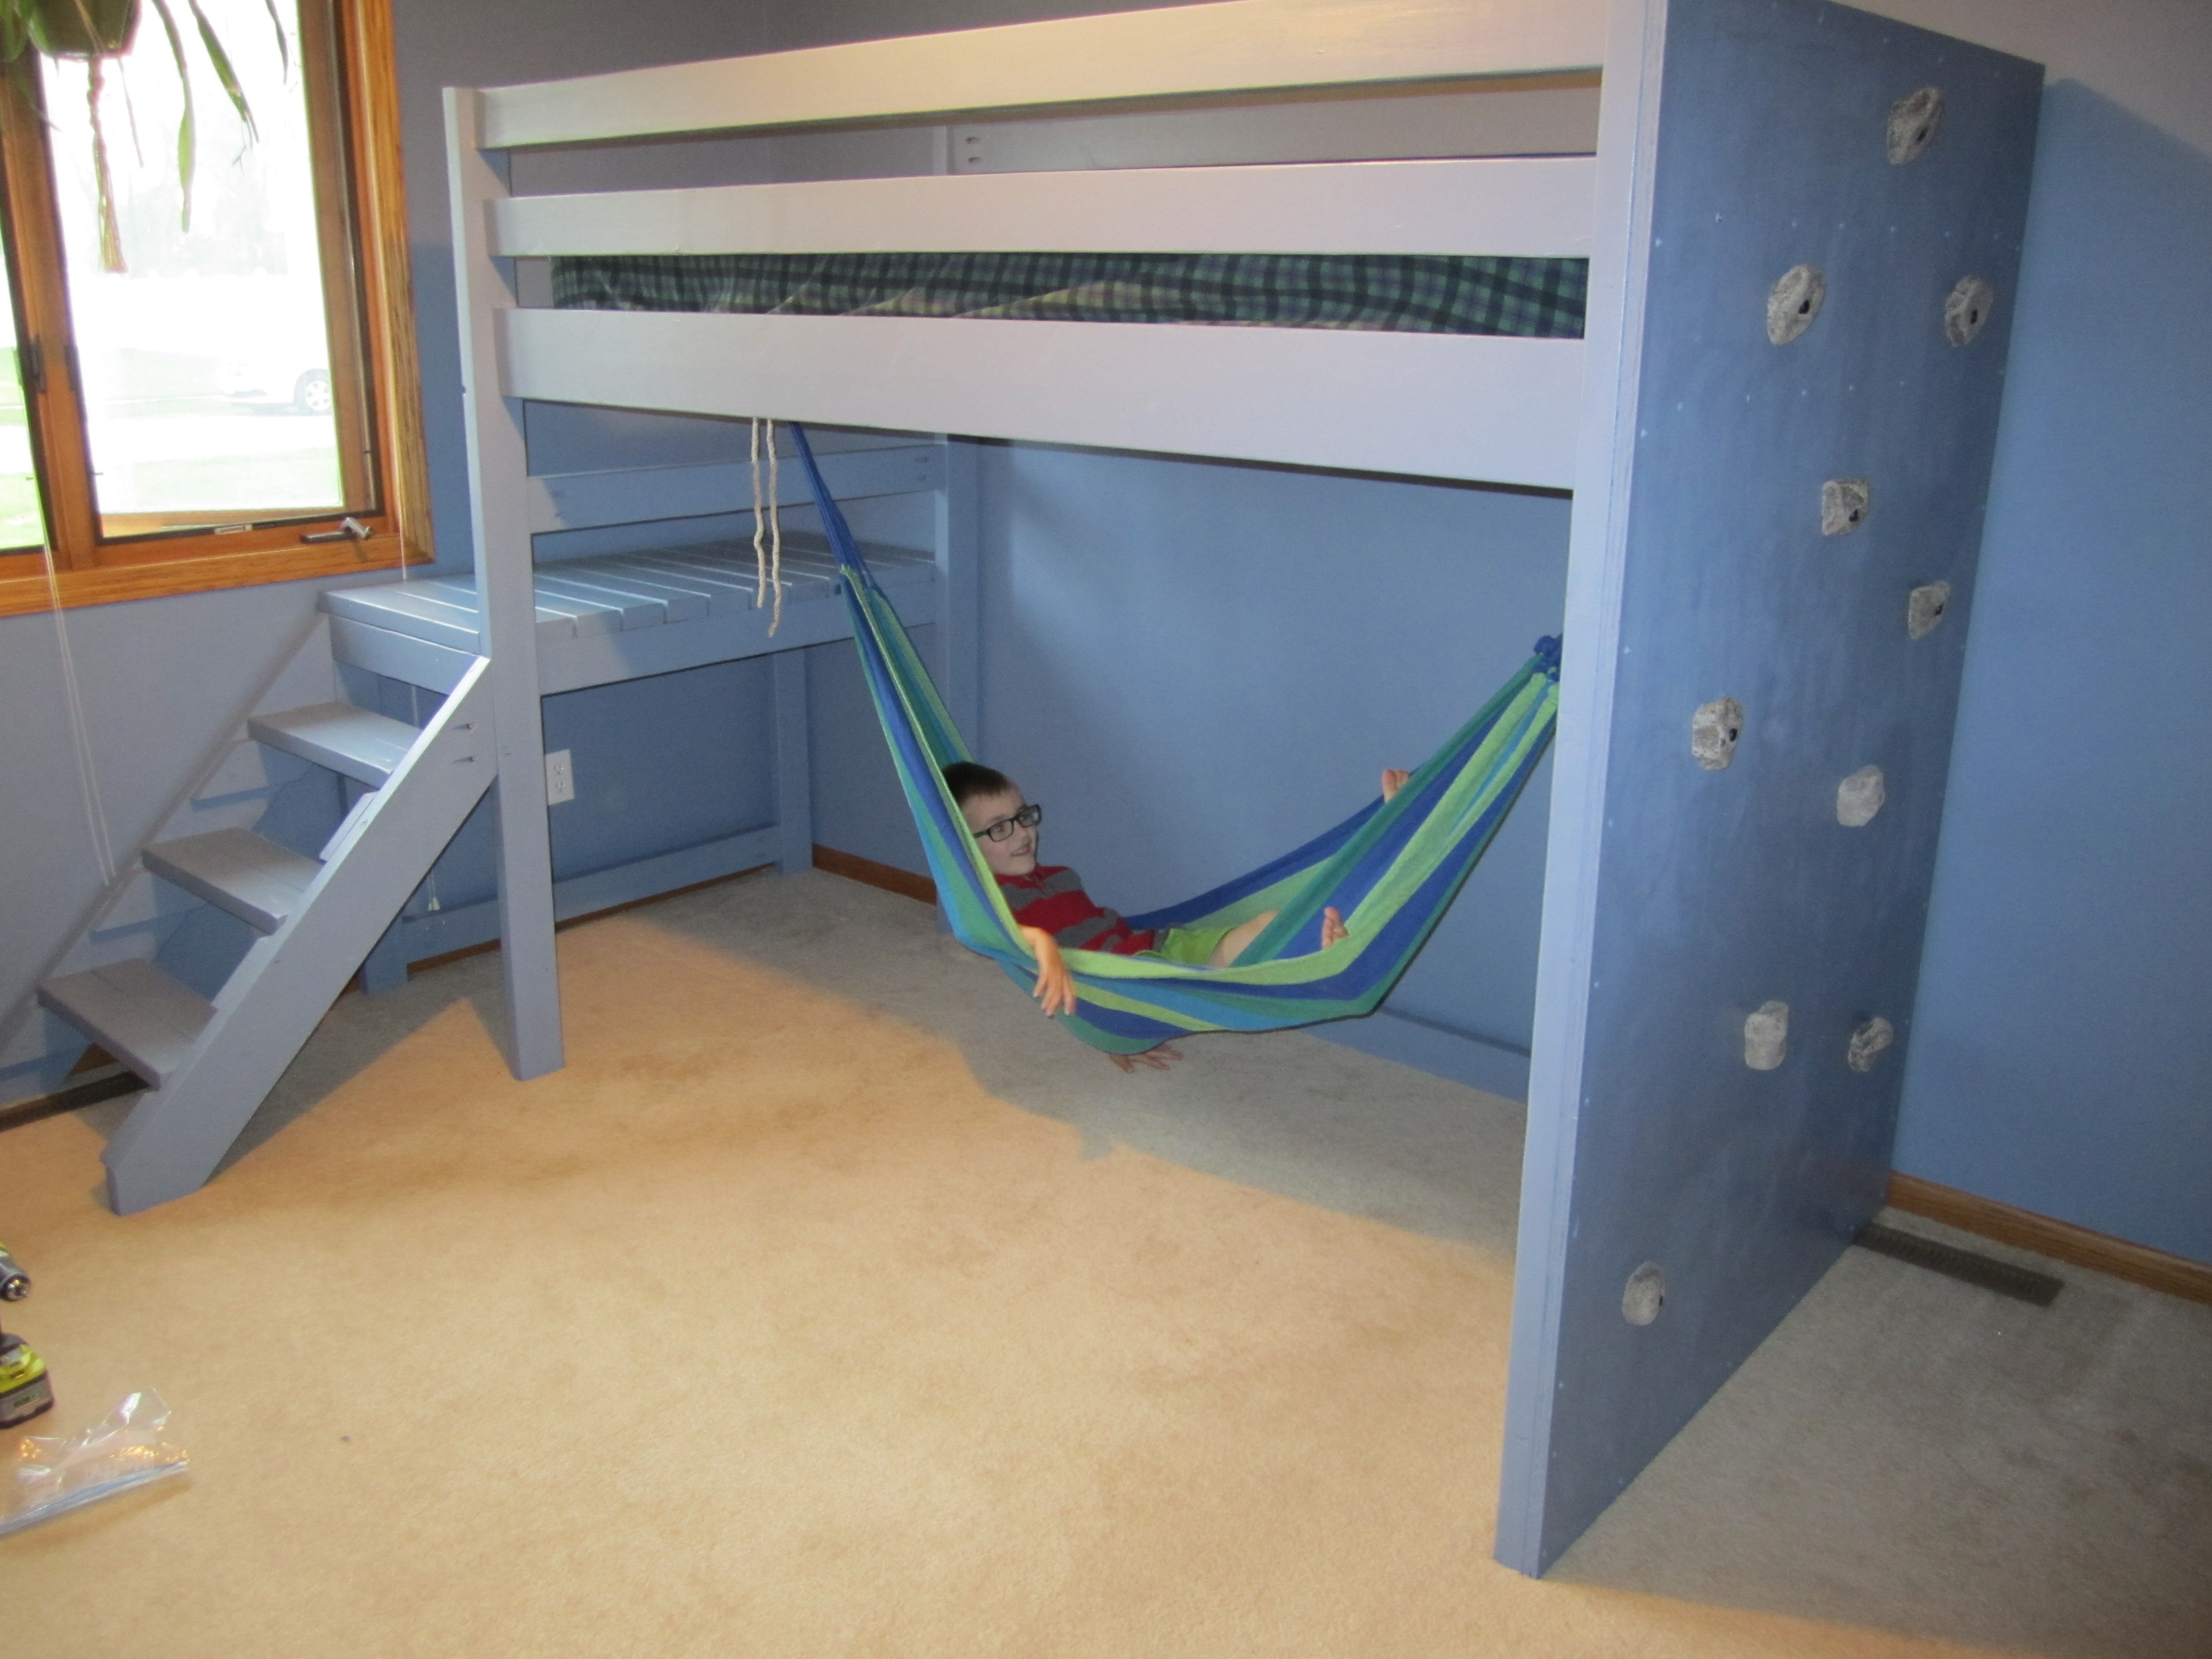
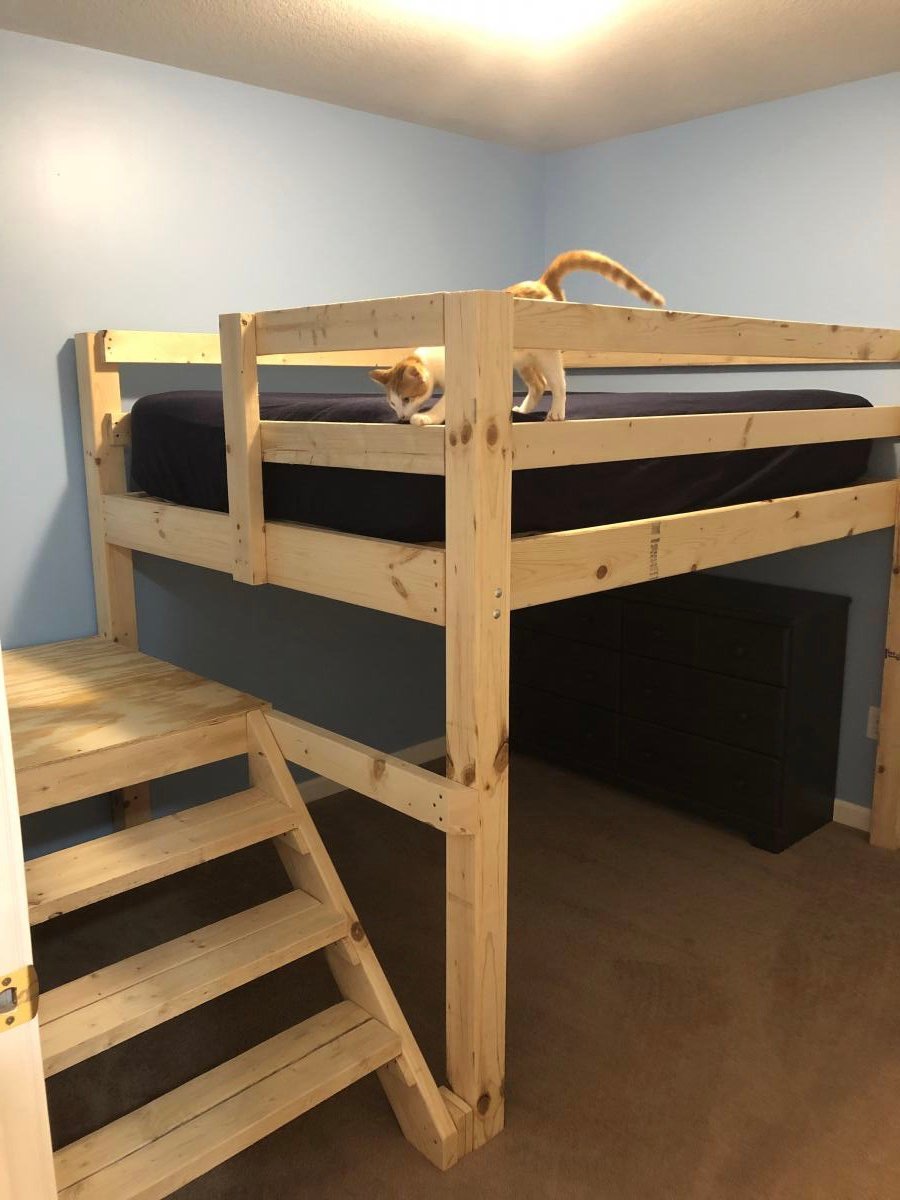
Found this awesome project but decided to add on a rock climbing wall and an underslung Hammock to upgrade it to full Birthday present levels. My son now calls it his "Epic Bed" and absolutely loves it!
Built from Plan(s)
Estimated Cost
$200
Estimated Time Investment
Weekend Project (10-20 Hours)
Finish Used
Used 2 coats of primer included Dutch Boy wall paint and sealed with Polycrylic.
Recommended Skill Level
Beginner
DIY Outdoor Sectional
I used the armless chair plan, and altered the one armed plans to make two chaises. Then I increased the size slightly to accommodate the 25x25 pillows I bought. This took about 12 hours with one person working. I am super proud of it! Finished today, and will eventually stain after the wood has dried out a little. Thank you, Ana, for making straightforward plans that gave me the confidence to do my first woodworking project!
Andrea in Michigan
Tapered planter
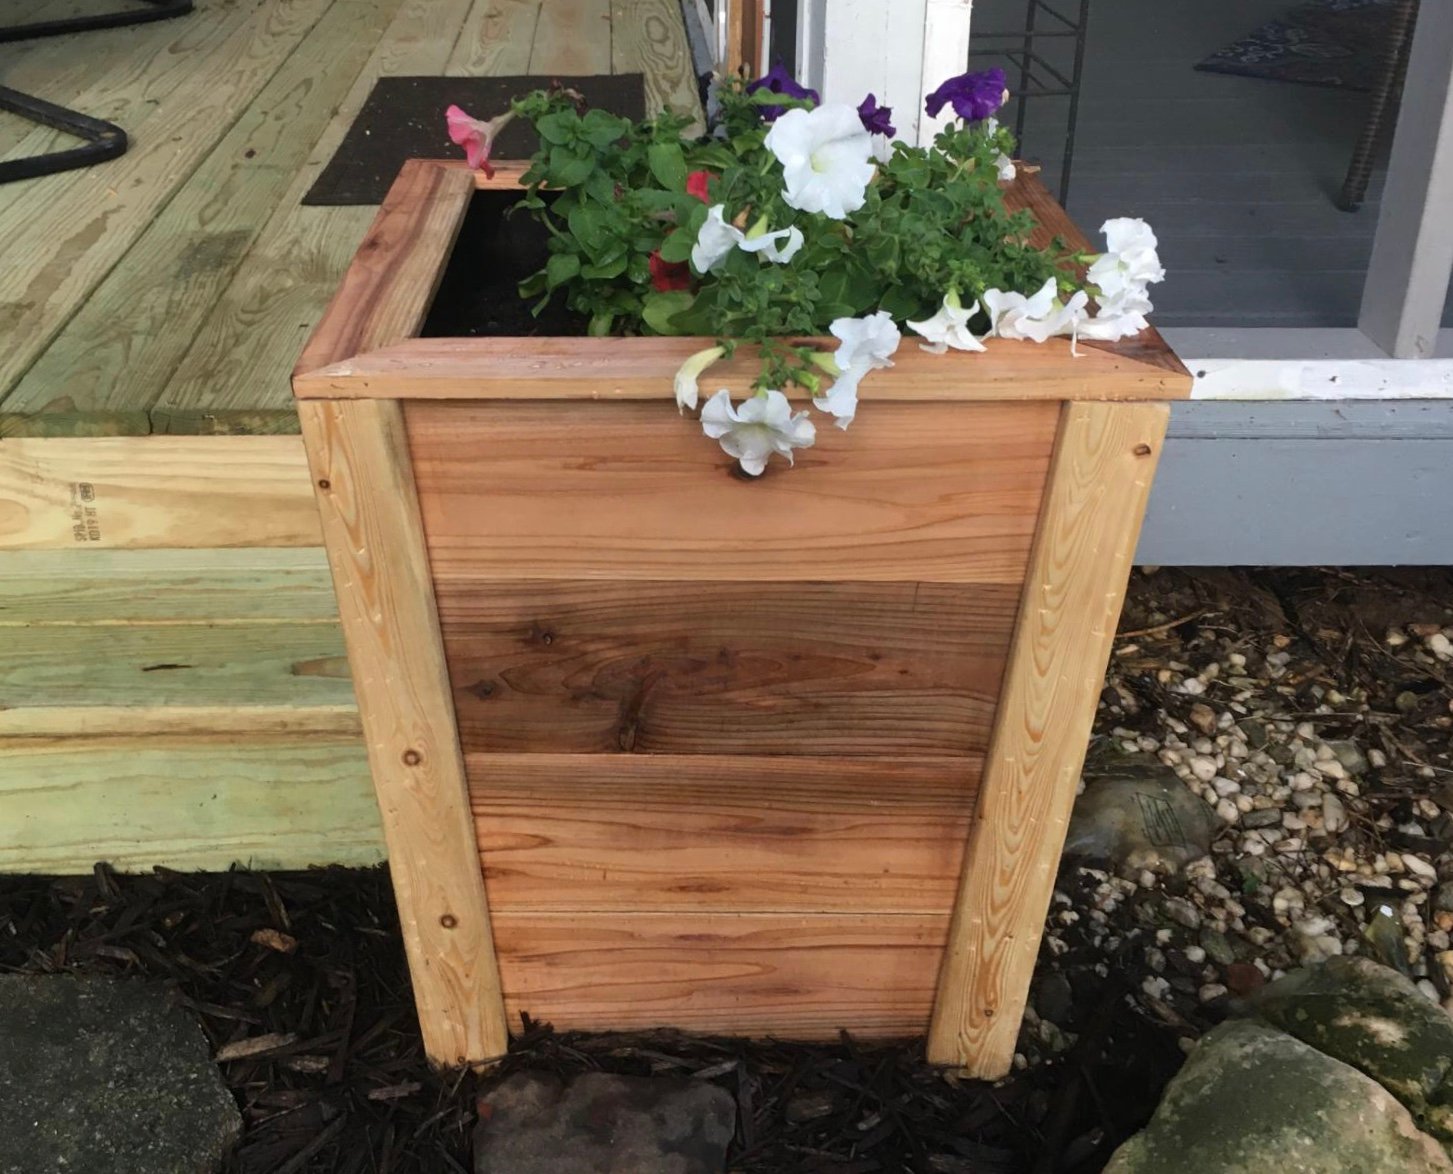
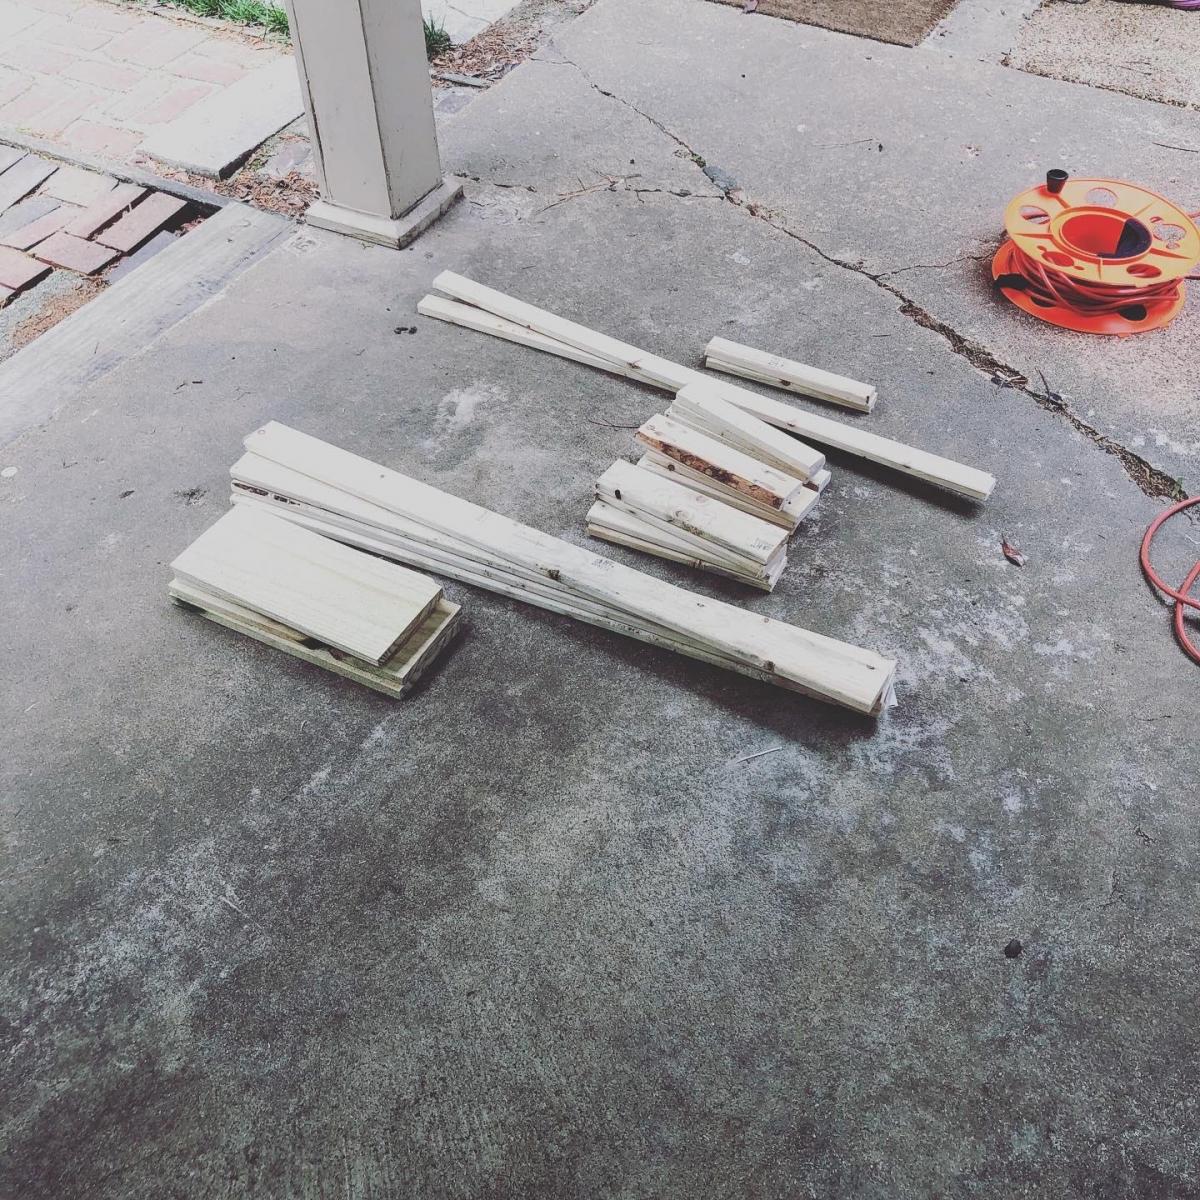
Next time, I will cut the 1x2 and 1x3 at the 5 degree angle to match the top and bottom planes...
Thanks for the idea! It is great
Built from Plan(s)
Estimated Cost
30.00
Estimated Time Investment
An Hour or Two (0-2 Hours)
Finish Used
Sanded with 80 grit and clear polyurethane
Recommended Skill Level
Beginner
Two-Tone X Desk with Drawer
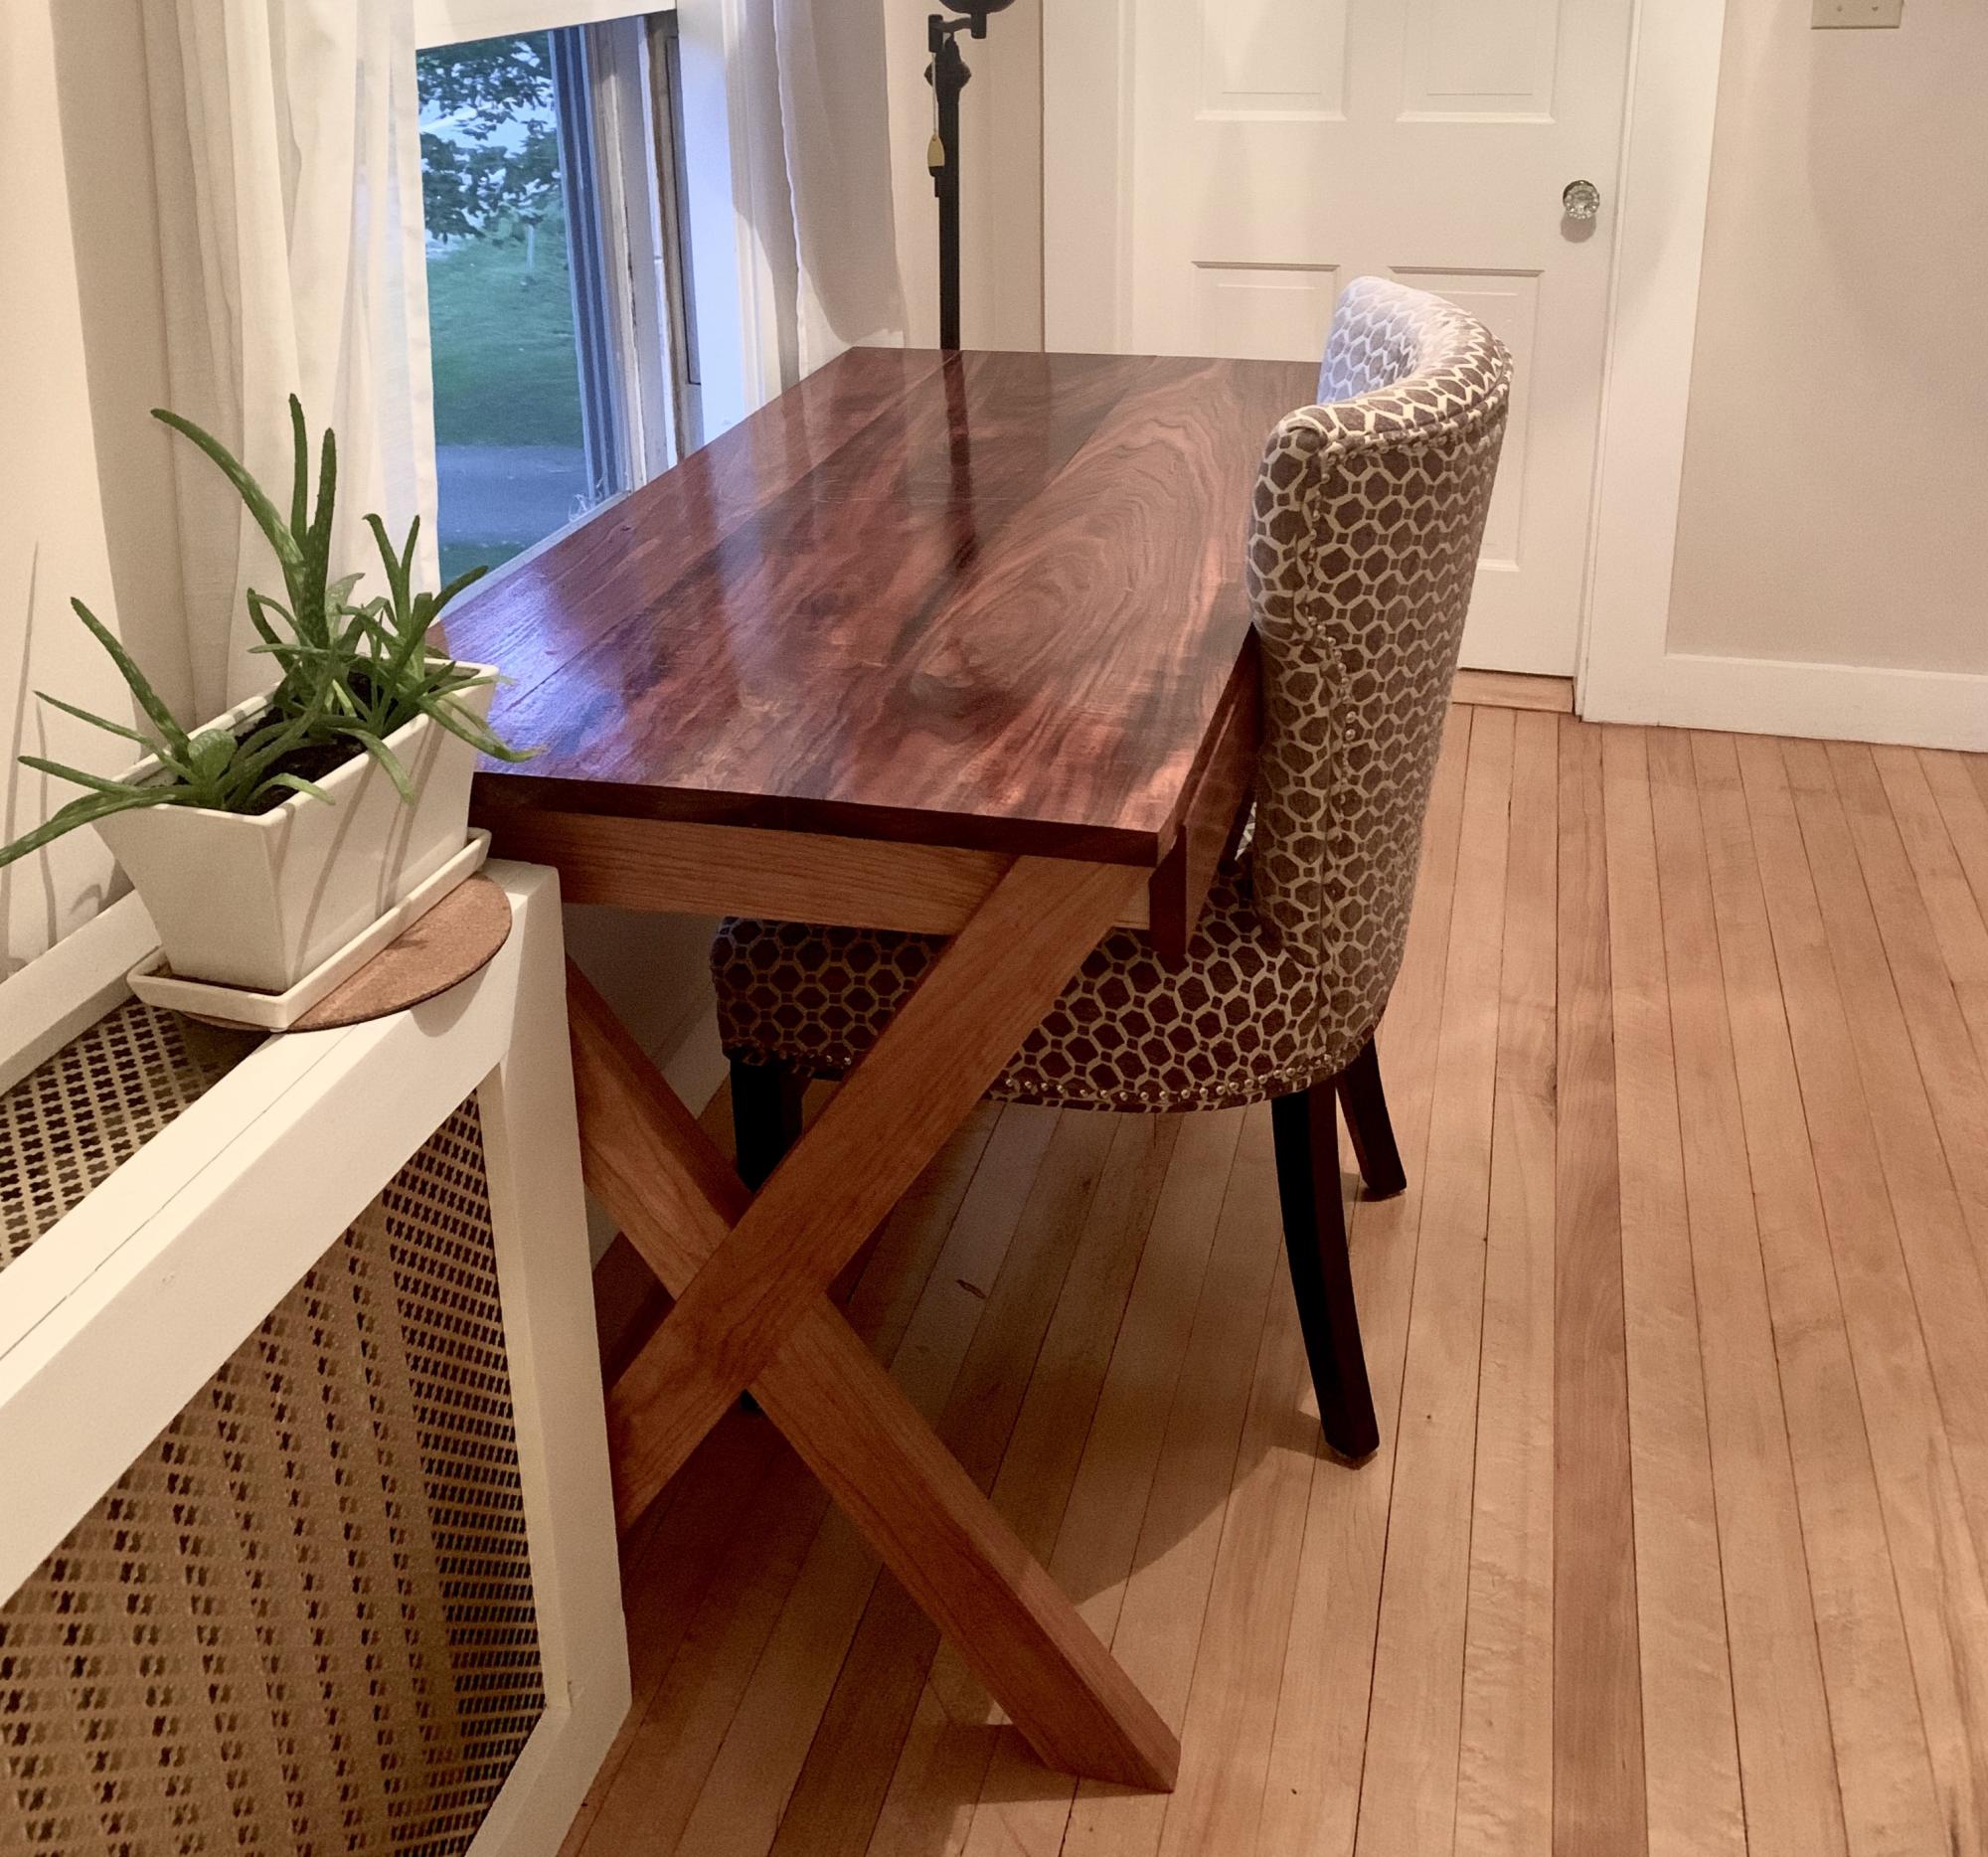
I'm a recent grad and made this desk during Covid-19 quarantine. Now I get to use it as my work from home desk as I enter the workforce. This was my first big project I made myself, and I had some trouble with the dimensions of the tops of the legs not matching the plans, but that could be just me. I used ball bearing slides because the drawer front was pretty heavy, but they were very difficult to install. I would recommend using the cheap slides as they give more room for error. Very happy with how it turned out! The horizontal support board between the legs makes a great footrest.
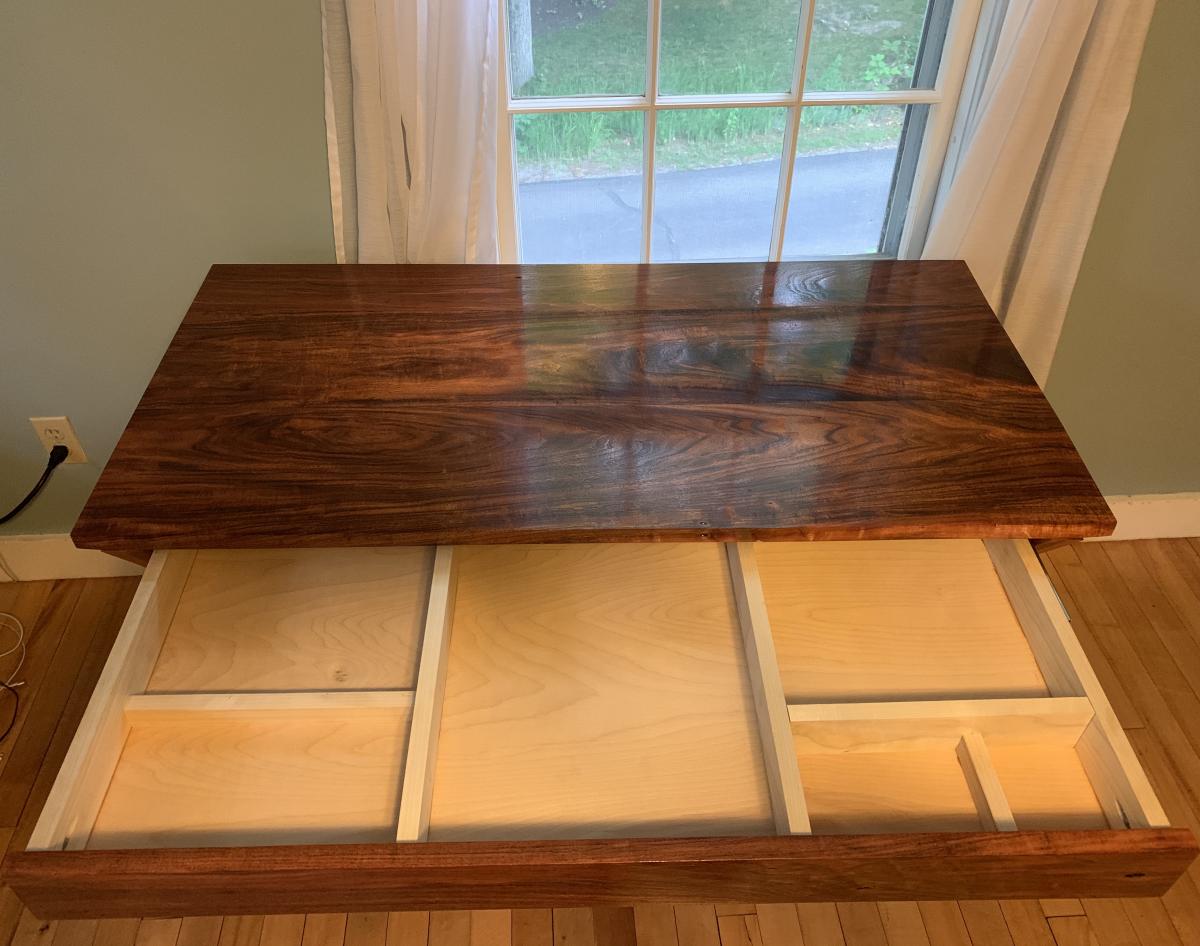
Built from Plan(s)
Estimated Cost
Don't ask
Estimated Time Investment
Week Long Project (20 Hours or More)
Finish Used
Morado had 5 coats tung oil
Cherry had 3 coats danish oil
Cherry had 3 coats danish oil
Recommended Skill Level
Intermediate
Planter steps
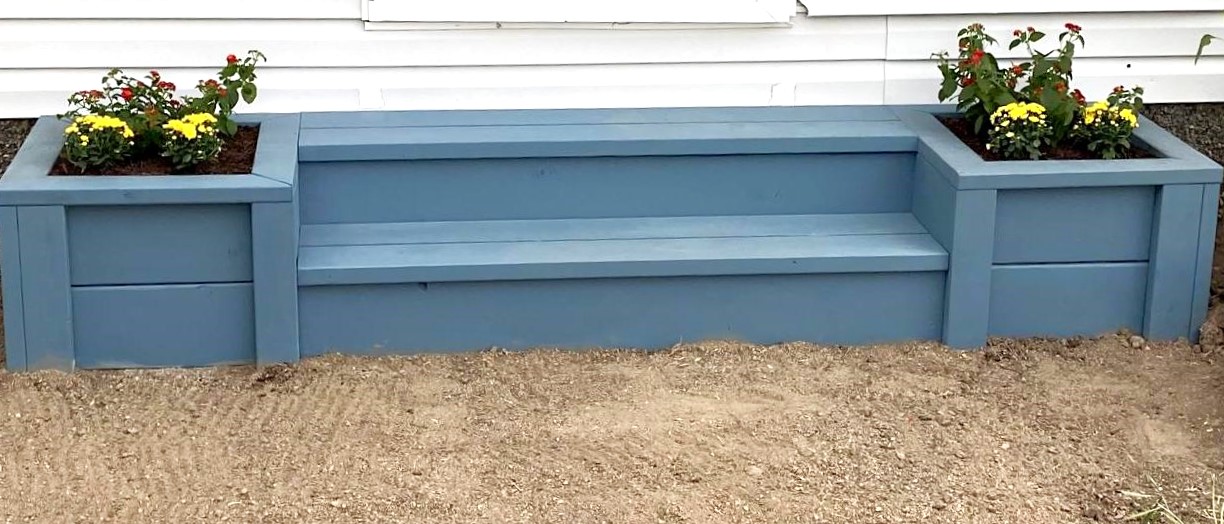
These steps turned out great!!! My in-laws were using some busted up pallets as a front porch so I knocked these out in a few hours. The blue stain looks really good and matches the other blue on various out-buildings. Very easy project and the plans available were spot on. Thanks Ana!!
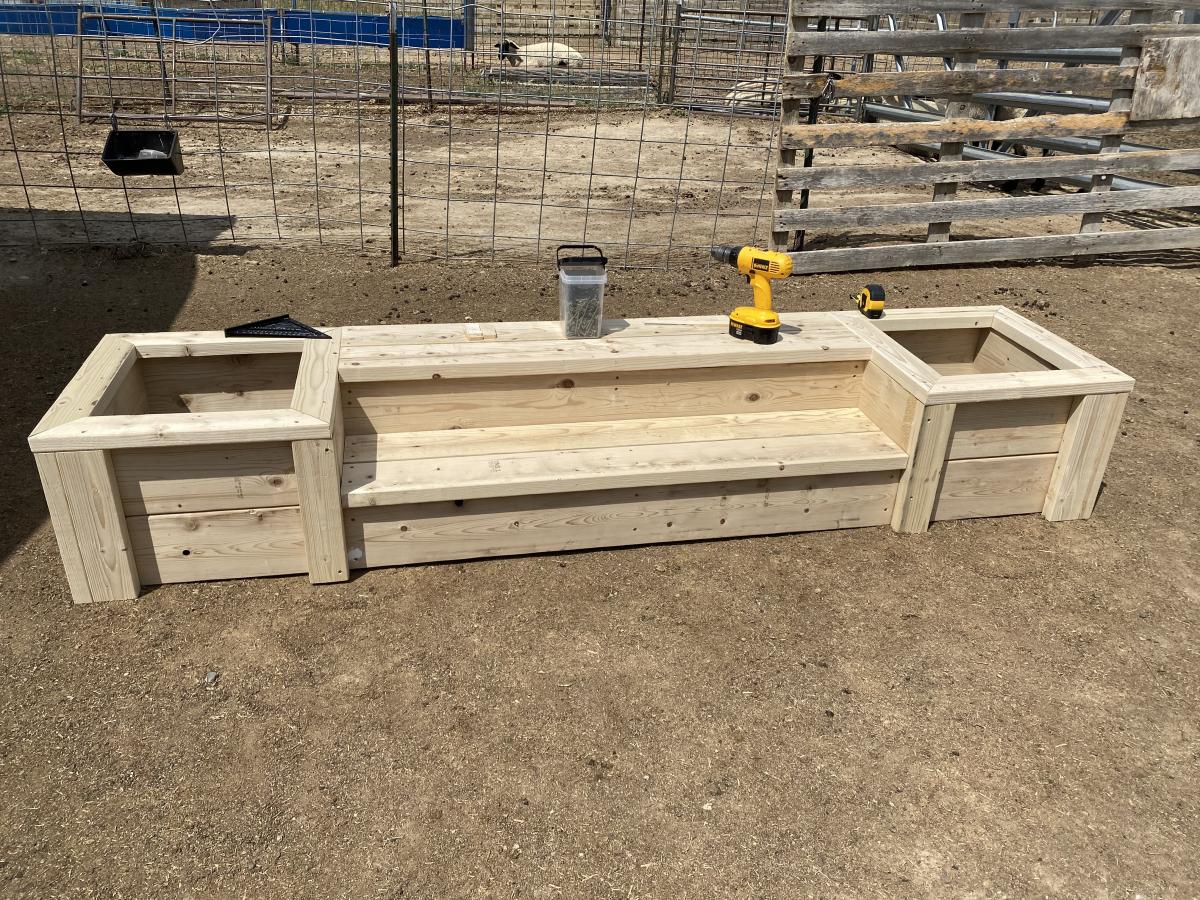
Built from Plan(s)
Estimated Cost
$175
Estimated Time Investment
Day Project (6-9 Hours)
Finish Used
Stain
Recommended Skill Level
Starter Project
Peg Doll House
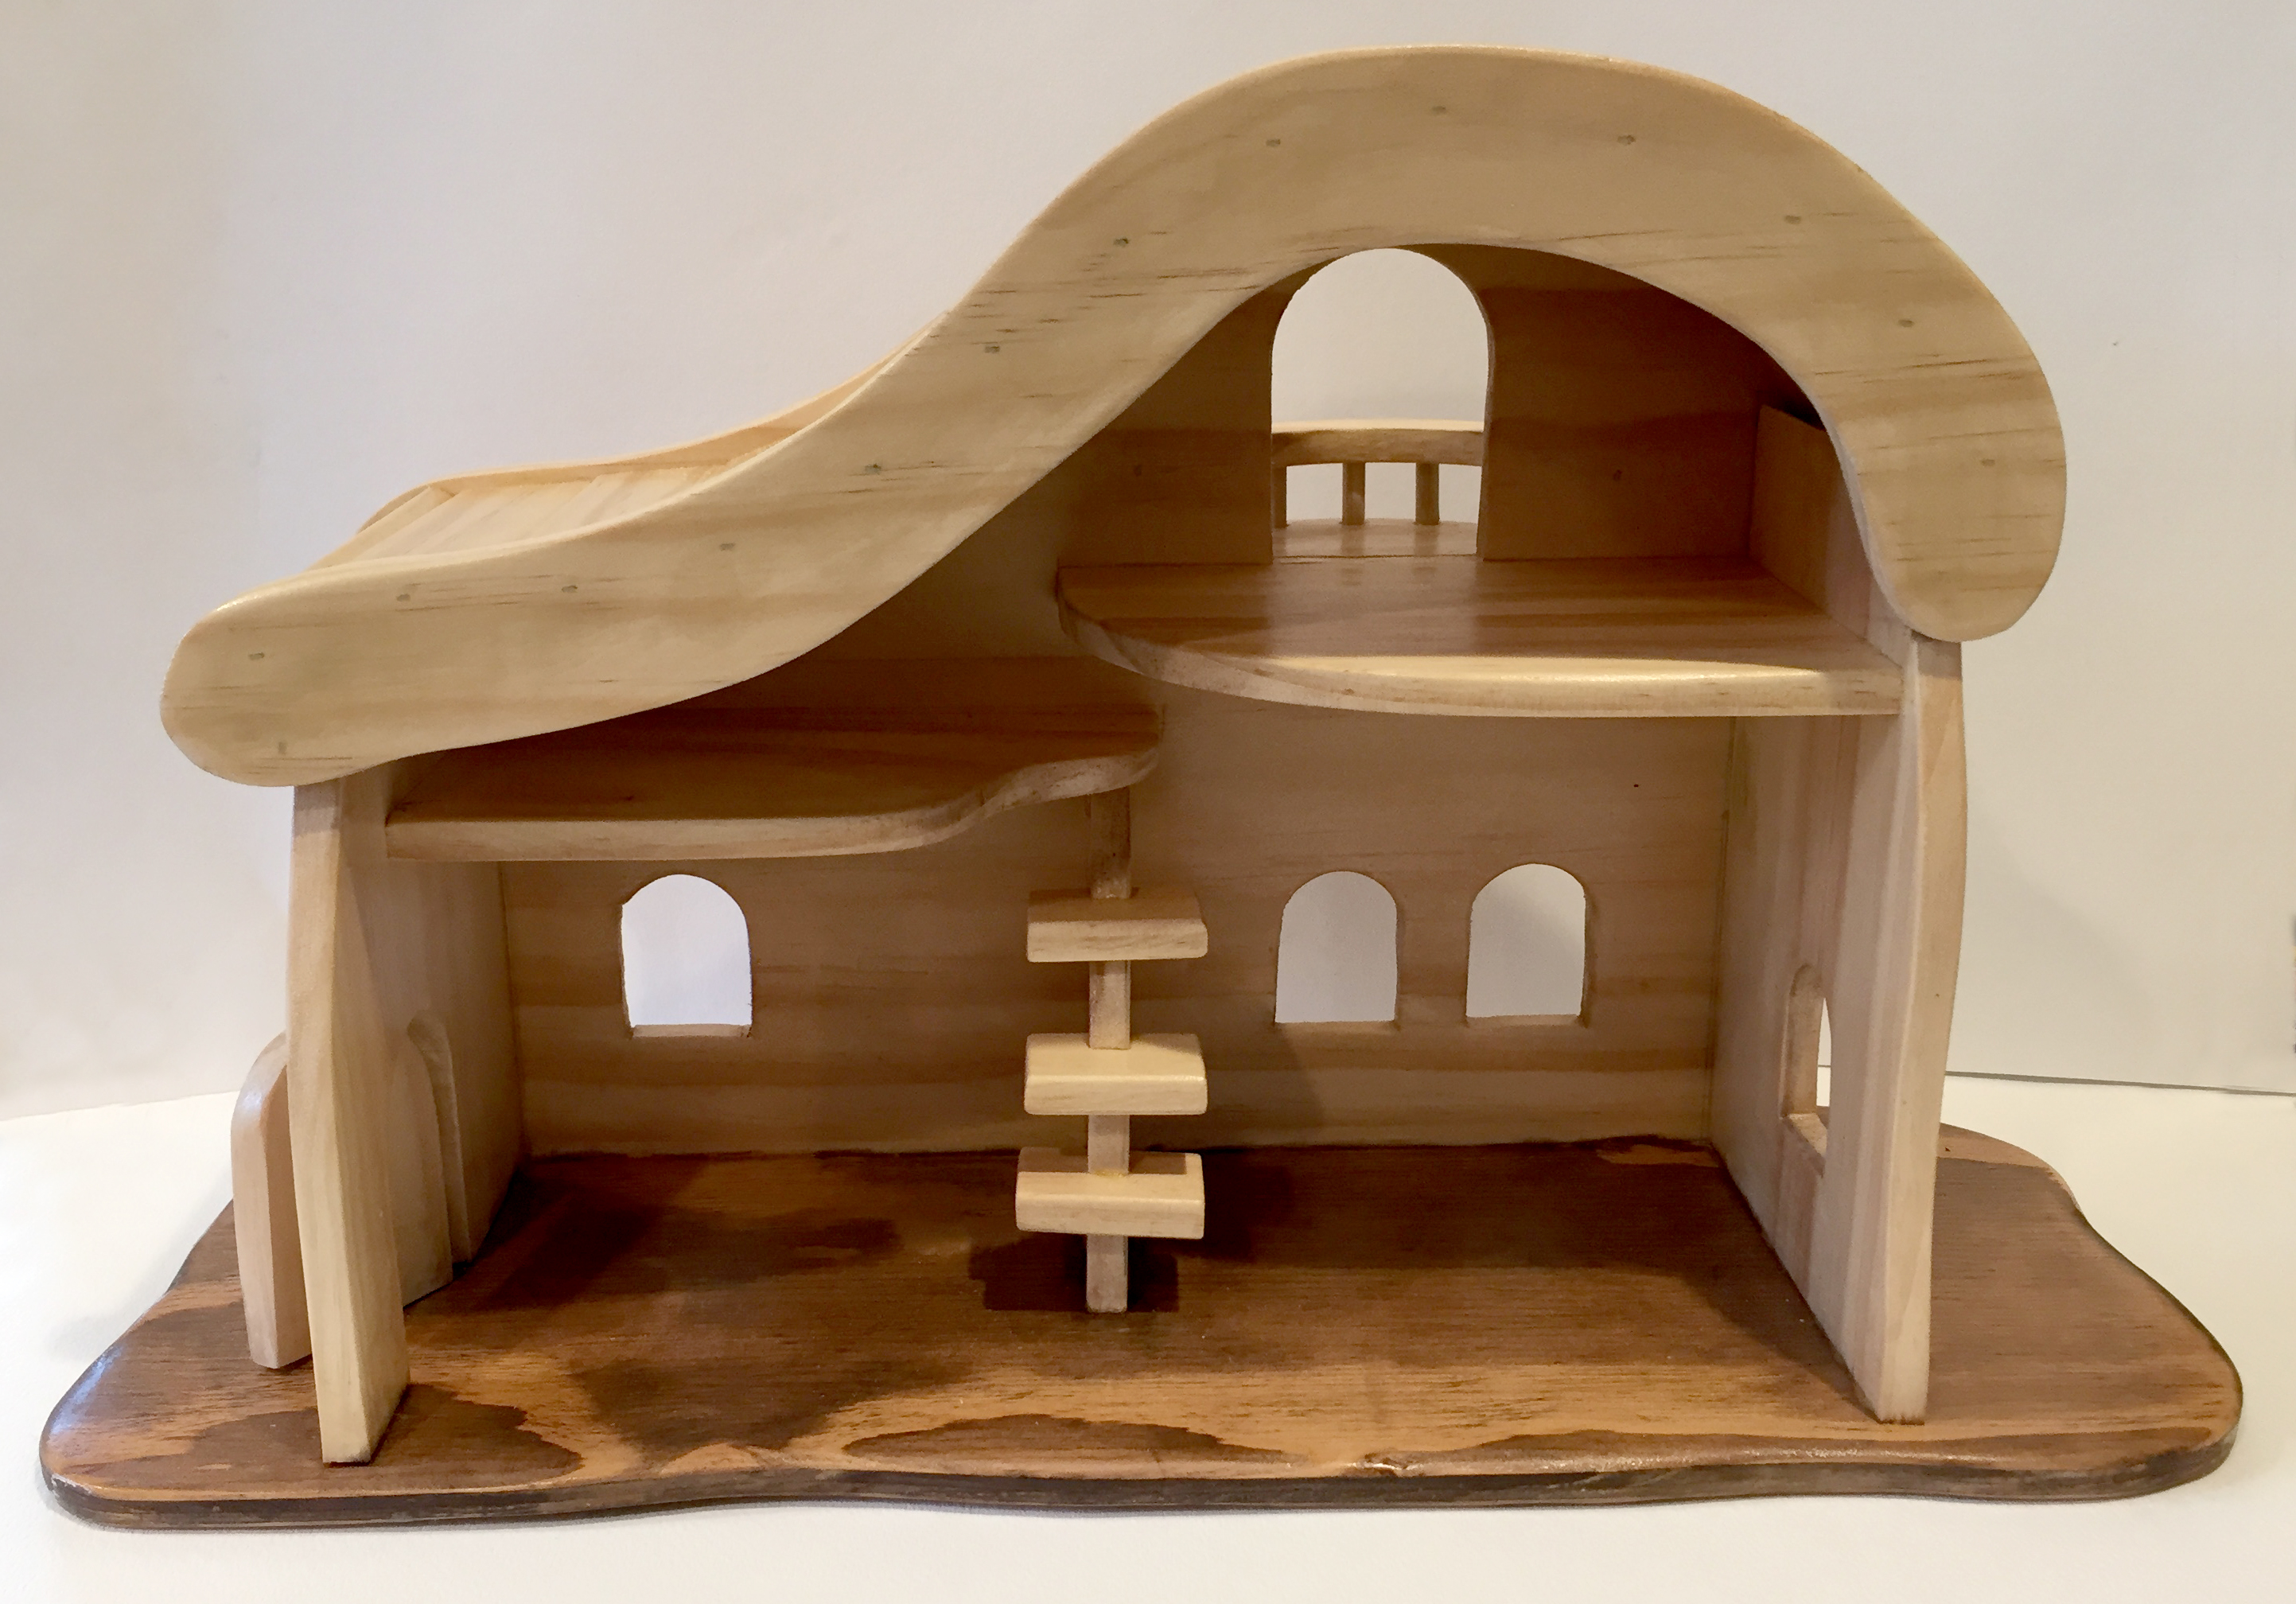
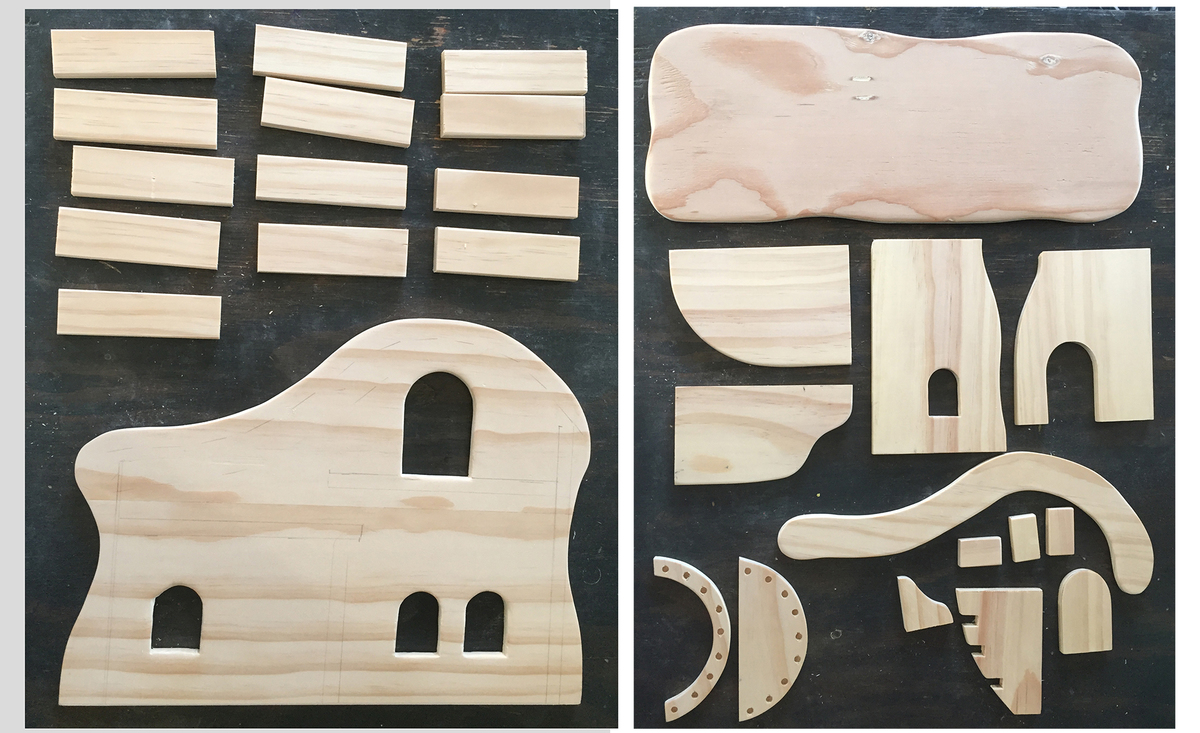
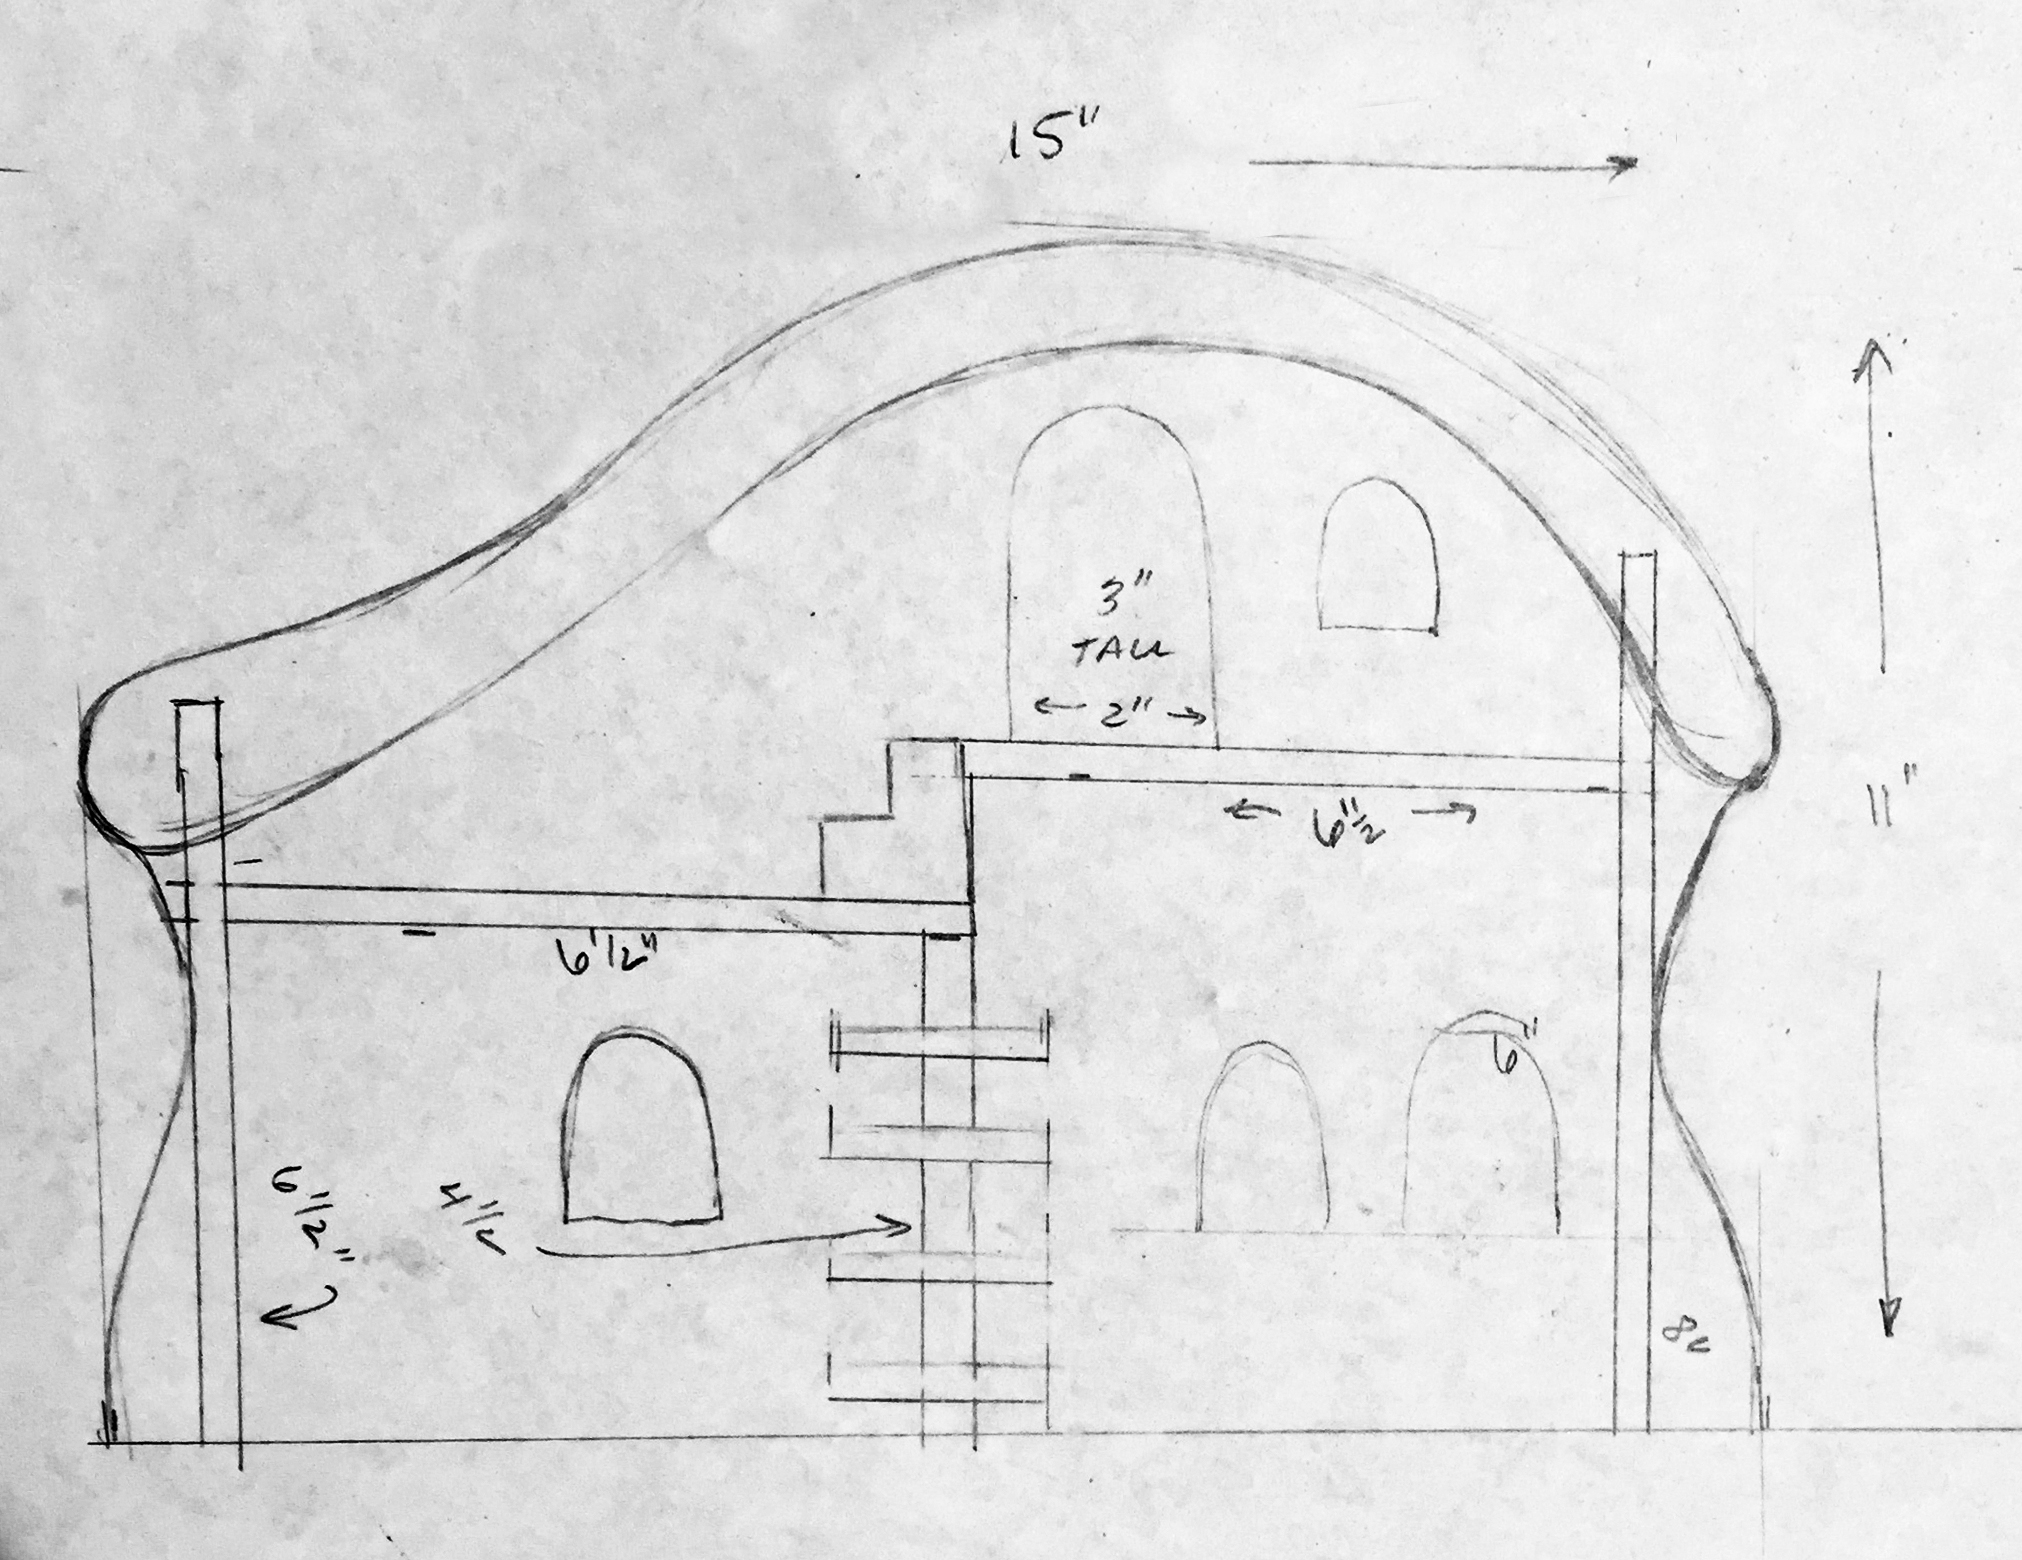
My grandson wanted a set of peg dolls and a house to play with them in. I wanted to build something that was gender-neutral - so many doll houses are pink and feminine! This doll house is sized just right for his peg dolls and playmobil people. It's made from 1/2" poplar, although it could also be cut from a sheet of 1/2" plywood.
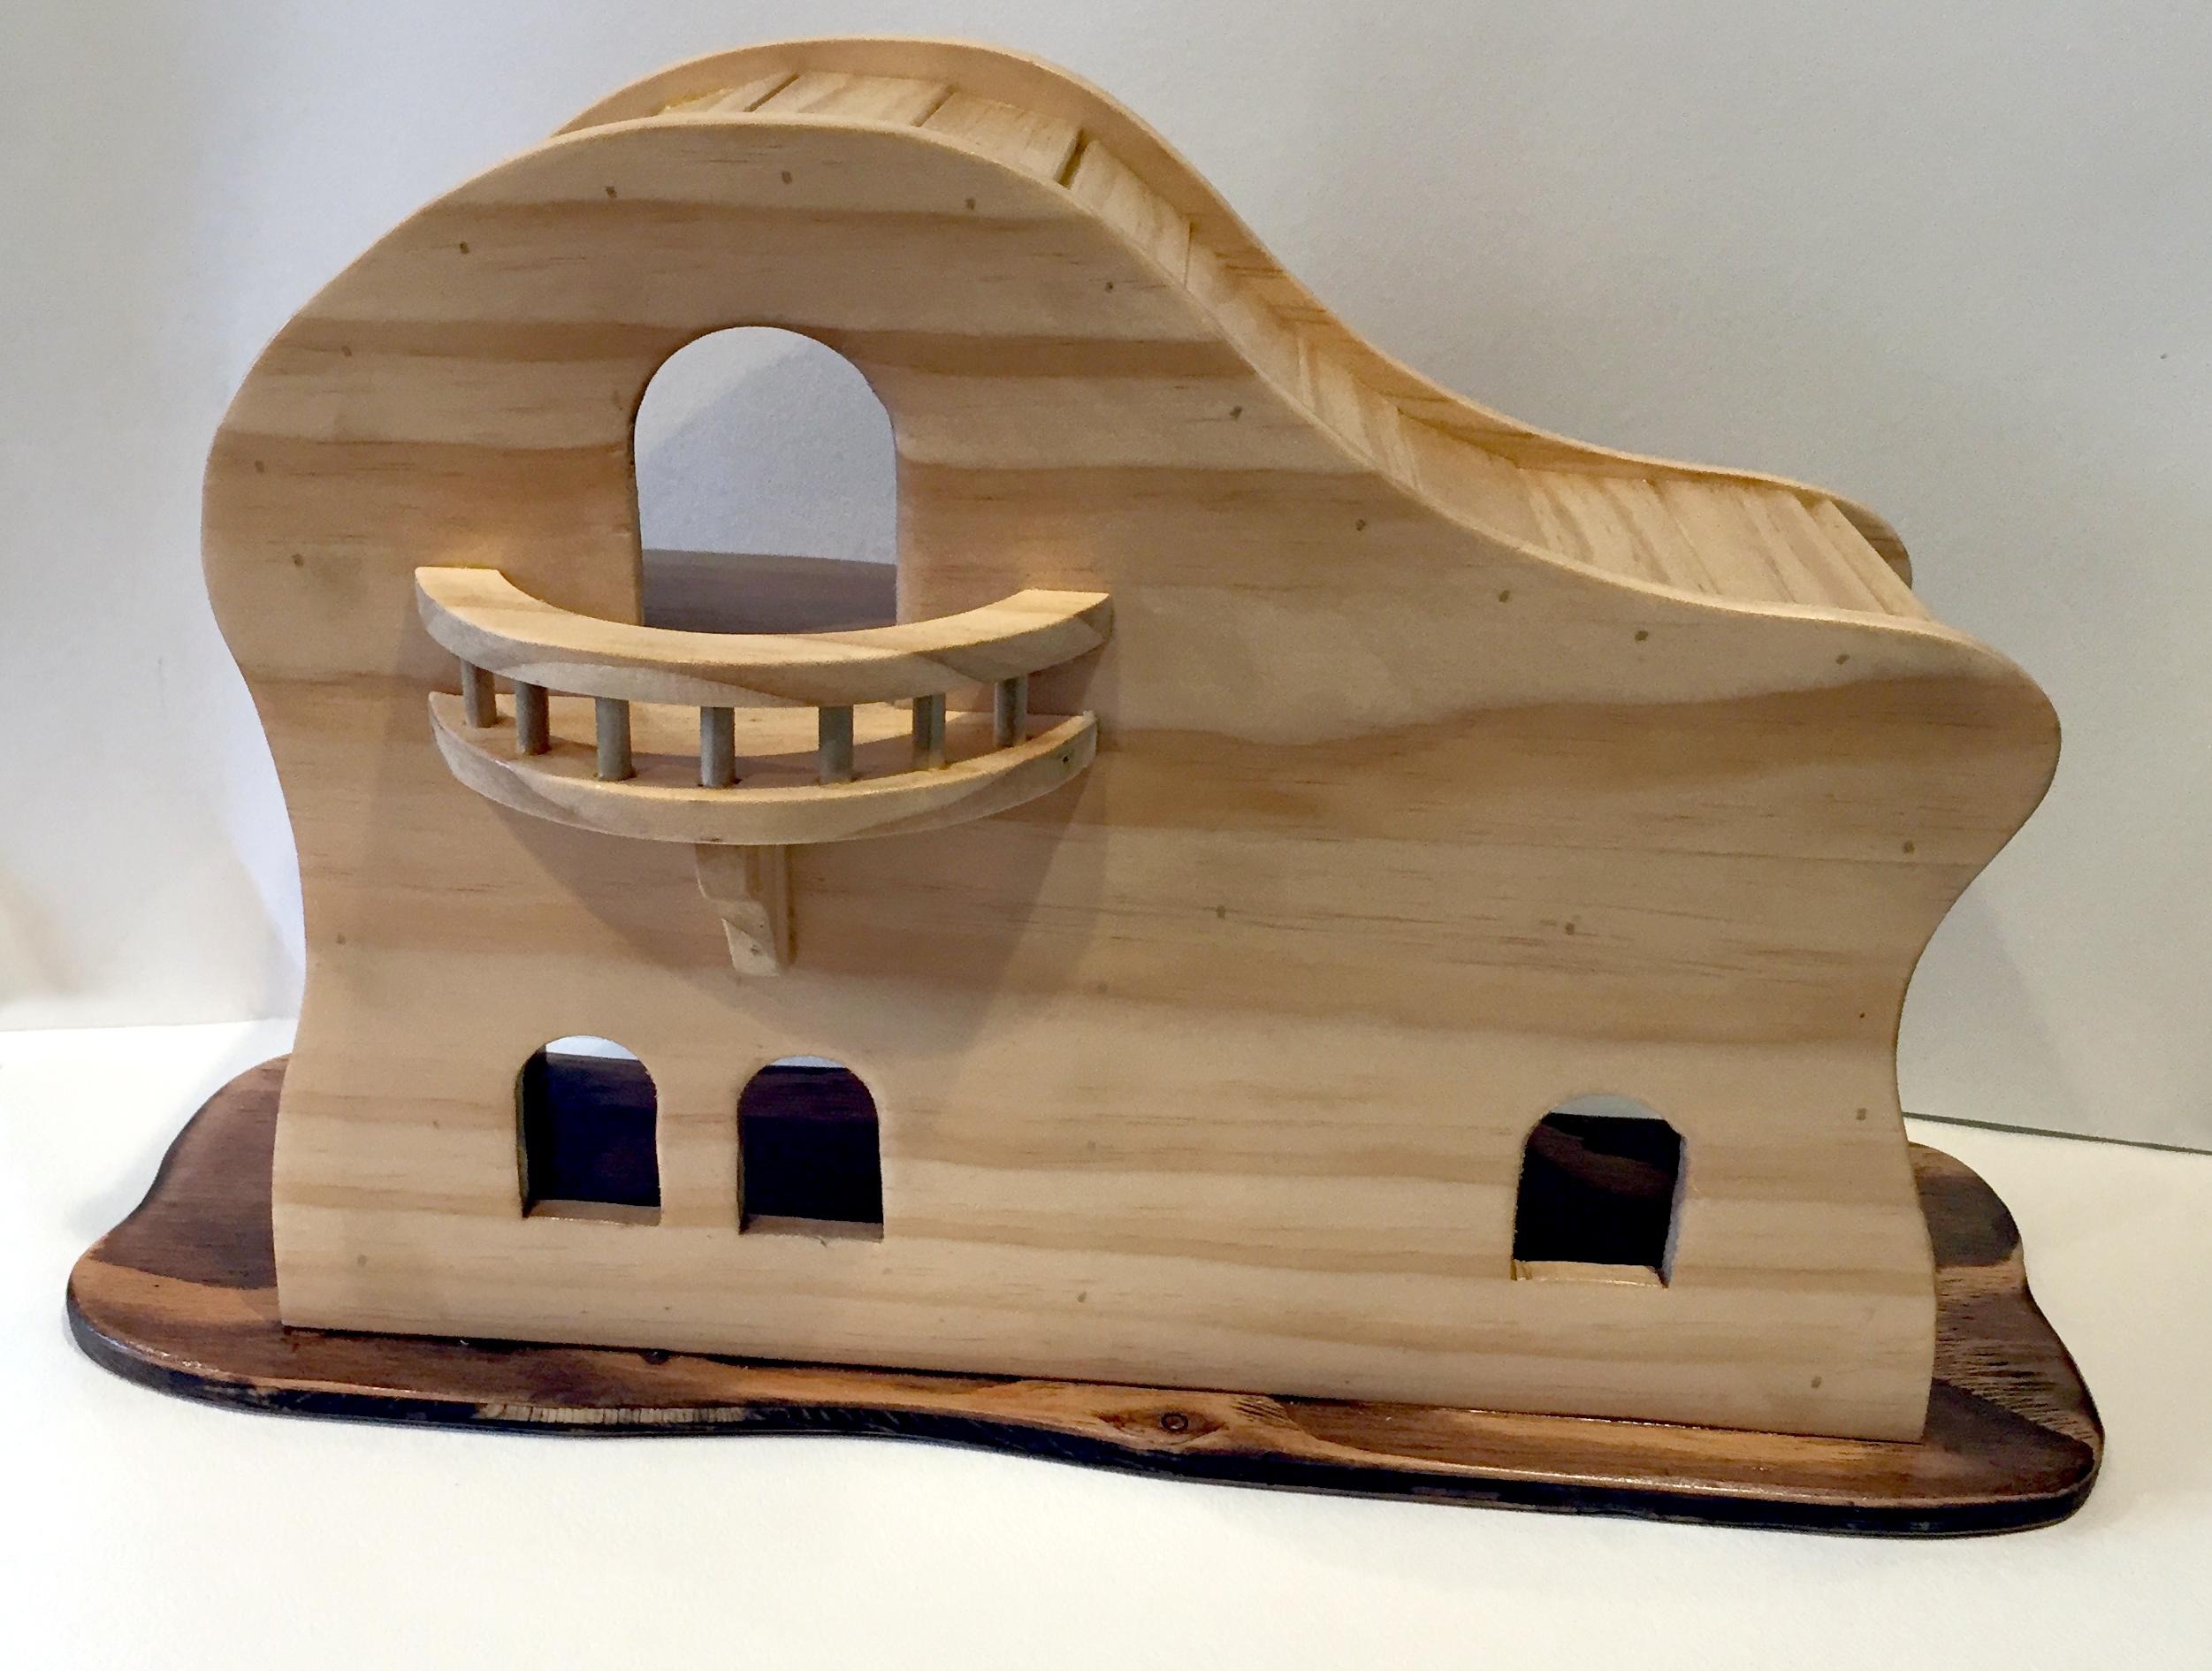
Estimated Cost
$20
Estimated Time Investment
Day Project (6-9 Hours)
Finish Used
clear polycrylic
Recommended Skill Level
Beginner
Farmhouse Style Toy Box / Blanket Chest
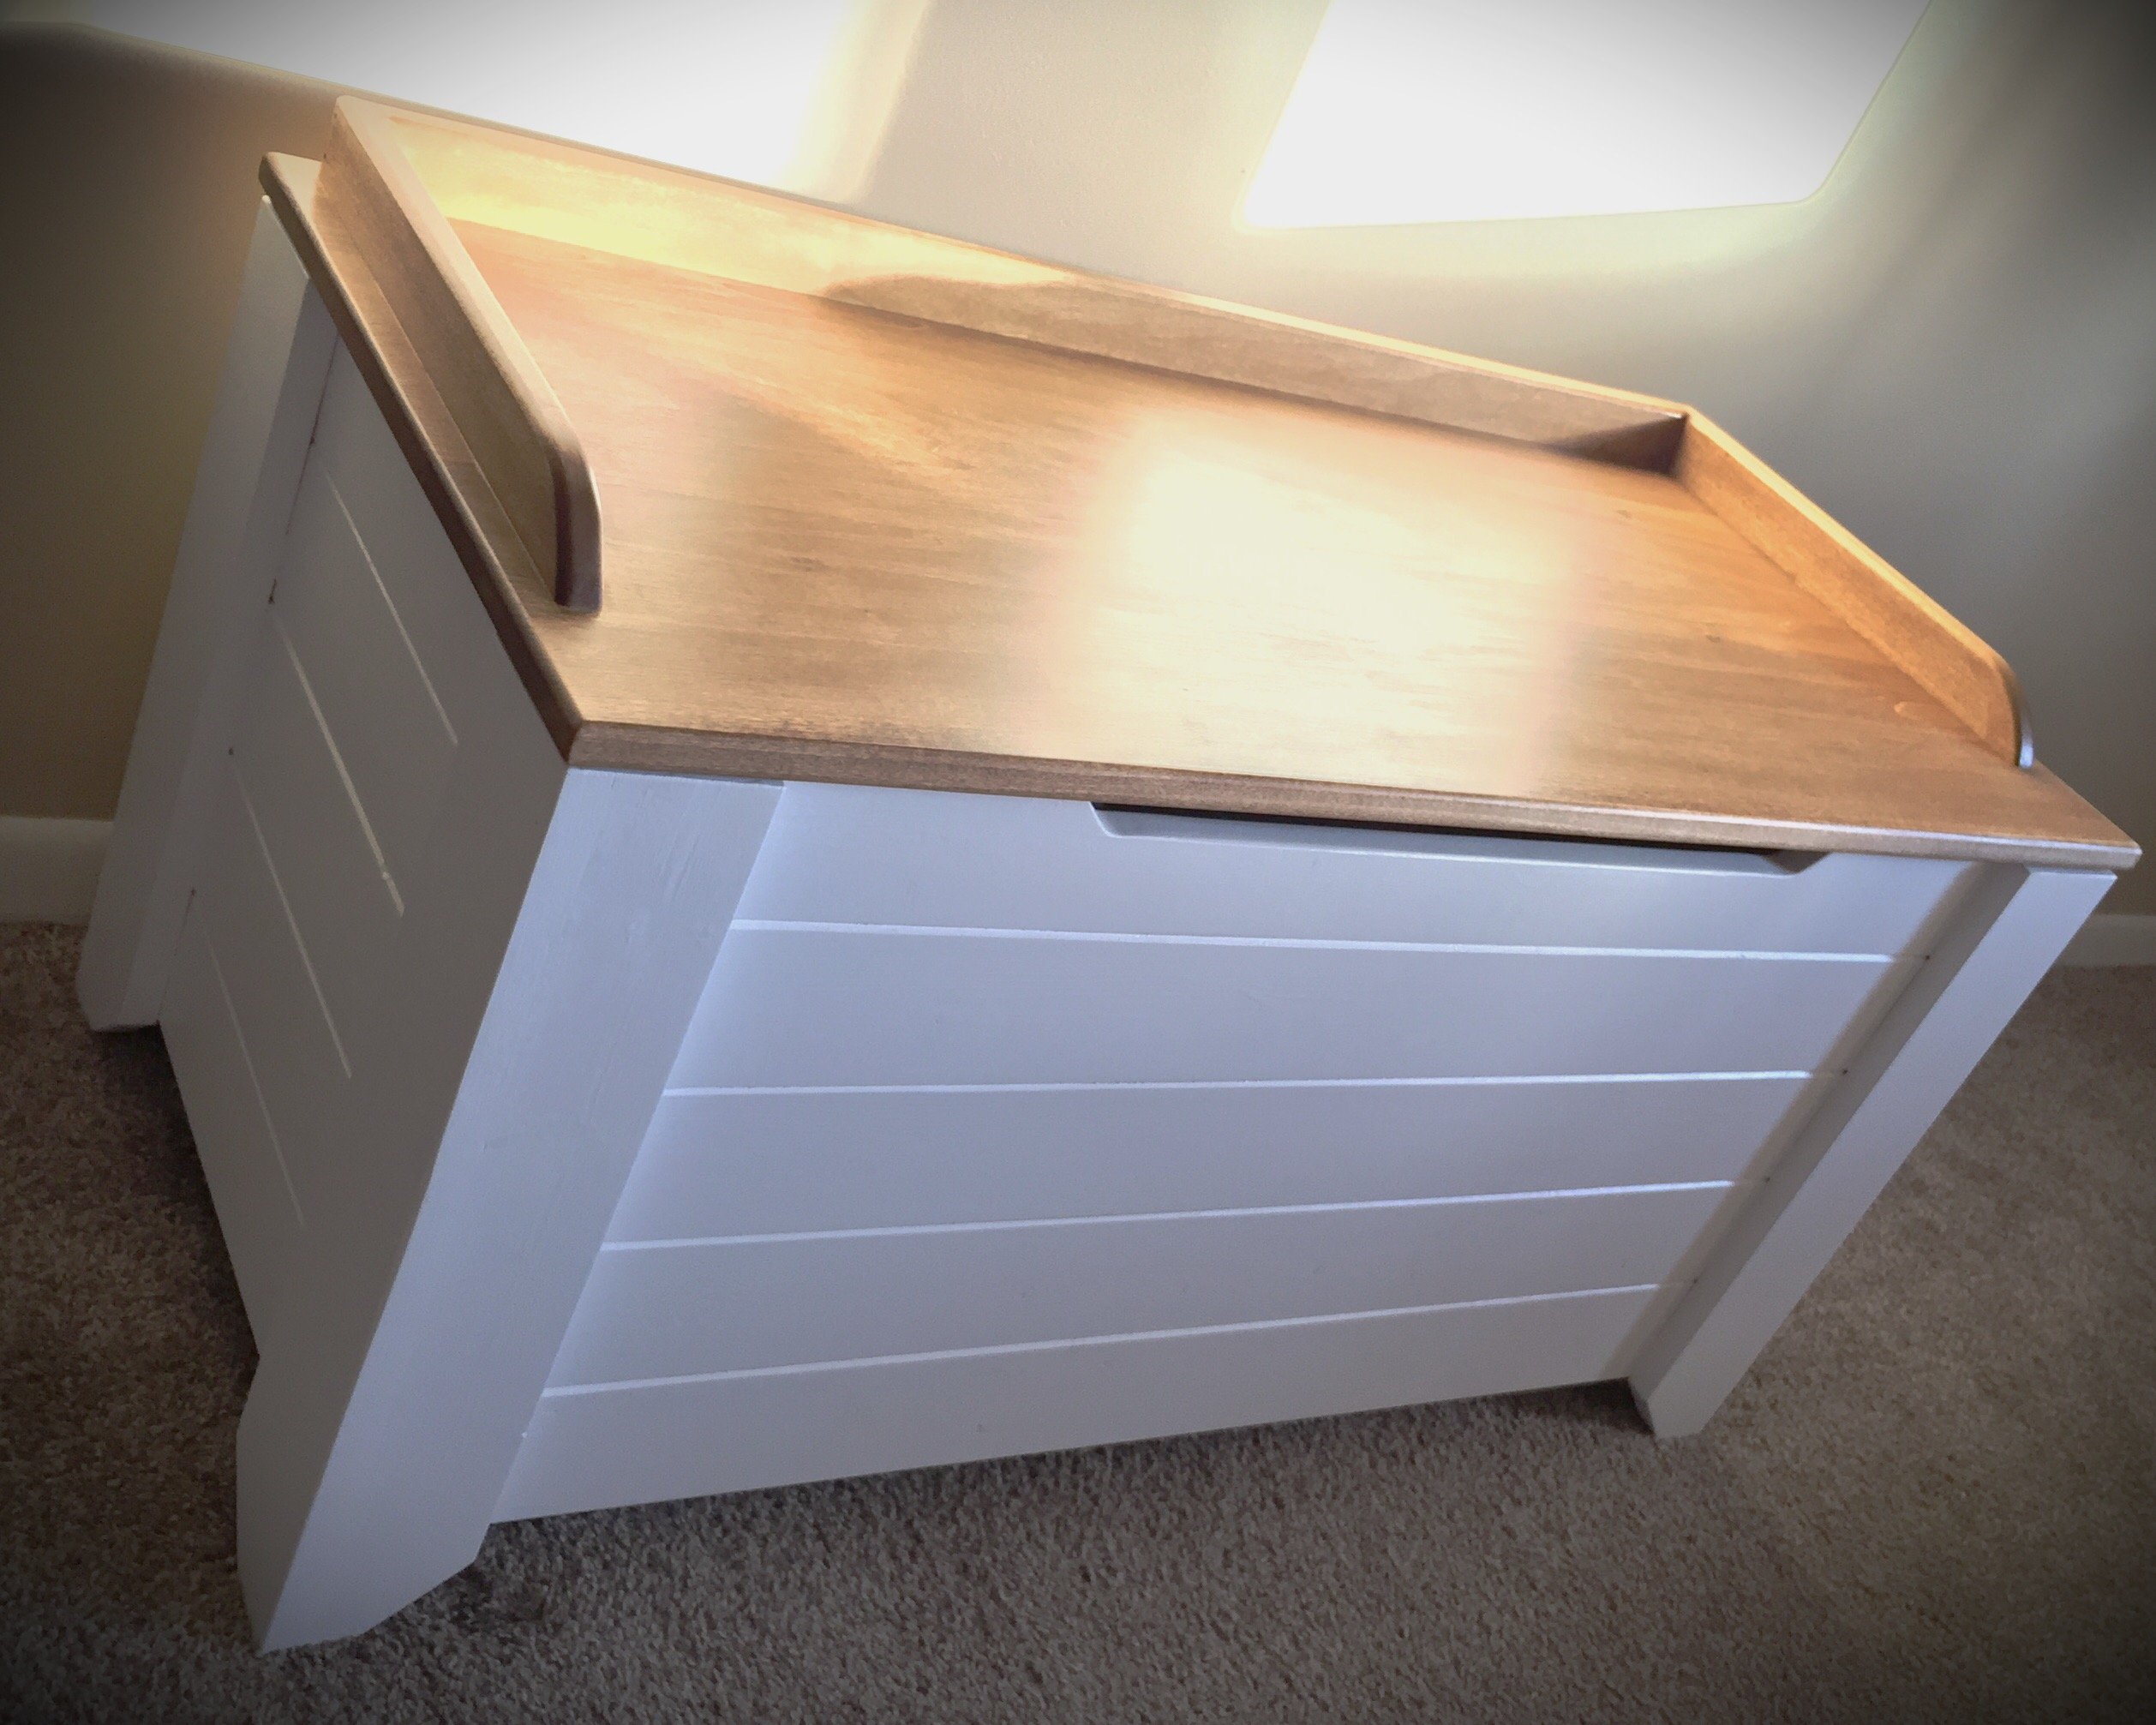
I built this for my daughter after Christmas sinse she had the living room covered in toys. The dimensions are 37" x 18" x 20"
Built from Plan(s)
Estimated Cost
$75
Estimated Time Investment
Weekend Project (10-20 Hours)
Finish Used
Watco Danish Oil - Medium Walnut (2 coats) with a light sanding between coats with 220 grit, I allowed 24 hours between each coat to dry. To protect the surface I used water based polyurathane matte finish (3 coats) with a light sanding - 400 grit.
Recommended Skill Level
Beginner
Comments
Tue, 01/09/2018 - 05:51
More details!
HI Anna,
Can you provide more pictures or instructions on how you assembled this toy box? i want to make one just like it!
Thanks!
Wed, 03/10/2021 - 16:31
Pronounced panel edges
Looking at the wall panels they look like the long edge of each panel has a small bevel cut on it. This gives each panel edge a more pronounced or well-defined edge? Is this true? Was it done with a router?
Stocking hanger with added top
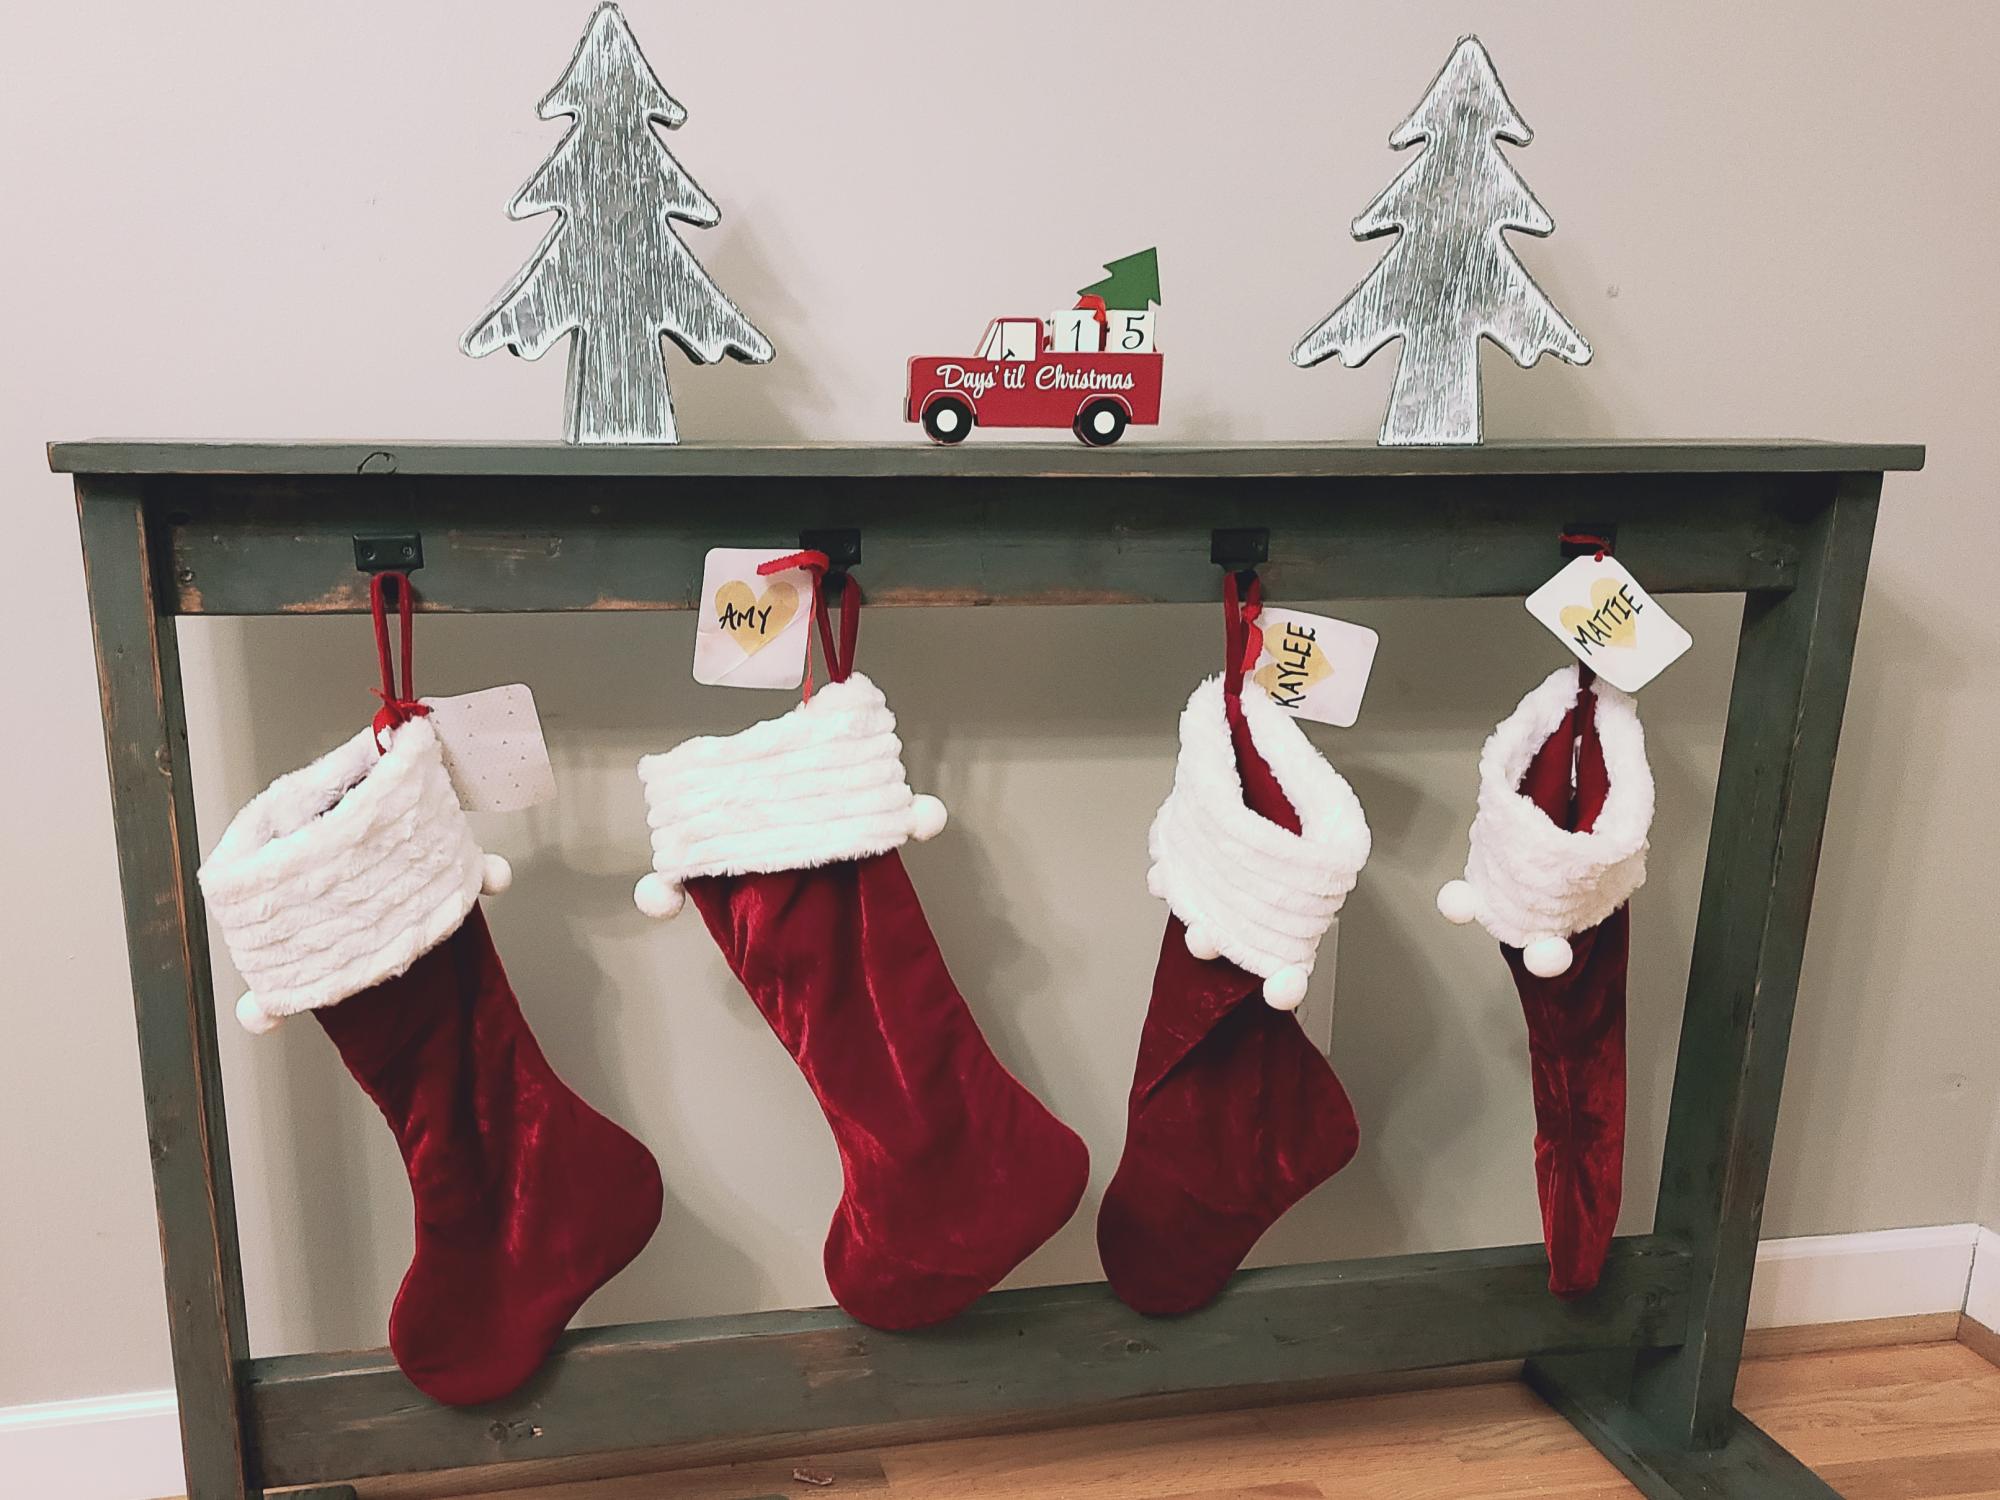
Started built from https://www.ana-white.com/woodworking-projects/stocking-stand plan.
My finished product is mostly the same, except I added a little to beef it up. I added decking board size wood for the feet to give it more stability. Santa leaves heavy things in sticking sometimes. I wanted to be prepared! 😁 I made the top 2x4 flush with the top of the sides and added a 1x6 across the top like a shelf. If I get to do it in time, I'm going to add a 1x8 (or 2x8) stained a dark wood color on top and may add a little trim between it and the 1x6 to beef it up. I love it! Might be able to repurpose someway during the rest of the year. Thanks Ana White for the plans!
Built from Plan(s)
Estimated Cost
Less than $20 because I had most wood and finishing materials on hand.
Estimated Time Investment
Afternoon Project (3-6 Hours)
Finish Used
I painted it with a gray color satin wall paint I bought from the sample section and after it dried, sanded it up to distress. I then wiped on a Chestnut Minwax stain for a short time and wiped it right off. After that dried I wiped it all over with the Minwax Wipe-on satin polyurethane.
Recommended Skill Level
Beginner
Horizontal Porch Planters
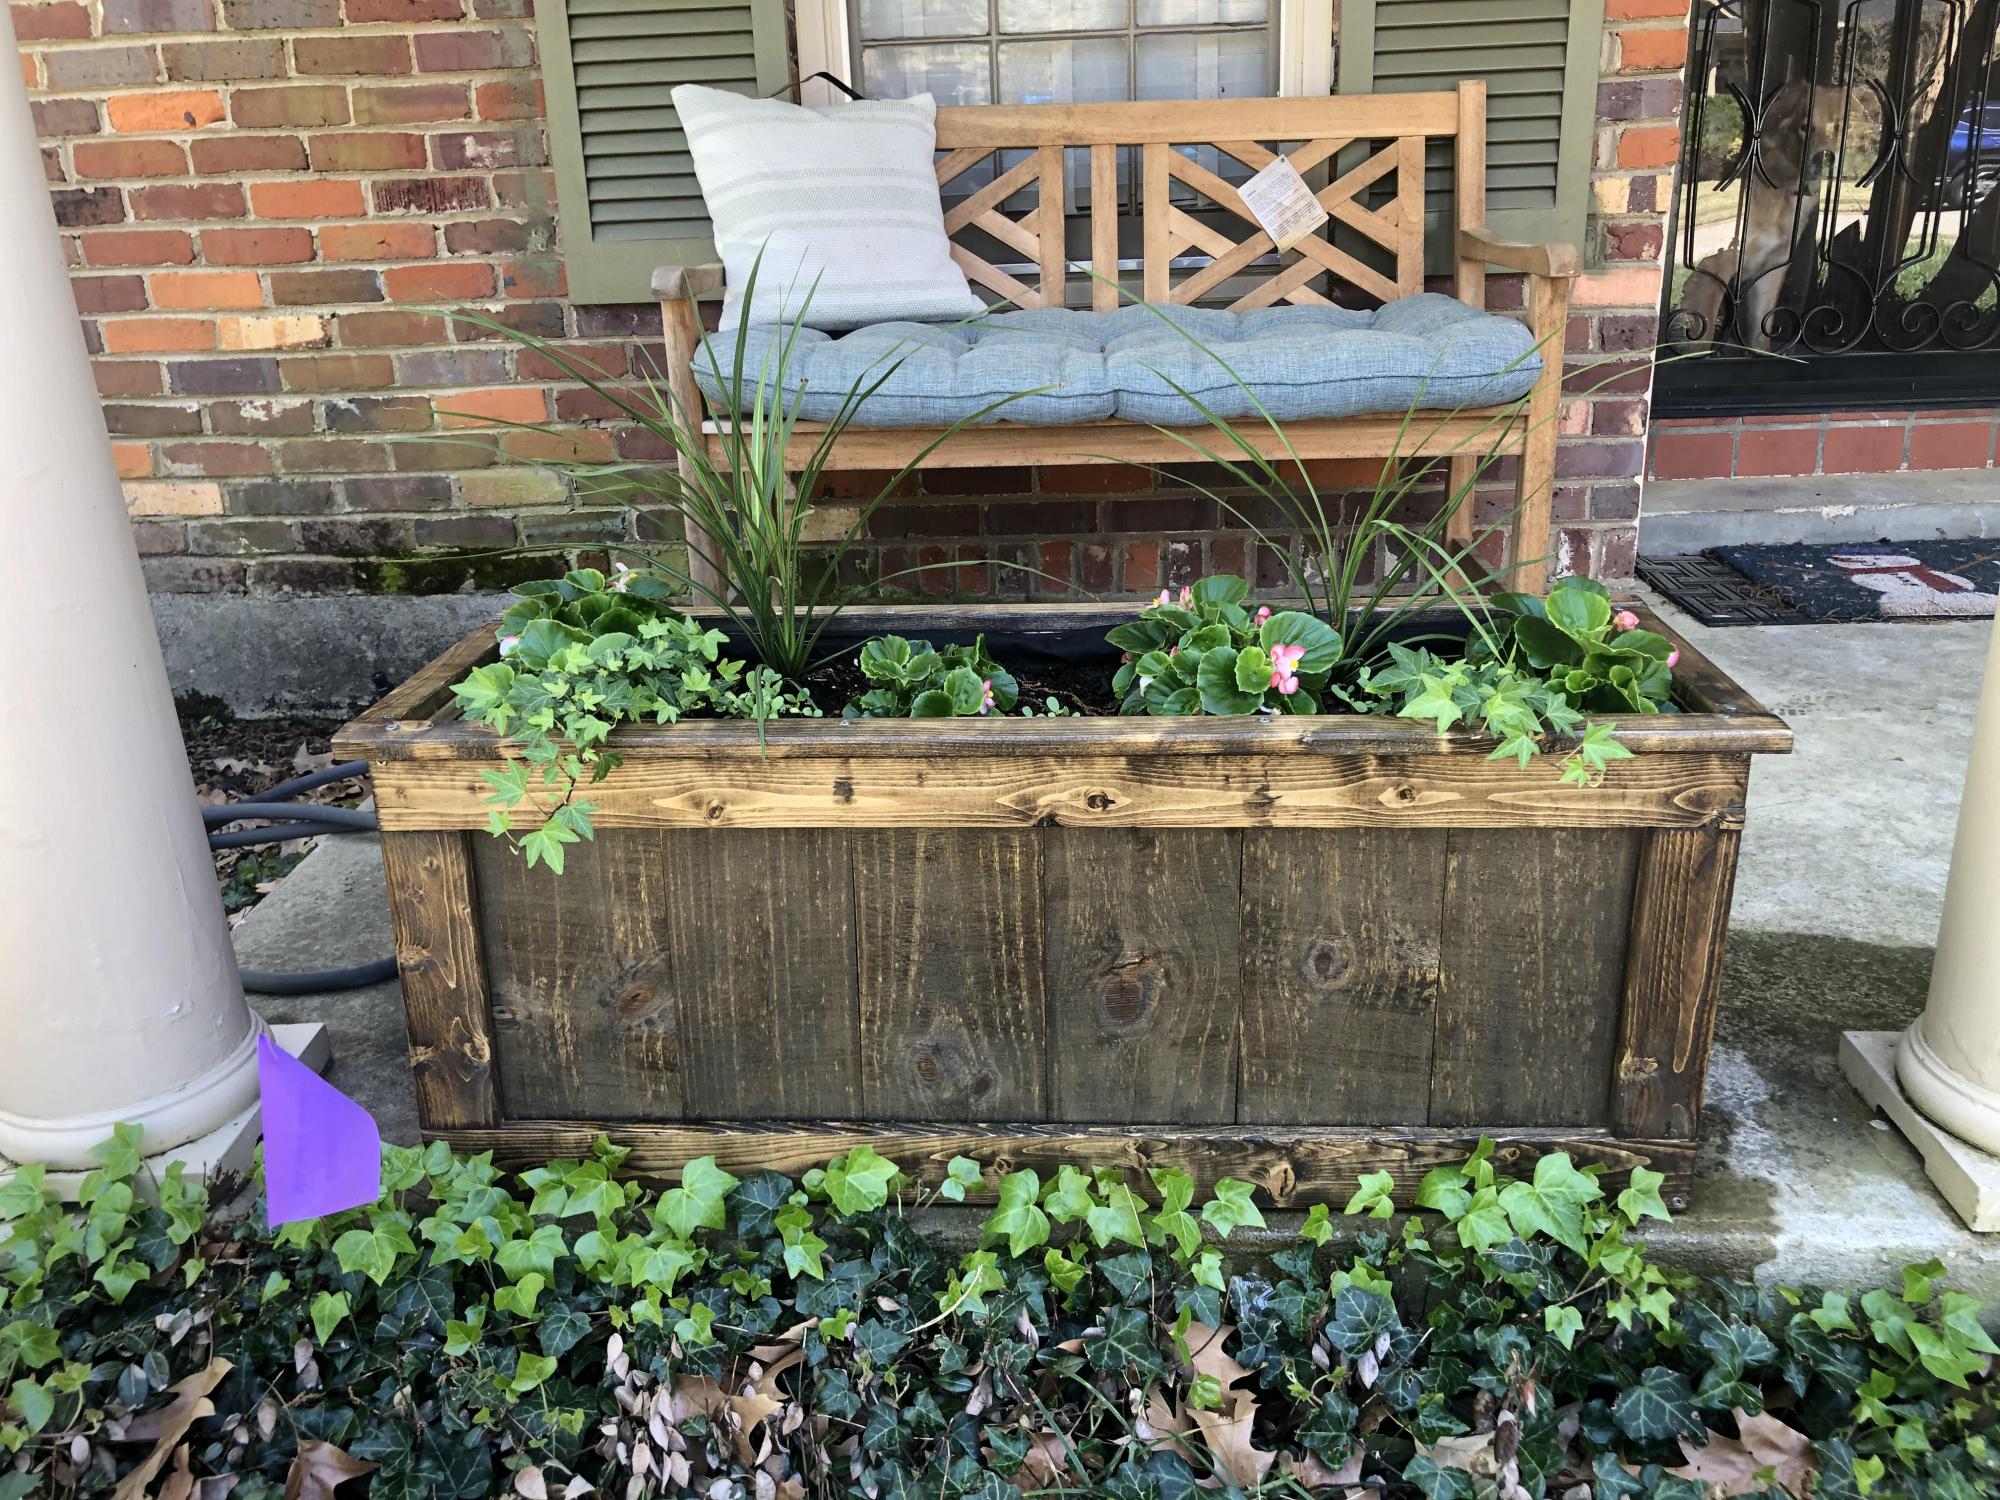
Hi Ana! I recently got into woodworking because I saw my neighbors who had some cute horizontal planters but everywhere I looked, they were so expensive! I couldn't find plans exactly how I wanted them so I used your "Cedar Front Porch Planter Plans" and flipped them sideways so that they were shorter/longer instead of taller. Somehow I got all the measurements right and they turned out beautifully! I have made four more since then for family and friends. I was even able to get my mom to help me (see photo!). I wanted to share with you and feel free to share w/ your followers! I hope to complete some more projects...thanks to your website for giving me inspiration and also teaching me how to use power tools!
Built from: https://www.ana-white.com/woodworking-projects/frame-and-panel-planters
Estimated Cost
25
Estimated Time Investment
Afternoon Project (3-6 Hours)
Finish Used
Sanded lightly with orbital sander. Stained with Miniwax Jacobean waterbased stain and sealed with Miniwax Polyurathane.
Recommended Skill Level
Intermediate
Comments
brookifer86
Wed, 06/15/2011 - 19:10
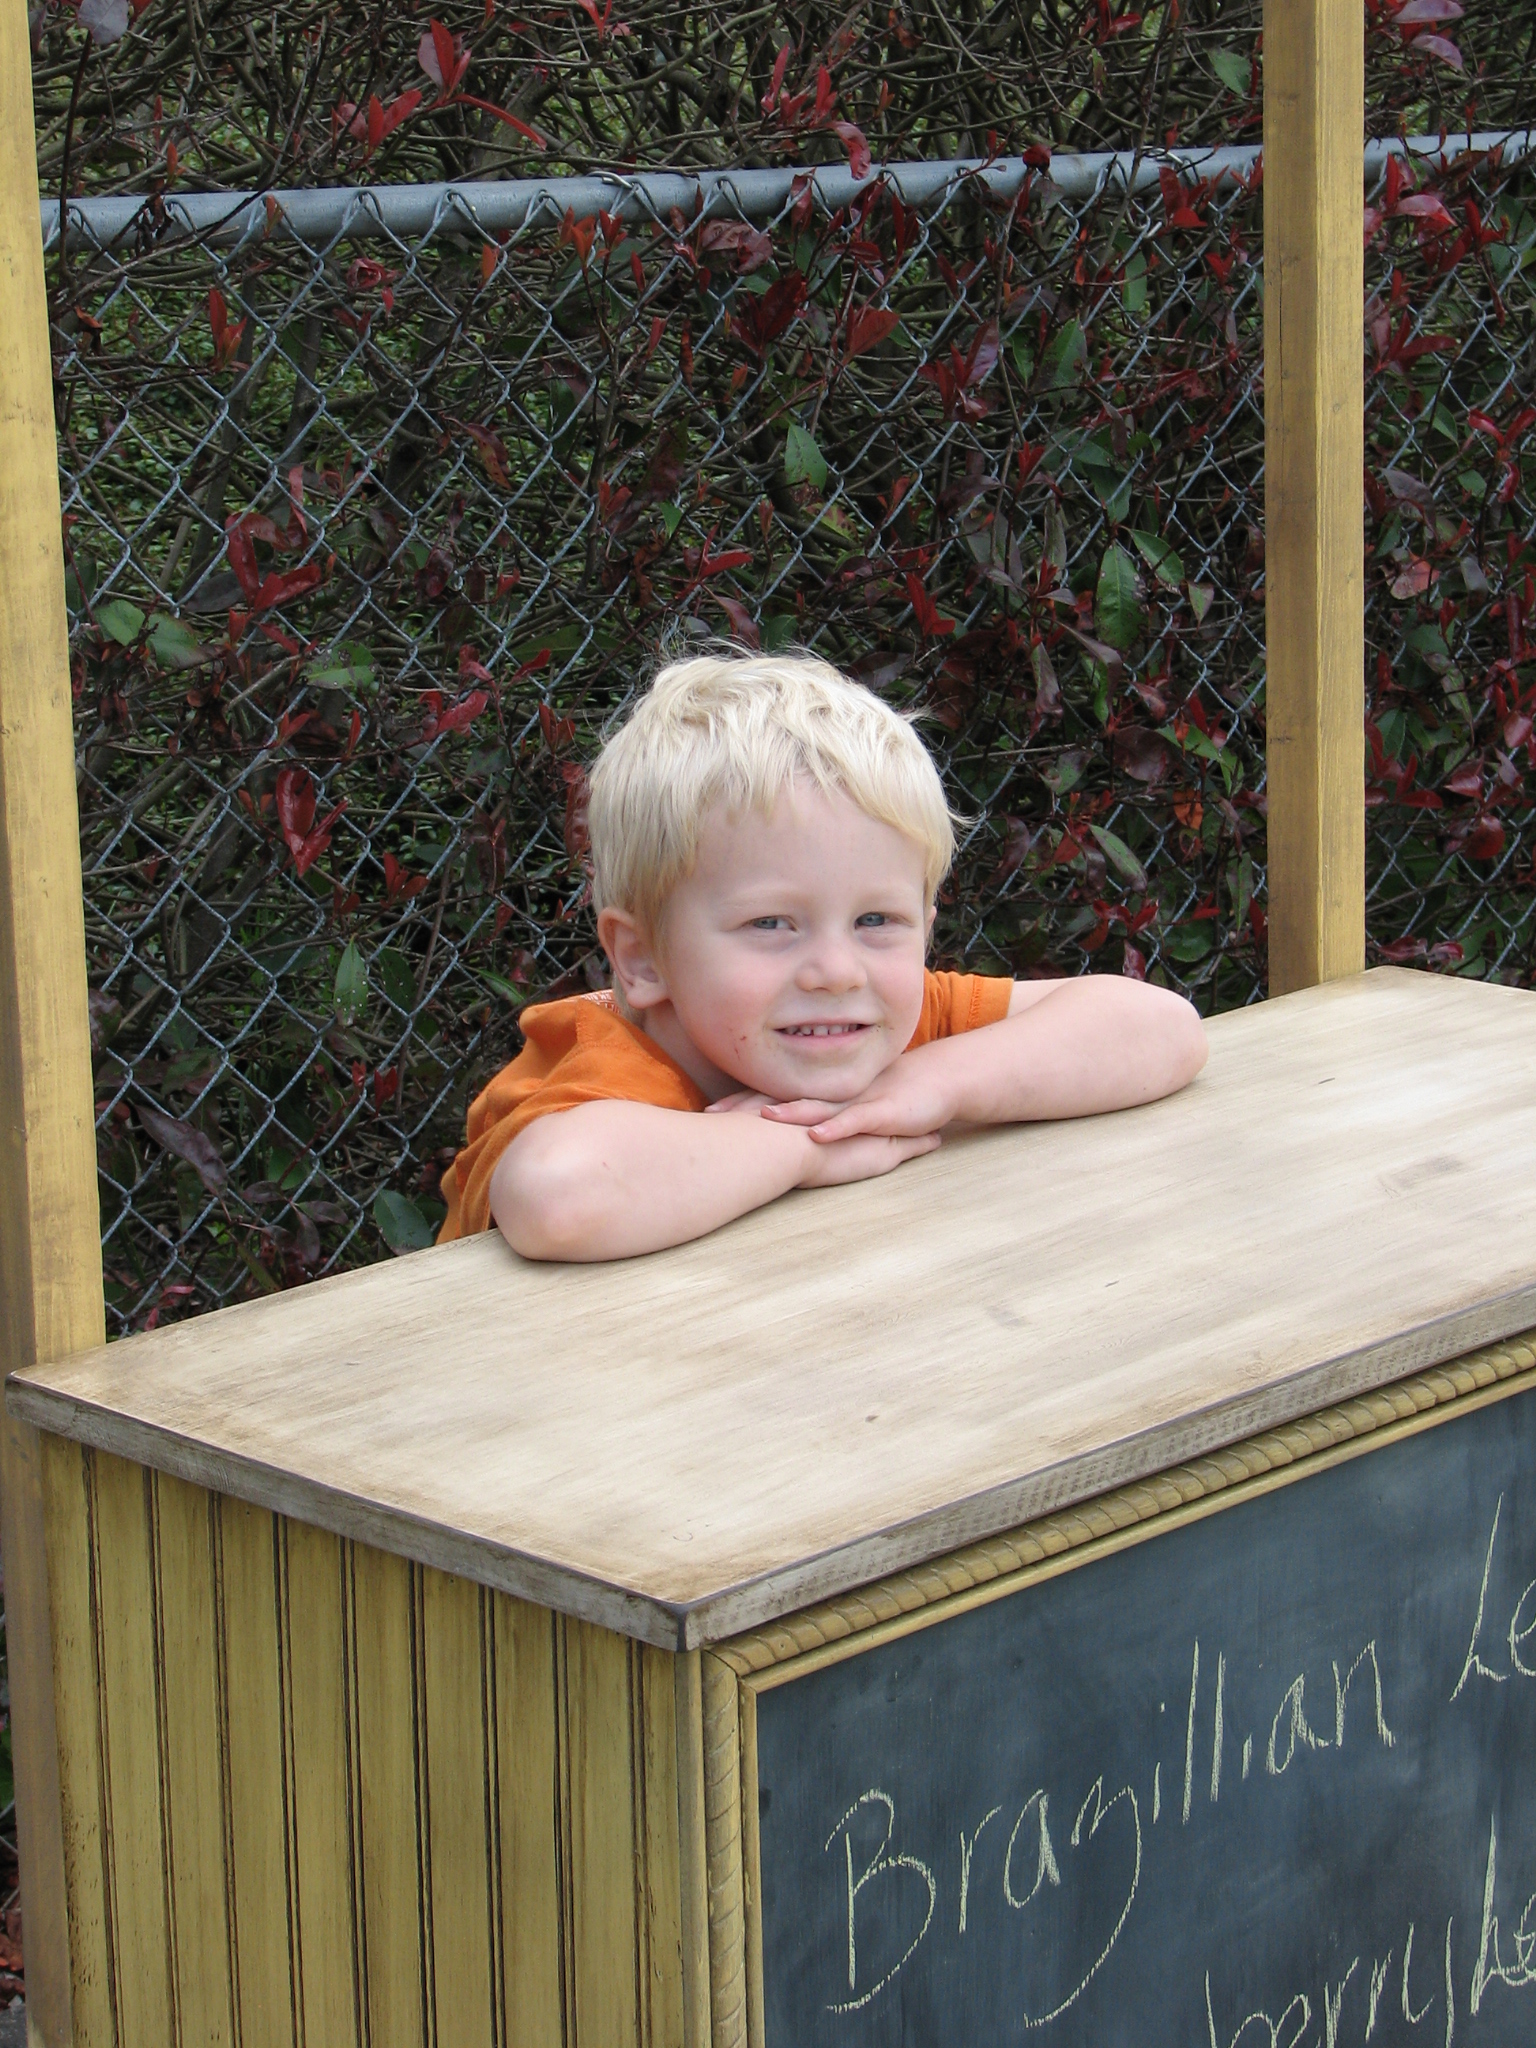
Stunning!
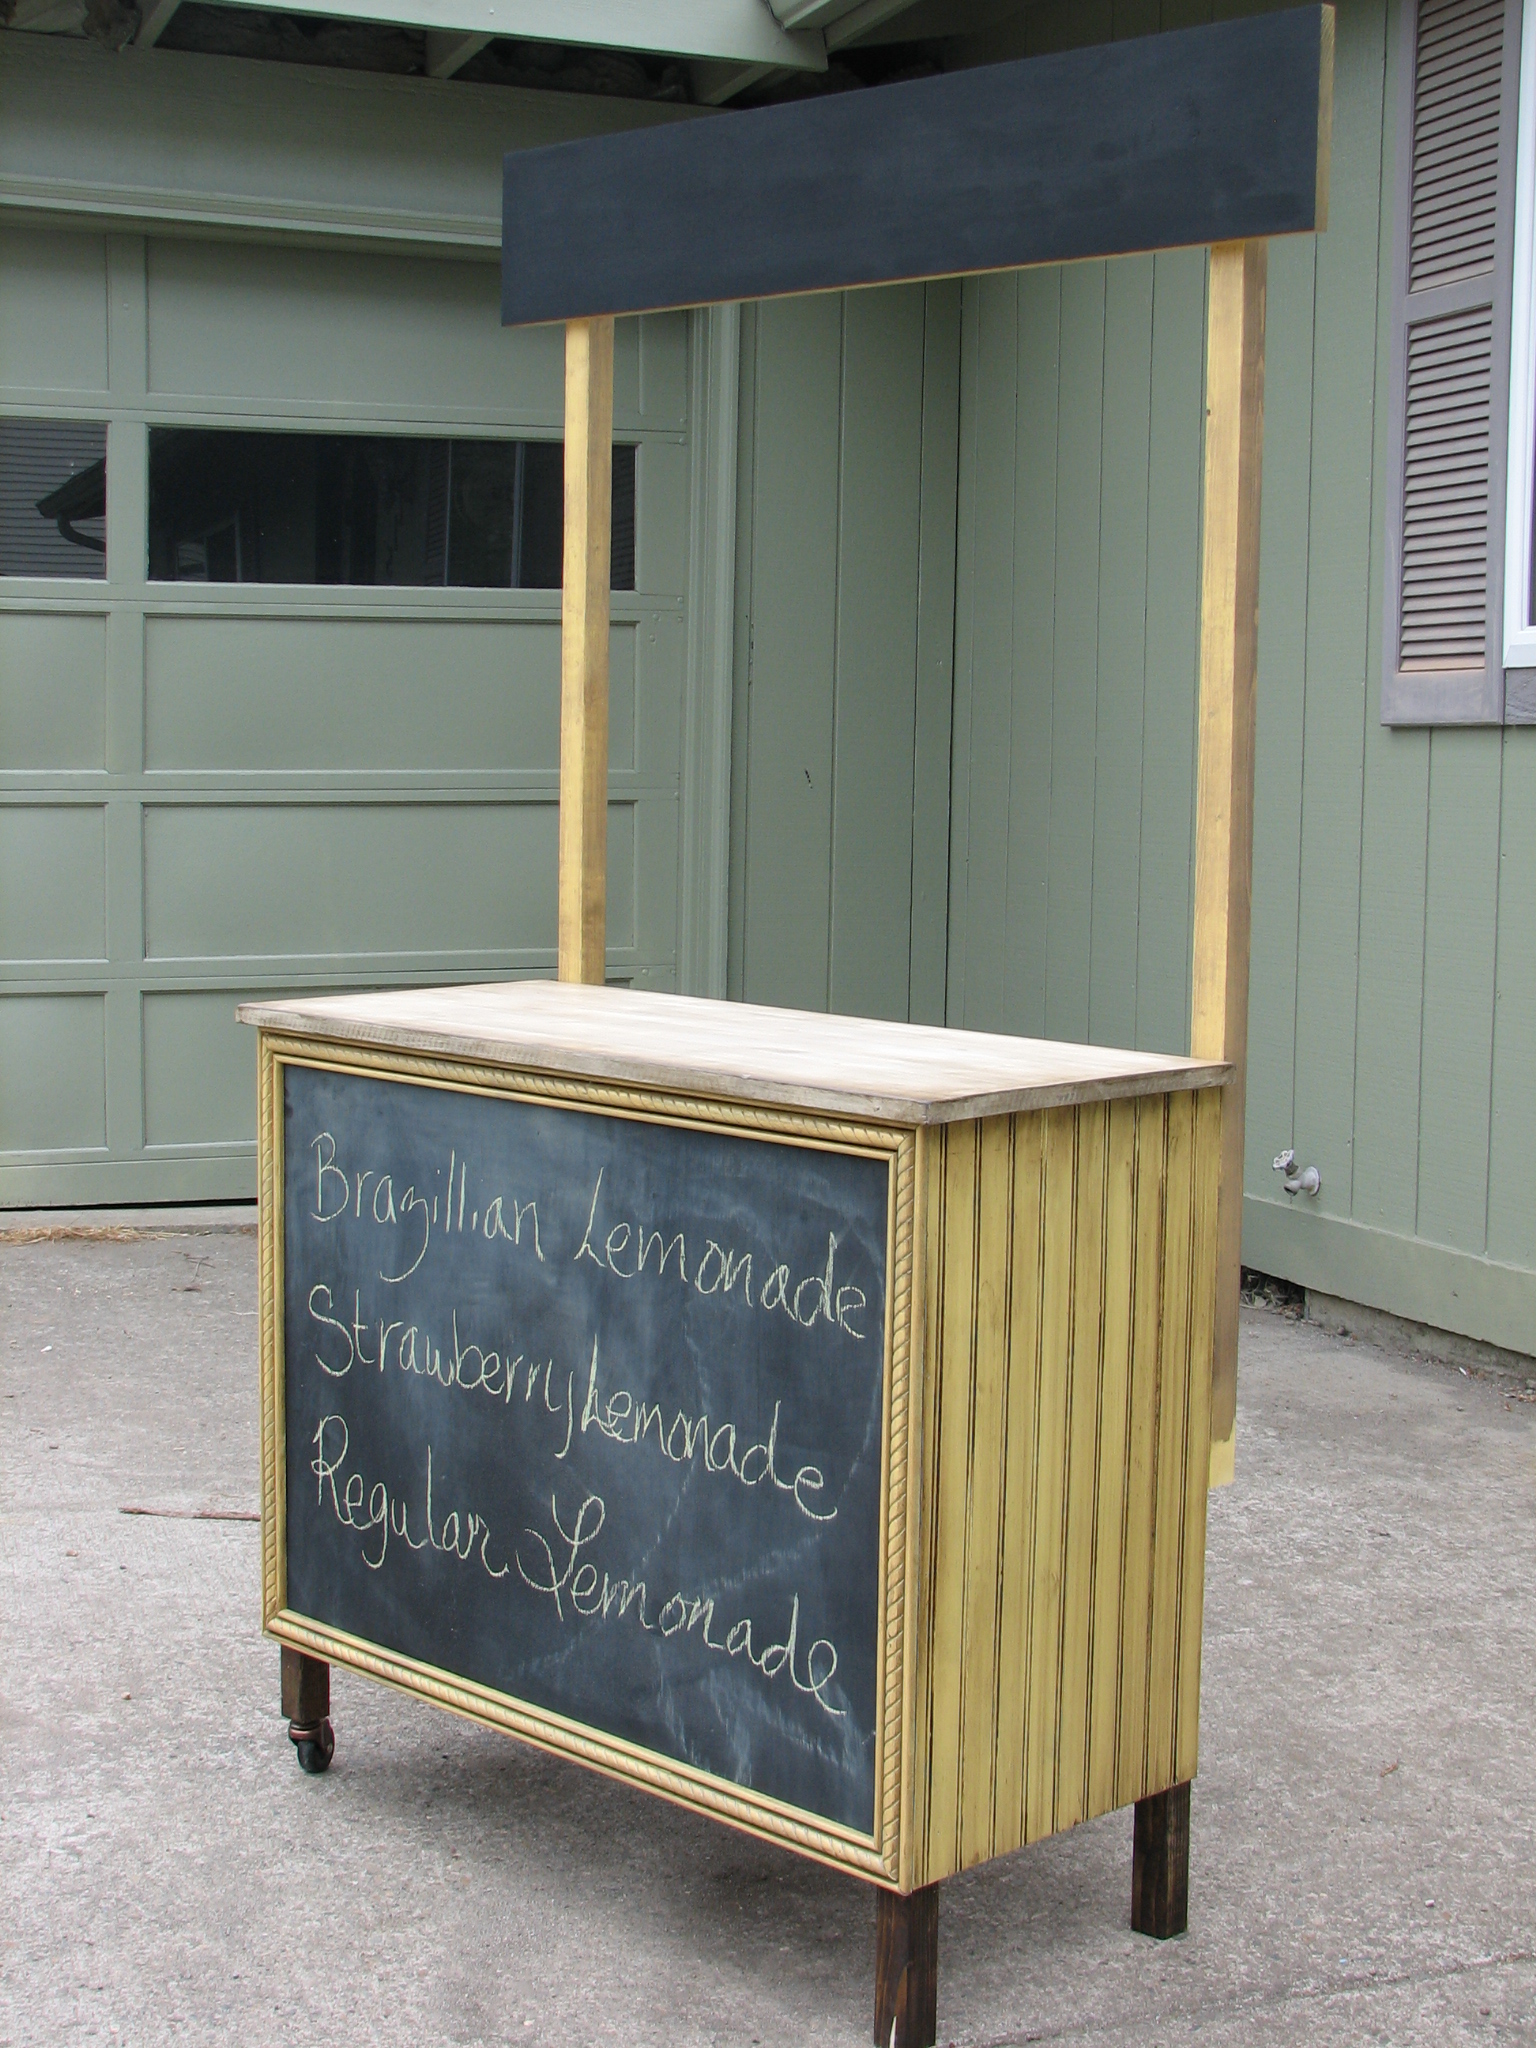
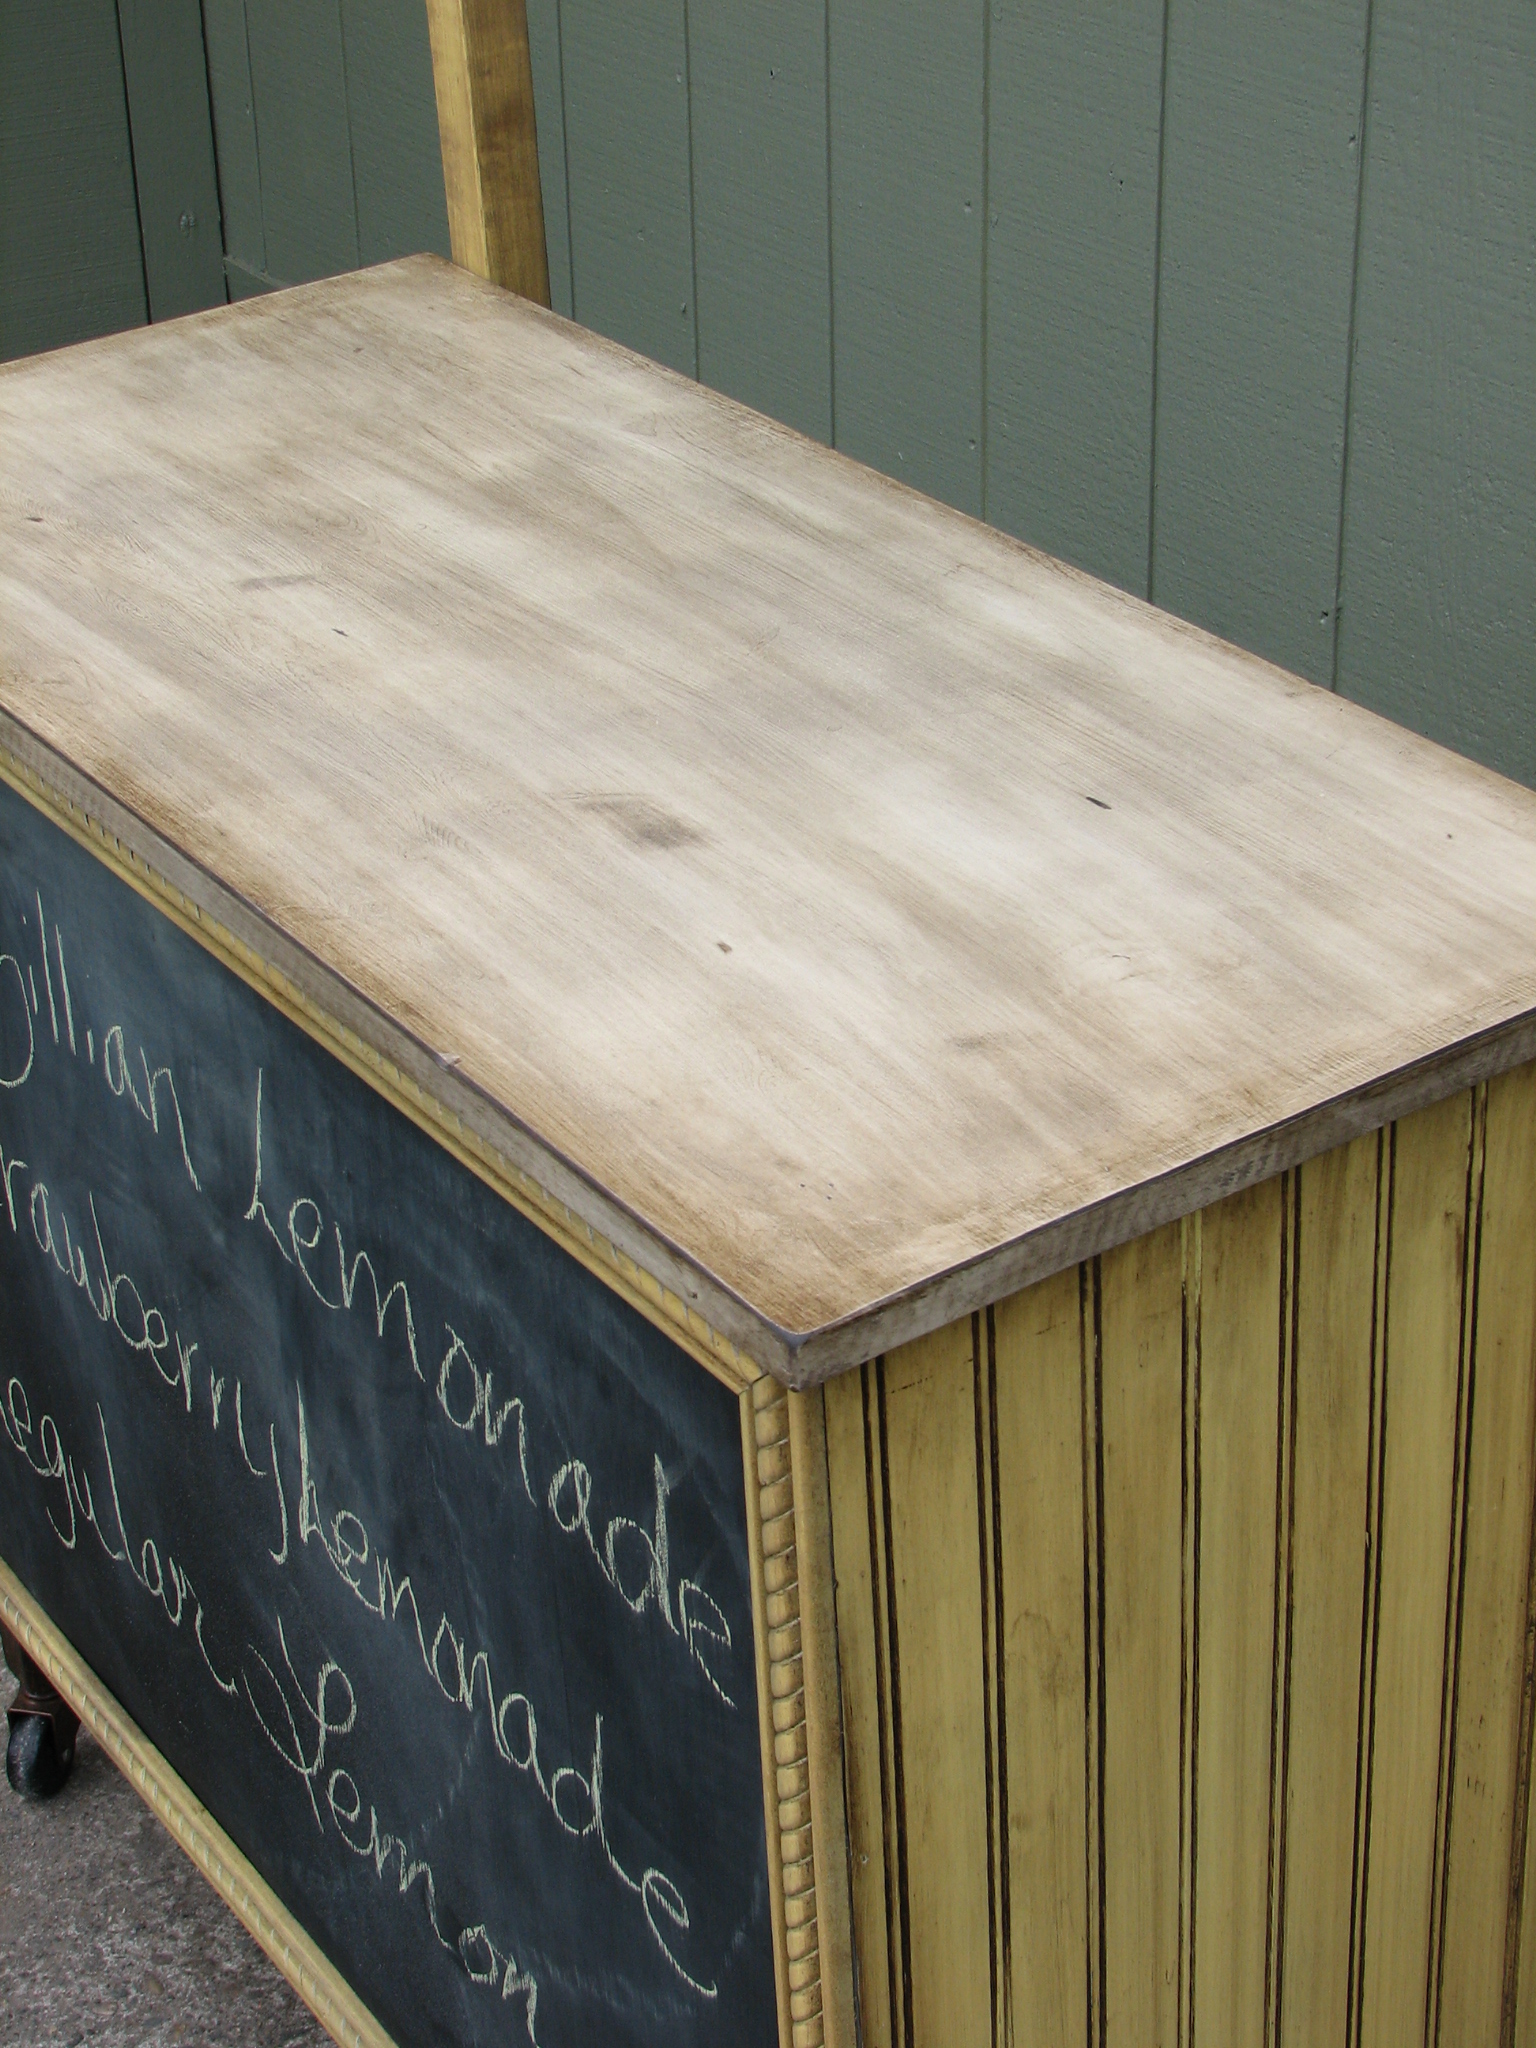
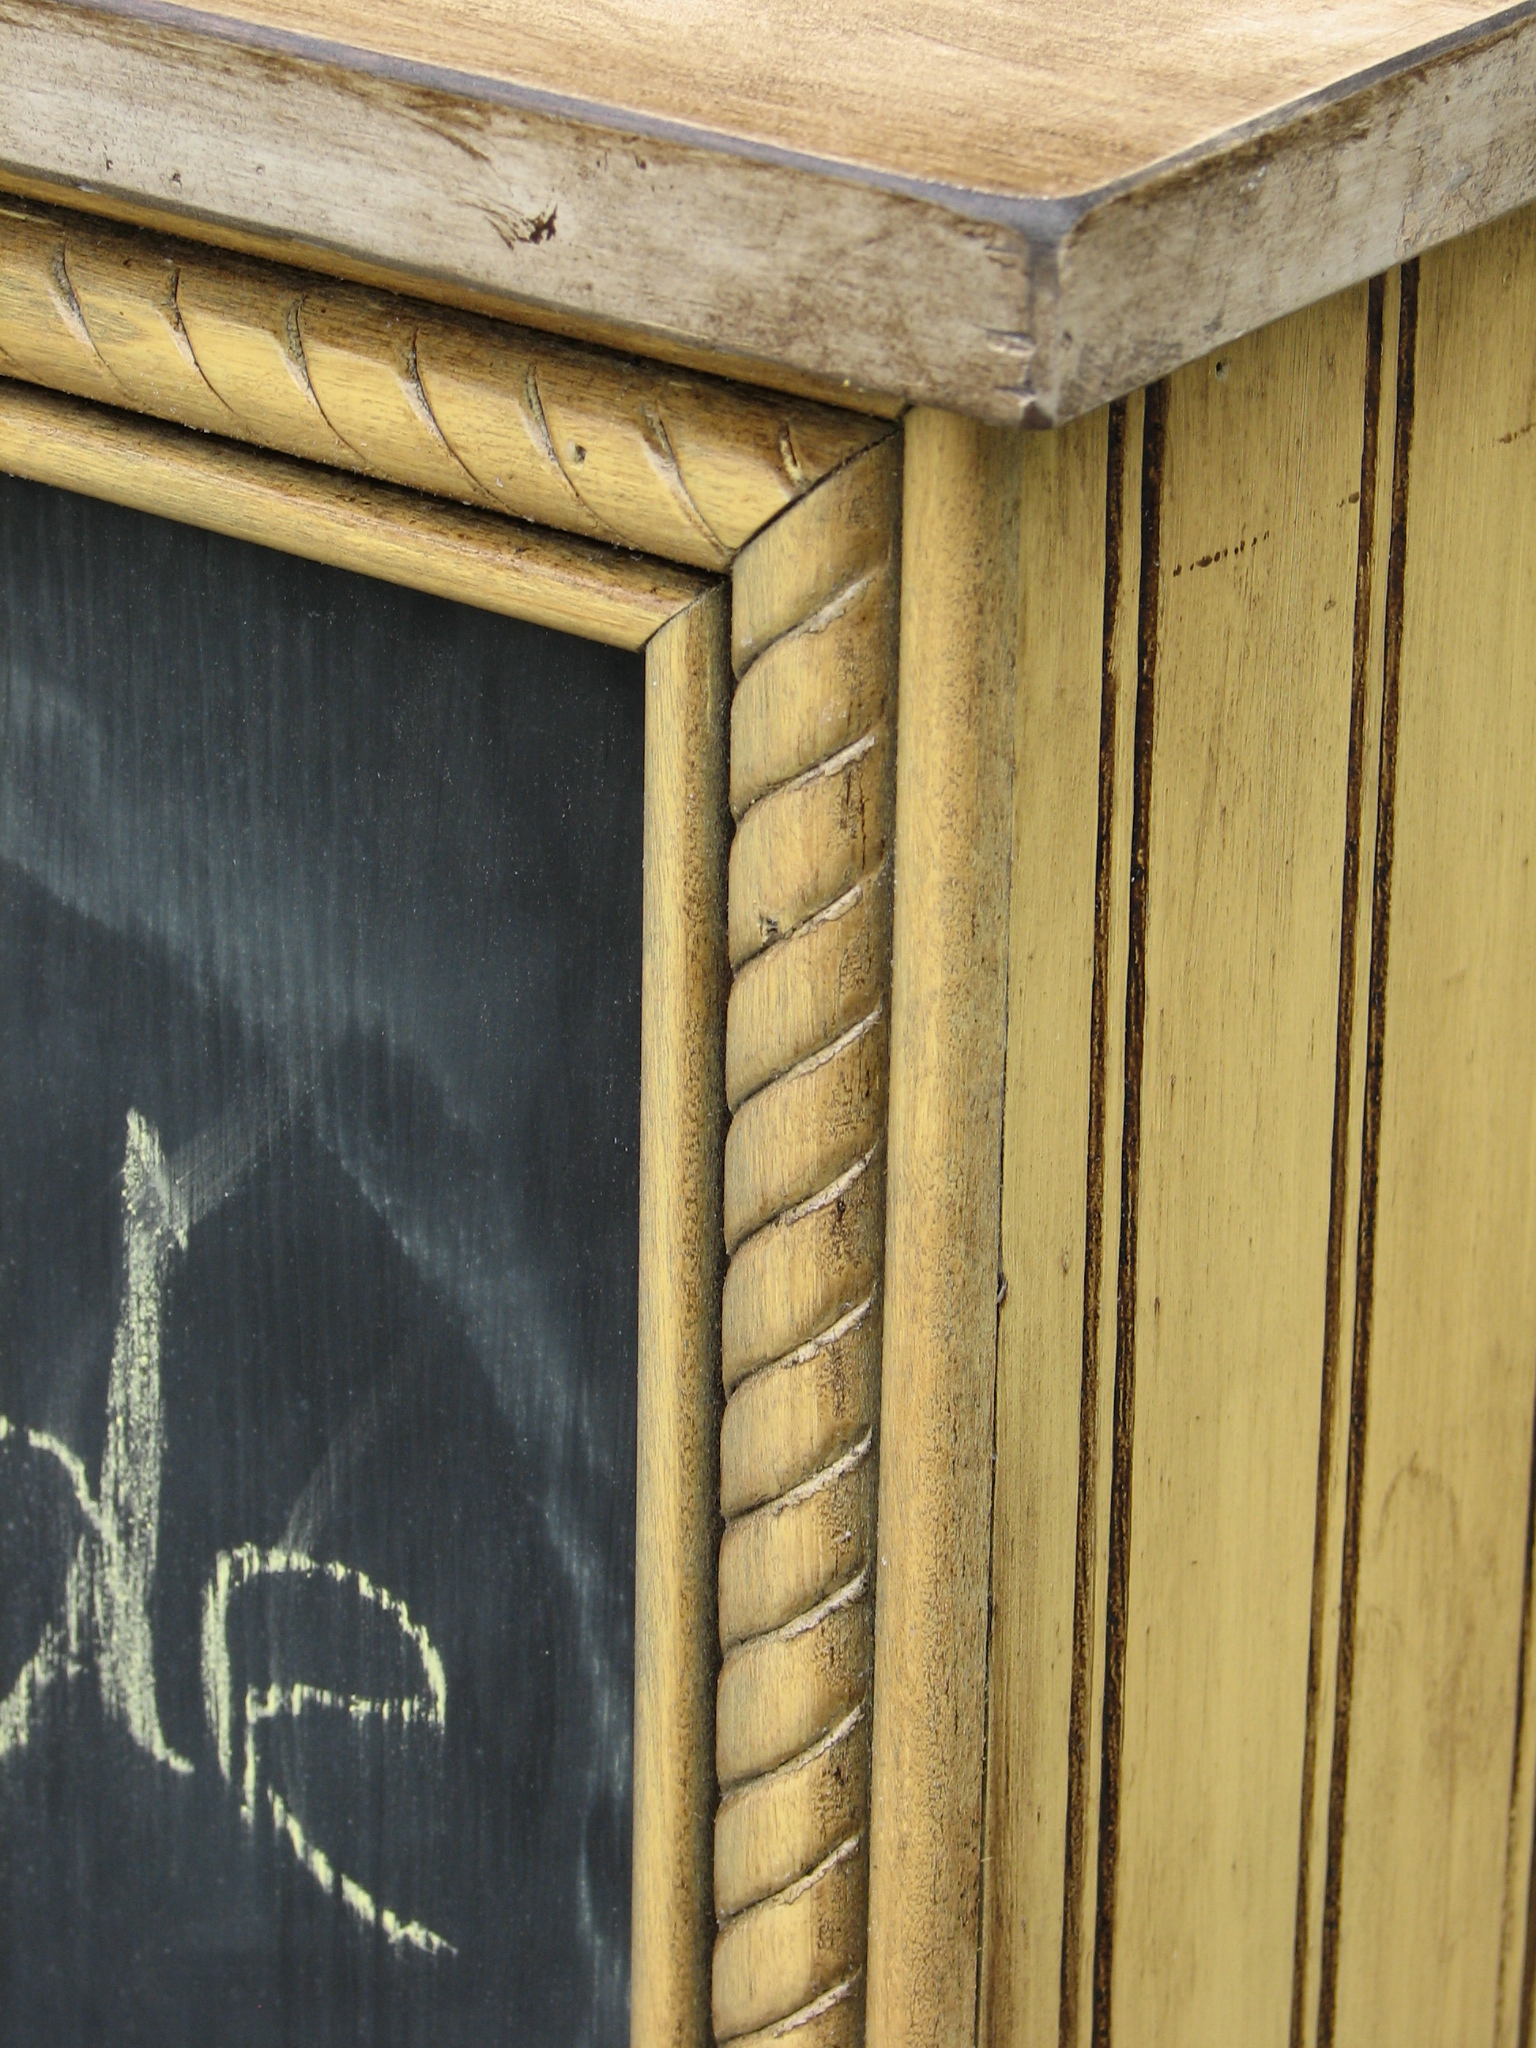
How can you not buy lemonade from a stand this pretty, and a kiddo that cute?! The finish is amazing
jsle_bel
Thu, 06/16/2011 - 09:08
Thank you!
Thank you! I'm really happy with how it came out and I've already received bites on orders. I think it's the kiddo that makes the build so appealing ;)
Lisa 411 (not verified)
Thu, 10/18/2012 - 04:28
Yeah I would totally buy
Yeah I would totally buy lemonade from that face! lol