Community Brag Posts

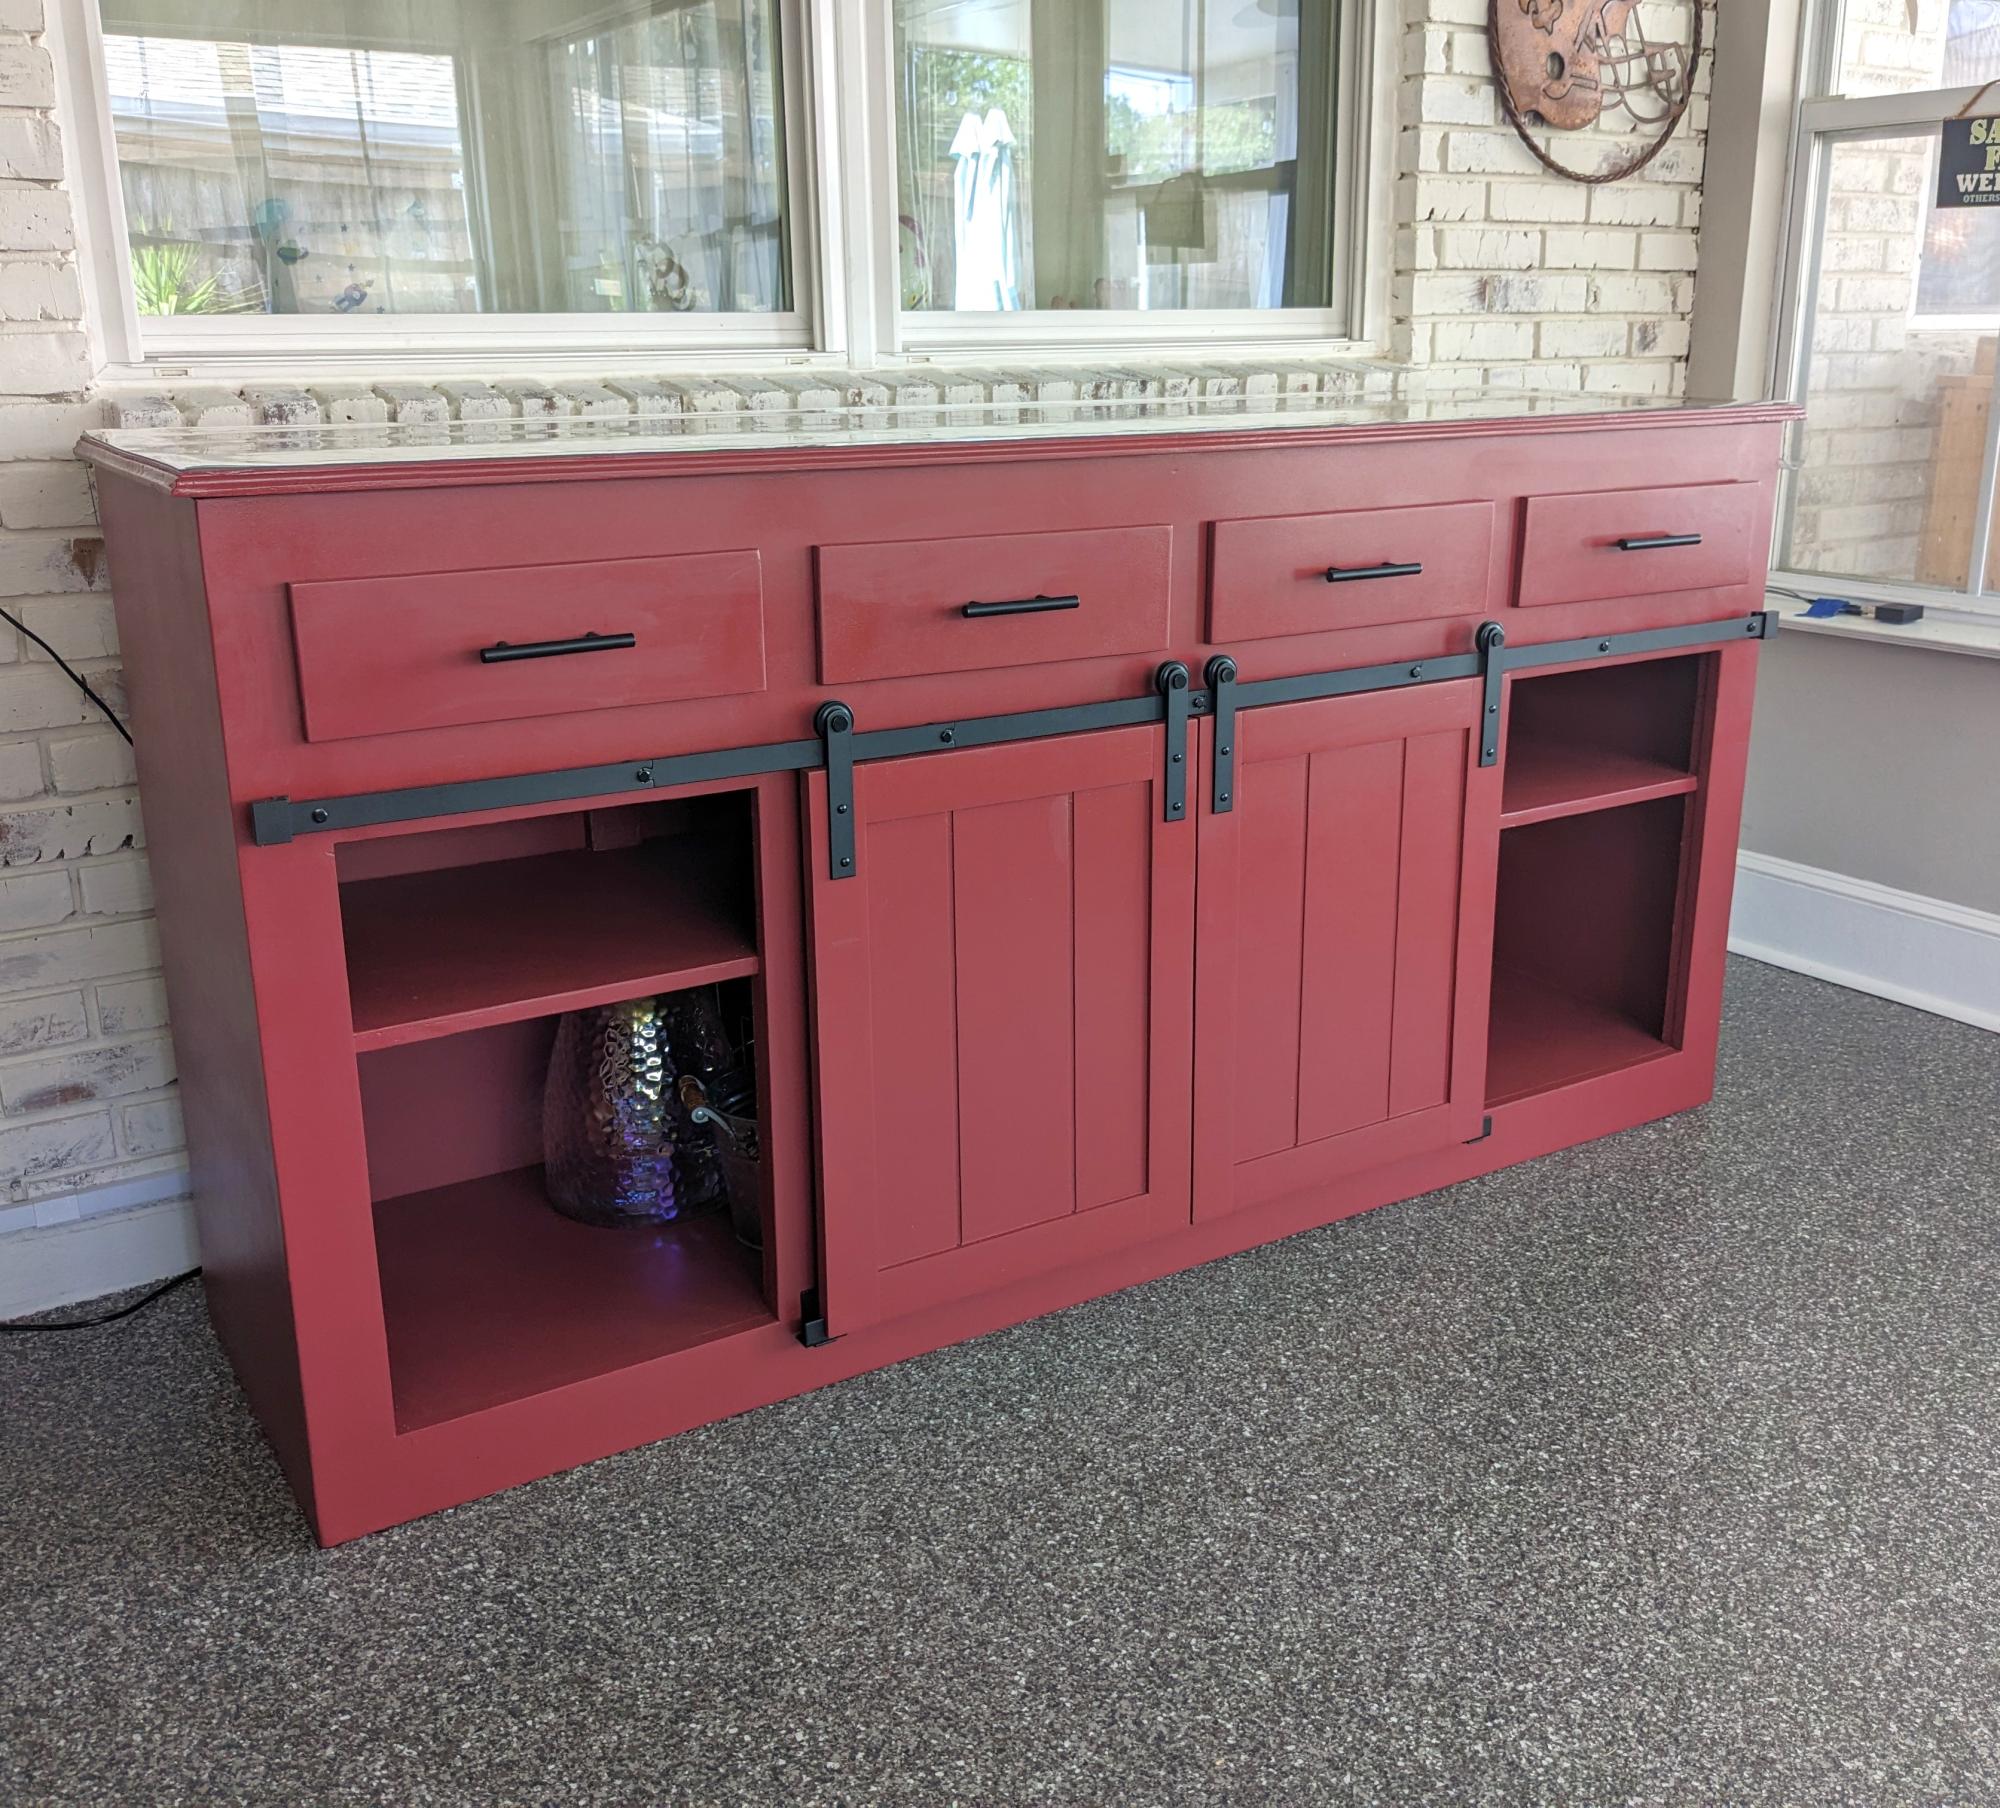
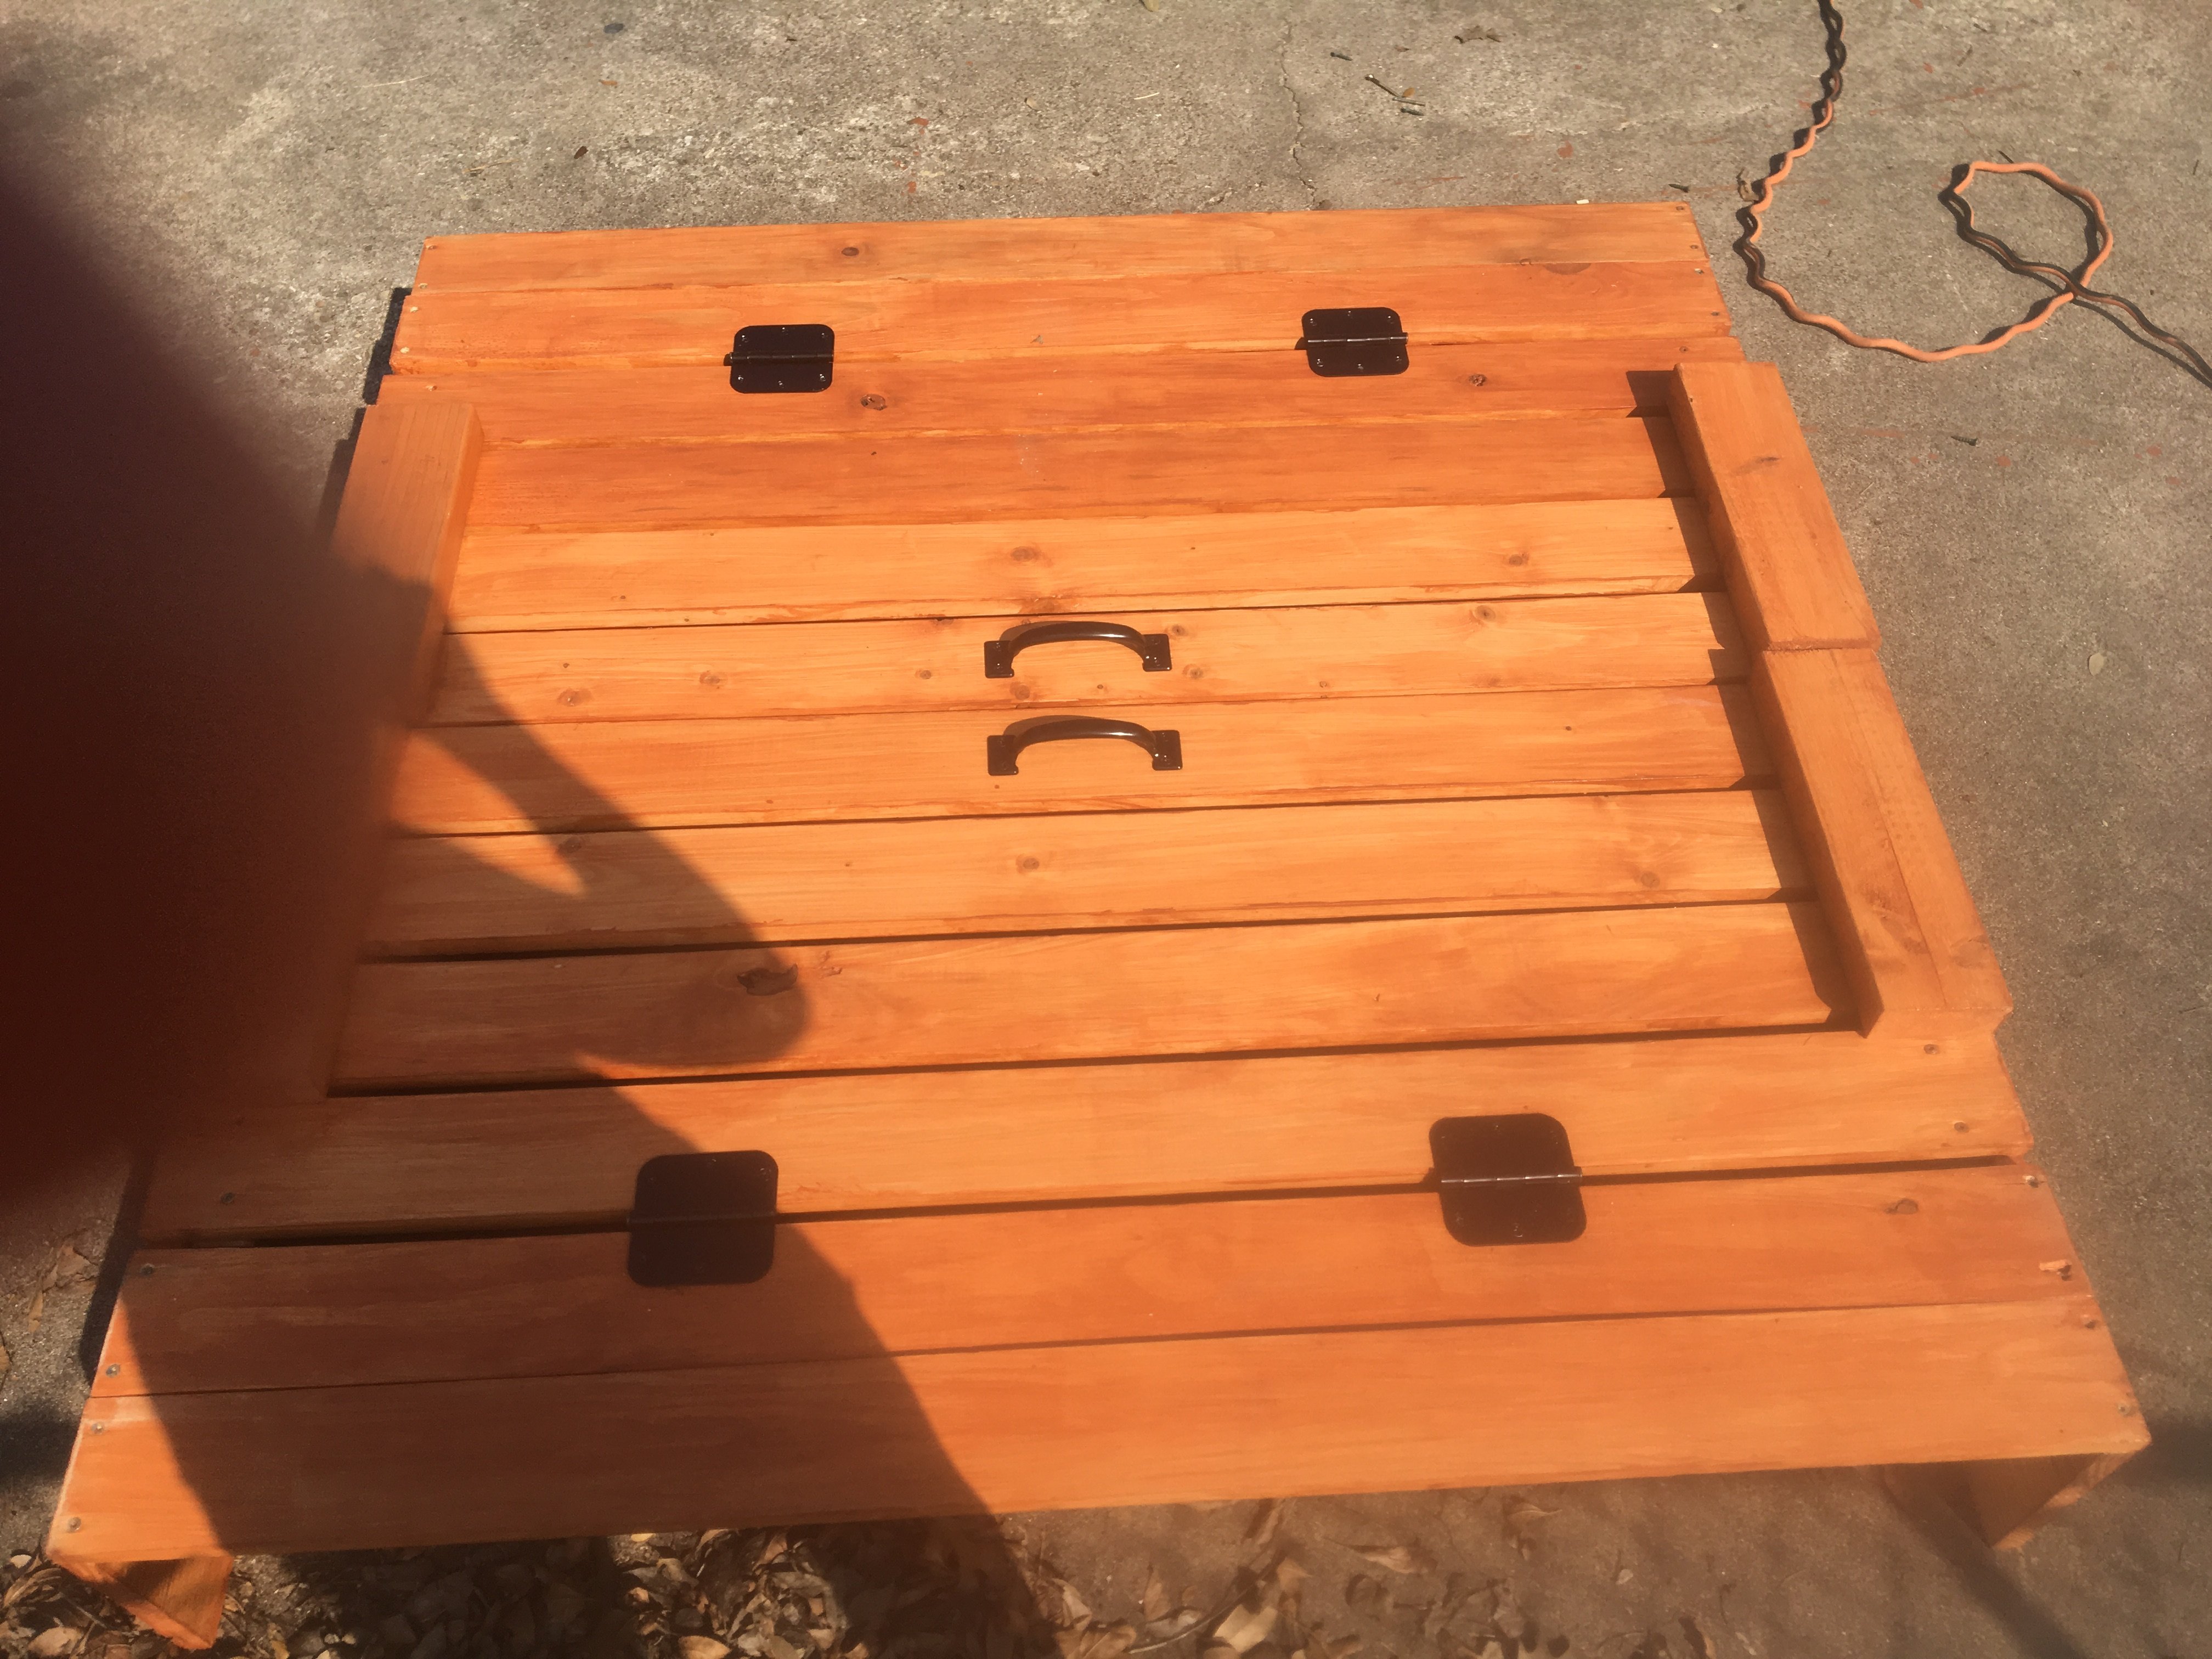
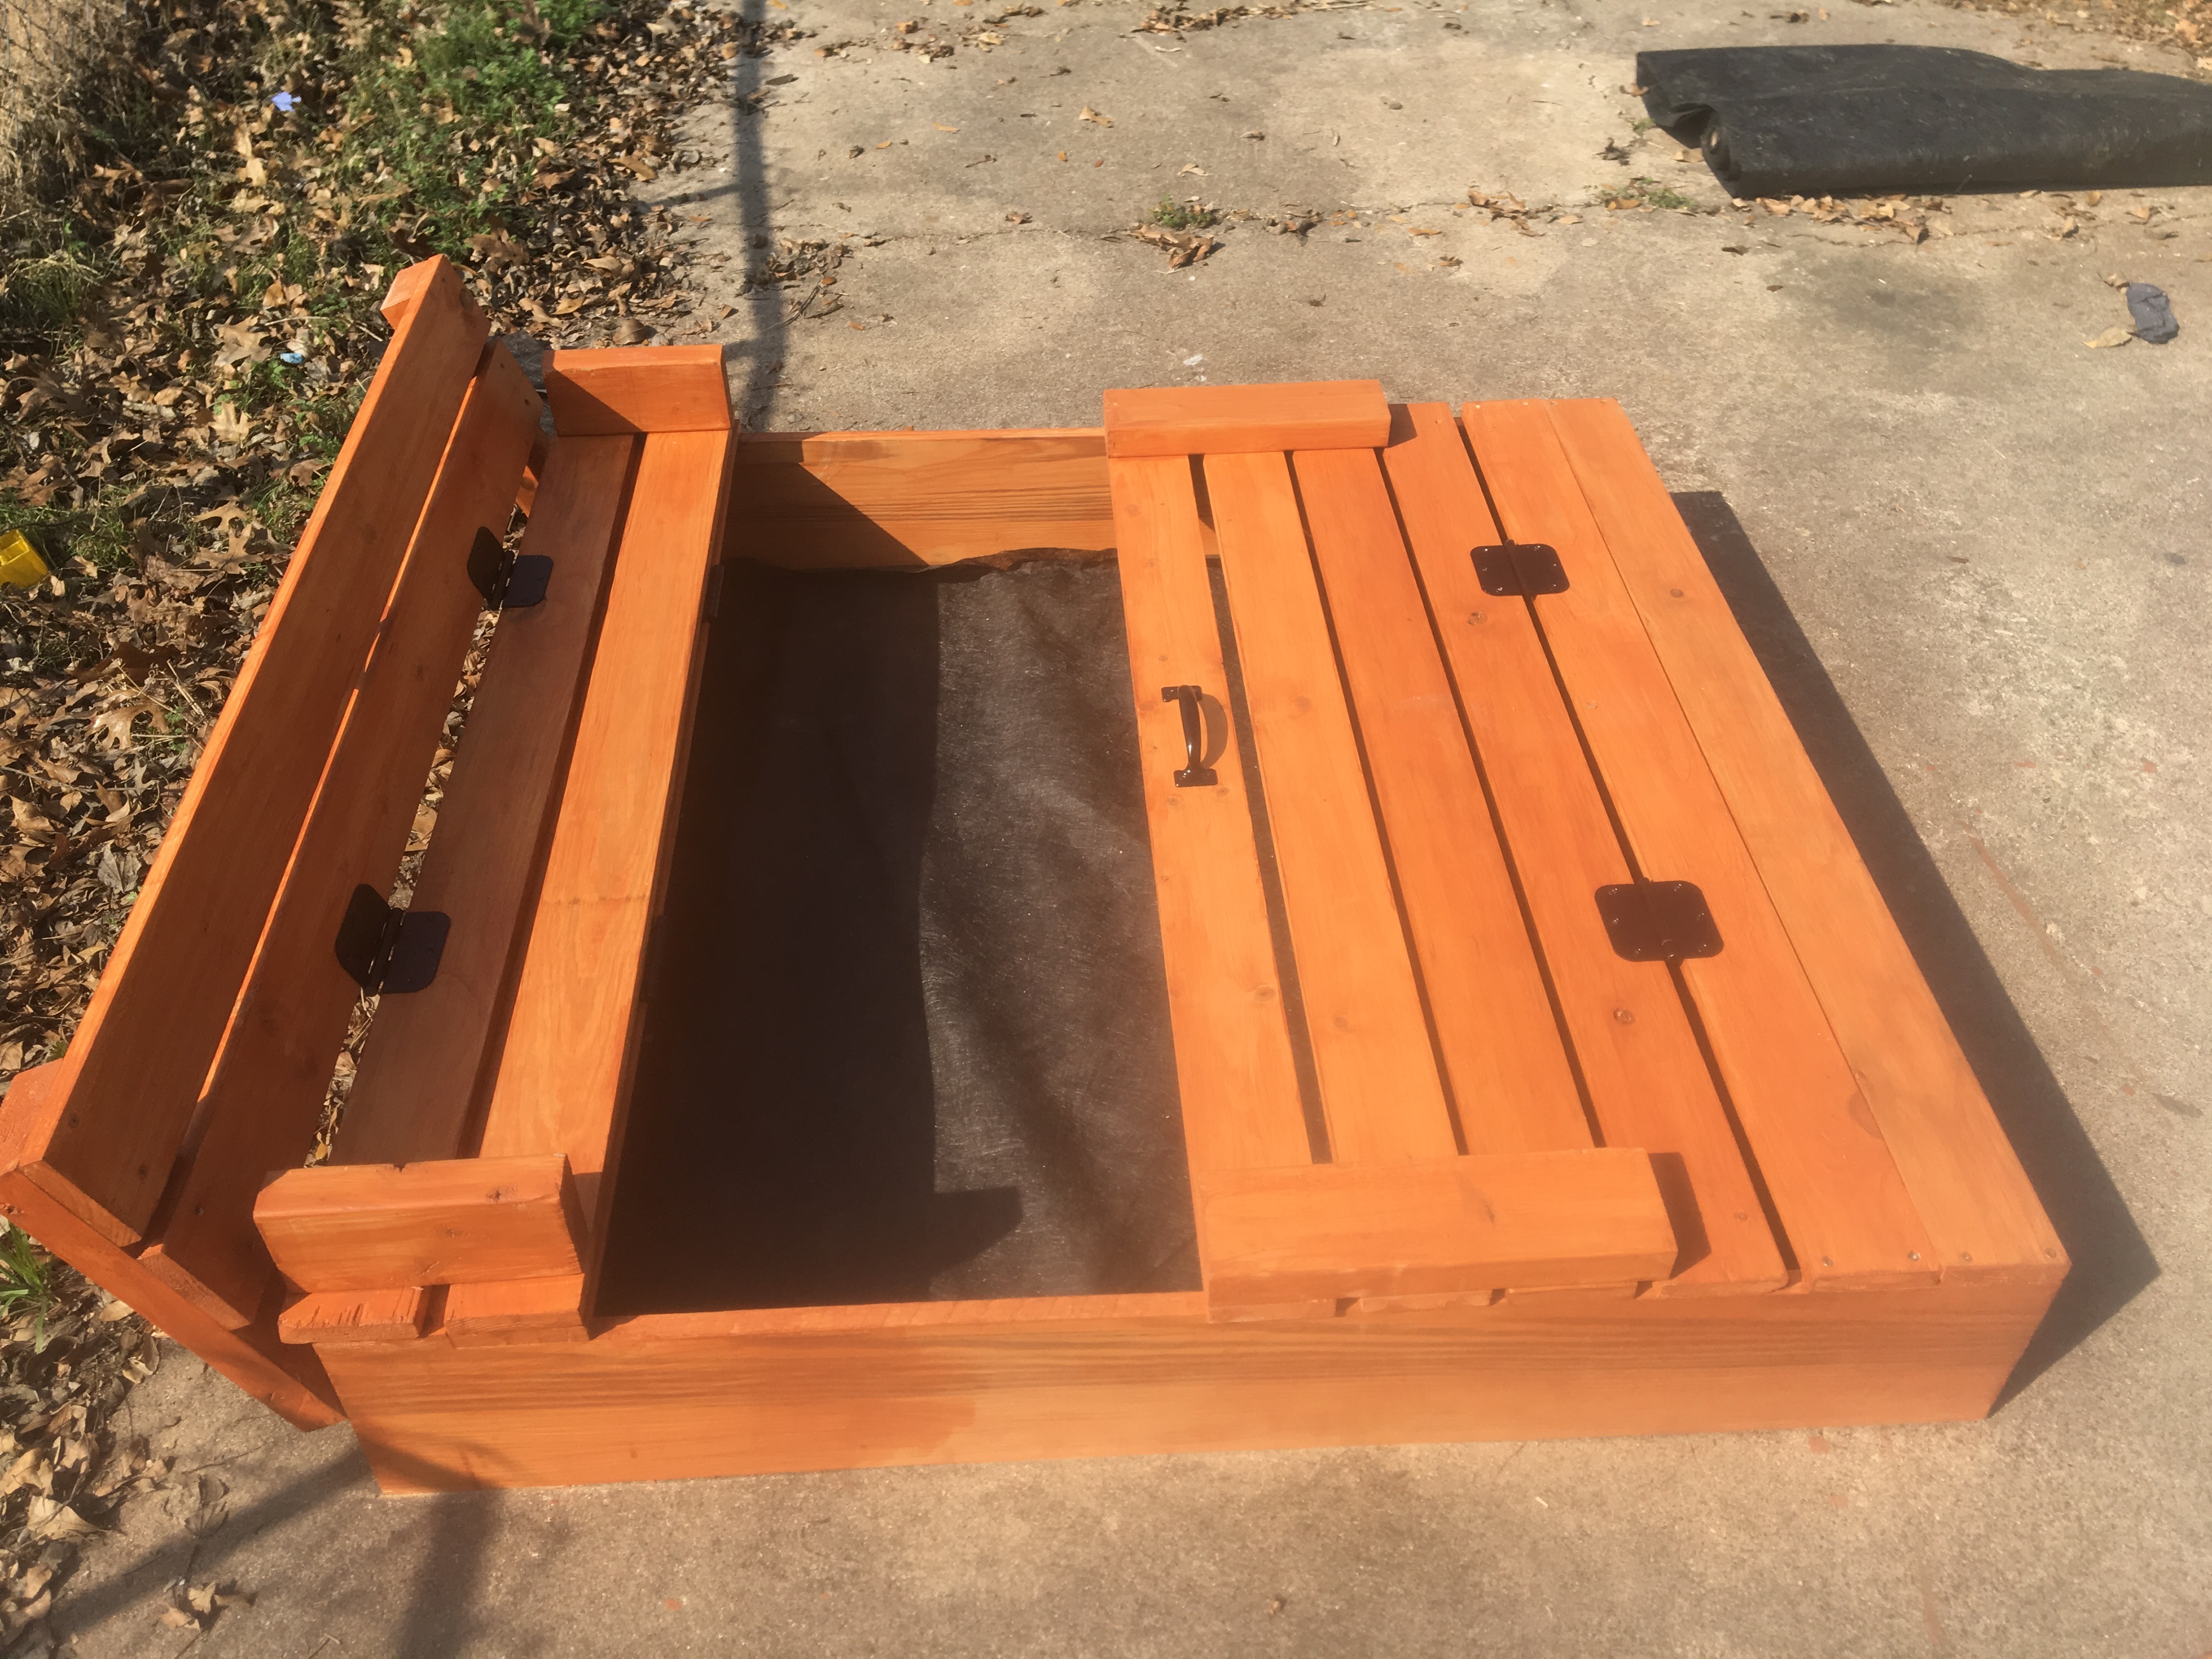
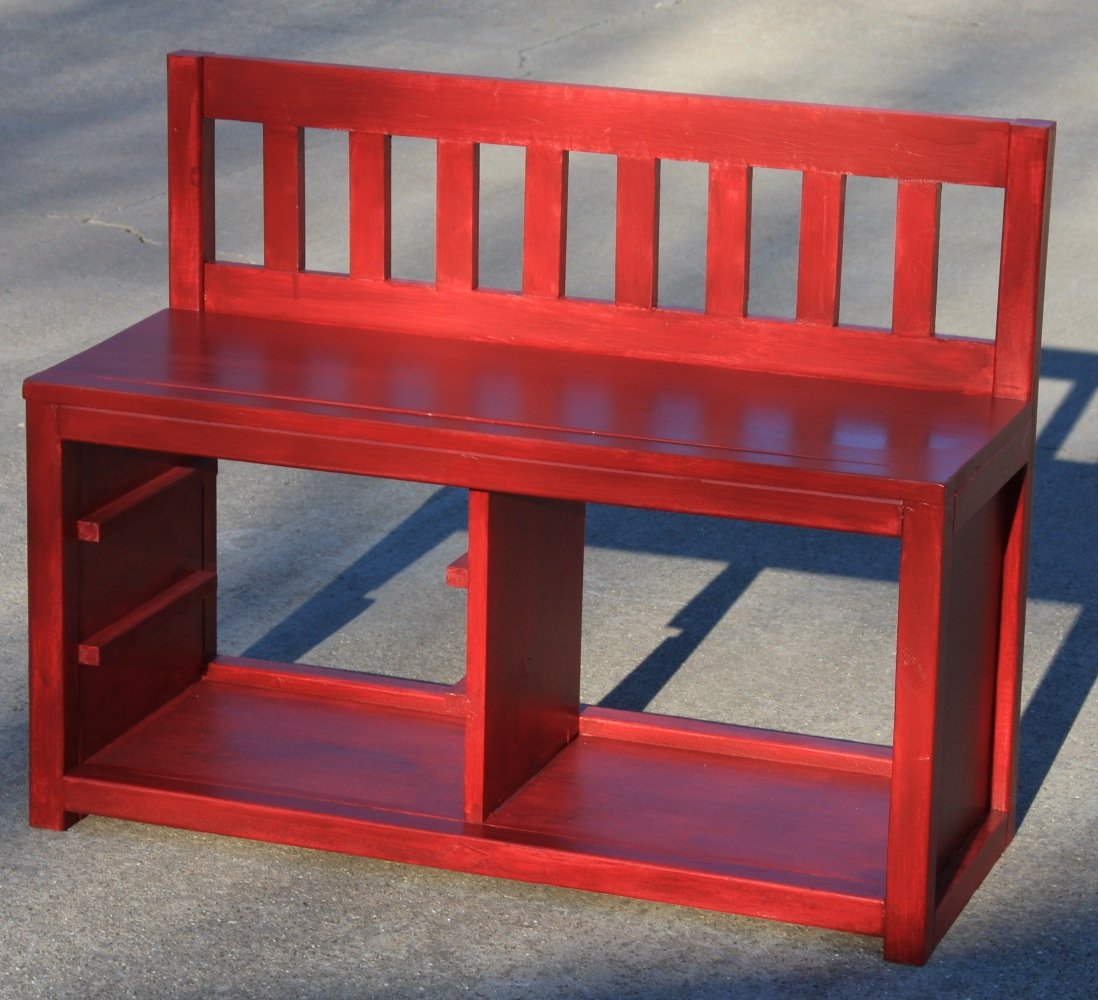
A cottage bench with shoe rack

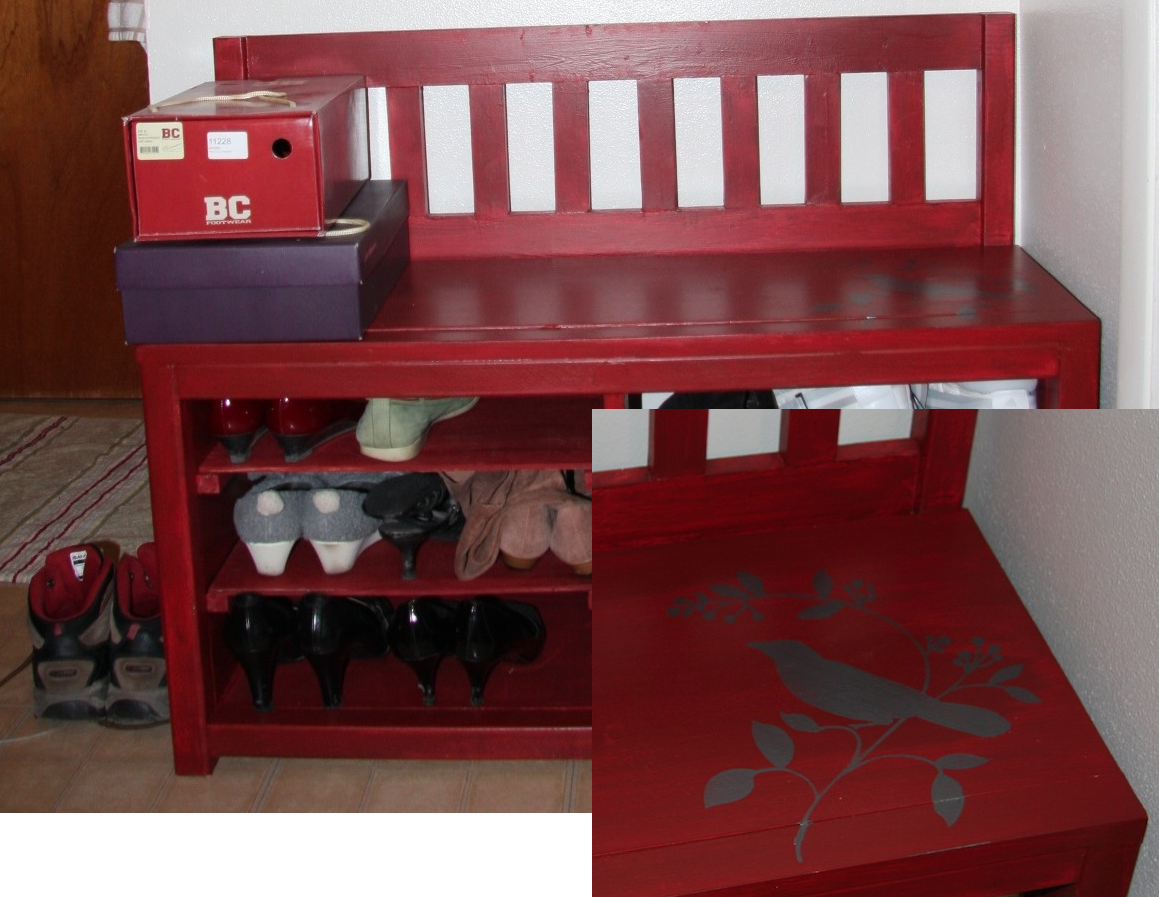
Only slightly modified cottage bench - I made the storage area bigger and added shelves to put my shoes. Only my second project so it's not perfect (especially the paint job) but I loooove it! Sure, the shoe rack I had was perfectly functional and bigger, but this is waaay prettier.

Found a perfect red oops paint at Lowes and I even added a little birdie stencil. I have a few more pieces I'm working on and hope to finish soon. Thank you Ana for the plans!
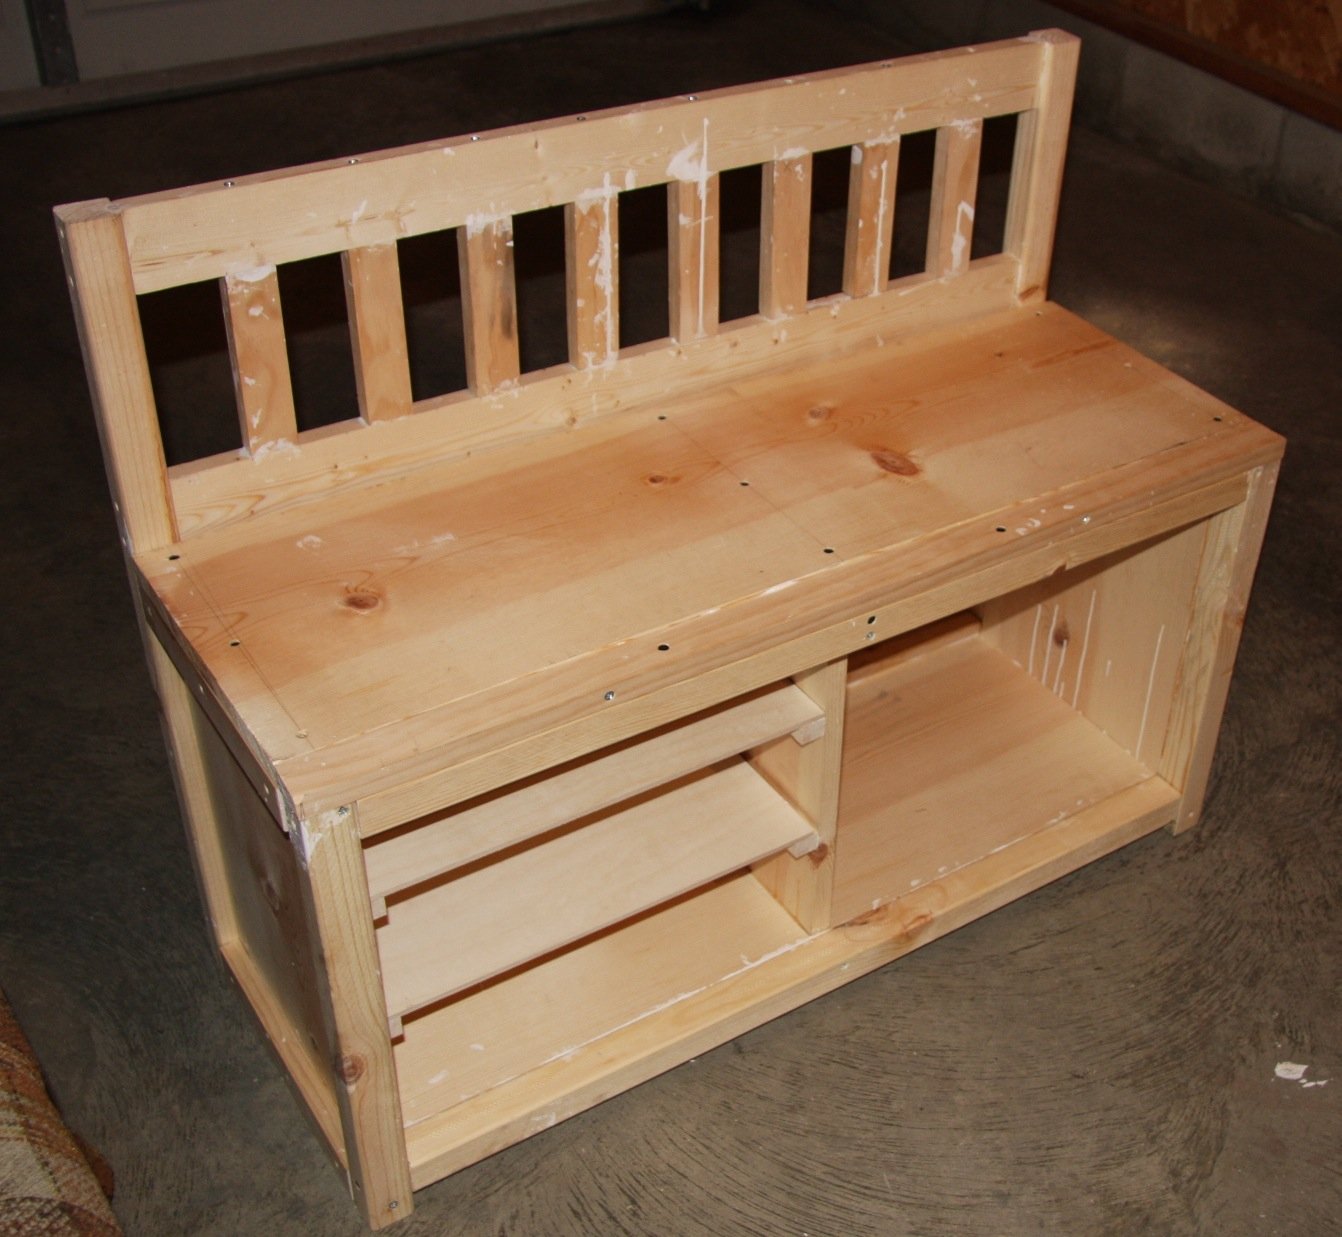
Estimated Time Investment
Weekend Project (10-20 Hours)
Finish Used
Primer and two coats of paint, lightly sanded in between. I skipped the top coat because I want the red color to naturally fade with use.
Recommended Skill Level
Starter Project

Backyard seating

Submitted by Anonymous (not verified) on Mon, 06/06/2022 - 13:17

We needed some additional seating in the backyard so I built 6 Adirondack chairs for the fire pit and the bench using the plans that you have shared on Facebook. They turned out really nice and so far they have been a big hit!!

Thanks!!

Comments

Corner Hutch Storage Bed for my Girls

Submitted by hawaiitara on Tue, 08/09/2011 - 16:19

I made this bed for my 2 girls who share a room. It was my first real attempt at building anything substantial. They are thrilled. The plans were so easy to follow. The only thing I did different was use 3 inch screws in the hutch base because I felt it made it more sturdy. I used bead board for the outside of the hutch and the back of the book cases. Thanks Ana for such great plans.

Estimated Cost
$525
Estimated Time Investment
Weekend Project (10-20 Hours)
Finish Used
White semi gloss paint with special walnut minwax stain brushed over to age
Recommended Skill Level
Beginner

Comments

sgilly

Tue, 08/09/2011 - 18:31

What lucky little girls to have a mom who can build them beautiful furniture! Great job.

Rachel Stacy (not verified)

Tue, 12/25/2012 - 04:39

I really want to do this for our twins who are about to move to big girl beds. However, I do not see the plans for this. Do you have a pdf to show how to build them? I especially love the hutch!

Simple bench for outdoor patio or deck

Submitted by ScottG on Sat, 01/23/2016 - 23:44

Built two simple deck benches from plans found on this site.

Estimated Cost
About $40 for each bench. That includes the price of the wood and stains used.
Estimated Time Investment
Weekend Project (10-20 Hours)
Finish Used
Used Minwax water-based stain for the gray color and Minwax oil-based stains for the other colors. Will add a couple of coats of outdoor urathane once benches are moved outdoors. Base for the bench was built first using the 2x3 studs. Once that was complete, I built a frame using the 1x4 pine and then cut the pieces for inside of the frame to correct length. Then stained all of the pieces. The pieces are joined to the frame using pocket holes and the frame with pieces attached is joined to the base also using pocket holes. In this way, no screw holes are showing on top surface.
Recommended Skill Level
Beginner

Bypass Closet Doors for the hallway and master bedroom

Submitted by AlohaMama on Thu, 01/26/2012 - 12:00

I loved the Idea of new closet doors and hated the idea of bi-folds. My house is crooked it seems. The doors don't sit straight and bi-folds always fall off their tracks. When I came upon the plans for Bypass Doors from Old Paint Designs I was hooked! I made 4 doors for the hallway in 1 day, oiled it with Danish Oil in Dark Walnut, hung it the next day and what a difference!! Glass is rather expensive in Hawaii and so is plexi-glass so I opted for Bead Board which gave it a more "country" feel instead of a more modern feel. I wish I could have used glass but the $150 price tag just wasn't fitting into my budget very well. My hubby loved the bypass doors so much he asked me to build them for our open closet. 2 days of work, 8 doors, 2 closets done!

Built from Plan(s)
Estimated Time Investment
Day Project (6-9 Hours)
Finish Used
Danish Oil
Recommended Skill Level
Beginner

Comments

Jilley27 (not verified)

Tue, 08/28/2012 - 15:27

Great job on the doors! I am interested in doing this myself. I will have to make 4 doors for my closet as well since I have such a large opening. Can you tell me what the measurments of your closets are? Also what are the dimensions of the pine that you used? Thanks a bunch!

In reply to by Jilley27 (not verified)

AlohaMama

Tue, 08/28/2012 - 18:44

My closet opening is about 8' across. Each door is 26" wide and 79" tall. I made them so the would have a 1" overlap on each side...

I used 1x6 @ 8' lengths of pine. I like the really knotty pine with lots of character! Have fun building! These were pretty simple to make once you get all the boards cut.

DIY Loft Bed

We adjusted the plans slightly to better fit our room. Rather than an angled set of stairs leading to the platform, we replaced it with a short vertical ladder. We also increased the height of the bed to allow for another bunk in the lower section for when Callaghan outgrows his crib. Plus, we added handles to the bed which made it easier for Luke to get up and down.

Estimated Cost
75
Estimated Time Investment
Afternoon Project (3-6 Hours)
Recommended Skill Level
Beginner

Comments

Child adirondack chairs

Submitted by sidman on Tue, 02/14/2012 - 02:37

I just had to build these for my two kids. Thanks Ana!

Built from Plan(s)
Estimated Cost
15.00
Estimated Time Investment
Weekend Project (10-20 Hours)
Finish Used
Painte two of them per the kids request and the other I just coated with a light oak with poly stain.
Recommended Skill Level
Starter Project

Patio Table

Submitted by Rennie82 on Wed, 06/13/2012 - 17:42

Project took a lot more time and patience than the last few little ones that I have done. I like the simple outdoor table but wanted a little bit more. I used the basic concept and mixed it with a patio table from PB that I really enjoyed but didnt want to pay $800 for. The table looks fantastic and am still debating on what type of finish, if any, to use. Hoping to make the matching bench soon for one of the sides of the table.

Built from Plan(s)
Estimated Cost
Around $120 including the carriage bolts so I can take off the legs.
Estimated Time Investment
Weekend Project (10-20 Hours)
Finish Used
None as of yet, leaning towards Thompsons clear waterproofer
Recommended Skill Level
Intermediate

Comments

Kitchen Island

We had an area in our kitchen where the washer and dryer use to be, and we wanted to build a cabinet that would fit in that spot. We took these plans and adjusted the sizes to fit the space we needed. We made the depth deeper and we cut off one of the side drawers and doors. We found a pre-made 1 1/2 inch butcher block counter top at a local wood supply warehouse that fit our needs perfectly. The countertop was about a quarter of the price of the whole cabinet, but it was worth it. In the drawers we used wrapping paper that we found at Cost Plus which fits us to a "T". We painted it with General Finish Milk Paint in Bayberry Green and used a clear coat with a satin finish. My biggest advice to someone making this cabinet is to take your time and make sure everything is square.

Built from Plan(s)
Estimated Cost
$600
Estimated Time Investment
Week Long Project (20 Hours or More)
Finish Used
General Finish Milk Paint Bayberry Green, Satin Clear Coat
Recommended Skill Level
Intermediate

Comments

vabvive

Mon, 07/02/2012 - 10:10

You've done a beautiful job! What did you find was key to getting everything square?

This is lovely & has inspired me to make my own. I need a piece for my master bedroom that I can use as a TV stand and also to conceal my laundry baskets. Originally I'd planned on adapting a sideboard and using a tip-out door like Ana's trash bin for the laundry -- but this piece is so beautiful I may just ensure that my laundry basket will fit inside and build as-is so that I can easily have the option to use it differently if I want to.

Schweizerfamily

Wed, 07/04/2012 - 06:59

Thank you so much. We purchased a couple of Clamp it Assemby Sqares from rockler.com. These helped a lot for getting everything square. We also took our time and did not rush.

Dustin (not verified)

Wed, 07/11/2012 - 19:42

Love your modified sideboard! The color is gorgeous and the butcher block is a great addition!

I was wondering what kind of hinges you used. I looked for flush mount hinges at Lowes today and they are not going to work. I want it to look like yours where you can barely see the hinge.

Do you remember the name of it? Where you got it? Pic? Any help would be appreciated!!

Dustin Roberts
[email protected]

Schweizerfamily

Wed, 07/11/2012 - 20:15

Thank you very much. We had a really hard time finding hinges also. We tried Home Depot and Lowes and came up empty. We finally went on to Hillary Louise's blog and follow the links to the website where she bought her hinges. http://www.cabinetparts.com

Here are the links that she posted.

http://www.cabinetparts.com/p/amerock-traditional-cabinet-hinges-AMCM31…

http://www.cabinetparts.com/p/amerock-traditional-cabinet-hinges-AMCM31…

We just bought ours in a different color.

Becka (not verified)

Sat, 09/08/2012 - 13:14

My husband & I are looking to build our own too but the dimensions of the original plan would make it too big for our dining area. Yours would be a perfect size though - would you mind posting the size adjustment for yours? Or could you email it to me? I would be forever grateful :)

Love the color you painted it too....very nice choice!

Becka Krikorian (not verified)

Sat, 09/08/2012 - 13:18

My husband & I are looking to build our own too but the dimensions of the original plan would make it too big for our dining area. Yours would be a perfect size though - would you mind posting the size adjustment for yours? Or could you email it to me? I would be forever grateful :)

Love the color you painted it too....very nice choice!

rhettar

Sat, 01/19/2013 - 11:37

This is exactly the size down I had in mind and was wondering how it would look with one door off by itself, it looks great! I even thought about incorporating one door to actually be a tilt or pull out for trash. You guys did a wonderful job and it looks like it was built in where you ended up putting it in your kitchen... Are you going to do a little something now to match on the other side of the stove?

Schweizerfamily

Fri, 01/25/2013 - 09:12

Thats a great idea. We were thinking one our next projects would be a mix between this and Ana's recycling center with the tilt out for dog food.

Rolling laundry cart

Submitted by smitcher on Wed, 06/03/2020 - 13:48

My husband and I have been inspired by your website and are getting started with wood working projects. We did this cart on the weekend. We used MDF board for the front, back and shelf bottoms because we had it laying around after replacing our garage shelving. I’m pleased with how it turned out given that we are just beginners. I do think we’ll have to invest in a table saw. Not a fan of working with MDF board. We used the example found on Infarrantlycreative.net but changed it up slightly. (Sorry about the first photo, I can’t seem to delete it)

Estimated Cost
Under


Approximately $35 CAD because we had the MDF, paint and nails
Estimated Time Investment
Afternoon Project (3-6 Hours)
Recommended Skill Level
Beginner

Comments

Barn Door Console with Drawers

Submitted by Anonymous (not verified) on Mon, 05/06/2024 - 13:27

Being a newby to woodworking, I wasn't sure if I could tackle this build. I saw pictures on your website and decided to give it a try. However, my wife wanted drawers so I made the doors a little shorter in order to add the 4 drawers but keep the height at 36". Thanks for your inspiration. I'm getting more comfortable everyday.
 

Louis Villarrubia


Daughters blue Playhouse

Submitted by rysos81 on Thu, 07/23/2020 - 08:55

I used the basic framing plan for the project, but extended roof overhangs, added engineered siding / trim and cedar shake roofing. I put 2x4 bracing on for the platform.

Estimated Time Investment
Week Long Project (20 Hours or More)
Recommended Skill Level
Intermediate
Seasonal And Holiday

Dream Table!

Submitted by Anonymous (not verified) on Thu, 02/06/2020 - 11:44

Love love how this turned out! Great plans. We've been wanting to build this for years now. Works great for us...we are a military family and move every 3 years so being given able to break this down into pieces easily makes it easy on our moves! Thank you for the plans!


benches are next!

Built from Plan(s)
Estimated Cost
$126
Estimated Time Investment
Weekend Project (10-20 Hours)
Finish Used
Single coat Minwax early American
Varthane semi gloss poly
Recommended Skill Level
Intermediate

Sandbox with seats

Submitted by Anonymous (not verified) on Mon, 02/13/2017 - 22:09

This was my first project ever. I had a lot of fun and it didn't quite turn out right but next time it will be perfect.

Built from Plan(s)
Estimated Cost
$65
Estimated Time Investment
Day Project (6-9 Hours)
Finish Used
Thompson water seal in cedar
Recommended Skill Level
Beginner

Craftsman playhouse!

Love how this turned out!! Thank you thank you Ana!! Plans were great, I think we got it done for just about $250! 

Thanks again!

Built from Plan(s)
Estimated Cost
$250
Estimated Time Investment
Weekend Project (10-20 Hours)
Recommended Skill Level
Intermediate

Comments

Doggy loft bed!

Submitted by Anonymous (not verified) on Sat, 06/03/2017 - 17:31

My dog loves to people watch all day while I'm at work and she needed a new bed so I took the plans for the lower platform and modified them so it would stand alone. Took the platform and put it on the bottom so that her bed would sit inside instead of on top where she could more easily fall off.

I tried building without PH screws at first and all I ended up with was a lot of cracked and wasted lumber. Got the PH jig and finished the whole build myself in 2 hours. Sanding, staining, and sealing tomorrow but I'm just so excited about it I had to post now!

Estimated Cost
With the two sets of lumber, having to buy the jig, hardware, stain, and electric sander it cost me about $130
Estimated Time Investment
Afternoon Project (3-6 Hours)
Recommended Skill Level
Beginner

Comments

Sand Box

Submitted by lbrennec on Thu, 05/09/2013 - 05:54

I gave this one to my Dad to do. Of course he made some changes. But she loves her sand box and we love it too! Thought I would share some pictures of the construction after he brought the parts to our house. 400 pounds of sand later.

Estimated Time Investment
Weekend Project (10-20 Hours)
Recommended Skill Level
Intermediate

Kids Adirondack chairs

Submitted by redhead_61 on Fri, 04/08/2011 - 13:39

This was admittedly a little harder than I thought.  The first one turned out short of perfection trying to get things looking great.  The second one was better using a level and being more careful.  However, the fact that my nail gun totally went out halfway through made the project a long one.  But my kids LOVE them and they look so cute and luxurious out in my grass.  I love it. 

Built from Plan(s)
Estimated Cost
$10
Estimated Time Investment
Afternoon Project (3-6 Hours)
Finish Used
off white paint and poly
Recommended Skill Level
Beginner

Octagon Picnic Table

Submitted by Anonymous (not verified) on Sat, 04/09/2022 - 10:23

I just finished this octagon picnic table as per your plans
the 2x6 are all clear Western Red Cedar and the skeleton is
Douglas Fir. I think it turned out astonishingly excellent.

Thanks for the inspiration Ana.

Seasonal And Holiday

My Ikea Lack Inspired Bookshelf

This was my third project, but it is my favorite to date!

Estimated Time Investment
Day Project (6-9 Hours)
Finish Used
2 coats of Benjamin Moore Natura paint in Banana Yellow
2 Coats of poly acrylic
Recommended Skill Level
Beginner

Comments

joyreneeb (not verified)

Tue, 09/20/2011 - 12:16

Can you give a price estimate on your project? Looks great, btw!

In reply to by joyreneeb (not verified)

CapriciousElle

Fri, 09/30/2011 - 21:21

The lumber was about $25 and the paint I ordered online with a few other colors, but it is listed at $21.99. I only ordered a quart. Everything else I already had around the house. I hope that helps!

Back