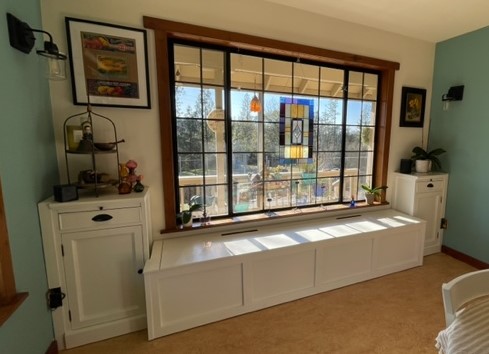
Banquette Bench Before and After
Thank you for the awesome banquet plans! The banquet will have cushions added and be a nice place to put an extra table for the kids at holidays. It is also amazing storage.
Built from Plan(s)
Thank you for the awesome banquet plans! The banquet will have cushions added and be a nice place to put an extra table for the kids at holidays. It is also amazing storage.
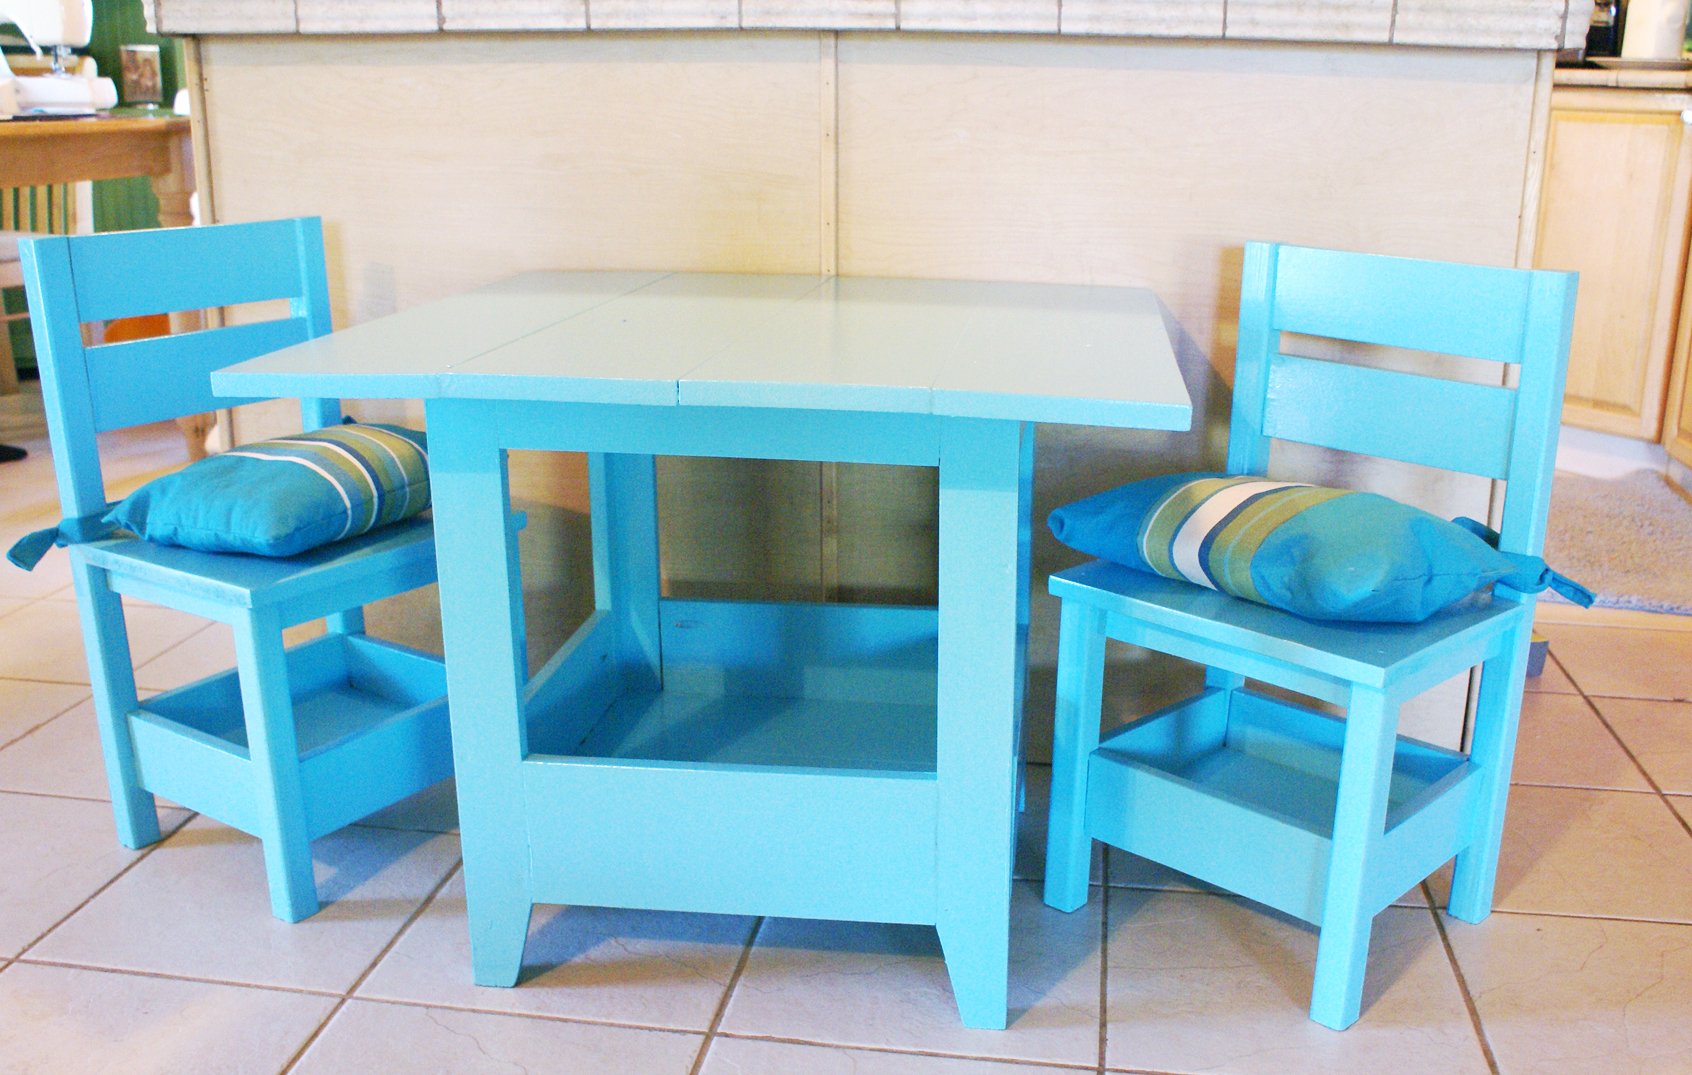
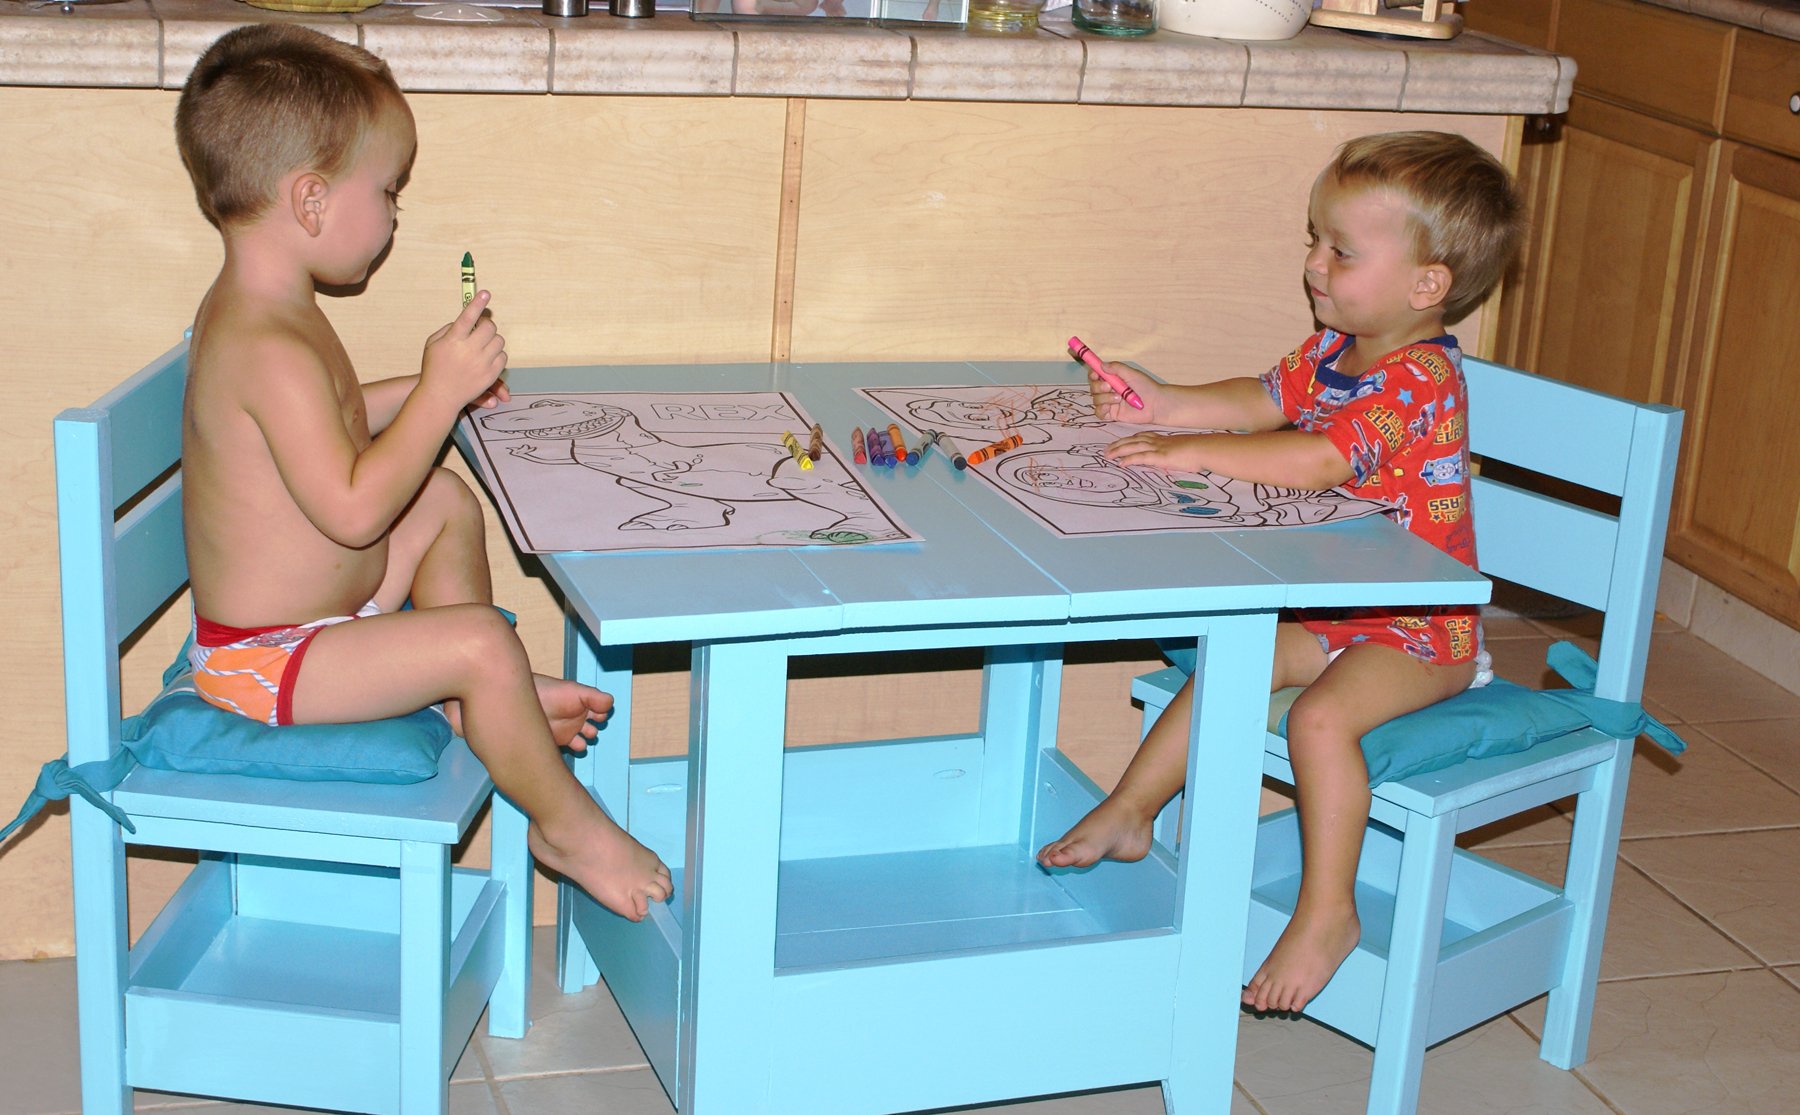
I saw where another builder had modified this plan slightly to have the square top, and I just loved it. We needed a homeschooling space that would be big enough for my preschooler and his little brother. My guys LOVE their table. I had a glass top that I had planned to top it with because I really loved that about the other table too, but as I wash placing the glass on my finished project it shattered in my hands. I took that as the Lord telling me to hold off on the glass top for now :)
This table and chair set is awesome, sturdy, easy to follow and perfect for our needs!
Tue, 10/25/2011 - 11:33
Really great job! Looks like your little ones like it, too.
Mon, 03/26/2012 - 01:36
Hi, I'm on a time crunch trying to get some projects built this week while my husband is off work & before he might deploy! He just built a desk yesterday to provide some work space/laptop space for me & it turned out amazing! The other thing I really want to complete is a kids table/chair set & I was considering your design after seeing the cute picture of your kids & how large the table appeared with them sitting at it. Can you tell me, are there plans for this one & if so, where or what it is called & also how tall your table is & what the length/width of the table top is? It looks like a large work space/surface on top which is something I'm hoping for with a preschooler homeschooling & his little brother to use together when he's older (still a baby for now). How old are your kids in the picture?! I'm trying to get an idea how long this sort of table set might be able to get use before it is outgrown like our current set. Any other tips/help would be great if you have the chance! Thanks so much!!!
Mon, 03/26/2012 - 01:42
Hi, I was wondering if you could tell me where the plans are for this table & the size of your table top Length/Width? It looks like a large space with both your kids using it - how old are they in the picture (I have a 4 year old and an infant). I'm wondering if my 4 year old & his friends would fit this table well with room to grow into it. Anyway, any tips if we were to build this? I have my husband home for a week & he built a desk yesterday that turned out amazing (one of the modular type plans that Ana shared). Anyway, if you are able to respond quickly, I'd love to try to run to Lowe's today & work on this with him tomorrow possibly. Thanks so much!
In reply to Questions by Guest (not verified)
Mon, 03/26/2012 - 05:16
I used the plan for the storage table : http://ana-white.com/2009/11/plan-kids-large-storage-play-table.html. I just modified the top like I had seen someone else do. I believe it was 31" x 31" or something very close to that. My boys are 3.5 and 2 in the photo, and now at 4.5 and 2.5 they both still have lots of room to grow. They love having their little table just for them.
Hope this helps!!! Good luck!
Tue, 03/27/2012 - 04:58
Thanks! I saw that the other builder posted something about 30x30. Would 31x31 also work or would it be too tipsy if leaned upon?! If you get a second, would you mind measuring yours? I love the color too by the way! My oldest is 3.5 right now so that make me more confident that he'll fit the table okay for a while. He seems to be growing fast these days though, so hopefully he won't outgrow it too fast! Thanks so much!
Tue, 03/27/2012 - 08:41
My top measures 29" x 29" actually. It doesn't seem to be anywhere close to tipping when my munchkins are leaning on it, but if you wanted to do the 31" squared, it may be best to add an extra inch or two to the bottom base as well. Just to insure the stability. It shouldn't be too hard to do.
Hopefully this helps!
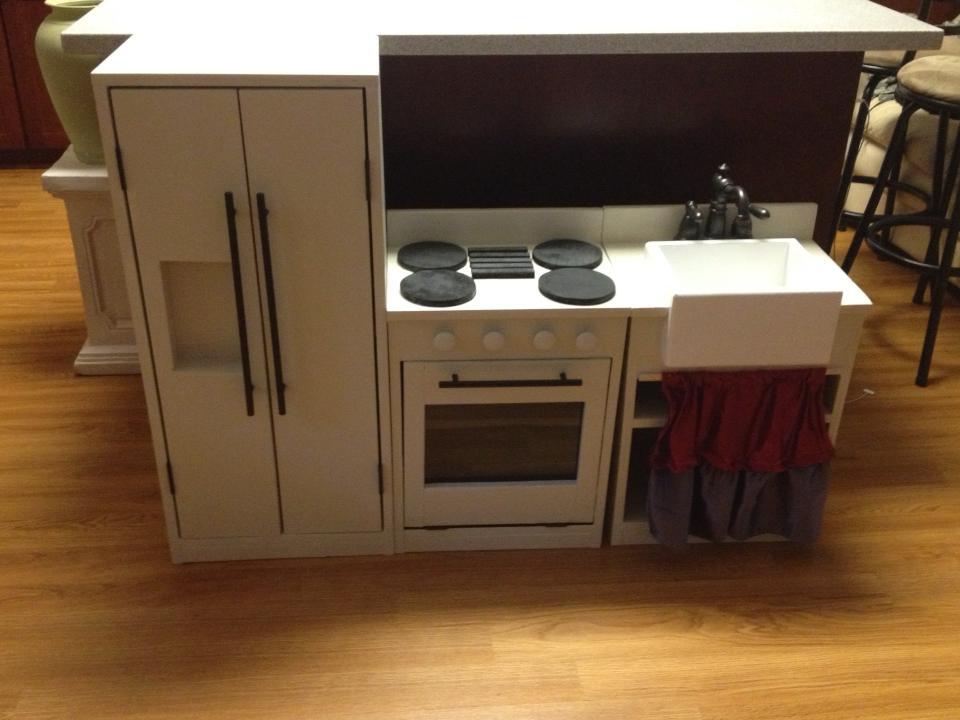
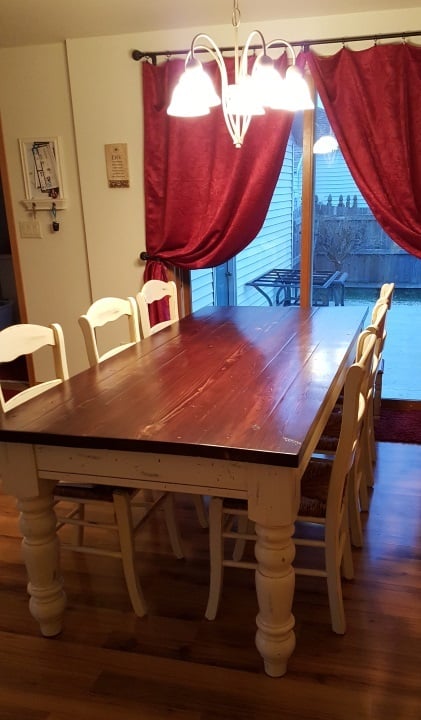
This was a kitchen for friends daughters birthday. I used my nail gun on this, made it so much easier:)
Thank you for the inspiration - I love how mine turned out!

Mon, 01/04/2016 - 17:11
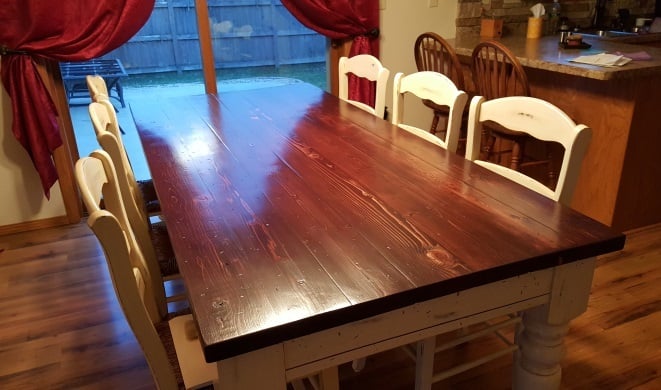
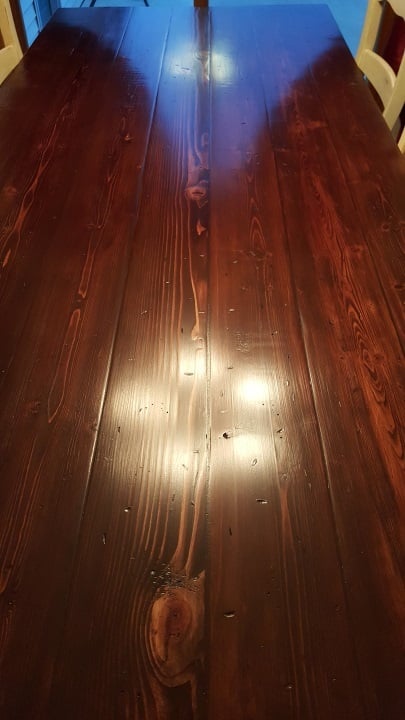
It looks beautiful! What did you use to stain the table top?
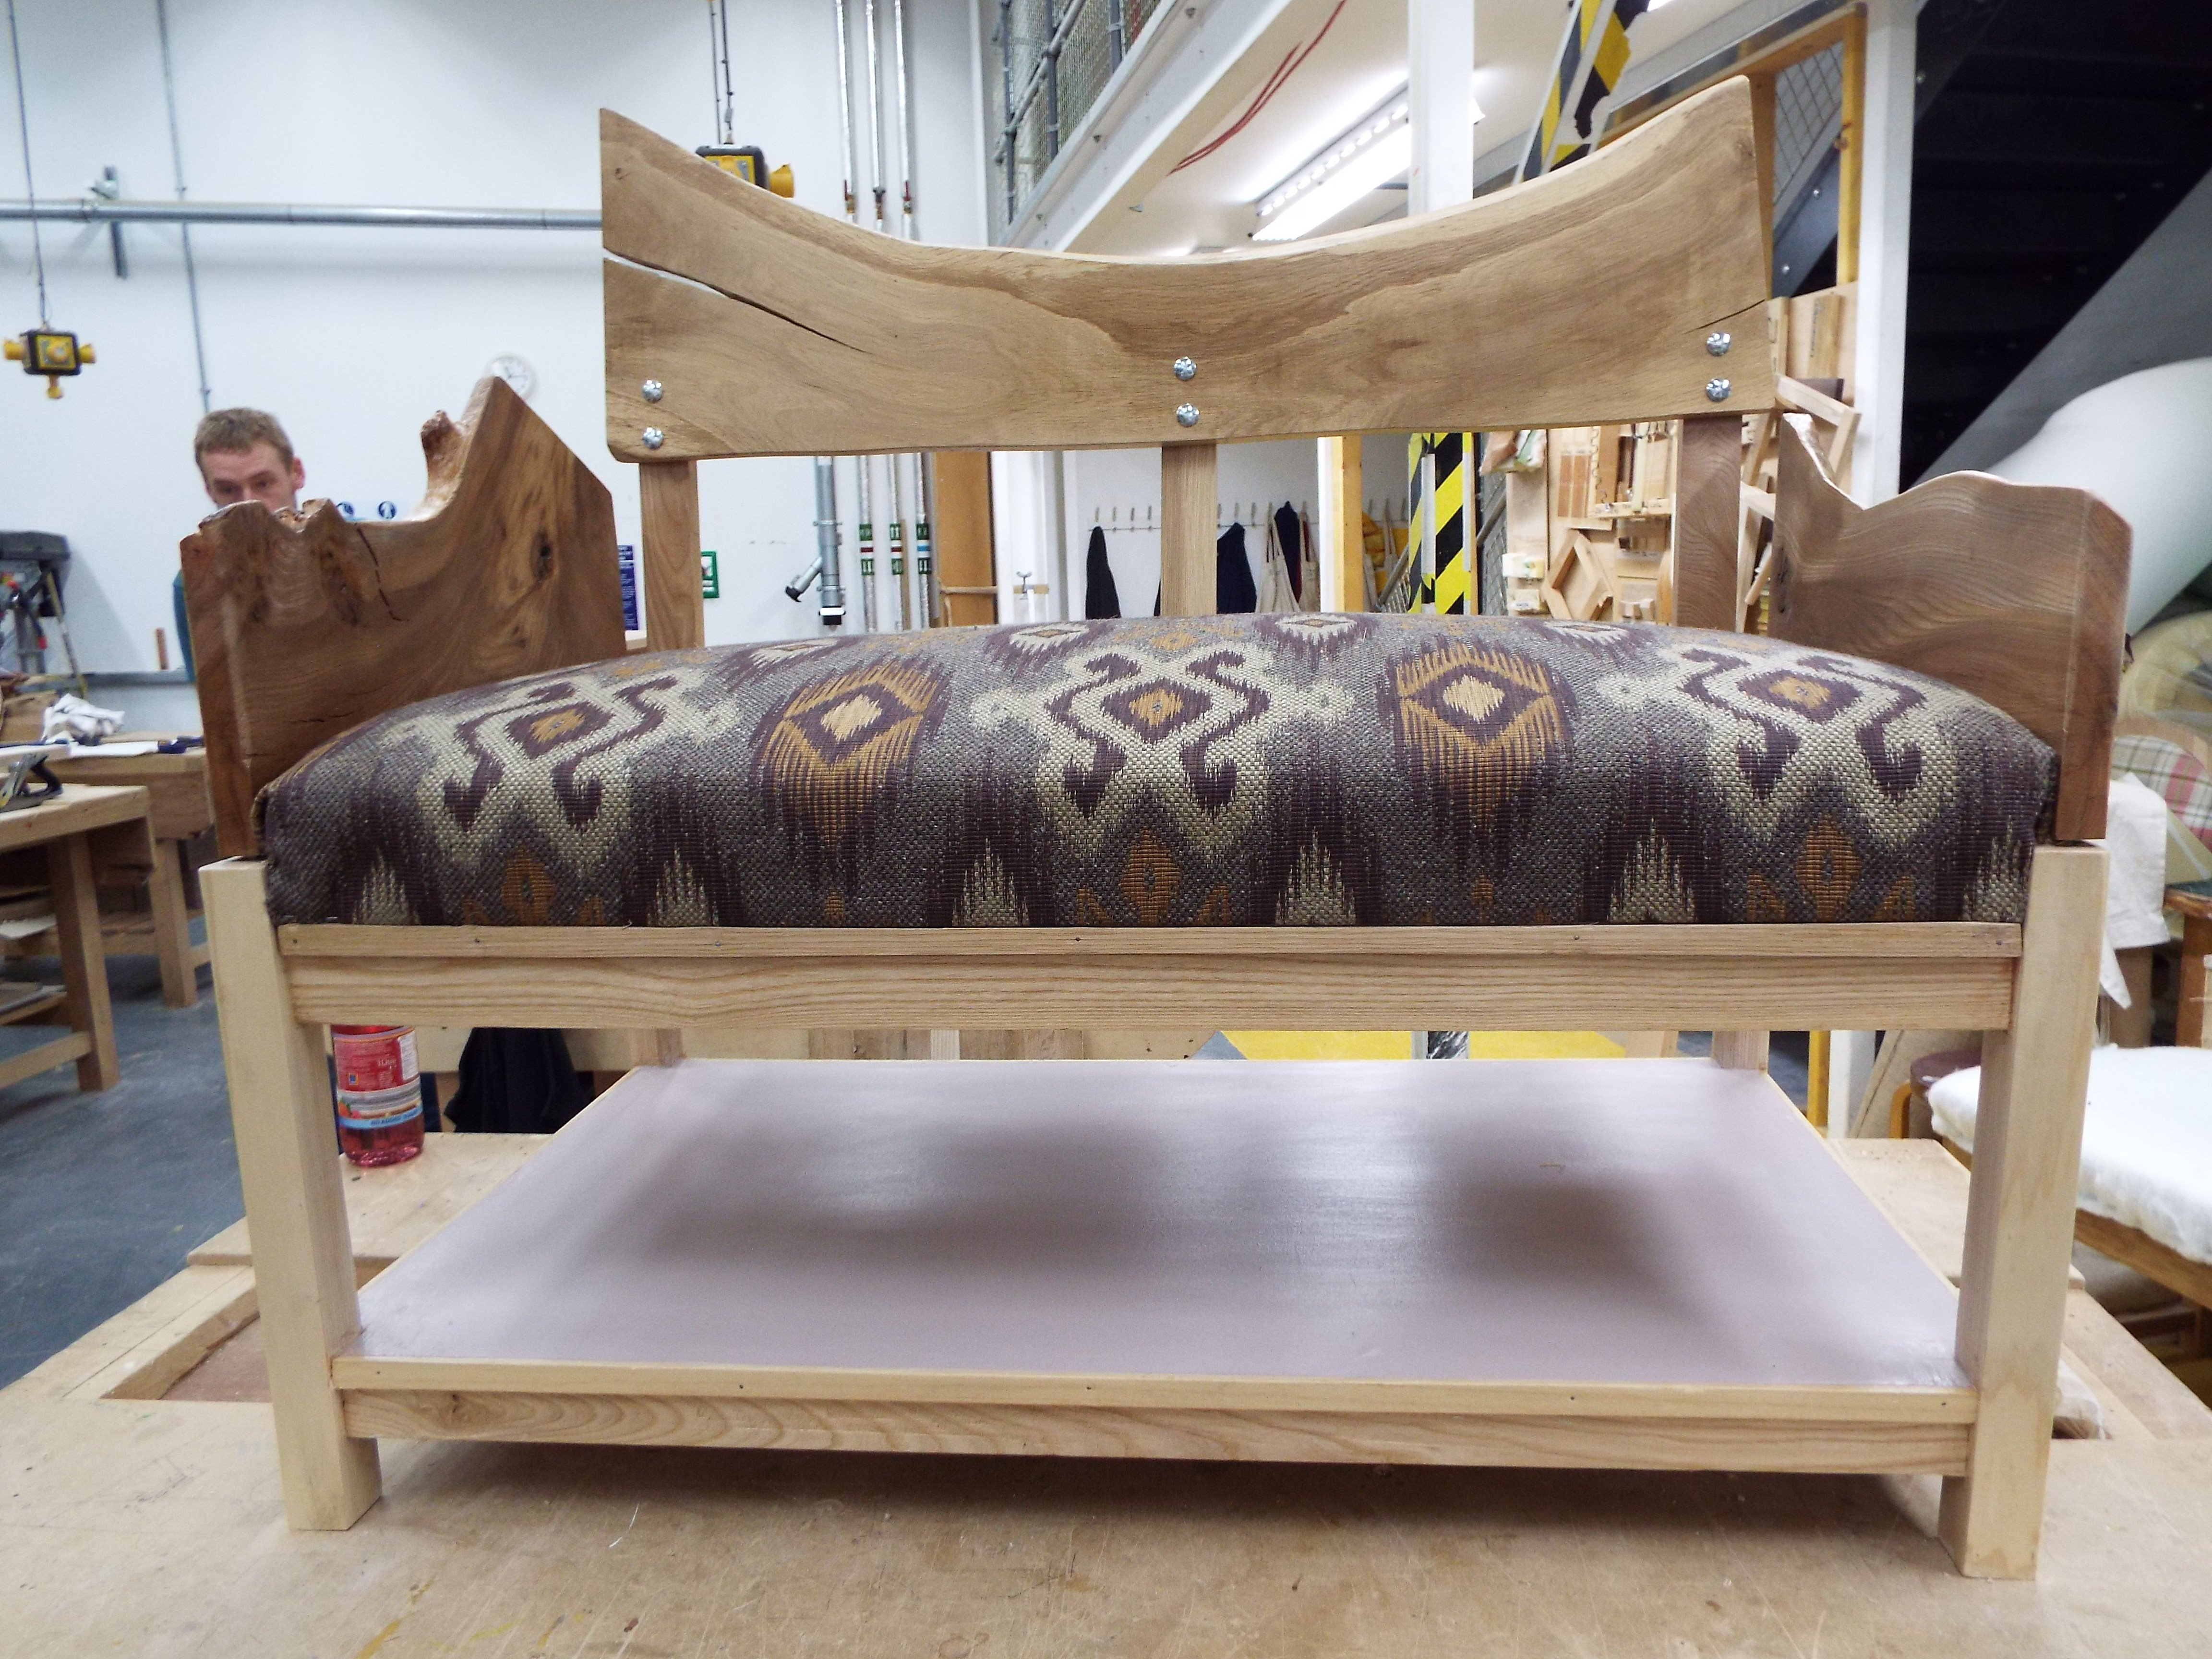
was my project at collage on my first course self desian and cost of extra wood £38 MATERIAL TO COVER £25
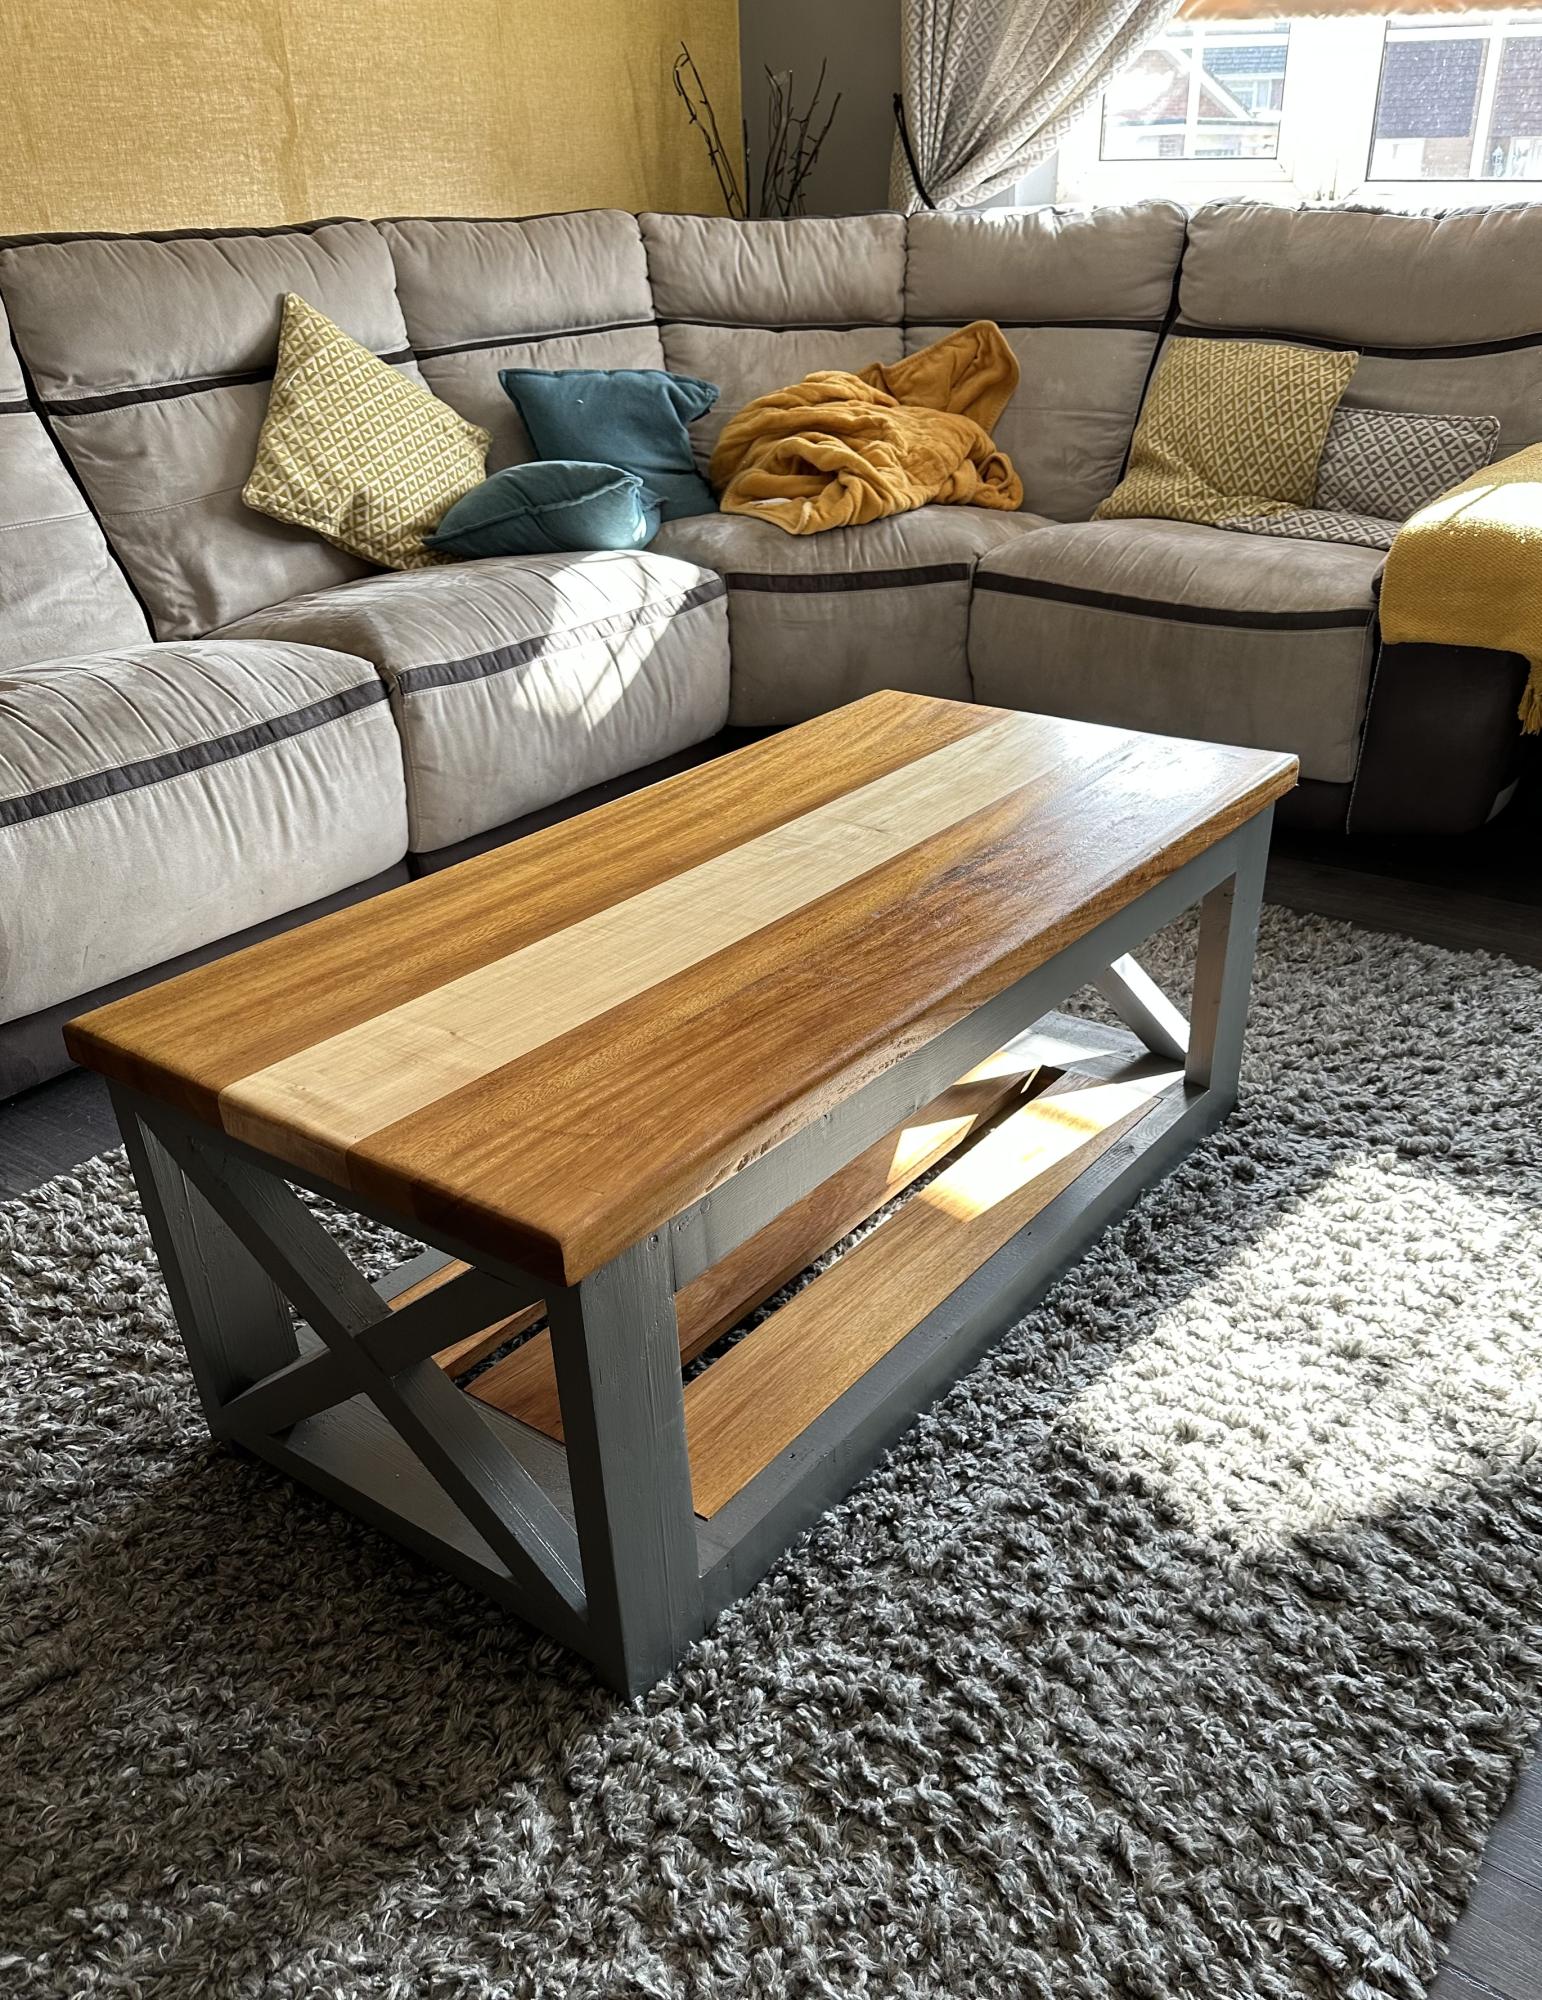
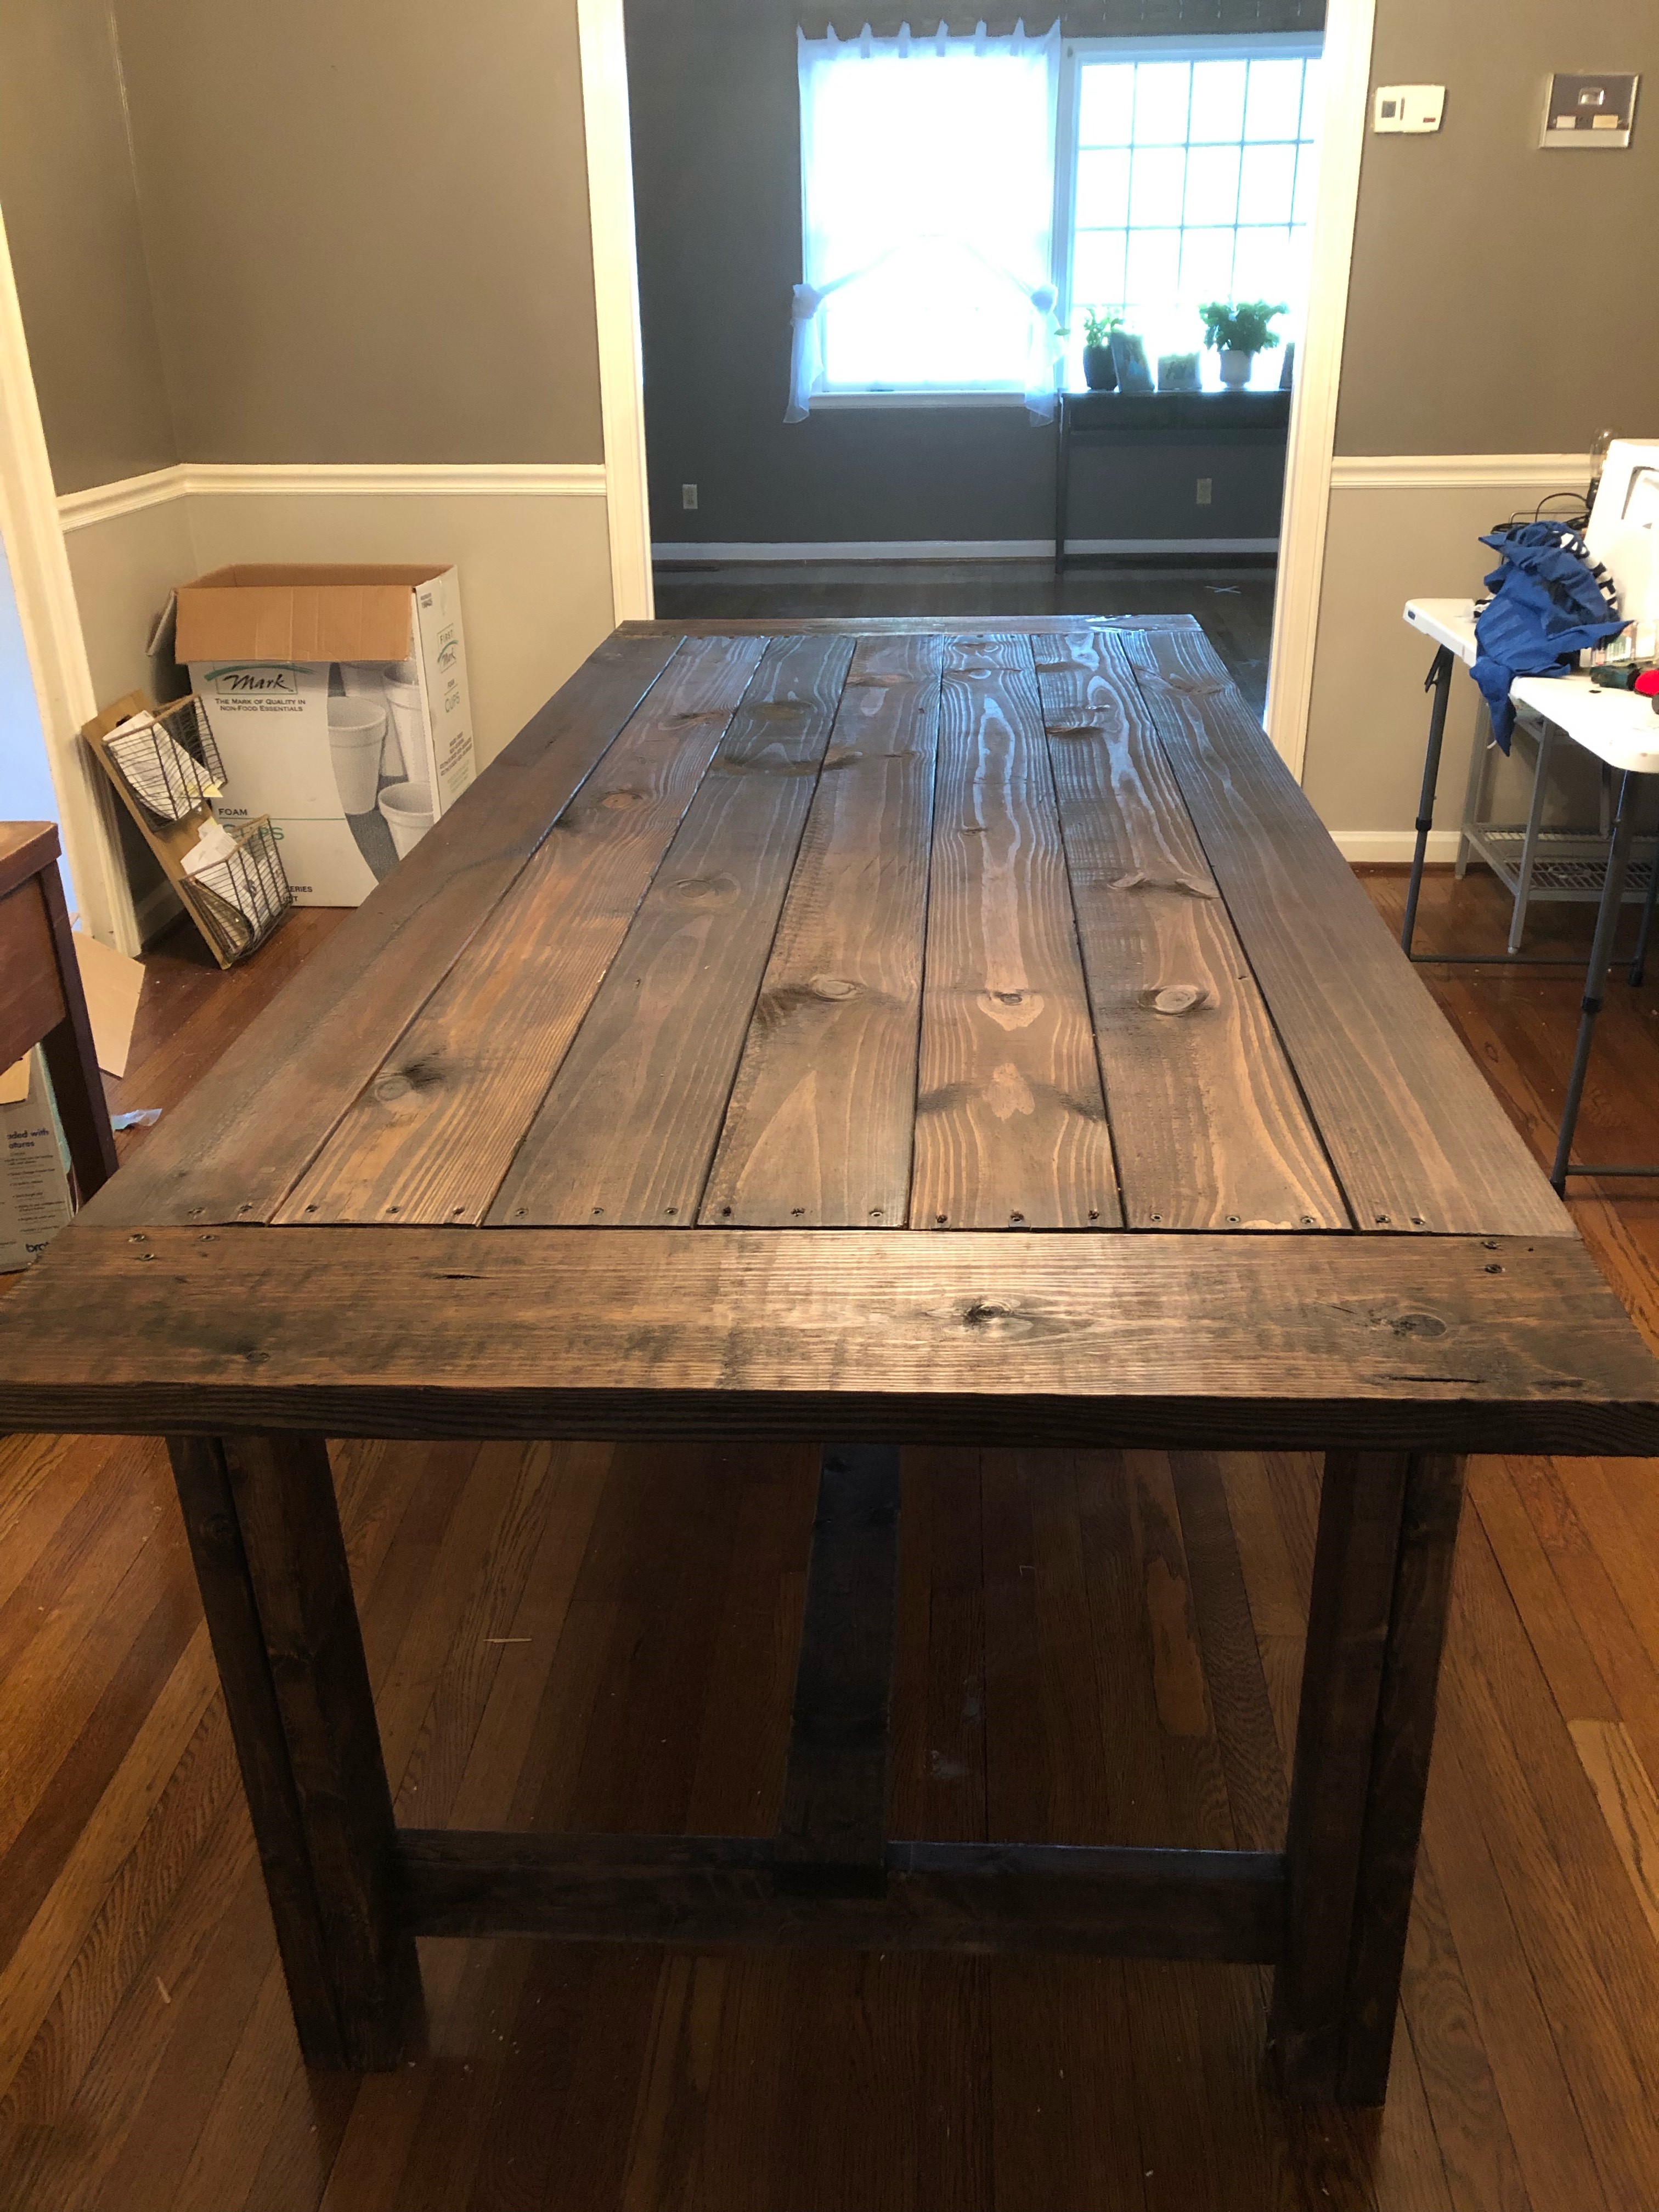
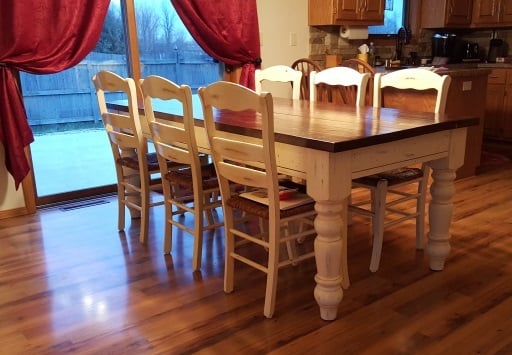
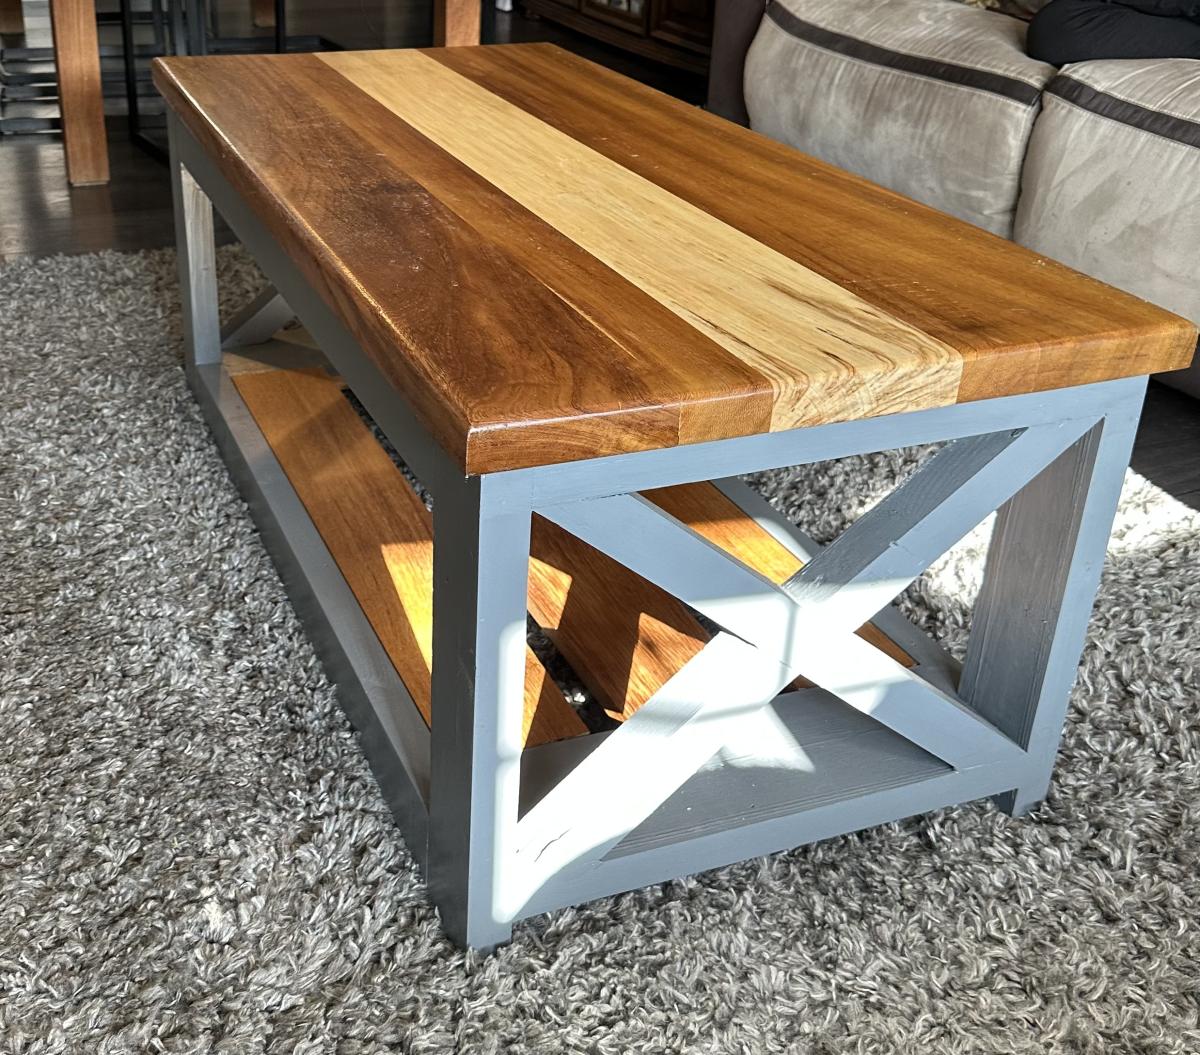
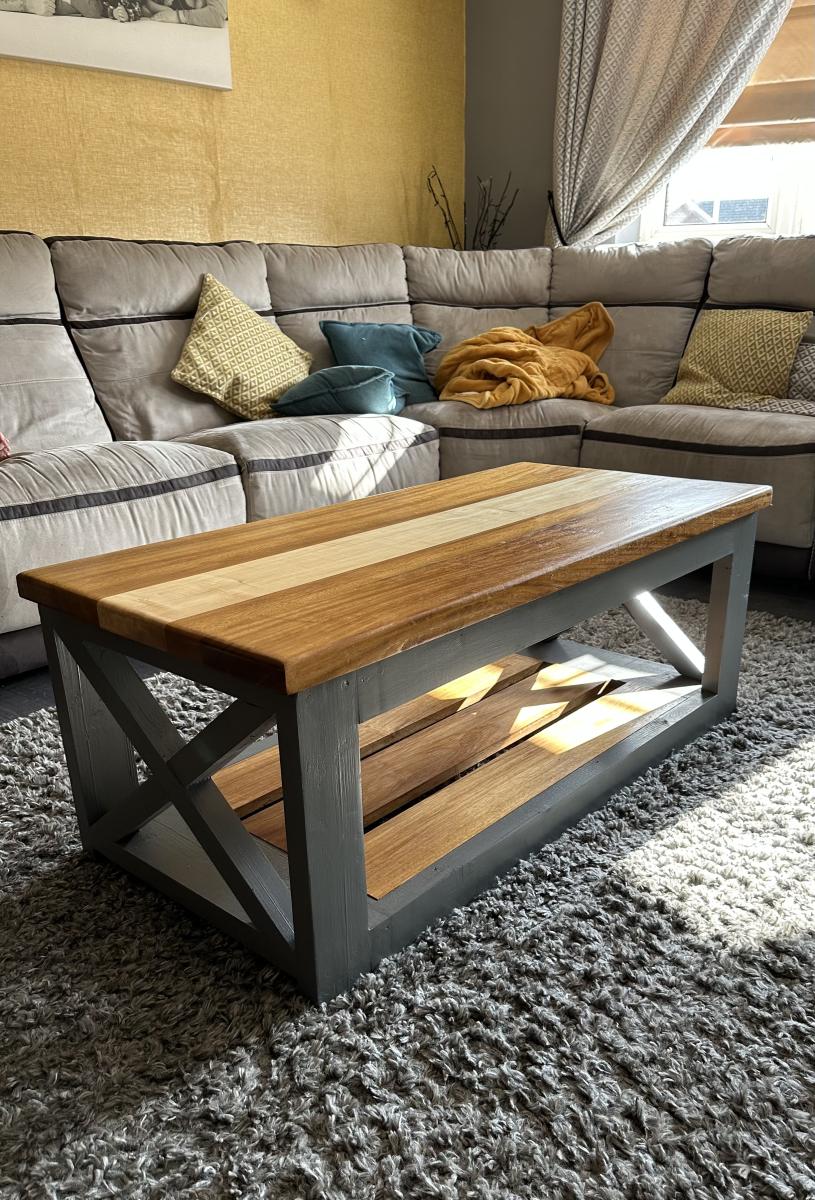
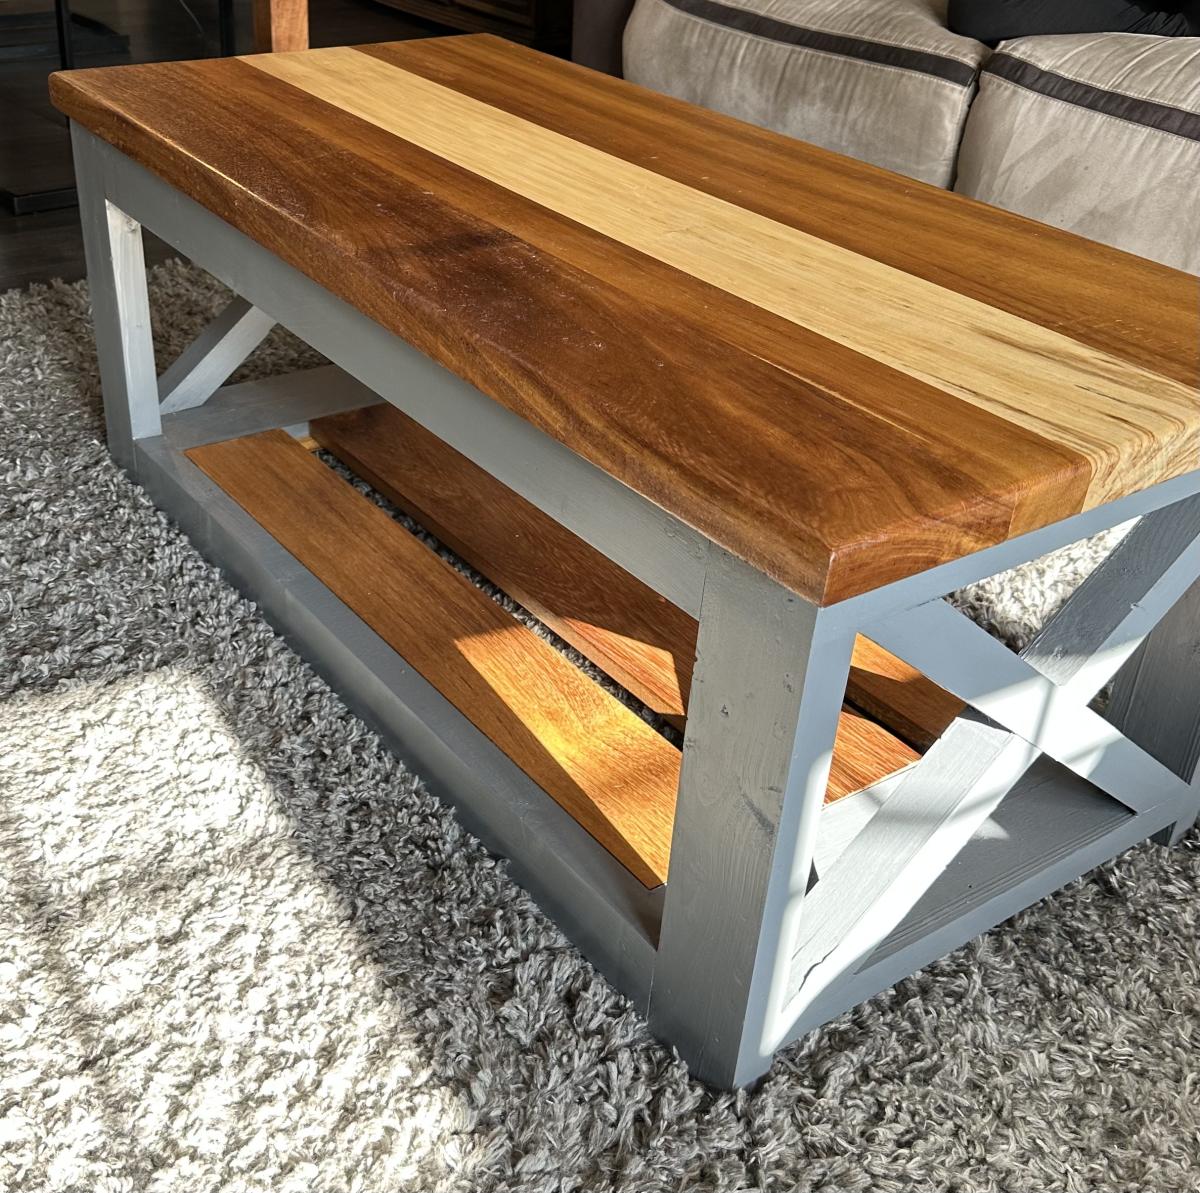
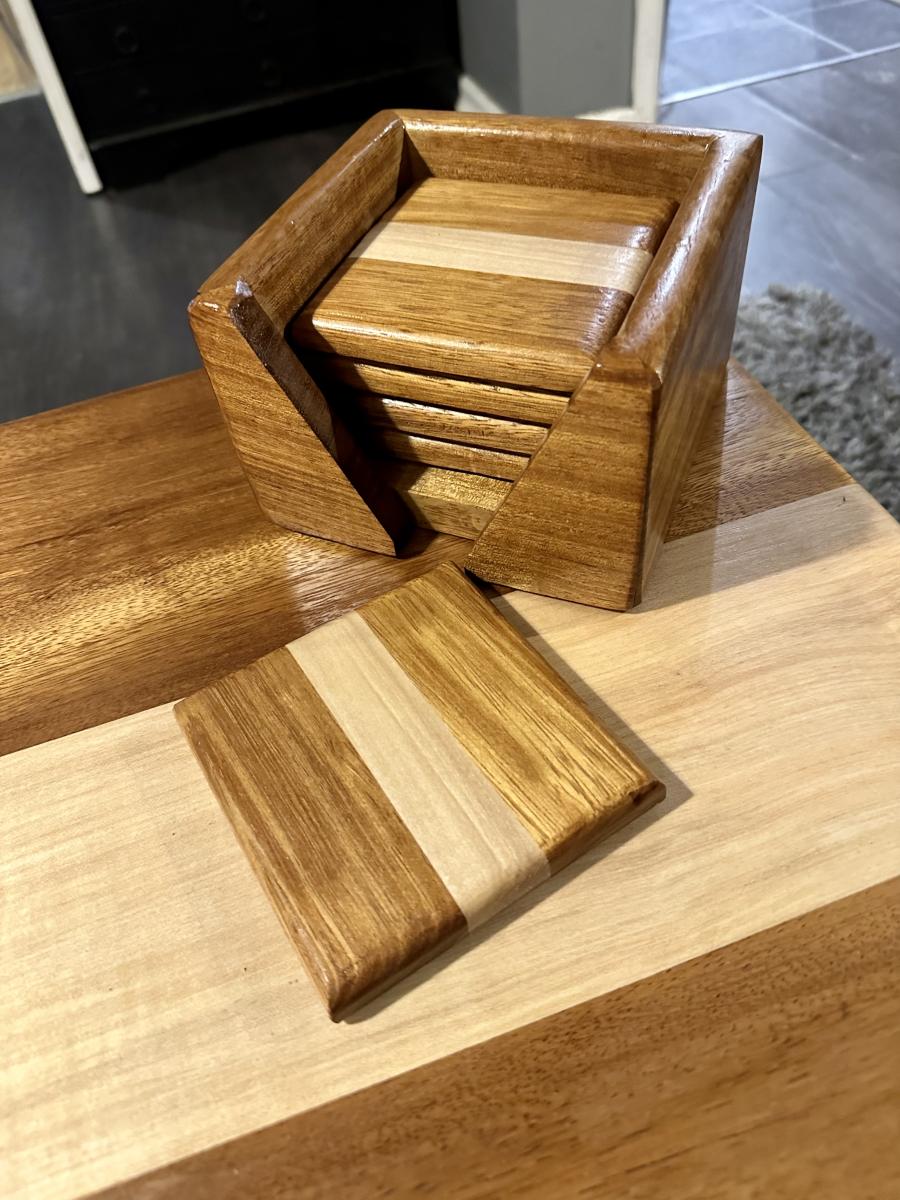
Wanted a new coffee table and loved the plans for this. I wanted something slight different though with a solid hardwood top.
I used only reclaimed timber. The frame is from old construction lumber which I planted and squared off. The top and bottom slats are iroko and sycamore sourced from commercial wood recycling project.
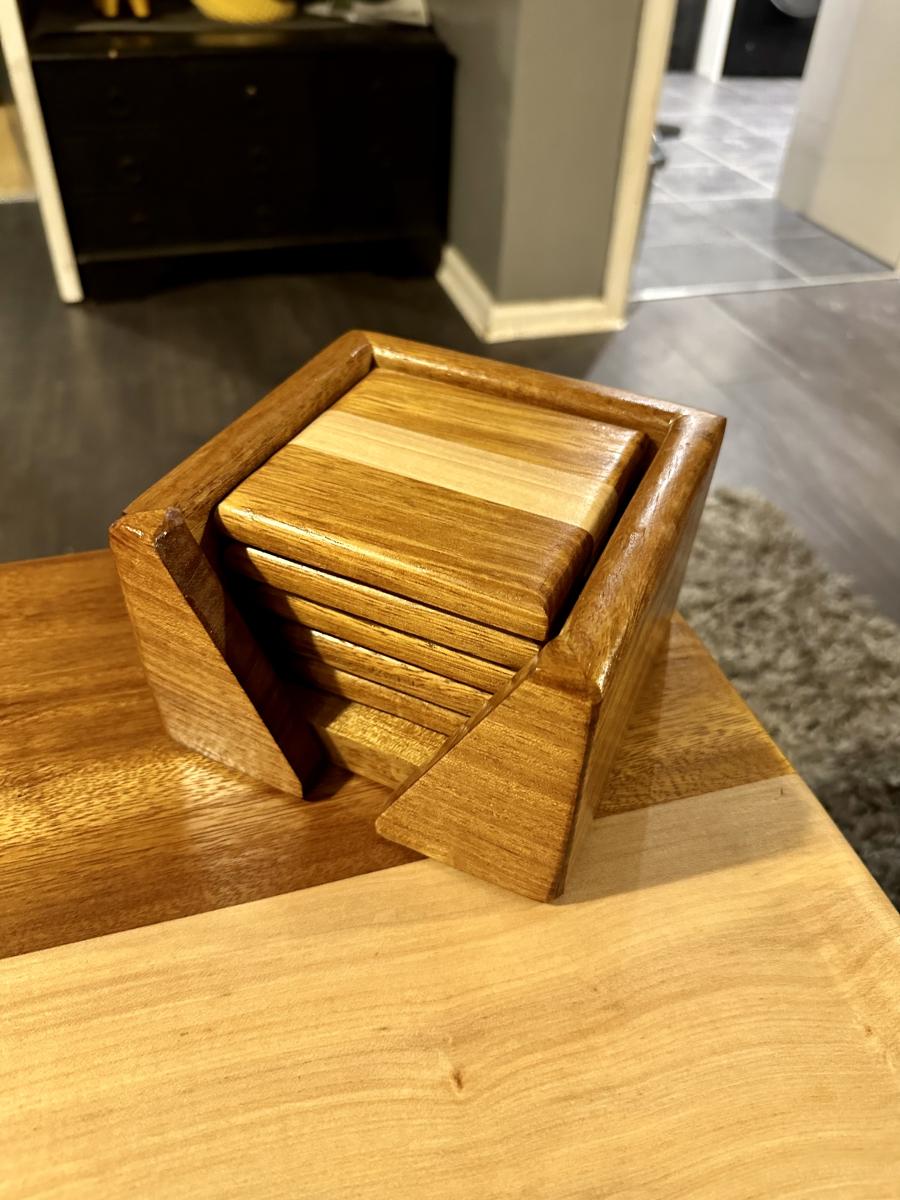
I had a little bit of wood left over so made some matching coasters and coaster holder
Sat, 02/18/2023 - 20:21
You did a stellar job on this! Thank you for sharing:)
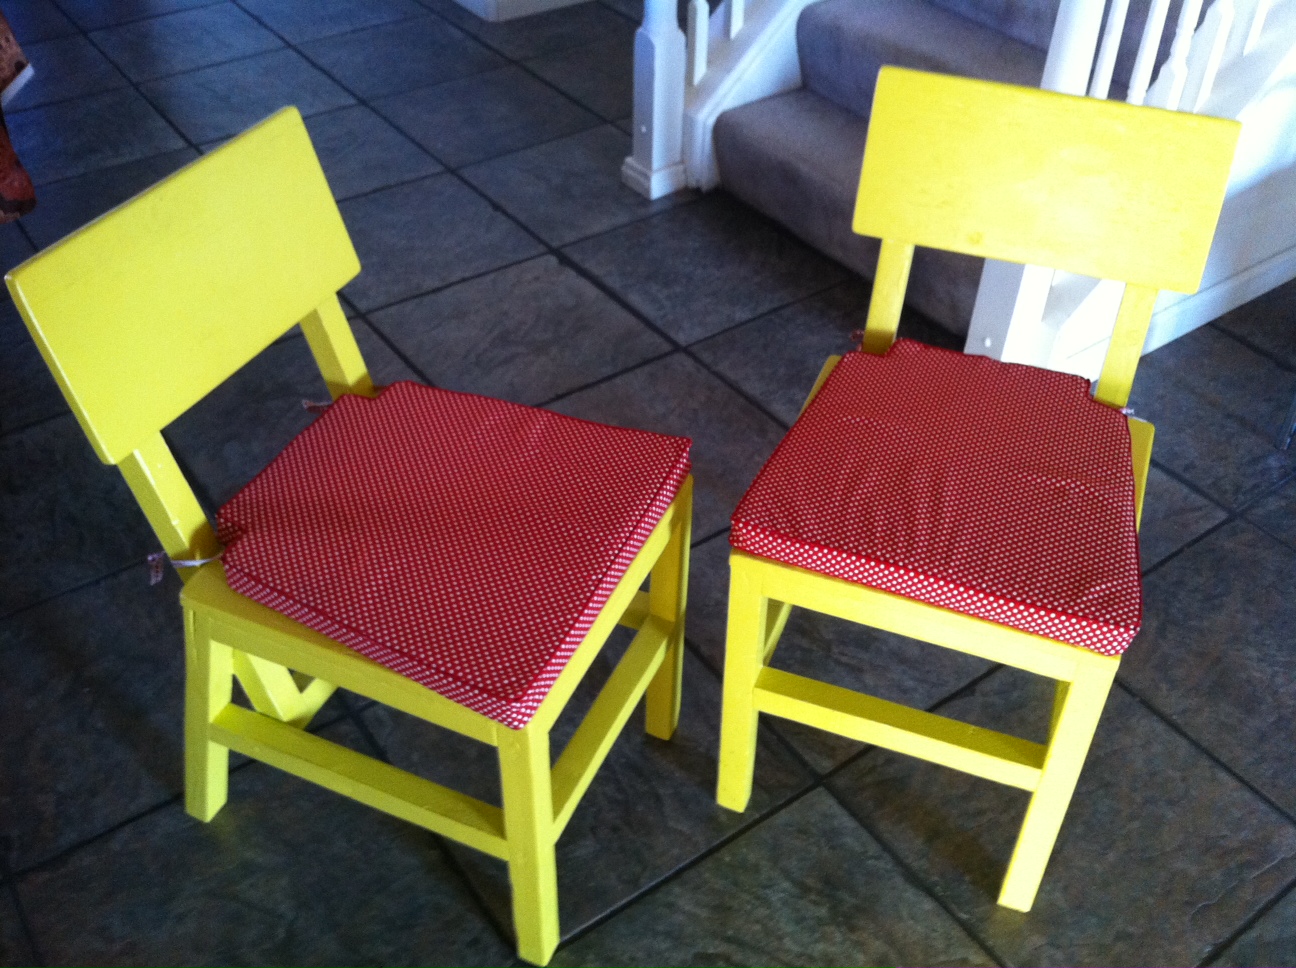
After our Wal-Mart dining room chairs started falling apart (after 8 years of use) I decided it was time to replace those ugly old things with something a bit more unique. The Harriet Chair really caught my eye, so I set out to build it! My wife, Judi, chose the mustard yellow color and we thought it would be cool to add contrast with some red and white polkadot seat pads from IKEA ($9.99 ea.).
These are the first two I've built, with a goal to eventually build a total of 6-8 to fit around a table I also plan on building.
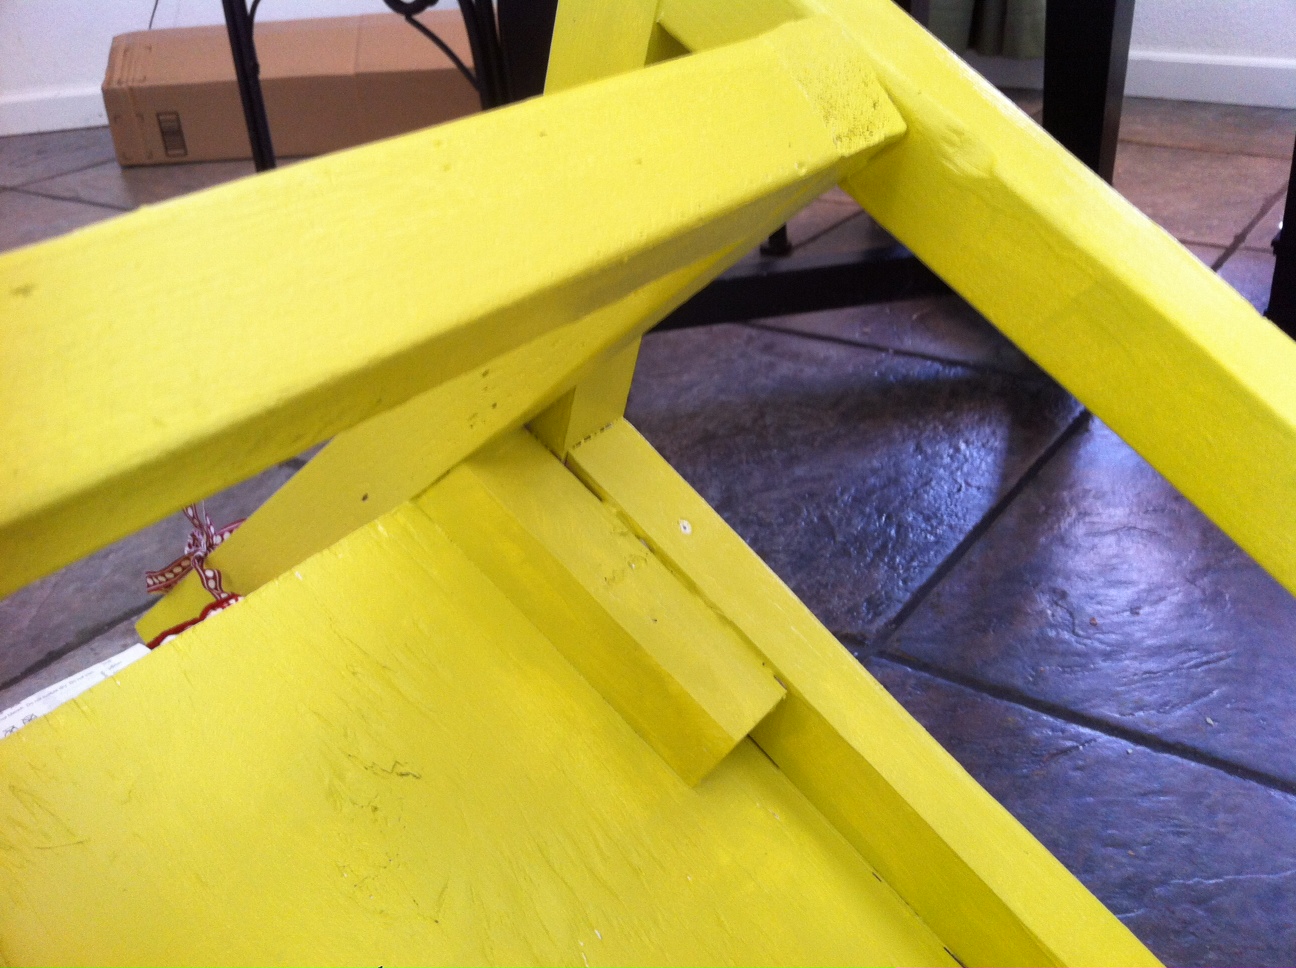
I made the addition of the front support as Judi likes to rest her feet on it. And, as you can see in the second photo, I added a small brace, cut at 15 deg., on the bottom side screwed to each backrest 2x2, and screwed to the underside of the seat (chair is upside down in photo). This gives additional rigidity and support for the backrest and also provides a nice guide to ensure the backrest has an exact 15 deg. angle on every chair. This was at no additional cost as I used scrap 2x2 pieces for it. And best of all this addition stays hidden and in no way changes the original aesthetic of the chair.
The chairs are extremely sturdy, comfortable and look great in our dining room! The only change I will make on the next set is using higher quality plywood as I had to putty this plywood a bit more than I had hoped. Otherwise, what an easy and inexpensive upgrade to our space!
Fri, 11/04/2011 - 14:59
Haven't been able to add the Kreg to my tool chest yet so I used glue and screws. Pre-drilled all the holes of course. Came out extremely sturdy. This was one of my first projects of this nature so I've learned a ton from each chair I make. These two were the first and the next ones have been a lot more precise and sharp looking.
Sat, 11/05/2011 - 00:59
Thanks for your answer! I'll try it that way too then...
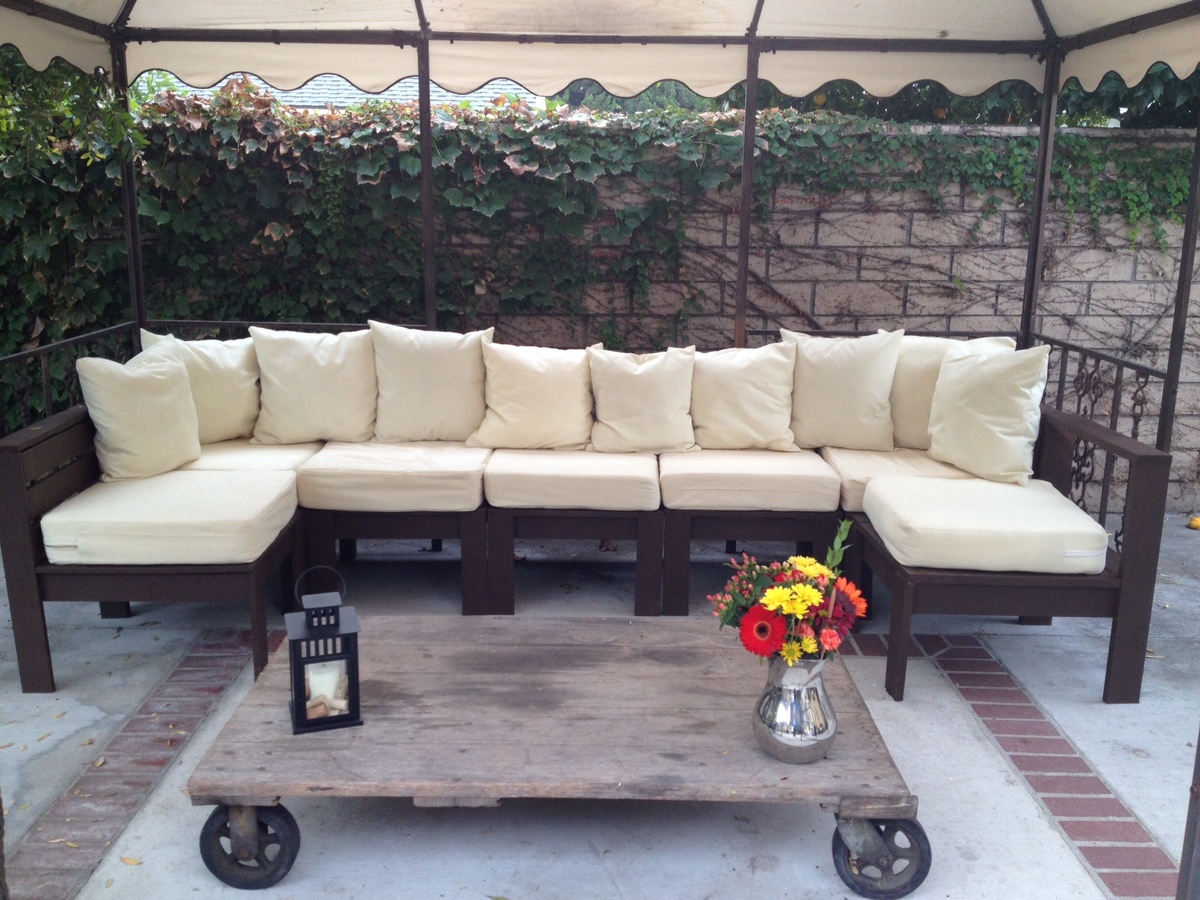
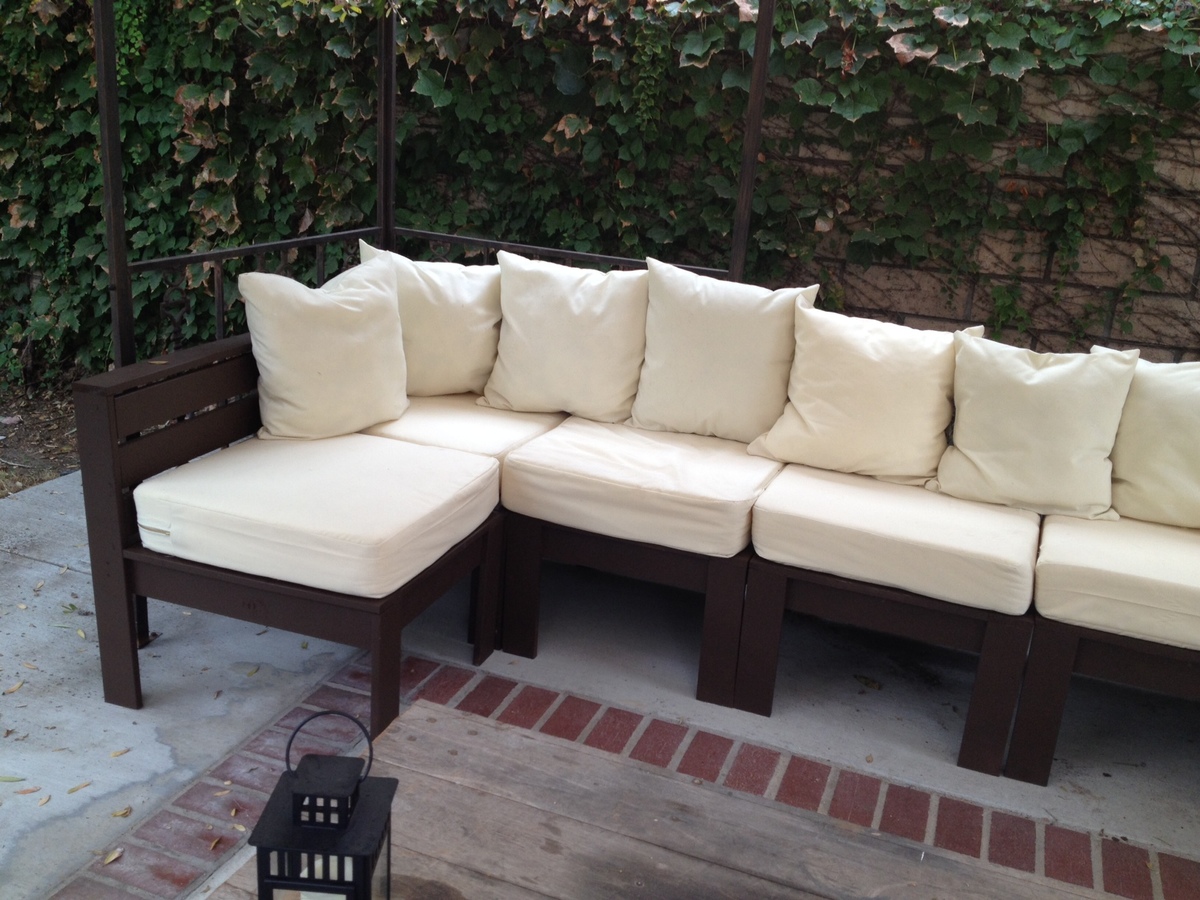
This is the first wood working project I took on. My husband thought I should start with, like a birdhouse or something, but I'm a "go big or go home" kind of person (plus I hate birds), so I thought a seven piece sectional was the way to go. After a few lessons from him on the miter saw, I got the clear to work on the project solo. (My husband builds a lot of our furniture but I insisted I wanted to do this 100% myself...and he surprisingly agreed).
The first section took a really long time for me to do (maybe 4 hours), but considering I've never even so much as drilled a hole for a screw, I considered it a success. After that (and after I decided to go out and buy a Kreg Jig - best invention ever - and ditch the "knock off" I tried to buy/use), it was pretty smooth sailing from then on out. Aside from being time consuming, I was surprised at how easy the plans were to follow. Ana it truly amazing for publishing these.
From start to finish, it probably took me a month to complete (and THANK GOD we bought a paint sprayer in anticipation for painting the outside of our house, or I think it would've taken at least another week to finish). But that's also because I stupidly decided to sew all of the cushions/pillows myself. I just couldn't justify ordering pre-made ones for seven individual pieces (the price quote I was getting for that and what I wanted was close to $1,000 in itself).
Overall, I'm VERY excited/please with how it turned out. I priced out the West Elm sectional of this size and it would've cost us about six times what it cost us to build from scratch. I can't wait to take on the next project (after a much needed break...)

Mon, 10/21/2013 - 10:40
I am so impressed, what a beautiful space you created!Thanks for sharing!
Mon, 10/21/2013 - 15:02
I stumbled upon your site a couple of months ago, and I'm a bit obsessed. I have a laundry list of projects I want to do now...more to come!
- Nicole

Wed, 10/23/2013 - 10:04
Looks awesome! To bad cushions are so flippin expensive.
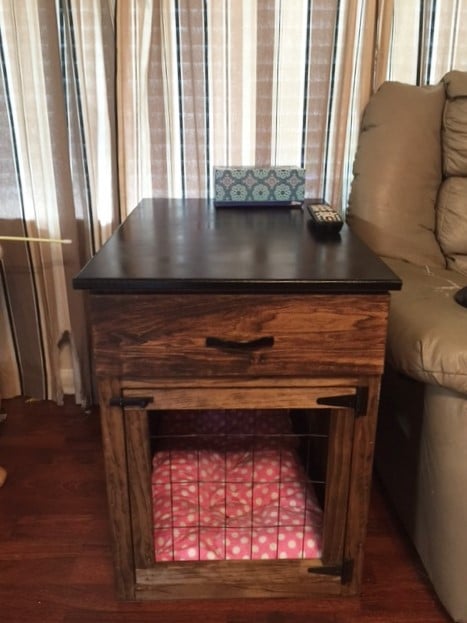
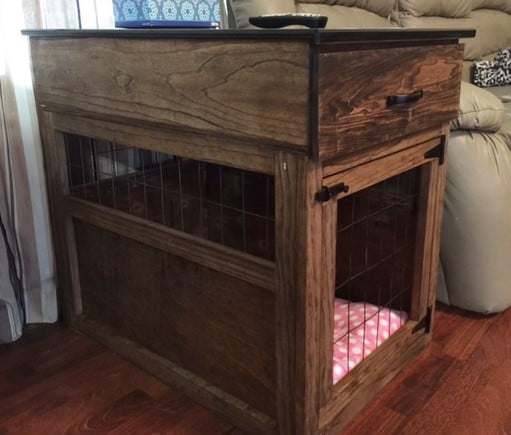
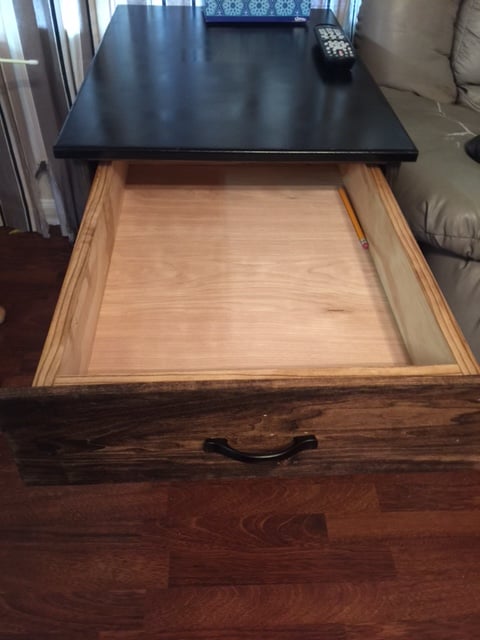
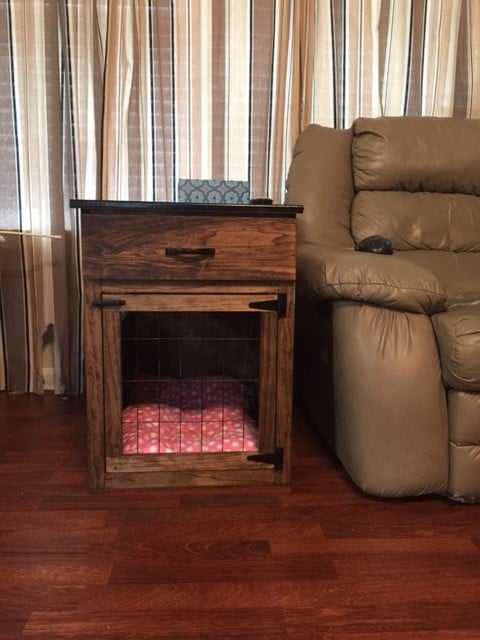
You may remember my green stratton day beds that I built a long time ago- finally I have another project to post- I am soo happy I found Ana White's website. We just got back from a 2.5 week vacation in Israel and my dogs were staying with my sister. She told me they had been sleeping in the same kennel together instead of separately. Their kennels are too small so I decided to build them one using wood I already had. But since they are small dogs, I decided to size it down- but I wanted it end table height- so I built a smaller kennel- 20"H x 19"W x 28"D. but... I added a drawer to the top to bring it to the right height. You can read all about it on my blog- link below.


Video link: https://youtu.be/VfVbId3FeU4
Fun and easy project
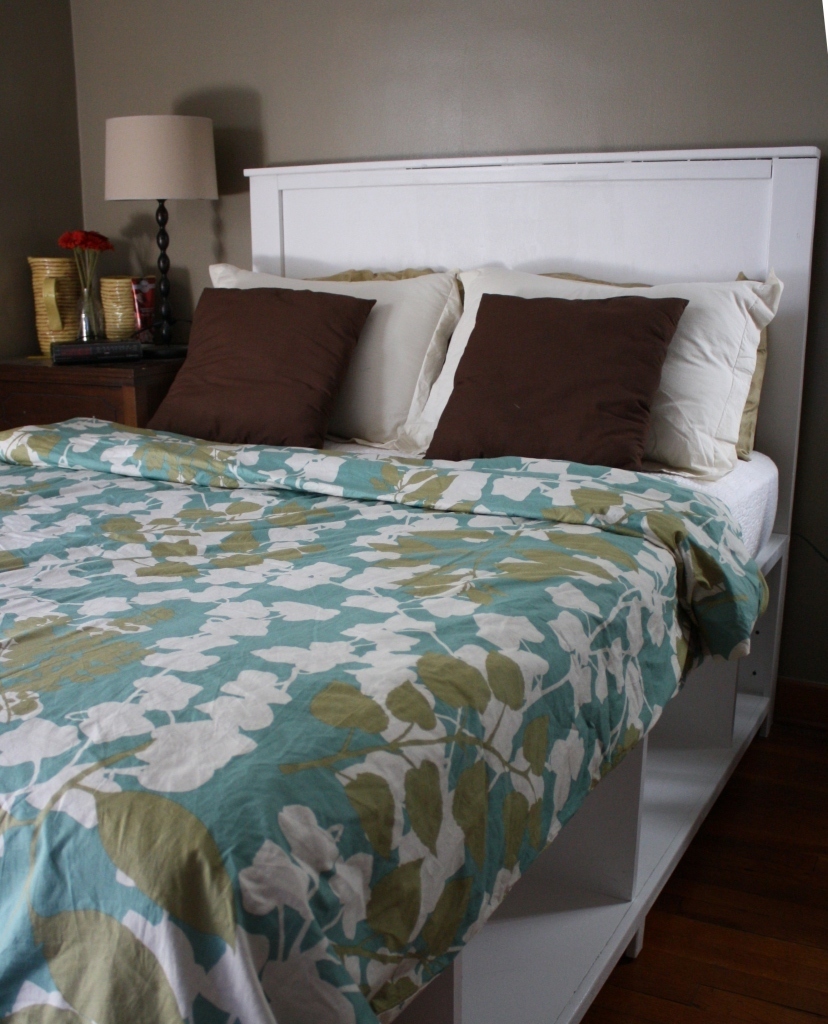
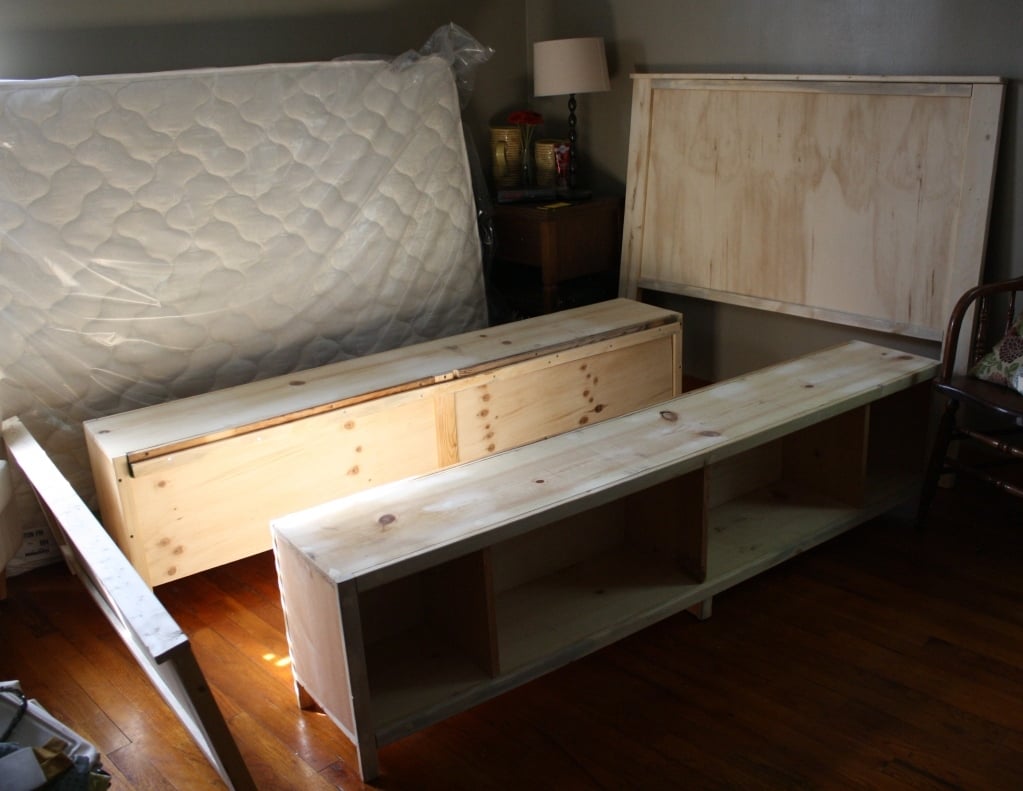
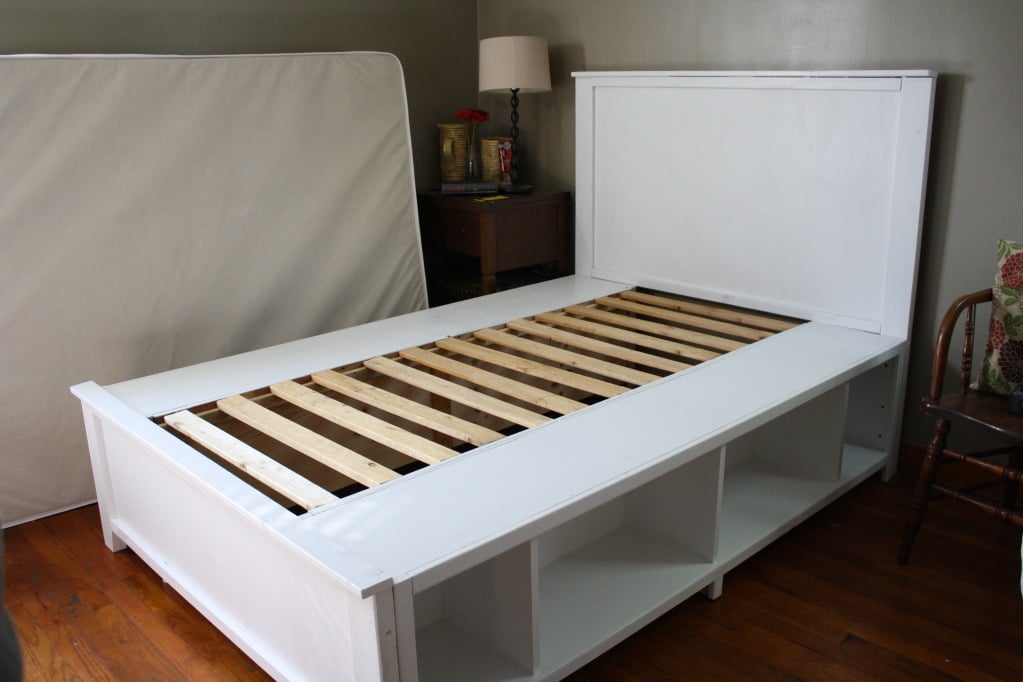
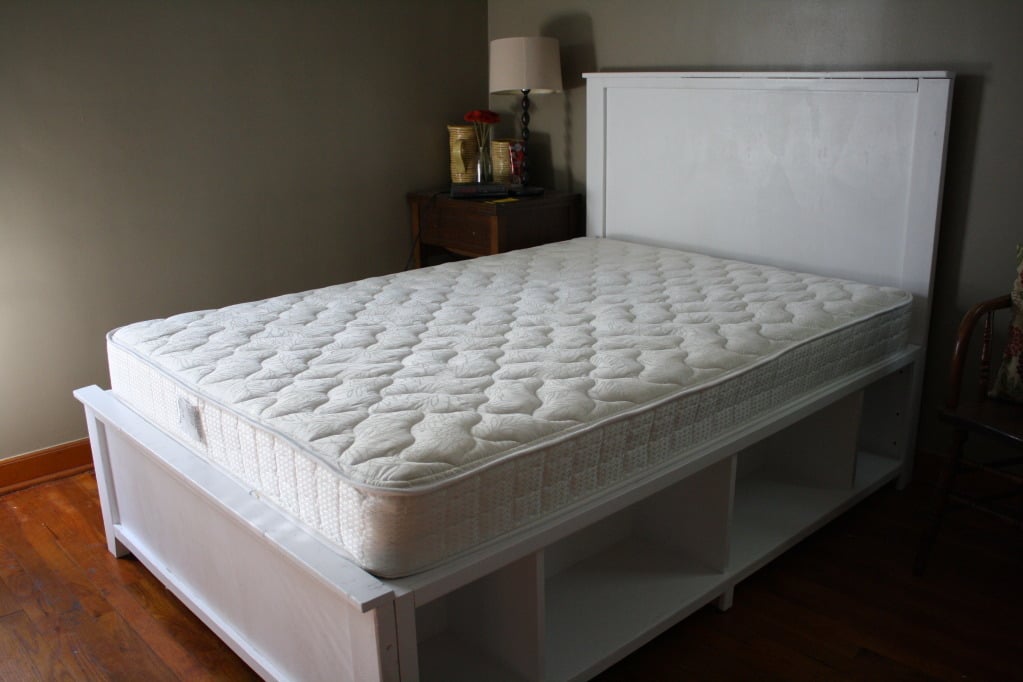
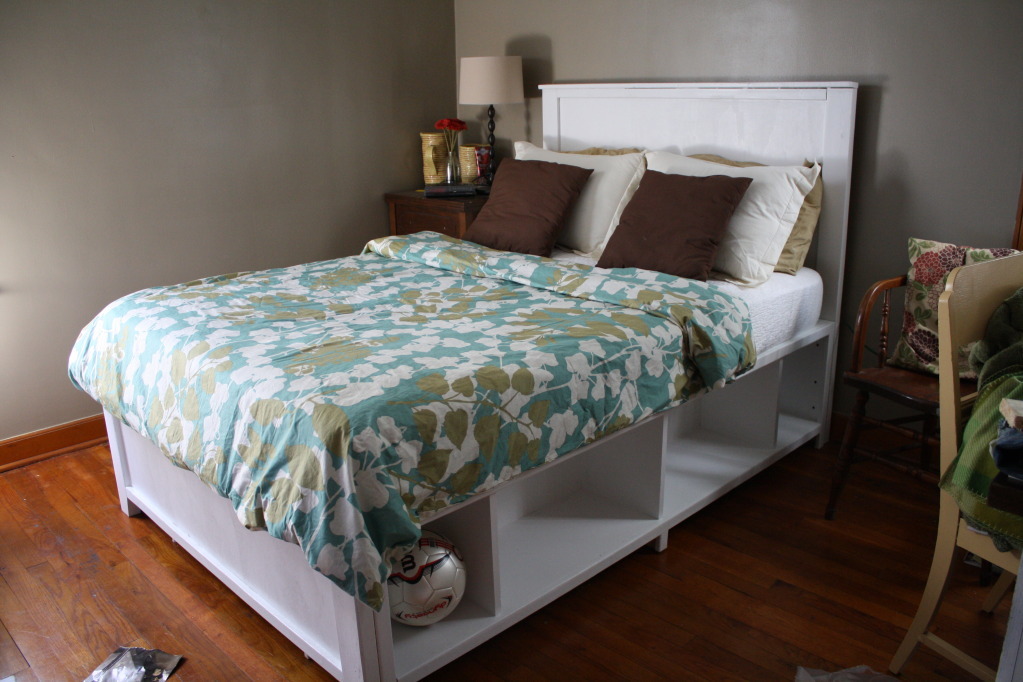
When I saw the plans for this bed I knew it was exactly what I wanted for our guest room/office. I loved that it had storage underneath for extra blankets and office supplies and I loved the simple, clean look. I think it turned out great! We made it full size so it could sleep 2 people and we added an extra set of legs in the middle of the benches to make them extra sturdy. We want to add doors to some of the cubbies later.
This is the first piece of furniture I've painted instead of staining, and I'm so glad I did! The white looks so sharp against the gray walls. I don't think any stain would have turned out as good for the room.
The project came together really easily. We just worked on it for a couple hours on two Saturday afternoons and it was done really fast. The assembly was easy as well, and I love the concept of this bed being built of units that can be moved around or re-purposed later.
Thanks Ana for the great plans!
Fri, 01/04/2013 - 12:57
I cannot find the plans to make this bed. There is only a description of the bed. Could I please get the plans for the Full Size Hailey Storage bed?
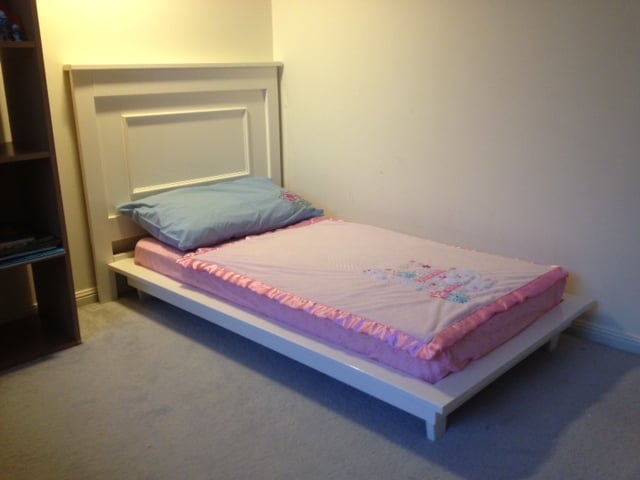
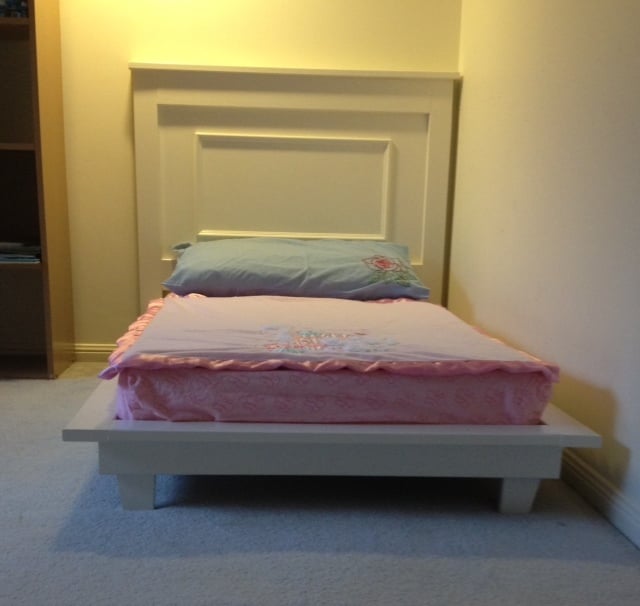
First build and totally happy with result . The excitement and smiles of our 18 months old grand-daughter was worth every effort !

Thu, 10/24/2013 - 01:42
Thank you Ana for sharing your resources and providing the encouragement to try new things .

Thu, 10/24/2013 - 13:20
Love this bed! What a super cute room for your grand-daughter! Looks totally professional, would never guess this is a first build -- Great job!

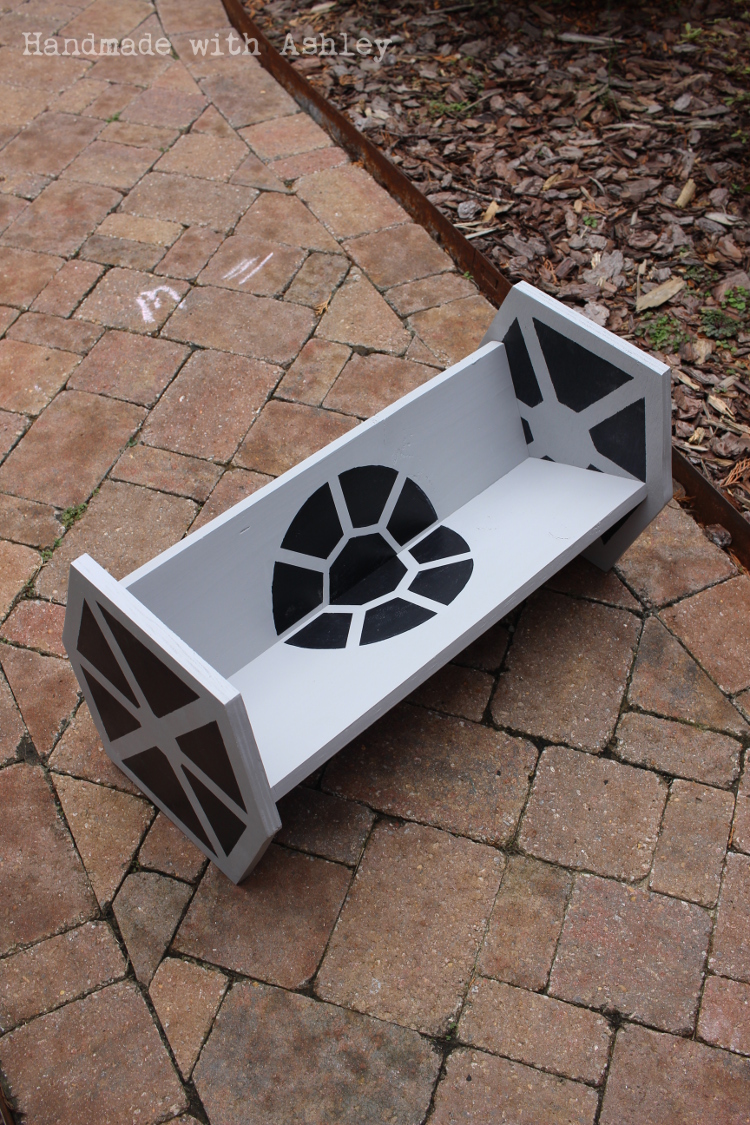
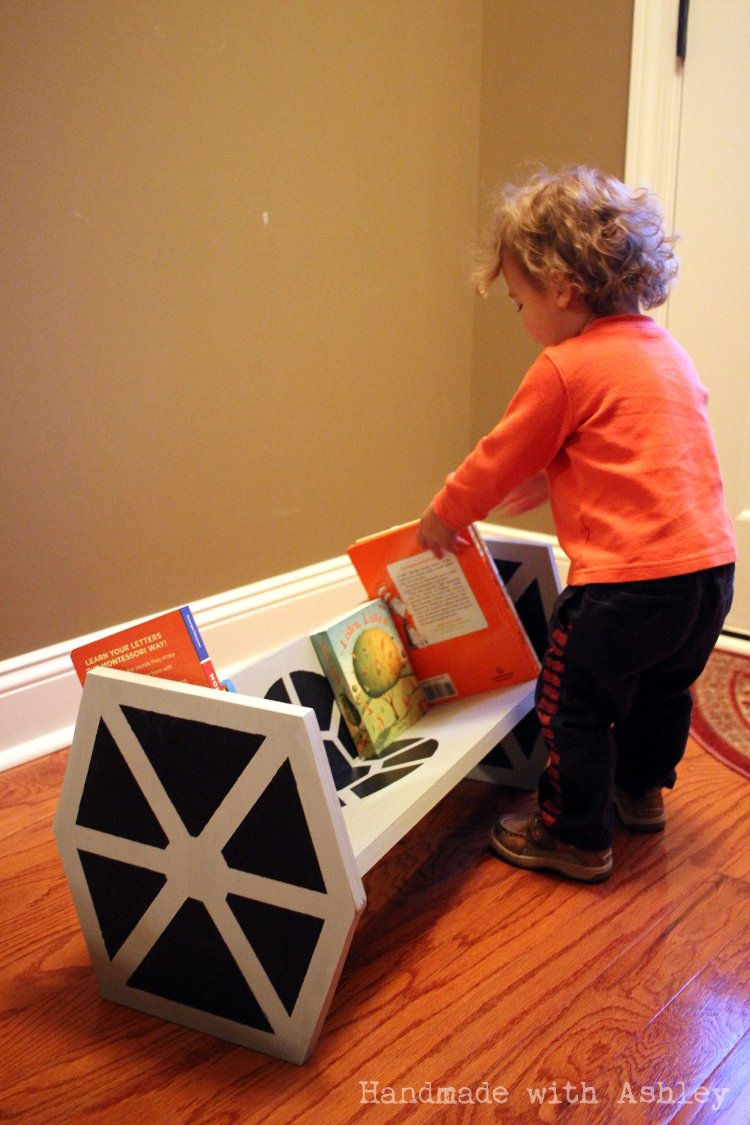
To bring a bit of order to my son's growing book collection, I built him a TIE fighter bookshelf. (By him I mean me, because he doesn't really care about TIE fighters. Chewbacca? Yes.) I was able to make use of some scrap lumber I already owned. Paint was the only item I purchased for the project.
The plumbing underneath was a bit wonky, so we needed something that was open on the side against the wall and could be built in place around the plumbing. Added a few shelves to hide said plumbing.
LOVED doing this! I am a total beginner so it is not truly perfect but that is what we love about it! My five year old helped me and learned how to work an electric screwdriver. We saw Pottery Barn was broadcasting a table like this and using that the screws showed as a marketing piece - so we have some screws showing and it is soooo warm and inviting. It looks 100 years old. Everyone loves it!! Thank you for the great inspiration. We made ours 6 feet long and 3 feet wide to fit our space and 4x4's for the legs.
Thu, 11/24/2011 - 20:26
Can I have the step by step plan too! Pretty please! I love this table :)
Thank you so much
-erin
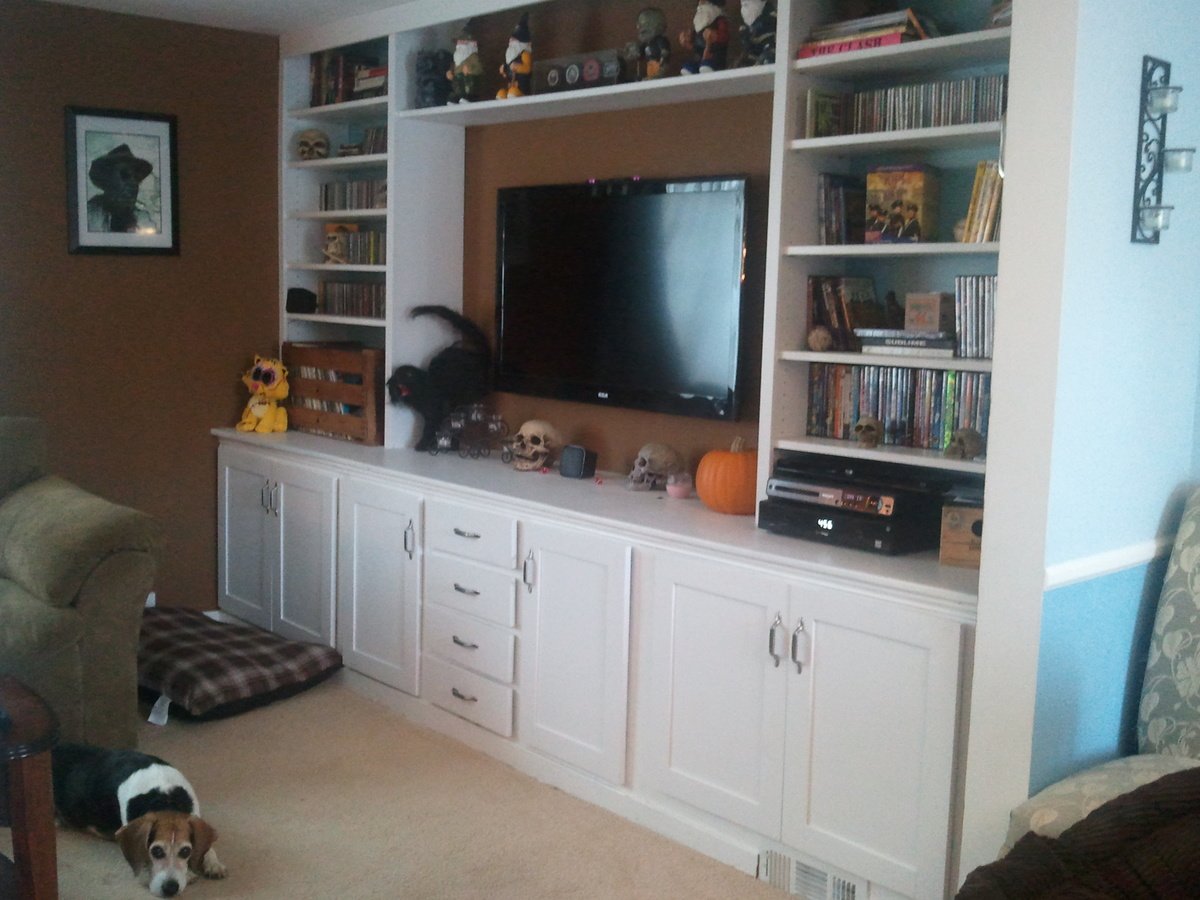
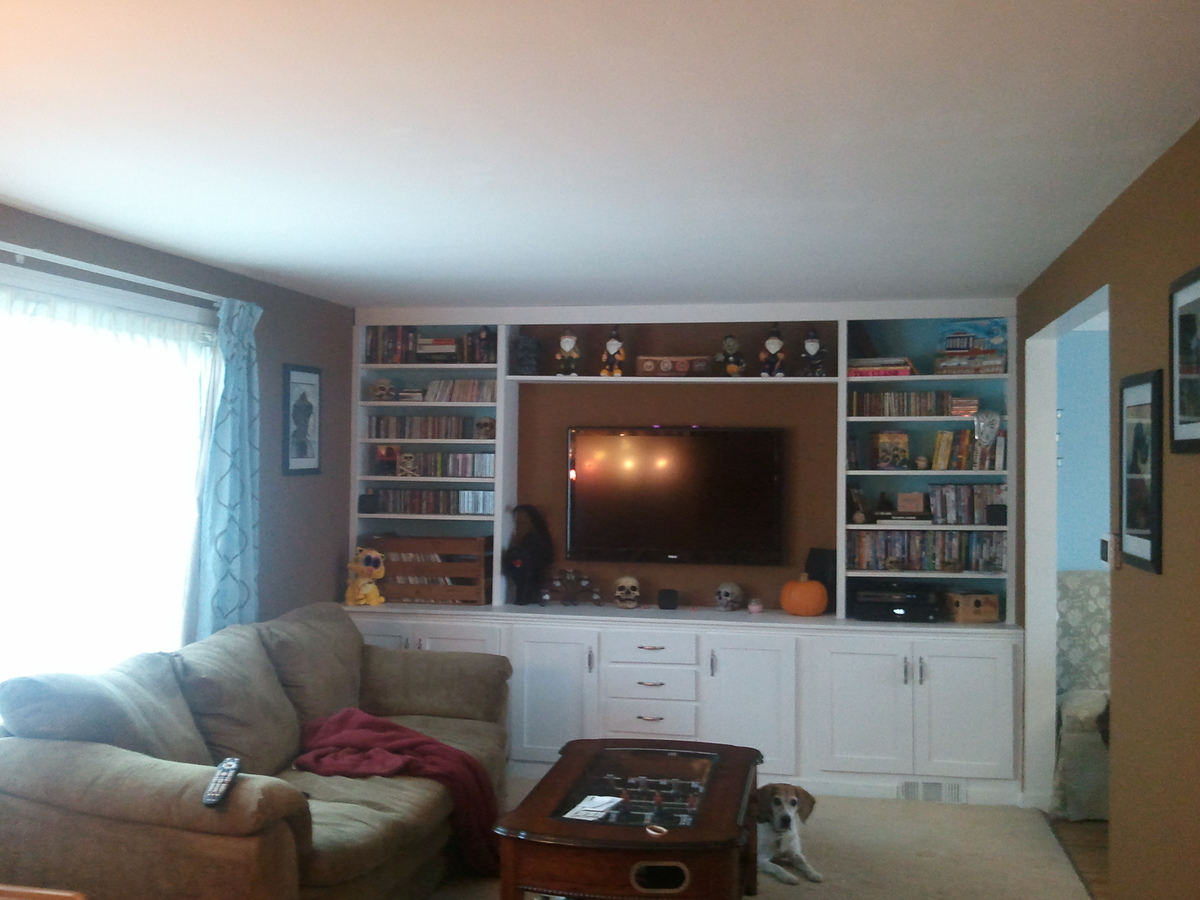
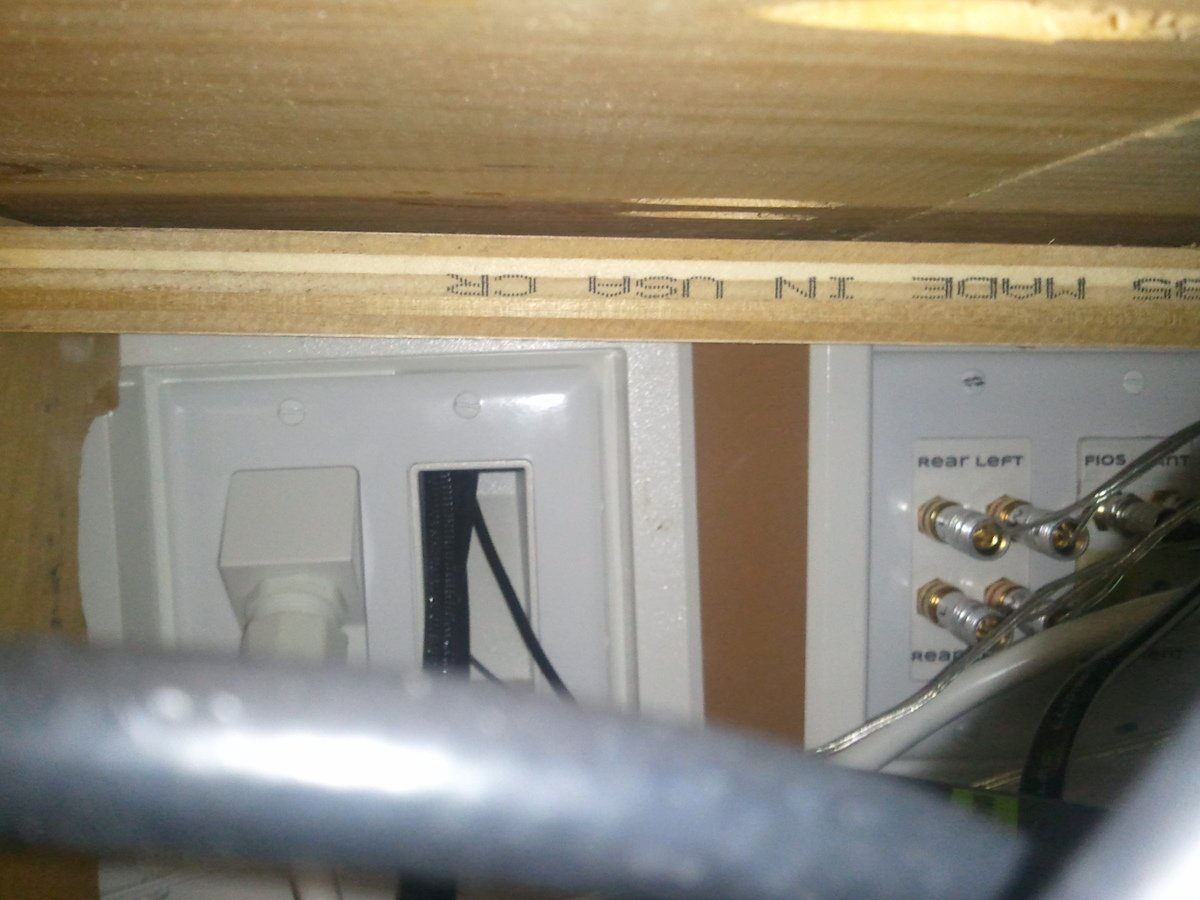
This took me about a year to complete, start to finish, but there was a lot of downtime. I started by running the wires through the wall and taking the opportunity to add a ground to the outlet on this wall.
The bottom cabinets are from Ana's kitchen cabinet base plans, but they are a little shorter, shallower and do not have a toekick cut out. My hope is that this will serve as good practice to do an entire kitchen!! I built these based on my modified plans, pulled back the carpet (there is hardwood under them that I intend to expose at some point), popped off the baseboard, and installed these as if they were kitchen cabinets. The top is 6 pieces of whitewood 1x12's "Kregged" together - I wish I had used plywood but an entire piece would still not be long enough, so that was awkward either way. There is a simple piece of molding under the edge of the "countertop". At that point, not much got done all summer and we just had base cabinets with no uppers and no doors.
More recently, I finally got more time to work on this and created the upper shelves. I just kinda winged these. A whole bunch of 1x12's, I cut 4 the height of what I needed (about 5', from the countertop to the ceiling) and I made a bunch of shelves cut to size. I wound up making more shelves than we needed, but I put shelf pin holes in the vertical pieces so all of the upper shelves are adjustable! I used a kreg shelf pin jig and it worked great. The middle shelf above the TV was cut and added after everything else since I knew it would've been more difficult to calculate the length than to just measure after everything was in. I added some molding to cover up some things that didn't quite line up perfectly and to beef up the vertical pieces (1x2's make 'em look a little wider and cover the edges of the shelves). We finally have storage for all of the cd's and dvd's!!
I was a little nervous to do the doors, but the post for how to do doors came out at a perfect time. Turns out the hardware I bought way at the beginning was pretty cool and let you adjust up/down, distance from the cabinet, and left/right a few mm each way just by turning a screw. I'm glad I went with the fancy self-close-soft-close ones! I'm also in love with the handles I found.
I had some issues with the drawers and they don't slide perfectly, I think it's mostly a squareness issue. I'm planning on getting the kreg drawer jigs before I do the kitchen. I got the fancy soft close ones to see how they'd work to see if I want to use them in the kitchen, if I can't do a better job then I might opt for the cheaper ones!
I have intentions of adding crown molding to this room and that will go across the front of this when I do. I added a 1x4 across the top that can act as a base when we finally get around to that.


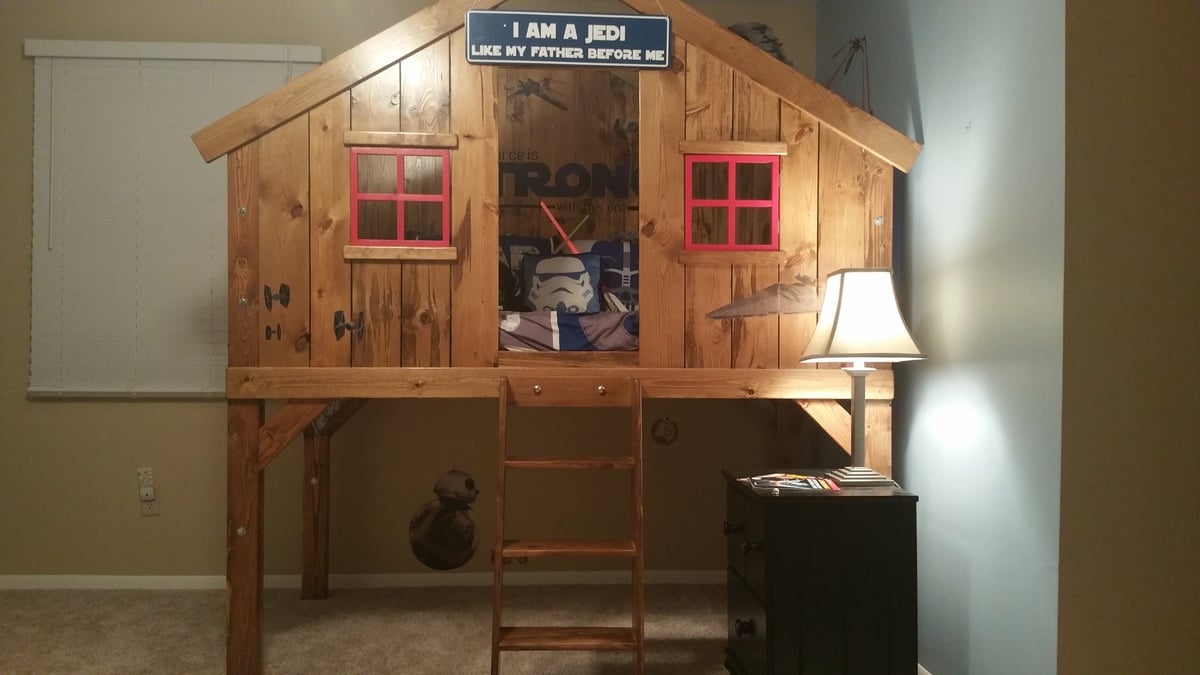
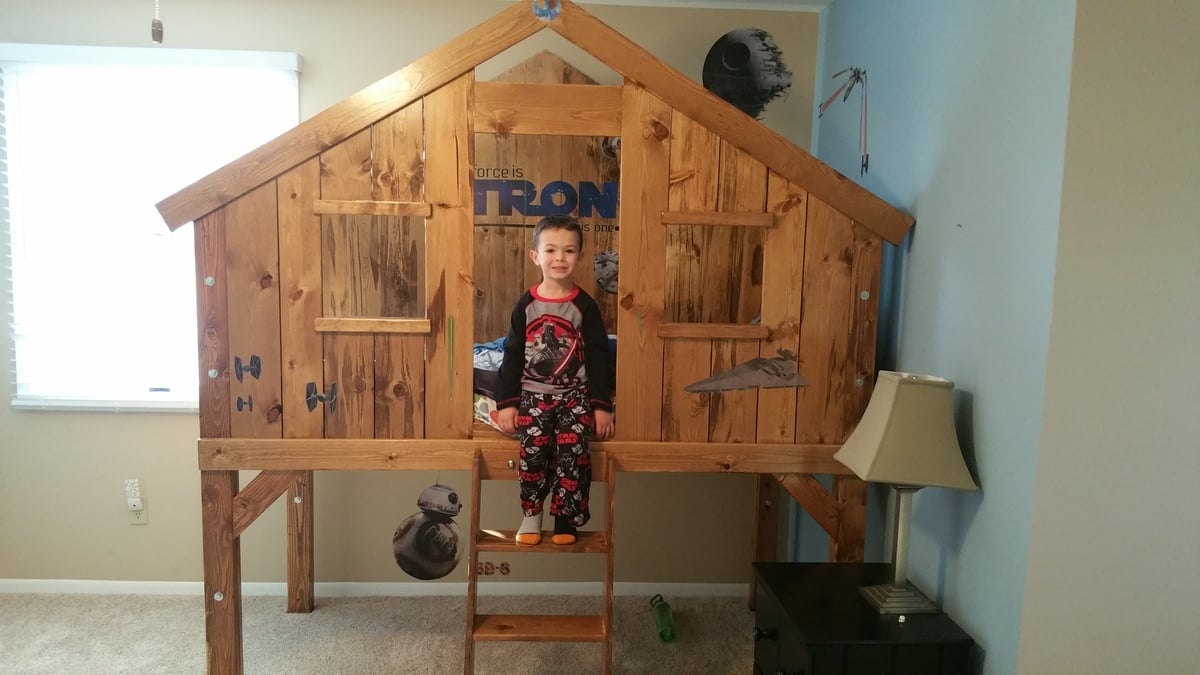
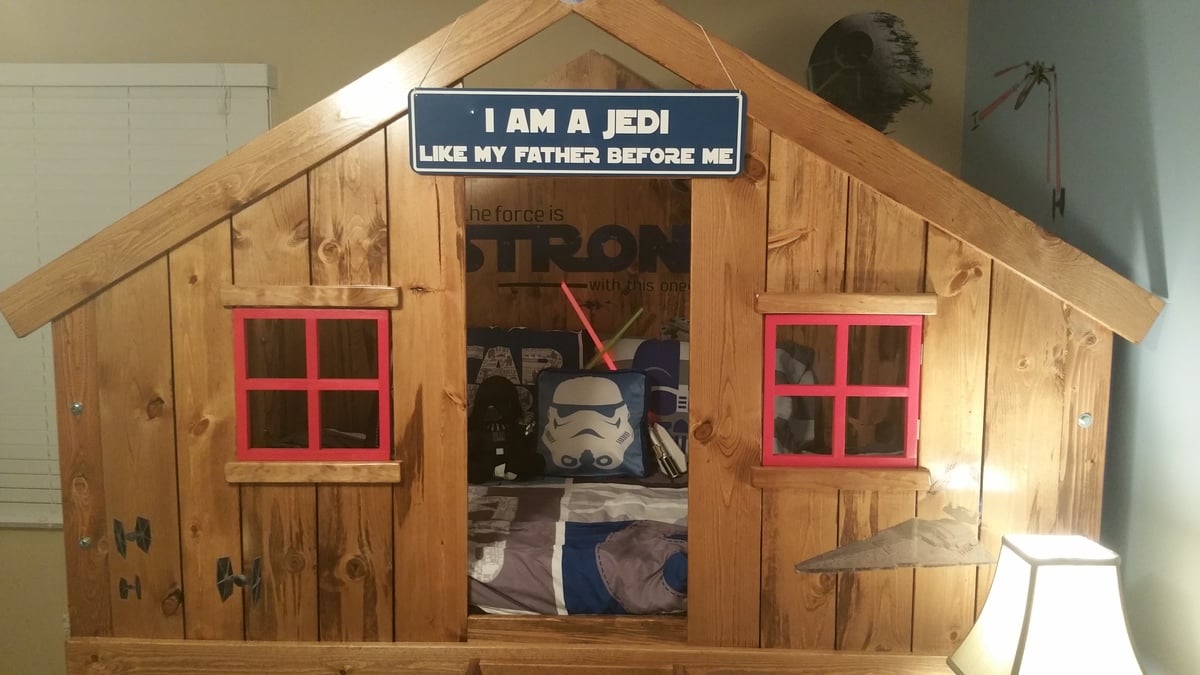
I originally got the idea to build a bed for my son when I needed to get something new for him and went looking online for beds for sale on Craigslist. I found a bed that looked like a barn and that made me search for plans to build one since why overpay for something you can build yourself?! I found Ana’s plan and knew immediately it was the one. I started at Thanksgiving and had it finished for Christmas. I can’t thank Ana and Jamie from That’s My Letter enough for such great plans. They were so detailed but easy to follow. I do all my own rehab work on my house and I am a weekend warrior carpenter so this was a really fun build. My son is about to turn 5 and is a huge Star Wars fan and so am I. I knew this had to be my theme so I bought him a bunch of stickers and a sign (couldn't help myself on this one, had to do the Jedi like my father sign) to decorate the bed on Christmas day. He was excited to get the stickers but he didn’t know I built this for him. I hid it in the garage the whole time and he never found out. So when we went to his room to see if for the first time he went nuts. My 2 year old daughter loved it too and they play in it together all the time. I had a few issues during the build with some measurements but was able to make it work. In the end I love it and so do the kids, especially my son! The window grilles take it to another level so I recommend them if you build this. I even sanded a lot of the edges around the windows and in the doorway to give it a more “weathered” look. I already have my next project chosen from Ana’s plans. I will hopefully be posting the results of the X desk build in the near future. Thank you Ana for all the plans, I will most definitely be showing this off and giving you credit every time. Chris


Great plans; thanks Ana . . .
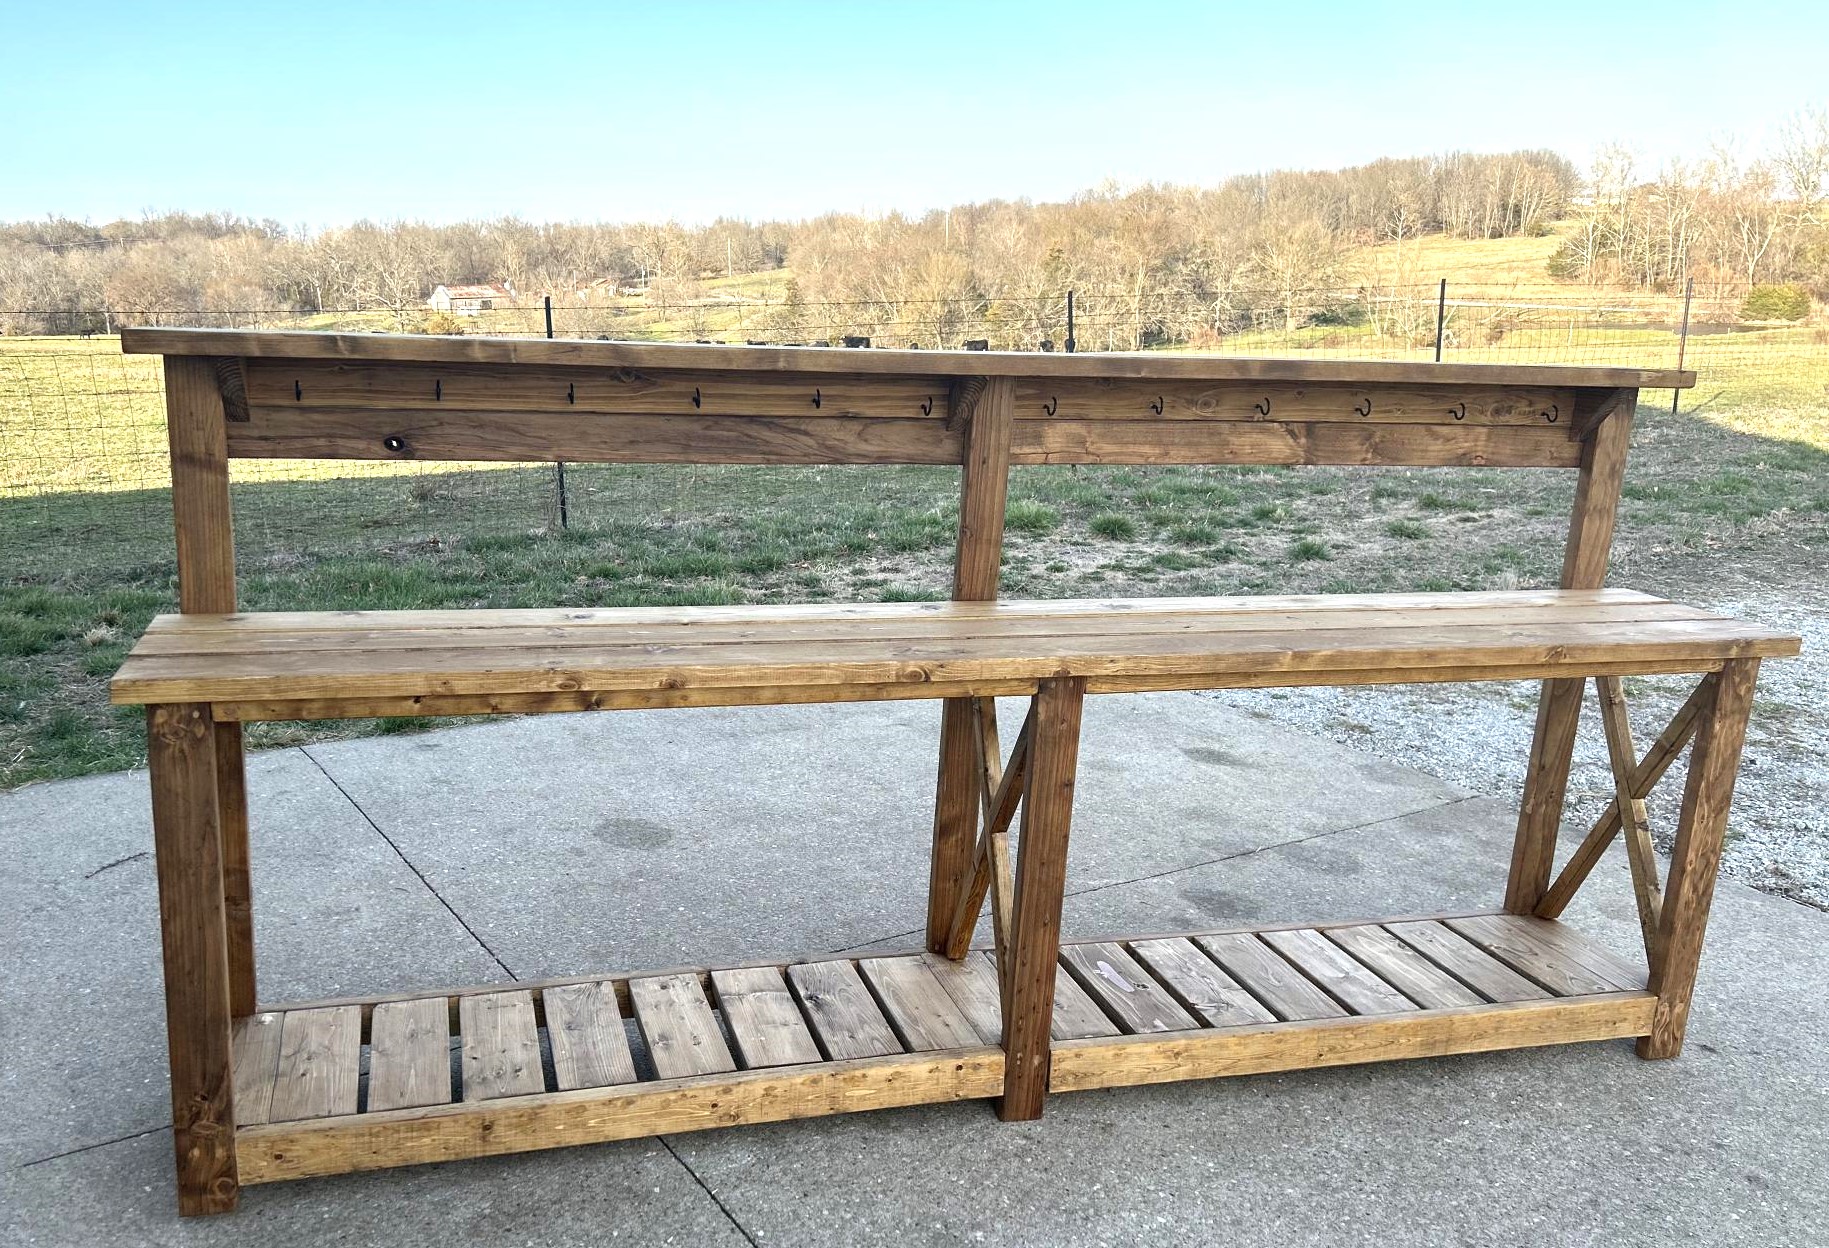
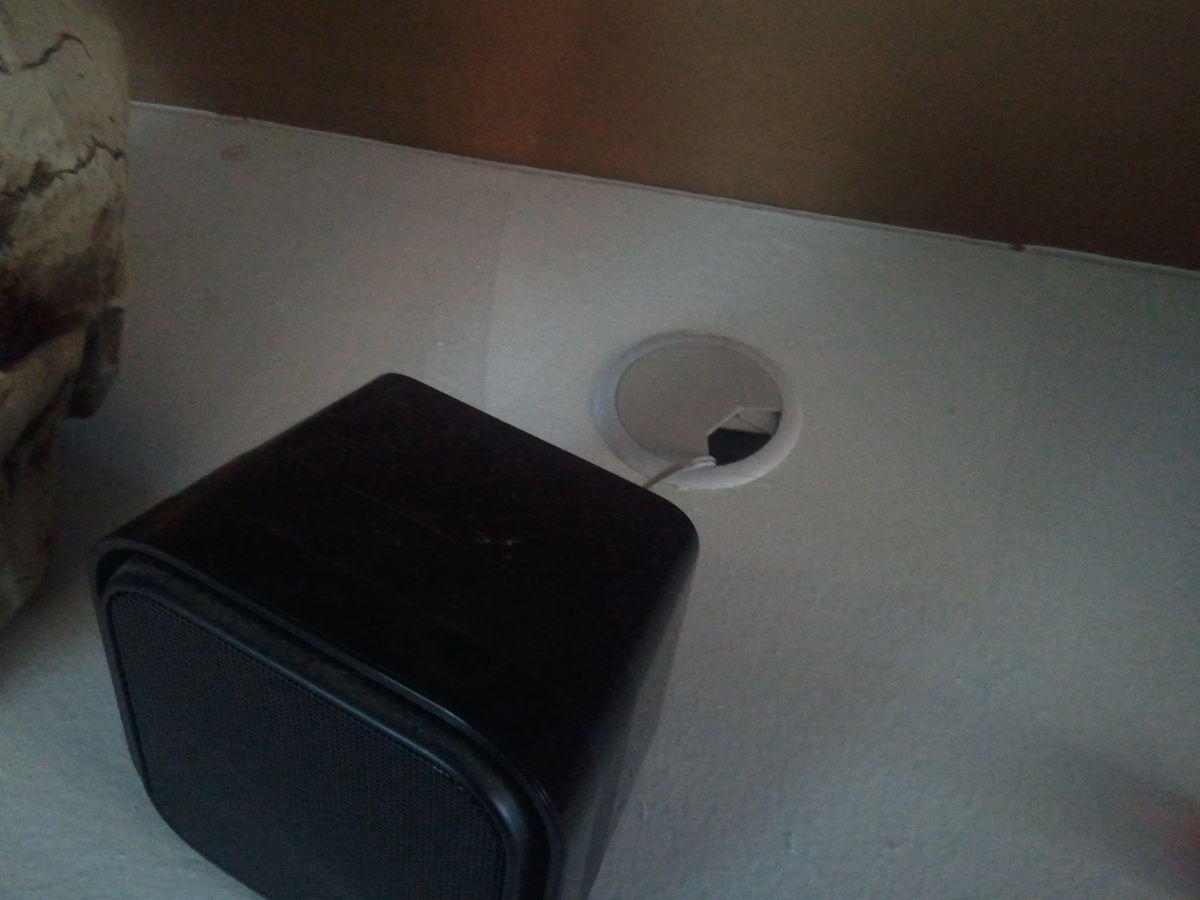
I built this 10’ long potting bench to fit into a 12’ barn stall. It fills the need to have a work surface plus room for storage on top and underneath. The hooks provide a place to hang my many hand tools and my Bluetooth speaker.
Fri, 03/10/2023 - 12:19
This is such a great idea for a house stall! Thank you for sharing that it can be done.