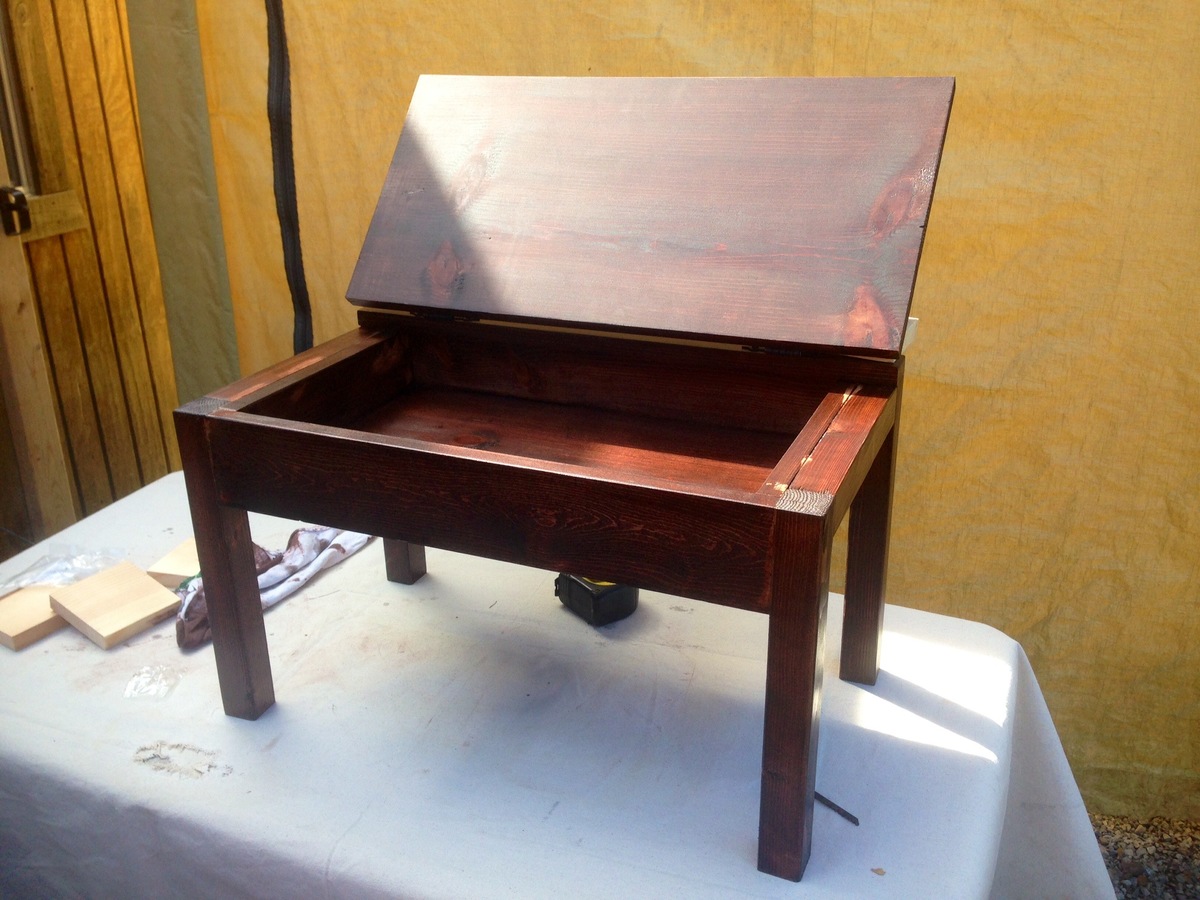
Lap Desk
![](/sites/default/files/3154835245_1380672460.jpg)
Made 2 of these for my daughters. Then had a request for one from a teacher for a homebound student awaiting a liver transplant. I love that this site has given me the opportunity and means to help serve others. Thank you Ana!!!
![](/sites/default/files/3154835247_1380672460.jpg)
Made 2 of these for my daughters. Then had a request for one from a teacher for a homebound student awaiting a liver transplant. I love that this site has given me the opportunity and means to help serve others. Thank you Ana!!!
The goal of this project was to create a buffet / serving table to compliment the large farmhouse table I made a while back. We have been using a folding table for a buffet line at large family gatherings and that just didnt seem right when placed next to the giant 10' table. (info for the table: http://www.ana-white.com/2014/07/big-farmhouse-table)
The build is similar to the farmhouse table, but the materials are a bit smaller due to the size of the table. The legs are 2x3's and the table top itself is made of 2x6's outlining a 2' x 5' section of tile. All of the other materials (stretchers and apron) are made from 1x3s. The tile is set so it sits about 1/8" higher than the wood. This is to allow hot pans and plates to be placed directly on the tile without a trivet or other separator. The tile sets on a 3/4" piece of MDF supported by small 1x2 slats underneath.
All of the joinery is accomplished with glue and Kreg Jig / Screws.
https://m.imgur.com/gallery/e9J96Q2 Good build, certainly had its challenges. Overall totally worth it to see how much my wife liked the end product.
Queen size distressed farmhouse bed and nightstand with expanded metal inserts in door and headboard that we made rusty and then clear coated.
I made this yard sign just in time for Halloween. I FINALLY found a use for some of my scrap wood. This was a fun project, start to finish in one day. I used stain and paint to add bold color. Details are on my blog.
Made this for my granddaughter Reagan's American Girl doll. I made the bed and my wife made the sheets and blanket and pillow. Your plans were awesome!
Made it taller and added a shelf
Loved building these planter boxes!
I was able to use my laser to addd some personalization.
I also added small wedges at two levels in all four corners. This not only made it very sturdy but with a half lap “x” it creates two levels to pick from for different size pots
I had an idea in my head of what I wanted for deck seating/lounging in my mind but just couldn't seem to get to the "nitty gritty" of creating workable plans. Then, while googling through images of double loungers I stumbled onto Ana's site. Wow! I felt like a fish that had just found the water! With the detailed plans generously provided for a double lounger I was able to create my "vision" with just slight modifications. The loungers are actually two chairs and two ottomans that fit together or come apart depending on how much "togetherness" the situation calls for. And best of all - almost all the materials were left overs and cut pieces from another deck and fencing project. For cushions (not in this photo) I used two inexpensive "Hide A Mats" folding beds from Costco that I covered with waterproof duck fabric. I can't thank you enough, Ana, for taking the time to share your talent so freely. I'm truly grateful. As is Jake, the Redbone Coonhound, who insisted on being in the photo!
Tue, 10/04/2011 - 22:46
Beautiful job! I really need to create these for our backyard too, and Buck, our treeing walker coonhound :) lol. Jake is a cutie!
Tue, 10/04/2011 - 22:46
Beautiful job! I really need to create these for our backyard too, and Buck, our treeing walker coonhound :) lol. Jake is a cutie!
Thu, 10/06/2011 - 06:18
I would have never thought to break it up into a chair and ottoman. Brillant! I love that idea!
We made this for our sons 5th Birthday. We adjusted the measurements for a twin/XL hoping it will last him until college!
I had loved the king size panel headboard so I knew I wanted to build that, I also built the platform and remainder of the frame from the farmhouse king bed plan. It took me a while to get this built but was totally worth it.
Loft bed over perpendicular twin base. Added puck led lighting for about $10.
Resized the sectional to fit on our patio for my husband’s man cave! Also built the table and bar area using Ana White’s wood ordering system.
I built a couple trestle play tables for a friend of mine a few weeks ago and she needed some seating, but didn't want stools. So I used the stools as a jumping off point for a small bench for these tables.
I used the height and width of the stool, but then made it long for a bench. Used 10 degree angle cuts for legs (not double bevel), added apron and stretcher, then nailed on the top.
Love this table! We scaled it down to a 7 foot table. Very easy to make, very simple to follow instructions. This table cost us $400 to make. That is because we purchased the Kreg Jig master kit for $139. We also purchased a gallon of the stain which was $27 and a gallon of the Miniwax that was $38. You do not need a gallon of either for this project. We have other projects of Ana's that we want to do with the same color stain, that's why we bought so much of it. If you already have all of the tools and if you purchase a smaller amount of stain and Miniwax, this project will cost you a lot less to make. Keep this in mind before you go to Lowes! Thank you Ana!!
Fun to build altered the doll plan a bit with a spare peice of plywood to match the toddler bed better.
Had a lot of fun building this coop! We added a nesting box, a back ventilation door and a side doo that opens for full cleaning.
Tue, 04/07/2020 - 15:15
Love you version and add ons! How is it going in real life? I was also wondering if add a nest box no the side...
This was my first time building a hall tree. I’m a huge fan of Ana White and love watching her videos and tutorials. I’m not an expert builder, just self taught. For this project, I used bead board for the backing which cost about $31, and it’s called Rustic Barnwood. I also decided to go with something different, and chose Slate stain to give some slight contrast. I really enjoyed working on this. I can’t wait to share my next project. Thank you Ana, I’m a huge fan!
Wed, 02/01/2023 - 08:53
Great hall tree, thank you so much for sharing, can't wait to see your next project!
We really needed a large outdoor table for the Royal Wedding, and though the designs Simple Outdoor Dining Table would be perfect.
We used reclaimed roofing timer for the top and painted pine for the base. Really easy to build and it was a really quick solution. All in it cost us around £80 to build and took half a day.
Our finished stove and sink play kitchen! It was an easy build, it just a loooong time to paint, finish and find accessories. We found stuff mostly through amazon. It took us about 20 hours to do (4 for building) and turned out great. Some tips: Prime boards before assembling. It will save lots of time! We put 3 coats of poly to seal everything in. We used euro style self closing hinges which look so nice! Also, we ended up using black paint for the stovetop and white paint for the "burners"
Fri, 10/11/2013 - 16:10
This is super cute! You did a great job on this, love the way you decorated and accessorized. :)
Fri, 10/11/2013 - 19:54
This is so cute! You did a fantastic job. Great idea to just paint the burners. It looks really good. I think I might make this my next project. Then I can get rid of the ugly plastic play kitchen.
I got a puppy. A joyful, full of energy and fun-loving English mastiff puppy. Best way to potty train a 40 lb puppy is crate training and the entry way's wall was getting eaten. So I made this in a couple of days. Mostly just waiting for the stain, paint and poly to dry and it's up and working.
Hinges on sale at Lowes going out of business =$0.99
Latch on sale at Hobby Lobby 50% off = $5.50
Knob purchased at ReStore =$0.50