Community Brag Posts
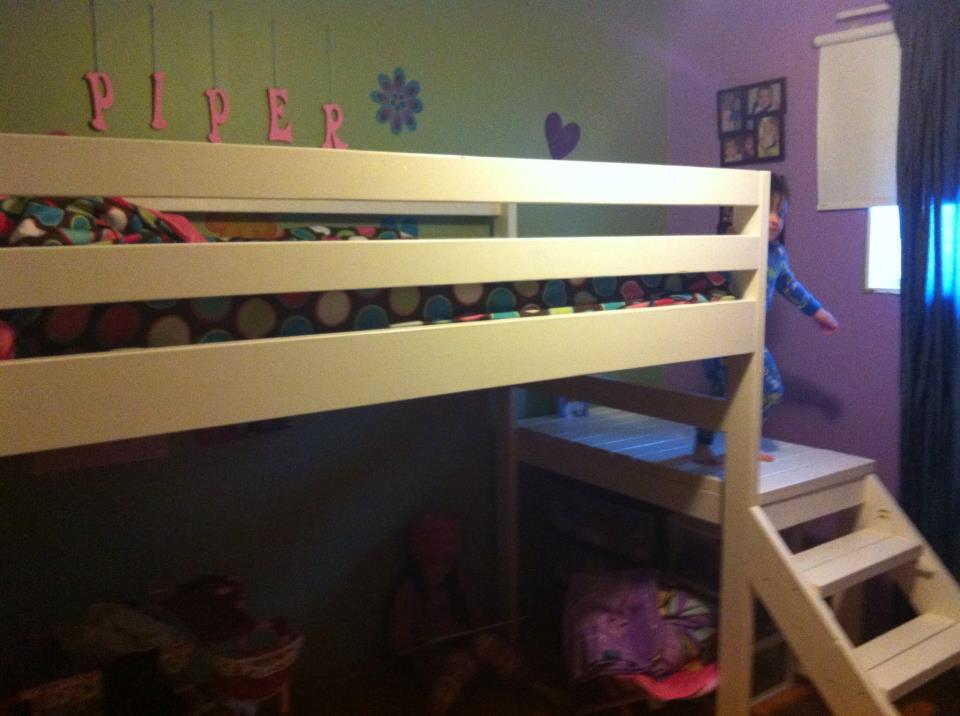
Henry's Bus Loft Bed
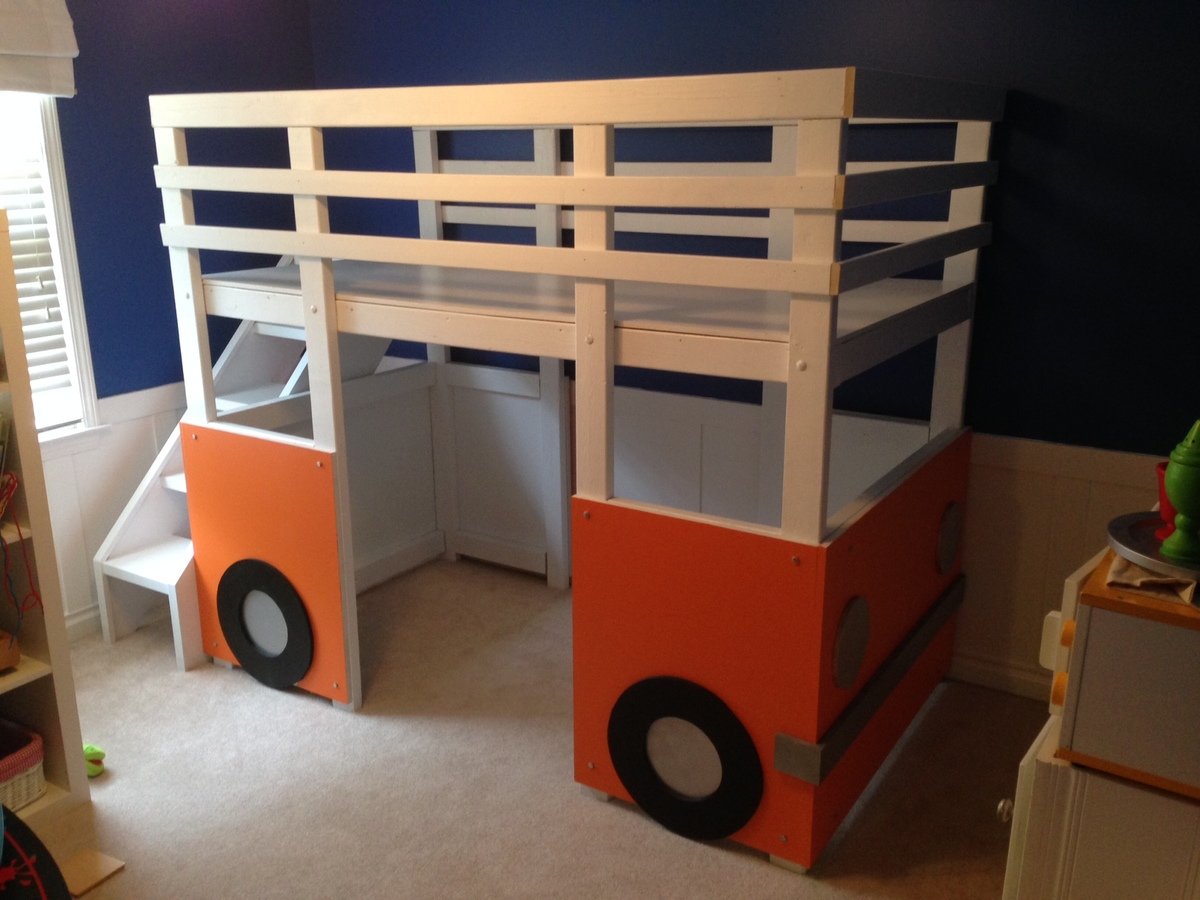
Although not taken directly from your plans, it was highly inspired by ideas from this great website. Thanks Ana for putting such a great DIY resource together.
This is a simple, great looking loft bed.
Made with basic tools -> circular saw, drill, jig saw, and pocket hole jig. Lumber was all standard MDF sheet, 2x4s, 1x2s and 2x2s.
I would estimate total cost around $225 or so including all hardware, lumber, paint, etc.
My son is 3, so I designed a set of stairs. They can easily be removed in a year or so and replaced with a ladder.
Next up is a cottage style loft bed for his twin sister!
Built from Plan(s)
Estimated Cost
225
Estimated Time Investment
Weekend Project (10-20 Hours)
Finish Used
Painted finish
Recommended Skill Level
Intermediate
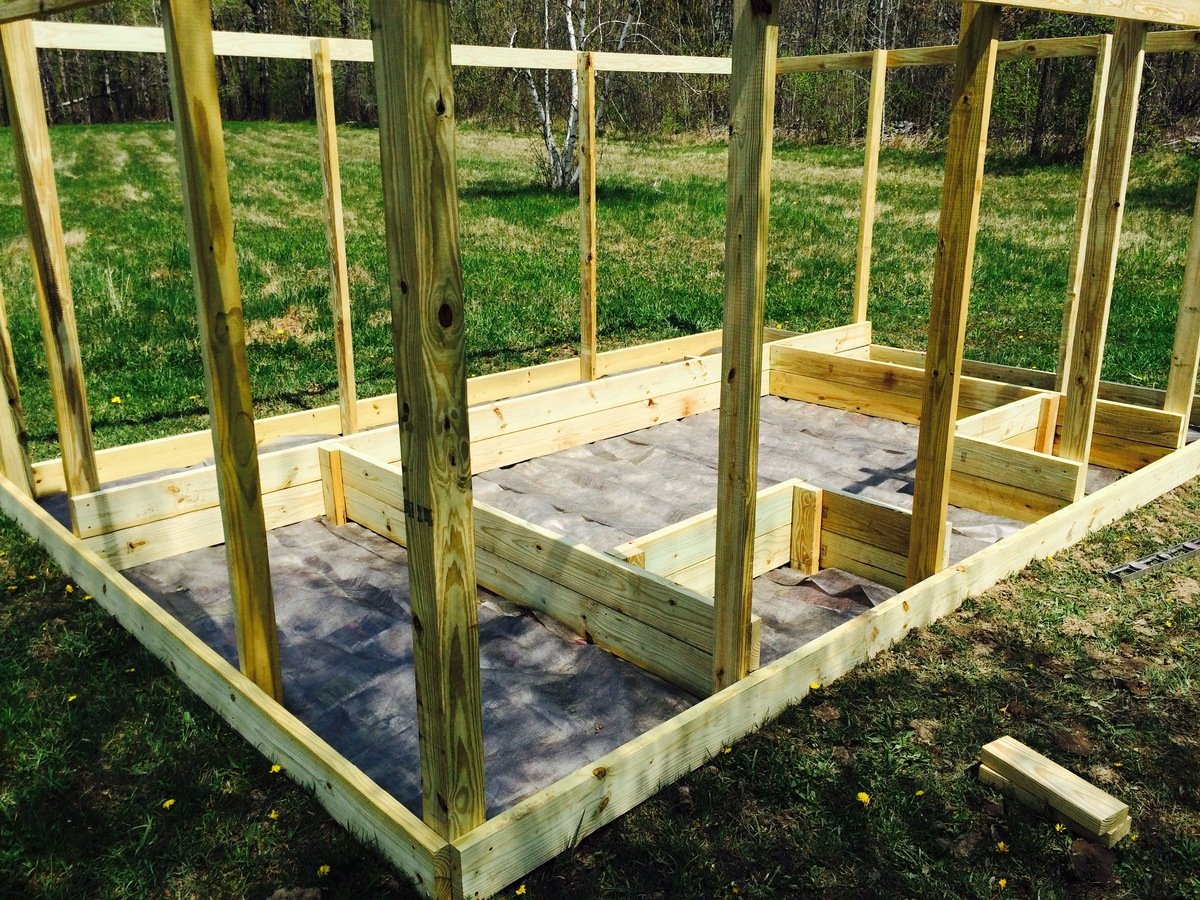
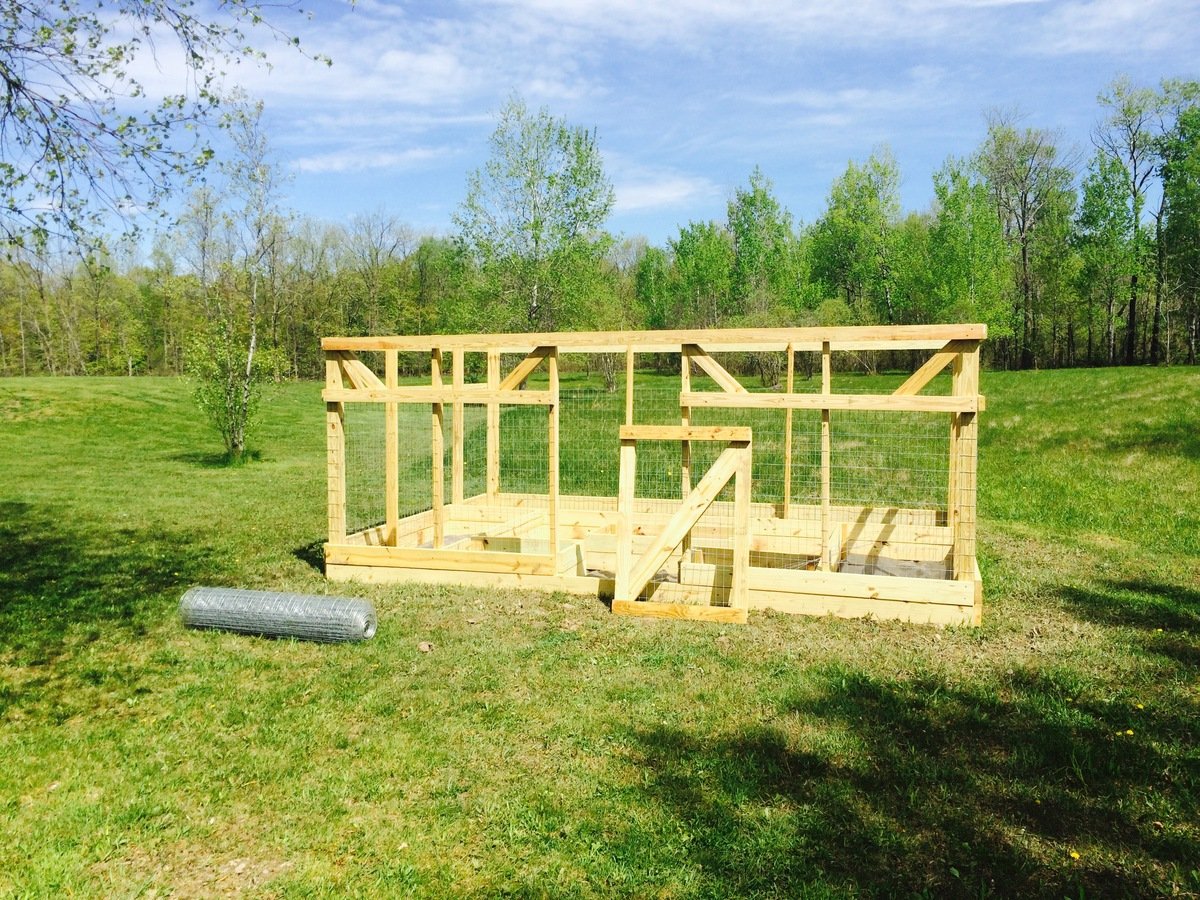
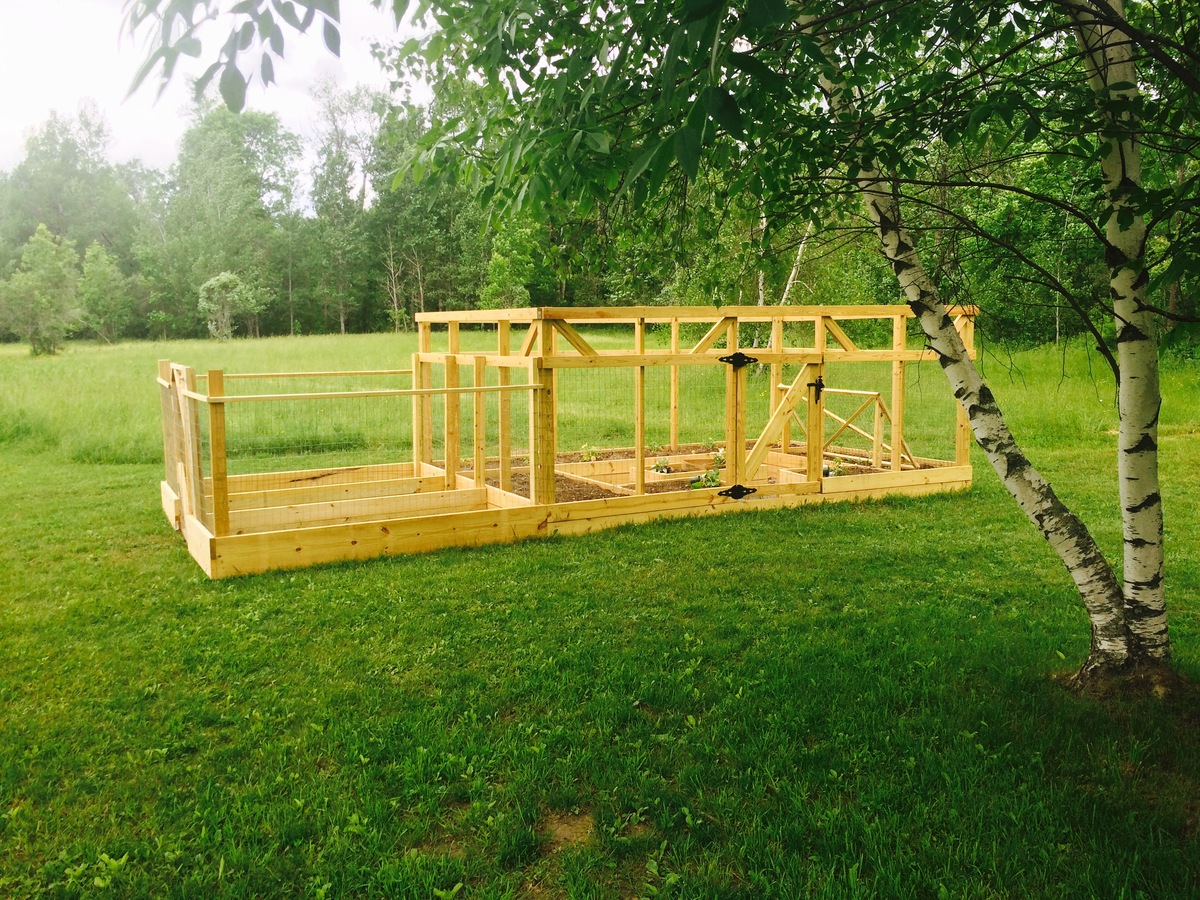
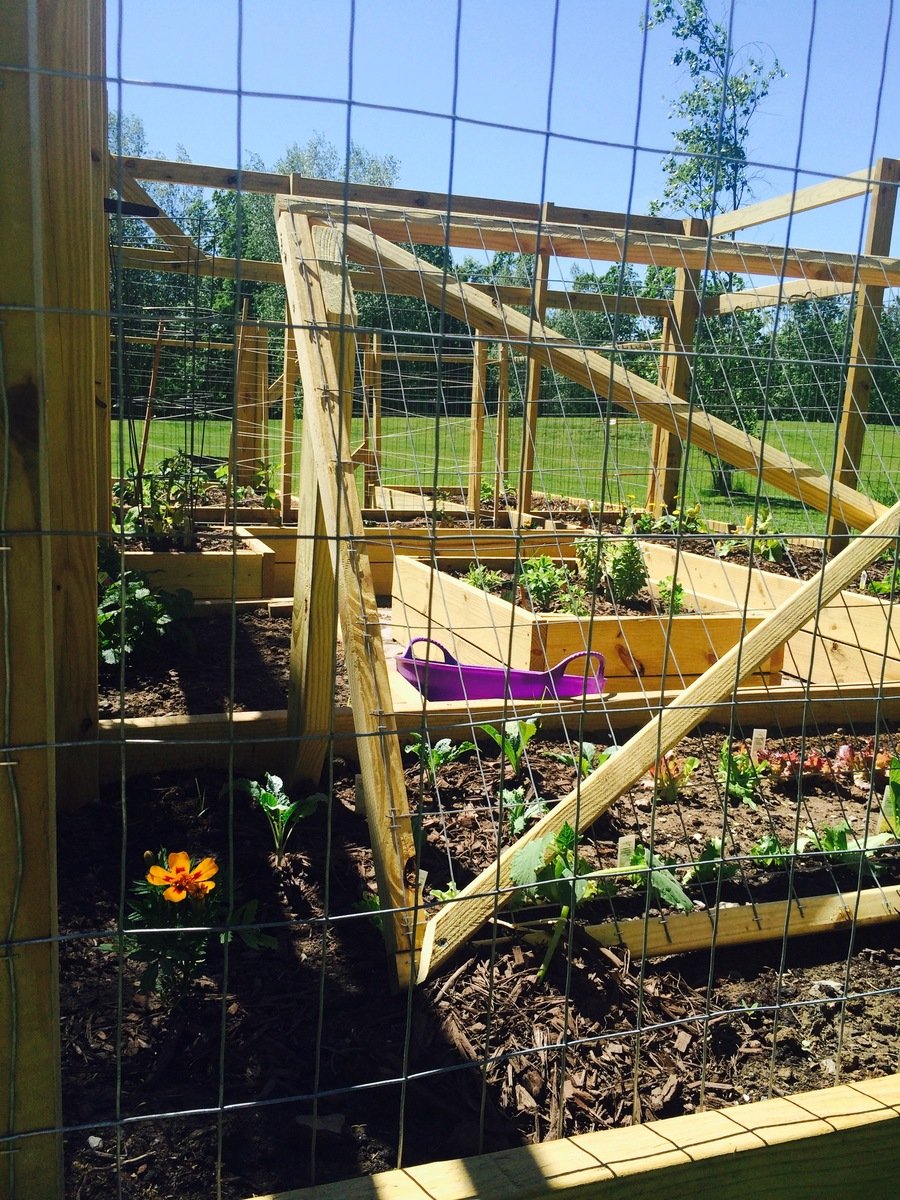
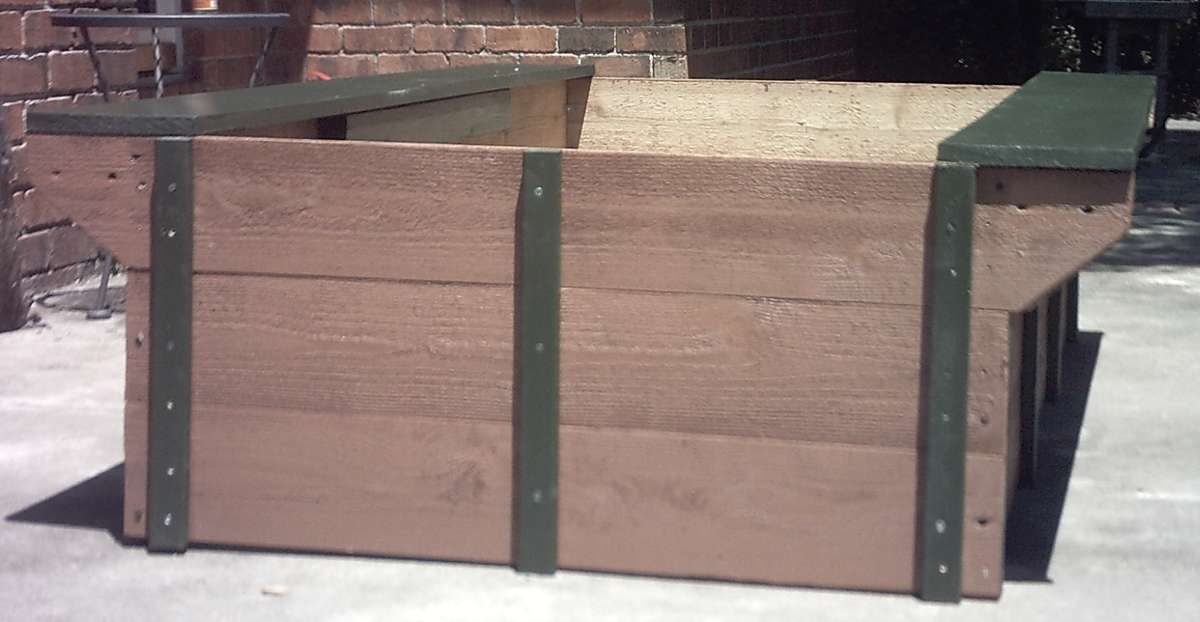
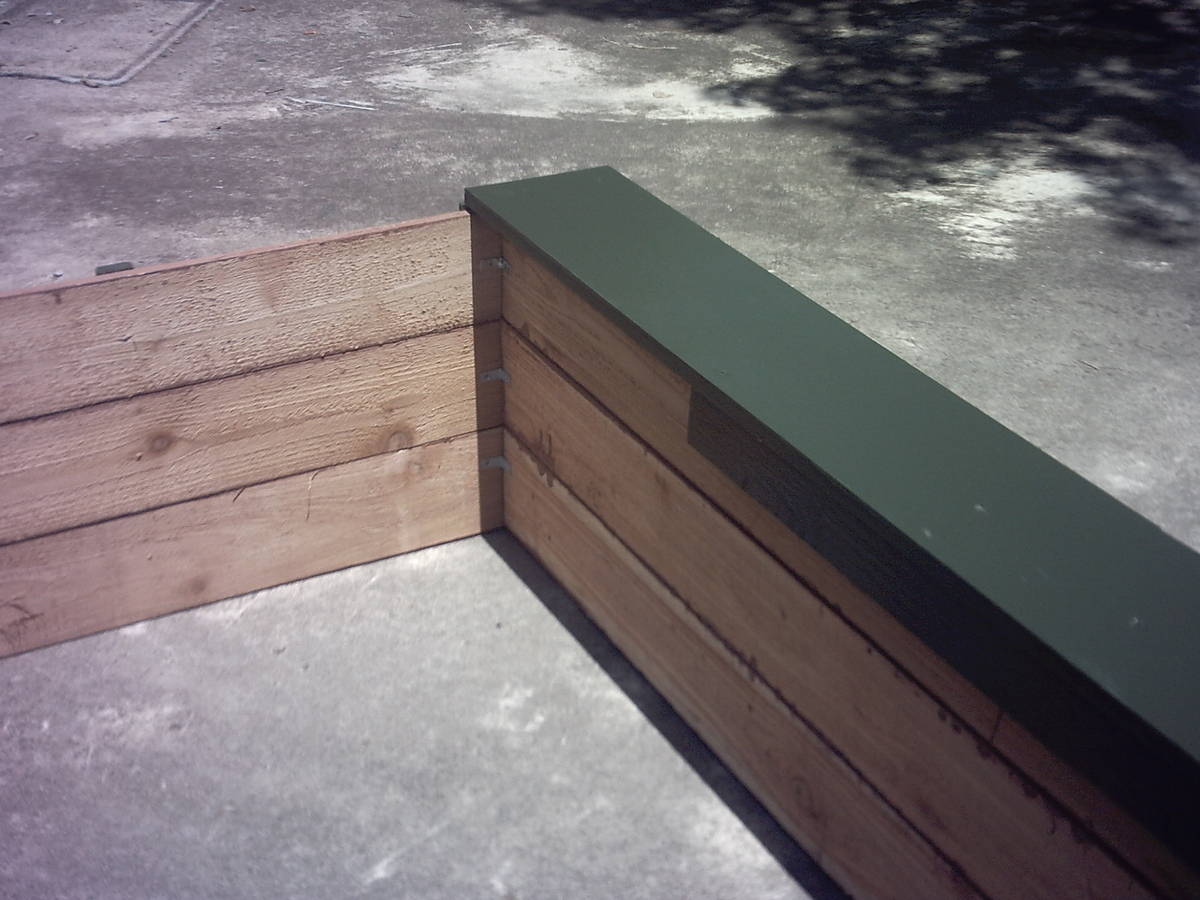
Raised Bed Garden Enclosure
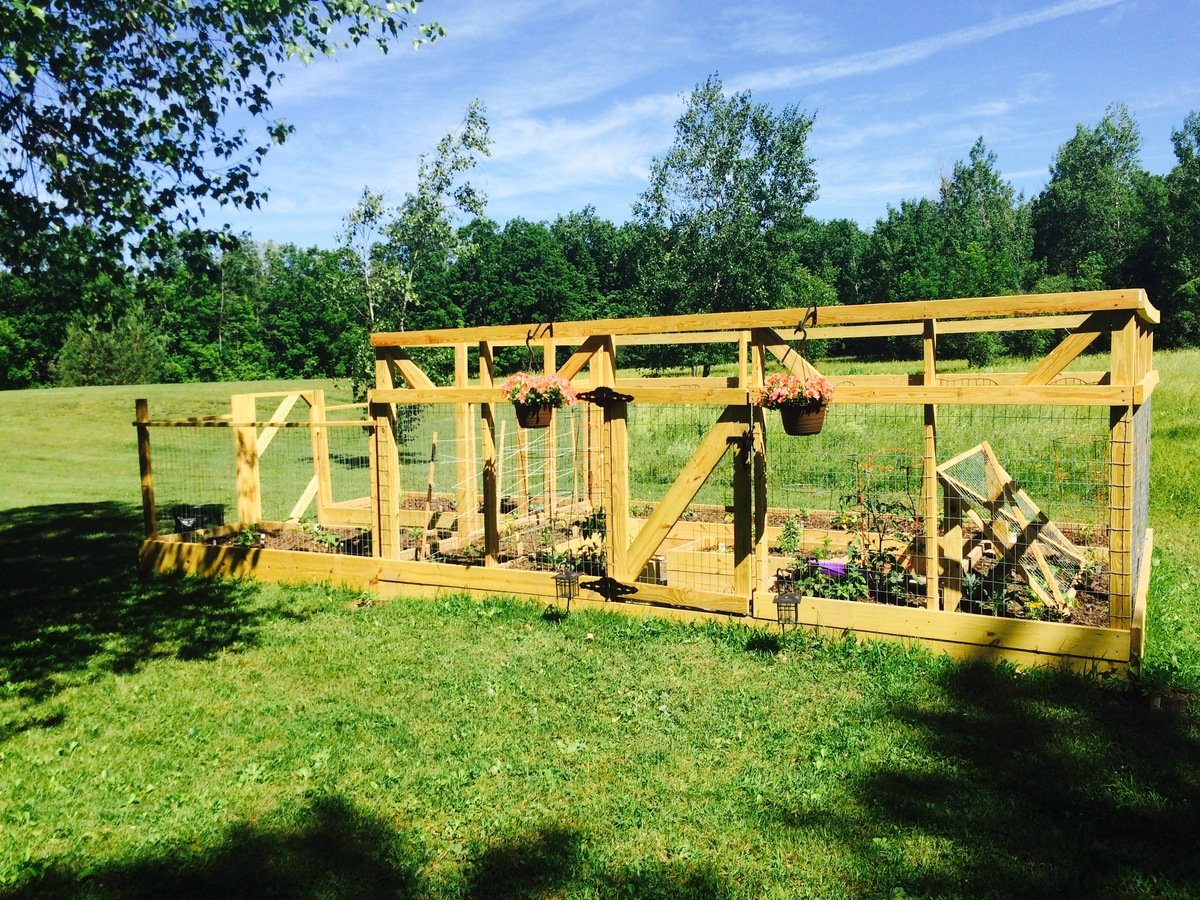
With lots of deer, rabbits, coyotes, and the occasional bear, garden enclosures are a must in our area (although I am not sure they will really help if a bear decides they're interested in our food). As our old garden enclosure was falling down due to the high winds and a quite a few winters in upstate New York, my mom found a horseshoe shaped garden with rasied beds that she loved. So, after searching around for a good plan, I found Ana White's collaboration with Home Depot for this enclosure.
While the original plan was far too small for our needs, I was able to expand the length of the enclosure creating enough room to add two small beds on either side of the door and a center bed, which is perfect for herbs. The build was not difficult as I was able to do most of it by myself (with the exception of contructing the frame and attaching the door) and I am sure this would go much quicker with an extra set of hands. As I did not have a large chunk of time to devote to this project, it did take me quite some time stretched over a few weeks. Nonetheless, I am very happy with how it turned out.
After construction, my family got a little garden happy and decided we wanted to plant even more vegetables than we had originally planned. So, we created a much simpler but nonetheless less pest-proof enclosure for two more beds to the left of our original project (shown in the photos).
Although this was an expensive project (exact price is unkown), it is quite sturdy and we expect it to last a long time and provide lots of vegetables. We added some hanging baskets for decoration and decided next year we will add some morning glories around the outside corners for some extra shade during the afternoons. Some minor alterations also included a latch that allows us to open and close the door from both sides, we actually picked up a gate latch kit for this part of the project, and using welded wire fencing instead of chicken wire. While the welded wire added to the cost, it will hold up better to the wind and snow and is still protective enough to keep out our main predators.
Thanks so much for the plans Ana! In the begining, our neighbors joked we were building a guest house :). I have included some photos from throughout the build as well.

Built from Plan(s)
Estimated Cost
~$500?, we had to make some adjustments in size and swap out some materials due to the high winds we get, so this could probably be done for cheaper. The cost is also a guess as I am not completely sure what the total came to after many trips to the store. Nonetheless, our garden is twice the size of the enclosure kits Home Depot and other stores sell for what I predict to be more than twice the cost.
Estimated Time Investment
Week Long Project (20 Hours or More)
Finish Used
Unfinished
Recommended Skill Level
Beginner
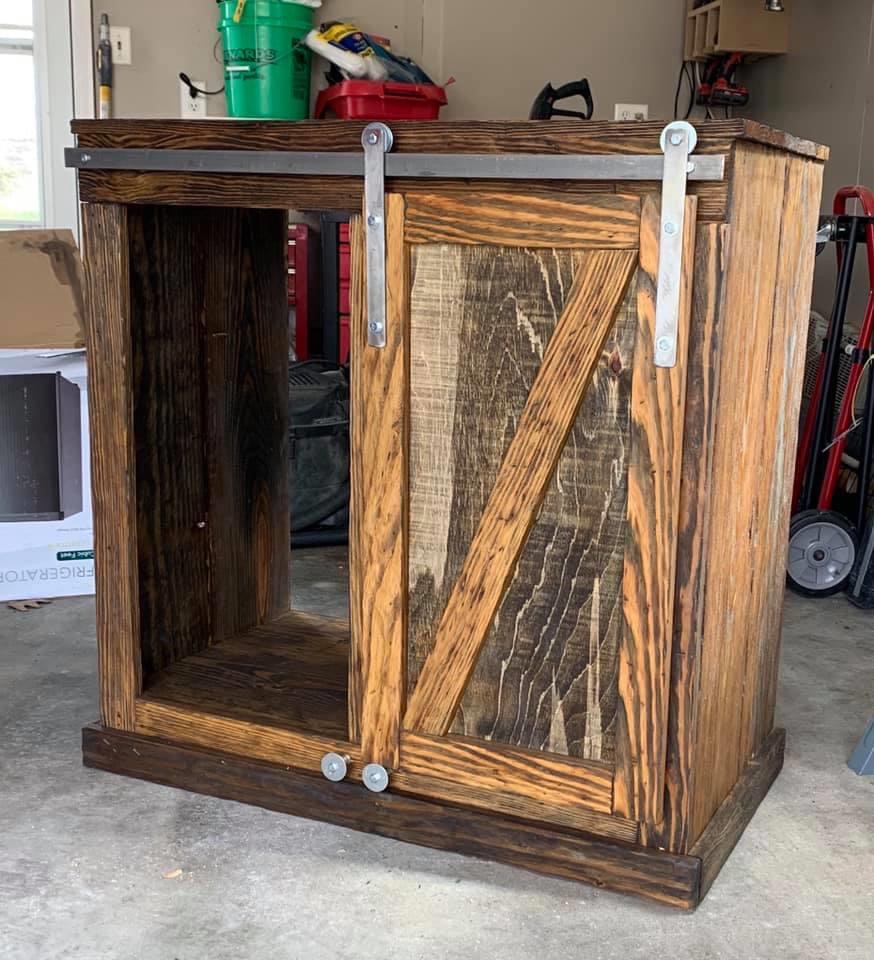
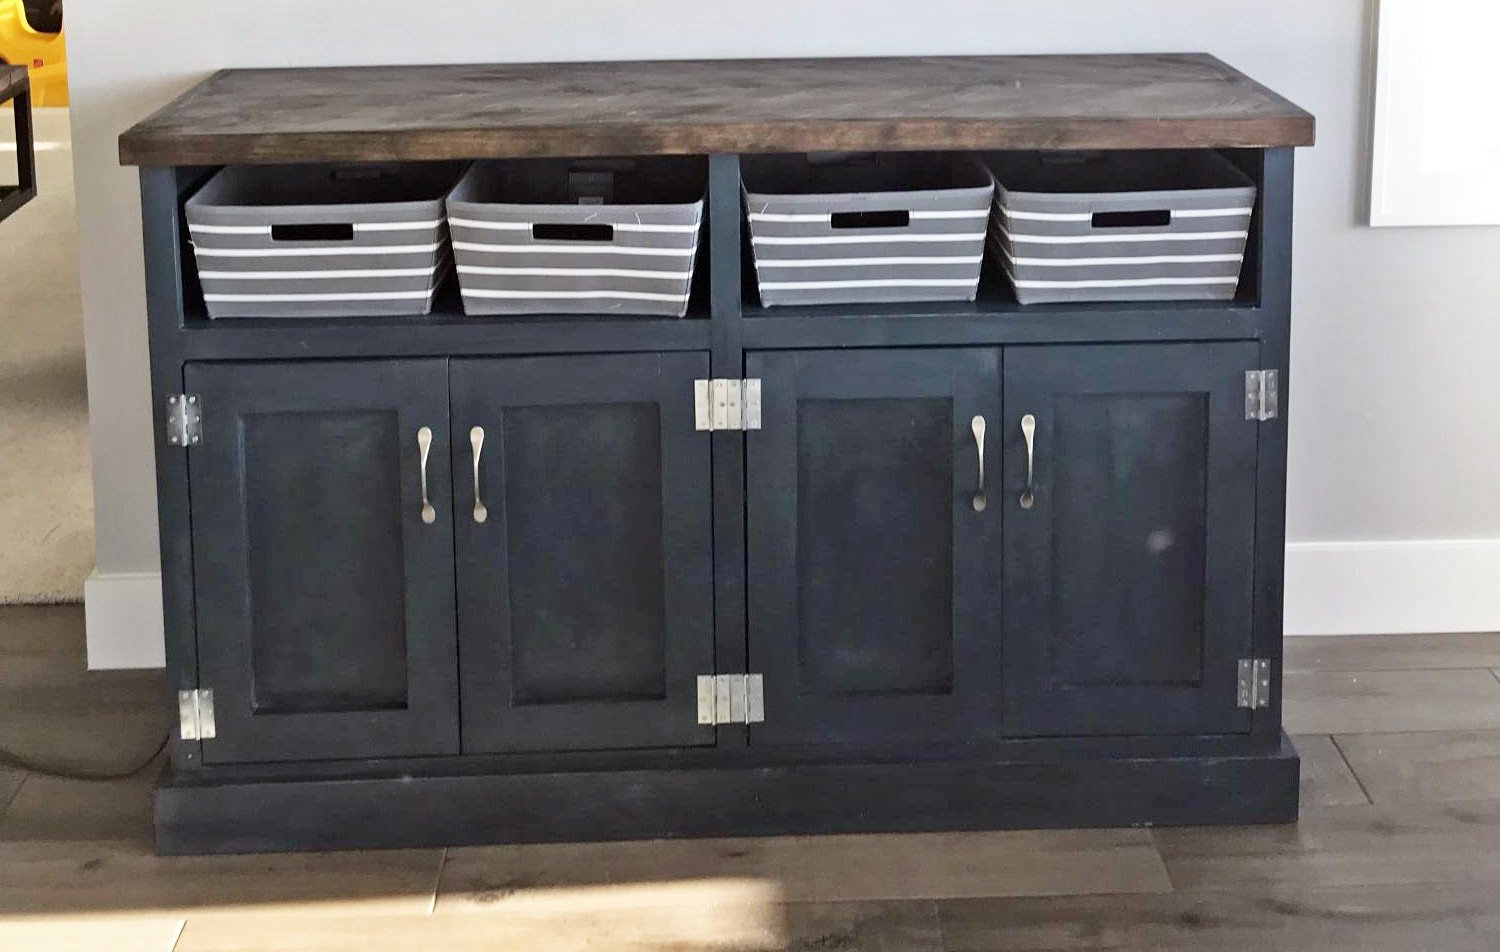
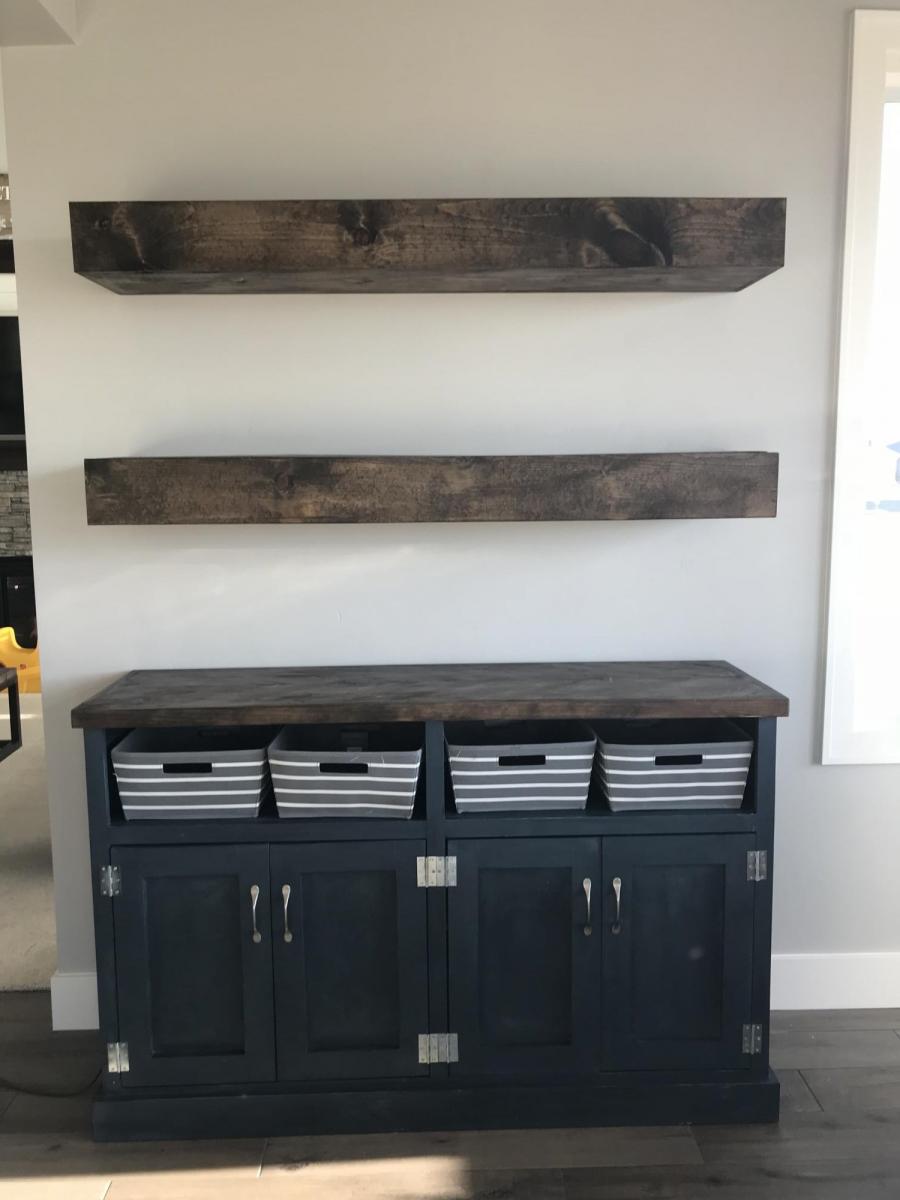
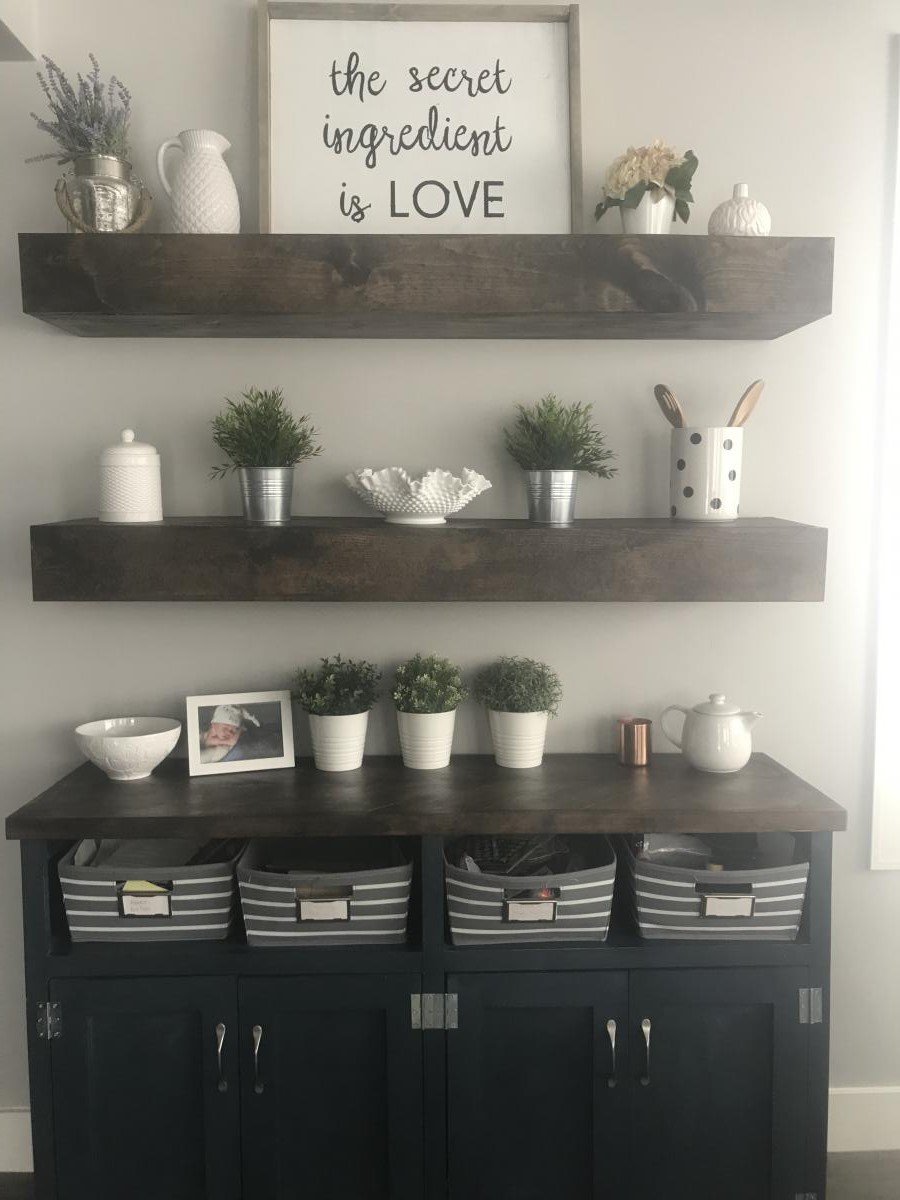
Coffee bar
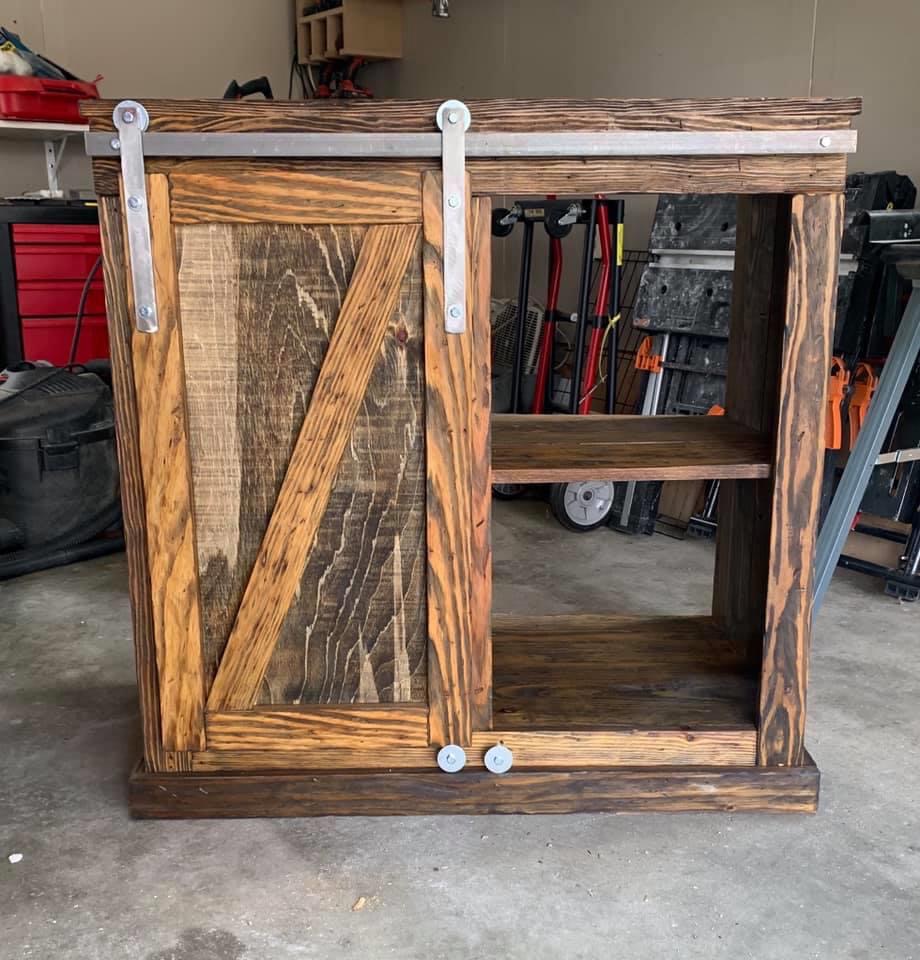
I used the plans for the mini frig/microwave cabinet. I modify the length and width because of the scrap wood I used. The wood I used was from our basement stairs that we retreaded. I used a cup wire brush on the wood to give it the rustic look. The barn door hardware was from Ana’s tutorial video (turned out great). First coat of stain was honey oak, I left it on for a couple of minute then wiped it off. Second coat was ebony, same technique as the first coat. Once the stained dried used a spray matte poly on the top, did 4 coats, sanding with a 800 grit between coats. Hope you’ll like it
Estimated Time Investment
Weekend Project (10-20 Hours)
Recommended Skill Level
Intermediate
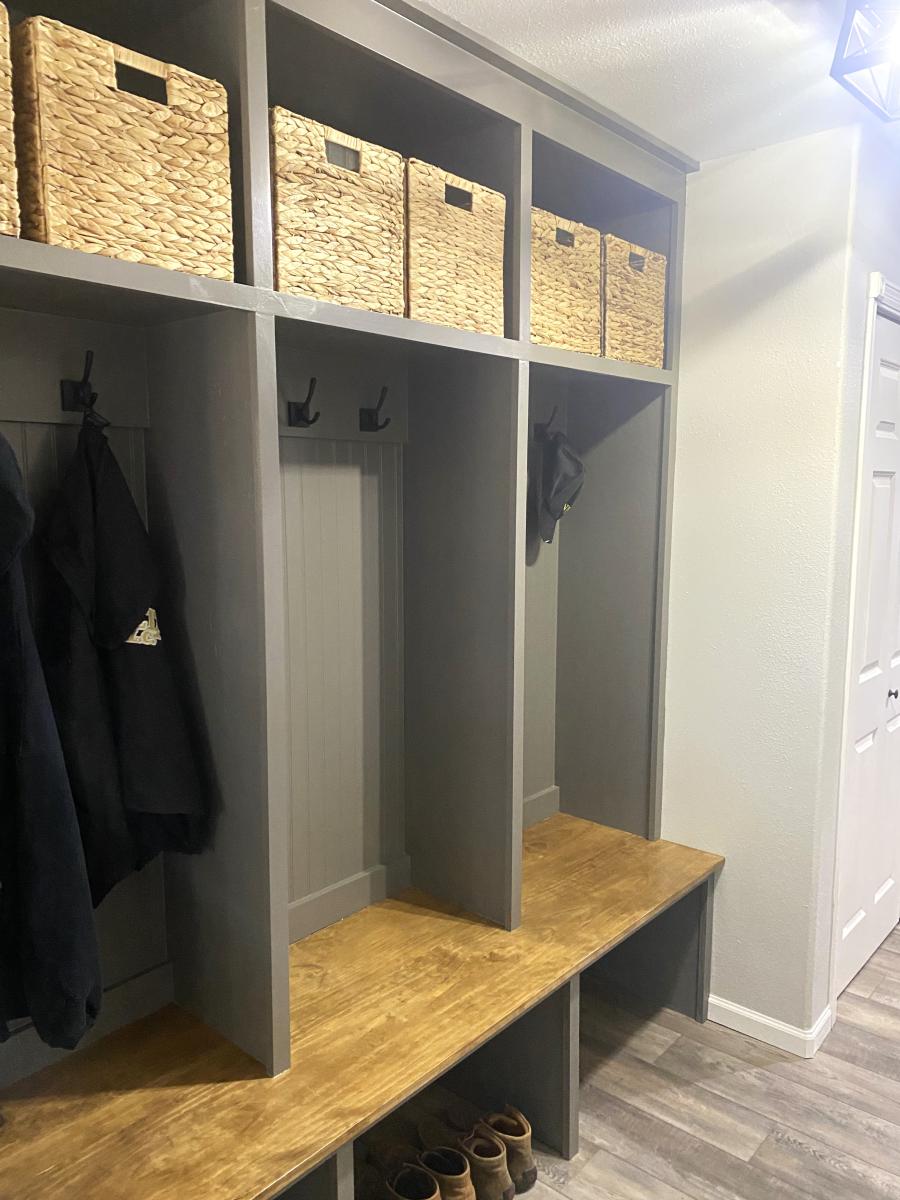
Laundry Mudroom
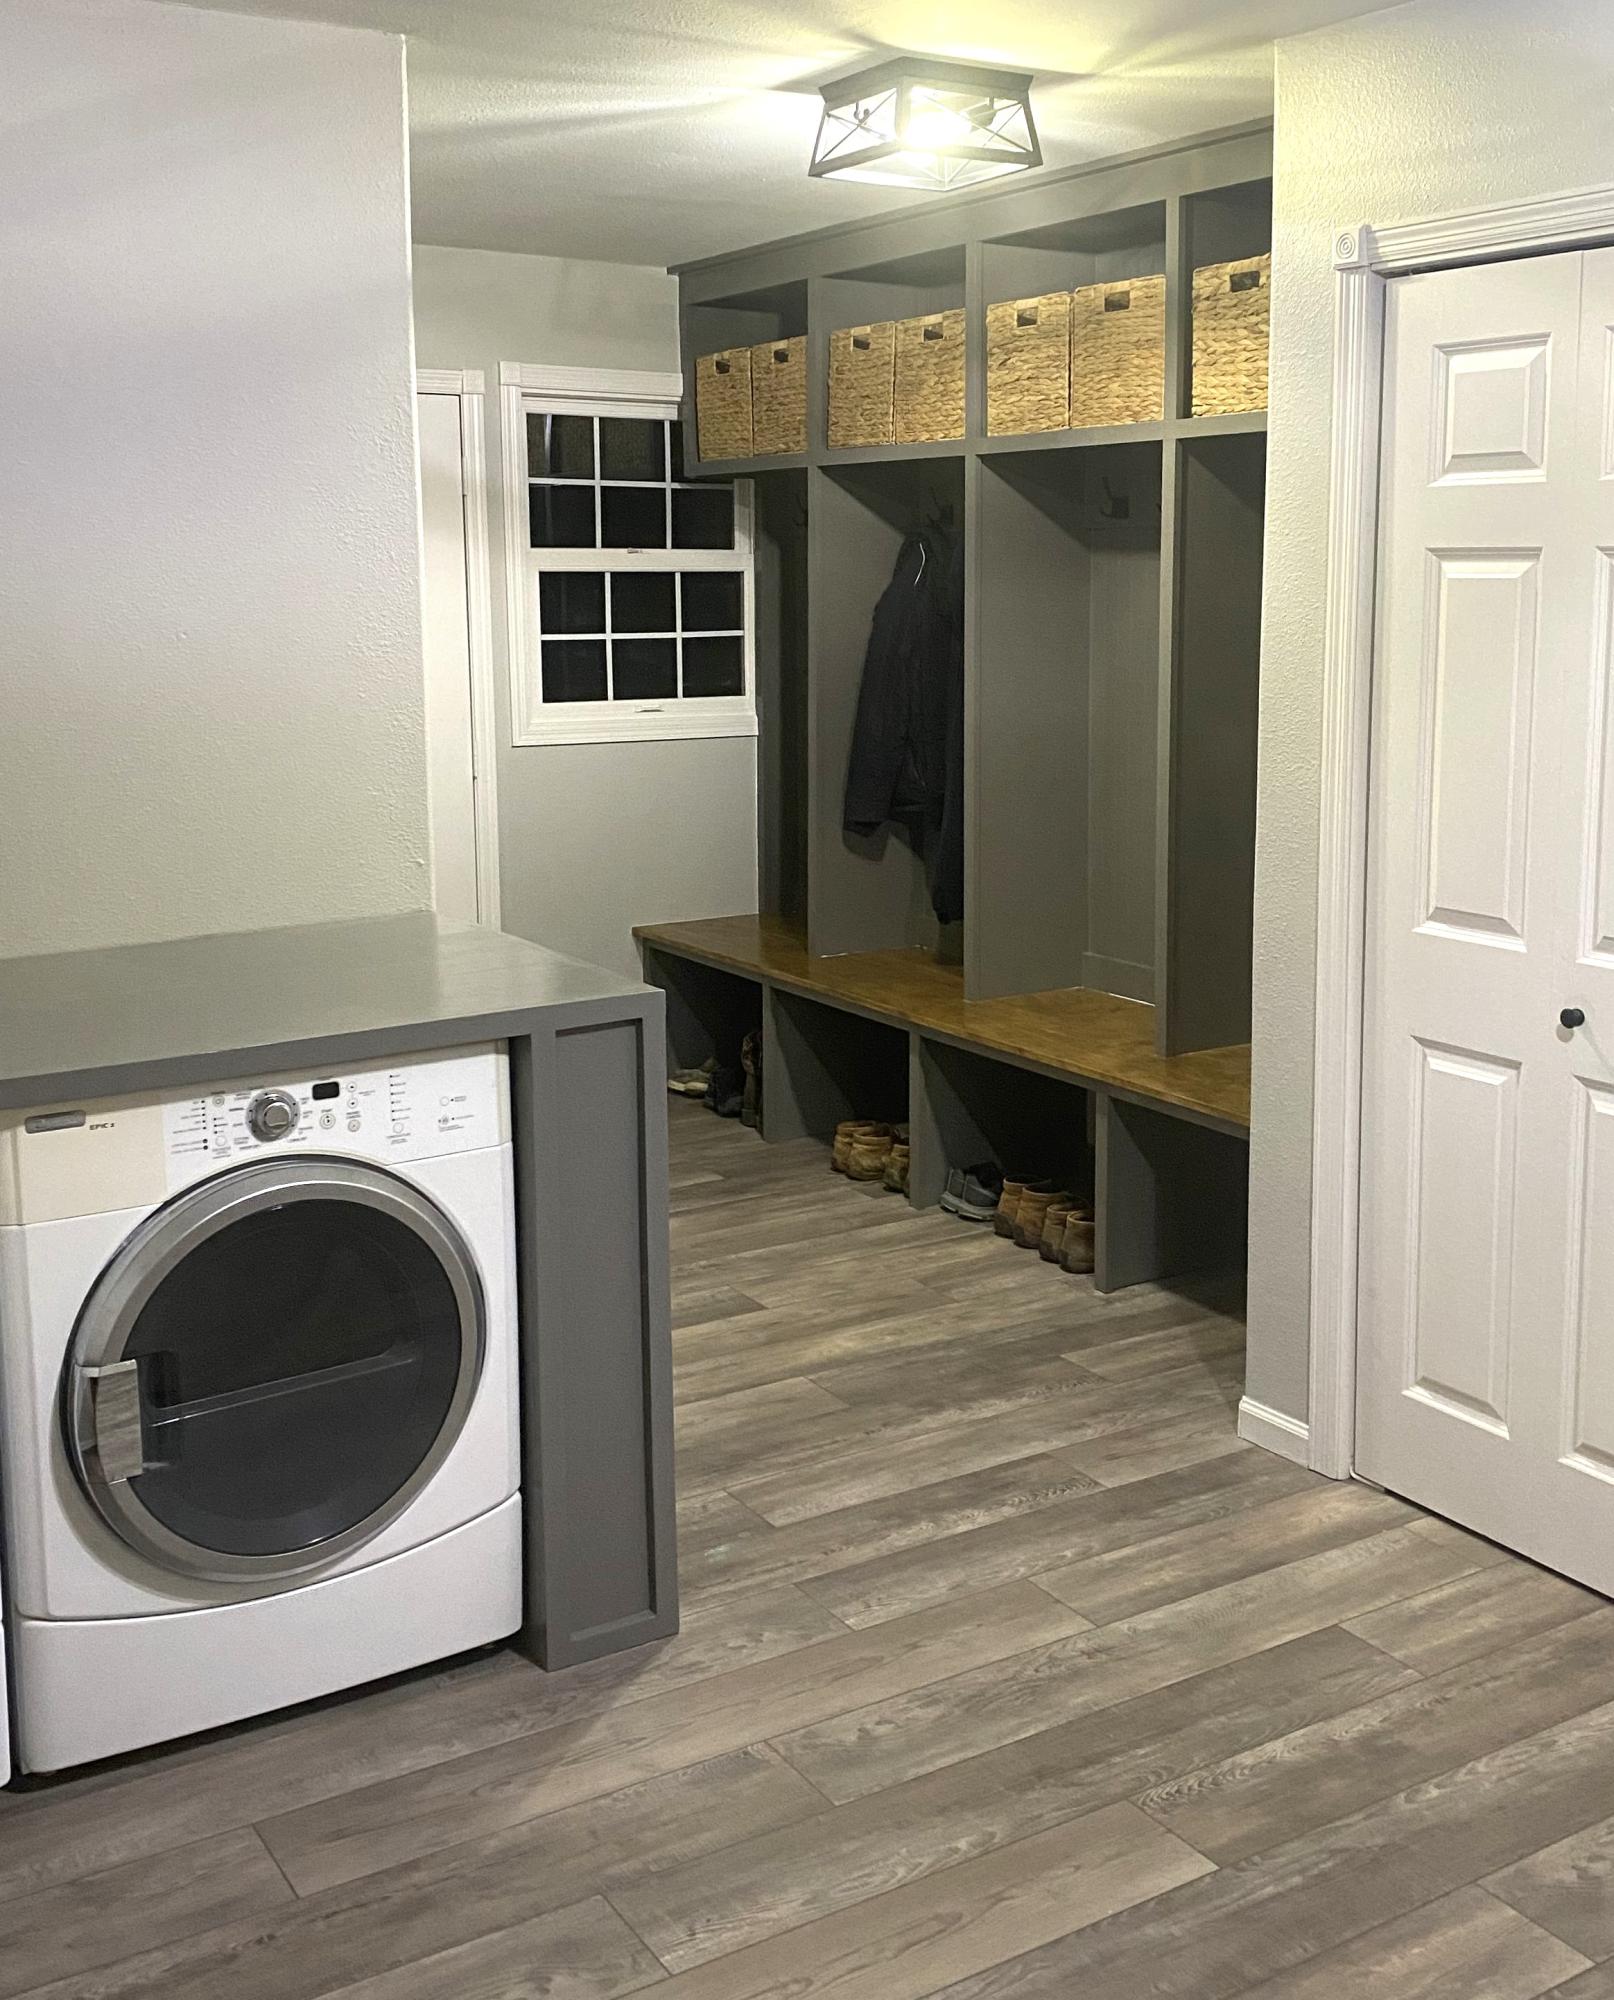
Laundry Mudroom Storage
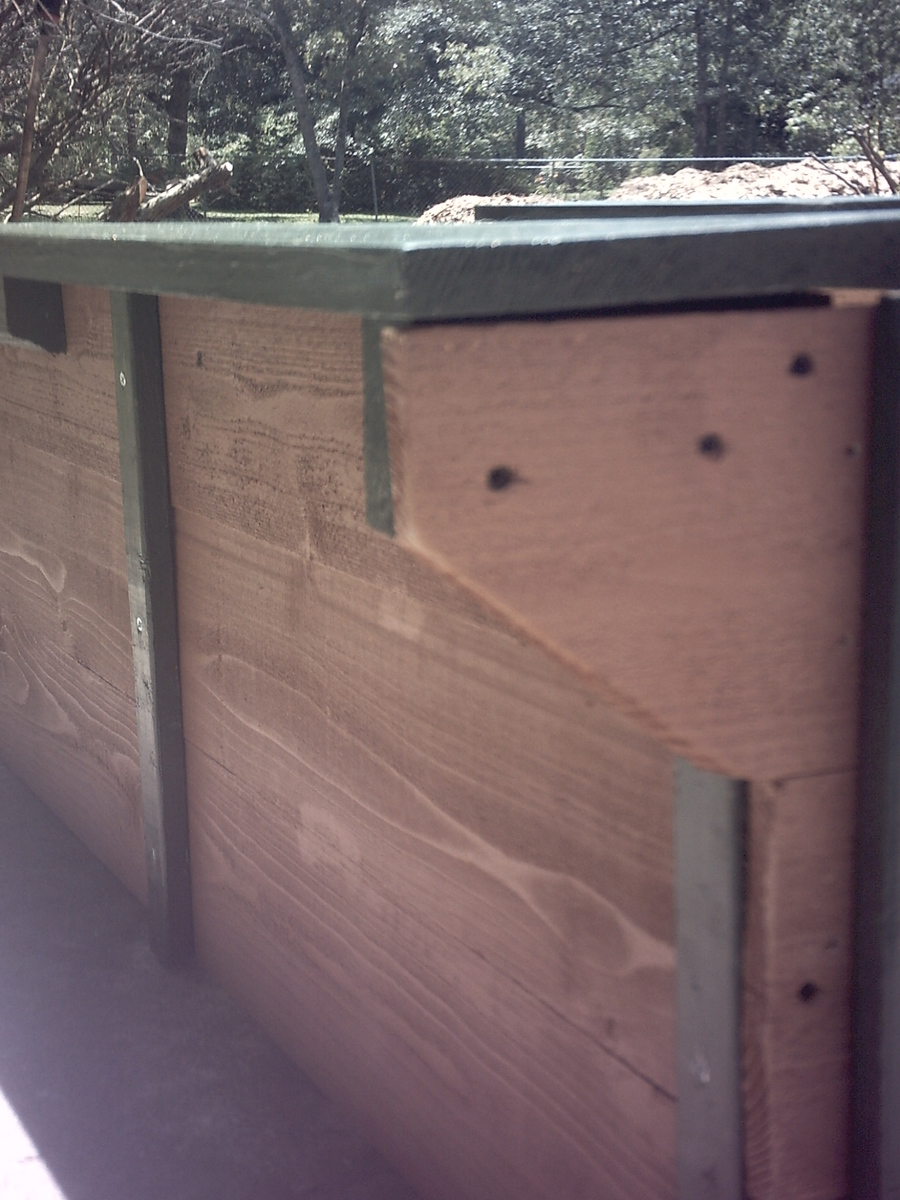
Raised Bed With Added Bench Shelves
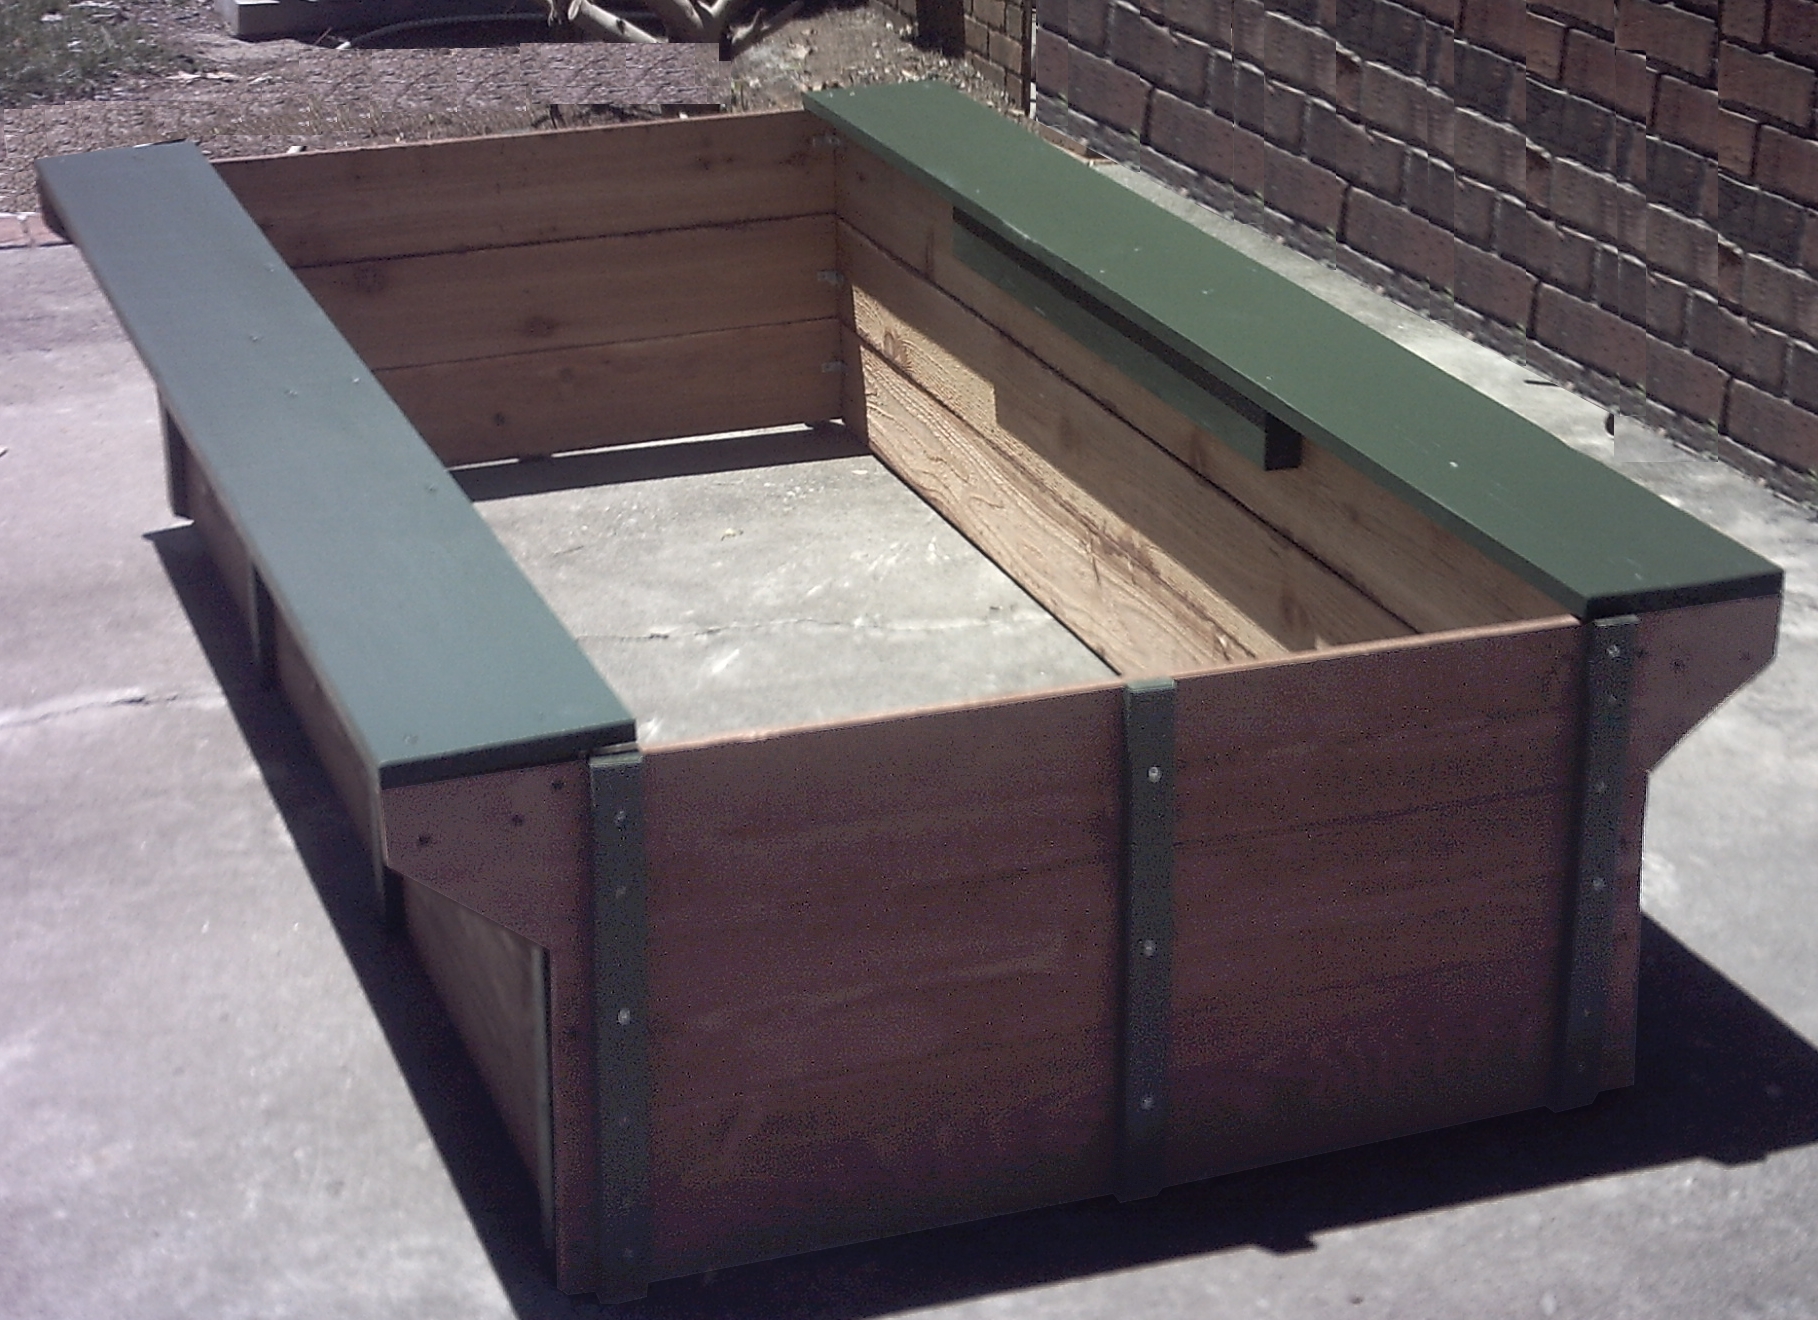
This box is 3 boards high (cedar dog-eared fence pickets), using the full length of the pickets for the sides and 1/2 the length of the boards for the ends. The dog ears were removed with a pull saw before painting and construction.
A 12ft, 8 inch wide, pressure treated pine plank was used to create a bench shelf along the sides. The plank was halved to create 2 benches. Small, 1 x 2s hold all three boards flush to form the sides. Segments of 2 x 4's were secured to create braces that hold the benches. The upper level of the end boards are longer than the bottom two and serve as additional support for the ends of the pine bench boards.
Wood screws were used for assembly. Corner brackets reinforce the interior corners for added stability. All exterior boards were painted before assembly.
The bed interior is 17" deep 33" wide x 71" long.
Built from Plan(s)
Estimated Cost
$20
Estimated Time Investment
Afternoon Project (3-6 Hours)
Finish Used
Indoor/outdoor latex ($5 surplus).
Recommended Skill Level
Beginner
Comments

Mon, 06/04/2012 - 12:10
Love it! As I get older I am
Love it! As I get older I am looking more and more at switching my garden space over to raised beds. The added bench is a great idea.
In reply to Love it! As I get older I am by Pam the Goatherd
Mon, 06/04/2012 - 16:14
Same here!
This one is a gift, but left me wishing it were mine. It looks so inviting that one of my sons asked for his own gardening space and started drawing up plans.
Thankfully, it's easy enough to put together with interruptions. I have lots of interruptions. I did the cutting in one session, the painting in another, the assembly third and then some final touch ups with the paint.
The cedar smells WONDERFUL. The benches are narrow but sturdy enough to handle my dangerous curves *cough* *smile*
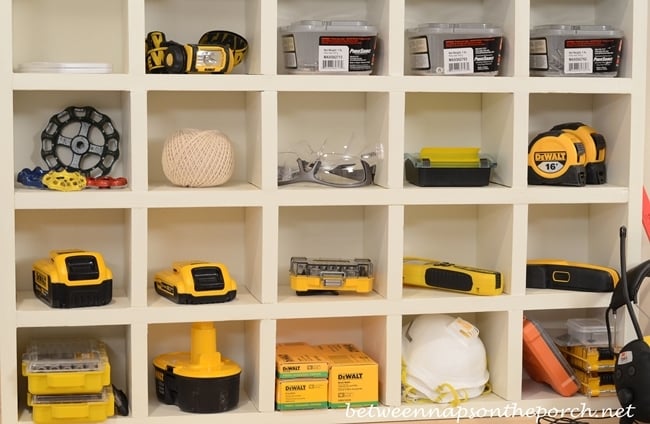
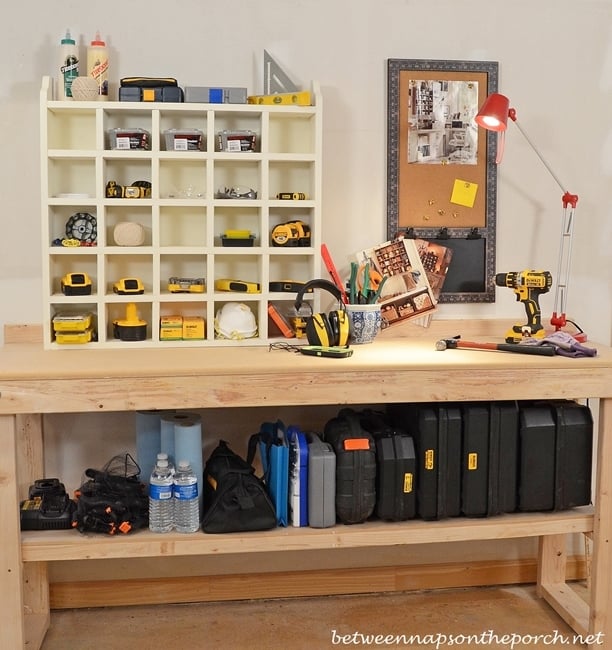
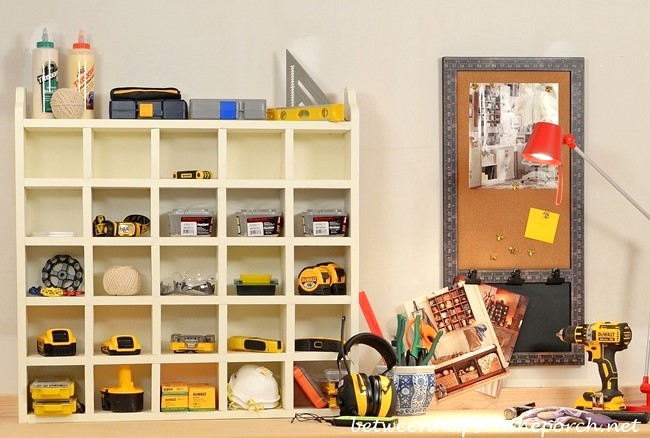
Cubby Organizer (Pottery Barn Inspired)
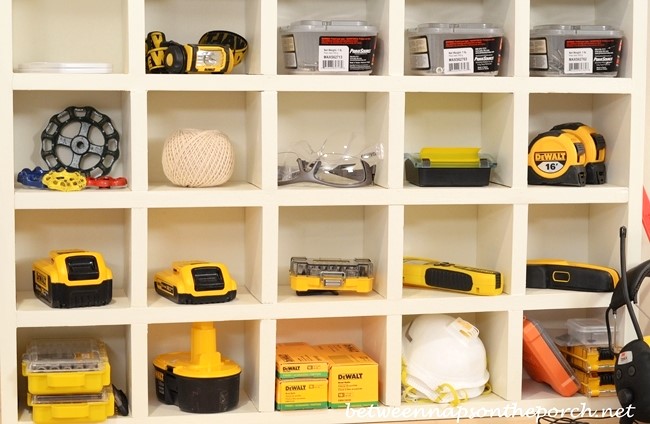
This cubby organizer is great for storage, displaying collectibles or as an advent calendar. I'm using mine in my mini-workshop for storing tools and supplies I use frequently when woodworking. Tutorial can be found at my blog here: http://betweennapsontheporch.net/build-a-cubby-organizer-pottery-barn-i… Thanks Ana for supplying the plans!
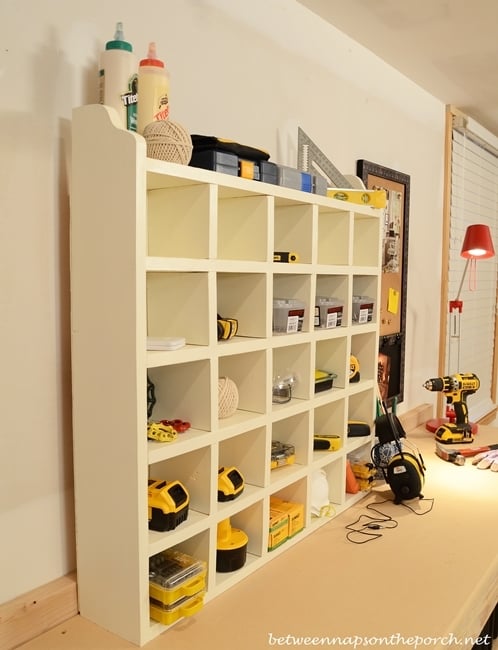
Built from Plan(s)
Estimated Cost
$40
Estimated Time Investment
Day Project (6-9 Hours)
Finish Used
I used Sherwin Williams Dover White paint for a soft white. Stain would work great for this piece, too.
Recommended Skill Level
Beginner
Loft Bed
This took me 4 days to sand (by hand), prime and paint so daddy and papa to put together the bed she's always wanted.
Built from Plan(s)
Estimated Cost
approx. $150, for wood, screws, paint, and Kreg Jig.
Estimated Time Investment
Weekend Project (10-20 Hours)
Recommended Skill Level
Beginner
Entryway console with open shelves
Console used as art center with modified chevron top. To make the top I use 1/2” plywood cut to the desired size of the top (minus 1.5” in width and length), nailed chevron pieces (made from 1 x 4 boards) to the top and trimmed the edges with 1x2 boards.

Built from Plan(s)
Estimated Cost
100
Estimated Time Investment
Weekend Project (10-20 Hours)
Finish Used
Base is Rustoleum chalk paint in coastal blue. Top is Varathane Fast dry in Dark Walnut.
Recommended Skill Level
Intermediate
Comments

2 Seater Bench with Table in the Middle

Modified the bench from the plans I got from DIY Pete to curve the back like an Adirondack. Bench given to a Disabled Vet and his wife.
Rob L.
Comments
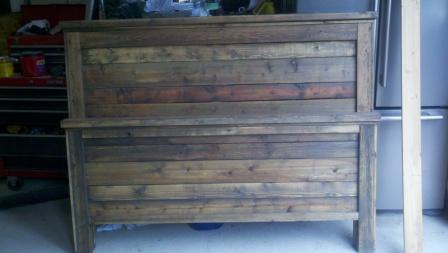
Handmade from this plan

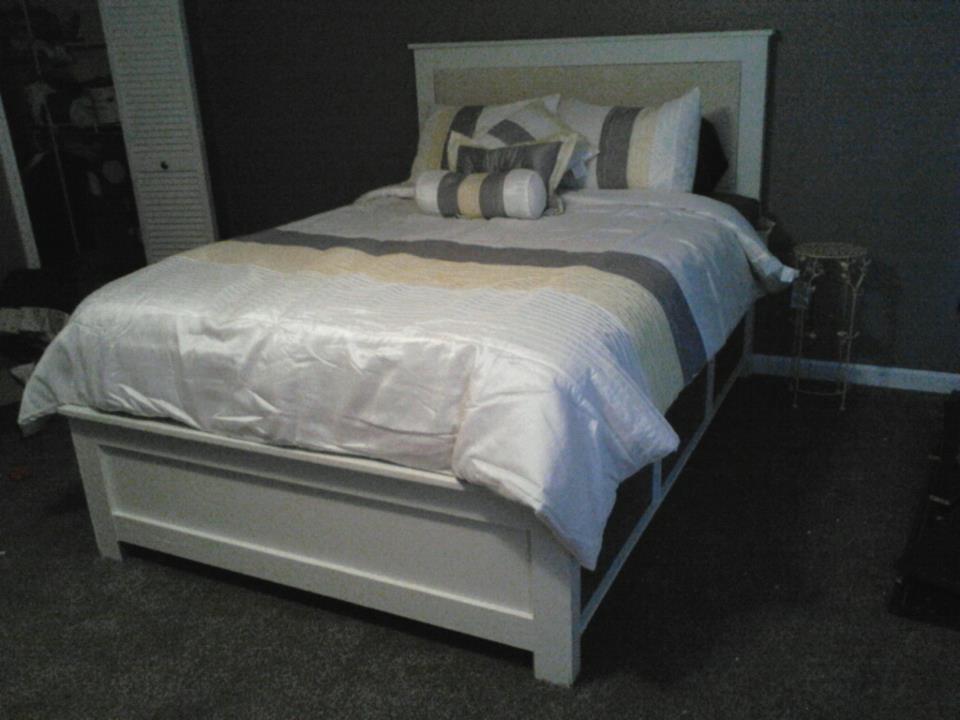
I decided to make the headboard from this pan for the bed in one of my two guest room. After making the first one out of knotty alder and to full specs, I was so happy with it, that I decided to make it again for my second guest room, this time out of reclaimed and weathered pine and fir, but I needed the full bed frame too. Also due to the height of the headboard and window placement in the room, I lowered the height of the headboard by about a foot and then fashioned a foot board from the original headboard design. Bed rails were made from 2X6 fir and attached with rail hangers which costs about $15.00 I used a driftwood stain and it really brought out the grain of the wood. Thanks for the plans guys this worked out awesome.
Estimated Cost
$30.00
Estimated Time Investment
Weekend Project (10-20 Hours)
Finish Used
Driftwood stain
Recommended Skill Level
Beginner
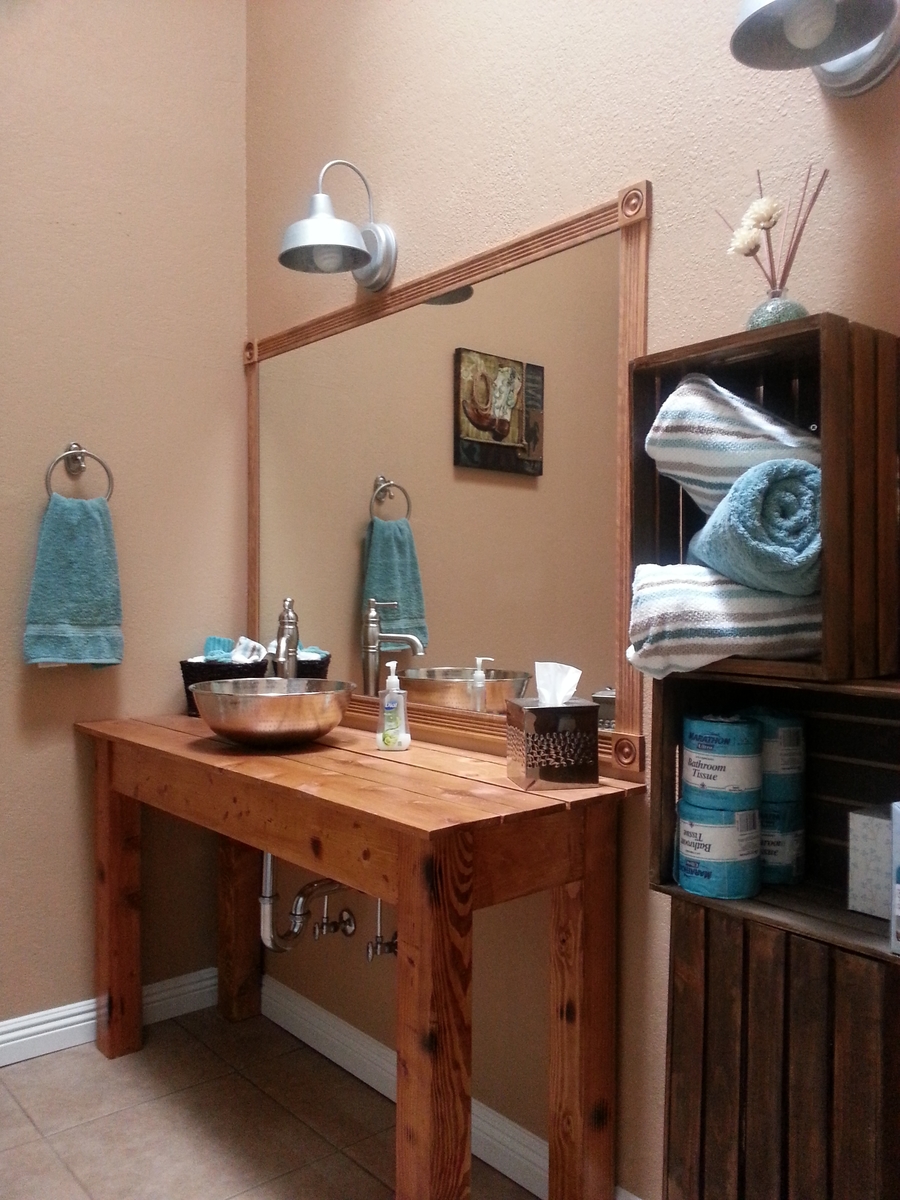
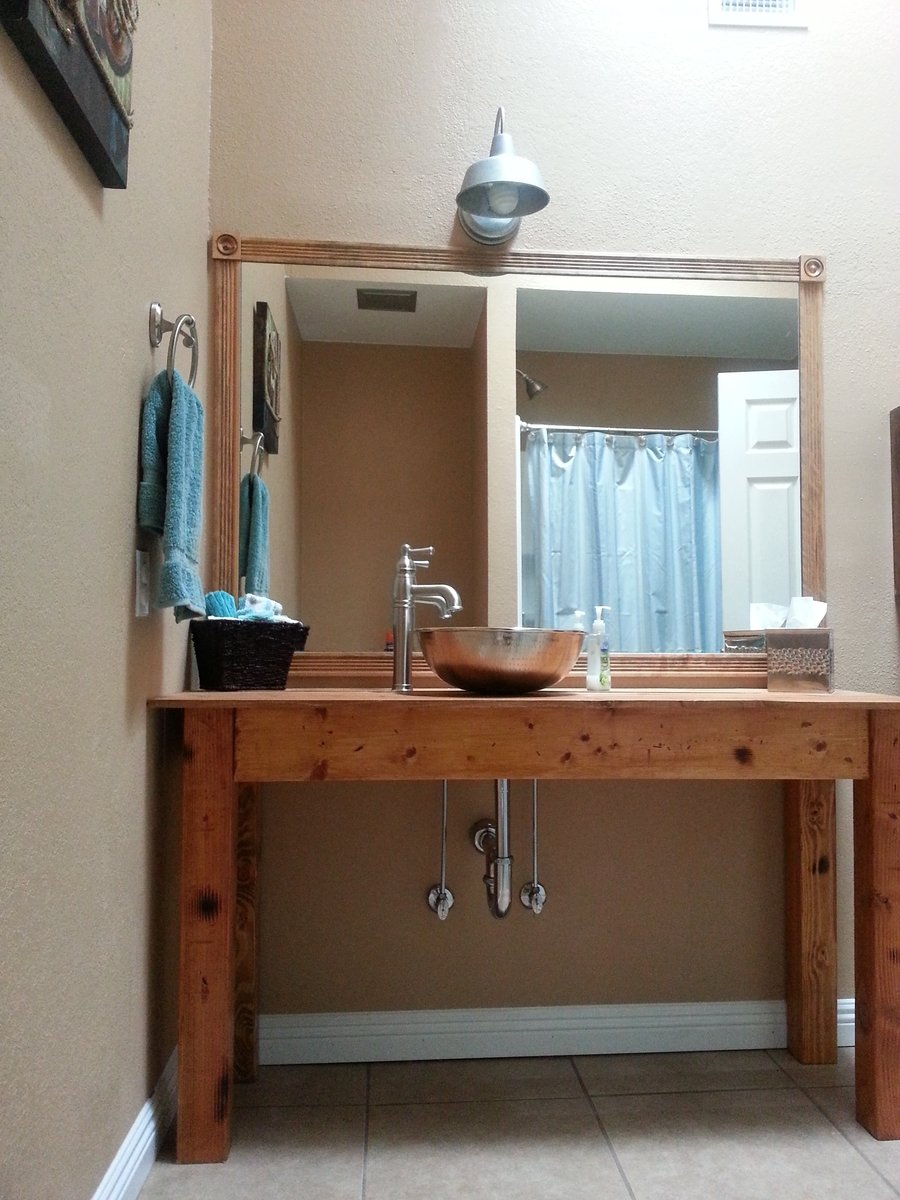
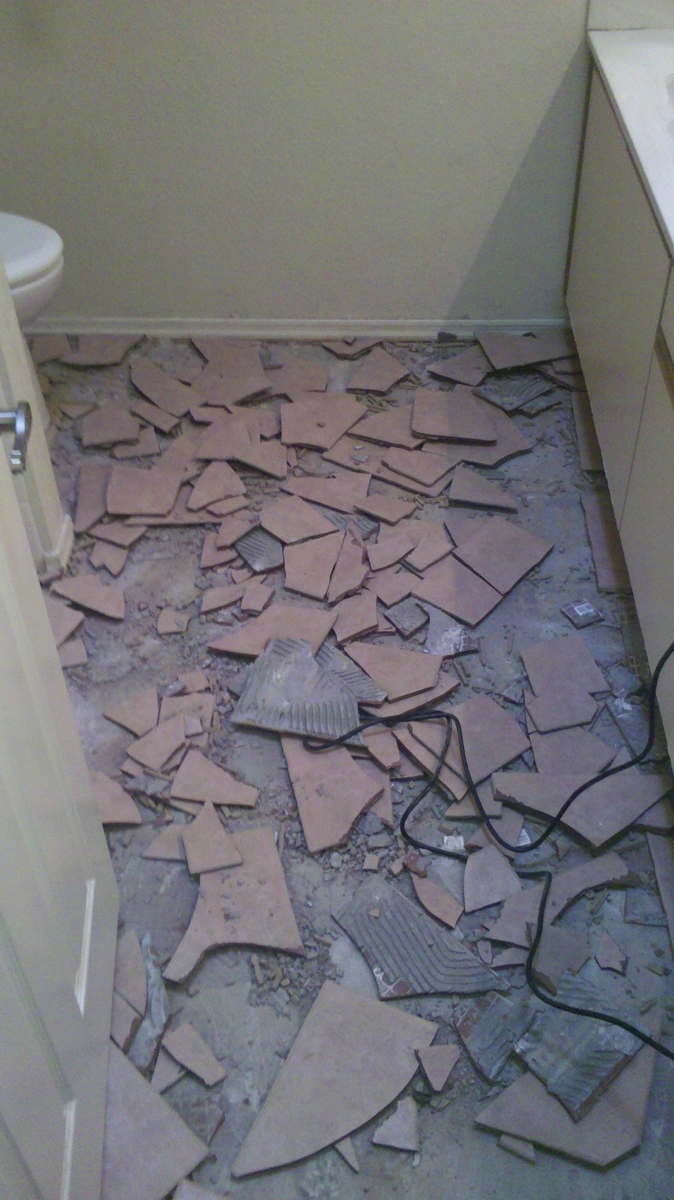
Farmhouse Rustic Style Vanity
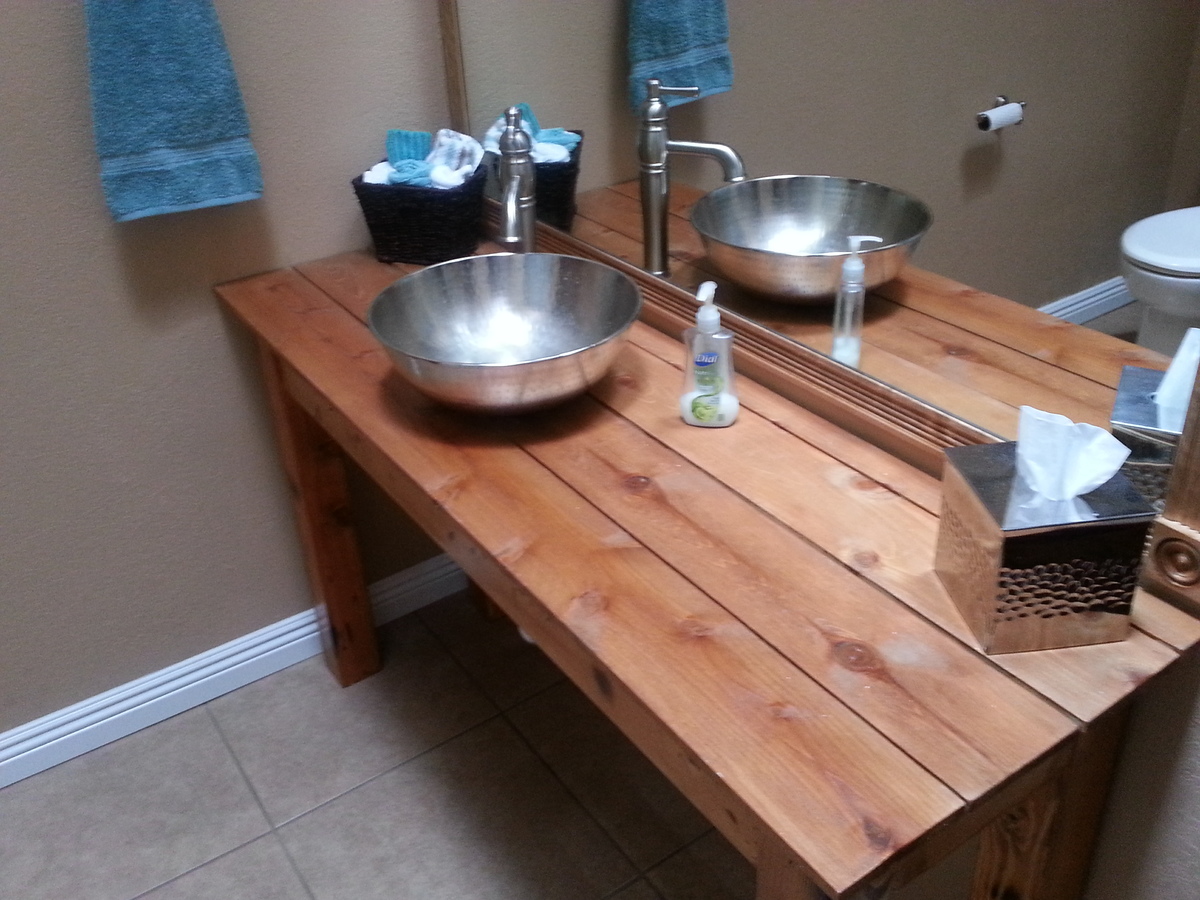
This remodel project was a year in the making. We purchased this 1980's house (notice the before pic) 3-years ago and immediately started tearing into it... all of it. The bathrooms were the last on the list to be remodeled. An impending baby shower spurred the need to complete this project, and we're pleased with how it came out.
We searched high and low when trying to decide on the vanity, and came across the plans for the one pictured here when searching for "Rustic" or "Western". Coming from a family of carpenters, I felt comfortable enough in my ability to tackle this simple project. I'm a tall guy so I wanted something that was comfortable for me to use as well. I made this vanity higher and longer than the plans originally called for.
The space in the bathroom allows for a dual sink, but we're a small family and felt the 2nd sink wasn't necessary at this time. I don't like to remove features that are already present, so the bottom crate is actually covering the plumbing in case we or the next owner decide to add a second sink. The other crates obviously provide the storage that isn't currently present with this type of vanity. I may add a shelf on the bottom, but I like the open look and feel.
The counter top is simply cedar fencing that's been well sanded, stained and protected with 4 coats of Poly. I staggered the top to give it a different look as well.
The mirror was the full length of the wall, but cut down to match the size of the new vanity and framed on the wall.
The lights ($29) are simple, outdoor galvanized coach lamps found at Lowes.
The vessel sink ($99) was found at homedepot.com (much better selection than at your local store), and the faucet ($149) came from Lowes.
Our guests loved the bathroom, as do my wife and I.
Built from Plan(s)
Estimated Time Investment
Weekend Project (10-20 Hours)
Finish Used
Dark Walnut Stain
Clear Poly
Clear Poly
Recommended Skill Level
Intermediate
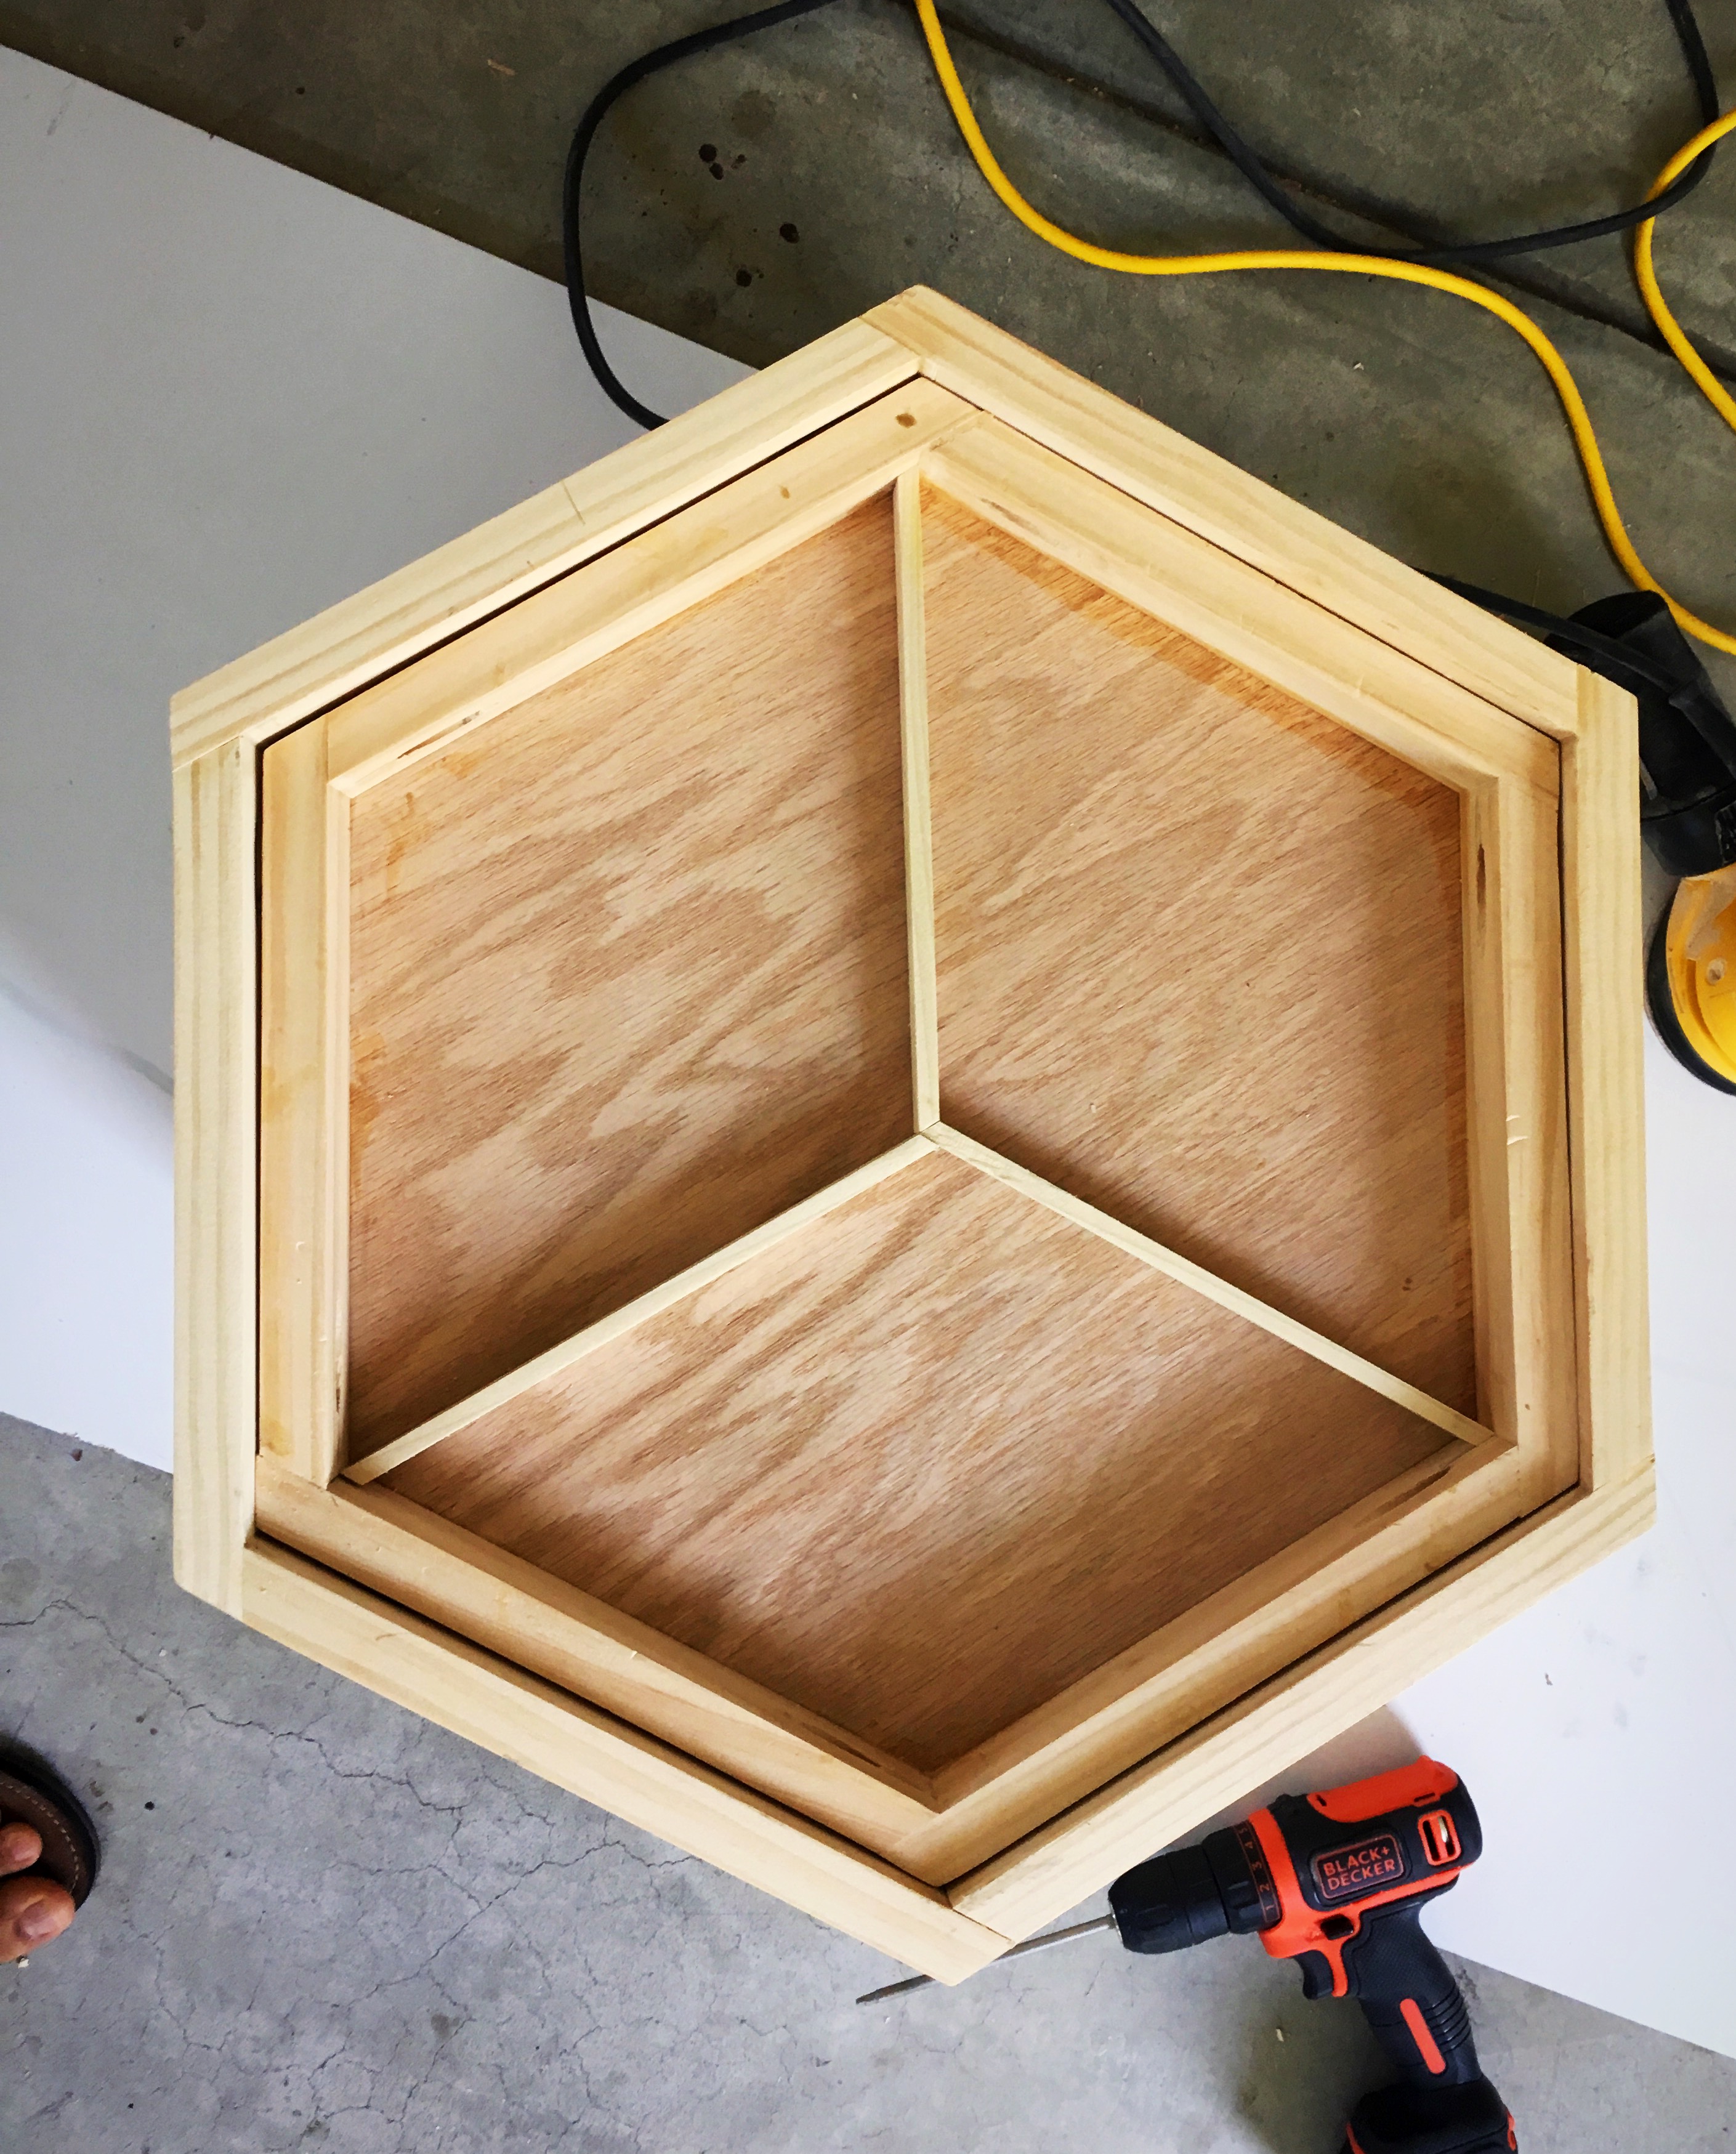
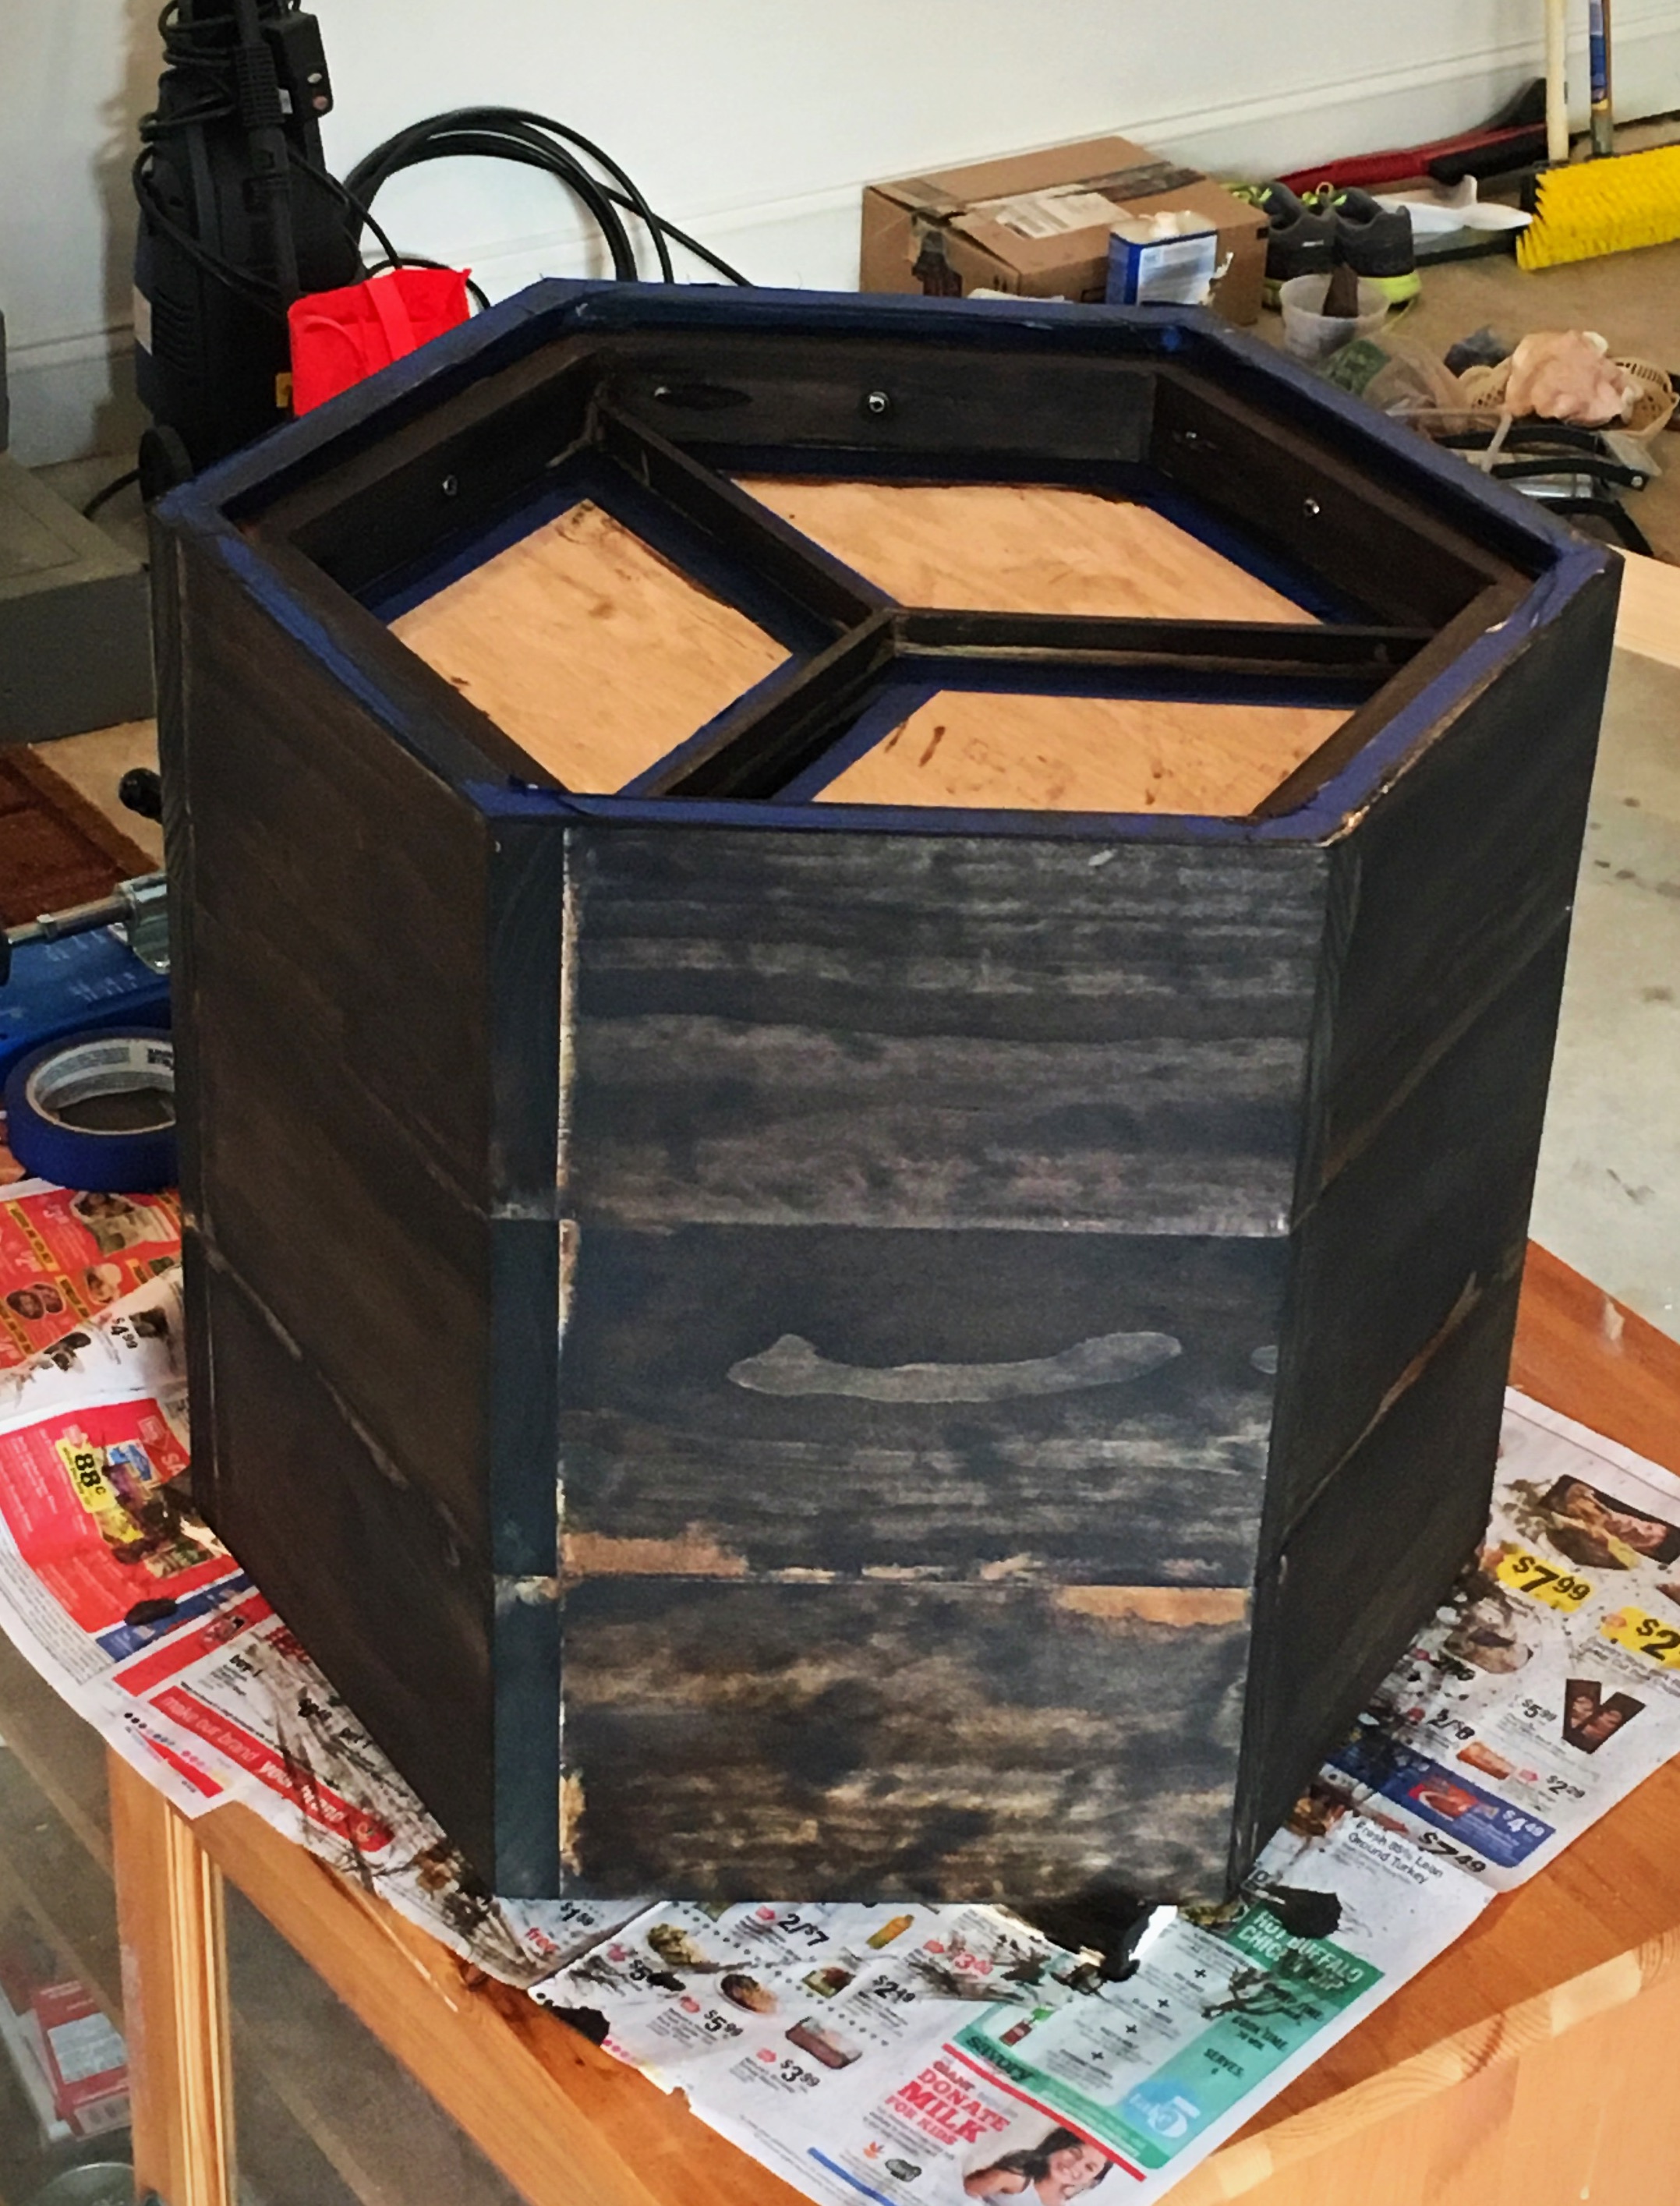
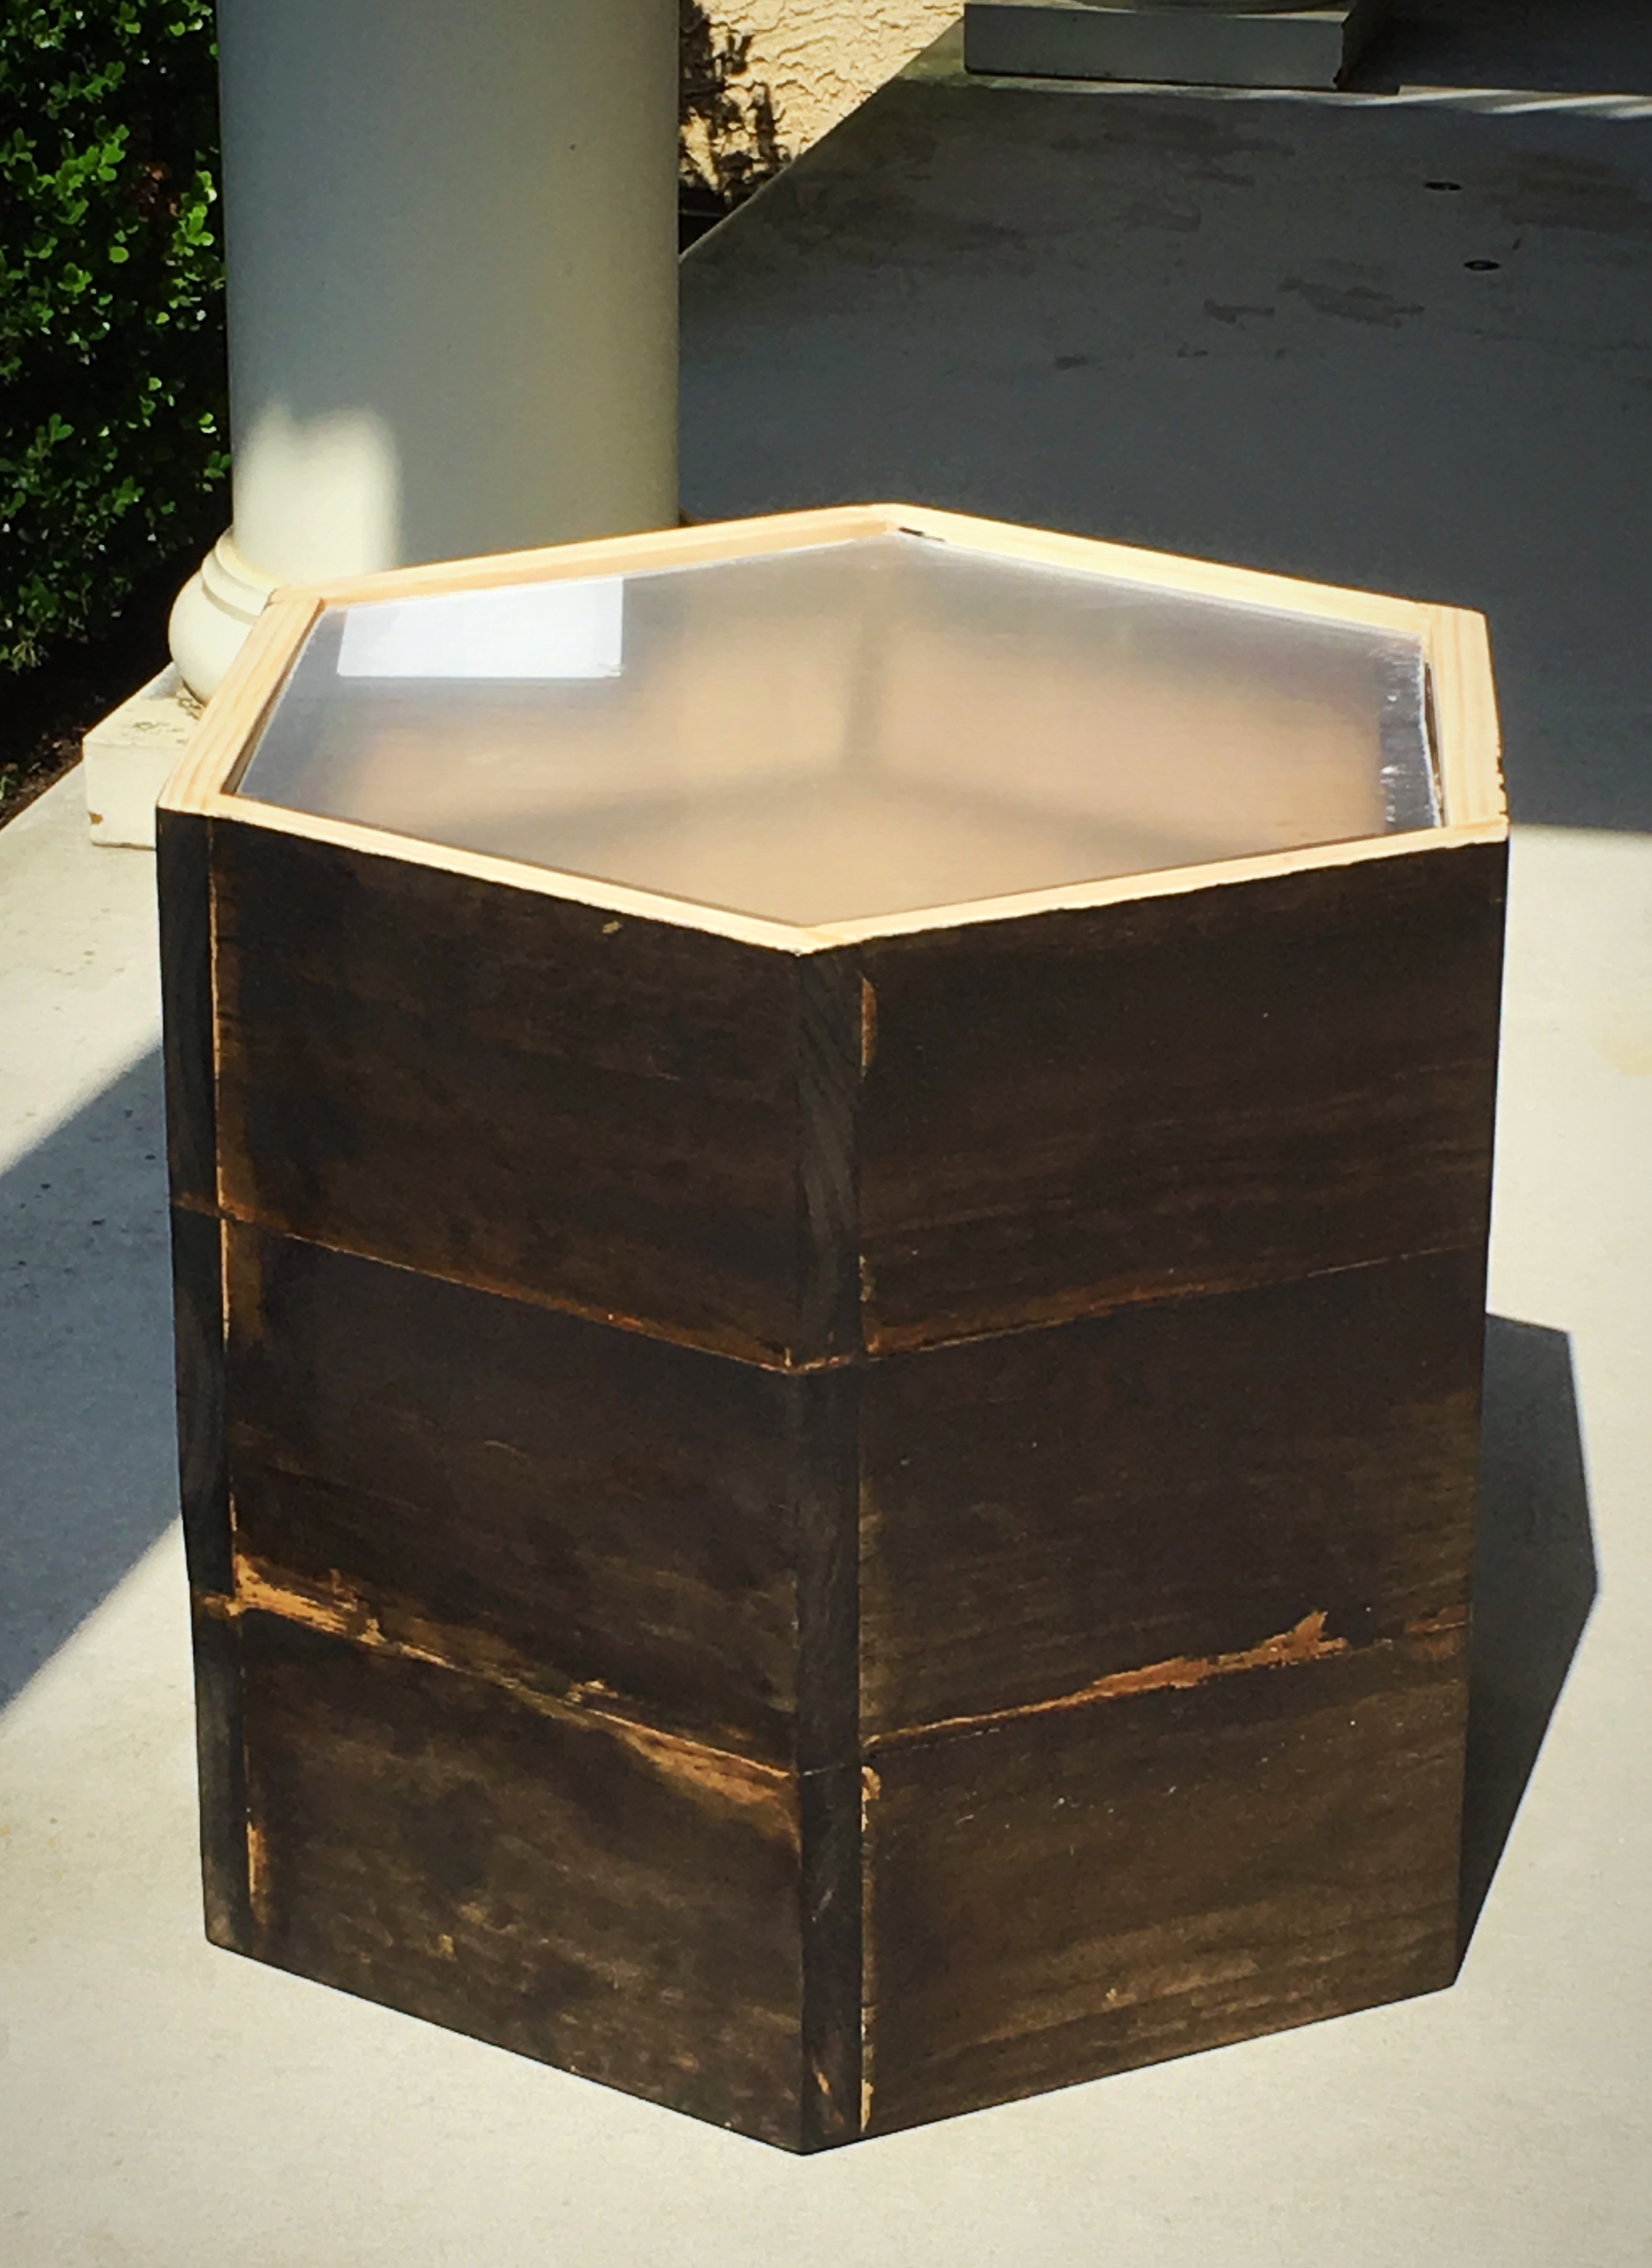
Hexagonal Side/Cofee Table
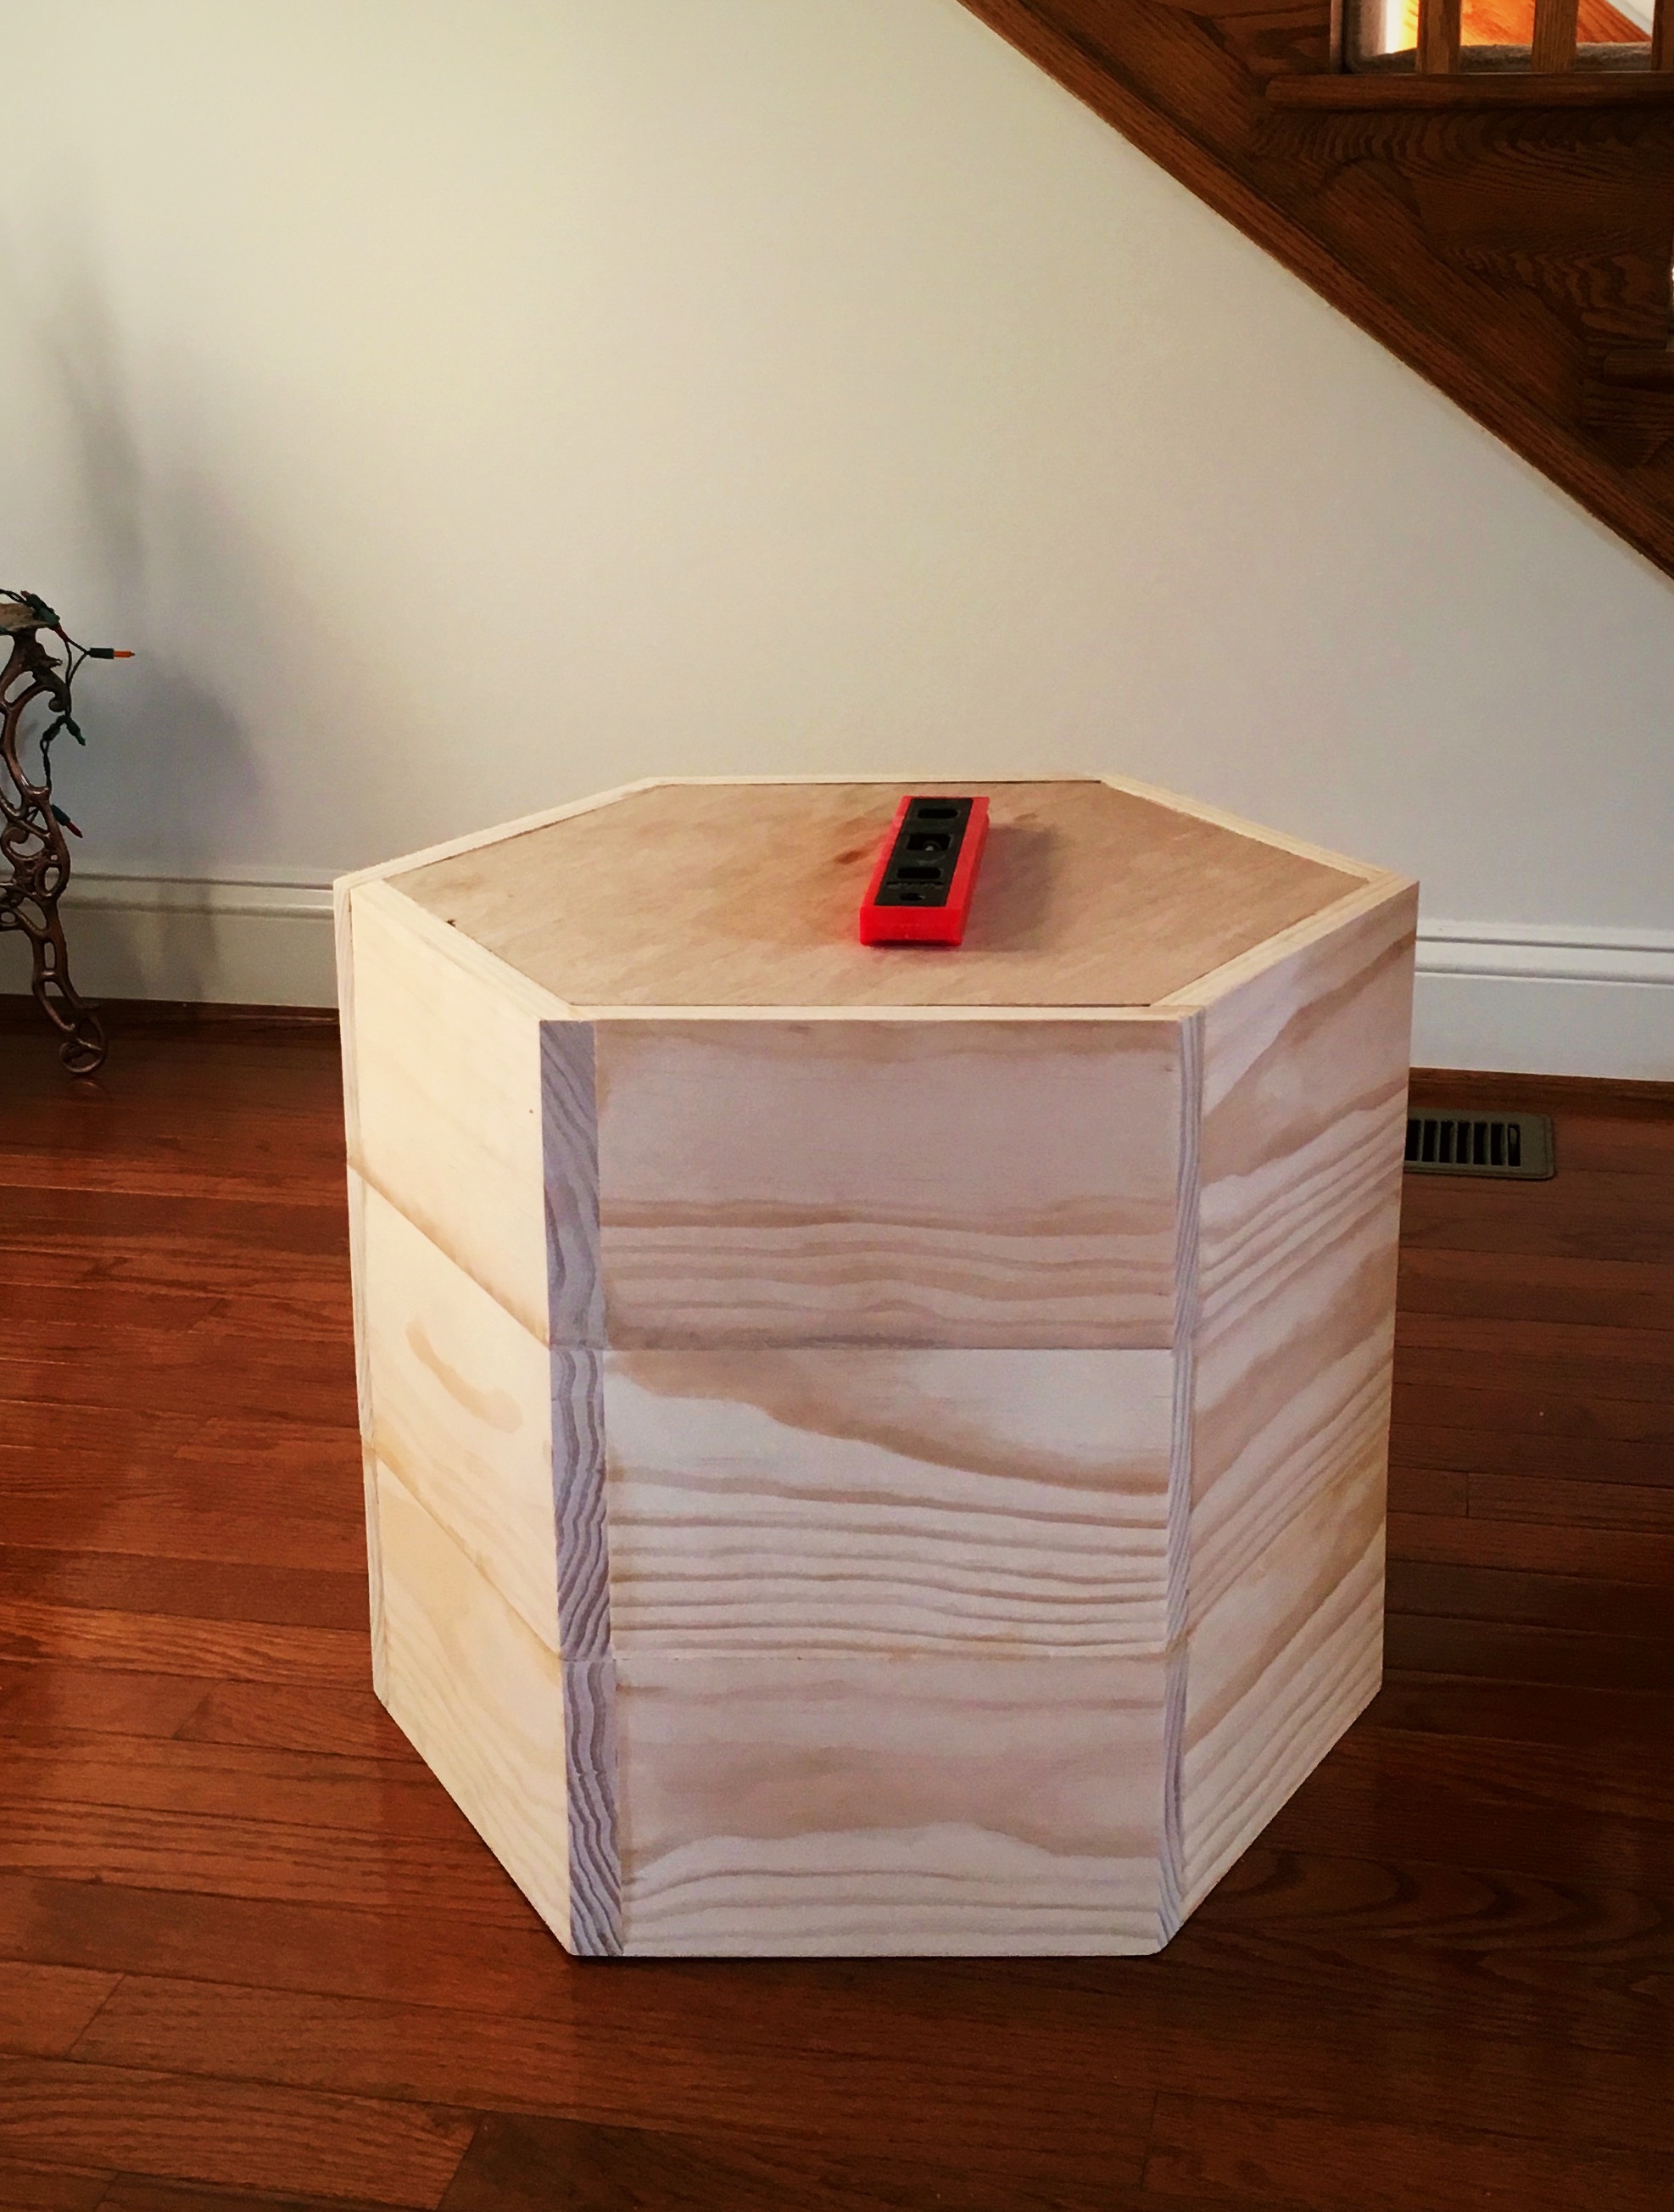
I tried this as my first ever project after going through different plans and technique. I did great (I think :-) ) until end and think i screwed up with staining. There is dried glue left on the surafce which i thought i sanded but appeared as soon as i stained.
Feed back / comments on the design and please suggest a way to fix the staining issue.
Estimated Cost
70 $
Estimated Time Investment
Weekend Project (10-20 Hours)
Finish Used
Stain
Recommended Skill Level
Beginner
Adapted Farmhouse Bed
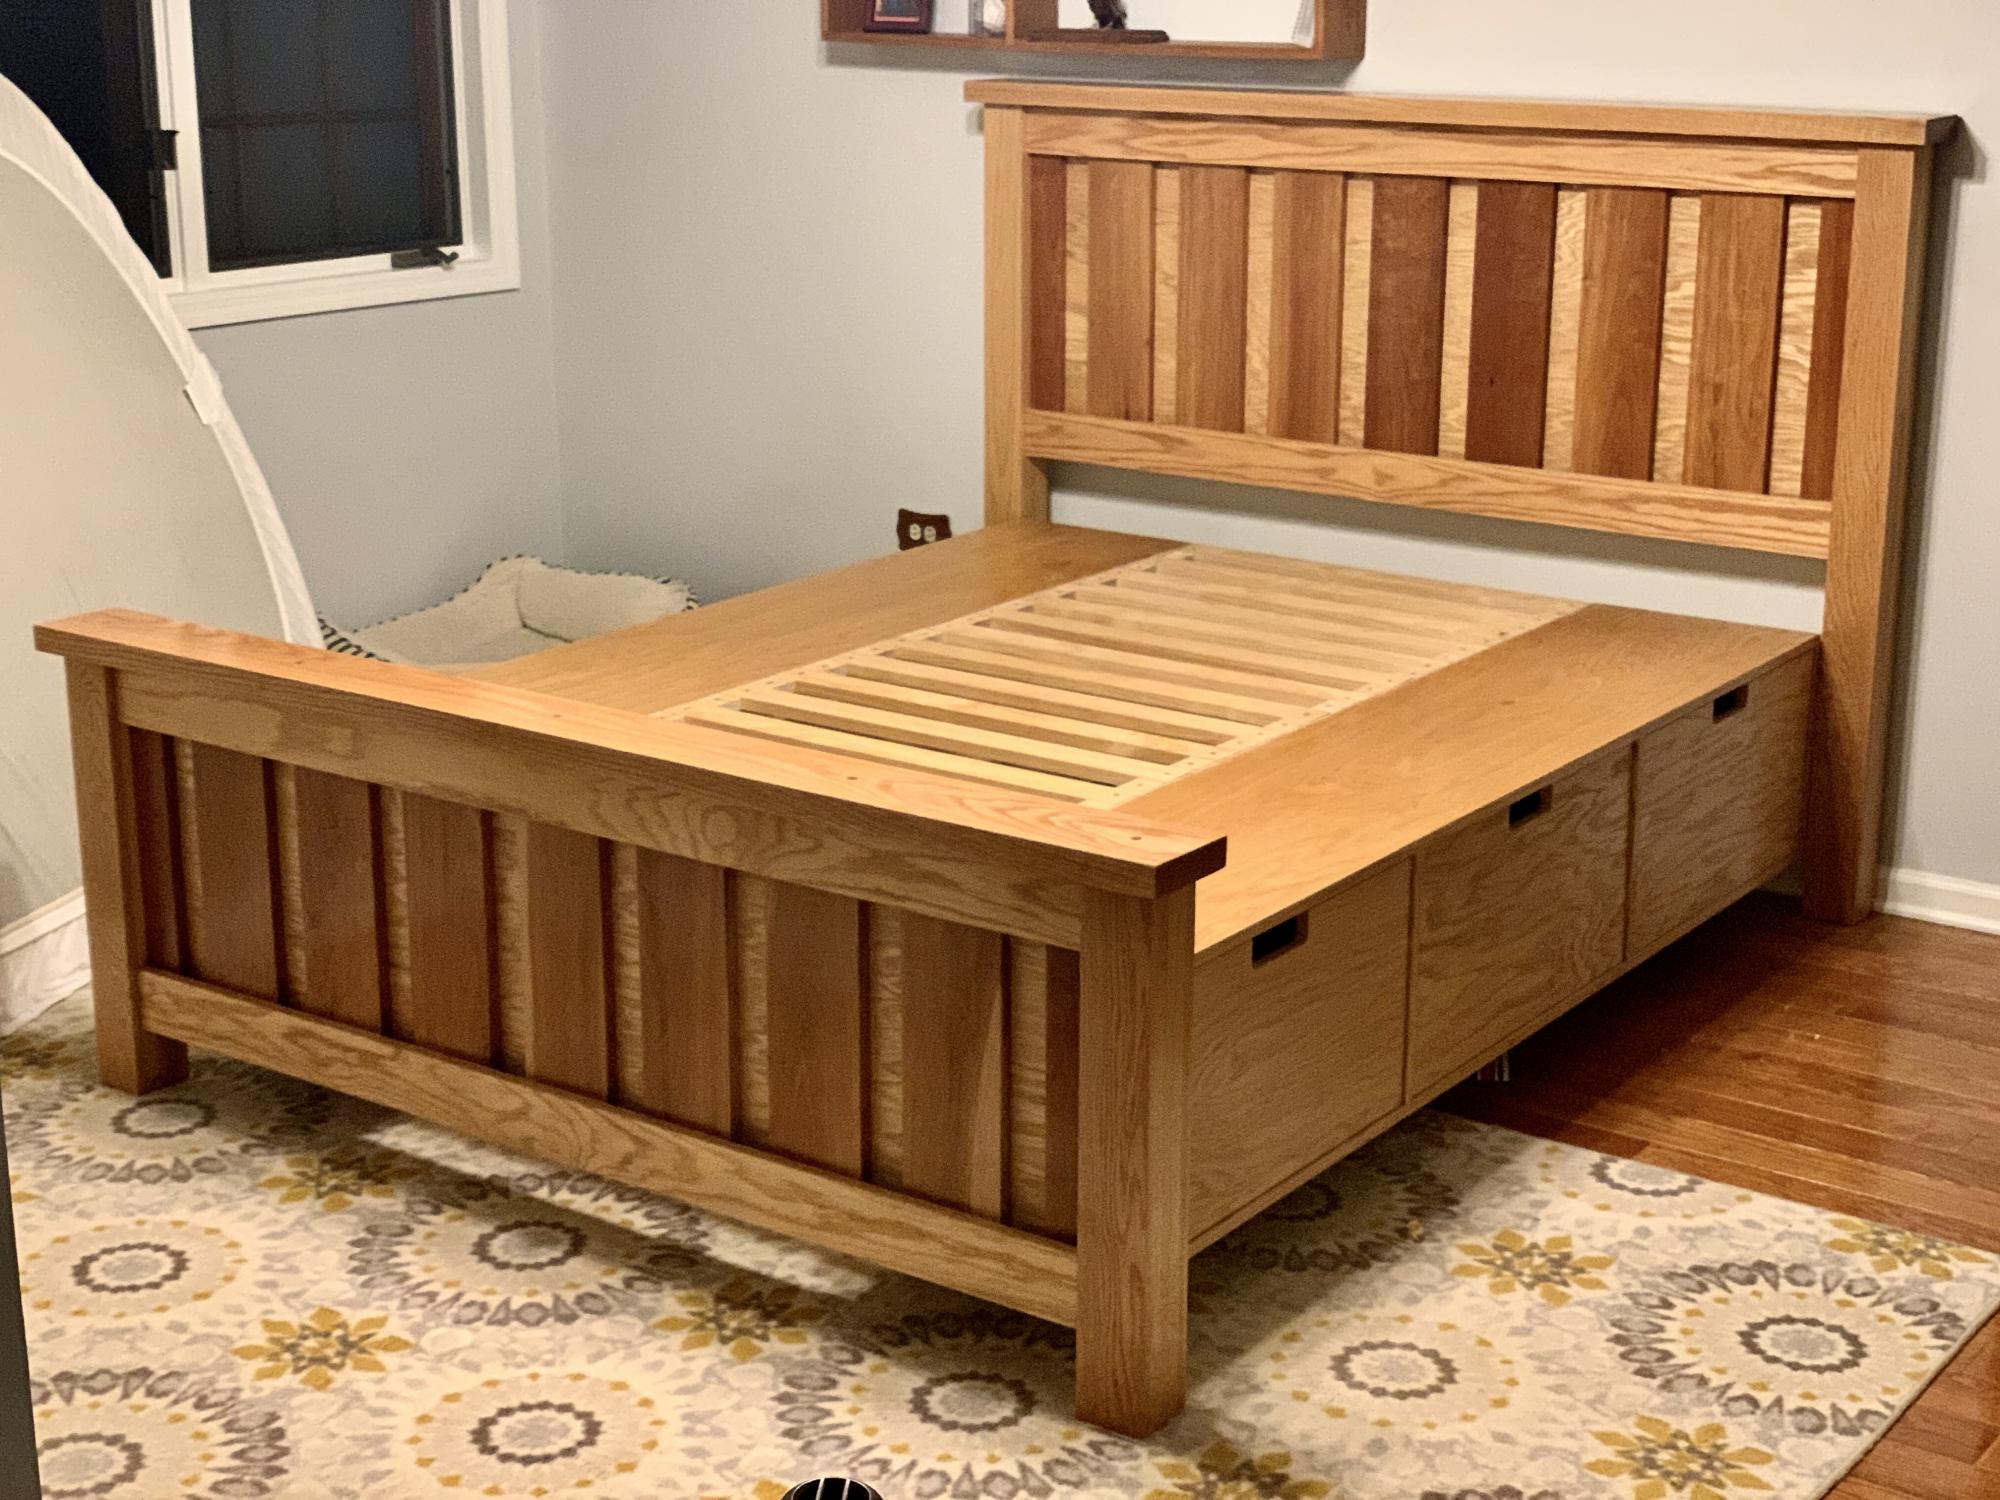
I made this with on the farmhouse bed plans using red oak and cherry. A new child, new house, and two dogs later, I finally managed to finish it after three years.
Built from Plan(s)
Estimated Cost
1,000
Finish Used
Super-blonde Shellac, paste wax
Recommended Skill Level
Advanced
Fireplace Mantle with Milled Wood

Your plans were so helpful. I used rough cut lumber from a white pine we harvested and milled ourselves, so had to do a bit of figuring, and also increased the height to 48”. I just love it and your plans made it so much easier.

Built from Plan(s)
Seasonal And Holiday
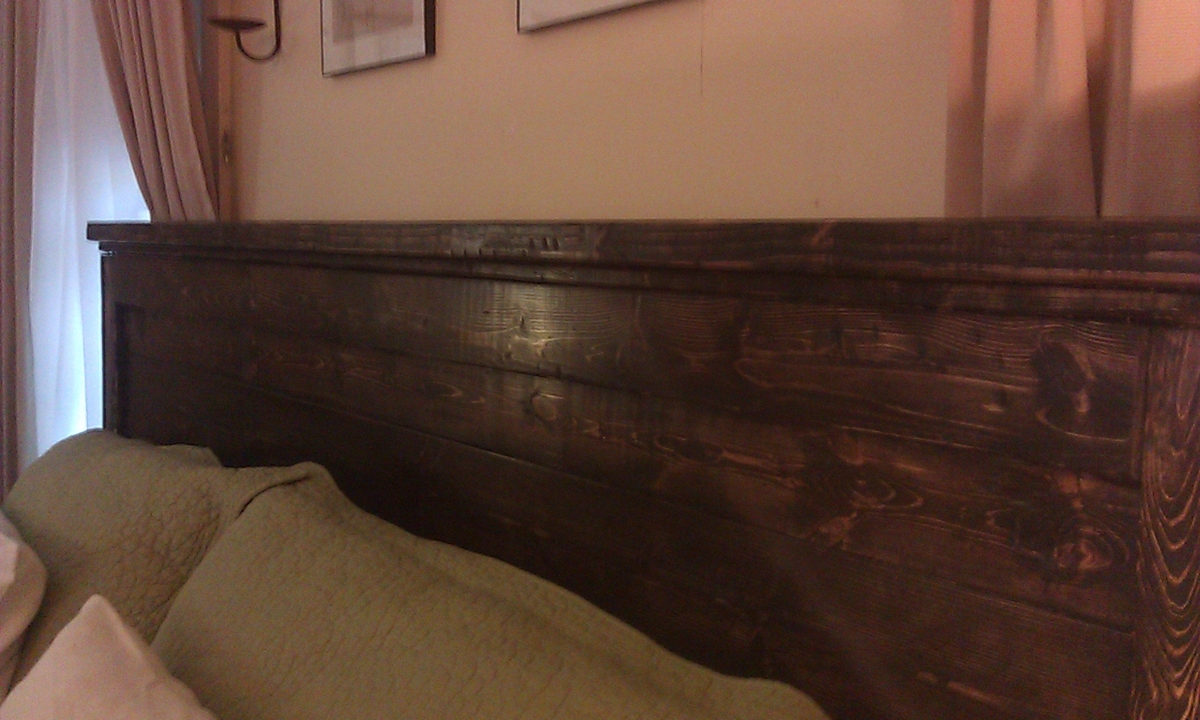
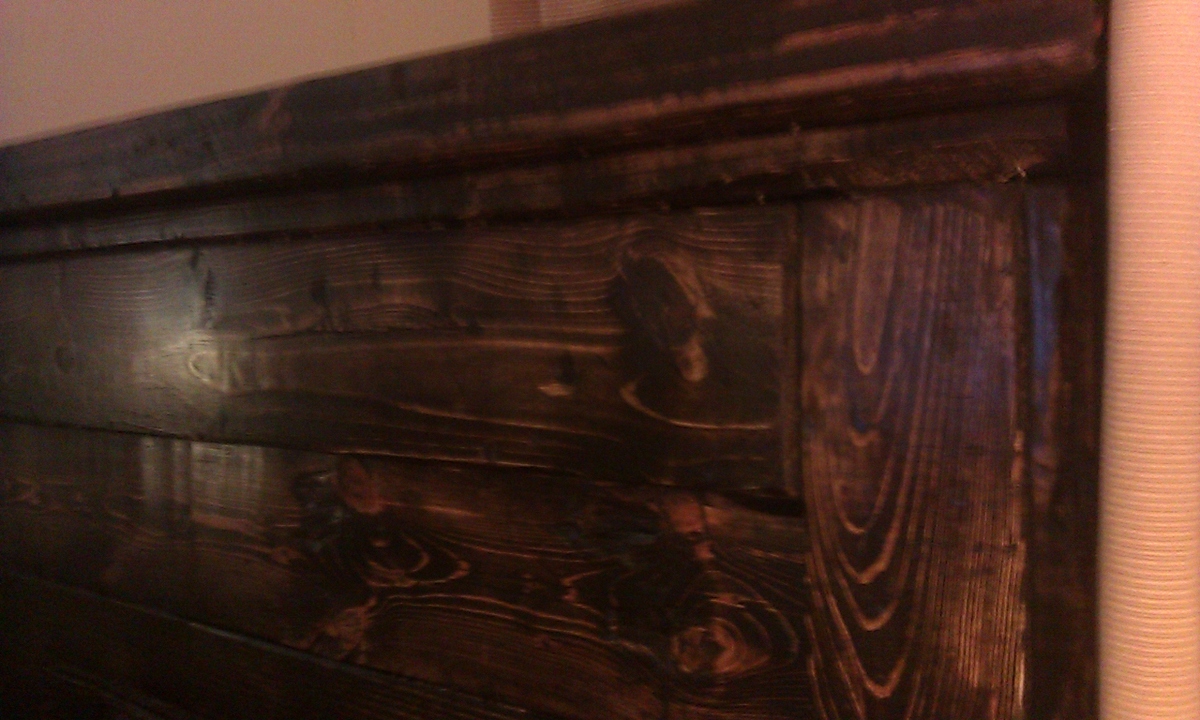
king-sized planked wood headboard
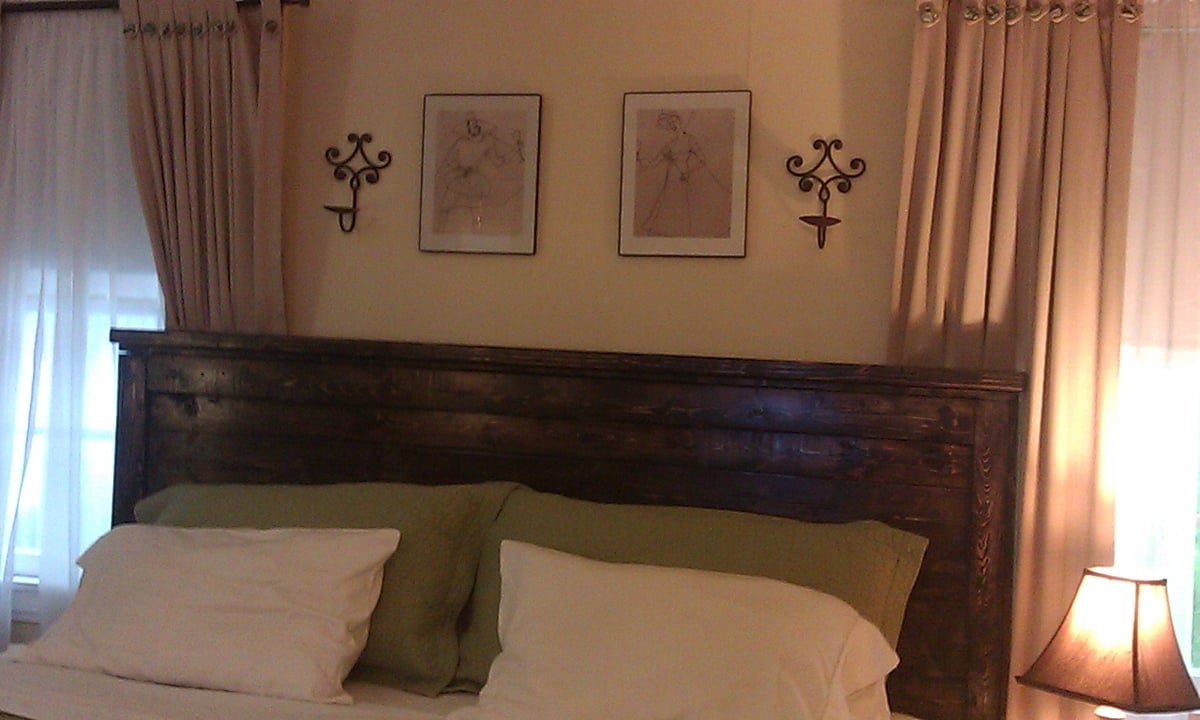
This was an incredibly easy project. The construction only took a couple of hours, but because of the horrific humidity it took me days to finish staining and waxing the headboad. The wood was the cheapest Home Depot had to offer. It was perfectly imperfect. For the finish, I used 3 coats of Minwax Stain in Jacobean, sanding with steel wool in between each coat. I finished the stain with 2 coats of Minwax Paste Wax.
Built from Plan(s)
Estimated Time Investment
Week Long Project (20 Hours or More)
Finish Used
Minwax Stain: Jacobean
Minwax Paste Wax
Minwax Paste Wax
Recommended Skill Level
Starter Project
Comments
Big Kids picnic table
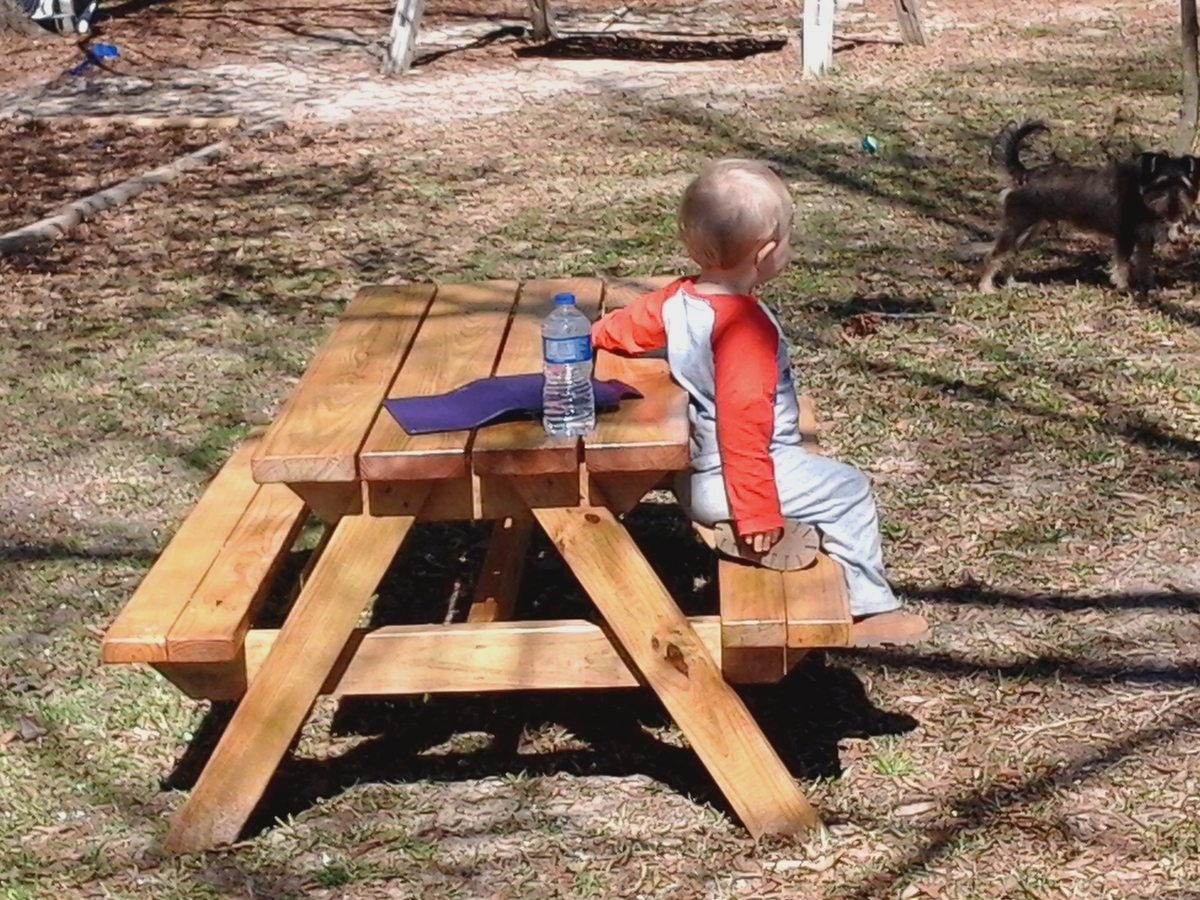
This is the first wood working project that I did, all by myself, Thank you so much Ana for sharing your plans. Sense then I have built another one but used a 2x8 for the seats instead of the 2x4's to make one solid seat and used decking boards for the top instead of the 2x4's. I have added the 2nd table to show what it looks like. Thank you so much Ana for sharing your plans. I have enjoyed it so much and i'm getting more confident building other things.
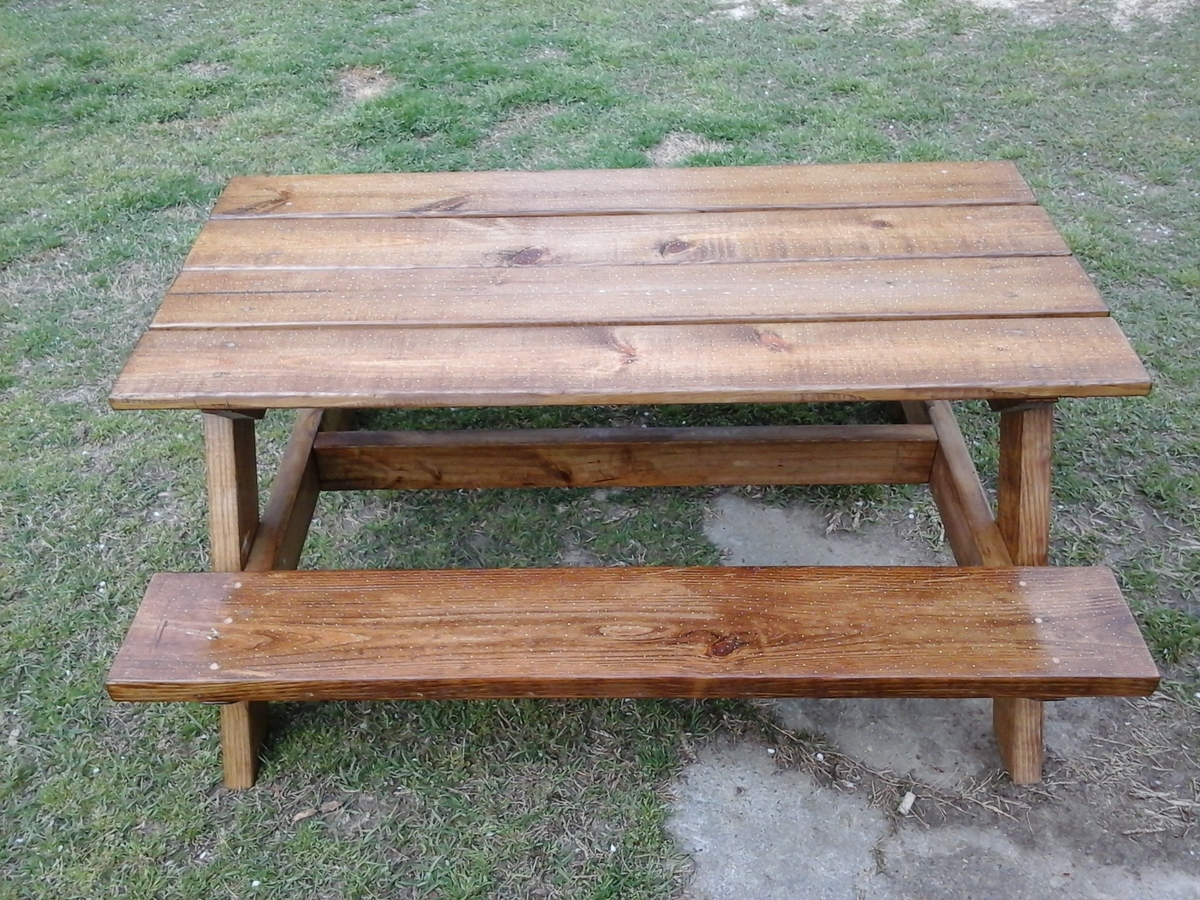
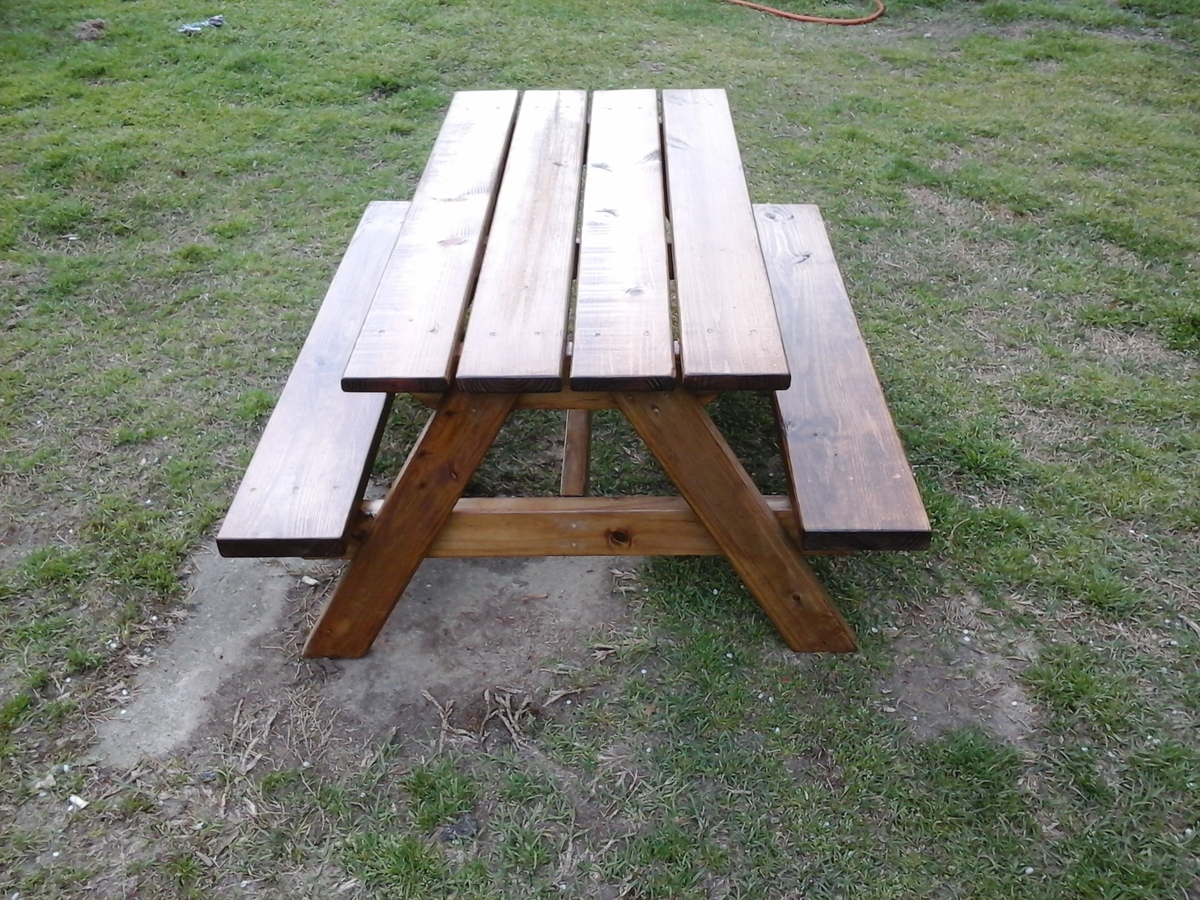
Built from Plan(s)
Estimated Time Investment
Afternoon Project (3-6 Hours)
Finish Used
I stained this table with pecan stain, and then poly coated. Didn't know that you don't have to use PT wood if your going to stain a project. Saves on the cost of the wood if you want to stain it. PT cost more then non-PT. I know now. :)
Recommended Skill Level
Starter Project
Rustic X Coffee Table
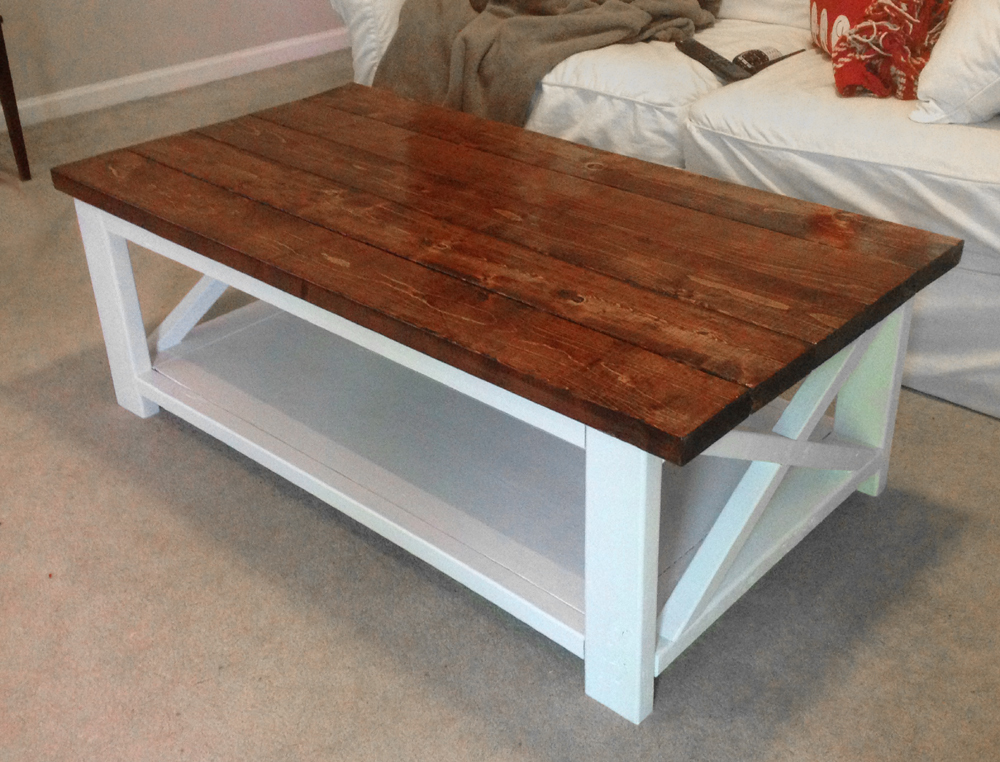
We moved into a new house with exposed dark beams and white railings. Plus, we were gifted a new white couch, so the wife wanted a new coffee table. I loved this project and decided to do it a little different and try the dual finish look to go with our furnishings and house. We love the finished product. Assembly was a snap. As always, the staining and clear coat step took the longest.
Built from Plan(s)
Estimated Time Investment
Weekend Project (10-20 Hours)
Finish Used
Red Oak Stain with clear gloss finish for the top. Plain white gloss paint for bottom frame.
Recommended Skill Level
Beginner
Blanket Ladder
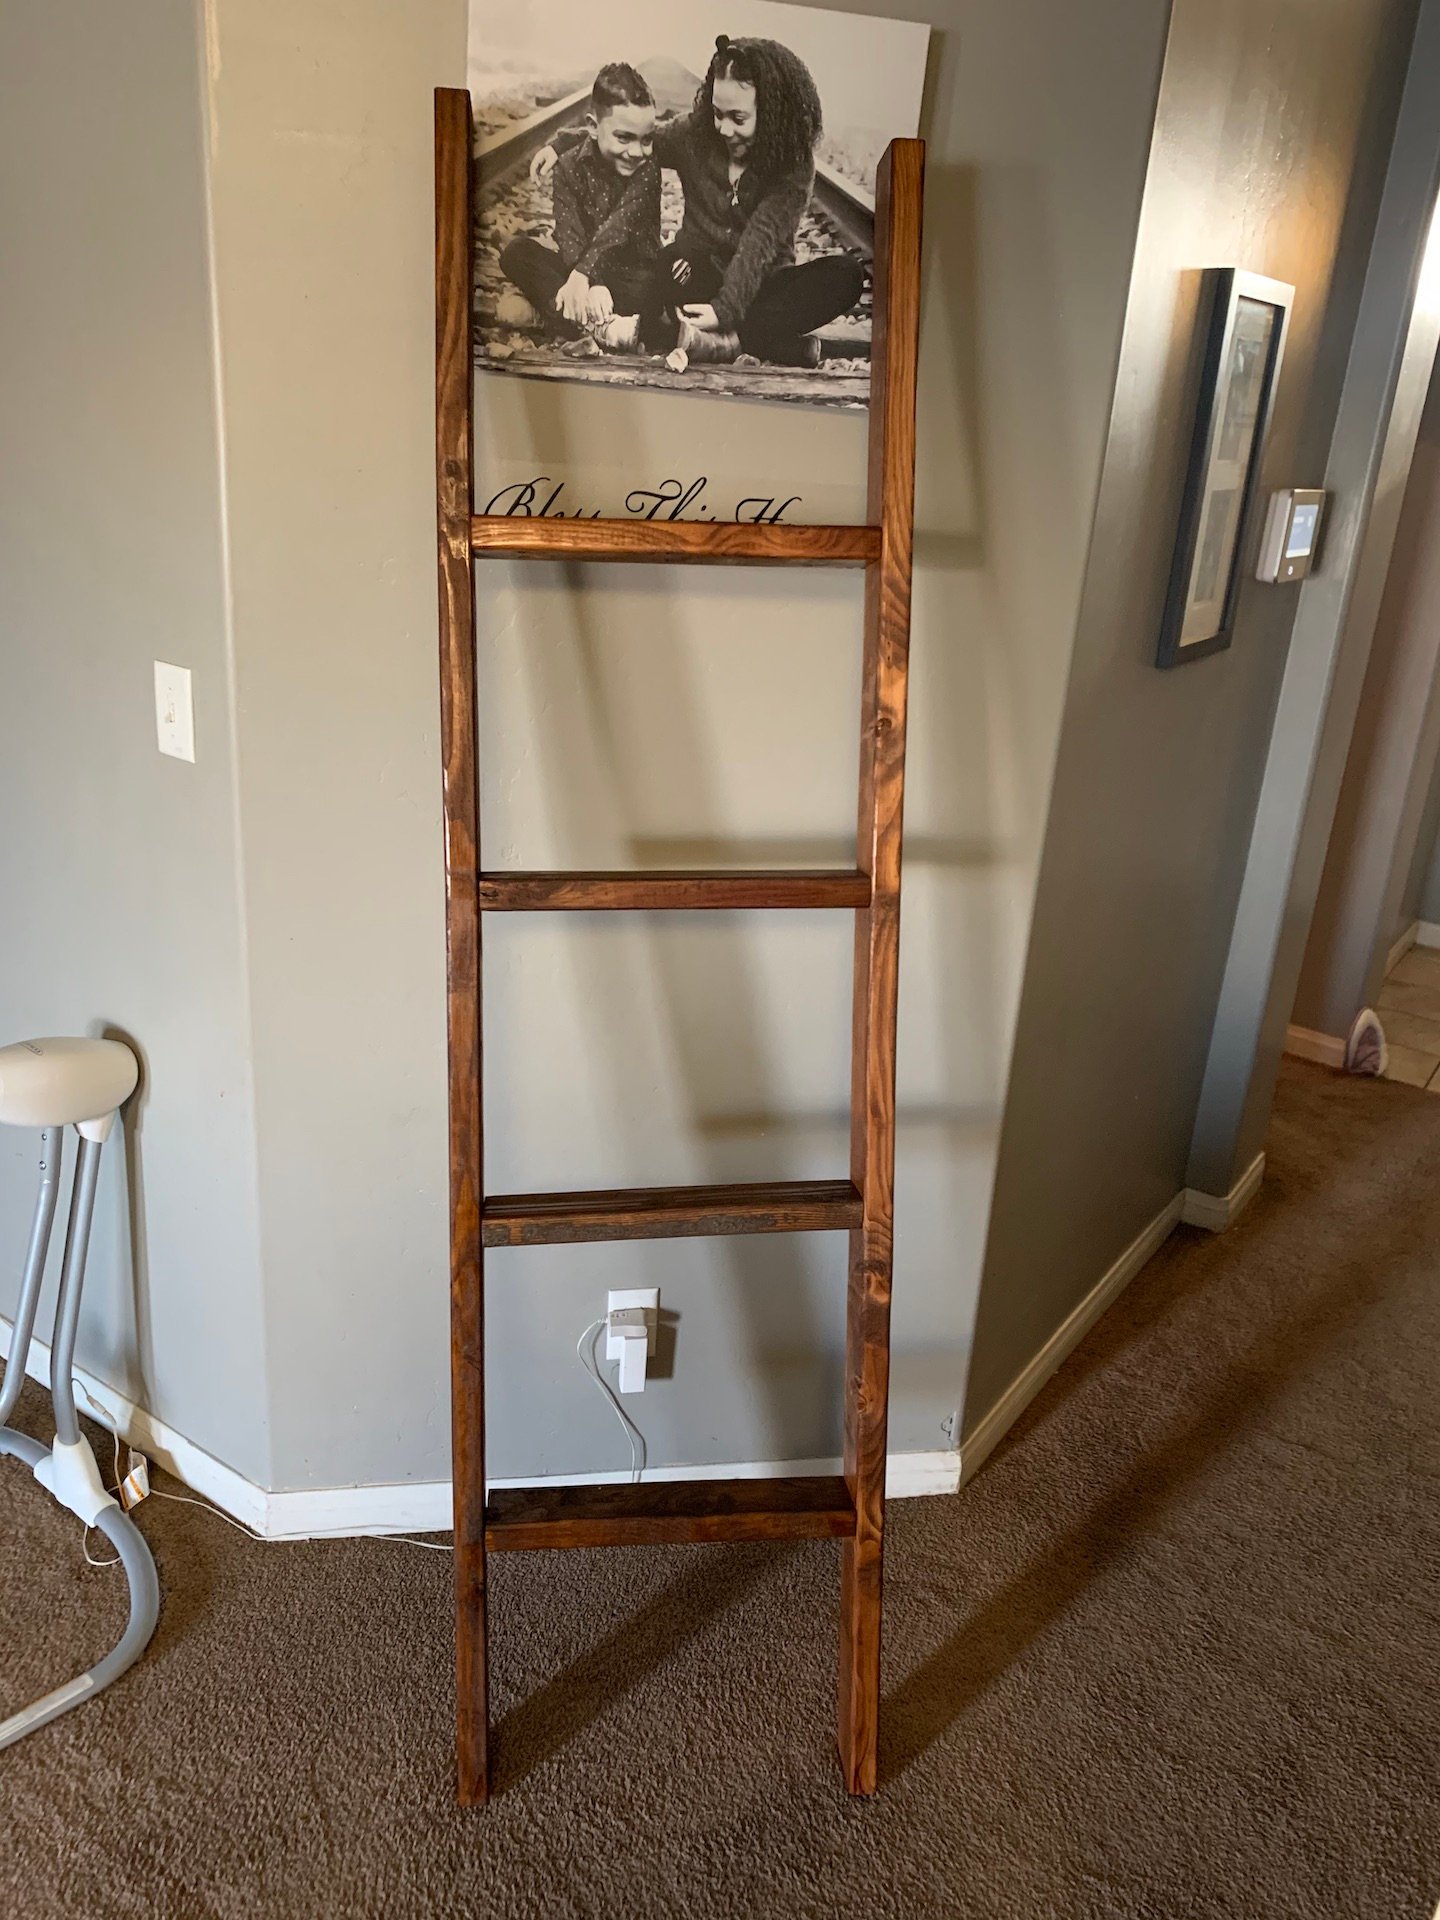
My wife asked if I can build her a blanket ladder as oppose to buying one in the store for $60+. I used scrap 2x4s I had around my workshop. I also used pocket holes. Very quick and easy project for anyone just getting started!
Built from Plan(s)
Estimated Cost
$10
Finish Used
I used 120 grit sand paper and stain it with Minwax Dark Walnut using a paint brush.
Recommended Skill Level
Starter Project
Tall Dresser
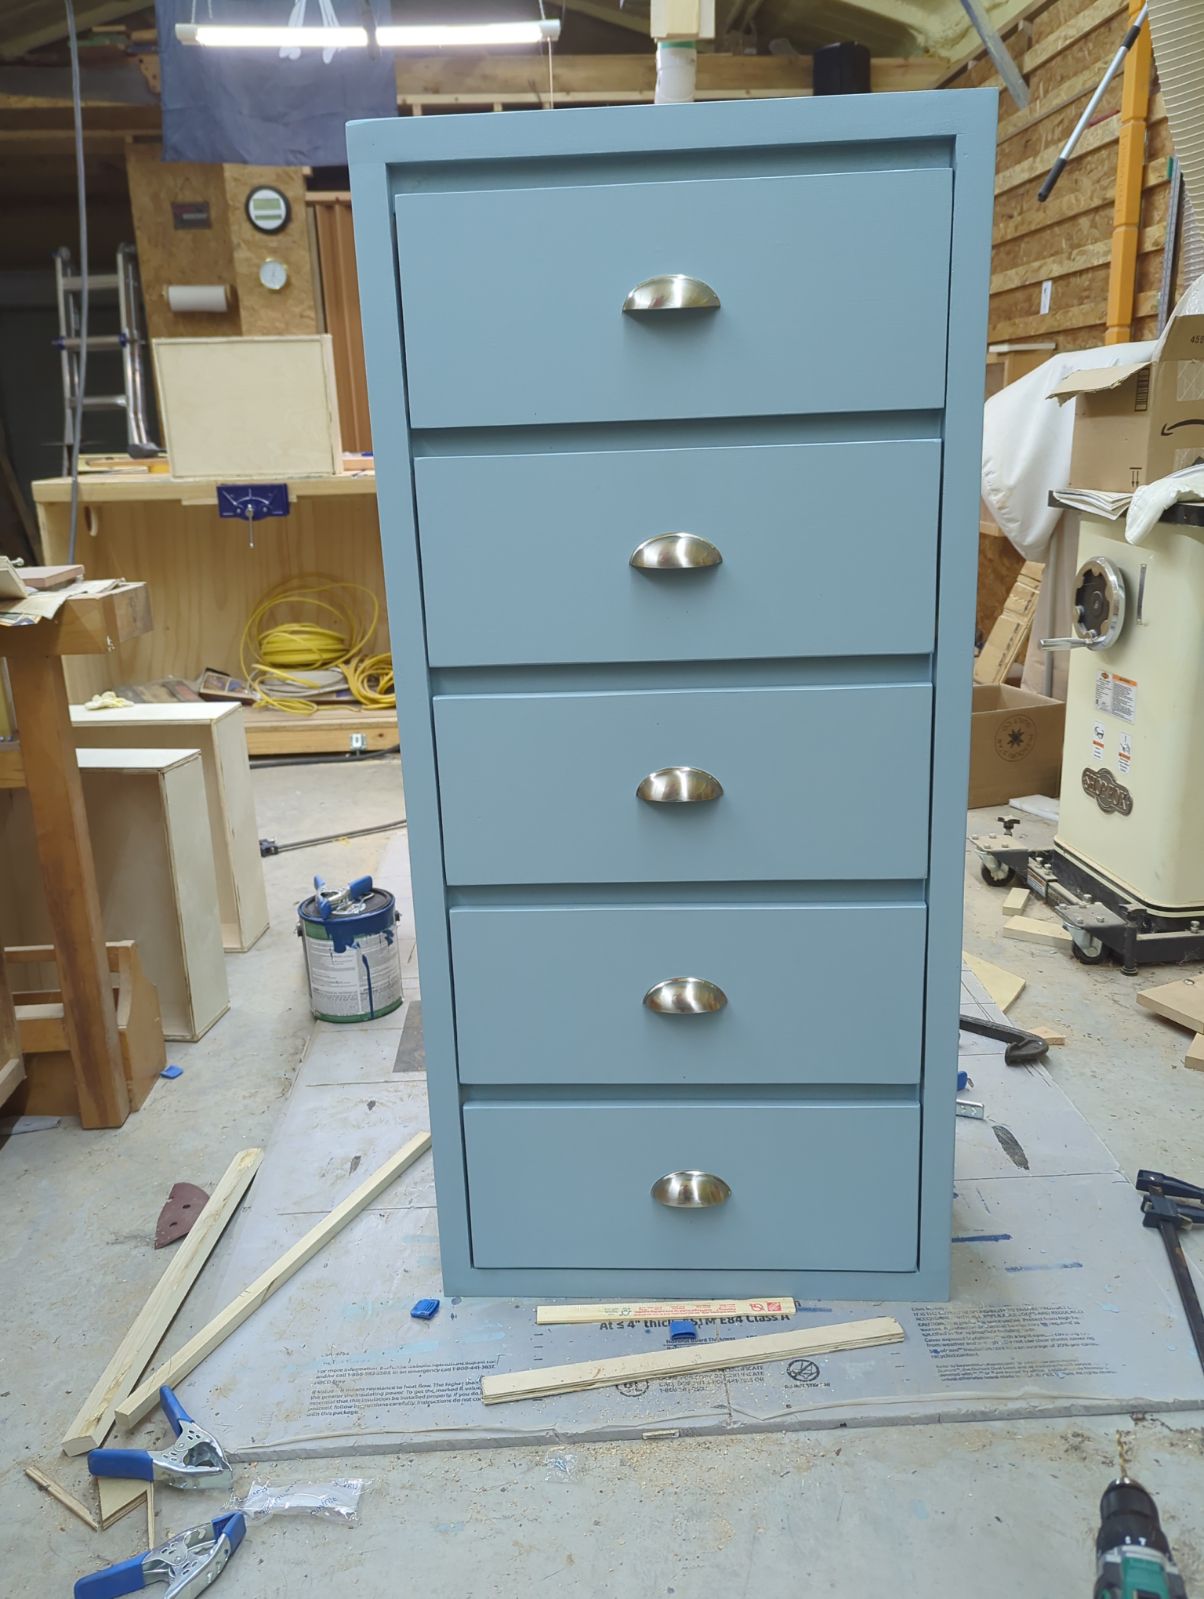
A Christmas gift for my G- kid!!!!
Built from Plan(s)
Comments
pioneer bed, twin
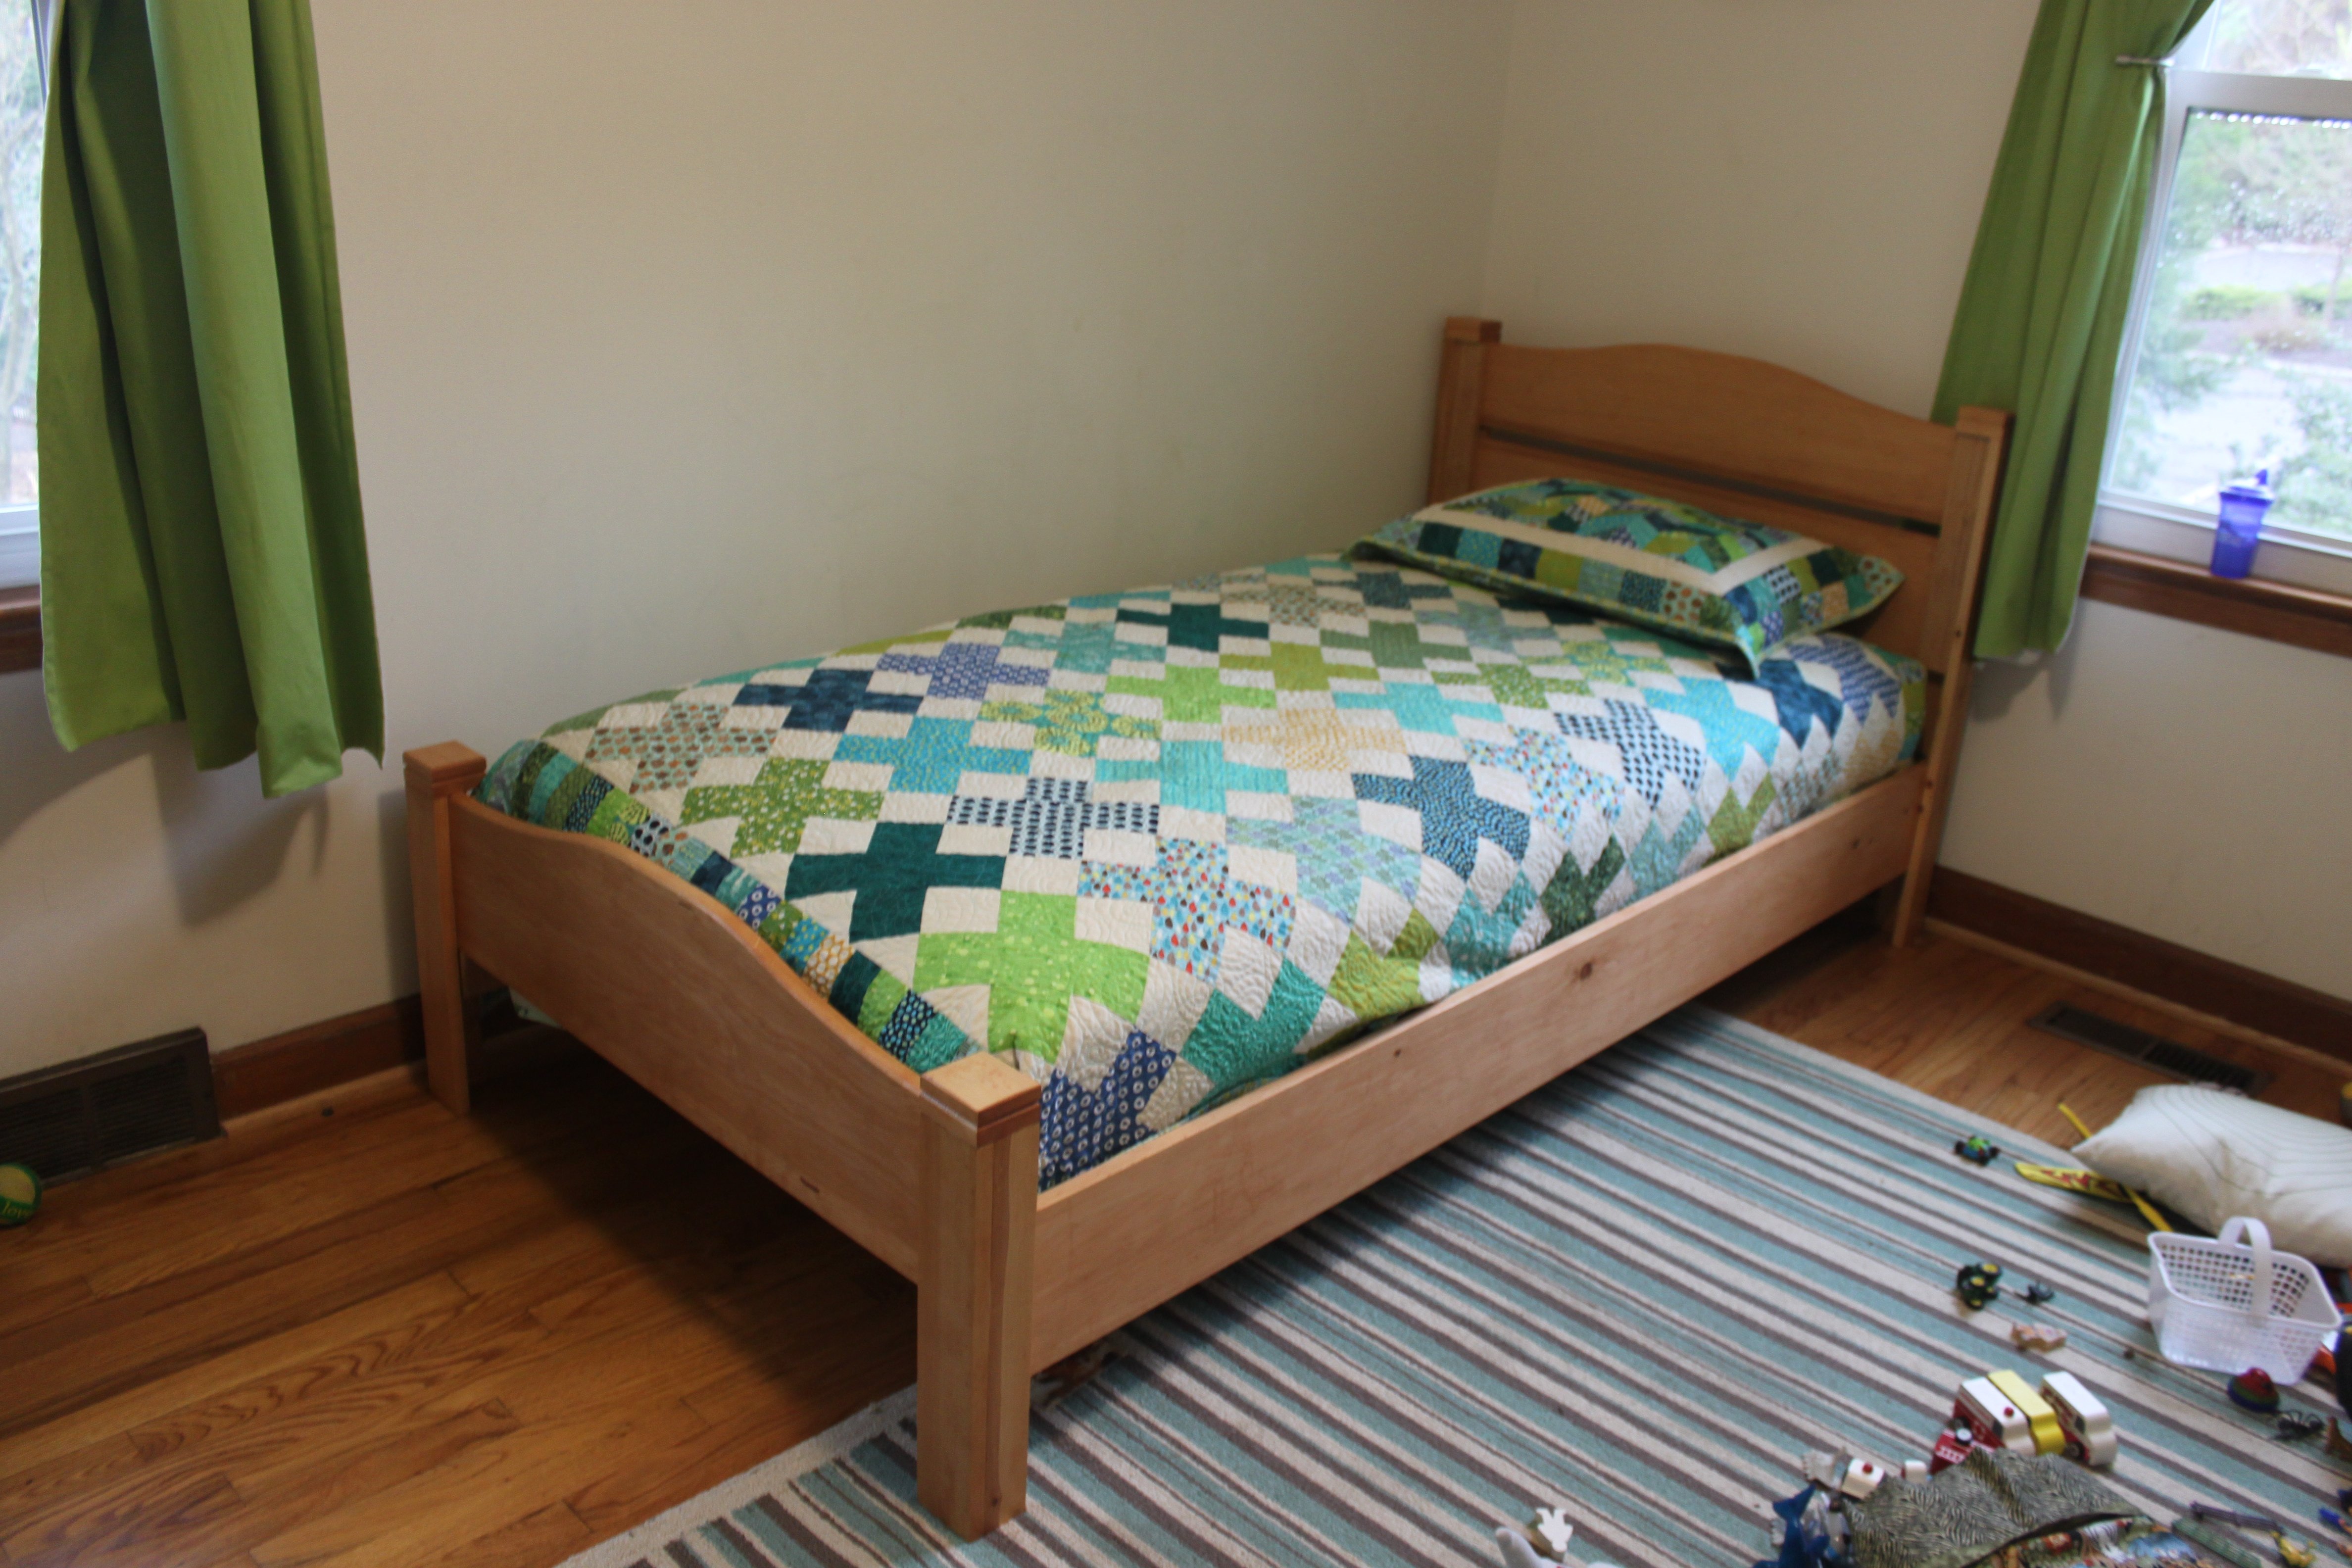
I followed the twin pioneer bed plans, made a few changes here and there. My 3-year old son loves it!
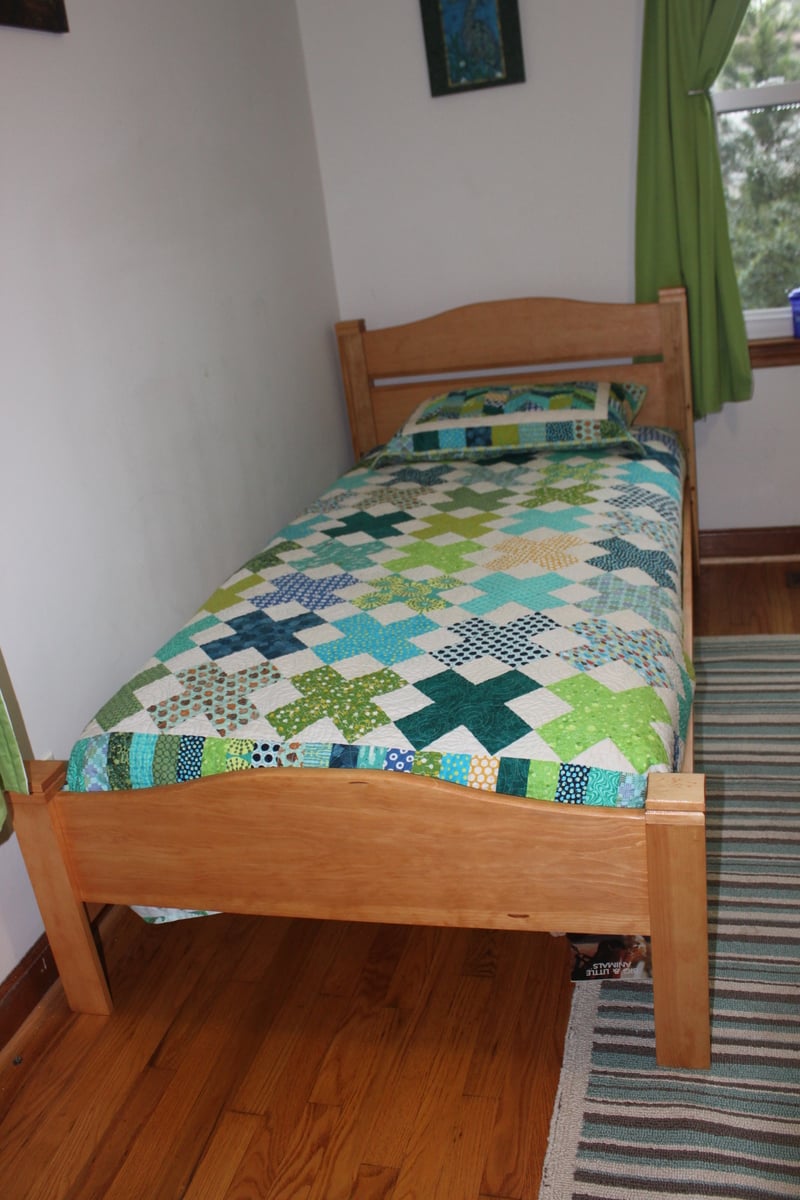
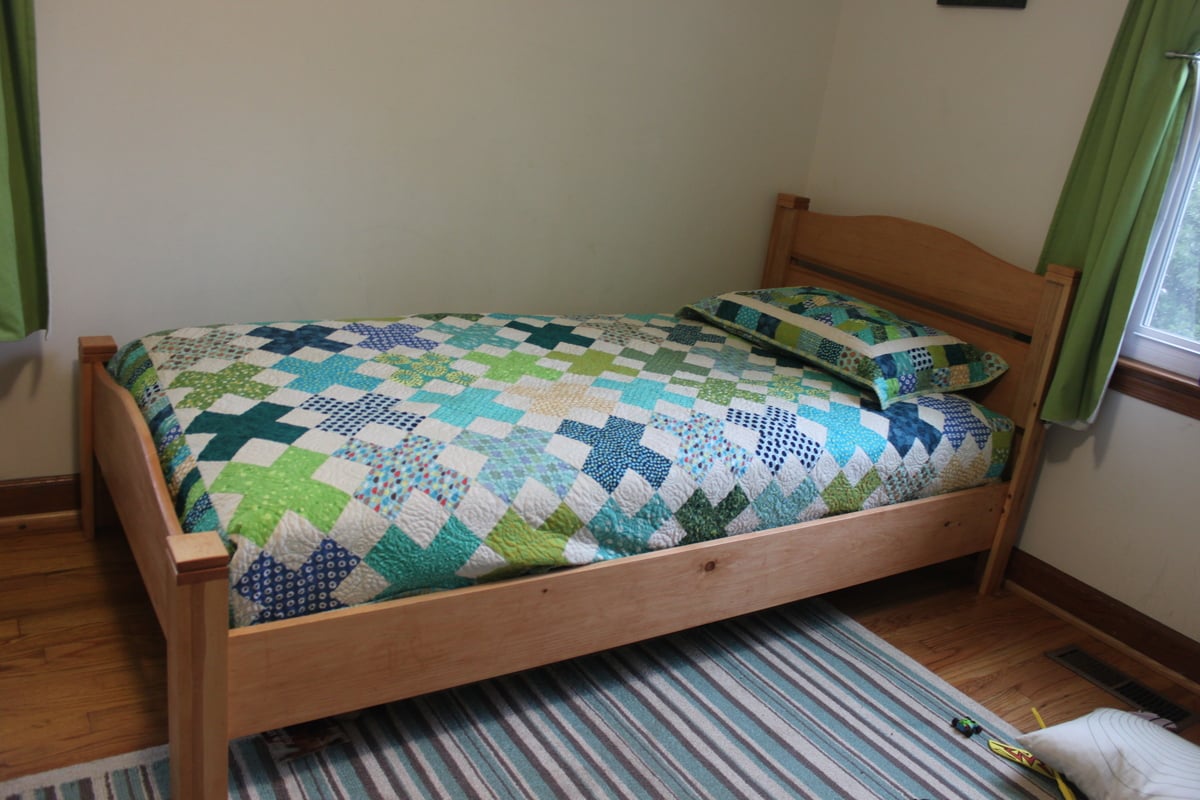
Built from Plan(s)
Estimated Time Investment
Weekend Project (10-20 Hours)
Finish Used
Light stain, matte varnish
Recommended Skill Level
Intermediate