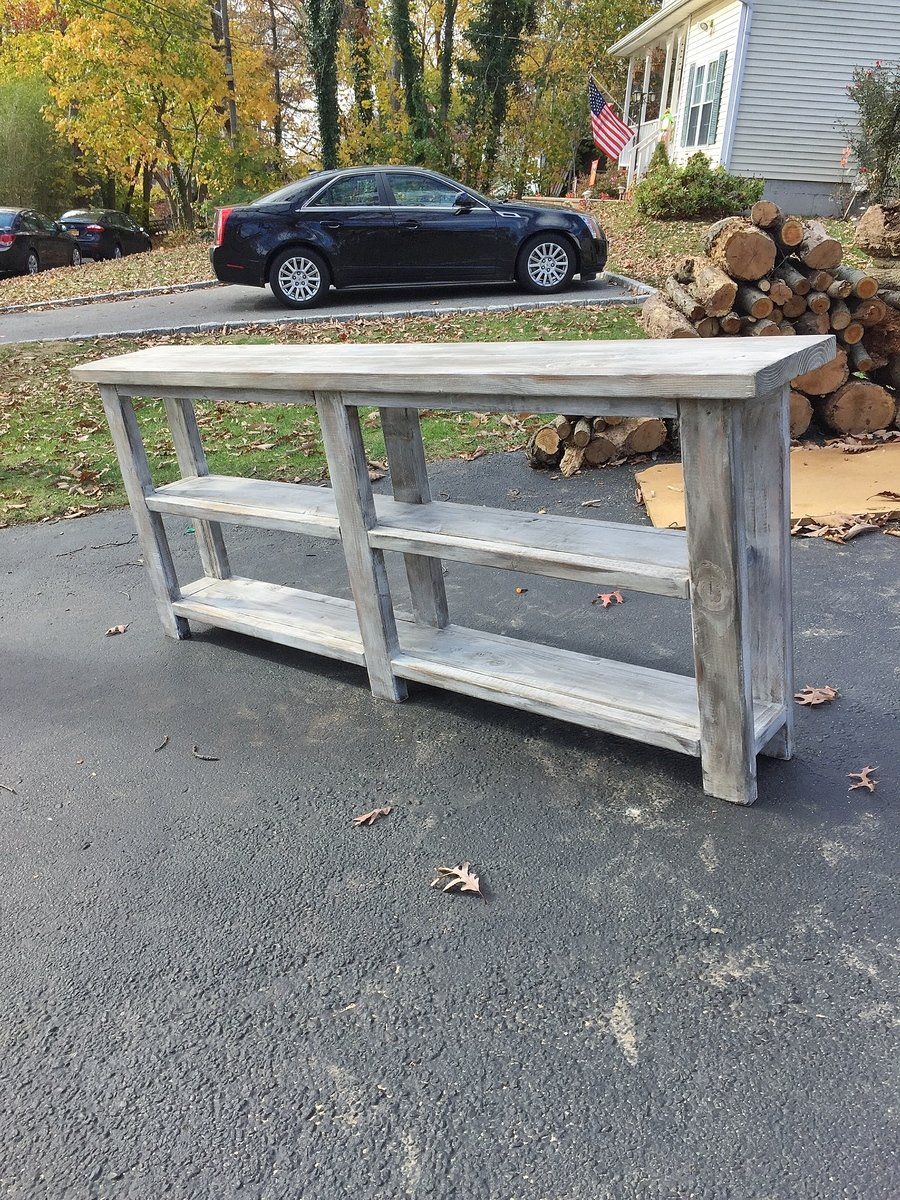
Community Brag Posts

Bathroom Cabinet

Submitted by Smokeydog on Wed, 11/11/2015 - 10:58

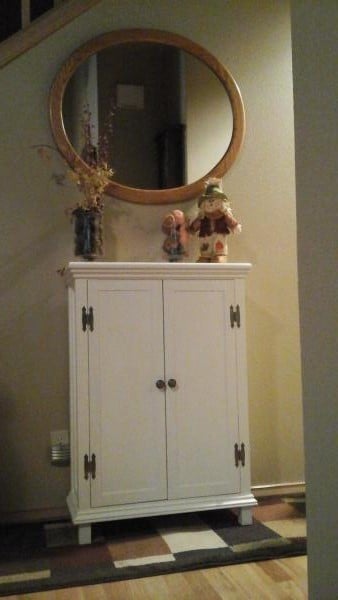
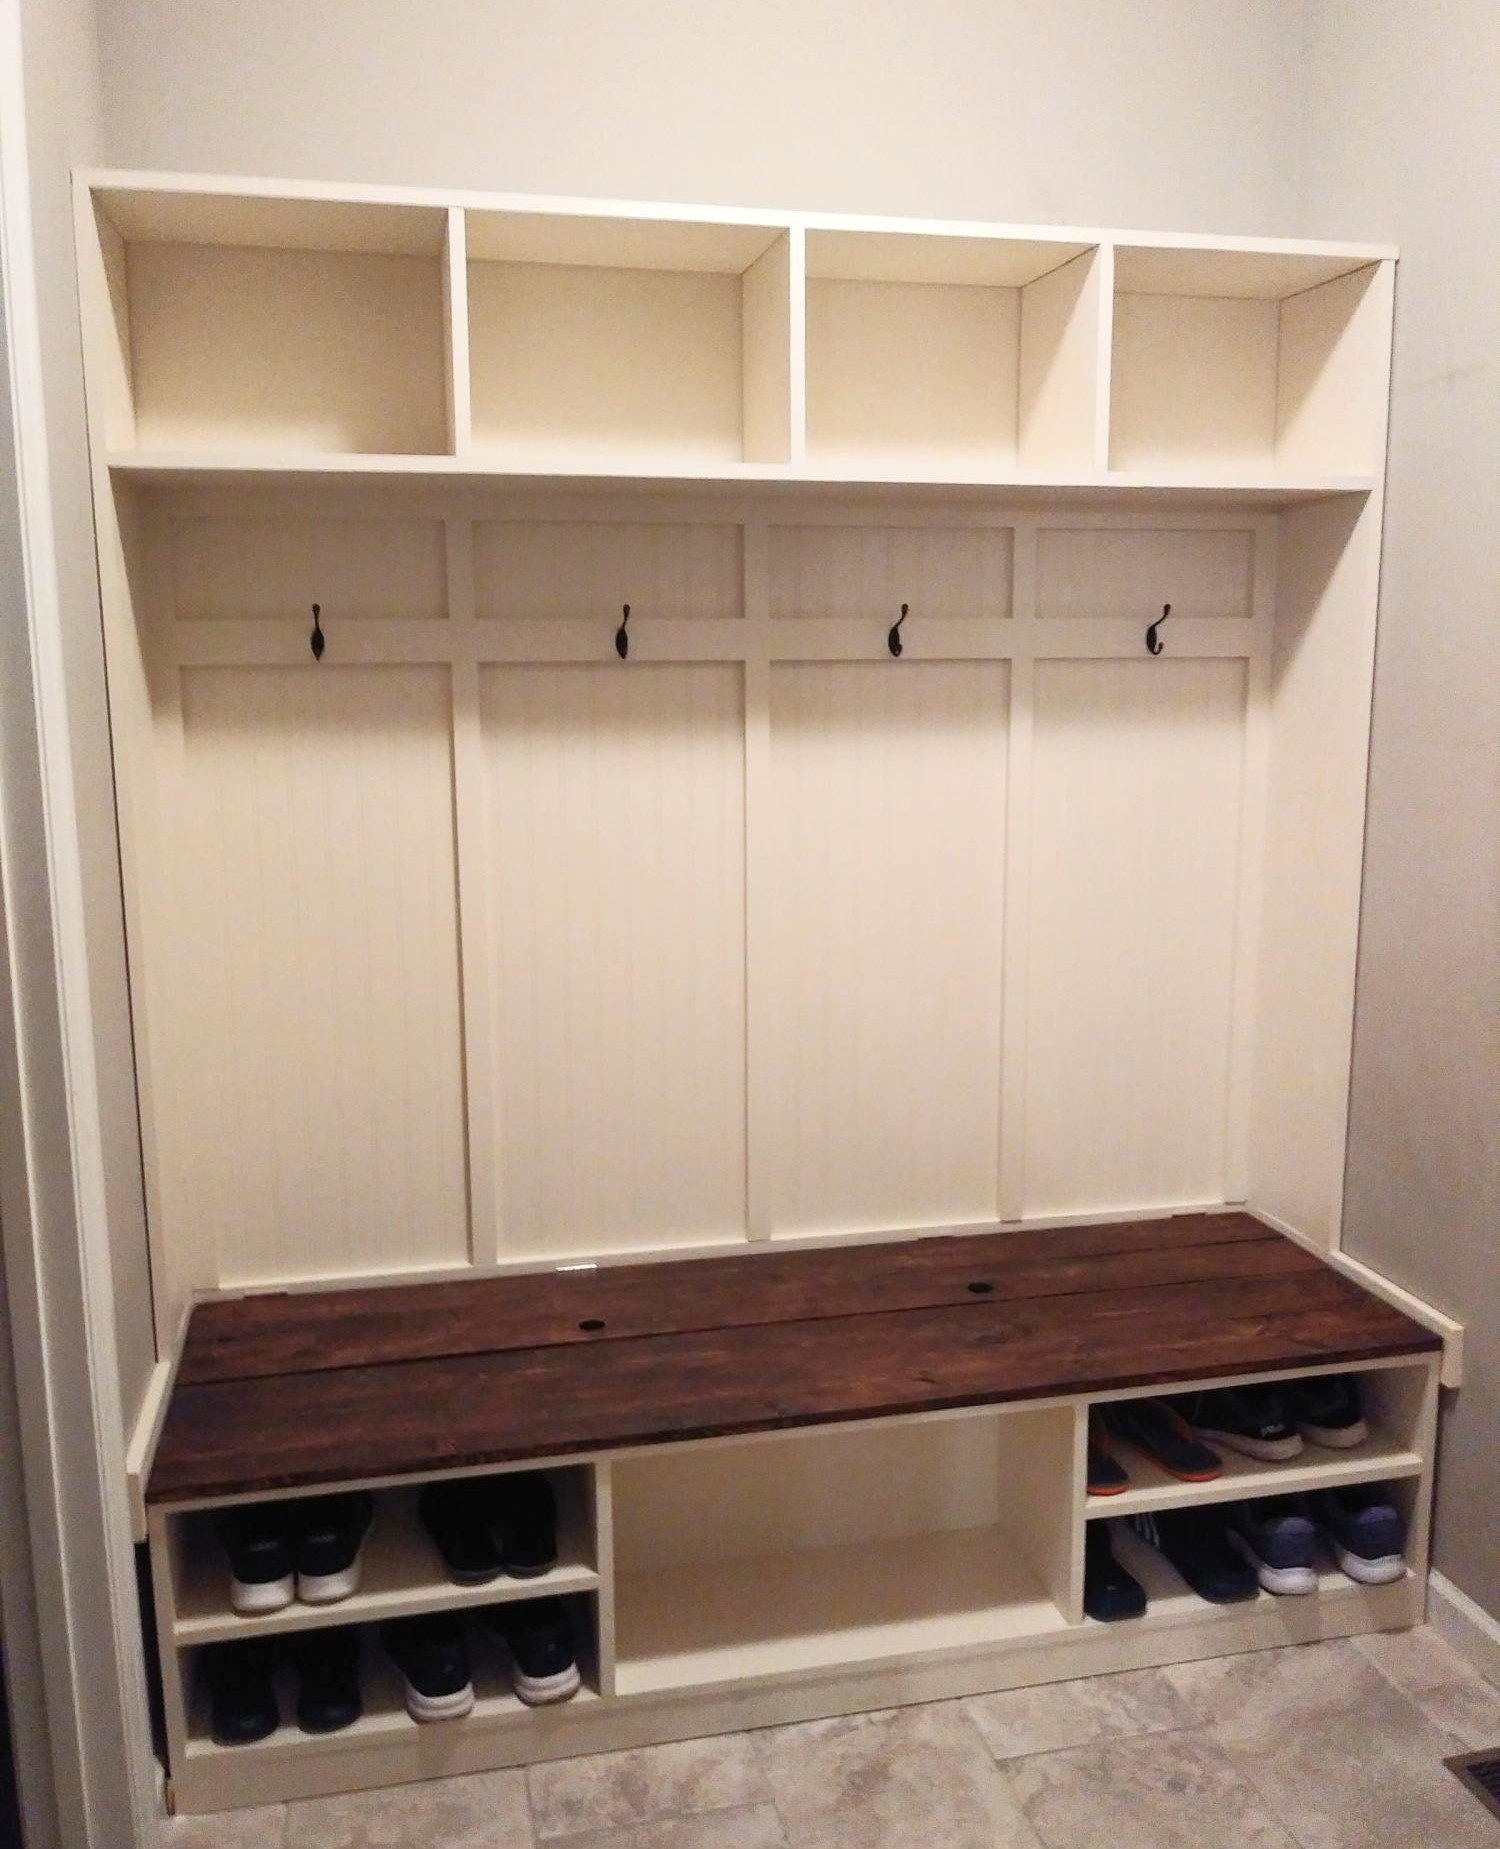
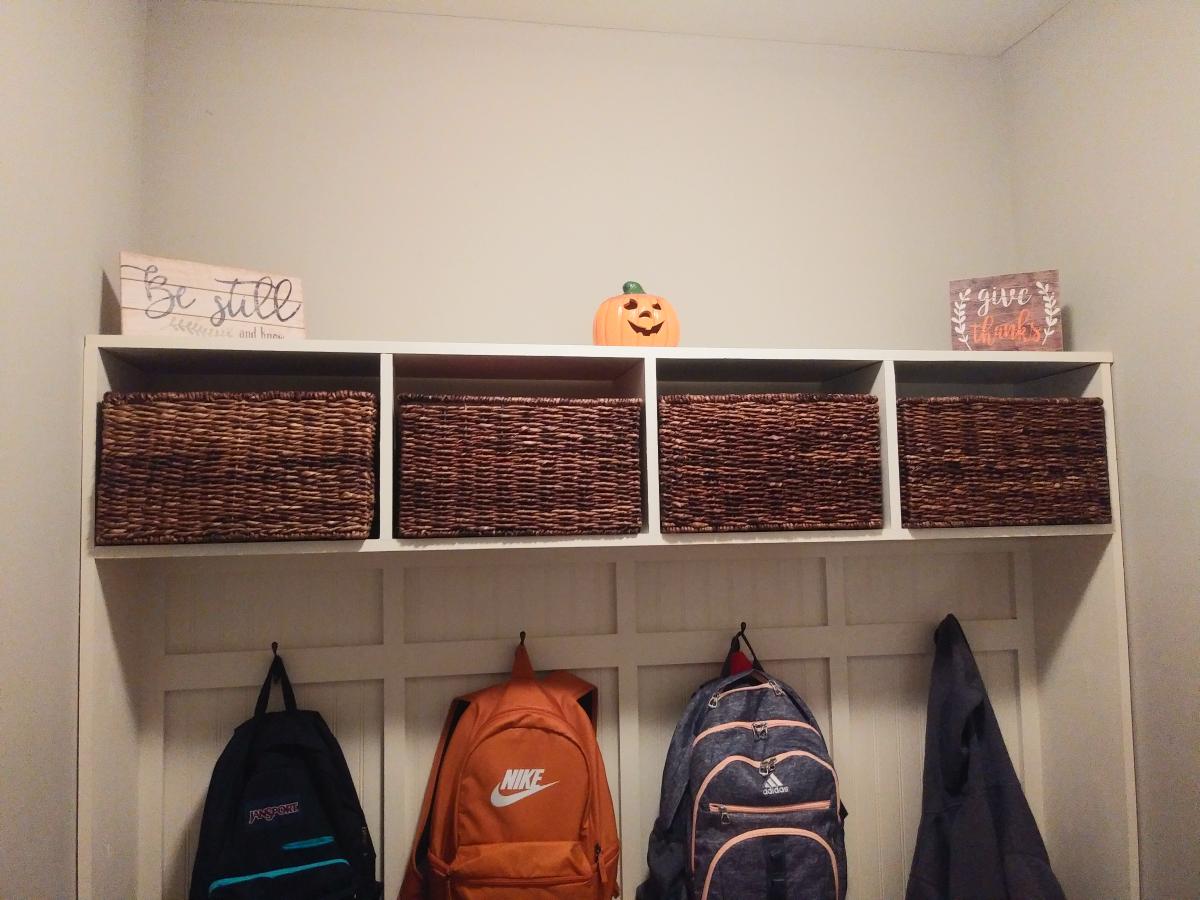
I built this cabinet for a little additional bathroom storage.  I used select pine for most of the project and some old leftover hardwood flooring for the top.  The lines of the hardwood gave the cabinet top a nice rustic appearance.  I am happy how this project turned out.

Built from Plan(s)
Estimated Cost
Around 100.00.
Estimated Time Investment
Weekend Project (10-20 Hours)
Finish Used
BEHR satin paints
Recommended Skill Level
Intermediate

Rustic x console table

Submitted by Anonymous (not verified) on Tue, 01/01/2019 - 06:41

Made from rustic x console plans from Ana white

Estimated Cost
120
Estimated Time Investment
Weekend Project (10-20 Hours)
Finish Used
Minwax early American
Recommended Skill Level
Intermediate

Mudroom Bench

Submitted by Anonymous (not verified) on Fri, 09/23/2022 - 15:43

This mudroom bench is my favorite Ana White build! Everyone has a place for shoes, backpacks and boots can be stored in the bench. We added baskets to keep gloves, hats and other small items organized.

Comments

Chairs, Chairs Everywhere!

I started about a year ago building my bench. It has been on Ana's Site before- especially for the color- Citron from Orange. I also modified the arm supports to look more modern and changed the boards to be 10" on the seat and 12" on the backs.

This year my neighbor who is a painter and I teamed up and built 6 chairs and another bench! I cut all the wood, then my neighbor primed and painted all sides except one flat. After assembly, another 2 coats of paint went on all surfaces.

It was about $400 in material for 1 bench and 6 chairs (bought from Blue)

Oh- BTW. The table is from Target with a coat of red Rustoleum!

Built from Plan(s)
Estimated Cost
$400 + paint (1 Bench & 6 Chairs)
Estimated Time Investment
Week Long Project (20 Hours or More)
Finish Used
Zinzer Primer
Outdoor Laytex Gloss
Recommended Skill Level
Intermediate

Comments

Easy Whiteboard

Submitted by Bekah on Tue, 09/10/2013 - 21:38

We wanted to put up a whiteboard to use for homeschooling and were amazed at the cost of even a small one. We got some shower board from Lowes that measures 8 feet by 4 feet, put 1x2" boards over the top and side edges and screwed through them into the wall studs, and added a Ten Dollar Ledge shelf we'd already been using for the kids' books. Super easy and it looks great!

Built from Plan(s)
Estimated Cost
Less than $30
Estimated Time Investment
An Hour or Two (0-2 Hours)
Recommended Skill Level
Starter Project

Farmhouse Table

Submitted by Greena57 on Mon, 11/16/2015 - 07:39

This is the first table I have ever built the pocket screw plans were simple to follow. Benches were made using the same basic premise. I made sure they were short enough to fit completely under the table when not in use.

Estimated Time Investment
Weekend Project (10-20 Hours)
Finish Used
Classic Grey and Weathered Oak mix for stain. Antique White painted base which I then wiped a the same stain on and quickly wiped off
Recommended Skill Level
Beginner

Building Block Pyramid

Submitted by TamIam on Thu, 01/03/2019 - 23:08

I used the homemade holiday plans to make this as a Christmas gift for my 2-year-old great-niece and it worked out really great!

Estimated Cost
$35-40
Estimated Time Investment
Weekend Project (10-20 Hours)
Finish Used
I finished the blocks with kid-safe, non-toxic acrylic paint and the tray with interior, latex, semi-gloss white paint.


I’ve used food coloring on blocks in the past, making toys for my rabbits, and it works well, but I was short on time and never would have gotten good coverage, thus the swap to acrylic paint.
Recommended Skill Level
Beginner

Comments

Egg Holder

Submitted by Anonymous (not verified) on Sat, 10/01/2022 - 13:17

This was very easy to make and I love how it turned out! It was a fun gift to give to our chicken-loving friends:-).

Built from Plan(s)

Comments

The Boy's Bed

We had the Upside-Down bed from IKEA for our little guy, but my husband continued to complain on how he had to "crawl" into the bed. Okay, scrap that. No problem. I just searched Ana's plans for a nice bed I could make. And add a trundle. There you go.

I did modify the height of the headboard, as I plan on moving Jack to an upstairs bedrooms that has slanted walls. I wanted this bed to fit in any configuration, so I had to take 10" off the headboard. Also, due to the impending moving, I wanted the bed to easily be taken apart. So I attached the side rails with surface mounted keyhold brackets from Rockler Woodworking. They work great.

Estimated Time Investment
Day Project (6-9 Hours)
Finish Used
I love to distress and antique furniture, but to my husband's delight, I just decided to paint this bed. I used Sherwin William's Regatta. I first put on two coats of primer and then 3 coats of the paint. I did want to use my nifty Wagner spray gun, but we were having really rainy weather and I couldn't set up outside. And because I'm impatient, I just decided to brush it in the garage.
Recommended Skill Level
Beginner

Comments

Guest (not verified)

Mon, 08/29/2011 - 07:51

Great job! I am hoping to make two of these for my boys and would love to have the trundles. Could you give the specs on that? Thanks!

debandtom25

Wed, 08/31/2011 - 17:42

The specs will be different depending on the size mattress you have -- what I mean by size is height. I just used a foam mattress that was only 5 inches high. I wanted the mattress to fit bigger than the sides of the trundle, so I might have made it just 4 inches high (not including the wheels underneath). I made sure I had about 1.5" of clearance total between the headboard and footboard to move the trundle in and out.

Just make sure you take into account how thick your mattress is, the widths of your boards and the height of your wheels. Give yourself a little room for bedding and you should be all set.

Guest (not verified)

Mon, 11/21/2011 - 10:06

The bed looks awesome! The hubby and I are gonna attempt to make one just like it (with the shorter headboard as well). I also have a 5 inch mattress for the trundle. The questions I have are: 1) How much space did you leave between the floor and the bottom of the trundle? 2)What is the distance between the floor and the bottom of the side rail? 3) did you use the 1x10 for your side rail? (we are going to be using a 1x8 instead). 4) Did you order your casters from Rockler as well, or find them at a home improvement store?

Thanks so much, in advance!

debandtom25

Wed, 11/23/2011 - 11:58

1. The sides of the trundle are not flush with the bottom. The bottom (that the bed rests on) is about 2" higher than the side rails. This allows room for the wheels and about an 3/4: between the floor and the side rails. This measurement will all depend on the size of the casters you get and how much room you have beneath your bed for the trundle.
2. As mentioned above, there is about 3/4" between side rail and bottom of floor. Like I said before, it's total preference and how much room you have to work with.
3. I did use a 1X10, mainly because I like the look of the wide board.
4. I got the casters from HD or Lowes (can't remember).

Hope this helps!

Guest (not verified)

Sun, 01/29/2012 - 23:15

I love this and am going to make for my sons bed but I didn't see what you used to attach the sides to the base...unless I just didn't see it. :-) Did you use "L" brackets?

Saadia (not verified)

Sun, 03/25/2012 - 12:30

Hi, I was just wondering how you adjust the cleats when you are using the rockler brackets? I plan on using 2 x 8 for the siderails so there isn't enough room to fit the bracket and cleat along the edge. Did you have to shorten your cleat by just a little bit?

KAD050209 (not verified)

Fri, 08/17/2012 - 23:32

I was wondering if you could tell me how many inches the gap is from the bed to wall (where you have the bed horizontal against the wall)? Just trying to get an idea; my daughter is young and don't want her falling between the gap at night :) Thanks ahead of time!

In reply to by KAD050209 (not verified)

debandtom25

Wed, 09/05/2012 - 20:16

The gap is about 3.25". I remember one of the first nights that Jack slept in his bed he fell in the gap. I wasn't expecting that at all. We just stuffed the extra bed pillows in there at night. We don't even remember to do it anymore and he's never fallen in again.

Threshing Board Table

I wanted a character filled leave outside table for my pergola. I wanted to use reclaimed boards of some kind. I got estimates starting at $1,000 and I wasn't even sure I liked them. Then - hurray - I found your blog and started browsing through the DIY plans for farmhouse tables. I had a couple of ideas. First, I needed to find the wood. I found the gorgeous (still caked with manure) 2" thick barn threshing boards for a very reasonable price and they were long enough, at 8 feet, for my dream table to start taking shape.

The idea of creating with wood has always appealed to me, but I have never had any idea how to begin. Enter your plans + my lovely friend Lisa and her miter saw. As per the easy to follow instructions I went shopping for the wood. I chose a lovely cedar board which I think will weather nicely without taking away from the great patina on the top of the table.

Again - as per the easy to follow instructions - my friend and I put together the table, cleaned up and popped a bottle of sparkling wine to toast - all in about 3 hours!

BIG thanks to you and your inspiring work!

Built from Plan(s)
Estimated Cost
$40. for bottom of table, @$250. for reclaimed wood
Estimated Time Investment
Afternoon Project (3-6 Hours)
Finish Used
Top finished in a clear marine varnish.
Recommended Skill Level
Beginner

Comments

Console/sofa table

I made this table top with 2-2x6 boards to make it more narrow. I used 1-2x6 for the shelf and just adjusted the plan accordingly. The finish is dark walnut stain, then painted with rustoleum chalked linen white paint, distressed then covered with Minwax finishin wax in natural color.

Built from Plan(s)
Estimated Time Investment
Afternoon Project (3-6 Hours)
Finish Used
Minwax Dark Walnut stain
Rustoleum chalked linen white chalk paint
Minwax finishing wax natural color
Recommended Skill Level
Intermediate

Comments

Bookcase Dollhouse

Submitted by Anonymous (not verified) on Mon, 01/07/2019 - 11:23

My aunt wanted to get her grandaughter a dollhouse for Christmas.  I came to Ana's website and found this plan.  It was tedious and time-consuming, but it was worth it.  This was such a great confidence builder and has led me to build a lot more things for other people.  I can't wait to see what the future holds.  Used these plans...http://www.ana-white.com/2012/07/bookcase-dollhouse

Built from Plan(s)
Estimated Time Investment
Weekend Project (10-20 Hours)
Finish Used
White paint
Recommended Skill Level
Intermediate

Planters

Submitted by Anonymous (not verified) on Sat, 10/15/2022 - 17:36

Just made these planters. I haven't painted them yet but I had to post it. They came out perfect. Thanks Ana for easy to follow plans.

Comments

Niki's Modified Console Table

By using the simple console table project plan, I built my own console table. I changed some of the dimensions in order to make it fit in our apartment. I found the directions to be clear and easy to follow. To see more pictures, check out my blog, Sweet Southern Charm!

http://sweet-southern-charm.blogspot.com/2011/08/i-built-console-table…

Estimated Cost
$30
Estimated Time Investment
Weekend Project (10-20 Hours)
Finish Used
Antique Oak Stains and Off White Paint in Satin
Recommended Skill Level
Beginner

Table with storage crates

Large Table with 2 super large crates on wheels. It is about 4 feet wide and sits about 2 1/2 feet tall. I use the table for random projects, homework, crafts, ect. The crates I store extra blankets in one and in the other a lot of quilting items.

Estimated Time Investment
Day Project (6-9 Hours)
Finish Used
Table is painted a blue color and the crates stained in golden oak.
Recommended Skill Level
Beginner

LARGE FARMHOUSE TABLE

Submitted by mdbennes on Mon, 11/23/2015 - 09:25

I used Ana's plans for this project, but had to deviate since I built it for a friend who needed a table for 14!!  This thing is huge, 12 feet long, and about 44 inches wide.  I made it out of pine, 2x8s for the top but stuck to the plans for the frame.  It weighs about 200lbs or more, and had to move it with 4 guys...used an enclosed trailer to move it from my house to theirs. They love it so that's all that counts!  Oh ya, in the picture, you will see Ana's rustic X console table too! 

Estimated Cost
$150
Estimated Time Investment
Weekend Project (10-20 Hours)
Finish Used
Minwax English Chestnut stain, then a GLOSS polyurethane
Recommended Skill Level
Beginner

Functional Workspace

Submitted by jvos on Fri, 01/11/2019 - 20:19

I don't have much space for a workshop in my home - just the corner of my basement.  This plan was the answer!  It adds so much storage and functionality.  I plan to add some shelves to both units but love them already.  Thank you so much!

Estimated Time Investment
Afternoon Project (3-6 Hours)
Recommended Skill Level
Beginner

X based pedestal table

Submitted by Anonymous (not verified) on Wed, 10/19/2022 - 18:05

I was so impressed with the dining table i decided to make a lamp table as well

Comments

Farmhouse Doll Bed for Jennifer

I built the farmhouse doll bed for my 3 year old daughter. She has 2 dolls and always wants to sleep with her.I placed the doll bed near her bed and then they can sleep together. She is very happy. I am satisfied with the result and I think I will build an other doll bed.
Thank you so much Ana!

Estimated Cost
free, I used wood scrap and I already had the fabrics
Estimated Time Investment
An Hour or Two (0-2 Hours)
Finish Used
2 coats of Green acrylic paint and 1 coat of brilliant varnish
Recommended Skill Level
Starter Project

Comments

Media Console

Submitted by deondoond on Thu, 09/19/2013 - 10:32

This is my first attempt at any kind of wood working. We used the plans from:

http://ana-white.com/2011/03/rustic-media-console-0

We left out the middle doors and chose to do a little bit of distressing on the finish since we love the look. We're very happy with how it turned out and are ready for the next project!

Built from Plan(s)
Estimated Cost
~$150
Estimated Time Investment
Weekend Project (10-20 Hours)
Finish Used
We primed and then painted with a high gloss paint. We did some light sanding around edges to try and make it look like natural wear and then stained the exposed wood with Valspar transparent mocha glaze to make the exposed wood look older.
Recommended Skill Level
Intermediate

Fireplace Barrier

Submitted by ccapps4284 on Tue, 11/24/2015 - 10:54

I was worried about my 13 month old Grandson getting burned by the glass on our gas log fireplace. And I could not find a screen that was not metal and was sturdy enough that I felt comfortable using. So, I did some measuring and built my own to match our existing mantle and frame around the fireplace. Made my own 2x2s for the rail as I could not find any straight enough and "knot free". My wife was a little hesitant when I told her I was going to buld something because I am not the fastest builder as I just do it hwne I get time and feel like it but, this only took a couple of weeks including the painting and staining. I can take it apart in 3 pieces for the summer and store it in the garage.

Estimated Cost
75.00
Estimated Time Investment
Week Long Project (20 Hours or More)
Finish Used
Latex Paint and Minwax stain
Recommended Skill Level
Intermediate