Barbecue/BBQ Quick Built-in
![](/sites/default/files/1_6.jpeg)
This was just a standard BBQ with an attached folding table. I used a combo of Ana's plans to add a little character and style to the BBQ and it made a huge difference in not only the BBQ, but also the backyard.
![](/sites/default/files/image_14.jpeg)
This was just a standard BBQ with an attached folding table. I used a combo of Ana's plans to add a little character and style to the BBQ and it made a huge difference in not only the BBQ, but also the backyard.
I took the original plans and modified them to work with my requirements. Most of this piece is made with pallet wood. I made the rails from aluminum bars and sliding door pulleys.
I built this cabinet to store magazines and diapers (towels when the time comes) in the small 1/2 bath.
The top was made with left over oak pieces from when I ripped out the carpet and 2x12 stairs and replaced with oak treads.
This is the prototype build for the Cedar 2-drawer desktop storage cube. It is made from 1 piece of ½” x 5 ½” x 6’ fence picket, about $3 for wood. I had based this plan on a board that is ½” thick and 5 ½” wide, and had identified areas in the plan where you’ll want to measure and cut as you build. I found this especially important on the prototype build, since it turned out the picket I bought was 5 3/8” wide, which affected the depth of the shelf, length of the drawer sides, and the size of the drawer bottom. Measuring and trimming as you go gives the best fit for all the pieces. Probably the most helpful thing besides keeping the measuring tape handy, was some 60-grit sandpaper. After everything was assembled, I used 60-grit sandpaper with my palm sander to sand down any high spots caused by cupping, to get the outsides nice and smooth. Followed up with some 220-grit for a nice smooth final sand. The pulls are some ¾” x 1 ½” pieces of the cedar, sanded well on all sides. I just cut these from the scraps, and they are glued on. You can use regular knobs or pulls if you like. You may need a shorter screw or a ¼” spacer, since the drawer face is only ½” thick. The screws for regular knobs are normally sized for a ¾” thick door or drawer face. This build took about 3 hours. Finishing time will depend on the type of finish used. My words of advice for building this would be: Take your time measuring. Measure twice before cutting. Sand thoroughly. Have fun!
I made this using the Rustic X console plans but changed a few aspects. Instead of 2x2's I used 2x3's to beef up the cross beams and removed the X. Also extended the shelves out a few extra inches.
It took me about 2 hours to finish my ladder. I used 3 2x4s. The sides are 6 feet long and the rungs 17 inches each with a space of 13 inches in between. I used PH for the rungs.
I stained it with medium walnut Danish oil.
I left 5 inches from the top. I wished I had left more room in the bottom but still pleased with the outcome.
We decided to redo our laundry room, and my wife really love the idea of doing a pedestal for the washer/dry. Built the first off your plans then made a smaller one to add more storage space. My Wife loves the loves the laundry now.
Sat, 07/09/2022 - 08:19
These look fantastic, thank you for sharing. Anything to make laundry more fun:)
The plans for this table were very easy to follow, and I completed the project in one day.
I love the numbered cubbies from pottery barn kids, and decided to make a version of them for our son's new desk in his playroom. Our son keeps his science things in them.
I built this to donate to our church's fall festival's live auction. My peg board didn't line up with the boards for me to completely screw it in, but I just used nails in those spot...no big deal at all!
chest size 60" long 22" deep 22" tall
made with pine
painted white with a walnut stained top
My daughter and her room mate were looking for coffee table that is small enough for their dorm and able to store items underneath.
This plan was easy to follow and I completed it within a weekend. I even took the pocket hole suggestion for the table top.
The Golden Oak stain looks great on the 2x6xs. I added two coats of polyurethane to make that top as smooth as glass.
An artsy twist on the typical coat rack. Instead of coat hooks I used railroad ties. Instead of paint, i used a blow torch and burnt it black and for the art.... I used a dremel tool and engraved a classroom of 1st graders artwork into the wood.
Wed, 08/03/2011 - 16:06
Cool! I love the creative touches you used to make this unique.
This project has taken longer than anticipated. I love how it turned out, and so does my son. My husband did most of the work on this. I will be adding pictures once I finish the window grids and the bottom curtains.
I blogged more details if interested in reading.
Rustic X-Console Table made from just 2x6s striped in half to make the legs instead of using 2x4s and cutting down a 2x6 to 1 1/2in cuts to make 1x1 stripes. I used 3/4in sanded plywood for the shelves. Everything was put together with Kreg jig screws and wood glue. Stain was applied using an air compressor and spray gun to spray a even coat of stain in sections at a time, while the stain is still wet, I wipe off the excess stain with a clean rag leaving an even wood stain finish results. This cuts the staining from what would normally take hours of painful hand staining to just minutes with a spray gun. After the stain drys, I go over the table with either fine wool pad or 1000 grit sand paper to remove any rough spots. I then apply the polyurethane with the spray gun as well. Once that dries, I go over the table again with 2000 grit wet/dry sand paper leaving a ultra smooth even finish. I use a total of 6 (2x6 white pine boards) striped to needed sizes and half of (4x8 sanded 3/4in plywood) for this project. I had to modify the demensions for the different sizes of cuts, but overall saving money instead of buying the individual 2x4s,1x1s, and solid pine boards. It takes a bit longer but well worth it.
Made for my grandson Christmas 2017
Our old cluttered coat closet is now lockers with lots of storage. I chose not to do the Braden bench due to a space issue so I framed a bench out with 2x4's, lined it with ply wood, covered the front with some trim and bead board and topped it with a nice piece of stained oak 3/4 inch plywood. The lids were cut and attached with continuous hinges and inside I used 2 lift hinges so that little fingers won't get smashed. I attached the lockers to the bench with a few Kreg jig screws which worked really well.
Sat, 08/06/2011 - 21:35
Wow that looks great! It really opens up the space and I like the stained oak top, very classic.
Sun, 08/07/2011 - 07:22
This is so nice!! It makes the area look so different and I'm sure you appreciate all that extra storage. I also love that stained top. It looks perfect with the floors.
Sun, 08/07/2011 - 13:42
Love this idea! I think I'll make a flip top bench to fit my closet. I could climb on it to reach the upper shelves, or sit on it to put my shoes on. And it will be so much nicer than the hampers I'm using for shoe storage right now. Thanks for the inspiration--it looks fantastic and is a great use of space.
Mon, 08/29/2011 - 06:48
Thanks. I am glad you ladies like it. It has been a God-send for us! The old backpack dumping ground is now a hallway again:). I have even added a "daddy locker between the door and the lockers with a small box for his stuff....I think I need one now too.
Mon, 09/12/2011 - 17:41
This looks amazing! If you can, would you tell me the dimensions from top down, just heights, of the cubby system. I'm trying to get a feel for the propotions.
Thanks!
Tue, 09/20/2011 - 16:06
We have 8 foot ceilings. This nook is 65inches wide so each locker is 15 inches wide (and change). The bench is 18 inches high. The lockers are 45 inches high. The paper cubbies are 4 inches. The square cubbies are around 10 to 12 inches as are the top rectangular cubbies. I wish now that I would have also bumped out the square cubbies to make the deeper and provide a place to put some more down hanging hooks but it has been so handy that it is hard for me to complain about much.
This was the most complicated project I've built yet, and of course I had a few problems. First, I drilled some holes in the wrong places, and things didn't line up. So i drilled them again. Then I had trouble with holding everything level without a helper. When it came time for the plant stand to stand ip, it wouldn't.
No worries. I screwed a couple of short boards underneath the top rack and made it a Stationary Plant Stand!
The thing is really cute and everyone asks me where I got it. I tell them I made it myself from Ana White plans. They never notice the extra holes in the legs or wonder why I can't fold it up and store it!
Large version of the toy box for the basement. Added a half shelf in the bottom row for small items (cars).
my mailbox was hit by a vehicle so I decided I wanted to do something creative/different but also didn't want to spend much money as it may just get taken out again in the future :)
this is a good project to get kids to help you with
instead of cutting into the concrete easement, I installed 2 post bases & locked them with sleeve anchors. They're sturdy enough but will give if hit again. drilling the holes for the sleeve anchors was the hardest part of the project.
I used a left over 4x4x8 for the posts, scrap 1x4s, 1x2s up the sides (1/2" gap between boards), and a 2x4 scrap to attach the mailbox. I eyeballed the width between posts using the mailbox itself. I left over stain from another project (almost bought a quart of oops paint at HD)
I figure the total cost would have been about $100
It's a super easy project that took about 4hrs. I've already had a couple of neighbors come by to take measurements to try something similar.
FYI: USPS guildlines for installing a curbside mailbox: https://www.usps.com/manage/mailboxes.htm
Comments
mdwstgrl
Mon, 05/23/2016 - 12:29
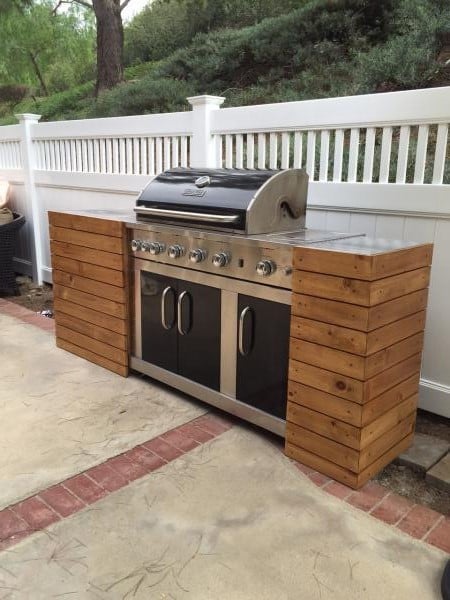
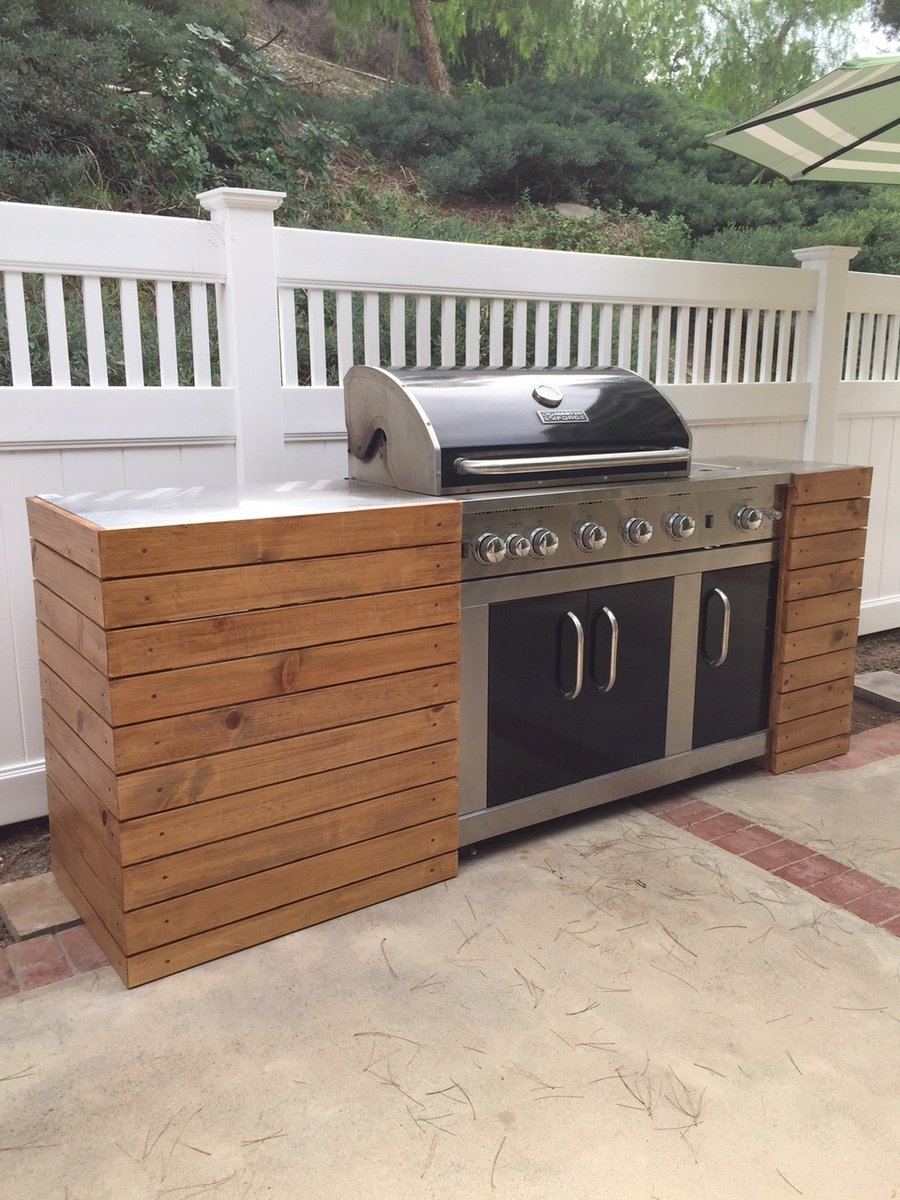
BBQ Built In
Hello: Very interested in which plans you used to build the BBQ Built In. Thank you.
[email protected]
Wed, 06/08/2016 - 09:22
BARBECUE/BBQ QUICK BUILT-IN
Hello dbryant1977, please share the plans. Also, what's brand/model of BBQ? Very nice.
cmsorensen604
Sun, 05/05/2019 - 07:33
bbq surround
How do I get the plans for this
kobej9
Thu, 04/09/2020 - 18:27
This is my guess on the…
This is my guess on the plans used! https://www.ana-white.com/woodworking-projects/diy-grill-island-featuri…
TruTalesFeats
Mon, 06/03/2019 - 06:45
Barbecue/BBQ Quick Built-in
Please, which plans did you use for this?
bprice89
Fri, 08/30/2019 - 09:50
Are there plans for this…
Are there plans for this project or at least some pictures from while you were building it?
joany515
Mon, 03/16/2020 - 14:55
Built in BBQ
Would definitely like plans for this :)
kobej9
Thu, 04/09/2020 - 18:27
This is my guess on the…
This is my guess on the plans used! https://www.ana-white.com/woodworking-projects/diy-grill-island-featuri…
dchil23
Wed, 04/22/2020 - 15:52
Can you provide us with the…
Can you provide us with the plans for this? I would love to build one.
Angie Jester
Mon, 03/04/2024 - 14:49
Can you provide us with the plans for this?
Hello: Very interested in which plans you used to build the BBQ Built In. Thank you.