Community Brag Posts
Modern Farmhouse Bed - First Wood Project!
King sized bed. My first project. I’m a 69 year old female and had a blast making it.
Built from Plan(s)
Fancy Doll Bed

This was my first project! WIth some guidance from my husband, we were able to complete this during naptime (minus paint, of course). It was a fun project and I can't wait to try a different one! (Not sure why it looks so crooked in this picture! It looks nice and even in person.)
Estimated Cost
$50
Estimated Time Investment
An Hour or Two (0-2 Hours)
Recommended Skill Level
Starter Project
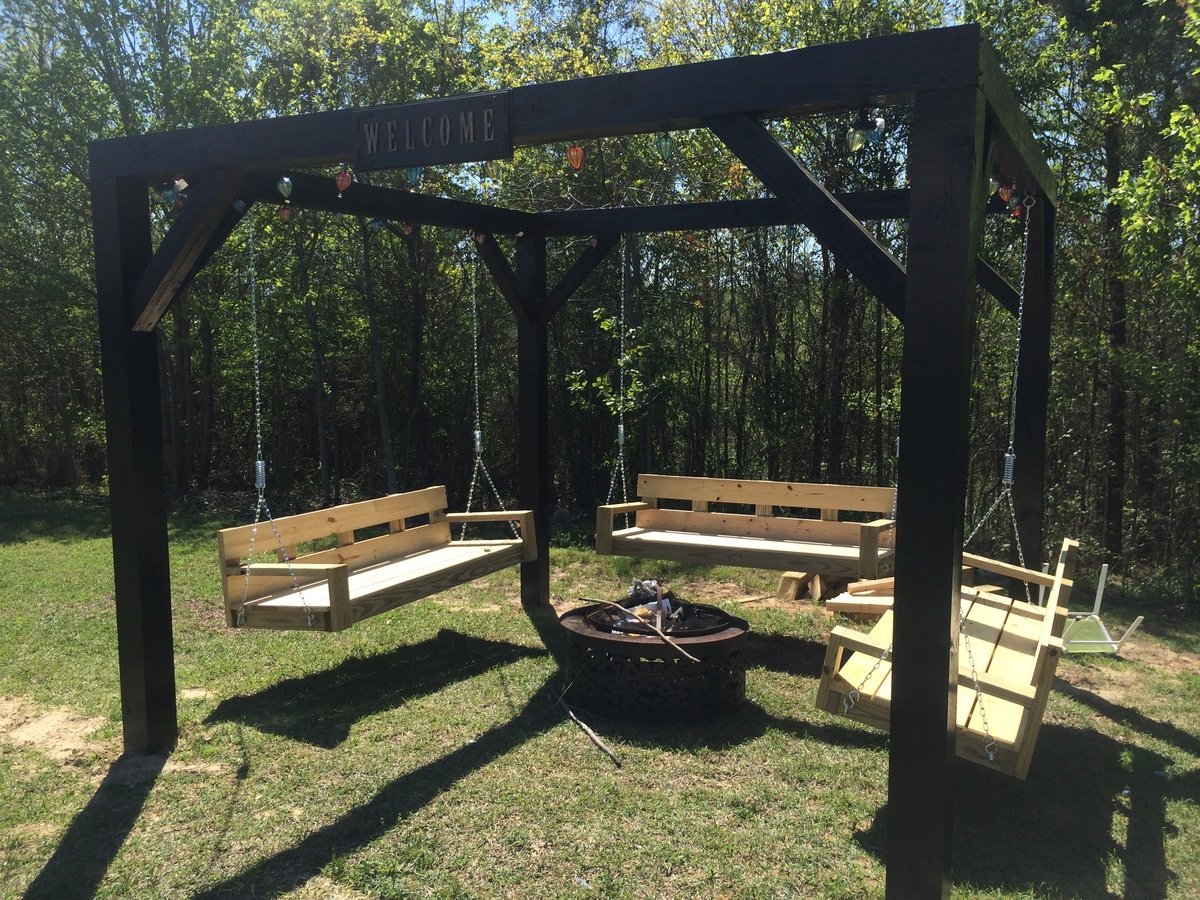
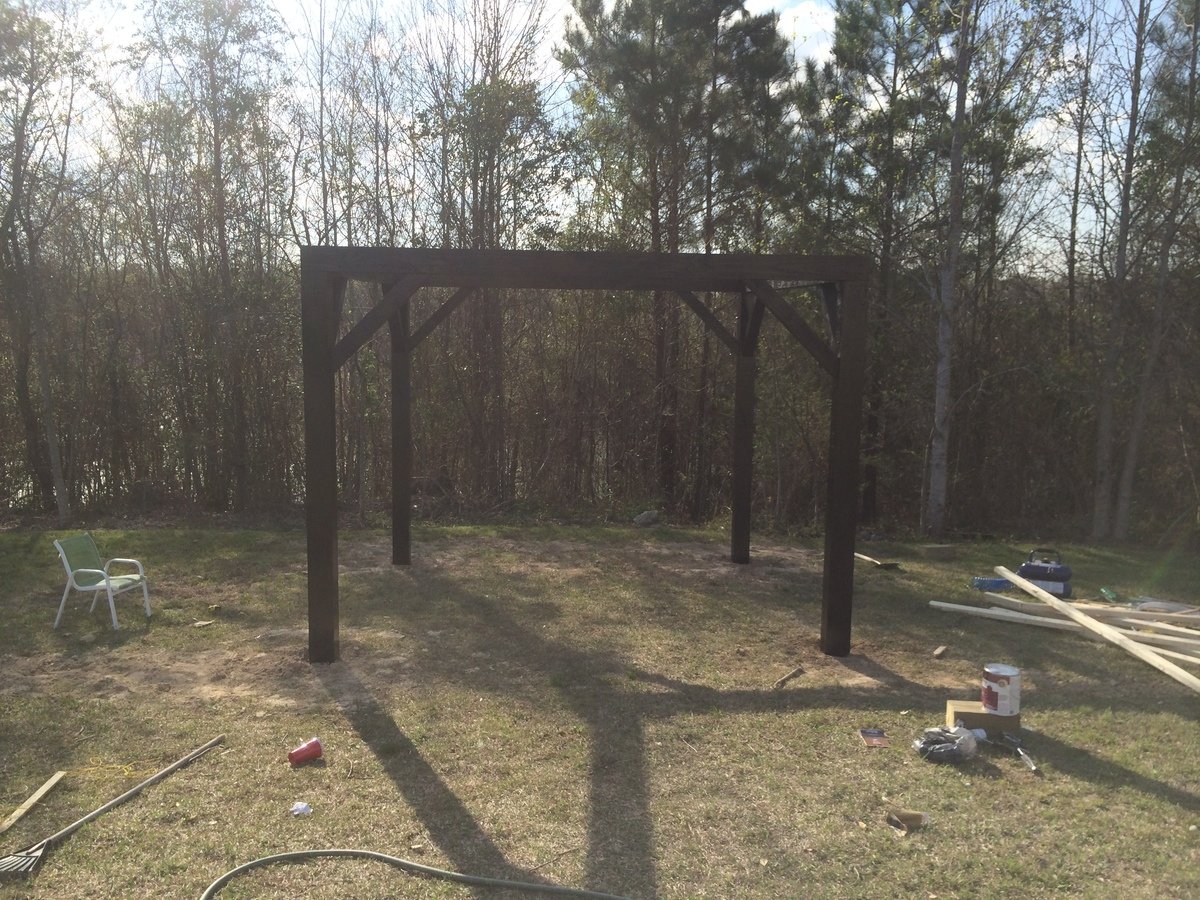
Fire Pit Swings
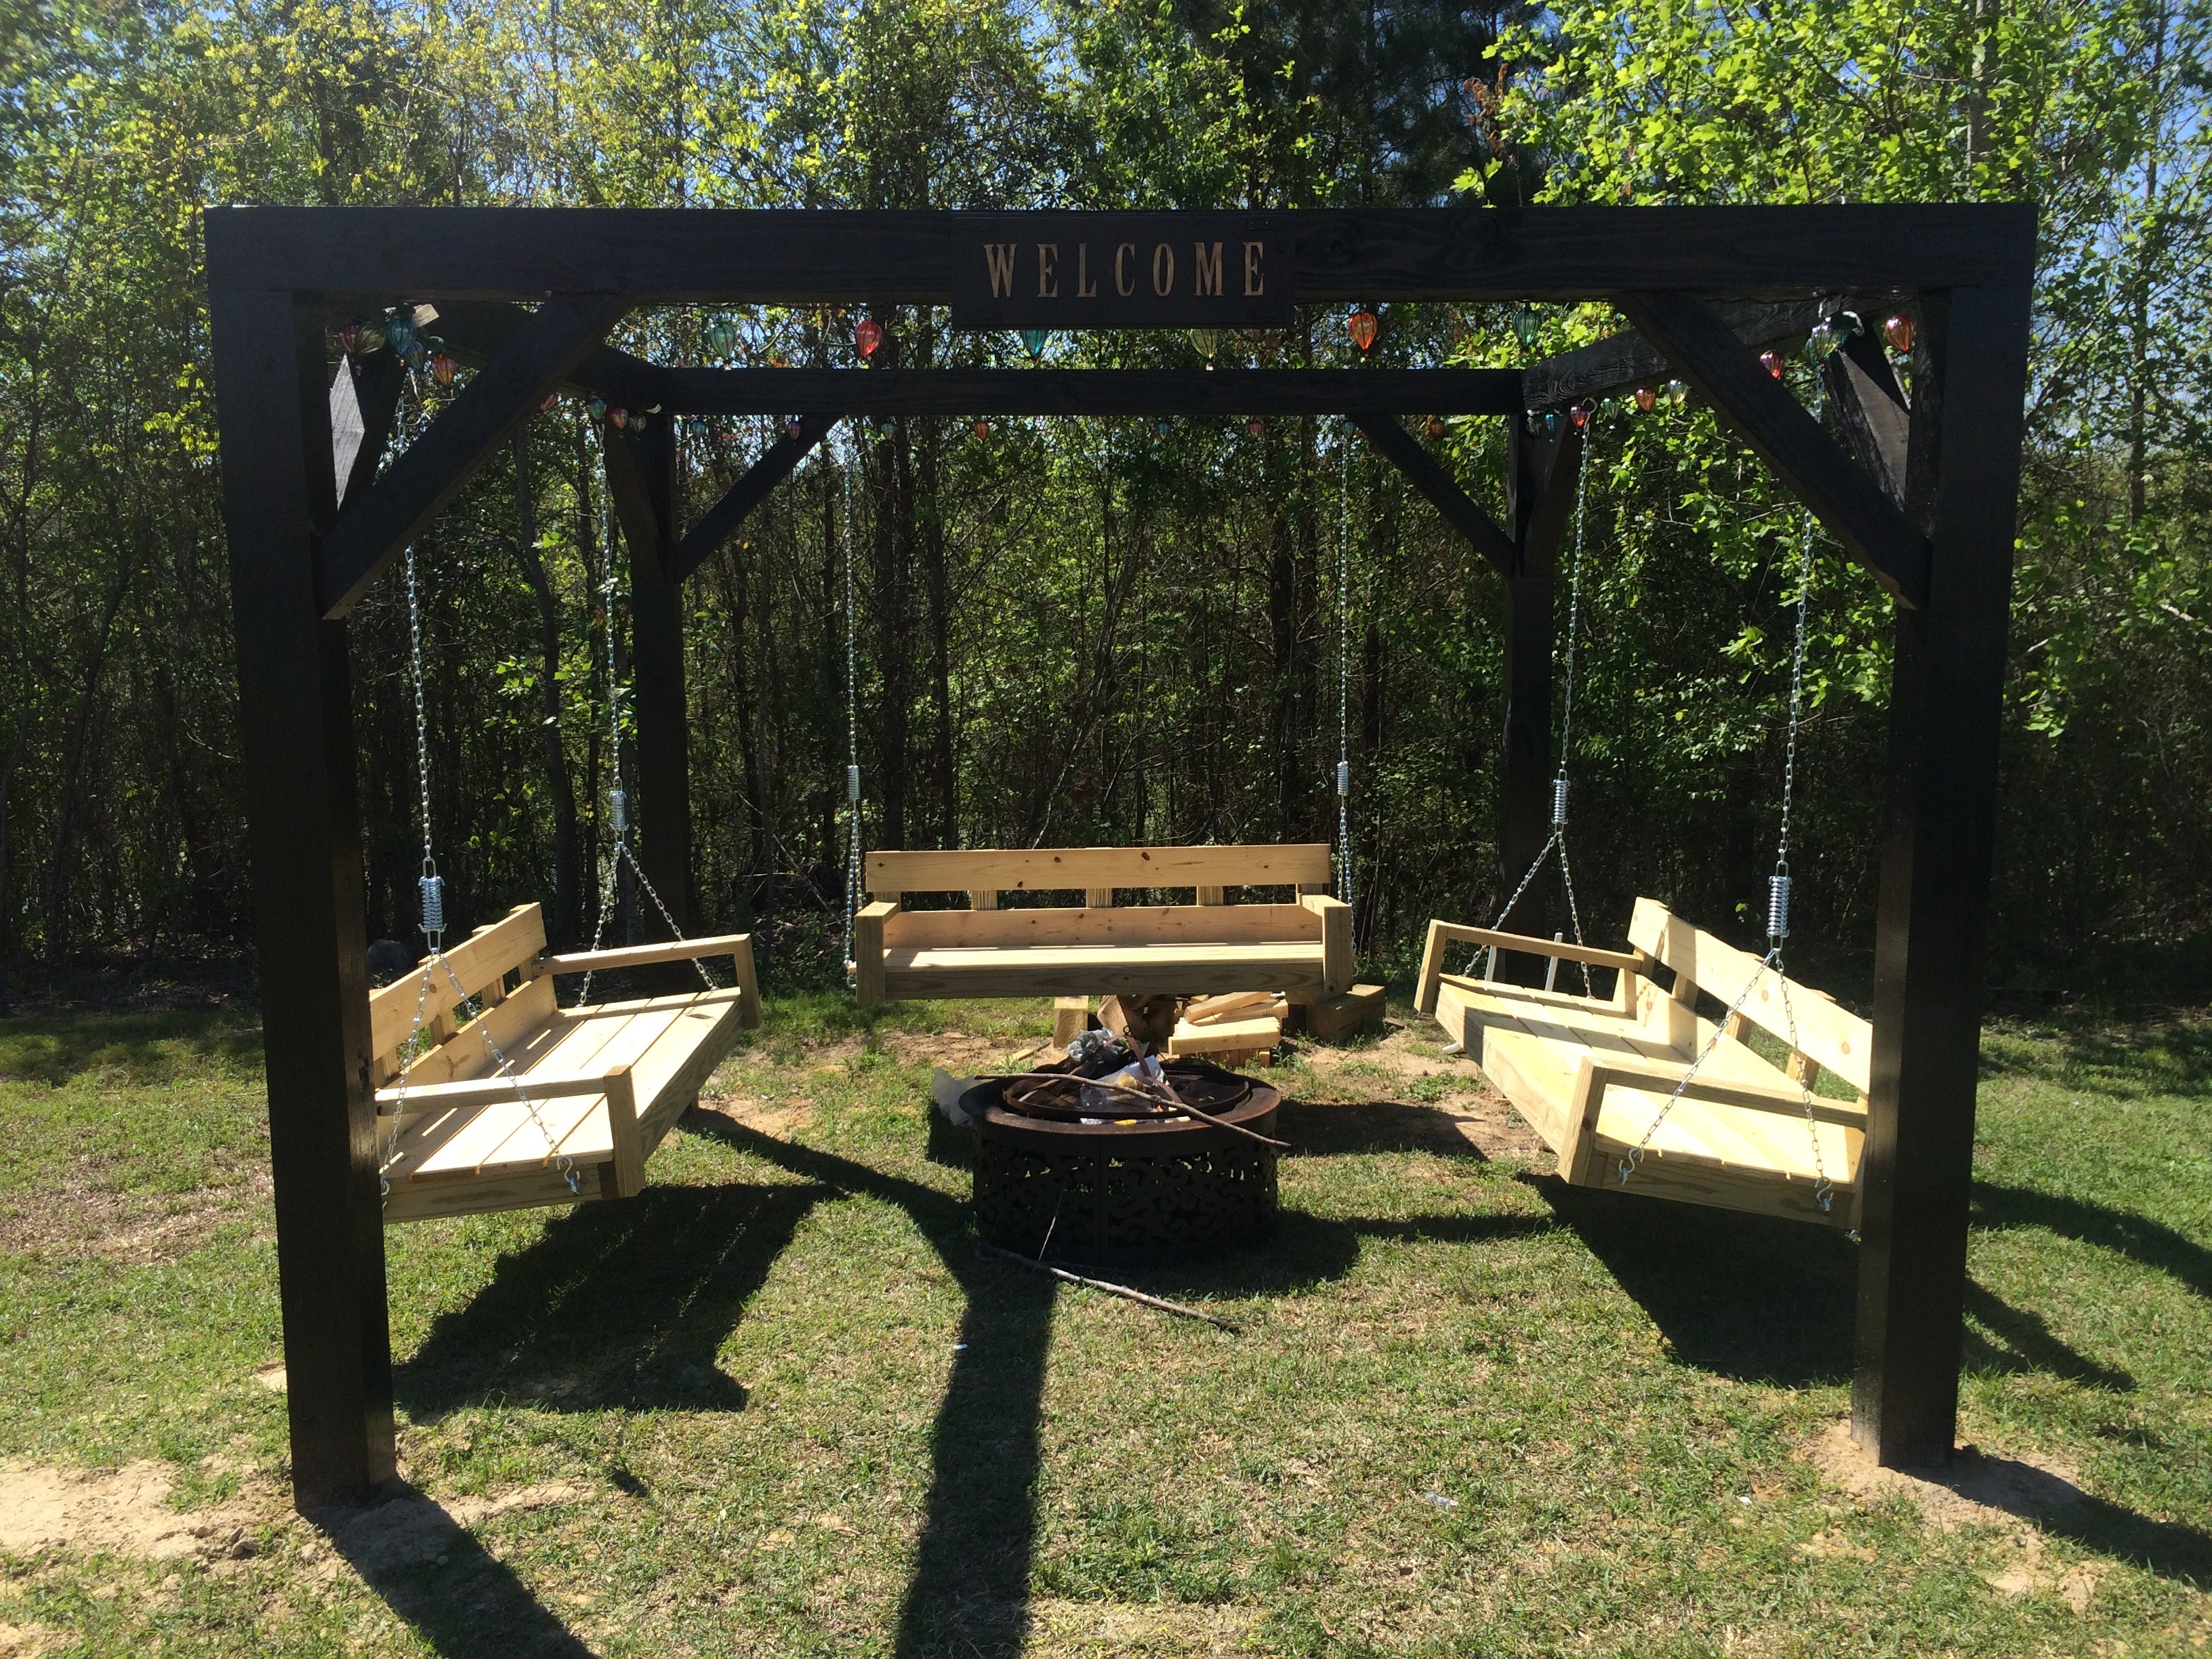
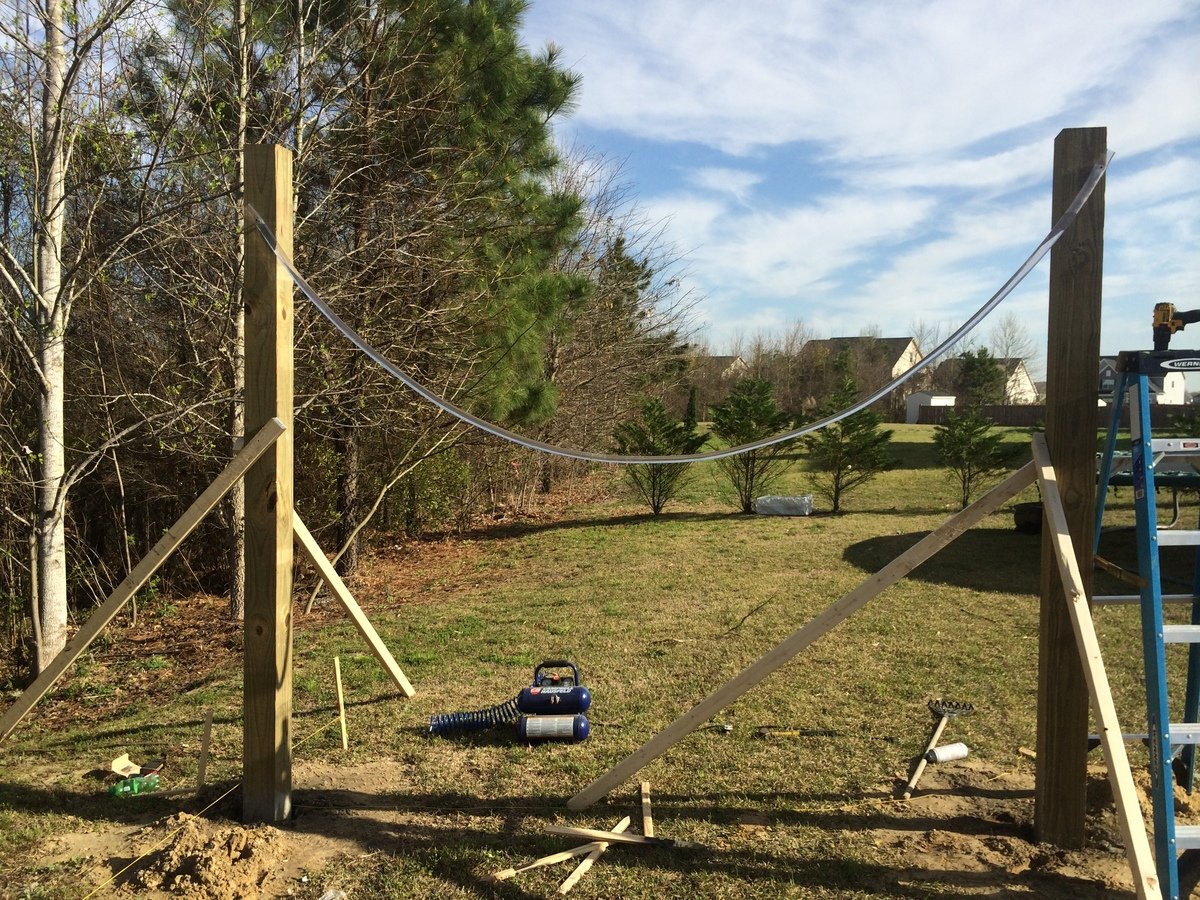
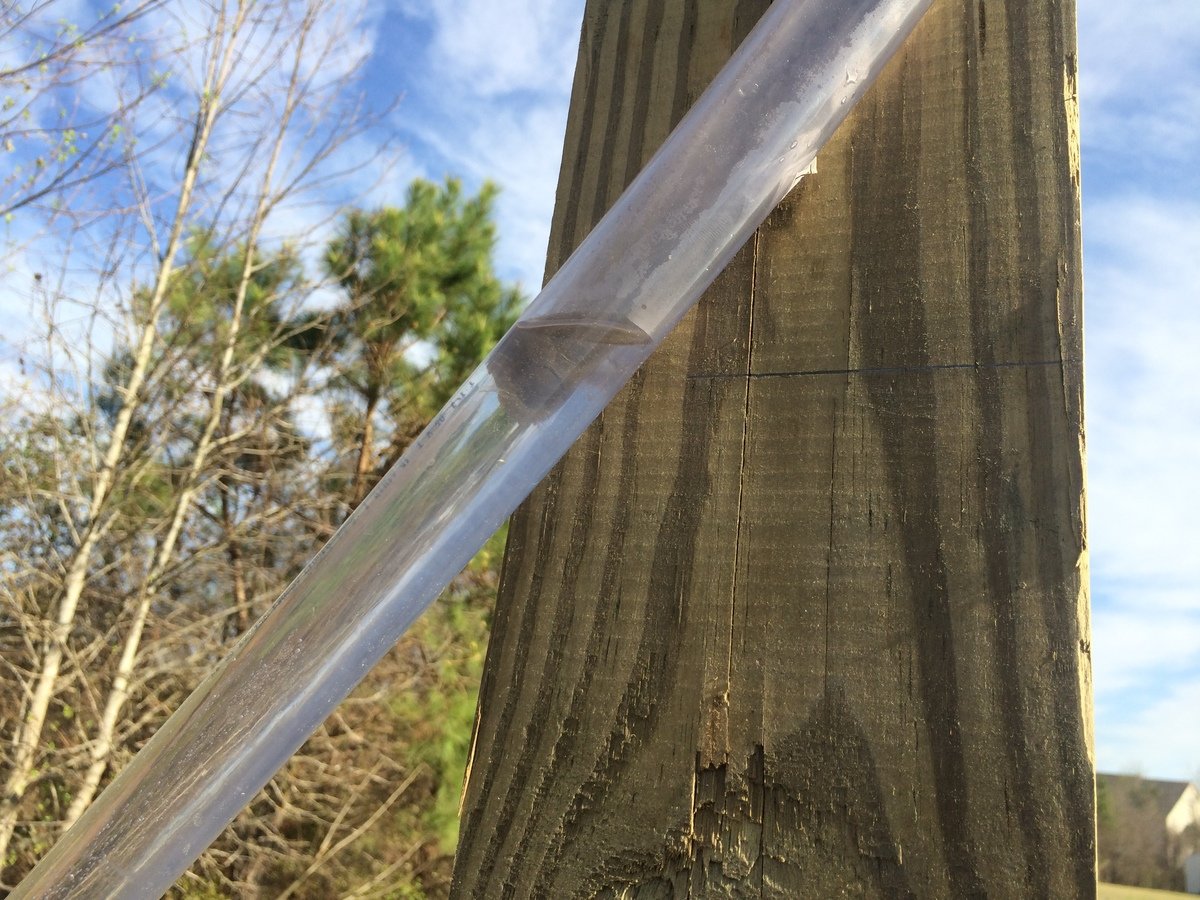
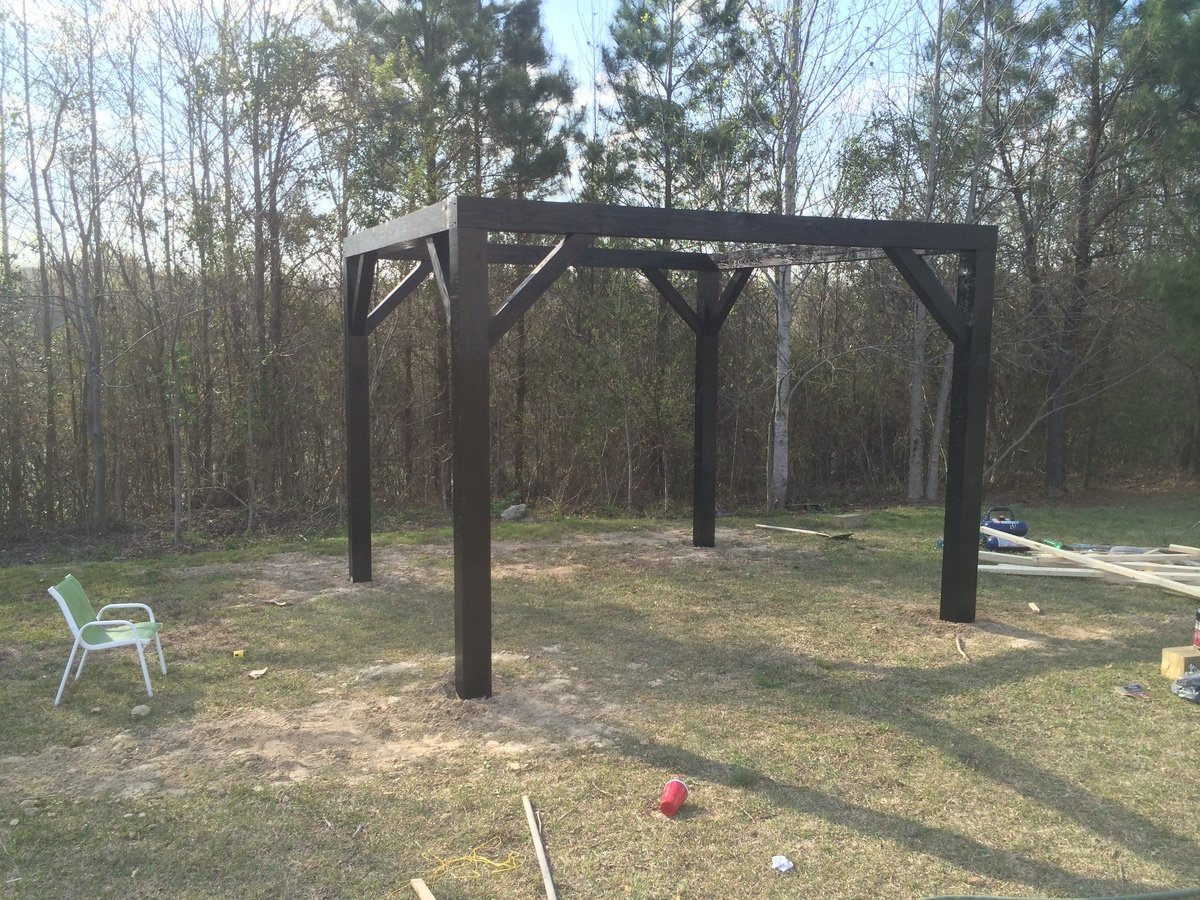
My wife saw something like this on Pinterest and desperately wanted one. The one she saw was hexagonal in shape. We didn't need as many swings so we went with just a plain square shape. We used 6x6s for the legs and posts across the top and used 4x4s for the angled support pieces. We built the swings using the plan from this website. All the materials can be picked up at the blue and orange stores. However when it came to the springs for the swings, the blue store was 1/3 of the price of HD. The legs are 12' long and buried 4' under the ground and cemented in for strength. Luckily I am retired military and was able to rent an auger for 1/2 the price of HD or the blue store. You could do it by hand but it saved us hours and lots of back pain. We found our dimensions for the size we wanted and spray painted dots on the ground where the posts were going to go. We dug the holes and stuffed the 6x6s in them. Using a post level we made sure they were plum. We braced them and added the quickrete and left them to setup over night. The next day we had to make sure all the tops were level with each other. This is where having some knowledge of physics paid off. I took clear tubing and screwed it above the height that I wanted on one post and then screwed the other end to another post. Fill it with water until the water level on the first post is where I wanted it (8 feet high) and it will automatically fill it level on the other end. There is a picture of this above. Water will always level itself out. I had to do this because my yard is at a slight down hill grade. We marked it and cut the tops off to make it level. After attaching the 6x6s on the top with 8" lag bolts it was time to paint. After painting was done we built 3 swings from Ana's plans. We shortened them by 6" to give room to walk between the legs and the swings. All in all it was a great project that only took two dedicated weekends. My wife still has to paint the swings though.
Built from Plan(s)
Estimated Cost
$600ish
Estimated Time Investment
Week Long Project (20 Hours or More)
Finish Used
We used an oil base Black Barn Paint from the blue store.
Recommended Skill Level
Intermediate
Comments

Wed, 05/27/2015 - 07:42
6x6 attachment to the top
How did you attach the 6x6's to the top? Is it a miter cut at 45 degrees and then put together with the lag bolts. I'm kinda confused. Thanks.
Wed, 05/27/2015 - 22:38
Sounds Like
It sounds and looks like the top 6x6s are mitered and sit on top of the end of the vertical posts. I'd say at least one lag bolt each way to hold the mitered corner together and then at least one in each piece down into the vertical to hold it in place.
Sun, 07/19/2015 - 16:26
Are there plans?
I have looked at several versions including the hexagon pergola's, but this is exactly what we want. Do you have plans that you can email me? [email protected]
Sun, 04/19/2020 - 12:33
Plans please
If you recurved plans can you please send to me?
[email protected]
Sun, 04/19/2020 - 12:33
Plans please
If you recurved plans can you please send to me?
[email protected]
Wed, 04/29/2020 - 16:18
Need material list and plans
I was looking for material list and plans if you have any please send to [email protected] thanks
Mon, 04/27/2020 - 10:24
WOW, LOVE!!! This is simply…
WOW, LOVE!!! This is simply gorgeous! What a warm and welcoming addition to your yard. And thanks for sharing your method of finding level for your posts on your sloped yard. I absolutely love it!
Thu, 10/22/2020 - 06:53
Requesting Plans
Love this, can you please email me the plans @ [email protected]
Fri, 03/26/2021 - 05:58
This is beautiful. Would…
This is beautiful. Would love to see the plans for this. How small can it be made?

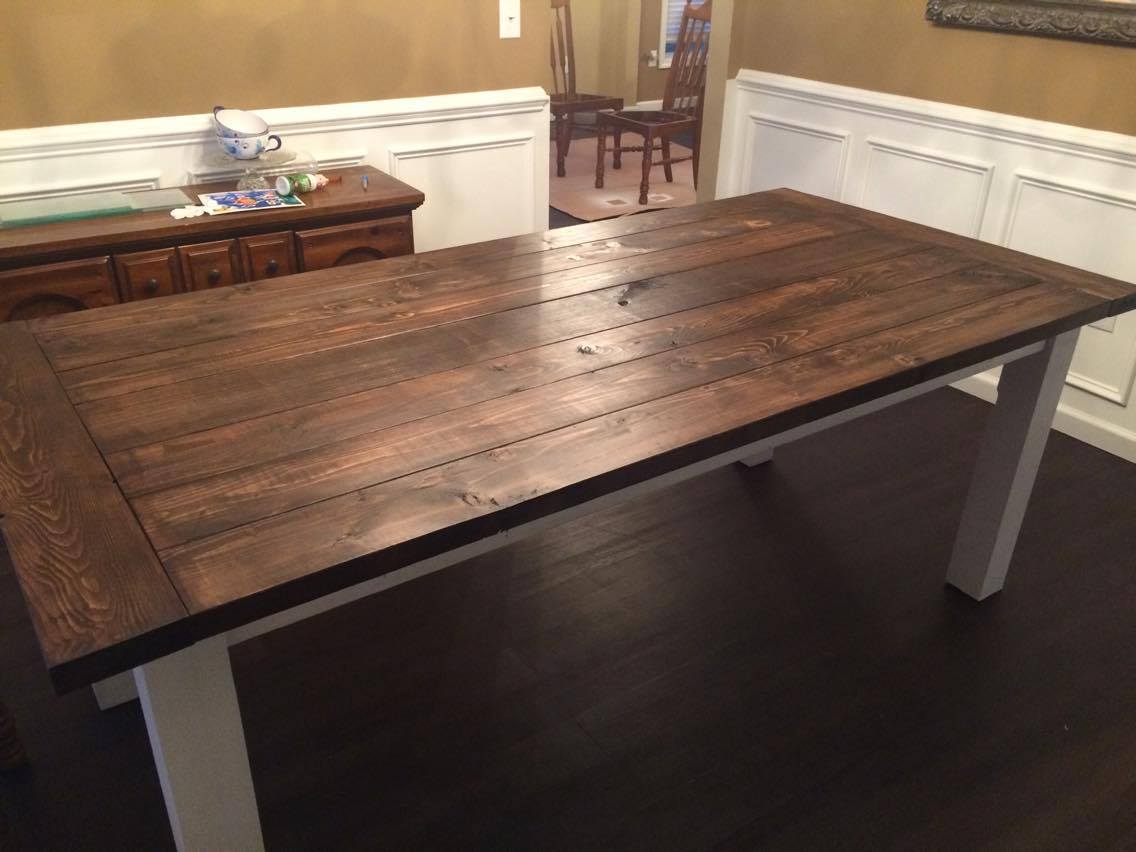
Slightly adjusted pocket hole plan
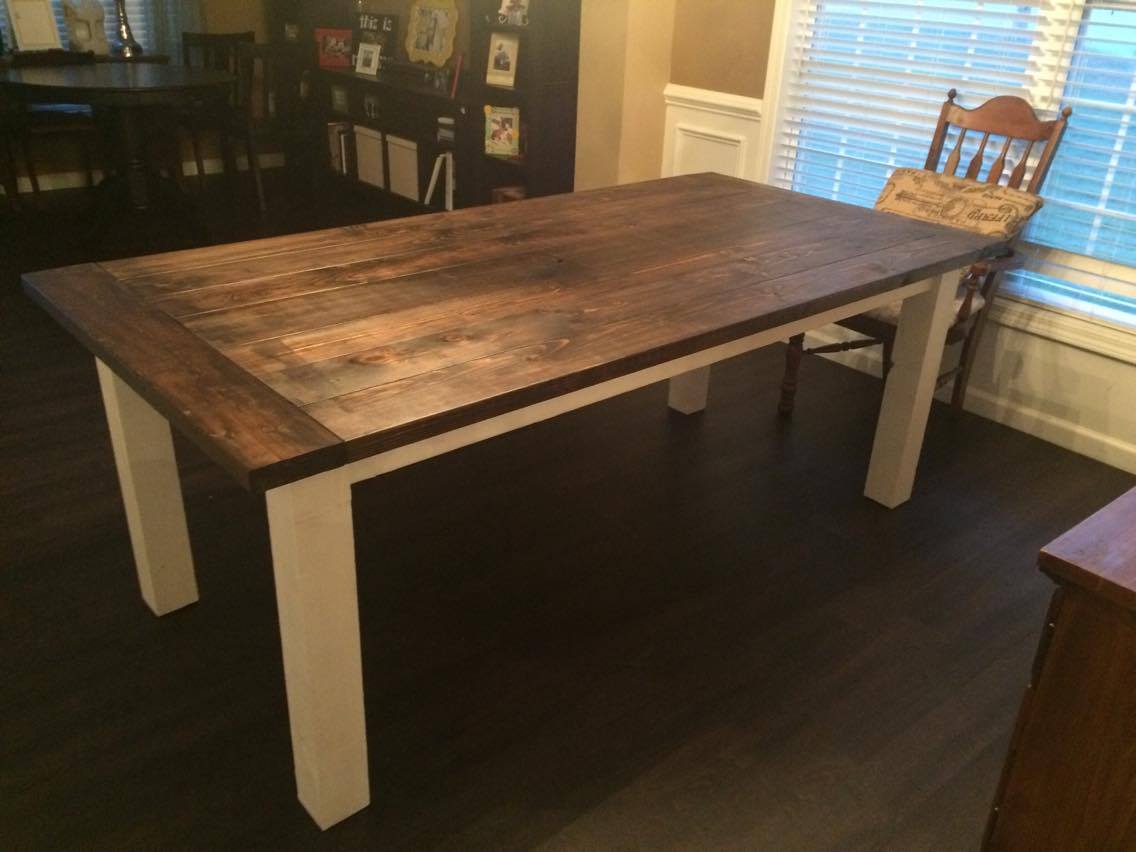
We decided to adjust this plan by removing the stretchers on the bottom. We knew we wanted to use the ends of the table for seating fairly regularly without adding a leaf on the end. The lack of support doesn't seem to have any effect on the sturdiness of the table. This was a super fun (and first woodworking) project! Can't wait to knock out the bench!
Built from Plan(s)
Estimated Cost
We spent around $85 total on materials. (This is not including tools I bought for the project.) I purchased a Kreg Jig for around $40 and a 6" Kreg clamp for $35. This was a great investment, not only for this project, but also more projects down the road.
Estimated Time Investment
Weekend Project (10-20 Hours)
Finish Used
The legs and apron were a painted with a Valspar Ultra White chalk paint. If you have the option to buy anything other than cedar 4x4's for you legs, DO IT!. Cedar soaked up so much paint and made it hard to get the clean, white look we were going for. The top is a stain color called Kona made by Rust-Oleum. We used about 3/4 of an 8oz can. We sealed it with Minwax Polycrylic Protective Finish.
Recommended Skill Level
Starter Project
Barn Door TV Console
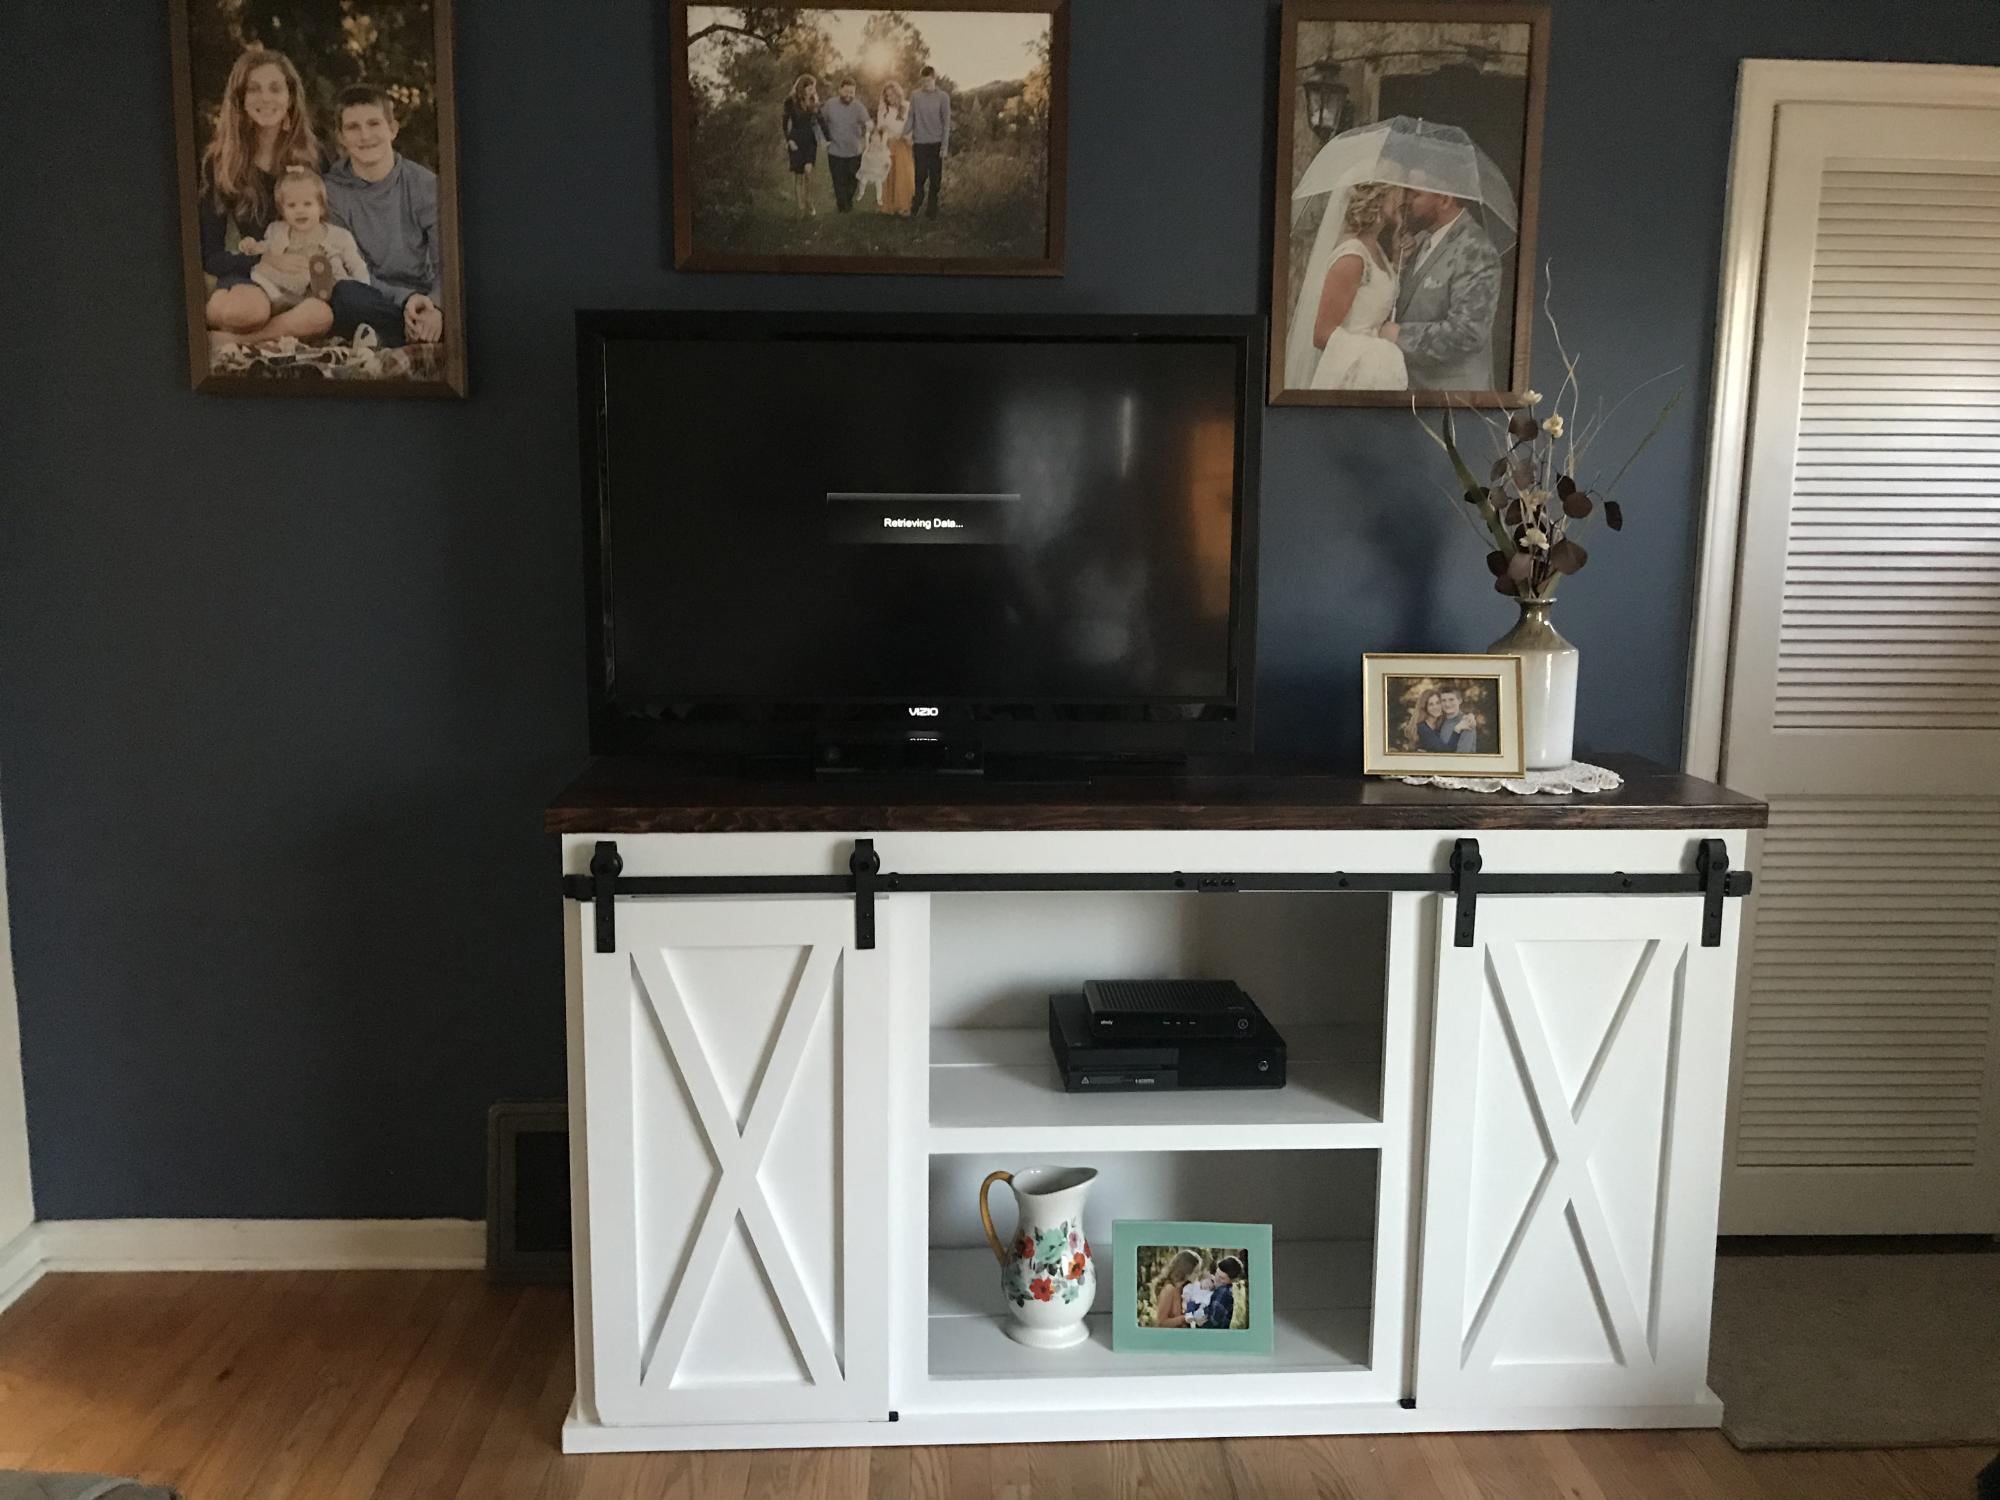
I built this during quarantine. Dark walnut on the top, and pure white paint ok the base and doors.
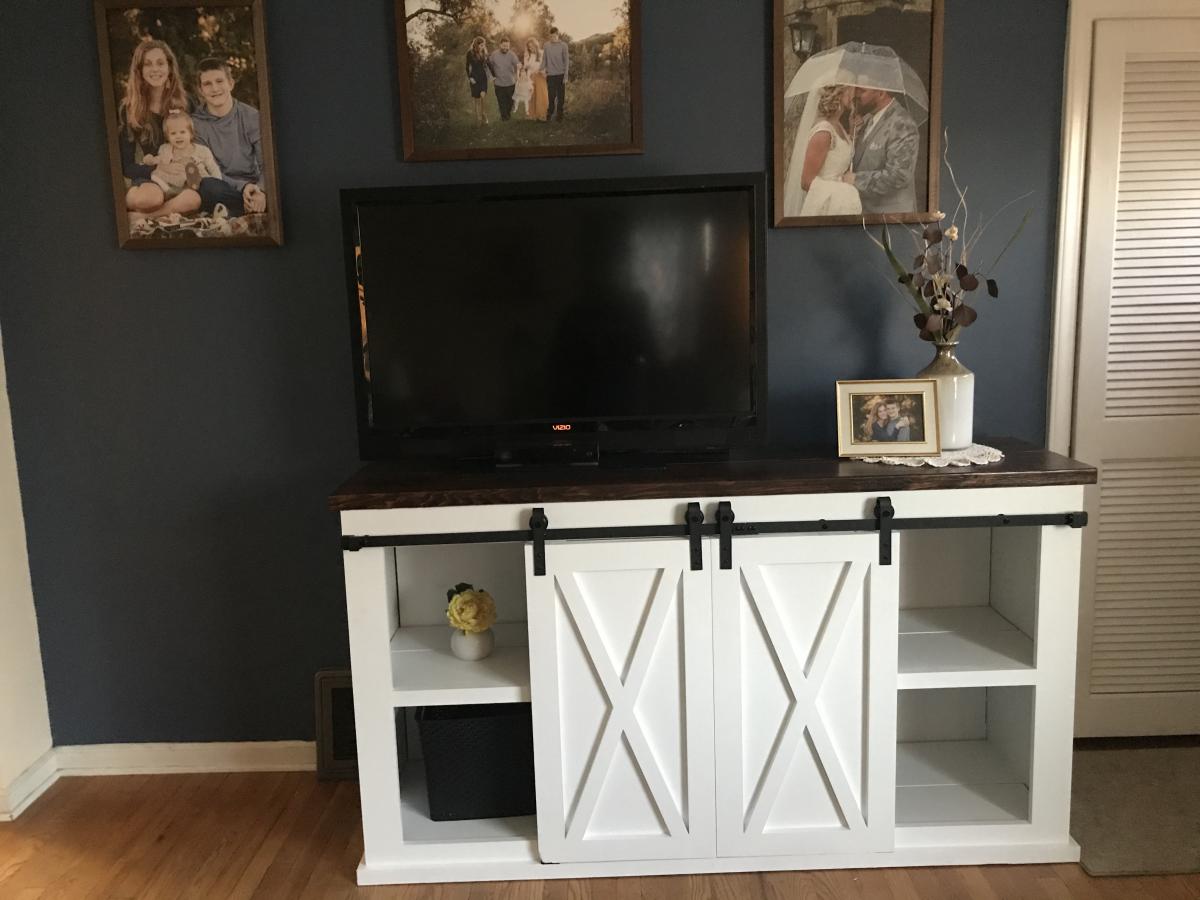
Built from Plan(s)
Estimated Cost
$350
Estimated Time Investment
Week Long Project (20 Hours or More)
Finish Used
Dark walnut stain, satin poly
pure white satin paint
pure white satin paint
Recommended Skill Level
Intermediate
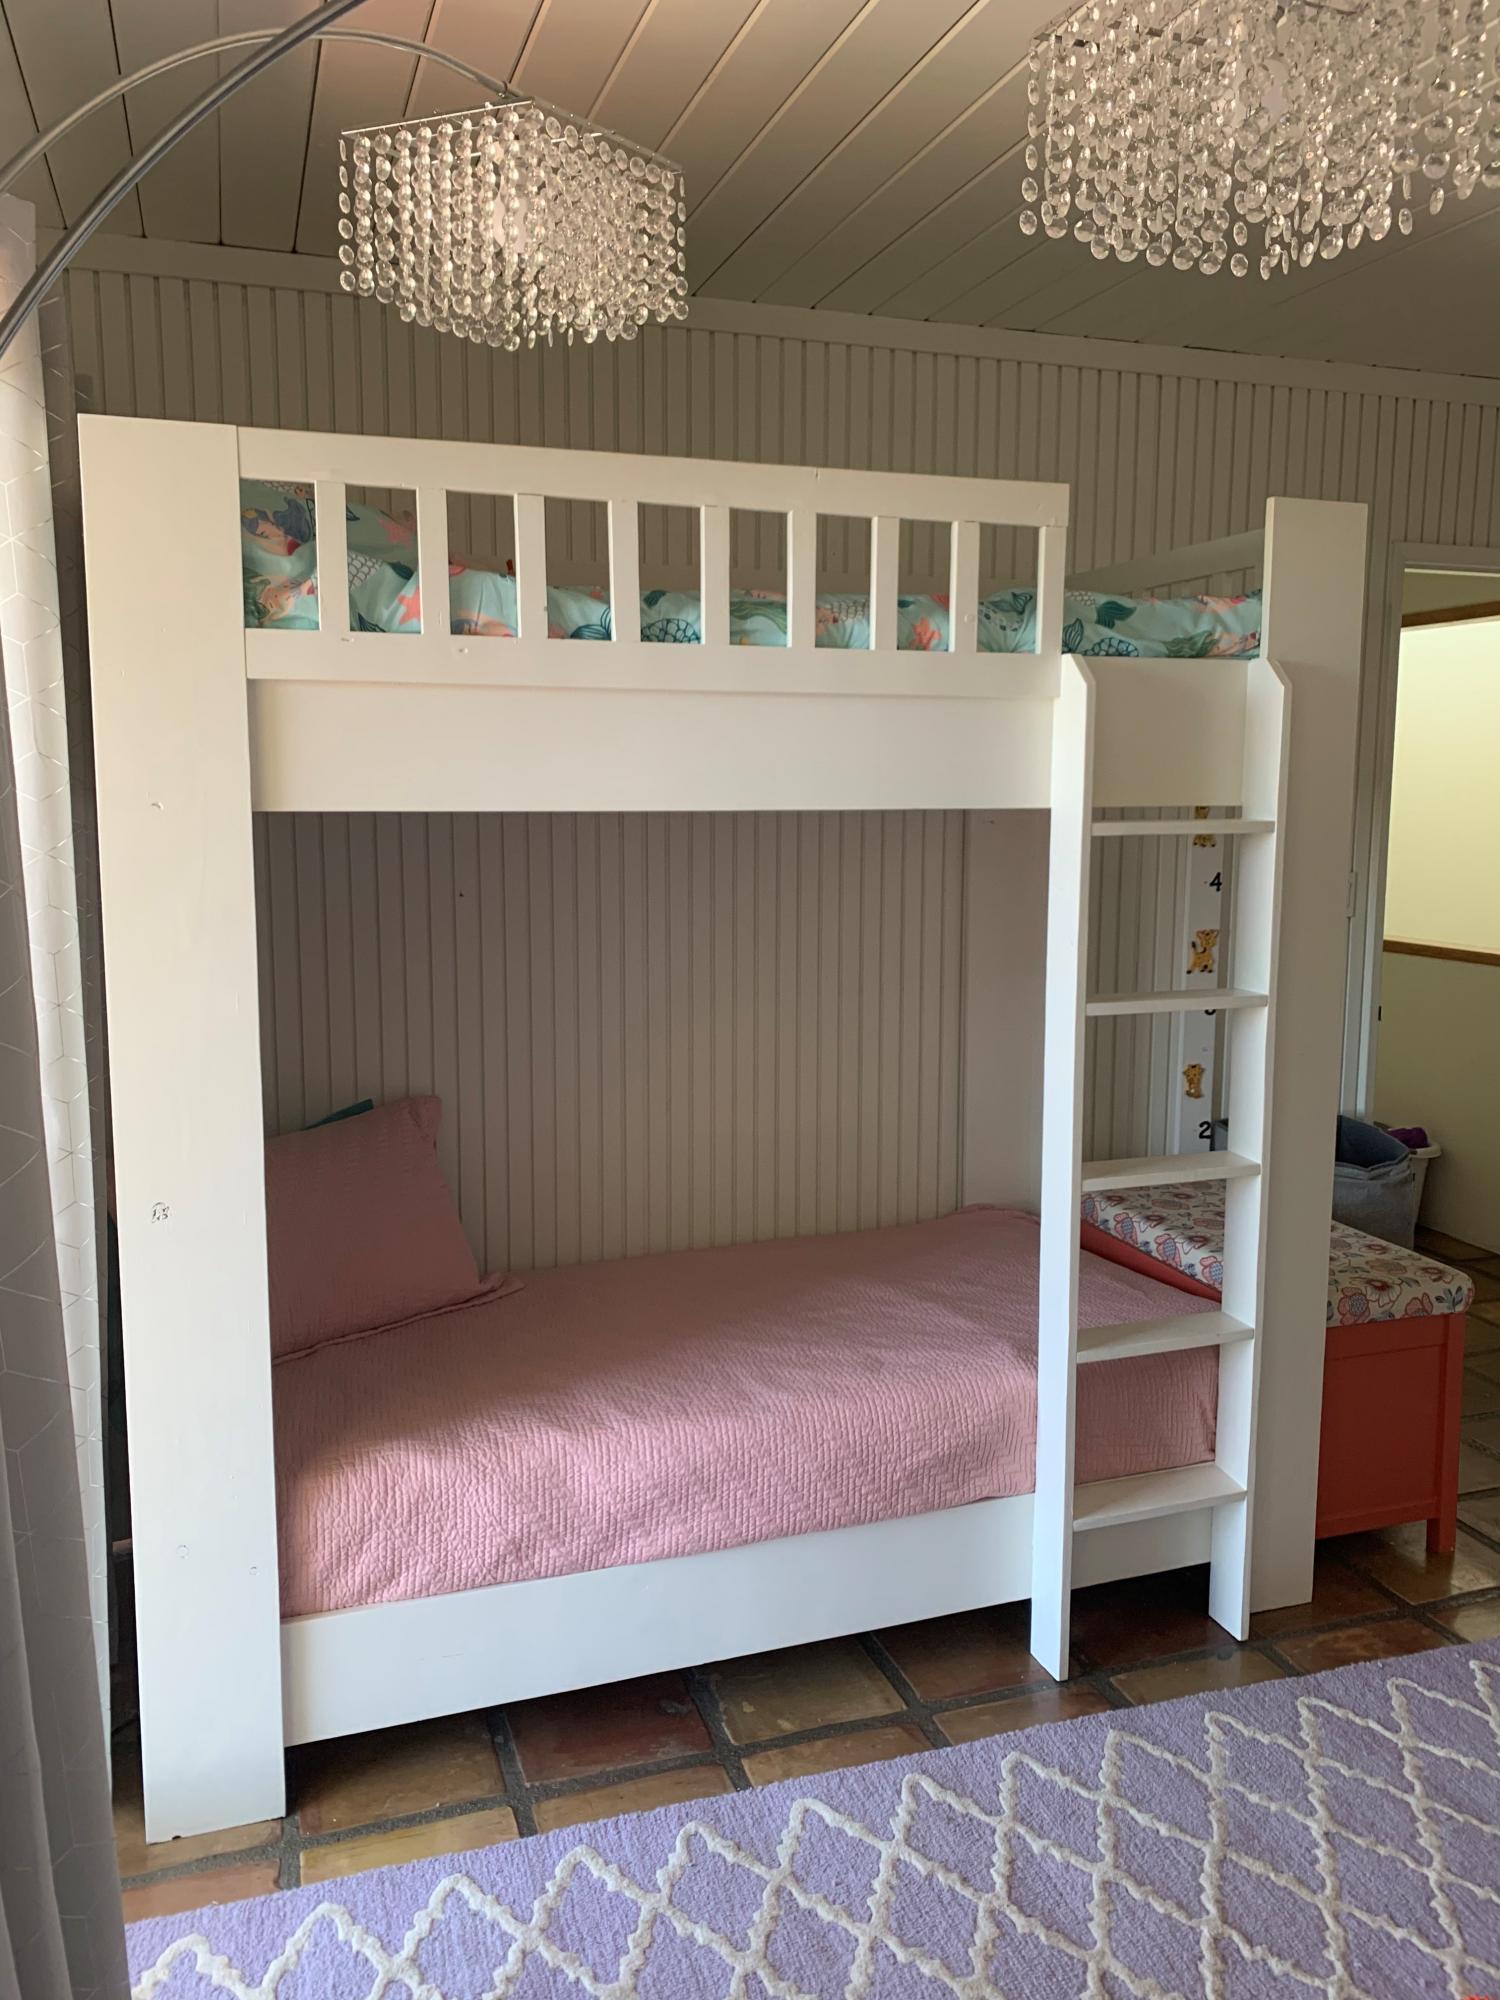
Playroom Loft Bed
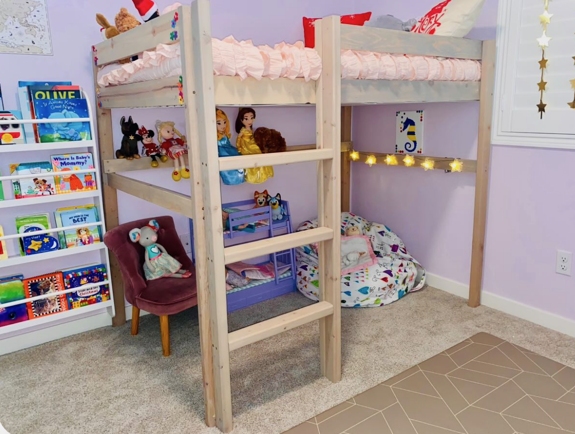
Built this loft bed for my girls playroom! They love it.
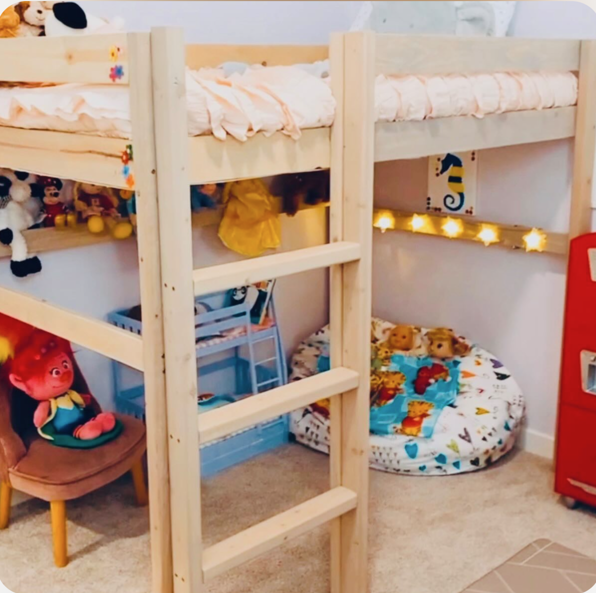
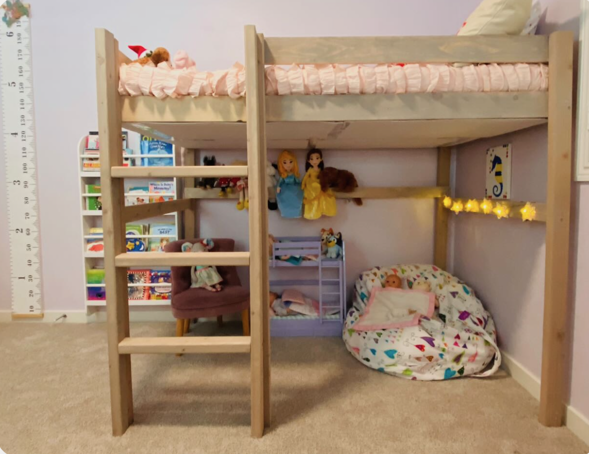
Built from Plan(s)
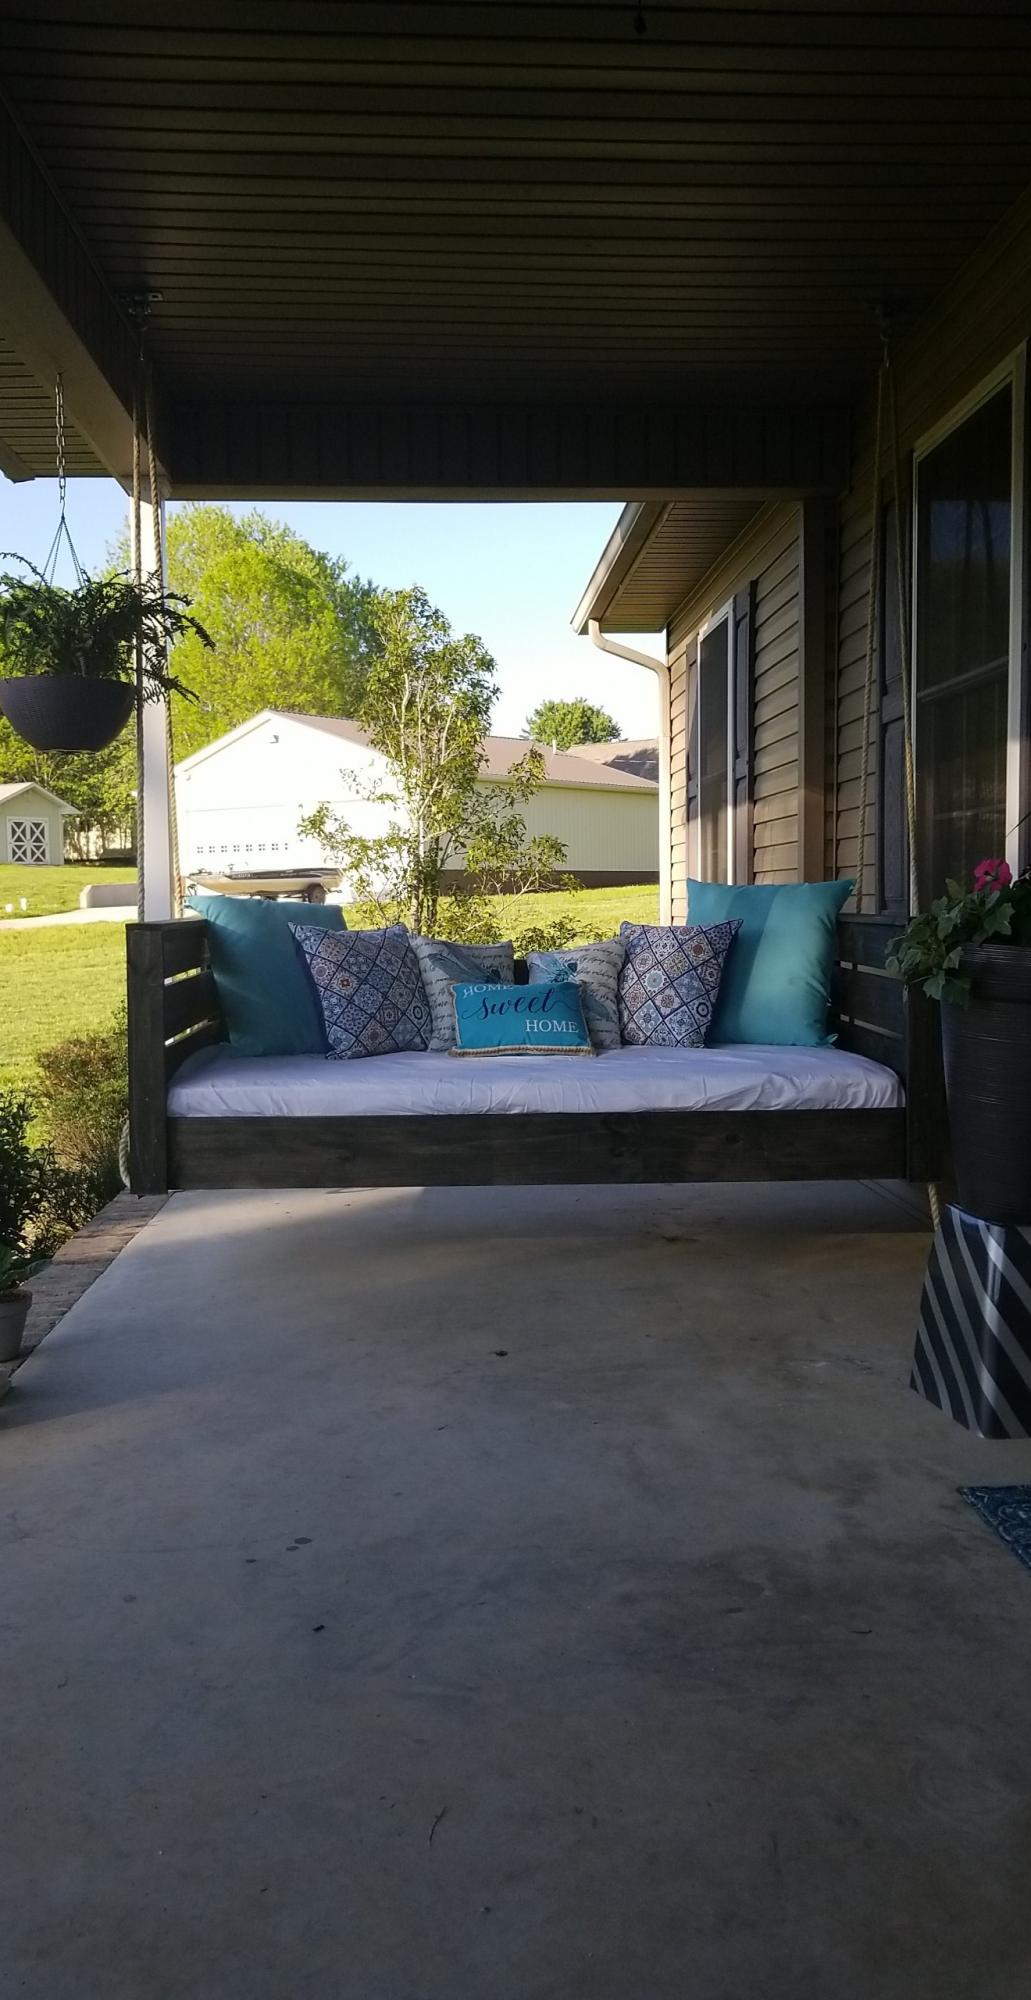
Swing Bed - Time to Relax!
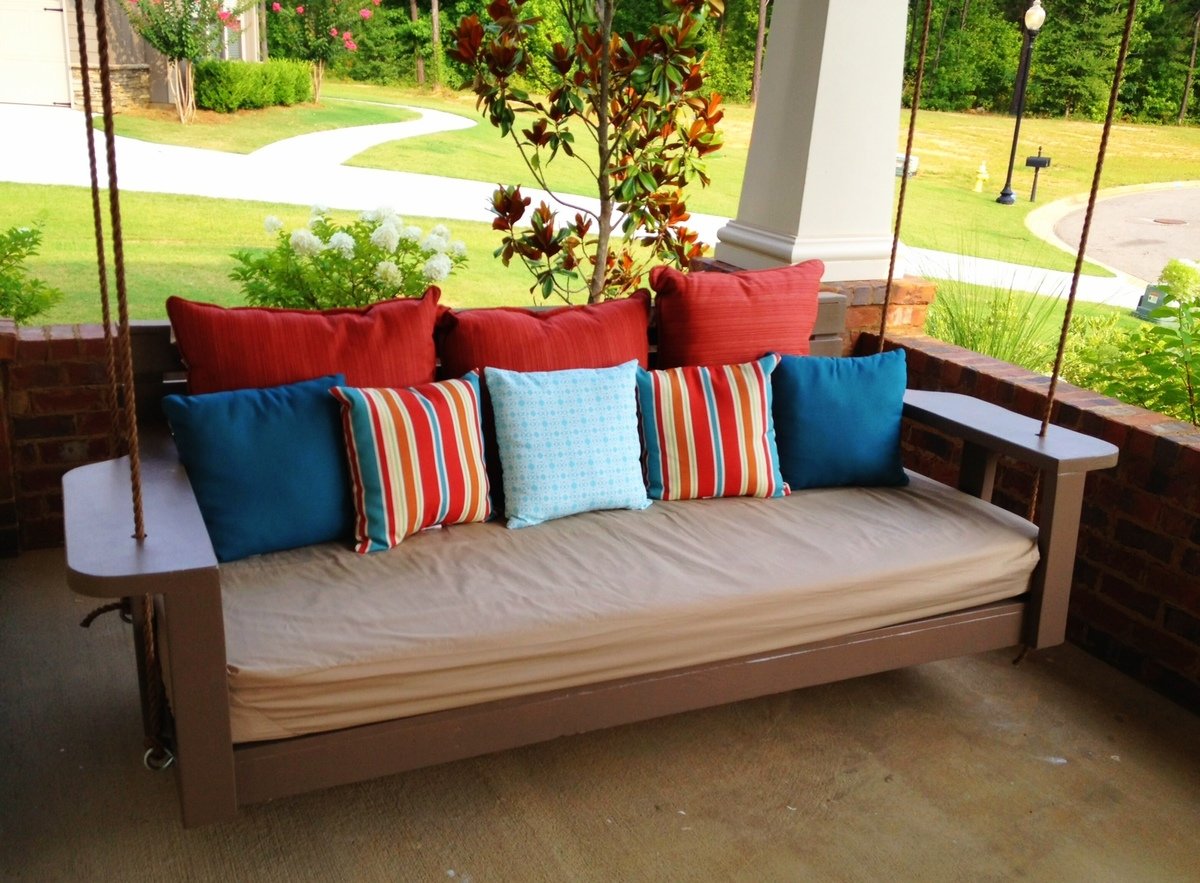
A few years ago our family vacationed in Watercolor, on the northwest Florida coast. We loved the house we stayed in so much when we returned home we put our house up for sale so we could build a home similar to the one we stayed in. One of the features we loved so much was the large covered front porch and most of all the swing bed it showcased. My wife spent every morning and night that week relaxing in that swing. I promised my wife then that I would make sure got her own swing. Thanks to Ana White, she was back in her (new) swing last night.
I began with the "Large Modern Porch Swing" plan and made some changes. I wanted to use a twin size mattress so I increased the size of the swing's base. Also, because the mattress was 6" I lifted the arms and back. The arms are the biggest and best change I think. I had seen someone else do similar arms, but I they used an 1x12 I think. I wanted a heavier look, so I used a 2x10.
Built from Plan(s)
Estimated Cost
$200
Estimated Time Investment
Weekend Project (10-20 Hours)
Finish Used
Glidden Paint - Monterrey Cliffs
Recommended Skill Level
Beginner
Comments

Wed, 07/17/2013 - 13:56
Porch Swing / Bed
Do you use a regular twin mattress? What do you do when it rains?
Kids Easy Bike Rack
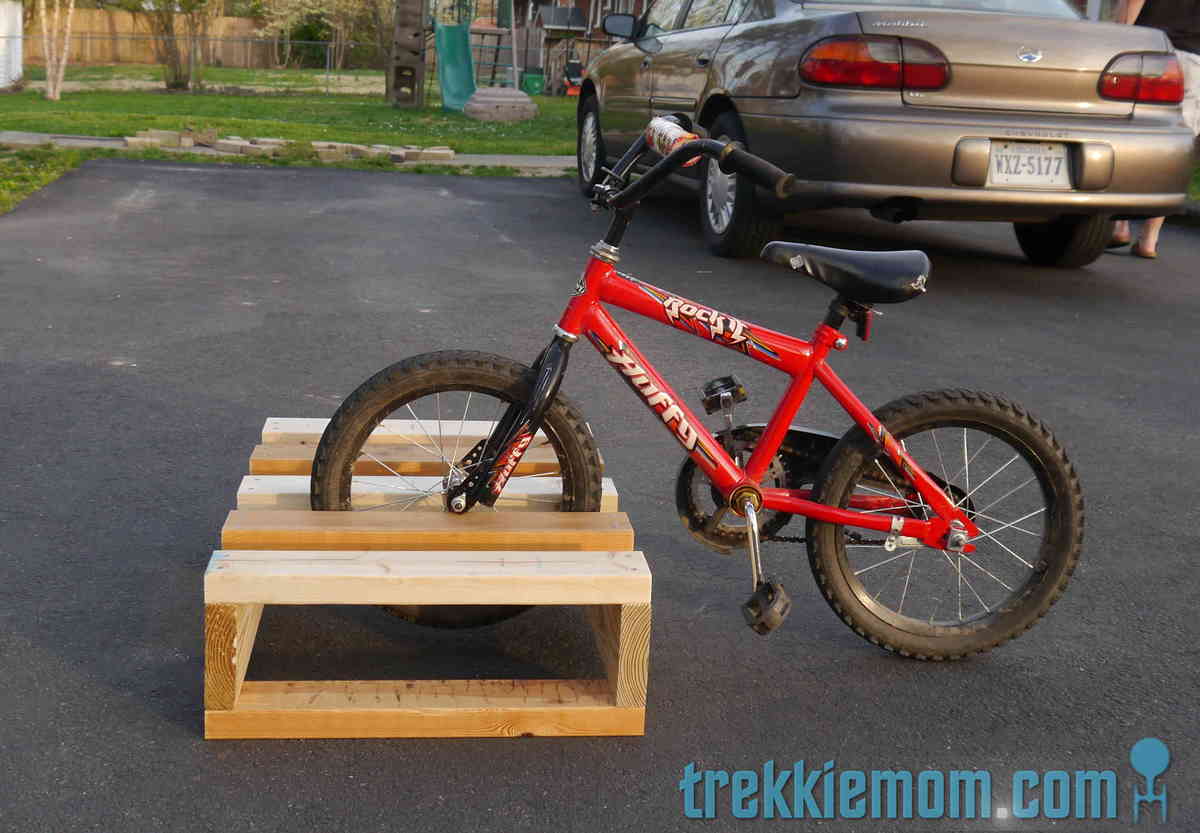
A few weekends ago, I went into our tool house to get my bike out so I could ride to work, and I had to remove so many obstacles, that I was too late to ride to work, and as a result, boiling mad. Several of the objects I had to move out of my way were my kids bikes that don't have kick stands, which my kids just haphazardly dump on their sides on the floor of the shed.
I had had the idea to build a bike rack out of spare 2x4s for the kids' bikes for a while, but this incident cemented my resolve to finish it quickly.
I had some scrap 2x4s and 2x6 wood left over from another project, which I used to compose my bike rack. It has 4 slots for 4 bikes.
I did some light sanding to prevent splinters, but I did not apply any finish because of the way it was going to be used and it would not be exposed to the elements.
It took very little time to put together. If I had more claps, I could have done it more quickly.
If you are interested in making something that looks just like mine, stop by my blog to get the details.
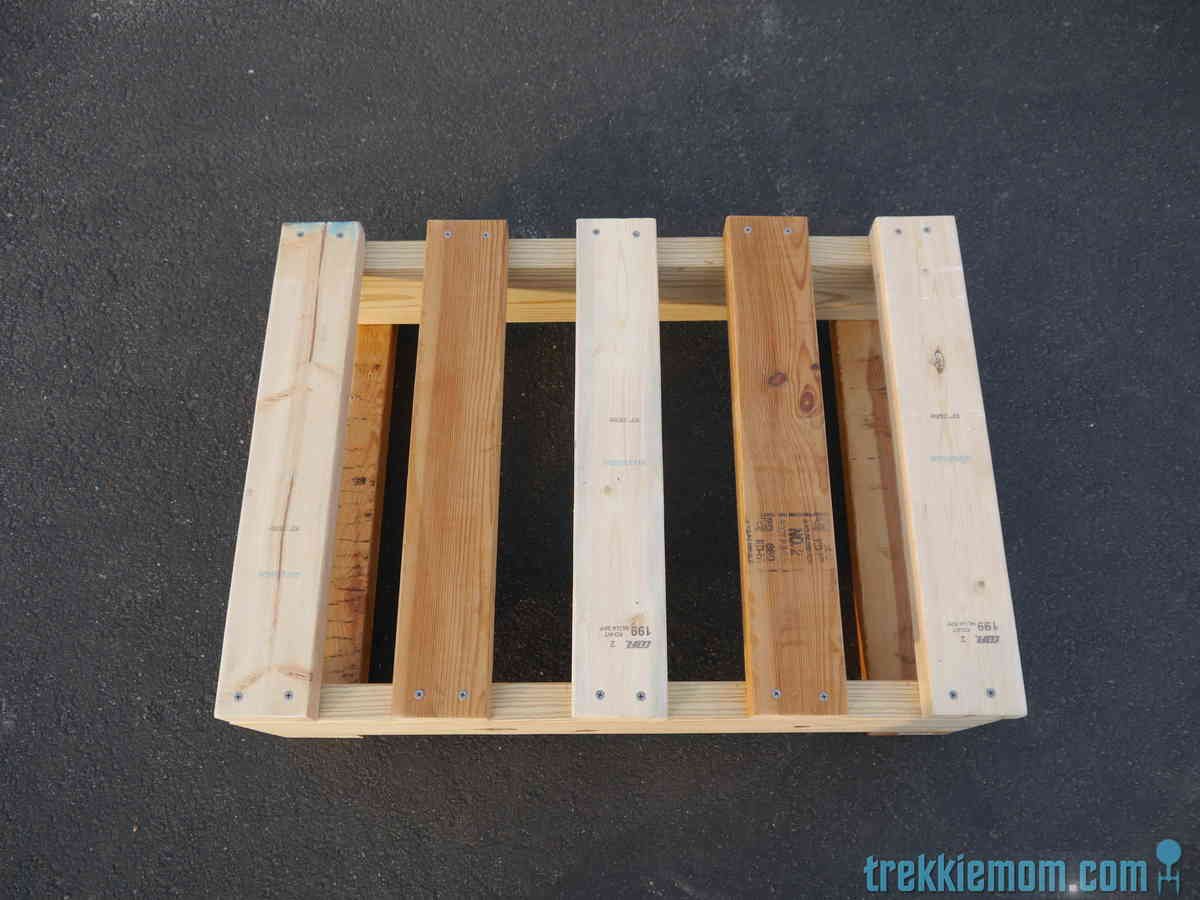
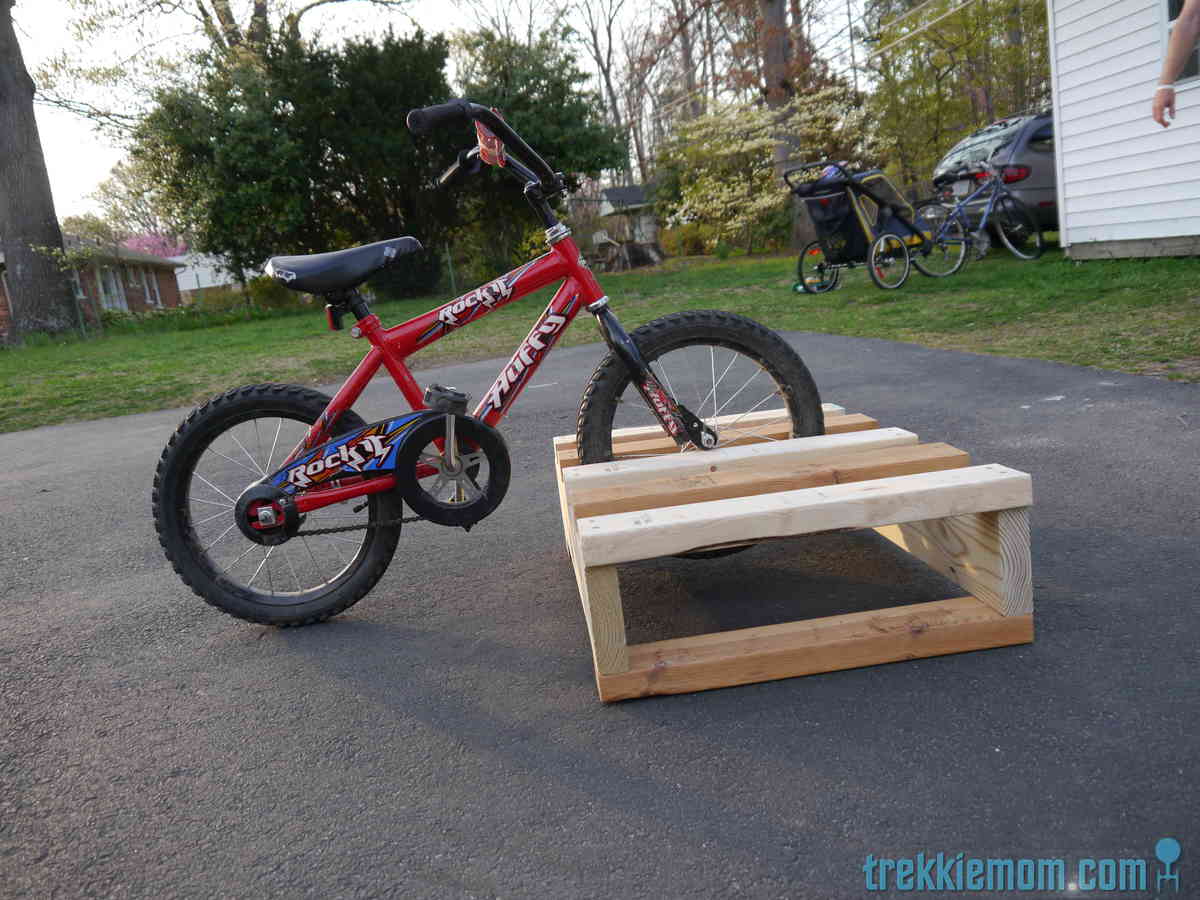
Estimated Cost
$10 - $15
Estimated Time Investment
An Hour or Two (0-2 Hours)
Finish Used
None
Recommended Skill Level
Starter Project
King farmhouse storage bed
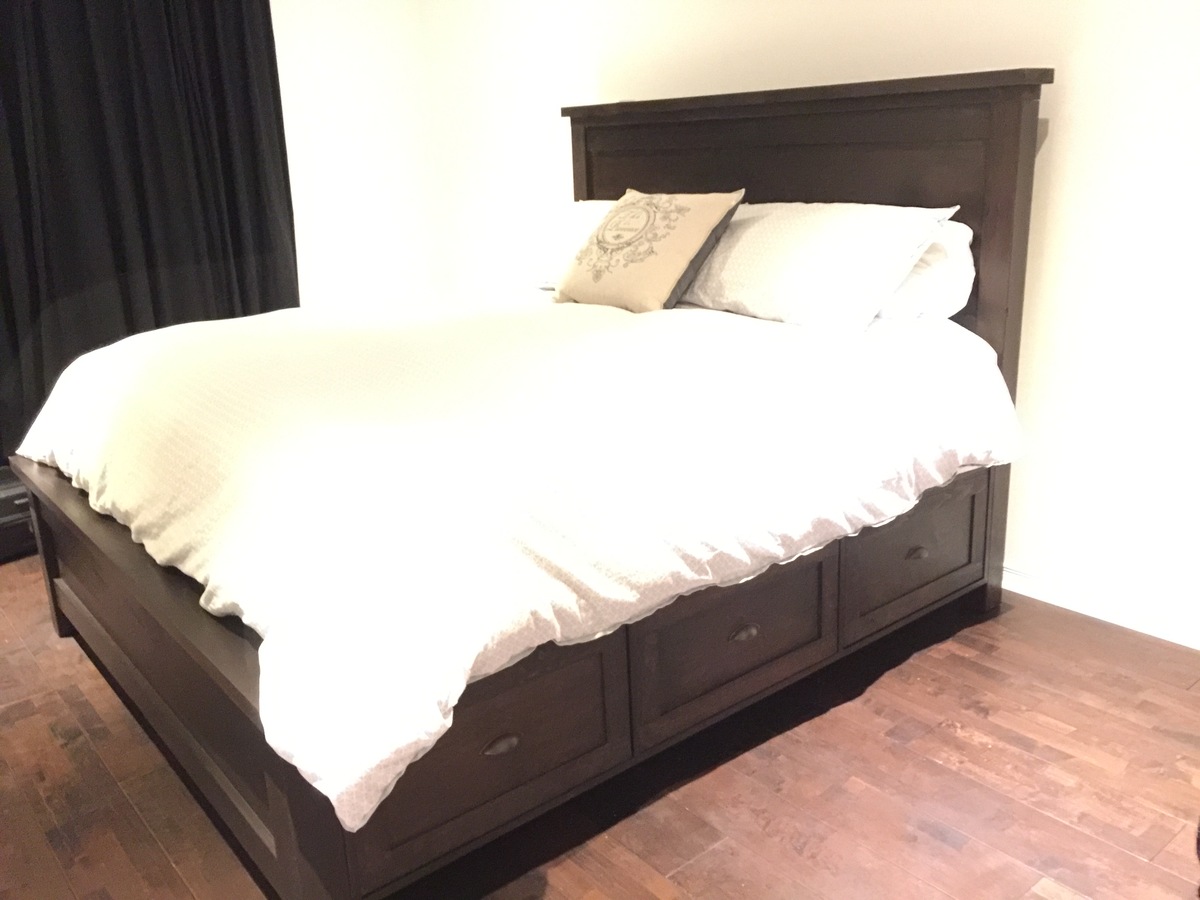
Modified plans for a king.
Made of pine and cedar.
Took about a week of evenings.
Estimated Cost
500
Estimated Time Investment
Weekend Project (10-20 Hours)
Finish Used
Kona varathane and clear.
Recommended Skill Level
Intermediate
Comments
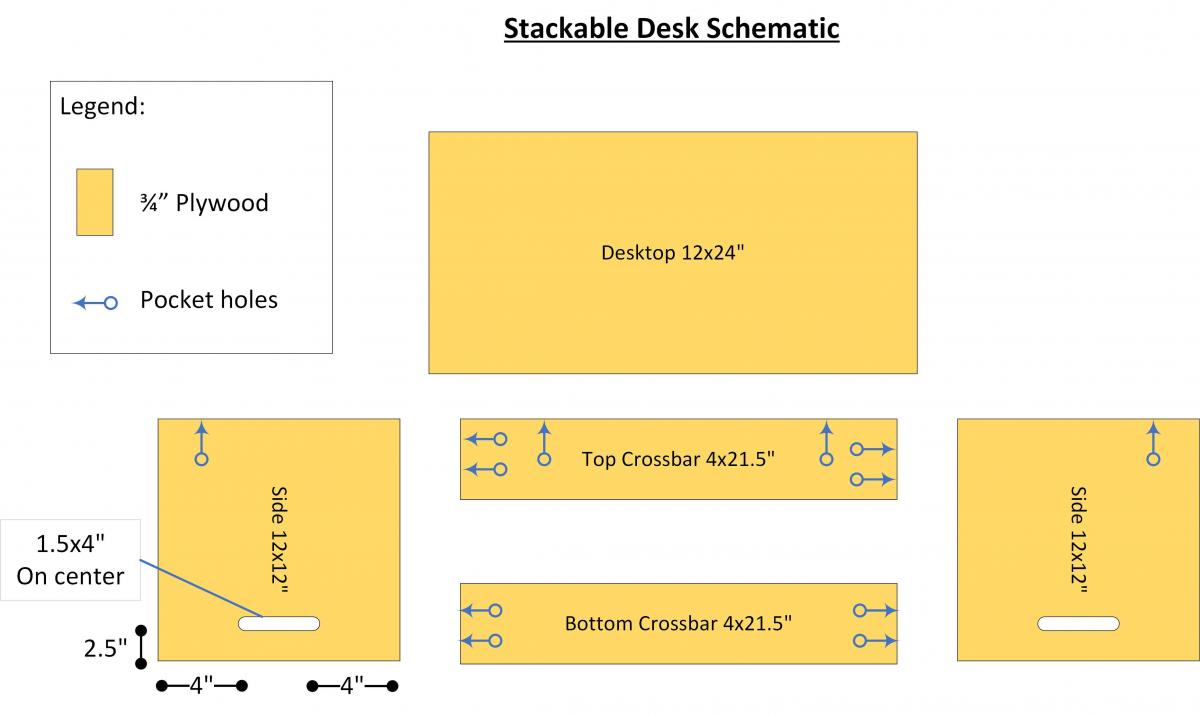
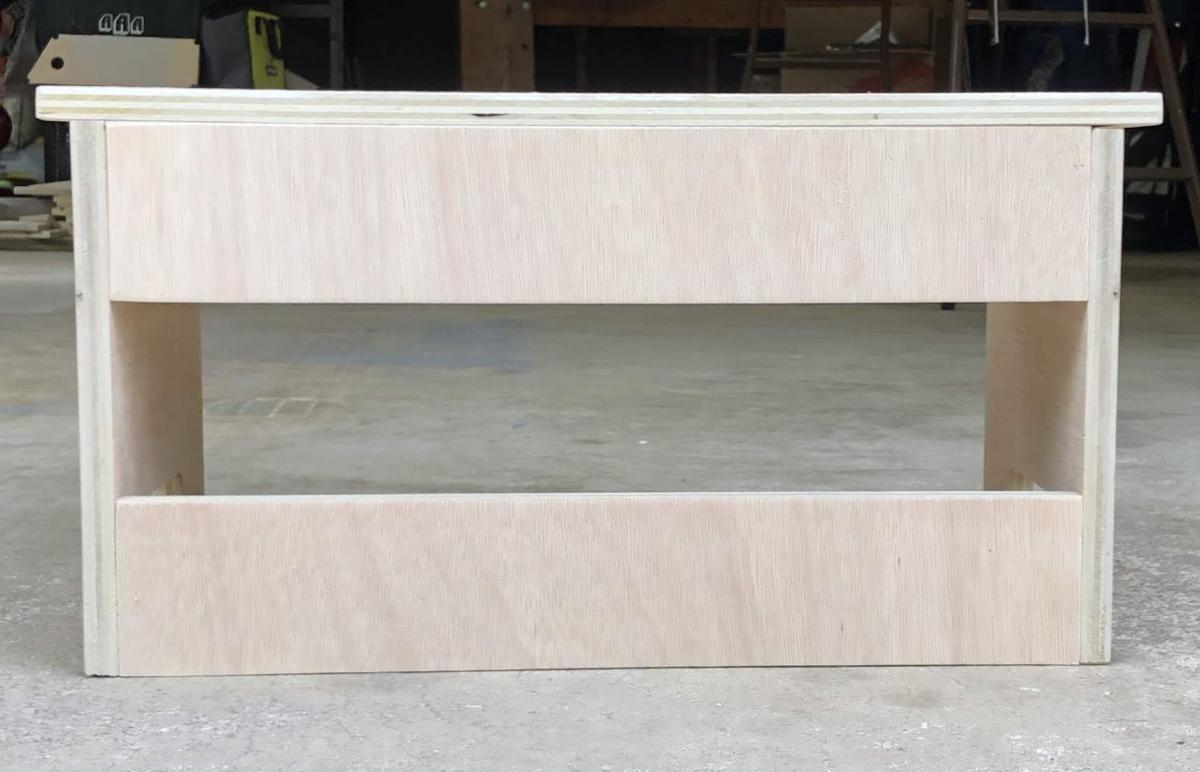
Nice and practical pair of desks/shelves
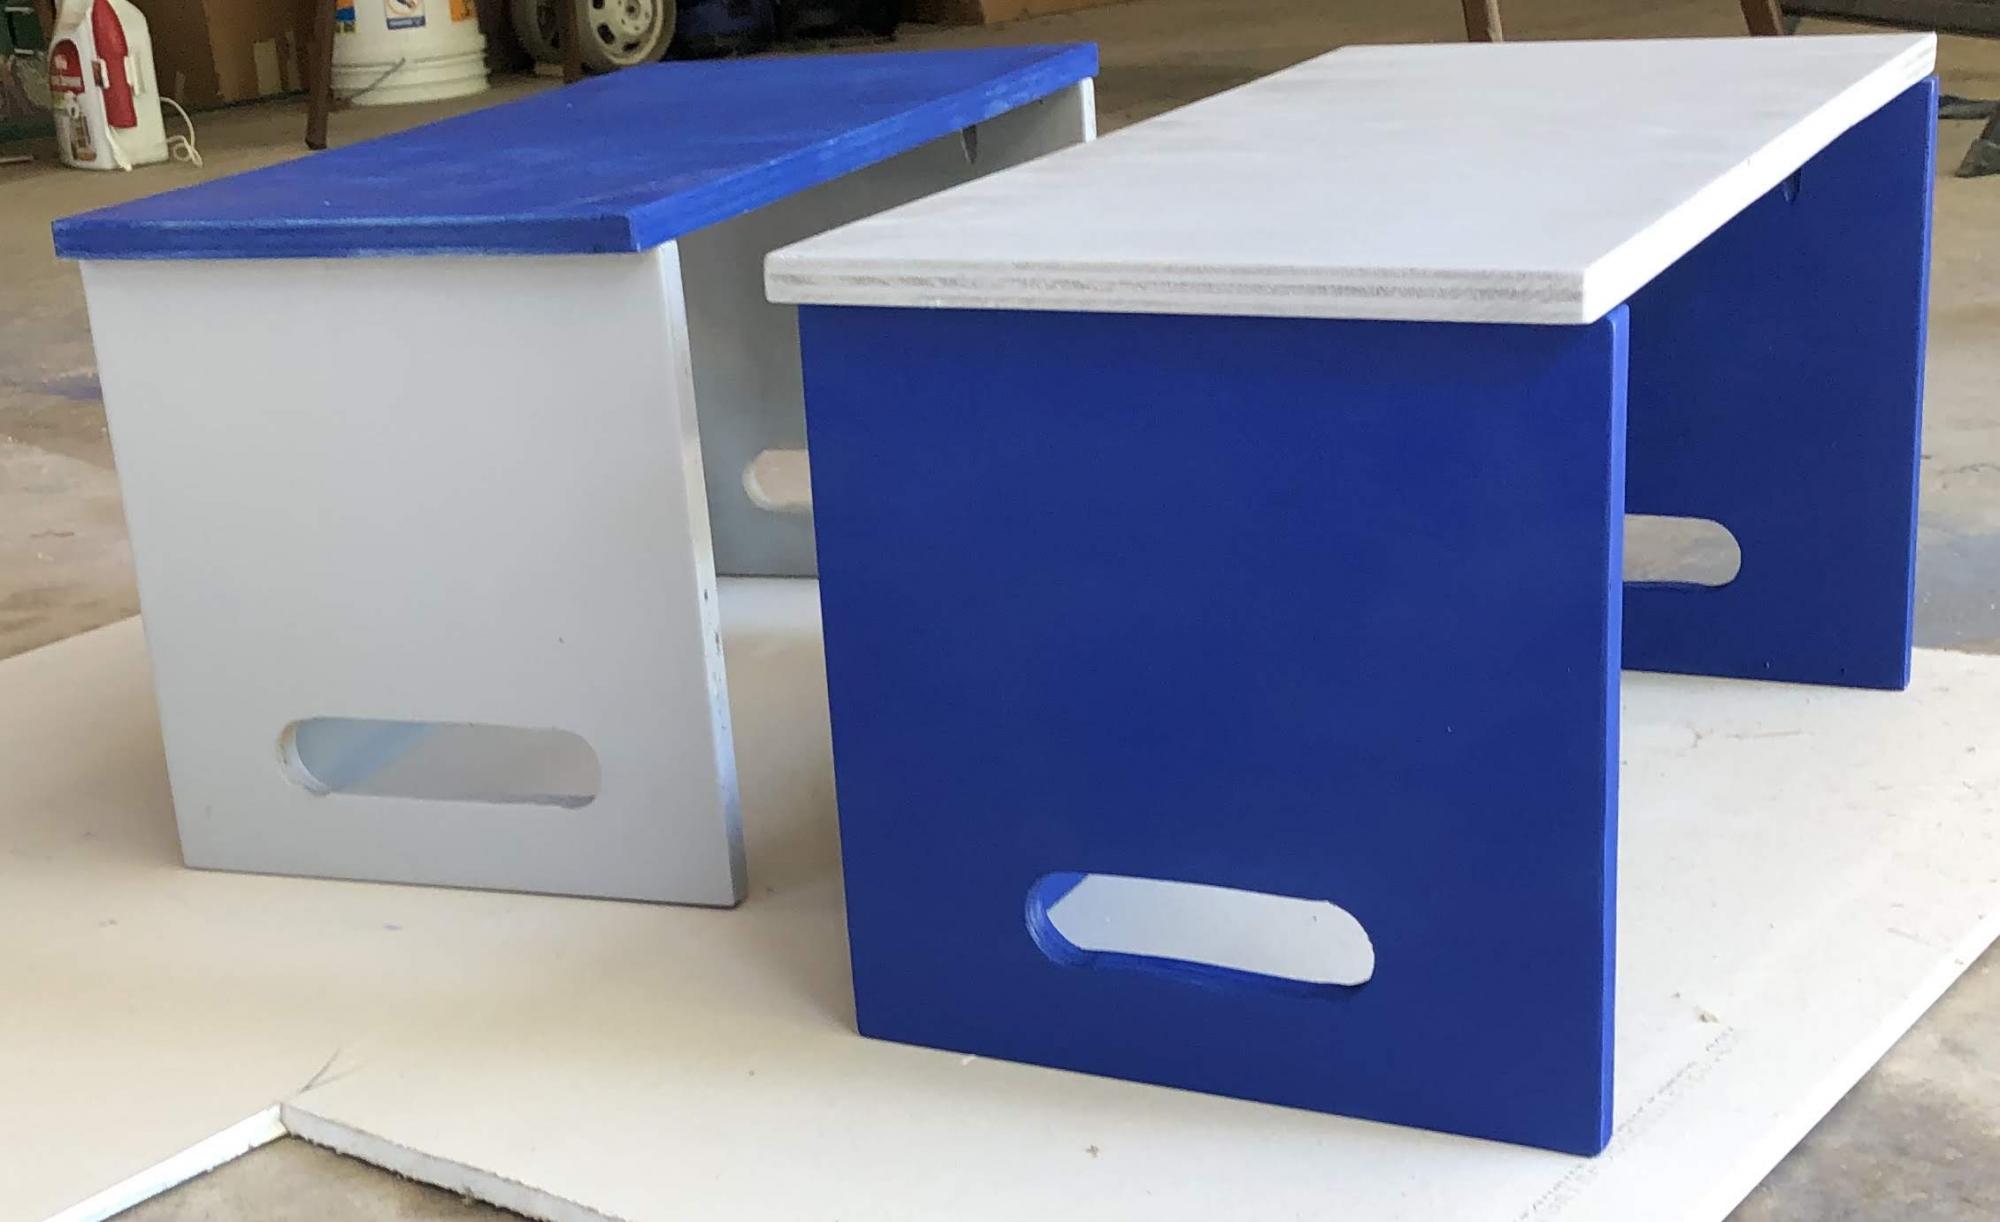
Built this using the Ana White plan. Construction was done in less than a day using leftover lumber from other repairs around the house. Painting and varnishing took multiple days for the paint and varnish to dry and cure though.
Used pocket screws - as shown in my diagram - to hold the pieces together.
The family has enjoyed using the desks and if you stack one on top of the other, the bottom one creates a shelf also. Will make a few more to share.
Thanks for sharing the plans.
Estimated Time Investment
Week Long Project (20 Hours or More)
Finish Used
Spray paint and spray on varnish.
Recommended Skill Level
Starter Project
DIY Play Kitchen
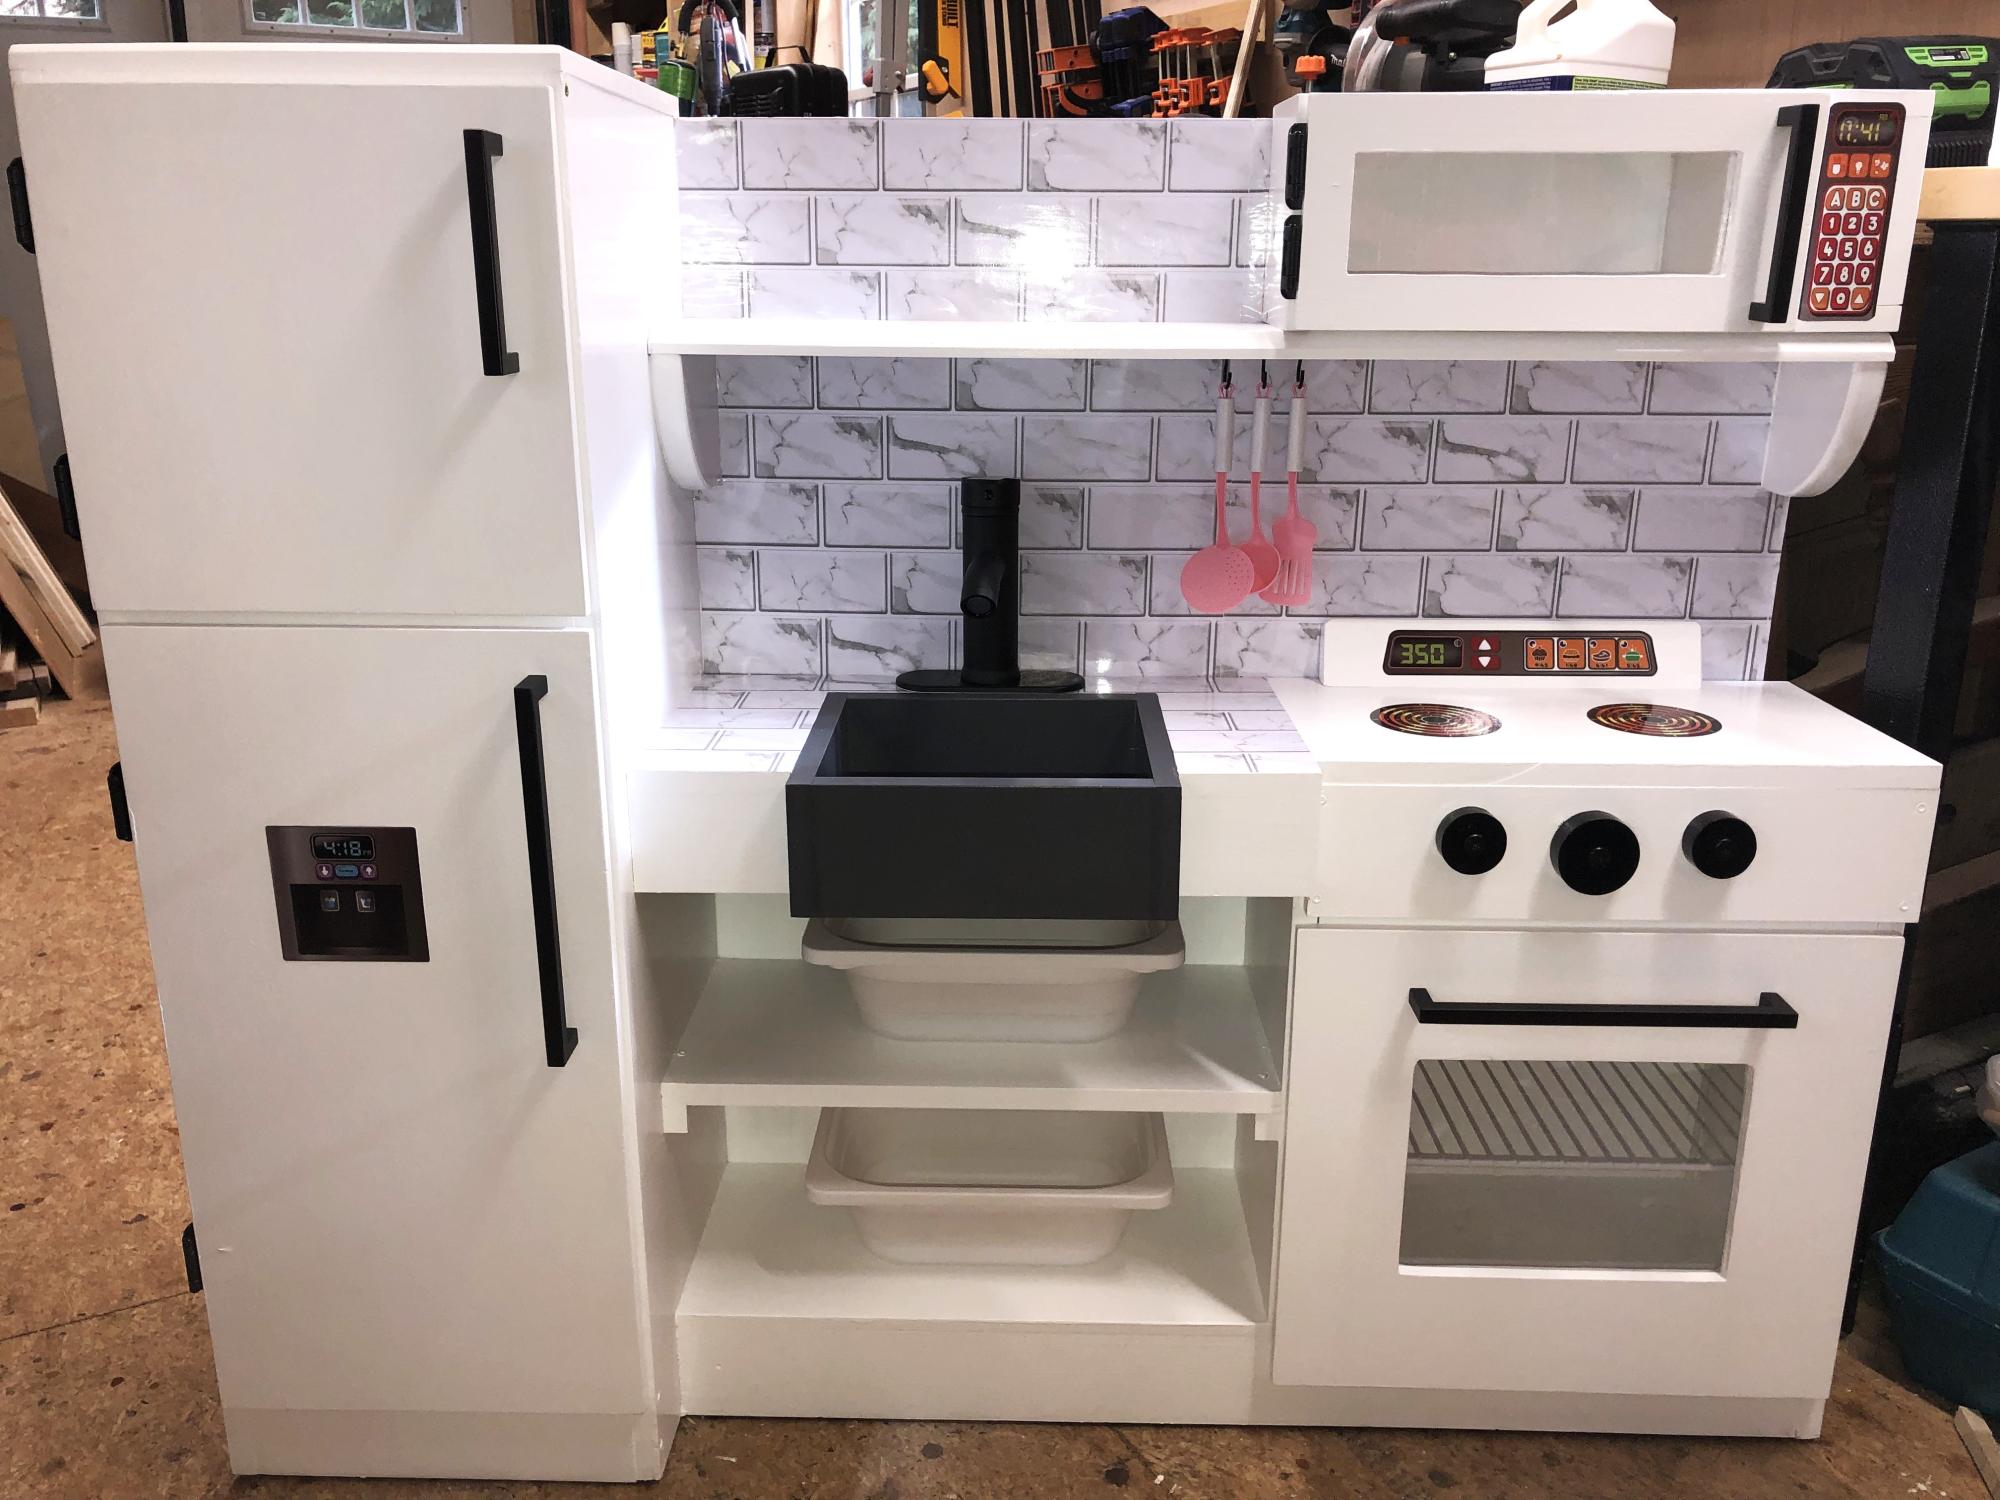
I made this for my two great granddaughters (6 and 2) I used the plan for One Piece Play Kitchen. I added some depth to the refrigerator. Made the Farmhouse sink from wood left over from a bed I took apart.
purchased from Amazon:
decals: $22
Peel and stick granite $8.50
Polycarbonate Clear plastic : $10
Cabinet Handles: $17
Facit: $19.99
8 hinges $13.50
Cabinet paint: $29
Wood materials were left over from previous projects. So total cost was less than $150
Pamela Grindstaff
Built from Plan(s)
Modified Outside Table
I'm just starting out. I built this from scrap wood I had laying around. I followed the plan except for the table top. Here I used a 2x6 that I cut on the miter saw, and used bowties to help give the middle more strength.
Estimated Time Investment
Afternoon Project (3-6 Hours)
Finish Used
Minwax Wood Finish, Provincial
Recommended Skill Level
Beginner
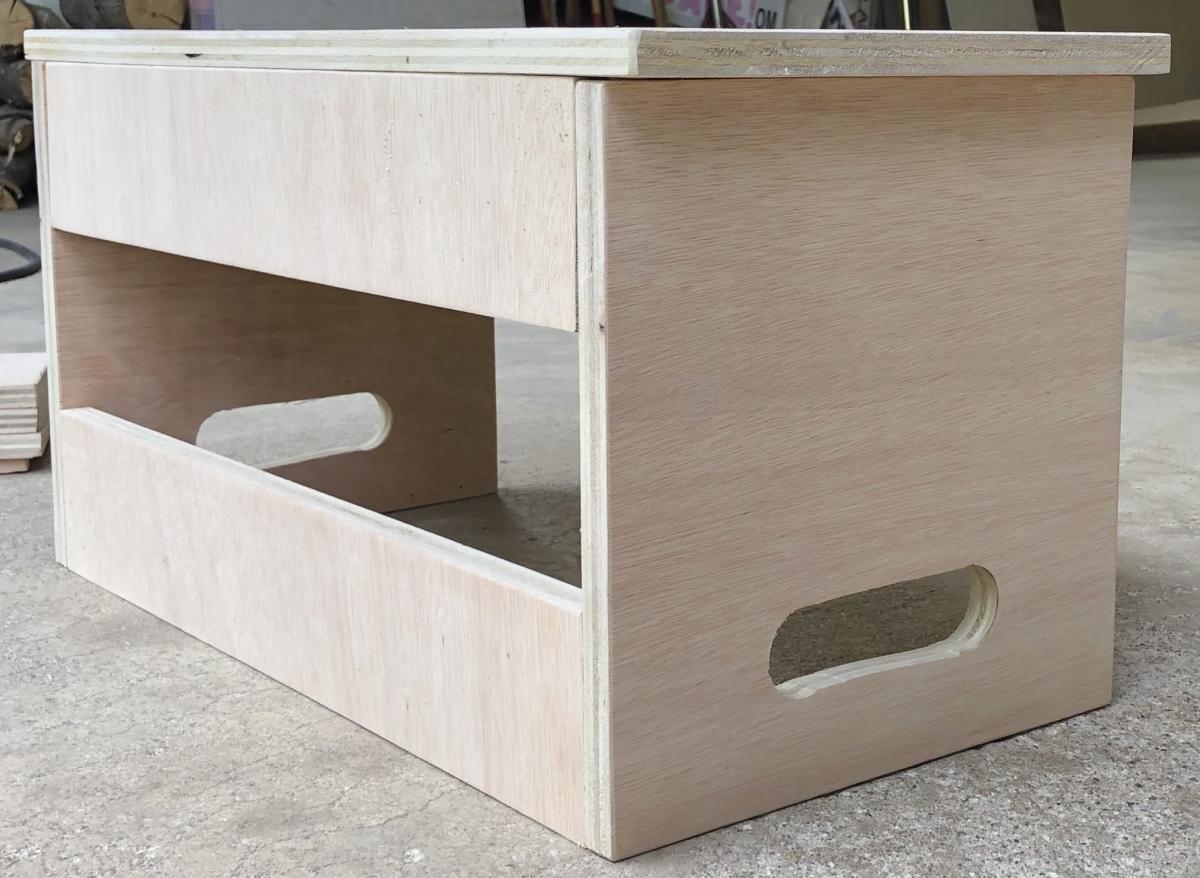
Bathroom Step Stool
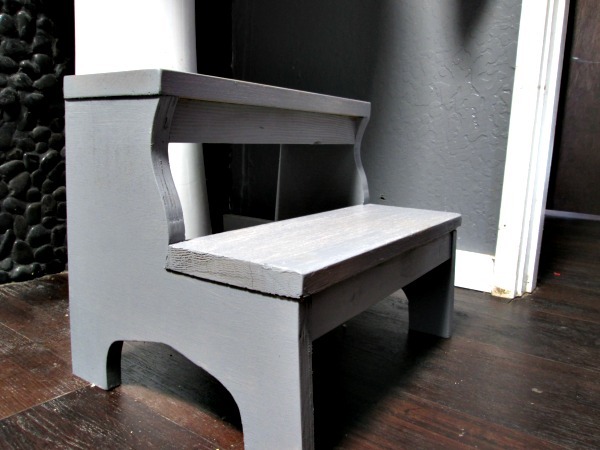
My daughter needed a step stool to reach the sink in our bathroom. I simplified the jigsaw cuts for this design to accommodate my learning curve. :) I used leftover plywood for the sides and 1x6s for both steps because it was what I had on hand in my garage. It was fun to make and is something we use every day!
Built from Plan(s)
Estimated Cost
Free for me, made of scrap wood
Estimated Time Investment
Afternoon Project (3-6 Hours)
Finish Used
Olympic Semi-Gloss Latex in Victorian Pewter
Recommended Skill Level
Beginner
6ft Farmhouse Table
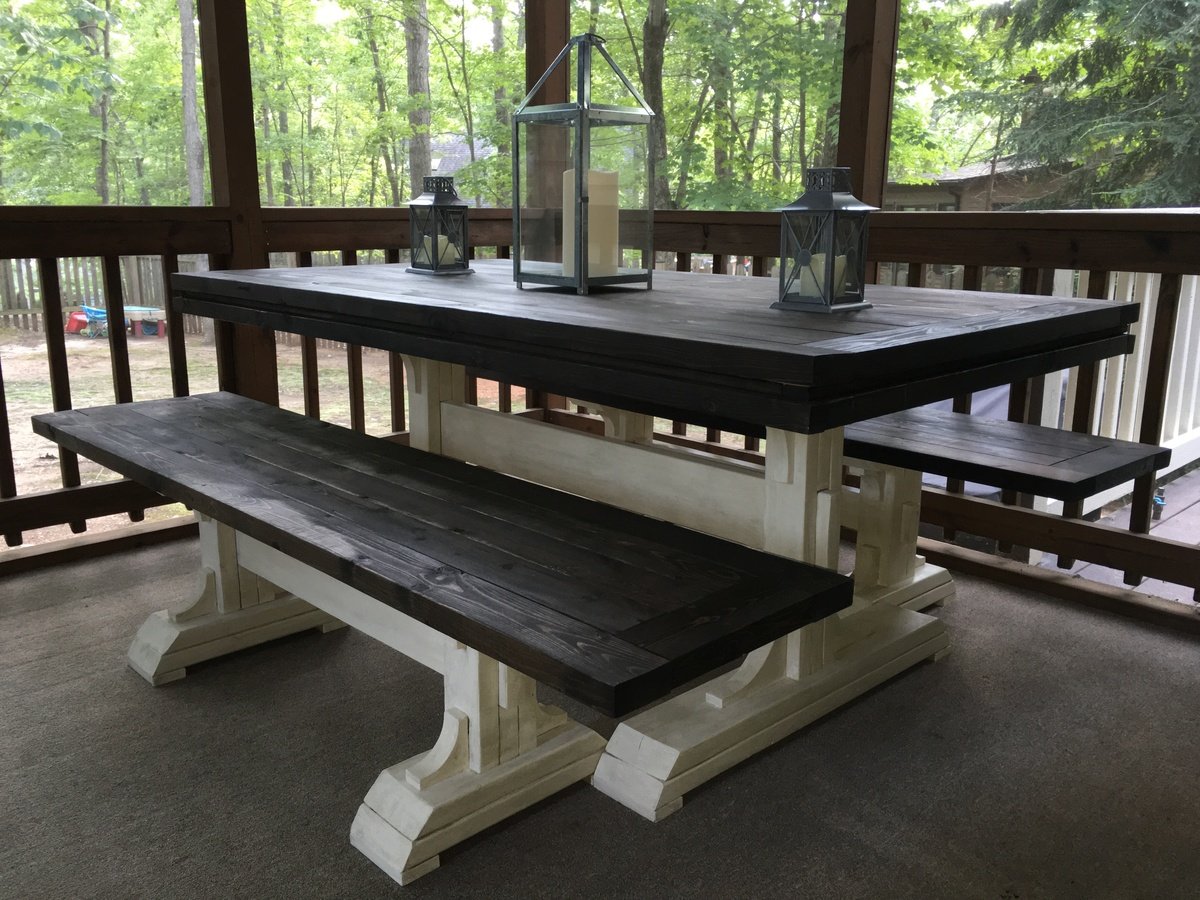
Built this 6ft 2 pedestal table. Moved the legs closer together on the benches so that they could slide under the table.
Built from Plan(s)
Estimated Cost
$200
Estimated Time Investment
Week Long Project (20 Hours or More)
Finish Used
Jacobean stain & glazed chalk paint
Recommended Skill Level
Intermediate
Sturdy Workbench - made larger size for custom wall space
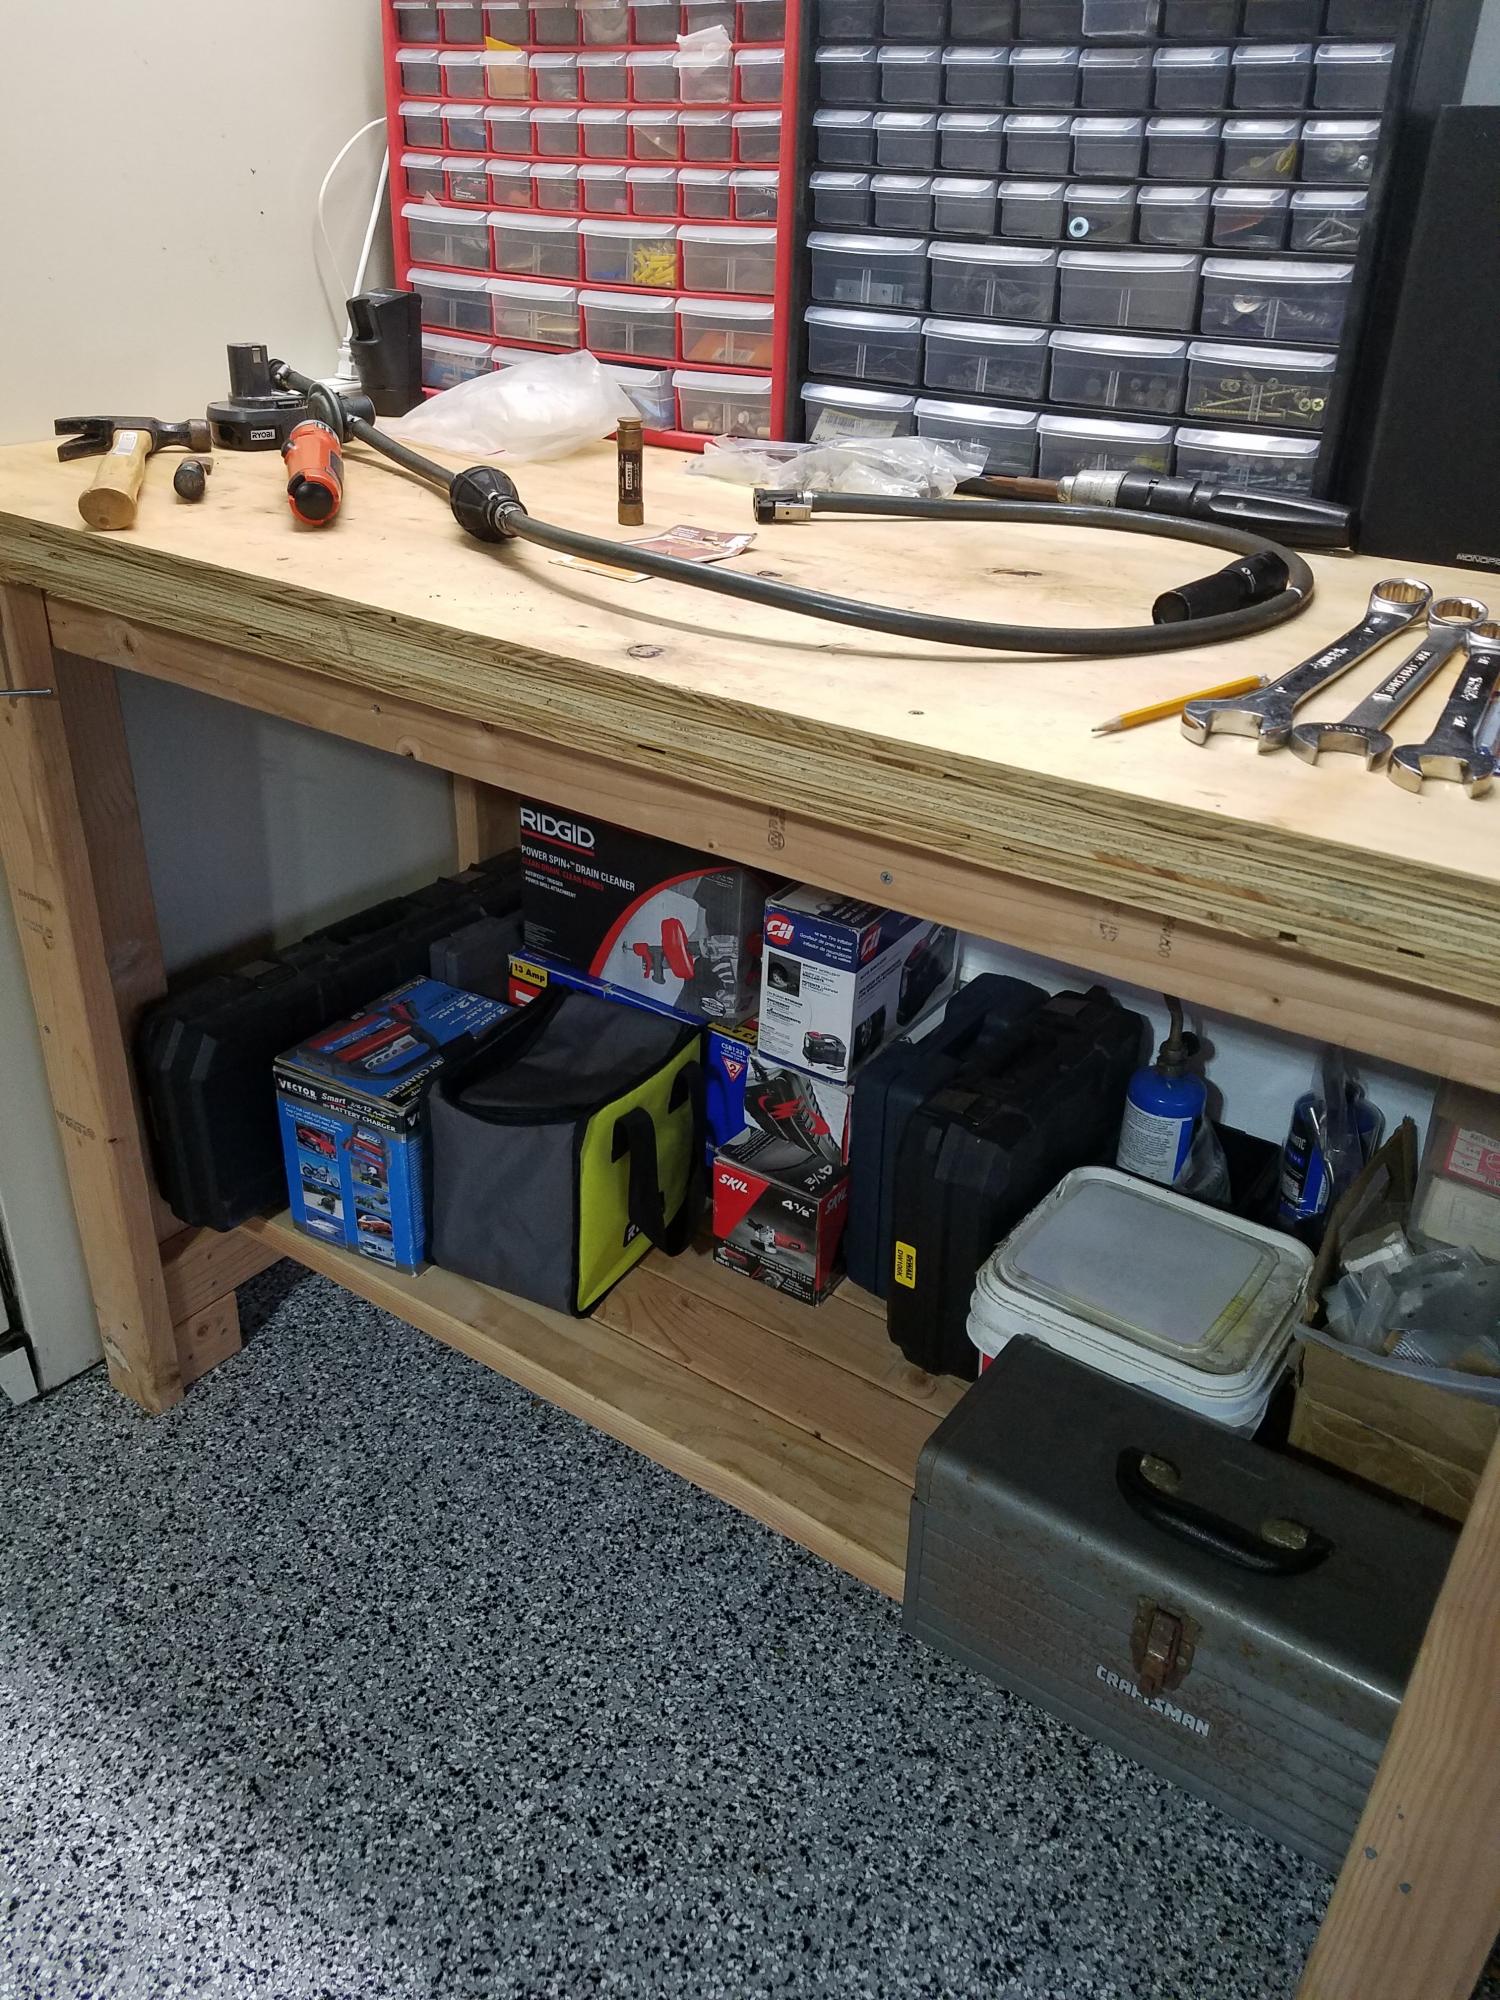
This is the perfect workbench for my garage here in South Florida. I modified the plans using 2x4 actual dimensions so that the outside dimensions were 60" wide x 40" height x 30" deep. I designed it for my husband and he is 6'4" so I wanted it to be taller for him. I used 3 sheets of plywood (3/4" thick each layer) for the top and it is super sturdy. For the bottom shelf, I left one 2x4 off so that it wouldn't hit our shins while standing at the front. I was concerned at first that the wider bench (60") may need an additional bottom shelf support in the middle. It did not need this extra support. The shelf can hold a lot of weight with no concern. See all the tools that are on that shelf in my pic. Thank you Ana White for these great plans - it was my first workbench that I have built. I am looking forward to more woodworking projects.
Built from Plan(s)
Finish Used
I used a spray on wood sealer.
Recommended Skill Level
Beginner
Cal King Wood Headboard
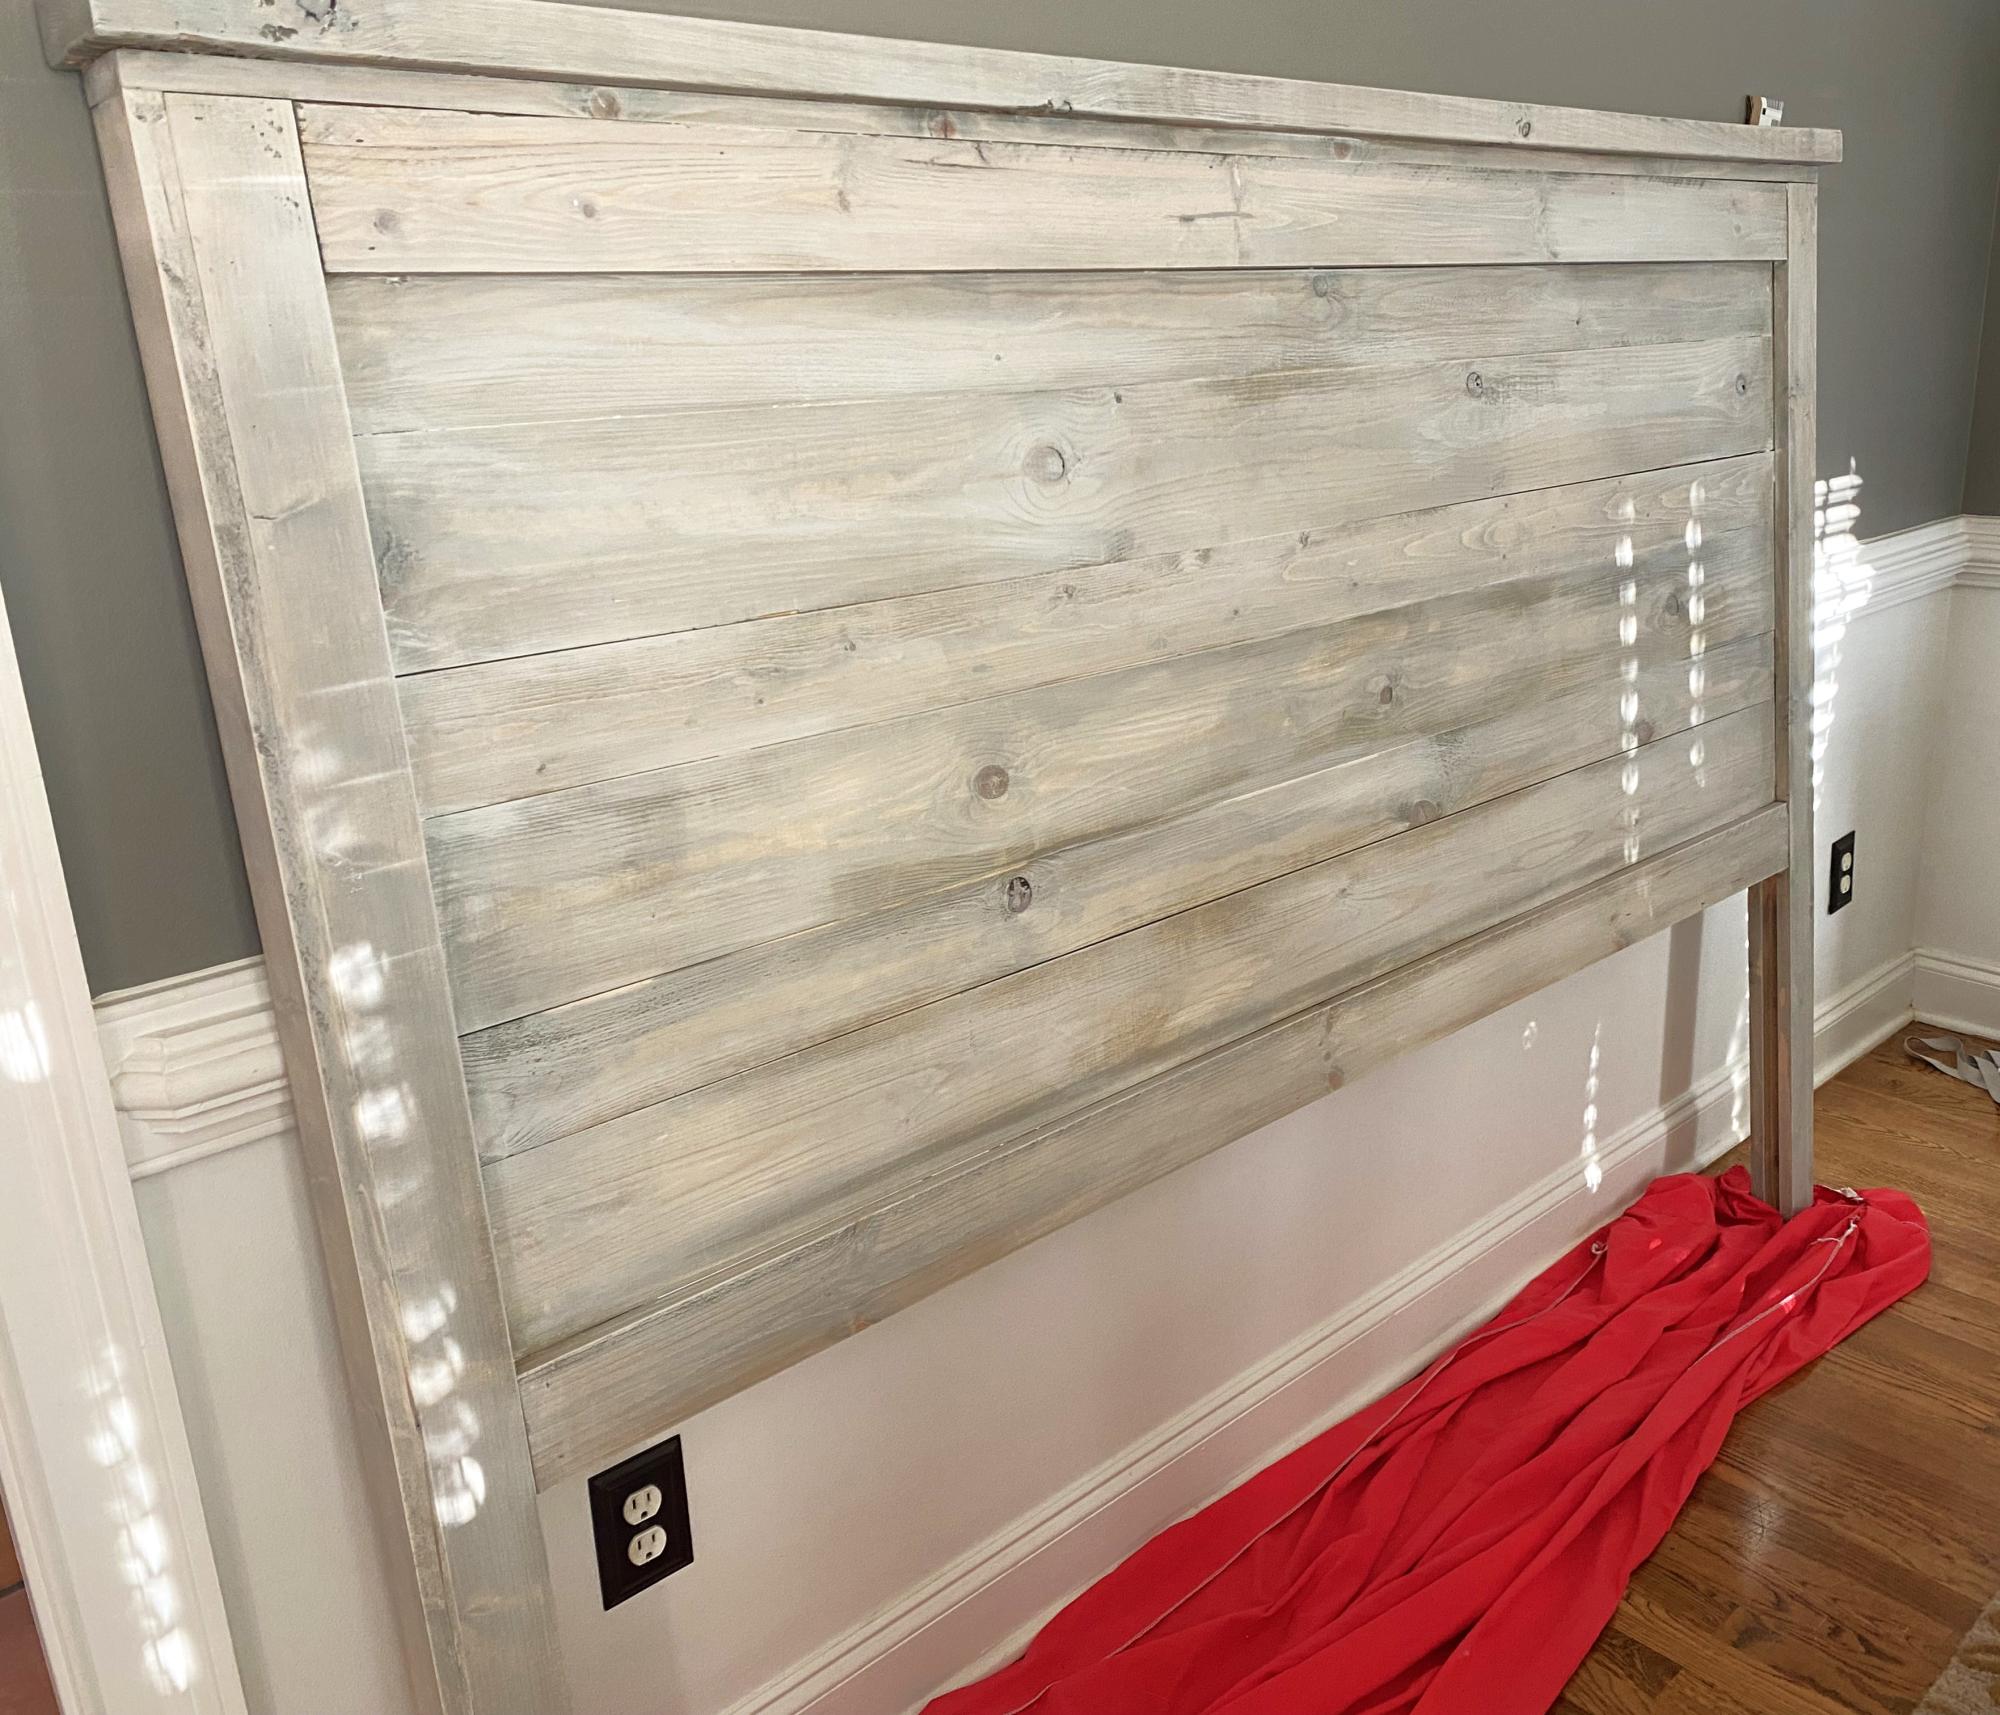
Cal king headboard
Christmas gift
Built from Plan(s)
Built-in Bookshelves
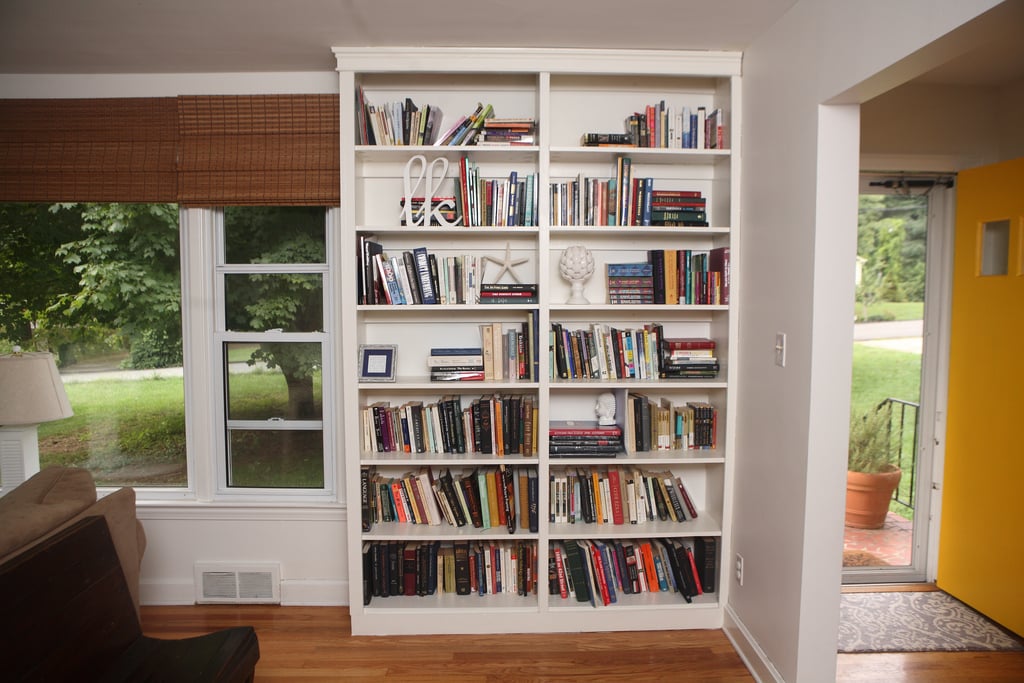
These built-in bookshelves were my first project, and were loosely based on the Willy bookshelf plans, although I changed the dimensions, set them on a 2x4 base, and added trim to the sides and molding on top.
Built from Plan(s)
Estimated Cost
~$120 in lumber
Estimated Time Investment
Weekend Project (10-20 Hours)
Finish Used
Benjamin Moore white dove in advance
Recommended Skill Level
Starter Project
Comments
Sat, 08/11/2012 - 05:58
built in bookshelf
hello,
Just wondering how the sides and middle part are built. They look like thicker than 1/2 in.Is it a trim or a 1x2? or did you use some 2x4 too?
I am looking at building a bookcase too but i wanted something more massive than 1/2 in. like yours.
Thanks
Great job!! looks awesome
Tue, 08/21/2012 - 05:31
I made the two bookshelves
I made the two bookshelves separately so I could move them in my house easier. Each has 1x12 sides (so 3/4" thick), and and that's 1x2 trim over the side and middle.
Thanks!
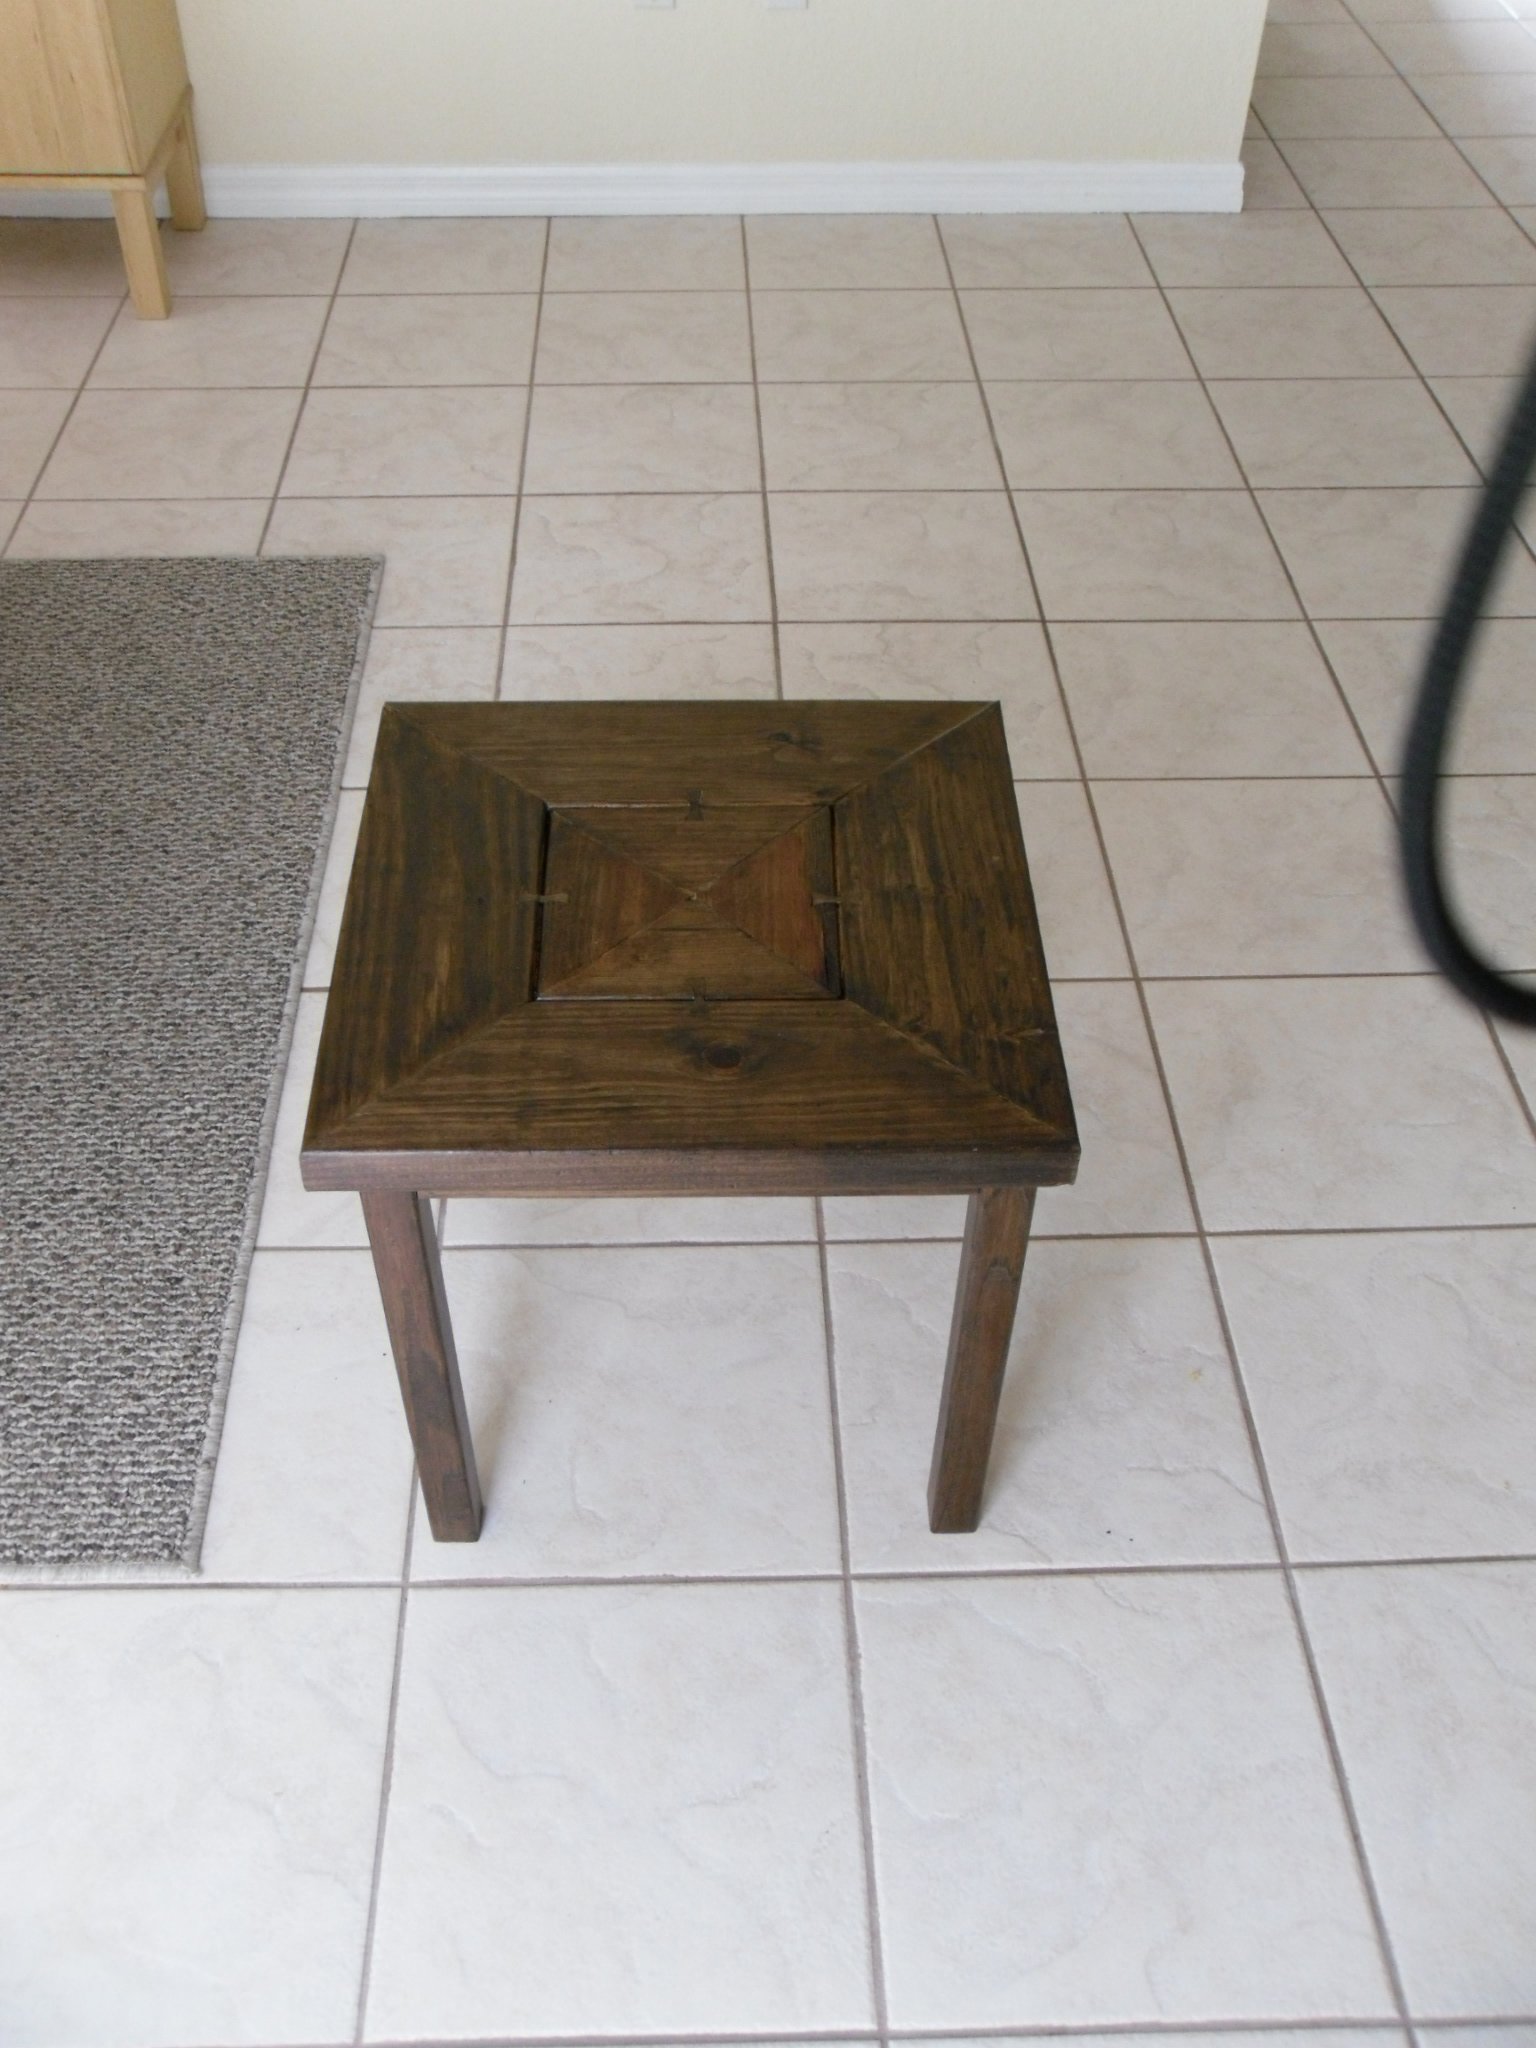
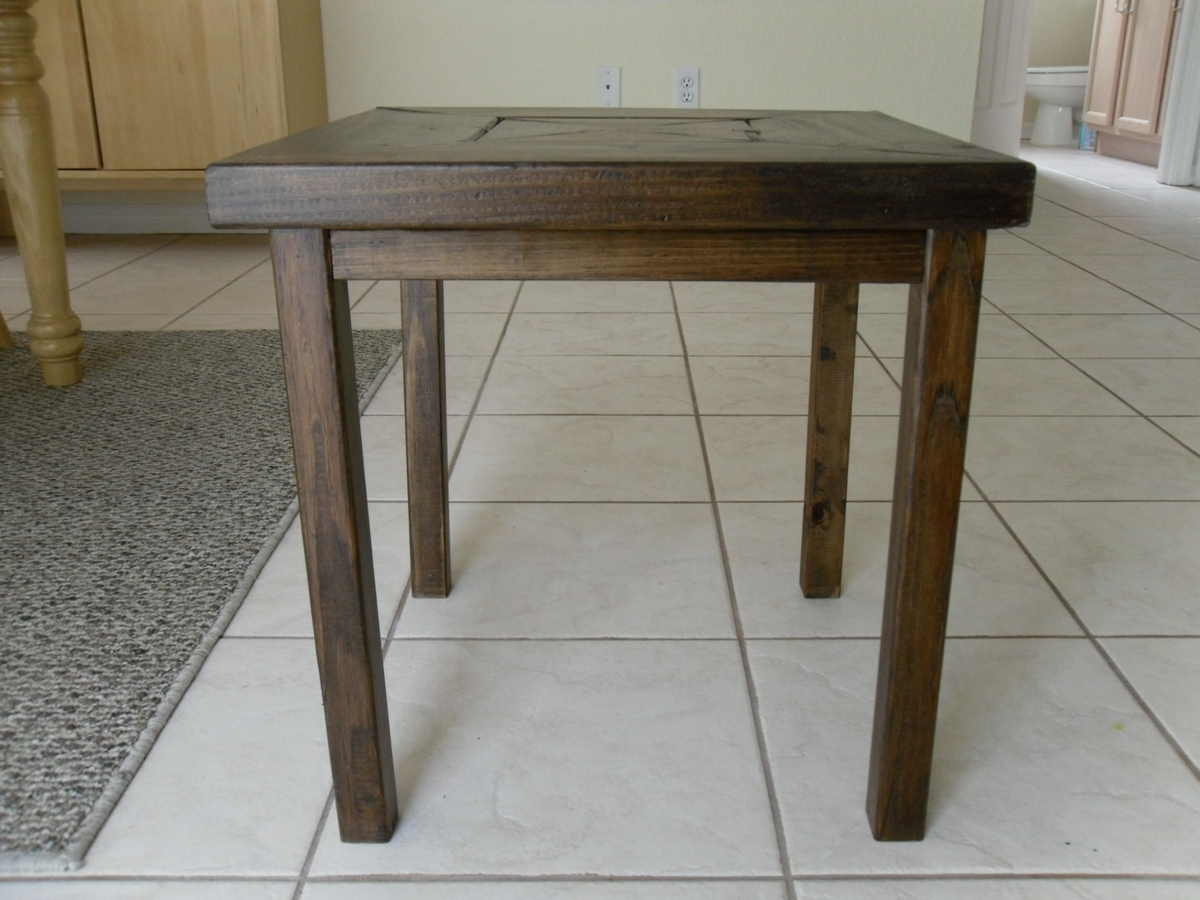
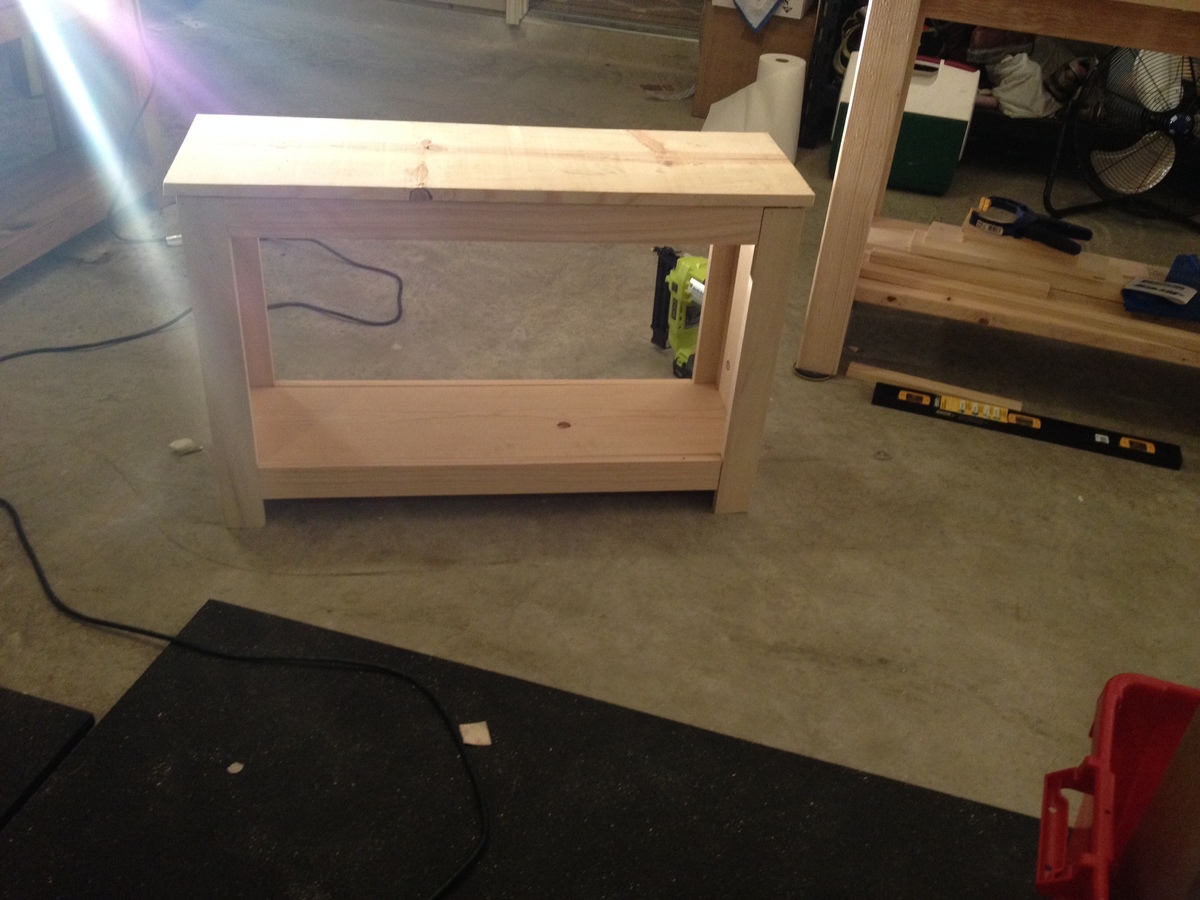
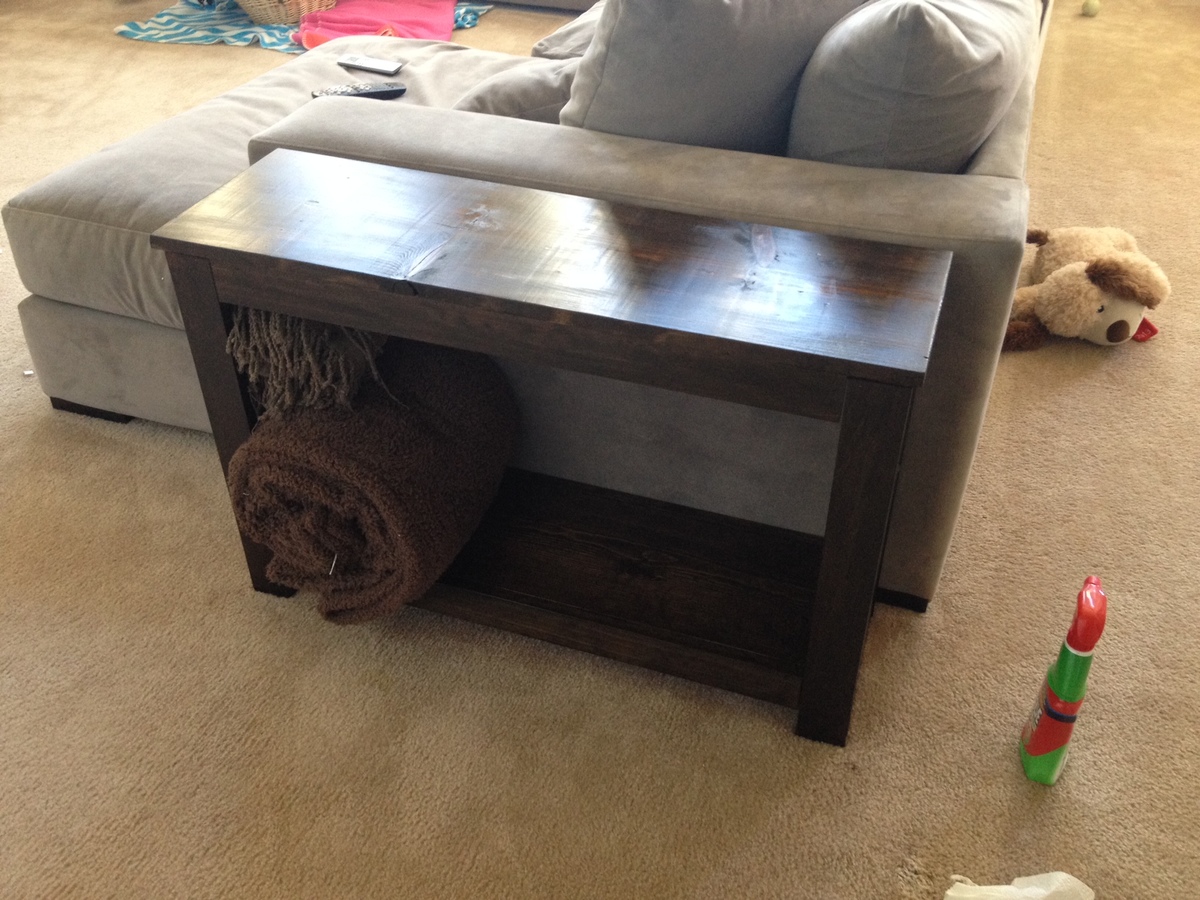
Spa Bench turned End Table
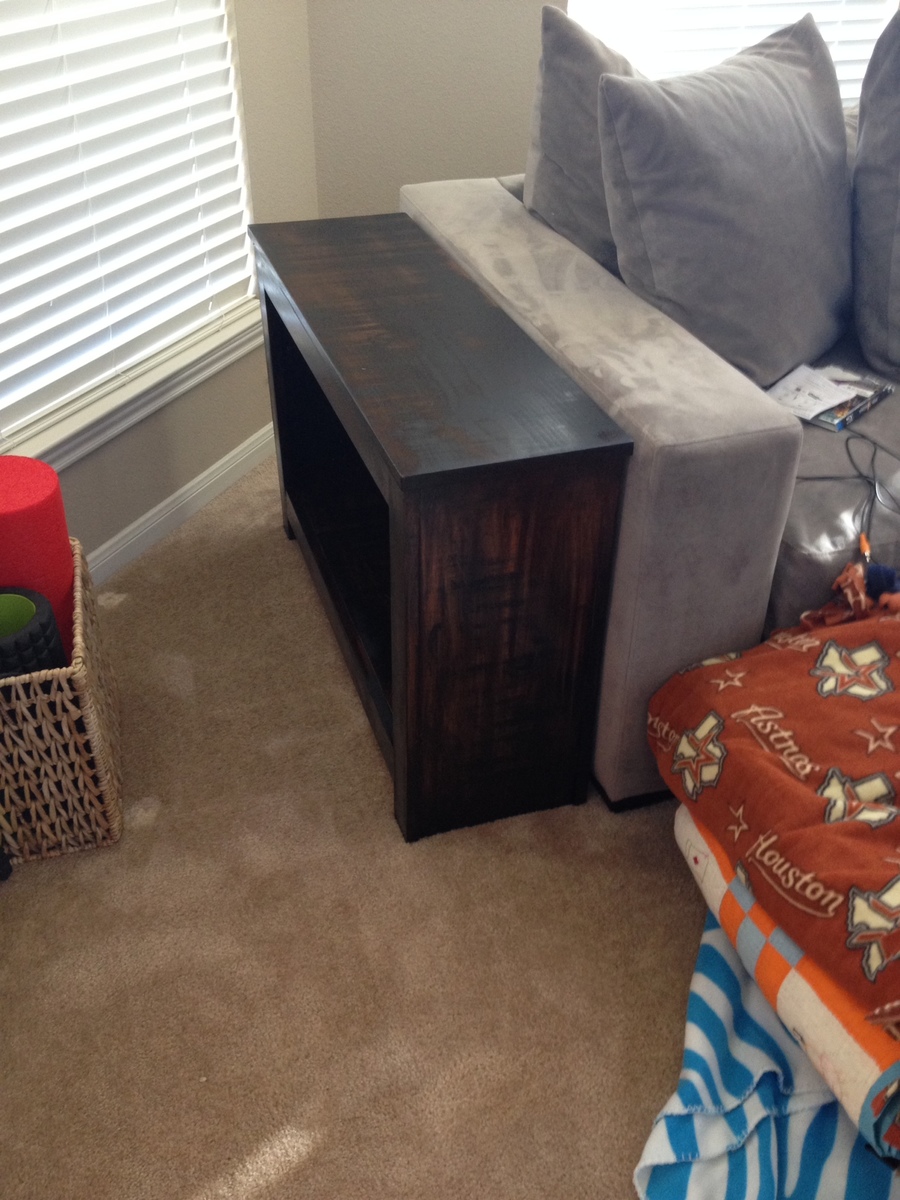
I was wanting long, skinny end tables for my couch and when I came upon the spa bench plan I knew it was perfect length and size for what I wanted. I only altered the plans by making it taller to fit my couch. This was my second build and I learned a lot through the process so these are not perfect but I love the imperfections. I also didn't like the first stain that I put on the tables and when I tried taking it off my sander made weird marks but it gave it a more rustic look which I ended up loving. (Which I could never recreate on purpose)


Built from Plan(s)
Estimated Time Investment
Afternoon Project (3-6 Hours)
Finish Used
Minwax Polyshade Antique Walnut sanded down and then 3 coats of Minwax Ebony which 2 coats of Minwax Fast-Drying Polyurethane Satin
Recommended Skill Level
Beginner
Clara Table and 4 dollar stackable chairs
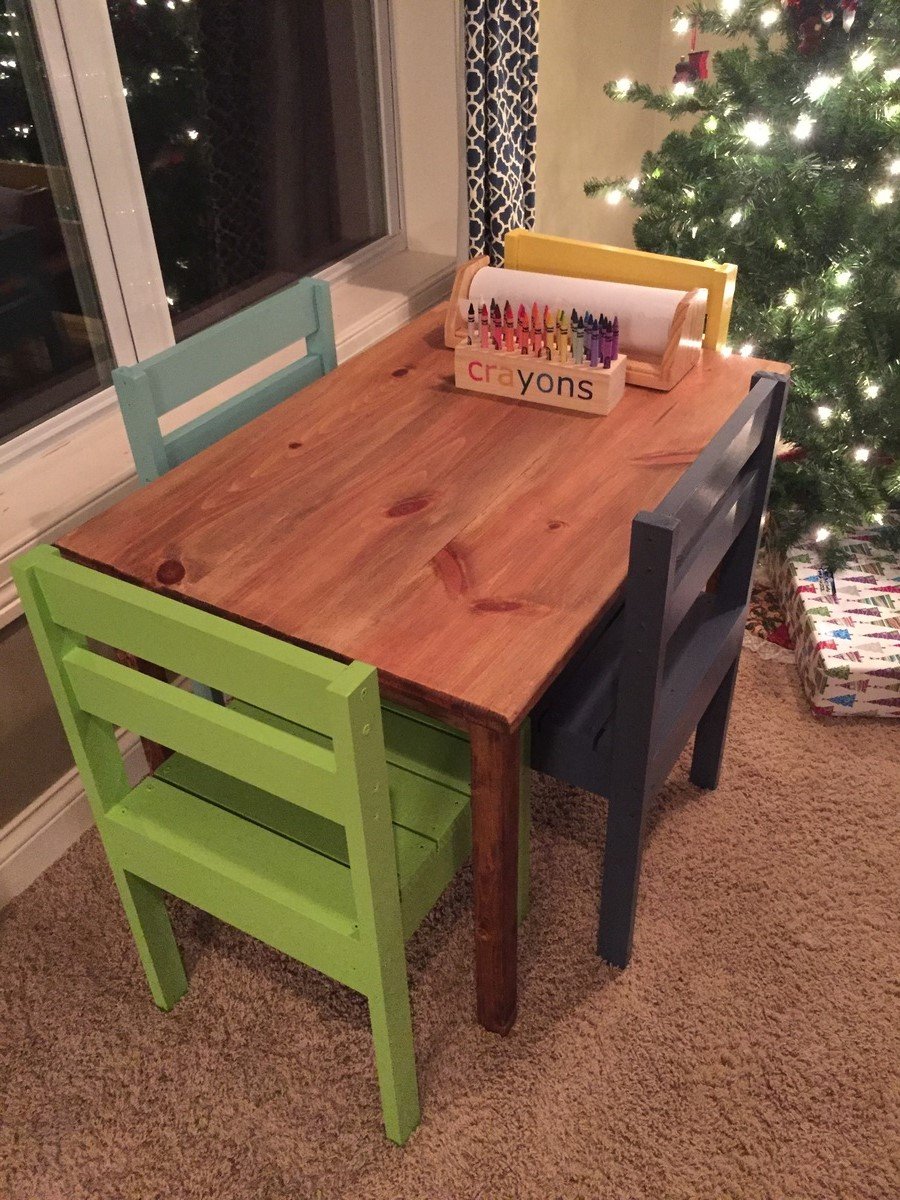
Clara table and 4 dollar stackable chairs. I used Minwax Early American on the table and a variety of paint colors on the chairs to keep it fun. I also used select pine on the chairs which increased the cost but cut down on sanding time. I also routered the top edge of the table to create a smoother edge.
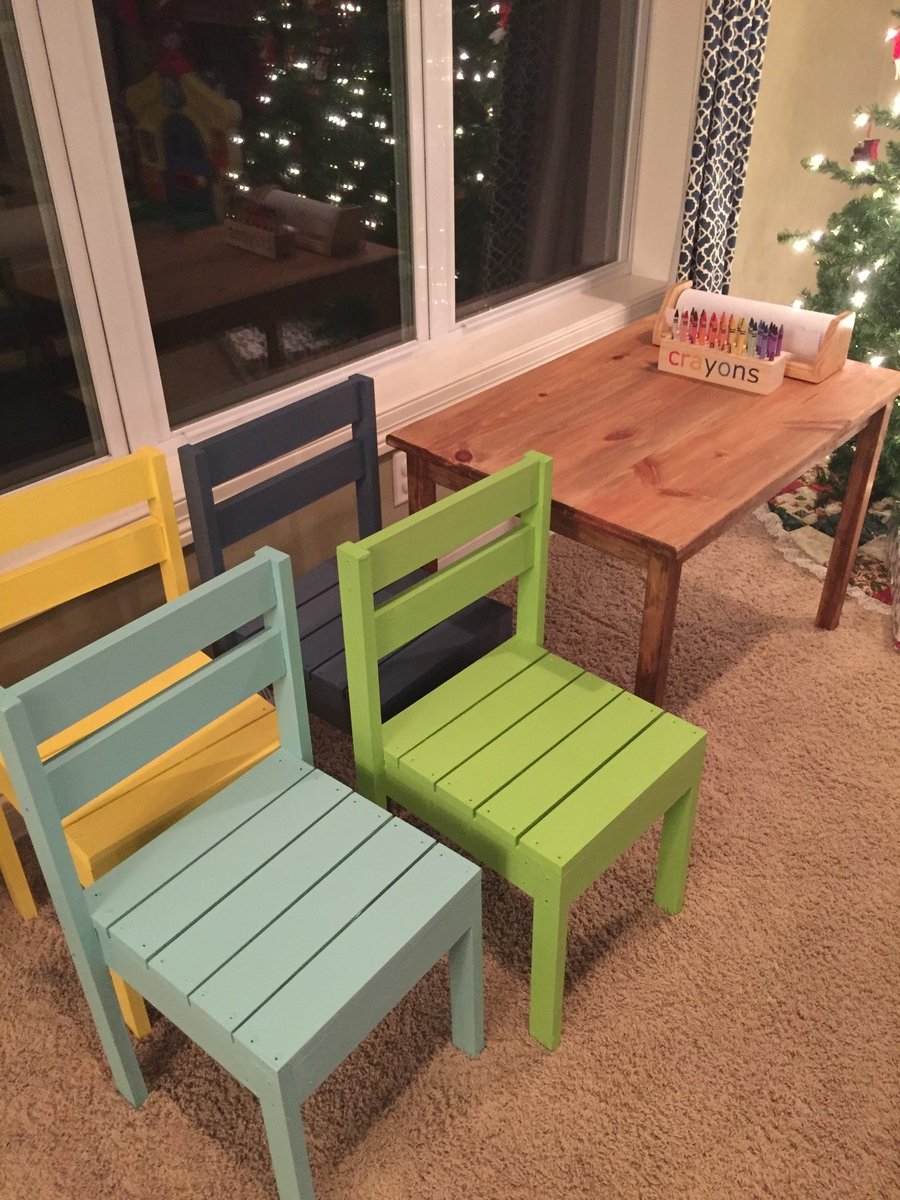
Built from Plan(s)
Estimated Cost
$40
Estimated Time Investment
Day Project (6-9 Hours)
Finish Used
Minwax Early American, Paint
Recommended Skill Level
Starter Project
Rustic Modern Bunk Bed
We build this bunk bed from the Rustic Modern Bunk Bed plans. We finished it with one coat of primer and one coat of Dunn Edwards Swiss Coffee. This project was made easier with a Dewalt 12'' sliding compound miter saw, Kreg K4, and a speed square for every aspect of the project.
Built from Plan(s)
Estimated Cost
$300
Estimated Time Investment
Weekend Project (10-20 Hours)
Finish Used
Dunn Edwards Swiss Coffee
Recommended Skill Level
Intermediate
Comments
rcromeo
Sun, 05/07/2023 - 11:27
Porch
Porch