Community Brag Posts

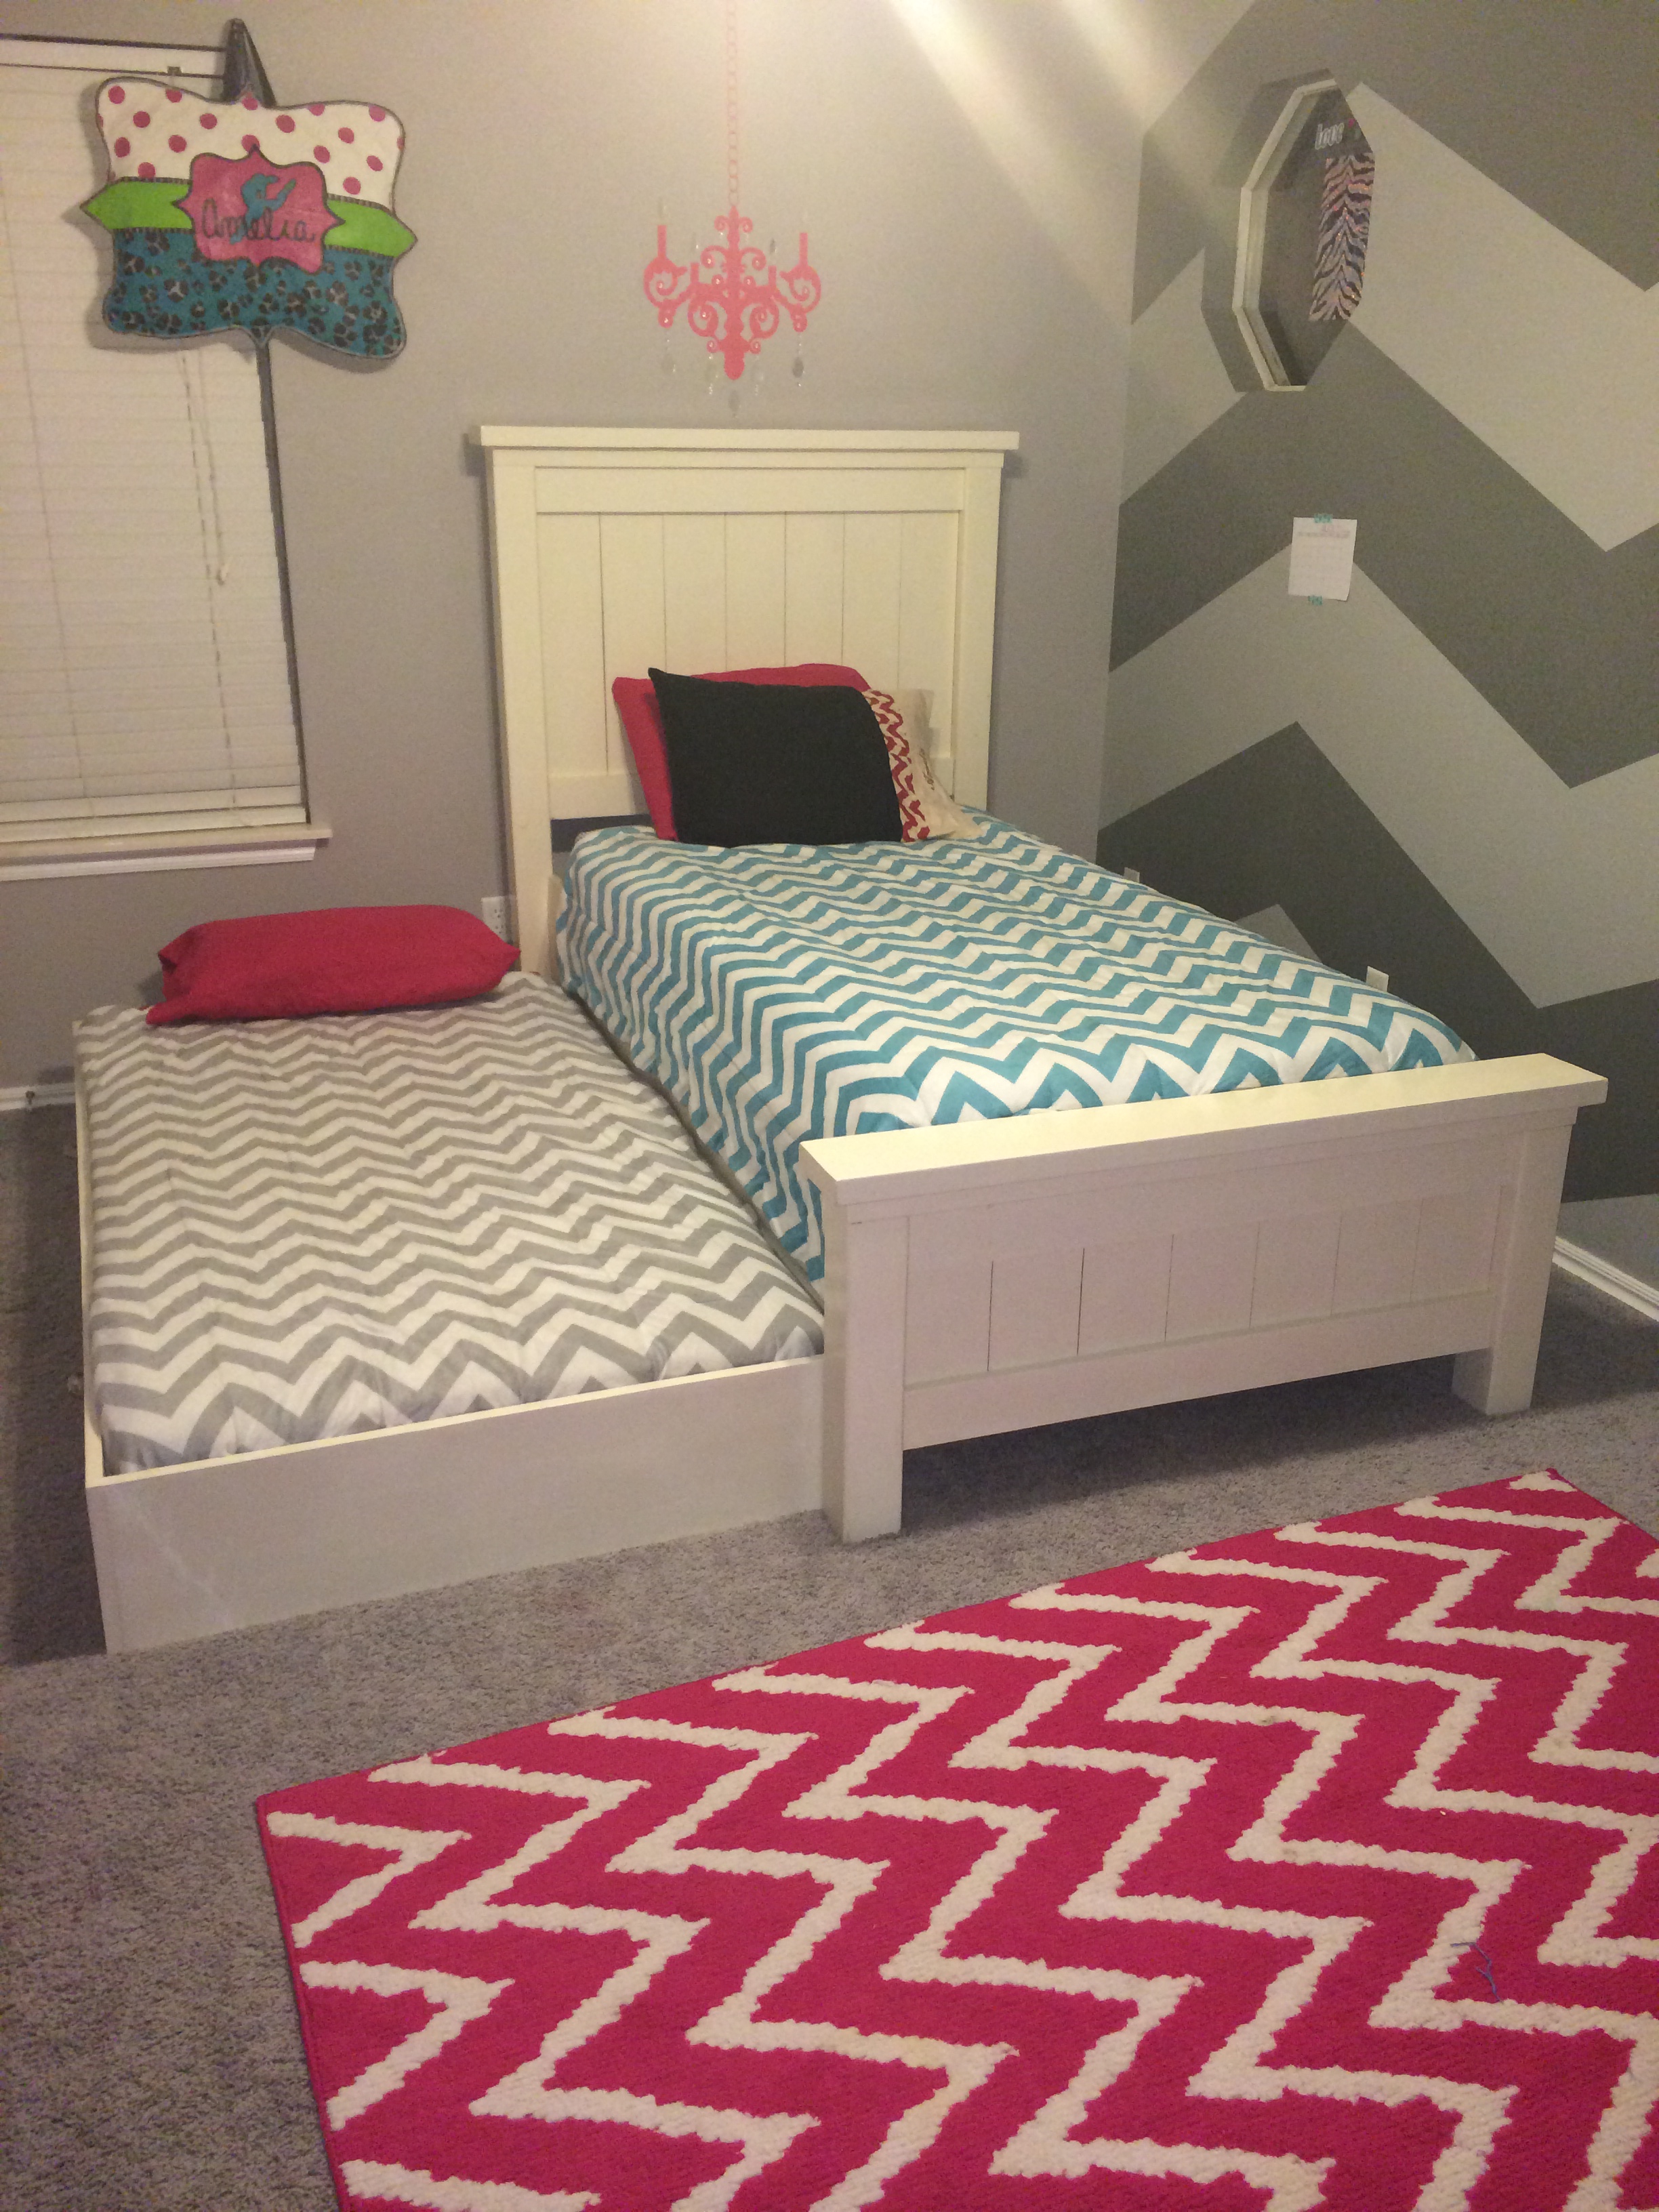
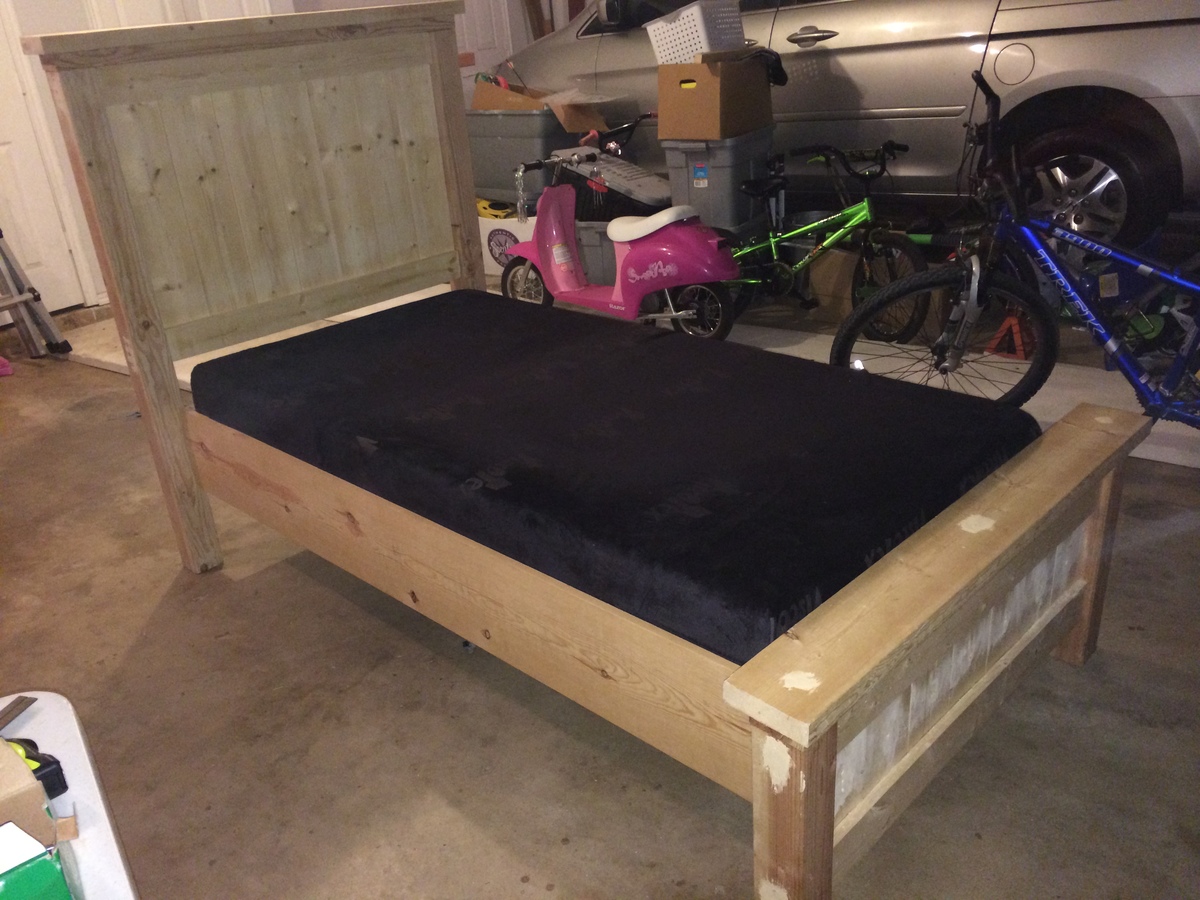
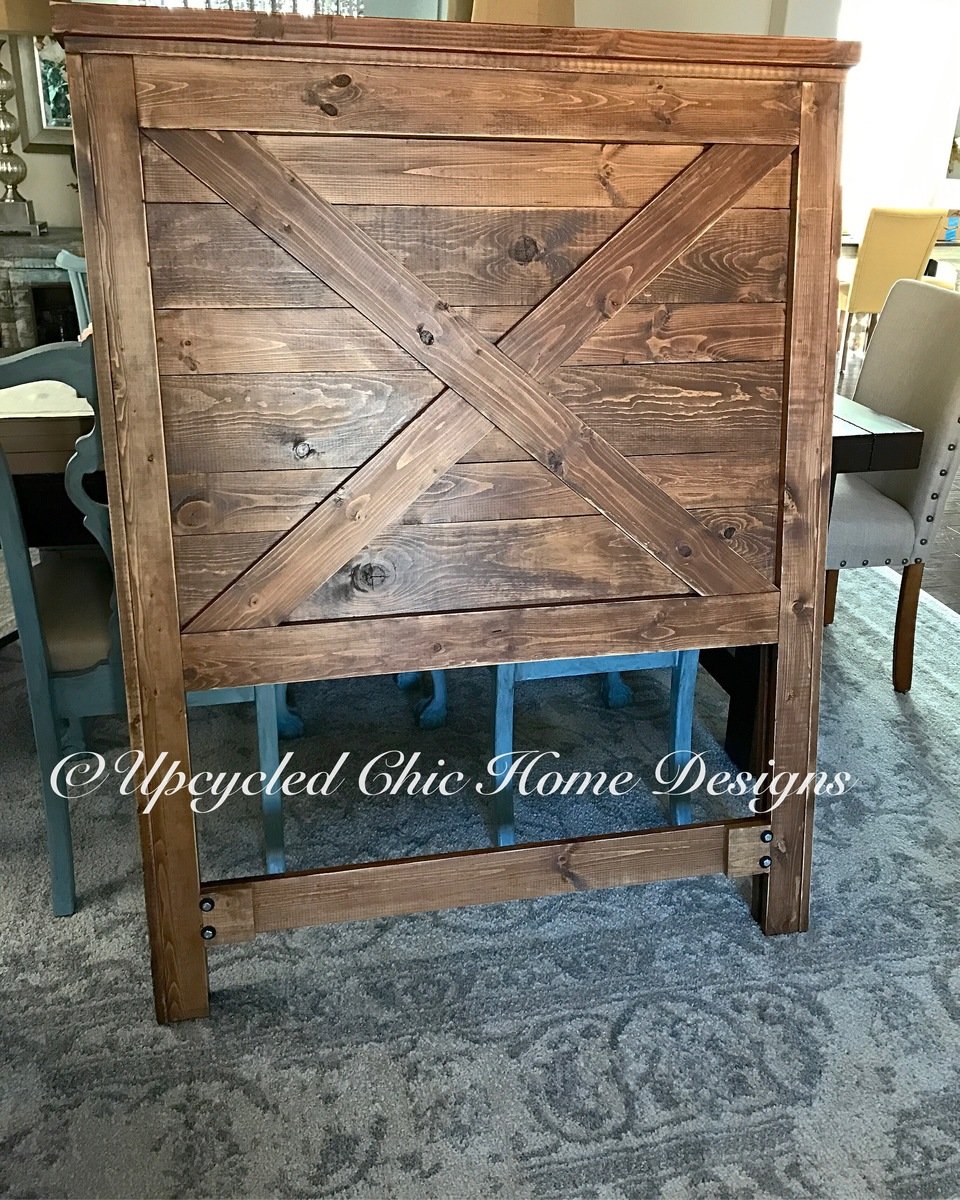
Reclaimed-Wood Headboard

Submitted by keribeth on Fri, 07/06/2012 - 14:49

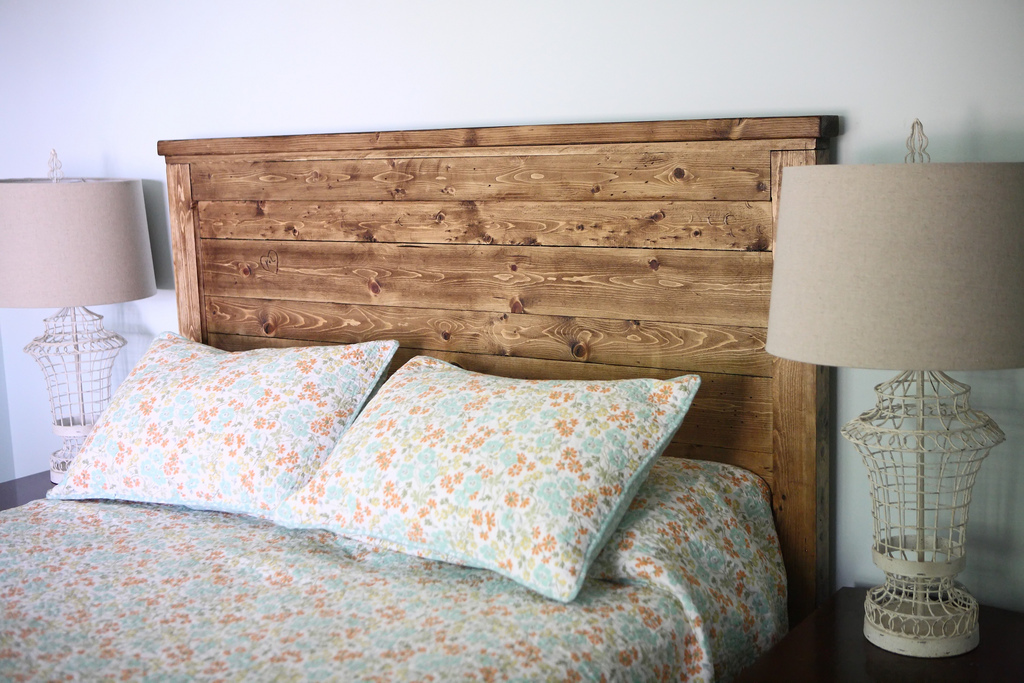
Reclaimed-wood headboard from pine boards with minwax aged oak gel stain and stain finish wipe-on polyacrylic. I distressed some of the board with a screwdriver, a pipe, and whatever else I found in the garage, and etched my and my wife's initials in a heart on one side. Aww!

Estimated Cost
~$85 in lumber
Estimated Time Investment
Day Project (6-9 Hours)
Finish Used
Minwax gel stain in aged oak
Recommended Skill Level
Starter Project

Comments

MichelleC

Fri, 07/06/2012 - 19:44

I was going to carve mine and my hubby's initials in a heart on our reclaimed headboard, too!!!!! I didn't end up doing it because I think we'll eventually sell it and build a headboard with padding on it since my husband likes something padded to lean against while watching tv at night.

Rolling laundry cart

Submitted by smitcher on Wed, 06/03/2020 - 13:48

My husband and I have been inspired by your website and are getting started with wood working projects. We did this cart on the weekend. We used MDF board for the front, back and shelf bottoms because we had it laying around after replacing our garage shelving. I’m pleased with how it turned out given that we are just beginners. I do think we’ll have to invest in a table saw. Not a fan of working with MDF board. We used the example found on Infarrantlycreative.net but changed it up slightly. (Sorry about the first photo, I can’t seem to delete it)

Estimated Cost
Under


Approximately $35 CAD because we had the MDF, paint and nails
Estimated Time Investment
Afternoon Project (3-6 Hours)
Recommended Skill Level
Beginner

Comments

beachy cottage laundry room with Sausha's pedestal!

Submitted by imeeshu on Mon, 07/30/2012 - 07:33

we remodeled the laundry room to have a beachy cottage feel. best part is getting the washer and dryer off the ground with Sausha's pedestal.

Estimated Cost
$500
Estimated Time Investment
Week Long Project (20 Hours or More)
Finish Used
Benjamin Moore's Ultra White in flat as a primer. Annie Sloan's Louis Blue over primer, then dry brushed Annie Sloan Paris Gray. Sanded with fine sandpaper. Wiped clean and vacuumed. Then clear wax and dark wax, rubbed in very well.
Recommended Skill Level
Intermediate

Picnic Tables

Submitted by Anonymous (not verified) on Fri, 03/22/2024 - 07:53

Using some of your different picnic table plans, I have been building, casually, picnic tables that are made using handpicked wood of similar grain orientation, same species, etc, creating a unique piece every time. I'm turning into a real wood nerd! They are all sanded and sealed for greater weather resistance and to accentuate the natural look of the wood.

Sam Warburton Productions

Rustic X wedding arch

Submitted by becca9872 on Sun, 08/19/2012 - 21:12

Lydia wanted a wooden arch for her wedding with the x legs. So we ordered a pattern for an arch from woodcraftplans.com and modified the legs to include the x design. We used pine lumber in 2x8, 2x4 and 1x2. The lumber was routed with the cove edge to smooth the corners. We cut the 2x8 with the jigsaw to make the two pieces for the arch then glued and screwed them together, then used filler to conceal the seams. Then we clamped the front and back together and sanded forever to get them to match. Then routed the edges again to make them pretty. The legs and x's are 2x4's cut to fit and they ended up being the easiest part to work with. The battens are 1x2's that we ripped from 1x4's and routed with the cove edge. I stained it with Minwax Red Oak 215 by brushing it on and wiping it off. The legs where together during staining but the top wasn't, I wanted to stain and polyurethane each batten and crosspiece before it was attached. We polyurethaned it 2 coats then put it together and put the last coat on. We used Ace Brand Gloss polyurethane. It shines like glass. It can be taken apart and transported in three pieces, the leg pieces and the top are bolted together with carriage bolts. This was a very heavy/ bulky project and you need a helper when building this. I think its intermediate because of the difficulty cutting the arch pieces out of the bigger boards with the jigsaw. My husband ,my sister, my brother-in-law and I worked on this for about a week and it turned out beautifully!

Estimated Cost
less than $75
Estimated Time Investment
Week Long Project (20 Hours or More)
Recommended Skill Level
Intermediate

Comments

spiceylg

Tue, 08/21/2012 - 11:06

I submitted a comment yesterday and it's not showing up here. You did a beautiful job. What a loving special touch for her special day. Not to mention it can be used for many years to come!

Julie76578 (not verified)

Tue, 01/22/2013 - 19:05

Hi, I'm interested in building this arch for my upcoming wedding. I can't find the plans on the woodcraftplans.com website. Have any advice on how I could locate that? Your help is appreciated.
-Julie

Lukabravo

Tue, 03/22/2016 - 21:07

Hey guys and gals, love this project idea. I too am getting married and would love to build this for my wedding, but I can't find the plans anywhere! I even went onto that woodcraft website and still nothing. Any help would be greatly appreciated!

Thanks,

Luke

My First Builds!

Submitted by DiyIsFun on Tue, 06/23/2020 - 09:33

Made the swing and two sets of planters since we were on stay Home orders. I’d never done anything like this...ever! My husband helped me hang the swing. We love, love the results. (Now to make a seat cushion😆) I couldn’t tag the plans for the modern square planter boxes. They are huge and I can hardly wait until Christmas to put trees in all four!

Comments

Seasonal And Holiday

Essential Outdoor Set

Submitted by Anonymous (not verified) on Fri, 05/03/2024 - 13:47

Hi Ana,
thank you for all you inspiring build plans
I have build a few of your 2x4 out door furniture plan
2x4 outdoor sofa
2x4 one arm outdoor sofa
2x4 outdoor side table
2 pcs of the essential outdoor chair for deep seat cushion.

Johan Janssen from the Netherlands

Open Seat Octagon Picnic Table

Submitted by Anonymous (not verified) on Mon, 05/13/2024 - 07:47

I had a lot of fun building this table! Ana's plan was easy to follow, even for a beginner like myself! The only thing it needs is exterior paint. I will definitely try another project from this site! Thank you Ana!

Vicky Shank

Pool Lounge Chairs

Submitted by Fitnpink on Wed, 07/15/2020 - 17:00

Part of a huge order I did for outdoor furniture. Love how they turned out! Thank you!

Comments

Seasonal And Holiday

cubby seats

These are the cubby seats featured on Shanty 2 Chic's site along with Pottery Barn inspired Trestle table. This was a lot of fun to make because it was the first project I did using my hand saw. I normally have the wood cut at home depot. But now I can do it on my own!! you can check them out on my blog: goldhoopstochickencoops.blogspot.com

Built from Plan(s)
Estimated Cost
$25
Estimated Time Investment
Afternoon Project (3-6 Hours)
Finish Used
Rust-oleum aqua and lemon grass
Recommended Skill Level
Beginner

Twin Farmhouse Bed with Trundle

We made the traditional Twin Farmhouse bed using Ana's plans. We did modify the height of the headboard and foot board in case we decide to move the bed to under her window.

I was very particular about the sizing and placements of the sideboard/trundle. I did not want a big gap between the mattress and the trundle. Also, did not want the actual bed mattress to sit down too far into the 1X10 and look like a crib.

Very happy with the results. Thanks so much, Ana!!!

Estimated Time Investment
Week Long Project (20 Hours or More)
Finish Used
2 coats Valspar Antique White, semi gloss
2 coats Minwax Polycrylic
Recommended Skill Level
Beginner

Comments

ladybug618

Mon, 08/18/2014 - 05:01

This looks great! I see you have carpet (as do I) did you use caster wheels? It looks like it's resting on the floor. I want t build but, I'm concerned about the ease of sliding. Tips appreciated.

Thanks in advance.

Adirondack Chairs for new Fire Pit area

Submitted by TonyLiddic on Thu, 08/06/2020 - 09:58

We've been talking about adding a fire pit and seating area for awhile. Our oldest daughter's graduation party combined with extra available time due to Corona presented a perfect opportunity to try something new. I've never built anything like this and have very limited experience with woodworking but I came across these chair plans when searching for chairs to buy. Not too bad for a first project! Started digging up sod about a month before the Grad Party. Worked on it a couple hours a day and maybe 3 full weekend days. Came out great and is a wonderful addition to our backyard.

Estimated Cost
$900
Estimated Time Investment
Week Long Project (20 Hours or More)
Finish Used
1 thin coat of Thompson Timber Oil (Cedar Semi-Transparent) applied before assembling each chair. Used about 2/3 gallon for all 5 chairs and light posts.

Built In Cabinet and Bookshelf

Submitted by kristen on Wed, 12/26/2012 - 21:54

I didn't really follow any of Ana's plans for this build, but it is a result of using her plans up to this point in my woodworking journey that enabled me to complete this one! I don't own a table saw, so this was constructed using a circular saw, miter saw, Kreg jig, and a nail gun. It was the first time I've had to cut and attach crown molding, and I also learned how to cope baseboard trim using a Dremel. Another first was using a router to rabbet out the back so the plywood back wasn't visible from the sides. I learn something new every build :)

I'm thrilled with the change in the room with this new project. We had two narrower bookcases side-by-side in there before, and they were about the height of the windows with a stain color that didn't match any of the other wood pieces in the rooms. This cabinet looks like it belongs in the room.

Estimated Cost
around $200
Estimated Time Investment
Week Long Project (20 Hours or More)
Finish Used
Primer, off-white paint in satin, Polycrylic topcoat in satin. 320 grit sanding in between all paint and topcoat coats.
Recommended Skill Level
Intermediate

Comments

moosmani

Thu, 12/27/2012 - 07:54

Very well done. It fits right in and looks absolutely beautiful. I am working and practicing to reach your skill level so I can do amazing things too!

Cindy from Indiana (not verified)

Thu, 12/27/2012 - 09:14

Love this! Really great job!

DIY Farmhouse Table

Based on Ana White's Instructions and Cut List, here was our purchase list:
(figures are rounded)
 
Heat Treated Wood:
$12 (4) 2x4@ 8 feet
$9 (2) 2x8 @ 12 feet
$6 (1) 2x8 @ 8 feet
$8 (1) 2x10 @ 8 feet
$55 | (1) 4x4 @ 10 feet **
**This was difficult to find.  We couldn't get it at Lowe's or Home Depot,
but found a small local wood yard.
 
Other Materials:
$9 | Rust-oleum Kona Wood Stain
$18 | Minwax Polycrylic
$10 | (2) Pocket Hole Plugs
$4 | 3" Foam Trim Roller
$8 | (2) 2.5" Pocket Hole Screws
$6 | 3" Wood Screws
 
Total Cost - $145
Estimated Cost
$145
Estimated Time Investment
Weekend Project (10-20 Hours)
Finish Used
MinWax Polycrylic 3 coats - Semi Gloss, but will be finishing it again in Satin (Maybe).
Rust-oleum Kona stain.
Recommended Skill Level
Beginner

Comments

Modern Park Bench - Son & Daughter In-law Christmas Gift

Submitted by mballway on Fri, 12/25/2020 - 14:13

A first for me in many years, over 40+. Not really since basic wood shop projects in Middle School. Anyway, my son (and daughter in-law, but she doesn't know) had asked for a backyard patio bench for Christmas this year (2020) so what could go wrong. Anyway, the plans are straight forward in this design. He saw the picture of a stained version on YouTube and said that would be perfect. The project took me three late afternoons/evenings as my day job took priority. After making all the cuts and beginning assembly I could really see this coming together nicely once the four legs were attached. Between wood fill and sanding I asked what finish they preferred and was told he would finish that part. So I sanded the exterior on it and glad for having him finish the coatings as I was just finished it that point on Christmas Eve Day. The red bow is also first for me.

Built from Plan(s)
Estimated Cost
< $100.00
Estimated Time Investment
Afternoon Project (3-6 Hours)
Recommended Skill Level
Intermediate

Outdoor To Indoor Wine Caddy

Submitted by calcowoods on Tue, 12/29/2020 - 08:30

Built a number of wine caddies with/without the stake. Stake useful for an outdoor environment, yet not useful for an indoor table top setting. Provided a simple alteration by inserting a t-nut into the bottom of the caddy & a hanger bolt screwed into top of stake. Simply screw in stake as needed.

Estimated Cost
$4
Estimated Time Investment
Afternoon Project (3-6 Hours)
Finish Used
Minwax Cherry and Minwax Satin Polyurethane
Recommended Skill Level
Beginner

X Brace Twin Headboard

Submitted by Anonymous (not verified) on Thu, 03/23/2017 - 14:24

We took the plans for the twin headboard modification and added an x brace to make it look like a barn door.  We also added a piece to the bottom for additional support for mounting to the boxspring as well as to prevent warping and narrowing of the posts.  

Estimated Cost
$110
Estimated Time Investment
Afternoon Project (3-6 Hours)
Finish Used
Varathane 2X Ultimate Wood Stain in Early American and then lightly distressed. Minwax wipe on poly in satin.
Recommended Skill Level
Beginner

Rolling rustic wood dresser

Submitted by Captin on Sun, 12/28/2014 - 11:42

Fun build.  Took me a few weeks but enjoyed it.  Gave a ton of storage for my sons room.

Built from Plan(s)
Estimated Cost
250
Estimated Time Investment
Week Long Project (20 Hours or More)
Finish Used
Golden oak
Recommended Skill Level
Beginner

Buffet

Submitted by Anonymous (not verified) on Wed, 03/29/2017 - 10:01

My first Ana project!  Different dimension and no drawers but still based off the original plans. Love it!

Built from Plan(s)
Estimated Cost
$285
Estimated Time Investment
Week Long Project (20 Hours or More)
Finish Used
minwax stain with satin poly
Recommended Skill Level
Intermediate
Back