Community Brag Posts

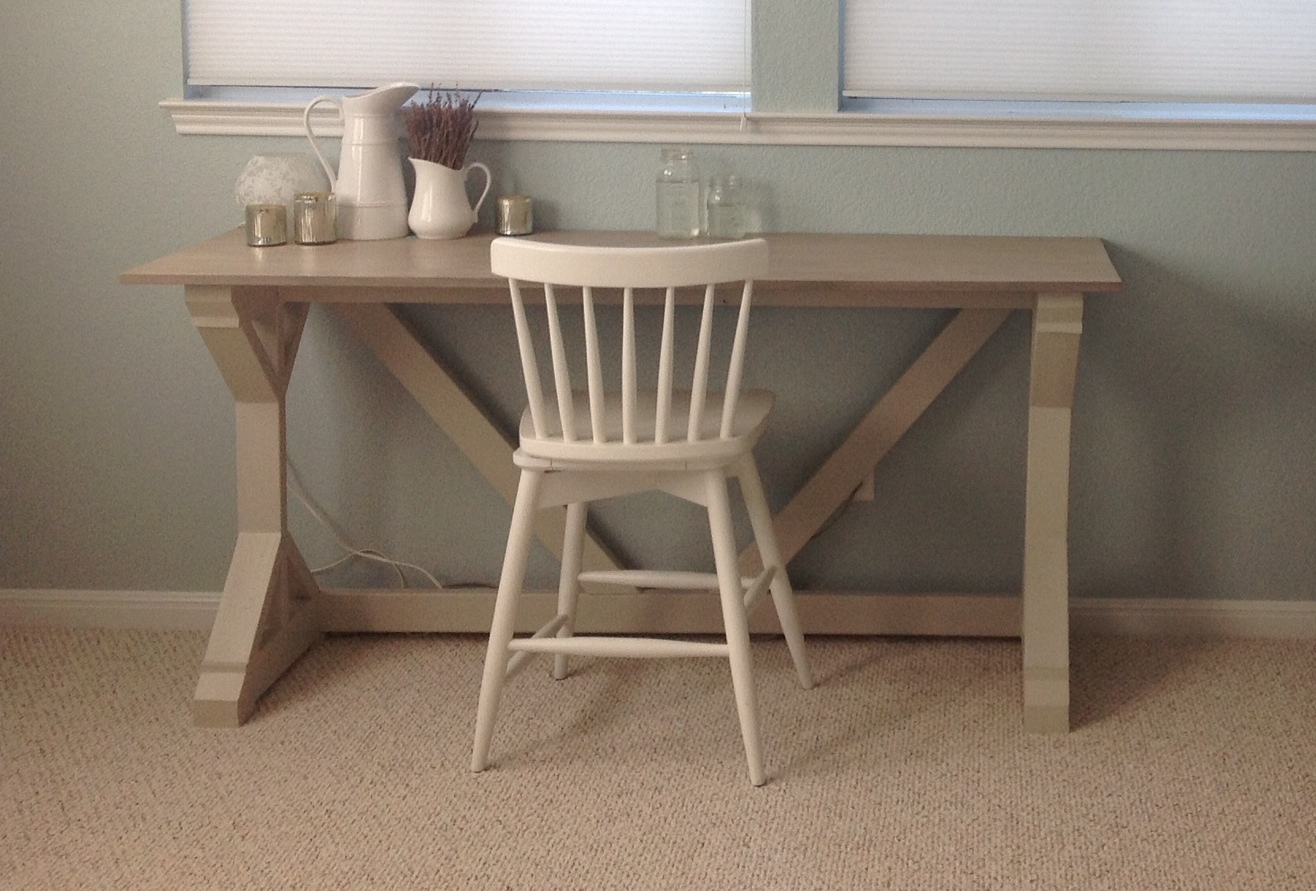
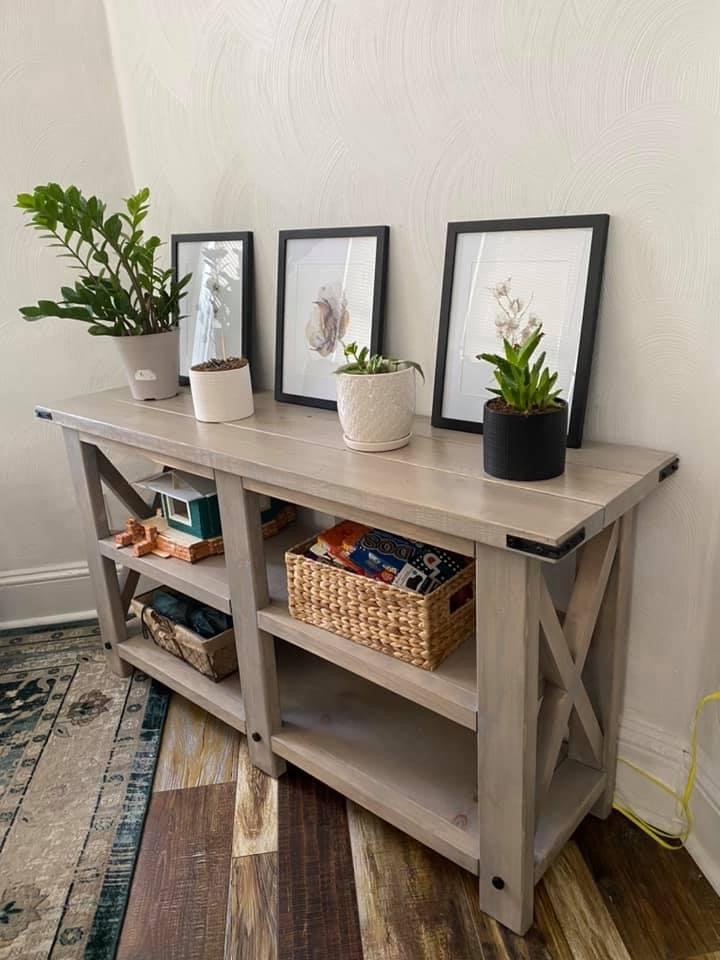
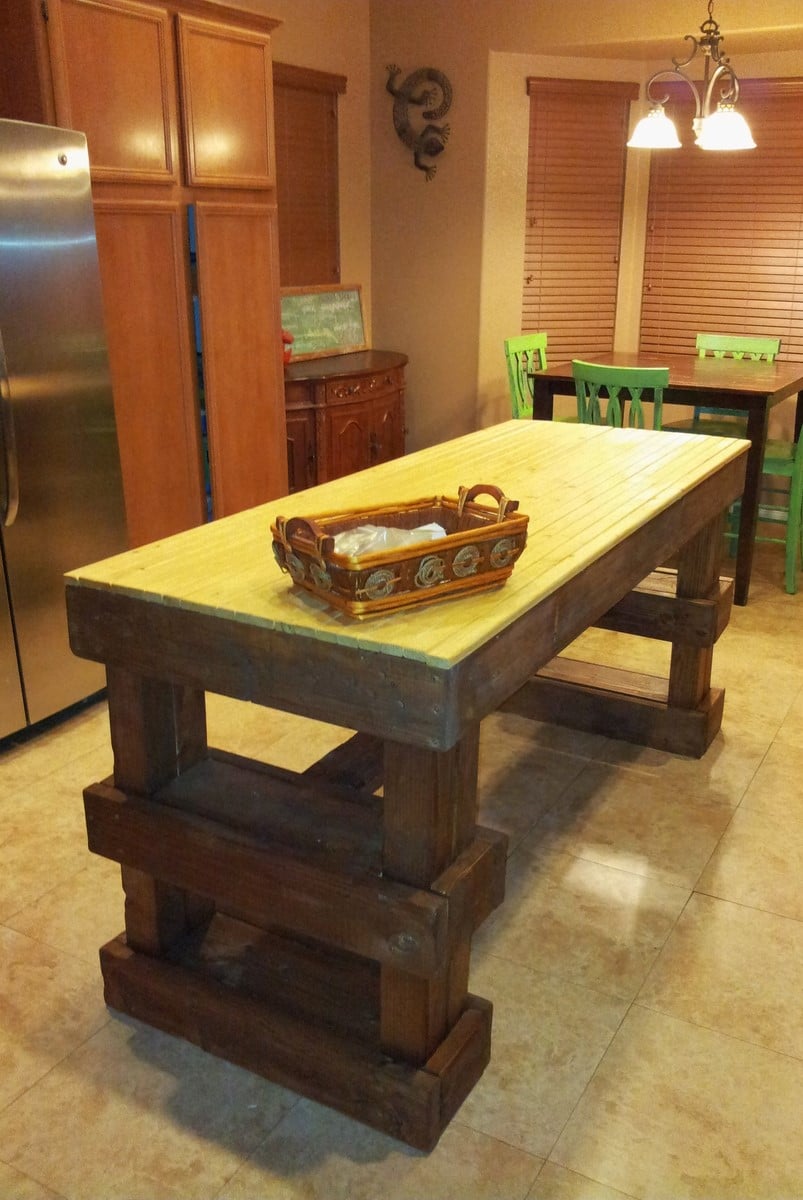
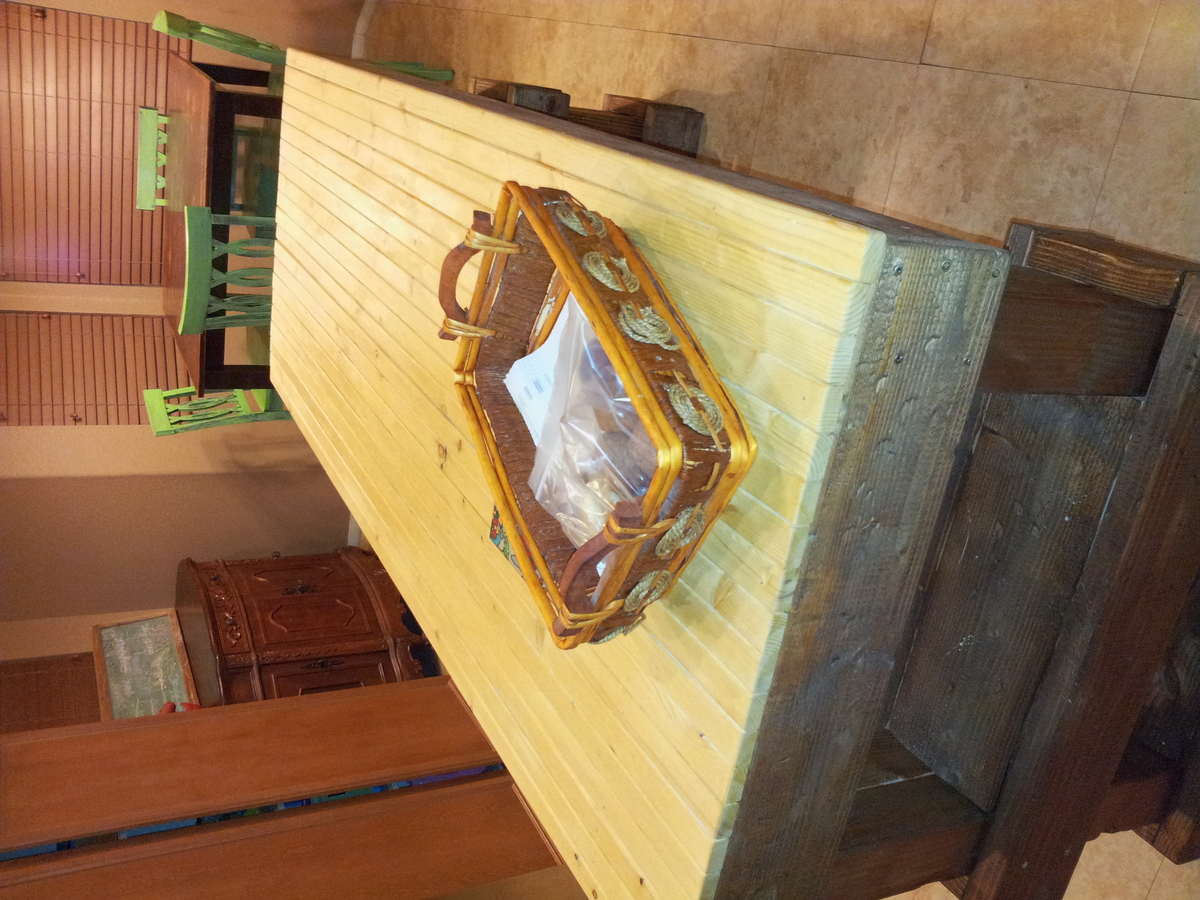
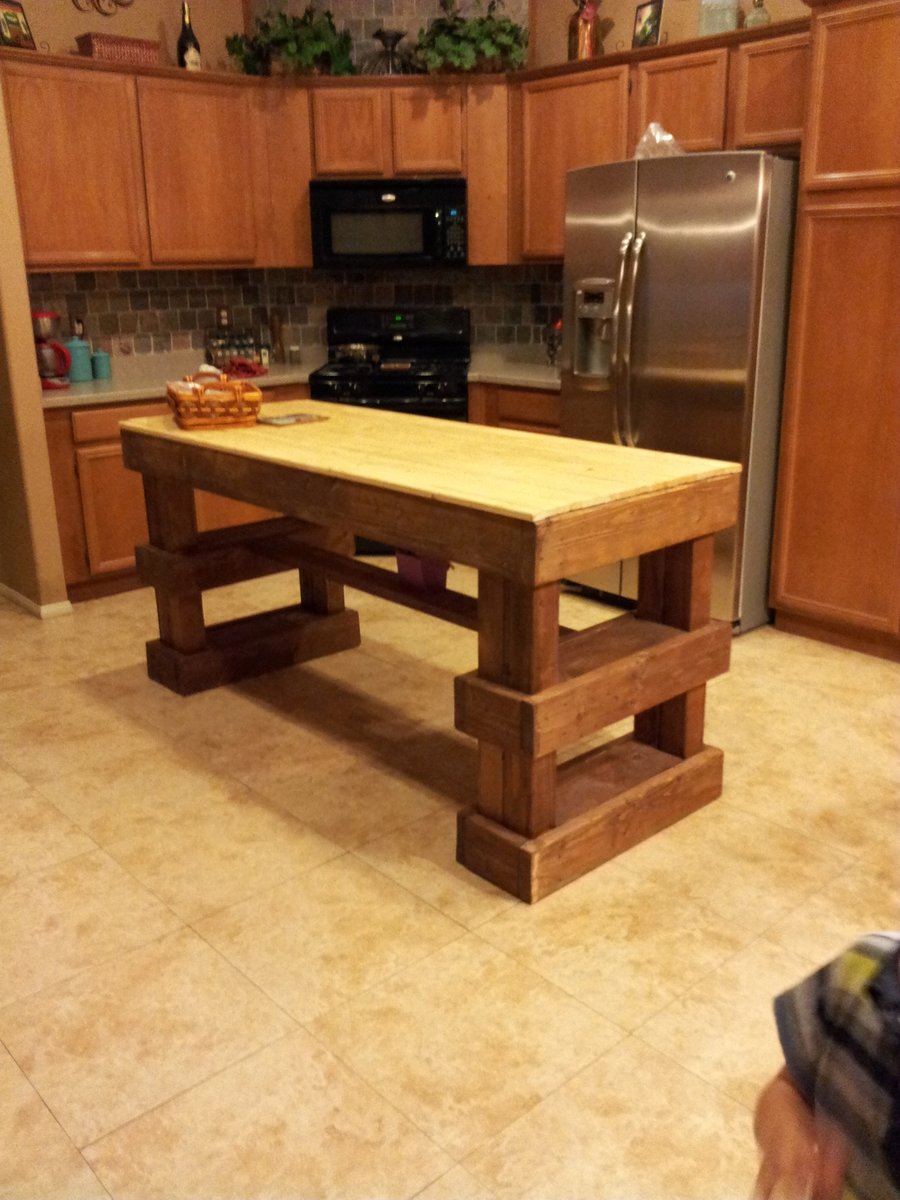
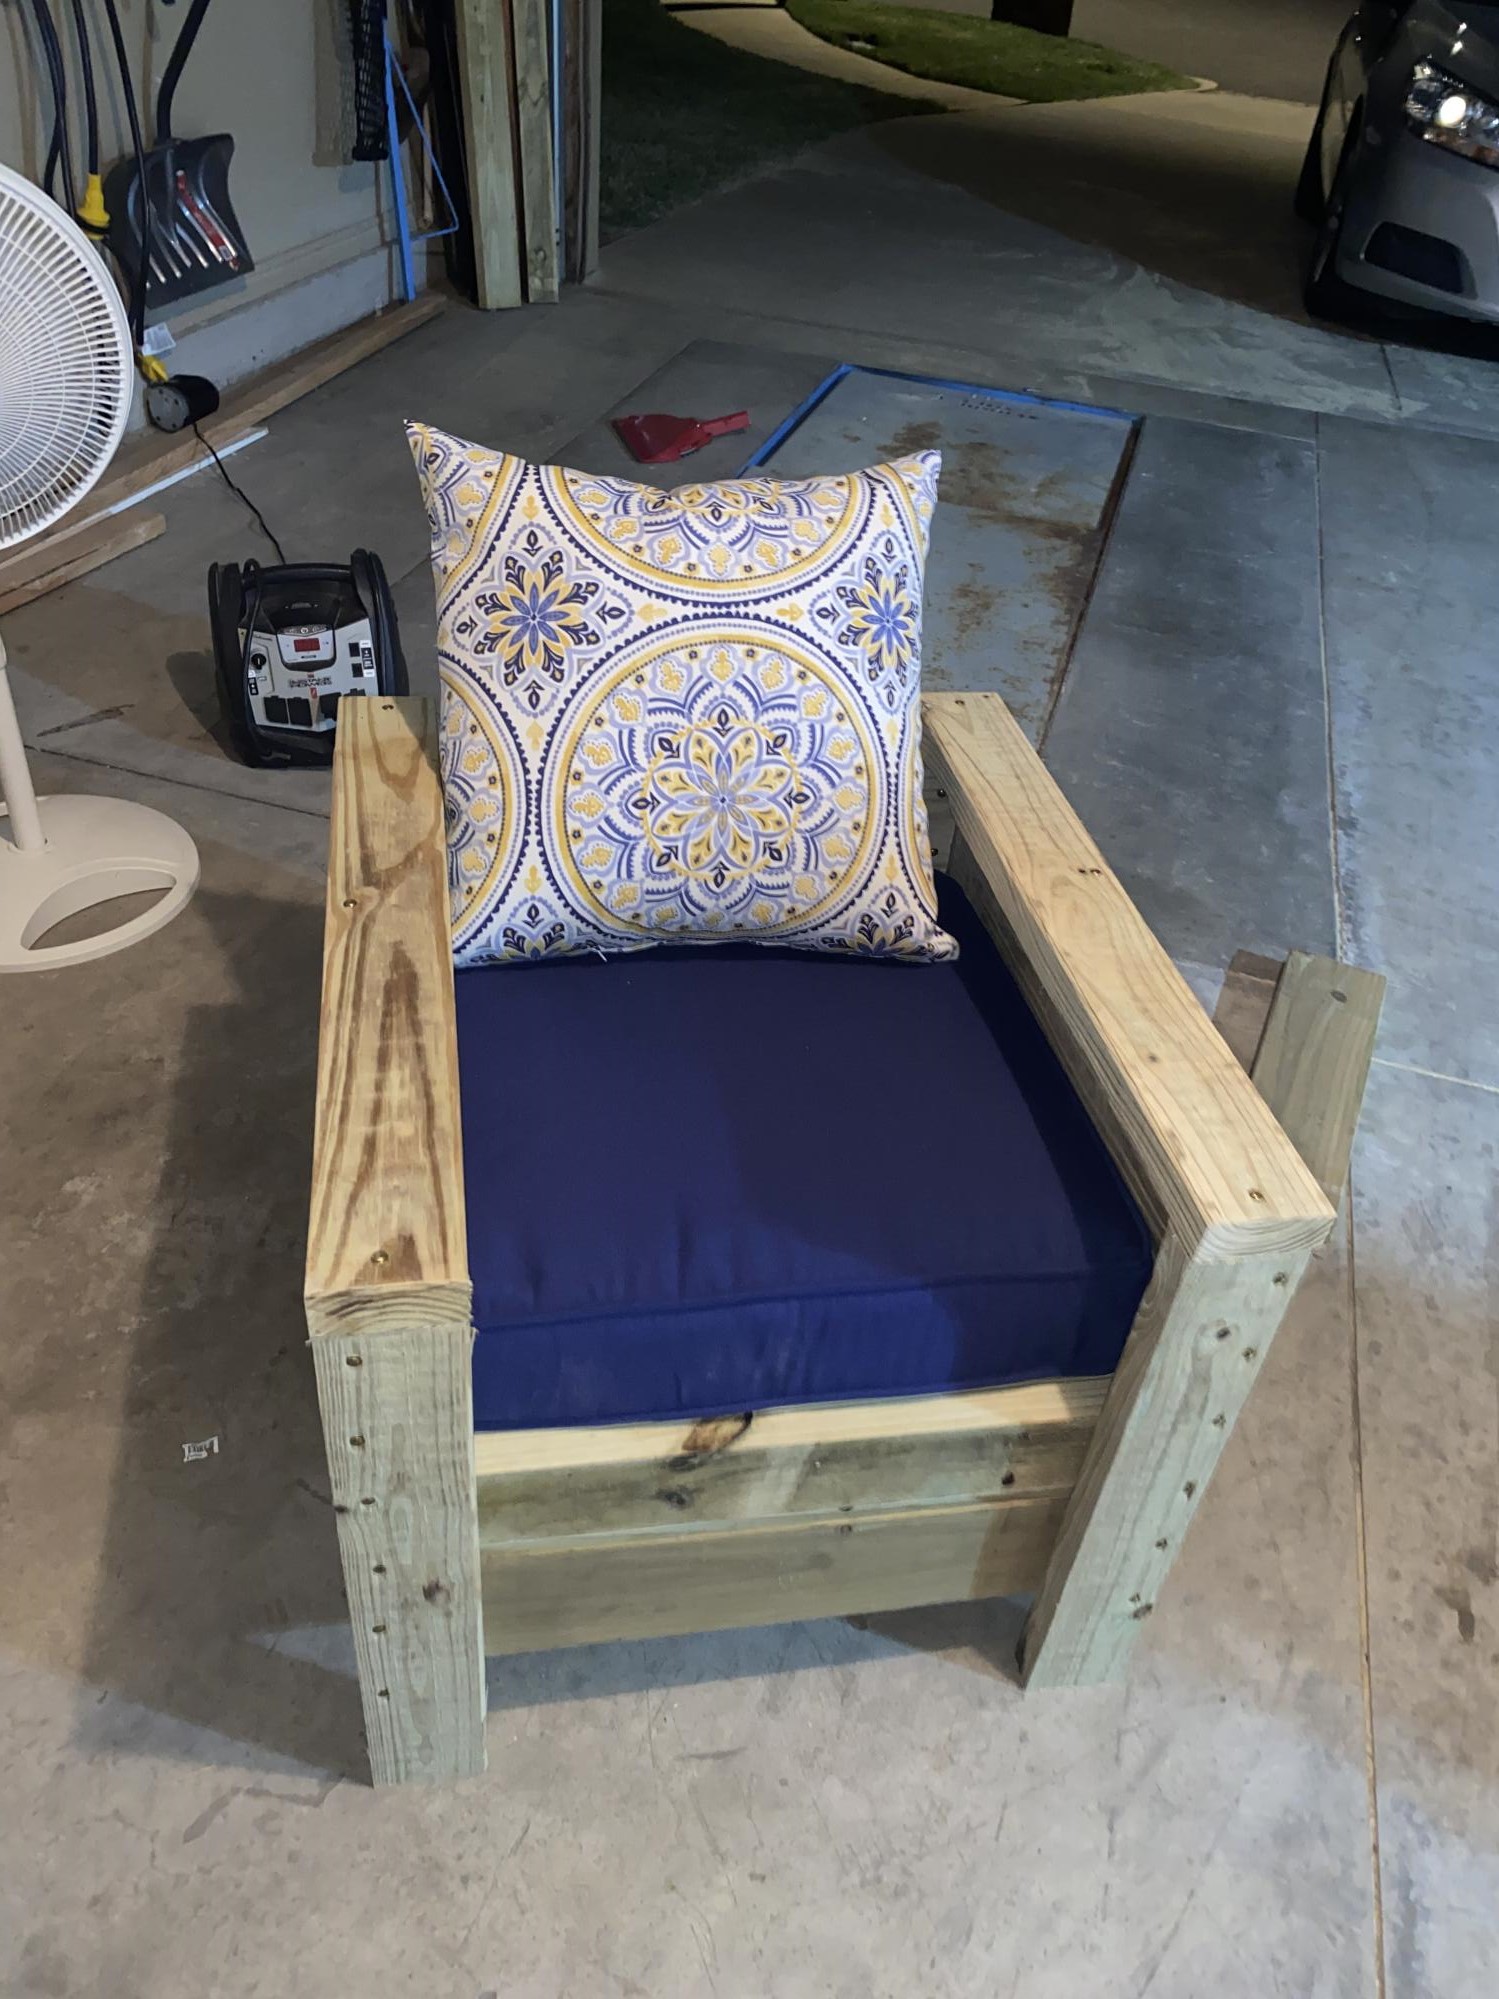
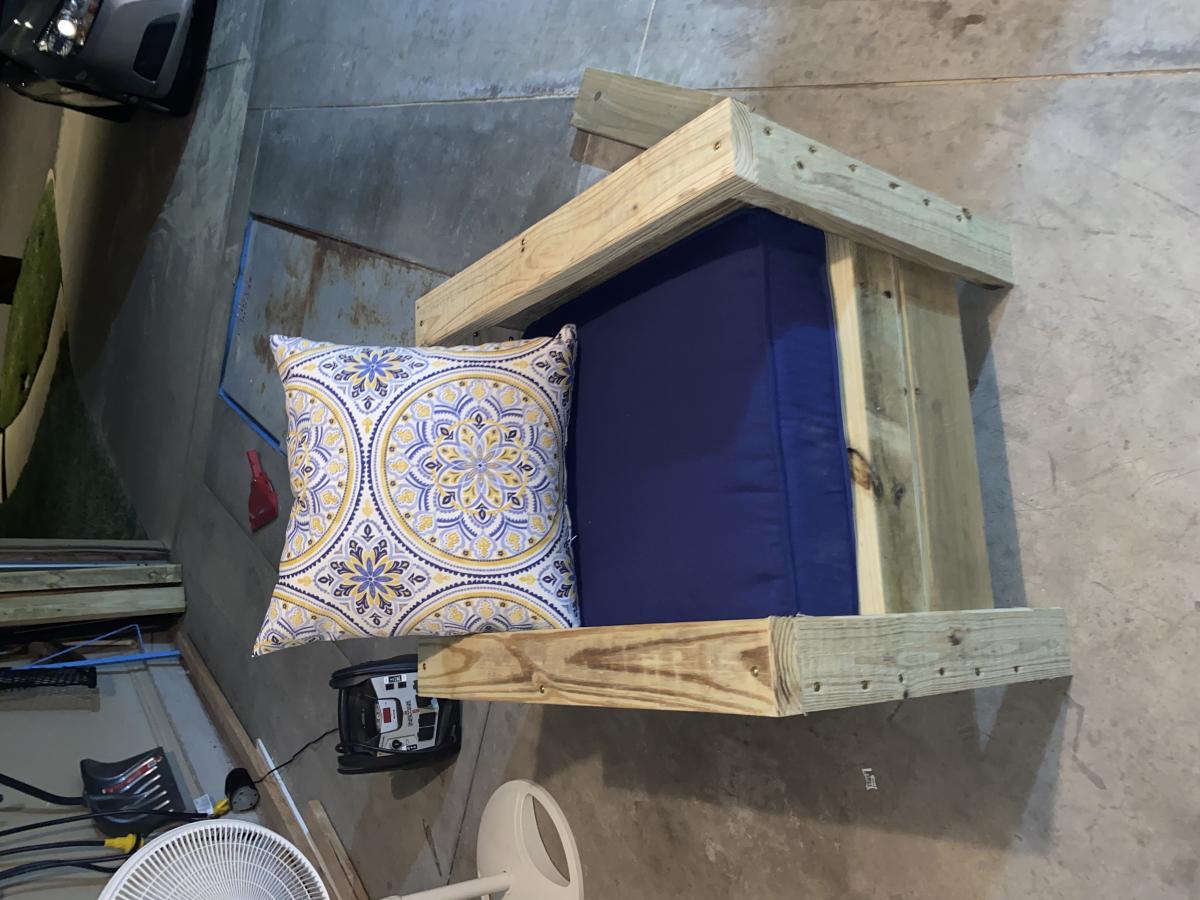
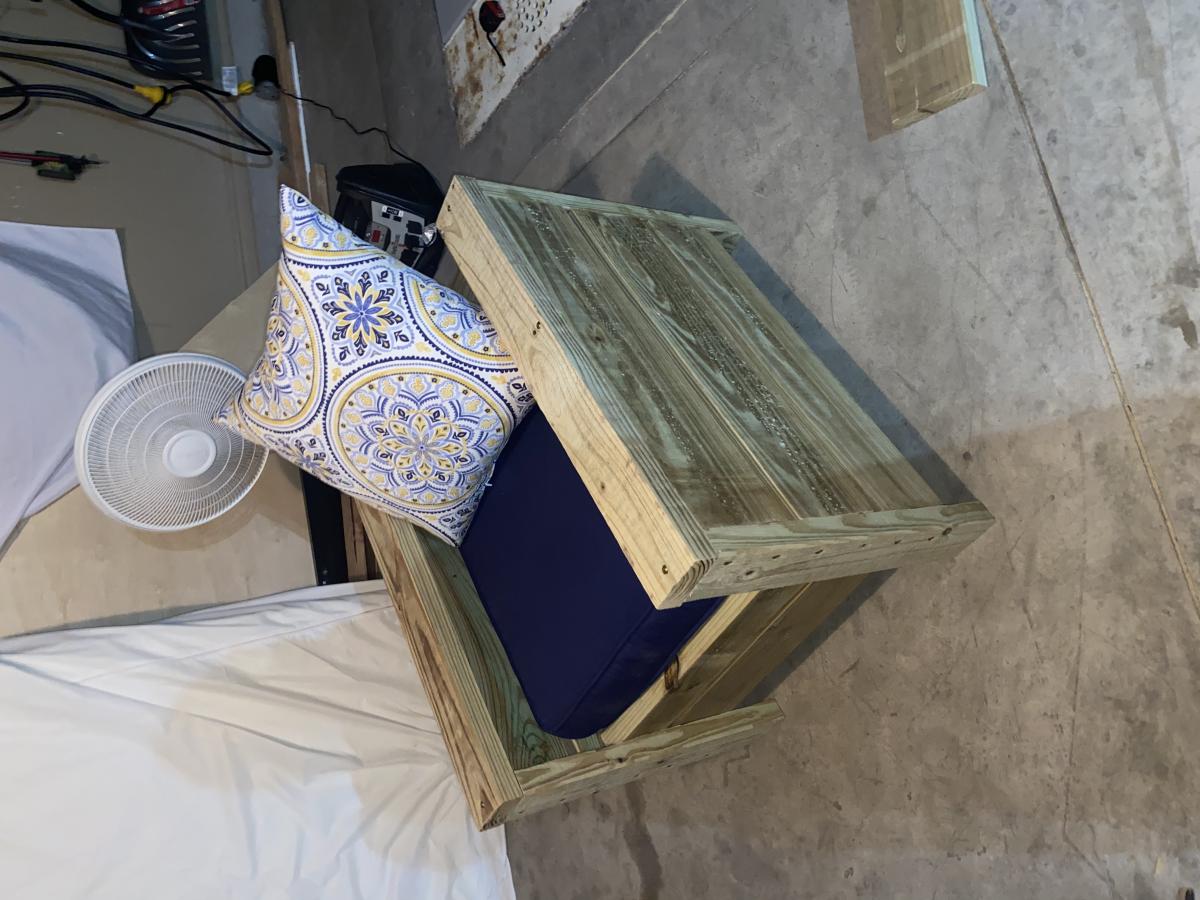
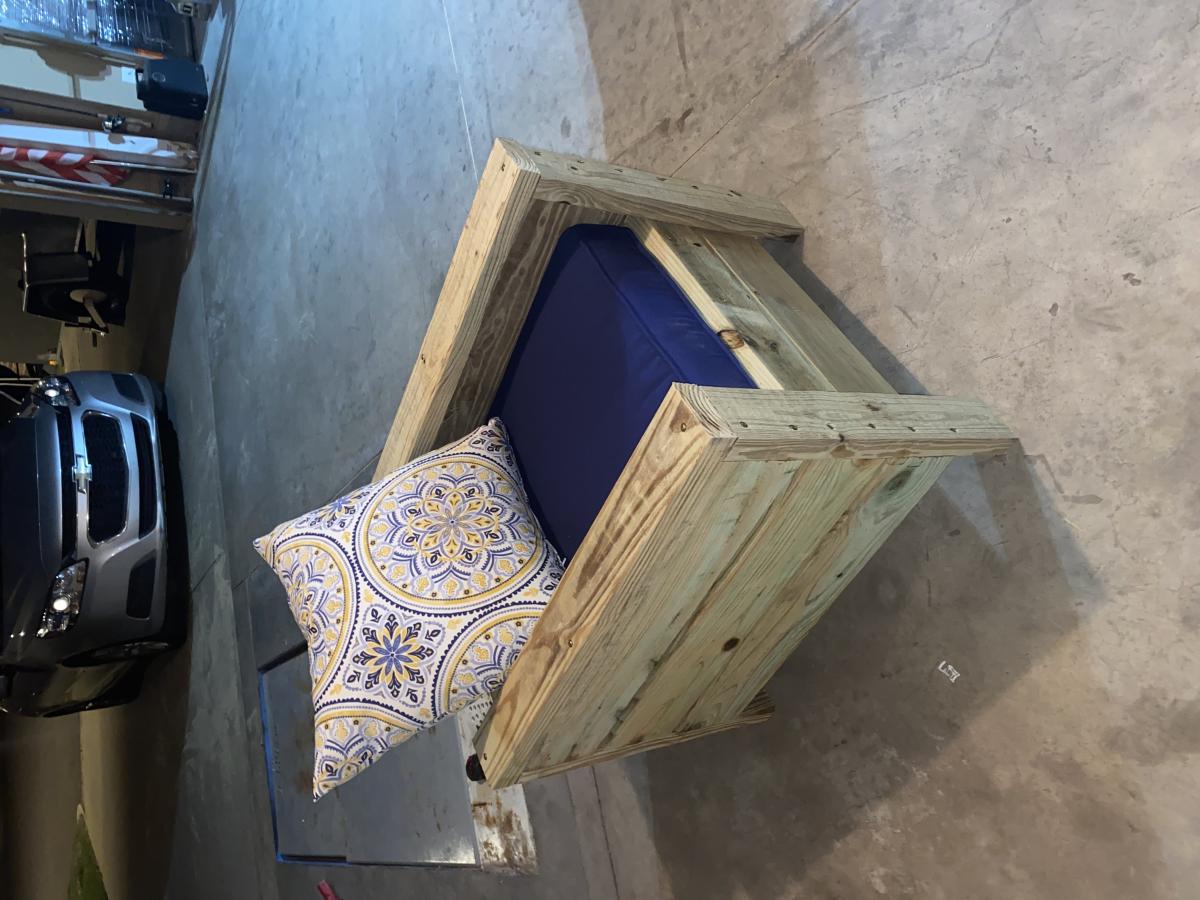
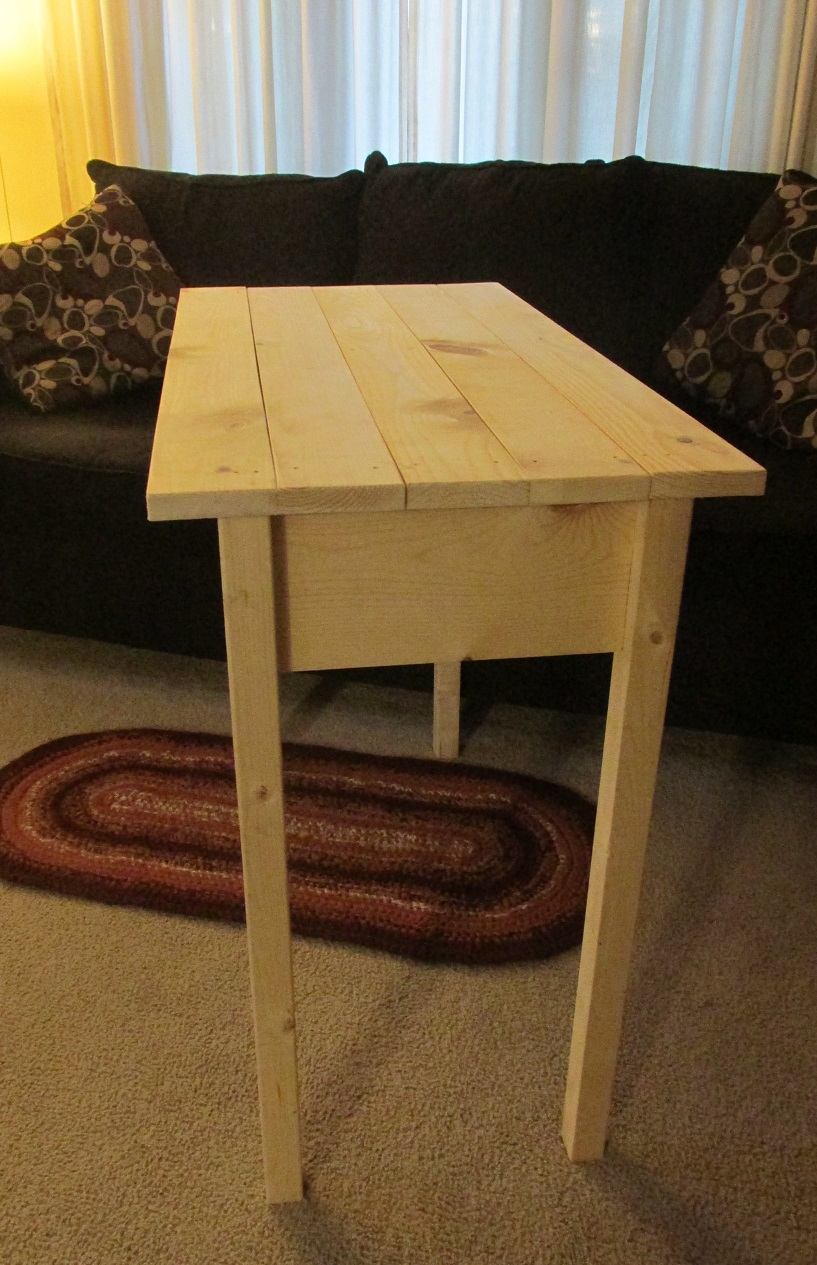
Slim Trus Console Table by Drew Cameron

Submitted by deaconcam on Thu, 09/13/2018 - 09:30

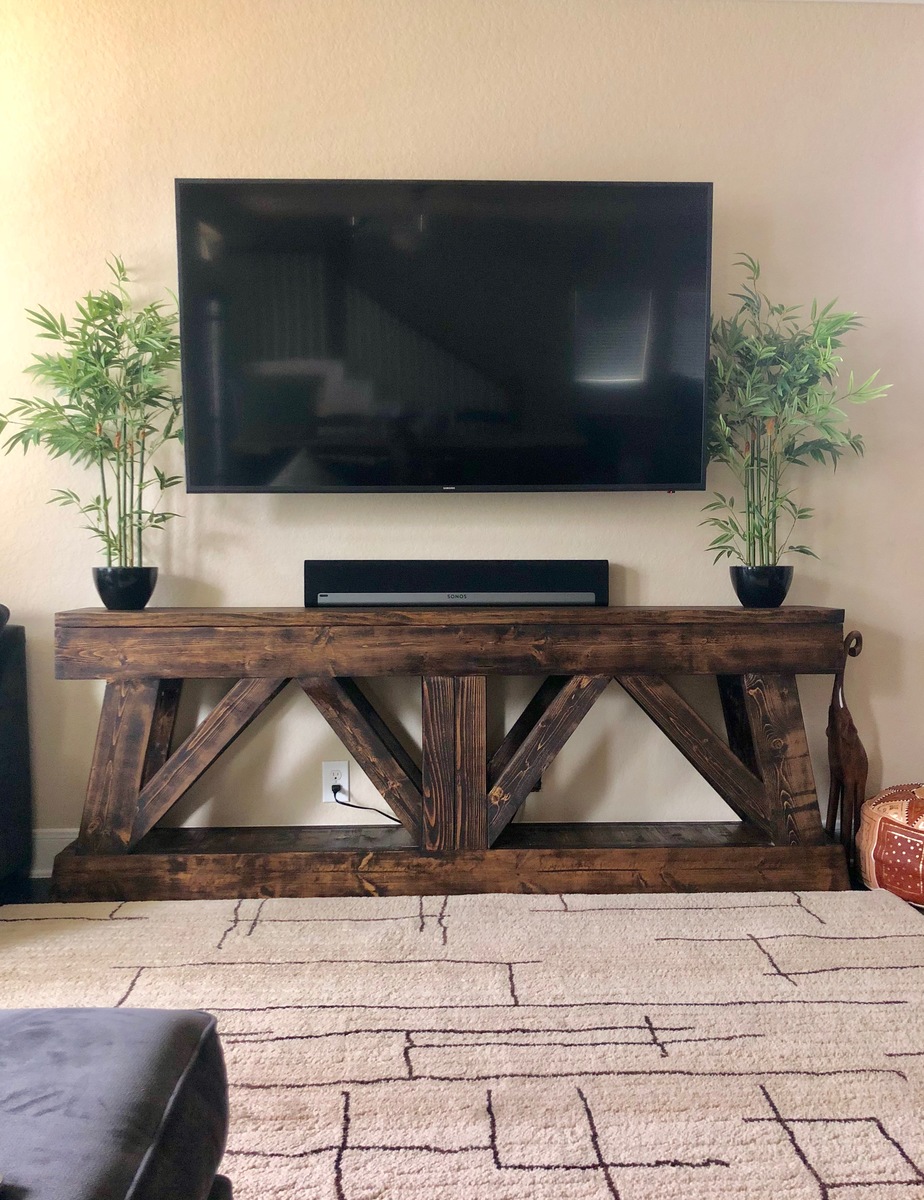
This project was a great learning experience and turned out fantastic. The mitered/beveled cuts were a bit tricky for me, It took me a while to understand how to use my miter saw to make the cuts correctly. Other than that, the building plans were clear and easy to follow. Cara, an author at Inspired Workshop, posted the plans at the following link: https://theinspiredworkshop.com/diy-slim-truss-console-table/ 


-Drew Cameron

Built from Plan(s)
Estimated Cost
$100
Estimated Time Investment
Weekend Project (10-20 Hours)
Finish Used
Minwax PolyShades Espresso Oil-based Interior Stain
Recommended Skill Level
Intermediate

Comments

Backyard seating

Submitted by Anonymous (not verified) on Mon, 06/06/2022 - 13:17

We needed some additional seating in the backyard so I built 6 Adirondack chairs for the fire pit and the bench using the plans that you have shared on Facebook. They turned out really nice and so far they have been a big hit!!

Thanks!!

Comments

Organizing My Little Boys!

Submitted by MamaPepper on Sun, 07/17/2011 - 15:05

I really needed an entry way system that was easy to corral all of my 3 boys shoes/coats/crap, etc. . . and I LOVED this plan! I messed up on the frame, so just left it off, and decided that I didn't need the back either. I painted little chalkboards on the side of each boys cubby.

I'm fairly certain that this isn't made perfectly, but it's perfect for us! This was my 2nd project and I'm really super psyched about it!

Built from Plan(s)
Estimated Cost
$60ish or so?
Estimated Time Investment
Weekend Project (10-20 Hours)
Recommended Skill Level
Beginner

King Size Farmhouse Bed

Submitted by krochelle on Tue, 08/20/2013 - 08:12

This bed was made as a Christmas present for my parents. At the time, there were no plans for a king-sized bed so I modified the queen plans to fit their mattress. I added a 5th leg to support the center of the bed and also added some plywood sheets underneath to better support the mattress.

Estimated Cost
$150
Estimated Time Investment
Weekend Project (10-20 Hours)
Finish Used
"A Day at the Jeweller" by Valspar with a red mahogany stain over (used almost as a glaze)
Recommended Skill Level
Intermediate

Counter Height Craft Desk

Submitted by Stockweb on Mon, 09/28/2015 - 07:39

This was pretty easy for my first build!  Don't look too closely though....  I raised thedesk to counter height to adjust for working while standing and add a bar stool.  The hardest part was adjusting the angle of the diagonal braces.  For the desktop I found a 2' X 6' piece of aspen at the blue big box store.  Sanded well, grey "whitewashed" it and sealed with paste wax. 

Built from Plan(s)
Finish Used
Base painted with satin interior in revere pewter. Made my own grey wash for the desktop and sealed with paste wax.
Recommended Skill Level
Starter Project

Comments

DIY outdoor chairs for our firepit

Here is one of the new chairs I'm building for our new fire pit.  They are made out of four pressure treated 2x6s (and one 2x4), and have a comfortable 18" seat depth, 19" seat width, and 110 degree angle for the backrest.  

More information, and a link to our plans are located on our blog, FamousArtisan.com

Estimated Cost
$50
Estimated Time Investment
Day Project (6-9 Hours)
Finish Used
None yet.
Recommended Skill Level
Intermediate

Comments

Adirondack side table ~ using recycled pallet wood

Submitted by Sharon L. on Sun, 07/24/2011 - 06:37

This was a very fun and one of the easiest projects I have made from Ana's plans! This makes me want to see if I can make matching chairs as well!

If you have seen my other projects, you know that I try to keep the lumber cost of my projects as close to free as possible. Living on the Eastern Shore of Virginia, pallets are not free, so I did have to pay $2 for each pallet, being VERY choosy about the slats being all the same size and straight. The hardest part of the project was taking the pallets apart! Check the blog link for more details.

I used 1 1/2 pallets for this project, and the following tools:

Jigsaw (to cut the ends off the pallet)

Pry-bar (to loosen the slats from the center of the pallet)

Miter saw

Drill

Table Saw (ripping the 2x4 sections of the pallet, to make the legs and spacers of the table)

Palm sander

Estimated Cost
less that $20
Estimated Time Investment
Day Project (6-9 Hours)
Finish Used
Gripper Grey primer by Glidden (leftover from other projects)

Brilliant Red Acrylic by Benjamin Moore (also leftover)

I use the Gripper Grey primer/sealer on most outdoor projects because it is a nice one-coat sealer and great for underneath darker colors.

The Brilliant Red is an off-the-shelf color.

I would recommend removing and priming/painting the tabletop pieces separately(after assembly)so that you can assure great coverage between the slats, being careful to remember where each piece belongs.
Recommended Skill Level
Beginner

Rustic Table w/ two tone finish

Submitted by Ash_Ahrens on Wed, 08/21/2013 - 19:35

This was totally my first real build. Like most others I modified the plans to fit in my mother-in-law's dining room. I used 4x4s for the legs and built two benches to go with it.

Estimated Time Investment
Week Long Project (20 Hours or More)
Finish Used
Varathane Cabernet stain with polyurethane top coat.
Recommended Skill Level
Beginner

Grandy Console with Barn Doors

Built in about 2 days.  Hardest part was definitely the hardware.  Looks great!

Built from Plan(s)
Estimated Time Investment
Weekend Project (10-20 Hours)
Recommended Skill Level
Intermediate

Comments

Jelmelda3

Sun, 10/18/2015 - 10:49

This came out so awesome. Did you use the same dimensions given in the example? Also what size is your TV? I ask because I want to build this but I'm scared my TV would be too small but this actually looks really great! 

HankTheTank

Thu, 02/11/2016 - 08:32

I used the same dimensions as the plan.  That TV is a 42".  We have since upgraded to a 60" and it now looks more proportionally correct.

HankTheTank

Thu, 02/11/2016 - 08:32

The hardware was a pain in the butt.  The metal bar was easy to cut actually.  I just put one of my old blades back on my mitre saw and it worked great.  Extracting the wheels from their casing was the most challenging.  I ended up putting the entire thing in a vise and drilling through it.  It is totally worth it though.  Everyone who comes over is obsessed with it.  Also, I did not attach the boards on top.  It's much easier to move if you take those boards and the doors off and carry it.  Good luck guys!

HankTheTank

Thu, 02/11/2016 - 08:29

I used the same dimensions as the plan.  That TV is a 42".  We have since upgraded to a 60" and it now looks more proportionally correct.  The hardware was a pain in the butt.  The metal bar was easy to cut actually.  I just put one of my old blades back on my mitre saw and it worked great.  Extracting the wheels from their casing was the most challenging.  I ended up putting the entire thing in a vise and drilling through it.  It is totally worth it though.  Everyone who comes over is obsessed with it.  Also, I did not attach the boards on top.  It's much easier to move if you take those boards and the doors off and carry it.  Good luck everyone!  

Ashlin

Sat, 03/26/2016 - 08:41

Hey, love how this turned out! Was wondering where you purchased the barn door hardware? Been stuck with trying to find some that won't break the bank!

Rgoodwin1206

Tue, 01/03/2017 - 00:02

Can you please help me as to exactly what hardware to get

 My husband and I can only find the hardware for the big barn doors. We are so lost and no one can help us!


Fortnite Battle Bus boys bedroom loft

Submitted by bbcarey on Mon, 10/15/2018 - 08:31

We remodelled my son's room and what better theme than Fortnite for an 8 year old... and what better loft than the Battle Bus!!

Estimated Time Investment
Week Long Project (20 Hours or More)
Finish Used
Latex paint
Recommended Skill Level
Intermediate

Rustic x console table

Submitted by Anonymous (not verified) on Sun, 06/26/2022 - 18:38

Built this for a friend of mine, but didn’t need it quite as long…I absolutely love this table!!!

Built from Plan(s)

Comments

Bedroom Dresser Cubbies / Media Stand

Submitted by Debi G on Wed, 07/27/2011 - 14:08

This is inspired by pieces I've seen here, though I sketched it out on paper myself to make sure it would suit the limited space in our room. I built the simple piece to match our bed (made from Ana and her reader's plans, see my photos below).

Originally, I planned to include cabinet doors, but with the limited space we have, this is better for us.

For nightstands, I stained plain wooden crates I had in the basement. Still working on how to hide the cords.

The baskets under my bed are from Bed Bath Beyond. The baskets in the "dresser" are from Target.

Sorry about the poor photo quality.

Built from Plan(s)
Estimated Cost
Built from leftover materials (Baskets $5.99 each)
Estimated Time Investment
Afternoon Project (3-6 Hours)
Finish Used
Minwax Provincial (one coat) and one Minwax water-based poly coat.
Recommended Skill Level
Beginner

Comments

Debi G

Wed, 07/27/2011 - 14:09

I was trying to show that these pieces are a set, but instead the photos look pretty random.

Debi G

Sat, 12/10/2011 - 07:41

Sorry I haven't logged in in so long--the bed follows plans for the king Stratton, combined with the reclaimed wood headboard. The headboard is attached to the wall. We can slide the foot bench part out to hide presents behind, which is really handy (though heavy) to do.

Chunky Rustic Kitchen Island

I wanted a Super Rustic and Super Chunky Island with out the Super High price tag. So I turned to pintrest for inspiration. I switched up a few things , but the end result was EXACTLY what I was looking for. Score!!!!

Estimated Time Investment
Weekend Project (10-20 Hours)
Finish Used
Early American stain from Minwax.
Recommended Skill Level
Beginner

Memorial flag case

Submitted by TMW on Wed, 10/07/2015 - 13:11

I built this case for my Grandma when my Grampa died. I wanted to be able to display the shells as well. The design is a combination of a few I saw and like different aspects of.

Estimated Cost
$30
Estimated Time Investment
Afternoon Project (3-6 Hours)
Finish Used
shellac
Recommended Skill Level
Beginner

Comments

Garage shelv

Submitted by Anonymous (not verified) on Tue, 10/23/2018 - 18:38

104.5” long, 17 1/2” wide. Heughan varies but on average is 72”. My garage slopes downward, so each front leg is a different length which made the unit level. I used joist hangers instead of pocket holes. 

Estimated Cost
$300
Estimated Time Investment
Week Long Project (20 Hours or More)
Recommended Skill Level
Intermediate

Outdoor chair

Submitted by Anonymous (not verified) on Sat, 07/09/2022 - 22:36

I have not yet sanded or sealed the chairs. I made two in 5 hours because I ran out of screws and had to go and get some more but I made these for my husband and my 15 year wedding anniversary to be able to spend more time outside after the kids go to bed. It cost me $130 plus the cushions to build

Comments

Mini Farmhouse Bedside Table

Submitted by bcarter_1 on Tue, 10/30/2018 - 04:20

I'm just learning to make things with wood, I made two of these for the bedropom update last year.

Estimated Time Investment
Weekend Project (10-20 Hours)
Recommended Skill Level
Beginner

Comments

Extra Large Canopy Bed

Submitted by Anonymous (not verified) on Sat, 07/23/2022 - 08:34

I followed the plans on the site but made the rear posts the full size of an 8 foot 4X4. For the front posts I had to cut down to fit around the fan/light. For the headboard I simply put 2X6's spaced out 3 1/2 inch between, I used scrap 2X4 for spacing. To attach all the piece I use those newer large Kreg screws for large lumber, way bigger and stronger screws. The bed platform is 1/2 plywood, added a 2X4 for support and skipped the support in the middle. Extra screws and metal L brackets hidden and added for support. Used a router to round out all edges and multi-tool to sand the rest.

Comments