Community Brag Posts

Craftsman Frame

Submitted by pde00311 on Tue, 06/03/2014 - 08:50

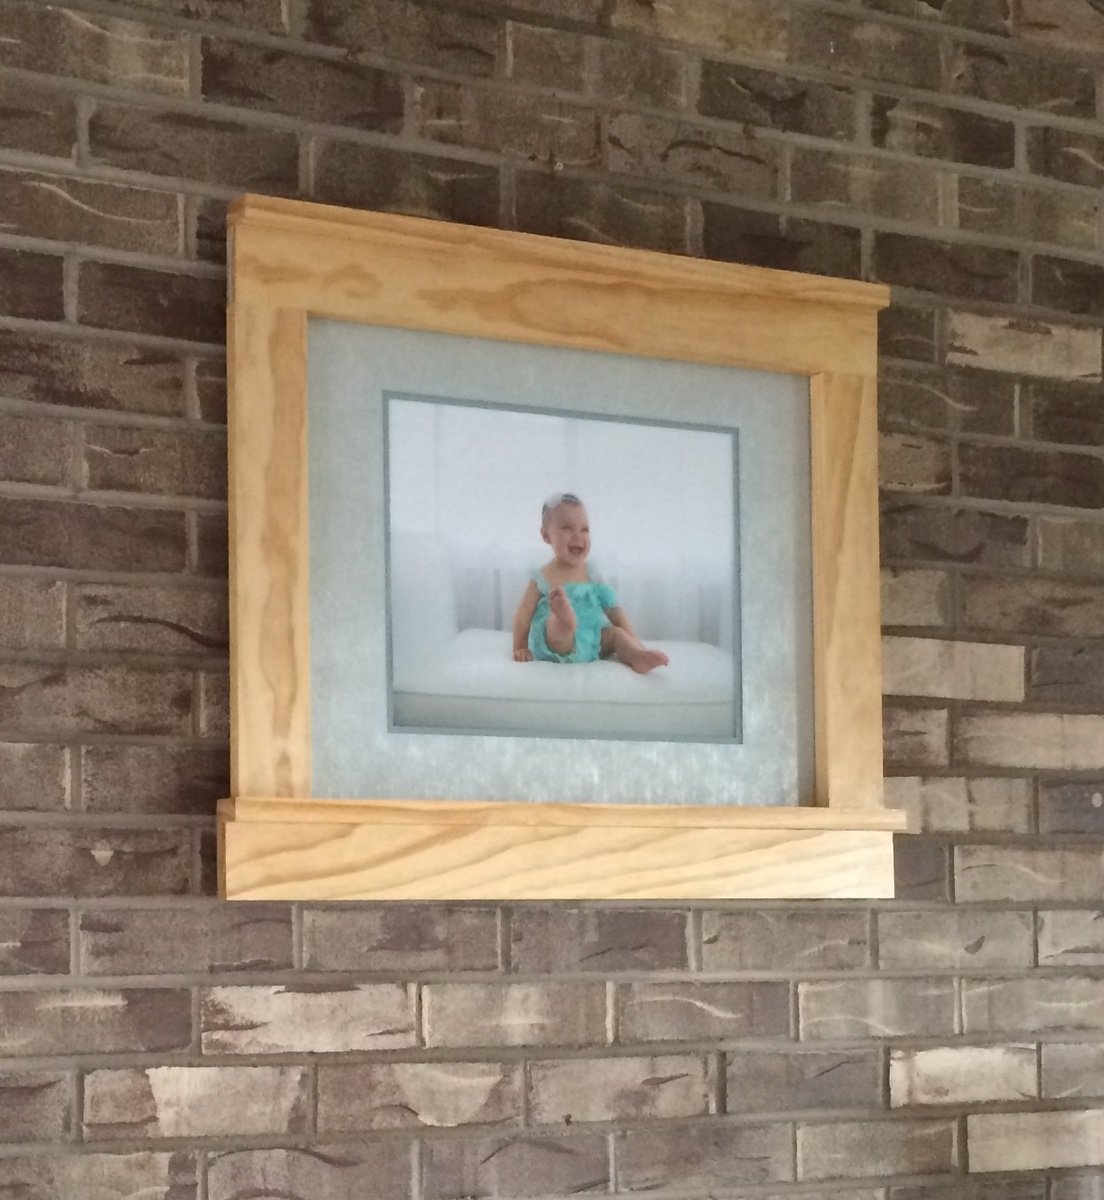
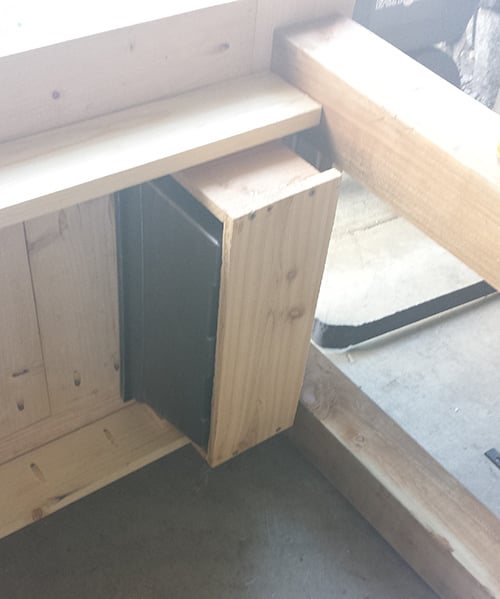
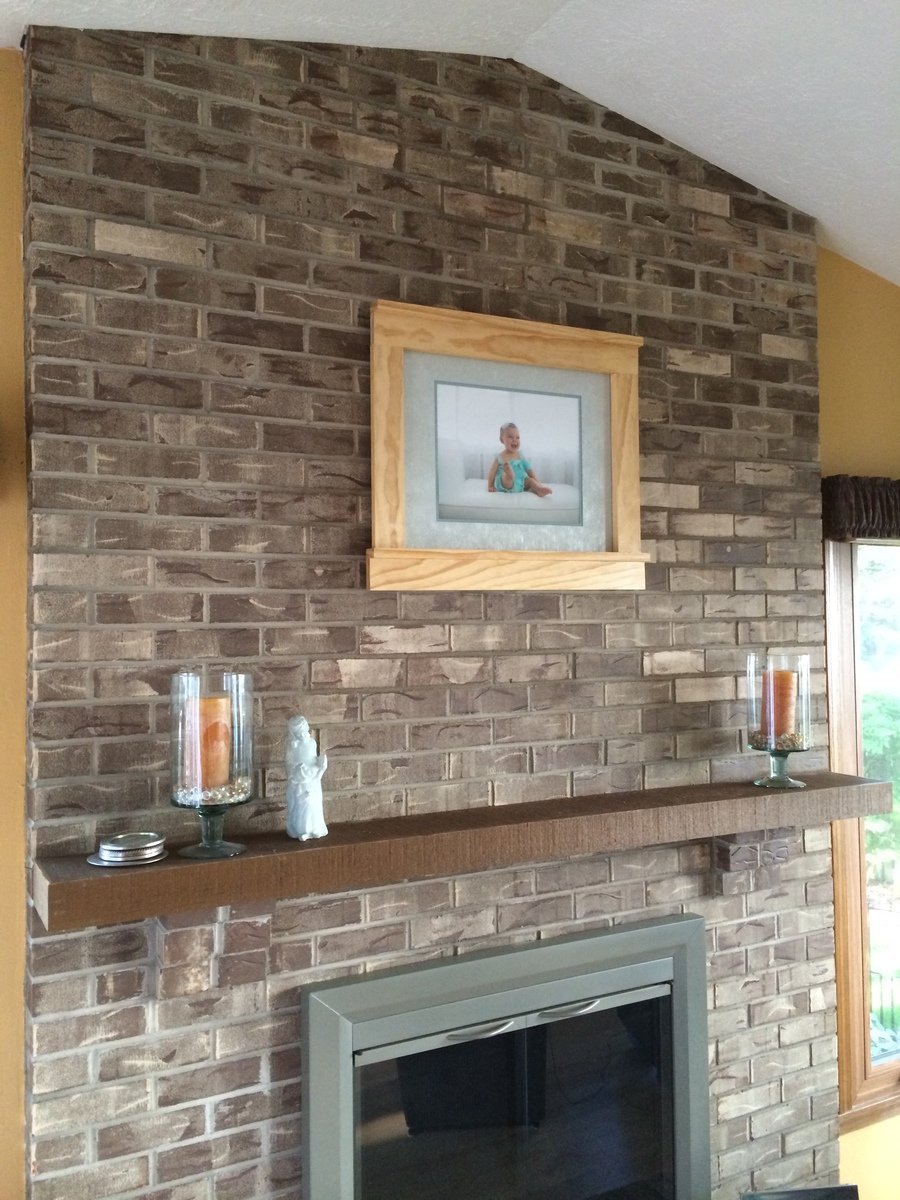
Our new house has an imposing exposed brick wall over a fireplace and mantle. To fill the big wall, we wanted to post enlarged pictures of our baby/family, but did not want to spend to money on a massive frame. Executing these plans turned out awesome. We blew up a photo, had a matte and glass cut to size, and then I built the craftsman frame to fit around everything. The framing probably would have been better/easier if I had a router to cut out an indent on the backside, but I ended up framing the photo/glass/matte inside some plain molding I nailed to the back.

Built from Plan(s)
Estimated Cost
$10
Estimated Time Investment
An Hour or Two (0-2 Hours)
Finish Used
Minwax Ipswich Pine with Polycrylic
Recommended Skill Level
Beginner

Tiny Apartment Table

Submitted by mcnessa on Mon, 09/05/2016 - 15:05

Modified the plans somewhat to accommodate the limitations of my daughter's tiny studio apartment. Took 4 inches off the width, centered a cart type base, and put it on wheels so she can use it as a desk or roll it into the kitchen space when she has company.

Also used 1x4 inches boards for the white boxes and used one board the length of the back and put hinges on all 3 top sections.  Drilled a hole with a gromet in the center section so she can feed a powercord through to her laptop.


Estimated Time Investment
Day Project (6-9 Hours)
Finish Used
Used Varathane Red Mahogany wood stain and sealed it with polyurethane.
Recommended Skill Level
Beginner

Simple Composting Toilet Outhouse

Submitted by Emillie on Thu, 06/18/2020 - 13:36

We built this composting toilet as one of the first things we did on our piece of vacant land. (How can you build anything else without somewhere to go when nature calls?)

An eco-friendly design was important to us, so we used cedar fencing instead of plywood. Otherwise, we followed Ana White's simple outhouse plans. It came out perfectly! It even has a rain barrel for hand washing.

Estimated Cost
800
Estimated Time Investment
Weekend Project (10-20 Hours)
Finish Used
We stained the outside with a semi-transparent stain and varnished the inside with an outdoor varnish.
Recommended Skill Level
Beginner

Custom Cat Loader Planter Box

Submitted by Anonymous (not verified) on Tue, 03/26/2024 - 10:06

Hi Ana! My husband is a heavy equipment operator so I built him a cat loader planter box. I made this up as I went and I really enjoyed it. Thank you for giving me the confidence to build , being a 65 yr old grandmother.


Rustic "X" Coffee Table

Submitted by Meagan84 on Wed, 08/15/2012 - 16:12

This table was super easy to make and is solid as a rock! I'm very happy with the way it turned out. It is the first piece of indoor furniture I have made. I did need 3 2x2x8's instead of two though. I don't know if it was my inexperience or what, but that is the only thing I had trouble with.

I finished it exactly like Hillary did, with the steel wood vinegar concoction, but mine came out much more brown than hers did. It wasn't exactly what I had planned, but in the end I'm happy with it. I guess that's one of those things that can't be controlled.

I can't wait to build the end table to match!

Built from Plan(s)
Estimated Cost
$75
Estimated Time Investment
Weekend Project (10-20 Hours)
Finish Used
Hillary's oxidizing method starting with strong tea, then adding a coat of steel wool and vinegar mix. Then used Minwax Finishing paste wax.
Recommended Skill Level
Beginner

Comments

Hillary (not verified)

Mon, 08/27/2012 - 22:41

Gorgeous, Meagan! It did come out a lot more brown than mine. That is so strange. I guess with oxidizing you never really know what you're going to get! I go a bit crazy with scraps before I oxidize and I experiment with more or less vinegar to tone down the effect. Anyway, yours is really beautiful and looks super square and sturdy. You did a great job.

Workbench

Submitted by Ulrike on Sun, 06/21/2020 - 09:37

Built 2 of the workbenches for our garage. The plans made assembly very easy and quick. We had Home Depot cut the plywood to size.

Estimated Time Investment
Afternoon Project (3-6 Hours)

Comments

Truss End Table

I had trouble with this project. I wasn't sure of the terminology, off square and such. It went well, I ended up not putting the truss part on due to not paying attention when cutting the wood.

Built from Plan(s)
Estimated Cost
$20
Estimated Time Investment
Afternoon Project (3-6 Hours)
Finish Used
Rust-Oleum Ultimate Dark Walnut
Recommended Skill Level
Beginner

Double dog coffee table crate

I LOVE the way this turned out! I used truck bed liner for the floor and the sides because one of the dogs is still a puppy and truck bed liner is TOUGH and waterproof (in case of accidents)! I made one side of the crate huge and one side small to match the size of our dogs. The really nice thing is that you can't tell by looking at it that it is two different sizes inside. This looks so much better than those ugly wire or plastic crates.

Built from Plan(s)
Estimated Cost
$85
Estimated Time Investment
Weekend Project (10-20 Hours)
Finish Used
I primed all of the wood except the lid. On the interior I sprayed truck bed liner over the primer. On the outside I used Beyer high gloss "parchment paper" color. (I used high gloss so dog dirt, dander and fur would be easy to wipe off). I used Minwax wood prep first and then I stained the top with Minwax espresso. It took about 3 coats of stain to get the color I wanted and 2 coats of paint after the primer.
Recommended Skill Level
Beginner

Comments

Leaning Bathroom Ladder Shelf

Submitted by Anm343 on Fri, 09/09/2016 - 11:46

This leaning shelf was the perfect solution to my tiny (and tiled) bathroom. I didn't want to have to put screw holes in the walls and have been searching for a project. 

I made the shelves out of reclamed barn wood which made the project a little bit harder to get perfect square and level but it was worth it. The legs are 2x4s. The hardest part was definitely making sure the shelves were level on the legs. Lots of clamps helped! 


Estimated Cost
20 dollars
Estimated Time Investment
Afternoon Project (3-6 Hours)
Finish Used
Early American and Rust-Oleum Triple Thick Poly in Clear Matte
Recommended Skill Level
Beginner

Ultimate Workbench for me

Submitted by ianr on Mon, 06/22/2020 - 15:13

I altered the original plans in the following ways:

  • Only built one rolling cart because I already had a multi-drawer tool chest that fit right under the workbench.
  • Built the right half of the workbench as a separate piece from the miter table because attic access is right above it and we need to move the workbench to get to it.
  • Built a half cart for the table saw because the Dewalt contractor saw extends too far to the sides to have it boxed in.
  • I'm going to add a sliding plate that locks down for my miter saw so I can pull it away from the wall without dragging or lifting it.
  • I used a nail gun with two inch nails instead of staples since I don't own a staple gun that holds staples that long.

I'm not that experienced with projects so here are a couple of things I learned:

  • Attach the castors far enough under the cart so that the wheel never extends beyond the sides.
  • Watch what grade sandpaper you use on the plywood. It's easy to strip off a layer.
  • This was not a one-person project for me. Even with clamps, I still needed help bracing parts and rotating pieces.

Thanks for the great plan! Now I can start on all the other projects on our improvement list.

Estimated Cost
350
Estimated Time Investment
Weekend Project (10-20 Hours)
Recommended Skill Level
Intermediate

Turned Leg Coffee Table

Submitted by maryjacob on Mon, 08/20/2012 - 18:57

Okay, don't mind the husband and the pooch in the background there! I fell in love with the Pottery Barn version of this table (actually, I've fallen in love with everything from Pottery Barn, if we're being honest here), so I've been wanting to make this coffee table for quite awhile. I found the legs on ebay for a really low price, so I splurged and bought premium 5/4" thick pine planks for the table top to make it look more substantial. This table was so easy to assemble using pocket holes. My husband and I both love how it turned out!

Estimated Cost
About $130 for all wood and finishing supplies
Estimated Time Investment
Weekend Project (10-20 Hours)
Finish Used
Stained with a mix of Minwax English Chestnut and Minwax Dark Walnut, then finished with 3 coats of Minwax Clear Satin Polyurethane
Recommended Skill Level
Beginner

Leaning Shelf

Submitted by Wayoff on Tue, 06/10/2014 - 19:26

This was my first project and we think it turned out great..Thank you for sharing your plans and showing that anyone can do this.

Built from Plan(s)
Estimated Cost
50.00
Estimated Time Investment
Weekend Project (10-20 Hours)
Finish Used
Chocolate Fudge Truffle satin paint.
Recommended Skill Level
Beginner

Three Cube Bench

Submitted by Anonymous (not verified) on Sun, 09/11/2016 - 07:42

I used the bench top from Ana's Farmhouse Table and took 1.5in off the legs to compensate.  Got the baskets on Amazon.

Estimated Cost
$60
Estimated Time Investment
Weekend Project (10-20 Hours)
Finish Used
Special Walnut over Honey Oak
Recommended Skill Level
Beginner

2x4 Outdoor Sectional

Submitted by Iraida on Wed, 06/24/2020 - 22:57

Have been wanting to spruce up my little outdoor patio with an outdoor sectional, but couldn't bear to purchase one due to the high cost. Made the decision to build the outdoor sectional, but purchased the cushions first in order to commit myself to the project. While I worked on the outdoor sectional, my younger sister built herself a bed frame from Ana's plans. I purchased the pre-drill screws, but my dad suggested I pre-drill the wood with his horizontal table drill (made the screws go straight in). Extremely happy and proud of the final product. Super affordable and it was a great project to work alongside my parents.

You do need to add an additional 28.5" 2x4 Outdoor Sofa /One Arm 2x4 Outdoor Sofa (missing from the plans). I can't remember which one was missing the piece.

~$350 ("grey" cushions were a little less than ~$200 from Big Lots (used 15% discount during Memorial Day Sale). Wood, stain, screws, wood putty, and glue ~$150.

Originally used Valspar Tintable Neutral Base Semi-Transparent Exterior Stain and Sealer (1 quart) in the color "Dutch Licorice". The color was more of a blue-grey, which was not what I was going for. Had some leftover Varathane Carbon Gray Interior Wood Stain (less than 1 quart) from a ladder blanket project and painted over the Valspar Stain/Sealer.

Estimated Cost
~$350 ("grey" cushions were a little less than ~$200 from Big Lots (used 15% discount during Memorial Day Sale). Wood and stain ~$150.
Estimated Time Investment
Weekend Project (10-20 Hours)
Finish Used
Originally used Valspar Tintable Neutral Base Semi-Transparent Exterior Stain and Sealer (1 quart) in the color "Dutch Licorice". The color was more of a blue-grey, which was not what I was going for. Had some leftover Varathane Carbon Gray Interior Wood Stain (less than 1 quart) from a ladder blanket project and painted over the Valspar Stain/Sealer.
Recommended Skill Level
Beginner

Schoolwork organizer

Submitted by Deborah on Thu, 08/23/2012 - 15:45

I'm trying to revamp our family "launch pad" in time for the start of school and was hoping to have a box for each kid to drop off their school forms and stuff. The "numbered cubbies on the wall" plan is just not practical for us -- I don't need a lot of little cubbies, just a few big ones! So I modified it to work for us. The letters are each of my boys' initials.

Also, I used scrap wood and leftover paint. So basically the cost was almost nothing, just a few nails and some wood glue.

Built from Plan(s)
Estimated Cost
0
Estimated Time Investment
An Hour or Two (0-2 Hours)
Finish Used
First I painted the piece black, and then covered it with some light gray house paint I had leftover. I used a sharpie pen for the letters and distressed everything.
Recommended Skill Level
Beginner

Grill Prep Table with built-in cooler

Submitted by coolove on Sun, 06/15/2014 - 18:03

I made this for my father for Father's Day. I wanted to do a grilling prep table with a built in cooler. The cooler part is not really just for drinks but also a place to store barbeque utensils while in use.

Height is 36 inches. Made out of 2x6s, 1x4s, and 4x4s. Because the table is so short, the planter slides in and out from the side underneath the table top. I had cut the top before buying the planter which lead me to do a few changes to my initial design on the fly.

Estimated Cost
$36 for wood excluding the top. (Already had on hand), $25 for bbq accessories
Estimated Time Investment
Weekend Project (10-20 Hours)
Finish Used
Varathane Dark Walnut. Two coats. And Cabot Spar Finish Semi-gloss. Four coats for the top and three coats for the bottom shelf.
Recommended Skill Level
Beginner

Comments

Cross35

Thu, 03/12/2015 - 10:50

I love to grill and would love to build one of these. Do you have any other details on your design? Cut lengths or anything? I'm too new to building to deviate to far from plans right now haha.

Thanks!

Back