Community Brag Posts
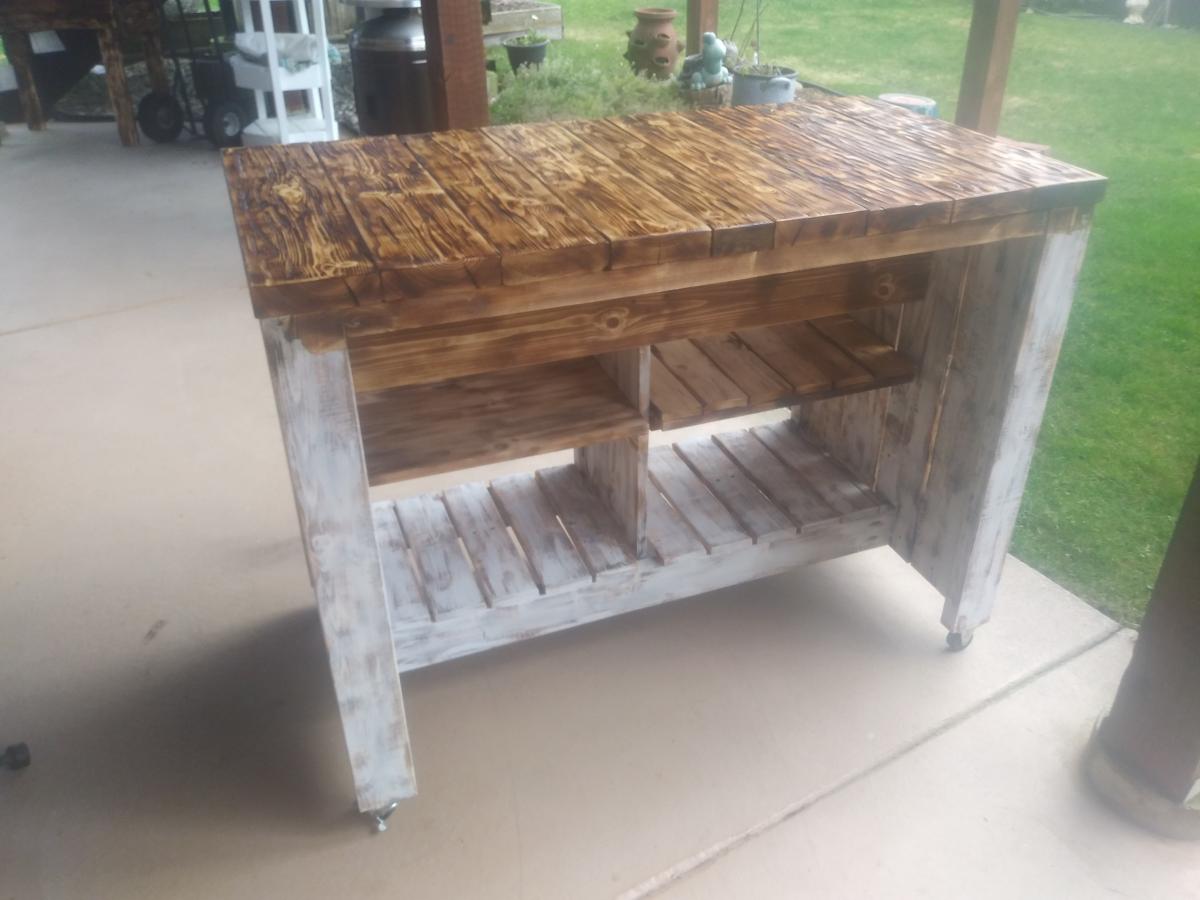
Kitchen Island with pallet wood
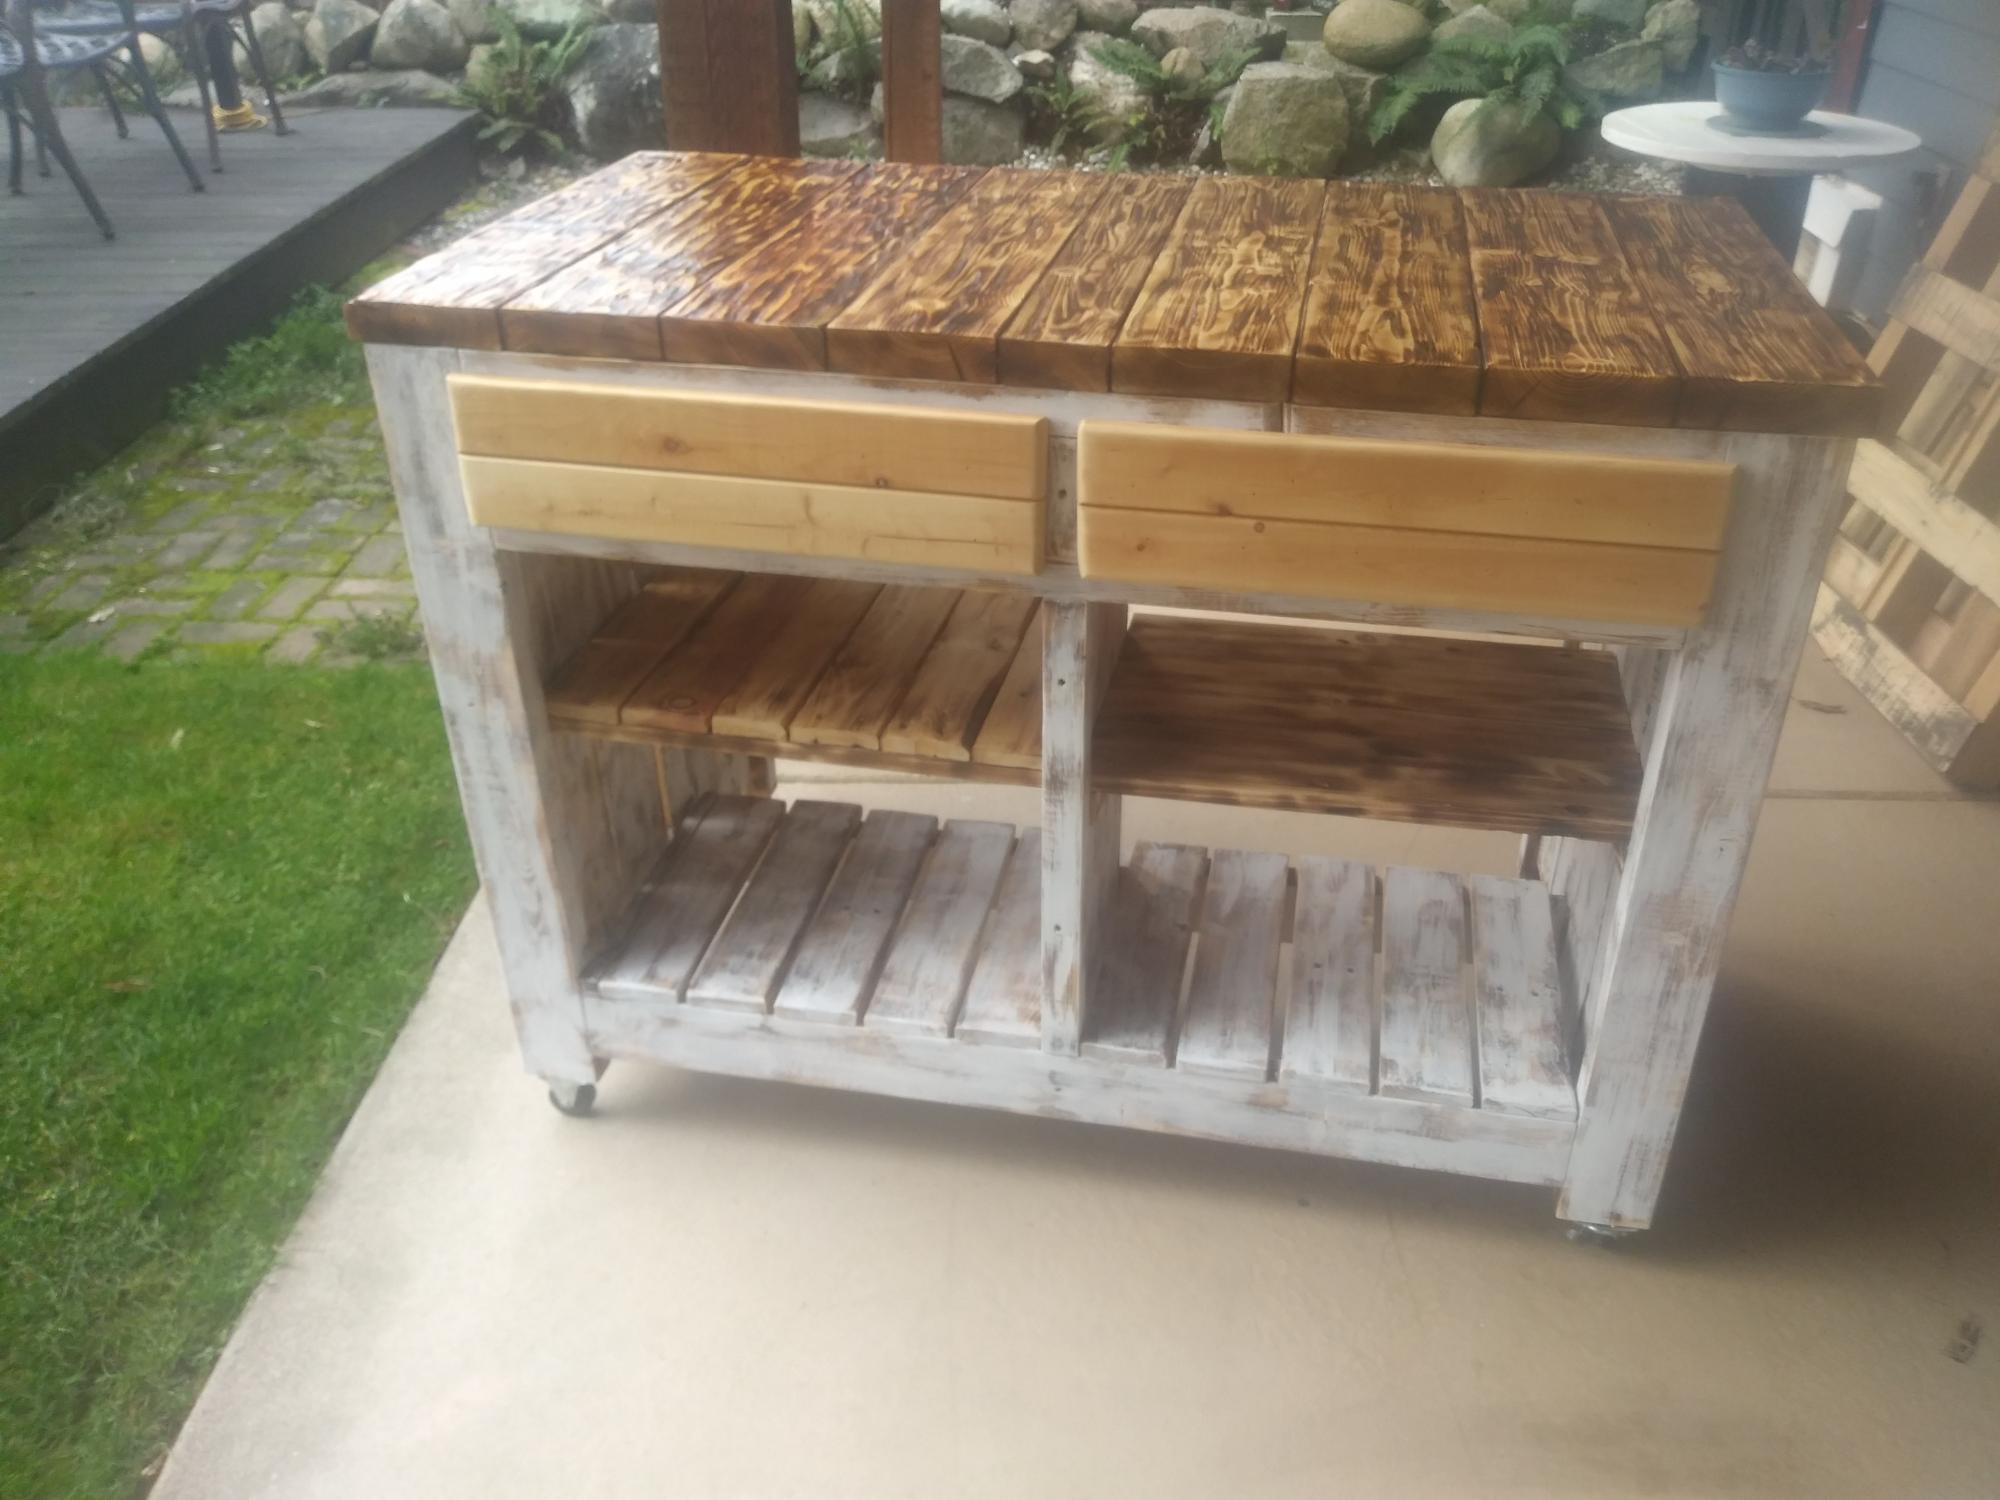
After following Ana Whit and other bloggers for a long time i figured my skills were at a level to try an advanced build like the Kitchen Island.. But i also wanted to challenge myself even more and was determined to make it from as much reclaimed wood as i could, mainly pallet wood.
With a lot of modifications to make it work i think I got a good result from these plans.
While i used as much reclaimed wood as i could, i still needed some clean 2x4's , 2x2's
Built from Plan(s)
Estimated Cost
$50
Estimated Time Investment
Week Long Project (20 Hours or More)
Finish Used
I burned the top and used a cup wire brush on an angle grinder to get the effect of barn wood. then a couple coats of lacquer on the top. And a spray finish of polyacrylic for everything else.
chalk pain ( linin) to do the White wash
chalk pain ( linin) to do the White wash
Recommended Skill Level
Advanced
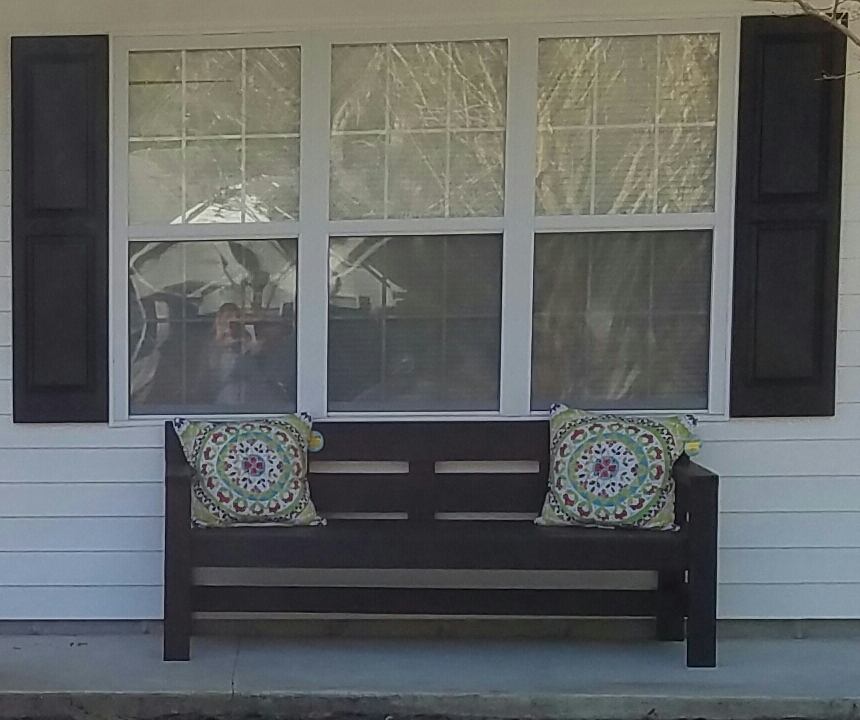
Entryway Bench
My husband and I used your instructions and made this bench! We are further furnishing our home, and we love it! We went with a weathered gray stain to match some other furniture we have.
Estimated Time Investment
Weekend Project (10-20 Hours)
Recommended Skill Level
Starter Project
Comments
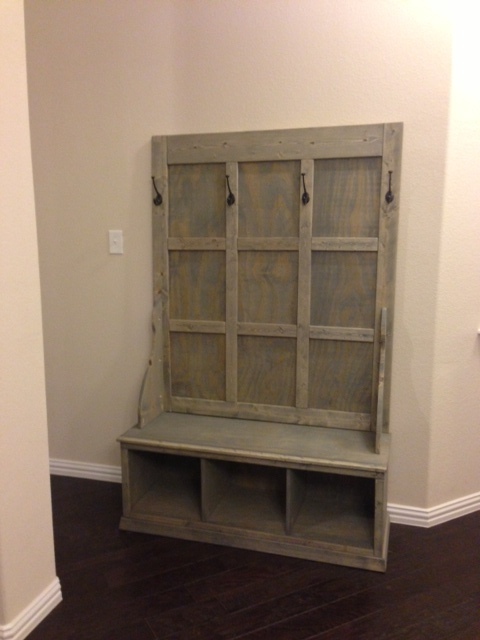
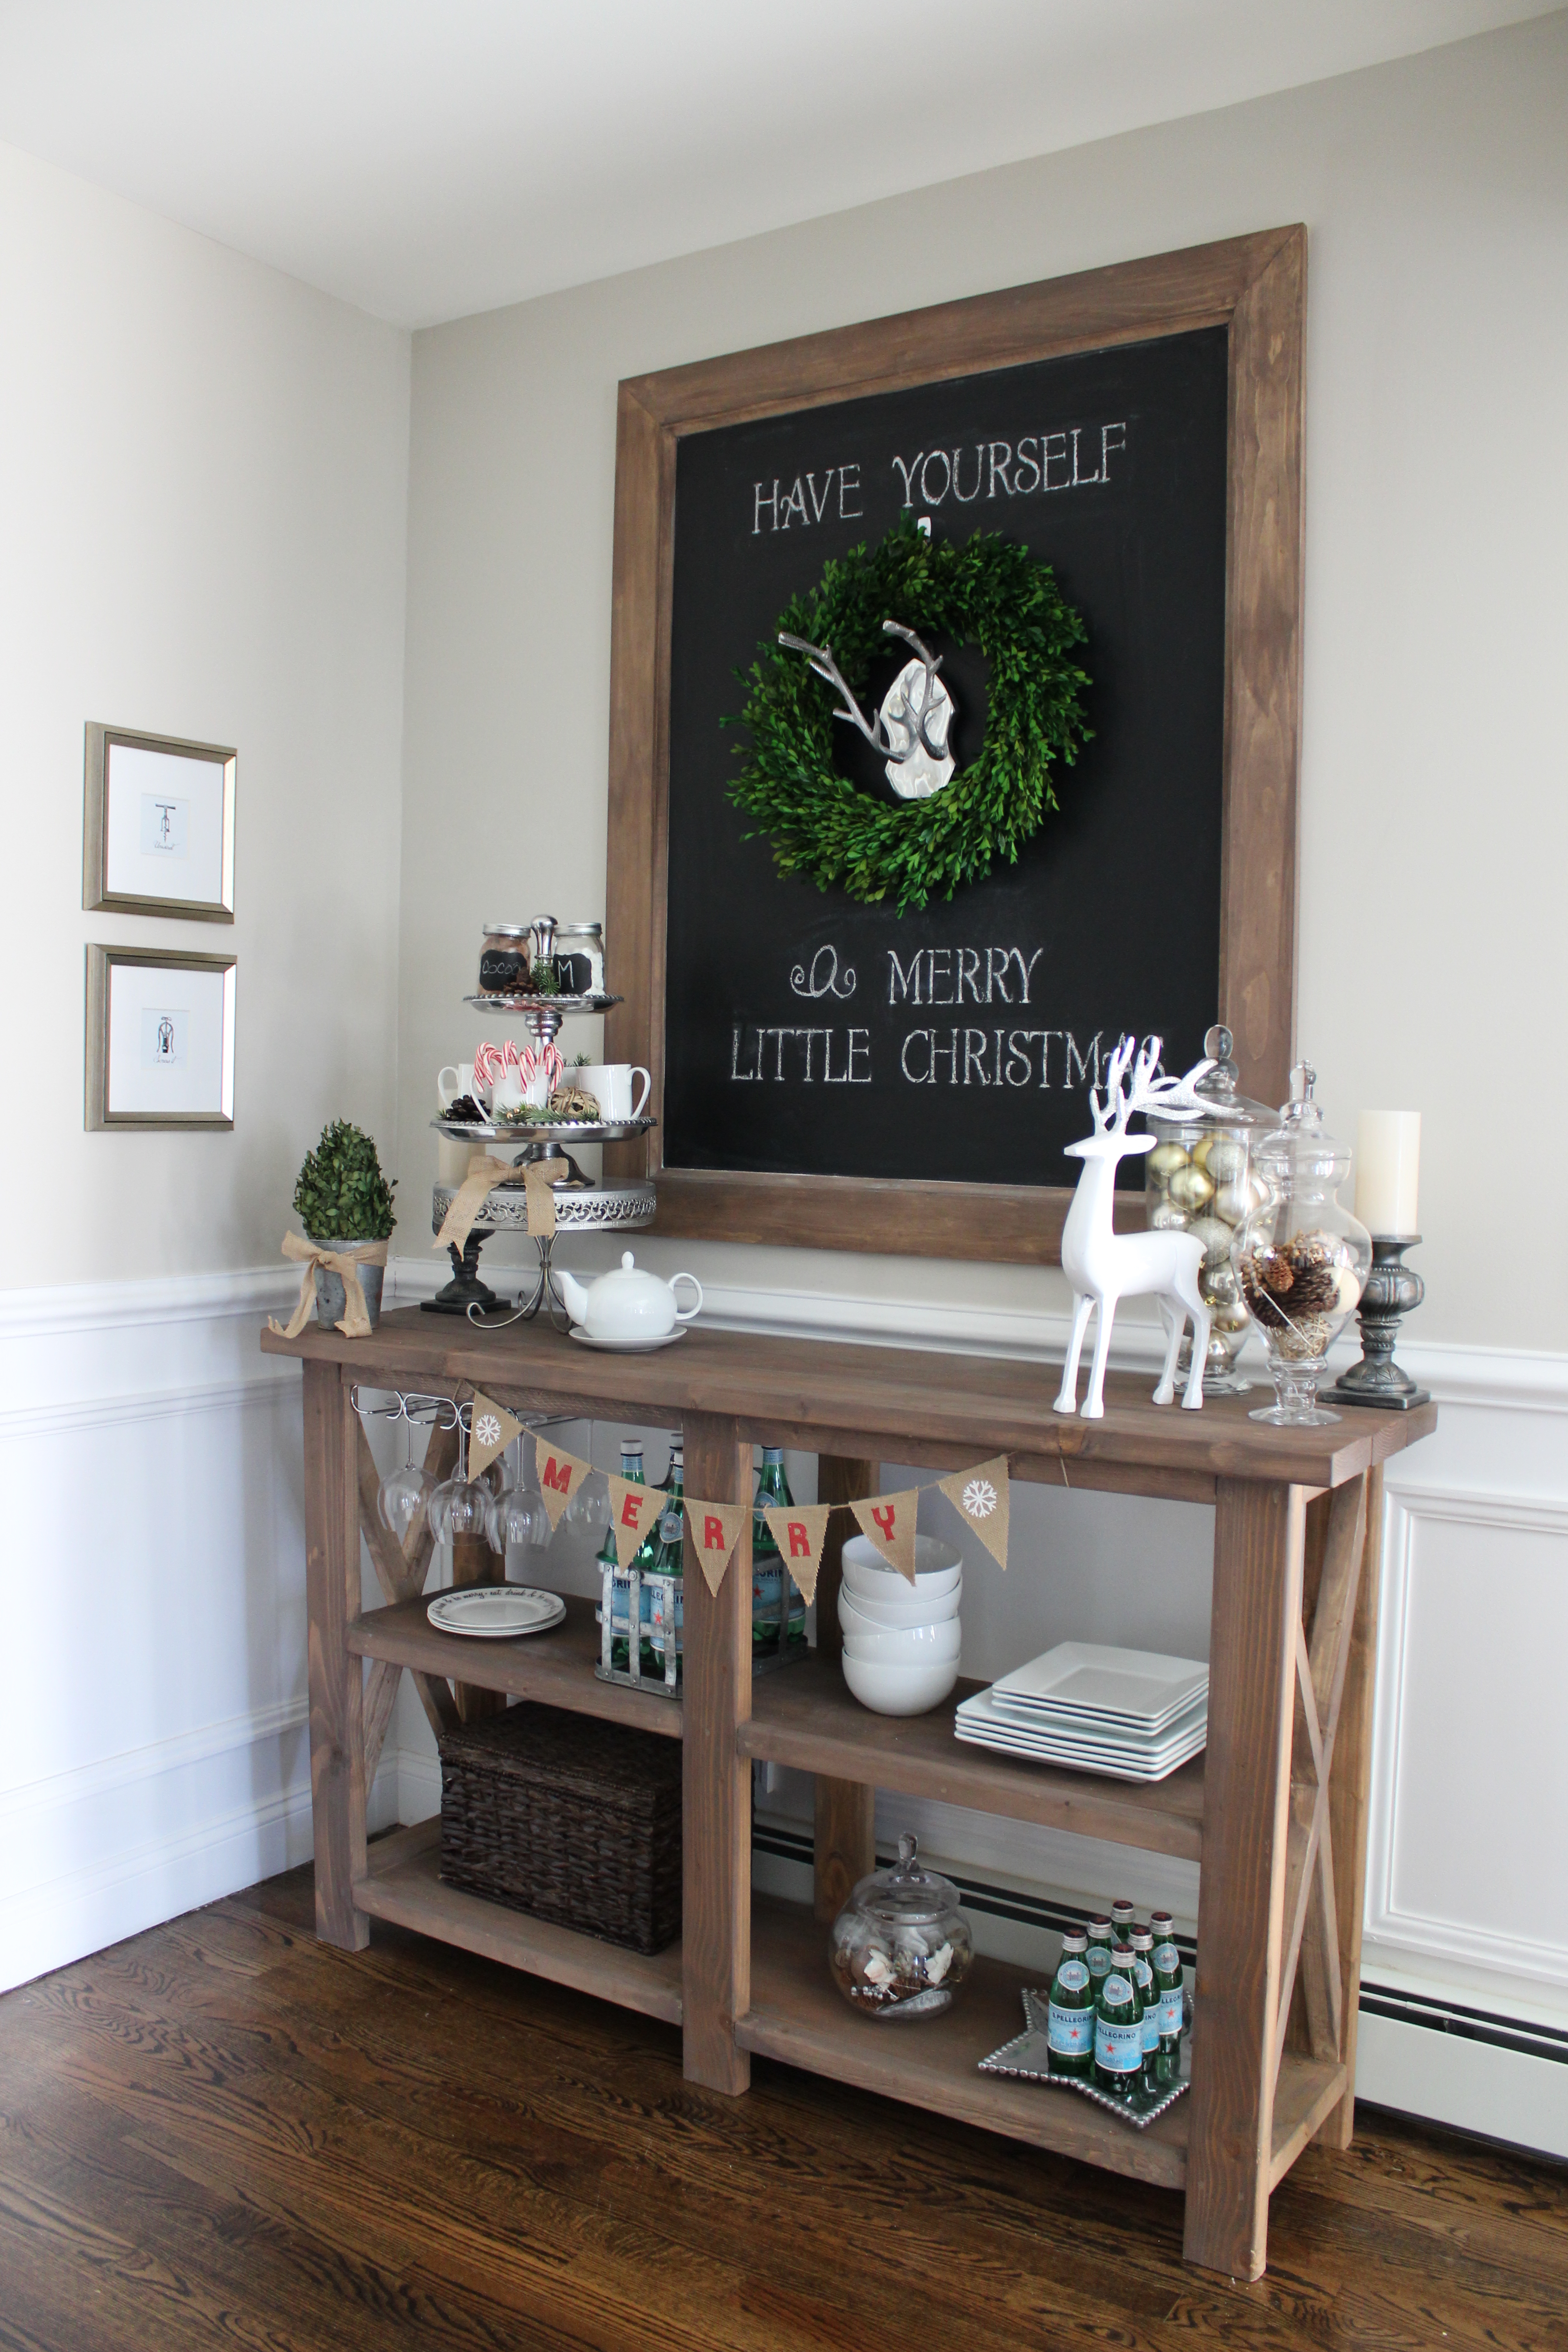
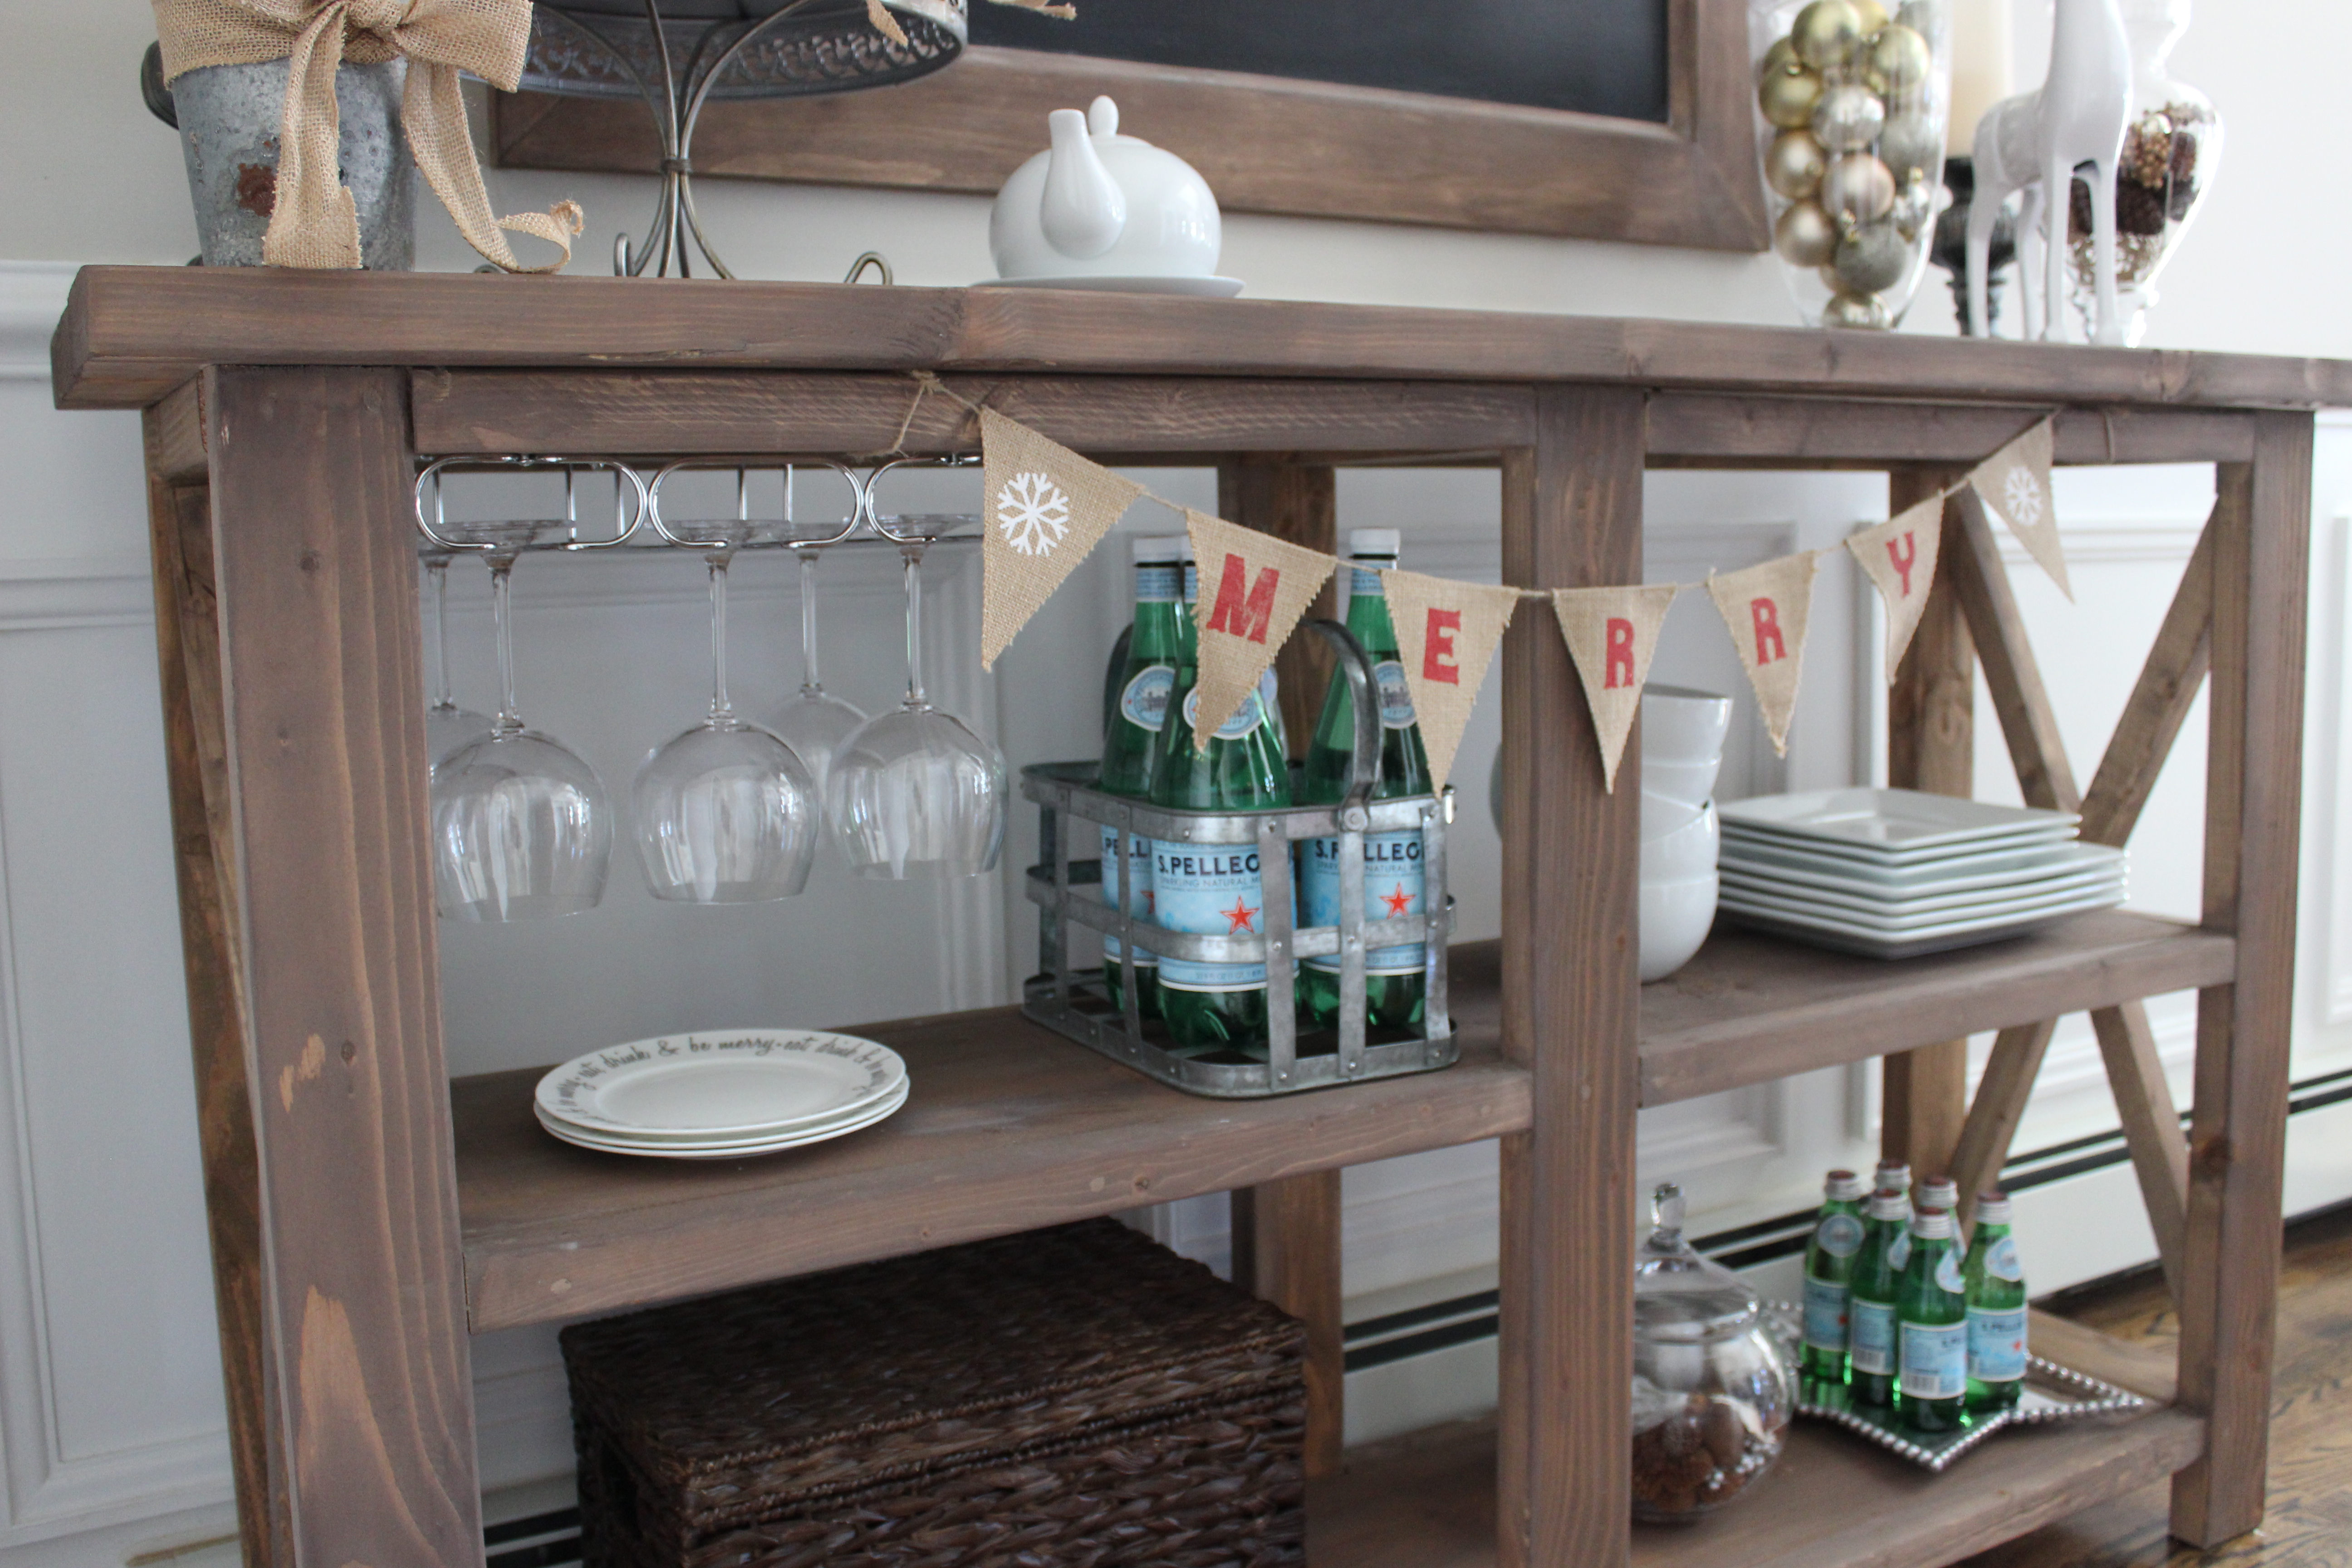
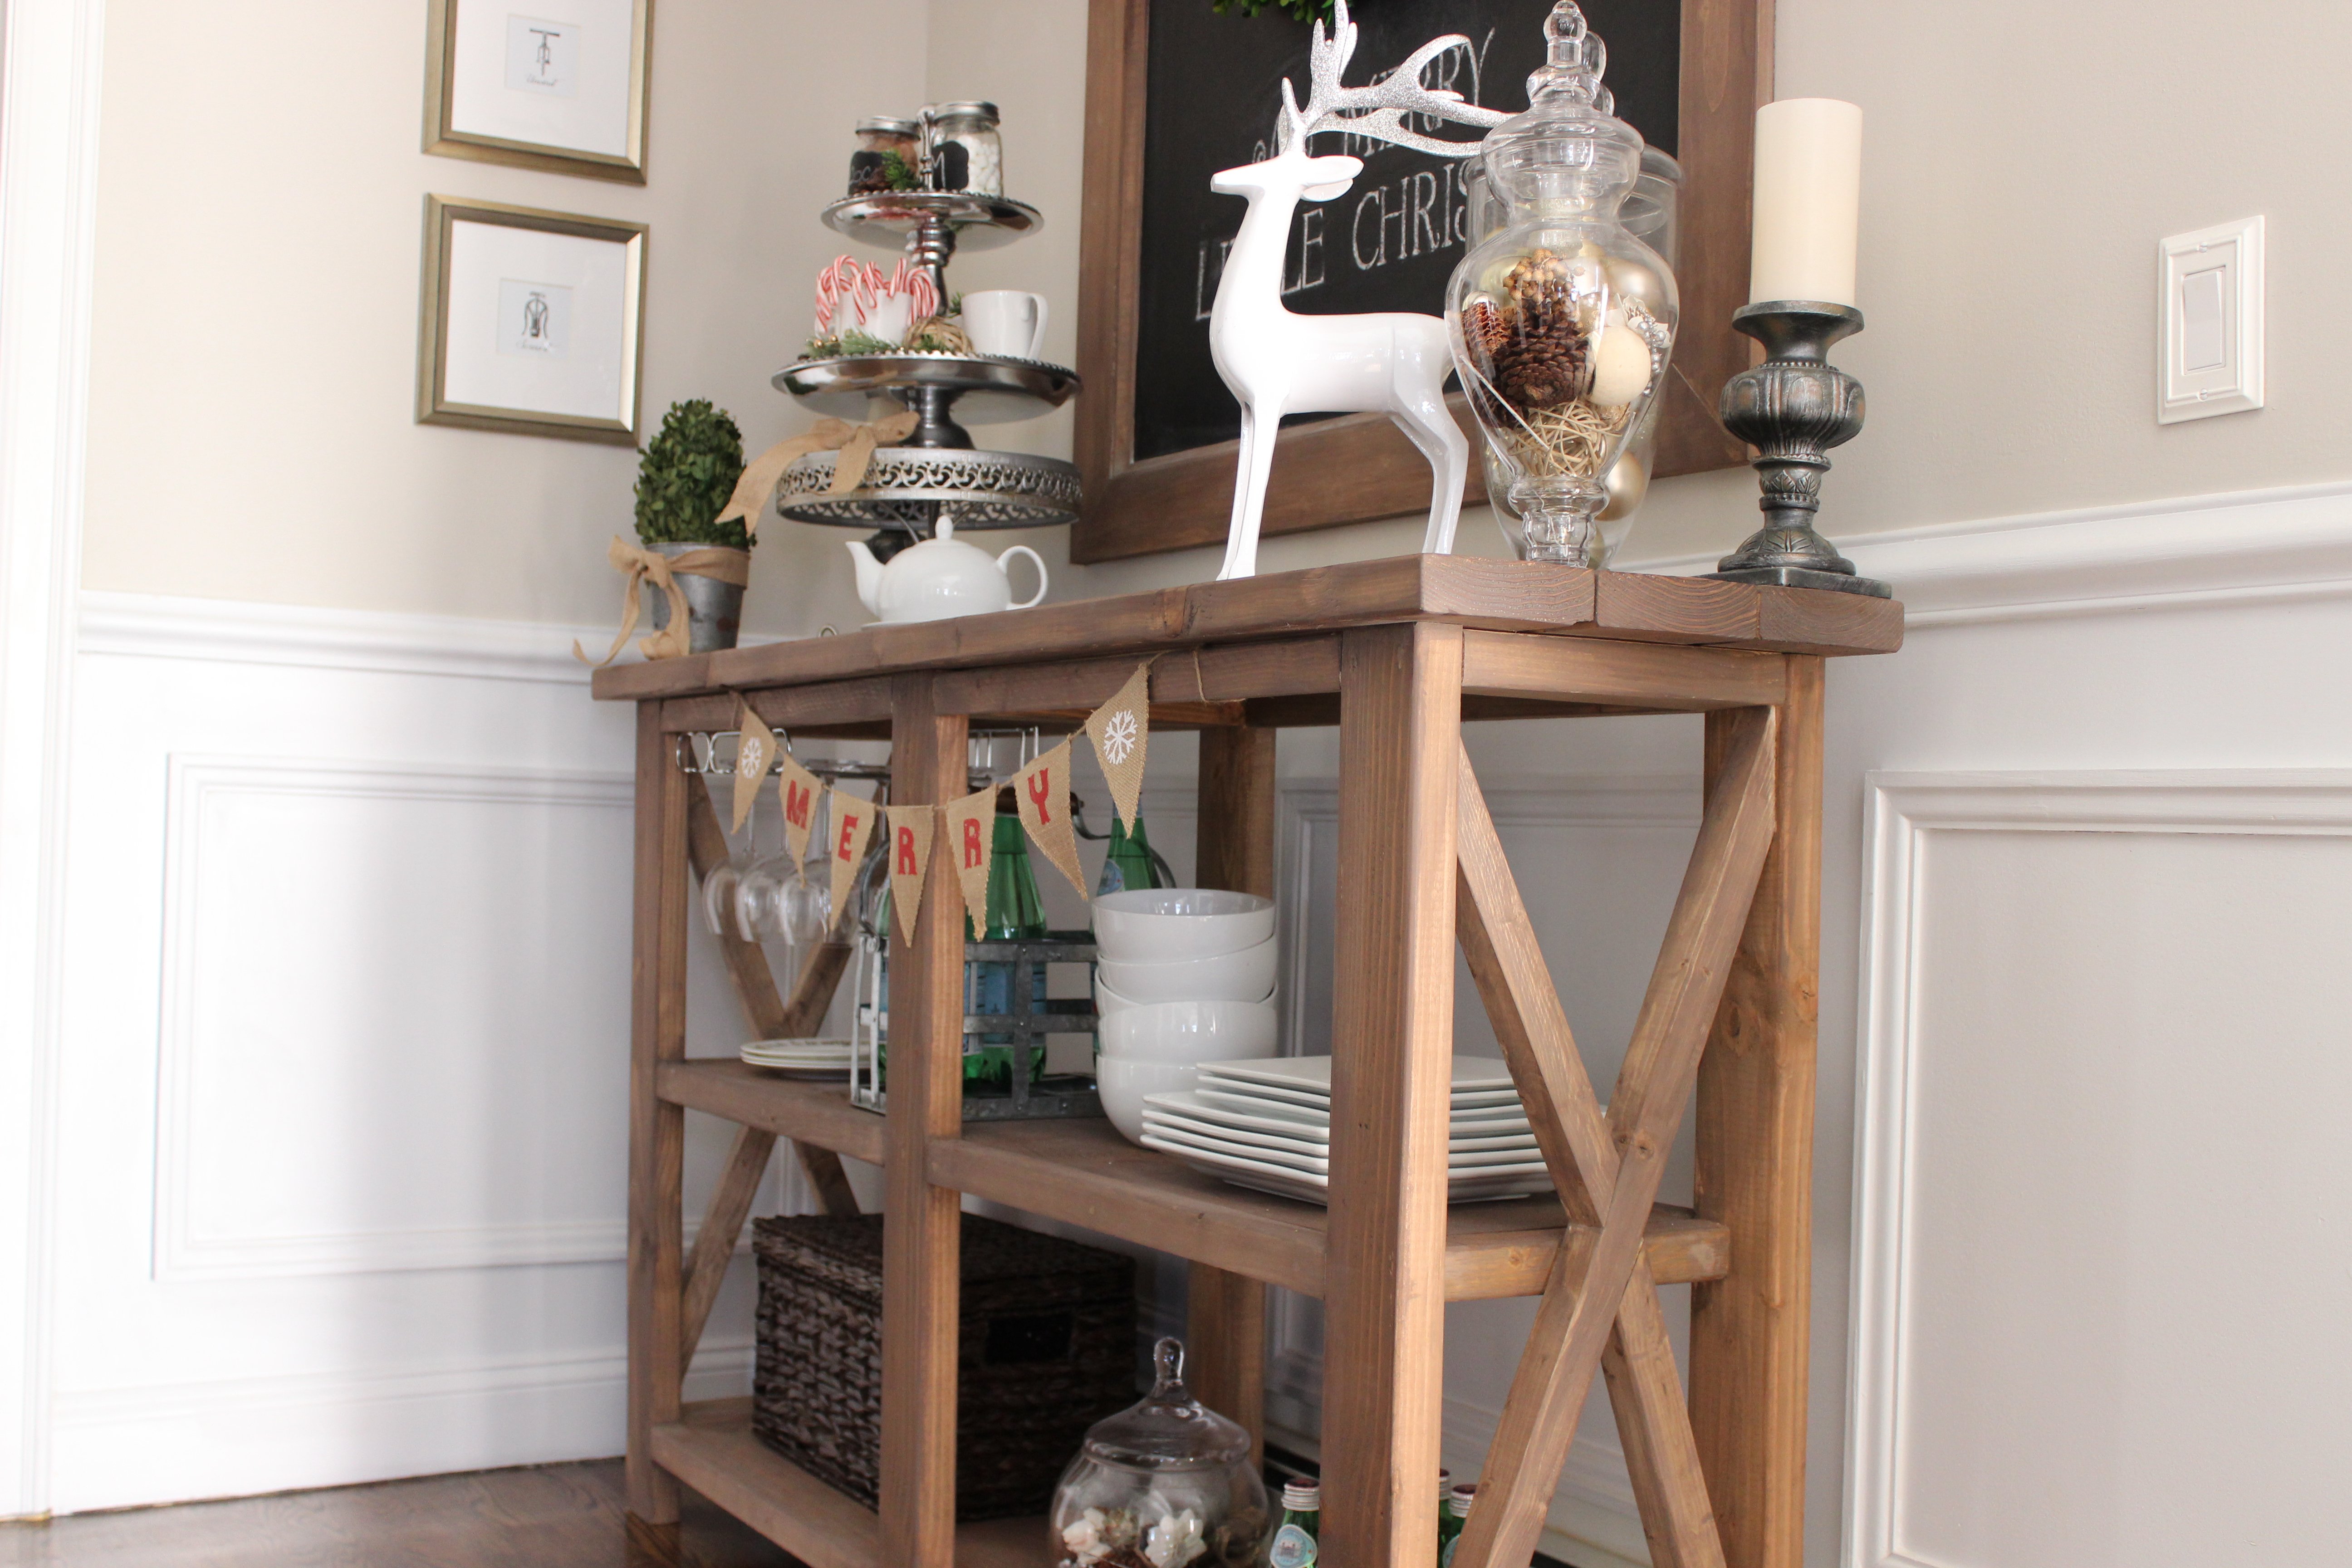
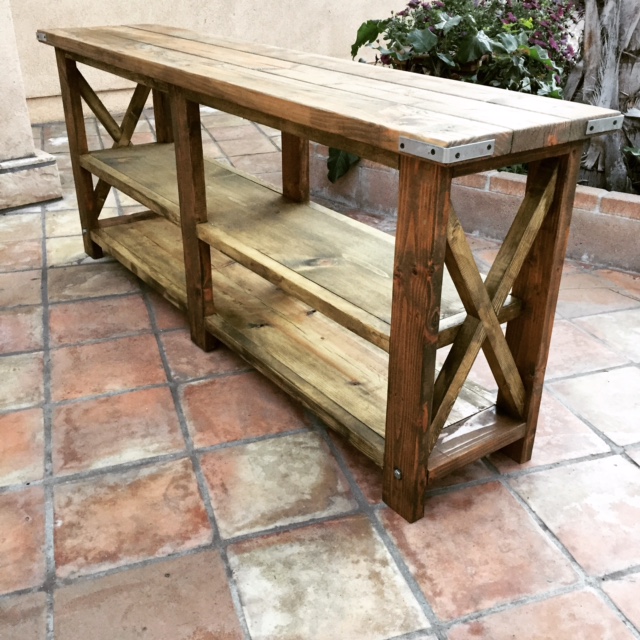
Rustic X Console Table
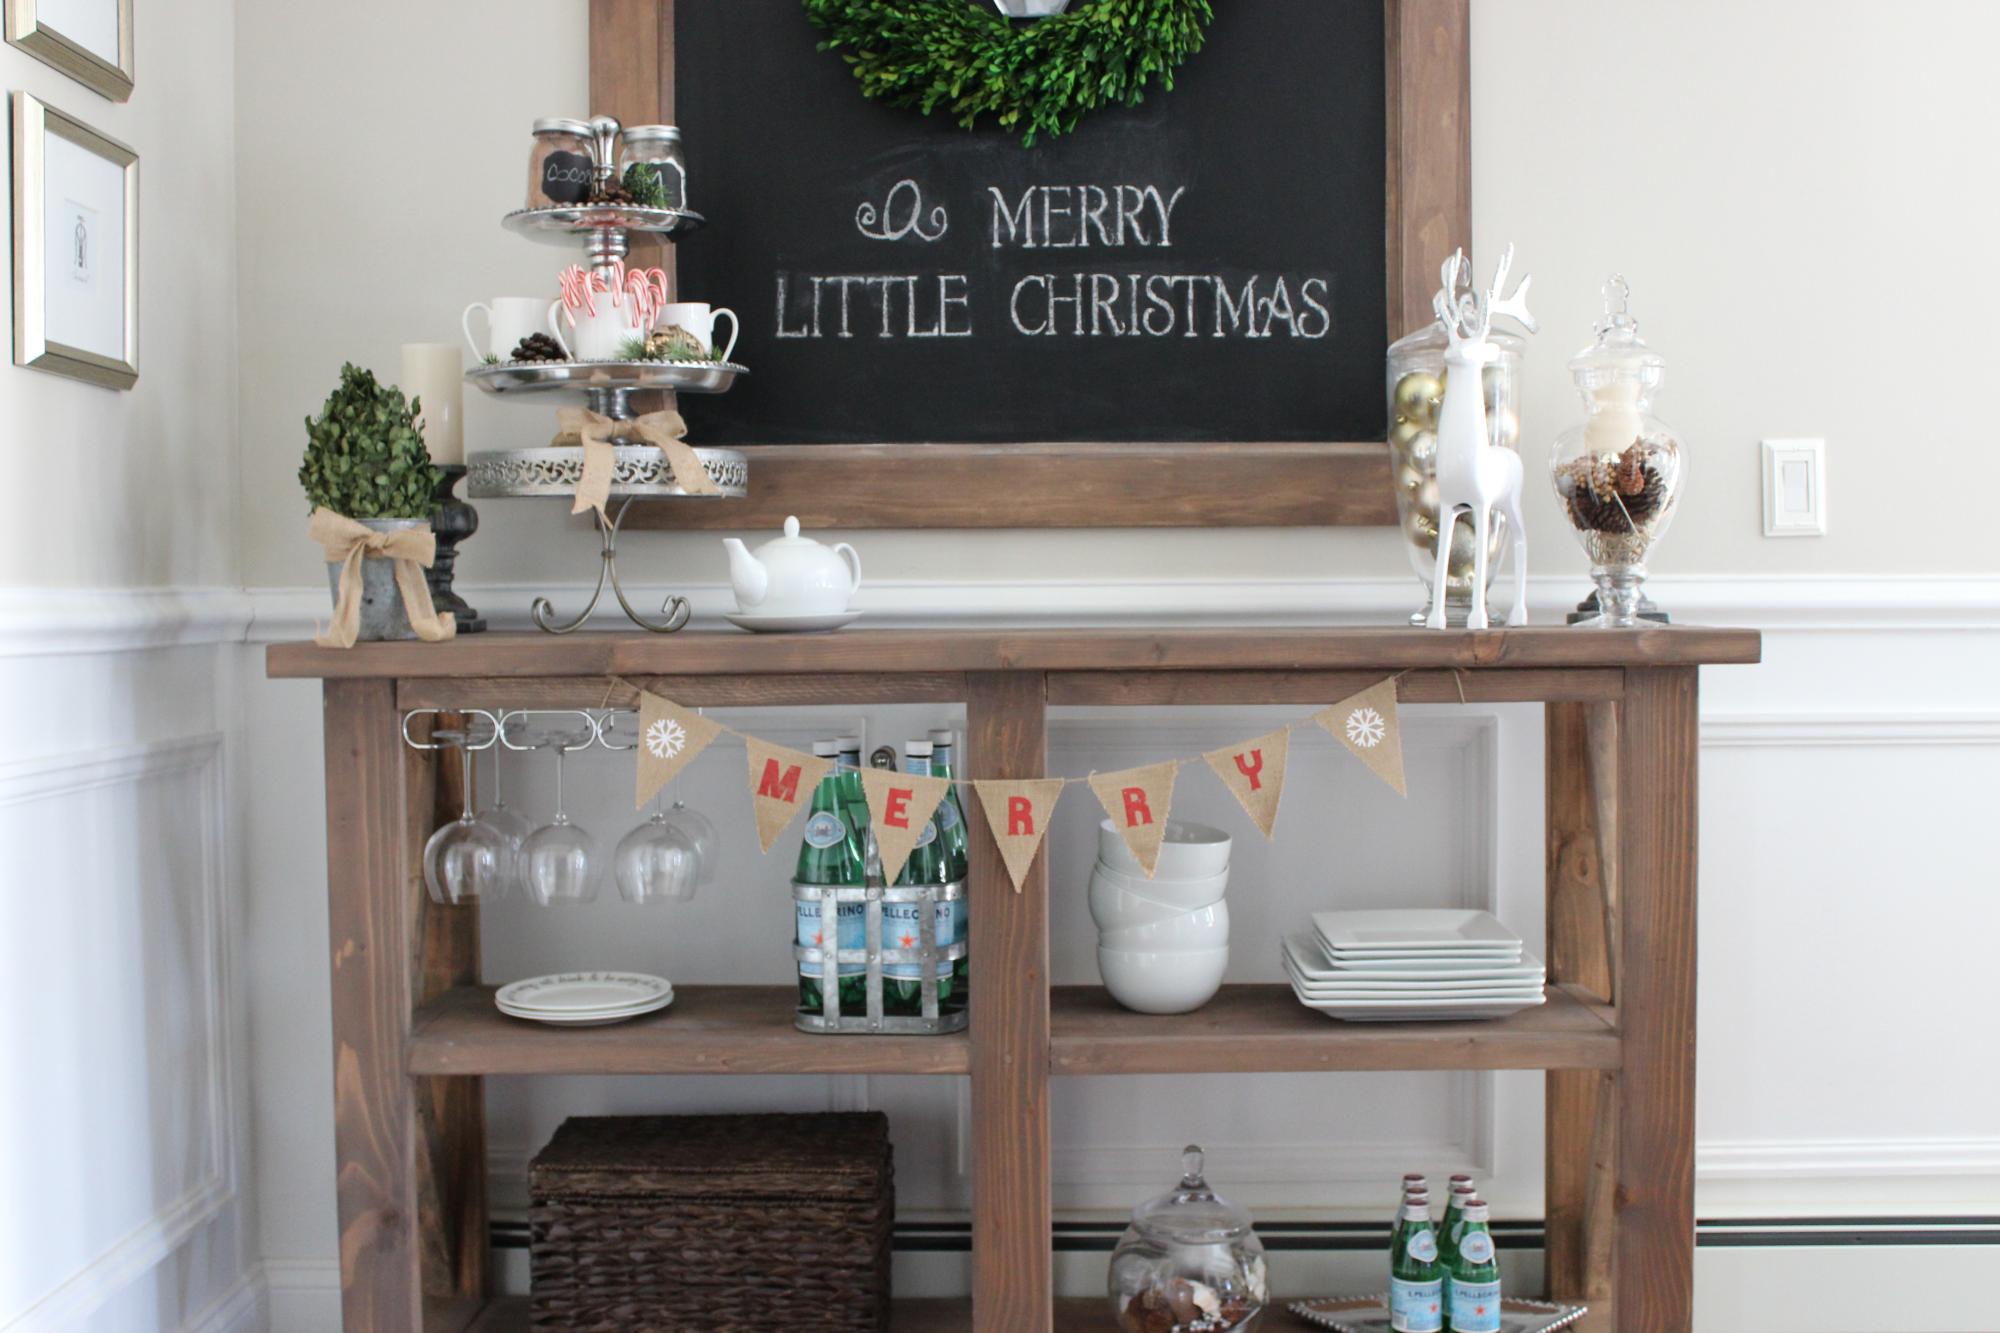
This console table was exactly what I wanted! We changed the measurements and made it a little smaller to fit in the corner of the room. My brother built this table for me and he was able to build it in 2 hours. The directions were easy and informative. Thank you so much Ana! I love your furniture!!!
Built from Plan(s)
Estimated Cost
The total cost including lumber and stain was $160.00.
Estimated Time Investment
Afternoon Project (3-6 Hours)
Finish Used
I used Milk Paint in the color "Curo" but watered it down to use as a stain.
Recommended Skill Level
Beginner
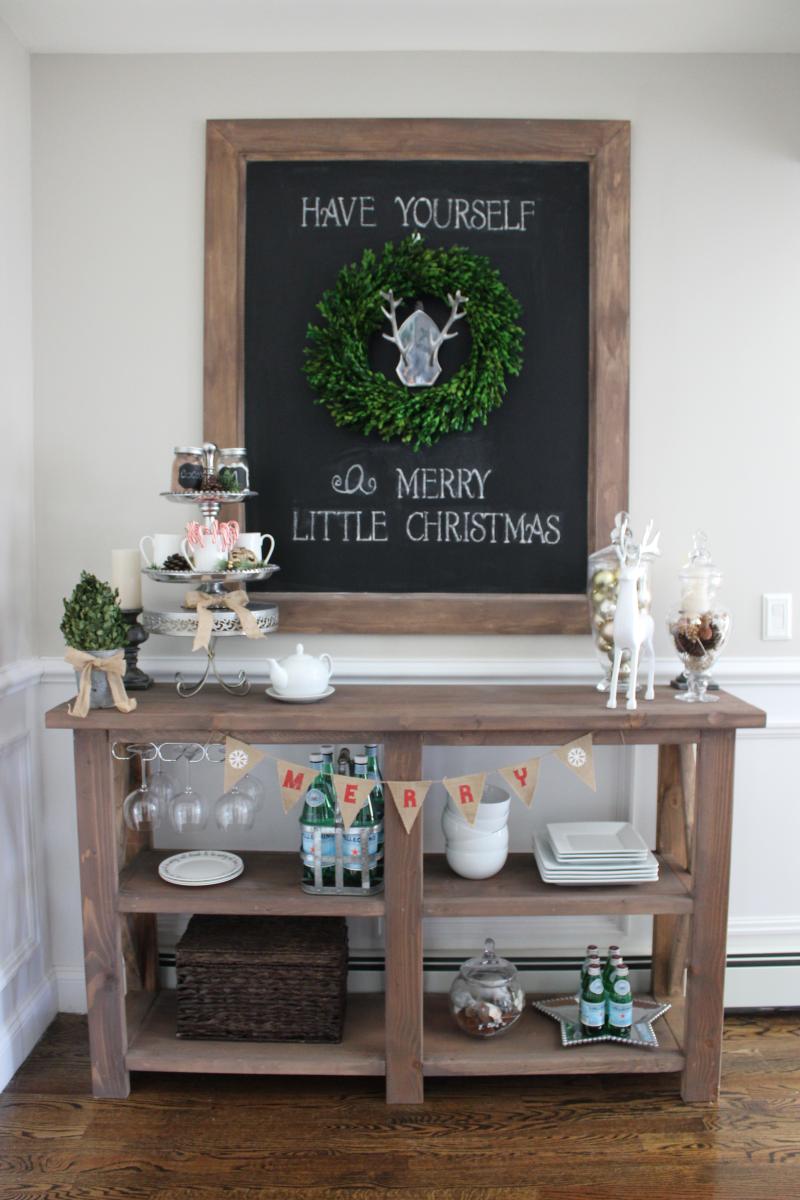
Seasonal And Holiday
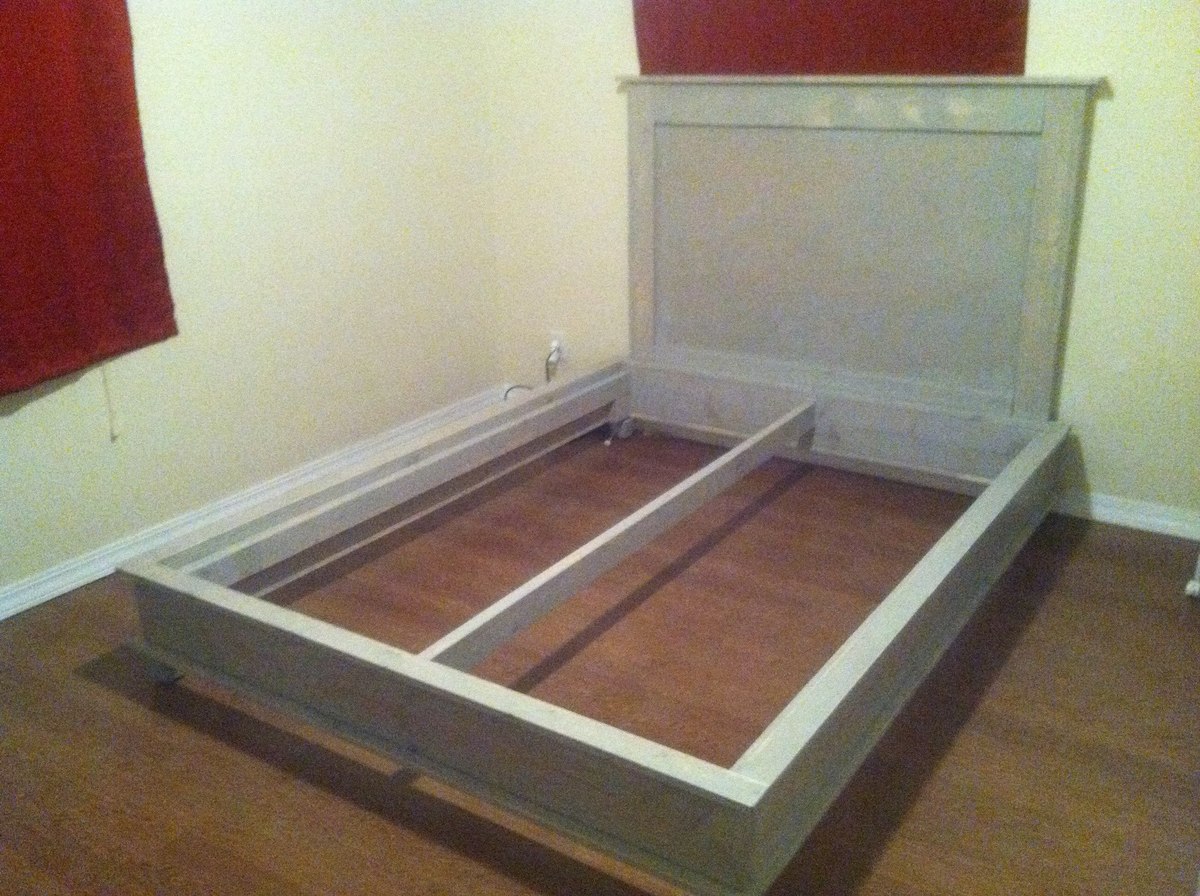
Toddler Sized Cabin Bed (Crib Mattress)
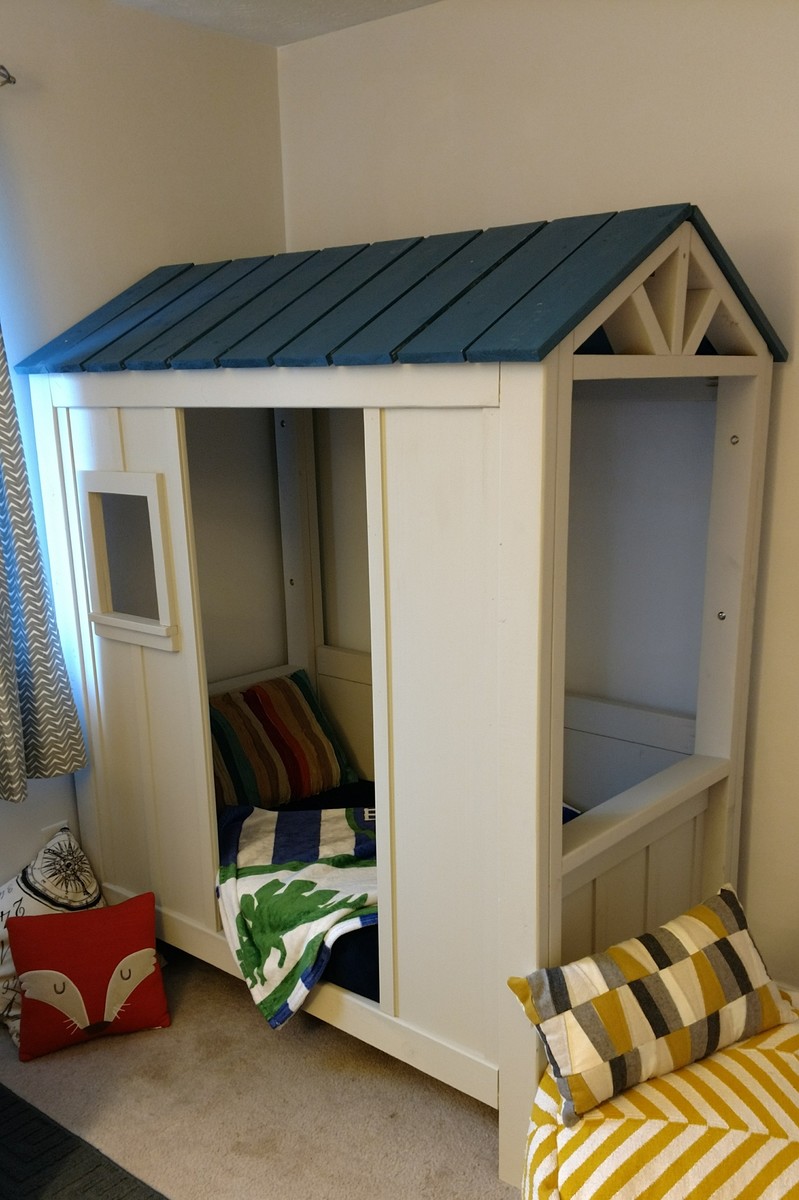
Loved the twin sized cabin bed but my grandson is a few years away from needing a big boy bed. Husband scaled down the plans and this is what we came up with.
Built from Plan(s)
Estimated Cost
$150
Estimated Time Investment
Weekend Project (10-20 Hours)
Recommended Skill Level
Intermediate
Corner Cabinet - Large
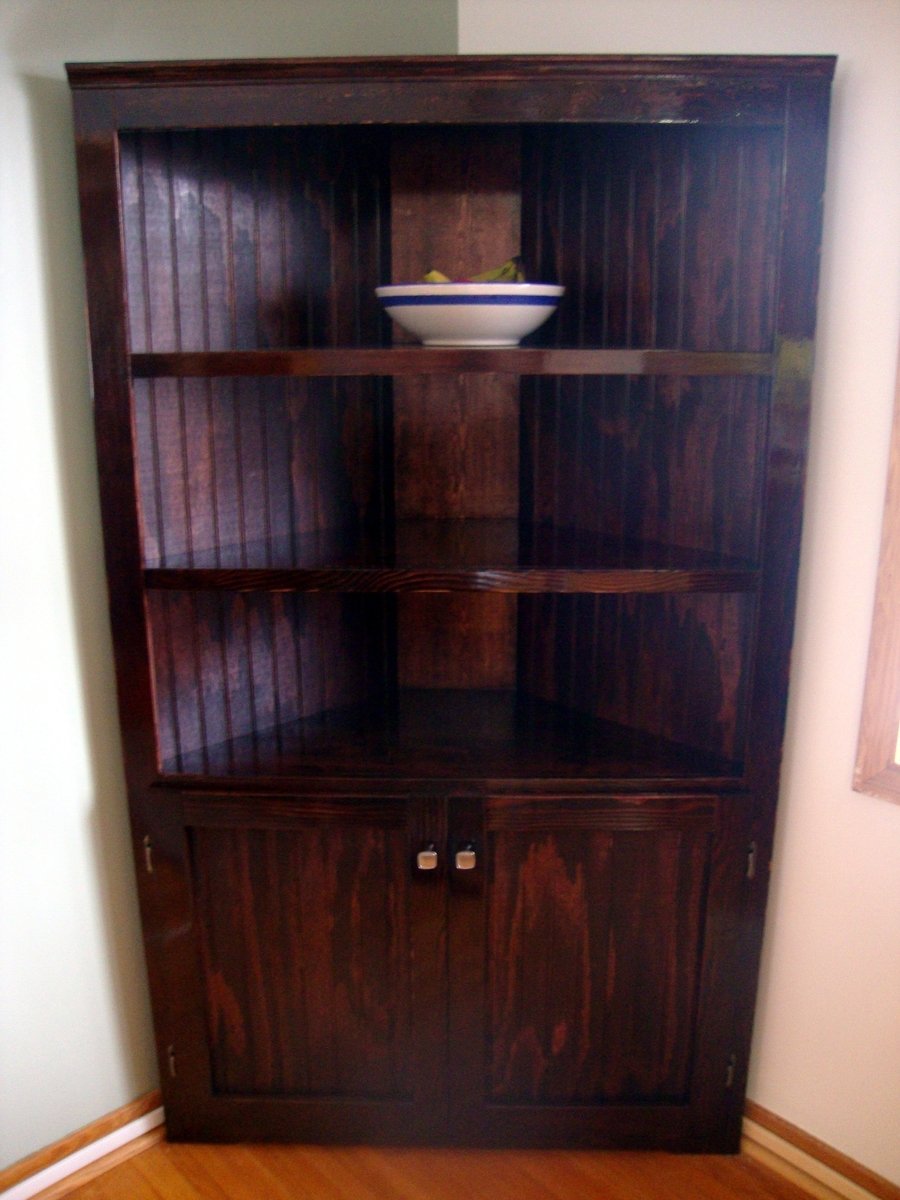
I built this larger than the specs given because I wanted it to hold more. 12in shelves with an 8in back just seemed way too small. That would hold a plant or a bowl (as seen in the other brags). This can hold a plant *and* a bowl. If your space can accomodate it, I suggest making this larger.
This has shelves 16in deep and the back is 10in wide. This resulted in a front profile of about 42in across and a side depth of about 30in. I also added two cross members (?) over the shelves to give it a more finished look
Attach the back to the shelves first and then measure the rest from there. The materials list is modified as follows: back = 1x10x6ft, shelves = 2 x 3/4in by 16in by 8ft (will be enough to make all 6 shelves).
Pine back and shelves but I went with fir for the front frame/doors because the fir was much straighter and less prone to warping. It was my first time using a pocket hole jig. You gotta love that thing. The only other tool we used was a jig saw and a nice long straight edge (and a chop saw - helps with accuracy when building the frames).
Total cost of project was around $300 but considering we couldn't find anything like this in any store, and it fit our needs perfectly, it was well worth the time, cost and effort. The pictures don't do it justice.
Thank you Ana! It was just what we were looking for.
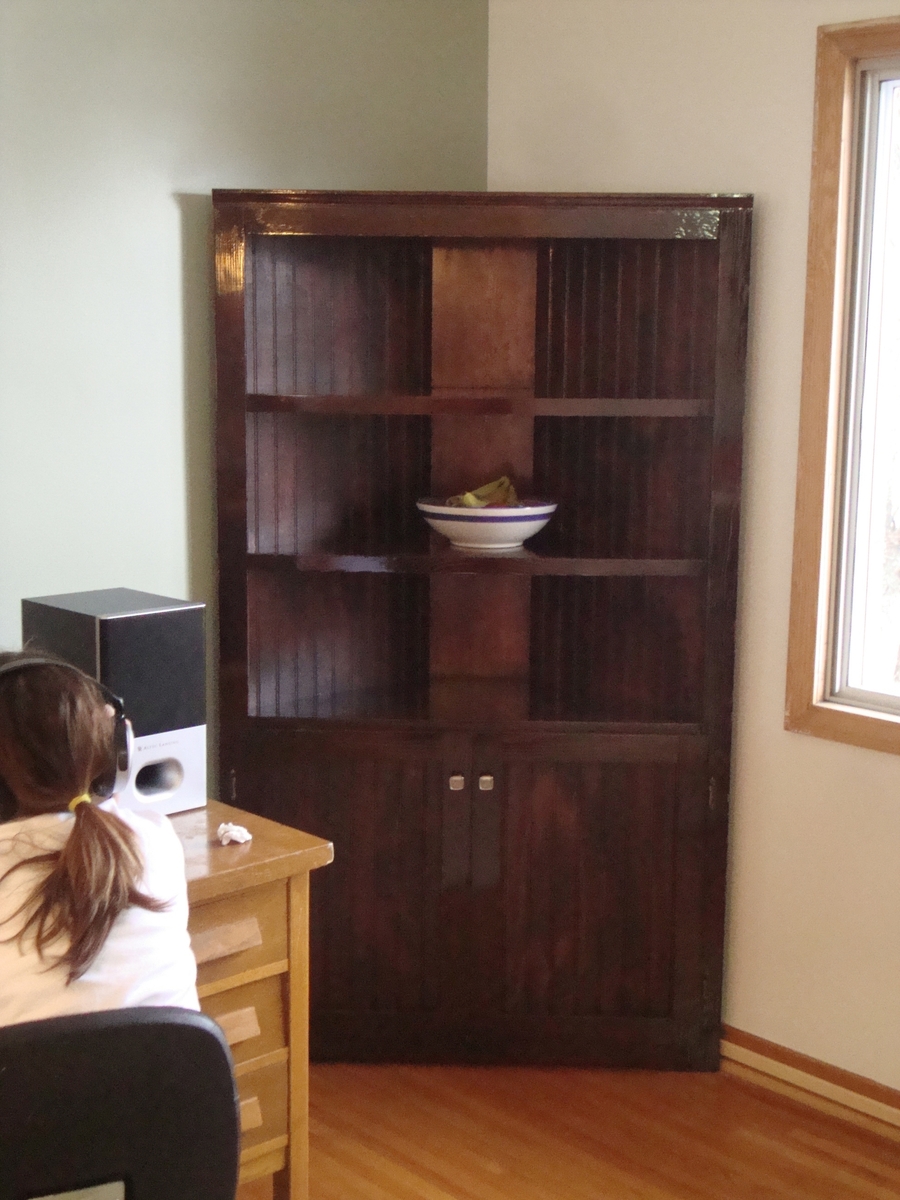
Built from Plan(s)
Estimated Cost
$300
Estimated Time Investment
Week Long Project (20 Hours or More)
Finish Used
Minwax wood treatment, stain and gloss spar urethan on the shelves and frames. Minwax tonge finish on the beadboard.
Recommended Skill Level
Intermediate
Desk build With My 7yr Old
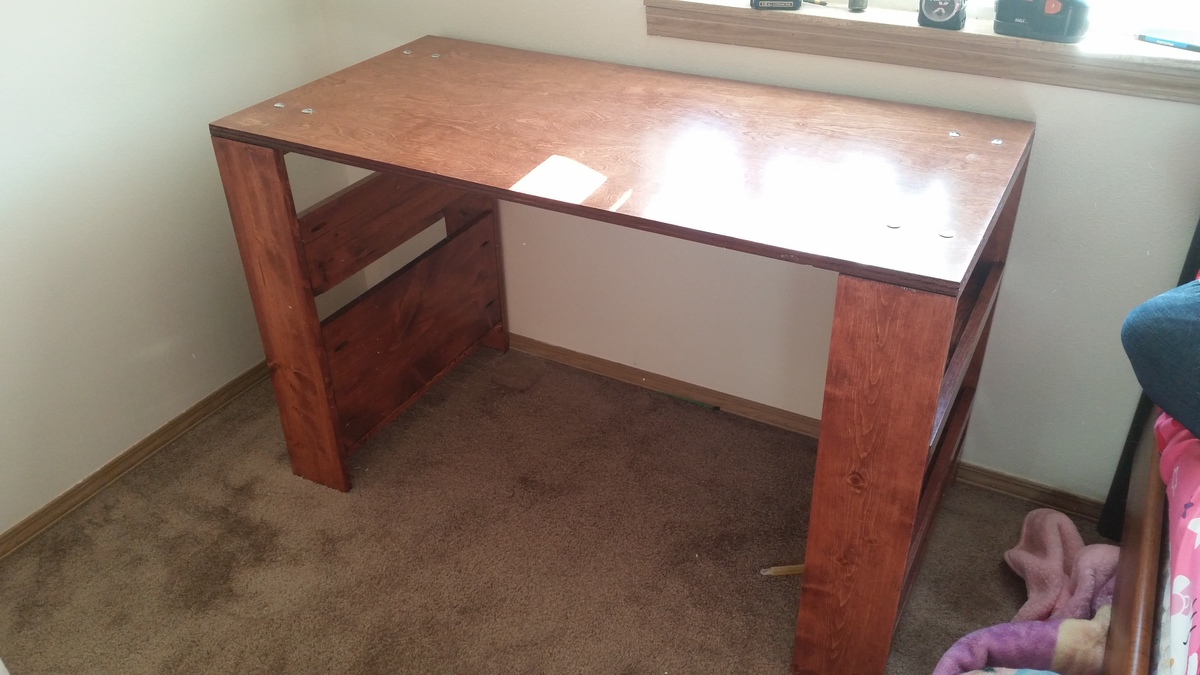
My daughter and I decided to build her a desk this past summer. We went with a precut project board from Home Depot for the top. I didnt like how the bookshelves were attached so I used round head bolts and nylock bolts underneath. This way I can later resurface the top as well as makes it easier to move. We used a redwood stain and 4 coats of clear semi gloss.

Built from Plan(s)
Estimated Cost
80
Estimated Time Investment
Weekend Project (10-20 Hours)
Recommended Skill Level
Beginner
One Arm Outdoor Sectional
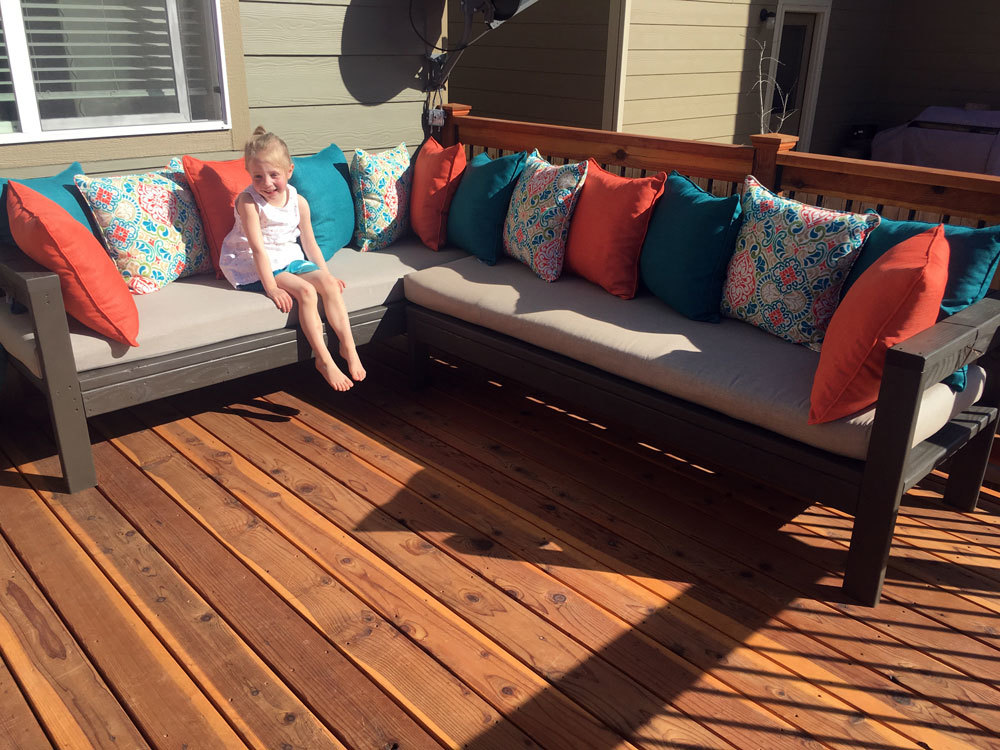
We are loving this outdoor sectional! It was super easy to build! The hardest part was figuring out cushions. I made the bottom cushions and got the back pillows on sale at Costco for less than I could make them. Thank you!
Built from Plan(s)
Estimated Cost
Less than $100 not counting cushions.
Estimated Time Investment
Weekend Project (10-20 Hours)
Finish Used
Outdoor Sherwin Williams Sealskin
Recommended Skill Level
Beginner
Comments
farmhouse Table - Updated Pocket hole

We made 30 tables for our daughters 2017 wedding . We finished them with Miss Mustard seed Curio milk paint ( diluted to a stain 4 to 1 )and Hemp oil.

Built from Plan(s)
Comments
Inspired by Ana.
Loved this idea so much - I developed it as a kit for my Scouts to put together.

Built from Plan(s)
Estimated Cost
$10.00
Estimated Time Investment
Afternoon Project (3-6 Hours)
Finish Used
This one was left unfinished. I use milk paint to finish. Gives it the old fashioned/weather look.
Recommended Skill Level
Beginner
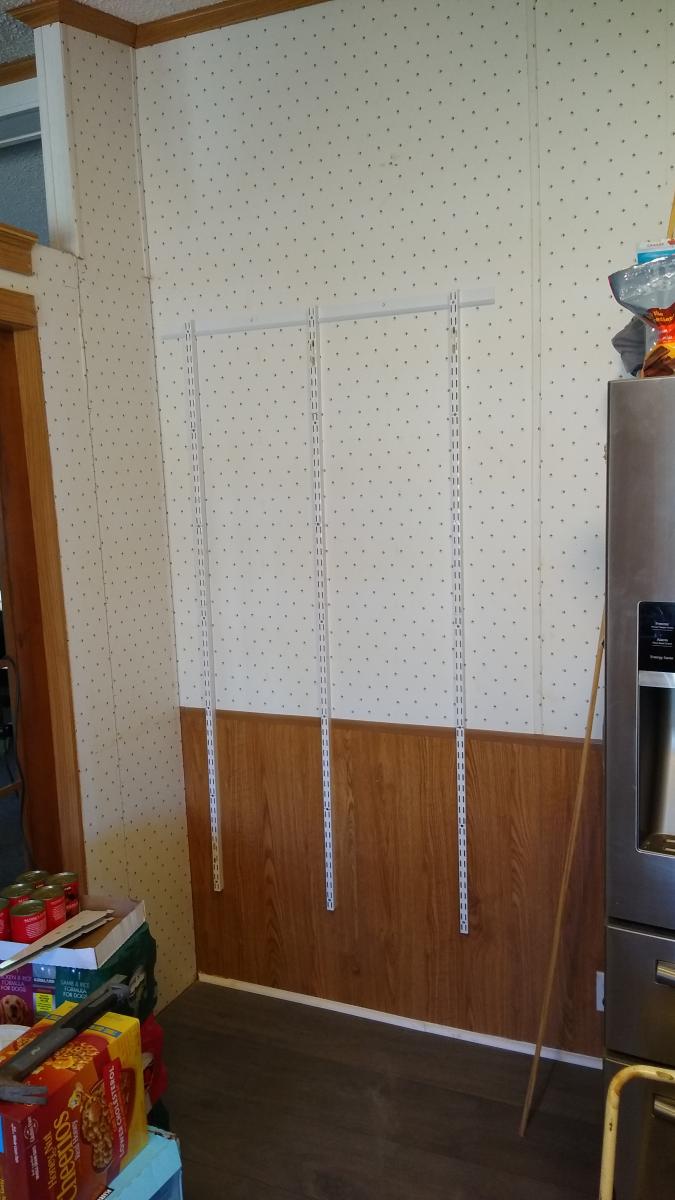
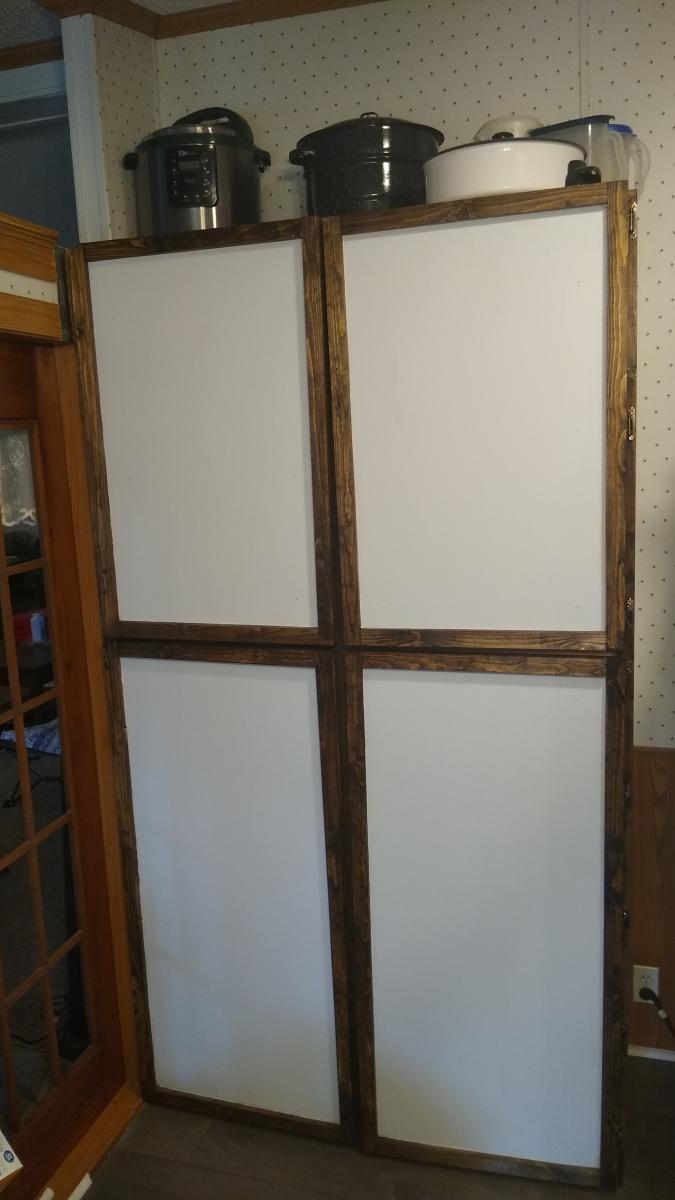
Spice Rack into Pantry
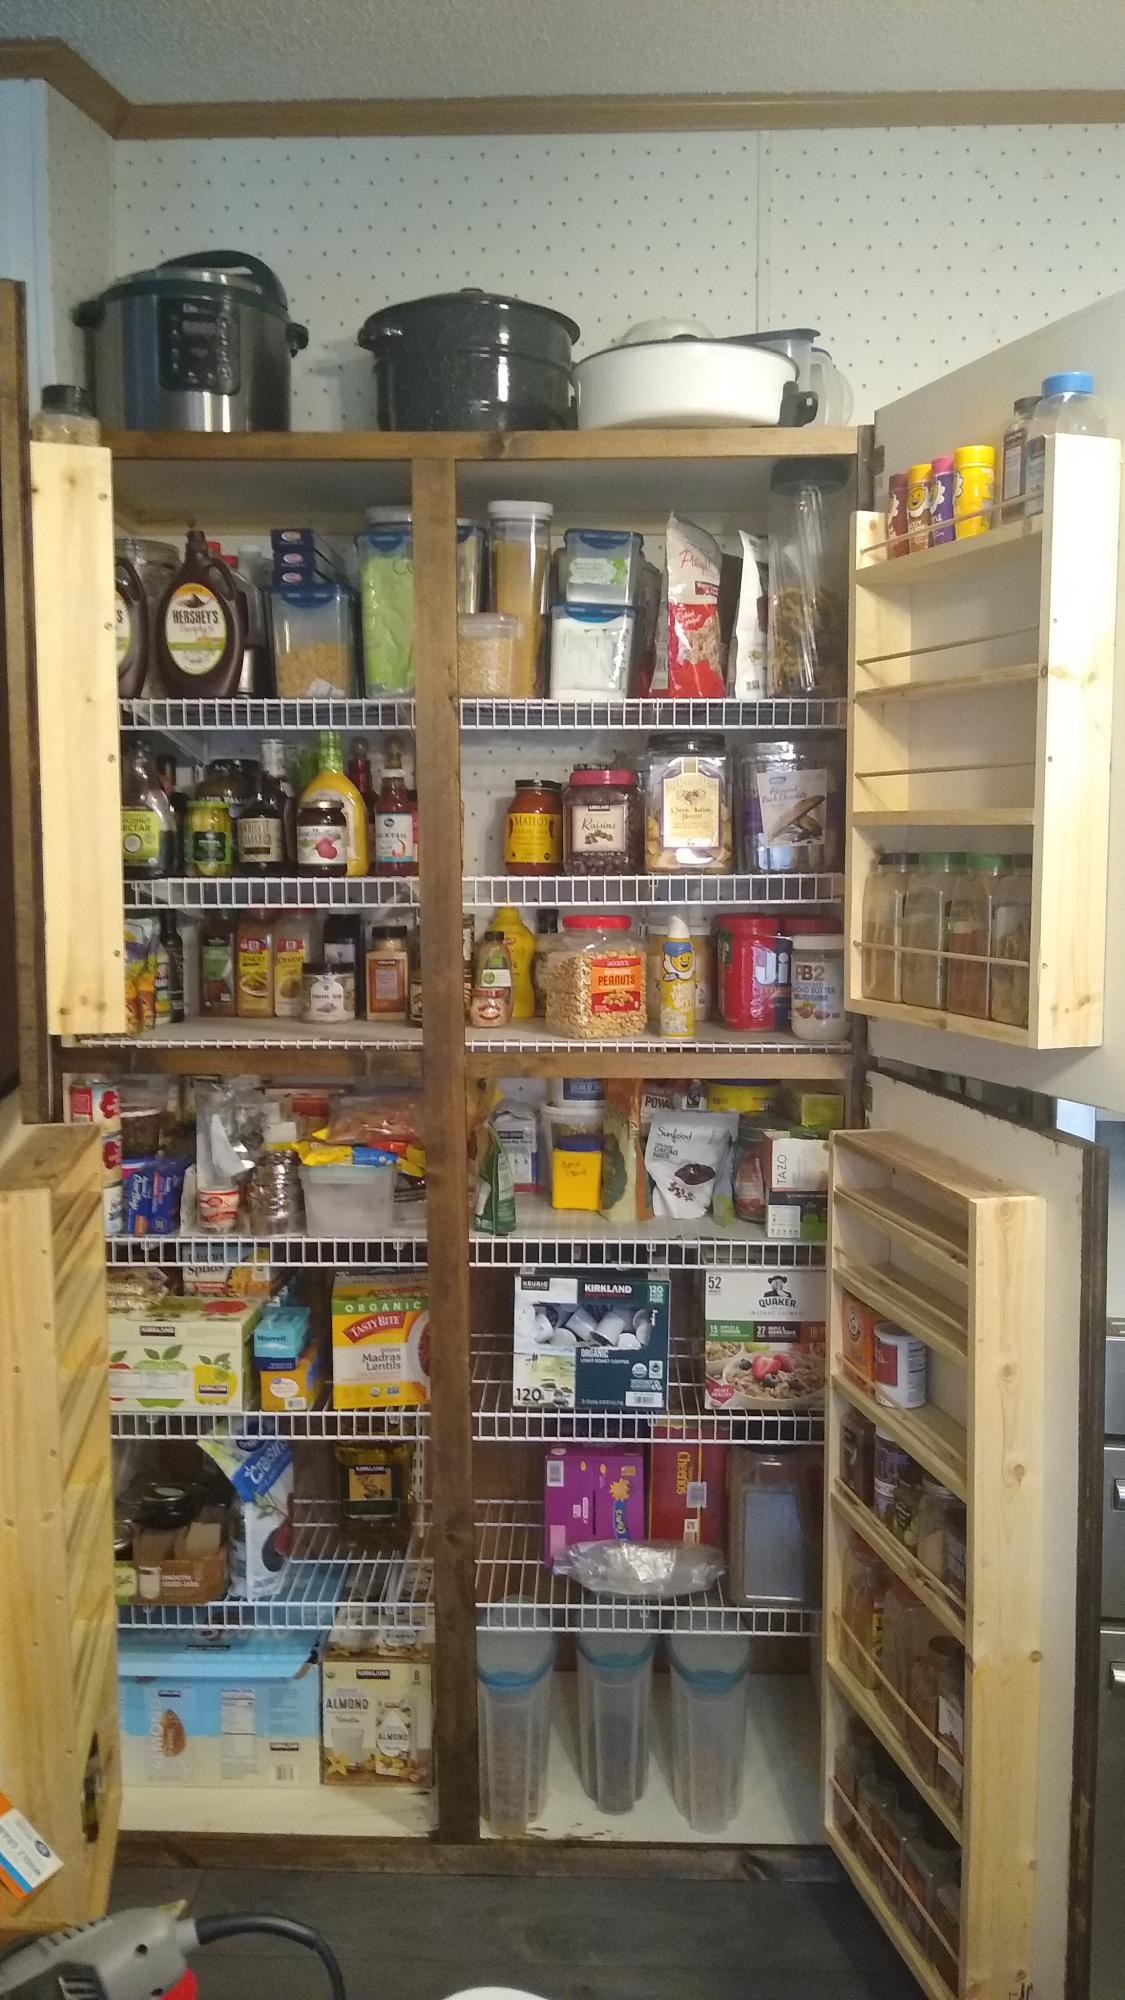
I was going to build a spice rack but the project kept growing until this is what I had. It's 50 long x 96 tall x 22 wide . I started with the wire shelving already being used and I used 1/2 inch plywood, face framed with 1x2's and 1x3's built the door spice rack using 1x4's attached to plywood door frames doors with 1x2's. Hung the doors with 3 self closing hinges on top and 5 on bottom because the doors are heavy and will be more so once the spices are added. Works beautifully. Painted doors with valspar acrylic using a paint brush and stained the attached 1x2 outer frame and the face frame with walnut.
Edit : since posting the entire inside has been painted and I'm thinking I should of even built it bigger or the next project rather needs to be another one😂
Built from Plan(s)
Finish Used
Walnut stain and acrylic paint
Recommended Skill Level
Intermediate

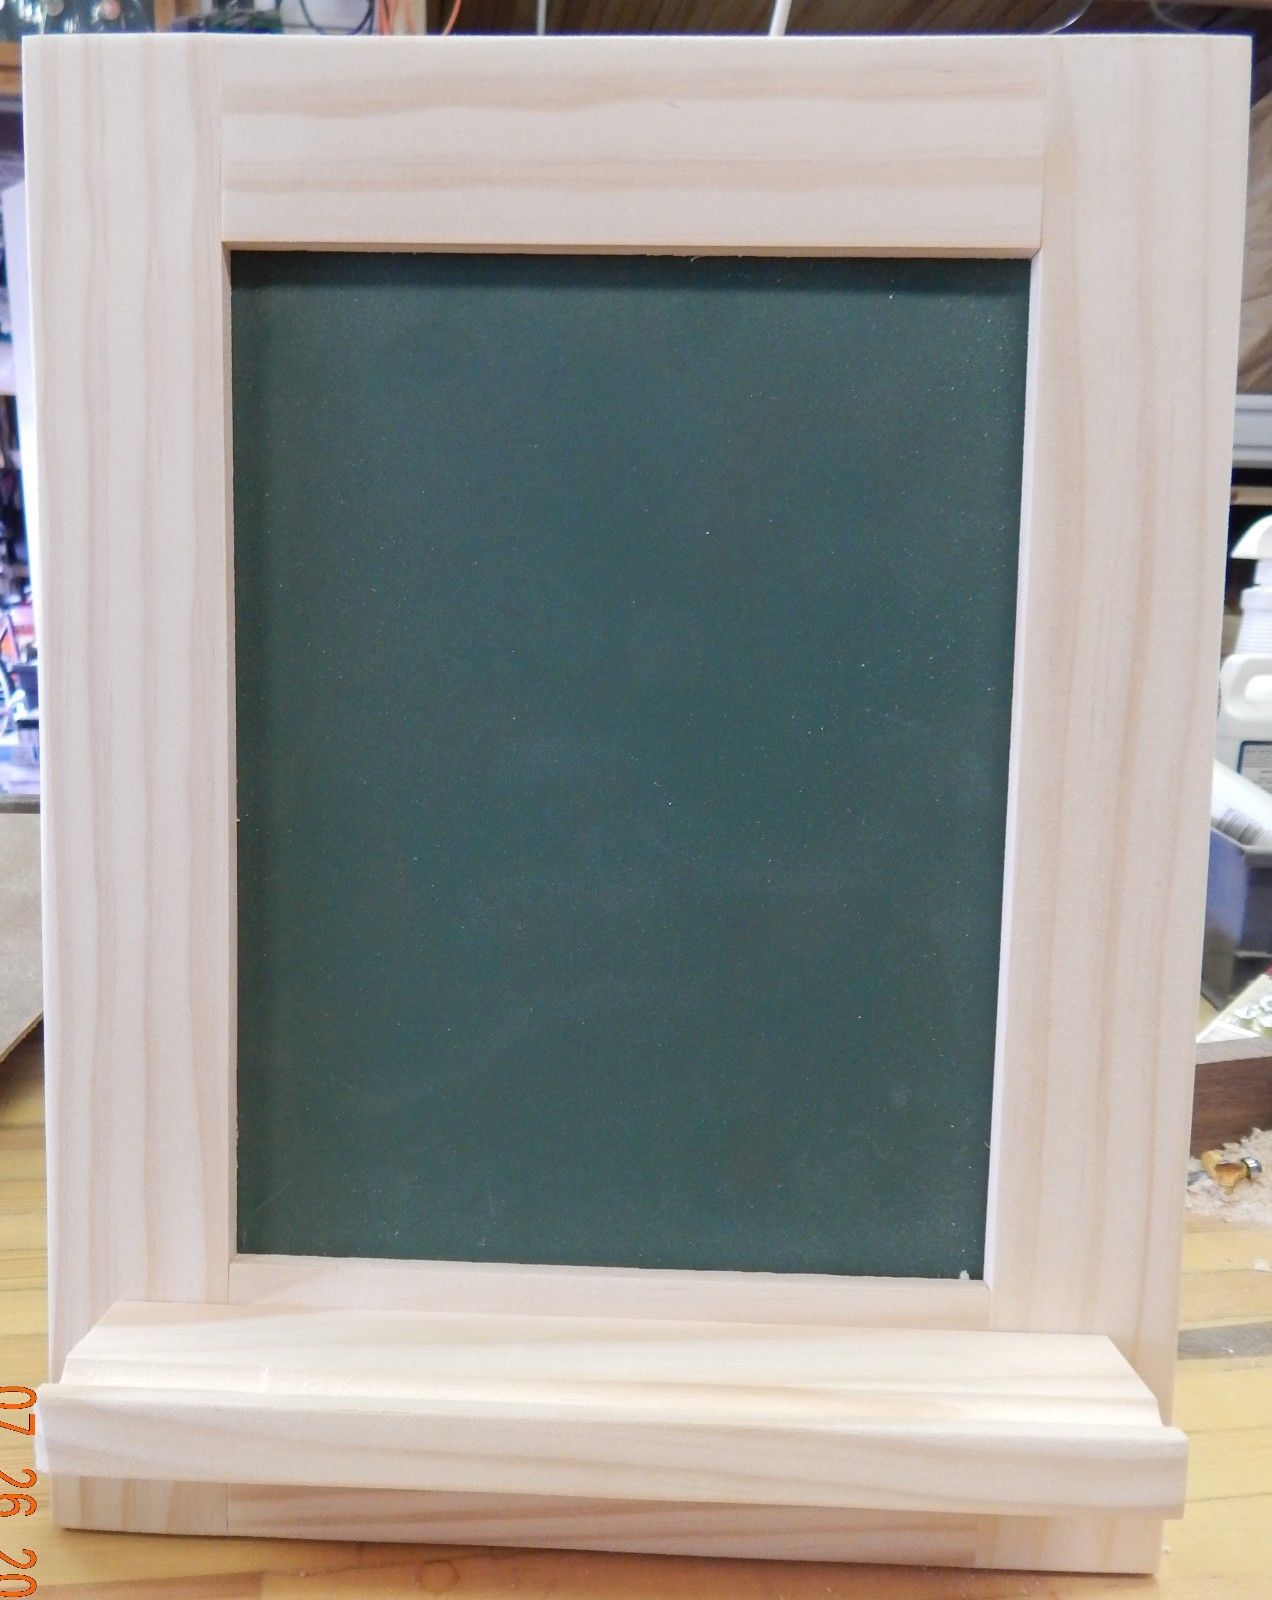
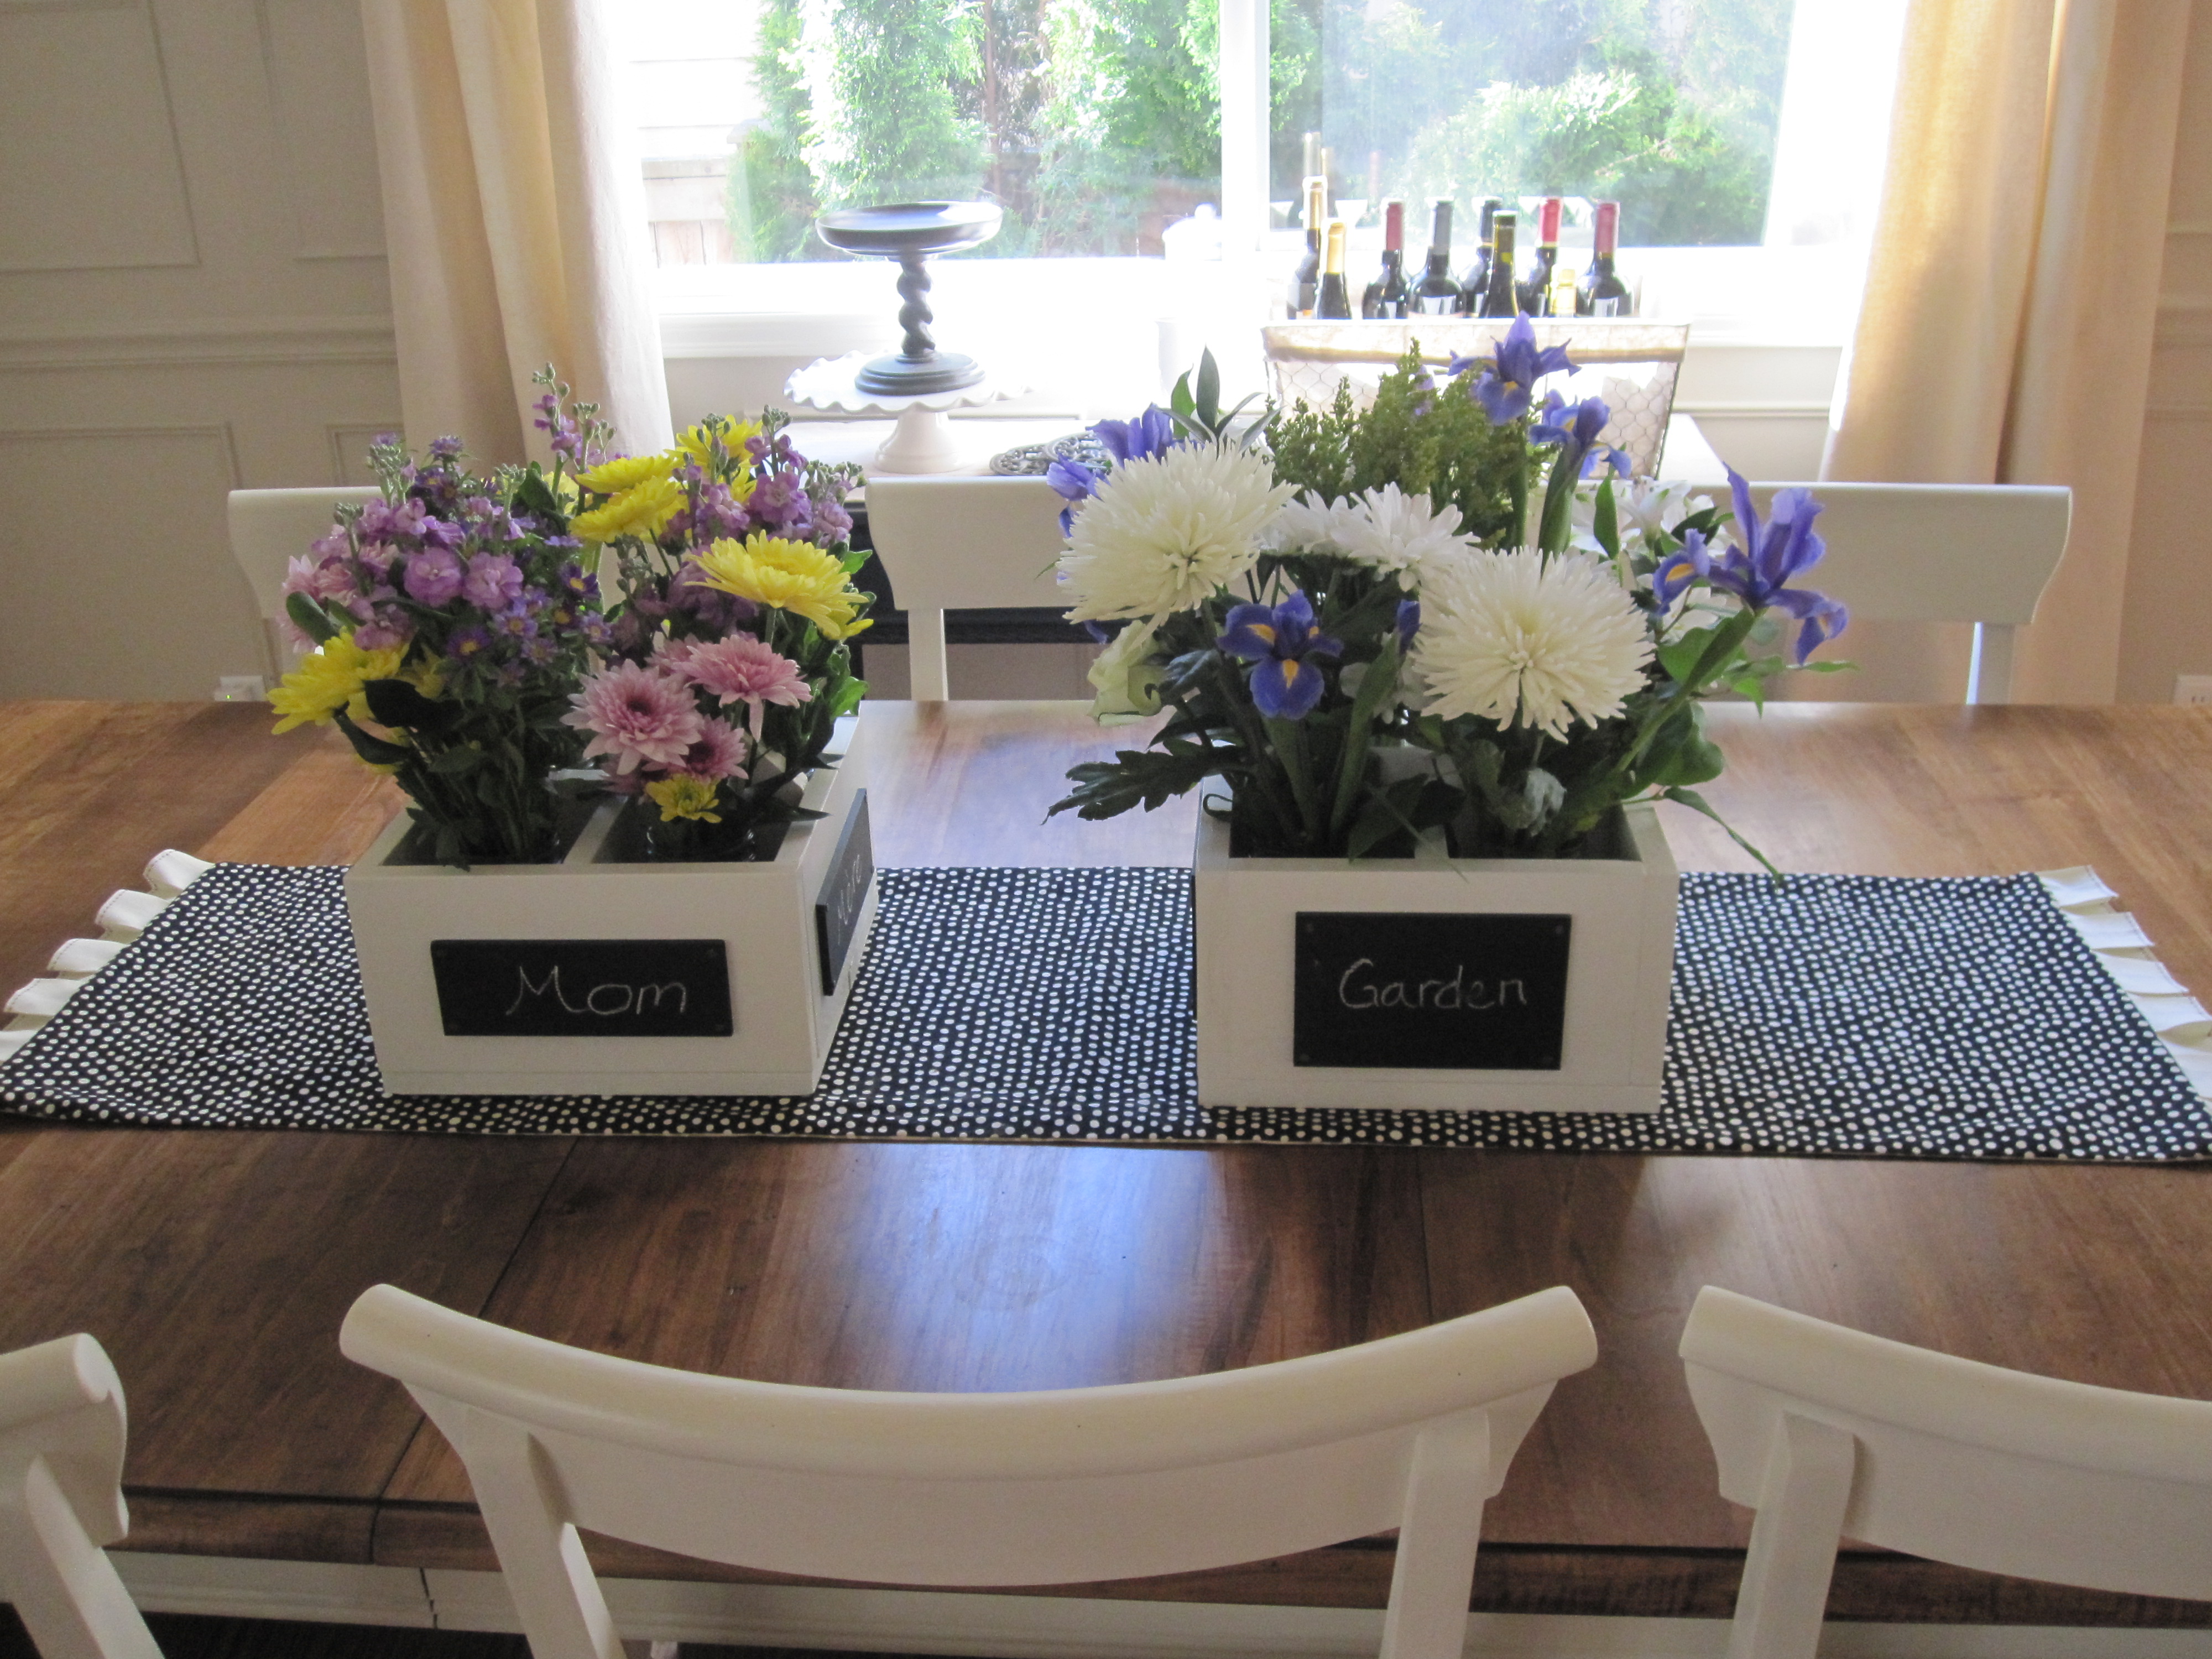
Flower Caddy
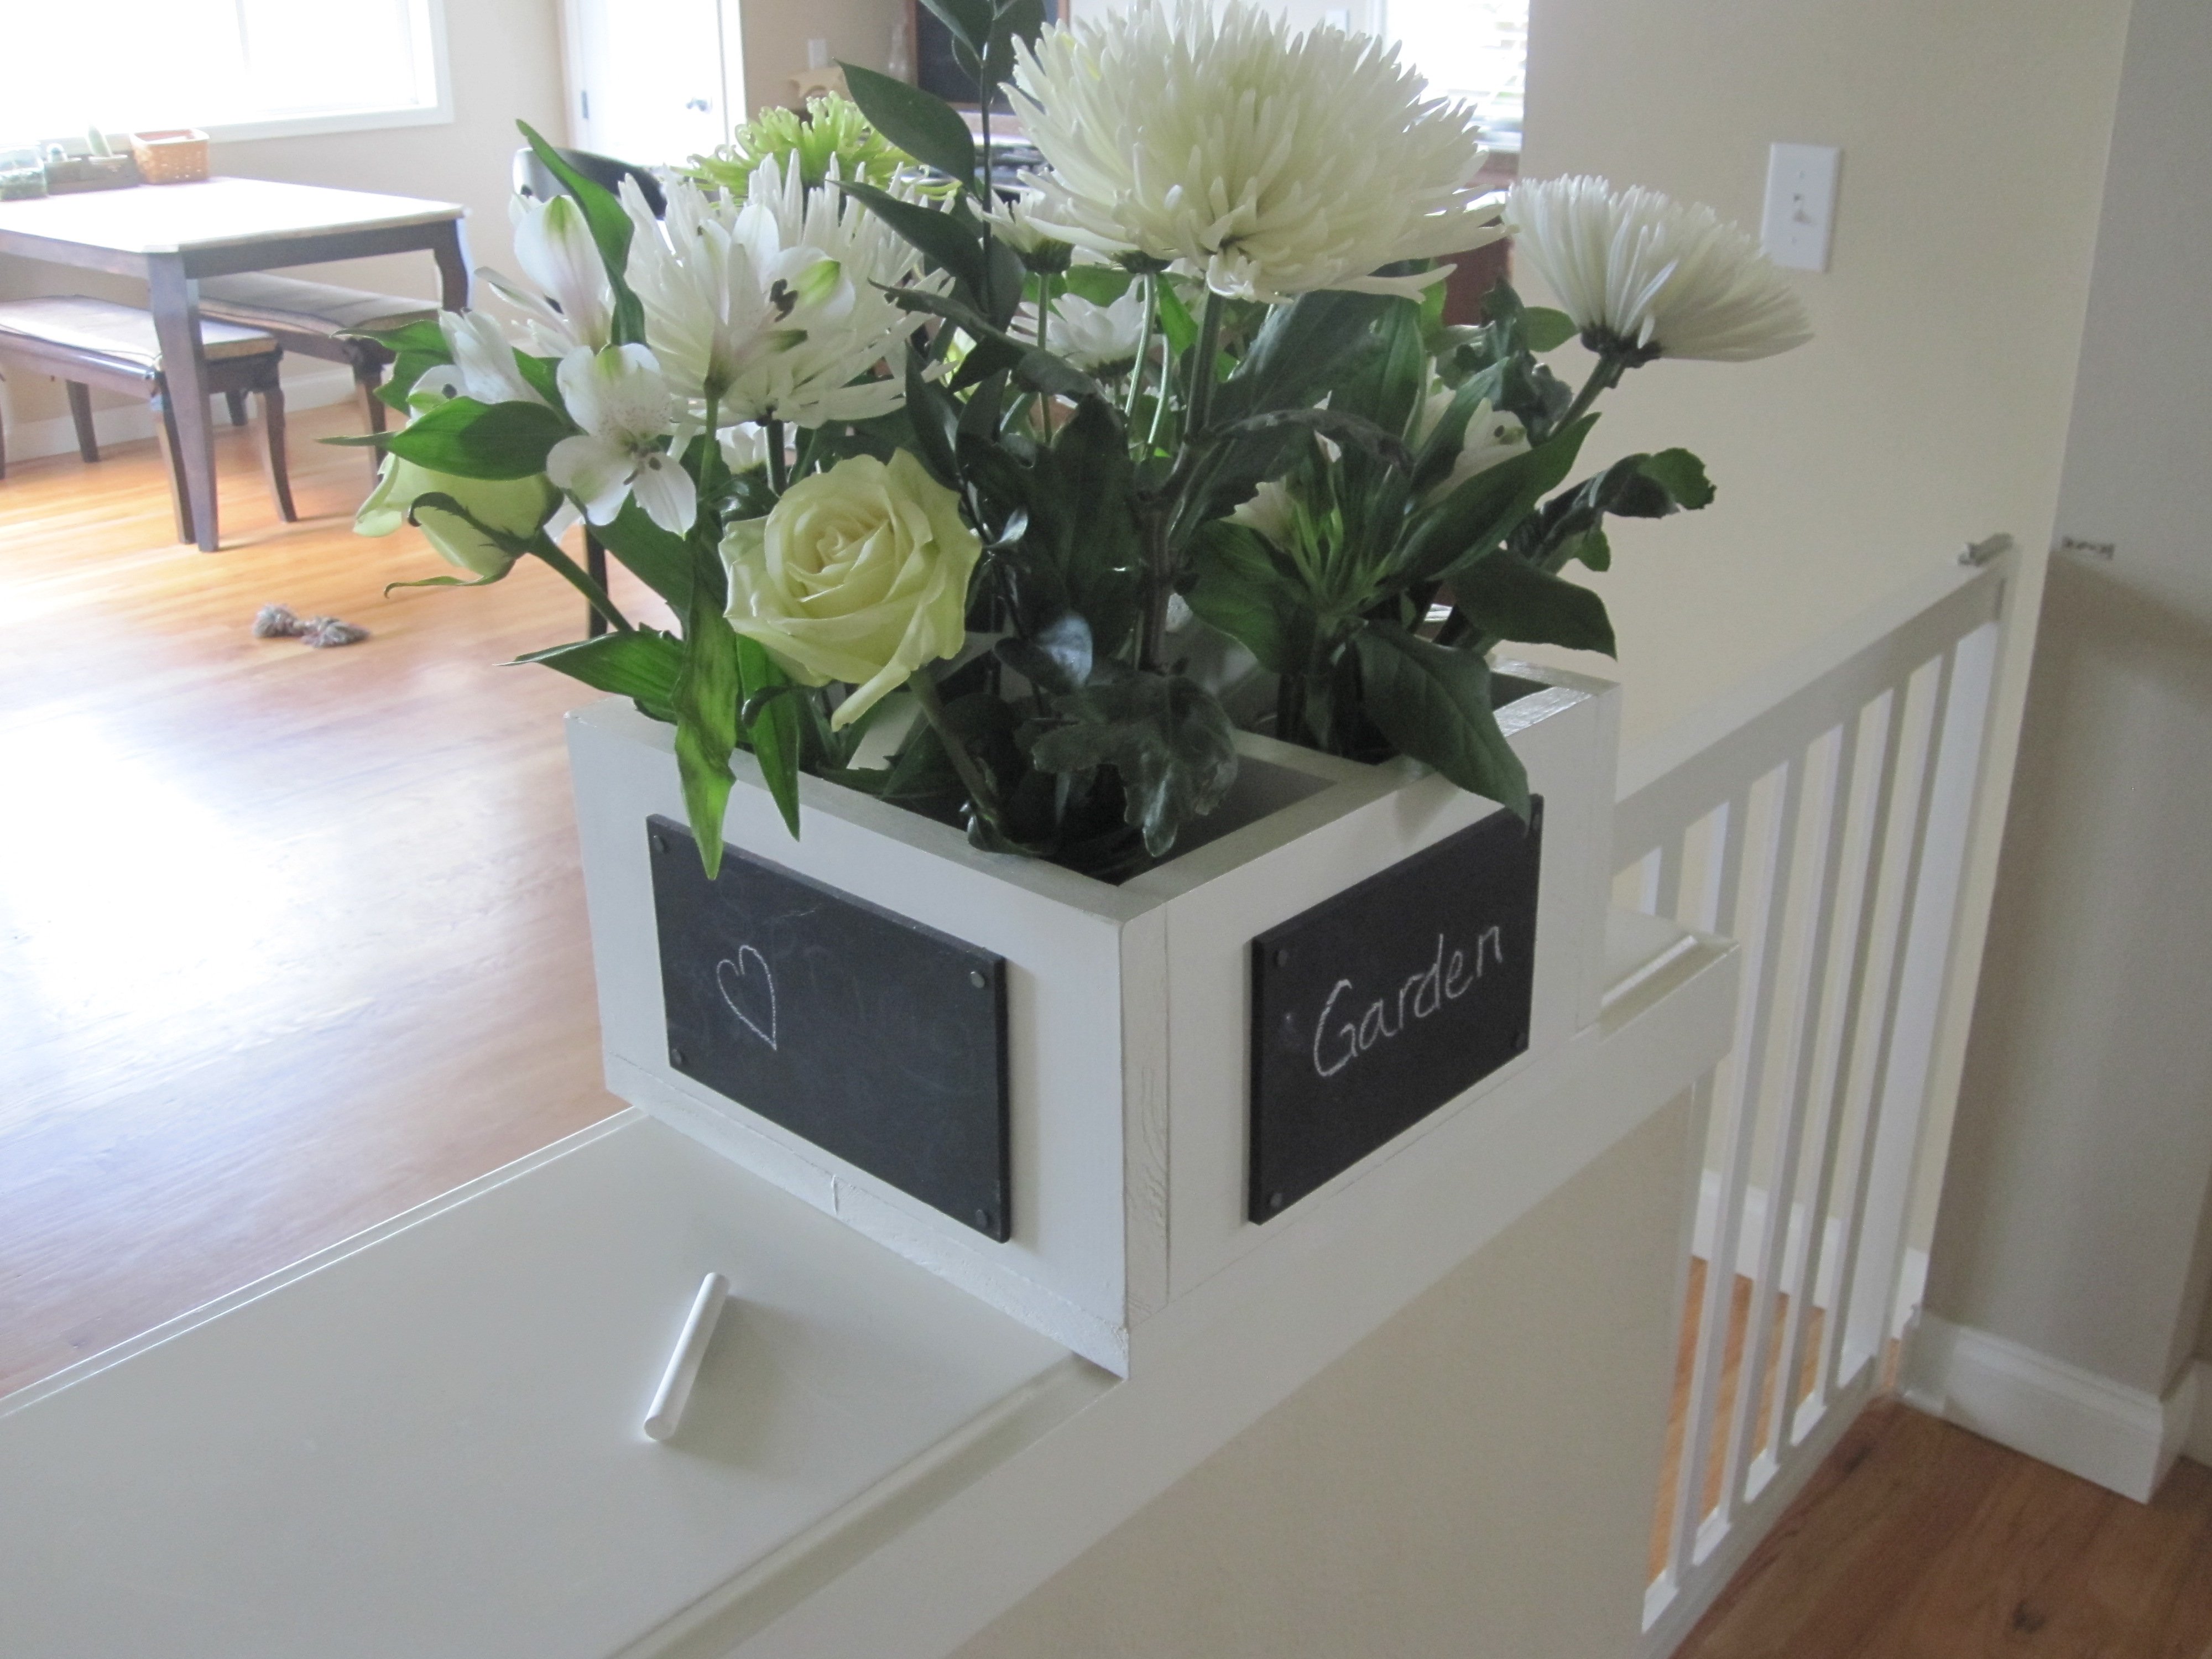
I made three of these caddies from Ana's 'Reclaimed Soda Crate Caddy' plan. I finished all three in white semi-gloss paint and added mason jars to hold flowers, pens, silverware, you name it. I kept one for myself and gave the other two to my mom and mom-in-law for Mother's Day. I completed this project around 3 years ago, and since then have used my flower caddy whenever I remember to get a bouquet. It always brightens up my decor and receives compliments. It's a very cute and unique project. Enjoy!

Built from Plan(s)
Estimated Cost
$20
Estimated Time Investment
Afternoon Project (3-6 Hours)
Finish Used
one coat of primer followed by two coats of Sherwin-Williams Dover White in semi-gloss
Recommended Skill Level
Beginner
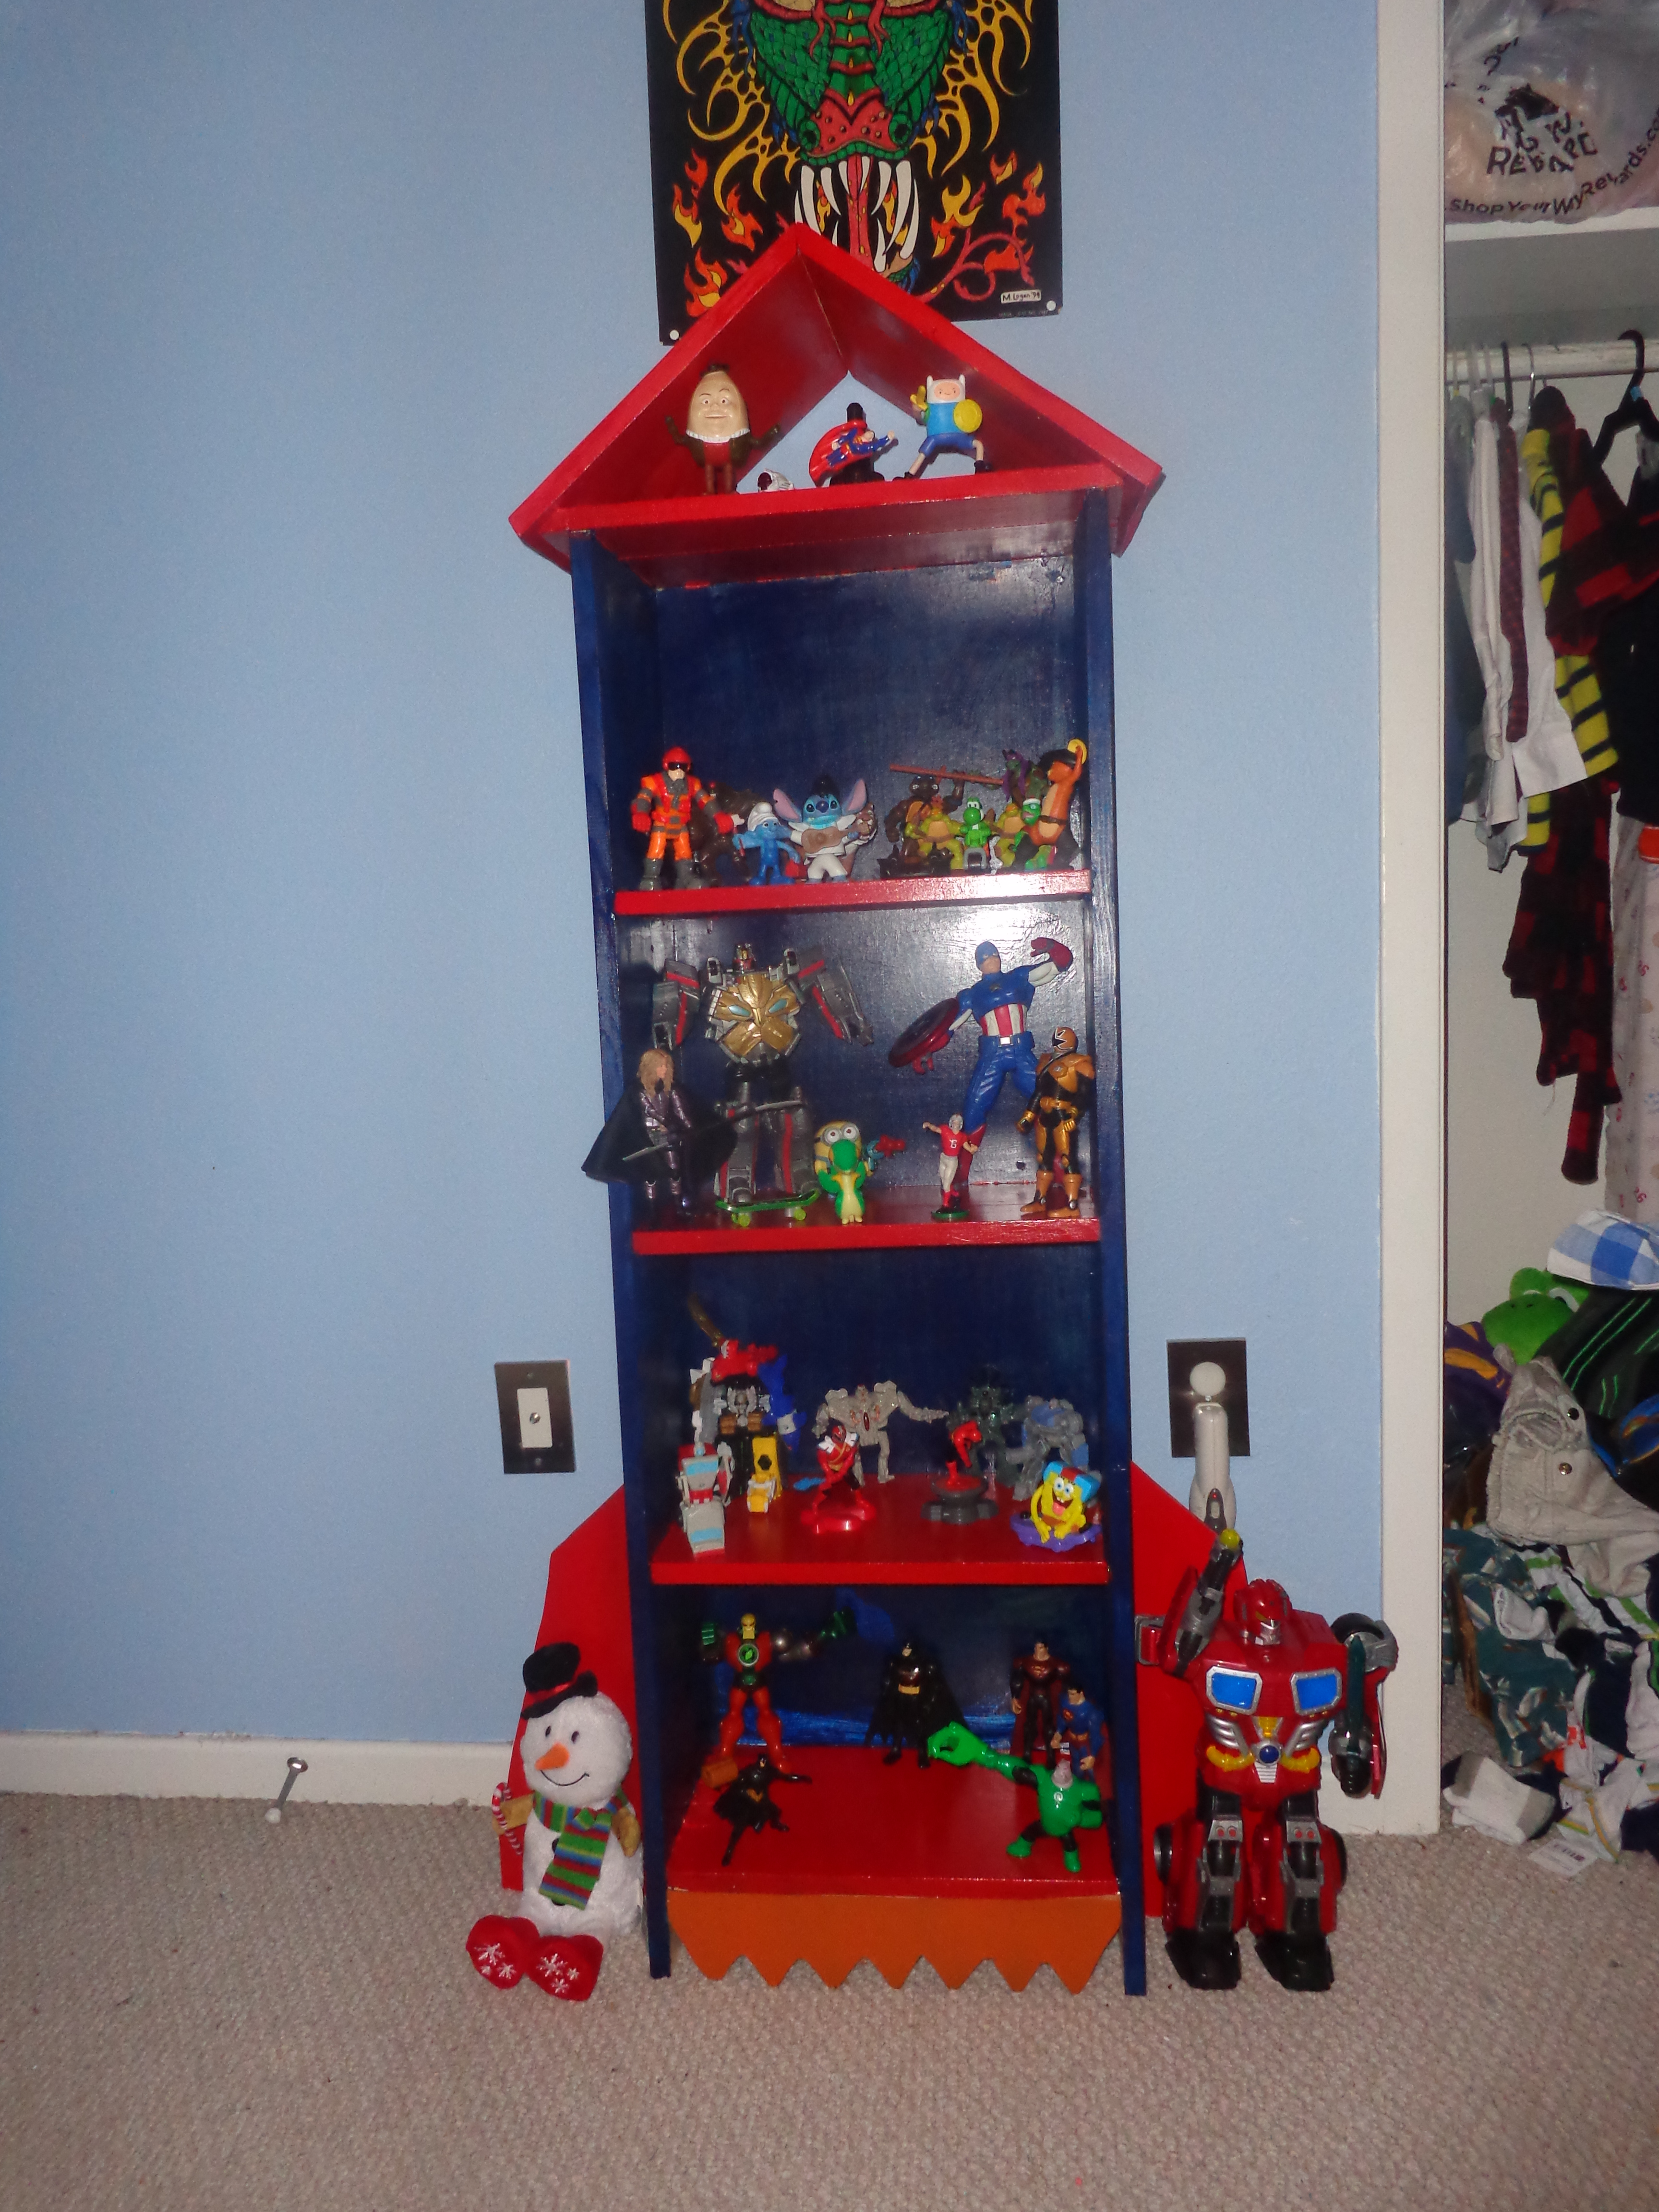
Rocket Bookcase

Built this several years ago to display my sons action figures
Built from Plan(s)
Estimated Cost
$100
Estimated Time Investment
Afternoon Project (3-6 Hours)
Finish Used
apple red and navy blue
Recommended Skill Level
Intermediate
Frame around bathroom mirror
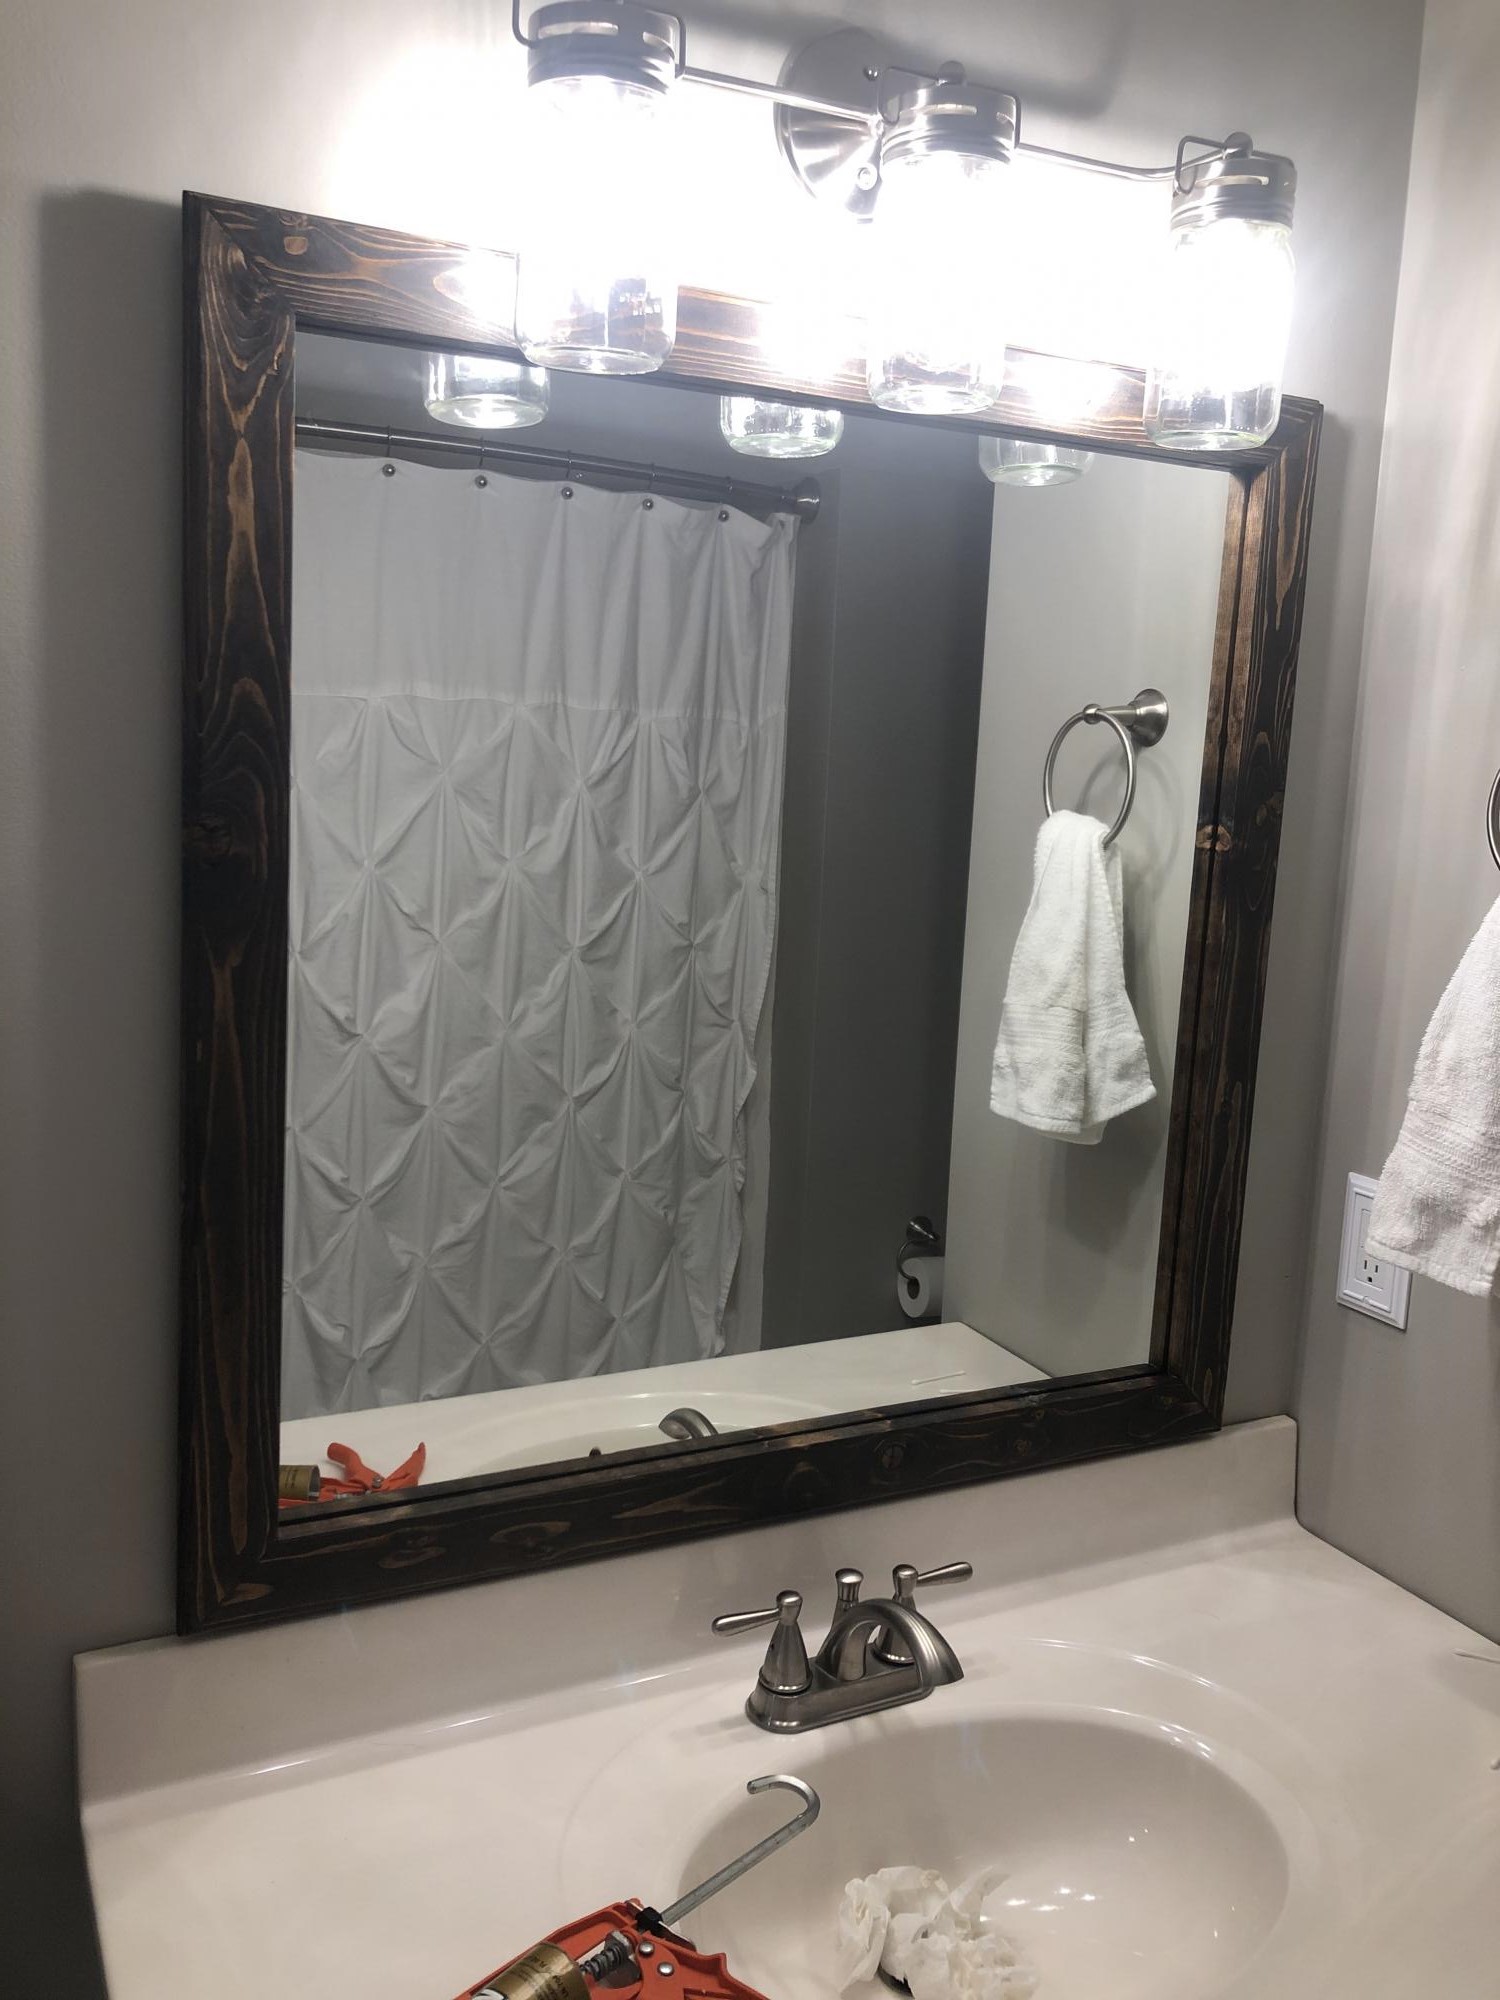
I built a frame around the bathroom mirror. I used pine 2x3s. I used pocket holes and glue on my joints. I used minwax dark walnut. I’m happy with how it turned out.
Estimated Cost
Less than $10
Estimated Time Investment
An Hour or Two (0-2 Hours)
Recommended Skill Level
Beginner
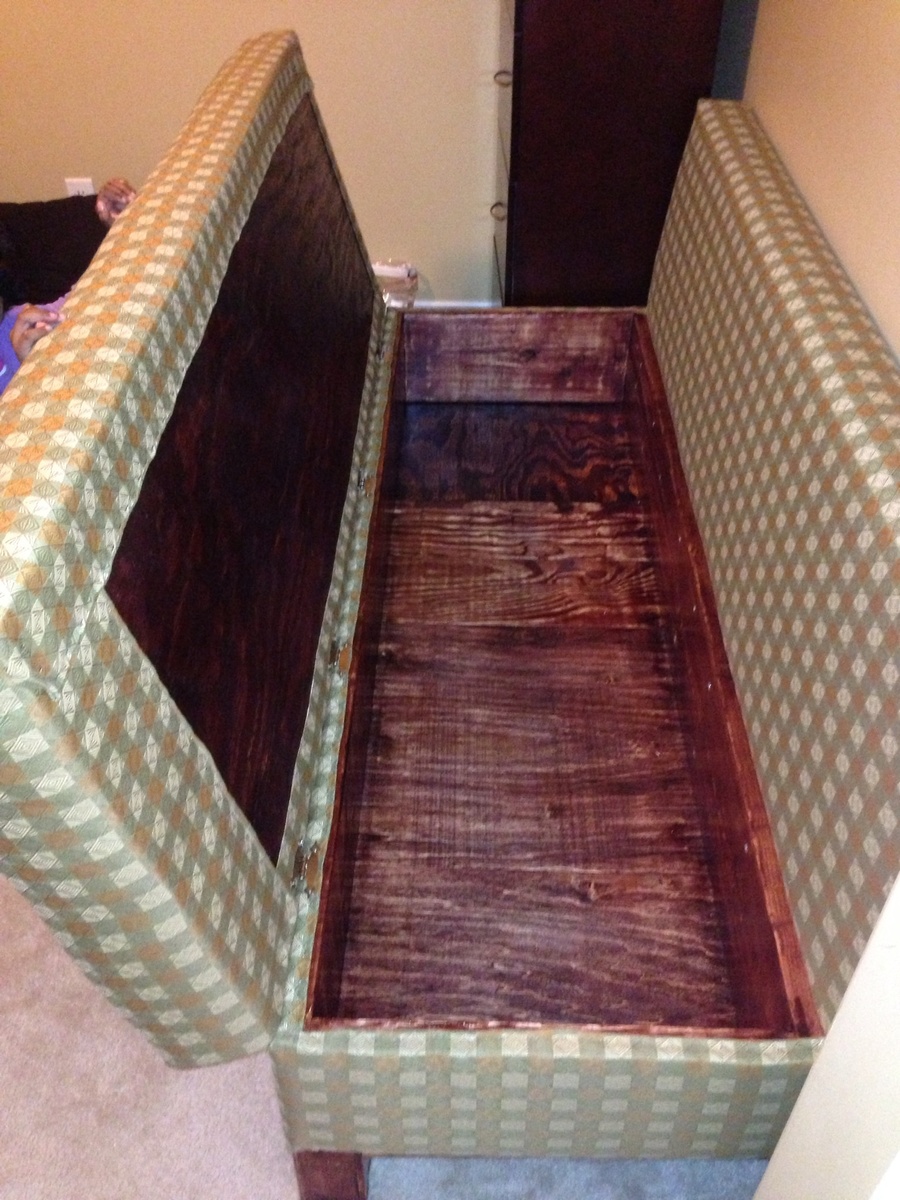
Office seating and lounging
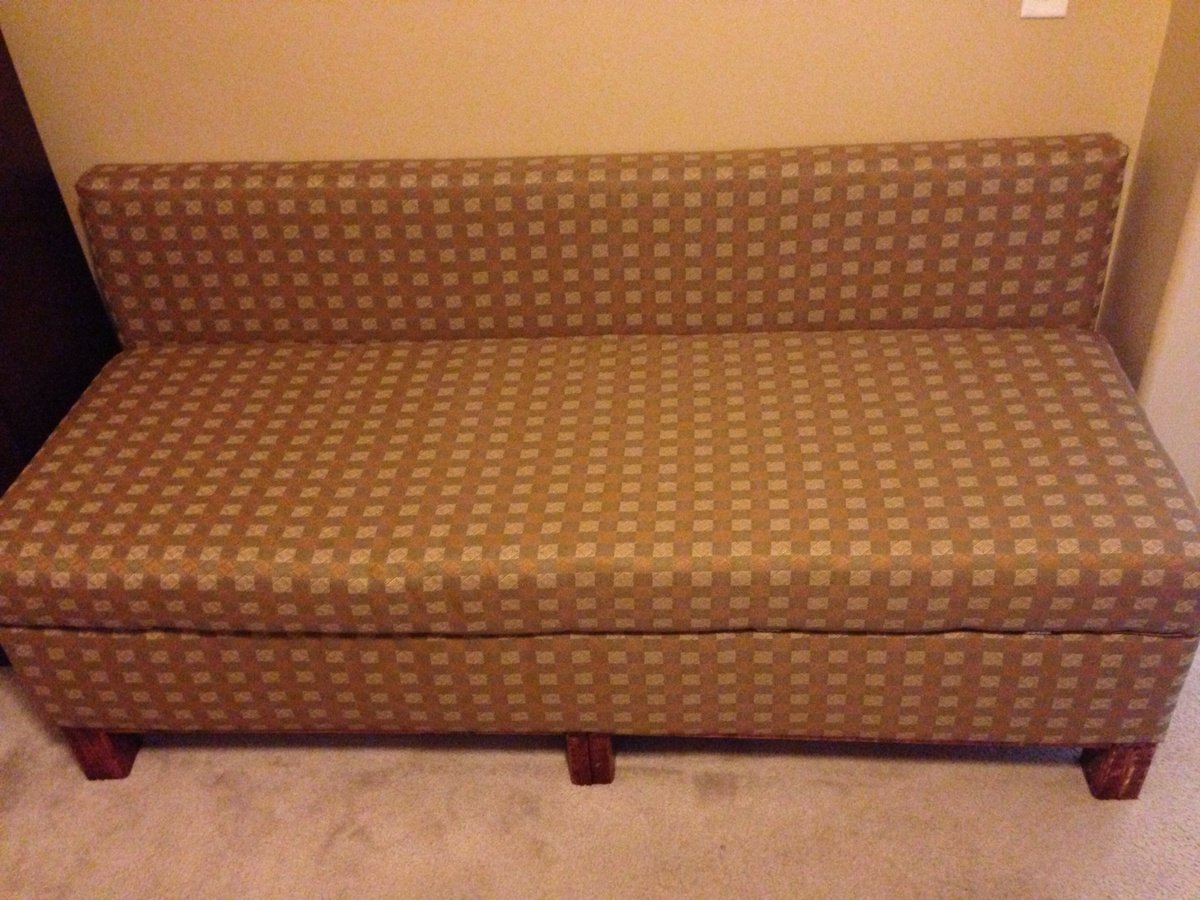
This is my 3rd project from this site and I am very ecstatic with the result. Though I am from a family of carpenters ( father and brother are carpenters) I am an amateur at this. I followed the plan with a little modification for 24 X 72 foam padding. Additionally I added batting to the top and side of the foam pad to add extra cushion.
Built from Plan(s)
Recommended Skill Level
Beginner
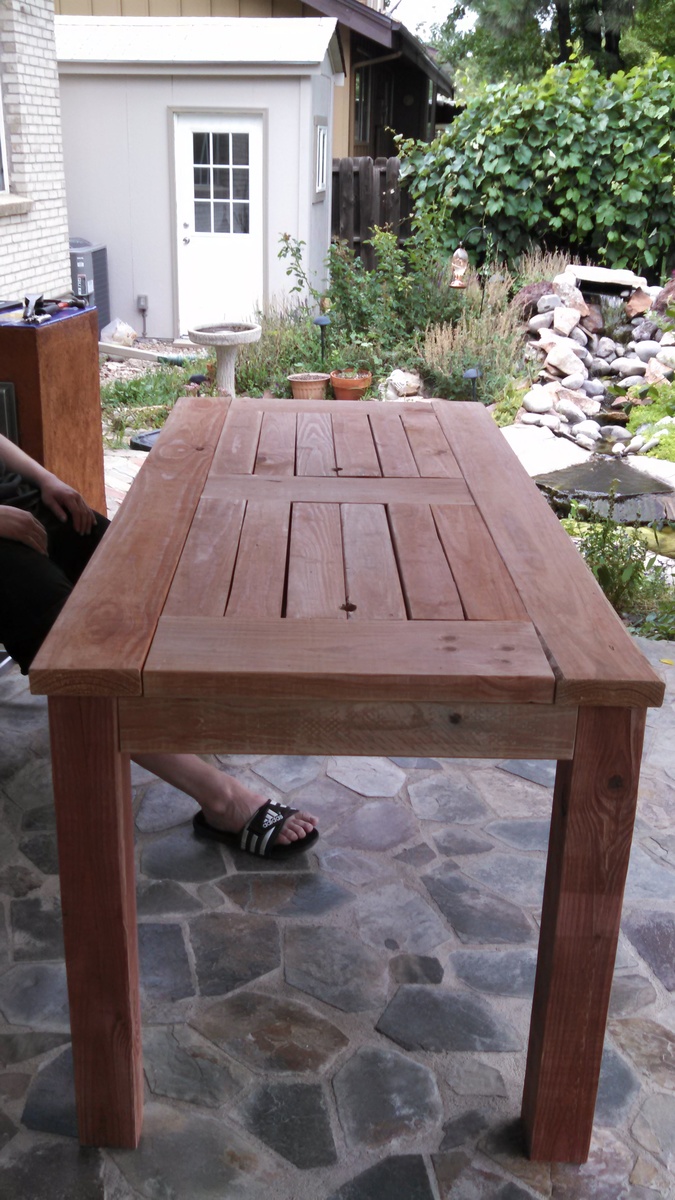
Cooler Patio Table August 2014
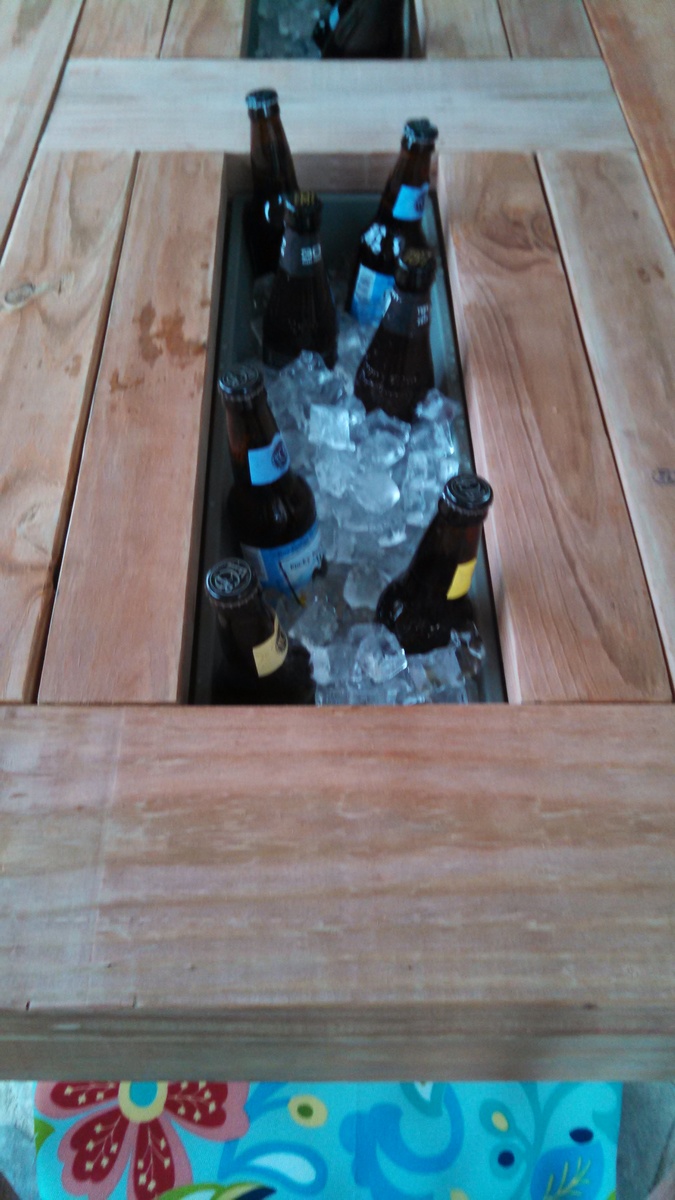
We built a slightly sturdier version of this patio table with 4x4 legs instead of 2x4 legs.
Built from Plan(s)
Estimated Cost
$250
Estimated Time Investment
Afternoon Project (3-6 Hours)
Recommended Skill Level
Beginner
Comments

Deck swing
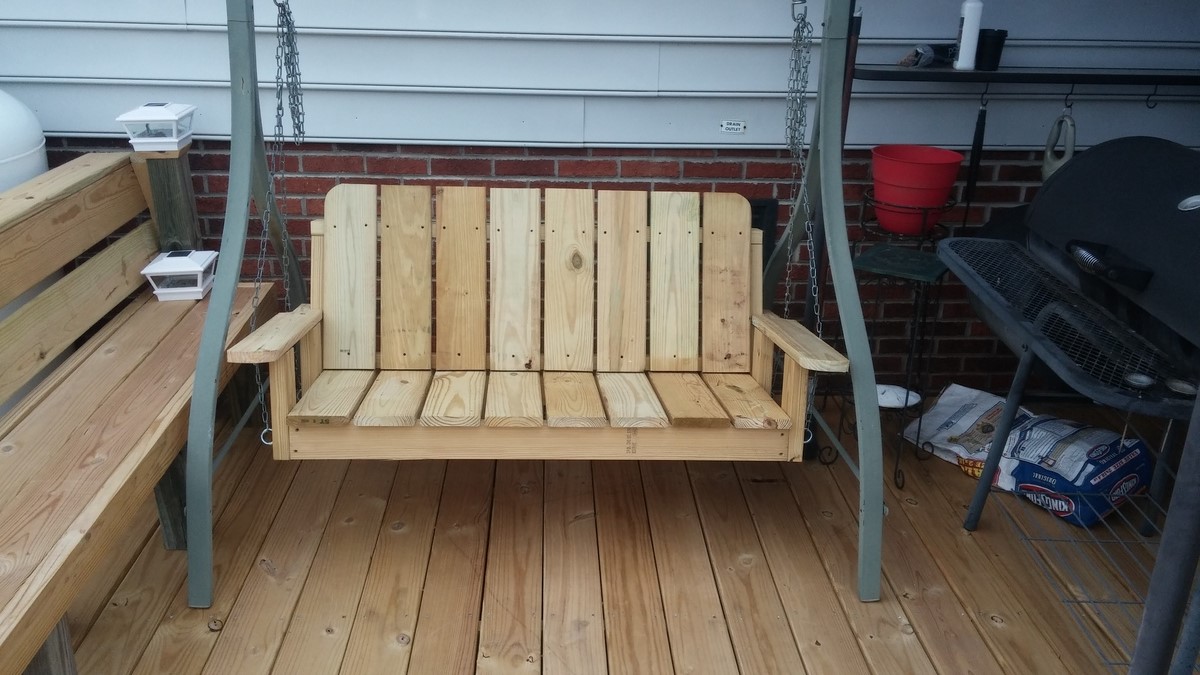
Used left over deck boards
Built from Plan(s)
Estimated Cost
20.00
Estimated Time Investment
Day Project (6-9 Hours)
Recommended Skill Level
Beginner
S&H bedroom
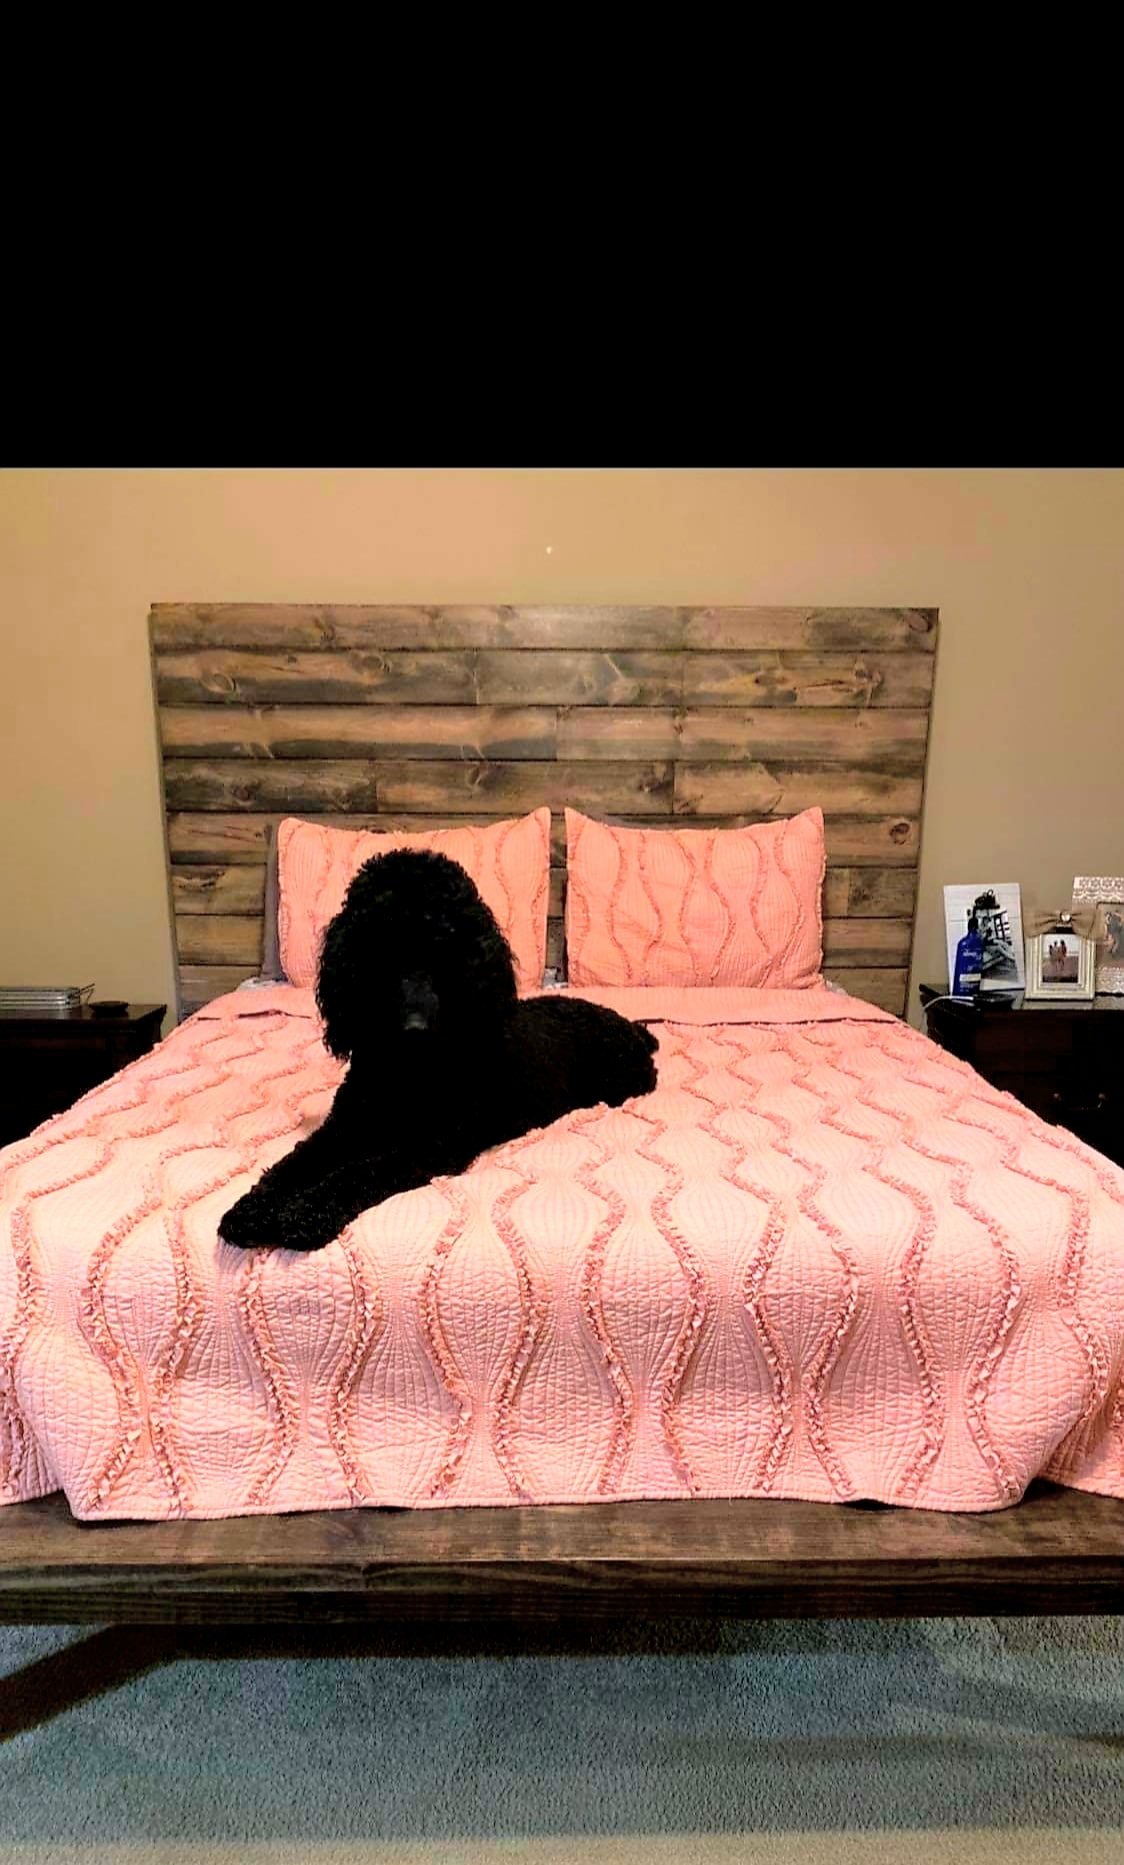
My nephew ordered the bed for his bride to be and one year later I gifted them the bedside tables to match as a wedding gift. This plan was easy for someone who has trouble with drawers!
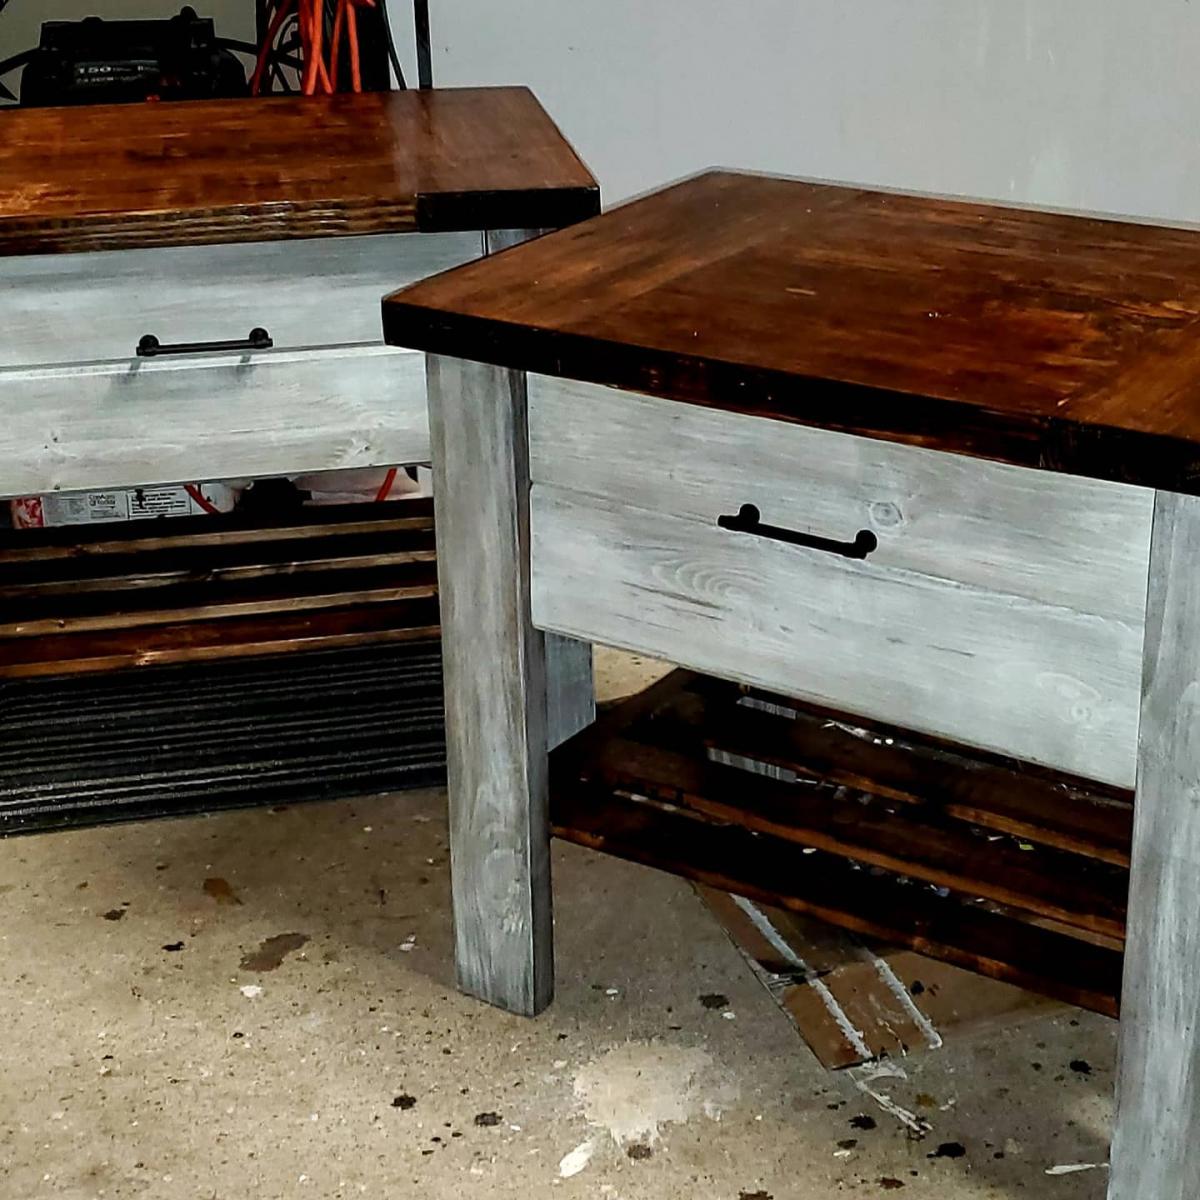
Built from Plan(s)
Estimated Cost
basically free. Used scrap wood from beds built. bought hardware only.
Estimated Time Investment
Weekend Project (10-20 Hours)
Finish Used
Expresso stain with dry brush white paint.
Recommended Skill Level
Beginner