Community Brag Posts

An updated bathroom vanity
This was a part of my recent bathroom remodel (new floor tile, shower tile, toilet, and vanity). The plans came out of looking at my favorite home sites, which for this were Ana White and Remodelaholic, and realizing that the vanities in my price were were cheap and not that cheap.
The vanity build itself didn't take that long but had to be done is small segments due to lack of one giant clump of time. Total wood cost was around $60, plus $5 for the gloss polyurethane, $60 for the sink (clearance) and $100 for the faucet. More importantly, the vanity fits the space that I had in the efficient bathroom.
Estimated Cost
$225 (vanity, sink bowl, and faucet)
Estimated Time Investment
Weekend Project (10-20 Hours)
Finish Used
White Painted Sides, Ebony stain top
Recommended Skill Level
Beginner
Comments
Thu, 11/13/2014 - 20:02
Help me make this
I absolutely love this! What modifications did you come up with to make the door?
Sideboard to Match Farmhouse Table
My niece asked that I build a sideboard to match her farmhouse table. It was a good learning experience for me.
Built from Plan(s)
Estimated Cost
350 to 375.
Estimated Time Investment
Week Long Project (20 Hours or More)
Finish Used
Minwax dark walnut stain and satin finish
Recommended Skill Level
Intermediate
Comments


Fri, 02/27/2015 - 11:23
This is gorgeous! I love it!
This is gorgeous! I love it! The way that you staged it and the color is really handsome!
Fri, 02/27/2015 - 17:24
My uncle did an amazing job!
My uncle did an amazing job! I am very very happy with my sideboard!! Not only is it beautiful, but it offers so much storage. I love it!!!

Had to adjust the width to fit better / but I did it!!
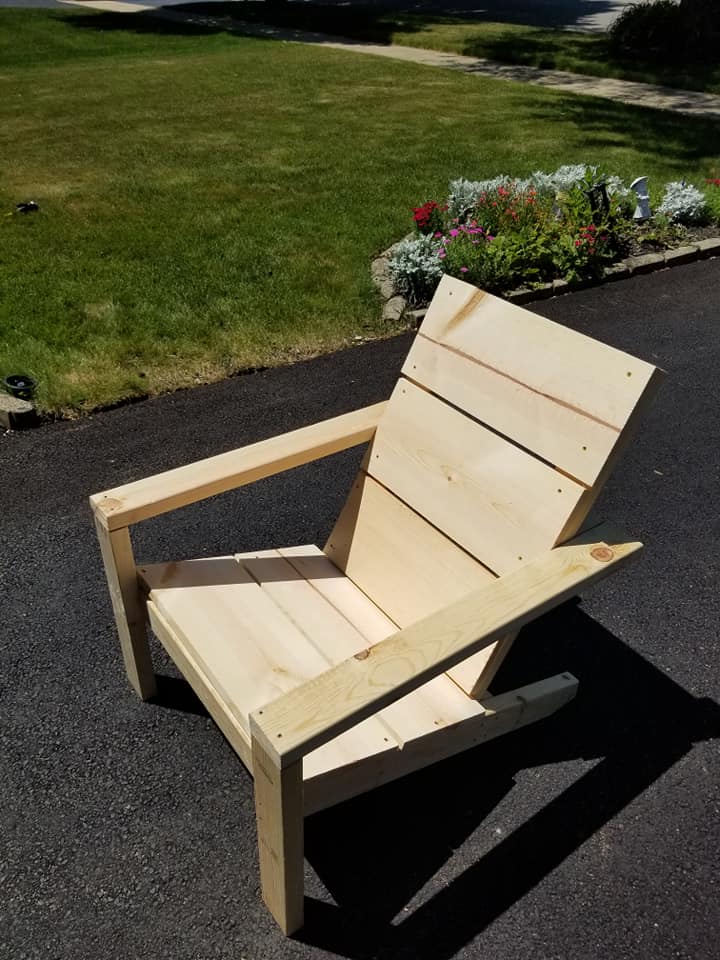
I had to adjust the width to fit my much wider "Seat".
:P...Also that rear angle was a struggle...Otherwise plans were spot on!
Thanks Ana.
Built from Plan(s)
Estimated Cost
50
Estimated Time Investment
Afternoon Project (3-6 Hours)
Finish Used
Not decided Yet.
Recommended Skill Level
Intermediate
Comments
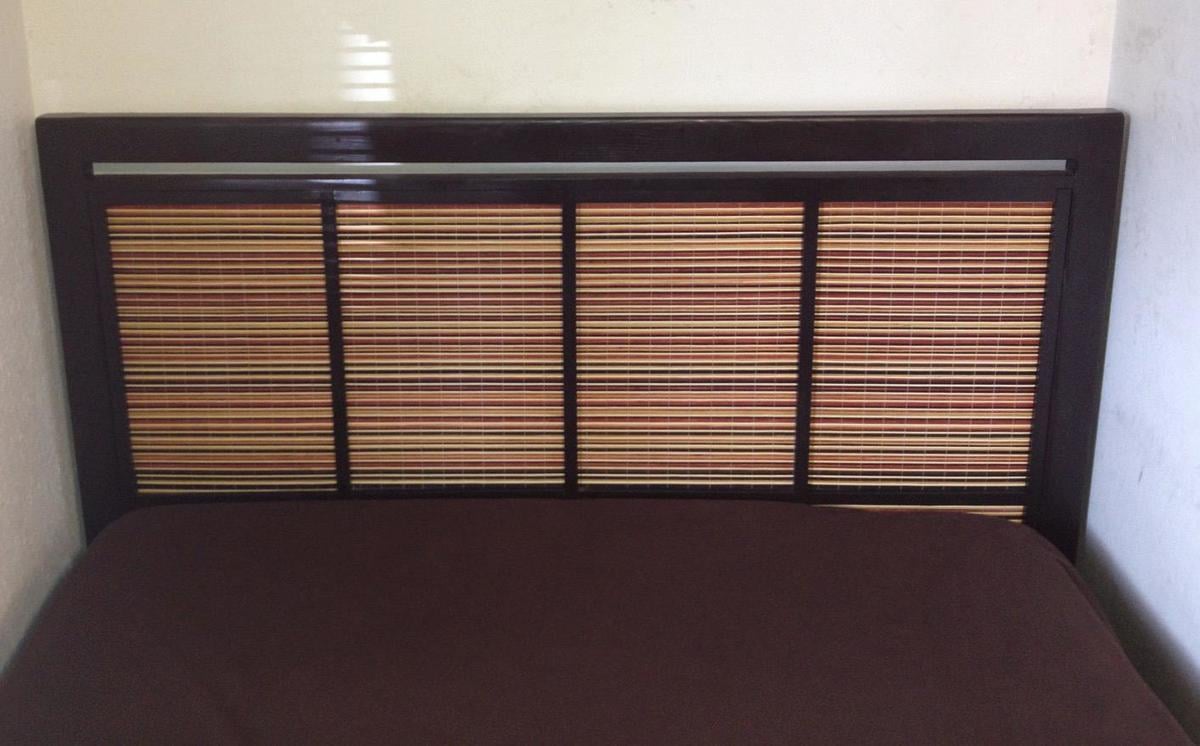
A Different Kind of Chunky
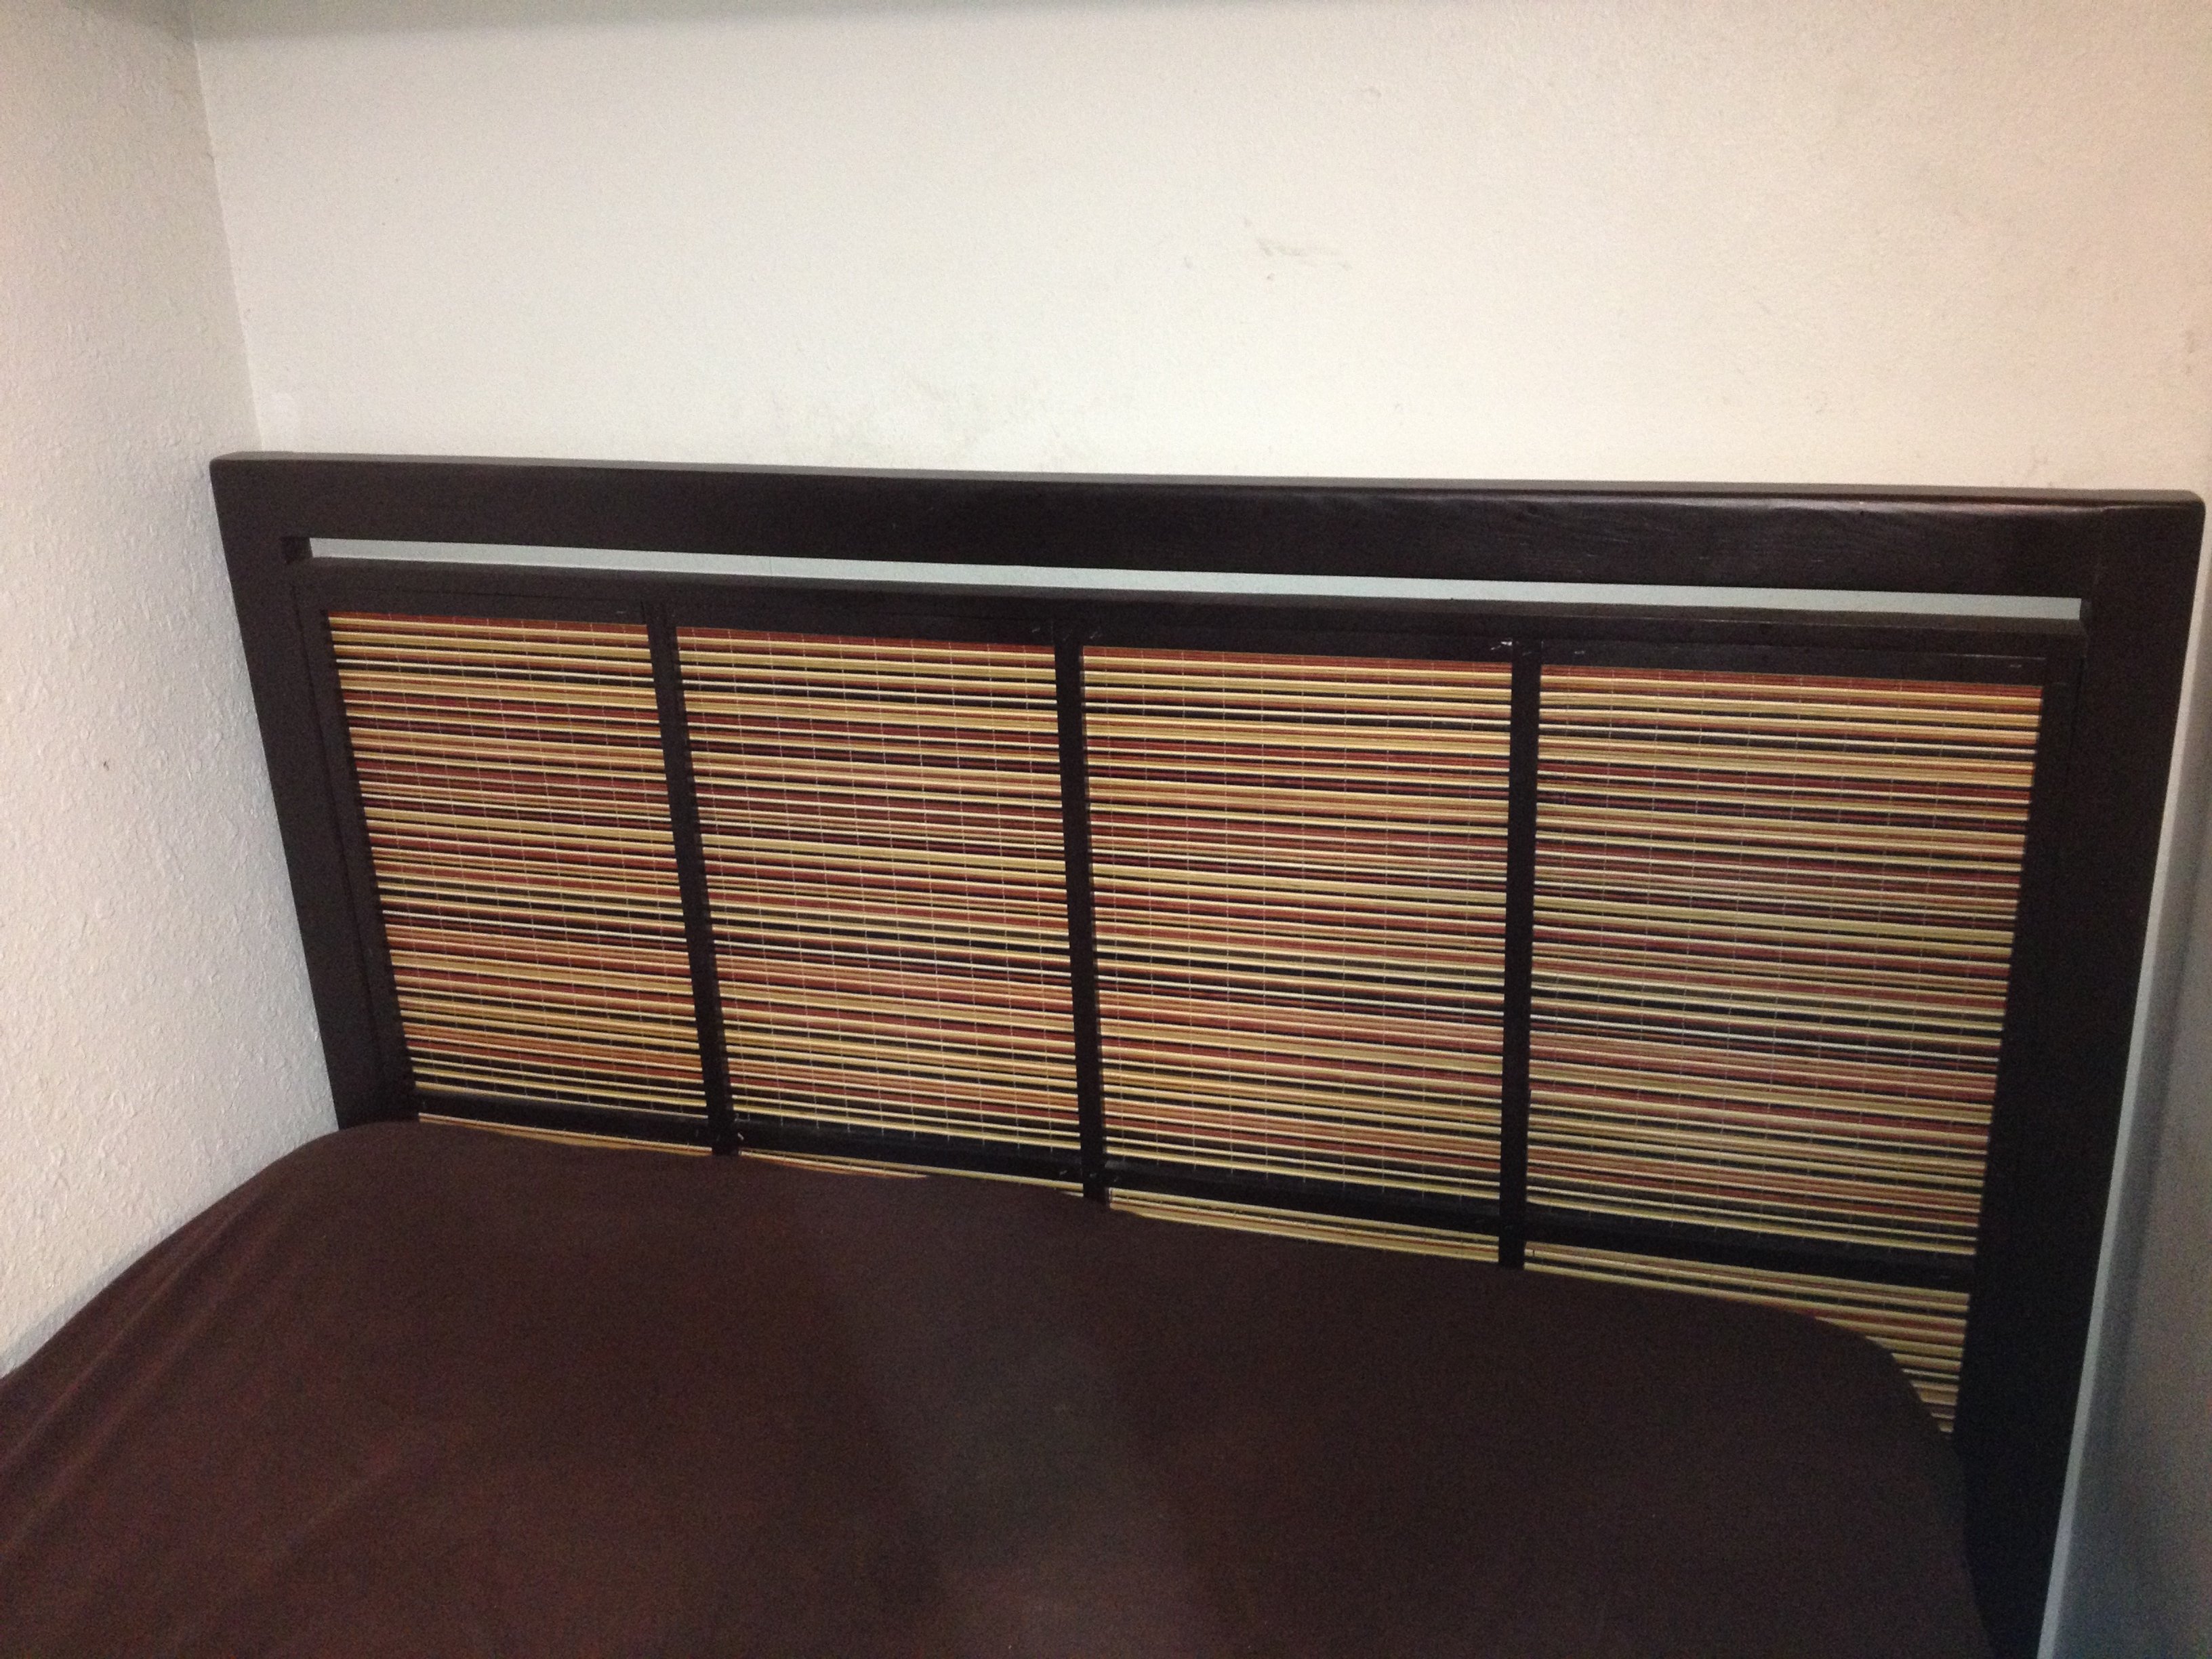
This was my first woodworking project.
The inspiration for the project came from the "Dark Mahogany Chase Chunky" headboard from World Market. At $300 (at the time) it was out of my price range. But after looking at it for a while, I decided I could do it myself.
I used and modified several of Ana White's headboard plans to come up with the final (rough) idea.
I used 3 2x3 boards for the frame, a 3/4" thick piece of plywood for the body (which I had cut at the hardware store) and a 1x2 to top the plywood. I was just going to paint the whole thing but I found these bamboo placemats and decided to incorporate them into the project. At $1 each why not? I used 3/4"x1/2" S4S Moulding for the grid.
the cost of materials was about $66 but I had enough plywood left over for another headboard.

Estimated Cost
About $55
Estimated Time Investment
Afternoon Project (3-6 Hours)
Finish Used
Rustoleum Painter's Finish 2x in dark walnut satin finish. Semi-gloss spray poly.
Recommended Skill Level
Starter Project
Comments
Mon, 04/22/2013 - 16:11
I really took a lot of ideas
I really took a lot of ideas from different headboard plans from Ana's site and from what I could figure out about the headboard from World Market.
I used 1x3's at 48" for the sides and a 1x3 at 52" for the cross rail attached with glue and 2 2-1/2" PH screws (1 1/2" PHs) on each side. I also used a 1x2 at 52" to "cap" the plywood using just brad nails and glue
I had the 3/4" plywood cut to 52"x30" at the hardware store. The plywood started at 13.5" up from the bottom. It's attached to the side rails with 7 1-1/4" PH screws (3/4" PHs) per side.
The placemats I found were 18"x13" so 4 fit across just fine. I've also found other vinyl placemats w/ awesome designs that could work.
I used 3/4"x1/2" S4S Moulding to basically just cover the seems though I think any kind of small moulding could work. I used brad nails to attach them (next time I may do it from behind so there are no nail holes to fill).
Here's a picture of another headboard I'm making w/ a similar design but with a larger gap so the side rails are at 52" instead of 48". http://i.imgur.com/nGH369f.jpg http://i.imgur.com/N8ARznD.jpg
I'm painting this one as well. I think if I were going to stain it, I'd opt for a nice birch or oak plywood instead and do the wood conditioner first so the stain goes on a bit more even.
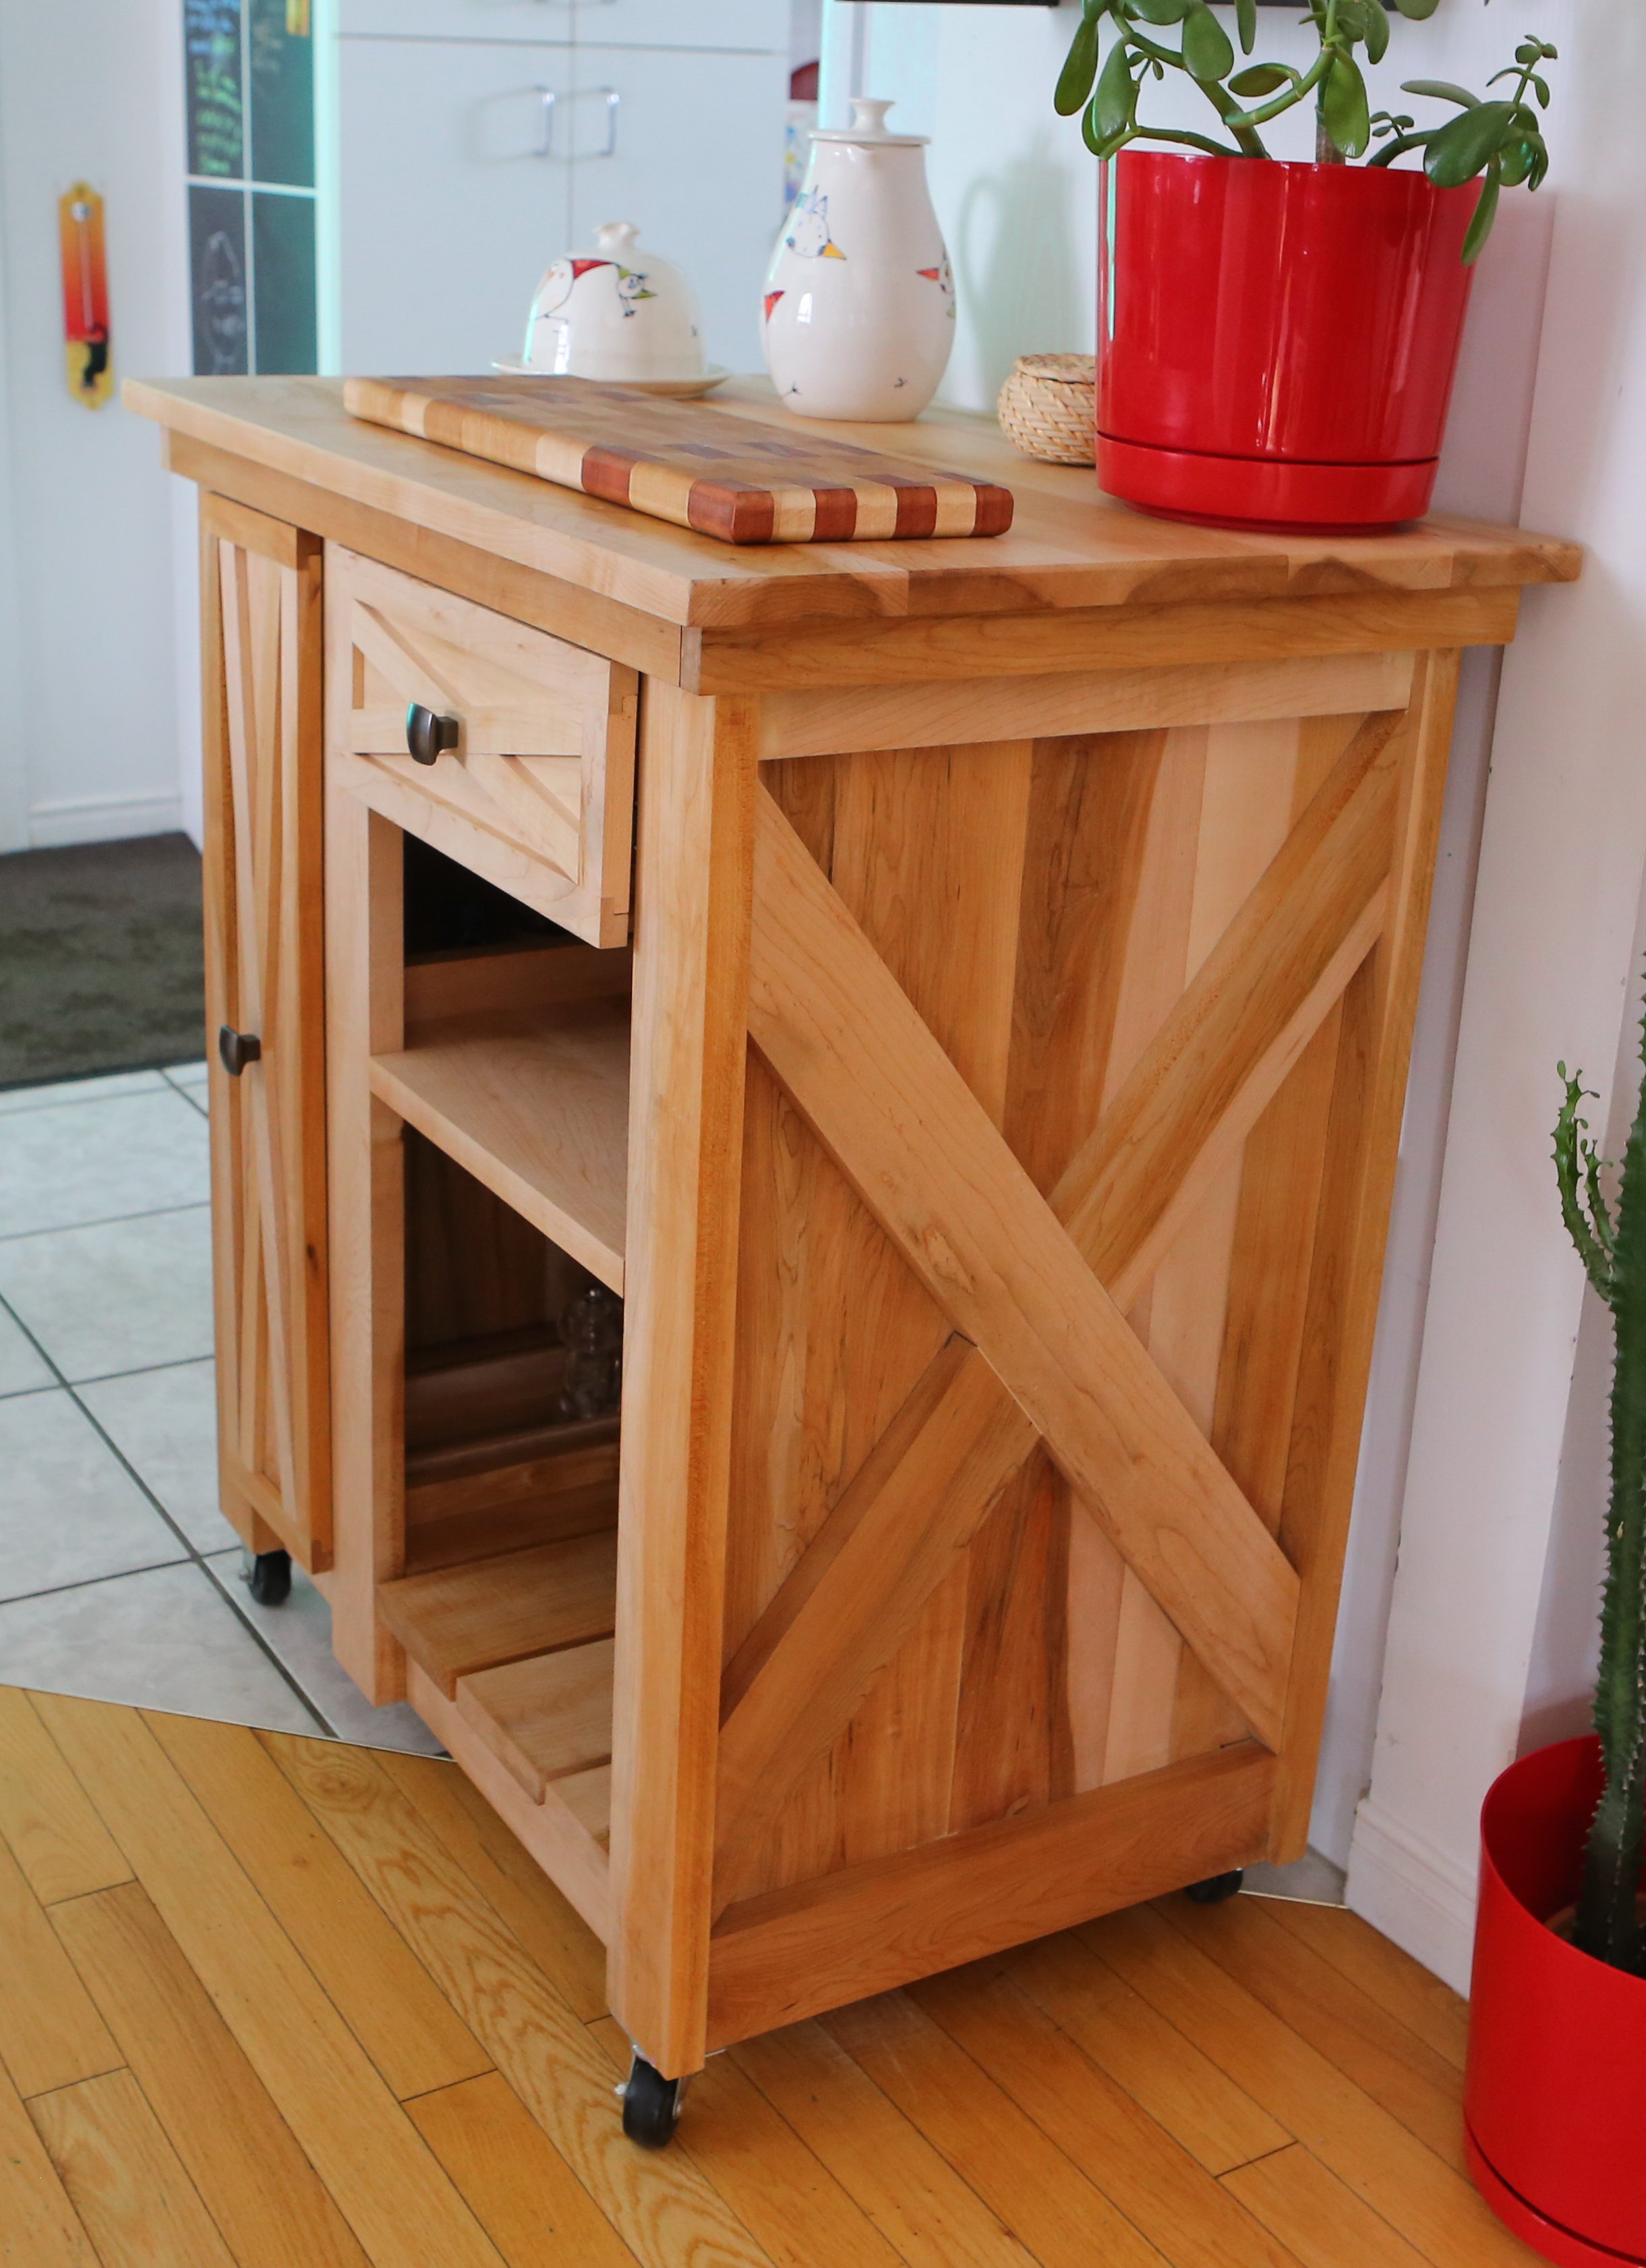
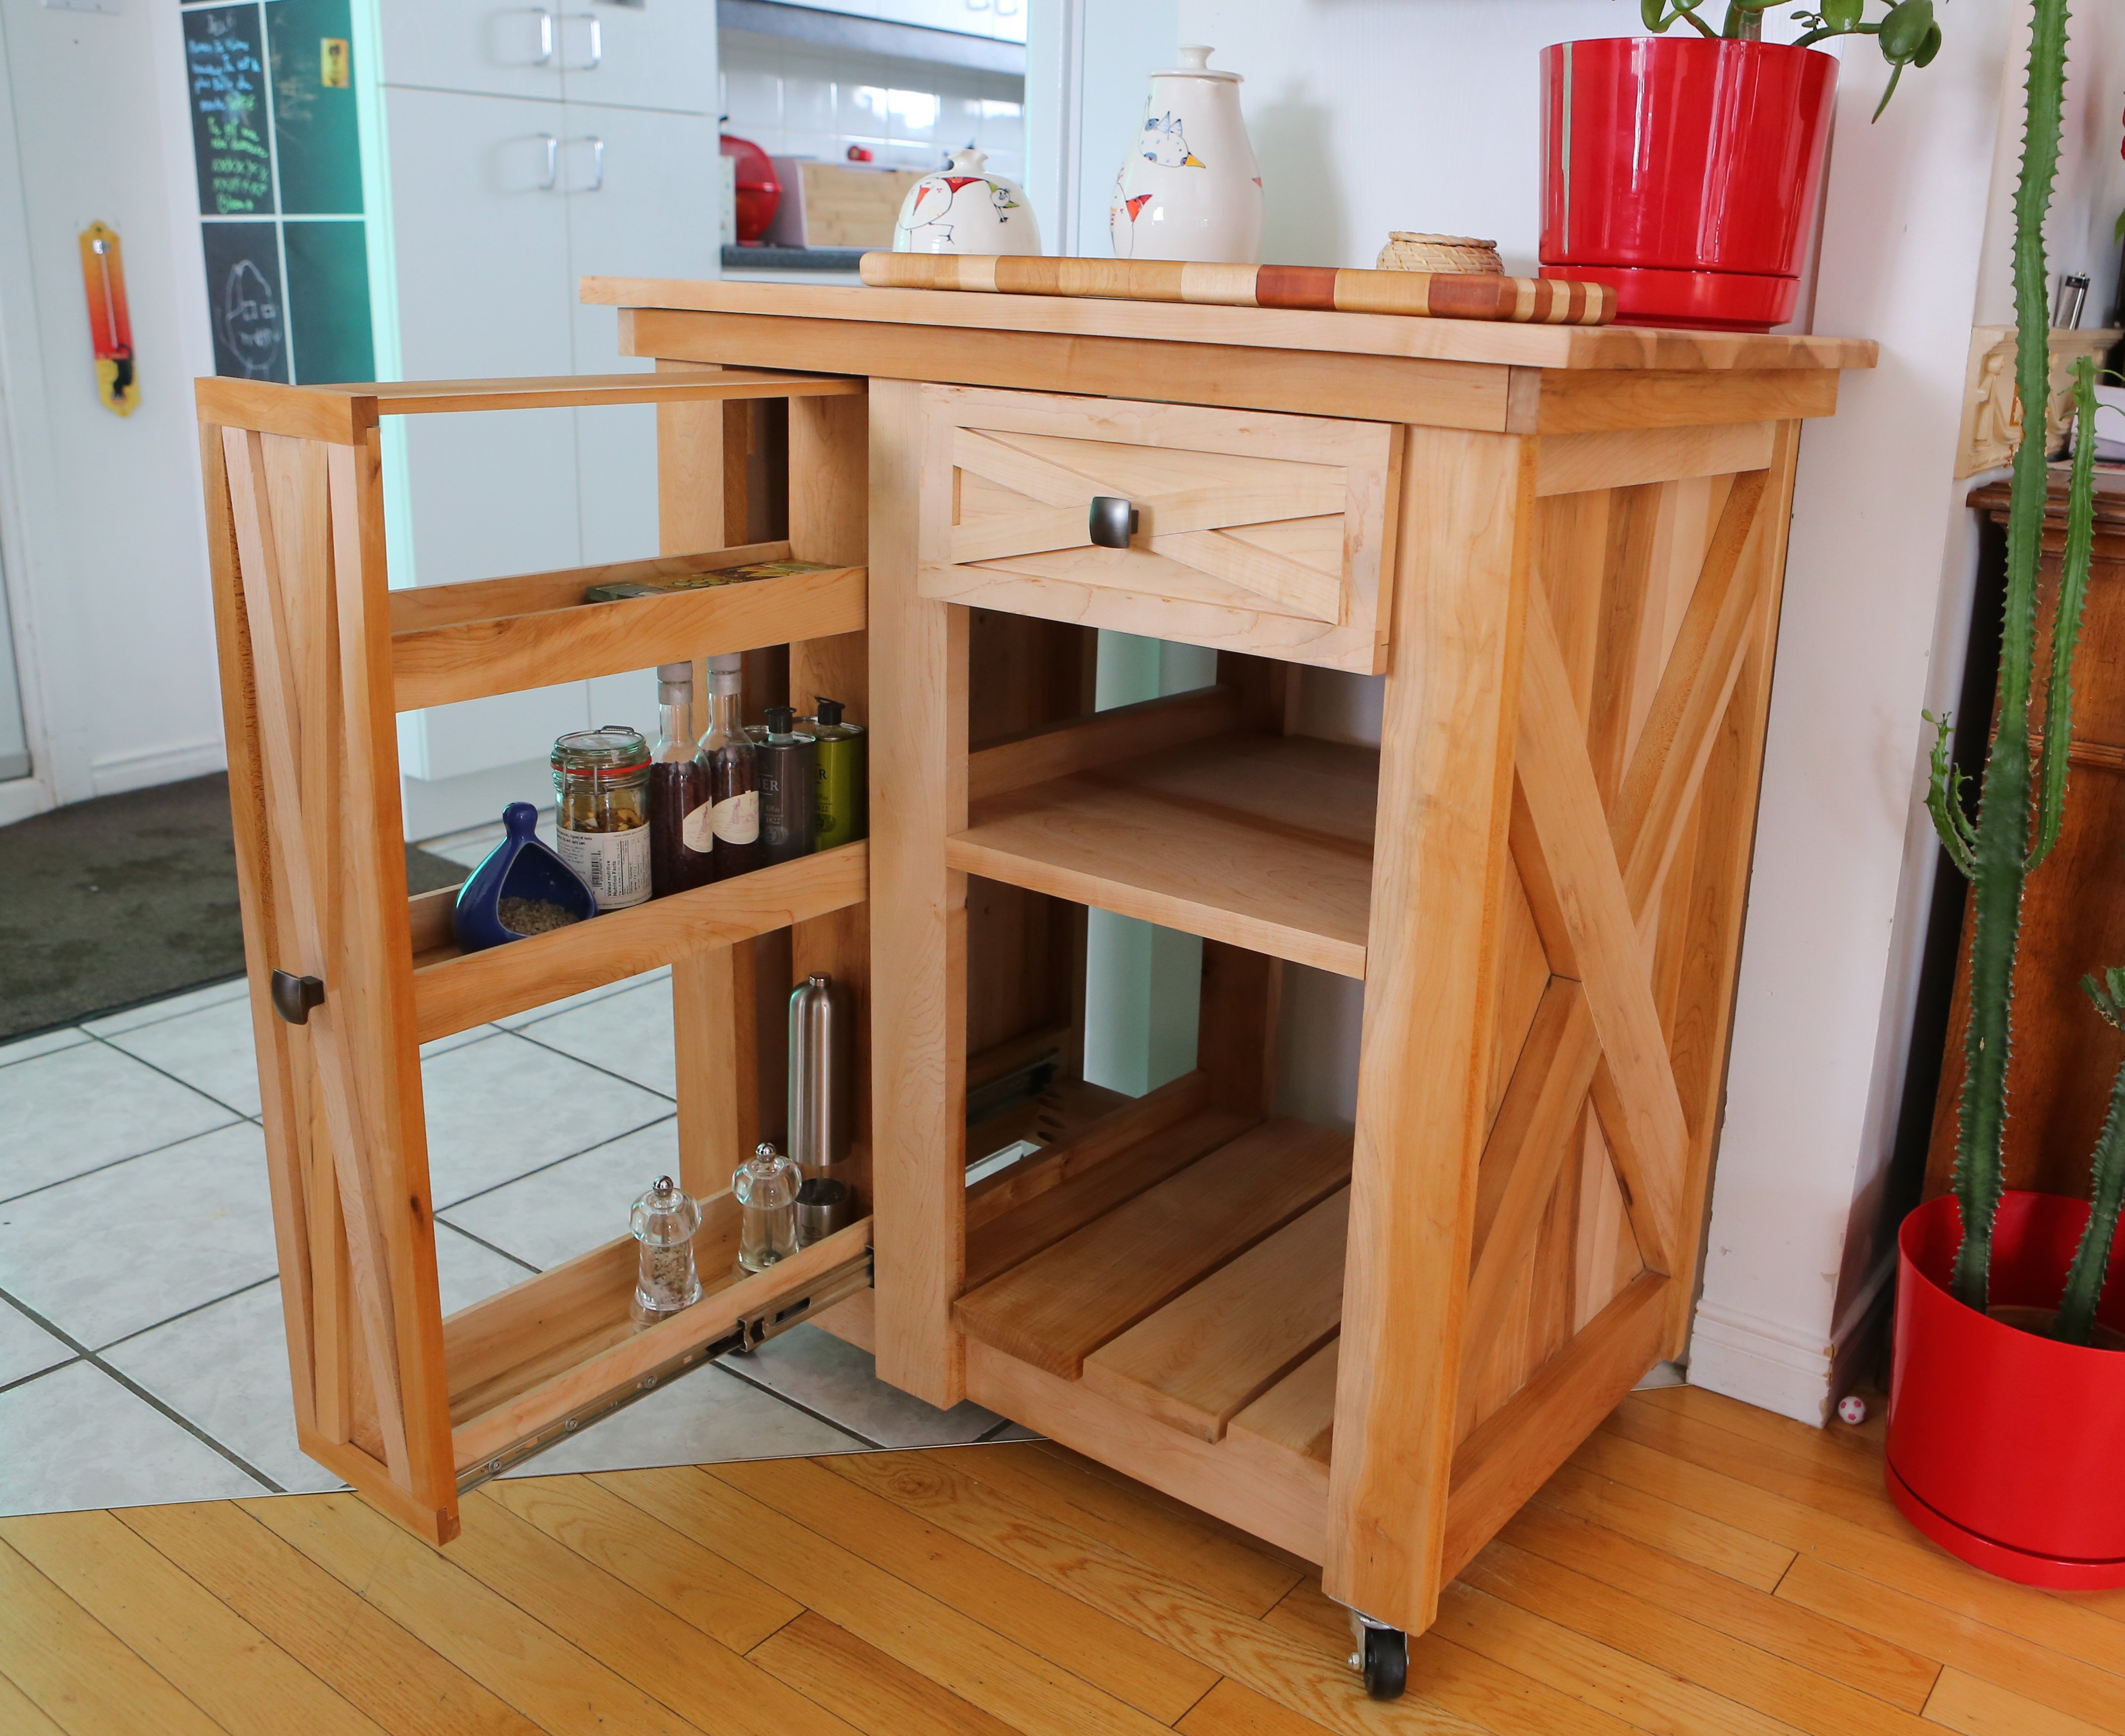
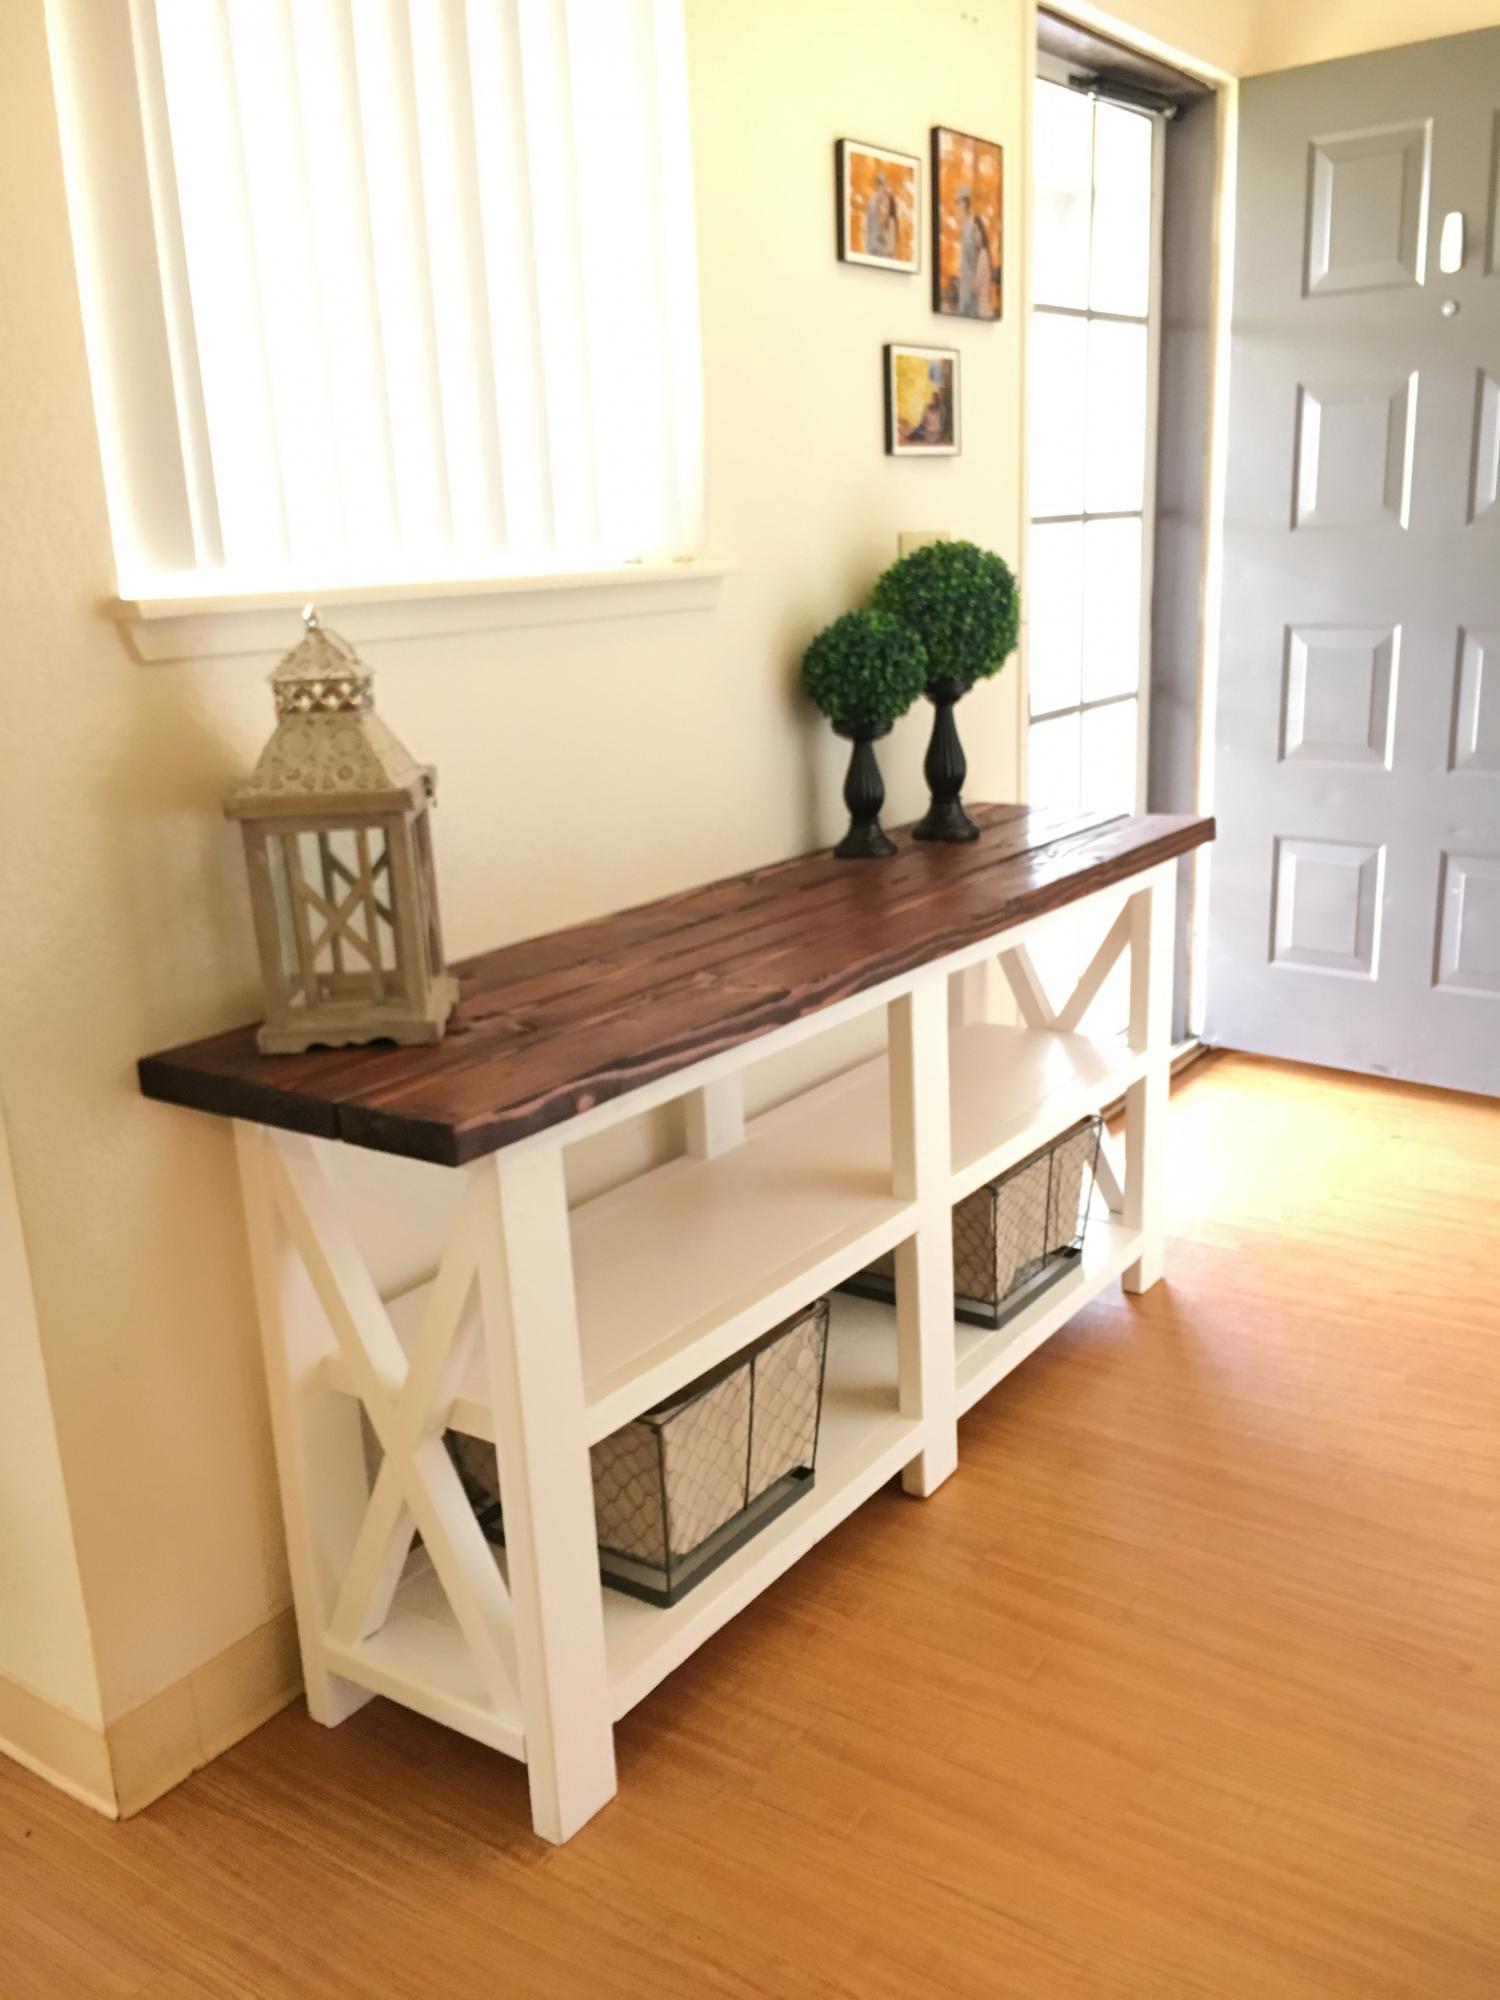
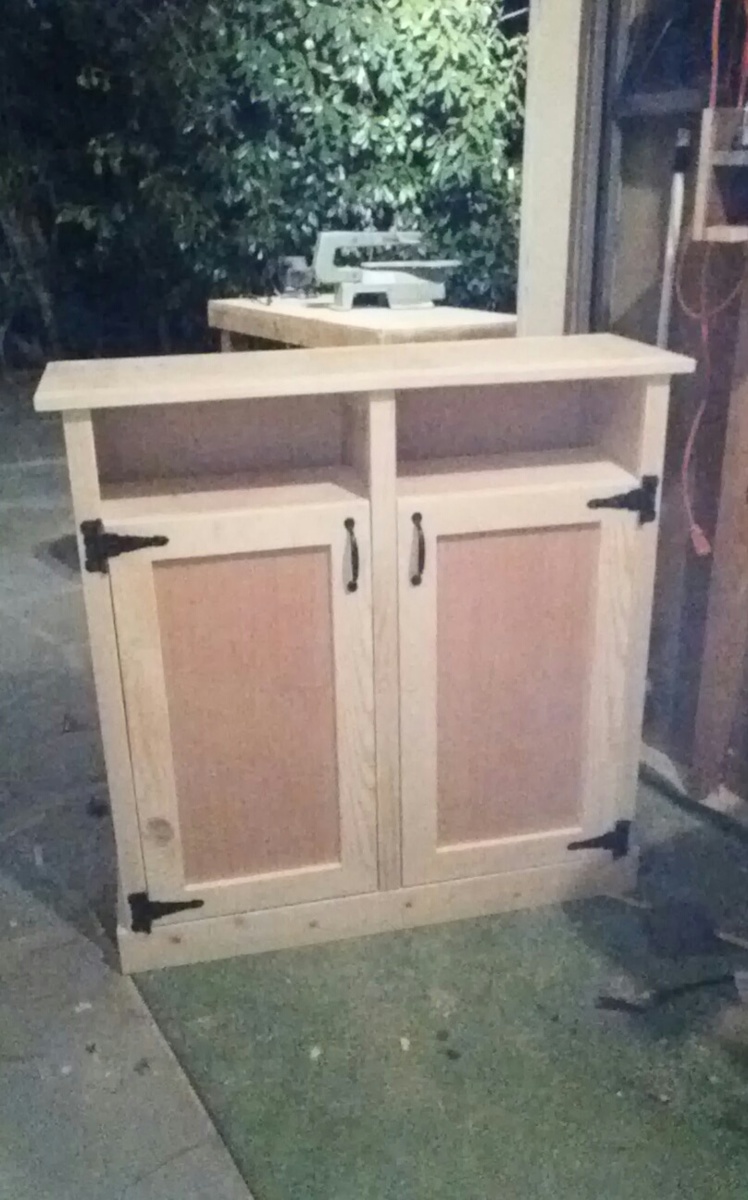
Modified version of the Rustic X small rolling kitchen island
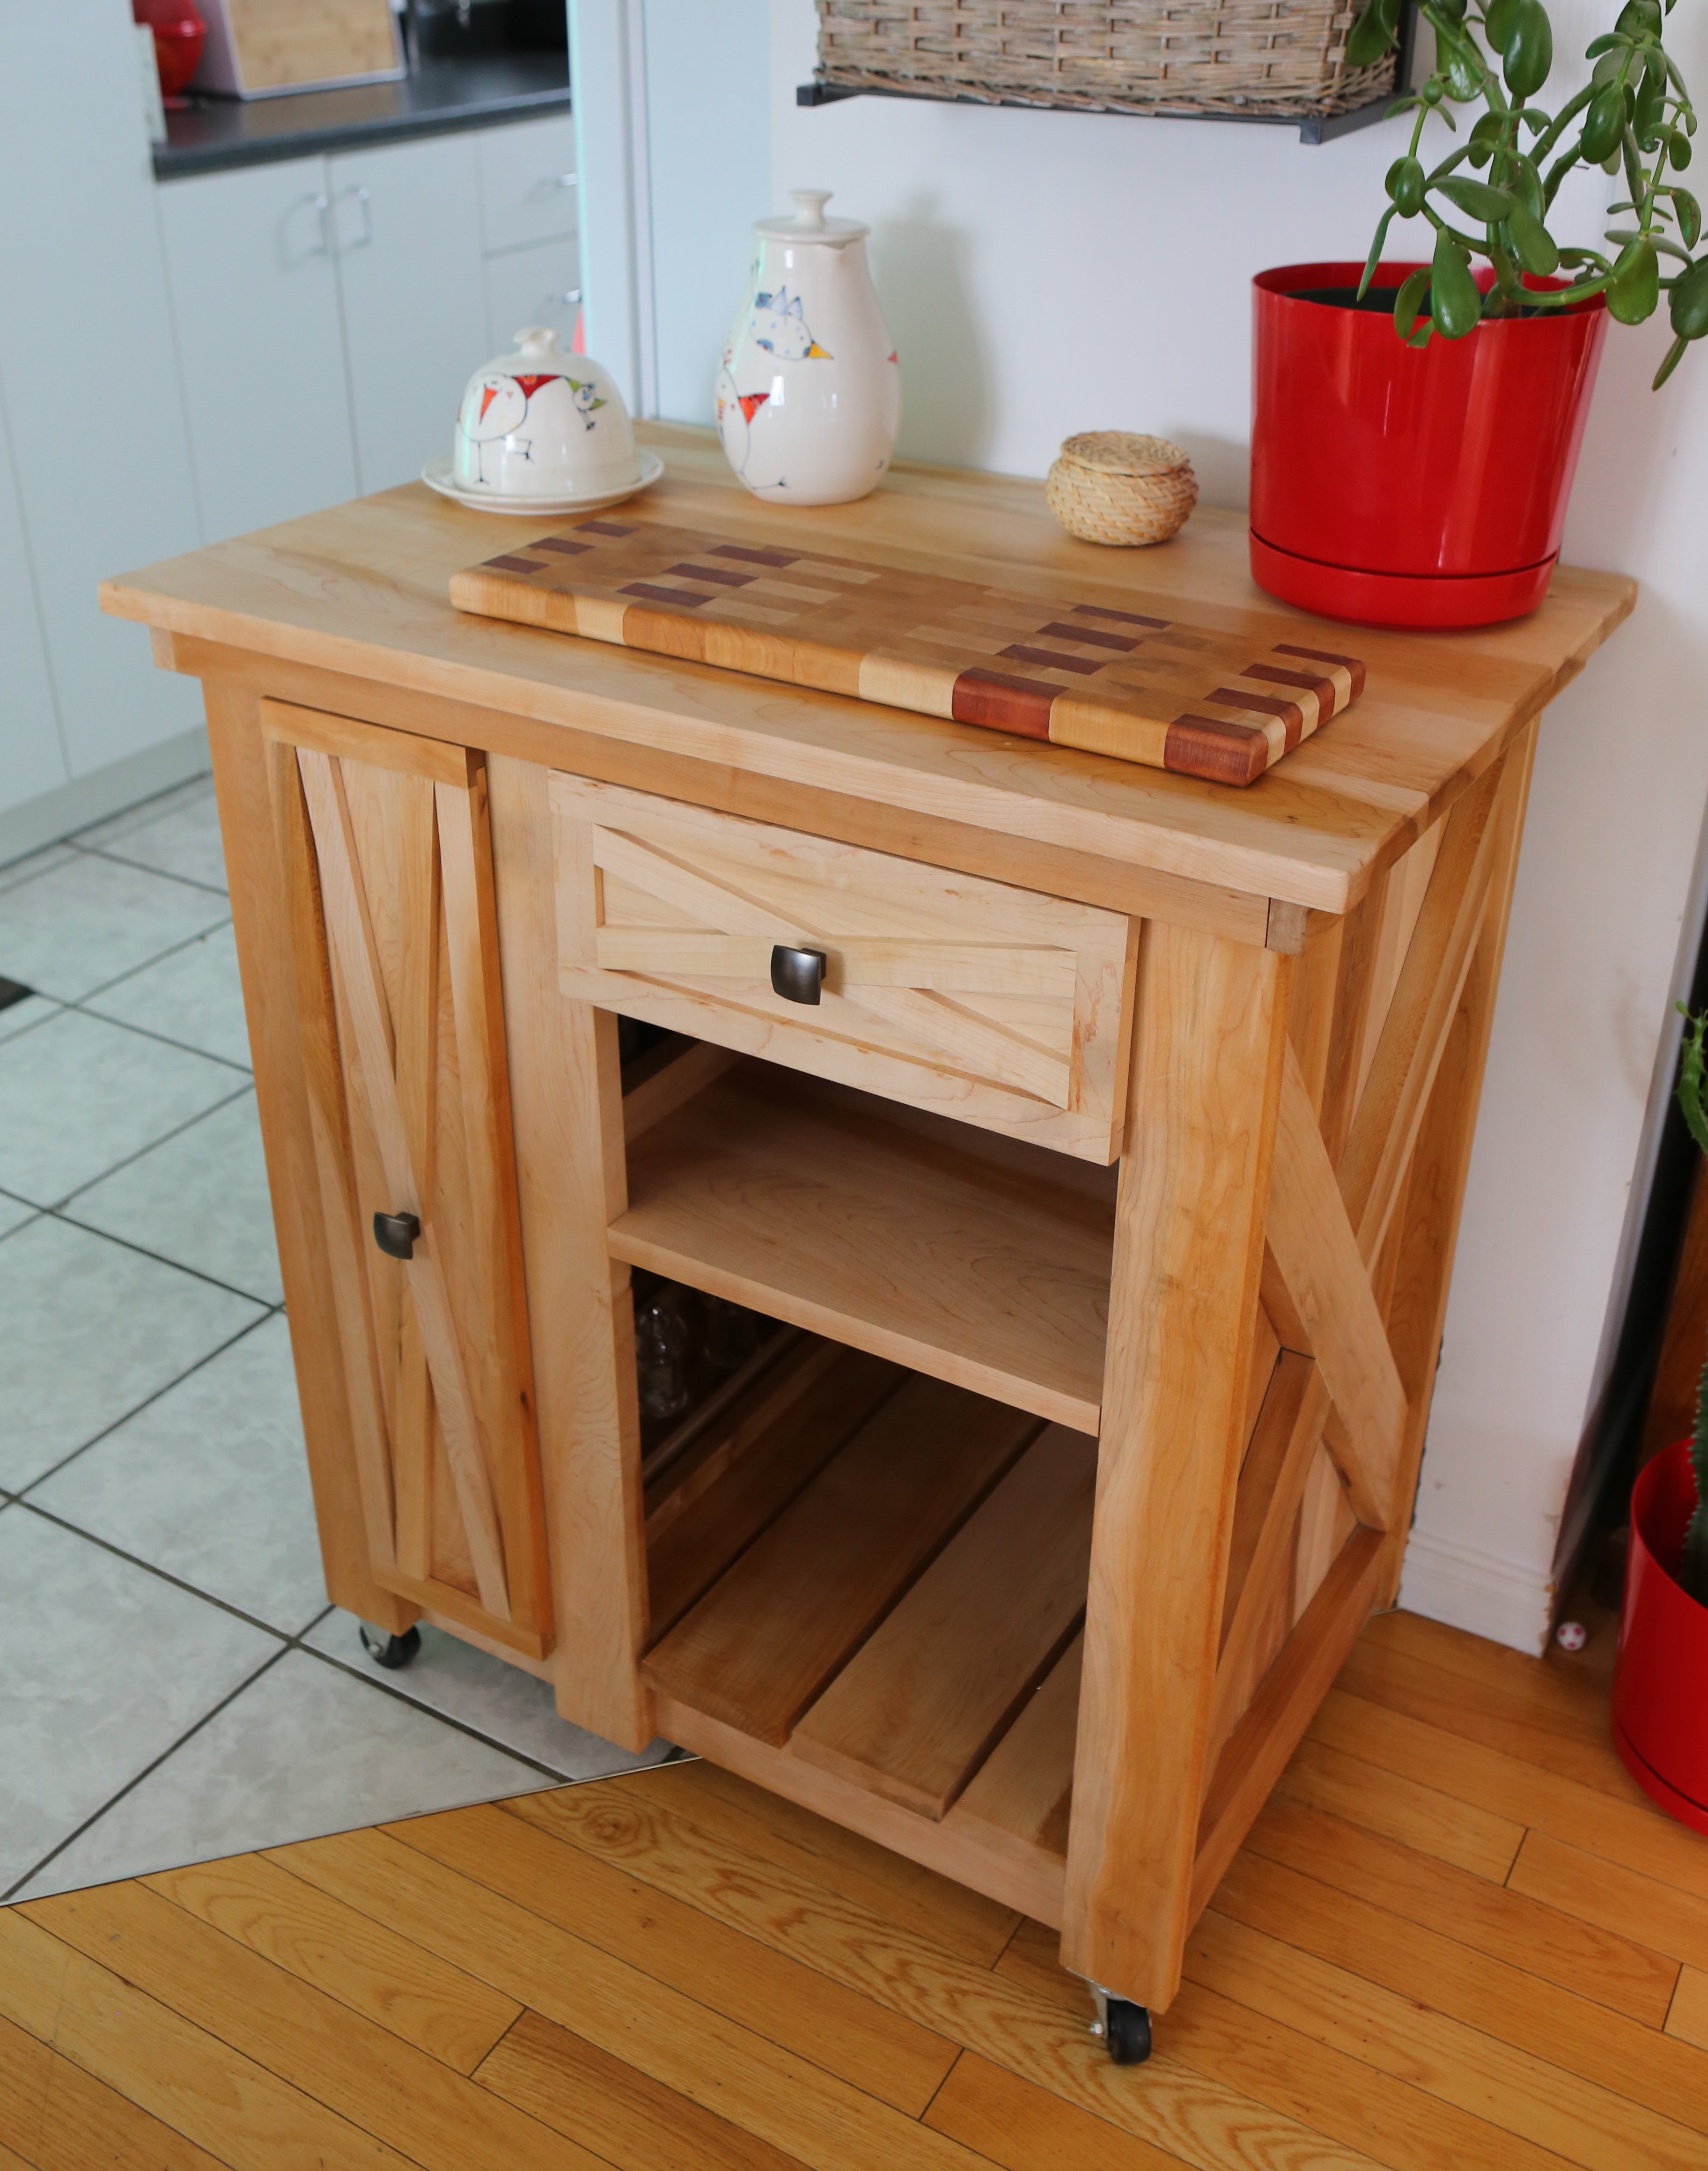
When I showed this kitchen island plan to my wife, she said she wanted it, but with a vertical drawer on the side... Me, I wanted to modify the drawers and shelf to use the full width of the kitchen island.
I had to modify the plans a little bit more because it's built 100% from maple. Since my maple lumber is 1"1/8 thick after planning, I could not get exactly the 2x4 size obiviously.
The sides (behind the X), and the top are boards that I glued together (laminated).
The drawers have X "signs" to copy the X design on the sides of the kitchen island. First I made a frame around the panel, and then added a X inside. It may seems rough to get the right angle for the X, but I found a trick! I measured the angle with a rope from side to side of the panel. I set the mitter saw to this angle and never touched it again. To make the opposite angle (center of the X), I cut a scrap of wood with this angle, reverse this piece of wood and cut the X decoration while holding it side by side with the piece of scrap wood.
Another little modification: the drawers have full extension sliders for smooth operation..
thanks for the plans :-)
Eric, Quebec, Canada
Built from Plan(s)
Estimated Time Investment
Weekend Project (10-20 Hours)
Finish Used
Oil
Recommended Skill Level
Intermediate
Comments

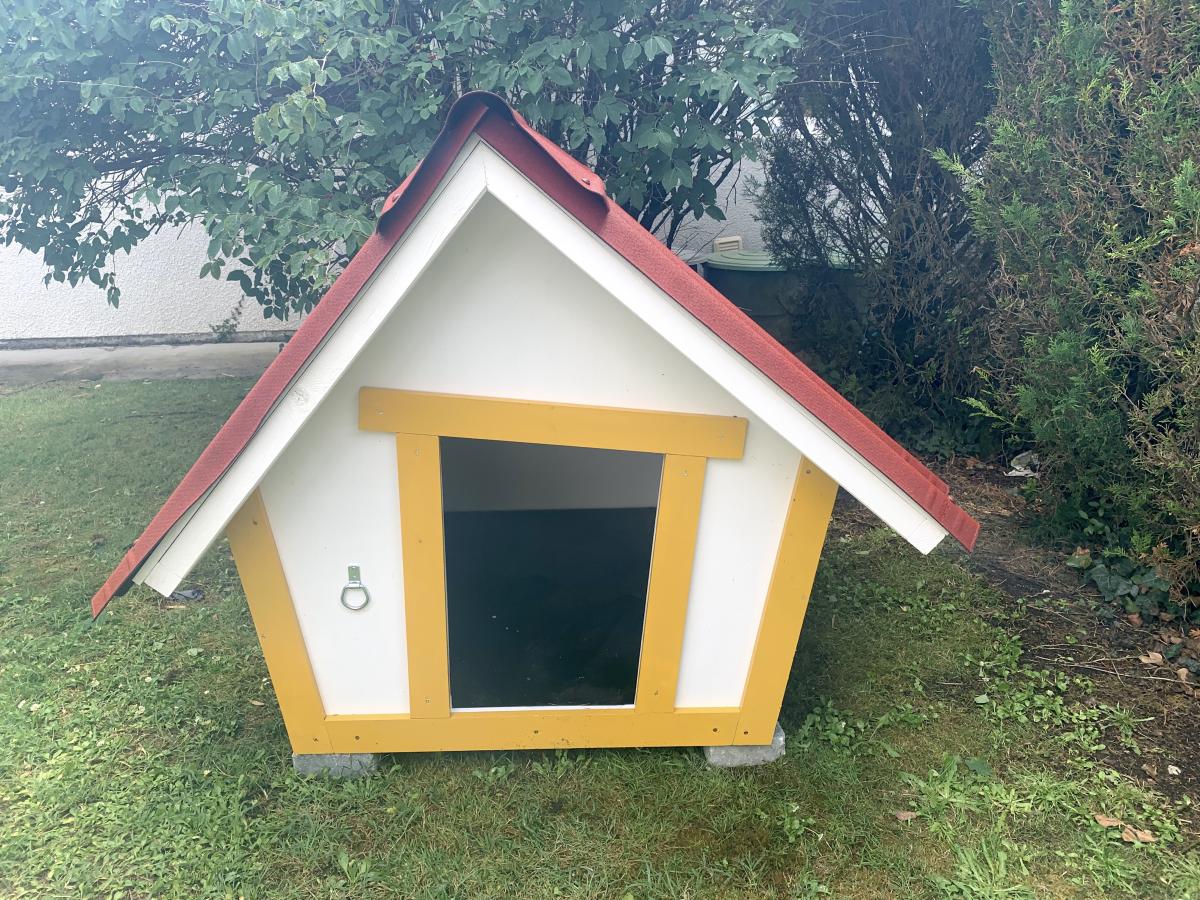
Crooked dog house
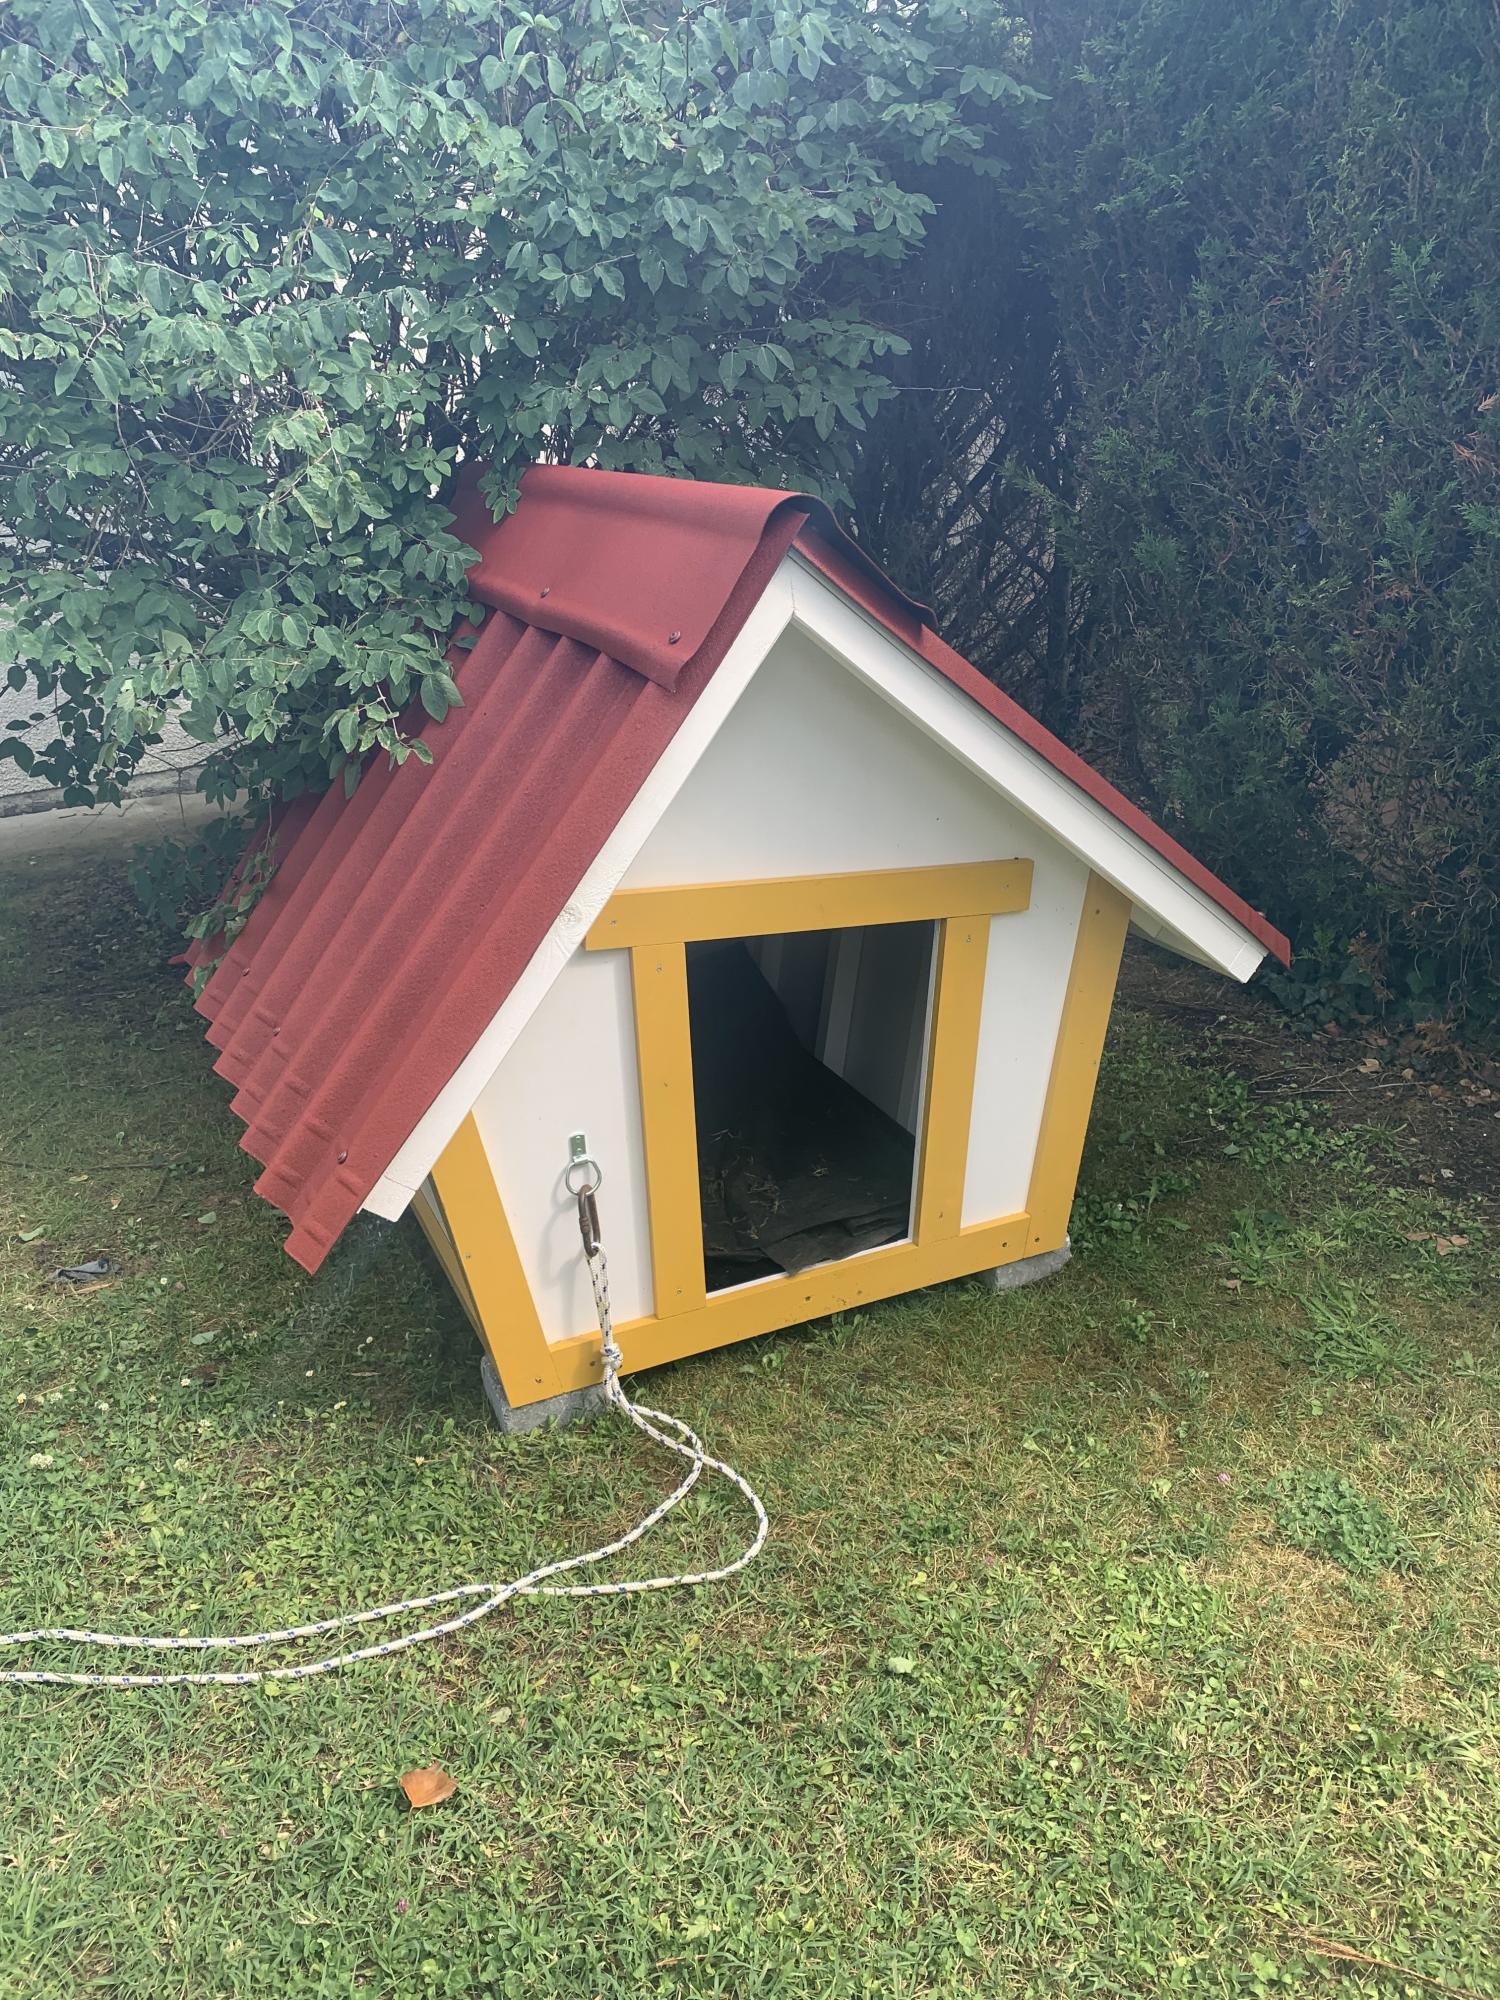
Thanks for the plan!
Built from Plan(s)
Estimated Time Investment
Week Long Project (20 Hours or More)
Recommended Skill Level
Intermediate
She loves it!
Took a weekend when I got time off of work. Would do things differently the next time and love the kreg jig. Will be buying the kreg jig clamps soon.
Estimated Time Investment
Weekend Project (10-20 Hours)
Finish Used
Stain and laquer
Recommended Skill Level
Beginner
Comments

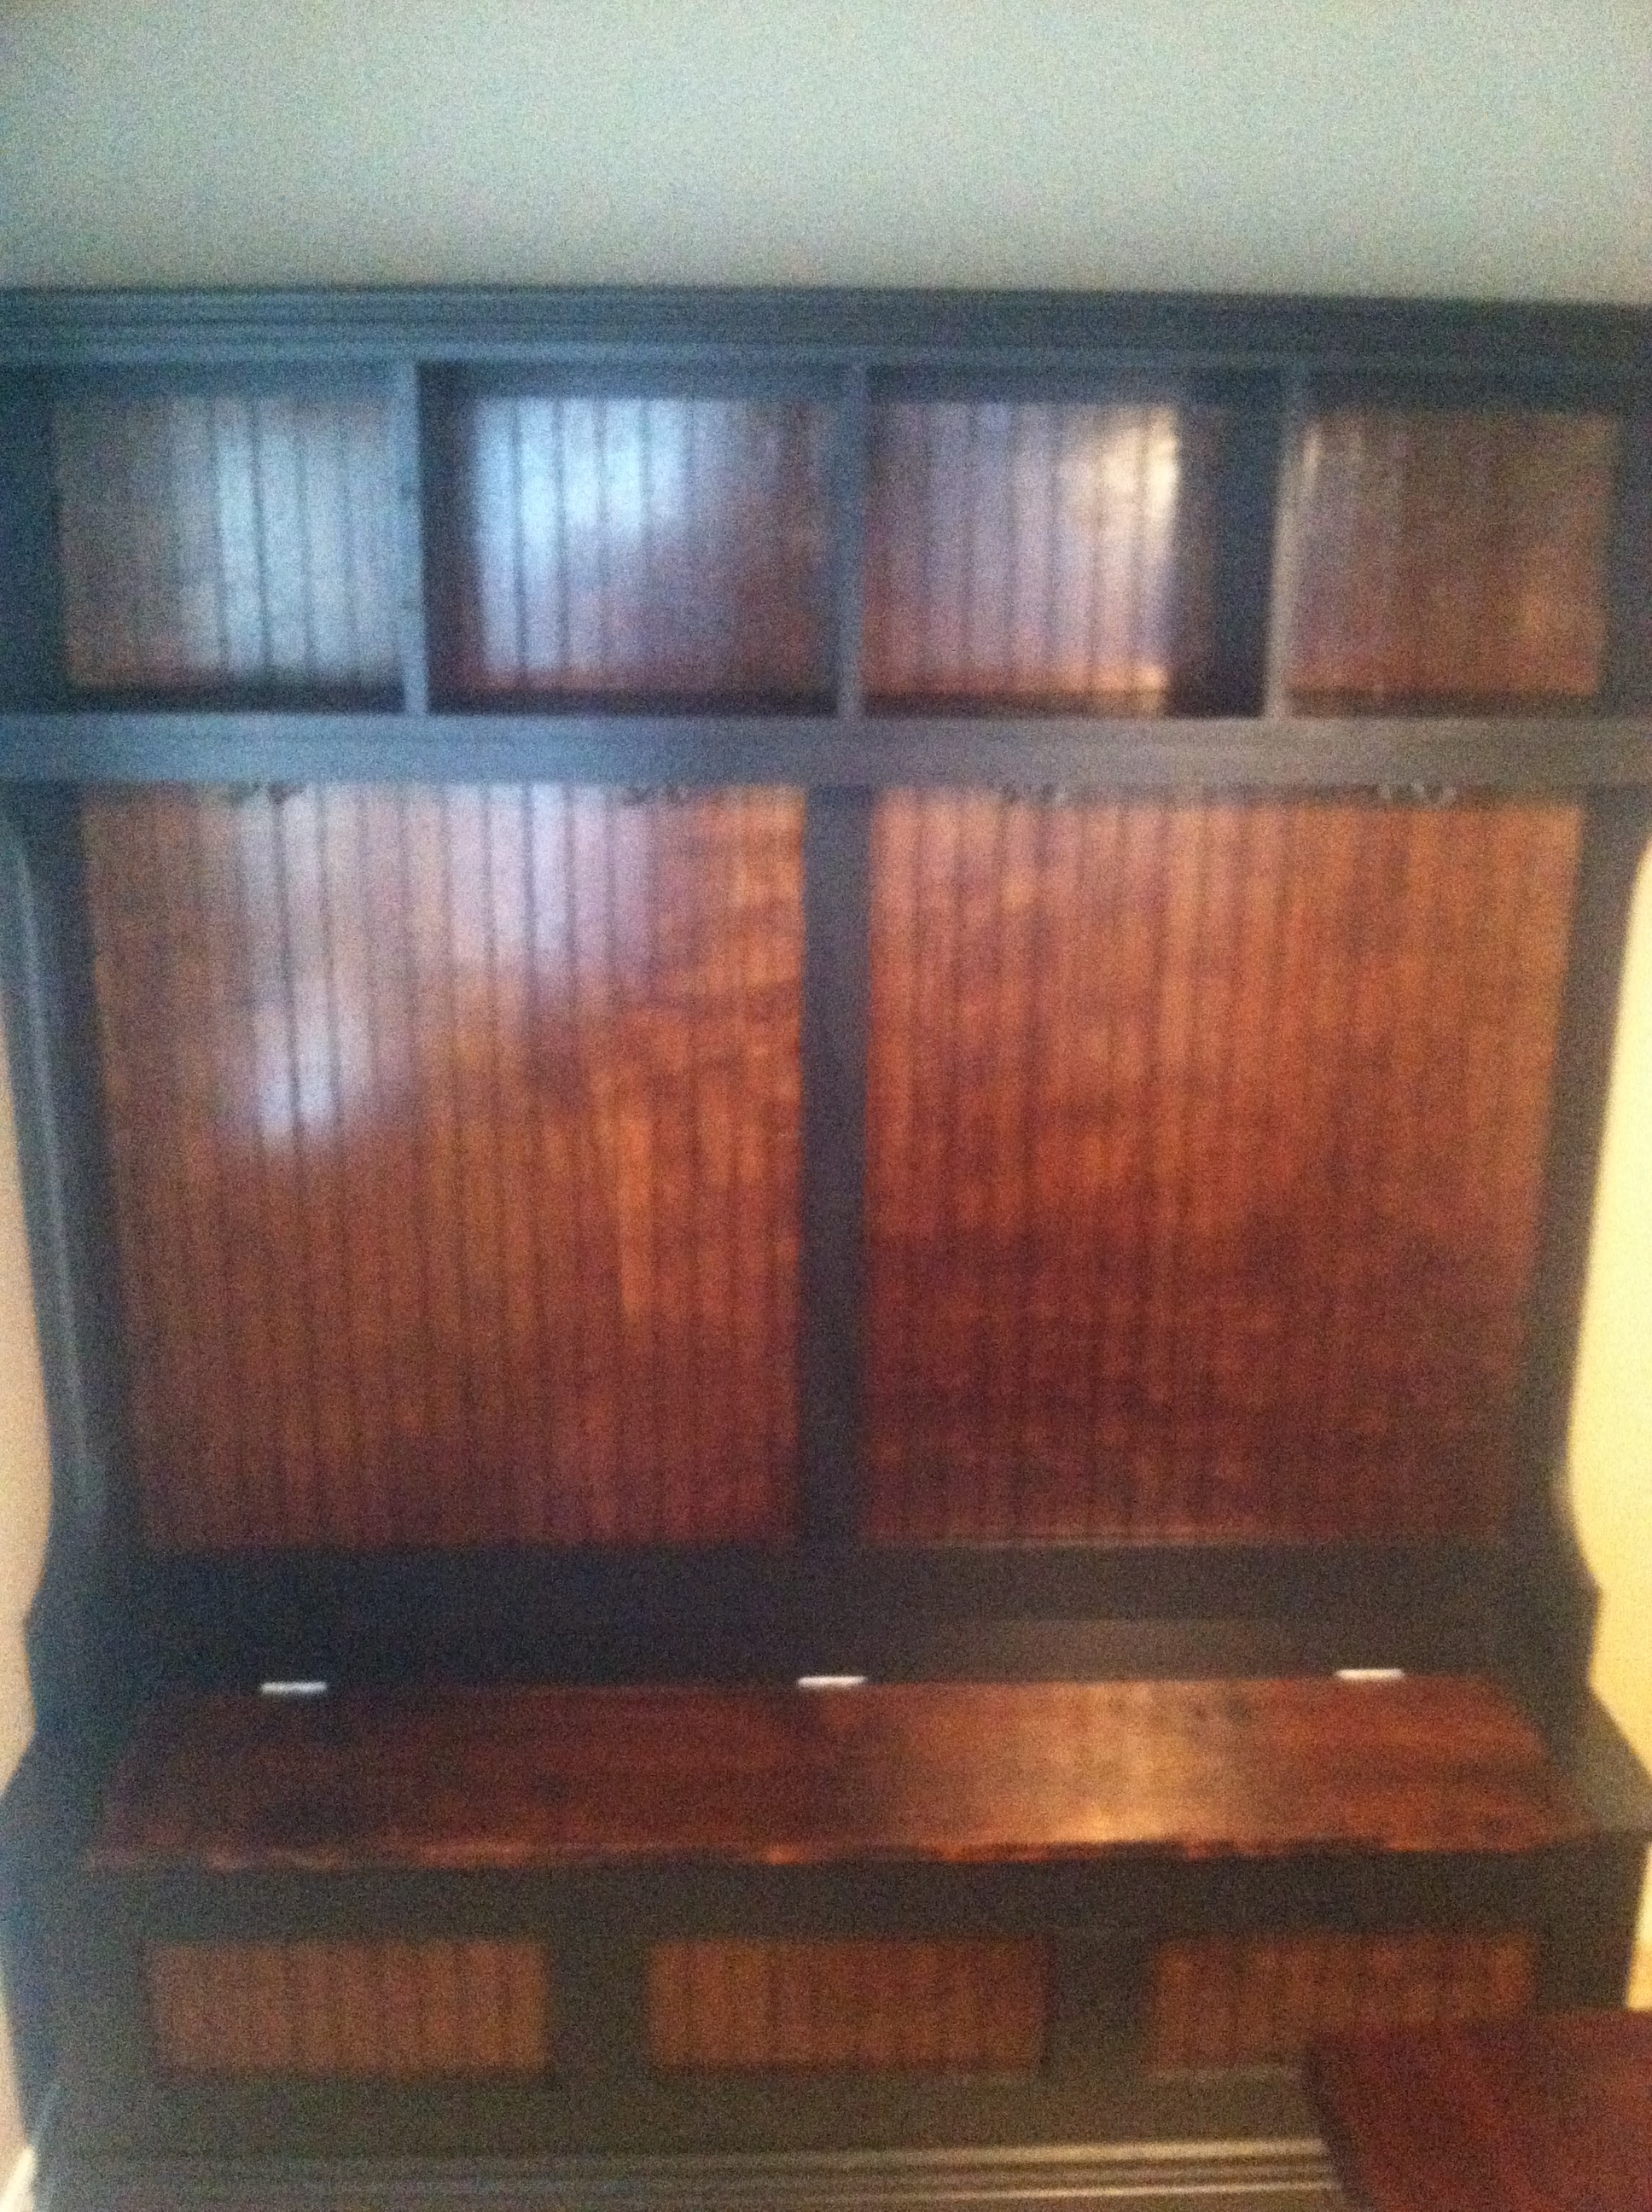
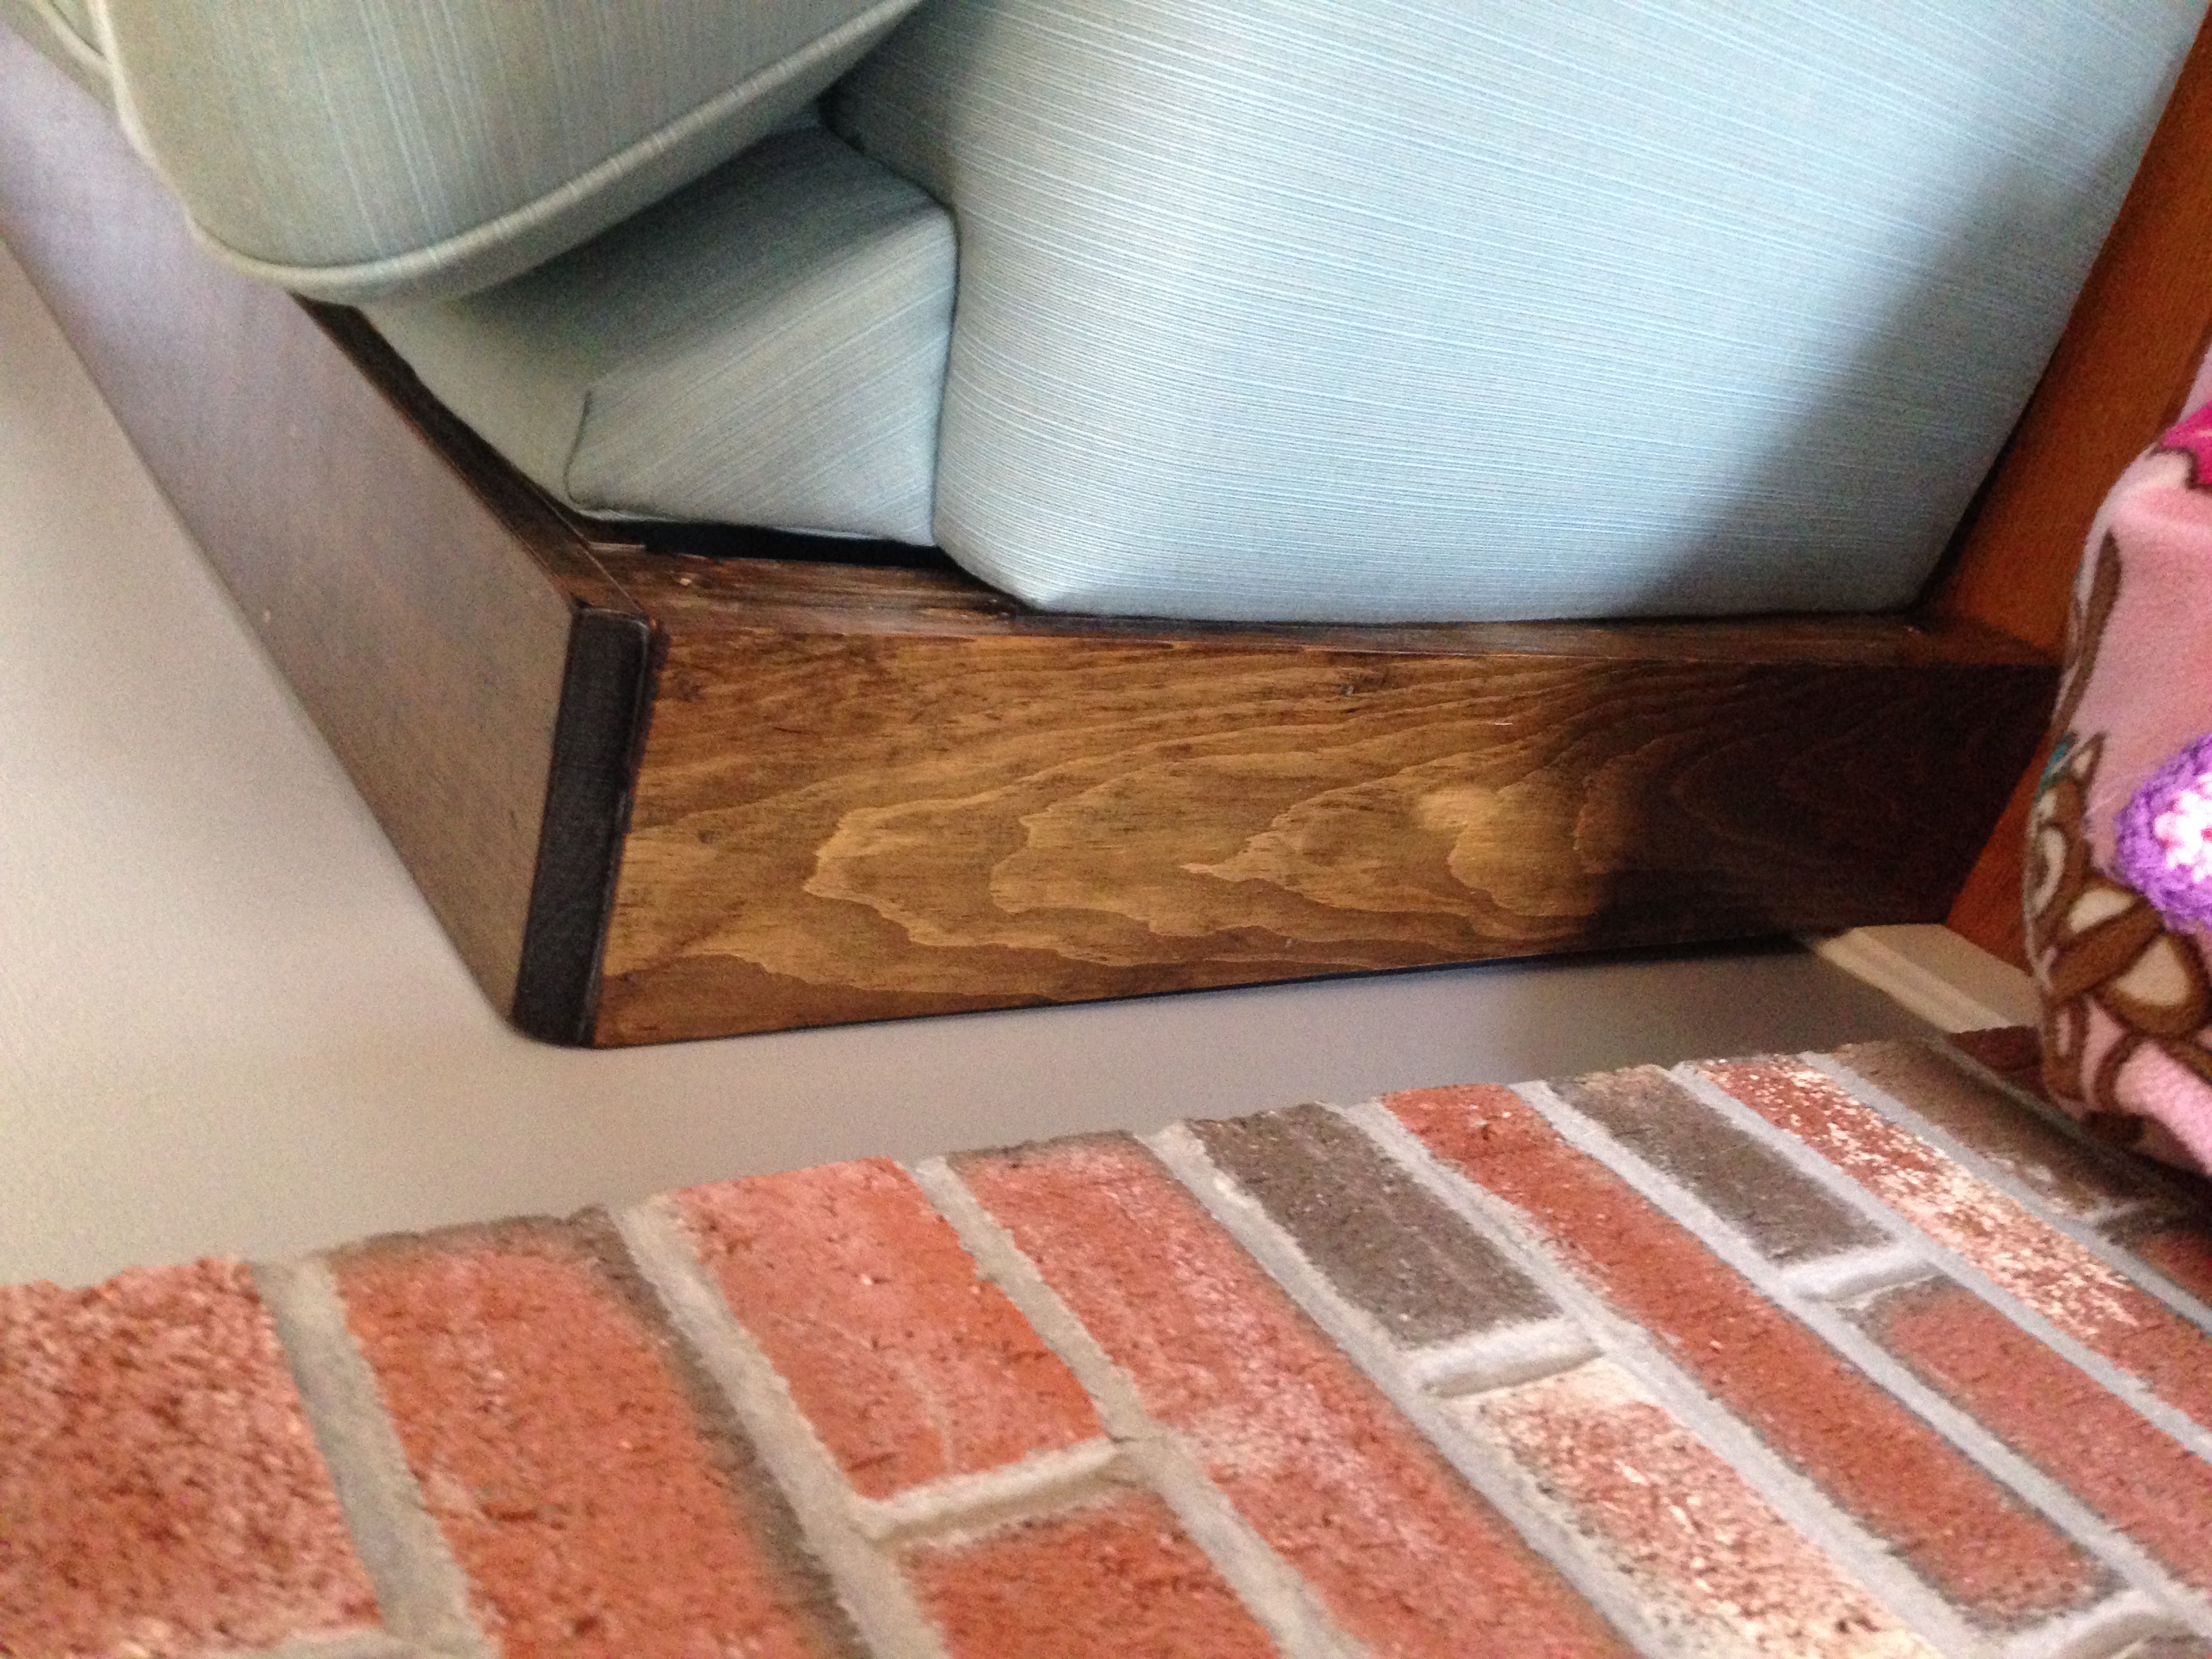
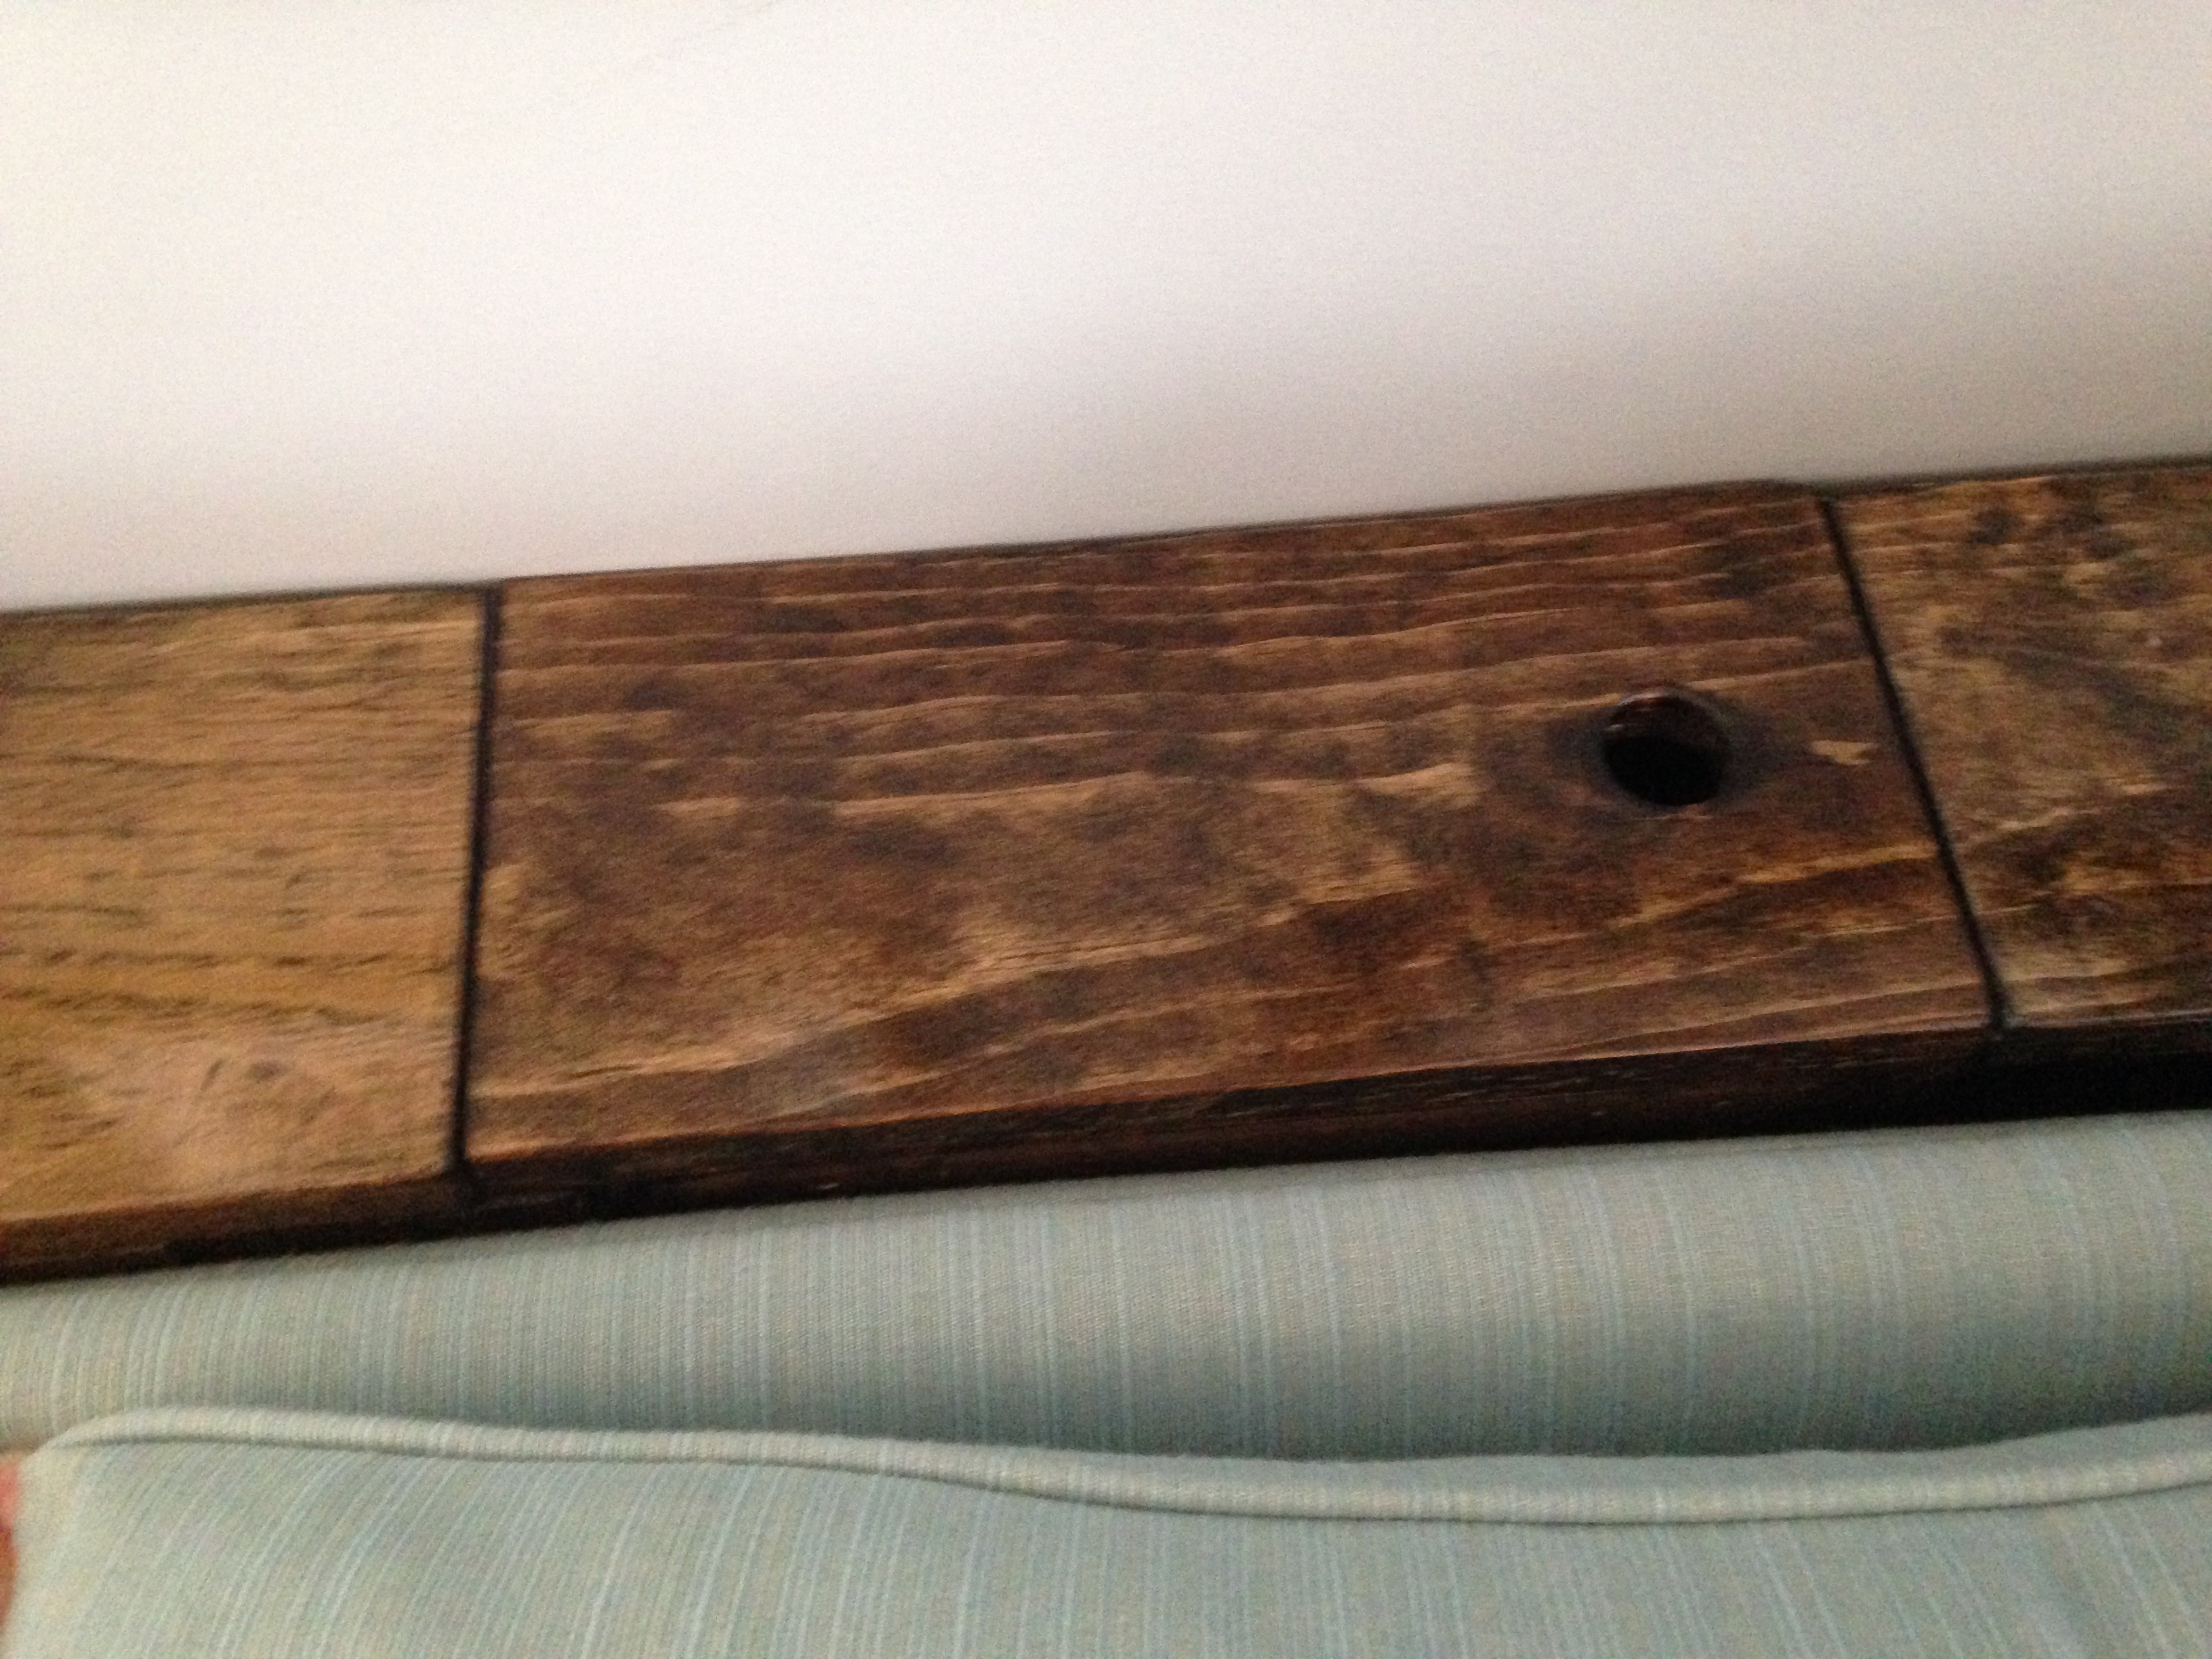
Sofa table with Power Strip
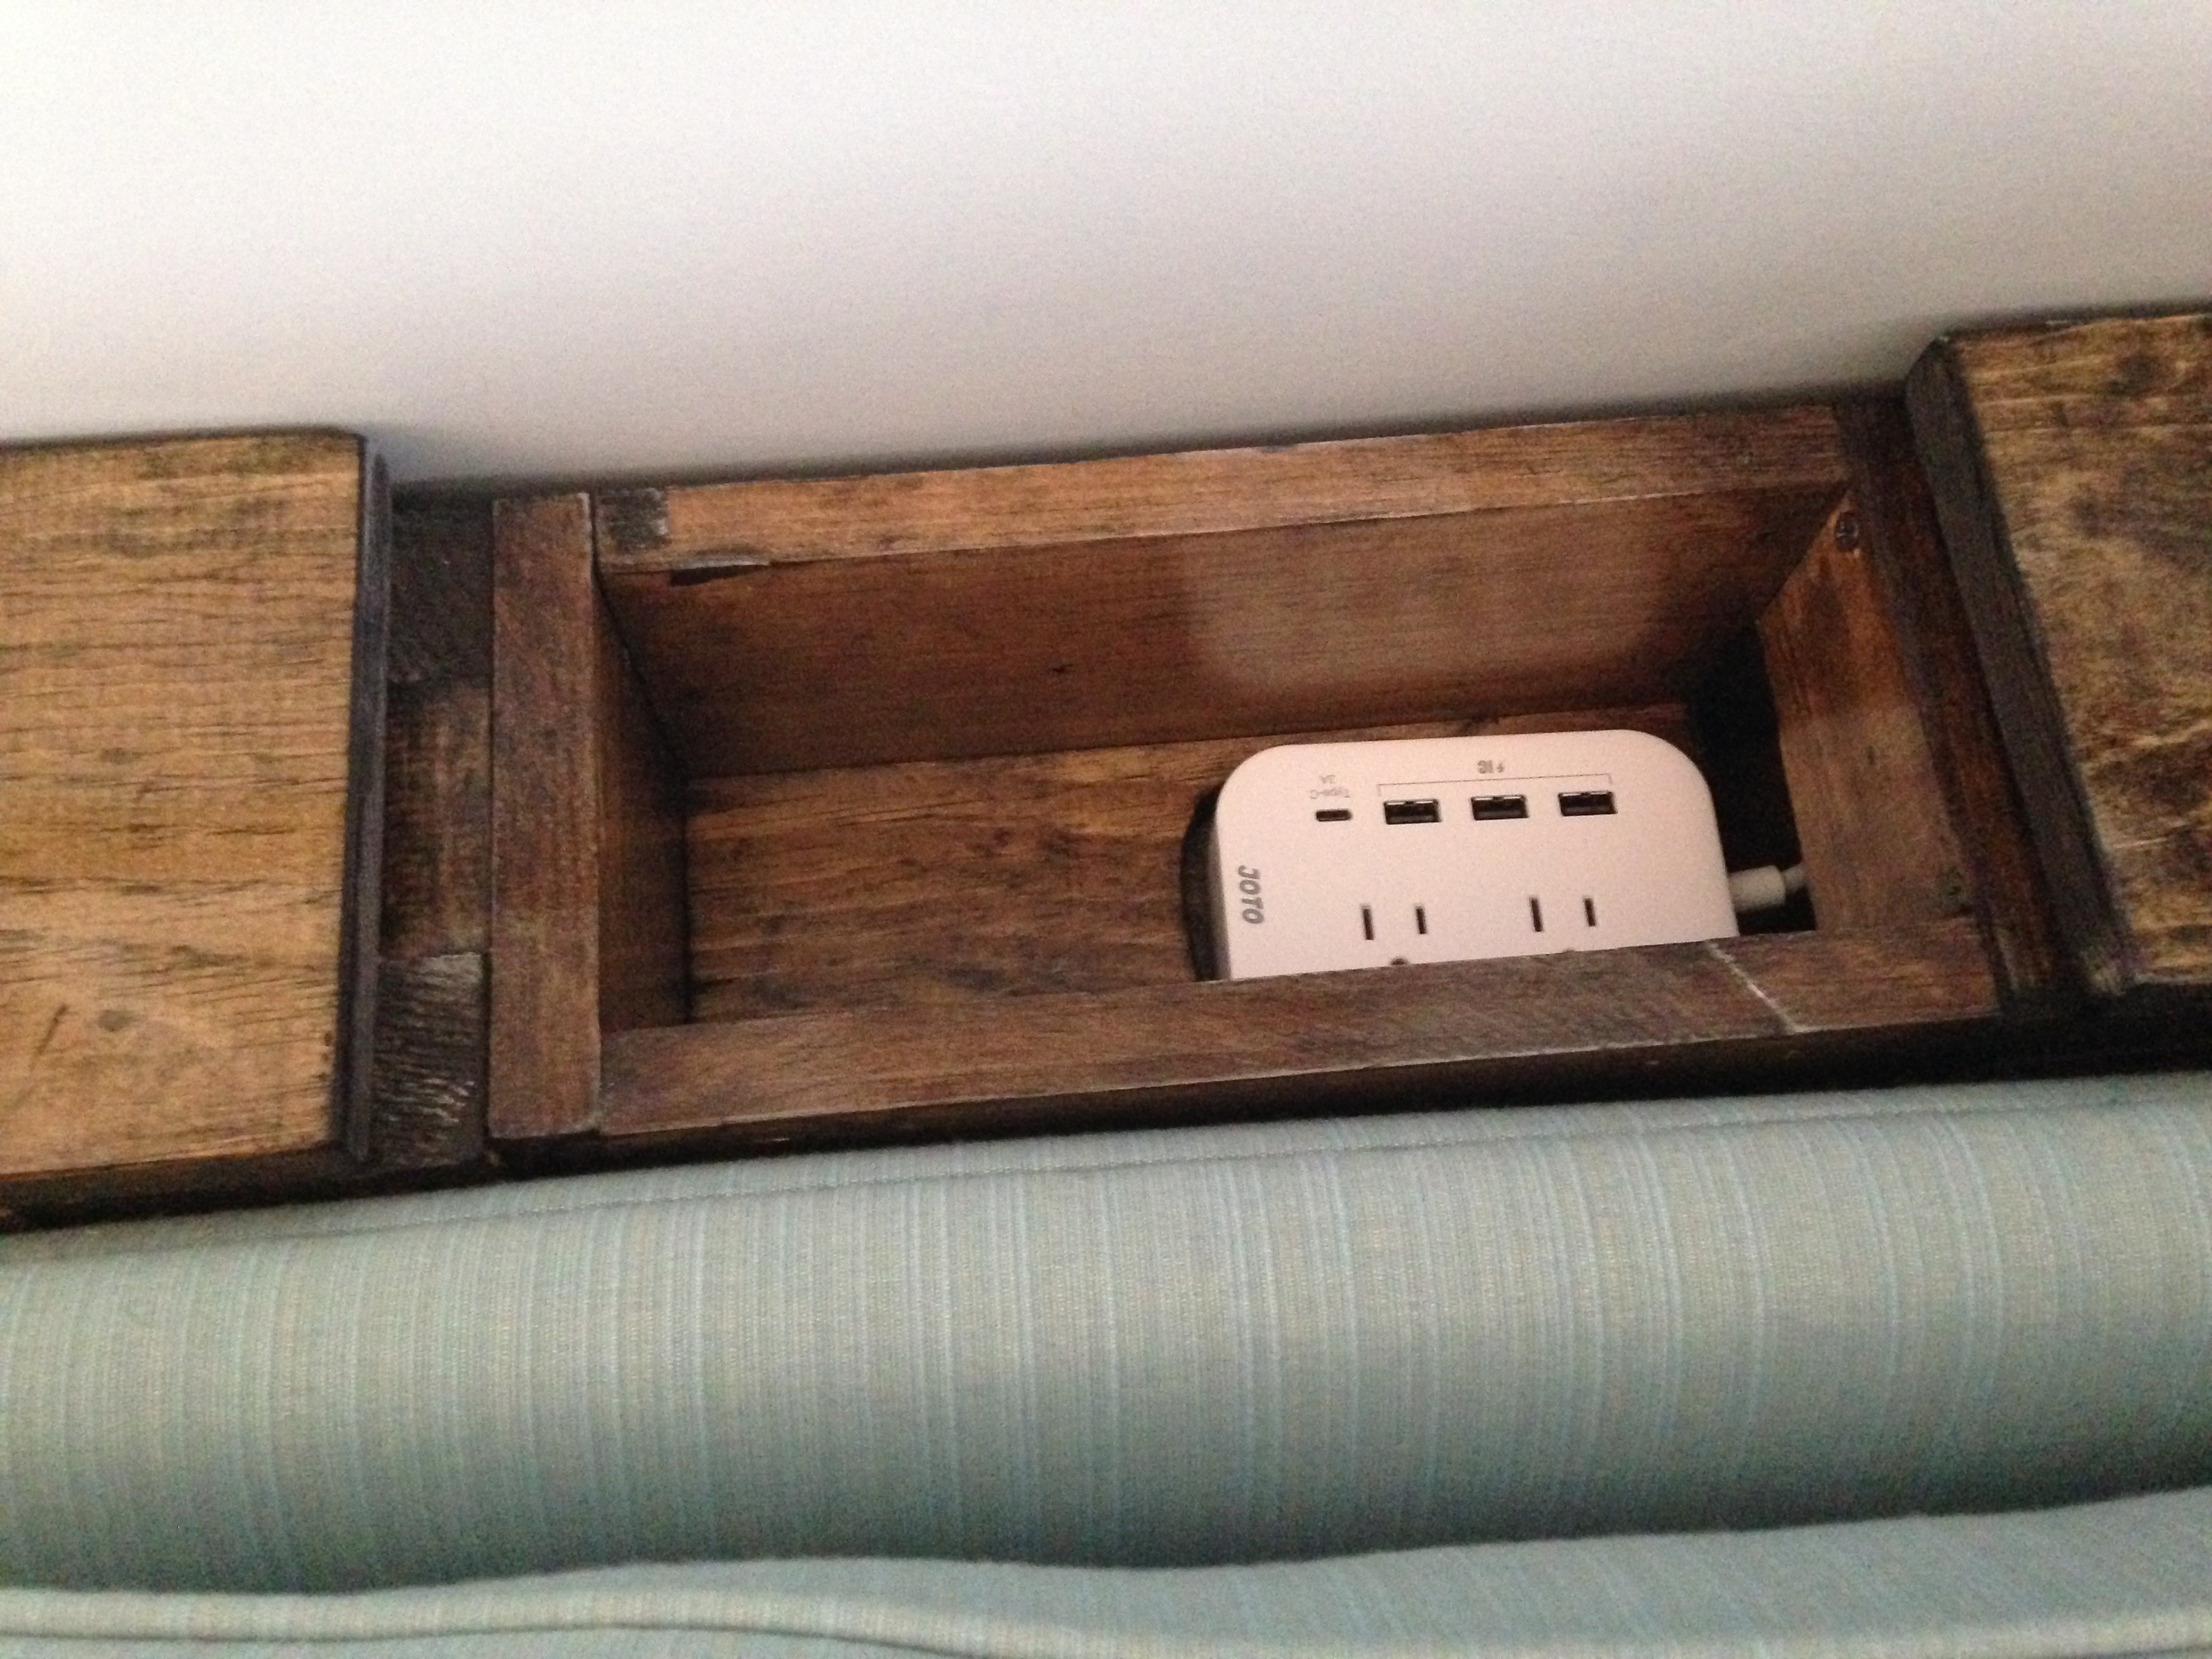
This massive 10 foot sofa table had to be built in 2 sections for transport, then re-attached in place. Power strip is in a hidden cubby in the center of the table with a cover that pops off when in use. Boards cover the end of the table to prevent the kitties from hiding behind the couch.
Used a combination of several plans to create my own design!

Estimated Time Investment
Day Project (6-9 Hours)
Finish Used
Provincial minx stain with glossy poly
Recommended Skill Level
Intermediate
Comments
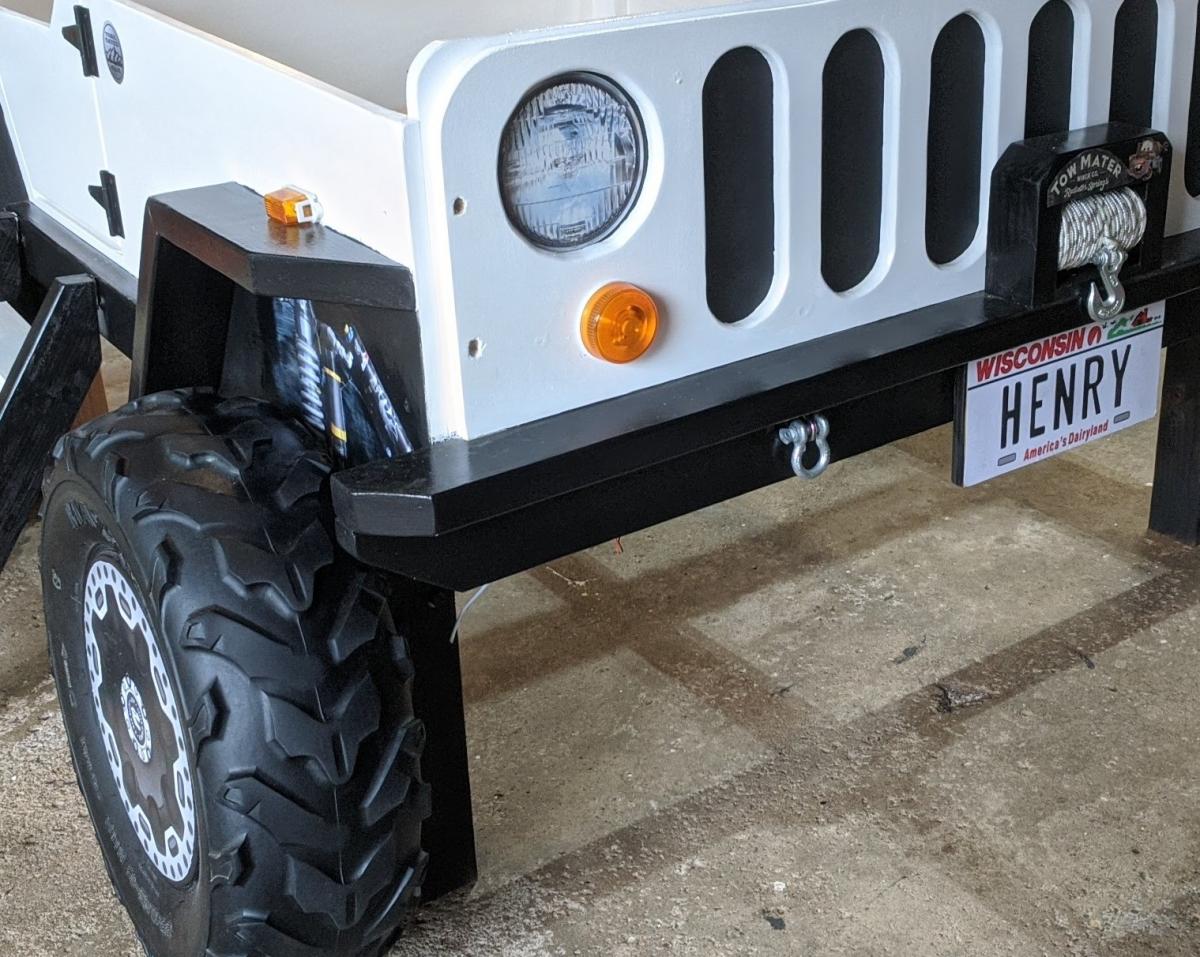
Jeep Bed
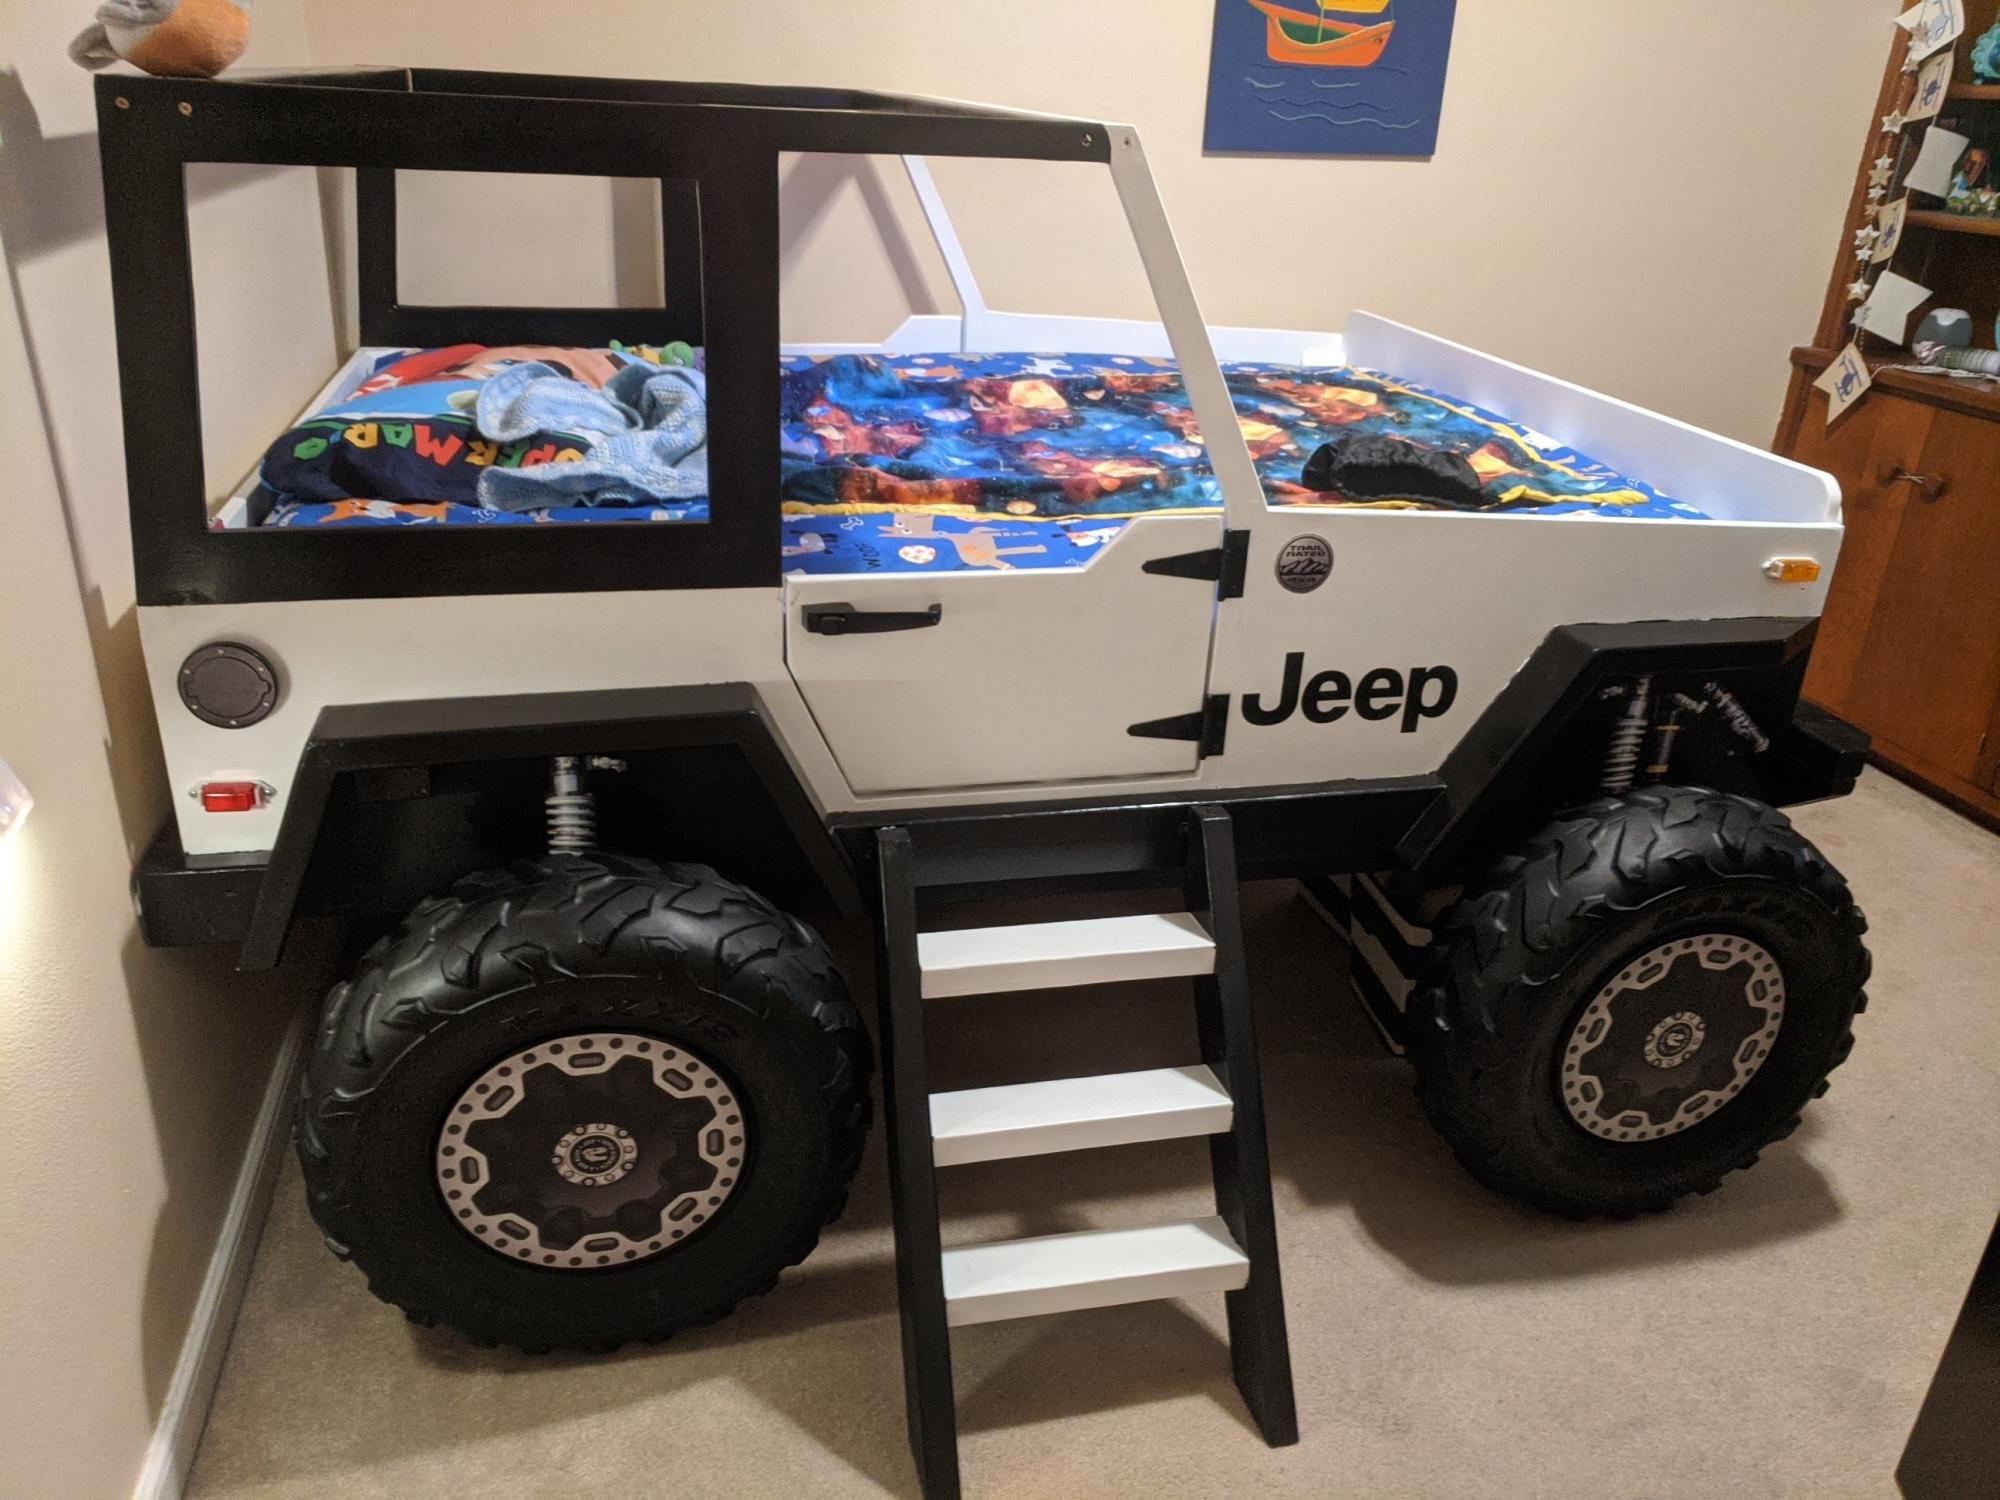
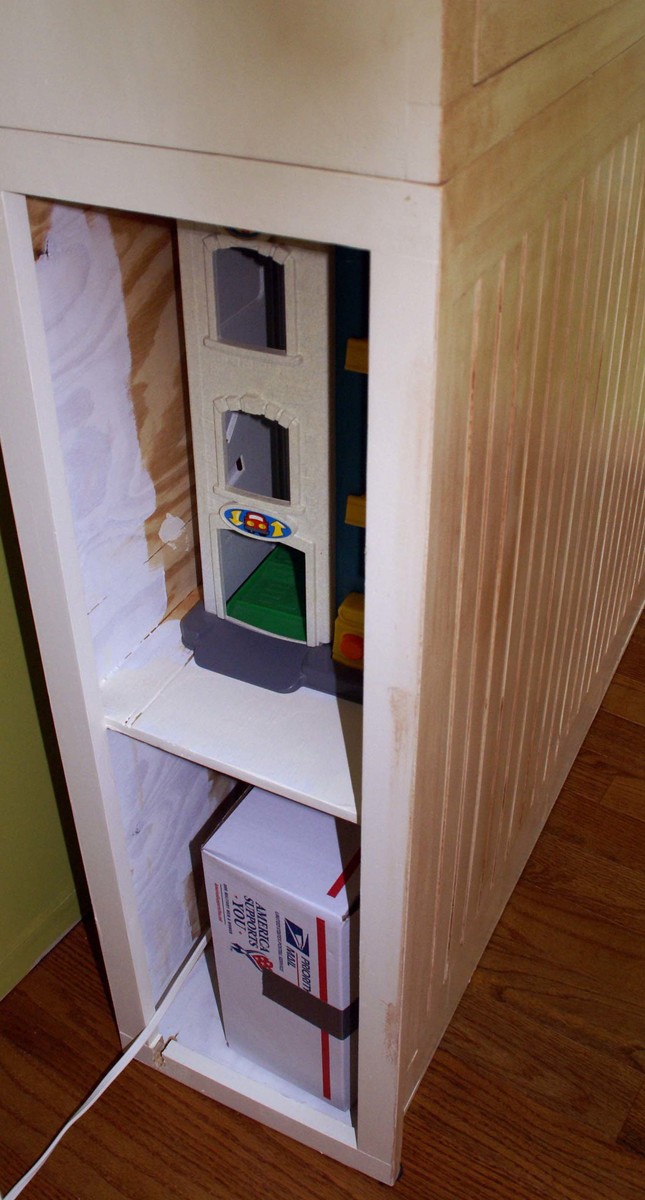
I hope this is OK to add here. It's not an Ana White plan, so moderator please delete if it is not allowed. I made this bed for my grandson. I bought a plan online and modified it from a twin to a full size bed. The dome light and running lights work as night lights. A motion sensor light activates if he crosses the door to illuminate the ladder. Front tire is made as a step so his parents can climb in and read to him. The whole thing is on EZ Sliders so they can move it away from the wall to make the bed.
Estimated Cost
$150.00
Estimated Time Investment
Weekend Project (10-20 Hours)
Finish Used
Latex paint.
Recommended Skill Level
Beginner
Comments
Mon, 07/05/2021 - 21:59
AH-MAZING!!!
Wonderful job, thank you for sharing! The details are spot on:)
work apron

I love this apron, perfect for hiding pencils from my husband.
Built from Plan(s)
Estimated Cost
$3
Estimated Time Investment
An Hour or Two (0-2 Hours)
Recommended Skill Level
Starter Project
Comments

Sun, 06/15/2014 - 01:15
Beautiful Pencil Hiding
Cute fabric combination, and I especially love the line, "perfect for hiding pencils from my husband." =D
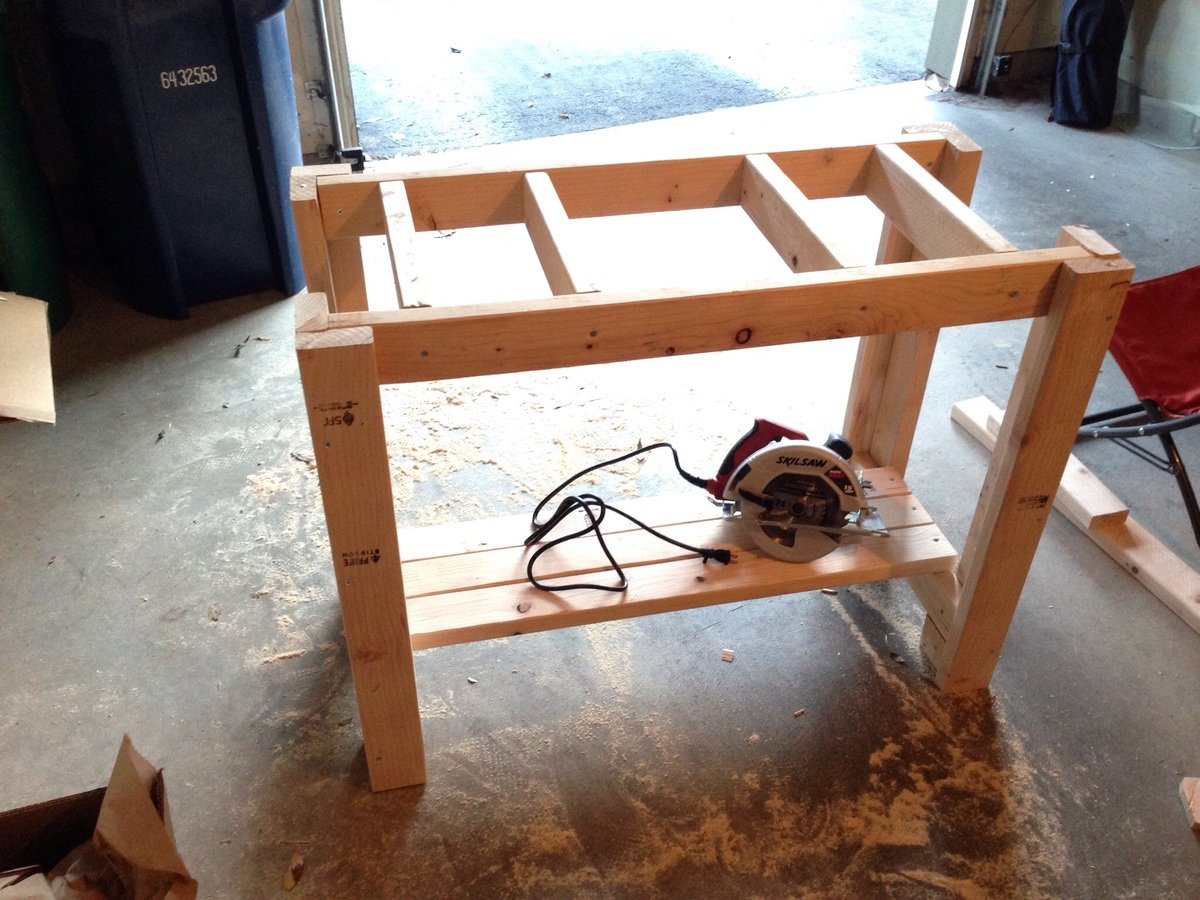
First ever project - Workbench
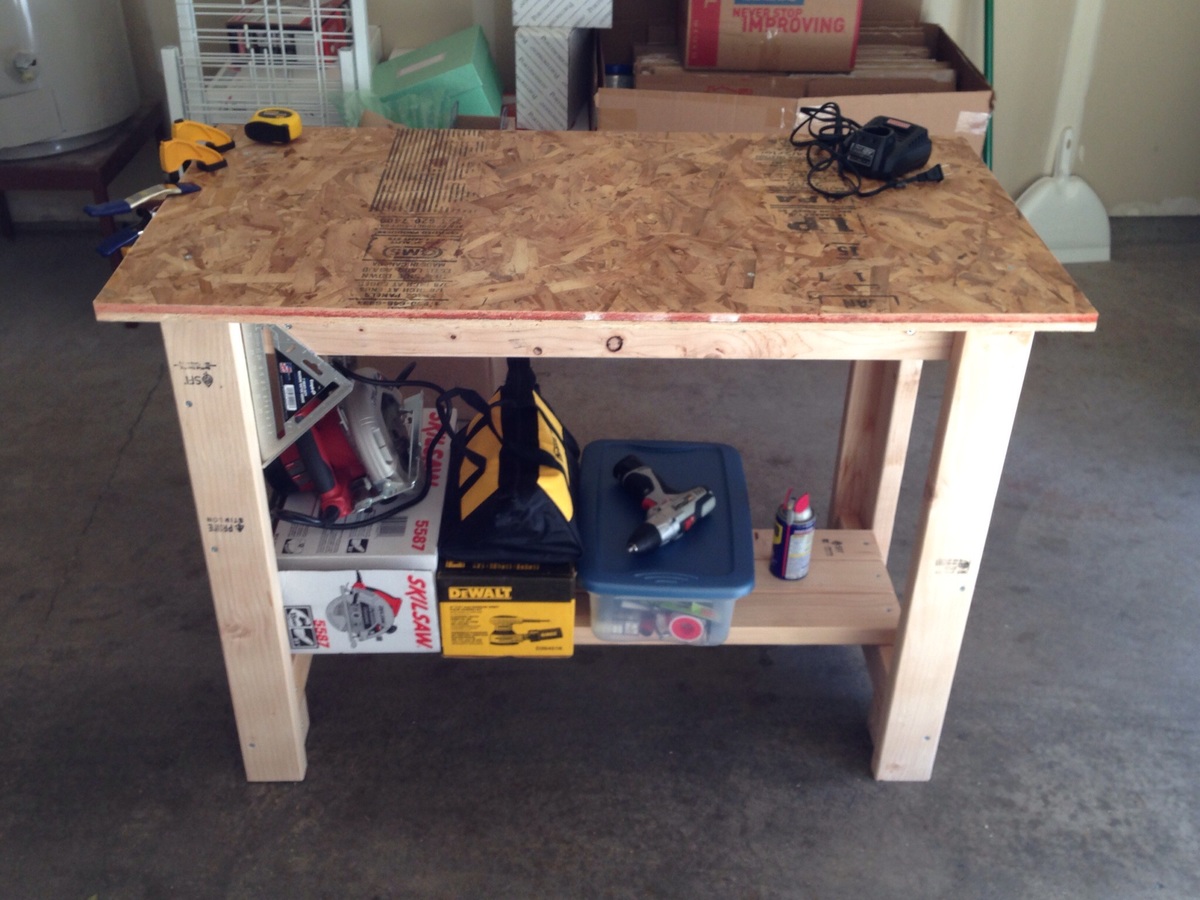
Just started woodworking. This is my first ever build. Surprised with how sturdy this bench is.
Built from Plan(s)
Estimated Cost
$30
Estimated Time Investment
Afternoon Project (3-6 Hours)
Recommended Skill Level
Beginner
X Console
For my first build I am super proud. Plans were very understable & made it easy to build. Definitely looking forward to building more things!
Built from Plan(s)
Estimated Cost
$60-$70
Estimated Time Investment
Day Project (6-9 Hours)
Finish Used
Stain & semi gloss white interior paint.
Recommended Skill Level
Beginner
Full Size Storage Beds - Extra Tall
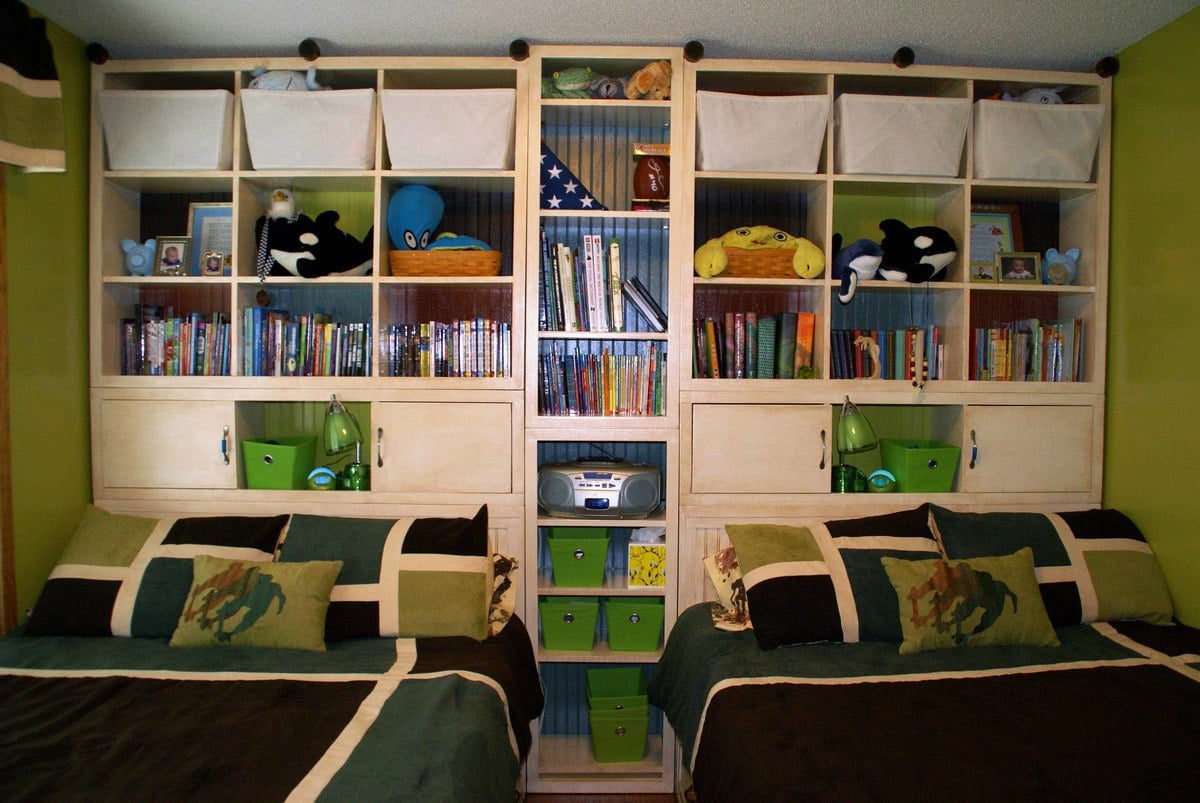
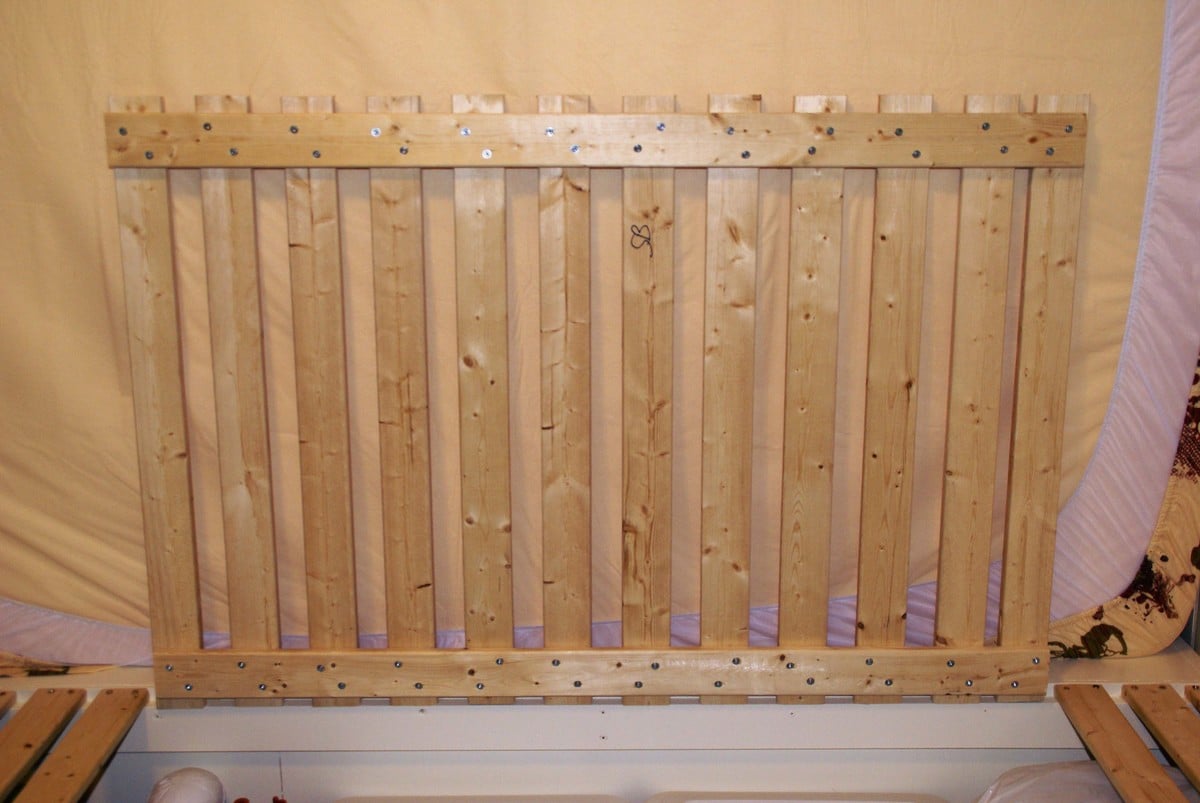
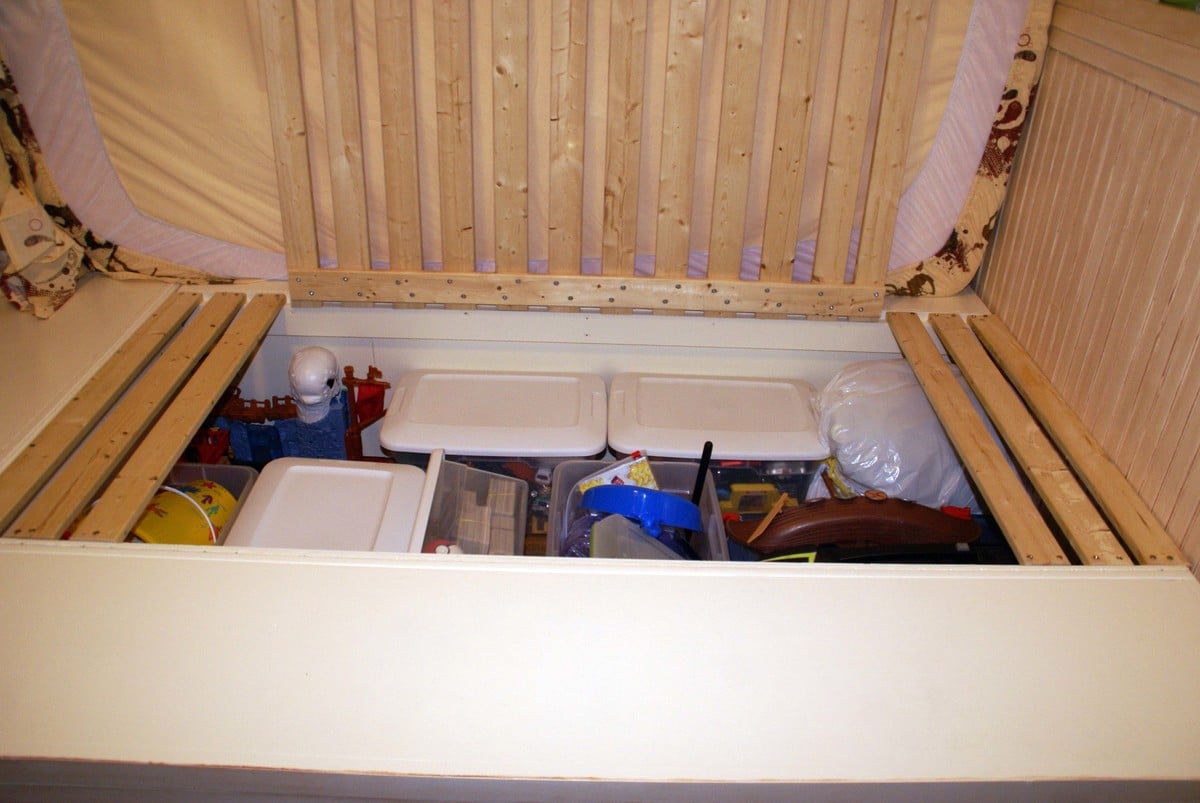
When my sons outgrew their twin sized beds and primary colored room, I had already fallen in love with Ana's storage bed collection. I was happy to see that a full size bed was included in the plans. Building it yourself means you can adjust any plans to fit your room exactly, and I planned to squeeze storage out of every inch of their 11.5 foot wide room. The first adjustment I made was to make the headboard taller, so that their pillows would not rest against the small hutch with doors. I also added height to the cubby hutch, making it a 9 cubby unit. The entire bed unit is 92 inches tall. The center tall bookcase is actually two 47 inch tall units stacked. I have watched too many home improvement shows where tall units are built off site only to not fit up stairs or around corners. The center unit is 94 inches tall and 19 inches wide, filling the wall exactly with only an inch of wiggle room to spare. I also added drawers to the open cubbies in the bed base. This was my first time making drawers, but Ana has instructions on the site, so it was no problem.The sides of the bed base facing the walls are just open cubbies as in the original plan. Beadboard paneling faces the drawer fronts, cabinet backs and the face of the headboards. Did I mention how much storage these beds have? The hollow headboards are not accessible once the center bookcase was in place, but that didn't stop me from filling them up. I had 6 Rubbermaid bins (18 gallon) in our basement full of stored Hot Wheels, Little People and other sets. All of the contents fit in the headboards alone. I also put some large saved toys in the under bed cubbies that face the wall. Yes, the Little People Garage will fit! My favorite modification was added an extra crosswise 1x3 that ties together a large section of the slats that support the mattress. This makes an easy lid allowing that you can lift to access even more storage under the mattress. We store their camping gear and off season clothes under the mattresses. I can't total the hours, I worked on this project on and off for about 9 months. When the building was nearing completion I started looking for bedding so I could match the paint colors to the bedding. I painted all the plywood back panels before attaching them to the cabinets. This was especially a life saver with back of the 9 cubby unit, as there are four colors in this section. After painting, everything was glazed with Valspar Translucent Color Glaze in Mocha. When this layer was dry I coated everything with a protective coat of Minwax Polycrylic. If you are wondering about dark circles are at the top of the unit near the ceiling, I had a great idea to use solar landscaping lights up there for a soft lighting effect. It looked great for a few nights until the batteries wore out. There is not enough natural light in the room to charge them. They have since been replaced with a couple strings of cheap colored lights. They are shoved way back towards the wall where you can't see the wires, but are on a timer, so at night they give a nice glow on the ceiling.
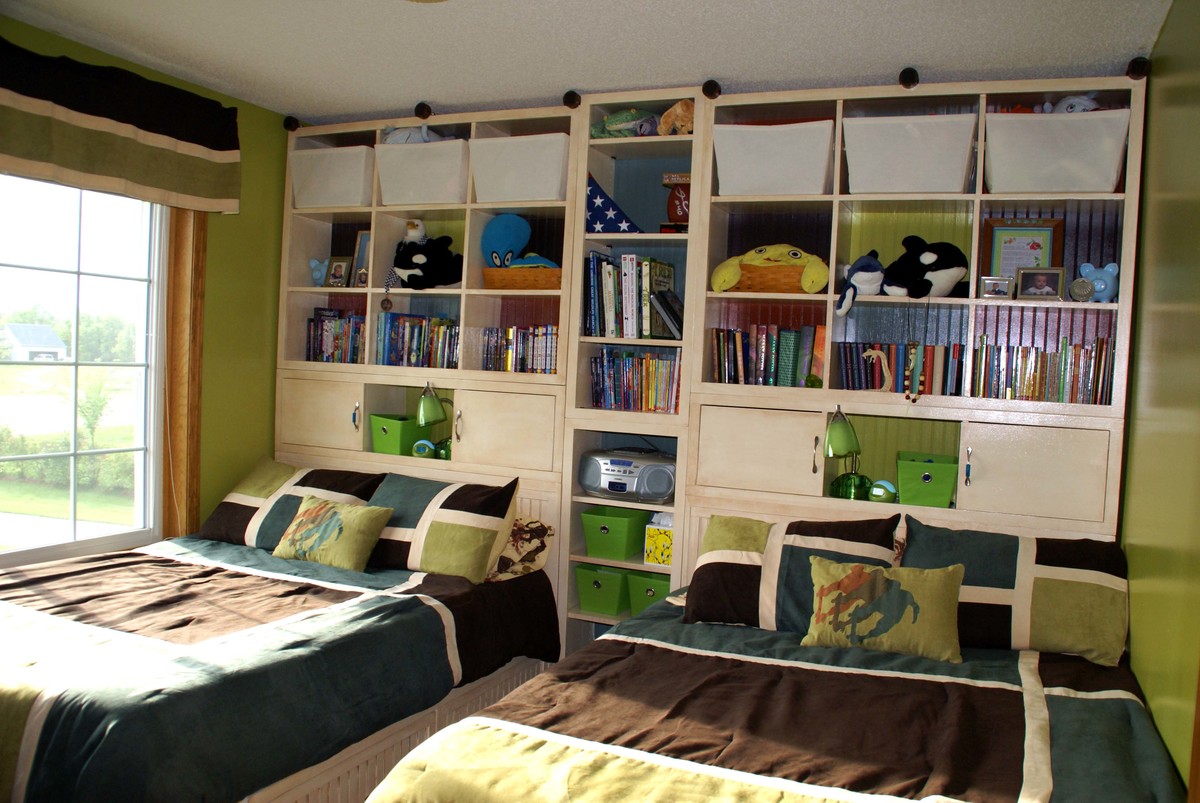
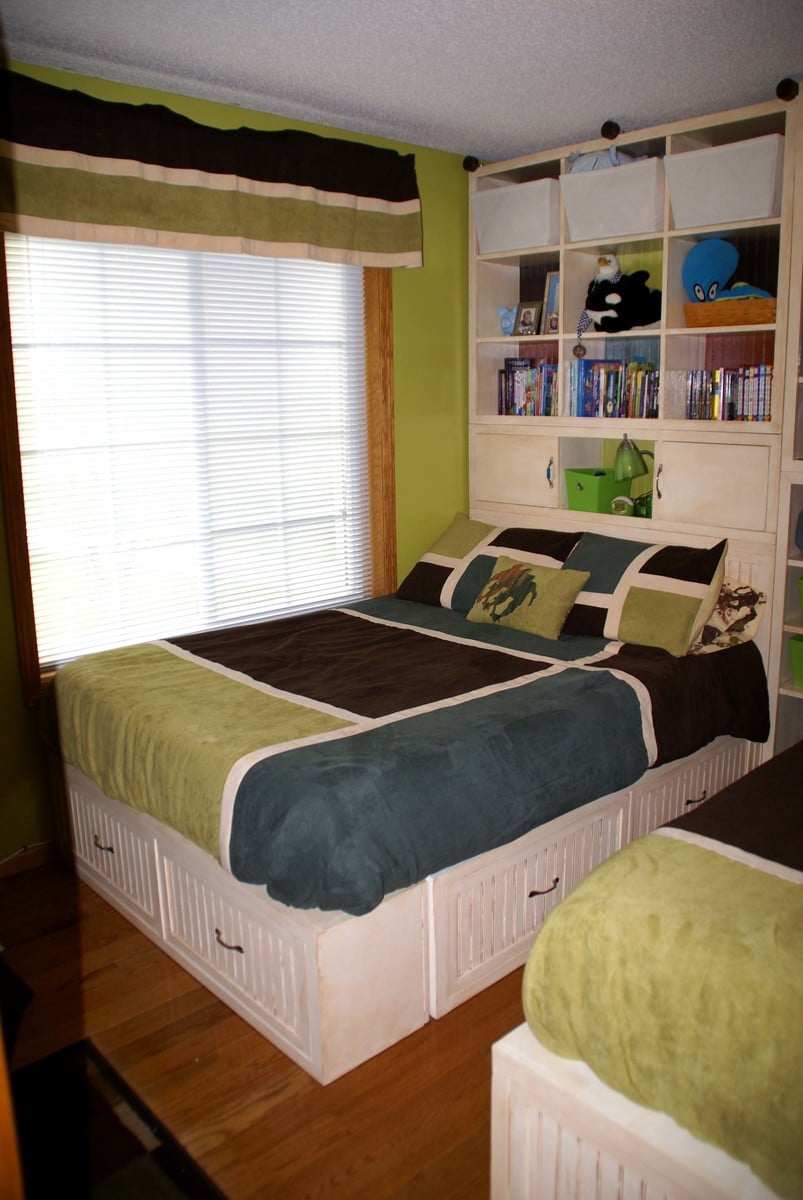

Built from Plan(s)
Estimated Time Investment
Week Long Project (20 Hours or More)
Finish Used
All Paint by Valspar
Main Color: Homestead Resort Cameo White
Accent Colors to match Jacobson Bedding from JC Penney:
Gilded Pesto
Rusted Earth
Brown Velvet
Redstone Blue Spruce
Valspar Translucent Color Glaze in Mocha
Minwax Gloss Polycrylic
Gatehouse brand satin nickel hardware from Lowes
Main Color: Homestead Resort Cameo White
Accent Colors to match Jacobson Bedding from JC Penney:
Gilded Pesto
Rusted Earth
Brown Velvet
Redstone Blue Spruce
Valspar Translucent Color Glaze in Mocha
Minwax Gloss Polycrylic
Gatehouse brand satin nickel hardware from Lowes
Recommended Skill Level
Intermediate
Comments
Sat, 04/20/2013 - 07:42
WOWZER
This is AMAZING! I will be moving to HI soon and will not be able to take any of my furniture with me. Was concerned about storage and usability issues, but you have sent my concerns totally out the window. I also like the idea with the solar lights. Props to you !!!!!
Kitchen Hutch
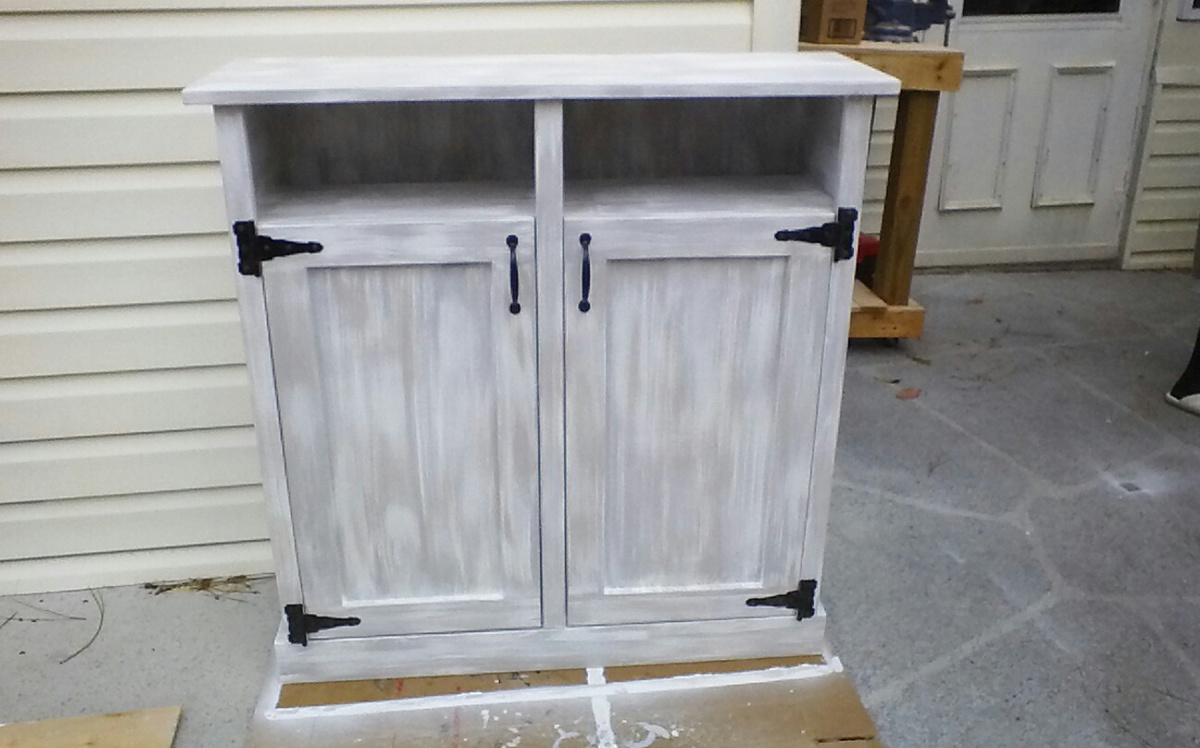
I've built a lot of things...mainly corn hole boards for friends and family but this is my first furniture build. My wife's Valentine present! Now I'm thinking my new big screen tv sure could use a nice Apothecary media cabinet.

Built from Plan(s)
Estimated Cost
I used expensive 3/4 in birch plywood so around $130
Estimated Time Investment
Weekend Project (10-20 Hours)
Finish Used
CHALK Paint with a chalk varnish for a protective finish
Recommended Skill Level
Beginner
Comments
Sandbox with Seat
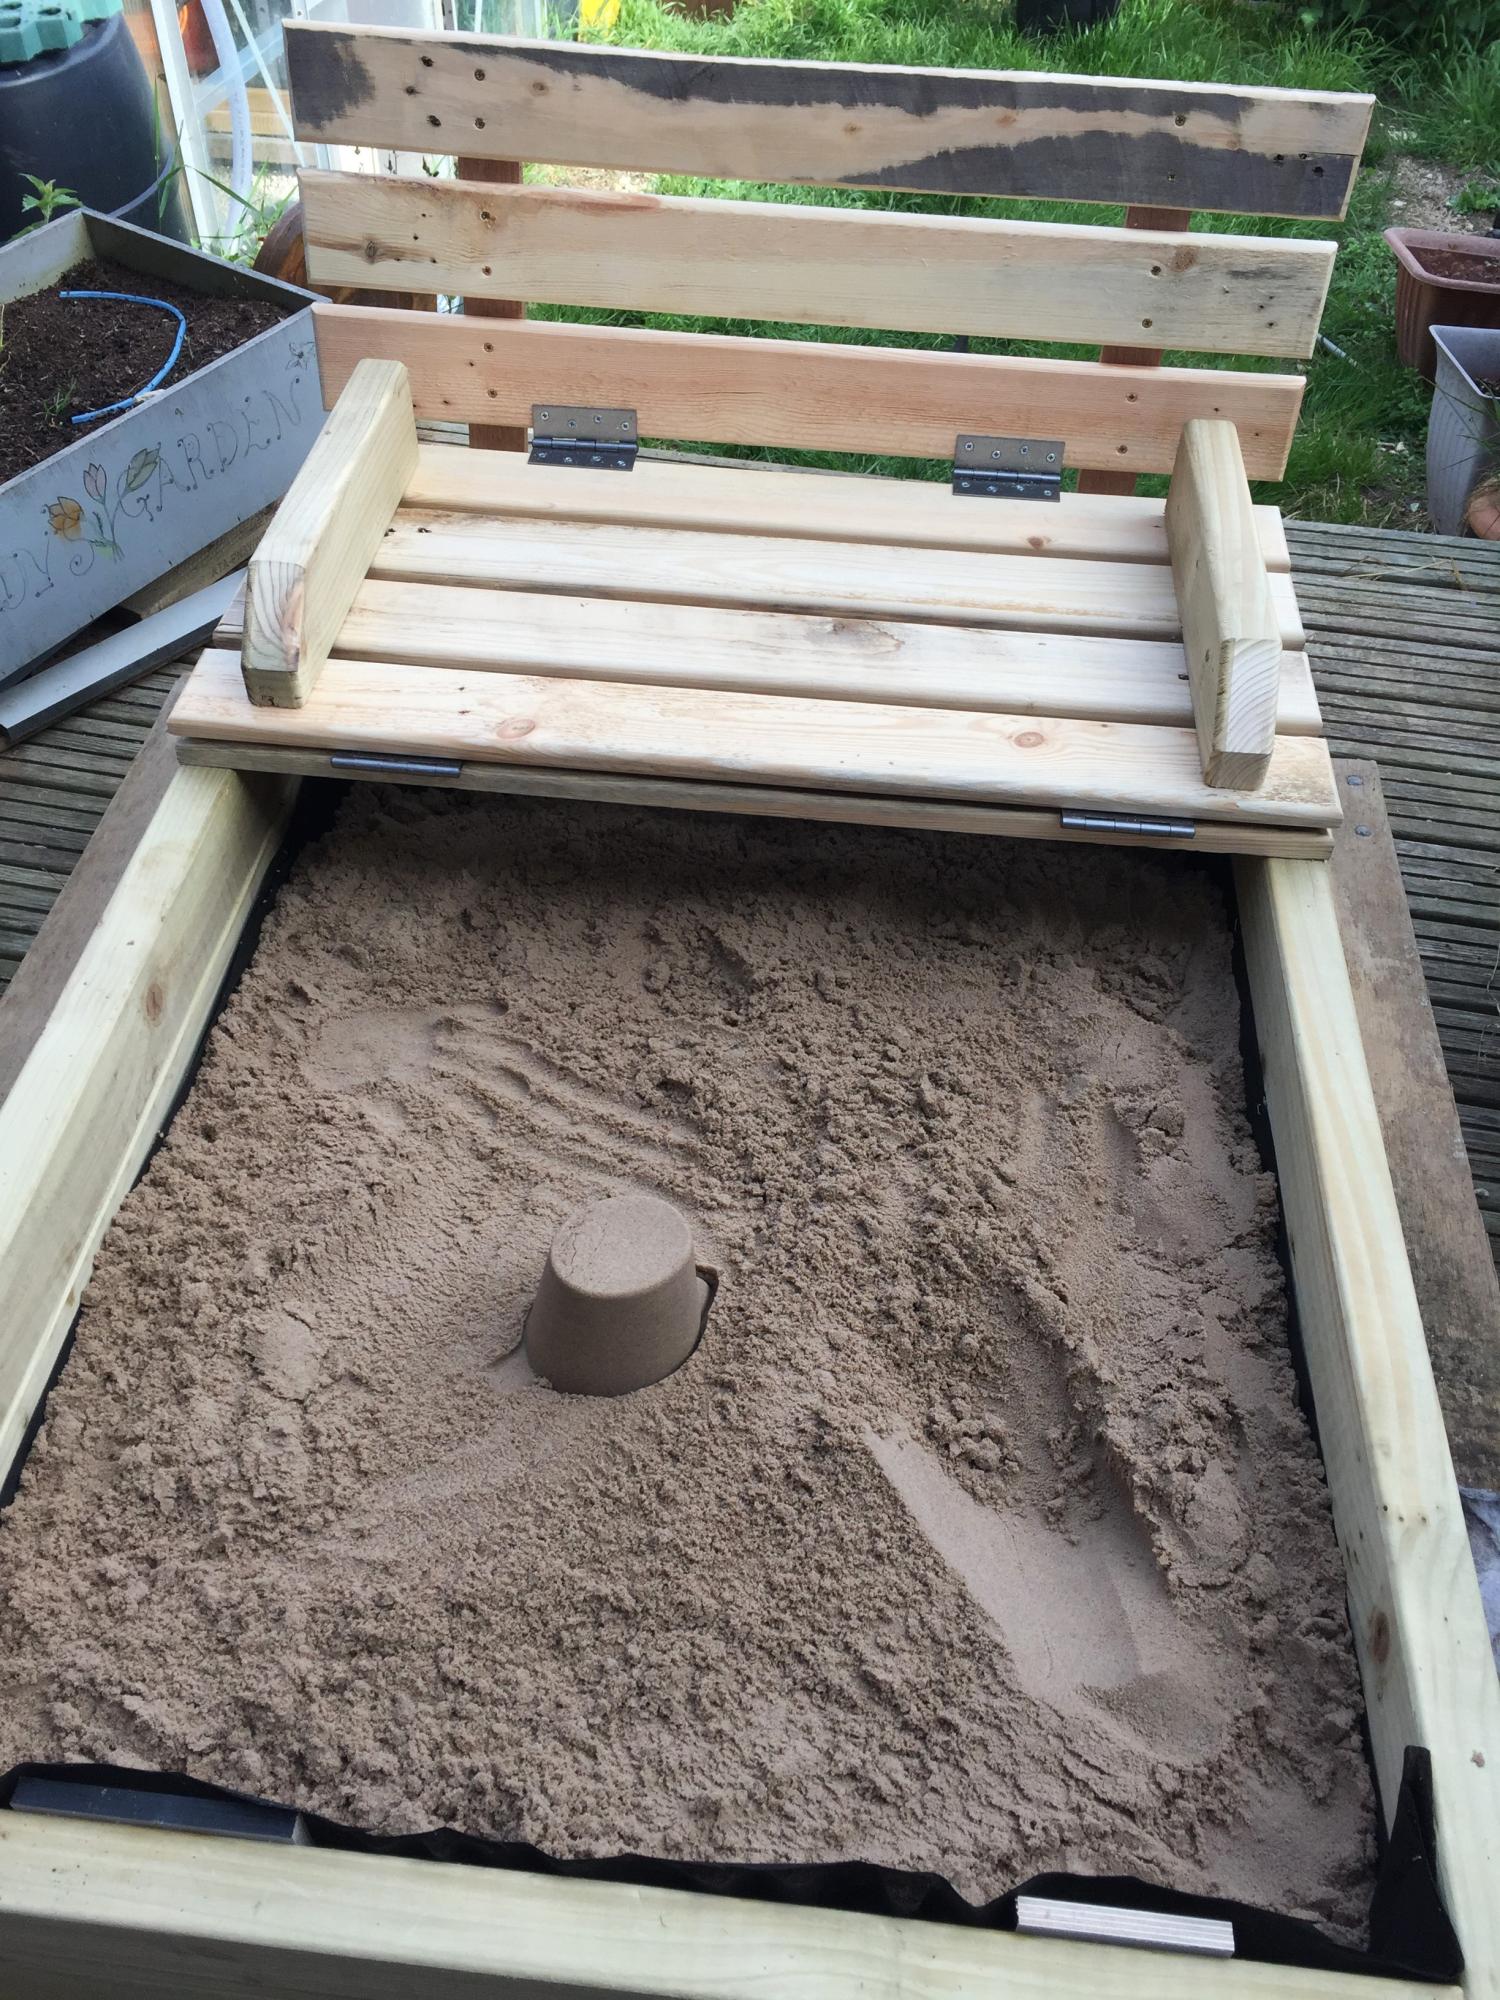
I tried to make a similar sand box as yours but as space was limited I decided to only make a 1 seat version. As a first attempt of making something proper I think it turned out well. Base frame is made of 4 x2s and the lid and seat contruction it pallet wood planed to make it nice and smooth. Granddaughter loves it.

Built from Plan(s)
Estimated Cost
£20 for bags of play sand, I already had the 4x2s and pallet wood is free.
Estimated Time Investment
Day Project (6-9 Hours)
Finish Used
no finish as yet
Recommended Skill Level
Beginner
Dresser
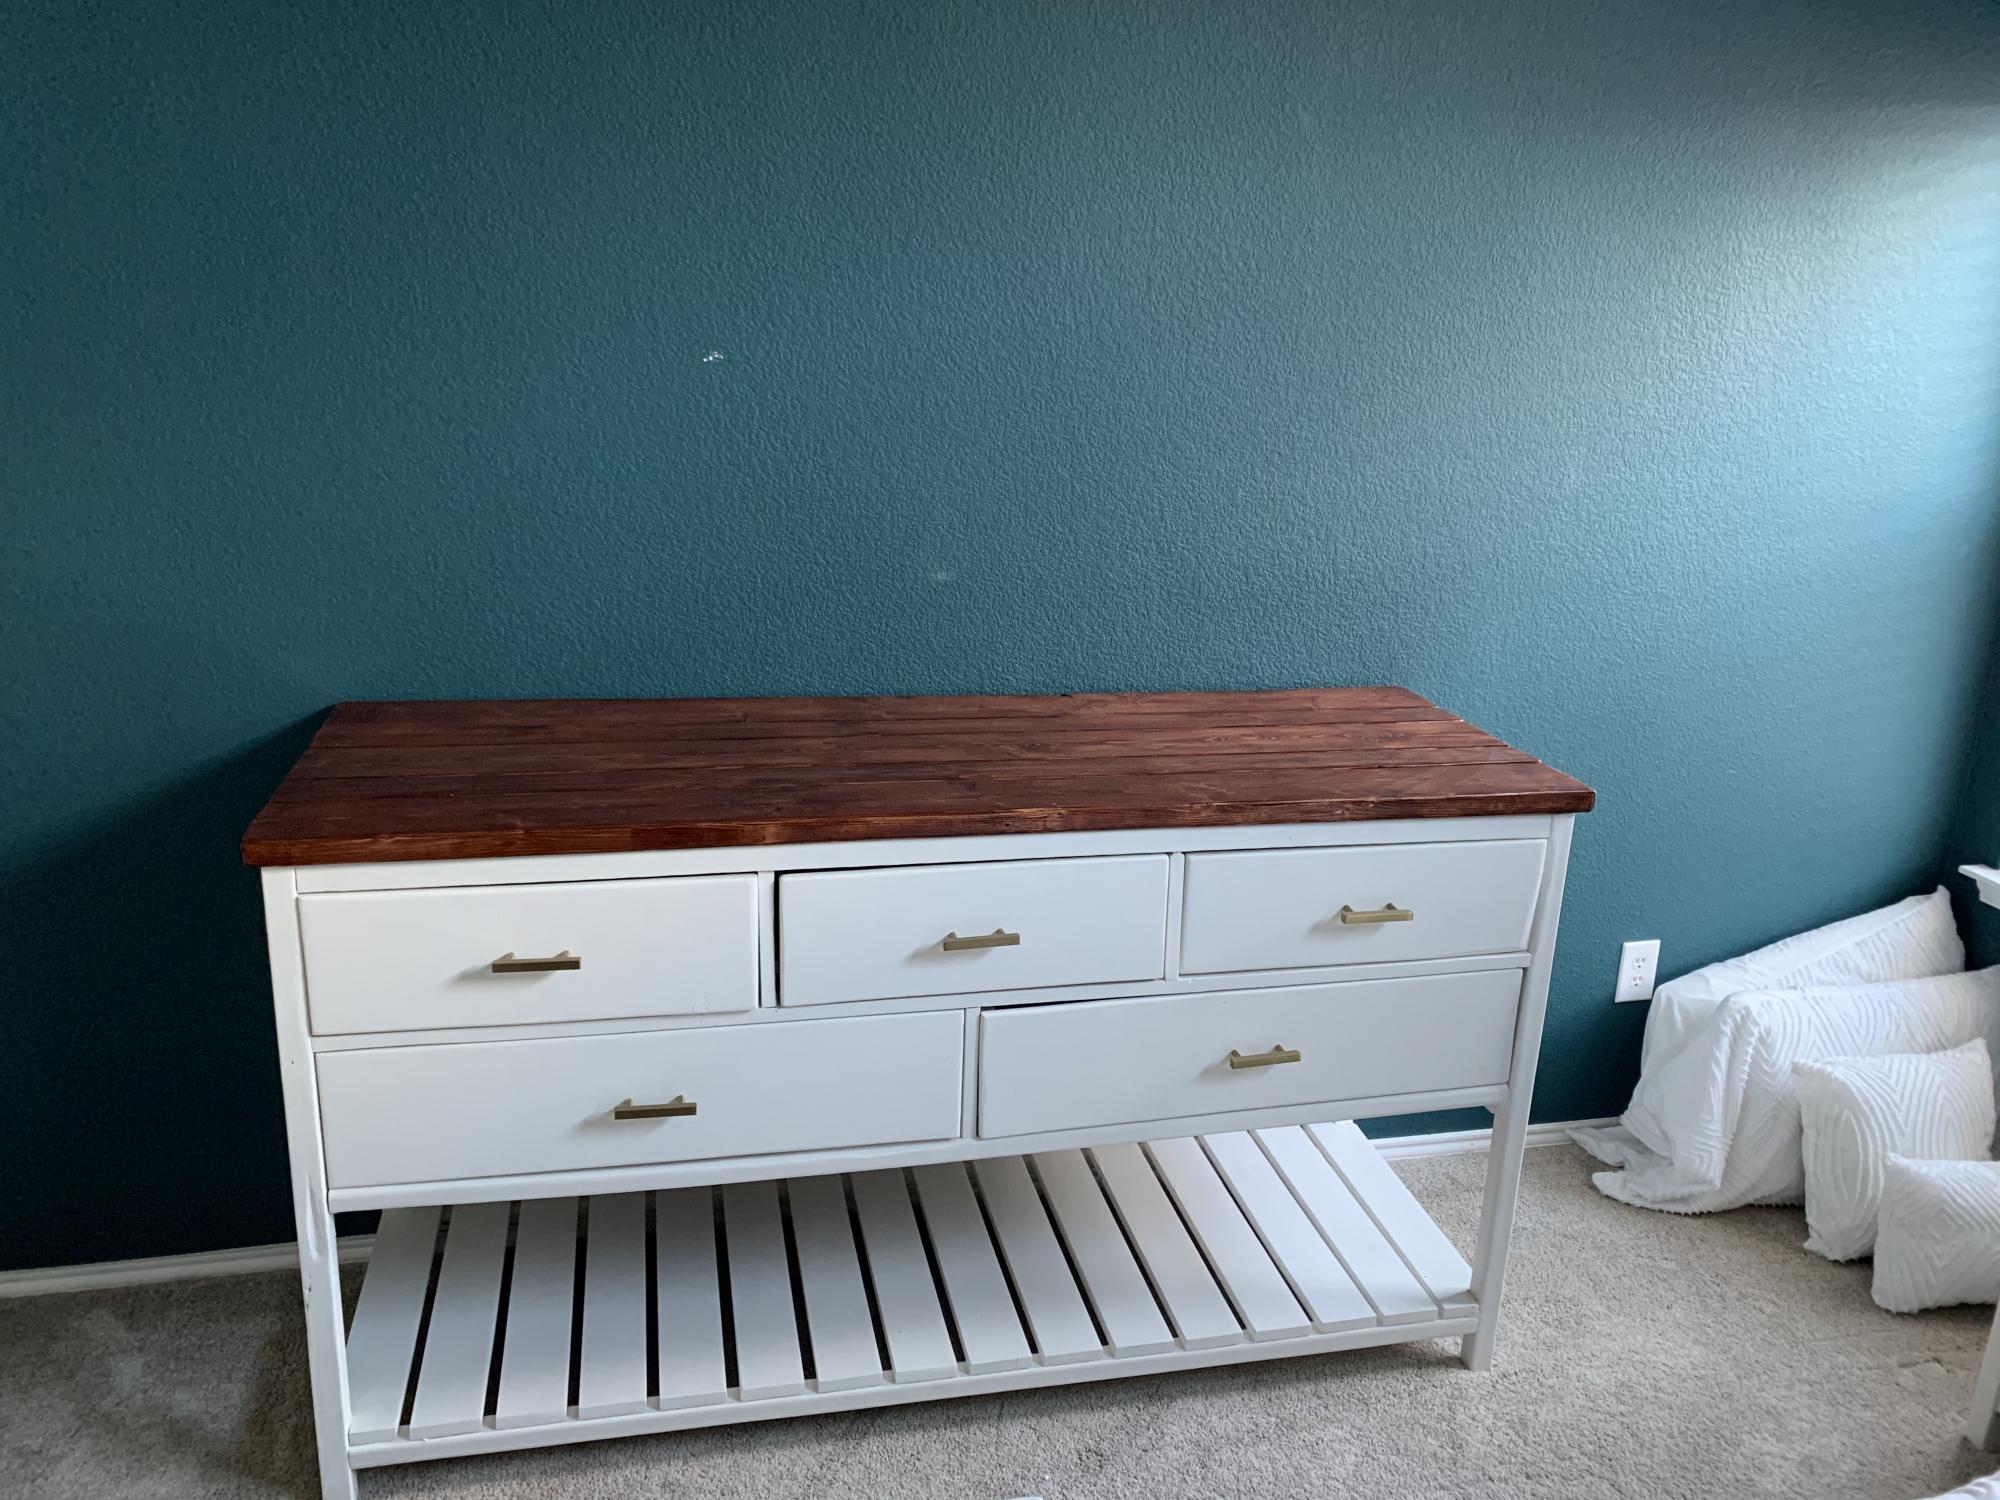
Liked this project. Make sure all the pieces are straight or you will have issues. And having an extra person to help with drawer slides made a huge difference.
Built from Plan(s)
Estimated Cost
140
Estimated Time Investment
Week Long Project (20 Hours or More)
Recommended Skill Level
Advanced
Comments
Rustic Table Completed...just needs to be finished! So proud!
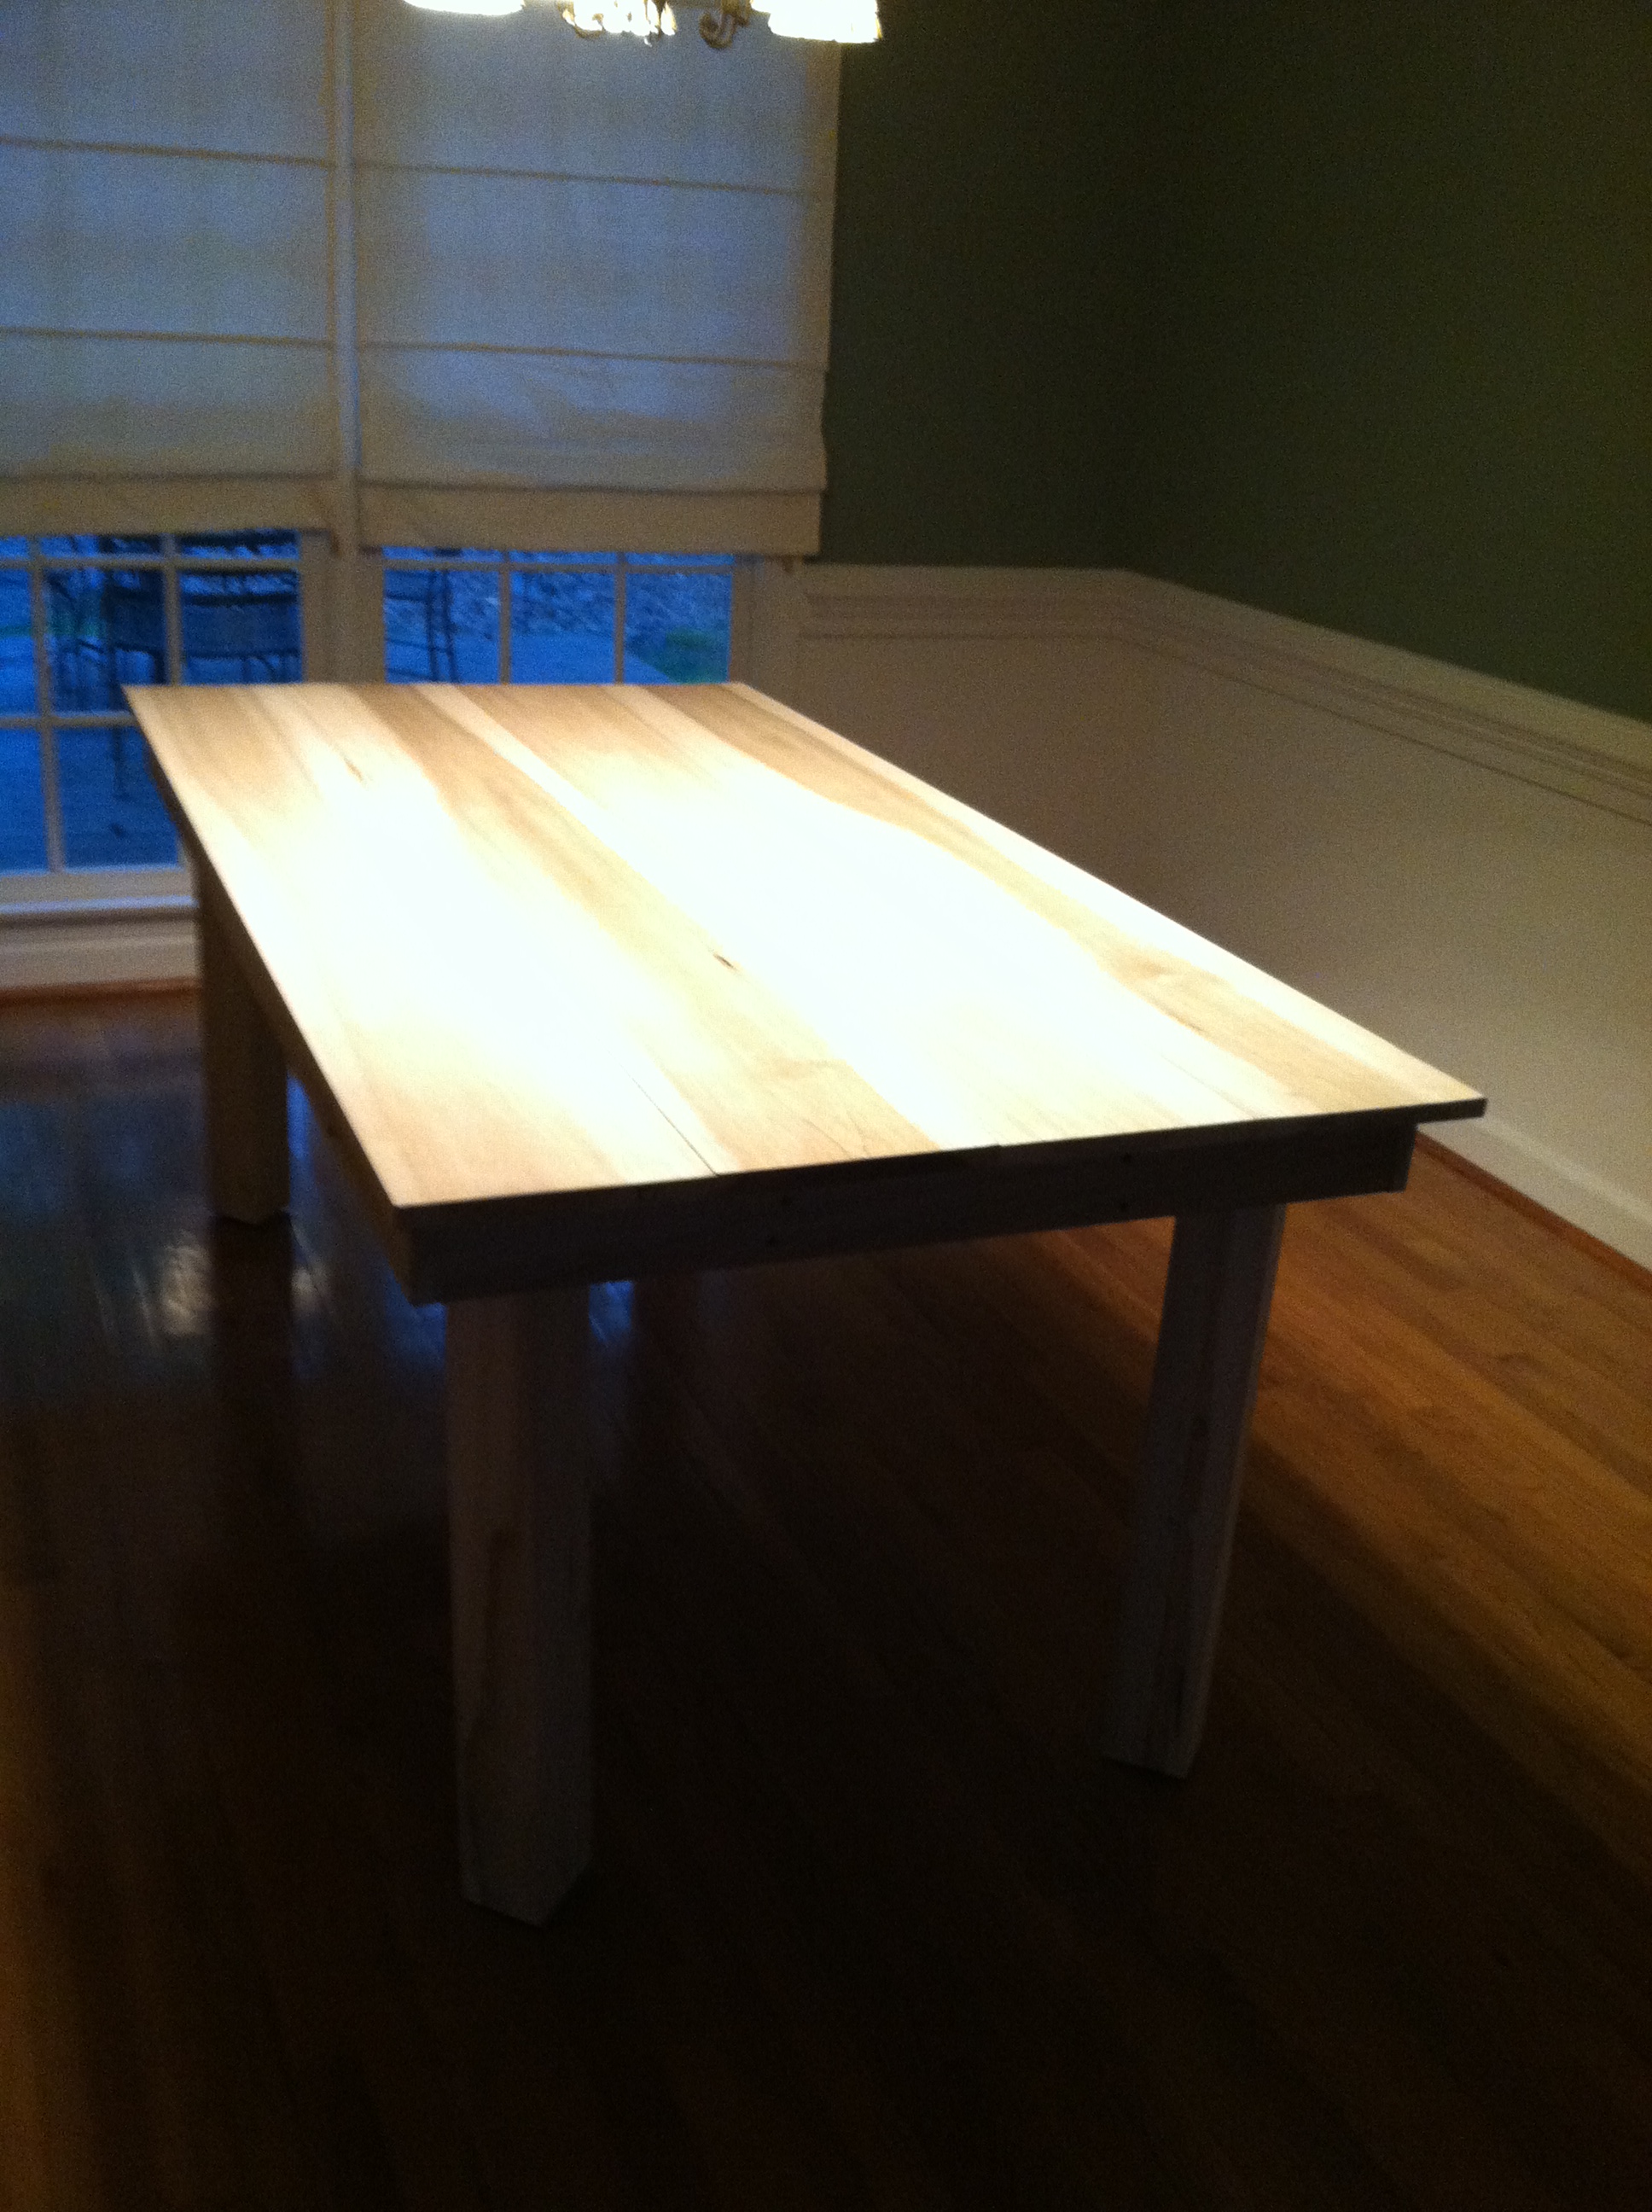
Rustic table plans with slight modification of the width and the legs were mounted differently for a little added flair. So many finishes to choose from....
Built from Plan(s)
Estimated Cost
$115 for poplar wood and $100 for legs made by local artist from poplar
Estimated Time Investment
Afternoon Project (3-6 Hours)
Finish Used
None yet!
Recommended Skill Level
Beginner