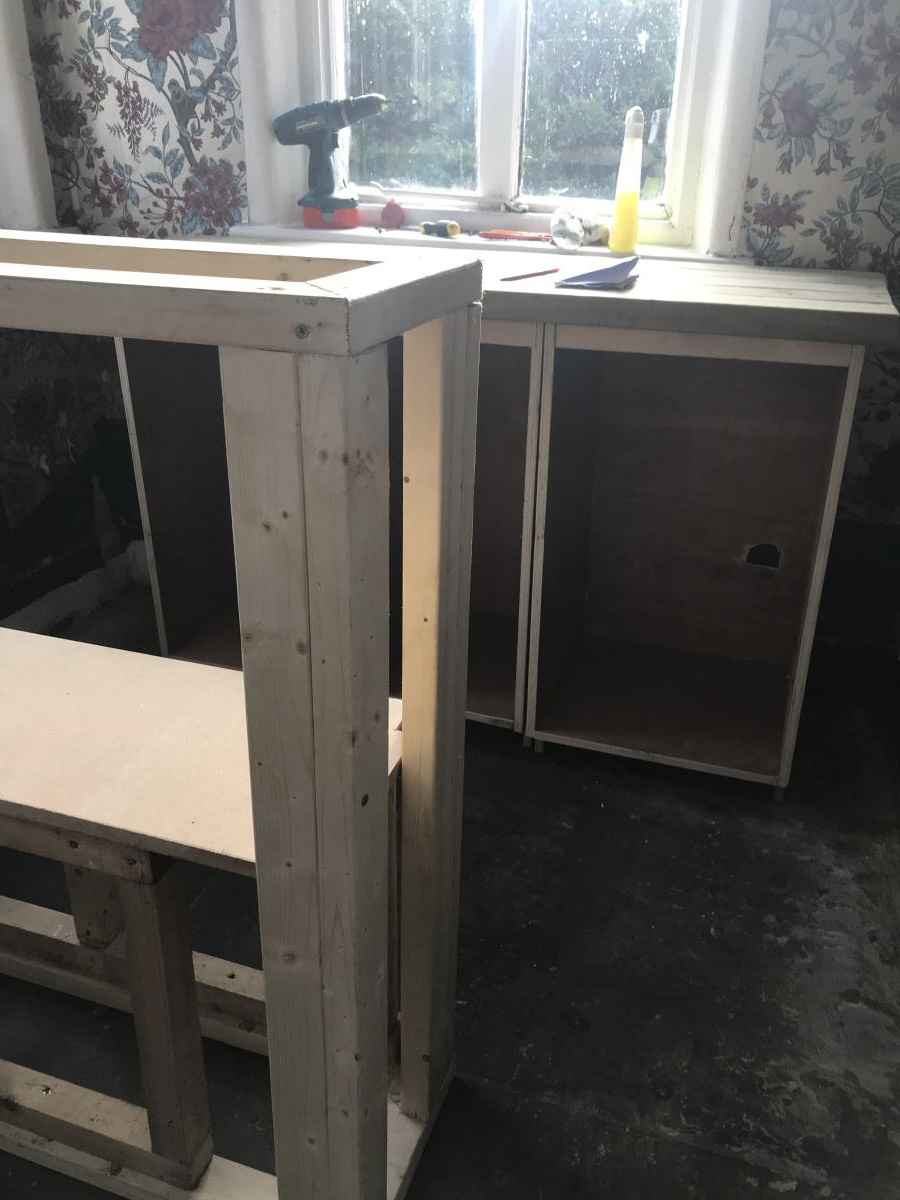
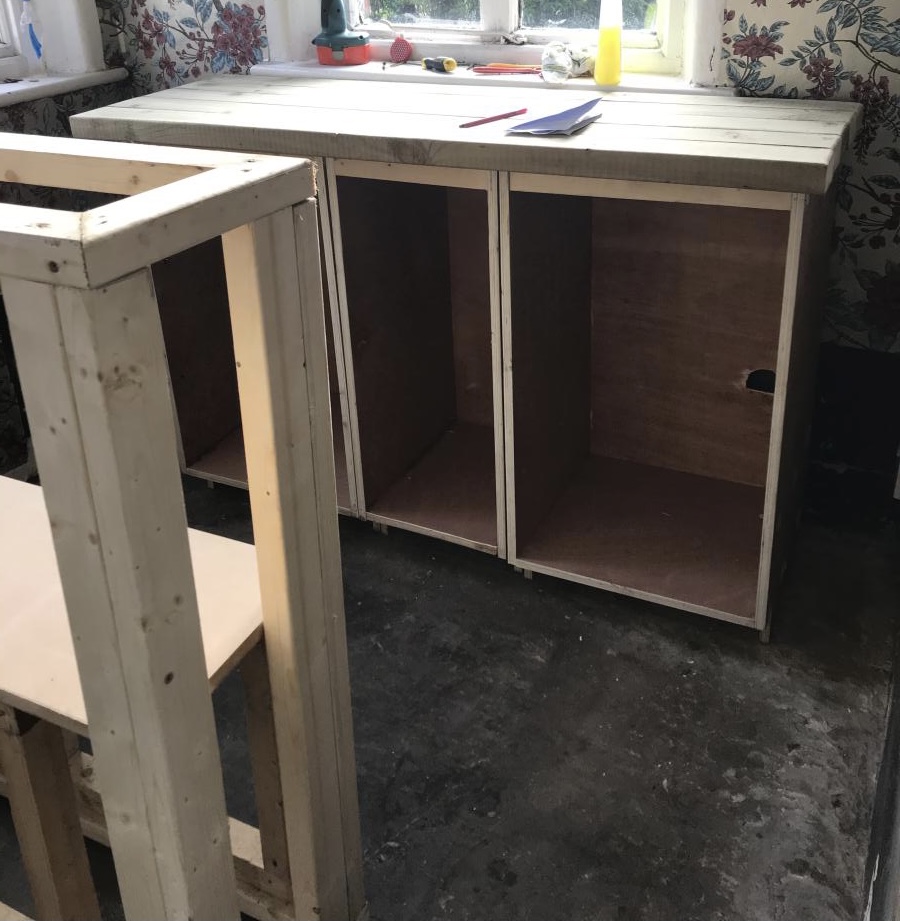
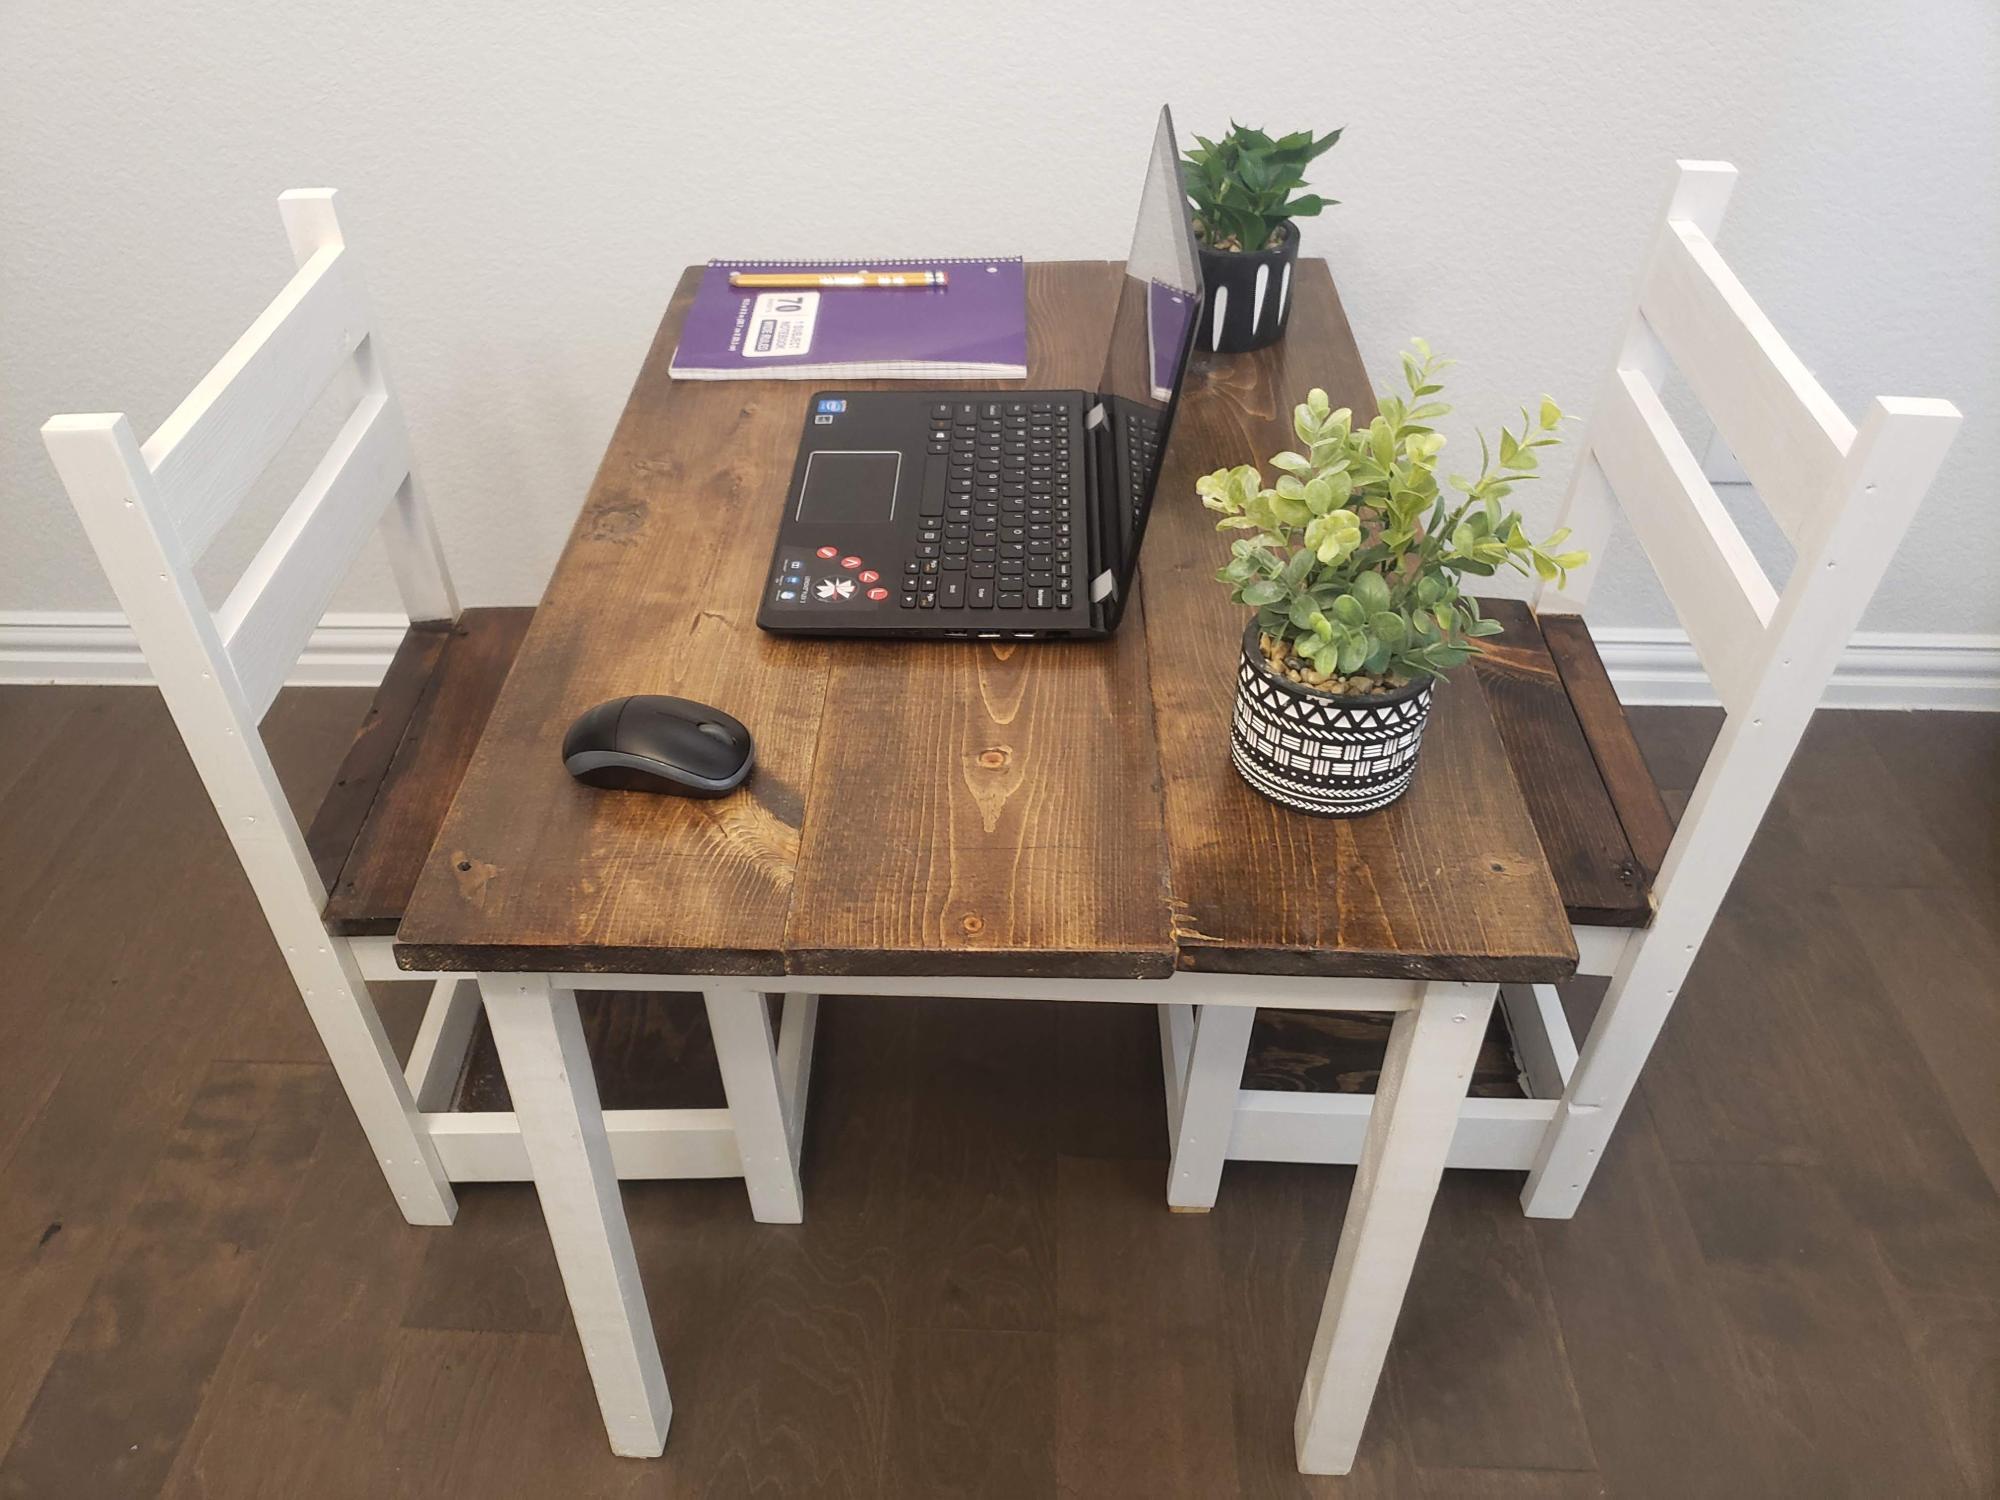
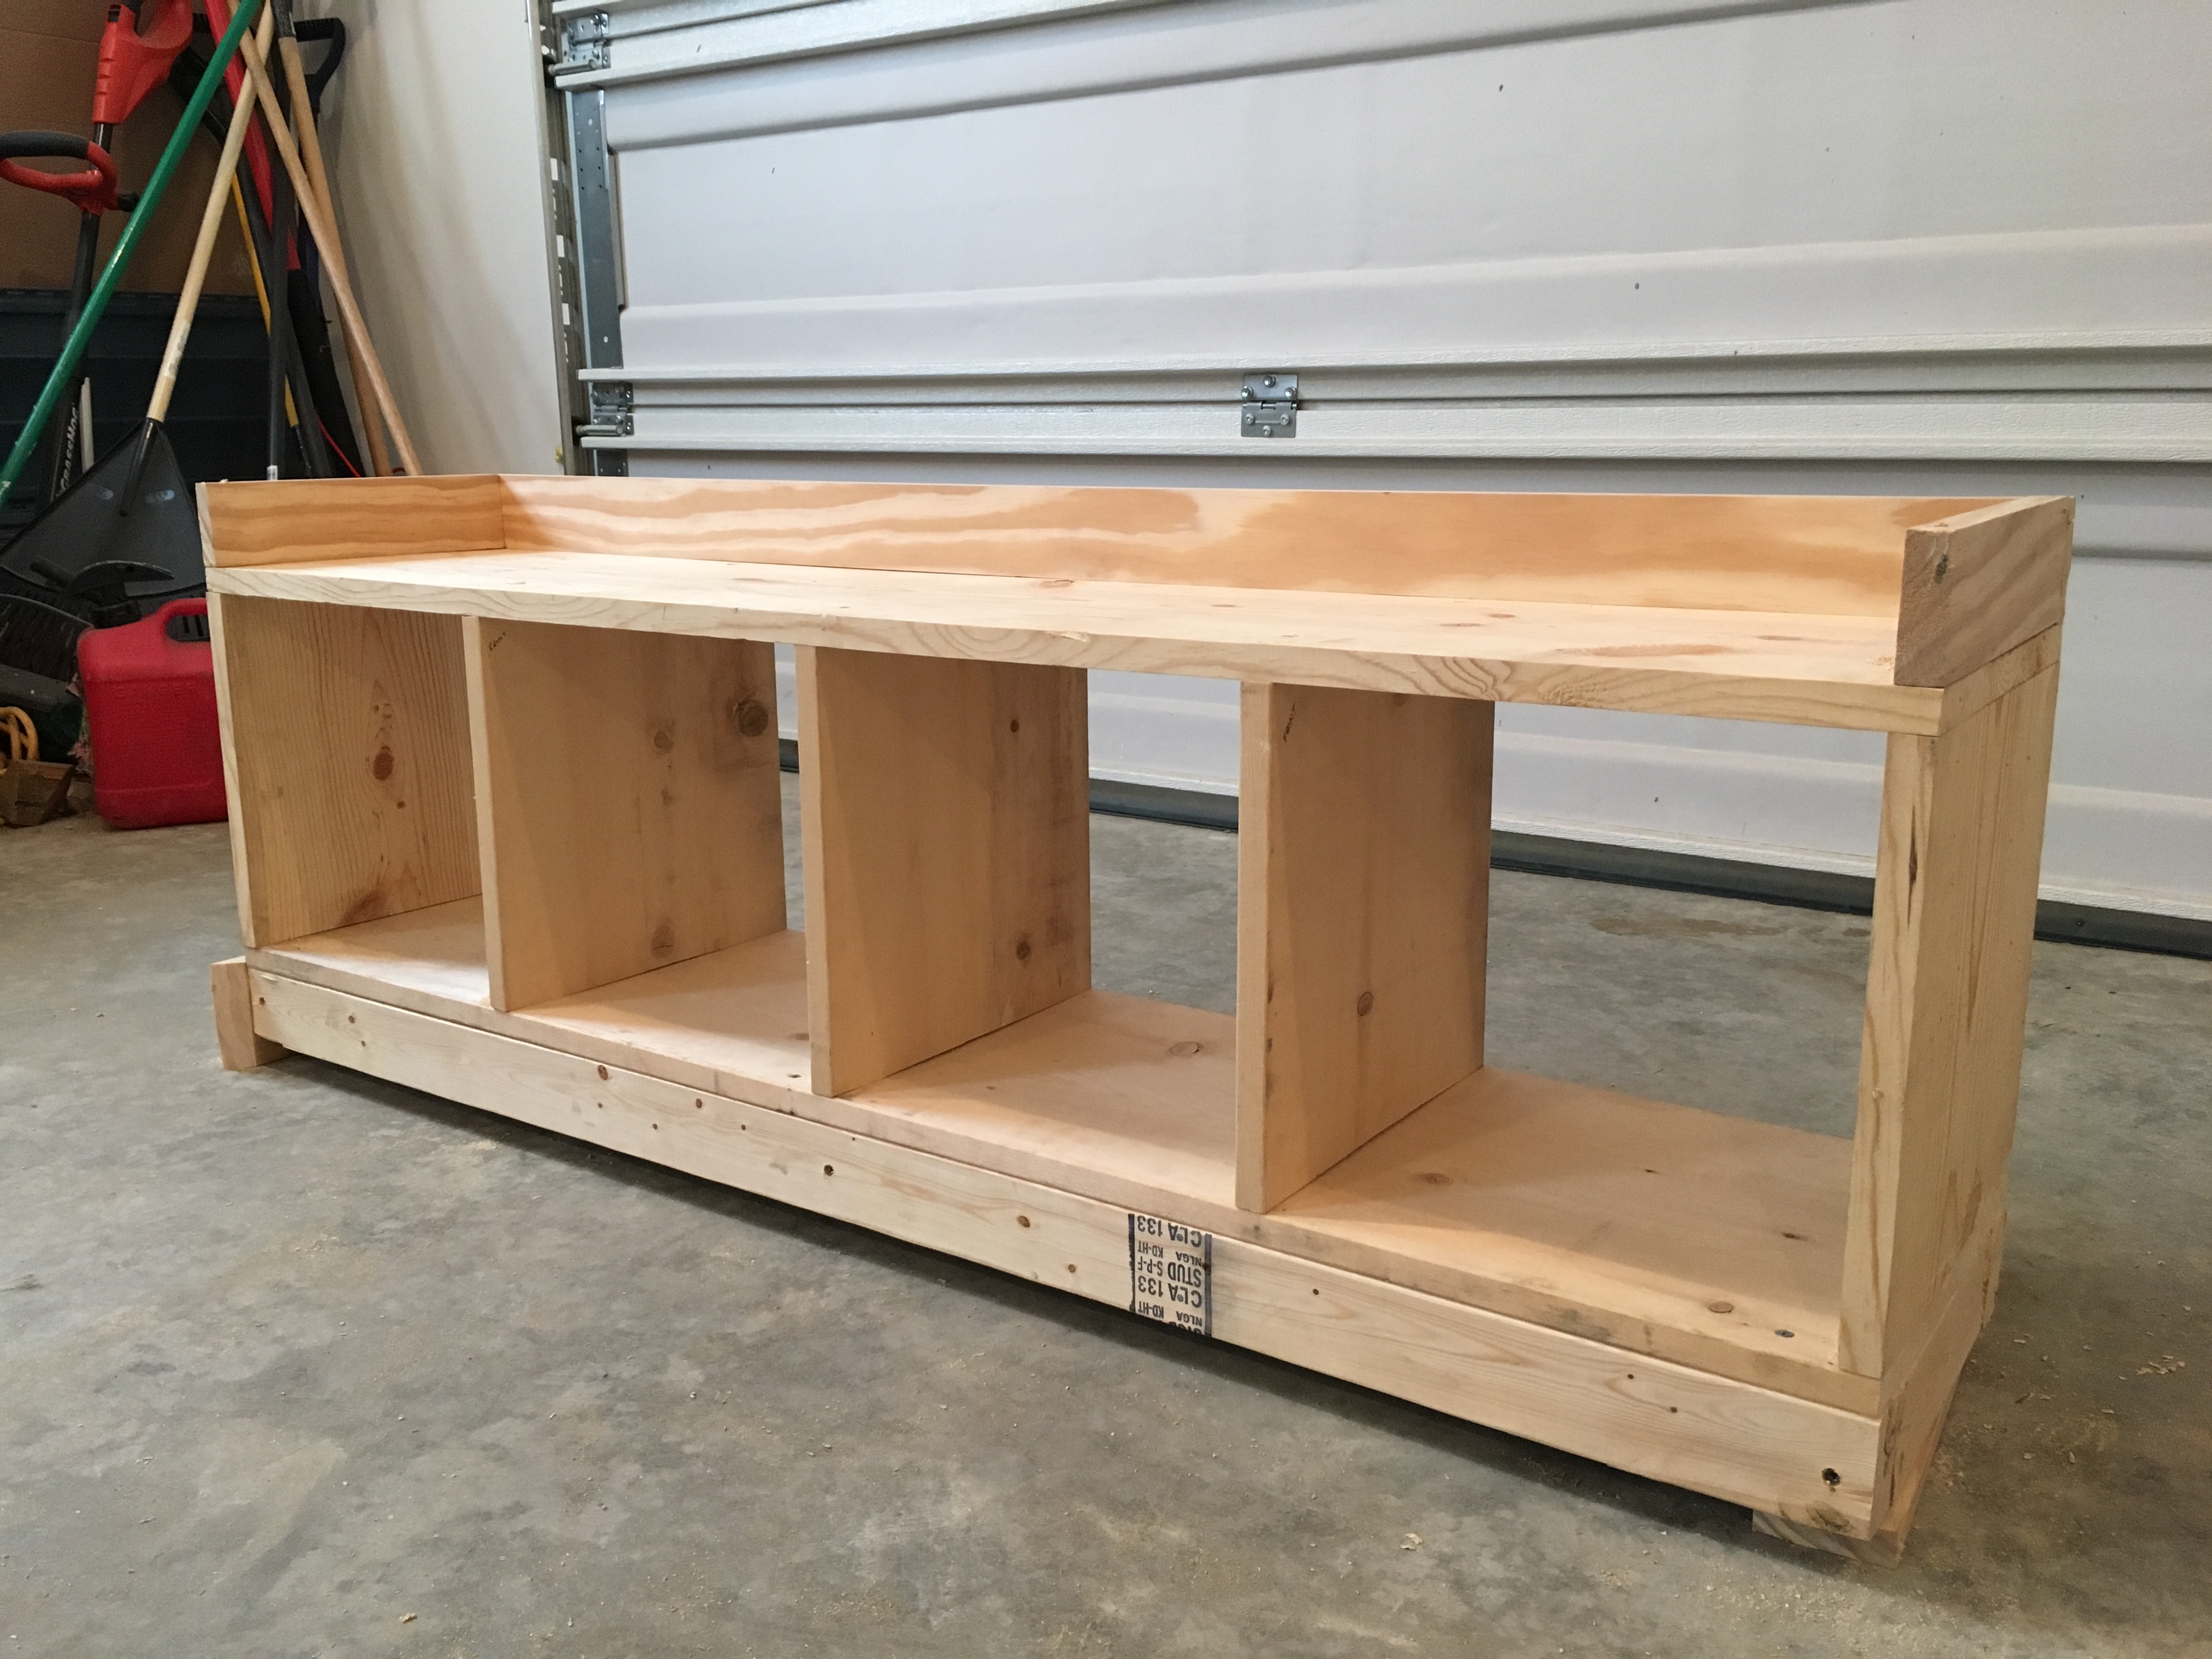
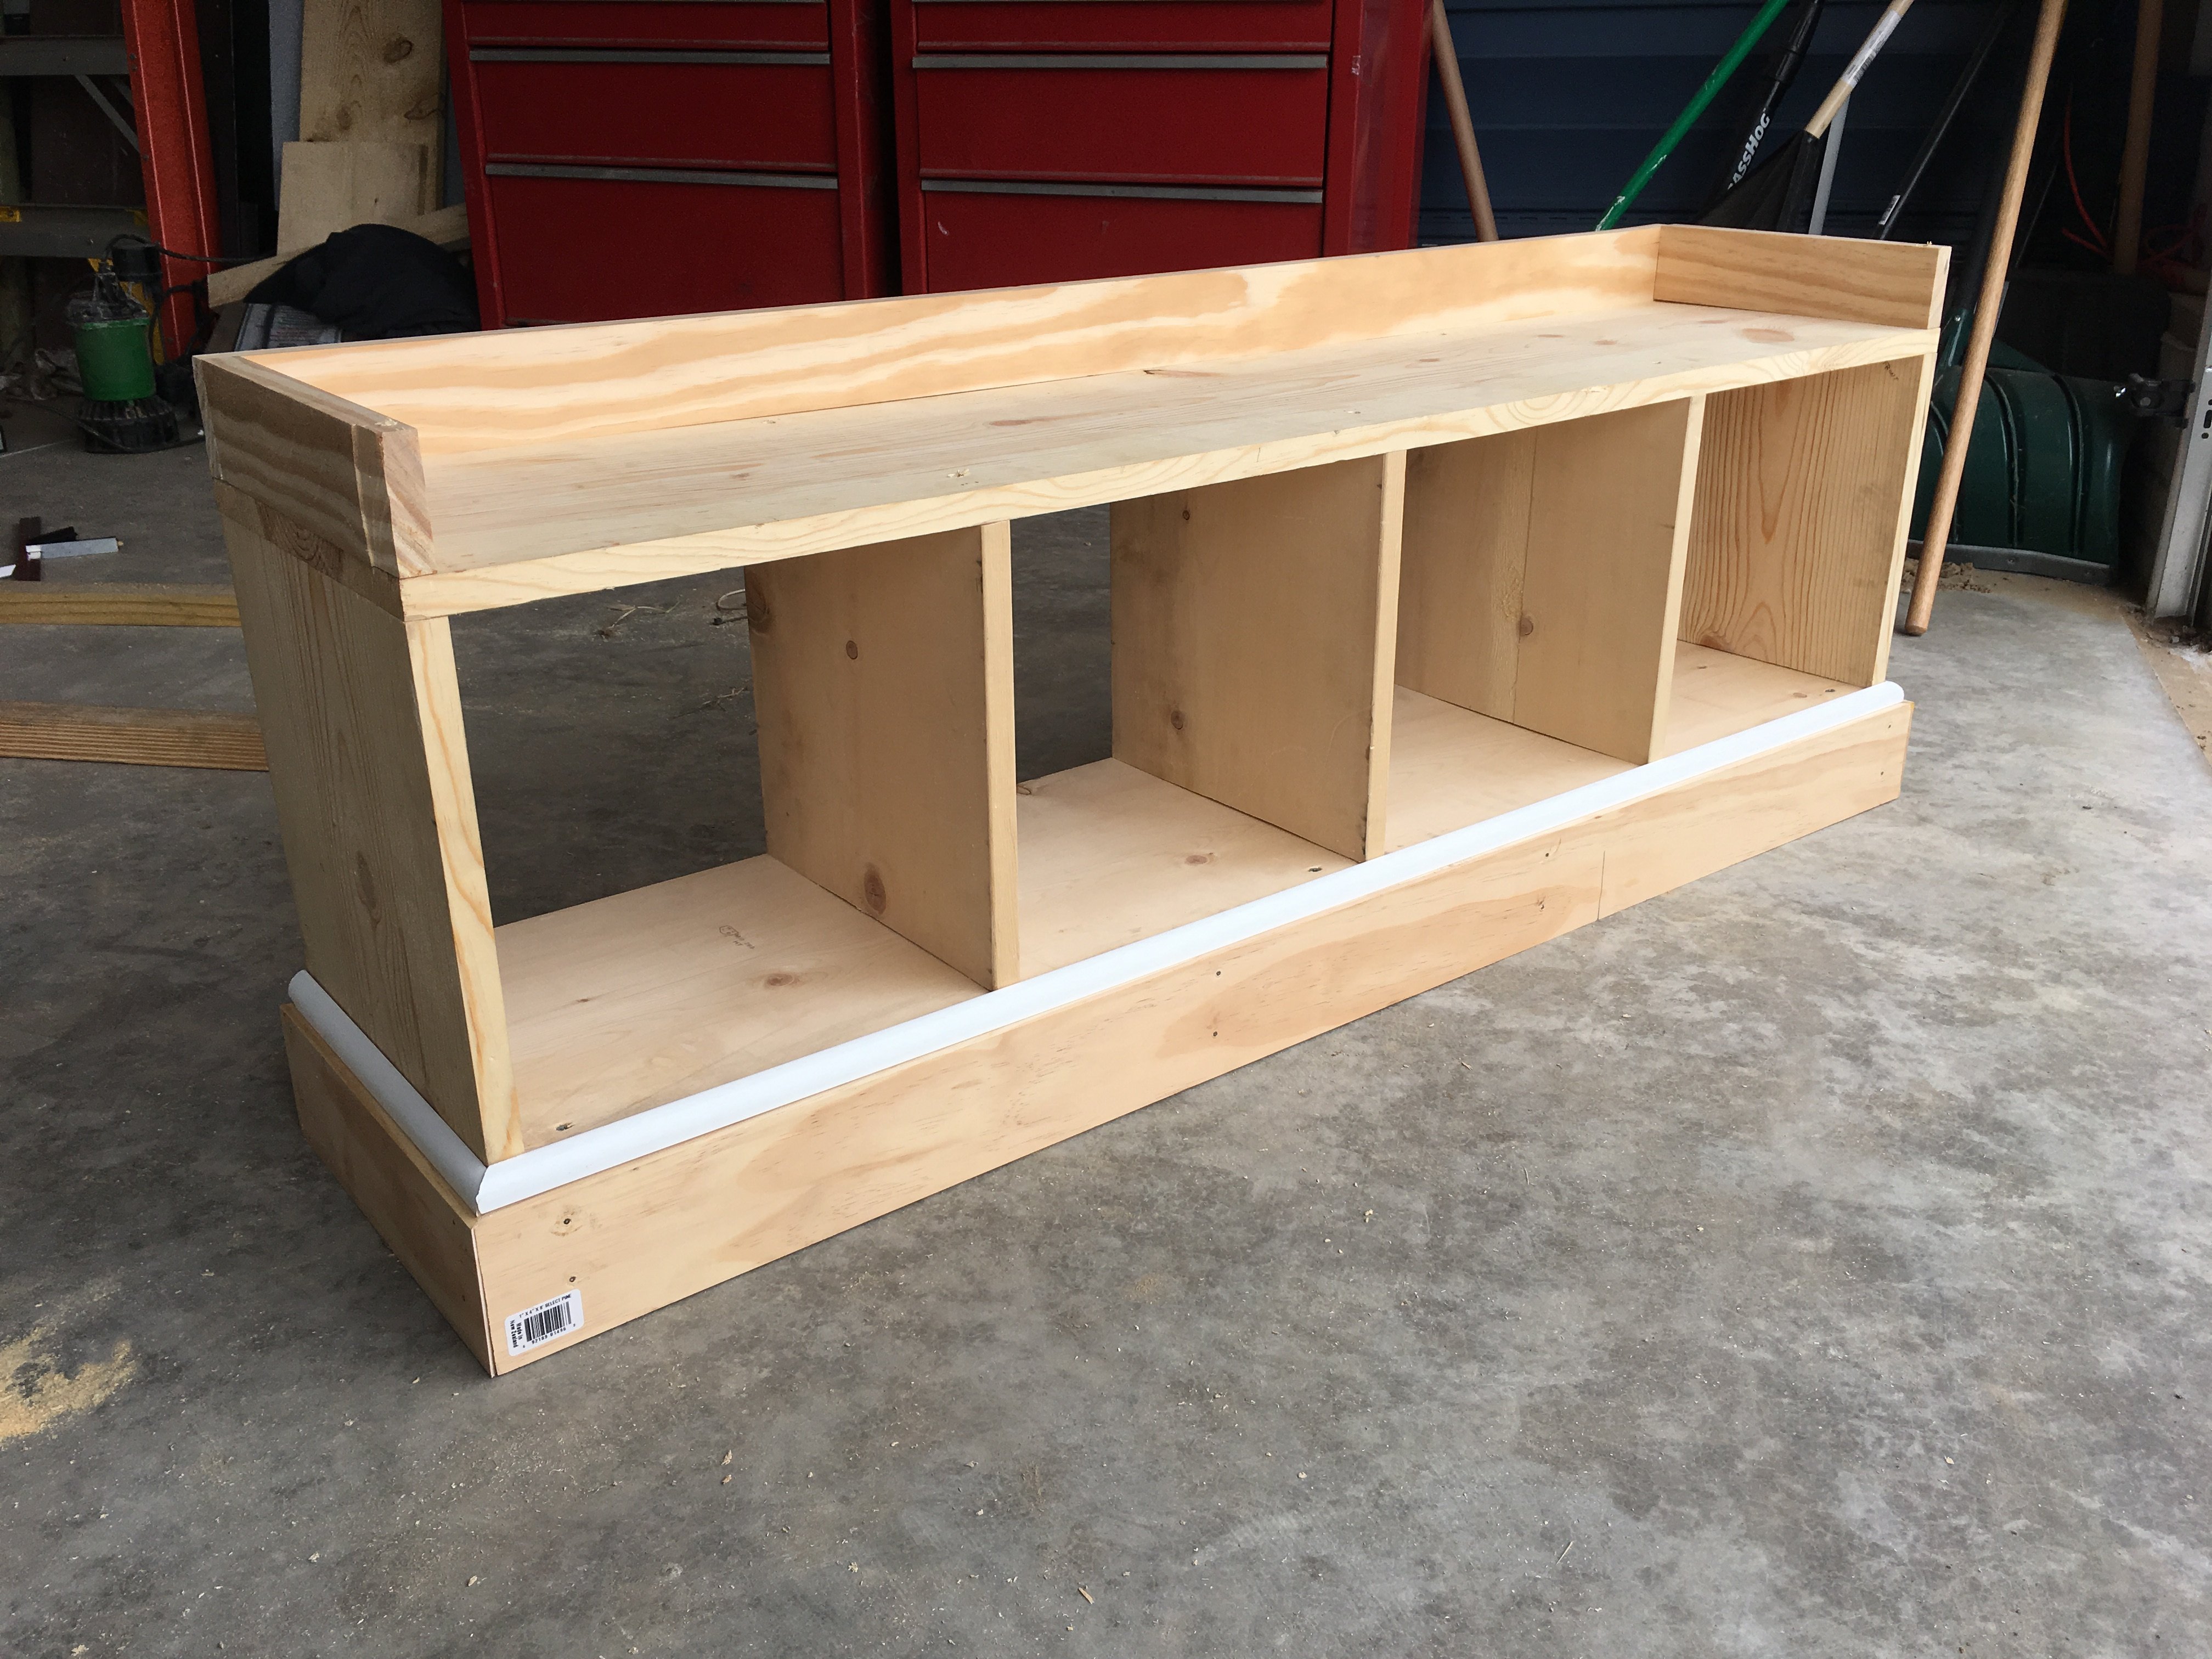
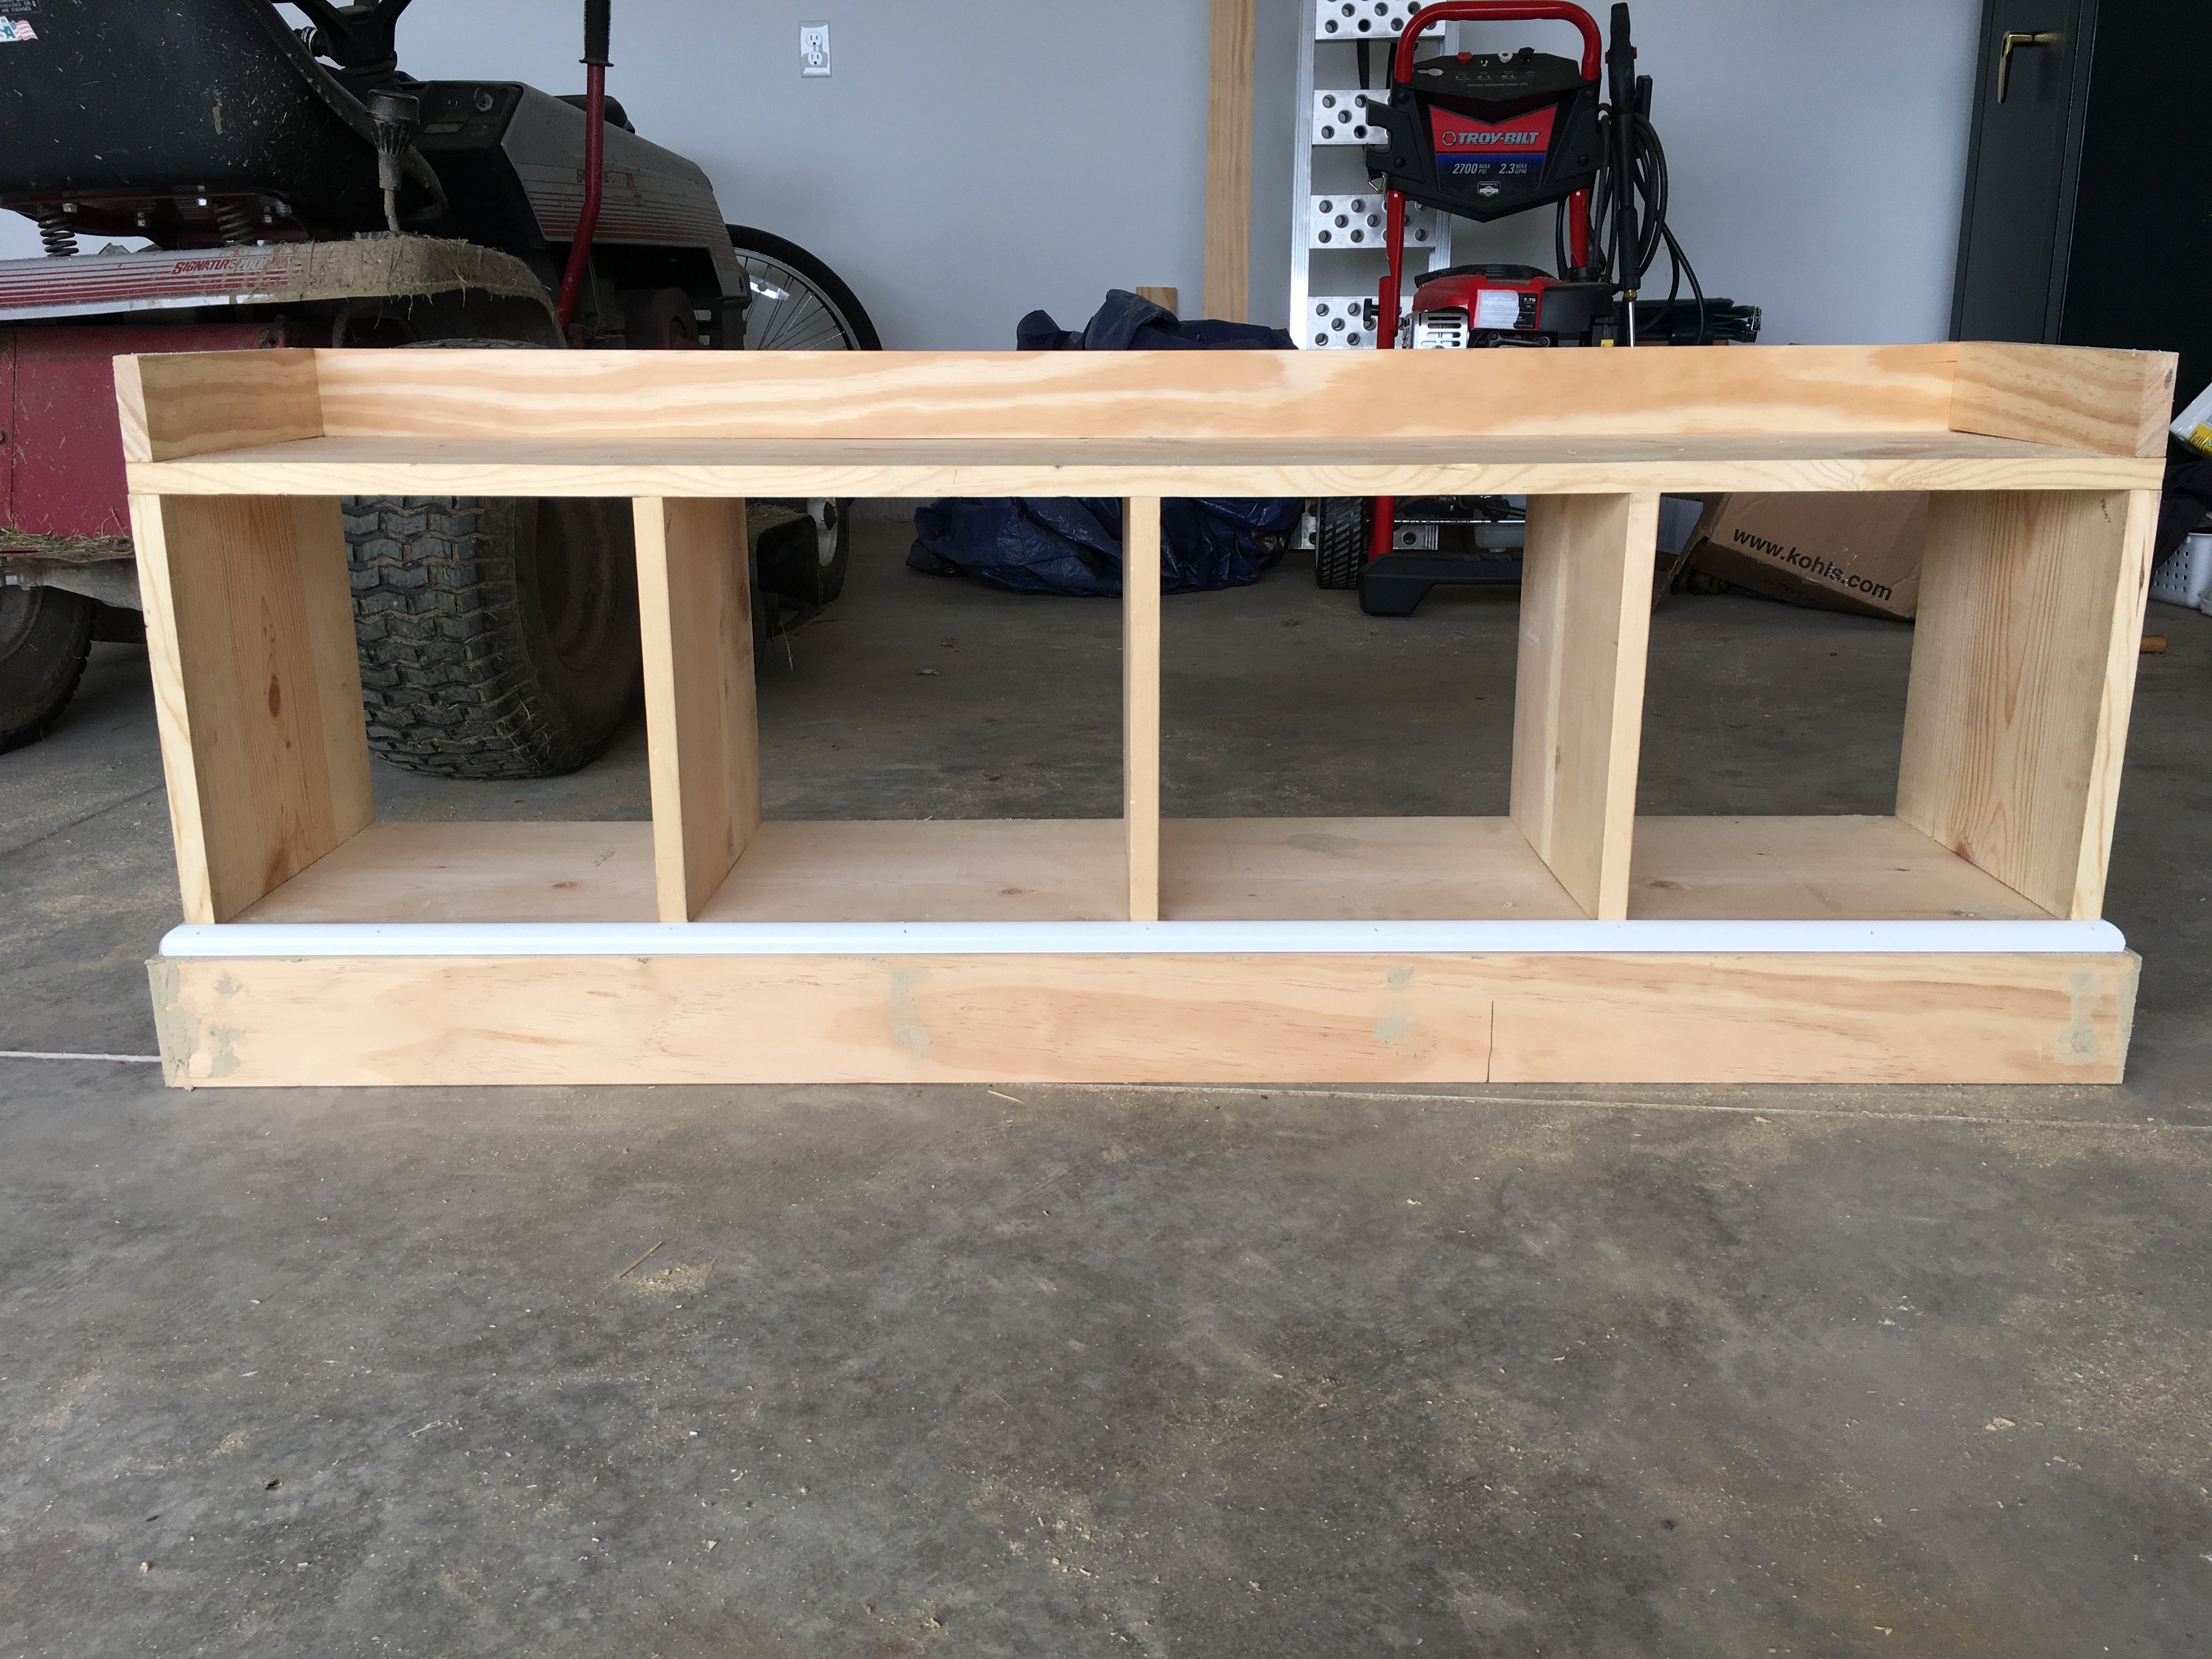
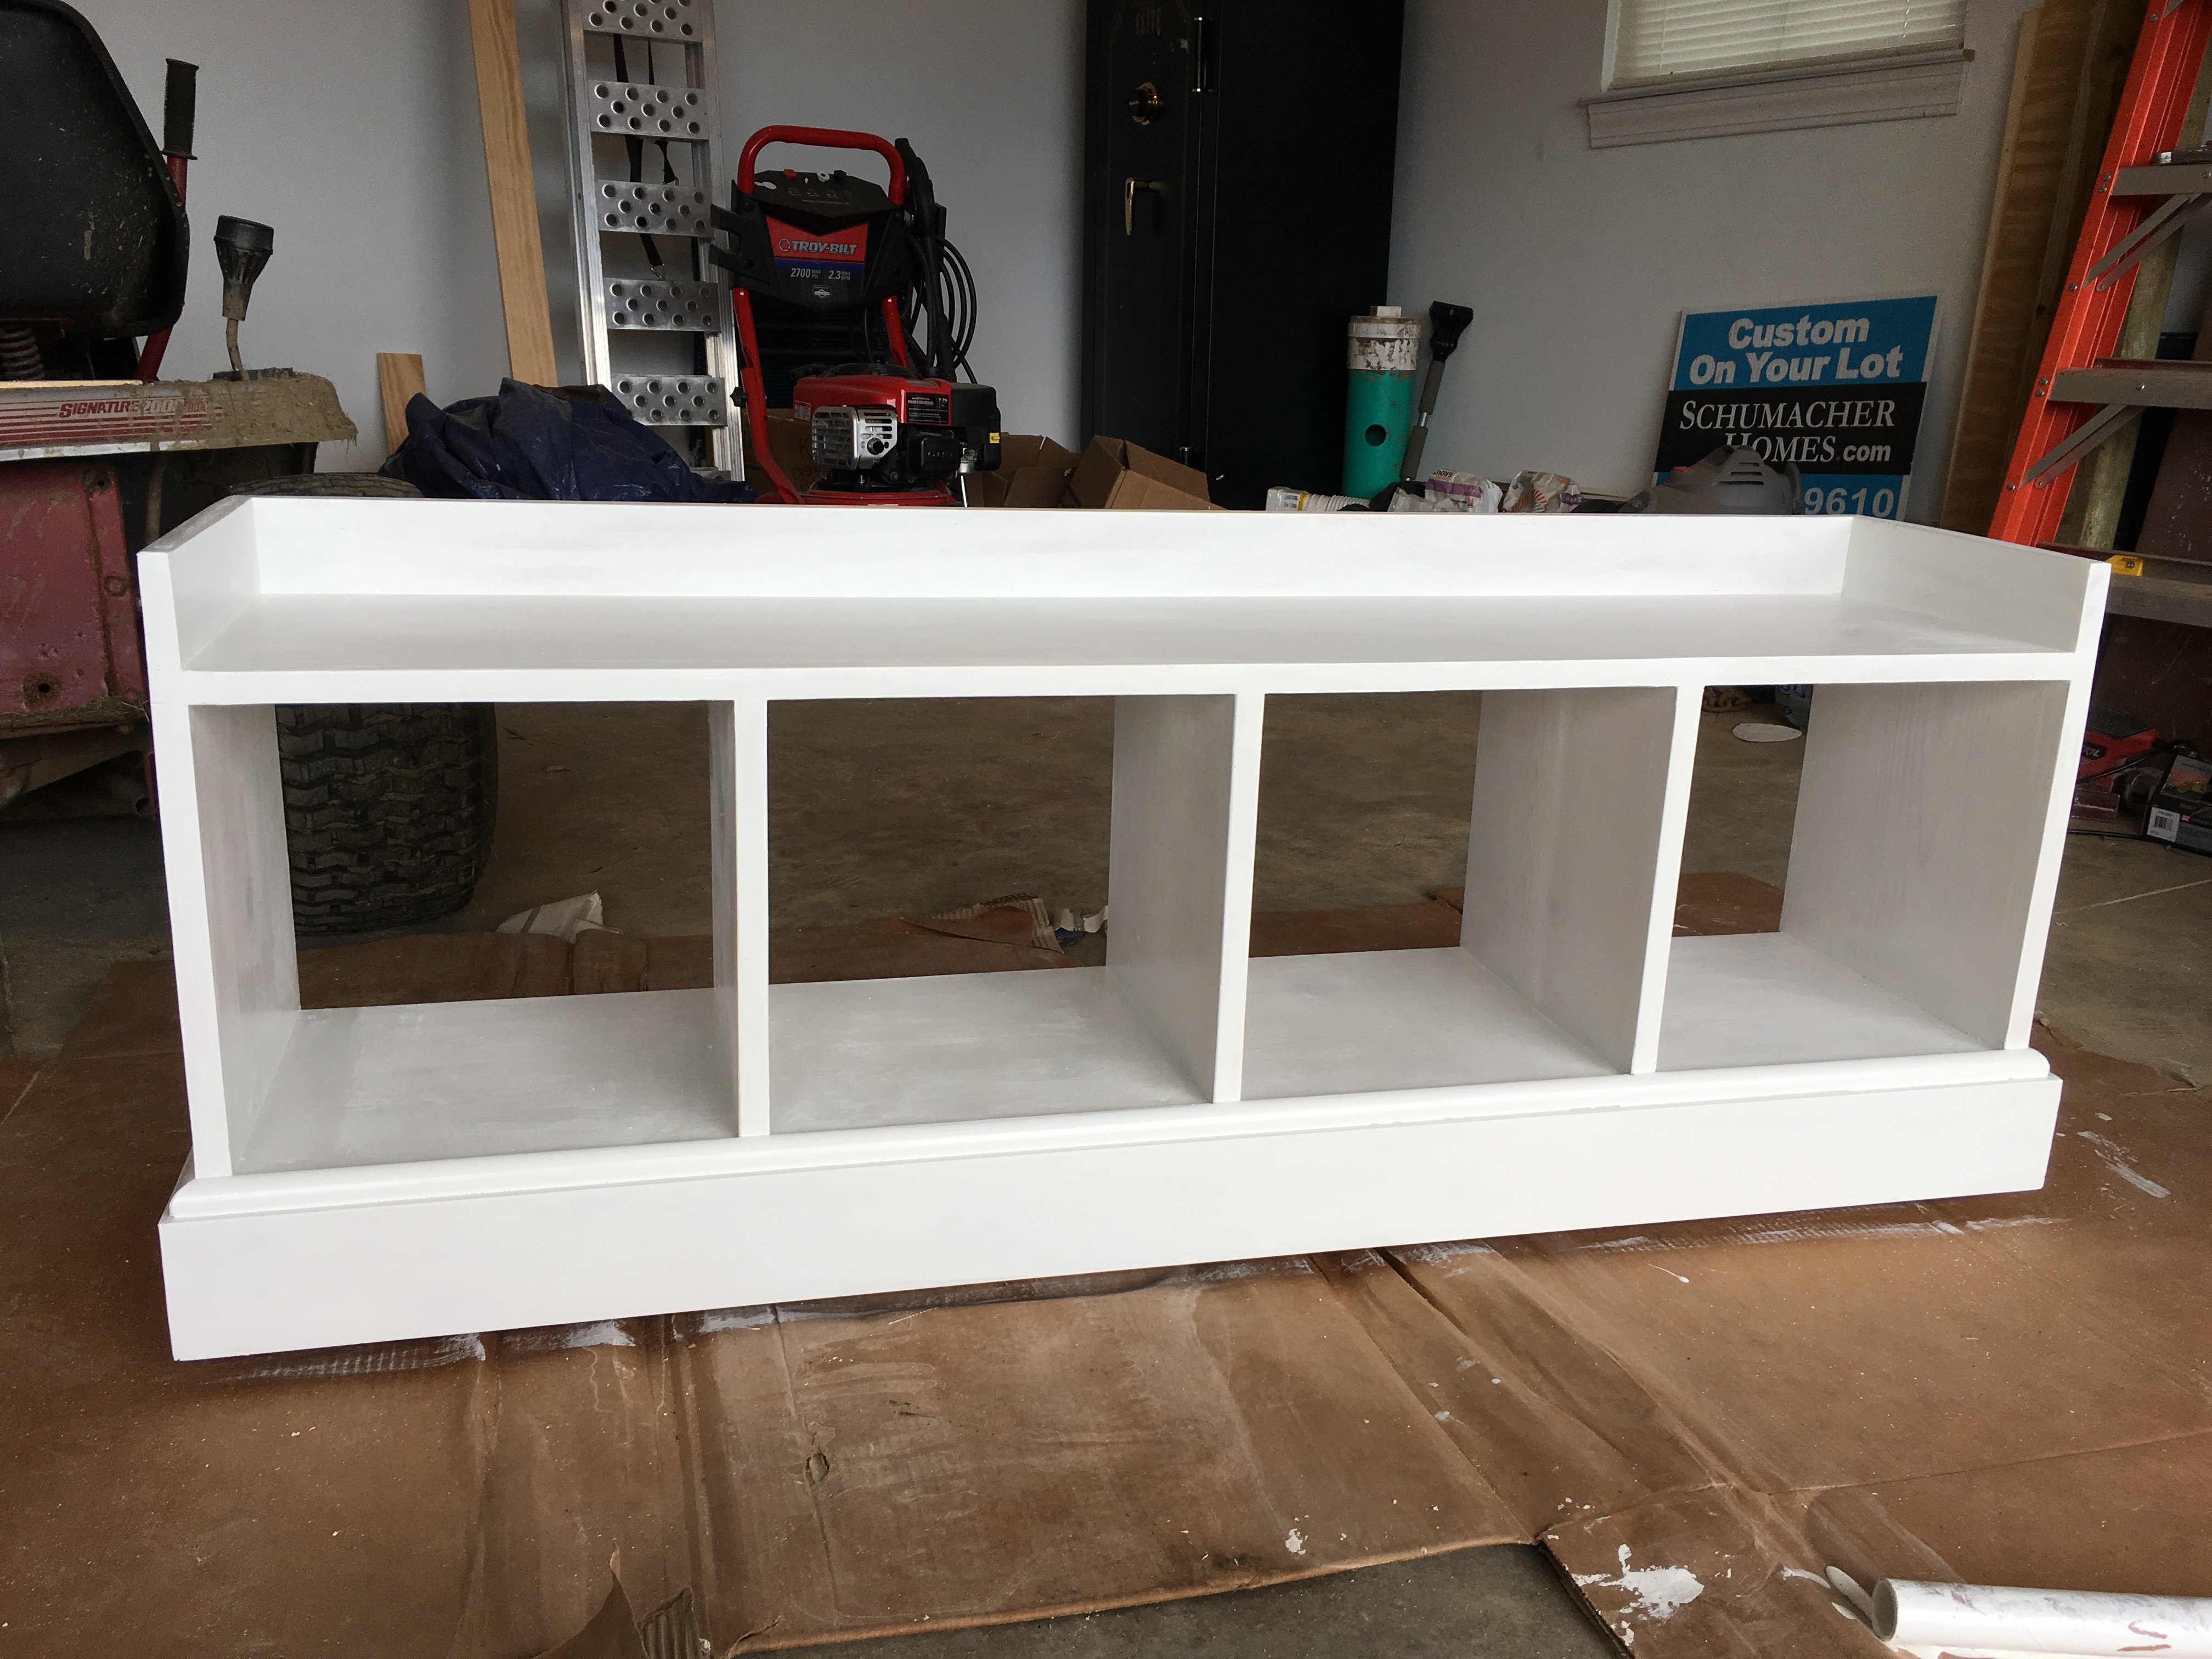
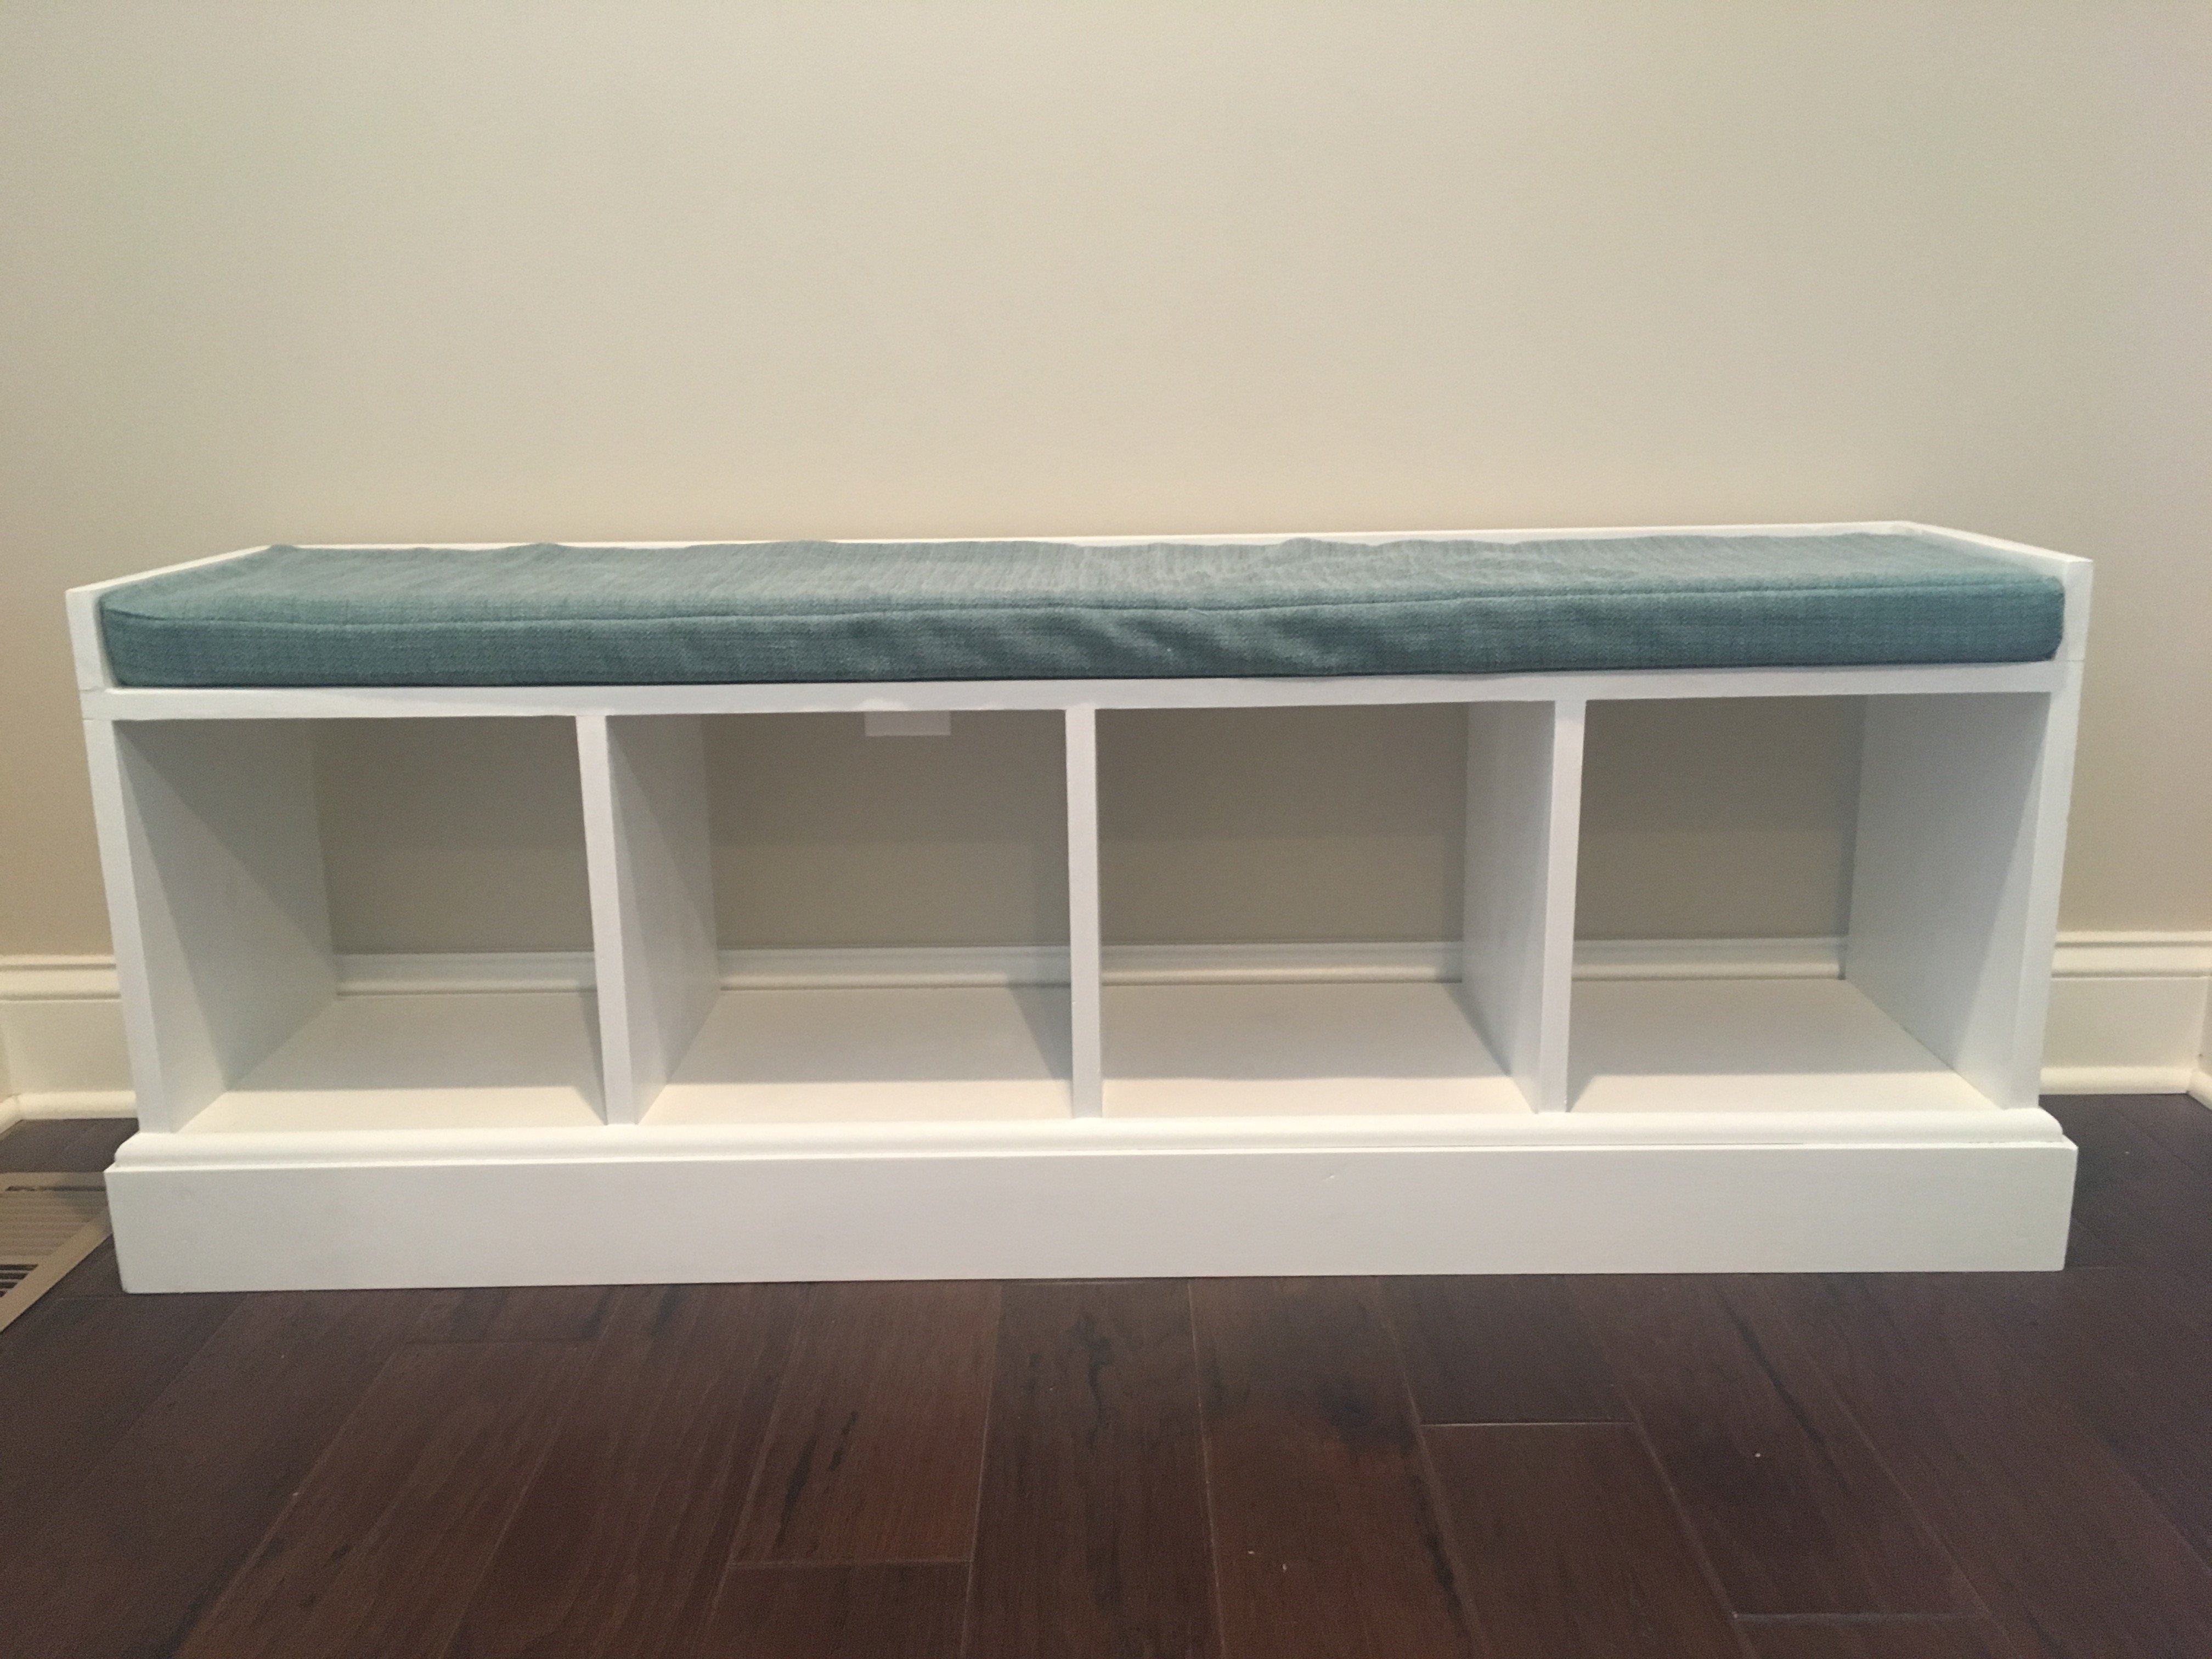
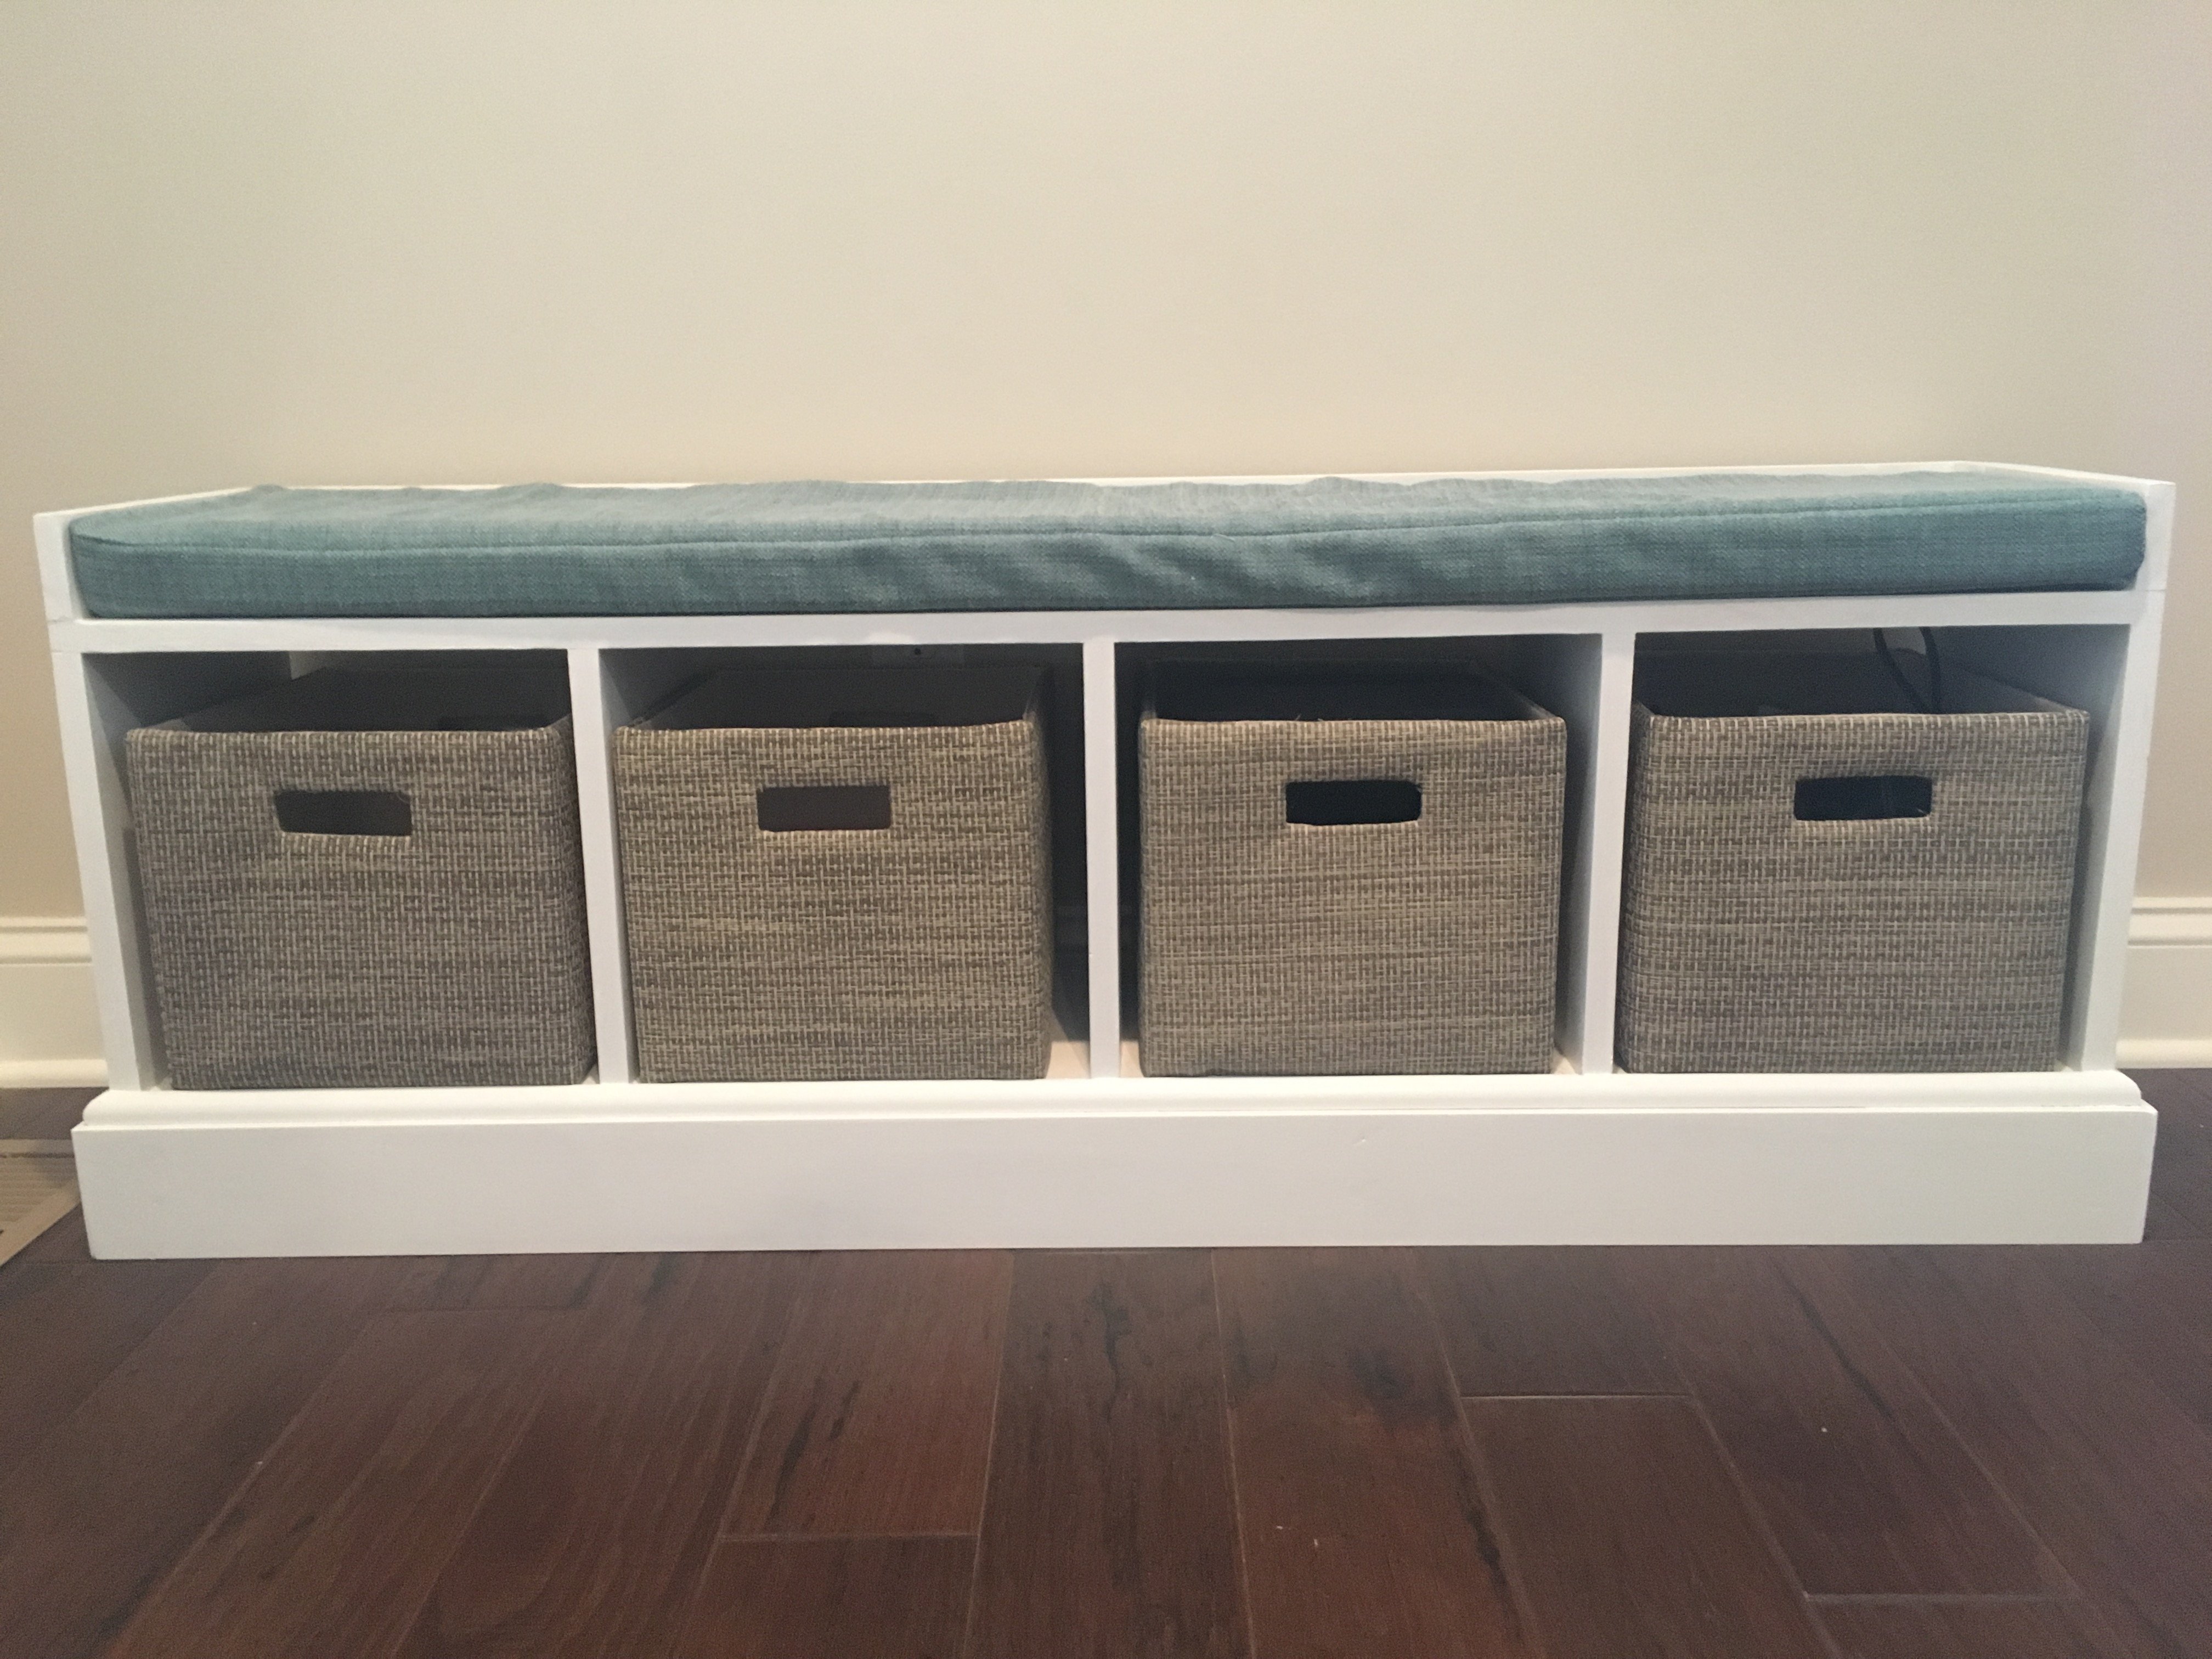
Smurf Blue Farmhouse Bed with Guardrails
![](/sites/default/files/30193_10150194938050607_698935606_12499793_8359835_n.jpg)
Just finished the Twin-sized Farmhouse bed, I love the easy to do plans. The only power tools I used were a jigsay & drill.
I've been meaning to build my own desk for my office and I wanted to stay true to the Eco Modular design. But, then I was offered a huge promotion with a larger office in a city 3 hours away. The space already had the "executive style" desk made by prison industries, so I thought I would replace it with with the "executive style" based off the Eco Modular design. I used Purebond plywood, cut all of the pieces at my house, put them in my car, drove them 3 hours to the new office, and crossed my fingers that it would all fit...and it did! The drawer faces were a bit more of a challenge, getting everything sized properly, but it's all come together. I like having the shelf on the one side to get my printer off the desktop. More room to spread out.
We were using a 1970's dresser set which was constructed of mdf wood with a laminate teak exterior . I decided to do a makeover that would match our bed. Instead of simply painting, I decided to use solid wood (pine) and get rid of the poor laminate drawer fronts.
More photos and tips on my blog about this project:
http://www.woodworkingfourdummies.com/blog/dresser-set-makeover
Cheers,
Ian
Great Plans! Thank you so much. My first go at a piece of "fine" furniture and I couldn't be happier with how it turned out.
Used single V-Groove on the head and footboard.
Modified the bed slats to be easily removed
Modified the sideboards for easy removal.
We modified the plans from the outdoor sectional to fit a single 22x24 pillow. We also made it a little longer and added back slats to provide some additional support. I guess it looks a bit like a hybrid between the outdoor sectional and an adirondack chair. Really easy build. I think it took about 3 hours to cut, sand, and build, and then a few coats of stain and spar urathane and we were ready to go!
We built 2 of these tables for the McDonald’s in our area for the front of their building. With a few modifications to fit the space. We made the top of the table a foot smaller so it’s 3 x 4 feet. We also put extra bracing on the legs so the table would not tip over if one person was to sit on it. I love this table and will be making one for myself
I added the bottom shelf by using (4) 1x3's. I also swapped out the 1x4 back for a 1x6 to give the top shelf more height. Lots more details on my blog.
This one took a while in between taken care of the baby and working full time this one took me prolly 2 weekends or longer to do if I didn't have to do all that stuff lol. I had this horrible wiring rack if you can see that went top to bottom and these stupid sliding doors that I really hate bc with the dresser there it's like I can't get in so I just took them off I really want to put in a bifold dorr there but can't so I prolly will hang bead's instead. Kadence really enjoyed picking out the colors and helping me paint. I started off on debating for awhile what I was going to paint what color. I was gonna paint it all pink and do a design of something in green but I think this turned out pretty nicley and really compliment's there purple room. Yay I saved my office from going to the basement!!! Kadence is really happy to get to share her bedroom and I am really happy to be able to get into the closet and actually want to use it so hopefully the room will stay clean and I can get ride of some furniture and get rid of the piles of clothes in my living room lol. I also am glad she can put her own clothes away bc it's just her size. I don't think I am done yet with it tho. I want to put some things on to hang her day hat's on and some ledges towards the out side I think to hold her books. This one cost a little bit more for everything almost about 200 prolly with all the extra's we got for it and the expensive pine. It also took longer bc I had to tear out the old rack and mudd the hole's and tear out the carpet in the closet so I could see the old wood floor and place this in correctly needed to get rid of the carpet eventually any ways. The painting took awhile also of course because I had to prime then paint if I would have used one color it prolly wouldn't have taken that long.
Mon, 05/13/2013 - 13:03
I finally figured out how to do the blog!! So this is my very first blog!!!! I was so excited to be able to publish my great work!
Top is using old scrap 4 x 10 sanded down to 220 grit and the 2 x 6 is cut at 10 degree so it support the top using pocket hole jig, I used 4 3.5 inch deck screw
We decided to finally update our 35 year old kitchen. We rent so our landlord agreed to foot the bill for all the material. Ended up costing $6500 including Soapstone counters ($40 per slab remnant on OfferUp) hardwood floor ($60 leftover materials on Craigslist) and new Convection/air fryer range. Not too bad and I owe you a huge debt of gratitude for help making it all possible with your plans.
Tue, 11/07/2023 - 07:05
It looks great, it's exactly what you need for your kitchen.
So, here is my unexciting step stool. It became a hodge podge of material because I didn’t have practically ANYTHING on the cut list in my shop! So the sides are made of 2 1×4′s a 1×3 and a 1×2 pocket holed together! The bottom kick is two 1×3′s and the top is a piece of 5/8″ plywood. The back is plywood too, and the treads are two pieces (each) of 1×4! Talk about a weird way to build Ana’s simple plan!
I decided not to do the storage step since I really didn’t need it, and I was tired of scrounging for wood too! It still needs a touch-up of putty (especially the opposite side because I forgot to mirror the pieces and all the pocket holes are on the outside! whoops!) and then some sort of easy to clean paint.
Took me a couple hours to put together on a cold Christmas afternoon while my son was sleeping and my mother-in-law and guy were watching Shrek on tv.
Very unexciting. Not nearly as exciting as the lockers I’ve been coveting…
Except…. when you see just how happy my lil guy was when he got up from his nap….
… and then it becomes a WHOLE LOT more exciting!
Merry Christmas everyone!
This was my husband's first project, to build our son a new big boy bed. For being his first project, it went pretty smoothly. He worked on it off and on for about a week, but didn't take longer than 12-14 hours or so. We painted it with a semi-gloss white paint, and I'm currently working on curtains (made to look like a barn) to hang on the bed. Noah loves his new bed!
I found the plans for this table after googling "rustic coffee table". I had planned on purchasing a table until I saw this photo and LOVED it. It took a little time to convince my husband to take this on with me since neither one of us has experience building furniture. We decided to purchase the wood from a higher end lumber yard since the big box stores didn't carry much kiln dried lumber. We wanted to start on our project without having to wait for the lumber to dry out in the sun first.
This is definitely a two "man" job. The only issue we had was figuring out the "x's" since our saw didn't go past 45 degrees. We decided to just eye ball it and made the cuts. The cuts came out perfect. We also had some issue trying to figure out how to secure the "x's". After a few strategically placed screws and some wood glue, they stayed put and look great! We also took a lot of time sanding and picking out the perfect stain. We decided not to do the oxodizing treatment (husband vetoed that) and instead mixed two shades of minwax satin stain. I am so happy with the end result!
Most of my builds come from Ana White inspiration . Jobs simplified and cost effective. She is the absolute best . !
Mon, 10/04/2021 - 16:57
WOW! These are all great projects, thank you so much for taking the time to share!
The only thing I did different to the plan was add 4.5 inches to the back slats so I could round the edges and 3 inches to the right arm rest so I could cut out a track to rest a wine glass. One thing I highly recommend is to create a stencil of the stringer. I did and now I have it for the next one so the next chair will be consistent. Thanks Ana white, this site is very therapeutic for me. Already built 3 projects in the last month.
Thu, 06/06/2013 - 06:38
The mods on this make me now want to build a set of these, the wine glass holder is genius! love the rounded front and back, so much better than original plans, thanks for inspiration!
Coffee Table
I chose to make the chair which came out great although the plans were only for one chair I thought it waa easy to do.
This was supposed to be a table top, however I screwed up a corner so we stained it and turned it into a headboard. We decided to add eye bolts and make it look like it was suspended from the ceiling with rope.
I made the shim bed a long time ago and really liked the look and height of the apothecary side table. I can put all my books and stationary and the stuff I want stashed next to my bed. I modifyied the plan slightly to have shims make up the front panels so it has a slight rustic feel to it and matches my bed. Thanks to Ana's plans I am starting to make my own bedroom set for under $300 bucks and completely to my taste.
I told our daughter I would build her this bed for her birthday. She is still choosing what colors to paint it. Overall cost was $217 using white pine. She is's in love with this bed. started it Saturday morning and had it all put together by Sunday afternoon. I changed up the guard rail. Instead of screwing it in, I added a second set of 1×3s on the back side, so it is easy to slide on and off to make the bed.