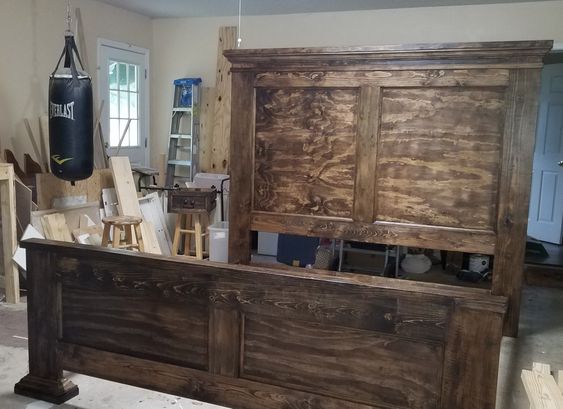
Beach House Headboard
![](/sites/default/files/IMG_0240.jpg)
My wife wanted an antiqued turquiose headboard for our beach house. Your plans and dimensions worked perfectly. I added the center support to bring the warped boards into compliance. Thank you Ana ...
This my first woodworking project. It is far from perfect but turned out okay!
Sat, 05/04/2019 - 13:43
Love it! This is gorgeous, what a great first project.
Thank you for sharing a brag post, we appreciate it!
Used this app to build a custom nook for shoes and coats. Its been fantastic and super easy to put together!
Sun, 02/26/2023 - 16:29
Great custom solution! Thank you so much for sharing your awesome project.
Used the plans here, but adjusted to fit my own hampers and to use all scraps on hand, including leftover primer and paint. Completly FREE build!
Sun, 12/04/2011 - 08:22
This looks awesome!! Very curious to know how you like it and do you have any problems keeping the washer on the pedestal. Are the washer and dryer mounted to the pedestal, if so how? Have been looking at lots of these plans but none of the comments talk about using it.
Wed, 02/01/2012 - 11:37
As long as the washer has been well levelled with the bottom levellers attached and your floor and pedestal are level, there really shouldn't be a problem. I did make the pedestal larger because I was a little nervous also. So far no problems whatsoever.
A lap desk for each Grandkid. They love using them for watching TV, reading, and a flat surface for building Lego castles...
Just a couple of suggestions. First the holes must be drilled exactly in the middle of the leg and the frame or the leg will not fold properly. I suggest placing the hole about 1/16" off center and then sanding the leg to make it flush when folded. Second the bolt only needs to be 2". I also used my $30 trim router from Harbor Freight to round-over all of the exposed edges.
Sat, 11/30/2013 - 06:55
Did you have any issues with the cap nuts loosening when you raise and lower the legs? I bought 2" bolts (1/4" bolts and drilled 1/4" holes. Now the bolts turn when I raise and lower the legs and the cap nuts loosen. I'd appreciate any suggestions you might have. Thanks!
I made a simple rolling crate, and put it on its sides. Attached casters on the bottom. I used my scrap 2x4's for the top. Boom! A beautiful rolling side table with storage.
I had a client send me a pic of the bed she wanted. It was very similar to Ana's tall panel bed. She was upsizing from a queen to a king and wanted it to match her previous set.
"It’s screaming creative clutter 🤣😅 but at least I got it built! Thank you so much @anawhitediy for the desk plans 🖤"
Andrea Howell
Farmhouse doll bed modified one slat narrower.
Thu, 11/17/2011 - 10:07
Jaime this bed and bedding is adorable!!! I love the colors! Thanks for sharing with us!
In reply to Jaime this bed and bedding is by Ana White
Thu, 11/17/2011 - 12:17
Hope you don't mind the modification to make it narrower. Thinking about you getting that roof on asap! Happy Thanksgiving.
This Pergola cost around 200 to build for lumber, concrete (poured around posts) and an additional 50-60 for fabric used to create shade.
It went up in about 8 hours from start to finish with the help of a novice friend.
I omitted some of the column details to save time and money.
This was a lot of fun. Altered it to make it 44" x 44". 4 seater
I came across some 18'x12"x1" (actual size) boards that were milled around 1870. These planks came out of the roof for the building. Rather than cut them down I just built a "double frame"
I used 2x redwood for the frame.
Here is my version of the shiplap fireplace wall finished up!
Shared by Cass Griffin
After seeing the many posts on here about the great laundry basket dresser, my husband and I embarked on our first project. I knew I wanted the double dresser with the counter for folding on top. We love how it turned out! Since this picture, I have added shelves on the far left section. I also chose to use 1x2 for the slats instead of the "L" shaped pieces of steel.
Wed, 11/30/2011 - 05:42
Very nice blog!! I learned how to decorate site amazingly by visiting here. Informative, instructive and as a reader I enjoyed this post. See you on your next updates. :)
We wanted a table but didn't want to pay the ridiculous price of 600-800$ for table then 250$ for one bench.So we made our own table. 6ft long. Along with two matching benches. Think the total project cost us around 200$ for wood.
I fell in love with the truss beam table, but realized that it would be too small for our family of 7. With a little altering and using ideas from the pub/counter table, my husband and I were able to complete this lovely square table!! It stands about 36 inches high and is about 60 inches across. I am in love!
We used Ana White's plans beginner farm table plans to build this table and can't recommend these plans more! Thank you Ana! The build took my husband and I two hours to build. The sanding, sealing, painting, stenciling, and finishing took several days, but the actually build was VERY easy and straightforward. We're total beginners, so we were very happy. The stencils are from Cutting Edge Stencils and are called "Indian Inlay Furniture Stencil Kit by Kim Myles."
Wife wanted a cabinet in our front room and she loved this design . She even helped with the finish the top is made from the same birch plywood
Tue, 03/21/2023 - 11:18
Love the finish and great build, thanks for sharing!
Fun Build and got me interested in learning more.
Tue, 03/10/2015 - 13:00
I really like this plan and put it together in about an hour yesterday. Only one problem...the measurements consider the width of the 1x12 as being 3/4 by 11 1/2. The 1 x 12 I purchased in Home Depot are 11 1/4 inches wide. I'll have to Kreg jig some 1x4's together to make the top, but it should work out fine. I am a beginner at wood working, so I've learned to pay more close attention to the actual width's of boards.
I thought this bed was also available on Ana's site, but it was a previous brag post submitted by the builder (I think her name is Brook?) and referred back to her blog. Here's her brag post:
http://ana-white.com/2011/04/lydia-baby-bed?destination=node%2F1911
and here's her blog:
http://killerbdesign.wordpress.com/2011/04/22/knocked-off-lydia-baby-be…
The larger sized plans are available on Ana's site. It's really not that much different from the farmhouse doll bed and it's called the Lydia Doll Bed. I didn't add the side molding and built the box where the mattress sits following Ana's farmhouse doll plans. I also simplified the design on the decorative curved pieces because I didn't want to bother with sanding a more intricate design. I had elves in the workshop this year. My sisters came to visit with brother's-in-law and one brother-in-law routed the top head and footboard piece to give it more pizzaz. We built several for my annual church craft show.
Thank you thank Ana for this awesome plan. It took me a week to transform the ruff cedar into beautiful 2x4. We use the kreg jig everywhere we could so the holes would be hidden, and black deck screws, and I couldn't wait for the cushions to share :) we added the extra pieces at the back and armrests. We used 12 boards 2x4x8 and no waste as we changed the measurements of 24" instead of 25.5 and height at 11" for the seat. One regret I used Thompson water sealer... we live in Florida and I am planning on leaving it outdoor.
Thu, 06/09/2016 - 18:32
I made them ;) bought the foam on Amazon 72x24x6 (I wished I bought 5 inches high instead) and the fabric I found in a discount fabric store , sumbrella fabric for $12.00 a yard!!! And cut all the cushion seats 24x24 and the back pillows I copied the pottery barn lumbar pillow size, I believe it was 26x18 razor age .
Thu, 06/09/2016 - 18:34
I made them ;) bought the foam on Amazon 72x24x6 (I wished I bought 5 inches high instead) and the fabric I found in a discount fabric store , sumbrella fabric for $12.00 a yard!!! And cut all the cushion seats 24x24 and the back pillows I copied the pottery barn lumbar pillow size, I believe it was 26x18 razor age .
Thu, 06/09/2016 - 18:41
I made them ;) bought the foam on Amazon 72x24x6 (I wished I bought 5 inches high instead) and the fabric I found in a discount fabric store , sumbrella fabric for $12.00 a yard!!! And cut all the cushion seats 24x24 and the back pillows I copied the pottery barn lumbar pillow size, I believe it was 26x18 razor age .
Thu, 06/09/2016 - 18:37
I made them ;) bought the foam on Amazon 72x24x6 (I wished I bought 5 inches high instead) and the fabric I found in a discount fabric store , sumbrella fabric for $12.00 a yard!!! And cut all the cushion seats 24x24 and the back pillows I copied the pottery barn lumbar pillow size, I believe it was 26x18 razor age .