Community Brag Posts

Simple Bed - Twin used as a daybed

Submitted by lrollins05 on Fri, 05/04/2012 - 07:54

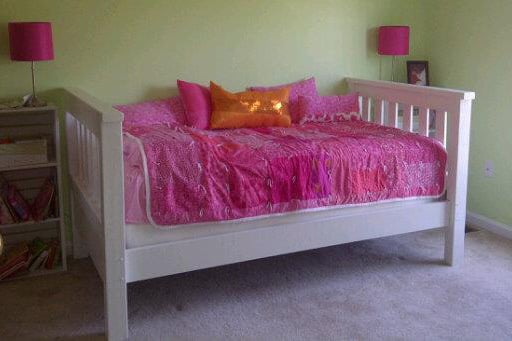
My dad used the plans for the Simple Bed - twin size and built two. Then he took the headboards from both to build the bed for our daughter's room. It sets against a wall, so it looks like a daybed since both ends are the same height. She loves it! The other bed will have both foot boards and will be used in our son's room when he is old enough for a twin bed. Our daughter loves the bed and our son can't wait to get his....and we all love that Pap made it just for them! :)

Built from Plan(s)
Finish Used
Painted with interior white latex
Recommended Skill Level
Intermediate

Fancy X Desk

Submitted by strouse6 on Mon, 02/17/2014 - 19:02

Great first project I used to justify the purchase of a miter saw to the wife. She promptly provided a list of additional items to build for her. This was a great beginner's project and confidence builder for follow on builds. Thanks Ana, Home Depot and Lowe's should be thankful for your site also.

Built from Plan(s)
Estimated Cost
$100 (initial purchase of some tools)
Estimated Time Investment
Weekend Project (10-20 Hours)
Finish Used
Rustoleum Ebony
Rustoleum water based semi gloss polyeurathane
Recommended Skill Level
Beginner

Comments

carcreek

Tue, 02/18/2014 - 07:12

The dark staining in the pine you purchased is most likely the result of the pine beetle. This is the appearance of the wood infected with the beetle. It does not affect the quality of the wood but adds some beautiful colors and patterns!!
Very nice desk!

strouse6

Wed, 02/19/2014 - 20:36

I managed to snag another pine board with similar coloring for the top of a bookshelf I'm building. Thanks for the info - can't imagine why these haven't all been snatched up - are they less desirable? The wife insisted on the dark stain but in the future these will get poly or a light stain to show it off.

carcreek

Thu, 02/20/2014 - 10:06

I personally love the beetle stain. Apparently you either love it or hate it. For interest sake google a company called Azure wood. They are a company that harvests pine beetle infected wood and they make amazing and beautiful one of a kind furniture.

Providence table made smaller

Submitted by Anonymous (not verified) on Tue, 05/17/2016 - 10:12

We altered Ana's plans and made a little bit smaller version of it. :)


Built from Plan(s)
Estimated Time Investment
Week Long Project (20 Hours or More)
Finish Used
Tikkurila Valtti Puuöljy Akva
Recommended Skill Level
Intermediate

Laundry Basket Dresser

Submitted by KaraBoo on Mon, 05/07/2012 - 10:18

I modified the tall and lengthwise laundry basket dresser a bit to make this shorter version. I also combined it into a single dresser instead of it being two separate dressers side by side. I put the dresser on casters so that I can roll it around my laundry room. I can tuck it away in the closet area or roll it out and use it as a folding counter.

Estimated Cost
$100
Estimated Time Investment
Afternoon Project (3-6 Hours)
Finish Used
Behr Ultra, Enchanted Evening
Recommended Skill Level
Beginner

Comments

spiceylg

Mon, 05/07/2012 - 12:41

Love that it was combined into one and on casters. Very smart. Cool color, too!

Jenna Meagher (not verified)

Sun, 05/13/2012 - 09:02

I would love to do this modified version! Can you share your dimensions?

KaraBoo

Sun, 05/13/2012 - 19:35

Jenna, I used 3/4" MDF and these are the dimensions:

1 Back piece - 37 1/4" x 37 1/4"
2 pieces for top & bottom - 37 1/4" x 25"
3 pieces for sides and middle - 35 3/4" x 25"

I used the same dimensions for the 1x2's as are in the original project and pretty much assembled it following the steps as she has written. Just remember to add 1x2's on both sides of the center divider and you're good to go! Hope that helps and if you have any questions, I'll be happy to try to help. :)

Aimee Comte (not verified)

Tue, 08/07/2012 - 09:41

Do you know what kind of laundry basket you used & where you got them? Based on the pictures they look like the sterilite 2 bushel ultra however the dimensions look too big. Did you have to modify the plans to make them wider?

Thanks!

Rolling Storage Crate

I am re-doing my walk in pantry, and this was the first step. I desperately needed a place for the hundreds of water bottles we keep. I put all those water bottles that were previously rolling all over the place and put them in this beautiful Industrial-style crate. I will admit before doing that my kids enjoyed going on a few laps around the house in it first!! Very pretty, very versatile.

Estimated Time Investment
Afternoon Project (3-6 Hours)
Finish Used
Minwax Special Walnut stain
Recommended Skill Level
Starter Project

Comments

Val Manchuk

Tue, 02/25/2014 - 22:27

I built this crate too! I love how roomy it is, and what a good way to store water bottles. You did a great job!

Val @ artsybuildinglady.blogspot.ca

Murphy bed with shelf

Submitted by Anonymous (not verified) on Fri, 05/20/2016 - 21:14

This is the murphy bed I made using ana's plans and making the bed legs when it's down and a shelf when it's up!  This was to keep the bed off the floor.  Thanks again Ana

Estimated Cost
100
Estimated Time Investment
Day Project (6-9 Hours)
Finish Used
Paint
Recommended Skill Level
Beginner

Comments

ypowell

Wed, 11/30/2016 - 19:04

Hi, I am hanging my bed off the floor too. Can you tell me what kind of hinge you used and a photo of how you attached them? Mine is not turning out right. Thank you

cayoder

Sun, 02/12/2017 - 06:05

Hi Ana!  I love the Murphy bed and feel like it is just what I need for my new home.  I have sold my family home of 30 years and am moving closer to the grandchildren.  Looking at buying a 1905 home that is less than 1/2 the size of my old home.  I am 63 and most of my friends are in the same age range.  If they come to visit, I need a bed that's a little higher off the floor.  I don't really want to hang the bed off the floor as shown in some of these, but instead like the look of a cabinet.  However, I was thinking of putting doors on it so we could pull the bed down with fold out legs of some sort.  Any suggestions?

DIY Hand Pump Fountain

Submitted by Anonymous (not verified) on Tue, 10/17/2023 - 07:41

I had an old hand pump that I turned into a fountain.

Lynda Westbrook

Great Simple Bench

Submitted by chadw on Mon, 02/24/2014 - 13:20

I loved the look of this bench. I made this for some of our friends that have a large family staying with them. I think one is in the future for us as well! I followed the plan as a guide, but made a couple modifications to meet the needs. It turned out great and the plans were easy to follow. 1) I used 3 - 2x6 boards for the top instead of 4 - 2x4's 2) the bench length was increased to 72" long 3) I reversed the angled cross braces to give support in the middle of the bench due to its increased length. 4) the angle on the cross braces was change to allow the braces to intersect with the top closer to the middle of the bench.

Built from Plan(s)
Estimated Cost
$60 with finishing materials
Estimated Time Investment
Afternoon Project (3-6 Hours)
Finish Used
General Finishes "Lamp Black" Milk Paint was brushed on and General Finishes "Flat" High Performance Top Coat. Both paint and top coat are water based. The paint was brushed on and the top coat was sprayed on in layers using a spray gun.
Recommended Skill Level
Beginner

Wood Planter

I created this wood planter using Ana's "Cedar Planter for under $20!" plans.  They were so easy to follow, this project took me about 2 hours (having no clue what I was doing) and it turned out beautifully!!! I will be making more after discovering how easy it was and inexpensive.  Thanks Ana for letting us in on your secrets!

Built from Plan(s)
Estimated Cost
$20
Estimated Time Investment
An Hour or Two (0-2 Hours)
Finish Used
Finished using a blend of Minwax Classic Grey and Jacobean
Recommended Skill Level
Starter Project

Kendal Extra Wide Dresser with Dovetails

Submitted by Anonymous (not verified) on Sat, 02/29/2020 - 12:47

My daughter recently threw out a lot of her things because she wanted to have a grown up room and not a kids room. So she asked if I could make her furniture and wanted a dresser as her first piece. So I couldn't say no!

This was my second project from this web site and my first dresser. Boy was it tough, but I loved every minute of it! Even though the plans were marked Advanced, I made it even more so by trying out dovetailing for all the drawers. By hand. With just a Japanese pull saw and chisels. That added about 10 hours onto the total build, but it was for my daughter, so it was worth it!

This is how it turned out.

Built from Plan(s)
Estimated Cost
Roughly $200
Estimated Time Investment
Week Long Project (20 Hours or More)
Finish Used
White Paint (3 coats) and Classic Black PolyShades wood stain and polyurethane by Minwax. Because the wood stain has polyurethane in it, it can get really messy really fast! If you get it on you, soap won't help for clean up. Try olive oil.
Recommended Skill Level
Advanced

COVERED SANDBOX WITH BUILT IN SEATS

Once we hade the frame of it built, we stapled landscaping fabric and chicken wire to the bottom to keep weeds and moles/gophers from coming up through the bottom.

Other than that... We followed the plans as given.

The kids LOVE it!

Built from Plan(s)
Estimated Cost
$80.00
Estimated Time Investment
Afternoon Project (3-6 Hours)
Recommended Skill Level
Starter Project

Rolling Rustic Wood Dresser

Submitted by AmJoy37 on Tue, 02/25/2014 - 20:50

We need bedroom furniture desperately! So, I decided, for my second build I would start in our bedroom! The dresser first, because I was going crazy without a place to put my clothes!

Built from Plan(s)
Estimated Cost
$220
Estimated Time Investment
Weekend Project (10-20 Hours)
Finish Used
Homemade chalk paint
Recommended Skill Level
Beginner

Custom desk

Submitted by Aggiegirl on Thu, 03/12/2020 - 04:35

I started with the Cindy Wood Console Table and made some modifications. A friend wanted a desk that had colors added to the top. 

Estimated Cost
$150
Estimated Time Investment
Weekend Project (10-20 Hours)
Finish Used
Mixwax Early American stain
Recommended Skill Level
Intermediate

Dress Up Storage

Submitted by AandTsMom on Wed, 05/16/2012 - 10:31

Built this for my daughter's 2nd birthday. Now her dresses, shoes, jewelry, etc. are organized and easily accessible! Of course she immediately threw out the clothes, called it a boat, and climbed inside. At least its being put to use!

Estimated Cost
$20 - had some materials on hand
Estimated Time Investment
Afternoon Project (3-6 Hours)
Finish Used
Flat pink paint and Polycrylic finish
Recommended Skill Level
Starter Project

Cyndi Console Table - Modified

Submitted by DIYER_MD on Sun, 03/02/2014 - 18:04

This was built using the Cyndi Console Table plan as the basis. I modified it slightly by adding inset doors and trim between the drawers and doors. I thought that his gives it a more balanced look and feel.

I finished it by painting it two toned using Olympic One Burning Bush (red) and Arabian Sands (beige top).

I love how this turned out.

Estimated Cost
$150.00
Estimated Time Investment
Weekend Project (10-20 Hours)
Finish Used
Olympic One Paint: Burning Bush (red) and Arabian Sands (beige)
Recommended Skill Level
Intermediate

Not a great plan but I managed.

Submitted by Camaro05 on Tue, 05/31/2016 - 12:06

So not all of the measurements in this plan are correct, and it doesn't include any top for the table nor does it box in the back side of the tilt out. The instructions are also very scant. The table comes out very heavy and this design probably could have been done without the heavy 2x4's. I'm used to Ana's designs and this "lady goat" is not close to Ana's work. Definitely glad I have some experience otherwise this would have been a bust. Also with a little Googling, I found that 1/2" metal conduit clamps turned upside down work great for holding the kettle and keeping the heat off of the wood.

Estimated Cost
Without Grill $150-$200
Estimated Time Investment
Day Project (6-9 Hours)
Finish Used
Exterior Paint
Recommended Skill Level
Intermediate

Ladder shelf wall unit with desk and file drawer

Submitted by hummbaby on Sun, 03/22/2020 - 20:38

Been in need of shelving and new desk space for the family for a while. Used this post (https://www.ana-white.com/community-projects/ladder-filing-cabinet) as inspiration and then used Autocad to lay it out to fit its space. Took way longer than planned after hurting my back shortly after starting(unrelated) and then just having a busy life with work, family, church, etc. Very proud of the outcome.

I wanted to do the under drawer cabinet slides, but the width and weight of the drawer put too much stress on the slides, so I created pieces to hold the hardware on the sides.

It is just under 12' wide from end to end and 7' tall.

Built from Plan(s)
Estimated Cost
$300
Estimated Time Investment
Week Long Project (20 Hours or More)
Finish Used
Minwax Ebony stain and Varathane polyurethane
Recommended Skill Level
Intermediate
Back