Community Brag Posts

Loft Over Single Bed

Submitted by Anonymous (not verified) on Mon, 01/15/2024 - 18:24

I decided to build a bunk bed for my grandson and his half sister when she came to visit. I enlisted the help of my 7 year old grandson to help with sanding and he was so excited! I was very pleased how it turned out and watching my grandson's excitement was an absolute joy! I can't wait to build more things together!

Norma Jasman

Hailey Platform Bed

Since we moved 2 months ago, our bed has been a mattress on the floor. Being busy with other projects needed to make the house more liveable, I kept putting off this one until I just couldn't stand it any more.
So I spent the weekend getting over the fear of the people at my local lumbar supply store (the guys aren't always very nice, but I lucked out and got one of the ladies to help), buying the materials and building the bed. It took a good solid weekend. But by Sunday night, no more sleeping on the floor.
Finished with minwax ebony stain and lemon oil (my cats hate it, keeps them from clawing the pine to shreds)
Now hopefully I can get to the headboard...at least once all my kitchen cupboards have doors, haha.

Built from Plan(s)
Estimated Cost
$90
Estimated Time Investment
Weekend Project (10-20 Hours)
Finish Used
minwax ebony stain, lemon oil
Recommended Skill Level
Beginner

Comments

Kevin Cooke (not verified)

Tue, 10/23/2012 - 06:52

Hey! Looks great, did you end up putting in the slats or does the mattress/boxspring not need the extra support? I am going to try and tackle this project sometime this week.

Thanks!

Breakfast Nook Table

Submitted by vlilly on Sun, 04/27/2014 - 13:37

This table was my very first project and I am proud of myself! After getting married in January and closing on our house in February, I was overwhelmed with all the empty space! (Being 19 and buying a brand new house.. everything was foreign to me! We had NO furniture!) We needed a decent place to eat instead of using the borrowed barstools and my dad has all the tools I could ever need, so I figured I could try out building our own kitchen table! I think it went well! Since then I have made a media cabinet, a dining table and bench, storage cubbys for above the fridge, a mail holder, a towel holder and a wooden tray for our ottoman ALL from Anas plans! I'm just now getting around to posting my brags :)

Estimated Time Investment
Weekend Project (10-20 Hours)
Finish Used
Stained with Rustoleum Dark Walnut and given a couple coats of Rustoleum poly in Matte!
Recommended Skill Level
Intermediate

Rustic X Coffee Table

Submitted by Anonymous (not verified) on Wed, 07/27/2016 - 18:46

This was my first attempt to build furniture. Me and my daughter built this for her first house. This was very easy if you follow the plan instructions. I had an extra 2x2 to play with the angles till I got them right for the x. We didn't want the grey finish so we used one coat of Miniwax Early American with 2 coats of polyurethane satin finish. We used star nails instead of the bolts and used the angle brackets that we spray painted both black. It took a weekend but I plan on building the end tables next and it should go quickly since I have the hang of the plans now.

Built from Plan(s)
Estimated Cost
$70
Estimated Time Investment
Weekend Project (10-20 Hours)
Finish Used
Minimax Early American and Polyurethane Satin finish. The hardest part by far was figuring out the x angles. I had an extra 2x2 so I was able to play around with the cuts till I got it right then just duplicated in for the other end.
Recommended Skill Level
Beginner

Camp Loft Bed w/ Modification

Submitted by zpbrown84 on Tue, 05/19/2020 - 07:27

This was my first project to tackle from this website and I had some help from my Father in Law who is pretty good at carpentry. I have picked up a lot from this site as far as tips and such and this was the first of many projects for me.

Estimated Cost
$200
Estimated Time Investment
Day Project (6-9 Hours)
Finish Used
We have not finished it yet but the plan is the kids pick the color and help paint it
Recommended Skill Level
Intermediate

Dress-up Box

Submitted by Anonymous (not verified) on Tue, 01/23/2024 - 09:35

I made this "dress up box" for my granddaughter. She loves dress up and also likes to sit in boxes - lol... I lined it with cedar planks and added a cushion on top. I put a few coats of polyurethane over the glitter paint to reduce the chance of getting glitter everywhere. I made it a little smaller (24 inches wide instead of 37 because of space concerns). She loves sitting in it and looking at herself. (the mirror is unbreakable plastic of some sort). There is also a faux fur blanket (removable) in the bottom of it so she's comfortable sitting in there. Thank you so much Ana for all of your plans! It's so very kind of you to share them.

Kathy Taylor

Built from Plan(s)

Modified Wide Cabin Dresser

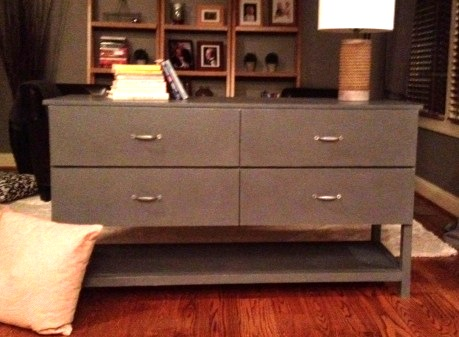
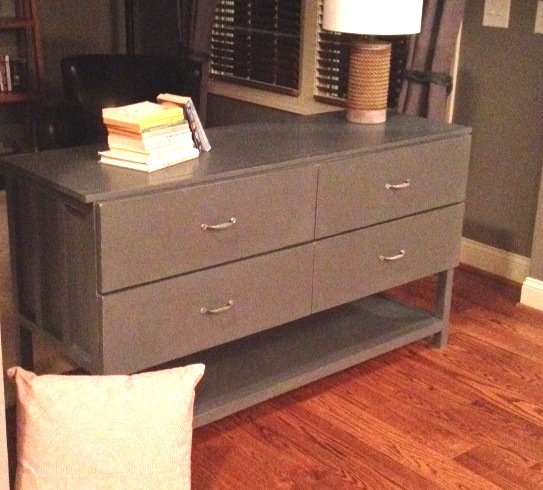
This dresser is for our 2-year-old, as part of his big-boy room. We'll also be making him a full-sized version of the twin cabin loft bed (just the bed on the floor with headboard/footboard - no loft).

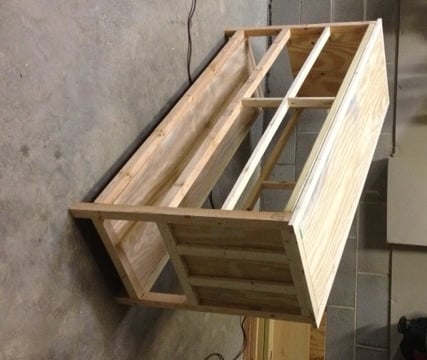
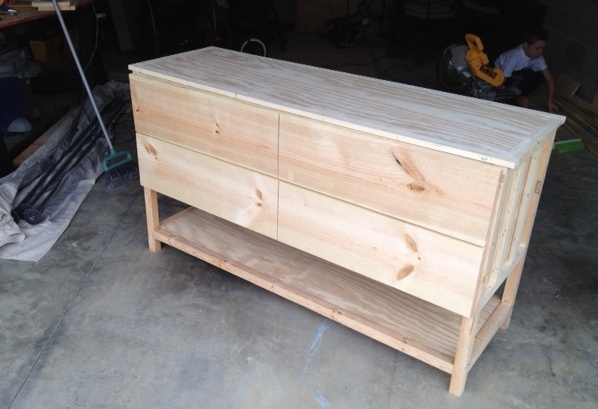
This was our first non-beginner project, as well as our first time making drawers.....and we definitely underestimated how difficult drawers can be, even when you're constantly making sure everything is square!

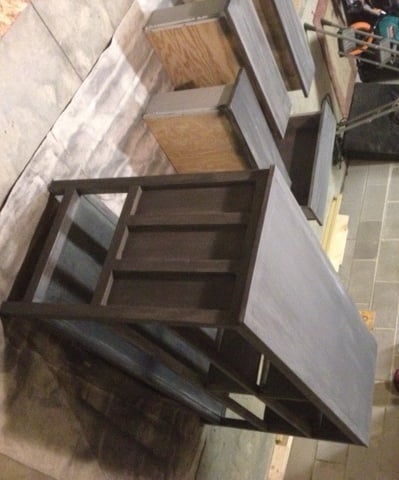
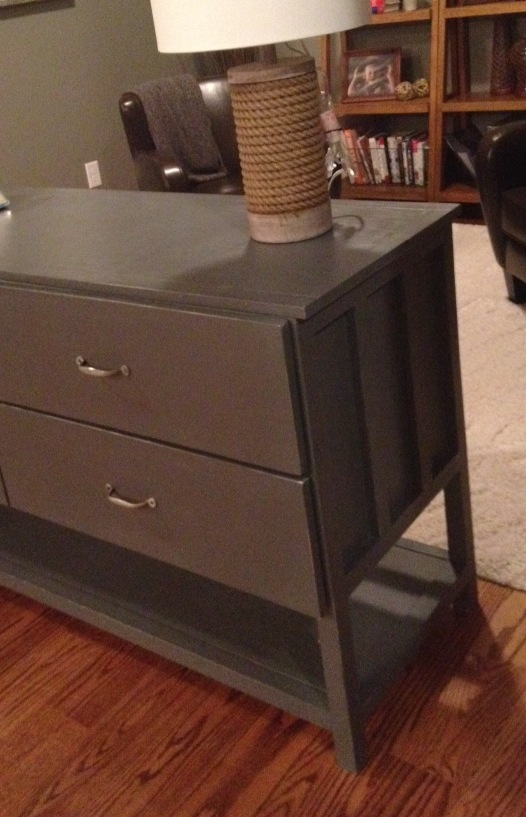
I loved the original plan, but my husband thought it might be a bit easier on us beginners to do 4 equal-sized drawers, instead of 5 drawers in 2 different sizes. However, due to a mistake we made in the frame (that we chose not to correct), we didn't have 4 equal holes for the drawers to slide into :-( ..... and therefore needed to put the drawer fronts on the outside of the dresser. I wasn't happy about that at first, but felt like we made it work in the end.

We knew we were going to paint instead of stain, so we used various types of wood. We initially had 2x2s of a different wood type for the legs, but ended up removing them, and replacing with ripped down 2x4s, which seemed to make it sturdier, and were less bowed.

Estimated Cost
$200-$250
Estimated Time Investment
Week Long Project (20 Hours or More)
Finish Used
Annie Sloan Chalk Paint (mix of Paris Gray, Graphite, and Black) and AS Clear Wax
Recommended Skill Level
Intermediate

Comments

Wagon for riding mower

Submitted by lookitsash on Sun, 07/31/2016 - 17:39

Ever since I got a riding mower, I’ve been waiting for the chance to do something really cool with it (other than cut the lawn, of course).  So what started off as a joke to bring a hayride farm experience to the backyard for my son became a real project to build a wagon for my riding mower.  Not only do I use it to pull my son and his friends around the yard, but its such a timesaver for hauling things back and forth (like 10+ bags of grass clippings to the curb).  Check out my blog post at JustMeasuringUp.com for all the details.  I documented the project from beginning to end with lots of pics.

Estimated Cost
Around $120
Estimated Time Investment
Weekend Project (10-20 Hours)
Finish Used
I applied deck stain to the non-PT wood to protect it from rain
Recommended Skill Level
Beginner

Potting Bench!!

Submitted by Anonymous (not verified) on Fri, 05/22/2020 - 15:58

This was my first major wood working project! My fiancé did help (well he started showing me an easier way to cut with a circular saw) and cut the bottom slate. I think it turned out well!! The X feature was tough without a miter saw, but they turned out well!
I LOVE this so much!!!! I want to make another. One thing was I need to learn how to maximize my cuts. I didn’t follow the video, so I had to buy another board. That comes with time and I’m ok with it.

Built from Plan(s)

Barn Greenhouse

Submitted by John Jeter on Sun, 07/15/2012 - 21:31

1000 dollars coat in materials. Payed neighbor 250 dollars to help me do the project. We have been known to have termites in the area so I laid a foundation of cinder block filled with concrete. I could not fin tin to match hers so we had to cut some sorrugated up to complete the project.

Estimated Time Investment
Week Long Project (20 Hours or More)
Finish Used
Greenhouse
Recommended Skill Level
Intermediate

Pottery Barn Knock-Off Zinc Coffee Table

Submitted by efmolly on Sat, 05/03/2014 - 21:19

I love the look of a zinc wrapped table top, so I decided to knock-off the Pottery Barn "Abbott" table. The top was from an old kitchen table that I cut down to size. I had access to a sheet metal break to crease the edges of the zinc. I used counter top adhesive to attach the sheet metal to the wood top, and soldered the corners together for a clean seam. The legs were posts from an old pallet. It took some math to figure what angle I needed to cut the ends at, but it wasn't too bad. To notch the posts together, I first lined up the posts to create the "x" and ascribed where they crossed. Then, I set the blade of my circular saw one-half the thickness of the post. Next, made several passes through the marked area, about 1/8" apart. All I had to do at that point was knock out the thin strips of wood and scrape the space with my chisel. I attach the top to the table base, I simply pre-drilled 4 holes in the top end of each post, then flipped the top upside down. I then just had to line up each corner of the top and base and drive in 2" wood screws.

Estimated Cost
$45
Estimated Time Investment
Day Project (6-9 Hours)
Finish Used
I used a patina to age the zinc, then sealed it with furniture wax. The reclaimed pine I left in it's original weathered finish.
Recommended Skill Level
Intermediate

Comments

First furniture build

Submitted by sweasler on Sun, 05/24/2020 - 13:03

My first real furniture build. I think it came out great. Decided to use 1x5 instead of 1x10 for the seat and back. Really easy build. After I did the first one the second one went together quickly. I did sand and finish before assembly. Next time I’ll probably wait until after to finish it. I had to make several small adjustments durning assembly.

Estimated Cost
$110 for both
Estimated Time Investment
Day Project (6-9 Hours)
Finish Used
Valspar Pre-tinted Canyon Brown Transparent Stain and Sealer
Recommended Skill Level
Intermediate

Dollhouse Bookshelf

Submitted by Anonymous (not verified) on Mon, 02/05/2024 - 09:06

Dollhouse we built for granddaughter using a picture her mom sent us. I do woodworking and my wife paints or stains.

Wendell lindsey

Tommy Bookcase

Submitted by shastacoke on Wed, 07/18/2012 - 09:47

This is my second project I've done with Ana White's plans. I wanted something to fill this space in the town home I live in. It was empty and kind of dull. A lot of crap would collect on the floor and it drove me nuts!! So, I built this bookcase and I absolutely love it!! Thank you so much Ana White for the plan and inspiration.

Estimated Cost
$75
Estimated Time Investment
Afternoon Project (3-6 Hours)
Finish Used
I sanded the wood down and I used 1 coat of polyurethane. I used a semi-goss poly on this. The reddish color is the natural red in cherry wood.
Recommended Skill Level
Intermediate

Windmill

Submitted by Jason48 on Wed, 05/07/2014 - 08:56

Made from a picture on the internet and made a few changes so it would more complete

Estimated Cost
231.00
Estimated Time Investment
Week Long Project (20 Hours or More)
Recommended Skill Level
Intermediate

Comments

Ken C

Mon, 04/26/2021 - 07:34

I really like the way this windmill looks and would love to make one. Are there plans somewhere?

TV console

Submitted by Anonymous (not verified) on Mon, 08/08/2016 - 08:13

It took me two months to build as I only worked few hours over weekends. The most challenging part was the hardware. After a lot of trial and error figured out something that works.

Built from Plan(s)
Estimated Cost
$350
Estimated Time Investment
Week Long Project (20 Hours or More)
Finish Used
Minwax preconditioner, stain and polyurathene (semi gloss finish)
Recommended Skill Level
Intermediate

Whole Wall of Shelves

Submitted by Anonymous (not verified) on Mon, 02/12/2024 - 09:18

My granddaughter showed me a picture and asked if I could build a wall of shelves. This is the result. I used ideas from several places and stretched my skills into new areas. She loves it and filled it with her favorite things!
 

Al Meyer

Little Adirondack Chair

I built this sweet adirondack chair for a friend's 1st birthday. The plans are simple and easy to follow and we already have added at least two more of these to our to-do list! The angled cuts on the stringers were intimidating, but I just took my time with a hand saw and am happy with the results.

The use of furring strips meant tons of sanding and wood filler which added a lot of time to the project. All of the screws were countersunk and filled. I sprayed the sides of the boards before assembly for good coverage, but not the face of the boards because I had planned on using the wood filler. If leaving your screws exposed (or if you aren't as sloppy with filler as I am - seriously I have a love/hate relationship with the stuff!), painting first would make things much simpler.

To paint her name, I printed it out then pressed the paper over the apron of the chair and used a pen to write over the outline of the name. This left an indent which I was able to brush inside of with a white glossy interior/exterior paint we had on hand.

Estimated Time Investment
Afternoon Project (3-6 Hours)
Finish Used
I used Rustoleum sprays paints - Primer, Candy Pink Gloss, and Clear Gloss.
Recommended Skill Level
Beginner

Doll House

Submitted by cvillegurl on Sat, 05/10/2014 - 11:31

My hubby followed the plans. He made the stairs a bit different. The plans were excellent. It is so sturdy. We had these magnetic mirrors designed for a school locker, so we put those on both sides of the house. The monogram, we picked up an oval wooden piece and the letter P for a buck each and painted them. Looks awesome! Giving this to my niece as she turns today! Thank you! Thank you! Thank you!

Estimated Cost
Around 80
Estimated Time Investment
Day Project (6-9 Hours)
Recommended Skill Level
Beginner

Comments

Back