Community Brag Posts

Electric Fireplace Surround

Slowly replacing all of the furniture in my home with things that I build. I used pallets for the structure, maple flooring for the facing, some scrap from shutter doors for the doors, 1×2 for the trim and adhesive tiles from the local ReStore for the top and around the fireplace insert. Perfectly fits a 65" tv. 

Estimated Cost
Less than $25 + the insert that I took from a particle board surround purchased from Menards several years ago.
Estimated Time Investment
Week Long Project (20 Hours or More)
Finish Used
Minwax, variety of stains, Minwax polyurethane.
Recommended Skill Level
Intermediate

Farmhouse Loft Bed for Double Mattress, Not too low, not too tall!

Submitted by DirtSquirt on Wed, 11/30/2011 - 12:31

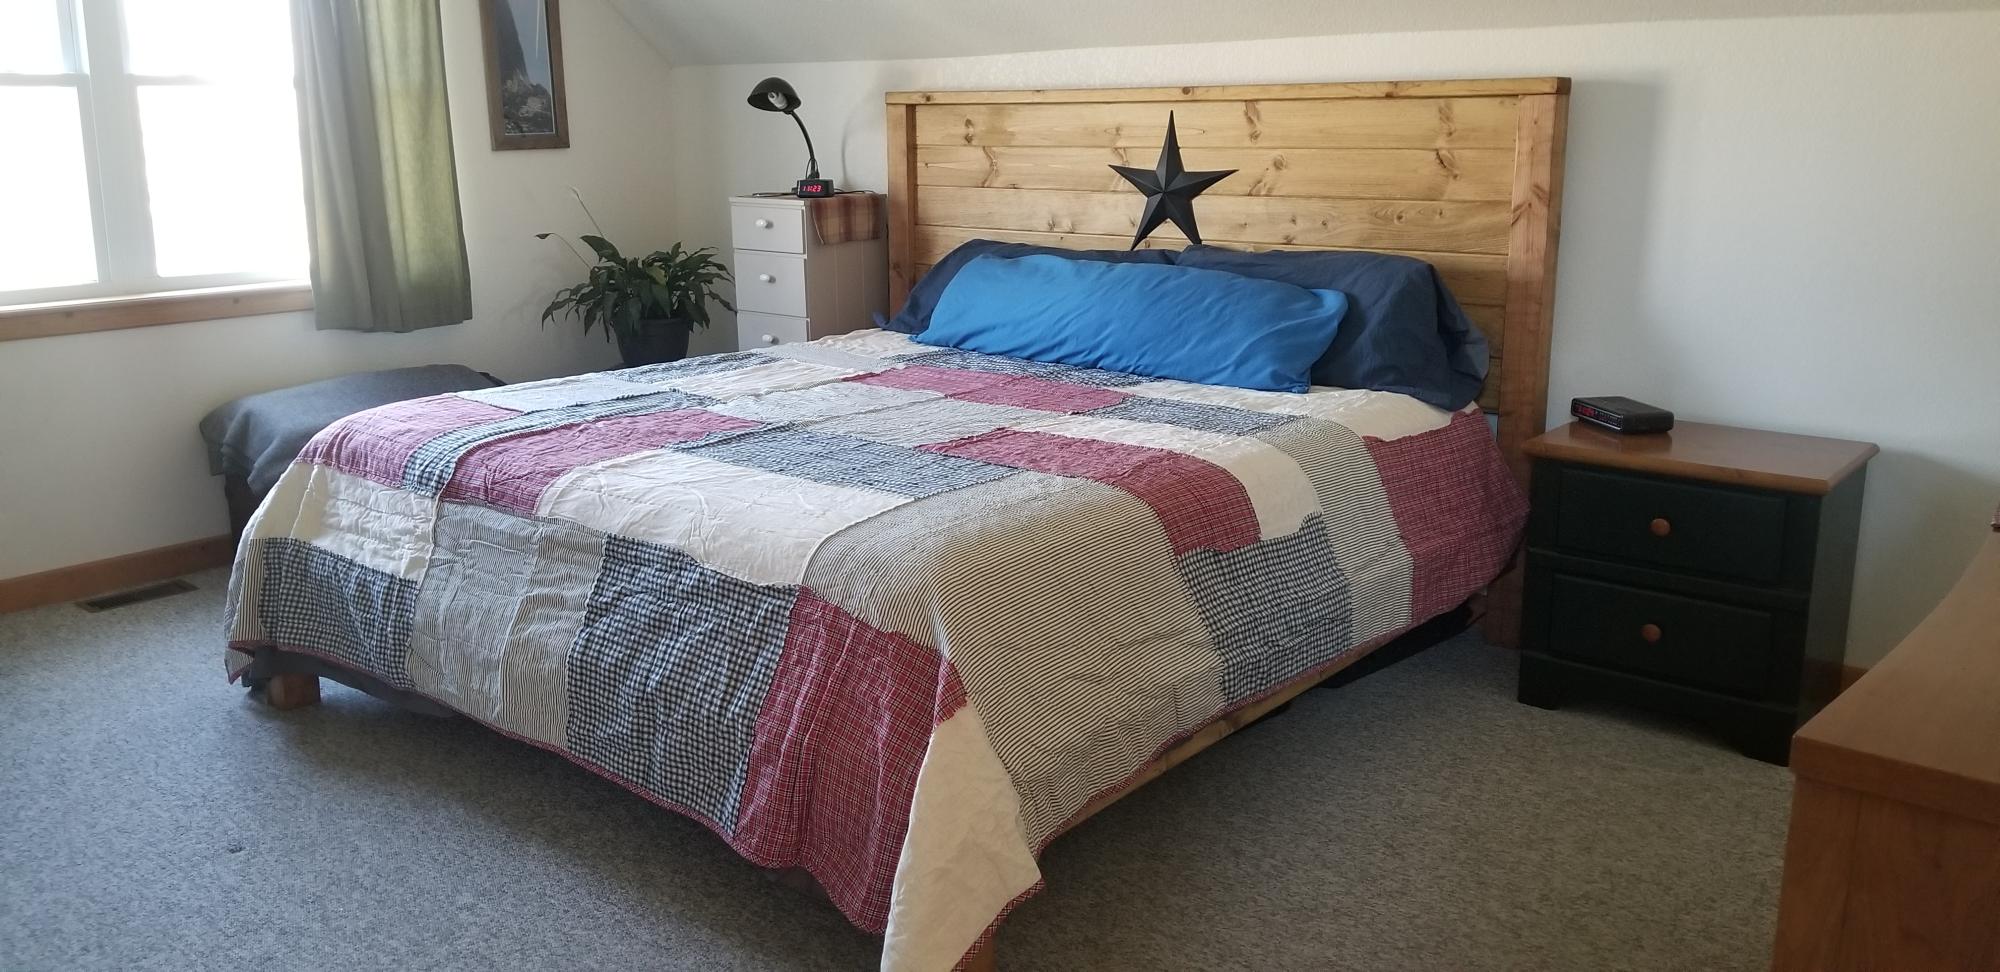
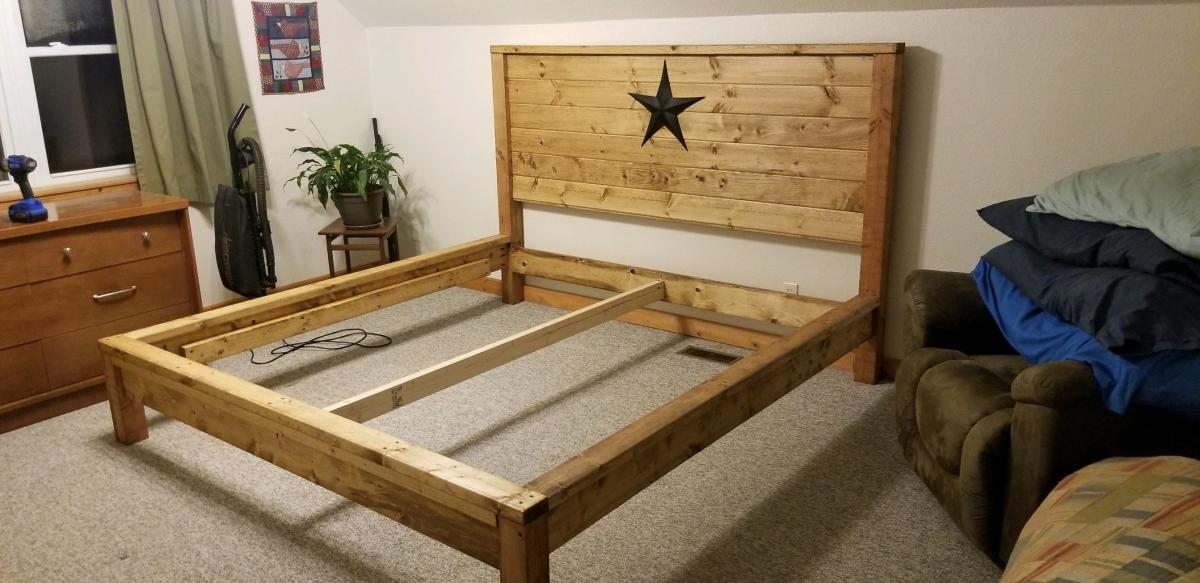
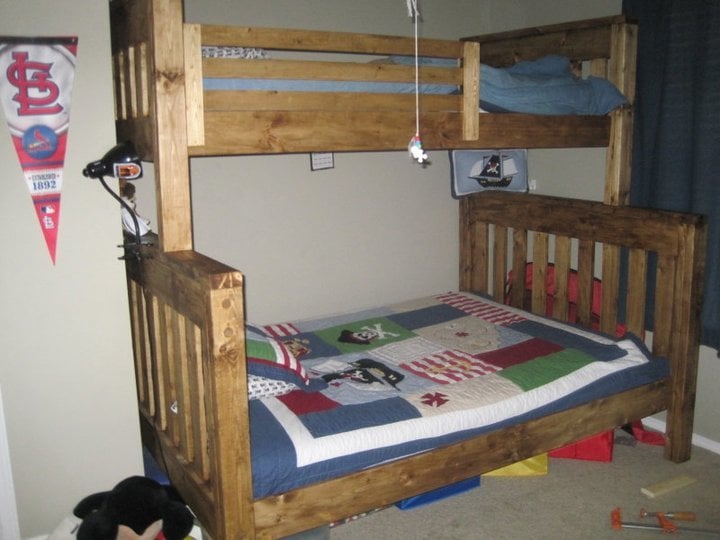
We couldn't find a mid-height, double loft bed for our daughter that we liked that wasn't ridiculously expensive, so we decided to build one ourselves! I found some awesome plans on this website and played around with a few until I created exactly what we wanted. I mostly used the Full Size Farmhouse Bed plan but also used some aspects from the loft bed plan for the guardrails and the bottom rails. Then we went out and bought the wood and started building! This is really the first thing that I have ever built (my husband has never built anything either) and it turned out so well. I think it is gorgeous and I am so proud of it! This is my first brag post so forgive me if I am doing it wrong! Lots of instructions on how I built it below, so scroll down if you just want to see the pictures.

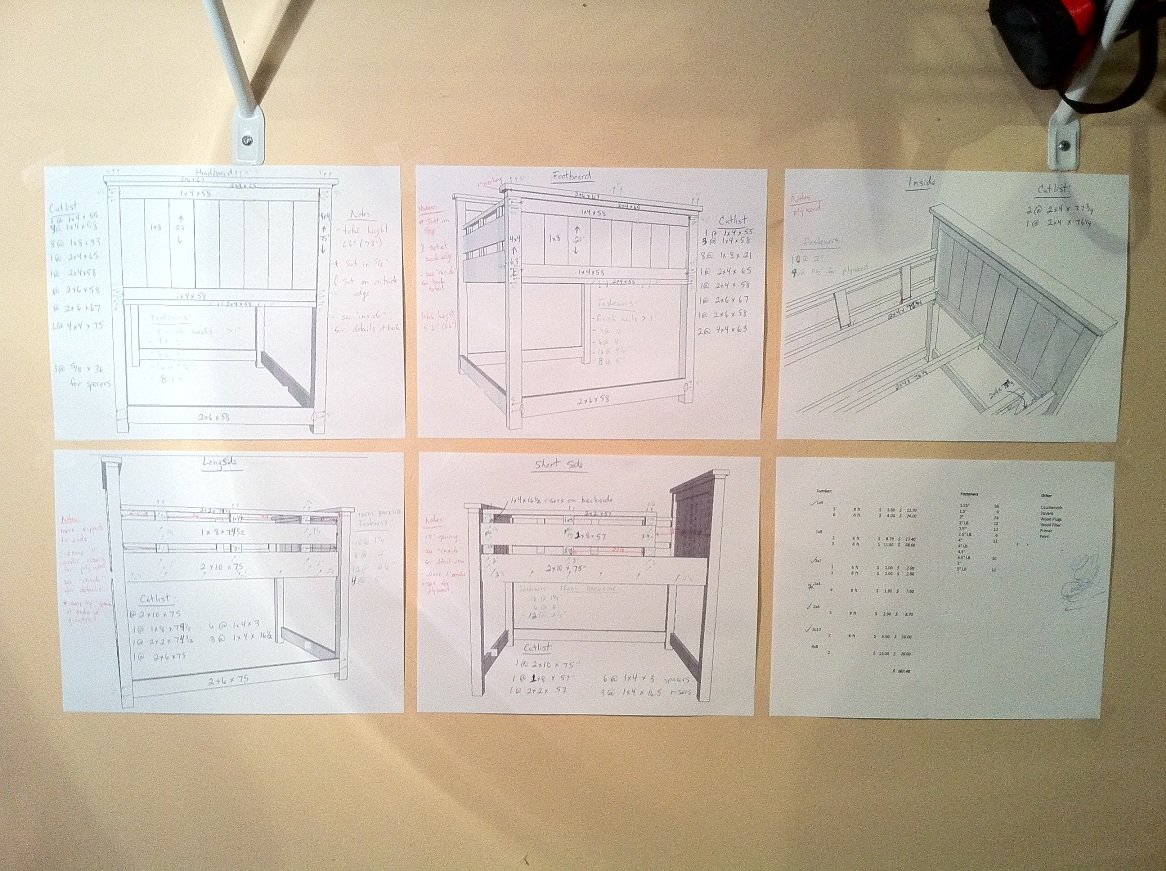
I used Google Sketch-Up to build the bed first and to tweak the plans. Below I will explain some of the changes that I made.

- I actually did not trim anything off of the ends of the head board or foot board as shown in the Full sized bed plans. I just built the bed to be as wide as 8 x 1x8s and adjusted the plan accordingly. I figured that if I had to climb up there to change the sheets, the extra room around the mattress would be appreciated. The 1x8s that I used were 7 1/4" wide.

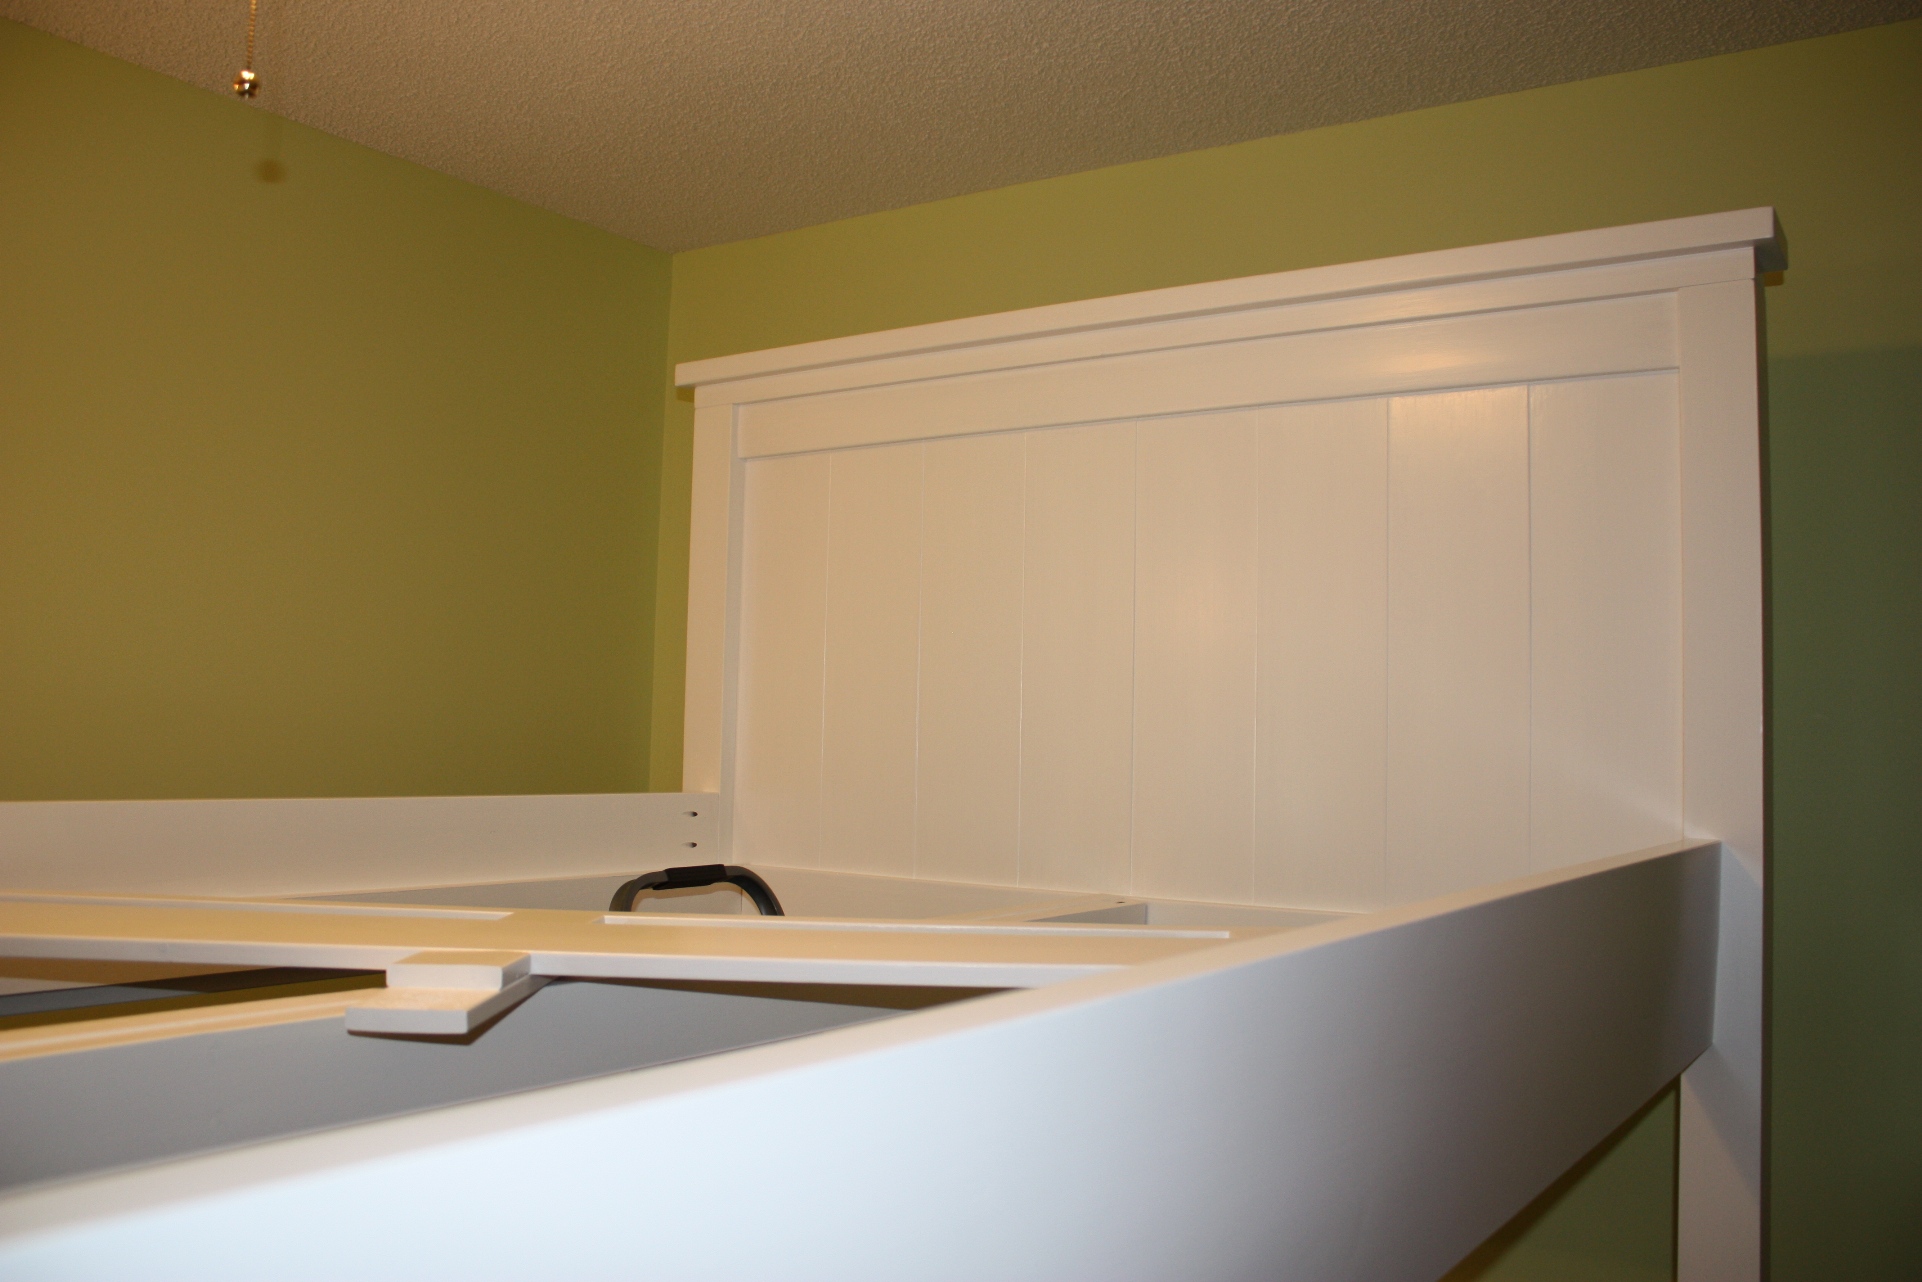
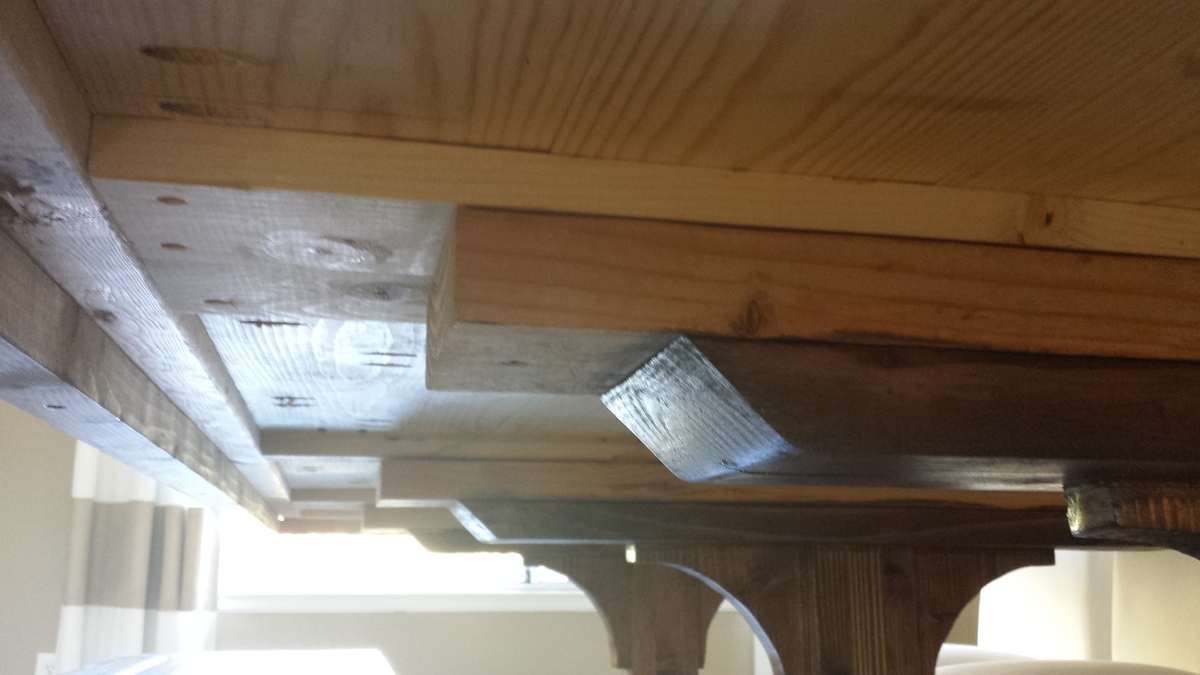
- I bolted a 2x4 to the 4x4 posts right under the foot board and headboard panels for the side rail supports to sit on. I wanted it to be extra strong as the bed was going to be up high and I figured the bed would take a lot of abuse from the kids.

- The siderails were made from a 2x10 glued and screwed to a 2x4. The 2x4 sits on top of the 2x4s at the bottom of the headboard and footboard panels and is screwed into the 4x4 posts. The 2x10s are also screwed into the 4x4 posts.

- Since the mattress would be sitting up higher on the headboard and footboard than in the original plans, I added 3" to the length of the 1x8s used in the panels.

- I had planned to make a slatted base out of 1x4s to support the mattress so I also placed 2 x 2x4s on edge lengthwise down the middle of the bed to support the slats. Those 2x4s are also supported on top of the 2x4s at the bottom of the head and foot boards. The inexpensive 1x4s here are very rough on the one side which I did not want touching the mattress or for the kids to get splinters from while playing under the bed. The nice ones were super expensive at around $18 for a 14' board. It turned out to be less expensive and much less work to buy a queen sized slatted bed base from the big Blue and Yellow inexpensive furniture store here and trim the ends of the boards to length with my mitre saw. n even bigger bonus is that the wood is already finished and didn't require anything further than screwing it down to the supports.

- I made the height of the area under the bed 45" (just tall enough for DD to stand under for now) and adjusted the length of the 4x4 posts accordingly.

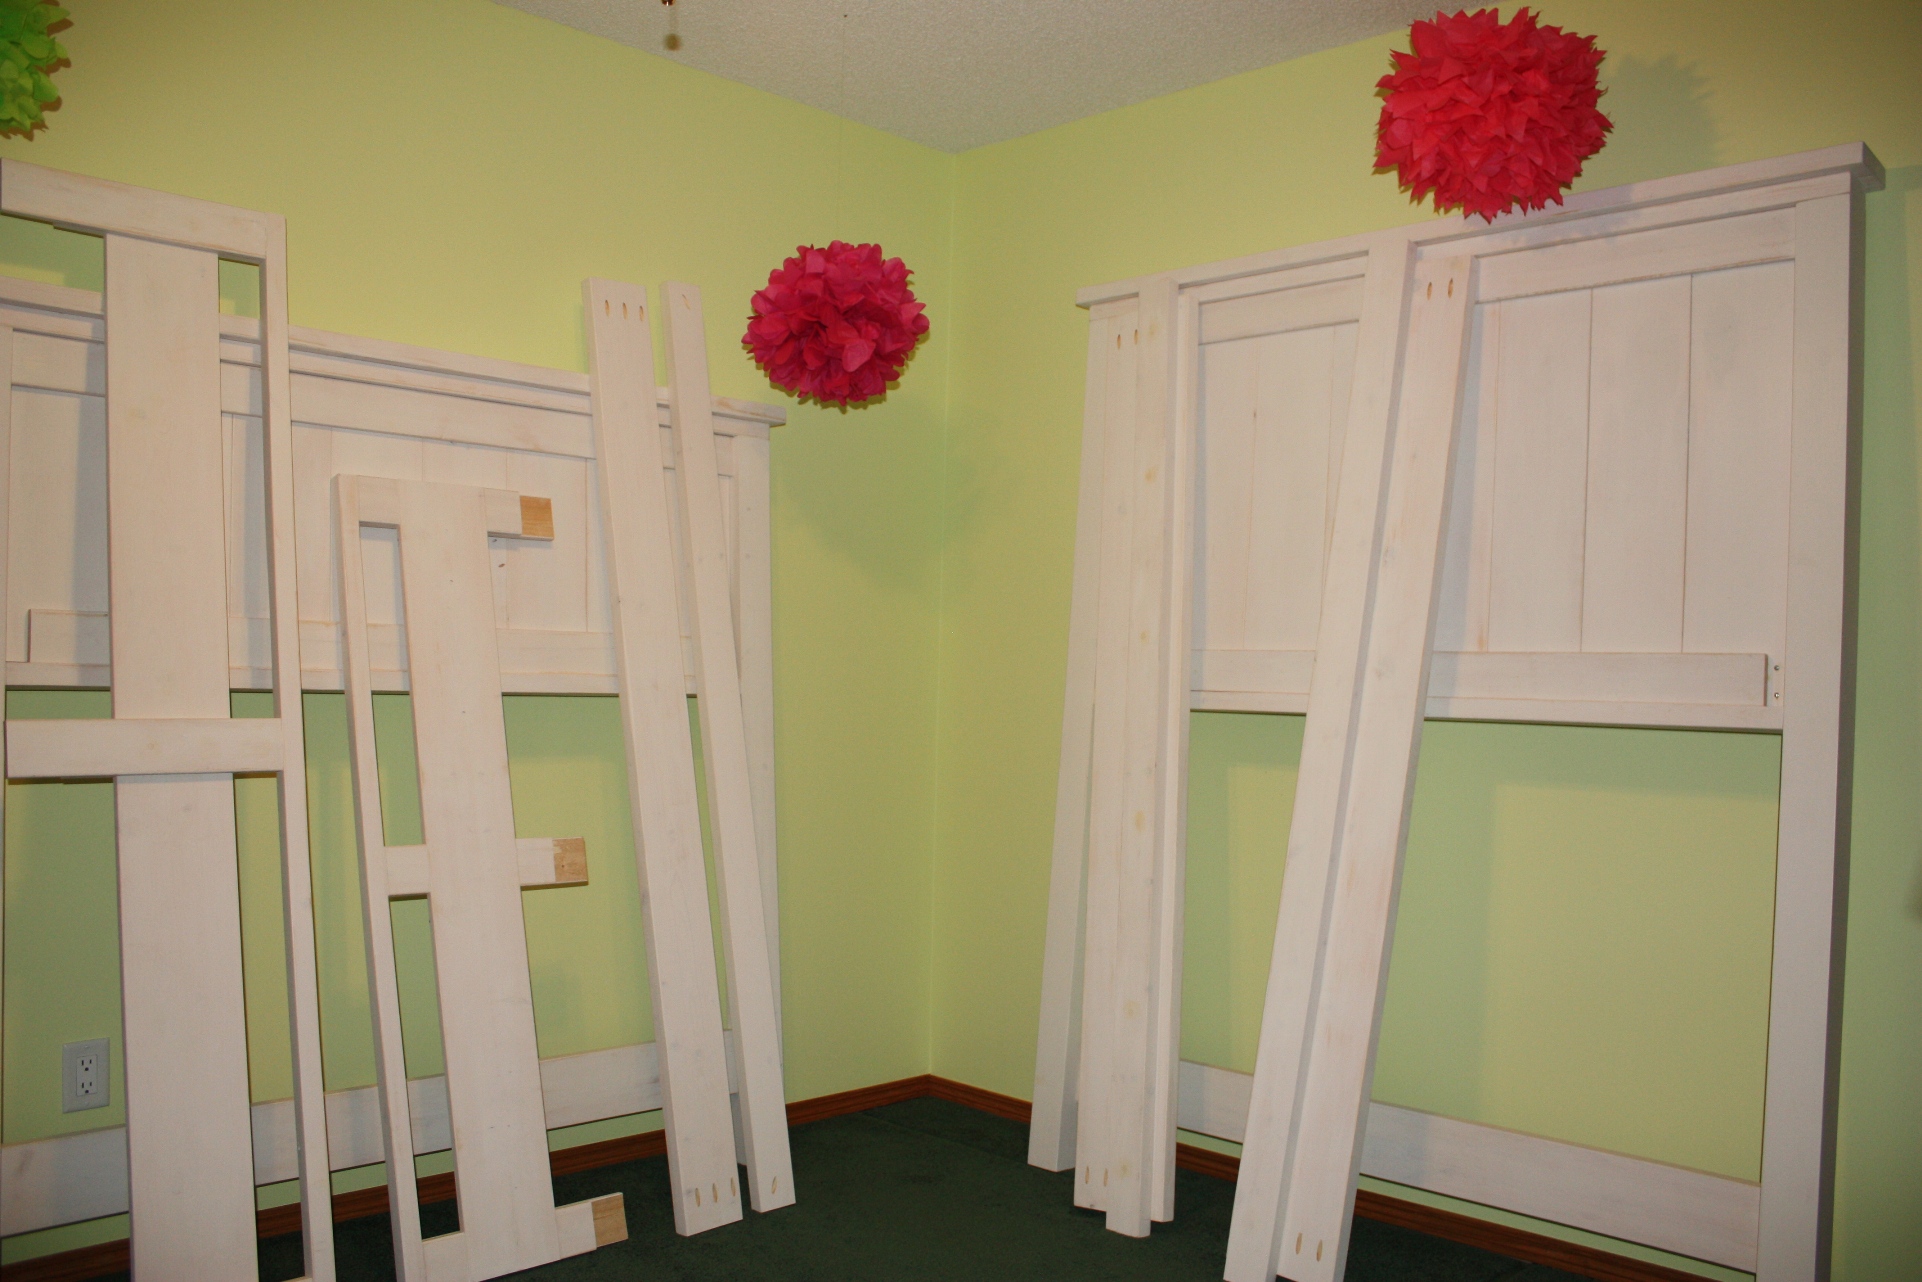
- I assembled the bed into different large pieces before bringing it inside. The headboard and footboard are 2 solid sections that cannot be taken apart. The side pieces are made to be able to come off if we ever need to move the bed.

- I couldn't find any really good instructions anywhere on how to build a ladder or to change ladder plans to suit our needs so I built it after the bed was built. I found it easier to envision this way and to figure out the angles. I build the ladder out of 2x3s.

I have the Google Sketch-Up plans for the bed (minus the ladder) if anyone is interested, but as I said before, I am not an experienced builder so I do not think I should post them here. Maybe someone can use them as a base to create their own plan with though. I found Sketch-up to be a very valuable tool as I actually "built" the bed virtually before ever touching the wood. It helped me figure out what order to put things together in and also allowed me to perfect my design before making any cuts. It still took many trips to and discussions with people at my local Orange store to figure out what kind of fasteners to use and where to use each type. I brought printouts of my plans so that they would be able to help me better.

A couple of finishing touches that I did:

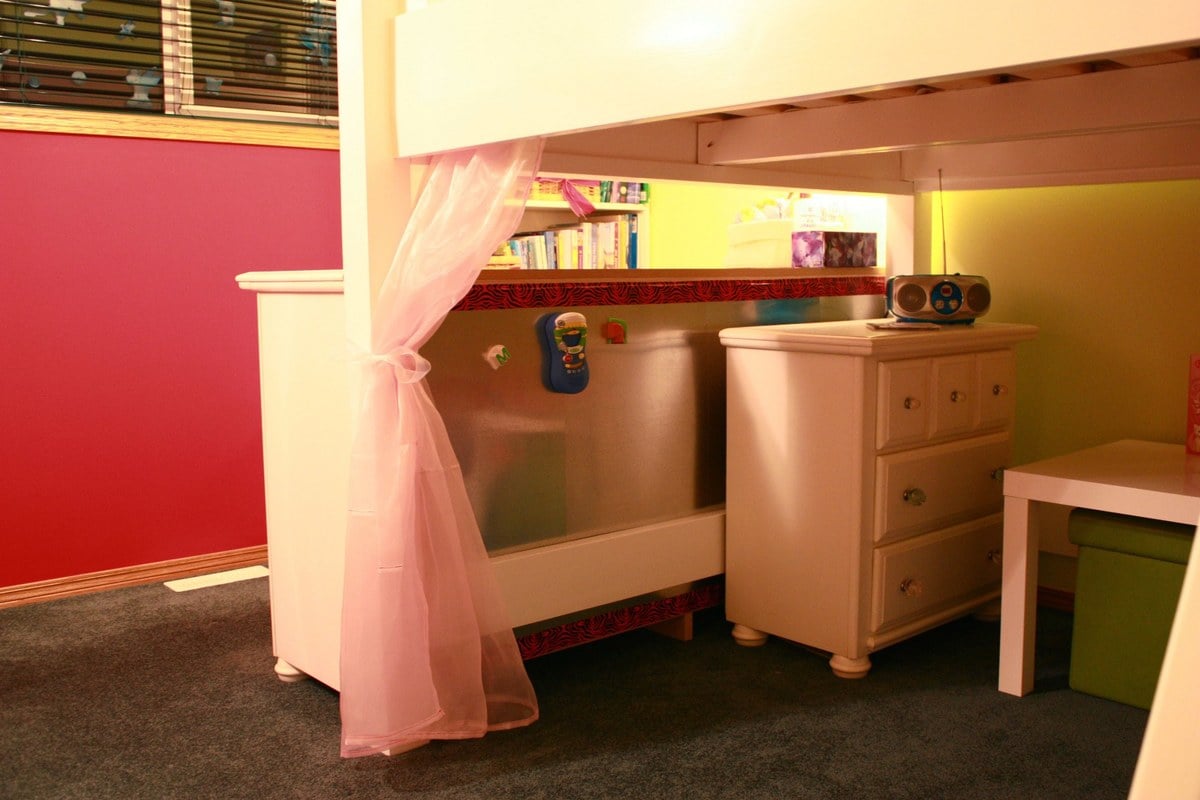
- I sewed some pretty curtains and hung them from aircraft cable and eye hooks under the bed.

- The back of her dresser was exposed under the bed and did not look very nice so I created a magnetic wall by screwing some inexpensive metal sheets meant for ducts to the back of it. I have temporarily covered all of the exposed edges with pink patterned duct tape but plan to trim it out at some point.

Hope you like it!

Estimated Cost
$500 - $600
Estimated Time Investment
Week Long Project (20 Hours or More)
Finish Used
I sanded every piece of lumber starting with 50 grit sand paper down to 120 grit until each one was smooth. Then I filled in any large knots with wood filler, sanded and then primed. I sanded the primer down again to get rid of the brush marks and make it smooth. I did all of this before cutting the boards to length as I figured it was easier to work on fewer long boards than on more short boards. This prep work definitely took the majority of the project time.

After the bed was assembled, I put the first coat of paint on the back of the headboard (to test it out where no one will see), I found I didn't like how the paint was sitting in the gaps and seams so we went around the entire bed and used Dap Alex Paintable Caulk to fill them in. We didn't fill the gaps in entirely as we wanted to keep the texture, we just filled them in enough so that the paint would sit on top of the Dap instead of flowing right through in some places. Then I painted the entire bed. I left the side guardrails off and painted them separately before installing.

The paint used was Benjamin Moore's Advance in Pearl finish. The colour is a warmish white called Polar Bear. BM's Advance paint is a water-borne alkyd paint so (from what I was told) it acts like an oil paint but cleans up like a latex paint. I do not have any experience painting with oil-based paints. I originally tried to roll the paint on with a foam roller as advised at the paint store but I did not like how the finish looked. Again, it was just the first coat on the back of the headboard that no one will see. It left lots of tiny little bubbles in the paint. I eventually settled on rolling the paint on with a microfibre roller and then brushing it out with a natural bristle brush. You can see still the brush strokes, but they are fairly subtle and I actually like how they look. It only took two coats and I love how the finish looks. Painting with this paint probably took a little longer than if I had used another type of paint as you need at least 16 hours between coats and then 3-5 days for it to cure. Hopefully it turns out to be as durable as advertised and it was worth it. It was also quite pricey at $70/gallon here in Alberta but I only used just over half of the can so I will be able to use the rest for the next project.
Recommended Skill Level
Beginner

Comments

spiceylg

Thu, 12/01/2011 - 05:27

I can not believe you tackled this for your very first project! You should be so proud as it came out beautiful! Your daughter must be thrilled!!!

Guest (not verified)

Thu, 12/29/2011 - 19:51

Could you please send me the plans. I would love to look at them.
Amanda

tomjnc5

Fri, 05/03/2019 - 04:15

Hello DirtSquirt,

My granddaughter just asked me to loft her queen bed and loves your plan. Is it still possible to get the plans you made up so I can modify for queen.  Thank you

tomjnc5

Guest (not verified)

Sun, 12/11/2011 - 01:34

I have been googling some many website for a full size loft bed and came across this one at 4am Sunday. Can you please send me the mesurements and plan for this bed. I would love to build it just the way you did.

DirtSquirt

Mon, 12/12/2011 - 23:09

If you know how to use Google Sketch-up, I could send you the plans that I made up. All of the measurements are on there if you know how to use the tape measure tool.

Farraha97

Fri, 01/05/2018 - 21:53

hi I know this is a old post but can I get the plans? My husband needs the direct directions. [email protected] also look into we transfer, you  can upload big documents up there and just post the link then people don’t have to bug you all the time they can just download it. Hope that helps you.

thanks for your time.

Guest (not verified)

Thu, 12/29/2011 - 14:34

I LOVE this bed. I do not know how to use google sketch-up but we are wanting to build the farmhouse into a twin loft bed and the plans you used would definitely help us figure out how. If you could send me your plans Id really appreciate it and Ill somehow figure out how google sketch-up works. Thank you so much for sharing!

Megan Schaeffer (not verified)

Fri, 05/11/2012 - 15:04

Can you please send me your plans we are trying to do almost this exact thing for our twins!!!

Guest (not verified)

Fri, 12/30/2011 - 08:55

This is great. I know that you have had many requests but would you also send me the plans? I can use sketch-up and/or regular plans.
Thanks,

I. Carter (not verified)

Wed, 01/04/2012 - 13:15

I love your project!! Could I get a copy of the plans as well? Thanks!

DirtSquirt

Thu, 01/05/2012 - 21:53

I did send plans to those who included an address, but I'm not sure how to get them to the rest of you!

Guest (not verified)

Mon, 01/16/2012 - 11:24

your loft is so great, and looks beautiful, exactly what my 13 year old wants, she has a very small room. could you send me the plans as well? great job!!!!

Guest (not verified)

Mon, 01/16/2012 - 11:24

your loft is so great, and looks beautiful, exactly what my 13 year old wants, she has a very small room. could you send me the plans as well? great job!!!!

Guest (not verified)

Thu, 01/19/2012 - 10:27

Any chance I could get your Google Sketchup plans too? We are moving soon and want to do something like this for both of our kids. Thank you! [email protected]

Lisa Chavez (not verified)

Wed, 01/25/2012 - 08:22

I LOVE THIS!! Can i please get the plans sent to me as well?
[email protected]

Thank goodness for your post on here, we are planning to start building on Friday and I couldnt have found it at a better time! =)

Allyson O (not verified)

Sat, 02/04/2012 - 20:05

What an awesome bed! I am trying to build something like this for my 8 year old. Could you sen d me the plans? [email protected] Thanks,

Ryan Mitchell (not verified)

Mon, 02/06/2012 - 06:50

Could you please send these plans to
[email protected] ?

I love it!. I have been looking for loft bed plans that are of mid height for a while.

Thanks!

G Quintilio (not verified)

Mon, 02/06/2012 - 21:15

Congrats on your project! It looks like something that would cost $1000 ++ at any store. I too would like a copy of the plans. I'm envisioning a distressed and stained version for my son. Thanks! [email protected]

Guest (not verified)

Wed, 02/15/2012 - 16:19

Actually just purchased a floor sample loft bed for our son today...having 2nd thoughts because it seems cheap...so I browsed Ana's site...and WOW! This is WAY better - love the design. Am hoping you could please send the plans our way too...we are all so envious! Thanks! [email protected]

Guest (not verified)

Mon, 03/26/2012 - 16:16

THANK YOU SO MUCH for sending the plans so quick. We ended up building the bed, but in twin size for our son....took us about 3 weekends to finish....and it's incredible! I don't know how to post a pic here, but thx so much Marcie....we ended up building a forward facing bookshelf too bc once we got this huge bed in, there was not enough room for his standard bookshelf

In reply to by Guest (not verified)

gina10151

Wed, 05/20/2015 - 00:20

I am trying desperately to get my hands on the google sketchup plans for the original full size loft bed. could you please send to me as dirt squirt doesnt respond anymore

Guest (not verified)

Mon, 02/20/2012 - 15:40

This bed is so beautiful, it is exactly what I was looking for. My husband and I have never built anything before, but with the right directions I think that we could totally manage this project. Could I please get a copy of your plans so that we can make this bed for our 13 year old for her birthday. Thank you so much.
Brandi

Guest (not verified)

Mon, 02/20/2012 - 15:46

I would love to have a copy of your plans. This bed would be perfect for my daughter. Thanks so much

Brandi

Guest (not verified)

Mon, 02/20/2012 - 19:47

I have sent the Sketch-Up files to all those who have supplied some way to contact them. I'm sorry that I can't send them to those with no contact info. :( I feel badly if you are waiting for them...

In reply to by Guest (not verified)

gina10151

Tue, 05/19/2015 - 01:40

Hello,

I am looking for the plans to this bed as well. I created a comment on your post but i am not sure if you received it as the post seems quite old.

[email protected].

I am new to this and there is no way I could build that bed without the plans and instructions.

I am also new to google sketchup I am shocked that you were able to do this plan up in it. I downloaded it and couldn't even draw a line never mind a 3d bed plan?

In reply to by Guest (not verified)

gina10151

Wed, 05/20/2015 - 00:21

Please send the google sketch plans for the farmhouse loft plans I understand dirt squirt is no longer replying and I desperately want to build the bed for my son

farmhouse table with bowling alley top

Submitted by sara ford on Tue, 10/29/2013 - 18:43

I used the farmhouse table plans to build a base, and then used an 88" stretch of bowling lane from a bowling alley demo nearby. The sturdy base looks great with the 2" thick maple top. Thanks for a great plan.

Estimated Cost
$400
Estimated Time Investment
Week Long Project (20 Hours or More)
Finish Used
miniwax cherry
Recommended Skill Level
Intermediate

Comments

Shiplap/bomb crate farm table

Submitted by Anonymous (not verified) on Sat, 01/16/2016 - 11:15

I built this project with wood out of a 100+ year old house. When the house was tore down they discovered instead of ship lap, some of the walls were covered with wood from old military bomb crates. What a score! The dimensions of this table are 30" tall x 36" wide x 7' long. Now I am going to find some old chairs and recover the cushions with burlap/feedsack. Thanks Ana, your plans have helped me so much.

Estimated Cost
$150
Estimated Time Investment
Weekend Project (10-20 Hours)
Finish Used
Pecan with gloss poly single step, then sanded some back off.
Recommended Skill Level
Beginner

Firepit Table

firepit within a table....great fun!

Estimated Cost
£270
Estimated Time Investment
Weekend Project (10-20 Hours)
Finish Used
fireproof paint
Recommended Skill Level
Beginner

Comments

Mug Tree Stand

Submitted by Anonymous (not verified) on Tue, 03/21/2023 - 12:05

I followed Ana's plans for this Mug Tree stand! I absolutely adore it! Great plans and cute stand.

Built from Plan(s)

Comments

Laundry Basket Dresser

Submitted by spiceylg on Mon, 12/05/2011 - 07:42

I was showing a friend Ana's website and the laundry basket dresser picture appeared and she immediately told me, yes told me, lol, to make one for her. First time working with MDF and had to have my hubby's help because it's way too heavy. For that alone, not sure I'd use it again. Also, two places, it bubbled a little, not sure why. She loved it and wants another. I'm never sure how long these projects take as I don't do it all at one time. It's on the weekends when I have a chance and after work.

Built from Plan(s)
Estimated Cost
$25
Finish Used
Latex primer and Benjamin Moore's Linen White rolled on with a foam roller.
Recommended Skill Level
Beginner

Comments

Farmhouse Bed

Submitted by Cole on Sun, 11/03/2013 - 07:04

Our version of the farmhouse bed!

Estimated Cost
$250
Estimated Time Investment
Weekend Project (10-20 Hours)
Recommended Skill Level
Beginner

patio living room - modified from modern chair plan

Submitted by herbsuprb1 on Wed, 06/12/2019 - 09:09

I created two sofas, a love seat and a table by modifying the modern chair.  I added a back extension, tipped the back back 10 degrees, and angled the seat platform down a few degrees.  Considered doing Adirondack arms, but my wife preferred the rectangular shape.  The table is a variation of the 2x4 patio table (base construction similar), but we substituted pine 4x4 legs for the 2x4s, and implemented a 2x6 "picture frame" around Mexican tile on top.

I used pocket screws to attach the arms to the sides, and also to hide screws on the table "picture frame".

All-in-all, I would say this is an elegant-looking patio set that should last quite a while.  Very solid, very heavy to move around (my only complaint).

We plan to add some colorful throw pillows.


Estimated Cost
This project was created from a Menard's metal siding trim "shipping crate" that they refused to take back on return - so the many 16 foot 2x6s came to me for free. With hardware, stain, sanding pads and the pocket screw jig, I would guess I have about $300 there. The cushions were somewhat expensive, but are built to last - got those from Ikea - "Duvholmen" and "Folsom" haha - 24 1/4" x 24 1/4" cushions, 24 1/4" x 16" back pillows. Those were about $65 (per SEAT) .. so 8 for this project ($520). The cushions only come in this light tan, or medium/dark grey.
Estimated Time Investment
Week Long Project (20 Hours or More)
Finish Used
Behr semi transparent outdoor stain (Padre Brown). First sofa was assembled then stained (mistake). The other pieces were cut, sanded 60/120 and stained. Arms were additionally sanded with a 320 grit prior to staining. Stained all pieces two coats with small roller, then brushed over. Assembly after staining produced a cleaner look on the stained finish.
Recommended Skill Level
Beginner

Comments

Farmhouse platform bed. 1st furniture build.

Submitted by Anonymous (not verified) on Sat, 03/25/2023 - 13:34

My husband thought I was joking when I suggested I could build this bed instead of purchasing one. Was my first time building furniture but won't be the last.

Built from Plan(s)

Comments

Triple Pedestal Farmhouse Table and Bench

Submitted by Anzura on Tue, 11/05/2013 - 15:12

I'm so in love with this table! We altered the plans slightly by making the table wider. Enough to put 2 chairs on the end. The table will hold 12 people pretty comfortably with a lot of room in the middle for food. We added a 2x2 under the 2x4 frame instead of the sandwich look. We also mitered the corners for a more finished look. I finished with Minwax Special Walnut and applied 2 coats of oil based poly with a light scrub on final coat with steel wool.

Estimated Time Investment
Week Long Project (20 Hours or More)
Recommended Skill Level
Starter Project

Comments

kmah

Wed, 12/18/2013 - 09:04

Hi - I love this and we are planning on building it over the Christmas holidays. I really like your modifications of the mitered edge, the elimination of the "sandwich edge", and the wider table. What was the finish dimensions of your table? Did you just add an additional (or 2) 1x6 to the tabletop? Also, it doesn't look like you changed the legs at all to support the wider top - is this true? We have 4 kids who are always hanging on our furniture so I need something nice and sturdy but also big enough to seat us all plus the many guests we have in our house!

Anzura

Wed, 12/18/2013 - 11:10

The finished table dimensions are approx 8 ft long and 4 1/2 wide. There's 9 1x6 boards inside the 2x4 frame. We didn't alter the pedestals at all. We added a longer 2x4 between the table and the top of the pedestals for extra table support. The bottom of the pedestals are plenty wide enough to accommodate the extra table width.
It's a darn lovely awesome table. Sat 12 people comfortably at Thanksgiving with enough room for all the turkey dinner fixings.
It's also become the favorite homework station during the week. So much room to spread out books and papers.
Good luck!!!

kmah

Sun, 12/22/2013 - 13:21

Did you plane the edges of your 1x6 boards so that they would be nice and tight? I'm concerned about where the boards meet together - that crumbs, milk spills, etc will get caught down in the grooves! Did you do something special on the finish to fill in any grooves? What kind of wood did you use?

Anzura

Sun, 12/22/2013 - 14:34

1x's are already square. They aren't like 2x's with the rounded edges. We just used a kreg jig to attach them together. There are no gaps at all. We didn't plane the 2x4 frame and there is a tiny gap there. You might want to plane the inside edge of the 2x4 frame to avoid food crumbs in the gaps, but it's sorta hard to keep everything square unless you have a super nice table saw. Ours is cheapo. I used some wood filler on a test piece and hated the look after the finish! The nooks and crannies are what make this table rustic and lovely. Use place mats ;)

The wood is just regular old lumber from Home Depot. There are no choices on different type of wood. Everything we got was kiln dried except a few pieces, but don't be fooled, those warp after you buy them too.

kmah

Sun, 12/22/2013 - 17:24

great - thanks for the info and the quick replies!

dbh

Sun, 04/06/2014 - 10:41

In the original plans, the top 2x6 on the pedestals are 36 1/2", which means they can be drilled into the 2x4 frame. On your modifications, the original pedestals wouldn't be long enough to reach the 2x4 frame, so did you just make the top 2x6 on the pedestal longer? I'm sorry I'm confused, but I like the wider table and am just trying to see how you attached the pedestals to the top.

It might be explained by "We added a longer 2x4 between the table and the top of the pedestals for extra table support." but I'm still not 100% understanding how it's attached.

Thanks for any help!

Anzura

Sun, 04/06/2014 - 16:14

I added another picture of the underside of the table to clear up any confusion. hope this helps.

Adirondack Set

Submitted by JamieLynn on Mon, 06/24/2019 - 11:48

These were a labor of love!  I bought my first miter saw and decided this would be the project to try angles.  It wasn't easy but I figured it out.  

These were pretty easy otherwise to put together once you get past the stringers.  They aren't perfect but they are very sturdy.  I've had a few people ask me to make them one too!

Estimated Cost
$60 each
Scraps for the small table
Estimated Time Investment
Weekend Project (10-20 Hours)
Finish Used
Rustoleum Door Paint
Recommended Skill Level
Beginner

Tall corner media cabinet

Submitted by Mjgrasley on Thu, 11/07/2013 - 13:32

I wanted to rearrange the livingroom but needed a corner cabinet since the t,v sits on the fireplace mantle. I loved this plan except it didn't have any drawers for the DVD's so I just did the top portion on the bottom. I made the bottom slots wider and made drawers for them....perfect solution for my needs...

Built from Plan(s)
Estimated Cost
160.00 including hardware and stains
Estimated Time Investment
Week Long Project (20 Hours or More)
Finish Used
Minwax Cherry with polyurethane first then Mission walnut with polyurethane
Recommended Skill Level
Intermediate

Work Bench

Submitted by kyounghome on Sun, 07/07/2019 - 08:36

Got tired of working on the floor so built this.  Took me about 6 hours.  Was in no hurry.  Happy it is done and all my tools are organized.

Estimated Cost
Cost approximately $120.00
Estimated Time Investment
Afternoon Project (3-6 Hours)
Recommended Skill Level
Beginner

Comments

porcupine

Sat, 03/20/2021 - 12:38

I love this with the shelves at the back. I want something like this I can attach my hand crank flour mill to as well as have a place to store all my jarred grains and flour. Do you have plans for this?

Simple Bed Bunks

Ok, to start off with I am a guy and I love to build things, but I'm not some techincally savvy dude. I need simple plans and this was an awesome build! I love it, my kids love it, and most importantly my wife loves it. As others have said, It is BIG. but small things I did saved some space. For instance I cut the 3" off of the tops of the headboards to save 6" of linear space. Little things went wrong along the way, but they always do... finished in about 4 days workings sporadically. I've got about 350$ in it, and couldnt be more pleased. I will definately build more things from your plans. IF anyone is thinking of building it DO IT! Definatley need the KREG Jig. I should have bought that thing a long time ago. would have made several projects easier.

Farmhouse Night Stand

Submitted by danie386 on Mon, 12/19/2011 - 19:40

My husband and I re-created the farmhouse bed night stand from Ana White!! I tried to stain it first but didn't have much luck and decided to paint it to match our farmhouse bed.

We didn't follow the plans exactly. Since our bed was higher we made our own measurements for this project.

Built from Plan(s)
Estimated Cost
100
Estimated Time Investment
Weekend Project (10-20 Hours)
Finish Used
Behr Ultra Premium White
Recommended Skill Level
Beginner

Redwood Step Stool

Submitted by klshively on Sun, 11/10/2013 - 14:57

I gave these plans to our neighbor and he made this beautiful step stool for my boys. It is the perfect size and I love the beautiful grain and color of the redwood. Because he used redwood it is quite heavy, but also very sturdy! We plan on having in the family for a very long time.

Built from Plan(s)
Estimated Cost
$28 for the wood
Recommended Skill Level
Beginner

Comments

Castle for my Niece

Submitted by Anonymous (not verified) on Tue, 01/26/2016 - 13:29

My sisters family was coming for a visit, all the way from england. I wanted to make it special for my niece so I built this bed from your plans. I made a few minor modifications, like adding an extra step (as she's quite small) and rather than making a wood slide, I found a plastic slide at my local hardware store and used that instead. I think that simplified the project, at least for myself. Thanks for the great idea and plans.

Estimated Time Investment
Week Long Project (20 Hours or More)
Recommended Skill Level
Intermediate

Rustic X Coffee and End Tables

Really enjoyed building these tables. The plans are great and easy to follow! I aged the wood before staining it, then finished them with 3 coats of poly! Best thing is my wife loves her new “Pottery Barn” like tables!

Estimated Cost
$250 for coffee table and 2 end tables
Estimated Time Investment
Weekend Project (10-20 Hours)
Recommended Skill Level
Beginner