Community Brag Posts

Play Stand

Submitted by jgettings on Sat, 01/04/2014 - 16:01

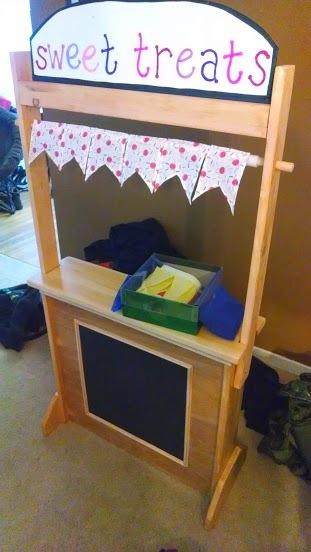
I saw this at the perfect time for deciding to make one for my niece for Christmas. It was too cute of an idea to not make!! She turns 3 at the end of January and it's perfect-sized for her. From what I hear, she threw a tantrum when her parents told her she had to stop playing with it because it was naptime! I'm hoping that she will share with her brother when he's older (he's about 7mos now) and they can play with it together.

I apologize for the lack of pictures, I got the buntings done about one day before we had to pack it up to head out for the holidays, so there wasn't much time for pictures!

For the hutch part, I attached each side with bolts and wing nuts so that it could be knocked down for transport (especially since we have smallish cars and had to drive an hour to gift it, and the recipient had to drive 2 hours back to their house!). I added some holes just under the dowel (lining up with the holes in the base when knocked down) so that it could be connected again as a shorter version for transport. This actually worked out pretty well and you can almost use the dowel as a handle when it's like that. The only issue I ran into with that was once I put the lower velcro on for the theater curtains, they would hit when trying to collapse it and we wound up losing one in transport.

Buntings weren't too hard, but I've been sewing much longer than I've been building! I did have some issues getting the theater curtain to lay right.

Built from Plan(s)
Estimated Cost
50
Estimated Time Investment
Afternoon Project (3-6 Hours)
Finish Used
Minwax stain, I think it was some kind of "oak" color. Also, chalkboard spray paint for the chalkboard piece. The signs are foamboard with sharpie drawn on and electrical tape to cover the raw edges (I wish I had some white electrical tape!!). Most of the fabric I used was from those little "quilting" squares since my supply of scrap fabric is seriously lacking!
Recommended Skill Level
Intermediate

Bench an top

Submitted by Anonymous (not verified) on Sun, 11/10/2019 - 18:14

Definitely a fun project(s). I started Using pine, countersinking wood screws, and brad nailer. Now I’m using a kreg jig and ripping my own 1xs out of birch plywood. The top pictures in the doubles were my first draft and the bottoms are my second draft. I sold my first bench! Next buy is a table saw , router , miter saw, then on to some cabinet work! Thanks so much for the step by step designs. Oh and I‘ve been cutting everything with my skil saw. So the bench is 21”t x5’w x15.5 “deep the top is plywood ripped into 1x10 but top 1x is 10.5” deep 5’ wide also. Basically just made everything to fit my spot in my house . Not bad for third set of actual furniture.

Estimated Cost
$400
Estimated Time Investment
Weekend Project (10-20 Hours)
Finish Used
Varathane pre stain wood conditioner
Kona varathane 3x faster oil based stain
Mini wax one coat polyurethane
Satin nickel hooks from Home Depot
Fabric 2.3 yards from joanns
Fabric tac joanns
Batting joanns
Cushion Home Depot
K5 kreg jig
Skil saw worm drive
Recommended Skill Level
Beginner

L-Shape Outdoor Bench

Submitted by ShannonG on Mon, 07/24/2023 - 13:21

Modified to make an L shaped bench . Absolutely love it! Thank you!

Built from Plan(s)

Comments

$20 VERY STURDY Work bench

Submitted by BJ D on Fri, 03/16/2012 - 11:32

This plan isn't an Ana-White, but I wanted to share due to the low cost. I'm sure many of you are like me and are about tired of building on the garage floor.

(I'll be posting more projects soon)

I modified the plan slightly by making a thicker top (doubled the OSB and some 1/2 plywood I had around the garage for a smoother surface.) and 1 x 4 furring strips for trim around the top edge. This gave a very sturdy setup and matched the height of my table saw, making this my outfeed table when needed.

Estimated Time Investment
An Hour or Two (0-2 Hours)
Finish Used
No finish. It's a workbench.
Recommended Skill Level
Starter Project

Hanging Loft Bed

We decided to make loft beds for our girls room to offer them more space and also give them some individual room. The old room had daybeds that just took up so much of the room.

I saw the hanging beds on this site and thought they would be great. So I got to work.. I used 1x4 s for the platform to lighten the weight of the bed. I had to customize the sizes a bit but that wasn't a big deal. I used the Kreg jig to joint the 2x4s as well as on the rail posts. They are attached below the platform to the front 2x4. We also used chain rather than rope as chain doesn't give.

We are really pleased with the results. The girls love them. Each has their own desk space now, they shared one before, and their own storage space.

Cost us with all wood, supplies, hardware, paint, about $150-175

Estimated Cost
150
Estimated Time Investment
Week Long Project (20 Hours or More)
Recommended Skill Level
Beginner

Entryway Bench

Submitted by Anonymous (not verified) on Mon, 03/28/2016 - 13:04

I just completed my first project and while it's not perfect, I learned a lot and am pleased with the results!

Estimated Time Investment
Week Long Project (20 Hours or More)
Finish Used
Leftover flat white paint and polycrilic satin finish
Recommended Skill Level
Beginner

Lego Table

Submitted by kelseyt15 on Mon, 11/18/2019 - 10:52

I built this Lego table for my son’s fifth birthday. I added some dividers in the trays for organization, Brickyard plates for the table top and road tape around the edges. 

Built from Plan(s)
Estimated Cost
$70
Estimated Time Investment
Day Project (6-9 Hours)
Finish Used
Paint and polyethylene over the road table
Recommended Skill Level
Beginner

Comments

Pottery Barn Studio Leaning Shelf

Followed the plans but used hardwood for the edging instead of a veneer.
On the desk version I found that screws are needed from the inside of the desk sides to the frame to strengthen the joint. I also added a cross brace to support the desktop, the brace also conceals the power strip and laptop cables.

The desk version also needs to be secured to the wall with more than the picture hanging kit. I used a painted screw and fender washer on the middle shelf. With that attachment the desk is solid as a rock.

Built from Plan(s)
Estimated Cost
for two about 80 bucks in lumber and screws.
Estimated Time Investment
Weekend Project (10-20 Hours)
Finish Used
Minwax® Pre-Stain Wood Conditioner - an attempts to even out the final stain finish.

Minwax® Wood Finish™ English Chestnut 233 --- was an even color across all the woods.

Minwax® Polycrylic® Protective Finish -- Water based with low odor.
Recommended Skill Level
Intermediate

Comments

Bunk beds for 18" dolls

Submitted by petera on Thu, 01/09/2014 - 07:53

These bunk beds are a big hit for daughters, nieces, granddaughters, and even full grown kids. After making a few as gifts, I decided to make three at once and cover several birthday parties at once.

The plans were very well done and I just followed along. Worked great!

Thanks for the plans!

Peter

p.s. I put that these take more than 20 hrs, because there's a lot of gluing and waiting time while doing the guard rails.

p.s.s. An old pillowcase is the perfect size for material for the mattresses.

Estimated Time Investment
Week Long Project (20 Hours or More)
Recommended Skill Level
Beginner

Easy Three Cube Bench with Stained Top

This bench was really simple to make. I built it over the course of three days - I needed the first night for the wood glue to set, and then the second night for the paint to dry. I added two 2x8 boards on top, stained a dark walnut, for a more finished look. I'm so proud of how this turned out - it's my first wood working project of any sort since my grade 8 shop class! Next up: the Bigger Kid Picnic Table. :)

Built from Plan(s)
Estimated Cost
$50 CDN
Estimated Time Investment
Weekend Project (10-20 Hours)
Finish Used
I used a semi-gloss paint for the bottom and a walnut stain for the top, then put two layers of indoor/outdoor Verathane on it, since it's to be used in our mudroom.
Recommended Skill Level
Beginner

Large Porch Bench

Submitted by kwildman on Mon, 11/25/2019 - 14:46

This very large porch bench is made of regular pine since it is under a covered porch.  I did modify the back and change from the x design to this diagonal.  I like it!  The plan was easy to follow and I will be making another one for the other side of the porch!  I used exterior black paint.  

Estimated Cost
100
Estimated Time Investment
Weekend Project (10-20 Hours)
Finish Used
Black exterior paint
Recommended Skill Level
Intermediate

Comments

kwildman

Tue, 04/21/2020 - 02:33

Hi! Sorry I just saw your comment. I just measured and cut to fit after I got the back together. I just placed the boards how I wanted them and marked the angles and cut them. The center is just straight boards cut to fit. I used 2x4 scrap pieces that I had left over.

Big Boy Bed

Submitted by Anonymous (not verified) on Tue, 08/01/2023 - 14:56

New bed for my boy. Great plan and not expensive.

Sean Hight on Facebook

Comments

Mini Laundry Basket Dresser

Submitted by kendaves on Tue, 03/20/2012 - 19:39

This is a mini version of the Laundry Basket Dresser that fits 2 baskets instead of 3. VERY easy to do!

Built from Plan(s)
Estimated Cost
100 (w/ a lot of left over lumber to do another project)
Estimated Time Investment
An Hour or Two (0-2 Hours)
Recommended Skill Level
Starter Project

Rustic Console Table

Submitted by jennpenney on Fri, 01/10/2014 - 14:16

Thanks Ana White for creating such great plans! This was my first furniture build and I must say I am so happy I did it! Our living and kitchen area are now complete (finished mine just in time for Christmas) which was a life saver! This table can hold a lot of decor and cookies!!

Have yet to get the hardware spray painted and attached - but even with out it looks amazing (already have been asked by 4 friends when I can build them one). We decided to go with Grey Stain and a satin poly.

Estimated Time Investment
Weekend Project (10-20 Hours)
Recommended Skill Level
Intermediate

Land of Nod toy box

Submitted by Anonymous (not verified) on Sat, 04/02/2016 - 01:25

We've just moved and closet space is very limited to just clothes for my two girls. I have been wanting to get them a toy box but wanted something that I could say that I had made for them. The original plan was ok but these kids have a lot of toys. Most of the time I'll build the full project and then disassemble to ensure that everything lines up properly, that's when I decided that the depth wasn't going to be enough for these young hoarders. Before final prep I added an extra 1x4 to the front and back of the side panels. Overall I'm very happy with the way it came out. 

Built from Plan(s)
Estimated Cost
The total cost was just a little more than $100. Wood is kinda expensive here in Hawaii.
Estimated Time Investment
Weekend Project (10-20 Hours)
Finish Used
Gliden country white
Recommended Skill Level
Beginner

Toy box

Submitted by Anonymous (not verified) on Sat, 11/30/2019 - 22:43

My husband and I made the toy box for my granddaughter. I Love Anna White's designs and are making the kids table and chairs now for her birthday.

Thank you
Gary and Amy Piche

Farmhouse Bed

Submitted by Anonymous (not verified) on Sun, 08/06/2023 - 13:42

Every year I ask my dad to help me build something and here is our project for the year. I absolutely LOVE this bed!
 

Samantha

Built from Plan(s)

Chunky Leg Bed

Submitted by Delilah on Fri, 03/23/2012 - 19:19

We made this in king size, and used a 2x4 instead of a 2x6 for the center so the mattress would sit a little lower. We also built the legs around 2 1x6 blocks each instead of one.

Estimated Cost
$150
Estimated Time Investment
Weekend Project (10-20 Hours)
Finish Used
Minwax natural and two coats of satin poly.
Recommended Skill Level
Beginner

Toy Box

Submitted by LARMO on Sun, 01/12/2014 - 10:23

Toy box plan from sunset magazine and letters from elentology.com for name letters. I traced the letters from printer paper onto the back rest using a pen, painted the letters and traced with a black painter pen.

Estimated Cost
$100
Estimated Time Investment
Afternoon Project (3-6 Hours)
Finish Used
Goss latex, craft paint for letters, craft paint pen for outline
Recommended Skill Level
Intermediate