Community Brag Posts

Sleek side Tables

Built these from an inspired photo of a table from Wayfair. However, I need to customize to fit my friends living space. I routed out the tops and dowel jig the legs. These came out so beautiful!

Estimated Cost
150
Estimated Time Investment
Week Long Project (20 Hours or More)
Finish Used
Dark Walnut Minwax stain
Recommended Skill Level
Advanced

Comments

memorial bench

Submitted by bethstark on Wed, 03/20/2013 - 14:27

My husband and I built this as a memorial bench for a friend of a friend that , lost a child to a car accident last year. Hopefully it will give her a peaceful spot to sit in her garden. Thanks for the plans and support!

Built from Plan(s)
Estimated Cost
45
Estimated Time Investment
Weekend Project (10-20 Hours)
Finish Used
Behr deck wood finish in cedar
Recommended Skill Level
Beginner

Modified Parson Tower Desk

For my second build, I made myself a desk! I really liked the clean lines of the Parson Tower Desk, but it was too big for my space, and I really wanted some storage. I was a little nervous to make any mods since I'm pretty new to building, but I think the desk turned out pretty well. I used the Tower Desk plans, extended the shelf width to fit my printer (on bottom), and then added a file drawer and a "hidden drawer" for smaller items and documents.

Built from Plan(s)
Estimated Cost
$100-$120 including hardware
Estimated Time Investment
Week Long Project (20 Hours or More)
Finish Used
Layer 1: Minwax water based Charcoal Grey; Layer 2: Minwax water based Classic Black; Layers 3, 4, & 5: Polycrylic
Recommended Skill Level
Beginner

Comments

Vintage Style Apple Crate

Submitted by Anonymous (not verified) on Tue, 05/02/2017 - 12:49

Handmade vintage style Apple crate with logo printed in the side. Guide can be found at my blog 

Estimated Cost
Zero. Used pine pallet wood and tools and hardware that I already had
Estimated Time Investment
Afternoon Project (3-6 Hours)
Finish Used
Haven't been got a around to finish yet as i am considering my options
Recommended Skill Level
Beginner

Val's Toy Box

Submitted by Anonymous (not verified) on Wed, 04/21/2021 - 04:55

Using free plywood scrap from a local business, I made the toy box by cutting the 3/4 plywood into the same nominal sized wood. I filled in the edge of the exposed wood with spackling and sanded it smooth. Two issues I came across with this build. The width of the top shelf, nominal 7 1/4", was too wide so I cut it down to 6" and the middle shelf supports stuck out side of the angled rail so I cut those down by about 1/8". Three coats of paint to cover. I'm pretty proud of myself as this was tagged as an advanced build and it's only the fourth item I've built! Thanks for the great project plans!

Built from Plan(s)
Estimated Cost
$14 (wood was free)
Estimated Time Investment
Weekend Project (10-20 Hours)
Finish Used
Rustoleum Ultra Cover Premium Latex Paint, satin, claret wine. Primed with Kilz white primer. Needed 3 coats of paint to get full coverage of white primer. Paint directions recommended against rollering it but it left too many brush strokes so the second and third coats were applied with a 4" roller.
Recommended Skill Level
Intermediate

Comments

White Twin Platform Bed

This was a pretty simply bed to make and would have only probably taken half a day to build if we were more familiar with building furniture from scratch. Instead of using the pocket-hole screws we just used countersink screws as suggested in one of the comments of this tutorial and that work great. We just filling the holes afterwards before painting. For more tips and advice from what we learned from building this bed you can check out my blog post on the bed http://www.stripesandpolkadotsblog.com/take-back-tuesday-diy-platform-b…

Estimated Cost
120 for both the bed and headboard
Estimated Time Investment
Day Project (6-9 Hours)
Finish Used
Semi-Gloss White paint and primer
Recommended Skill Level
Beginner

Benchwright end table

I took the plans for ana white's benchwright coffee table and created this end table.  This is an exact replica of the Pottery Barn benchwright end table.  The wood was distressed by hand and finished with dye, dark walnut gel stain and three coats of satin poly. 


- Brad 

Built from Plan(s)
Estimated Cost
$200.00
Estimated Time Investment
Weekend Project (10-20 Hours)
Finish Used
Transtint dye, antique walnut gel stain, water based poly
Recommended Skill Level
Intermediate

Comments

marenras

Mon, 02/09/2015 - 14:33

Your finish work is phenomenal. Closest I've seen to pulling of the PB finish. What color transtint do you use? Any other finishing tips? I've build a couple of knock off PB pieces, but haven't nailed the finish yet.

In reply to by marenras

timberandsoul

Mon, 03/09/2015 - 22:10

Hi. Thank you for the compliments. First of all, using Alder vs douglas fir or pine plays a big difference in the finish look, but start with pine and see where you get using this process. I first mix de-waxed shellac with a few drops of medium brown transtint dye. It MUST be de-waxed shellac. Experiment with the amount of dye added. I spray one coat of that shellac and dye mixture on the wood. The shellac seals the wood allowing for even stain absorption and a non-blotchy finish. The dye obviously darkens the wood. Then I apply one to two coats of gel stain. I like general finishes antique walnut color. At the next step I sometimes add a glaze, and sometimes I don't, it just depends on what I am seeing. Lastly I seal the wood with a water based poly. Good luck!

colleenps

Tue, 03/31/2015 - 10:04

I love the finish you've done on these, and like someone else said it is the closest to PB I've seen yet! I am trying to fix a horrible stain job I did on a project and had a quick question. When you said you sprayed the shellac and dye, do you mean with a spray bottle? Also what kind of de-waxed shellac did you use? I've never used shellac and I see they have flakes and premixed stuff. Thanks!

timberandsoul

Thu, 04/09/2015 - 15:25

Hi There. Sorry for the late response. The spray the shellac with the dye using a HVLP sprayer. Google HVLP sprayers. They are very cheap and will help out tremendously. I don't recommend using shellac flakes, they can be challenging for a beginner. I use premixed shellac. I use de-waxed shellac because you can apply polyurethane over it. If you plan on applying shellac as a top coat instead of poly you don't have to worry about de-waxed.

juliekayg

Thu, 03/24/2016 - 11:41

This is absolutely beautiful and what I've been looking for to match my Benchwright coffee table!! Do you remember the dimensions you used?

dbender49

Fri, 01/21/2022 - 09:26

I really like your take on this PB table. It looks like you changed it significantly from the console table plans from which you derived it, and I have a couple questions. First, the legs do not look like 2x4s; what are the dimensions you used? Second, the bottom shelf is much thicker than the 1x12 from the plans; what lumber did you use? And how is this bottom shelf attached to the legs? Square-notched to fit around the corners of the legs?

Sideboard

Submitted by Anonymous (not verified) on Fri, 05/05/2017 - 16:26

Long sideboard. 

Estimated Cost
About $180 for the wood. About $27 for paint and $15 for stain.
Estimated Time Investment
Week Long Project (20 Hours or More)
Finish Used
Used rustolium chalk paint white for the bottom and a wiping stain in dark roast color for the top. And a lacquer on the stain. Behind the Xs on the doors is old chicken wire.
Recommended Skill Level
Intermediate

Rustic Wine Rack

Submitted by tracysmith on Fri, 03/29/2013 - 11:17

I've built many custom pieces for local folks but this one with all it's half circles really threw me - how was I going to do those, make them precise and not spend 3 days doing it. It's simple really.... I cheated!! LOL I used a 3 1/8" hole saw for the larger ones and a 1" hole saw for the smaller ones. I also took two boards and clamped them together with pipe clamps and then drilled two at once! It gives it a more consistent look and cuts the time literally in half!

I used a home brew for the stain. Had a friend of mine do the engraving for the front header piece. I think the whole project took between 10 - 15 hours to do because there was a lot of experimenting with the stain and there was also readjusting the sides and top to look how I wanted.

The client loves it and I'll post a pic on my Facebook page of the whole thing loaded up with wine, later today.

Estimated Cost
$250 was retail on this
Estimated Time Investment
Weekend Project (10-20 Hours)
Finish Used
The finish used was steel wool dissolved in vinegar with a secret ingredient added. :-)
Recommended Skill Level
Advanced

Minnie Mouse Storage Daybed

This was my first project form this website and it was a great experience.  I used the storage daybed plans and modified them slightly so I could attach the Minnie Mouse headboard for my daughter.


Only difference form the plans is that i did not put the trim on the back of the boxes and instead build a craddle about 2 inches deep to hold the bulk of the head board.  I used 1/2 sanded plywood to create that and the bow. the mouse head is just pained black where as the bow I got a little more creative with.  I cut out the design topped it with furniture foam then fabric backing to hold it in place and create a smooth look.  After that I streched the pink fabric over it and stapled it in place on the back before attaching it to the head.  I also used some 1 x 2 pieces to run along the back to create feet for the headboard to add stability. 

All in all this project was alot of fun and my daughter loved it.

Built from Plan(s)
Estimated Cost
Around 350 - 400. I used cabinet grade pine plywood and pine wood trim so that's the reason for the cost. You can probably do the whole thing for about 250 if you use regular plywood and white wood.
Estimated Time Investment
Week Long Project (20 Hours or More)
Finish Used
Latex paint - black and white
Recommended Skill Level
Beginner

Comments

Rustic Coffee Table

Submitted by zeuss0101 on Tue, 05/09/2017 - 12:16

Built this 8 feet rustic coffee table from your website. Thank you so much for all you do. I love love your ideas.  I want to build everything lol. I've learned so much from your website.  Thank you again. My next project is a playhouse for my son. I will be posting some pictures.

Estimated Cost
Estimated cost is about $75
Estimated Time Investment
Afternoon Project (3-6 Hours)
Finish Used
not yet decided but thinking of rustic grayish color
Recommended Skill Level
Intermediate

Farmhouse Desk

Submitted by Anonymous (not verified) on Fri, 05/07/2021 - 20:22

Based on a design I saw on this site. Used dark cherry stain plus polyurethane that I got from Ollie's for $3.99. All pallet wood- 1x4s and 2x6's. My first glue-up AND my first use of sealant. Really pleased with the result. Thanks for the idea.

Built from Plan(s)
Finish Used
dark cherry stain plus polyurethane that I got from Ollie's for $3.99. Three coats with light sanding in between applications. Dried at least an hour each coat. Paint was interior semi-gloss- two coats.

Comments

Fancy Hall Tree

Submitted by JHardaway on Sun, 03/31/2013 - 18:58

The Plans for this project made it relatively easy for a first time builder. Always wanting to build some furniture for my wife, I decided to start with this and it turned out way better than I ever expected. I used red oak and oak purebond plywood. I took a slightly different approach, using a 3/4" thick board of plywood for the back vice the 1/2 inch, which really gave the back a nice solid feel. I also assembled the lattice backing directly onto the backing plywood board and then attached the completed back to the finished Bench section (I know I didn't explain that well, the pictures show it better). Lastly I left off the arms for a variety of reasons, not the least of which was that I still need some work on cutting curves. Finished with one coat of Cabot Dark Mahogany and 2 coats of Rust-O-Leum satin polyurethane.

Built from Plan(s)
Estimated Cost
300
Estimated Time Investment
Weekend Project (10-20 Hours)
Finish Used
Cabot Dark Mahogany (1 coat) using cheap foam brushes and Rust-O-Leum satin polyurethane (2 coats) using nice-ish regular brushes. Sanded between coats with super fine (320 grit) sandpaper.
Recommended Skill Level
Beginner

Comments

Despicable Me Minion Theme Playhouse Loft bed

Submitted by Abzman on Sat, 02/14/2015 - 00:47

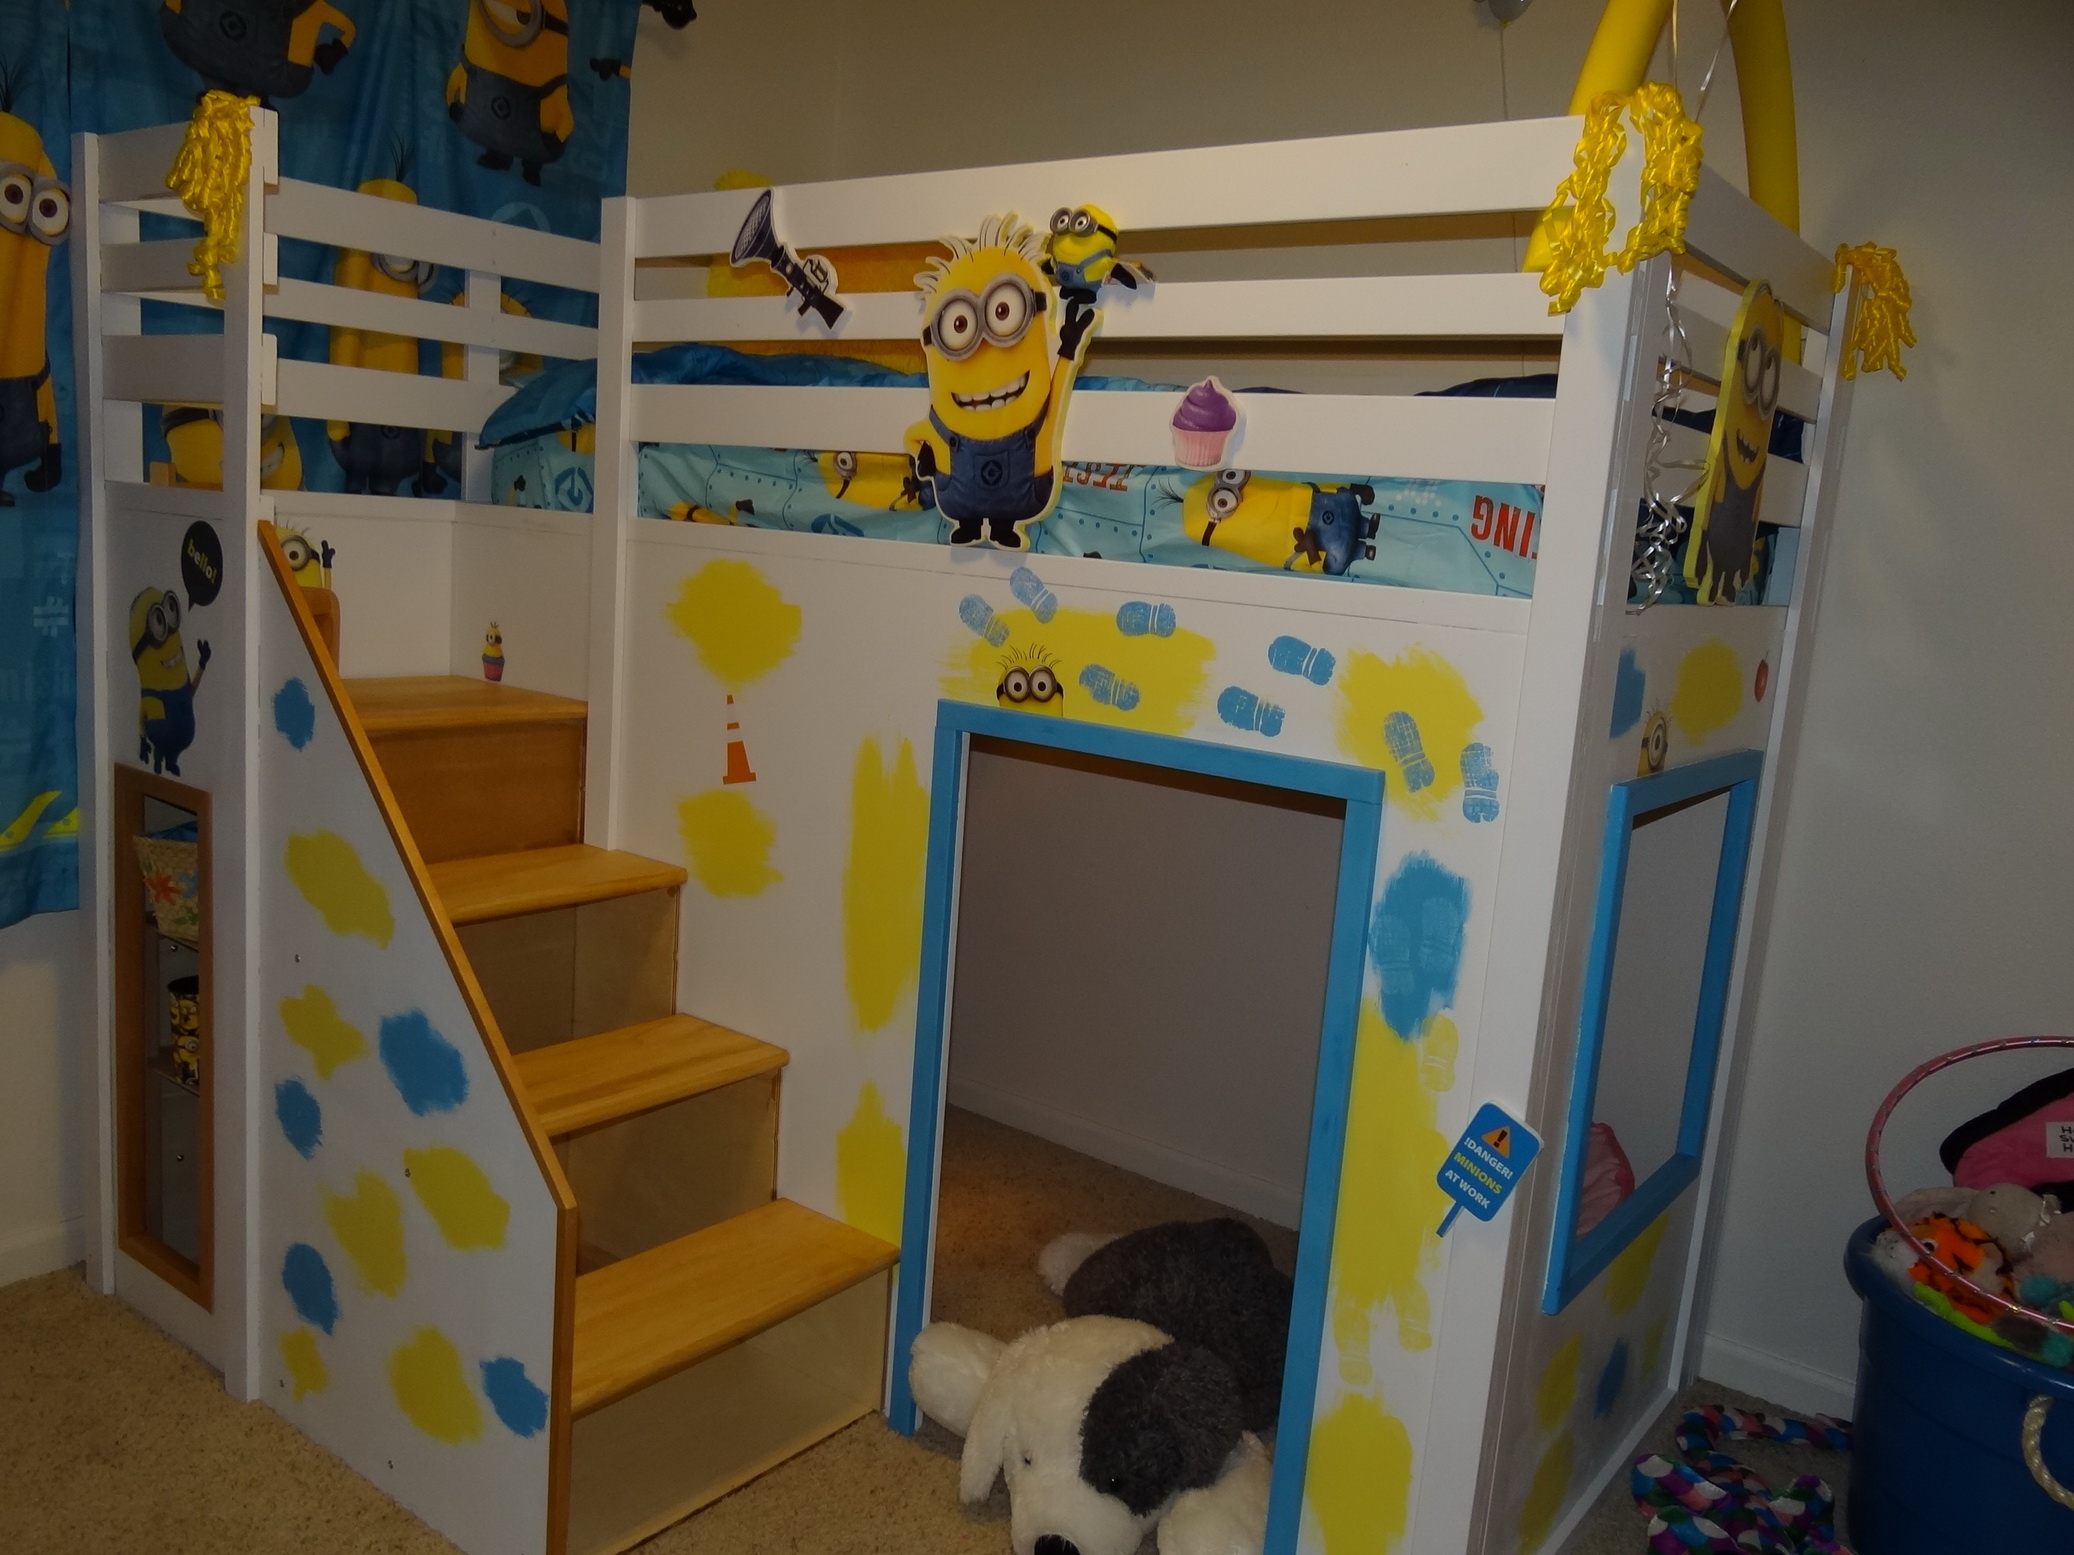
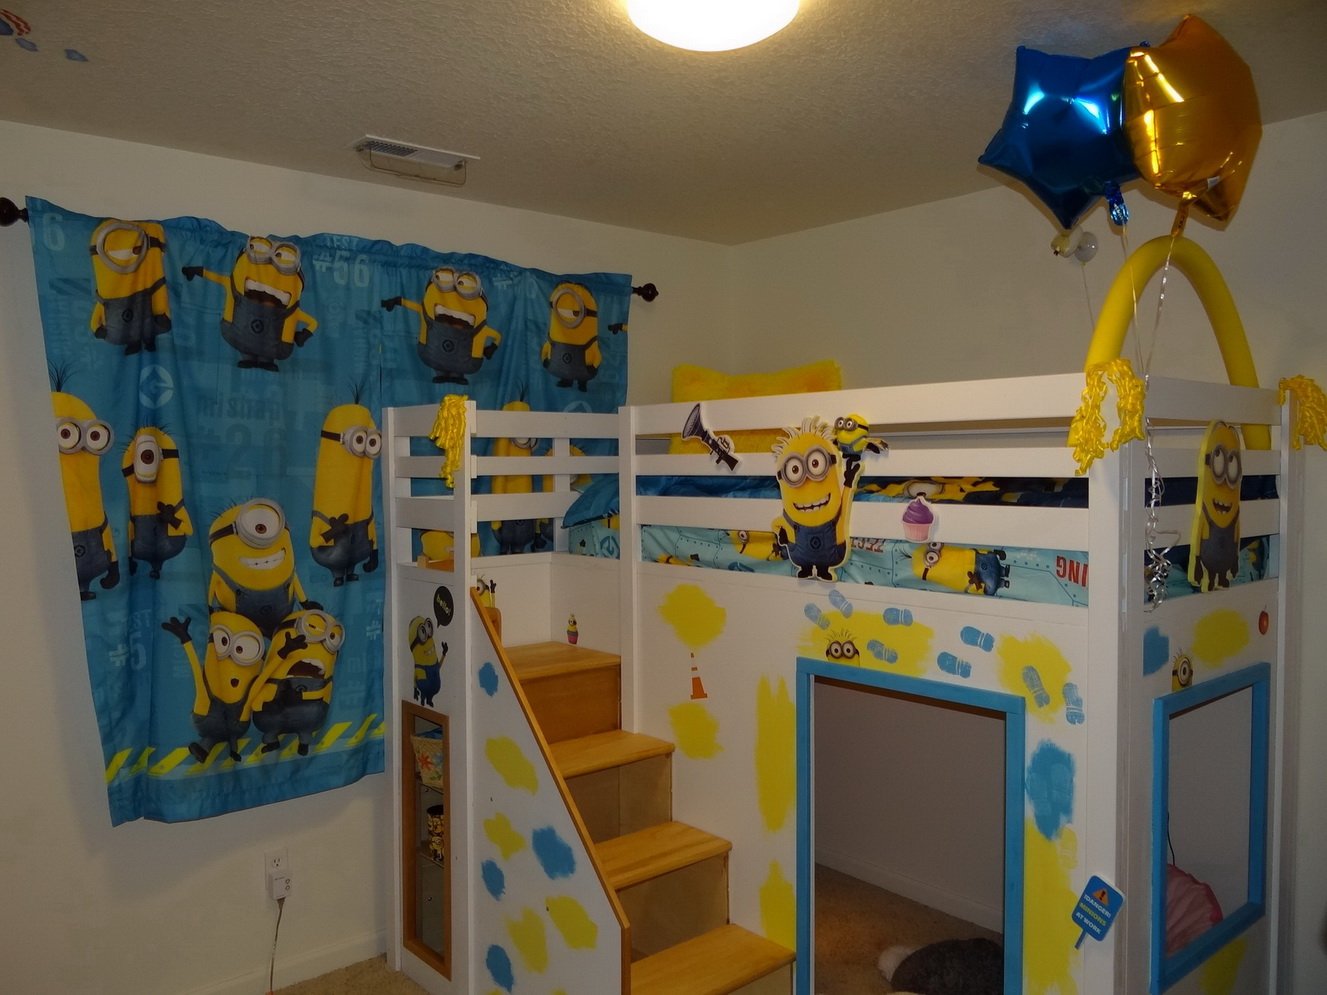
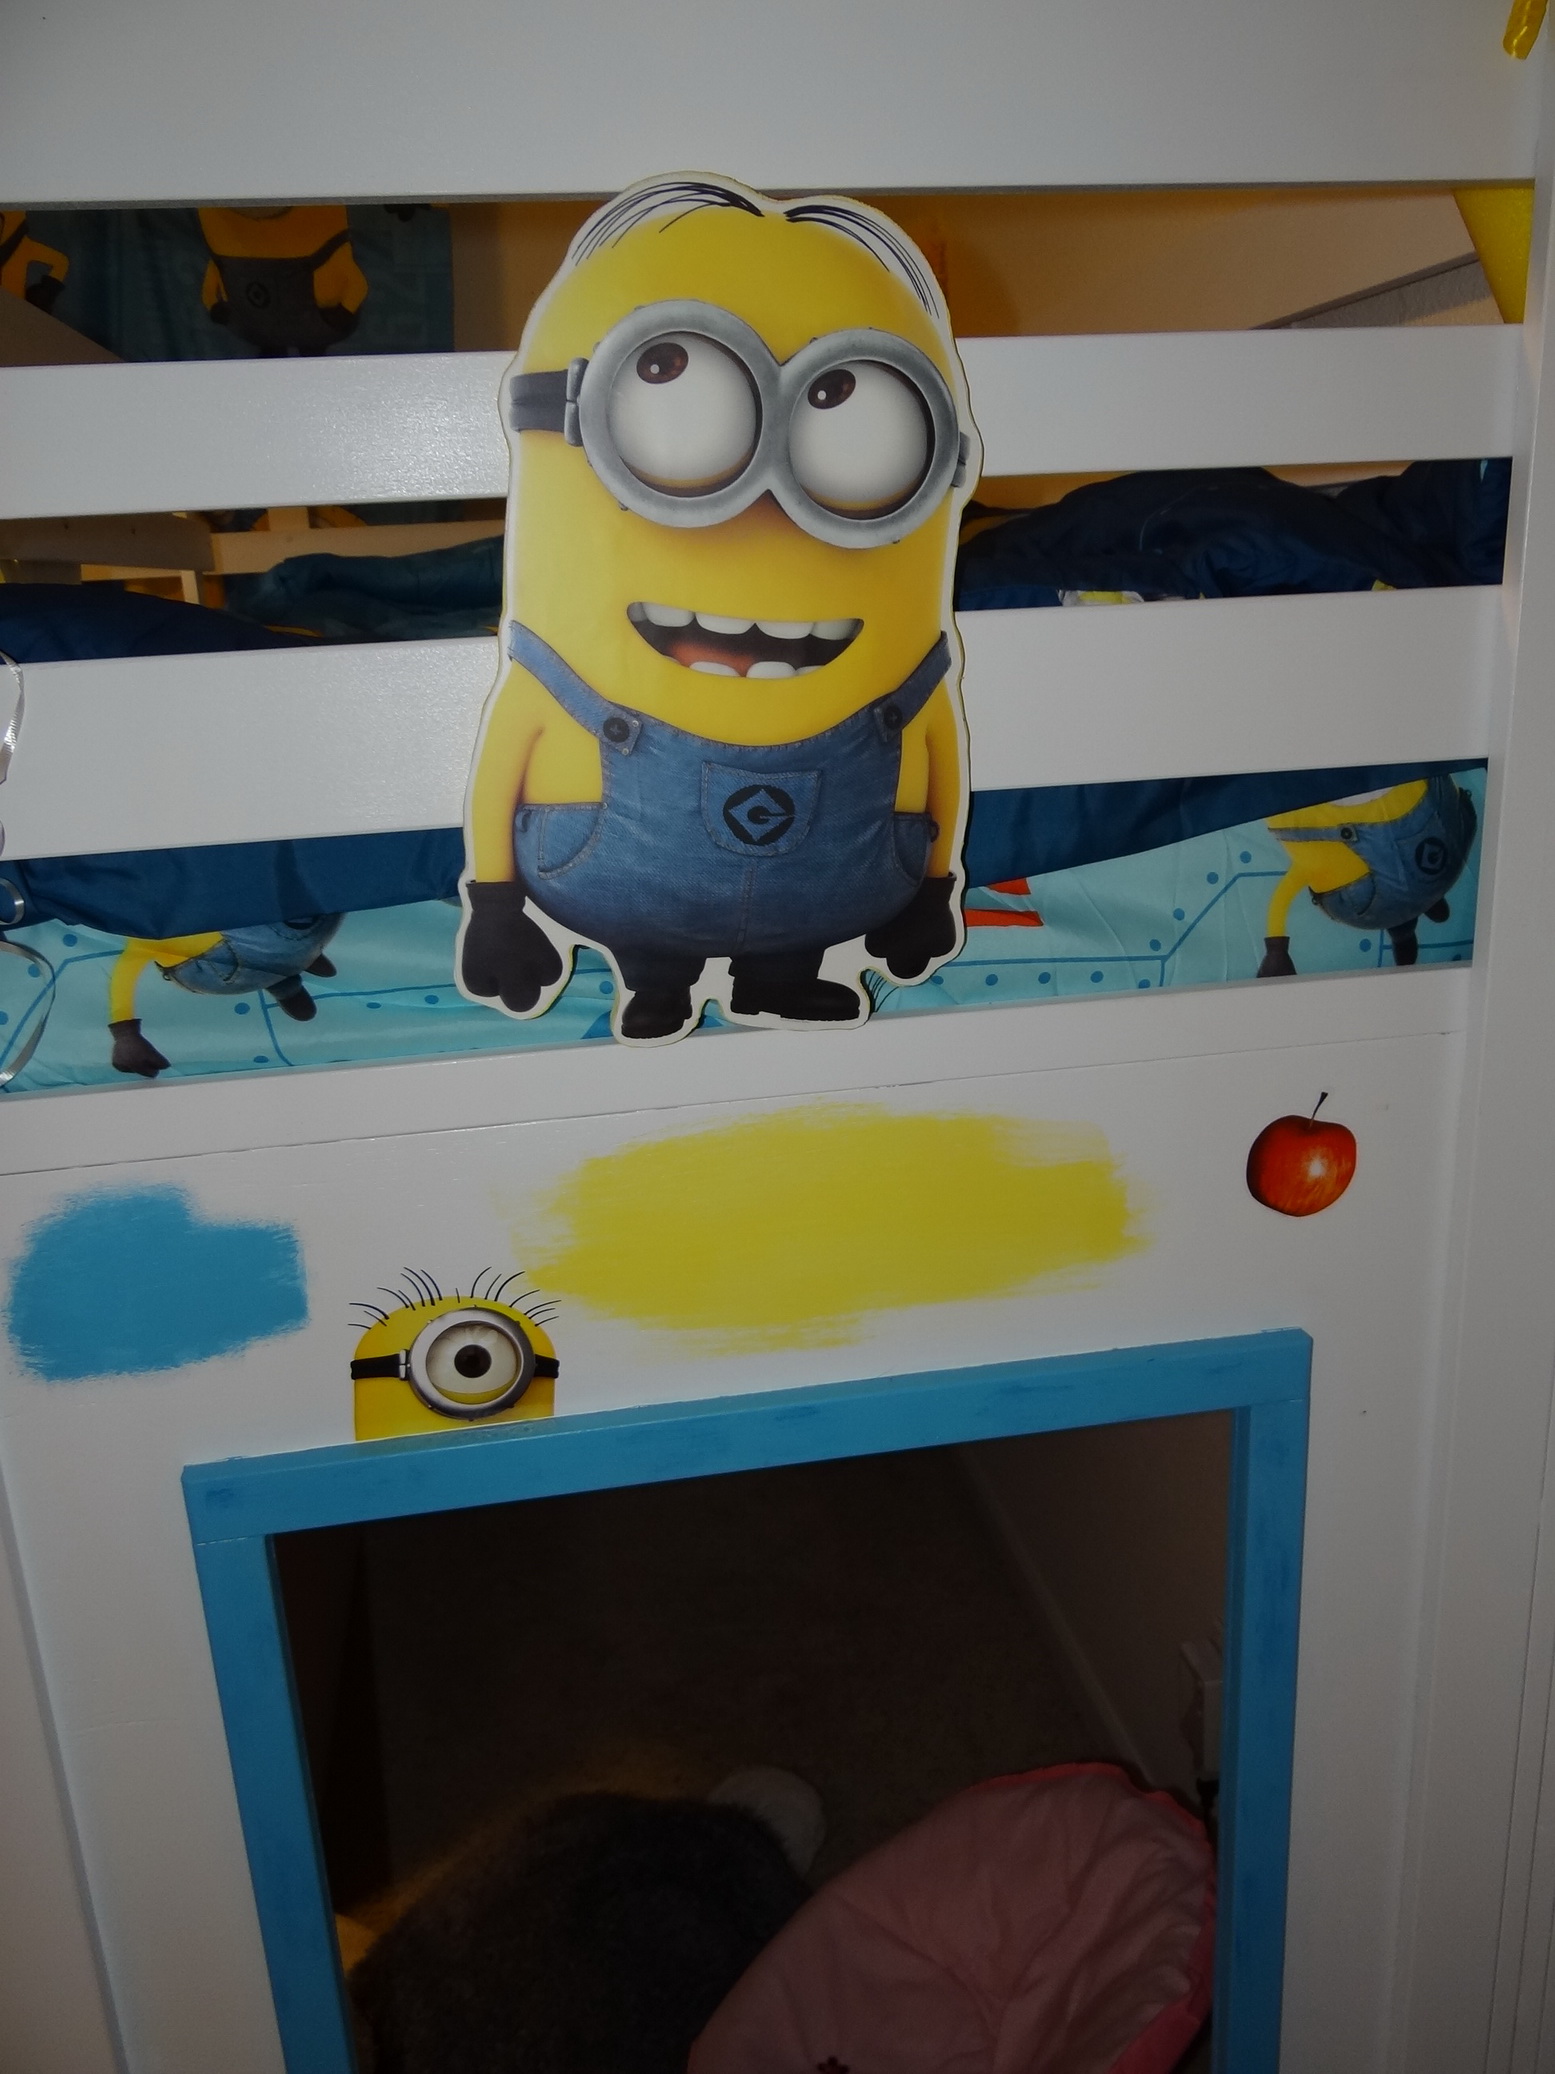
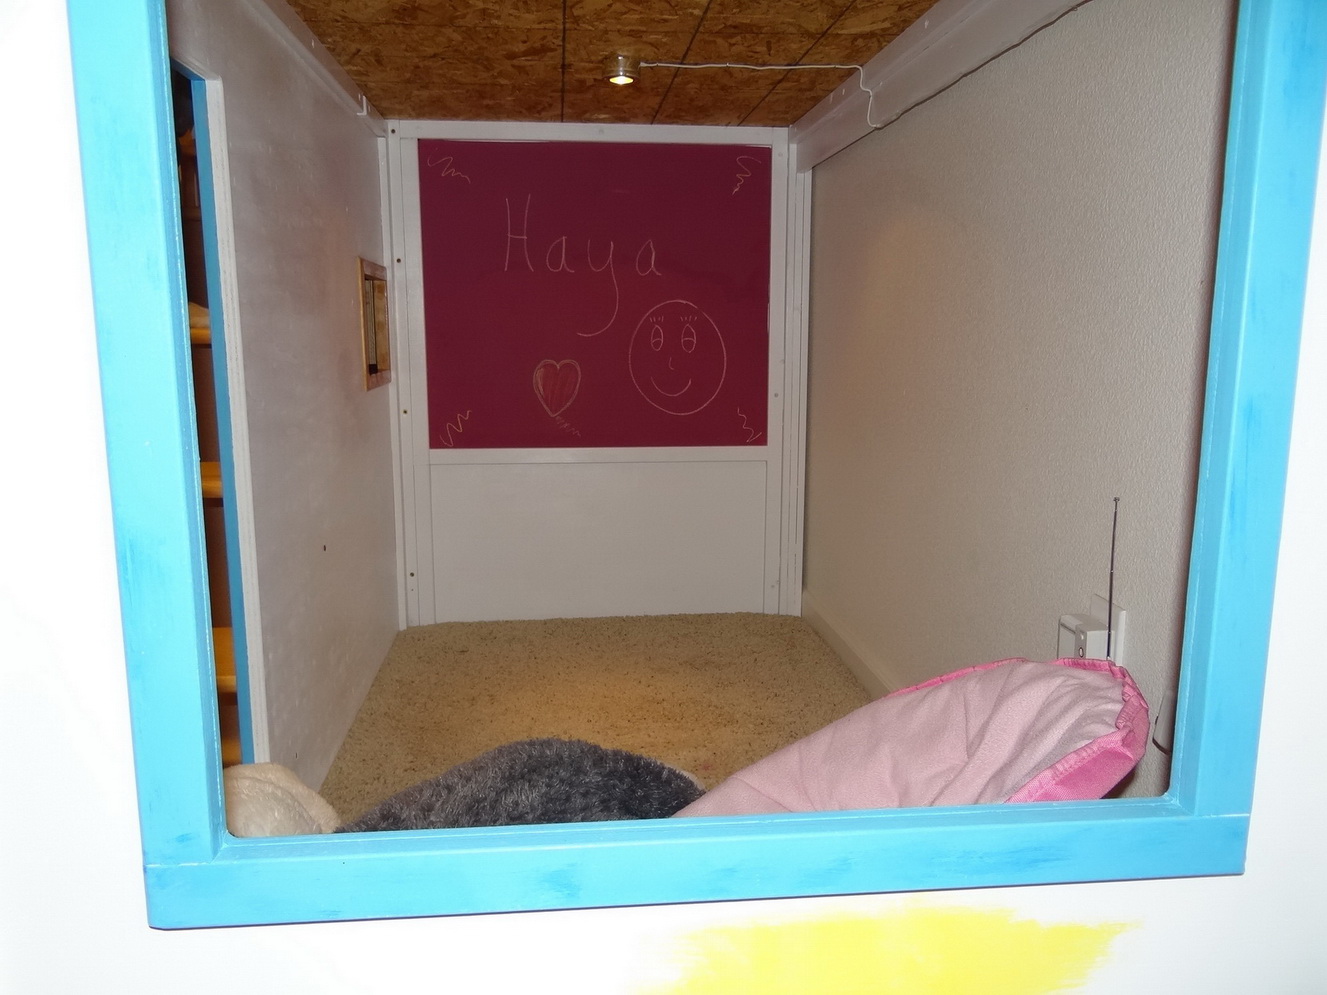
I built this bed when my kids and wife were away on vacation (again).  It was for my youngest (3 1/2 yrs) who loves, or shall I say loved Minions.  I had one month to get it done.  Room is small so I designed it with the stairs on the front.  I ordered minion stickers and cut out the shapes from plywood then glued the entire sticker.  The figures also serve as support for the rails.  

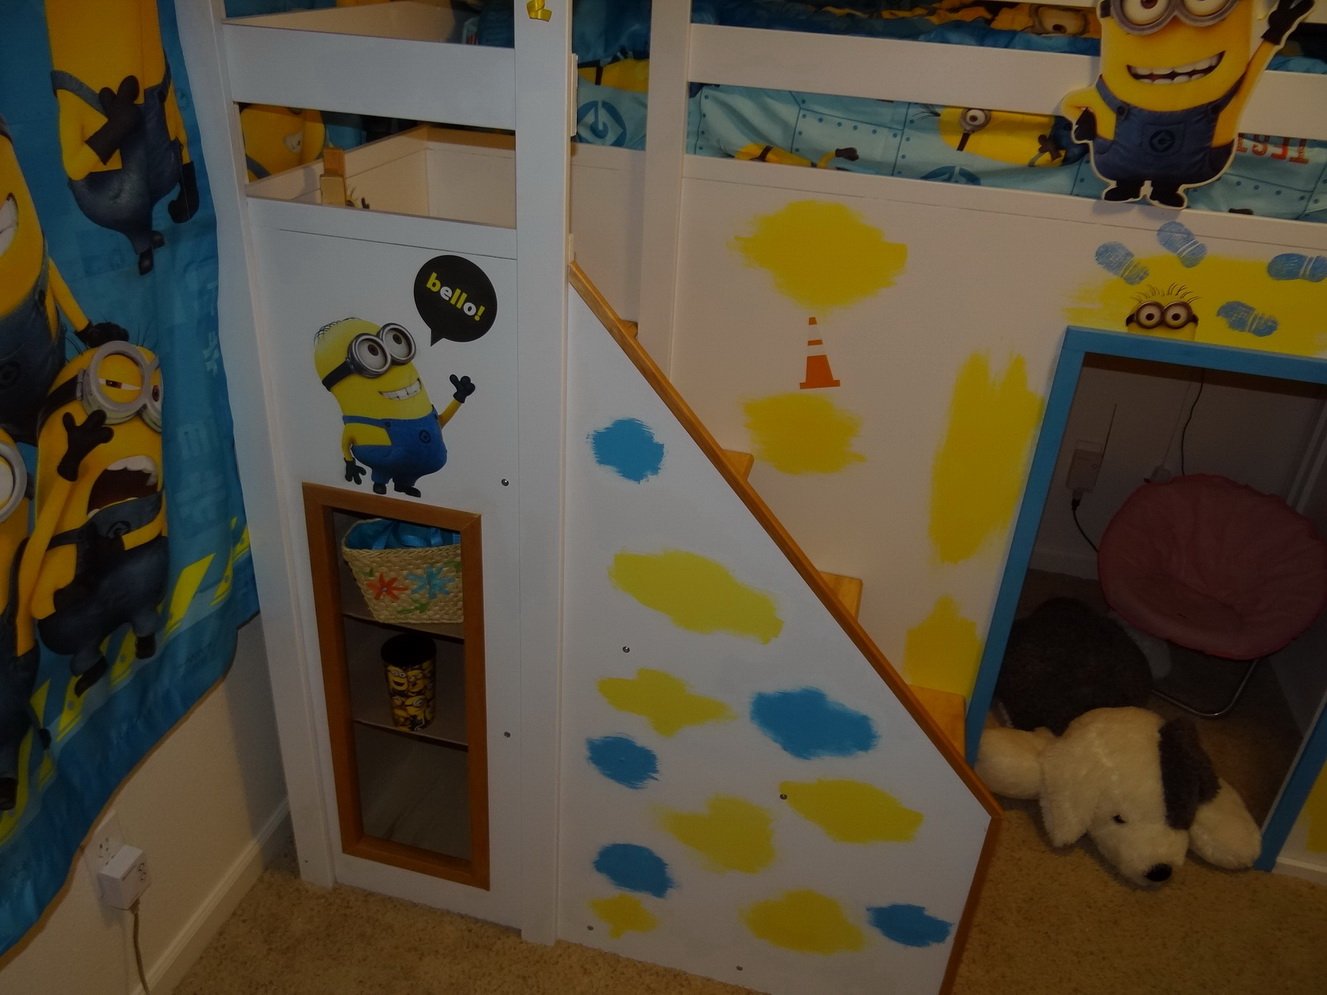
On the side of the stairs is a storage area while on the inside there's an opening with another storage area for chalk and toys!  There's a chalkboard inside the playhouse and a low voltage light. I left the side to the wall open which would allow using the bed in different configurations such that another bed would sit below it perpendicular to the top.  Just an idea.

Bad news is, after the initial day of excitement when she saw it, she asked for her toddler bed and didn't want Minions any more! 

The good news is that I lost about 15 lbs working on it part time after work!

The stairs are not yet finished as I will do two drawers and a shelf.

Unfortunately I never had time to put the design to paper.  It was all in my head mostly done during my commute to and from work.  I had a couple of big goof ups as a result as you would expect.


Estimated Cost
Need the final tally but I believe it was close to $500
Estimated Time Investment
Week Long Project (20 Hours or More)
Recommended Skill Level
Intermediate

Full Farmhouse Headboard

Submitted by Klem413 on Thu, 04/04/2013 - 07:22

We made this for our son with regular pine boards.

Estimated Cost
40.00
Estimated Time Investment
Afternoon Project (3-6 Hours)
Finish Used
Minwax Polyshades Classic Black
Recommended Skill Level
Beginner

Mini Farmhouse Side Table

We built this for our new grandson's nursery. The rest of his furniture is white and our daughter wanted to bring in some wood tones. We modified the table to be a little shorter than the plan so it wouldn't be too much taller than the arm of the glider in the nursery. I also added a 1x2 to act as a drawer stop.

Built from Plan(s)
Estimated Time Investment
Day Project (6-9 Hours)
Finish Used
I applied a wood conditioner and let it set for about 15 minutes. I used a combination of Minwax Weathered Oak and Early American. I brushed on the Weathered Oak first then followed with the Early American. I let that set about 15 minutes then wiped off the excess. I finished it with two coats of Polycrylic.
Recommended Skill Level
Intermediate

Comments

Farmhouse table and bench - white base with stained top

Submitted by Anonymous (not verified) on Mon, 05/15/2017 - 19:36

We went off the Farmhouse table and bench design but had to customize the length of the table and bench so that it fit in our kitchen space. The table was our first ever project and we made a few mistakes but learned from them and built the bench and are hoping to move up to the Farmhouse bed and then the fullstorage bed. 

Estimated Time Investment
Afternoon Project (3-6 Hours)
Finish Used
Used everlasting in chalk paint for bottom and top then brushed blue over the top let dry then stained the top with minwax dark walnut and wiped off. Applied a few layers until desired look. Dry brushed more blue and white in between stain layers then used polycrylic semi gloss finish
Recommended Skill Level
Starter Project

Outdoor Sofa

Submitted by Anonymous (not verified) on Tue, 05/25/2021 - 17:53

Made some adjustments to the original plans to help support larger cushions and pillows.

Built from Plan(s)
Estimated Cost
$400
Estimated Time Investment
Day Project (6-9 Hours)
Finish Used
Used a roll of tape as a guide to round the headrest and arms.
Recommended Skill Level
Beginner

Comments