Community Brag Posts
Rustic Bench as Wedding Guestbook
Having already built a rustic bench to go with my Farmhouse Table, I knew it would be the perfect guest "book" bench for my wedding. For only $15 (I had the lumber for the top on hand), and the help of all my bridesmaids during my bachelorette weekend, we built this bench in just about an hour. Everybody had a hand in it, which makes it even more meaningful. It sits at the foot of the Farmhouse Bed my husband and I built from reclaimed barnwood from my father. I love that we have something so hand-made and sentimental to commemorate our wedding celebration. It makes me smile every time I look at it!
Built from Plan(s)
Estimated Cost
$15
Estimated Time Investment
An Hour or Two (0-2 Hours)
Finish Used
I sanded the entire bench with 80,150,200. I primed the entire bench (including the underside, just to cover all my bases) then painted 2 coats of semi gloss white, sanding with 200 between coats. To make the center design, I printed out my art onto computer paper, covered the back with graphite (just scribbling with a pencil) then taped it to my bench. Trace the outline of your art with a pencil and a firm hand. When you remove the paper, you'll see the outline of your design. I traced it with silver paint pen, then filled it in. After I had all my signatures I sealed the top with two coats of Mod Podge (but polycrylic would probably work too).
Recommended Skill Level
Starter Project
Happy Mother's Day
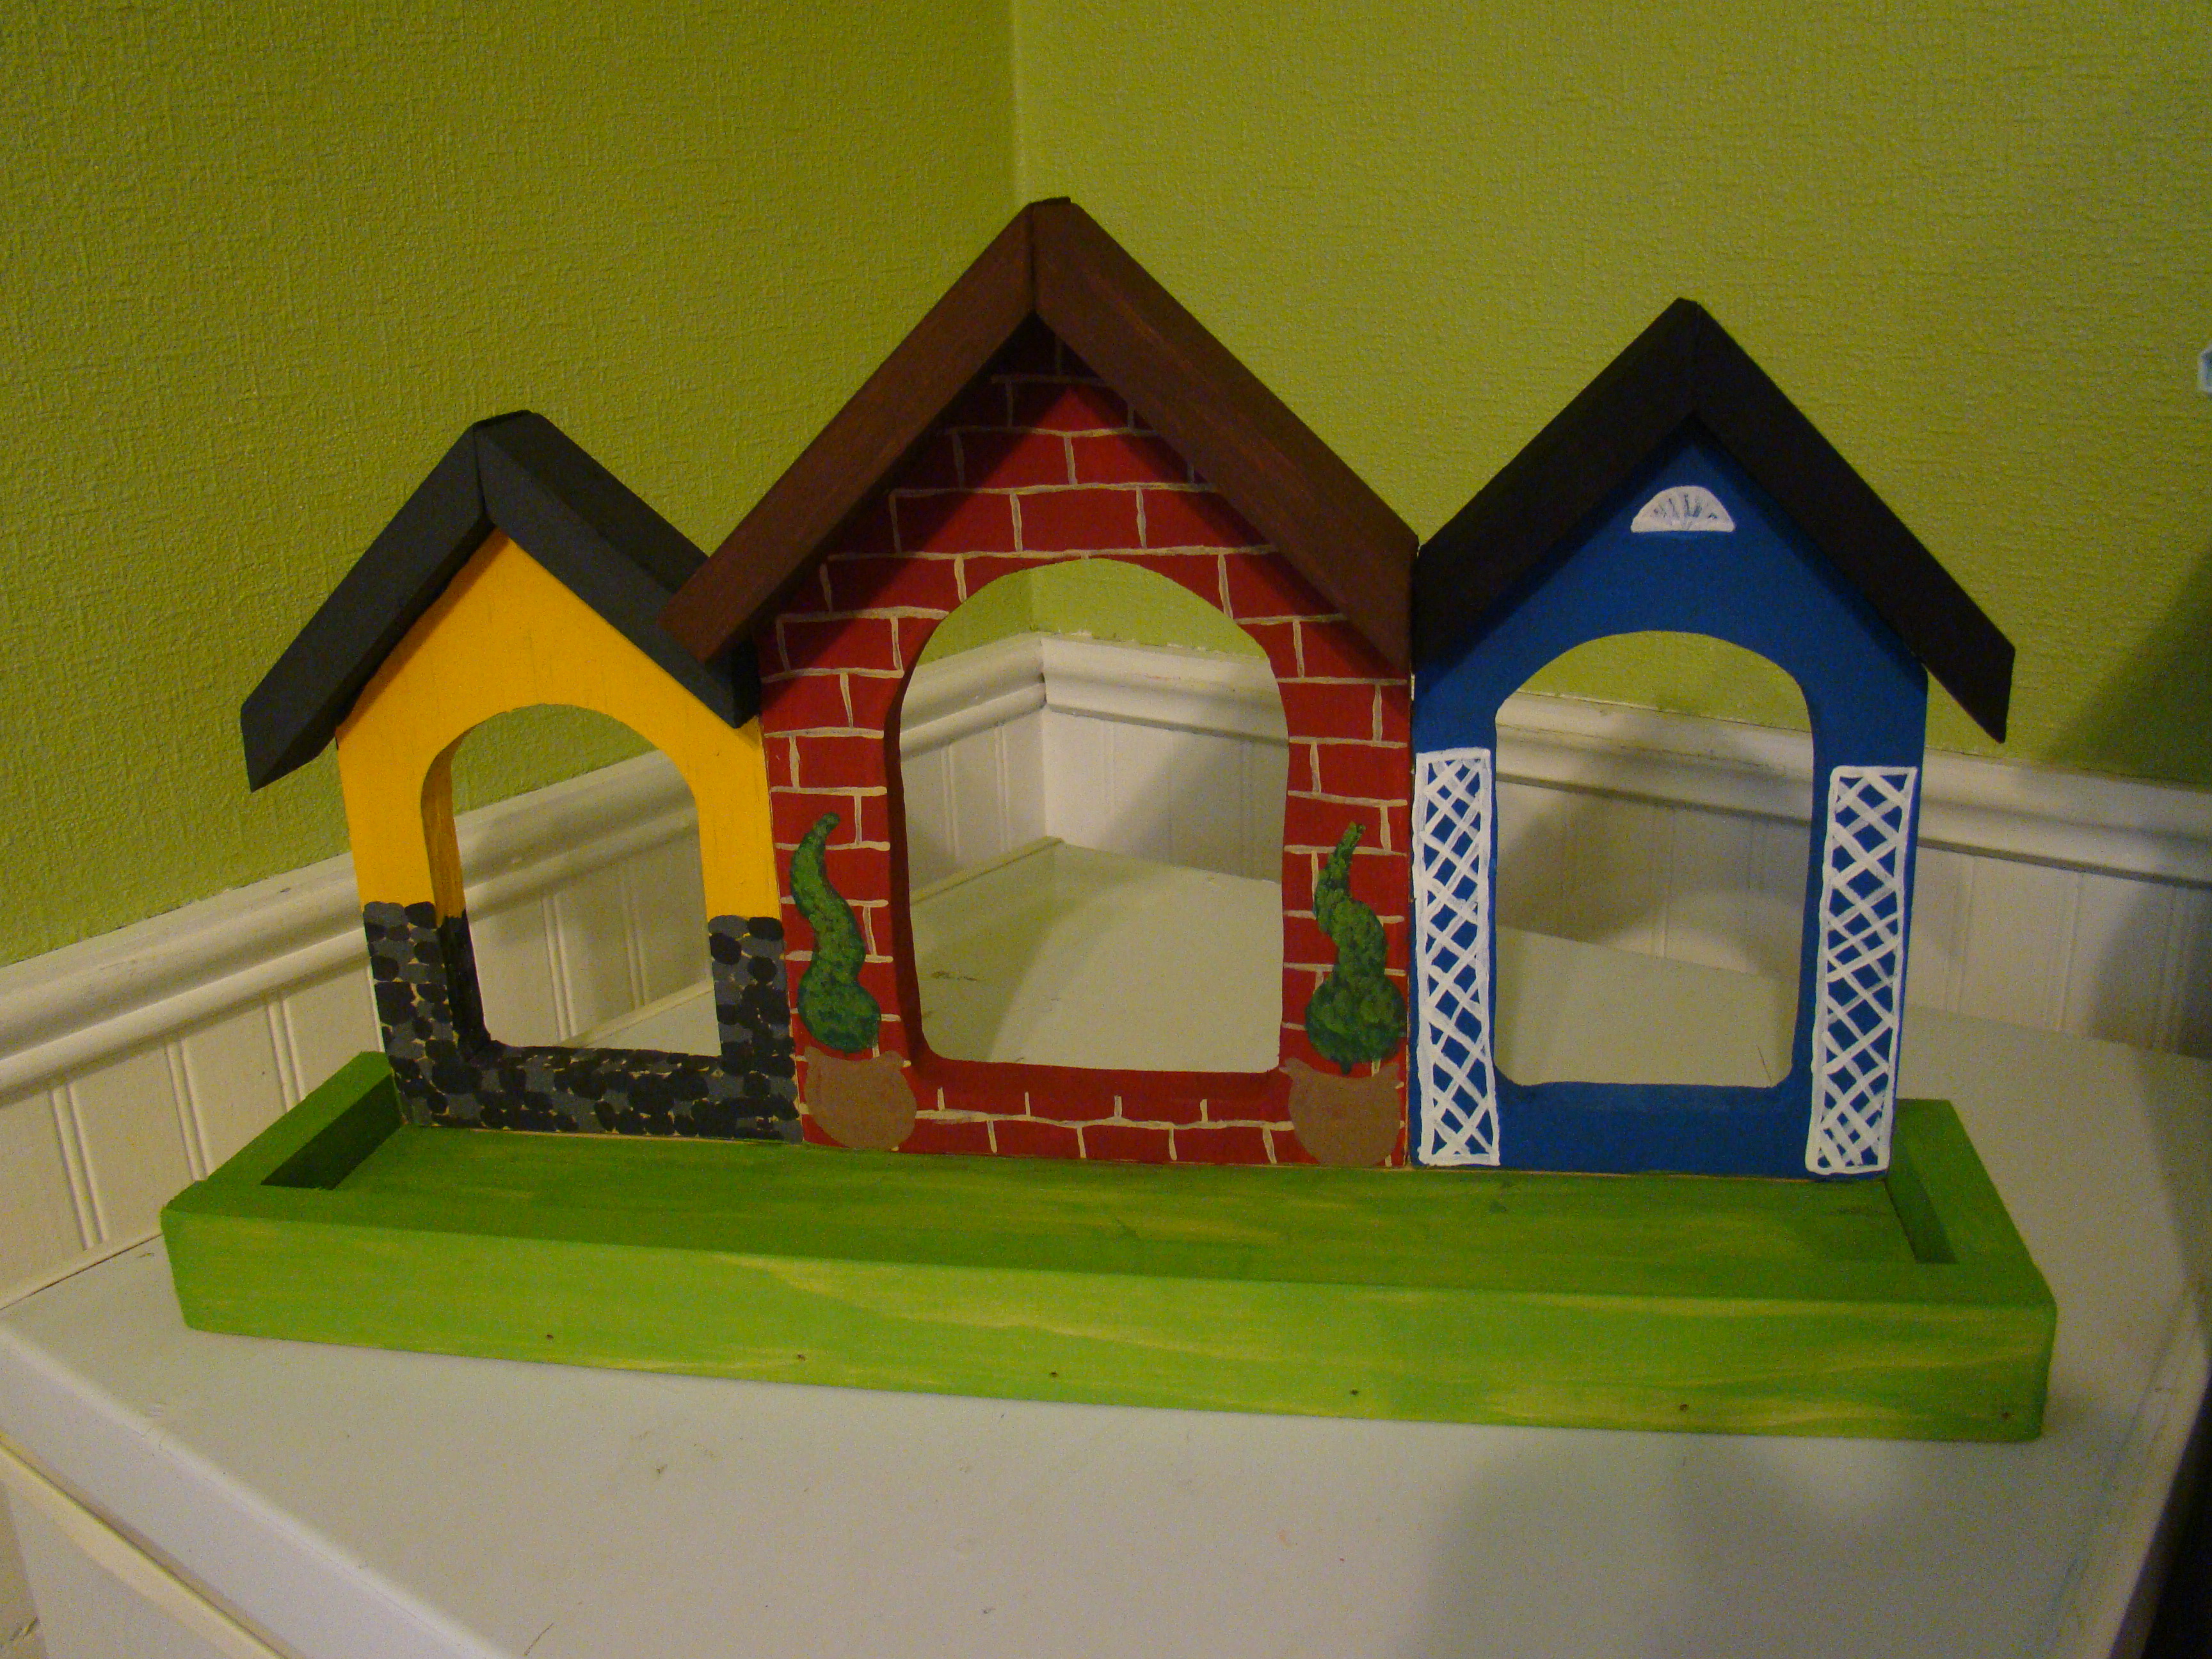
My homemade mother's day gift for my mother in law. She likes to sit in her living room looking out the big picture window at the birds eating at her birdfeeders. It's also a favorite passtime of my son who spends time there occasionally. What better gift than this! I wanted to do something a little less simple than the single "house" so I made the main one smaller, and then added two more houses to make bird townhouses.
Estimated Cost
$10
Estimated Time Investment
Afternoon Project (3-6 Hours)
Finish Used
acrylic tole paints. Will seal it with something suitable for outdoor use.
Recommended Skill Level
Beginner
Triple Pedestal Farmhouse

My husband and I were on the search for a dining room table. We loved the look of Pottery Barn and Restoration Hardware but did not want to spend the money for it. Then we came across the plans for this table. We had already used Ana's plans for a Restoration Hardware coffee table that we loved, so figured we'd give this table a shot. These pictures don't do this table enough justice. My husband and I LOVE the plans and everything about this table! It has so much detail and character as you would see from expensive stores. To top it off, we got it complete just in time for having our family over on Easter. Thank you Ana for sharing this gorgeous plans!
- Amber and Dave


Built from Plan(s)
Estimated Cost
I would estimate around $200 but we bought some tools that we can use on other projects as well :)
Estimated Time Investment
Week Long Project (20 Hours or More)
Finish Used
Minwax Special Walnut Stain - Two coats
Minwax Fast-Drying Semi-Gloss Polyurethane - Three coats
Minwax Fast-Drying Semi-Gloss Polyurethane - Three coats
Recommended Skill Level
Advanced
Comments

Wed, 04/01/2015 - 16:29
Beautiful! I've been
Beautiful! I've been drooling over this table too. Yours looks amazing! It looks longer. How long did you make it?
Thu, 04/02/2015 - 11:43
Thanks so much! It is longer
Thanks so much! It is longer than I thought it would be. I was originally going to do three chairs on either side and two at the ends. But I love how it turned out even better. We followed Ana's plans and is 106" long. Fits perfect on 8x10 rug! :)
Thu, 04/02/2015 - 13:14
Beautiful!
what beautiful work! The stain choice is just perfect. Do you mind my asking where you bought your chairs? I'm having a difficult time finding chairs with a plain fabric.
Fri, 04/03/2015 - 09:11
Thank you! We actually got
Thank you! We actually got them from Target. We have the counter stools in dark grey for our island and we really liked those so we decided to go with the same for the dining room.
http://www.target.com/p/threshold-brookline-tufted-dining-chair-set-of-…

Mon, 04/06/2015 - 16:14
Gorgeous! I love the look of
Gorgeous! I love the look of this in your room!
Thu, 04/23/2015 - 11:06
Thanks so much Ana!! We LOVE
Thanks so much Ana!! We LOVE it!! Already had several dinner parties and get SO many compliments! :)
Patio Chair

The plans were very easy and the chair came together nicely and quickly. I used all 2x4's instead of 2x4's + 2x6's and alternated 1x2's for dimension. My husband is a pretty big and tall guy and he really liked how the chair felt sitting in it. Very roomy for even him. I could've gotten this done in about an hour, except where I live it was about 110 degree dry heat so I had to take a lot of water breaks. But overall, I love the chair!!!
Estimated Cost
$25.50
Estimated Time Investment
An Hour or Two (0-2 Hours)
Finish Used
Behr Desert Sand Semi Transparent
Recommended Skill Level
Starter Project
Corner bench

I always wanted a corner bench for the kitchen table at my family cottage. Lots of room for everyone and little kids don’t fall off. Love this plan. Thanks for sharing it!
Comments
Tue, 10/05/2021 - 10:10
Excellent gathering place!
Thank you for sharing, it looks beautiful and functional!
Tryde Side Table
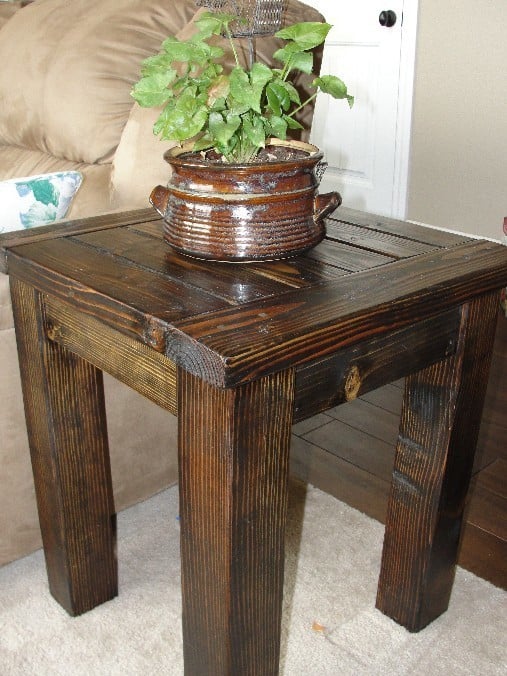
This was my very first project, with a little help from the husband.
Built from Plan(s)
Estimated Time Investment
Day Project (6-9 Hours)
Finish Used
Minwax Jacobean stain and polyurethane.
Recommended Skill Level
Beginner
Mother's Day

I just wanted you to see what a great Mother's Day gift your planter made. It was a great project for a 4 year old grandson!!!
Thanks, Ana
Estimated Cost
$10.00 including plants.
Estimated Time Investment
An Hour or Two (0-2 Hours)
Recommended Skill Level
Starter Project
Comments
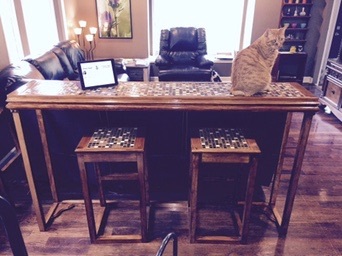
Tiled Bar & Bar Stools
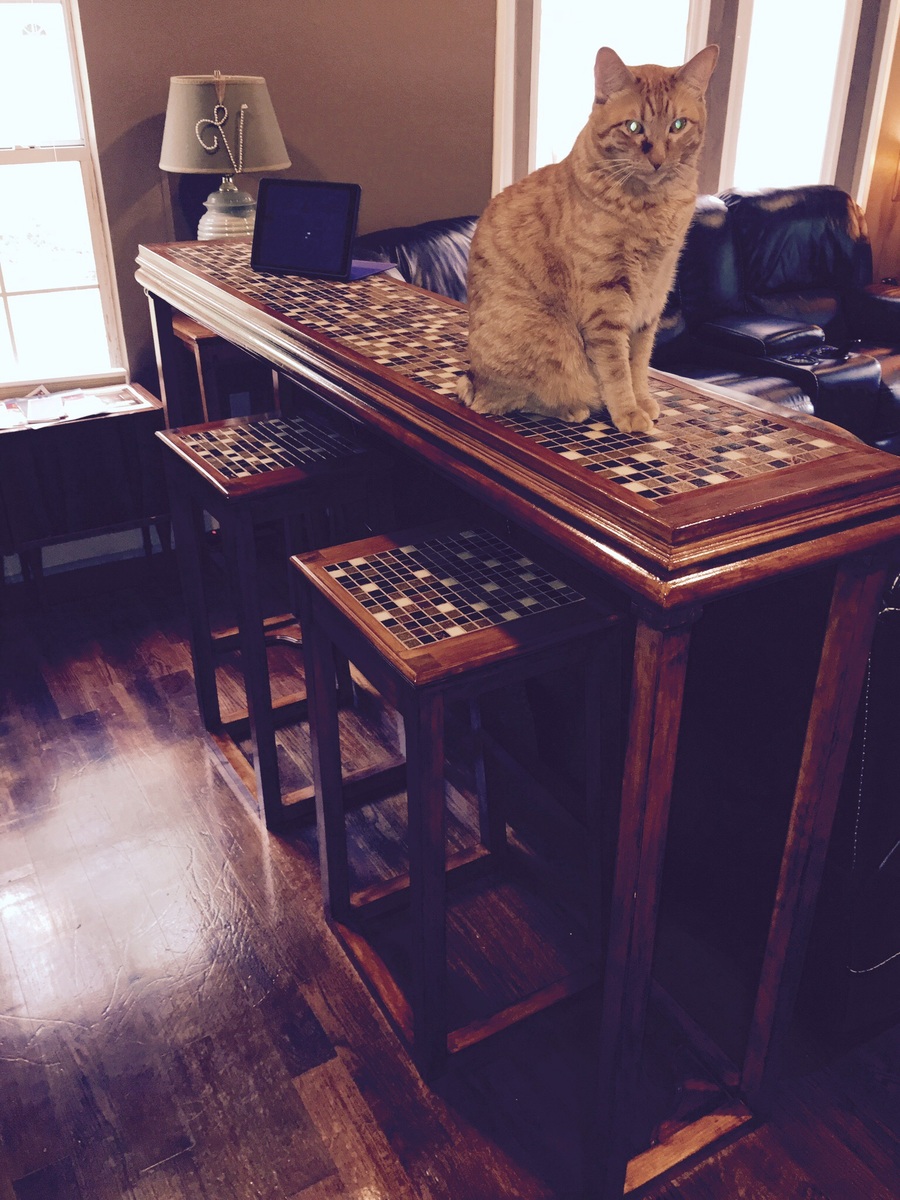
This was my second Anna project! I changed this one up quite a bit (size and style) so it would fit the area were I wanted to use it. I just love how it turned out!
The tiles were left over from my kitchen backsplash. They are inset so that they are practically flush with the wood on the top.
Total cost: ~ $150.00 for the bar and 3 bar stools.
Built from Plan(s)
Estimated Cost
150.00
Estimated Time Investment
Weekend Project (10-20 Hours)
Finish Used
Antique Walnut Gloss - stain & poly in one
I found the stain & poly in one to be hard to work.
I found the stain & poly in one to be hard to work.
Recommended Skill Level
Beginner
Comments

One arm sectional with table from scraps
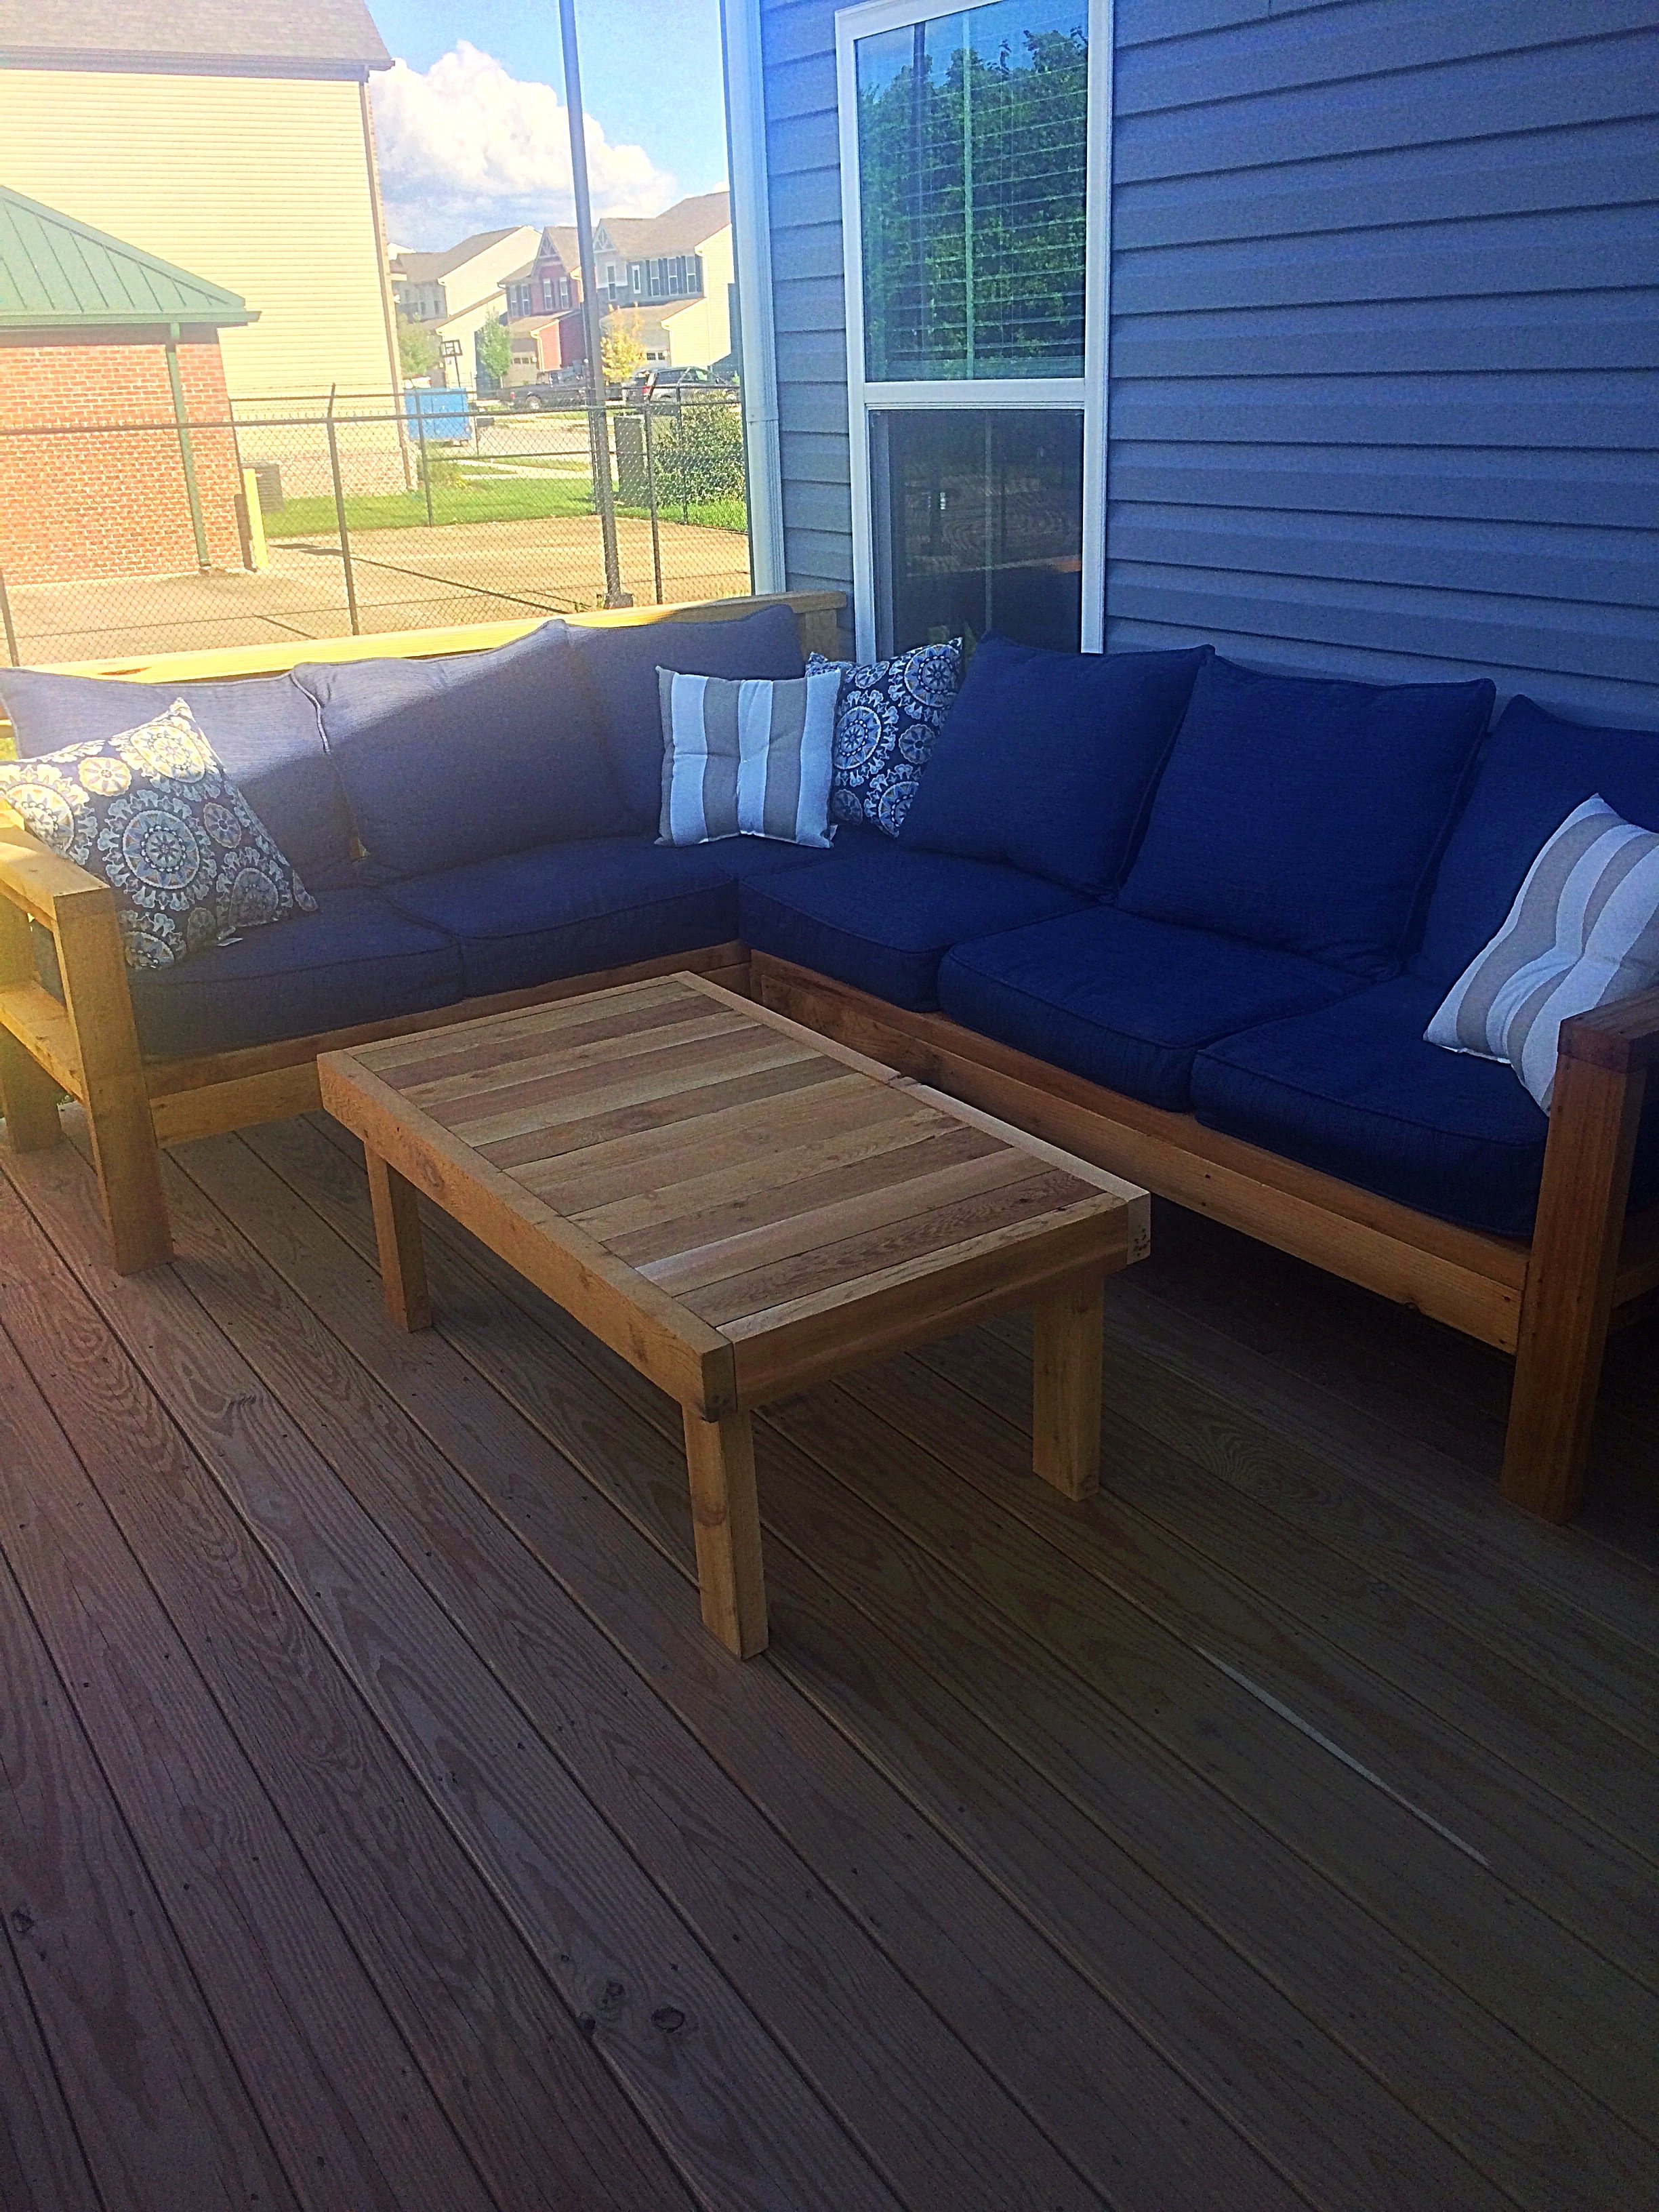
We built the one arm sectional but 8 ft cedar was all we could buy. So with the scraps left over we built the coffee table to match. Couldn't be happier with it.
Built from Plan(s)
Estimated Cost
$250 without cushions
Estimated Time Investment
Weekend Project (10-20 Hours)
Finish Used
None
Recommended Skill Level
Beginner
Children Book Ledges

I’m a complete beginner without any sort of wood working experience. The only experience I have is taking a jigsaw to my dresser while my husband was gone for the day.
When I was visiting my in-laws, I decided to start a project. I knew the 10$ ledges were a great easy first project. My main lesson from the project is to check the state of your wood! I was at a home improvement center that goes and gets the wood for you. I had it bundled and didn’t bother to check it until the next day. By that time there was a couple of feet of snow and all the highways and roads to the home improvement center was closed, and most in South Dakota for that matter. (I’m going to venture a guess that Ana probably deals with worse conditions in her neck of the woods.) Any who, the wood was a bit rough and ugly…even for pine, but I decided to deal with it. I was snowed in and may as well do a project while I was!
The only adjustment I had to make was cutting them in half since an 8 foot shelf wouldn’t travel back home with me in our SUV. This ended up making them a bit off when I put them on the wall, but it was a necessity and I’ll deal with it. I used a table saw and belt sander for the most part. It was the first time I used this equipment. After my husband gave me a lesson, he had strict orders to back off and let me do the work. The plans work absolutely great. My husband and I agree that the shelves create a whole new atmosphere in the room.
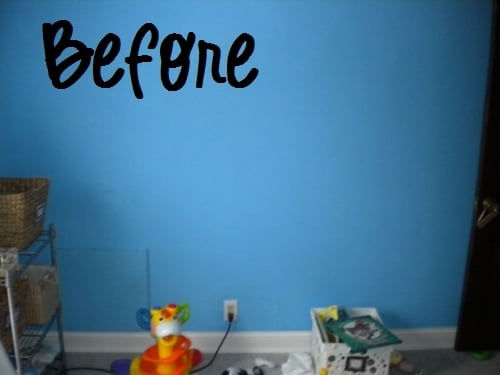
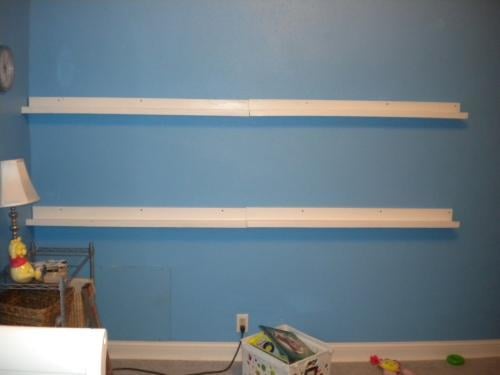

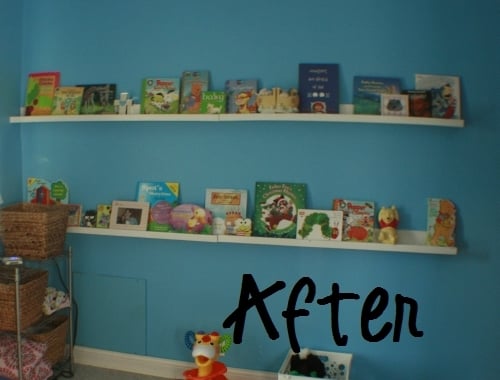
Estimated Cost
$20.00
Estimated Time Investment
Afternoon Project (3-6 Hours)
Finish Used
I have previously tried semi-gloss latex paint to get white furniture. I have had problems with yellowing with this method. I decided to try white enamel paint this time. It definitely created a more finished look. I used two coats of primer first, then about four coats of enamel. The look is a smooth shiny white finish.
Recommended Skill Level
Starter Project
Toybox with lid

This entire project was built with 3/4 MDF plywood. The lid is 3/4 MDF with sides routed for rounded edge for professional appearance. Inside the box are two friction hinges ( one on right and one one left) to support the lid.
On the bottom of toybox are four casters with mounting plates that attach to bottom. Two of the wheels have locks while 2 are 360 degree motion.
The paint is Signature Series and primer used is Kills high hiding low odor.
The letters on the front are 4 inch letters purchased from BIGLOTS. Holes were countersunk into the letters, screwed to front of toybox, and filled with wood filler.
I couldn't be happier with how this project turned out.


Estimated Cost
$50
Estimated Time Investment
Weekend Project (10-20 Hours)
Finish Used
Valspar Satin Signature Series at Lowes
Recommended Skill Level
Intermediate
Sofa Table.jpg
Just finished this table and am very pleased with how it came out. My original intention was for it to match the gray finish of the one posted with the plans, which it originally did. However, after applying several coats of polyurethane, it changed the color to bring out much more of the brown and now having very little gray. I was also originally planning on adding the hardware on the corners and legs, but decided that because of the way the finish turned out, it would detract more from the appearance than it would add. Just a tip for anyone who is going to try and use the same finishing treatment as the one in the original plan with the vinegar and steel wool. I made the mixture and let it sit in a mason jar, waiting for some visual change to occur to the solution so as to match the picture on the website. After letting it sit for about a week and a half, and not seeing any change and only having what appeared to be clear vinegar still in the jar, I decided to try it out on some scrap wood. It worked just fine. So I guess my point is that you shouldnt be surprised if the solution doesnt appear any different, just open the jar up and try it out.
Built from Plan(s)
Estimated Cost
$100
Estimated Time Investment
Week Long Project (20 Hours or More)
Finish Used
I used the black tea treatment as described in the directions. I also used the steel wool and vinegar solution after applying the tea. I then used the steel wool I still had to sand down the finish. I then applied three coats of a water based polyurethane to he body and four coats to the top.
Recommended Skill Level
Beginner
Comments
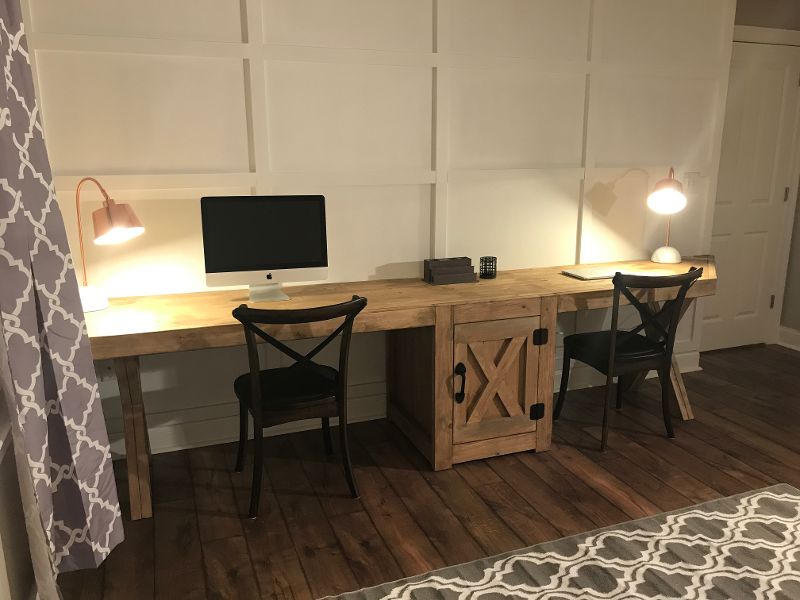
Double Barn Desk
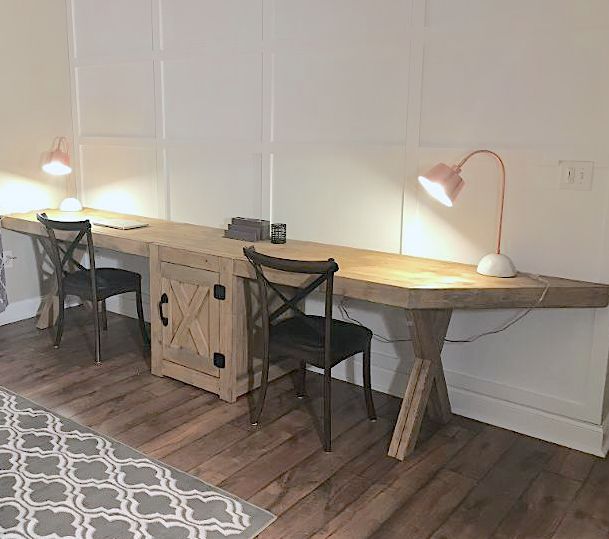
Built this from a picture my wife showed me so I do not have plans just customized it to the room.
The desk top was made from wood planks, put together with Kreg Jig and glue.
The cabinet was made with 2x4’s and pine boards.
The legs were made from 2x4’s with a 30 degree angle.
The desk and cabinet were wrapped in 2x4’s
The hinges and door handle were bought at home depot.
Desk Top is 12 Feet by 26 inches.
Desk Top Planks (4) 8X10
Cabinet (3) 2x4 (1) 3x1 (5) 5x1
Trim (5) 2x4
Tools used
Kreg Jig
Square
Tape Measure
Drill
Sander
Glue
Table Saw
Miter Saw
Kreg Screws 1 1/4 – 2 ½.
Project Cost approx. $200
Used weathered Milk Paint for the finish.
Built from Plan(s)
Estimated Cost
Approx 200.00
Estimated Time Investment
Week Long Project (20 Hours or More)
Finish Used
Weathered Milk Paint
Recommended Skill Level
Intermediate
See Saw By: Ray

The grandchildren love the see saw. it is very sturdy. Great plans Ana.
Thanks
Ray
Built from Plan(s)
Comments
Mon, 10/04/2021 - 16:44
Wonderful!
Such lucky grandchildren! Thank you for sharing, it looks fantastic.
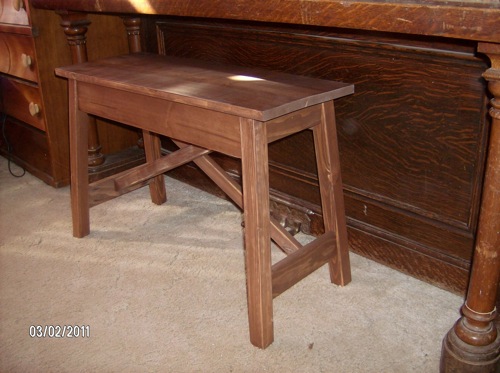
Rustic X Bench
This was a really cute bench that I thought would look nice paired up with my grandmother’s piano we’d inherited after she passed. My 13 year old daughter has been taking lessons and needed something better than a folding chair to sit on when she practiced (at least I thought so).
We did modify it a bit. We made it a bit taller for her to be able to sit comfortably at the piano. We also ran into a little bit of trouble when putting this together because the shopping list isn’t exactly right on the plans. Other than that, this was a great plan, easy to do and very inexpensive. Even if you had to buy the stain (which we didn’t as we had some left over from another project) it should still only cost about $27 or so. So for under $30 you’ve got this great bench that is super cute and very functional. Can’t beat that!!!!
Thanks Ana for posting the plans and allowing us to all live in your world! This is a great website and a wonderful online community. I check out the site everyday to see what’s new!
Thanks again!!!!!!
Built from Plan(s)
Estimated Cost
$18.50
Estimated Time Investment
An Hour or Two (0-2 Hours)
Finish Used
Minwax water-based stain, clear tint in Coffee
Recommended Skill Level
Starter Project
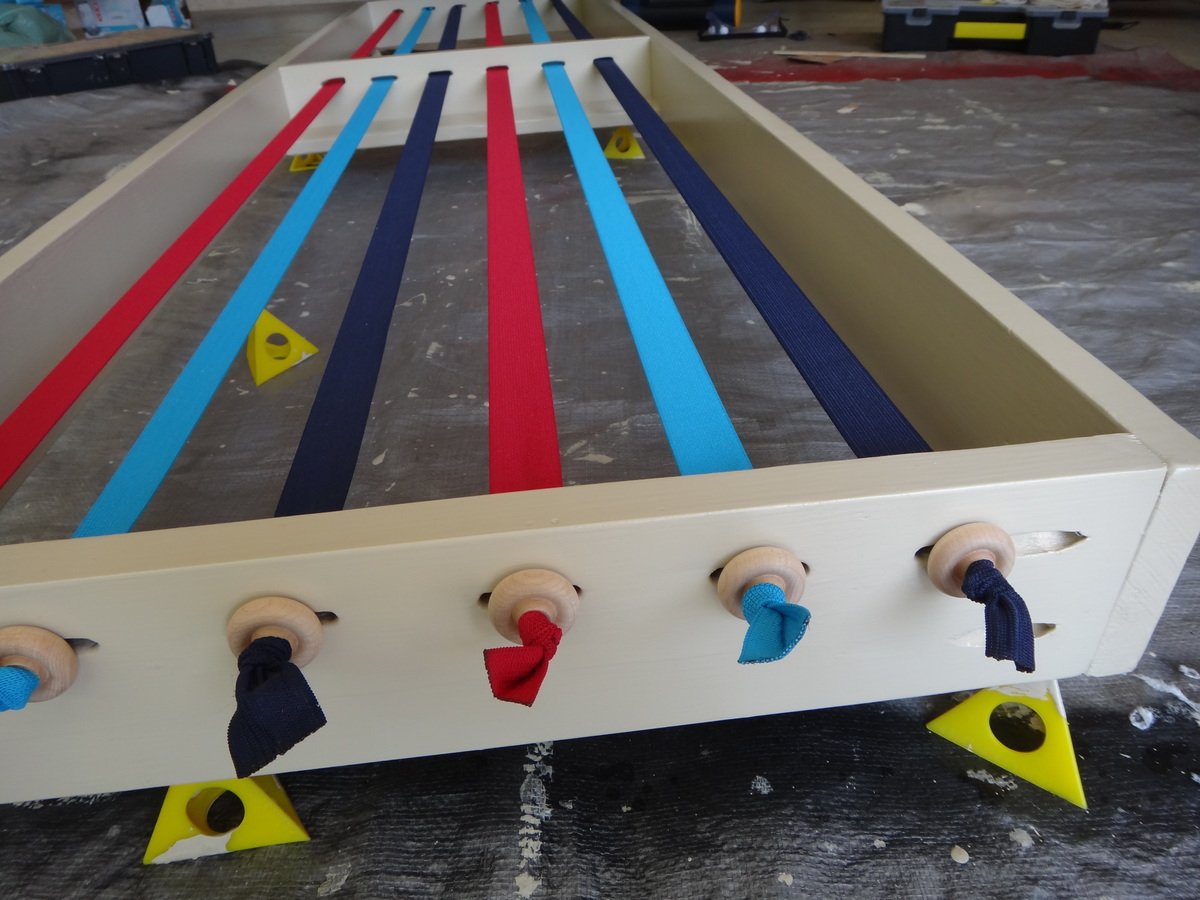
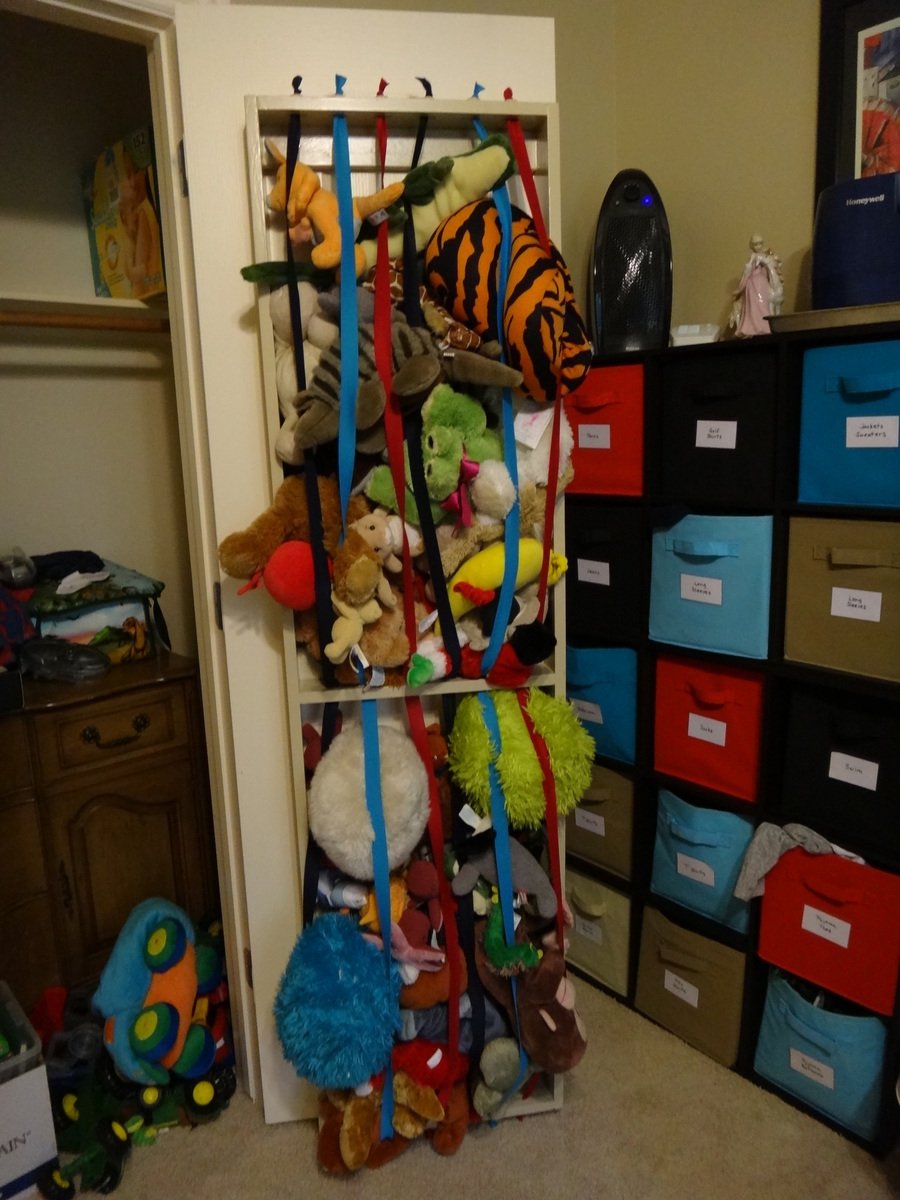
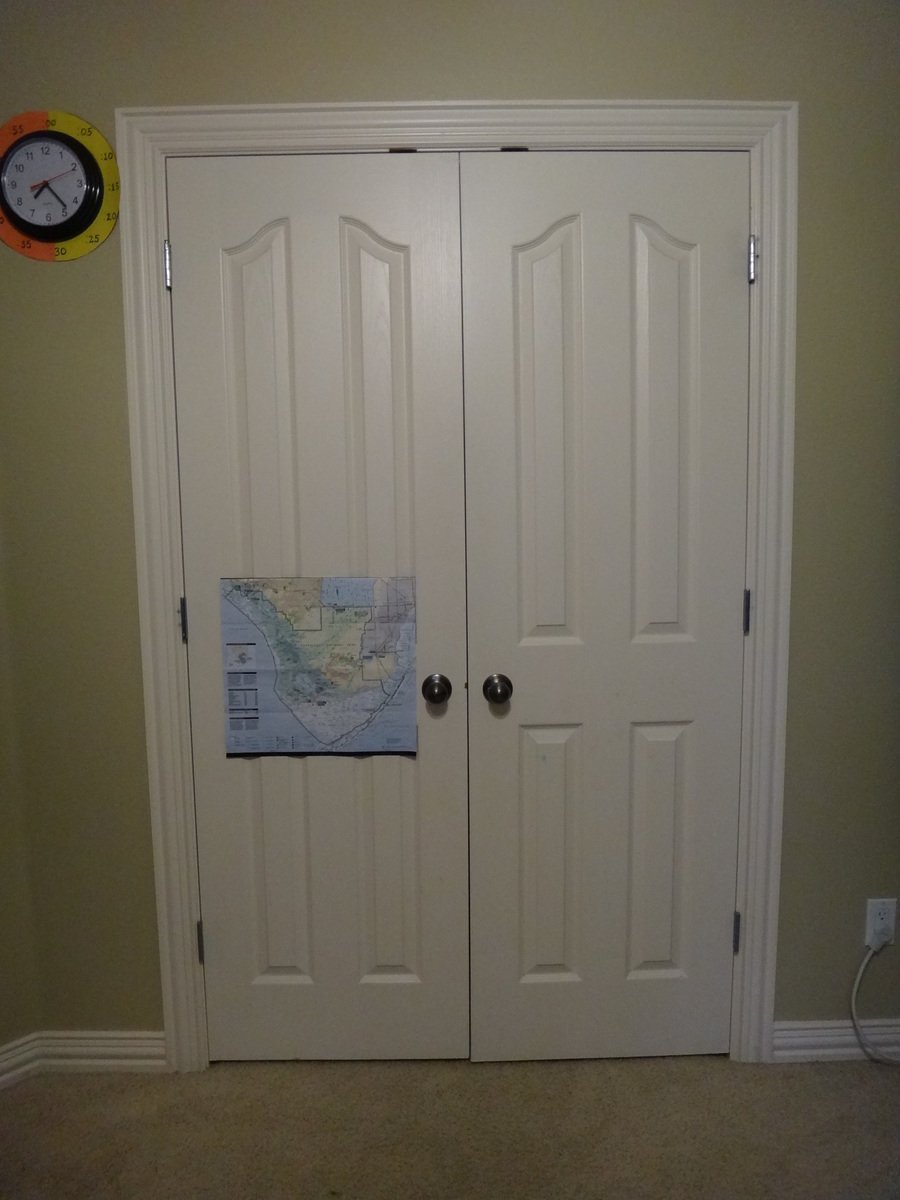
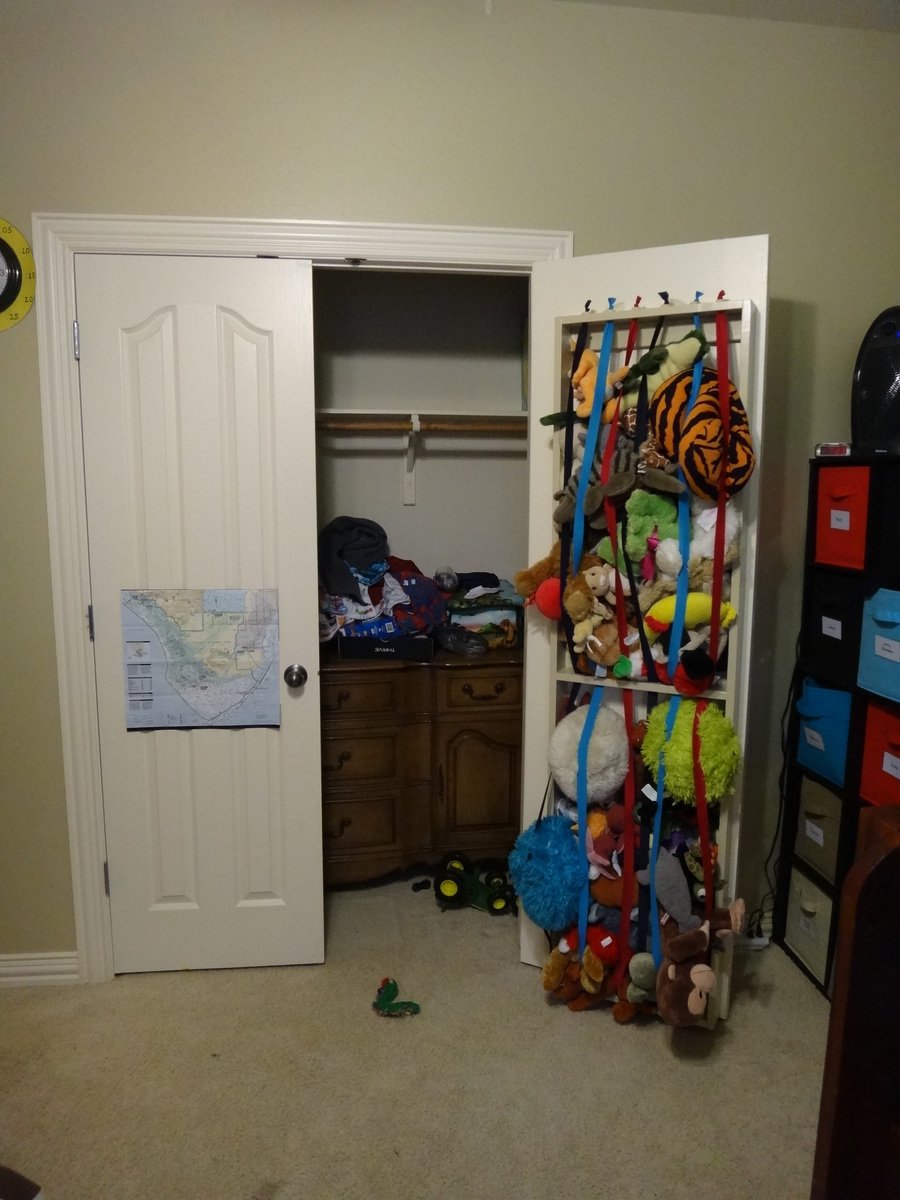
Stuffed Animal Cage
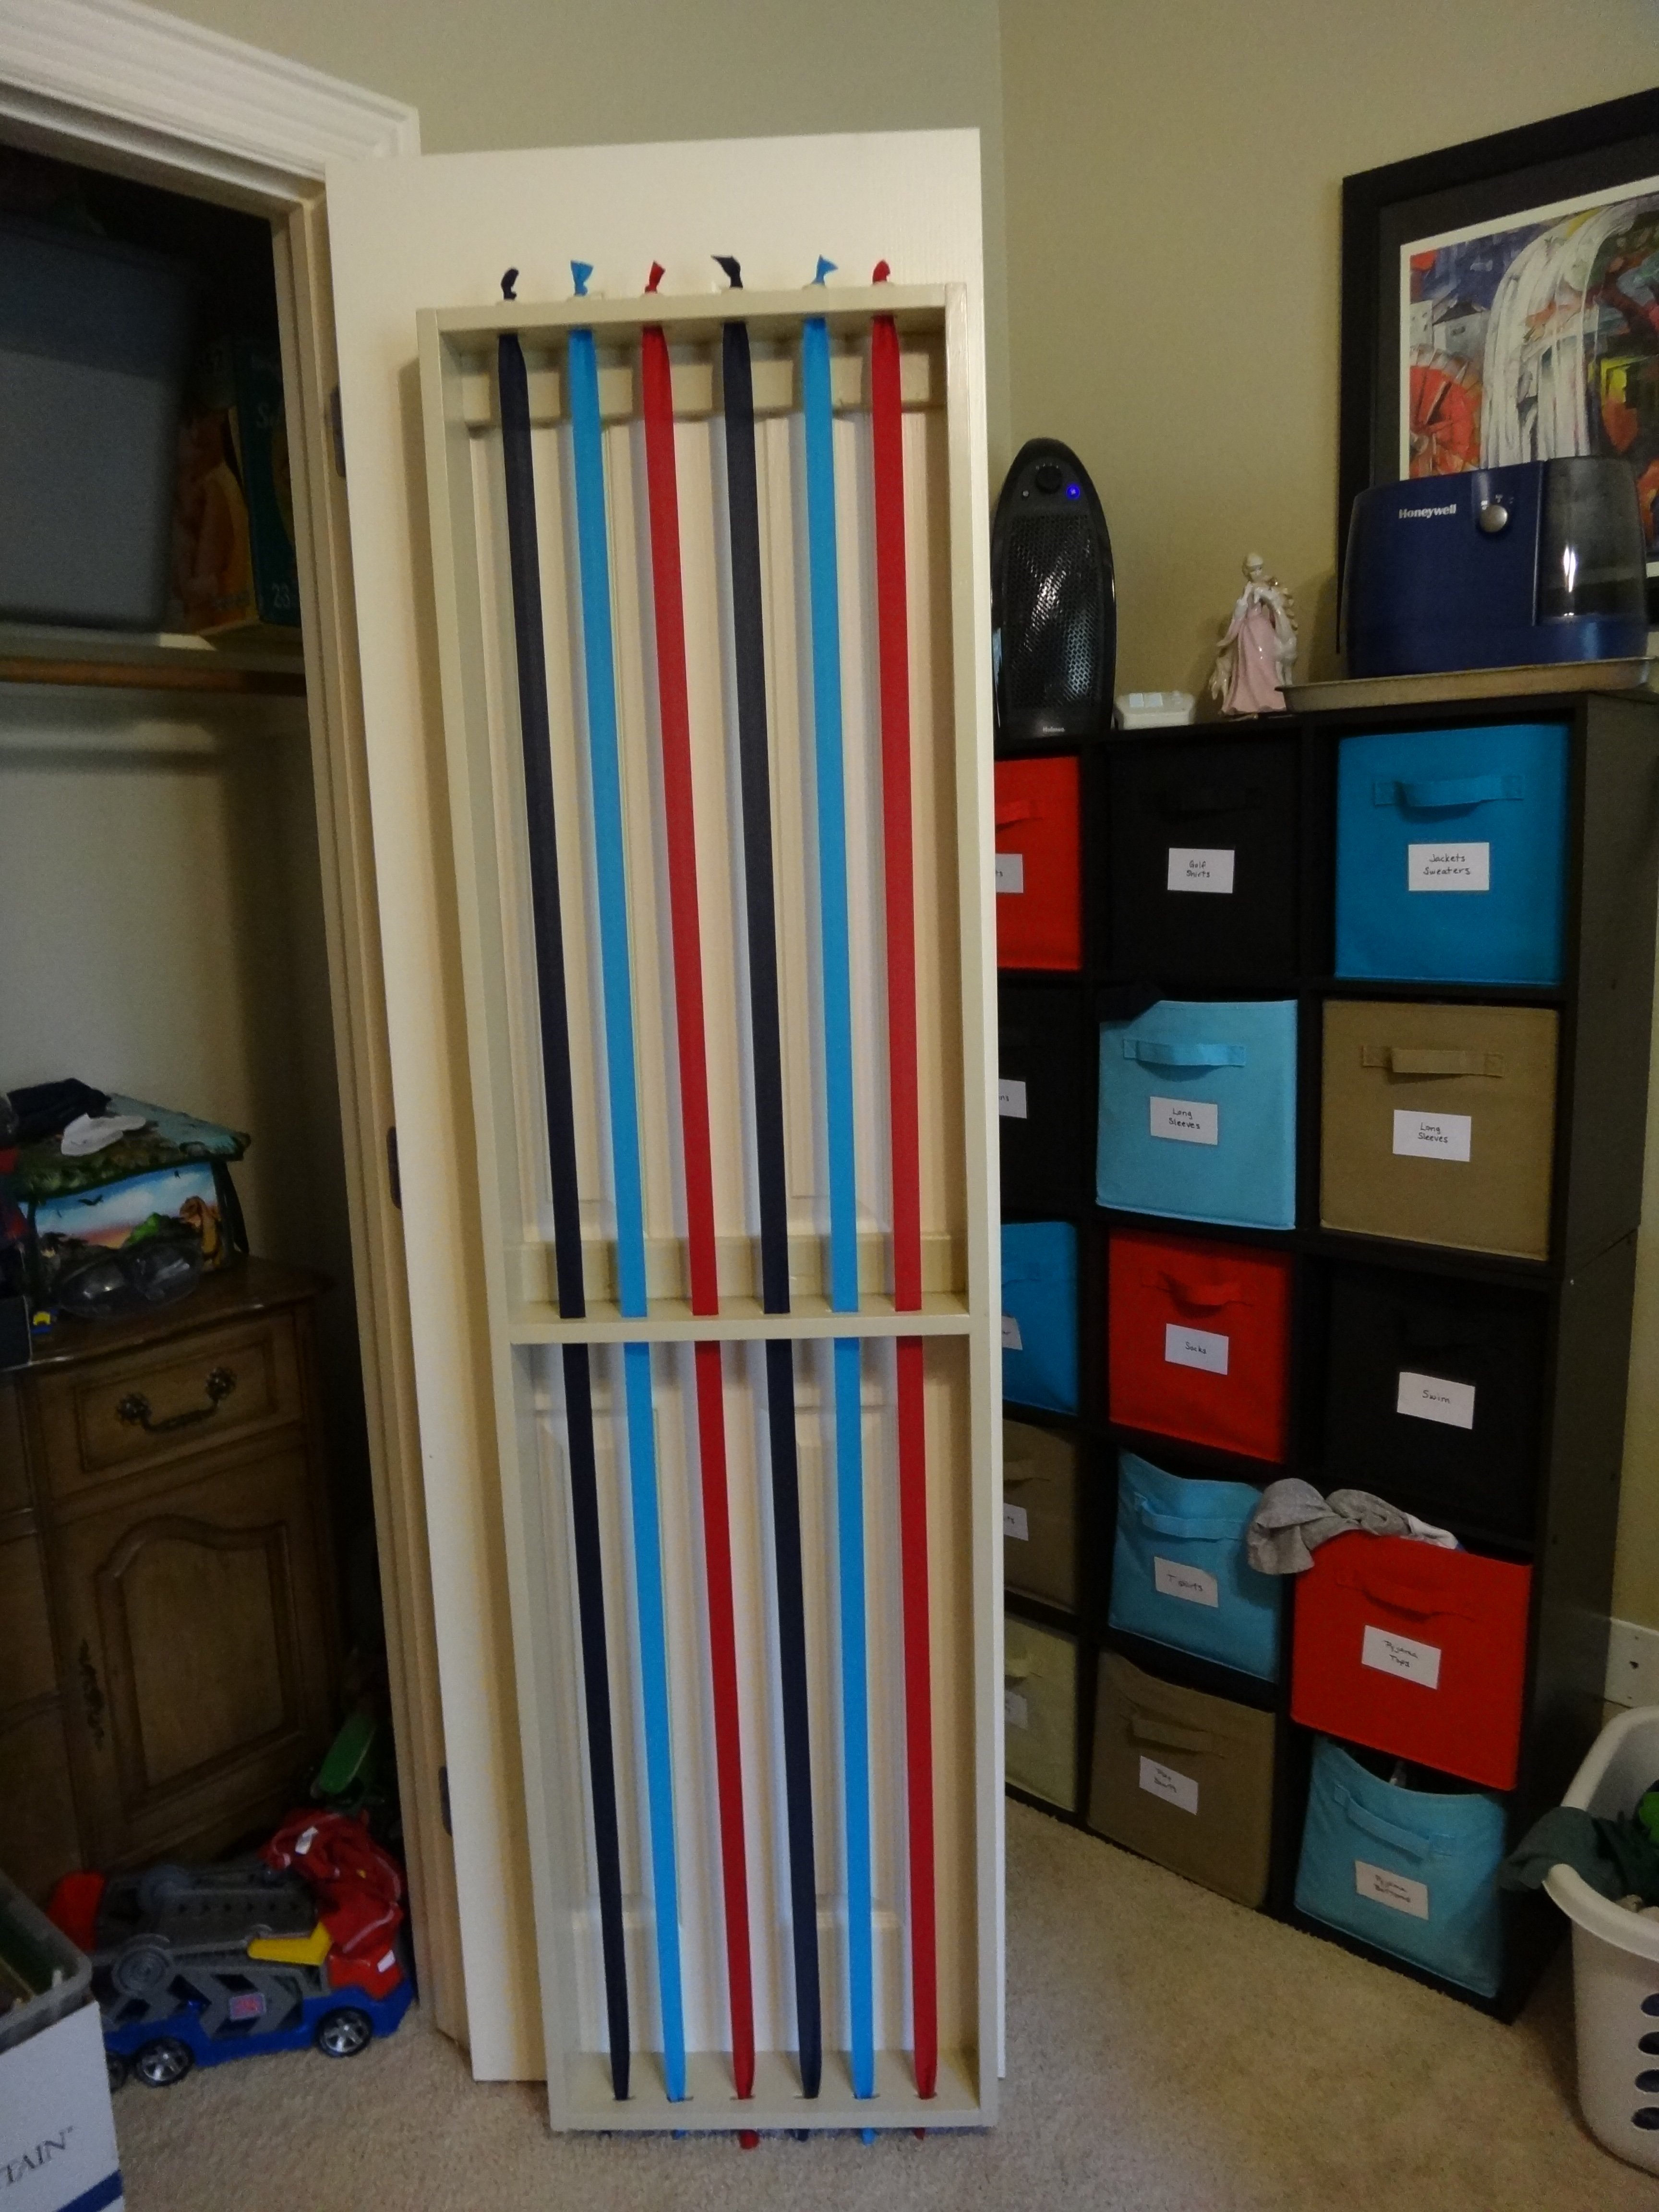
No more free range stuffed animals! We needed stuffed animal storage because they are bulky and keeping them in bins meant the one the kids wanted was always on the bottom. But none of us (my husband and I included) could manage to cull them.
I was inspired by the way Walmart contains their giant beach balls -- bungee cord verticals on a fixed frame. I was going to make it free standing til I saw the behind closet door storage plans. Perfect!
I made the frame and shelf from 1x4s because that was the depth of my doorframe -- 3.5 inches. It took (3) 1x4s @6' - One for each side and one cut for the top, bottom, and shelf/support.
I couldn't find bungee cord by the roll (should have checked Amazon first!), so I bought colored 1 inch wide elastic from JoAnns. Each 3 yard pkg cost $4. I needed 3, so that drove the price up. I cut them in half, and the 4.5' lengths have plenty of give on the 6' frame, so you could probably use standard 4' bungee cords from the box store.
I used my router to make the holes for the elastic. I used wooden toy wheels to keep the knotted elastic from being pulled through the holes. You could just drill holes, but my router was new and I wanted to practice with it.
The kids love putting their stuffed toys away now, and they can see all of them so they can pick the ones they want to play with rather than dumping them all out of a bin. I love it.
I've already decided to do the other door with the bottom half of the frame in elastic like this for costume storage, and the top half shelves. Thank you, Ana!
Built from Plan(s)
Estimated Cost
$30
Estimated Time Investment
Afternoon Project (3-6 Hours)
Finish Used
2 coats of leftover interior latex, then 2 coats of Polycrylic.
Recommended Skill Level
Starter Project
Comments

Bunny Trug
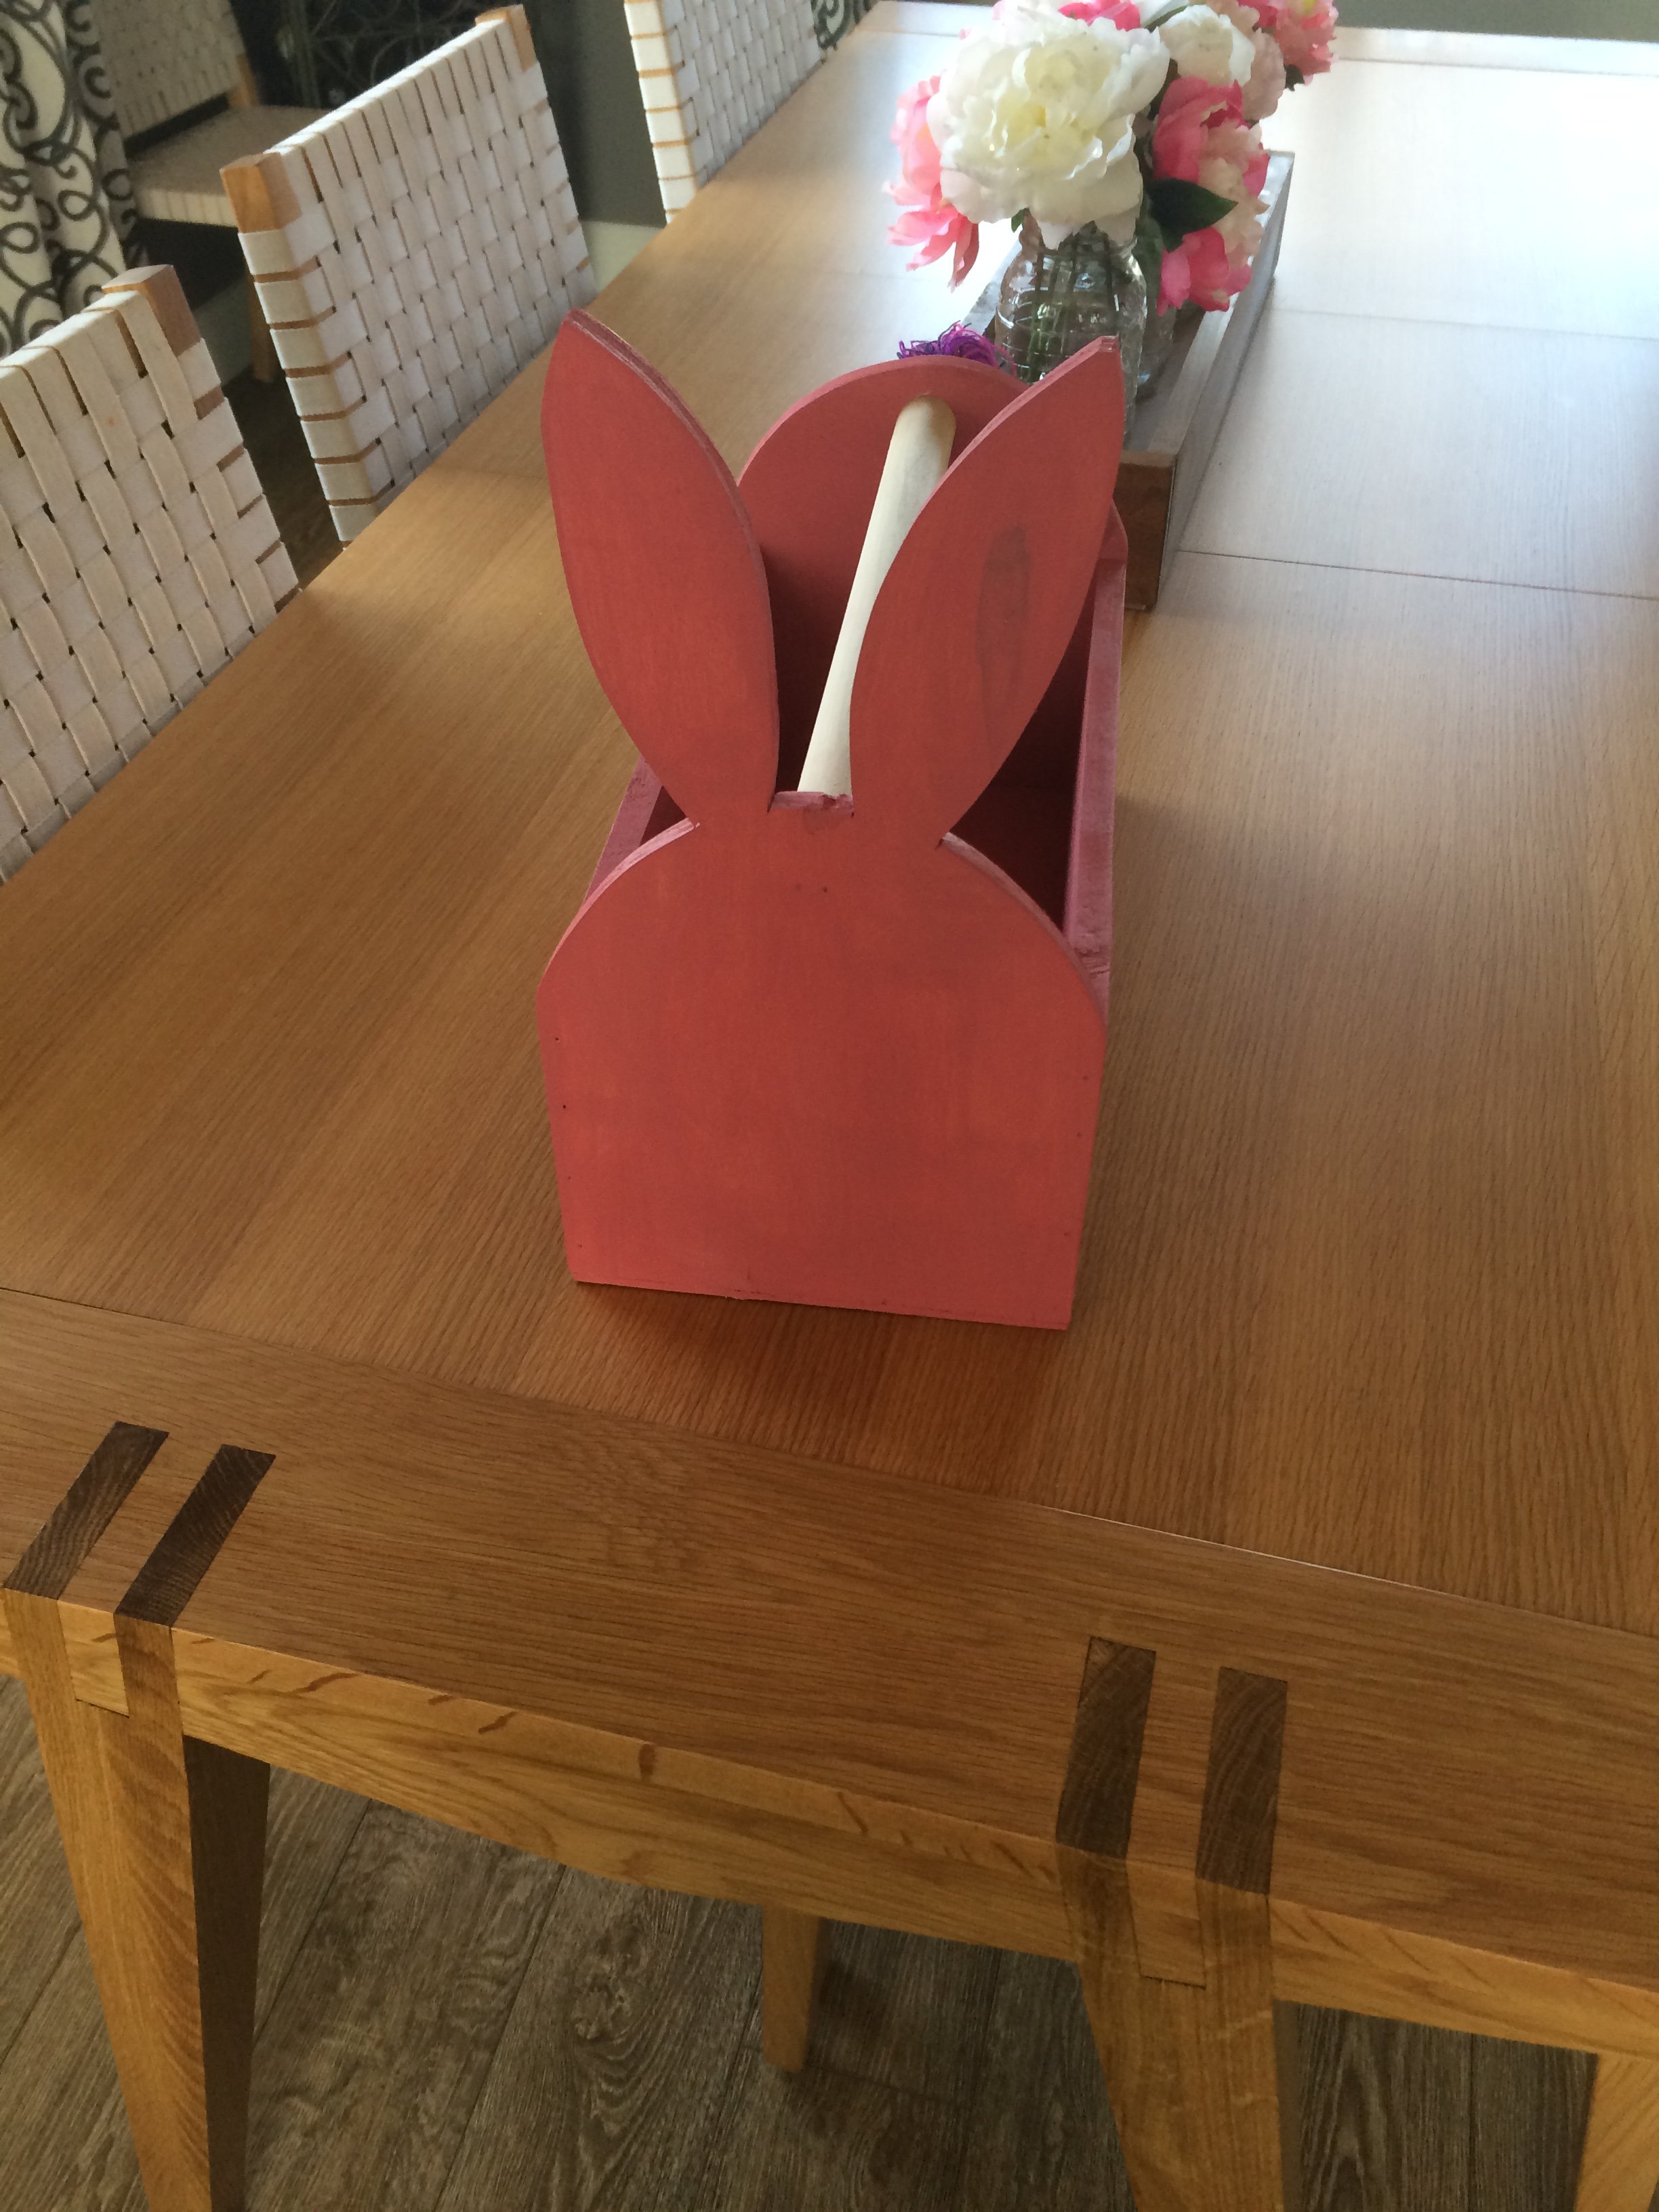
Fun project that the kids were able to help with.
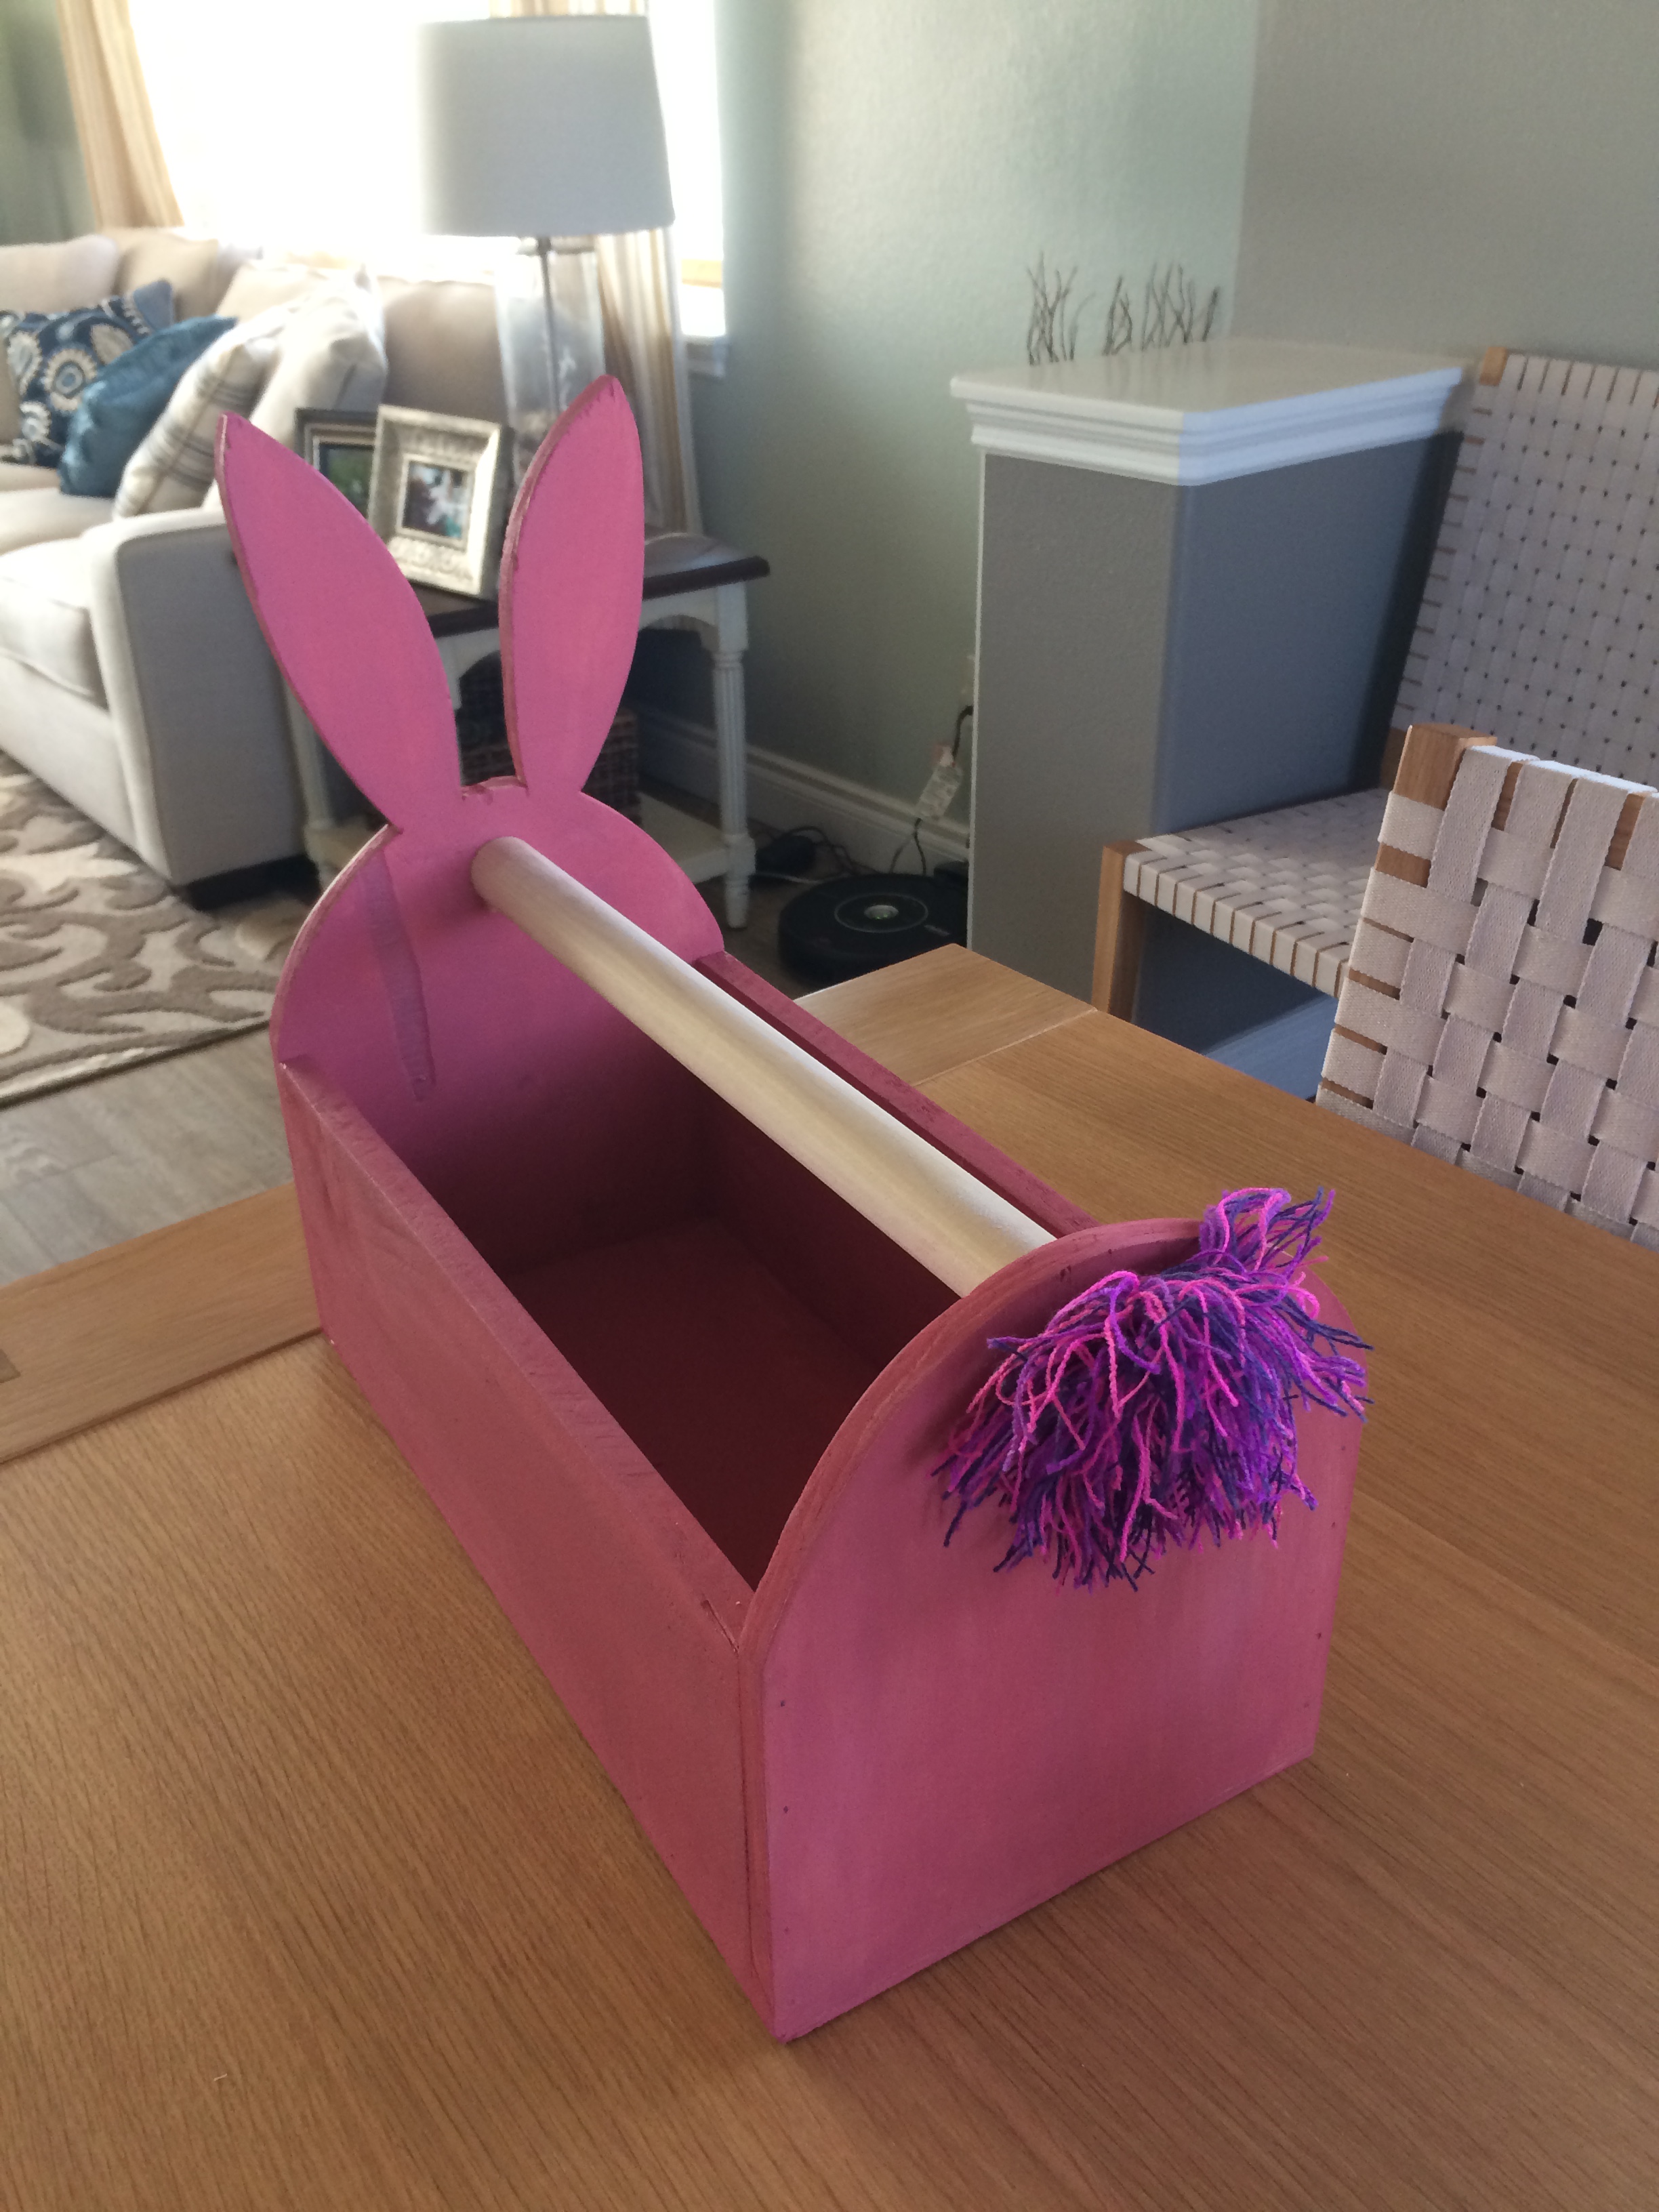
Built from Plan(s)
Estimated Cost
Nothing!
Estimated Time Investment
An Hour or Two (0-2 Hours)
Finish Used
A free pink paint sample.
Recommended Skill Level
Starter Project
Hall Tree Combo
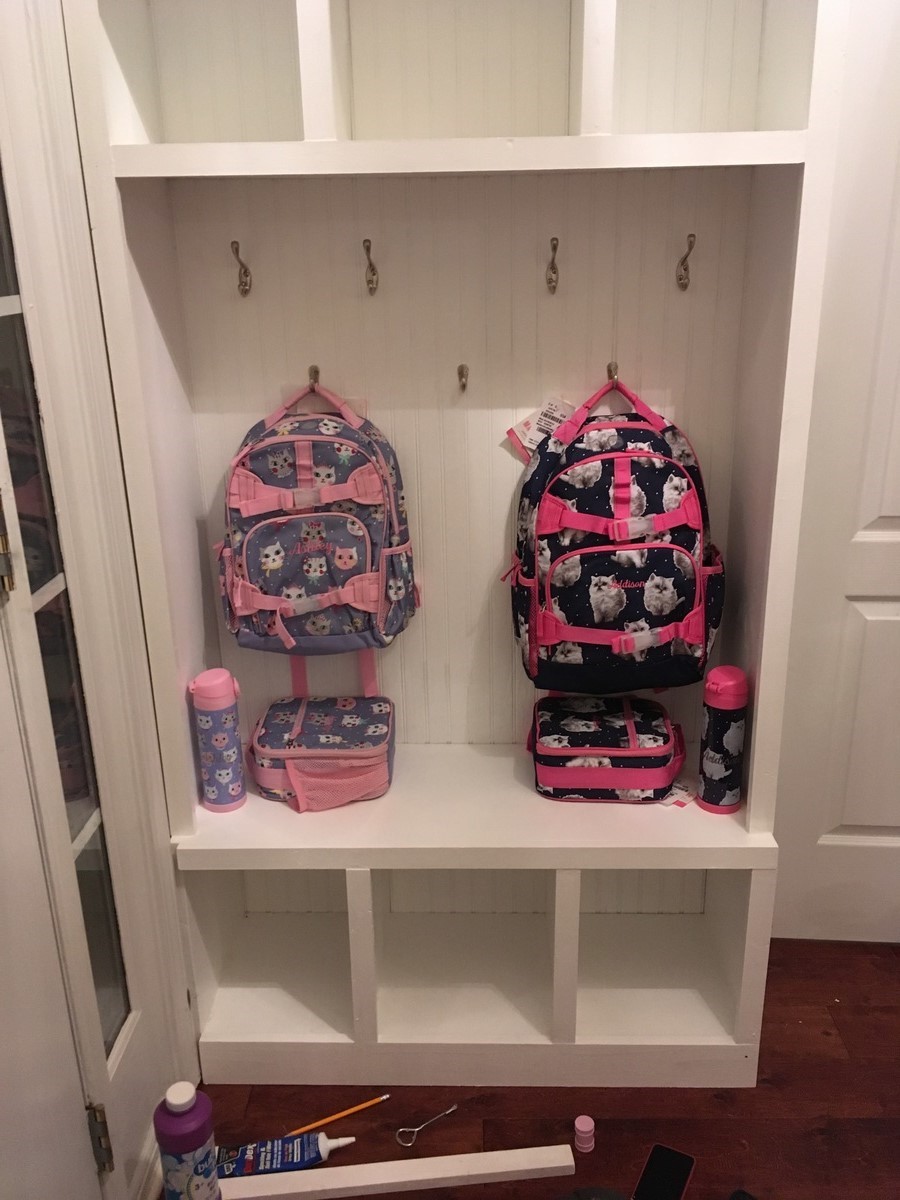
I started with the Fancy Hall tree plan, but decided to add cubbies to the top. This is the first "real" thing I have ever made. I could only work on it every other week, so it took longer than expected. Thanks for the plans!!
Built from Plan(s)
Estimated Time Investment
Week Long Project (20 Hours or More)
Recommended Skill Level
Beginner
Twin Platform Bed with Hairpin Legs
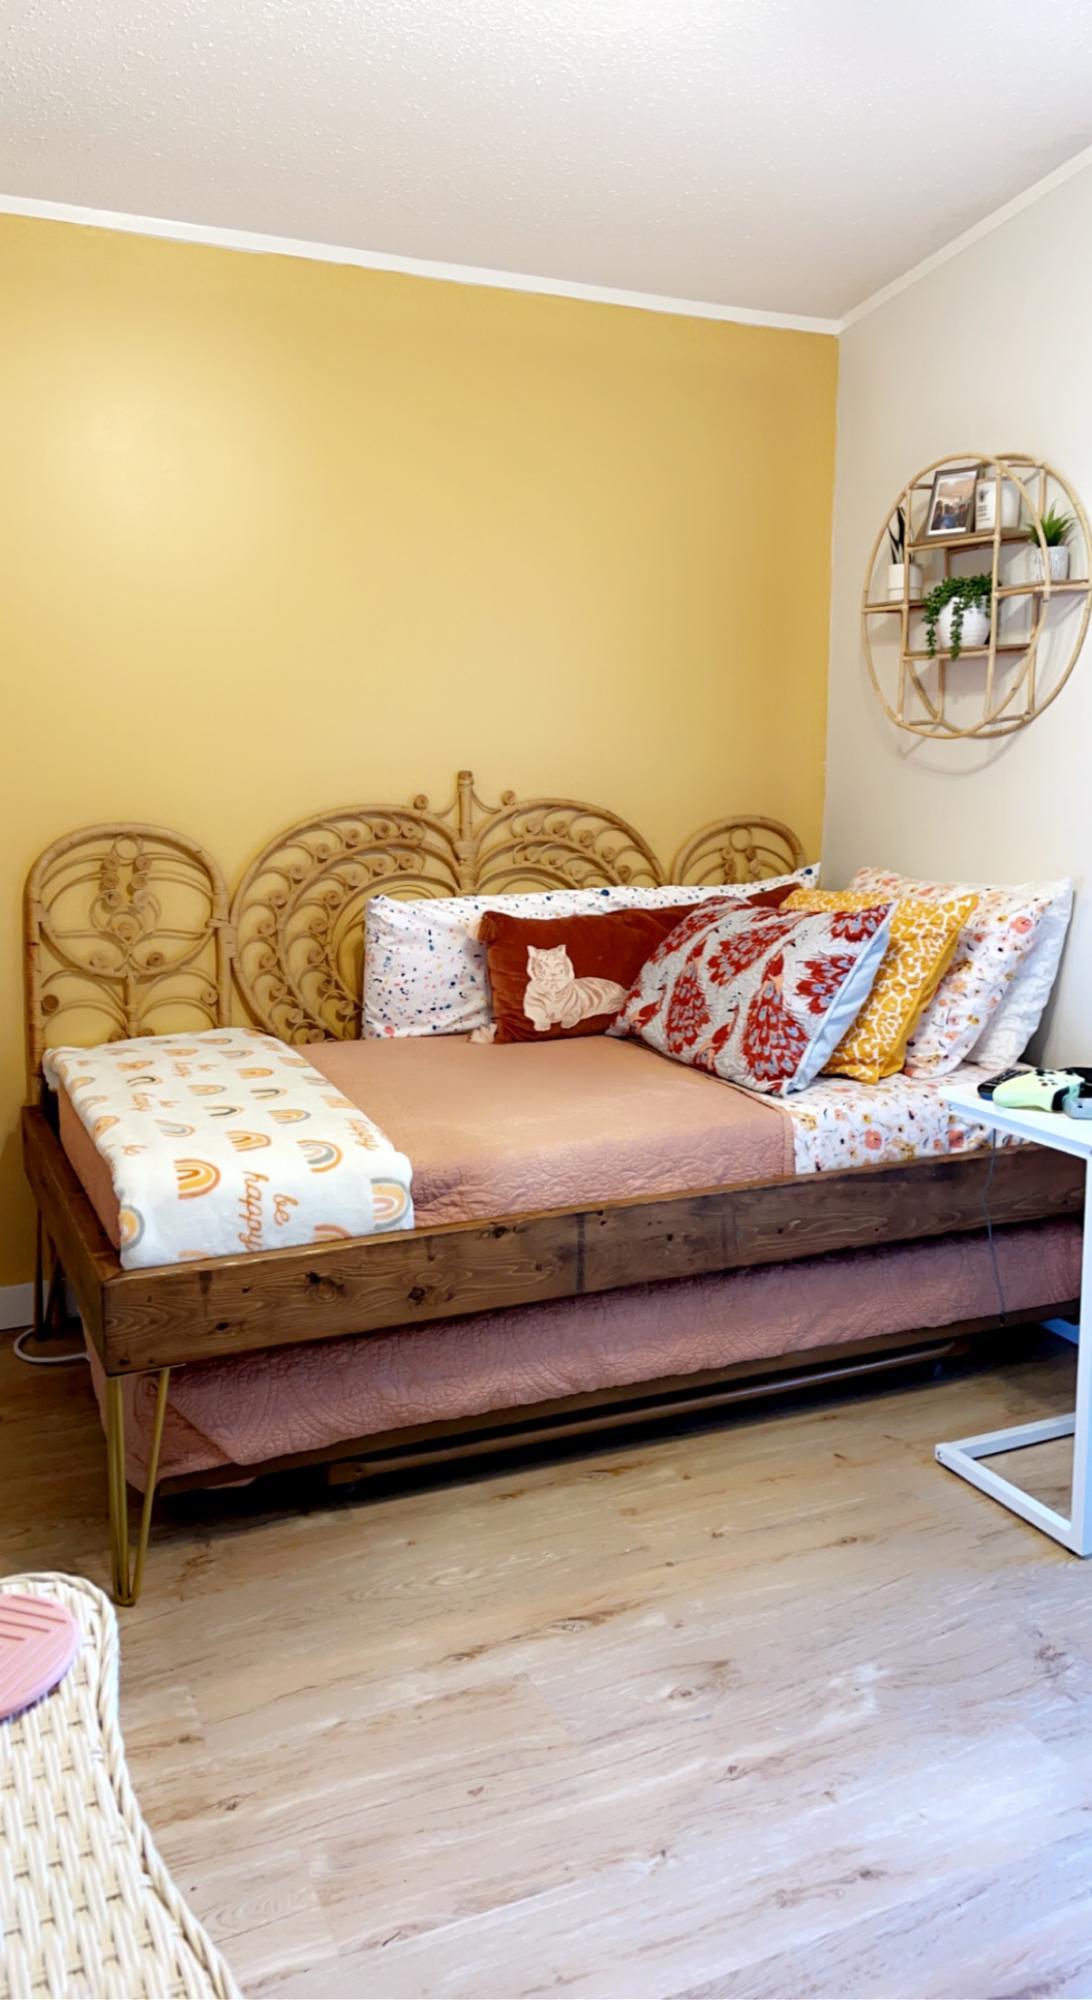
I used untreated 2” x 6” boards, mitered the corners and stained with Minwax Early American.
The 14” golden hairpin legs are from Amazon however, after I built the bed, I realized the mattress on the trundle was getting caught on the angles of the legs so I’ve ordered straight legs as replacements. It should take care of the issue. Lesson learned! 🤣 Overall, I built it myself, it’s very sturdy and she loves it! Thanks Anna for the plans!!!
Built from Plan(s)
Comments
doll bed
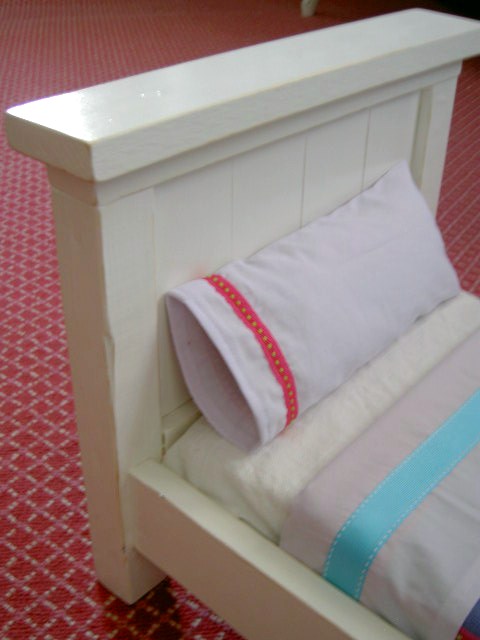
Farmhouse doll bed modified - one slat less in width.
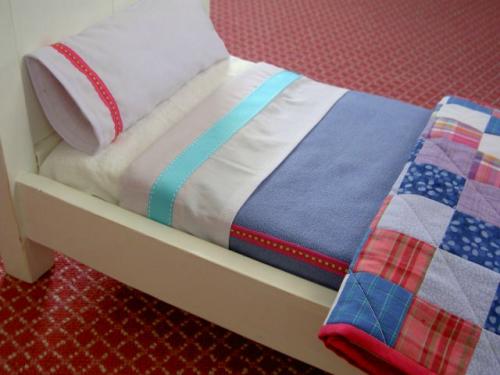
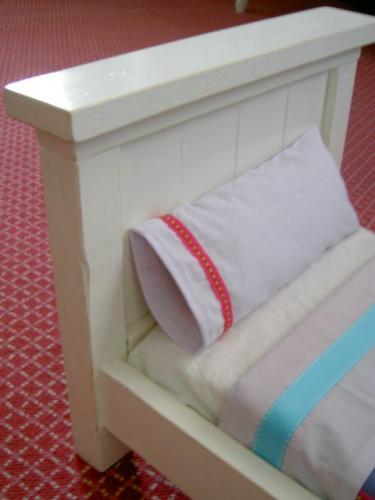
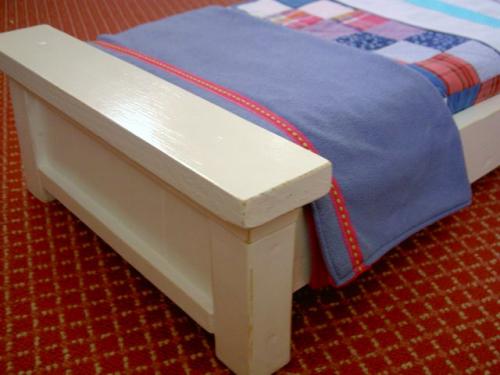
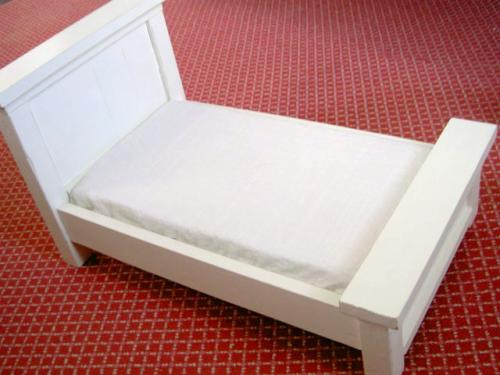
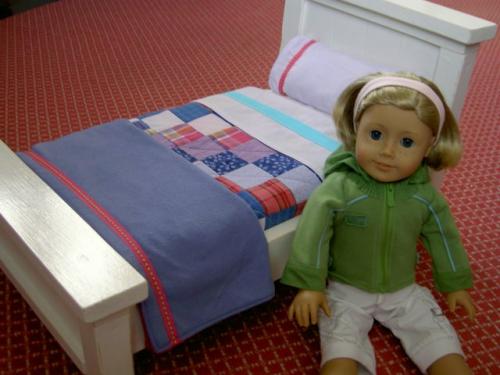
Built from Plan(s)
Estimated Cost
$10.00
Estimated Time Investment
Afternoon Project (3-6 Hours)
Finish Used
1. one coat primer
2. two coats Behr white semi gloss
3. one coat satin poly
2. two coats Behr white semi gloss
3. one coat satin poly
Recommended Skill Level
Beginner
Comments
Ana White Admin
Tue, 10/05/2021 - 11:07
Empowering!
Thank you so much for using our service, it turned out amazing!