Community Brag Posts
DIY Walk-in Pantry Shelving
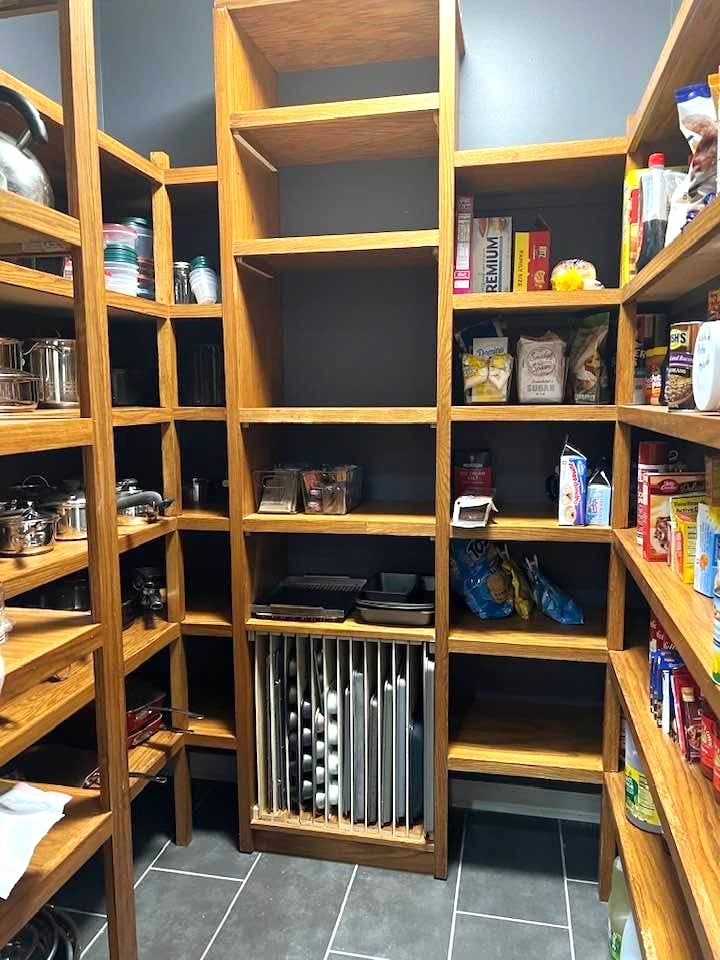
Built new shelving in our 6' x 6' pantry using red oak plywood shelving and 2" x 2" red oak corner shelf supports and red oak 1" x 2" trim. Used plans modified from Ana White site.
Pat Edwards, Ashland City, TN
Built from Plan(s)
Comments
Sat, 11/18/2023 - 12:47
Beautiful pantry!
Thanks for sharing, it looks great! Love the custom baking sheet storage:)
Joss' Big Boy Bed

My building write-up goes with the post for the plans. The only thing I need to add here is the change I made on the toddler rail. The first one I did wasn't quite long enough for my little guy. He's quite the squirmmy bug at night, so he kept slipping off the bed with the shorter one. He never just really fell hard, but it was enough to wake him up a few times, so I added a little more length to the rail and it seems to be working much better. I'm excited to see how this bed will evolve :) Hoping to make a few additions to it a little further down the road!
Built from Plan(s)
Estimated Cost
$450
Estimated Time Investment
Week Long Project (20 Hours or More)
Finish Used
Distressed a few shades of blues and greens of interior flat paints. Wiped on a light coat of a satin poly for the top coat.
Recommended Skill Level
Intermediate
10 Cube Shelf
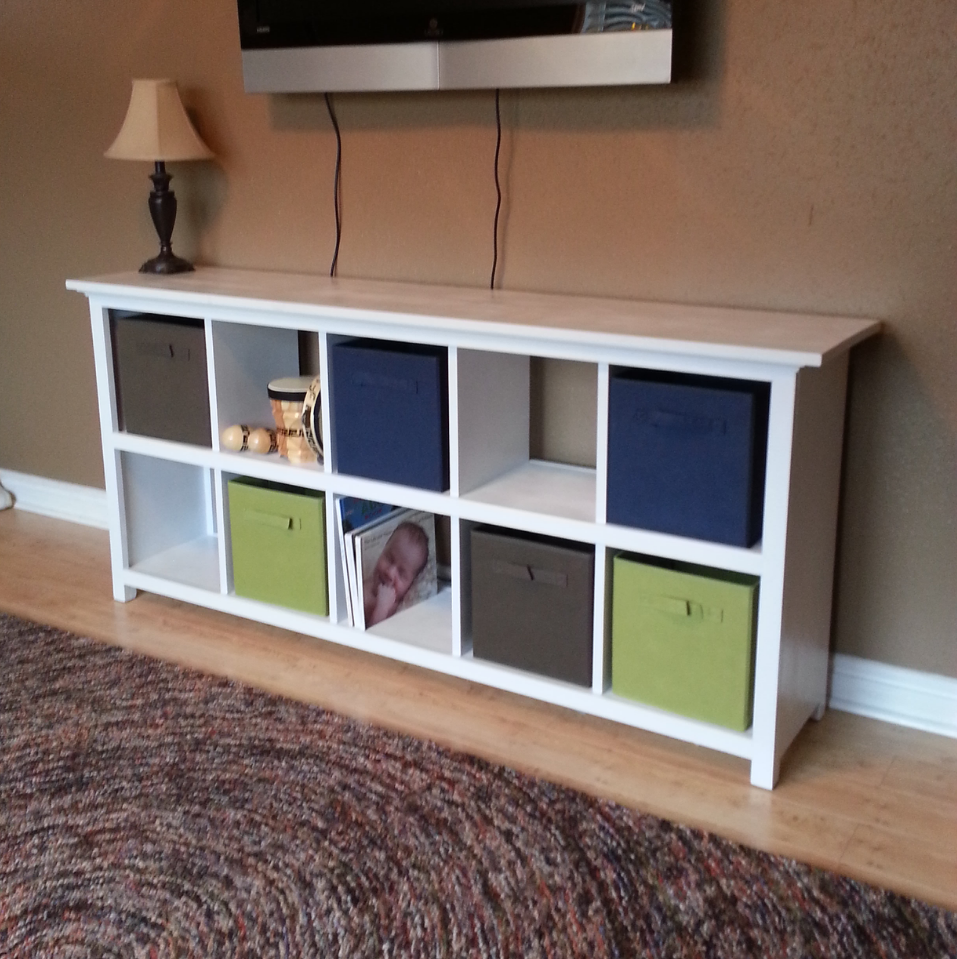
Expanded the 6 cube shelf to 10 cubes, beefed up the feet a little and fancied up the top to more closely match the picture in the plan page. Just joined a couple 1x8's and cut to length for the top.
Used the Kreg Jig to make the shelf box and face frames - biscuit joiner for top.
Built from Plan(s)
Estimated Cost
150? had some leftover material and spent a little extra on finishes.
Estimated Time Investment
Weekend Project (10-20 Hours)
Finish Used
primer/spray paint
Recommended Skill Level
Beginner
Comments
Wed, 11/26/2014 - 05:32
Hi John- this is exactly what
Hi John- this is exactly what I'm looking for- did you by any chance save your modification measurements and cut list? Also- I'm considering putting a 50 inch tv on the unit- would you recommend additional support? Thanks for any help.
A Little Longer
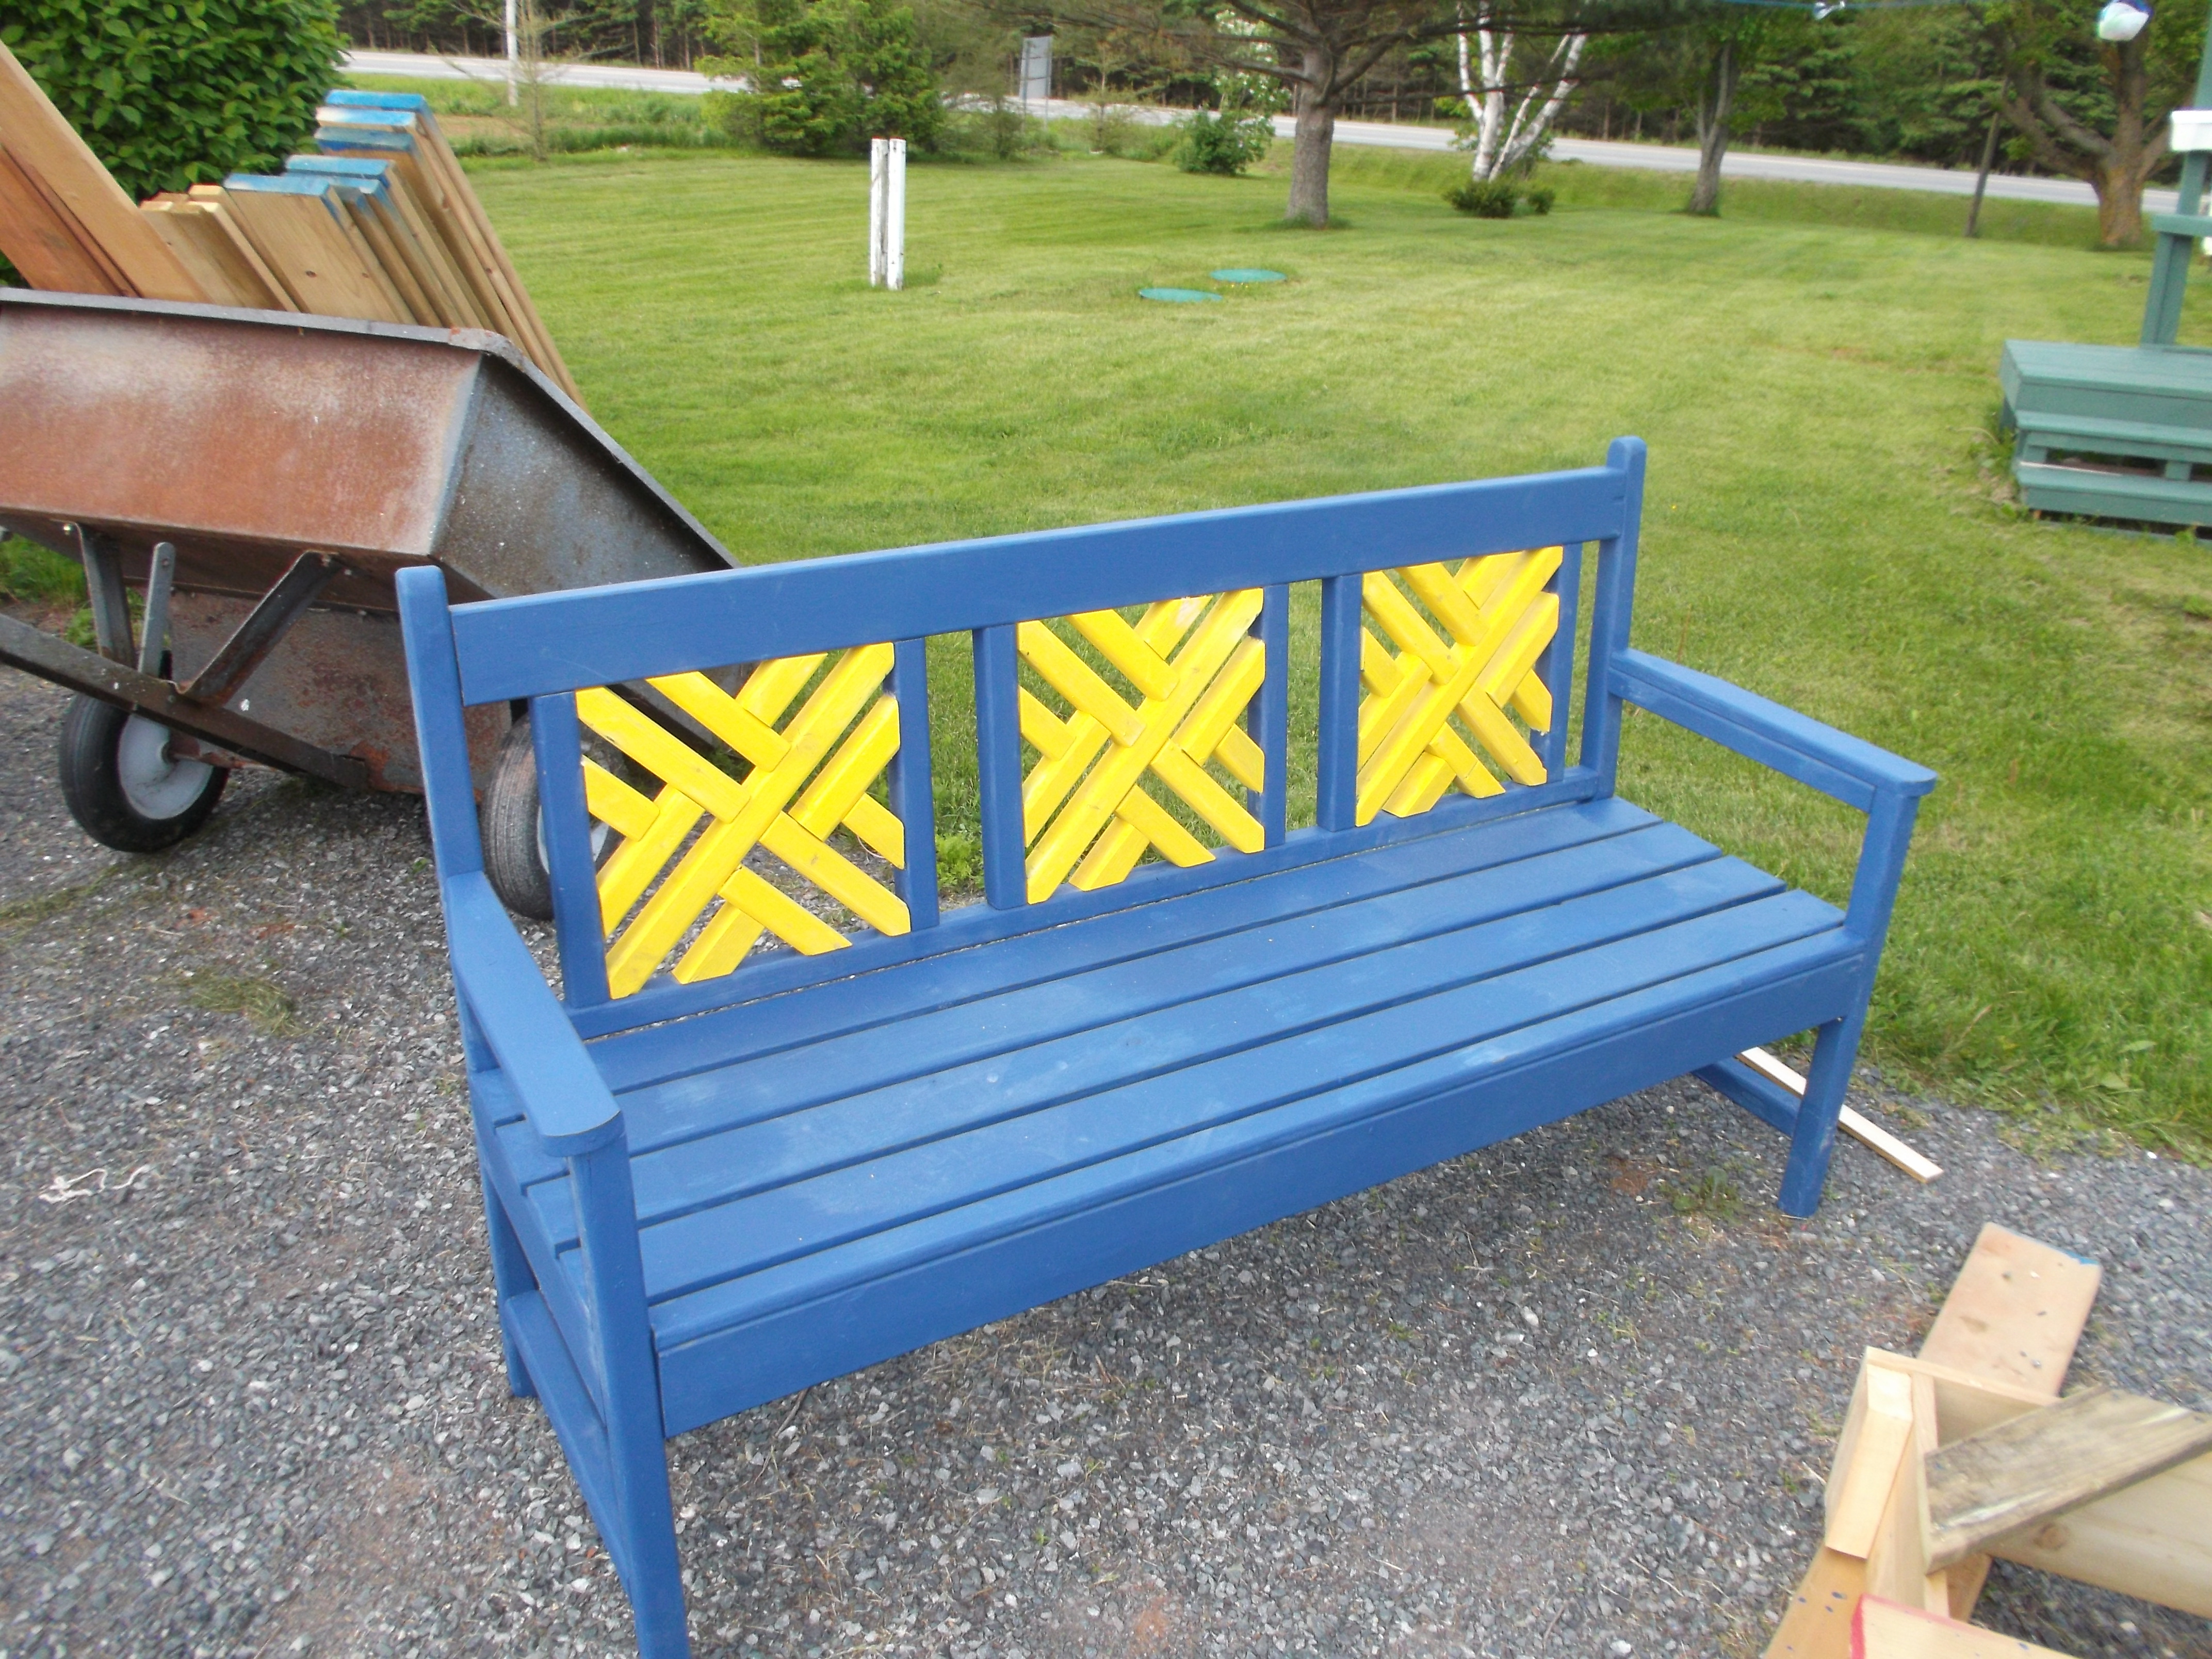
I followed plan but added 20 extra inches and an extra woven insert plus an extra brace in center of seat.
Built from Plan(s)
Estimated Cost
Roughly $60
Estimated Time Investment
Week Long Project (20 Hours or More)
Finish Used
Coloured wood stain
Recommended Skill Level
Intermediate
Office Desk
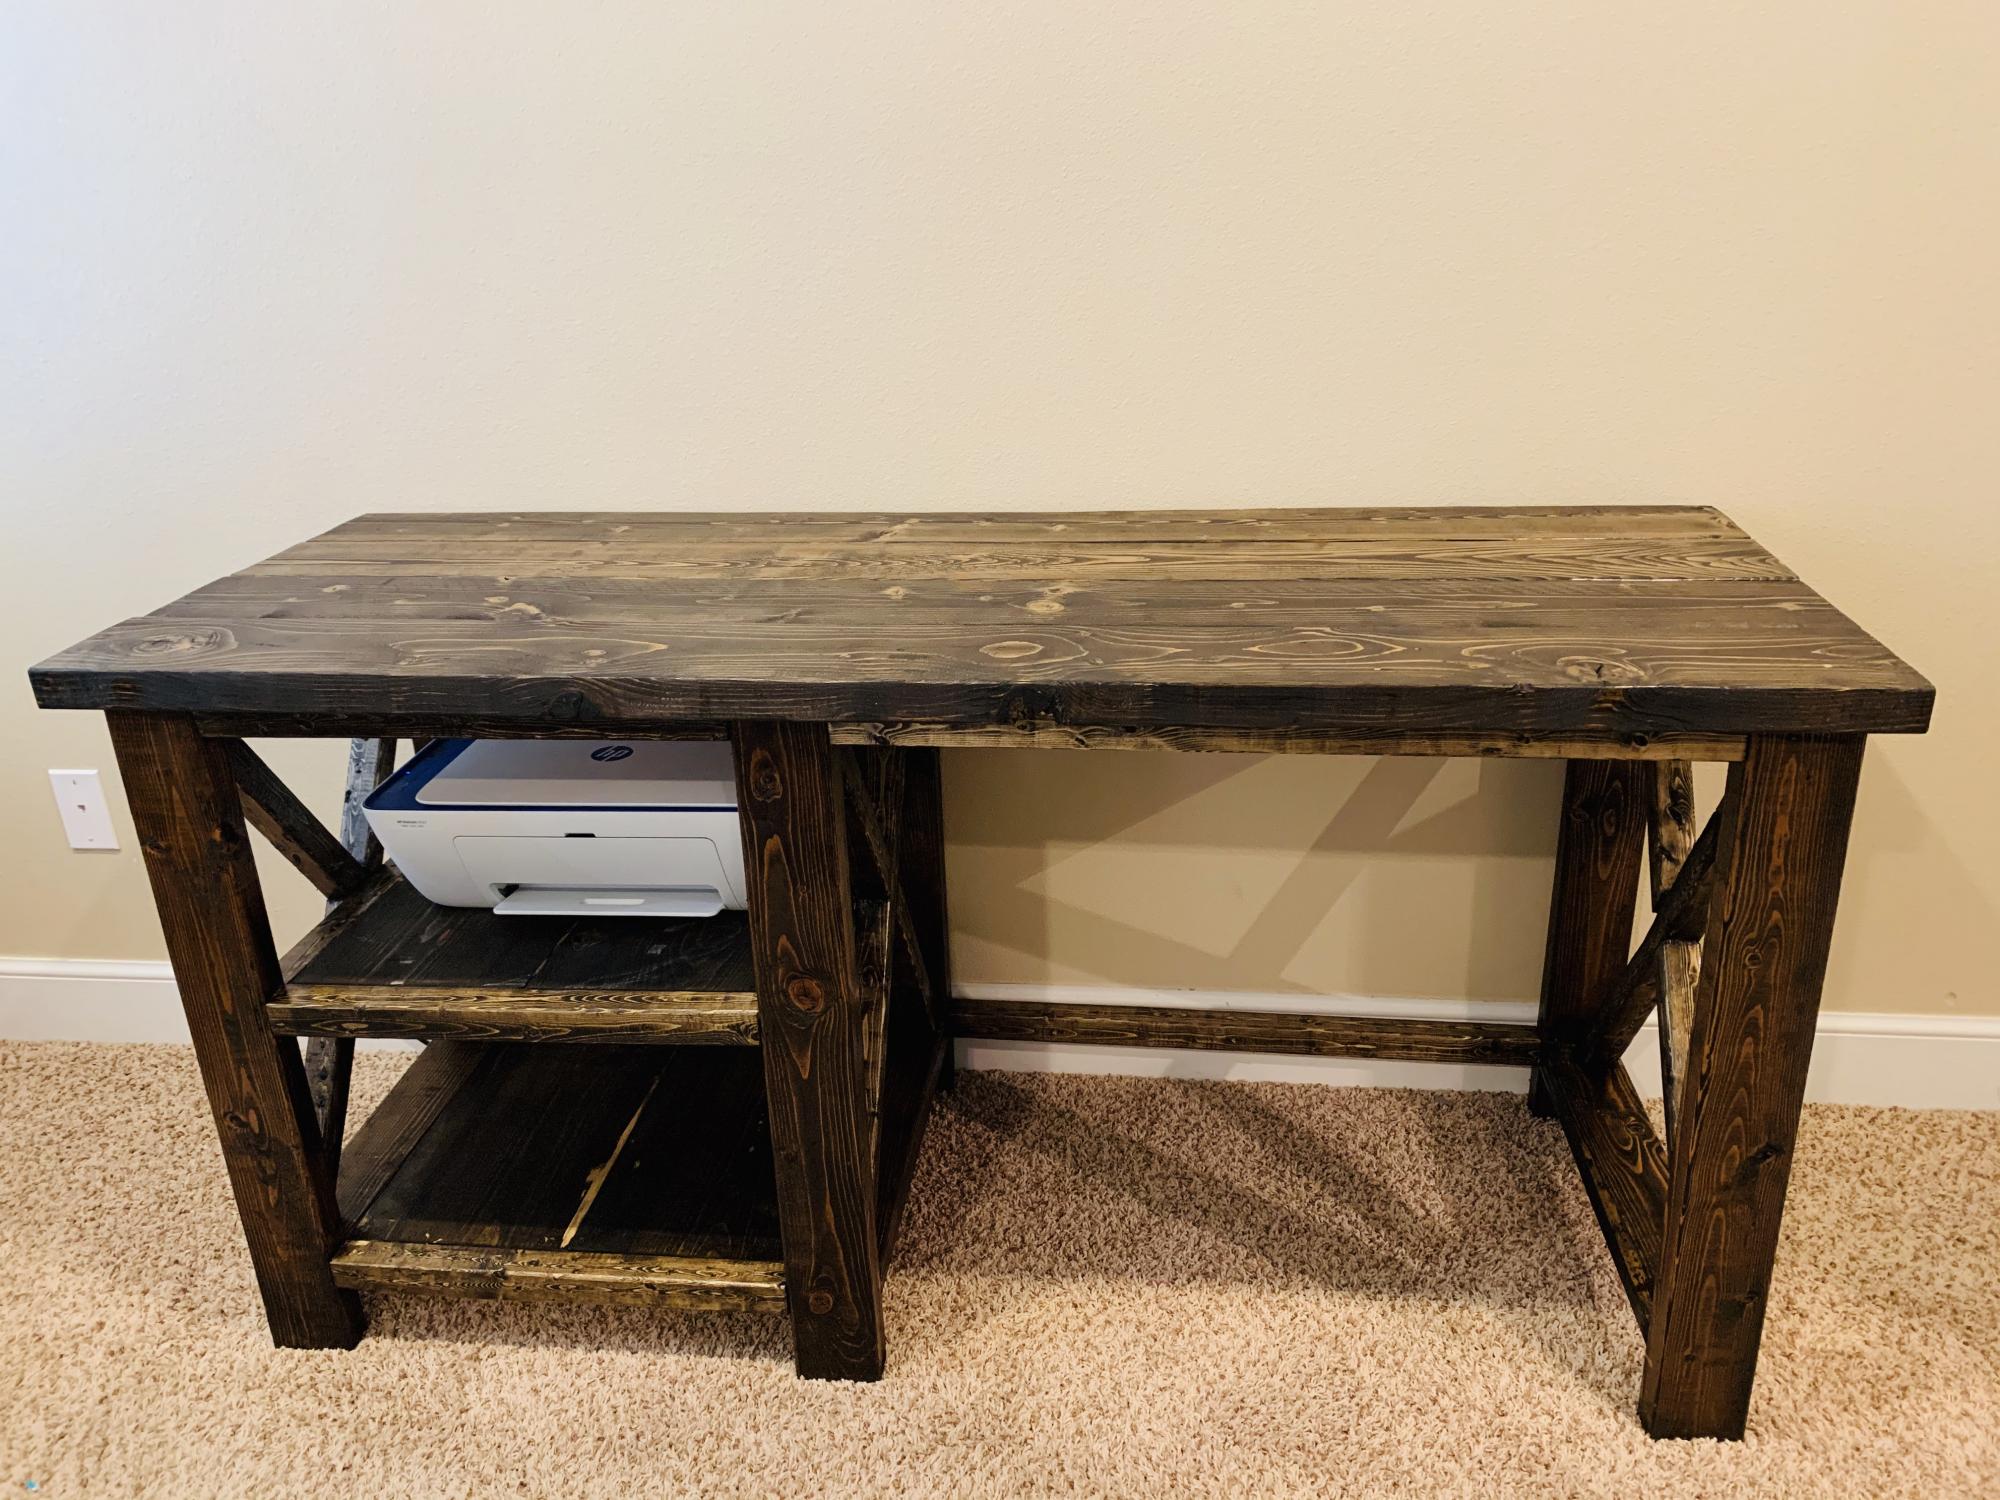
This was my first project. I followed the plans exactly! I LOVE it! It is a perfect desk that I will be using to work through this remote teaching I'm having to do. Thank you for the plans. Next up-Rustic X Console!
Built from Plan(s)
Estimated Cost
$70
Estimated Time Investment
Day Project (6-9 Hours)
Finish Used
Wood Conditioner, Stain, Polyurethane Top Coat
Recommended Skill Level
Intermediate
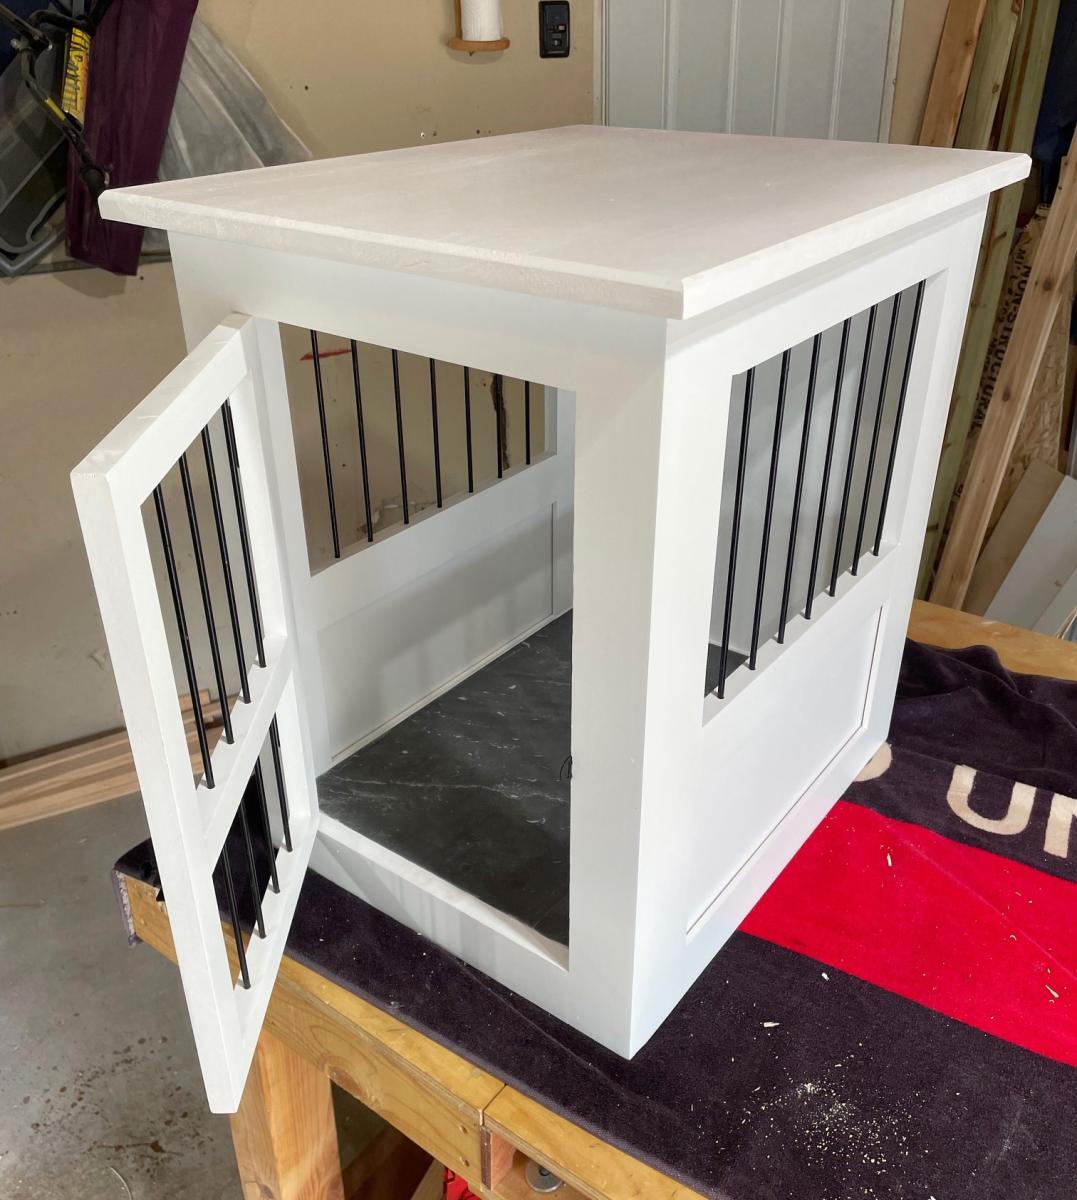
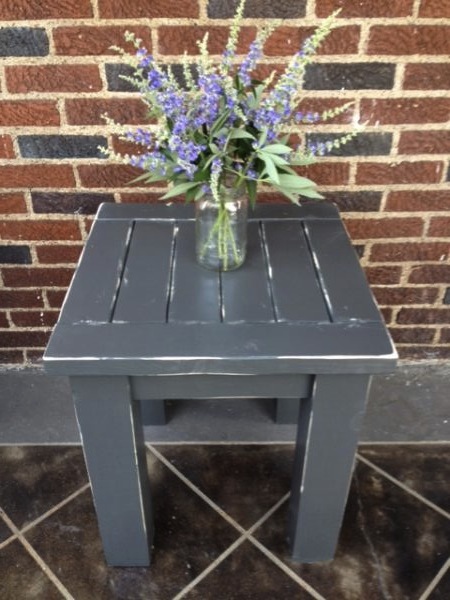
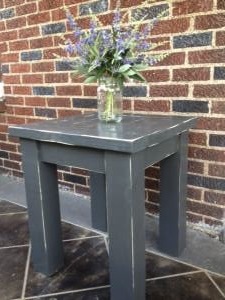
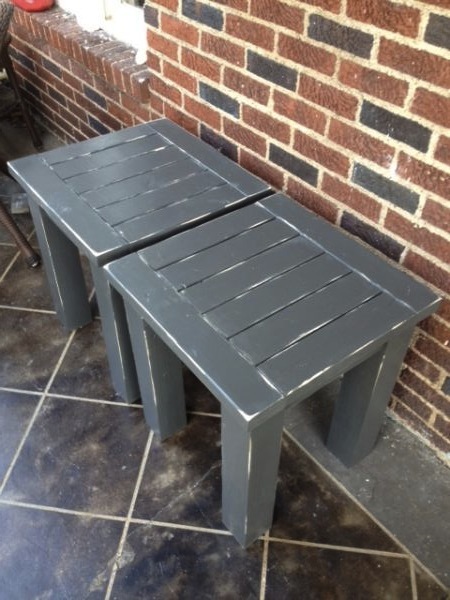
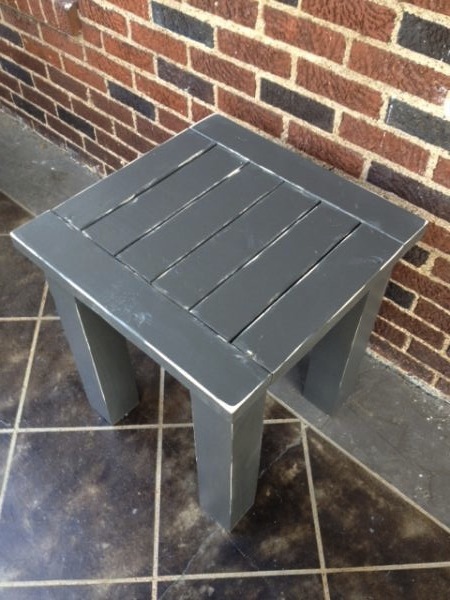
DIY Dog Kennel Side Table
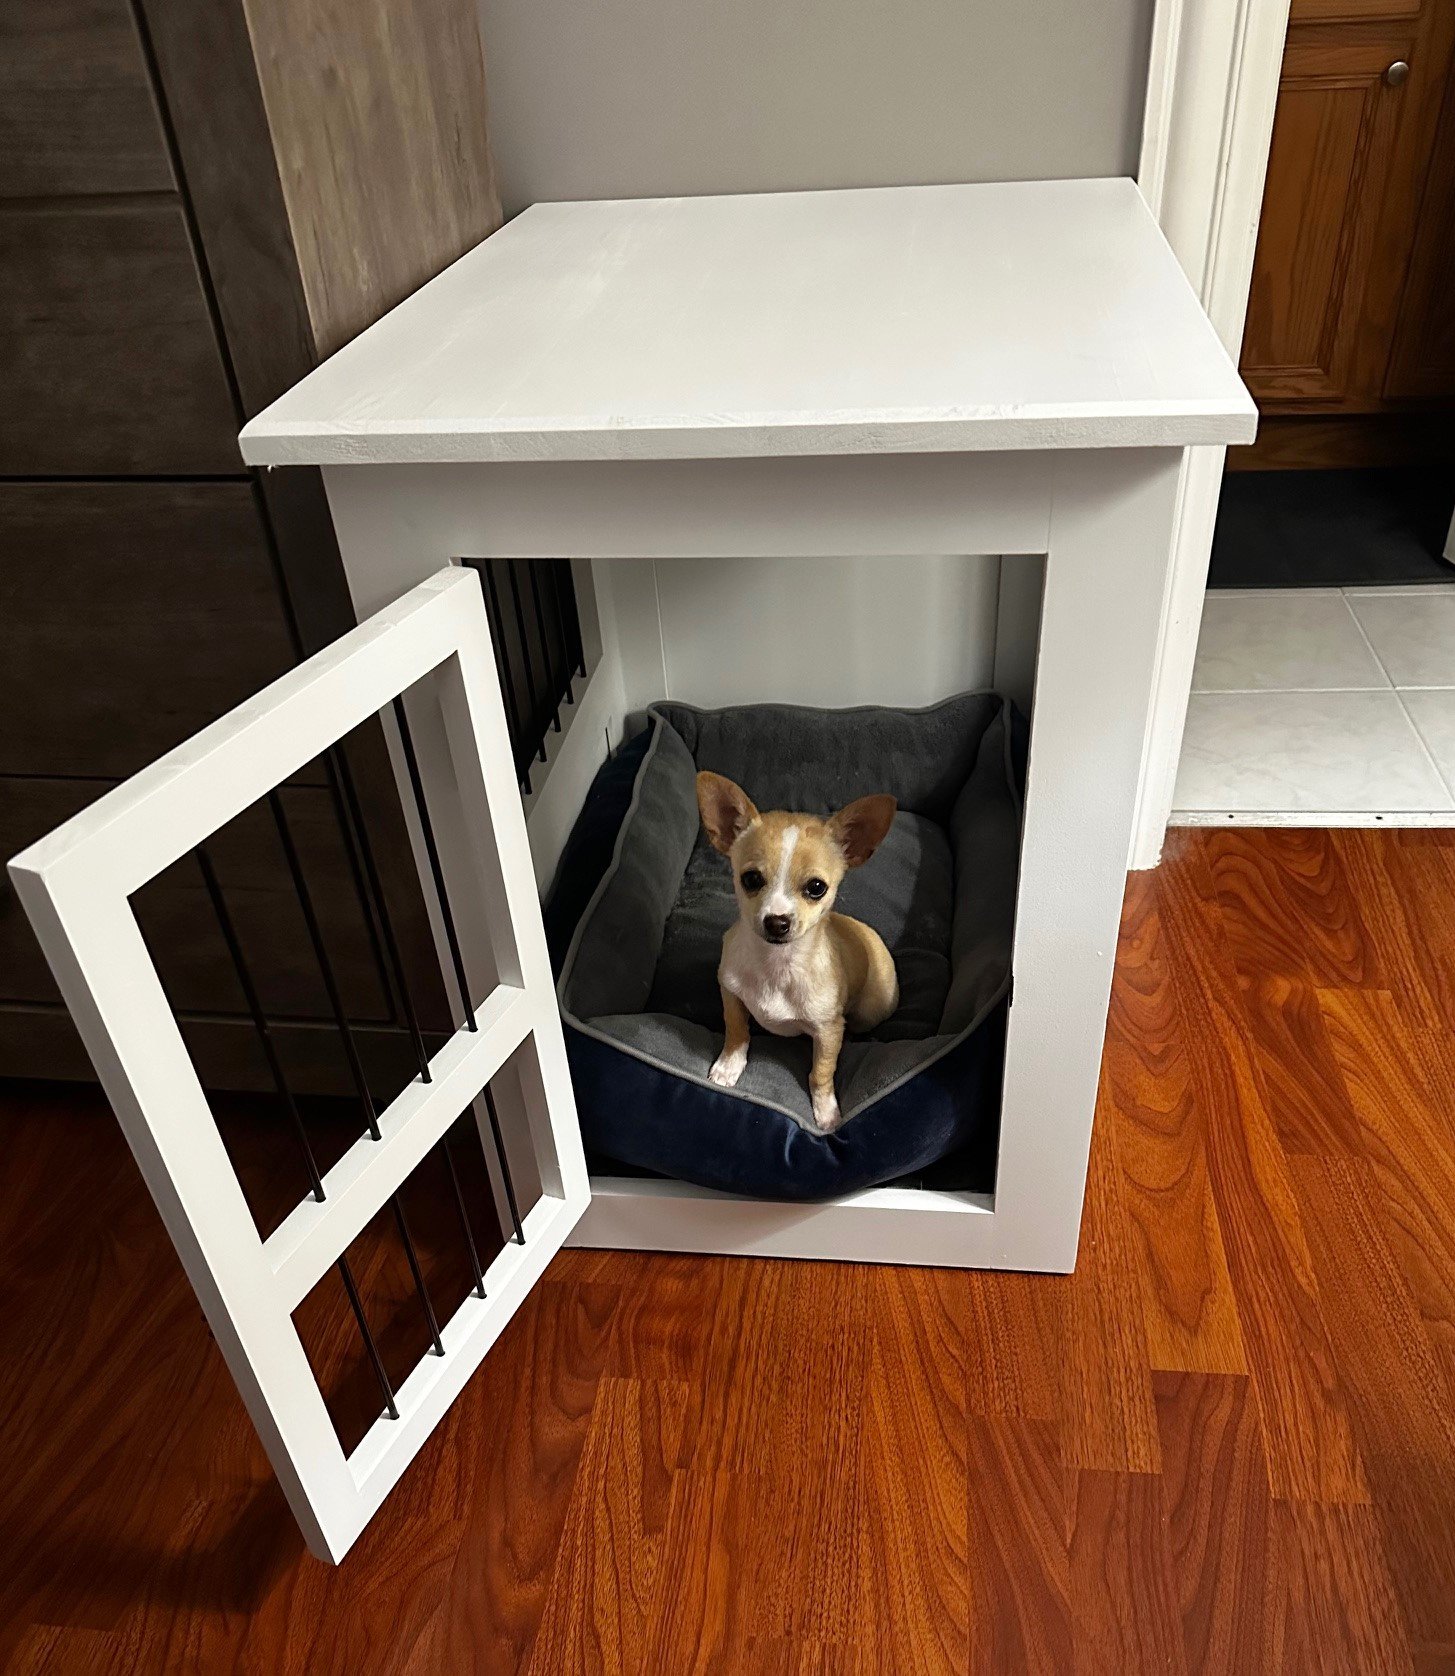
Built from Ana's Dog Crate End Table plans. Used steel rods instead of wood slats.
Built from Plan(s)
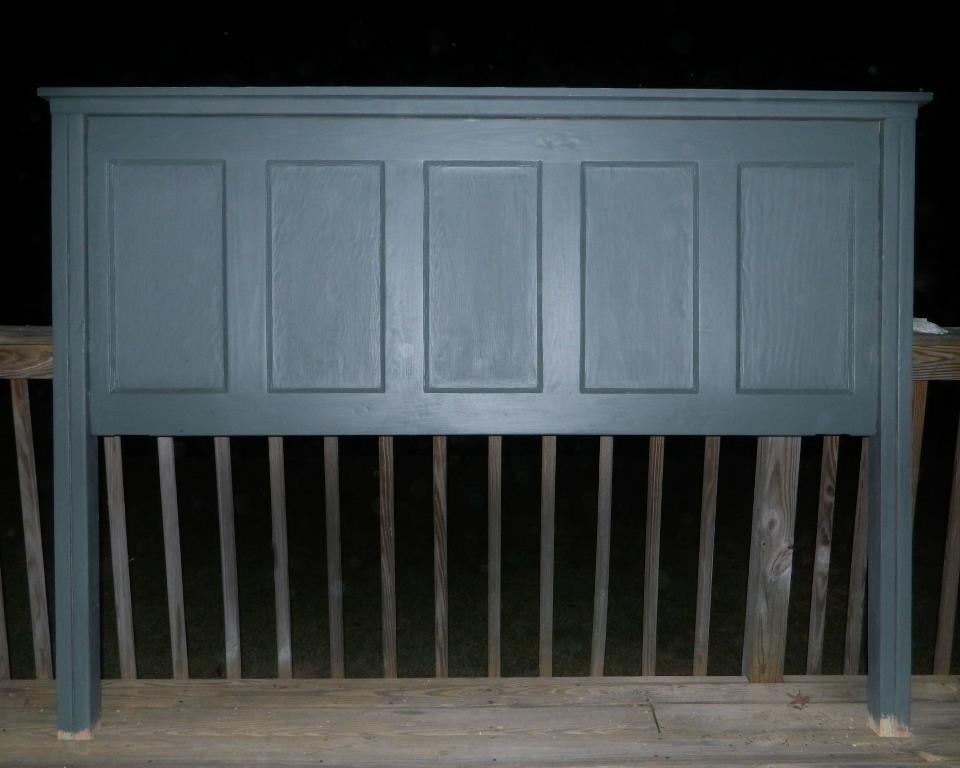
Headboard out of a door
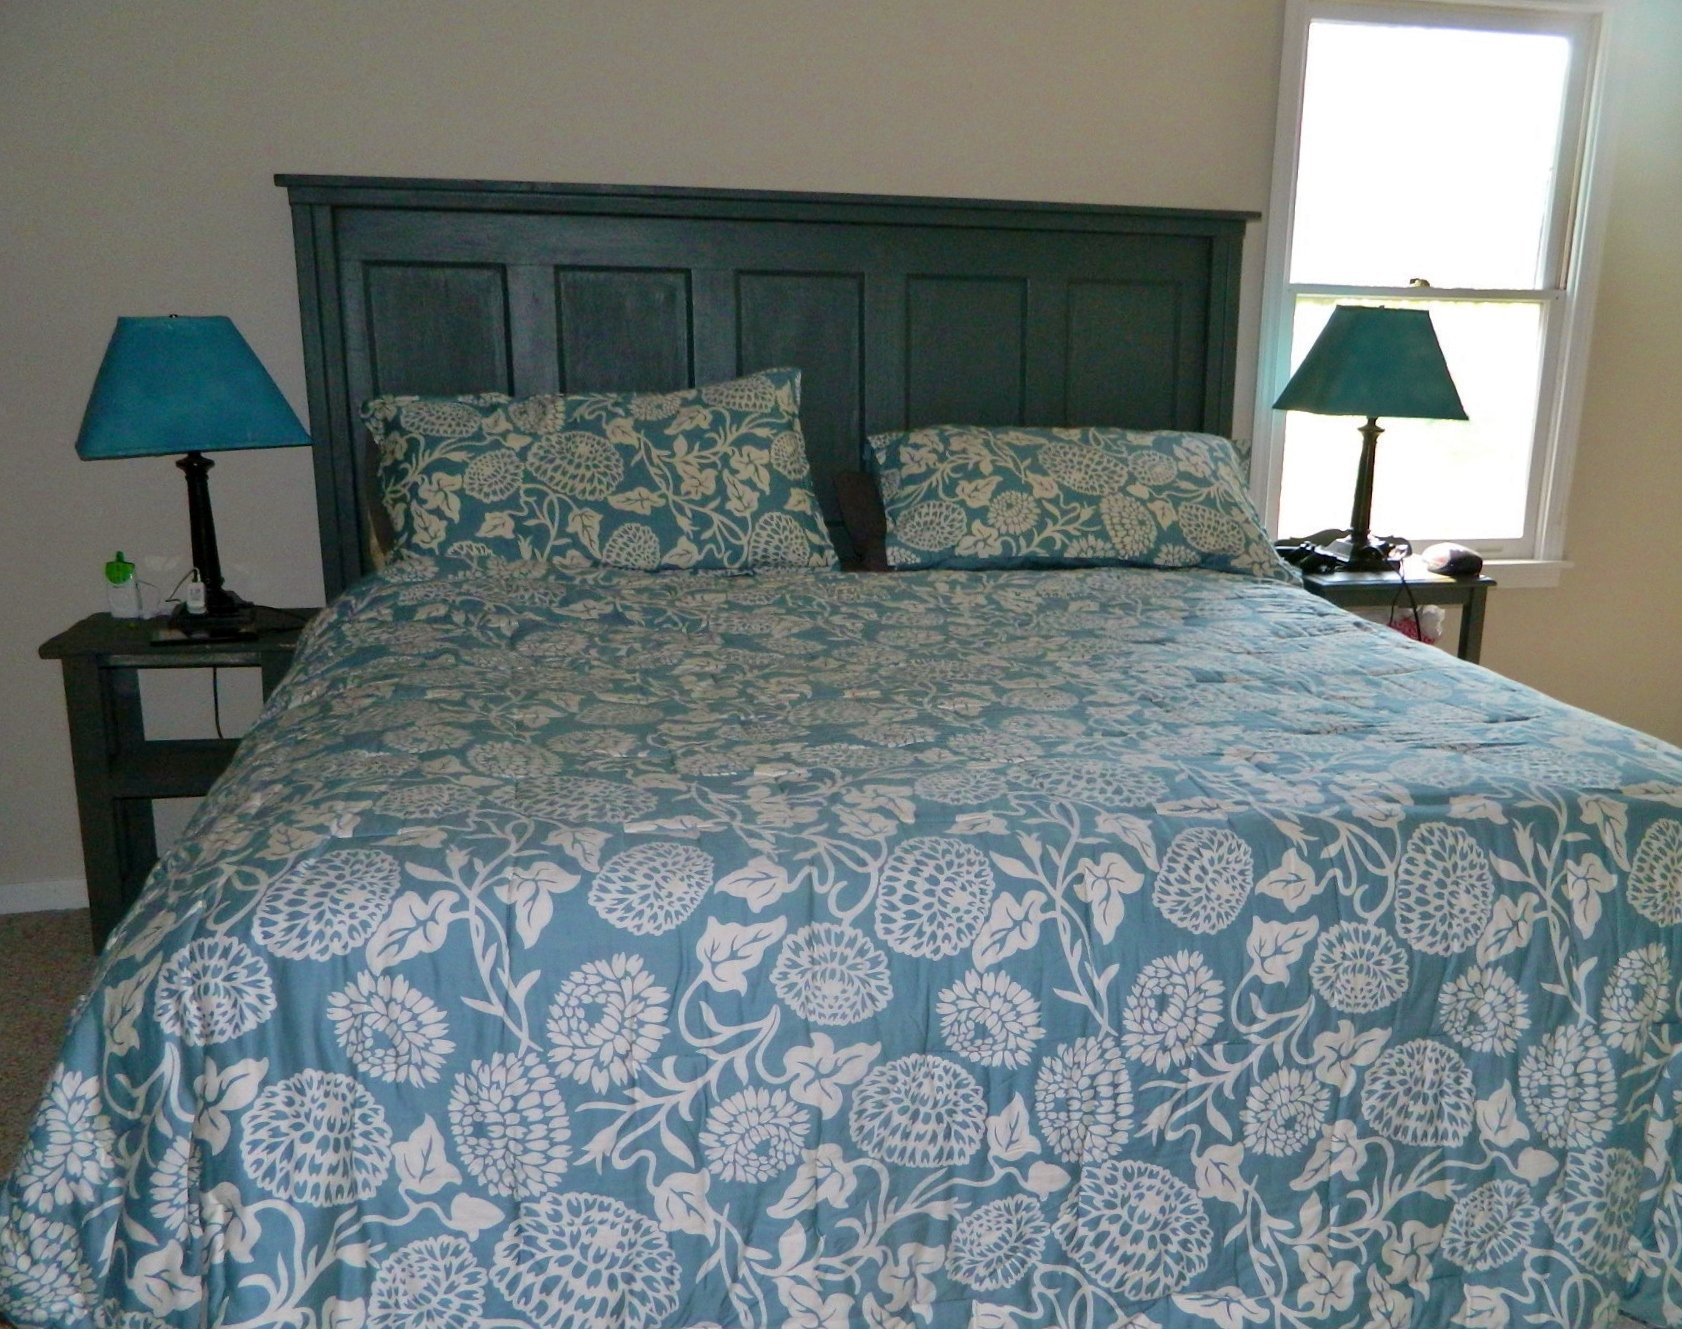
I made this headboard last year. I got tired of my 5 year old shutting the door on my 2 year old, it was a large heavy old wooden door, so I took it off the hinges and had it sitting there staring at me forever. So I decided to make a headboard out of it. It was simple, just using the basics of the farmhouse bed around it. I love it :D

Built from Plan(s)
Estimated Time Investment
Day Project (6-9 Hours)
Finish Used
A can of mistinted semigloss paint from walmart
Recommended Skill Level
Beginner
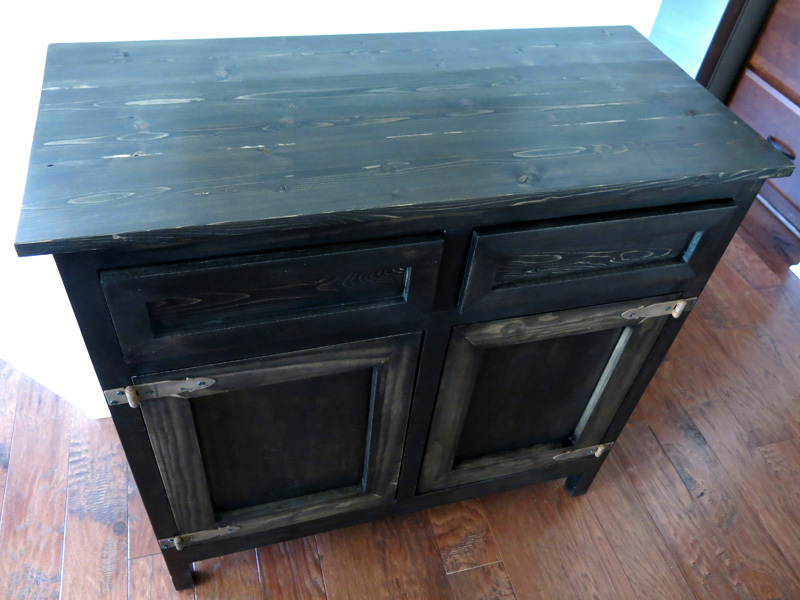
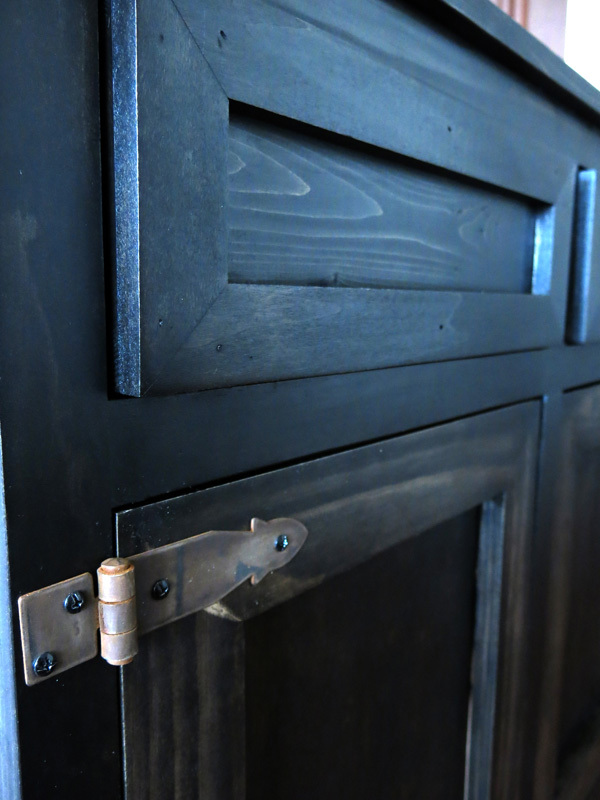
Entry Way Cabinet
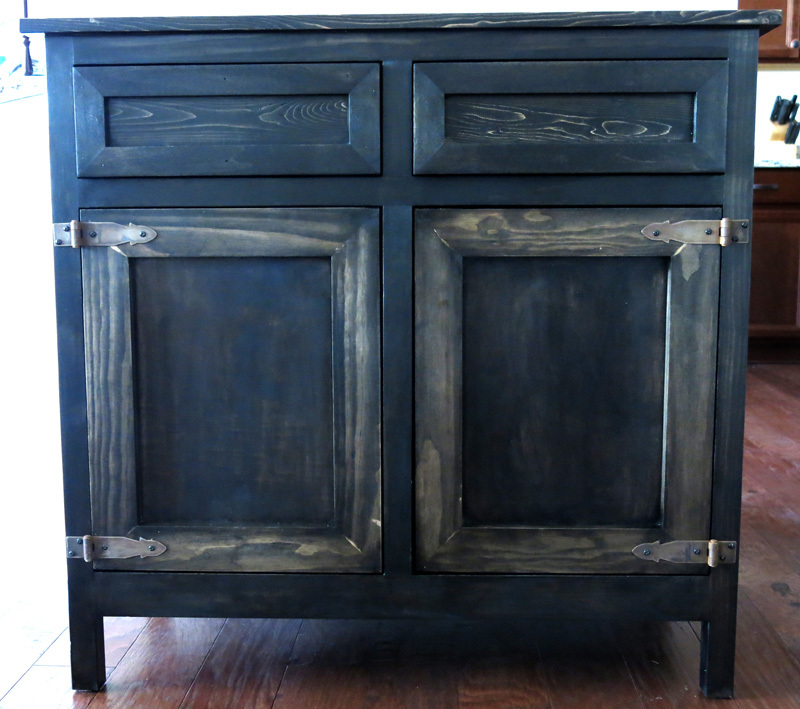
Entry Way Table. Although not made from one of your plans I wanted to share it as is the biggest thing I have made so far from my own design.
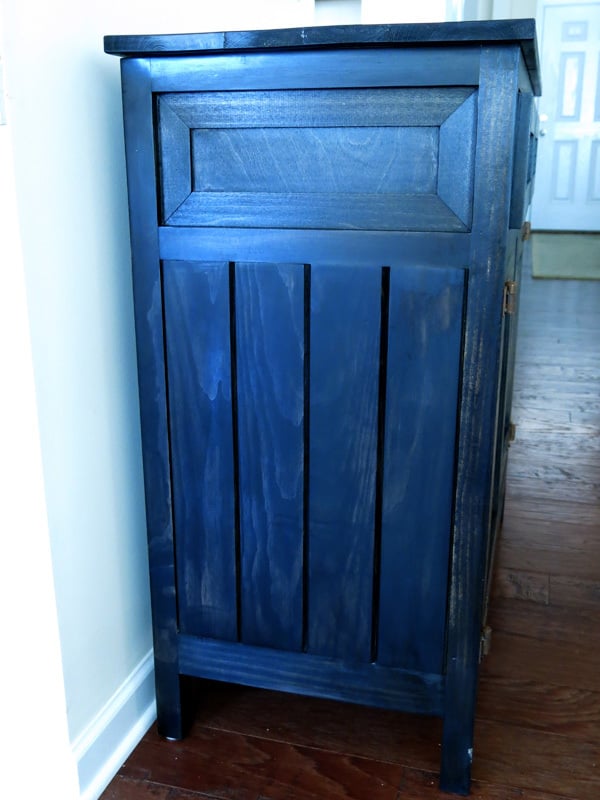
Estimated Cost
$210
Estimated Time Investment
Weekend Project (10-20 Hours)
Finish Used
Minwax Ebony (2 coats) and Minwax Poly Satin Finish (2 coats).
Recommended Skill Level
Intermediate
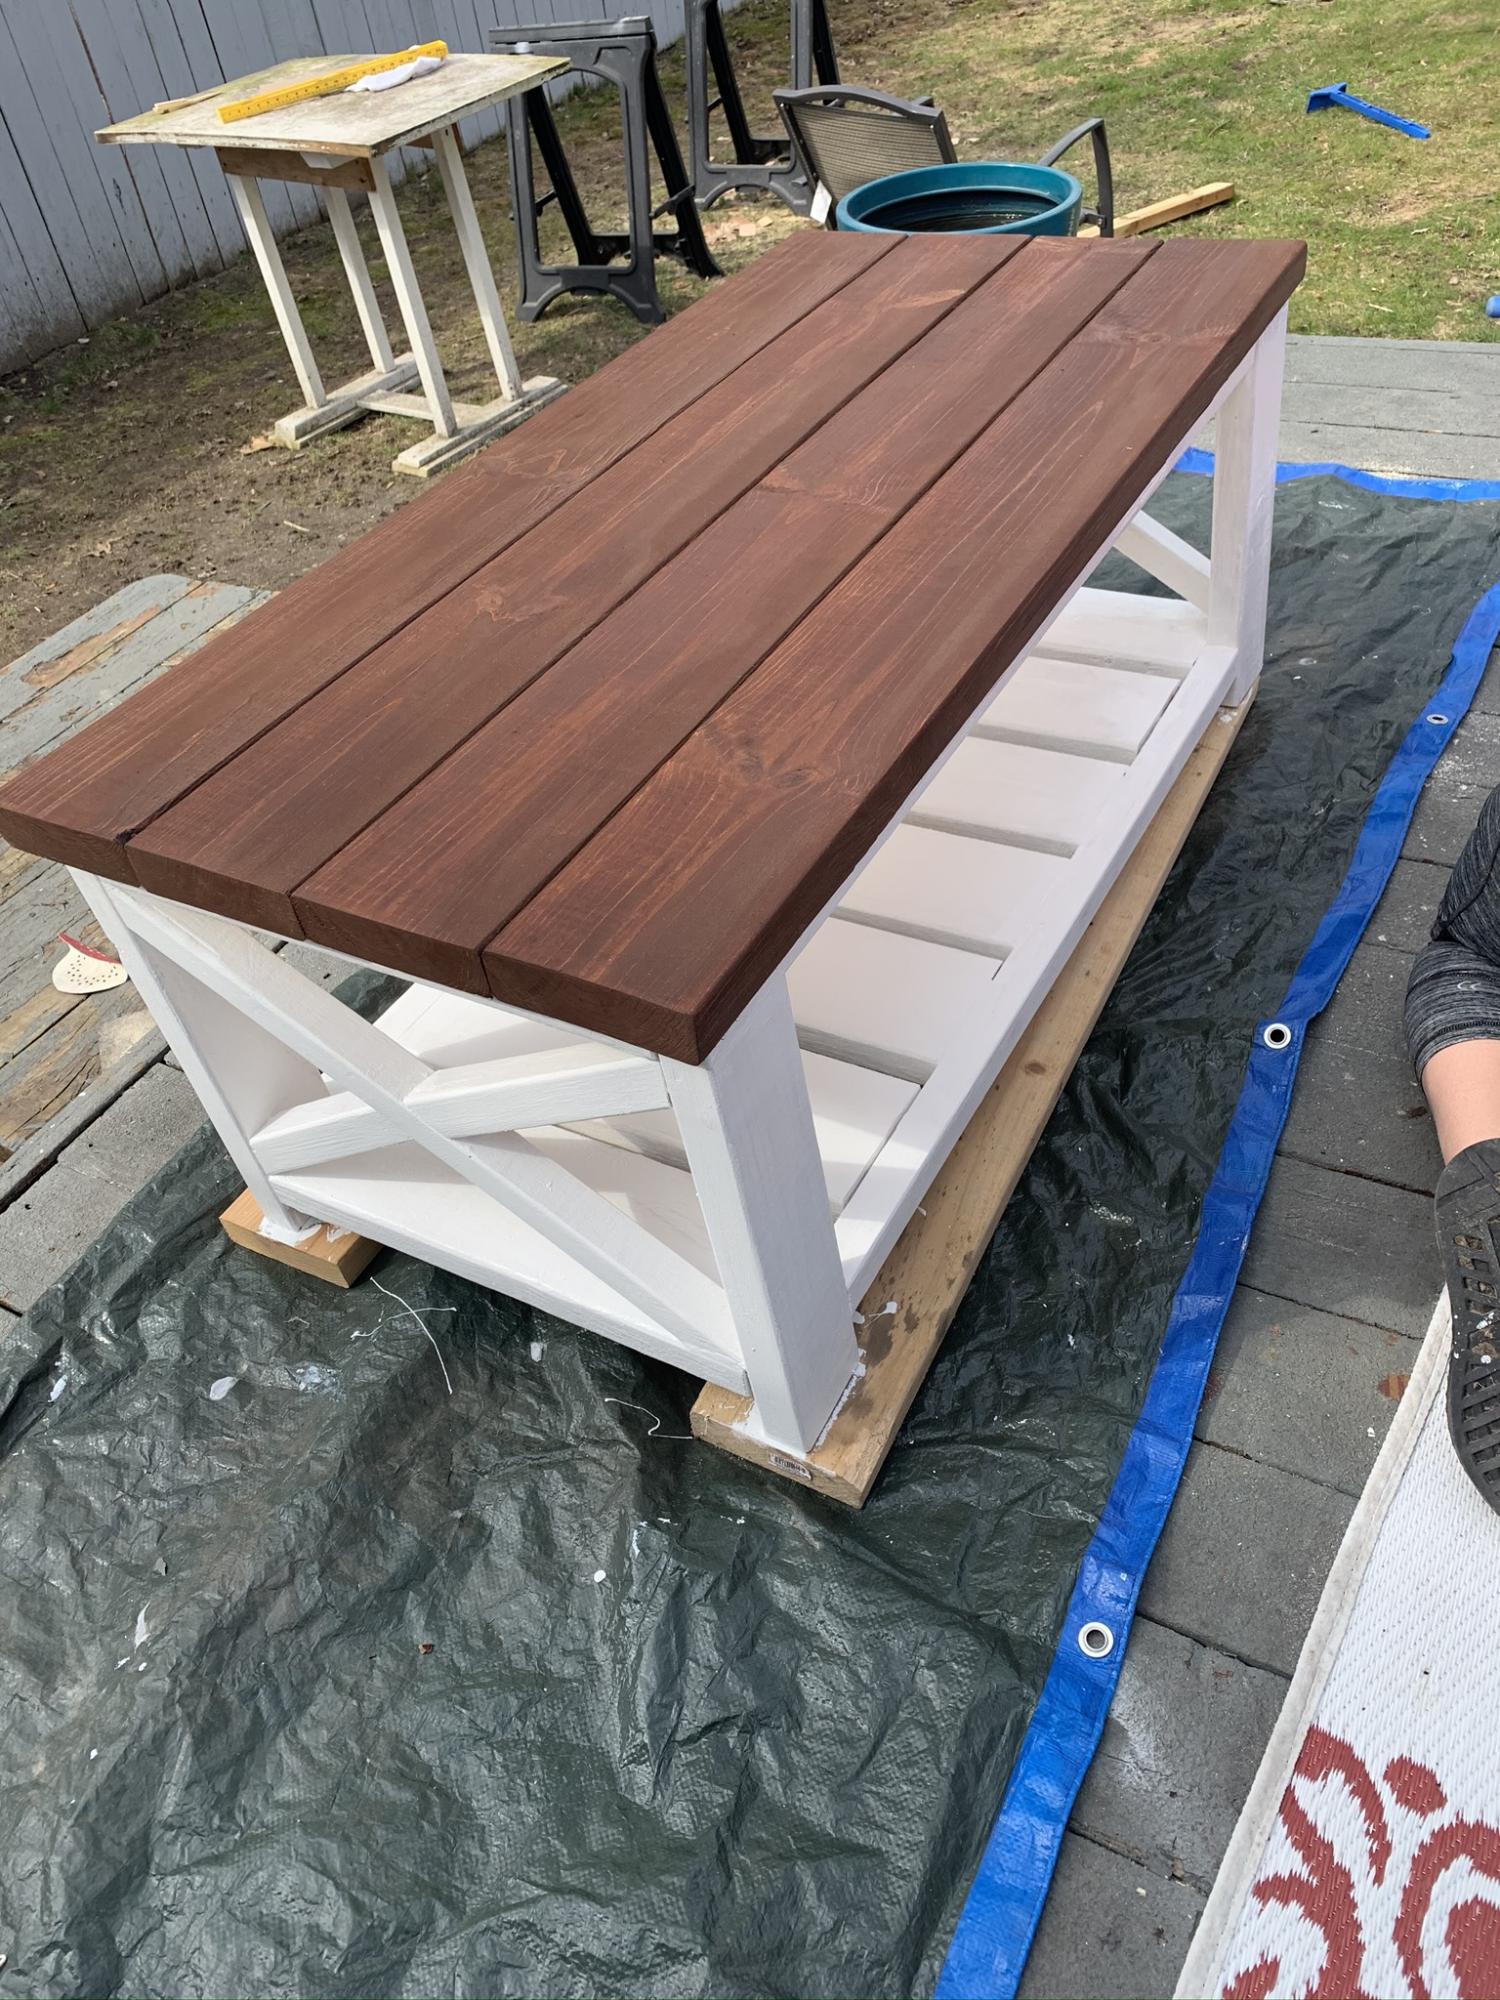
Build Michaela's Kitchen Island
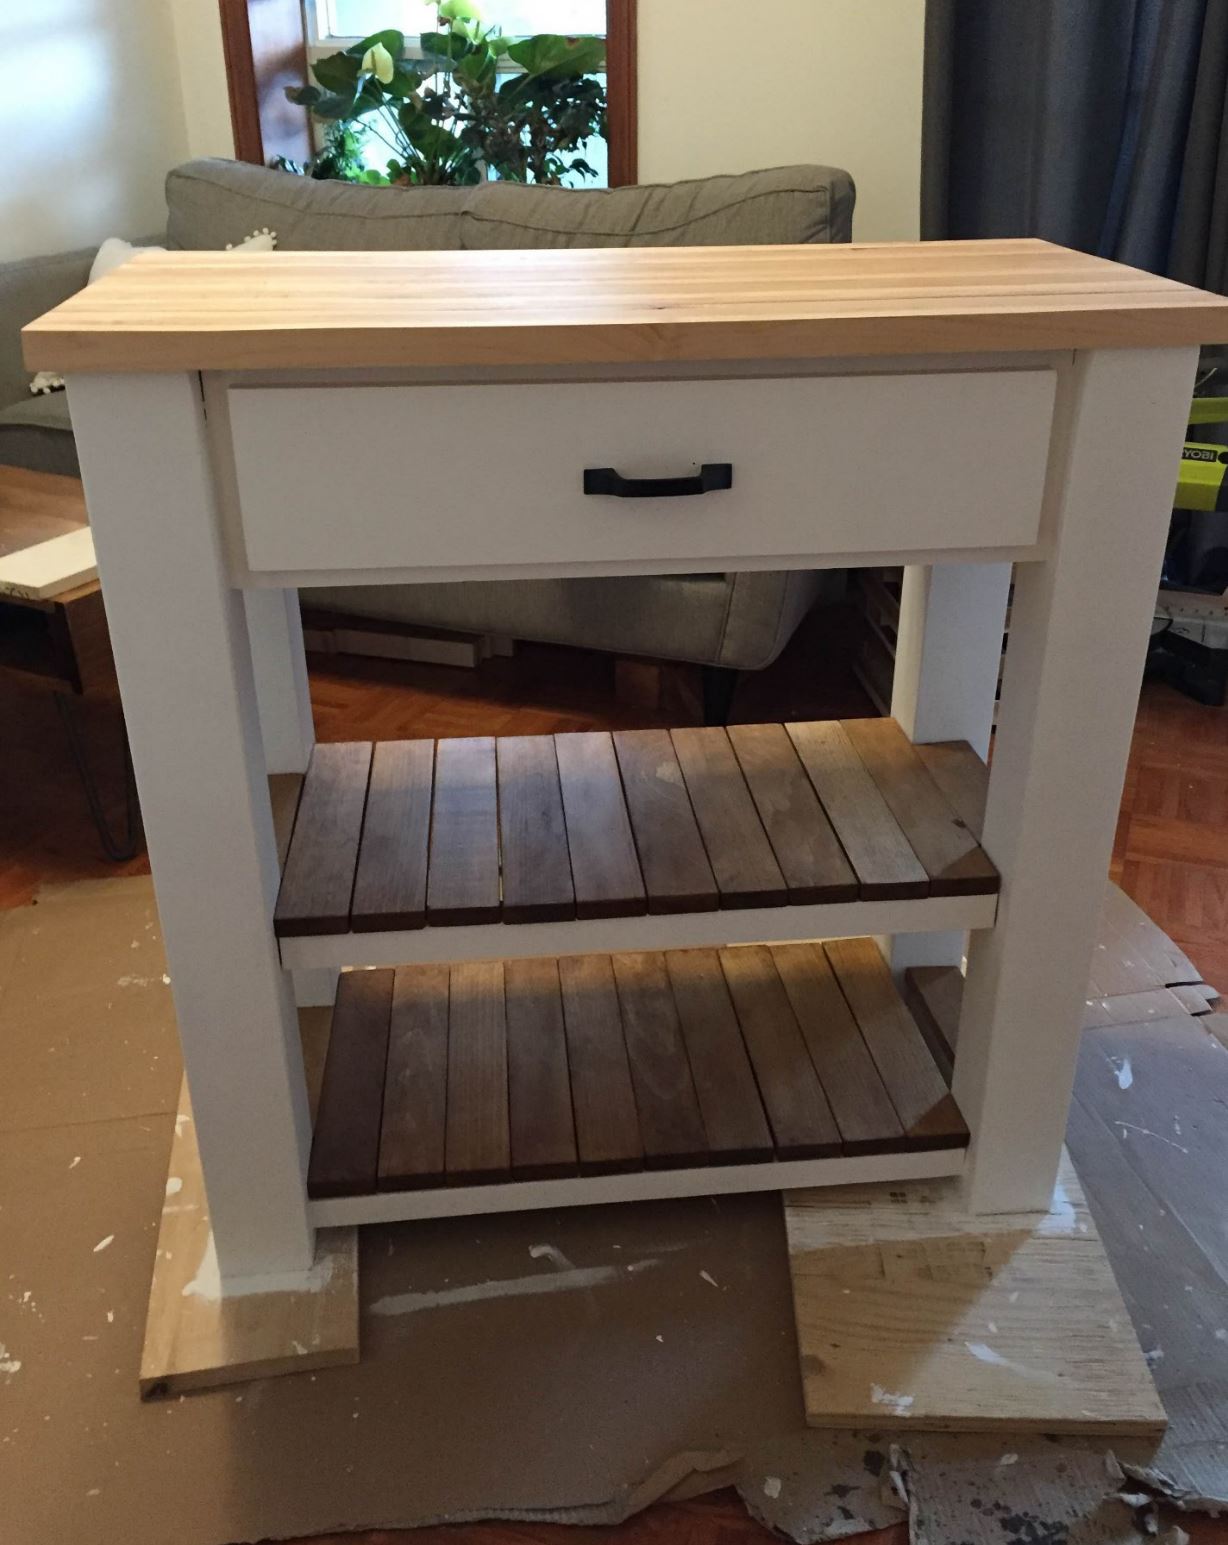
Used ana's plan as more so a guidance. The top is made out of 3/4inch hard maple planks glued/clamped together. The harder part was then planing the top down to ensure the top was relatively flat. All the other wood was pine.
The slats were stained golden oak and incurred 1 coat of polyurathane. Really love this piece.
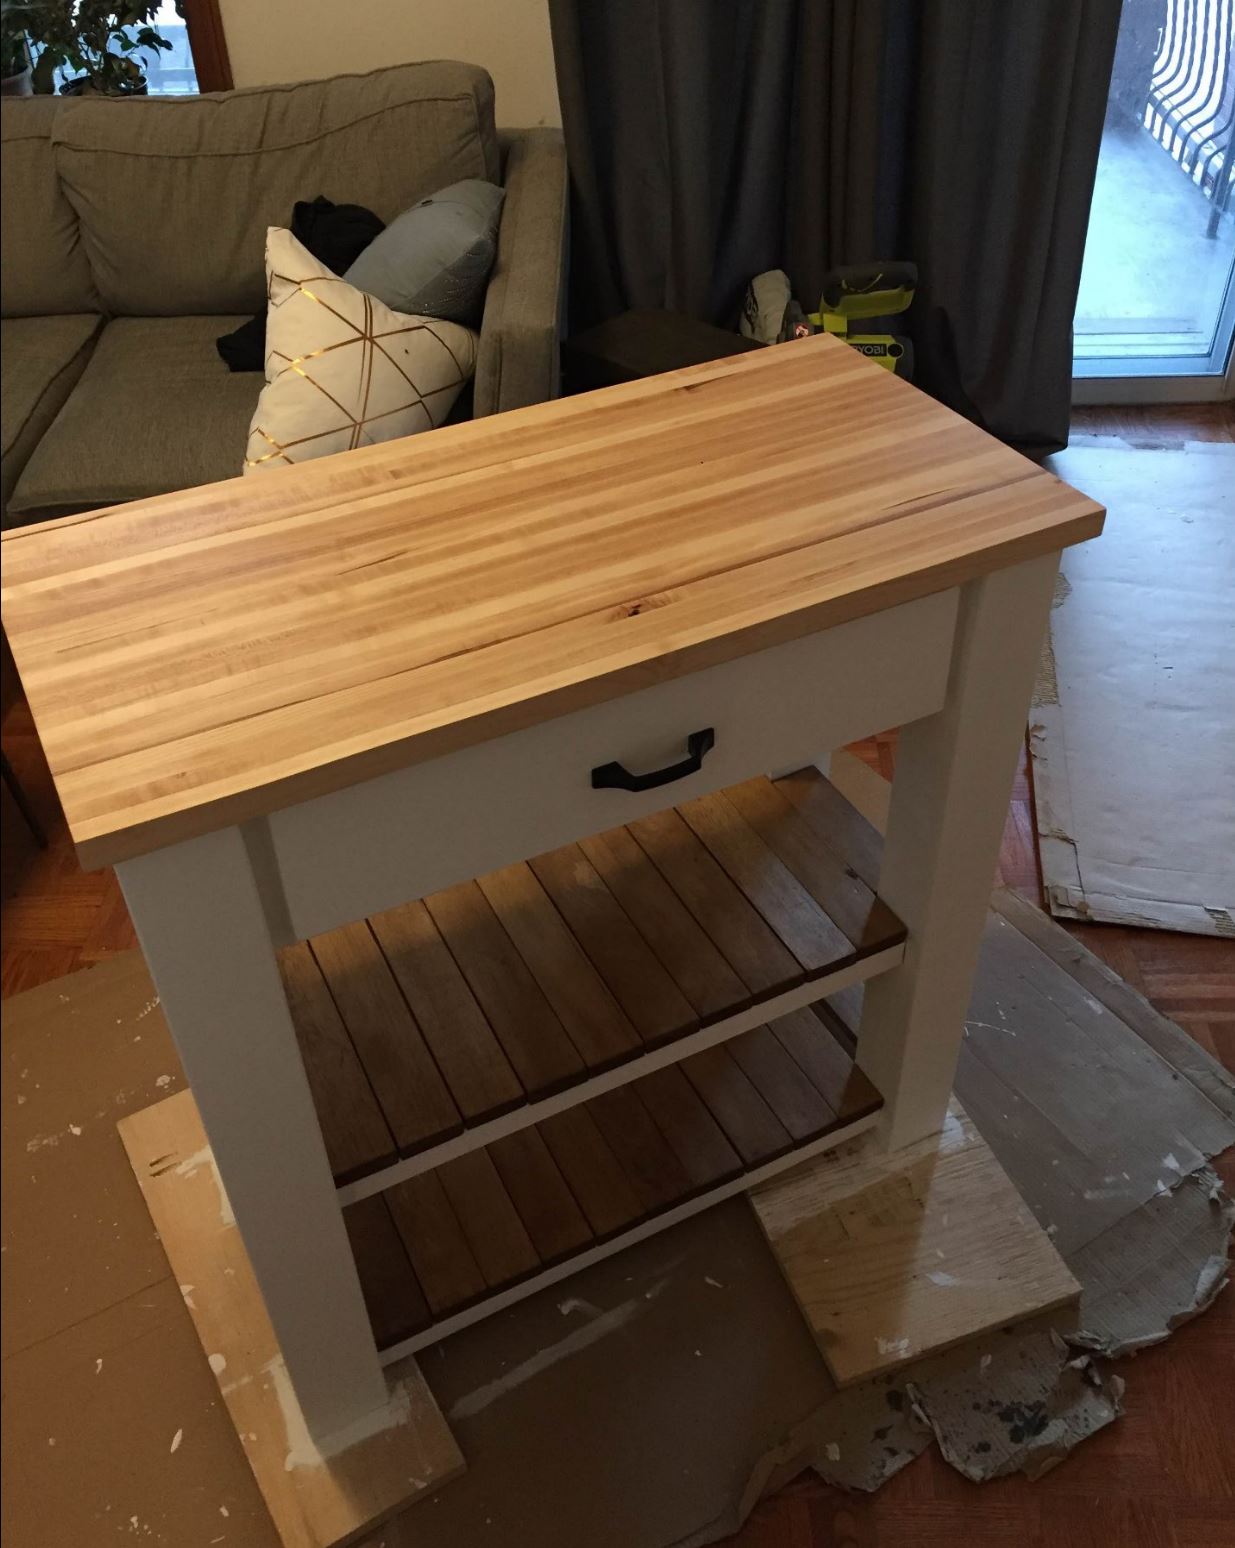
Estimated Cost
The maple planks costed a bit. Total was probably $200
Estimated Time Investment
Weekend Project (10-20 Hours)
Recommended Skill Level
Advanced
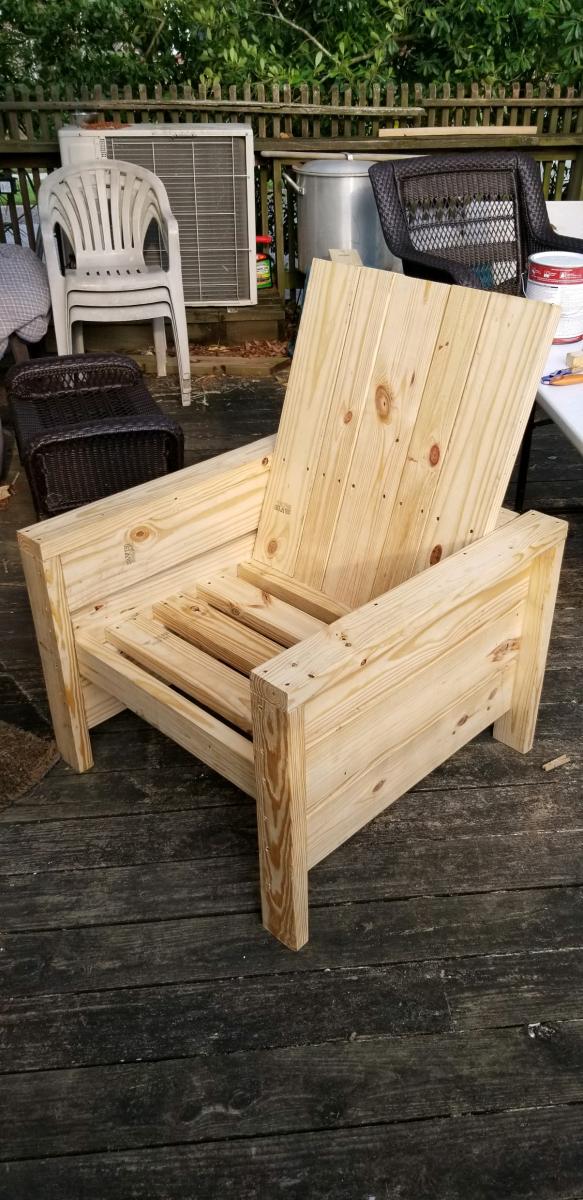
My version of the outdoor chair
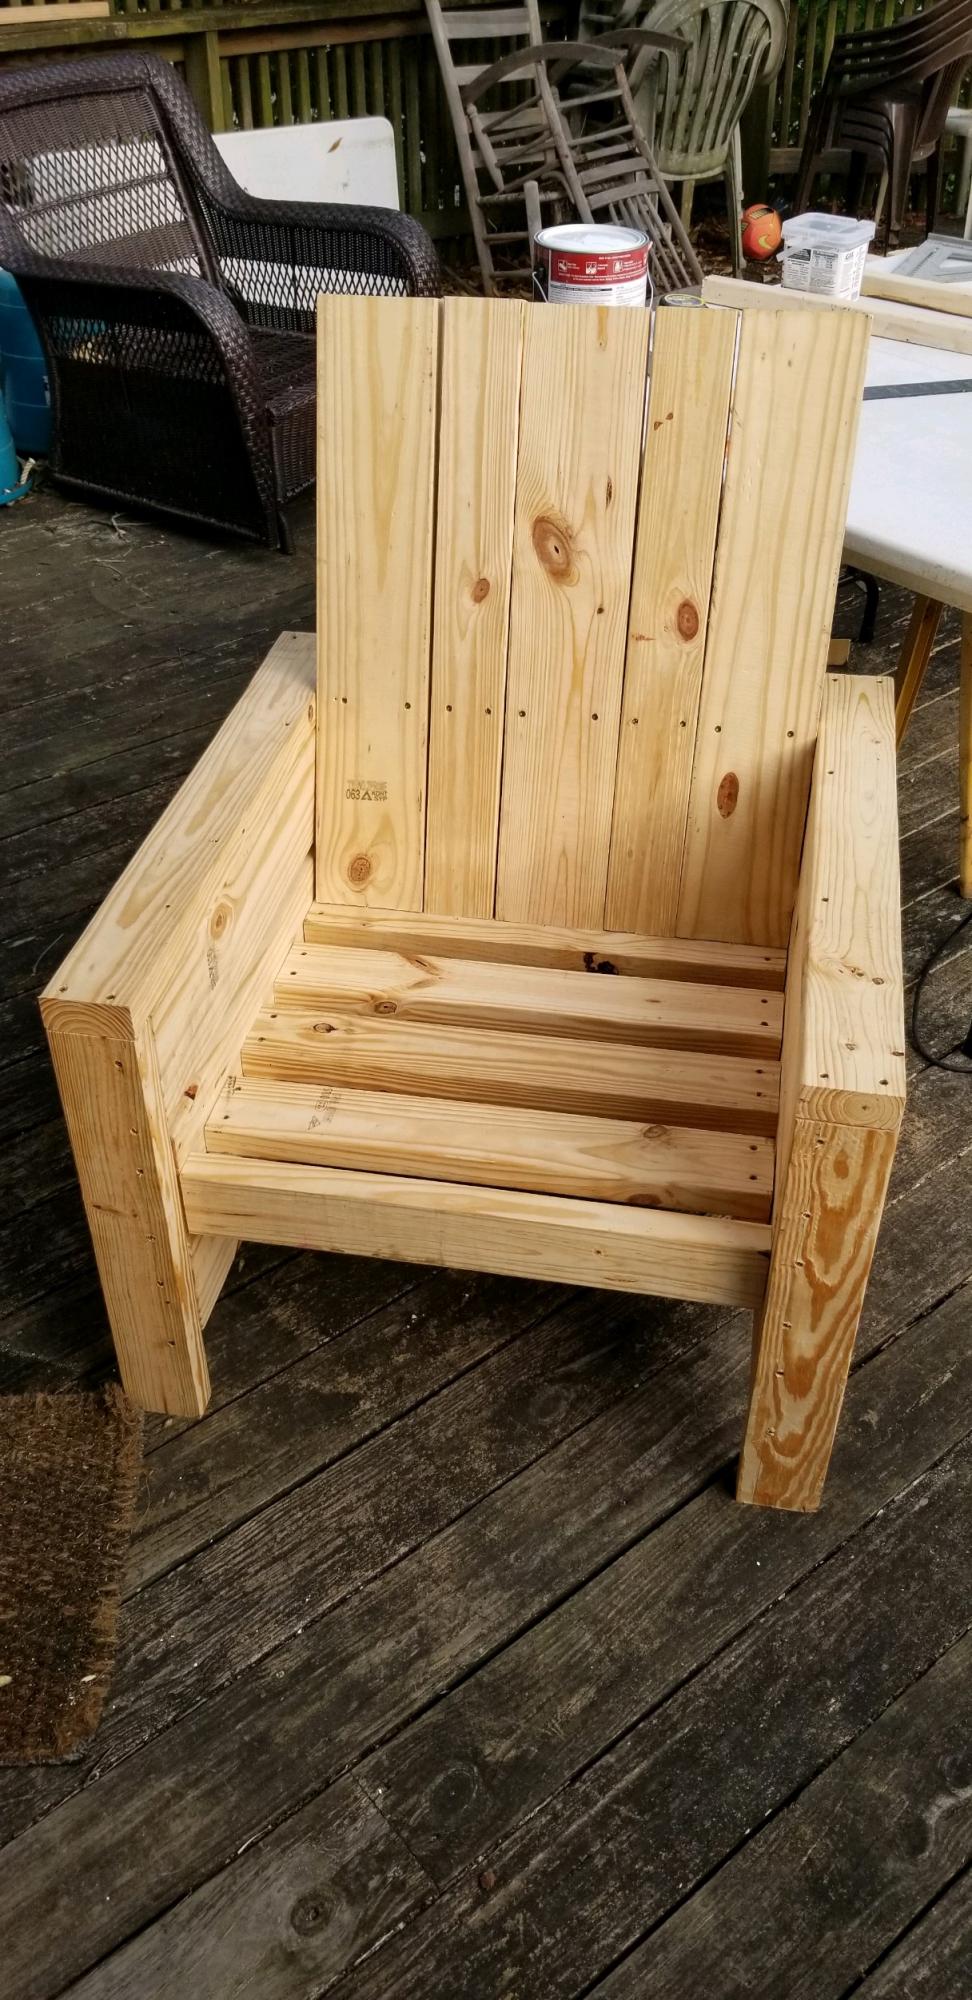
I saw the plan and thought I would give it a shot. My wife loved the plan, but wanted something with a higher back. I used the bases of the plan as is, but I adjusted by adding some higher pieces at the back. They are attached at the seat flat and the back rail. It worked out pretty well. I still need to sand and stain.
Built from Plan(s)
Estimated Time Investment
Afternoon Project (3-6 Hours)
Finish Used
None yet
Recommended Skill Level
Beginner
Fireplace Wall with Hearth
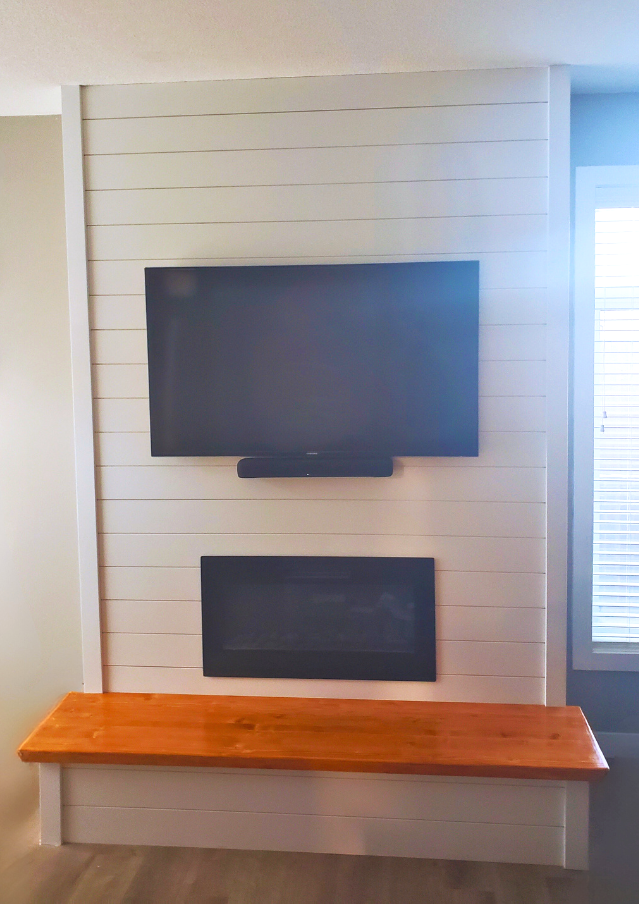
Fireplace Bumpus. I decided to add a hearth. I am so pleased with project.
Arne de Jong from Calgary Alberta Canada
Built from Plan(s)
The Carb Cupboard
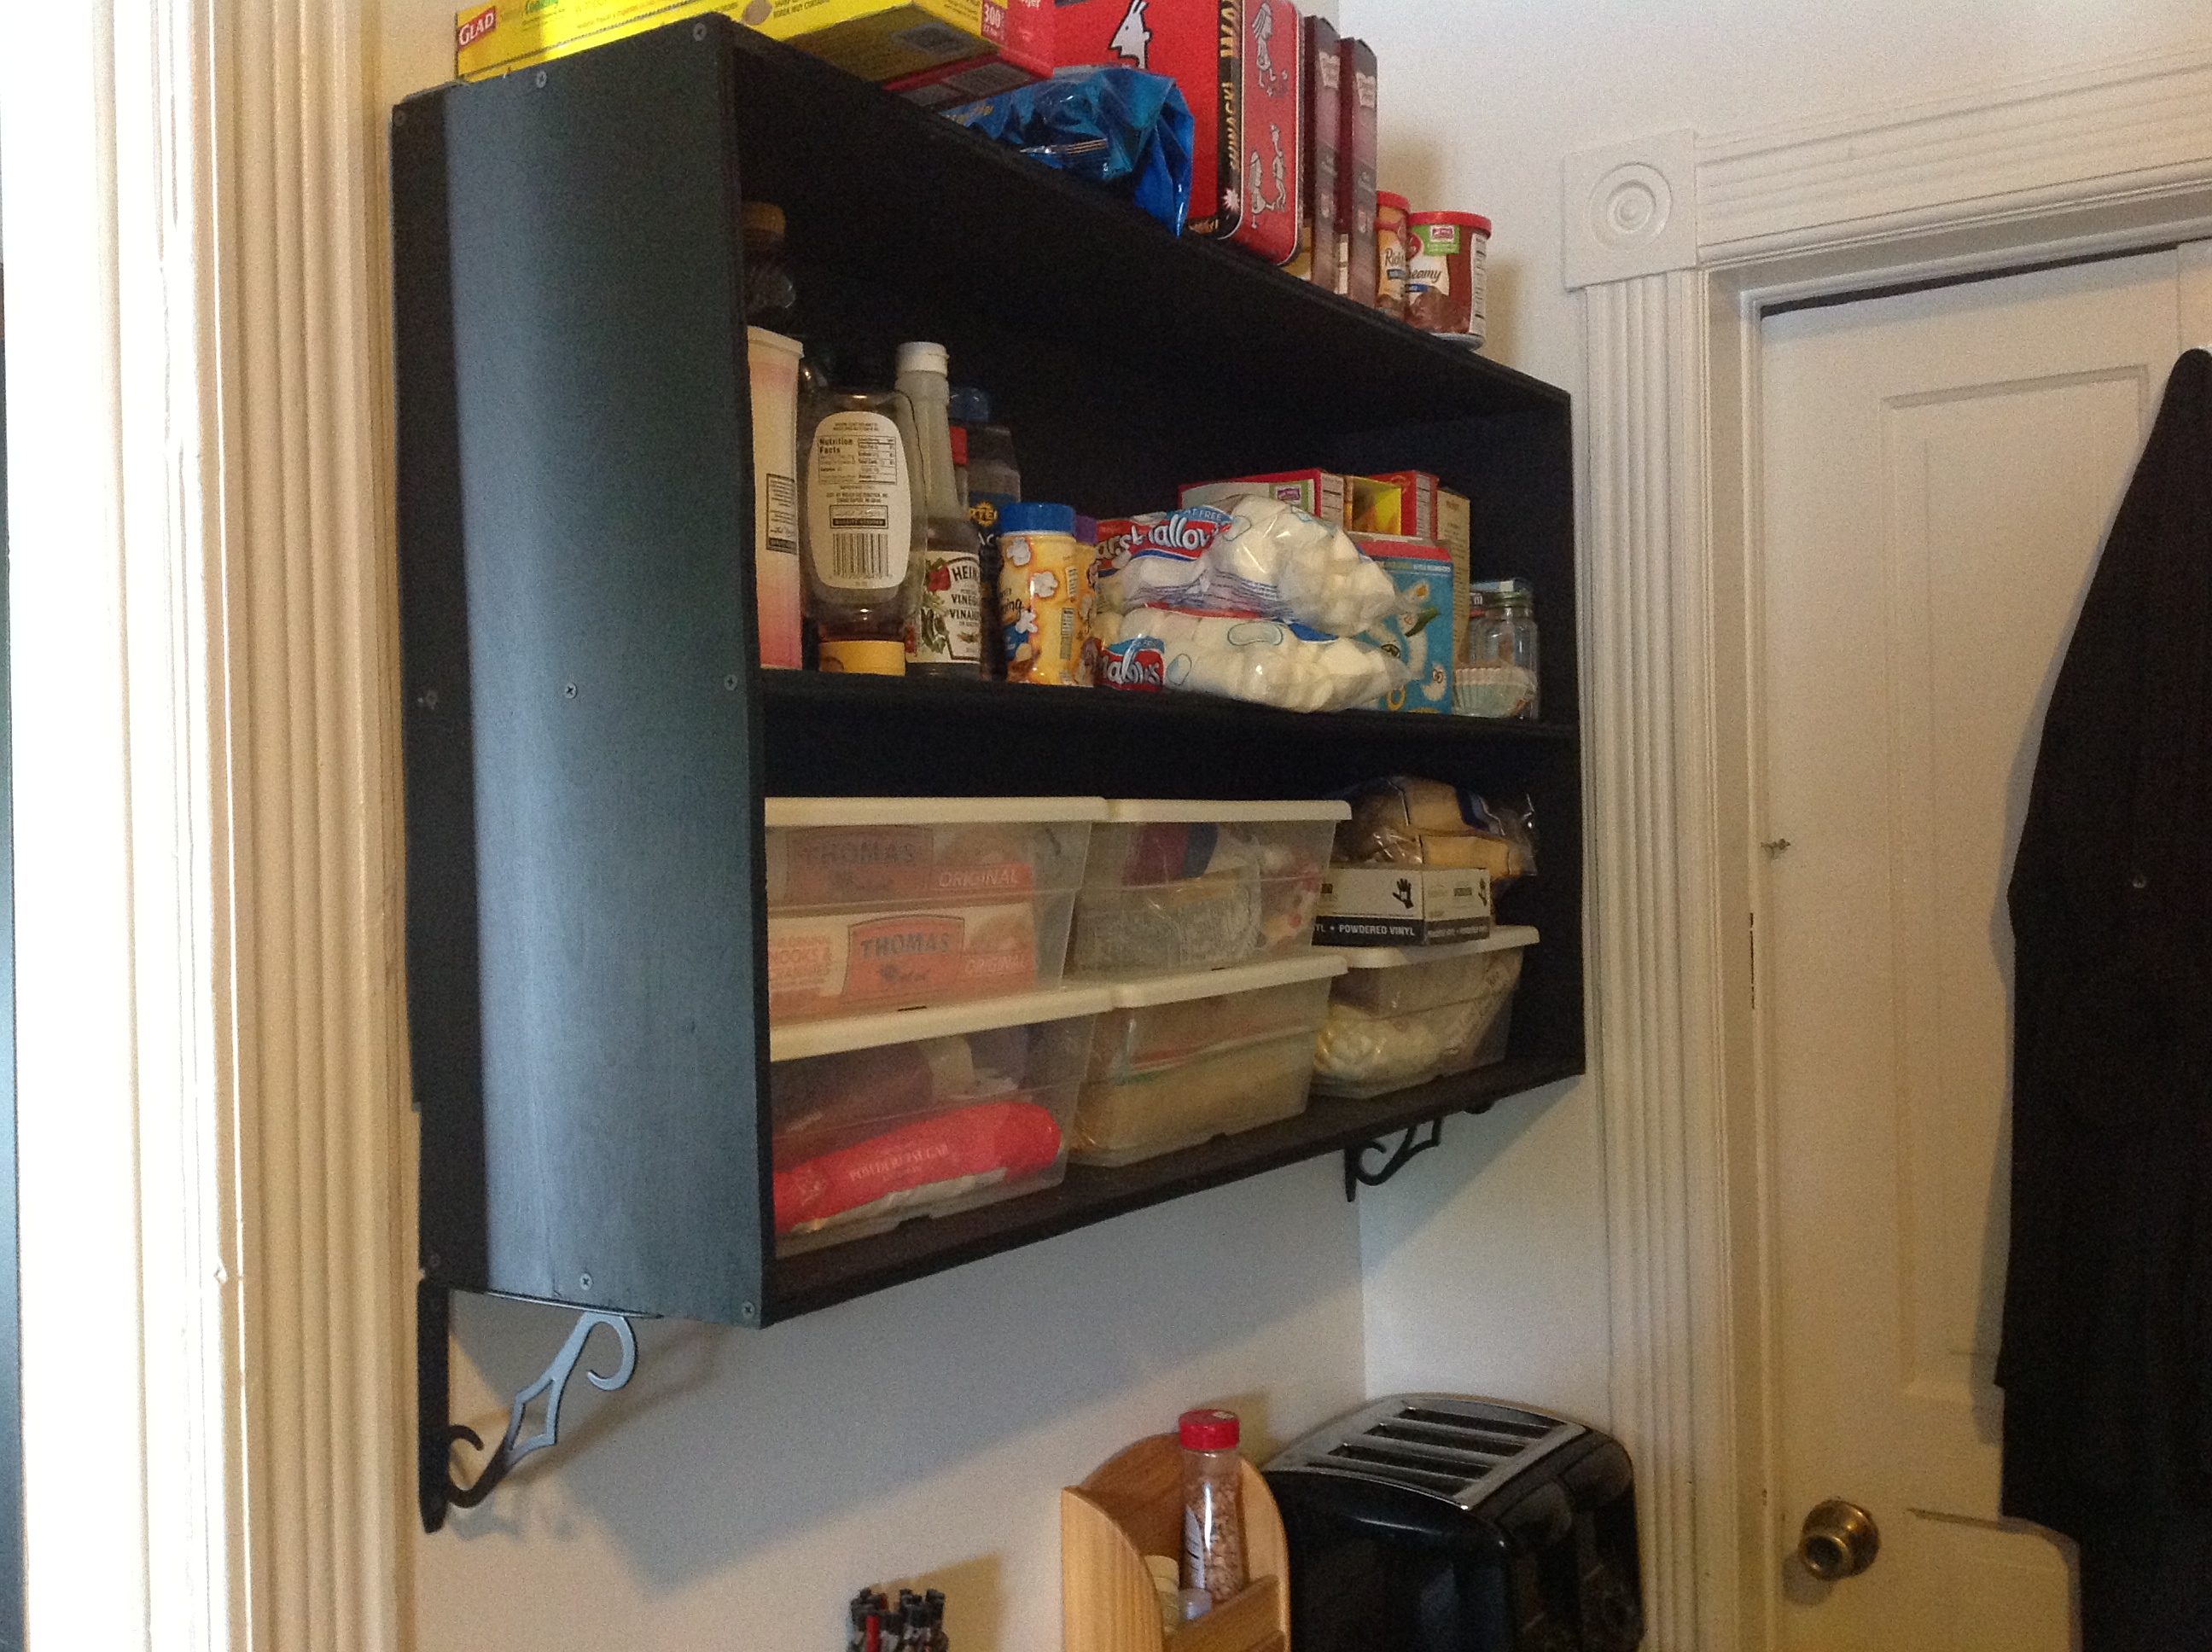
Anther creation of my own but this would easily be created from Ana's plans for this wall shelf. There isn’t much cupboard storage in our kitchen so when friends gave us a sideboard they didn’t have use for & it fit perfectly in one of our kitchen’s oddly spaced corners we were thrilled. It became our “Toasting Station” where the toaster & Panini grill are. I decided that we needed matching shelving to house our “Carbs” since it was much easier to make toast & sandwiches when the bread was right above the toasting implements.
Estimated Time Investment
Afternoon Project (3-6 Hours)
Finish Used
Valspar Flat Black Indorr/Outdoor Enamel
Recommended Skill Level
Beginner
Comments
Fancy Hall Tree, scaled down
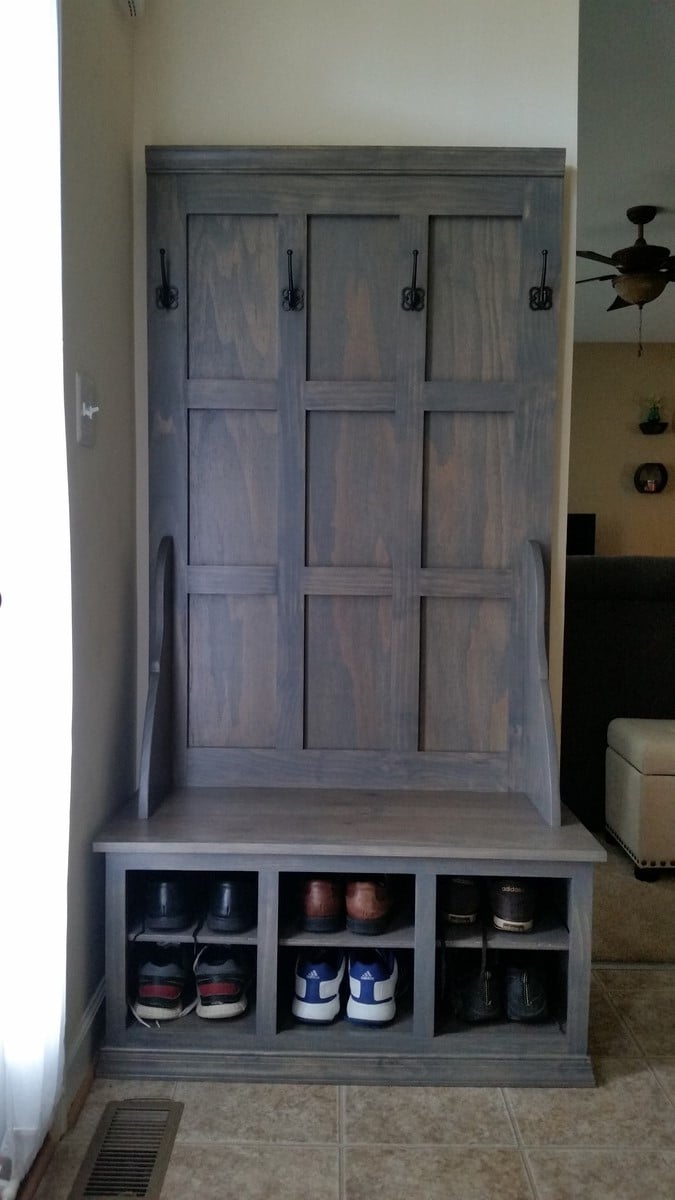
I scaled down the fancy hall tree plans to 39" wide to fit along our entry way wall. I also added shelves for shoes. It was a great birthday present for my wife, thanks Ana!
Built from Plan(s)
Estimated Time Investment
Week Long Project (20 Hours or More)
Finish Used
Minwax classic grey 271 oil stain, and minwax polycrylic sealant.
Recommended Skill Level
Intermediate
Simple Step Stool
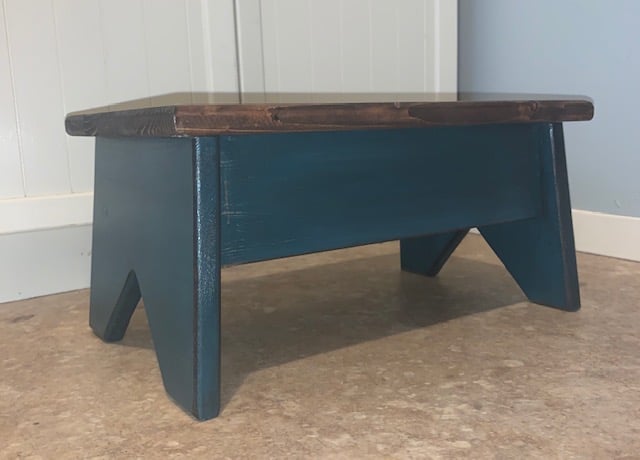
Simple Step stool. My husband suggested we needed one of these for our pantry, so I whipped one up for us! The plan was so easy to follow, it took me about 20 mins to make this stool.
Built from Plan(s)
Estimated Cost
$7 CAD
Estimated Time Investment
An Hour or Two (0-2 Hours)
Finish Used
Minwax Stain in Espresso
Chalk Paint in Tidal Pond, "distressed" then stained over in Espresso
Sealed with Minwax polyacrylic
Chalk Paint in Tidal Pond, "distressed" then stained over in Espresso
Sealed with Minwax polyacrylic
Recommended Skill Level
Starter Project
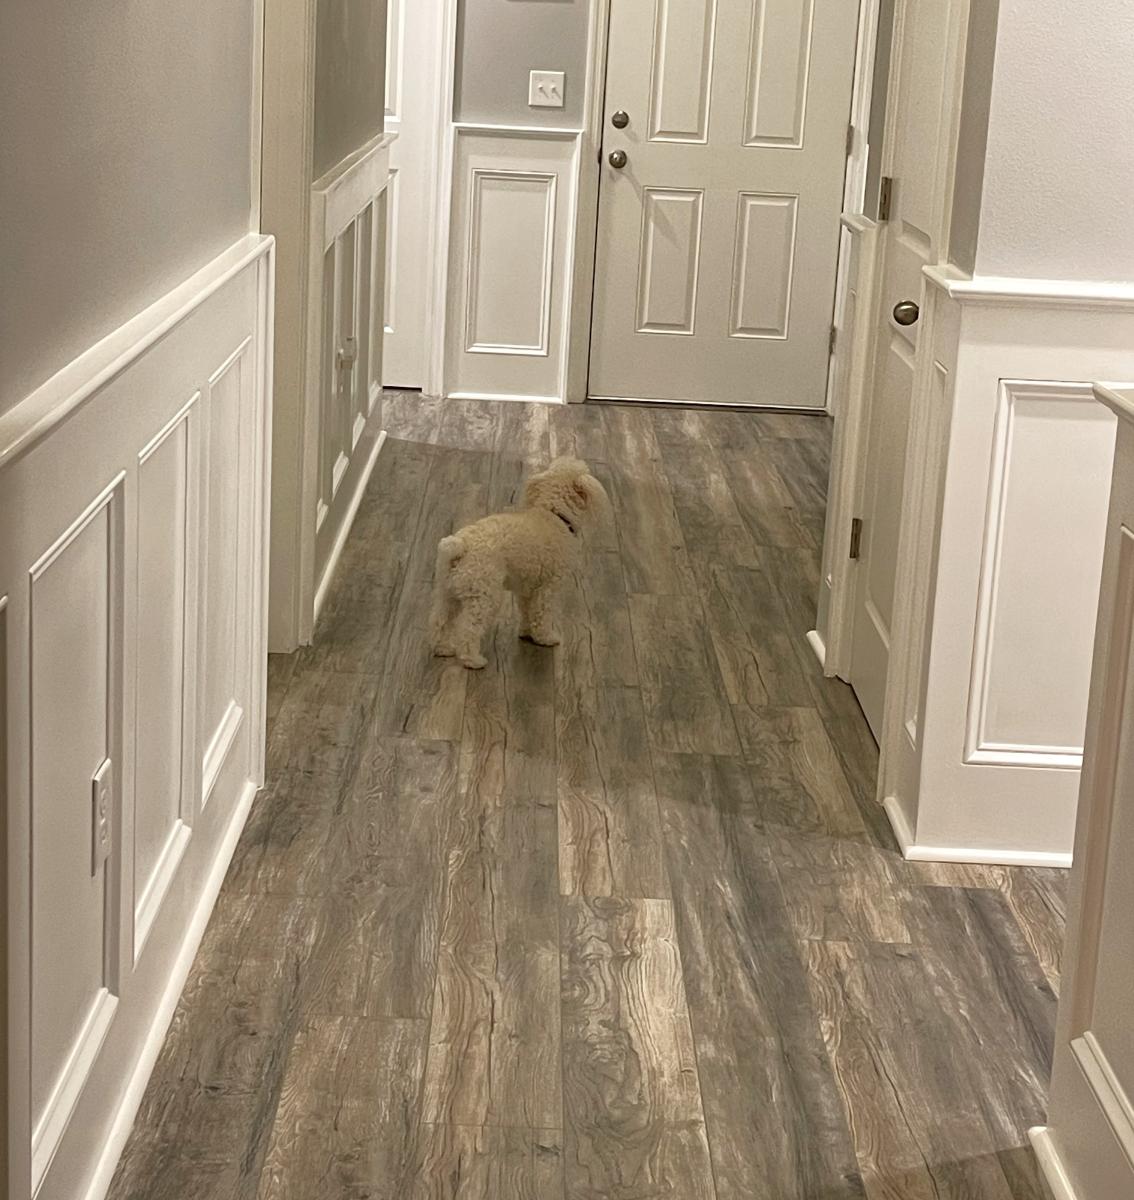
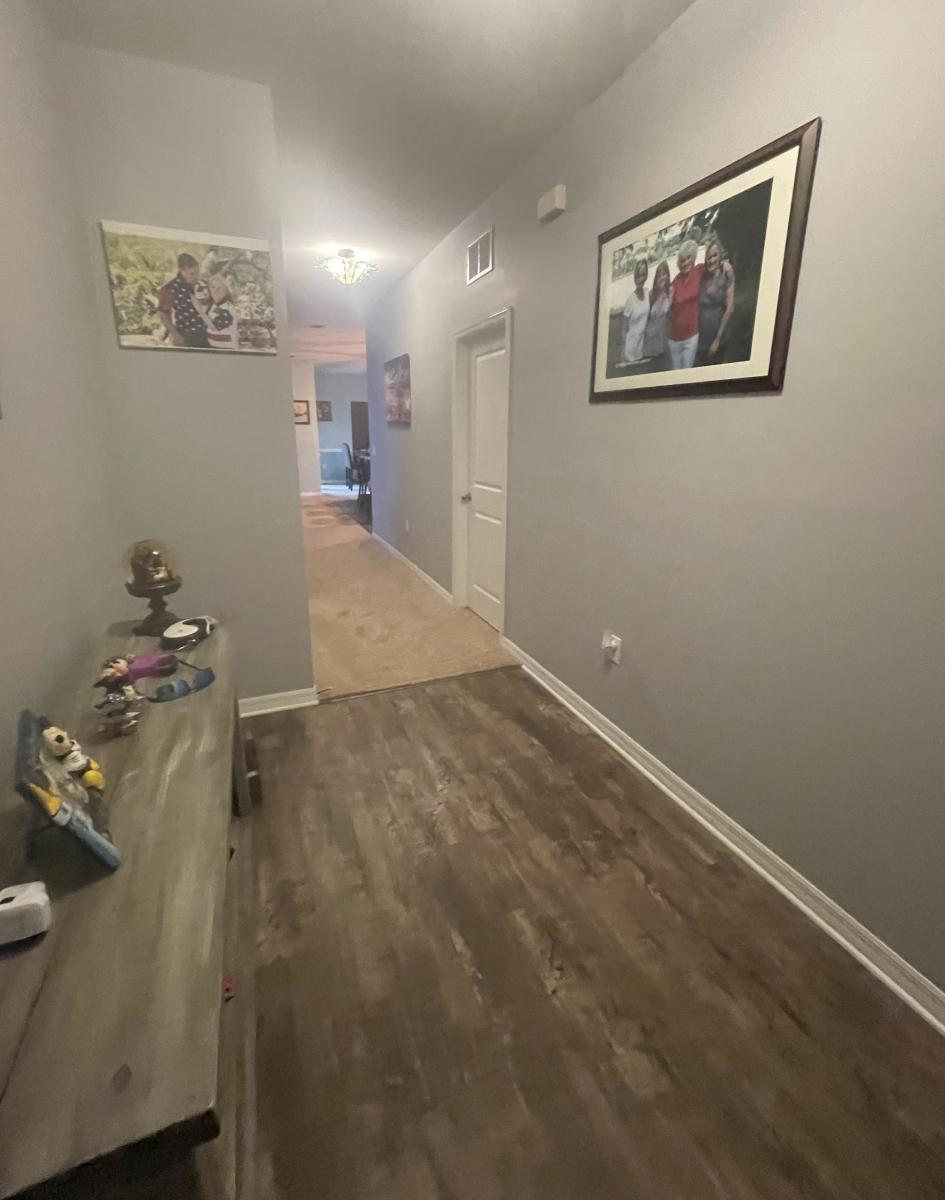
Wainscoated Hallway Upgrade
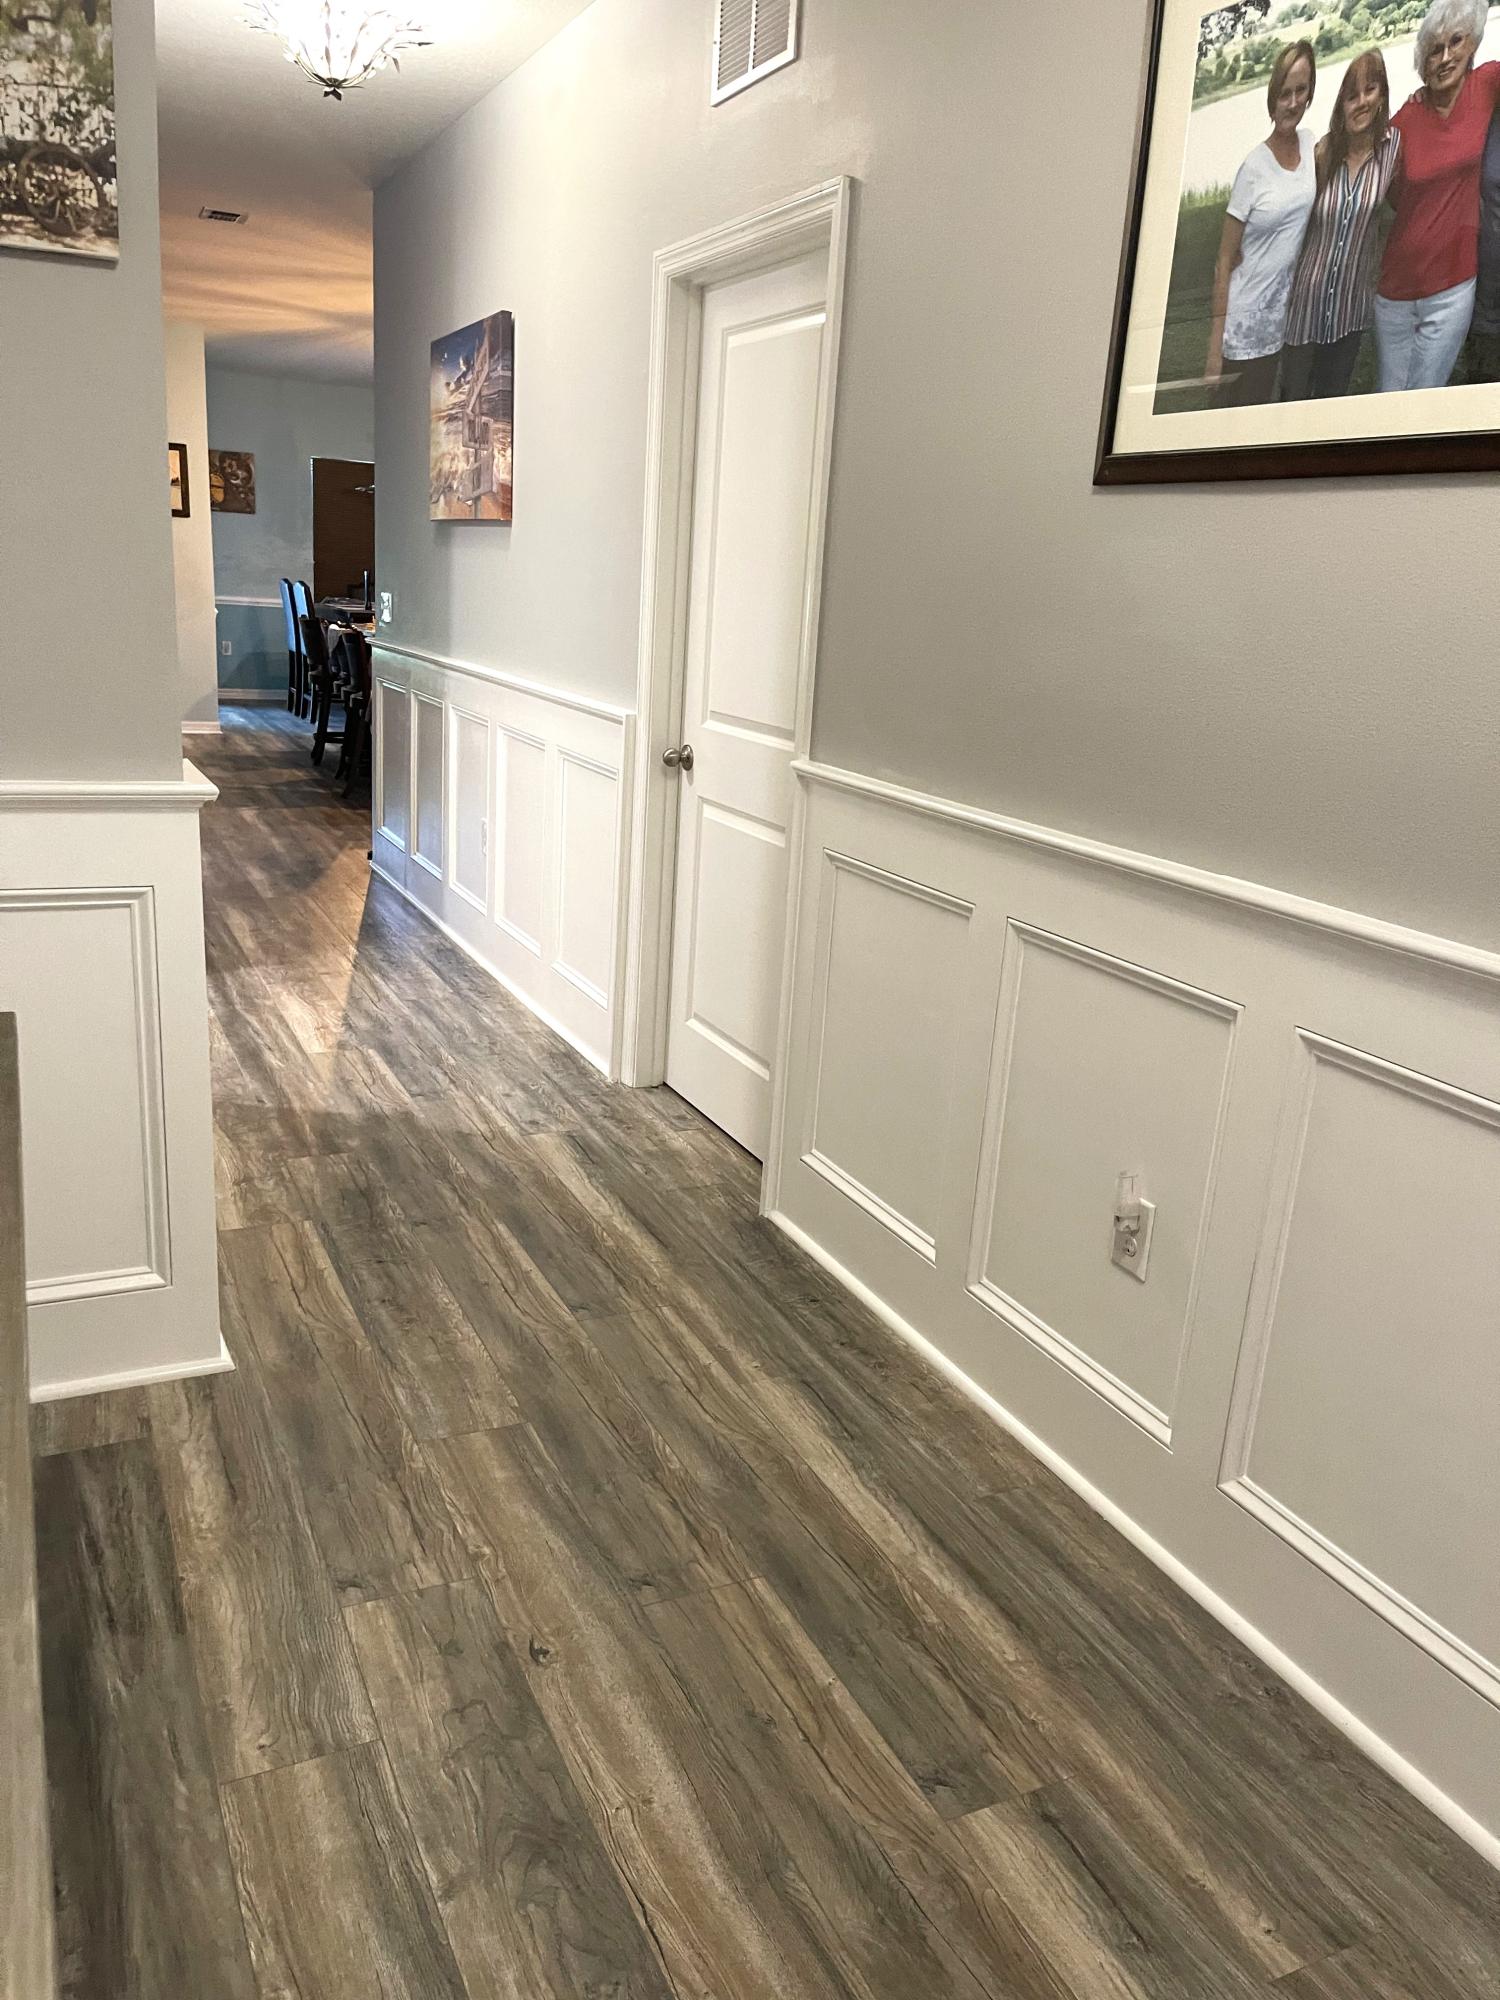
We moved into our new home. The hallway looked dark and gloomy. I decided wainscot the hallway. I brought 2x6 and 2x8 for hallway. Started installing on the wall and framed out the wall after completing the wainscot still didn’t look to my satisfaction. I then changed the carpet and installed laminate flooring. Everyone who comes to our home loves the look.

Tryed Side Table
This was my first project using an Ana White plan. I thought the plans were easy to understand and follow which made the project go smooth. I am a fan of painted and distressed furniture so I went with that look for this project. After painting the tables I used a hand sander to scuff up the corners and then added "worm holes" using a hammer and nail.
Estimated Cost
$20
Estimated Time Investment
An Hour or Two (0-2 Hours)
Finish Used
Paint
Recommended Skill Level
Beginner
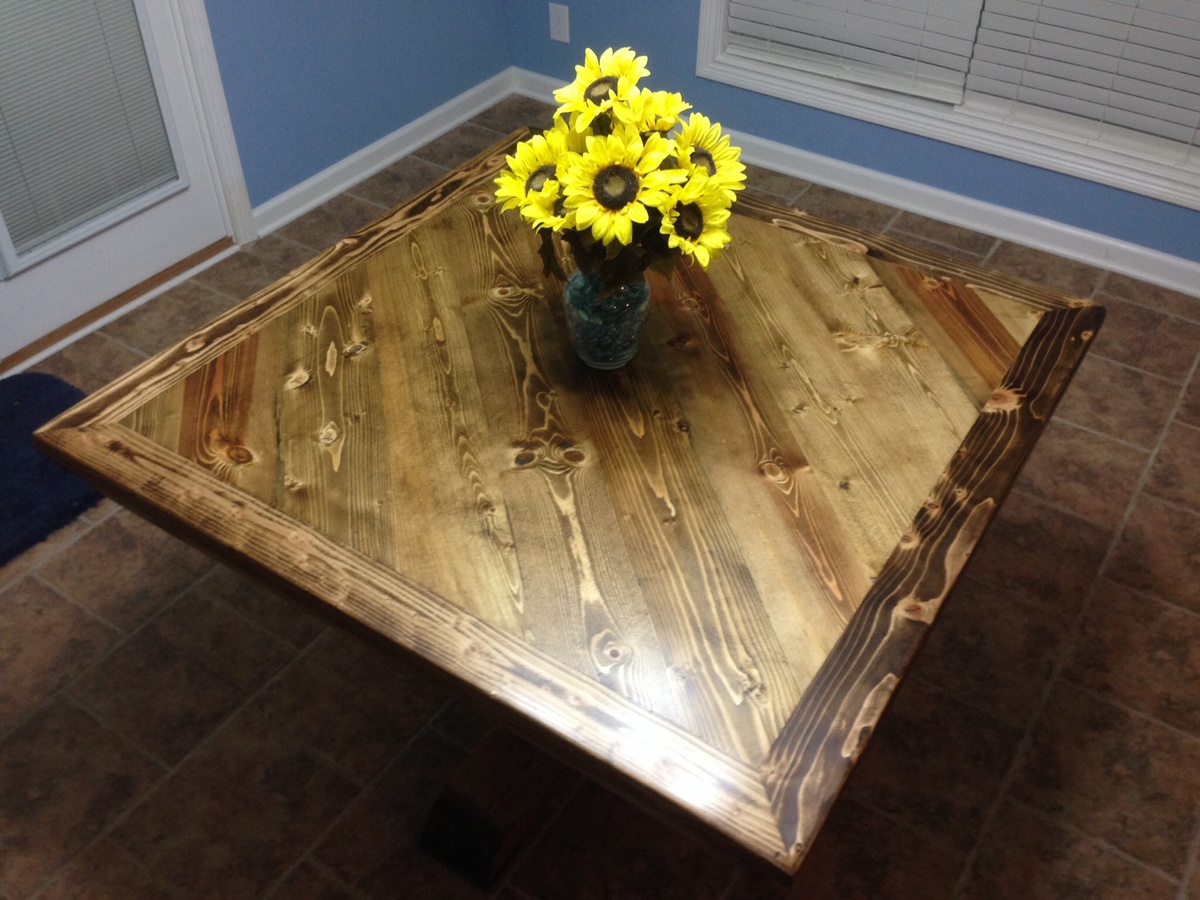
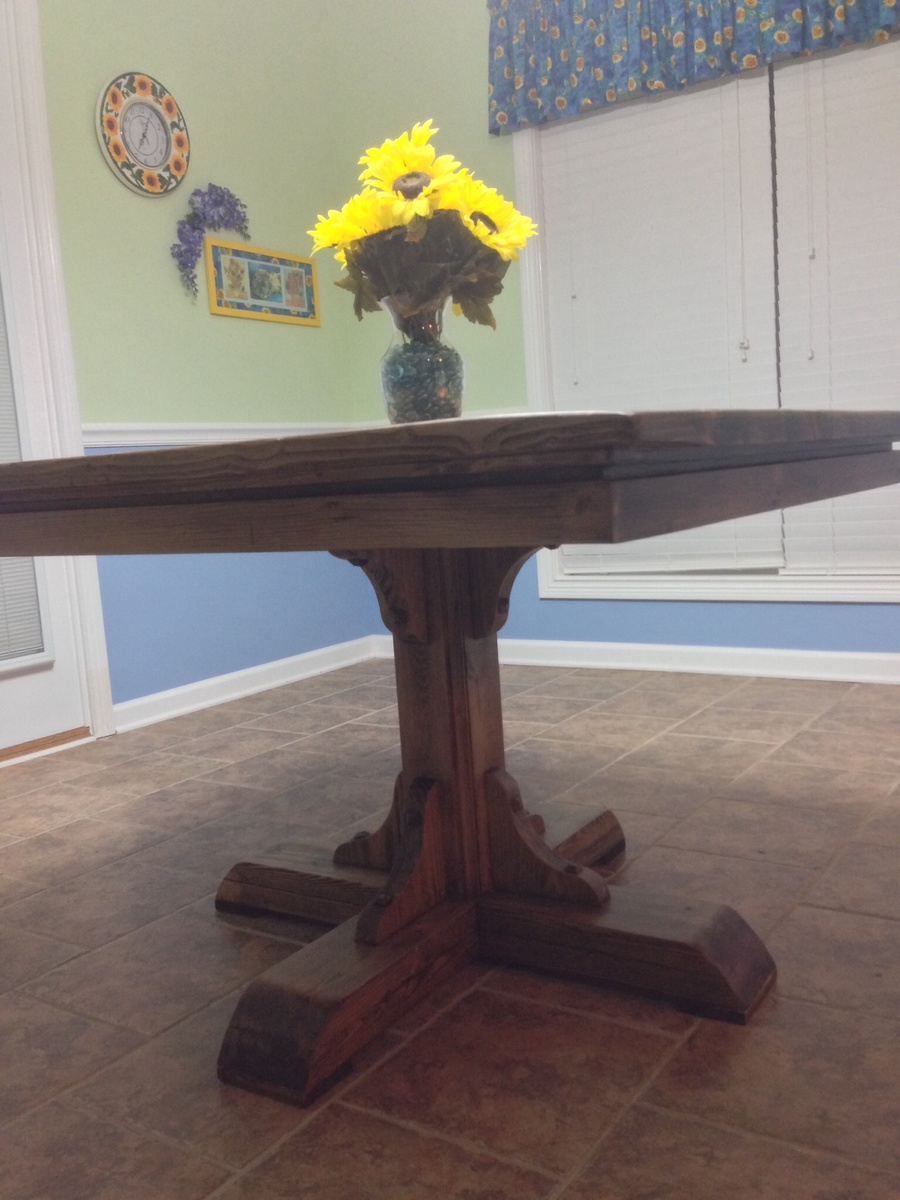
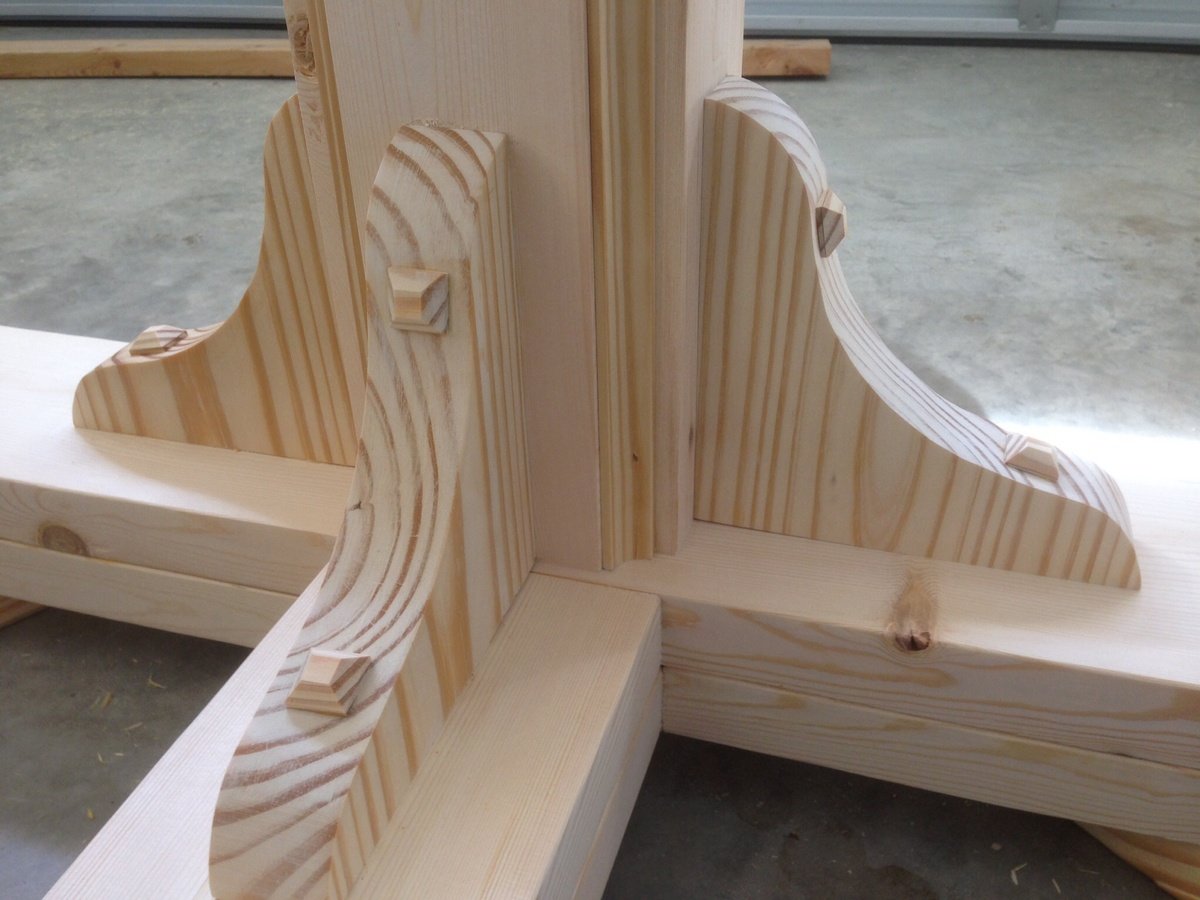
Farmhouse Pedestal Table Build
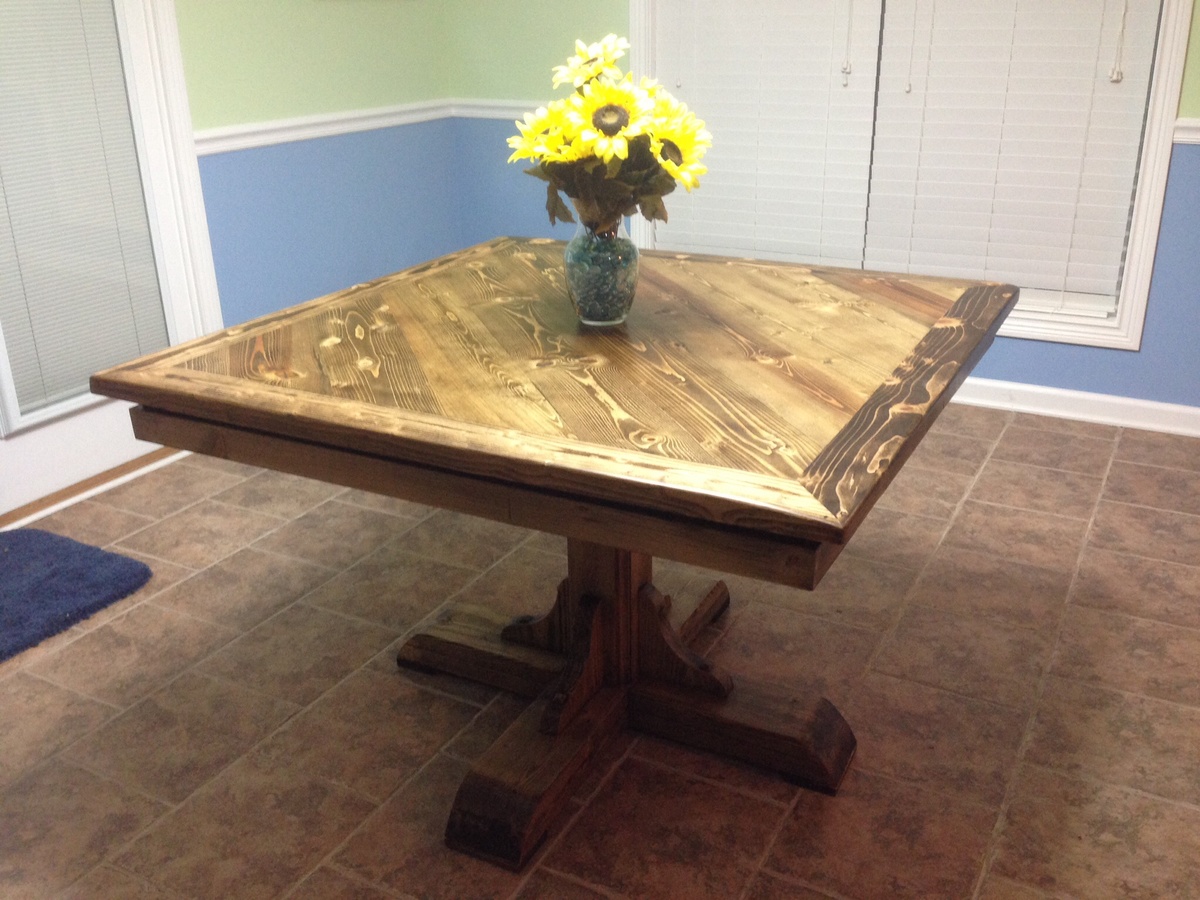
I used the plans from your site to build this table for a friend. I made a couple of little design changes just to make it look different. The plans were very easy to follow, and I had a lot of fun putting this together. I did have a small problem with the pine stock wanting to bow and twist, but that was taken care of with the planer and sander.
Built from Plan(s)
Finish Used
MinWax Dark Walnut and satin polyurethane
Recommended Skill Level
Intermediate
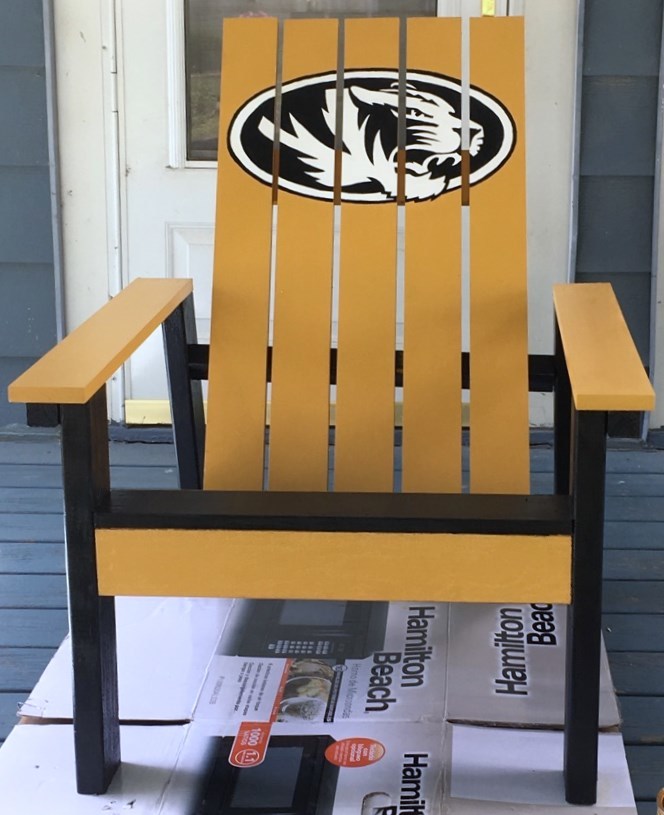
Sports theme Adirondack Chairs
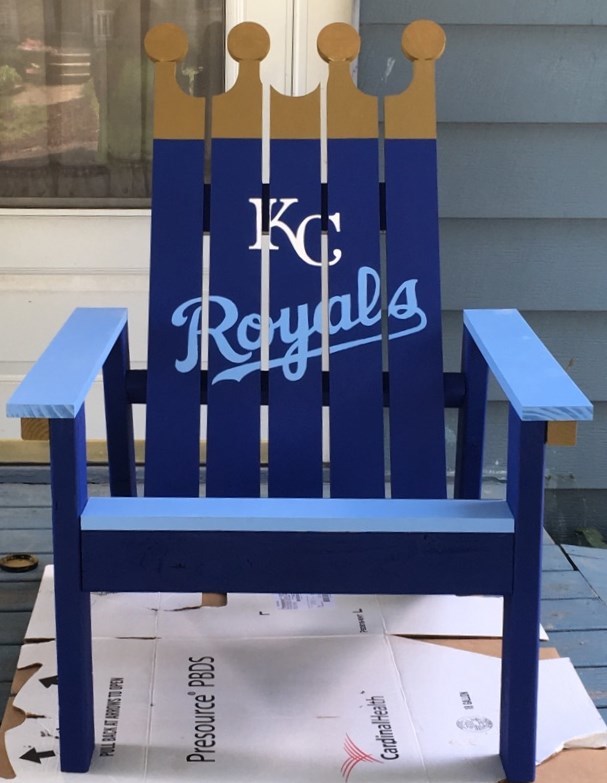
These chairs turned out awesome!!! Go Royals! Go Tigers! The step-by-step directions were great and easy to follow. We went with a fun twist on the Royals chair by cutting out the top with the scroll saw to look like the crown. Turned out great, couldn't be happier with the outcome and will definitely be making more!
Built from Plan(s)
Estimated Cost
$50 per chair
Estimated Time Investment
Day Project (6-9 Hours)
Finish Used
decals are all hand painted which took the longest, the chairs themselves were easy to make and assemble. Great step-by-step plans! I went with the actual team colors that I found info on at our local Home Depot (the sample size paint worked great, no reason to get quart or gallon size) and applied a couple thick (but not runny) coats of polyurethane.
Recommended Skill Level
Intermediate
Cedar planter with trellis
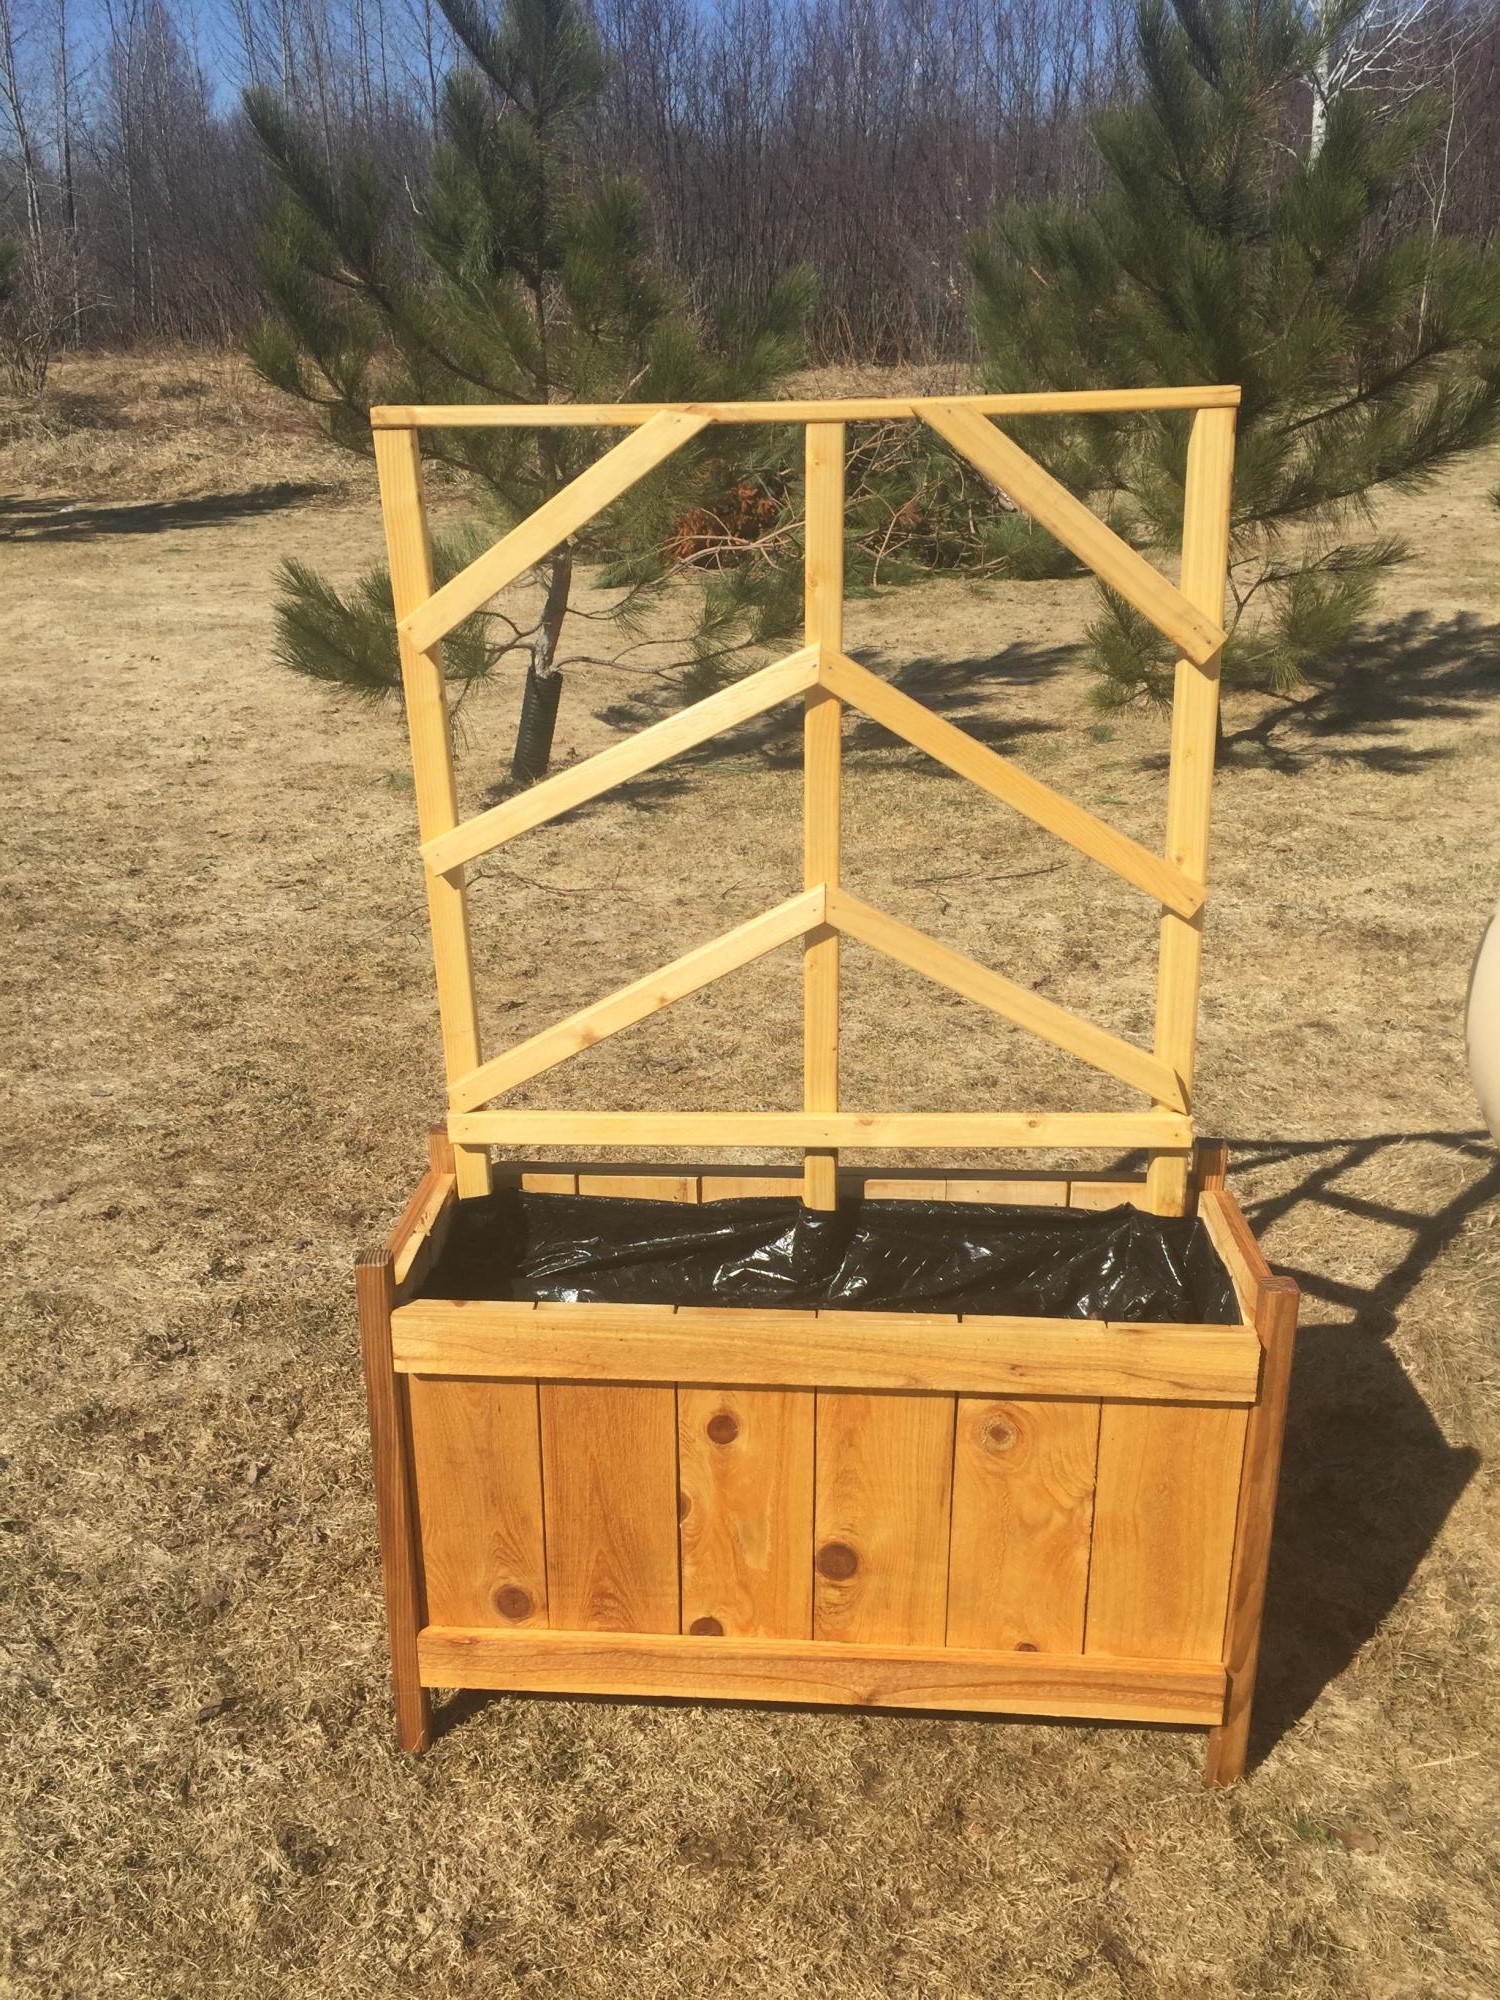
My first cedar planter with trellis. Fun and easy project. Using it in front of my propane tank to hide it.
Built from Plan(s)
Estimated Time Investment
Afternoon Project (3-6 Hours)
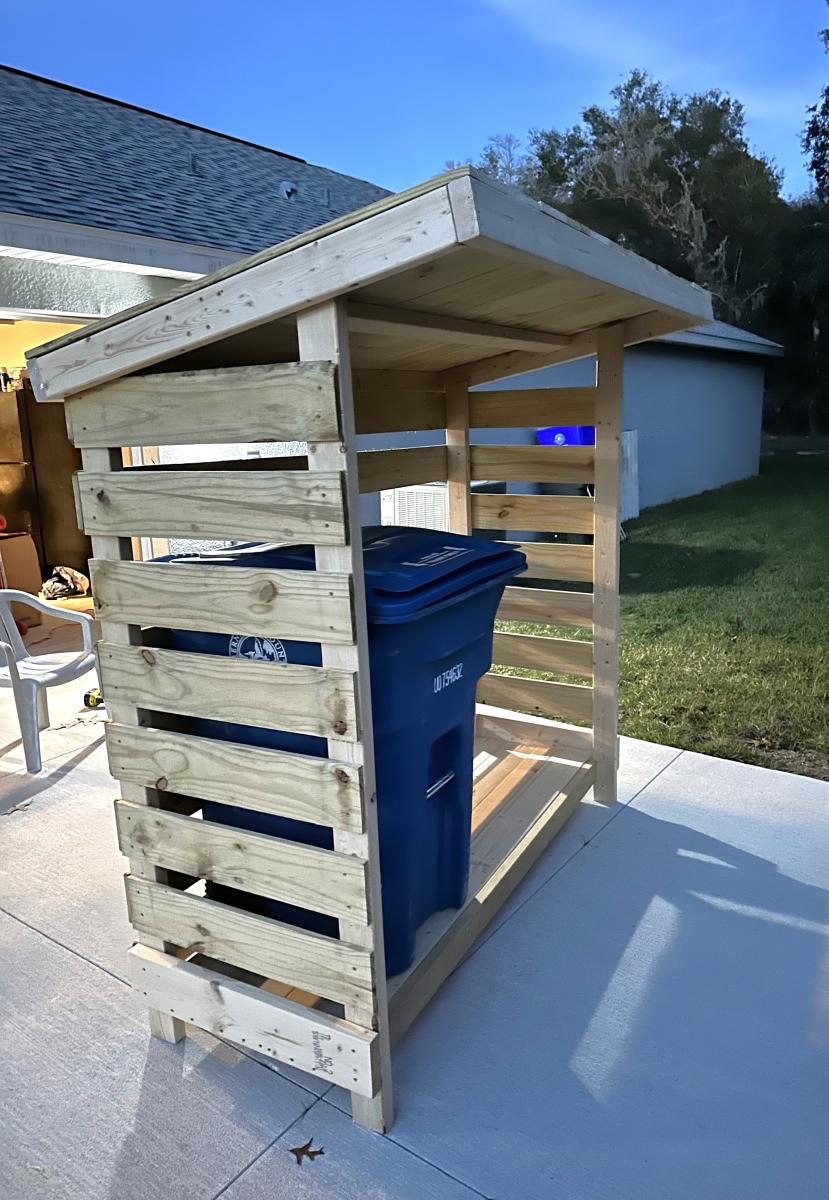
Outdoor Garbage Can Shed
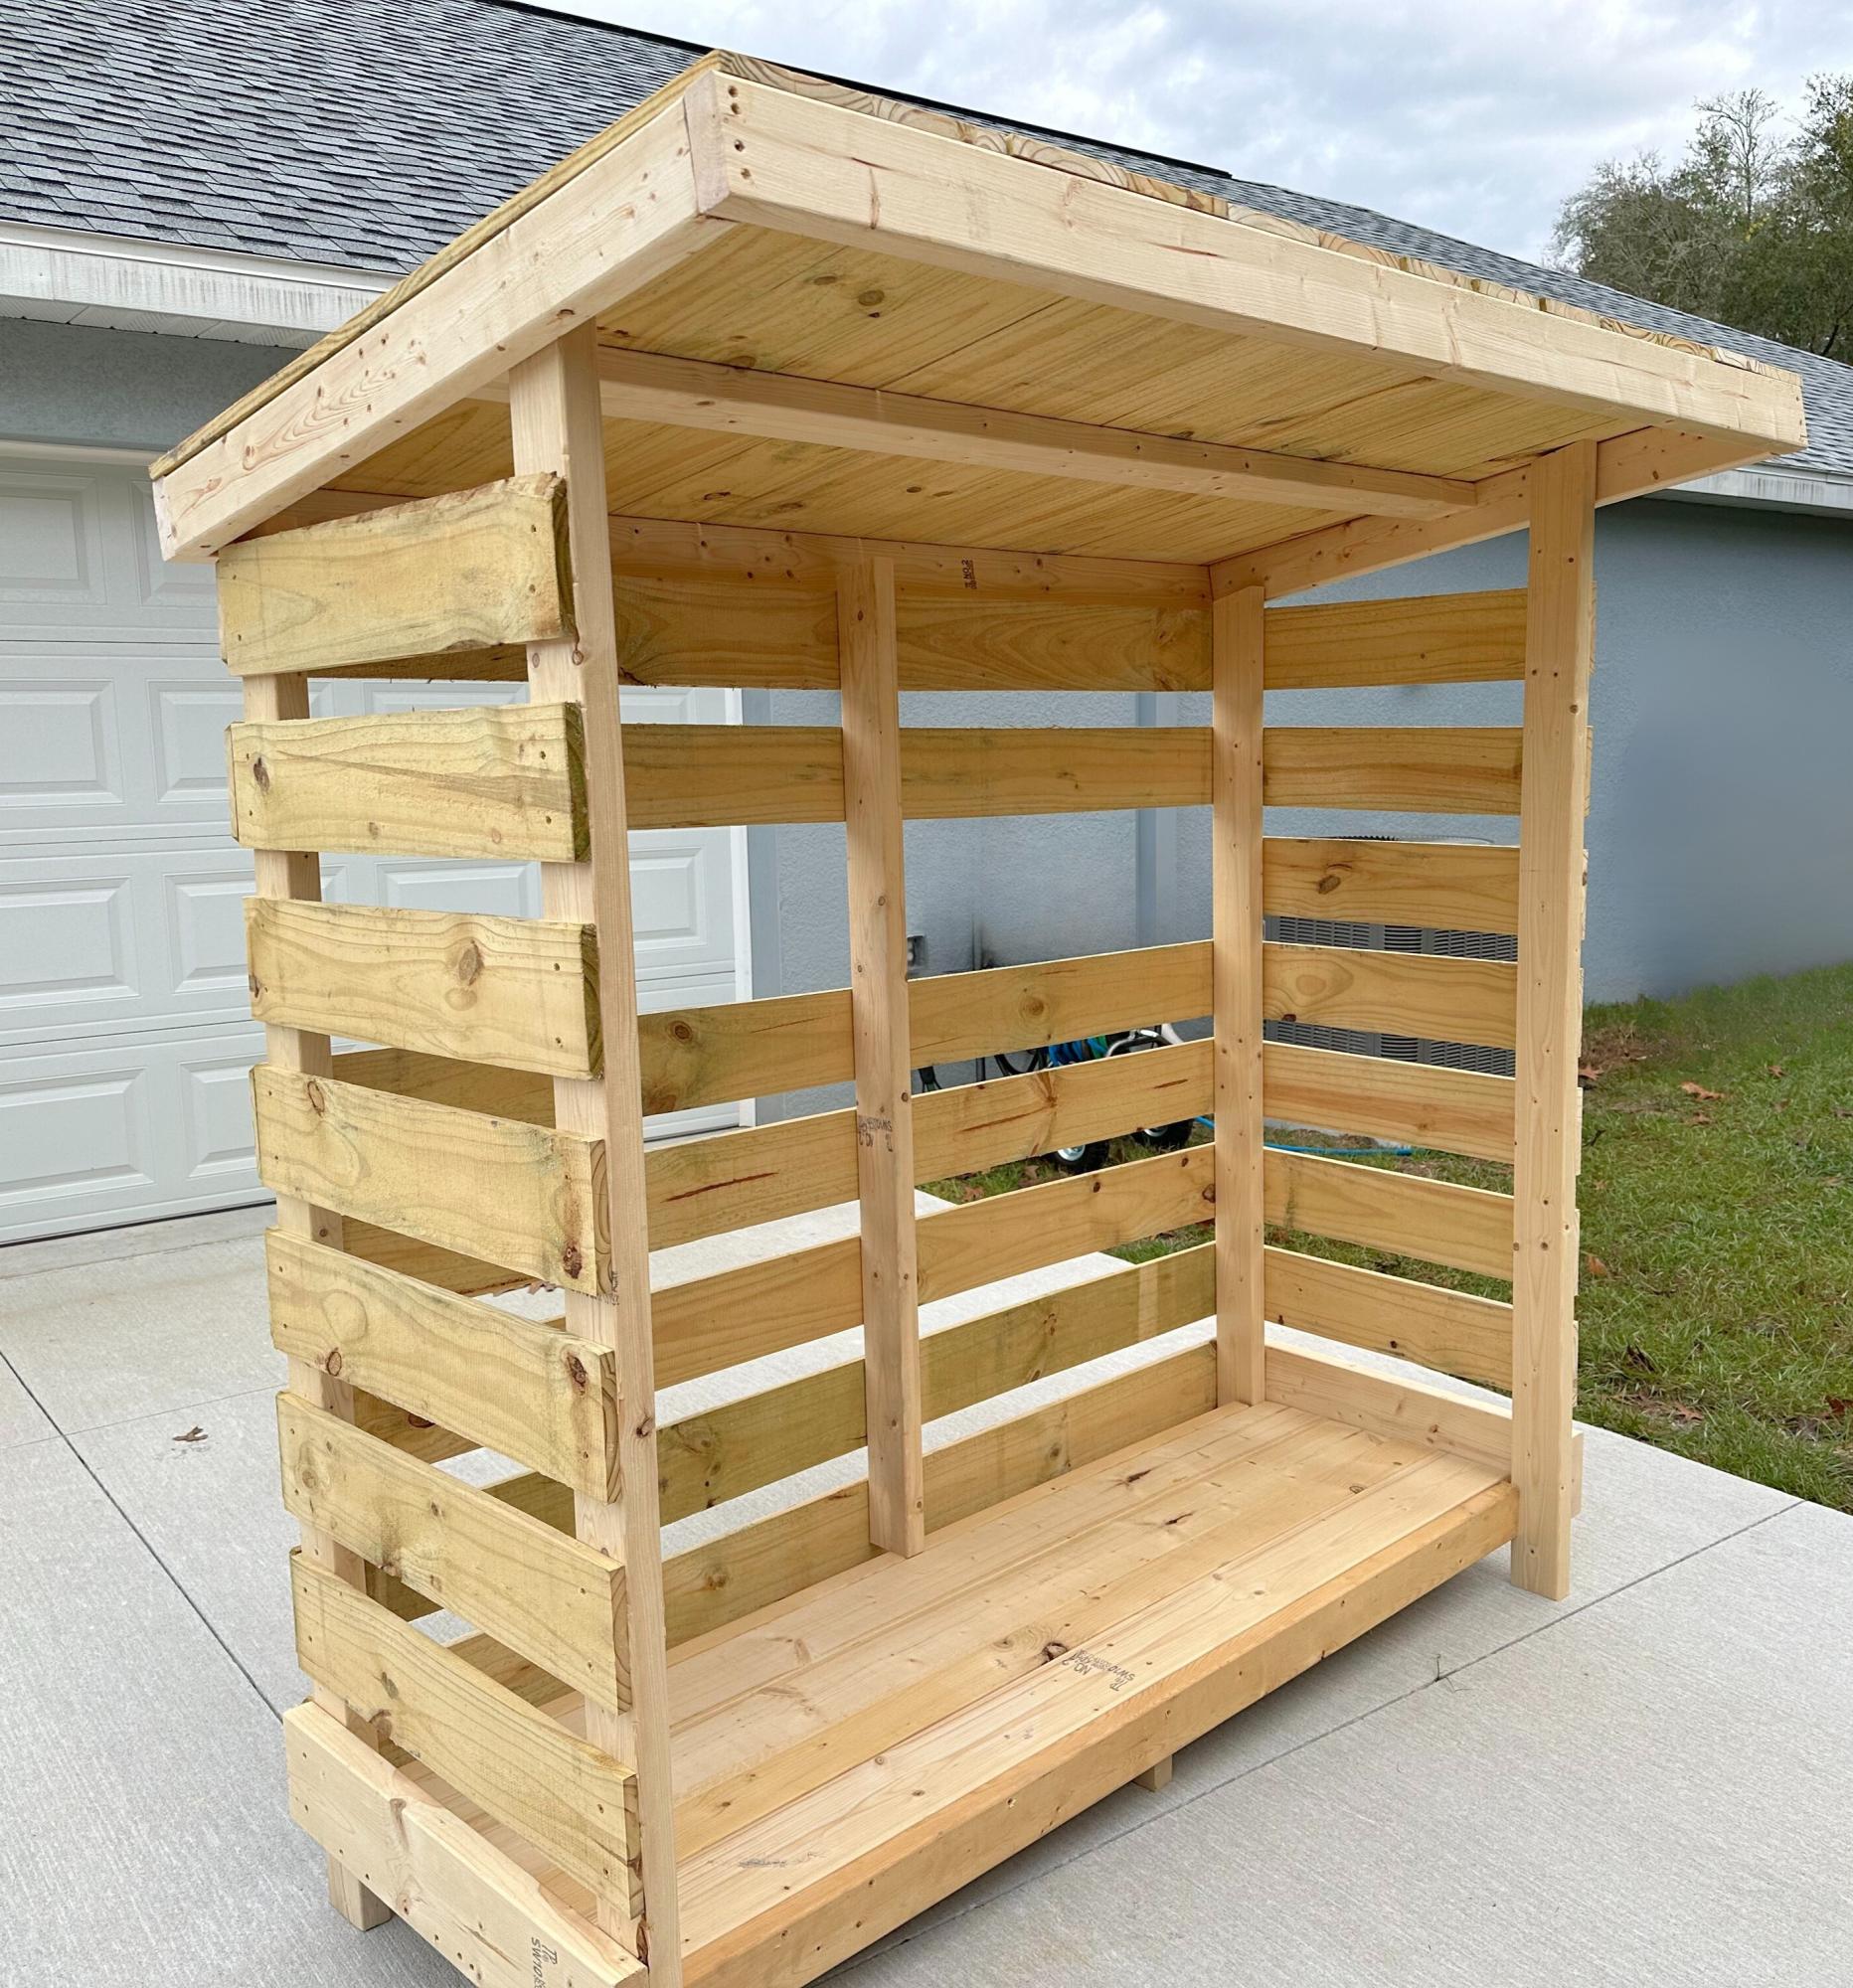
Chose the small firewood shed project as a "template" if you will .. built this to house our garbage cans and eventually put a gate on it to "help deter" the Florida black bears (we do multiple things to keep them at bay) but this will also just be a nicer looking way to keep the cans outside.
I modified the floor since the firewood shed had a floor that was suitable for, well, firewood but not so much for rolling garbage cans. Had to leave the one slat off the back for the depth of the can which I didn't completely account for in the beginning. Overall, still need to paint it and water seal it but happy with how it turned out.
Built from Plan(s)