Community Brag Posts

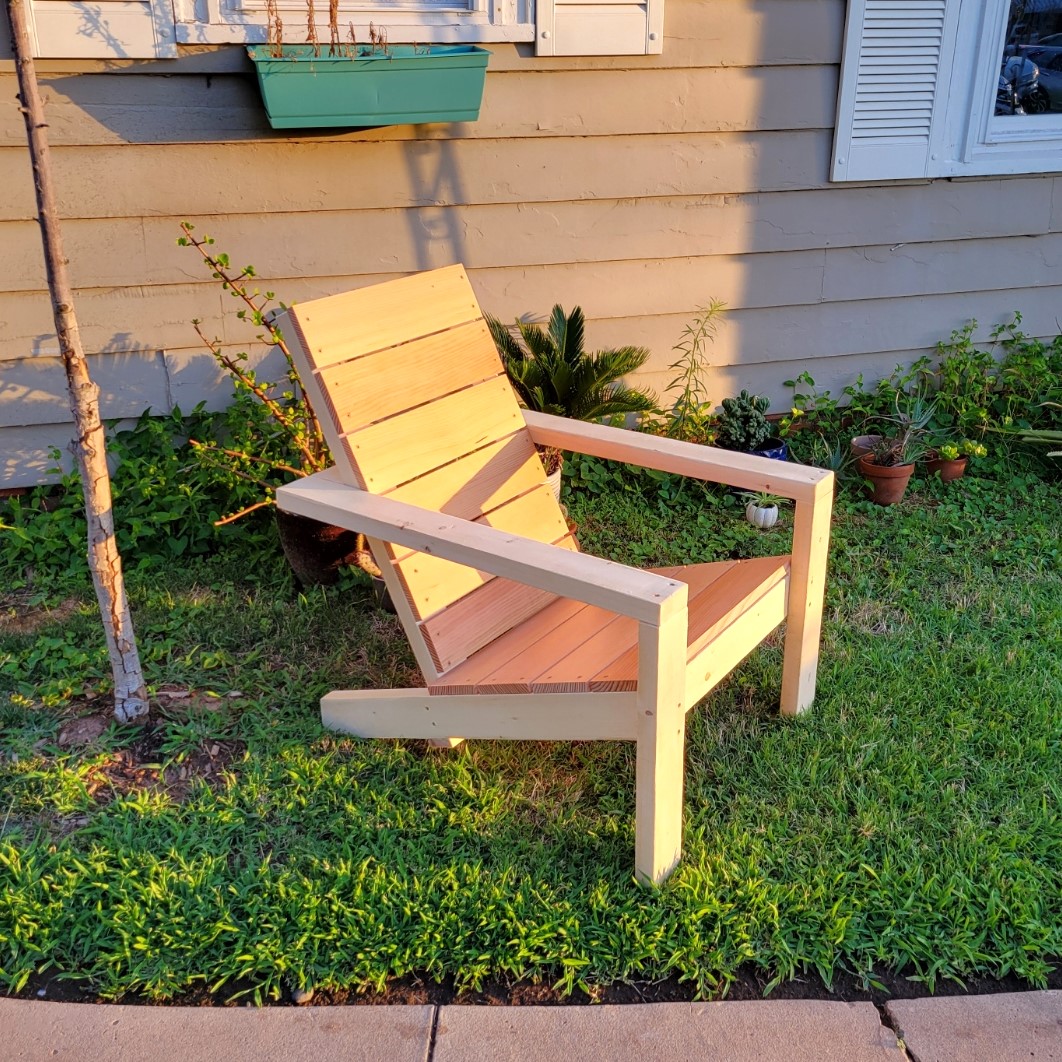
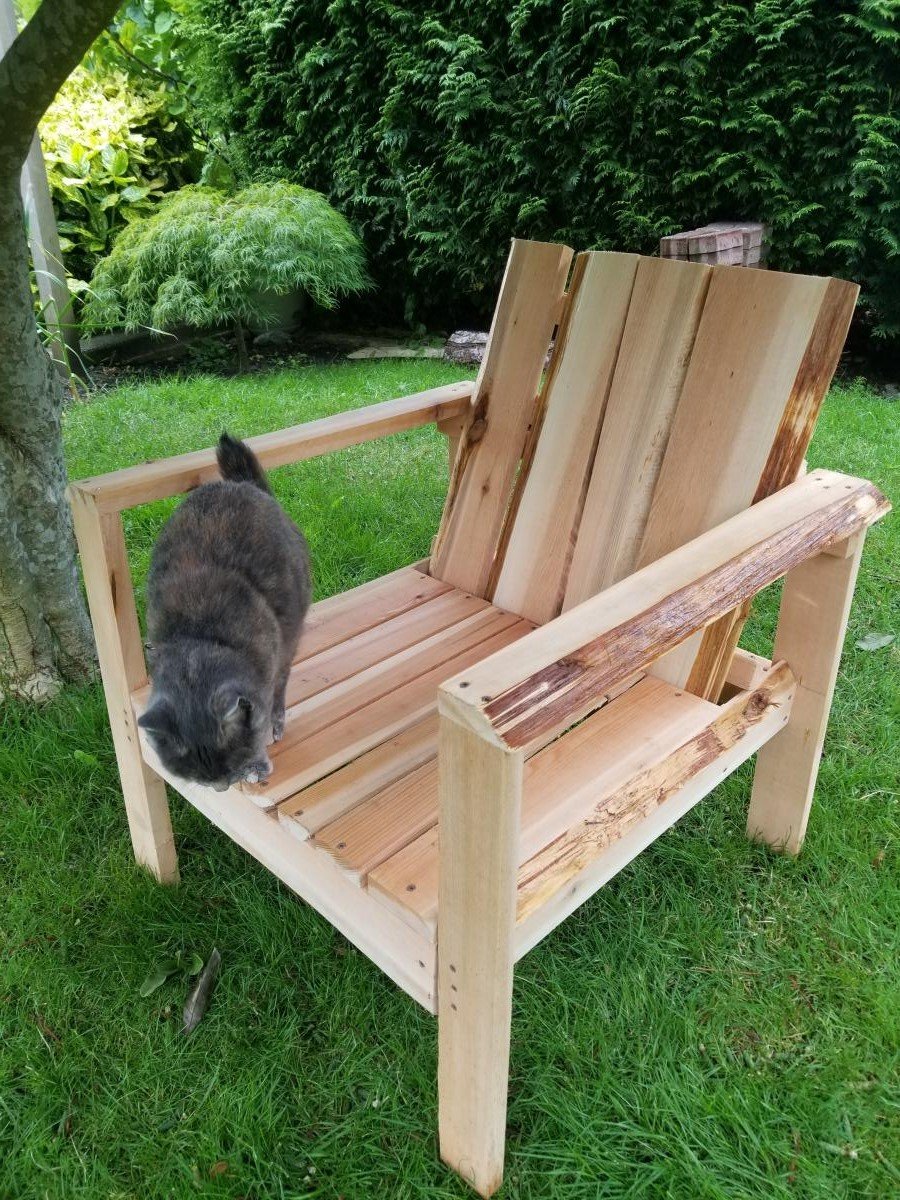
Live-Edge Cedar Chair

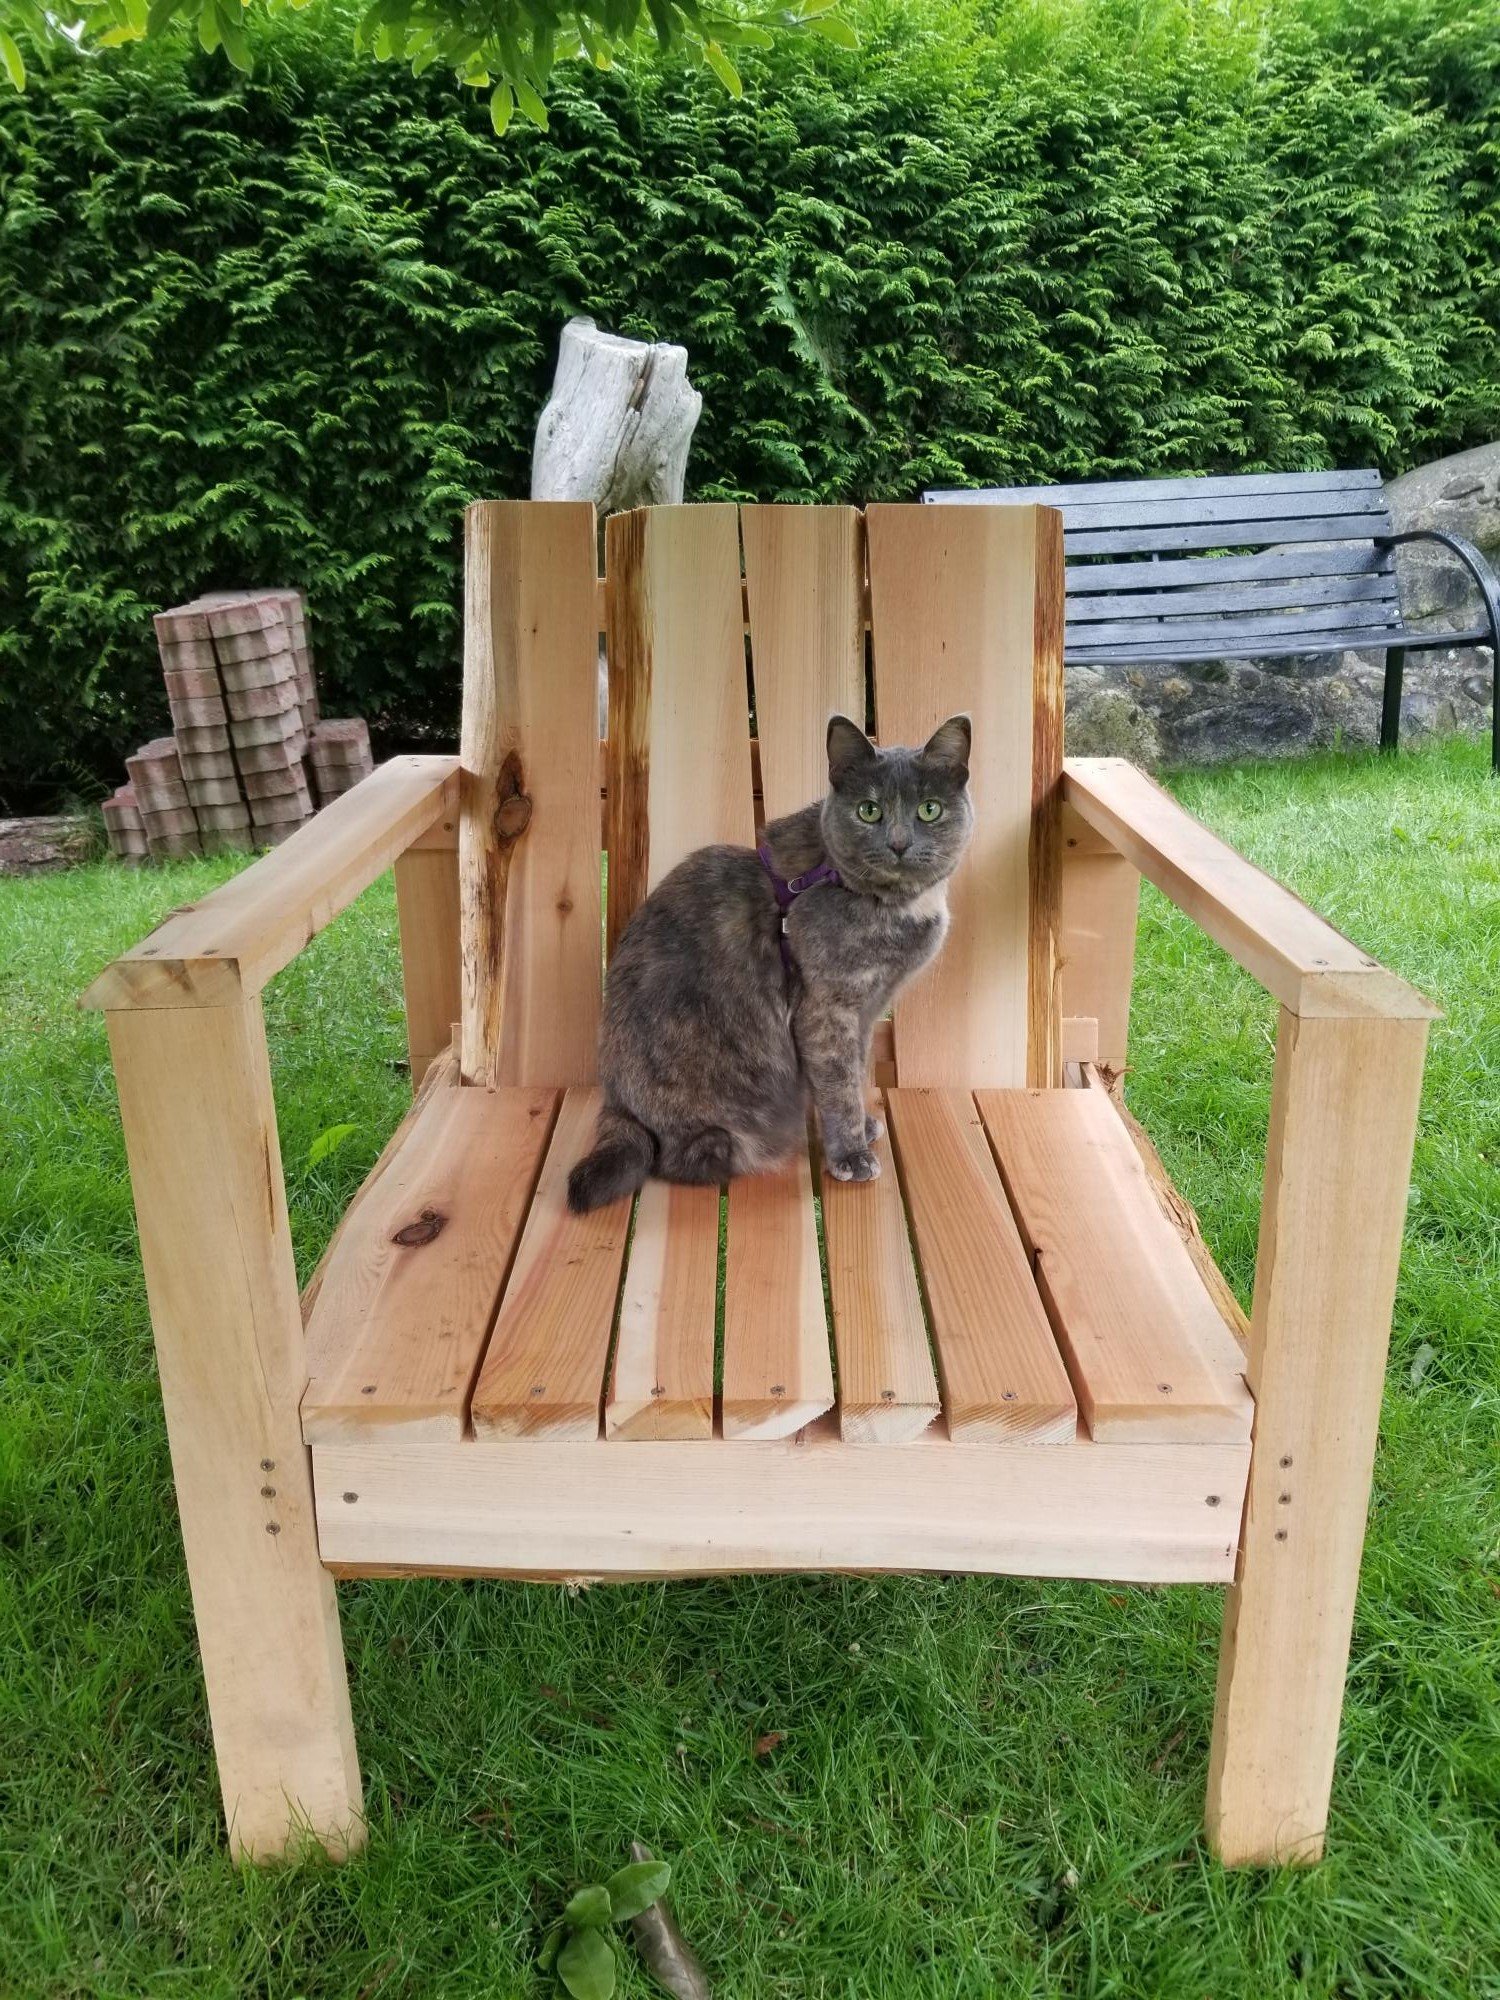
This chair came together beautifully and is really an impressive piece. I managed to finish it in about 8 hours start to finish. I used the "original plans" that are linked in the description in order to avoid pocket holes (which are out of my skill range for now). In step 2, there is an option to place the back support on the inside of the legs instead of the outside for lesser of an incline. I followed this and would strongly recommend it. The chair is sturdy, wide, and comfortable even without a cushion. Thank you for the detailed plans!

Built from Plan(s)
Estimated Cost
<$5 - cedar is off-cuts from a mill
Estimated Time Investment
Day Project (6-9 Hours)
Finish Used
None yet
Recommended Skill Level
Beginner

X Coffee Table

Submitted by mcputs on Sun, 10/07/2012 - 17:41

This is the Rustic X Coffee Table without the rustic finish. I used cedar wood with Early American stain. This was my first furniture project and I am so happy I did it. We needed a coffee table badly and I couldn't fathom spending several hundred on a good one. This one saved money and I appreciate it so much more. Because I used cedar the cost of the project was about $100. I used pine on the 1X12s on the bottom shelf and once stained it looks just fine. I did not stain the under side of the table top so as to maintain the smell of cedar.

Built from Plan(s)
Estimated Cost
$100
Estimated Time Investment
Weekend Project (10-20 Hours)
Finish Used
Stain: Varathane - Early American
I started with Varathane Wood Conditioner, then applied one coat of stain, wiping with a cloth after application. To finish I applied two coats of Minwax polyurethane.
Recommended Skill Level
Intermediate

Comments

jlynchtx

Fri, 01/05/2018 - 23:10

The table look great! Thinking about building one myself soon? Have you noticed any warping or cracking of the wood since you built this? 

King chestwick headboard and platform bed

After 16 years of marriage our bed literally fell apart. Rather than agreeing to buy a new bedroom set, my husband said I should just build a new bed. It turned out even better than I ever thought it would. I got the platform bed plans from addicted2decorating's blog. Thanks Ana and Shanty sisters for another great plan! I had to modify for the king size and mounted it to the wall because it was HEAVY. I used metal French cleats from HD.

Estimated Cost
$133
Estimated Time Investment
Weekend Project (10-20 Hours)
Finish Used
Varathane ultimate stain light walnut and varathane fast drying polyurethane
Recommended Skill Level
Beginner

Two toned toddler bed

Submitted by Katurn89 on Sat, 11/12/2016 - 12:50

This was the first building project I have ever done. it was easy and fun. The end product is sturdy and looks stylish. I'm very happy with it. 

Built from Plan(s)
Estimated Cost
$60
Estimated Time Investment
Week Long Project (20 Hours or More)
Finish Used
Polycrylic
Recommended Skill Level
Beginner

Farmhouse Bench

Submitted by Mikia on Tue, 10/09/2012 - 23:43

A 1m version of the farmhouse bench. We needed a shorter one for the hallway and realized that the only way would be if we built it ourselves. My bf and I built this together and it's really sturdy. Some adaption to the plan was made since it's shorter. It's very useful and we all love it. It's used each and every day.

Estimated Cost
200 SEK
Estimated Time Investment
Afternoon Project (3-6 Hours)
Finish Used
Stain.
Recommended Skill Level
Starter Project

Hallway table

Submitted by Nicto21 on Sat, 08/02/2014 - 16:43

I made this hallway table for my gf's bday. It is really simply apart from taking apart pallets and squaring them off. The project only costs about $40-50, which most of the cost came from the purchasing of the table legs. I angled the pallet boards to be approximately 45 degrees. For this project, I used a table saw to cut, pneumatic brad nailer, tite bond wood glue, kreg jig pocket hole and paint/stain.

Estimated Cost
$40-50
Estimated Time Investment
Afternoon Project (3-6 Hours)
Recommended Skill Level
Starter Project

2x4 shelving unit

Submitted by Anonymous (not verified) on Tue, 11/15/2016 - 12:05

I built your 2x4 shelving to fit a small space in my garage. The unit is really easy to customize and ended up being a perfect fit for my saws. Thanks Ana!

Estimated Time Investment
Afternoon Project (3-6 Hours)
Recommended Skill Level
Starter Project

Loft Bed

Submitted by BPJacobs on Mon, 08/03/2020 - 11:38

Built my first loft bed using these plans! The plans are comprehensive and easy to follow. Excuse the mess under the bed, but that is why we needed the extra space :-)
We also need to touch-up the paint a bit.

Estimated Cost
$200
Estimated Time Investment
Weekend Project (10-20 Hours)
Finish Used
Black furniture paint
Recommended Skill Level
Beginner

Mirror Project from the book!

Submitted by JoanneS on Sun, 10/14/2012 - 05:54

This project is the mirror from page 37 of The Handbuilt Home. I received my copy on Thursday night, built this and painted on Friday, then (impatiently) waited 24 hours for the paint to dry before distressing and hanging it up yesterday afternoon. The mirror was a plain one I found at Lowes for about $20 and attached with mirror clips. I attached to the wall with 2 1/2" screws through the frame into the wall studs. I was going to leave the screw heads exposed for decoration, but now I think I'll add a dab of gray on them to blend them in. This was a super fun project, easy to do. Love the book, and can't wait to build more projects from it! Ana, fab job on the book!!

Estimated Cost
$40
Estimated Time Investment
Afternoon Project (3-6 Hours)
Finish Used
1 coat white paint, 1 coat gray paint (greek column by Ace), after 24 hours, sanded with 220 and some 100 grit sandpaper to distress, then added a coat of soft wax to protect the surface.
Recommended Skill Level
Beginner

Comments

itzann

Sun, 10/14/2012 - 10:19

Very nice! I kind of like the black screw-heads showing!
-Ann

JoanneS

Sun, 10/14/2012 - 14:25

Thanks Ann! This was a fun project. I've been wanting a mirror to match that table since last year, and this one fits just right. My family said they liked the visible screws too, so I'm going to leave them as they are.
:)
Joanne

JoanneS

Thu, 08/29/2013 - 13:57

Ana, Thank you so much! I can't wait to get building on more projects from the book and from here too! You are awesome! :)

YankeeBelle, thank you! How do you make chalk paint? That sounds like a great time saver!
:)
Joanne

Wedding Guest Bench

Submitted by Linda7 on Tue, 08/05/2014 - 16:43

I saw a post some time ago from brookifer86 for a wedding guest bench...I knew I would build one someday. First I'd like to thank Ana for her plans Fancy X Farmhouse Bench, and Whitney at Shanty 2 Chic for the wonderful instructions/pictures for this build. I would also like to thank Brooke at Killer B Design (brookifer86) for the mods to this plan.

This bench had to be able to break into the top and legs as it had to go from Texas to California. That is why I used Whitney's idea for pocket holes to attach the top to the legs. I used 2" screws. Brooke shortened the table with just two legs, and used a project panel for a smoother top for writing. I did, too. She also added a 1" x 2 " board around the edge of the 3/4" panel to beef it up. I used this idea and mitered the corners of the board and filled in the space between the board and the panel to make it very smooth. I sand a lot, and I painted three coats, so this took several days for me to complete.

For signing the top, I purchased fine-tipped oil paint pens. I learned from other brag posts that permanent-type "Sharpie" pens would smear when a finish was applied later. Also, you should use spray poly-acrylic finish to avoid yellowing the white paint.

My dear friend's daughter was thrilled with her surprise, and the guest bench was a hit at the reception. Thanks to all the brag posters - I studied every single one.

Built from Plan(s)
Estimated Cost
$35 (for project panel and one quart paint - other wood was scrap I had on hand)
Estimated Time Investment
Weekend Project (10-20 Hours)
Finish Used
Valspar "Bright White" outdoor paint. three coats applied with a foam brush. Spray top with poly-acrylic to protect the signatures.
Recommended Skill Level
Beginner

My first project from scratch-bar

Submitted by Anonymous (not verified) on Fri, 11/18/2016 - 11:56

My inspiration for this piece was the Grandy Sliding Door Console - I made this piece to fit behind a sofa so adjusted the plans to customize my piece. 

I used plumbers pipe instead of barn door hardware - much more cost effective and still gave me the vintage look I was after.  I stained and distressed the wood and added some hardware! Voila!

I am hooked to your site, stay tuned for more projects! 


Built from Plan(s)
Estimated Cost
Total Cost of lumber - $101.00, Plumbers pipe - $18.00, Handle - $17.00 = $136.00
Estimated Time Investment
Day Project (6-9 Hours)
Finish Used
Painted each board different chalk paint color, white, yellow and blue - added black ring marks and used tools to mark up the top board. Once built sanded piece to desired look and then used antique wax to deepen the colors, finished with furniture polish- minwax!
Recommended Skill Level
Beginner

Fancy X Farmhouse Table

Submitted by cgibbs1637 on Thu, 08/06/2020 - 14:16

Finished this project about a week ago. Super easy directions and such a great look for our dining room!

Built from Plan(s)
Estimated Cost
$75
Estimated Time Investment
Afternoon Project (3-6 Hours)
Recommended Skill Level
Beginner

Counter Top Make-up Storage

Submitted by efmolly on Thu, 08/07/2014 - 09:54

I needed a way to store and organize my make-up without taking up drawer space. It is built very similar to a small dresser, but with no drawer slides.

Estimated Cost
$10
Estimated Time Investment
An Hour or Two (0-2 Hours)
Finish Used
I first stained the frame and drawer boxes with homemade oxidizing solution. Next, I layered gray and white latex paint, then distressed heavily with a belt sander.
Recommended Skill Level
Beginner

Full size farm house bed

Submitted by ttrotter on Tue, 11/22/2016 - 06:44

I found that if you use (16) 1x4's in lieu of the (8) 1x8's as for the panels no cutting is necessary for a standard full size bed.  Worked out wonderfully!

Built from Plan(s)
Estimated Time Investment
Weekend Project (10-20 Hours)
Finish Used
No finish, bare wood.
Recommended Skill Level
Intermediate

My Fancy X-Desk

Submitted by drickstan on Tue, 08/11/2020 - 09:57

I needed a better desk for working from home. I didn't have room for the 6' desk in the plans, so I modified it slightly to be 5'. The only tricky part with that was getting the angles right on the support braces in the back. I think it ended up being around 42 degrees instead of 45. I used a scrap 1X4 as a template instead of trying to measure and cut. I think that helped a lot.

I wanted some character in the desktop so I used 3/4" knotty pine joined with pocket hole screws and sanded it quite a bit. I love how it turned out after applying gel stain and a varathane finish!

Thank you so much for the inspiration, Ana!!

Built from Plan(s)
Estimated Cost
$75 CAD
Estimated Time Investment
Weekend Project (10-20 Hours)
Finish Used
Varathane KONA Gel Stain
Varathane Diamond Finish (3 coats)
Recommended Skill Level
Intermediate

Mom's Jelly Cabinet

Our first DIY furniture project. We told friends it was an assignment from couples therapy. lol Don't look too close or you will see the many flaws, but I can say it has character and will serve its purpose.

We had problems with the doors. I think they are true and plum, but the cabinet, not so much. They hang a little cockeyed, but they do swing. The plans for the doors didn't quite match the cabinet, but we are newbies so we could have misread the plans.

The hinges and latch are from the blue store - painted matte black from a can from the original nasty brass. The red is Balero and the shelves are a coordinating tan from Sherwin Williams. A coat of Minwax Polycrylic for protection. We used square wire from the blue store for the doors. We didn't router the doors to inset the wire, a stapler worked fine.

It was an absolute great first project that Husband & I enjoyed tremendously. Mom has been looking for a jelly cabinet for 6 months without success. Old functional furniture pieces just aren't manufactured anymore. This cupboard fit the bill perfectly.

Estimated Cost
$80 for wood and another $80 for paint and supplies
Estimated Time Investment
Weekend Project (10-20 Hours)
Finish Used
Sherwin Williams Balero Red and coordinating Tan with Minwax Polycrylic Spray
Recommended Skill Level
Beginner

Comments

Maira (not verified)

Tue, 10/23/2012 - 08:01

This is awesome. Seriously. You two did such a great job and your mom will enjoy it for many years. That red with the black hardware looks so great.

aruchti

Tue, 12/13/2016 - 07:41

Hi, I can't seem to find the plans for this, the PDF is just a PDF of the thread. I'd love to make this as a coffee stand. thanks!

aruchti

Tue, 12/13/2016 - 07:44

Hi, I can't seem to find the plans for this. would love to make this for a coffee stand. can you provide the link to the plans?


thanks!

first project

Submitted by gbhein on Sun, 08/10/2014 - 10:25

My very first project, made it for my girlfriends birthday. Did not have time to stain and paint them yet, will add finished pictures.

Estimated Cost
$550
Estimated Time Investment
Week Long Project (20 Hours or More)
Finish Used
none yet, will be staining table and painting chairs.
Recommended Skill Level
Beginner

Miter saw stand with rolling tool storage carts

Submitted by UCF99ENG on Fri, 11/25/2016 - 18:04

When I saw the plans for the miter saw stand that had two rolling tool storage carts, I knew I had to make it.  Having a cart used for an outfeed table is a brilliant idea.  It was a fun project to make.  I tweaked a few dimensions because I like taller workbenches because I'm taller.  Now my shop is looking more organized.

Estimated Time Investment
Weekend Project (10-20 Hours)
Recommended Skill Level
Intermediate

Comments

CSaintD

Sat, 03/18/2017 - 09:02

Very nicely done.  I am thinking about building the same system.  How is the dust control on the mitre saw working?  That is my one concern, that sawdust will be all over my other tools when I use the mitre saw.

UCF99ENG

Wed, 05/10/2017 - 20:47

I don't really have a dust control system.  I let the dust fall where it does and then just sweep it up.  I have a wet/dry vac but my wife uses it in the house because it's more powerful than many other vacuums.  If the dust gets out of control, I can just bring the wet/dry vac out to the garage and clean up.  There is lots of room to maneuver the vacuum.

CSaintD

Sat, 03/18/2017 - 09:07

Very nicely done! I am thinking about building this same system but am worried about the dust from the mitre saw getting all over my other tools stored in the rolling sections.  Do you have any issues with that?

Back