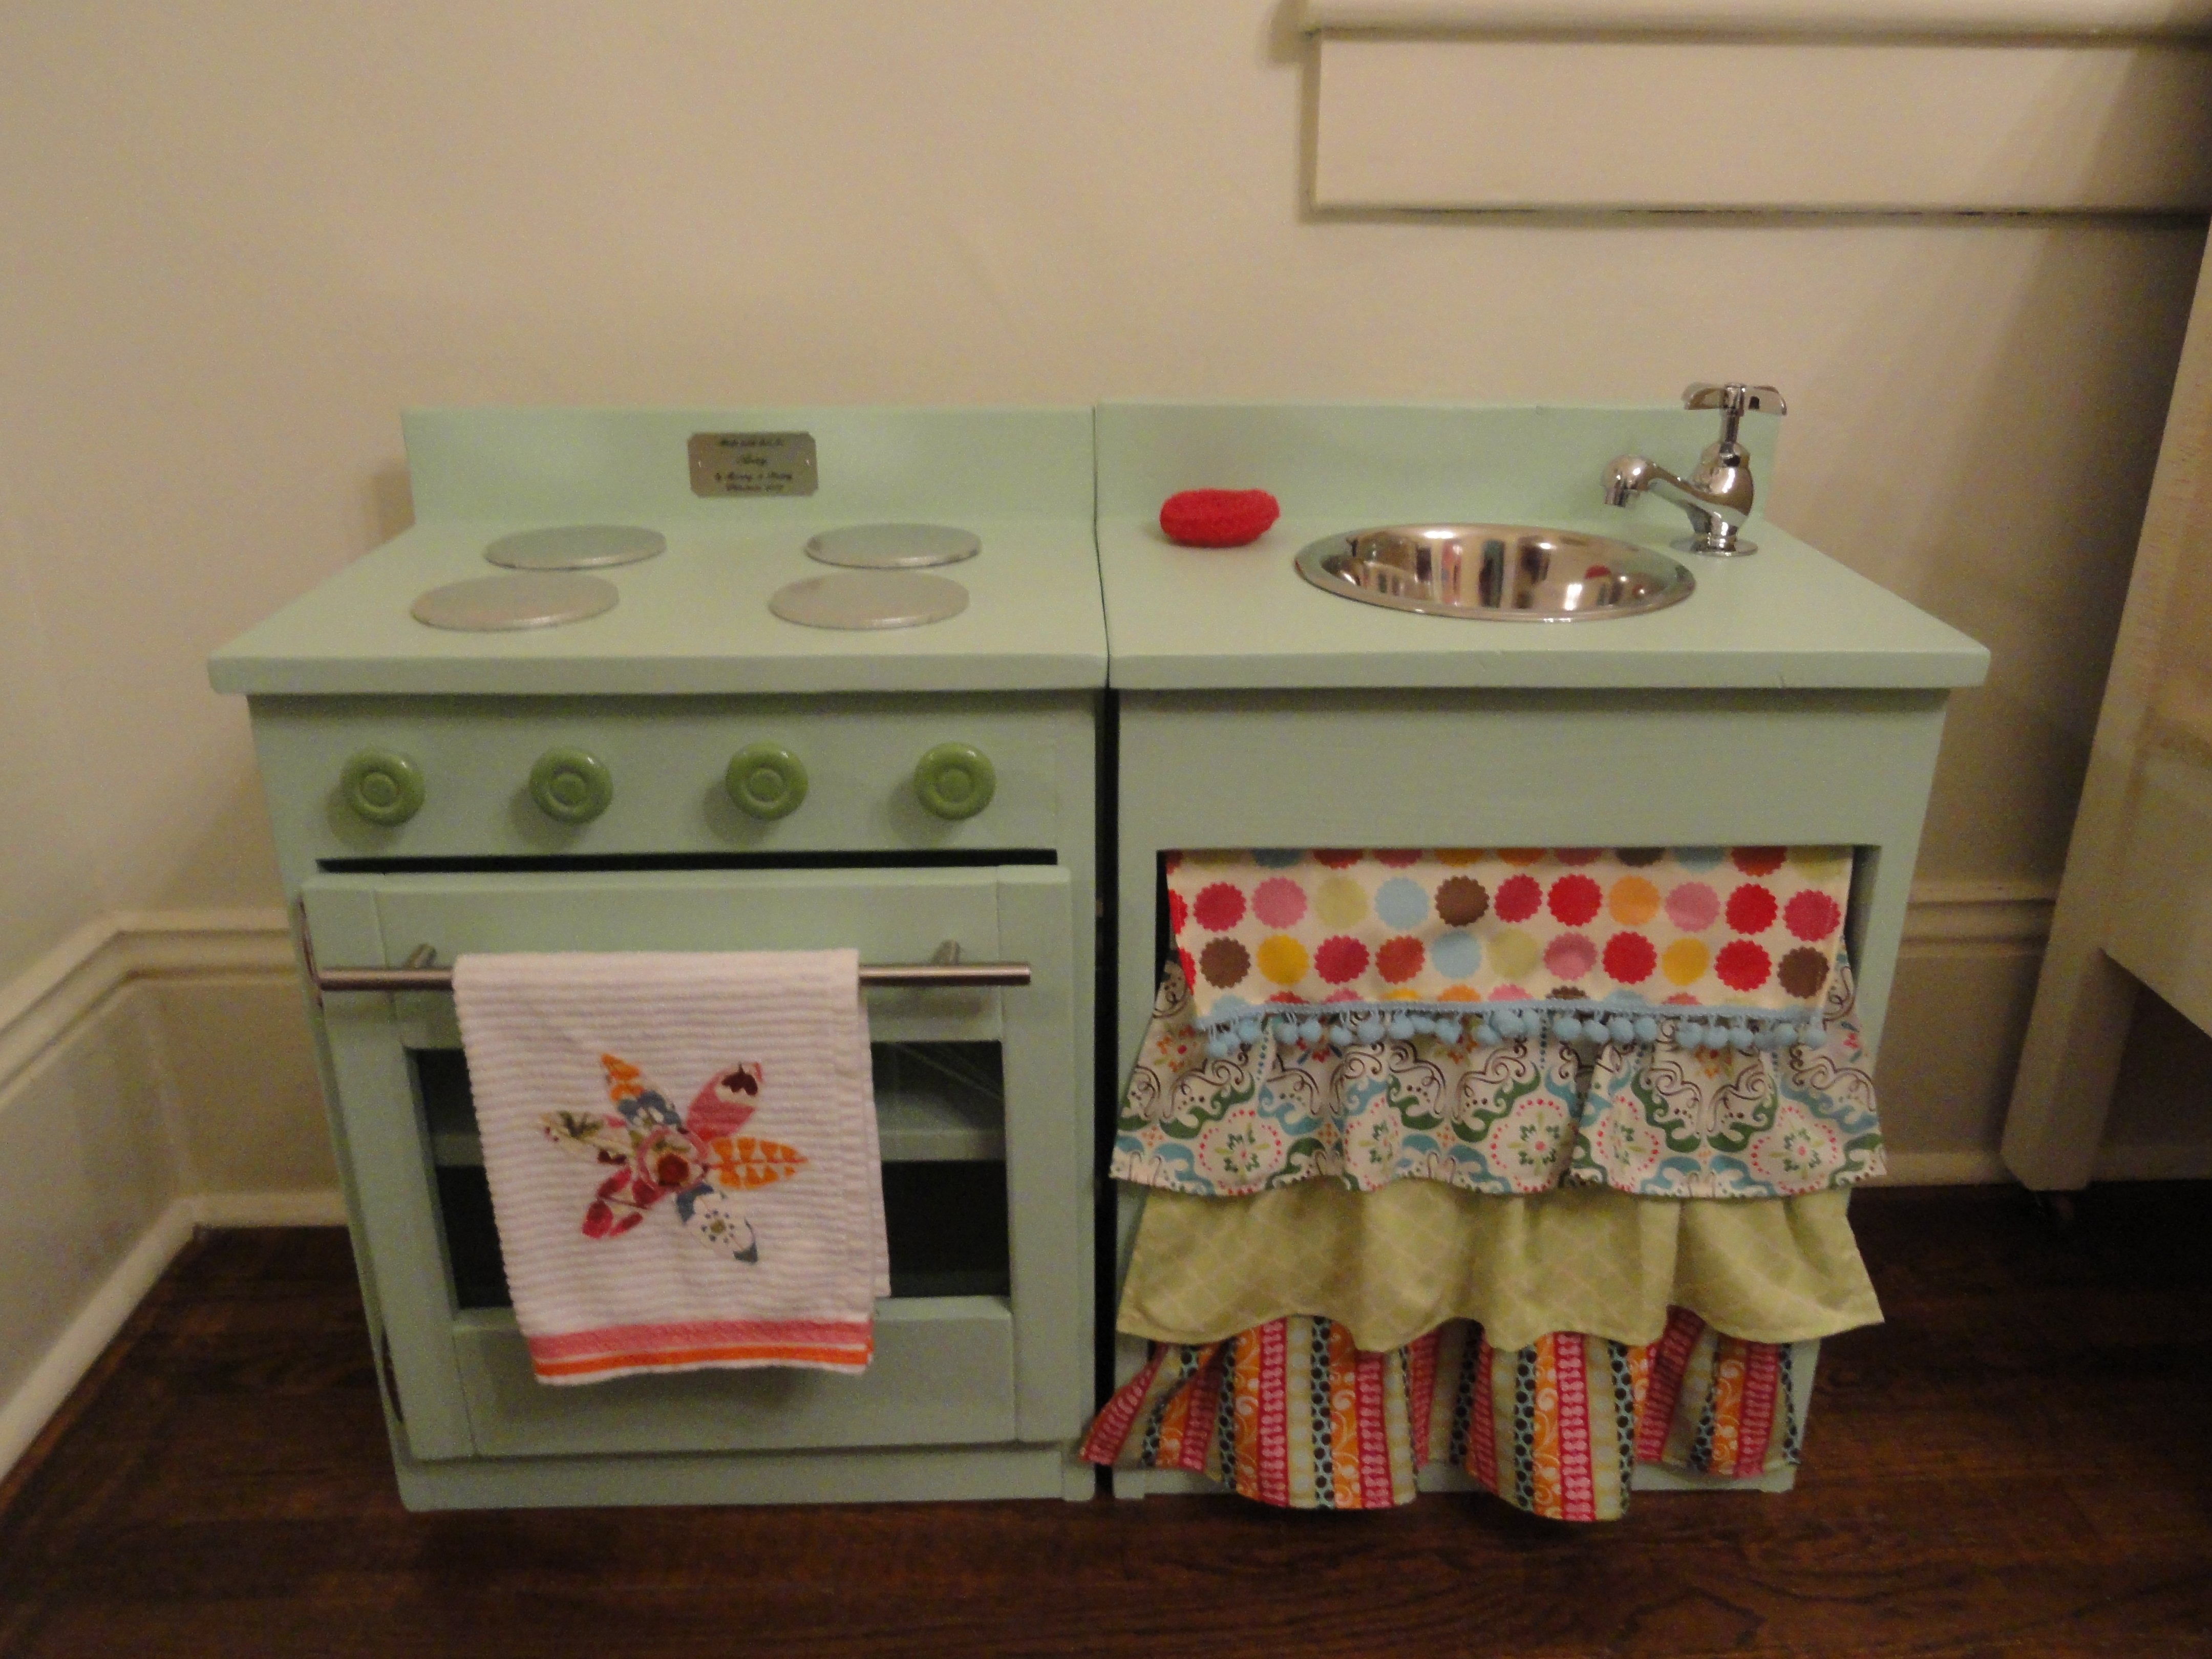
Tropical Pallet Outdoor Room: Renters’ Remodel
Yes we are RENTERS, and yes, we sneakily “REMODELED” a tropical island style outdoor room, with pallets!
Outdoor coffee table with lift top. Modified the top slightly but went by the plans otherwise. Still need to paint/stain. A fun build and super functional!
I made this in an afternoon as a wedding gift for my brother and soon to be sister-in-law. This was my first project using Ana's plans and I can't beleive I got it finished in a day. The hardest part was getting everything filled in and painted since I used paint grade pine. I did add a length of half round to the top just under the ledge for a little more decorative effect. I didn't realize how huge and heavy it would turn out. Guess that's just what happens when you build something entirely out of wood
This is a base loft bed which was my first project. I used raw pine for everything, and then stained. I added the flip top desk, and cubbys on the back wall as well for more storage. But then one of friends had an old play ground set, which he was selling at a ridiculously low price! Due to the pool and BBQ island however, it did not make sense to put these in the back yard. SO, I decided to take down the ladder and give him a rock wall! Both my son and daughter absolutely love it! I am now going to build the platform on the foot of the bed for the slide. More to come!!!! ;)
This was my first ever build, I had a blast! I have always wanted to work with wood but never knew where to start. We have 7 children and we have gone threw so many beds and wasted so much money over the years on cheap beds. I wanted to build something that was sturdy and something that would last. Thanks to Ana White I found these plans. My husband showed me how to use the tools and I got to work. We're a military family so we move every 1 to 3 years, so I had to make some adjustments so it could be taken apart and moved over and over again. Thank you Ana White for these plans and so much more. You have been such an inspiration, if it wasn't for you and your site I would've never have found the motivation and courage to start building.
Mon, 05/25/2015 - 16:57
Hi there, I'm interested to know what changes you made to the plan. We're military too and I can't see using just pocket screws to attach the side rails. Would you mind sharing with me?
Mon, 05/25/2015 - 17:41
Use one of these to attach the side rails to the head and foot boards:
http://www.rockler.com/search/go?w=bed%20brackets&asug=&sli_uuid=&sli_s…
I needed a table along side our hot tub, primarily for drinks or appetizers while using the hot tub. The farmhouse table plan worked out perfectly to its height and how it fit in well with the structure of the hot tub. It also does double duty with my grill directly across from it allowing me some storage shelves or grill items.
Tue, 10/05/2021 - 10:56
YES, love the multiple uses, gotta have a place to set your drink and relax! Thanks for sharing:)
Three cube bench for entryway.
My husband and I built this together over the course of three months. We would grab an hour here and there when we had the time.
I am notorious for my numerous "projects", but my husband is so patient and he usually indulges my curiosity. We both learned so much building this, and even though he feigns indifference, I can tell that my husband is just as proud as I am of the end result. We are absolute beginners and my critical eyes can find many imperfections, but I can't help but be amazed that we actually built this thing - this is huge for us!!
We plan to build the rest of the wall system eventually (piece by piece), but I couldn't wait to share.
Thanks Ana for giving us so much of yourself!!
P.S: Lumber wise you get what you pay for - even if you are painting, go for the higher quality plywood and craftboard. The price premium is well worth the frustration it will save you - especially if you are a beginner like us.
I know this is a pretty basic build but I still wanted to share it. I used pine for the entire piece. It took longer to finish this piece than to build it haha. The finishing process consided of a pre-stain condiitoner, antique walnut gel stain, and several coats of toner.
Wed, 11/22/2017 - 07:04
I would love to know the cuts and measurements for this cabinet.
I needed an outdoor table and thought this design would look lovely on my patio. I used 2x8's for the table and bench tops, which meant I couldn't run them through my 6" jointer; so I had to plane them as they came from the store. This resulted in a fair amount of sanding once I assembled the tops with a kreg jig and glue. Plugged the pocketholes and used an outdoor deck stain for protection. The stain over the plugged pocketholes looked interesting enough that I almost used those sides for the exposed tops, but ultimately decided on the cleaner finish. The 4x4 legs and apron are in a black matte exterior paint, and I used a 1 5/8" forstner bit for the umbrella holes. It's a fun project, and assembly doesn't take too long at all. My patio is now a great place for a morning cup of coffee while reading the paper and has already become the spot for neighborhood gatherings.
So my sister moved back to Southern California from New York. She found a great place but needed a table. I made one table and one bench. My sister then found two chairs for the other side. This is the second or third thing I have made/built from Ana’s site. Thank you for making me feel more manly with great instruction. I also built this pre Covid-19 when lumber was not so expensive.
Tue, 10/05/2021 - 09:55
Great housewarming gift, and very pretty too! Thanks for sharing!
My sister put in request for bigger coffee table and 2 end tables, again, the building part was not that difficult, the time consuming portion was staining. But they turned out great!
Thanks for the great plans!! Finally got this monster put together.
My husband and I built the 10 dollar ledges to use for book storage in our nursery. I love how they allow you to display the books as well as store them. This is the second time we have used this plan for wall decor in our house, and our fifth build overall from one of Ana's plans. I love all the fun options!
For the small size, we only needed three boards so it was inexpensive and they came out great.
I wanted to build a planter box by our front door, which is not exposed to the weather. I based the design on the video I saw on YouTube for the “Easy Build DIY Planter Box” made from cedar and painted white.. Being based in Australia I amended the dimensions to metric, and used plywood rather than cedar. I am delighted with the finished product. So many thanks, Ana, for your part in making this planter box on the other side of the world.
Cheers Noel
Tue, 10/05/2021 - 09:33
Thank you for sharing from across the world, that is absolutely gorgeous!
I built this set for my friends little girl, Alice. She’s the same age as my son Benjamin, and needed a kiddie table and chairs!
I had some trouble with the chairs, I need to work on my clamping and squaring. Now that I have picked up a better countersink bit my issues with screws should be solved though!
The table was super easy with the kreg jig! I got it clamped down well for each corner and the aprons/legs screwed together like a dream! I love that the table doesn’t have a single screw marring the surface of the wood, they’re all pocket holes underneath!
The chairs have a few more screw holes than they should’ve had, but they don’t look too bad. I decided to leave them unfinished so she can decide on the right finish for her space.
Thanx so much for the easy to follow plans Ana!
I took the original plan and tweaked it to have the X's on the sides to go along with the Weatherly Outdoor Sectional I made. Also, added the top ledge to finish it off.
Cost was less than $20 just as the plan said. Use fence pickets and furring strips to save money!
This was my first wood working project. I made this bunny Easter basket for my son's first Easter. Everyone loved it. I can't wait to try other projects!
Industrial chandelier for our dining room made from black iron pipe pieces from Lowes and some leftover black walnut scraps. It was a sometimes frustrating design-as-you go project that required loads of help from my electrical engineer husband. Love how it finally turned out!
Comments
Ana White
Mon, 03/30/2015 - 14:52
This is gorgeous! Thanks for
This is gorgeous! Thanks for sharing!
In reply to This is gorgeous! Thanks for by Ana White
ananda
Tue, 04/14/2015 - 22:59
thank you Ana !! i used to
thank you Ana !! i used to be a power tool phobia and you inspired me so much!! hugs and best wishes!