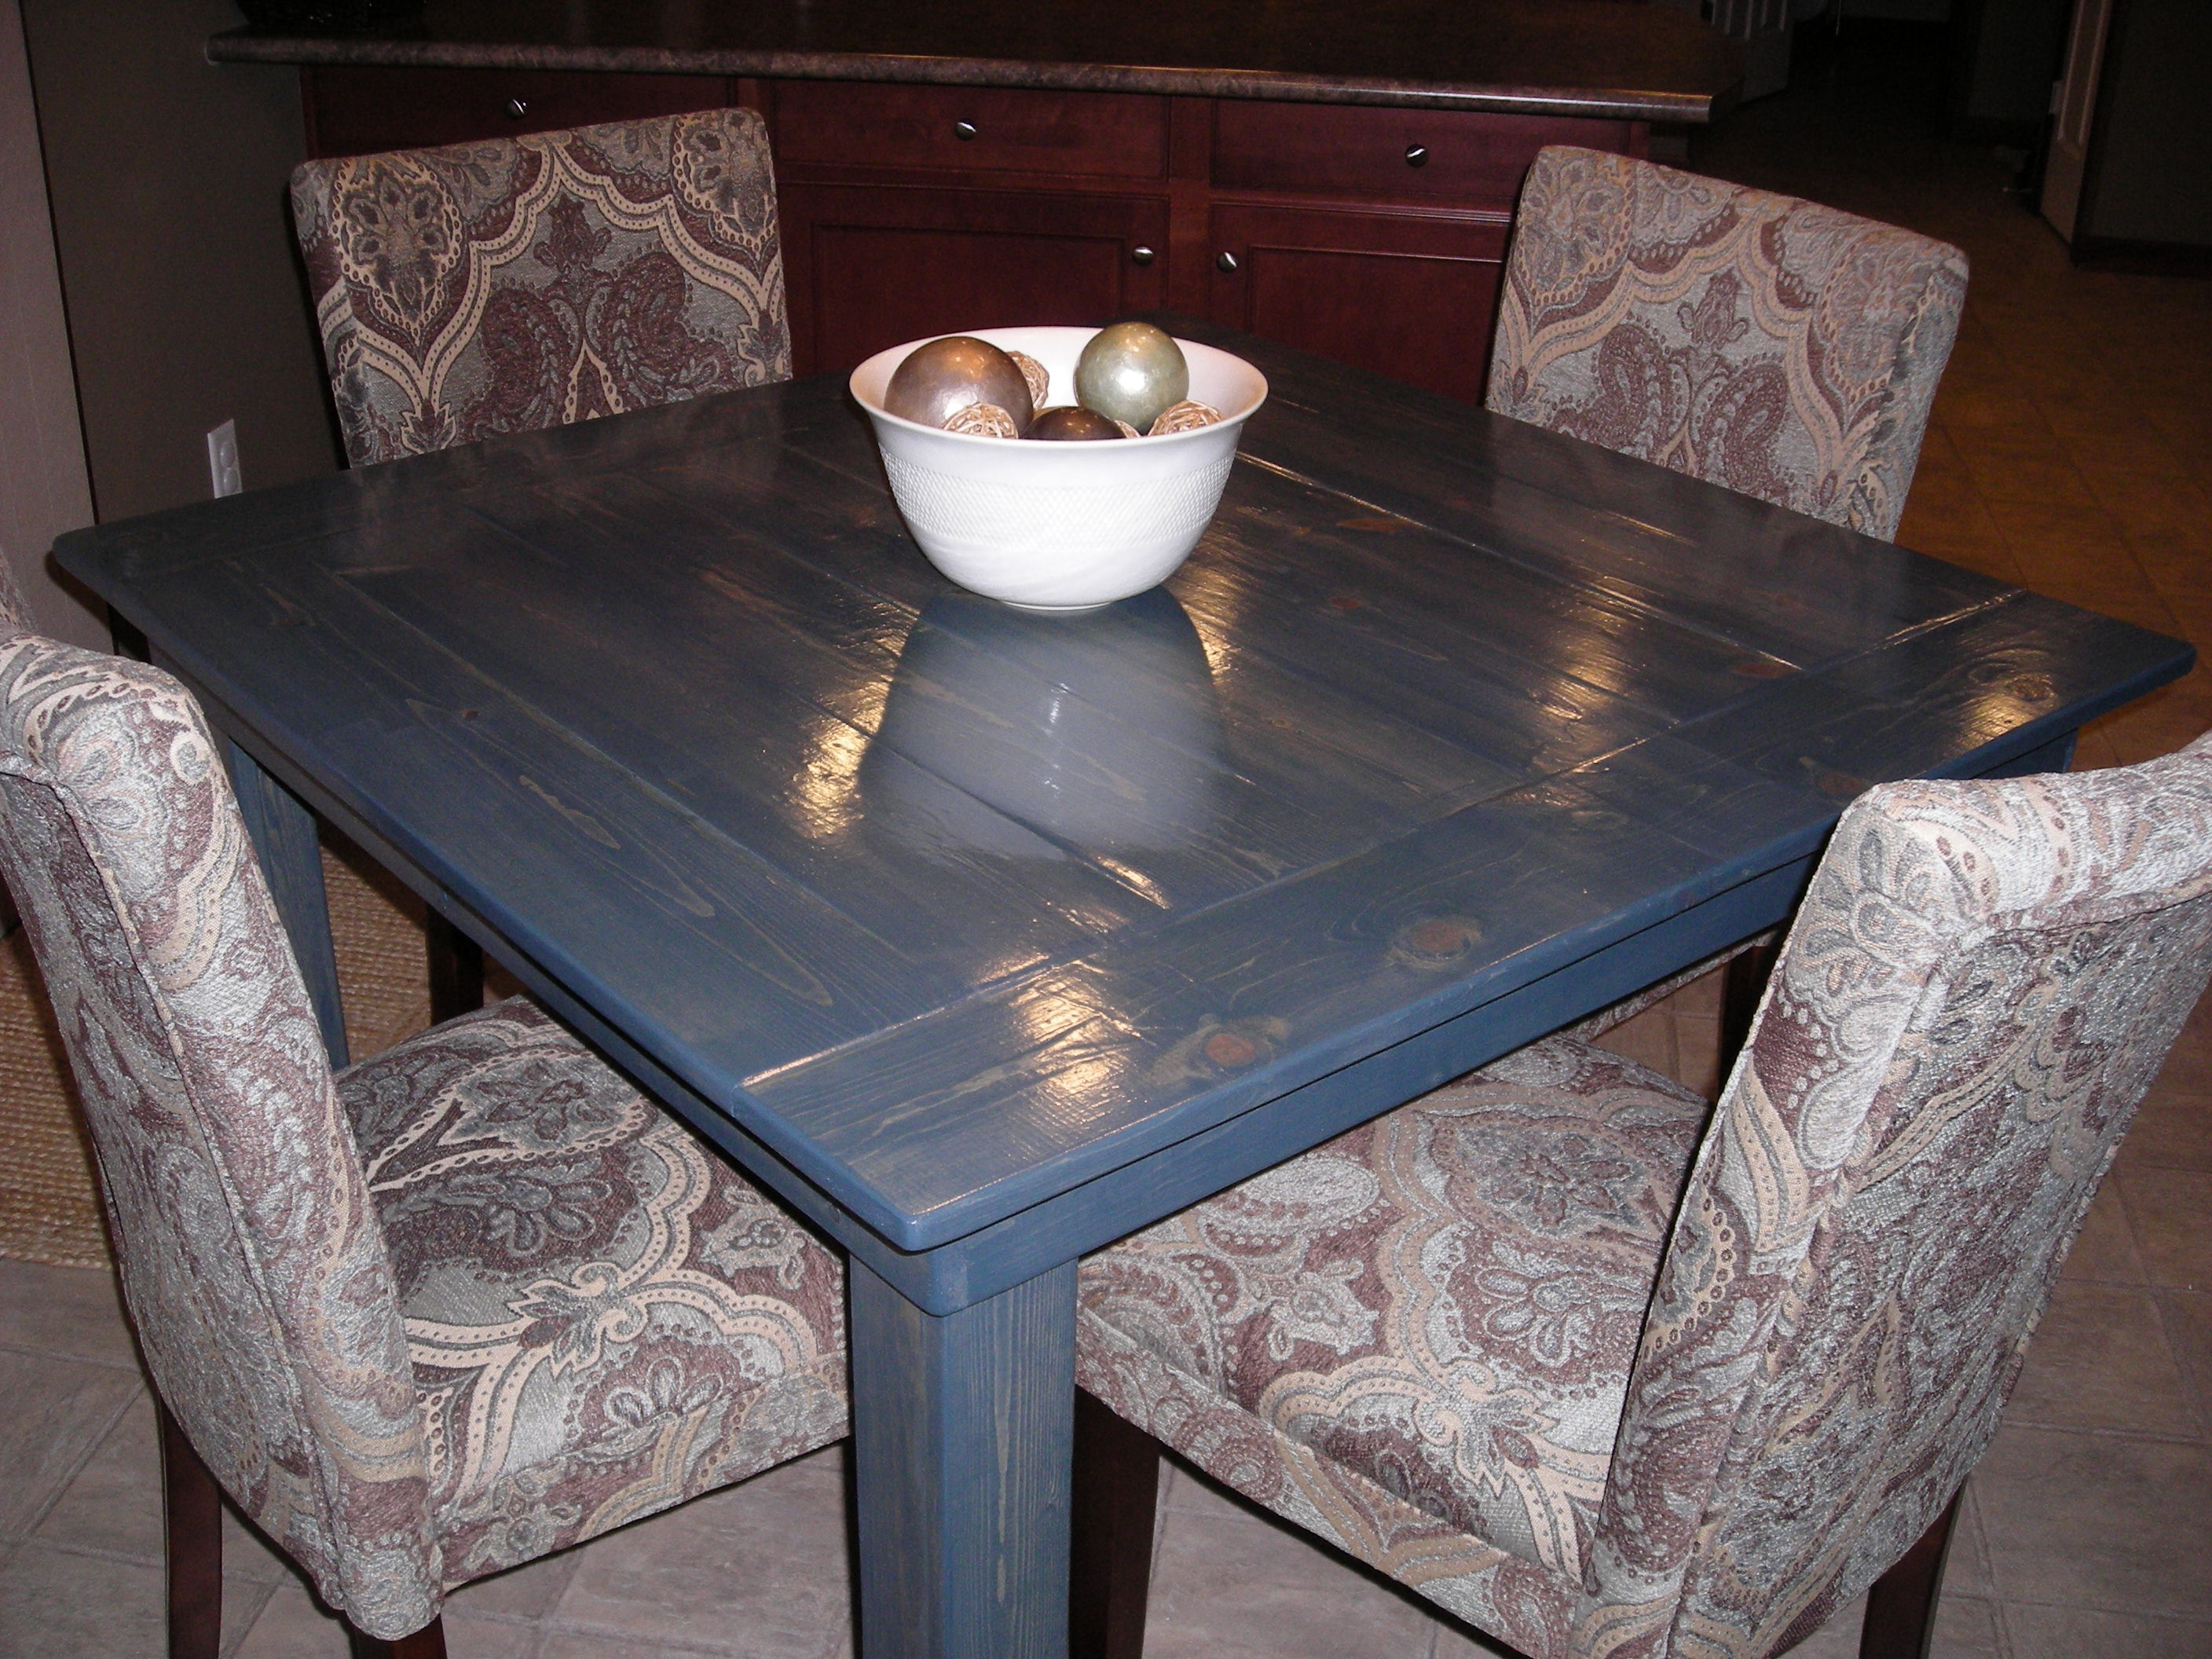
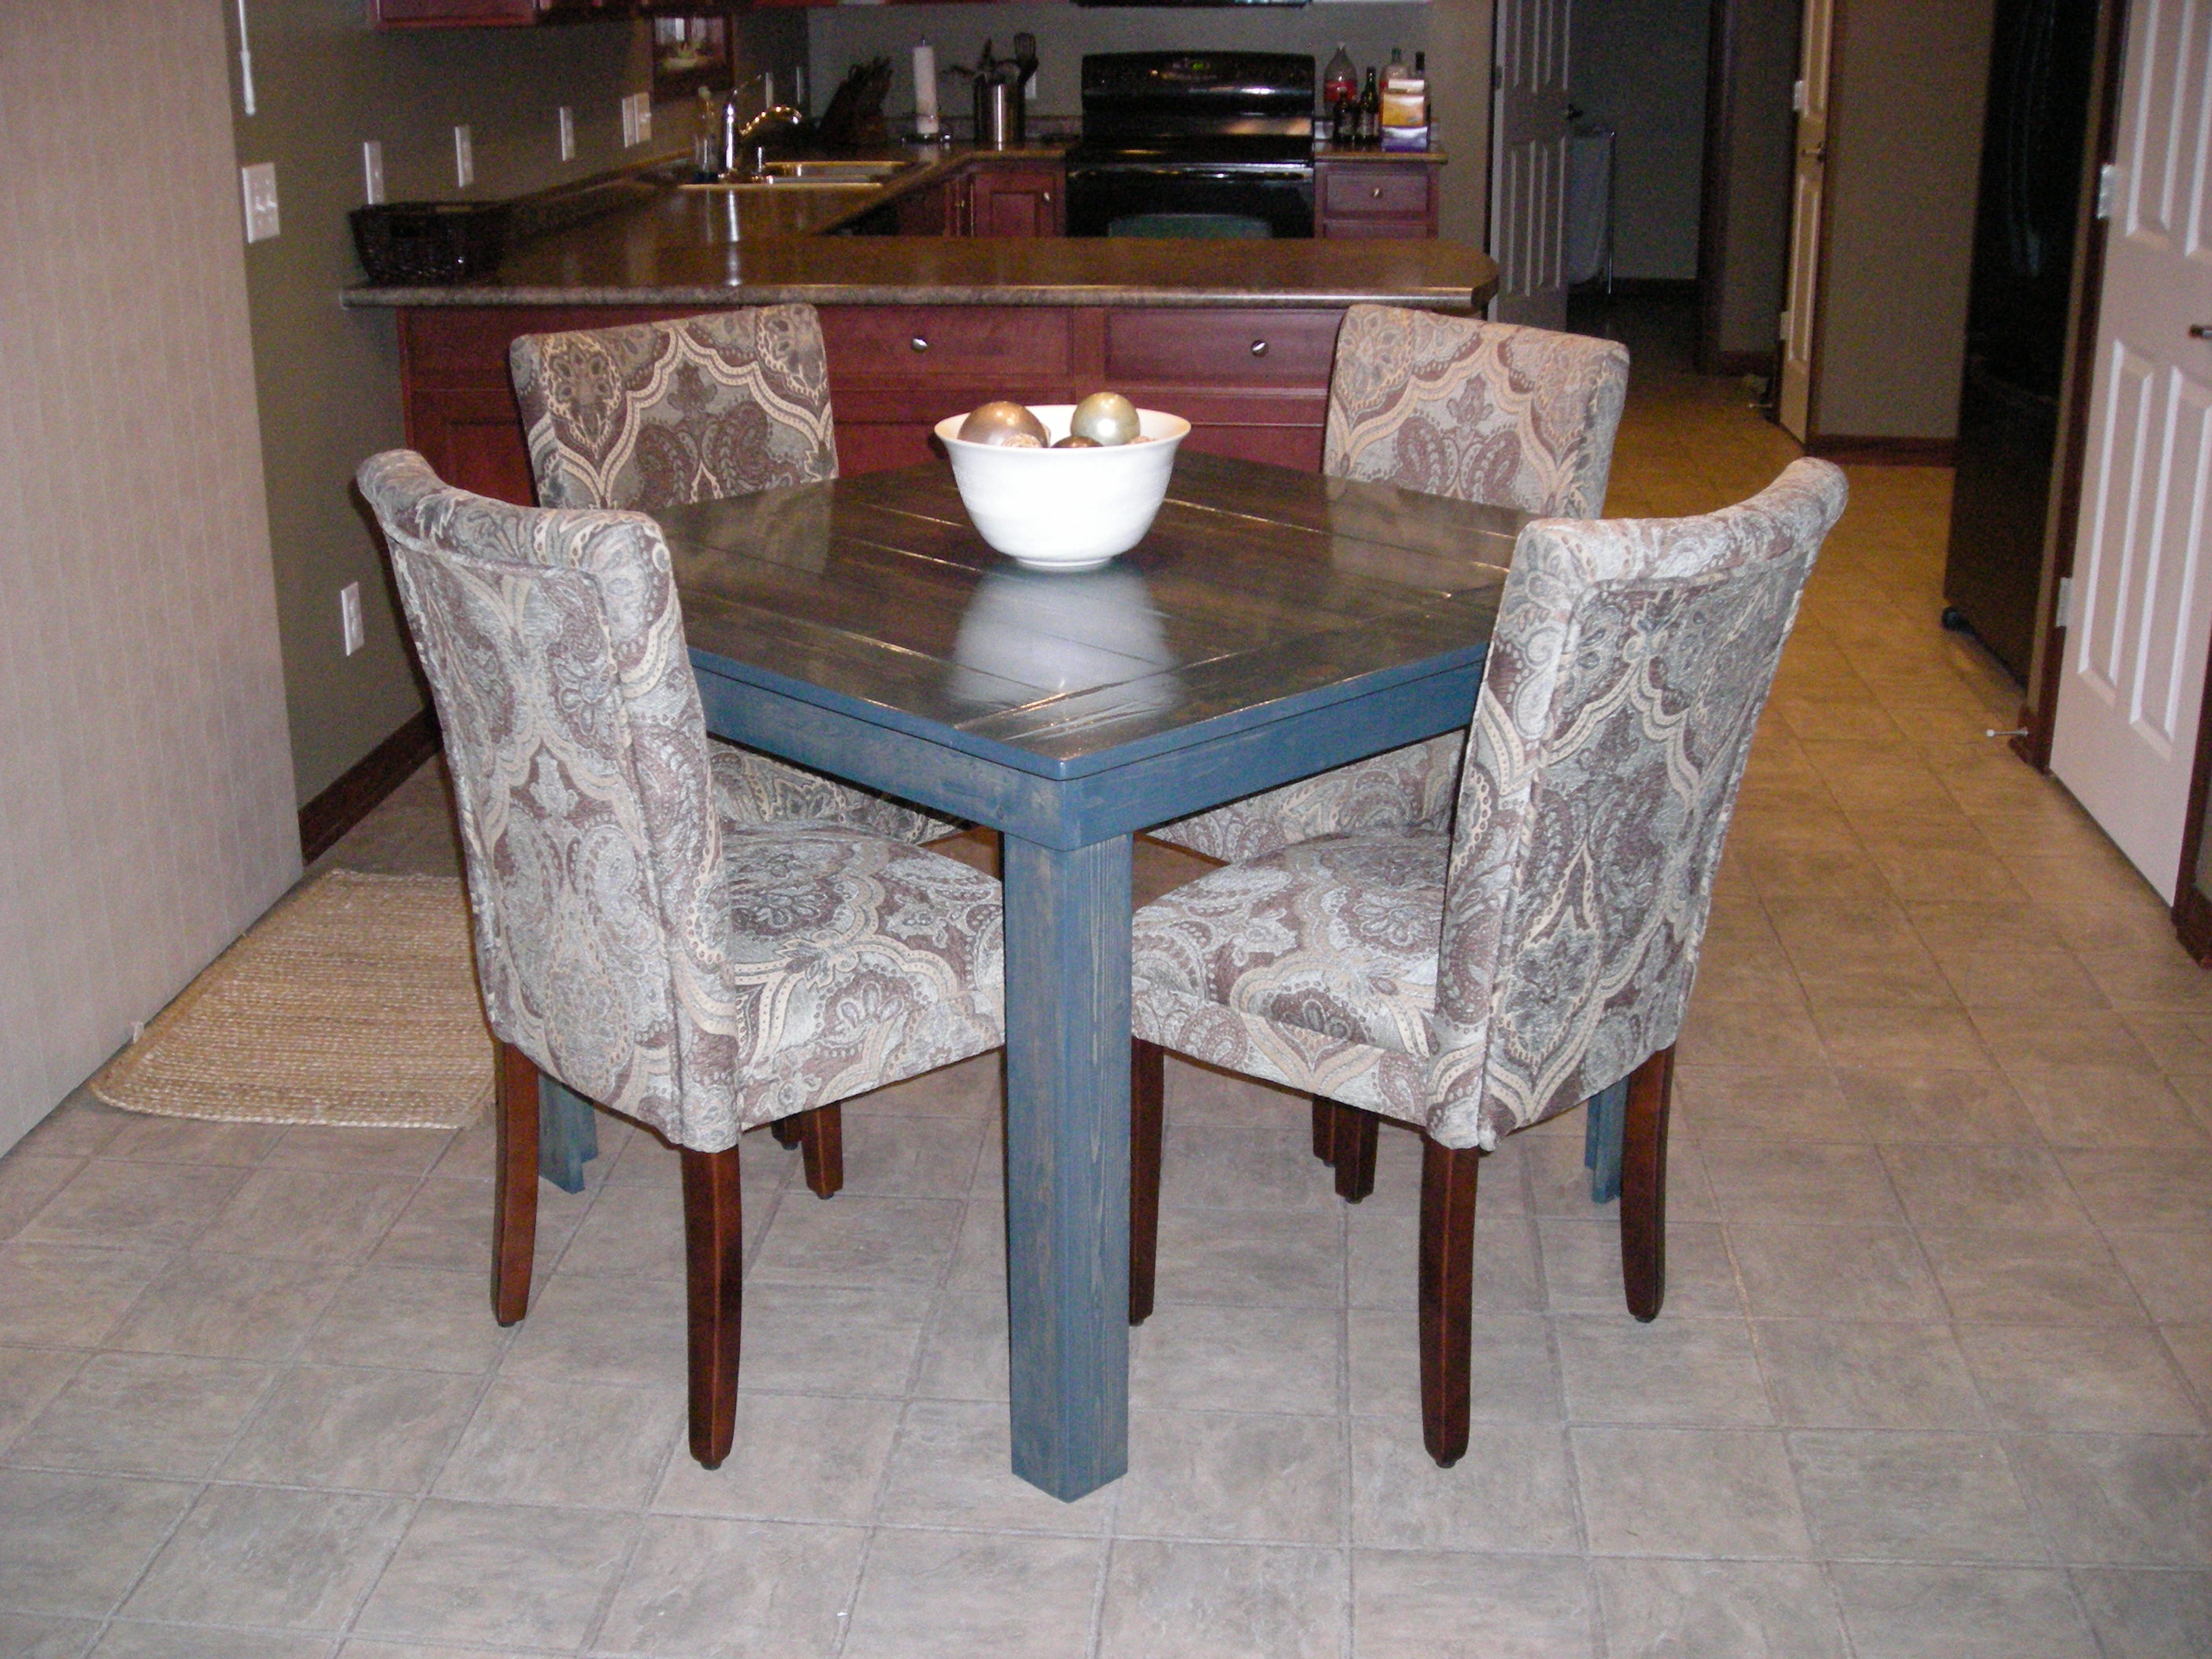
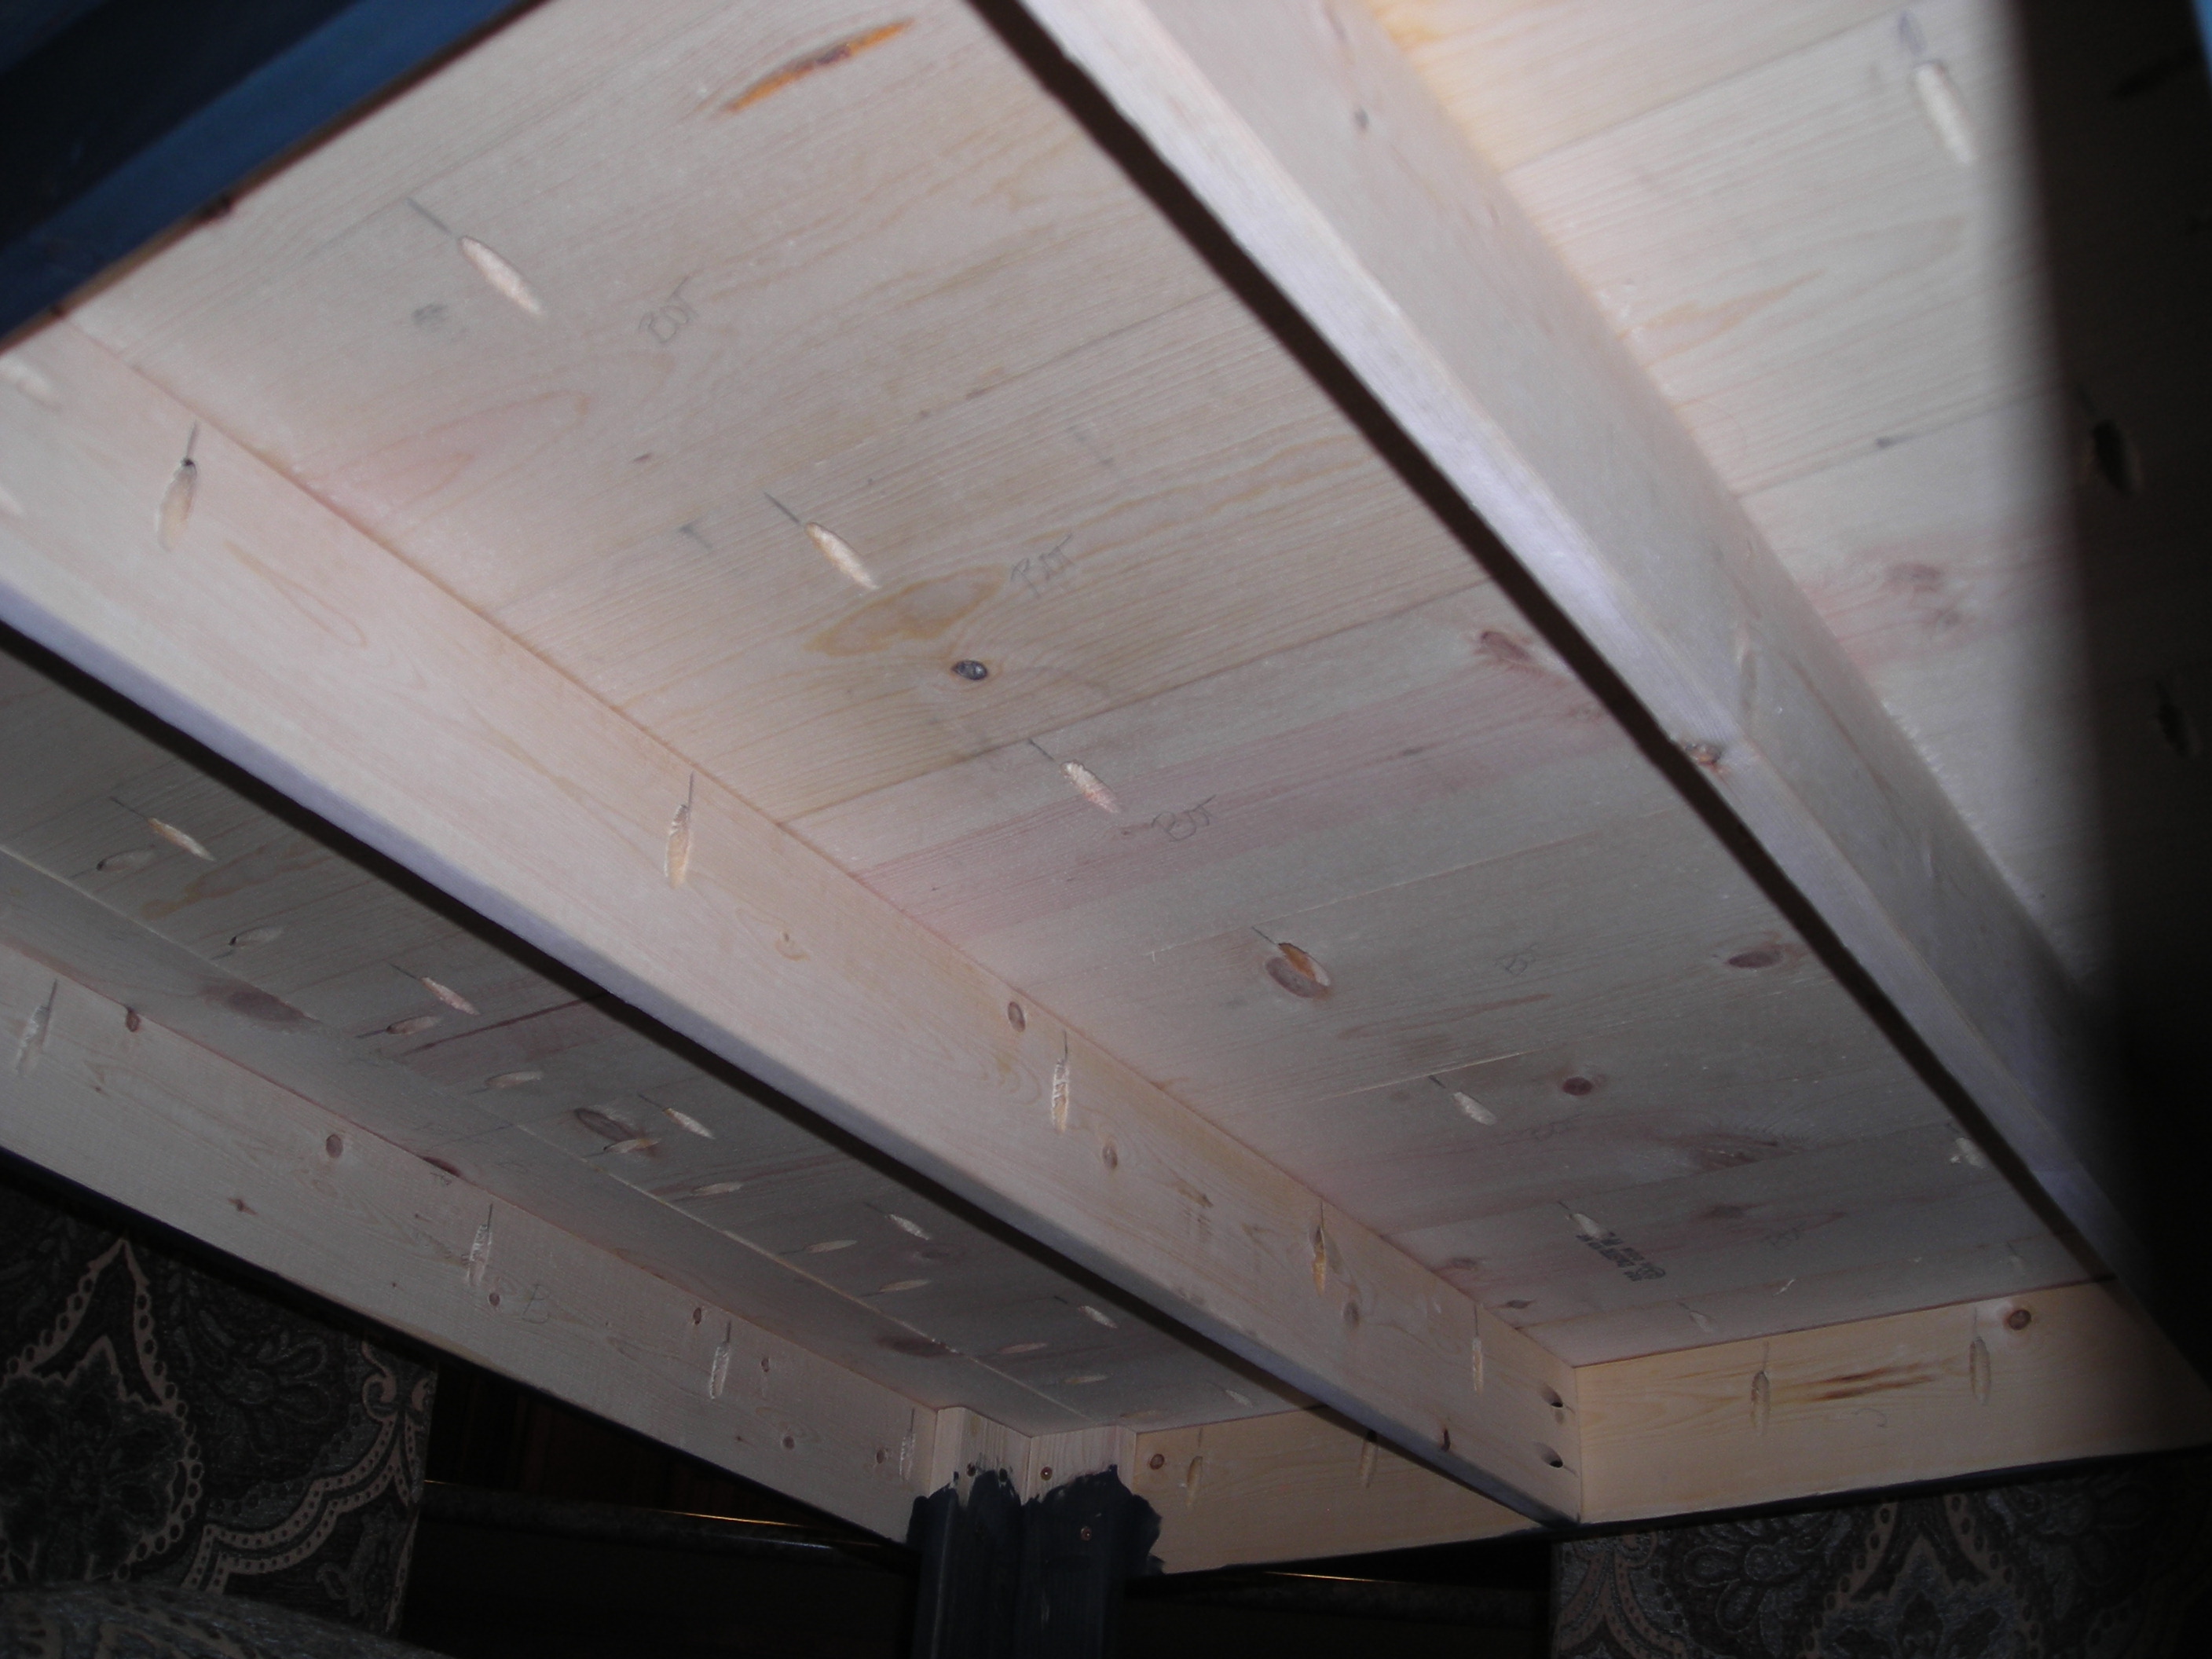
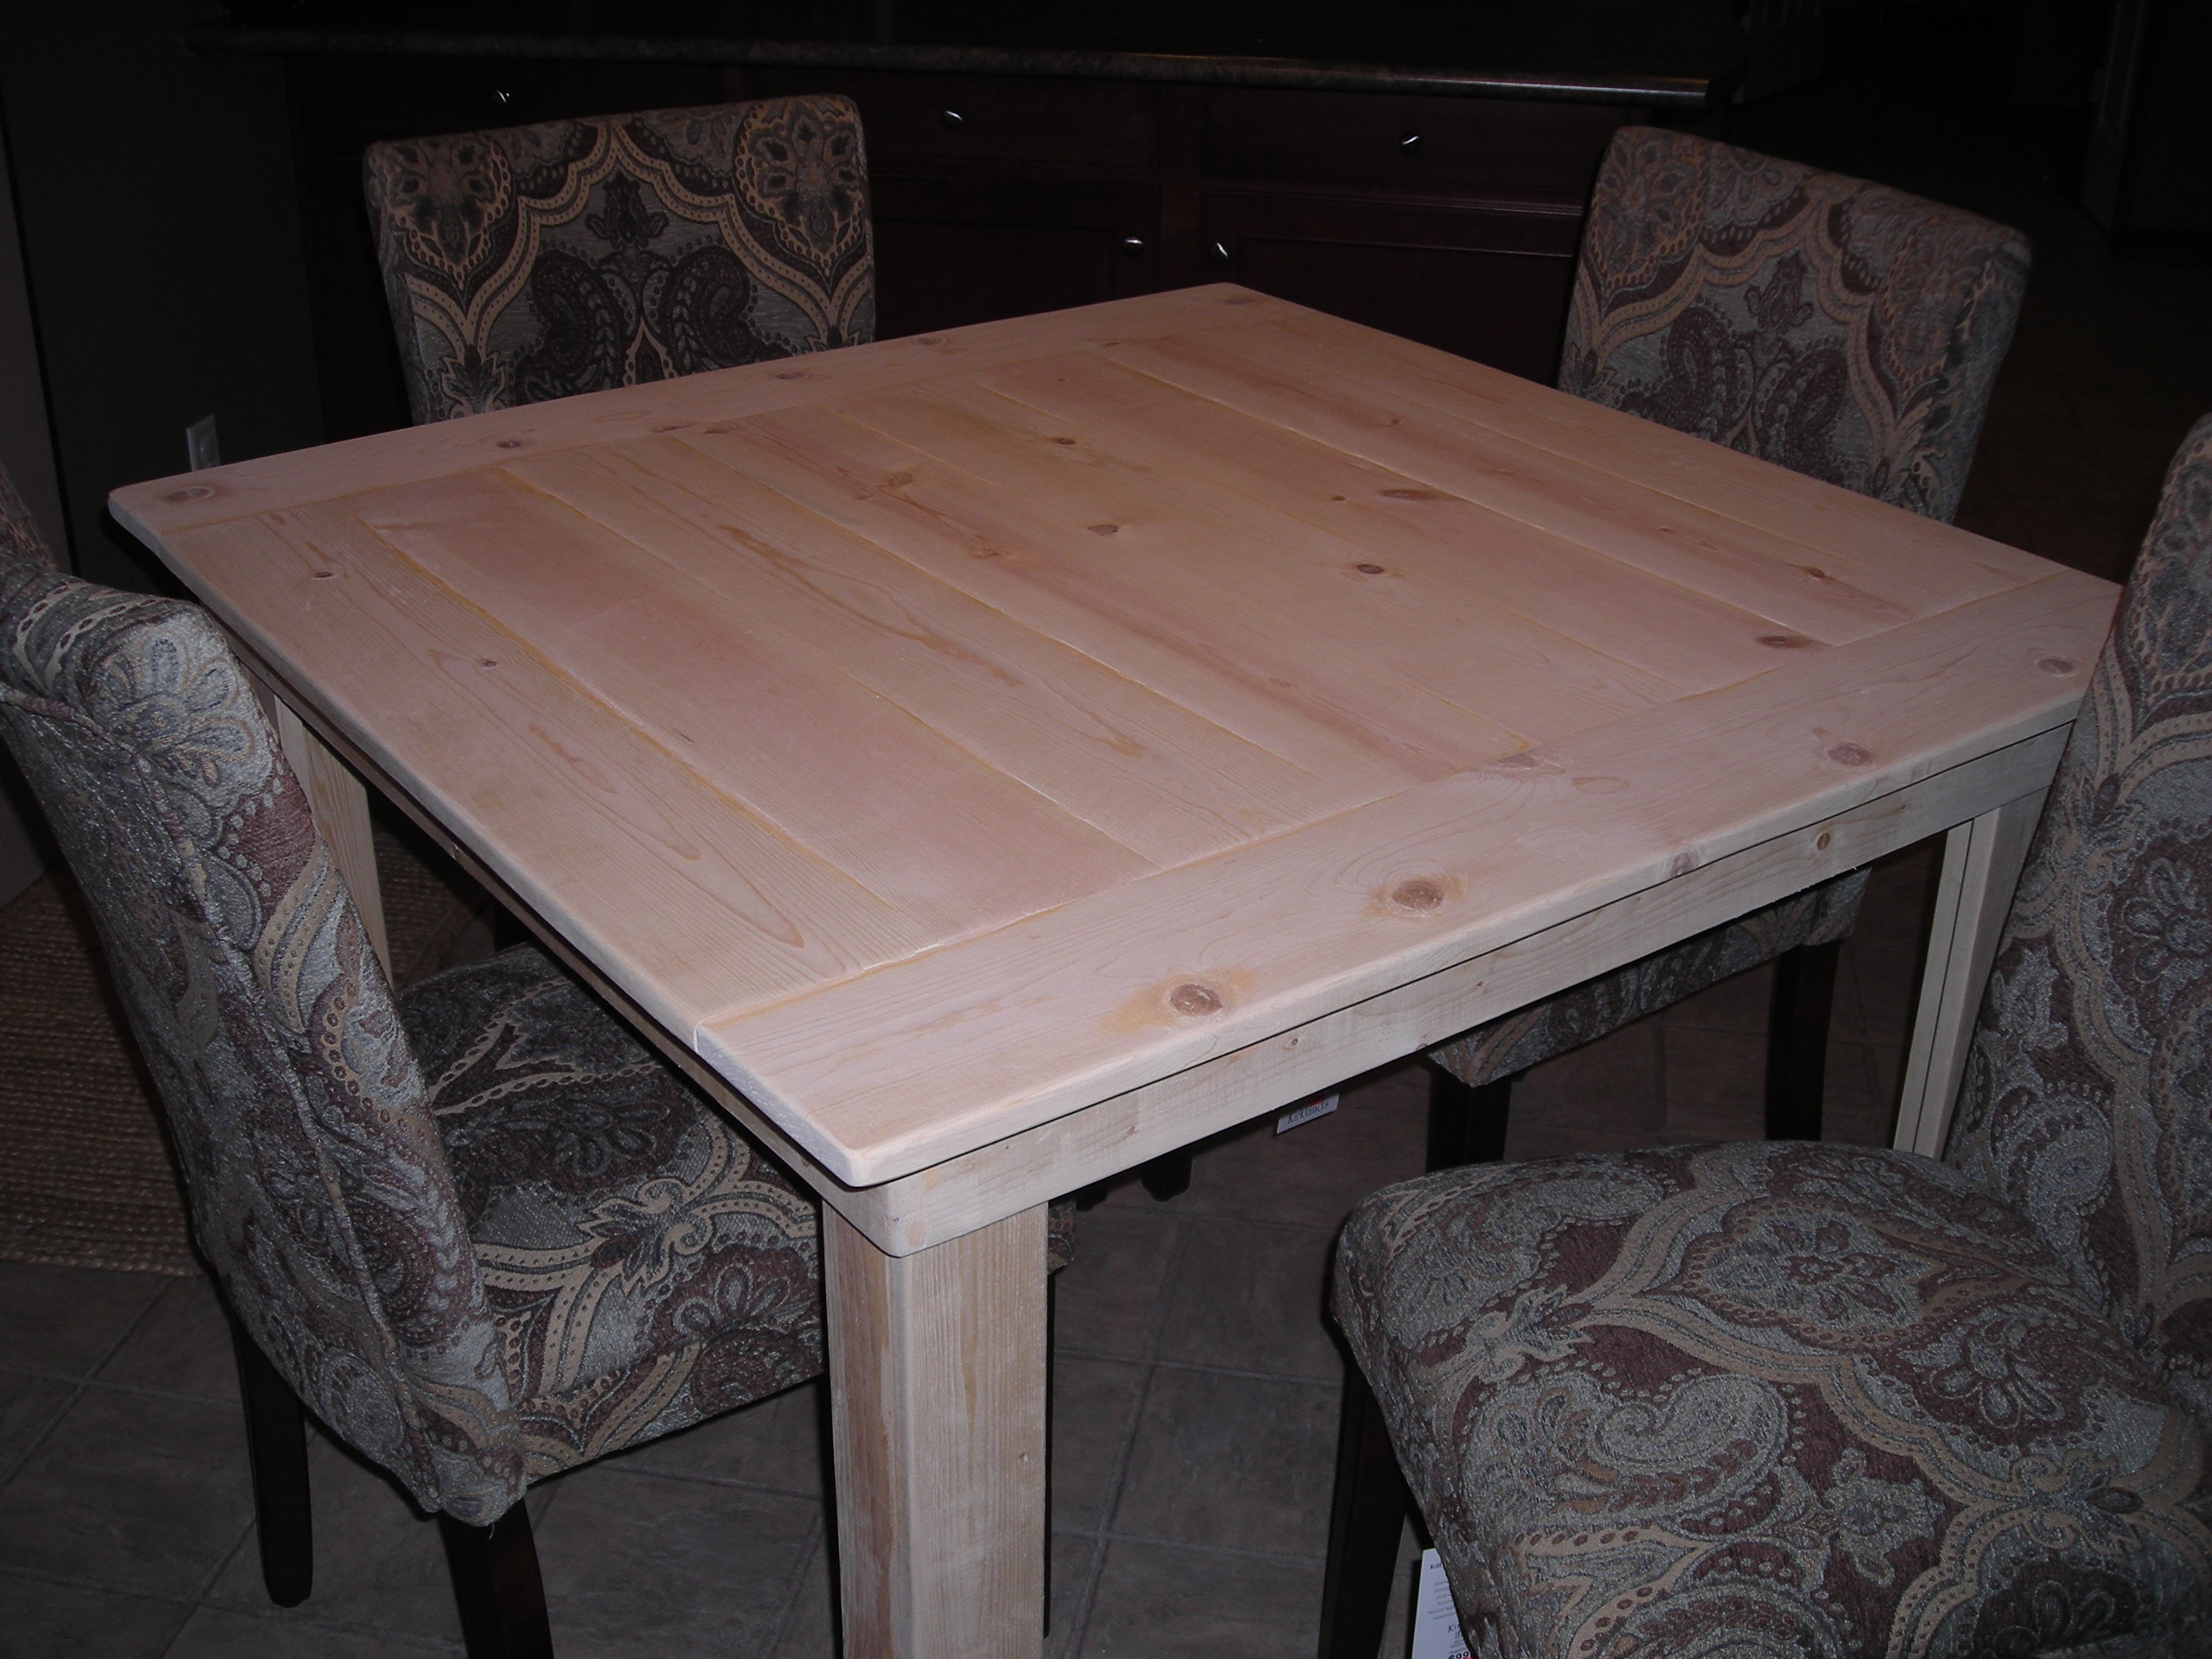
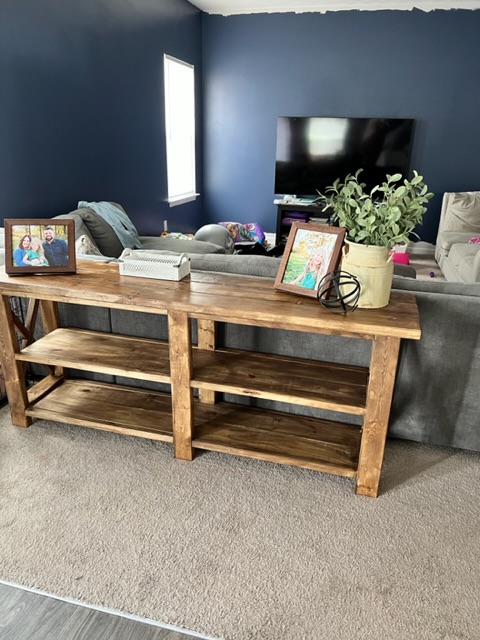
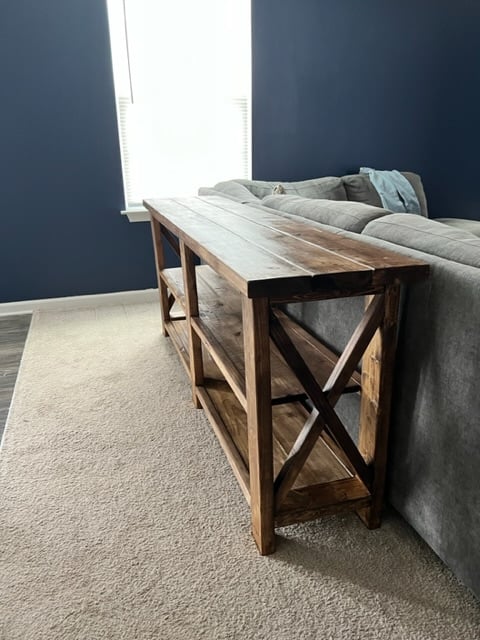
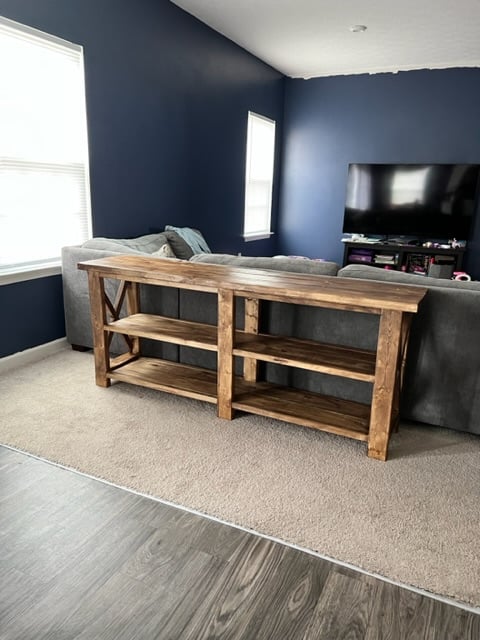
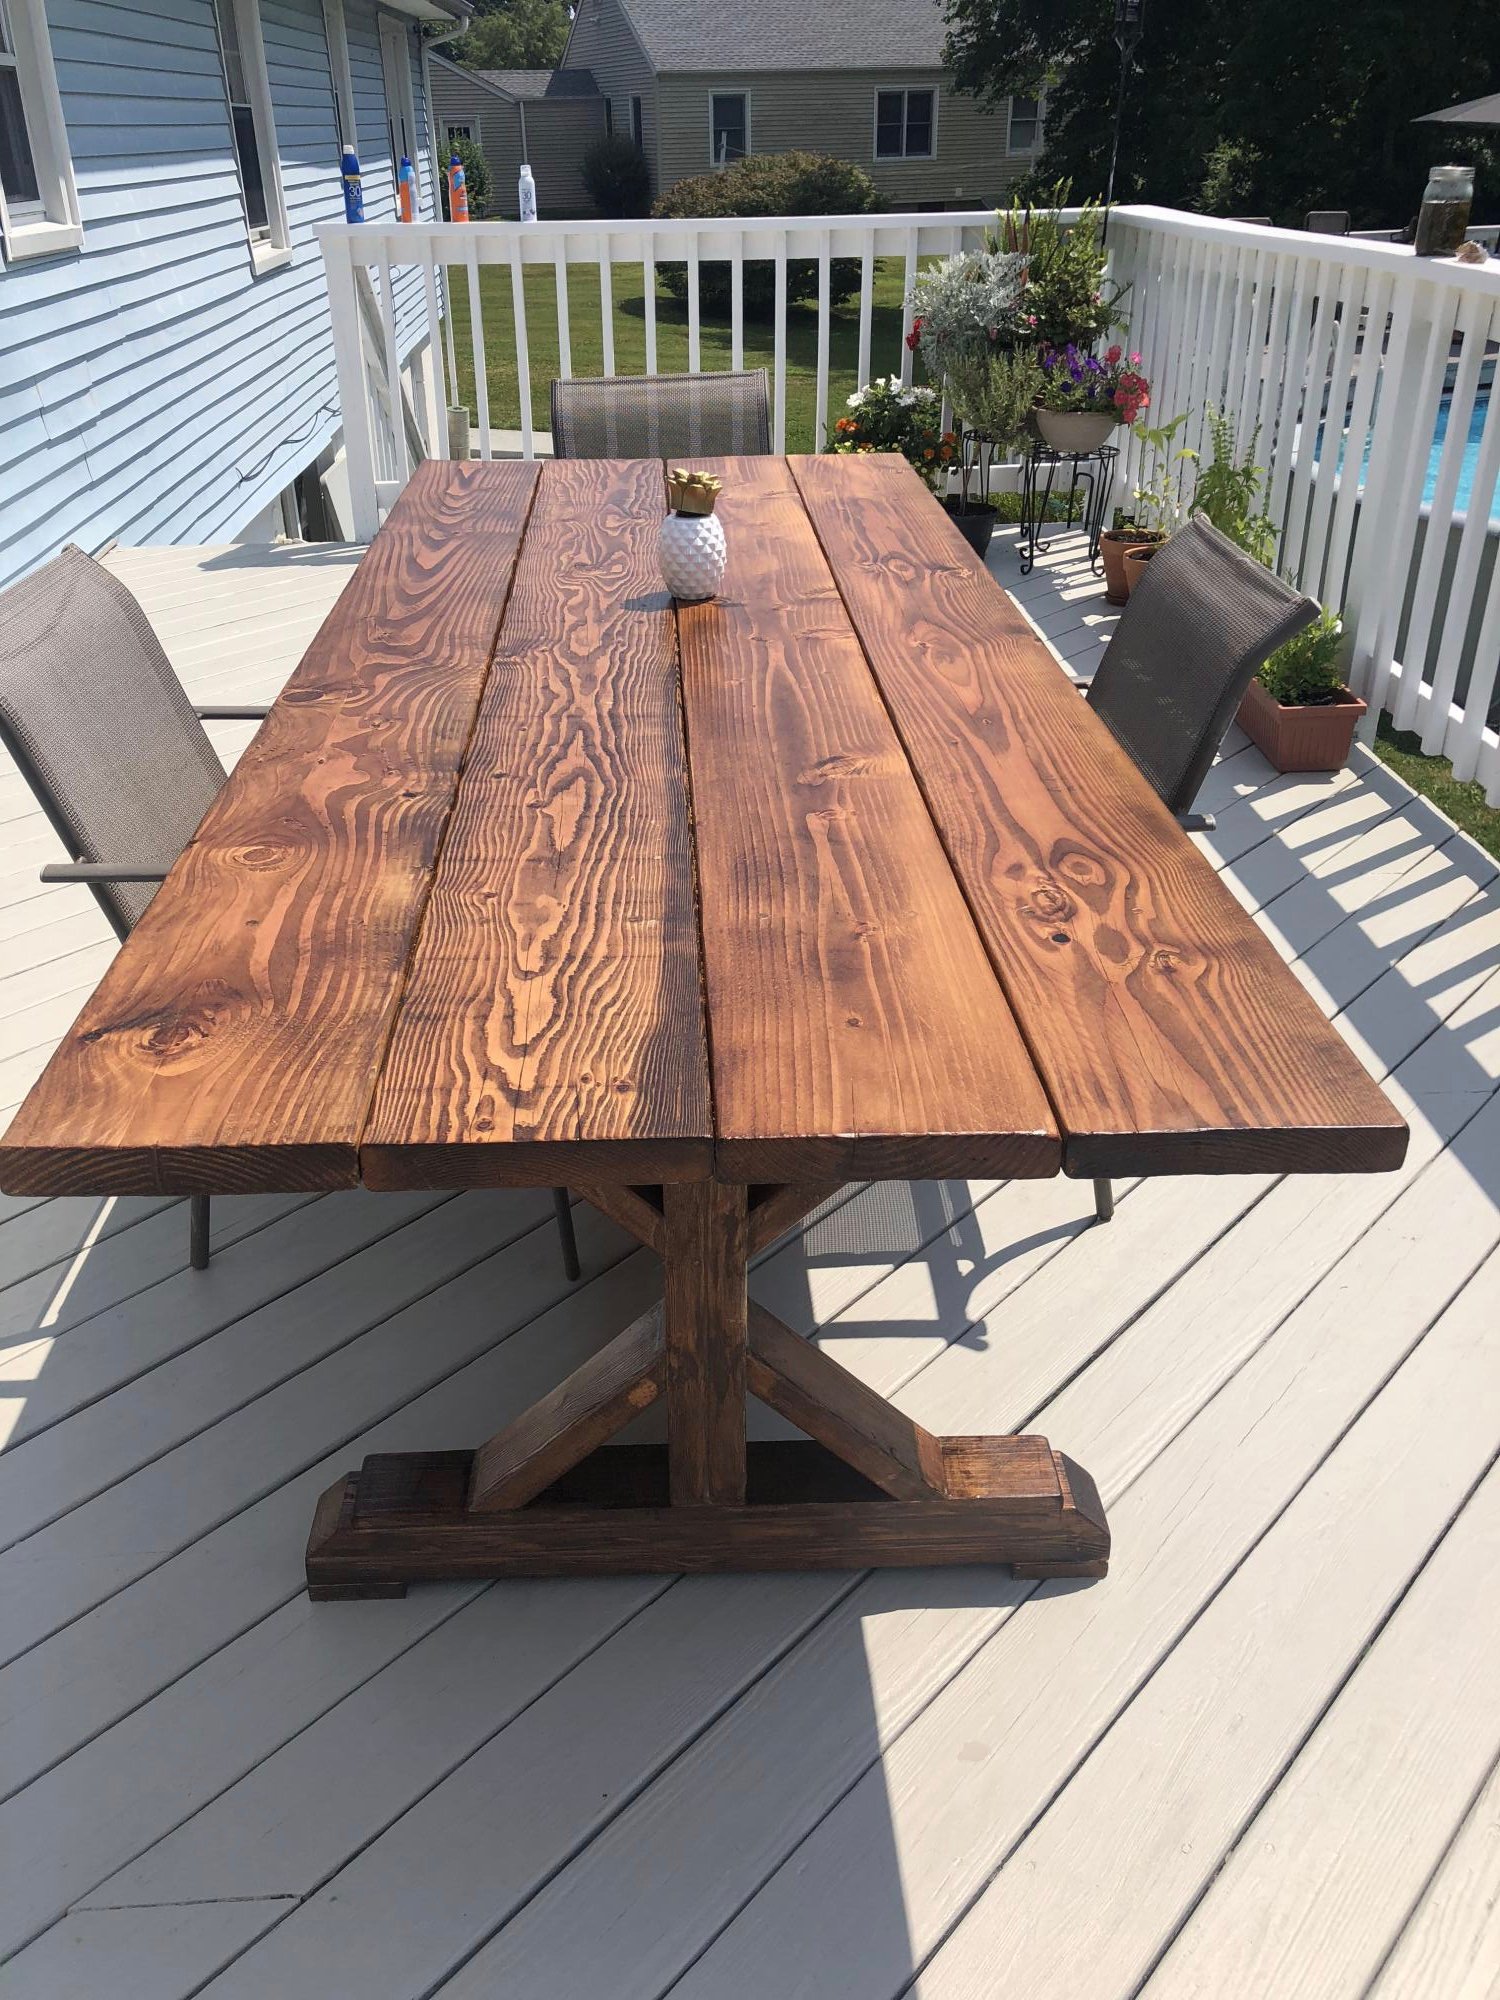
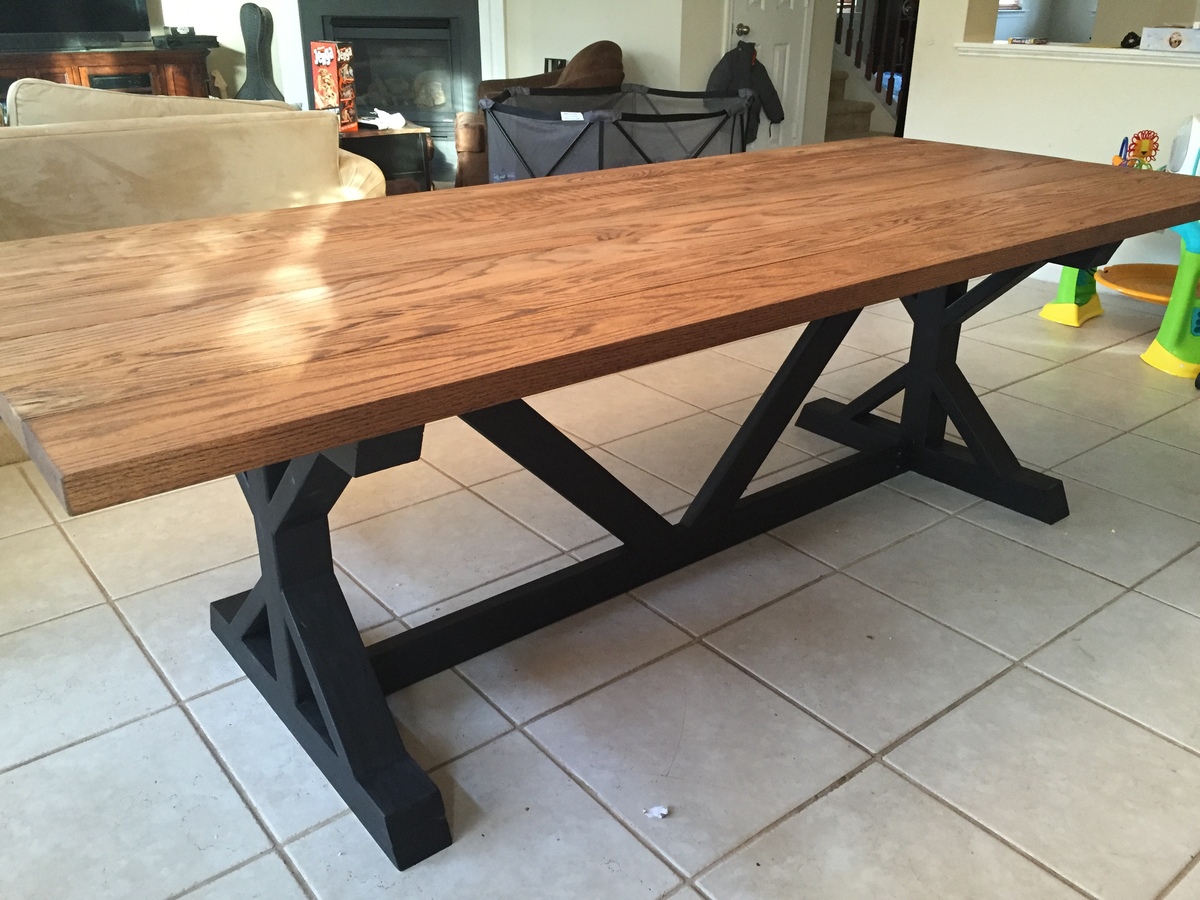
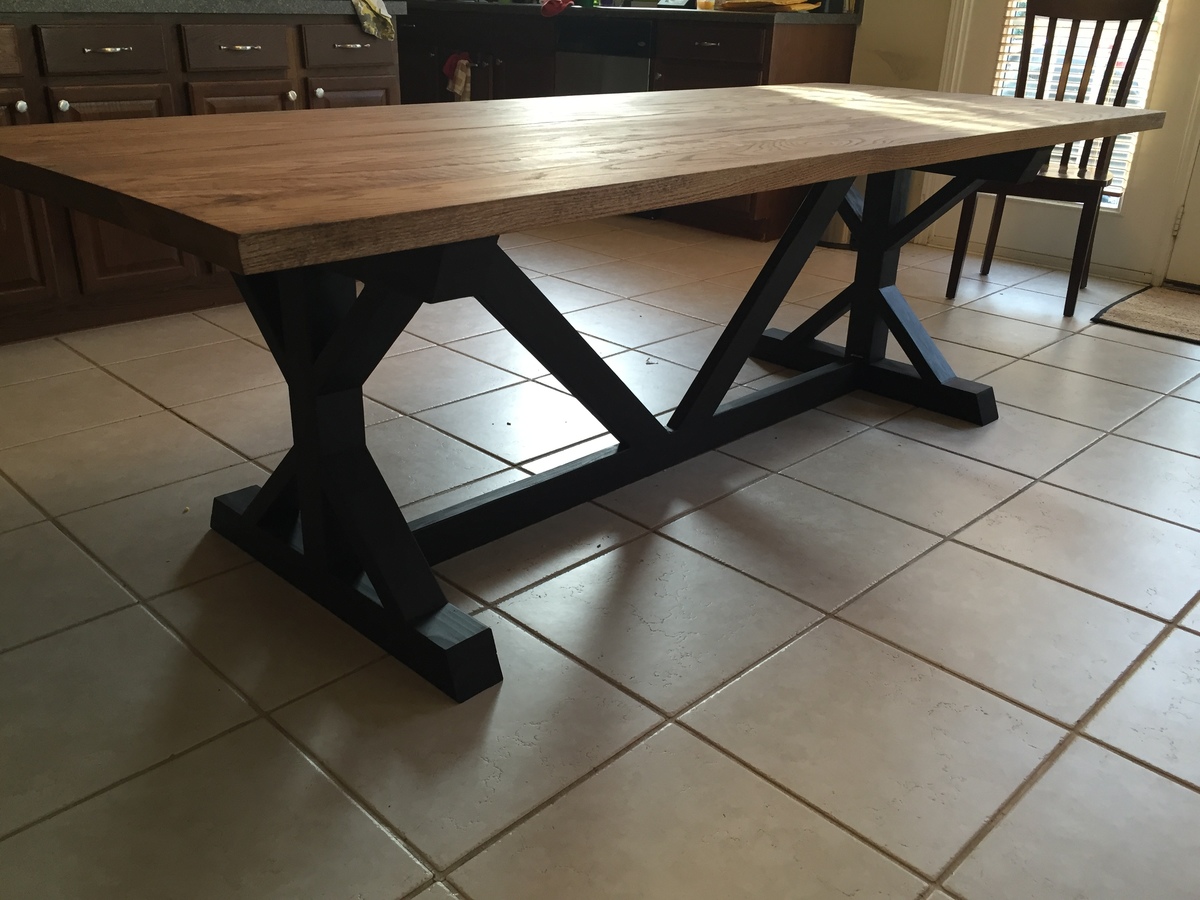
Community Brag Posts

First cooler down, 4 to go!

Submitted by sgilly on Fri, 06/14/2013 - 13:10

I do a lot of family gatherings and my daughter gave me a huge white cooler to accommodate all our different beverages. It's great to have, but its basic appearance didn't add much to the "party" atmosphere!

 My son-in-law has a small mill and after a recent visit he had sent me home with a trunk load of beautiful cedar. At that time I had no idea what I'd do with it. But, after seeing so many rustic coolers I decided that would be a perfect project to build with my cedar.


I built this before the cute blue ice chest was posted by Birds and Soap, but that would be a great plan to follow! 

My cooler had handles that were molded into the body of the chest, so the shape was a bit awkward to work with-especially considering that I'm really short on math skills! But, with a bit of trial and lots of error I made it work. I worked on it over several days, but if I'd buckled down and worked continuously I might have finished it in one day.

I love how it turned out, and after the 1st family gathering I had orders for 4 more (smaller) cooler chests!

Built from Plan(s)
Estimated Cost
I just paid for the cost of the sealer, but there's a lot of lumber involved, and if I'd had to buy the quality of cedar I used, it would probably have run me $100 or so. You might be able to get buy for less if you used cedar fence posts or white wood.
Estimated Time Investment
Day Project (6-9 Hours)
Finish Used
This cedar was a beautiful color (unlike cedar found in the big box stores), so I didn't want to change the color. I used one coat of Thompson's water seal, clear. It did darken the cedar quite a bit, but I still like it!
Recommended Skill Level
Intermediate

Farmhouse Table (My First Big Build!)

This was my first attempt at building a big project! I invested in a table saw a couple months ago since I sell handmade signs, but all I had tried to make were the signs and some very simple projects. I had been wanting a big farmhouse table for the longest time, but was so intimidated by such a big project! 


I finally got up the nerve and tackled it over the course of a weekend, and made the whole table by myself! I decided to buy a pocket hole Kreg Jig, which made the project go pretty smoothly. Ana's plan was easy to follow and I followed it to a T, other than using 2x6s instead of 2x8s for the tabletop, 2-2x4s instead of 4x4s for the legs, and extending the length a bit (my table is about 8.5 feet long!) It took me longer than it should have, I'm sure, but even as a beginner I finished the table from start to finish in a weekend. 


The finish is my favorite stain color, a half-and-half mix of Mixwax Weathered Oak and Espresso, topped with a coat of Varathane Triple Coat Matte Poly.


I built a matching bench the next day because I couldn't resist! I did accidentally put the end pocket holes on the wrong side of the end aprons, so they're facing outward (oops!) but I still love how the table turned out! I posted more photos of the process and finished product on my blog if you'd like to see more! 

Estimated Cost
$100
Estimated Time Investment
Day Project (6-9 Hours)
Finish Used
Minwax Weathered Oak
Minwax Espresso
Recommended Skill Level
Beginner

My Version of the Nursery Armoire

Submitted by tracysmith on Sat, 04/09/2011 - 22:35

We built this armoire cabinet for a client of ours (this was a paying gig) who needed extra storage in her bathroom.  I think it turned out beautifully if I do say so myself.  So much so that I decided the build two of these to put in my laundry room for extra storage.

This project took us a month and a week to do in overall time, but in that month, we didn't work on it everyday.  Actual build time was probably more like three weeks - 6 hours a day.  We tweaked a lot on this since it was going to a customer we didn't want anything wrong with it so if it was mine it probably wouldn't have consumed so much time.  We also had a couple of problems that arose and it took a bit of figuring to get past those.  All in all it was a great experience.  :-)
Modifications:
Height and width were altered to fit the available space.
Drawers were put on the outside of the upper doors instead of inside
Shelves on the bottom section were made into sliding shelves (see additional pics) so that the contents in the back were more easily accessible.
Thanks for posting these plans, it was a joy to build and help someone else with a project that they didn't have time to do themselves.  We appreciate the inspiration!
Built from Plan(s)
Estimated Cost
$425
Estimated Time Investment
Week Long Project (20 Hours or More)
Finish Used
Minwax Waterbased stain in Rosewood - 2 coats
Minwax Polyurethane - 3 coats
Recommended Skill Level
Intermediate

Adirondack End Table

Submitted by Bradski on Sun, 06/16/2013 - 07:10

My First Project

Estimated Cost
$40
Estimated Time Investment
Afternoon Project (3-6 Hours)
Finish Used
Paint
Recommended Skill Level
Beginner

Comments

Pool Furniture

I made the back slats taller on the second chair (salmon colored one) so I could just lay my head back. They were so easy and I can't believe I did this myself! We made the baby chair with the scraps and our grandbabies love it!

Built from Plan(s)
Estimated Cost
200.00 for all 4 pieces.
Estimated Time Investment
Weekend Project (10-20 Hours)
Recommended Skill Level
Beginner

James' Play Kitchen Chair

James got a sweet retro kitchen set for Christmas from his grandma. CarpenterMama scored a kids kitchen table (pretty sure it's authentic retro) at Goodwill for $8. All that he needed was a chair to sit in, and Ana's Four Dollar Stackable Chair fit quite nicely!

This was CarpenterMama's very first building project, and she is as proud as punch that she made something with her own two hands, some wood & screws, and oops paint. James is ecstatic that it is blue and he can sit in it. :-)

Estimated Cost
$5
Estimated Time Investment
Afternoon Project (3-6 Hours)
Finish Used
2 coats of Kilz primer then 1 coat of Behr medium base interior eggshell paint (from the "oops section" of the big orange store--only $5 for the gallon)
Recommended Skill Level
Starter Project

A Changing Table/Dresser for my Son's Rustic Nursery

Submitted by PHILLSAM on Tue, 06/18/2013 - 14:18

I wanted to share my most recent build with you.

With only weeks before my son is due I finished his changing table/dresser.

I am still new to this whole woodworking adventure and this was my largest project yet. (Completed project was around $95)

This dresser had a ton of ‘firsts’ for me and along with that I probably made nearly every mistake you can.

My firsts on this thing were:

-pocket holes
-sliding dovetails (to attach the drawer fronts)
-hand-cut dovetails (rear corners of the drawers)
-drawers with glides
-hinged doors
-table top fasteners
-distressing a paintjob

It was built knowing that my wife wanted it painted , hence the mismatched wood used(see pre-paint pics below). The nursery is designed around a rustic theme (see wall shelf unit in the first pic).
I will also be adding a hanging wall clock made from weathered pallet wood in the coming weeks.

I think one of the most challenging things for this project might have been the use of Home Depot lumber.
We were on a major budget so I purchased the cheapest wood in the sizes I needed. This meant combing throught the stacks to find acceptable pieces.
I do not own a jointer or planer, so in order to flatten and correct thickness issues with the wood I resorted to good ‘ol hand planes.
Time consuming, yes. But also very satisfying.

Built from Plan(s)
Estimated Time Investment
Week Long Project (20 Hours or More)
Finish Used
Painted all edges with a gray that matched the crib sheets, then painted over it with an off white (I think it was called Superhide White).
Next I took a file (adds texture to abrasions) to scuff up the edges revealing the gray paint and some of the bare wood.
Recommended Skill Level
Intermediate

Comments

danicarby

Sun, 04/12/2015 - 16:18

What an absolutely beautiful changing table! It's just my style too! Do you have building plans? I'm currently 7 months pregnant with baby #4 and trying to get our nursery together!

Farmhouse TV Console

Submitted by RenoRustic on Wed, 05/27/2015 - 10:04

So I bought a tv for our bedroom rather spur of the moment last year and when I decided I didn't to wall mount it I needed a console for the tv to sit. This was going to be my 3rd build and I had recently made the Mini Farmhouse Bedside table. I modified the Mini bedside plans to make the console a larger two drawer style. I also increased the height by about 2" to put the tv at a better viewing angle. I didn't know that there was a similar plan in Ana's book at the time, as it probably would have been easier to just follow that. Oh well.

Built from Plan(s)
Estimated Cost
$60
Estimated Time Investment
Weekend Project (10-20 Hours)
Finish Used
I built this with pine 2x2 and 1x6 boards. Stained with Minwax Special Walnut (I used conditioner first) and painted with Behr premium white paint (off the shelf- no mixing). I sanded it down to distress and did not use any poly as I felt that natural wear would add to the look. It's held up very well over the last year.
Recommended Skill Level
Beginner

Two Tone Weathered Gray X Farmhouse Table and Benches

Submitted by DeHenzel on Thu, 12/21/2017 - 10:22

A beautiful 6 1/2 foot weather gray farm table.  Thanks for the design, Ana!

Estimated Cost
$100
Estimated Time Investment
Weekend Project (10-20 Hours)
Finish Used
Top - weathers gray stain and satin polyurethane

Bottom - berh ultra white paint.
Recommended Skill Level
Intermediate

Sturdy work bench the hard way

Submitted by Devorlast on Fri, 12/17/2021 - 18:35

This was my first project and it was done entirely with a table saw, battery powered drill and a sander. It's uneven but stays stable in my shed/workshop. I learned a lot from making it and I hope to incorporate that knowledge in to my next project, L shaped desk for the wife.
The "decorative" edge was really just me testing a router that I got, you can see how it took chunks of the table top on the sides. I figured if I'm going to mess something up it might as well be the workbench.
As for the coating, it's just some polyurethane. I put three layers on the table top and one everywhere else, it looks slightly glossy and yellowish but its a lot less prone to denting then the bare wood was.

Built from Plan(s)

Comments

Doll furniture

Submitted by 3kidsilove on Fri, 04/15/2011 - 22:56

My husband made this chair in about 30 minutes. It was are first project from this sight. So easy and my niece loved it!! I painted he cut! what a team

Built from Plan(s)
Estimated Cost
4.00
Estimated Time Investment
An Hour or Two (0-2 Hours)
Finish Used
spray primer and teal spray paint then distressed with sand paper
Recommended Skill Level
Beginner

Perfect Dresser for an almost-teen boy

Submitted by ktkadoo on Thu, 06/20/2013 - 09:45

(again, I don't know why the image is showing up in the wrong direction)... While redoing my son's room, he needed a new dresser. His room is very small and we new we needed to be able to put it inside the closet. We couldn't find dressers that would fit the correct dimensions, but didn't think we had the ability (yet) to make a quality dresser for him. My kids don't like using dressers correctly anyway, so we thought this might be a great solution for him. Right now he is using the bottom area as a place for his shoes and small boxes for his underwear and socks. (We had thought about making one of the spaces into a shelf, but ended up not doing it, so I hadn't bought enough baskets).

Recommended Skill Level
Beginner

Fancy X Farmhouse Table

Submitted by ktprinkey on Sat, 05/30/2015 - 08:58


Built from Plan(s)
Estimated Cost
$100
Estimated Time Investment
Weekend Project (10-20 Hours)
Recommended Skill Level
Beginner

Comments

Driftwood12

Sun, 11/01/2015 - 08:45

Your table is gorgeous! I'm building this right now and am looking for this color stain ... What did you use? thank you!!

Driftwood12

Sun, 11/01/2015 - 08:45

Your table is gorgeous! I'm building this right now and am looking for this color stain ... What did you use? thank you!!

ktprinkey

Mon, 12/21/2015 - 21:04

Sorry I'm just now seeing your comment!  If you still need the info I used a coat of Rustoleums Weathered Gray and then a coat of Minwax Provincial.  I only left the Provincial sit on for maybe about a minute before wiping it off.  Hope this helps!

ktprinkey

Mon, 12/21/2015 - 21:05

Sorry I'm just now seeing your comment!  If you still need the info I used a coat of Rustoleums Weathered Gray and then a coat of Minwax Provincial.  I only left the Provincial sit on for maybe about a minute before wiping it off.  Hope this helps!

Modified Rustic X Console

Submitted by Jeremyg84 on Sun, 12/24/2017 - 18:44

I loved the original design but wanted to learn new skills and use hardwood.

I used a combination of pocket holes, biscuits to align the plates and the frames, and figure 8 fasteners to attach the top.

At a VERY low pace (~1-2 hours every day), and many mistakes, it took me about two months to complete this project. If I had to do it again, it would probably take me two-three weeks at the same pace.

Overall, I learned a lot and am very pleased with the final results.

Built from Plan(s)
Estimated Cost
$70
Estimated Time Investment
Week Long Project (20 Hours or More)
Finish Used
Frame - white acrylic paint, coated with wipe-on water based Minwax poly (to protect the paint)
Shelves- 3 layers of oil based wipe-on Minwax poly
Top- 3 layers of oil based wipe-on Minwax poly, then 3 layers of oil based brushed (fast drying) Minwax poly
Recommended Skill Level
Intermediate

Favorite bookshelf

Submitted by Anonymous (not verified) on Sat, 12/25/2021 - 17:56

Using favorite bookshelf design I built 2 shelves, one for books (5 shelves) and one for DVD’s (7 shelves with doors). These were a present for my daughter for Christmas she loves them. They are made of pine finished with General Finish brand Java gel stain.

Built from Plan(s)

Comments

Farmhouse Bed-My first build

Submitted by MattB on Tue, 04/19/2011 - 17:40

This was my first project. My wife saw it and told me to make it :)

Now I'm hooked
I already bought wood for my next two projects.
You rock Ana !!!!!
Built from Plan(s)
Estimated Cost
100-200
Estimated Time Investment
Weekend Project (10-20 Hours)
Finish Used
Dove white
Recommended Skill Level
Intermediate

Hailey Platform Bed Modified for Recycled Wood and Building in Small Spaces

This was my first building project! The bed is built almost entirely out of found wood. I modified the Hailey Platform Bed plans to suit the dimensions of the wood I had, and my very small work space.

I did most of the building in my living room and my apartment's miniature courtyard, which is much narrower than a bed. Because of this, the bed had to be able to be disassembled until after it was stained. The modified plans use brackets on the corners - even these were found! Most of the wood came from discarded pieces of other beds, found in the yearly big garbage collection. The centre support strut can also be disassembled, and is attached with a joist bracket.

I think the actual assembly and finishing of the bed could be done in a day, even for a beginner like me, but I spent many hours sanding the old finishes off of my found wood so I would have a uniform finish.

Built from Plan(s)
Estimated Cost
20
Estimated Time Investment
Week Long Project (20 Hours or More)
Finish Used
Cabot's Water-Based Stain and Varnish (all-in-one formula) in Sutherland Teak; 2 coats applied with a foam varnish brush.
Recommended Skill Level
Starter Project

Comments

JoanneS

Sun, 06/23/2013 - 06:00

Congratulations on your first build! It looks great! All that sanding you did really paid off -- your finish is so beautiful and smooth! Love the teak color. Great job!

dtherio

Thu, 07/03/2014 - 12:02

I just found this website and plans. I think I am going to build this for my new bed. I like the modifications you made to take it apart.

As I will be building a king sized bed, I will have to be able to take it apart in order to bring it into my room. Thank you for the ideas.

Walnut Slab Coffee Table

Submitted by SaraLodise on Wed, 06/03/2015 - 05:39

Finally happened upon a walnut slab to rejuvenate the top of my coffee table. I loved the wrought iron base, so I wanted to keep it, but the tabletop height needed increased to protect beverages from labrador tail attacks.

I cropped the existing wood top to serve for the base piece, sanded it down and stained it to blend in with the walnut. Four 2.75" wide walnut strips were used to create cubby spaces under the top slab for remotes, controllers, and keyboards.

The top slab was pretty rough, so it required heavy sanding to take finish evenly. I started with 80, 120, 220, and finished with 400, using mineral spirits to raise and knock down the grain. Finished with four coats of Waterlox original.

Estimated Cost
Black Walnut slab ~$299
Waterlox ~$30
Estimated Time Investment
Weekend Project (10-20 Hours)
Finish Used
Four coats of Waterlox Original
Recommended Skill Level
Beginner

Comments

Woven Garden Bench

Submitted by Anonymous (not verified) on Sun, 12/26/2021 - 13:13

I used White Oak, 2 X 2 and 2 X 4 for the frame with 1 X 4 for the seats. This was my first attempt at mortise and tenon joinery (instead of pocket screws) and the woven pieces were held in with dowel pins.

Built from Plan(s)

Comments

Reclaimed Wood Headboard

I built Ana's Reclaimed Wood Headboard.  This was the easiest piece I have built so far!  Very quick!  You can see the steps I took to finish it at our blog http://www.shanty-2-chic.com/2011/04/diy-headboard.html

Estimated Cost
$50
Estimated Time Investment
An Hour or Two (0-2 Hours)
Finish Used
Minwax Dark Walnut Stain and Minwax Polycrylic Gloss
Recommended Skill Level
Starter Project

WALL-MOUNTED WINE RACK

Submitted by crowner123 on Mon, 06/24/2013 - 14:54

This was a rack I helped my dad make so he could give it as a wedding gift. This is an attempt to build from plans that Ana posted here:

http://ana-white.com/2011/11/wall-mounted-wine-rack-dont-forget-erase-y…

We took 2 long long cherry boards with bark still on the sides, and ran them through the planer. Then we ripped them down the center to be able to use bark ends on each side and book-matched the cherry colors, but most people wont have to worry about that since they wont be using "found" cherry.

The back board is made up of four 1x7s cuts at 28.5 inches long. You can use whatever width you want, we just wound up with 7inch pieces. Then we used a Kreg Jig to screw those together flush (see picture of back). Once those 4 pieces were together we sanded the edges down to make the backboard smooth and flush.

The 8 mini shelves were 1x3.5s cut at 10 inches long. The middle and bottom shelves were 1x5s cut at 24.75 inches long. Again, we were using limited wood and had to adjust our measurements to make it work.

We spaced the bottom shelf flush with the bottom of the backboard and then would space 4.5 inches between the top of that and the bottom of the next shelf. Make sure there is still room for your wine bottle to fit between the floating shelves. ALSO, MAKE SURE YOU KEEP THE FLOATING SHELVES ACROSS FROM EACH OTHER LEVEL WITH ONE ANOTHER. You don't want your shelves to look lazily placed.

The way we placed the shelves on backboard was...involved.
- Clamp the shelves in place on the front of the board and trace them with pencil.
- Remove the shelves.
- Marke holes to drill within center of the trace.
- Drill those holes from the front of the board to the back.
- Reclamp the shelves back on and use the holes in the board to mark the clamped on shelves from the back.
- Unclamp the shelves and fully drill the shelves by themselves while they were not attached. (BE CAREFUL TO DRILL STRAIGHT and never come through the top or bottom of the shelf)
- Sand off your pencil marks after your drilling.
- Re-clamp the shelves to the backboard.
- Use 3" screws straight from the back into the shelves.
- Use 8 screws per big shelf and 3 screws per little shelf.

Then it was just slow and steadily clamping, tracing, drilling, re-clamping, drilling, sanding, re-clamping, and screwing the shelves on... You have to follow that pattern for each shelf or you risk ruining your shelf and if you have limited wood (like we did) that is not an option.

We also put very small pieces of wood to keep the bottles from rolling off their shelves. These were just scraps we had lying around and tapped them in with small finishing nails.

Good luck!

Estimated Cost
$50
Estimated Time Investment
Weekend Project (10-20 Hours)
Finish Used
These photos were taken pre-finish. That is just how beautiful the cherry looks! We will be spraying on a high gloss clear finish and we'll be done.
Recommended Skill Level
Intermediate