Community Brag Posts
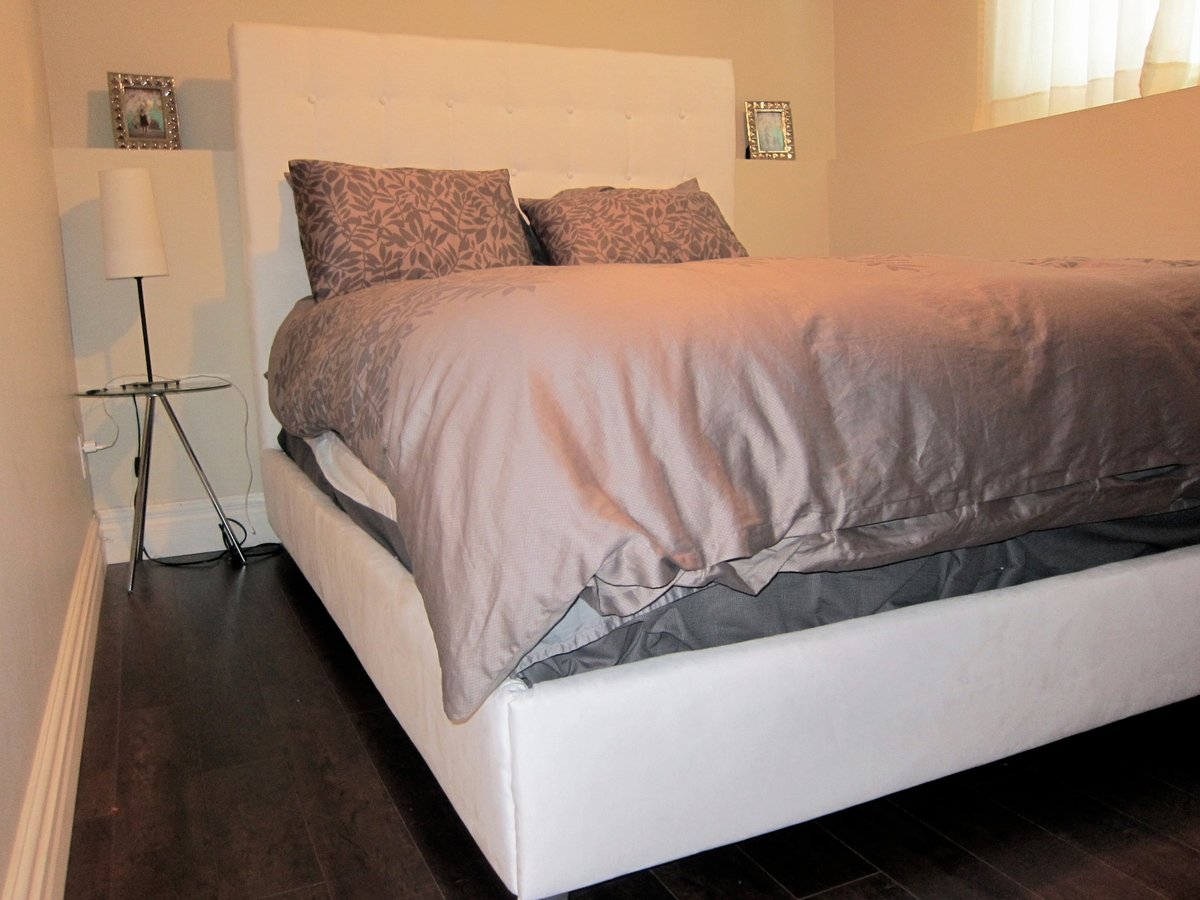
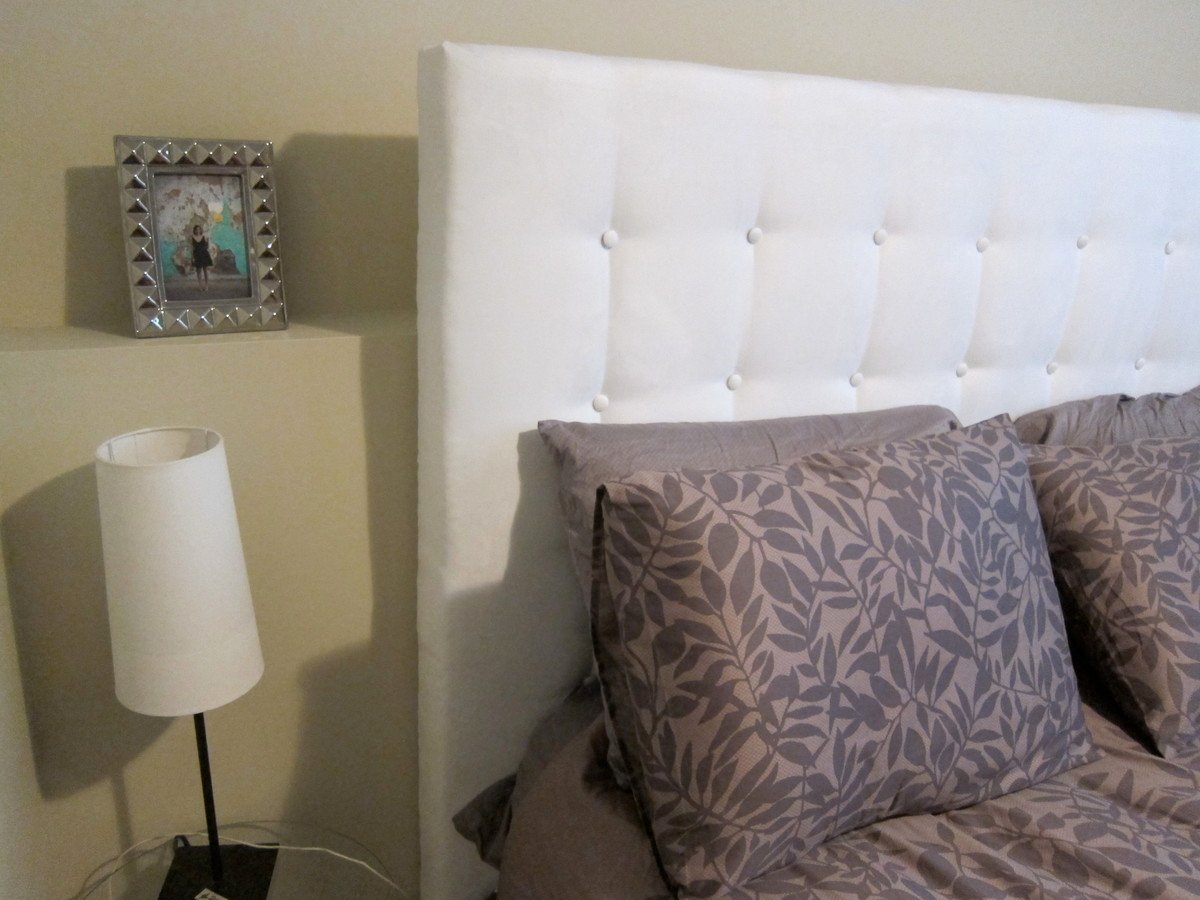
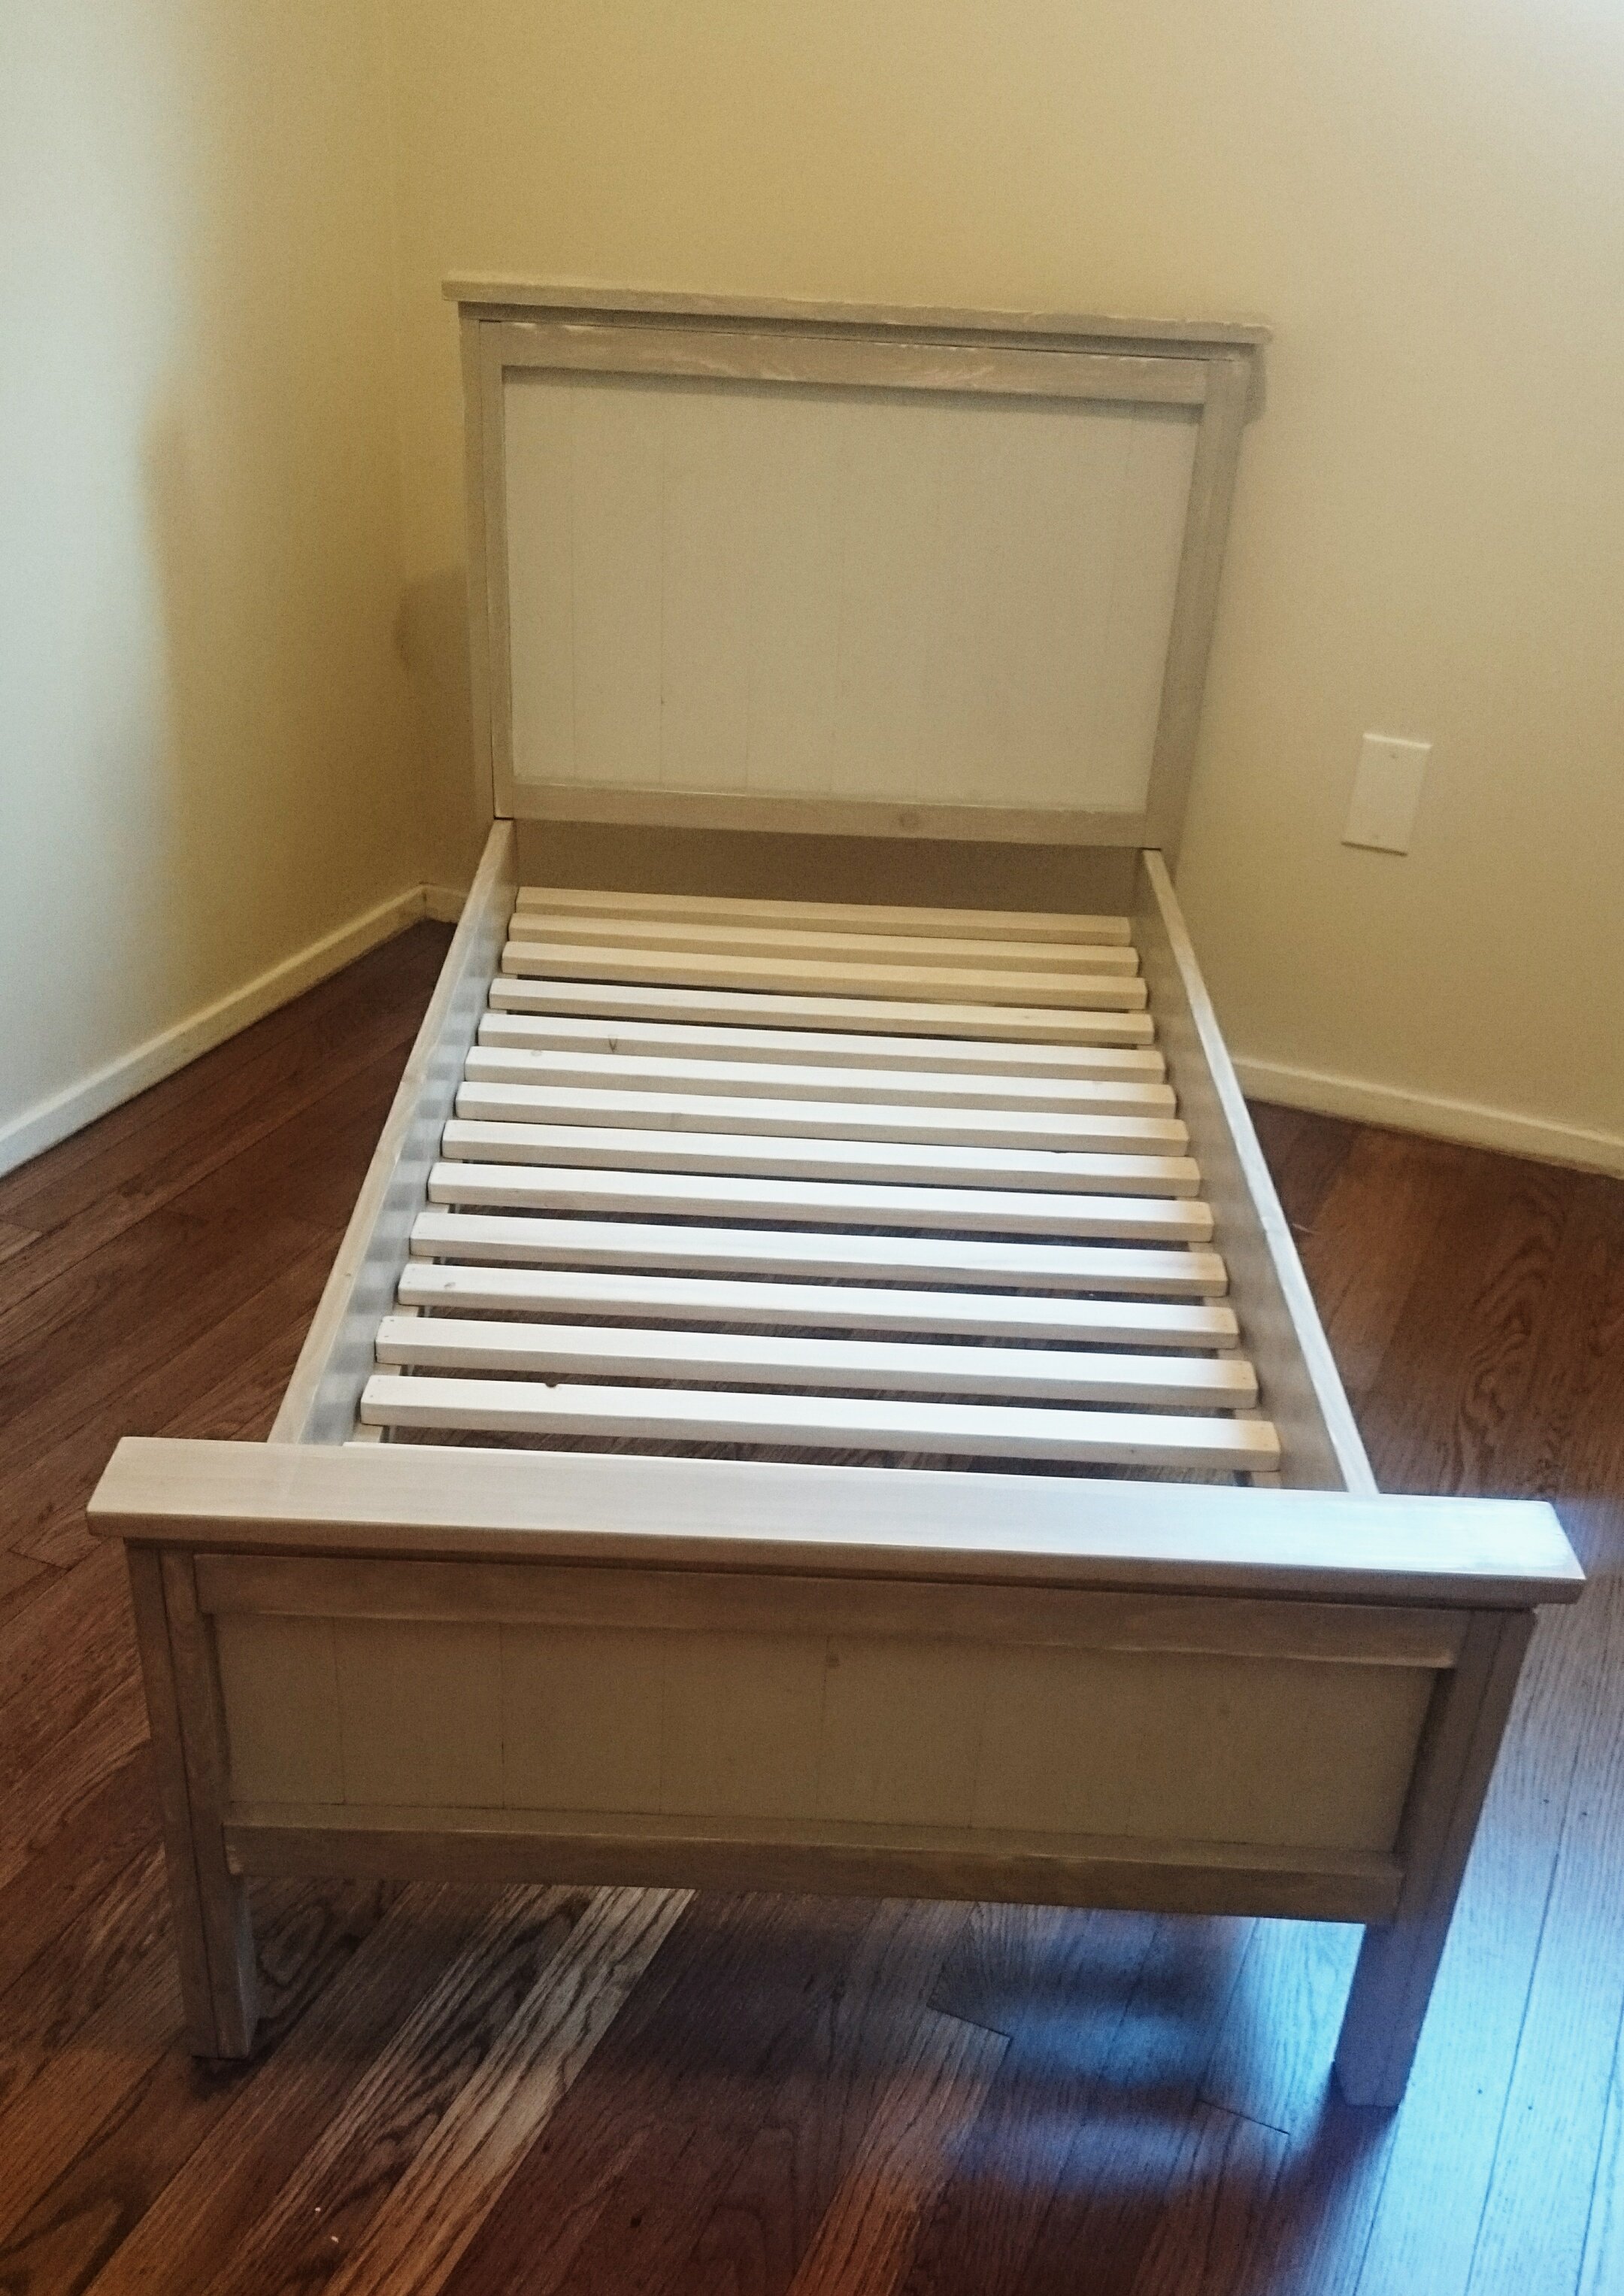
DIY Upholstered Bed

This is my first big build. I did make a small twin sized headboard a few years ago. But this time we built the entire bed frame along with the headboard. It took a loooong time but was totally worth it!

Built from Plan(s)
Estimated Cost
$350 - $400
Estimated Time Investment
Week Long Project (20 Hours or More)
Finish Used
fabric + batting + foam:)
Recommended Skill Level
Beginner
Comments

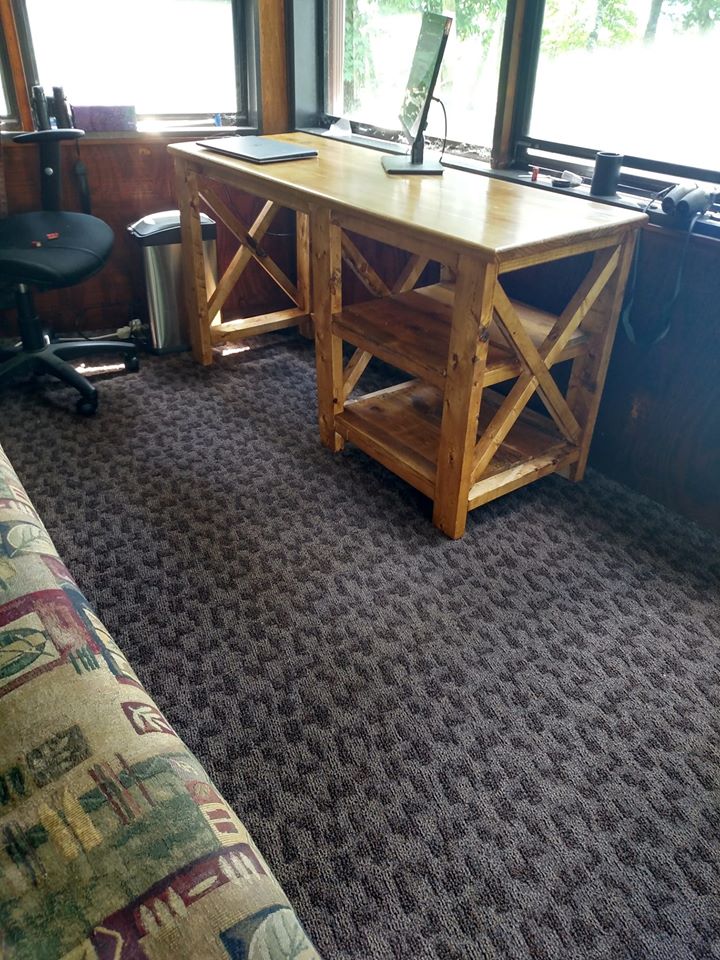
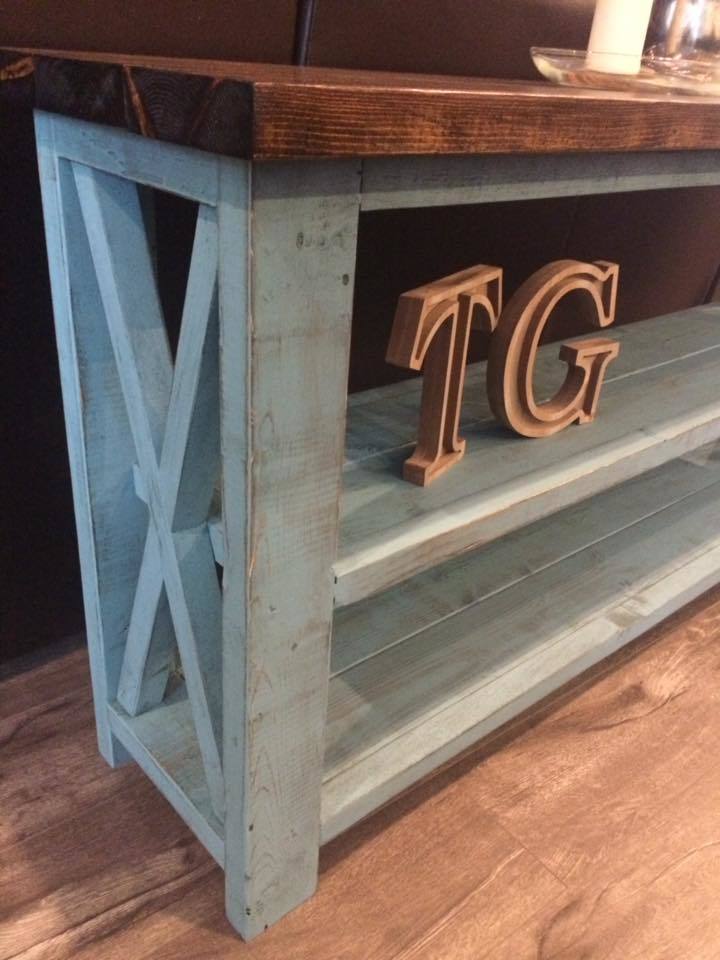
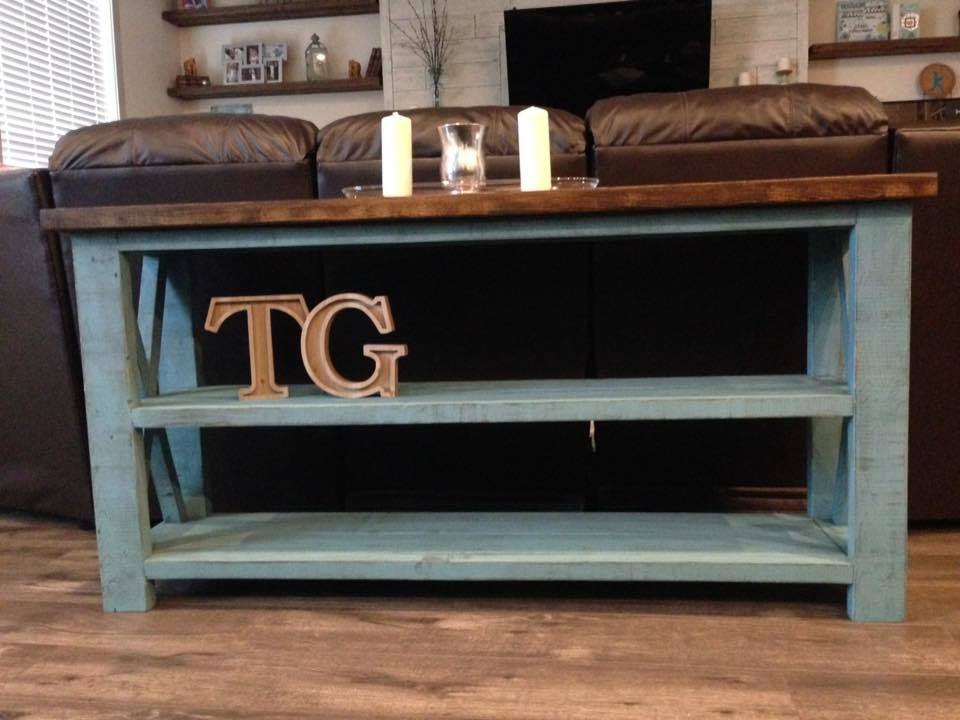
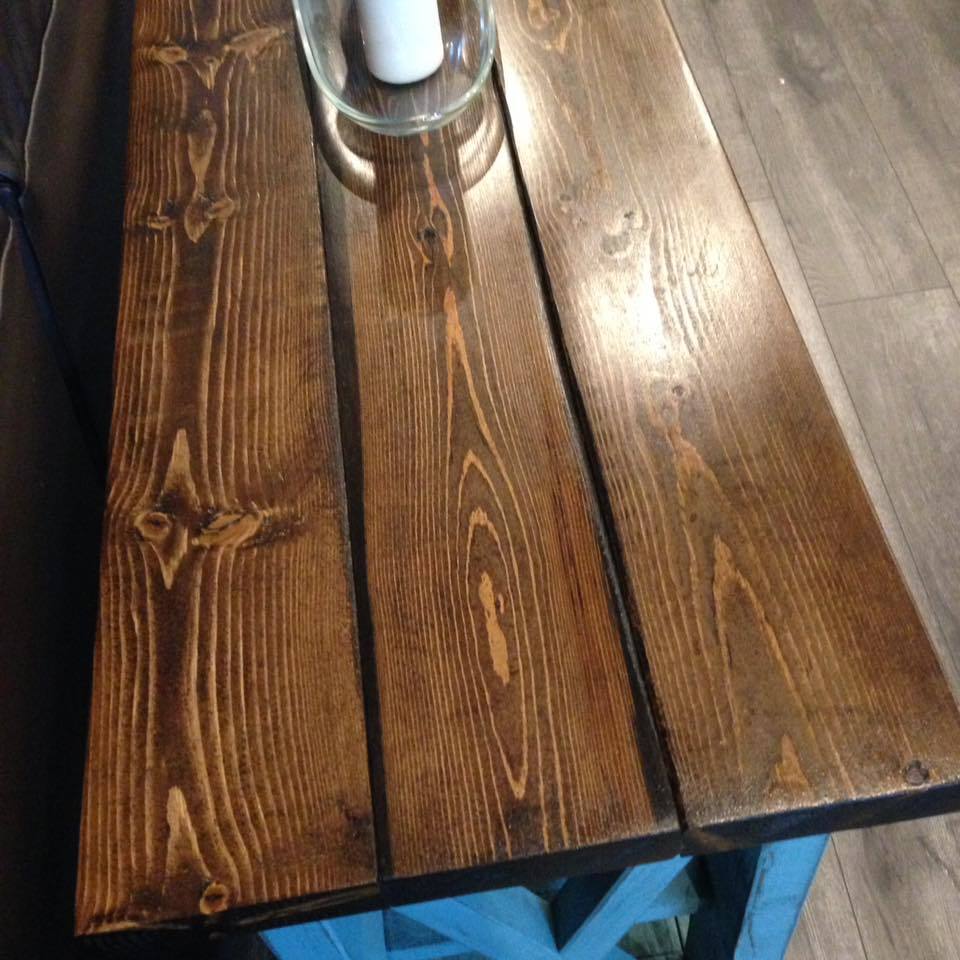
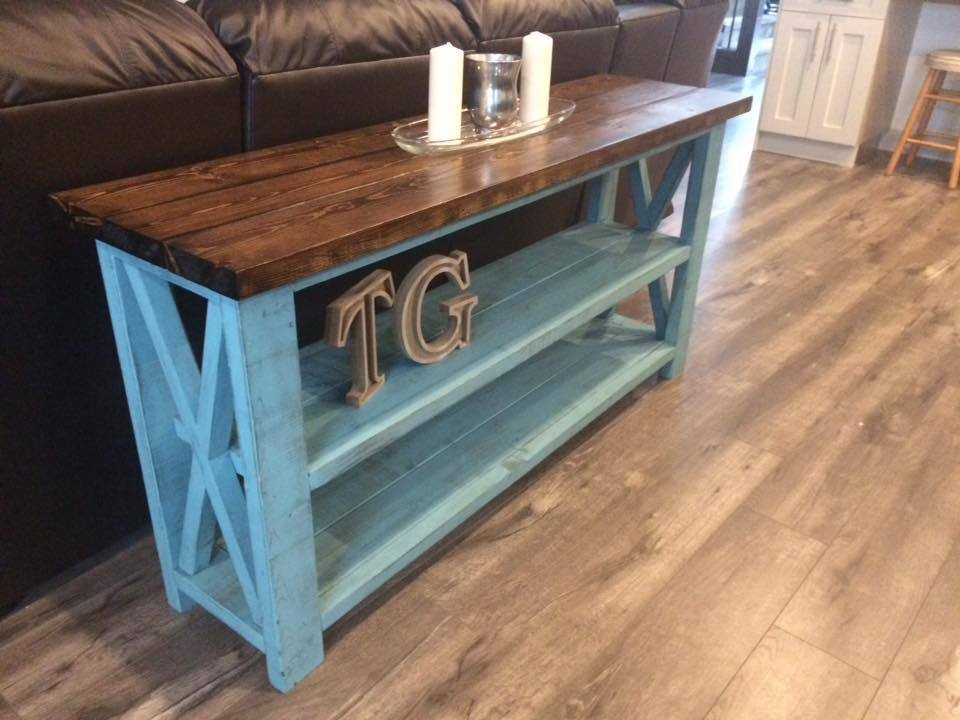
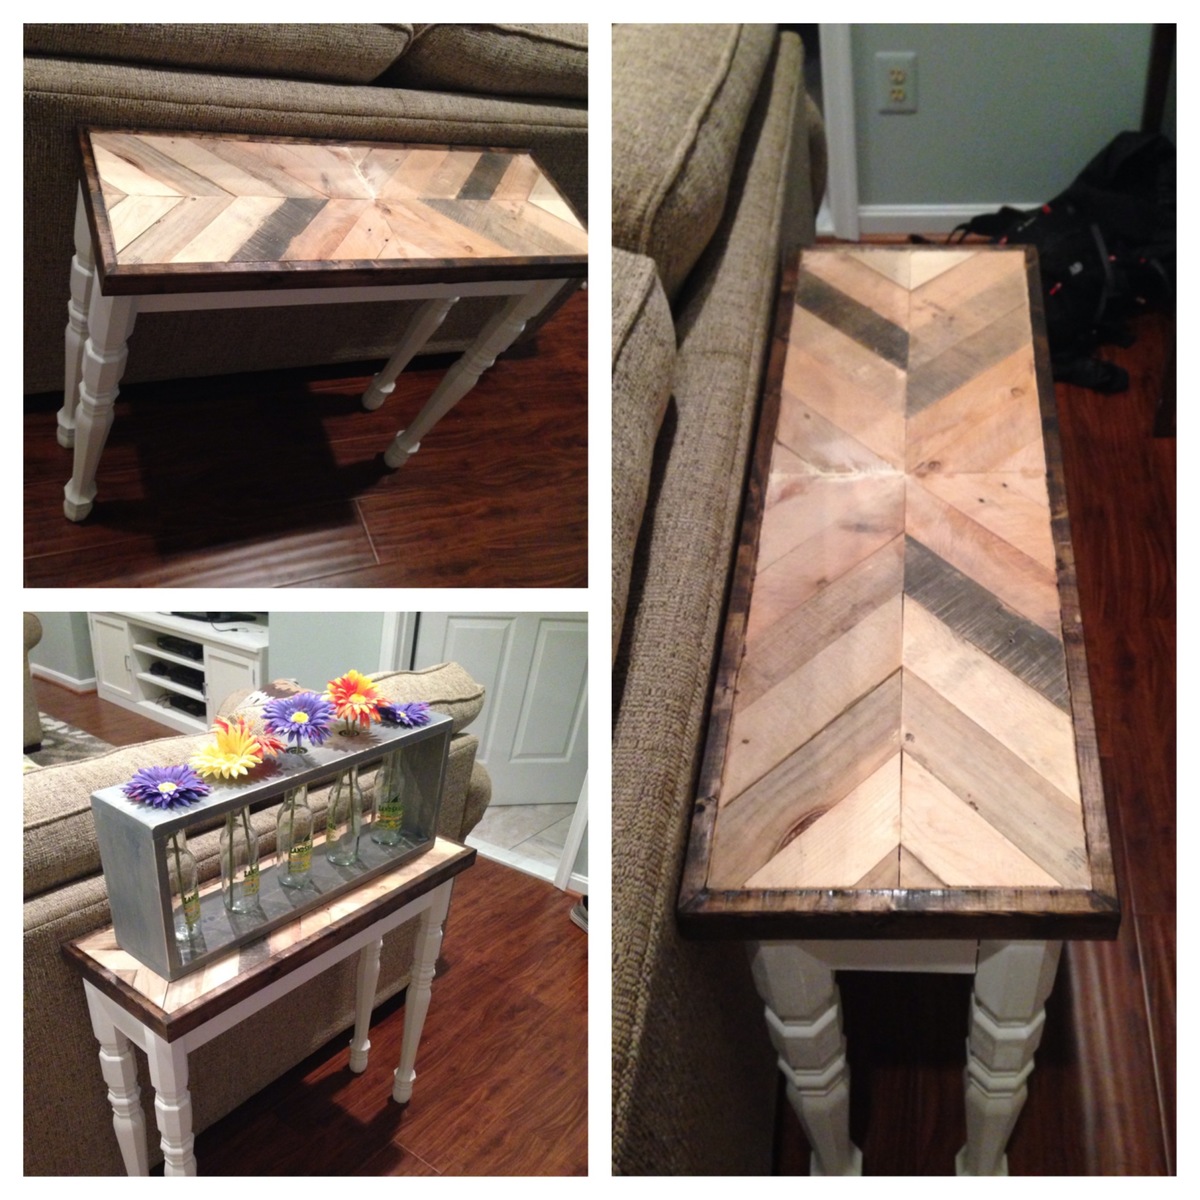
Rustic X Sofa Table
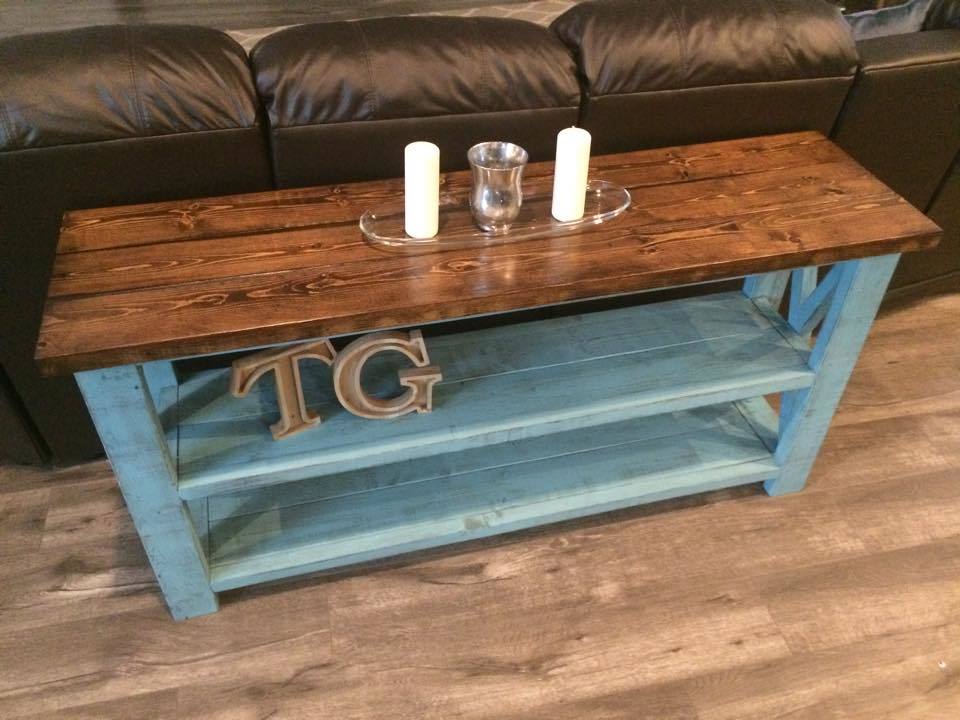
Slightly Modified from the Console table plan, but 2 toned Rustic X Console or Sofa Table with colored distressed finish
Built from Plan(s)
Estimated Cost
$60
Estimated Time Investment
Day Project (6-9 Hours)
Recommended Skill Level
Beginner
DIY Indoor Beverage Station
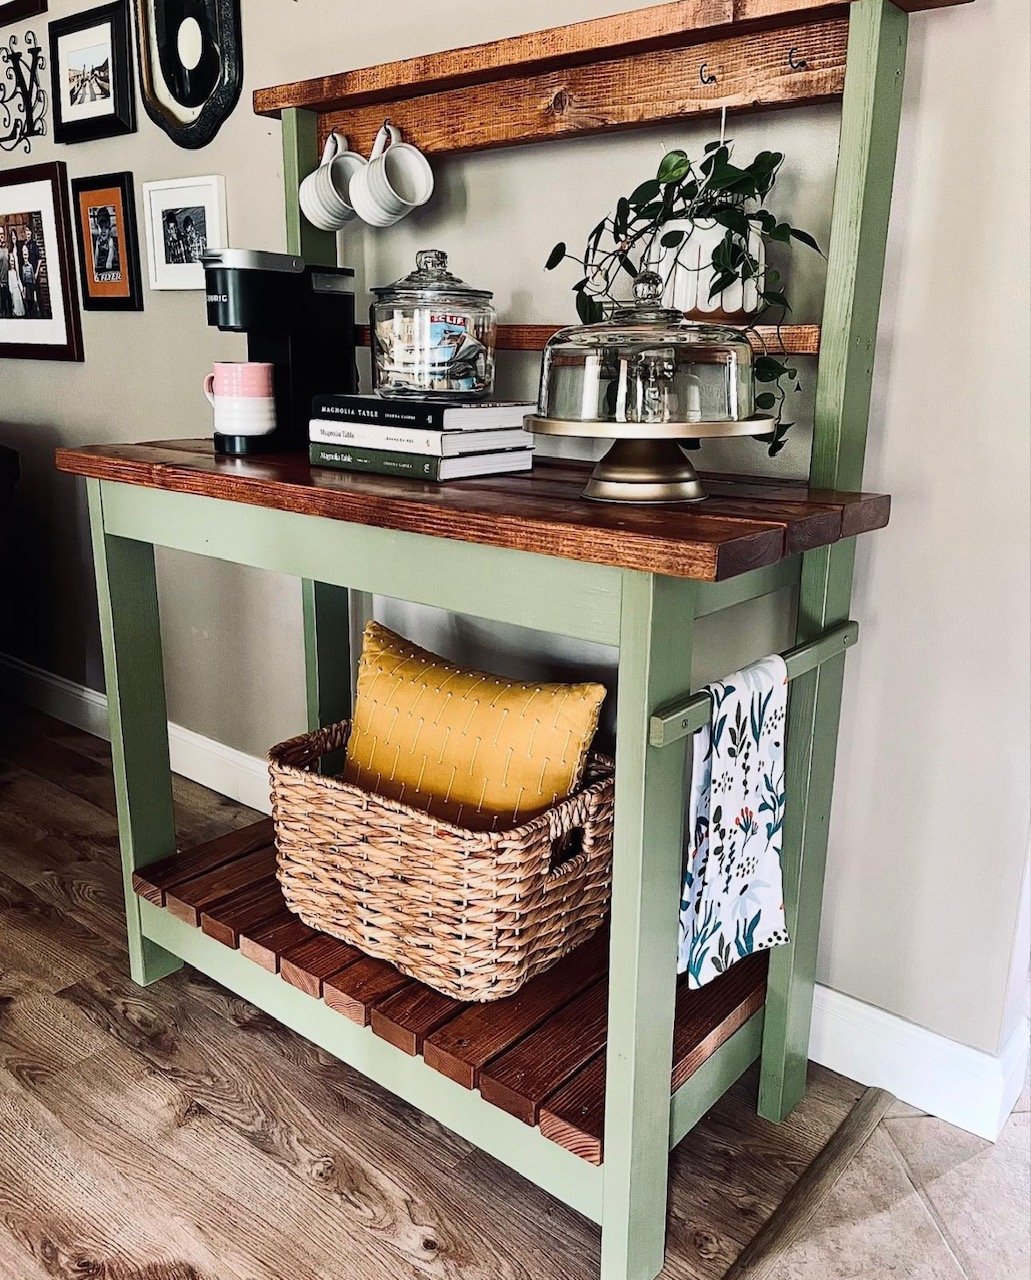
Beverage Station using the Farmhouse Potting Bench Plans by raising4kingsdesign on Instagram
Built from Plan(s)
Rocking moses basket stand
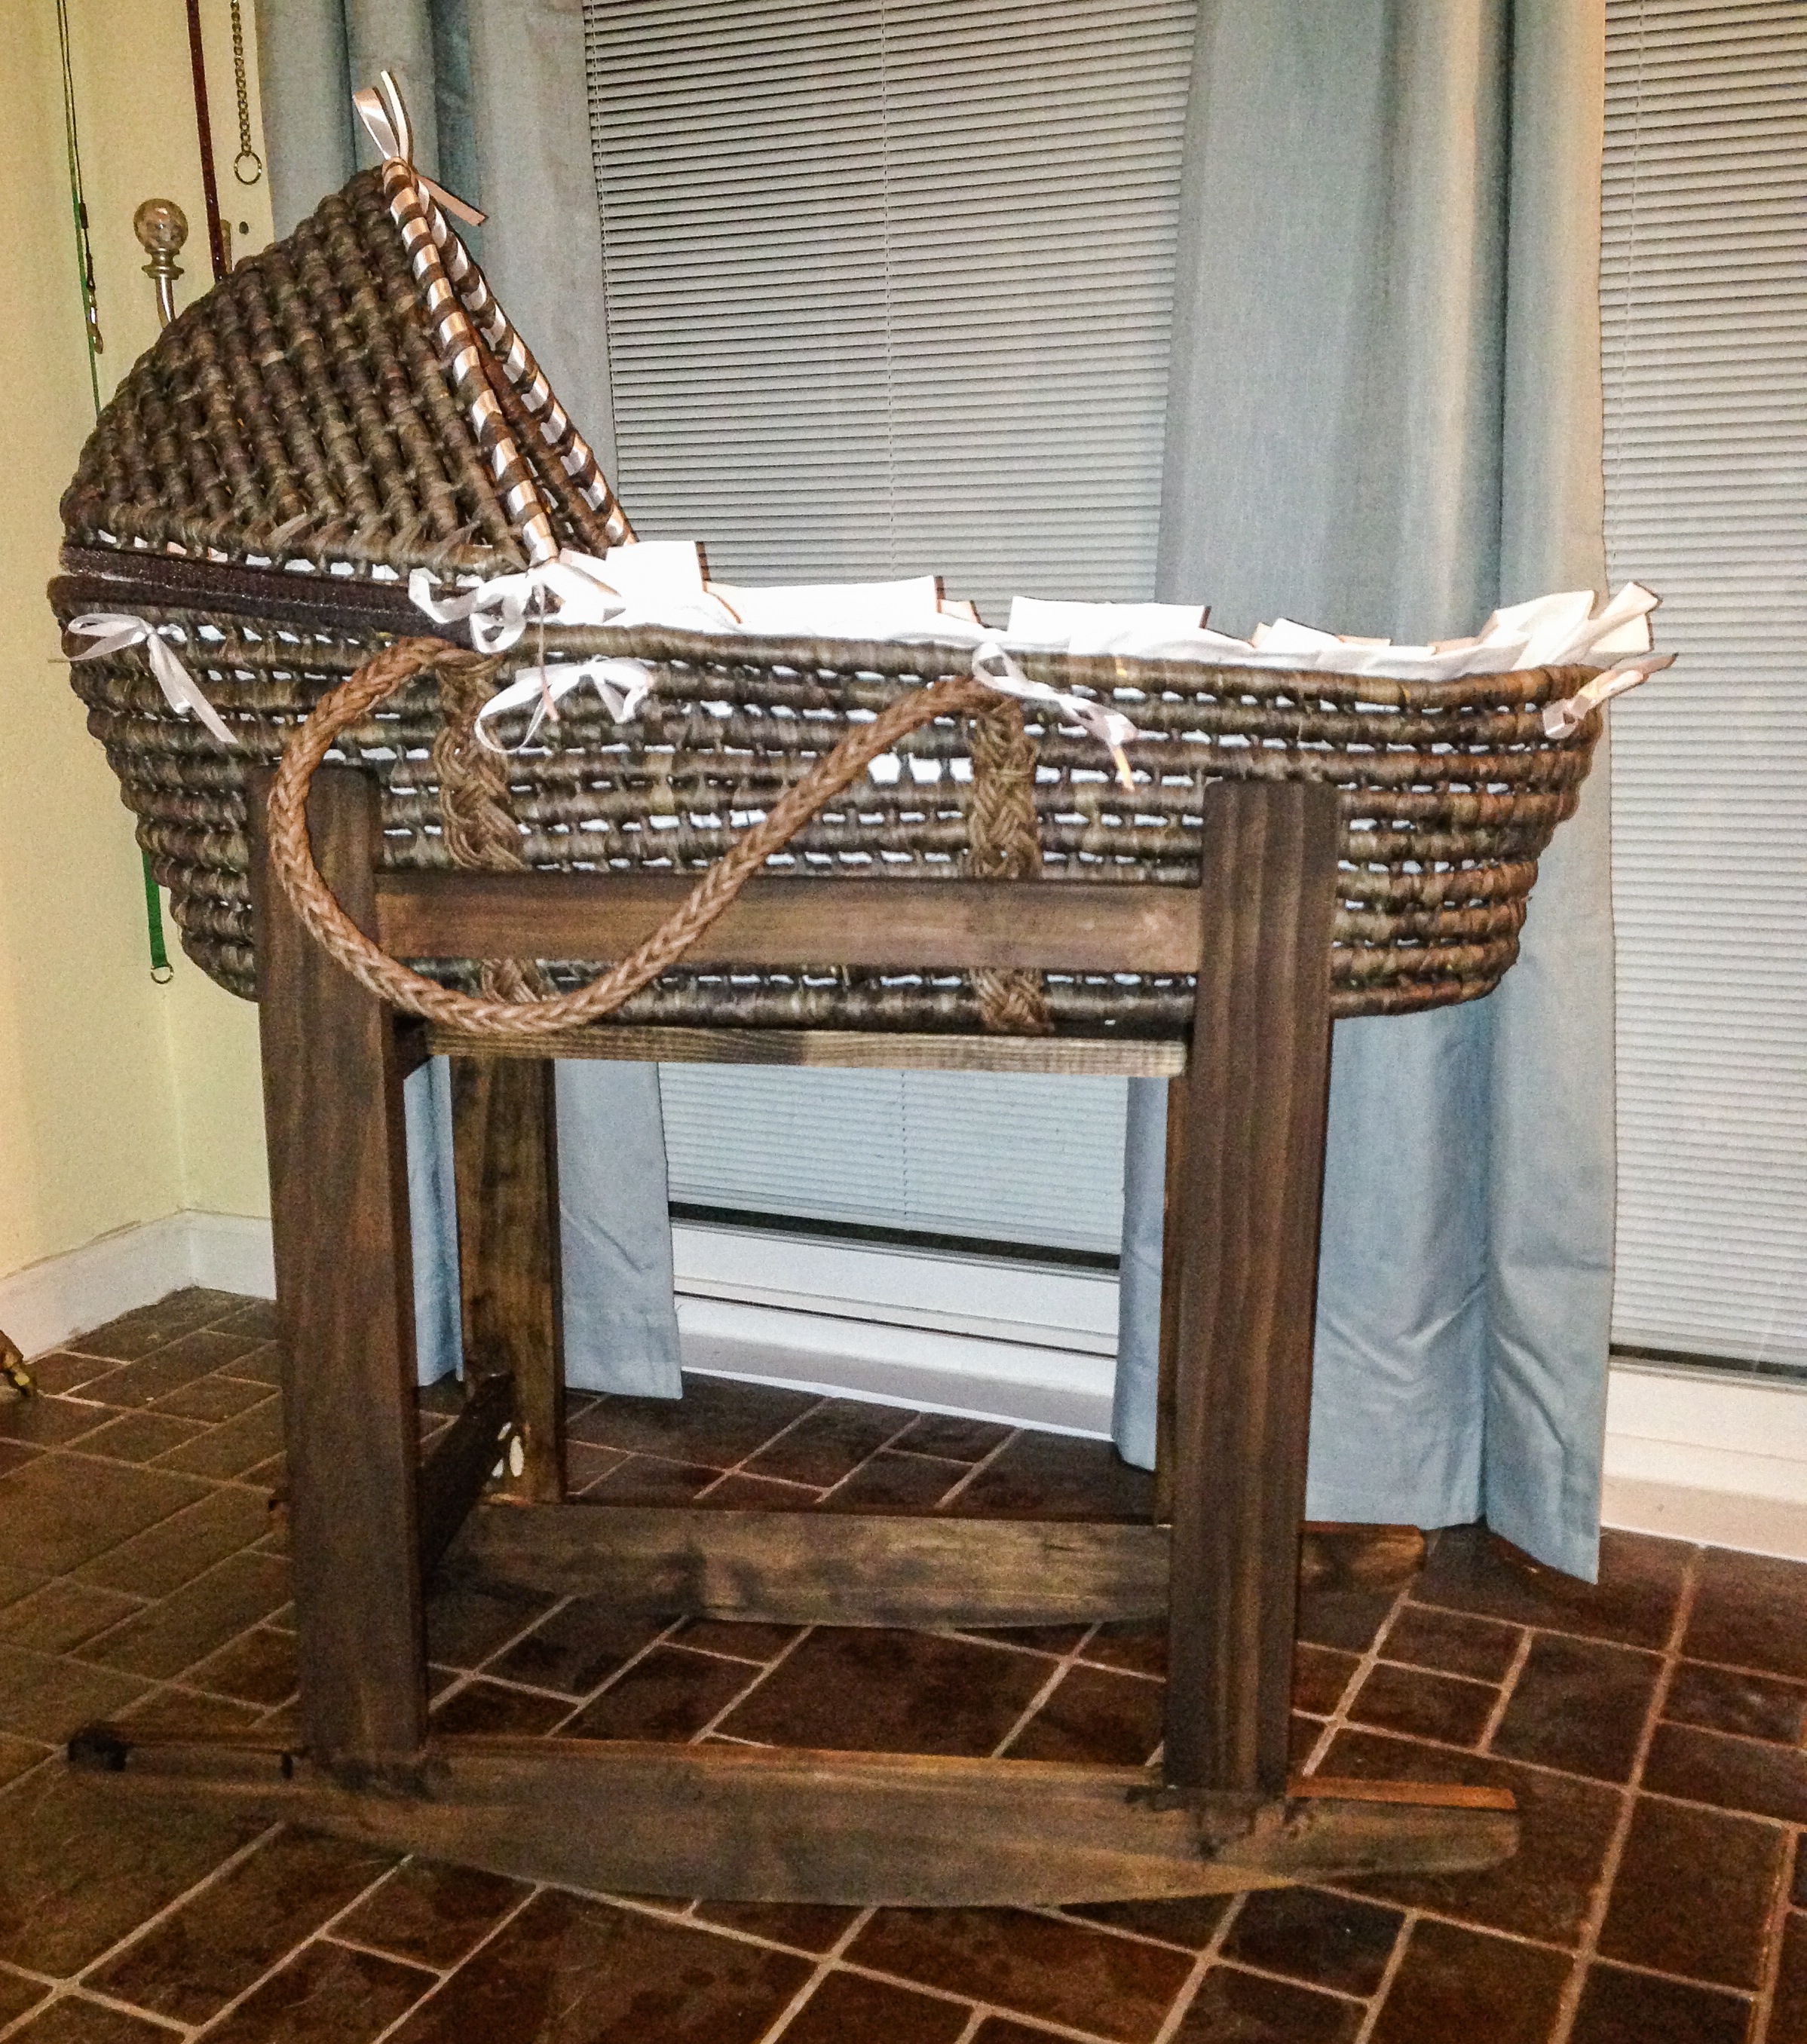
This is the third project I've built from Ana's blog, and my husband and I just LOVE it!!It was very easy to build, even six-months pregnant. I lucked out in that I had everything I needed for this project on hand with the exception of one 1x3 (and the basket, of course), making it a super affordable and much nicer-looking alternative to purchasing a portable bassinet.
I used pine for this build. The only modification I made to Ana's original plan were the rockers. I couldn't find the pattern for her rockers, so I took a rocking chair we had, laid it on it's side and traced its rockers onto a large piece of craft paper. I just used the sander to round off the corners on the top so that the legs would be easy to attach.
I built this in an evening and my husband was able to stain it that night as well. (He's not great with stain, so I had to clean it up a bit after this picture was taken and before the poly was put on.) Had I started earlier in the day, this would have easily been a one-day project including our trip to the store for the 1x3.
Estimated Cost
$7 (Plus $30 for the basket)
Estimated Time Investment
Afternoon Project (3-6 Hours)
Finish Used
Minwax stain in kona
Recommended Skill Level
Intermediate
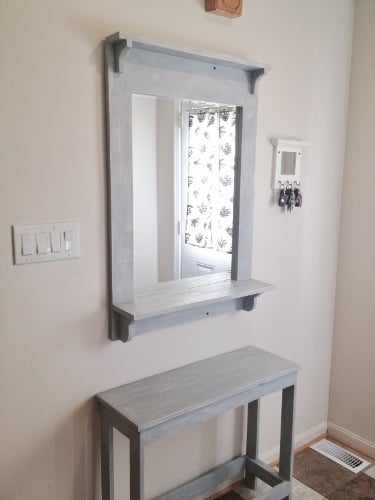
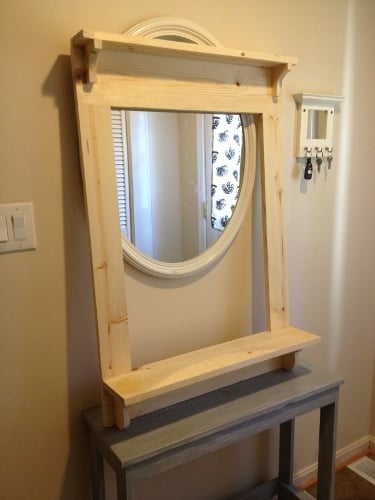
Our Beautiful Wall Tree
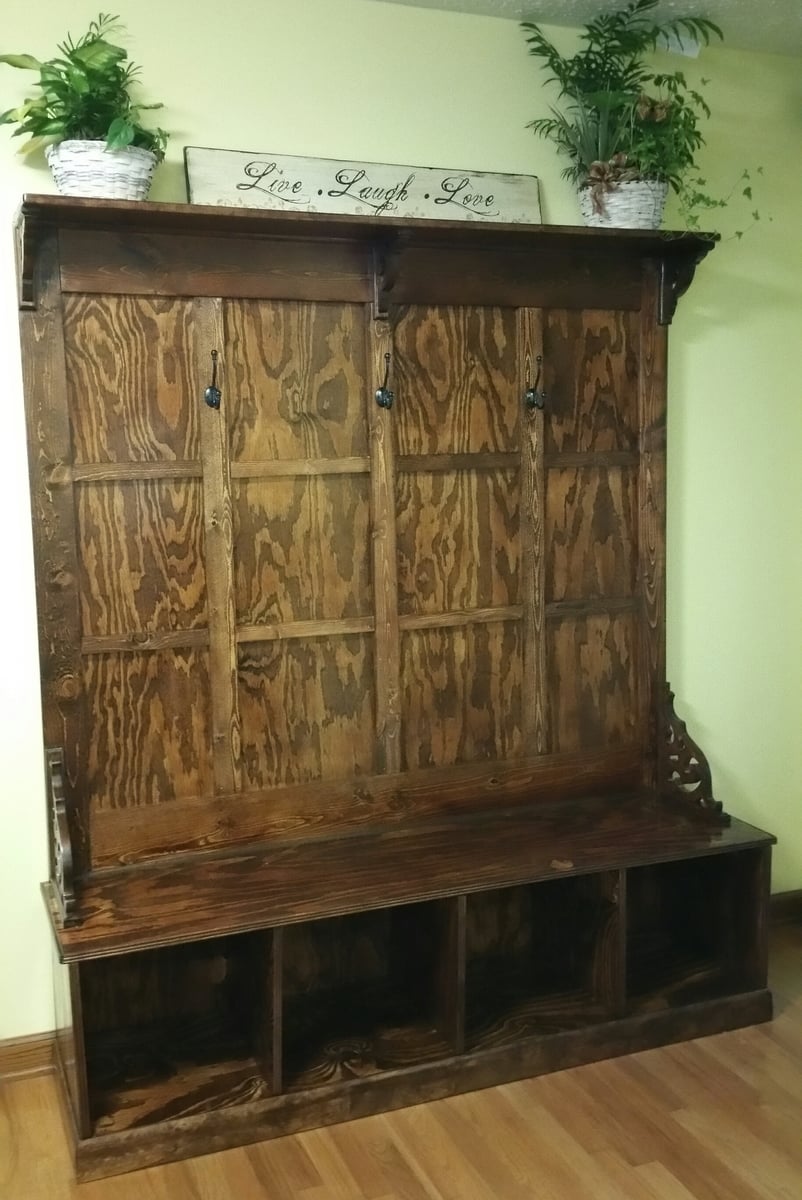
My husband and I did this as a weekend project. We had been looking for a bench like this for quite some time but they were either cheaply made or way too expensive. My husband went through the plans and decided he could do it. We added a shelf to it and also made it larger to fit the area we were putting it in. The great thing about the plans is that you are able to easily modify them to create what you are looking for.
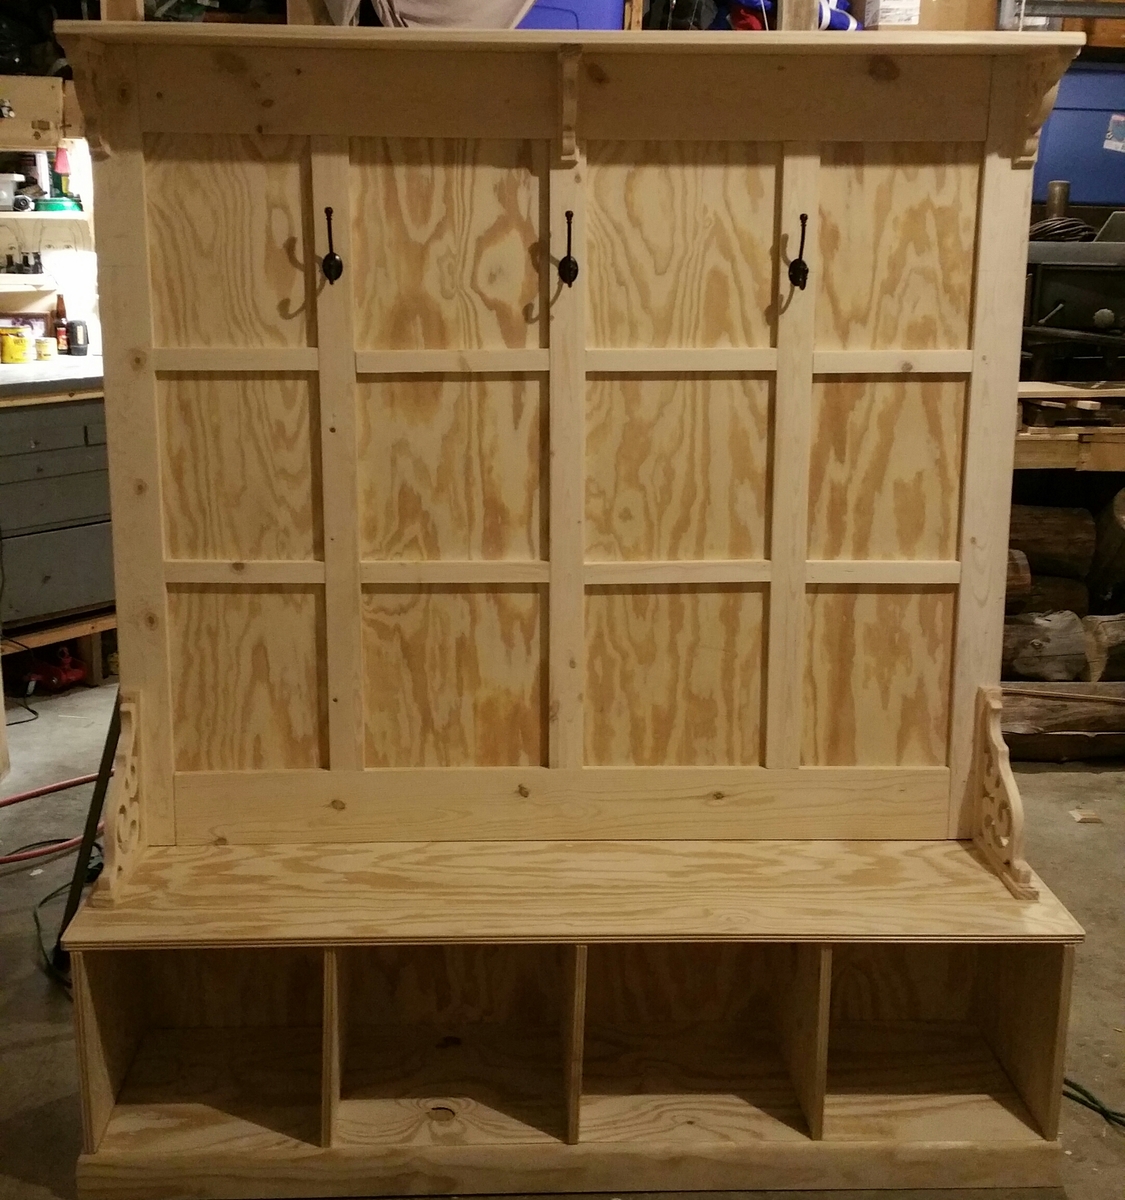
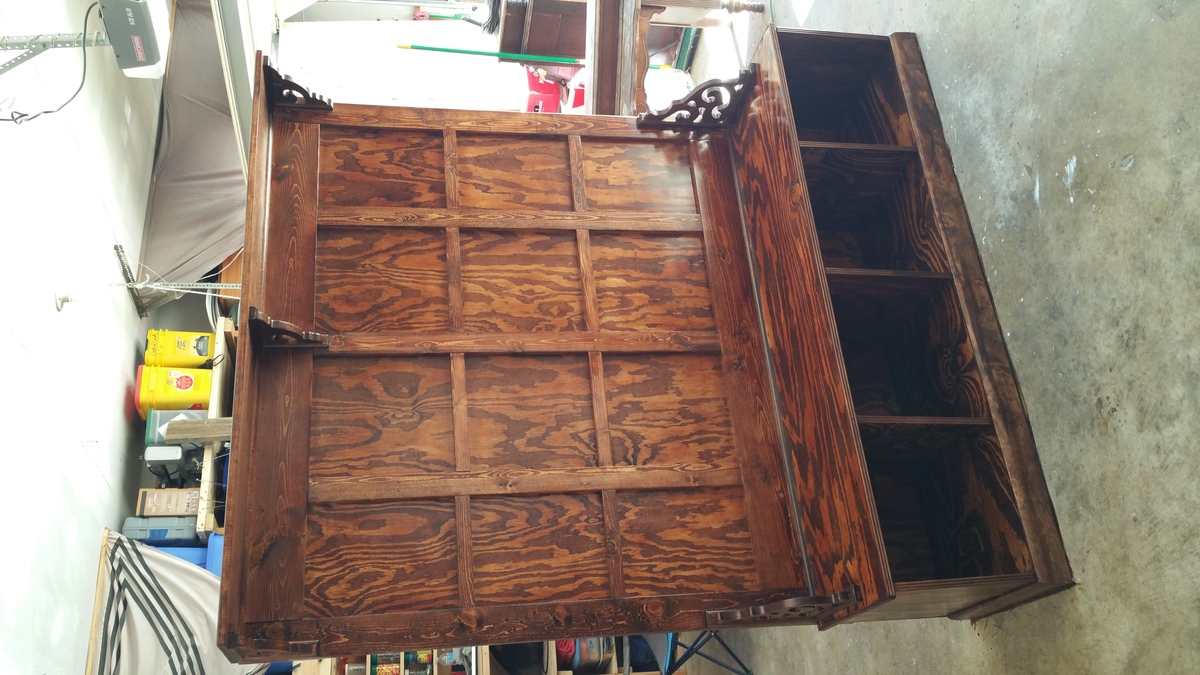
Estimated Cost
$250
Estimated Time Investment
Weekend Project (10-20 Hours)
Finish Used
We did a mix of 1:1 stains that we had on had then used a satin clear finish.
Recommended Skill Level
Intermediate
Live-Edge Cedar Chair
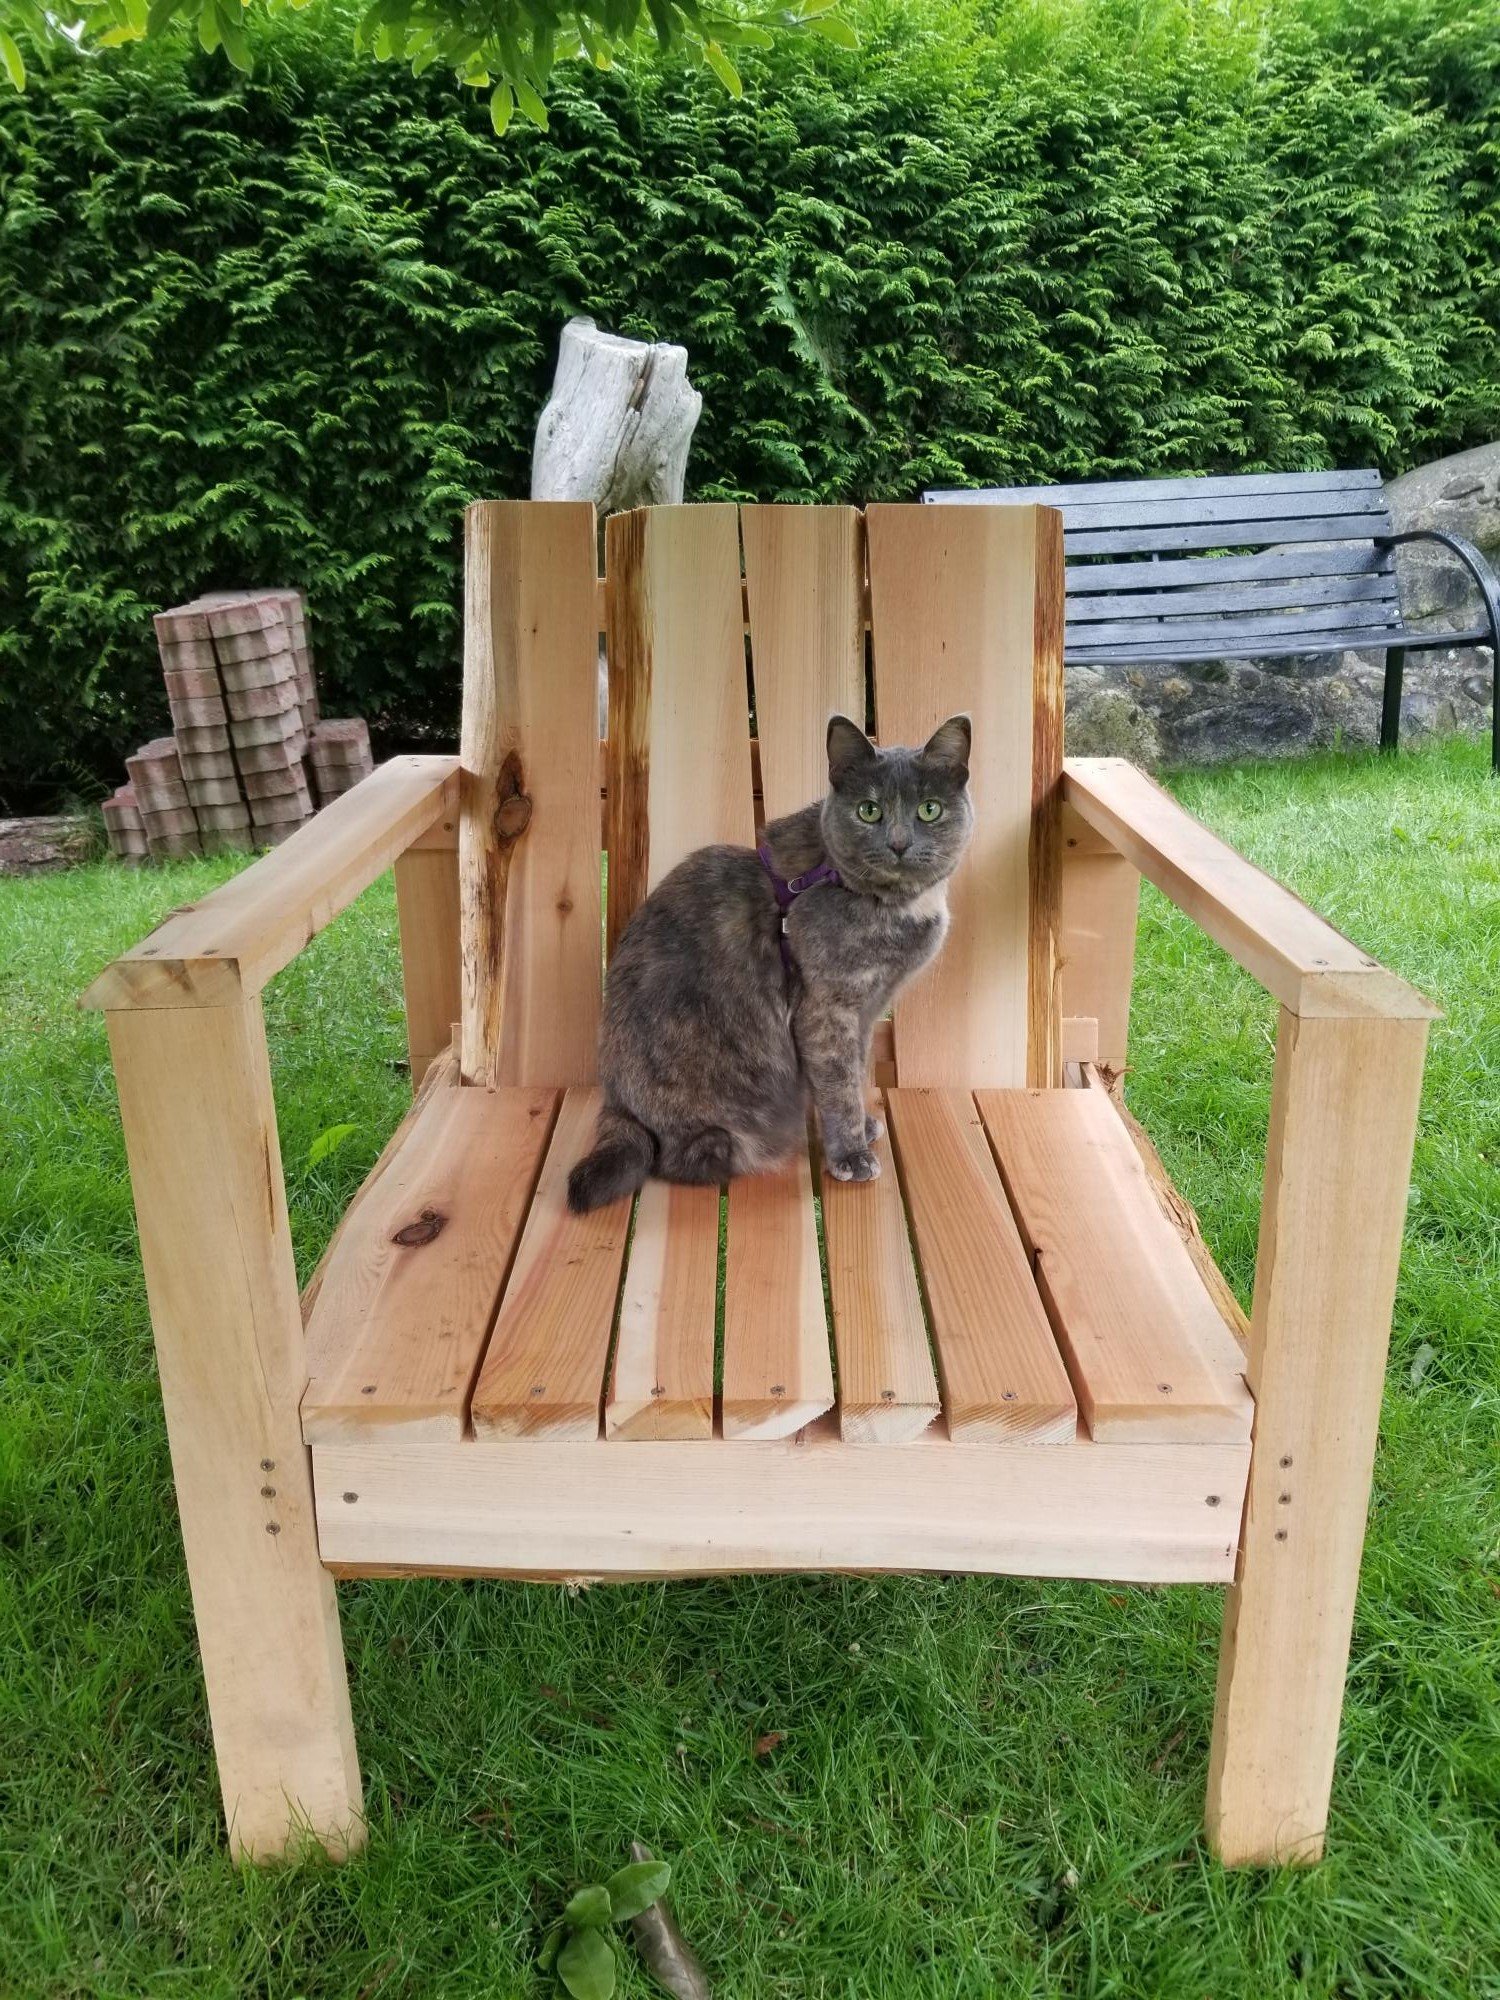
This chair came together beautifully and is really an impressive piece. I managed to finish it in about 8 hours start to finish. I used the "original plans" that are linked in the description in order to avoid pocket holes (which are out of my skill range for now). In step 2, there is an option to place the back support on the inside of the legs instead of the outside for lesser of an incline. I followed this and would strongly recommend it. The chair is sturdy, wide, and comfortable even without a cushion. Thank you for the detailed plans!
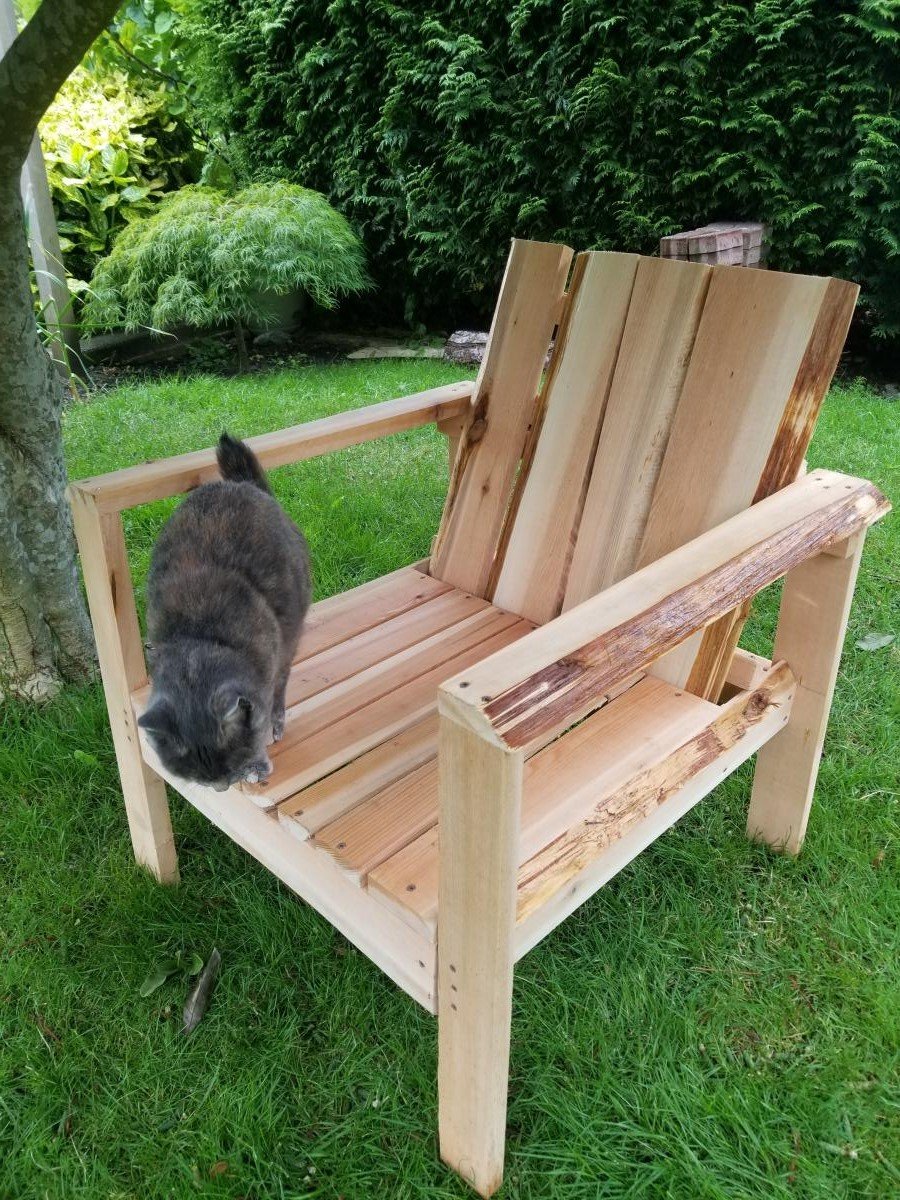
Built from Plan(s)
Estimated Cost
<$5 - cedar is off-cuts from a mill
Estimated Time Investment
Day Project (6-9 Hours)
Finish Used
None yet
Recommended Skill Level
Beginner
DIY Cedar Box Planter with Rope Handles
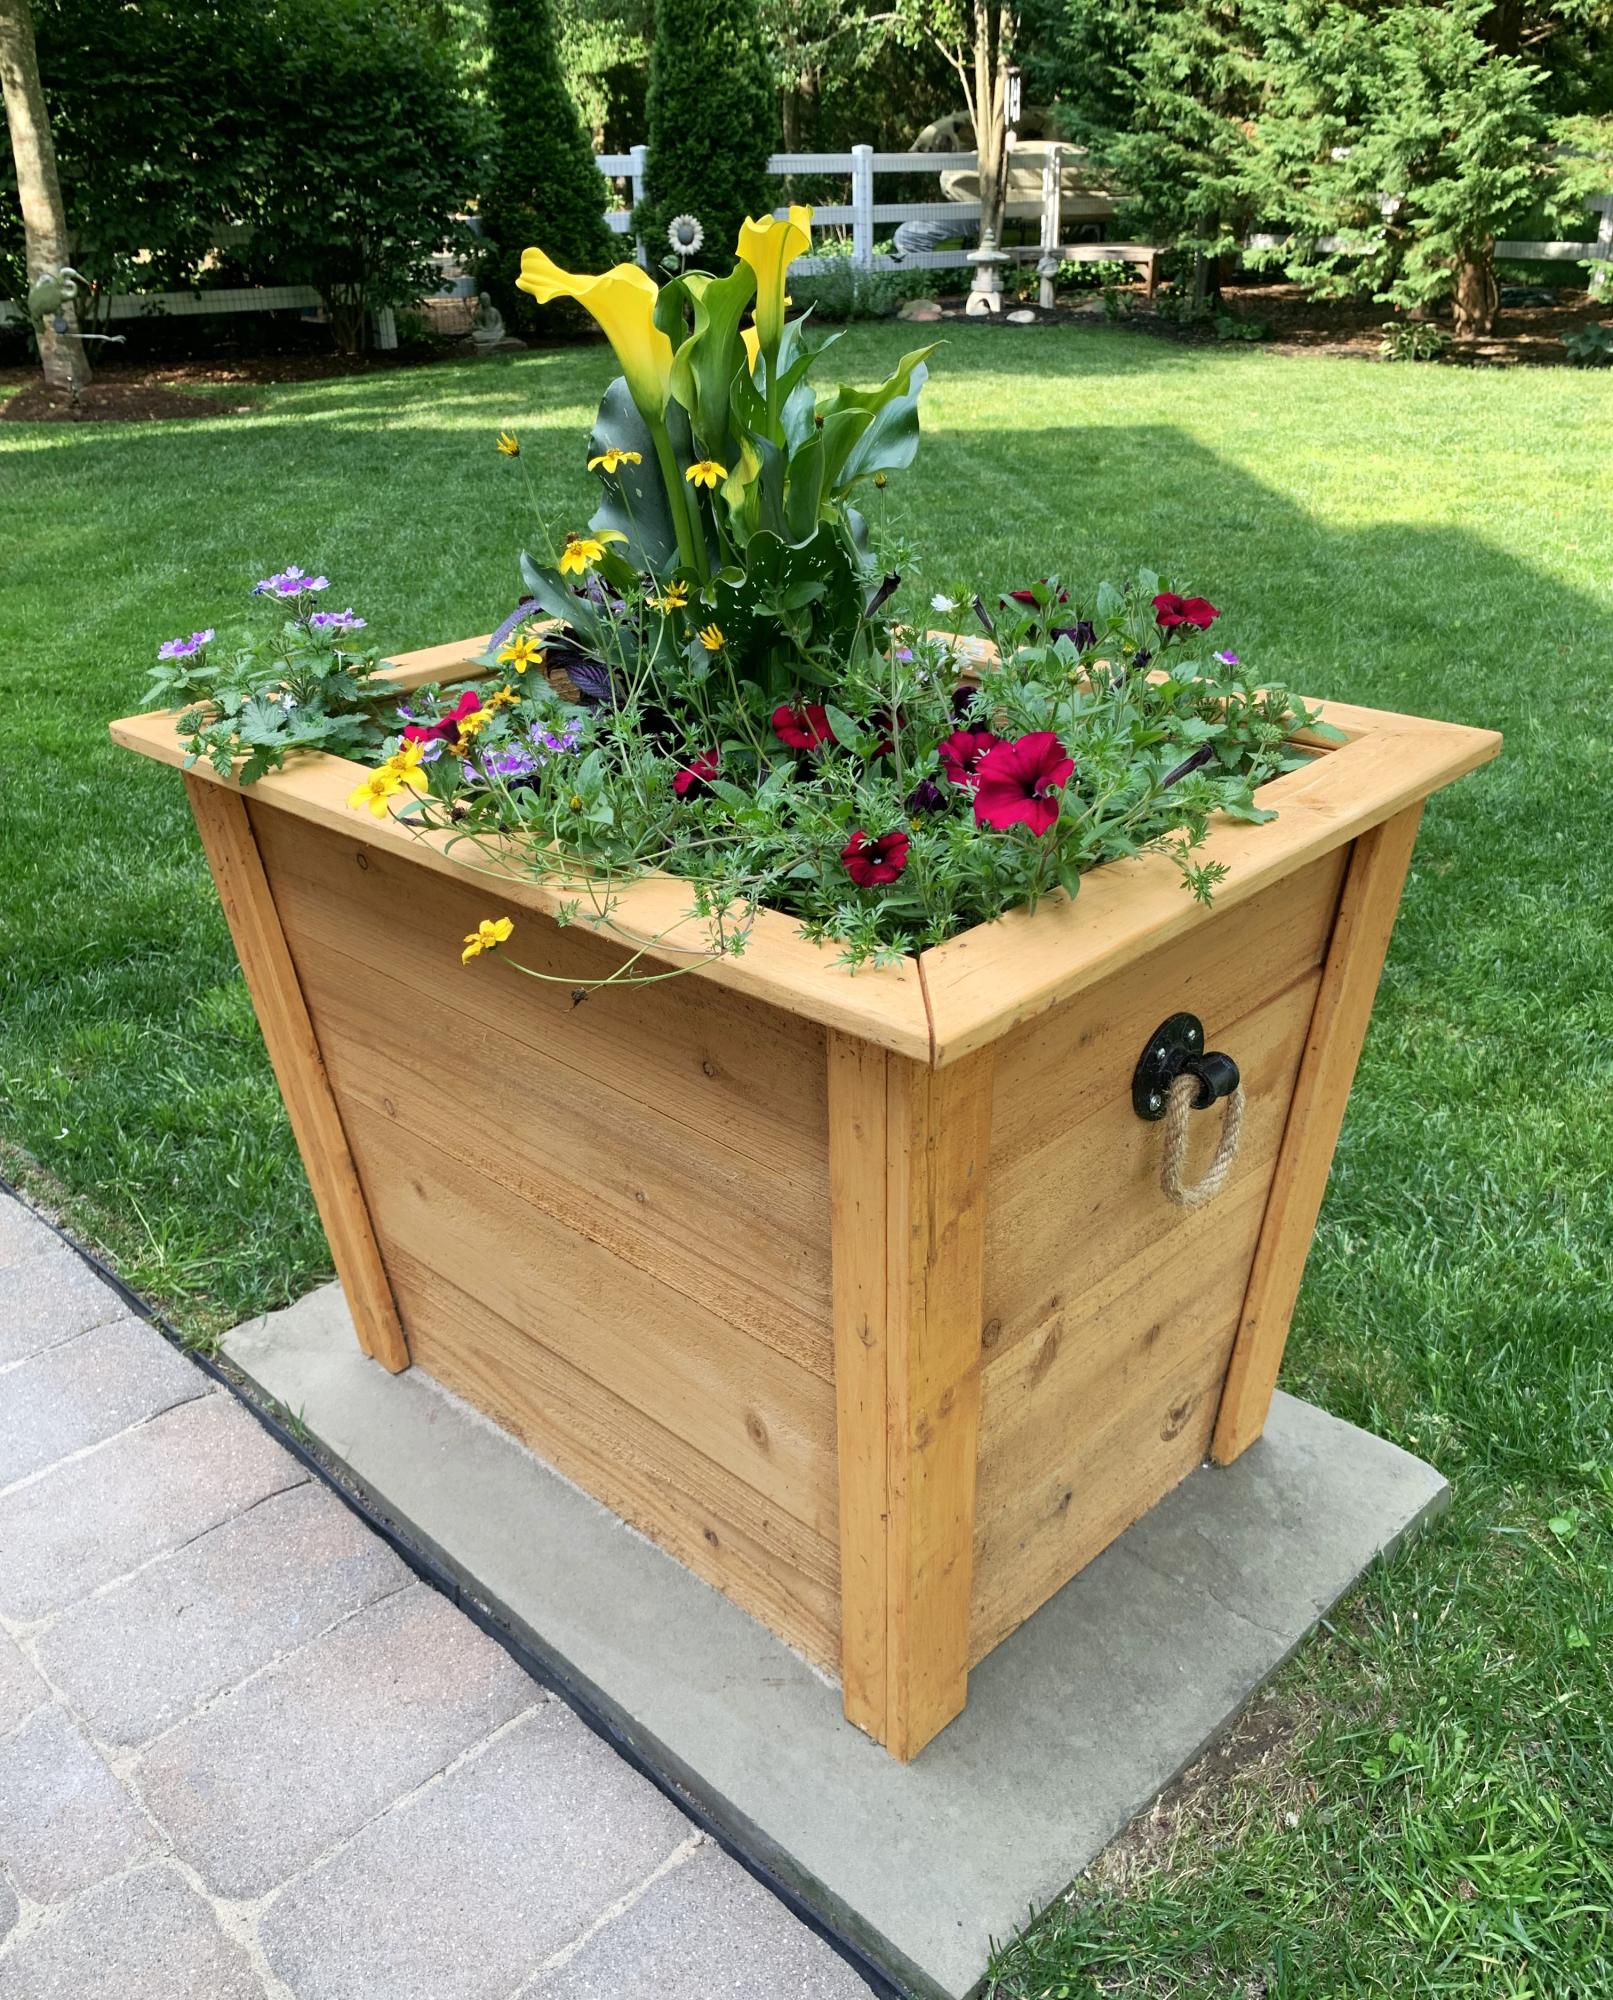
Loved the plan for this planters.
Audrey Noble
Built from Plan(s)
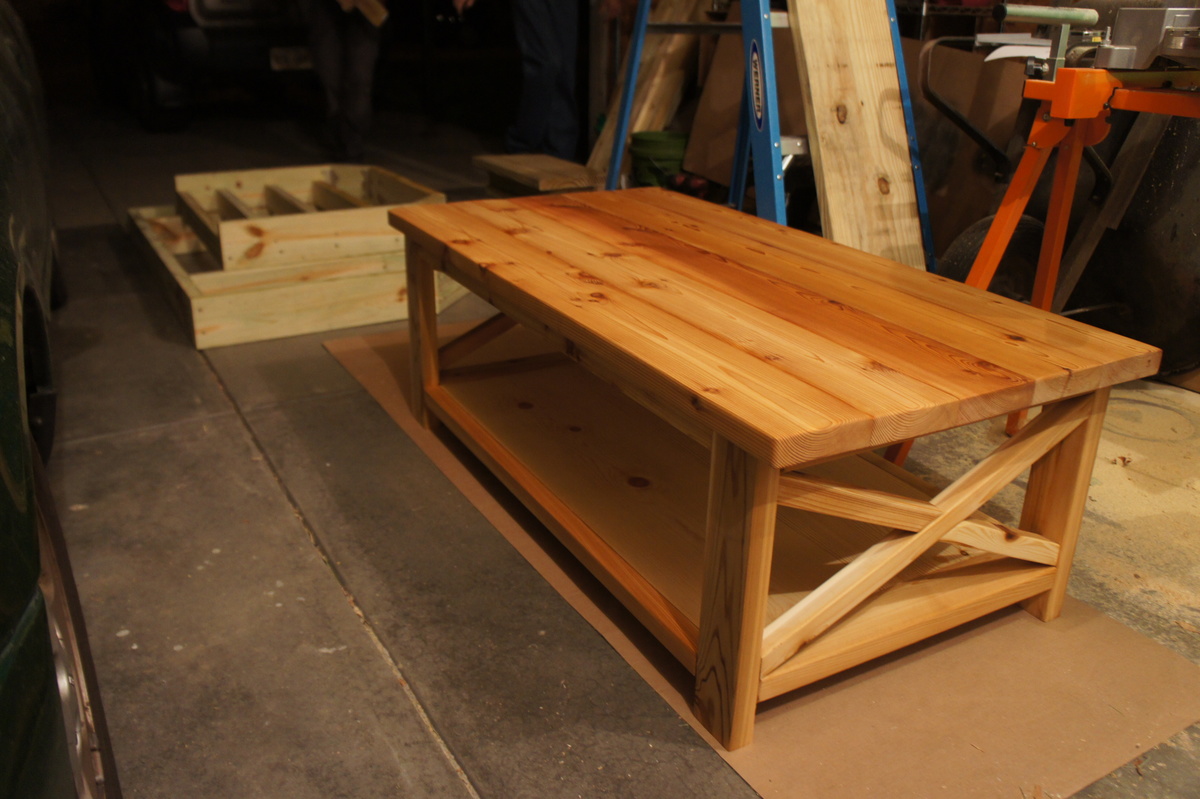
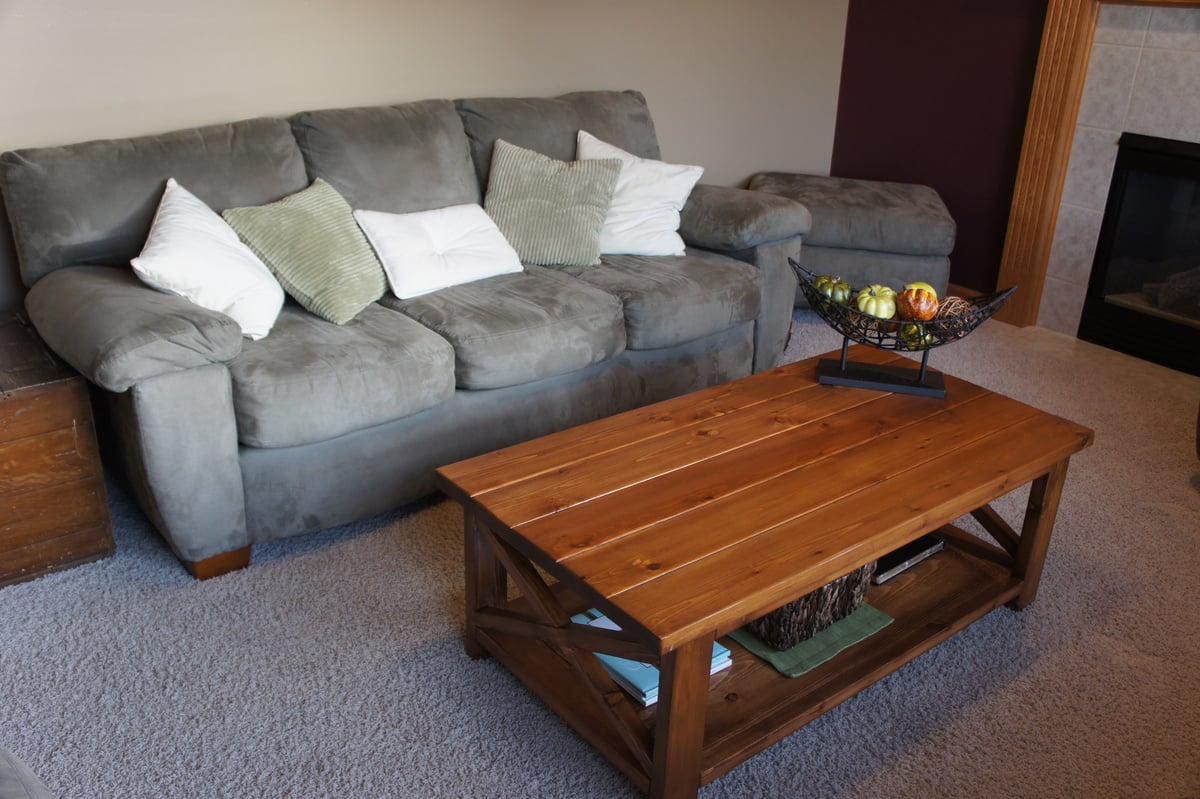
X Coffee Table
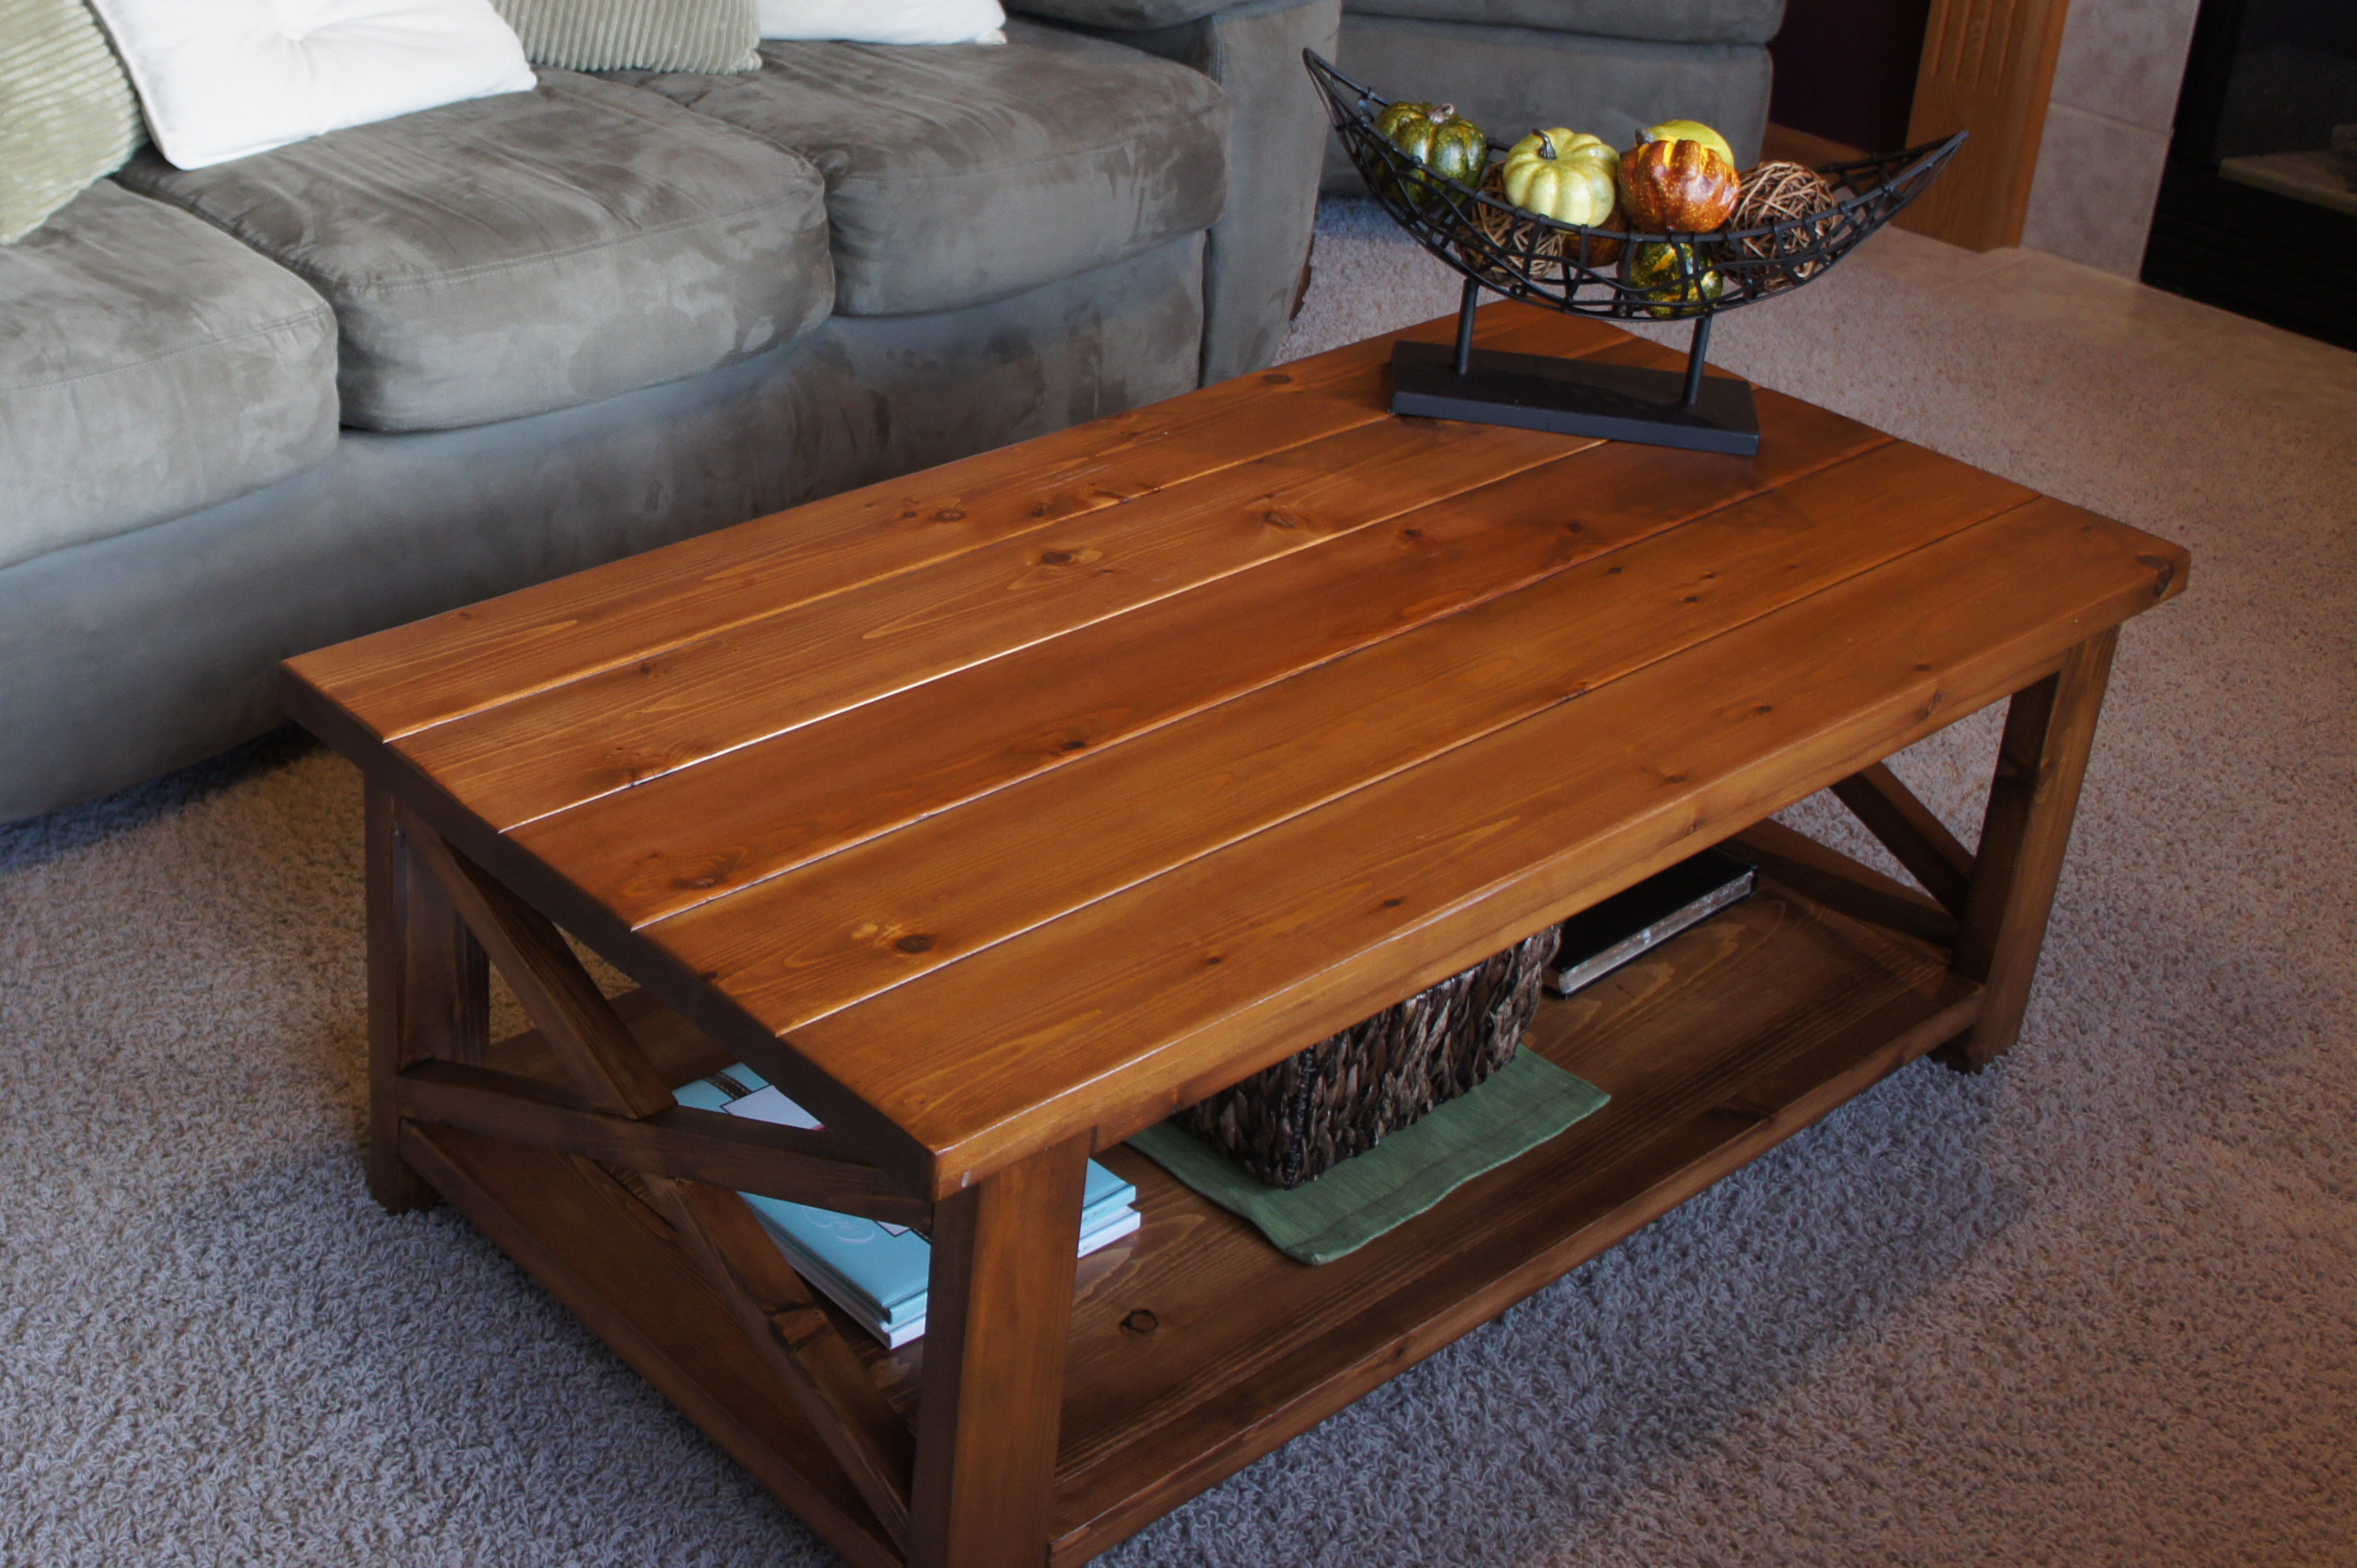
This is the Rustic X Coffee Table without the rustic finish. I used cedar wood with Early American stain. This was my first furniture project and I am so happy I did it. We needed a coffee table badly and I couldn't fathom spending several hundred on a good one. This one saved money and I appreciate it so much more. Because I used cedar the cost of the project was about $100. I used pine on the 1X12s on the bottom shelf and once stained it looks just fine. I did not stain the under side of the table top so as to maintain the smell of cedar.


Built from Plan(s)
Estimated Cost
$100
Estimated Time Investment
Weekend Project (10-20 Hours)
Finish Used
Stain: Varathane - Early American
I started with Varathane Wood Conditioner, then applied one coat of stain, wiping with a cloth after application. To finish I applied two coats of Minwax polyurethane.
I started with Varathane Wood Conditioner, then applied one coat of stain, wiping with a cloth after application. To finish I applied two coats of Minwax polyurethane.
Recommended Skill Level
Intermediate
Comments
Fri, 01/05/2018 - 23:10
Question...
The table look great! Thinking about building one myself soon? Have you noticed any warping or cracking of the wood since you built this?
King chestwick headboard and platform bed
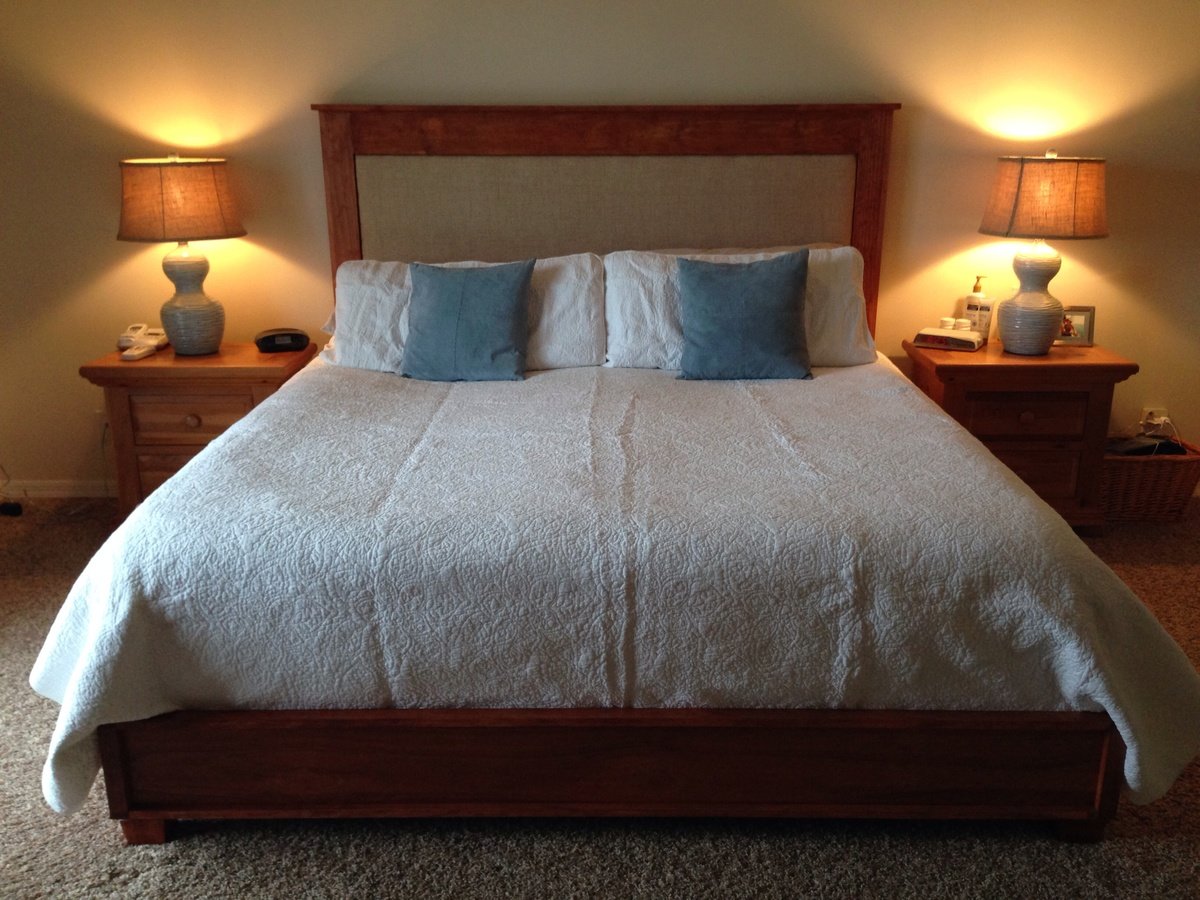
After 16 years of marriage our bed literally fell apart. Rather than agreeing to buy a new bedroom set, my husband said I should just build a new bed. It turned out even better than I ever thought it would. I got the platform bed plans from addicted2decorating's blog. Thanks Ana and Shanty sisters for another great plan! I had to modify for the king size and mounted it to the wall because it was HEAVY. I used metal French cleats from HD.
Built from Plan(s)
Estimated Cost
$133
Estimated Time Investment
Weekend Project (10-20 Hours)
Finish Used
Varathane ultimate stain light walnut and varathane fast drying polyurethane
Recommended Skill Level
Beginner
Two toned toddler bed
This was the first building project I have ever done. it was easy and fun. The end product is sturdy and looks stylish. I'm very happy with it.
Built from Plan(s)
Estimated Cost
$60
Estimated Time Investment
Week Long Project (20 Hours or More)
Finish Used
Polycrylic
Recommended Skill Level
Beginner
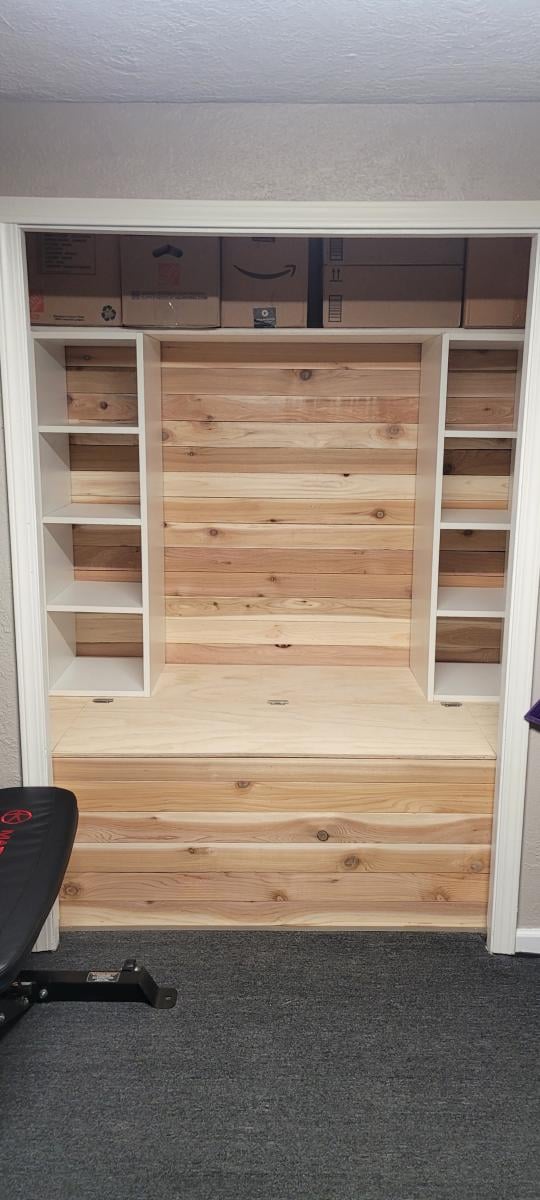
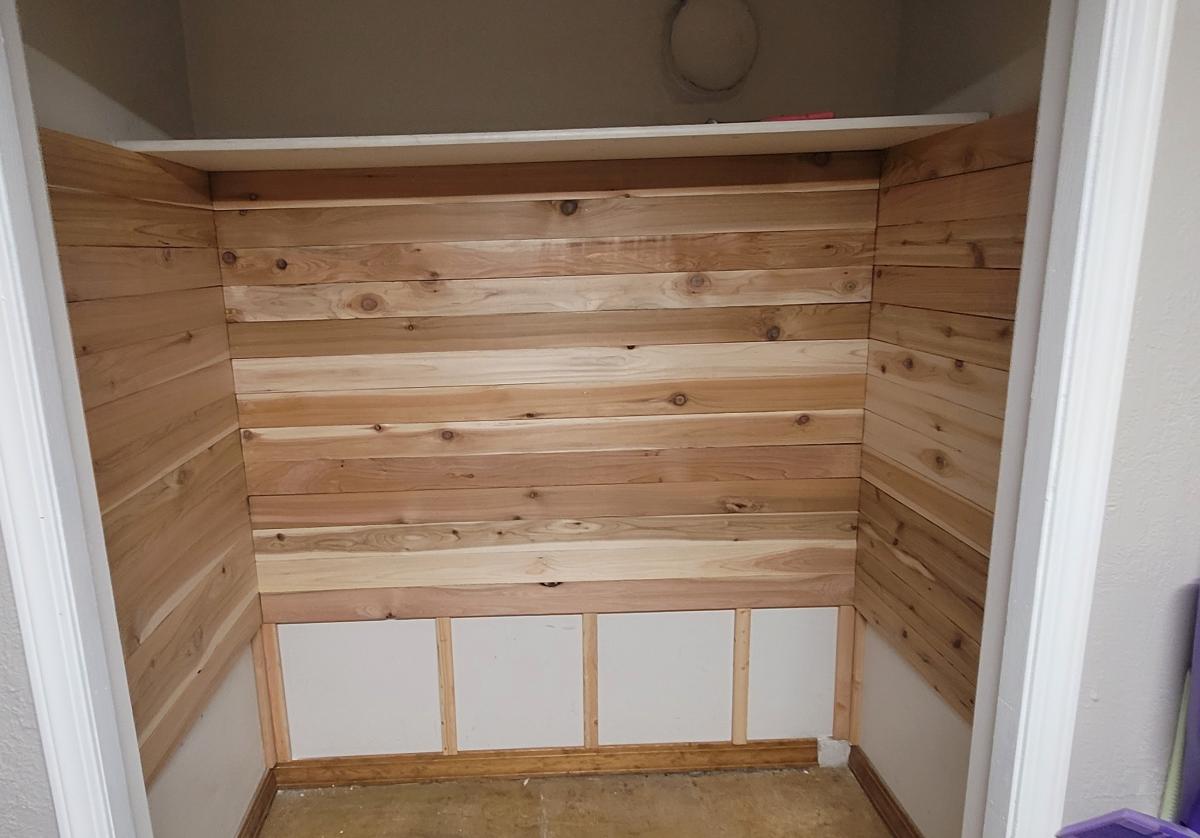
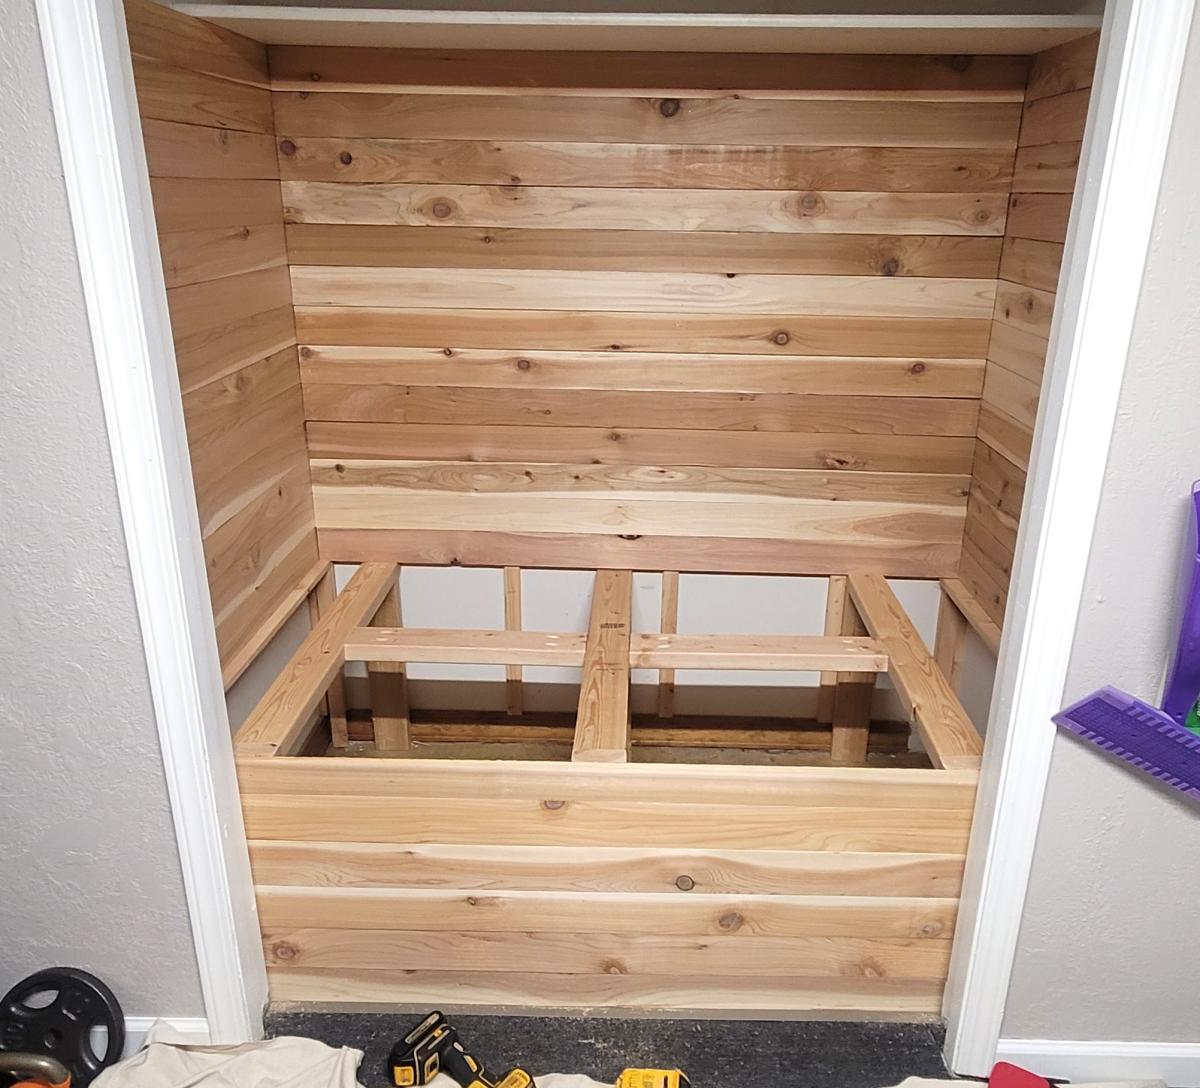
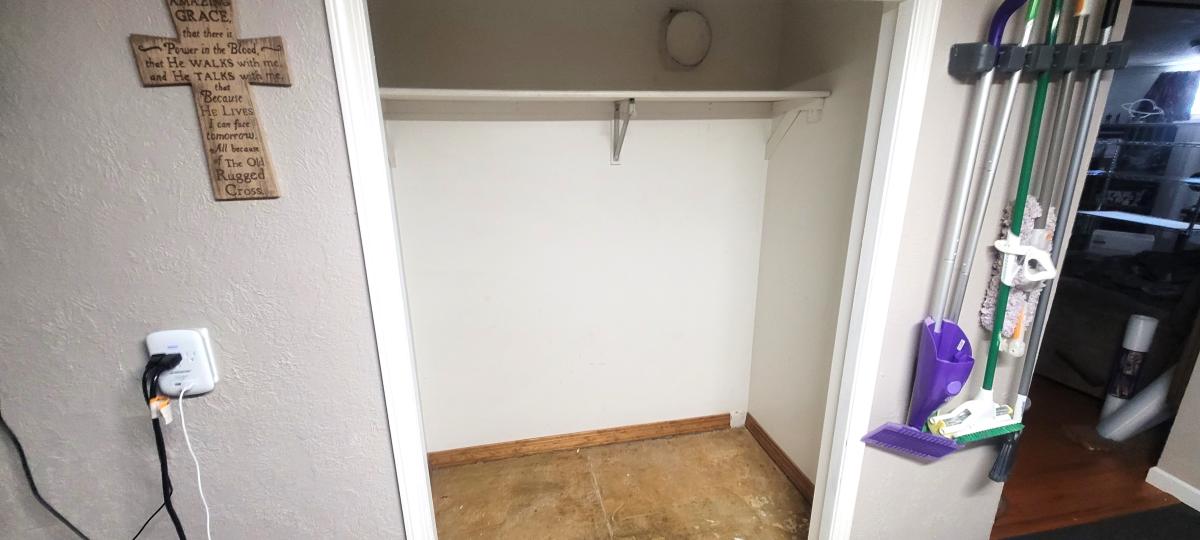
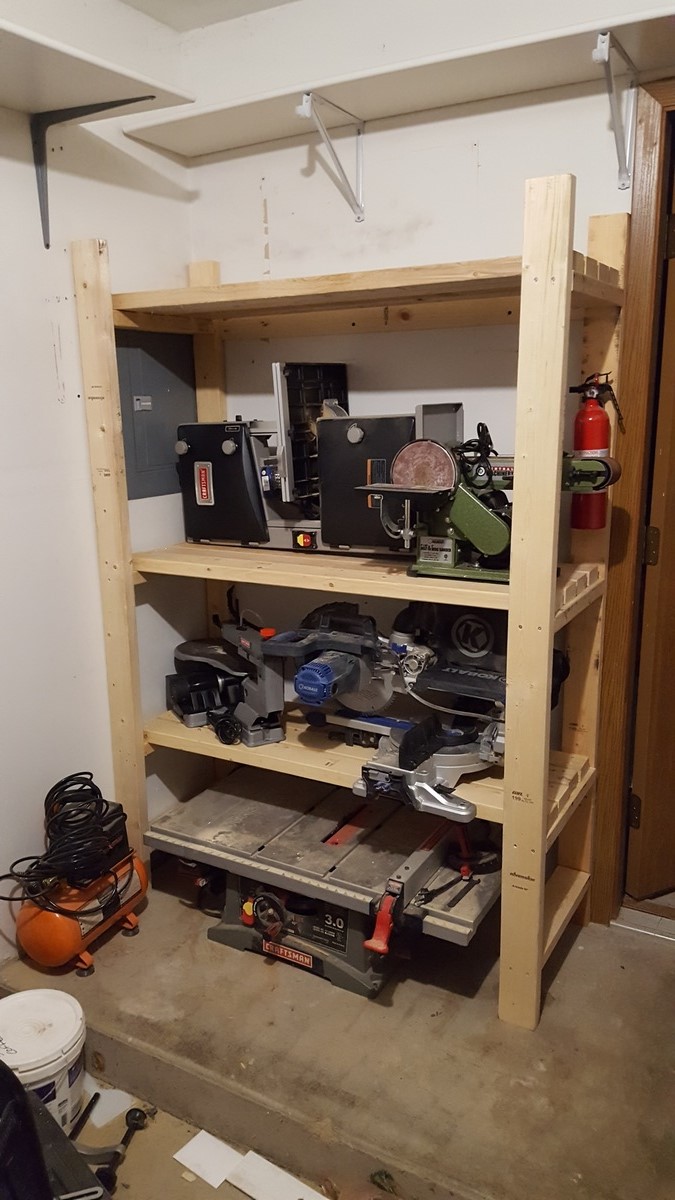
Basement Closet Upgrade

This is our basement closet. We wanted to make it more useful. We were inspired by the plans for the closet makeover.
Crystal L.
Built from Plan(s)
Seasonal And Holiday
Farmhouse Bench
A 1m version of the farmhouse bench. We needed a shorter one for the hallway and realized that the only way would be if we built it ourselves. My bf and I built this together and it's really sturdy. Some adaption to the plan was made since it's shorter. It's very useful and we all love it. It's used each and every day.
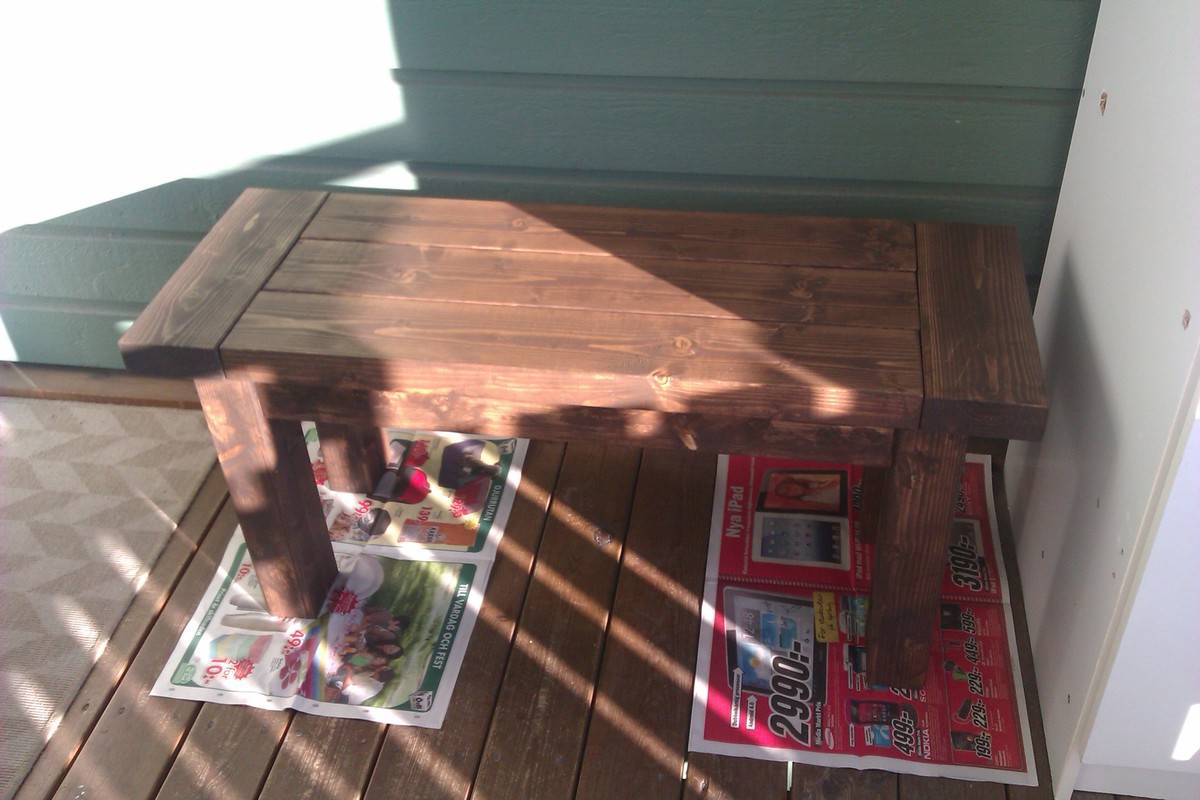
Built from Plan(s)
Estimated Cost
200 SEK
Estimated Time Investment
Afternoon Project (3-6 Hours)
Finish Used
Stain.
Recommended Skill Level
Starter Project
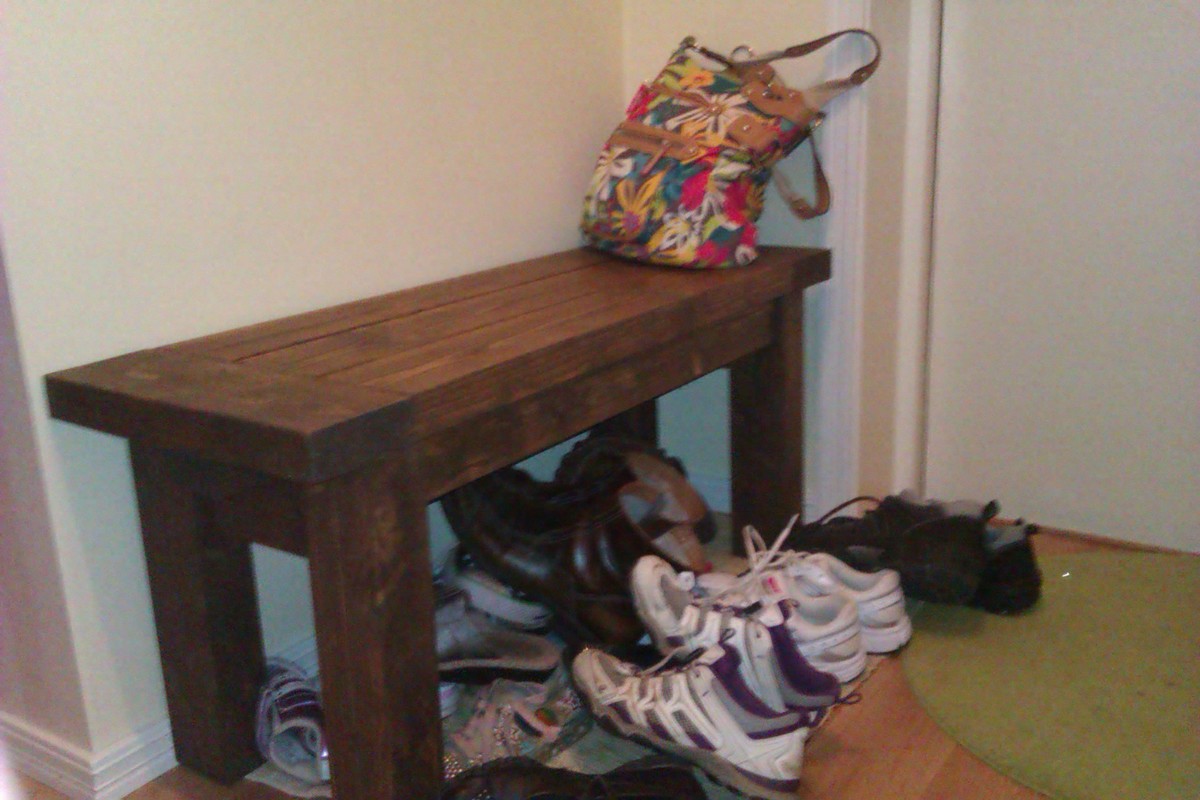
Hallway table

I made this hallway table for my gf's bday. It is really simply apart from taking apart pallets and squaring them off. The project only costs about $40-50, which most of the cost came from the purchasing of the table legs. I angled the pallet boards to be approximately 45 degrees. For this project, I used a table saw to cut, pneumatic brad nailer, tite bond wood glue, kreg jig pocket hole and paint/stain.
Estimated Cost
$40-50
Estimated Time Investment
Afternoon Project (3-6 Hours)
Recommended Skill Level
Starter Project
Loft Bed
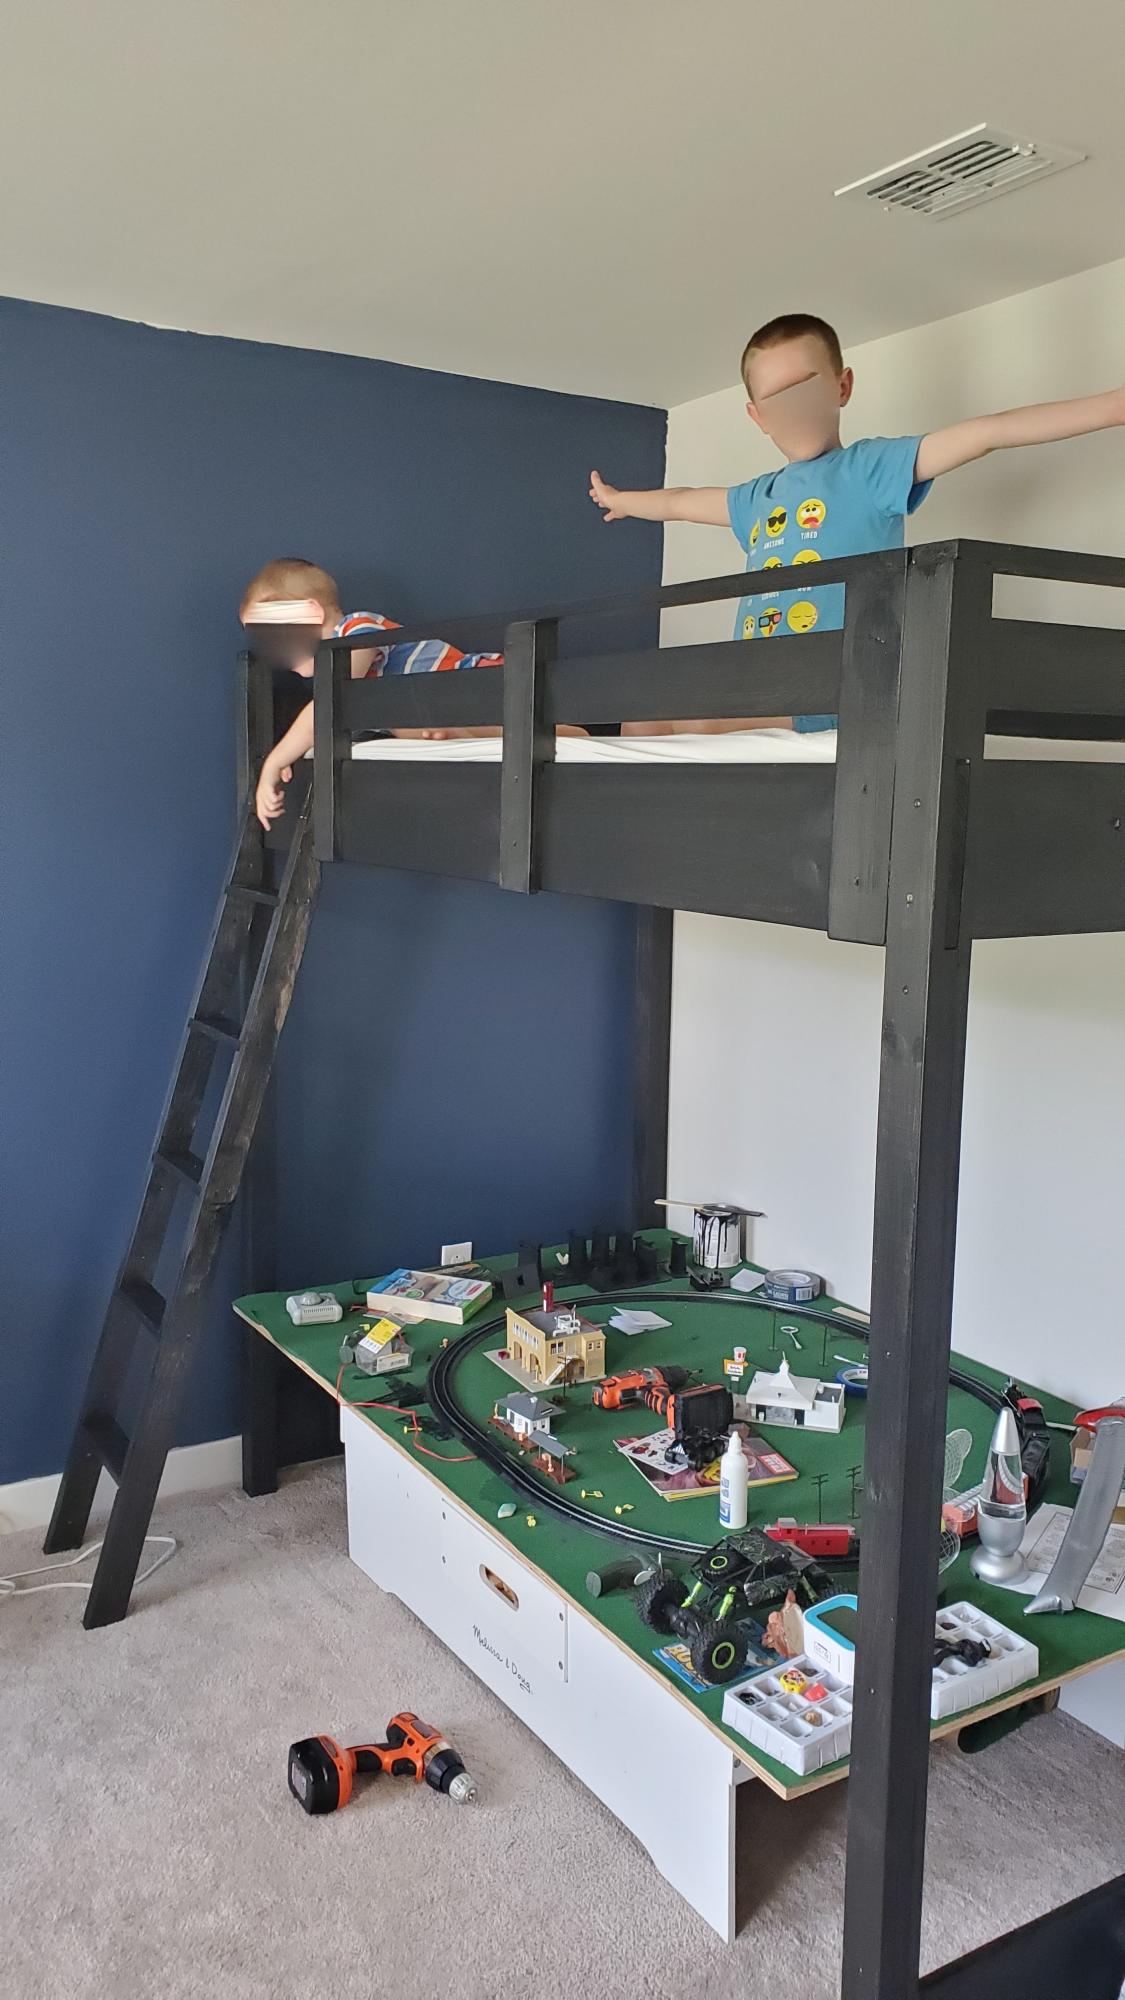
Built my first loft bed using these plans! The plans are comprehensive and easy to follow. Excuse the mess under the bed, but that is why we needed the extra space :-)
We also need to touch-up the paint a bit.
Estimated Cost
$200
Estimated Time Investment
Weekend Project (10-20 Hours)
Finish Used
Black furniture paint
Recommended Skill Level
Beginner
DIY Wood Adirondack Chair
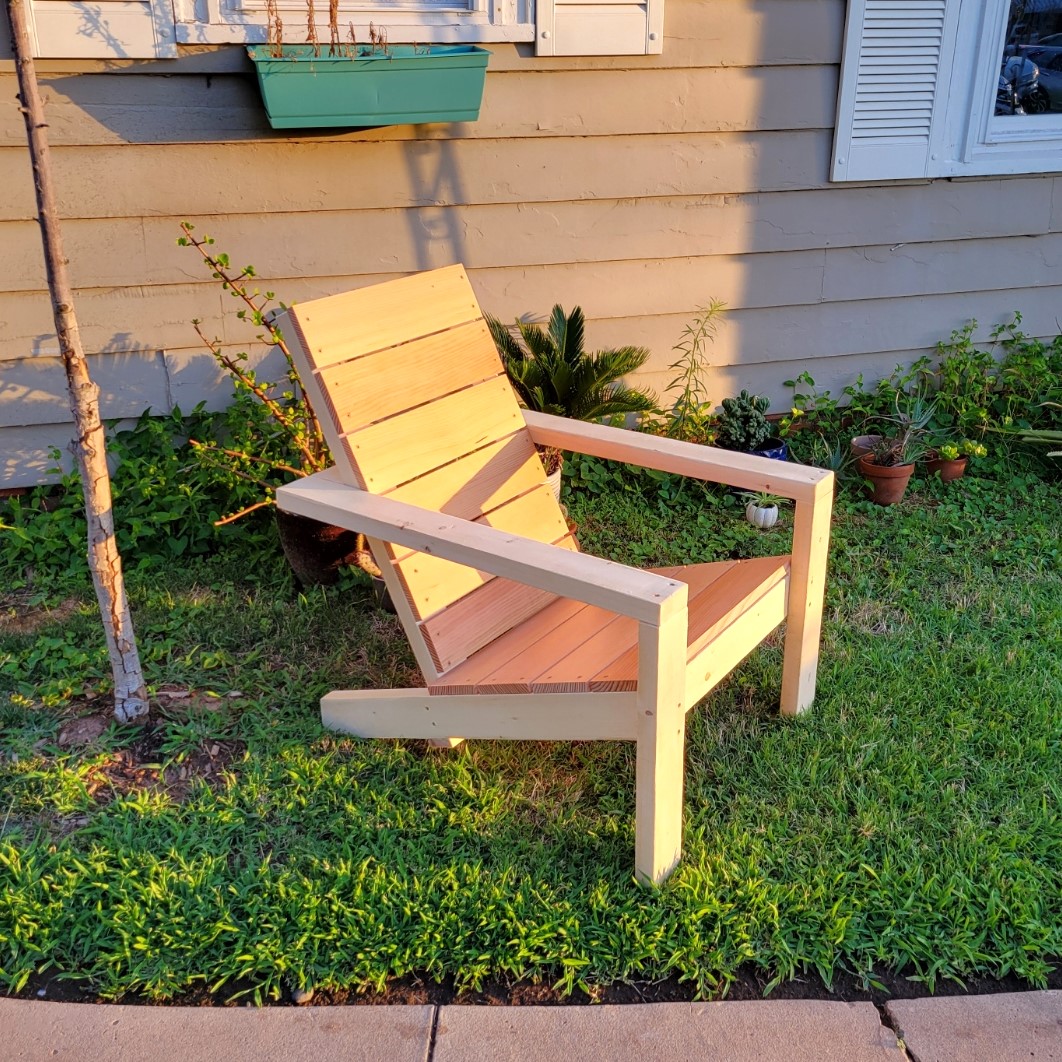
Modern Adirondack Chairs
Joseph Knauf
Built from Plan(s)
Mirror Project from the book!
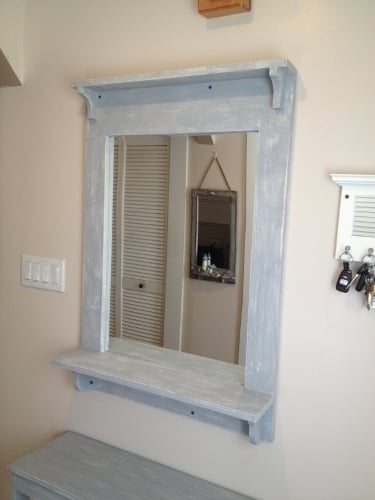
This project is the mirror from page 37 of The Handbuilt Home. I received my copy on Thursday night, built this and painted on Friday, then (impatiently) waited 24 hours for the paint to dry before distressing and hanging it up yesterday afternoon. The mirror was a plain one I found at Lowes for about $20 and attached with mirror clips. I attached to the wall with 2 1/2" screws through the frame into the wall studs. I was going to leave the screw heads exposed for decoration, but now I think I'll add a dab of gray on them to blend them in. This was a super fun project, easy to do. Love the book, and can't wait to build more projects from it! Ana, fab job on the book!!
Estimated Cost
$40
Estimated Time Investment
Afternoon Project (3-6 Hours)
Finish Used
1 coat white paint, 1 coat gray paint (greek column by Ace), after 24 hours, sanded with 220 and some 100 grit sandpaper to distress, then added a coat of soft wax to protect the surface.
Recommended Skill Level
Beginner
Comments

Sun, 10/14/2012 - 14:25
Thank you!
Thanks Ann! This was a fun project. I've been wanting a mirror to match that table since last year, and this one fits just right. My family said they liked the visible screws too, so I'm going to leave them as they are.
:)
Joanne

Sun, 10/14/2012 - 15:26
Joanne, this is beautiful!!!!
Joanne, this is beautiful!!!! I am so glad you like the mirror. We adore ours! Thanks for getting the book! Ana

Sun, 10/14/2012 - 16:03
Hooray!! What fun to see brag posts from book projects!!
Great job on the mirror!! I hate waiting for paint to dry also....that's why Ive taken to painting everything with homemade chalk paint...dries in minutes and I can get right to sanding and glazing. Love the gray you used!!
Thu, 08/29/2013 - 13:57
Ana, Thank you
Ana, Thank you so much! I can't wait to get building on more projects from the book and from here too! You are awesome! :)
YankeeBelle, thank you! How do you make chalk paint? That sounds like a great time saver!
:)
Joanne
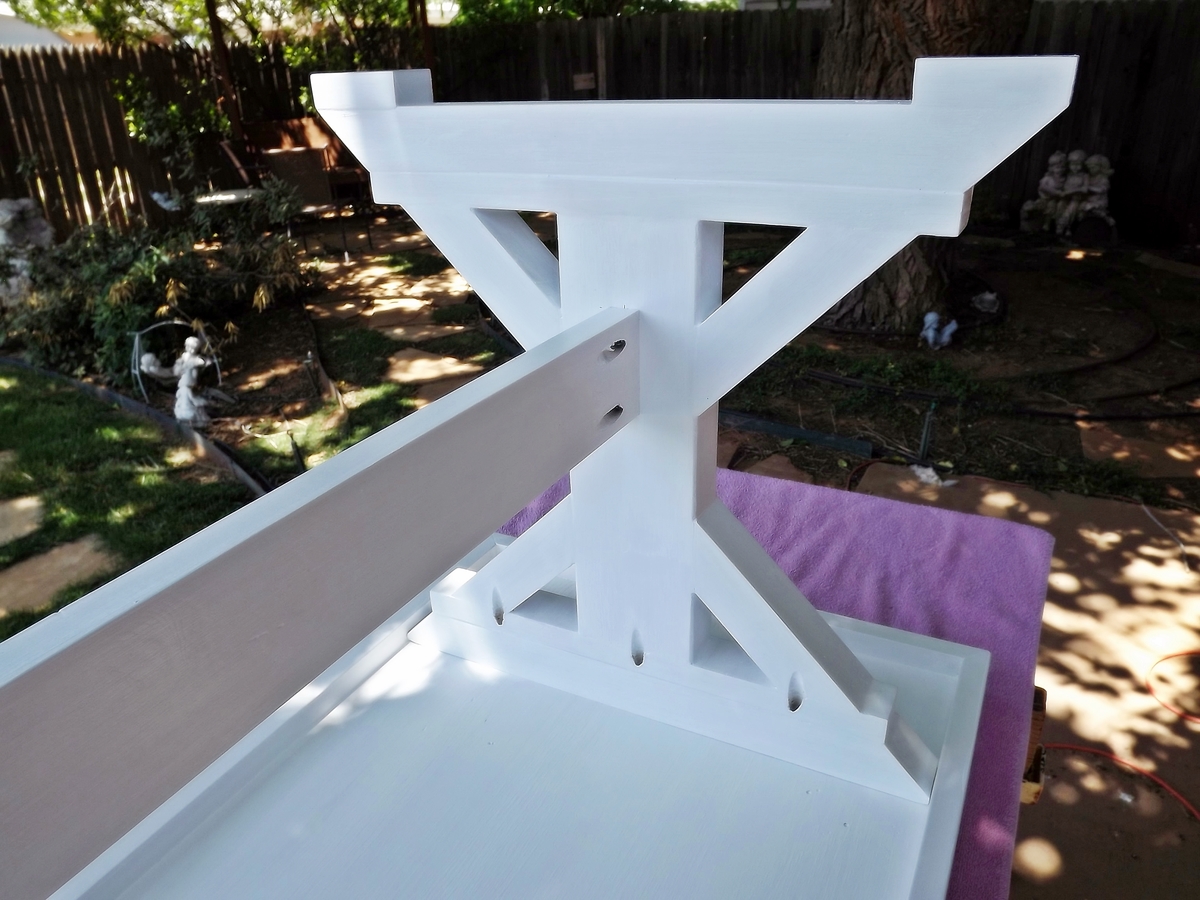
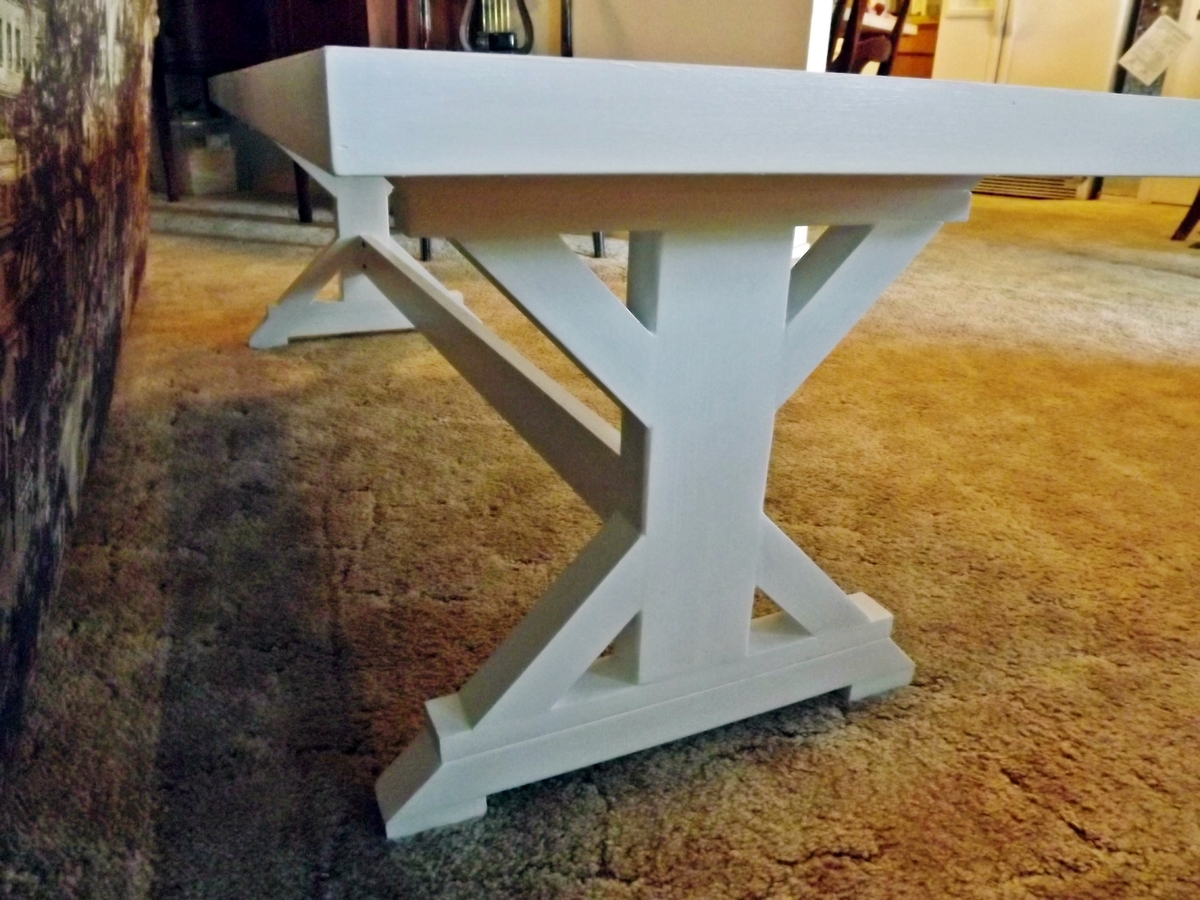
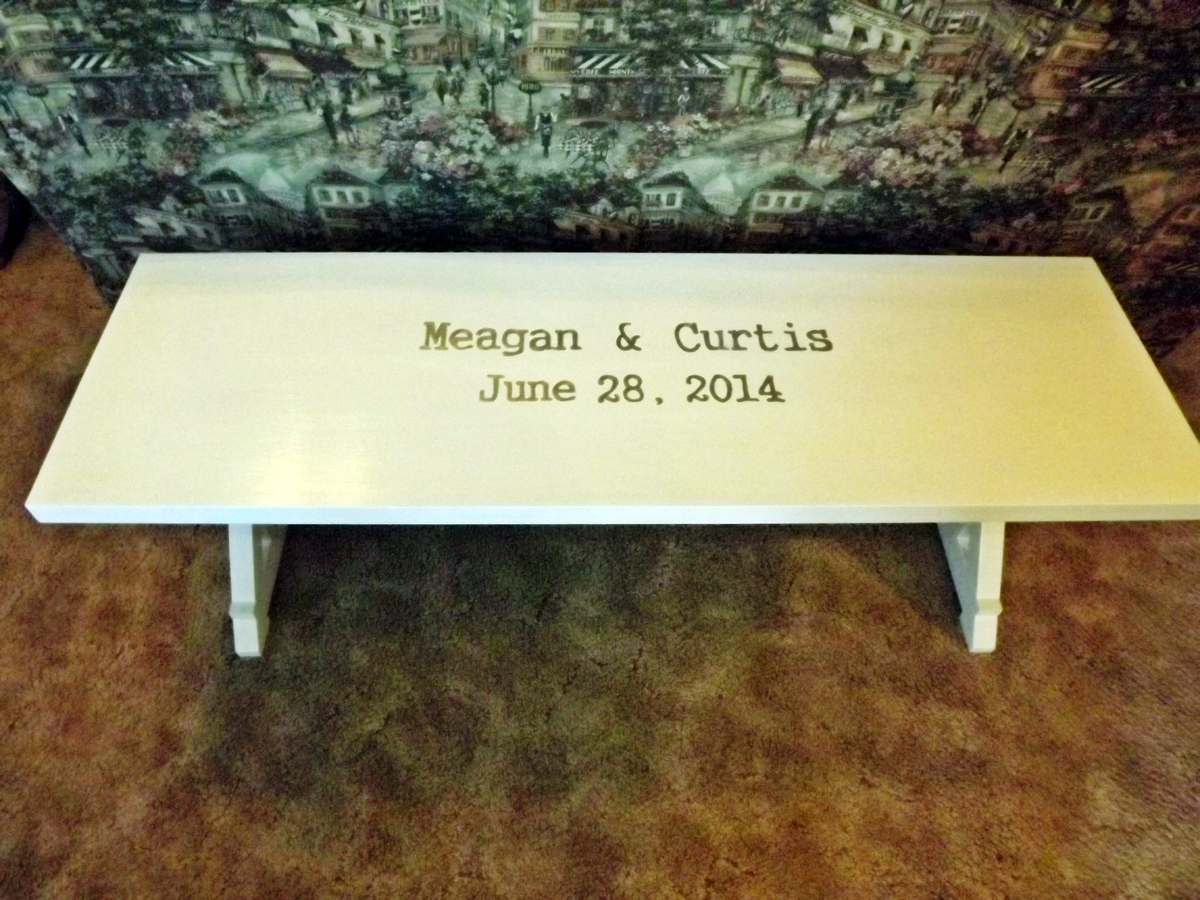
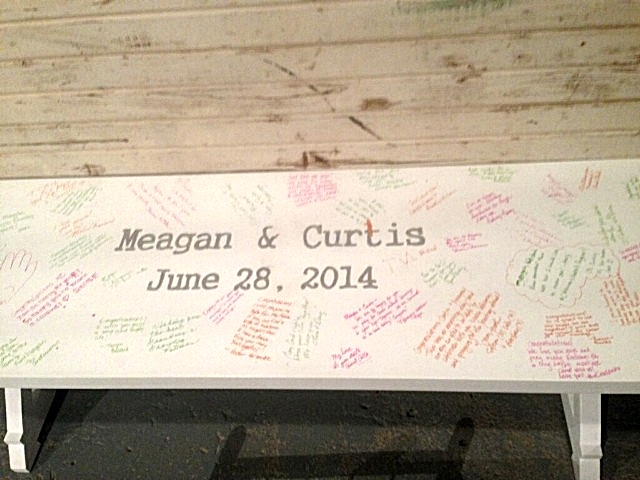
Wedding Guest Bench
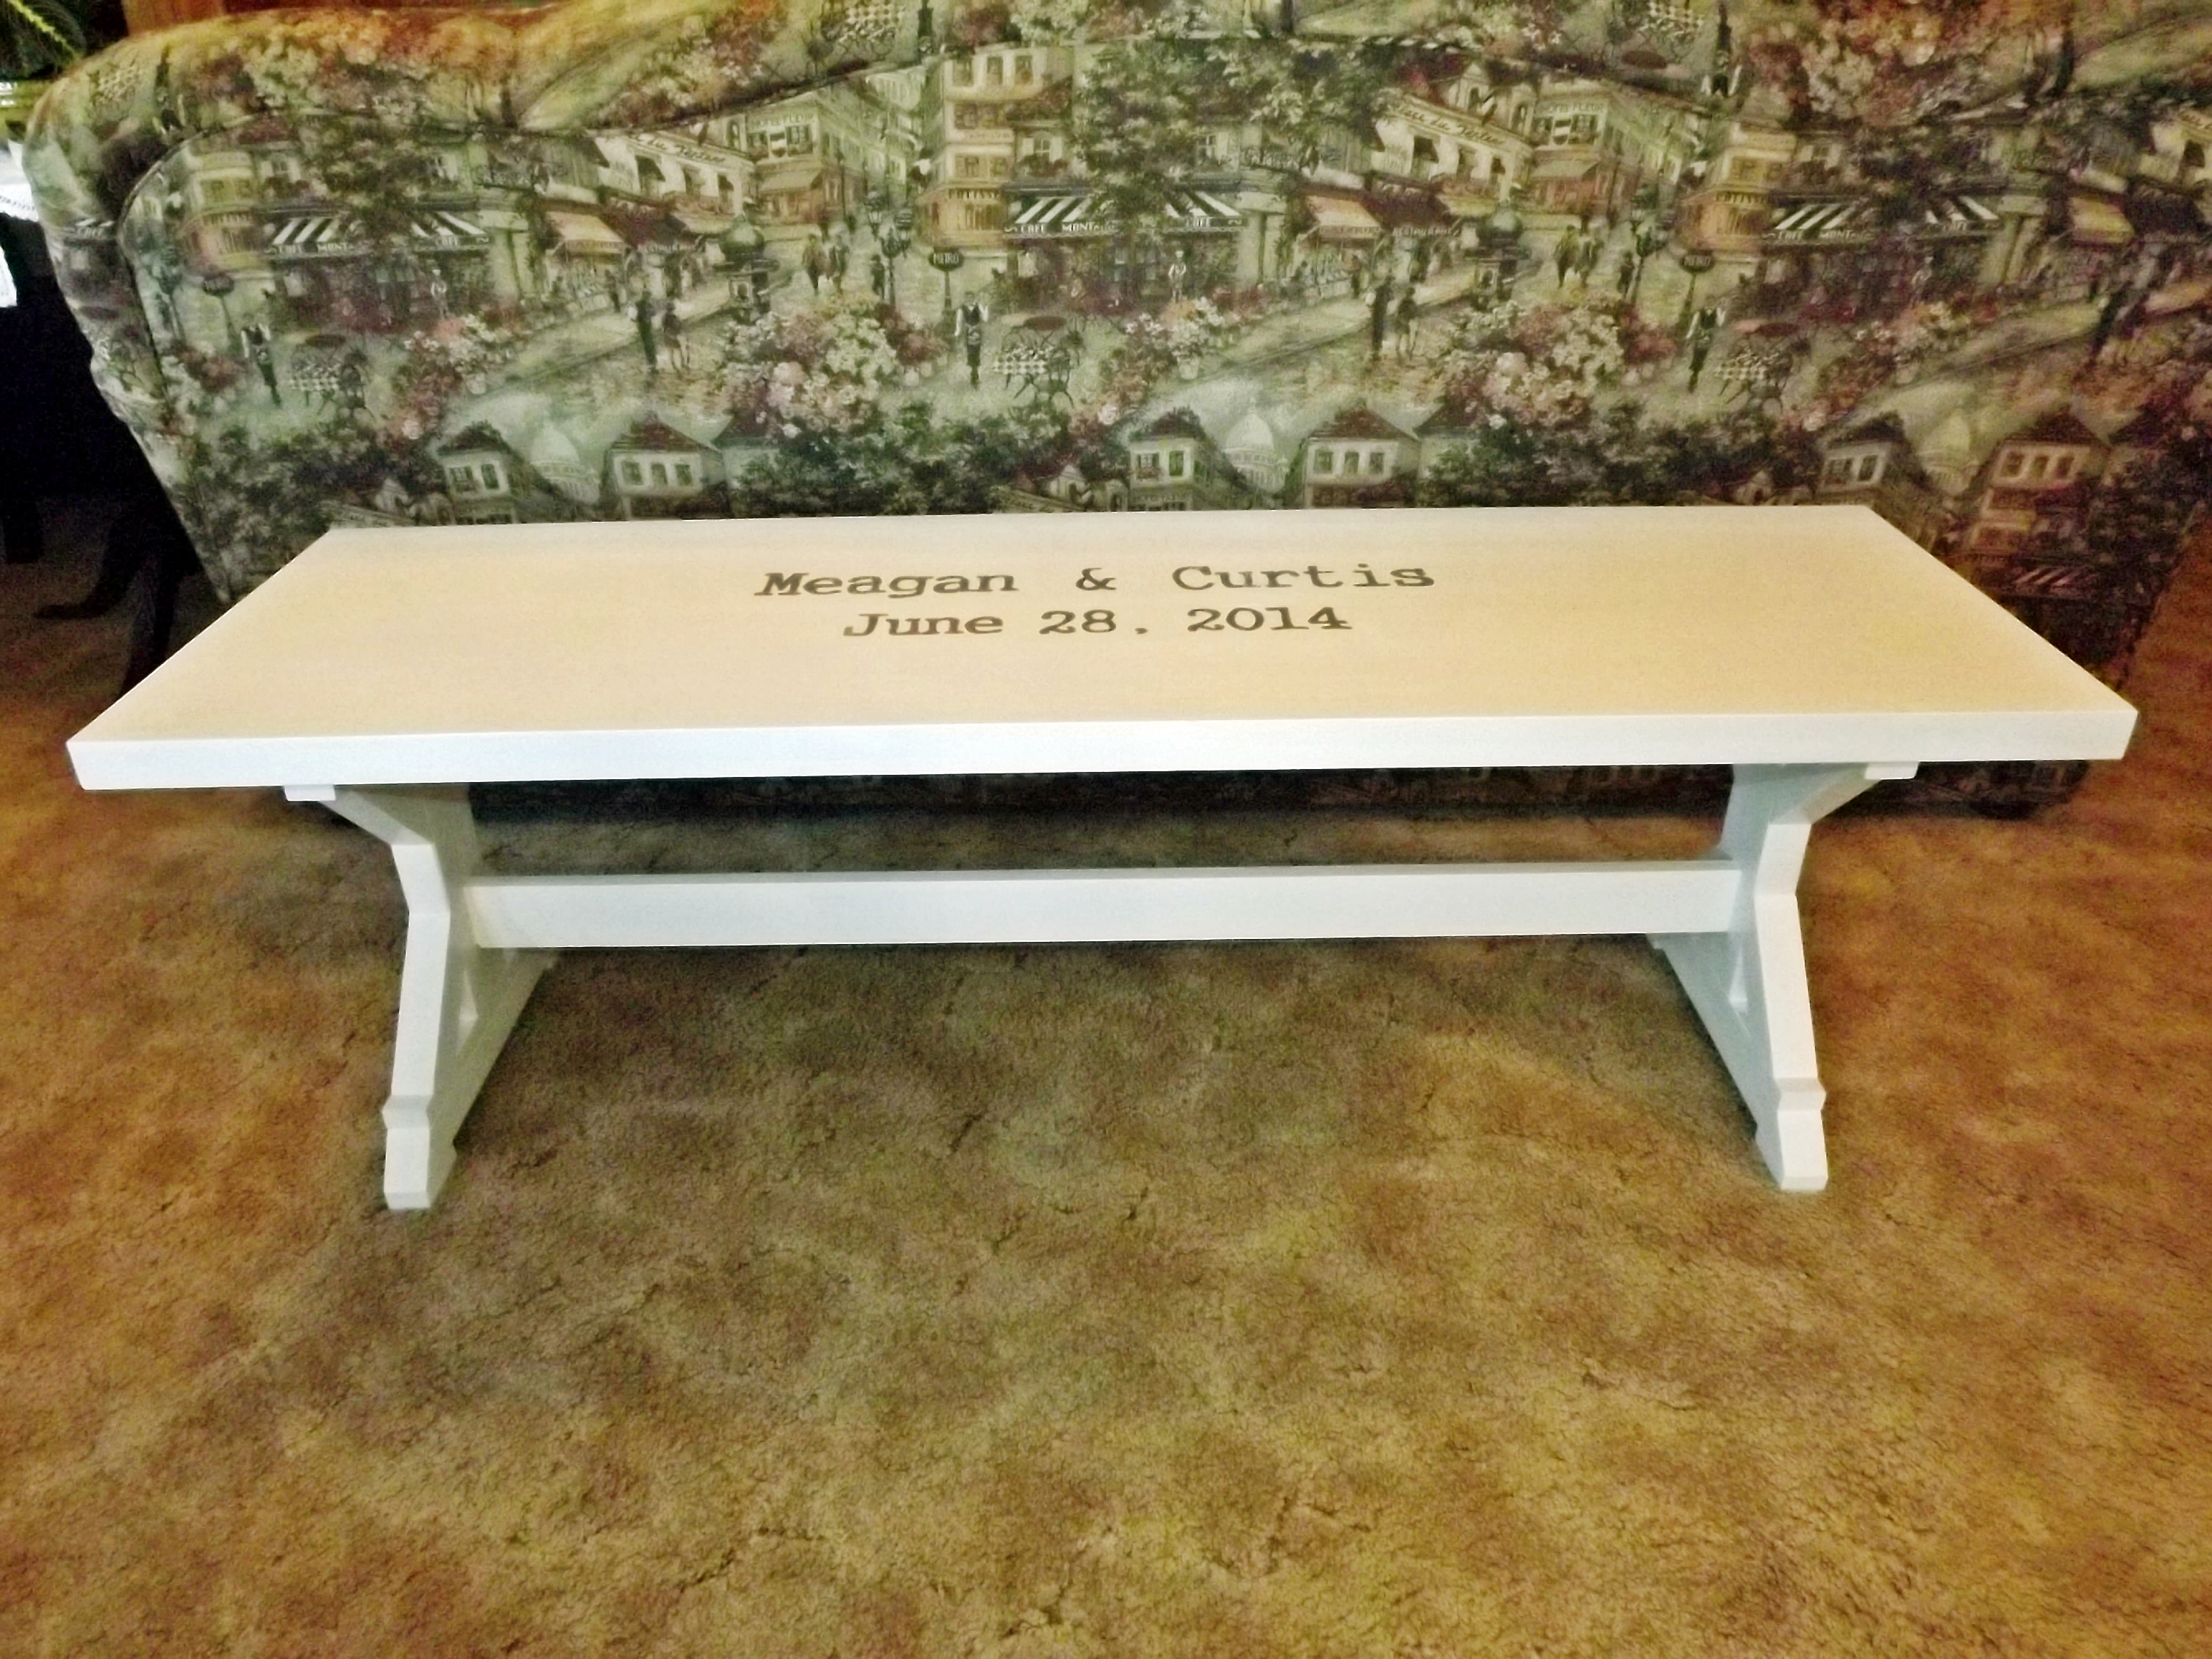
I saw a post some time ago from brookifer86 for a wedding guest bench...I knew I would build one someday. First I'd like to thank Ana for her plans Fancy X Farmhouse Bench, and Whitney at Shanty 2 Chic for the wonderful instructions/pictures for this build. I would also like to thank Brooke at Killer B Design (brookifer86) for the mods to this plan.
This bench had to be able to break into the top and legs as it had to go from Texas to California. That is why I used Whitney's idea for pocket holes to attach the top to the legs. I used 2" screws. Brooke shortened the table with just two legs, and used a project panel for a smoother top for writing. I did, too. She also added a 1" x 2 " board around the edge of the 3/4" panel to beef it up. I used this idea and mitered the corners of the board and filled in the space between the board and the panel to make it very smooth. I sand a lot, and I painted three coats, so this took several days for me to complete.
For signing the top, I purchased fine-tipped oil paint pens. I learned from other brag posts that permanent-type "Sharpie" pens would smear when a finish was applied later. Also, you should use spray poly-acrylic finish to avoid yellowing the white paint.
My dear friend's daughter was thrilled with her surprise, and the guest bench was a hit at the reception. Thanks to all the brag posters - I studied every single one.
Built from Plan(s)
Estimated Cost
$35 (for project panel and one quart paint - other wood was scrap I had on hand)
Estimated Time Investment
Weekend Project (10-20 Hours)
Finish Used
Valspar "Bright White" outdoor paint. three coats applied with a foam brush. Spray top with poly-acrylic to protect the signatures.
Recommended Skill Level
Beginner
My first project from scratch-bar
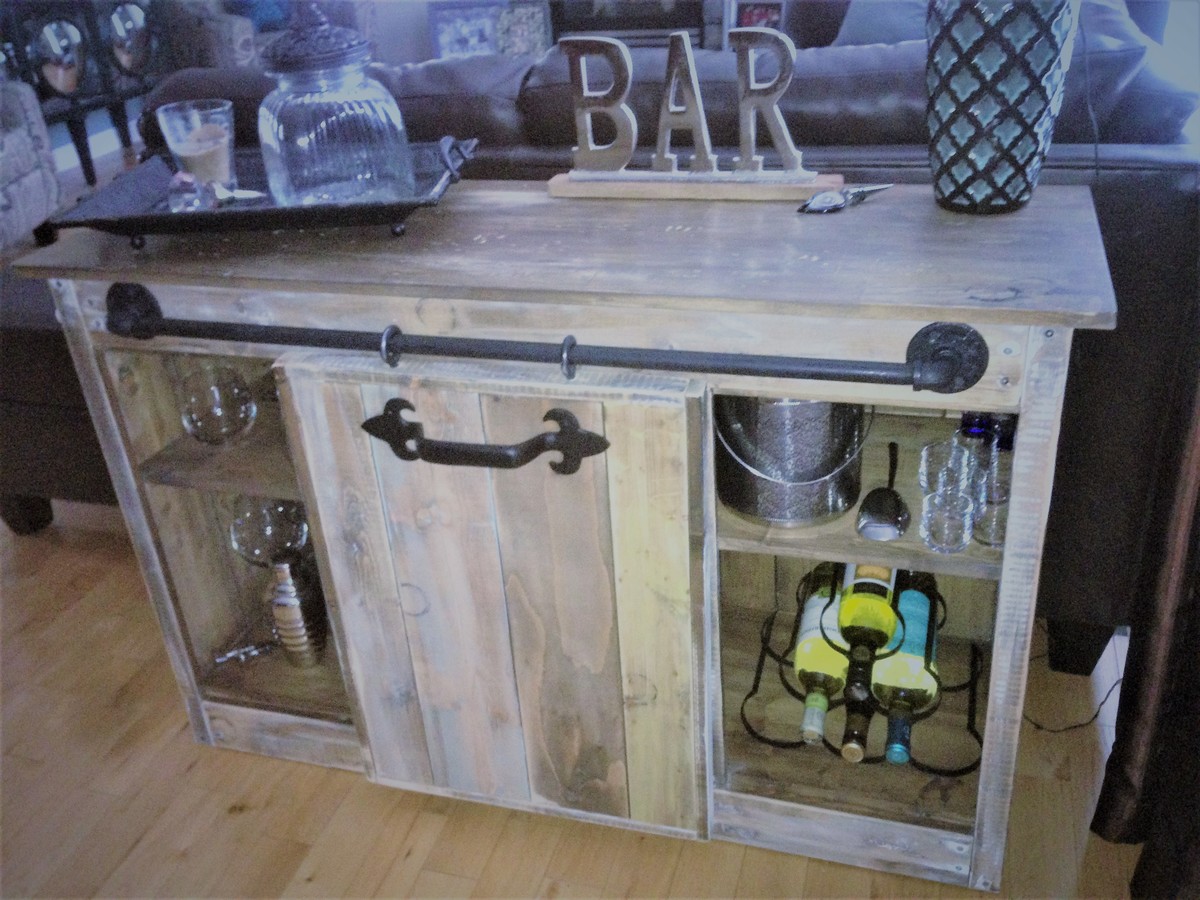
My inspiration for this piece was the Grandy Sliding Door Console - I made this piece to fit behind a sofa so adjusted the plans to customize my piece.
I used plumbers pipe instead of barn door hardware - much more cost effective and still gave me the vintage look I was after. I stained and distressed the wood and added some hardware! Voila!
I am hooked to your site, stay tuned for more projects!
Built from Plan(s)
Estimated Cost
Total Cost of lumber - $101.00, Plumbers pipe - $18.00, Handle - $17.00 = $136.00
Estimated Time Investment
Day Project (6-9 Hours)
Finish Used
Painted each board different chalk paint color, white, yellow and blue - added black ring marks and used tools to mark up the top board. Once built sanded piece to desired look and then used antique wax to deepen the colors, finished with furniture polish- minwax!
Recommended Skill Level
Beginner
Fancy X Farmhouse Table
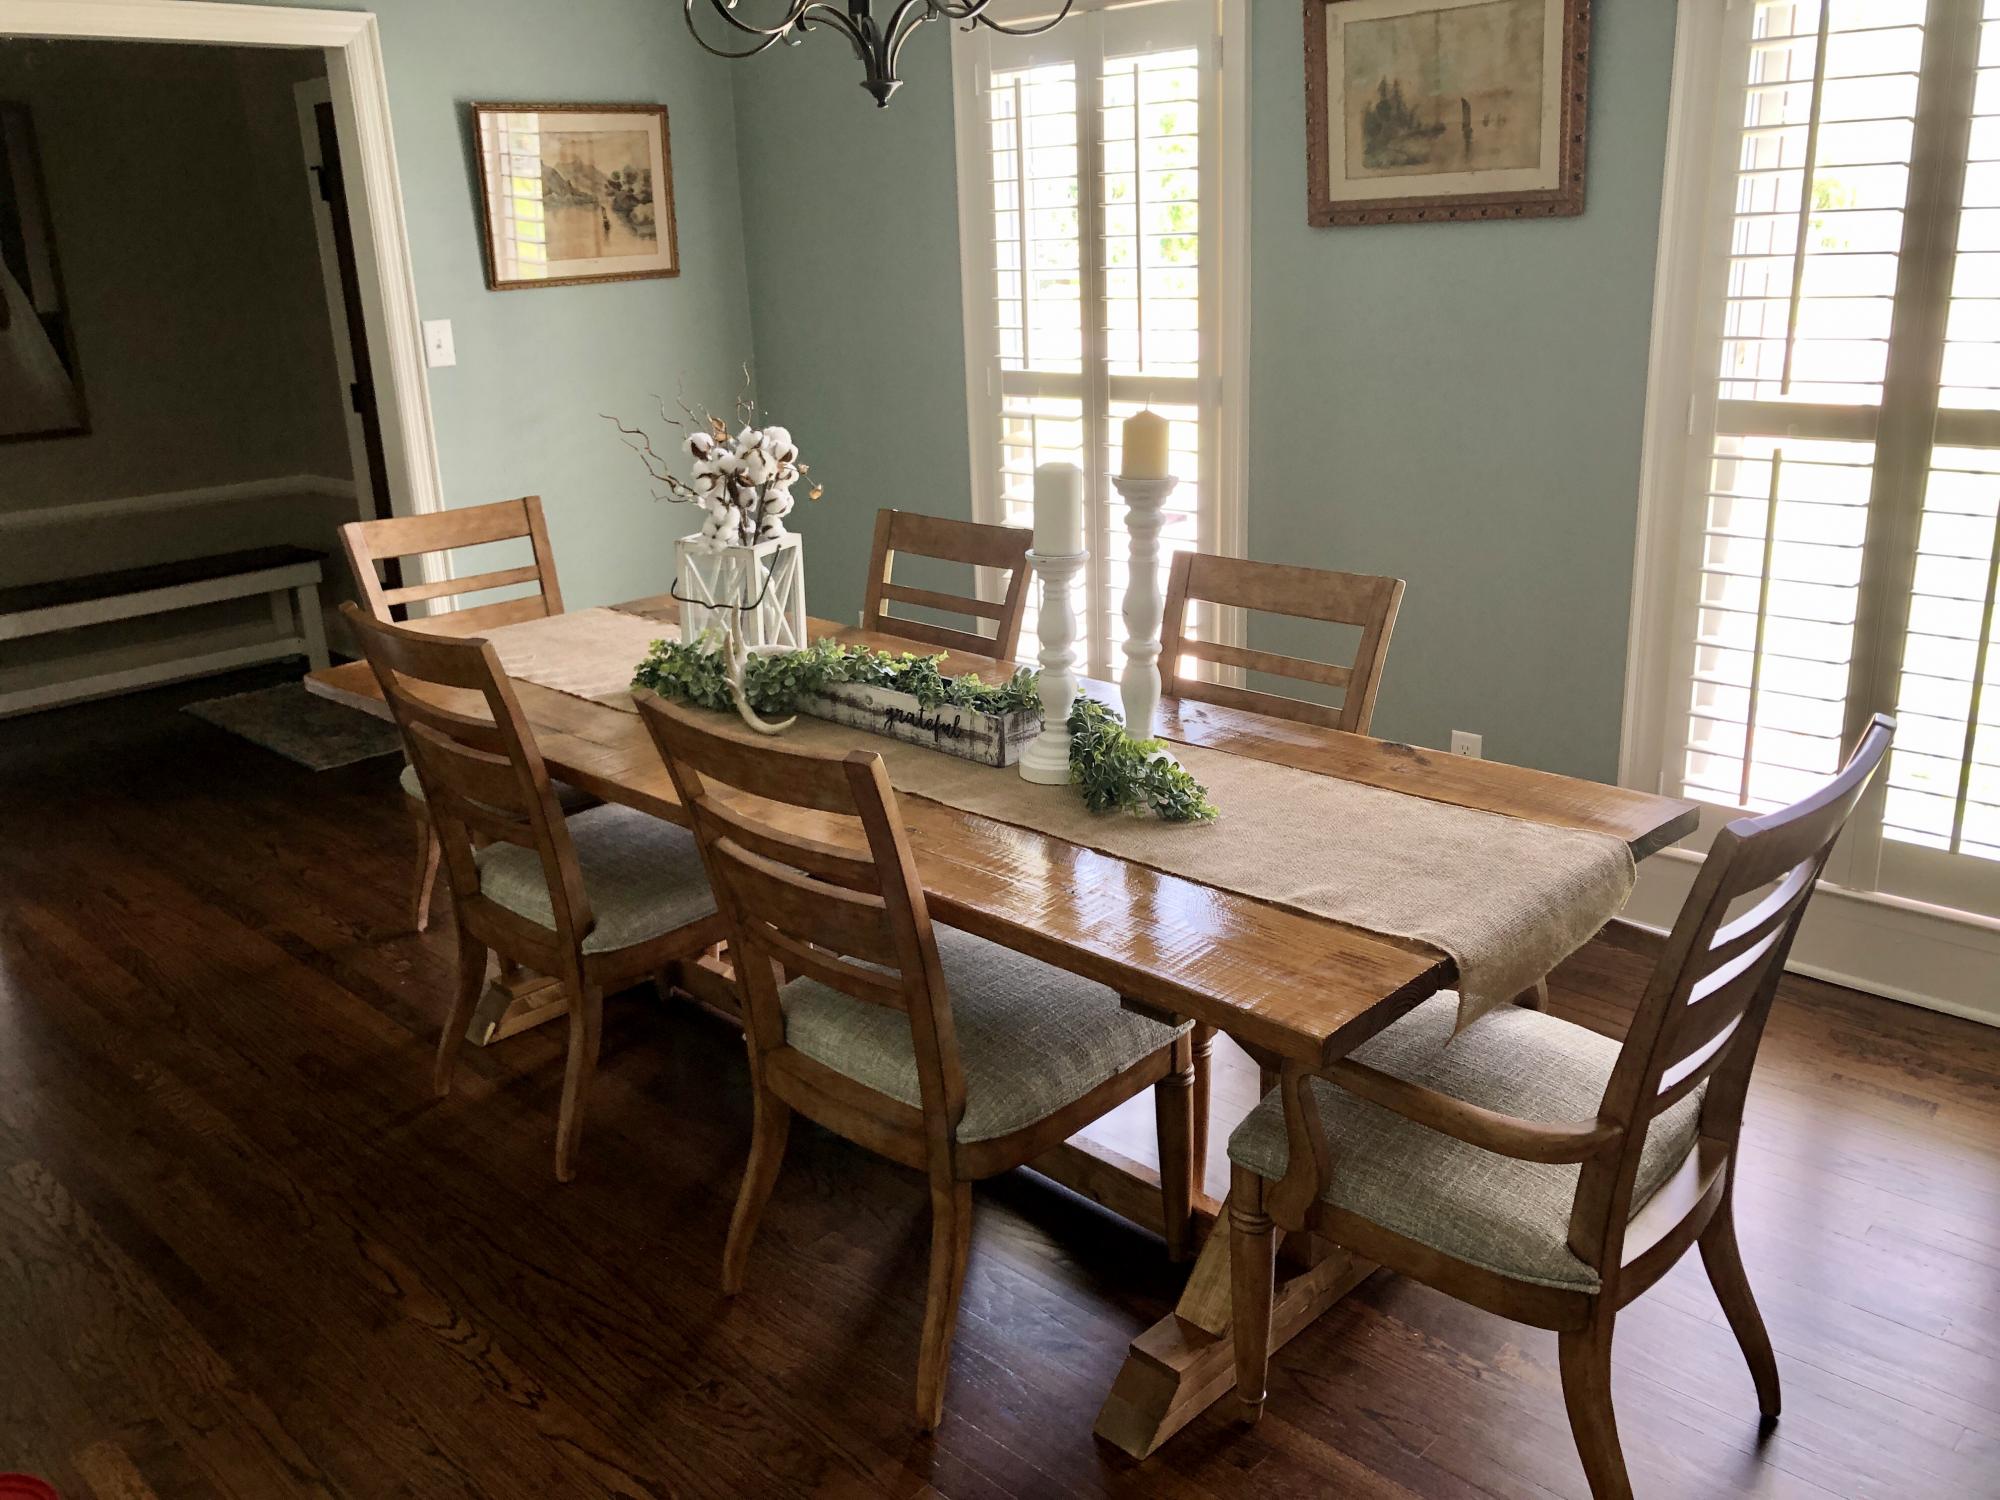
Finished this project about a week ago. Super easy directions and such a great look for our dining room!
Built from Plan(s)
Estimated Cost
$75
Estimated Time Investment
Afternoon Project (3-6 Hours)
Recommended Skill Level
Beginner