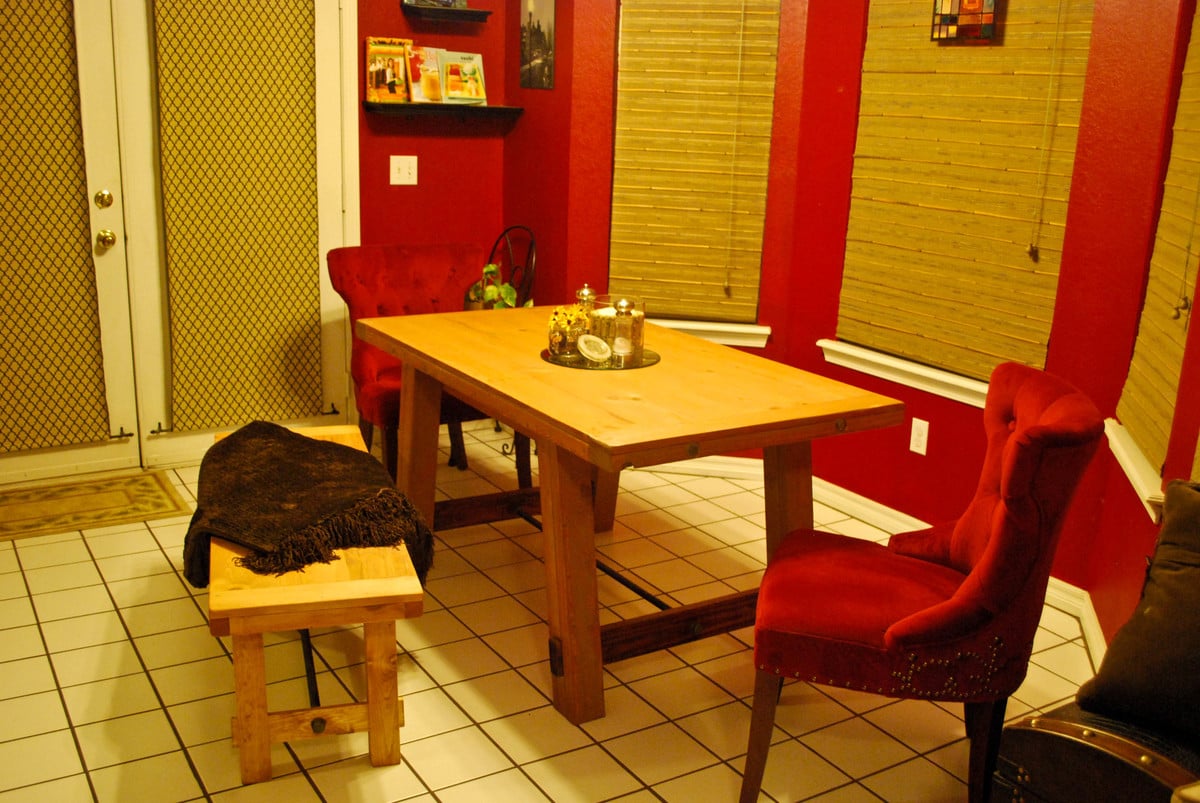
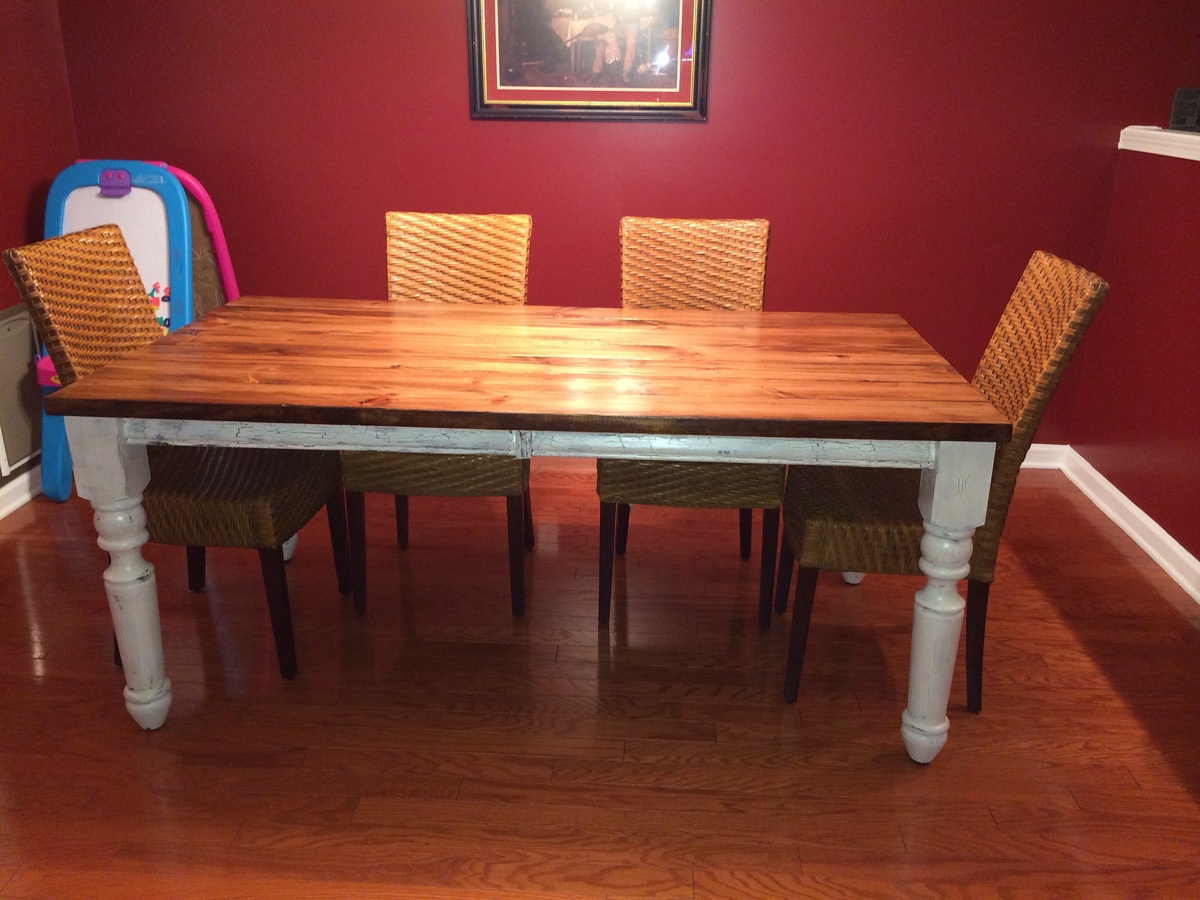
Community Brag Posts

Cedar table

Submitted by clarissa_a on Tue, 04/03/2012 - 10:52

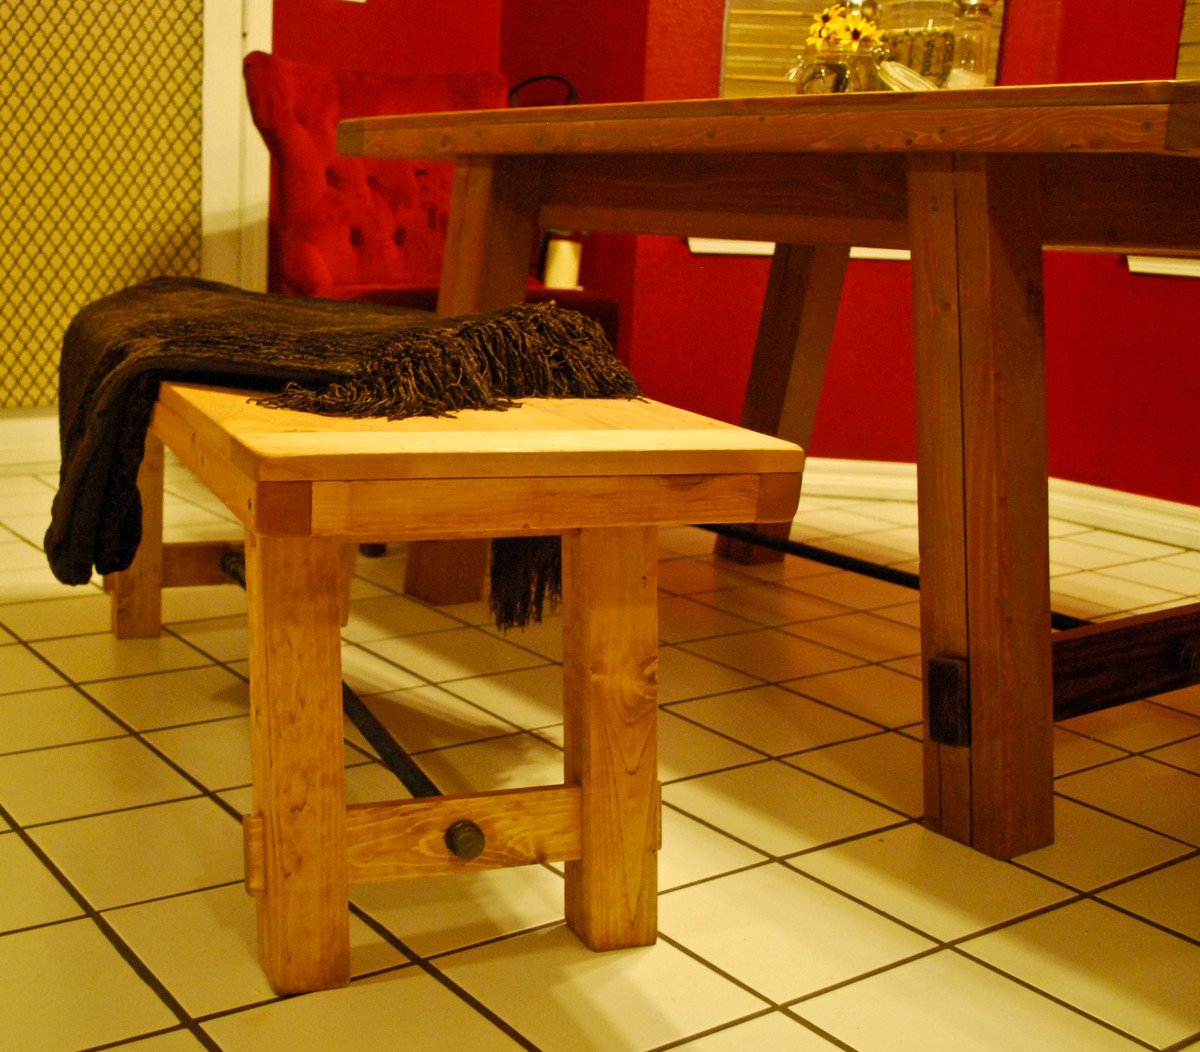
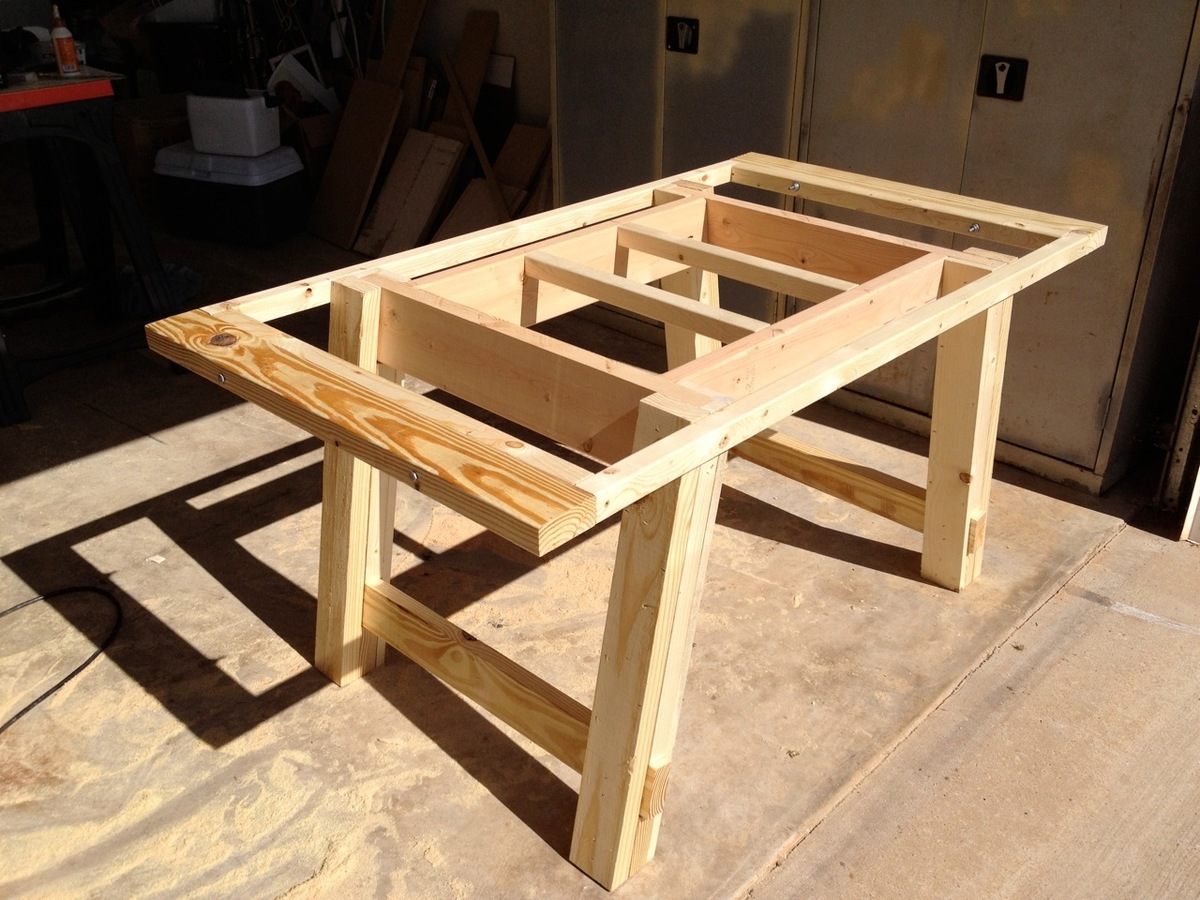
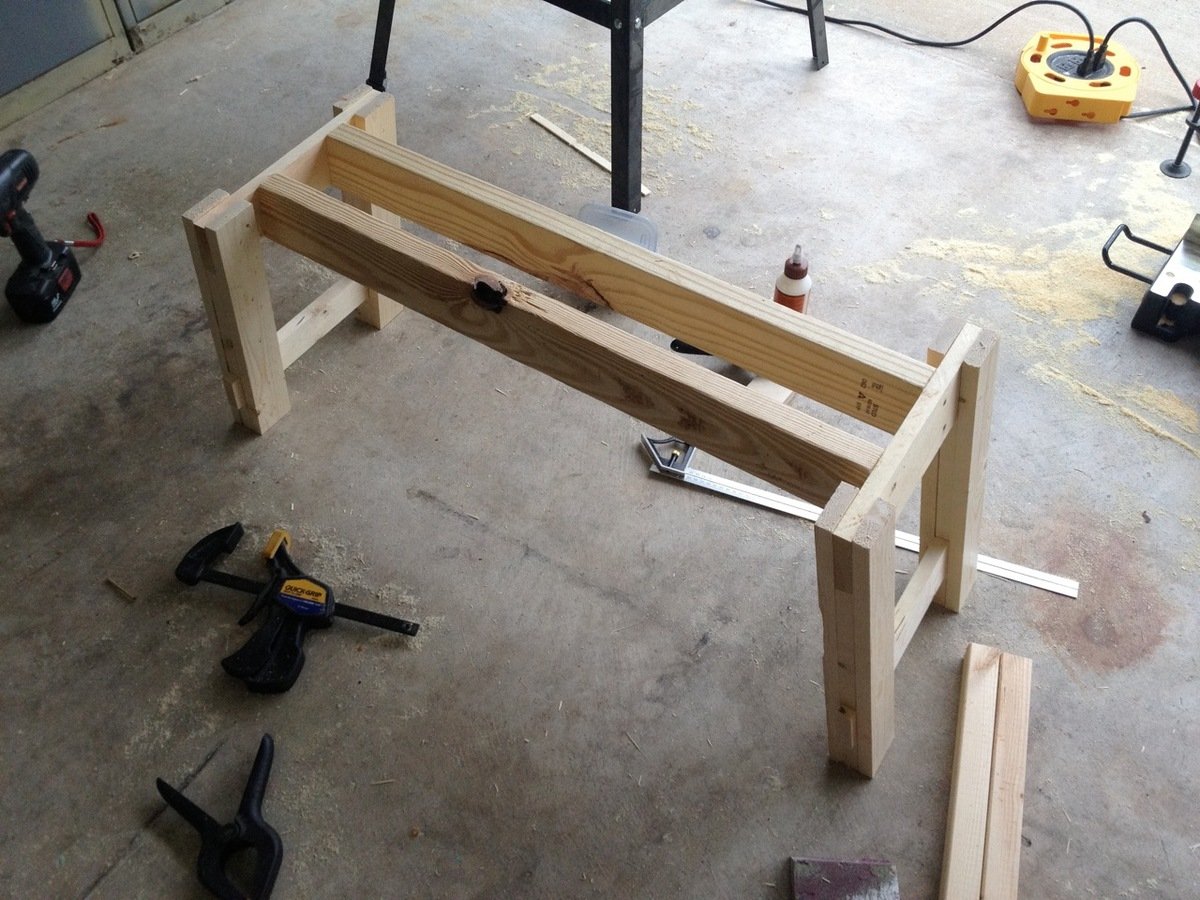
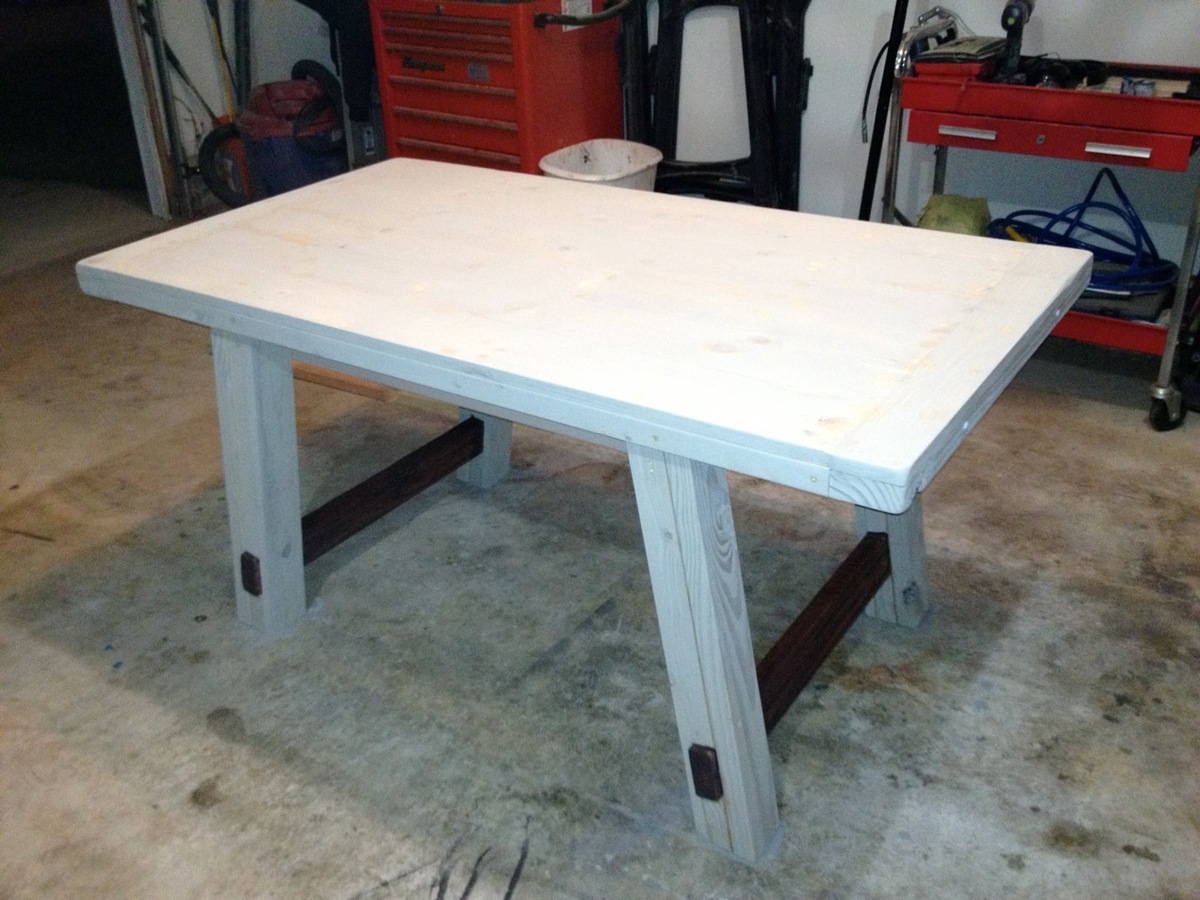
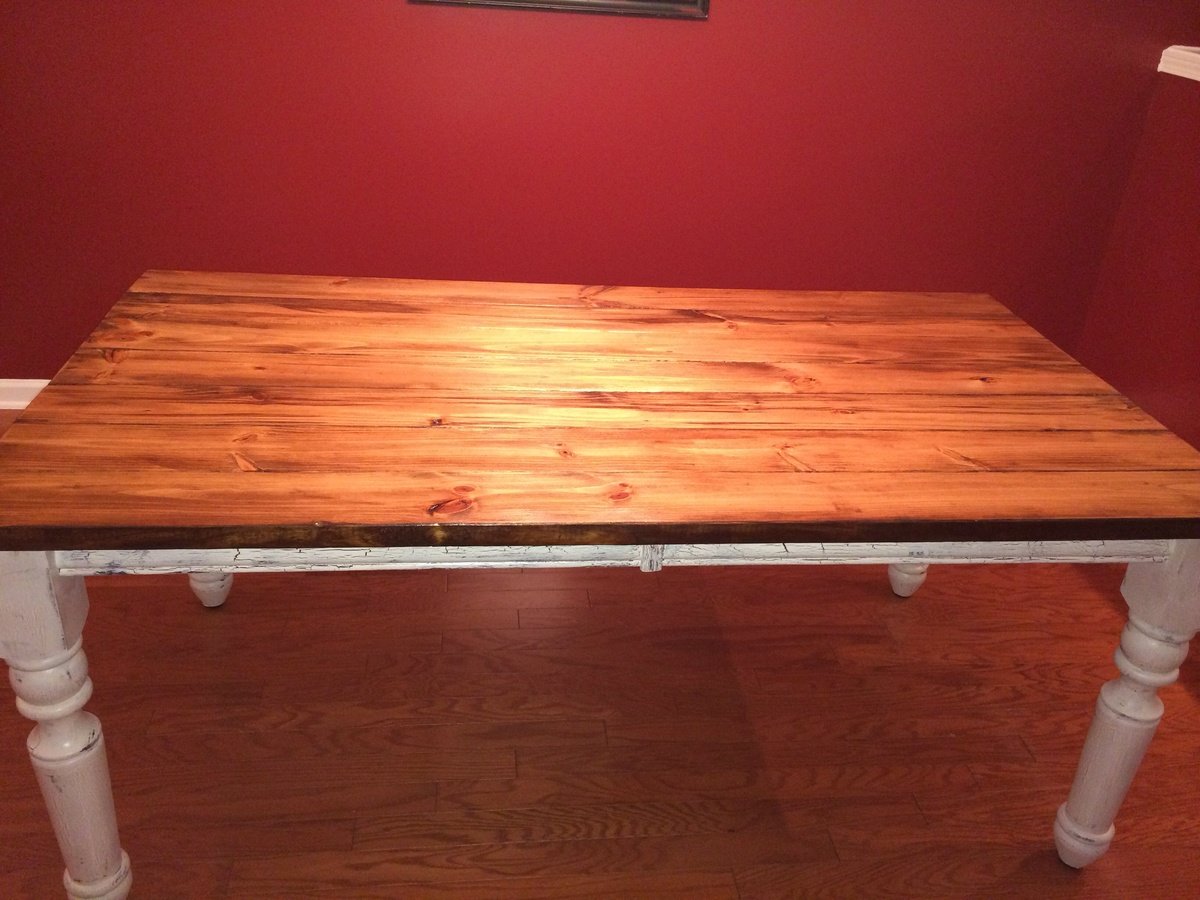
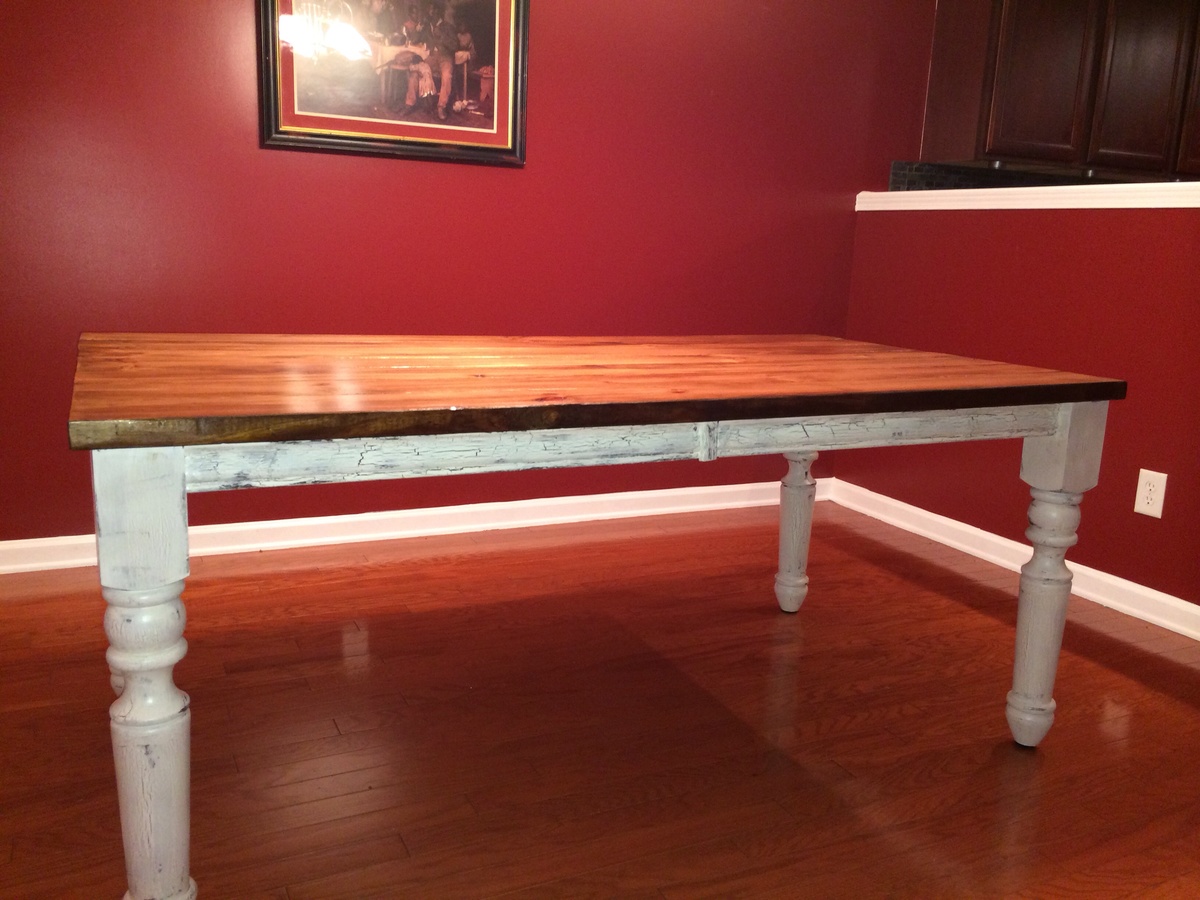
We made this table that seats 8. I loved the farmhouse table but we needed something that did not have cracks for food to seep into with 4 you kids this was a requirements. Much playing around with idea we made this table with out of Cedar 2x6's and a kreg Jig. The white spot is just extra poly we are filling a hole with. I did not want to use any wood filler We love it. We used legs I found on a old rusted table. In which I sanded them down and refinished them. The chairs we also found in the old storage shed on our property. We cleaned them up and painted them black. We do plan to make matching benches for the table.

Built from Plan(s)
Estimated Cost
$150 for total supplies (not counting jig)
Estimated Time Investment
Day Project (6-9 Hours)
Finish Used
Just clear coat
Recommended Skill Level
Beginner

Clara's Table

Submitted by gburge on Sat, 01/18/2014 - 21:21

I decided to dress it up a bit using oak for the surfaces. I then used Provincial stain by Minwax and semigloss poly. The legs/skirt are clear pine and both primed and painted. Rather than screw the seat to the frame from above, I used Kreg joints and secured it from below giving the chairs a smooth final finish.

Estimated Cost
$65
Estimated Time Investment
Weekend Project (10-20 Hours)
Finish Used
Minwax stain followed by semigloss poly.
Recommended Skill Level
Beginner

My Simple Outdoor Lounge Chair with 2x4 modification

I modified this chair with 2x4's as the base and 2x2 for decoration on arms, this is prior to sanding and finishing

Built from Plan(s)
Estimated Cost
$15-$20 dollars, depending on local lumber prices and finishing options.
Estimated Time Investment
An Hour or Two (0-2 Hours)
Finish Used
Unfinished
Recommended Skill Level
Beginner

Comments

RandyW

Sat, 06/13/2020 - 16:33

I always take my sander to the sharp edges and round them off

Simple Outdoor Chairs

Submitted by Anonymous (not verified) on Sun, 08/27/2023 - 12:22

I made two of the chairs using cedar 2x4's and then stained them cedar color. The cushions were on clearance at Lowes for 6.97 each. Super excited about that as well. For the back I did the three board suggestion versus just the two for more back support and I also added an extra board for the bottom seating. Project was pretty easy and the instructions were easy to follow.

Carrie

Wood Shop Storage Solutions...

It seems like organization is always a work in progress especially in my one car garage shop. Honestly it took years to realize what I needed to customize my space in order to organize things. I've built bulky work benches out of 2x4s and plywood. I've rearranged the work space over and over again over the last few years and finally came up with my own system

The miter station is a life saver. I had one of the fancy ones with the foldable wings but didn't like it. The object of it was to be able to fold the wings down for storage but I never did and it caused other space saving problems. Now I can easily store all of my small tools and woodworking knick knacks all in one spot. You can find plans for these if you google miter station, but take my advice and custom make one that fits all of your needs. There's a spot for my vice and speed square too. Things like that make it count.

The router table is probably my favorite tool in the shop. You can do so many things with the router table. I started out with just a top and a base and worked from there. Now everything router is in the cabinet ready to go.

Everything is on wheels. Us military guys and gals have to move around a lot so we have to plan for that. Now everything can just roll up the ramp and in to the truck.

Take some time and think about the efficiency of your shop space. How does everything flow? Or do you even flow at all? I used to woodwork myself in to a bunch of brick walls and now I don't.

Thanks for checking it out
Patrick

Estimated Cost
a lot hah
Recommended Skill Level
Intermediate

Comments

birdsandsoap

Fri, 04/06/2012 - 22:05

wow. This is very impressive. I love how tall the pieces are so you don't have to bend down, I'm always working with my tools on the ground and it is a pain.

I covet your router table.

And the miter station is awesome. I just may copy that! I love how it houses all of your other tools as well. OMG! It even holds your shop vac, and has a handy ledge for pipe clamps?! I would love a simple plan.

I'm really curious about your kreg jig setup on that work table too.... details please.

Well Done!

patrickhosey

Sat, 04/07/2012 - 09:20

You've got to get up off the ground. I did that for a looooong time and my back suffered big time.

The kreg jig is mounted to a piece of plywood. Then I drilled 2 holes in the top corners and hung them on the side of the work table.

The miter station has to be custom made for your shop needs but planning it out is very important. I needed a spot for my vice and a quick spot for my speed square. So I calculated all the space needed for 3 drawers and then just added a few inches. Also measure how high your saw sits and recess your work surface exactly that amount.

Grizzly tools has a good deal on simple router table set ups right now. I'd check that out. Eventually the miter saw will be hooked up to the shop vac. I bought an outlet that automatically turns the vacuum on when I use the saw.

It's just like the other stuff. Start with the face frame and the rest will come to you.

Patrick

claydowling

Sat, 04/07/2012 - 11:49

If working without plans makes you twitch, Startwoodworking.com, Fine Woodworking and Popular Woodworking usually all have plans for shop furniture like this. There are enough variations over the years that you can usually find the features you're looking for if you do some mixing and matching. I know there was a very nice router table plan last year.

For the record, I work more like Patrick unless what I'm building gets complex.

birdsandsoap

Sun, 04/08/2012 - 00:25

Me too! i always seem to get inspired by a plan, and by the end of the project, it's totally different than the original because of all of the adjustments I make. I have never even considered building shop furniture before, these photos are inspiring!

Thanks Clay for the link, I will have to go burn some time on that site as well. Someday (when I don't have a leaky garage) I will have a shop worthy of such beautiful equipment.

Great Job again, Patrick!

redhead_61

Sun, 04/15/2012 - 14:24

Uh, this is amazing. Good thing I can tell your shop vac and scraps bin have DUST on them, or I think you might be lying about this somewhere you actually work :) ! I just got around to finishing my work space table. I am planning on doing some major organizing before the heat of the summer hits, and then maybe a router table like this might make it to the top of my list.

Scott Kershaw (not verified)

Mon, 06/11/2012 - 19:56

Patrick, with the recent release of your Farmhouse Table, I find myself watching it over and over and my jaw is always on the floor by the end. In a way, the flow and the craftsmanship is intoxicating. My family is in the process of moving to a new home and I am mostly looking forward to organizing the garage space. I need a man cave and it needs a miter saw station and a router table.

Did you construct it all with pocket holes? What material is the majority of the carcasses, face frames and drawer fronts?

Thanks for the excellent pictures and marvelous video!

Scott

In reply to by Scott Kershaw (not verified)

patrickhosey

Mon, 06/11/2012 - 22:54

The materials are just standard pine boards from Home Depot. White pine for the face frames and drawers and 3/4 pine plywood for the cabinets. I'm glad you like the video and I really appreciate the nice words. We have some new stuff coming up, so be checking back for the router table plan.

Patrick

Scott Kershaw

Tue, 06/12/2012 - 18:36

Do you use a table saw for any of your projects? What would you estimate the cost of the miter saw station, alone, to be? For some odd reason, nice 3/4" birch plywood is the same cost as 3/4" pine/fir plywood here is Missoula, MT. An 8' x 4' sheet goes for ~$45. Is your switch for the vacuum the Rockler product like in this video: http://www.youtube.com/watch?v=7LmSVvOnxsI ? Sorry for all the questions. Your station is by far the closest to the what my mind has been imagining and what my garage could handle. Thanks!

patrickhosey

Tue, 06/12/2012 - 20:18

I just bought a used Grizzly table saw. It's pretty new to me so I'm all excited about learning on it. For the most part I used a circular saw with a straight edge. Now that I have a table saw, all that should go a lot faster. The switch is very similar to that one, but I bought it from sears a few years back. The miter station is hard to make plans for. Every miter saw is different so the platforms need to be different sizes to match whatever saw you're using. Then you have to keep in mind the size of your shop vac and design it around that as well.

claydowling

Wed, 06/13/2012 - 05:31

Table saws are something that can last fifty years or more without any trouble, so you can get them used pretty readily. You want to buy a good sturdy saw. Locally the used market is dominated by Craftsman/Sears saws. The saws made before 1962 were made by King-Seeley, a company local to me, and those are pretty good saws (I own one and really like it). The ones made after that were made by Emerson Electric, and the owners of those saws have not had such kind things to say about them.

cmm314

Tue, 09/16/2014 - 06:30

Hi Patrick,

I am in the process of desinging a similar miter station, but am curious as to how long your's is?  Some of the recommendations call for a full 8 ft long base, but not sure I have the space in my garage for something like that.  What is the length of yours?

Thanks!


justinjester

Thu, 06/02/2016 - 13:55

Hey Patrick. Thank you for providing so many plans to such beautiful pieces.  I am about to start working on the router station this weekend.  I can't wait to get started.  The reason for the message, could you possibly provide the plans for the miter station you created.  I am a new woodworker and I need plans to be able to create some of these pieces.  I would love to have a garage of similar pieces.  Is that something you could provide?  I would be happy to purchase it from you.  Thank you again for your hard work. - Justin

Corner TV stand

Submitted by TBarn on Tue, 01/21/2014 - 12:41

After a promise to get a new carpet and TV stand as an anniversary gift, I began a search for a corner stand that would fit a 50" flat screen and hid all of those ugly wires. Craig's List had nothing and the retail options were either cheaply made, ugly or crazy expensive. I stumbled upon Ann's page, and since my son has a wood shop in the basement, I figured why not try to build something. I used the original plan, but borrowed ideas from other brag posts to create a 36" tall model with overlay doors that we think looks great. Next project: bar stools for the kitchen island.

Built from Plan(s)
Estimated Cost
$200
Estimated Time Investment
Weekend Project (10-20 Hours)
Finish Used
Zinder Primer and Gidden (America's Finest) Semi Gloss
Recommended Skill Level
Intermediate

Faux Oars

Submitted by Smooter on Thu, 04/14/2016 - 10:13

Built these Ana White Faux Oars out of scrap pine. I experimented with the finish, trying to make a more weathered look. I used Minwax Special Walnut and Jacobean and white washed. I also rounded the edges using a router and orbital sander. Easy and fun project!

Built from Plan(s)
Estimated Cost
Free
Estimated Time Investment
An Hour or Two (0-2 Hours)
Finish Used
I used Minwax Special Walnut and Jacobean and white washed. I also rounded the edges using a router and orbital sander.
Recommended Skill Level
Beginner

Lego and Art Table

Submitted by ahicks6 on Fri, 12/27/2019 - 08:57

I looked everywhere for a Lego table that would fit my needs and not be super expensive, but I kept coming up with nothing. So I decided to make my own and to make it a place for my kids to do their art as well.

This was my first time using a Kreg Jig as I wanted it to be really stable. I found the drawers at The Container Store. They house all of the color coordinated Legos together.

It has been amazing so far and I'm so glad I didn't settle for any old Lego table on the market that didn't suit our needs. 

If you want more info regarding sizes, cut list, etc, let me know and I'll try to post them. 

Estimated Time Investment
Weekend Project (10-20 Hours)
Finish Used
Homemade chalk paint, Minwax Red Chestnut stain, Rustoleum Clear Enamel Spray
Recommended Skill Level
Intermediate

Benchwright Farmhouse table and bench

I started this Table and bench because, we have a one year old and we had a bar height table. Something a little shorter was needed, so I picked the Benchwright plans since they were most like our style. I used all white wood from Lowes and some pine 2x4's. Since the original plans made the table a little too large for our house I shortened the length on the table and bench by 15". This was the largest project I have done so far, but the plans are so easy to use, that the major time spent for me was getting the wood, and sanding and staining. I submitted the last picture here, because I originally picked out a Rust-oleum Sunbleached stain, or so it said. As you can see from the photo it just made everything grey, and was not the look I or my wife were looking for. I recommend very carefully picking a stain color out and testing it on similar wood before using it on your finished project. I spent two hours after this mistake sanding off the stain, and since it was grey it still shows through a lighter color. In the end we are both happy with the final product, and you don't learn until you try and mess-up a few times. I really had a lot of fun with this project, and can't wait for the next thing to build.

Estimated Cost
$200
Estimated Time Investment
Day Project (6-9 Hours)
Finish Used
Minwax-Ipswich Pine 221(two coats on table)(One coat on bench), Minwax-Bombay Mahogany Satin 380 (one coat left on for 15 mins on cross members)
Recommended Skill Level
Intermediate

Comments

Britterz (not verified)

Wed, 04/18/2012 - 11:43

Wow! Your table looks spectacular! Great job! I especially love that bench. I would like to build a bench to go with my benchright table. How did you do it?

dklunde

Wed, 05/30/2012 - 11:25

I dont see any screws on the ends of the planks into the top of the table.
Did you only screw up from the bottom? Did you do that on the plank ends
also?

Thank you for the in process photos too. It really helps alot. Also helps to
see that everything doesnt have to match up perfect seam-wise. I get too used
to manufactured stuff...and forget how beautiful hand made items can be
simply because of their imperfections in the woods.

In reply to by dklunde

Kevin.Leach

Wed, 06/06/2012 - 19:59

I used finish nails from the top into the structure, and then used wood filler to
Fill in the holes. The ends are only held on by the two bolts on the ends.

I appreciate the handmade quality of real wood furniture as well. Even when small mistakes are made here and there, the end result is something to be proud of.

dklunde

Wed, 05/30/2012 - 11:26

Sorry...just thought of another question.... Did you glue in between your planks?

In reply to by dklunde

Kevin.Leach

Wed, 06/06/2012 - 20:10

I did glue between the planks and underneath, I figured anything to keep the boards closer together and fill in the gaps would help.

Lego Farm House Bed

Submitted by Mamabear2 on Thu, 01/23/2014 - 07:32

we recently used the plans for the farm house twin bed, and created it with our own little twist for our 3 year old son! Instead of the normal slats we used car siding to create the "blocks" for my Lego vision. The bed is stained with a black gel stain by min wax, and the slates are painted from colors I picked out a Lowes. I wanted him to have a matching bed to his dress. I got this really neat dresser from a friend and I stained the out side and painted the draw fronts bright colors like Legos. our next project for his room will be night stands and possibly a bookshelf

Estimated Cost
150.00
Estimated Time Investment
Weekend Project (10-20 Hours)
Recommended Skill Level
Beginner

Comments

Washer Dryer Pedestals

Submitted by Kvnpalmer on Sun, 04/17/2016 - 13:57

We have a very small laundry room and we wanted some additional room to put shoes when we walk in. We also couldn't have the pedestal be too tall or our washer and dryer would hit the shelves we put in over the laundry room. For this reason I modified the plans to remove the bottom and adjusted the height of the plans to just fit. I was worried about the stability, but made this super strong.

Estimated Time Investment
Weekend Project (10-20 Hours)
Recommended Skill Level
Intermediate

Greenhouse Build

Submitted by Chris Rose on Tue, 12/31/2019 - 18:43

A microburst storm destroyed my first green house (last pic). I wanted something that would be stronger, I found Ana's plan and built a replacement. Was able to recycle some of the metal channels and panels from the destroyed one to cover the end sections and the door.

Outdoor Grill Station

Submitted by Anonymous (not verified) on Tue, 09/05/2023 - 09:21


This rolling bar was inspired by Ana White's plan.  It is used as a bar and conceals an electric smoker and a grill.  I added handles for moving and some hooks on the sides.  I stained the salvaged 2 X 6 's and brushed on clear oil based poly on the new Cedar fence boards.

Billie

Workbench Console Table

Submitted by DadsShop on Tue, 04/10/2012 - 17:37

Built this table over the weekend with the intention of selling it. My wife isnt so sure she wants to let it go now though! I used a 2 in 1 stain and poly that i am not happy with the results of. From now on im going to stick with the tried and true method of doing the stain and finish seperatly. Overall, i like the plans and will probably build a few more of these to sell.

Built from Plan(s)
Estimated Cost
125.00
Estimated Time Investment
Weekend Project (10-20 Hours)
Finish Used
Minwax 2 in 1 Dark Mahogony
Recommended Skill Level
Intermediate

DIY Farmhouse Table

Submitted by tnkrise2 on Sat, 01/25/2014 - 20:21

DIY farmhouse table built by my wonderful husband. We used legs from Osborne wood and the apron and legs were stained and antiqued using a crackle glaze and antique white paint. Love it. The plans were great. Our cost was high because we had to purchase a kreg jig. But it will get a lot if use. Next project will be the corona coffee table-square

Estimated Cost
450-500
Estimated Time Investment
Week Long Project (20 Hours or More)
Finish Used
Same as recommended in the plans.
Recommended Skill Level
Beginner

Tk u for all ur designs

Submitted by Cgovalle on Tue, 04/19/2016 - 15:05

Needed shelves for my shed. Ur design fit the bill. Cannot wait to make more

Estimated Cost
$70
Estimated Time Investment
Afternoon Project (3-6 Hours)
Recommended Skill Level
Beginner

Comments

Loft Cabin Bunk Bed

Best Christmas present according to my 4-year-old twins :)  I combined ideas from Jen Woodhouse's "cabin bed" and "loft cabin bed" after seeing another brag post from someone who had turned it into a bunk bed.  I added a separate platform for the lower mattress for uniformity and to provide some air circulation for the mattress.  I also opted for a 2x6 as the bottom weight-bearing beam because I wanted to be able to add an extra couple pocket screws since this mama likes to play in the top bunk too!  My girls took turns sleeping in the top/bottom for the first 2 nights, and have been camping out together in the top bunk ever since... and my husband and I are finally getting to sleep in on the weekends because they never want to come out of their room!  


**Side note -- I'm not sure how my pictures got flipped but I have no idea how to fix it!

Built from Plan(s)
Finish Used
3 coats of white primer + paint in satin finish for the main house
Varathane weathered grey for roof & stairs
Rustoleum "Chalked" in charcoal for window trim

Comments

Twinkies' mom

Fri, 10/02/2020 - 09:33

I am SO sorry but I haven't been on here since I posted the bunkbeds (almost 9 months ago!) I had written out all of my modified measurements on the Jen Woodhouse plans but have since lost it somewhere in my garage :( Here is what I can tell you at the moment: short side of "front" & "back" panels = 77.25" ; I kept the angles on the sides/roof the same, so the highest point of roof = 89" (I have short 8' ceilings so this leaves ~7" space up top). I used what I believe were 5" tongue & groove flooring panels instead of plywood for all sides, framed by 2x4s and 2x6 underneath for a little extra support. The height from the bottom of the top bunk to the floor is 38", and I added a 2x6 piece between the bottom legs of the 2 side pieces, flush with the outside edge. I built a rectangular frame for the bottom mattress using 2x6" on the long sides and 2x4 on the short sides -- the 2x4s are raised off the floor in order to allow for air circulation under the mattress and act as the end slats (they're flush on top with the rest of the slats, which I used 2x4s instead of the 1x in the plans)... instead of the 2x2 supports for the mattresses I used some scrap 2x3s from my kids old toddler beds which I had also built but tried to recycle as much of the wood as I could for this project, plus the 2x6 gave me a little more wiggle room -- if you use 2x4 you won't have space for 2x3 supports. The front "door" opening is 22.75", which I based on my size and me being able to get in and out easily (as mentioned above, I like to camp out with my kids sometimes!). The window openings are 12" w x 13.5" h, but the height is measured after I made a 1x3" window ledge which is flush with the inside of the wall; the rest of the windows are framed with 1x2s and 1x3s.
The full width of the side panels is 38" and the front/back are 78.5" -- I based these on the mattresses which I had already bought (Novaform twin from Costco -- since they're memory foam they're a little easier to "squeeze" in the top bunk than I would imagine a regular mattress would be).

I think that covers everything, sorry again about replying so late!

Twinkies' mom

Fri, 10/02/2020 - 09:42

2 more things:
The bottom "frame" was meant to be removable for easy assembly/disassembly as my family moves a lot! That is why I used the inner 2x4s to hold the long side rails together, and the short-side 2x6s which are attached to the side frames are merely fore the illusion that it's all one piece. I did place a couple 2.5" screws through the inside of the 2x4s right into the legs of the upper bunk to make sure it stays in place.
When building the front panels with the windows, I decided on door opening first, then window opening (based on the size of the tongue & groove flooring), then calculated the width of all the pieces to create the window opening. I used pocked holes to connect the tongue & groove flooring to the "frame" created by the 2x4 pieces, and TONS of wood glue in between the boards. Adding the window frames with glue & nails helped provide a little more stability to the windows, although once the glue was dry there was zero movement around the window but I never know with my extremely-destructive twins! Now they're able to climb all over the bunk using the window ledge for support and it's no problem.

Bedside Table

Submitted by AlHoward on Sat, 04/14/2012 - 10:18

Easy!

Built from Plan(s)
Estimated Cost
$55
Estimated Time Investment
Afternoon Project (3-6 Hours)
Finish Used
Painted one coat of semi gloss and sanded.
Recommended Skill Level
Beginner
Back