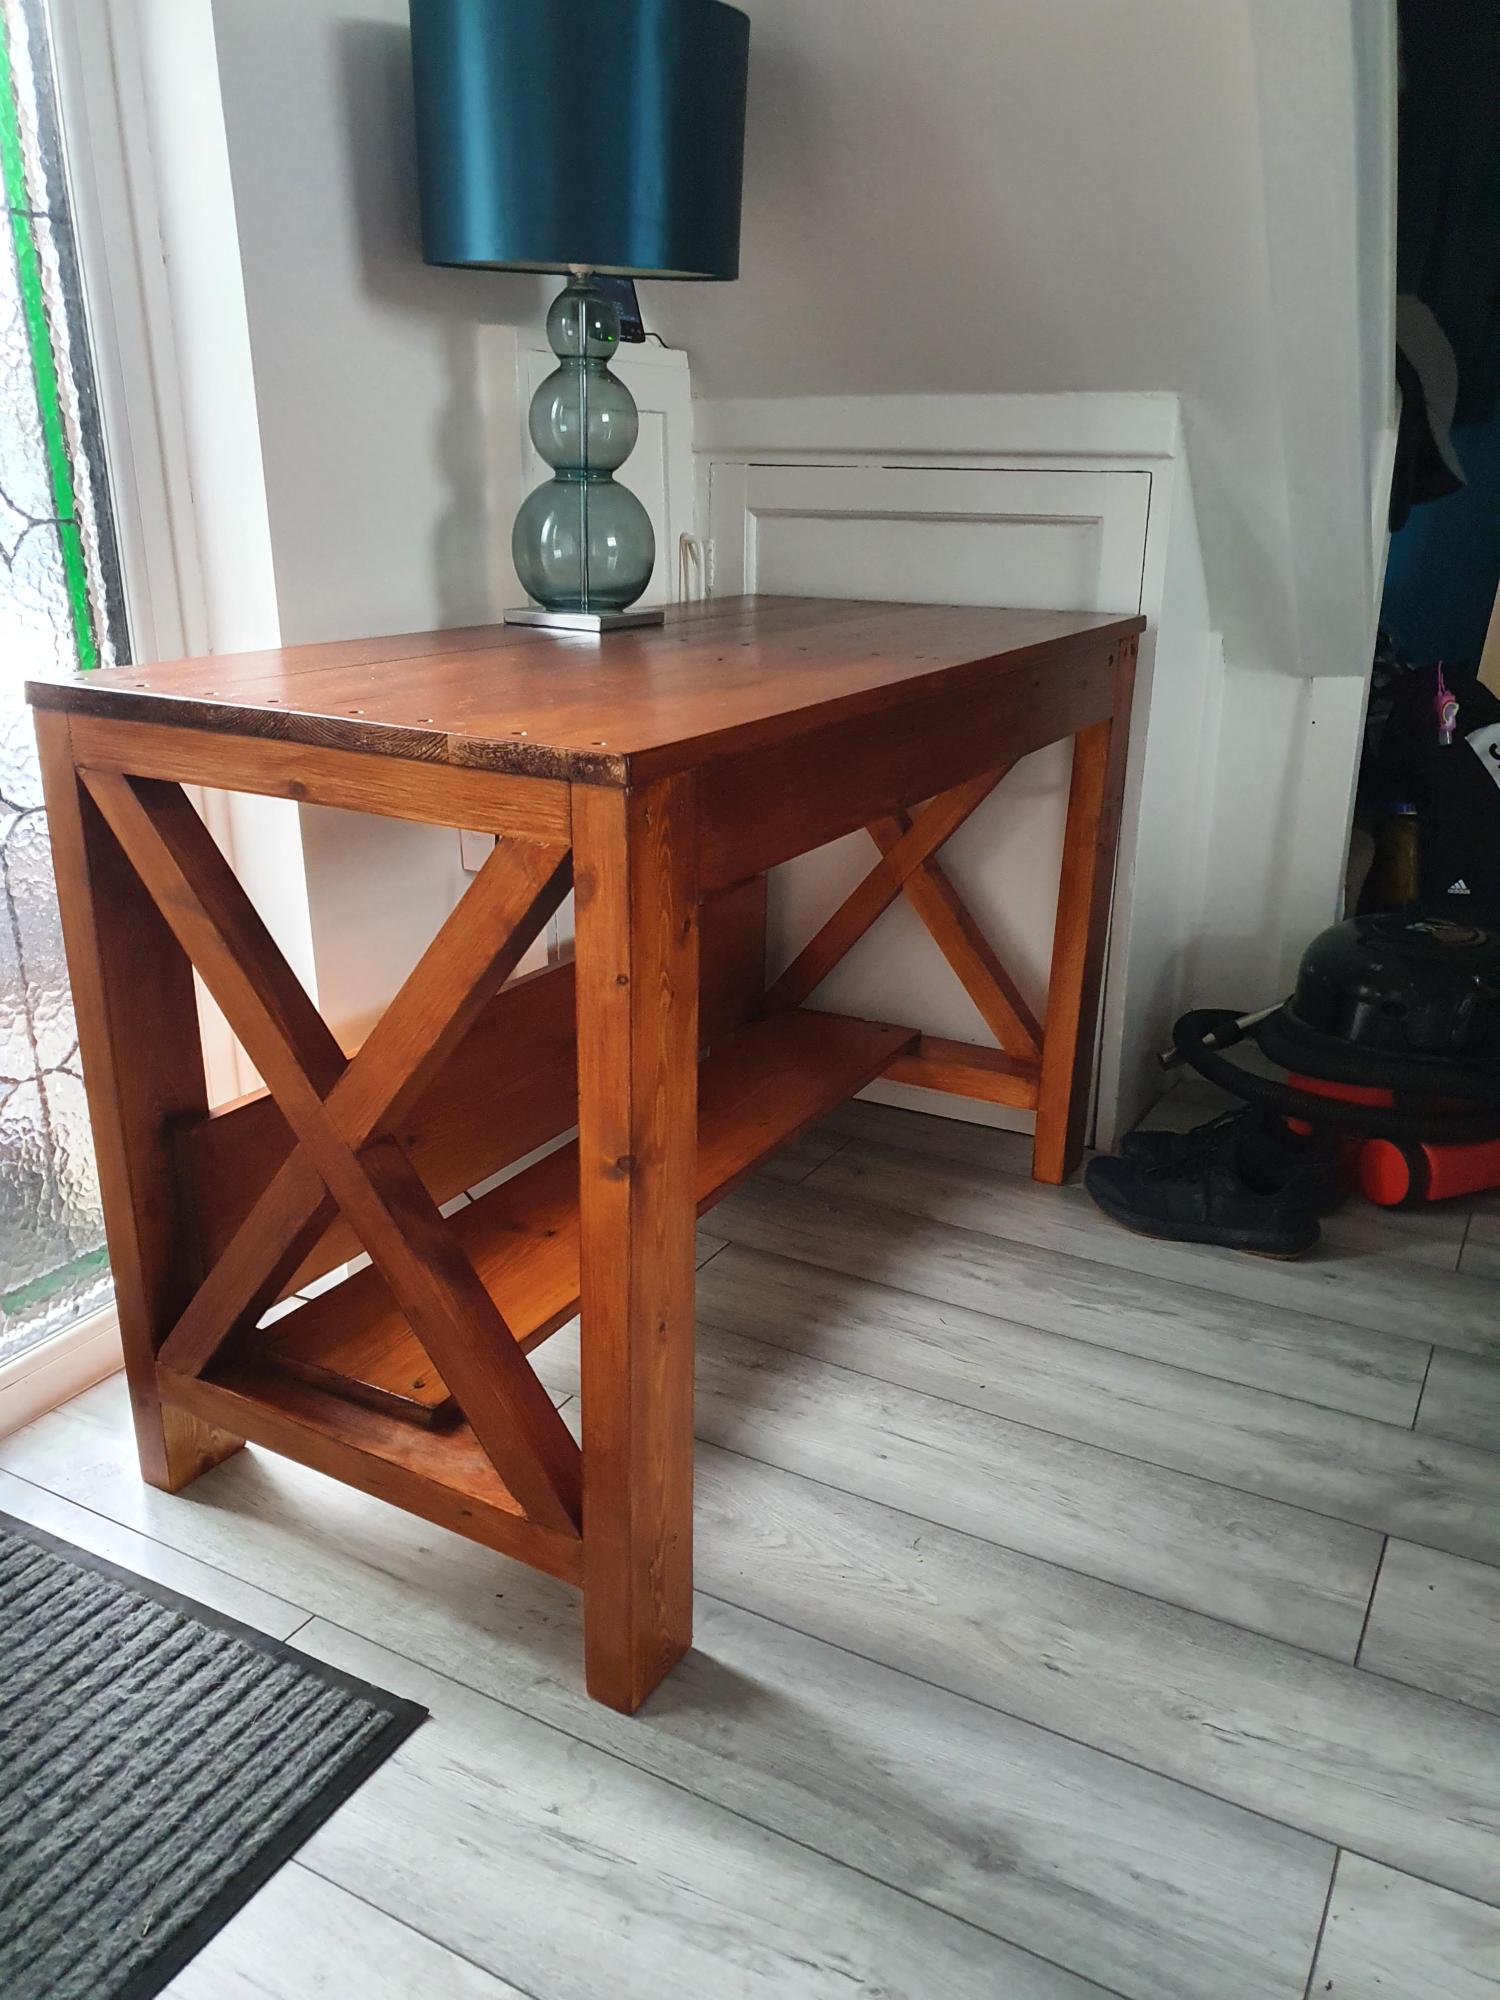
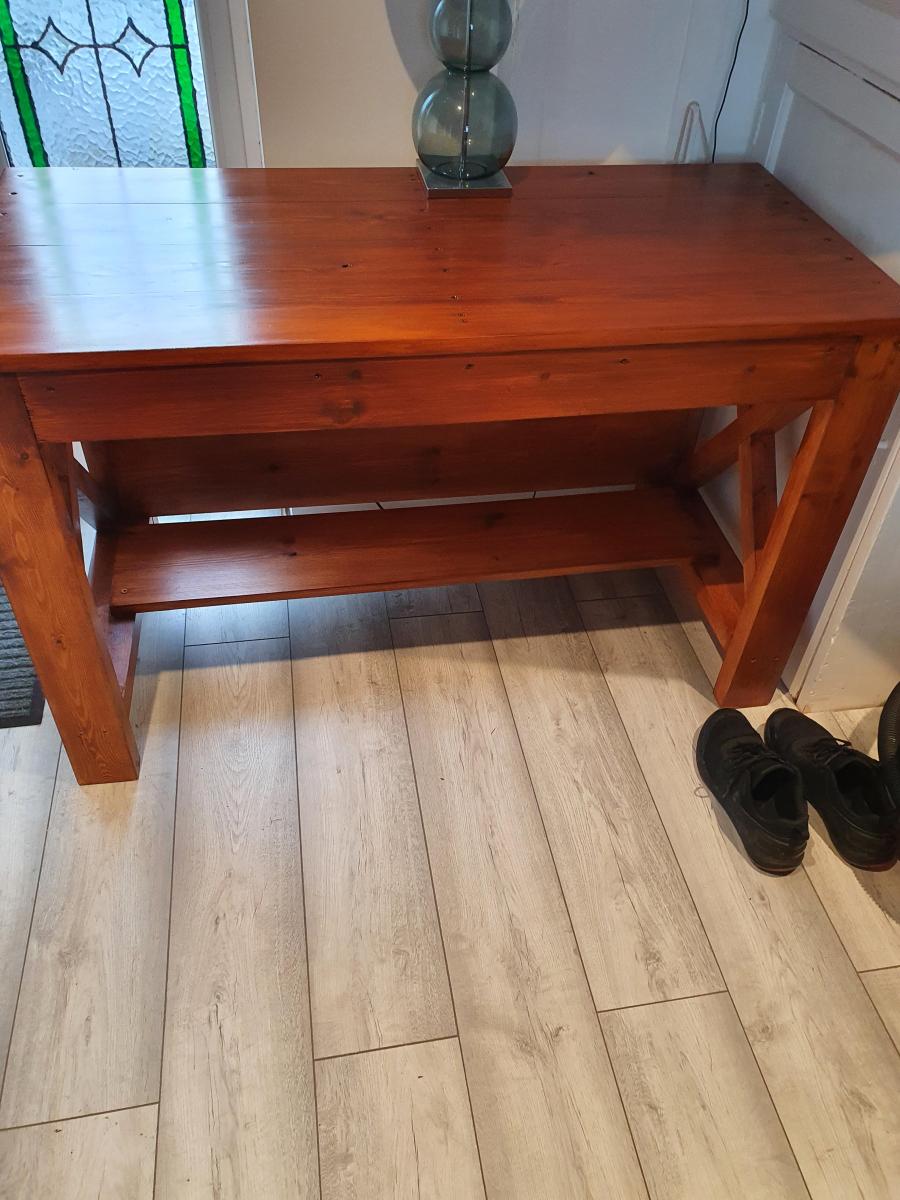
Tryde Side Tables
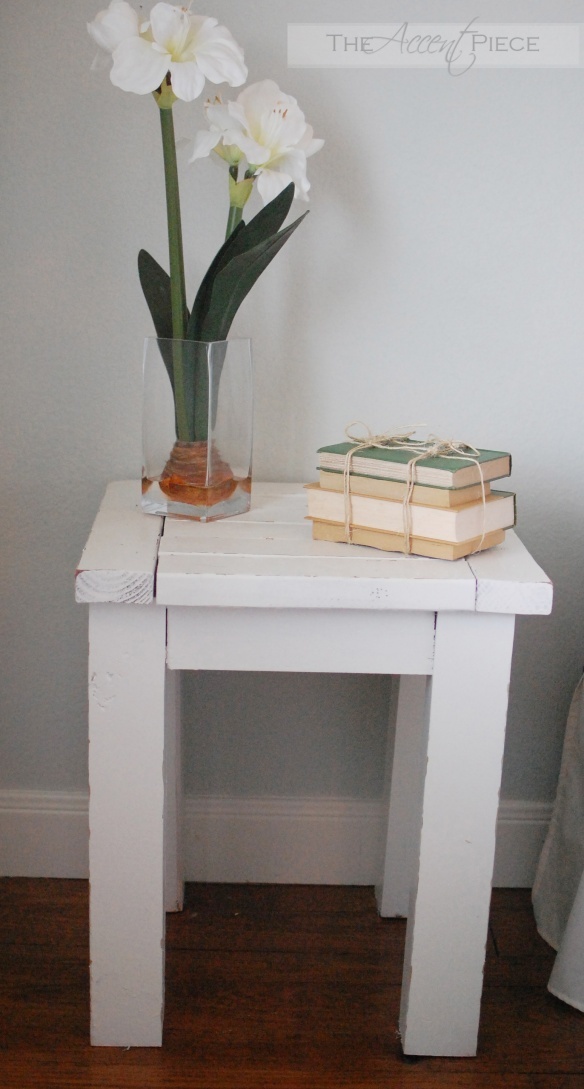
Made these for my guest bedroom!

Built from Plan(s)
Estimated Time Investment
Day Project (6-9 Hours)
Recommended Skill Level
Beginner
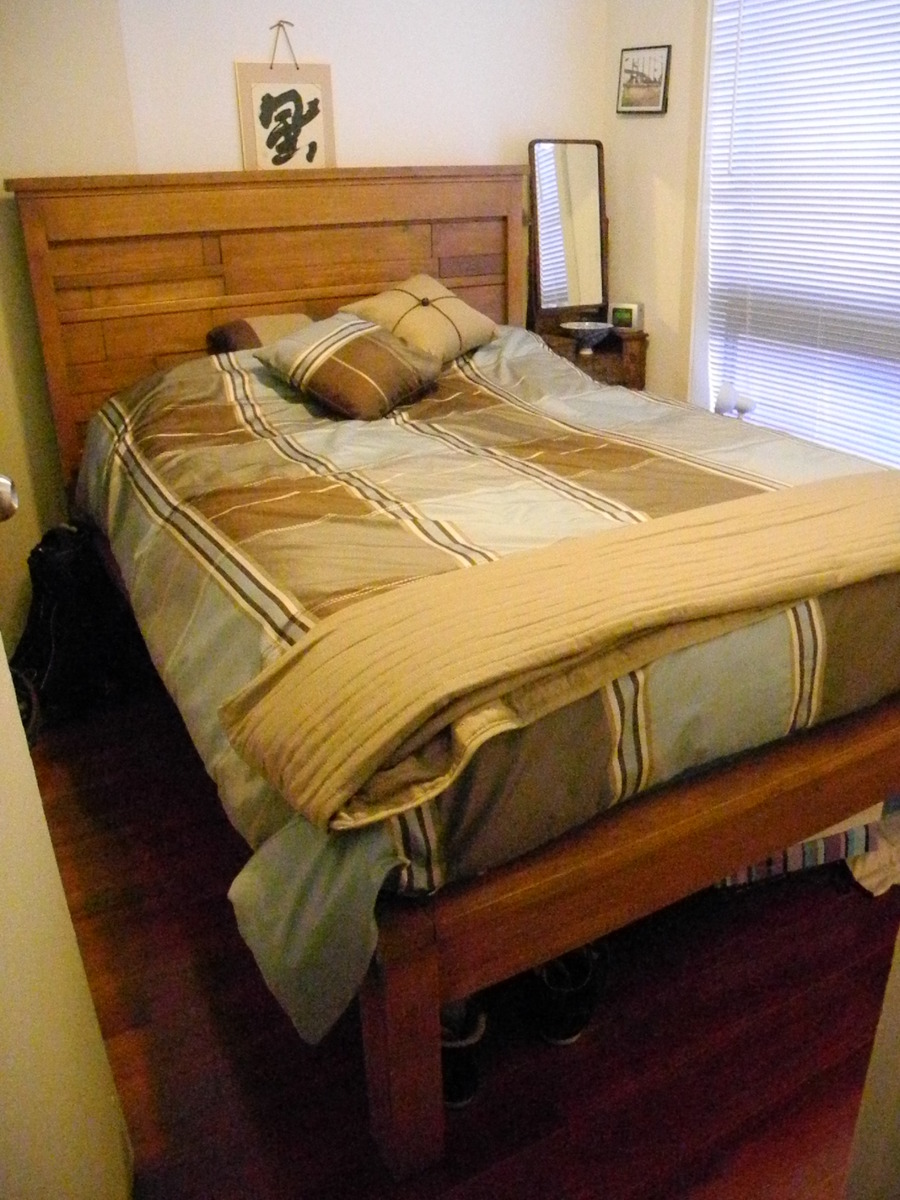
Made these for my guest bedroom!
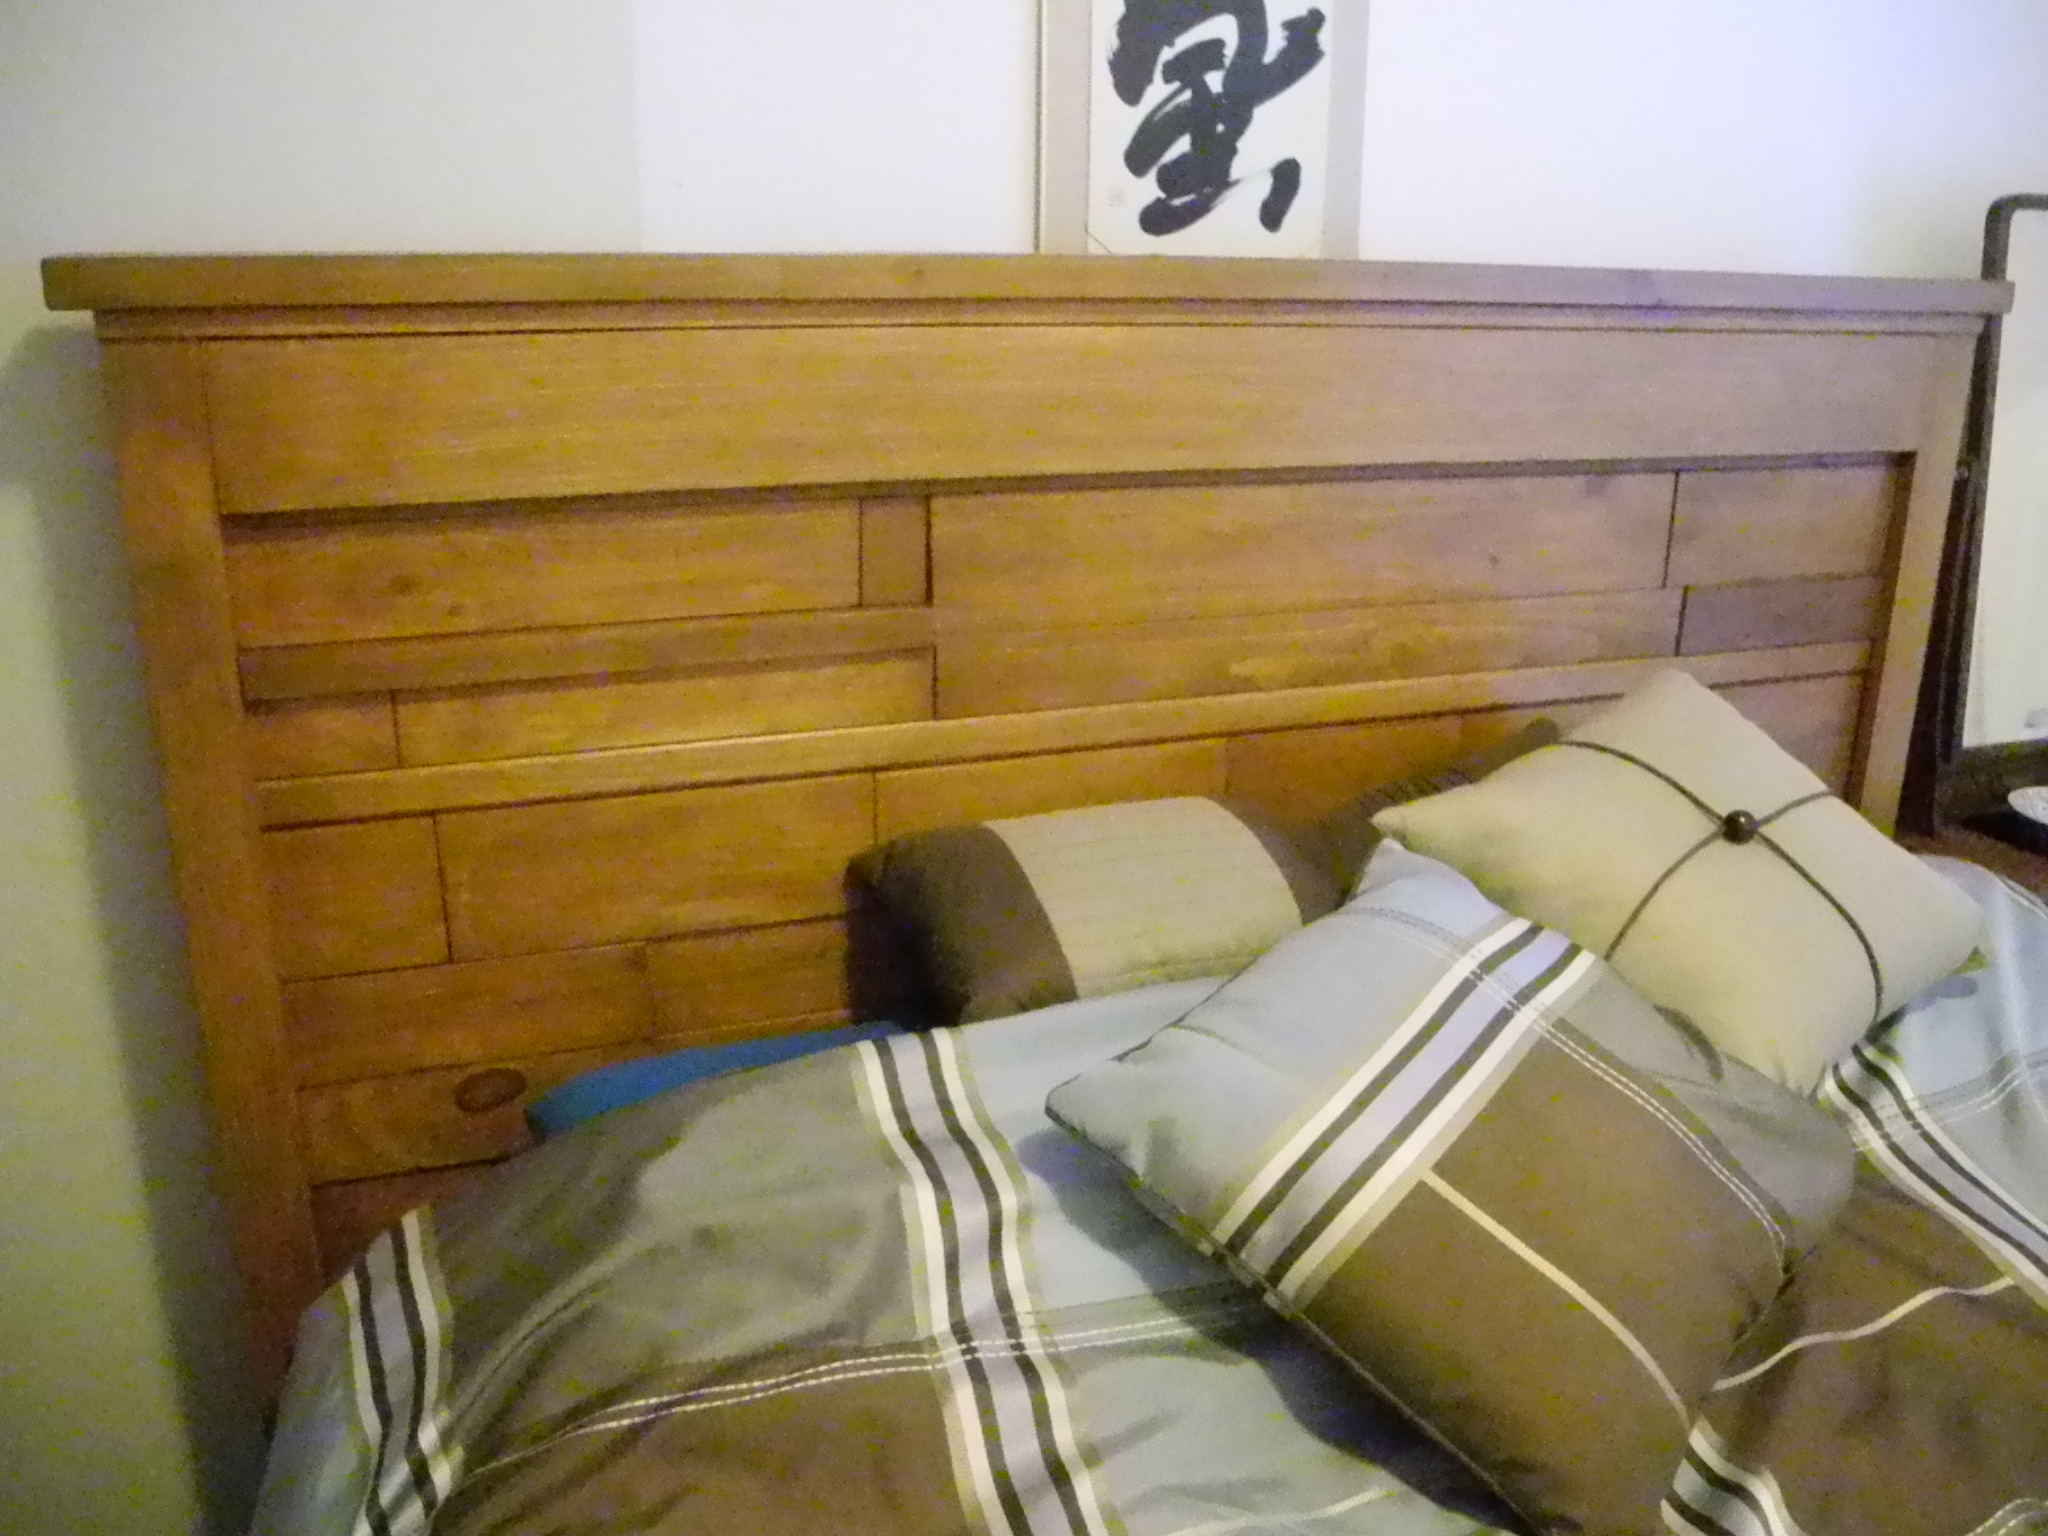
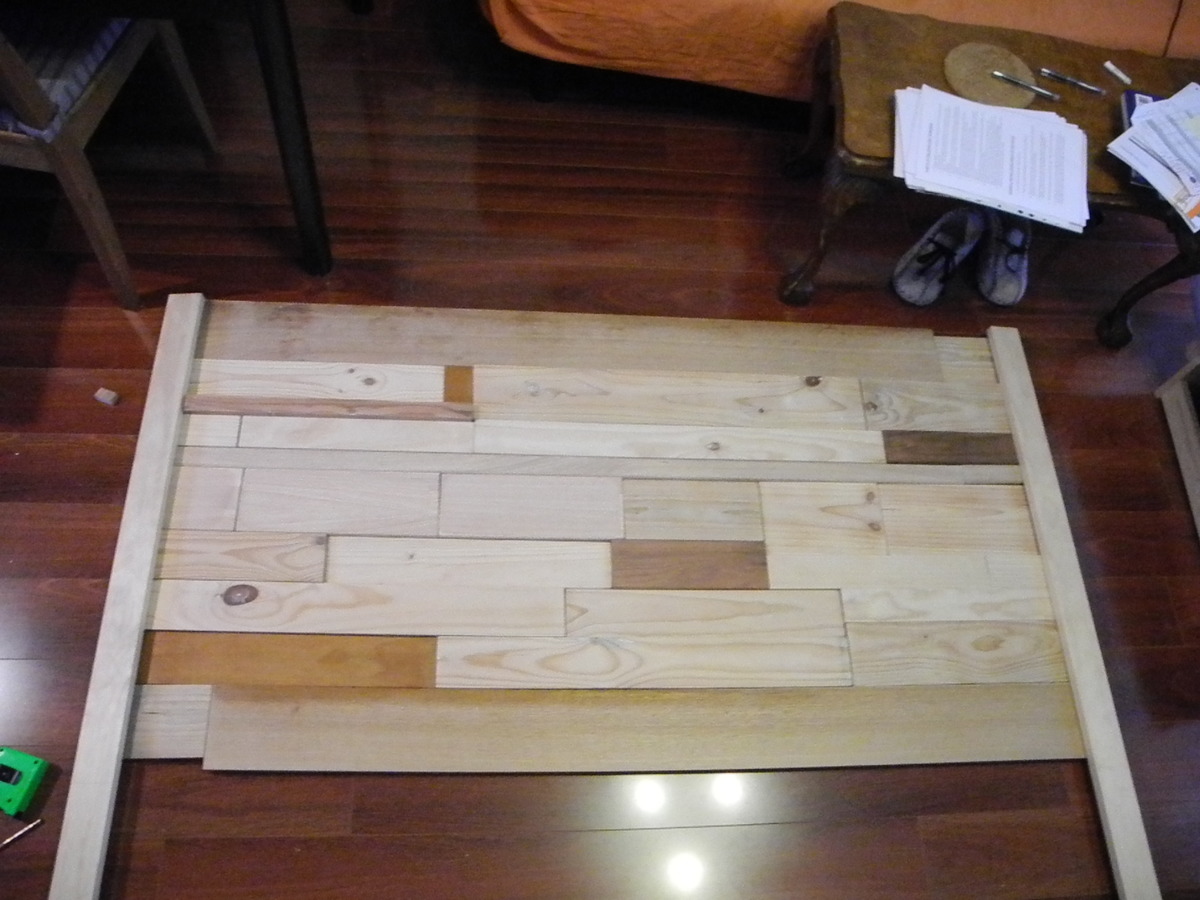
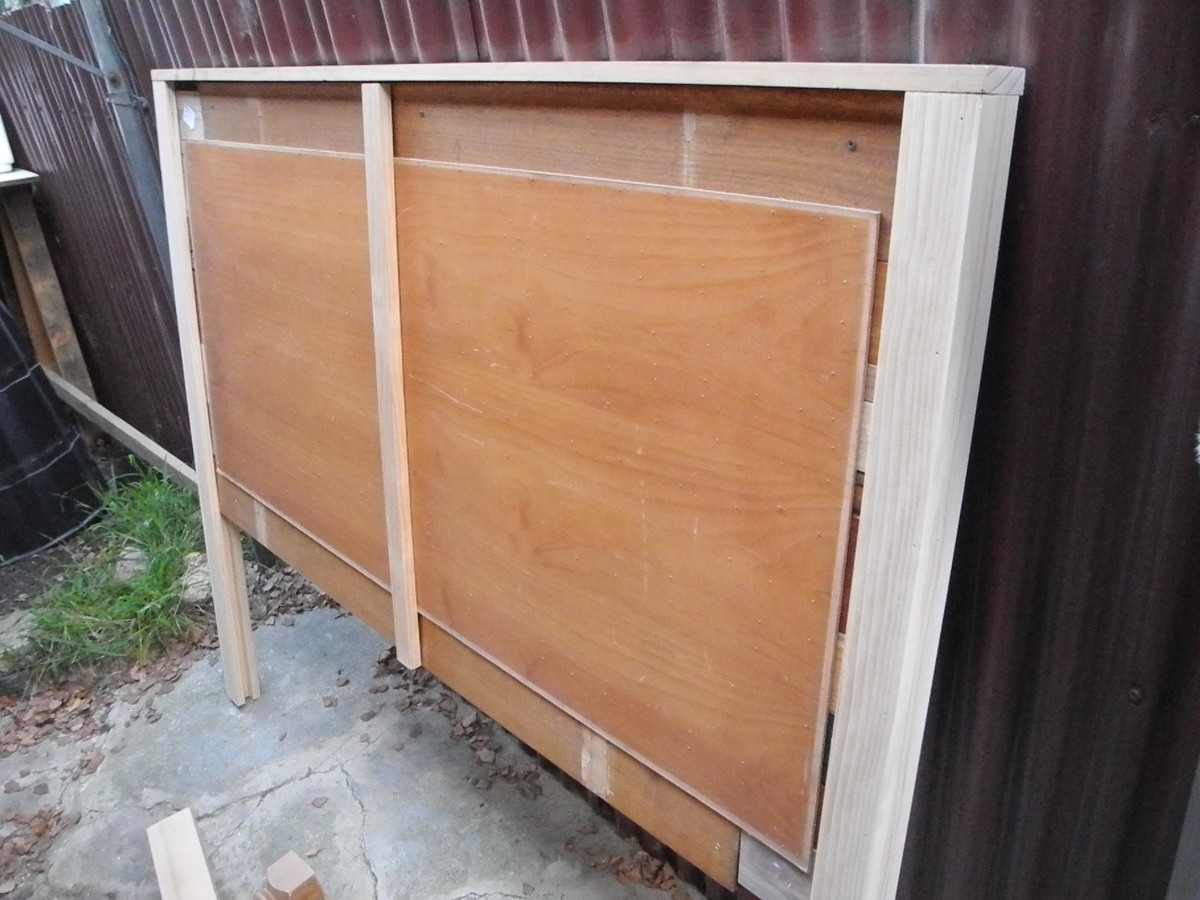
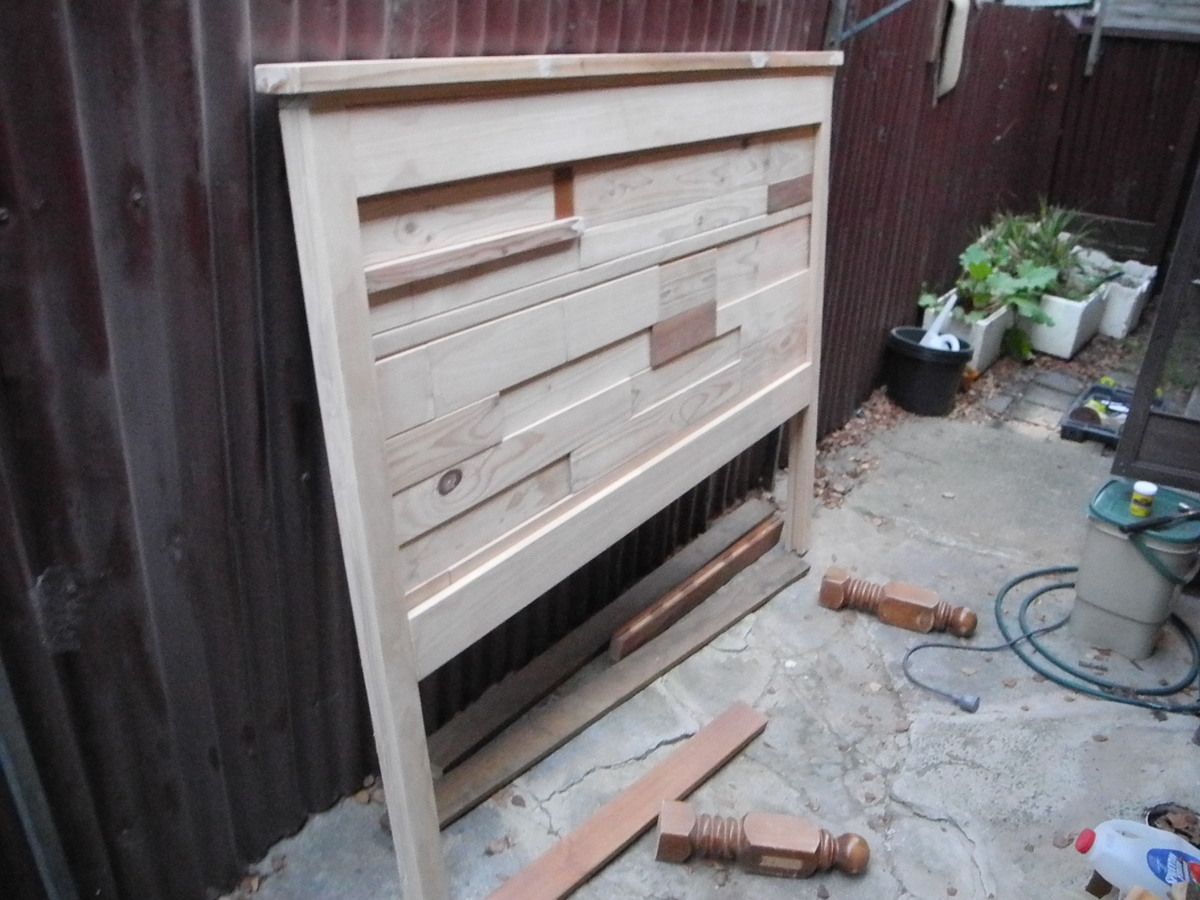
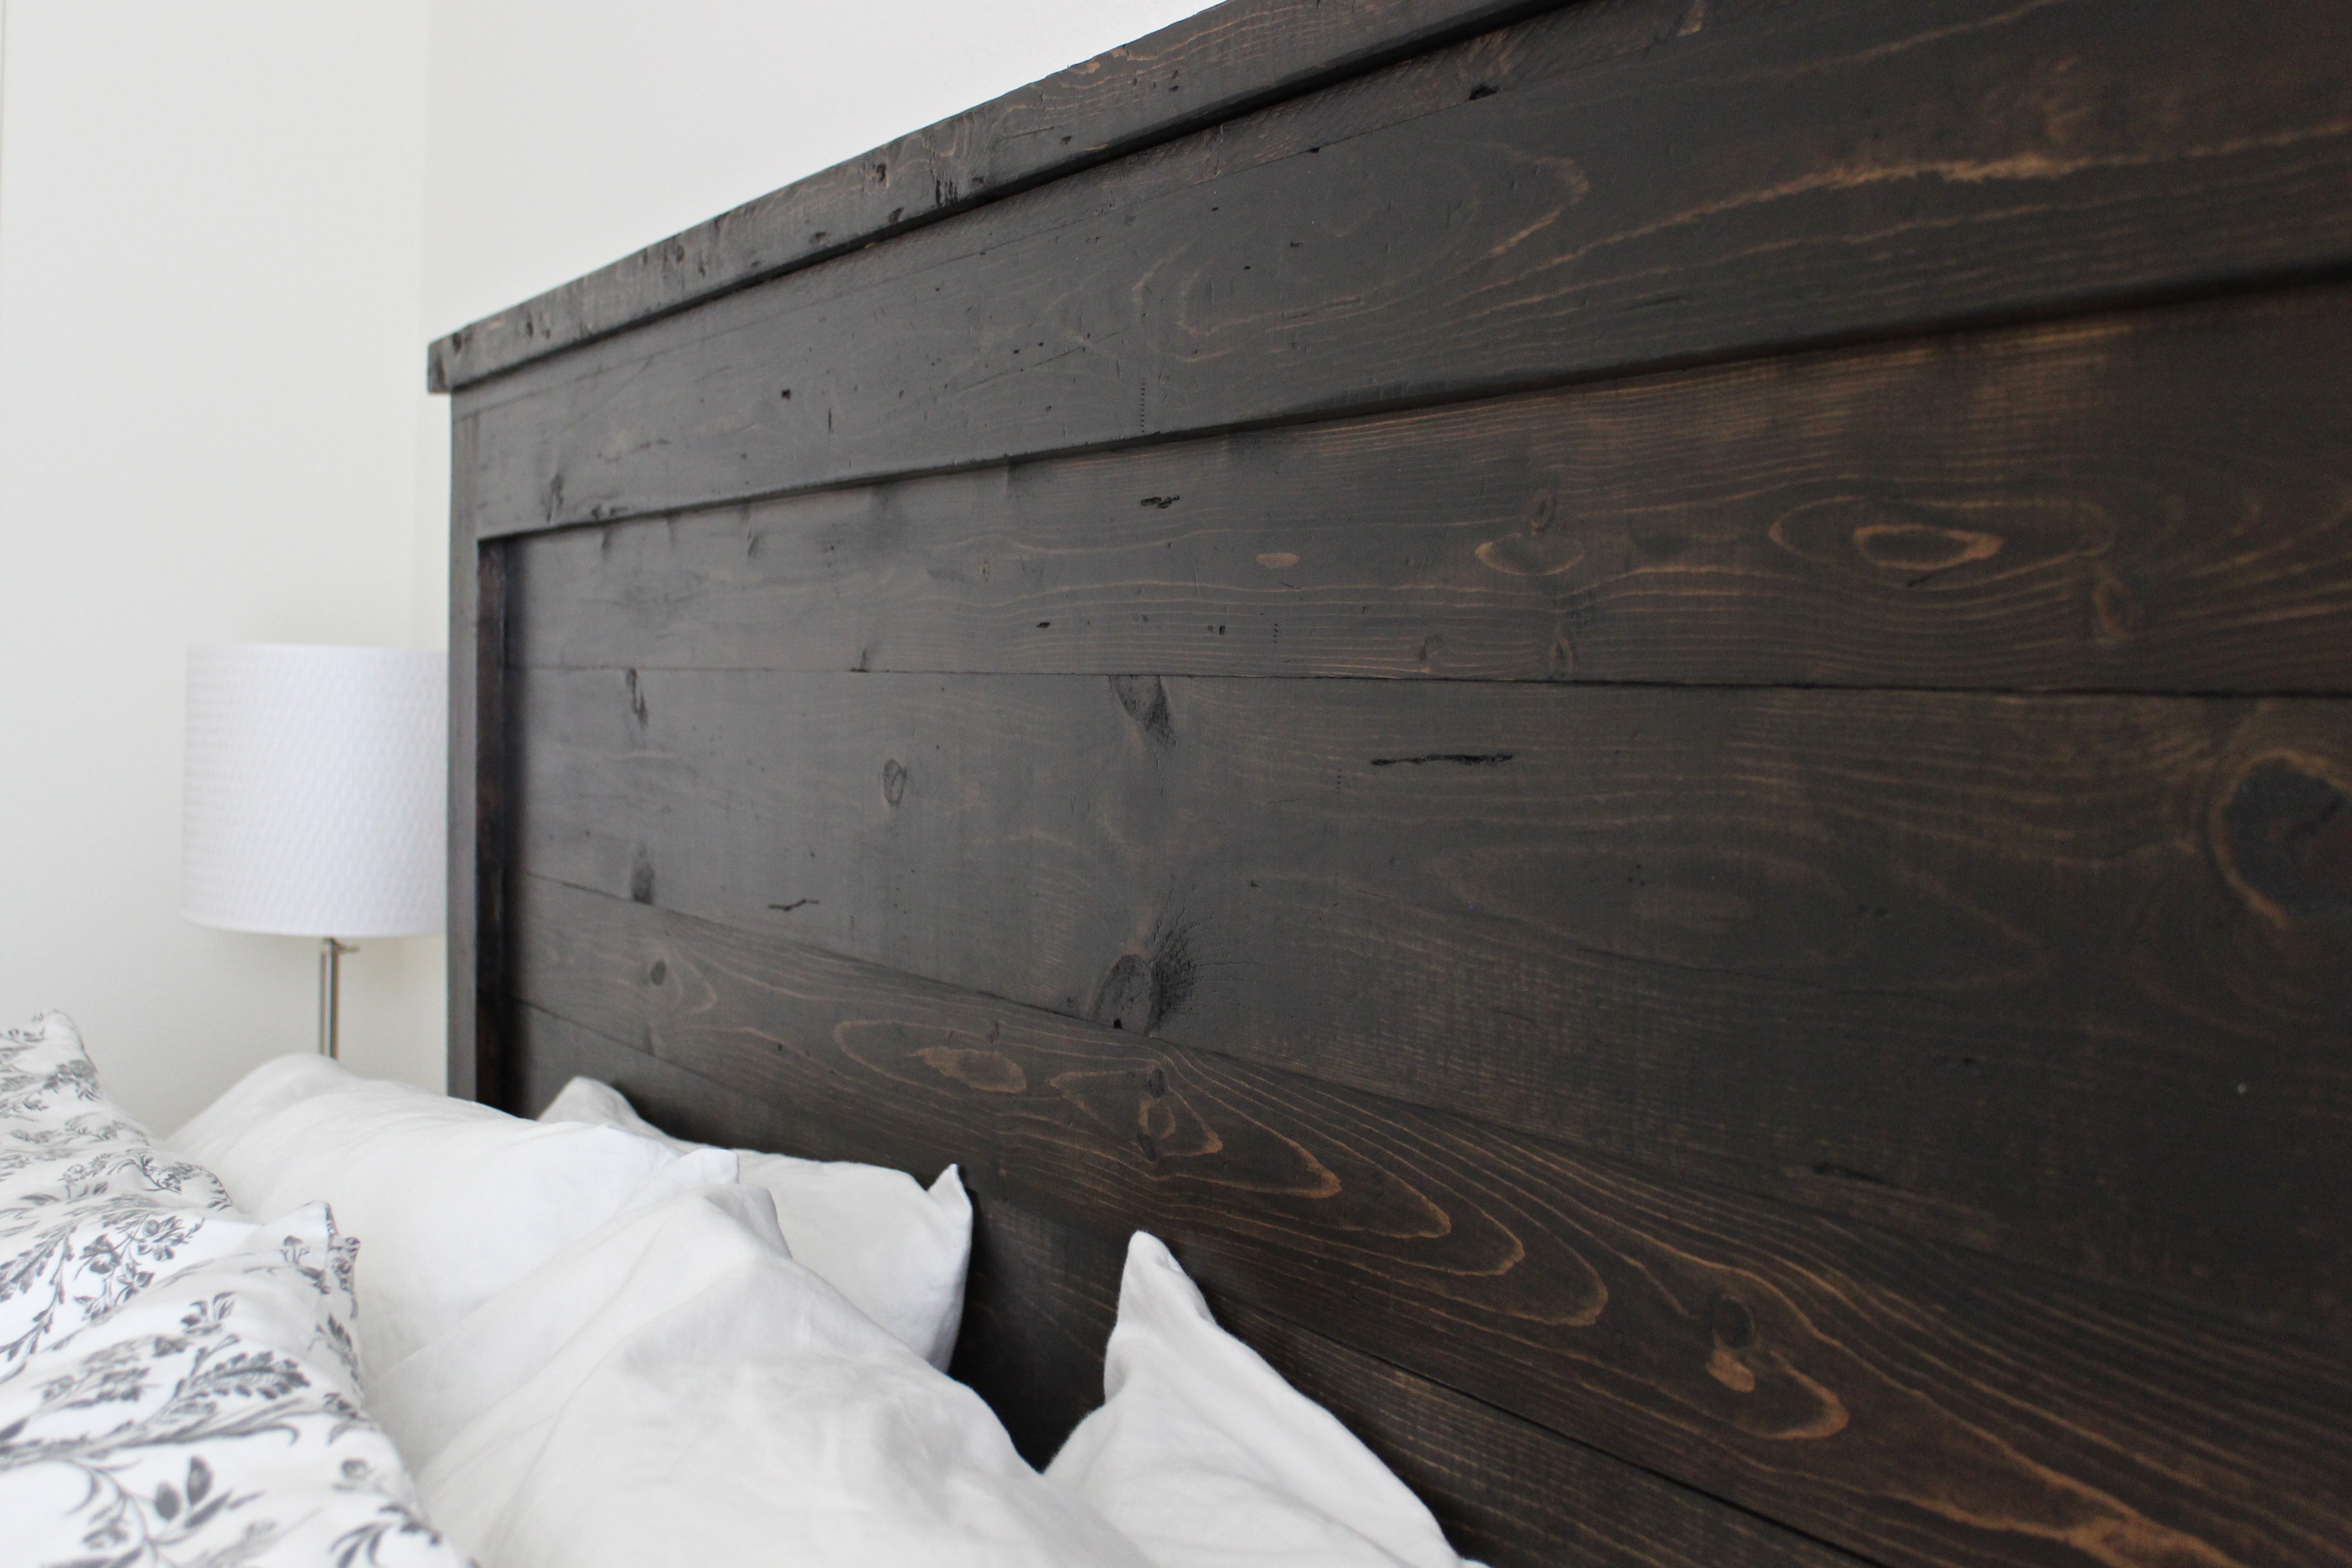
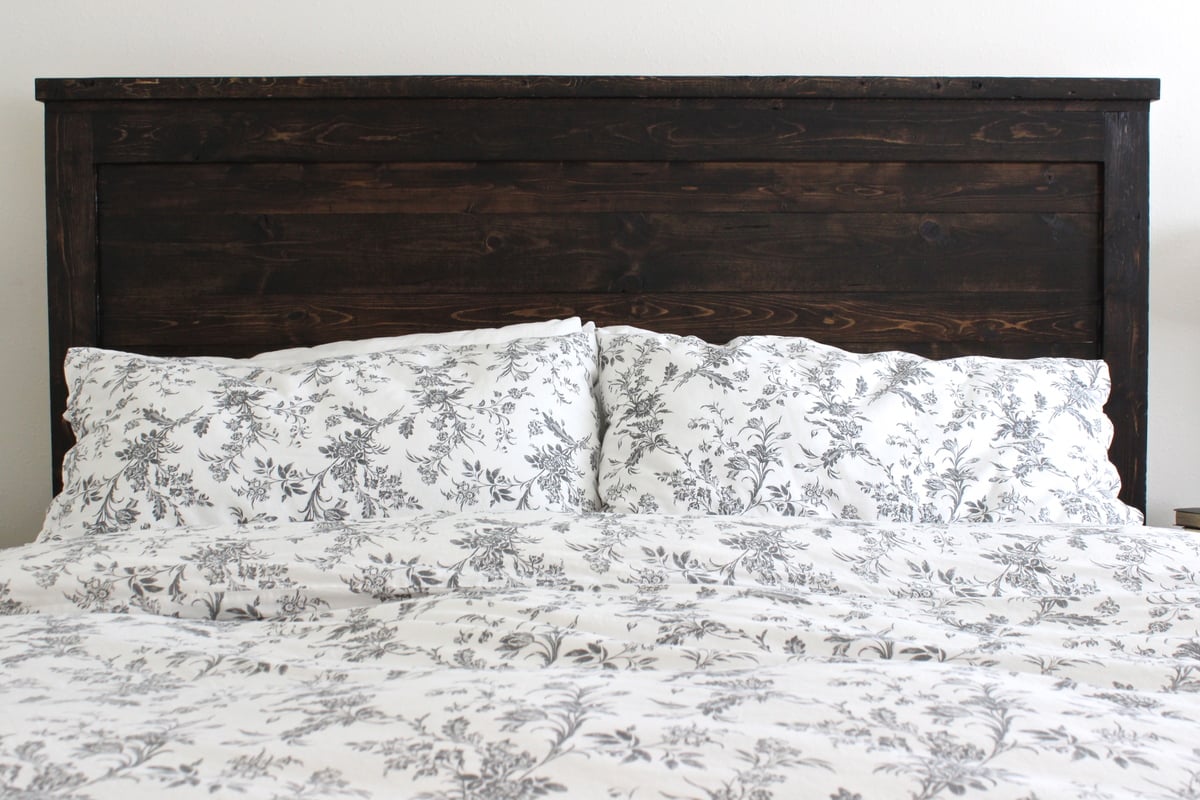
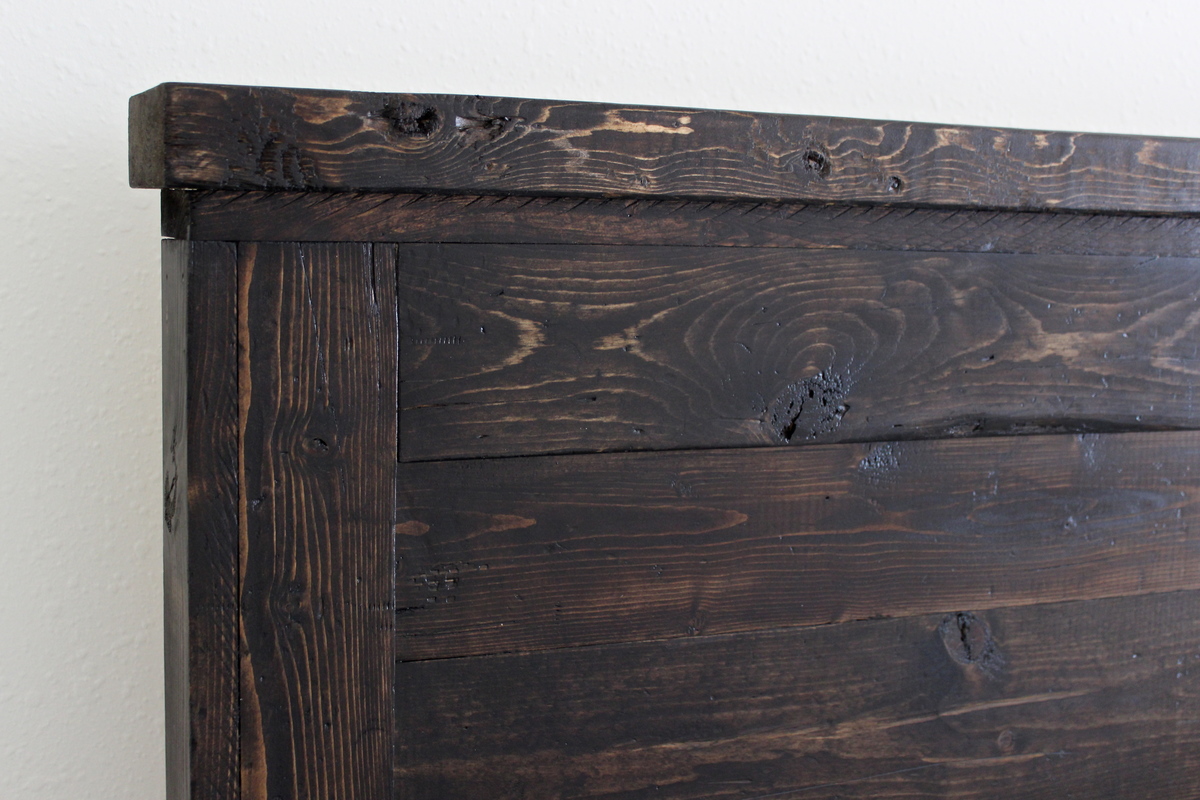
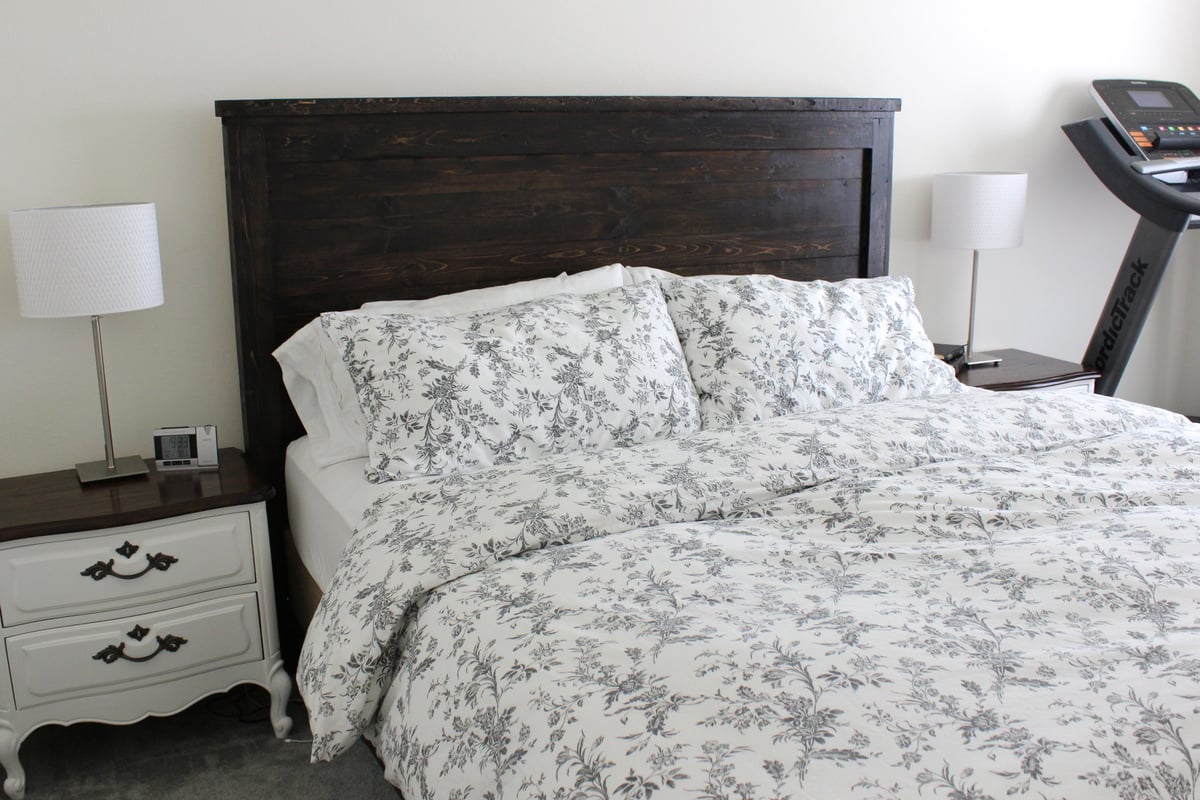
I used the Reclaimed Wood Look Headboard plans to make a headboard out of found, discarded wood. The only new wood is the vertical 1x3s and 1x2s that form the sides of the headboard. The bed is also made of reclaimed wood, using a modified version of the Hailey Platform Bed plans.
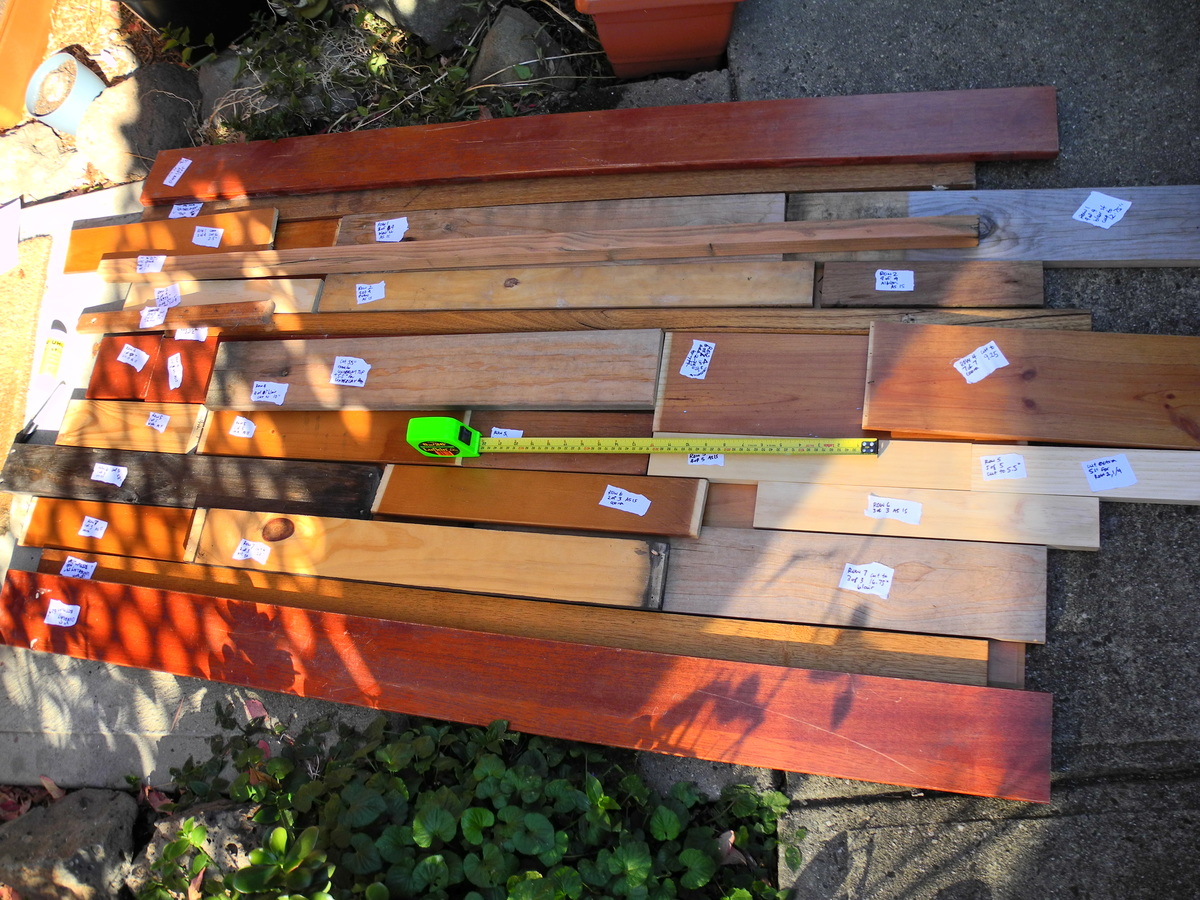
The plans are modified to create a patchwork look using scraps of wood in different sizes and thicknesses. The wood scraps were cut so that when put together they make up the total length and width of the horizontal planks in the plans. I glued and nailed all the patchwork pieces to a piece of MDF board I found, and added a vertical 1x2 for added support down the middle of the back.
The top 2x4 is made up of two pieces glued end-to-end with dowels in between, because I didn't find any long 2x4s I could reclaim. I didn't put the top and bottom trim on the back side, because it was already quite heavy and sturdy.
Tue, 08/06/2013 - 06:44
This piece is beautiful. I think it was worth the sanding.
My daughter needed a new bed and I really liked Ana's Hailey Storage Bed plans. I adjusted Ana's plans to fit a full size bed and I also made a different headboard and footboard. To see how I made the headboard and footboard follow the links below:
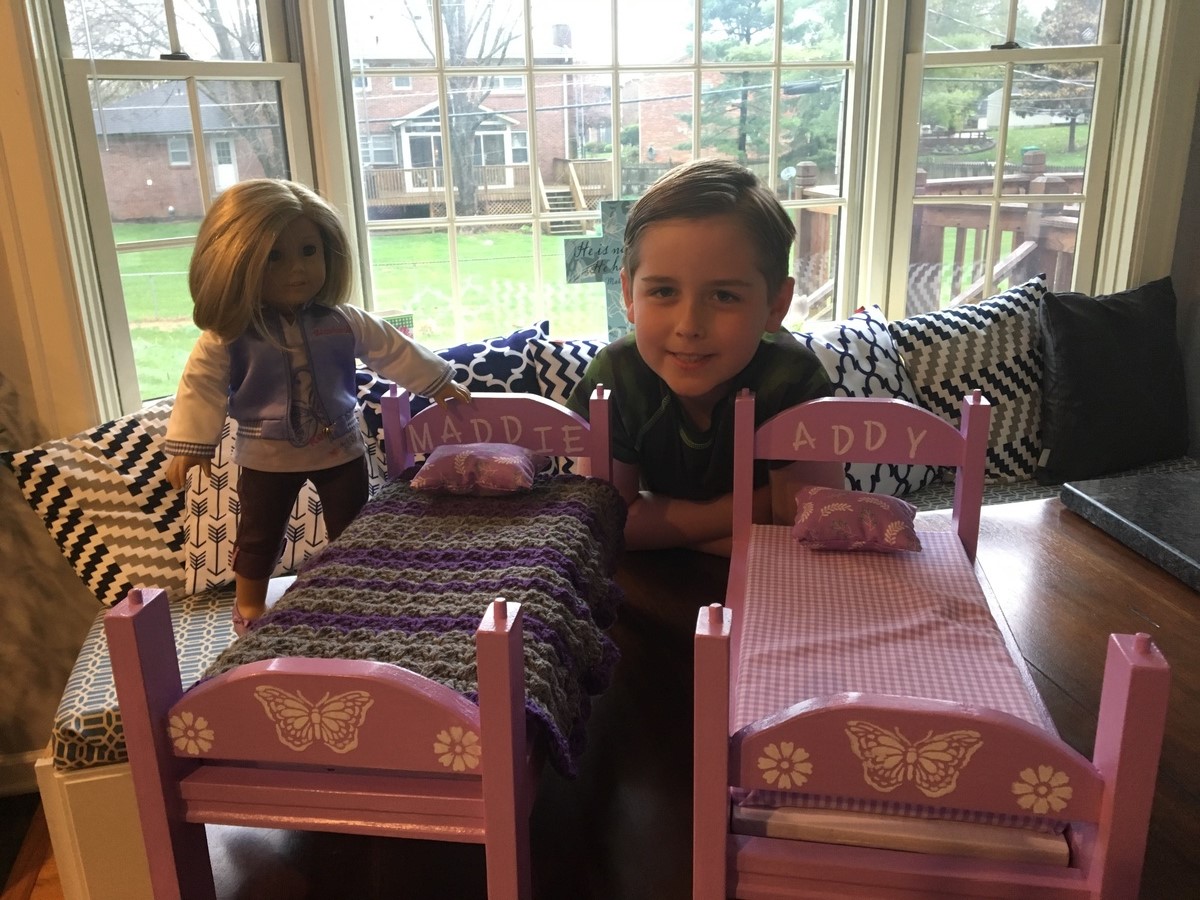
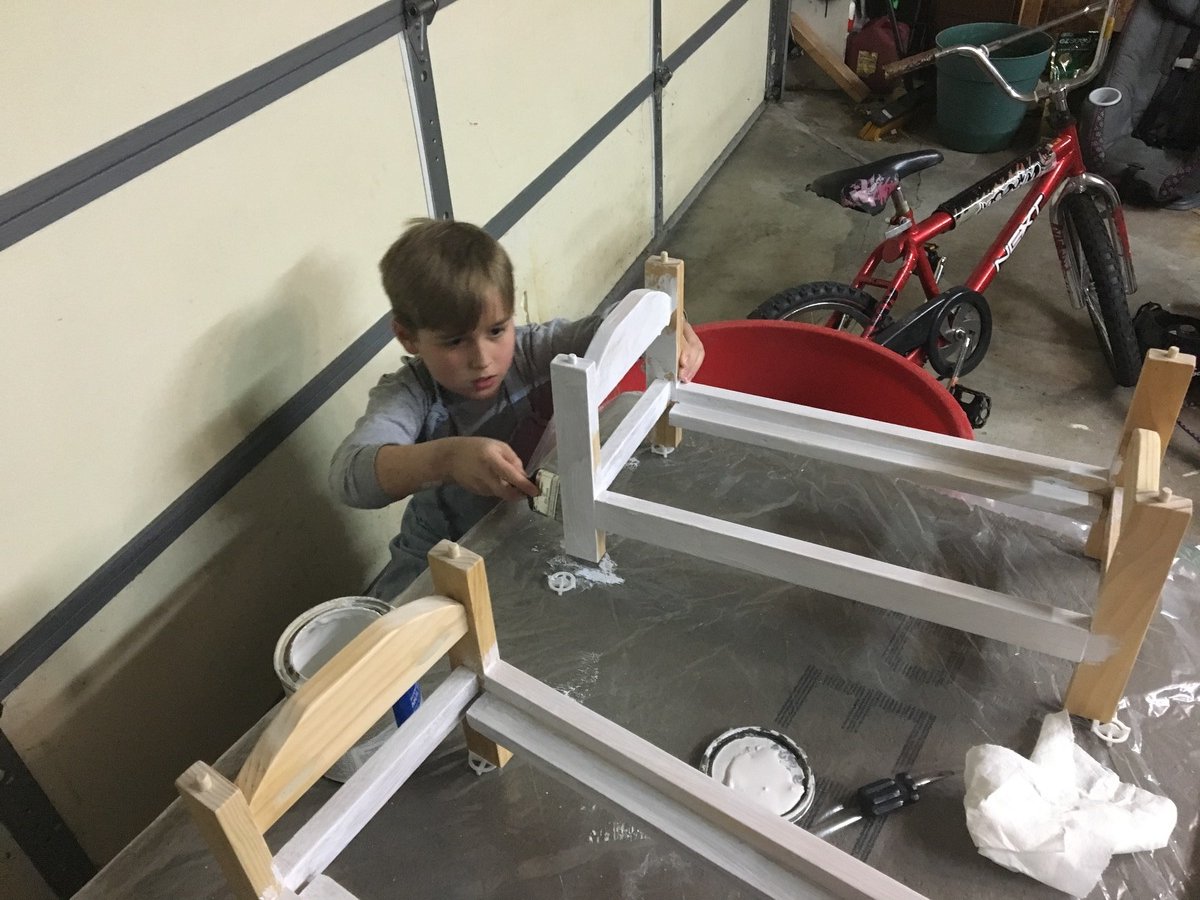
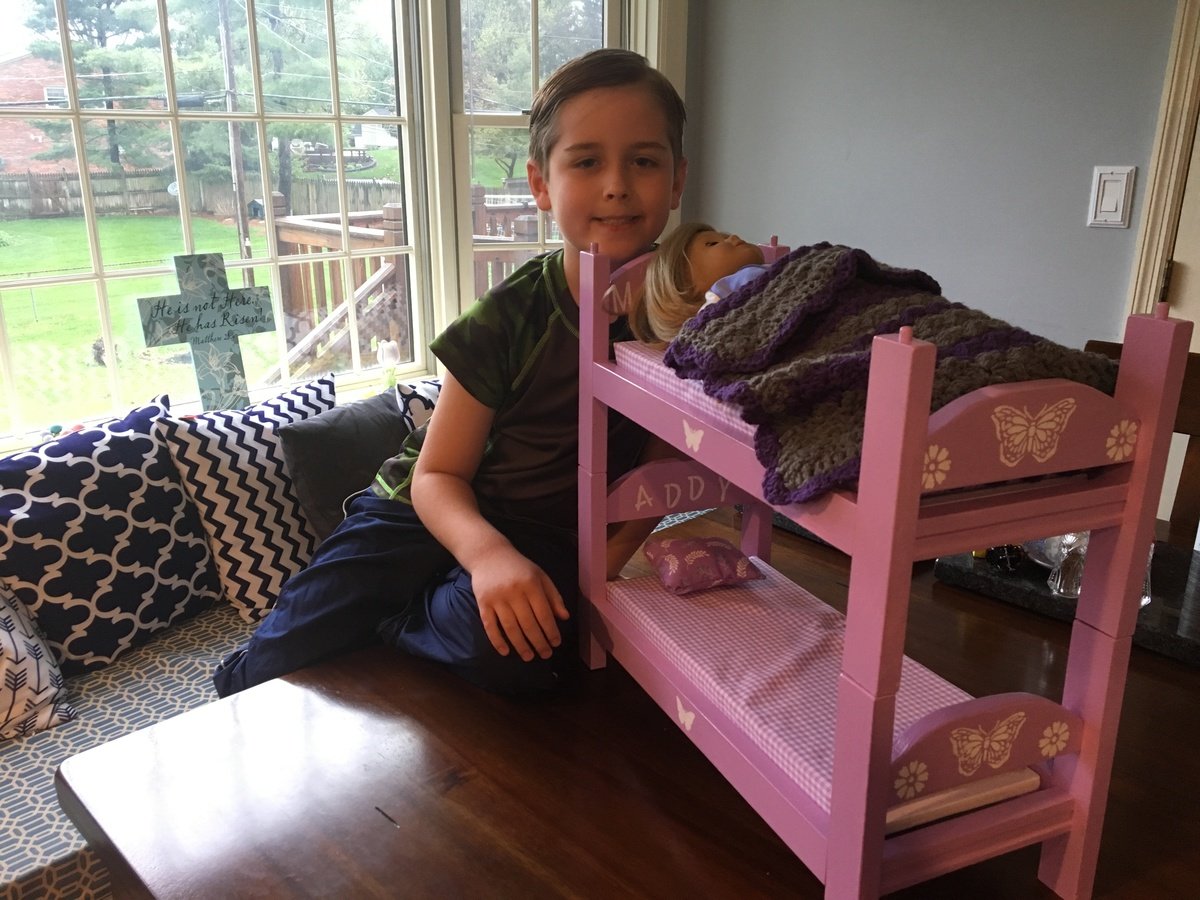
My son and I made these beds for a couple of his friends. We made them so that if they were ever together, they could bunk them up for their dolls. I had a great time working with him and incorporating his ideas into the project. He is very excited to give them the doll beds. http://www.ana-white.com/2012/12/plans/kid039s-kit-doll-bed

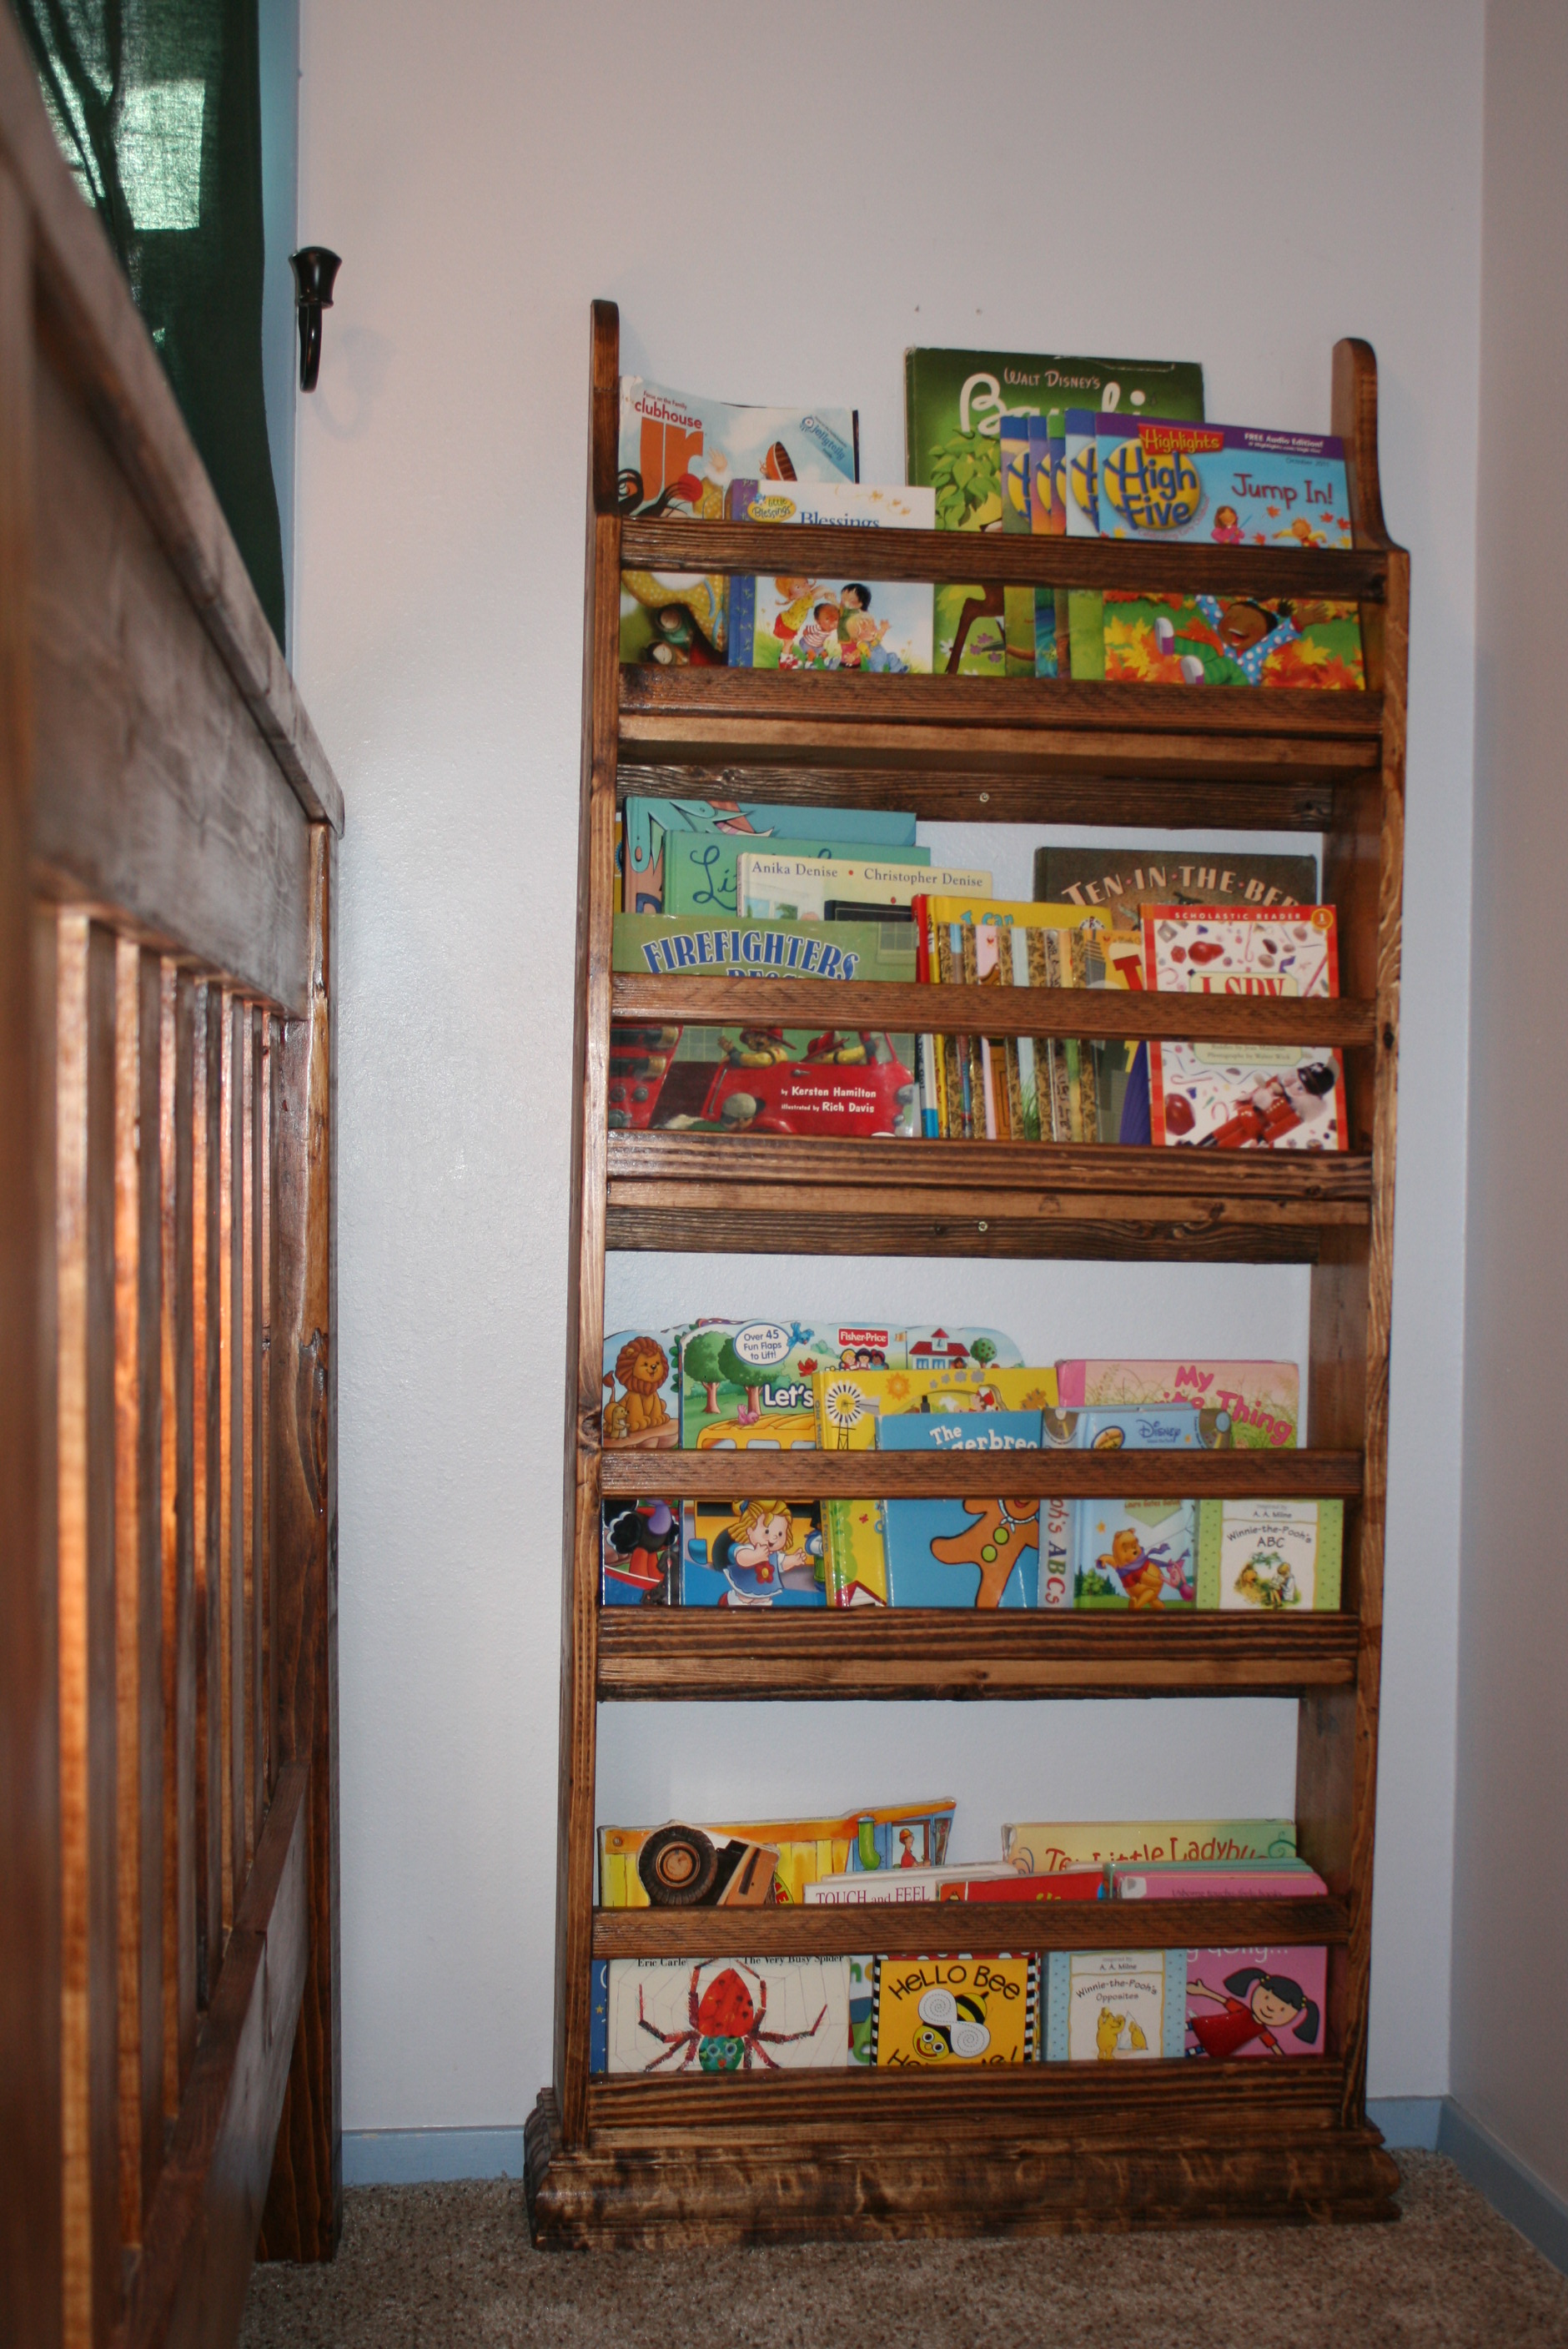
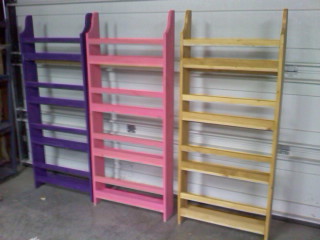
We really needed a place to organize my daughters books in the living room. These were fairly easy to make - my husband built them and I did the finishing.
I HIGHLY recommend the water-based poly. It is almost twice as expensive but it isn't near as smelly and it has a much lower VOC level.

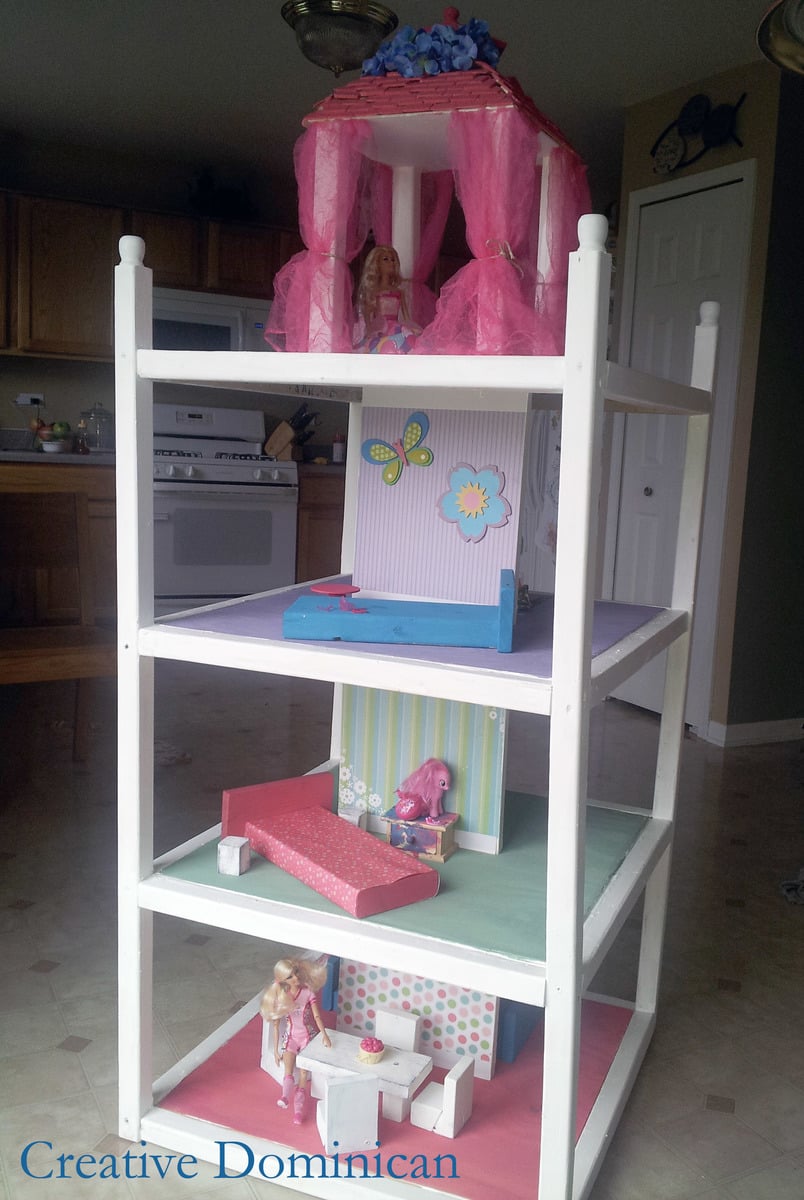
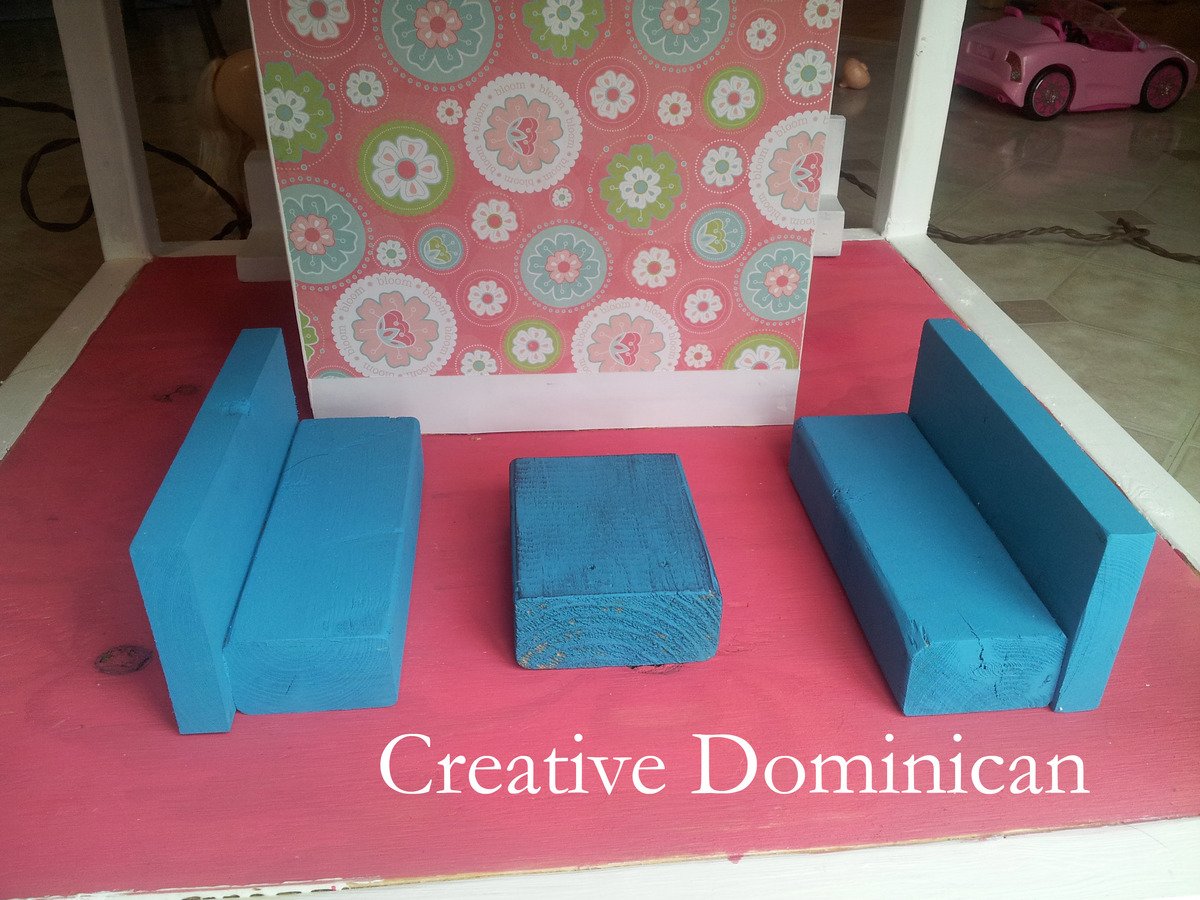
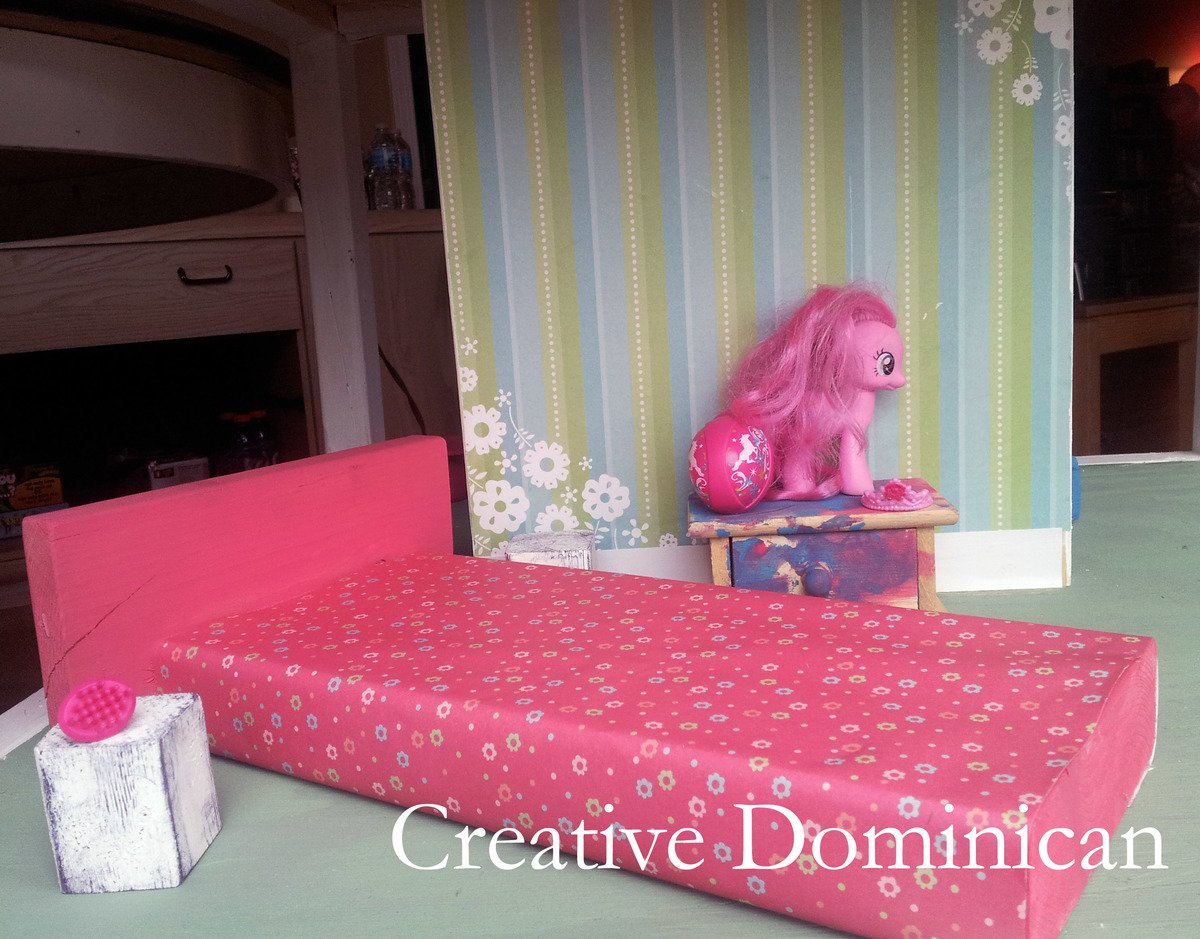
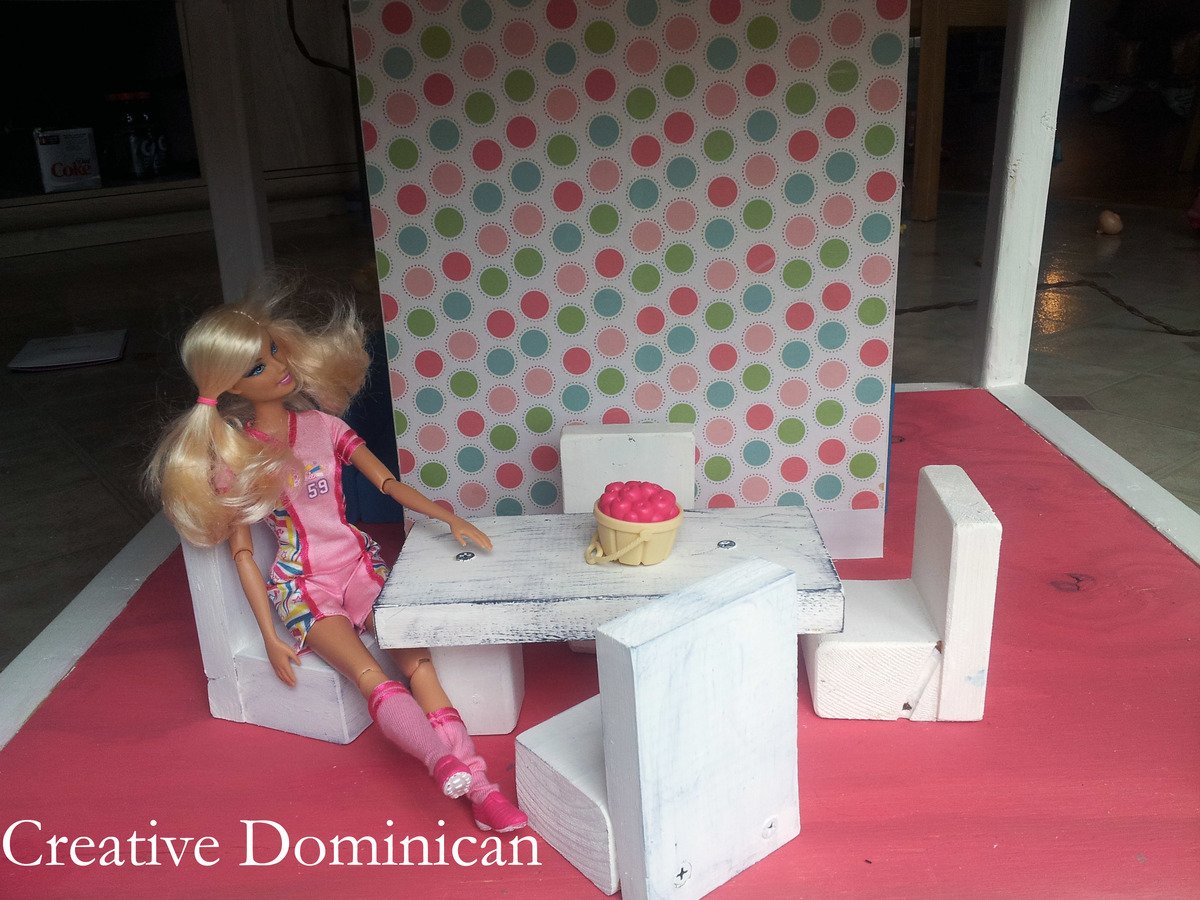
When my daughter asked for a dollhouse for her 3rd party I decided to just make her one and this Dream House plan was just perfect. I got a little carried away and added an extra floor. I also made some furniture out of scrap wood and I plan to add an elevator. This was a very fun project and my little one is already making requests for more furniture, pillows, blankets and a TV and video game room for the house.
I only spend about $50 total but that was using the cheapest wood I could find. The floors were made using plywood that was pre-cut at 24" x 24" . This project was a big hit with my little one. Thanks for the plans Ana.
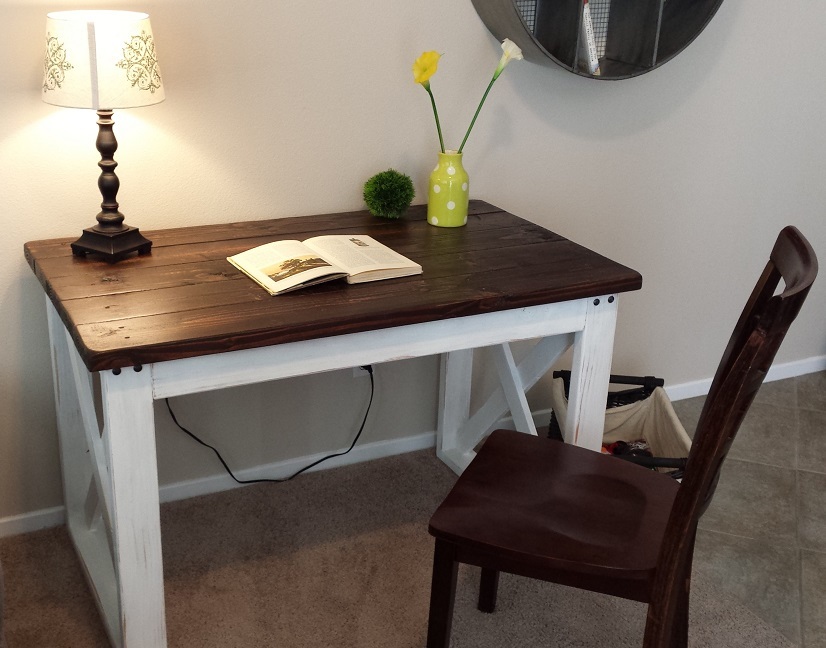
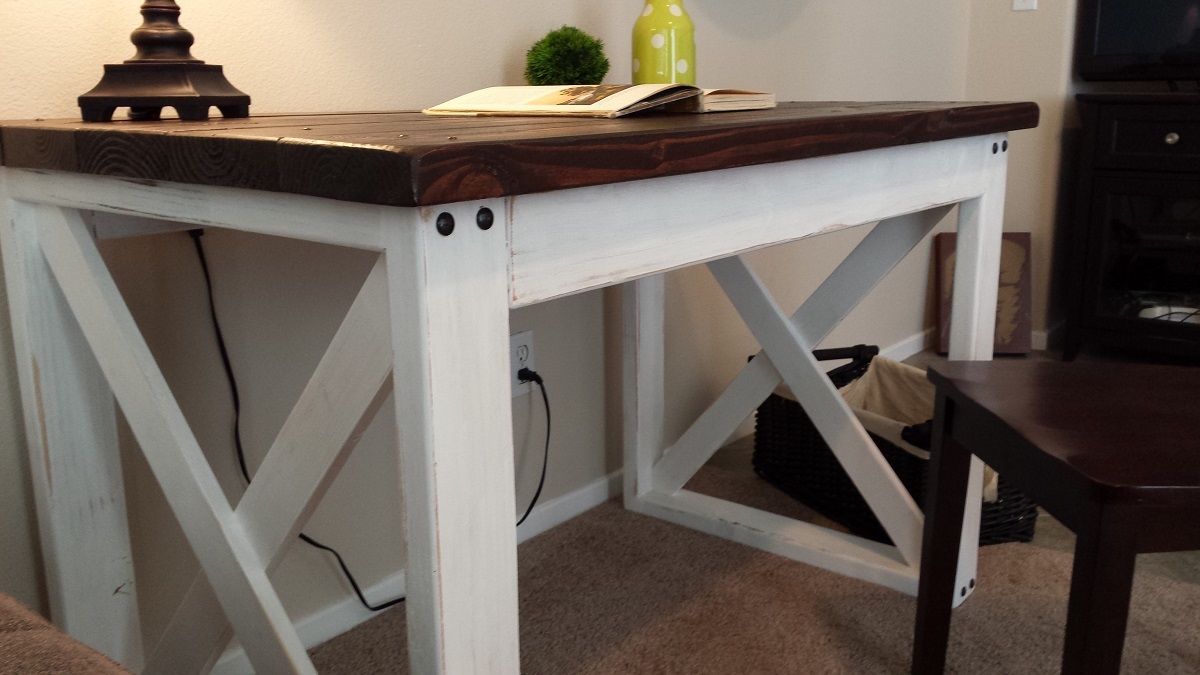
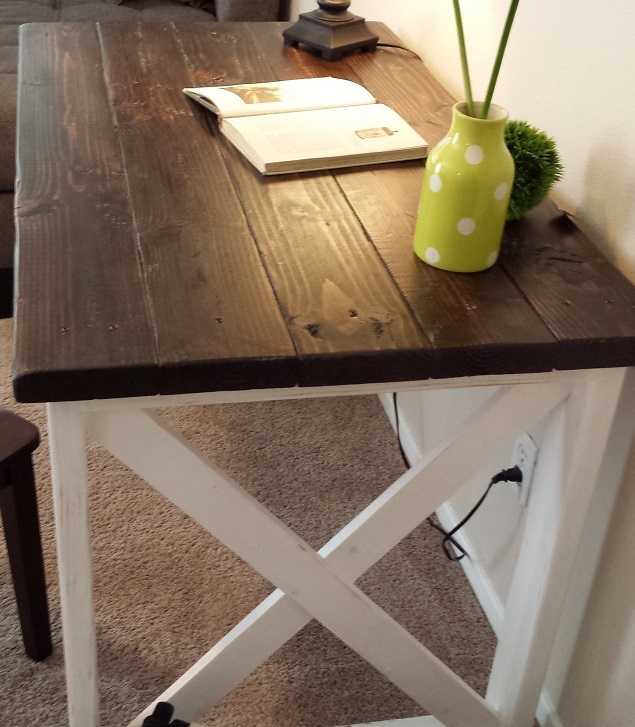
My first build using plans through this blog. This project took me about four hours total and cost about 40$ with wood, paint, stain, and hardware.
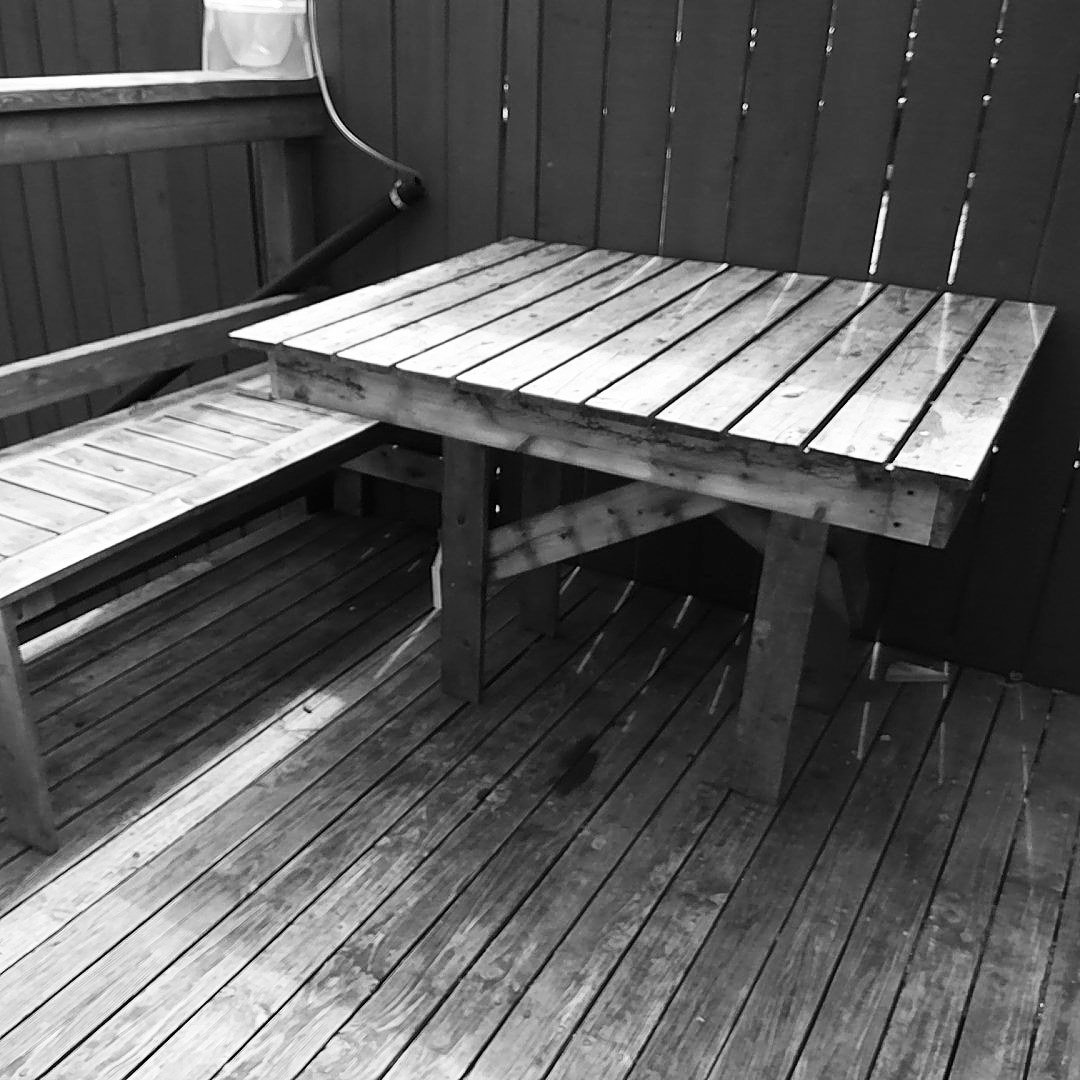
I found the table to be pretty wobbly so I reinforced it with some triangulation and I moved all the legs into the centre so the triangulation wouldn't get in the way of people sitting on all sides.

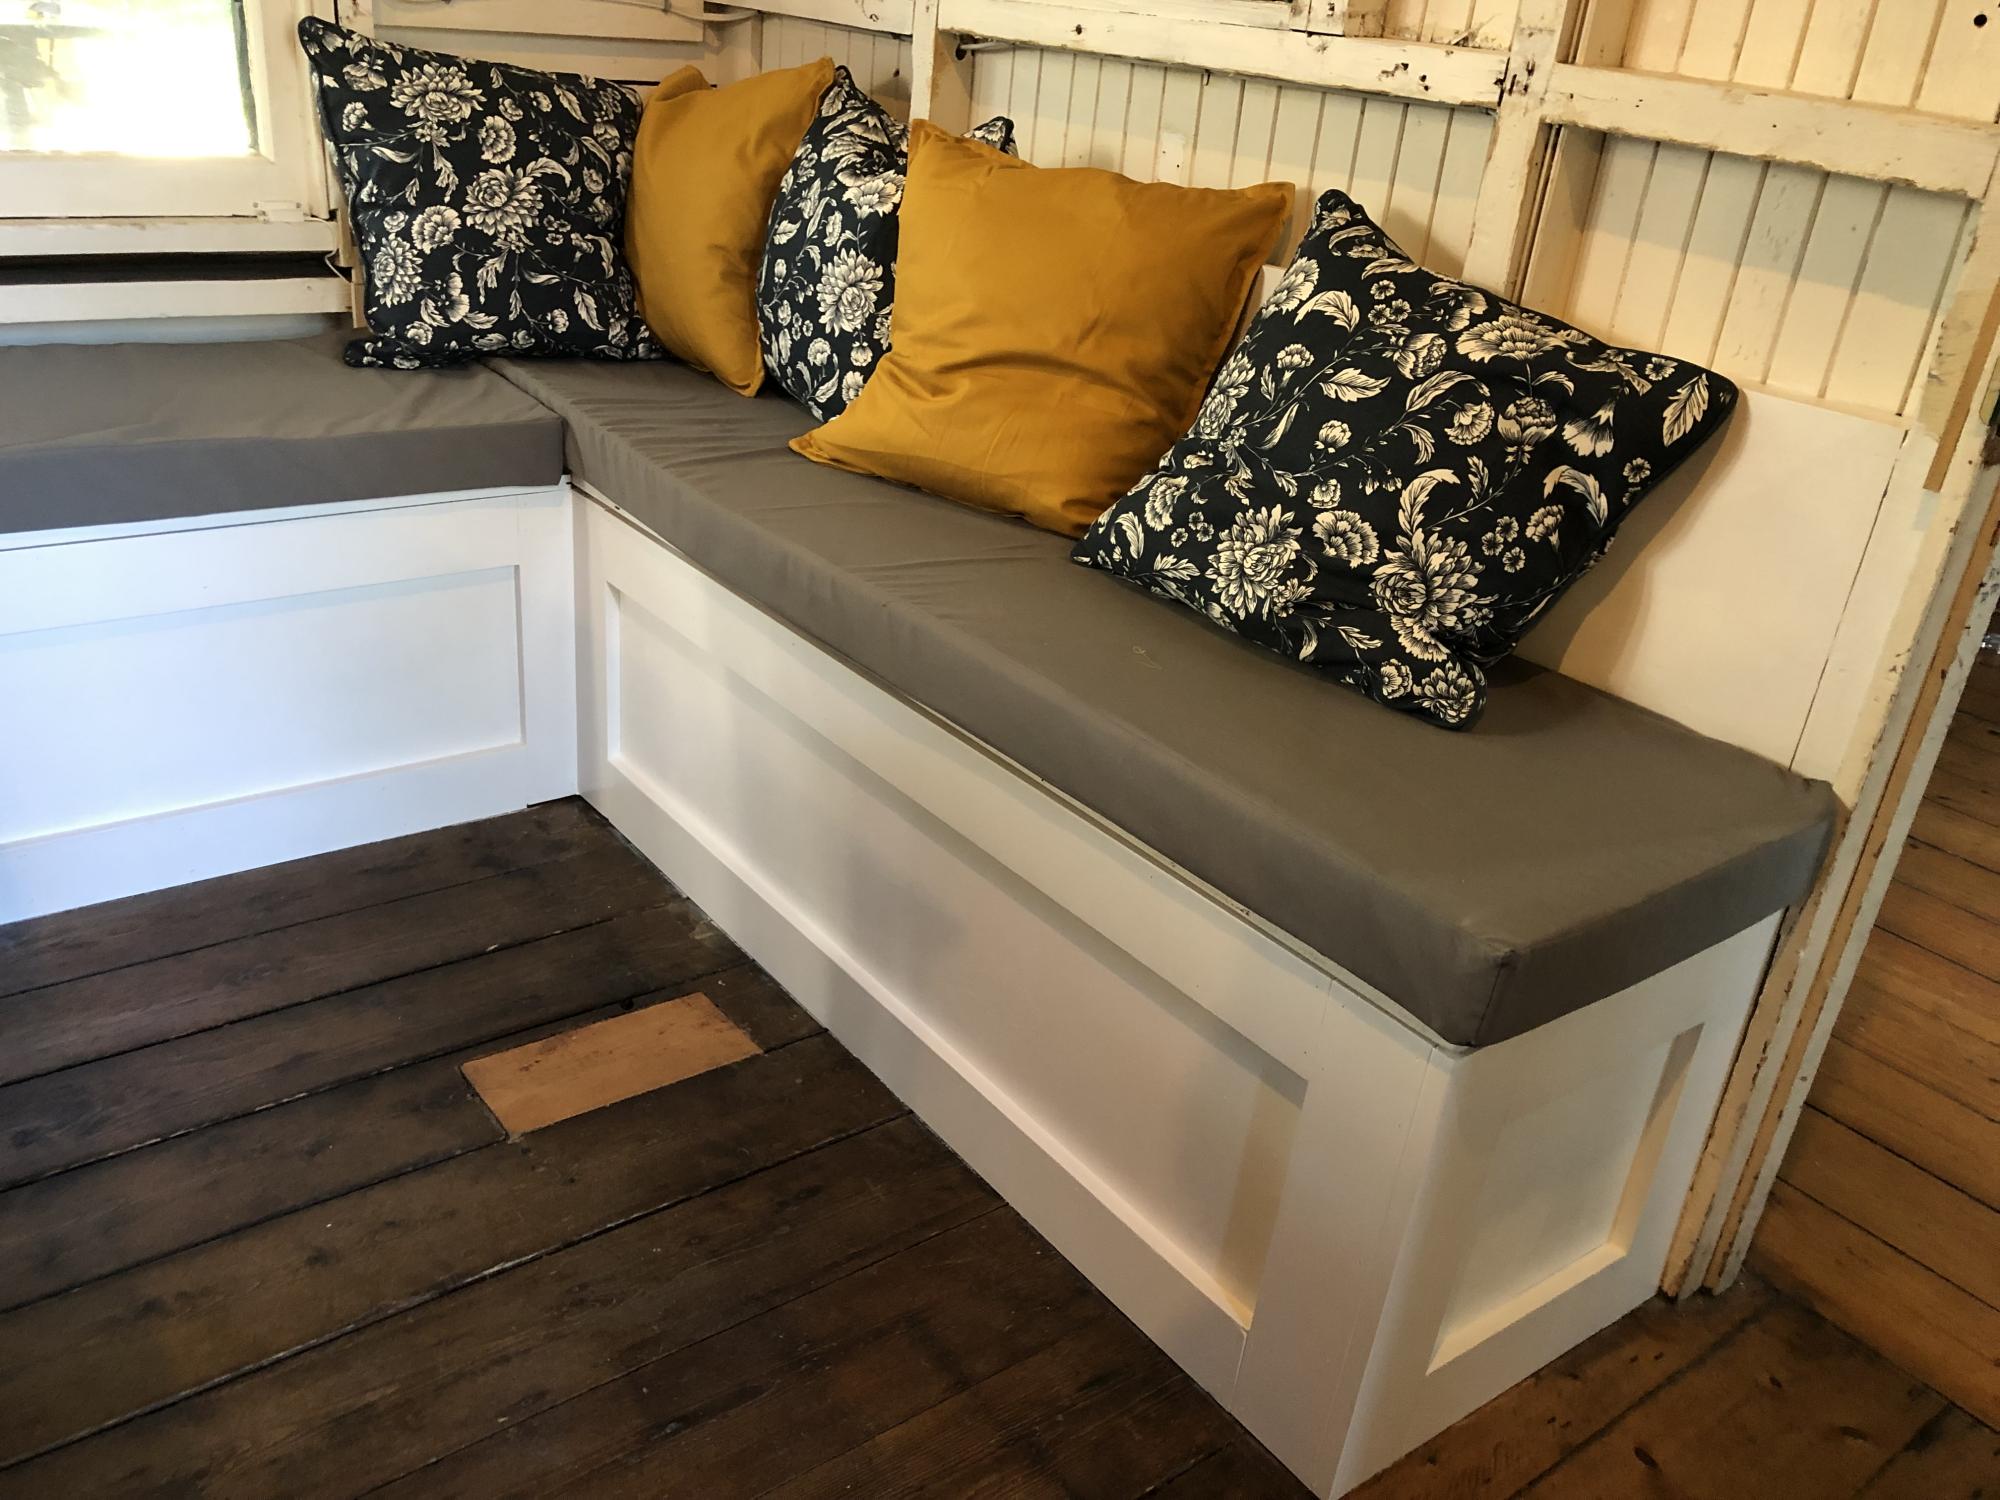
This is the first thing I built from your site. I used rainwear for the cushion so my grandkids can spill stuff and it won’t stain.
This is in my 134 year old cottage. Really spruced the place up.
Thanks for having your site - love the projects on it.
This was the first project in many years and I was pleasantly surprised how easy it was. I am so happy with the results. It was a great starter project to get me excited to do more projects.
This book shelf can be done even cheaper had I left the base trim off. It would have looked fine without it as well.
Thanks for the great plans!
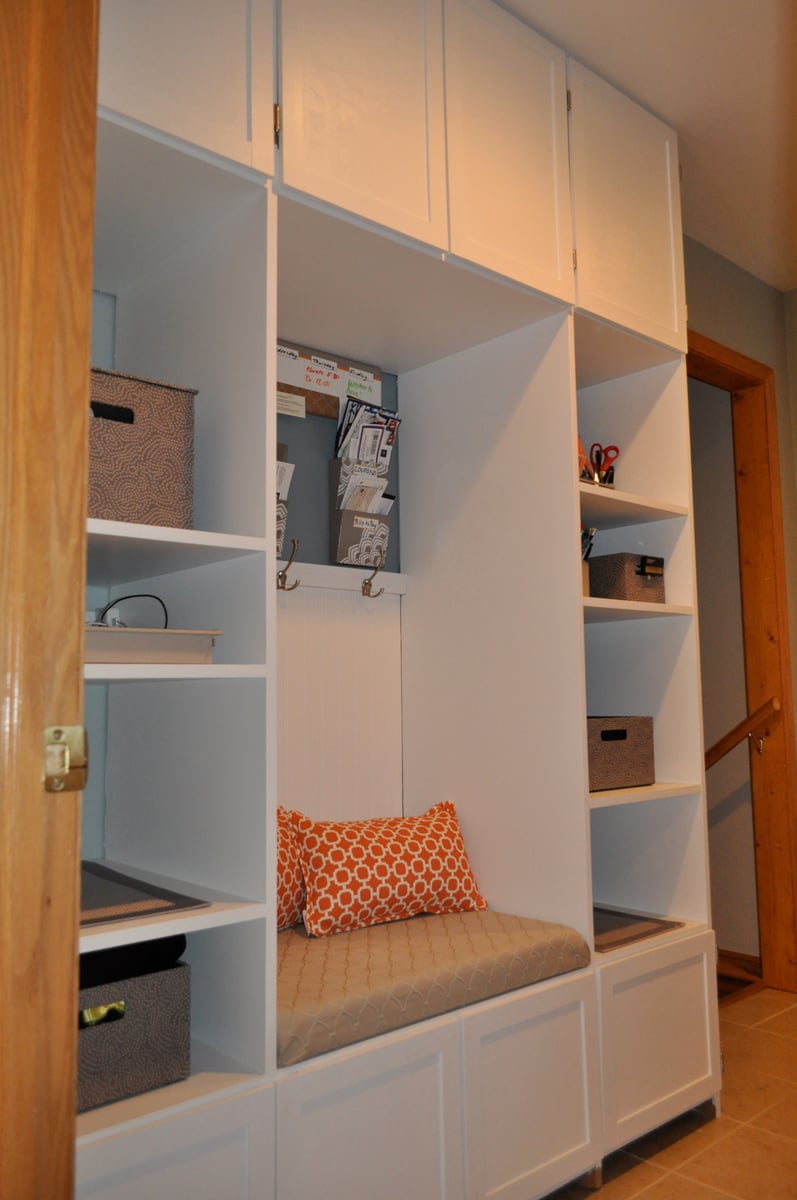
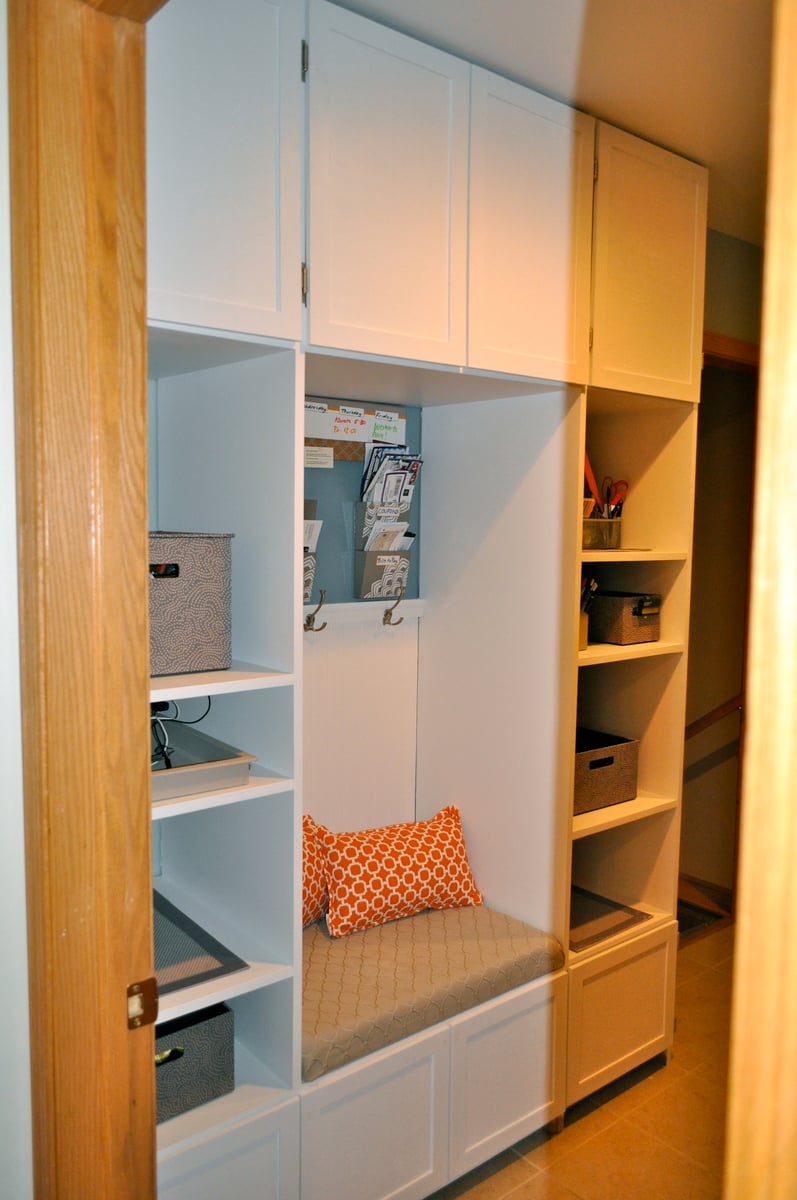
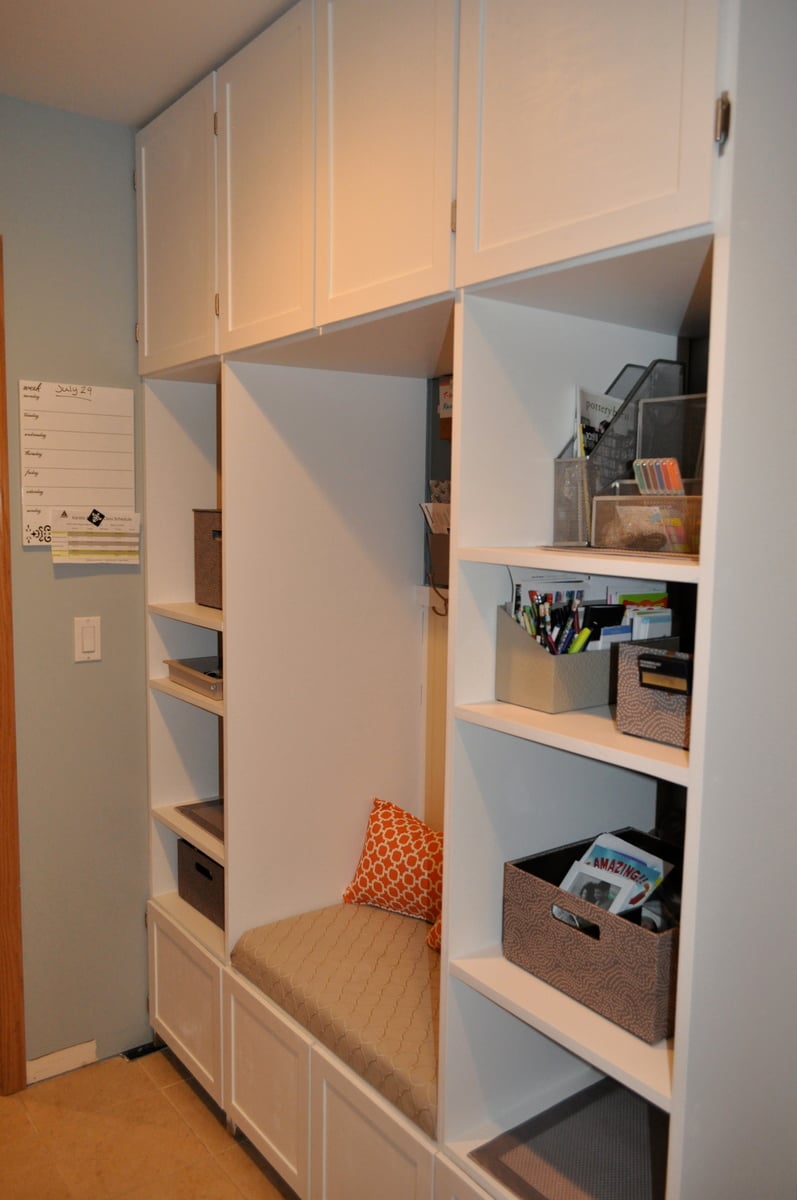
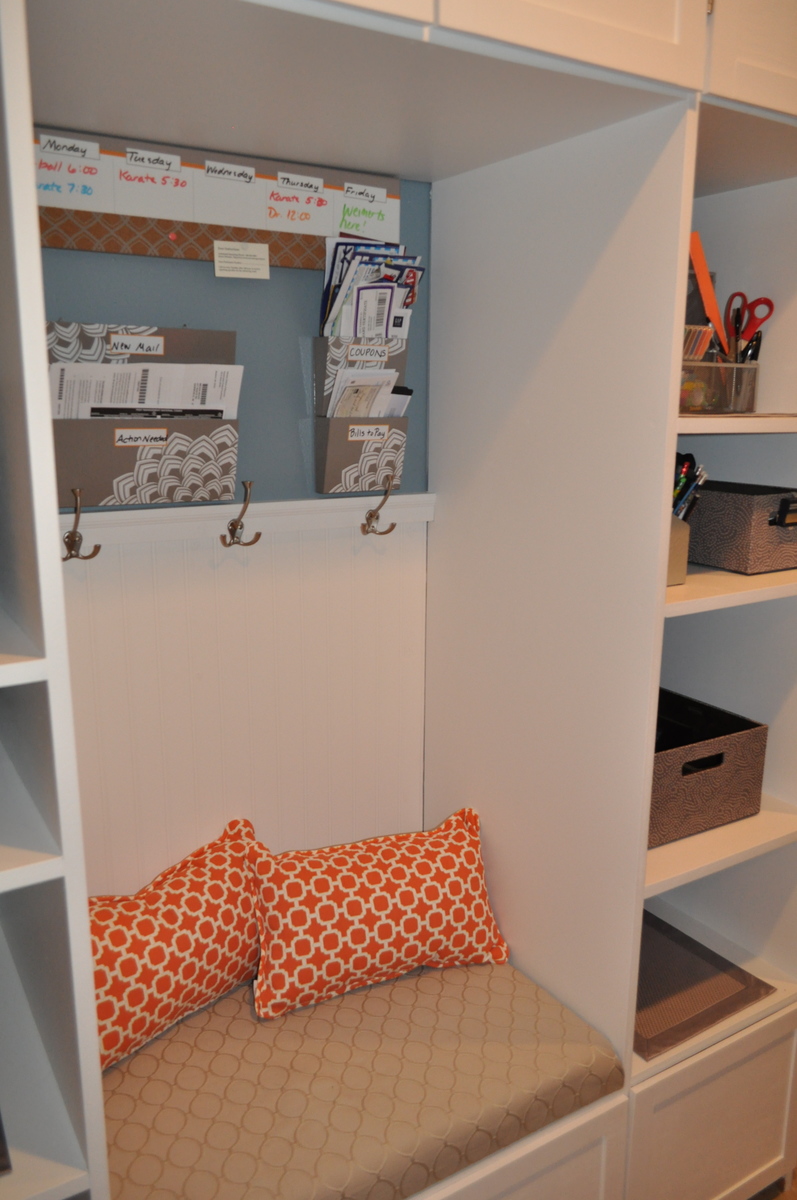
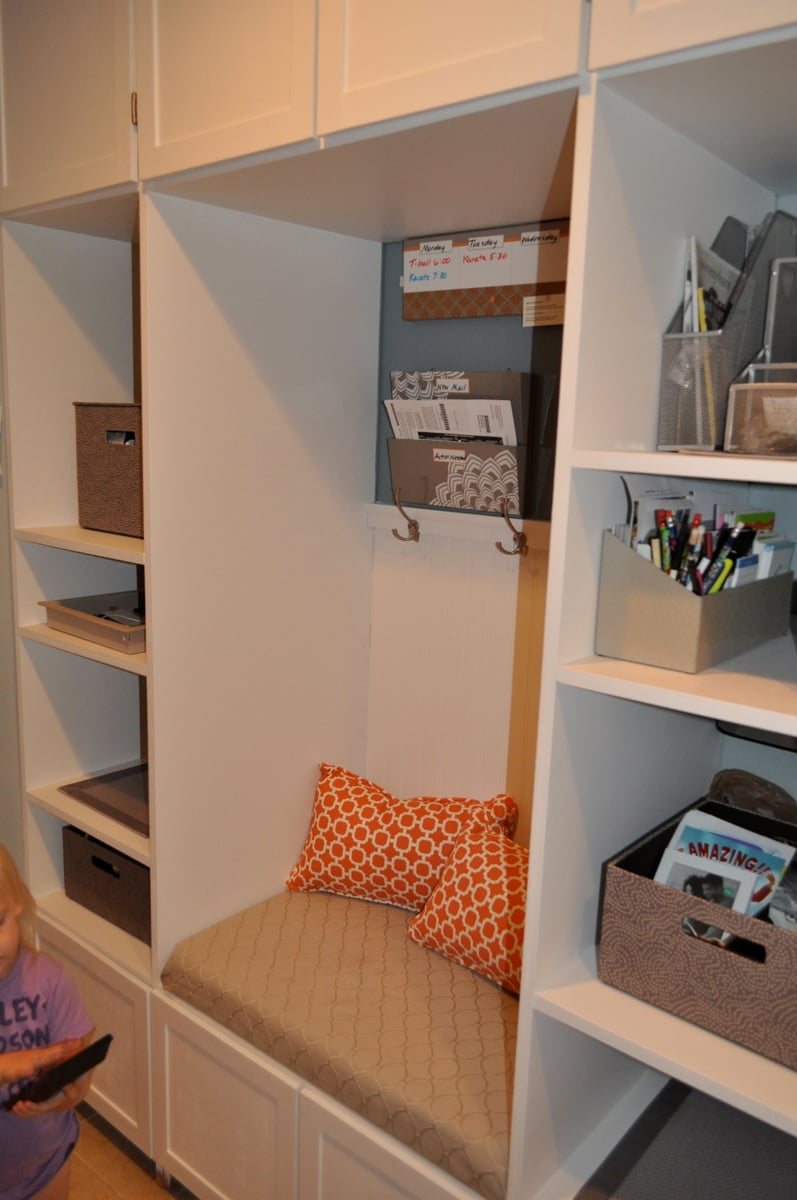
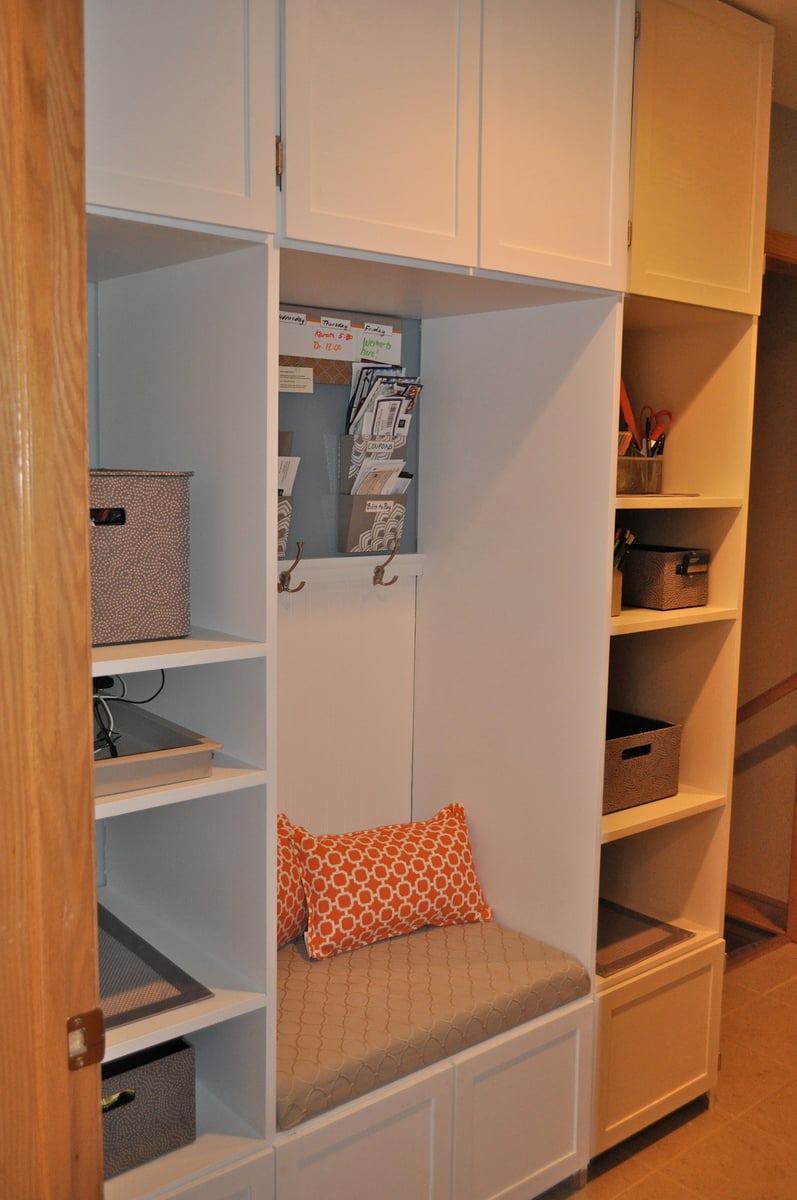
I was inspired by the Cutest Mudroom project. Our previous mudroom didn't work for us at all. There was wasted desk space and not enough storage. It was also a mis-match of cupboards, and without a window in the room, the wood and wall color made the room feel small and dark. We ripped out the previous shelving and desk and repainted a light blue color. I drew up plans based of the plans here to maximize our storage space. My husband and brother-in-law built the custom bookshelf towers on each side. We went all the way to the ceiling to maximize storage. I also decided to add cupboards across the top. We painted the entire thing white to keep things bright. We made the bench into a lift-top for storage of winter hats and mittens inside the bench. I upholstered the bench with fabric from Jo-Anns and found bright orange pillows at Linens and Things to give the room a pop of color. We put doors on the top and bottom cabinets and left the rest of the cubbies open and used fabric storage bins to keep everything organized. I love the touch of wainscoting in the middle and the hooks in the middle are for the kid's coats and backpacks. In the center of the whole unit is our family messaging and mail system.
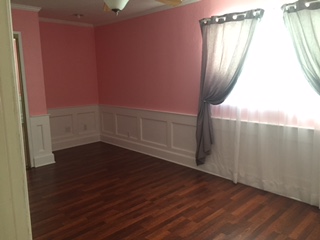
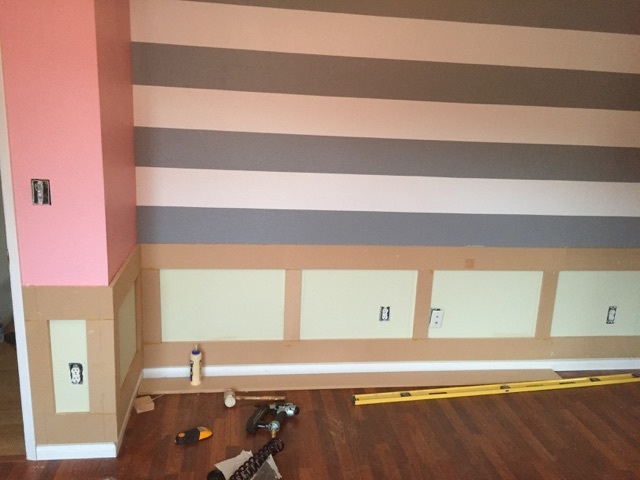
Check out our new nursery! I used MDF sheets ripped to 5 1/2" and 3 1/4" to make the frame of the paneling. I attached the rails and the stiles with 1 1/4" PH screws and mounted them to the wall with liquid nails and 16 guage brads. I framed all of the panels with quarter round and finished off the top with 1x2" poplar rounded over with a router. Check out my link to my instrucables page for a complete step by step layout!

The plans were easy enough to follow. I made the miter and table saw carts not as long because of the space I had to work with. These were perfect to provide a stand for my saws while at the same time giving me the additional storage I need. This was the last part of the garage that needed to be organized so I'm extremely pleased.

Sun, 07/08/2018 - 20:56
Glad the plans worked for you! So much extra storage now!
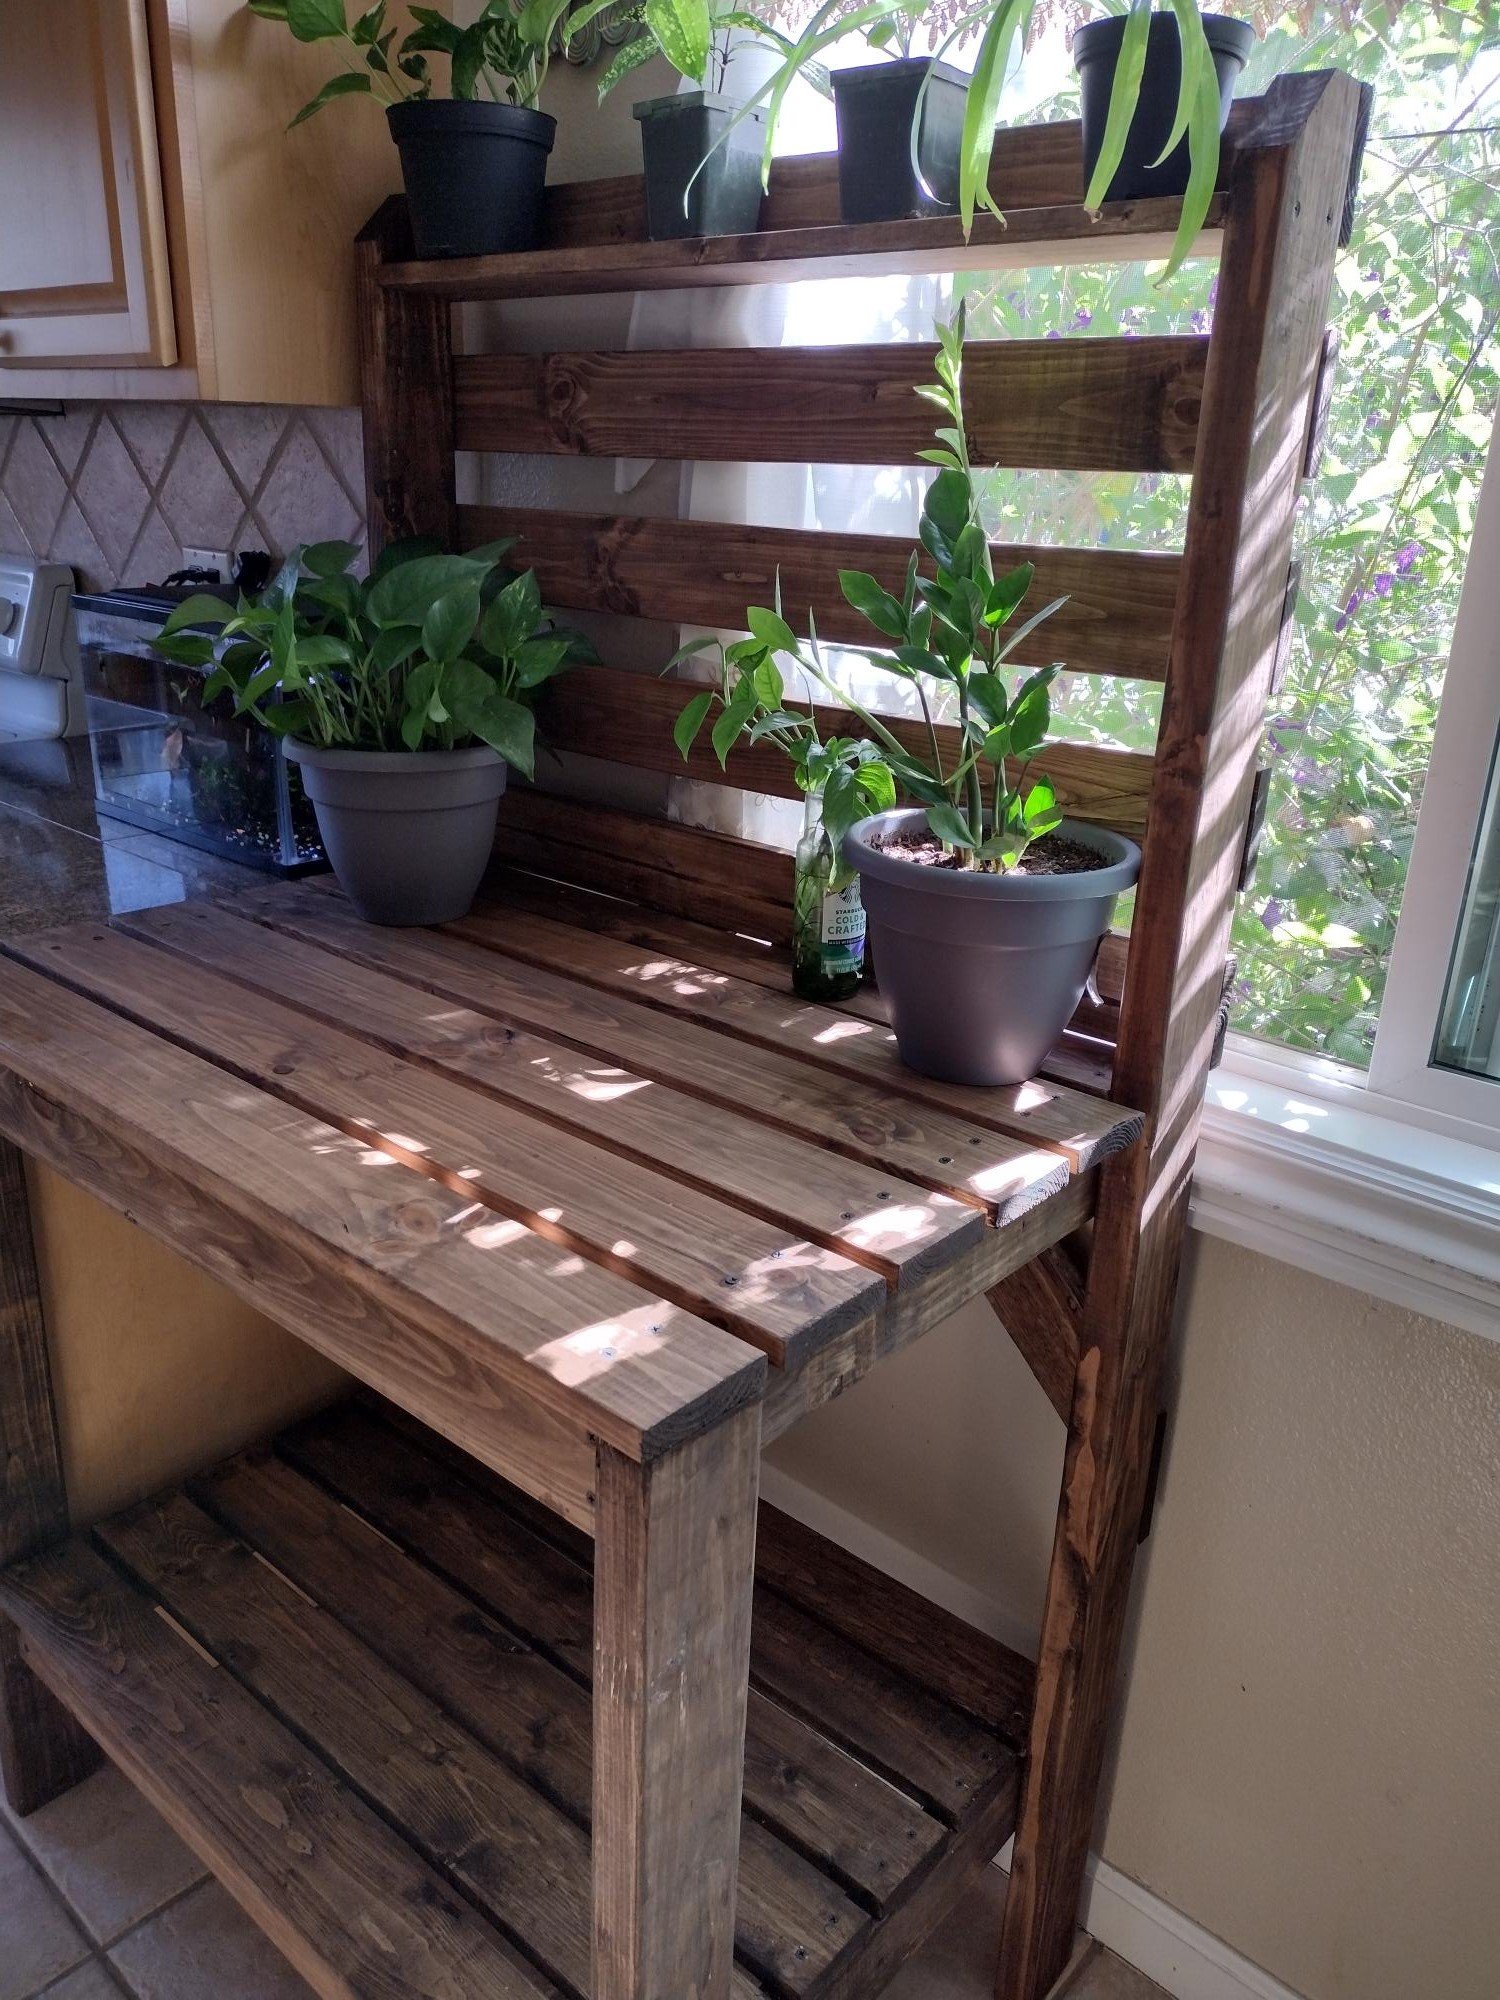
Simple potting bench in dark walnut

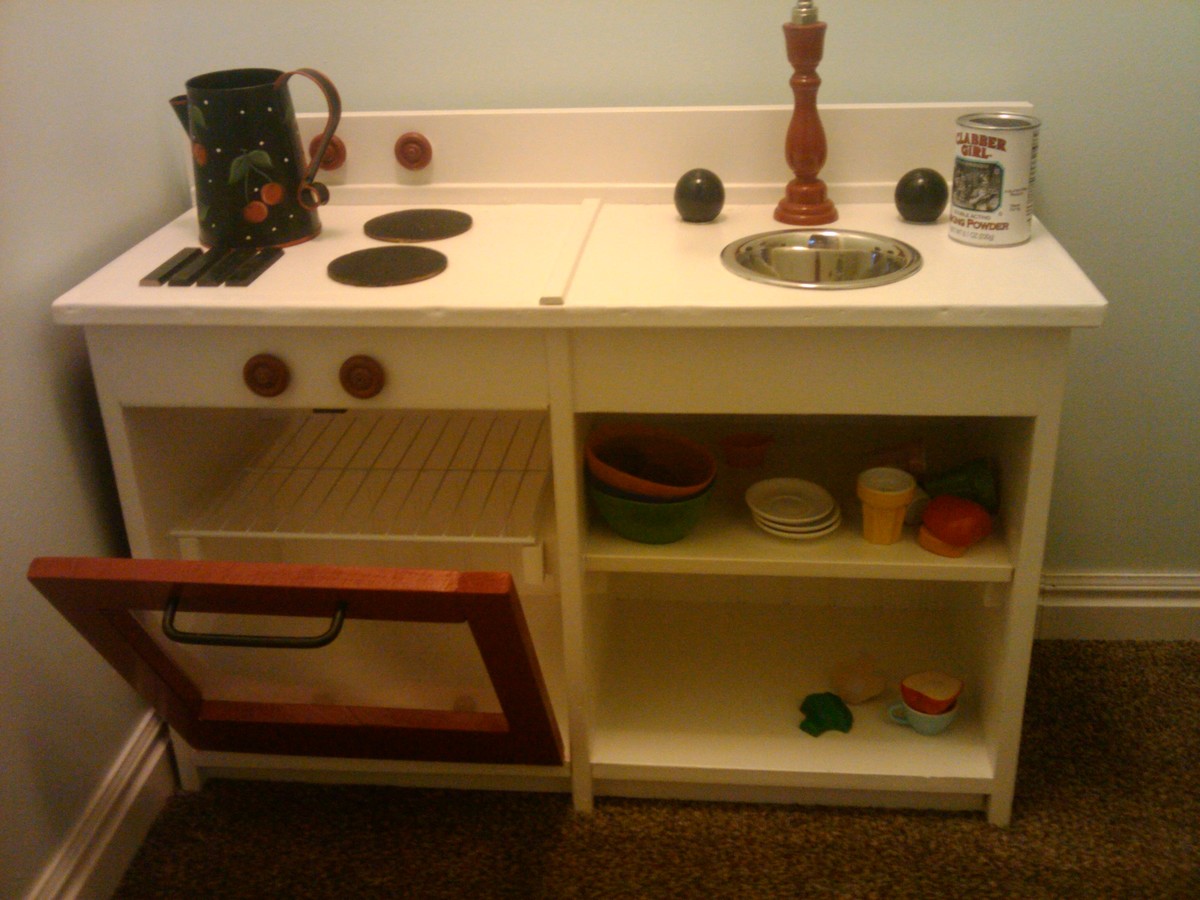
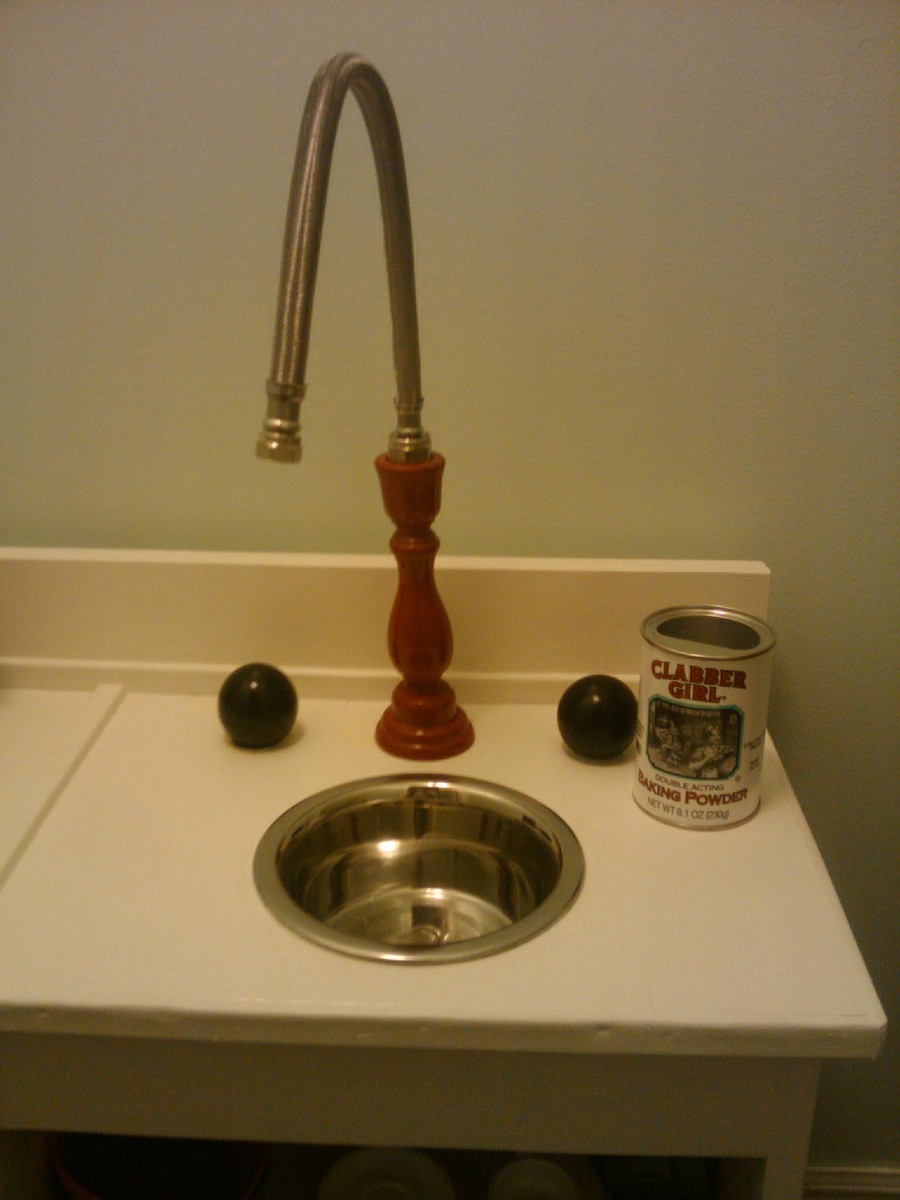
Love this site! My grandaughters were coming to stay and I was in the process of making a playroom/bedroom for them. I stumbled across this site just in time. I made the kitchen using the stove and sink plans from grace's kitchen except I combined them into one. So instead of having two seperate units, I just combined them together using one side panel for both, (making 3 20" long panels instead of 4) and placed one long countertop and backsplash. I used a candlestick holder (painted red) for the faucet, glued in a 1/2" in. threaded plastic nipple I had from the outdoor sprinkler system, and screwed on a hose for an icemaker for the refrigerator, (found at lowes in the plumbing department (cost 3.99)(I'm a widget girl!!) I love to look for things that could be used for something else. Then walaa, a faucet!!
Fri, 07/08/2011 - 12:43
My color inspiration for this project came from the clabborgirl baking powder tin, (pictured). Just to let you know inspiration can come from just about anywhere!!
Wed, 08/01/2012 - 05:08
I was thinking of doing a combination sink and oven just like this! Yours looks great.
This was my first project and I loved every second of it. I did the whole thing by myself (with the "help" of my two-year-old) and I'm 5 months pregnant! THAT is how easy it is.

Sun, 08/11/2013 - 20:41
How awesome is that? =D It looks gorgeous, and I applaud you for tackling it with your 2 year old and baby on the way. =D When I was pregnant, the only thing I considered doing was putting furniture together. Now that I've built furniture, I now realize how much harder it was to follow the assembly directions than it is to make your own assembly directions. Keep it up!
Bought only two 2x4s to complete this project. Ripped and chopped and milled like crazy to get it down to the dimensions of the plans. The pine is a little flimsy, I wouldn't recommend it unless you're on an extreme budget, but it CAN be done! Just know that any of the cross-bars that have a knot-hole will probably snap sooner than later. (Luckily I milled extras!)
Another cost tip is to skip the backing. I used two supports from the main material instead of any plywood. Watch out for wracking when doing the glue up and it'll be just fine. Fully supported with less weight too!
I wanted to share this build, as I get a lot of people asking me where I got the bed from and they're shocked (and many motivated!) to find I made it myself.
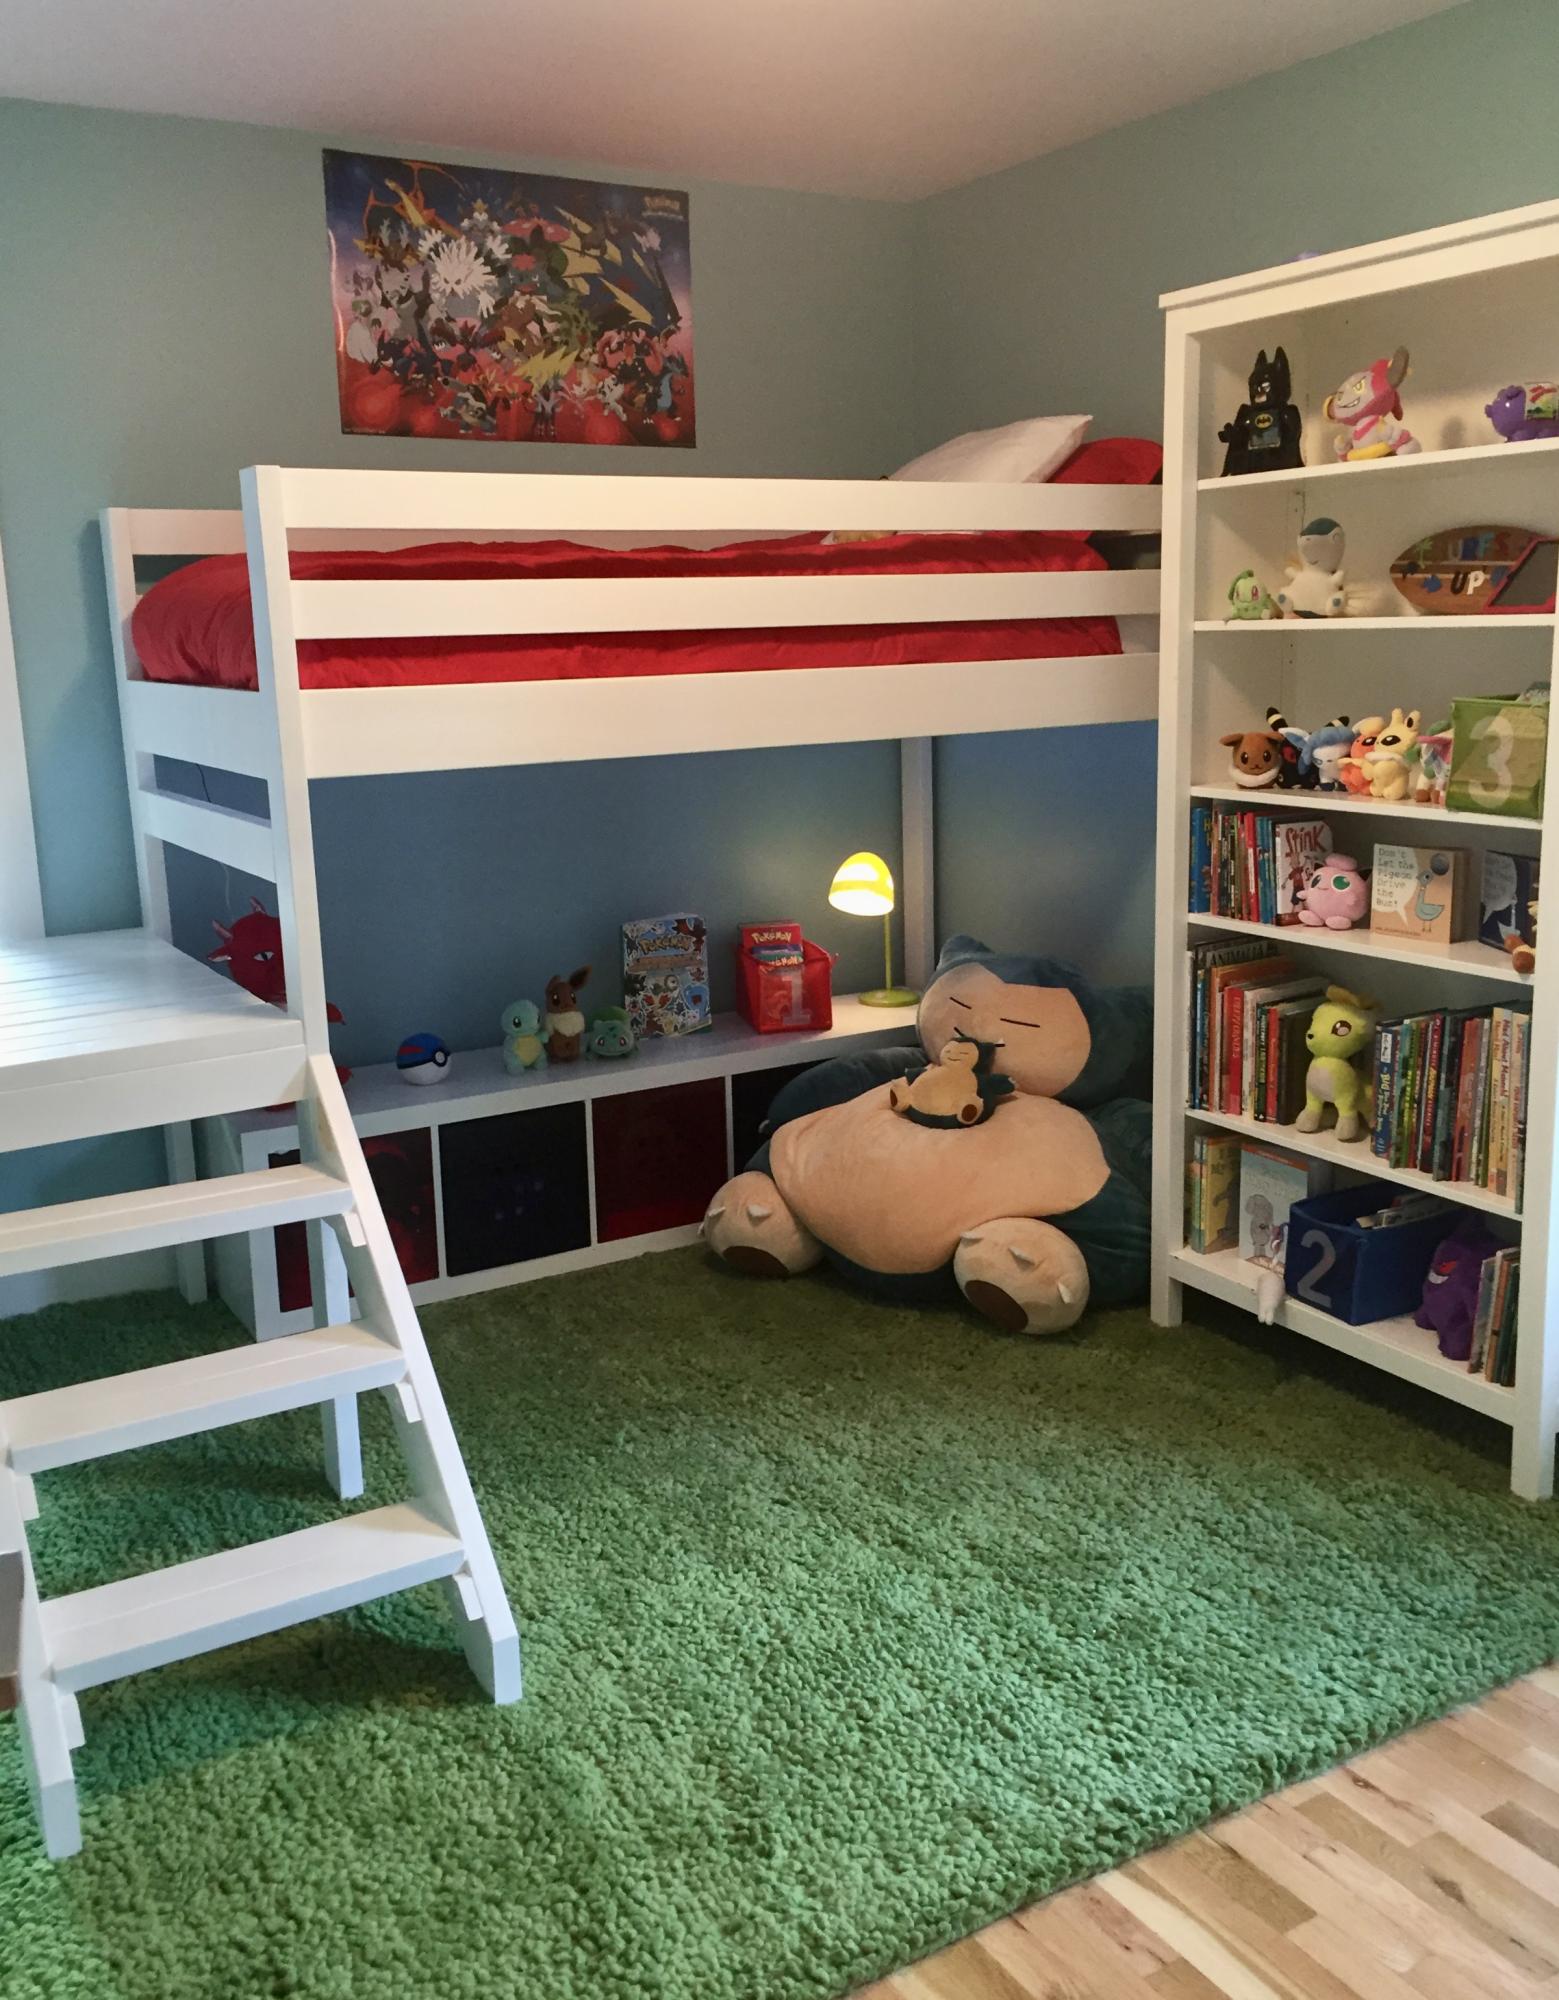
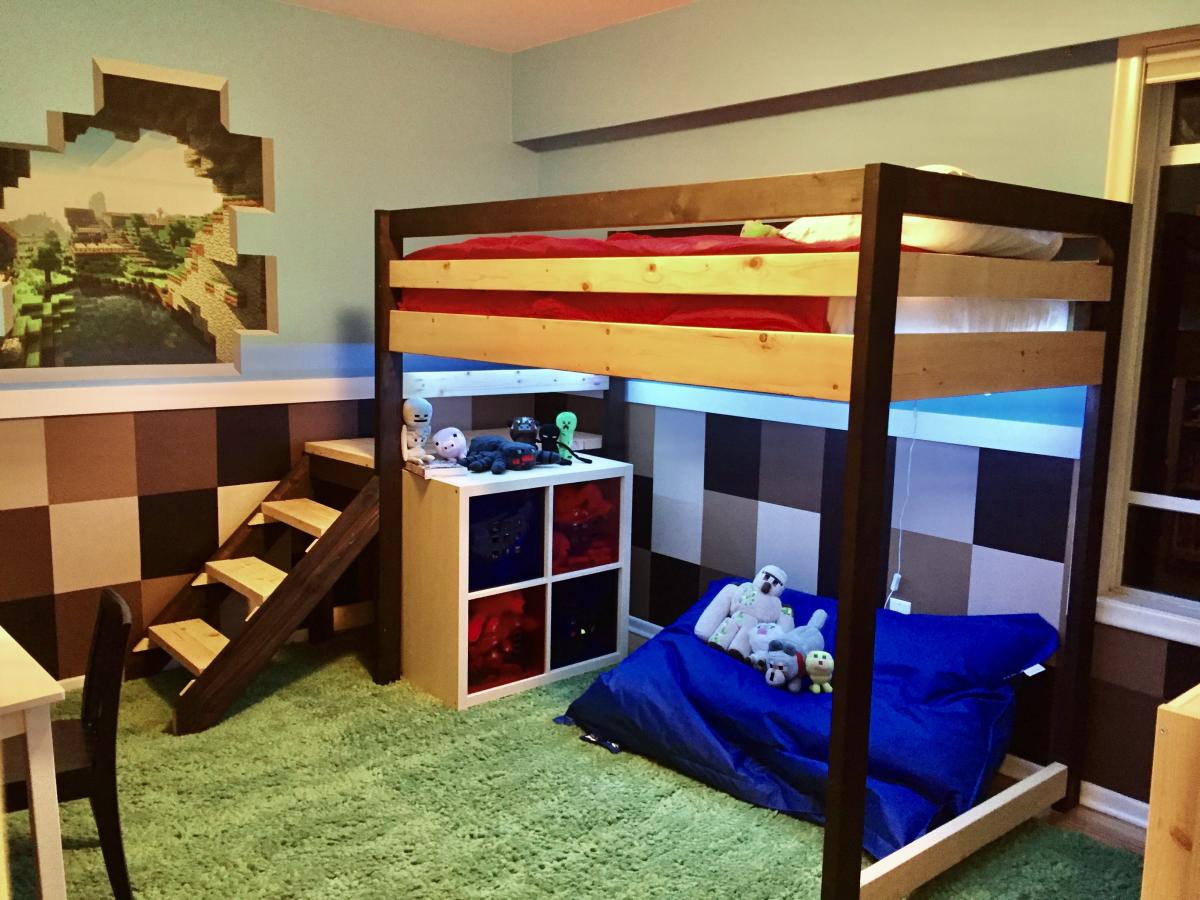
When we moved into our house about 6 years ago my son asked for a loft bed, but with relatively low ceilings in our house (and his desire for a Minecraft themed room), many of the ones we looked at in store wouldn't work. So I gave this a try, modifying sizes slightly to fit with the layout of the room. It worked perfectly for his Minecraft themed room, then, when tastes changed, with a couple of coats of paint it became part of his Pokemon room. We've recently moved to a new house, and sadly the bed doesn't work with his room here or his nearly teenage sized body, so the wood from it is now in our shed, waiting to be built into something new.
Thu, 05/12/2022 - 19:27
Thank you for sharing, what an awesome project! Thank you for sharing.
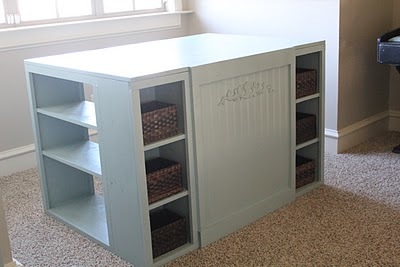
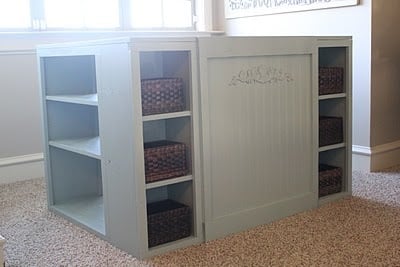
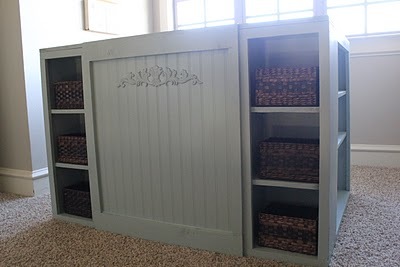
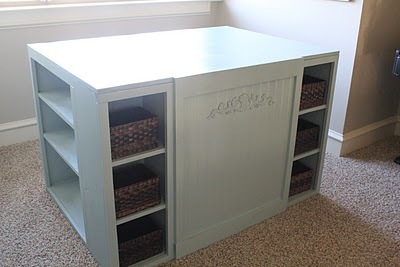
I used Ana's plan for the modern project table to create my craft table. I modified it just a bit by removing the "floating top" and covering the front to provide more hidden storage (a must for me). I used my brad nailer and gorilla glue to construct. I used all whitewood boards for the base and 3/4" mdf for the top. I love it! You can read more details at http://www.shanty-2-chic.com/2011/01/all-finished-yeah.html !


Comments
Lori E. (not verified)
Thu, 06/30/2011 - 08:04
They came out great, and your
They came out great, and your guest room looks LOVELY!!