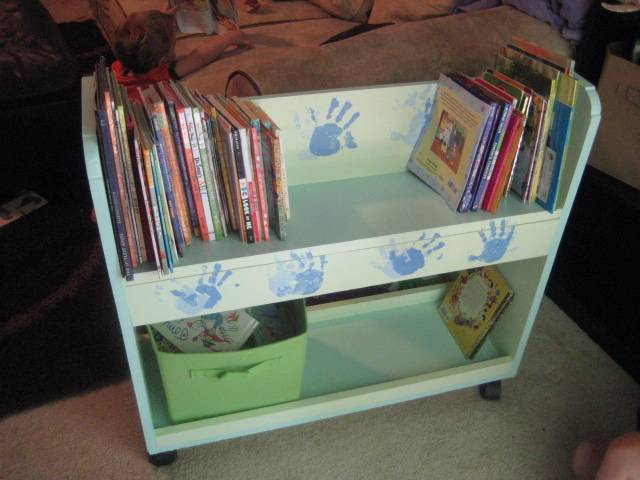
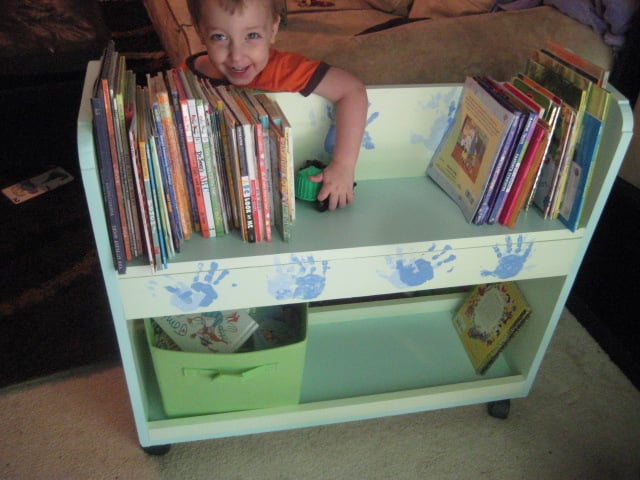
Community Brag Posts

Indoor Playhouse

Submitted by Alaskagirl on Thu, 02/28/2019 - 12:47

Husband and I built this beauty over a rainy weekend. He had cut the wood a few weeks before, then we had to wait for a free weekend to assemble. We switched the placement of the walls around so the bed wouldn’t go over a heat vent and had to trim a few inches off the legs to fit with our lowers ceiling. I painted the back wall with chalkboard paint and we added shelves to the side like shown in the blogpost linked on the build page. We added a light above and Christmas lights below to brighten things up. A book sling and pulley with basket added the perfect finishing touches. All our boys love this magical new addition to our youngest son’s room and gave already spent many hours playing there. 

Built from Plan(s)
Estimated Cost
$200
Estimated Time Investment
Weekend Project (10-20 Hours)
Finish Used
Haven’t finished yet, waiting for drier weather, then will add two coats clear polyurethane to keep the natural look.
Recommended Skill Level
Intermediate

Christmas gift for parents

This bench wowed my parents when they saw me pull up on Christmas Day when I came to visit. Also, this was my first time using the kreg pocket jig. They love sitting outside with their cats and this couldn’t have been easier than I thought. I’m 5’2” and this is a big bench and look forward to building one for myself.

Comments

The Console Table

Please tell me I’m not alone…!! I must admit that I have found myself (on more than one occasion) just staring at a room for what seems like an eternity…trying to figure out why the space isn’t functional or just feels a bit “off”. It was during one of these “I dare you to blink before I do” staring sessions that I decided to build a table for my guest room.

Lucky for me, I can always count on Ana’s plans to rescue me from decorating madness! Well at least when it comes to the furniture part. (For everything else…I probably need lots of therapy!)

But seriously…anyone else get caught up in the time-warp-room-stare?! I can’t be the only one… :-)

My console table's complete story: http://gleeinspired.blogspot.com/2011/03/console-table.html

Estimated Cost
$25
Estimated Time Investment
Afternoon Project (3-6 Hours)
Finish Used
One coat of Minwax Jacobean stain.
Recommended Skill Level
Beginner

Comments

Guest (not verified)

Sat, 10/15/2011 - 21:49

How did you go about finding the wood that you purchased? I'm a newbee and all i have are Lowes & HD around me, also since I'm just starting out I don't have a saw- any suggestions?

claydowling

Sun, 10/16/2011 - 02:22

Lowes and Home Depot both sell wood. However, it's worth finding a local lumber yard to get a better quality of material. Trying to build a table with material from a big-box store will be an exercise in frustration, because it will warp on you, and your nice flat table will develop some interesting twists that will probably keep all four feet from touching the ground at once. I've been there plenty of times, and it's very frustrating to tear something apart to replace wood that warped after everything was assembled.

If you go to a lumber yard and ask for #2 pine, you should get something pretty stable.

You'll also definitely need to pick up some tools. Anyplace that sells lumber has a saw that they can cut material to length with, but none of them will make cuts accurate enough for building furniture. The only cuts you want made for you are those necessary to get material into your vehicle.

There are hand tools of acceptable quality sold at Lowes and Home Depot (well, mostly acceptable quality: nobody sells a decent chisel). They're cheaper and a lot less intimidating than the power tools, and with a little practice it's easier to do accurate work. The downside is that you'll have to hunt a little more for resources to learn how to use them.

brookieanne (not verified)

Thu, 10/20/2011 - 15:03

I love the table - it looks great!
And the time-warp-room-stare??? Yep. That's why I'm on Ana's site! We just moved into a new house about 2 months ago and I need some furniture to help pull some rooms together!

Sandbox with built-in seats

I modified this a tad from the original plans to suit my needs. I will eventually be adding a platform with attached slide and swing set.

Plans were easy to follow. My store didn't have 1x8's so I stacked 1x4's and used my Kreg jig to join them together and then I added extra bracing.

I had seen this on Pinterest a couple years ago and thought it was the coolest thing! Io excited I was able to build it myself!

Built from Plan(s)
Estimated Cost
About $40
Estimated Time Investment
Day Project (6-9 Hours)
Finish Used
None yet. I will stain and seal everything when I get the entire play set finished.
Recommended Skill Level
Beginner

Reclaimed wood and hardware pergola

Submitted by Anonymous (not verified) on Fri, 03/08/2019 - 12:39

100% reclaimed wood and hardware used for this custom pergola.  Designed to be more modern and simple cuts.

Estimated Cost
0.00
Estimated Time Investment
Day Project (6-9 Hours)
Finish Used
None
Recommended Skill Level
Starter Project

outdoor sectional

Submitted by vic b on Tue, 10/11/2011 - 23:51

we put a few bolts in the legs for a bit of added strength, and extra back supports.

Recommended Skill Level
Intermediate

Comments

christie (not verified)

Fri, 06/08/2012 - 09:49

Hi there! Love it! We built one of these too but cannot find cushions for the back, considering it's rather short. Any advice or did you make them?

vic b

Tue, 07/17/2012 - 23:24

Hi, only just checked messages. I got the cushions from and outdoor furniture supply store off ebay Australia. They are replacement ones for a manufactured style of setting they sold, but worked perfectly for the sectional.

Old church pew makeover.

My church was getting new pews and asked if anyone wanted the old ones so I decided to take one and see what I could do with it! The second picture is what it used to look like. I had to take it all apart and cut it to the shorter size that I wanted. I then recovered it with some fabric I found for about $10. I then made legs out of a 2x4 and supported the legs with some 2x2 across the front, back and sides. I painted them with some black primer/paint that I had. This was so fun to do because I had to figure it out as I went along. It was a bit of a challenge at times and I learned a lot from this project. I really love the finished product.

Estimated Cost
$15
Estimated Time Investment
Day Project (6-9 Hours)
Finish Used
Black primer and paint.
Recommended Skill Level
Beginner

Rustic X Small Rolling Kitchen Island

Submitted by Anonymous (not verified) on Thu, 12/31/2015 - 11:46

Good tips from everyone. We added a 2x4 (hidden under the top) to have added saftey feature to ensure my kids wouldnt pull out the drawer.

Estimated Cost
$150
Estimated Time Investment
Weekend Project (10-20 Hours)
Finish Used
weathered walnut and poly clear
Recommended Skill Level
Beginner

Epoxied Craft Table

Submitted by Anonymous (not verified) on Tue, 03/12/2019 - 17:22

I built this table for my wife.  I added a 1/4 round to the edge of the table.  She did all of the finish work including the top which is Unicorn Spit and epoxy.  I turned out really nice.  Thanks for the plans!

Estimated Time Investment
Week Long Project (20 Hours or More)
Finish Used
Unicorn Spit, epoxy and interior paint
Recommended Skill Level
Intermediate

Comments

Farm House Toy Box

Submitted by 2RiversFP on Sat, 02/04/2023 - 18:26

Made this using your farm house toy box plans. Modified slightly as I incorporate old firefighter equipment into most of my projects. Built the frame but instead of slats used retired fire hose. Complete with a white board on the lid. Plans were perfect and allowed me to easily modify to get the result I wanted.

Comments

Media Console

Submitted by amil04 on Tue, 10/18/2011 - 11:38

I used the plans Ana offered as a starting off point for this project. I loved the photos of the exact plans, but it was too long and too short for the space I wanted to fill. I ended up building pull out drawers from pallets instead of installing the apothecary drawers in the plans. I used the bottom cubby to place a dog bed (which they love) and still have one one bin to build to fill the center hole. I used a solid piece of butcher block style wood on the top that I sealed Polyerathane. Thanks Ana!

Built from Plan(s)
Estimated Time Investment
Weekend Project (10-20 Hours)
Recommended Skill Level
Intermediate

Comments

sgilly02 (not verified)

Wed, 10/19/2011 - 11:11

This looks great. Like it was meant to be in that space! What material did you use?

Husky Farmhouse Table

Submitted by adk_native on Mon, 10/14/2013 - 09:11

I loved the husky farmhouse talbe and after using a small round dining table for years, I figured it was time to get a larger table. What a great build! I definitely appreciate Ana's plans and ideas. I finished it right before Halloween as you can see and my 4 yr old son loves the new table for our sit down meails.

Built from Plan(s)
Estimated Cost
$350
Estimated Time Investment
Week Long Project (20 Hours or More)
Finish Used
Minwax Dark Walnut stain, White primer/paint in one, Minwax fast drying polyurethane
Recommended Skill Level
Beginner

Comments

ariya3

Tue, 07/07/2015 - 00:27

I love this table and i am trying to find a cheap way to get a dining room set( chairs will be bought and stanined). My husband is good a building things, my only concern how do you get all that detail into the legs of the table? Is there anyway you can pre-buy them made? We don't have a wooden lathe to do anything intricate.

Thanks if you can advise

Extra-Large Wood Pet Kennel End Table

Submitted by Anonymous (not verified) on Sat, 01/02/2016 - 17:24

I followed Ana's plan exactly, but increased the dimensions to the standard XL crate size (42L x 28W). The base is painted gloss white and the top is stained espresso.

Built from Plan(s)
Estimated Time Investment
Week Long Project (20 Hours or More)
Finish Used
Gloss latex for the base and Minwax espresso stain on the top.
Recommended Skill Level
Intermediate

Hexagon Puzzle

Submitted by mtairymd on Tue, 03/19/2019 - 14:30

This is a fun and simple project to make. It consists of 12 pieces that are all the same size. The pieces are glued together to make 3 assemblies. Getting it apart or putting it together is the challenge. As always, there is a trick.

Build Instructions: https://www.instructables.com/id/Hexagon-Puzzle/

Solution: https://youtu.be/QUmHdIprCl0

Estimated Cost
$1
Estimated Time Investment
An Hour or Two (0-2 Hours)
Finish Used
None
Recommended Skill Level
Beginner

Becca Trunk

Submitted by Anonymous (not verified) on Thu, 02/09/2023 - 10:15

Thank you Ana for your detailed plans. Always so easy working on your projects.

Built from Plan(s)

Comments

Queen Farmhouse Headboard

Submitted by sharon-l on Sat, 10/22/2011 - 04:54

We eventually will build the rest of the bed, but for now we needed a headboard. Hubby helped me with this one, since it was large, I loved having an extra pair of hands. This headboard is reversible, so if our tastes change, we can unbolt it and flip it over to the side that is just stained and polyurethane. Pretty neat! This headboard is extra tall, because we have our bed frame up on risers, and we wanted a picture shelf but didn't want it interfering when we sat up in bed to read or what-not. Hubby used the router to make grooves in the top before we attached it, so our pictures wouldn't be crashing down on our head! Our metal bed frame comes just shy of the outer edge of the legs of the headboard, so when we build the rest of the bed, the side rails will meet the edge exactly. We placed the headboard behind the bed frame to mark where to drill the bolt holes and attached the headboard to the frame with 4 inch long, quarter inch wide bolts with washers and nuts. Two on each side.

Built from Plan(s)
Estimated Cost
$50-$60 just paint and lumber. We had some supplies left over from previous projects, including screws and the ship-lap boards.
Estimated Time Investment
Weekend Project (10-20 Hours)
Finish Used
We painted and distressed the boards, then applied stain to the distressed parts. We coated the entire thing with three coats of polyurethane.
Recommended Skill Level
Intermediate

Comments

Outdoor Providence Table

Submitted by splout on Thu, 10/17/2013 - 20:11

This was my first attempt at building a piece of furniture. It's an outdoor table based on the providence table plans. I used old 4x4 pressure treated posts from part of my fence that was no longer needed for the base. The posts were fit together using lap joints and secured using fastenlok screws. The base was then painted with french grey chalk paint (first time experimenting with chalk paint) and then covered with a thin coat of brown briwax. The top is made of 8 foot by 1 inch ipe boards that are 4 different widths but the overall width is about 42 inches. The ipe was purchased rough sawn and needed to be planed to uniform thickness. I used a natural stain meant specifically for ipe and other tropical hardwoods.

Built from Plan(s)
Estimated Cost
$220 for me - 200 for ipe boards, 20 for paint, 4x4 posts free
Estimated Time Investment
Weekend Project (10-20 Hours)
Finish Used
French grey chalk paint and briwax for base. Natural tropical hardwood stain for top.
Recommended Skill Level
Beginner

Benchright Knockoff

Submitted by Redducchic on Sun, 01/03/2016 - 22:18

My dad actually built this. I had been drooling over the table at Pottery Barn for two years but couldn't afford the $3000 price. Found the plans here and gave it to him with adjustments on the turnbuckles underneath. I wanted the V shape instead of straight across. The tabletop was obtained from an old wood bridge in Eastern WA. I love, love, love this table. The materials cost was $250. The labor was my birthday present. laugh

Estimated Cost
$300
Estimated Time Investment
Week Long Project (20 Hours or More)
Finish Used
Min wax Special Walnut stain, water-based Poly to seal
Recommended Skill Level
Intermediate

My daughters platform bed

Submitted by Anonymous (not verified) on Sun, 03/24/2019 - 05:33

I’m in love with how well this bed turned out. Modified by using a 2x4 for middle support and 1x4’s for slats. It was less money and felt better for support. 

Built from Plan(s)
Estimated Cost
$150
Estimated Time Investment
Weekend Project (10-20 Hours)
Finish Used
Early American stain & matte poly
Recommended Skill Level
Beginner