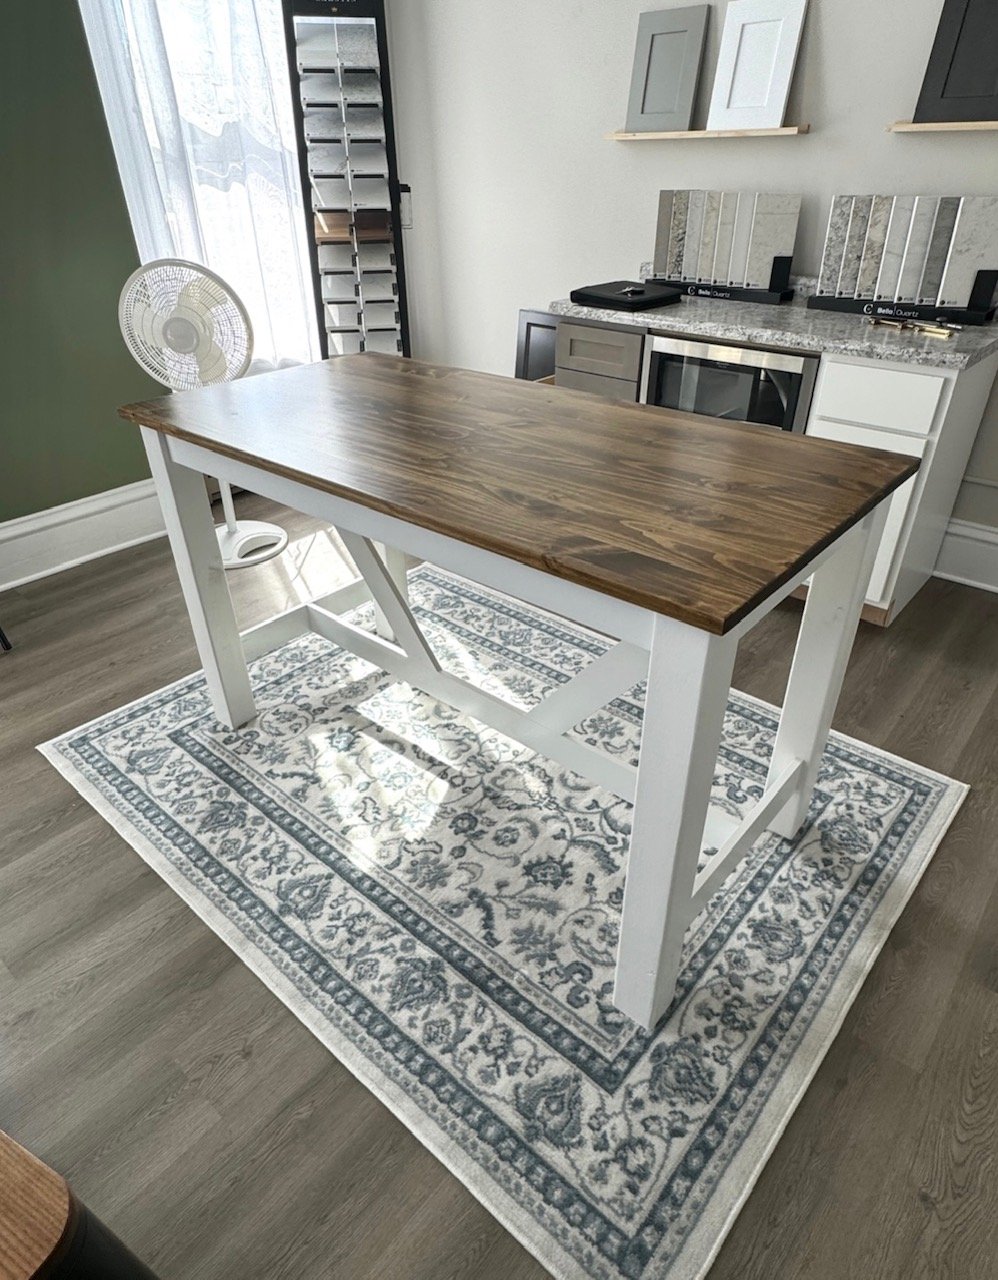
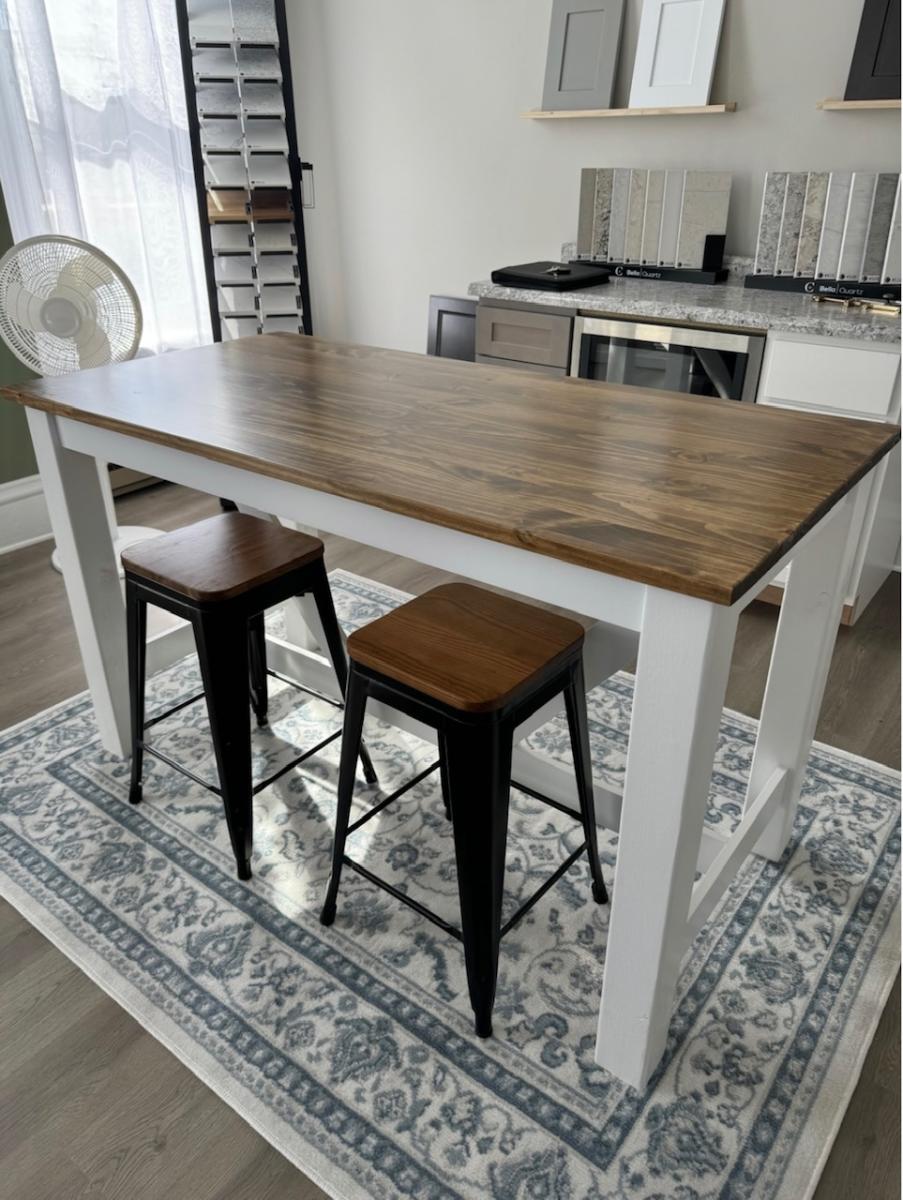
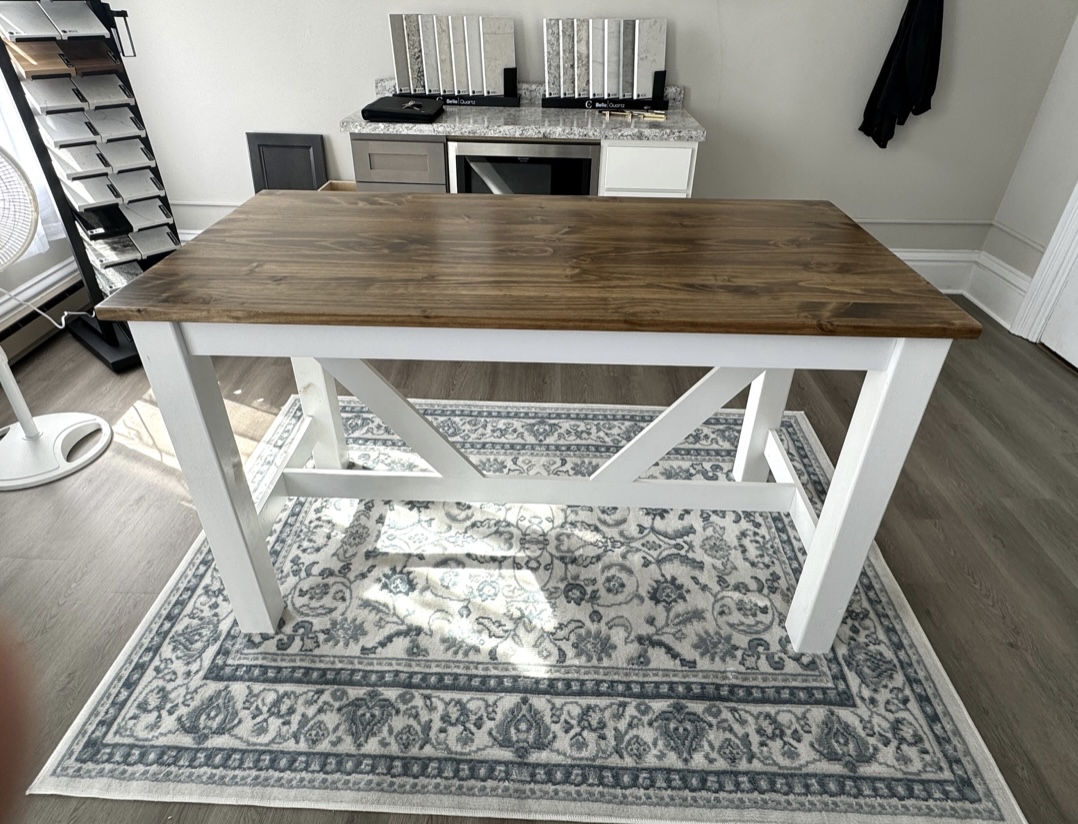
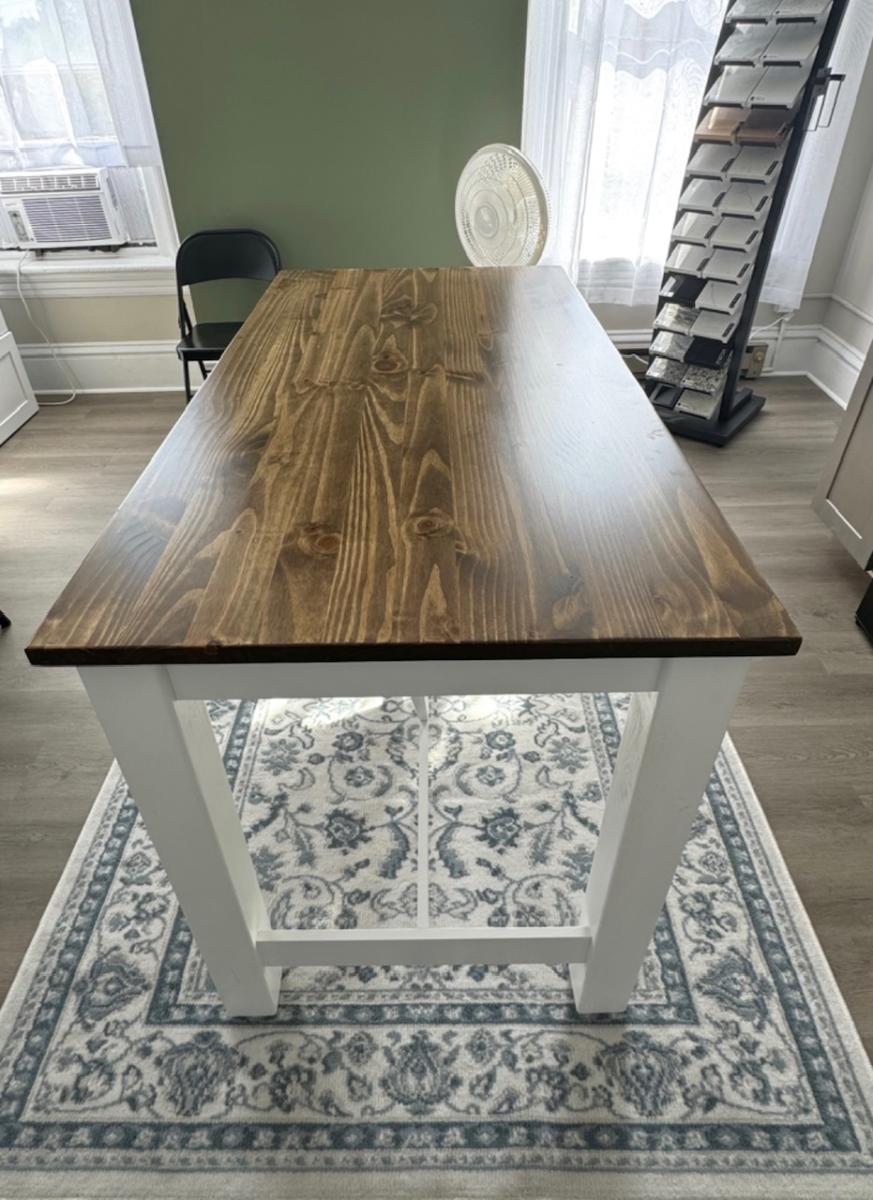
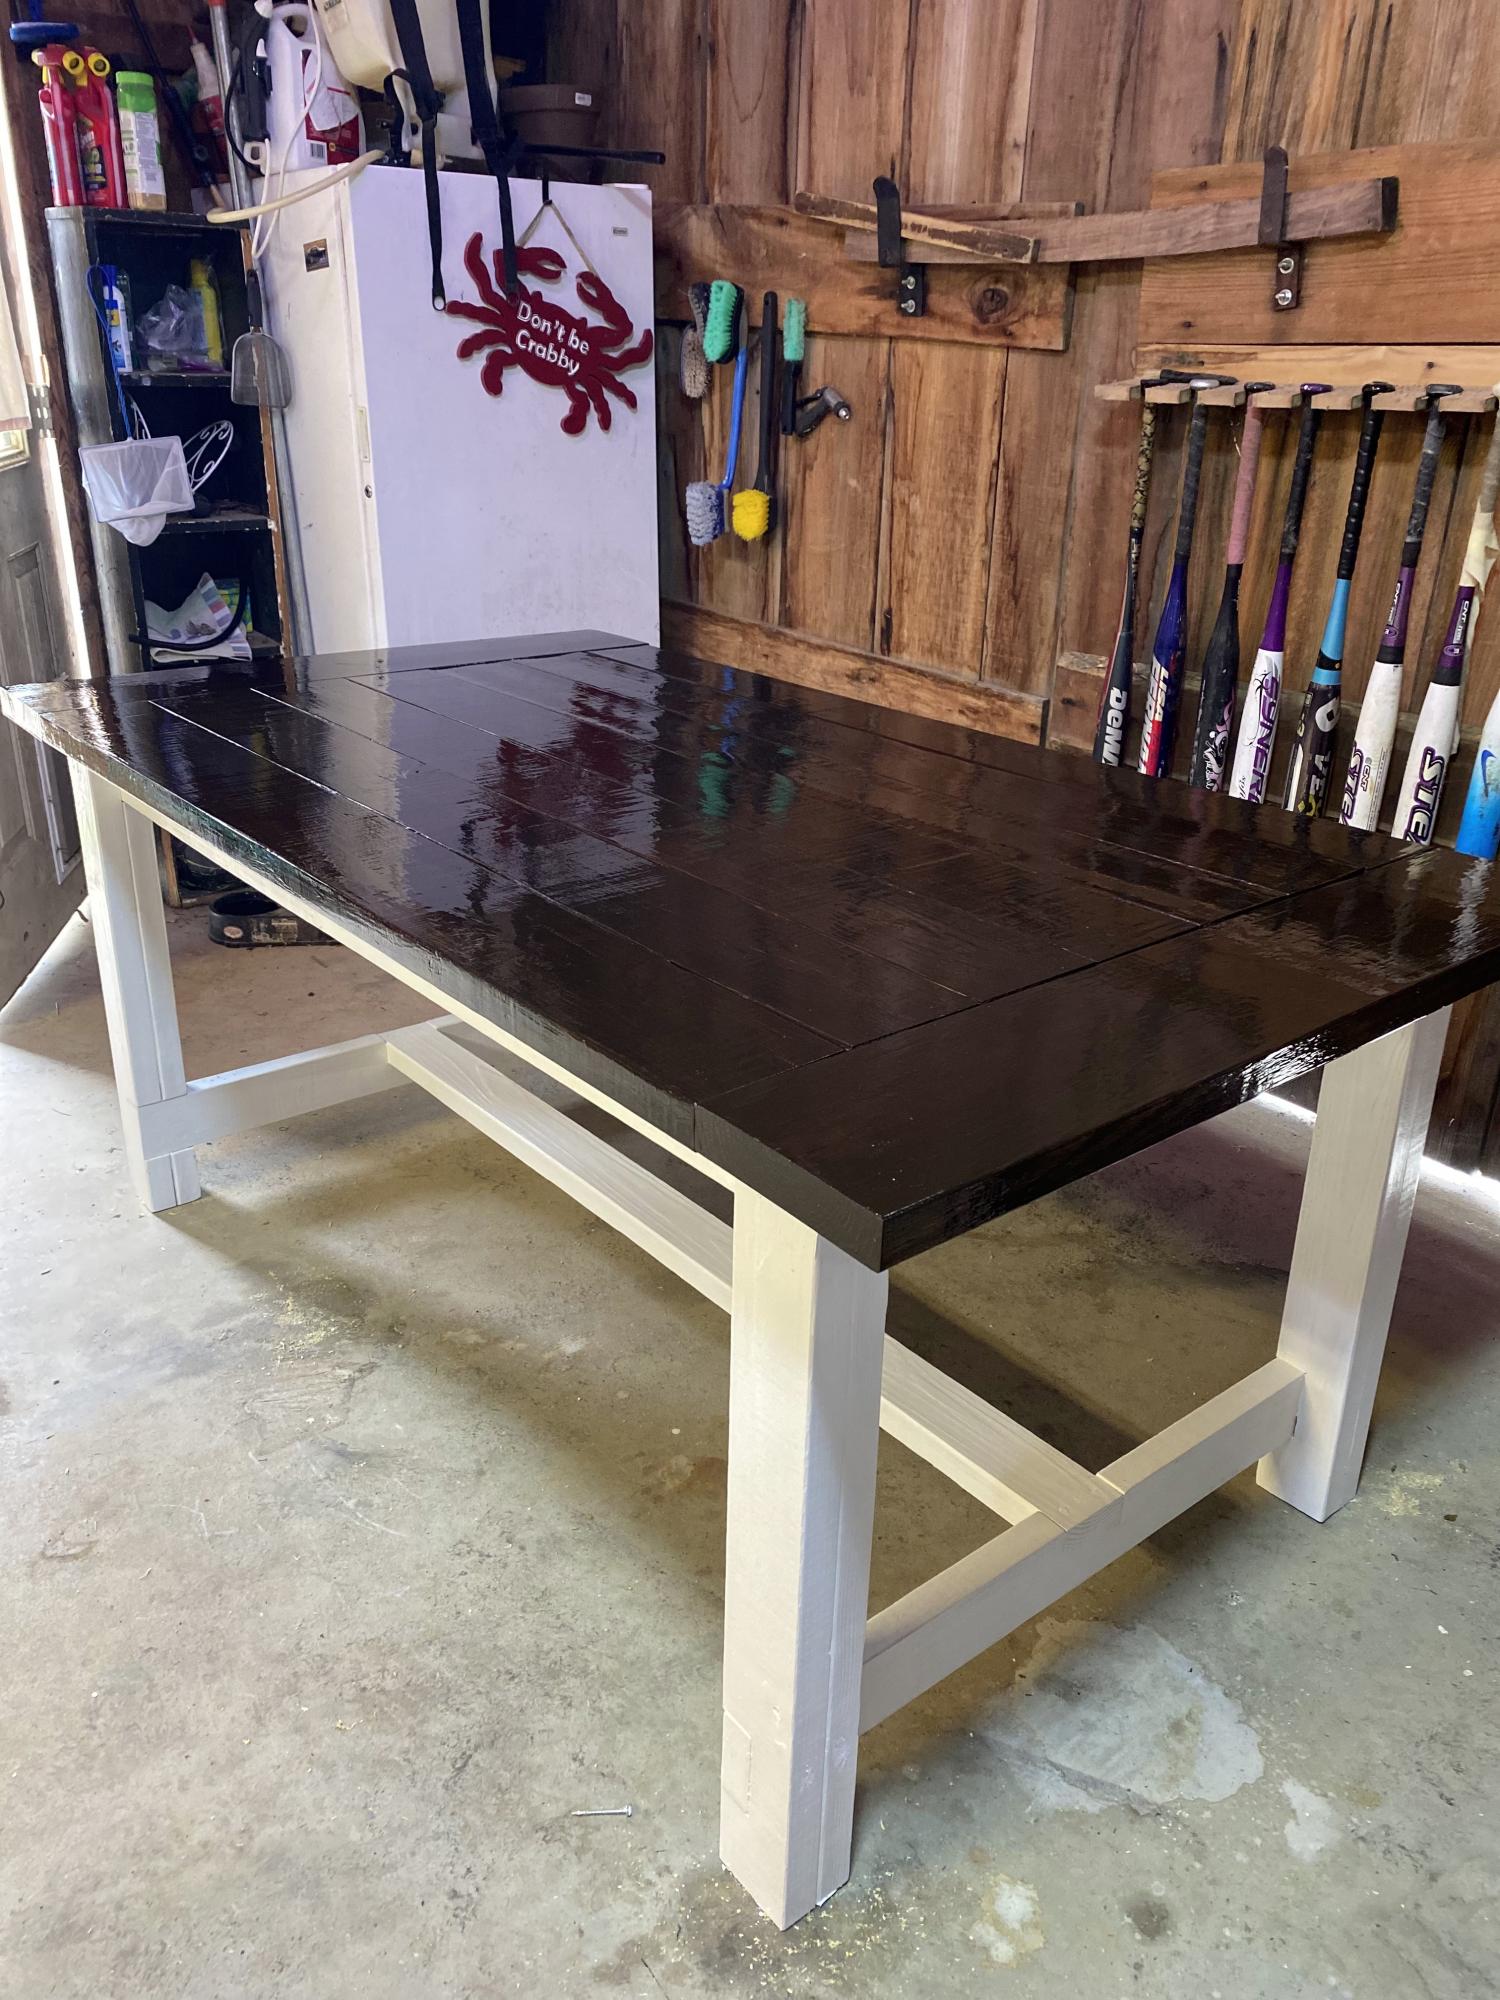
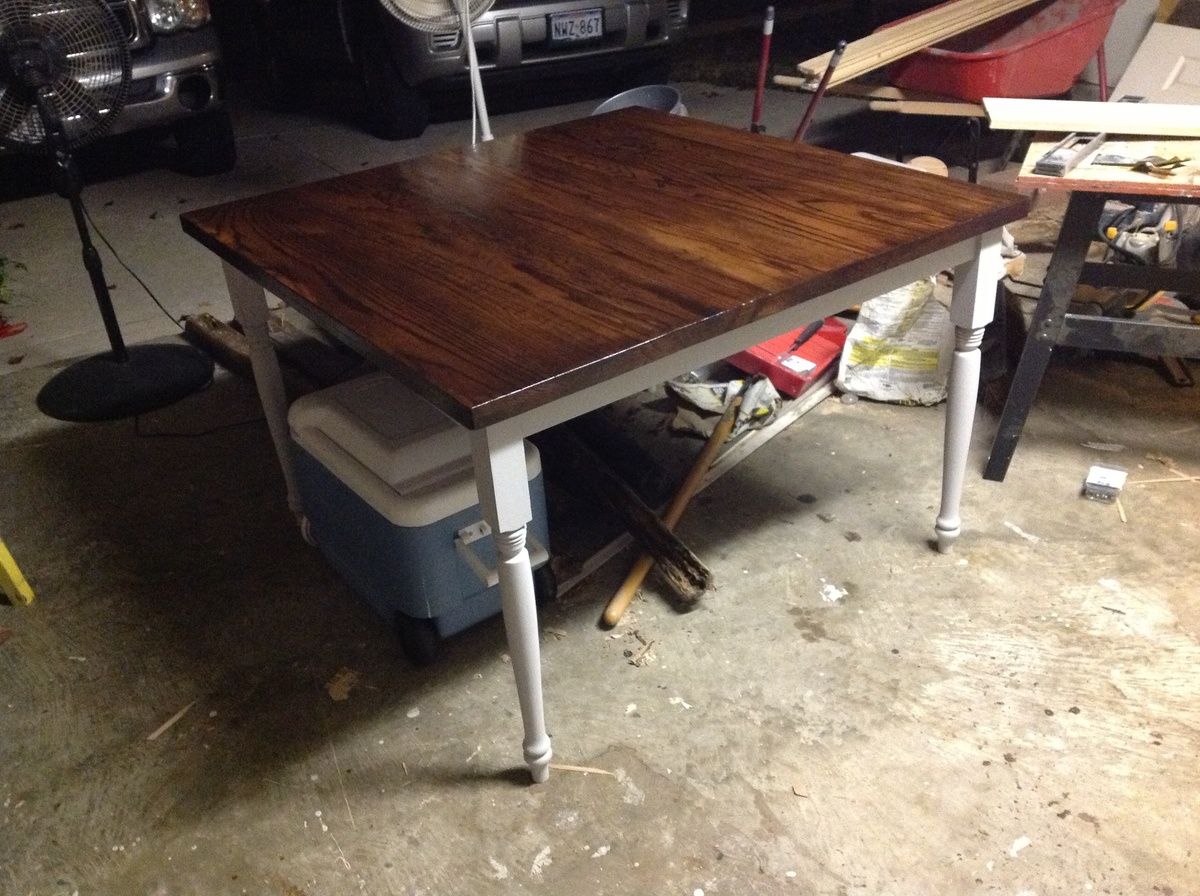
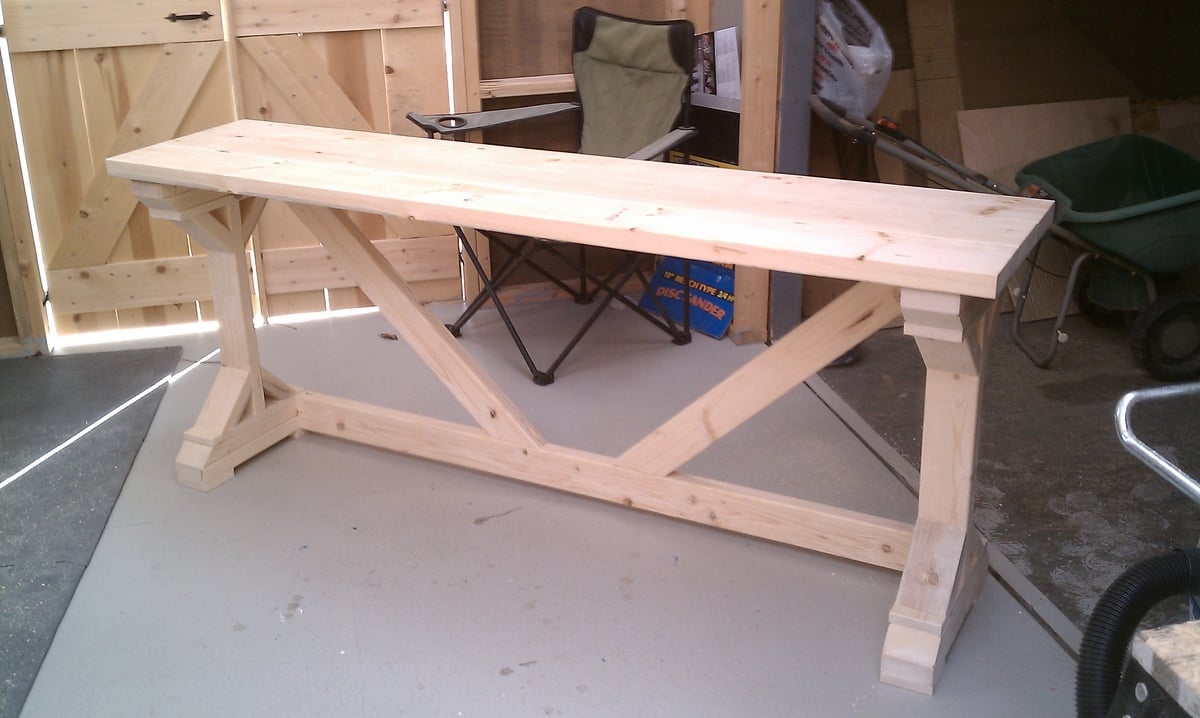
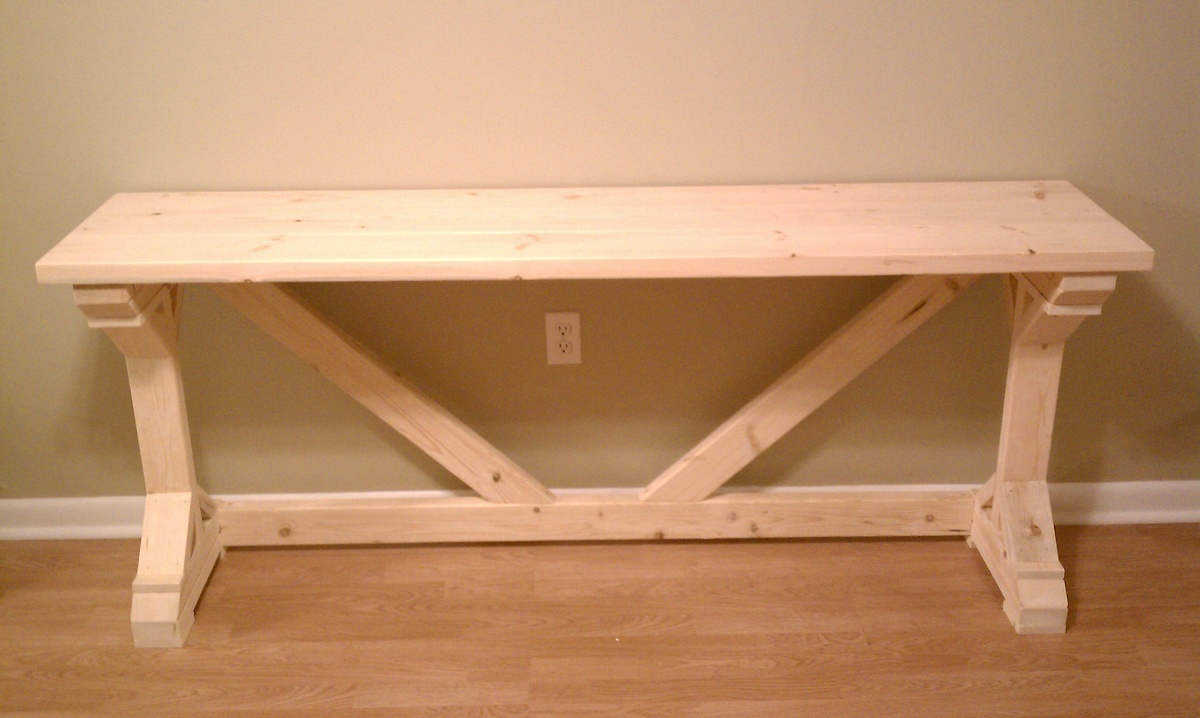
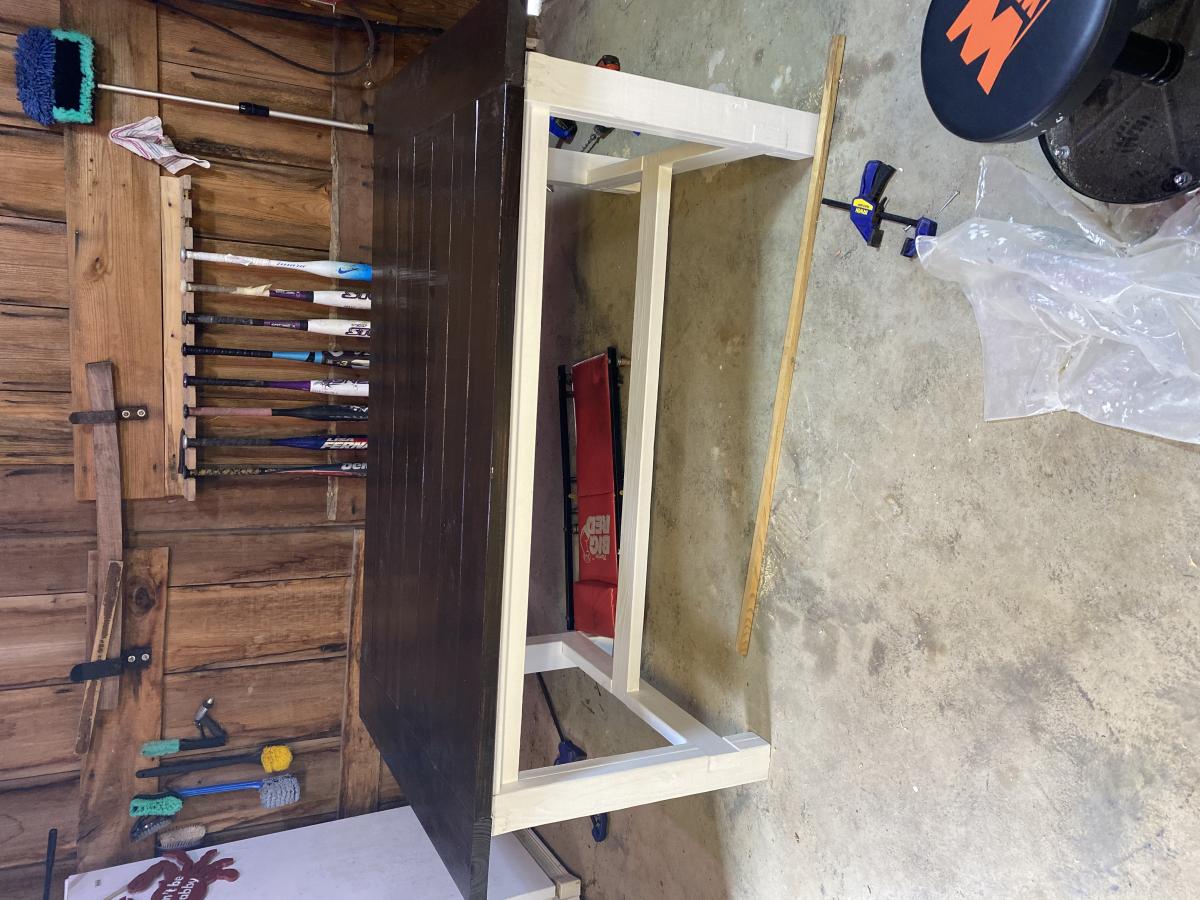
Community Brag Posts

Storage for baby toys, burp cloths and boppy!

Submitted by katetb on Fri, 08/31/2012 - 06:57

After buying materials for a not so baby friendly antique factory cart coffee table, which I unhappily had to veto, my husband was able to quickly assemble this table and it sat unfinished for a few months. He painted it a black semi-gloss inside and out.

It fits the boppy, lots of blankets and 4 fabric cubes to hold toys, rings, burp cloths... perfect to hide at least some of the baby stuff that has taken over our home.

And now I NEED the apothecary trundle coffee table for the den!

Estimated Time Investment
Weekend Project (10-20 Hours)
Recommended Skill Level
Beginner

Beach Shack

Submitted by jvuijk on Fri, 06/27/2014 - 19:28

Customized version of the clubhouse bed that is so popular! We went the extra mile on the finishing touches to ensure an awesome bed for our little guy! We made the bed taller for more space underneath and polished up the finished product to create a higher end look. Care was taken to precisely sand all areas of the bed for a smooth finish and polished look. All pocket-holes are filled with plugs and sanded smooth on the inside of the bed for an overall finished product. No shortcuts taken! We went the extra mile and painted the carriage bolts so they would blend in with the whitewash finish and also recessed the nut on the back of the legs for safety and added a cap so they are not visible. Top of the bed, above the door, is filled in and a custom ladder finishes off the look. We went with smaller lumber to build the ladder and it is perfect!! We are over the moon with this project and will be building more items as fast as we can. Also, the sign, under-bed shelves, and industrial shelves were built by my husband. He did an epic job creating this room!! We used better grade wood and spent a lot of time sanding to ensure a great bed in the end. We also went with a Benjamin Moore stain that was a little more expensive and took the time to finish the slats under the bed.

Built from Plan(s)
Estimated Cost
$400
Estimated Time Investment
Week Long Project (20 Hours or More)
Finish Used
Benjamin Moore exterior semi-transparent stain.
Recommended Skill Level
Intermediate

Comments

jeawels

Mon, 02/22/2016 - 07:38

I love this bed! I was looking at the BM site and was wondering what exact stain did you use? there are 5 different opacities & I want to make sure I get the right one.  Thanks!! 

Toy Box

Submitted by TaylorMade on Wed, 09/28/2016 - 10:46

Built from Ana's plans. Thank you so much Ana! I had just enough scraps for this and I just adore it in my girls room! 

Estimated Time Investment
Day Project (6-9 Hours)
Recommended Skill Level
Beginner

Potting bench

Submitted by Rynhffr on Mon, 07/06/2020 - 20:59

Took a few tries to get those side rails right just eyeballing the angles but finished product looked great!

Built from Plan(s)
Estimated Cost
100
Estimated Time Investment
Afternoon Project (3-6 Hours)
Recommended Skill Level
Beginner

Farmhouse table with fancy legs

Submitted by KellyRyan on Mon, 09/03/2012 - 13:47

I started looking for a farmhouse table months ago at antique stores and on Craig's list but never could find exactly what I was looking for at a reasonable price. A friend had pinned an Ana White plan on pinterest. I sent my boyfriend a link to the plans for the fancy farmhouse table and he decided to build it for my birthday!!! It took him a few afternoons and turned out exactly how I wanted it. It was fun to build and not too hard. We shorten the length to 6.5feet to fit in the dining room. I used Minwax dark walnut 2716 as the finish. I topped it with two coats of poly. It fits perfect and looks amazing!

Estimated Time Investment
Weekend Project (10-20 Hours)
Finish Used
Minwax prestain, then Dark Walnut and poly. Two coats of the stain and poly.
Recommended Skill Level
Beginner

DIY Garden Box with Trellis

Submitted by JenFarrell on Mon, 06/30/2014 - 07:13

We wanted a small garden to fit on the back patio stones and this plan fit well. We reduced the height because we have 3 small children to "help" water the plants. The trellis was hoping that we could extend the amount of produce we could grow. They're very heavy, sturdy and straightforward to build. Thanks very much!!

Estimated Cost
$120
Estimated Time Investment
Weekend Project (10-20 Hours)
Recommended Skill Level
Beginner

TV console

Submitted by Anonymous (not verified) on Mon, 10/03/2016 - 14:03

Super simple plans that were easy to follow for first time builders.  We really love how it turned out and are working on an end table of the same style now. 

Built from Plan(s)
Estimated Cost
$60
Estimated Time Investment
Weekend Project (10-20 Hours)
Finish Used
Oxidized finish darkened and sealed with tung oil
Recommended Skill Level
Beginner

Octagon picnic table.

Submitted by Anonymous (not verified) on Tue, 07/07/2020 - 17:15

I ended up going with the suggested 4 inch extension for more leg room. The outer boards measured out around 41 11/16". Two more 2x6x8's were used to do this along with a 2x4x10.

Estimated Cost
$300
Estimated Time Investment
Weekend Project (10-20 Hours)
Recommended Skill Level
Intermediate

Counter Height Planter

Submitted by Anonymous (not verified) on Sat, 05/11/2024 - 11:31

Hello everyone,
I collected unwanted wood and I put them in a good use. Transform them into planters . Many people throw excellent wood . Either, they aren’t aware or they purchased new furniture.
Thank you Mrs. Anna . She has inspired me with her excellent ideas. God bless you
Jean Abinajem


Farm House Table

Submitted by SamVT on Tue, 09/04/2012 - 21:17

I Got my inspiration from ana's website here. I have a 200+ year old house and I just redid the dining room so I figured now would be the time to make a table for it. I did not use standard pine lumber, this was done all in Vermont walnut that was cut about 4 miles from my house and milled on site. I like to keep a stock pile of local lumber (mostly red oak and walnut when it pops up). My only advice if you are working with rough cut lumber is to invest in a good planer and joiner (I know easier said than done). If anyone would like the exact plans I used I would be happy to send them to you.

Estimated Cost
300-400$
Estimated Time Investment
Week Long Project (20 Hours or More)
Finish Used
Poly
Recommended Skill Level
Intermediate

Comments

Home is Where the Shelves Are

I built five of these bookshelves for my living room. I wanted them to fill the one wall, so I just divided the length of the wall by five to determine how wide to make each shelf. Also, because I was building several to be pushed together, I didn't want the bulk of 2 by SPF, so I used laminated pine shelving. Two eight foot boards were needed for each shelf, and that left very little waste. I love how they turned out. I blogged more about them (including dimensions) here http://skonkers.blogspot.ca/2014/07/home-is-where-shelves-are.html

Built from Plan(s)
Estimated Time Investment
Afternoon Project (3-6 Hours)
Finish Used
I primed, then painted with CIL Artesian White
Recommended Skill Level
Beginner

Texas Flag Adirondack Chair

Submitted by pacificslu on Thu, 10/06/2016 - 06:37

Built from scrap lumber during my deployment with the US Navy to Camp Lemonnier, Djibouti, Africa, and brought home to Texas on my return Sept 2016. 

Built from Plan(s)
Estimated Cost
Since I used reclaimed wood from construction projects around the base, the cost of the project was almost zero. Paint, screws, and some clear-coat. That's about it.
Estimated Time Investment
Afternoon Project (3-6 Hours)
Finish Used
Spray paint and clear-coat. Now that I'm home, I plan to sand it and apply a coat of polyurethane to protect it from the weather.
Recommended Skill Level
Beginner

Comments

Big kids picnic table

Submitted by boneill on Wed, 07/08/2020 - 20:14

This was a easy build and is super strong . ITs built for a kid sized picnic table but I tested It with my weight to see how it holds up and (200 lbs) didn’t hurt it or even make the seat budge.

Built from Plan(s)
Estimated Cost
$55
Estimated Time Investment
Afternoon Project (3-6 Hours)
Finish Used
Valspar canyon brown transparent on seats and Table top . Black (midnight ) solid stain on the frame .
Recommended Skill Level
Intermediate

Wedding Bench Guestbook

Submitted by MrsGig on Fri, 09/07/2012 - 14:53

I really loved what brookifer86 did with the Rustic Bench plans here: http://ana-white.com/2011/03/rustic-bench-wedding-guestbook. When my daughter got engaged last fall, I knew that this would be a great wedding gift for the new couple.

It was helpful to read several times through her posts and followups. It took longer to come up with the name design than it did to build the bench, so give yourself plenty of lead time on this part. I was able to create the graphic in PowerPoint and enlarge it on my computer screen so that I could tape paper on the monitor and lightly trace the design for transfer to the bench. My husband suggested the addition of a princess crown over our daughter's name just for fun.

Thanks for the tip to use paint pens instead of markers. I made a sign at the reception with spare paper to alert people to shake the pens and give them a spot to test before writing on the bench.

I am doing a test with a spare painted board and the pens to make sure the application of the poly finish does not smear the signatures before sealing the signed bench.

Many thanks for the idea, Brooke, and thanks to Ana for the great bench plan!

Estimated Cost
$50 including wood, paint, and paint pens
Estimated Time Investment
Afternoon Project (3-6 Hours)
Finish Used
White exterior paint - satin finish
Recommended Skill Level
Starter Project

Comments

brookifer86

Sat, 09/08/2012 - 14:26

Oh my goodness, it looks so good! I'm so happy that someone else gets this awesome bench to look at forever ;) I know we totally love ours and it's one of my favorite builds in the house. Definitely test your finish, though, because I used ModPodge (horrible idea) and it's already yellowed in spots :( I'm hoping to figure out some way to salvage it and refinish the poly coat

MrsGig

Sun, 09/09/2012 - 16:32

Brooke, one of the comments on your posting from the person that used brown permanent markers and then had problems with the poly coat smearing gives me pause for caution. Too bad about the ModPodge yellowing. Everything that I have read so far does not indicate yellowing as a problem with it.

Don't feel bad, even the Minwax Polycrylic website for that product states "Because slight ambering may occur, spot test on an inconspicuous area and let dry to ensure satisfactory results." Because of that, I am leery about using it for my white painted bench.

I am testing Rust-Oleum’s Painter’s Touch Ultra Cover 2x Clear - initial results shows it going on clear and not smearing the signatures.

maharg1231

Sat, 02/16/2013 - 16:55

What a great idea! My niece is getting married in July and I think I might do this for her. I was just curious what your results were with the Rust-Oleum clear coat? Or if you found something that didn't end up yellowing?

Grill Station

Submitted by JDillen on Sat, 07/05/2014 - 15:32

Grill station

Built from Plan(s)
Estimated Cost
100
Estimated Time Investment
Afternoon Project (3-6 Hours)
Finish Used
Rustoleum Kona
Recommended Skill Level
Beginner

Teal King Farmhouse bed

Submitted by abbrater on Mon, 10/10/2016 - 13:36

I added six inches to all vertical measurements for the headboard and footboard to make this bed a little taller.  

This bed was easy to build – this was my 5th woodworking project ever.  It is however a BIG project in terms of size…I can carry the footboard by myself, but the headboard is a different story!  I used Jamison’s (from rogueengenieer.com) technique for attaching side rails.  My bed came out a little bit wide even though I sized down the width measurements to fit a king sized mattress used in the traditional orientation ( 76 inches wide by 80 inches long.)  Had I attached the rails on the insides of the 4/4 posts it would have been perfect, but I wanted to be able to break the bed down easily in case we move.  (We have a history of being semi-nomadic!)  I purchased the rail hardware off of amazon.  I also ended up using pocket holes to attach a 1x6 to the end of my top support board to keep the box springs from sliding up. 

 I LOVED the color of the feature bed on the California King Farm House plans, so I tried my best to match that.  I used a home right max sprayer for the primer, paint and polycrylic.  I hand applied the brown glaze with a sponge brush and wiped most of it away with old t-shirt rags.    I absolutely love the bed – it is super heavy and very sturdy!  Thanks Ana!

Estimated Cost
approx $250 including paint and hardware
Estimated Time Investment
Week Long Project (20 Hours or More)
Finish Used
2 coats kilz 2 primer.(sprayed on), 4 coats Caribe from Behr (home depot) (sprayed), glazed with rustoleum decorative glaze in java brown. 2 Coats of satin polycrylic (sprayed)
Recommended Skill Level
Beginner

Fully Functional Arcade Cabinet

Submitted by lehmanna36 on Fri, 07/10/2020 - 08:18

Didn't use plans for this, so I eyeballed basically everything. Certainly made for a more frustrating build, but I have to say I'm happy with the end result!

Estimated Cost
$300
Estimated Time Investment
Week Long Project (20 Hours or More)
Finish Used
Minwax Walnut
Recommended Skill Level
Intermediate

Comments