Community Brag Posts
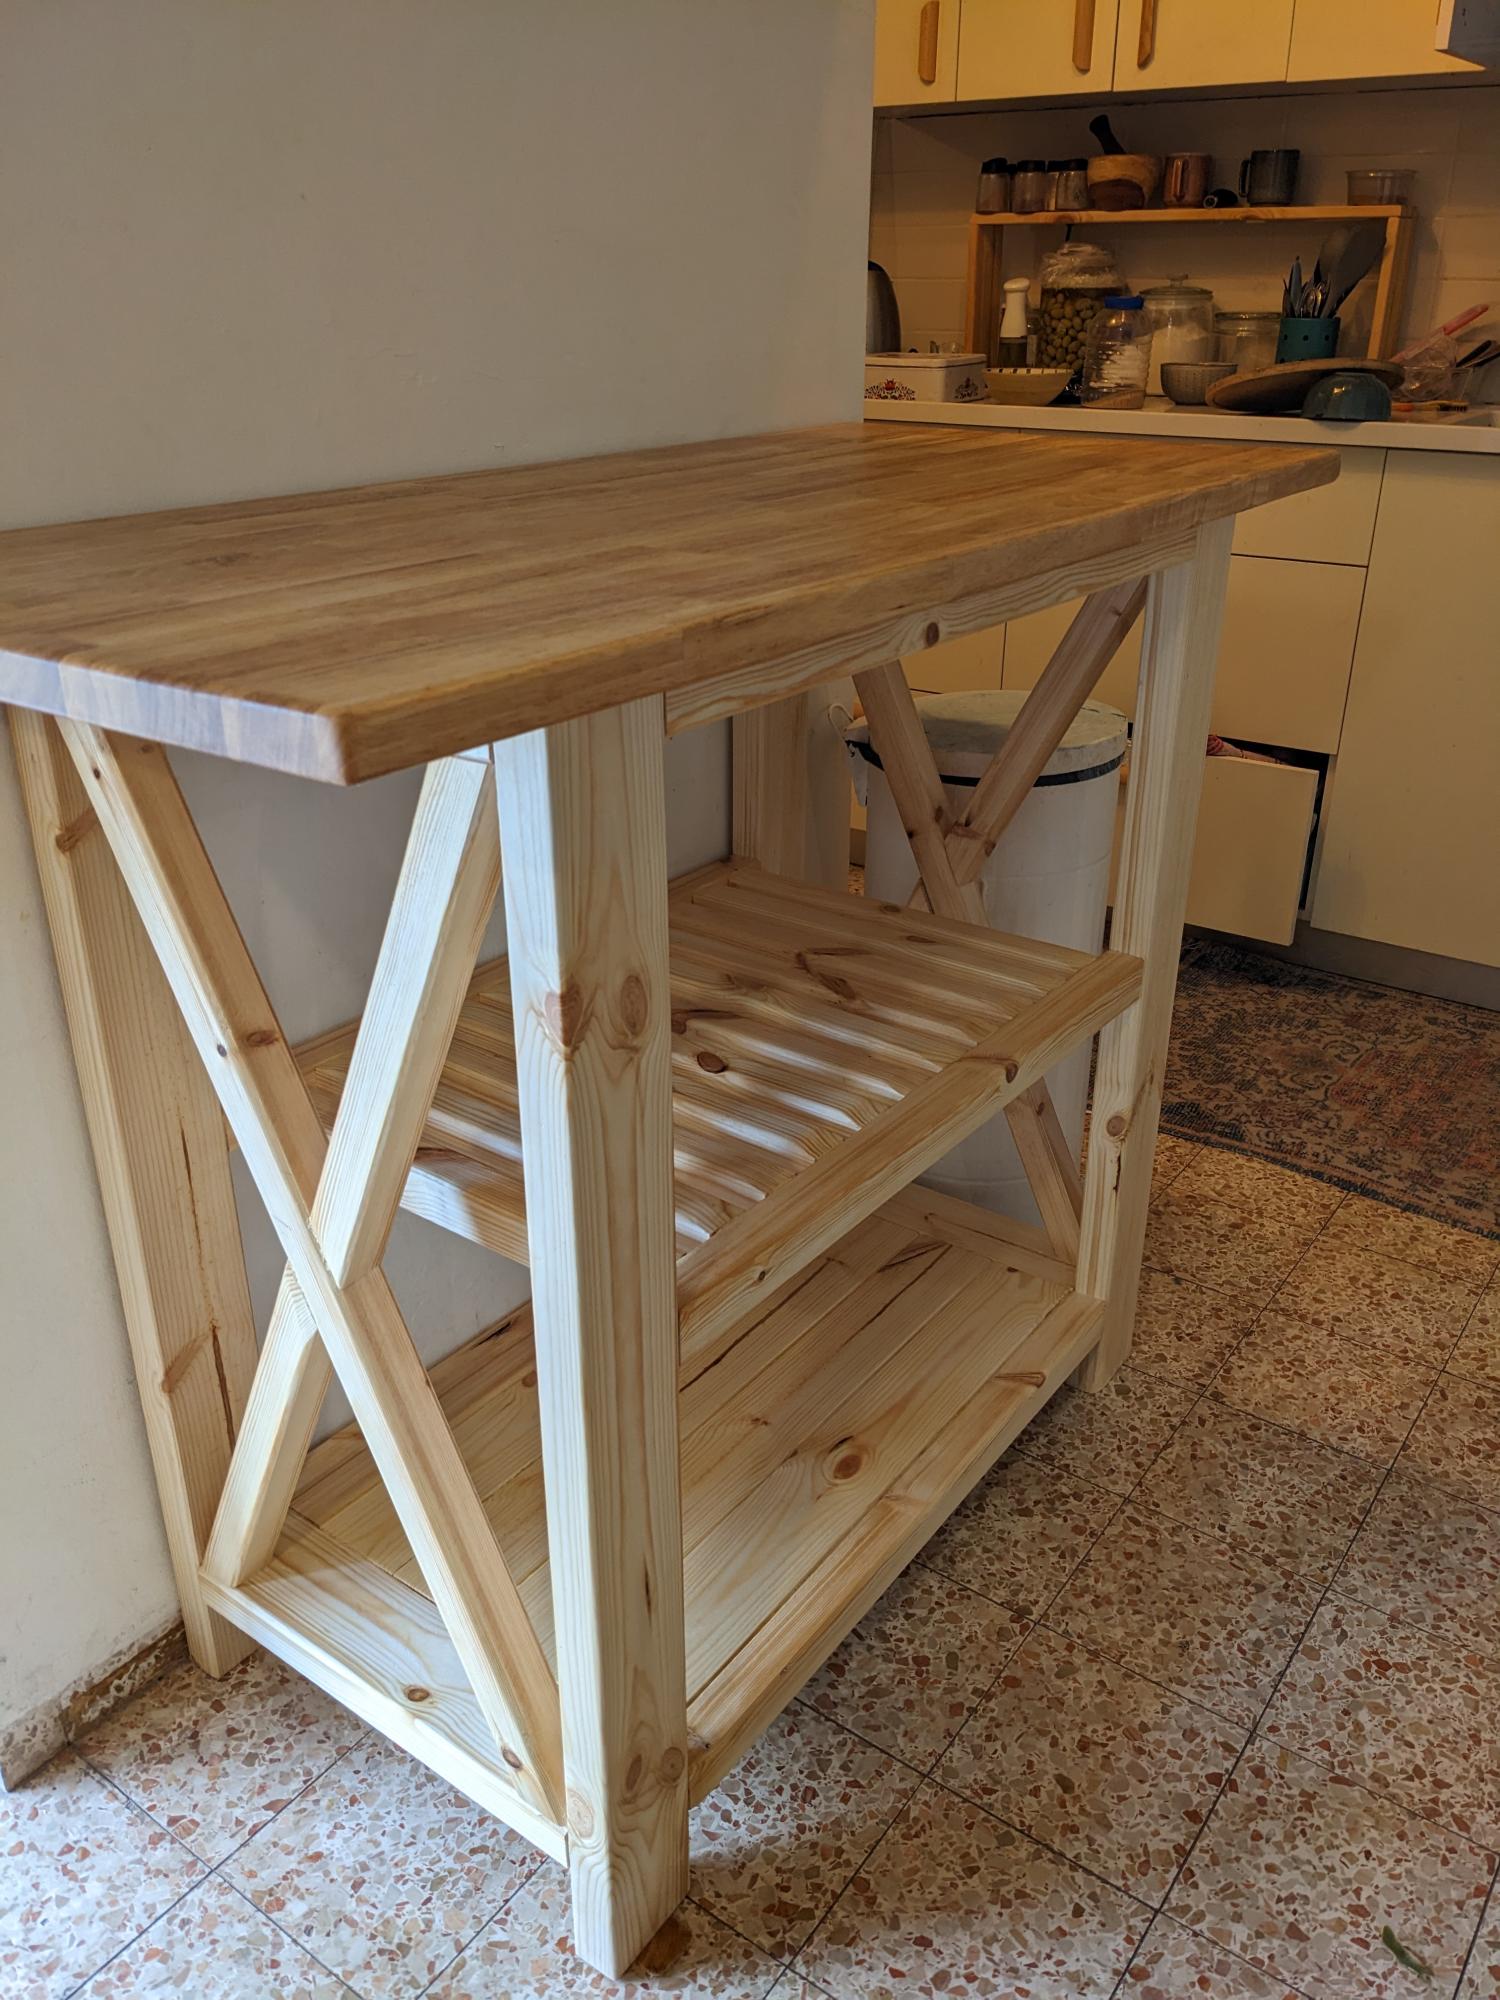
Media Console
I used the plans Ana offered as a starting off point for this project. I loved the photos of the exact plans, but it was too long and too short for the space I wanted to fill. I ended up building pull out drawers from pallets instead of installing the apothecary drawers in the plans. I used the bottom cubby to place a dog bed (which they love) and still have one one bin to build to fill the center hole. I used a solid piece of butcher block style wood on the top that I sealed Polyerathane. Thanks Ana!
Built from Plan(s)
Estimated Time Investment
Weekend Project (10-20 Hours)
Recommended Skill Level
Intermediate
Comments
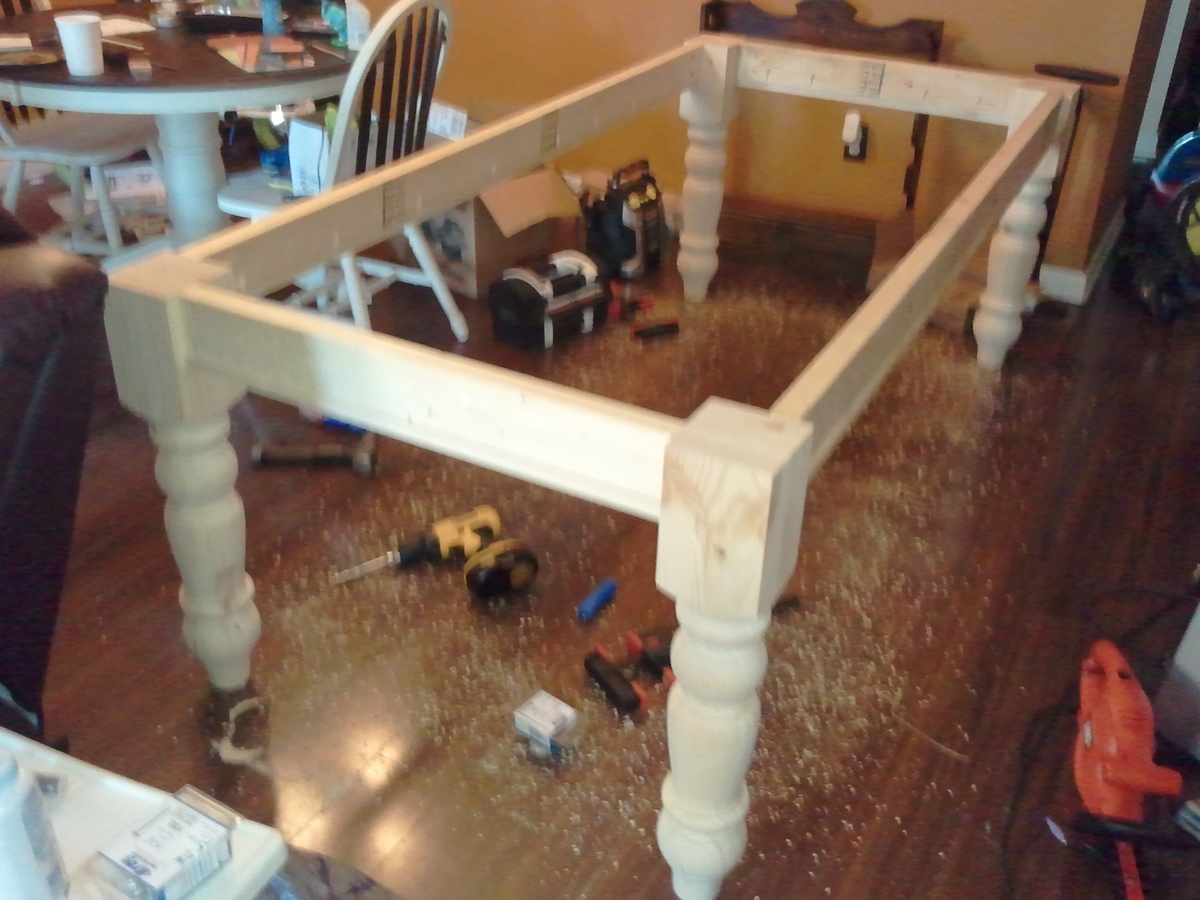
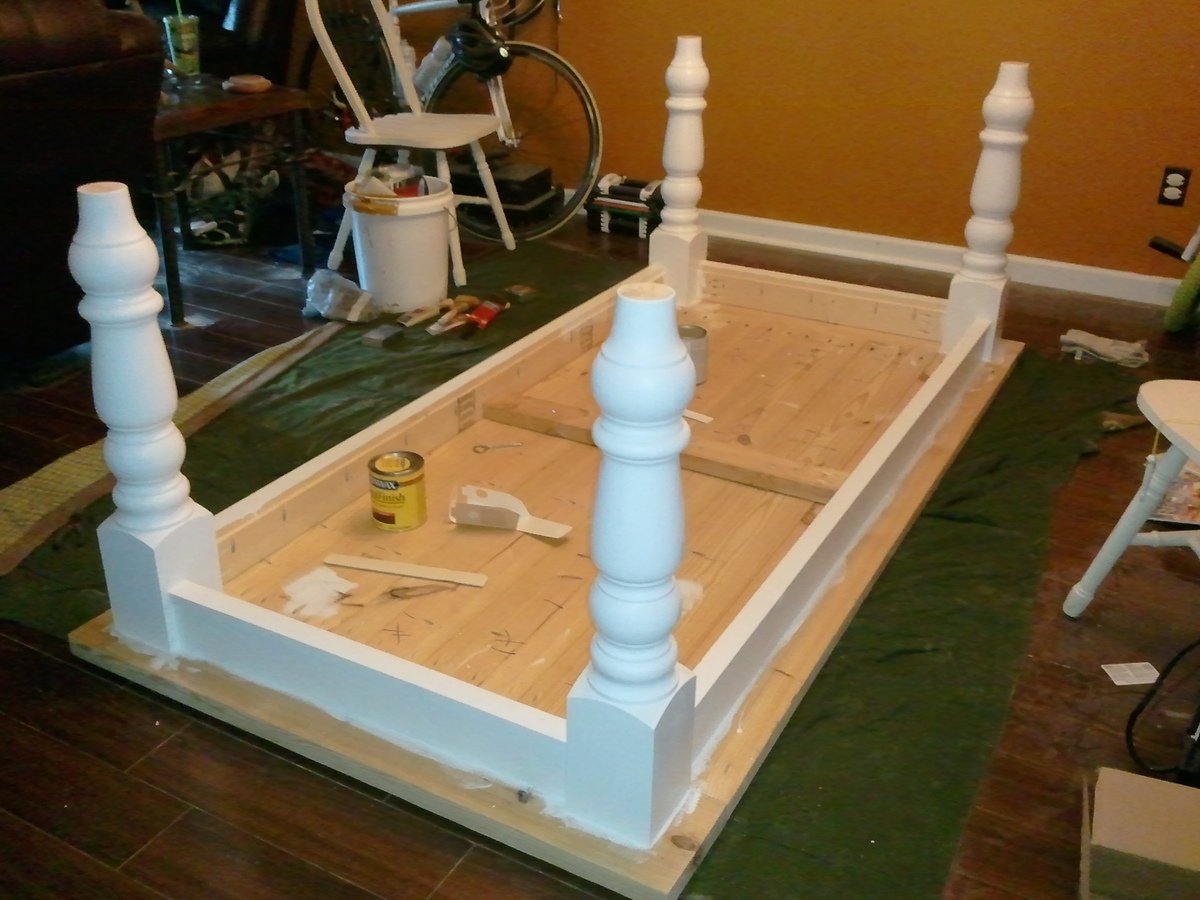
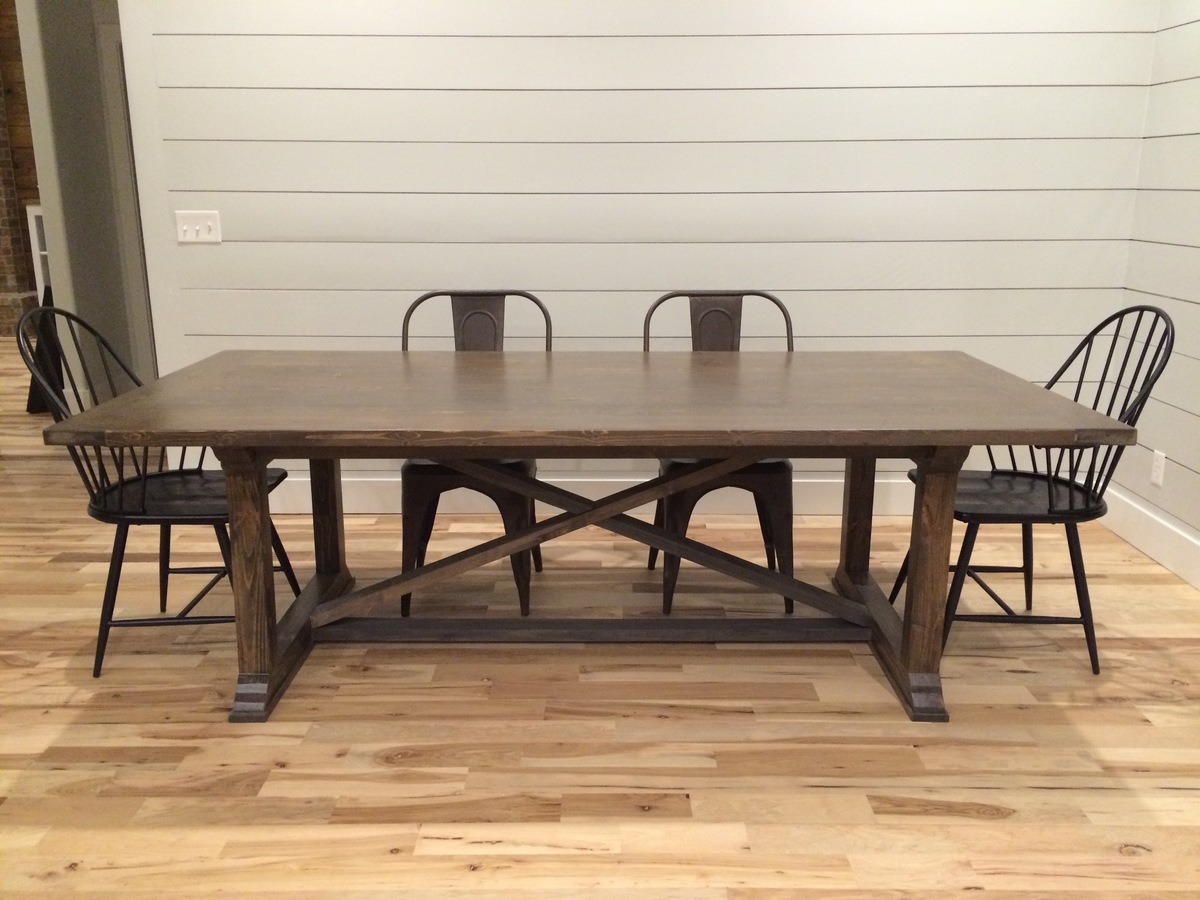
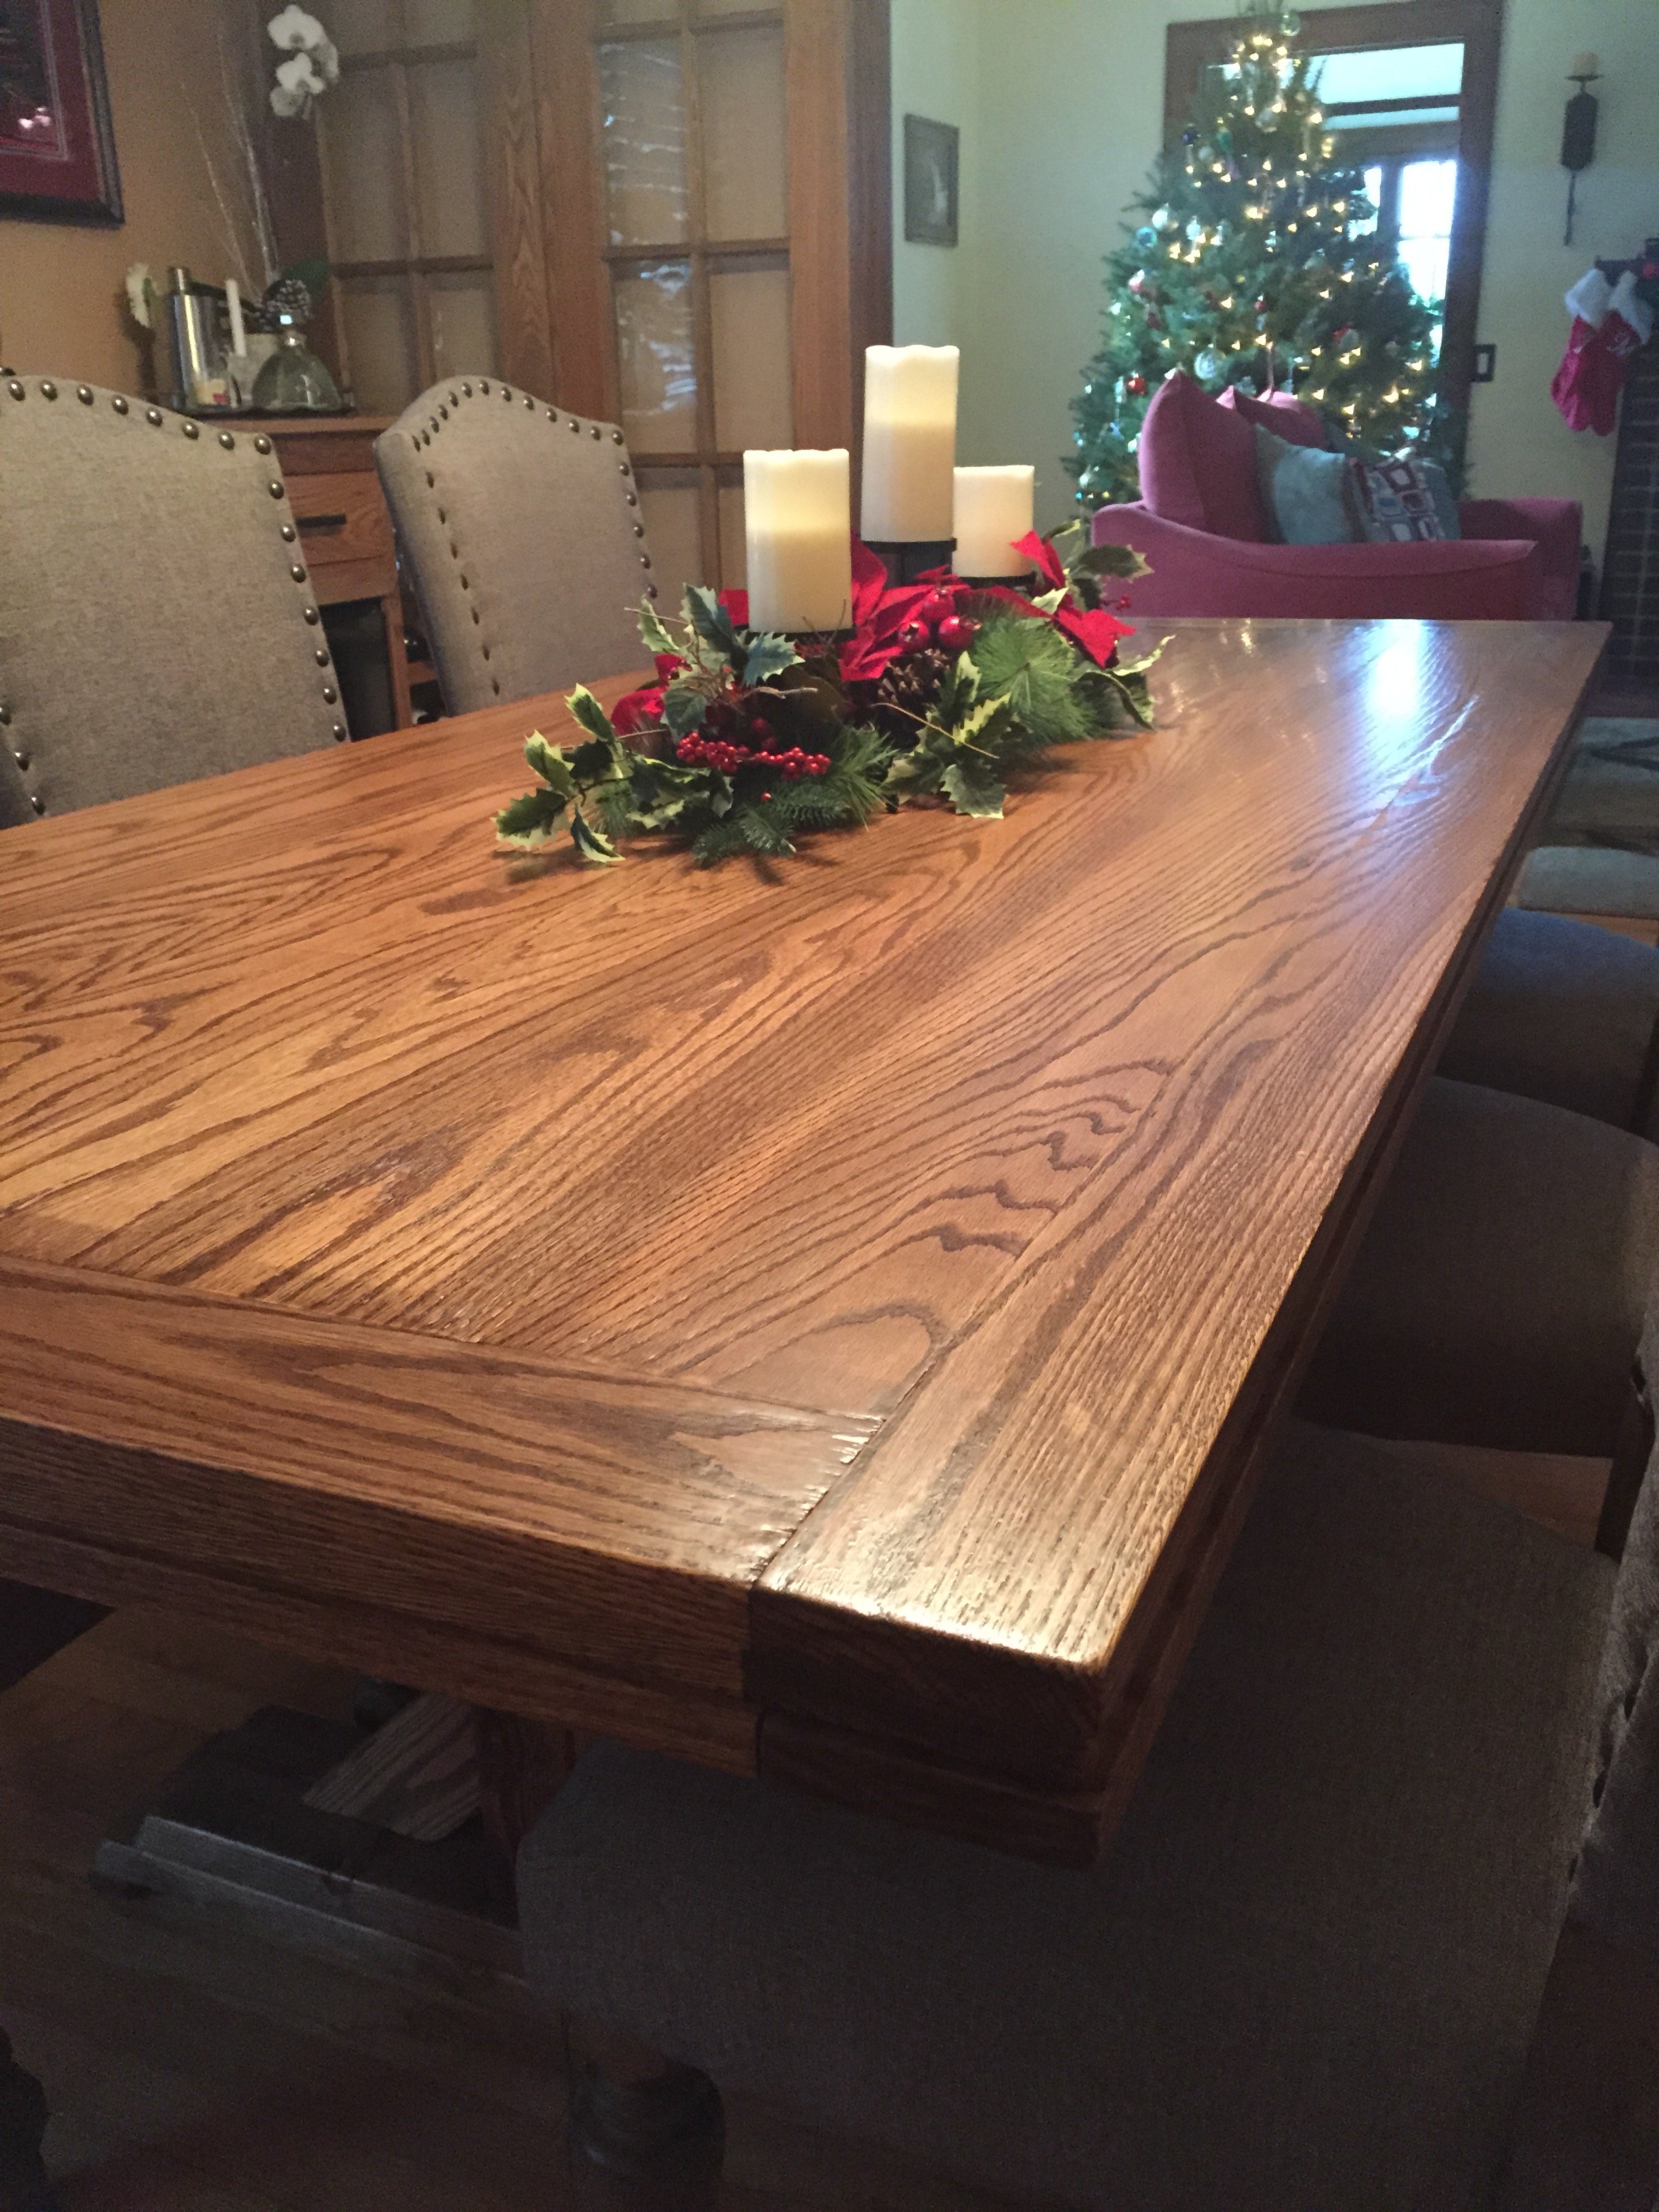
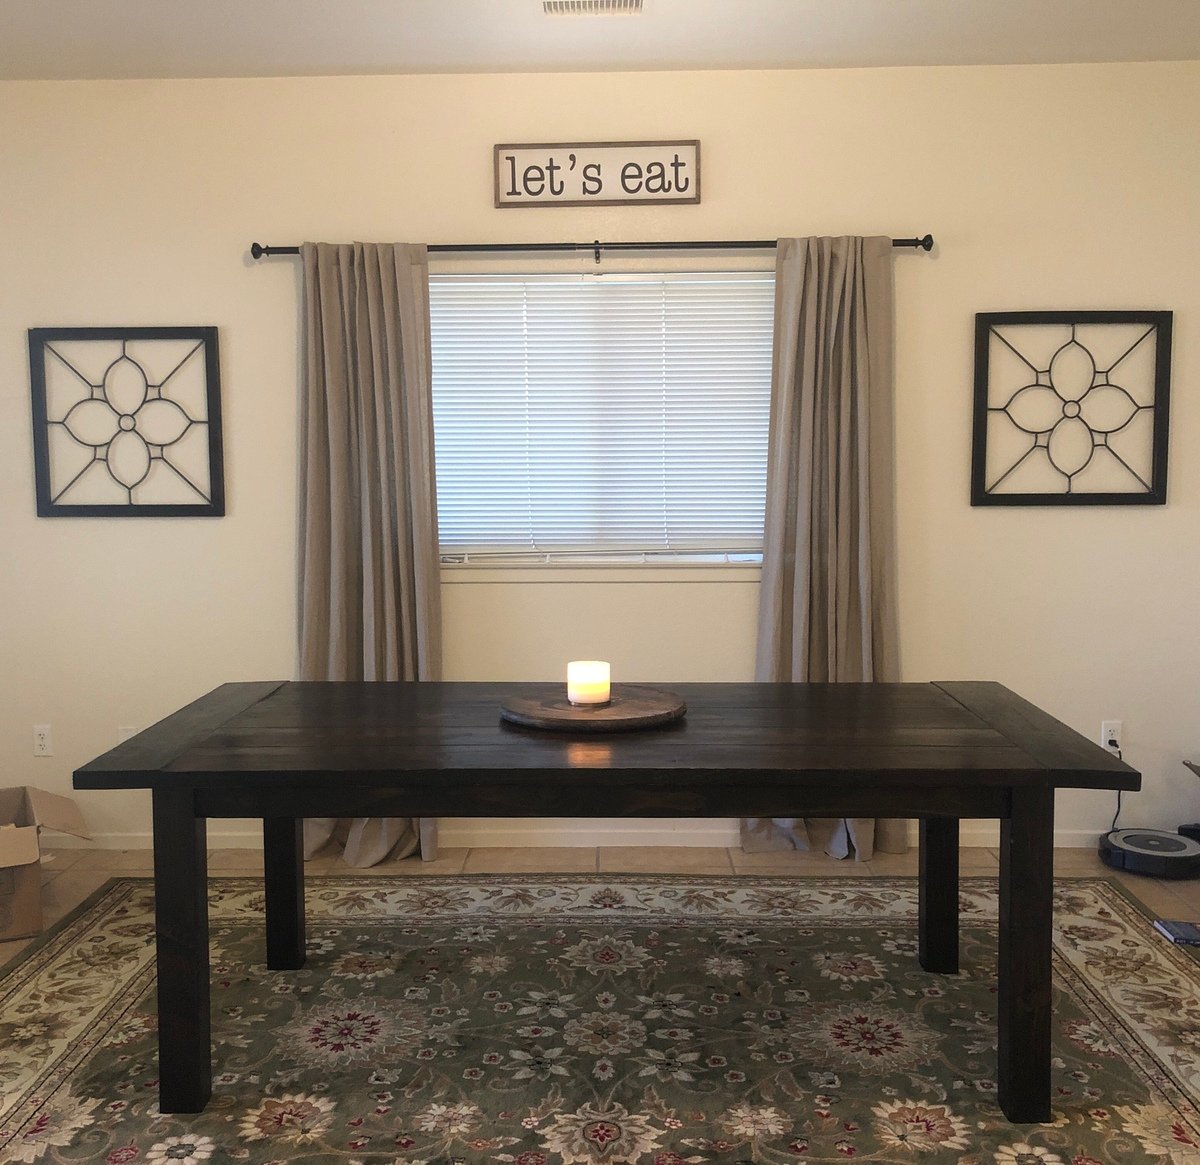
Husky Farmhouse Table
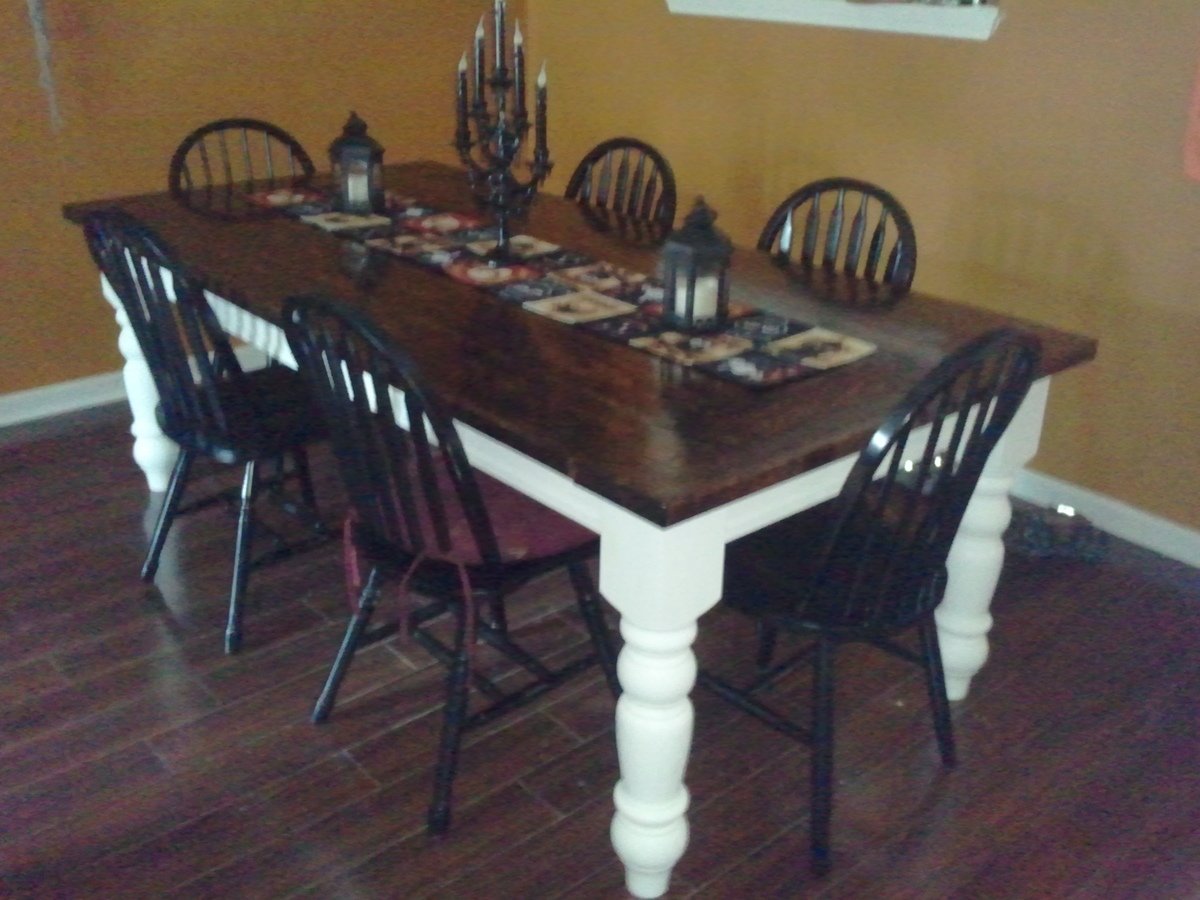
I loved the husky farmhouse talbe and after using a small round dining table for years, I figured it was time to get a larger table. What a great build! I definitely appreciate Ana's plans and ideas. I finished it right before Halloween as you can see and my 4 yr old son loves the new table for our sit down meails.

Built from Plan(s)
Estimated Cost
$350
Estimated Time Investment
Week Long Project (20 Hours or More)
Finish Used
Minwax Dark Walnut stain, White primer/paint in one, Minwax fast drying polyurethane
Recommended Skill Level
Beginner
Comments

Thu, 10/17/2013 - 09:28
Thank you Ana! Its been a
Thank you Ana! Its been a great addition to my home! =)
Tue, 07/07/2015 - 00:27
love this table
I love this table and i am trying to find a cheap way to get a dining room set( chairs will be bought and stanined). My husband is good a building things, my only concern how do you get all that detail into the legs of the table? Is there anyway you can pre-buy them made? We don't have a wooden lathe to do anything intricate.
Thanks if you can advise
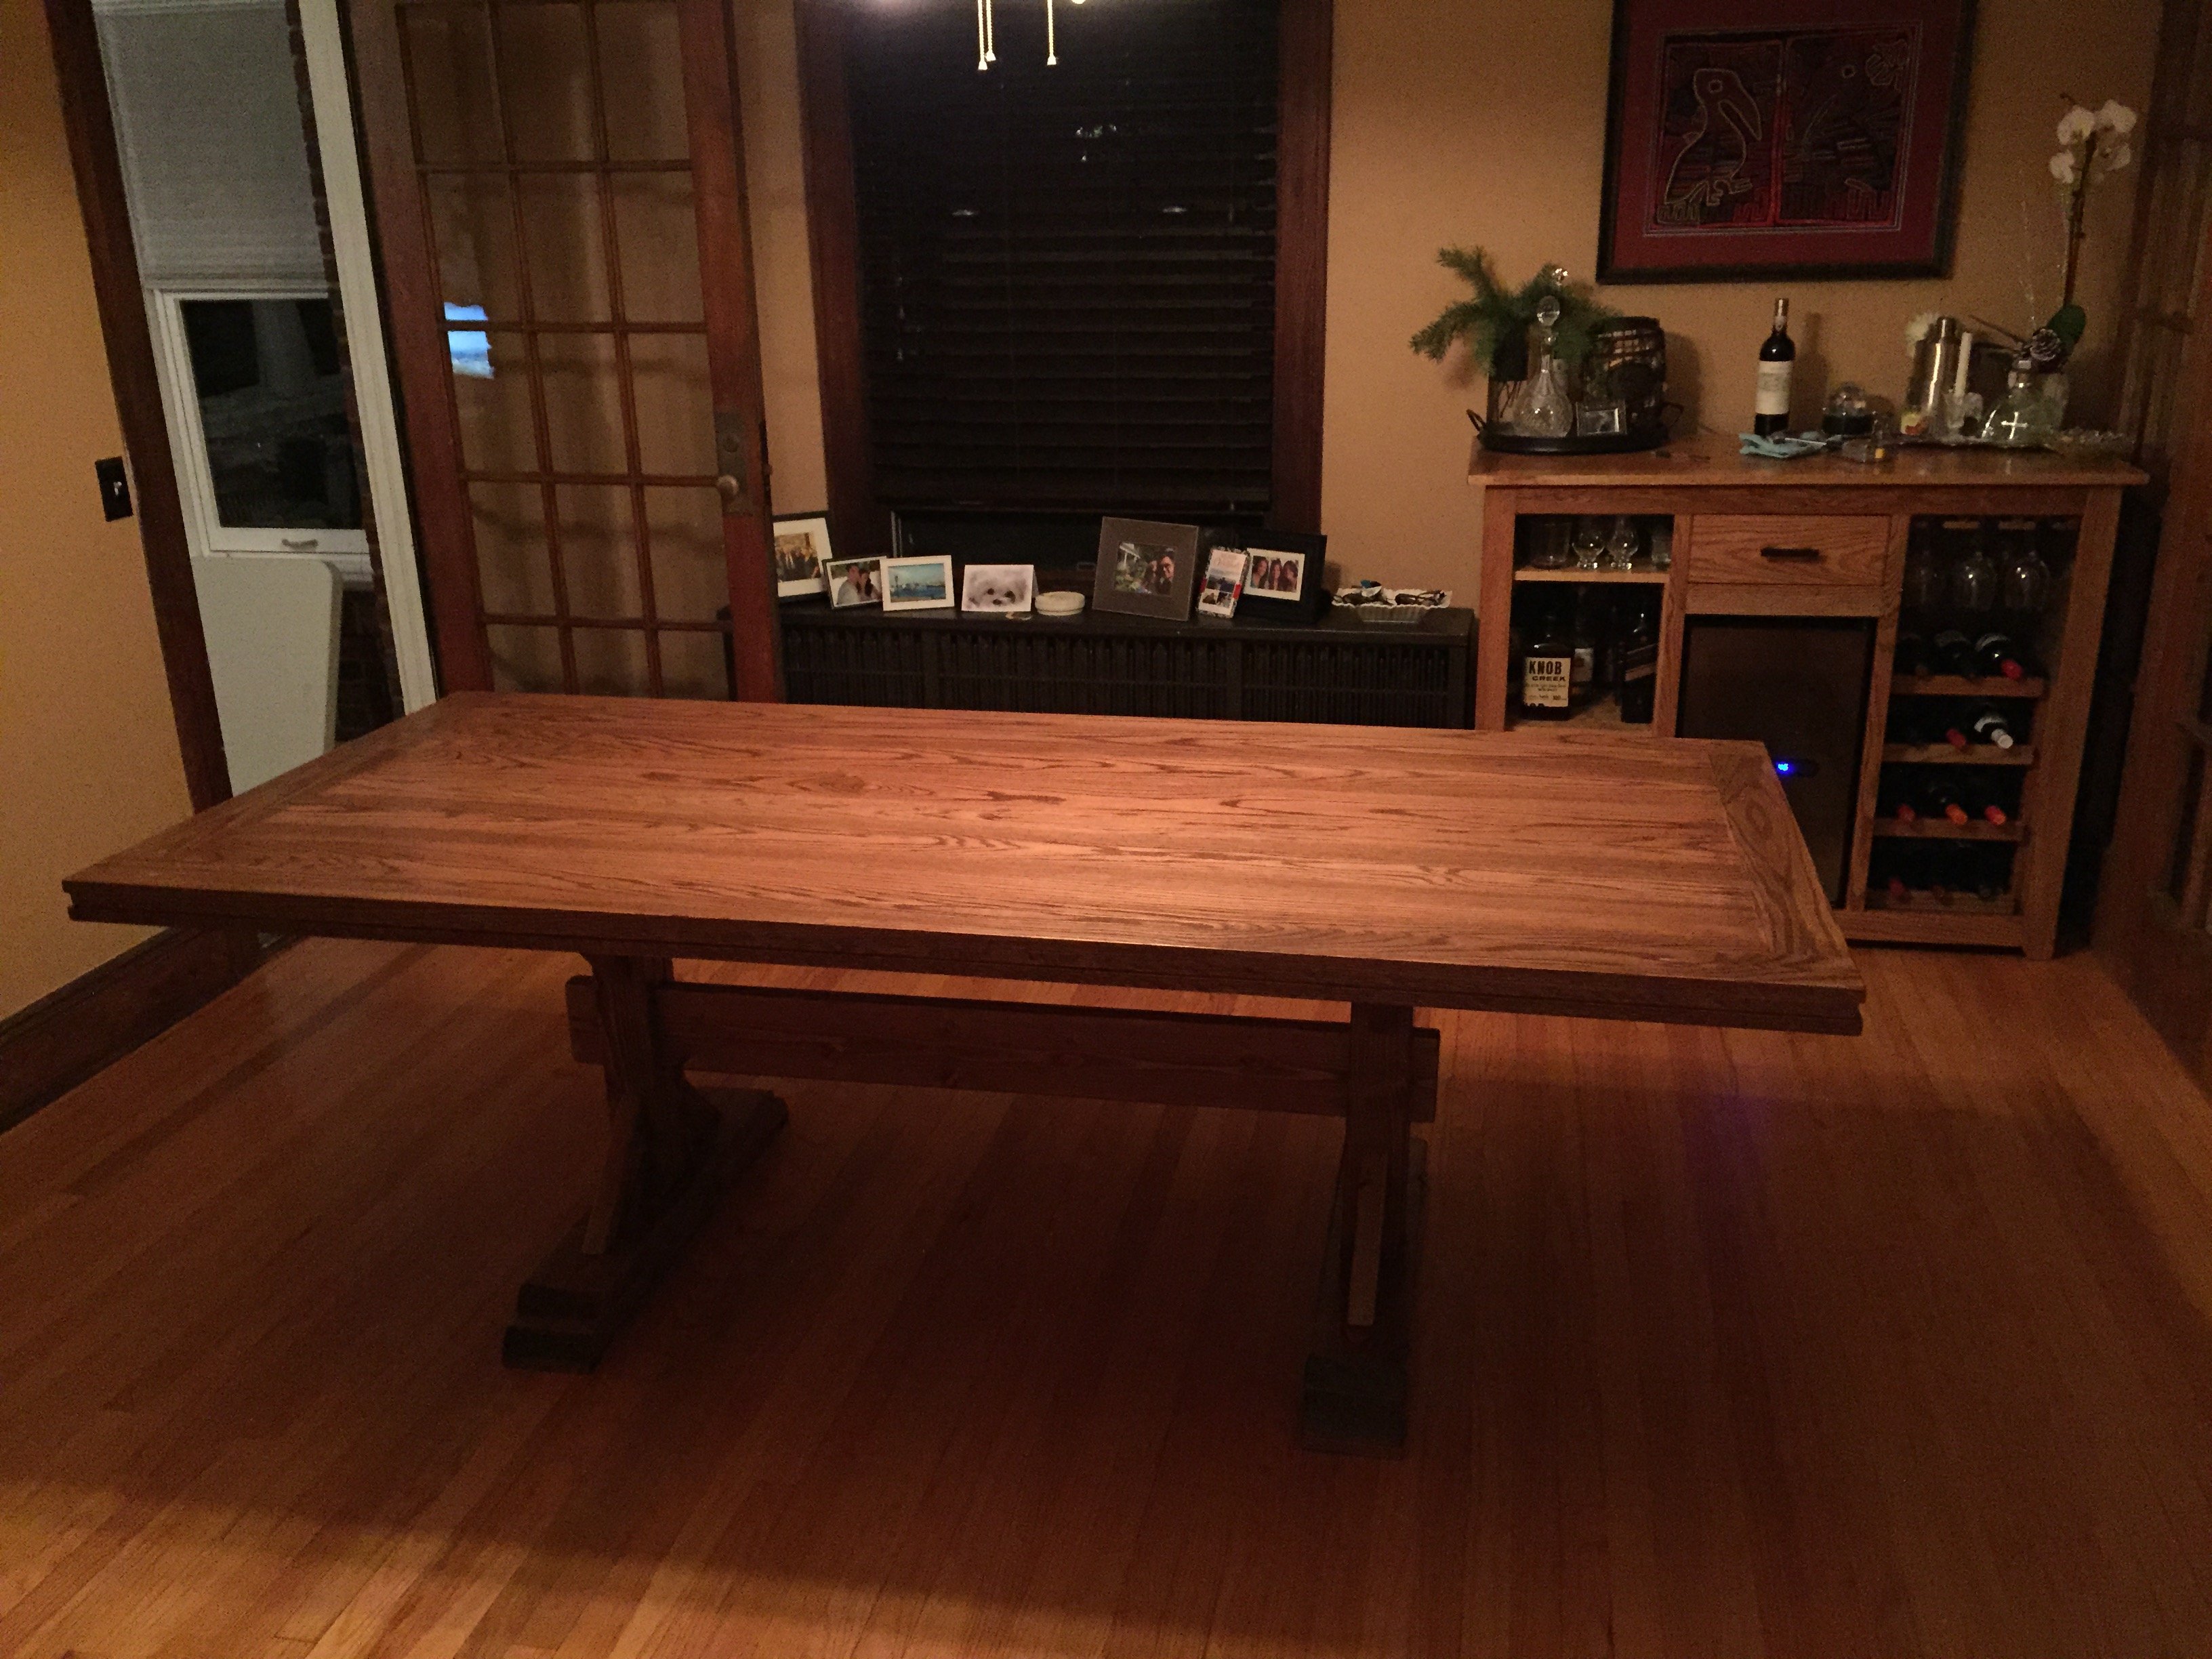
Farmhouse Dining Table
This table is the perfect length for our dining area. Pretty easy to build if you aren't new to building furniture.
Built from Plan(s)
Estimated Time Investment
Weekend Project (10-20 Hours)
Recommended Skill Level
Intermediate
8 foot mudroom hall tree
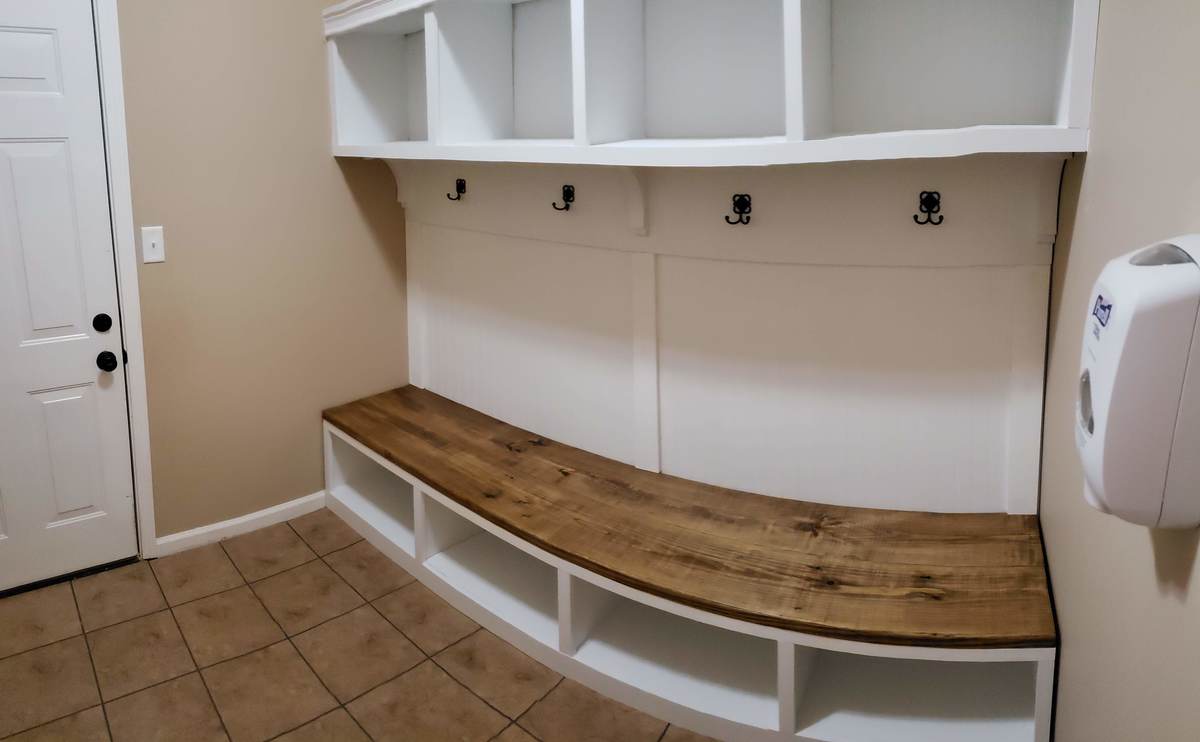
We had an 8' mudroom, that previously contained our laundry area as well. We moved that and had this space to fill up. We used 3/4" plywood for the most part, and some 1x2 finishing pieces in the front, as per your plan. We built the bench and then installed it, but the upper shelves had to be built in place on the wall, because we couldn't fit it in the room if we pre-built it. So that was a bit of a challence. Turned out great though. Thanks for the plans!
Built from Plan(s)
Estimated Cost
About $400
Estimated Time Investment
Weekend Project (10-20 Hours)
Finish Used
Mudroom and hall tree.
Recommended Skill Level
Intermediate
Comments
Faux fireplace mantel
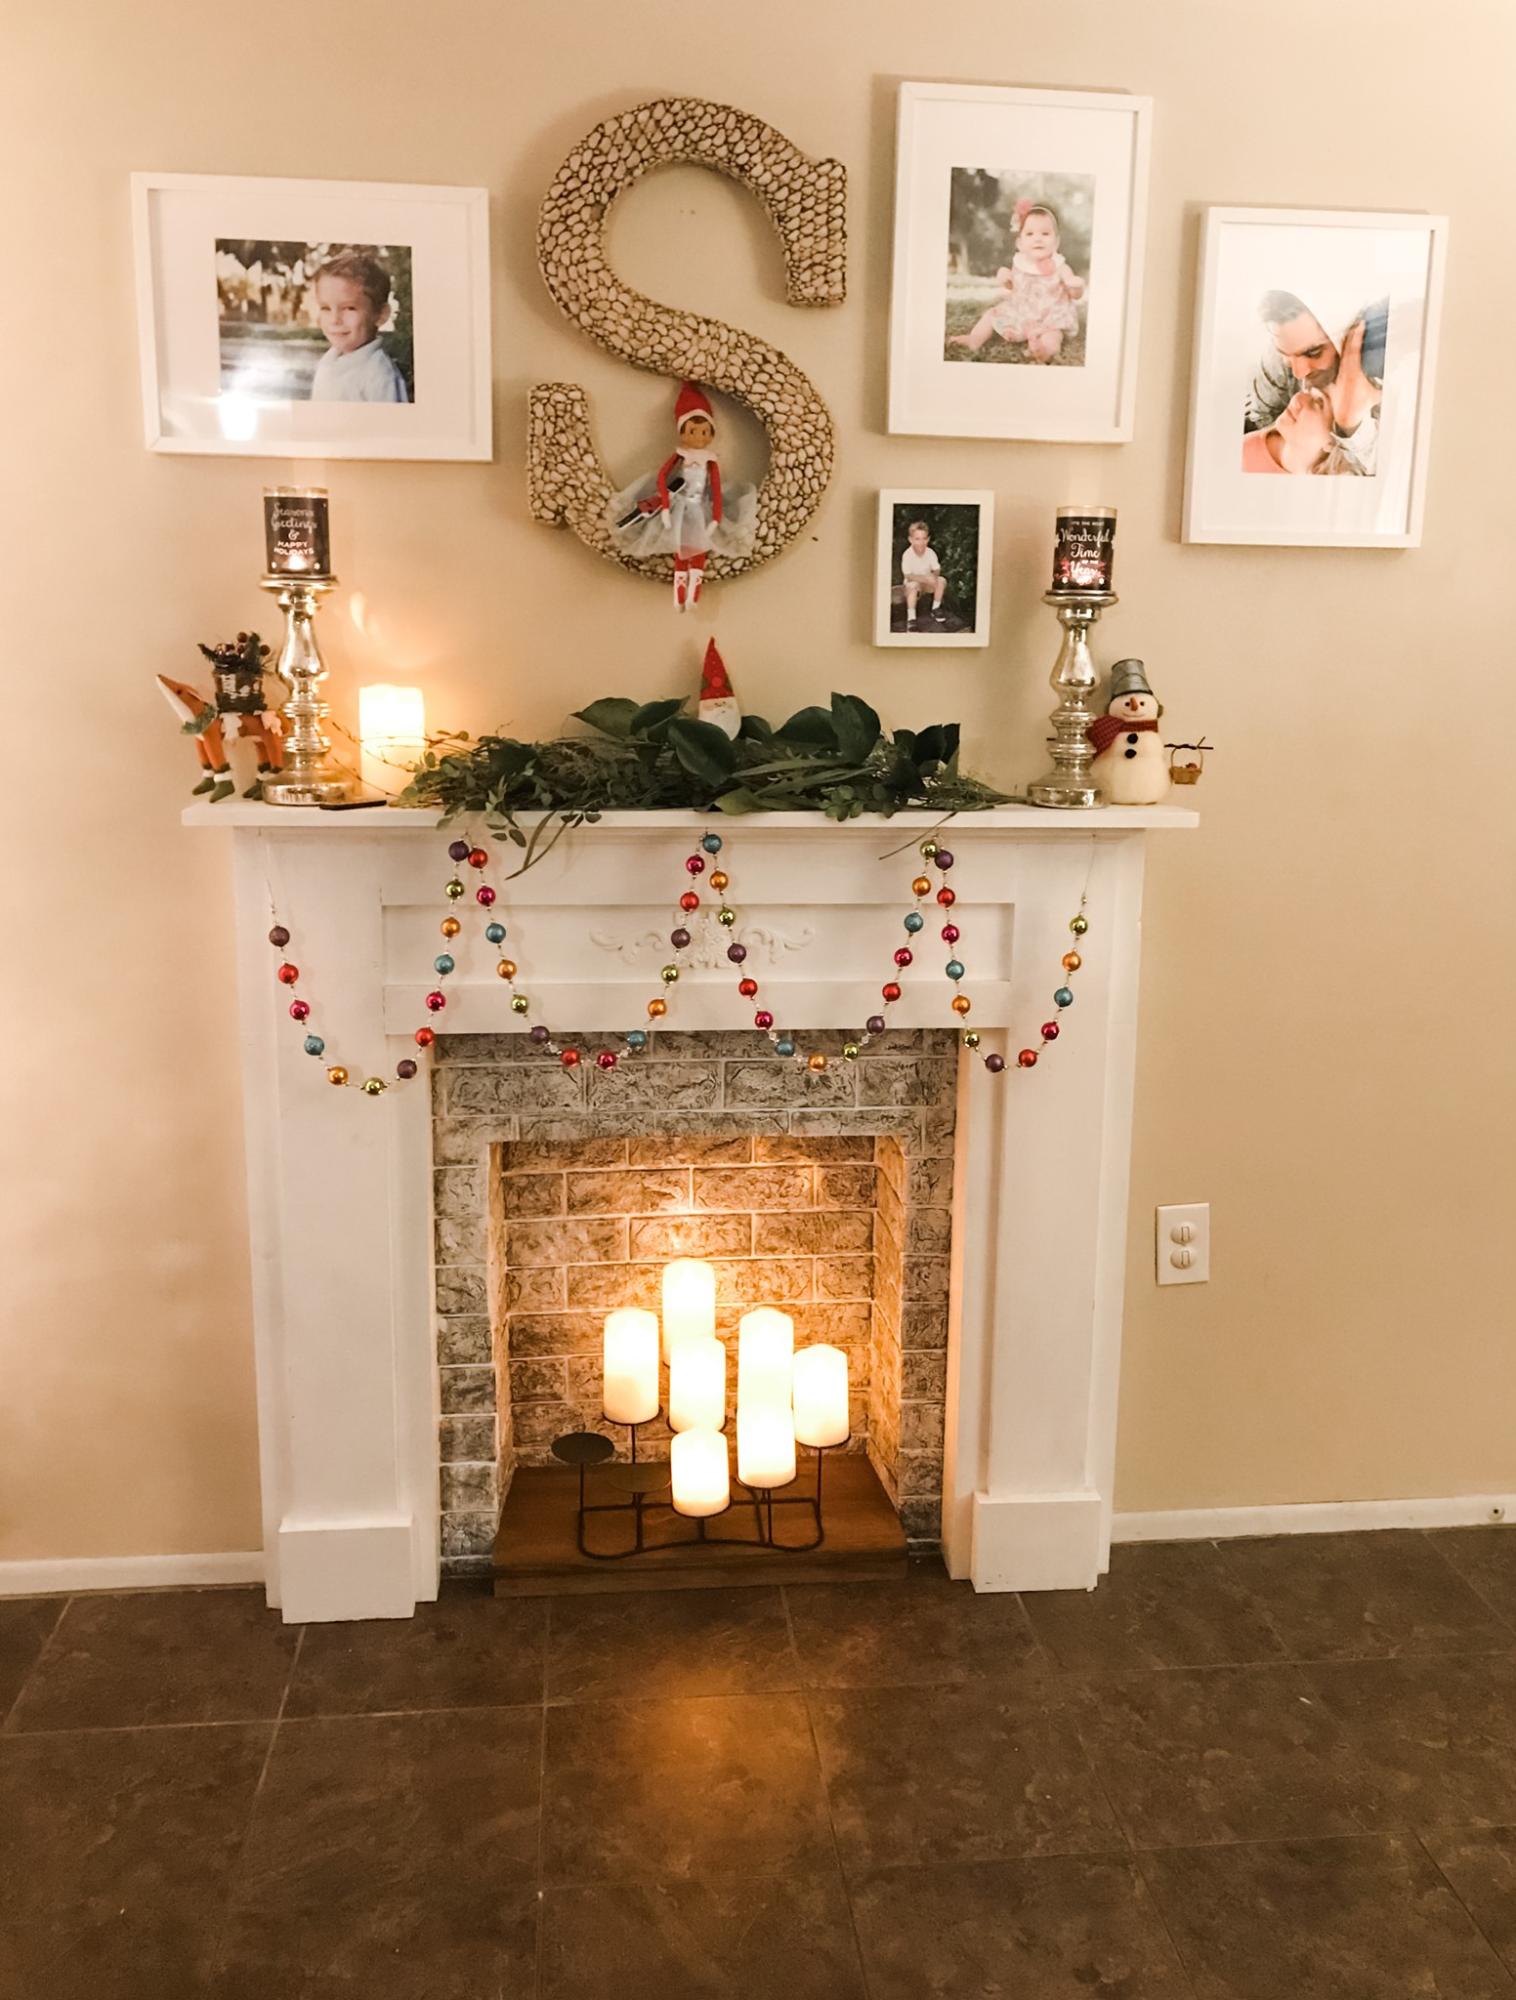
Took the faux mantel a step further and created a faux brick interior by cutting into the wall and building a simple wooden "hearth" to rest the candles on. I've had many people over to my house and they all thought that this was a real (although out of commission) fireplace. Faux brick panels were purchased on Amazon which comes in a plastic-y kind of material. Not quite styrofoam, but some type of foam that is easy to work with. Came in a white color, but I simply rubbed it with shades of beige and gray paint to achieve the look I wanted.
Built from Plan(s)
Comments
Sun, 02/12/2023 - 11:30
Wonderful cozy addition!
Love the brick accent, beautiful build! Thanks for sharing.
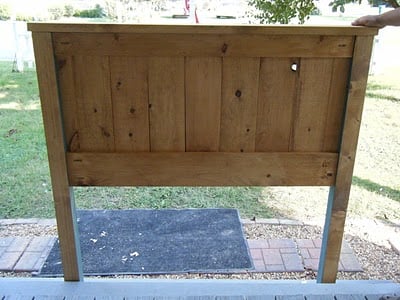
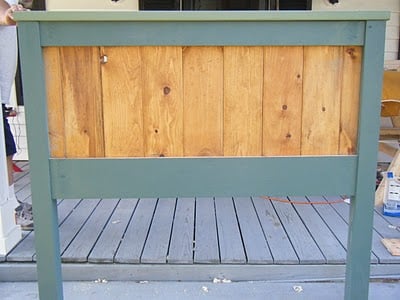
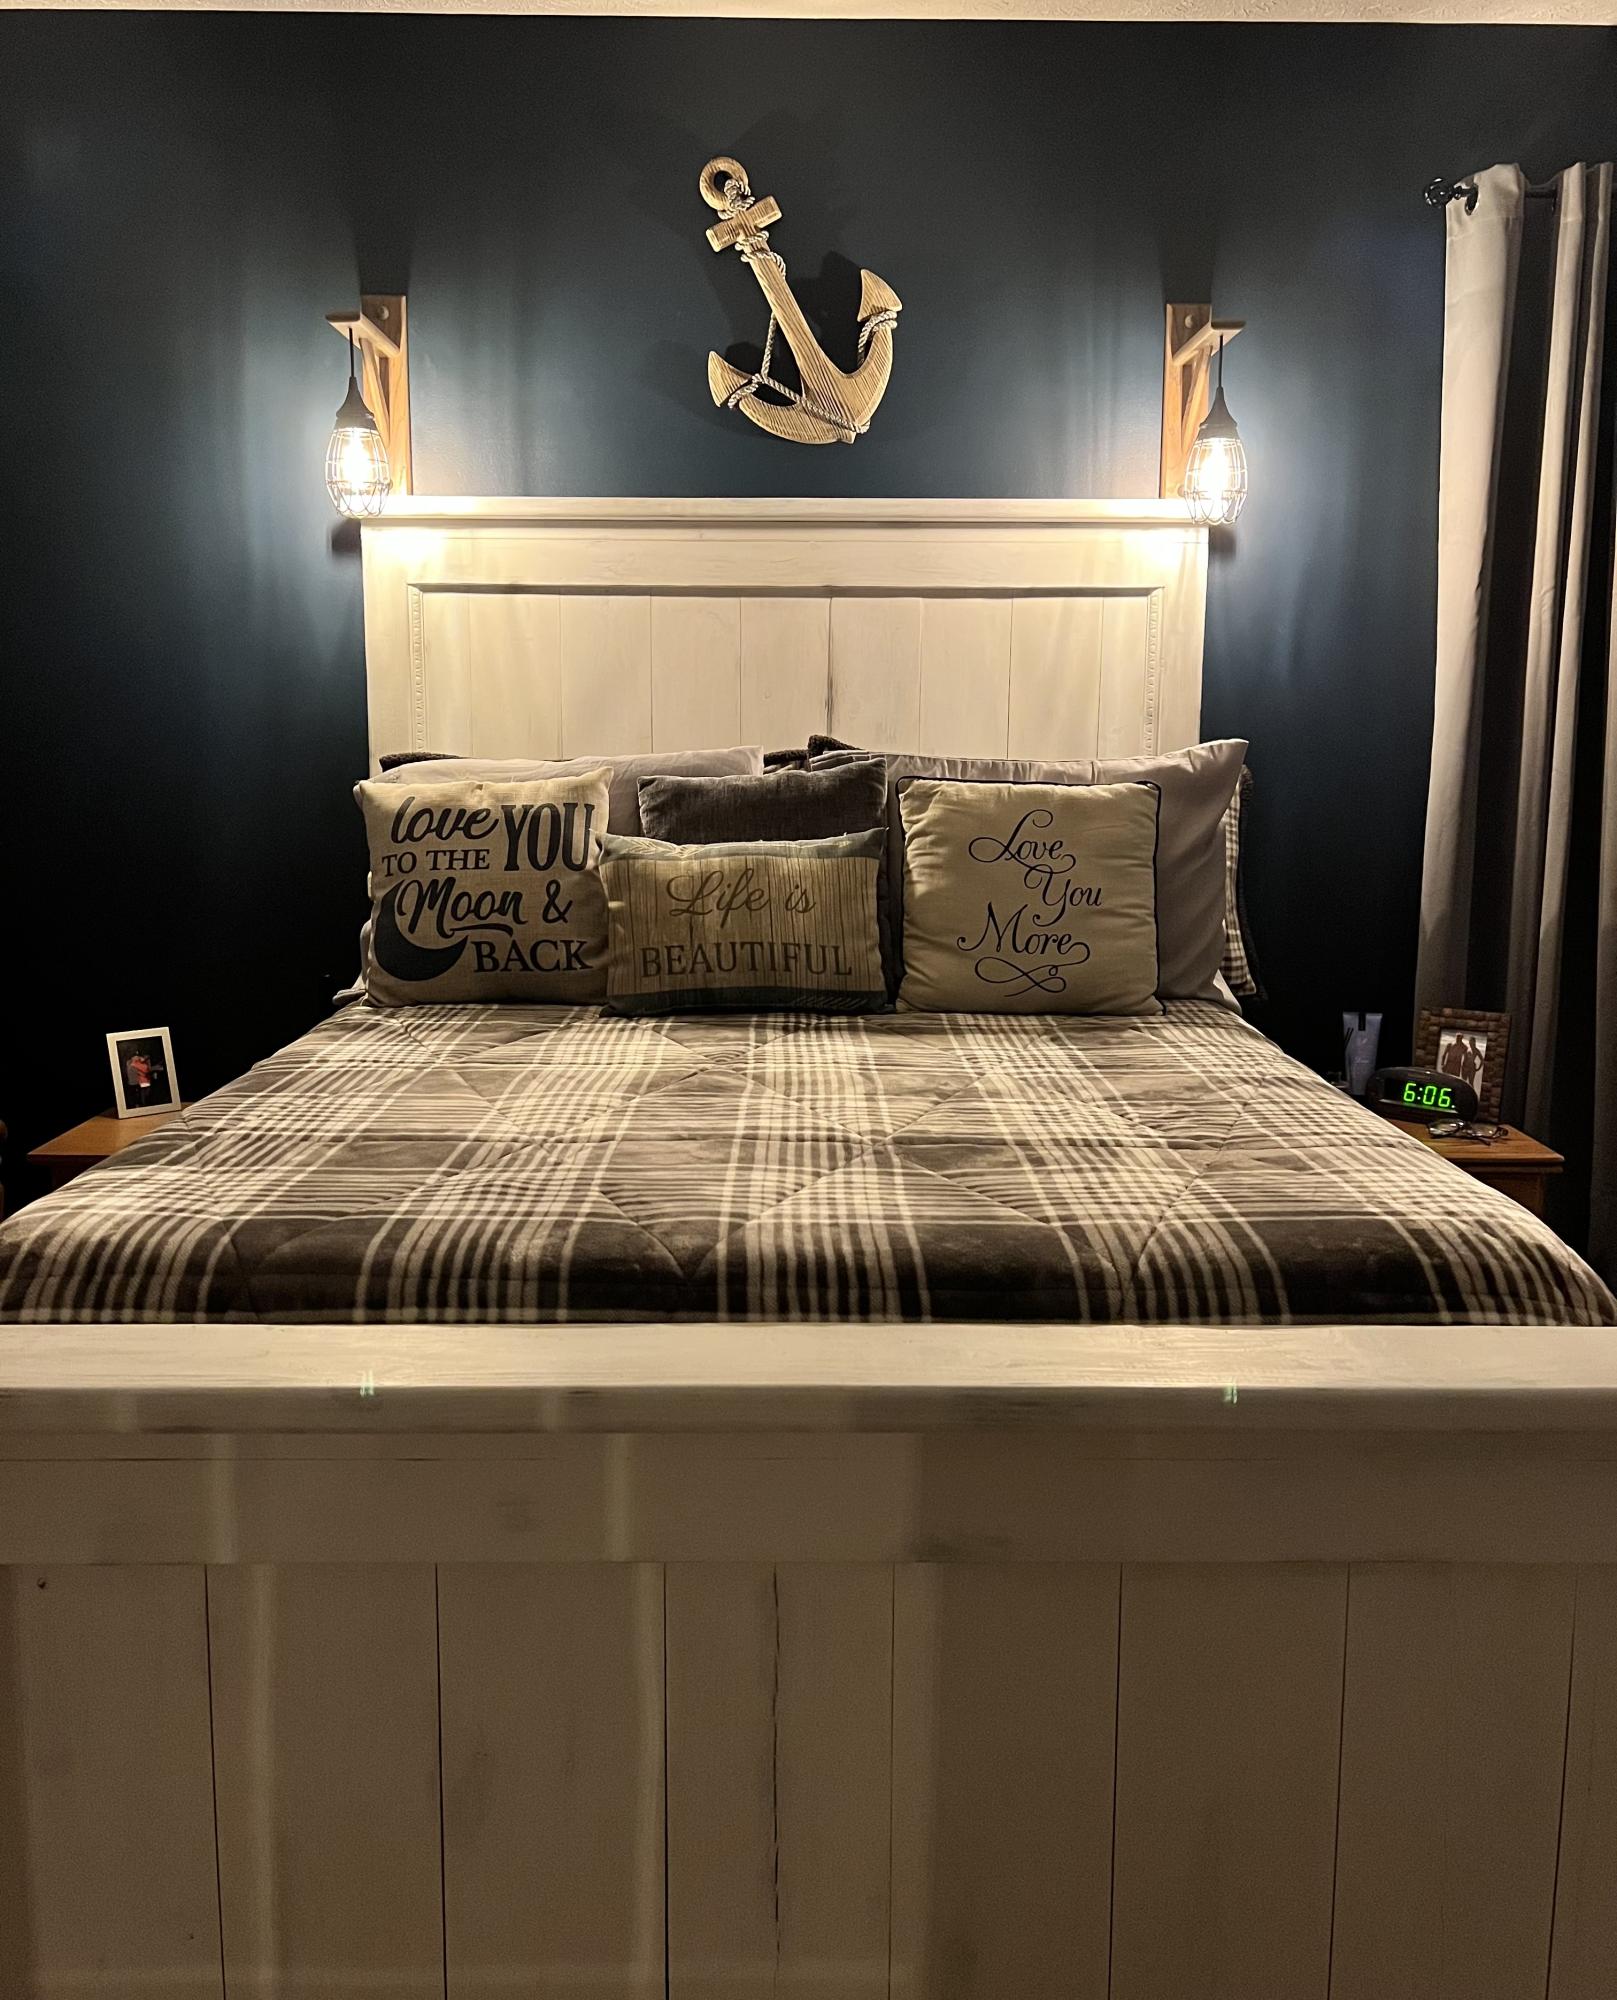
Queen Farmhouse Headboard
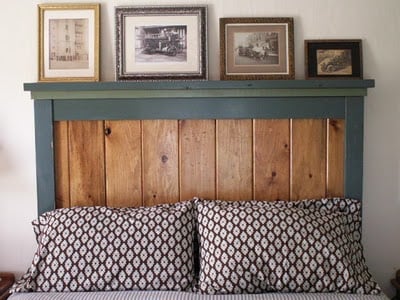
We eventually will build the rest of the bed, but for now we needed a headboard. Hubby helped me with this one, since it was large, I loved having an extra pair of hands. This headboard is reversible, so if our tastes change, we can unbolt it and flip it over to the side that is just stained and polyurethane. Pretty neat! This headboard is extra tall, because we have our bed frame up on risers, and we wanted a picture shelf but didn't want it interfering when we sat up in bed to read or what-not. Hubby used the router to make grooves in the top before we attached it, so our pictures wouldn't be crashing down on our head! Our metal bed frame comes just shy of the outer edge of the legs of the headboard, so when we build the rest of the bed, the side rails will meet the edge exactly. We placed the headboard behind the bed frame to mark where to drill the bolt holes and attached the headboard to the frame with 4 inch long, quarter inch wide bolts with washers and nuts. Two on each side.
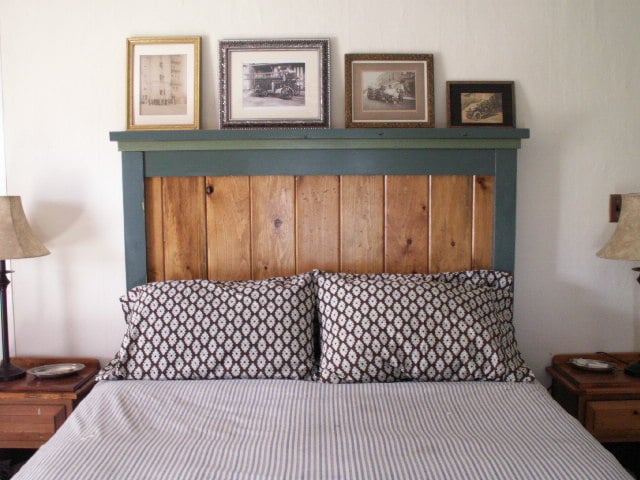
Built from Plan(s)
Estimated Cost
$50-$60 just paint and lumber. We had some supplies left over from previous projects, including screws and the ship-lap boards.
Estimated Time Investment
Weekend Project (10-20 Hours)
Finish Used
We painted and distressed the boards, then applied stain to the distressed parts. We coated the entire thing with three coats of polyurethane.
Recommended Skill Level
Intermediate
Comments
Sat, 10/22/2011 - 20:35
I love the plate rail detail on the top edge...
and the reversible idea is great.
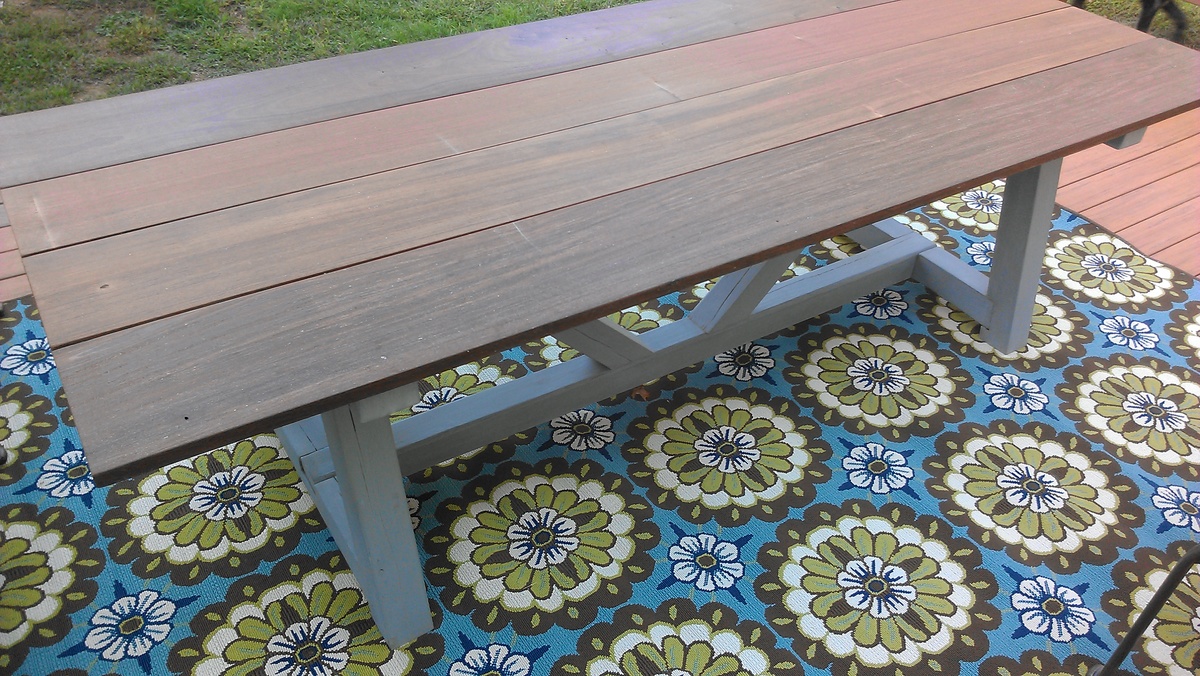
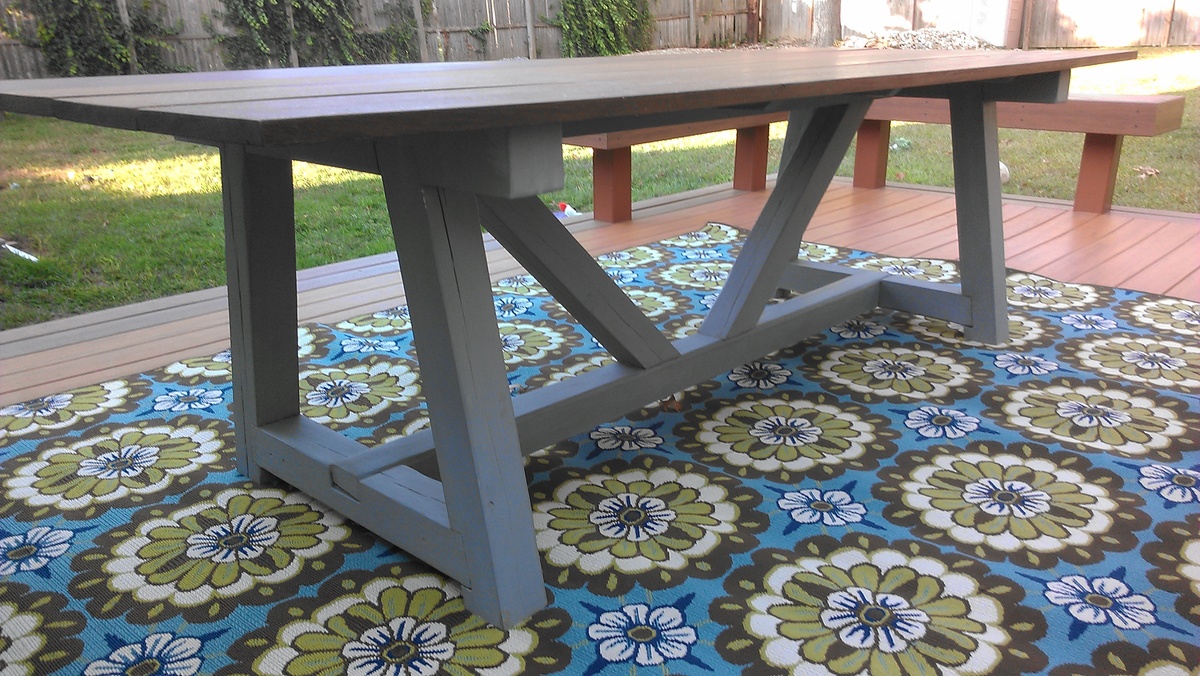
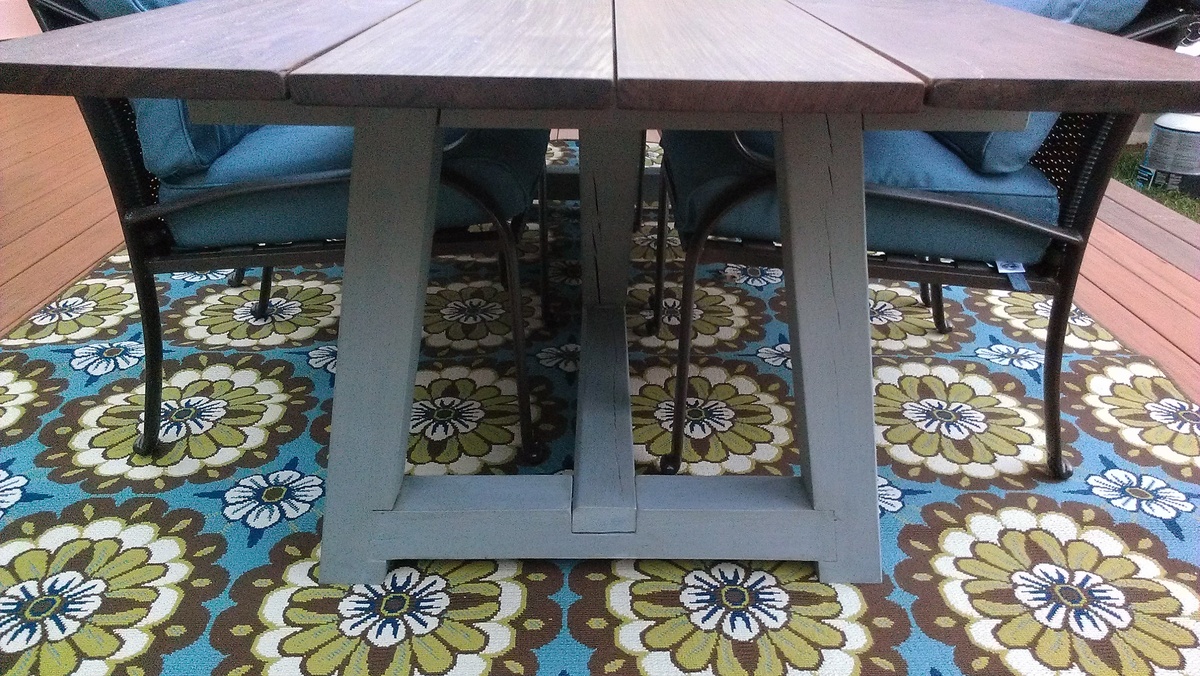
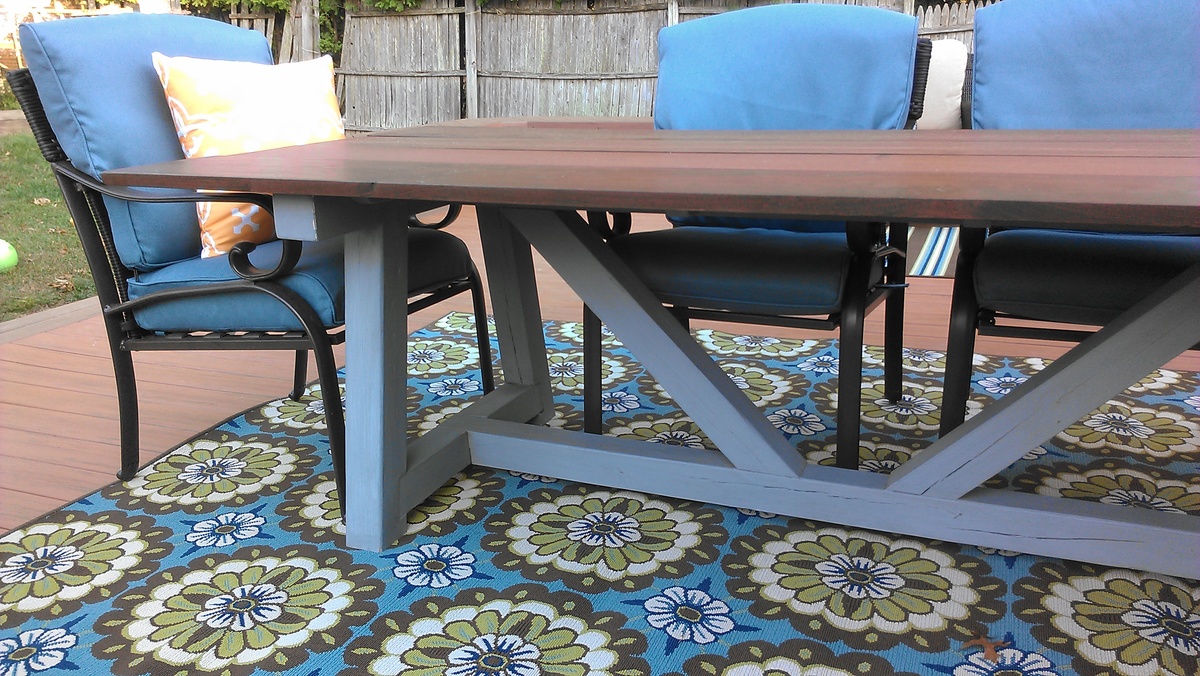
Outdoor Providence Table
This was my first attempt at building a piece of furniture. It's an outdoor table based on the providence table plans. I used old 4x4 pressure treated posts from part of my fence that was no longer needed for the base. The posts were fit together using lap joints and secured using fastenlok screws. The base was then painted with french grey chalk paint (first time experimenting with chalk paint) and then covered with a thin coat of brown briwax. The top is made of 8 foot by 1 inch ipe boards that are 4 different widths but the overall width is about 42 inches. The ipe was purchased rough sawn and needed to be planed to uniform thickness. I used a natural stain meant specifically for ipe and other tropical hardwoods.
Built from Plan(s)
Estimated Cost
$220 for me - 200 for ipe boards, 20 for paint, 4x4 posts free
Estimated Time Investment
Weekend Project (10-20 Hours)
Finish Used
French grey chalk paint and briwax for base. Natural tropical hardwood stain for top.
Recommended Skill Level
Beginner
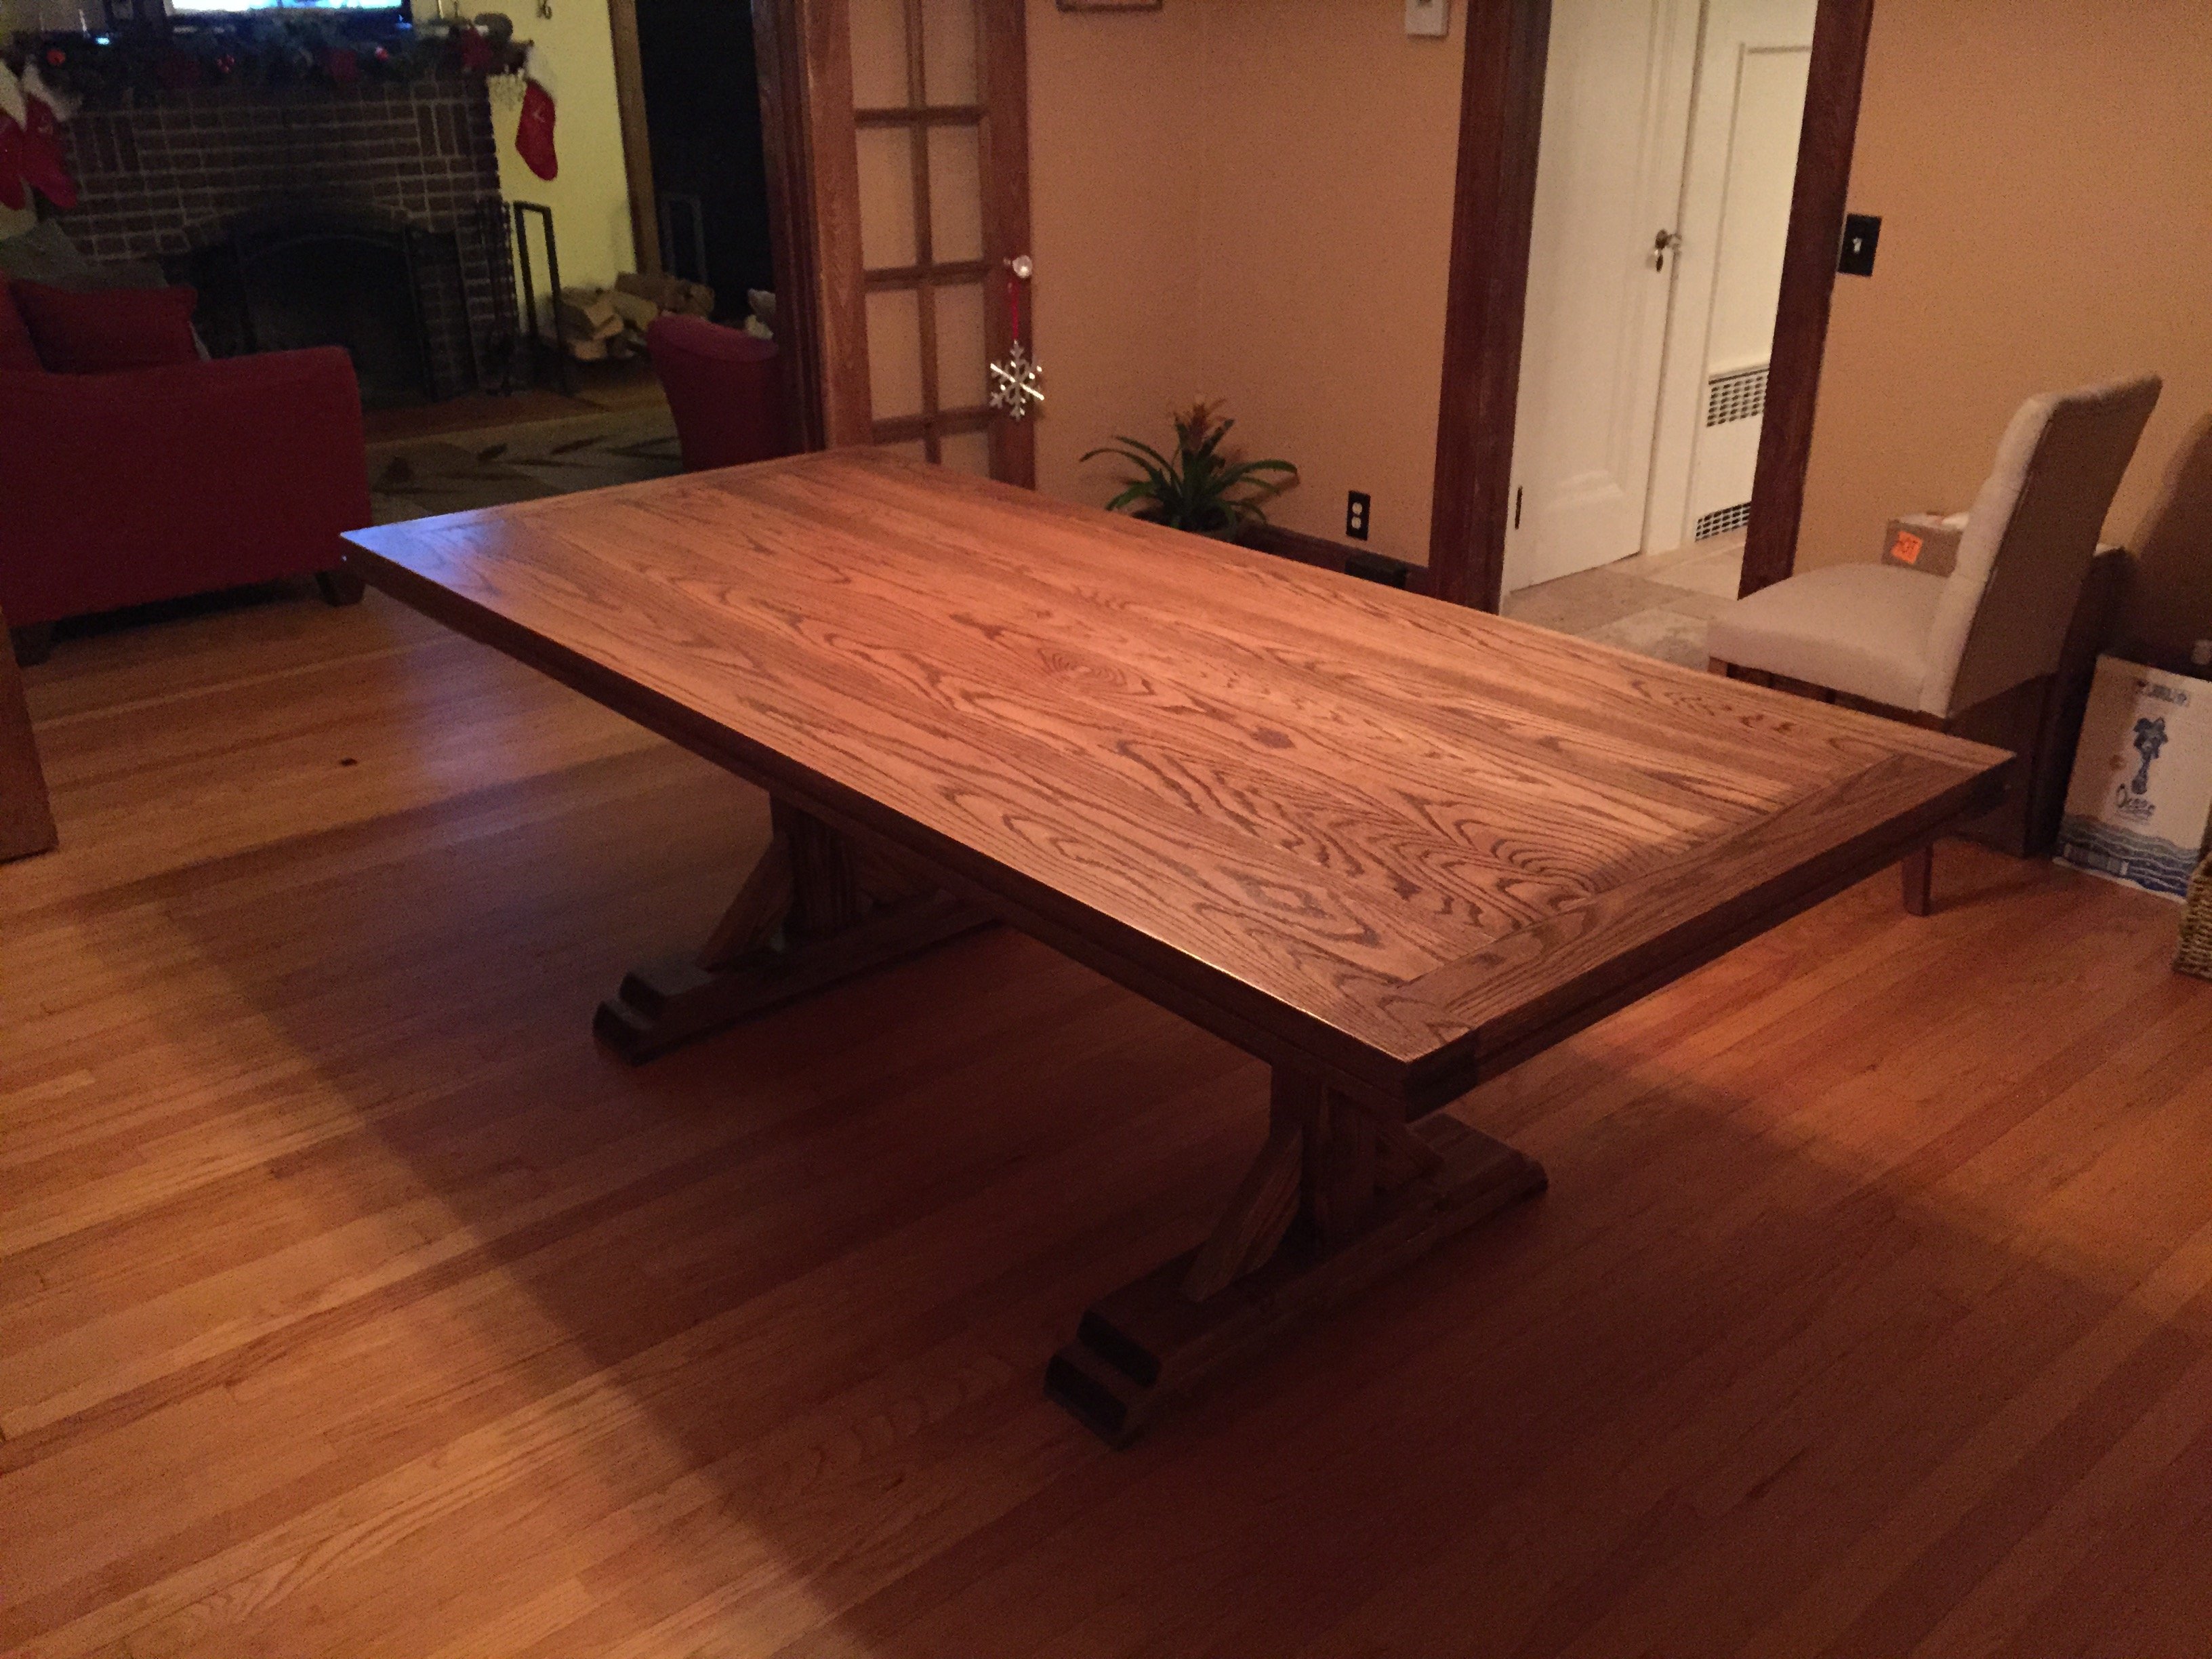
New Dining Table!
Keep on building on! This is the second peice I've built for our dining room - built a bar first. I opted to only make 2 pedestals instead of 3 that was on the plans. Dimensions are a tad smaller to fit our room nicely, measuring 90in x 40in. My wife and I absolutely love this table! I used Red Oak for the top and Doug fir for the base. Hardest part was lugging around that dense oak and looking for chairs! The stretcher was also a bit of a task as well. Had to go out a buy a rubber mallet to bang it in enough so that the slack on both ends were even. We particularly like this piece because it will be used often and many memories will be created around this table! Thanks again for the inspiration!


Built from Plan(s)
Estimated Cost
$400, sold previous dining table and chairs for $425
Estimated Time Investment
Weekend Project (10-20 Hours)
Finish Used
Miniwas Special Walnut, 3 Coats Spar Urethane
Recommended Skill Level
Intermediate
Comments
XXL Dog Crate
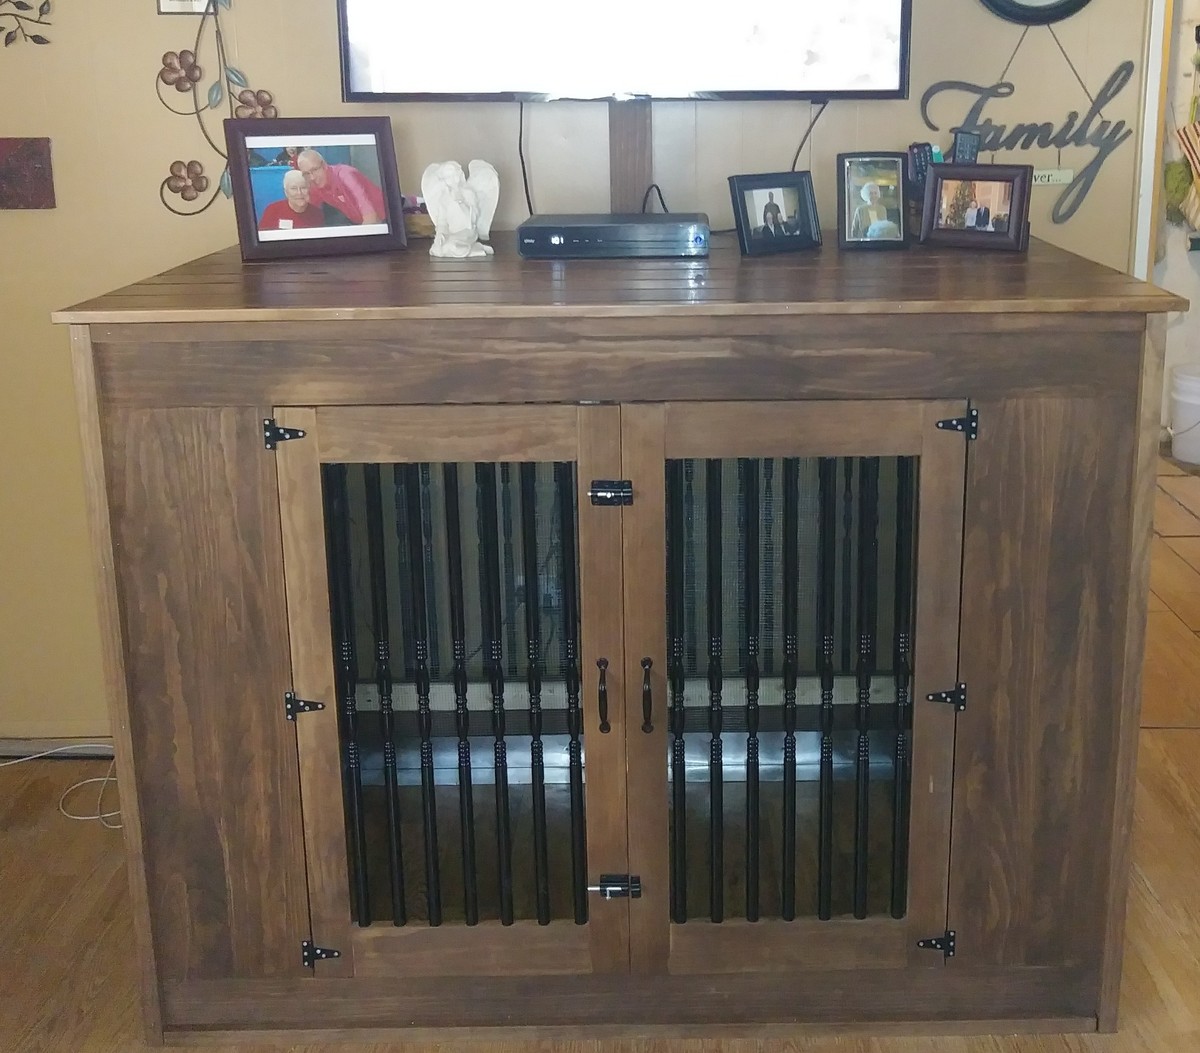
When we made the decision to get a Great Dane puppy, we knew she would need to be crate trained. The idea of a metal XXL crate wasn't terribly appealing so my wife suggested I build a piece of furniture. My skills are above beginner level but I had never built a piece of furniture. I started with the dimensions for the metal crates (54"L x 37"W x 45"T) and put pencil to paper. We agreed we wanted somewhat of a rustic look for the finished crate. I decided to use pine 1×4's, 1x3s and 1x2s, pinned and edge glued together. For ventilation I chose the black metal banister rails. The bottom of the crate is a sheet of sub floor covered with sheet vinyl. I lined the inside of the crate with hardware cloth to deter chewing on the wood. The top is made of tongue and groove carsiding, I had left over from another project. The 4 sides are finished in Dark Walnut Stain. The top has the same stain plus 3 coats of Satin Urethane.
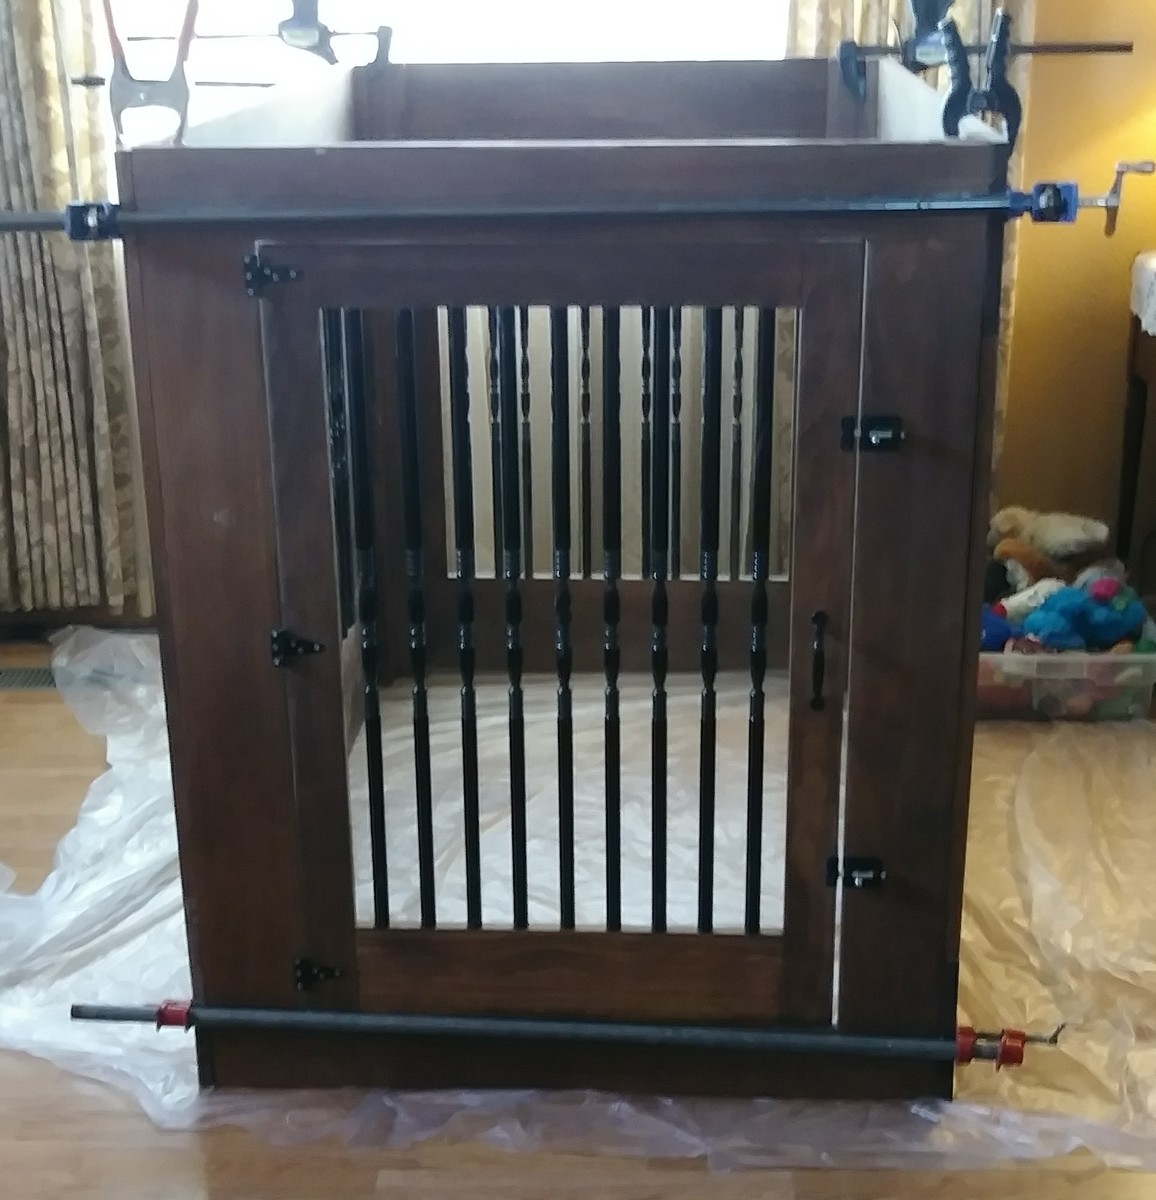
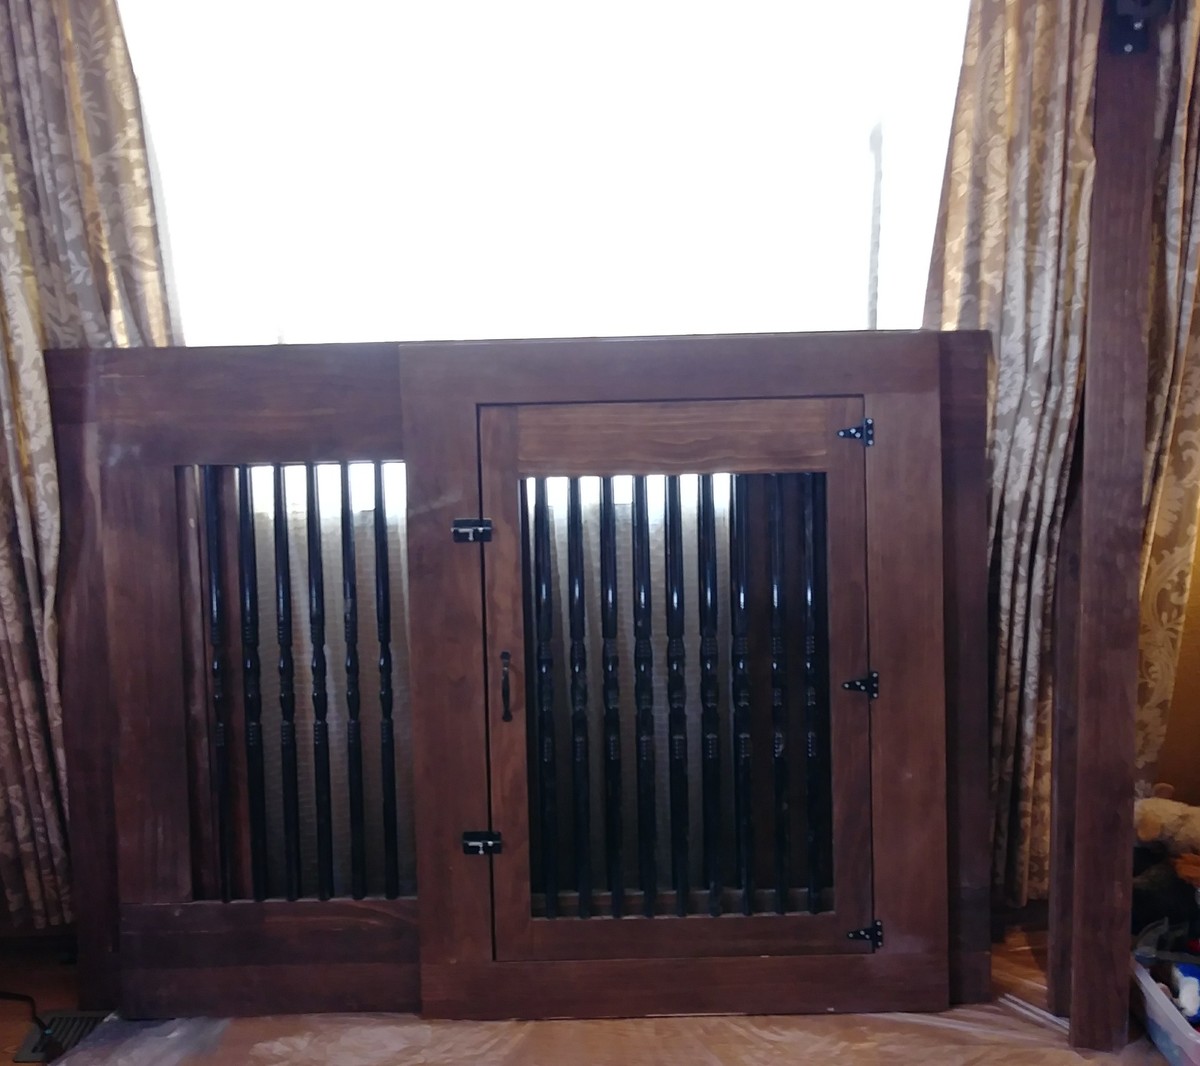
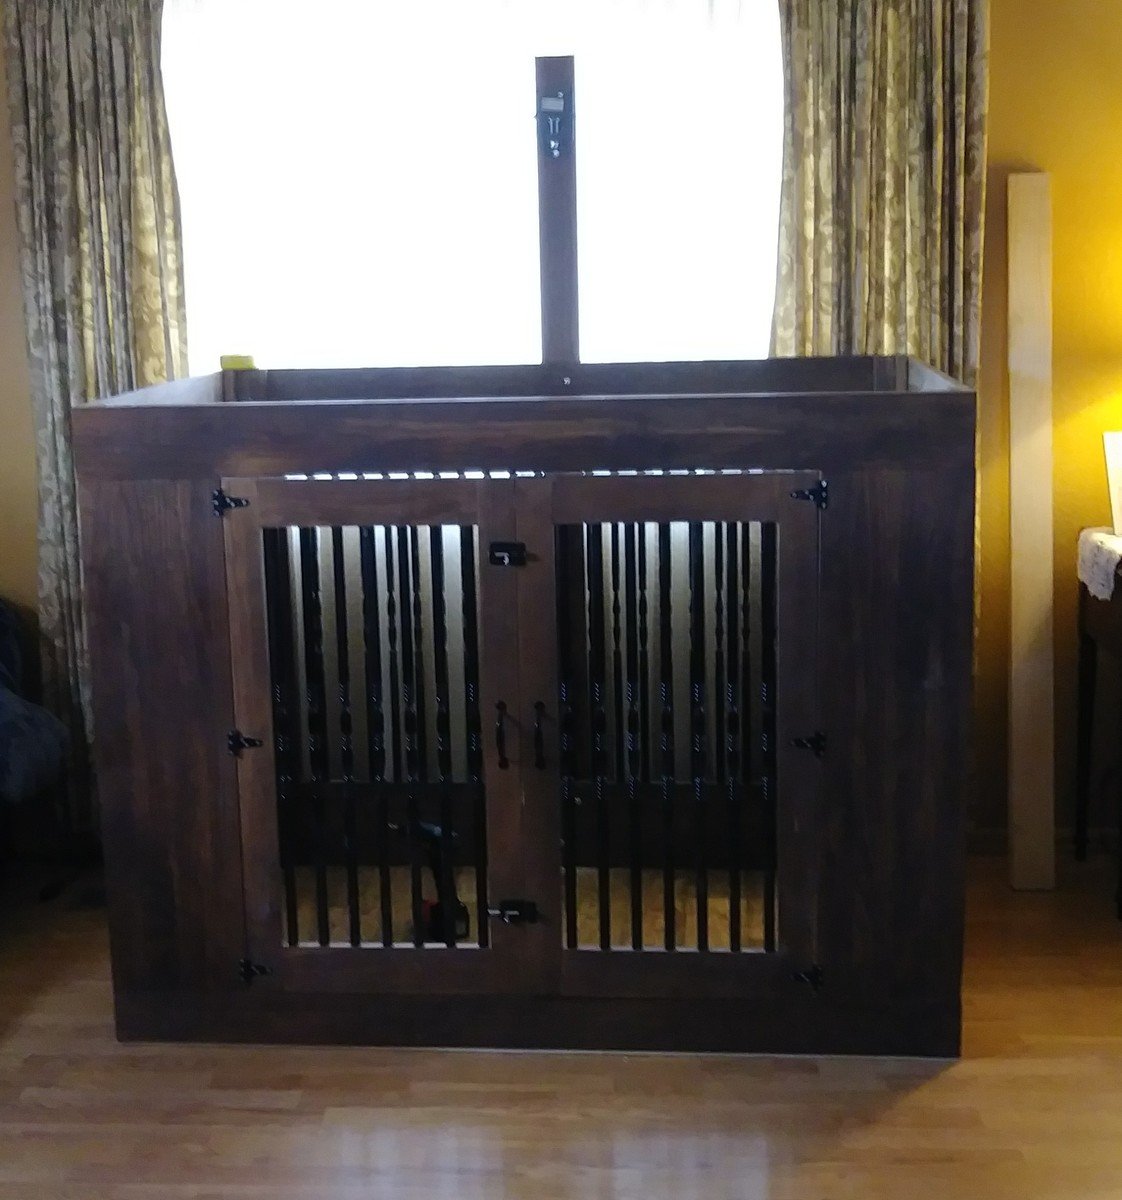
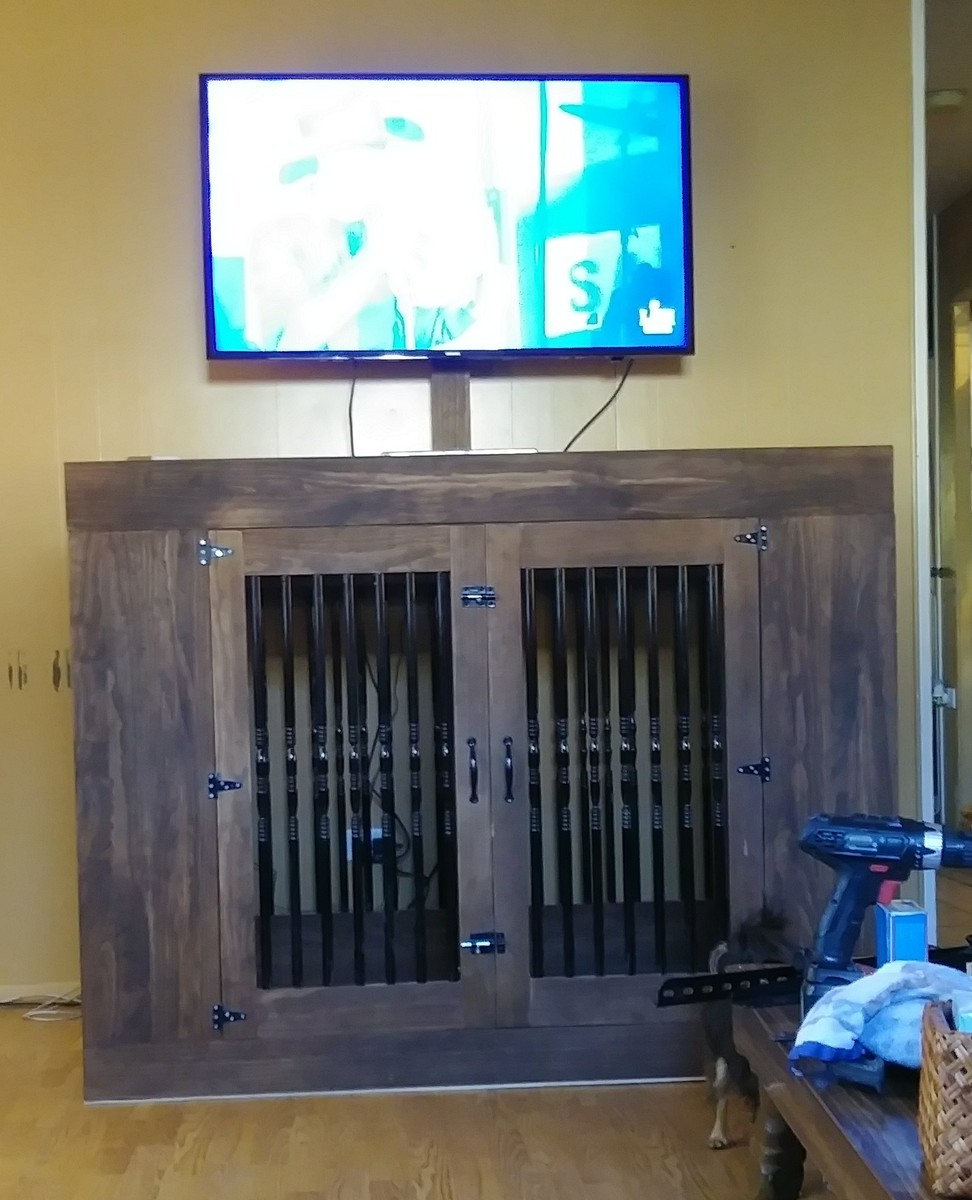

Estimated Time Investment
Week Long Project (20 Hours or More)
Finish Used
Sand sealer ( 2 coats), Dark Walnut Stain ( 1 coat brushed on using foam brush and wiped off with a rag) Satin Urethane on Top only ( foam brush applied, let dry overnight, light hand sanding with 220 grit wet/dry, repeated then 3rd and final coat was applied.)
Recommended Skill Level
Intermediate
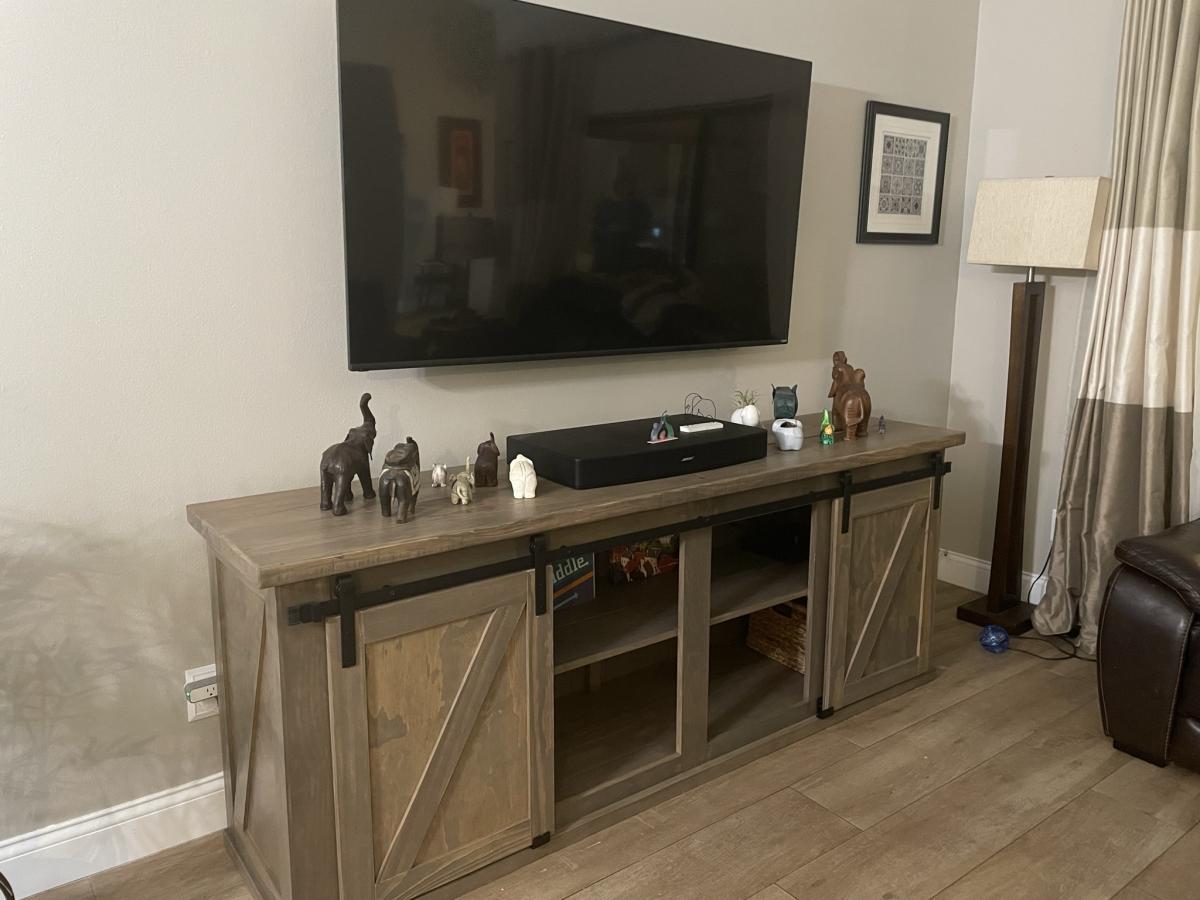
Farmhouse TV console table
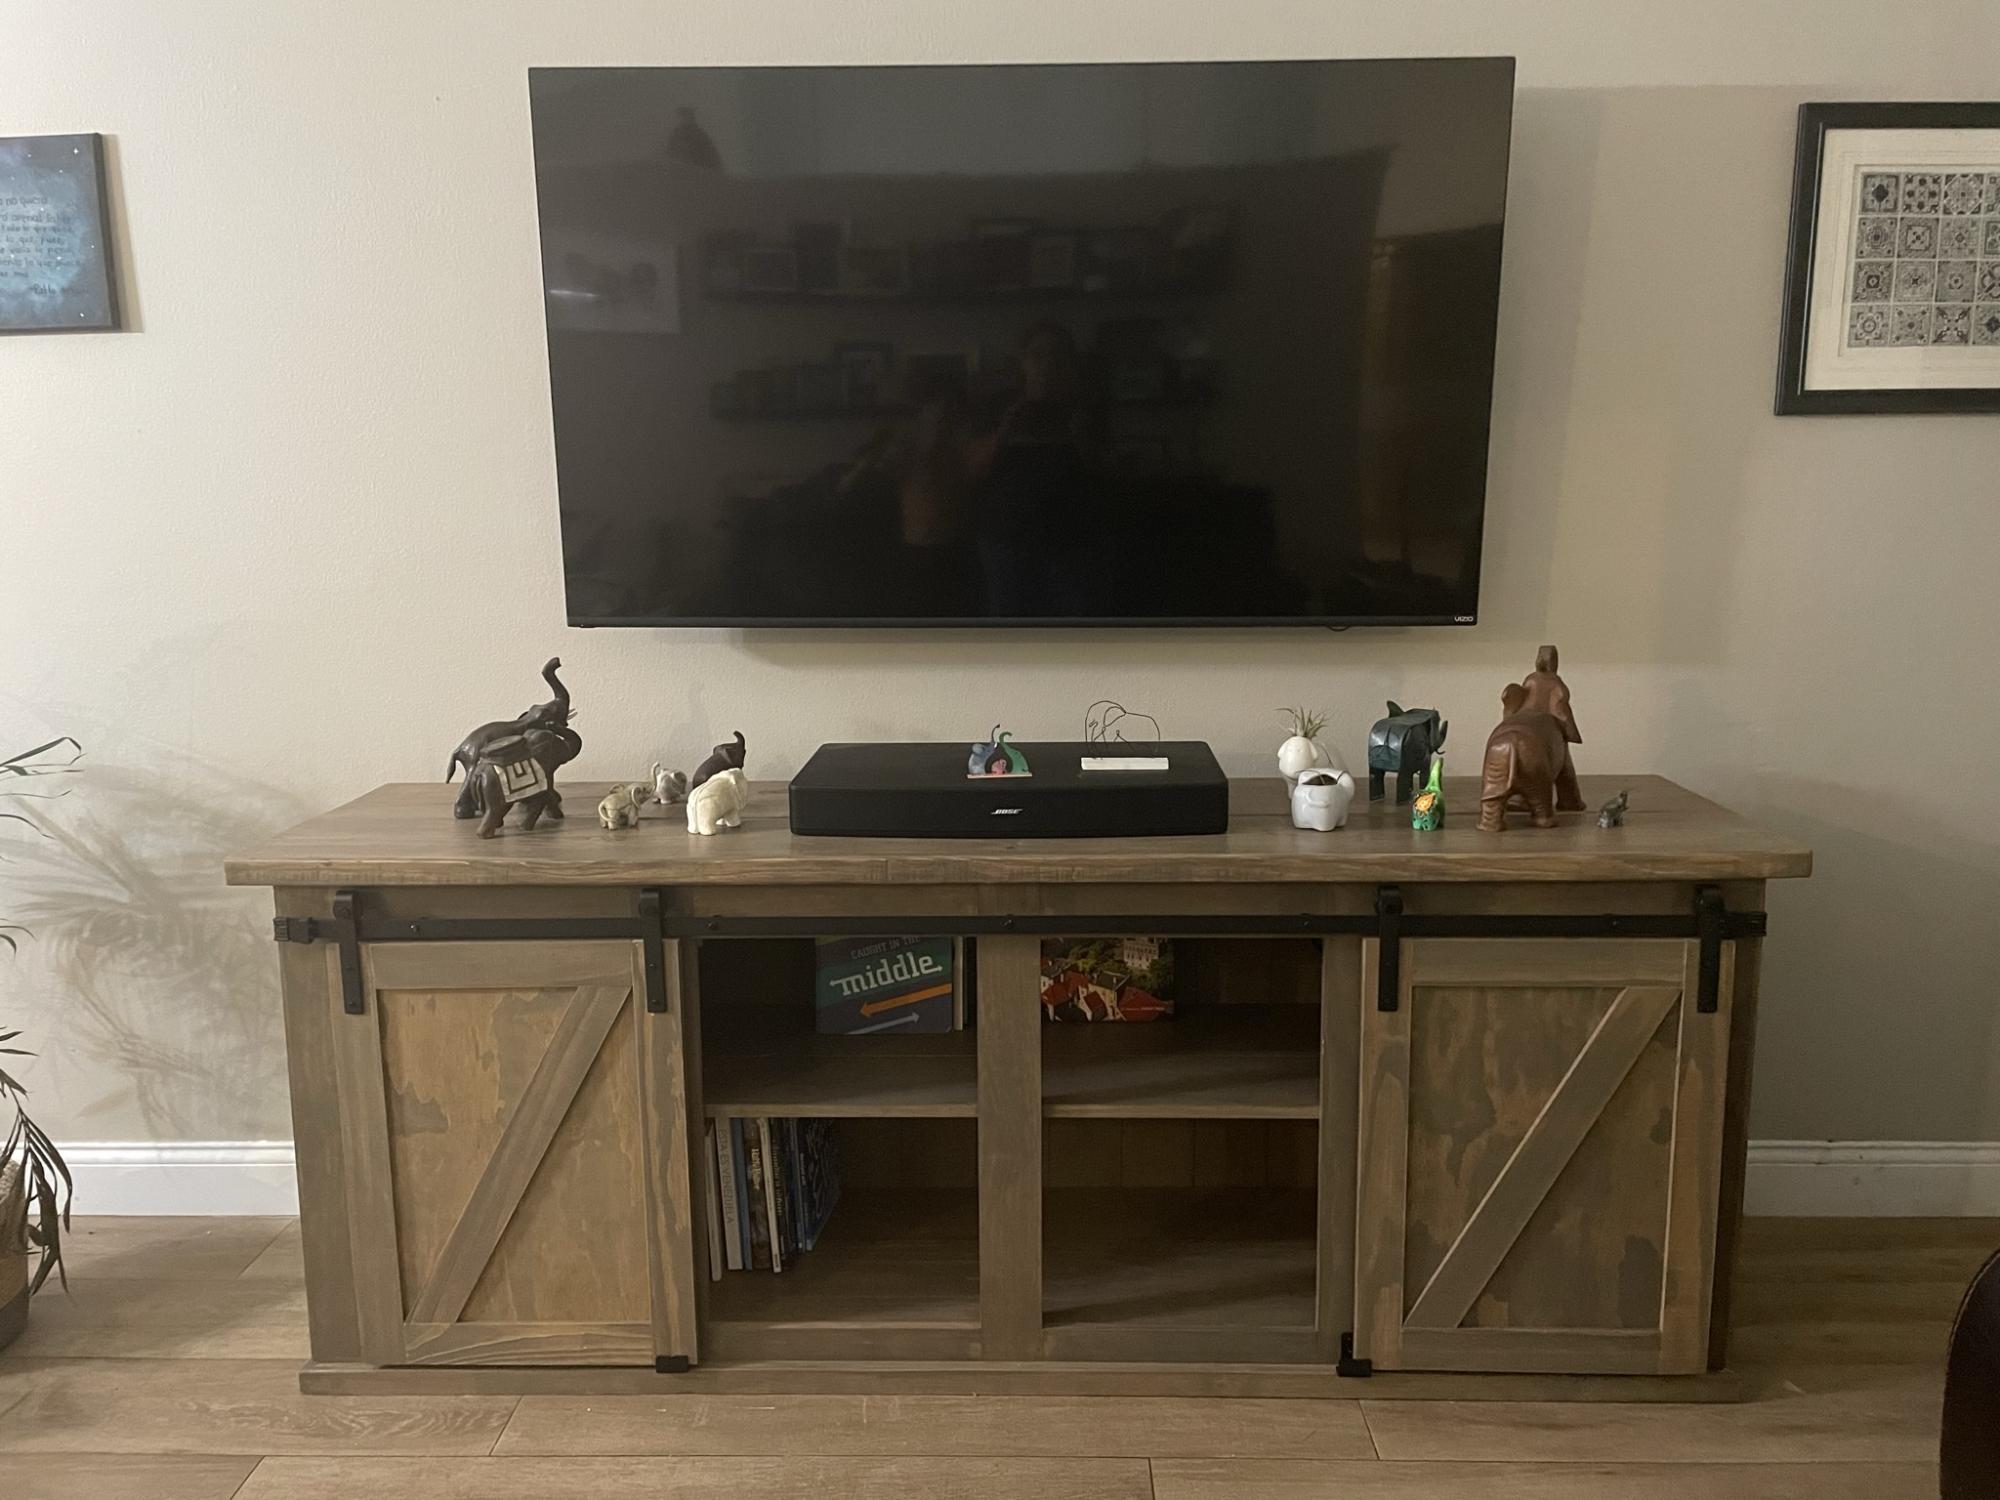
I built this TV console based on Ana’s plan and some modifications from The Turquoise home. Made it 6’ long and a bit lower to fit all my elephants below the TV.
It turned out beautiful and suuuper heavy.
Thank you Ana!
Built from Plan(s)
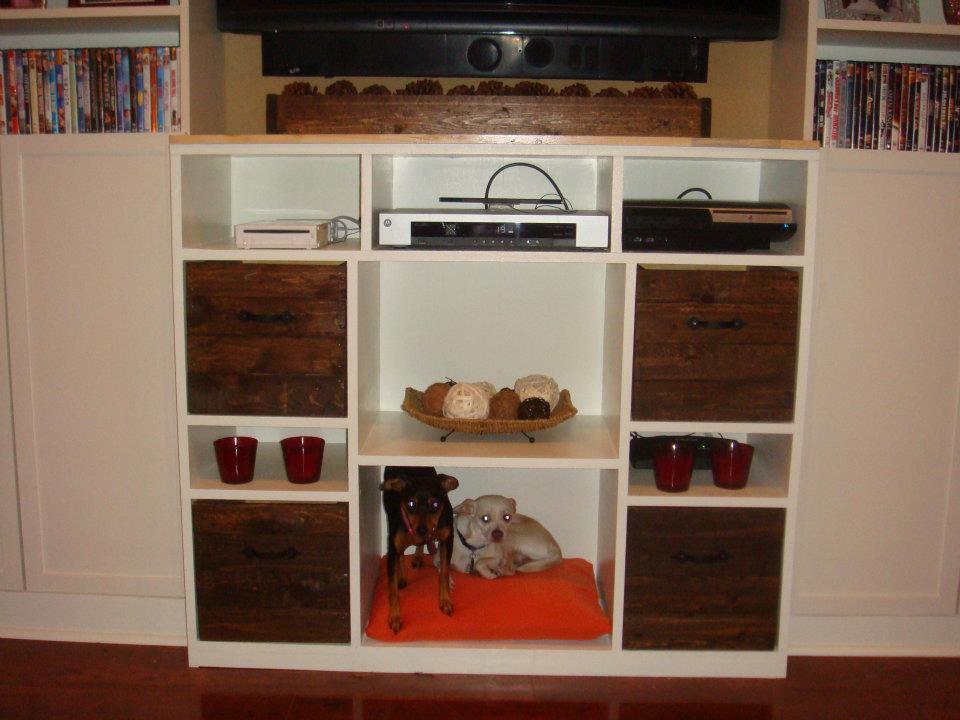
Entertainment Center Build
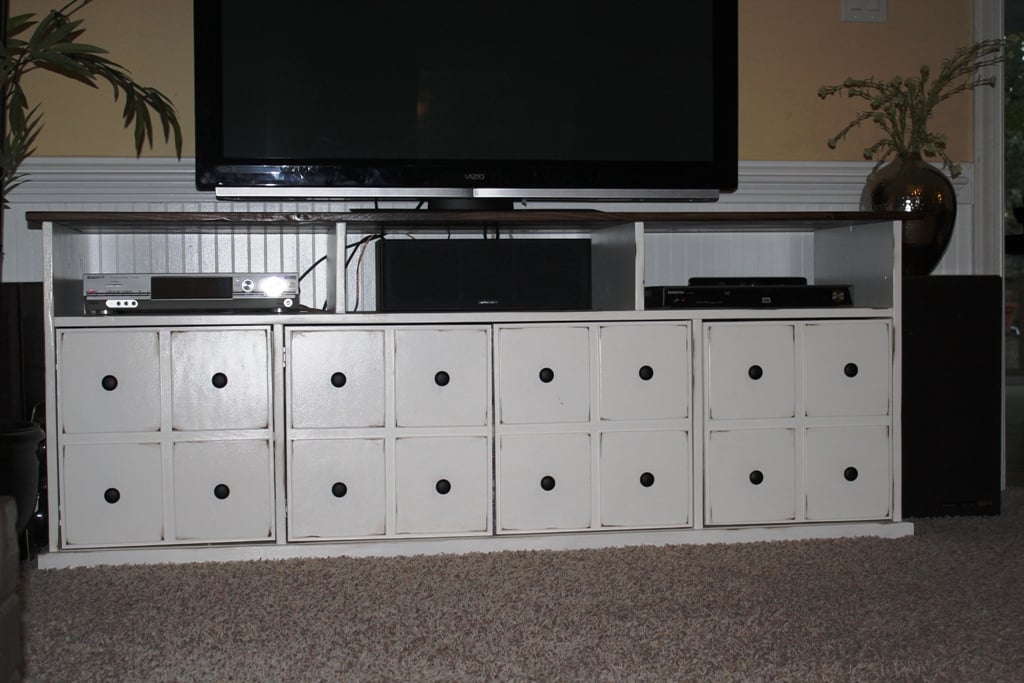
I have always loved the entertainment center from Pottery Barn. When I saw that the sale price was still $900, I knew my husband and I could build it for way cheaper. This took about a week (with a lot of breaks) and the total cost was around $250. I think the biggest expense was the all the knobs, but I feel like they make the piece!
Built from Plan(s)
Estimated Cost
$250
Estimated Time Investment
Weekend Project (10-20 Hours)
Finish Used
Top is Dark Walnut Stain, Bottom is Antique White Paint
Recommended Skill Level
Intermediate
Comments
Sun, 04/08/2012 - 23:53
Nice!!
It looks great!! My OCD is totally soothed by your perfectly spaced faux drawer fronts!! From looking closer at your pic I can see that you made all doors instead of drawers and doors. I want to do the same. It also looks like you used a different type of hinge than suggested. Any reason for that? Do you have shelves in all 4 spaces? Would you mind adding a few more detailed pictures, maybe with your doors open? Or just giving some more details to what you did differently would help.
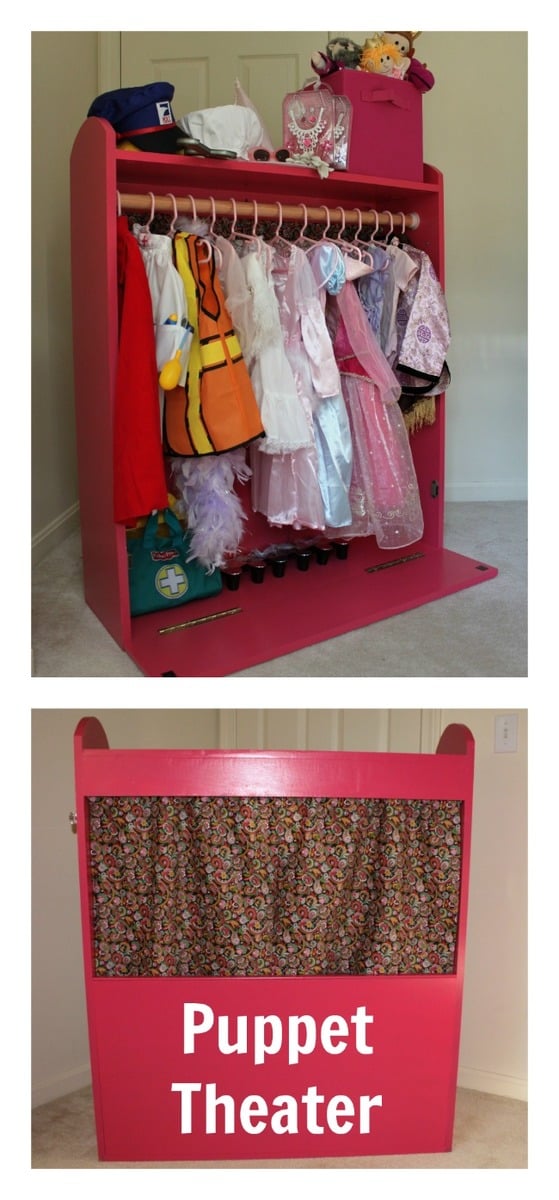
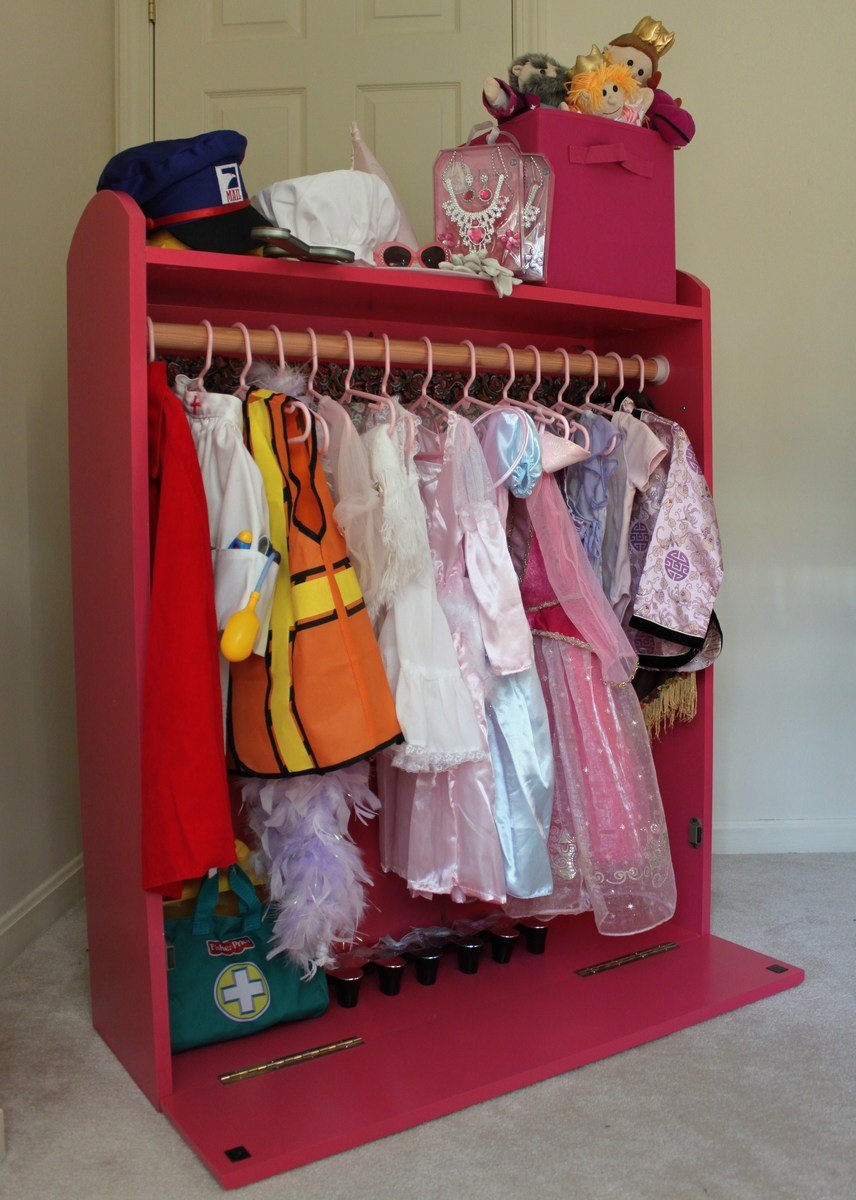
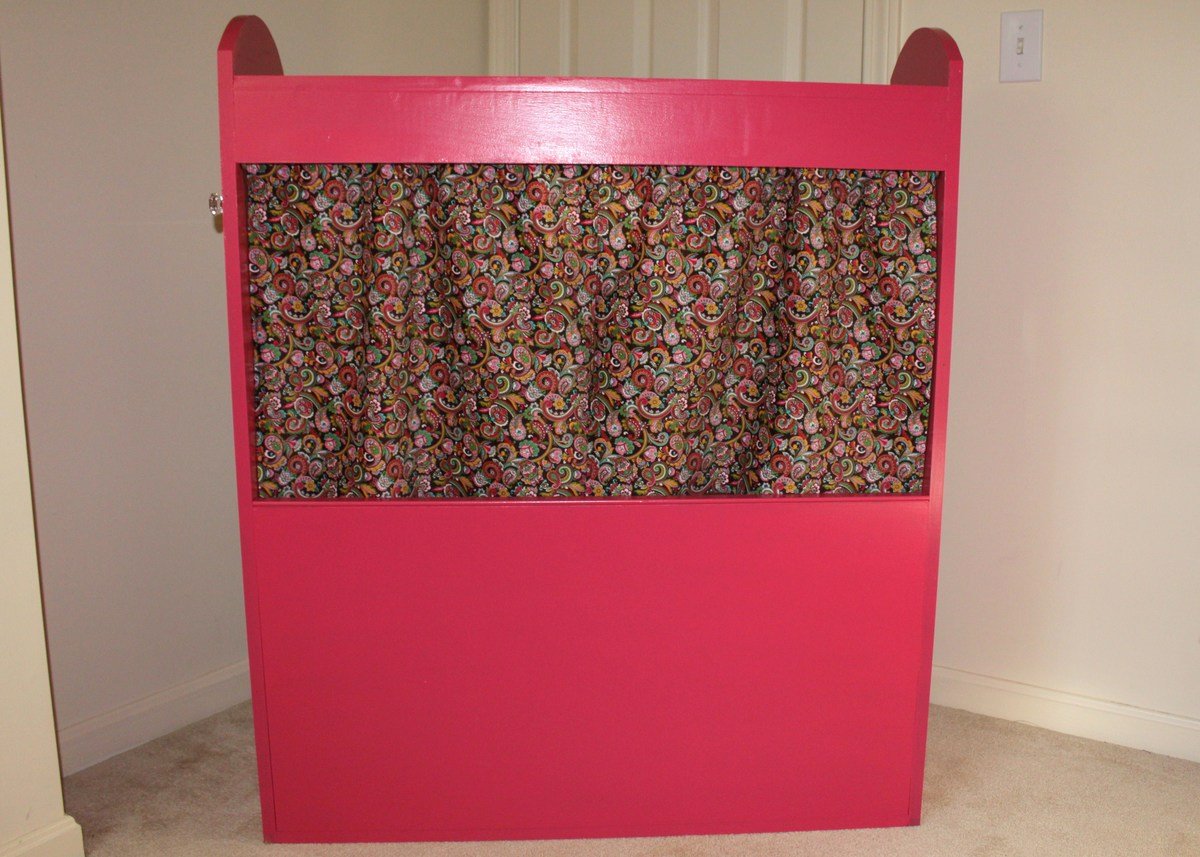
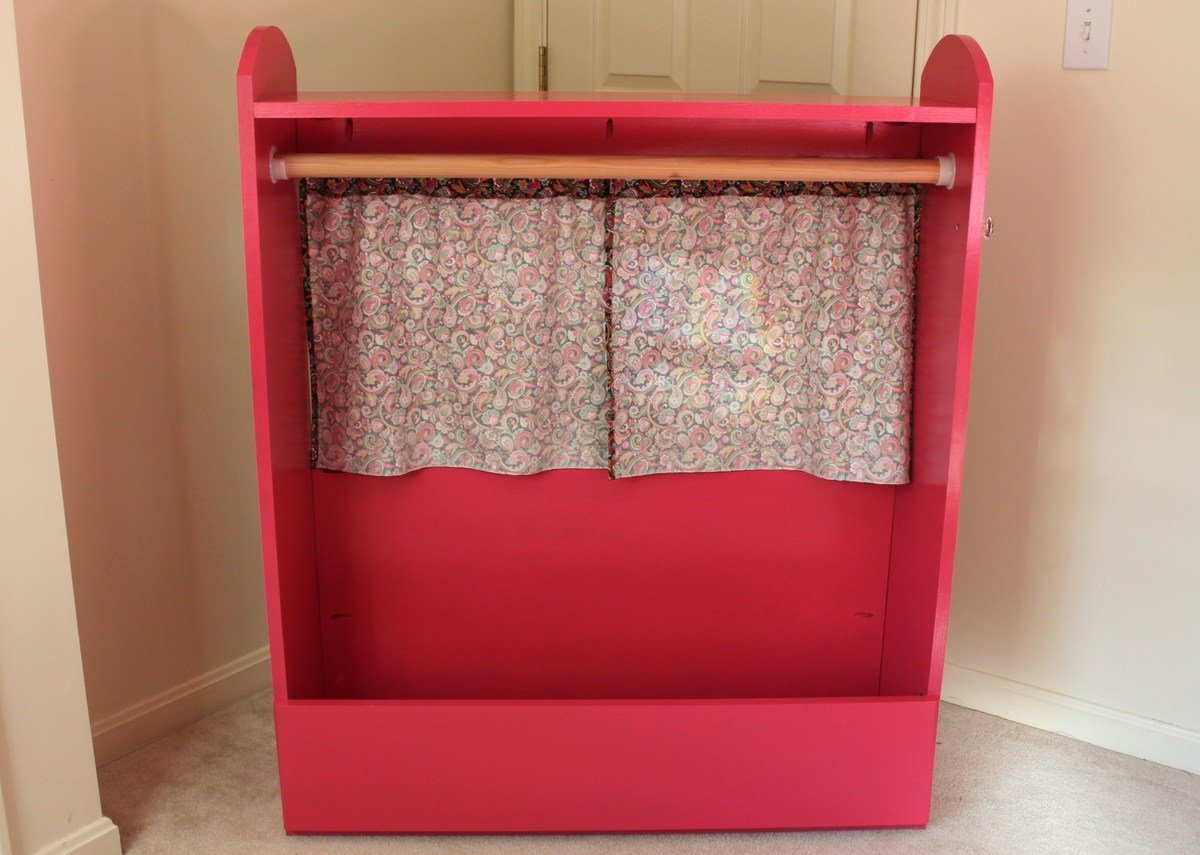
Dress Up Storage & Puppet Theater
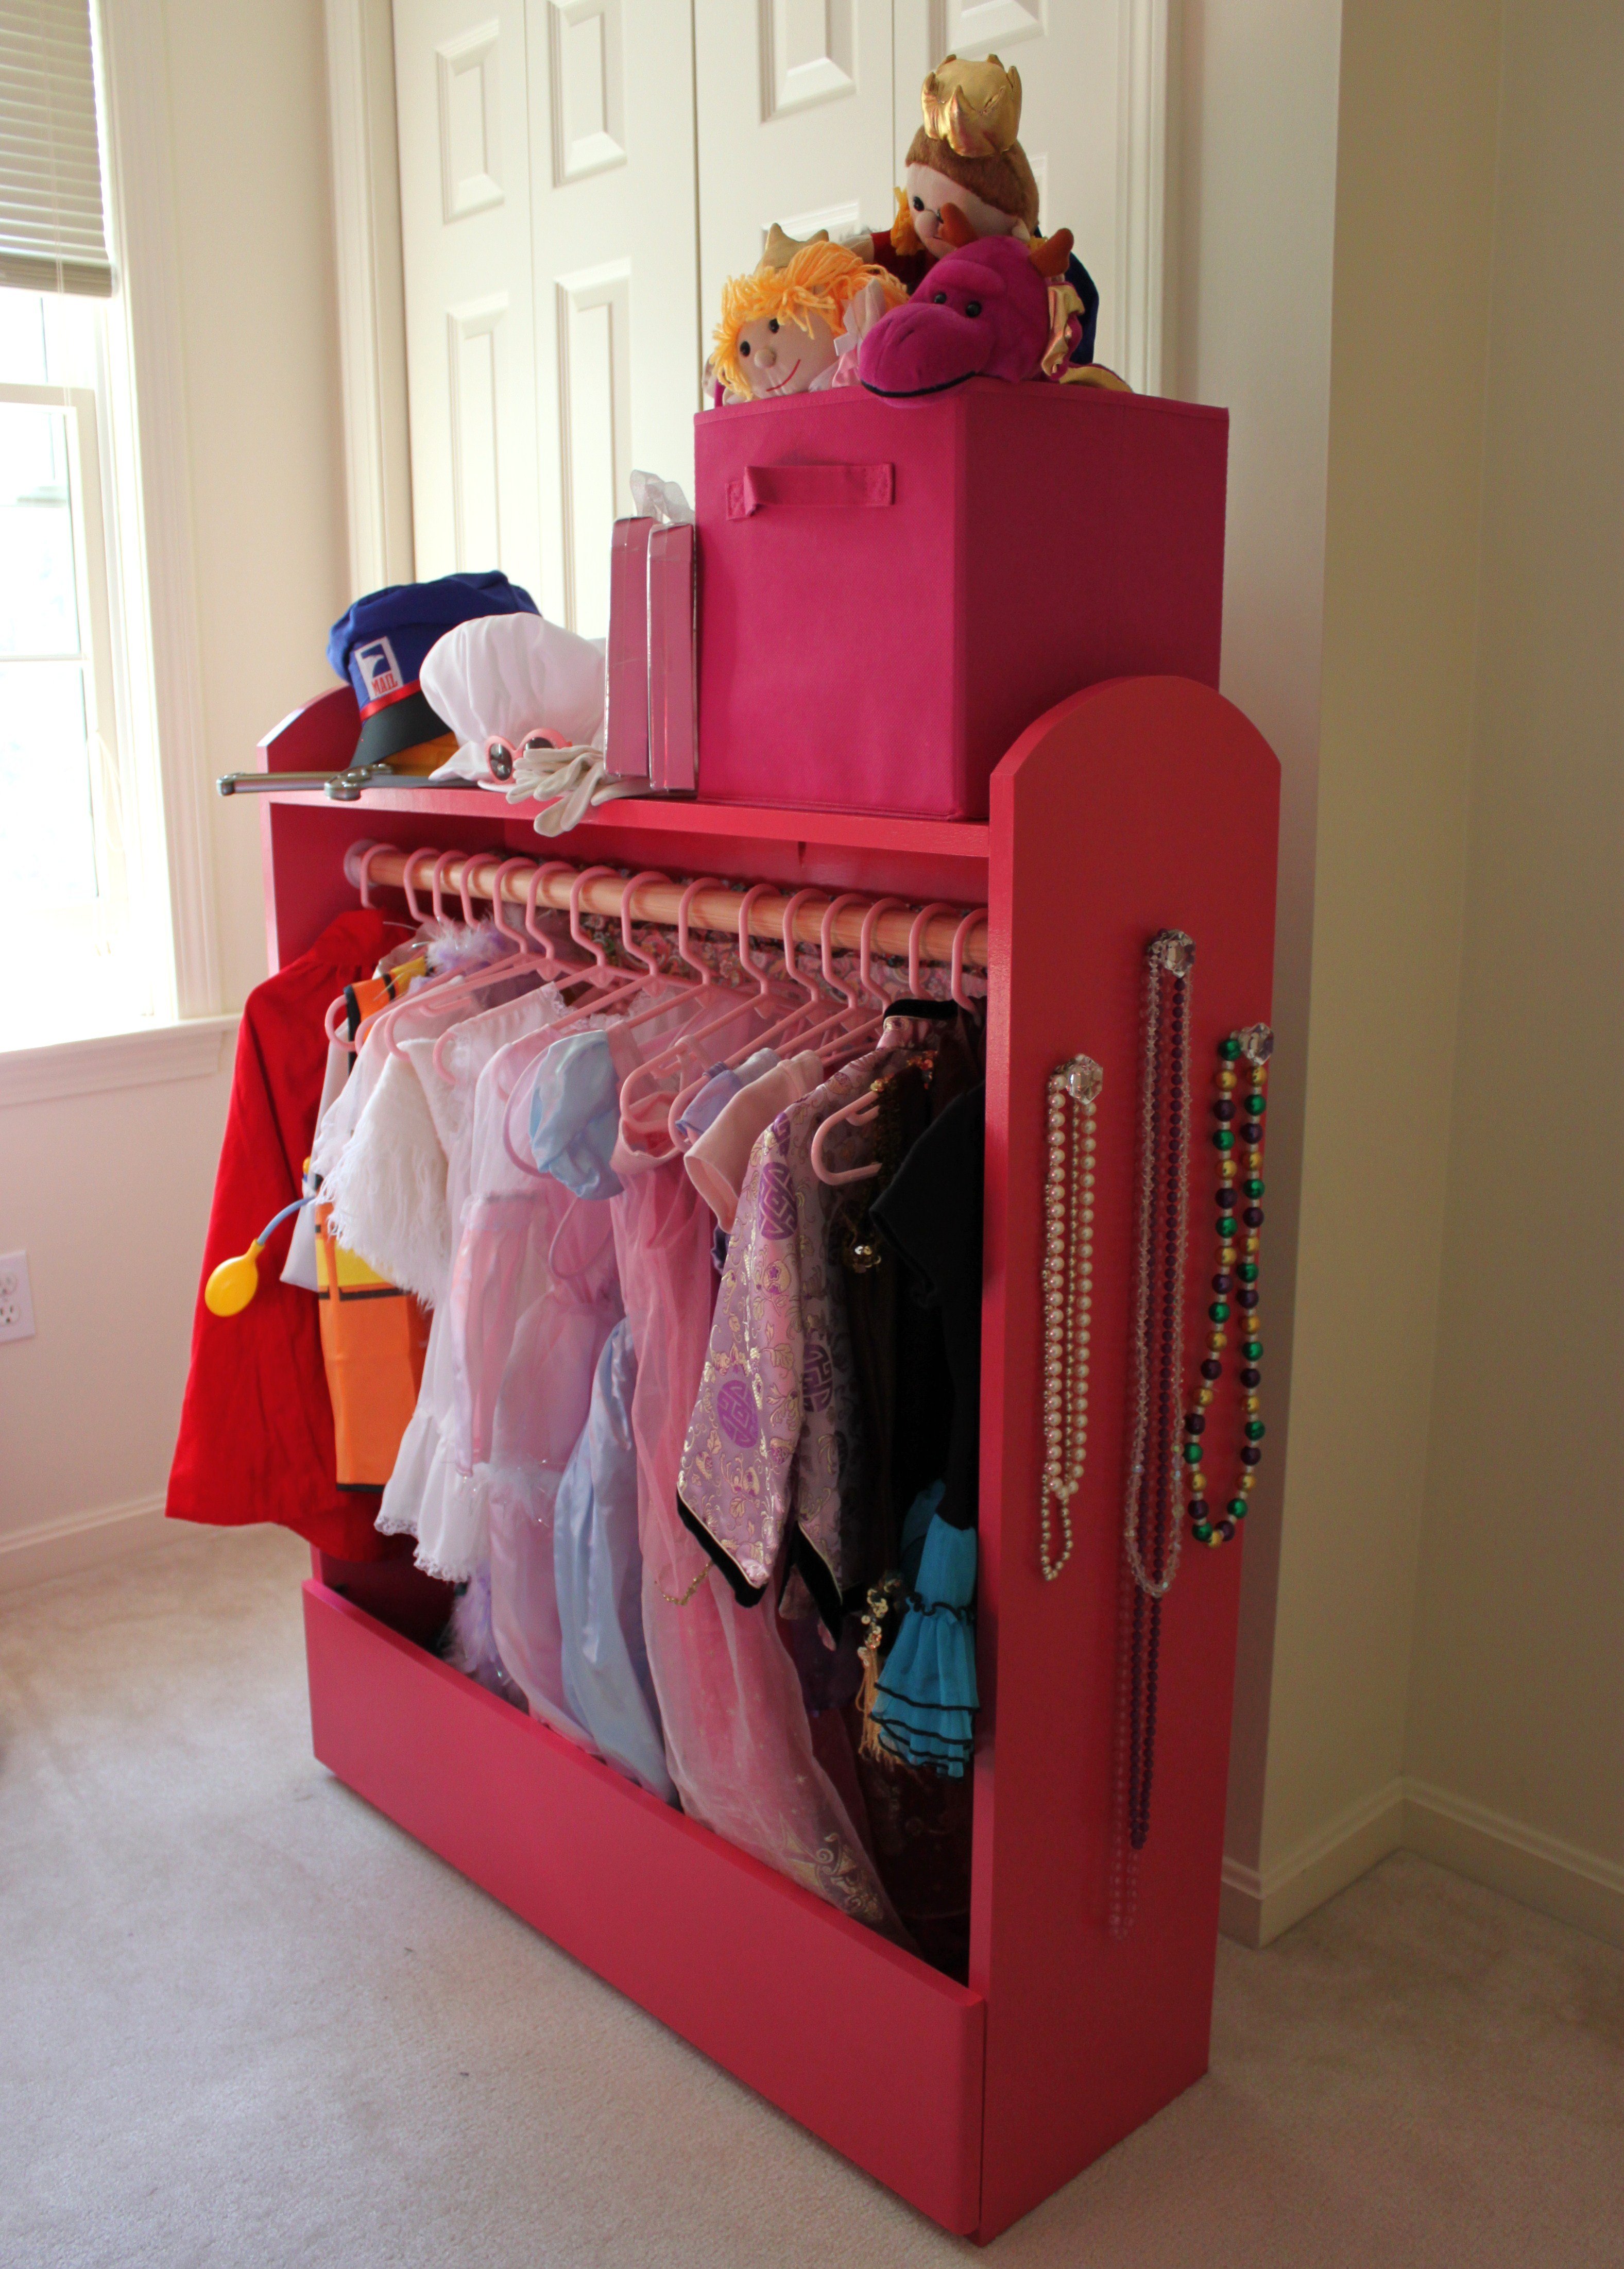
This is a great way to double up on space & creativity! My dad and I built this dress up storage/puppet theater for my daughters using Ana White's plans with added inspiration from The Picky Apple's post about their own top shelf and theater hacks - you can view it here: http://www.thepickyapple.com/blog/2011/03/24/dress-up-storage-bin-and-p…. We added hinges and magnetic catches to the front so that the storage center can be turned around and opened to lay flat for access to the puppet theater.
Built from Plan(s)
Estimated Cost
$50
Estimated Time Investment
Day Project (6-9 Hours)
Finish Used
primer then two coats of Valspar semi-gloss (in some pink I can't for the life of me remember or find the chip for!)
Recommended Skill Level
Beginner
Comments
Sun, 10/04/2015 - 12:44
Exact measurements?
Hi, I read you tweaked the plan and then did not know the dimensions of anything in the beginning. Have you gotten them since?
Doll Bed for Olivia
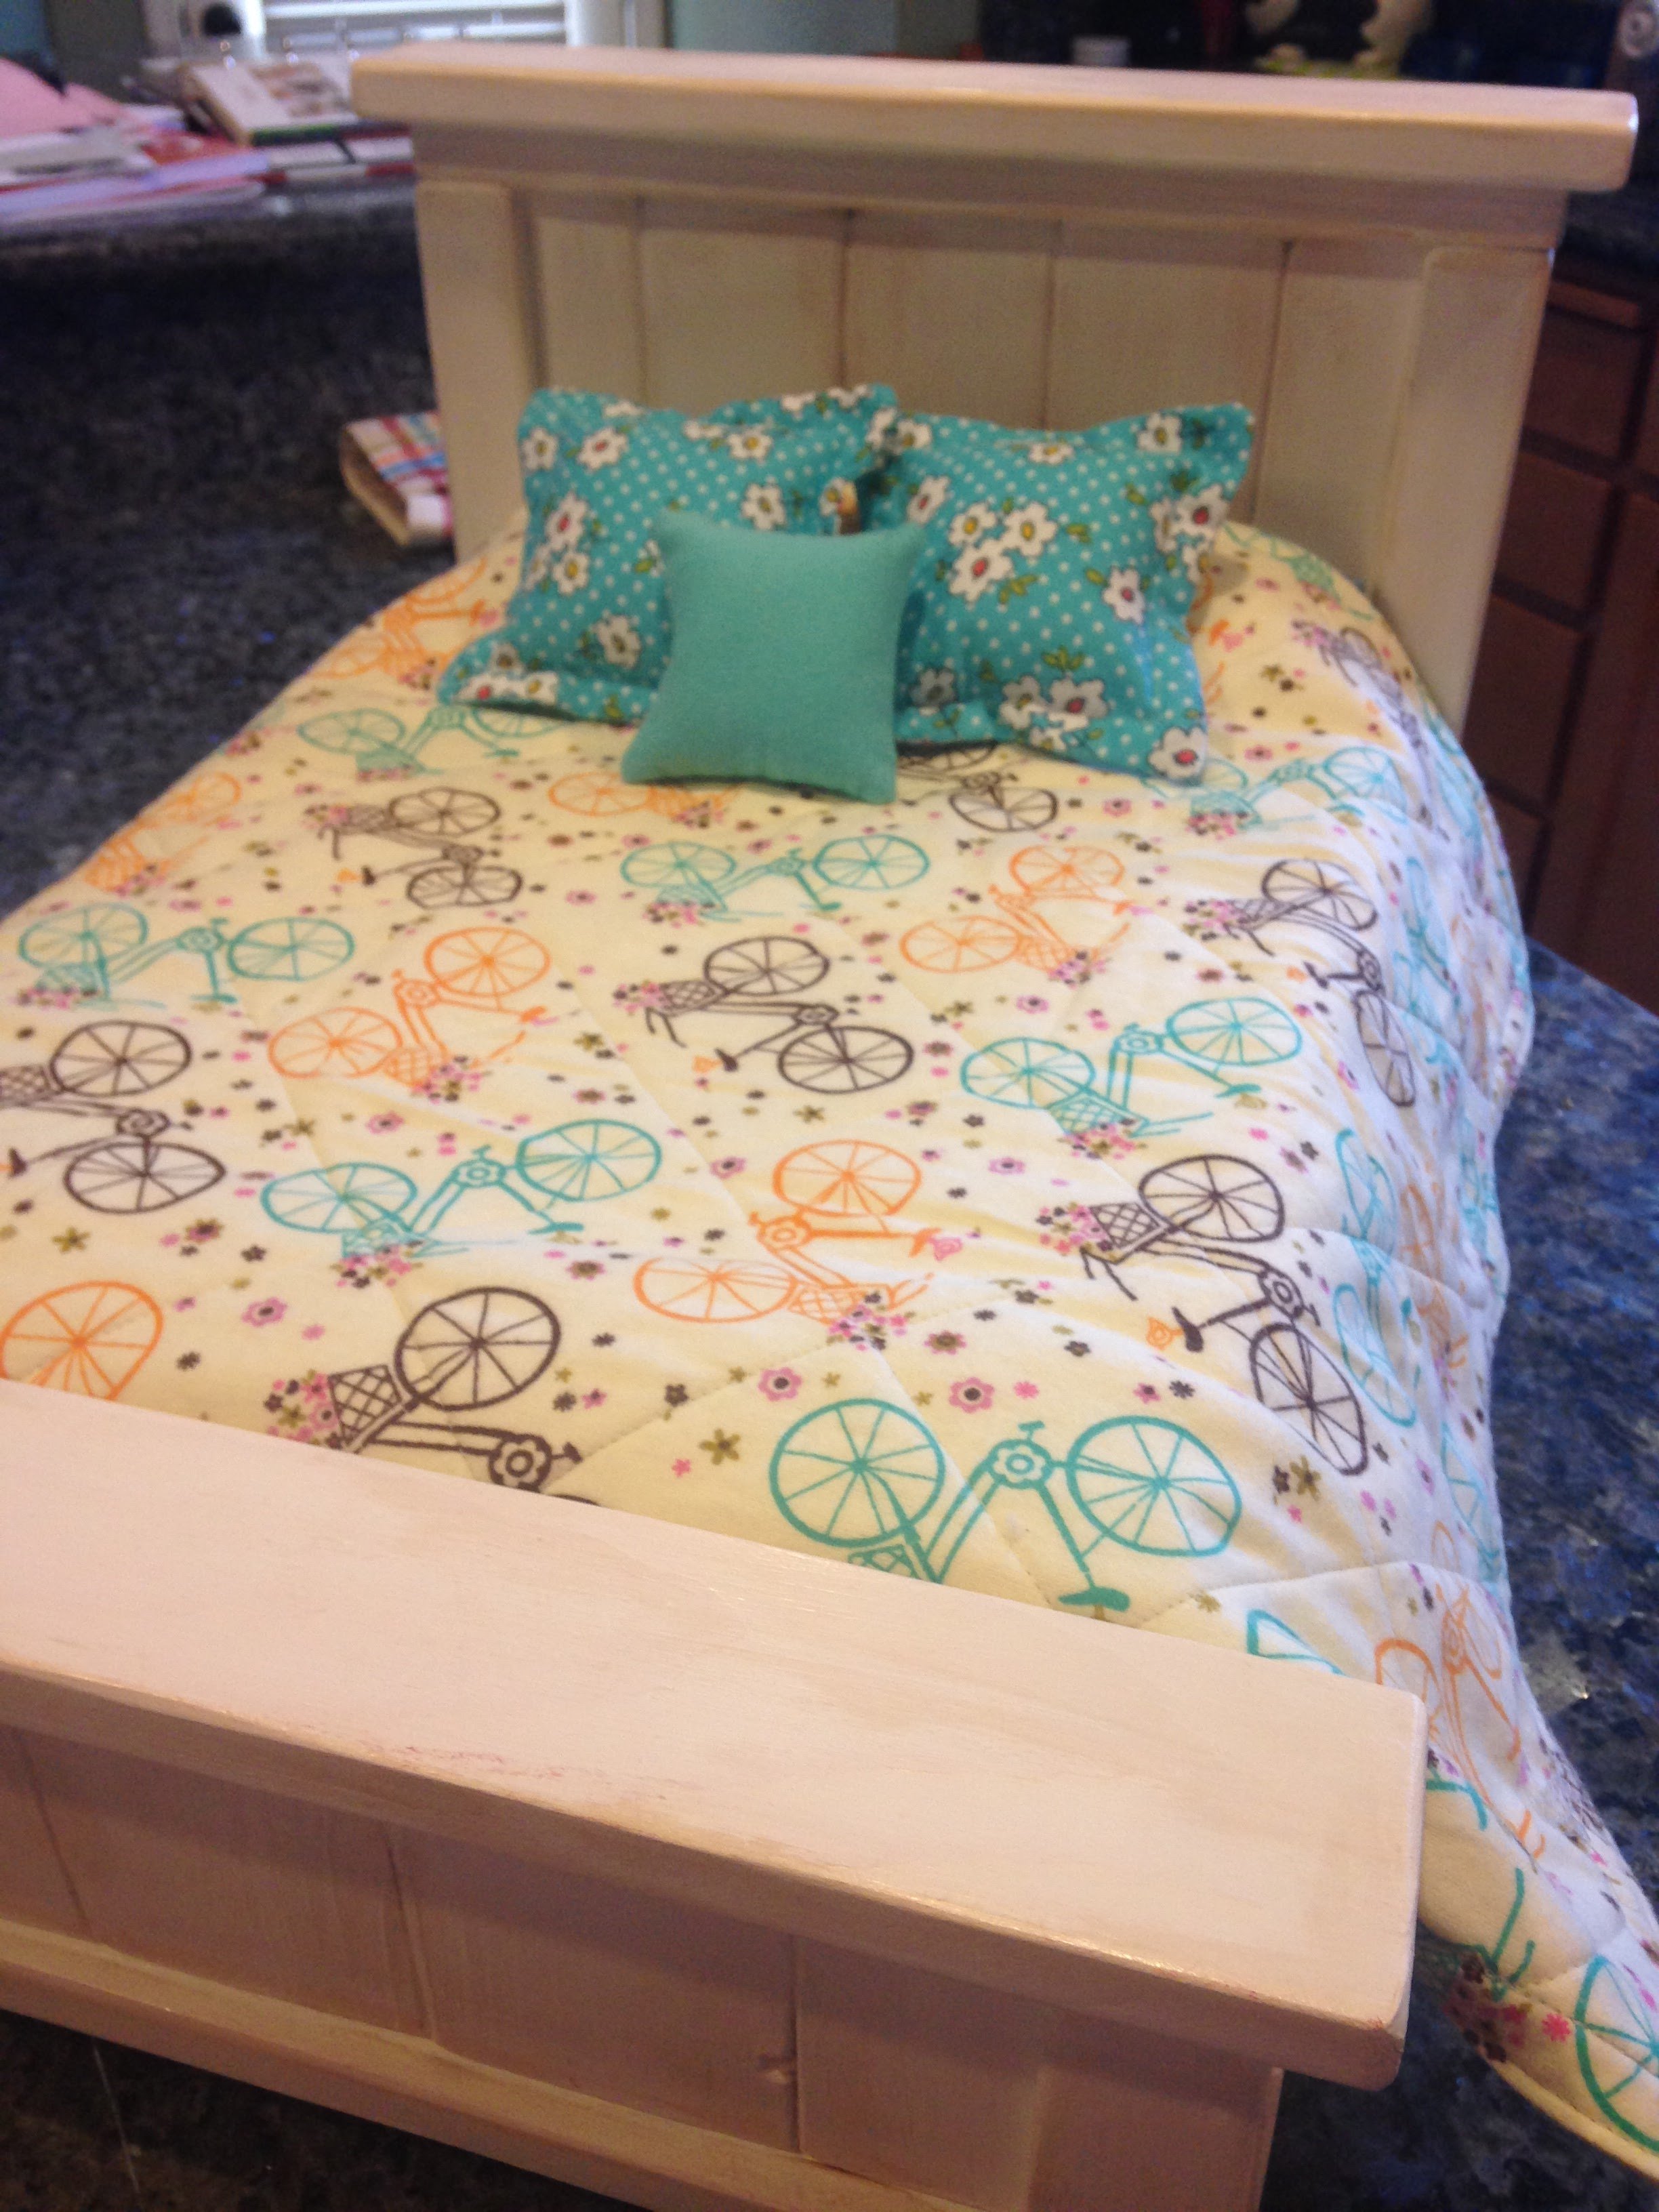
These are such fantastic plans! I found my 7yo niece lying across the bed under the Christmas Tree on Christmas Eve. She loved it so much she wouldn't let anyone carry it out to the car for her, she had to carry it herself! I think the picnic bench might be her birthday present...
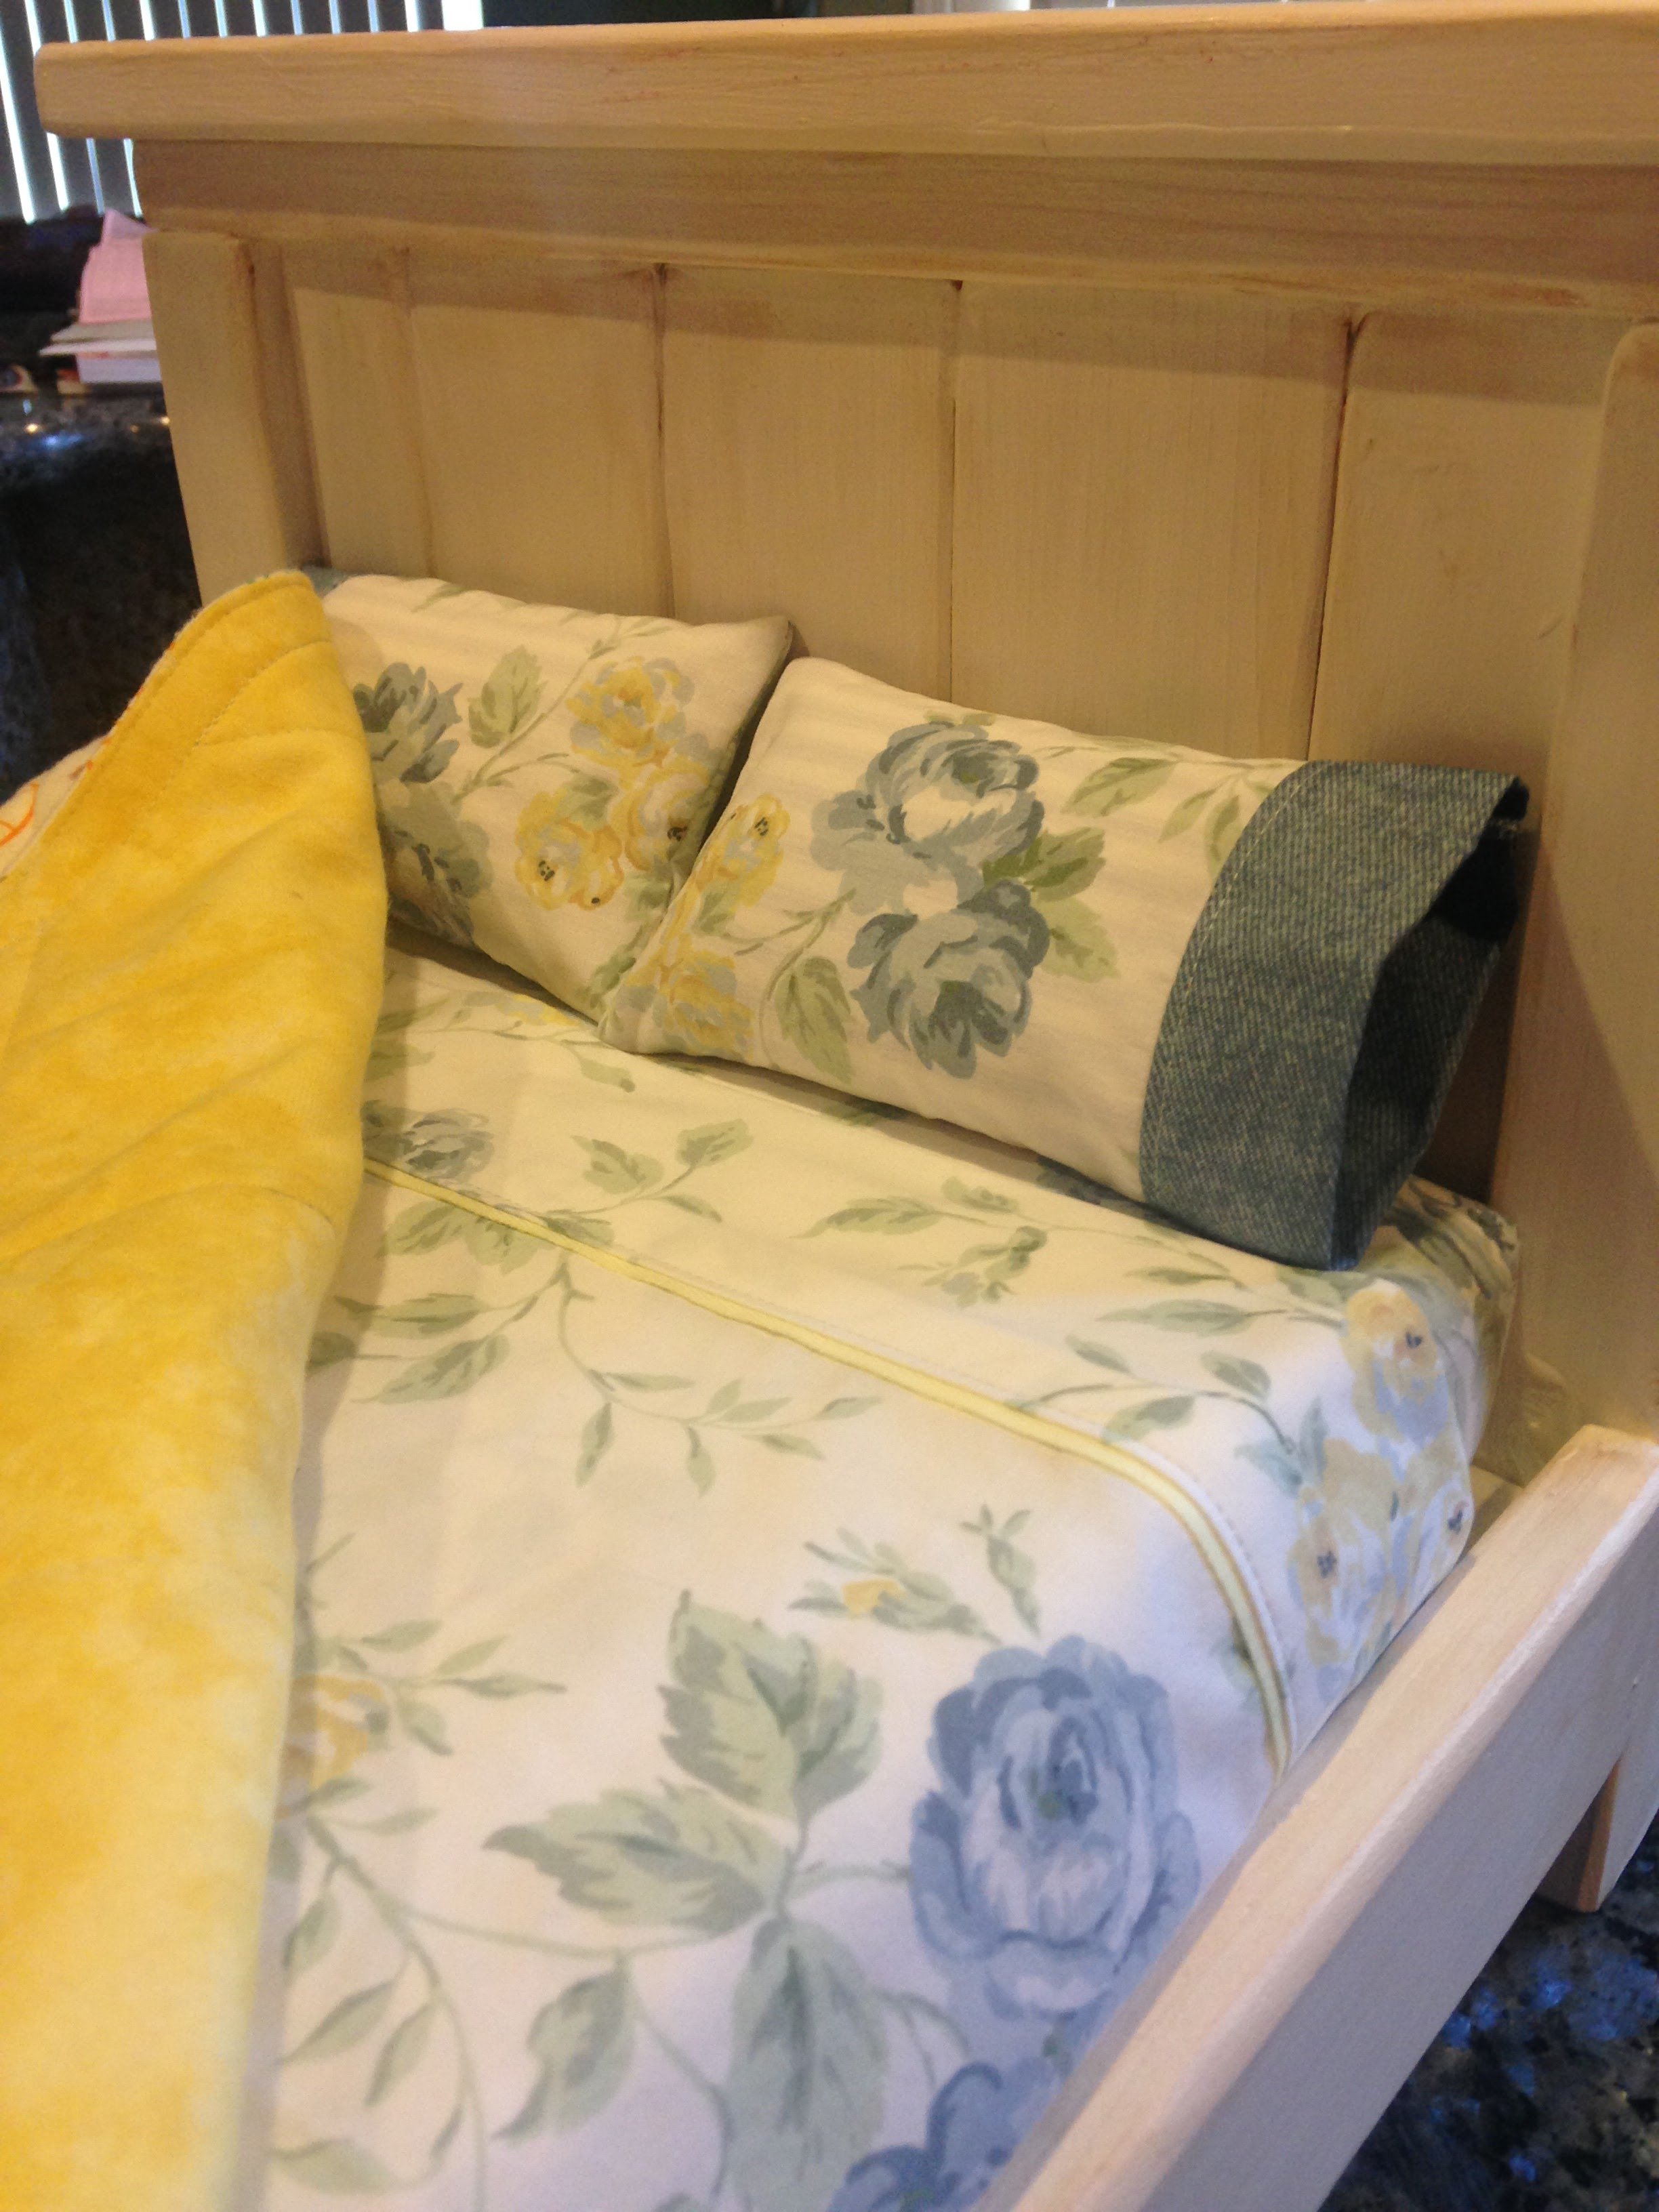
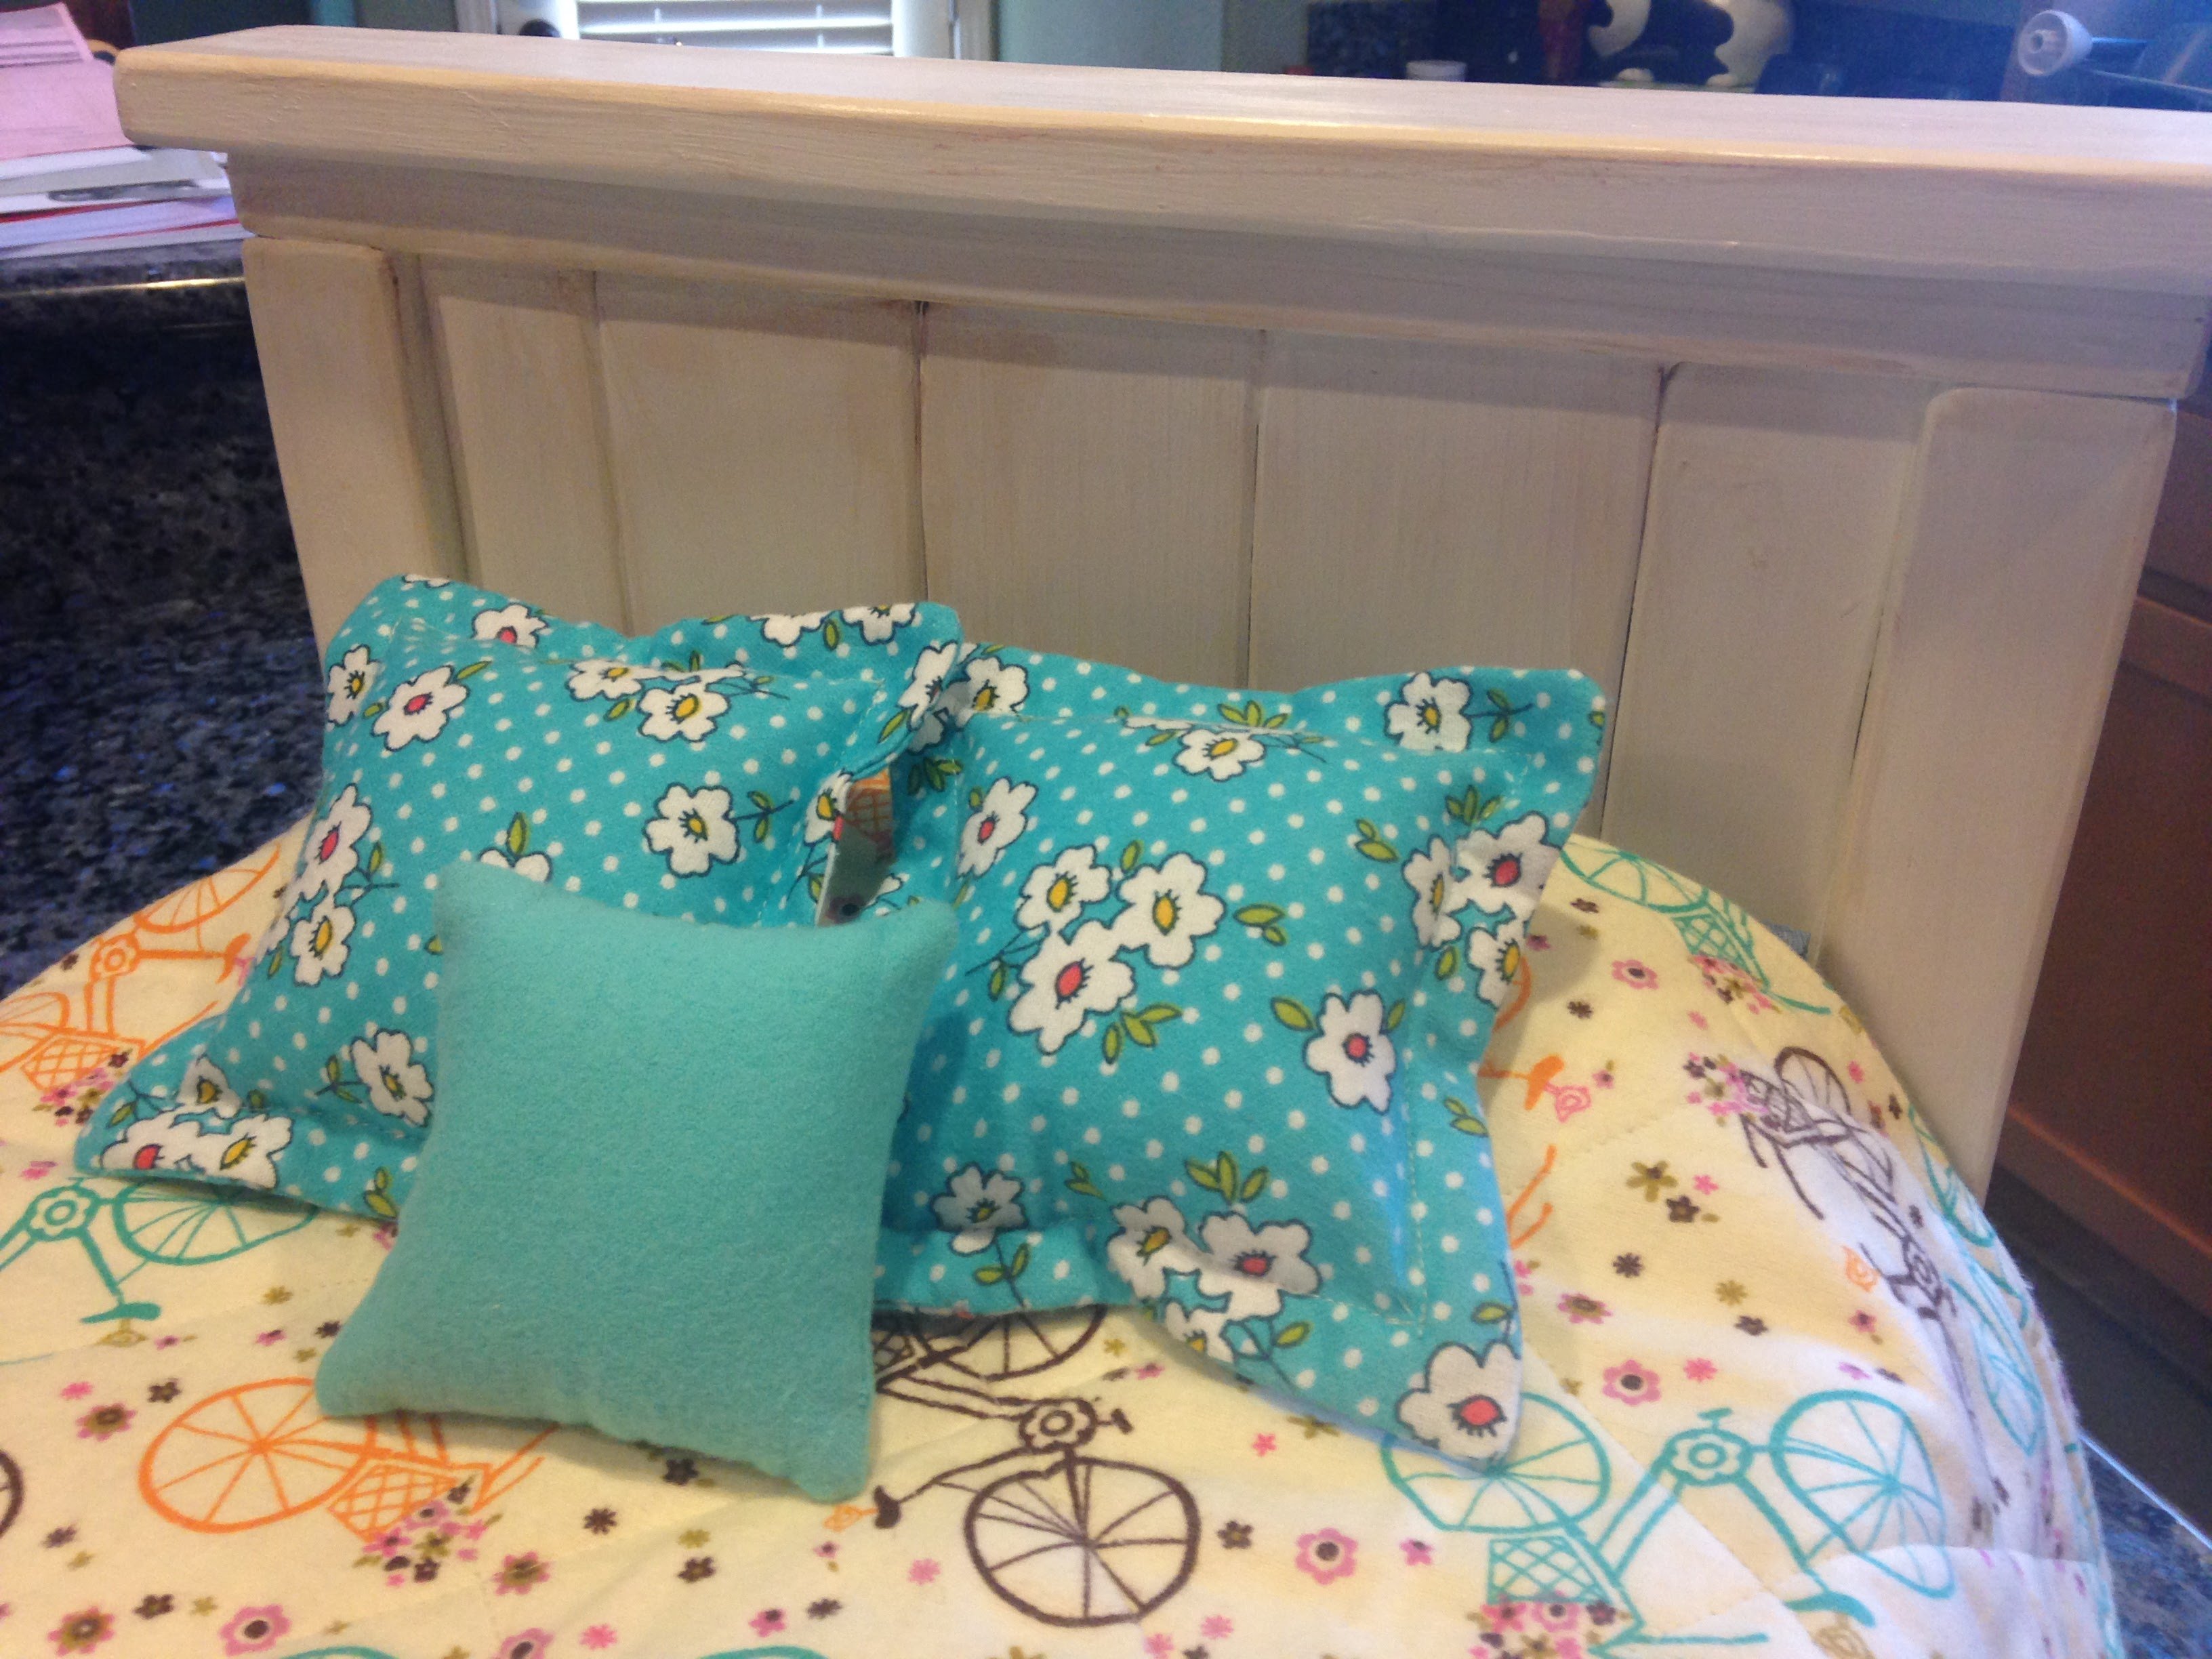
Built from Plan(s)
Estimated Time Investment
Afternoon Project (3-6 Hours)
Recommended Skill Level
Intermediate
Buffet with Copper Counter Top

Modified the plan to create an 96”L x 18”D x 36”H buffet with:
- Wine storage
- adjustable shelves
- 3 pull-out drawers
- sliding barn doors
- copper counter top

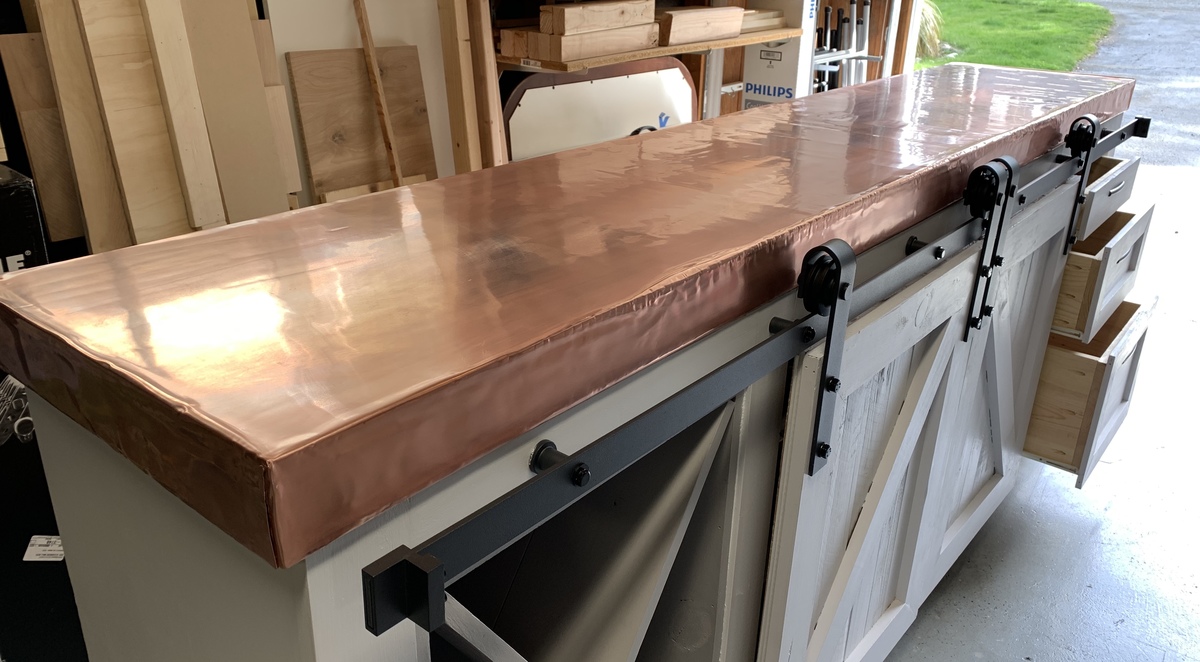
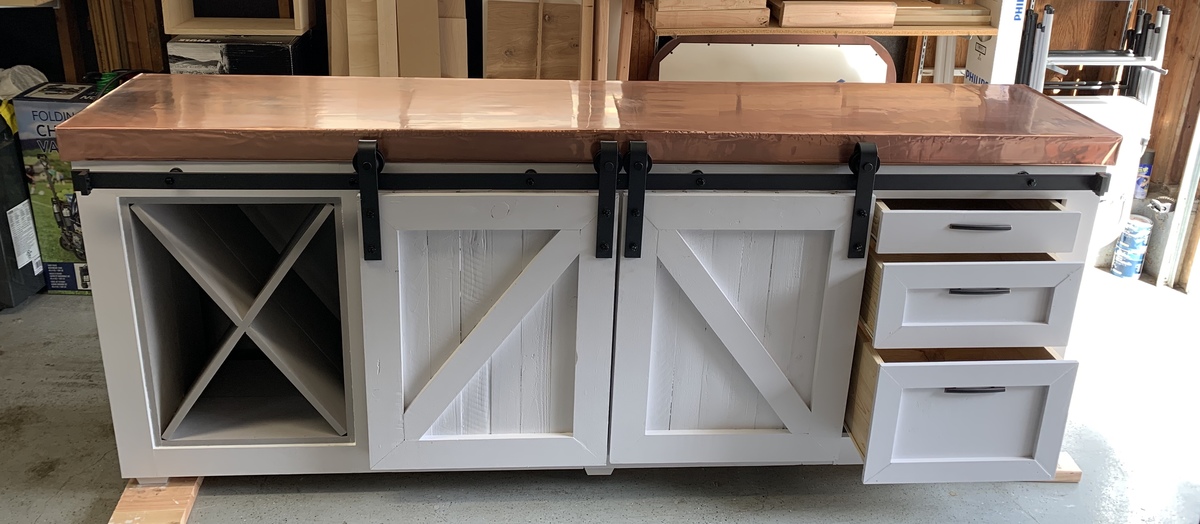
Finish Used
Paint. Copper.
Recommended Skill Level
Intermediate
Comments
Modern Farmhouse Bed
Super easy plans to follow. I modified a bit.
Built from Plan(s)
Comments
Front Porch Bench
I recently found this plan and decided to build it for my front porch. I am so happy to have finished this project (my second build) and look forward to decorating it for each holiday! I did not angle to the top of the bench because I wanted it to match my first build, the $4.00 chair.


Built from Plan(s)
Estimated Cost
$20 - $50
Estimated Time Investment
Day Project (6-9 Hours)
Finish Used
I painted the bench black with a gallon of "oops" paint I found at Home Depot for $7.00.
Recommended Skill Level
Beginner
Comments
Tue, 11/01/2011 - 12:30
Great Job!
Your bench looks really nice. I built this same bench for my mom for Christmas. It is sitting in my garage waiting to be sanded and then stained. So nice to see other's projects. Thanks for sharing!

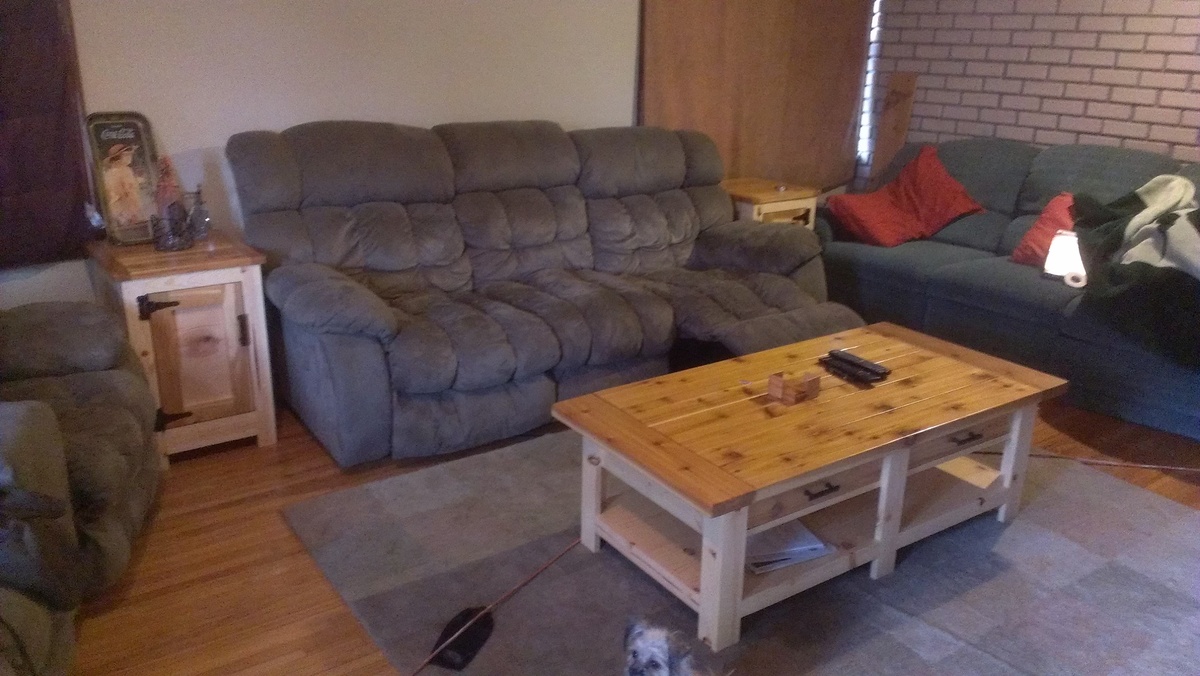
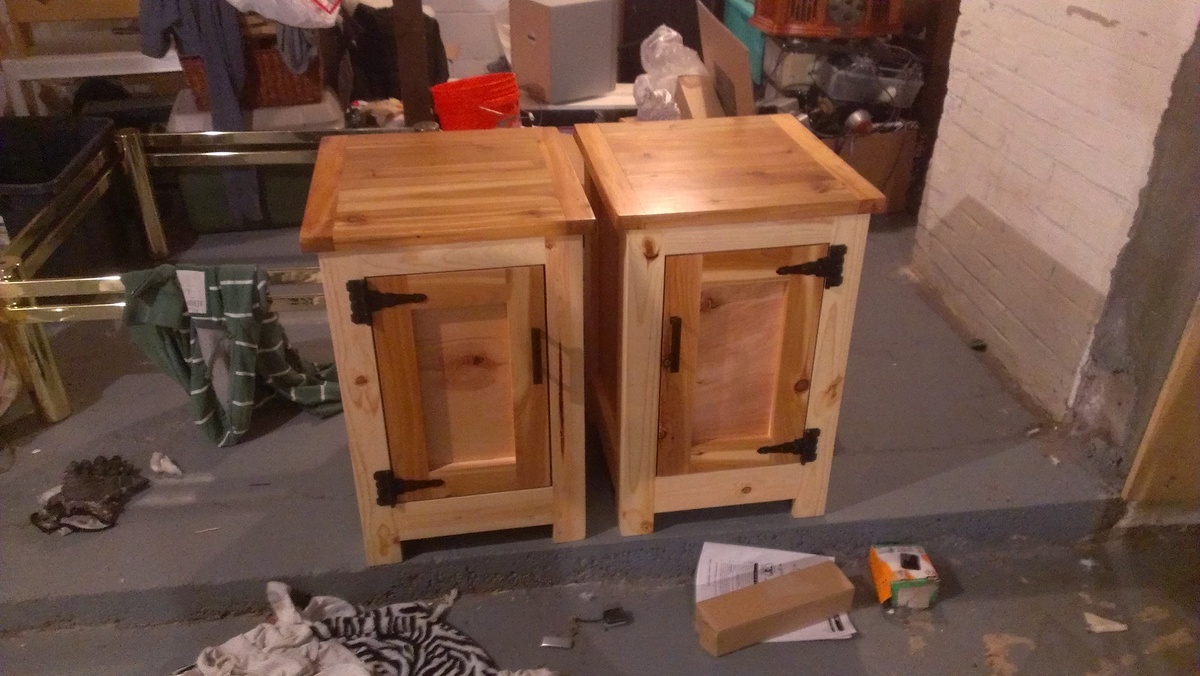
coffee table cedar top and drawer fronts
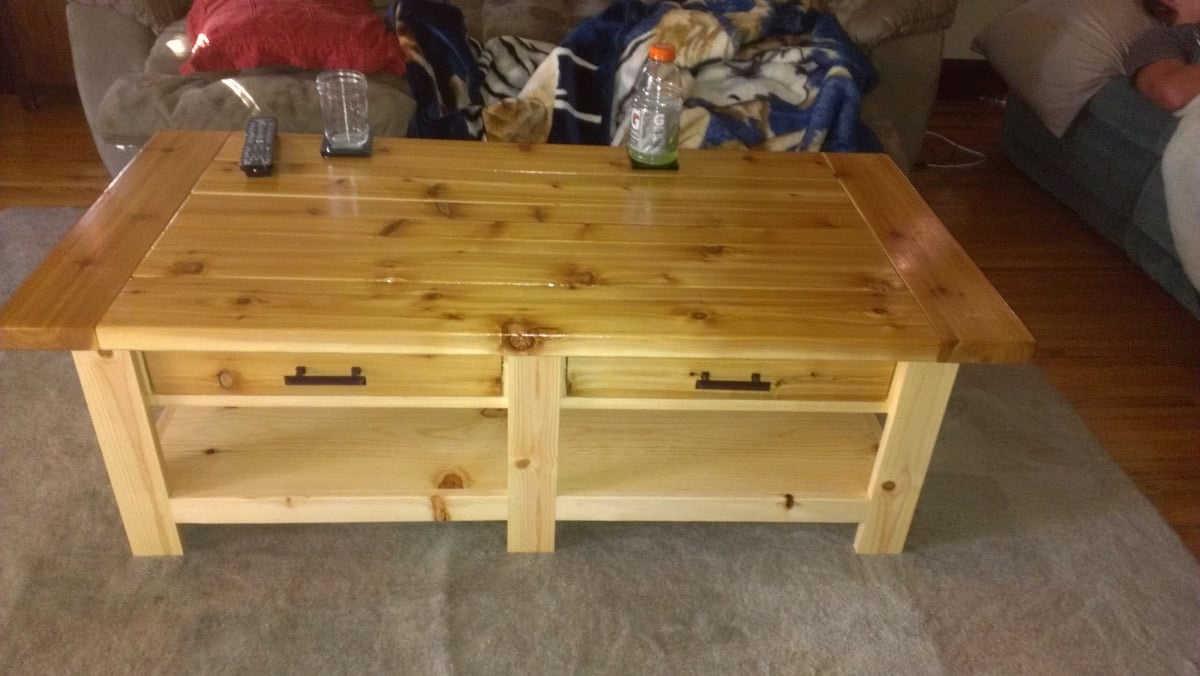
started and made the coffee table first then decided i wanted matching end tables so i looked up some different designs on here and decided on one. made the top and the front of the doors the same to match the top and drawers of the coffee table. next is gonna be the tv stand i think but here are the three all done.
Built from Plan(s)
Estimated Cost
200 for coffee table would have been more on end tables but got alot of scrap from my dad so only spent about 100 or so on those.
Estimated Time Investment
Week Long Project (20 Hours or More)
Finish Used
just varnished it with a waterproof varnish in case anyone sets stuff on it anyways so i shouldnt have to revarnish it for quite a few years. Ignore the messy basement. i want to bend some wooden handles for them now and fit them to the holes that i already have from the handles that are on them now.
Recommended Skill Level
Beginner
Garage shelving unit
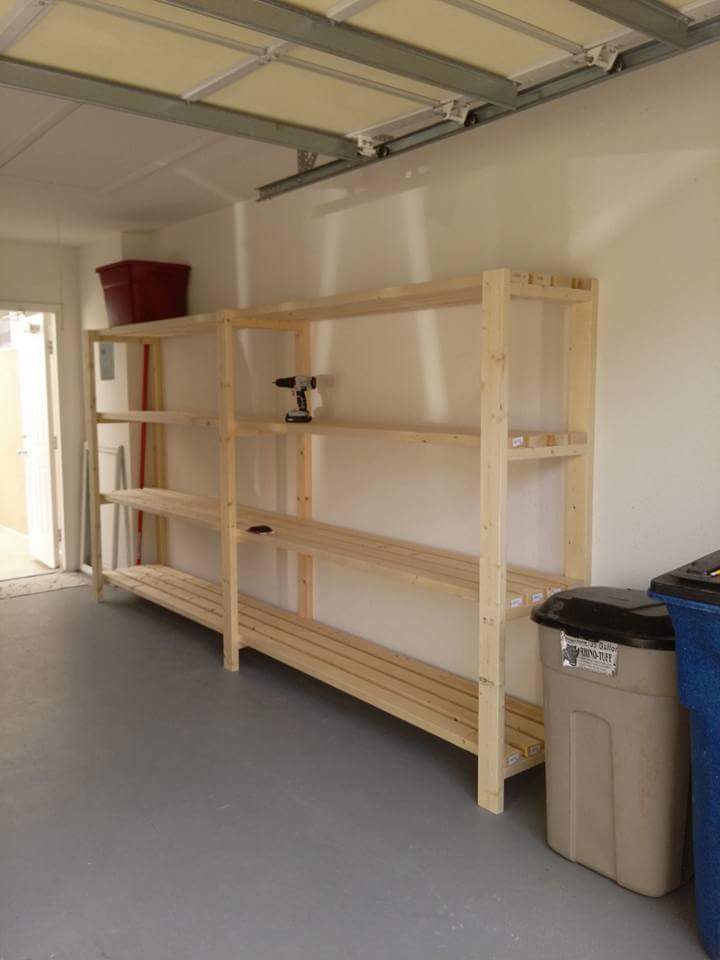
We made this peace 12 feet long, the hardest part was to find straight boards at home depot and adjust the feet because of an uneven garage floor. It was my first big project and hubby helped so I can't take all the credits :)

Built from Plan(s)
Estimated Cost
$126
Estimated Time Investment
Afternoon Project (3-6 Hours)
Finish Used
Unfinished
Recommended Skill Level
Beginner
Farmhouse dining table
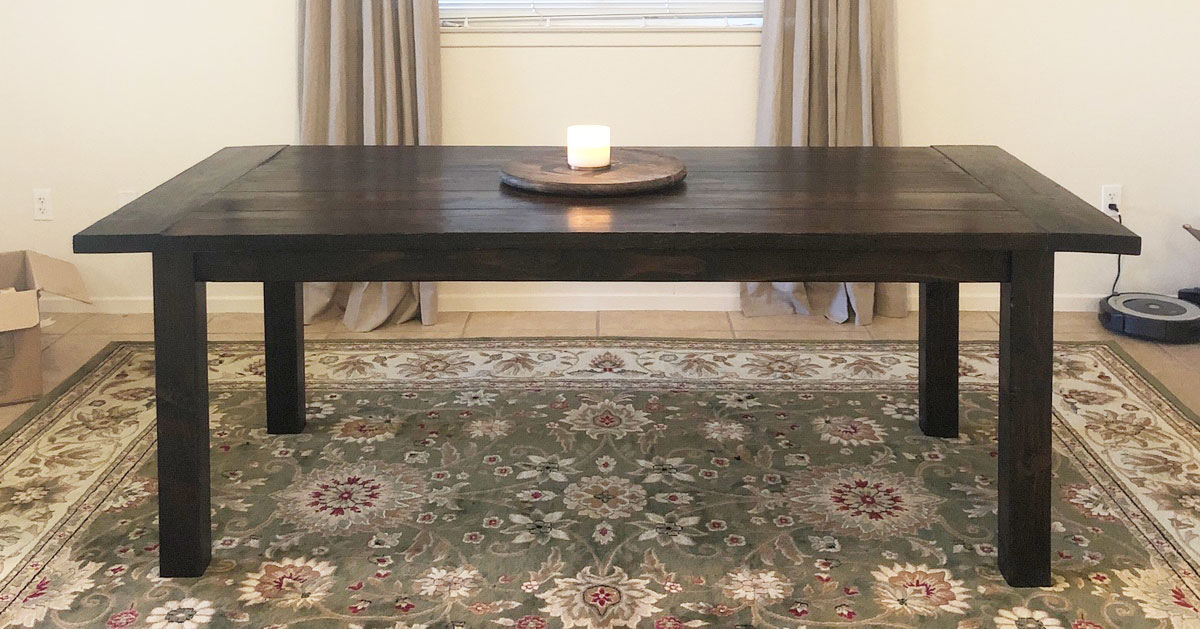
This was our first build together and first furniture piece from woodworking. The kreg jig really helped out and we didn’t have any major issues while building except for some board being warped but we fixed it with a planer.
Finished building the entire table in one day and staining and coats of poly took 2 extra days. It was a very easy build. When we move to a new area that has better access to lumber I’d like to remake this using oak/maple.
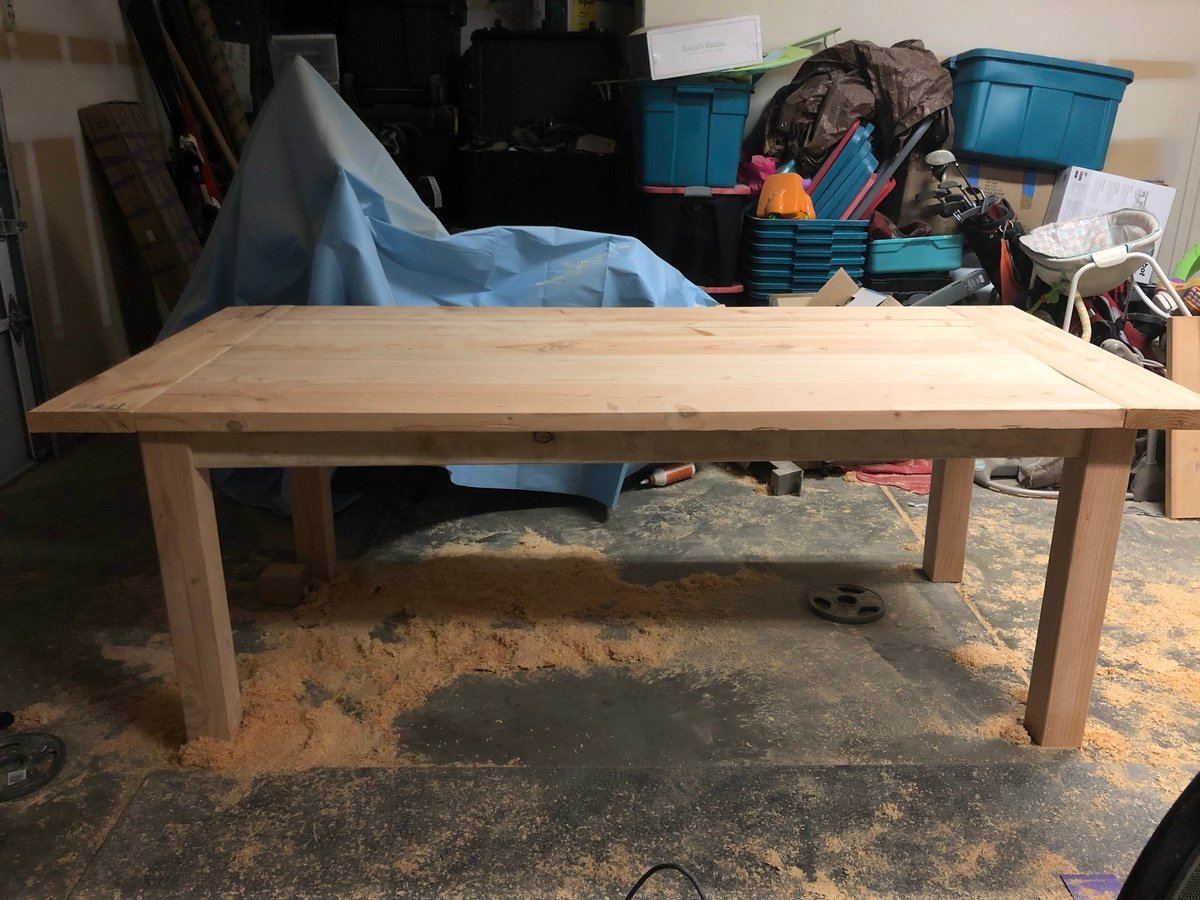
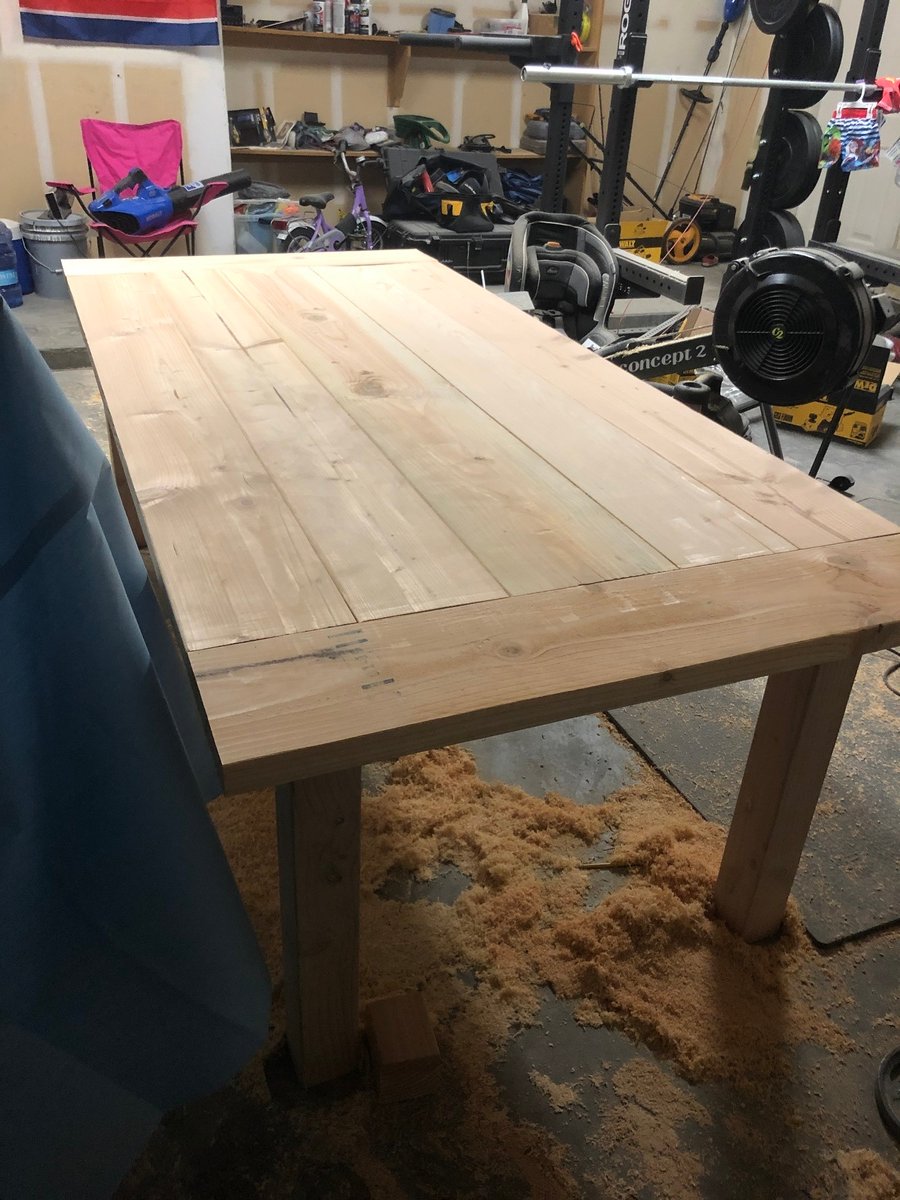
Built from Plan(s)
Estimated Cost
$125
Estimated Time Investment
Weekend Project (10-20 Hours)
Finish Used
Minwax Jacobean
Recommended Skill Level
Beginner
Work Bench

I used a lot of scrap 2 x 4's I had laying around. It's not pretty but I am really proud of it, I am going to be 70 this summer! So not bad for an "old lady!" I had so much fun making this!!
Comments
Sun, 02/26/2023 - 16:32
Great workbench!
Not bad at all! Thank you for sharing, can't wait to see what you build next:)
Comments
Ana White Admin
Sun, 02/05/2023 - 11:20
Beautiful console!
Thank you for sharing, this looks superb!