Community Brag Posts

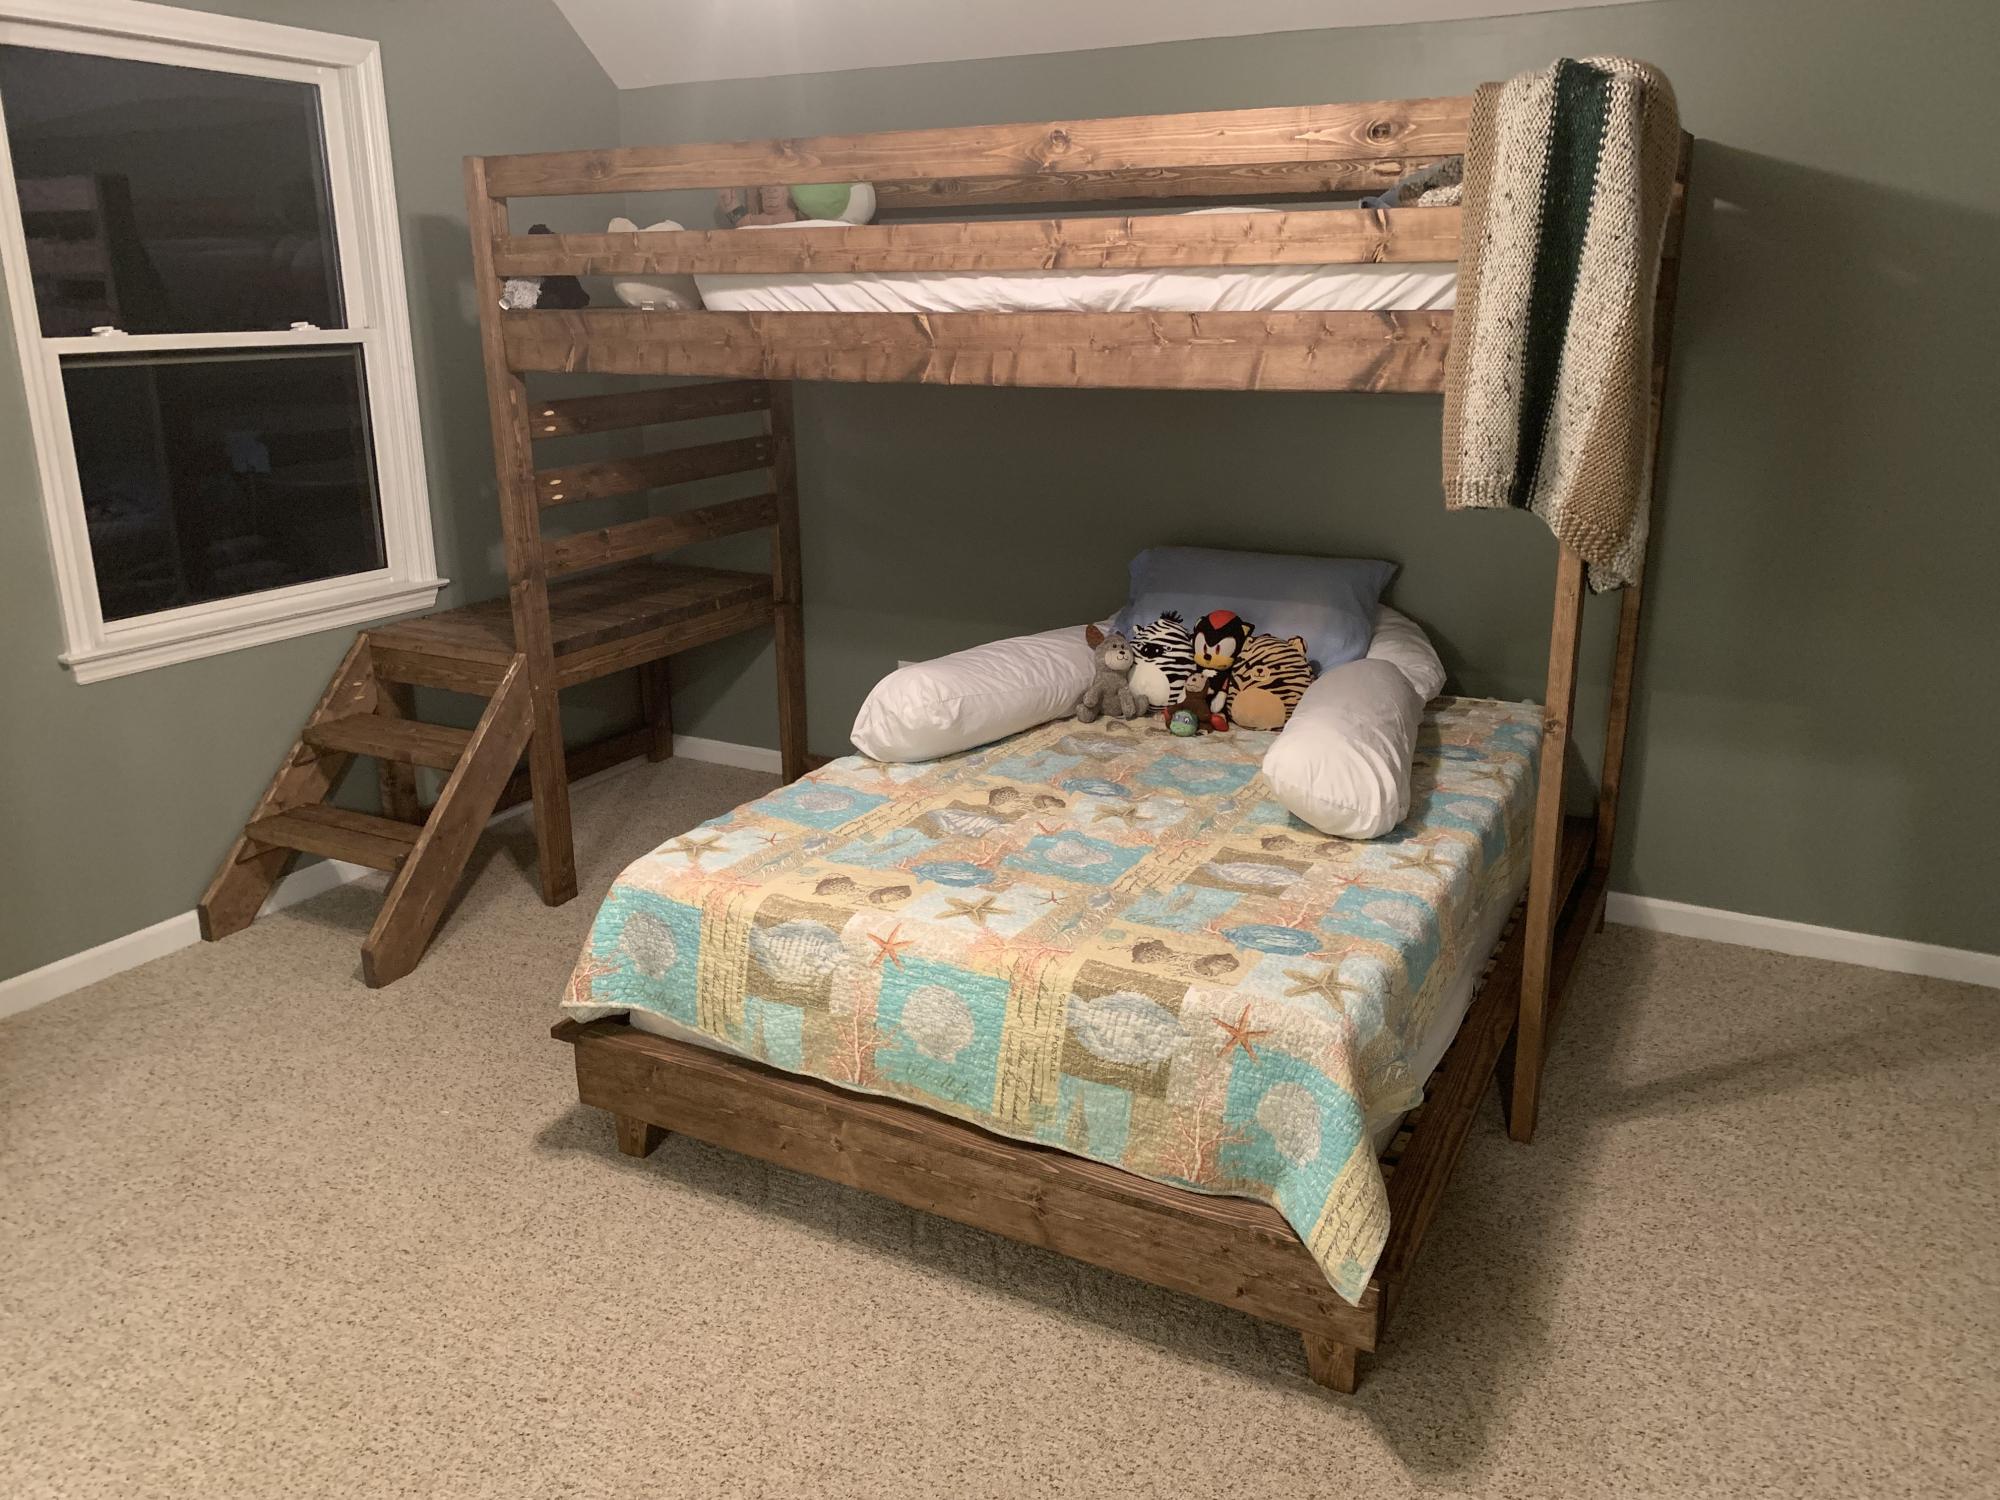
Princess Castle Loft Bed

Submitted by Mageiweb on Thu, 07/11/2013 - 18:27

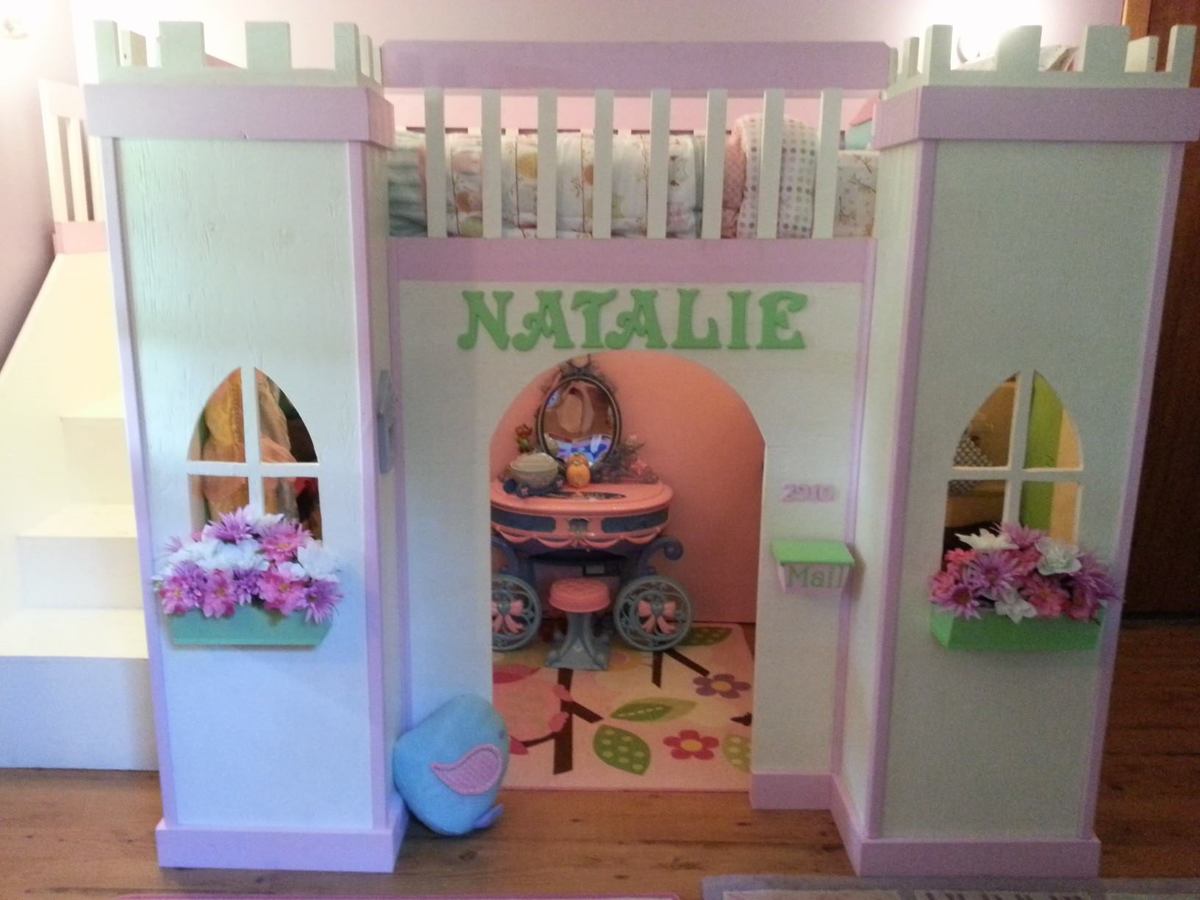
My Husband built this bed in about two weeks time (in addition to working 70+ hours at his real job). This past week I have helped with all the painting and decorating. As you can see he modified the plans to omit the slide. We hung soft white rope lights under the bed to illuminate the inside of the castle. My husband paired the rope lights with a remote control light switch so our daughter can turn them on and off safely. We are incredibly pleased with the results of our hard work as well as our sweet Natalie! Thank you Ana White for this amazing site of yours!!! My husband has also built from your site the clubhouse loft bed (PBK version) for our son, a computer desk, as well as the rustic X console table for me!!! We LOVE your site!!!! Thank you again!!!

Estimated Time Investment
Week Long Project (20 Hours or More)
Finish Used
Satin finish, paint and primer in one
Recommended Skill Level
Intermediate

Kids desk area

Submitted by Morg3148 on Tue, 07/07/2015 - 10:26

Here's the kids new desk area that I built. One desk for each kid, one Mac for each kid.

Estimated Cost
$50 per desk
Estimated Time Investment
Afternoon Project (3-6 Hours)
Finish Used
Stain, poly
Recommended Skill Level
Beginner

Daybed with Storage Trundle

Submitted by Crafty-Mom on Sat, 01/27/2018 - 10:38

This was my first project from Ana's website and I'm hooked! I'm a beginner, but thank goodness for my Dad's help because I have a lot of learning to do!

I wanted the drawer to be 1 drawer instead of 3. I feel like it looks cleaner (without having to adjust 3 drawers constantly to make it look good when you push them in). I was thinking the bed could actually be used as a trundle bed in the future too! I use this to store toys right now and it is Awesome!

I increased the bed size to fit a twin mattress and increased the height of the bed slightly so that the drawer would be a little bit deeper. We also added a back to the bed and carried around the trim to make all sides look the same. We added a bumper to the back and sides of the inside of the bed so the drawer is easy to push in and fits in snug. Finally we reinforced the bottom of the drawer with more 1x4 boards so that if a child does sleep in it, it would be more sturdy. I now have kids come over and jump into the drawer (literally) and I'm glad we reinforced it.

The changes we made did add to the cost and our time (as well as being newbies), but I think it's worth it and the bed turned out beautiful!

Estimated Cost
$180
Estimated Time Investment
Weekend Project (10-20 Hours)
Finish Used
Behr Marquee (I'll have to find the name of the white color we used). We almost went with chalk paint, but after talking to the HD guy, he talked me into this paint and I'm glad we used it! So much cheaper and turned out beautiful.
Recommended Skill Level
Beginner

Comments

Nisssc

Mon, 10/12/2020 - 07:51

This looks great! Any suggestion if I want cubbies instead of a trundle? Also, cubbies only on side as bed would be against the wall. Thanks for the inspiration!
Sandy

Michael Collection Bookcase Unit

Submitted by DTeague on Fri, 05/20/2011 - 08:43

Couldn't wait to show it off, I'll post another picture when I have it in the room! This goes with the Michael Collection twin platform bed. The open area you see will be covered by the bed. Its a bit dusty still and the top isn't completely finished but I'm so excited how it has turned out!

Estimated Cost
$75.00
Estimated Time Investment
Week Long Project (20 Hours or More)
Finish Used
Minwax Red Mahogony and Minwax Clear Satin Wipe on Poly
Recommended Skill Level
Intermediate

Sturdy Workbench Modified

Submitted by Seth on Sat, 07/13/2013 - 21:55

This is a modified version of the sturdy workbench. I made it six feet long, about three feet wide (I can't remember exactly), and 36'' high. Since I'm 6'2'', I needed a bench that didn't keep me constantly bending over.

I used Douglas Fir framing lumber and 3/4'' plywood for the surface. The plywood was a cheap replaceable option since hardwood is extremely expensive in my area. The wood warped a bit after I built it, so its clearly not perfect. But who cares, its a workbench after all...

I used left over paint / stain I had laying around in the garage. The gray is a custom mix interior paint, and the stain is Minwax Golden Oak. I used 1 coat of stain, and three coats of Poly.

Built from Plan(s)
Estimated Cost
$100
Estimated Time Investment
Afternoon Project (3-6 Hours)
Finish Used
Minwax golden oak 1x, conditioner 1x, and poly 3x.
Recommended Skill Level
Starter Project

Comments

Build to suit your needs.

Submitted by a179603 on Sat, 07/11/2015 - 09:32

First, if you don't have one, the pocket hole jig is the only way to go. I spent years cutting dado slots for shelves. What a game changer. I stayed with the over-all dimensions of the Dawson Media Console. Like so many, I made the inside areas fit our current and future needs. I could not be more pleased. Oh, I invested in an HVLP fan  sprayer for this. Again...how did I not already own this? The project turned out perfectly. From fit to finish it's excellent.

Finish Used
Used Martha Stewart black chalk paint. No wax stain underneath. Sprayed 3 coats of Minwax oil based poly. Sanded with 800 grit paper between coats. Used seeded glass in doors.
Recommended Skill Level
Intermediate

Mission style daybed

Submitted by Anonymous (not verified) on Sun, 01/30/2022 - 17:25

I made two foot boards for the ends and stretched the headboard for back. I also made the corner posts longer to accommodate a trundle bed underneath.

Built from Plan(s)

Comments

Classic Bunk Beds in Blue

My neighbor needed bunk beds and was fustrated that she couldn't find what she wanted for under $500. She knew that I built my entertainment center and asked for my help.

We picked out the classic bunk beds because they came apart in to small pieces that would be easier to handle since we live in three floor townhouses. She also really liked the ladder that didn't take up more floor space.

Building was fairly straight forward. It was a little hard to read the direction at times, so we had to depend on the photos at times.

The best part is that we spent under $150 for supplies not including the bedding and mattresses. That is a screaming deal.

Thanks for posting this plan. It turned out great.

Built from Plan(s)
Estimated Time Investment
Week Long Project (20 Hours or More)
Finish Used
Blue Paint
Recommended Skill Level
Beginner

reclaimed wood table

Submitted by lisaw on Mon, 07/15/2013 - 17:55

We took apart our old rotting picnic table, saved what wood we could salvage, sanded it all down and had enough wood to build this table. We added an extra board for the tabletop to make the slats sit closer together. It was easy to put together and would have taken less than two hours had it not been for all the sanding we had to do. Now we have a sturdy outdoor coffee table for our patio.

Estimated Cost
0
Estimated Time Investment
Afternoon Project (3-6 Hours)
Finish Used
We did not sand all the old finish off completely so we could keep that "reclaimed" look. We then brushed on a teak oil finish that has a hardener in it to protect the table from the elements.
Recommended Skill Level
Starter Project

Bookshelf

Loosely based on a few different plans found on internet and books, made this bookshelf out of oak plywood and oak boards.  

Estimated Cost
$300? Can't really remember
Estimated Time Investment
Week Long Project (20 Hours or More)
Finish Used
Minwax Red Oak stain
Recommended Skill Level
Intermediate

Farmhouse Table

Submitted by Oliviaryan on Sat, 02/03/2018 - 19:47

This is my (late) Christmas present from my boyfriend, based on the farmhouse table plans. He had no idea how to build a table, so I directed him to this site! The wood is 80+ years old, all reclaimed. The table top is white pine, and the legs are cypress. I hand picked the pieces I wanted from his old wood “collection”. I plan to put a light stain on it, and use a satin, water-impervious finish. I wanted it to look old, hence the reclaimed wood. I love tapered legs, so that was a must. He still has to countersink the screws he used on the apron (!) and plug them with white pine plugs. The table is 91” long, and 36” wide. 

Estimated Cost
$0 - wood was reclaimed that we had on hand, and we had everything else we needed.
Estimated Time Investment
Week Long Project (20 Hours or More)
Finish Used
None yet
Recommended Skill Level
Intermediate

Camp Loft Bed Plan adjusted to Twin over Full Bunk Bed

Submitted by Anonymous (not verified) on Mon, 02/21/2022 - 11:15

My young boys had been sharing a full bed and it was awful. We had an extra twin mattress so it was time to make them a bed. Loved the camp loft bed plan with stairs so that's what I went with. I did the Hailey bed frame plan for the full bed underneath and made some small adjustments on the loft bed - made it 6" higher, 18" longer (wanted room for a bedside table next to the full bed underneath - I just added extra decking on the top bunk part to fill in the space), and had to adjust the stair height because I wanted it to fit under the window - so only needed two steps instead of 3. The boys absolutely love it and their sisters did too - now I'm building 2 loft beds for their room, with a platform in-between the two beds. Will post that when finished! Still need to make a headboard for the full bed as well, but it works for now!

Comments

Simple Bookshelf

Submitted by binah06 on Thu, 05/26/2011 - 18:47

Came together pretty easily. Took about half a day.

Built from Plan(s)
Estimated Cost
$20 for wood, $20 for screws, nails, sandpaper and stain
Estimated Time Investment
Afternoon Project (3-6 Hours)
Finish Used
Minwax stain in Provincial. Tung oil as a finish. Might put a better finish on later.
Recommended Skill Level
Starter Project

Clip Rail Gallery

Submitted by Debi G on Wed, 07/17/2013 - 09:16

My son and I both enjoy changing out the artwork he chooses to display in his bedroom. We will be making another clip rail for the kitchen, right above the row of coat hooks. Waiting for the paint to dry is the most time consuming part of this project. Cheap & easy!

Built from Plan(s)
Estimated Cost
$4.00 for clips and board
Estimated Time Investment
An Hour or Two (0-2 Hours)
Finish Used
Painted to match a different wall of the room.
Recommended Skill Level
Starter Project

Helper tower

Submitted by cswoodburn on Sun, 07/19/2015 - 23:26

Made this awhile ago for my nephew. I thought an English phone booth would be neat. He is probably the only kid his age who knows what a rotary phone is. He loves using it and has never had a problem climbing in.

Built from Plan(s)
Estimated Time Investment
Weekend Project (10-20 Hours)
Recommended Skill Level
Beginner

My first ever build ..Counter height table.

Submitted by twcliburn on Fri, 02/09/2018 - 19:05

I used the Pub table/farmhouse table plans modified to 48x36 with framed edge over hang 2 inch all around ..I also used the turned legs from Lowes ..

Estimated Time Investment
Week Long Project (20 Hours or More)
Finish Used
The top I used weatherwood accelerator (love that stuff) and the legs and aprons antique white
Recommended Skill Level
Beginner

Tryde Coffee Table

Made a Tryde Coffee Table with my sister in a tiny porch of her tiny city apartment. We had all the lumber cut at HD, and even though the cuts were not precise, we made it work! It was easy to build, and was also the first time using a kreg jig, and I don't know how I made everything so far without it. Love the kreg jig!!

Built from Plan(s)
Estimated Cost
70
Estimated Time Investment
An Hour or Two (0-2 Hours)
Finish Used
Will sand it, apply pre-staining conditioner and use stain+varnish to finish.
Recommended Skill Level
Beginner

Outdoor Screen

Submitted by Debi G on Fri, 07/19/2013 - 06:30

Technically, we are not allowed to store trailers or boats outside of our garage. Since our back yard faces a popular path for runners, pedestrians and cyclists, I came up with this solution and we have not been reported.

The size isn't ideal (peekaboo canoe), but I went with boards I already had. I didn't sketch this out ahead of time, just pieced it together using a 6" board as my vertical guide and a 3" board as my horizontal guide.

Instead of digging post holes, I built it onto feet so that it's free-standing and portable. We can move it any time we need to get the trailer out from behind it.

Next summer, I may put planter boxes on top and build a second panel as well.

Estimated Time Investment
An Hour or Two (0-2 Hours)
Finish Used
outdoor stain with sealer
Recommended Skill Level
Starter Project

Twin Farmhouse Bed

Made a set of beds for twin girls!

Built from Plan(s)
Recommended Skill Level
Beginner

Comments

Linderbeans

Thu, 03/15/2018 - 19:16

I love the little embelishments on the foot board and head board! did you add these on after or prior to painting?

Linderbeans

Thu, 03/15/2018 - 19:17

I love the little embelishments on the foot board and head board! did you add these on after or prior to painting?