Sliding barndoor console sideboard
![](/sites/default/files/console1_0.jpg)
72L x 18W x 36H
![](/sites/default/files/20161006_132147.jpg)
72L x 18W x 36H
Slight variation on Ana’s Potting Bench. I lowered the bottom shelf and added a middle shelf with wood from a gate we removed. I’ve received many compliments. Thanks, Ana!
Kathy Joy
mini farm house tables
My brother-in-law built this plan as an end table for my wife and I as a present. We wanted to build a hallway table, so I decided to modify the plan to fit in the long hallway. It looks great and is very sturdy. I listed it as a weekend project, but it was VERY easy and fast to build, but the finishing took a while because of so much surface area & drying time.
Took be about 2.5 weeks to build this bed, working evenings and a couple full days on the weekend. I HIGHLY recommend getting a Kreg Jig. It made life so much easier.
To go from a queen to a king, simply add 16" to all of the width pieces. All of the length pieces will be the same for a queen and king.
I added one 2x2 support beam down the middle of the bed, with two 16 3/4 inch legs attached to it, for added support. I screwed the slats into all 3 of the 2x2 support beams.
The drawers are the trickiest part. Make sure you follow the plan in order, waiting to install the drawers until after you have screwed the storage bins to the headboard and footboard.
Stained with Minwax Early American, and sealed with Polyurethane. In the process of completing a 2nd to make a set
I made you planter. Thanks very much. Unfortunately they don't sell in the UK. I enjoyed making them though.
Karen K UK
This goes into the mud room next to the recycling unit that I just completed the other day. My first project out there was a wooden bench with re-claimed wood. Very simple. I finished all three pieces similar. I painted grey paint on parts of the pieces (two coats) and then used a clear polyurethane (two coats with sanding before and in-between) on the rest of the projects.
This project was easier then I expected, and I love the look. I almost bought one like this at Ikea last year. So glad I held off as this was way cheaper to build and now has more sentimental value instead!
I was able to find brown bins to fit at target.com for $6.50 a piece, and can't wait for them to ship here. 4 of the 6 will be used for shoe bins, and the other 2 will be used for hats and mittens (live in Minnesota). So much neater looking than the plastic shoe shelves we had before.
FYI: there is a cut missing on the cut list: It is the bottom piece. The cut is 28 3/4" and is not mentioned on the list or in the diagrams....
Thu, 05/19/2016 - 15:33
Hello! I'm new to woodworking. I recently purchased an 8v lithium-ion drill by Ryobi. It's taking forever to build my cabinet with six cubbies. I keep having to stop to charge the drill. Do you think a 12v drill/driver would suffice?
Thank you for your help! :)
Thu, 05/19/2016 - 16:33
Hi Suzanne - this is a great drill. The ryobi One + drill/driver uses an 18v battery which fits interchangeably onto the other One+ tools. This one is on sale as a set from Home depot, which comes with a battery and charger.
http://www.homedepot.com/p/Ryobi-ONE-18-Volt-Lithium-Ion-Compact-Drill-Driver-Kit-P1811/205651590
Also you can get extra capacity spare batteries to switch out with:
http://www.homedepot.com/p/Ryobi-ONE-18-Volt-High-Capacity-LITHIUM-Battery-2-Pack-P122/204321540
I love mine and have purchased several other One+ tools and the extra batteries as well. (I especially love the AirStrike 18 gage finish nailer which doesn't need a compressor). Happy building!
:) Joanne
Made a smaller version of the fire truck bed for our two boys. The youngest will move "downstairs" when he gets out of the crib. It was fun, but lots of work! It took me about 5 weeks of weekend/late evening work.
Thanks for the great plans and inspiration.
Connected Adirondack Chairs from Spring of 2015
These plans are super easy to follow! It took me about 4-6 hours to assemble the sofa and the same for the one arm sofa. However, filling screw holes, sanding and more sanding and did I mention the sanding...and the staining because we all love to watch paint dry. The weather here in Ohio was very cooperative, there was either a heat advisory or it was raining. Now that I’m looking back on it, hind site and all that I would have taken the time to sand and stain at least some of the pieces prior to assembling it was quite an under taking saving it all for the end.
Fri, 08/14/2020 - 14:17
The cushions are 25 inches long and 24 inches wide! I hope this helps
This was such a fun project! I’ve wanted to build a potting bench for years. I can’t imagine why it took so long take a shot at it, it’s such a simple build and only took a couple days.
I loved every part of this project! I did it all by myself except for having the nice man at Home Depot cut all of the pieces for me (thank you tony! :) ). I had to buy all of the tools and found what I needed at a local flea market, and spent no more that $15 each tool. It was great. I have enough left over scrap lumber to build a coffee table of some sort next. Thank you so much for the plans, they were super easy to read and follow! I was able to find cushions at Home Depot as well, although they are not displayed in the picture since i love the stained wood so much. Since it is fall they were marked down to only $25/each which is a HUGE discount from previously being $90. The cost of the cushions will be the most expensive part of this project for sure, so make sure you can find what you want first before you get into this project if you have a strict budget for it!
Tue, 10/23/2012 - 09:49
you did an awesome job, and love the stain! I myself cant draw a sraight line... i was interested in having someone build this for me, curious if you would be interested in building sofa, 2 chairs, 2 endtables and coffee table? Located in texas.. thanks
I made this from the Ana White Build a $10 Cedar Tiered Flower Planter or Herb Garden plans. It was a quick and easy fun project to work on.
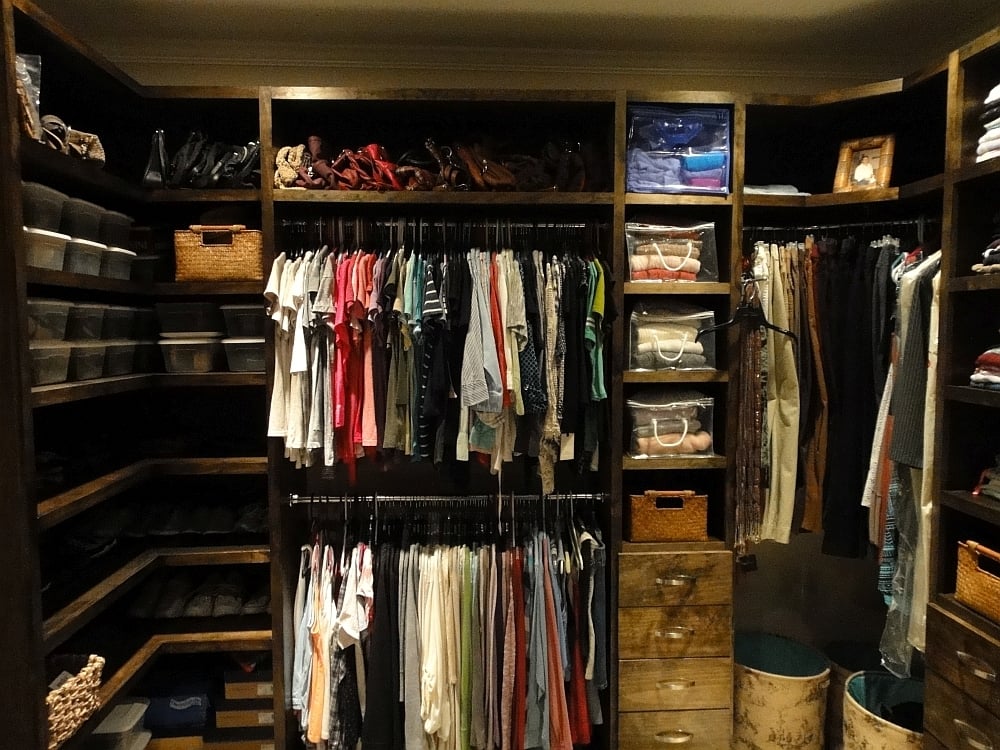
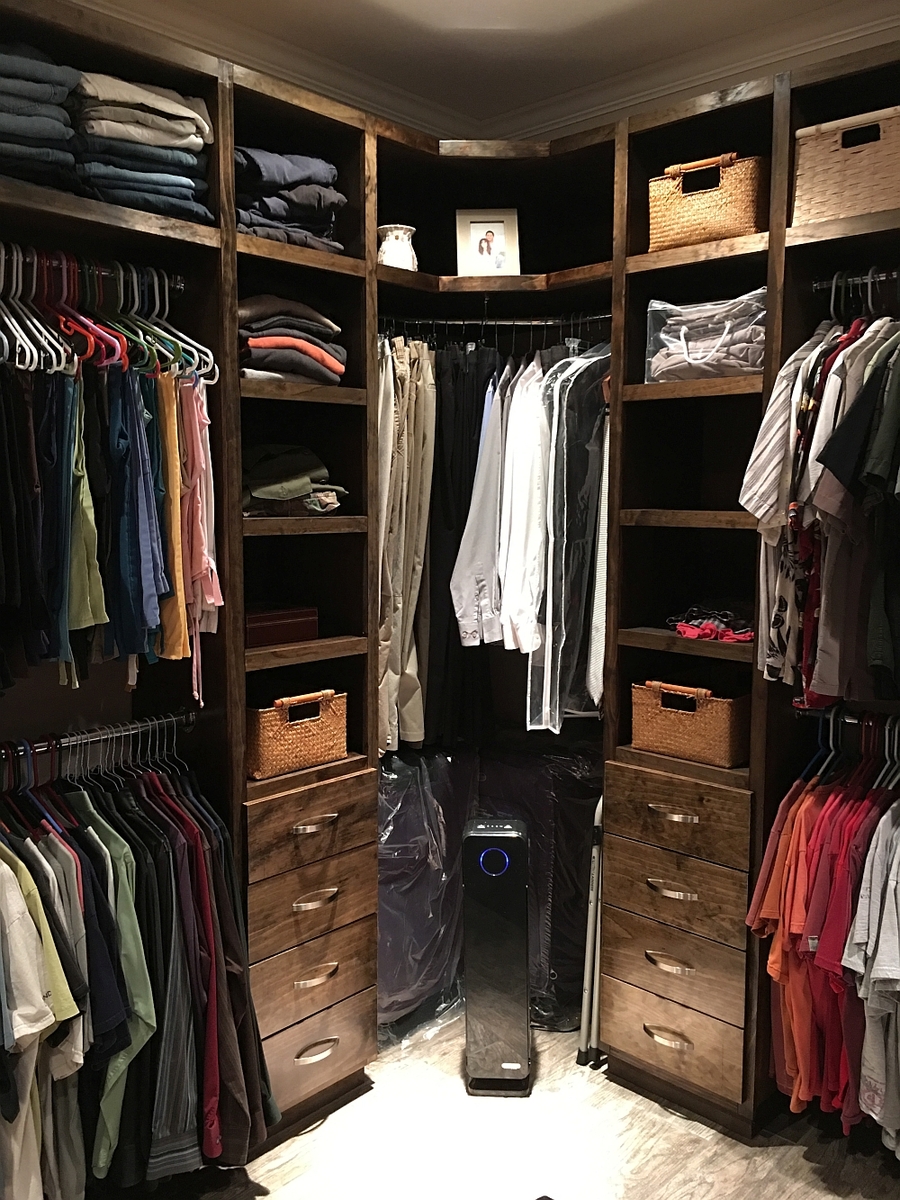
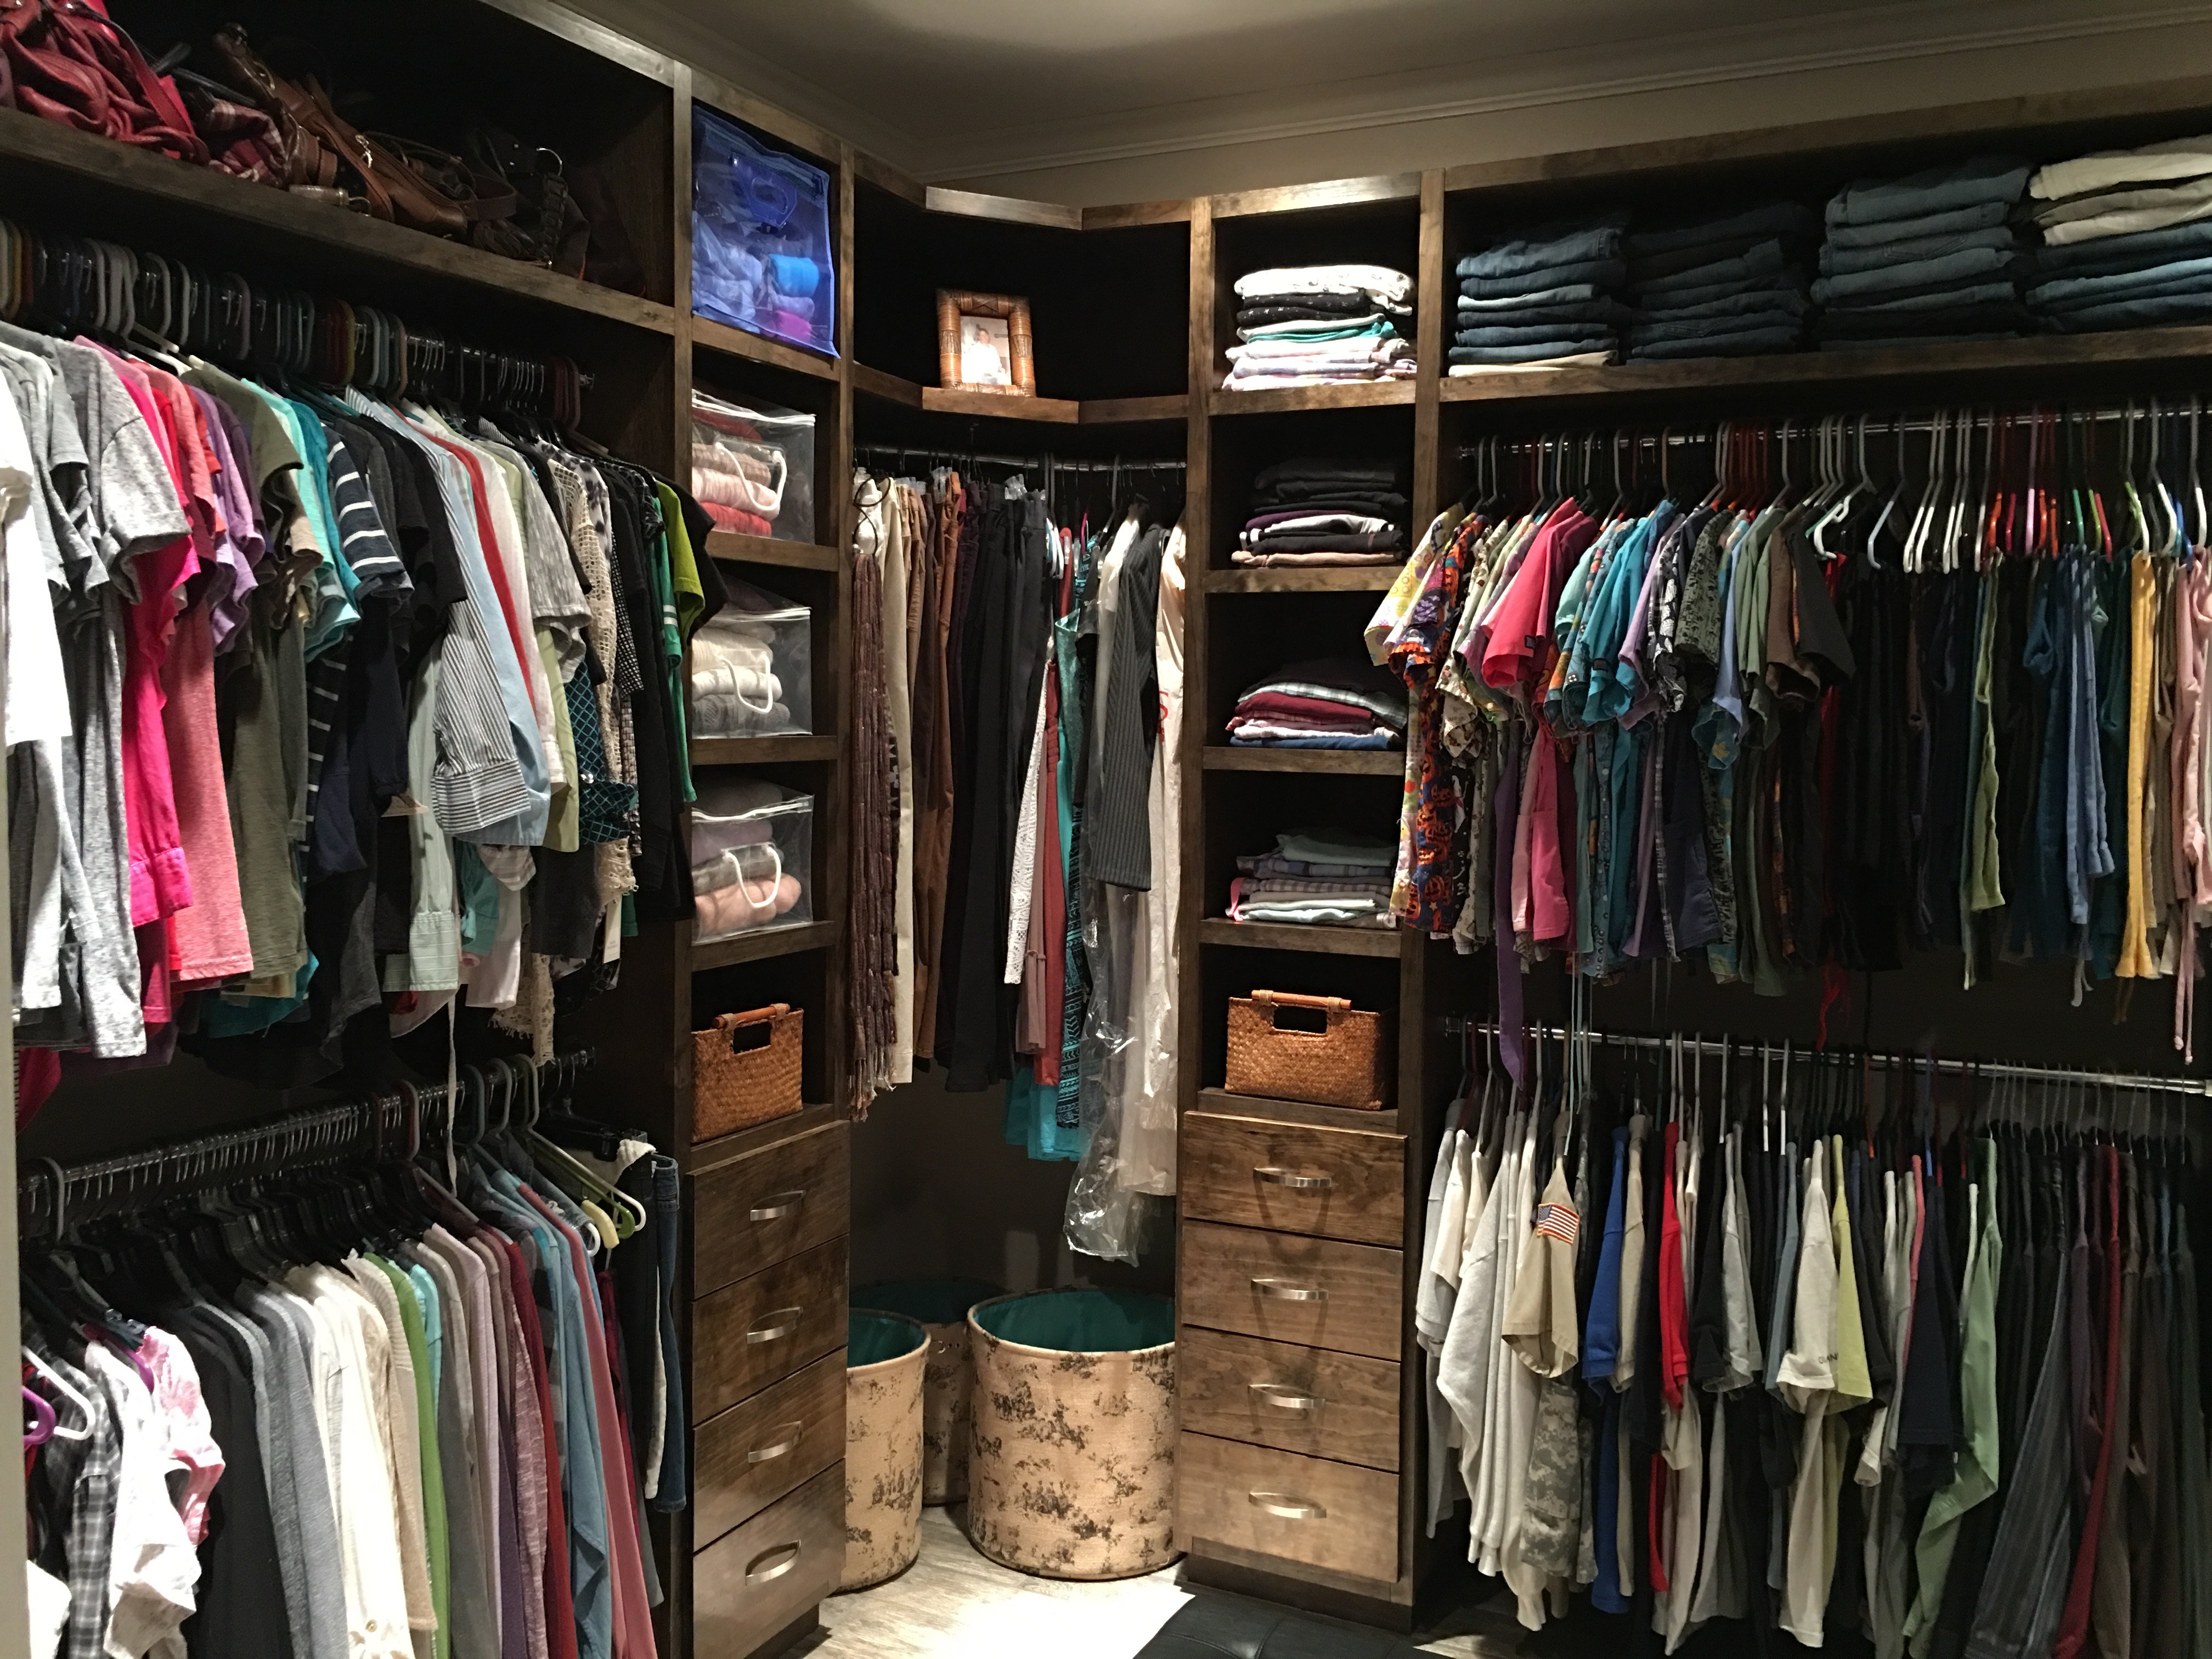
I built this closet system based on the plans here. So easy and so basic, just putting them all together to make a very nice looking closet setup. I used 12 sheets of birch plywood, and premium select 1x2 pine. All stained in Minwax Jacobean and satin clear througout with semi-gloss clear on the drawer fronts.
For the rods, I used chainlink top bars, which cost $6 for a 10' piece, and used #0000 steel wool to buff them out and then polished them. For the 45 degree corners, I used 1" electrical conduit, and placed two 45 degree bend in each piece, and again steel wool and polished them as well.
For the drawers, I used soft-close slides. When using these, I highly recommend installing the rear brackets as well, as they make installation so much easier. 16 pairs of soft-close drawer slides with brackets cost $120 for all of them on Amazon.
Thu, 01/02/2020 - 17:28
Great closet! Which soft close slides on Amazon did you buy?
What a great 'Beginner' project. Little mistakes or imperfections only add to its charm! This was a real confidence booster for me. I am so delighted with the results! I had most of the wood leftover from when our fence was built, so I only needed to pay for the screws, stain and hardware which made the whole project cost less than $50!
I made the grill table to match my chicken coop and my garden beds. Absolutely LOVE it!! (Ignore my cracked concrete (the table is level). The plans were easy to follow and it all came together great!! Thank you!
Kelly
I figured the first thing I should make was a bench to work on :)
I built this play kitchen for my daughter's second birthday during my newborn son's short naps or often with him strapped to me in his baby carrier. I spent more money on higher quality wood to save myself time and effort sanding the wood down. I splurged on a drinking faucet as it was the perfect size and a mini version of my real kitchen faucet. I used magnets on the fridge doors and oven door and a simple ribbon to prevent the oven door from opening too wide. I have built a few things befor-shelves, table, baby gate but consider myself a beginner who is still learning a lot about woodworking.
I built these beds for my son and daughter. They picked out their paint color and fabric for the curtains. I apologize for the picture being side ways. It uploaded up that way for some reason.