Community Brag Posts
Dress up centre

My princess-loving daughter needed somewhere to keep her collection of dress up outfits, so I made her this 'rolling rack'. Some mods that I made: I routed the edges for some interest and added moulding to the bottom to disguise the casters.
Estimated Cost
~ $35-40
Estimated Time Investment
Afternoon Project (3-6 Hours)
Finish Used
Rustoleum Painter's touch Spray paint in 'Sweet Pea'
Recommended Skill Level
Beginner
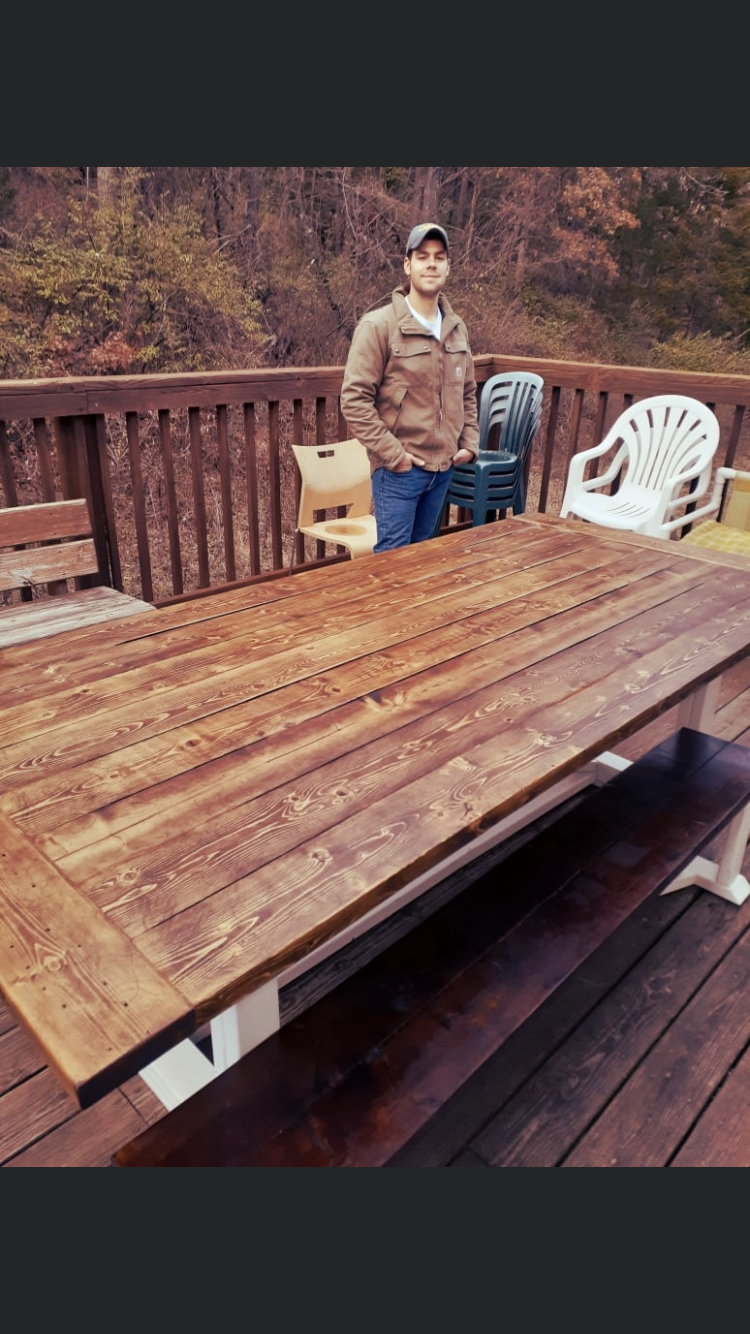
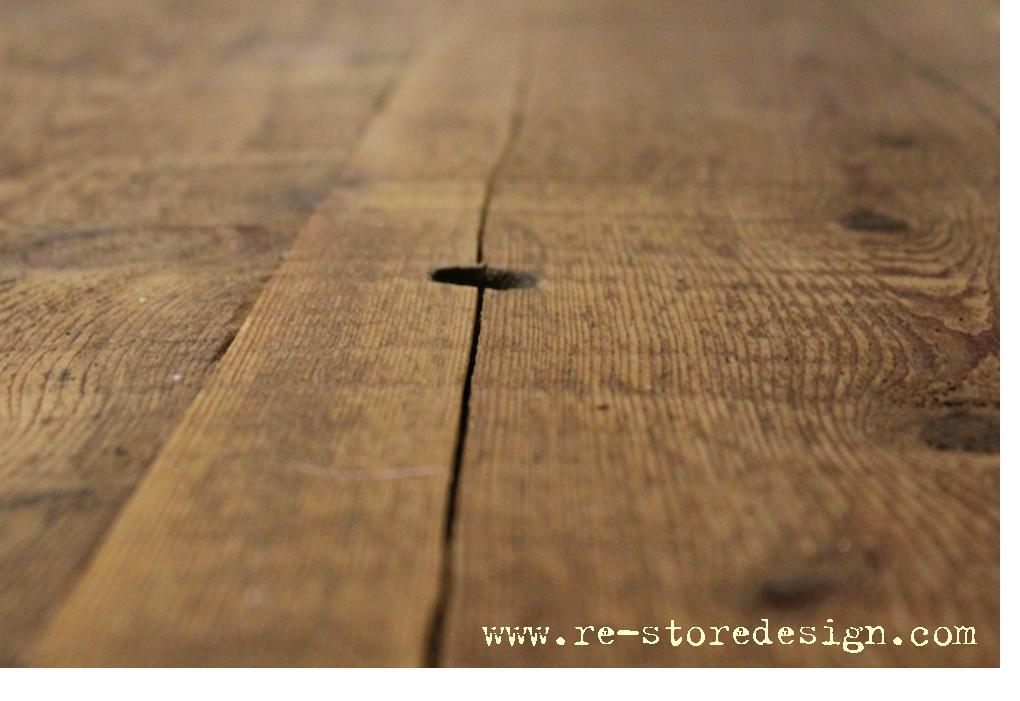
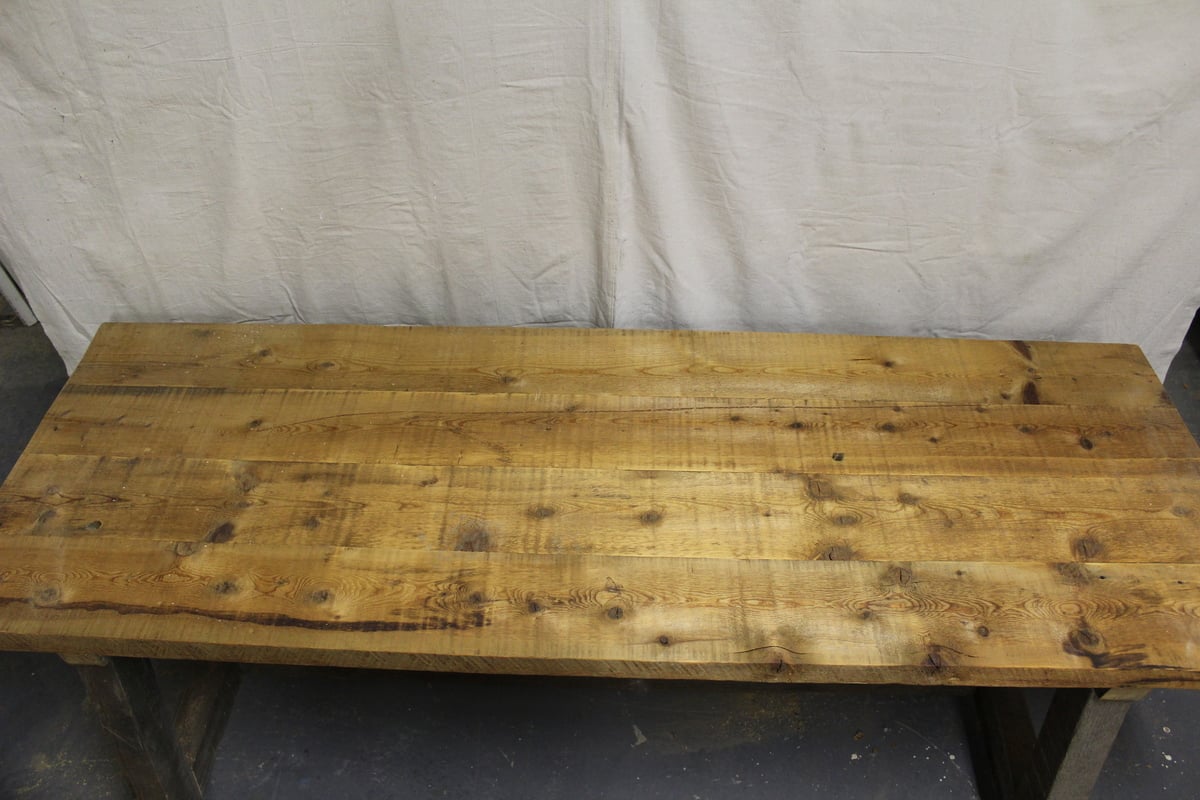
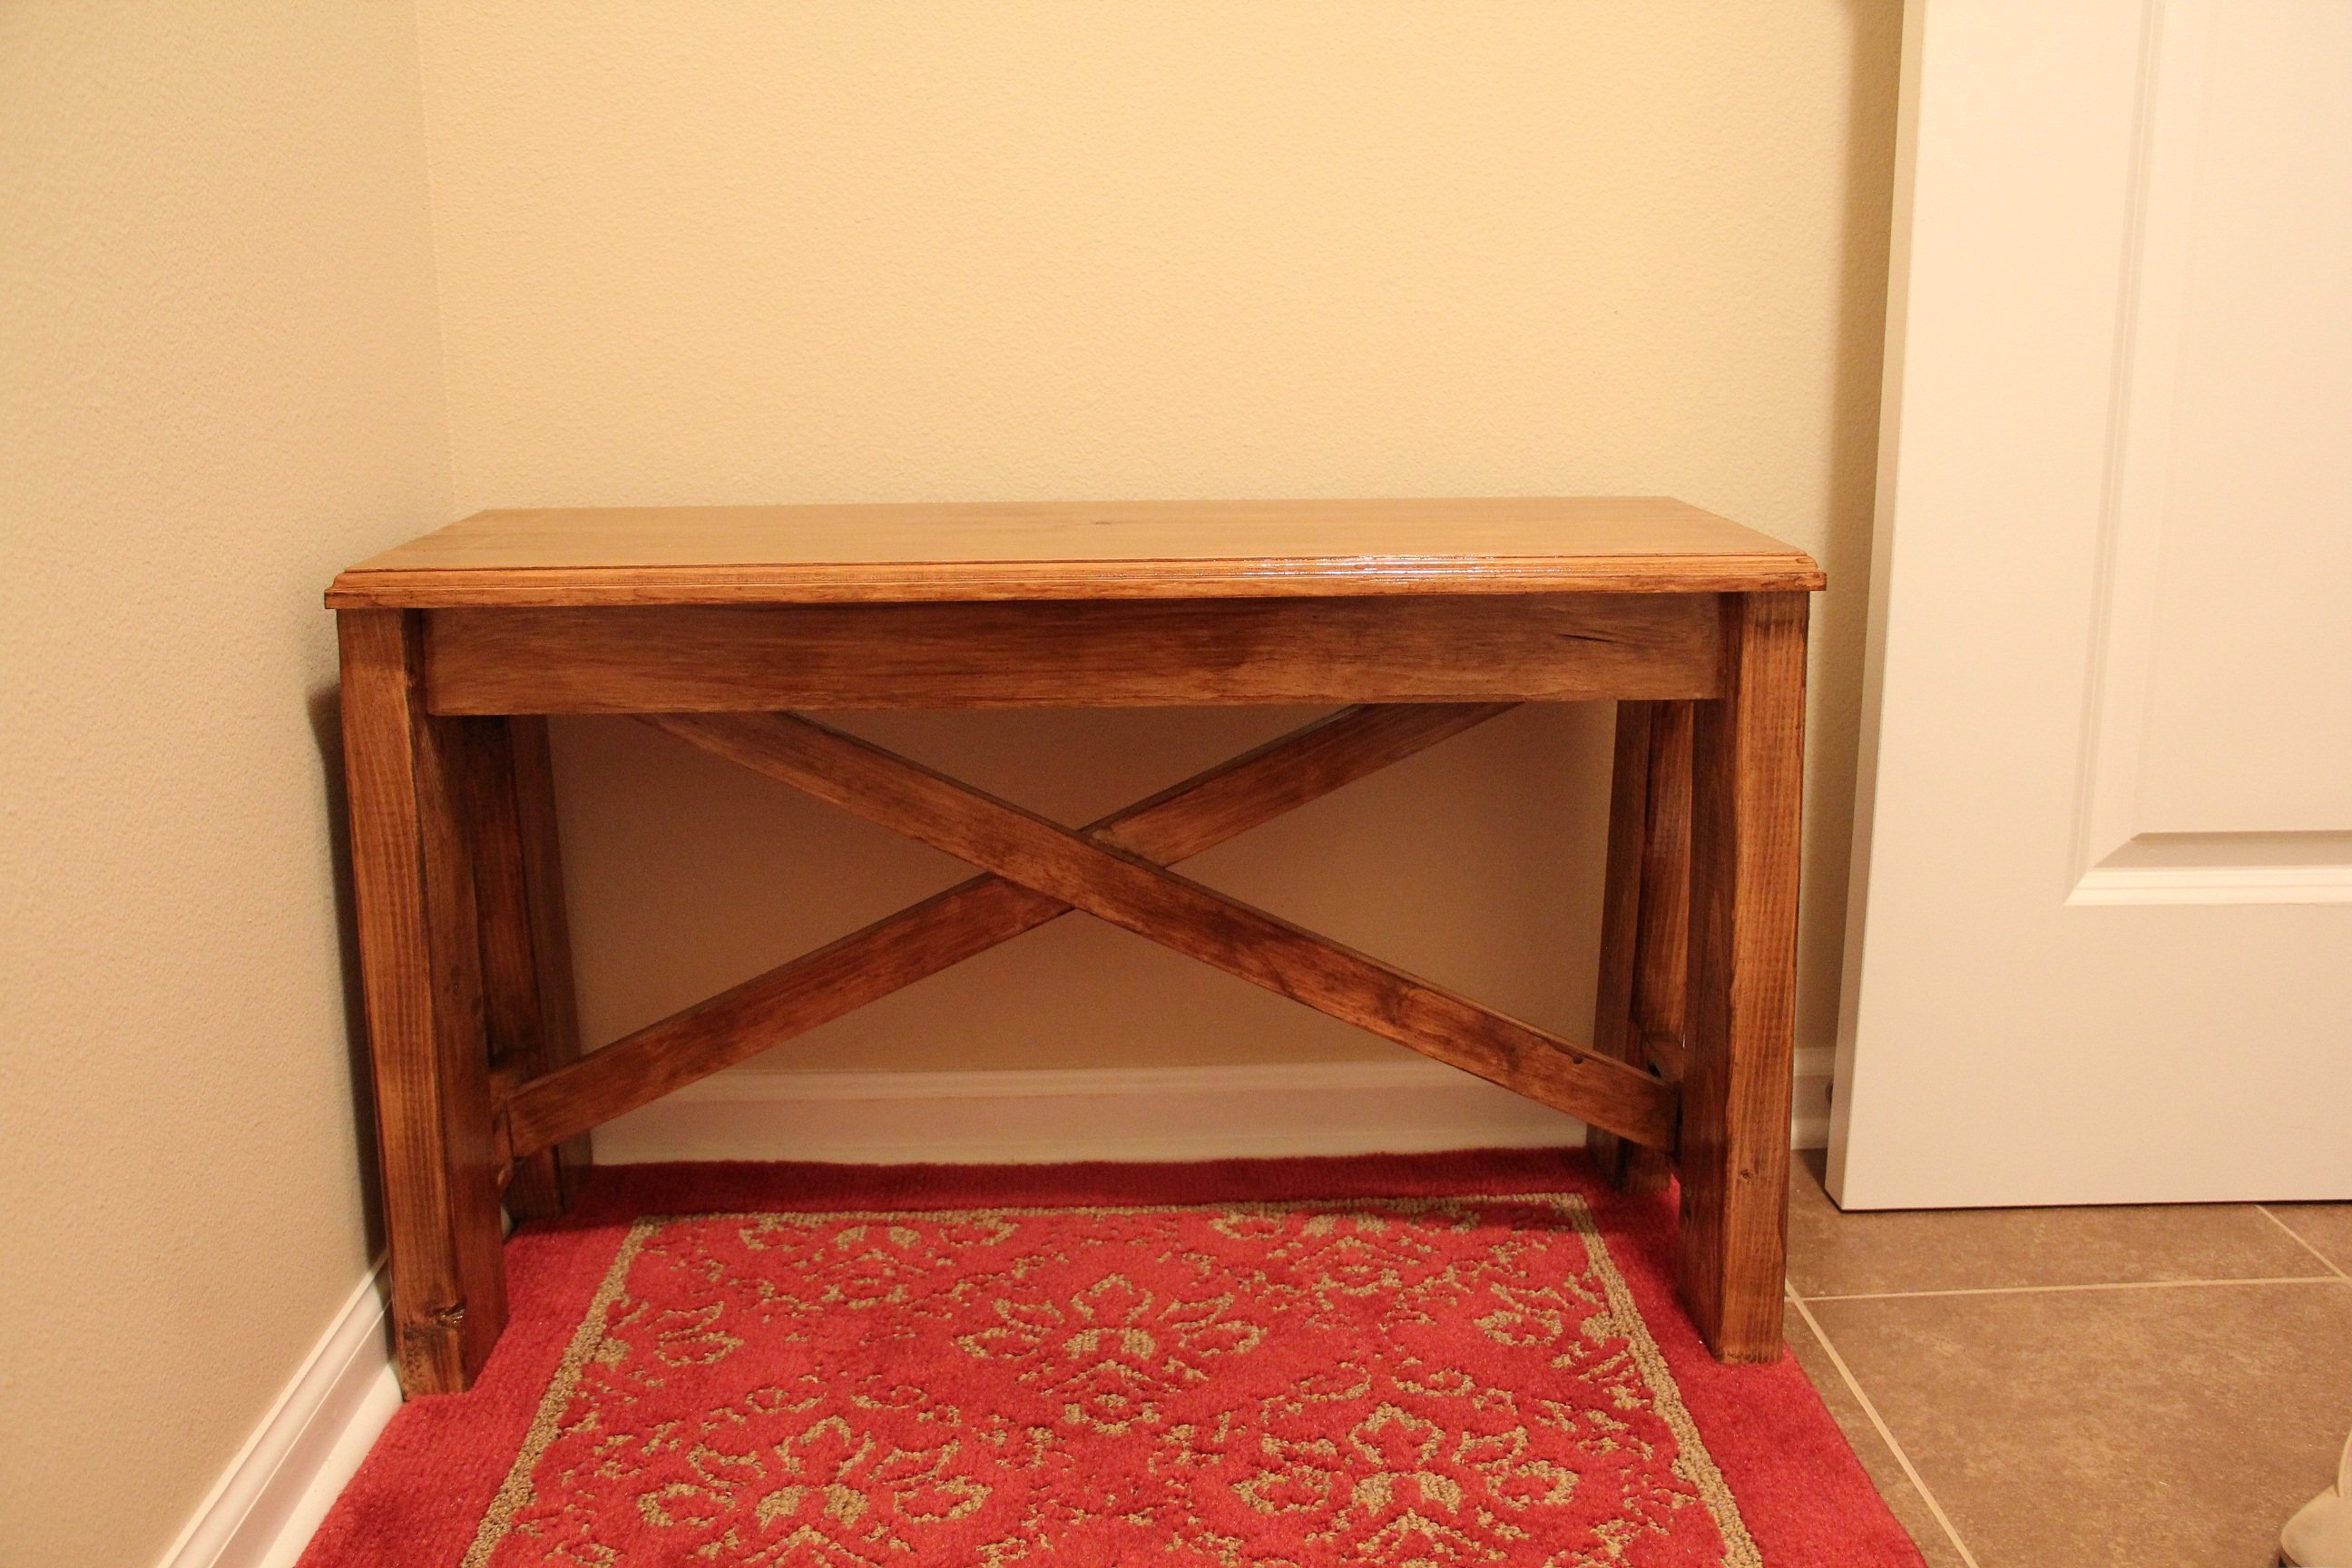
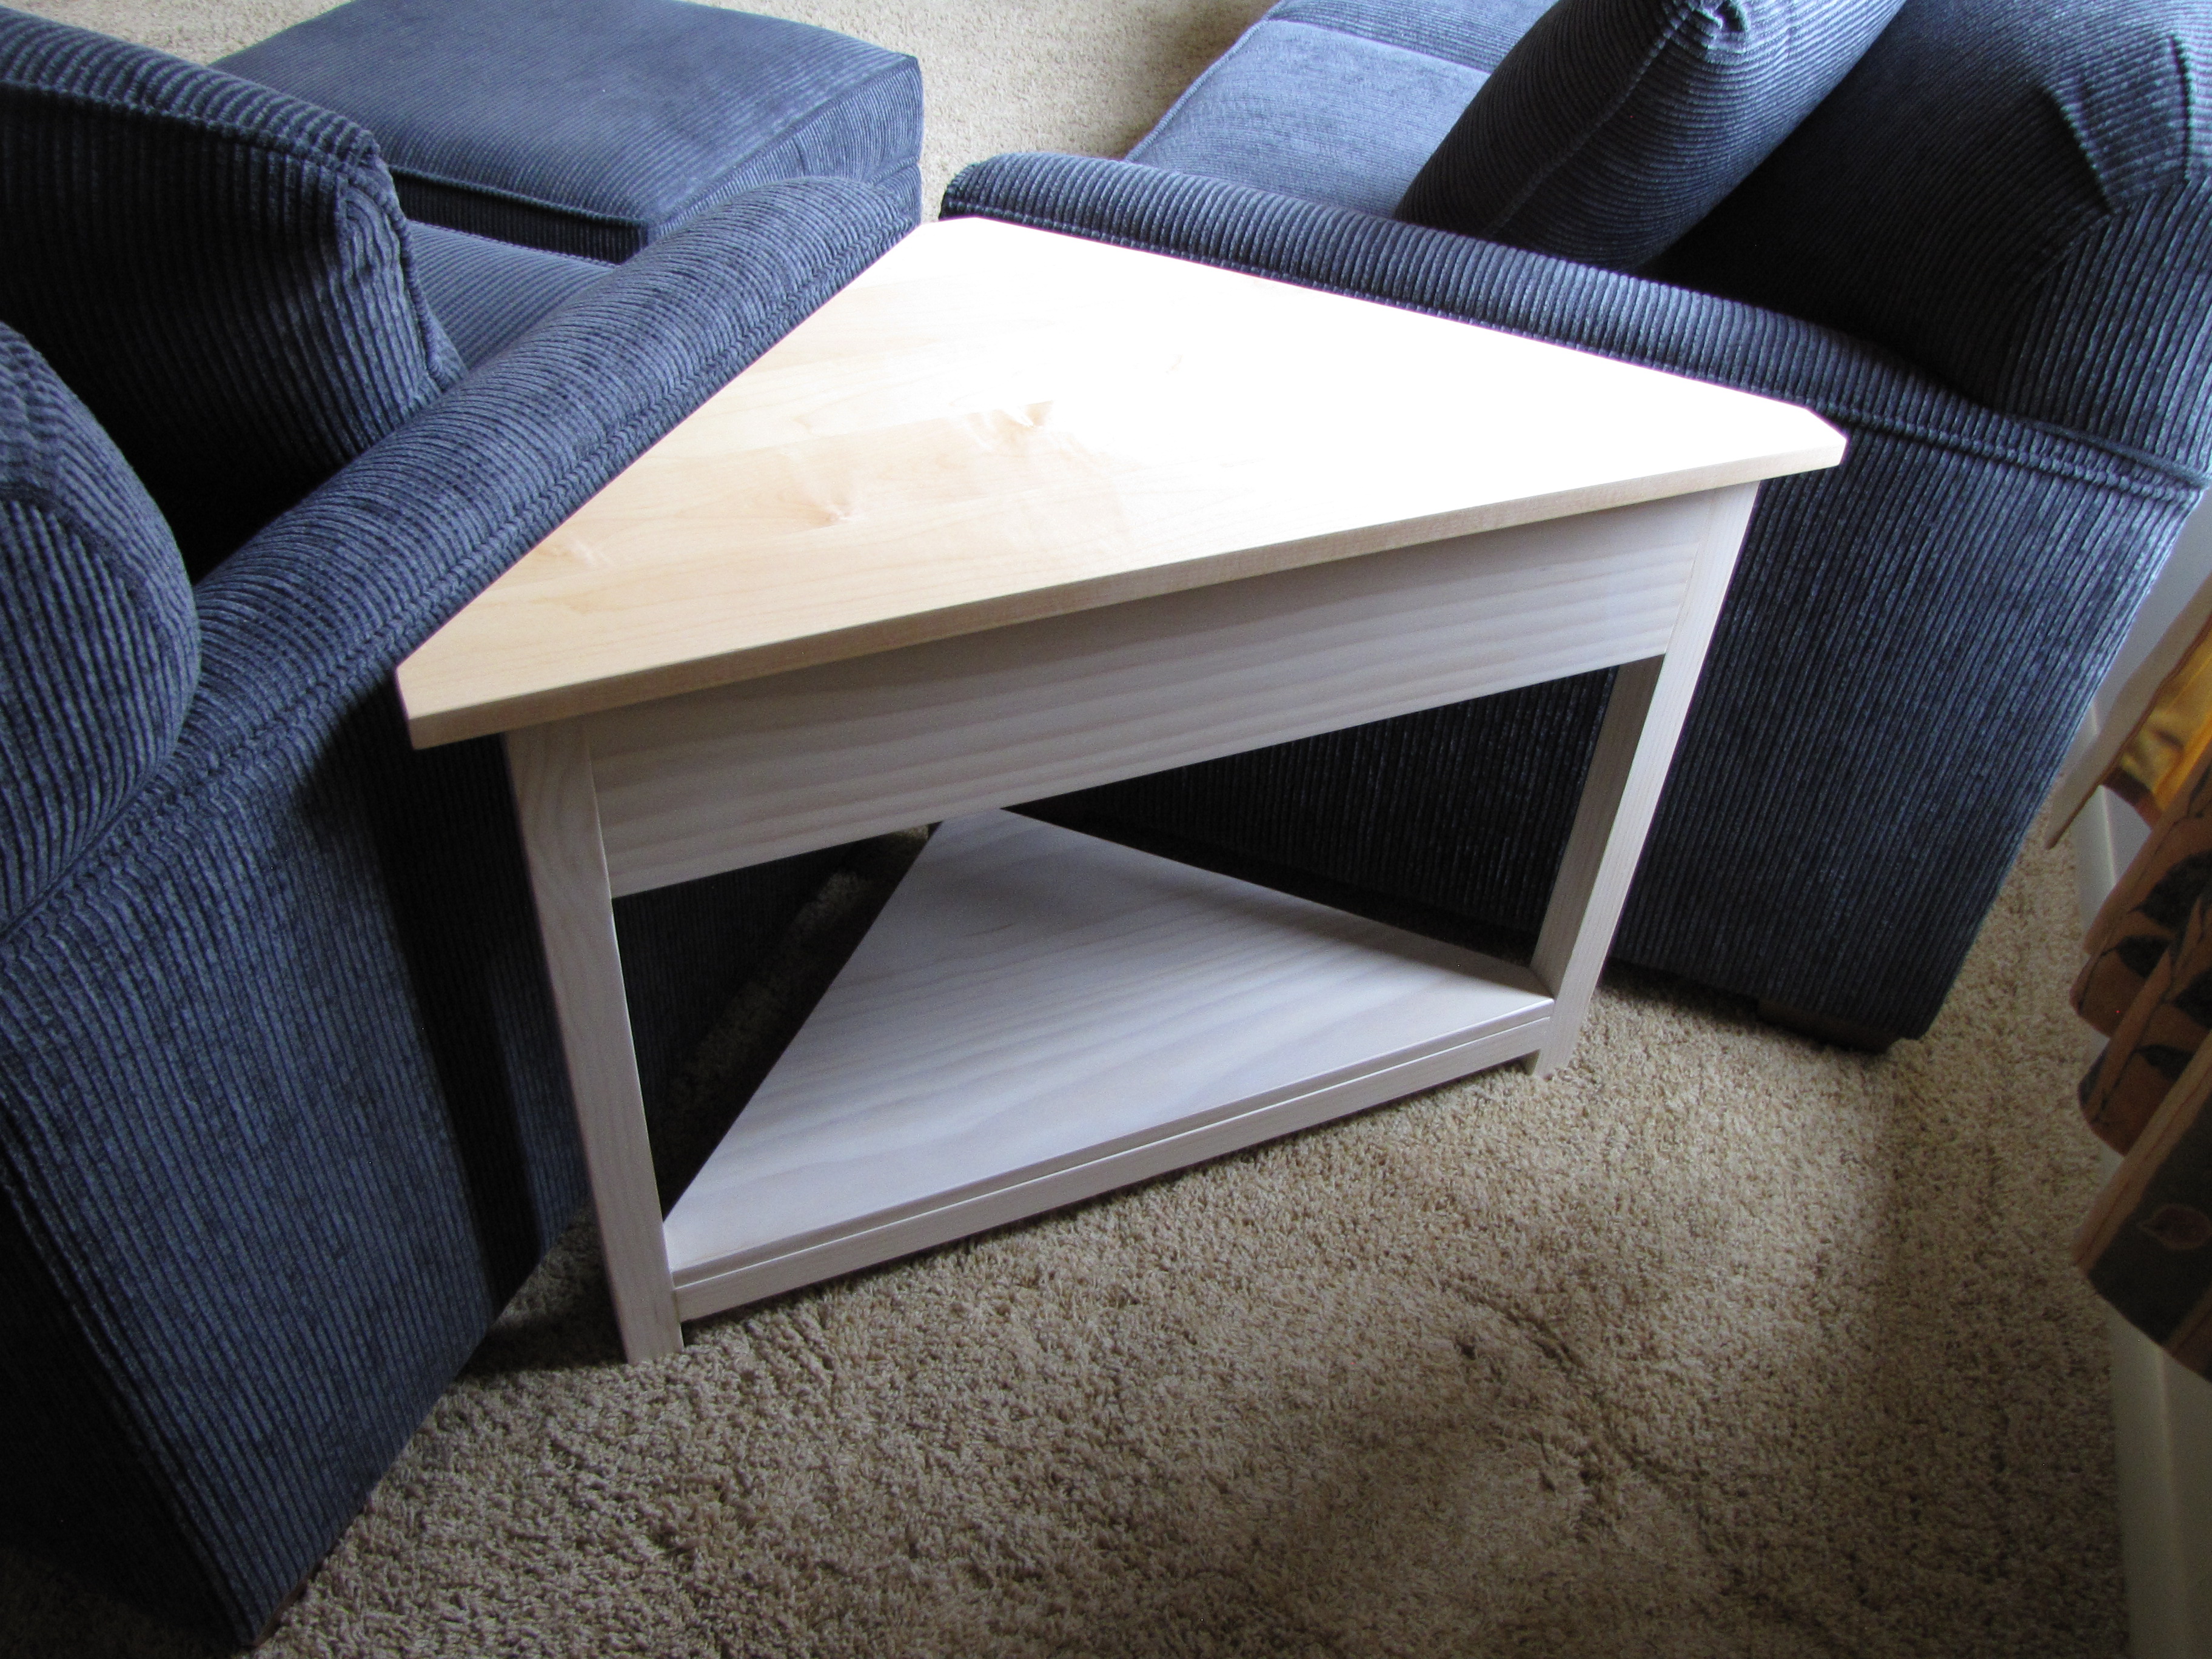
Truss Table
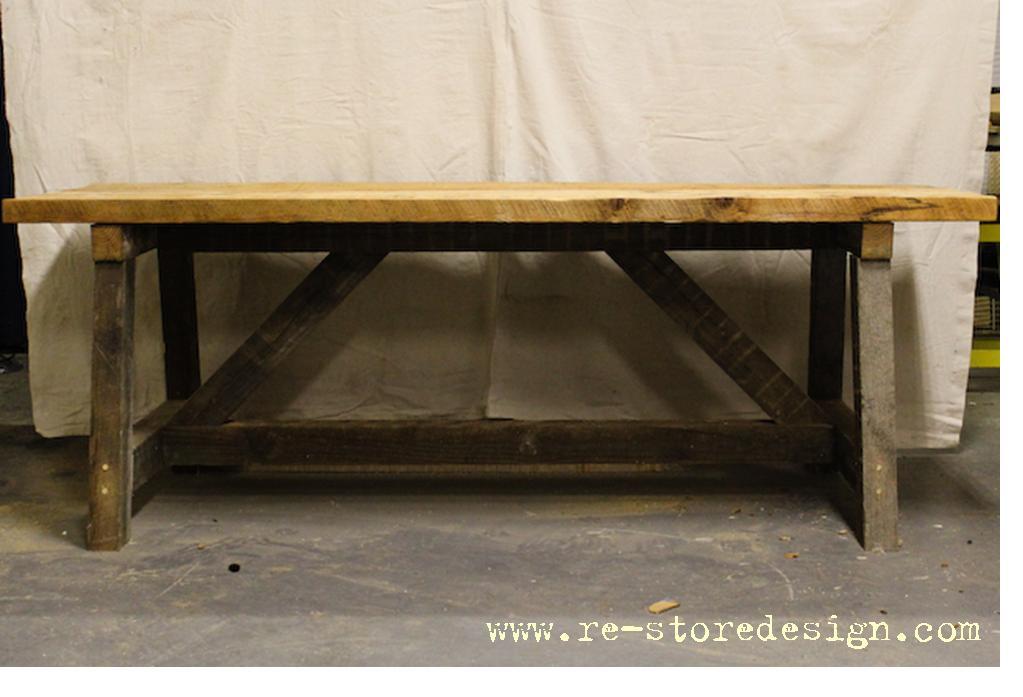
I have been wanted to build this table for over a year and finally had the time for it. The plans made the cuts very simple.
Built from Plan(s)
Estimated Time Investment
Weekend Project (10-20 Hours)
Finish Used
Watco Danish Oil - Natural
Recommended Skill Level
Intermediate
Comments

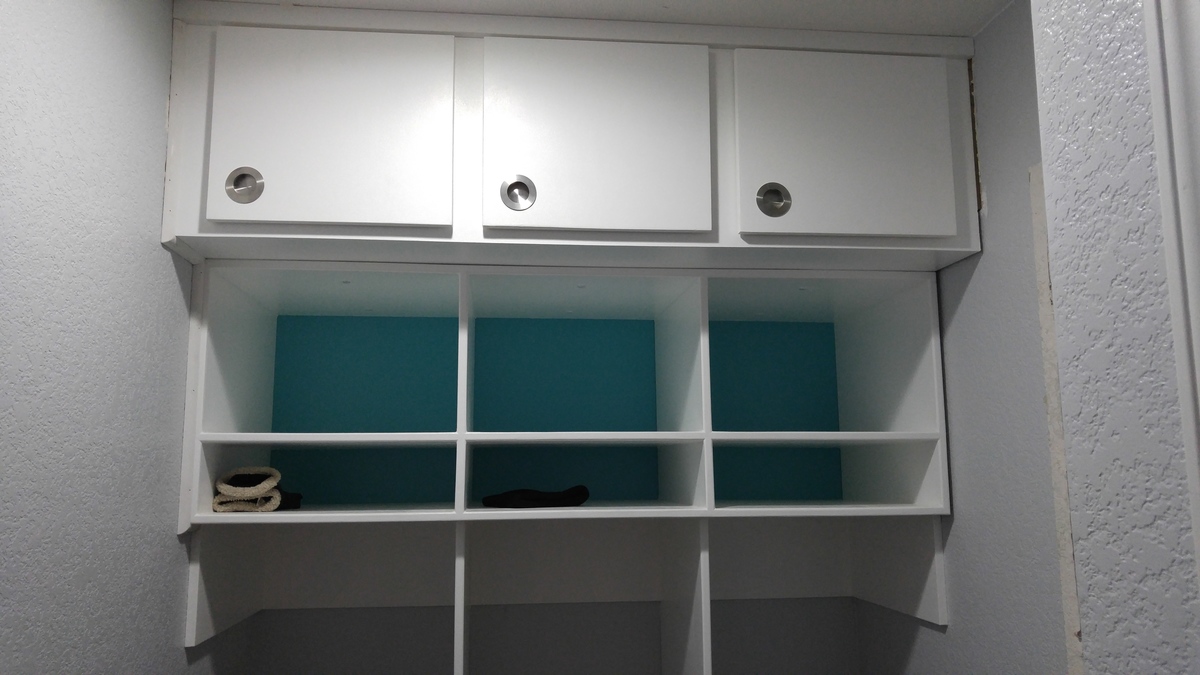
Closet-to-Mudroom Conversion
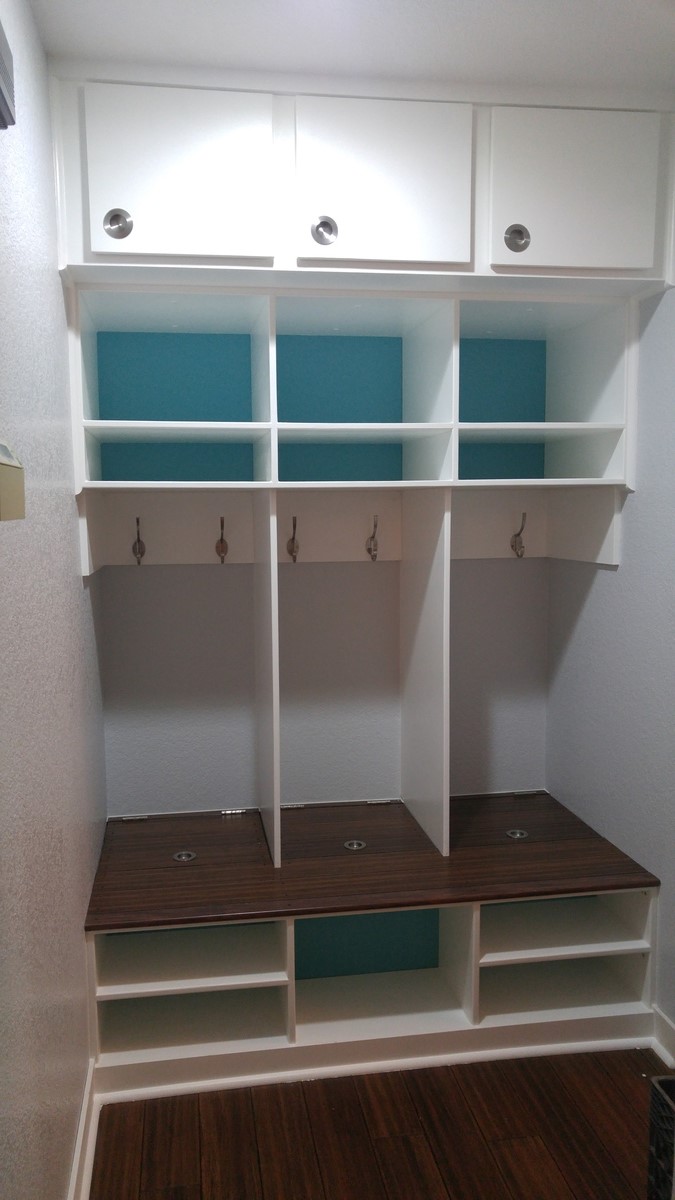
Starting from the Extra Wide Shoe Bench plans, I expanded the upper section considerably. The cabinetry is all cut from hardwood plywood and joined with pocket screws and glue. I don't have a table saw, so a circular saw and straightedge were extensively used.
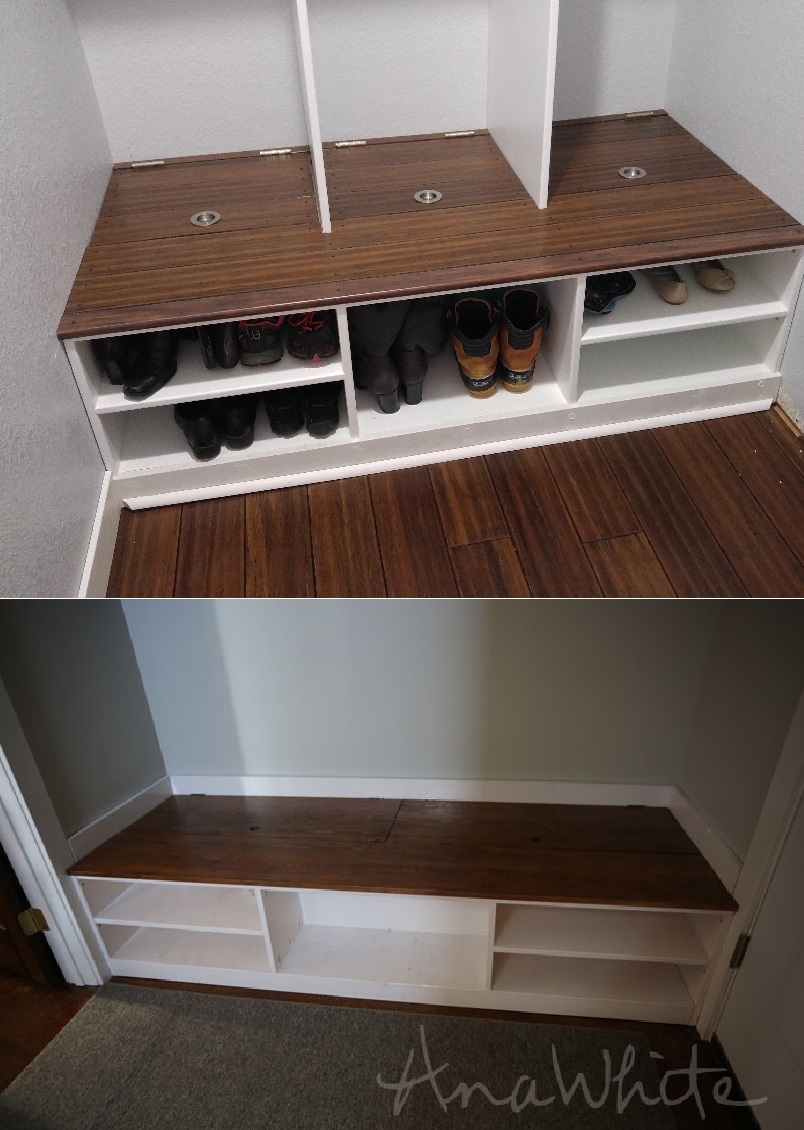
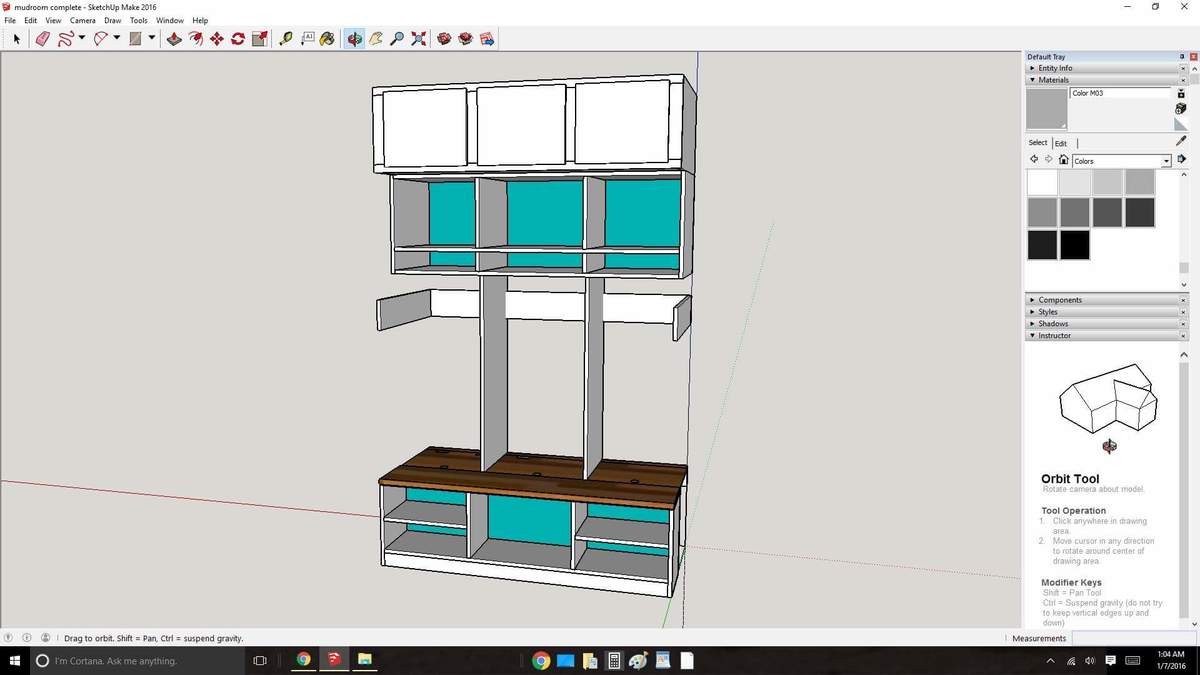
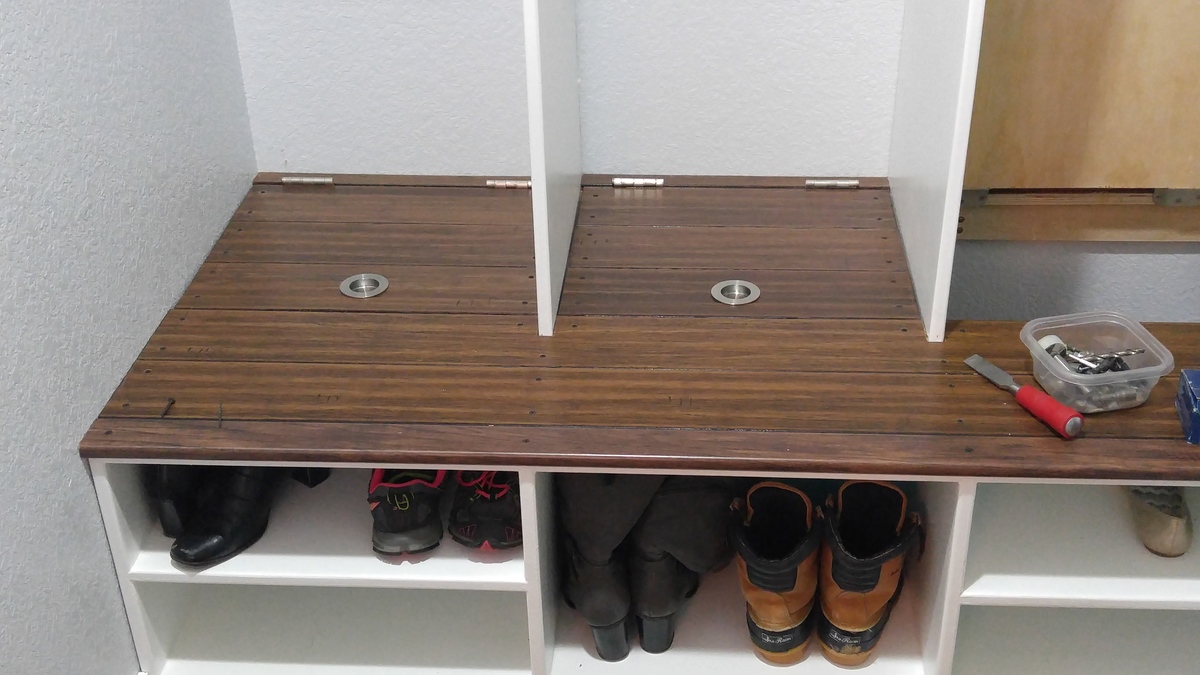
Estimated Cost
$400.00
Estimated Time Investment
Week Long Project (20 Hours or More)
Finish Used
Gloss paint.
Recommended Skill Level
Intermediate
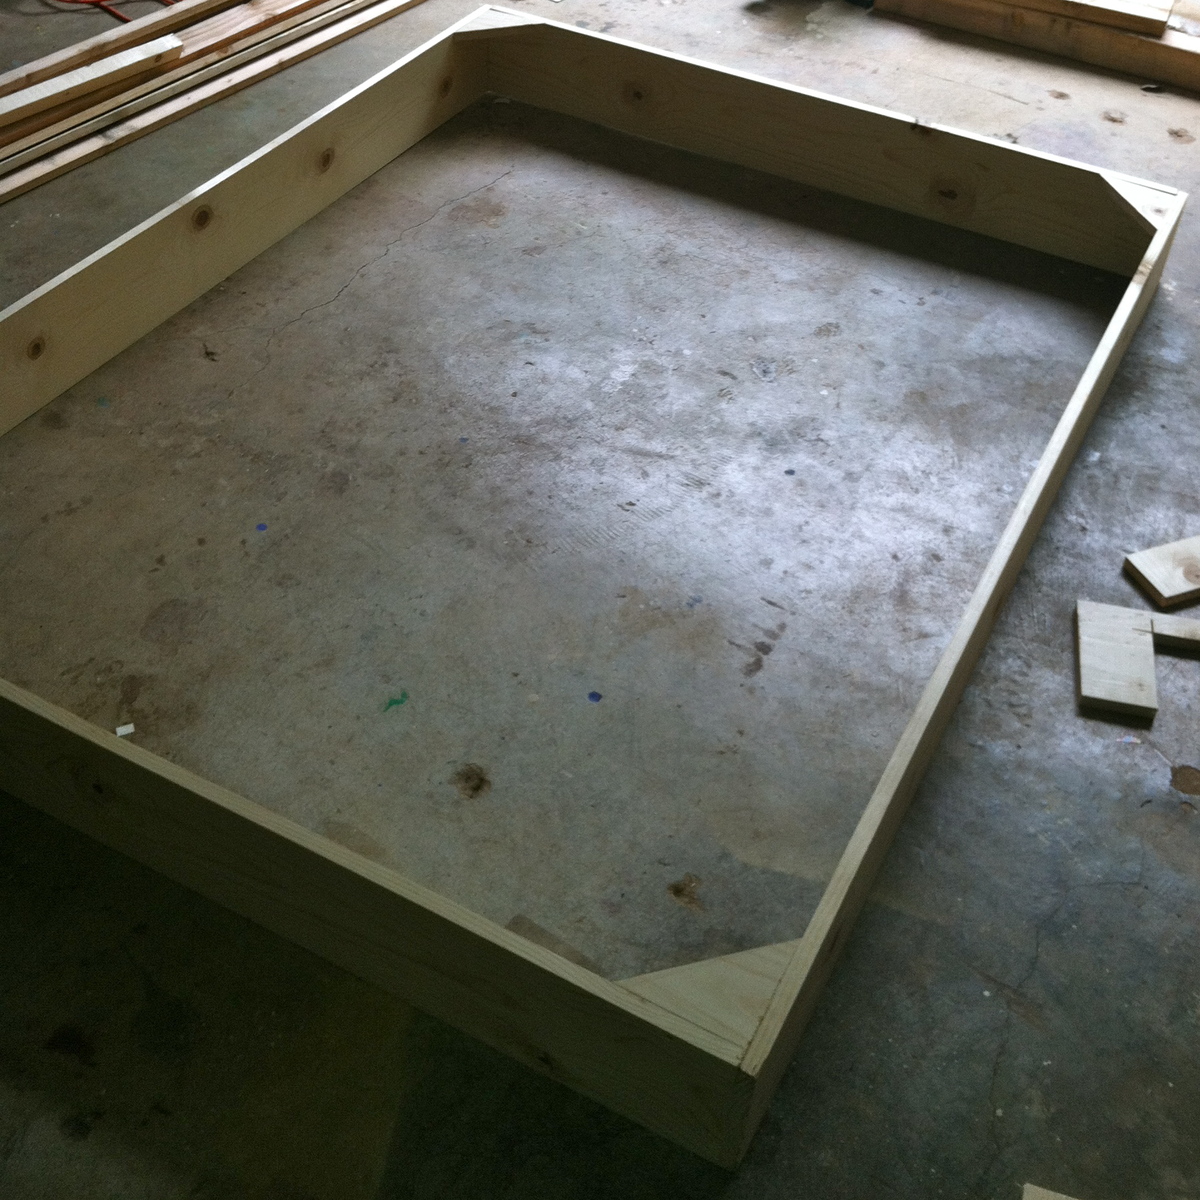
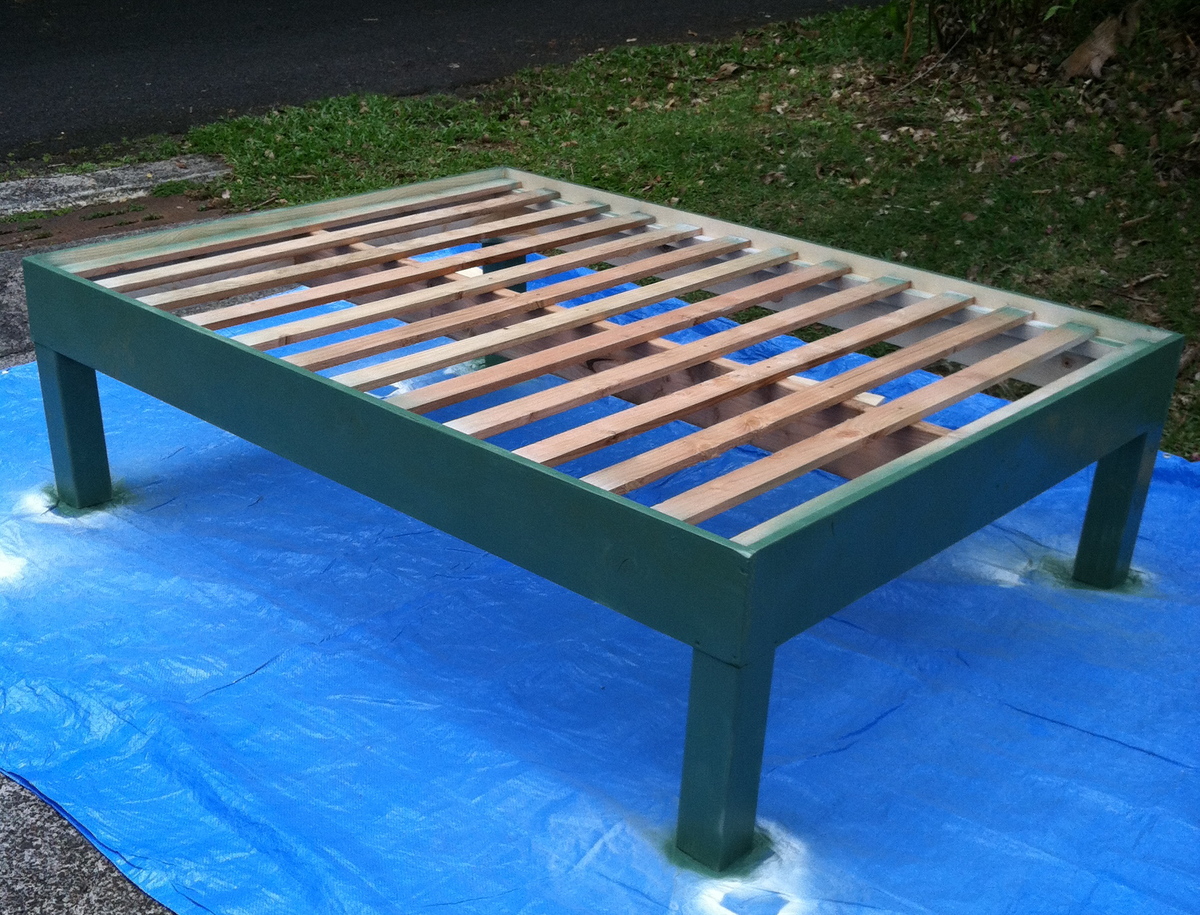
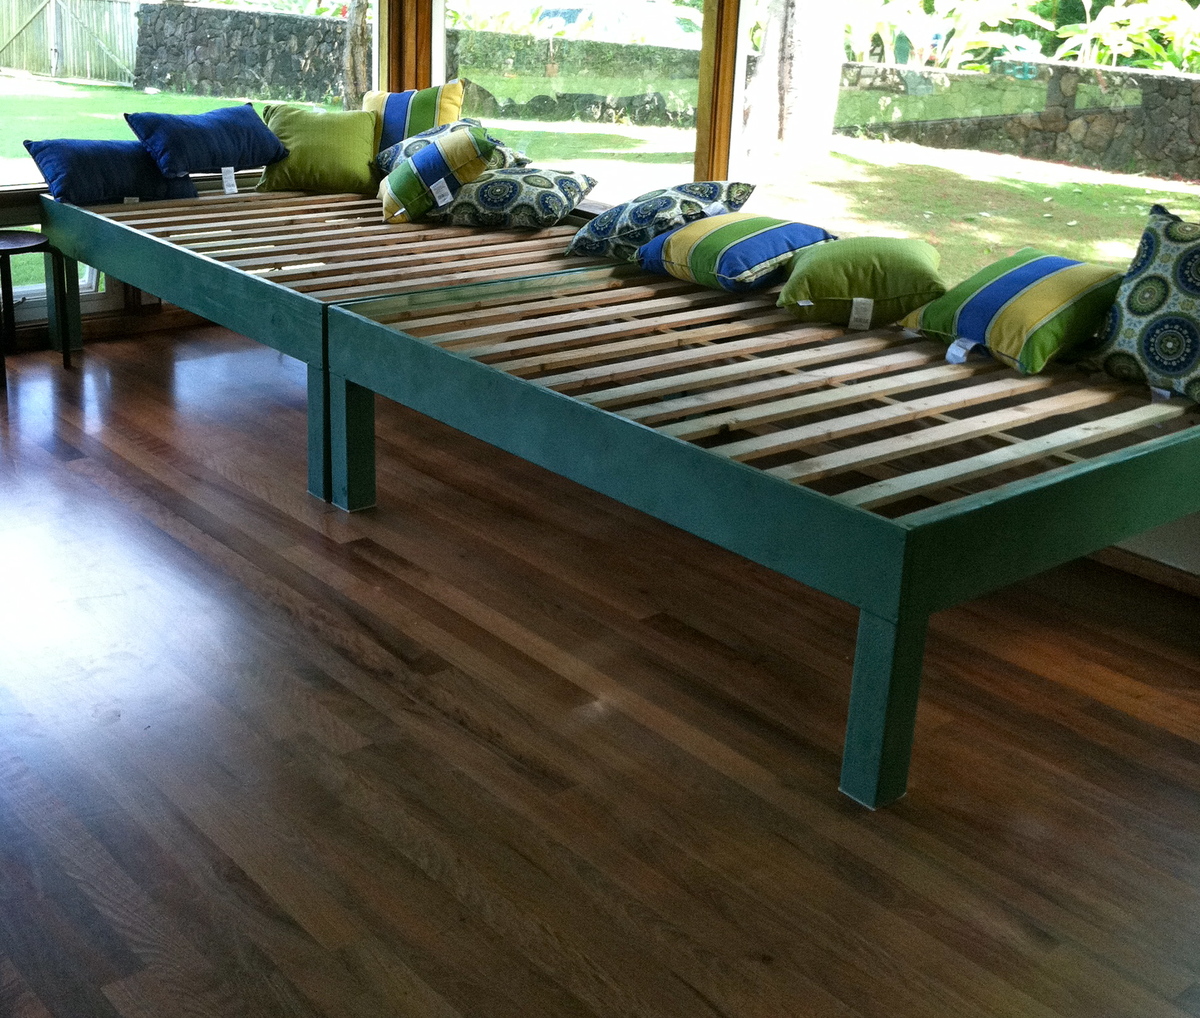
Indoor Punee/ Daybed
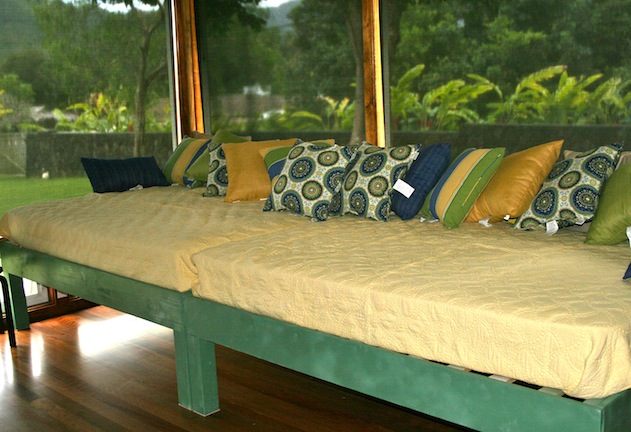
In our living room/sun room we needed a place to lounge as well as a place for guests to sleep. We used the chunky leg bed frame plans with the full size modifications to build 2 of them to make a giant Hawaii style Punee. We were able to build both of these easily in 1 day. We modified the legs and used 4x4's to make them taller and more rustic looking.
Built from Plan(s)
Estimated Cost
$200 for both
Estimated Time Investment
Day Project (6-9 Hours)
Finish Used
After priming, I spray painted them with Rustoleum 2x coverage in Satin Moss Green.
Recommended Skill Level
Beginner
Comments
Sat, 05/19/2012 - 14:47
This is beautiful!
Nice beds! They are very tropical looking - really blends in the outdoor with the indoors.
Junior Size Classic Bunk Bed
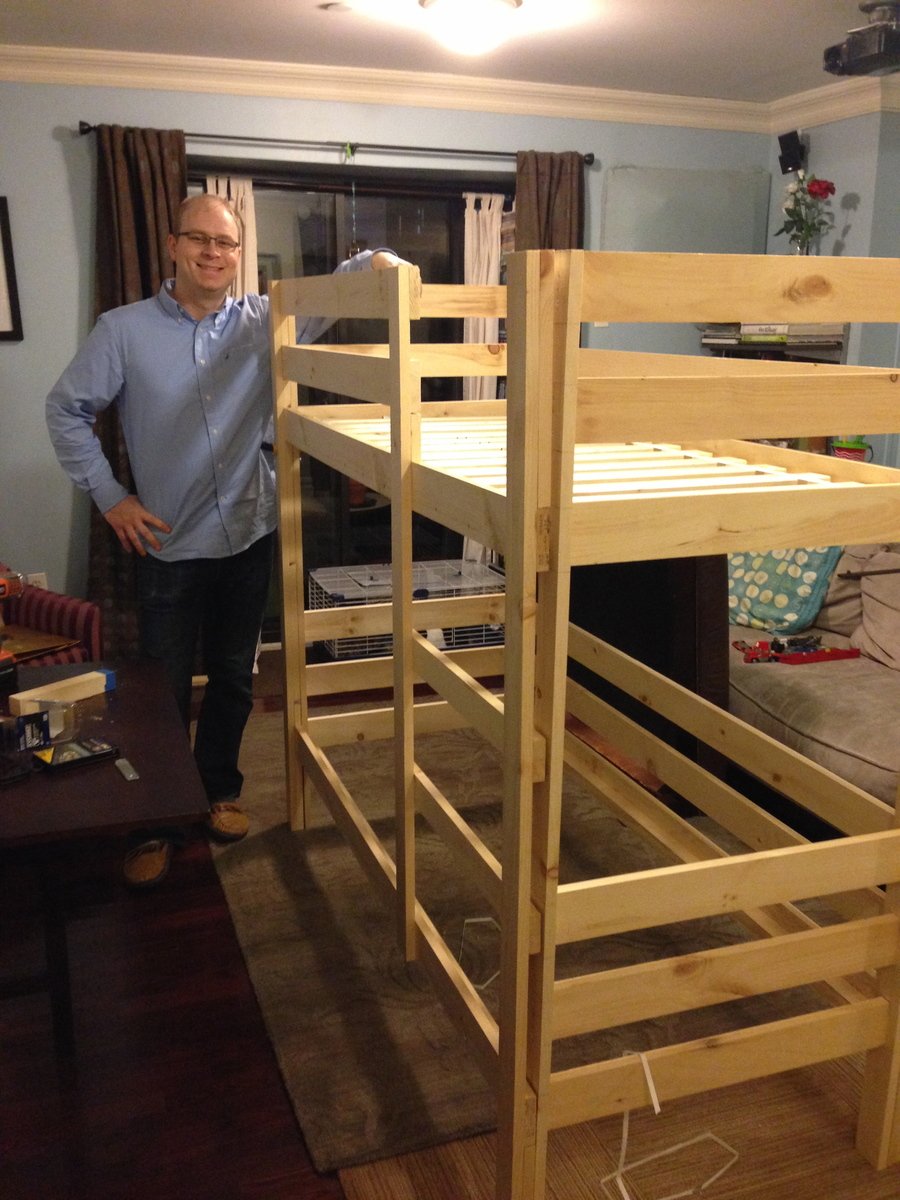
We built this in our living room start to finish - we live in an NYC apartment. Because of the small room size we chose to modify the plans to a small mattress - hoping that it will last our boys until they are about 5 and 7 (currently 2 and almost here). This blog post outlines our buy and cut list for the modified size: http://wp.me/p3DCu3-Kd
Built from Plan(s)
Estimated Cost
$215 (plus $200 for mattresses and bedding)
Estimated Time Investment
Weekend Project (10-20 Hours)
Finish Used
None
Recommended Skill Level
Beginner
How to make a 2 year old happy (the long way)
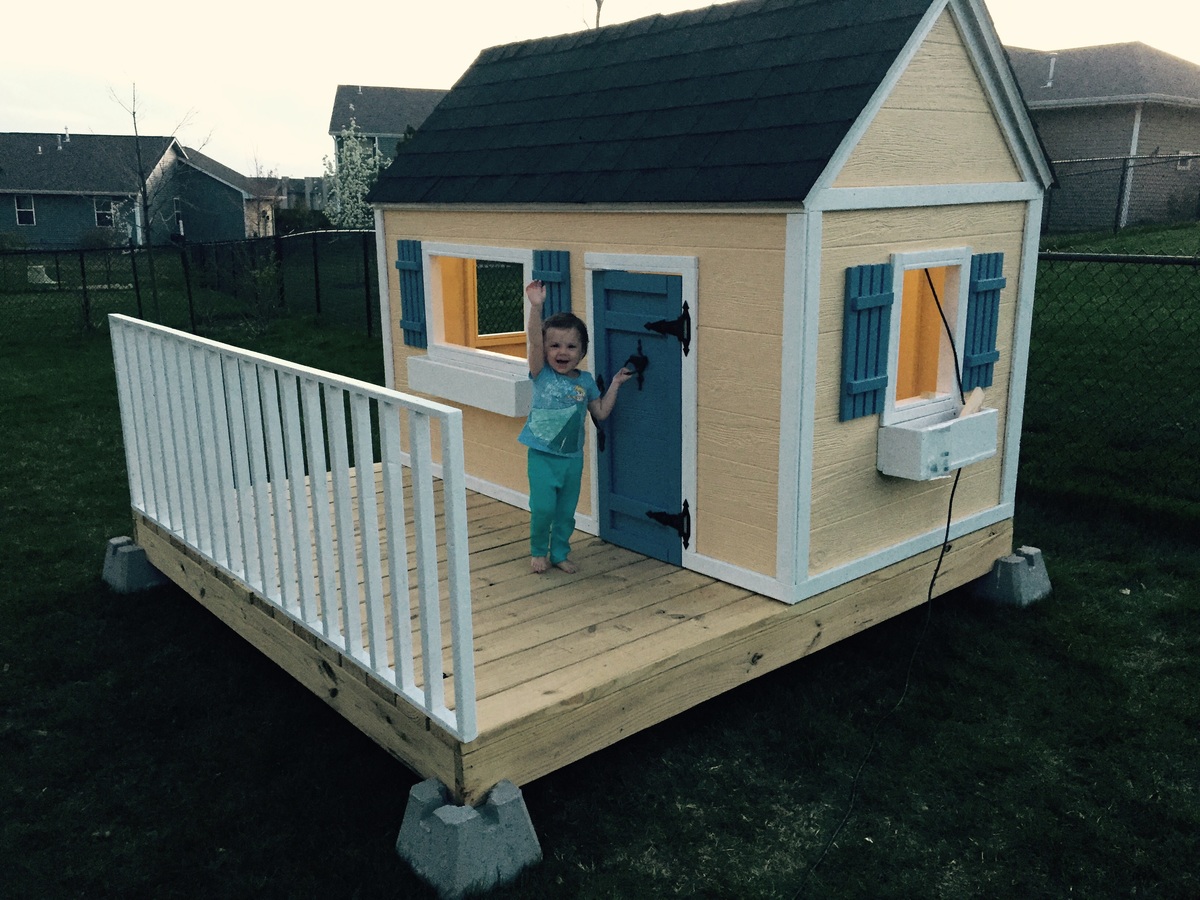
I started this in my garage this winter so that it was ready for spring. Nothing in this is too complicated but it requires some patience. It was all worth it to see how excited my daughter was to finally play with her friends.
Built from Plan(s)
Estimated Cost
$500
Estimated Time Investment
Week Long Project (20 Hours or More)
Finish Used
Exterior paint from SW
Recommended Skill Level
Intermediate
Comments
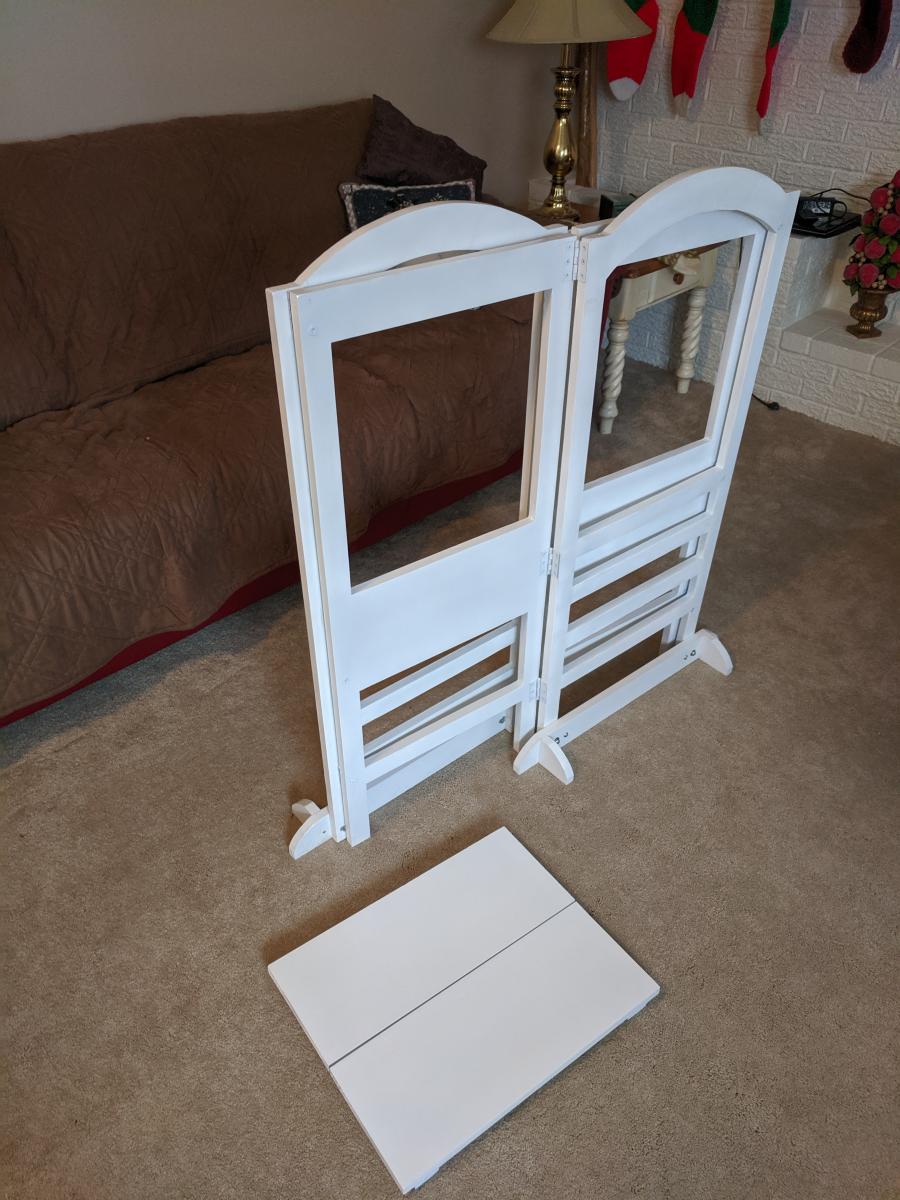
Christmas Helper Towers
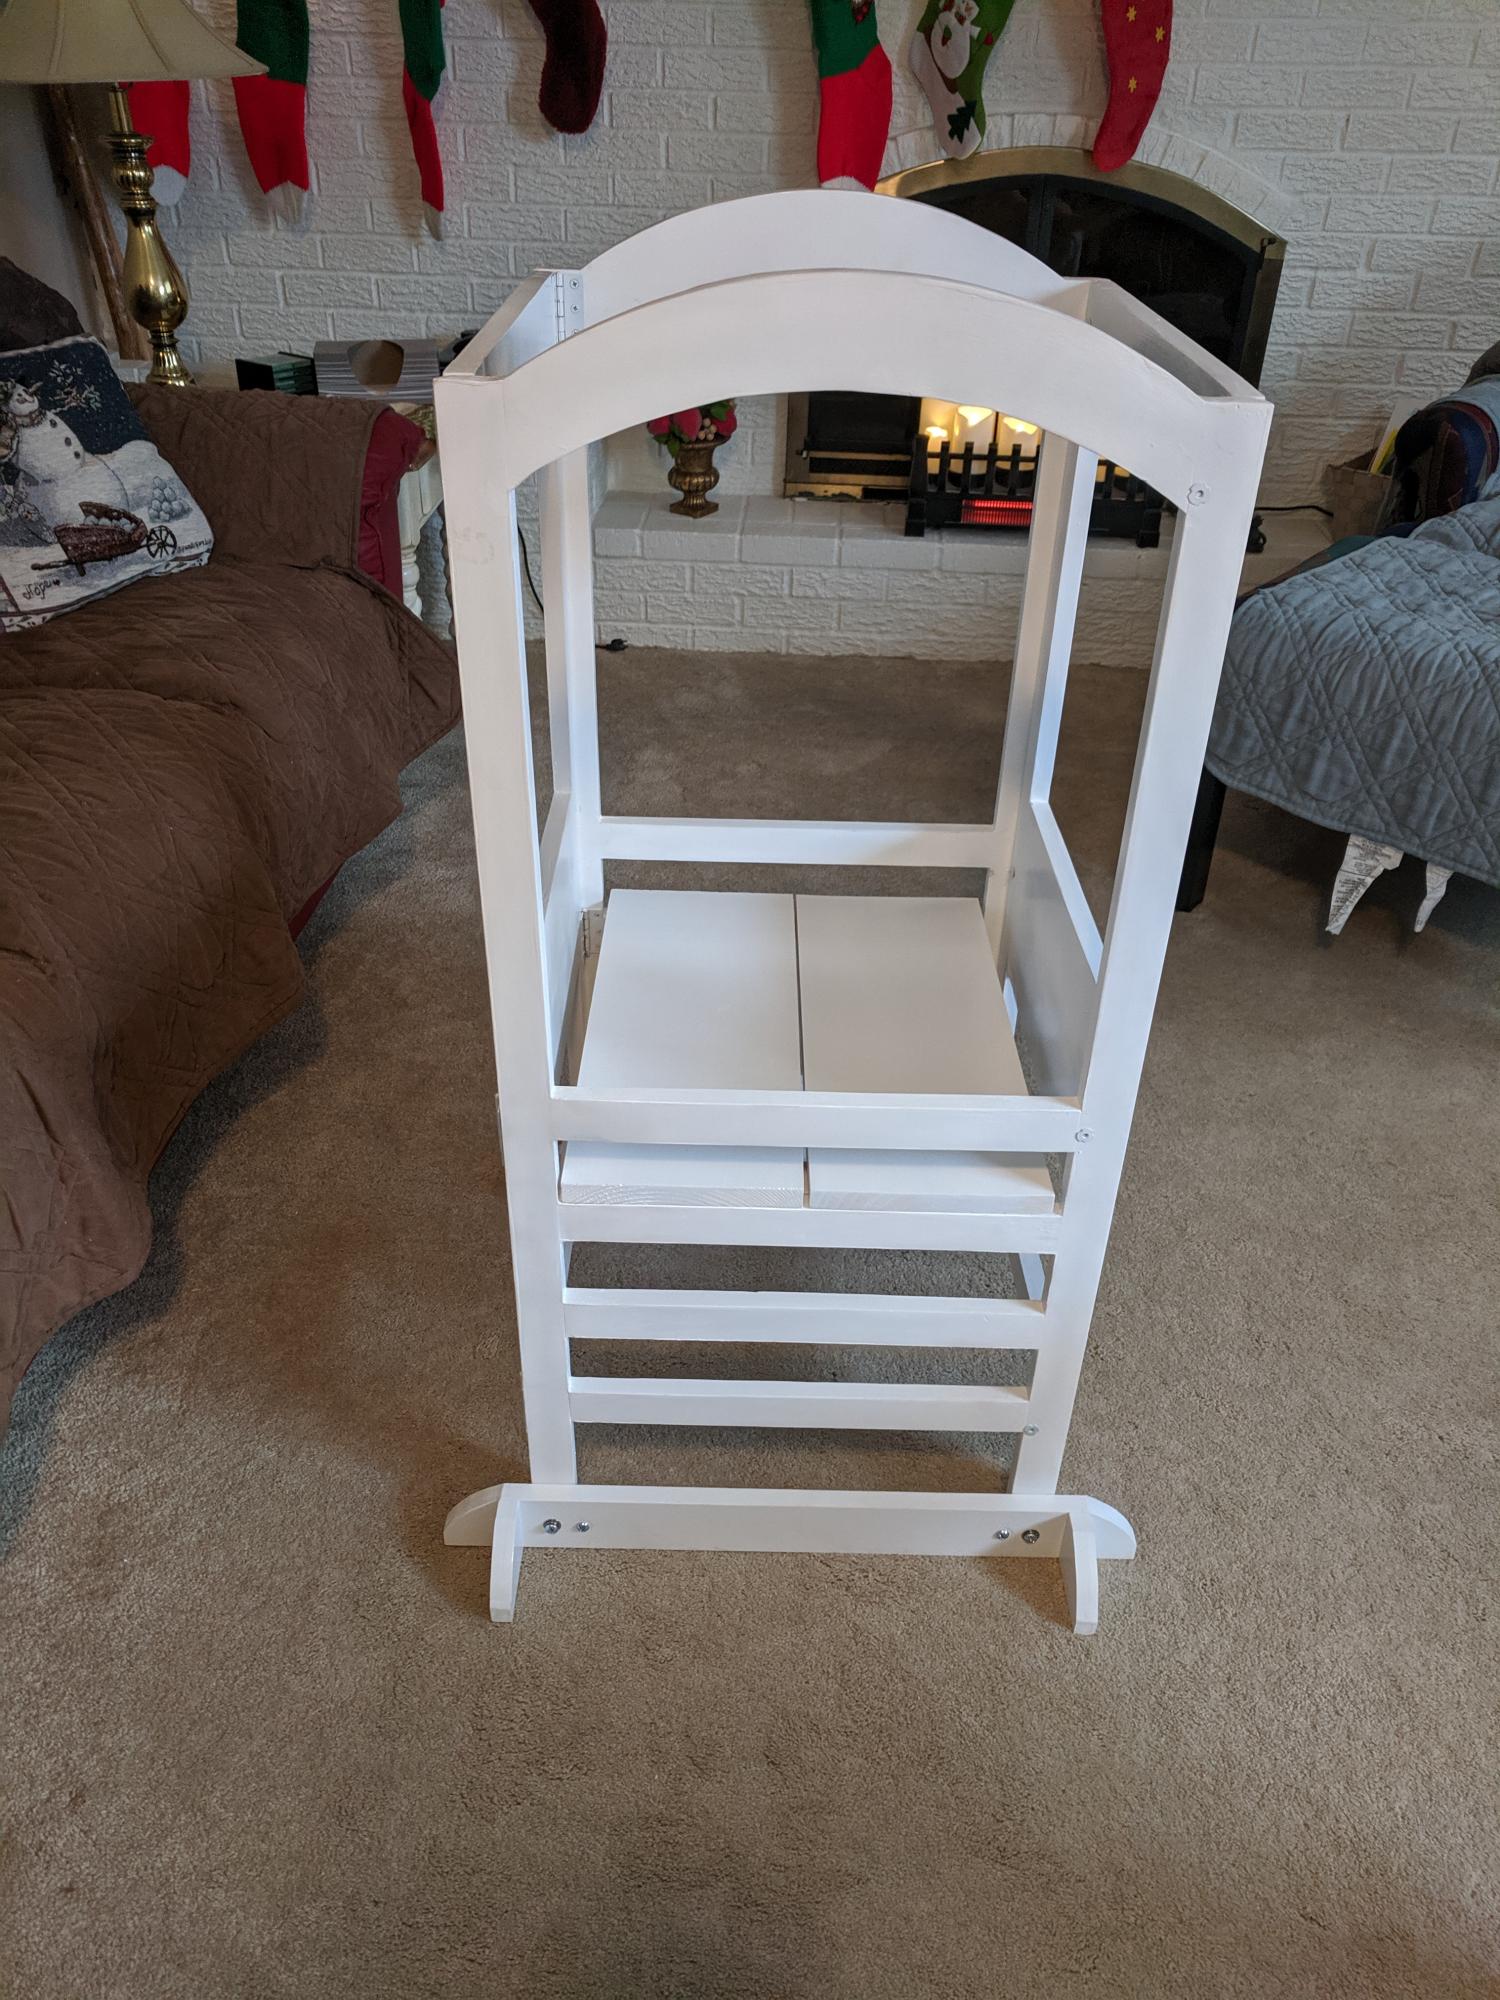
I built two of these for my grandkids for Christmas. One for each of my kid's homes. I used Phillip Moore's folding modification where each side is a separate panel. (Great mod!). I used one T-Nut per hinge on the side where short screws had to be used. I just felt a little safer having that connection that cannot come apart since my grandkids can get pretty active. The kids love them!! Thank you for this plan!
Built from Plan(s)
Estimated Time Investment
Day Project (6-9 Hours)
Finish Used
Paint and semi-gloss clear coat for easy cleanup. I recommend spray paint because no matter how hard I tried to avoid it, the sharp inside corners formed drips with a brush. Finally sanded them off and spray painted with much greater success.
Recommended Skill Level
Intermediate
Tall Cedar Planter
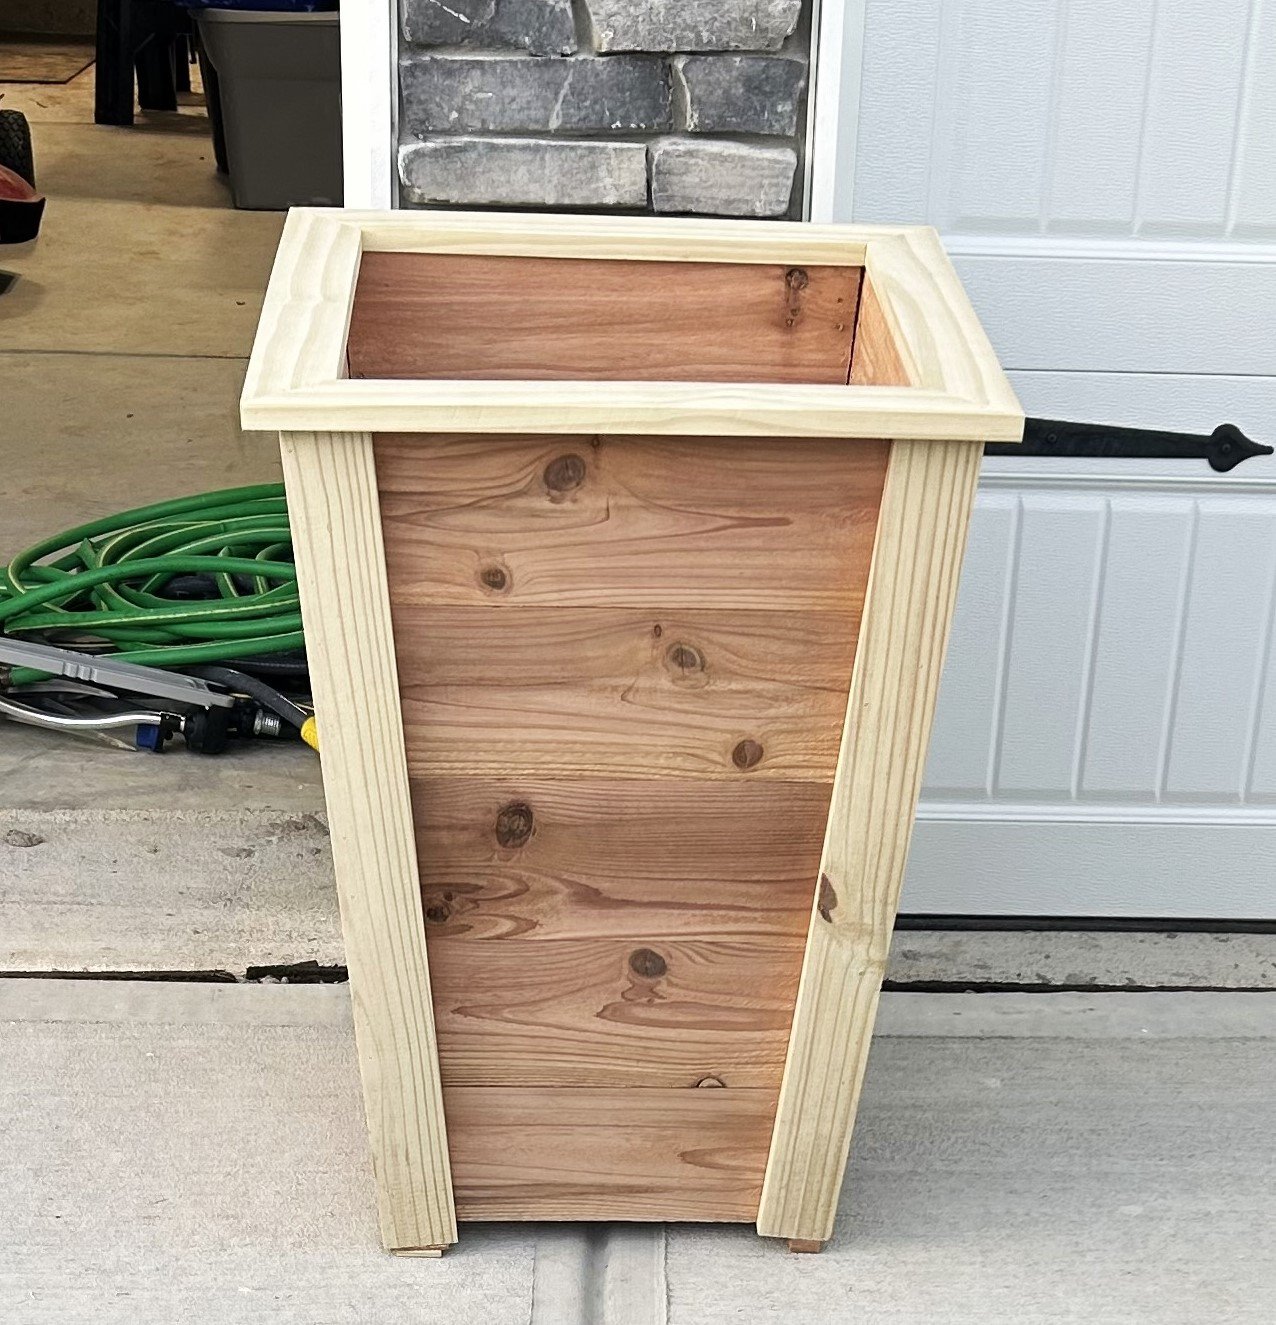
Made a tall wood planter from cedar and pine fence posts using Ana’s plans this weekend! Modified slightly and added a frame around top to give it a more finished look.
Awesome plans! Thanks Ana.
Built from Plan(s)
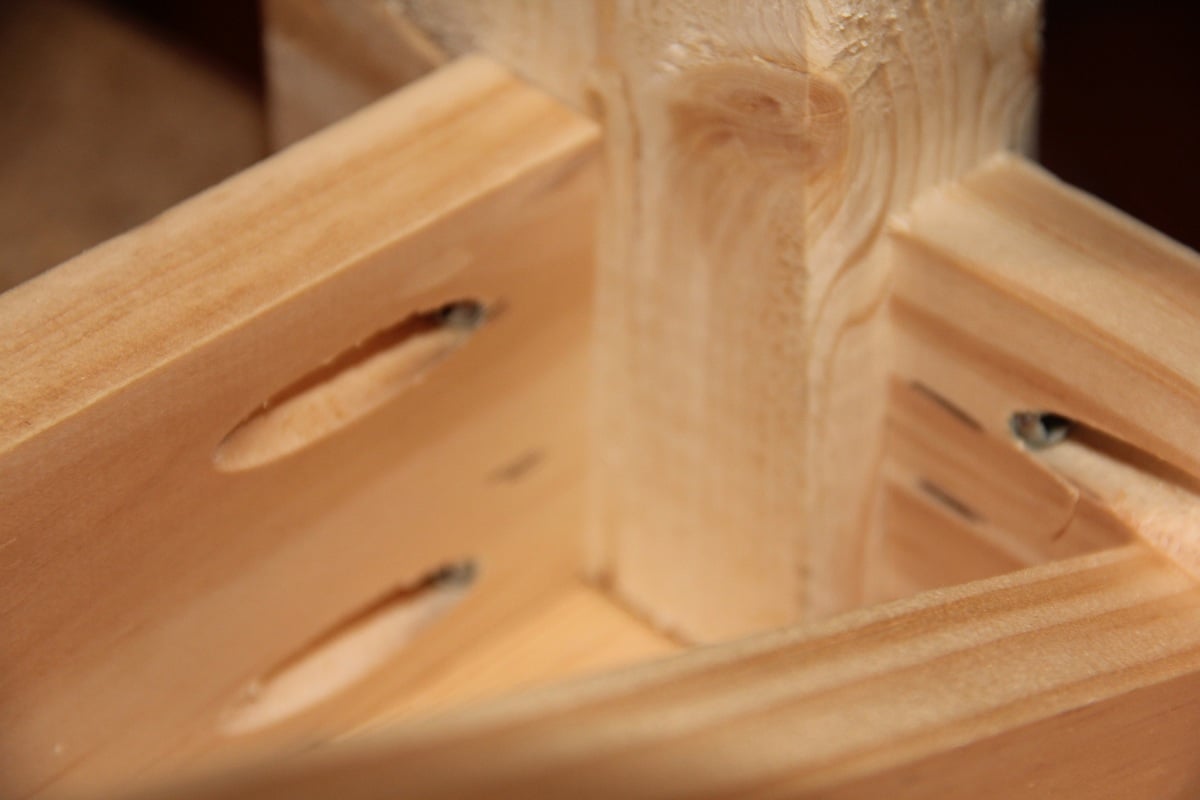
Rustic X Bench
My first real project from your site. This was my first time to use my pocket hole jig. Wow did it work great. The video was great made it very easy to follow the plans
Built from Plan(s)
Estimated Cost
$20.00
Estimated Time Investment
An Hour or Two (0-2 Hours)
Finish Used
Stain and polyurethane one step (2 coats)
Recommended Skill Level
Beginner
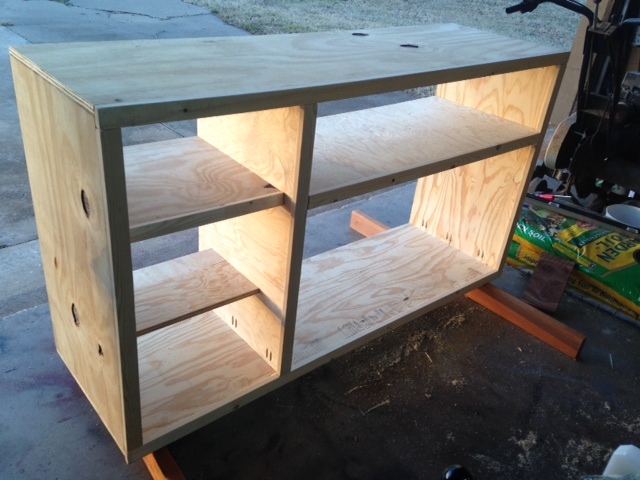
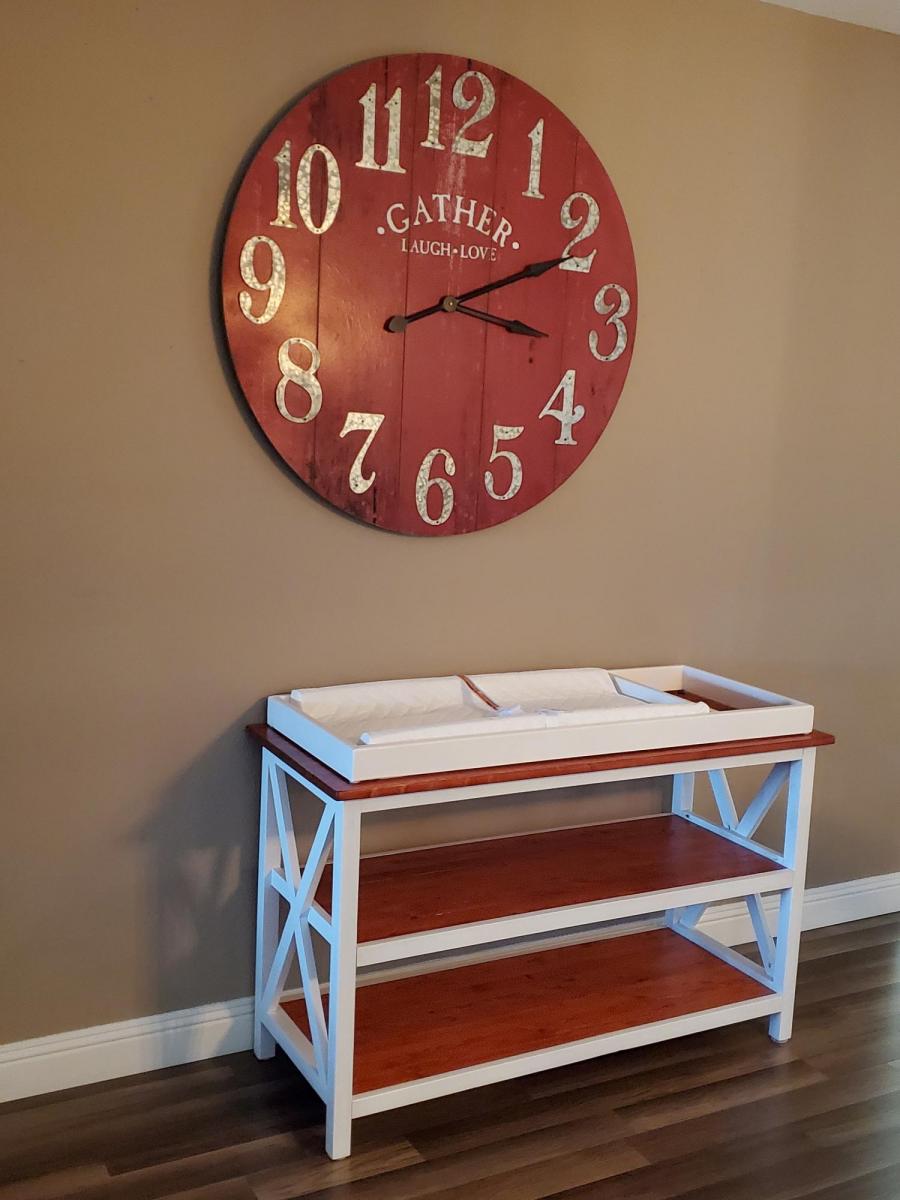
Buffet Changing Table
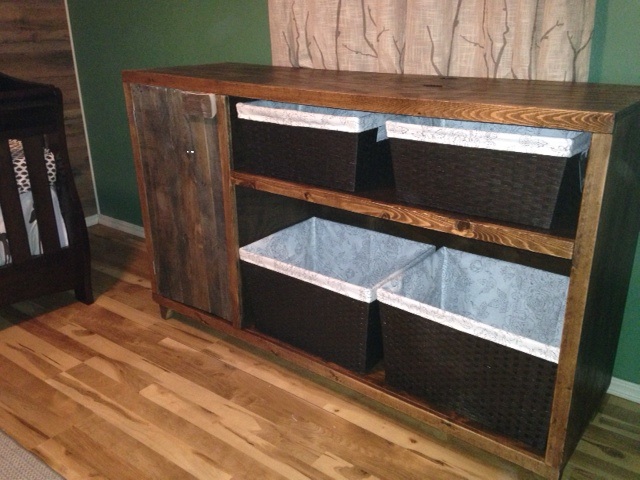
So I altered the Emersen Buffet a little. We needed a changing table and I liked the idea of having the baskets handy for diapers, ect.. I will add the changing pad topper after we get the actual pad.
The door is from a weathered pallet I reclaimed.
I must say this is my first large project of this type. I would have NOT been able to do it without Ana White's site. However, now I feel capable of a lot more.
Thanks so much.
T S
Estimated Cost
Probably less than $80 but even plywood is expensive!
Estimated Time Investment
Weekend Project (10-20 Hours)
Finish Used
Minwax - Special Walnut 2 coats, sand lightly, then coat of polyurethane - satin
Recommended Skill Level
Beginner
Kreg Jig Fun
I used whitewashed clear pine for the bases and maple for the tops. I also built a corner table to match. I used a Kreg Jig for the first time for all 3 tables.
Built from Plan(s)
Estimated Cost
$200
Estimated Time Investment
Week Long Project (20 Hours or More)
Finish Used
Whitewash stain for the bases. Polyurethane for the tops.
Recommended Skill Level
Intermediate
Rustic X DIY changing station w/ removable top

A Christmas gift for a friend who recently had a baby.
I went with one inch (3/4") project panels. The top shelf is 1"x 20". The lower shelves are 1"x 16", but I added 1 1/2" with two 1"x 2" banding. For the "x" brackets, I used 1"x 2" and added a middle piece to connect the legs and double as a side shelf ledge. The baby changing station top is secured by an L-bracket, where I added a block to keep the spacing even around the station top and screwed from underneath. (Note, you might have to trim the L-bracket to fit on the underside of the lip.) Also, I put on furniture felt under the baby changing station top to prevent any marring to the top shelf.
The removable top allows the changing station to become a standard shelving unit once the baby outgrows the changing station top. There are no holes drilled onto the topside of the top shelve as it's being secured by two L-brackets.

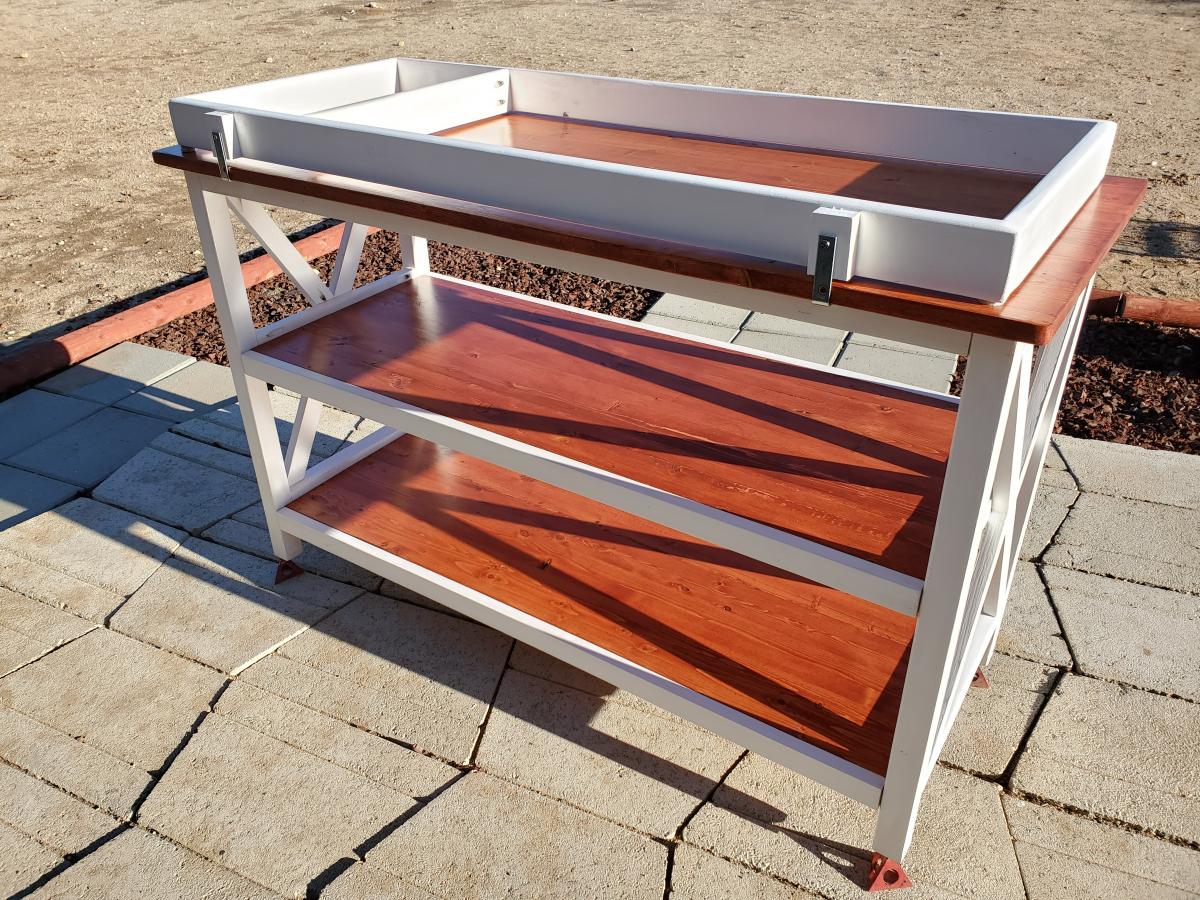
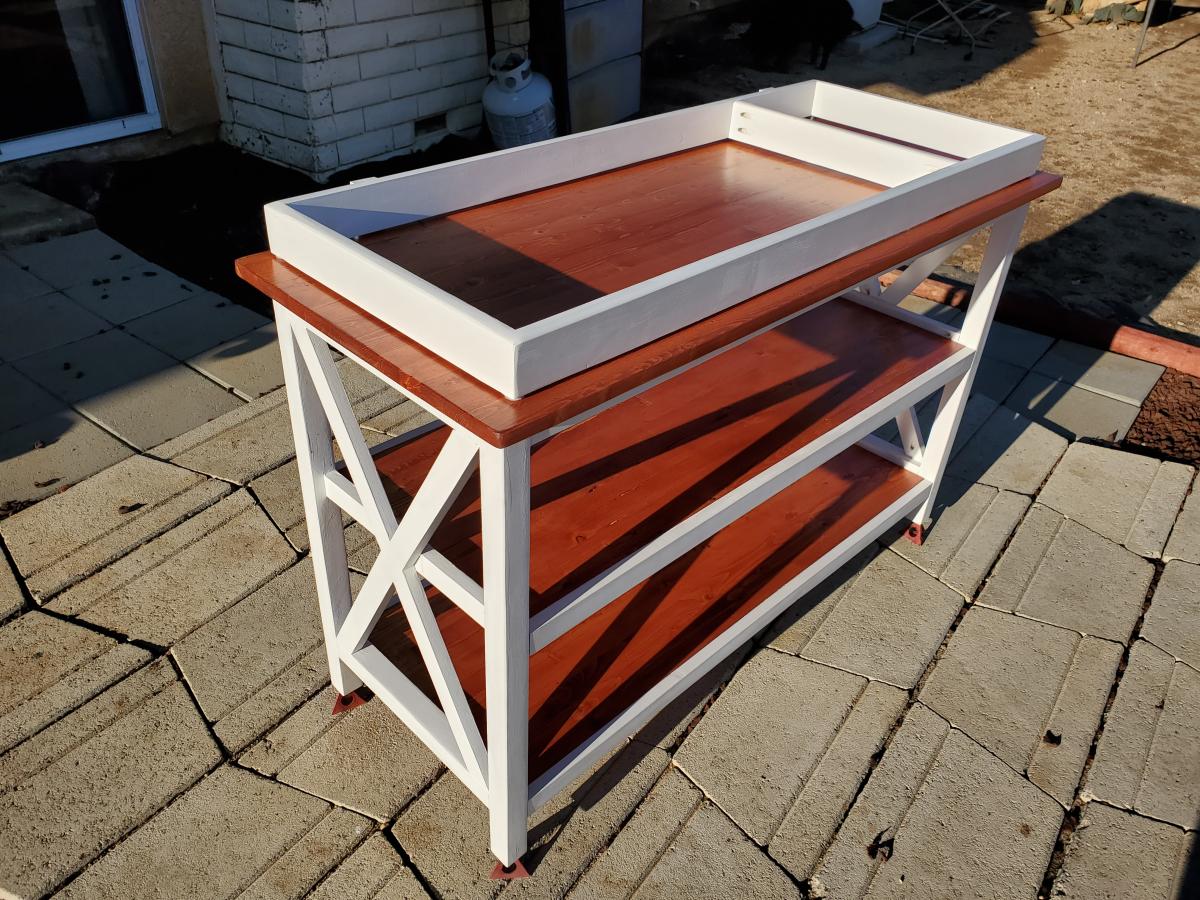
Built from Plan(s)
Estimated Cost
The wood cost was about $70.
Estimated Time Investment
Weekend Project (10-20 Hours)
Finish Used
Cherry stain, white paint, and poly.
I stained all three shelves first. I painted the rest of the project white, which needed two coats. Then I assembled the unit together. Afterwards, I applied three coats of poly with a foam brush. After the second coat of poly, i used a gray finishing pad. On the third and final coat of poly, I used a white finishing pad (finer than the gray pad).
I stained all three shelves first. I painted the rest of the project white, which needed two coats. Then I assembled the unit together. Afterwards, I applied three coats of poly with a foam brush. After the second coat of poly, i used a gray finishing pad. On the third and final coat of poly, I used a white finishing pad (finer than the gray pad).
Recommended Skill Level
Intermediate
Chicken Coop with Built-in Planter
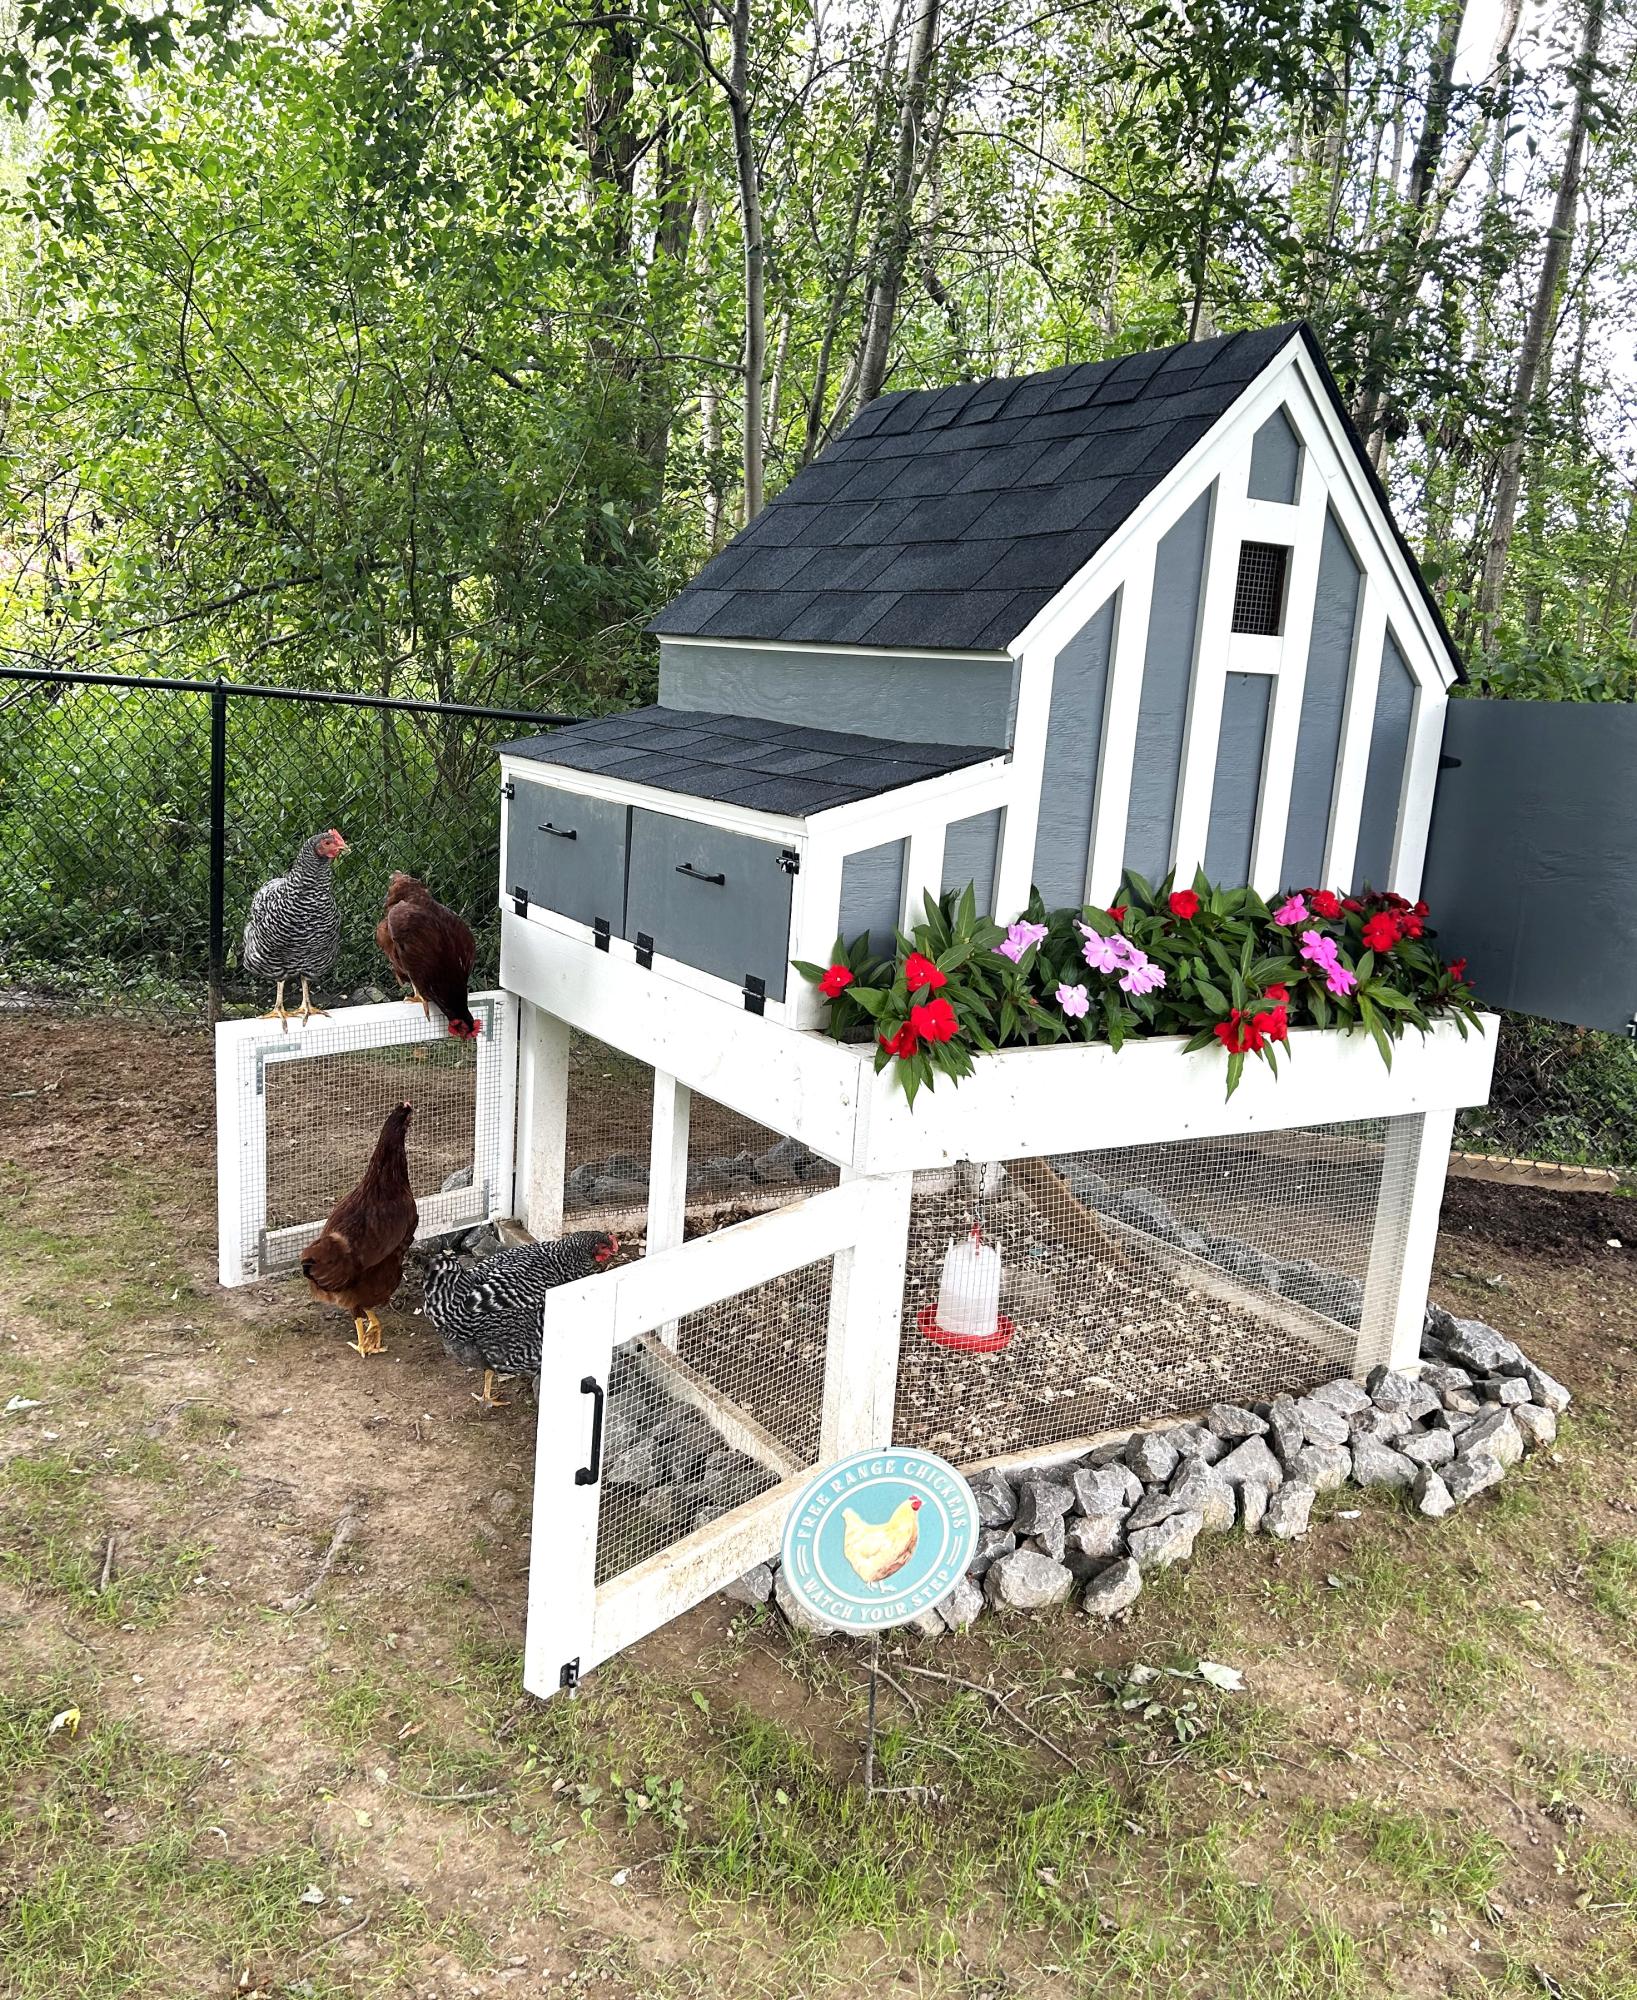
Absolutely loved how this thing turned out. Made a few customizations such as coop extension and drip edge. I have 4 happy hens and a coop that should last a lifetime. Thank you for the help!
Alex
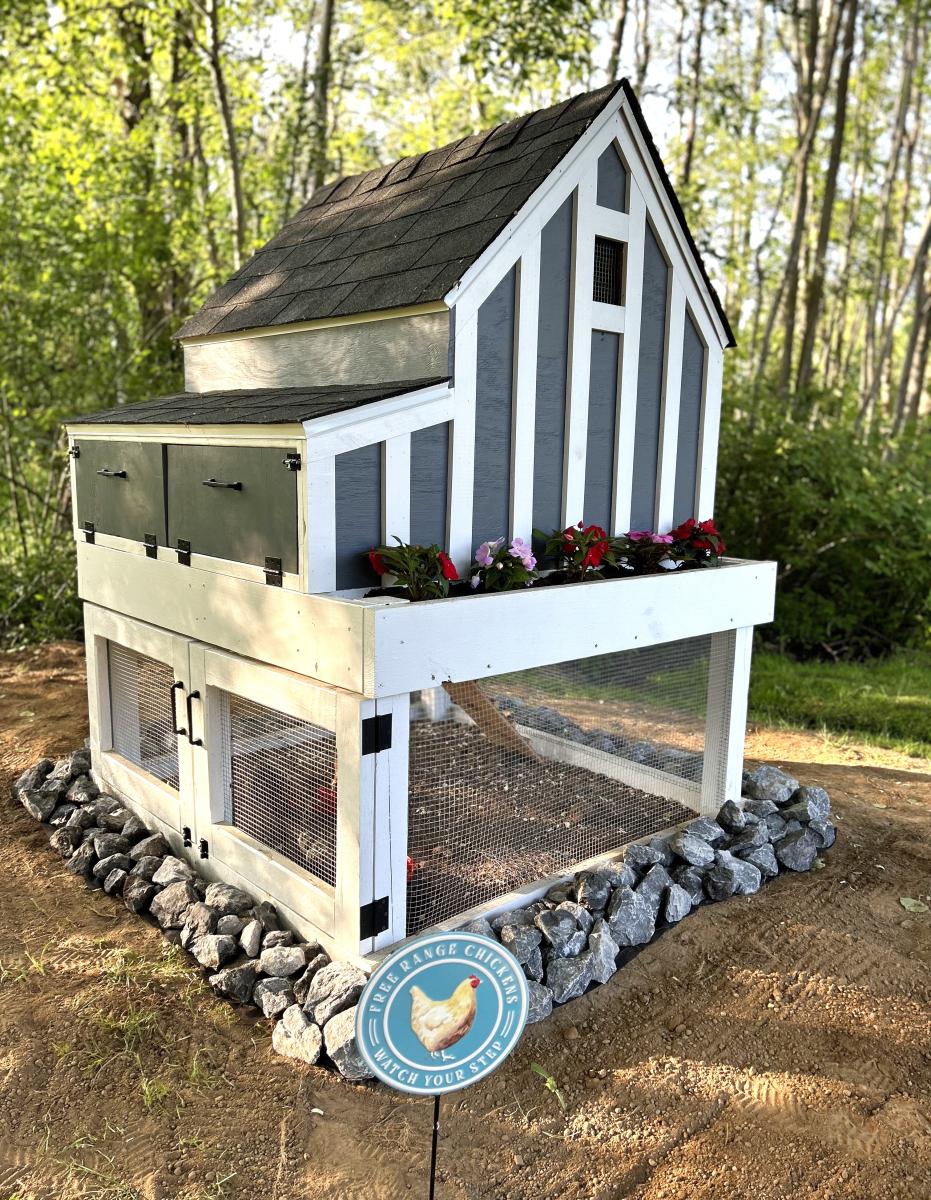
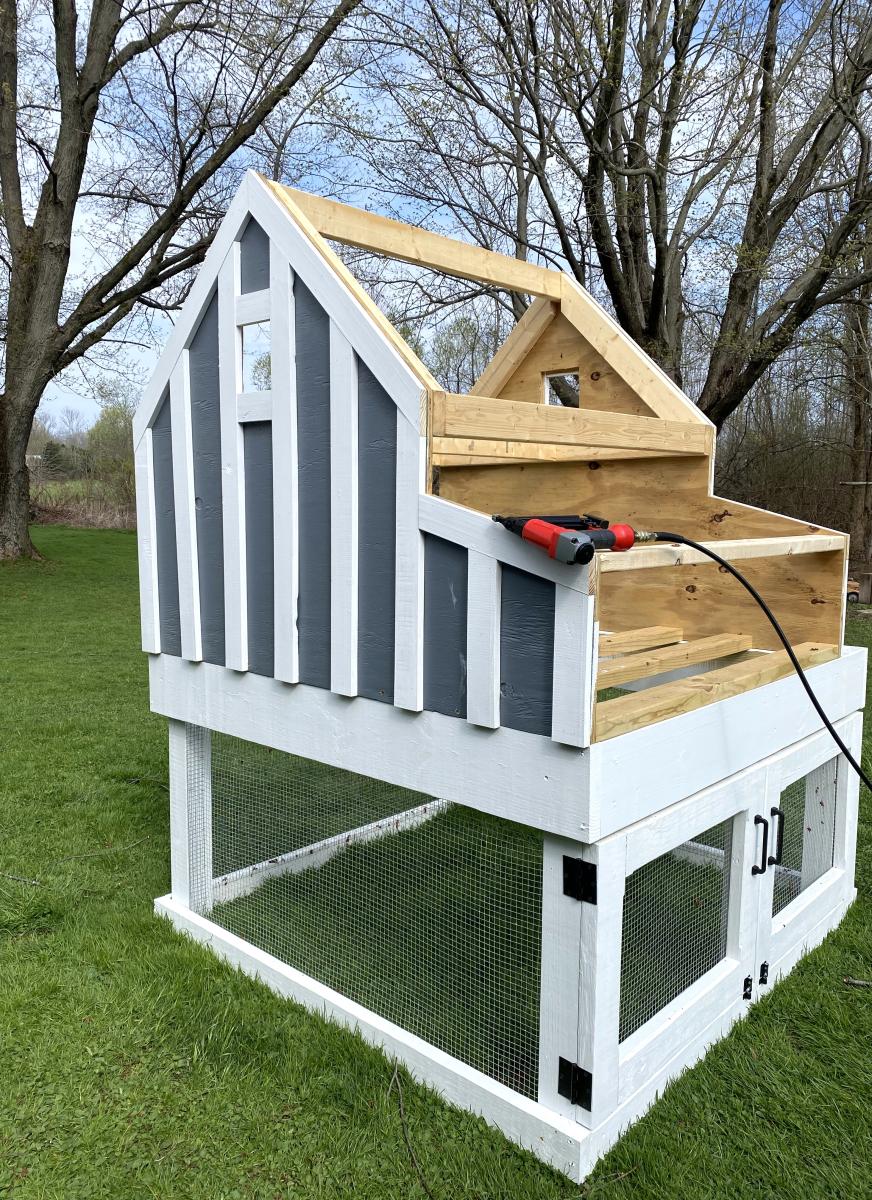
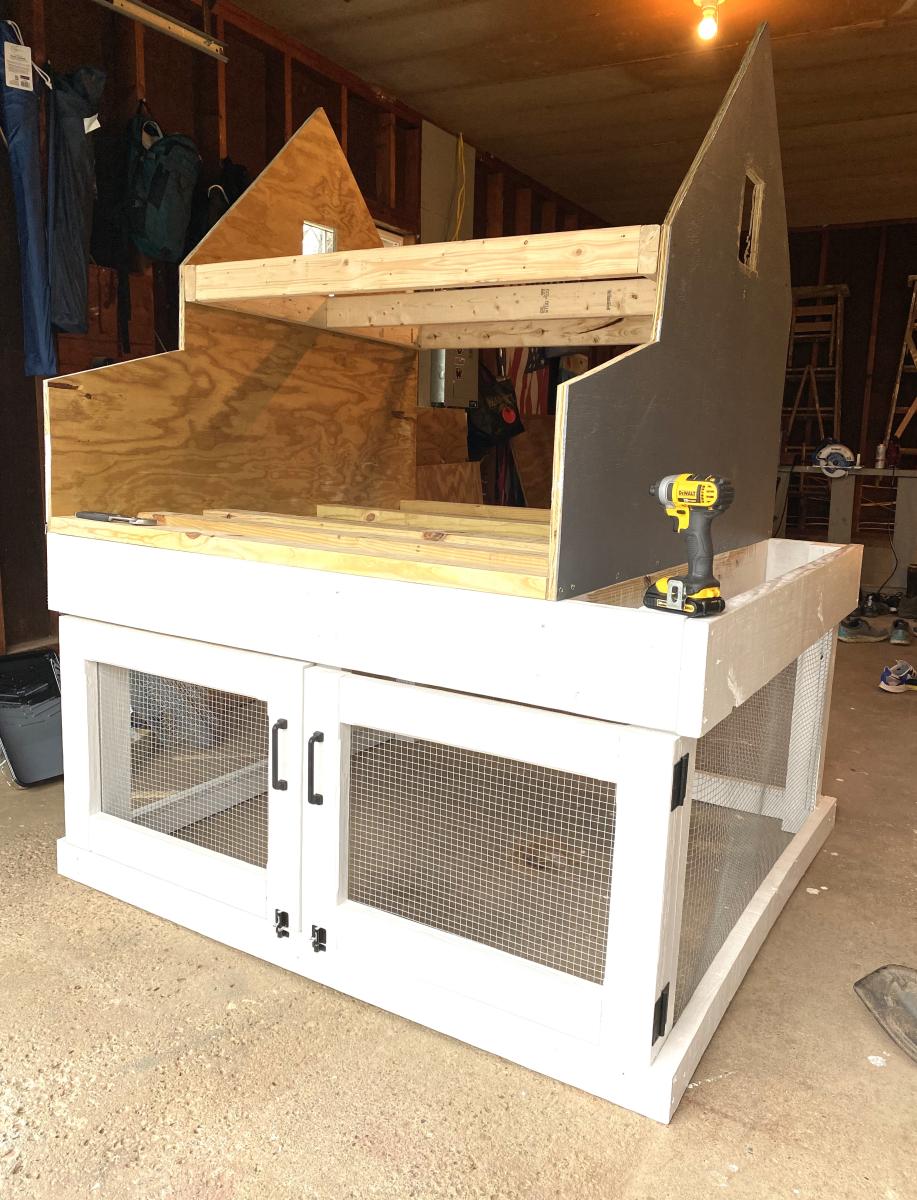
Built from Plan(s)
Cabin Bunk Beds

Customized the cabin Bunk bed palns and built this for about $200 and 2 weekends work.
Nuff said!

Built from Plan(s)
Estimated Cost
$200
Estimated Time Investment
Weekend Project (10-20 Hours)
Finish Used
None, unfinished wood rocks
Recommended Skill Level
Intermediate
Comments
Reese Media Cabinet
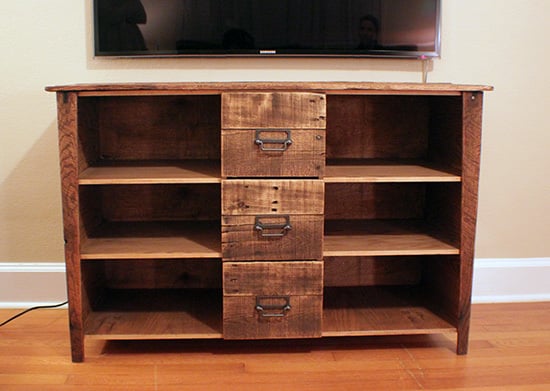
This was a media cabinet that I designed for some friends, and I've got a full how-to and FREE PLANS up on my site at

Estimated Time Investment
Week Long Project (20 Hours or More)
Finish Used
PolyShade Mission Oak - Satin
Recommended Skill Level
Intermediate
Sturdy workbench with sturdy top
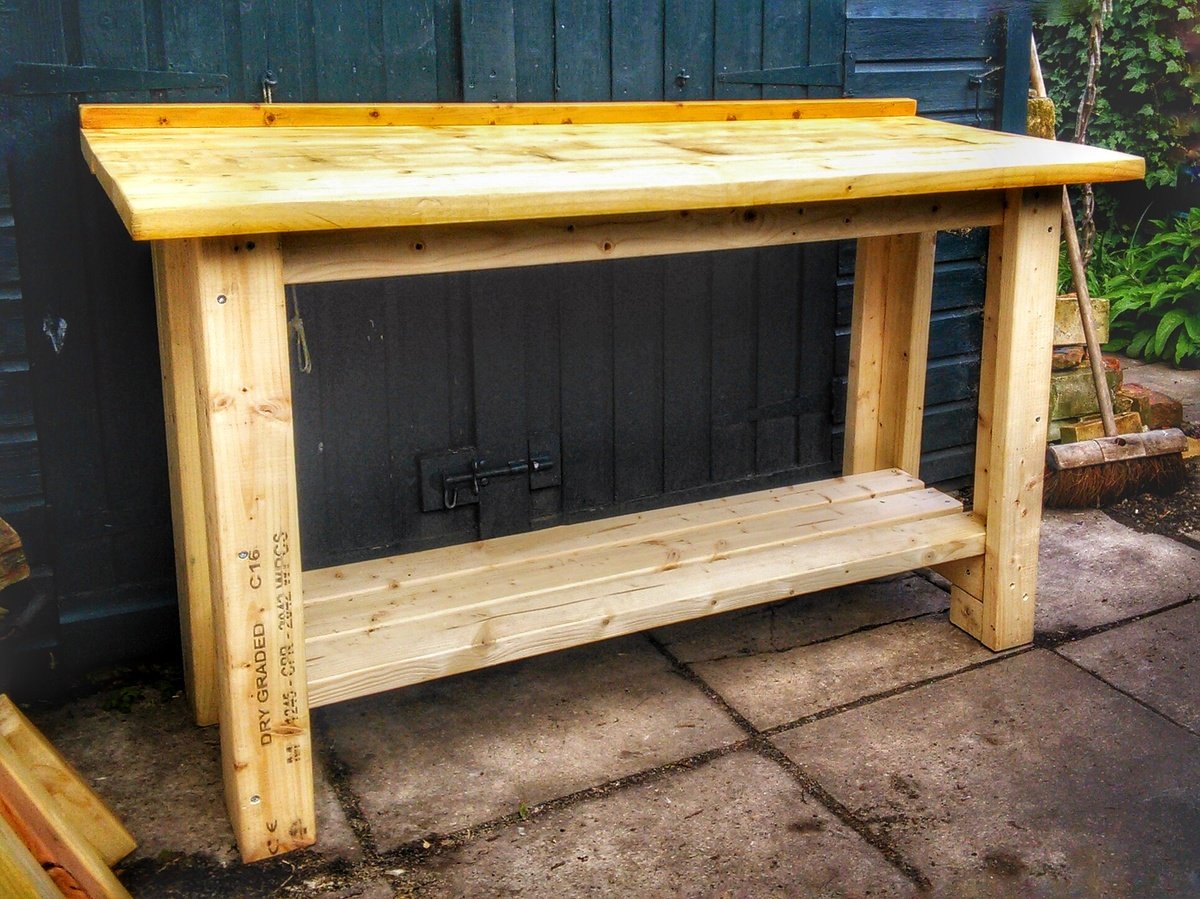
This version is five feet long. The sturdy top was made from scaffold boards. I nailed four stout 3" oval nails into the joining edges of two planks, then cut the projecting heads off at angle. Putting plenty of glue along the nail-free face I sash cramped the whole lot together overnight. Once screwed down I filled holes and cracks with epoxy woodfiller, gave it a though sanding and splashed on a generous amount of Danish Oil just to seal it from spilled coffee etc. Now all I have to do is line the shed...
Built from Plan(s)
Estimated Time Investment
Weekend Project (10-20 Hours)
Finish Used
Danish oil
Recommended Skill Level
Beginner
My try at a step stool
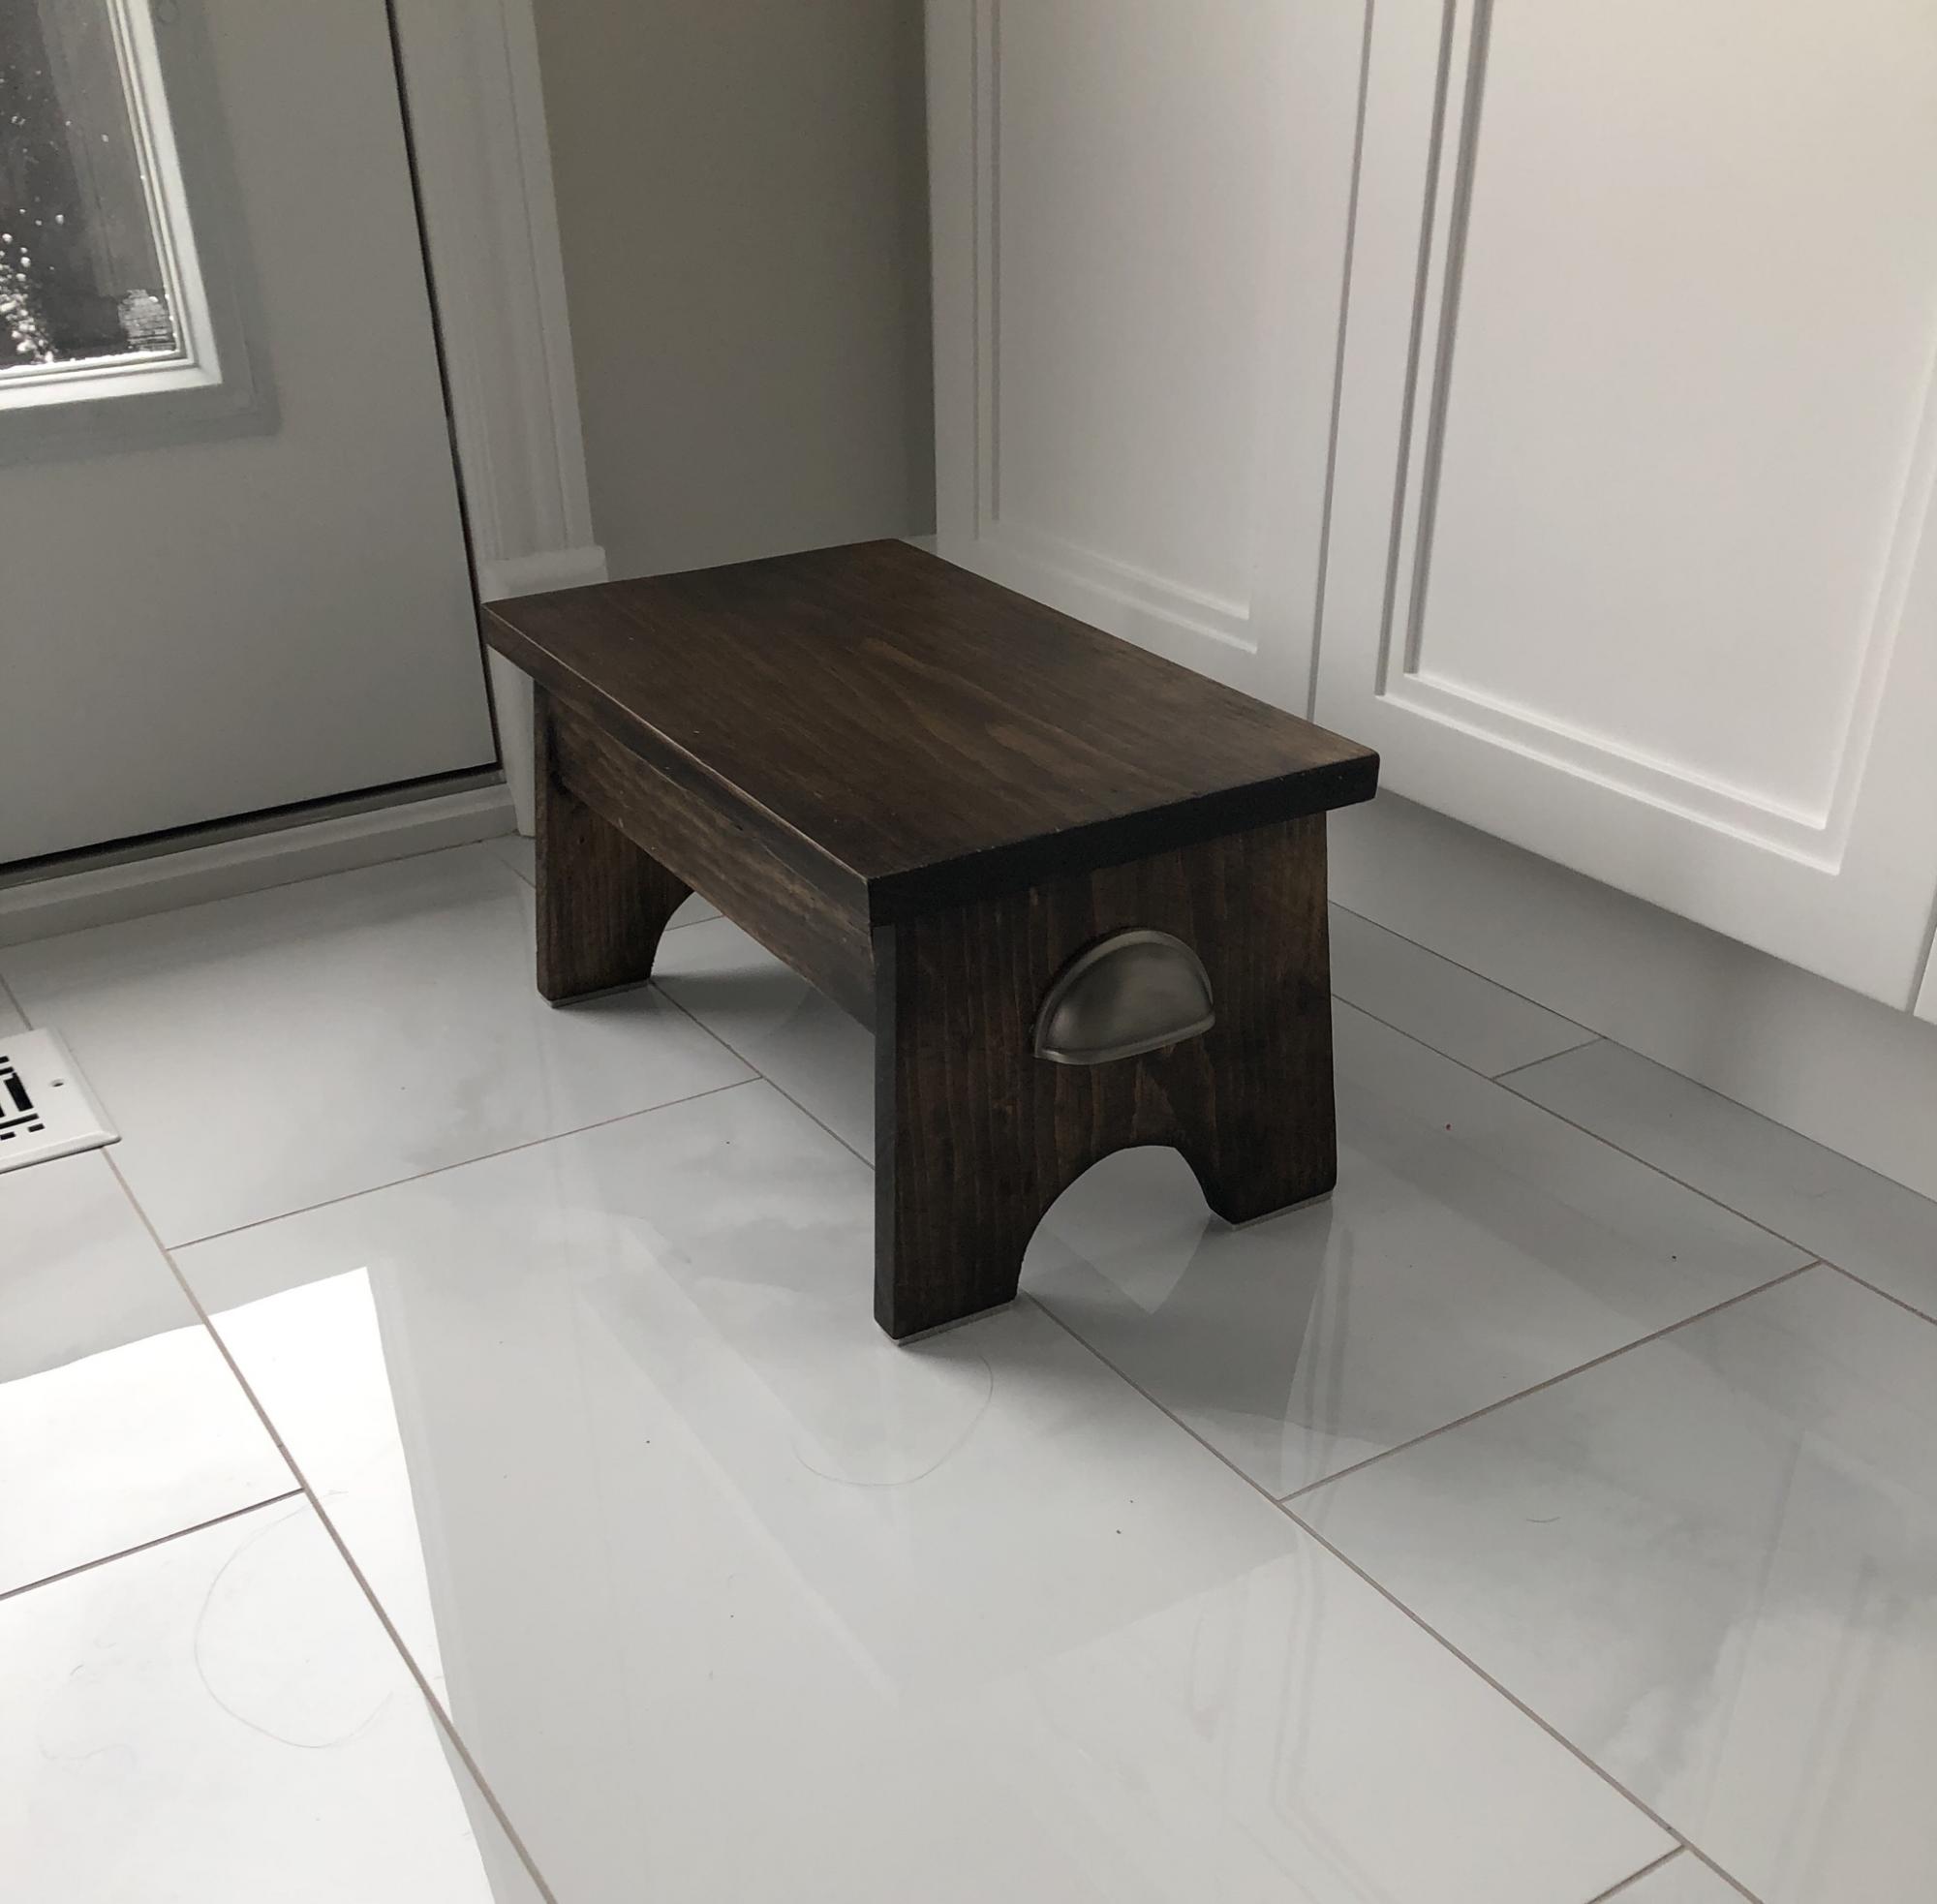
Had fun doing this one. I used a gel stain and about 4 coats of lacquer to finish
Built from Plan(s)
Baby Doll Crib
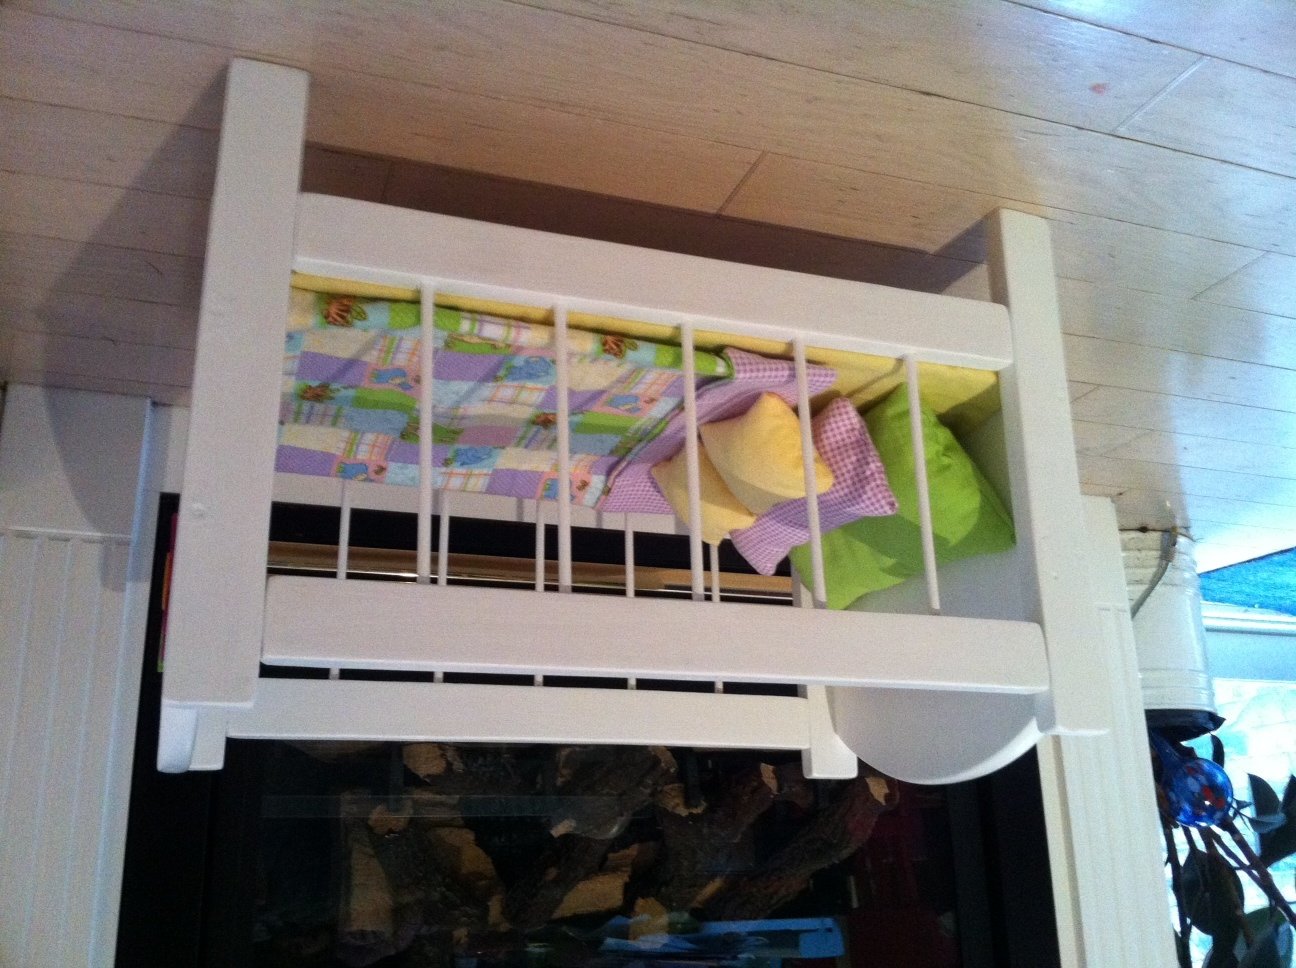
I made this as a birthday present for my two year old neice. It was really easy to make even for a beginner like myself. My five year daughter has been asking me every day if I would make her one "just like it" for her dolls, so I guess I know what I'm doing this weekend!
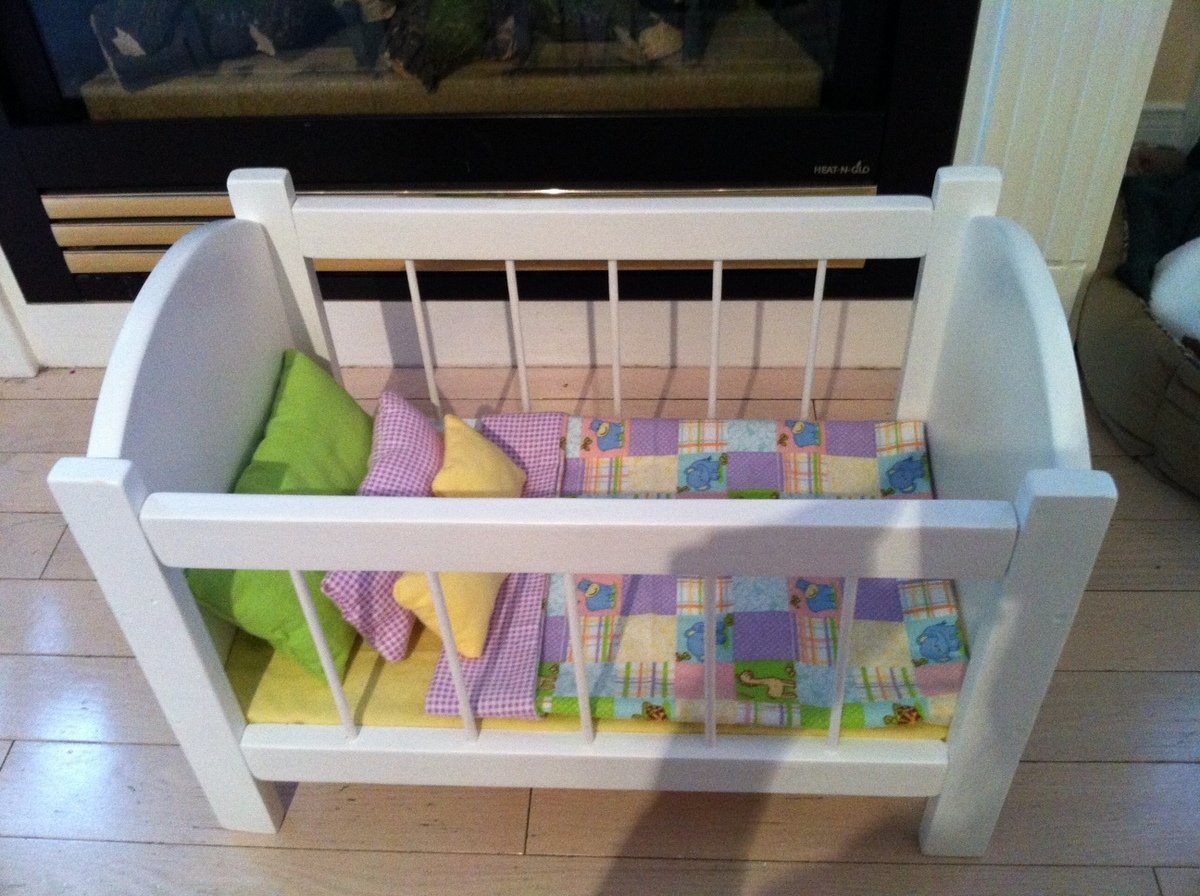
Built from Plan(s)
Estimated Cost
$41 (wood, paint, and fabric)
Estimated Time Investment
Afternoon Project (3-6 Hours)
Recommended Skill Level
Beginner
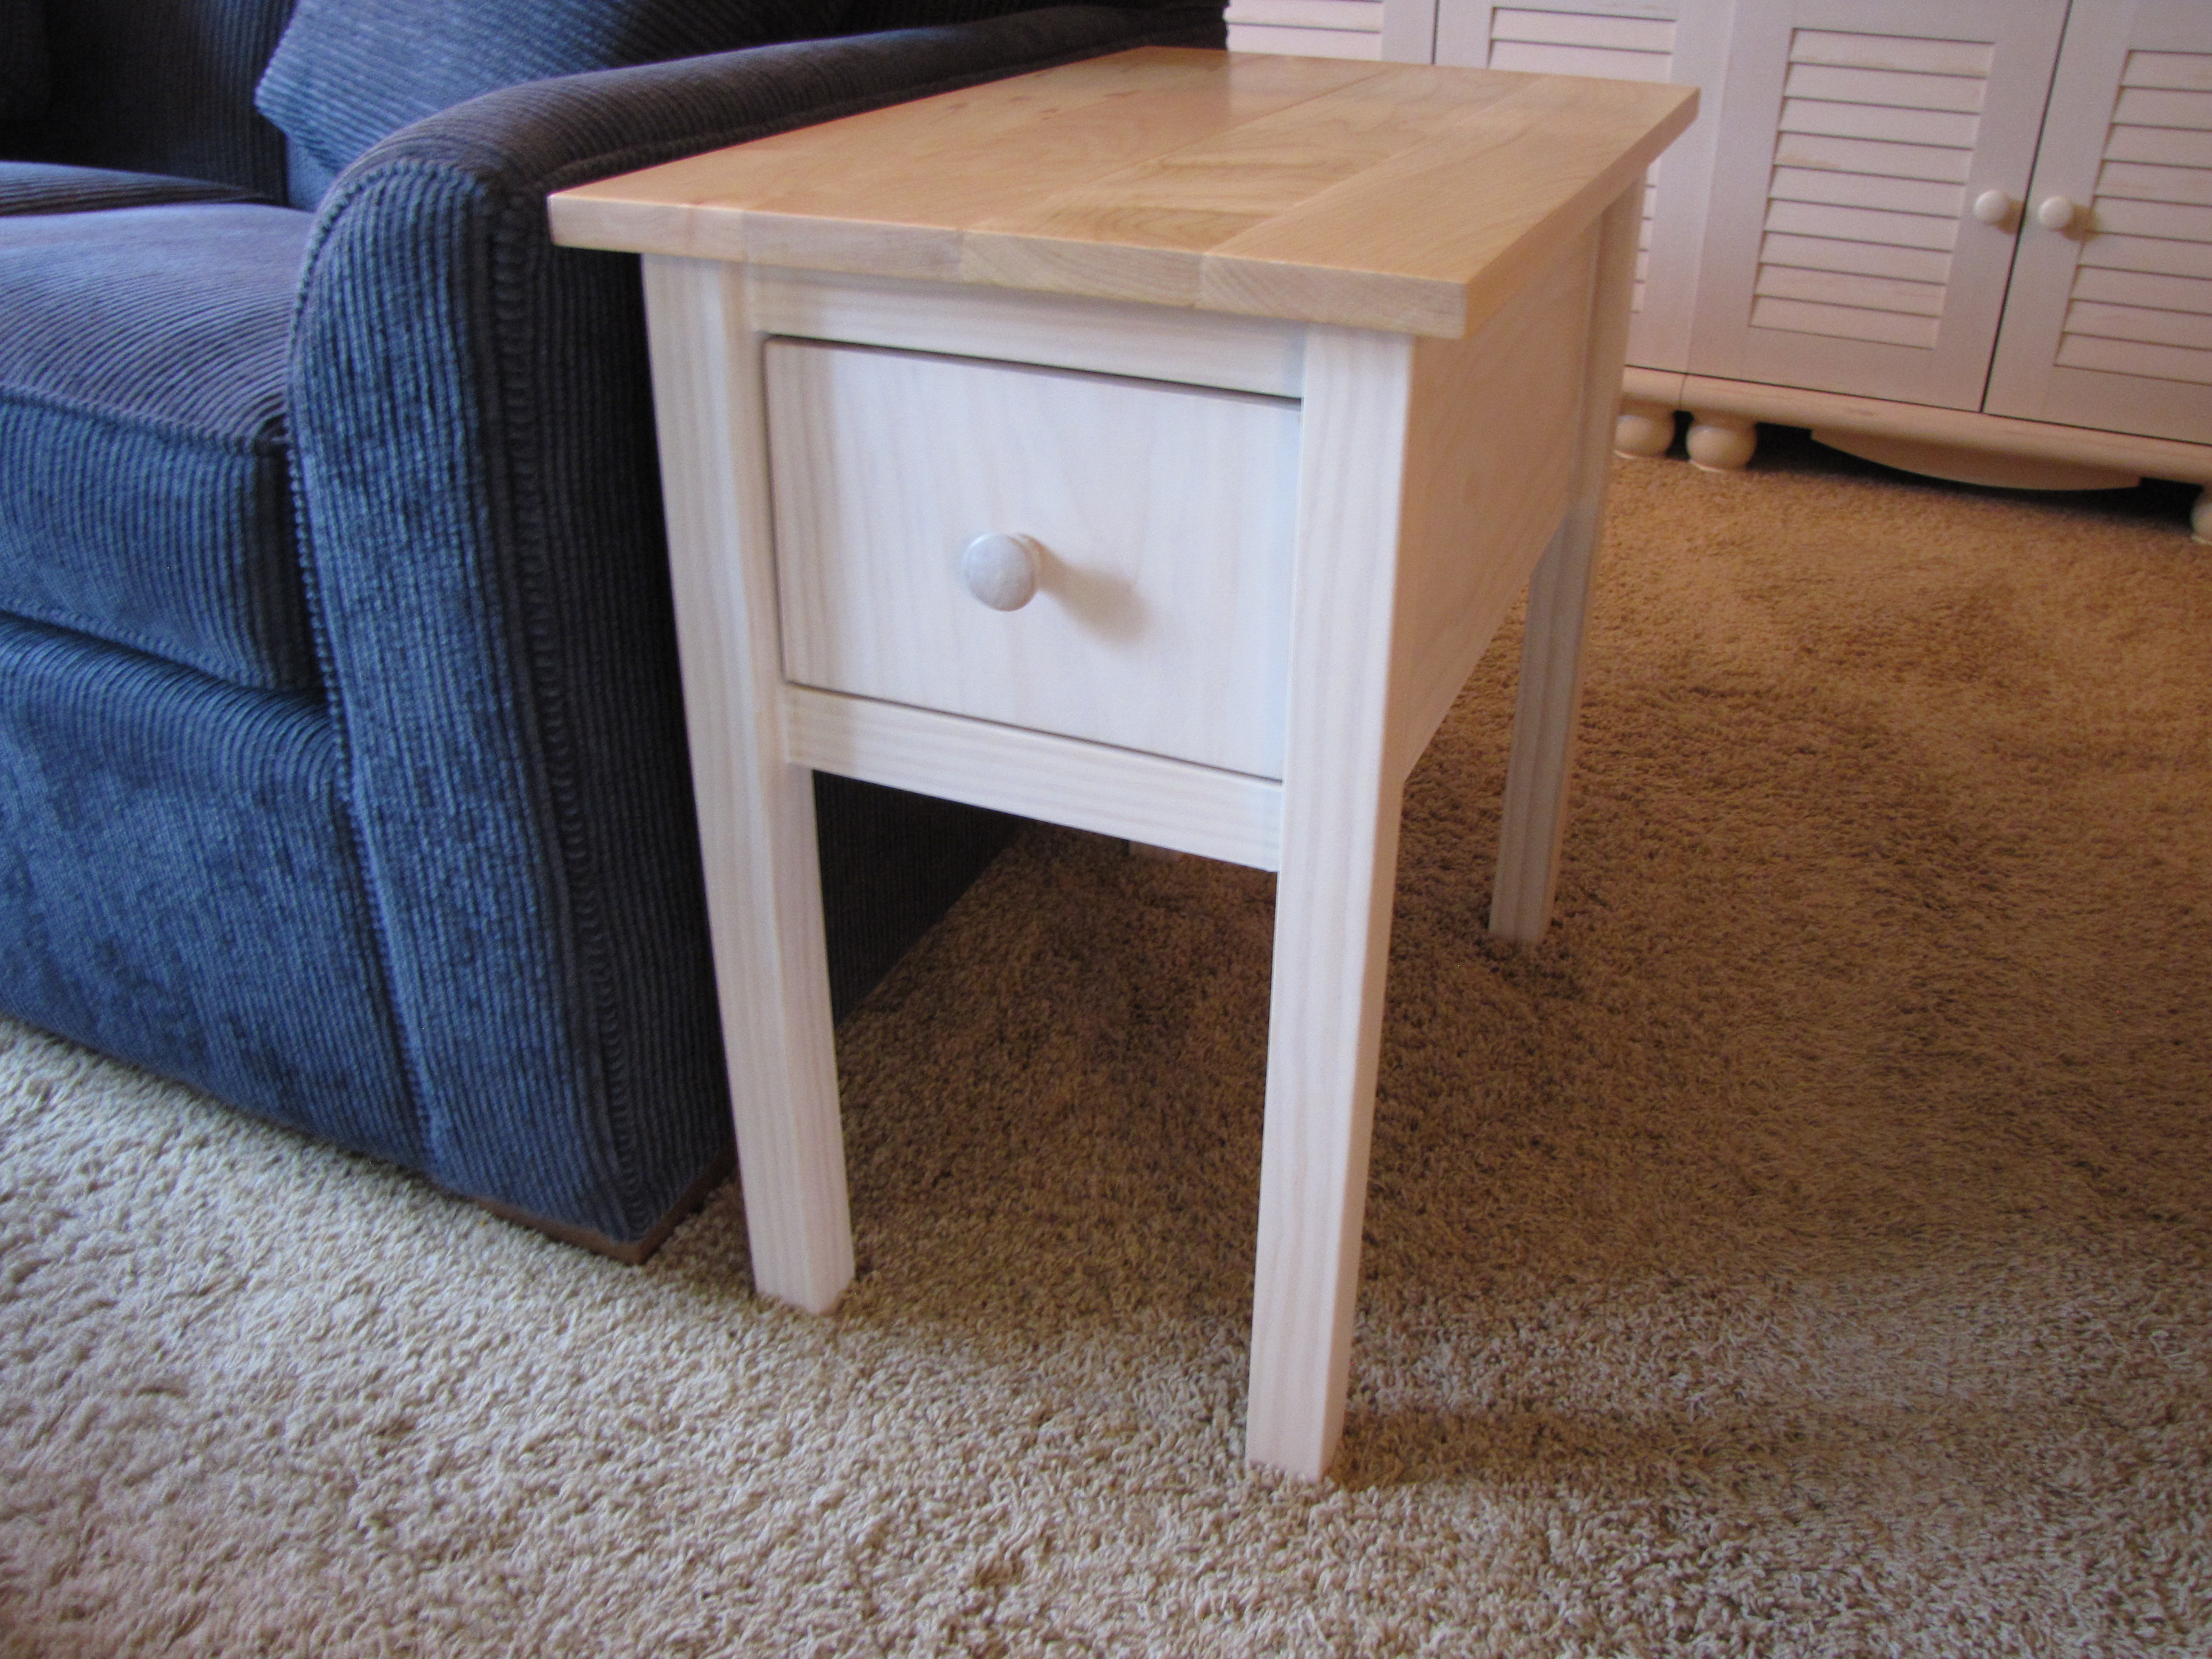
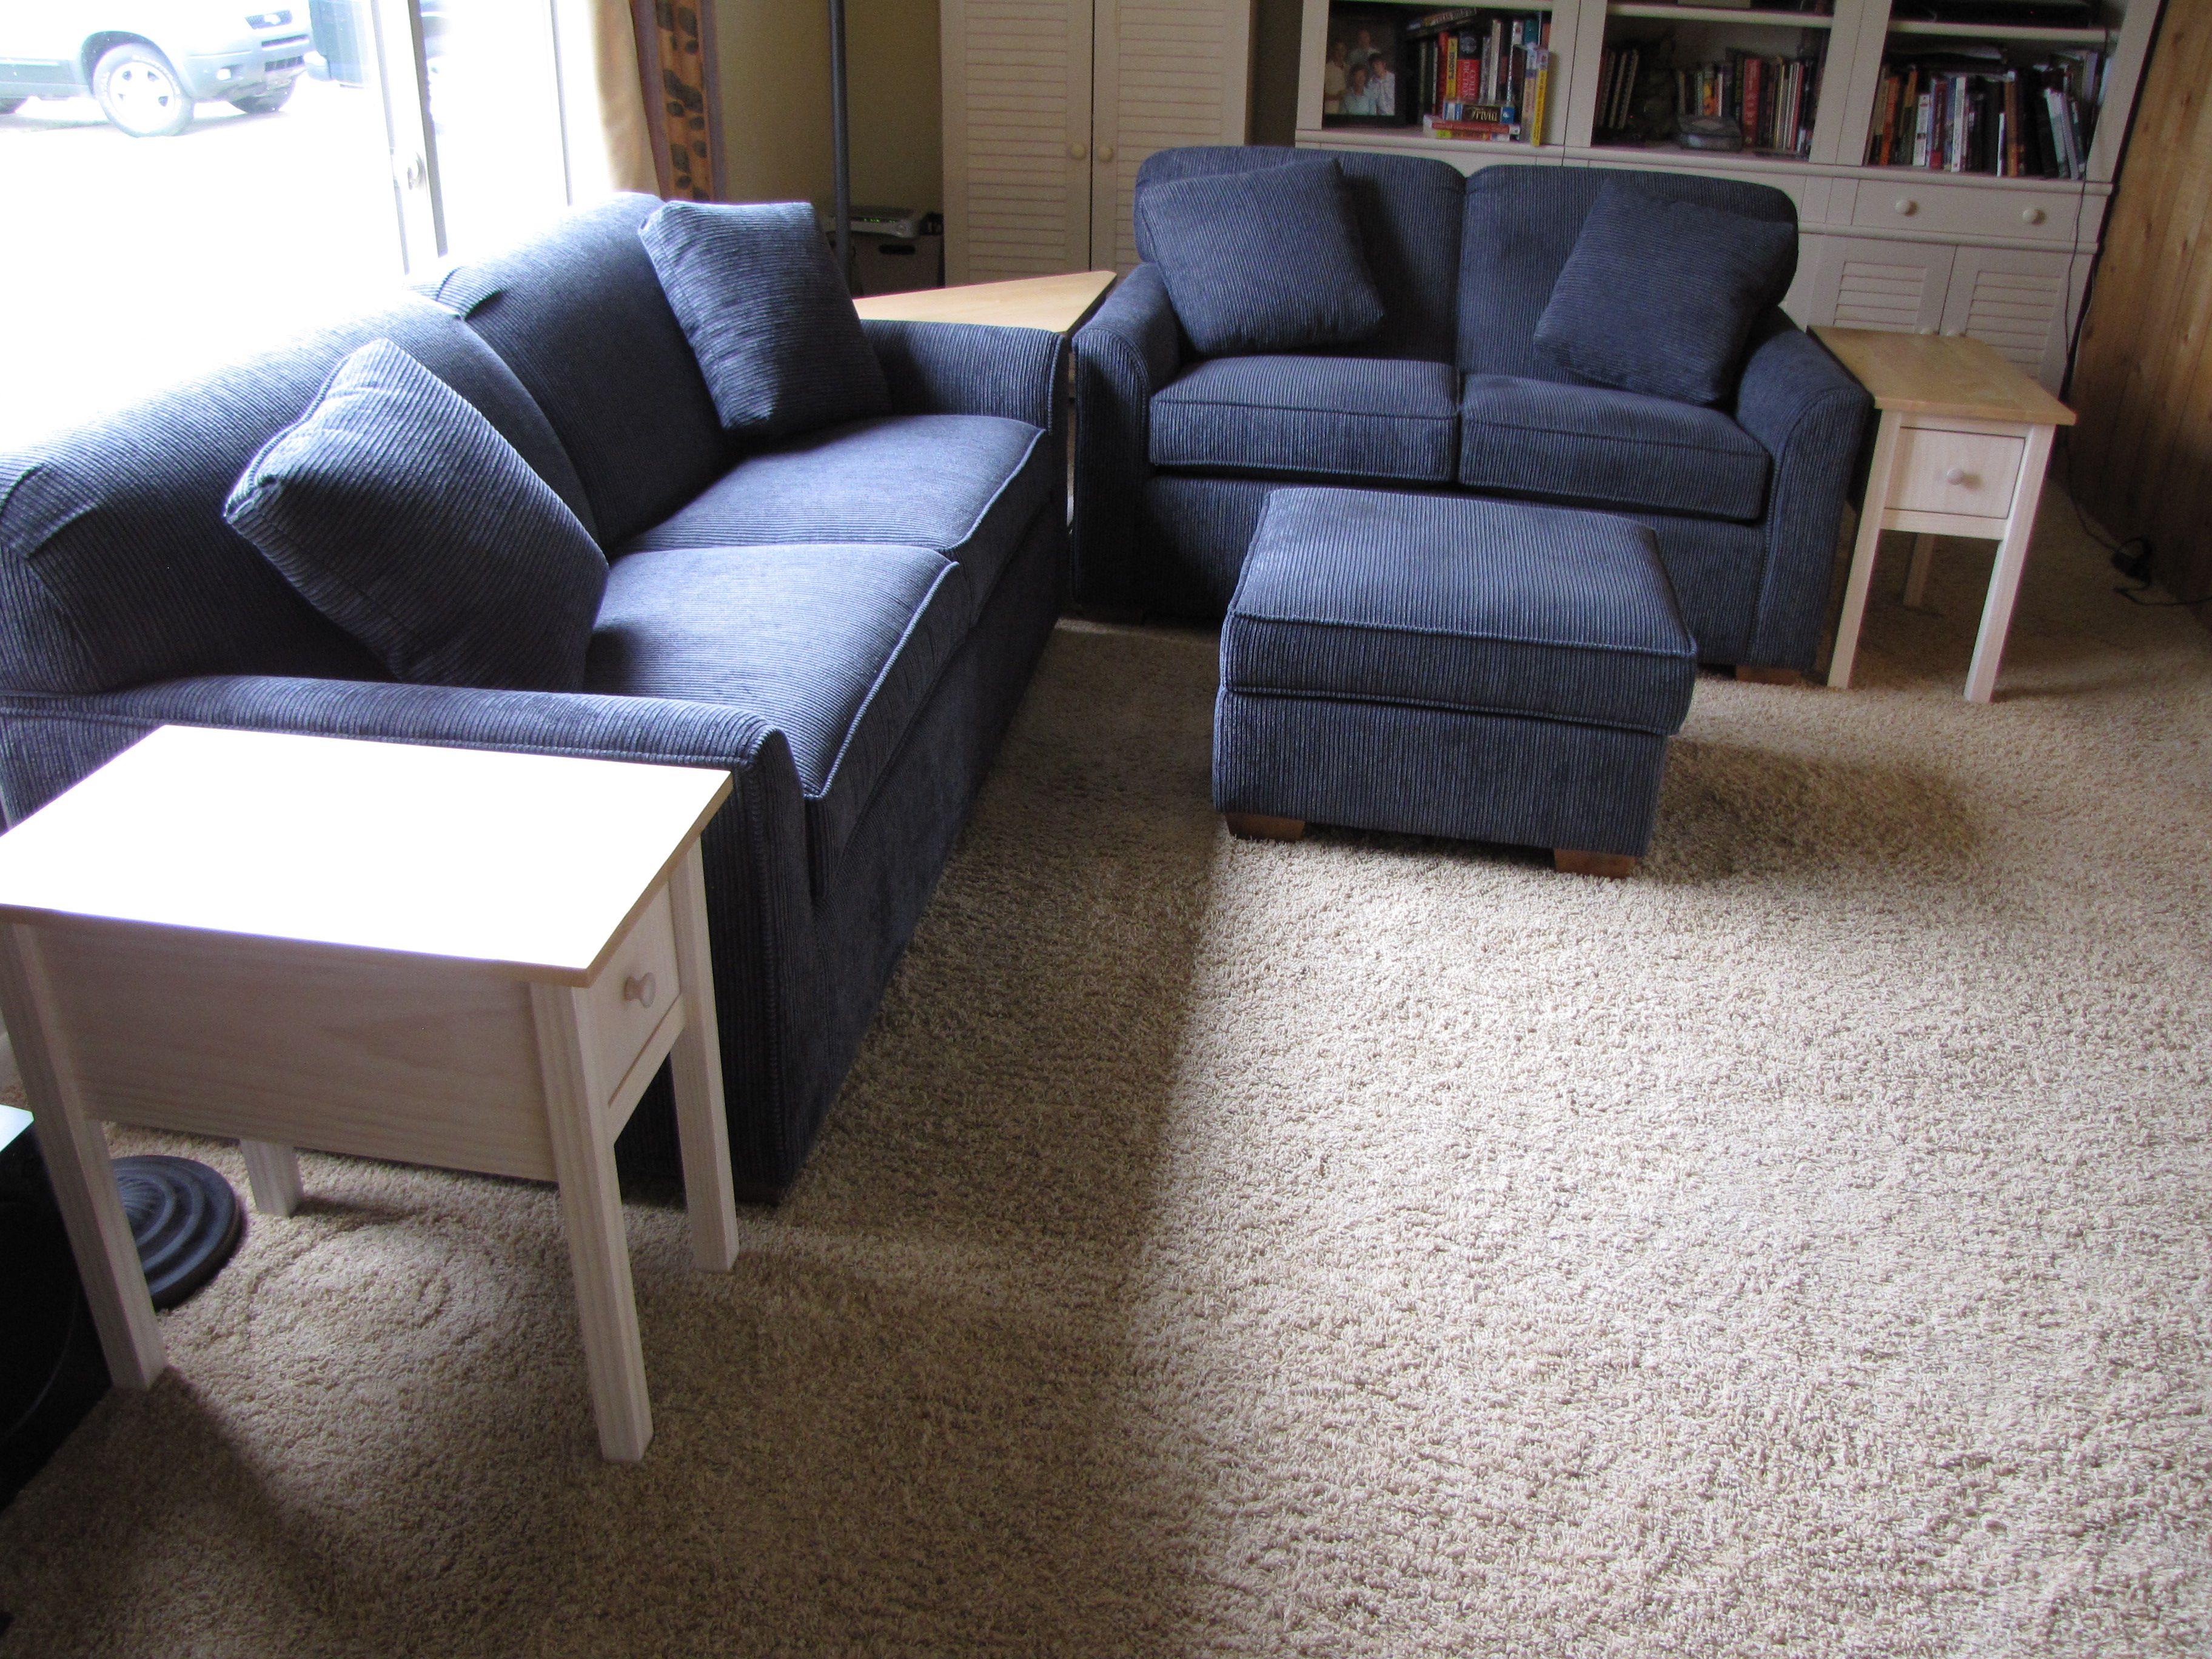
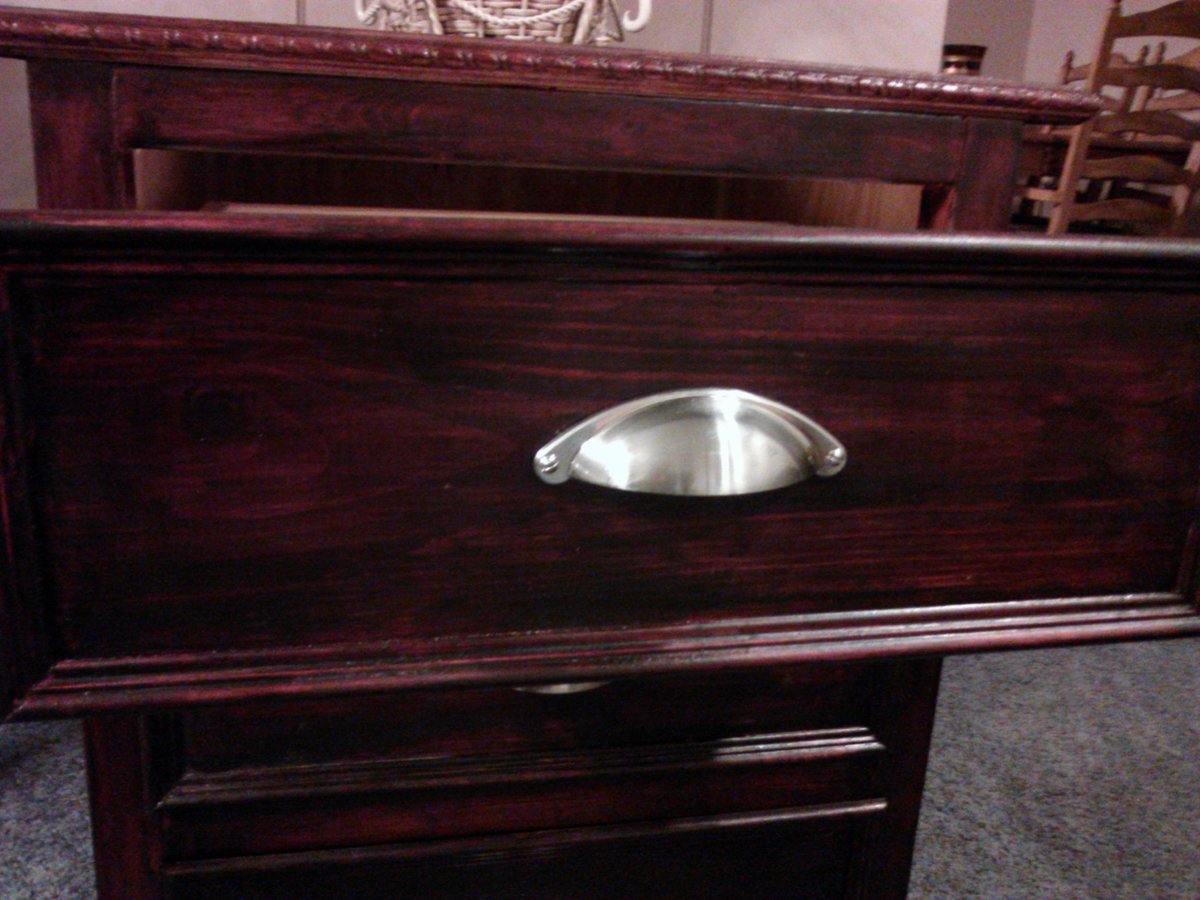
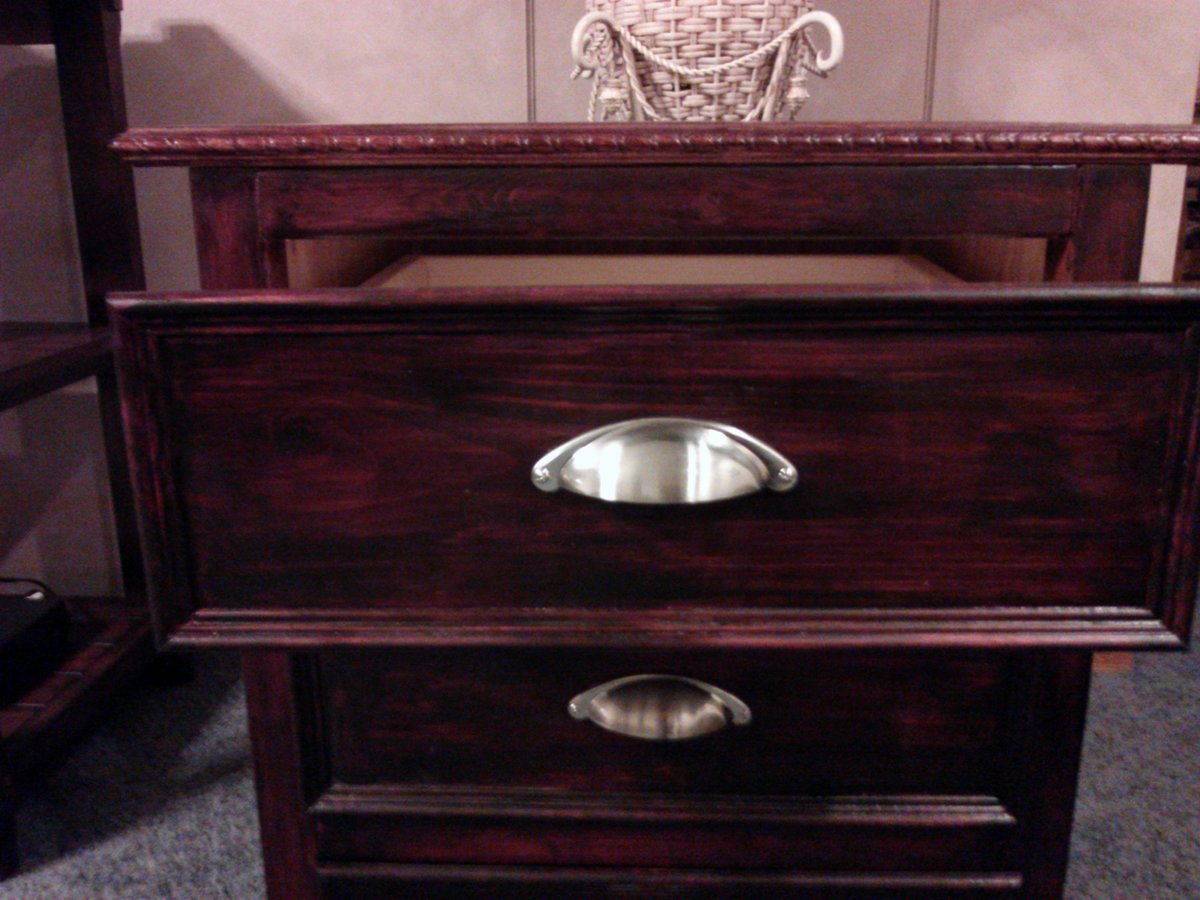
Debbie's Nightstand
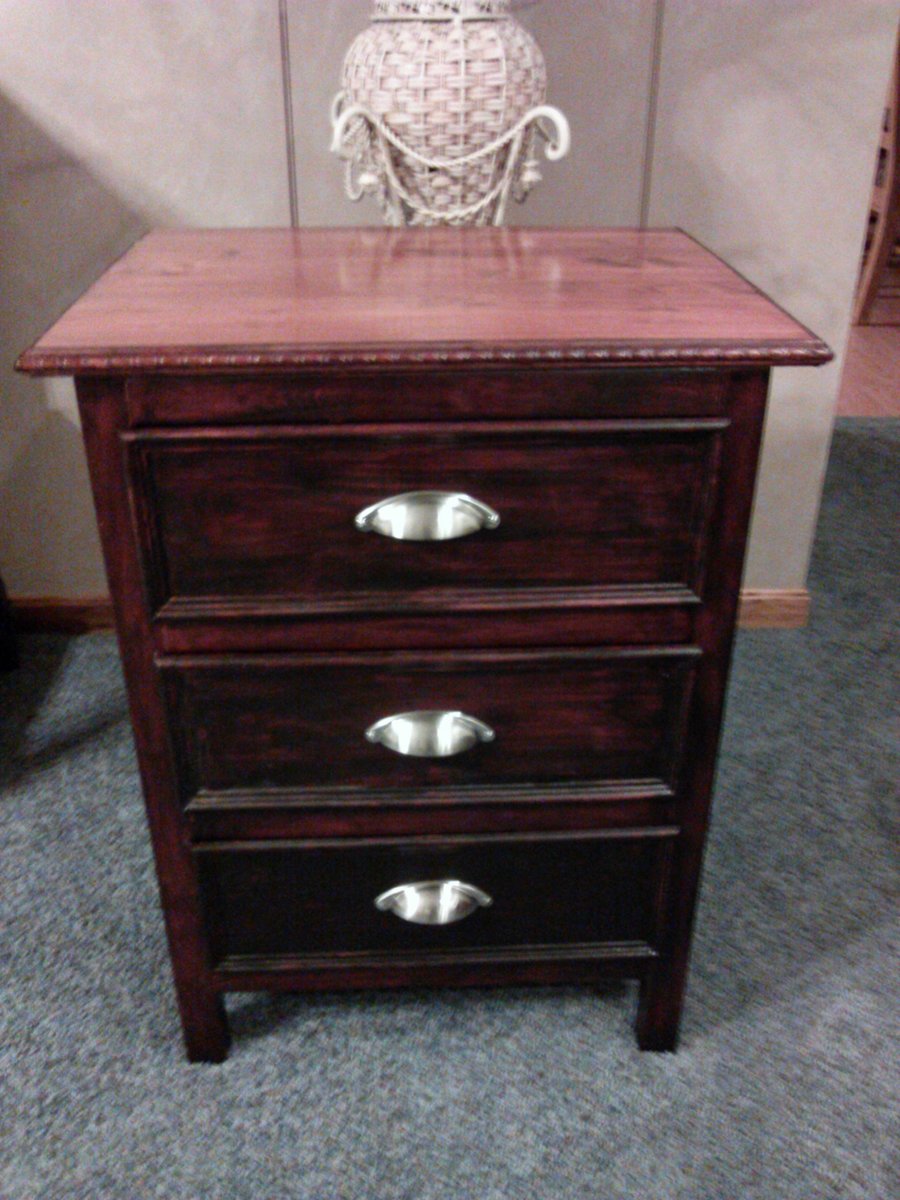
This stain color photographs blotchy looking. It does not look that way in person........
I used beadboard for the sides because I had some left over. I'm glad I did. I really like the way it looks. I also used trim on the outside of all the drawers. It really gives it a polished look. You could also use it if you have uneven gaps where the drawer slides in.
One other thing I did was use a solid piece for the top. I wanted it to be a smooth surface. I then trimmed the top piece with trim that I used on the Fancy Farmhouse Bed I made. I wanted to tie the two pieces together.
I've never made anything with drawers before. It is a bit more challenging, but not that bad if you are careful. However, I am not looking to build anything with drawers again for awhile :>}
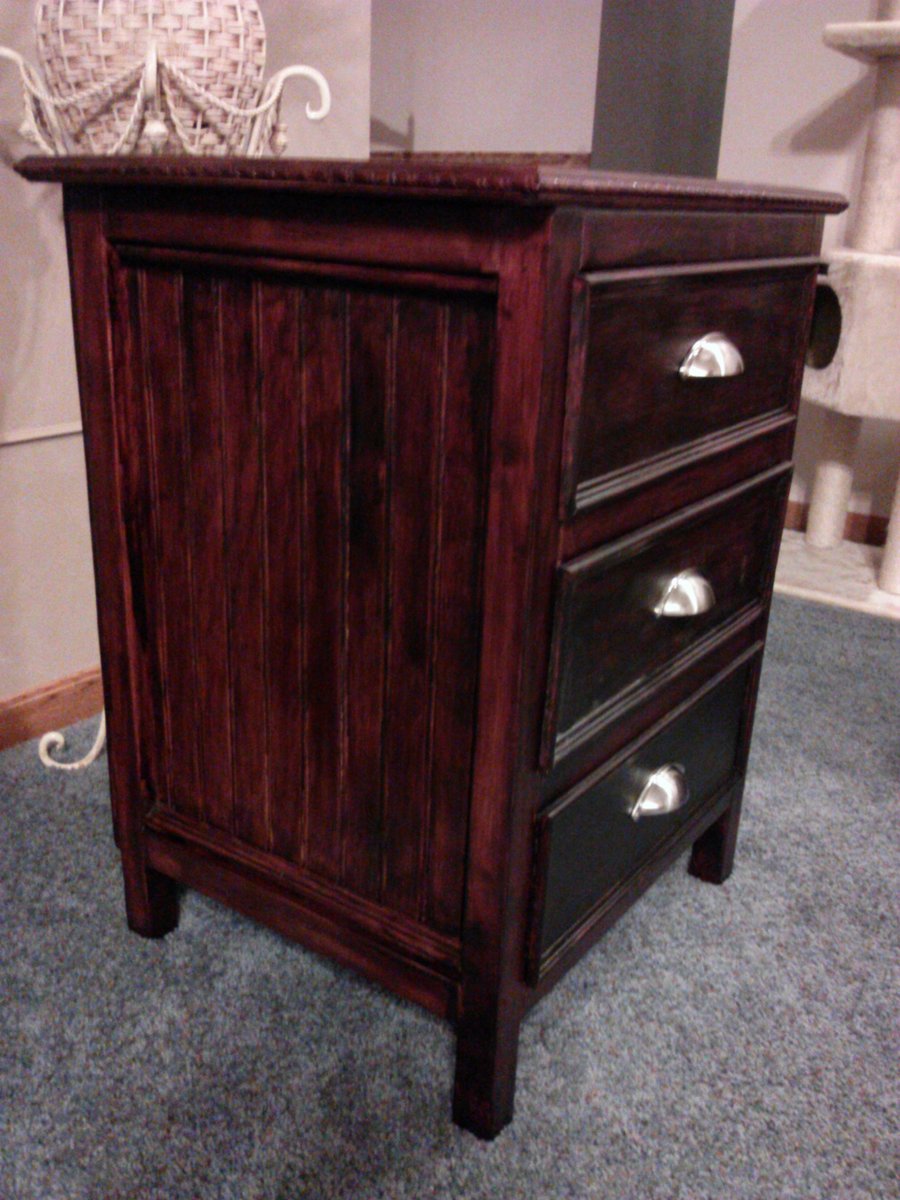
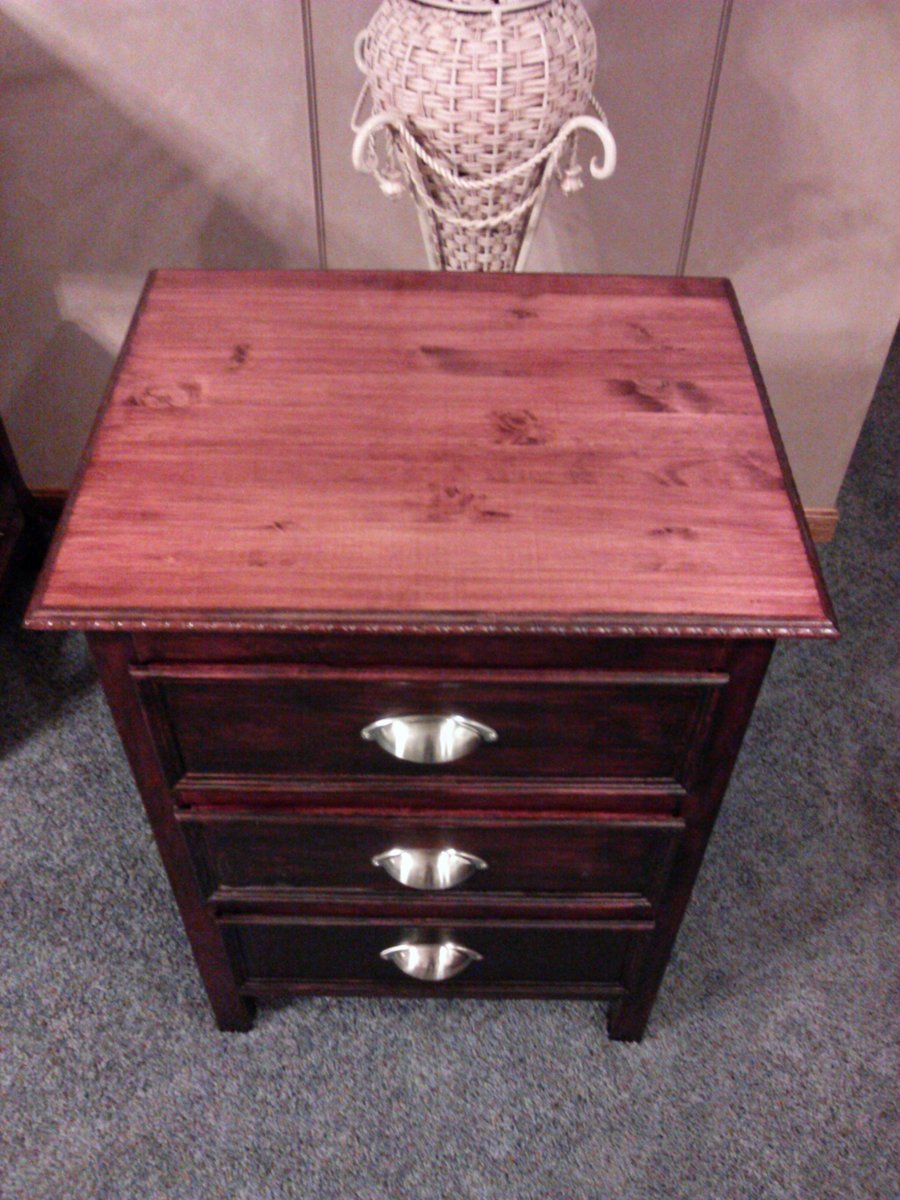
Built from Plan(s)
Estimated Cost
approx. $75 (drawer slides were $6 each, handles were $3.50 each, trim pieces are what really added to my costs)
Estimated Time Investment
Weekend Project (10-20 Hours)
Finish Used
Minwax Polyshades Bombay Mahogany Satin
Recommended Skill Level
Beginner
Comments
Sat, 02/01/2014 - 09:56
$75 Wow!!!
Pretty cheap and all wood. When we bought my daughter's bedroom set,her nightstand cost us an extra $160,and its cheap mdf with an extremely thin wood laminate over it. Wish I had found Ana's site before we purchased it,could have saved a ton and built a bedroom set out of real wood.
Superb job on the nightstand,really like the way the trim u added came out!!
Wood Handrail Banister

Naturally we based our plans on the space and the railing we needed. But it was easy to do once we had the vision and the supply list Ana White provides.
Built from Plan(s)
Recommended Skill Level
Intermediate