Community Brag Posts

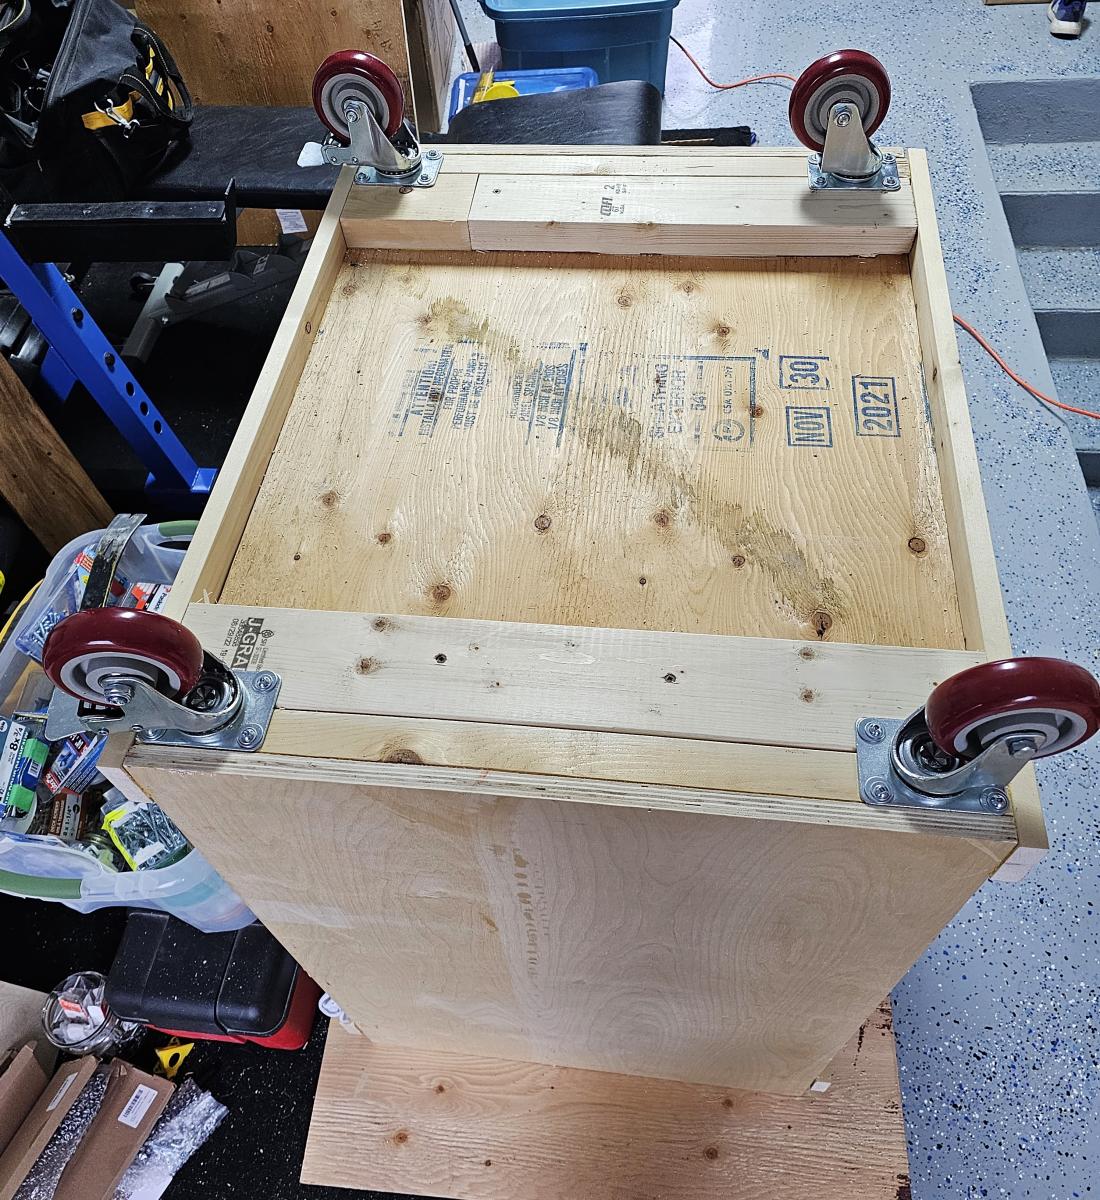
Rolling Miter Saw Stand

Submitted by Anonymous (not verified) on Mon, 11/13/2023 - 08:34

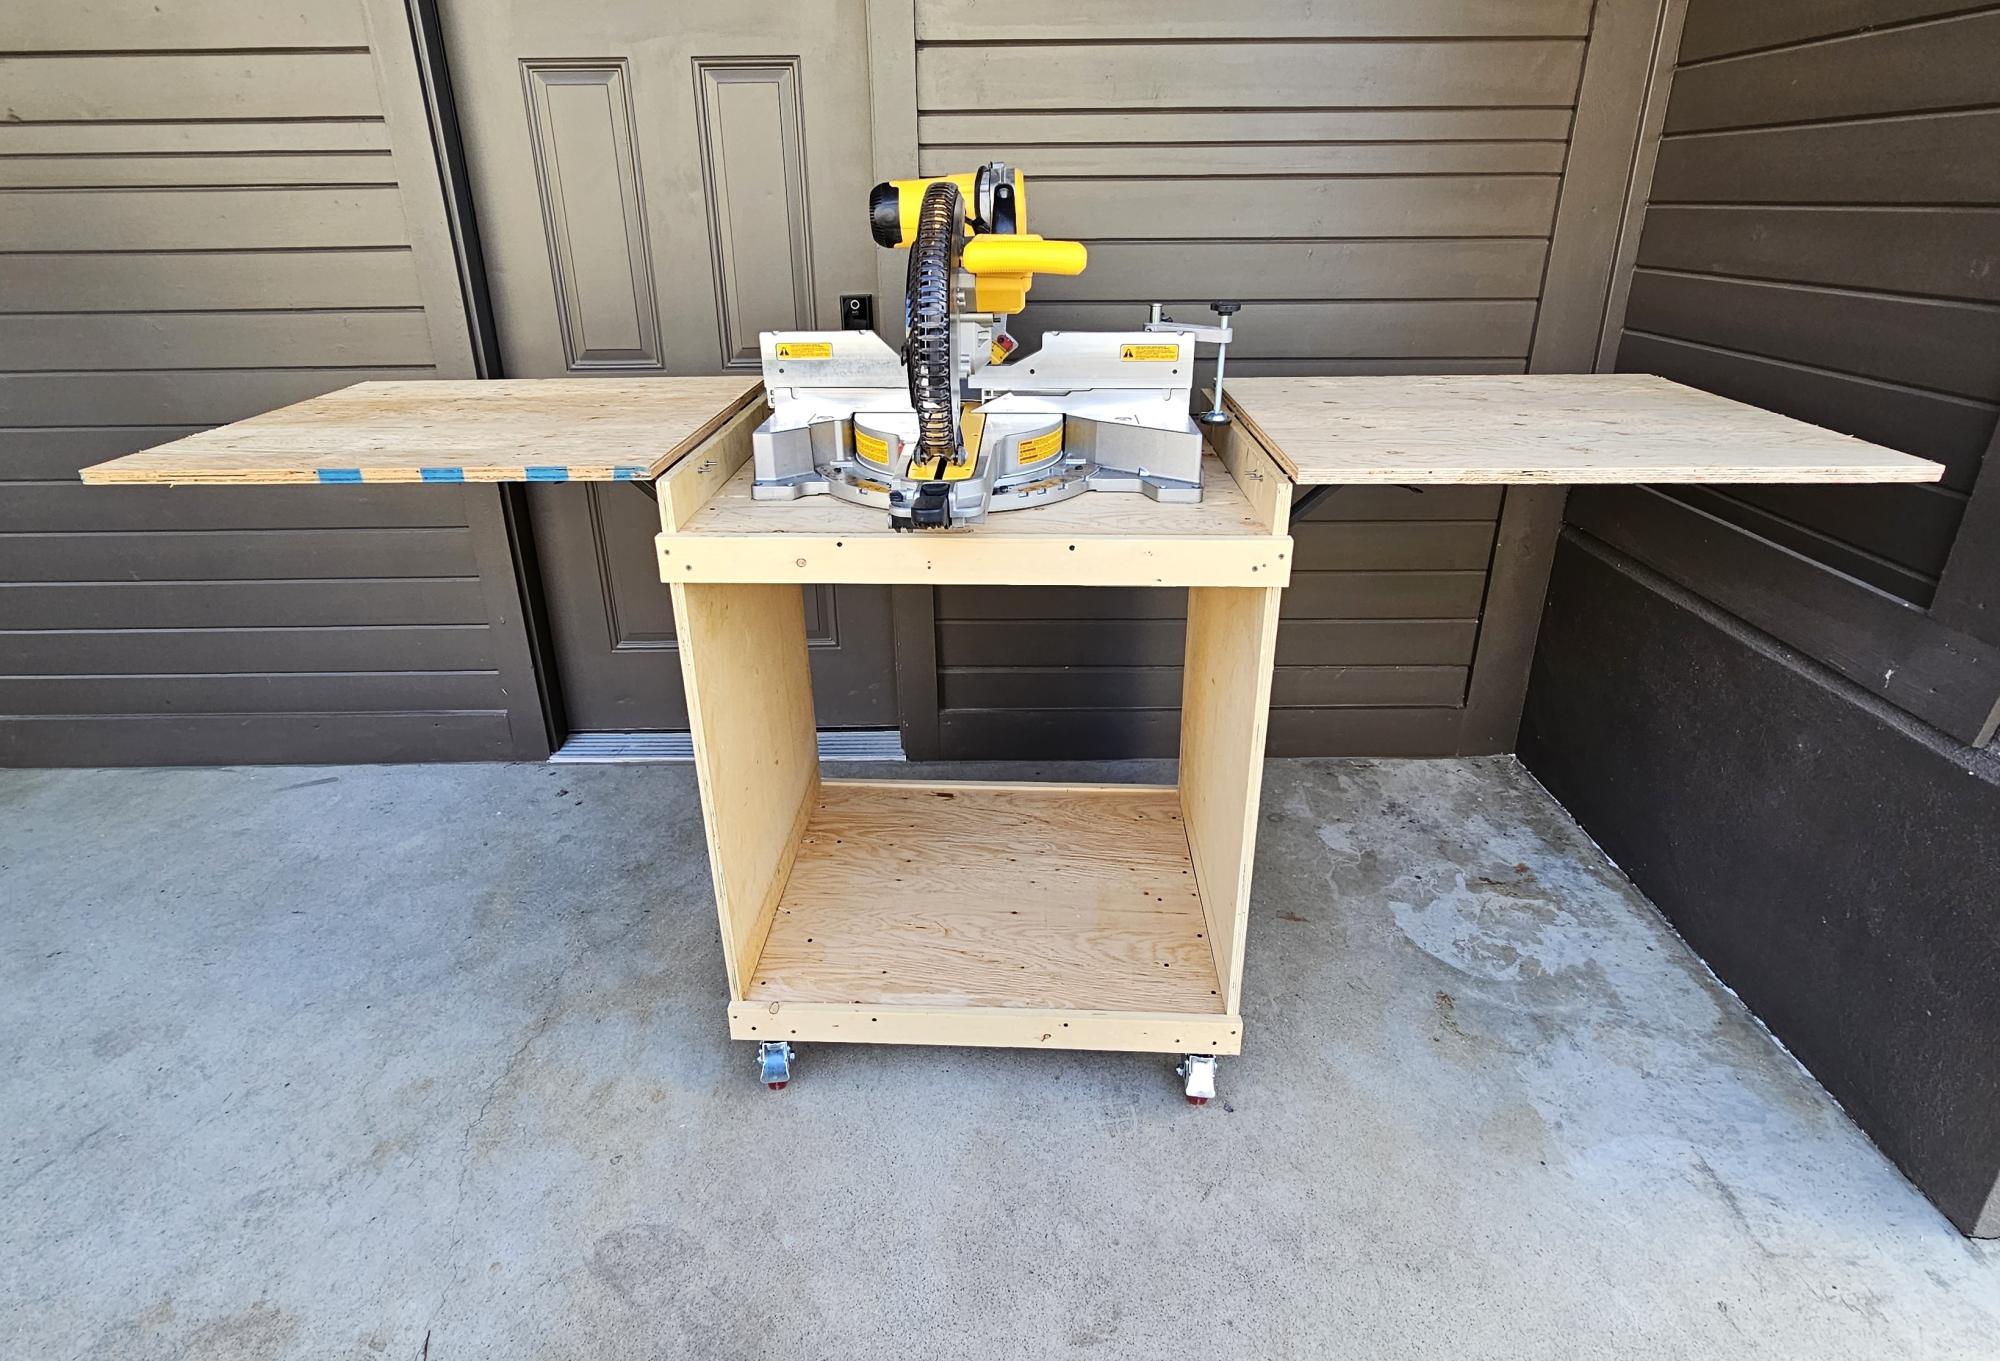
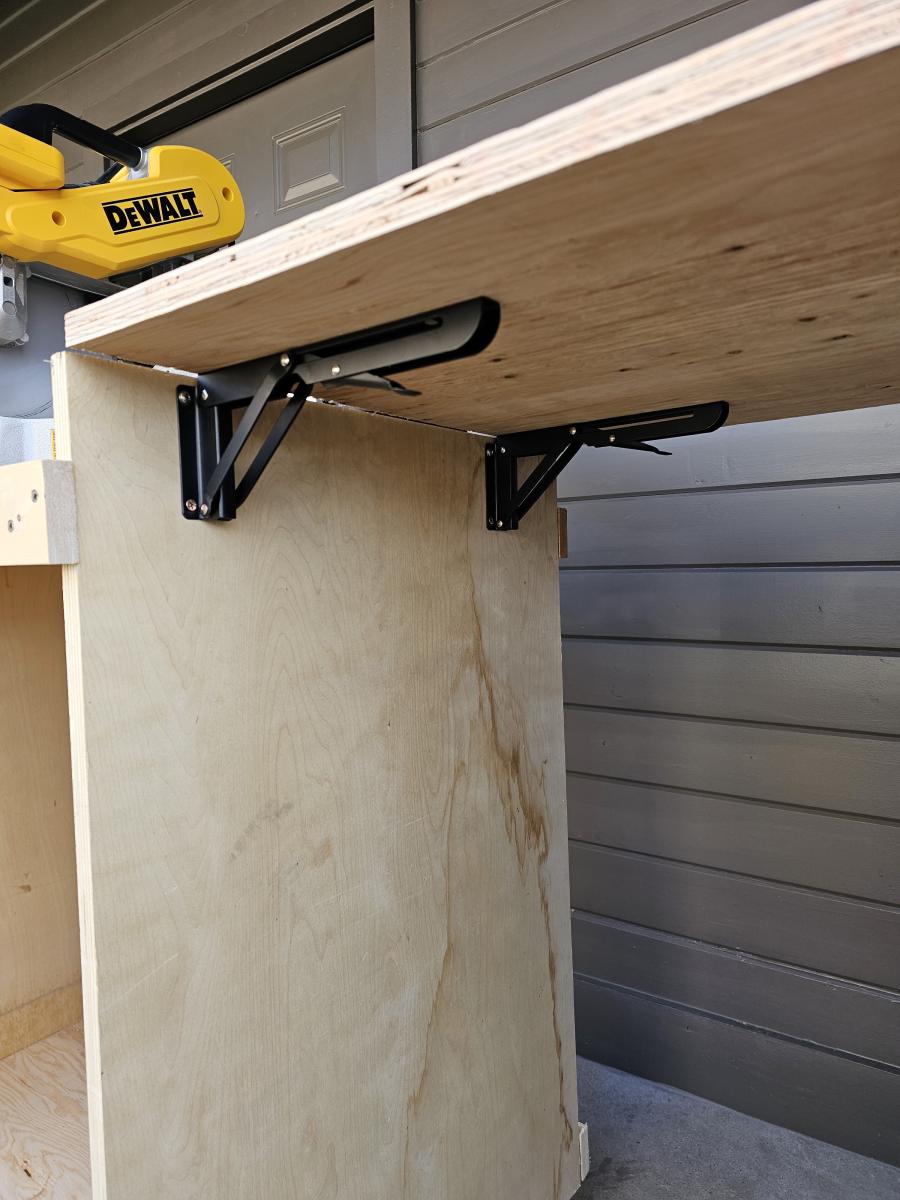
I pretty much followed the plans exactly as provided. The folding brackets I used are supposed to be heavy duty and able to handle up to 100 lbs. per pair of brackets. We'll see how they do. If needed, I might add the 2x2 or 2x4 braces I've seen many others do on here. It's nice to finally have my mitre saw off of my workbench.

These are the brackets and wheels I used.
https://www.amazon.ca/gp/product/B08PVFJ87Y/ref=ppx_yo_dt_b_asin_title_…

https://www.amazon.ca/gp/product/B093FQVV8P/ref=ppx_yo_dt_b_asin_title_…


Built from Plan(s)

outdoor sofa

Submitted by Anonymous (not verified) on Fri, 06/10/2016 - 16:15

This is the first thing i have made using 2x4's. the plans were very easy to follow. it cost me approxmently $100.00. I made the stripe pillows from fabric i have had.  

Estimated Cost
$100.00
Estimated Time Investment
Afternoon Project (3-6 Hours)
Finish Used
none
Recommended Skill Level
Starter Project

Comments

A-Frame Chicken coop

I built this chicken coop/tractor a few years ago, for my cousin. I loved the ease of the plans and the build, and she loved the hens in her backyard!

Built from Plan(s)
Estimated Cost
$150 CAD
Estimated Time Investment
Day Project (6-9 Hours)
Recommended Skill Level
Beginner

Sawhorse Table

Submitted by RHgaijin2 on Sat, 04/25/2020 - 20:48

I made this table for my two boys to do their homework on so I modified it a little to make it shorter.
I used reclaimed 2x4's for the base and MDF for the table top.

Built from Plan(s)
Estimated Cost
$40
Estimated Time Investment
Day Project (6-9 Hours)
Finish Used
black stain, white paint, polycrylic
Recommended Skill Level
Beginner

Poolside Hightop Deck Chair

I have used so many of Ana's plans, I decided to design my own chair! I wanted a high top patio style chair that the back was angled and had a footrest. This is perfect for my outdoor patio. I think I need to update the plan already to include a cup holder! Appreciate any feedback or comments.

Estimated Cost
$50
Estimated Time Investment
Afternoon Project (3-6 Hours)
Finish Used
None
Recommended Skill Level
Beginner

Farmhouse Stair Railing

Submitted by Anonymous (not verified) on Wed, 01/03/2024 - 08:44

We built our house 5 years ago and I’ve disliked our stairs since then. They were never finished and were big and bulky compared to the rest of the house. These plans were the perfect fit. We switched the top 2x4 for an actual handrail, purchased from a big box store. We used pocket holes to install it and I couldn’t be happier. It’s now my favorite thing in the house. We plan on adding a loft and will use these plans for the railing.

@livingsmallerintheholler


DIY Linen Cabinet

Submitted by Anonymous (not verified) on Mon, 01/08/2024 - 10:07

My husband and I built the Hemnes Linen Cabinet for our daughter and it turned out beautifully! Thanks for the plan, Ana.

Cheryl

Built from Plan(s)

Comments

Alden's two tone X book case

Submitted by Anonymous (not verified) on Sun, 08/14/2016 - 10:37

I built this book case for one of my Kids that wanted a new book case.

Estimated Cost
estimated cost $75,
Estimated Time Investment
Week Long Project (20 Hours or More)
Finish Used
rustic Mahogany wood stain (gel), apply Lacquer finish for additional protection and glossy finish.
Recommended Skill Level
Intermediate

Garden Enclosure

Submitted by Anonymous (not verified) on Mon, 03/04/2024 - 09:33

This is our riff on your plans. Two seasons in and not a single animal has breached our fortress.


Jan Perrone Greco on Facebook

Built from Plan(s)
Seasonal And Holiday

Simple Outhouse

Submitted by Anonymous (not verified) on Thu, 06/18/2020 - 13:45

We used the plans from the Simple Outhouse to make a space to hold our porta potty. The door is a repurposed barn door and I think it looks amazing! These plans were perfect for us as we were able to build it in panels and reassemble on our property by the lake. Some screened windows to allow for ventilation and light were the finishing touches. Thanks Anna for the simple to follow plans!

Built from Plan(s)
Estimated Cost
$200 Canadian
Estimated Time Investment
Weekend Project (10-20 Hours)
Finish Used
We used pressure treated wood for the base and deck. For inside, we repurposed some scraps of composite decking. Painted with exterior latex "driftwood".

Eagle Scout Project - 6 Outdoor Garden Benches

Submitted by Anonymous (not verified) on Wed, 04/17/2024 - 07:53

We found your great plans and site online.  My son, Michael made 6 Garden Benches for his Eagle Scout Service Project and donated them to the local Master Gardener’s Association.

They turned out beautiful!

Thank you for sharing your plans. We’re looking forward to building more of your projects!

The Taylors

Built from Plan(s)

Kentwood Bookshelf

Submitted by jcschmidts on Tue, 09/04/2012 - 19:50

This is our first woodworking project! My husband and I decided to build a bookshelf because my old store bought flimsy bookshelves didn't make it into our new home. They completely fell apart. Needless to say, with 16 boxes of books sitting in our bedroom, we were well motivated to build this bookcase!

Estimated Cost
$84
Estimated Time Investment
Day Project (6-9 Hours)
Finish Used
Minwax Kona
Recommended Skill Level
Beginner

Comments

spiceylg

Wed, 09/05/2012 - 06:04

Great job, especially for a first build! Welcome to the community!

12 year old built her bed!

Submitted by gmktt on Wed, 07/08/2020 - 20:01

Thanks Ana White for the awesome plans! My daughter decided she wanted a new bed, so I told her I’d help her build one. I am not a carpenter, by any stretch, but I thought it would be some good dad/daughter bonding time. She tweaked your plans, did all the cuts, drilling, sanding, and painting (well, most of the sanding and painting anyway), and tolerated her father with great grace. It turned out pretty well. We couldn’t have done it without your plans! Thanks again! —Gabe

Built from Plan(s)
Estimated Cost
$600.00
Estimated Time Investment
Week Long Project (20 Hours or More)
Finish Used
White semi-gloss interior latex.
Recommended Skill Level
Beginner

Comments

Farm Style Table

Submitted by Anonymous (not verified) on Wed, 10/26/2016 - 07:14

My boyfriend and I made this farm style table based on plans from Ana's site. We LOVE it. We wanted it to appear rustic with natural woods tones so we used Special Walnut Stain, Poly, and Light Brown Briwax. Even though it looks raw, its silky smooth to the touch. 

Thanks for posting these plans! We already on to our next project. We have the wood purchased for the rustic coffee table and console table, and I have my eye on the farmhouse bed frame and a set of night stand tables. 

Kate

Estimated Cost
$100 for the wood. We had all the tools already.
Estimated Time Investment
Week Long Project (20 Hours or More)
Finish Used
Special Walnut, Poly Gloss, and Lt. Brown Briwax.
Recommended Skill Level
Beginner

Murphy Bed - queen

Submitted by fielden_m on Mon, 10/08/2012 - 08:15

Taking the plans for the full sized Murphy bed (http://ana-white.com/2010/03/plans-a-murphy-bed-you-can-build-and-affor…) I added a few inches to convert to a queen and raised it off the floor 5 1/2 inches with removable fence post toppers.

The yellow head board lifts up and stores inside the frame when up. If I had it to do over again, I would sand and paint as I built. Thanks to Ana, I now have a guest room!

Estimated Cost
$150
Estimated Time Investment
Week Long Project (20 Hours or More)
Finish Used
wood was sanded, primed and painted
Recommended Skill Level
Intermediate

Comments

Cindy from Indiana (not verified)

Mon, 10/08/2012 - 11:13

Holy smokes! Great job! I just got my early birthday present - a Kreg Jig Master System!!! One of the first things I will be building is a murphy bed, so thank you for the inspiration.

It looks great!

nasrockswell

Wed, 04/24/2013 - 19:55

I love your adaptation of Ana's plans. Would you be willing to share the dimension for the queen murphy? Thank you!

fielden_m

Fri, 07/26/2013 - 18:51

I fudged the plans by adding to the width and height to make up for the change in bedding but also for the hinges and detachable feet. Measures will differ based on your hinges and feet.

vgb777

Mon, 04/29/2013 - 14:32

I am wondering what king of hinges you used for the bed. Did you use continuous (piano) hinges or regular door hinges? How wide are they? I am not sure what the acceptable width for the hinges is to be safe. Thanks.

fielden_m

Fri, 07/26/2013 - 18:47

I used 3 5" gate hinges. They are thick enough to leave a gap of 3/8" between my base and the part of the bed that swings down.

phelan1202

Wed, 06/12/2013 - 16:35

What were the altered measurements and exactly how did you raise it? I really like Anas plan except that the mattress was so close to the ground. I want to make this for my apartment and I'm painting the outside like a tardis. (:

fielden_m

Fri, 07/26/2013 - 18:50

I raised it 5 1/4 " using fence post toppers from home depot. The fence post toppers unscrew for upright storage. You could leave them in for a more dramatic look but I liked the cleaner lines with them out until needed

intrigued89

Sat, 11/02/2013 - 15:33

Would you be willing to share the dimensions you used when building your queen murphy? Even if they aren't exact, it would be such a big help to me!

rfpeterlin

Sat, 12/28/2013 - 03:33

That is definitely an attractive and well finished project. I am interested in how you finished the legs. I see in the second picture (bed in closed positions) where the toppers may have attached. Where do you store them?

fielden_m

Sat, 12/28/2013 - 22:56

In that same picture, if you look at the bottom 6 inches of the closed bed (under the hinge) there is a storage section where I hide the legs when the bed is raised. It is otherwise dead space and made for an easy storage conversion at the last minute.

Ben Childs

Sun, 01/10/2016 - 17:02

Can someone please help me I see this can be adjusted for a queen size bed. I don't know how to adjust the measurement to make it work. 

Ben Childs

Sun, 01/10/2016 - 17:04

Can someone please help me I see this can be adjusted for a queen size bed. I don't know how to adjust the measurement to make it work. 

Simple Modern Outdoor Sectional

This project my husband and I started together. We live in a very damp and rainy area where cushions would just be more of a pain than a comfort outside.
We decided to add slats on the back so the sectional would stand alone without cushions.

Well, after the first corner piece, I got busy and every day my husband would add another piece to it.

I did do much of the sanding and painting. We sanded and painted these before assembly, made life tons easier.

It was white pine with out exterior house paint color. We really love them!
Thank you Ana!!!

Estimated Cost
$170
Estimated Time Investment
Weekend Project (10-20 Hours)
Finish Used
Behr Exterior Paint and primer in one.
Recommended Skill Level
Beginner

Modular office sewing/craft table

Submitted by Anonymous (not verified) on Thu, 07/25/2019 - 17:58

We built three base units-each with different storage options and used the corner desk plans. Then created our own long desk top using a 6ft long board and using a jigsaw to create an open space for the sewing machine. 

Estimated Cost
$300
Estimated Time Investment
Week Long Project (20 Hours or More)
Finish Used
Semi gloss paint-behr paint and primer in classic silver. Polycrilic semi-gloss top coat-3 coats with wet sand before final coat.
Recommended Skill Level
Intermediate

Comments

Kreg Jig work bench with with a twist (fish cleaning table for the beach)

Submitted by wlfpkhack on Wed, 12/26/2012 - 12:17

My inlaws were building a beach house on the coast of NC. After years of going to the beach for family vacation and always renting houses that had water access and boat access, but no where to clean fish when we would return from the pier or boat, I decided to embark on a mission. I was introduced to the Kreg Jig work bench plans and felt that I could adapt this plan into what I wanted to do. I used all pressure treated lunber (including the plywood) and stainless steel fasteners. This did increase the cost, but was necessary for the intended location. I purchased a slab of cutting board material from USplastics.com (24" x 48") and glued and screwed it to the plywood bench top. I then mounted a bar sink and faucet for cold water access and it can either be set up on a dock to drain directly back into the water, or a 5 gallon bucket can be placed below the drain, obviously it could be piped to the drain system of the house also. It came out great. Father in law loved it, and I can't wait to see it get good use.

Estimated Cost
$200 includes the cutting board, sink and faucet
Estimated Time Investment
Day Project (6-9 Hours)
Finish Used
Wood sealer
Recommended Skill Level
Beginner

Tilt Out Trash Bin

This was my first project using an Ana White plan....Modified it a bit...quite happy with how it came out...it was very low cost to make and a lot of fun.

Estimated Time Investment
Weekend Project (10-20 Hours)
Finish Used
Varathane Stain....Spring Oak
Recommended Skill Level
Beginner

My First Build -- the $55 Fancy X Desk

This was my first build EVER. I had never even used a saw before, so if I can do this, so can YOU!

The original plans call for this desk to be 72" in length, but my space only allowed for a 60" desk, so I cut the 3 braces that go along the back down by 12", as well as the 2x6s that make the desktop. The cross-braces in the back were also cut down, but I did that by measuring for fit (as demonstrated by Ana in one of her videos where she made the x-bench).

I described this as a weekend project ONLY because of the time I had to allow between coats of paint, etc. I built it easily in one day (with kids at home!).

This was a GREAT experience and I am HOOKED! Thanks to Ana and Shanty-2-Chic for designing this!

Built from Plan(s)
Estimated Cost
$35
Estimated Time Investment
Weekend Project (10-20 Hours)
Finish Used
I painted the base with flat black paint, and the top of the desk with Minwax Jacobean stain (primed with the Wood Conditioner first, and finished with the Polcyrilic Spray that Ana recommends).
Recommended Skill Level
Intermediate

Comments

Lianna (not verified)

Tue, 01/08/2013 - 08:27

I hope to build this desk this week! Your post timing is great! AND your end result is gorgeous!!!

berryrach89

Thu, 01/10/2013 - 19:31

I absolutely love this. I've been searching for a new desk and I think I want to copy yours. Love it.

Jodye (not verified)

Fri, 01/11/2013 - 00:35

Well done...I too have been contemplating giving this ago. Our out door glass table exploded due to the heat here in Australia on monday...never going glass again...did I mention the nightmare clean up job :-((
Im building the big version....Im excited..you did it so I can too!

Nesting Grill Station

I was tired of seeing my propane bottle on the porch and this project was a perfect blending of camouflaged storage with lots of potential countertop workspace. My grill station is smaller and shorter than the original plans to better fit our family size and the porch space we have available. My husband has a bandsaw mill. When he was milling boards this fall, I asked for some 1/2" thick planks just for this project. I also had the knobs and wheels leftover from past salvaging work. I have been trying my best to use up "stock on hand" during this pandemic. Though I spent some time sanding the rough cut lumber, it still absorbed lots of stain. I wanted two tones of color, so that's good, but I still had to mix two stains together to have enough for the lighter parts.

Now we are looking forward to some cold weather BBQ meals!

Estimated Cost
$10 for screws, all else salvaged.
Estimated Time Investment
Weekend Project (10-20 Hours)
Finish Used
I stained the wood before joining it together so the two shades of stain wouldn't run together. For the darker parts I used Minwax Red Mahogany. On the lighter parts I mixed Minwax Early American with Natural (because I was running out). After staining I put the table together and finished it with Minwax Polycrylic, until that ran out, then Bona Mega satin floor finish. I put three coats of finish, sanding between coats.
Recommended Skill Level
Intermediate

Comments

mamasue72

Tue, 07/04/2023 - 08:38

Love this size. My deck is small so this is perfect. Thank you for posting the brag😊👌