Community Brag Posts

Modified Camp Loft Bed

Submitted by akwebb3 on Tue, 08/03/2021 - 14:07

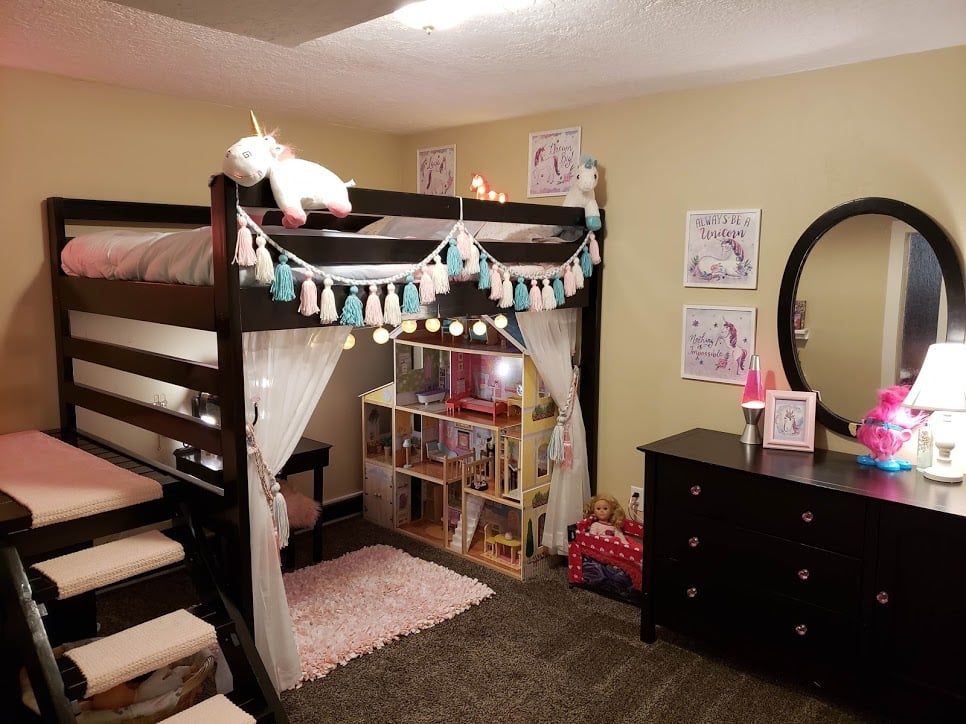
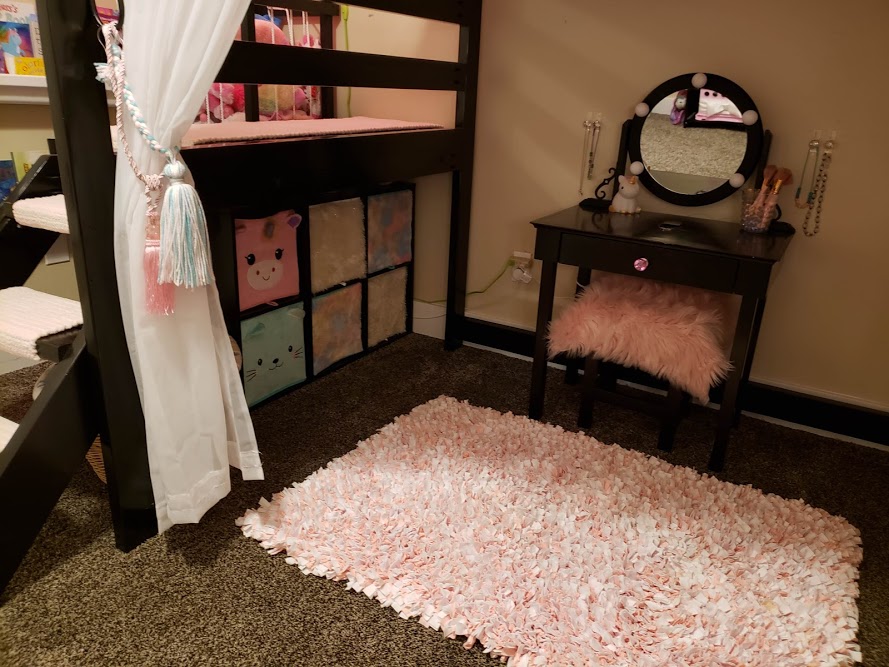
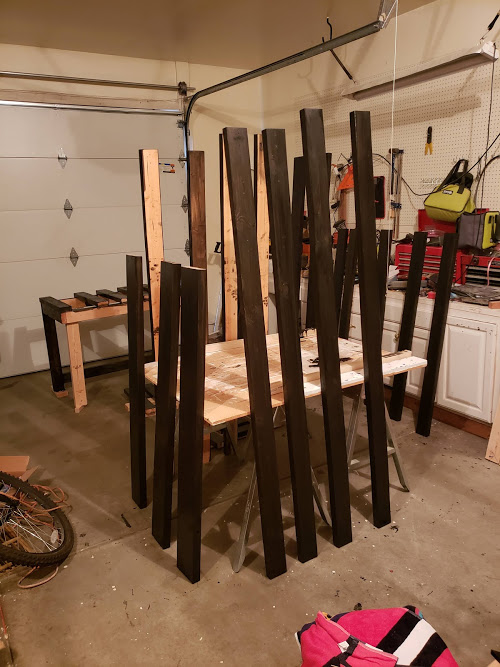
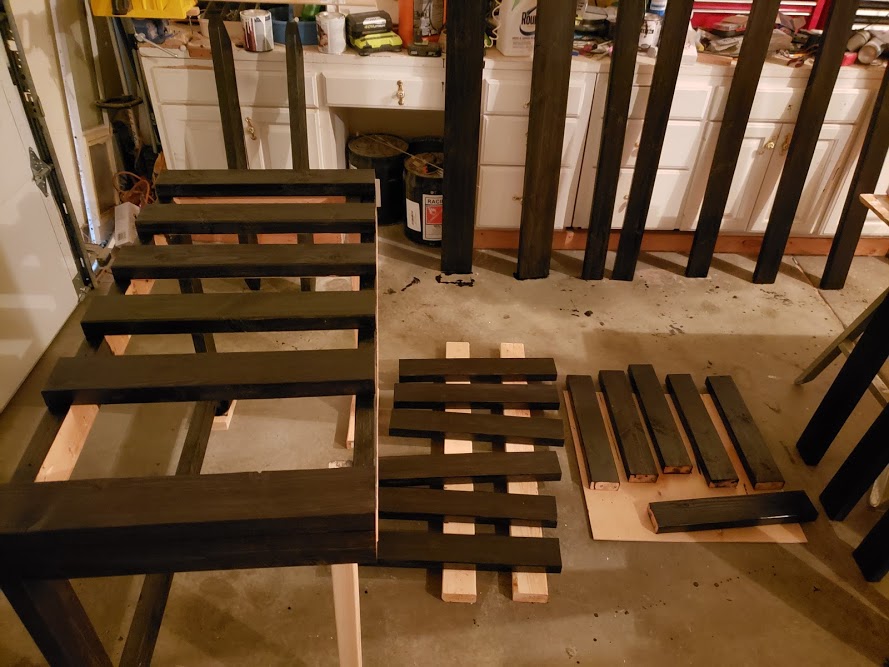
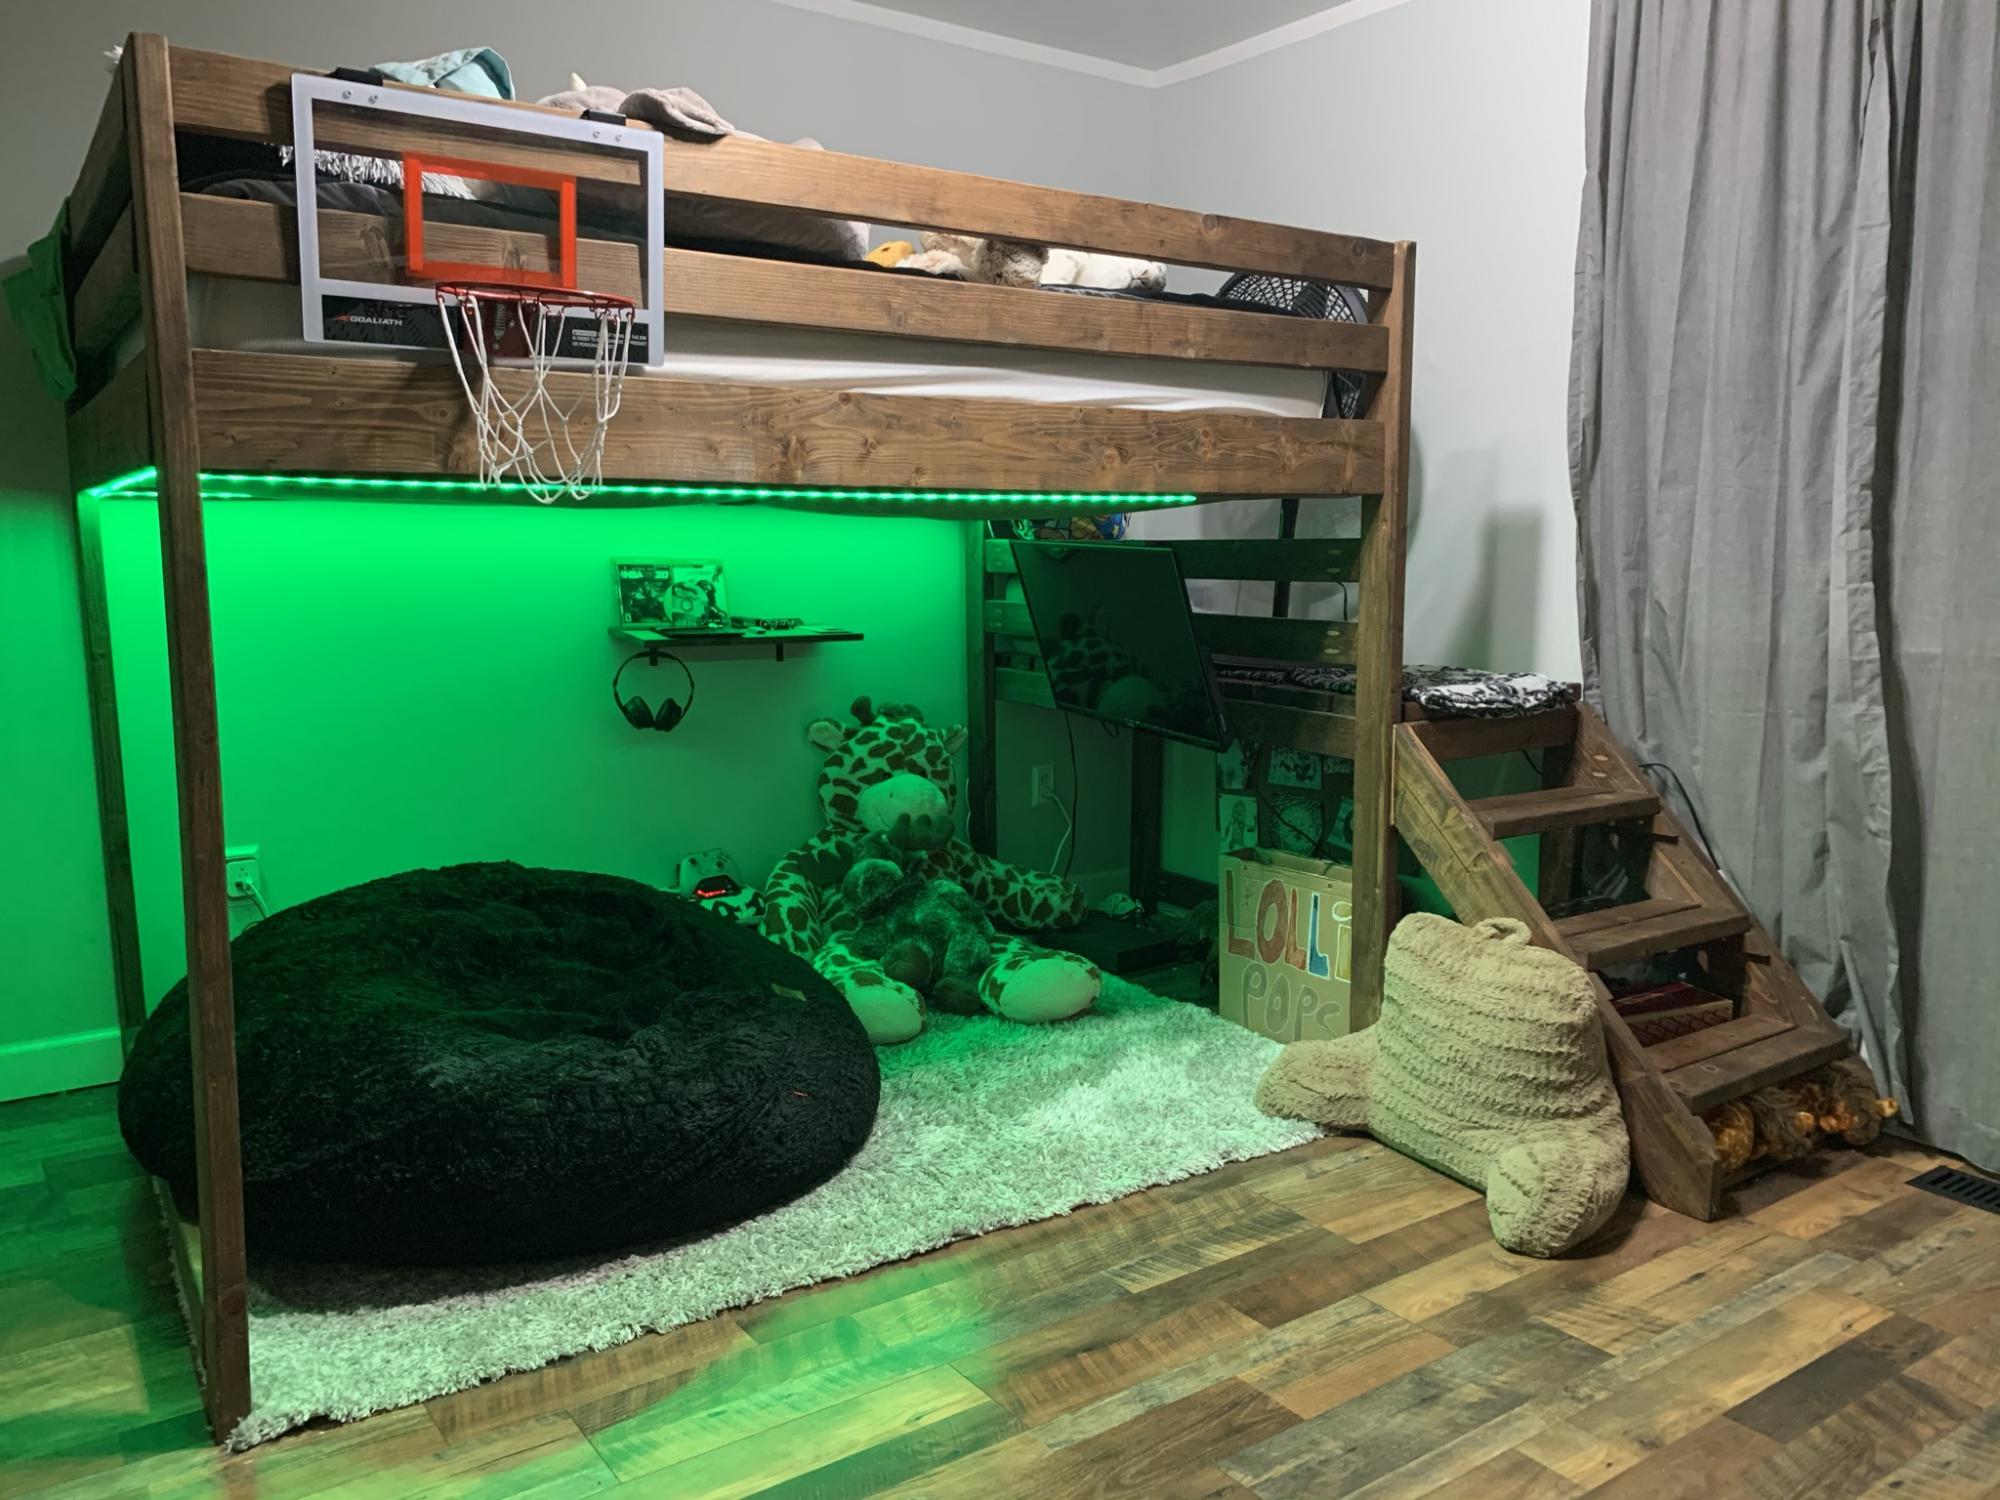
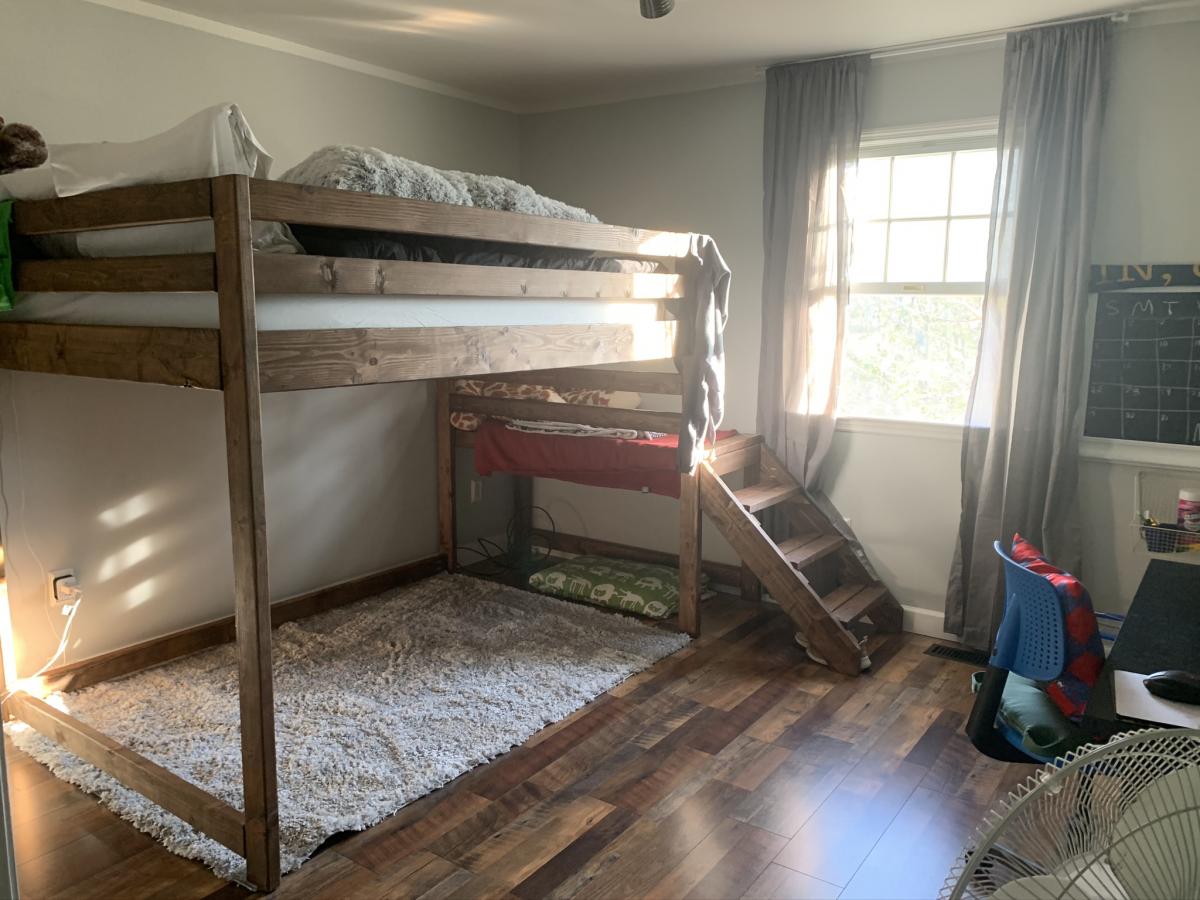
I may have spoiled my Grand-daughter a bit too much and her room was really full of stuff. I decided that I should just go ahead and spoil her a little more by building her a new bed for her birthday. I used the Camp Loft Bed plan but did modify it to fit her full size mattress and raised the height just a bit to make sure that her doll house would fit underneath. I am so happy with how it turned out! I love that I can fit her toy bins underneath the stairs where they are out of the way and how much more room she has to actually play. I used some really fat yarn and crocheted the little stair runners so it is nice and soft on her feet going up and down the stairs. This project did take longer then some of the others that I have done but I do also work a full time job. I had the bed actually built and put together in a weekend but then took it all apart for staining and finishing which took a long time. There were a lot of pieces to stain with multiple sides and coats to get the coverage I wanted so it would match her other furniture. I also did 3 coats of topcoat on each piece. Looking back if I had to do this over again I would have used 4x4's for the legs/bed posts. She is only 6 right now but as she gets older I will probably switch those so that it is a little more sturdy as she gets bigger.

Estimated Time Investment
Week Long Project (20 Hours or More)
Recommended Skill Level
Beginner

Comments

Queen Sized Stoarge Bed - cheaper version

I made the bulk of this bed from 2 sheets of OSB to make it cheaper. The headboard is from salvaged pallets and scrap studs from a construction site. Baskets or drawers forthcoming. Easy plans to follow.

Built from Plan(s)
Estimated Cost
$200
Estimated Time Investment
Week Long Project (20 Hours or More)
Finish Used
White Kilz and and white Kensington & Clark.
Recommended Skill Level
Intermediate

Triangular Rabbit Hutch

Submitted by Medeek on Fri, 05/03/2013 - 18:14

This is a rabbit hutch I created for my kids 5 rabbits. The thing that makes this hutch really nice is if you have a large lawn you can just move the hutch a little bit every day and the lawn gets mowed, fertilized and you don't have to worry about cleaning up all the rabbit droppings. I also mounted a rabbit feeder on the inside of the house door to keep the food dry, which has worked really well.

Here is a short blog of all the steps in its construction:
http://design.medeek.com/gallery/RH3080_COPALIS_2013/RH3080_COPALIS_201…

Estimated Cost
150
Estimated Time Investment
Day Project (6-9 Hours)
Finish Used
Exterior Paint brush or spray. Choose your color.
Recommended Skill Level
Beginner

Comments

Medeek

Sun, 05/05/2013 - 01:52

I apologize I haven't got the completed planset up for this project yet but I will try to get it up in the next couple of weeks as well as a very complete materials list. You will need to go to a farm/feed store to get the correct 1"x2" wire and 1/2"x1" wire for the floor. Do not go to Home Depot and use the cow wire they have or the hardware cloth for the floor, neither of which are the correct choice. Home Depot has the lumber but not the wire. If you have any questions or even improvements to my design I would be interested in hearing from you.

Medeek

Sun, 09/13/2015 - 19:18

Finally got around to uploading the plans.  I still need to create a material list for this plan but the basics are there now.   We've had rabbits in it for about a year but recently we've tried some guinea pigs and it works great for that as well.  The guinea pigs can pretty much live off just the grass and dandelions but you do need to move it daily to give them plenty to eat.

Bookshelf with bench for kid's room

Submitted by Anonymous (not verified) on Tue, 06/27/2017 - 15:12

I was looking for something for my son's room that would last him until college, so I adapted your plans and added hooks and a bench and stained it.  Bookends are all we are missing to make it perfect. He loves it, and I don't think he will be able to break it.  I could use a suggestion for anchoring it to the wall, though. Thank you for the great, easy-to-follow plan!

Estimated Cost
$75
Estimated Time Investment
Week Long Project (20 Hours or More)
Finish Used
Natural stain and polycrylic
Recommended Skill Level
Starter Project

Comments

DIYMomof4

Tue, 06/27/2017 - 18:30

Your bookshelf and bench look really nice and sturdy!  I'm sure it will hold up for many years.  As far as anchoring it to a wall, I have had luck with anti-tip furniture straps.  I would use several and anchor them right to the studs.  I also use long, self tapping construction screws instead of the screws that come in the package.  

Picnic Tables

For my son's 4th birthday party, we were doing it at our house and needed outdoor seating, so I took on the task of building 3 Toddler picnic tables and 1 smaller one. Building them was not that big of a deal, but painting all 4 took some time! After the party, we sent 1 to my parents, 1 to in-laws & 1 to my bro/sis-in-law, so only ended up with 1 left over. FYI-the picture on the plan is one of mine, thanks Ana!

Built from Plan(s)
Estimated Time Investment
Afternoon Project (3-6 Hours)
Finish Used
I primed each table, then painted them with 3 coats of paint and sealed them.
Recommended Skill Level
Beginner

Comments

Seasonal And Holiday

Grillin' and Chillin' - Outdoor Grill Food Prep Station

Needed a table for food prep with my grill and found your plans! I used treated lumber for the base and nice cedar planks for the top. The treated lumber had a whiter than usual color which made the base really pop out. I put a nice pecan stain on top and a few coats of poly so the BBQ sauce wouldn't stain it! This was so easy, literally took 2-3 hours to build, stain and poly was done over the next few days. Ready for my next ana-white project. Thanks for posting these plans.

Built from Plan(s)
Estimated Time Investment
Afternoon Project (3-6 Hours)
Finish Used
Simple pecan stain and minwax poly. Brushed on the stain and kept brushing until I got the darkness I wanted
Recommended Skill Level
Starter Project

Comments

tr7dul

Wed, 07/09/2014 - 16:24

I was looking on Pinterest and found this table. It was exactly what I was looking for. You inspired me to go out and buy a miter saw and some wood and make the table. It turned out wonderful. It now has a permanent place on my patio and gets used when I grill mostly. I was hoping to be able to upload a photo but don't see the option to do so. Anyway, I want to say thanks for the great plans/instructions.

Camp Loft Bed Full size

Submitted by katjagest on Wed, 10/06/2021 - 05:05

Made this Loft bed for a full size mattress in 2019 and it is still strong. I added a stretcher on the bottom of bed across the length of the the bed added strength.

Comments

Garage Shelving

Submitted by NLough on Thu, 12/16/2021 - 08:42

I made these shelves - following the plans on the site - with my kids who helped with the painting. What a straight forward way to organize the garage and have fun introducing kids to building. The shelves are deep enough for storage tubs, access items easily and are very sturdy. I would fully recommend this plan to get things sorted in your garage and have more room for other projects!

Comments

Rustic X Coffee Table, End Table and Console

Submitted by jbayer80 on Thu, 06/20/2013 - 07:07

This was a blast to build. This was all a gift for my wife since the traditional 5th anniversary gift is wood.

The coffee table and console are both awesome! The only thing I would change/modify is the end table, because its kinda big and doesn't really look its part of the set other than the "X". I would maybe take about 2 or 3 inches off all sides or maybe 3 off the sides so its not such a box.

Estimated Cost
$500
Estimated Time Investment
Week Long Project (20 Hours or More)
Finish Used
Kona on top and shelf (s) with 4 coats of polyurethane. Currently there is nothing on all other parts because I wasn't sure what I was going to do. I think I'm just going to put a few coats of poly on the "naked" parts and call it a day. I thought about painting the other pieces but that would hide the beautiful grain in the Douglas Fir. I don't like the idea of the entire thing being Kona because it looks too dark on the others I've seen on here (for my house only), then I thought about a very light stain but think I settled on it being naked with the poly. I would honestly love to hear what you guys think as I have not touched it yet.

Actually I was thinking it would be nice for Anna to have a section with a "poll" for someone like me who is kinda stuck on a finish to post a picture and have other vote on a few options....thoughts??? Anna??
Recommended Skill Level
Beginner

Comments

Val Manchuk

Thu, 06/20/2013 - 07:31

I'll start one! Go for the poly. You're absolutely right, it will bring up the beautiful grain, and show off the "X" accents. Nice work, by the way!

Val Manchuk

Thu, 06/20/2013 - 07:32

I'll start one! Go for the poly. You're absolutely right, it will bring up the beautiful grain, and show off the "X" accents. Nice work, by the way!

spiceylg

Thu, 06/20/2013 - 08:39

Beautiful builds! Wow, they look wonderful. What an amazing gift! From the pics, the end table looks fine, too, as the furniture isn't a small scale. I love the two-tone so I say go for just the poly!

WorkShopWendy

Thu, 06/20/2013 - 12:08

I think you did an amazing job :) love the contrast of the two tones. Using poly for the rest would be beautiful. I cant wait to do this project myself.

JoanneS

Thu, 06/20/2013 - 15:47

What a wonderful gift! These tables are beautiful, great job on this build! I love the two-tone - One more vote for the poly! :)

jbayer80

Fri, 06/21/2013 - 13:04

I'm going to go with only the Poly over the bare wood. Thanks for the comments and advise! It will be a few weeks due to work and travel but I'll send updated pics once its done.

Jbird

Sat, 02/24/2018 - 21:18

I like the naked/poly look too. The other option I think would look good would be painting it white. The contrast between the white frame and darker kona top and shelf would be cool. 

Northwest Ohio Pergola

Submitted by russell_h on Sat, 06/27/2015 - 17:57

I used flat stone and a masonry circular blade for the base of the corner posts. I also used 2 x 4's for both layers of the top boards. It was a lot of fun to build.

Built from Plan(s)
Estimated Cost
$250.00
Estimated Time Investment
Week Long Project (20 Hours or More)
Finish Used
I will stain and seal in a year
Recommended Skill Level
Intermediate

2x4 Garden Beds

Submitted by binah06 on Wed, 05/18/2011 - 09:37

My husband and I were inspired by Ana's plans, but needed to use up some wood we had laying around the garage because it was starting to bend and warp. We made the large box 2x6 ft and the smaller one is made from scrap and is about 15in x 2.5 ft.

Estimated Cost
free
Estimated Time Investment
An Hour or Two (0-2 Hours)
Finish Used
none
Recommended Skill Level
Starter Project

Outdoor Patio Deck Chairs

Submitted by nlindauer on Tue, 05/24/2011 - 06:42

Made these chairs from plans found on the Kerig Jig website. I added the cup holders for convenience and lowered the seats by 2 inches to account for our short legs. Chairs were stained with an outdoor fence treatment that was tinted with a light grey color.

Estimated Time Investment
Day Project (6-9 Hours)
Finish Used
Olympic Maximum Solid - Grey Base
Recommended Skill Level
Beginner

Wardrobe

Submitted by MERCMAN on Mon, 03/05/2018 - 08:44

Made from Mirroed Door Wardrobe Plans. Built from pine shelf boards at a cost of approx $7.00 per board. Light grey cabinet paint, primed with Bins primer as it also seals the knots. Used a kreg jig and glue to attach boards to each other to get then wide enough. No ply-wood was used. 

Estimated Time Investment
Week Long Project (20 Hours or More)
Finish Used
Bins Primer and Cabinet paint.
Recommended Skill Level
Intermediate

Backyard seating

Submitted by Anonymous (not verified) on Mon, 06/06/2022 - 13:17

We needed some additional seating in the backyard so I built 6 Adirondack chairs for the fire pit and the bench using the plans that you have shared on Facebook. They turned out really nice and so far they have been a big hit!!

Thanks!!

Comments

Comfortable Easy-Build Chair

Submitted by Sue Hill on Fri, 08/12/2022 - 14:43

This was a great project! If a 70 year old woman can build it, so can you. I had an old bench that used 2x4's and those plastic ends. I took it apart and salvaged most of the boards after sanding them down. So my cost was zero dollars to build this, but I'm sure it wouldn't last as long as using new wood.
I found the instructions easy to follow. I used 2 1/2" exterior star screws, and finished the wood with solid exterior stain in a sage green. The wood wasn't in great shape, so a transparent stain would not be a good choice for me.
I bought a $16 chair cushion and I'm tempted to make another chair!

Comments

Modern Patio Chairs/Love Sear

Submitted by Anonymous (not verified) on Sun, 09/25/2022 - 15:57

Super easy and fun project! We altered the original plans to build a loveseat and had zero issues. We did add some extra support below.
I did not find 25”x25” cushions within our price range so I settled for 25”x22.5” and they work but ultimately 25x25 works best.

Farmhouse Table

Submitted by Anonymous (not verified) on Fri, 01/04/2019 - 22:25

Love this table!

Recommended Skill Level
Beginner

Comments

Numbered Cubbies

Submitted by kari on Sun, 08/28/2011 - 15:16

Like so many others, I saw this and had to have one of my own. It was cute and quick - perfect! I had the same height issues that others had. The center supports are too tall for the 1x2 and 1x3 on the front. I wound up using all 1x3's, 2 on the front and 3 on the back. Because the cubbies came out a bit deeper, I thought I would try it as a utensil holder in the kitchen. Cute, huh.

Built from Plan(s)
Estimated Cost
less than $10
Estimated Time Investment
Afternoon Project (3-6 Hours)
Finish Used
I tried Ana's antique finish. The first layer I spray painted black. I didn't know if Ana sprayed or brushed on the white, but I brushed on mine. Painted the numbers on, then distressed it a bit.
Recommended Skill Level
Beginner

Comments