Community Brag Posts
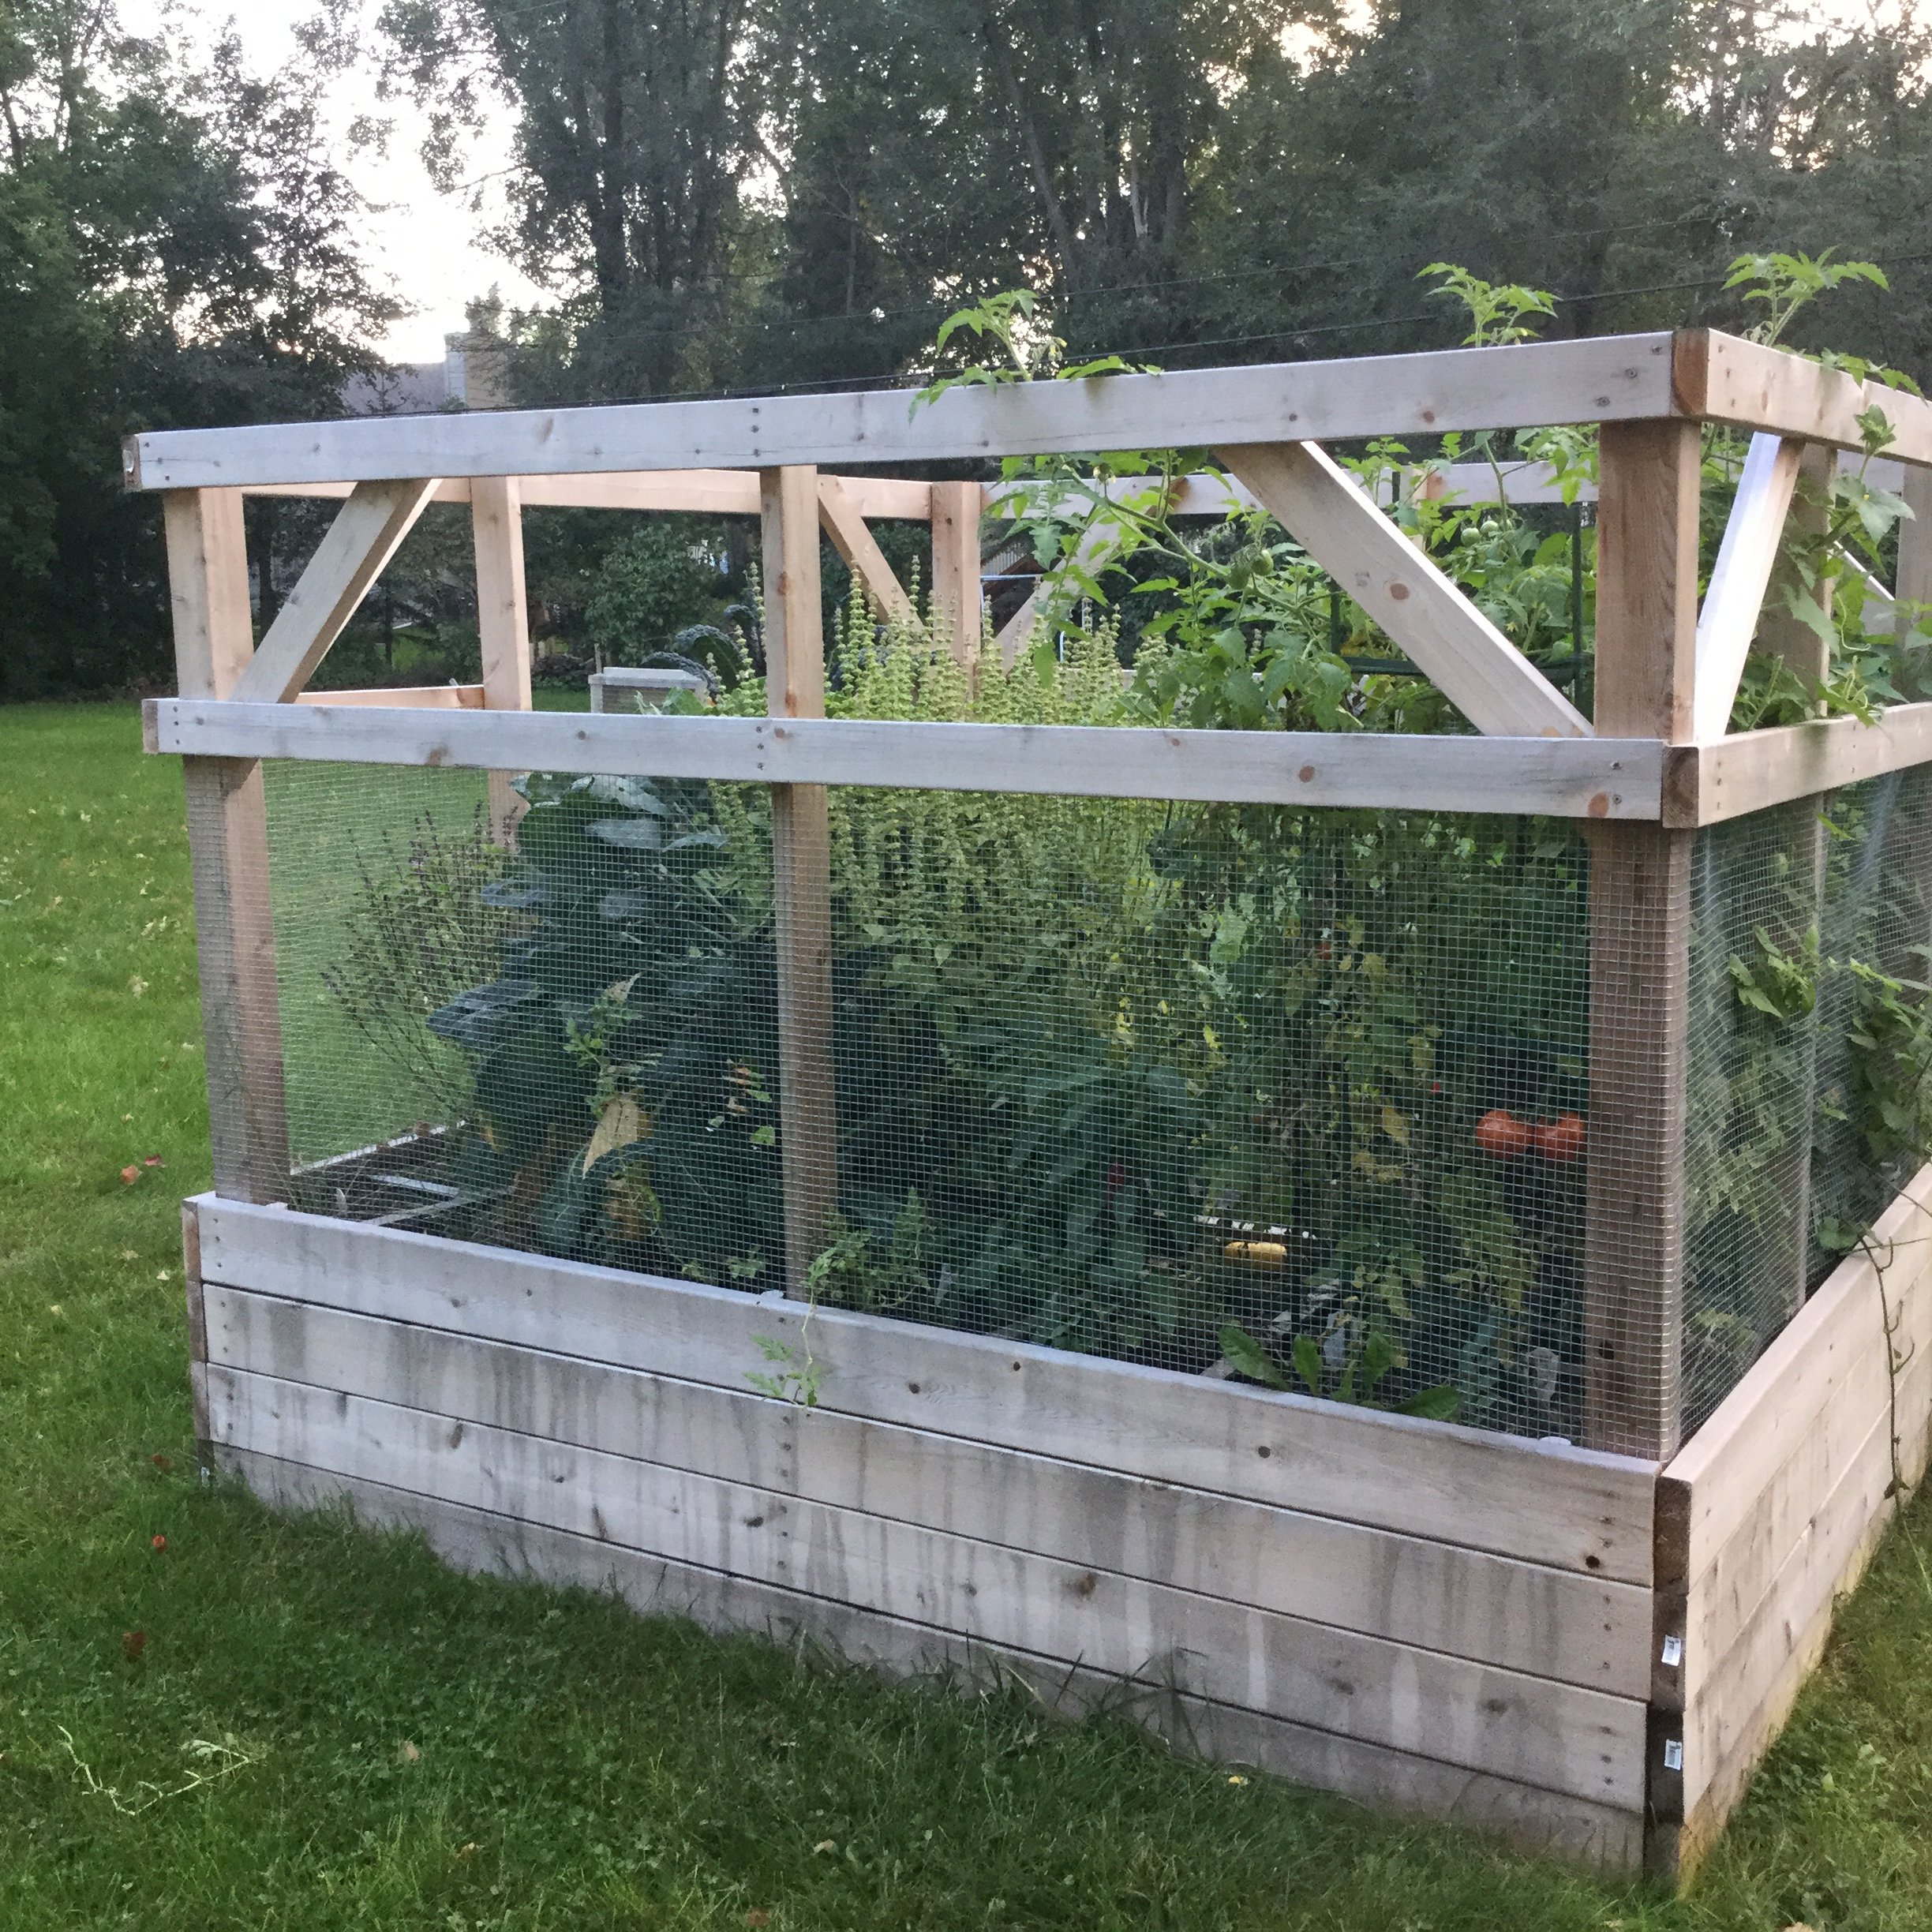
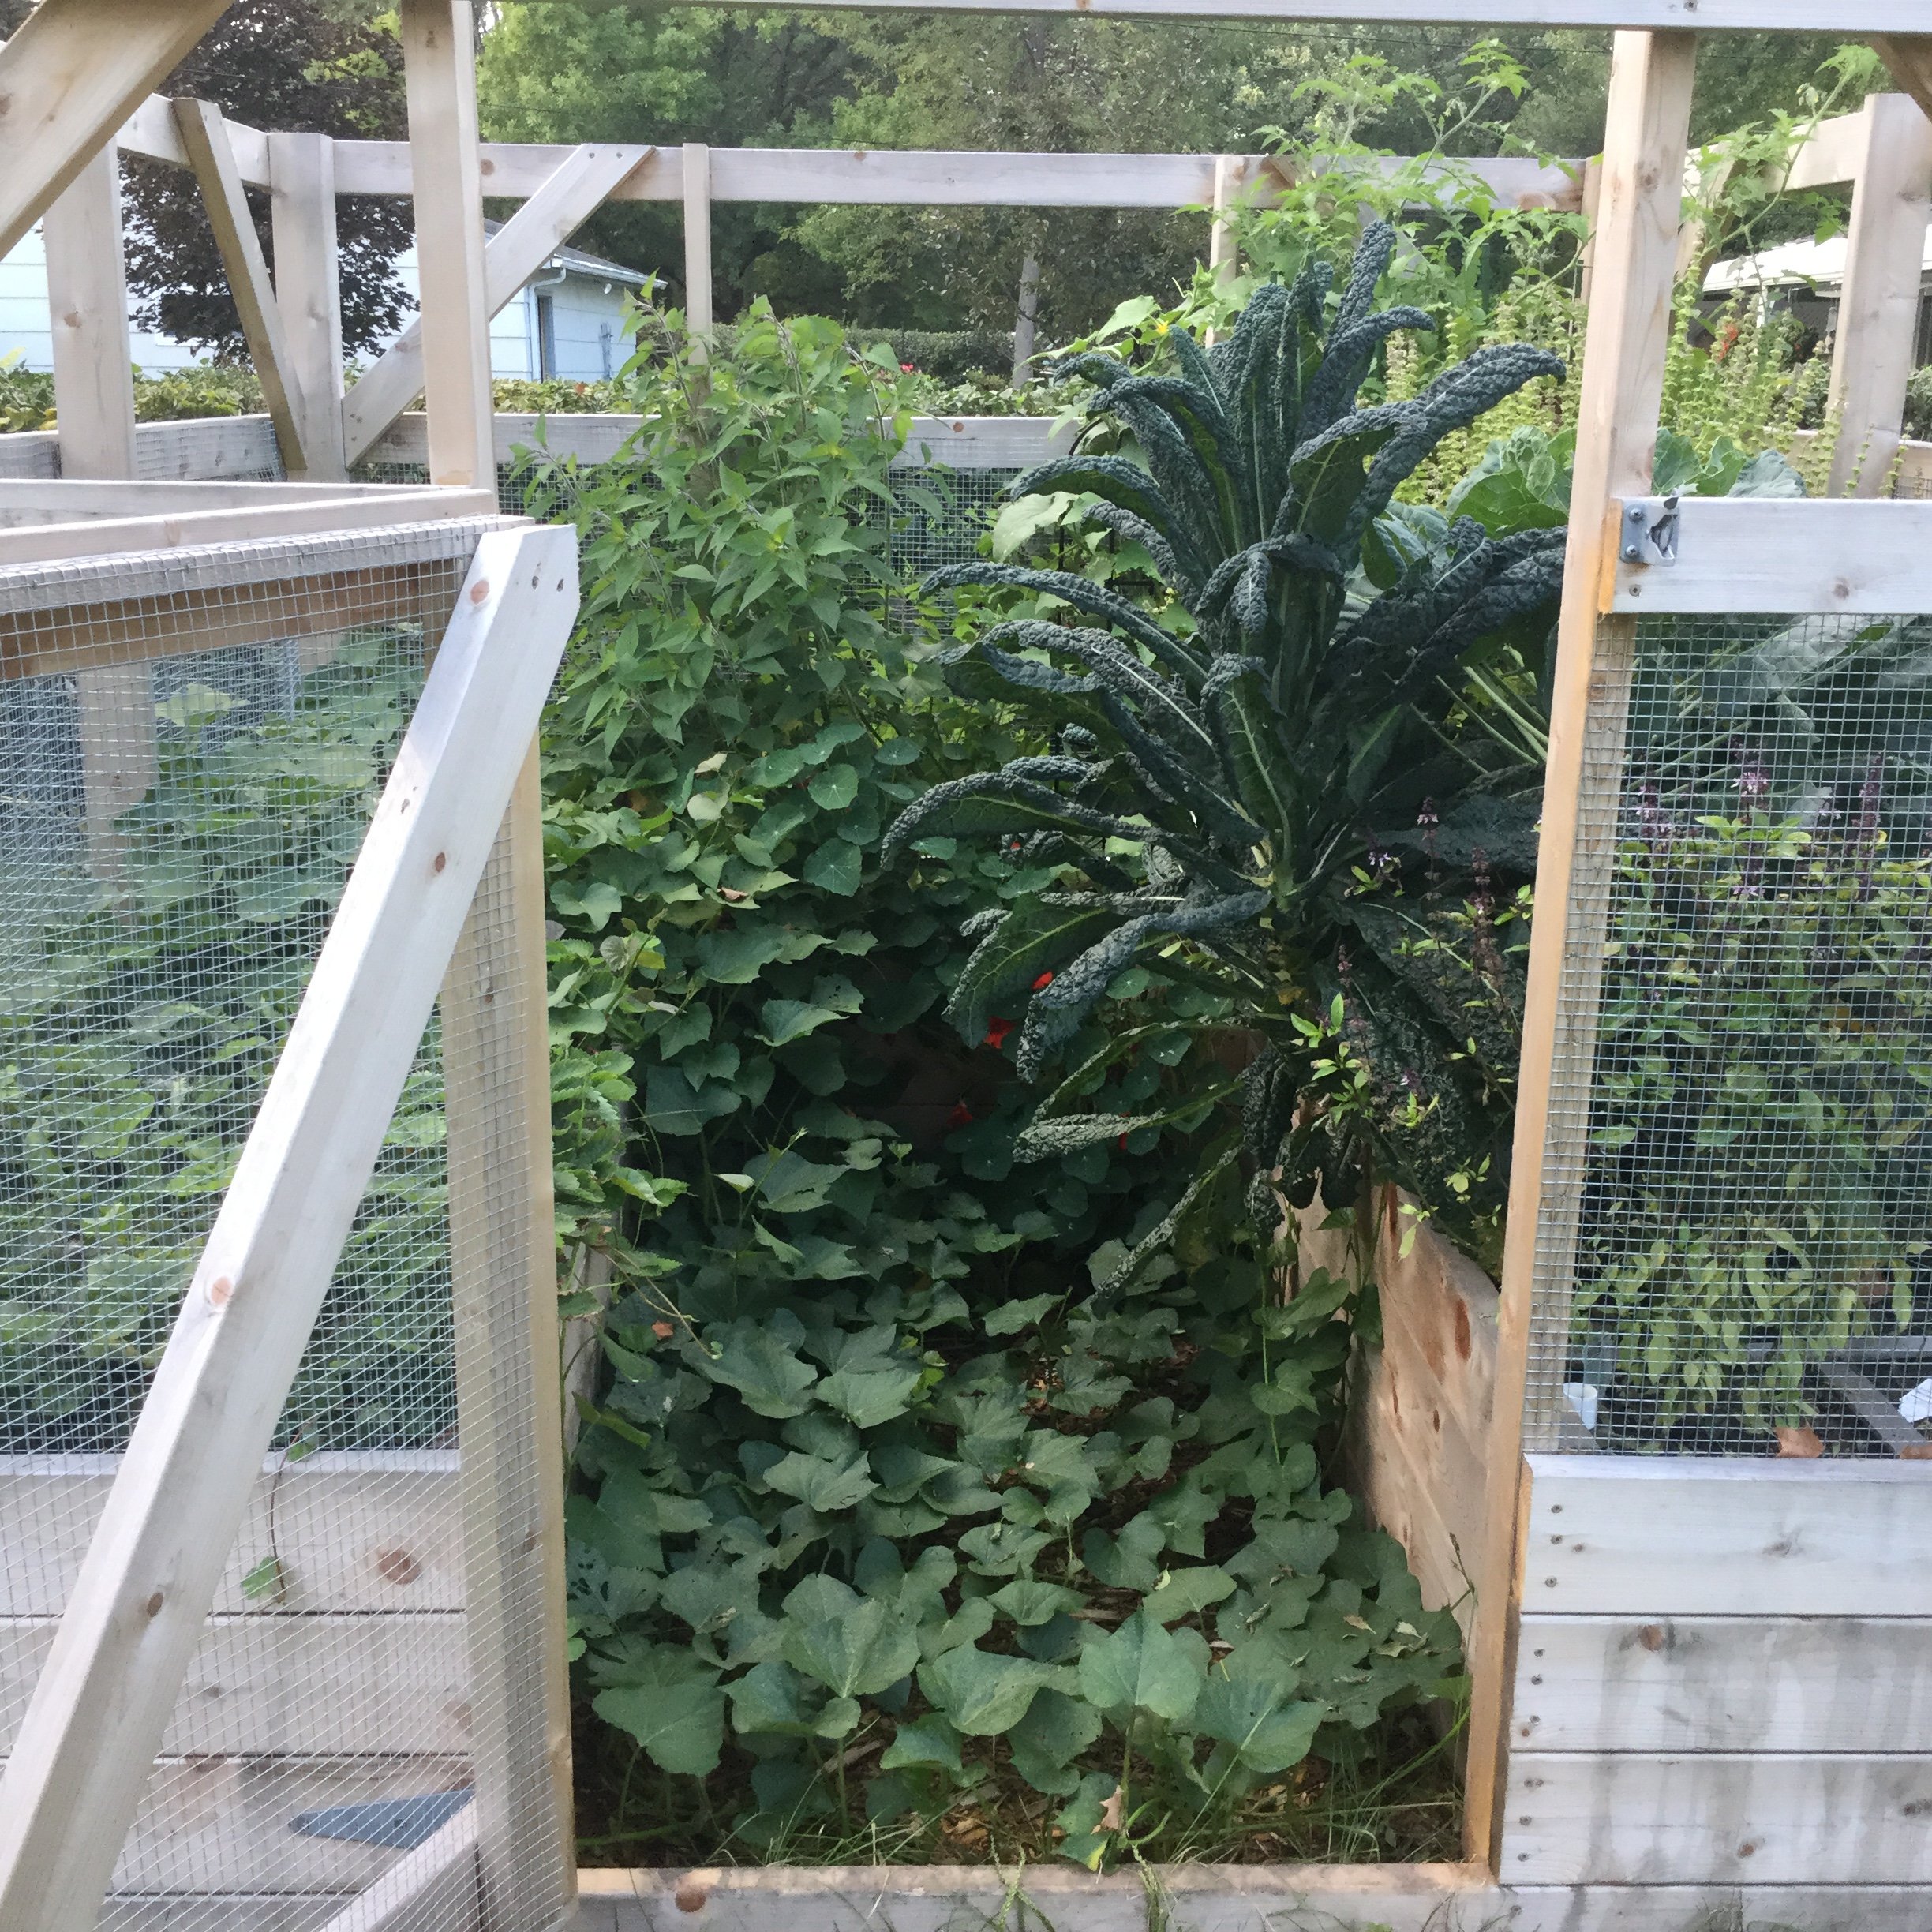
Garden Enclosure
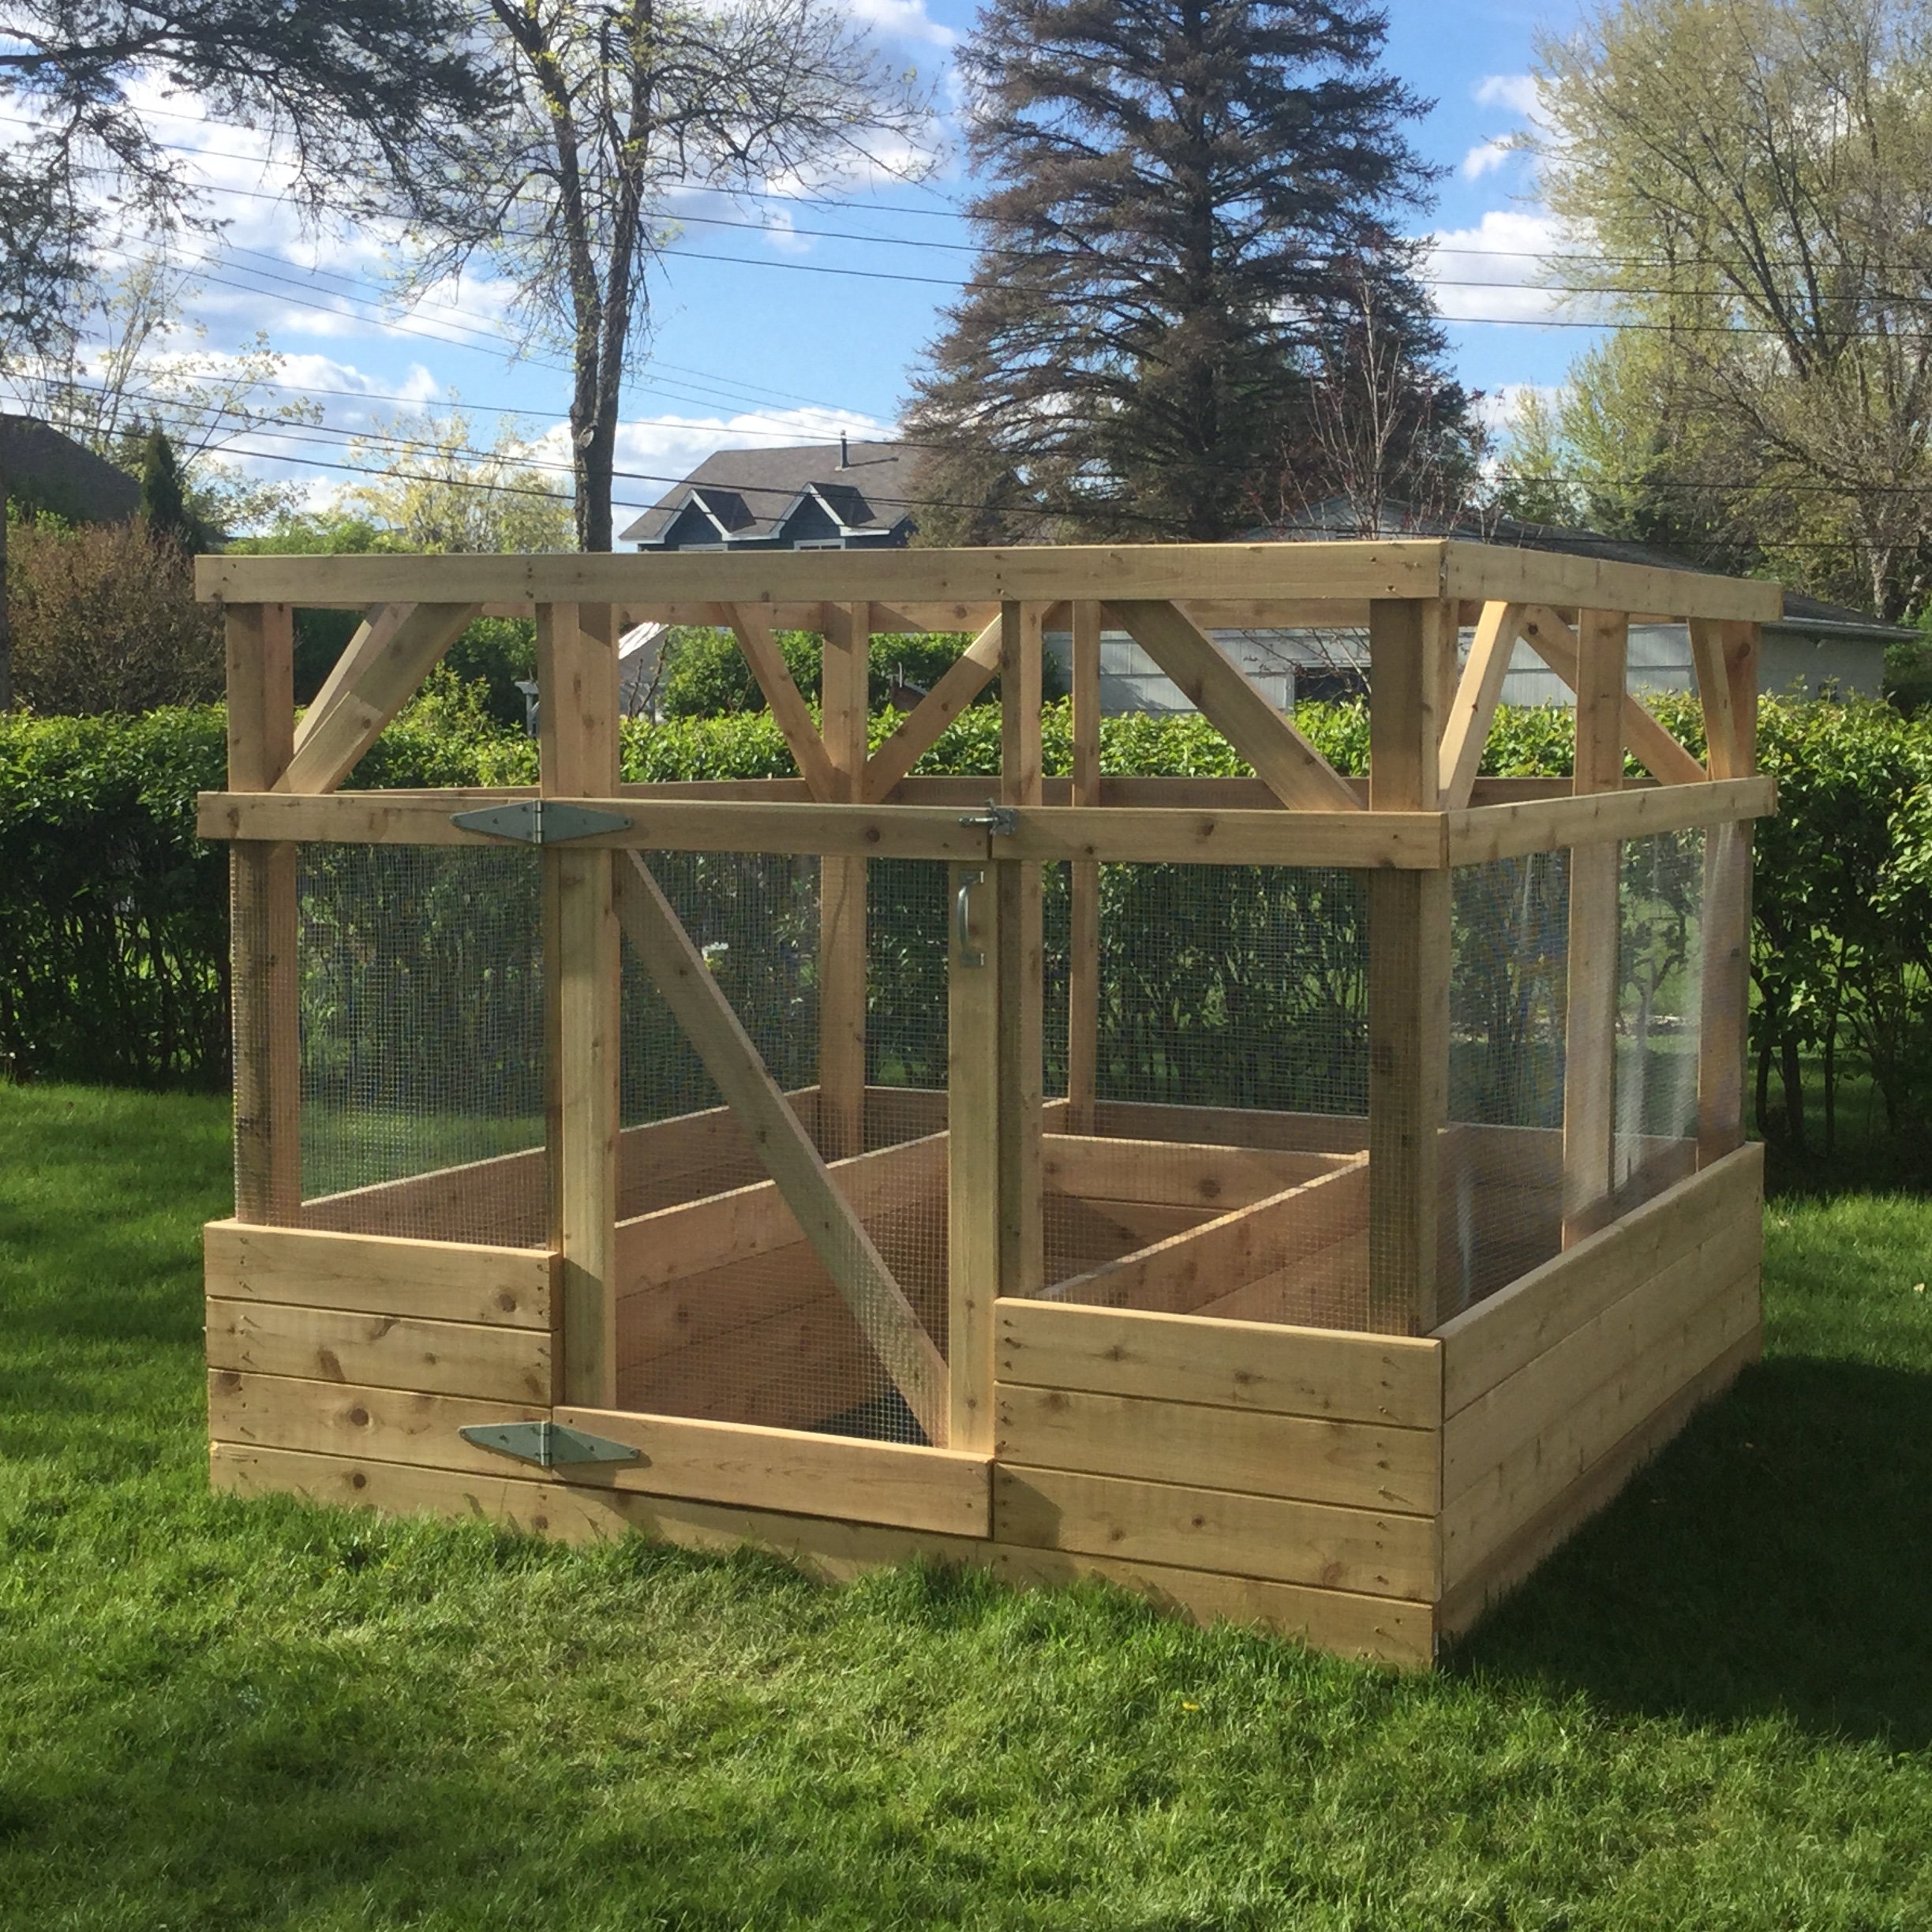
This was a fun project. The plans are written so that many of the boards don't need to be cut. It's made from cedar that (thank goodness) was on sale. I made the raised beds twice as deep as was called for in the plans because I wanted to minimize bending while I garden. That added to the cost of the lumber and the soil. I also like the way it looks.
I found it helpful to measure and cut the boards as I went. This was crucial for fitting the door. The most difficult part for us was working with the hardware cloth and trying to make it as smooth as possible.
It has been effective keeping deer and rabbits out of the garden. Things that can fly in are another issue.
Built from Plan(s)
Estimated Cost
>$500
Estimated Time Investment
Week Long Project (20 Hours or More)
Finish Used
None
Recommended Skill Level
Intermediate
Vintage step stool
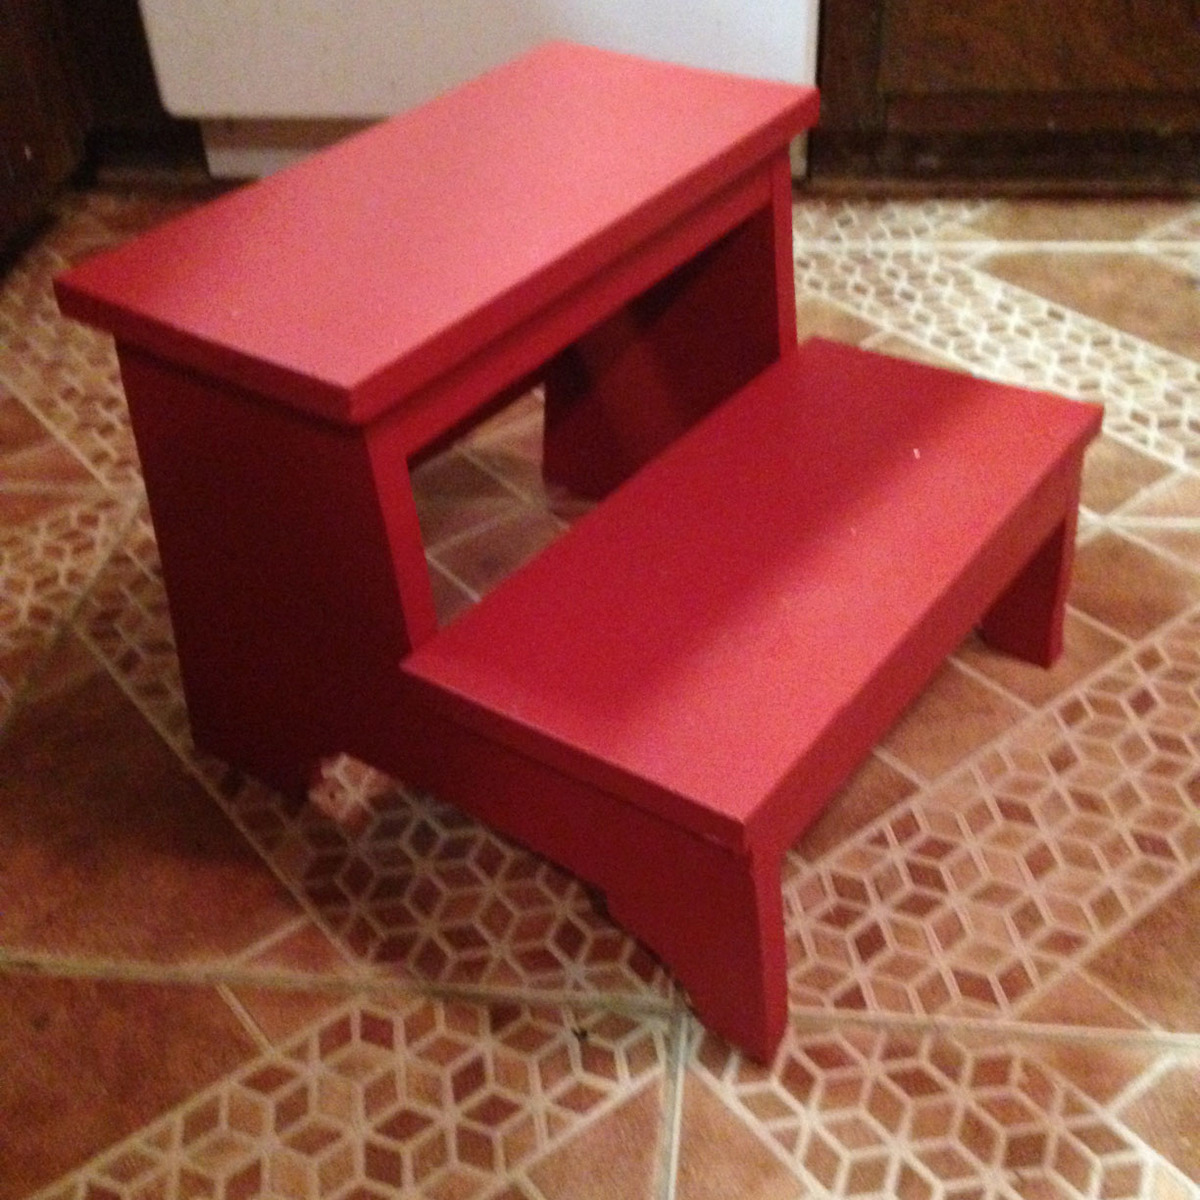
This project was wonderfully easy to build and it is a sturdy step stool I feel will last for a long time. I was able to build it very quickly, with minimal assistance. Painting and finishing adds to the time but it's beautiful.
Built from Plan(s)
Estimated Cost
$25 including paint, and primer, and there are scraps left over
Estimated Time Investment
Afternoon Project (3-6 Hours)
Finish Used
This is in my kitchen for my 2.5 year old to "help" me
Recommended Skill Level
Beginner
Loft bed turned into bunk beds!
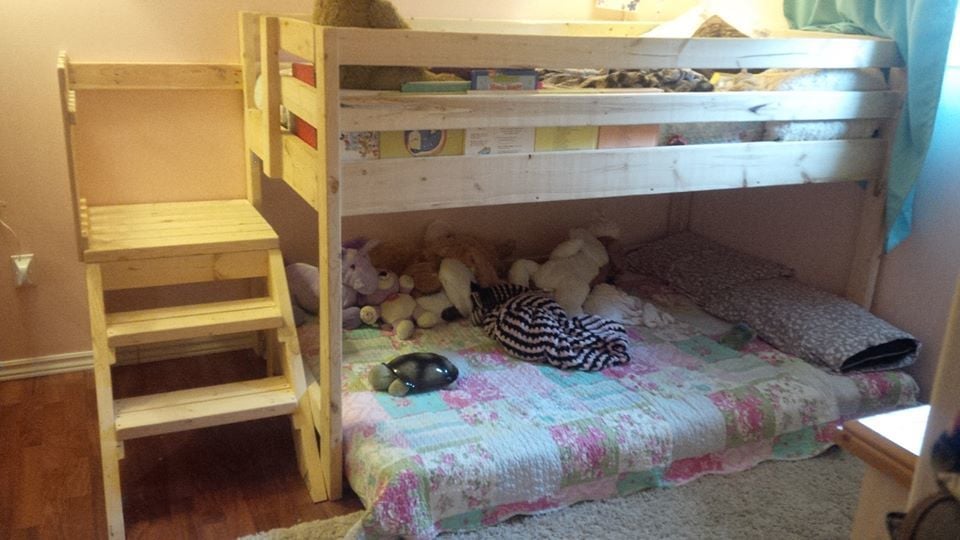
I needed bunk beds for my girls and found the camp loft bed - perfect! I liked how it used all 2x4s and 2x6s... made it easy to do everything with the chop saw. I customized the bed by lowering the overall height so that the actual bed is only 3 feet off the ground, and then I still had plenty of room for a mattress underneath for my three year old. I was strapped for space so I made the deck half the size so that the stairs stayed in between the bunk bed posts. I also added a little fence to the side of the deck since it's not up against a wall. I am so happy and proud of my work and I thank-you SO much for these wonderful easy-to-follow plans :)
Built from Plan(s)
Estimated Cost
$100
Estimated Time Investment
Weekend Project (10-20 Hours)
Finish Used
Sanded, unfinished
Recommended Skill Level
Beginner
Big Kids Picnic Table
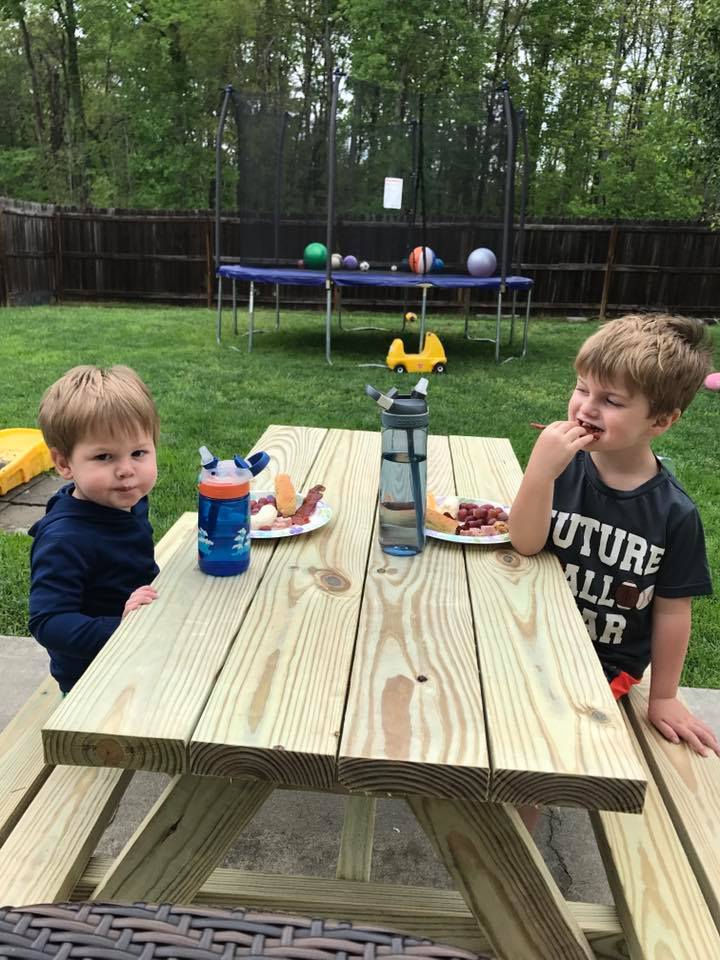
My son and I made this table this weekend in just a couple of hours with no problems. The directions were clear and easy to follow. Thank you for sharing them with us.
Built from Plan(s)
Estimated Cost
$40
Estimated Time Investment
An Hour or Two (0-2 Hours)
Recommended Skill Level
Beginner
Sandbox with Benches
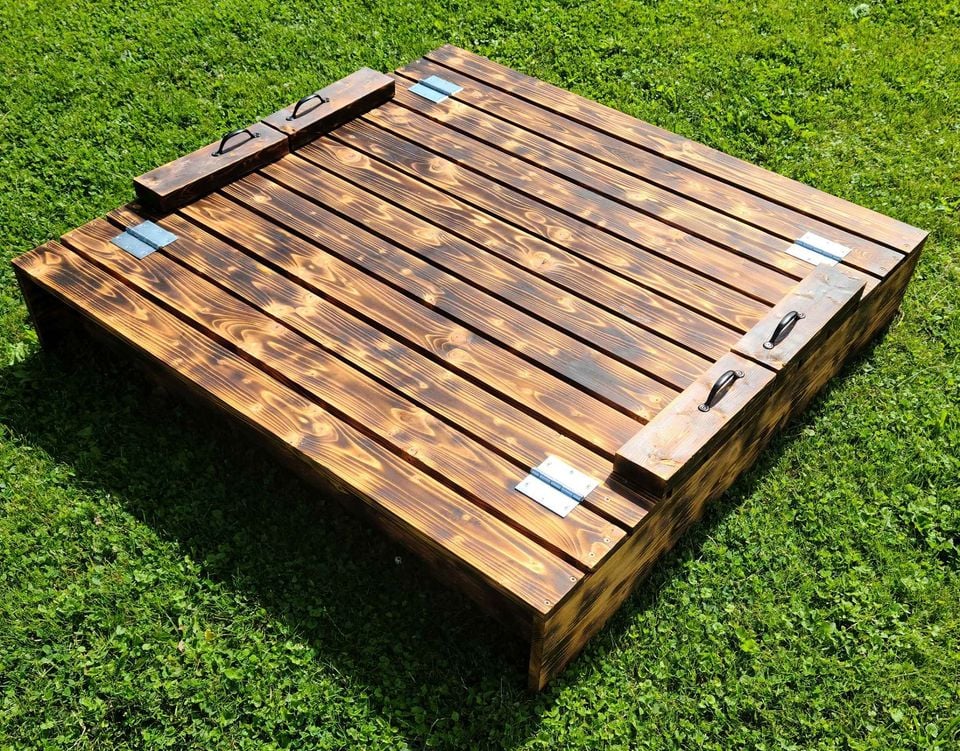
Burnt and stained with a semi transparent mahogany water sealer
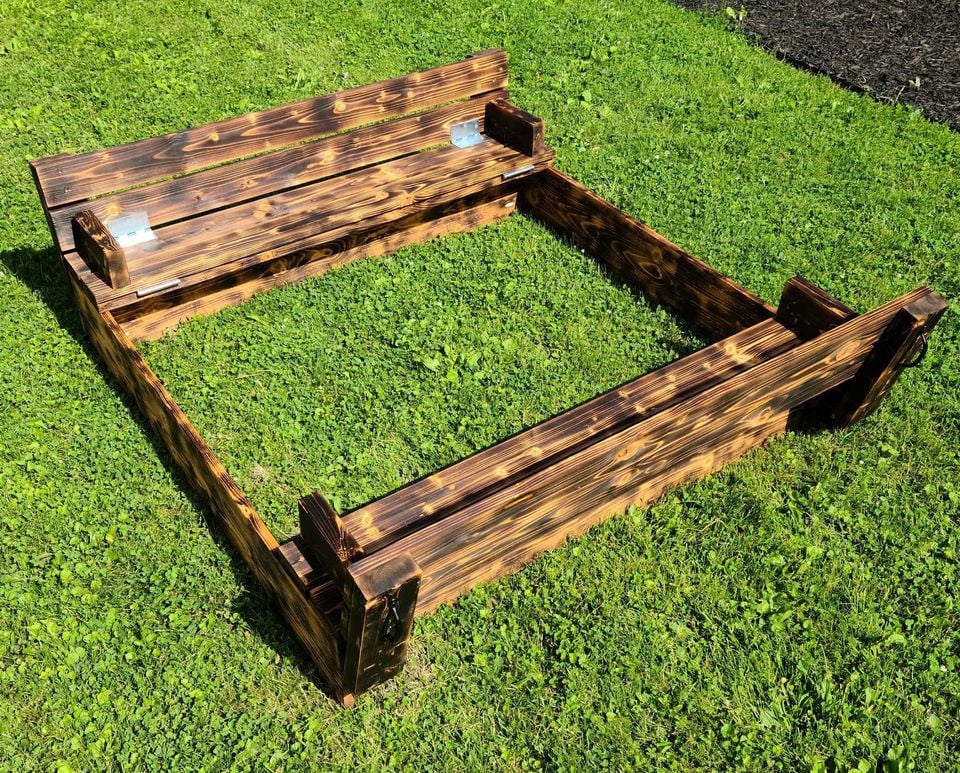
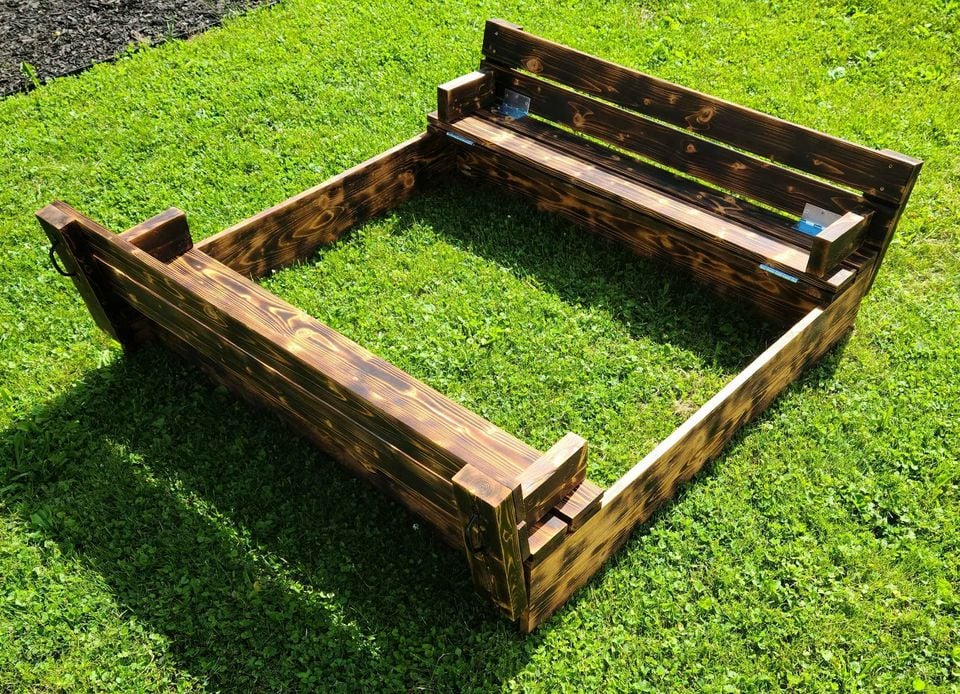
Built from Plan(s)
Estimated Cost
$120
Estimated Time Investment
Afternoon Project (3-6 Hours)
Recommended Skill Level
Beginner
Comments
4x4 Truss beam table and bench
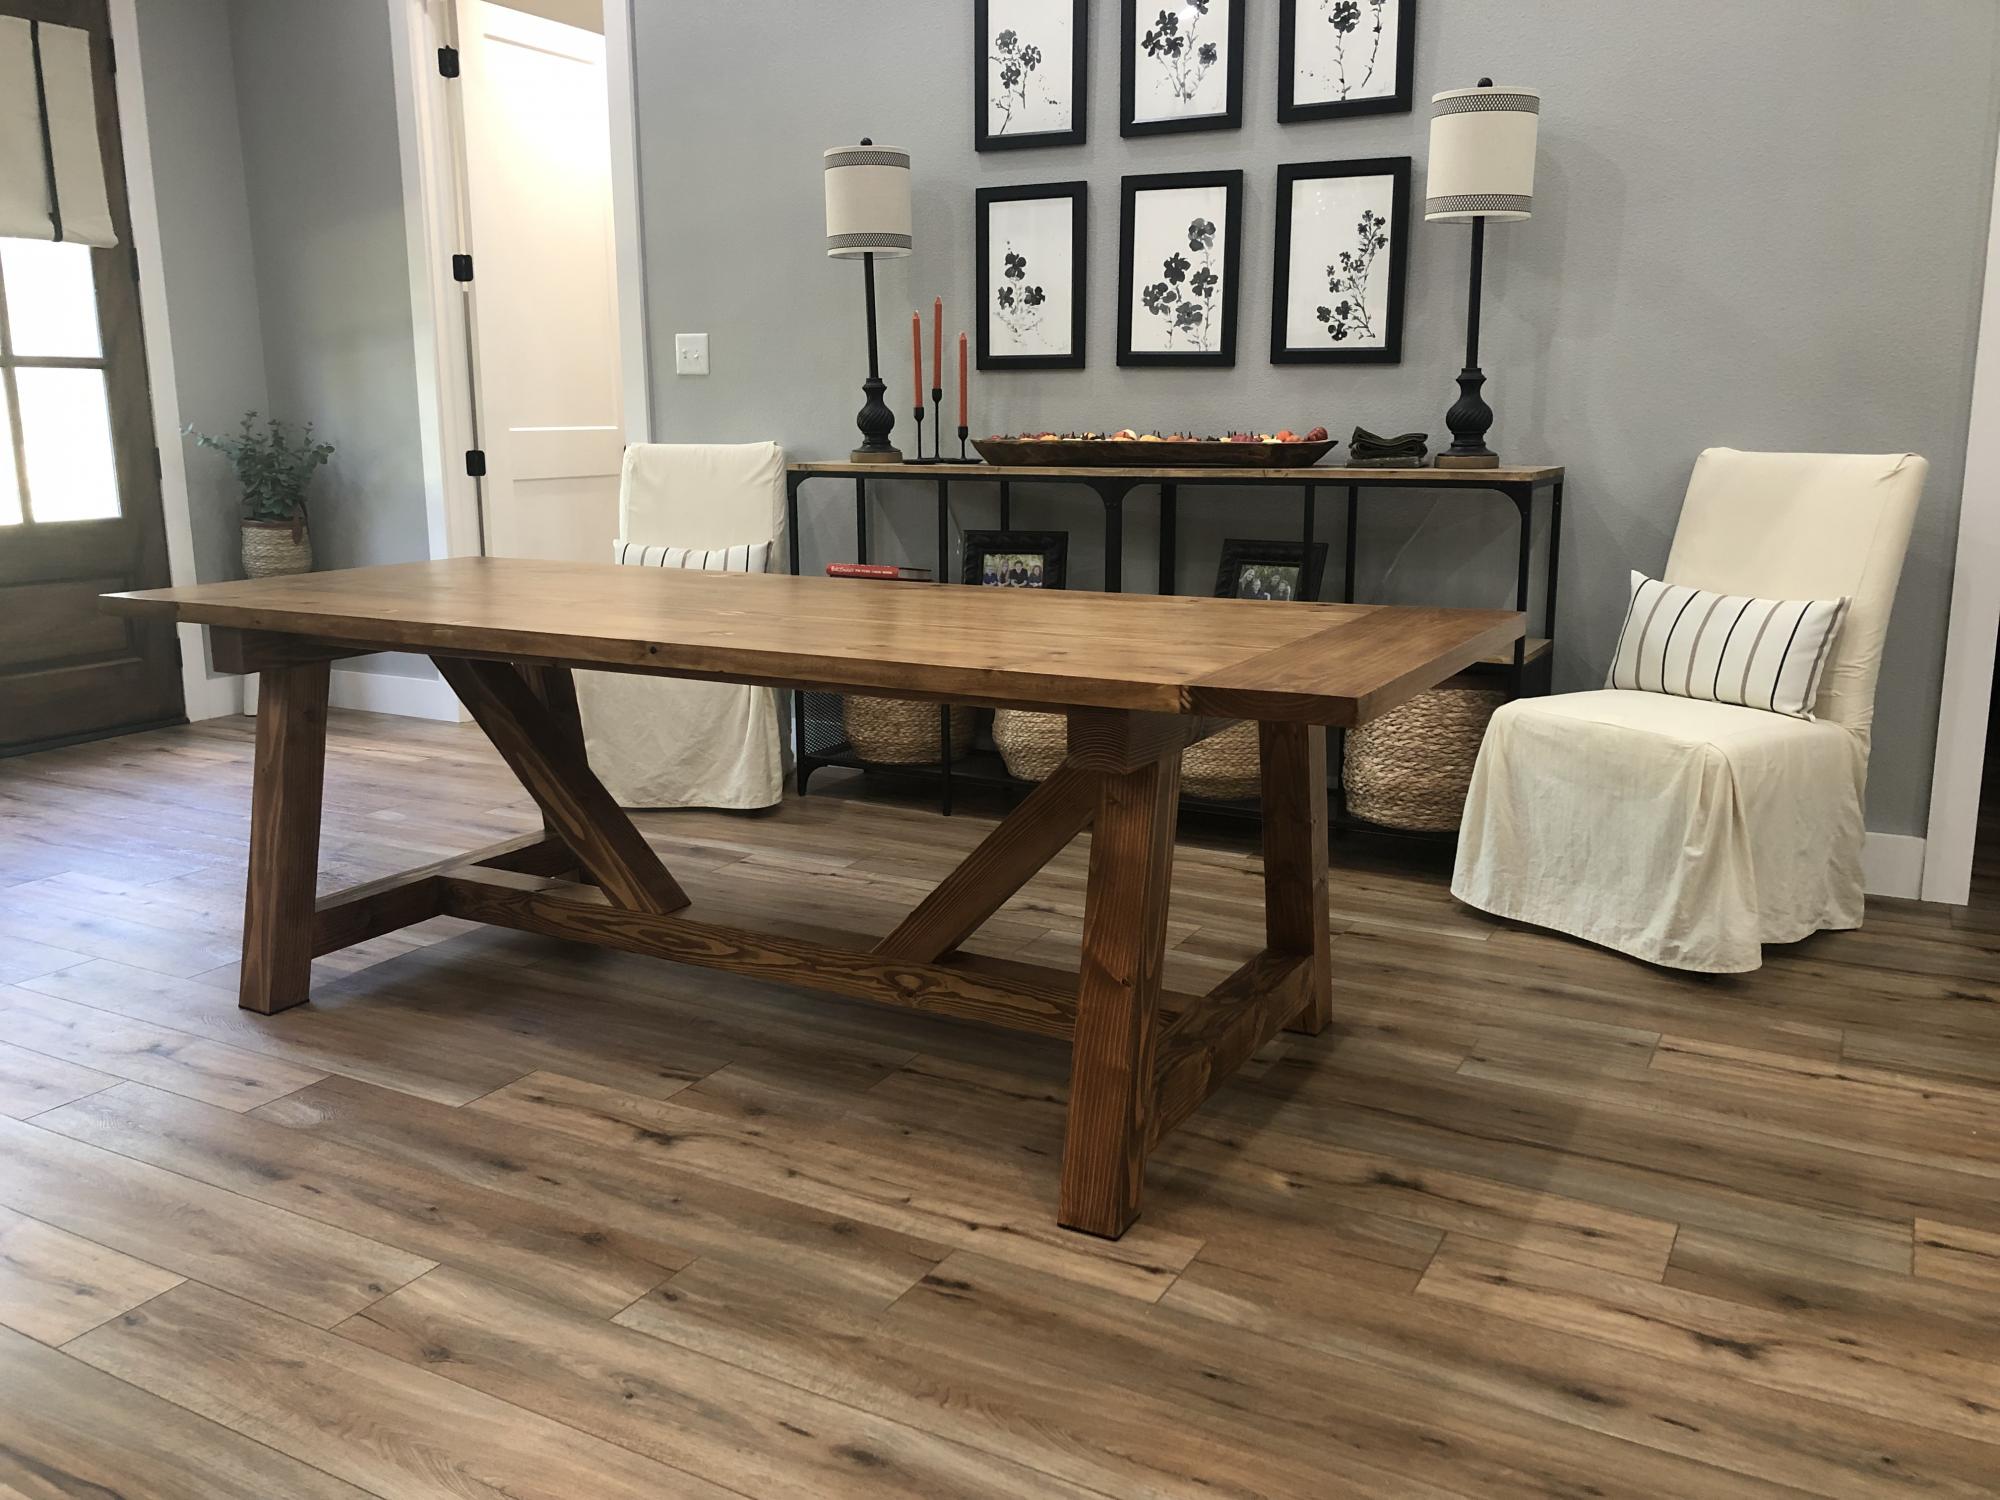
The plans were very easy to follow for non avid woodworkers. We decided to upholster the seat on the bench.
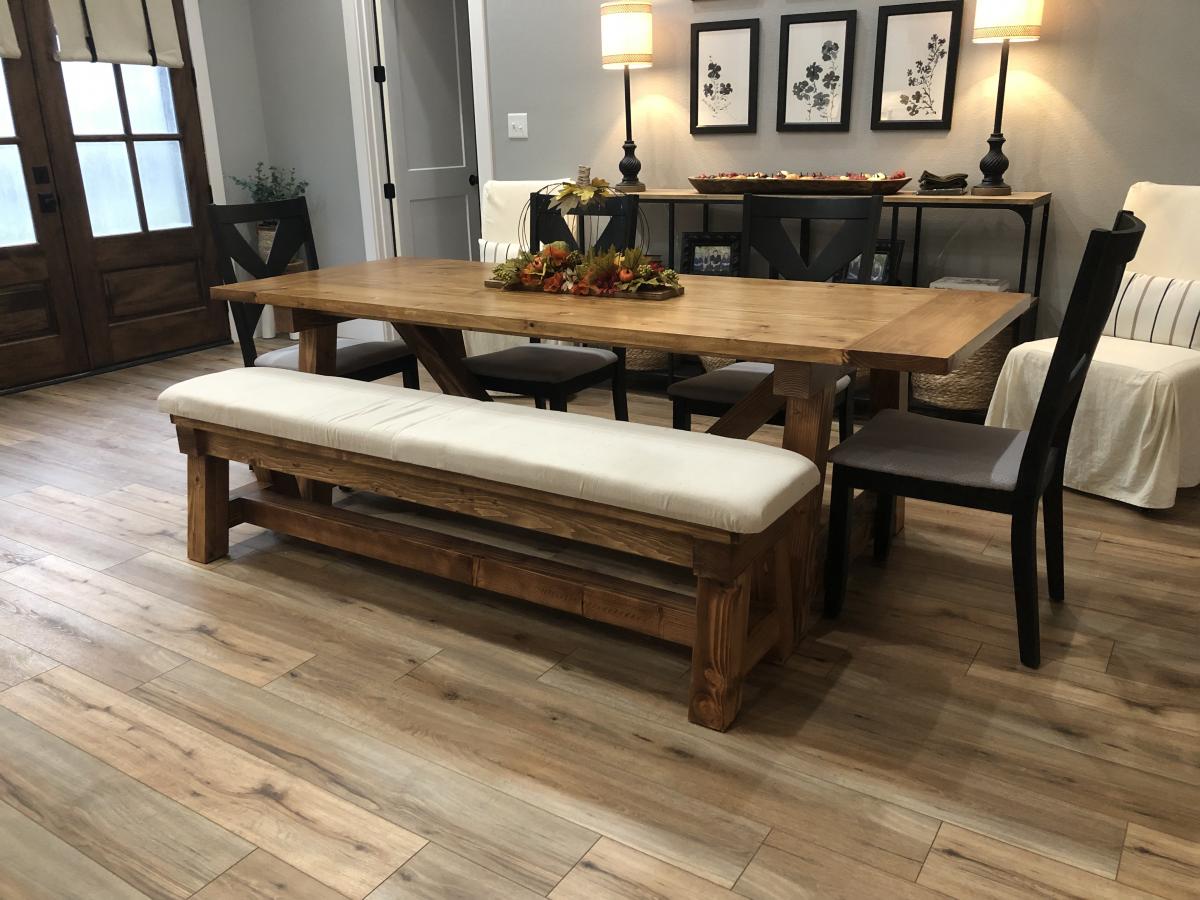
Built from Plan(s)
Comments
Tue, 10/05/2021 - 10:43
Great addition!
Looks professionally done and well built, the upholstered bench is a beautiful addition!
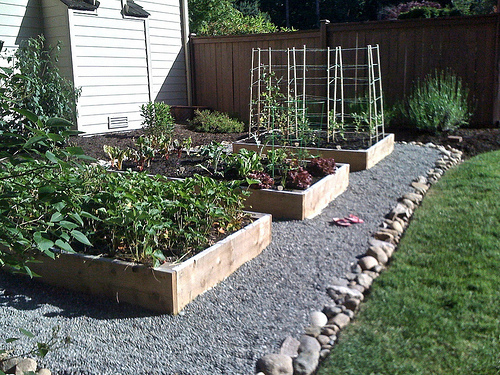
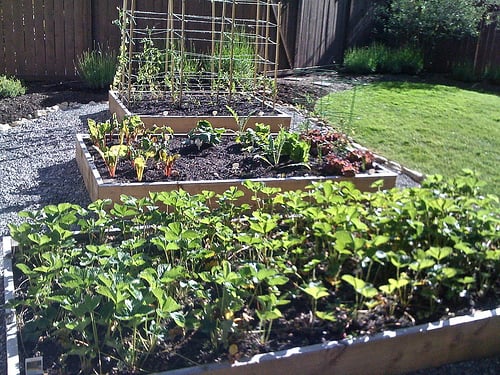
Raised Garden Beds!

Yay! Here are my raised beds, motivated by Ana White's post. :) I decided to use 2x lumber rather than 1x lumber because I plan to add benches on the ends of each bed. I just love how these turned out! I used Hemlock rather than cedar because it was a THIRD less expensive. Orange told me hemlock would last roughly 5-6 years whereas cedar would last 7-9 year. I staggered the sizes too - first bed (with the strawberries) is 4' x 10', second is 4' x 8' and the third (with the stakes) is 4' x 6'. Hubby hauled in a bunch of pea gravel to surround the beds while the girls and I added rocks from around our yard to the perimeter. :)
Built from Plan(s)
Estimated Time Investment
An Hour or Two (0-2 Hours)
Finish Used
None!
Recommended Skill Level
Beginner
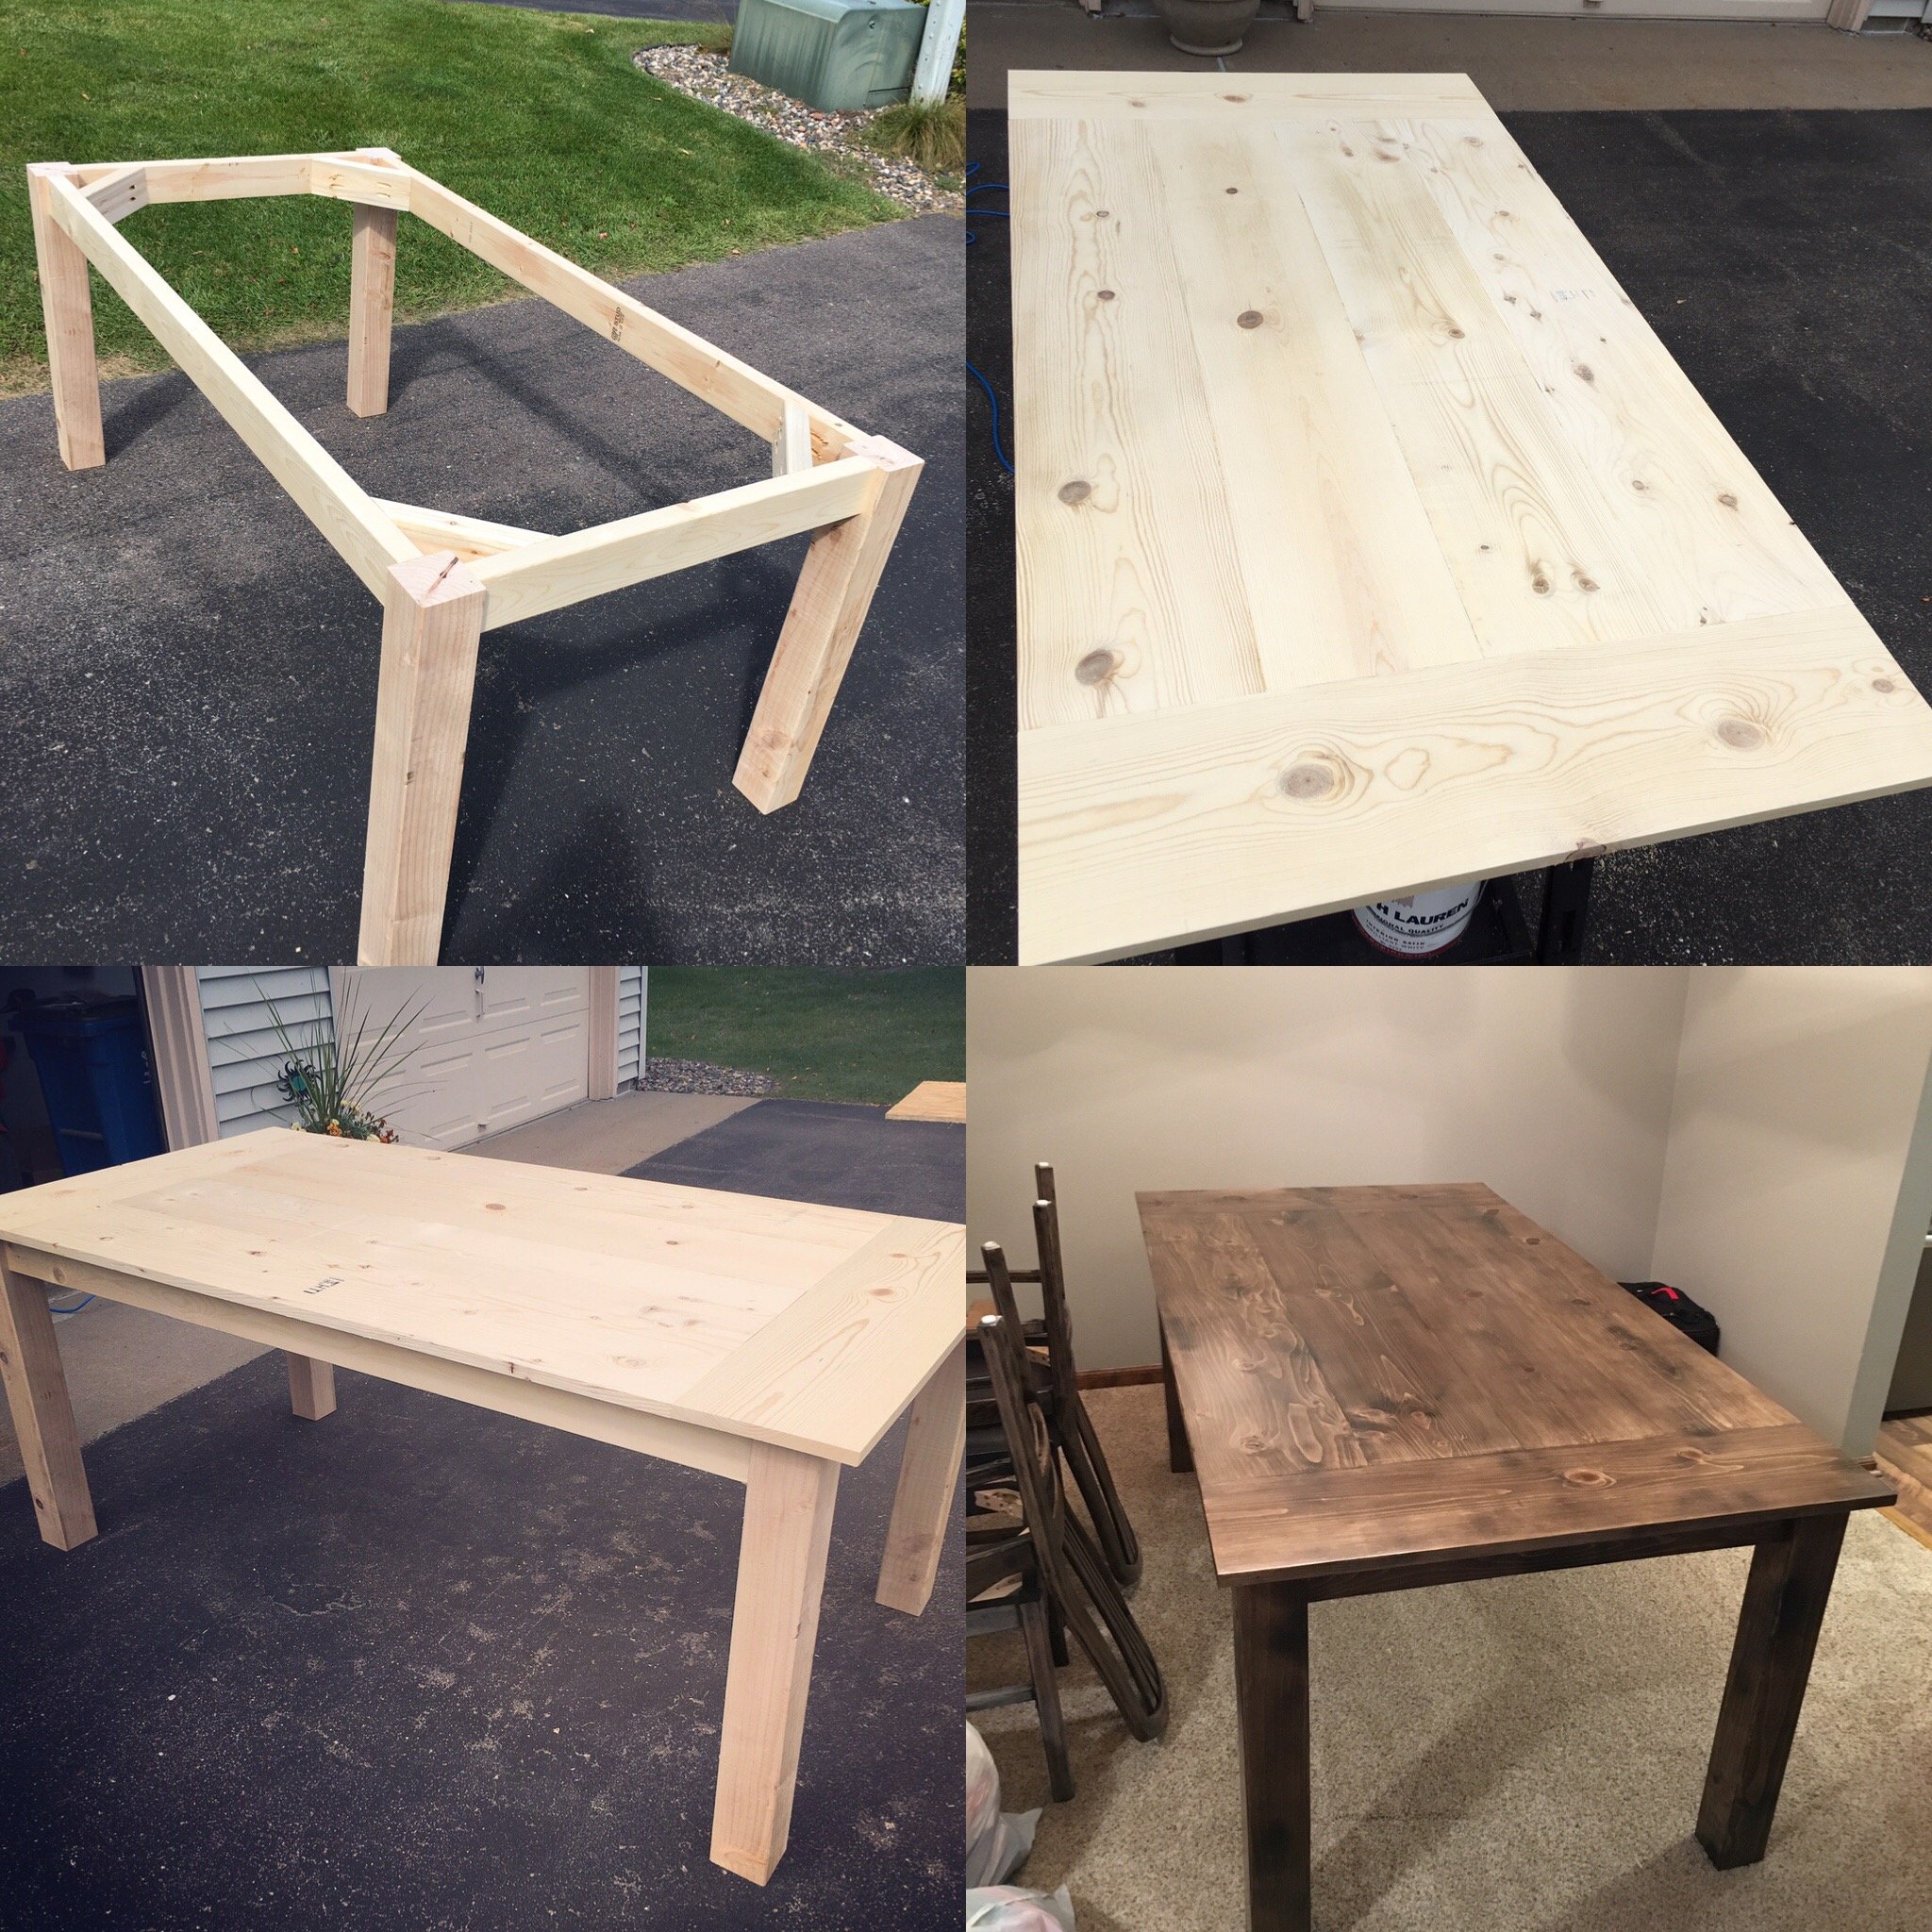
Rustic Table
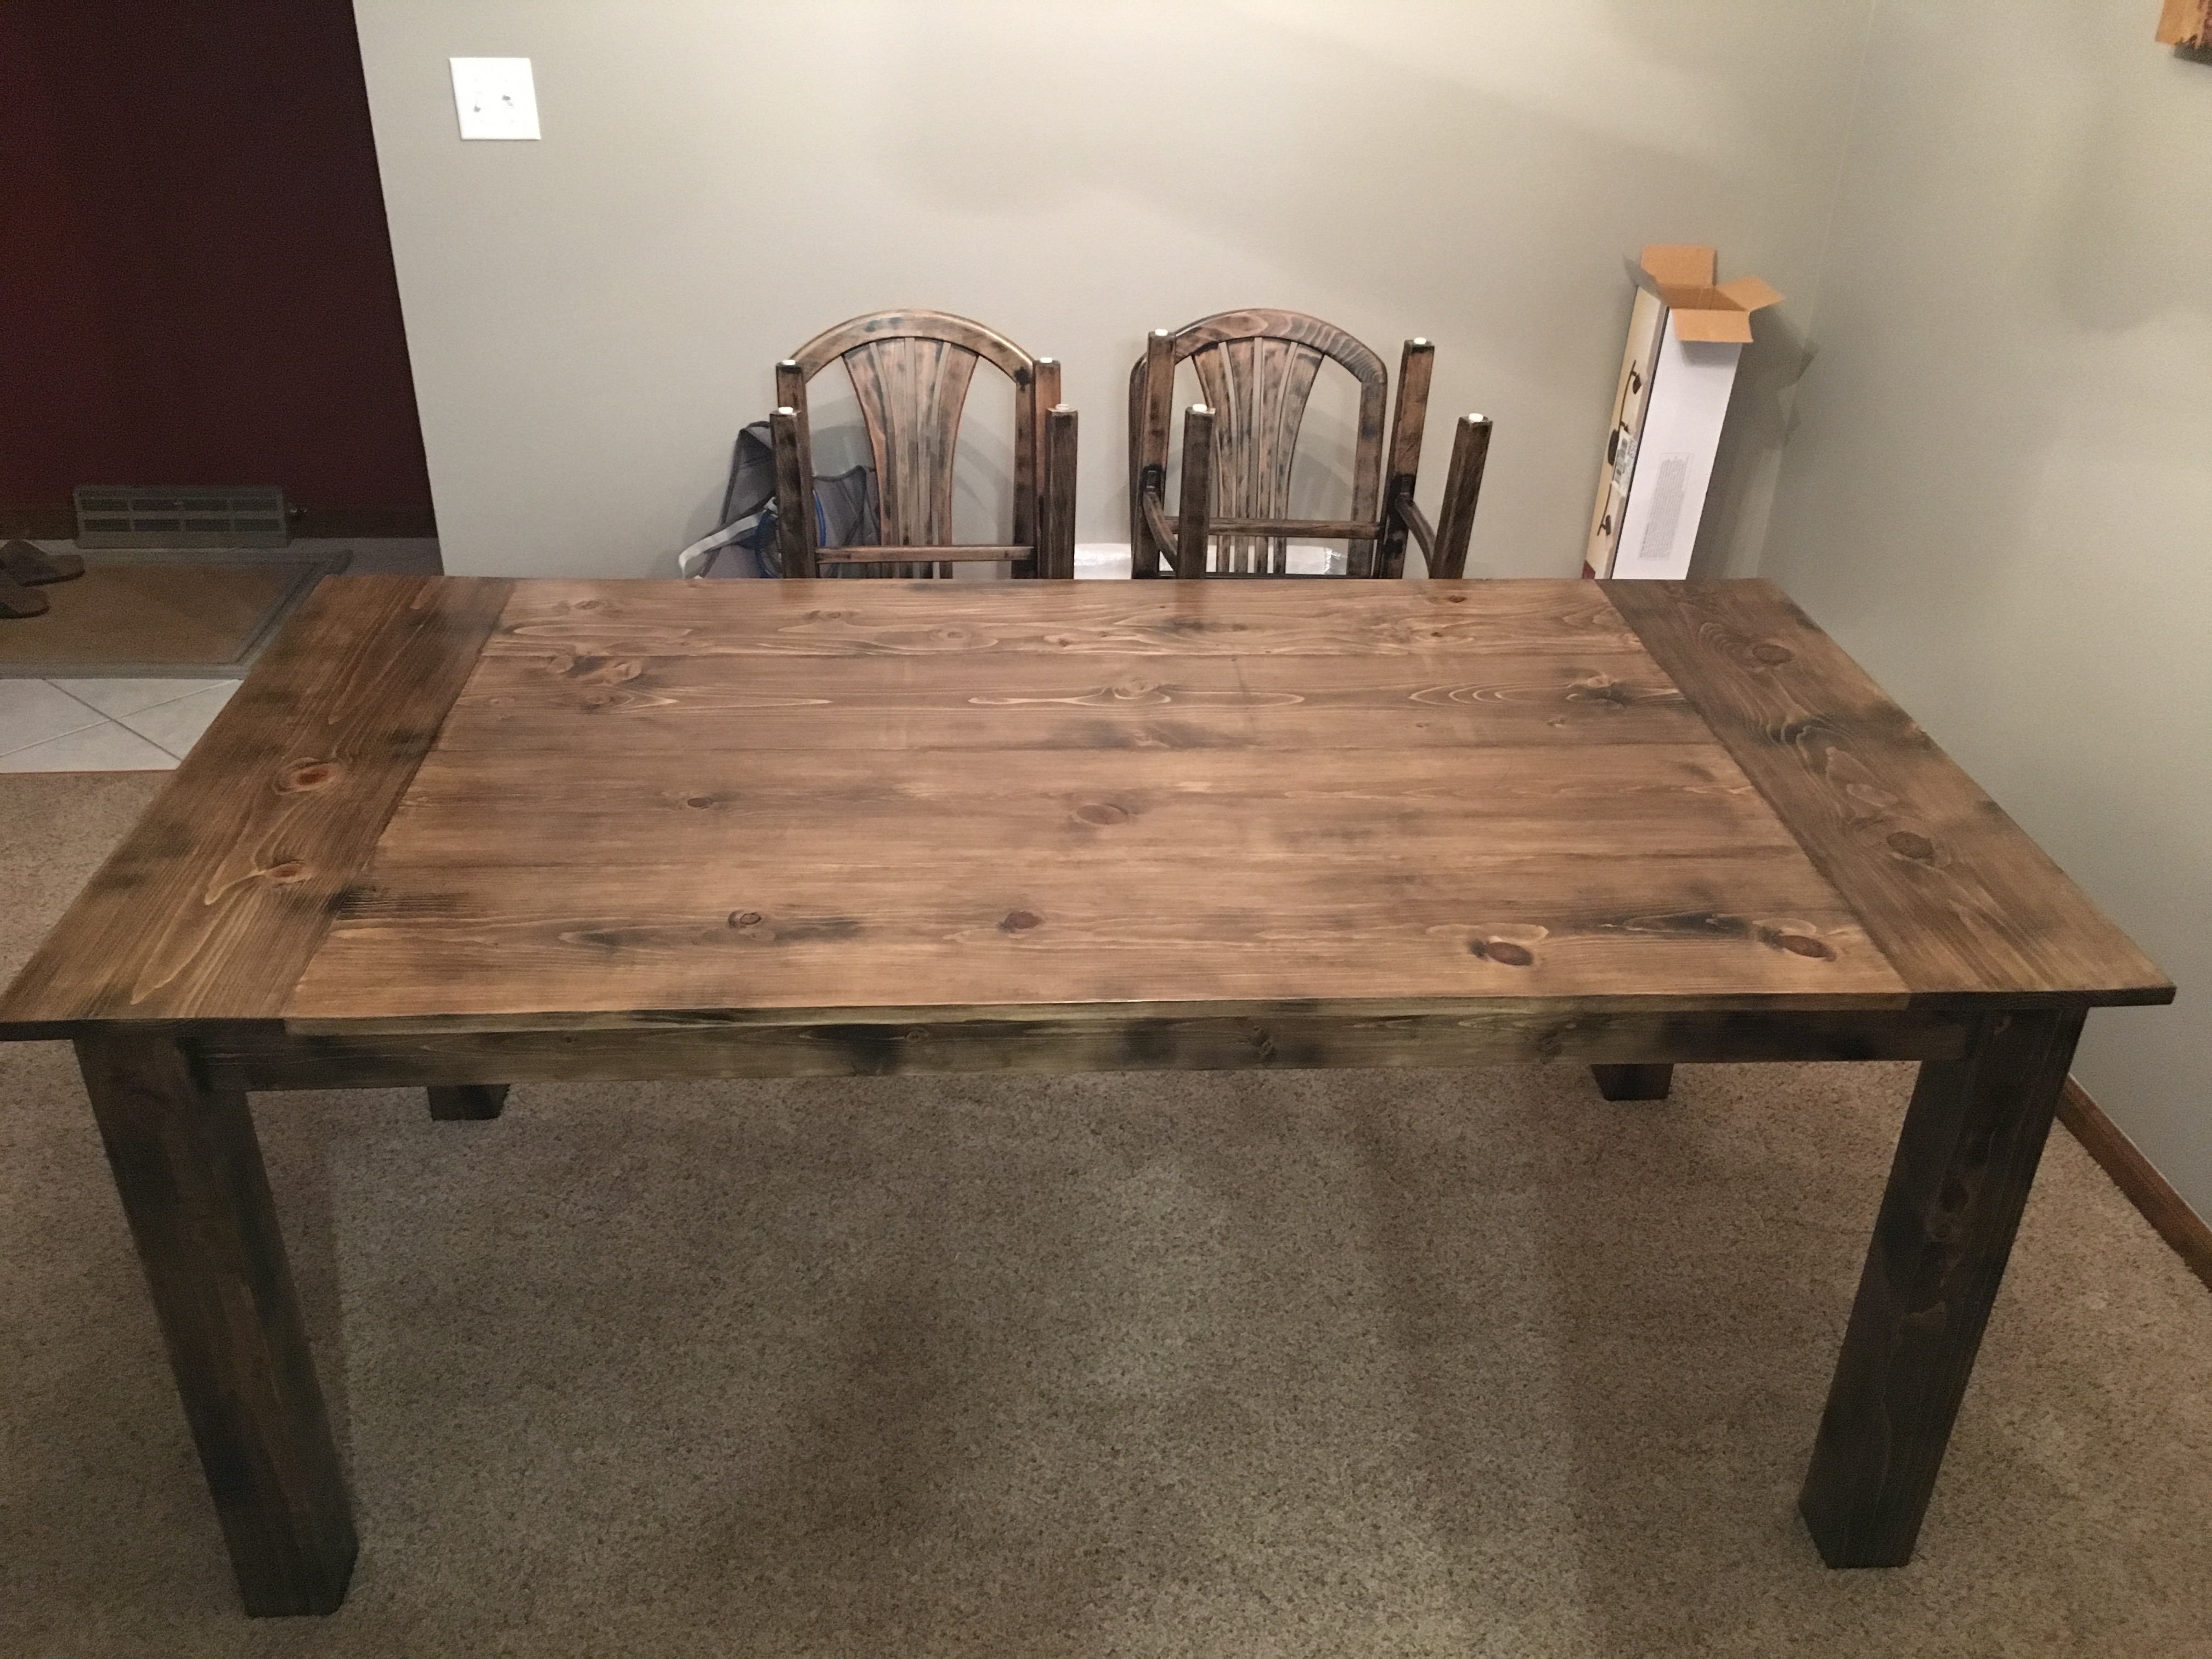
Built this table with some modifications from the rustic table plans. Made it 6ft and added the breadboard end. Fun project!
Built from Plan(s)
Estimated Cost
$70
Estimated Time Investment
Weekend Project (10-20 Hours)
Finish Used
Oil Based poly
Recommended Skill Level
Intermediate
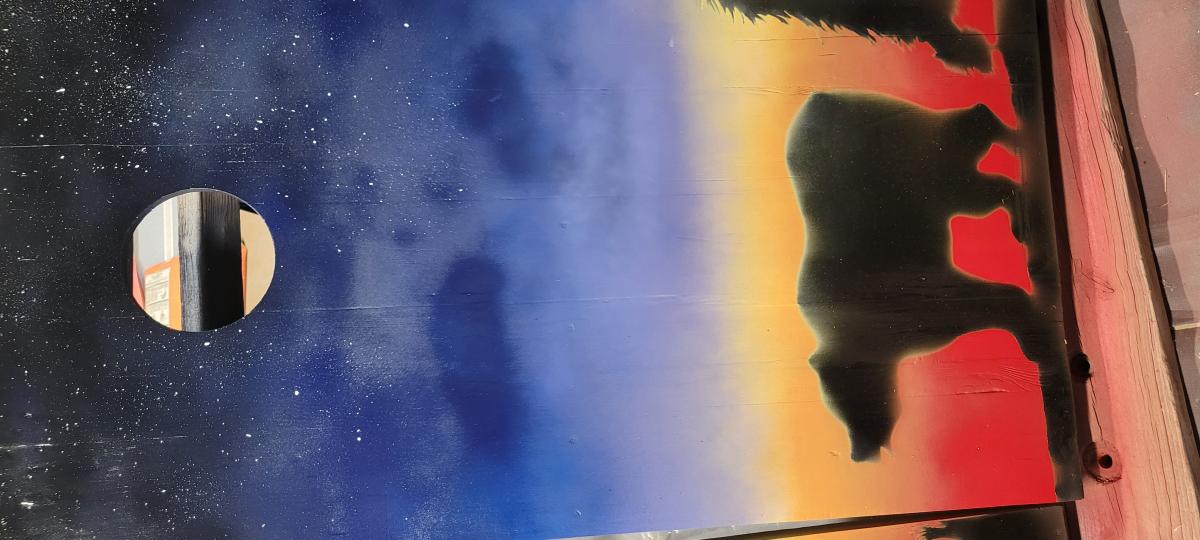
Cornhole Boards #1
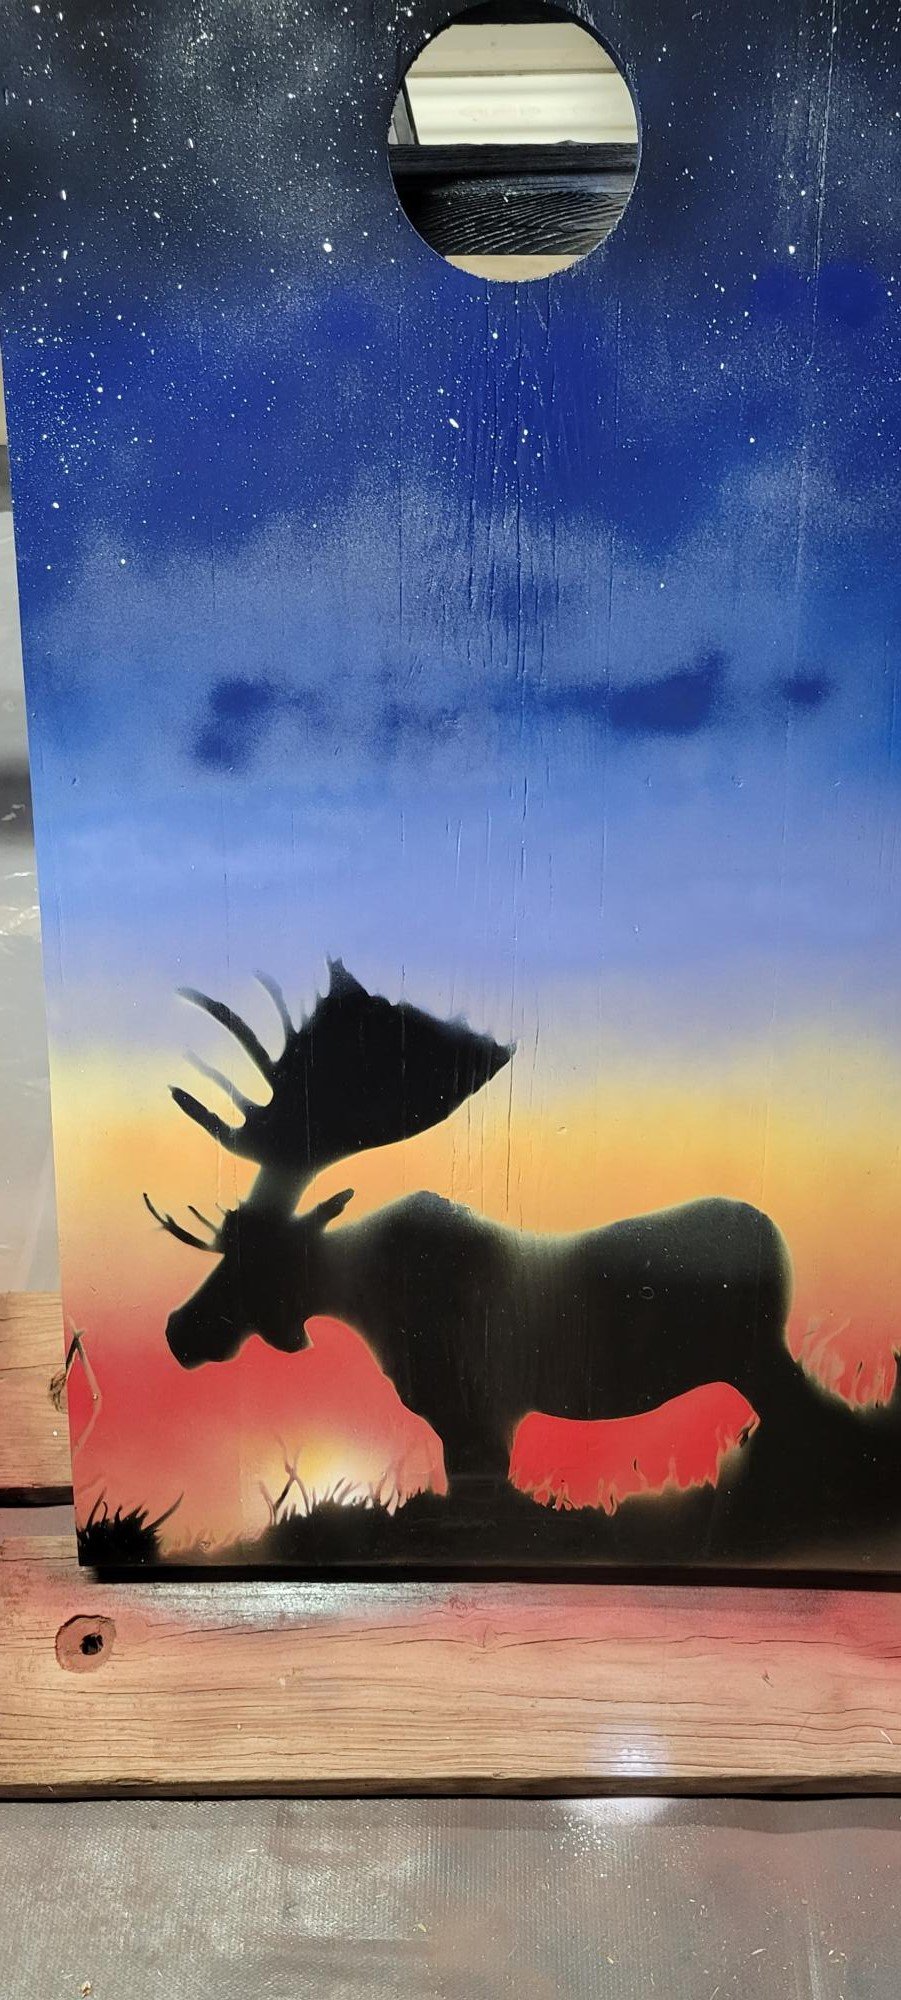
This is the first of the cornhole boards this year. Having never made such before, I learned a lot of the tips and tricks in this build. This build begins with cedar 2x4s and cedar fence pickets that I took down this last summer. I began by sanding the boards starting with 60 grit through to 320 grit with a belt sander up to 180 grit and hand sanding through 320 grit. The frame was glued up with Titebond II, then counter-sunk #8 x 1-1/2 screws. Next, we used nine (9) different cans of Rust-Oleum semi-gloss paint to fill in the background and to cover the moose and bear senciles drawn by my wife. The boards were then coated with Minwax Poly-Acrylic (9 coats) and Howard's Bee's Wax (6). The boards are secured with 3-inch toggle fasteners and the handles are Kayak straps with four (4) screw holes; I used the same Torx screws for strength and stability.
Built from Plan(s)
Comments
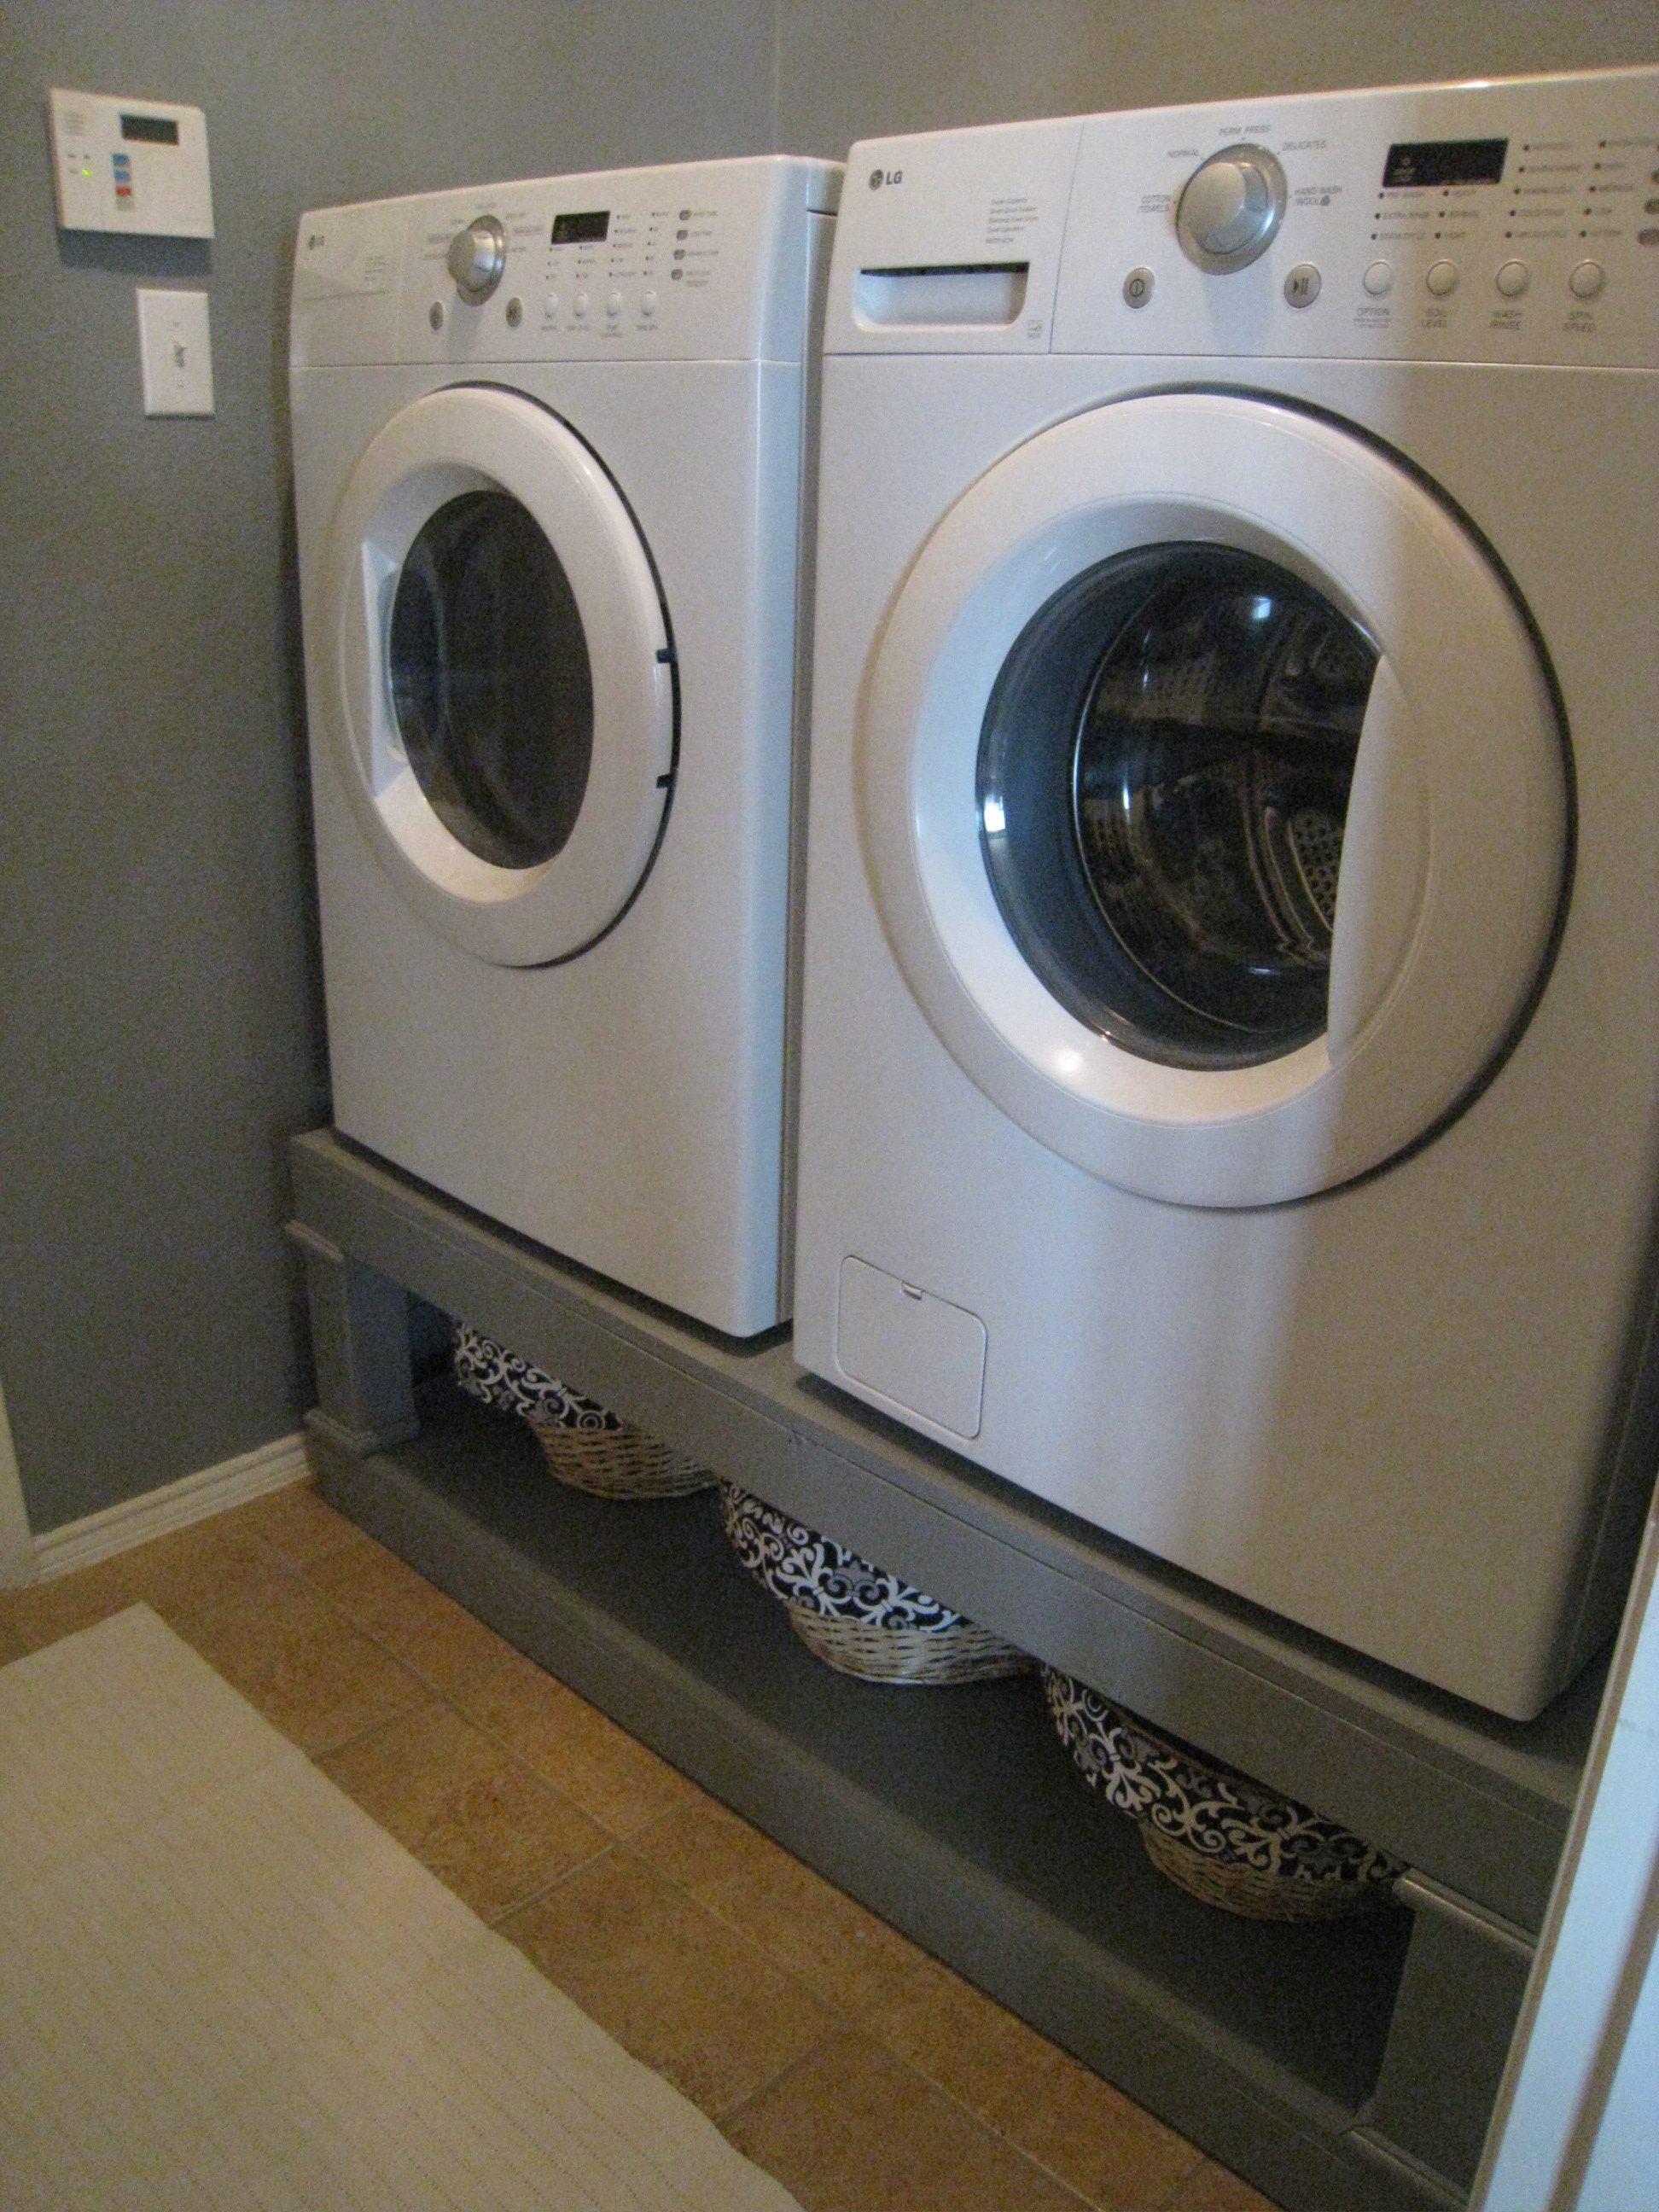
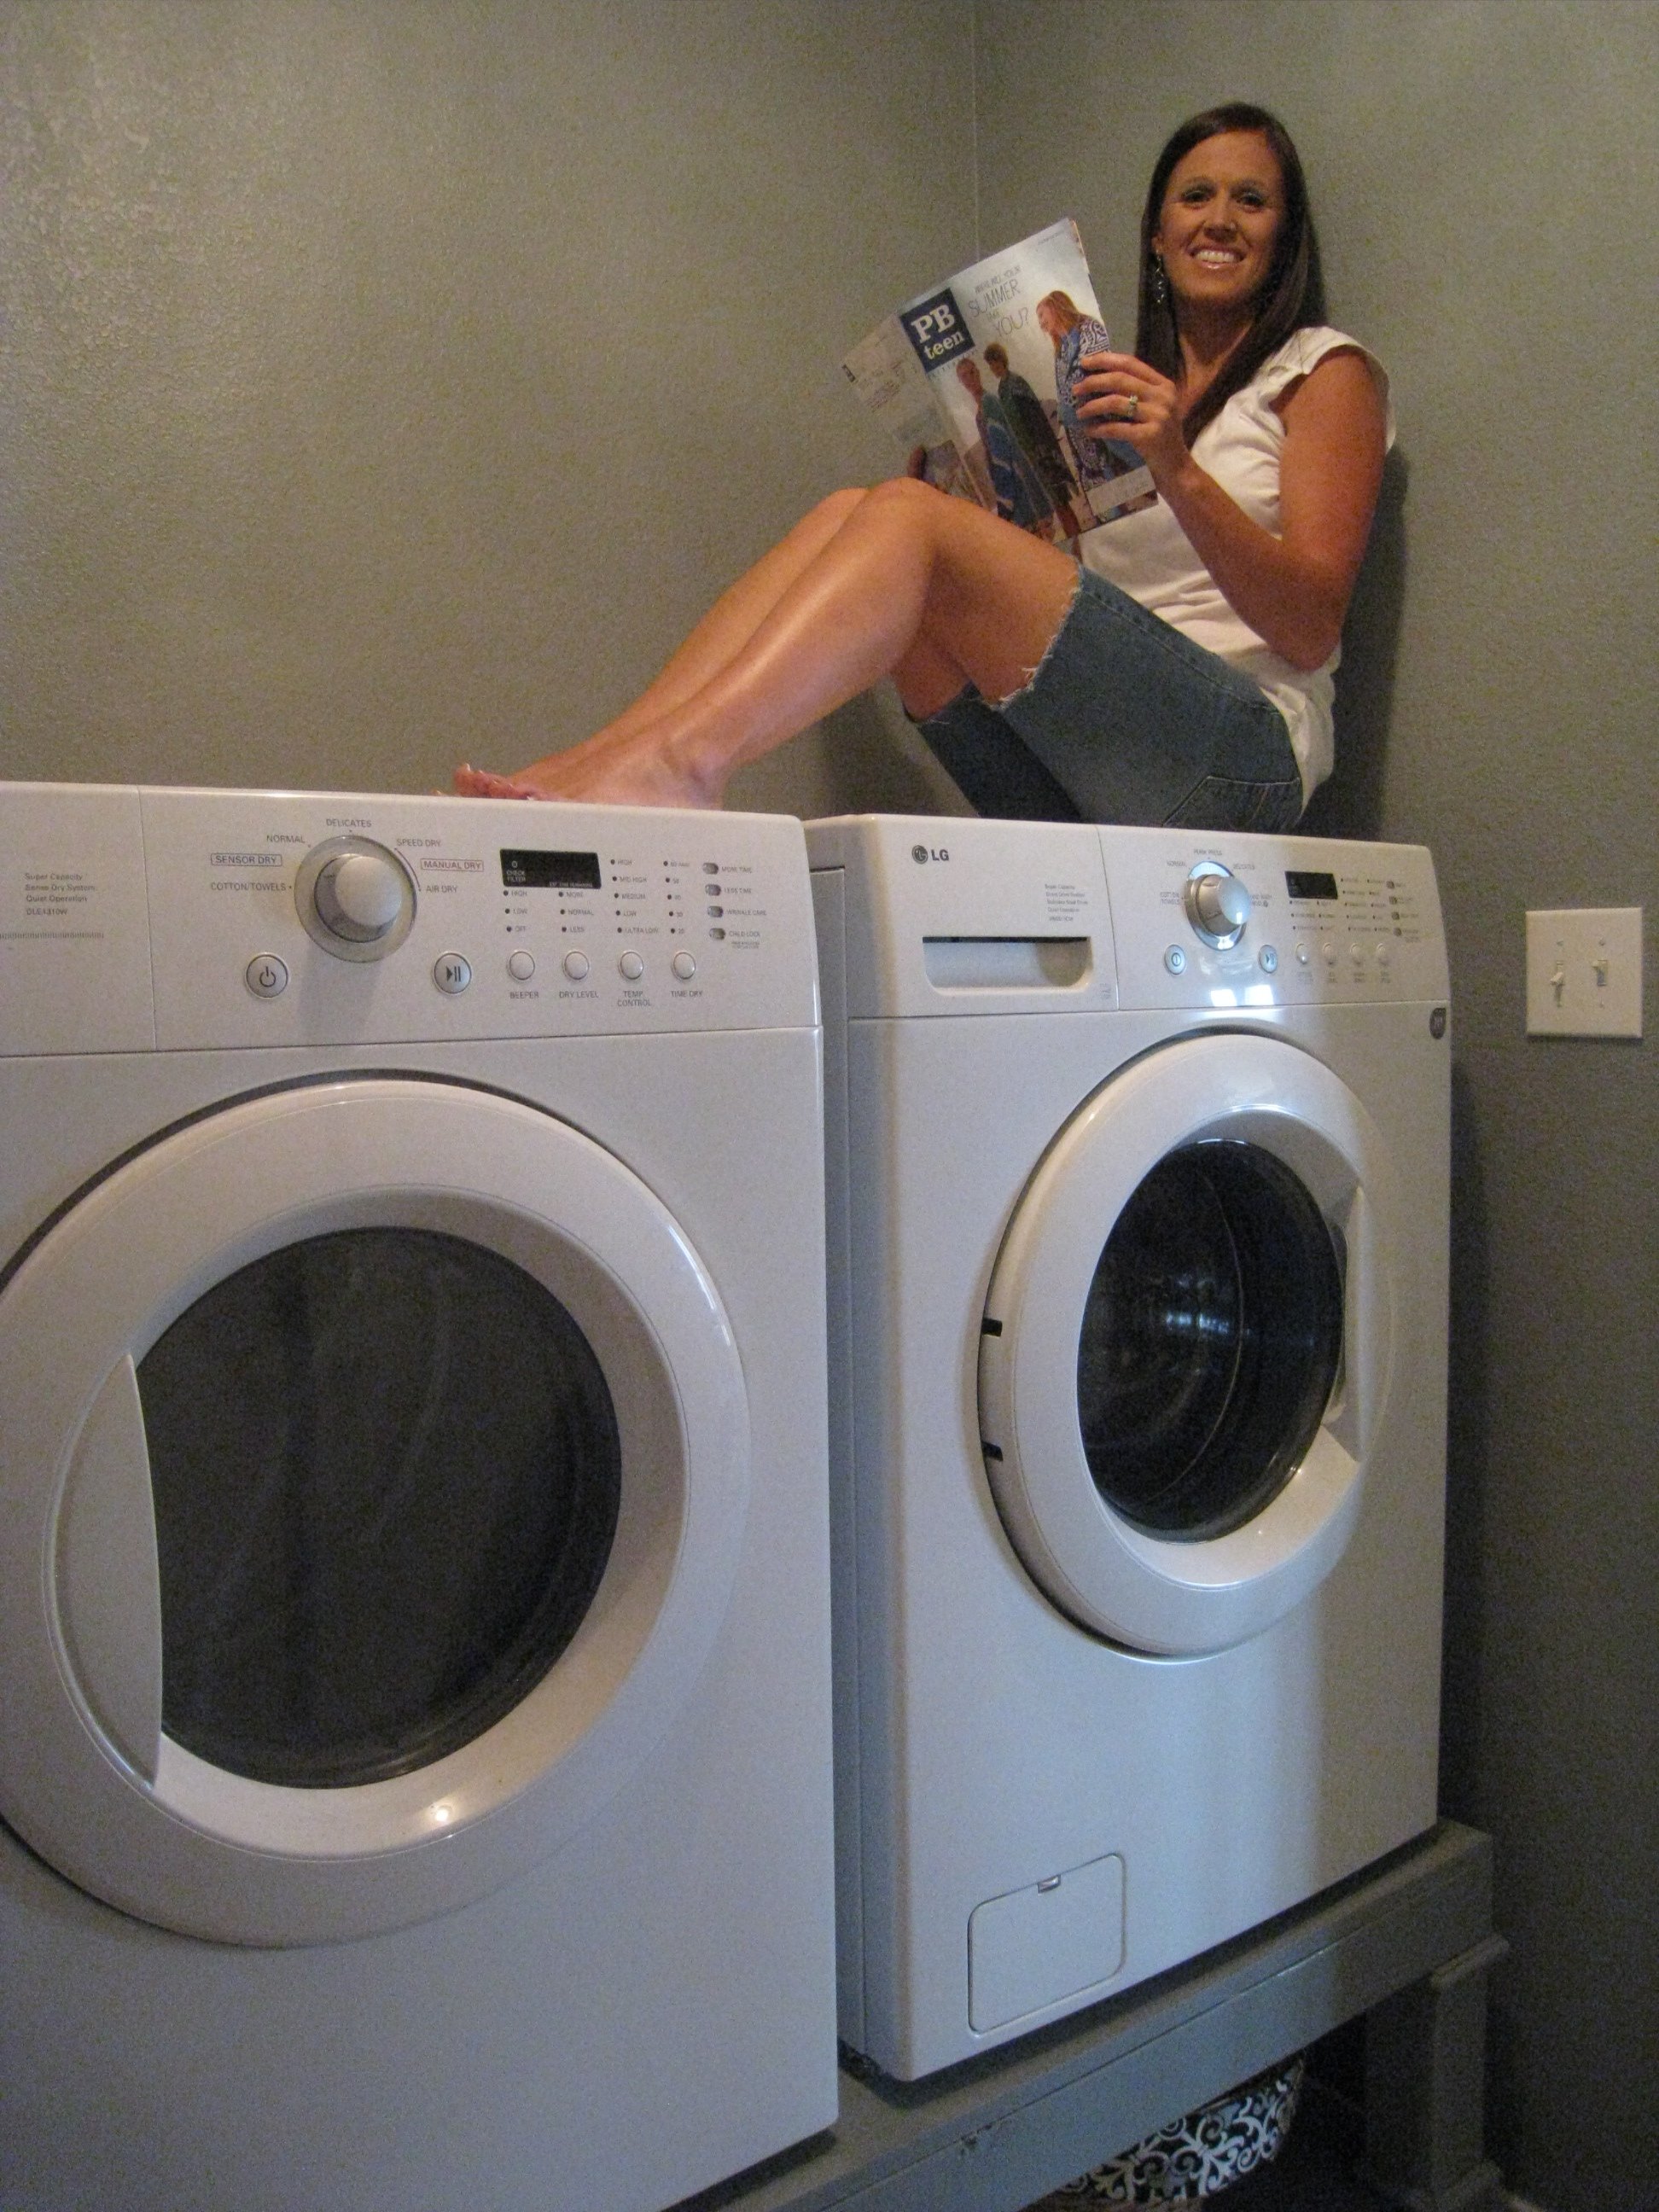
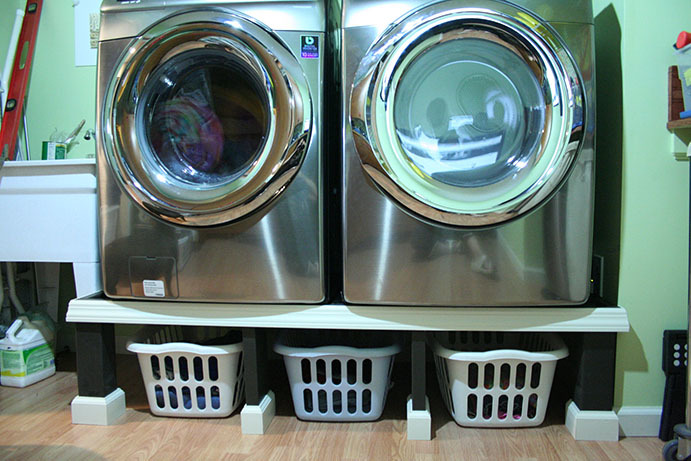
Washer/Dryer Pedestal

This was an easy build and after 2 months I am still in LOVE with it:)

Built from Plan(s)
Estimated Cost
$80
Estimated Time Investment
Day Project (6-9 Hours)
Finish Used
Behr paint
Recommended Skill Level
Beginner
Comments
Fri, 12/16/2011 - 10:59
Love these!
We have a HE front-loading washer and because of the power of the spin cycle, it vibrates/moves a lot. Anyone who has these pedestals have problems with that? I don't want a very expensive washer to take a tumble. :)
Modern Farmhouse Bed
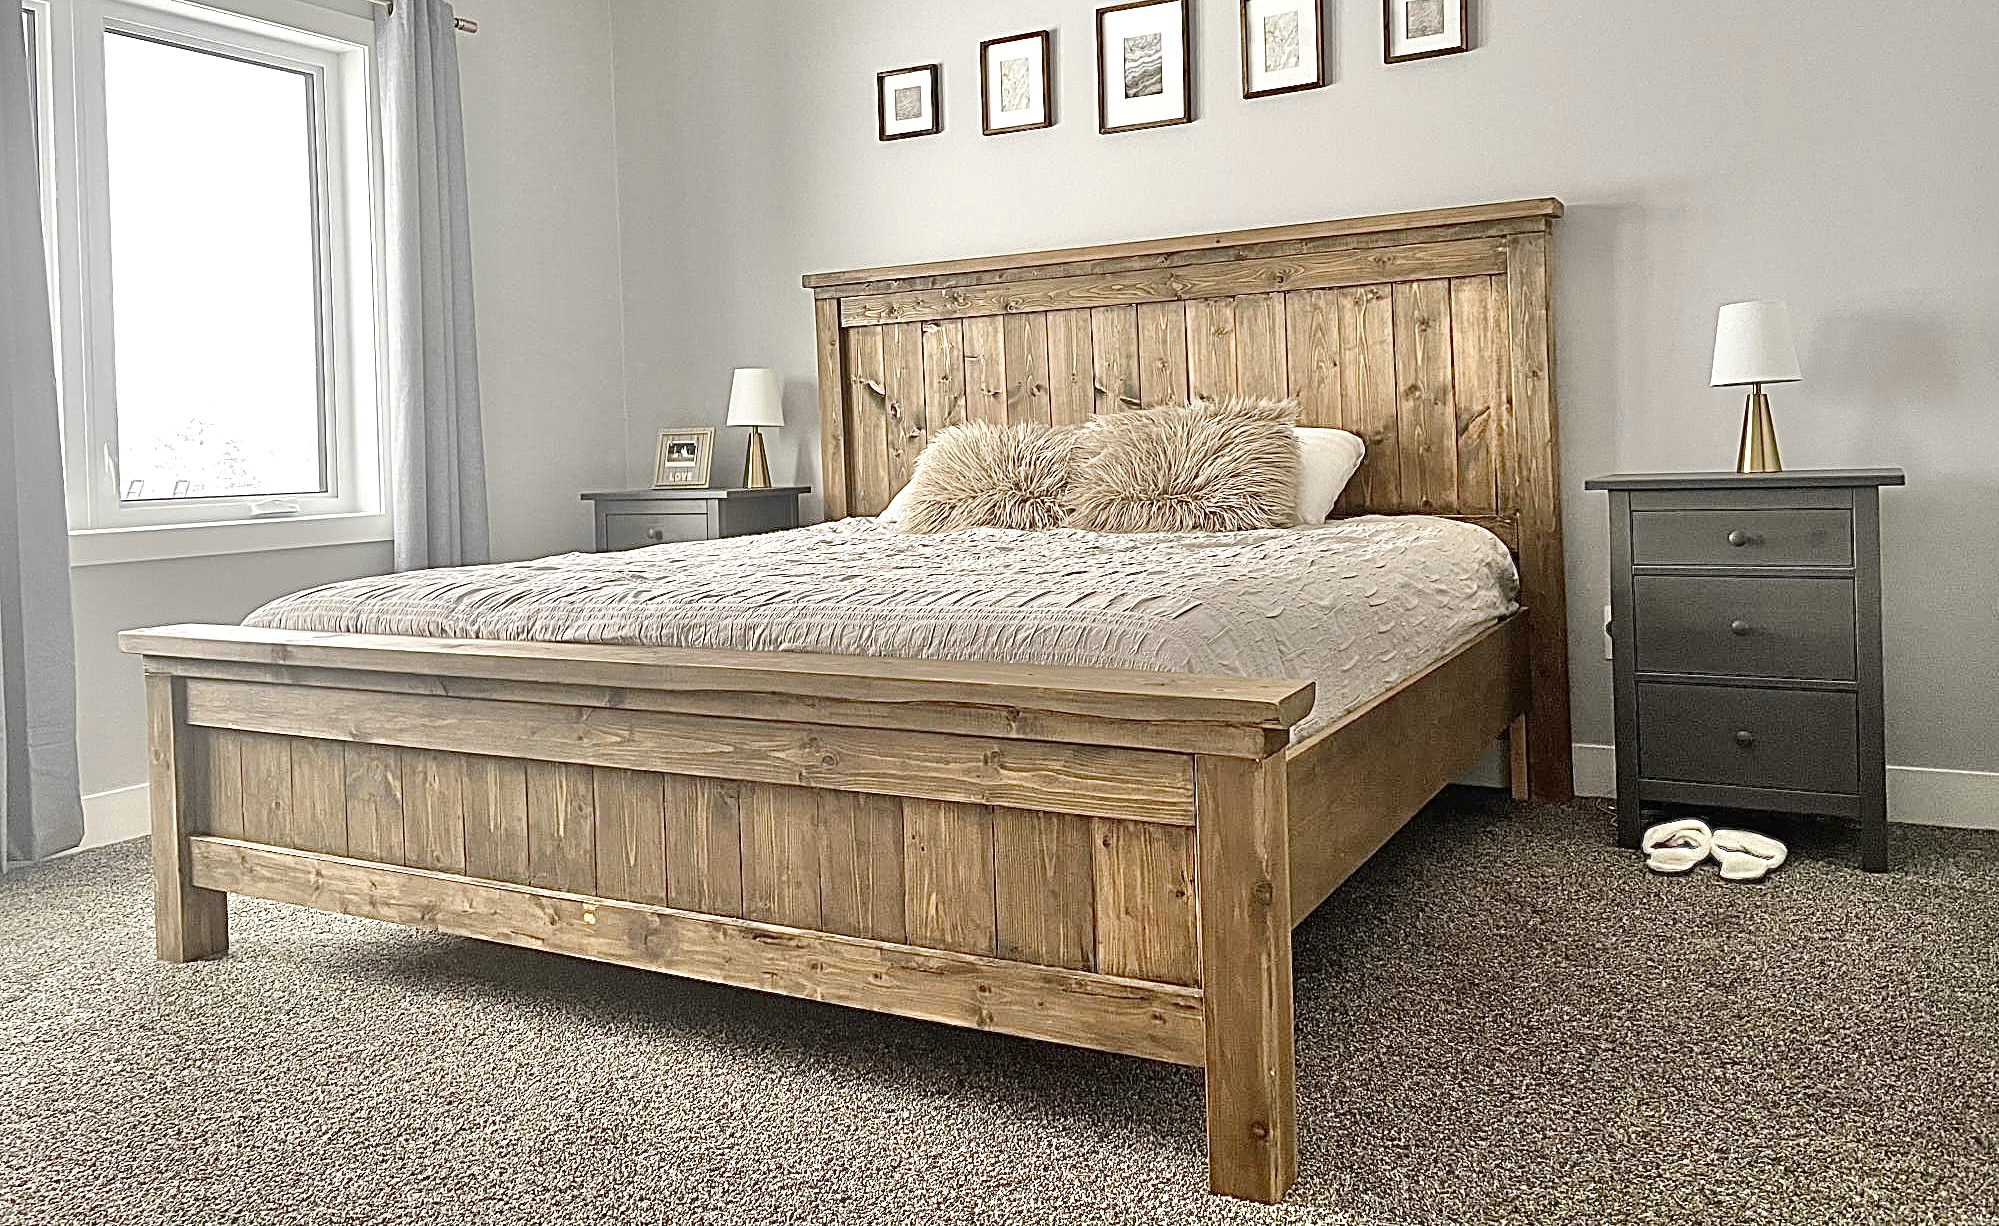
My husband and I had worked on this bed together, and we are so happy with it! We went with taller side tables that we purchased, and just stained the wood instead of painting it.
Built from Plan(s)
Comments
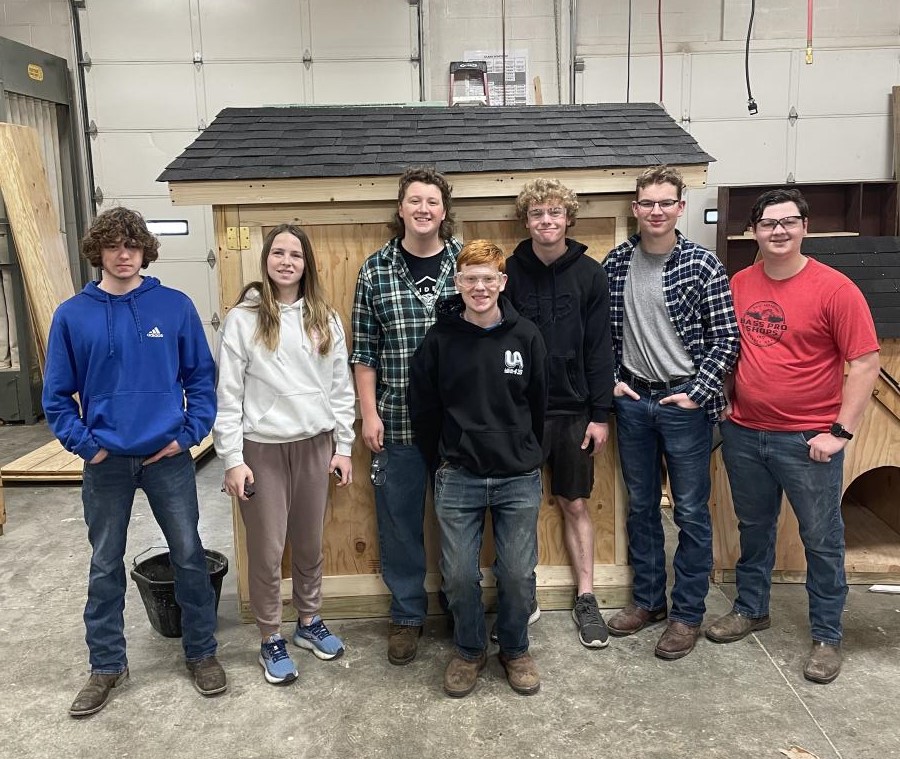
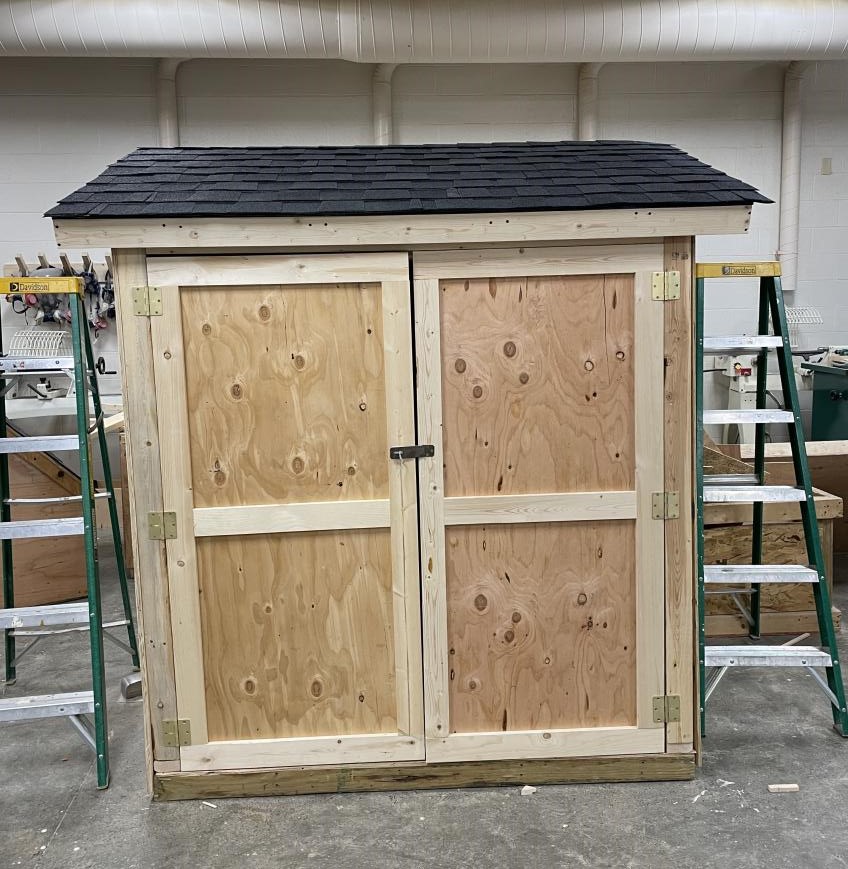
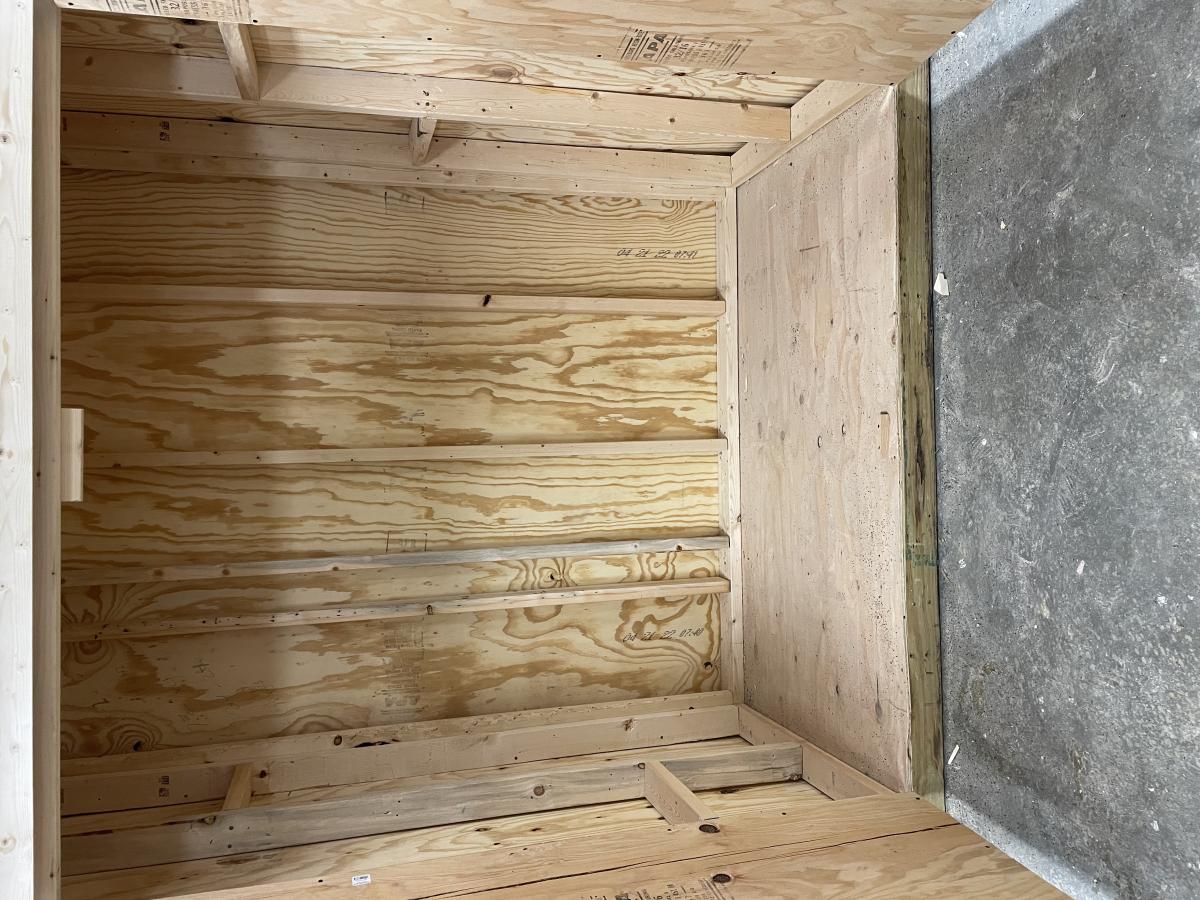
Lean-To Shed
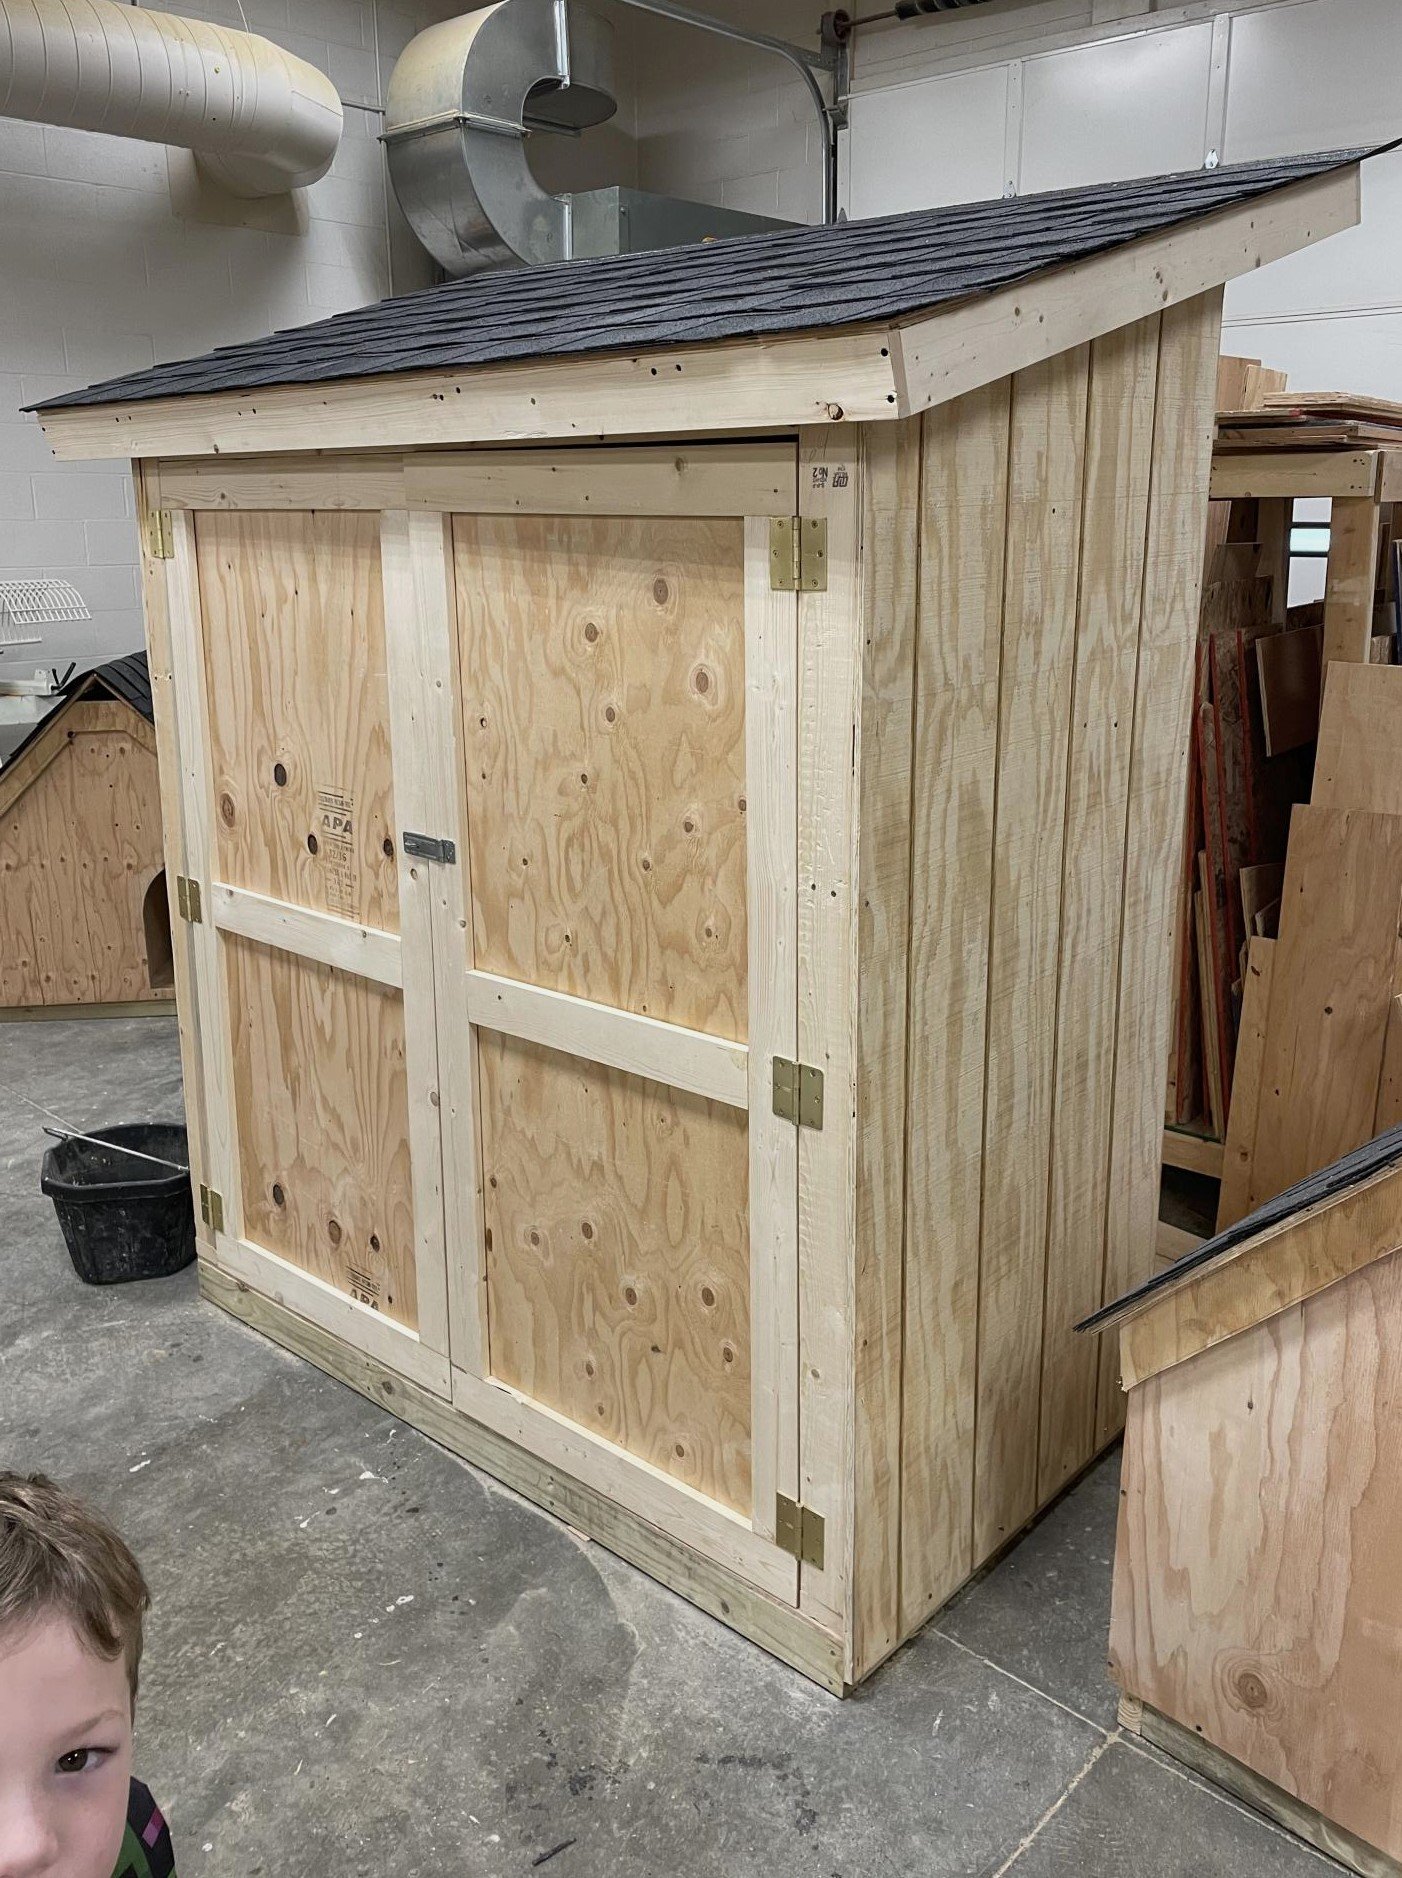
I’m a first year teacher of construction class at Waterloo High School in Illinois. We recently used your Small Cedar shed instructions with some modifications for a class project. It’s a bear getting cedar right now, so we used T1-11 for the outside and 2x4 for the frame.
Built from Plan(s)
Comments
Sat, 03/25/2023 - 09:14
Great project for your class!
Very fun and job well done! Thank you for sharing.
Sonny's Play Mud Kitchen
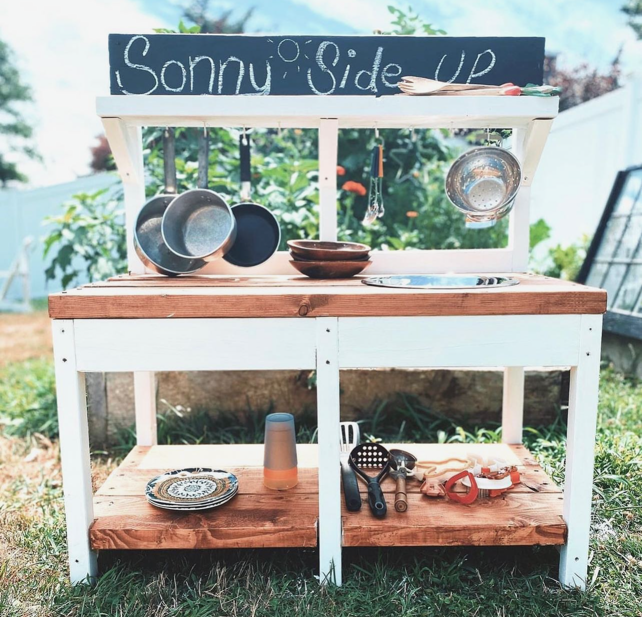
Darling Mud Kitchen by Sarah Jean Gammon
"I had this idea of making Sonny a mud-kitchen, a kids play kitchen for the yard. I mentioned it to Brent and he laughed saying he had enough projects on his list. This was not something he was going to build. Sooo I built this all by my self...or as Sonny would say, “me do this my own self”. It cost ~30 bucks in lumber and a trip to the thrift store for some second hand pots and pans. 3 hours later, a little paint, a little stain and voila... Sonny Side Up Mud Kitchen! Thanks for the plans Ana."
Built from Plan(s)
Octagonal Picnic Table
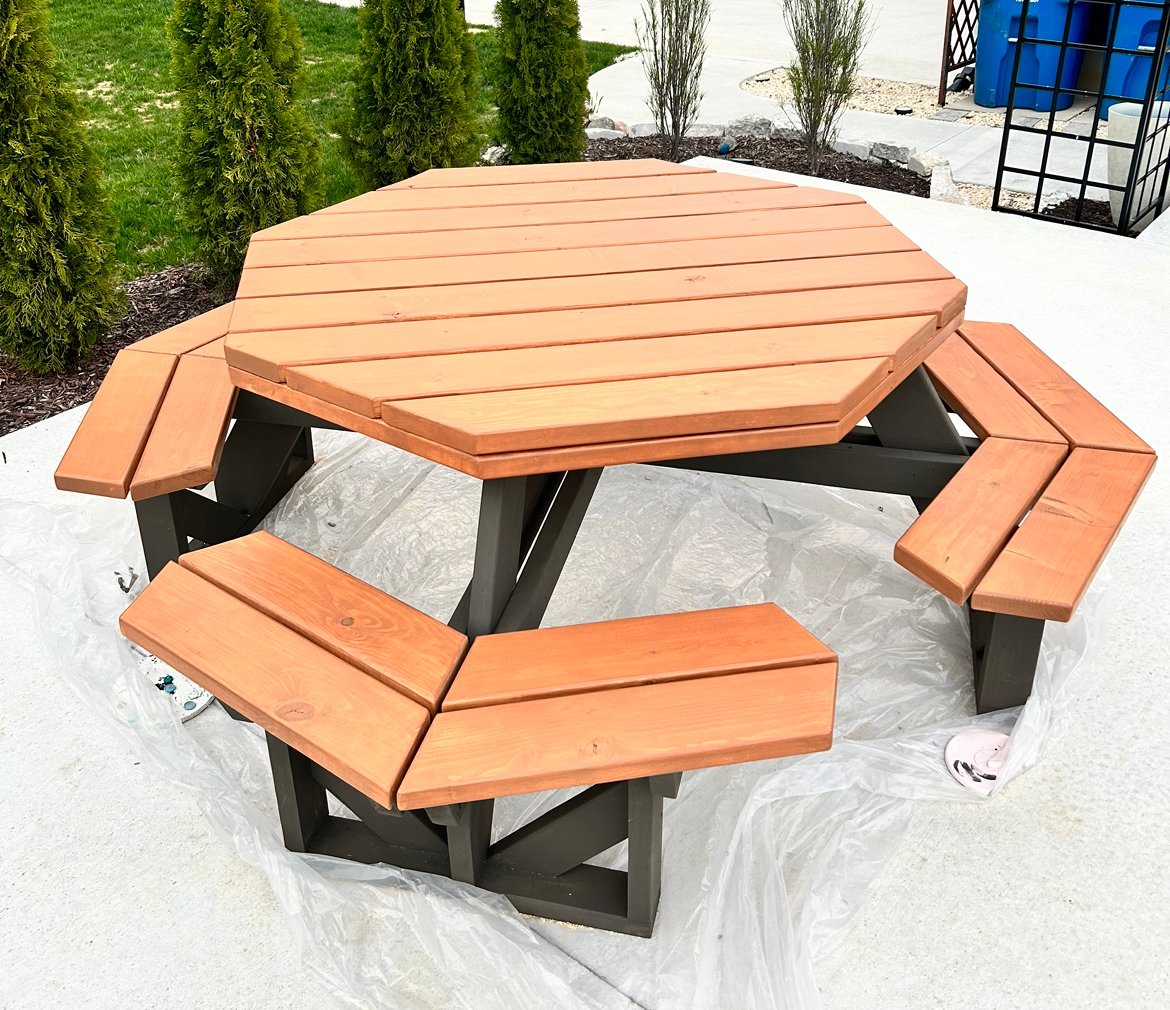
Great plans and easy to follow!
Built from Plan(s)
Comments
Modified washer/dryer pedestal
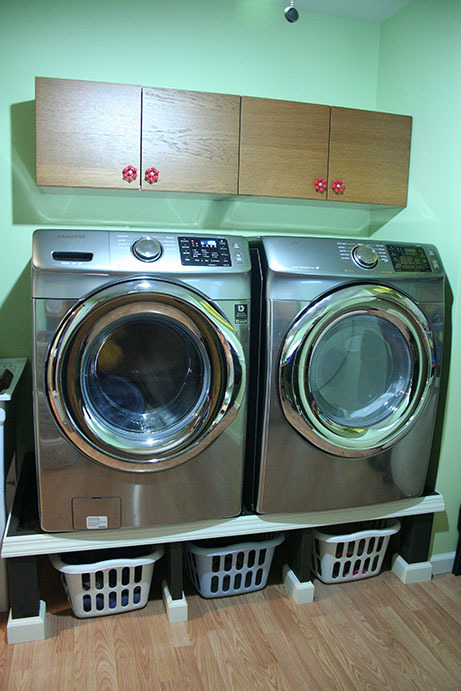
I loved the idea of building a washer and dryer pedestal for extra laundry basket storage underneath! Sashua's is beautiful so I took her idea and modified it a bit to work for me. My washer is very, very heavy and I was worried that if there was no support under the weight in the middle, it would start to bow and sag. The original plan also put the washer too high for me to have been able to use without a step stool. So in my modification I screwed cleats into the 2X4 frame of the laundry room wall, placed the 3/4" plywood on top of it and screwed it in. In the front, I used 4X4's as the two corner leg supports and then added two 1X6 supports in the front center, creating three laundry basket bays. I placed it directly onto the floor as opposed to building the bottom base. This saved me money since I was able to buy half the lumber and also allowed me to lower the height of the platform while leaving enough space for my baskets. The top of my platform is approximately 14 1/2" high, which is just low enough so that I can see into the soap filling compartment at the top of the washer. Being that I'm only 5'2" I would have needed to use a step stool to use my washer at the original 19 1/2" plan height. I framed the top edge of the platform with 2X2's, to ensure that my washer or dryer never walked off the edge. Finally, I added some trim along the front edge and around the legs and that's it!
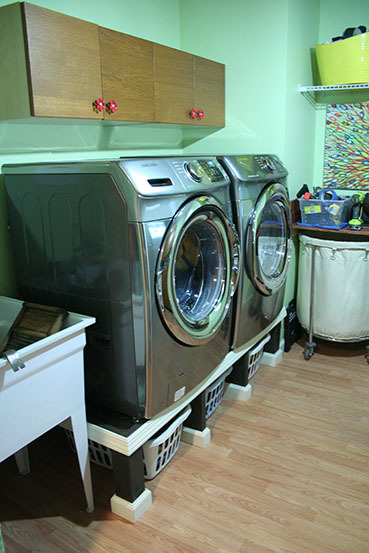
Built from Plan(s)
Estimated Cost
$60
Estimated Time Investment
Afternoon Project (3-6 Hours)
Recommended Skill Level
Beginner
Comments

Mon, 02/15/2016 - 12:25
Looks Great!!!
I REALLY like this modified version, I think it looks GREAT! when you say you screwed cleats to the back wall, are you talking a 2x4 across the back fastened to the studs, or what did you use? I think my wife would love this version, and I may just have to get started on one myself. ![]()
Doll bed factory
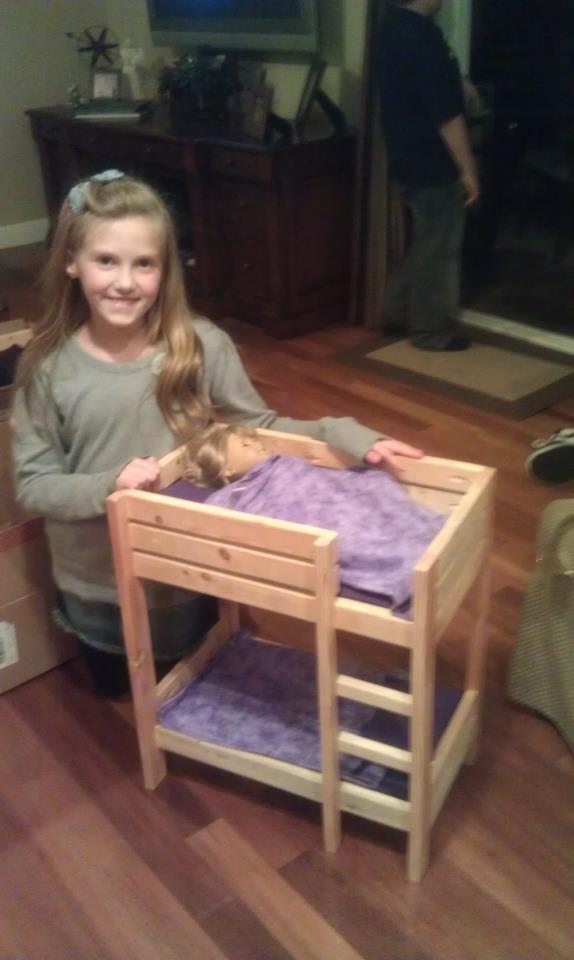
I fell in love with the darling bunk bed built by so many of Ana's readers. Since seeing it I've made several for my granddaughter, neighbors, and friends. What I've learned is that although they're cute, they take almost as much time as a full sized bed!
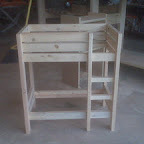


Built from Plan(s)
Estimated Cost
$20-30 (less if I used scraps!), another $10 for bedding materials
Estimated Time Investment
Afternoon Project (3-6 Hours)
Finish Used
I left most of the bunks natural. Filled, sanded and sprayed with 2 coats of clear poly. Others were painted white (after filling and sanding).
Recommended Skill Level
Beginner
Comments
Mon, 02/20/2012 - 18:54
American Doll bed
I love the beds. My child wants one so badly. I like yours better then the one American Girl makes.
Fri, 02/24/2012 - 20:48
Thank you!
That's a sweet thing to say. Evidently, others feel the same; I can't make enough of them! They're really pretty easy to make, I hope you try your hand at it!
Mon, 05/28/2012 - 17:27
Ana-White Doll Cradle pattern
Hi, I see you've made the Ana-White doll cradle from this post. The link to the pattern for the doll cradle appears to be missing as it is a dead link now. Do you know how I might obtain the pattern? Thanks so much
Cedar herb stand
Awesome project
Built from Plan(s)
Wood Snack Cabinet
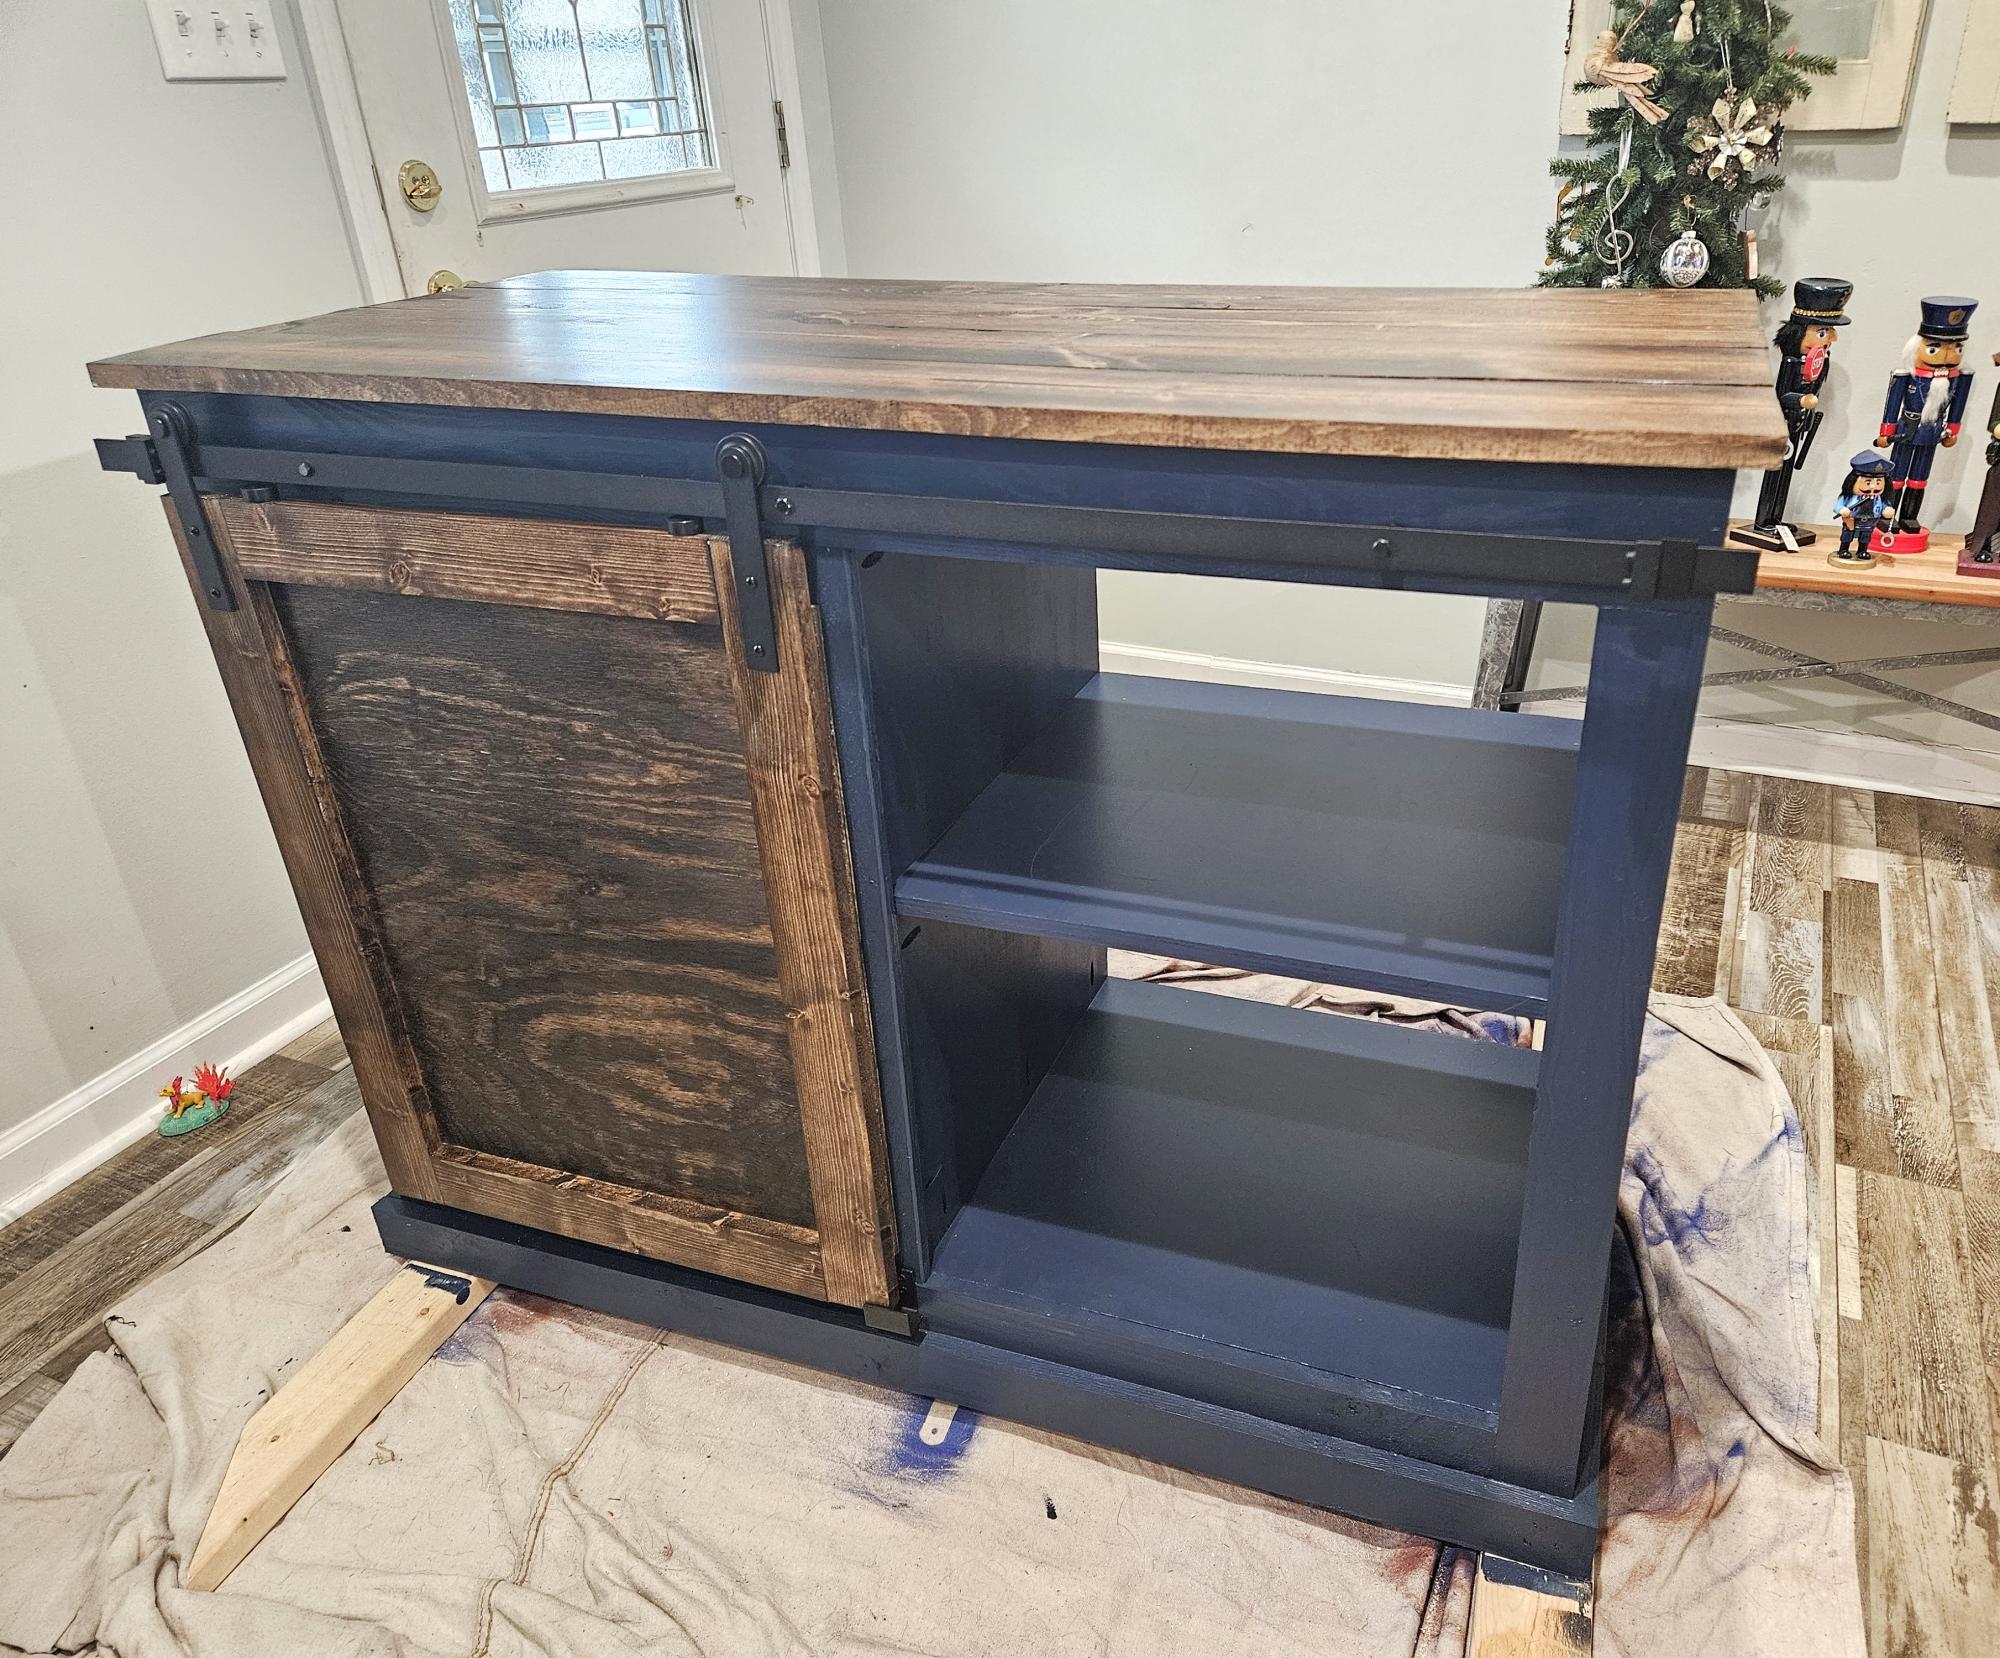
Great barn door cabinet build by Chuck A.
Built from Plan(s)
seesaw for big kids

I built a big kids see saw using 2x6's all around with a 2x8 seat. The center post is 30"h.


Built from Plan(s)
Estimated Cost
$25
Estimated Time Investment
An Hour or Two (0-2 Hours)
Finish Used
Minwax Helmsman 3 coats exterior grade clear satin poly
Recommended Skill Level
Intermediate
St. Patty's Day Cornhole Boards
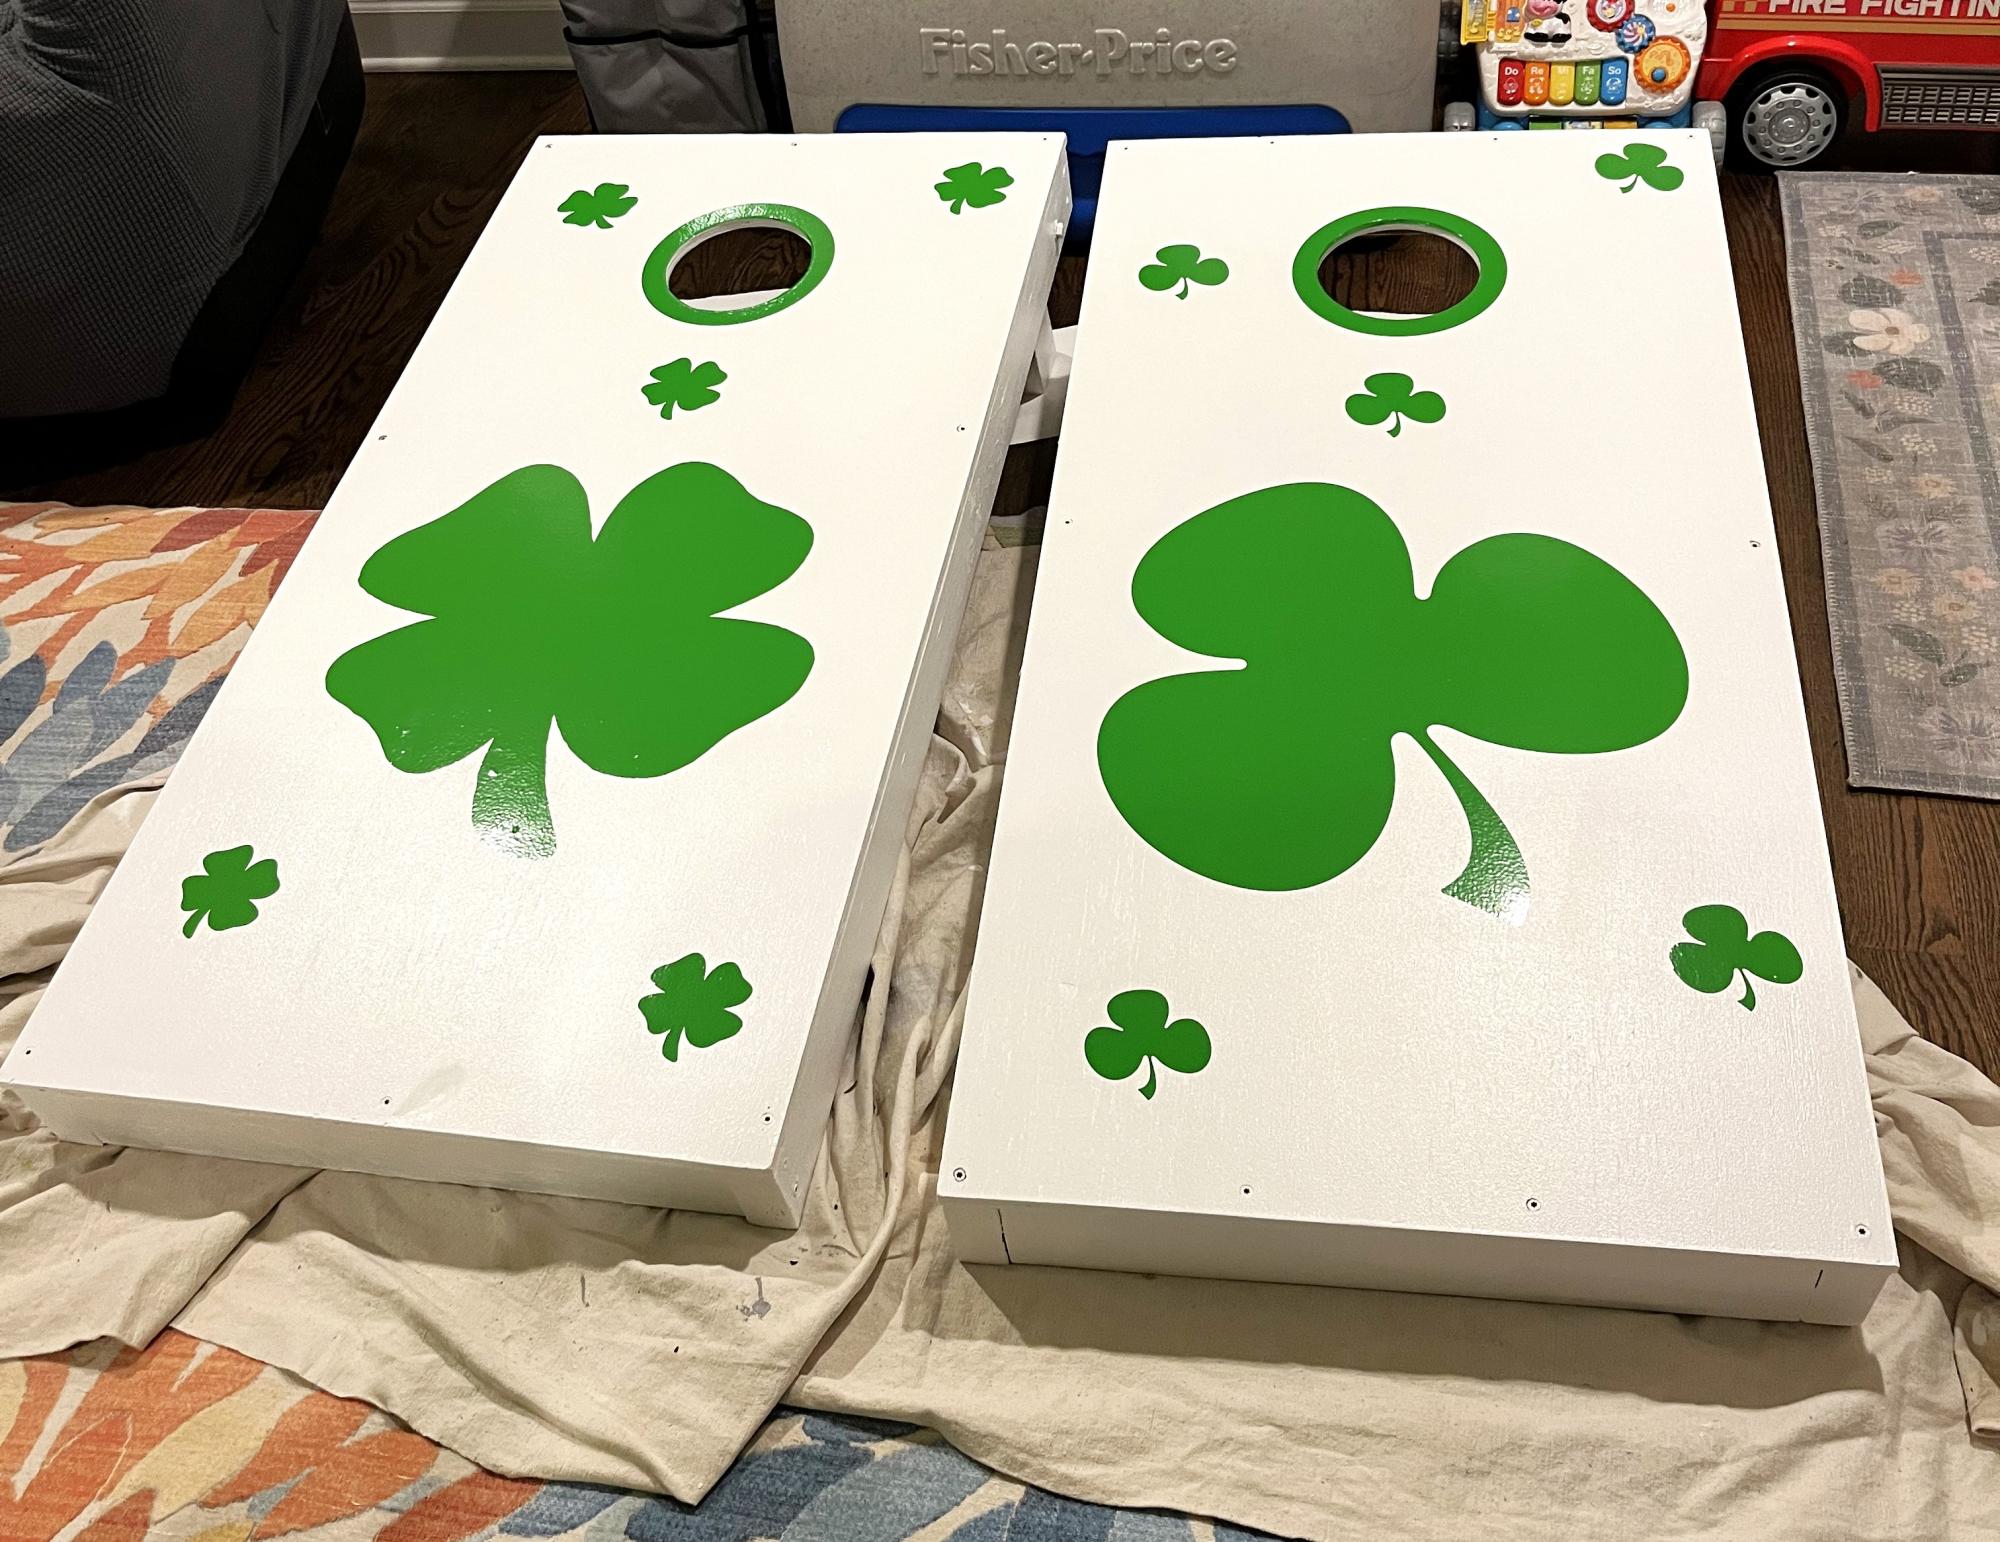
This was my second project and the step by step guide labs make everything doable. Ordered stickers and used them at a St Patrick’s Day party. Love
Built from Plan(s)