Community Brag Posts
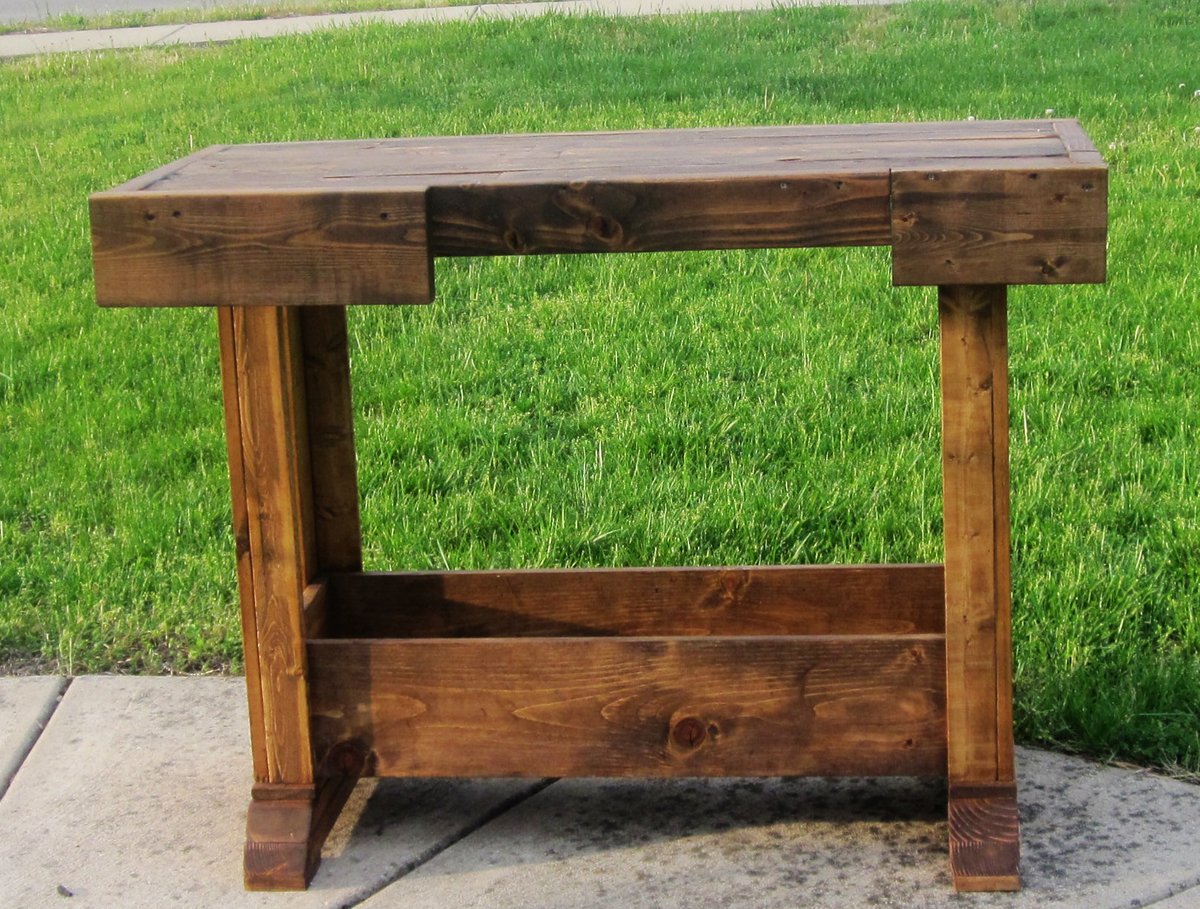
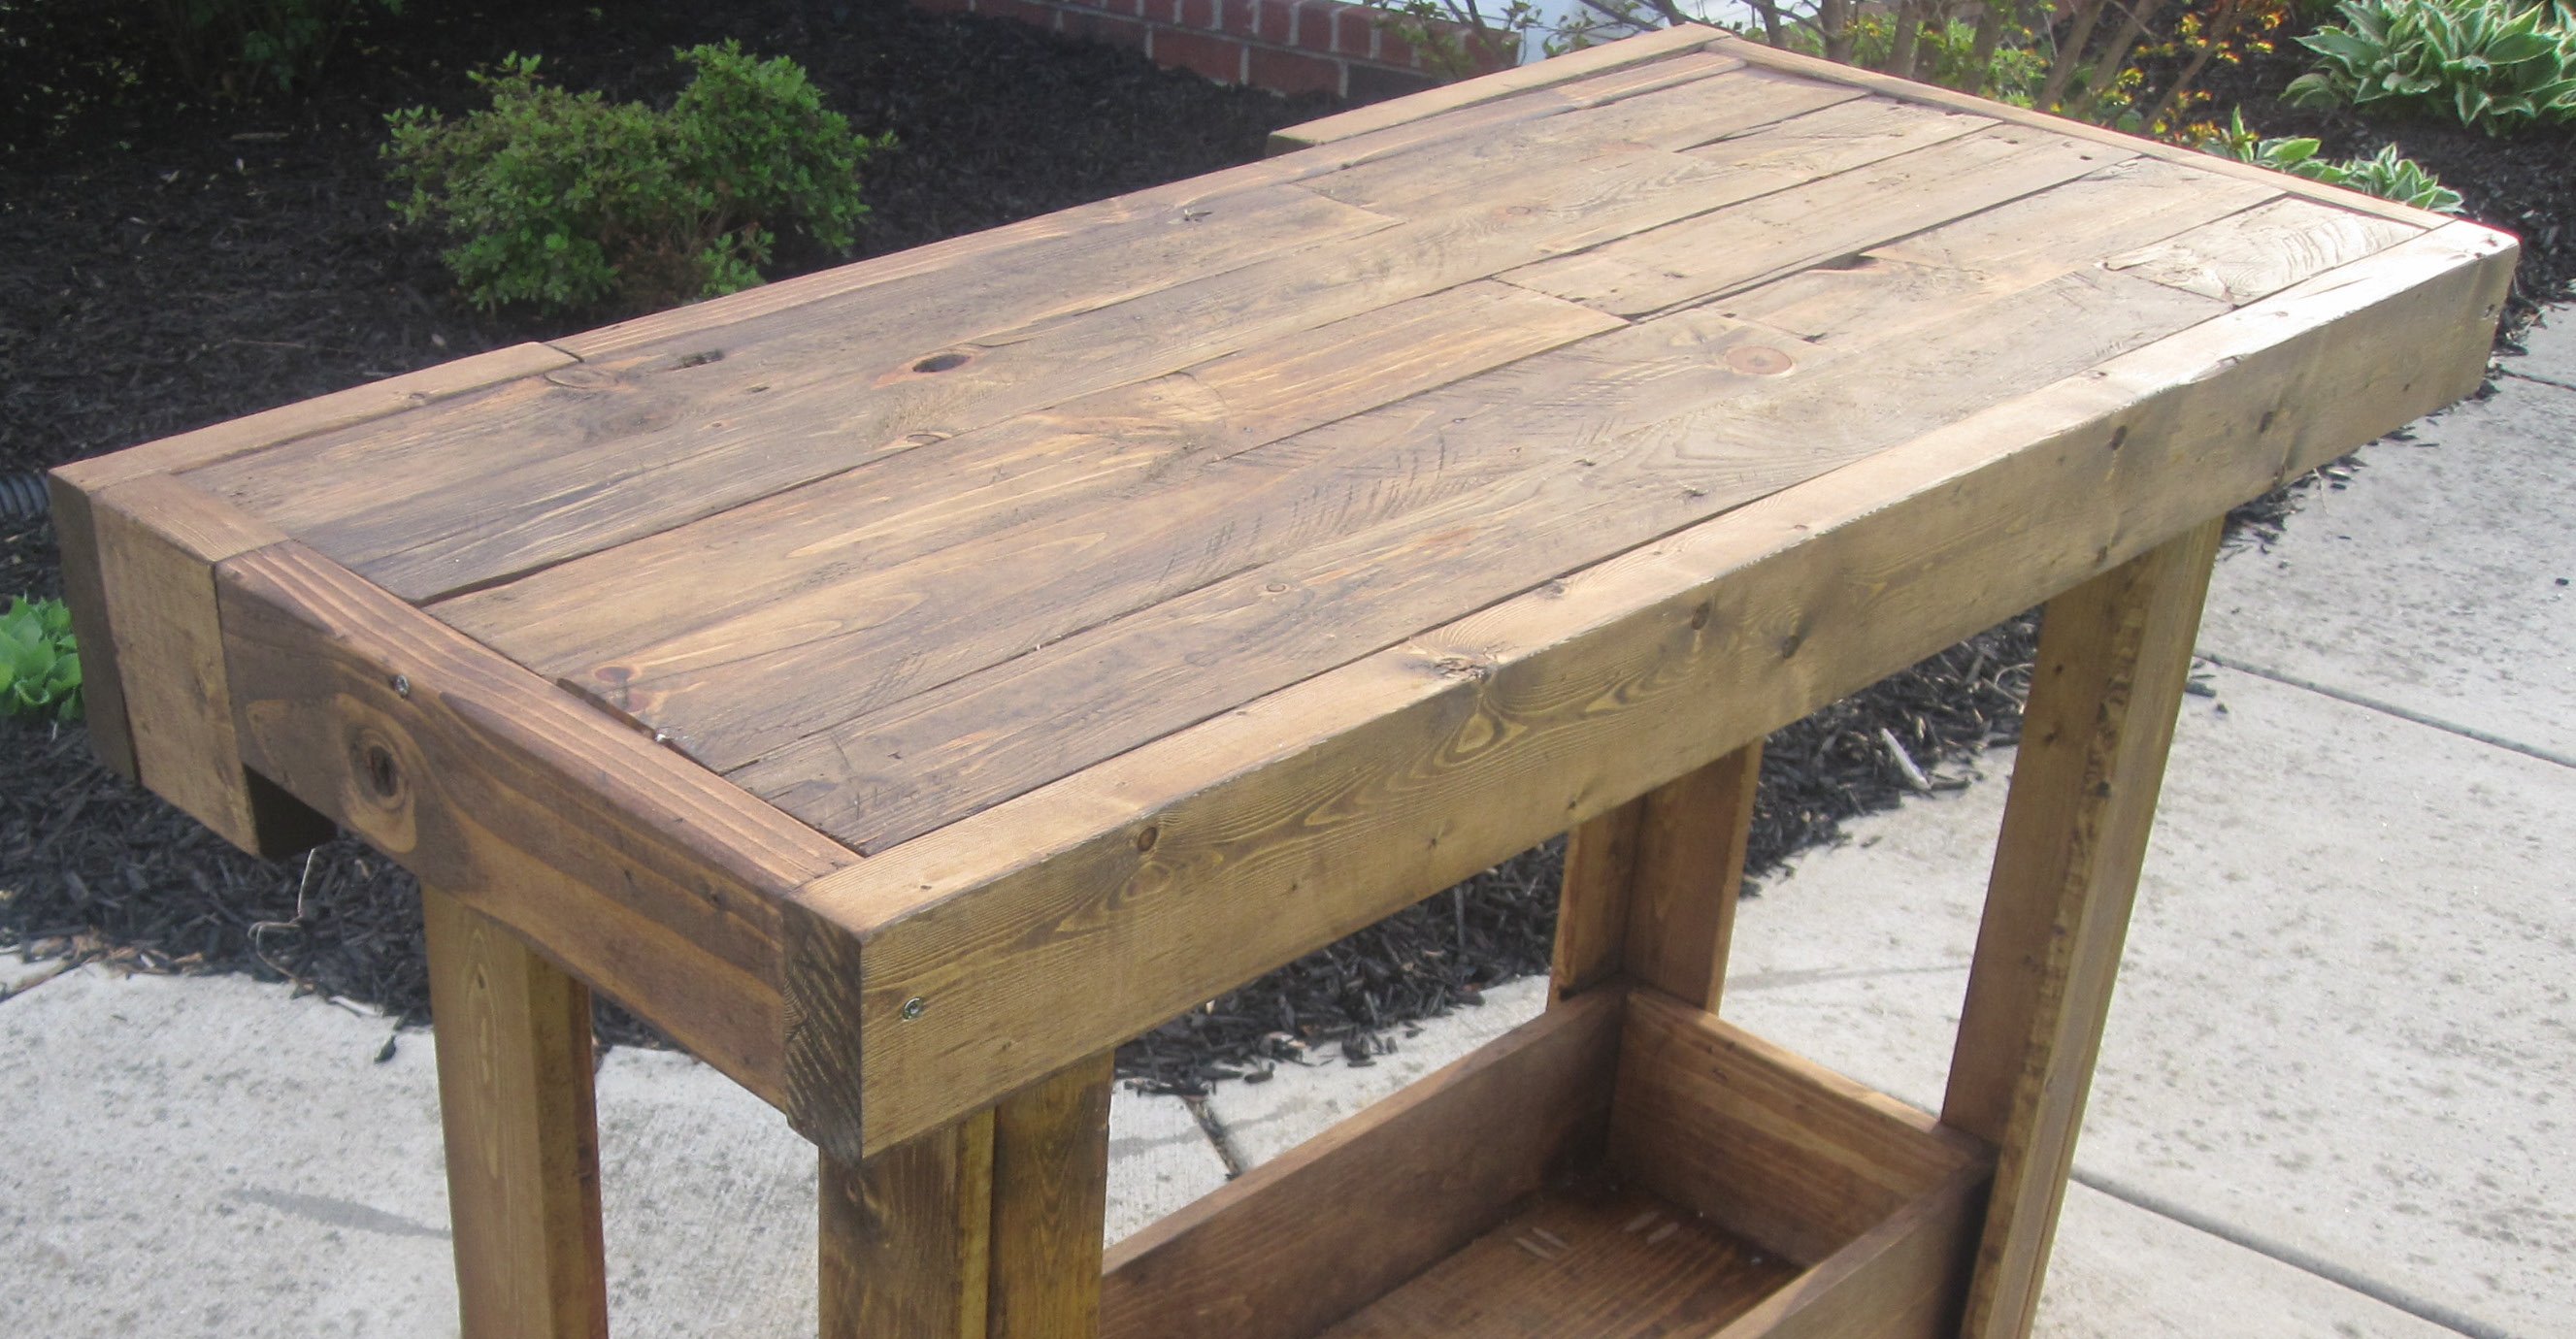
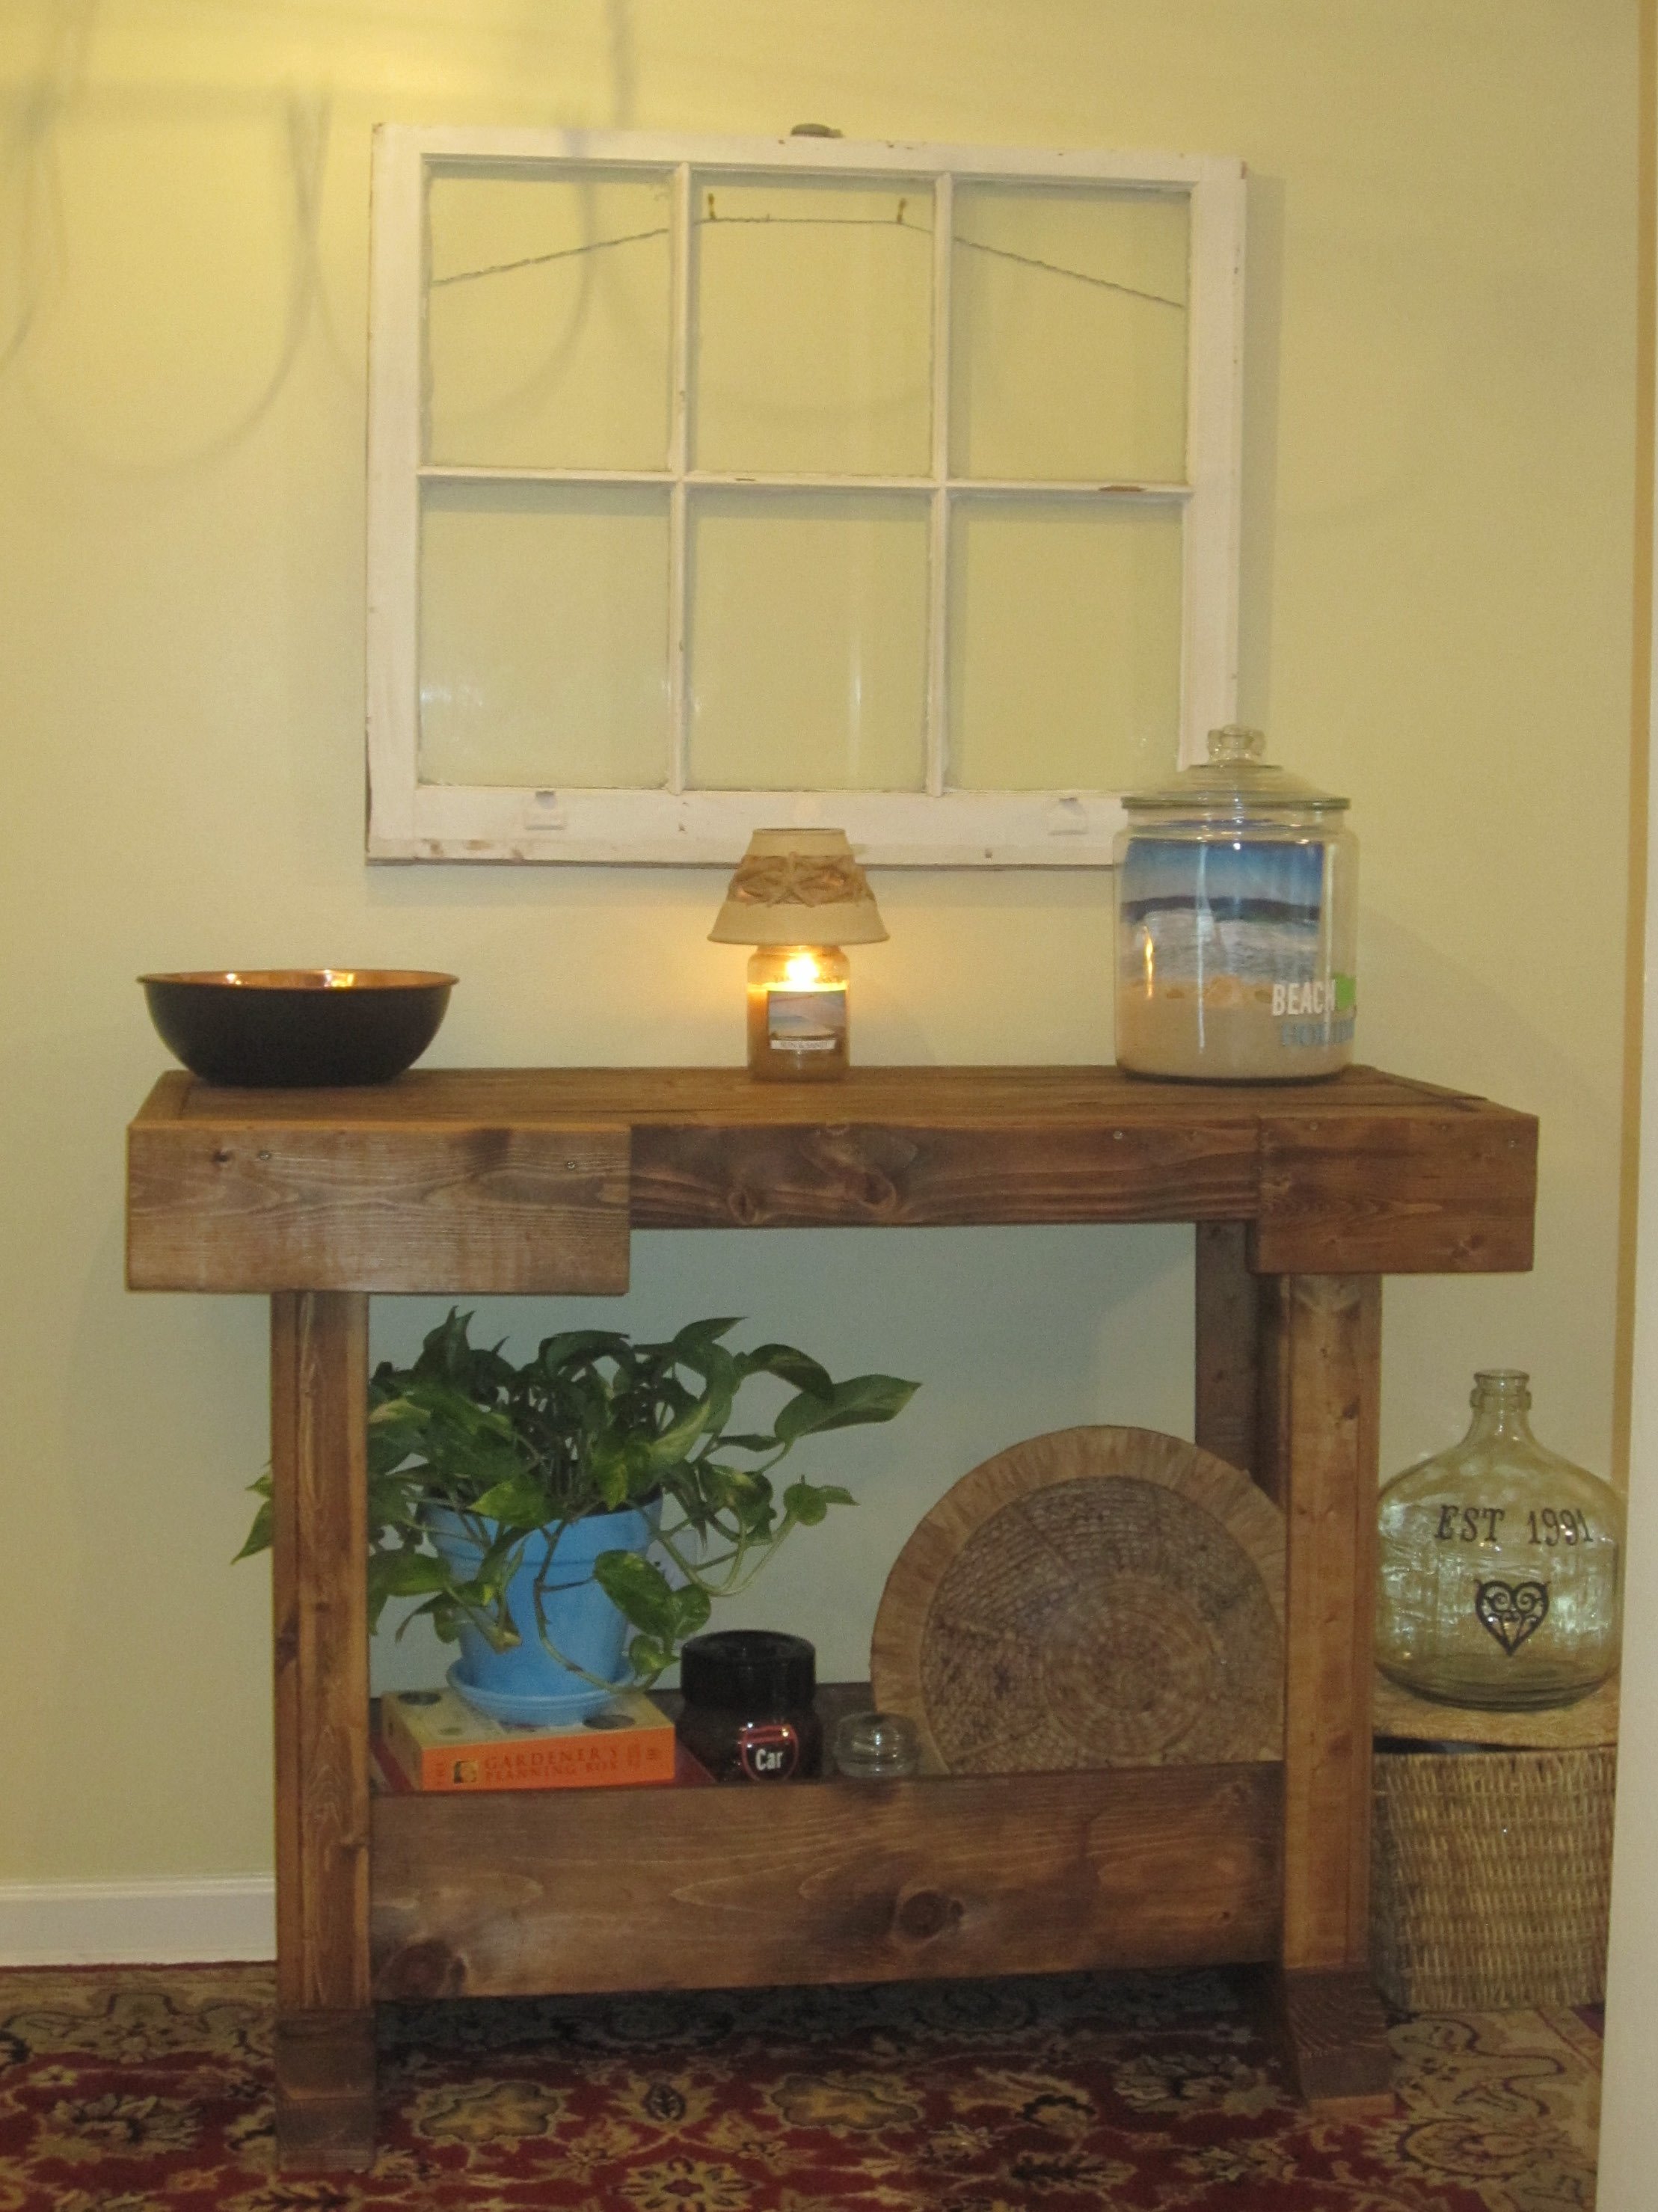
Antique Workbench Console
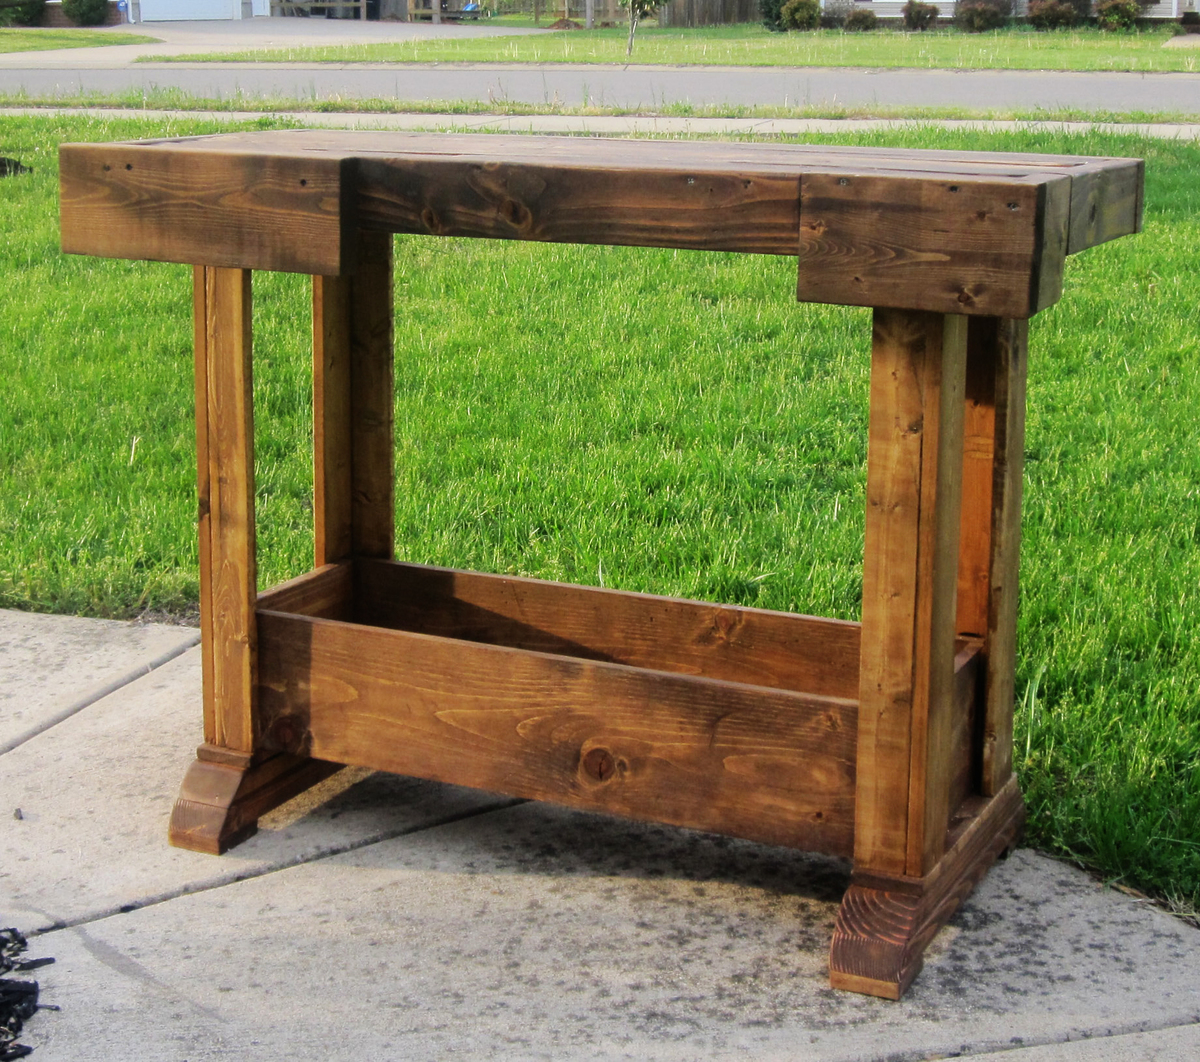
This was an easy project although it took us 3 weekends to get it finished. My son loves to help now but it slows down the process. We used wood we already had and reclaimed oak to make this table.
We had to resize the table to fit our entryway. The table design was 64” long and we made ours 48” in length. It was easy to do the math, the cuts for length were 75% of the original size. For example, the table top trim piece calls for a 64” cut, take 64 x 75% and you get 48. So that cut piece would be 48” instead of 64”. We kept all other measurements the same, both width and height. The only other change we made was in bottom shelf, it calls for a 1x12 and we already had a 2x12.
I am still looking for a metal piece(towel holder) to go on the front of the table.

Built from Plan(s)
Estimated Cost
15.00
Estimated Time Investment
Weekend Project (10-20 Hours)
Finish Used
Minwax English Chestnut
Recommended Skill Level
Beginner
Upholstered bed frame (King size)

I used the plans from Ana excepted converted the measurements to fit a King. Our mattress comes in on July 3 so I'm praying that it fits! This was our first project and we cannot wait to do more!!
Built from Plan(s)
Estimated Cost
$200
Estimated Time Investment
Weekend Project (10-20 Hours)
Finish Used
fabric from fabric.com
Recommended Skill Level
Starter Project
Comments

Tue, 06/25/2013 - 14:52
Thanks so much! I purchased
Thanks so much! I purchased it from fabric.com. I actually ordered a bunch of swatches first before I chose :)
Fri, 06/28/2013 - 17:51
That's really awesome! Well
That's really awesome! Well done! The Suzani print fabric was a nice choice :)
Tue, 04/13/2021 - 21:40
This is very cool! What size…
This is very cool! What size & type lumber did you use for the slats?

Stocking Hanger

Added a sign
Built from Plan(s)
Comments
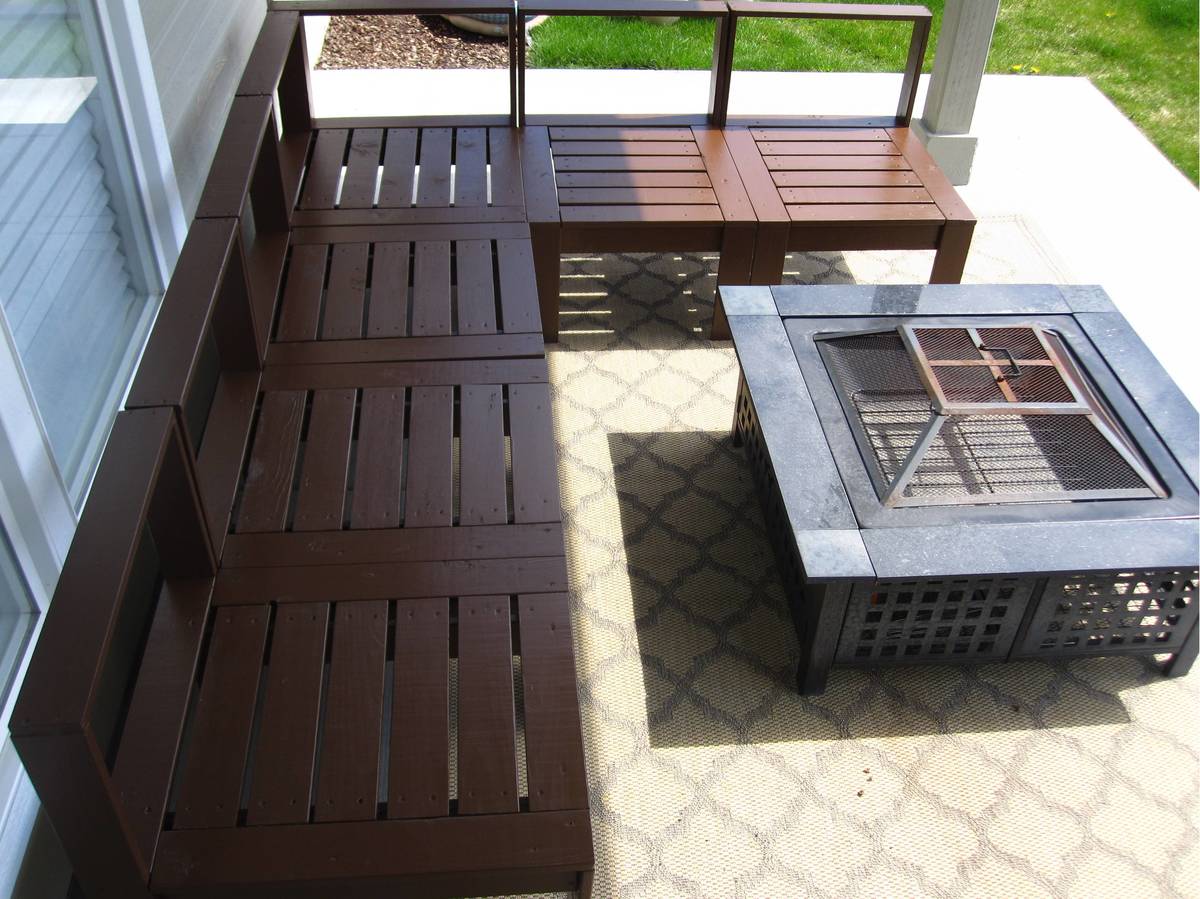
Outdoor Sectional
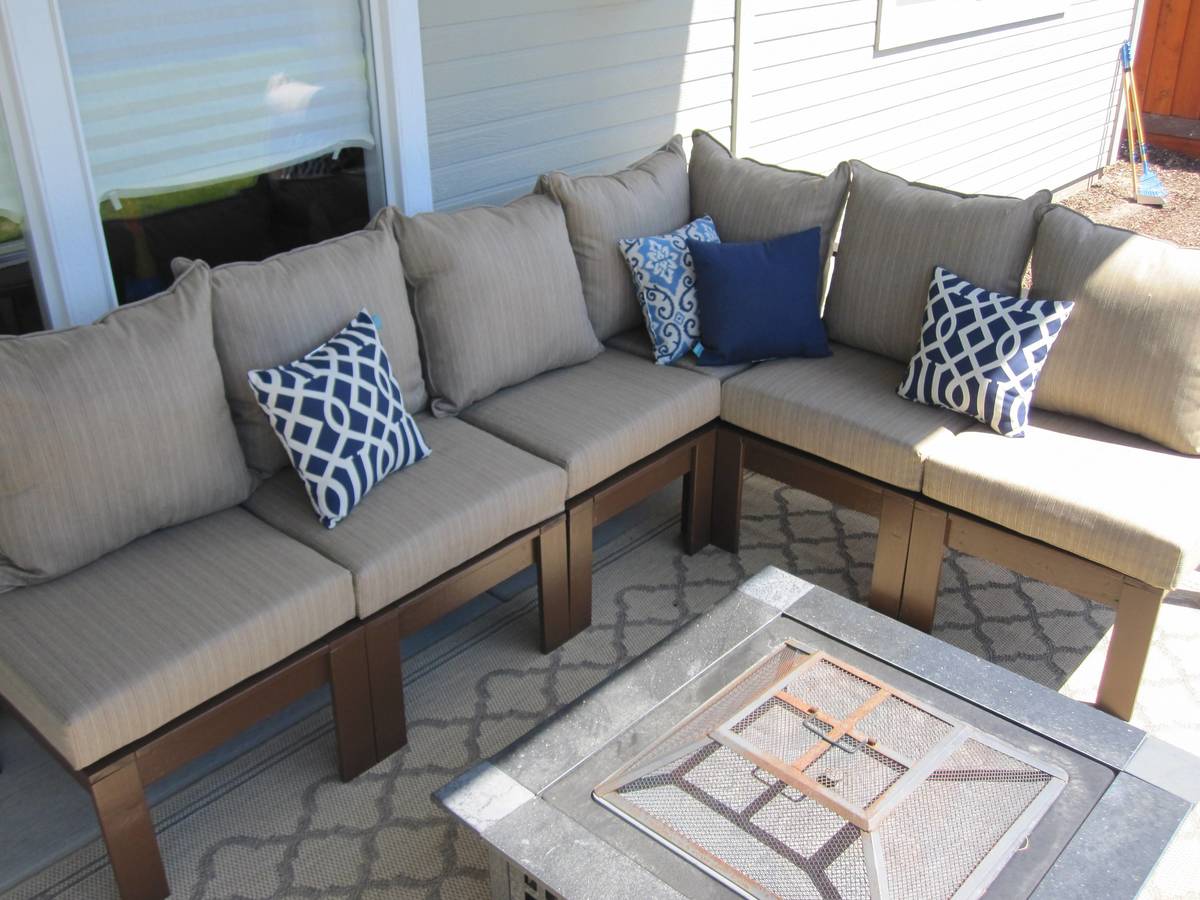
We needed furniture for our back patio and as I was searching for plans online, I stumbled across Ana-white.com. I was so excited to show my husband who built this in a day. I had thought that I would sew the cushions myself but after a few failed attempts at sewing box cushions with piping, I decided to buy the cushions. Buying them is actually a LOT cheaper as foam is very expensive in this size. I bought our cushions and back pillows from Walmart and the accent pillows from Target.
Cost: $355-cushions
$115-Wood
$25-Primer
$20-Paint
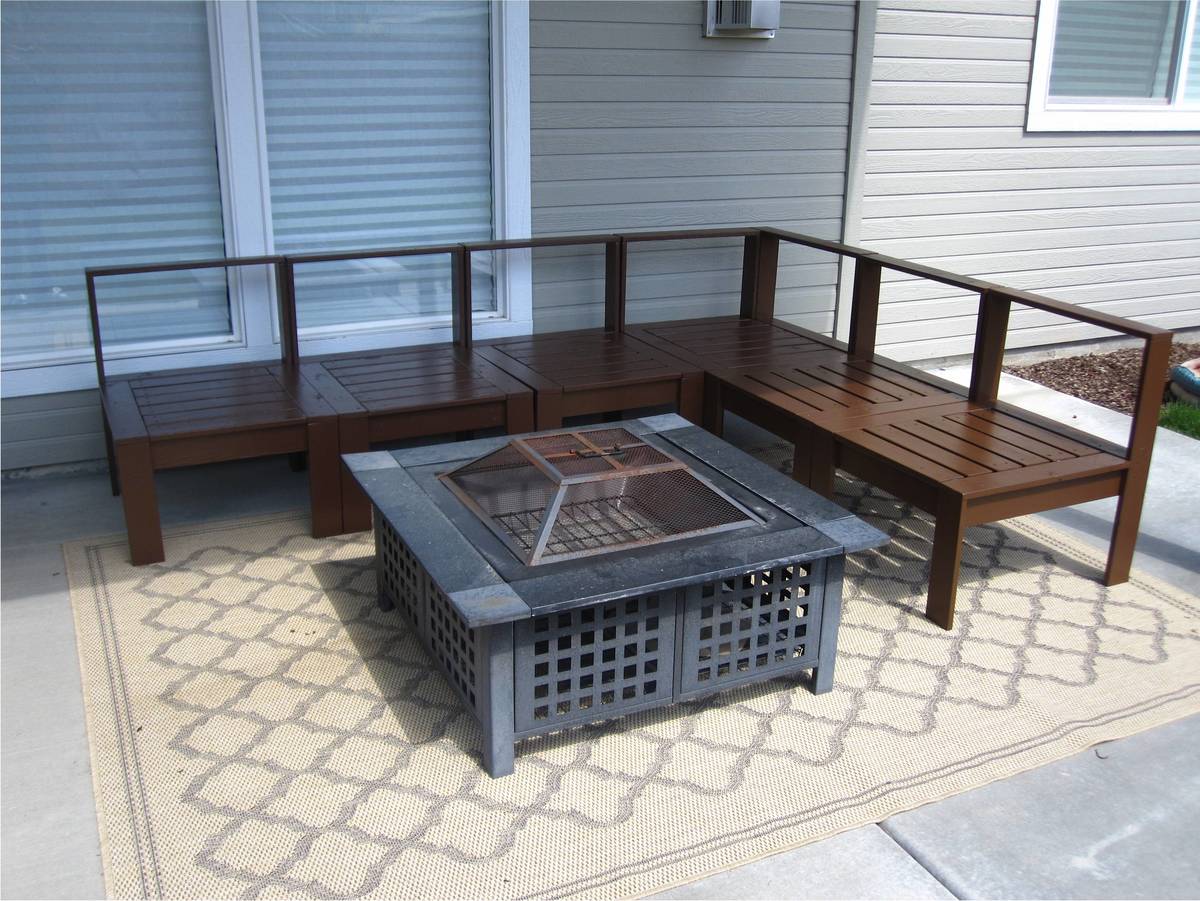
Estimated Cost
$500
Estimated Time Investment
Weekend Project (10-20 Hours)
Recommended Skill Level
Intermediate
Comments
Repurposed Rustic King SIze Headboard
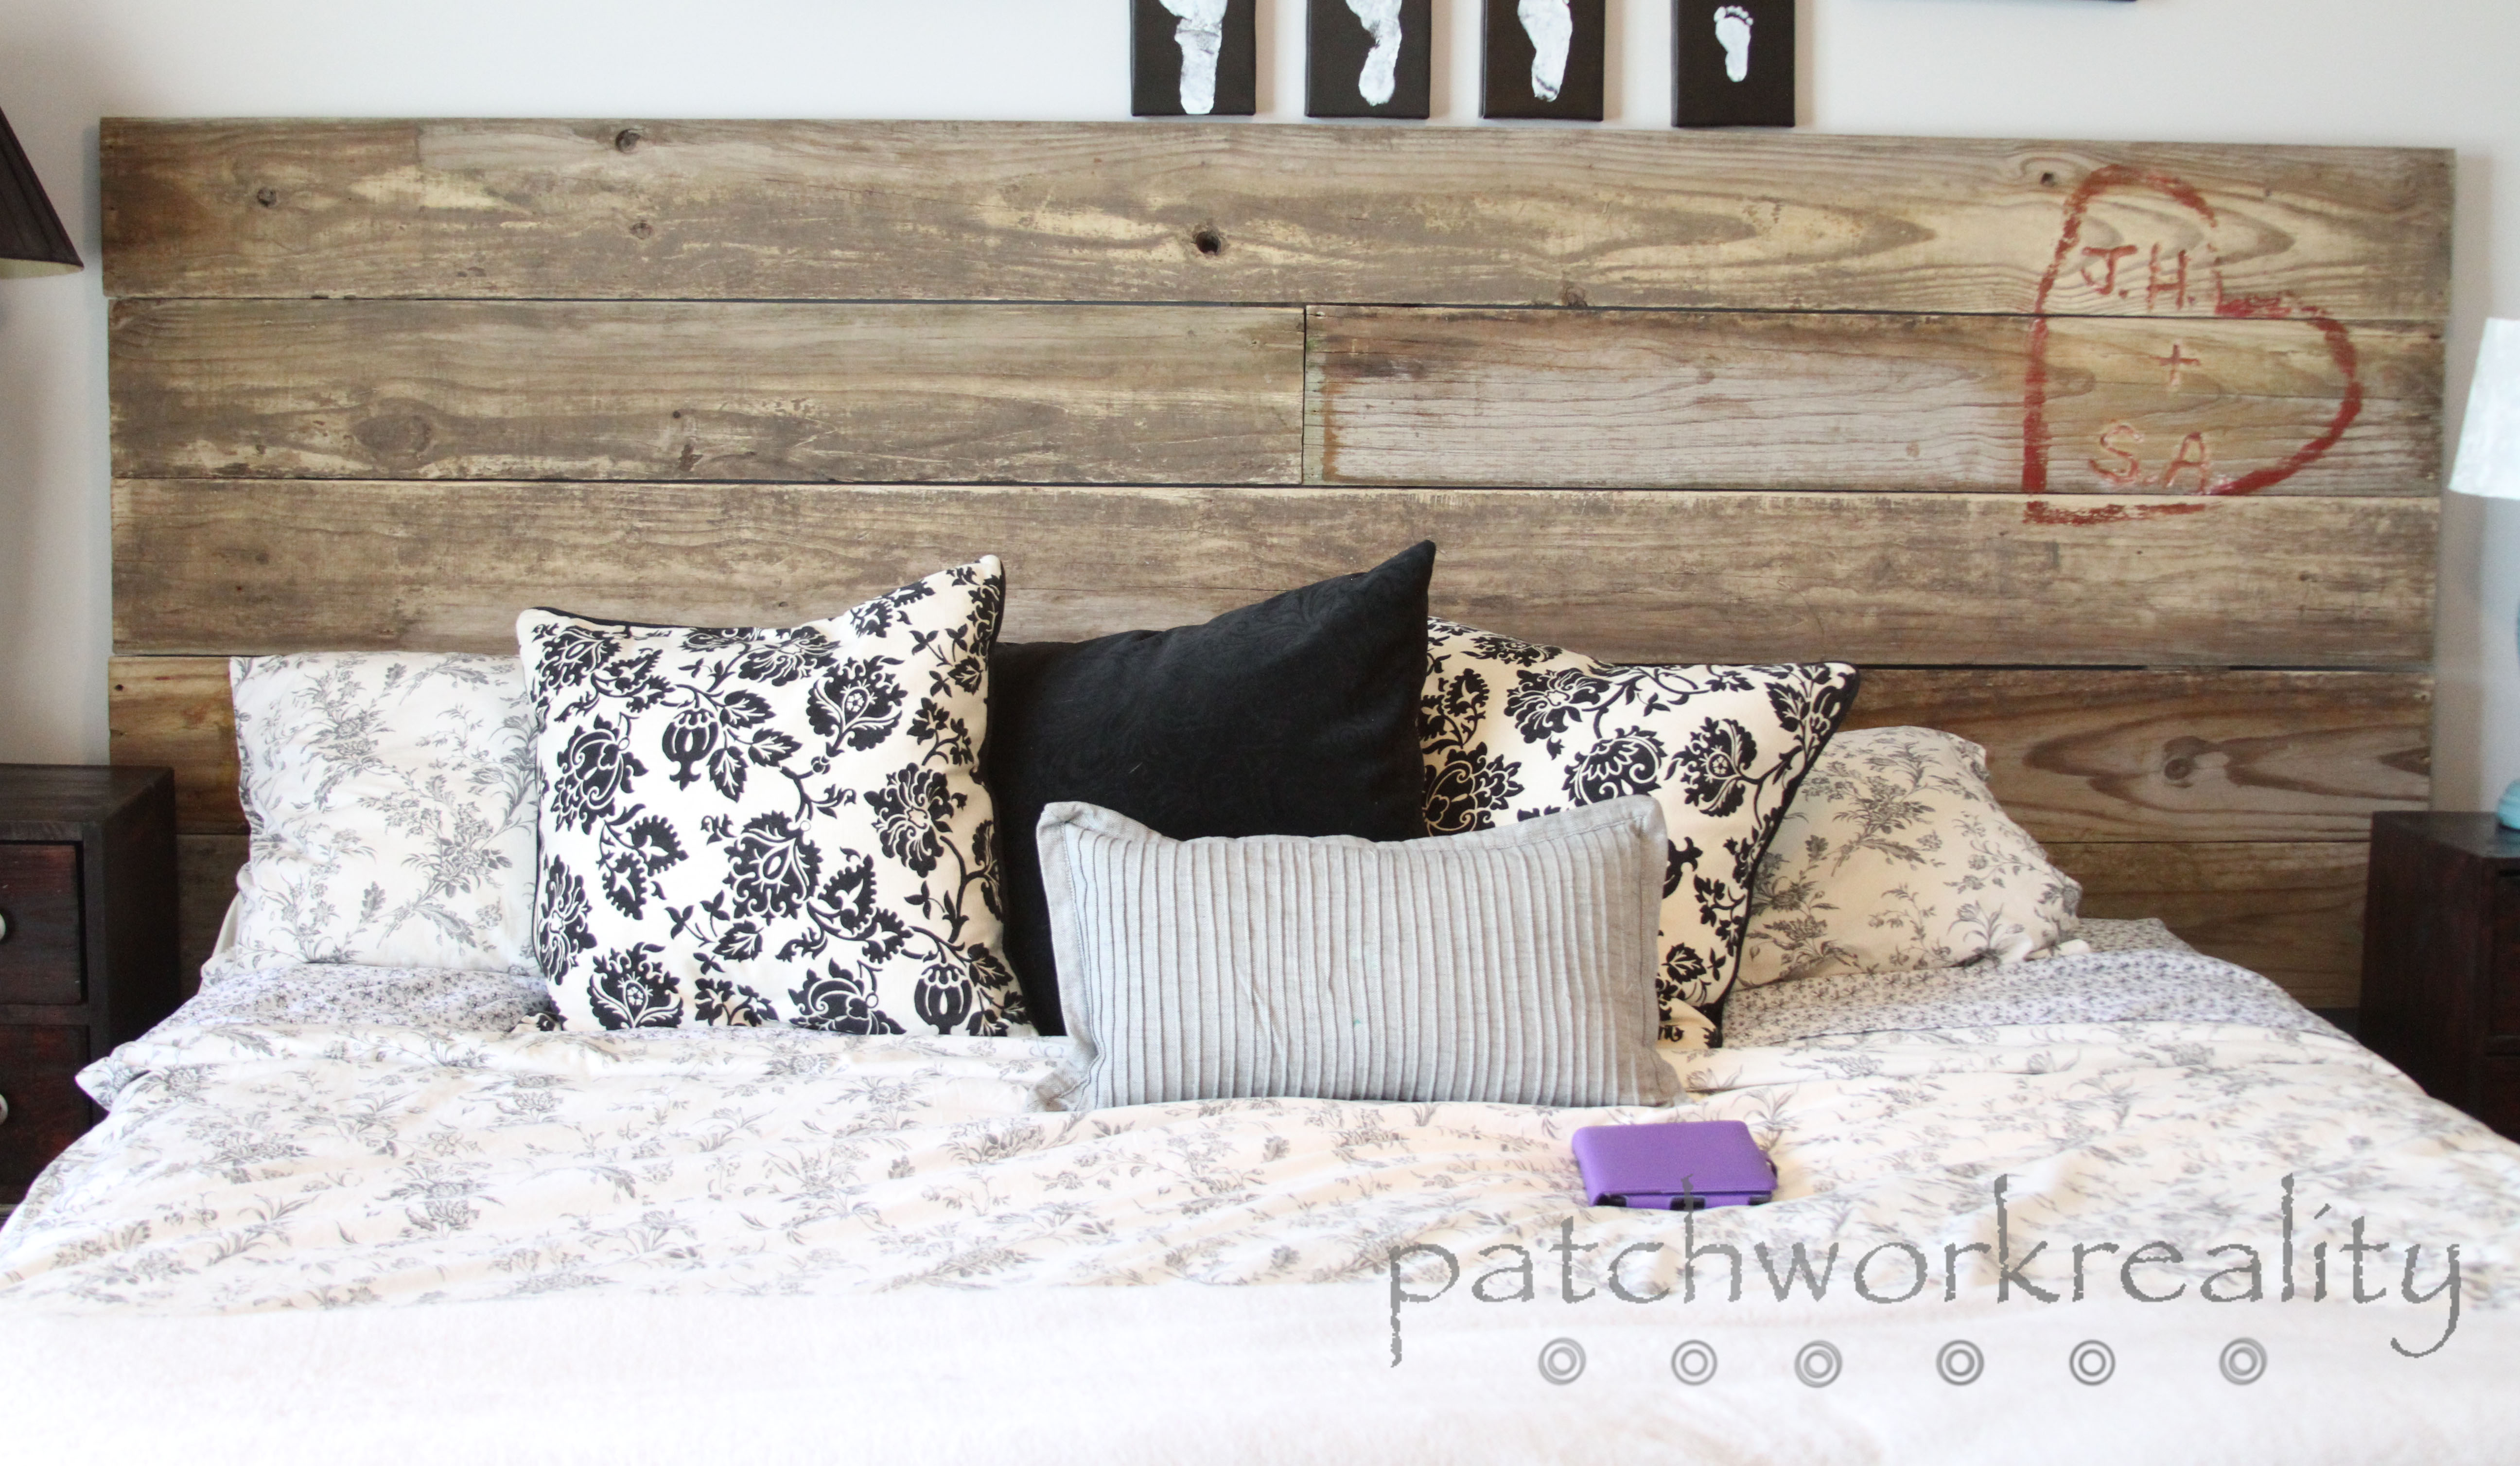
Made from reclaimed 1 X8 boards.
Nailed to 1 X 4 Boards on the back.
This was a very simple project to put together with nails and wood glue.
This took about 3 hours and most of the time spent was on carving the initials and painting.
Estimated Time Investment
Afternoon Project (3-6 Hours)
Recommended Skill Level
Beginner
Comments
Child's Rainbow Rocker toy

I originally found this on a Pinterest link. The DIY'er kindly blogged instructions as well as a template file for the side pieces. This is a child's rocker toy that uses non toxic food dye for the colored parts of the wood. A template is provided for the end pieces through a link provided or you can just eyeball your own. Overall, it is a fairly easy project but a bit time consuming.
When cutting out the template for the sides, it is best to cut the smaller holes first and the do the larger outer lines.
I used a Kreg's jig, Mitre saw, Jig saw, and a palm sander.

Estimated Cost
Estimated cost was around 50 dollars for the birch plywood end pieces and the inner poplar wood. Included in this cost was the two boxes of non toxic food dye and a box of Kreg's screws.
Estimated Time Investment
Weekend Project (10-20 Hours)
Finish Used
I use non toxic food dye/rubbing alcohol for the inner slats and MinWax polyacrylic for the end birch pieces.
A note about the food dyed wood: I used about 20 drops of food dye per 1/4 to 1/2 cup of rubbing alcohol and applied with a foam applicator. You have to be careful of what you lean your wood up against or it will create a line as the dye leeches out onto the other object. If I had to do it over again, I would have painted one side, let completely dry and then do the other side.
Since it is a child's toy, consider that you will need to sand, sand, and sand the side pieces very smooth to make sure little hands do not get splintered.
Recommended Skill Level
Beginner
Comments

Fri, 06/12/2015 - 10:56
I've had this pinned on my
I've had this pinned on my board for a while now. Glad to see someone else has made it. I'm not in a hurry since my kids are all grown but no grandchildren yet. Someday I'll have a need to make it.
Mon, 11/23/2015 - 07:17
Hi there. Thank you for the
Hi there. Thank you for the comment. My children are still using this. One thing I endede up learning is that the food dye needs to be sealed. I plan on using beeswax or something more natural to do it. If you don't, the color rubs off on the kids when they use it. :)
Thu, 12/24/2020 - 12:45
Wood Rainbow Rocker Tem[plate
Lianna, Hi there. Just saw this. For some reason, the link to the template I had on here is gone. So I did a google search and found this one:
https://www.scribd.com/document/370653463/Rainbow-Rocker-Template
Or you can go here: https://pin.it/5awfA92
You will have to have it enlarged. I got mine done at a local office supply store that could make larger engineer sized prints. I prefer to enlarge the entire print instead of printing off multiple sheets and taping it together.
Colorful Bunk Beds with Wraparound Shelves
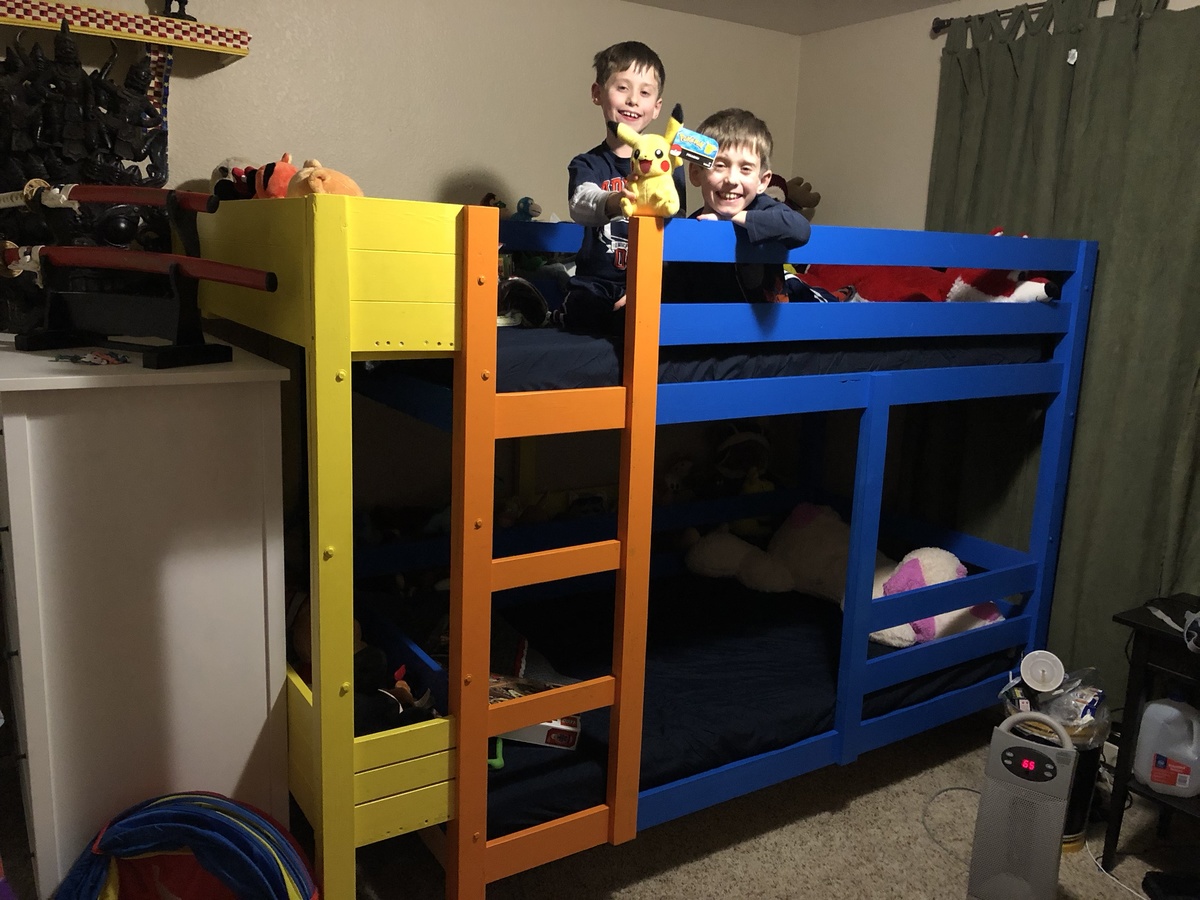
My sons have been ready for bunk beds for awhile and, being an apartment dweller, I wanted some that could be disassembled and reassembled. I really liked Ana's design for classic bunk beds. Because storage space is also at a premium for us, I thought to add wraparound shelves to the bed. I ended up with seven panels instead of four, plus shelving. Also, I wanted to add truncated safety railing to the bottom bunk. Lastly, I wanted to use a bright color scheme that incorporated some of my sons' favorite colors that would also serve to visually separate the shelves from the beds.
The construction plans are available in 11x17 PDF format from my blog, as are the source design files in Revit 2018 format.
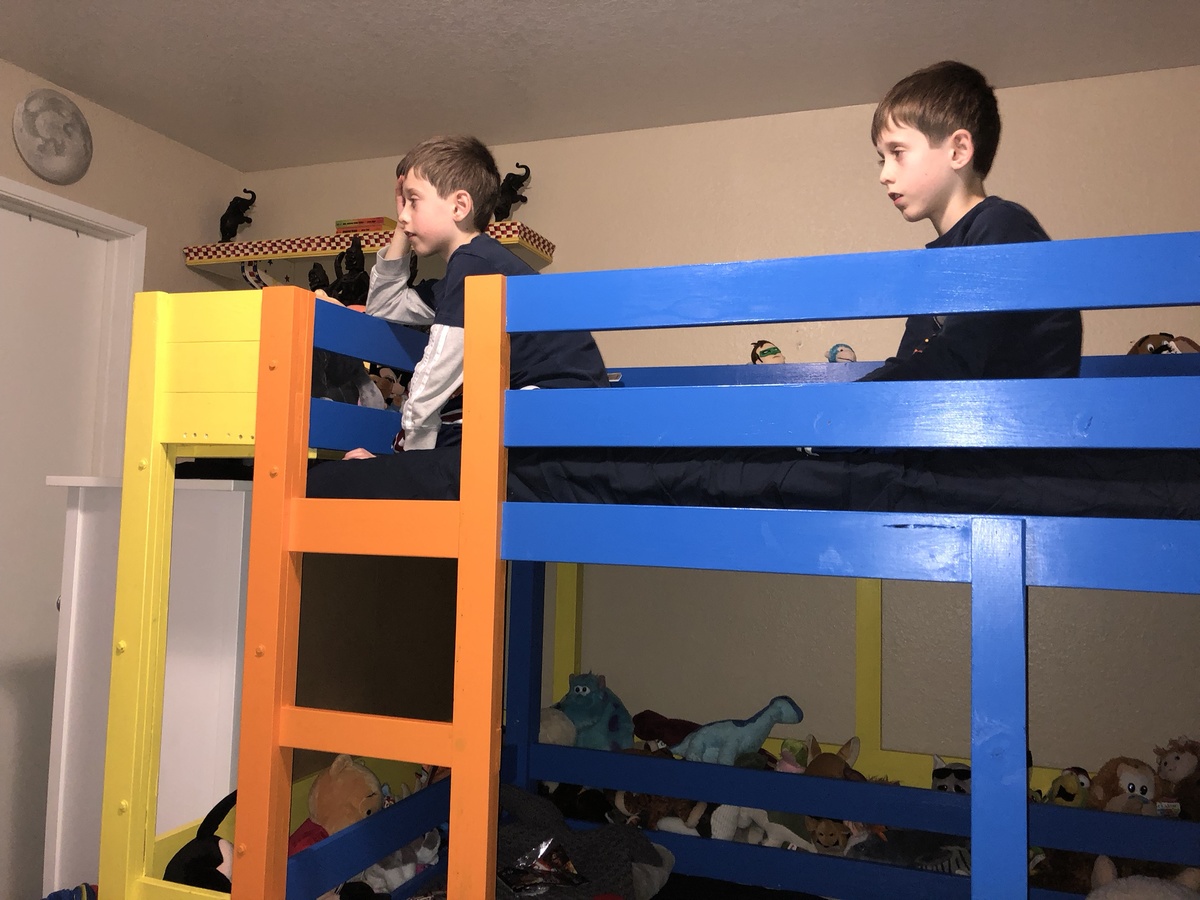
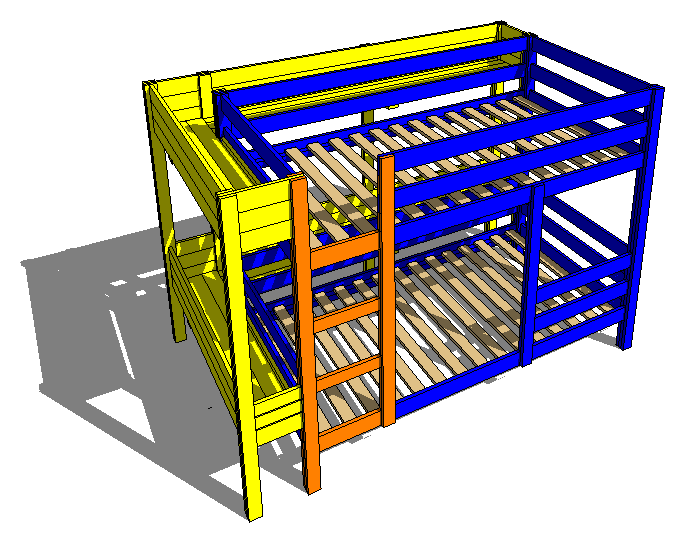
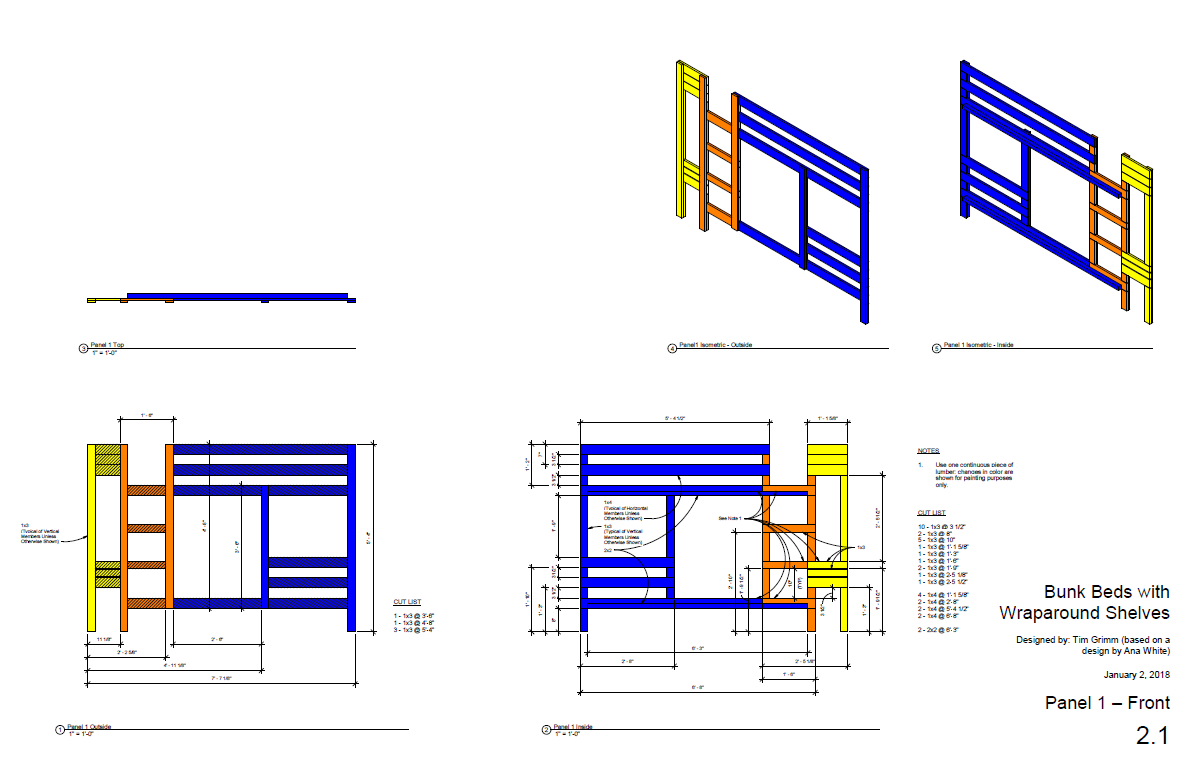
Built from Plan(s)
Estimated Cost
$750 all inclusive, including mattresses and bedding.
Estimated Time Investment
Week Long Project (20 Hours or More)
Finish Used
Sherwin Williams paints.
Recommended Skill Level
Intermediate
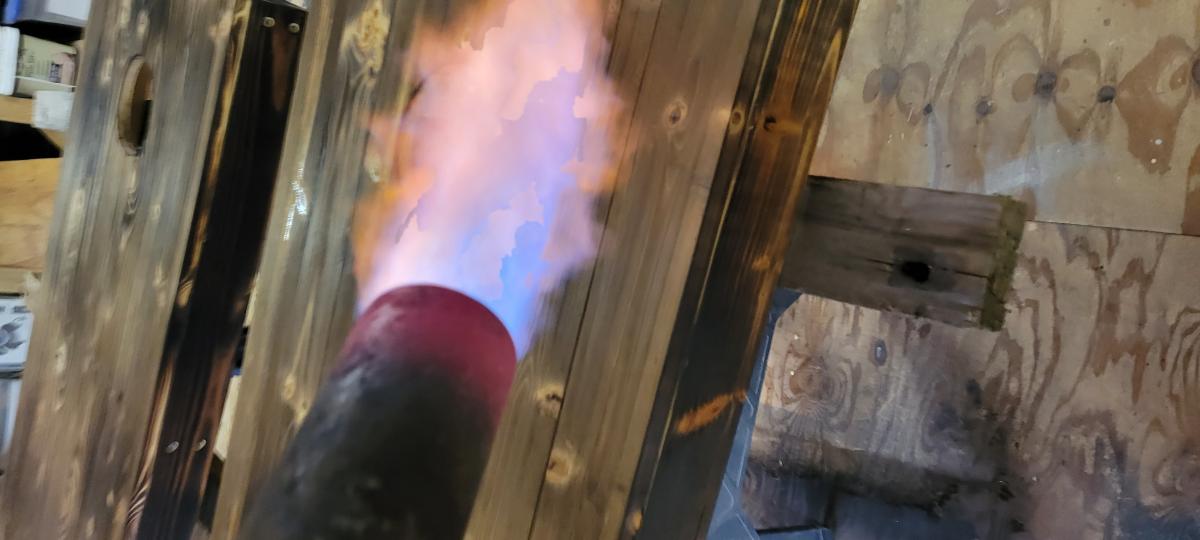
Shou Sugi Ban (Yakisugi)
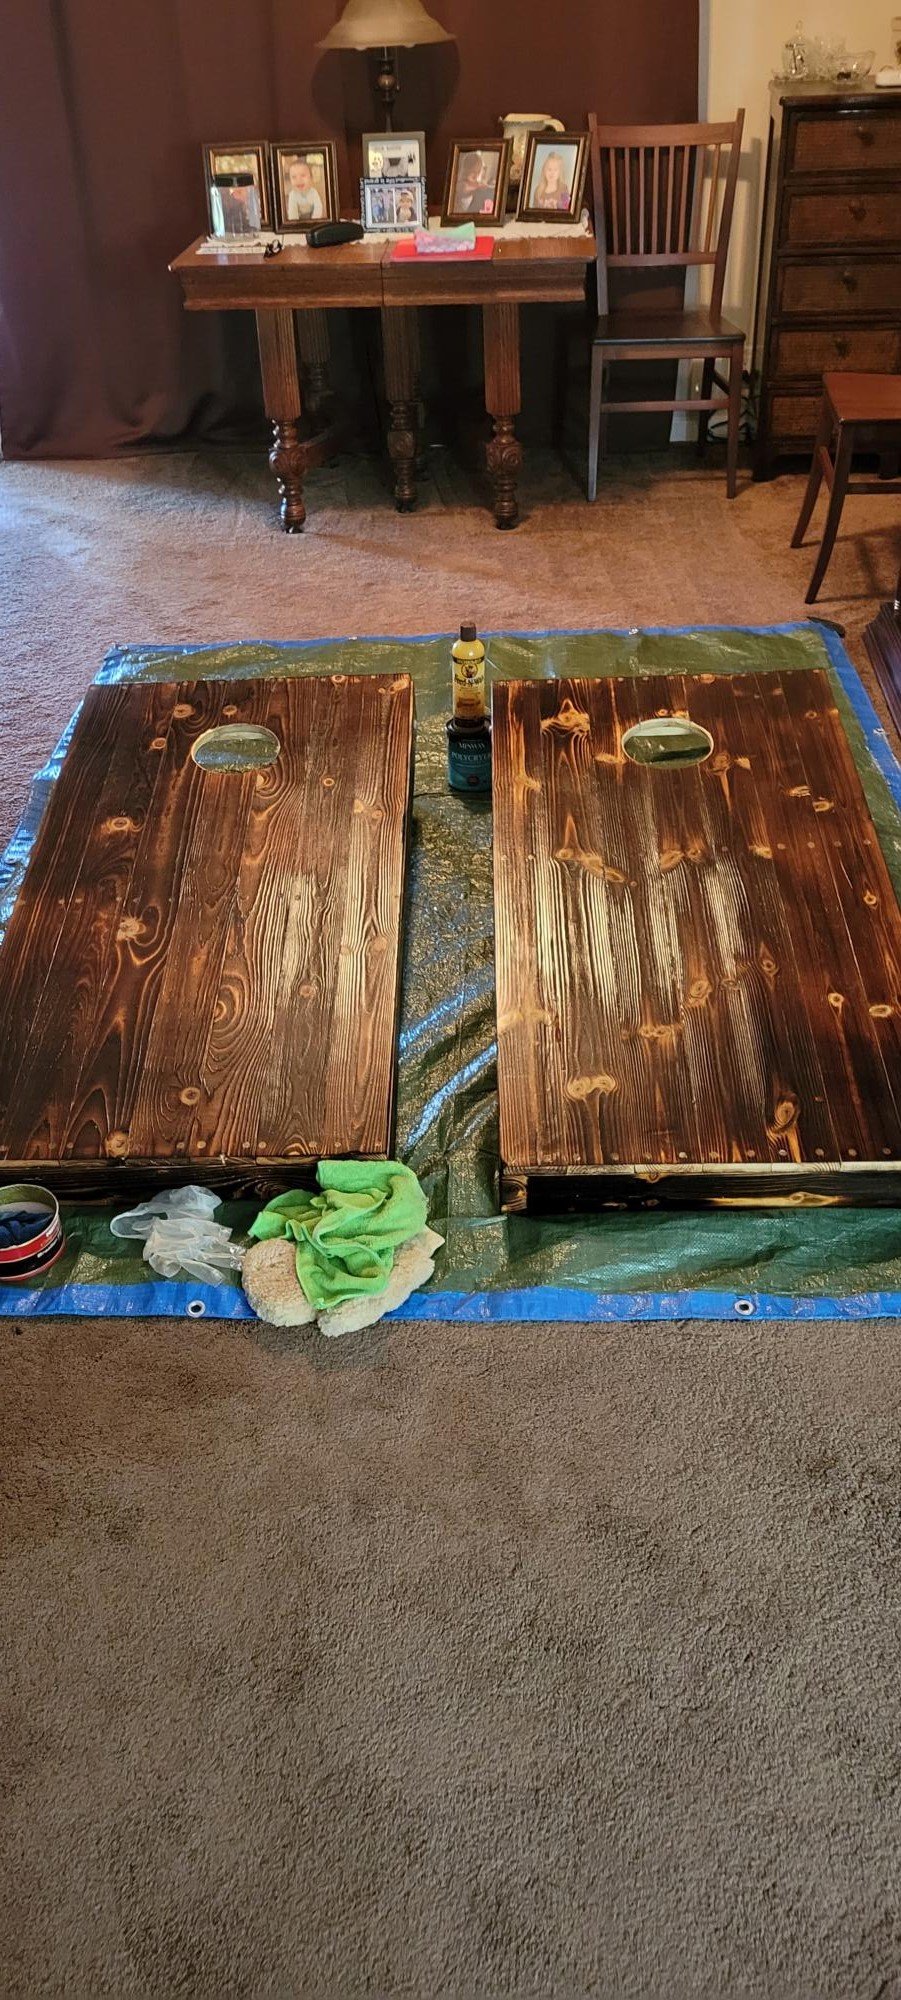
I'm James Farquhar, designer, and fabricator. This is the second set of cornhole boards I built this year. This set is the regulation size of 48" x 24" according to the American Cornhole Association. It is made from fir 2 x 4 s and pine 1 x 4 s (6 per board). Each board is glued with Titebond II and countersunk Torx top screws (#8 1-1/2 inches). It is coated with Minwax polyacrylic (8 layers sprayed on) and Howard's bee's wax (3 layers). The boards are secured with 3-inch toggle latches in pairs. Kayak carrying handles with four screw ports; I used the same Torx Screws I used to put the boards together, extra for strength. The total weight of the boards is 60 pounds. I used a Texas Flame Thrower to Shou Sugi Ban (Yakisugi), as a finish.
Playhouse in-progress
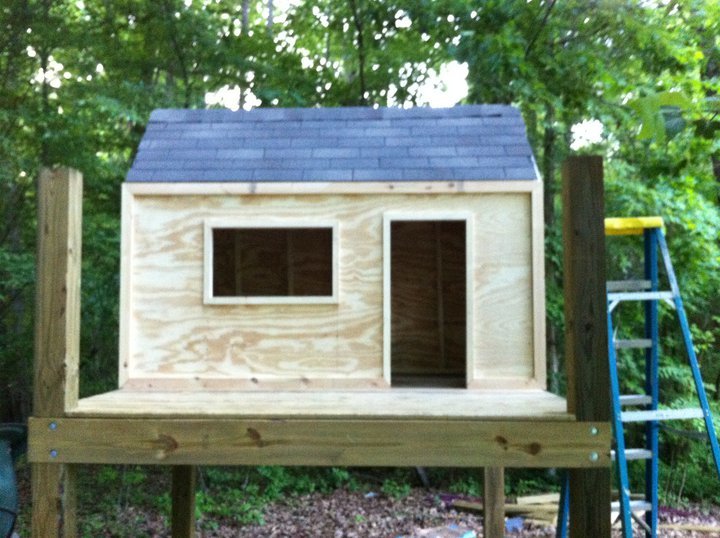
Due to rain (and horrible ability) this project has been taking a LONG time it seems. =) We had one of those "cheap" playsets from one of the warehouse clubs that would scare me to death anytime my girls got to swinging on it. So... we knocked it down and I took some liberty with the details from Ana's playset plans.
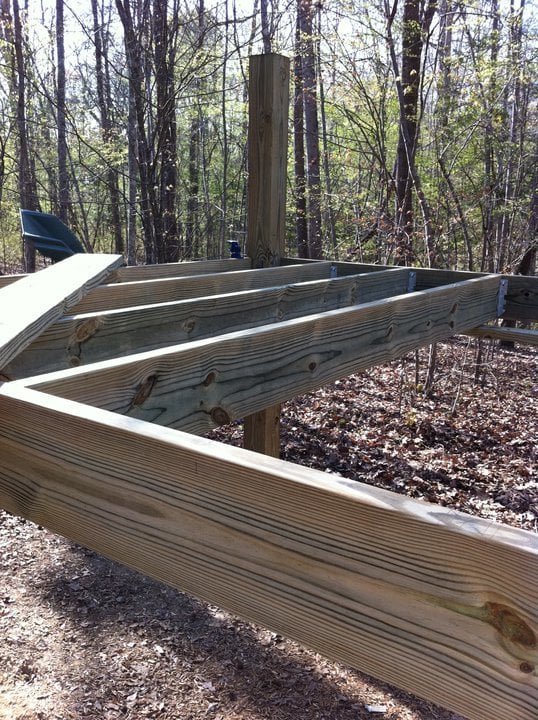

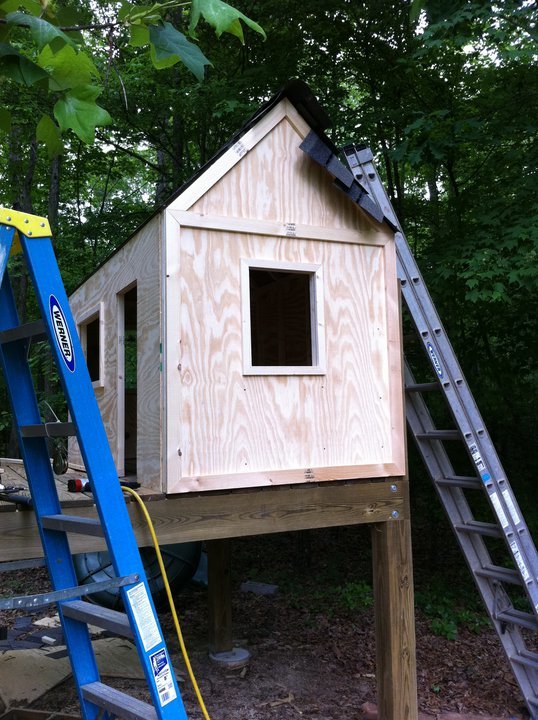
Built from Plan(s)
Estimated Cost
~$600 so far (concrete, wood, fasteners, shingles, etc..)
Finish Used
Will paint
Recommended Skill Level
Intermediate
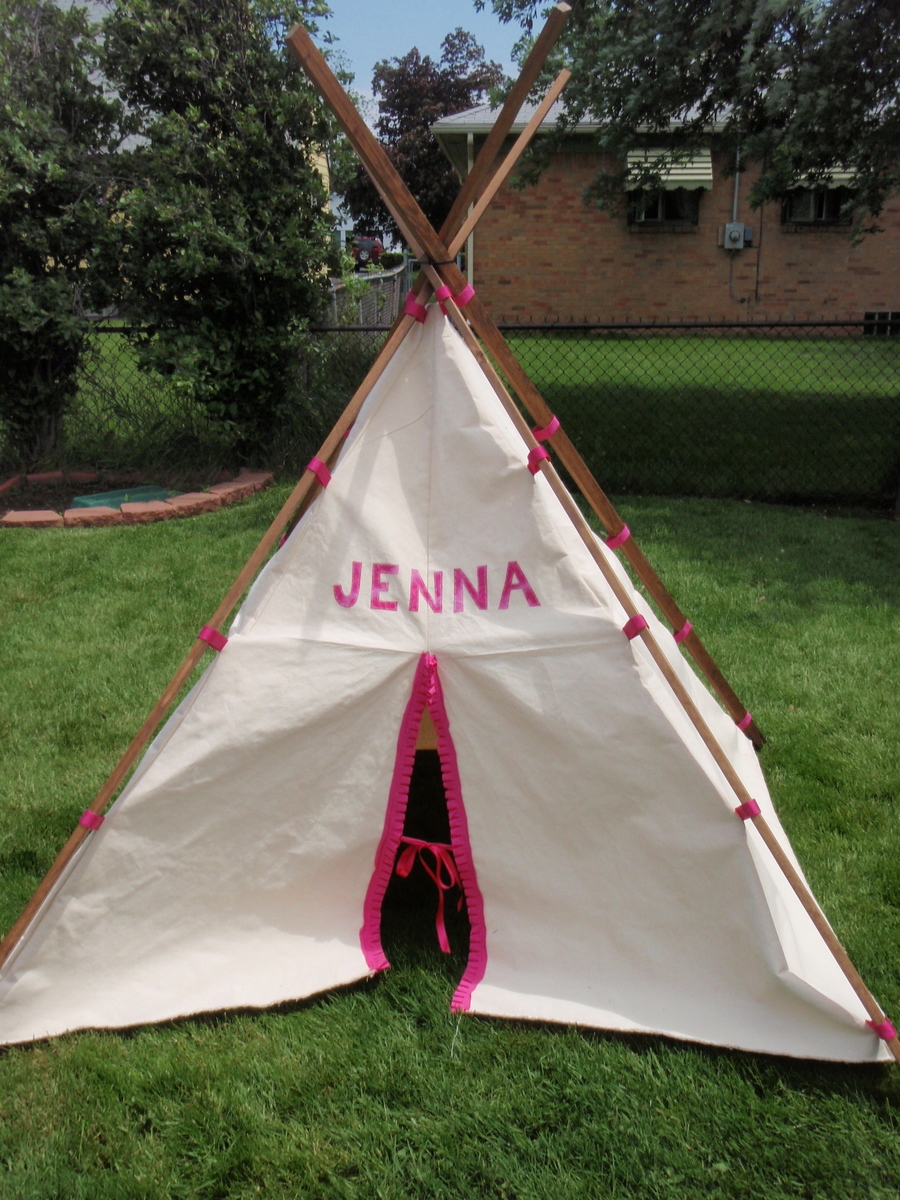
Teepee for Jenna's 6th Birthday!
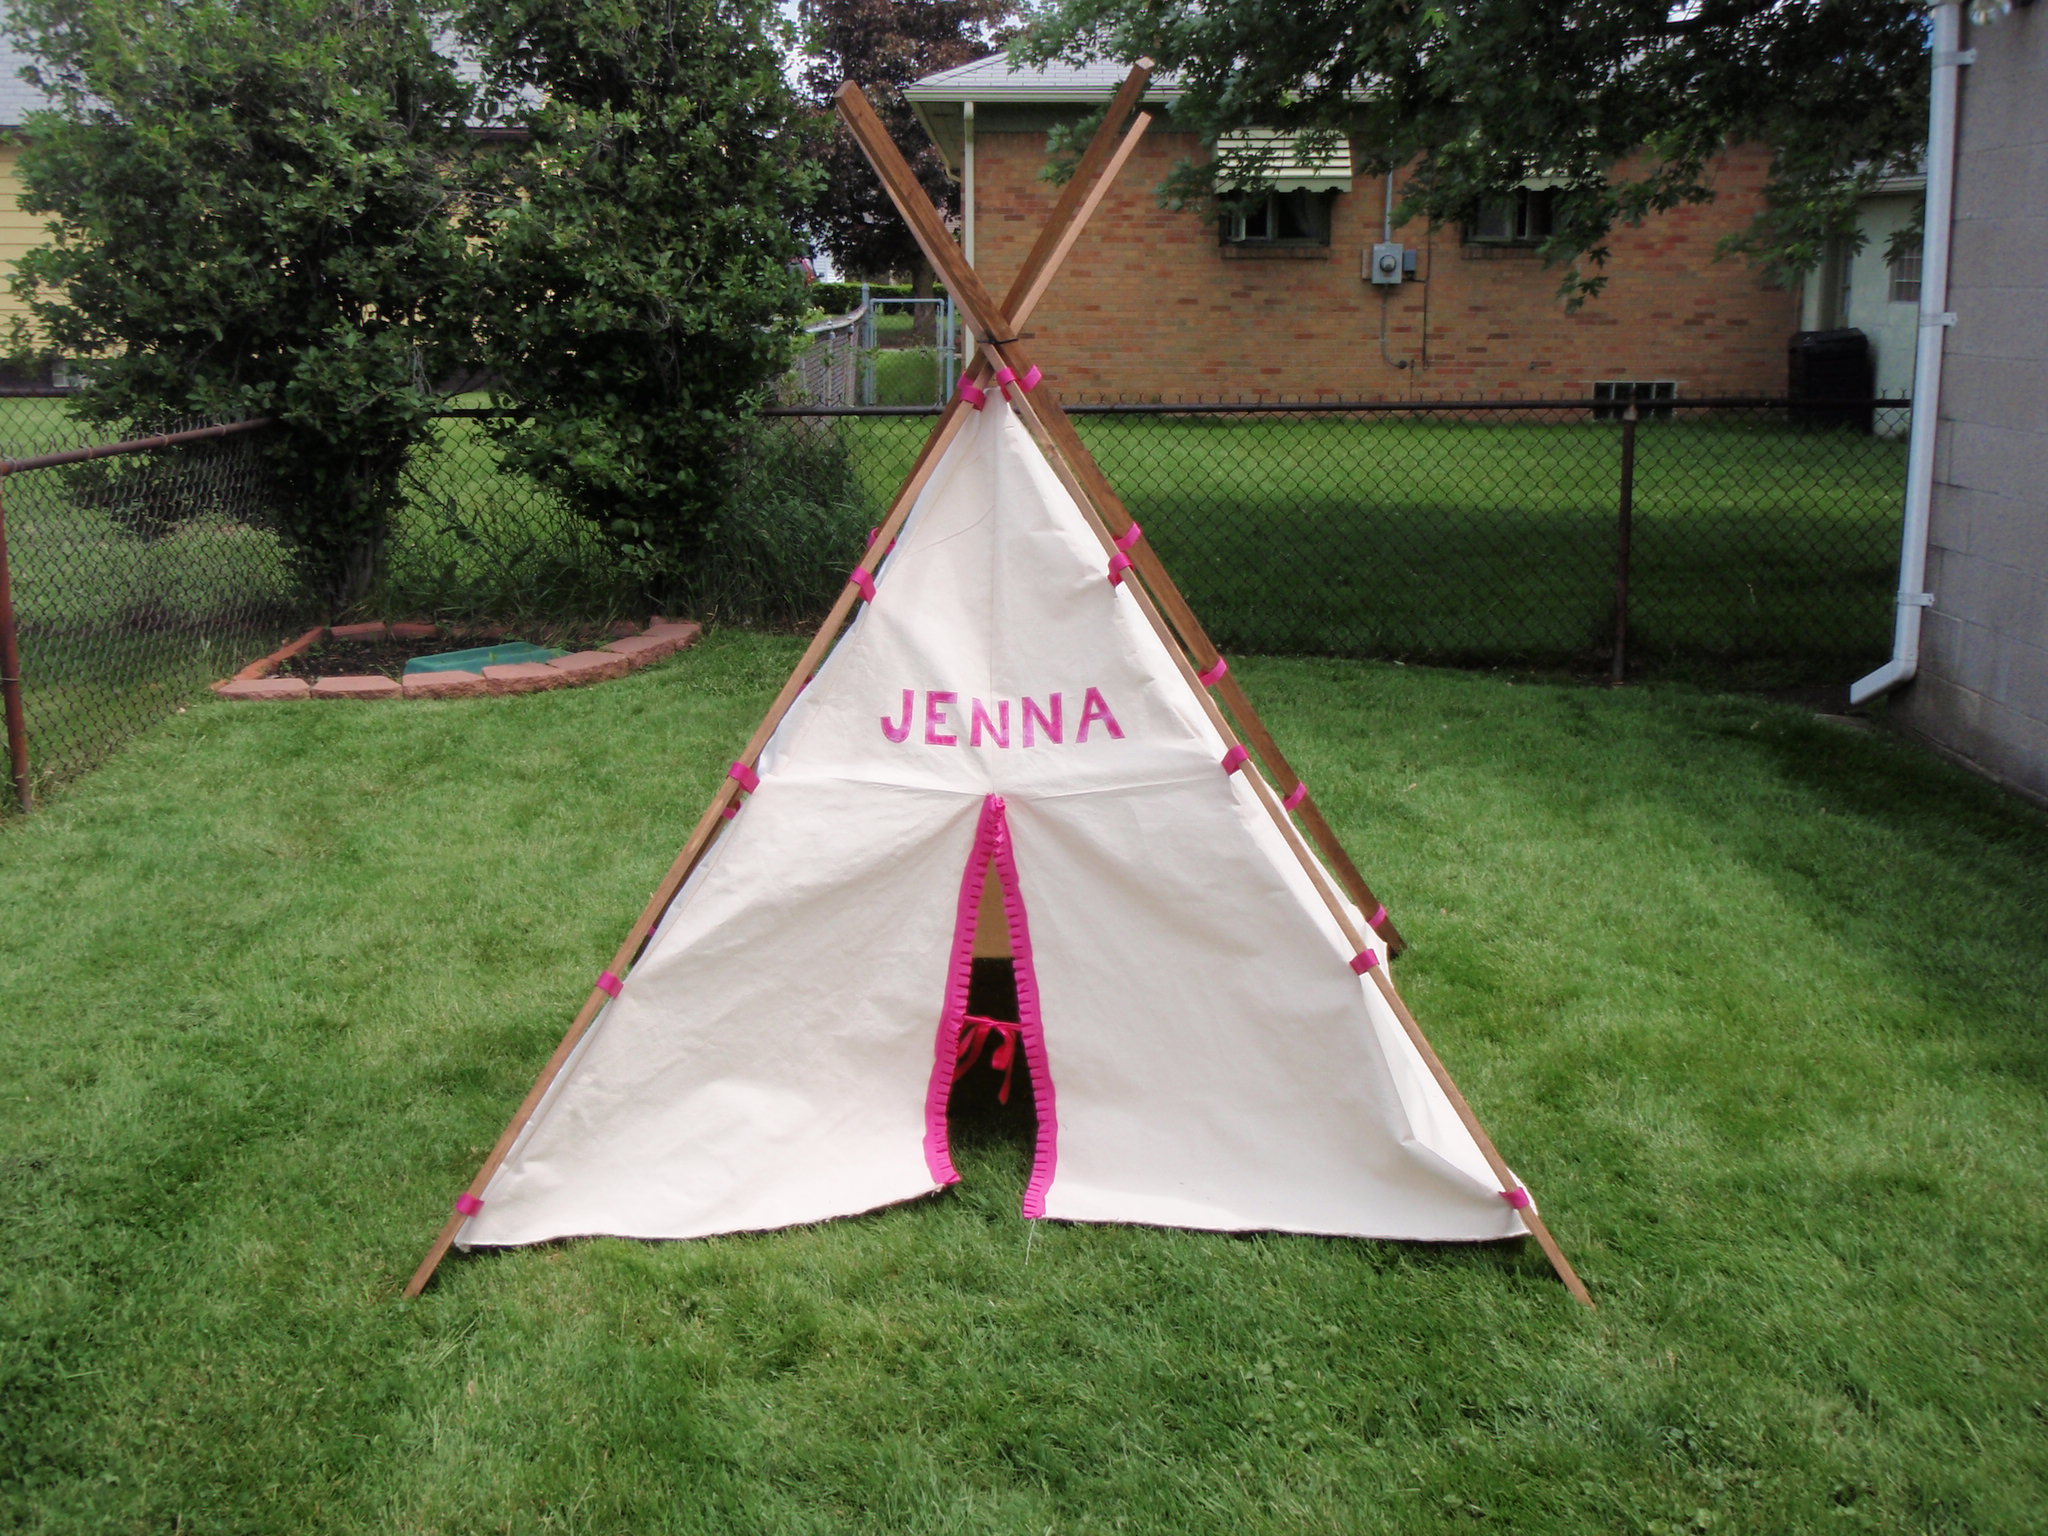
We made this play Teepee for our niece Jenna's sixth birthday in June. The kids absolutely loved it!! It was a HUGE hit at the party. All of the adults asked where we ordered it and could not believe it was homemade. The most priceless moment was when our 10 year old niece Jordan came out and saw it. Her mouth dropped and she couldn't believe her sister got a tent! She turned to me and said, "Aunt Lisa, you know you're going to have to make another one of those!" meaning she wanted one too! At one point there were about six piled in the tent. Its really quite roomy. And when we took it down because it started to rain, there were still kids inside! Any child will absolutely love this secret little hideout. Thank you for the plans Ana and Jaime!! =)
P.S. The pictures are before we ironed it! Looked even better without the wrinkles! LOL
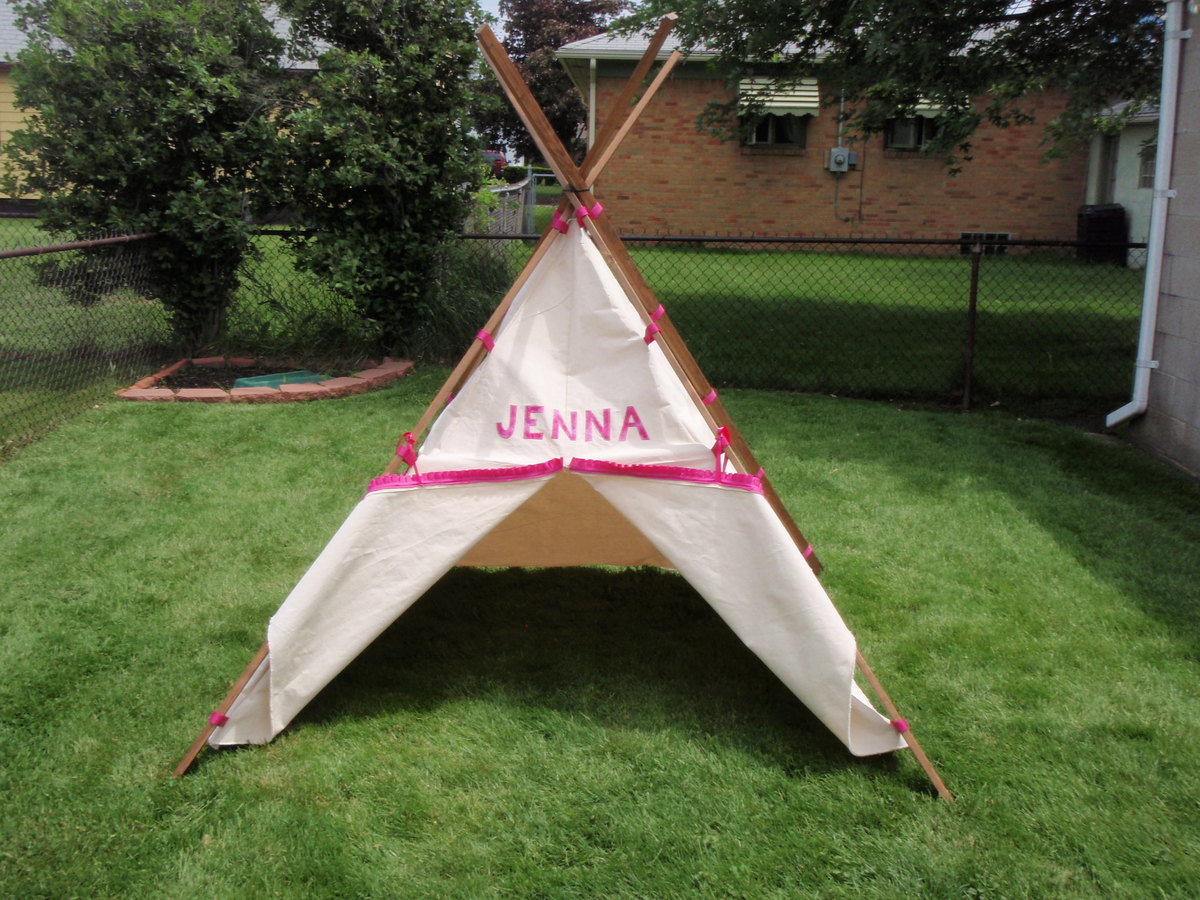
Built from Plan(s)
Estimated Cost
$50
Estimated Time Investment
Afternoon Project (3-6 Hours)
Finish Used
Min wax Provincial stain / canvas fabric --
I am not a sewer by any means so I recruited my stepmom to supervise (and let me use her sewing machine). It took us about 4 hours to lay out the pattern and sew it all together. But we really took our time and were in no rush to finish. We used heat transfer paper to stick the letters in the name on and then I hand sewed around the edges to be sure they would stay put. We bought all of our supplies at our local Hobby Lobby. We also bought a strap at the local hardware store to secure the poles at the top. We just wrapped it around the poles once we had them in place and secured with Velcro. This is a very sturdy teepee and easiest as a two person set up once you have it made. We also found that it was much easier to set this up on the grass rather than on concrete or a flat service. The poles seemed to dig into the ground a bit and keep everything in place.
I am not a sewer by any means so I recruited my stepmom to supervise (and let me use her sewing machine). It took us about 4 hours to lay out the pattern and sew it all together. But we really took our time and were in no rush to finish. We used heat transfer paper to stick the letters in the name on and then I hand sewed around the edges to be sure they would stay put. We bought all of our supplies at our local Hobby Lobby. We also bought a strap at the local hardware store to secure the poles at the top. We just wrapped it around the poles once we had them in place and secured with Velcro. This is a very sturdy teepee and easiest as a two person set up once you have it made. We also found that it was much easier to set this up on the grass rather than on concrete or a flat service. The poles seemed to dig into the ground a bit and keep everything in place.
Recommended Skill Level
Beginner
Comments

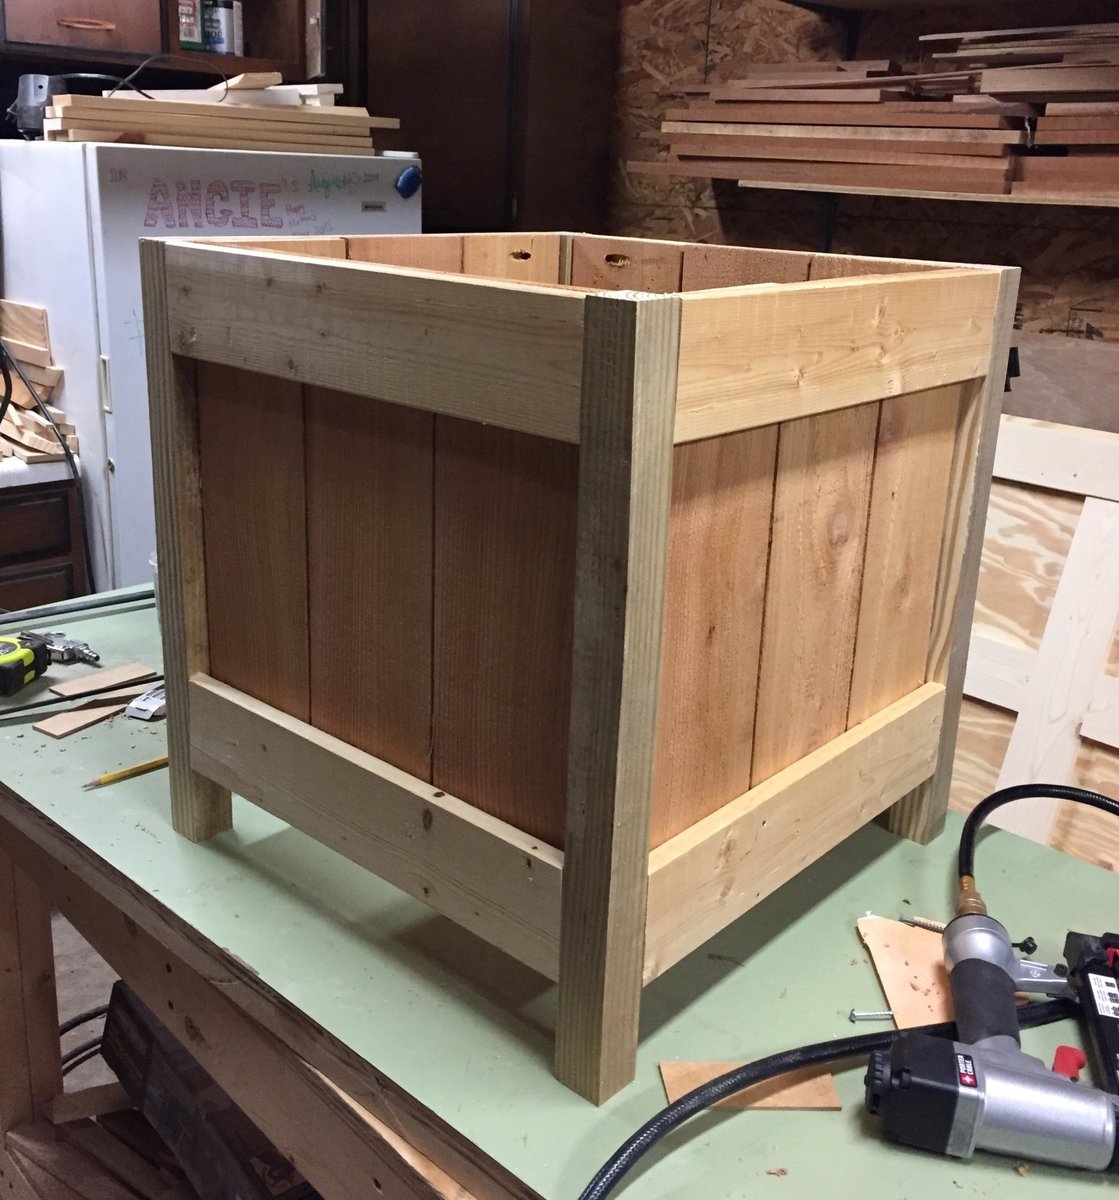
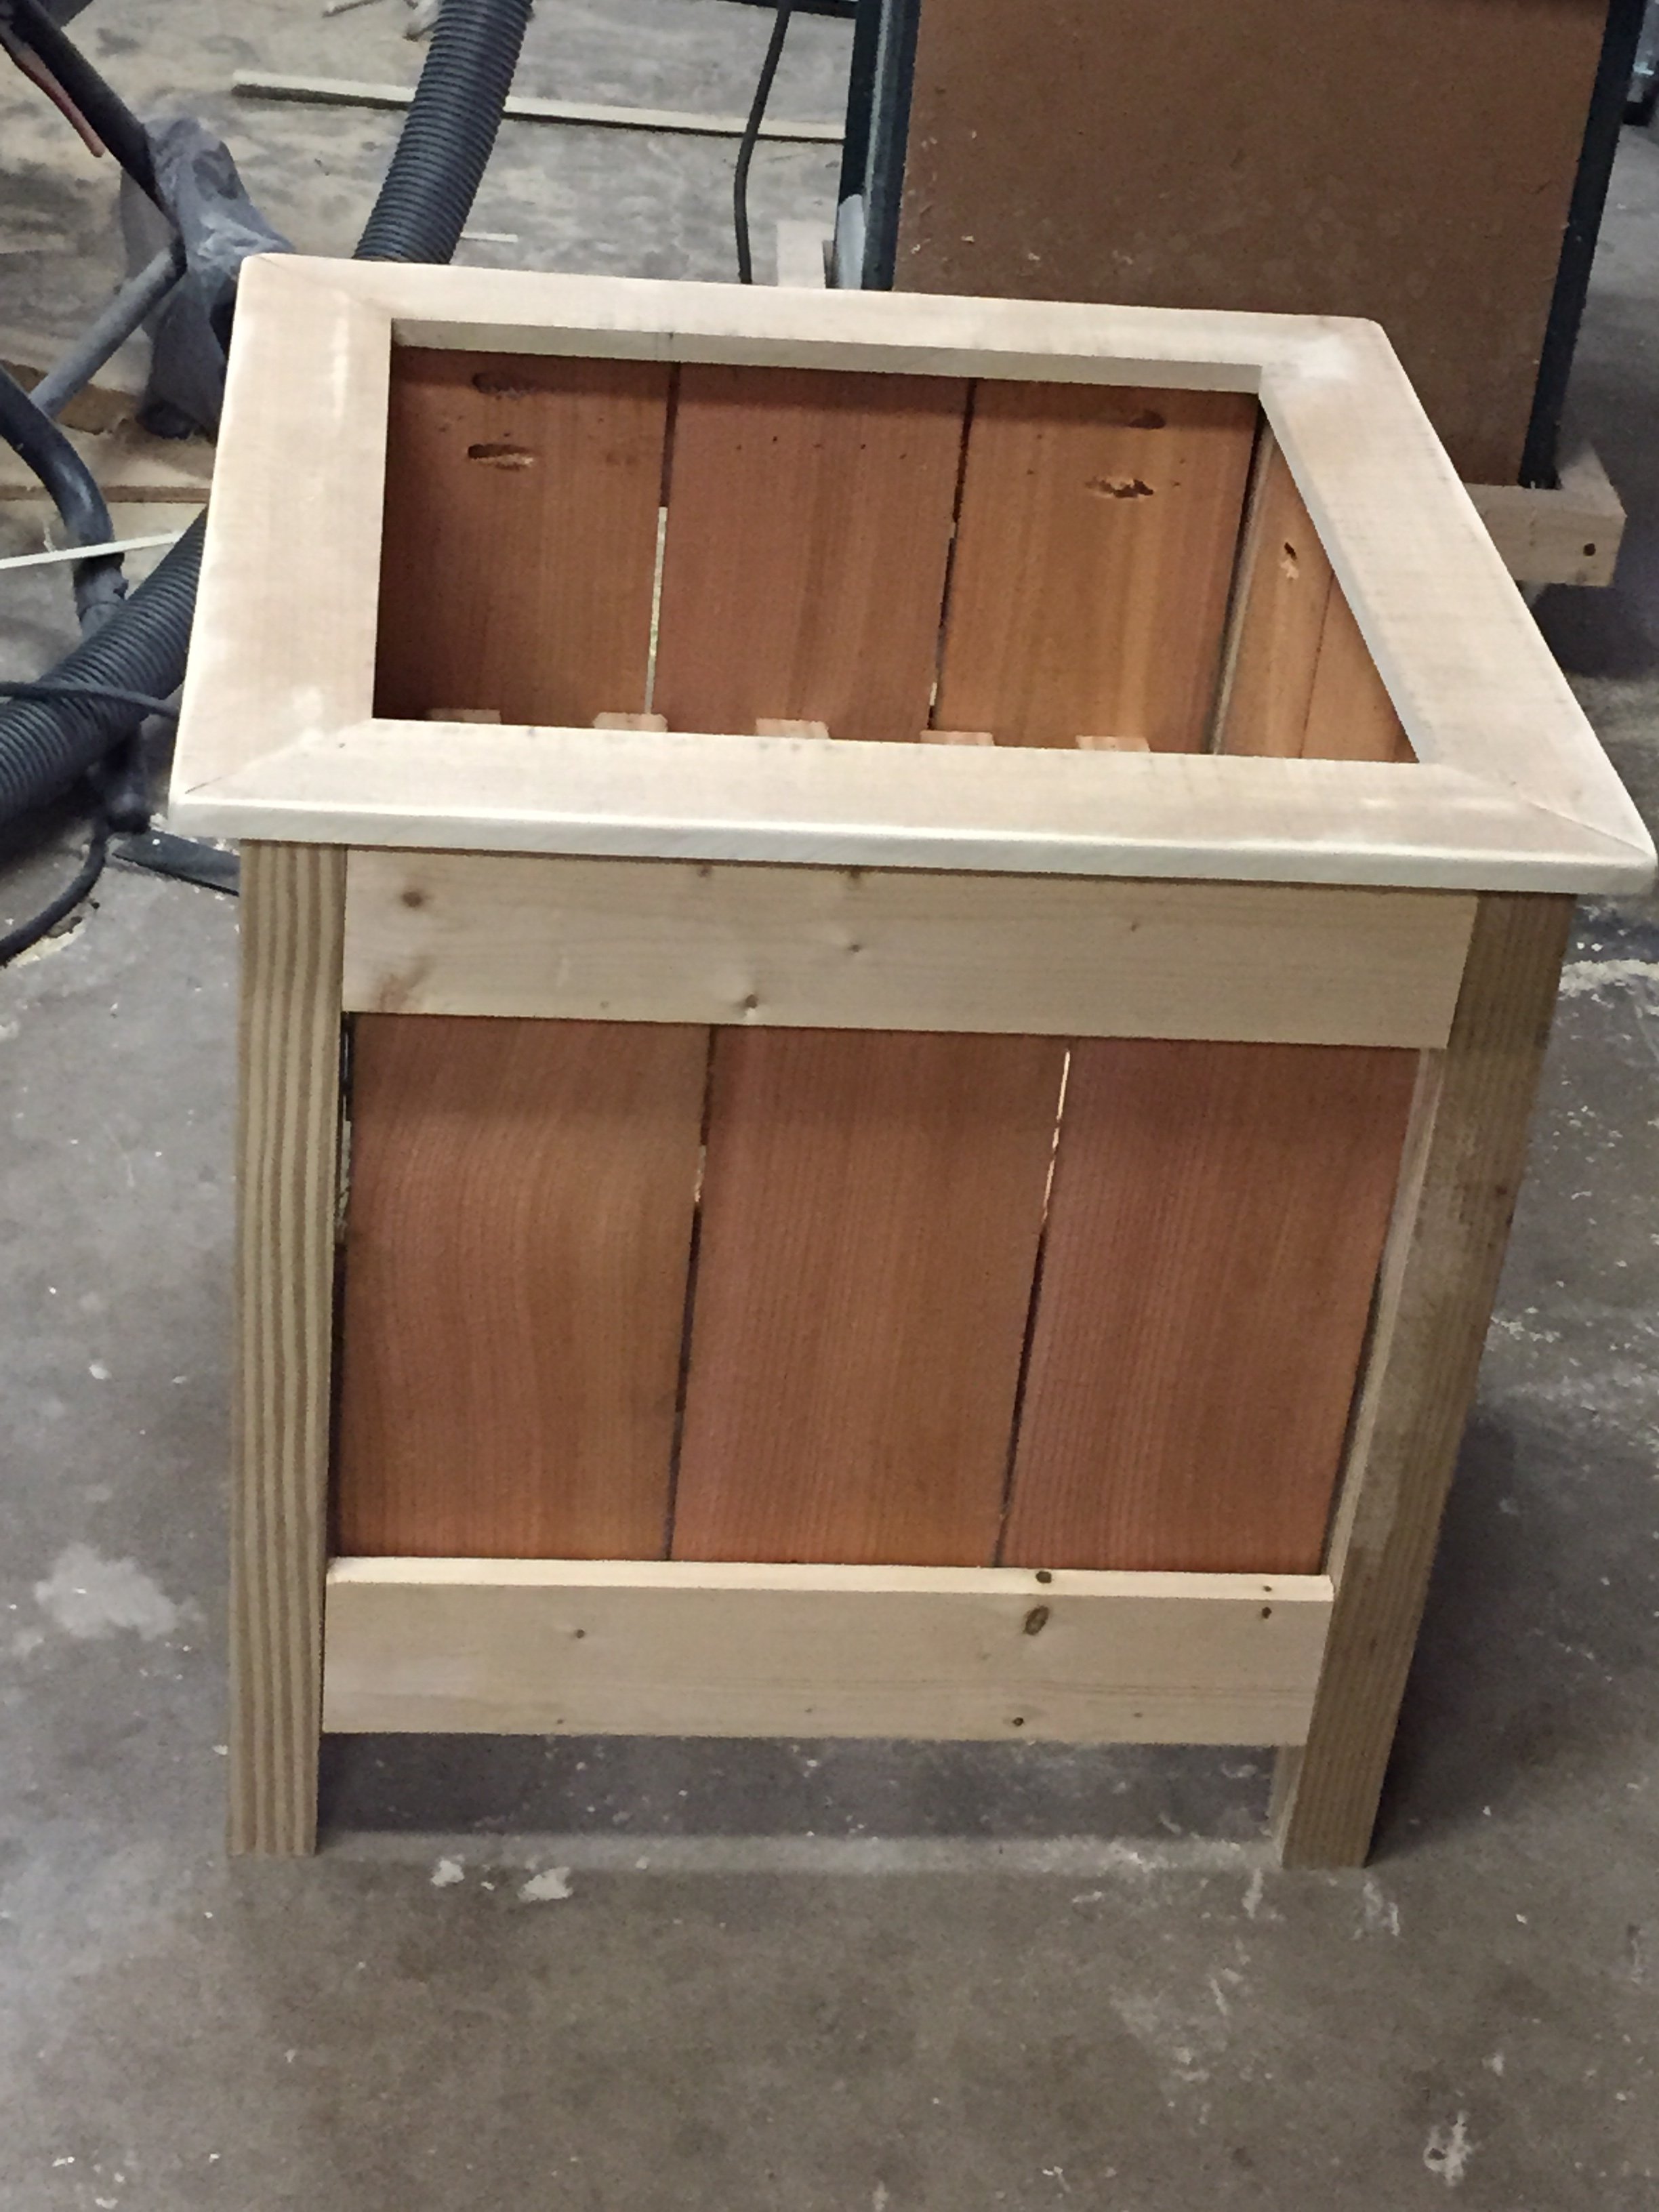
Cedar Planter
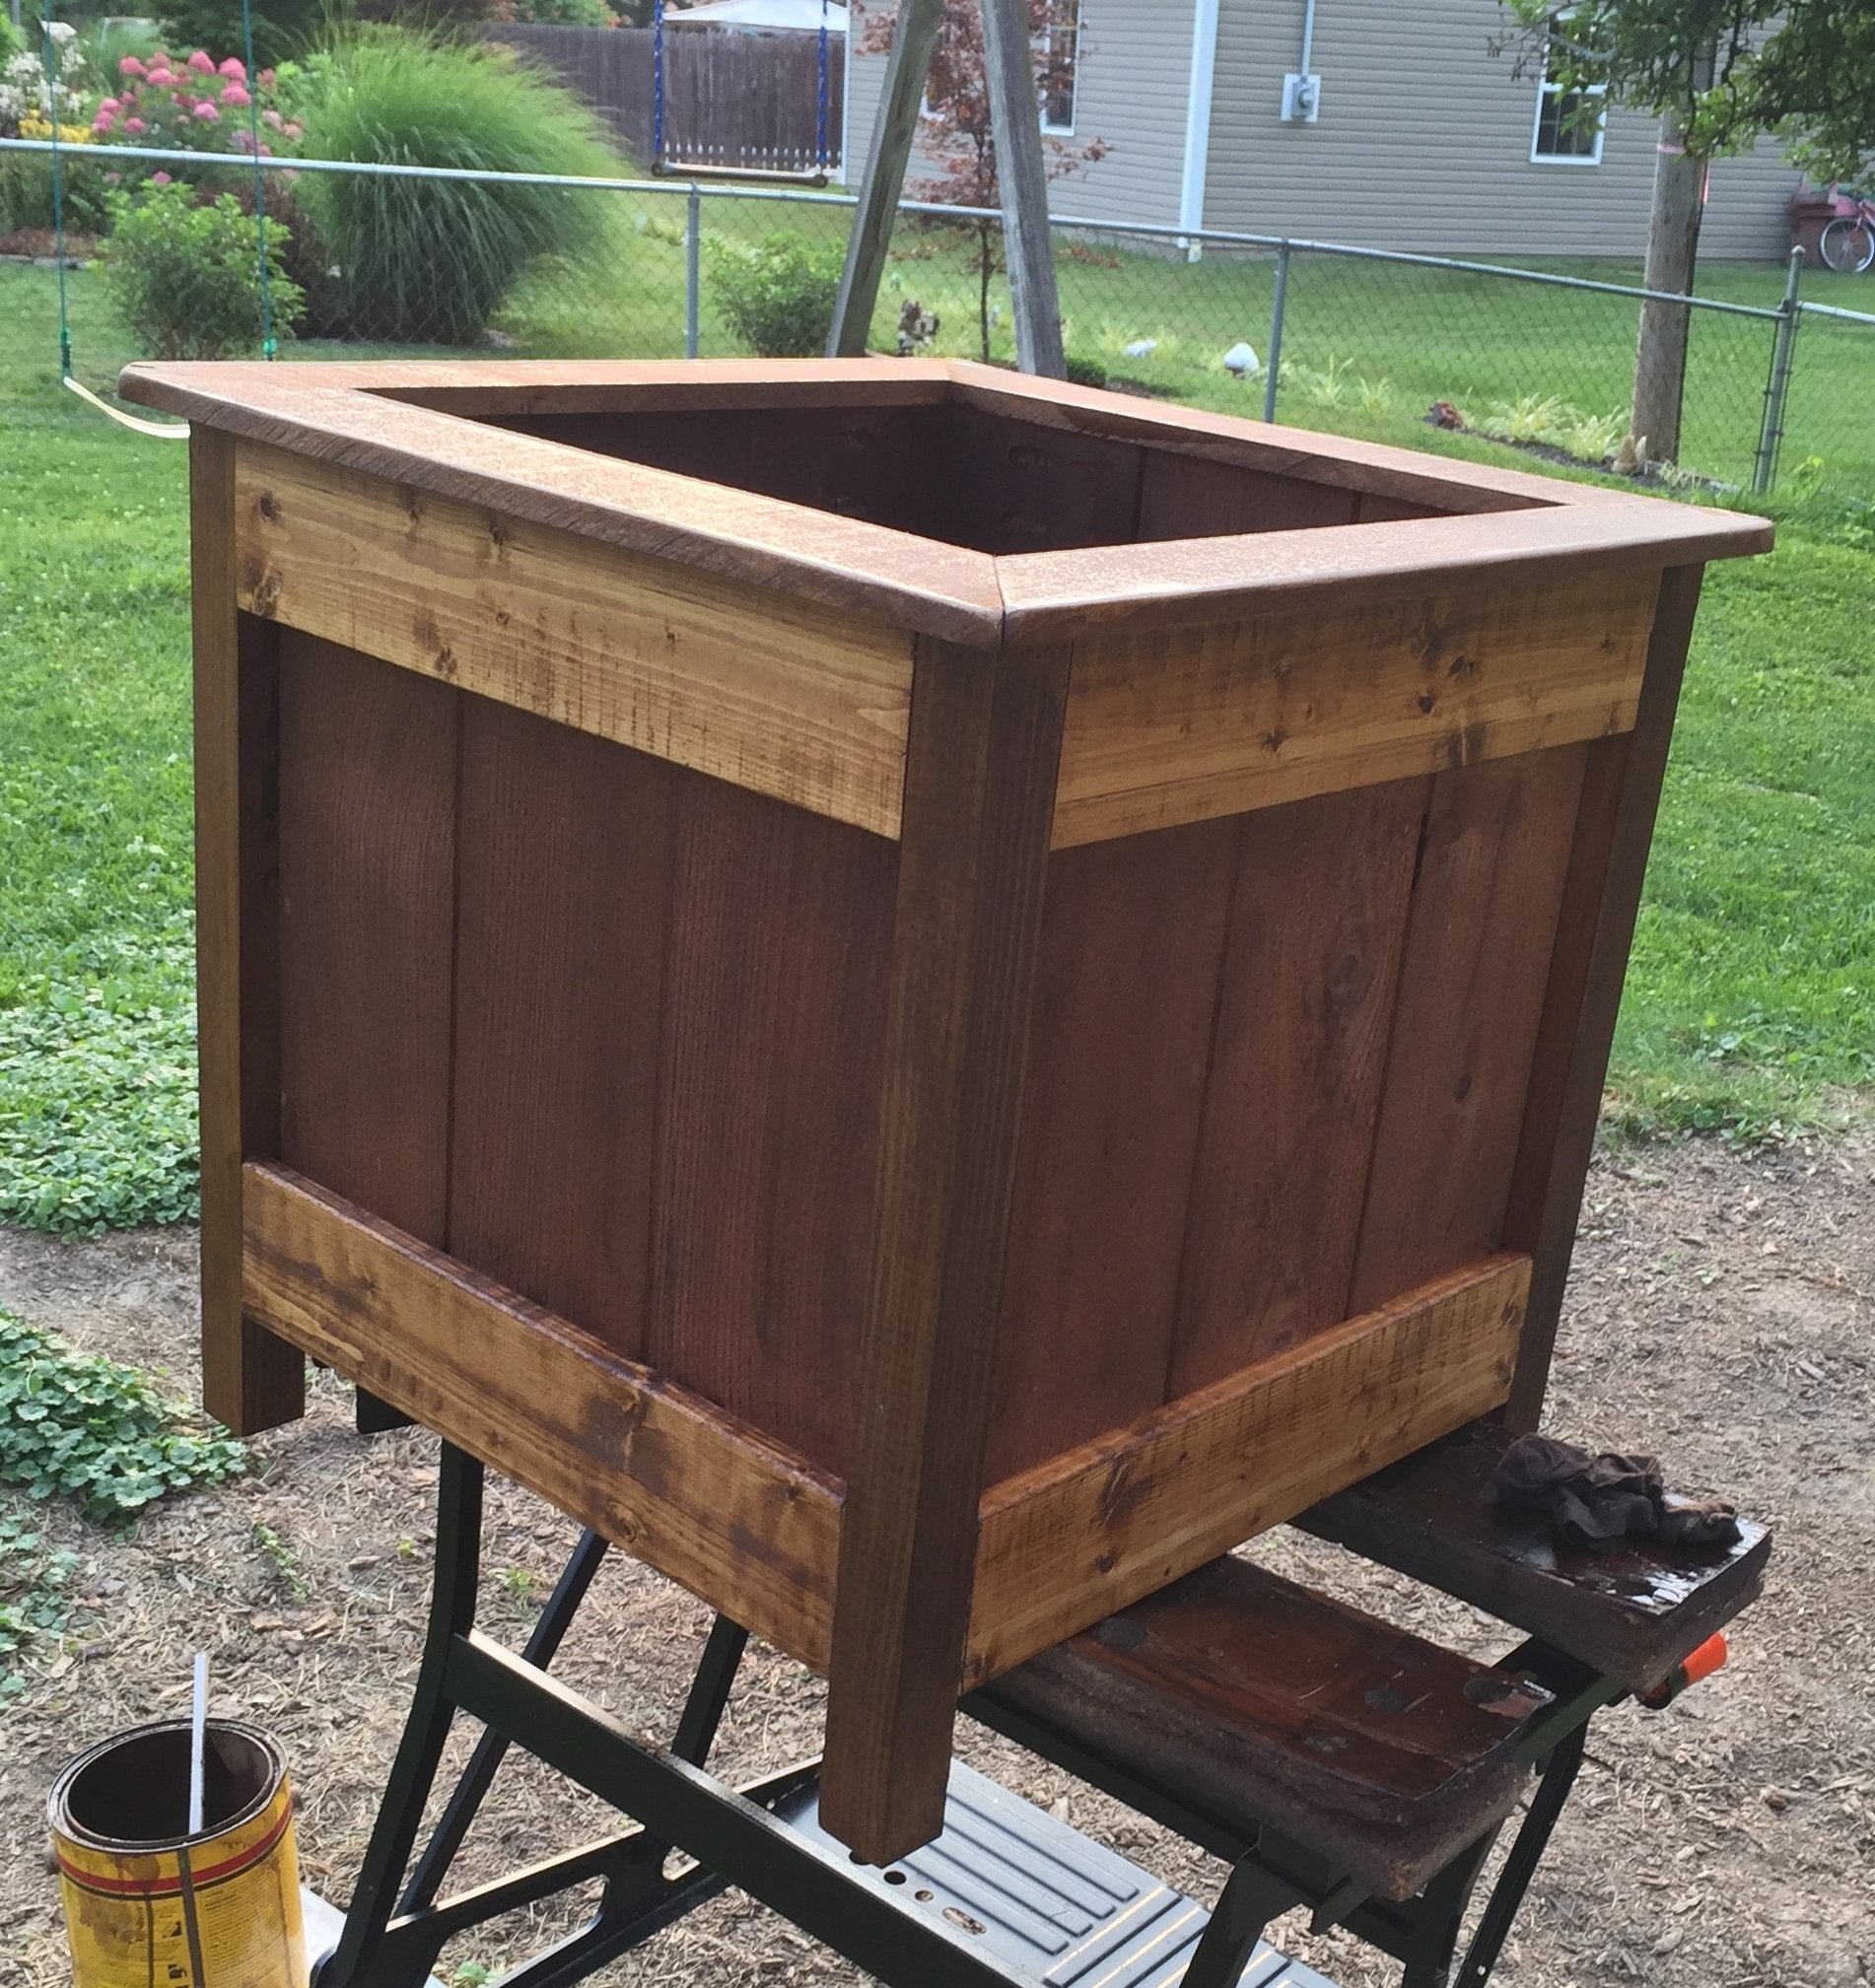
Used repurposed lumber for most of the project. Only thing I bought was the cedar pickets. This project cost less than $9
I also chose to cut the tops off and add mitered boards on top.
Built from Plan(s)
Estimated Cost
Less than $9 as the pickets were the only item I had to buy. Around here they are 2.27 each.
Estimated Time Investment
Afternoon Project (3-6 Hours)
Recommended Skill Level
Starter Project
Sliding Door Console
My husband and I made this for our daughter as a Christmas gift. We were very pleased how it turned out, especially being our first furniture project. We found the directions clear and easy to follow.
Our daughter was very surprised and loves it.
Built from Plan(s)
Estimated Time Investment
Week Long Project (20 Hours or More)
Finish Used
Painted the sides and stained the top.
Recommended Skill Level
Beginner
My first coffee table and desk!
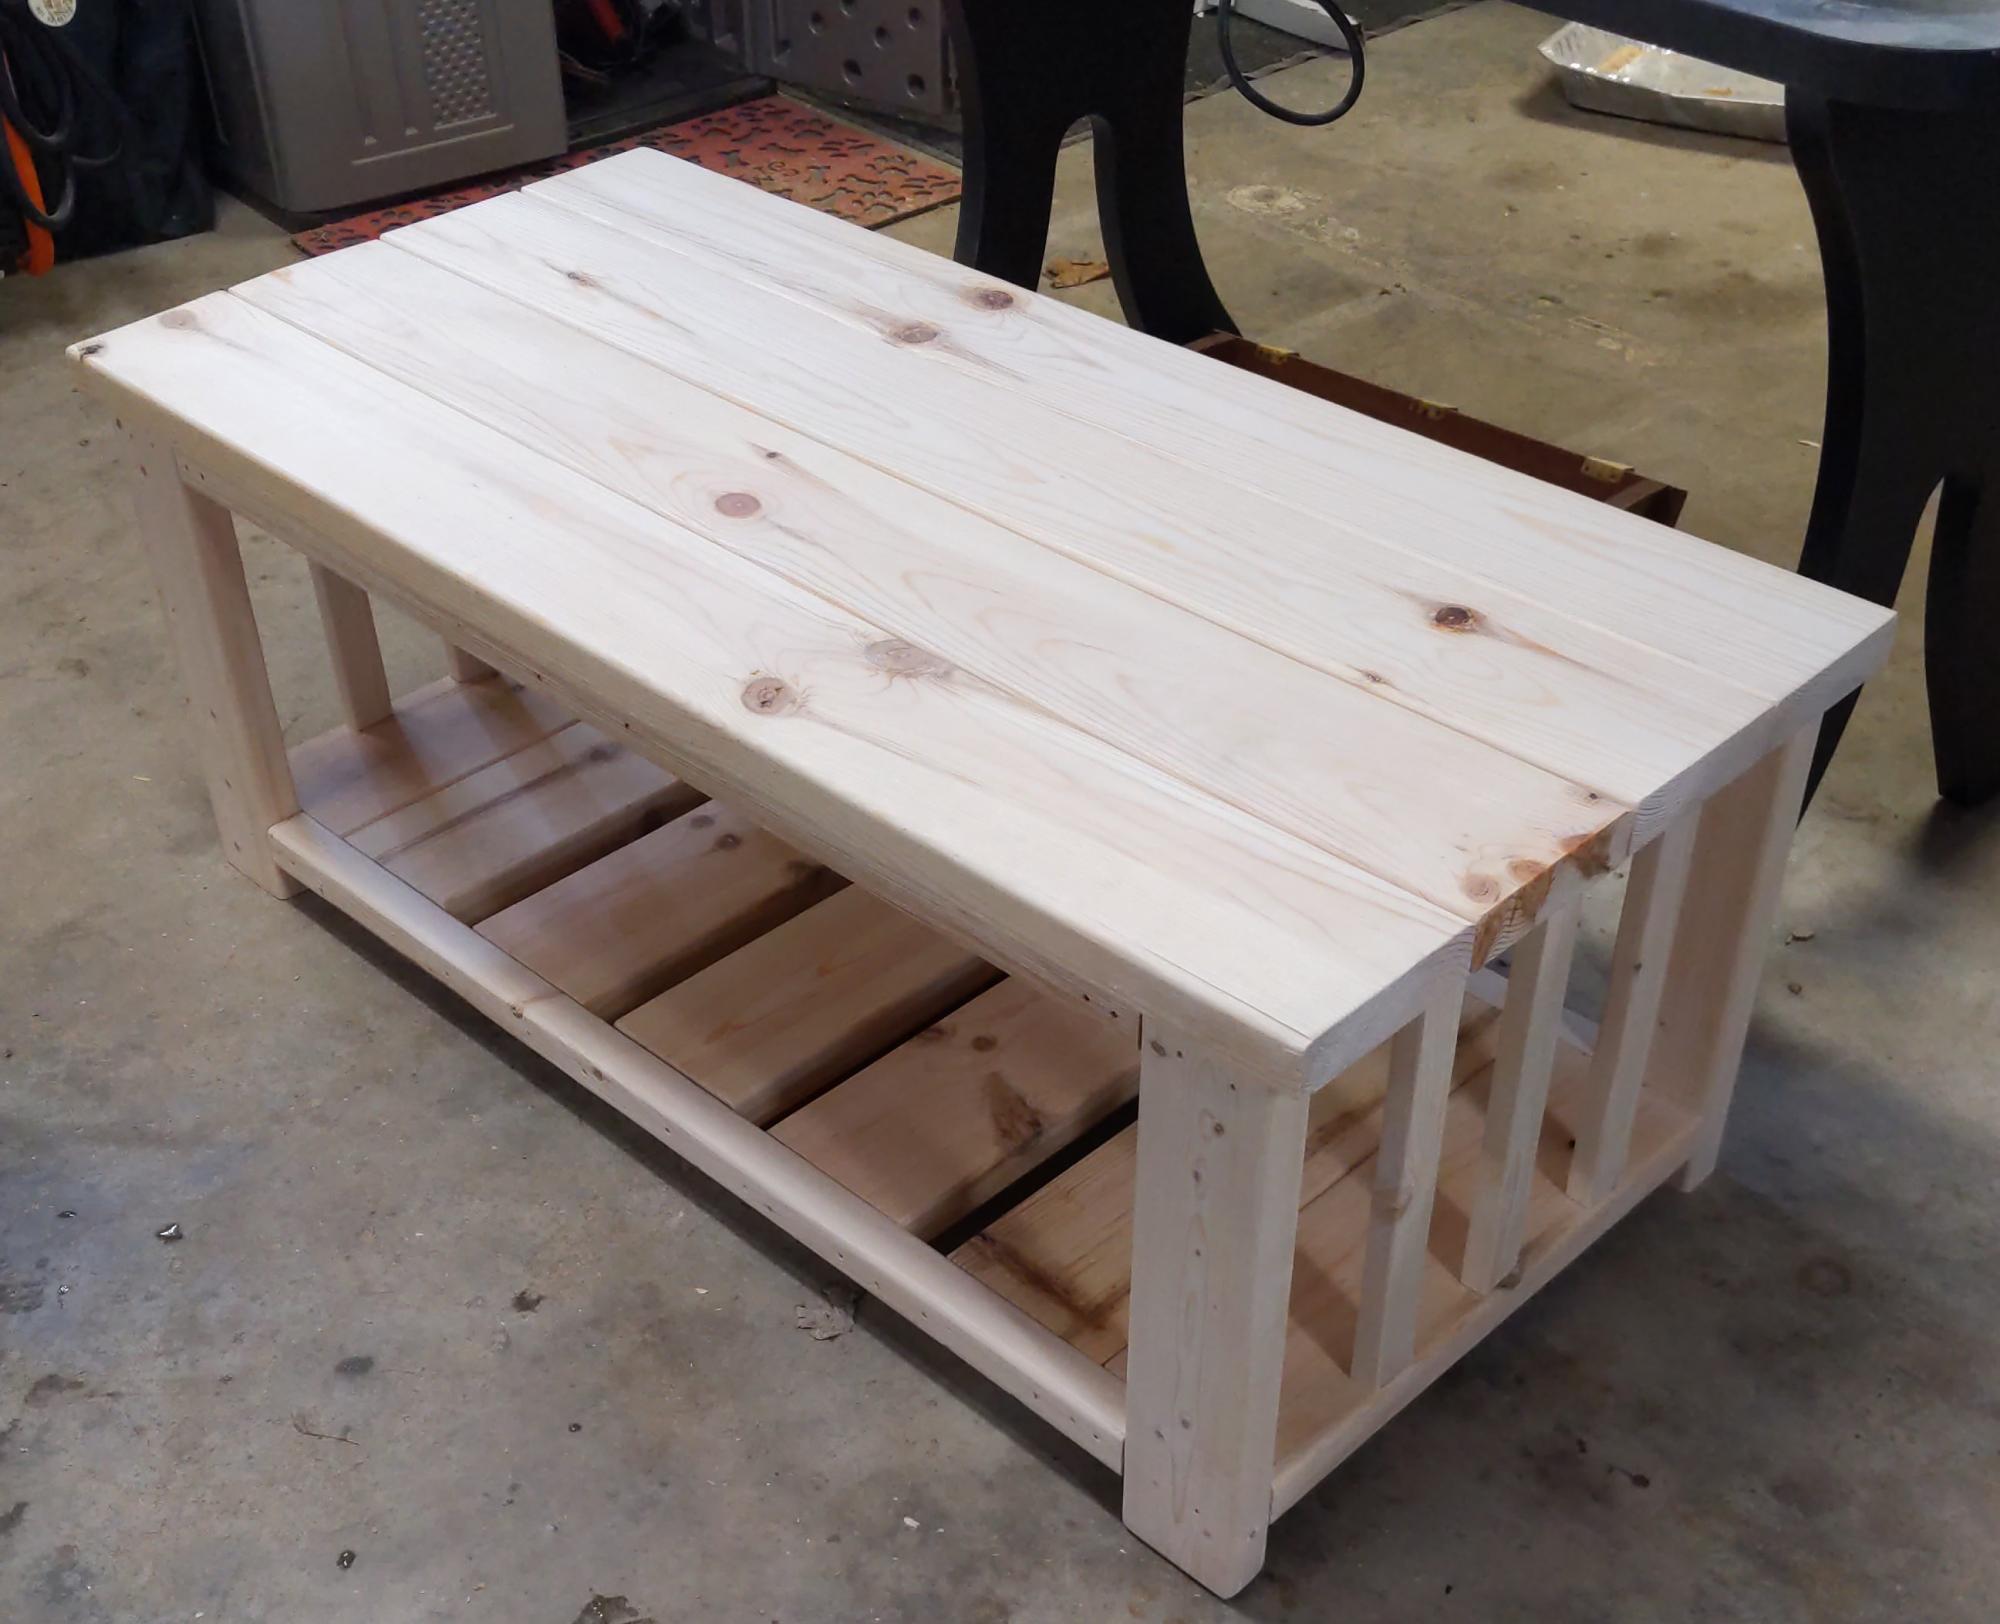
Ana, thanks for the online lessons! I’ve built four desks and the coffee table. Having fun too great retirement gig!
Ron from Ohio
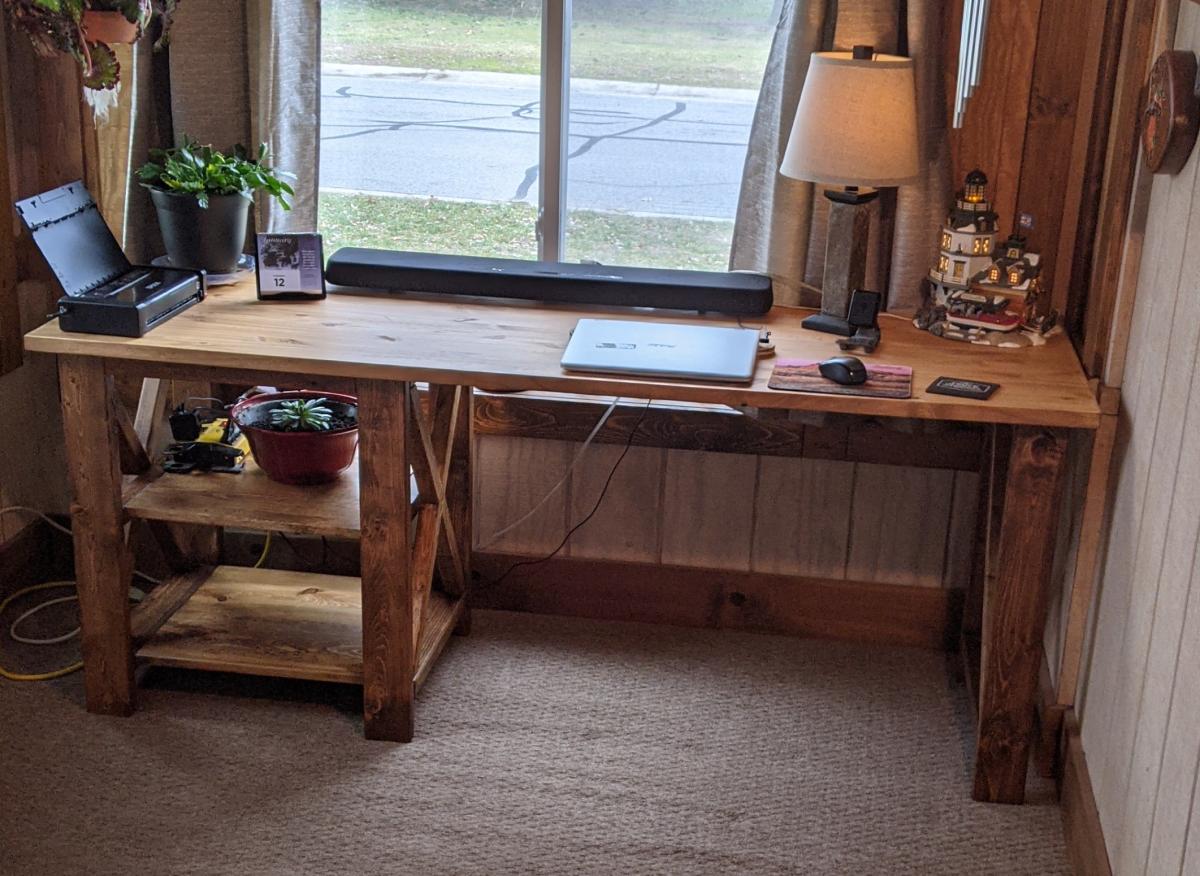
Built from Plan(s)
Comments
Entryway Bench and Storage shelf
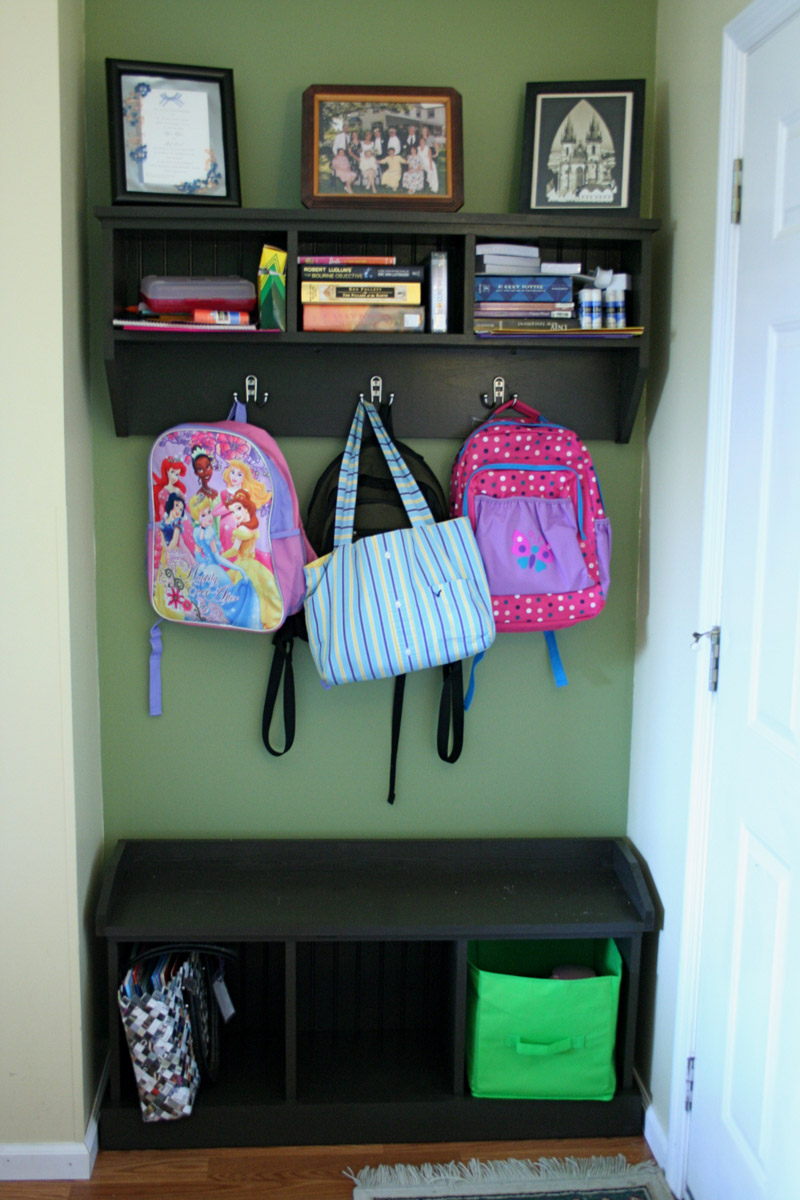
We cut this plan down by 8" in length to fit in a nook behind our front door. The opening was 44.5" and we cut our longest piece to 42" to make sure we had clearance for baseboards and door trim. We finished both items in an afternoon, even with adjusting measurements and having kids ages 5 and 2 "helping".
Built from Plan(s)
Estimated Cost
$65
Estimated Time Investment
Afternoon Project (3-6 Hours)
Finish Used
Can't remember the exact color - it's a deep brown by Behr.
Recommended Skill Level
Starter Project
My first project!
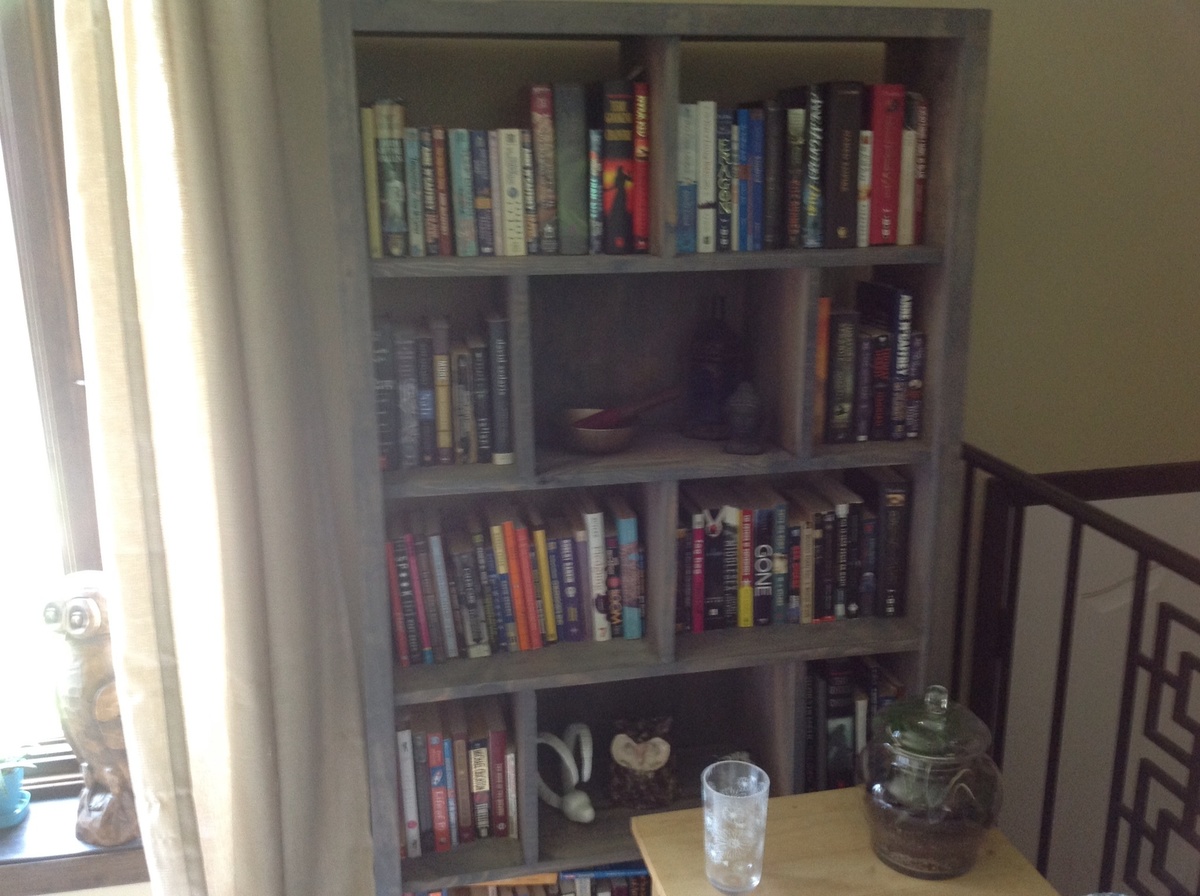
This was a bit daunting as my first woodworking project, but after a few mistakes (and taking it slow), I'm pretty proud of it!
Built from Plan(s)
Estimated Cost
65
Estimated Time Investment
Day Project (6-9 Hours)
Finish Used
Minwax gray 271 after pre-treating with minwax pre-stain conditioner
Recommended Skill Level
Beginner
Comments

Mon, 07/01/2013 - 16:07
Looks great!
Congrats - You did great on your first project! Looks super! Love the gray finish. Before you know it, instead of going to a store to look at furniture, you'll be "shopping" Ana's plans first to find just what you want. I'm so hooked on this site - since becoming a reader I haven't bought a single piece of "furniture store" furniture! :)
In reply to Looks great! by JoanneS
Mon, 07/01/2013 - 21:14
Thanks! I think I've already
Thanks!
I think I've already picked out my next project ;)
Pottery Barn Inspired Truss End Tables
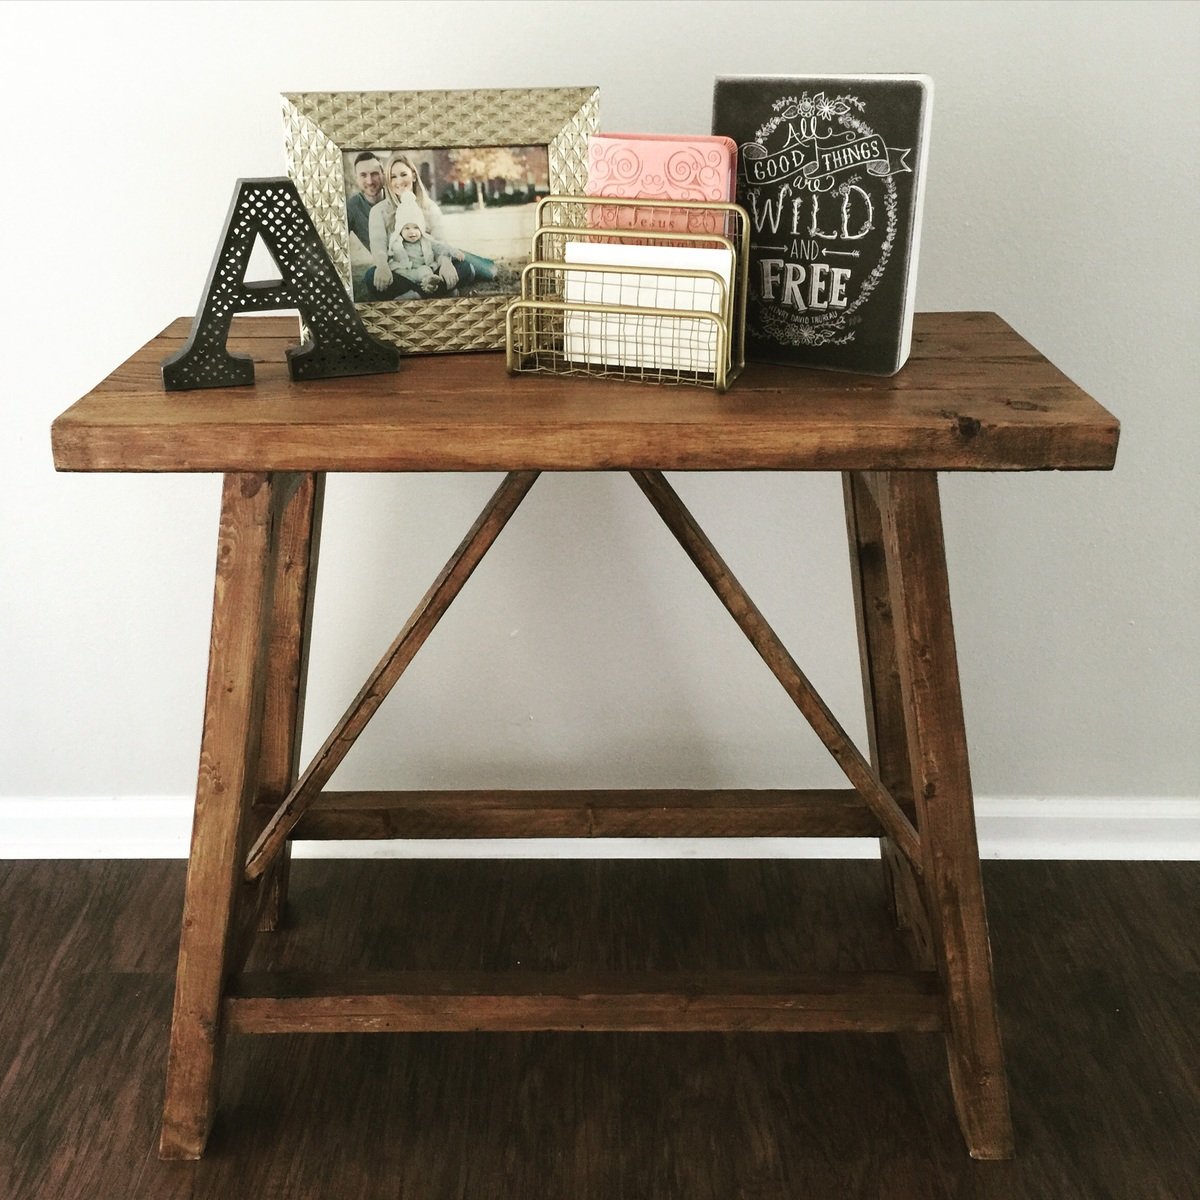
I changed up the plans so this table would fit my space better. This was my first time building with a Kreg jig and a miter saw(I'm a newbie). Love how it turned out!
Built from Plan(s)
Estimated Cost
$15
Estimated Time Investment
Afternoon Project (3-6 Hours)
Finish Used
Cabot brand in Aged Leather. One coat.
Recommended Skill Level
Beginner
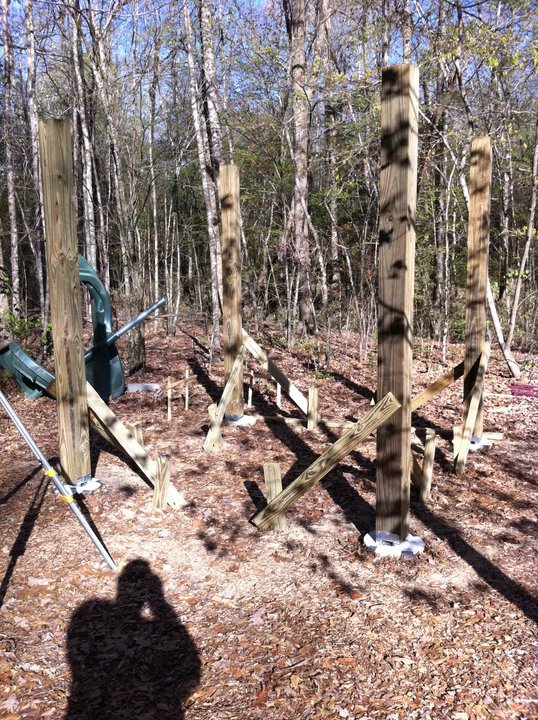
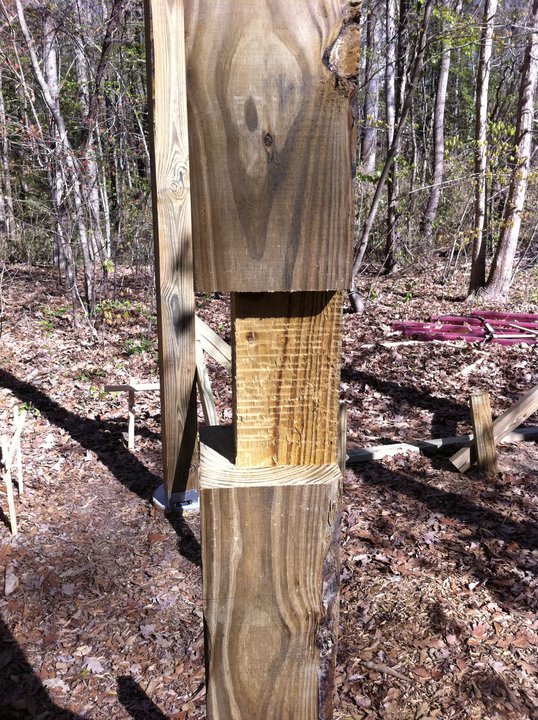
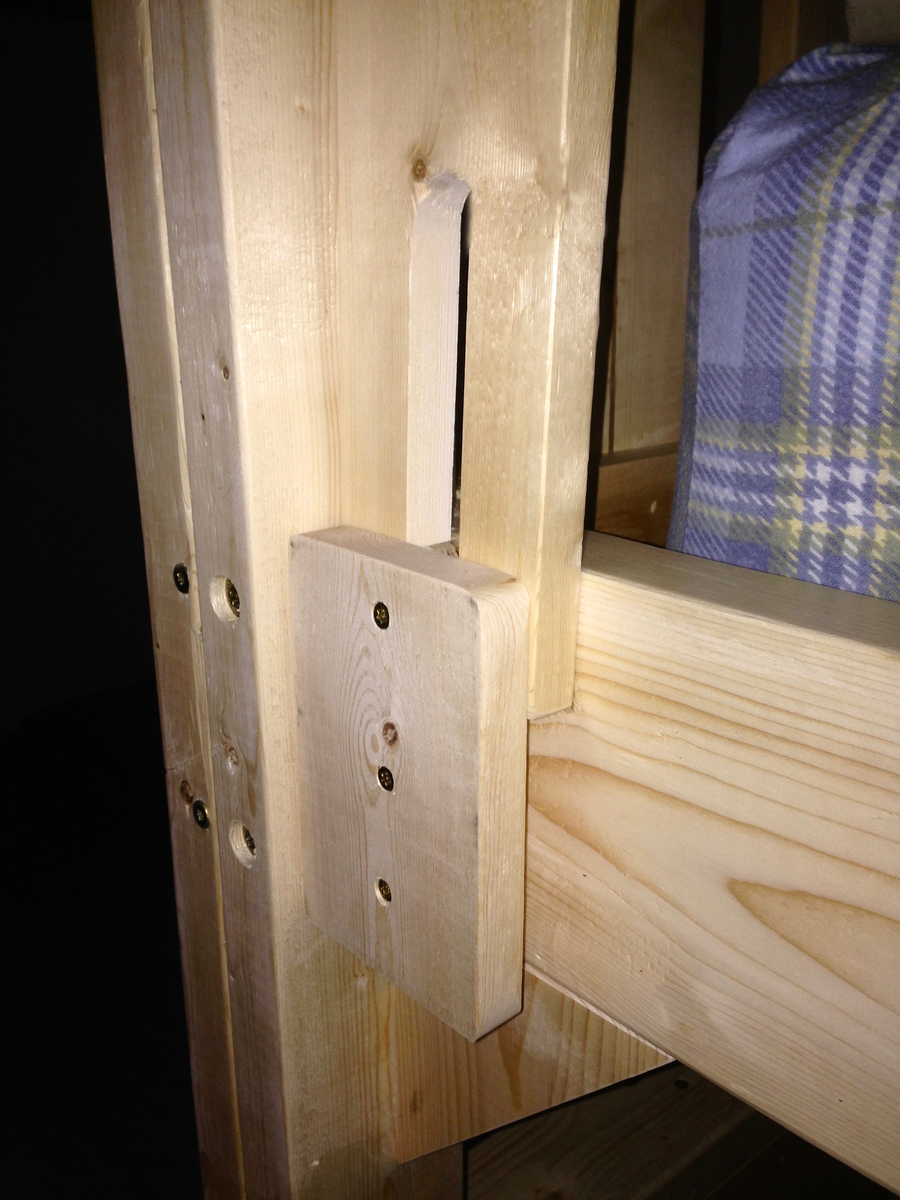
Bunkbed with revisions/improvements

I started looking for plans for a bunk bed for my grand kids and found Ana's Simple Bed and Simple Bunk Bed.
I took the advice of some of the posters here and used head board plans for both top and bottom beds. I drew up the entire bed in Sketchup prior to building and realized I could improve the strength a bit. The attached pictures illustrate those changes. I used laminated 2 x 4 posts for the legs and cut a notch to receive the rails into that notch on the inside 2 x 4. Making the rail longer to insert into this slot allows the bed to be supported directly on the 2 x 4 instead of relying only on screws. I then used 5 1/4 lag screws from the side through the 2 x 4 , the 2 x 6 rail and into the head board structure. Additionally, I screwed in triangular corner pieces under the rails to reduce racking when the kids play.
Making these changes, I also attached the end supports for the spring/mattress only to the head and foot boards which allows the rails to be separated for transport, i.e. smaller pieces. This thing is heavy!
I also slotted the stanchions on the guardrail for the top bunk, inserted into new supports, so it can be removed for easier changing of the sheets.
The kids really love this bed and played in it for most of the time they were visiting. Thanks Ana for the initilal plans.

Estimated Cost
I used expensive screws to enable disassembly and transport later but still came in under $200.
Estimated Time Investment
Week Long Project (20 Hours or More)
Finish Used
Poly
Recommended Skill Level
Intermediate
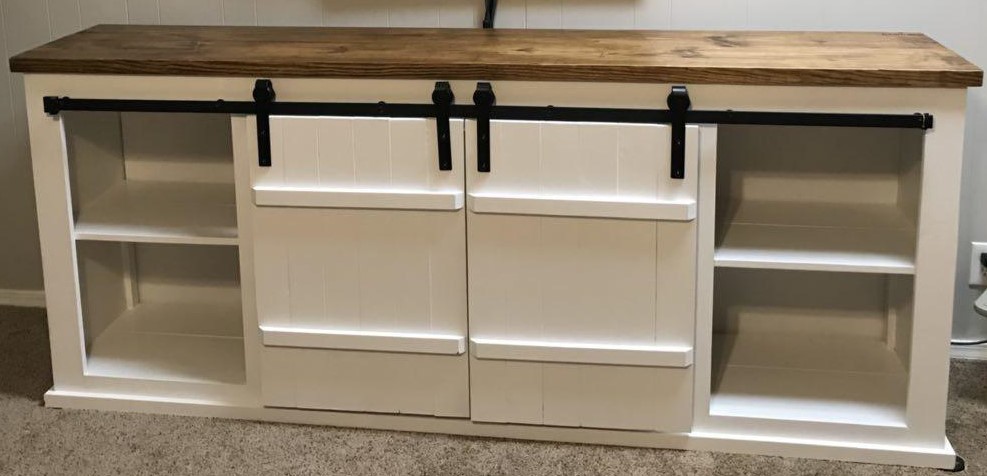
Garage shelving unit to inside shelving unit with barn door
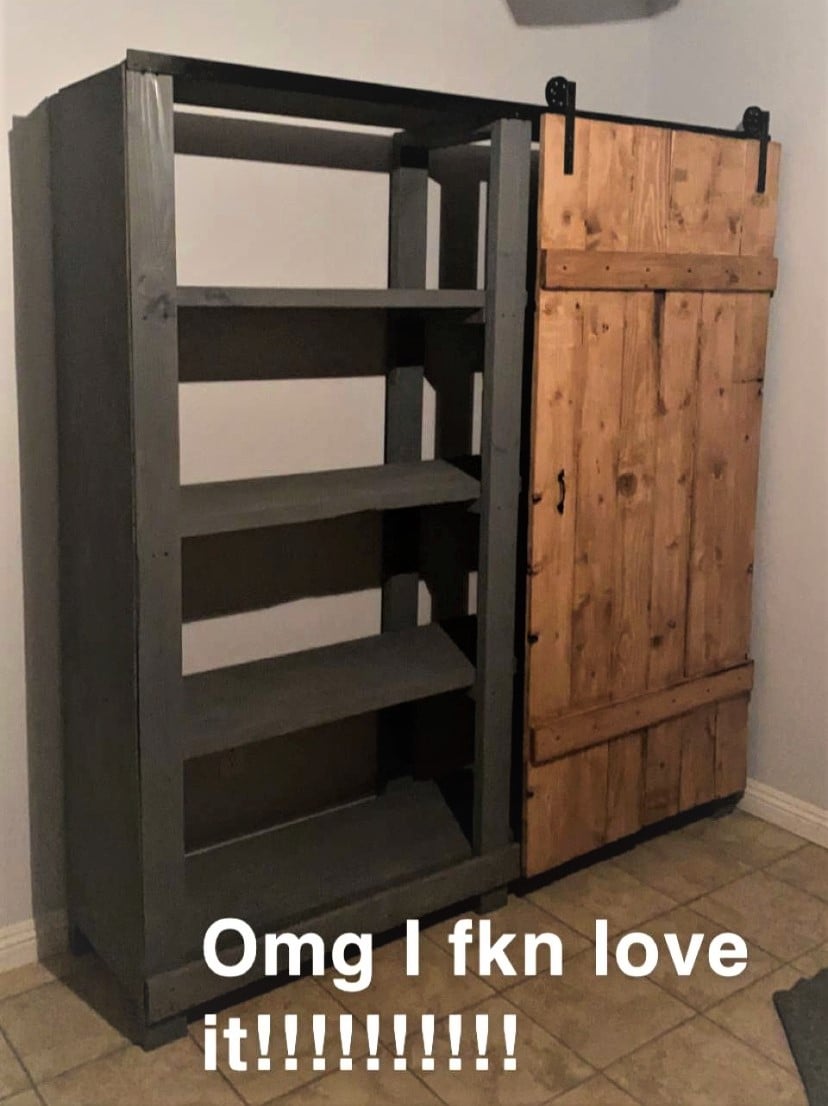
We too you’re 2x4 shelving unit with some small tweaking of measurements and added a barn door!
Built from Plan(s)
Comments
Ana White Admin
Sun, 12/26/2021 - 13:48
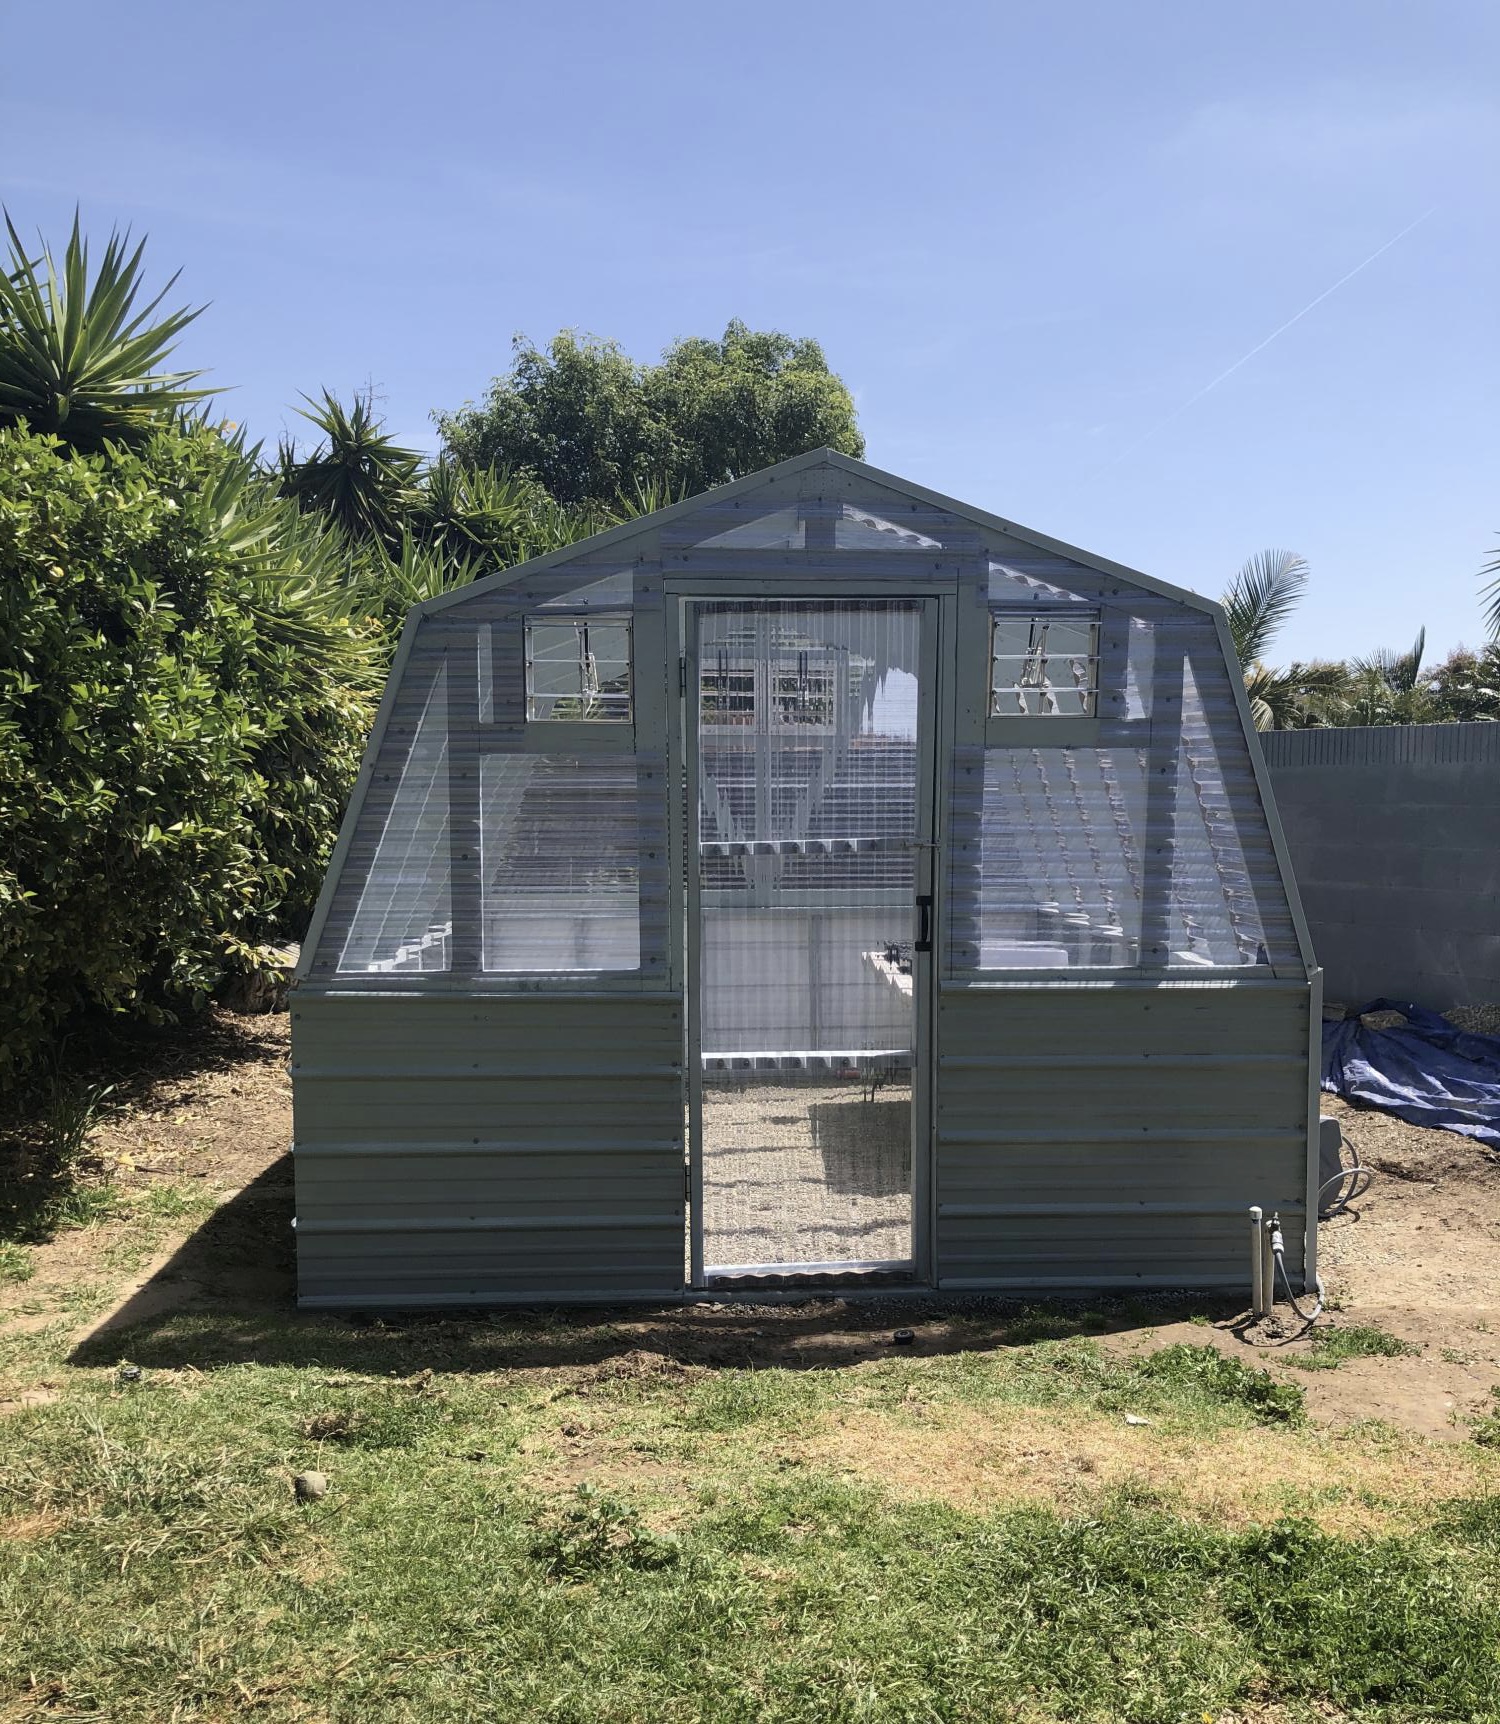
Gorgeous Greenhouse!
WOW, that looks amazing, thank you for sharing!