Community Brag Posts

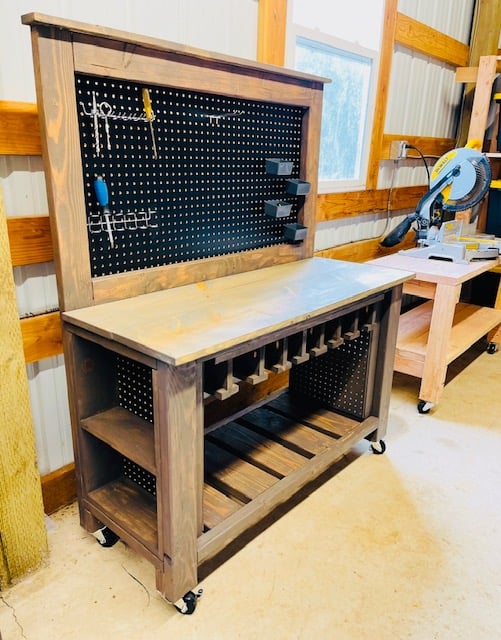
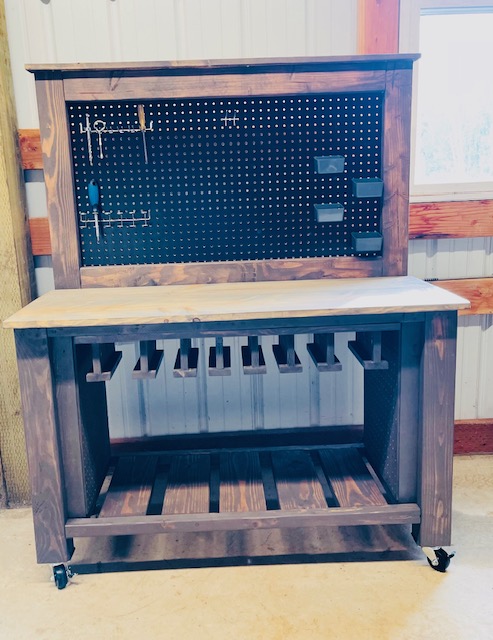
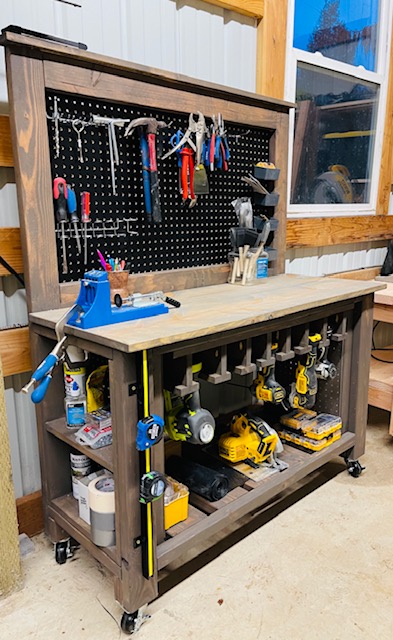
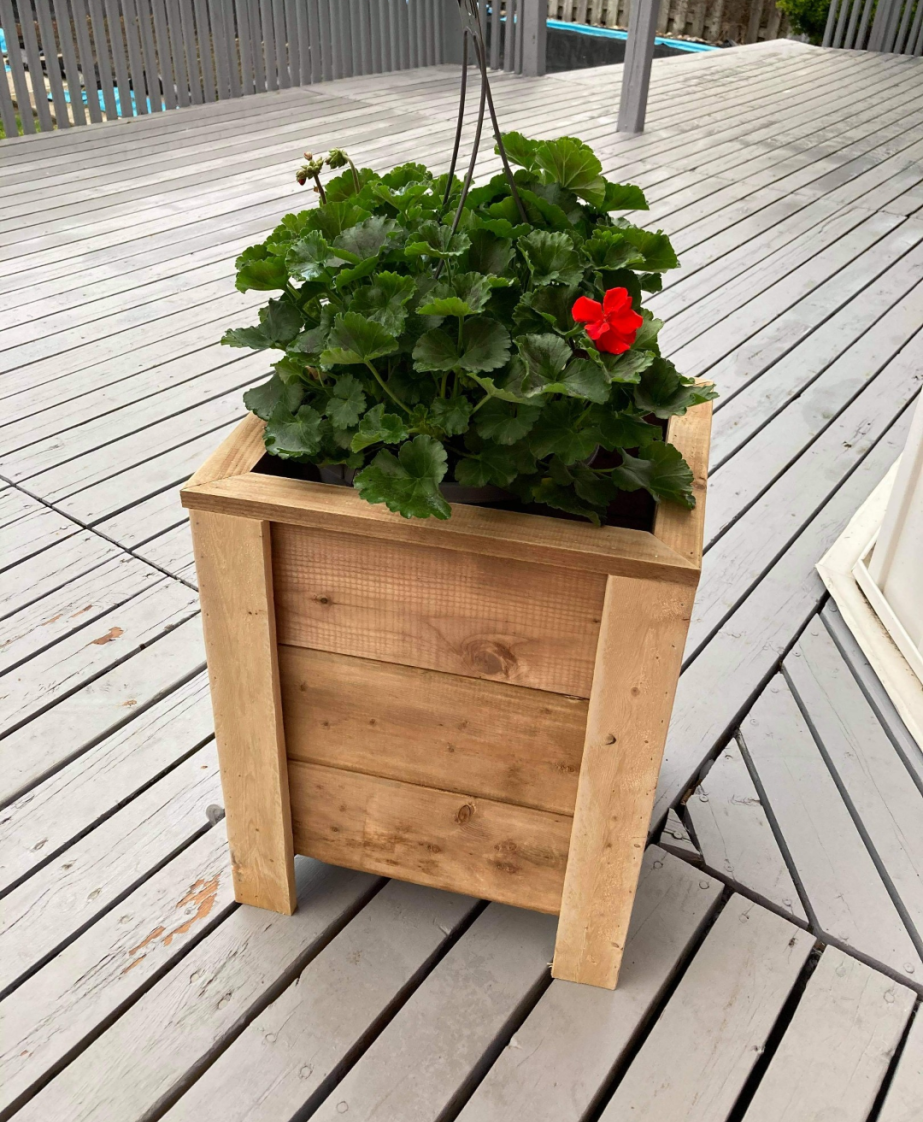
Ultimate Workbench for me

Submitted by ianr on Mon, 06/22/2020 - 15:13

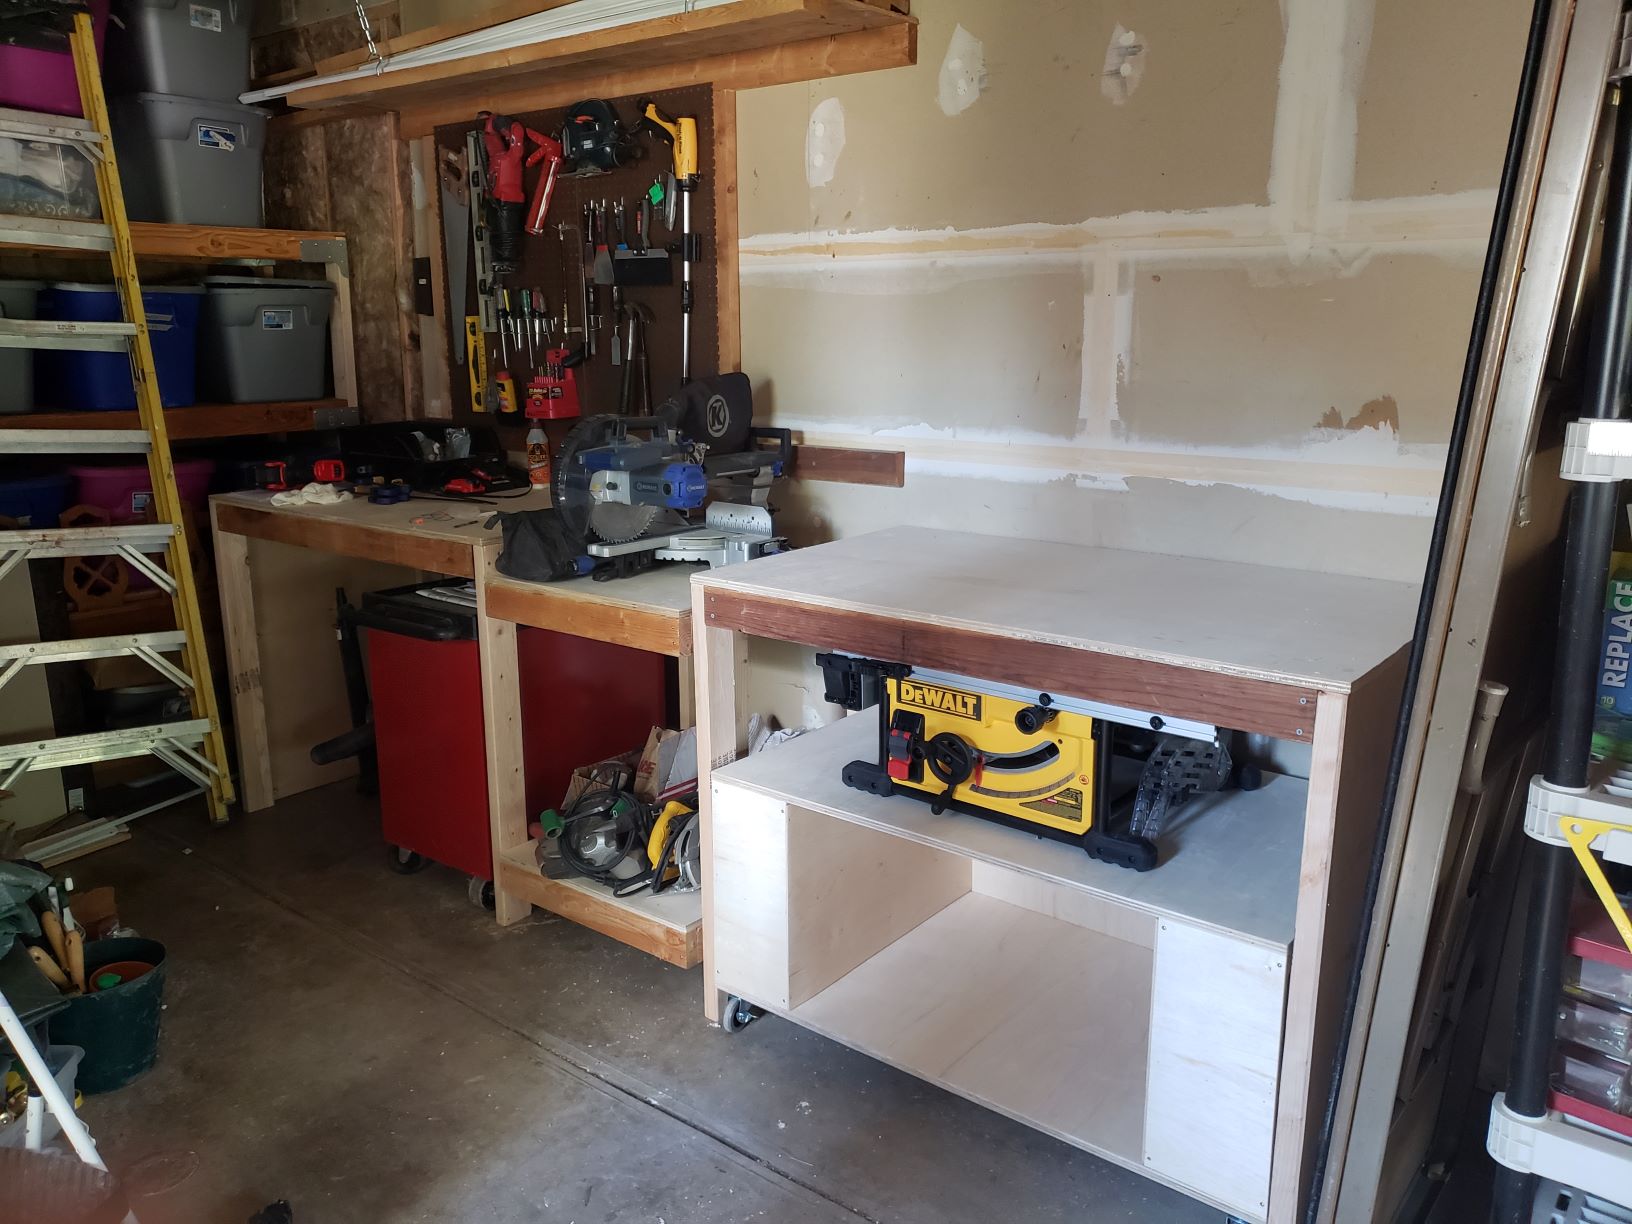
I altered the original plans in the following ways:

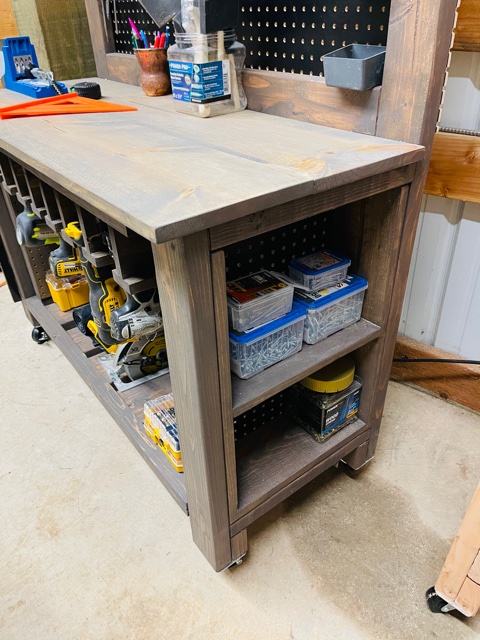
  • Only built one rolling cart because I already had a multi-drawer tool chest that fit right under the workbench.
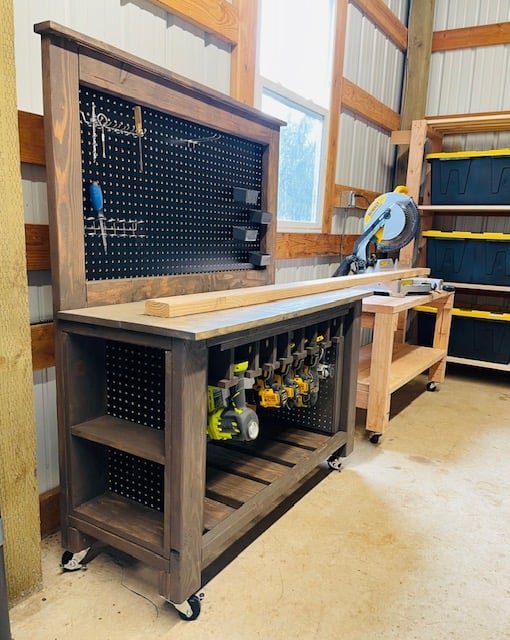
  • Built the right half of the workbench as a separate piece from the miter table because attic access is right above it and we need to move the workbench to get to it.
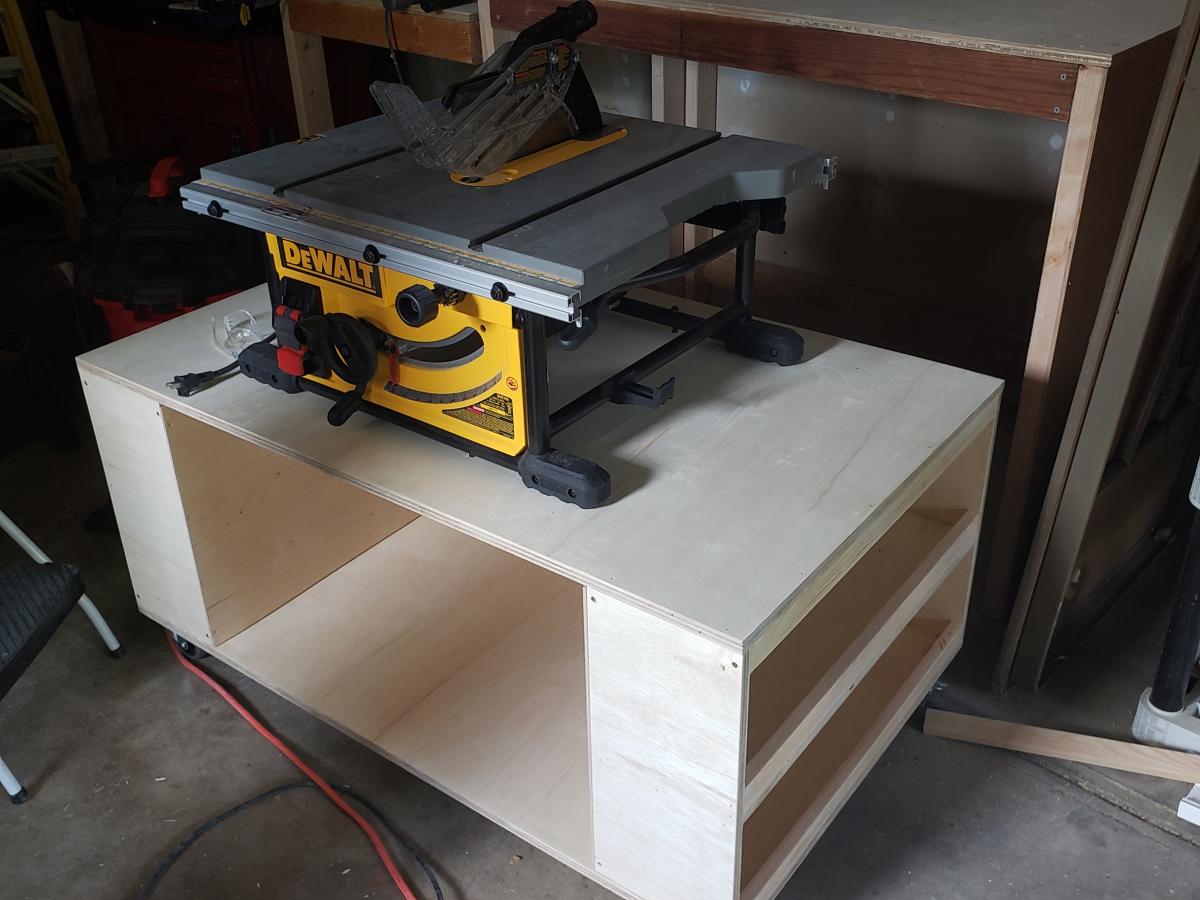
  • Built a half cart for the table saw because the Dewalt contractor saw extends too far to the sides to have it boxed in.
  • I'm going to add a sliding plate that locks down for my miter saw so I can pull it away from the wall without dragging or lifting it.
  • I used a nail gun with two inch nails instead of staples since I don't own a staple gun that holds staples that long.

I'm not that experienced with projects so here are a couple of things I learned:

  • Attach the castors far enough under the cart so that the wheel never extends beyond the sides.
  • Watch what grade sandpaper you use on the plywood. It's easy to strip off a layer.
  • This was not a one-person project for me. Even with clamps, I still needed help bracing parts and rotating pieces.

Thanks for the great plan! Now I can start on all the other projects on our improvement list.

Estimated Cost
350
Estimated Time Investment
Weekend Project (10-20 Hours)
Recommended Skill Level
Intermediate

Laundry Sorter

I was tired of having my laundry piled on my garage floor. These plans were the perfect solution. It fits great in the small space I had next to my washer. And it was so easy. I was able to do it all by myself. My husband just had to catch the plywood for me when I ripped it. I was able to find the baskets on the plans at Target and used left over paint from my sons' playroom. My laundry is now always sorted, making it much easier and faster to clean.

Estimated Cost
$60
Estimated Time Investment
Day Project (6-9 Hours)
Finish Used
Water based paint in eggshell finish. Since this was going to be in the garage I just used leftover paint. If it would have been used anywhere else, I would have used a semi-gloss.
Recommended Skill Level
Beginner

Simple Modern Outdoor Sectional

This project my husband and I started together. We live in a very damp and rainy area where cushions would just be more of a pain than a comfort outside.
We decided to add slats on the back so the sectional would stand alone without cushions.

Well, after the first corner piece, I got busy and every day my husband would add another piece to it.

I did do much of the sanding and painting. We sanded and painted these before assembly, made life tons easier.

It was white pine with out exterior house paint color. We really love them!
Thank you Ana!!!

Estimated Cost
$170
Estimated Time Investment
Weekend Project (10-20 Hours)
Finish Used
Behr Exterior Paint and primer in one.
Recommended Skill Level
Beginner

Pantry

Built this out of old Barnwood Pine !

Recommended Skill Level
Intermediate

Comments

kmschwer

Sun, 11/02/2014 - 18:27

This is beautiful and I just purchased my first home with my fiance and we have an old farm house. This would be amazing in our kitchen as our pantry. I must attempt to make it! Please help me :)

Modular office sewing/craft table

Submitted by Anonymous (not verified) on Thu, 07/25/2019 - 17:58

We built three base units-each with different storage options and used the corner desk plans. Then created our own long desk top using a 6ft long board and using a jigsaw to create an open space for the sewing machine. 

Estimated Cost
$300
Estimated Time Investment
Week Long Project (20 Hours or More)
Finish Used
Semi gloss paint-behr paint and primer in classic silver. Polycrilic semi-gloss top coat-3 coats with wet sand before final coat.
Recommended Skill Level
Intermediate

Comments

Vanity stool Katarina

Submitted by Gumball14 on Tue, 09/16/2014 - 08:11

Had plans but no instructions, so involved learning my own techniques which was fun and it came together including size modification.  Lots of cutting!!!

Estimated Cost
100 hardwood
Estimated Time Investment
Week Long Project (20 Hours or More)
Finish Used
Clear satin varathane, walnut and oak wood creates color
Recommended Skill Level
Intermediate

Comments

American Girl's Modern Sofa

Submitted by KaitieBee on Wed, 01/04/2017 - 18:25

I made this for an older girl (11) so decided to go for a trendy, modern design rather than a bright playful color. It was very quick, and I made it with scrap 3/4: plywood from another one of Ana's projects. I increased the width of the seat and back from 5 1/2" (a standard 1x6 width) to 6" for the back and 5 3/4" for the seat. This gave it a higher back and made the back side of the sofa completely flush (probably to account for using 3/4" plywood instead of a 1x6). I used Titebond glue, 1 1/4" brad nails, and clamps for assembly. I ironed veneer edging on all the raw plywood edges and sanded, then gave it a thick coat of paint. Instead of seat and back cushions, I included two square throw pillows lightly stuffed so they can be creased (as in the photo) like real throw pillows. Including sewing, the project took me an hour. PS: I photographed it next to an every-day object for rough size comparison. I had initially shown someone who thought I had made an actual couch. LOL, Maybe in my dreams!

Estimated Cost
$0-$10
Estimated Time Investment
An Hour or Two (0-2 Hours)
Finish Used
Acrylic paint, black.
Recommended Skill Level
Beginner

Rustic X and Lift top coffee table collaboration

Submitted by Juice577 on Tue, 10/06/2020 - 02:19

My fiancé seen the rustic x one and loved it but has always wanted a lift top one. I decided to combine the two and it turned out well.

Estimated Cost
80
Estimated Time Investment
Day Project (6-9 Hours)
Finish Used
Poly shades stain and rustoleum white satin paint
Recommended Skill Level
Beginner
Seasonal And Holiday

Pedestal Table Herringbone Top

Submitted by Anonymous (not verified) on Sun, 01/22/2017 - 10:38

Herringbone Table

Thanks for the wonderful plans! This is my 2nd Ana White build (traditional turned leg, pottery barn desk). I used the legs from this build and then leveraged some tips from another blog for the herringbone top using 2 sheets of MDF as a base (http://www.southernrevivals.com/2014/06/tile-top-herringbone-table-make…). My herringbone table took some planning, as it is over 13' long. Now all of my family can eat together when we get together!


Built from Plan(s)
Estimated Cost
$500
Estimated Time Investment
Week Long Project (20 Hours or More)
Finish Used
Provincial Stain (4 coats) and Semi Gloss Poly, both by Minwax
Recommended Skill Level
Intermediate

Comments

Split drawer built-in bench with oak herringbone top

Submitted by GeekAthair on Sat, 12/19/2020 - 10:17

My second take on Ana White's mudroom bench design. This time I went with a split drawer design to provide room for the power outlet on the wall behind it and made my first attempt at a custom herringbone pattern for the benchtop. The frame is made out of douglas fir and the benchtop is made out of reclaimed red oak. The herringbone pattern is accented by two geometric mountain ranges (Minwax Antique Jade wood stain), signifying our placement here in the Pacific Northwest, nestled between the Olympic and Cascade mountain ranges. The benchtop was finished with 3 coats of Minwax Fast-Drying Polyurethane (semi-gloss). I'm very happy with how it turned out and plan to make a similar benchtop to replace the one in our dining room once I clear my plate a bit :)

Built from Plan(s)
Estimated Cost
450
Estimated Time Investment
Week Long Project (20 Hours or More)
Finish Used
Minwax Fast-Drying Polyurethane in Semi-Gloss
Minwax Woodstain in Antique Jade (for the mountains as well as the frame and drawers)
Recommended Skill Level
Intermediate

Comments

Farmhouse Workbench with Tool Storage

Submitted by vendo on Thu, 01/28/2021 - 10:47

I took Ana's Farmhouse potting bench plan and made it a workbench with some mods. I added the tool storage and adjusted it for different widths depending on the tools. I added some support under the tabletop to attach the tool storage piece. On the ends, instead of the X detail I built shelves for each end for added storage for screws and paint. Finally the pegboard back allows for more storage! The height is consistent with the height of my chop saw on my other workbench for when I need to chop longer boards. I am very happy with how this project turned out and it is now full and in use!

Built from Plan(s)
Finish Used
Briarsmoke by varathane
Recommended Skill Level
Starter Project

Comments

susan_c95

Mon, 02/01/2021 - 09:26

I agree totally with ladybug’13! What great modifications to this bench for tool storage and organization! I also love that it’s on casters to easily move it where needed. Great job!!!

Modern Dorm Mini Refrigerator Microwave Cabinet

Submitted by rachelcb on Sat, 07/31/2021 - 12:35

I changed plan to make deeper. I also modified the bottom trim and top. I put a ball bearing soft door drawer guide on modern door so it can slide back and forth. I feel we need more modern plans on here but with a bit of creativity and using plans you can make anything. I have never built anything before. I love General Finishes Milk Paint in Snow White and I brushed rolled it on (sanded between 3 coats). It’s basically self leveling and leaves a nice matte finish. Used door glide in picture bought from homedepot in the 24 inch and that’s how wide door was and it was 36” tall. Door glide I only used one on top of the door not on bottom as well. Door piece of fiberboard with just strips glued on and quarters spacing them correct.

Estimated Cost
$200
Estimated Time Investment
Weekend Project (10-20 Hours)
Finish Used
Dorm mini refrigerator microwave cabinet
Recommended Skill Level
Starter Project

Comments

Outdoor Recording Studio Shed Build

Submitted by brittanyj on Wed, 09/01/2021 - 10:48

As an on camera actor, I found myself with zero work during the pandemic. All productions were shut down and my day job no longer existed. It was time to get creative.
Voice over work started booming, particularly for actors who could record from home, because recording studios were shut down. I've dabbled a bit in voice over and had been interested in diving in and took my first step by buying a sound reducing booth called a whisper room.

The problem? There was nowhere in our house to to put the 6'x8' booth. So it sat on the back porch for months, covered by a tarp.
For a woodworker, this just wouldn't do! It was time to build an out building to house the booth and have my own outdoor recording studio. I read endless books and watched videos on building recording studios and made my plans over a few months.

Finally, in March, I excavated the land and prepped it for a pour. We had a concrete guy come in and pour the slab.

As soon as that set, I began work from the ground up in building this fancy shed. It took me 3 months, but I learned so much about the basics of building a house, and now I am auditioning for professional projects in my beautiful studio. I couldn't be prouder.

I ran electric, ethernet, I put in flooring, I roofed, drywalled, made a custom door threshold, inserted a window and framed every last bit of this building. There were bumps along the way- to be expected in a one person build- but she's done and ready for work.

I documented the build from start to finish here: https://www.youtube.com/watch?v=yPcEW6cqhcQ

Comments

Pool equipment fence refresh

Submitted by Anonymous (not verified) on Thu, 07/06/2017 - 21:00

We love this fence refresh from the previous owner's solution to enclosing the pool equipment and a/c unit! It was the first time we fastened something to our house - drilling through stucco in the process. That was a big deal for us diy-ers! We made the frame out of 4x4's (which ended up being the most challenging part to the whole thing), applied the horizontal fencing boards and then used one of those $15 fence hardware kits - it was a great project that has made a huge difference in our backyard. Yay!

Estimated Cost
$300
Estimated Time Investment
Weekend Project (10-20 Hours)
Recommended Skill Level
Intermediate

Pallet Shelves

I love pallet shelves! Here I have three different sizes with three different finishes. It is amazing what 10 minutes, a jig saw, and a piece of sandpaper can do!

Estimated Cost
$0-$10 depending on finishing
Finish Used
Finish varies between heavily sanded to no sanding at all.
You can apply a stain and/or top coat.
Recommended Skill Level
Starter Project

Our version of the Tryde Collection

Submitted by seesaw on Sat, 03/12/2011 - 11:28

I left for work one morning, and came home to a coffee table and two end tables that my husband made while I was gone. They are absolutely beautiful and complete my living room. He found the plans easy to read and the projects themselves not hard at all.

Estimated Time Investment
Day Project (6-9 Hours)
Finish Used
Mix of Minwax Early American and Golden Oak
Recommended Skill Level
Starter Project

Twin captain bed

Submitted by meckylang on Sun, 05/17/2015 - 09:02

This bed was built custom for the girl who ordered it. She wanted both a bookcase headboard on the long side and a traditional headboard. The bookcase headboard could not block the window and needed to have access to the outlet behind the bed. The bed was designed to match a dresser that had already been purchased. The drawers below give additional storage.

Estimated Cost
$550
Estimated Time Investment
Week Long Project (20 Hours or More)
Finish Used
Primed and painted with 2 coats of flat latex paint.
Recommended Skill Level
Advanced

Comments

kevin2117

Mon, 02/13/2017 - 10:23

Hi there - you don't happen to have plans you can share for this bed, do you?

Thanks! ~ Kevin

My first project

Loved how these plans were so easy to follow and certainly appreciate the accompanying video.

Comments