Community Brag Posts

54" Round Pedestal Table

This was such a fun build. Instead of the square table top I opted for a 54" round table top and I also altered the plans for the base. I upped the size for each board used to give it a chunkier look ( Ex: instead of 2x4s, I used 2x6s and so on)

Estimated Cost
$110
Estimated Time Investment
Weekend Project (10-20 Hours)
Finish Used
1 Coat Minwax - Wood Conditioner
1 Coat Minwax - Ebony
3 Coats Minwax - Polycrylic
Recommended Skill Level
Intermediate

Comments

DIY Rustic Bathroom Vanity

I really like vessel sink vanities, so I did some research and found a couple of DIY projects I liked on Pinterest. I showed them to my husband and after telling him that I wanted a hybrid of about 3 vanities I liked he came up with the vanity that we (we as in he) built :)

Estimated Cost
Roughly $100 for the wood.
Estimated Time Investment
Weekend Project (10-20 Hours)
Finish Used
Stained and varnished
Recommended Skill Level
Intermediate

Drop Leaf Kitchen Island

Submitted by Boab on Wed, 03/01/2017 - 19:01

When I recently moved into a space with a kitchen and living room attached, I quickly realized that I wouldn't have room for a full size dinner table. I had seen extendable kitchen tables but none fit the bill, I was looking for something more compact. I also liked the idea of a bar / island with storage underneath, and I had noticed some had a drop leaf on 1 side which would be useful – but why not have 2 leafs for more dining space? When I decided to build my own table to fit these requirements it was difficult to find any plans out there, especially with drop leafs. Through lots of experimenting and research I finally built what I had envisioned: a kitchen island / bar with cart storage and two folding table leafs which expand to about 31/2 feet squared of eating / drinking area. I went through this trial and error process so you don’t have to, find more pictures and instructions here: http://bacheloronabudget.com/diy-drop-leaf-kitchen-island-cart/

Estimated Cost
$250
Estimated Time Investment
Weekend Project (10-20 Hours)
Finish Used
-Minwax Special Walnut Stain
-Minwax Wipe-on Poly
-White Paint (I used Rust-oleum Linen White)
Recommended Skill Level
Beginner

Dresser

Made this dresser for a friend.  She has 2 boys and wanted a sturdy dresser.  The Hudson plans are clearly written and the illustrations are great.  I used 100 pound full extension drawer glides and reinforced the areas where the glides mount with 2x2's to ensure the glides would not rip loose.  I modified the drawer construction using finger joints for increased strength.  


The flush mount drawers offer a challenge to get the spacing right and that the drawers are flush.  

Built from Plan(s)
Estimated Cost
$550
Estimated Time Investment
Week Long Project (20 Hours or More)
Finish Used
High gloss Latex paint
Recommended Skill Level
Intermediate

kids' lounge bench

Submitted by JennyInGex on Sun, 02/17/2013 - 00:33

My first project besides some simple shelves. I wanted to use old sturdy wood I had from parts of a bed so I used the ana white plan but improvised quite a bit. I also accidentally made it much higher but like it this way. I am going to paint it a deep bright greek blue in the spring. I am happy with it!

Built from Plan(s)
Estimated Cost
60 euros
Estimated Time Investment
Day Project (6-9 Hours)
Recommended Skill Level
Beginner

Comments

Living Room Wall Makeover

Submitted by djolly1231 on Sun, 05/30/2021 - 10:36

We have lived in our home for 2 yrs now and have been trying to figure out what we wanted to do with the plain boring wall with cords handing from out behind the tv due to no power outlet on that wall. We finally decided to do the whole wall in shiplap but the the cost of lumber going through the roof I went with 1/4 underlayment that I had ripped down to 6in strips at my local hardware store. I cut them down to size with my miter saw the painted them white before I attached them to the wall with 1 1/4 brad nails and used nickels for my space in between each row. The cabinets are 36 in tall. The carcass is made fro 3/4 in MDF and the face frames are made from 1x3 pine and attached with wood glue and brad nails. Cabinet doors are made from 1x4 pine for the frame and 1/4 underlayment for the center. I used my hand router to route out a 1/4 deep groove for the center to drop into the frame I used wood glue and brad nails to attach it to the frame and filled in any gaps with paintable caulk. They are attached to the studs in the wall with 3 in wood screws. The mantle is made from 1x6 pine boards and attached to a wall bracket made from 1x6 that are attached to the wall in each stud with 3 in wood screws. The mantle is attached with wood glue and 1 1/4 brad nails. The shelves were made out of 1/2 Poplar 4x8 plywood sheet ripped down to size. The wall brackets are made from 1x2 pine attached to studs with 3 in wood screws. And the shelves are attached with wood glue and 1 1/4 brad nails. I added 3 1x2 spacers to each shelf between the top and bottom board to prevent them from sagging before attaching the face of the shelves with wood glue and 1 1/4 in brad nails. This project took about a month to complete because I worked on it during free time. Also this was the first major build I have ever done so I was also learning along the way. Some parts were frustrating but most of it was fun and a great learning experience. Also this project evolved as I was building it. My wife loves the finished product. Now it’s time to find my next project.

Estimated Cost
500
Estimated Time Investment
Week Long Project (20 Hours or More)
Finish Used
Dark walnut stain. Valspar Ultra in eggshell and ultra white for the color of the cabinets , shiplap and crown
Recommended Skill Level
Intermediate

Comments

DIYGina

Tue, 12/05/2023 - 11:47

Surprisingly makes your living room appear so much larger compared to the before picture! Thank you for sharing your photos with us and congrats on a great result!

Gate-Leg Sewing Table

My husband and I built this table as our first project. We followed all of the dimensions from Ana's "Small Sewing Table" project here: http://ana-white.com/2010/10/plans/sewing-table-small-spaces?page=1 The only thing we changed was the size of the table top and the legs. We were worried about putting my heavy sewing machine on top of the leaf called for in the plan, so we created gate legs to support the leaves. Since the legs were going to be folded up in between the base and each leaf, we extended the center portion of the table top to accommodate the change. After it was assembled and stained, I decided that I didn't like the solid color, so I stenciled on a pattern with white latex enamel paint (what I had on hand) and continued to paint the base. After lightly scuffing it up with the sander, I layered 3 coats of poly on top. It has held up well, even after many large quilt projects! I just LOVE my sewing table!

Built from Plan(s)
Estimated Cost
$120
Estimated Time Investment
Weekend Project (10-20 Hours)
Finish Used
Golden Oak Minwax Stain
Polycrilic
Valspa Latex Enamel in Satin White
Recommended Skill Level
Beginner

Comments

TinyHouser

Fri, 08/05/2016 - 13:41

Hi there. Could you please tell me what the brackets are you used with the gateleg? Do you remember where you got them? Thank you!!!

msweeley

Sun, 05/12/2024 - 08:40

How heavy of sewing machine can this hold? My machine is 32 lbs. Would it be able to sit and be used on the “leaf” side of the table ?

Outdoor storage box

Submitted by mdsandell on Mon, 09/18/2017 - 10:46

I modified the plans slightly to go taller so it could fit a standard propane tank. I also added a hinged lid based on an image I found on Pinterest that did something very similar. I still need to sand and stain it next weekend.

Like others, I had a little trouble keeping the fence planks from splitting when screwing them to the 2x2 legs, since there was about an 1/8” gap between. I tried to find some scrap to fill in the gap and didn’t overtighten the screws. The lid was made entirely of 1x3”.

Built from Plan(s)
Estimated Cost
$35
Estimated Time Investment
Weekend Project (10-20 Hours)
Recommended Skill Level
Intermediate

Kid's Playhouse and Slide

Submitted by docfin02 on Mon, 03/28/2011 - 18:56

I LOVE these plans. This was my first project, and although it was a big one to start with, the plans were easy to follow. If I can do it, anyone can. I added the rock wall. My kids and I love it. Total cost for me (including all lumber, nails, paint, slide, etc.) is about $850.

Estimated Cost
$850
Estimated Time Investment
Week Long Project (20 Hours or More)
Finish Used
1 coat primer, 2 coats paint
Recommended Skill Level
Intermediate
Seasonal And Holiday

Crib Mattress Wood Sectional

Submitted by Anonymous (not verified) on Thu, 11/09/2017 - 09:55

Submitted by Abigail Marolt on Facebook -


I made a your crib mattress sectional with an extra armless couch to make one large U-shaped design! It was my first project with a kreg jig and a circular saw, but it certainly won't be my last. We love using this couch every day!

Recommended Skill Level
Starter Project

Big Ur (Sur) Table

Submitted by cchandler on Fri, 06/28/2013 - 21:24

I love the C&B Big Sur dining tables and was excited to come across these plans. I tackled making a copy of the Big Sur dining table using Ana's plans as a starting point with some modifications and custom dimensions (4' x 4' x 31"). This was my first major woodworking project and I wanted it to be as nice and strong as possible so I tackled joining the rails of the frame to the legs with mortise and tenon joints. The main reason I did this was because I used 1 1/4 and 1 3/4 red oak for the entire table and I just wasn't convinced screws could handle the weight of the top on the frame. I also wanted to learn how to make those joints. I used my plunge router to cut both the mortises and the tenons and it worked out reasonably well. Now that I have a table saw I will be using that with a dado blade for tenons in the future. I sanded to 320 grit and finished with four coats of General Finishes Gel Stain in Java followed by four coats of Minwax spray on polyurethane. The last step was to apply paste wax using 0000 steel wool and then buff with a clean rag. I love the way this came out and am now planning on making a bar cabinet with wine bottle holders in the same style. The total cost of the table was on the higher end than I'm used to because the wood was pricey but it was still so much less than the C&B Big Sur price tag. I'm lucky that I have a hardwood lumber supplier just a few minutes down the road that does custom milling of 100's of different species.

Built from Plan(s)
Estimated Cost
$300
Estimated Time Investment
Week Long Project (20 Hours or More)
Finish Used
General Finishes Gel Stain in Java and Minwax spray on polyurethane.
Recommended Skill Level
Intermediate

Triple cubby inspired part 2

Submitted by willowpond on Sun, 03/04/2018 - 15:13

I started with the triple cubby design, resized it to fit my space, made it desk height (30"), added shelves and doors.  It was my second project based on the triple cubby.  In the process I used a multitude of Kreg items - the rip cut, the pocket hole jig, the hinge jig, the cabinet knob jig, and the corner clamps.  Next up:  queen size drawer bases for my son's bed.

Estimated Cost
Domestic birch plywood (very high quality) - $70; moulding - $10; hinges - $33; cabinet knobs - $8
Estimated Time Investment
Weekend Project (10-20 Hours)
Finish Used
White latex paint
Recommended Skill Level
Beginner

Cedar Boxes

Submitted by drowland on Sat, 07/09/2011 - 07:18

We built these before we saw these plans, but they are pretty much the same... We added the chicken wire to keep the rabbits (and our dog) out of the garden. We added the owl to keep the birds out. We've gotten a ton of tomatoes, onions, and bell peppers so far. Next year, we'll add a few more beds. We also added the verticle garden to take up less space, but its not deep enough. We'll make the next one deeper.

Estimated Cost
$30
Estimated Time Investment
An Hour or Two (0-2 Hours)
Finish Used
none
Recommended Skill Level
Starter Project

Comments

KatieO (not verified)

Sat, 07/09/2011 - 20:11

Wow! LOVE IT! I love the taller posts so you can incorporate the chicken wire! I SOOOO needed to do something like that this year. Also, the vertical garden boxes are BRILLIANT! LOVE IT!

drowland

Thu, 11/17/2011 - 07:59

We ended up getting a ton of tomoatoes and green peppers from the garden boxes. We've actually built a couple more. We'll probably double again before next spring. We're looking at adding more veggies.

We now have ton of stuff planted for the fall...

Guest (not verified)

Tue, 03/13/2012 - 10:46

How did you build the upright planter boxes? Do you mind explaining the building process/design? I really want to plant this in my yard!

colton's mom (not verified)

Tue, 04/03/2012 - 06:19

i love the vertical boxes. I am just trying my hand at the world with a green thumb and could use as much advice as possible about how to make as well as to line the boxes or not to line them. All advice appreciated!

berman (not verified)

Fri, 11/23/2012 - 21:53

Hi, my name is berman. I found you pin from my pinterest and your box garden is so great. I am a newbie in this field and so interested to build garden in my house. If i can ask you some question, could you please to answer that?

cheers,
berman

Seasonal And Holiday

Rustic X beach beverage center

Submitted by one wolf on Tue, 09/08/2015 - 06:52

We used old dock wood for the surface of our X table for a nice beach house beverage center (sand bar!).  We adjusted the size to fit our space (a little longer and wider) and used additional studs for the shelves instead of 1" shelving, glued and PH/PS together.  To cut the X pieces I just held the 1x1 on the end of the table where it goes and marked the lines. Then I clamped a guide board at the correct angle on the table saw to make all the cuts, starting a bit long and shaving off until it just fit.  


With all the pocket holes and screws I wouldn't consider this a beginner project. Some additional steps and pictures in your description would help also.  End result is really nice.


Built from Plan(s)
Estimated Cost
$50
Estimated Time Investment
Weekend Project (10-20 Hours)
Finish Used
Patina wood from an old dock for the surface and the base is painted flat gray.
Recommended Skill Level
Intermediate

Comments

DIY Coffee Bar

Submitted by Liz Miller on Tue, 12/04/2018 - 10:37

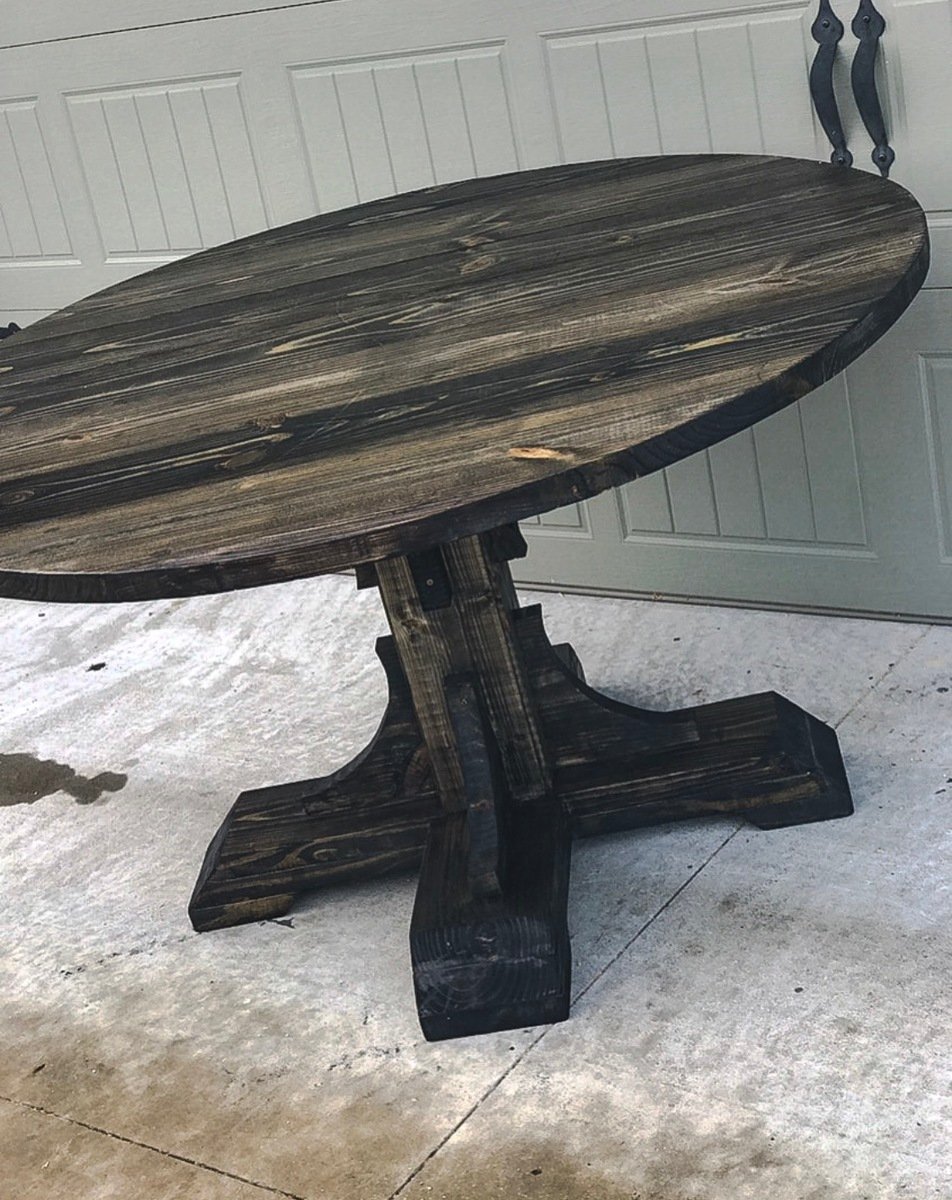
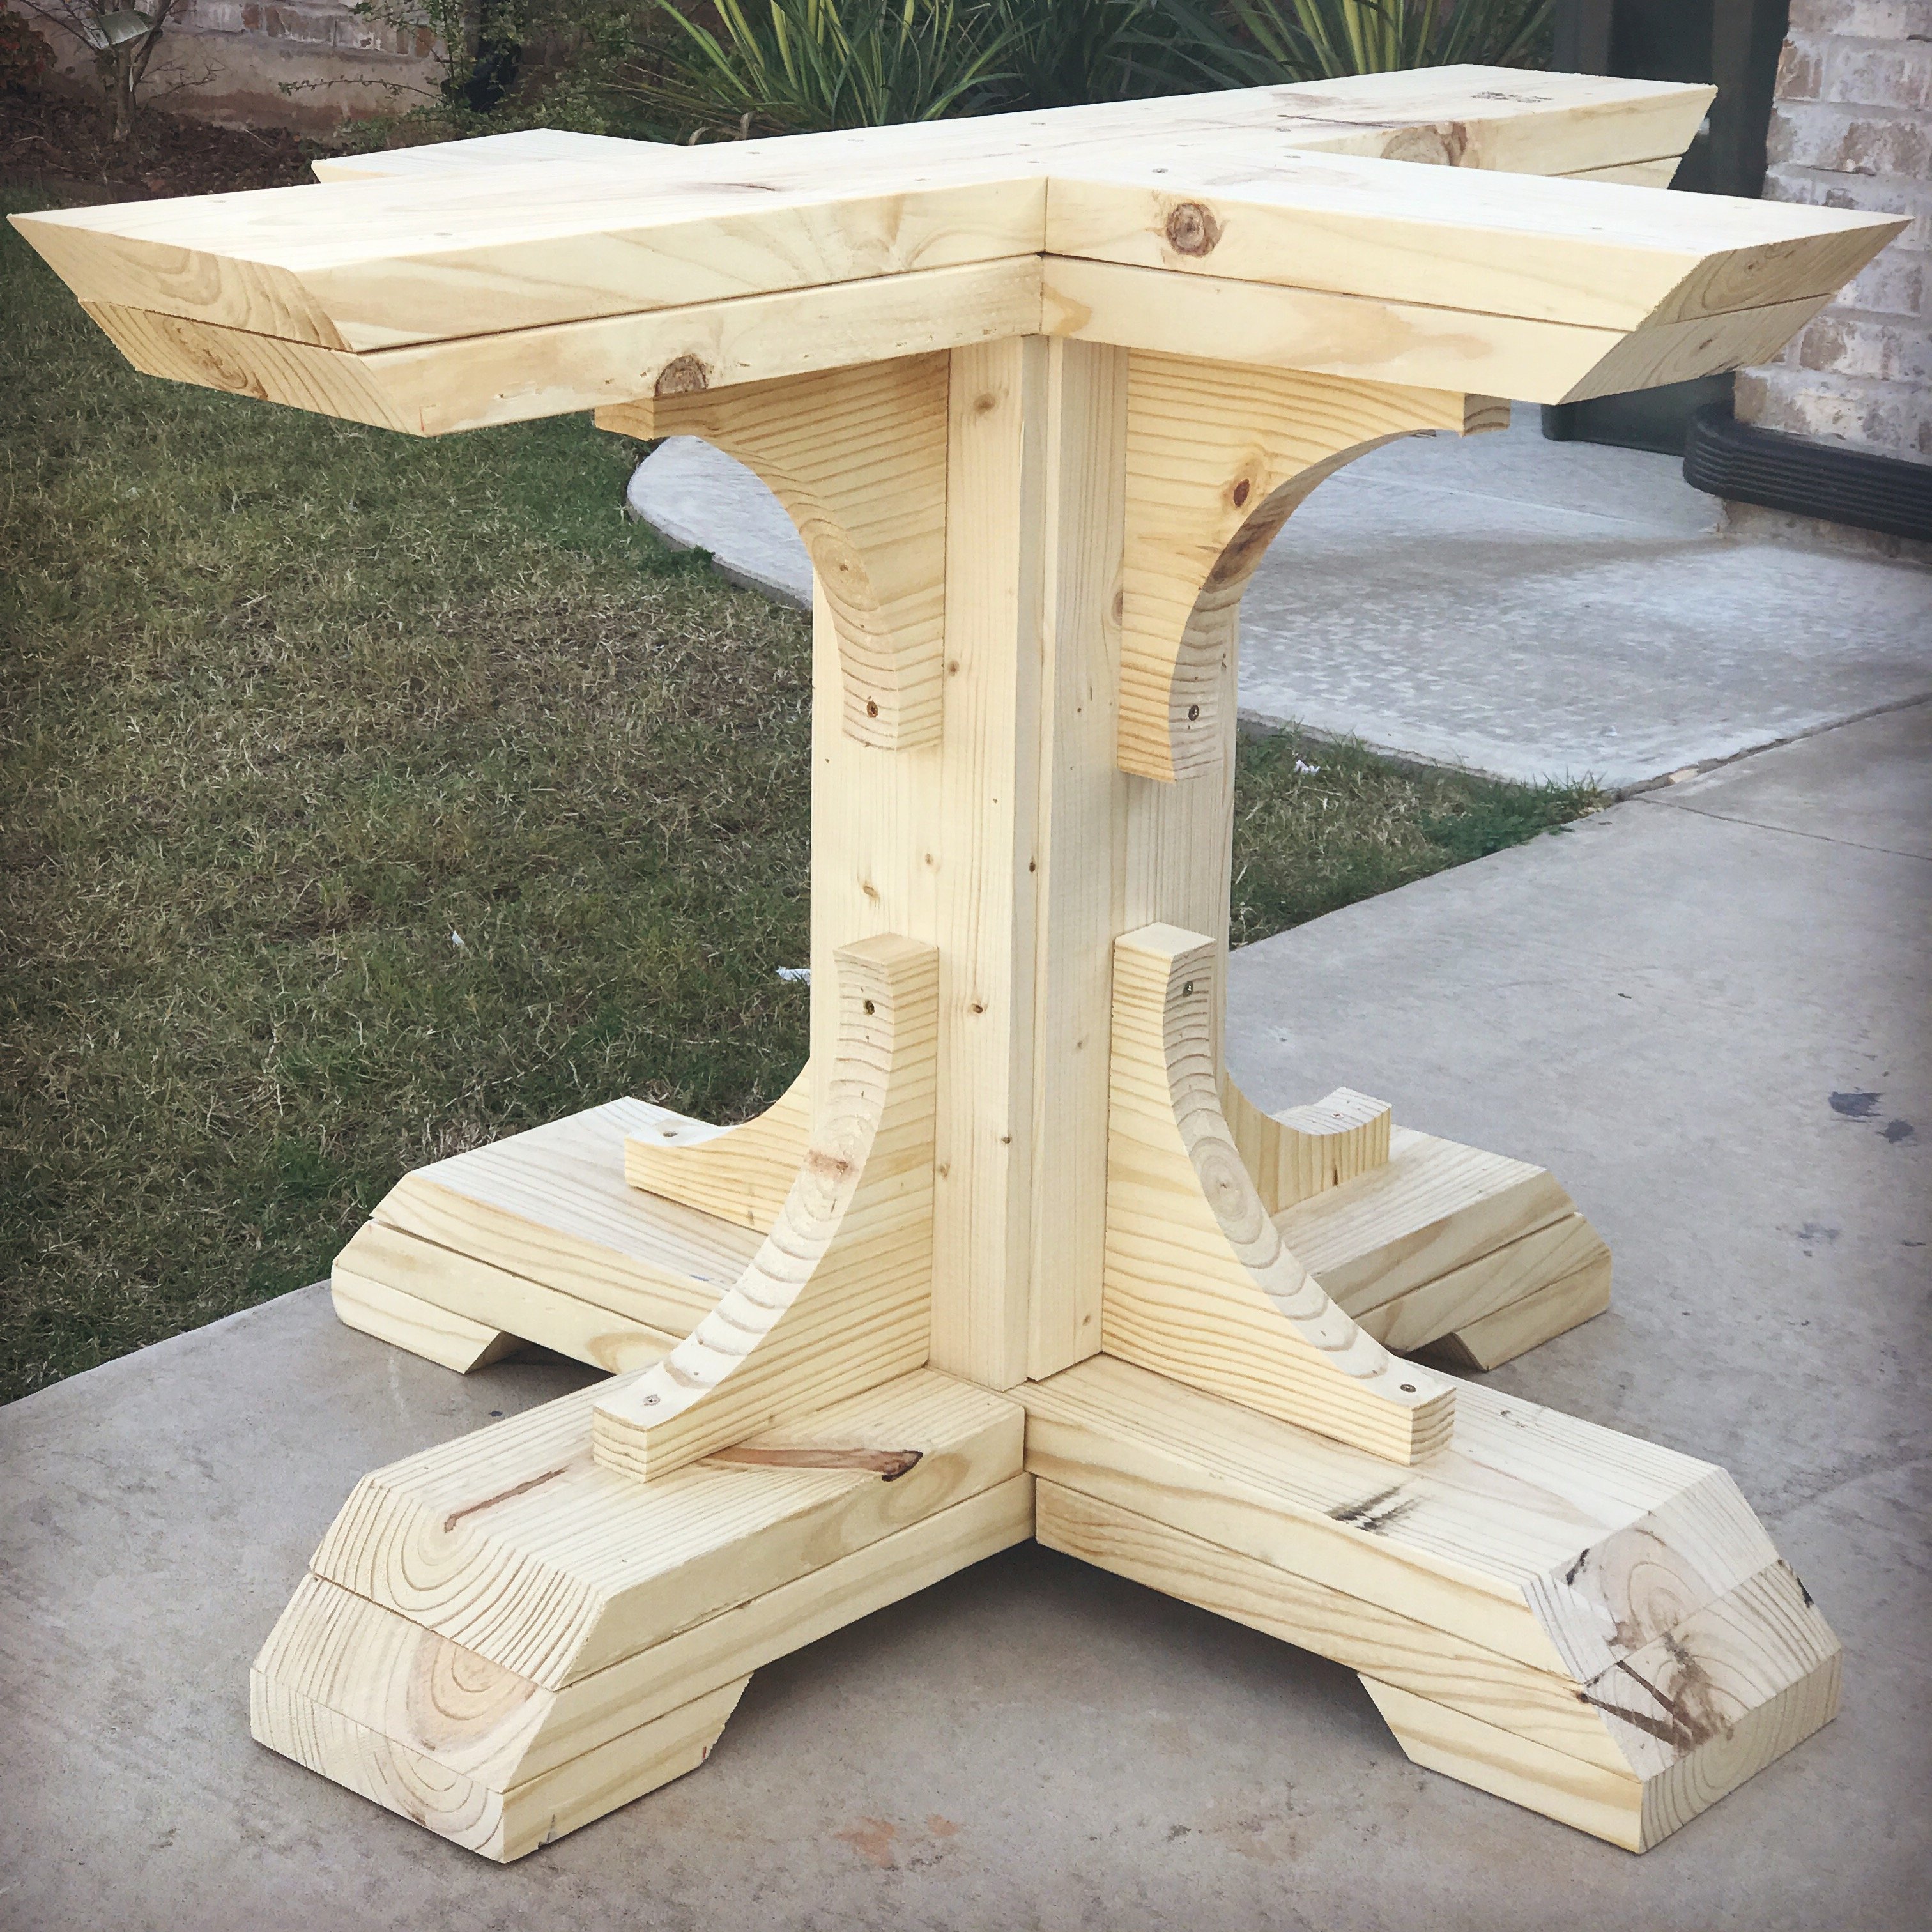
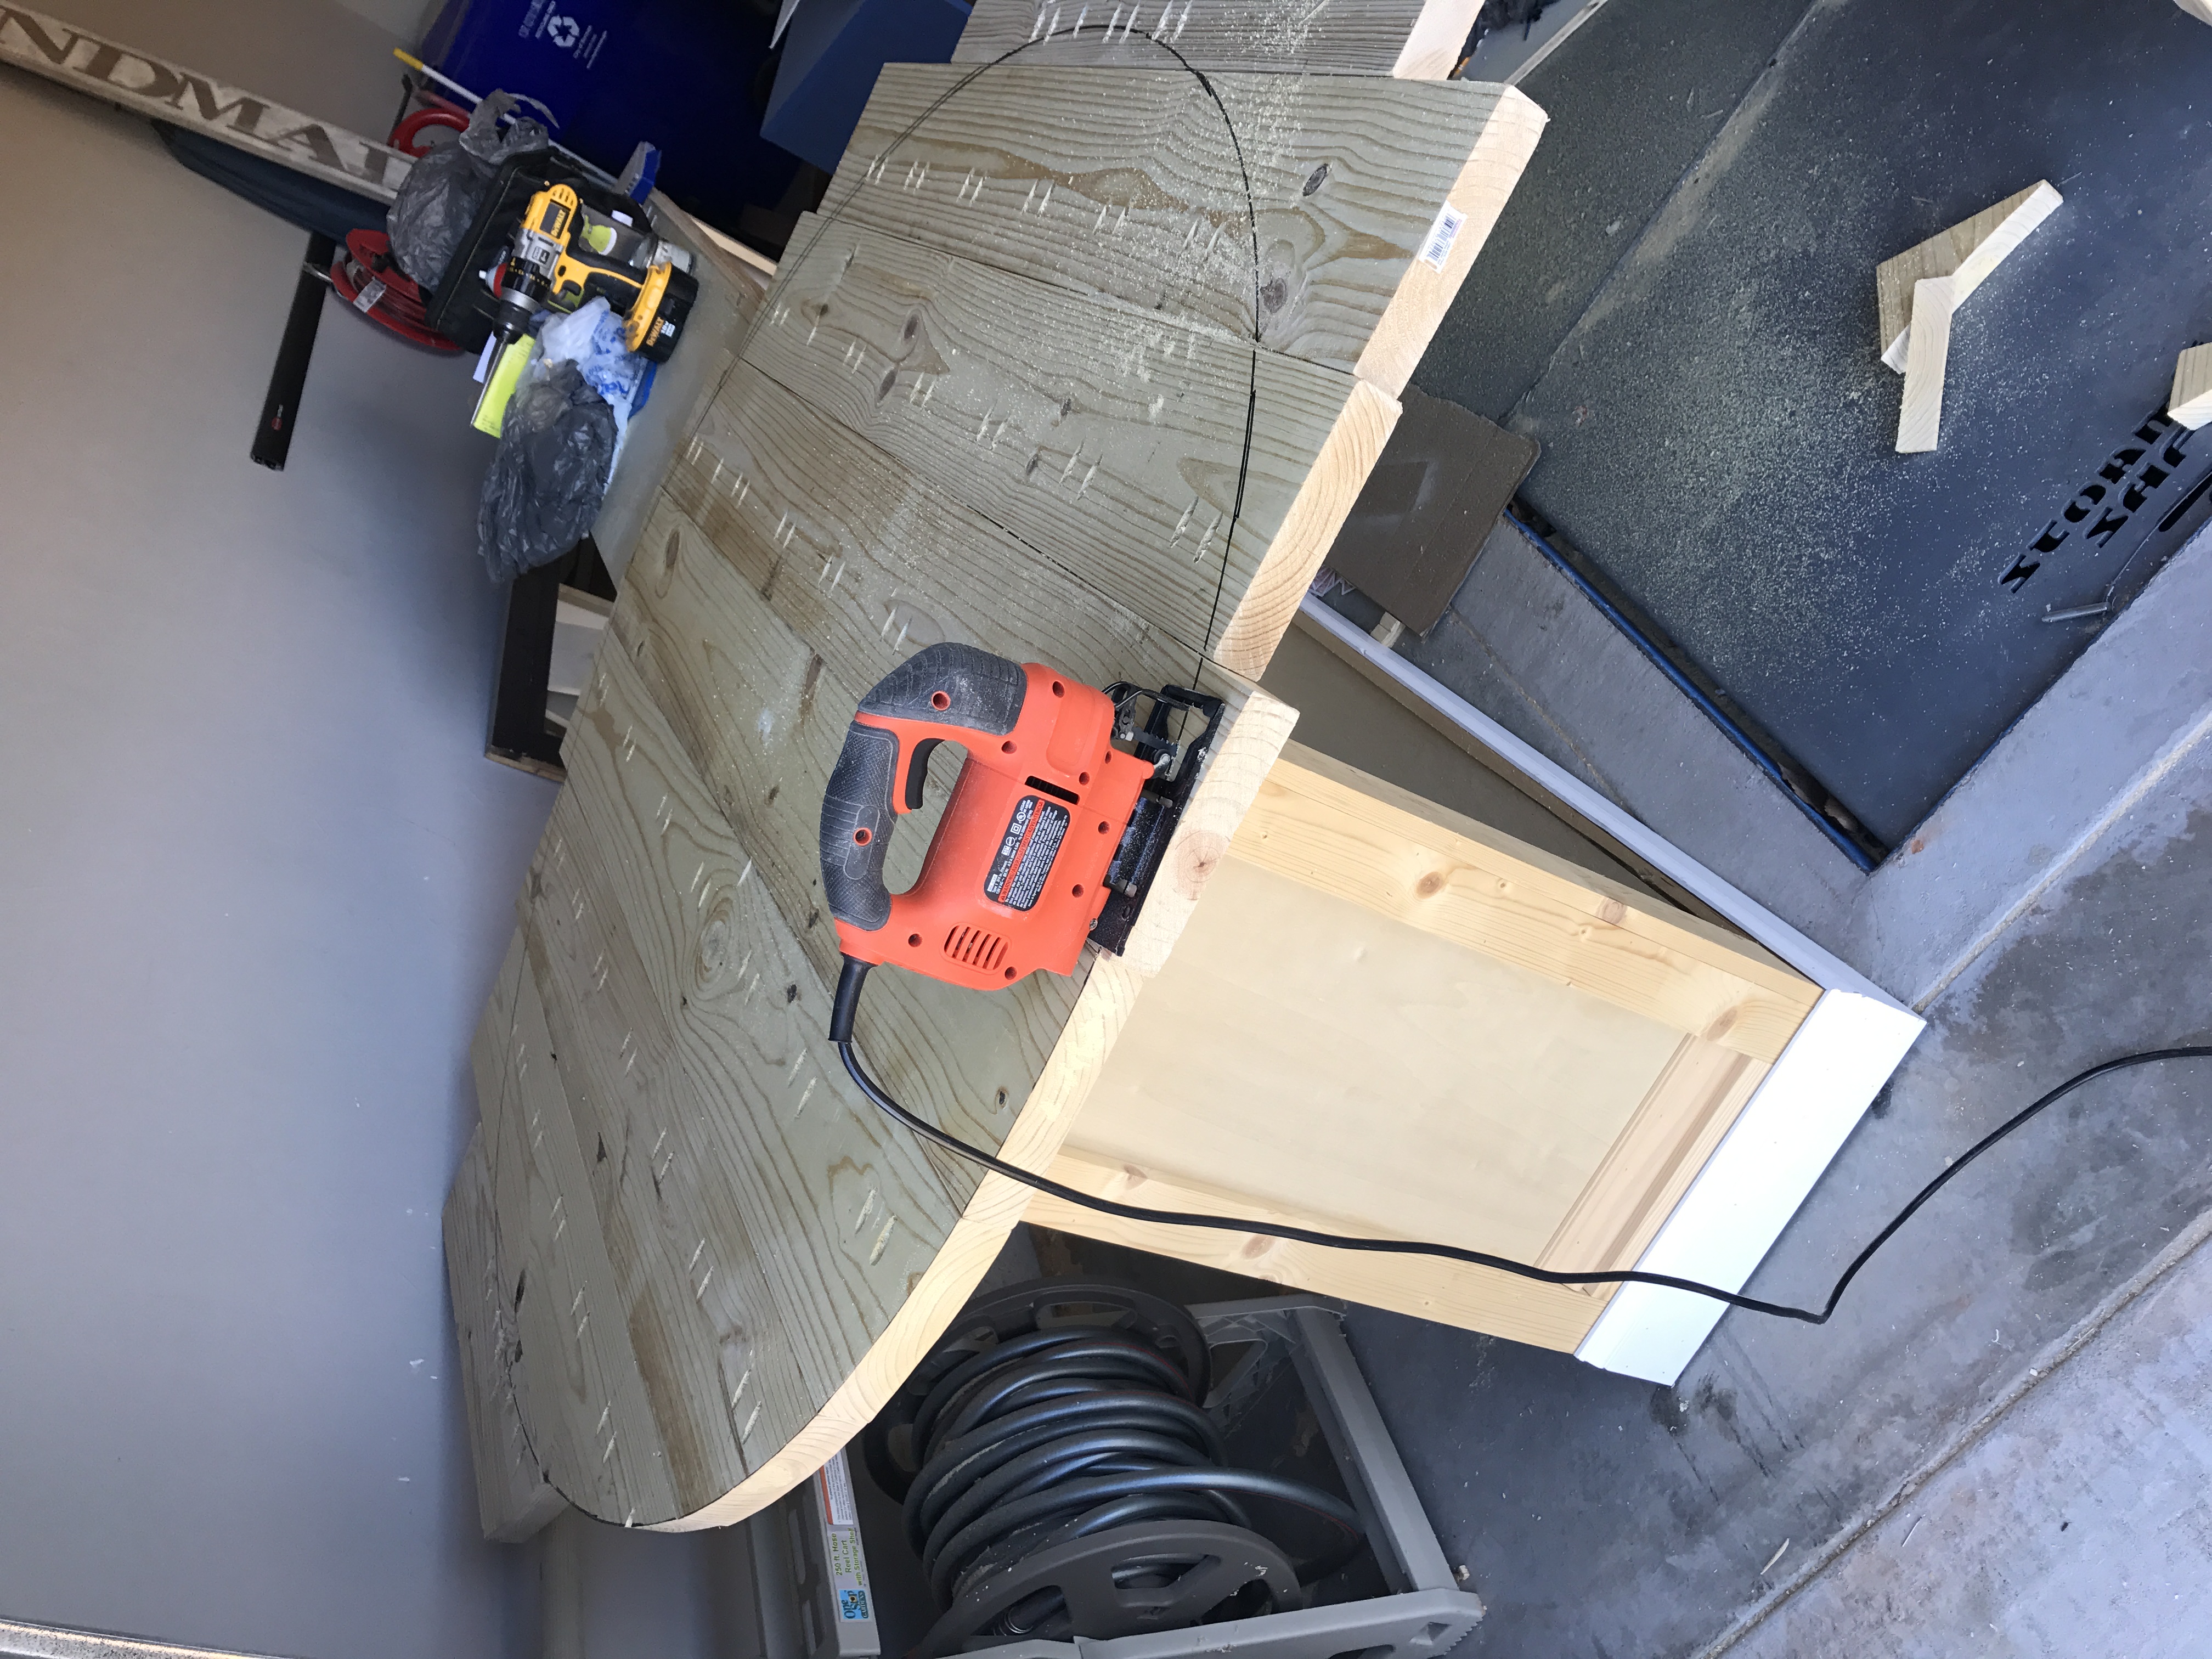
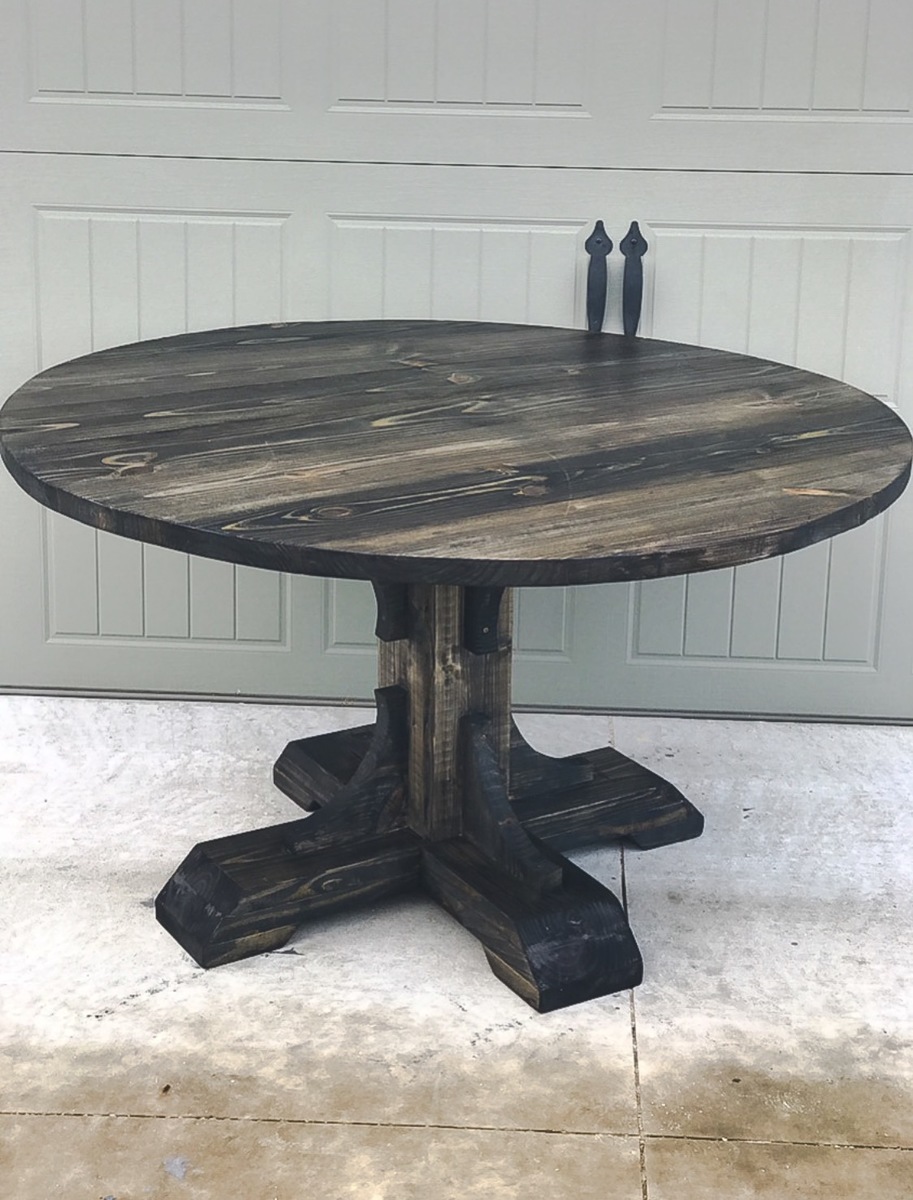
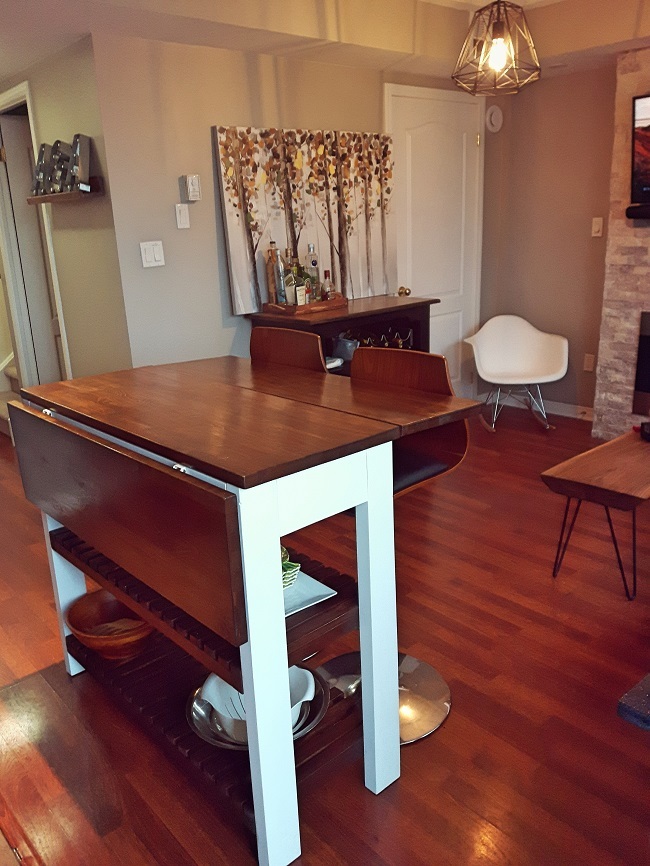
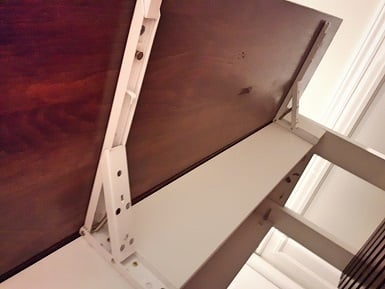
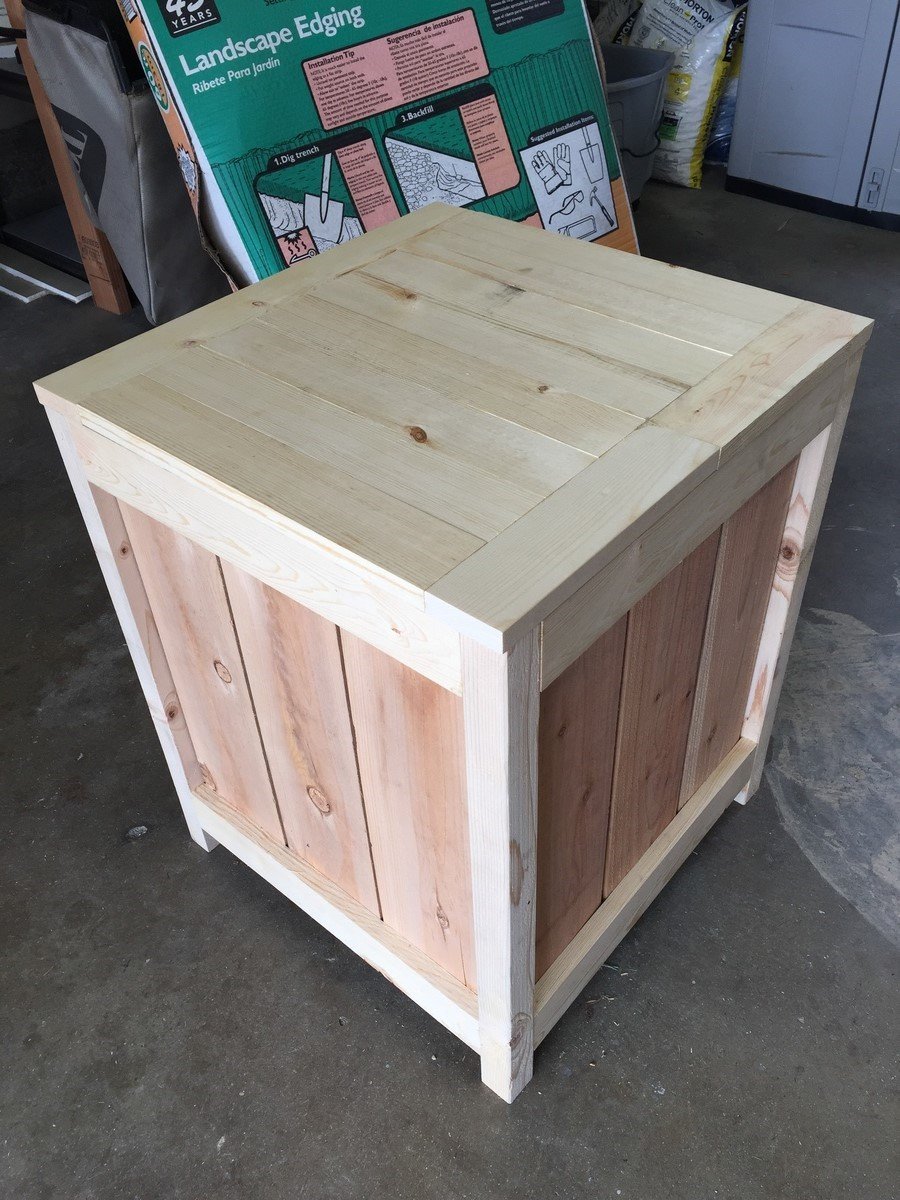
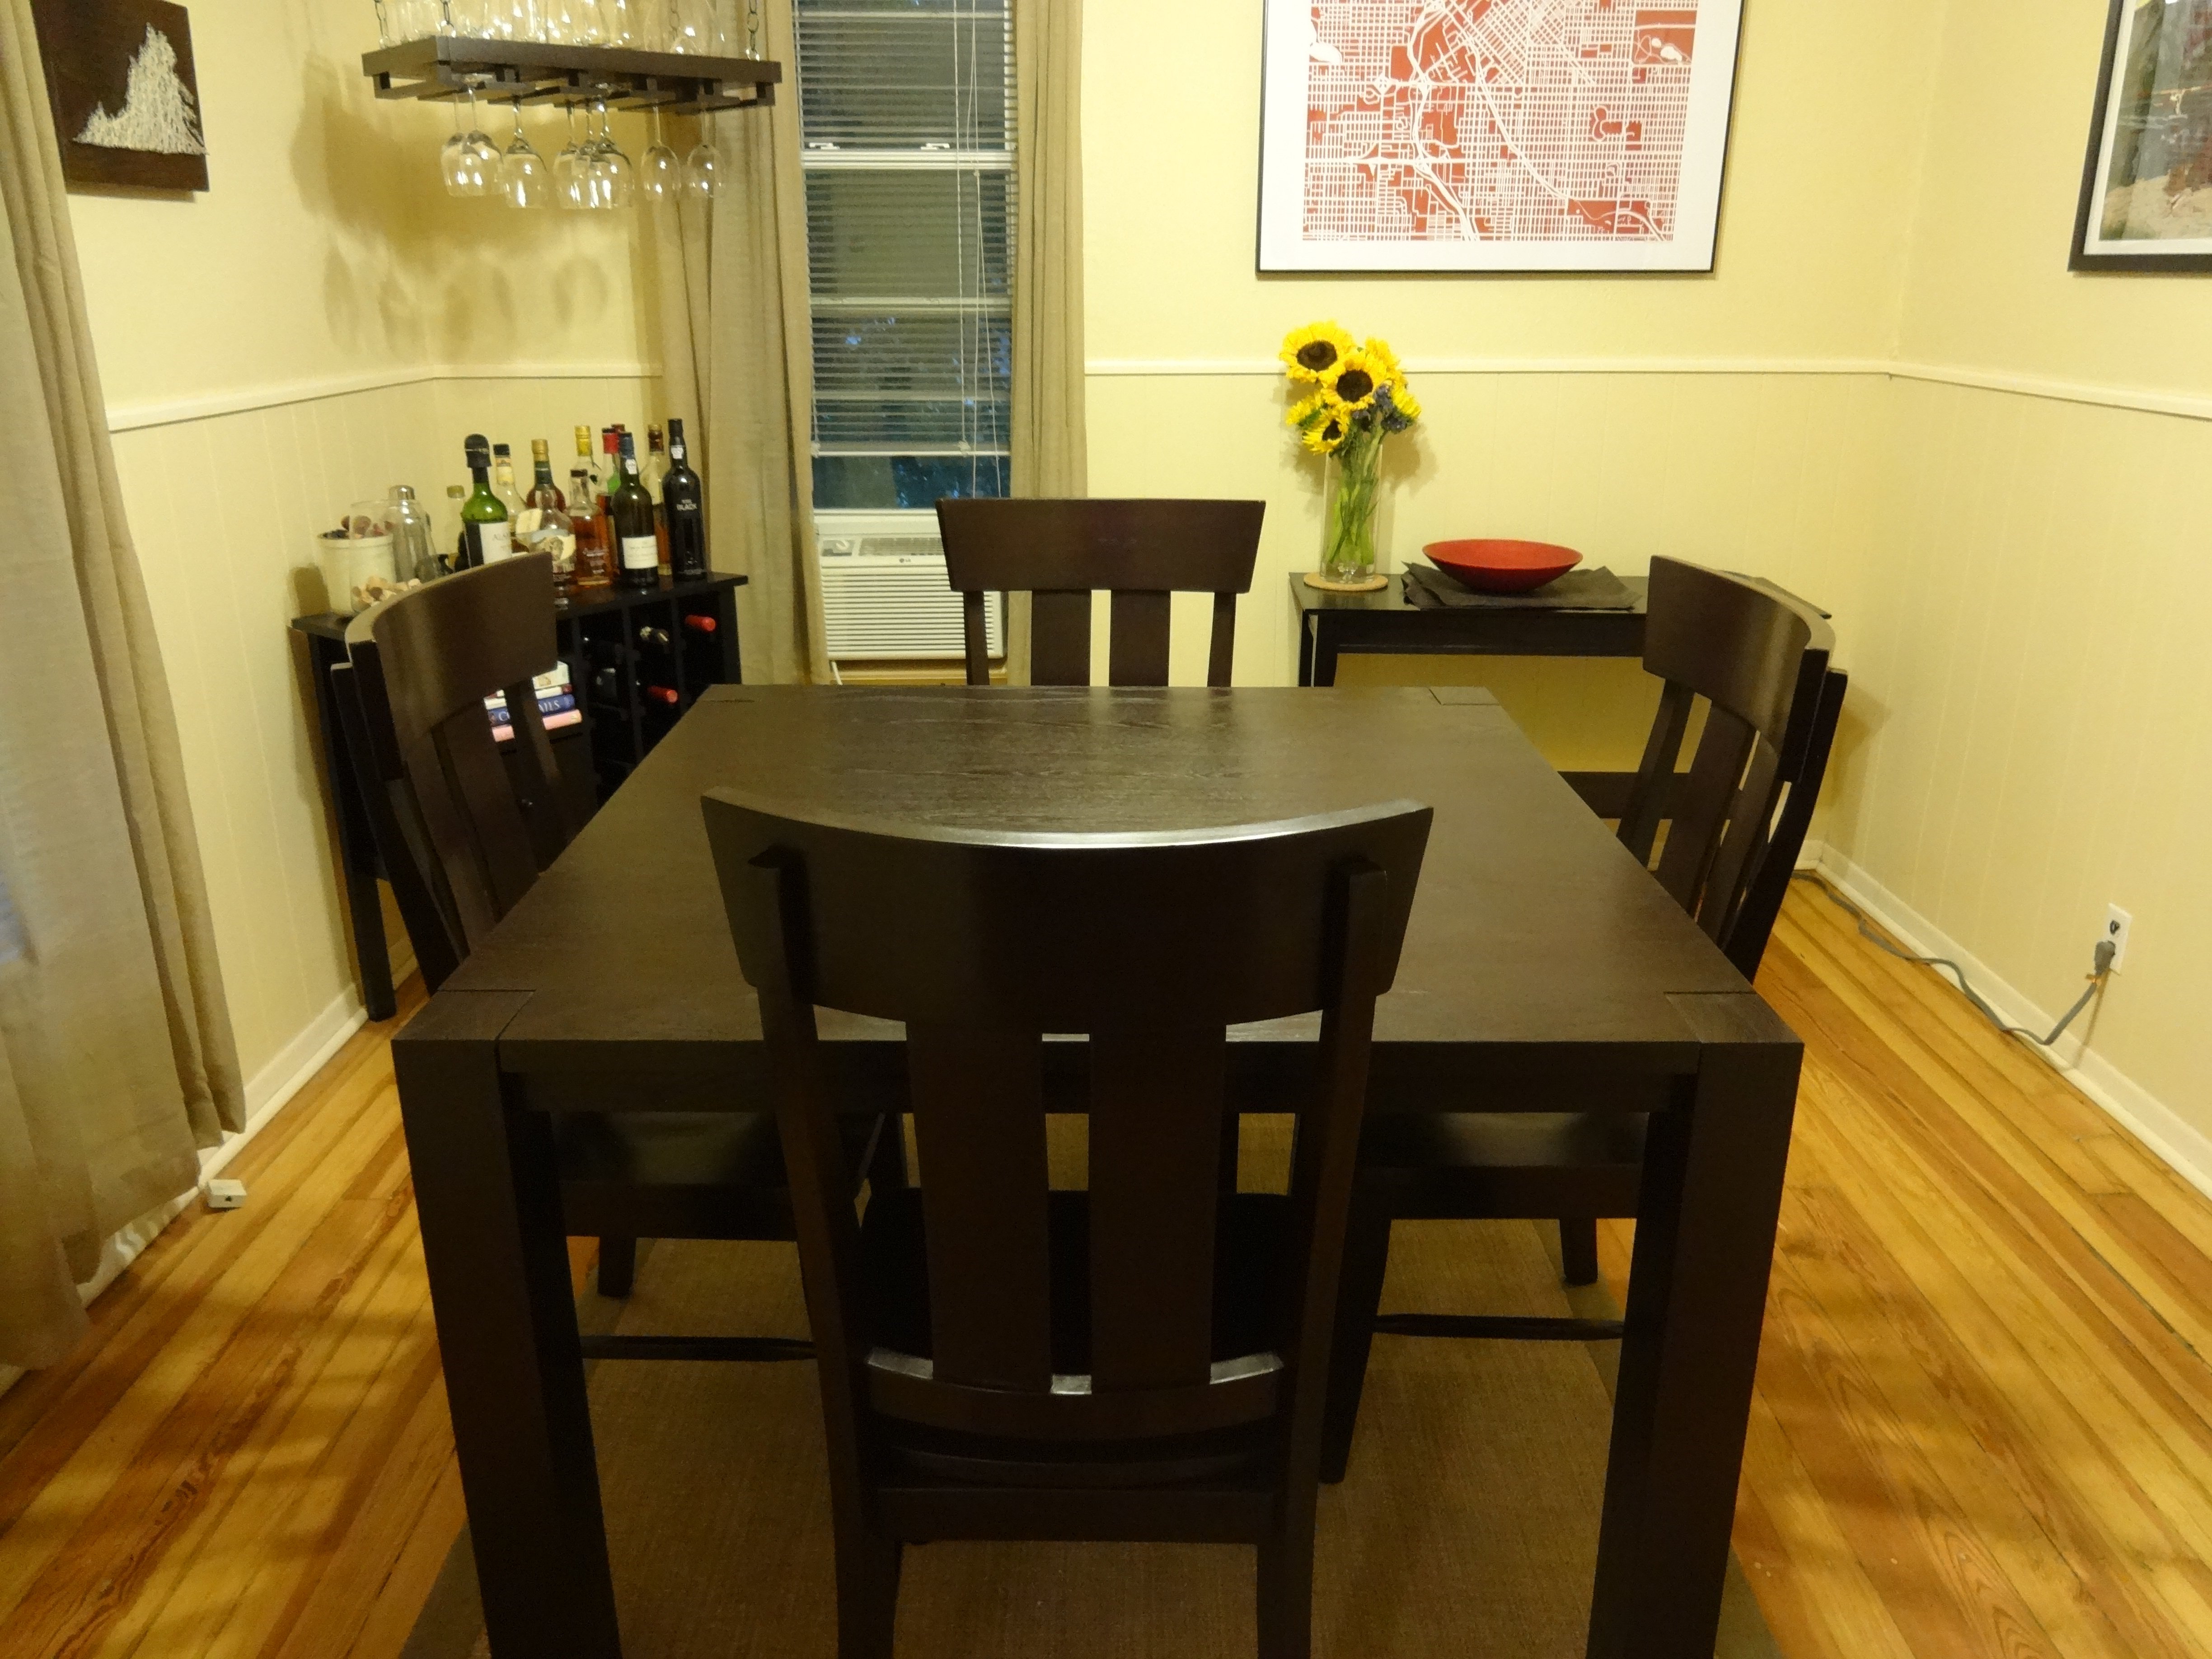
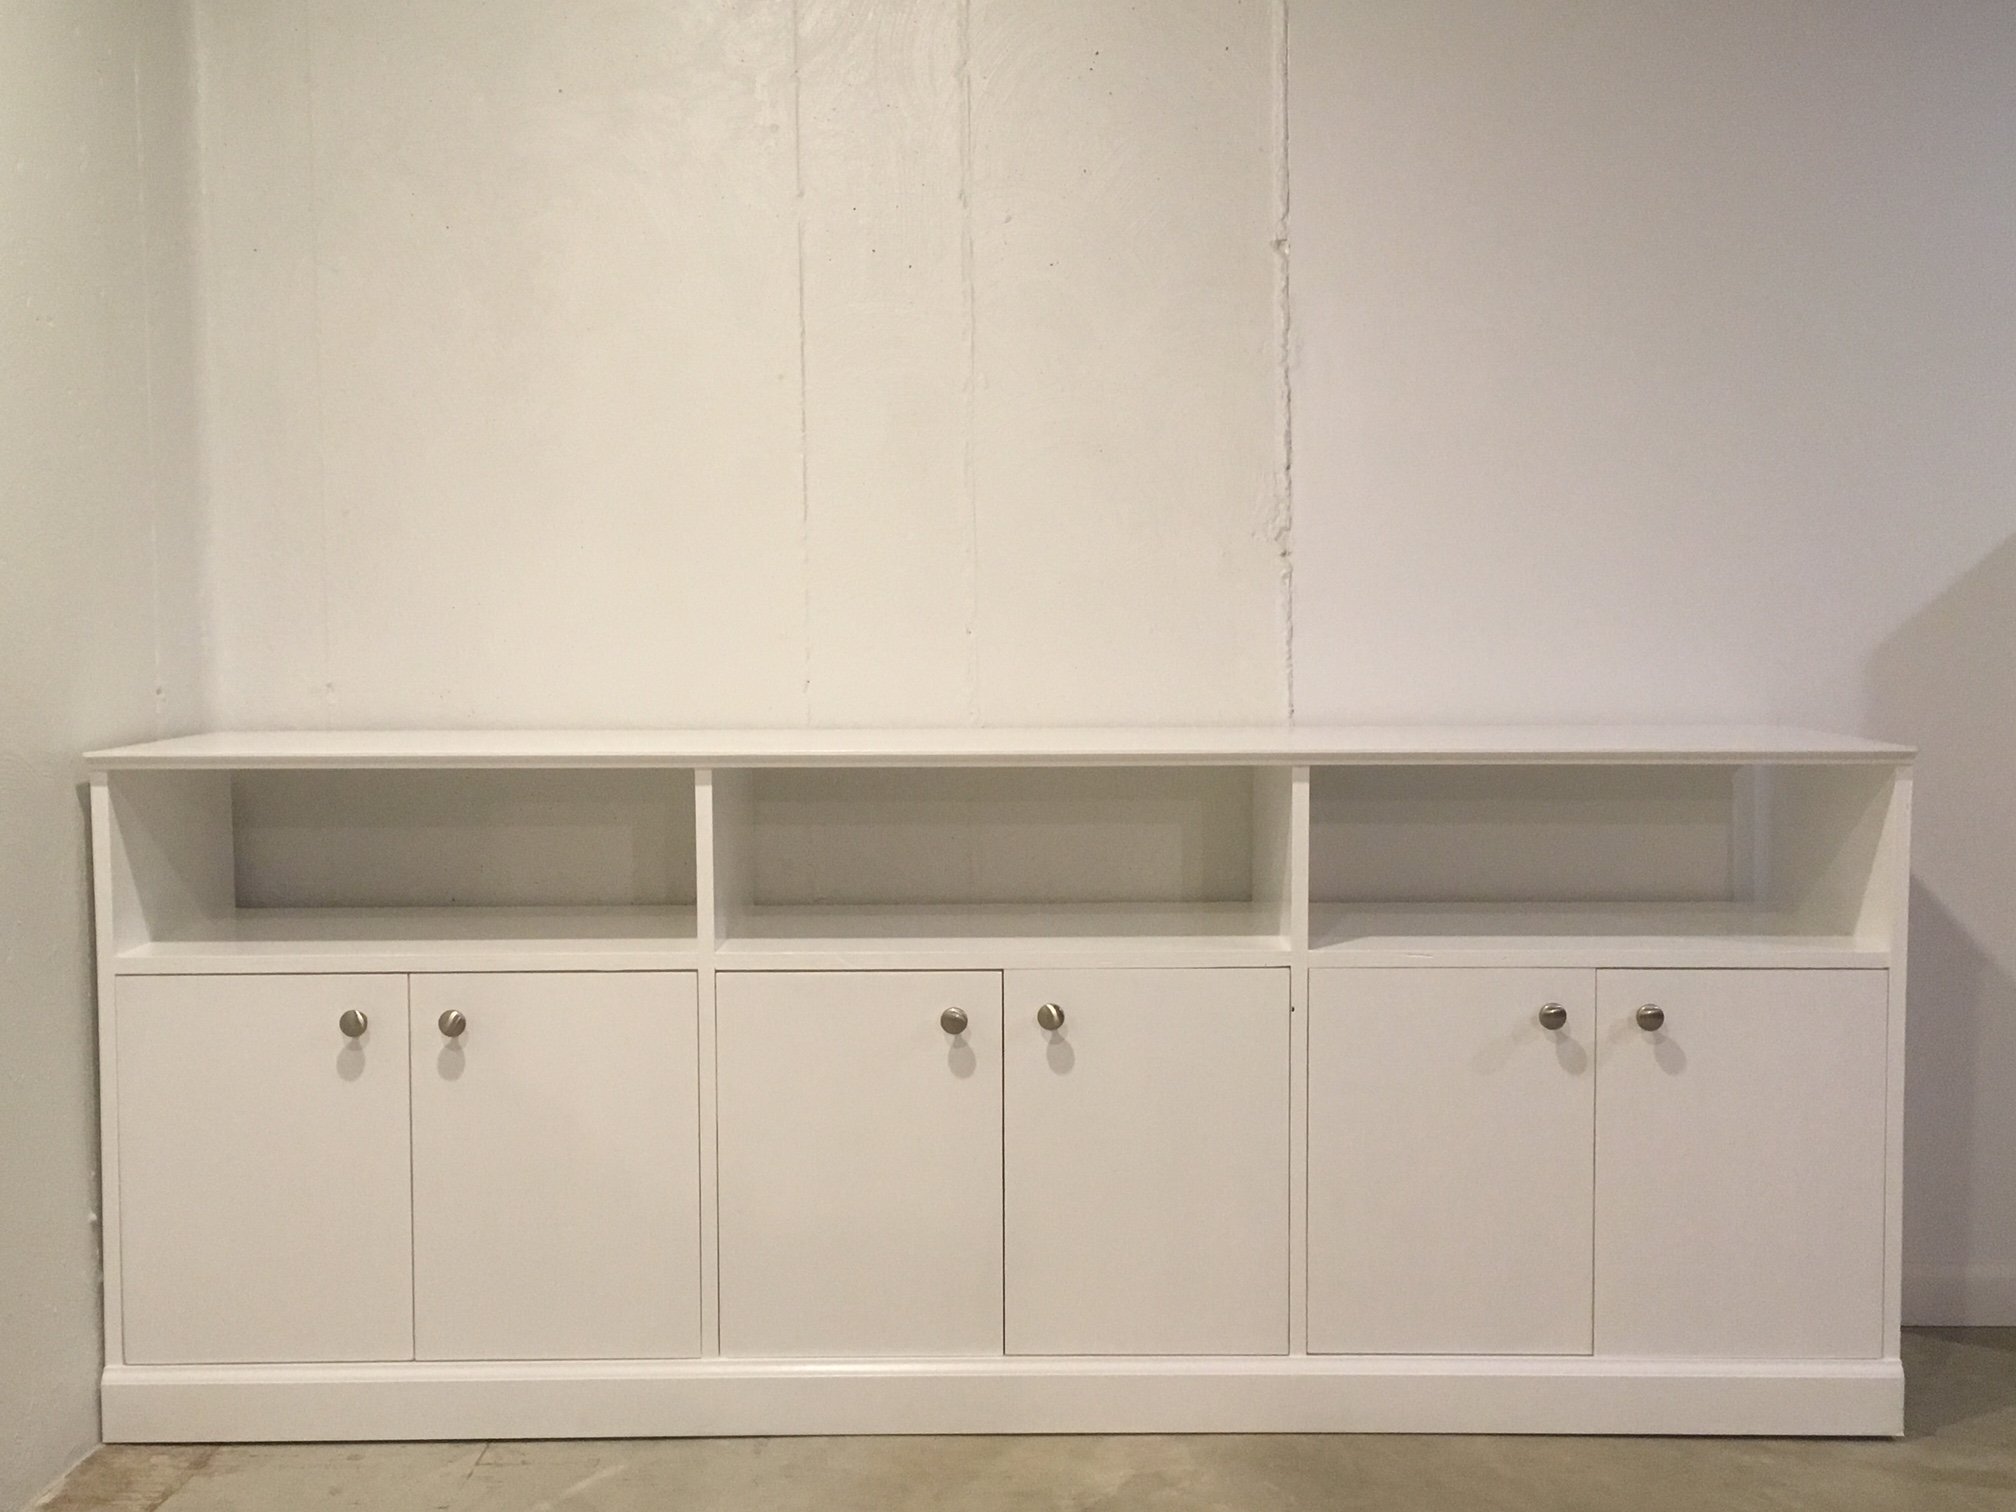
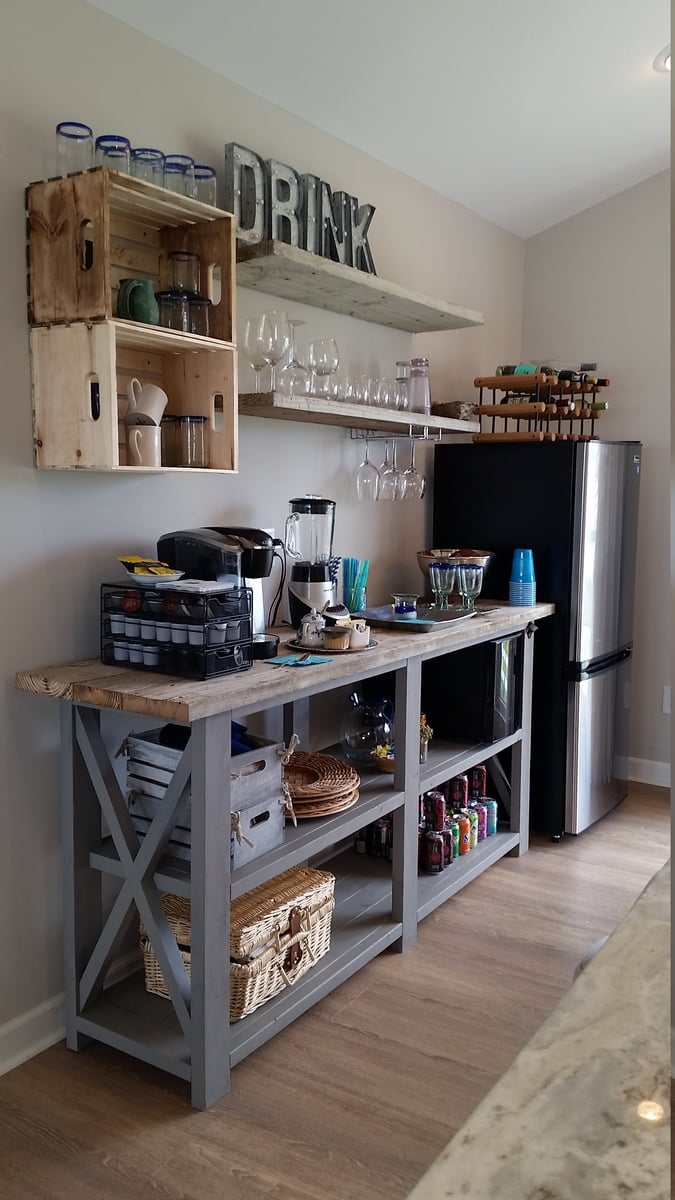
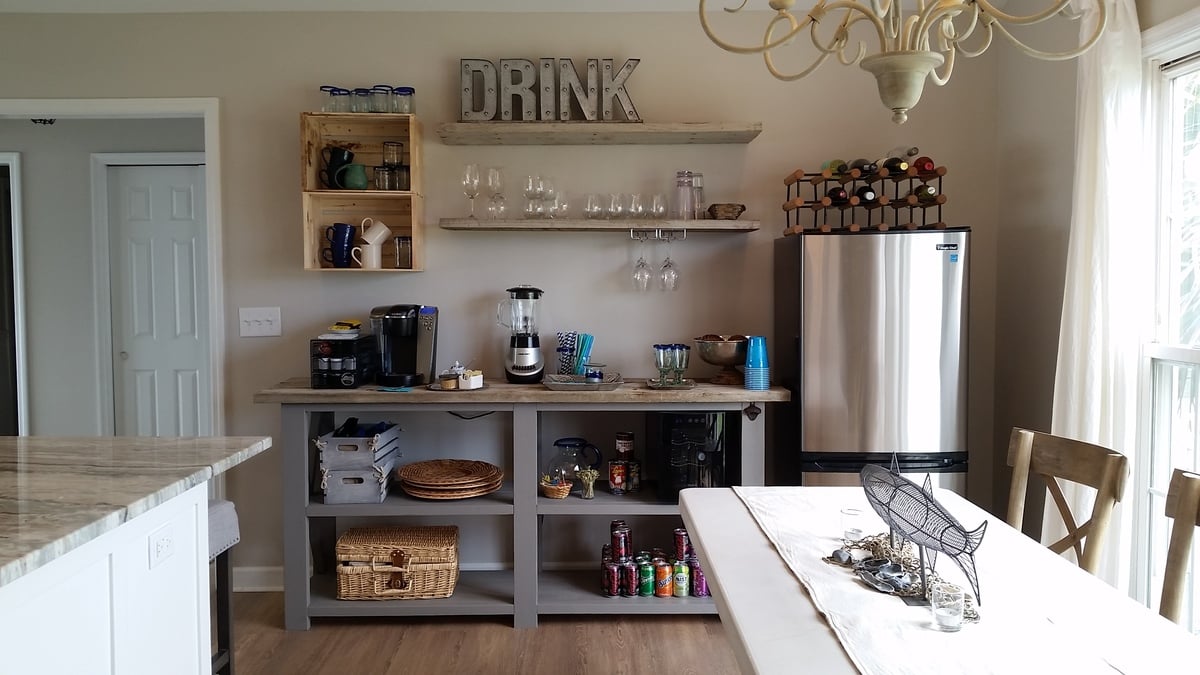
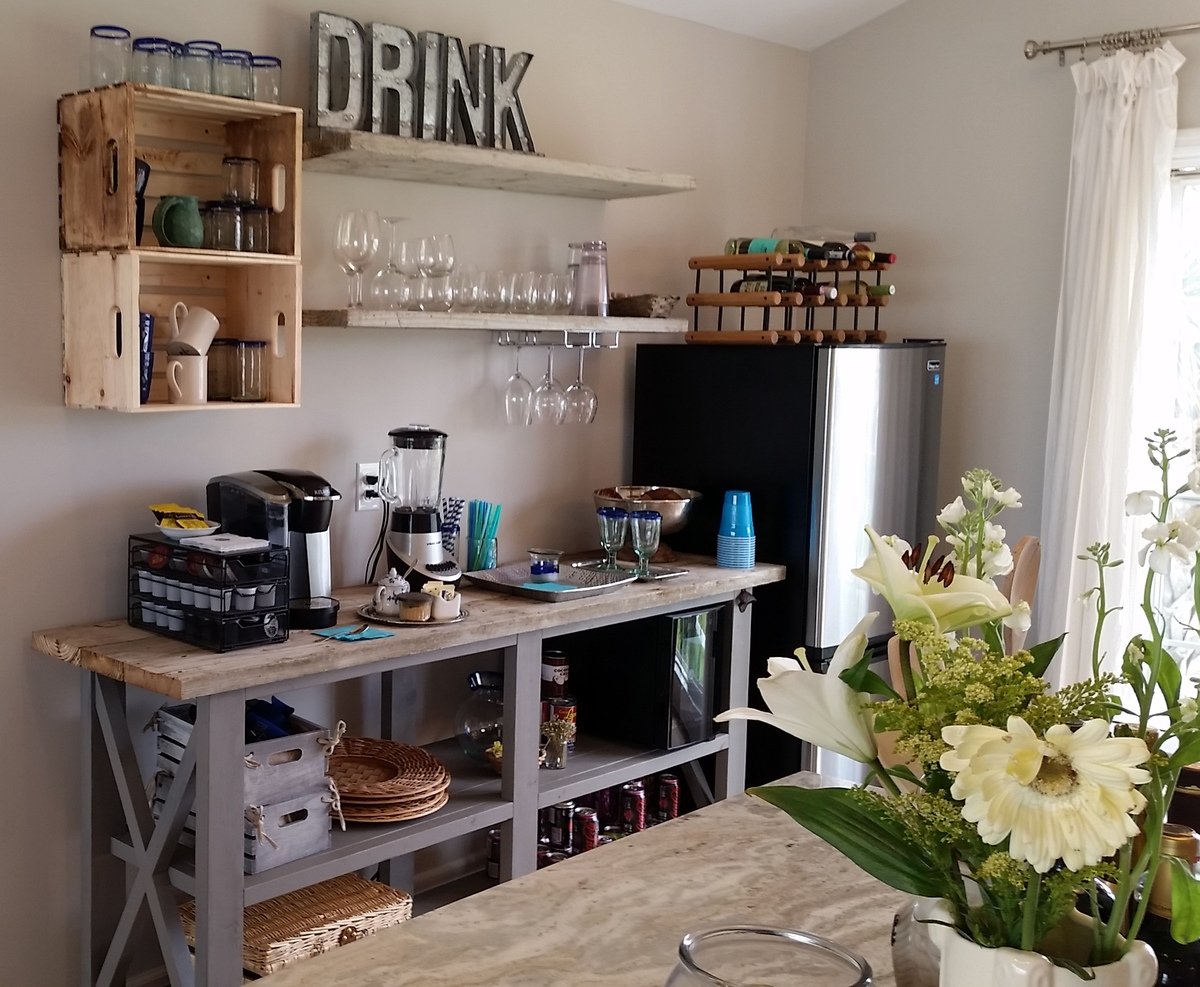
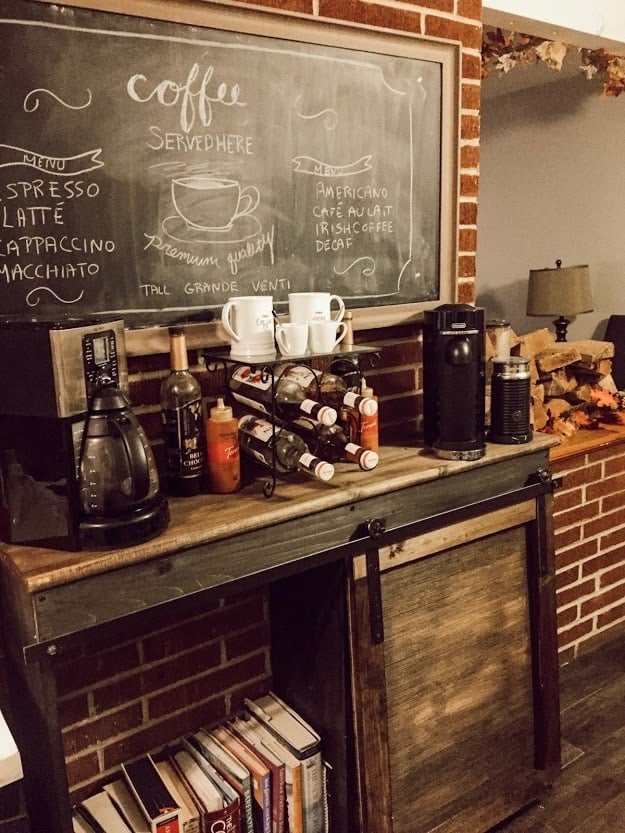
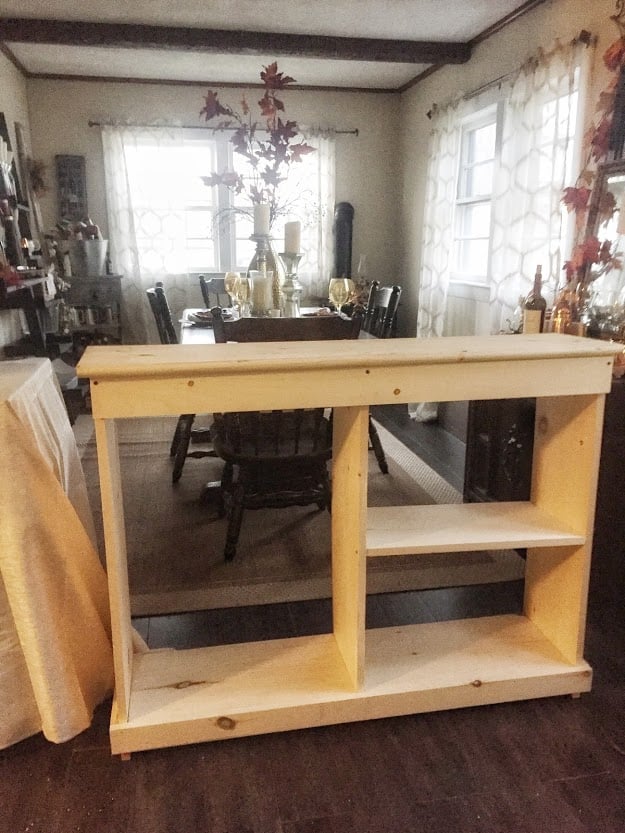
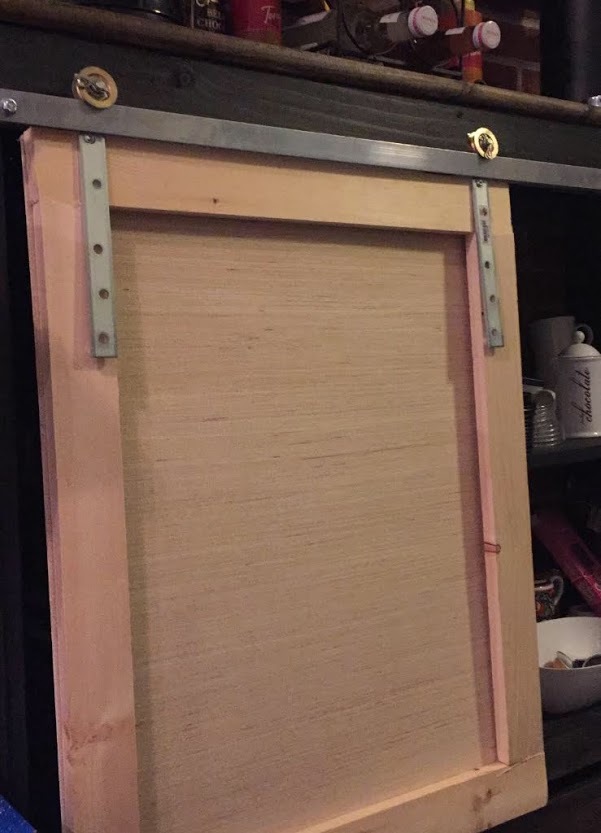
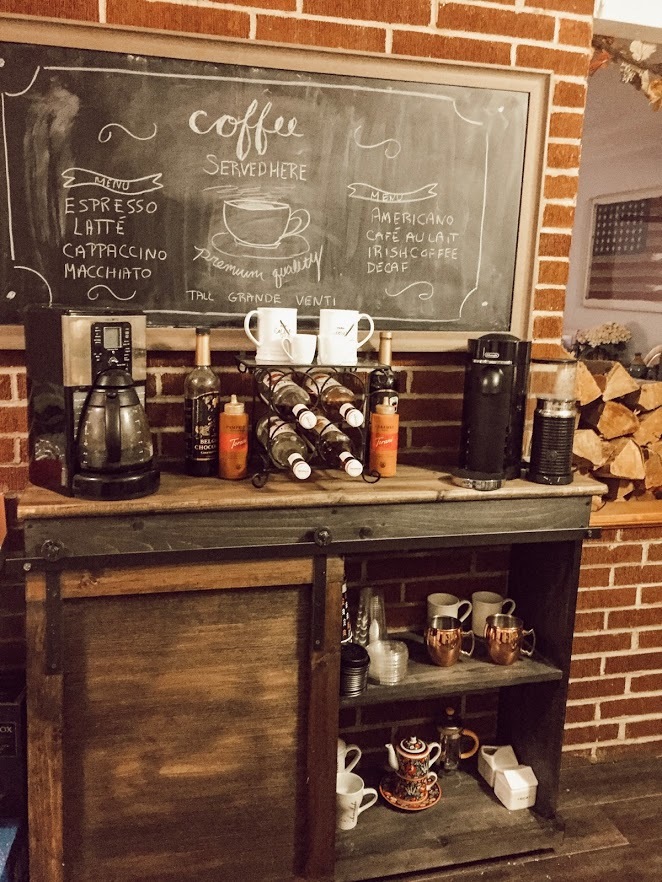
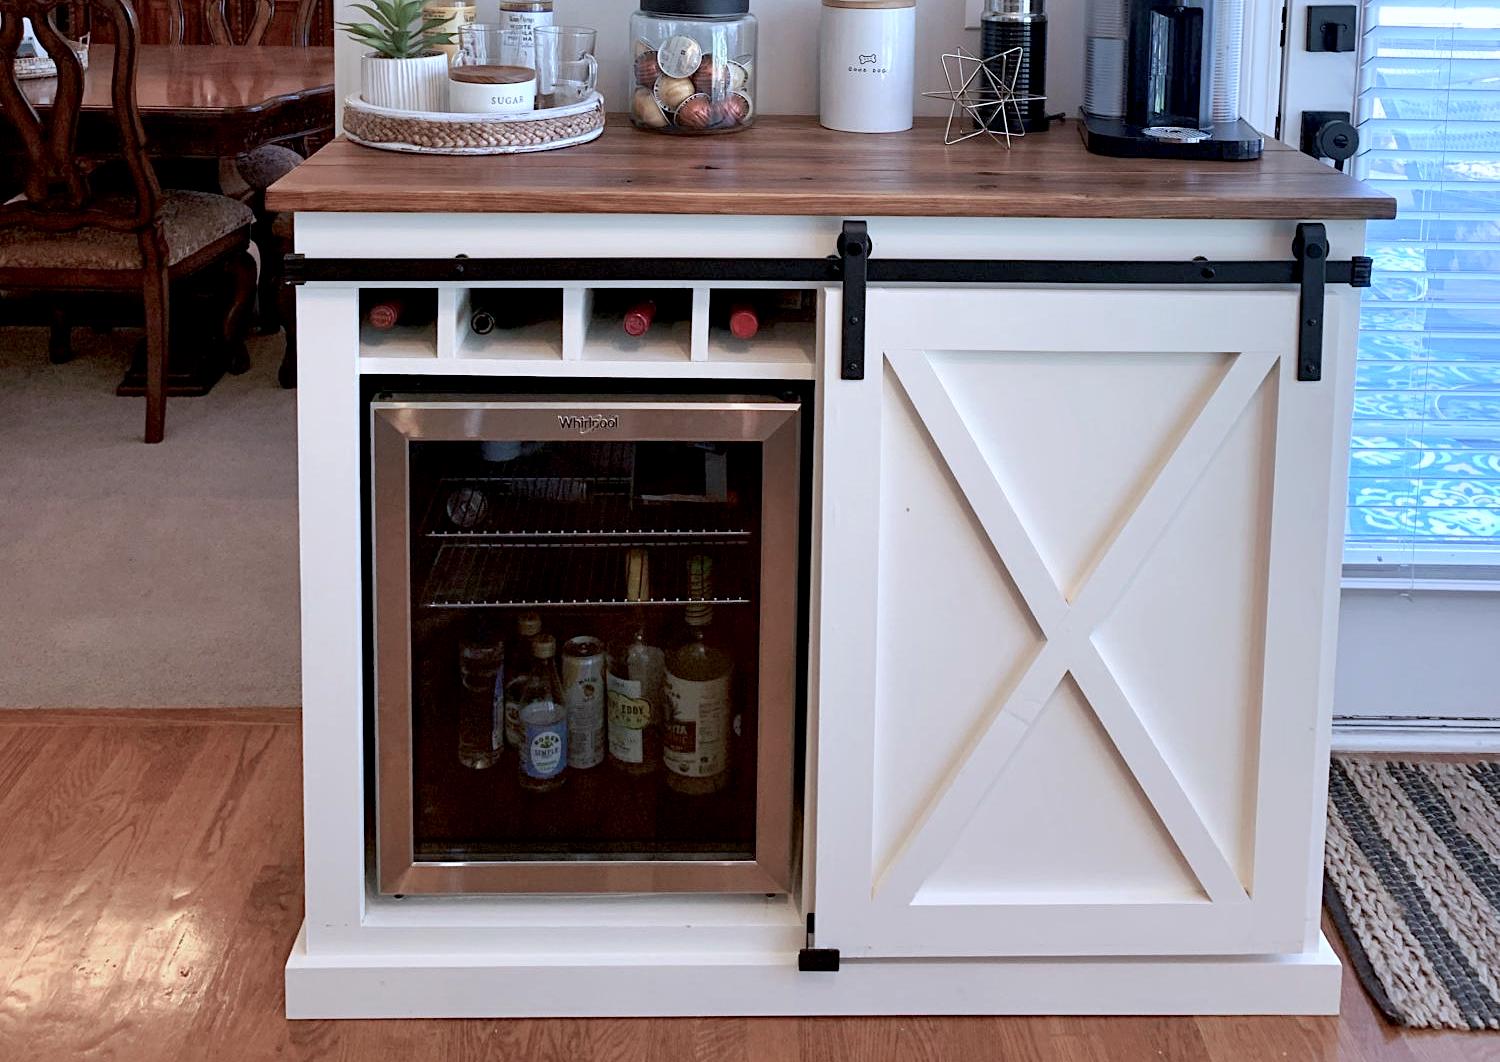
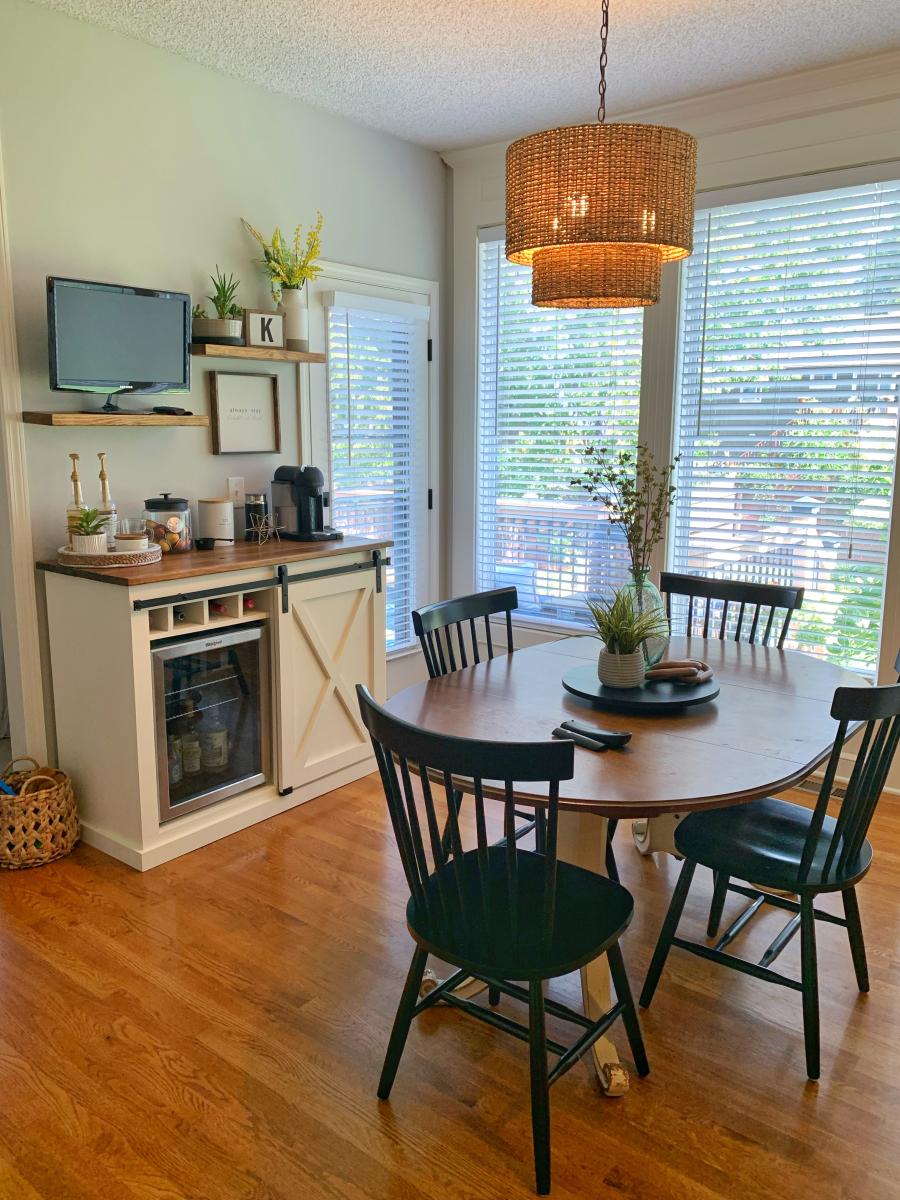
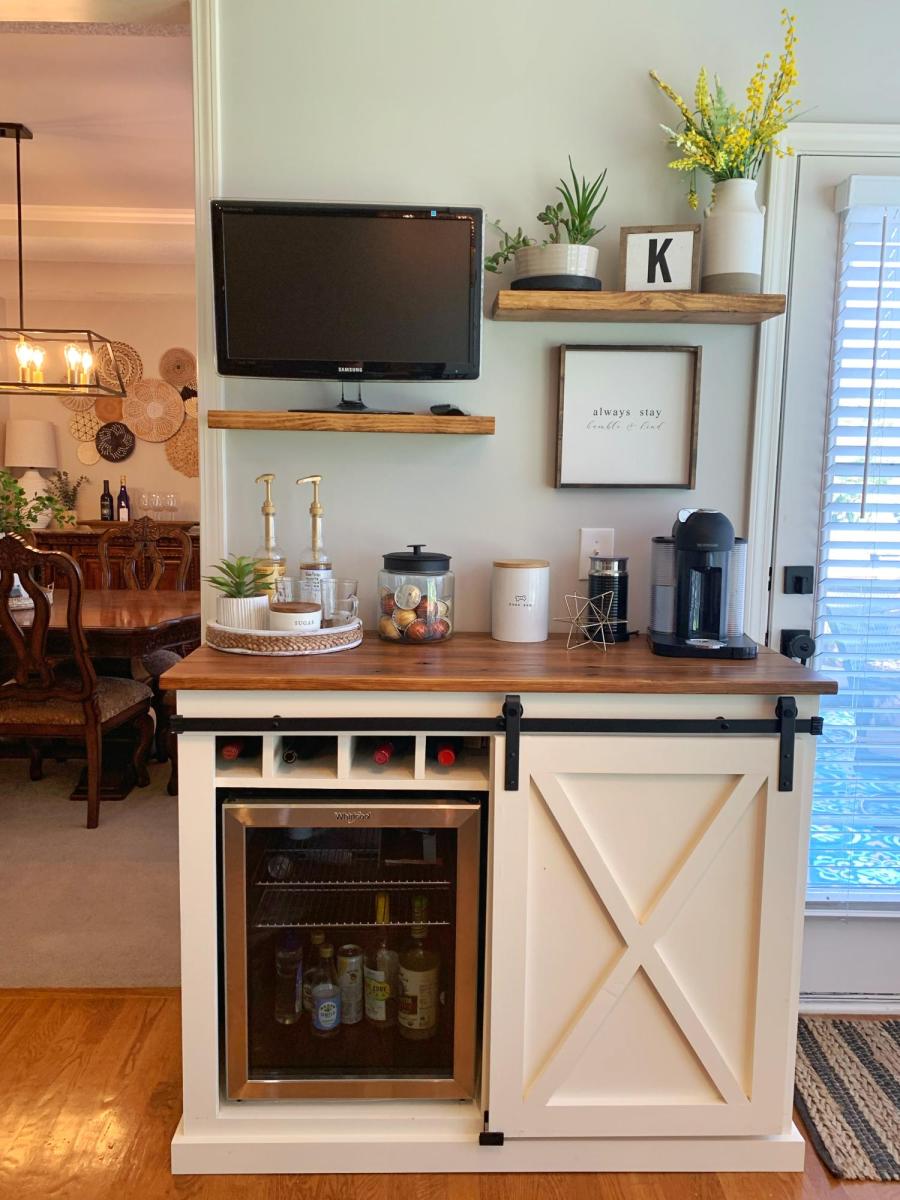
This was my first time using my own measurements for an Ana White build. I was really nervous but having completed a few other projects by following plans exactly, I felt confident I had gained the skill to branch out of my comfort zone. I had been looking at coffee bars for my kitchen, but at $300 and up, cheaply made and in the wrong dimensions,. I just knew I could build something with better quality for a portion of the price. This project took me half a day to build the carcass and then another afternoon to figure out the door hardware and stain. I used all 1 x boards and the final bar is 12" wide so I used 1 x 12 boards for everything except the trim.  All in all you could complete it in a few hours, it was really simple. I made the door hardware by popping open two pulleys and attaching them with metal somethings (not sure what they are) that I found at Lowes. I then ran a flat bar across the front using spacers like Ana did in hers. I painted the hardware with Rustoleum Oil Rubbed Bronze spray paint and stained the top of the bar with Minewax Dark Walnut, the bottom is Minewax Ebony. I still need to poly. One thing I changed up was the top. Instead of using a piece of plywood, pine, or combining pieces together, I used a stair tread! It was a little thicker than a typical 1 x, and also had a rounded edge which I think gives the piece a finished look! This is a piece of furniture I will truly use every single day and I couldn't be happier with how it turned out! The grand total? $60 for the wood and $20 for the hardware. $80 all in all (I had the stain leftover from another project). There's no way I could have bought a piece this nice for that price! 

Estimated Cost
$80 ($60 for wood and $20 for hardware) I had the stain from a previous project.
Estimated Time Investment
Afternoon Project (3-6 Hours)
Finish Used
The top is MInewax Dark Walnut, the base is Minewax Ebony, and the hardware is spray painted Rustoleum Oil Rubbed Bronze. I still need to poly the top.
Recommended Skill Level
Starter Project

Comments

Claire's Loft Bed

Submitted by hook Fam on Thu, 08/11/2011 - 10:00

A few months back a friend of my Sister asked if I would build a bed for her 10 year old daughter. I was excited to do it! So I finished up the projects I had already started and then went to work. I had never built bookshelves before. I wanted it clean and "hole-less" on the outside, so we found a Kreg Jig and I started learning. SUPER easy!! I believe it has been painted white. I can't wait to go see it!!
I followed Ana's plans except I used 2*2s for slats and used 16" wide boards for one of the bookshelves and the desk top. I want them to be able to use this for years to come and not out-grow it too quickly.

Estimated Cost
$300
Estimated Time Investment
Weekend Project (10-20 Hours)
Recommended Skill Level
Intermediate

Comments

Cindy from Indiana (not verified)

Sun, 10/23/2011 - 11:08

This turned out fantastic! You did a wonderful job.

judee (not verified)

Sat, 02/25/2012 - 05:56

hello just a quick question about the railing. Is it screwed on or is it just sitting over the wood? Very nice bed.

WannaMakeA LOFTBED (not verified)

Tue, 08/07/2012 - 13:35

How many 2x2s did you use? I think I am going to do the same to make sure that I do not outgrow the bed. Also did you have to change the size of the little bookshelves when you changed the desk to 16" instead of 12" ? I'm trying to build the whole set on my own (im 14)

In reply to by WannaMakeA LOFTBED (not verified)

hook Fam

Tue, 08/07/2012 - 15:09

I think I used around 20 2x2's, and did use a center beam to add strength. I only changed the one bookshelf to a 16" (the one under the desk). The other one I left as a 12". Good luck building your bed!

WannaMakeA LOFTBED (not verified)

Tue, 08/07/2012 - 18:29

Thank you sooo much. I have left questions in the comments sections and you are the only one who has answered. I greatly appreciate it.

jvanhorn

Sun, 05/12/2013 - 19:37

Hook fam, Thanks so much for your work and for the pictures. I really like how you left the lower back side of the big book shelf off and still included the desk behind. Love the 16" too and I think I will go with that for the desktop but leave the 12" for the shelves. Thanks again! This is now my next project!!!

Best Lounger Ever

Submitted by teeninyg on Sun, 08/21/2011 - 13:37

This was my second project from the site. I wanted somewhere to read my book on the back deck. This chair is perfect. When I get tired of reading I can lay it down and take a nap. It is very sturdy and easy to put together. I do recommend using pocket holes to assemble it. I found it much easier.

Estimated Cost
$70.00
Estimated Time Investment
Day Project (6-9 Hours)
Finish Used
I sanded the seat and sides of the chair. Then stained it with oak and finished it with polyurethane.
Recommended Skill Level
Beginner

Three story doll house

Submitted by Anonymous (not verified) on Sun, 01/06/2019 - 13:53

I built this American girl doll house for my daughter. I wanted to give her something to keep her youth alive! 

Estimated Cost
$150-200
Estimated Time Investment
Weekend Project (10-20 Hours)
Finish Used
Light grey paint for all the walls and ceiling. Classic grey stain by Minwax for the floors. I also added baseboards to all the rooms with some small trim I found in the window trim section at Home Depot.
Recommended Skill Level
Intermediate

Comments

Tessa2009

Sun, 01/06/2019 - 21:46

Thanks Ana! This is her momma that built it for her. I wanted to tackle something on my own and challenge myself. Your plans were amazing to work with. Thanks for taking the time to make these plans so easy to understand and follow. She is very happy with the doll house! Happy New Year! -Abbey

Coffee Bar

Submitted by Anonymous (not verified) on Wed, 12/28/2022 - 18:35

My wife wanted a coffee bar and I wanted a fridge for wine and beer. So we compromised on this.

Comments

Window seat built in

Submitted by daliae on Sat, 09/17/2011 - 20:19

I made this two years ago in my daughter's room, before I got to know Ana's site. This was my ever first carpentry project. It took me 4 whole days to finish. The whole wall is like a bay wall so I had to custom make the built in. Also – I did that when my husband was out of town so in order for me to be able to lift all the pieces from the basement to the second floor, I made it of 4 pieces. When my husband came back home he thought I paid someone to built it.

I made it out of 2x4’s and plywood. I trimmed the bottom with a trim.

One day I will add drawers and the cushions are in the making.

Estimated Cost
100 $
Estimated Time Investment
Week Long Project (20 Hours or More)
Finish Used
Primer and two coats of Valspar high gloos White Dove from Lowe's.
Recommended Skill Level
Beginner

Comments

nhoffer

Thu, 06/11/2015 - 20:20

Do you have more pics of the finished product...especially where it meets the angled wall? I don't have a table saw (yet) so I'm trying to figure out if I can handle this without one. :(

Above Toilet Cabinet

Submitted by Smokeydog on Thu, 12/24/2015 - 12:58

I built this above toilet cabinet for my son and his wife for Christmas. They moved into a new house and wanted this additional storage space.  Turned out pretty good!

Built from Plan(s)
Estimated Cost
$135.00
Estimated Time Investment
Weekend Project (10-20 Hours)
Finish Used
BEHR Satin Paint with primer
Recommended Skill Level
Intermediate