Planter, Lemonade Stand and Home Projects!
Lot's of fun projects!
by Rob

Lot's of fun projects!
by Rob
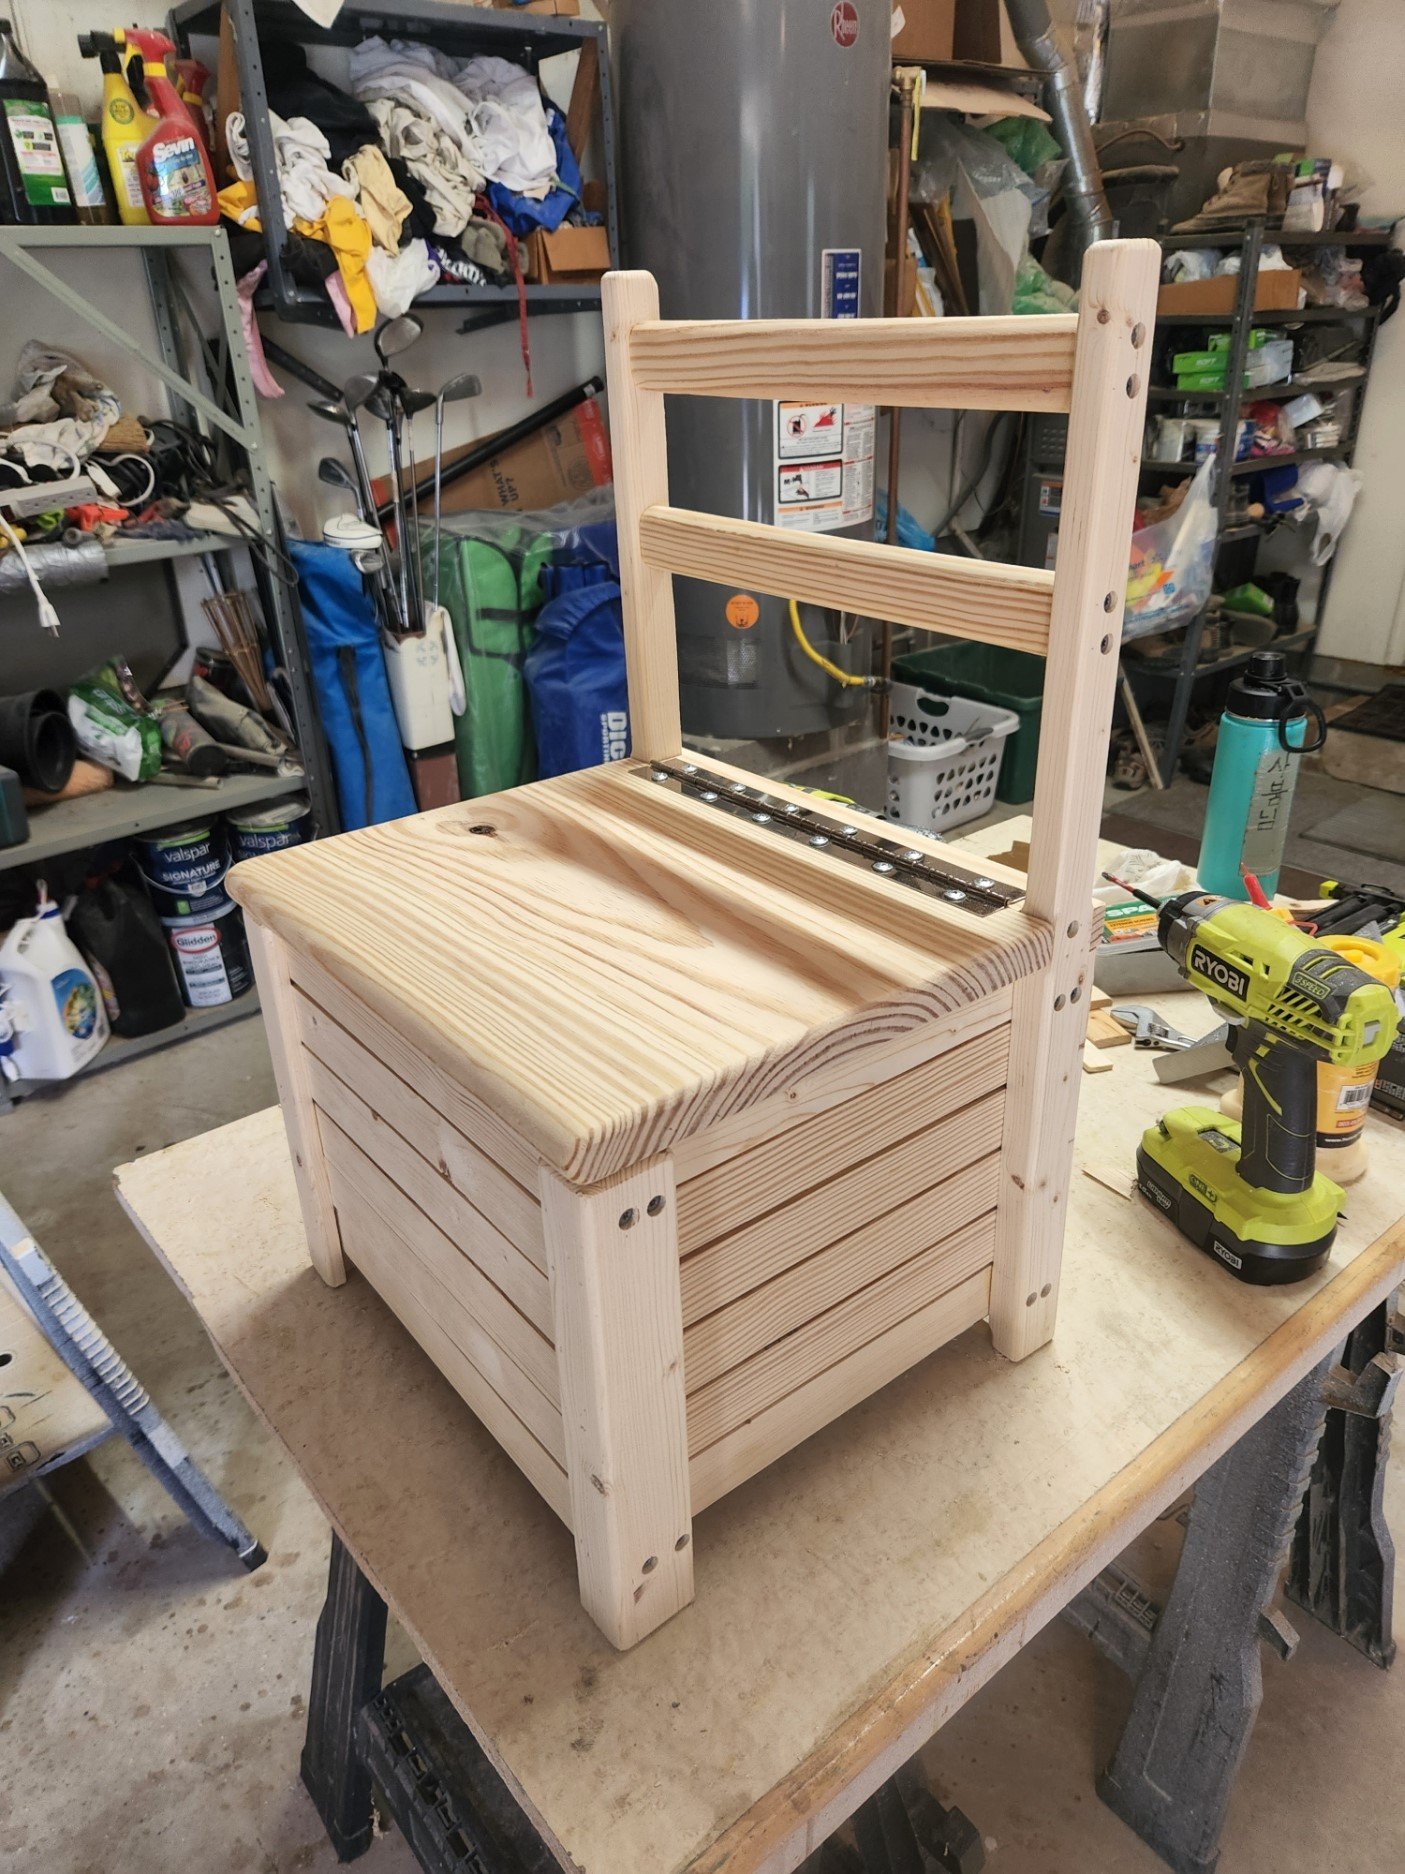
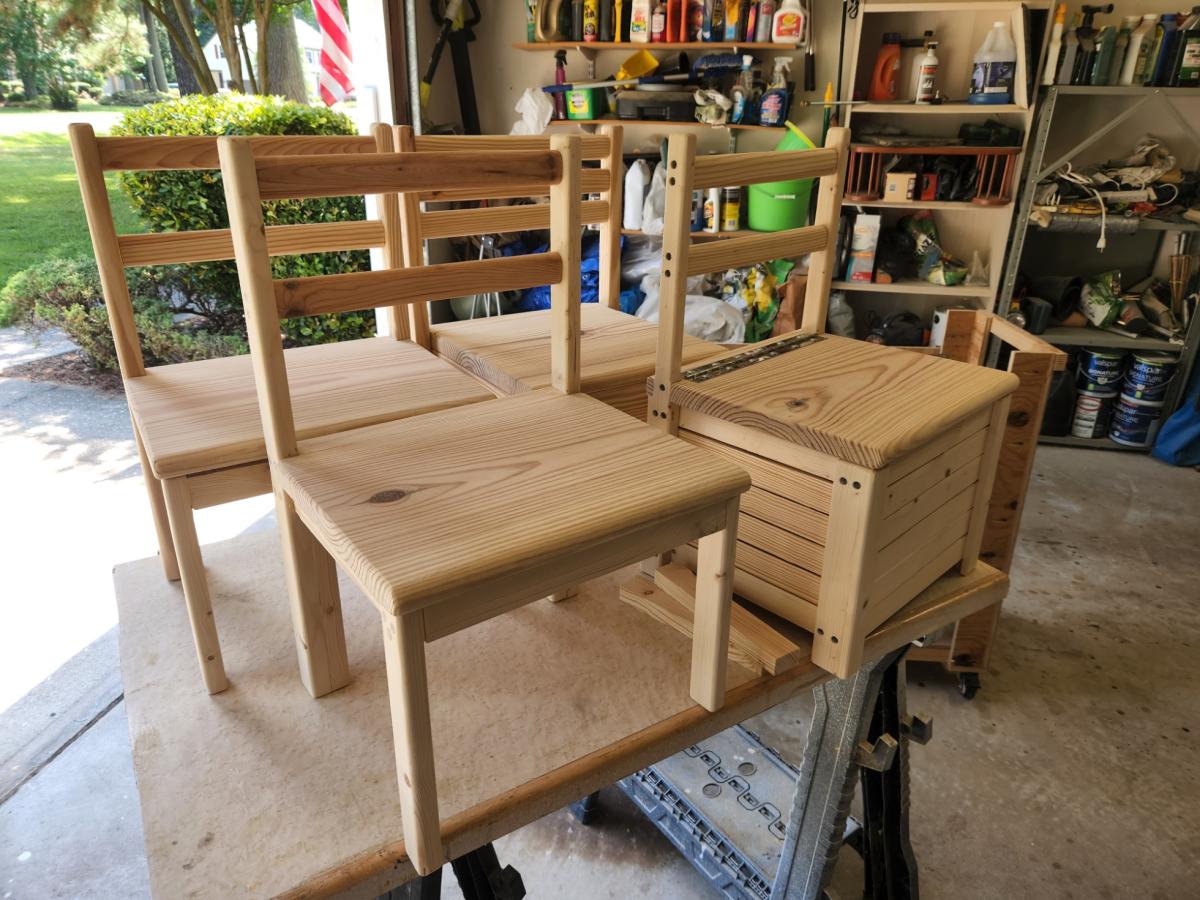
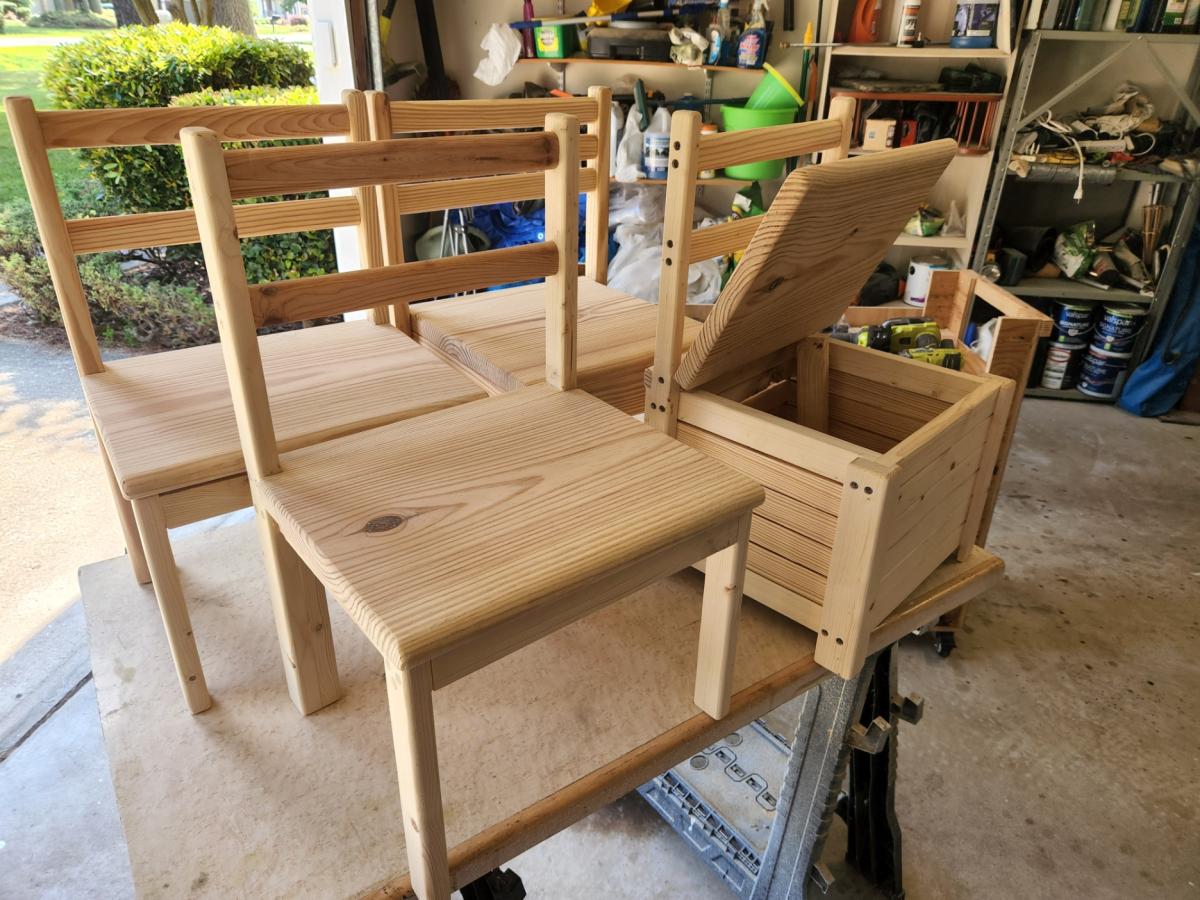
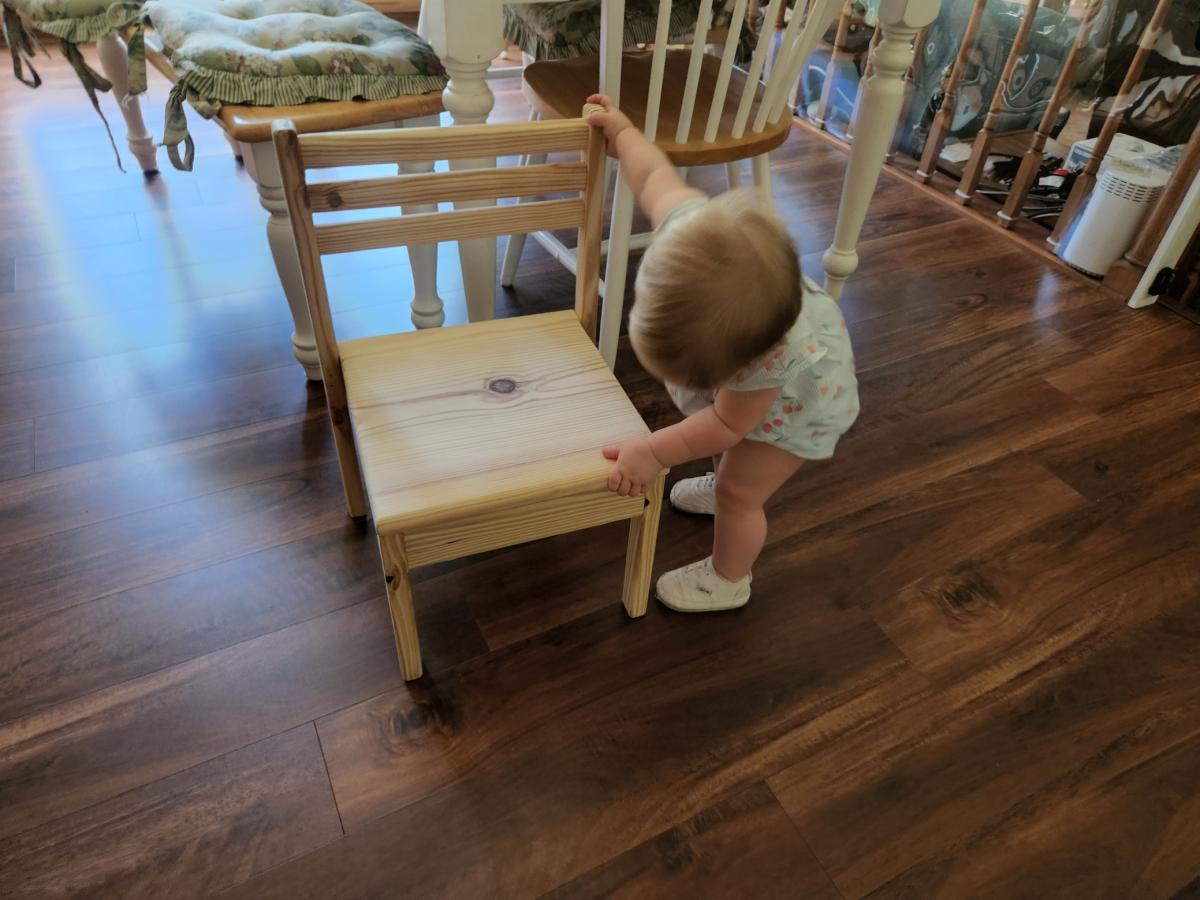
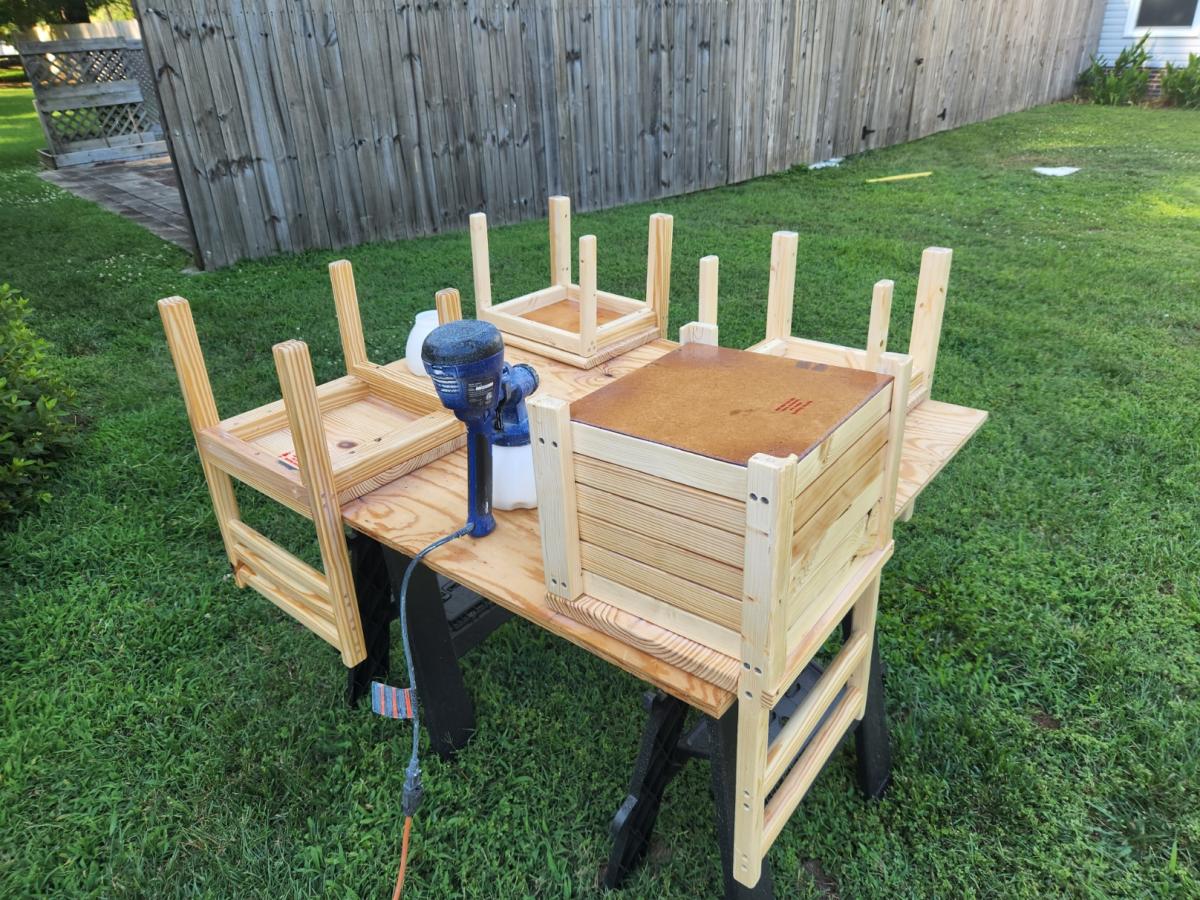
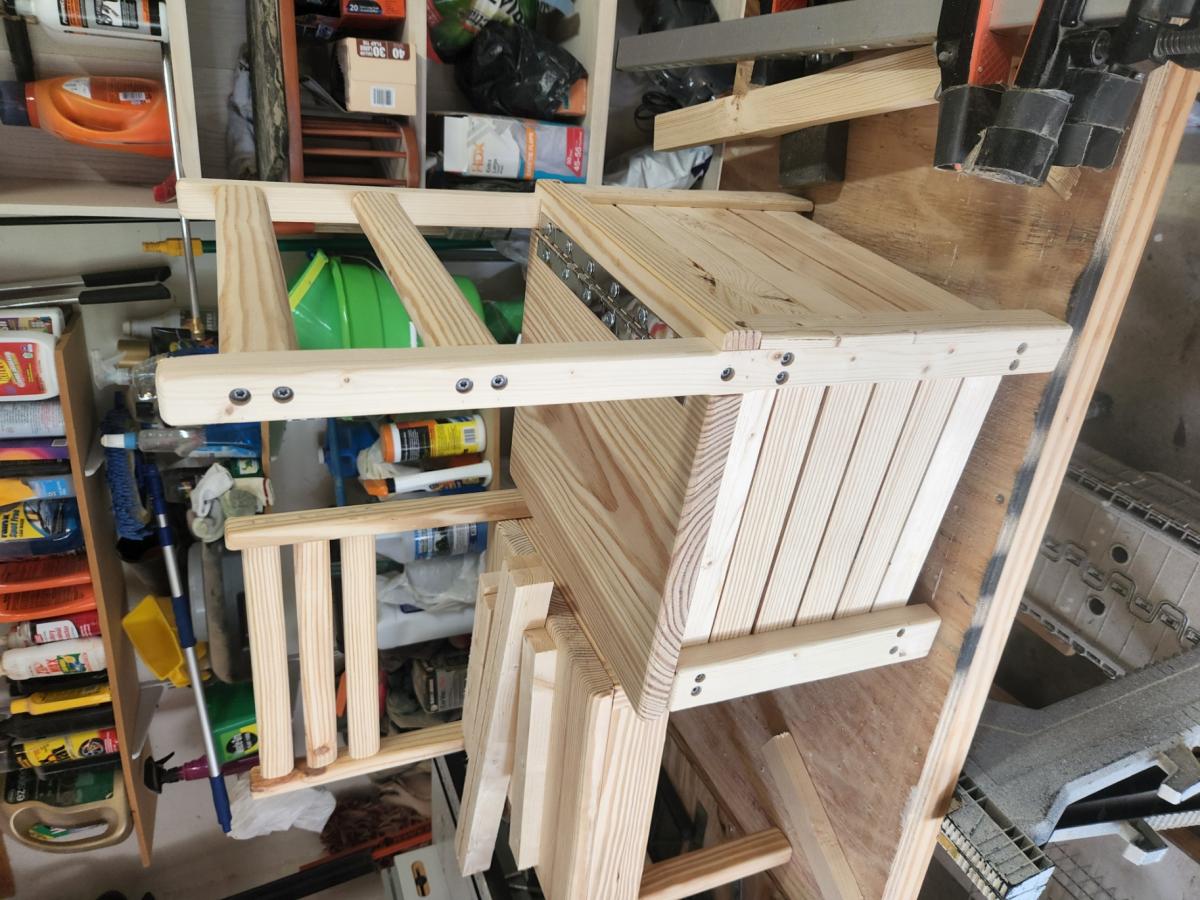
Made from Ana's Kids Chair with Storage. Love these little chairs. I riped up some 2x4's to 7/8th and used a 1 x 12 stair tread for the seats. glued with screws, then removed the screws and replaced with glue and dowels. Made for kids, strong enough for adults.
Mon, 07/04/2022 - 18:26
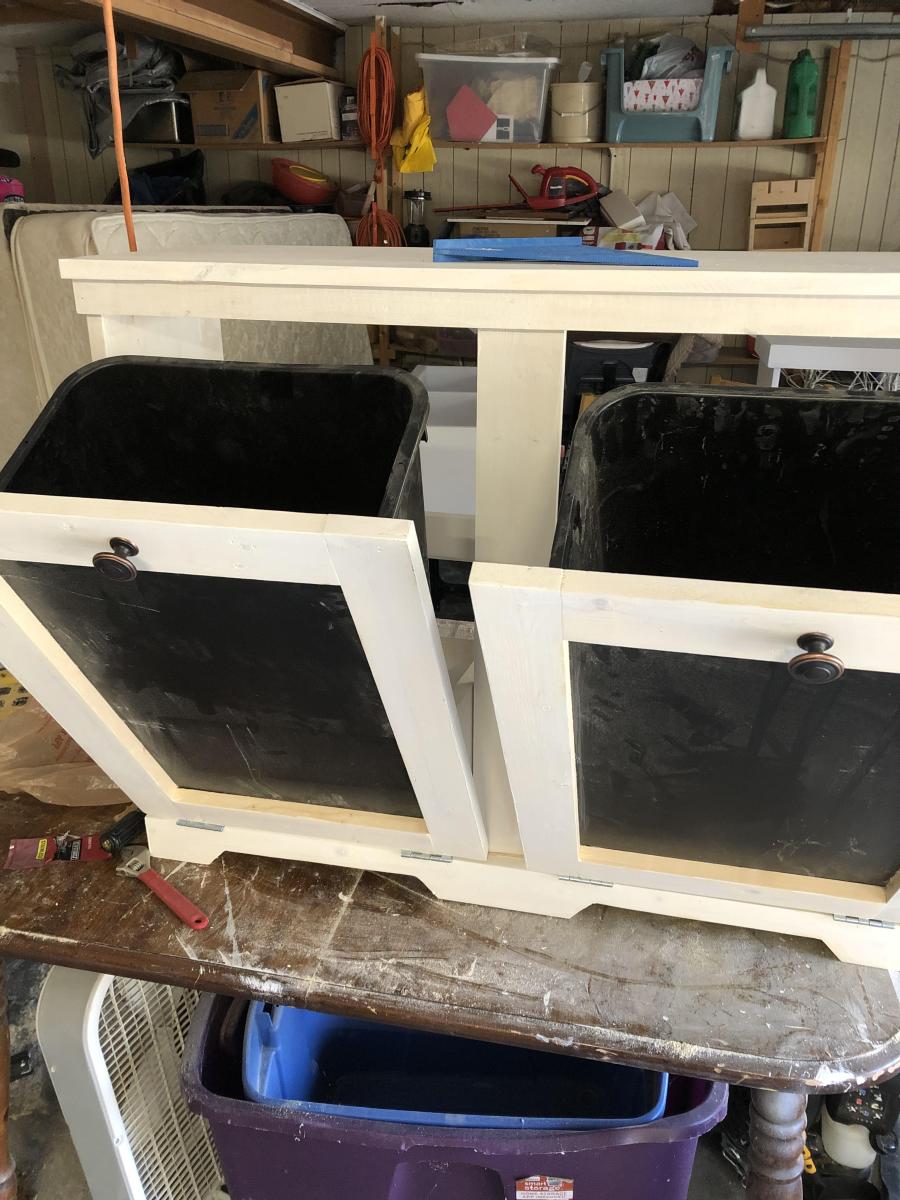
Built up the storage shelf with some laths and added a piano hinge to the seat. Nice little toy box.
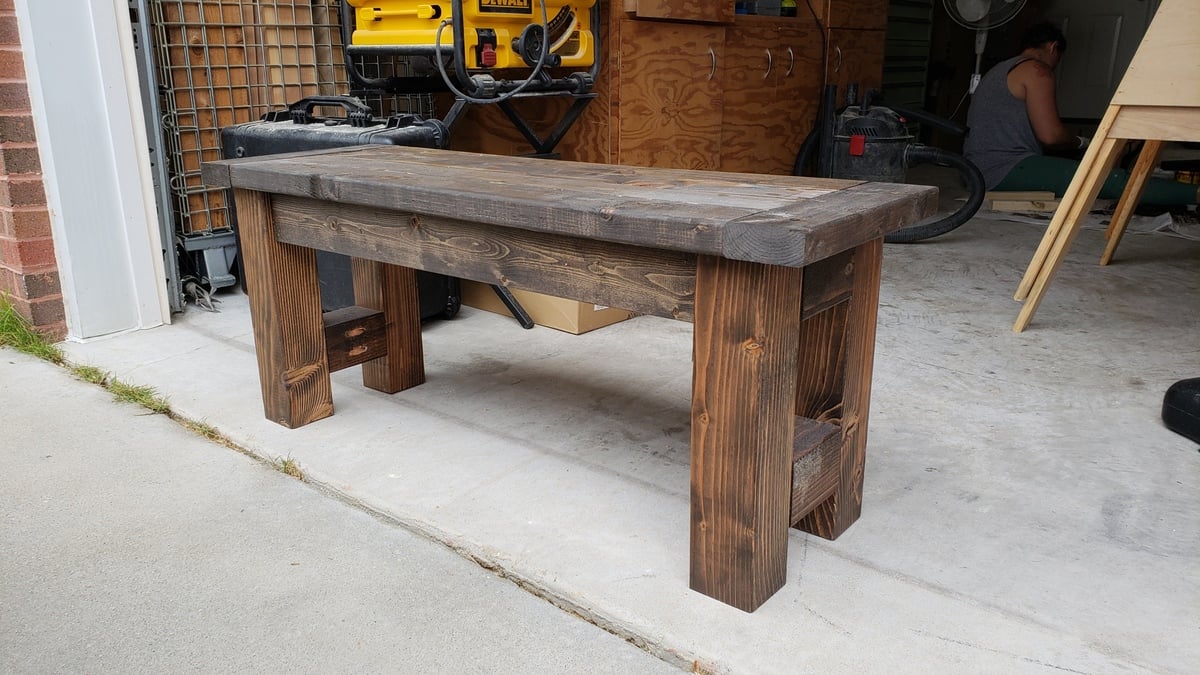
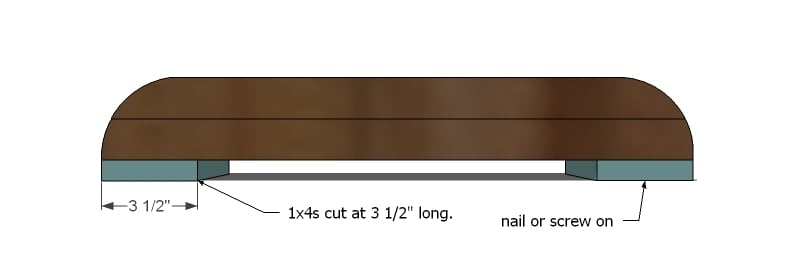
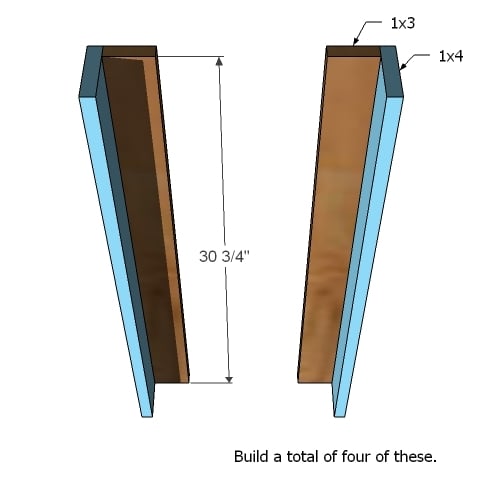
Made a 4 foot version of the farmhouse bench. I also used 4x4s for the legs instead of 2x4s. They work great, just makes the bench a little heavy.

Thanks for the plans!
I used my router and router Ed the edges. Love this!!
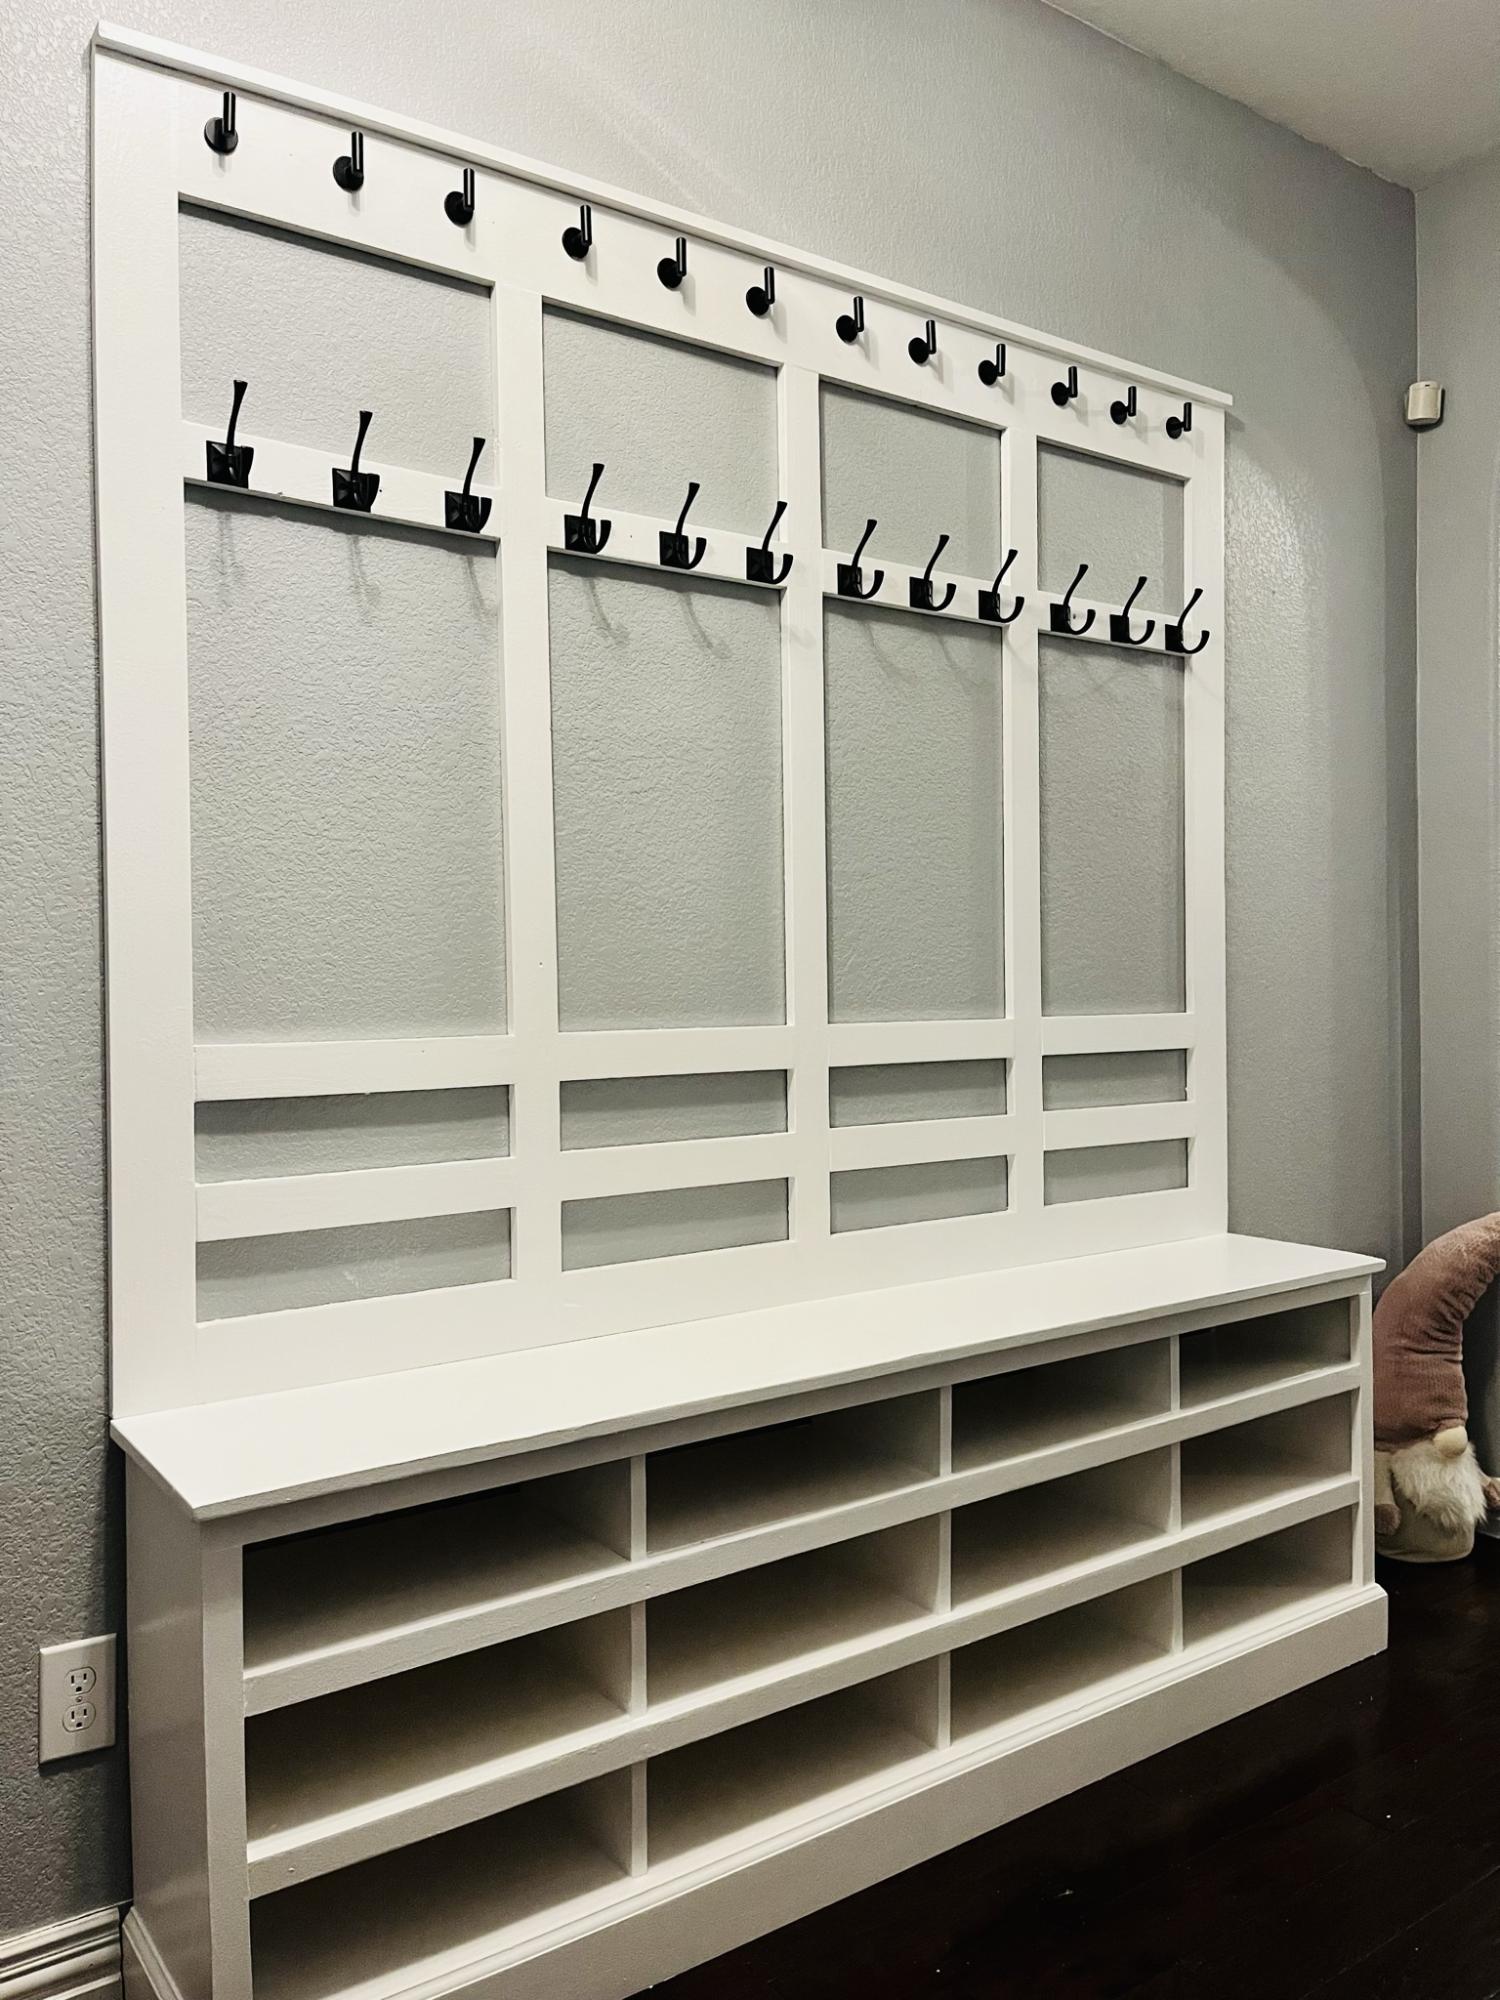
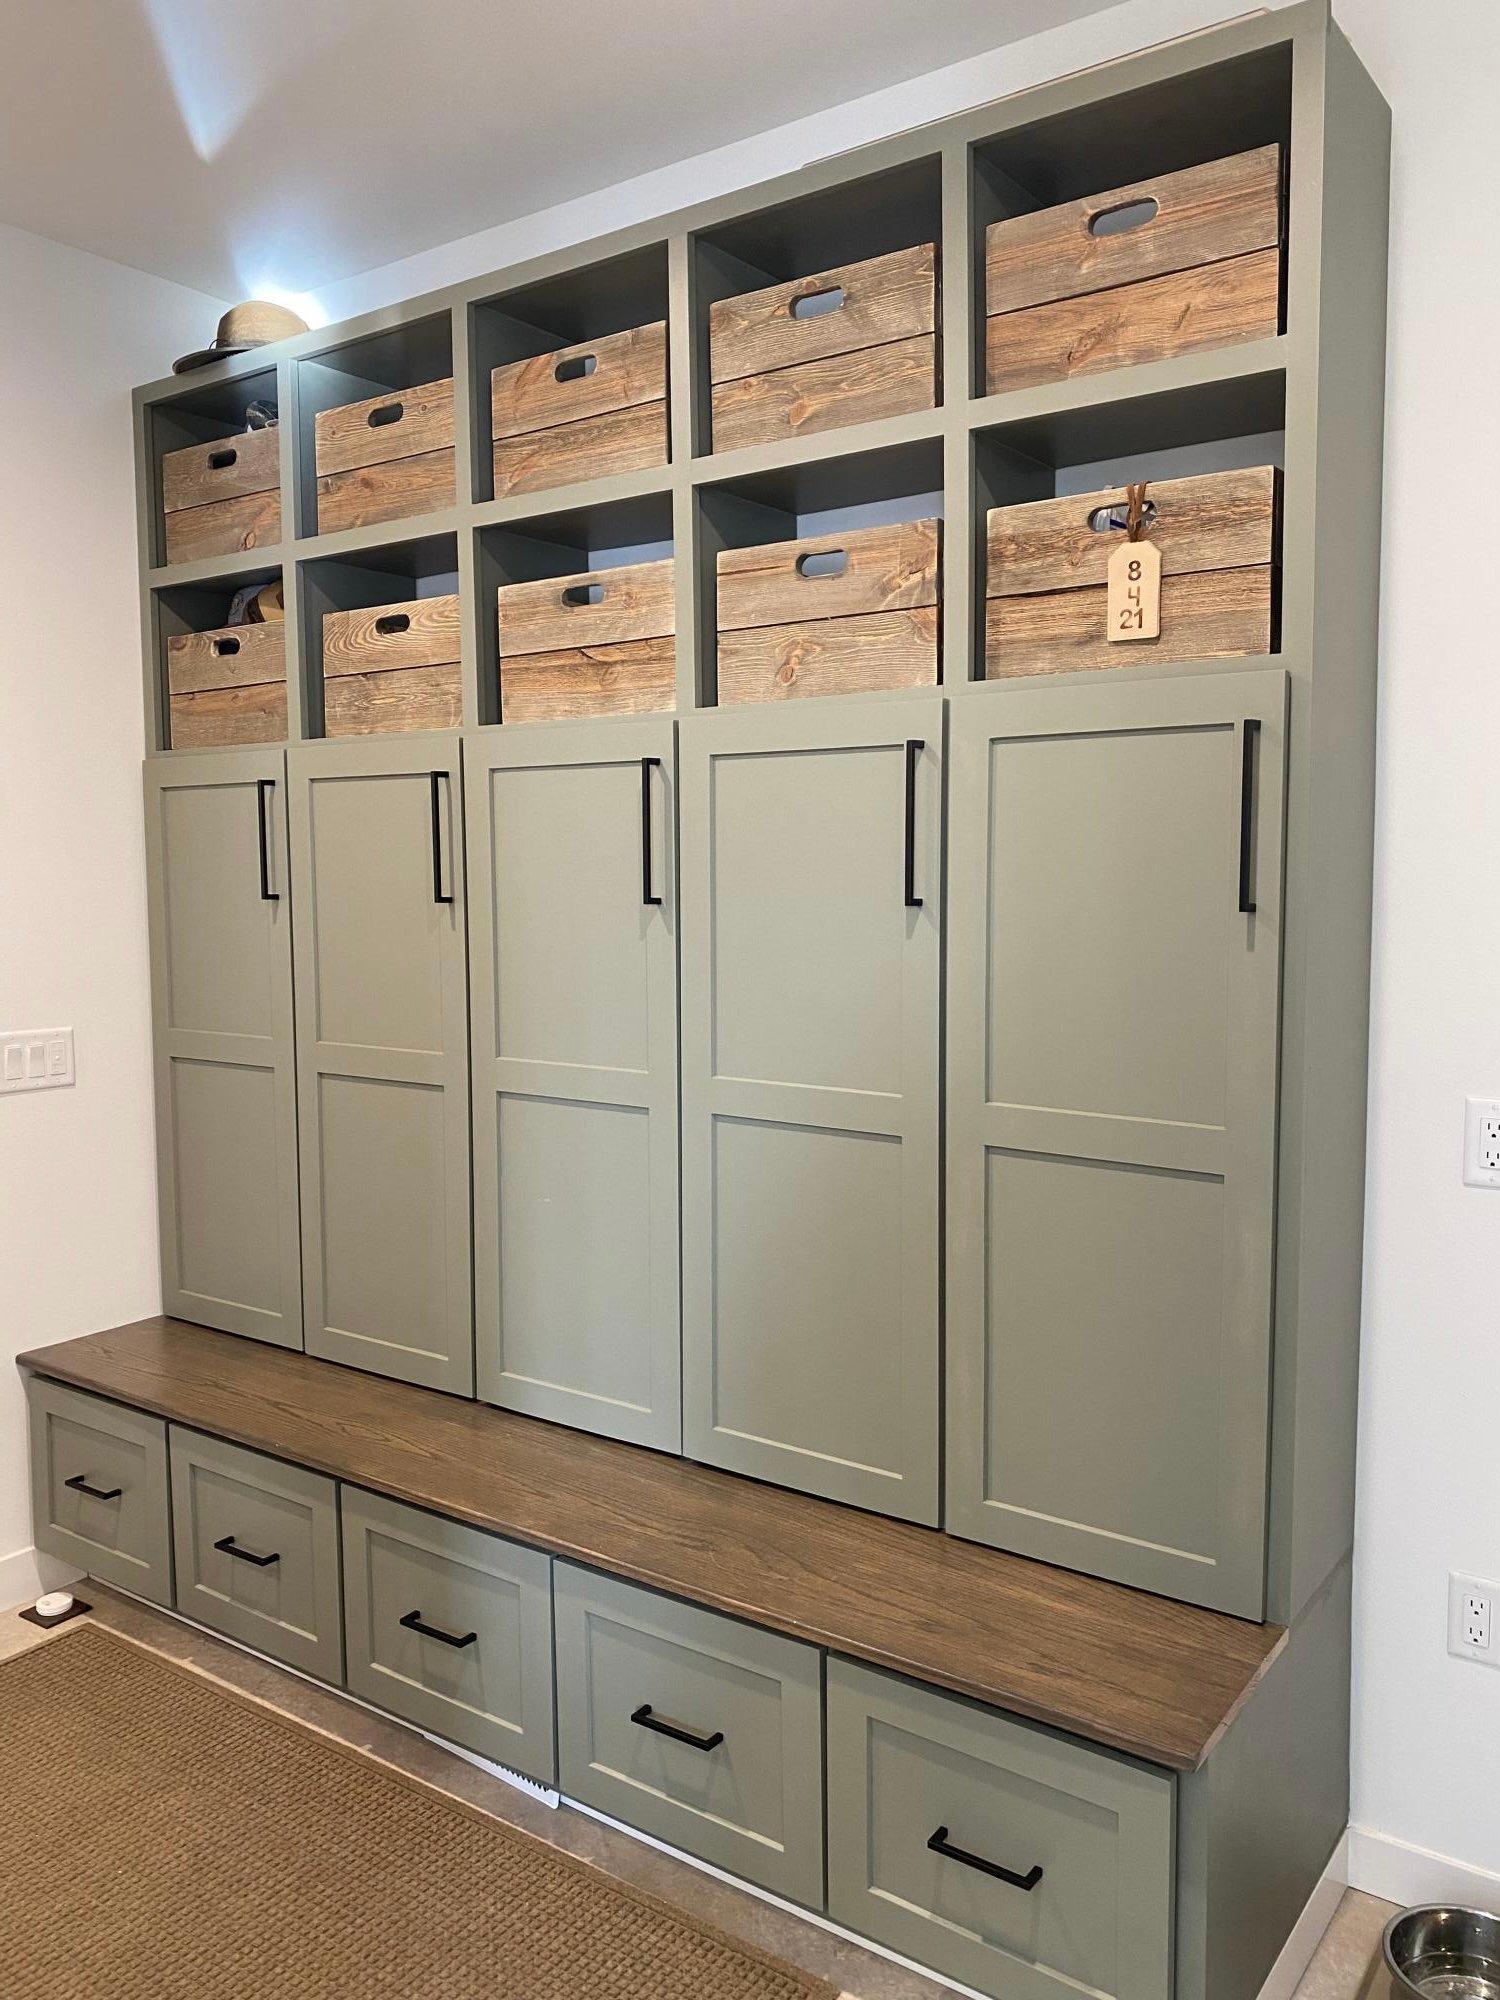
I modified the plans for the farmhouse hall tree to build this for our entryway. The farmhouse hall tree was a perfect base plan for this project! We went from a mess of jammed in jackets and piles of shoes to a clean and organized entrance! Thank you so much for providing the original plans! We love this!
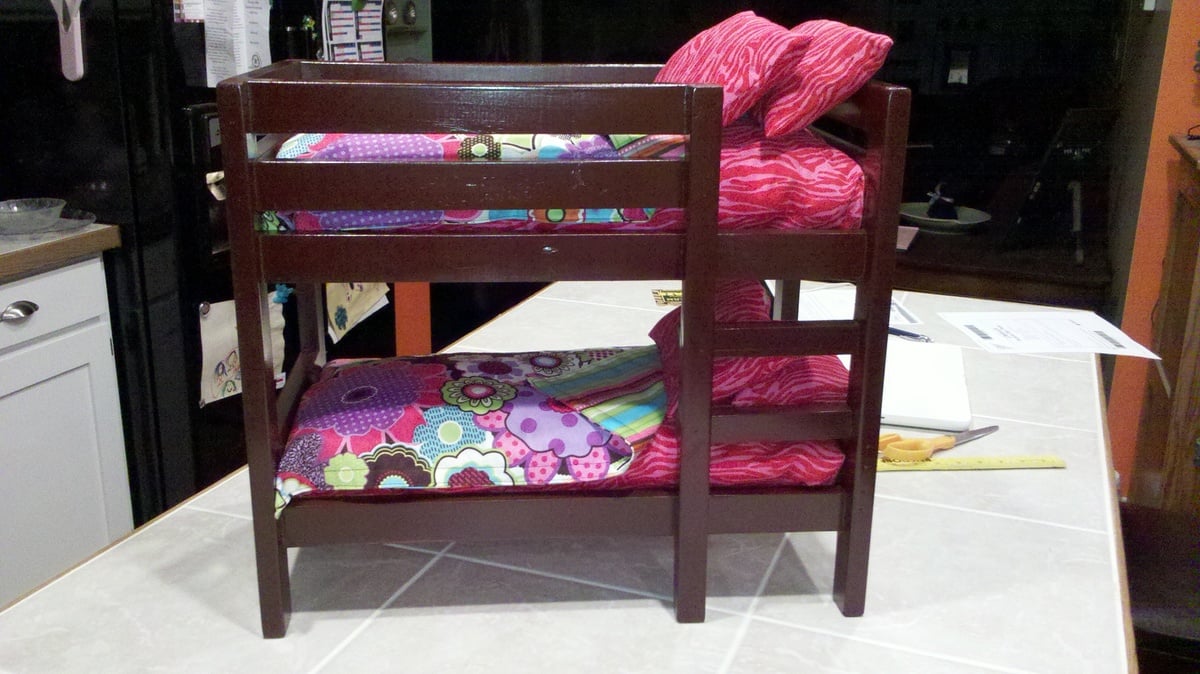
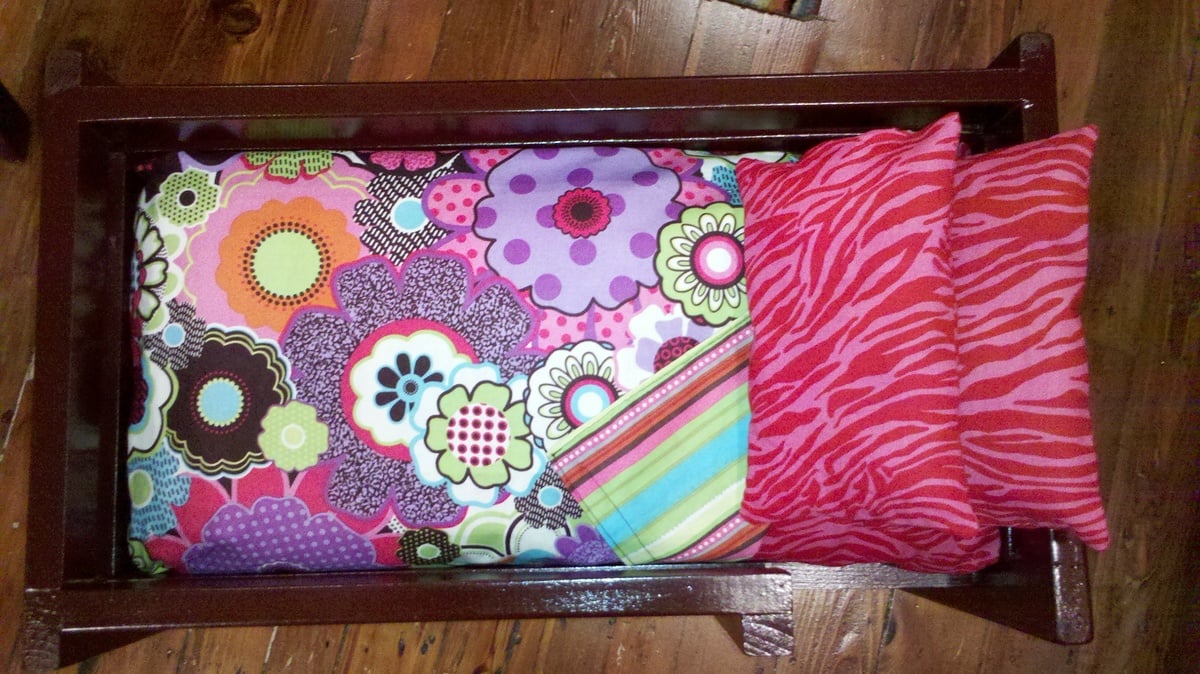
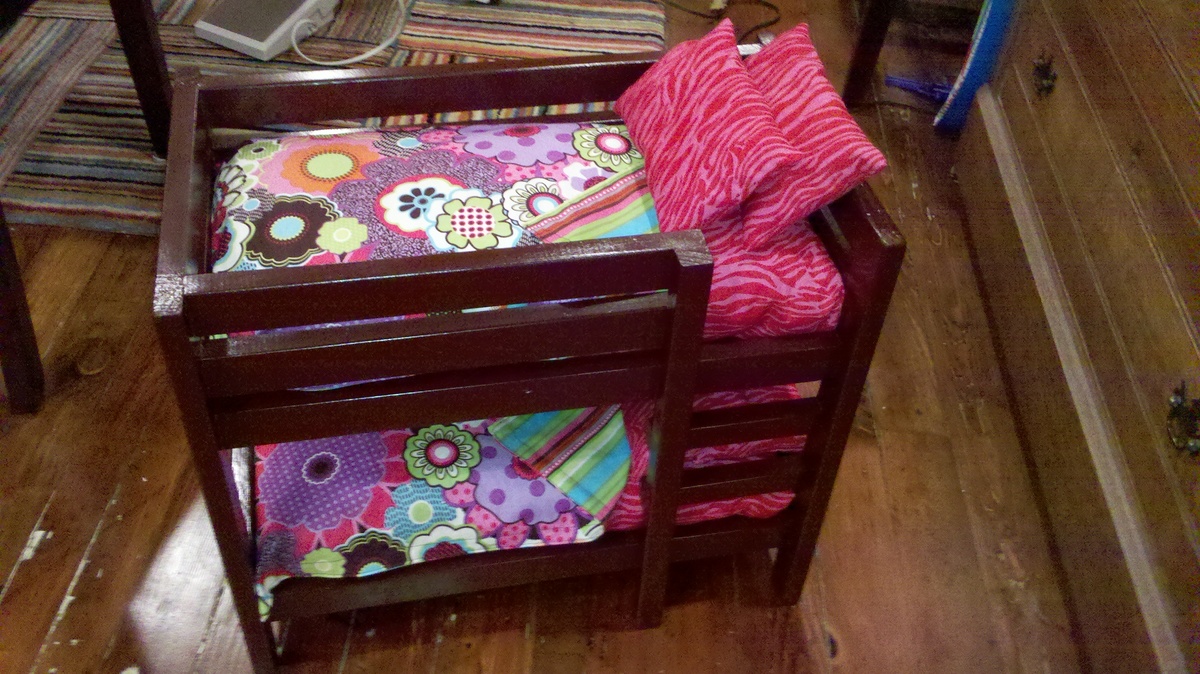
My daughter has really been getting into American Girl Dolls so I went on the official website to see if I could find some accessories for them for her birthday and YIKES - that stuff is expensive! So I went on Ana's site and found plans to make bunk beds. My daughter has four dolls so I figured we could build two sets at a fraction of the cost we could buy them at.
This was our first furniture project so we had to buy everything, which makes the project more expensive than if you have scraps laying around, but still totally worth it. My husband and I built two of these in about 3 hours. Sewing four of everything probably took another 2-3 hours.
I made the blankets reversable - flowers on one side, strips on the other so she could mix and match as she liked. I think I am going to make a reversable pillow for each bed with the blanket fabric, but I haven't gotten that far yet. I totally misunderstood how much fabric to buy - I thought it was 1/2 yard for mattress and then another 1/2 yard for the blanket, but it's not, it's 1/2 yard for both so needless to say I have a TON of fabric left over. Since this project went so well we are going to build a doll table and chairs for Christmas so I figure I can use the left overs for placemats, etc. and carry the theme through the set.
I love the way they turned out and I can't wait to give them to her for her birthday!!!

Your outhouse design was modified for a snowmobile club project as the building needs to be towed across a lake to a site next to a warming shelter. An LED light with a timer switch and solar battery charger were installed to provide light in a remote area of Lake of the Woods.
A steel hitch and skids with hyfax were added to the design.
Thank you for providing a design that allowed us to make modifications for winter outdoor recreation accommodations.
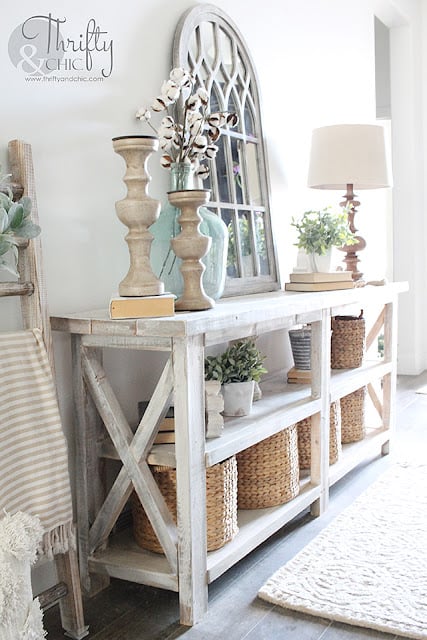
Thanks to Ana White we learned how to make these cubbies. The wood for the stained bench is from trees milled from my husband’s family farm.
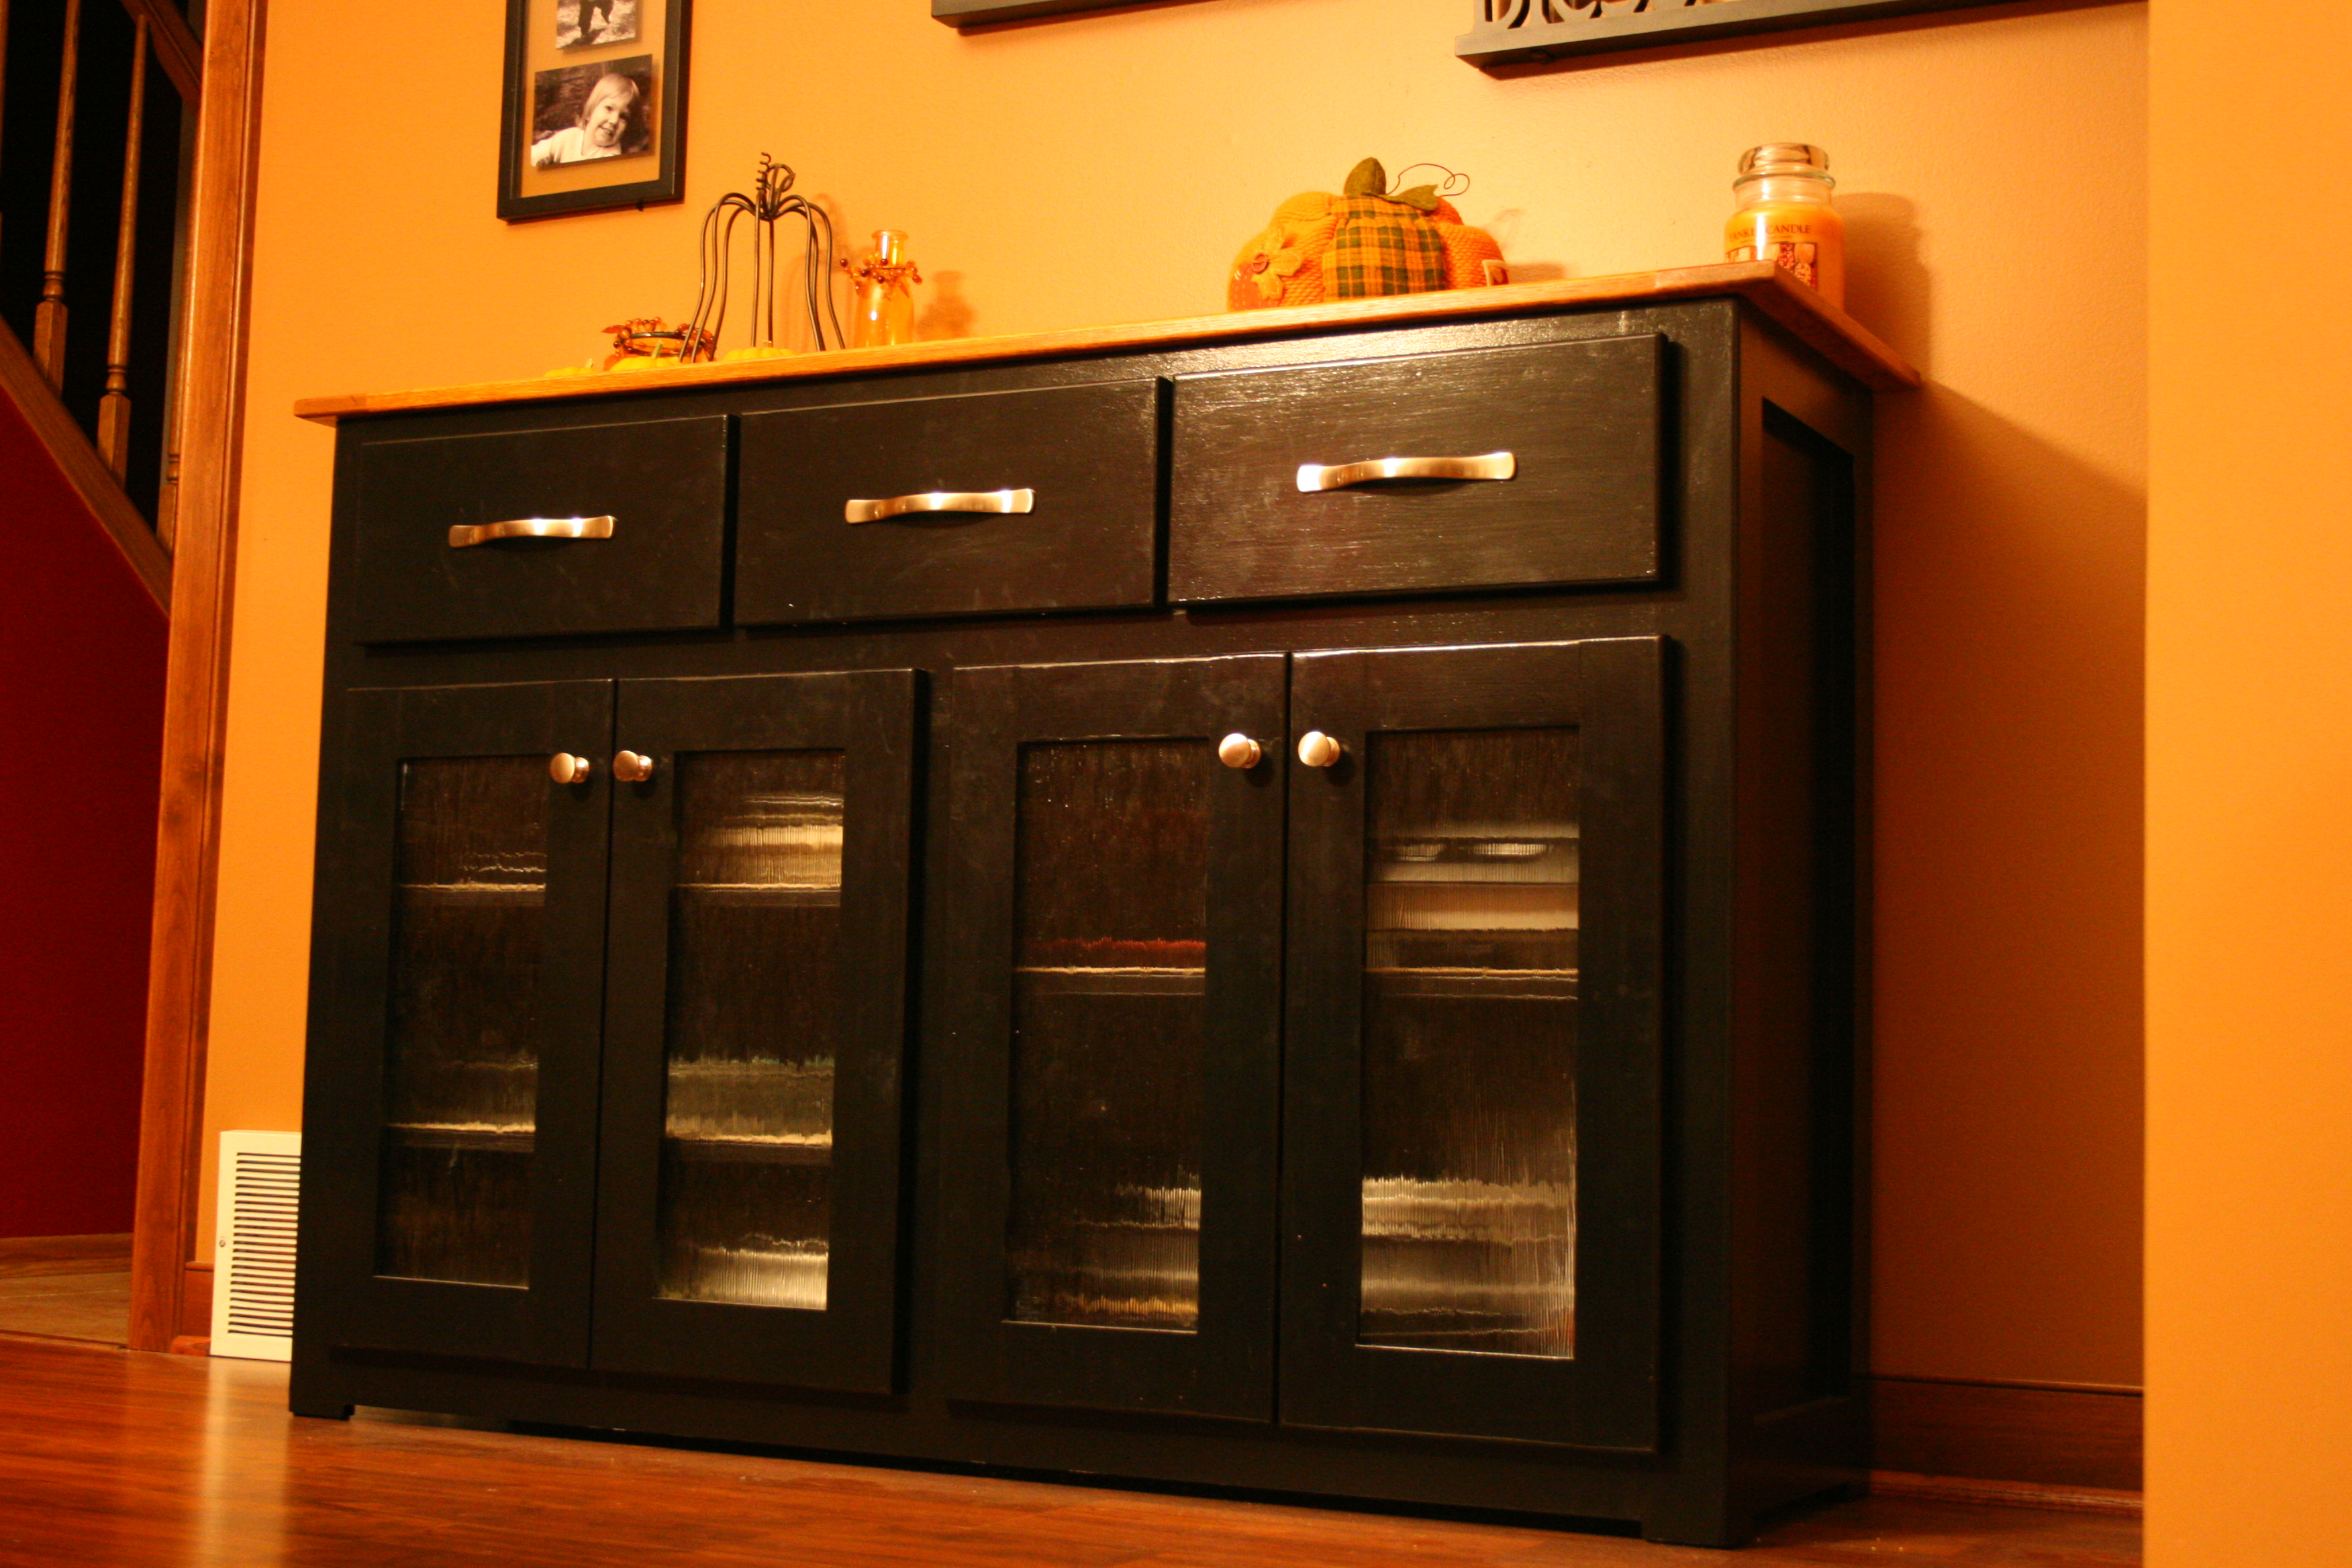
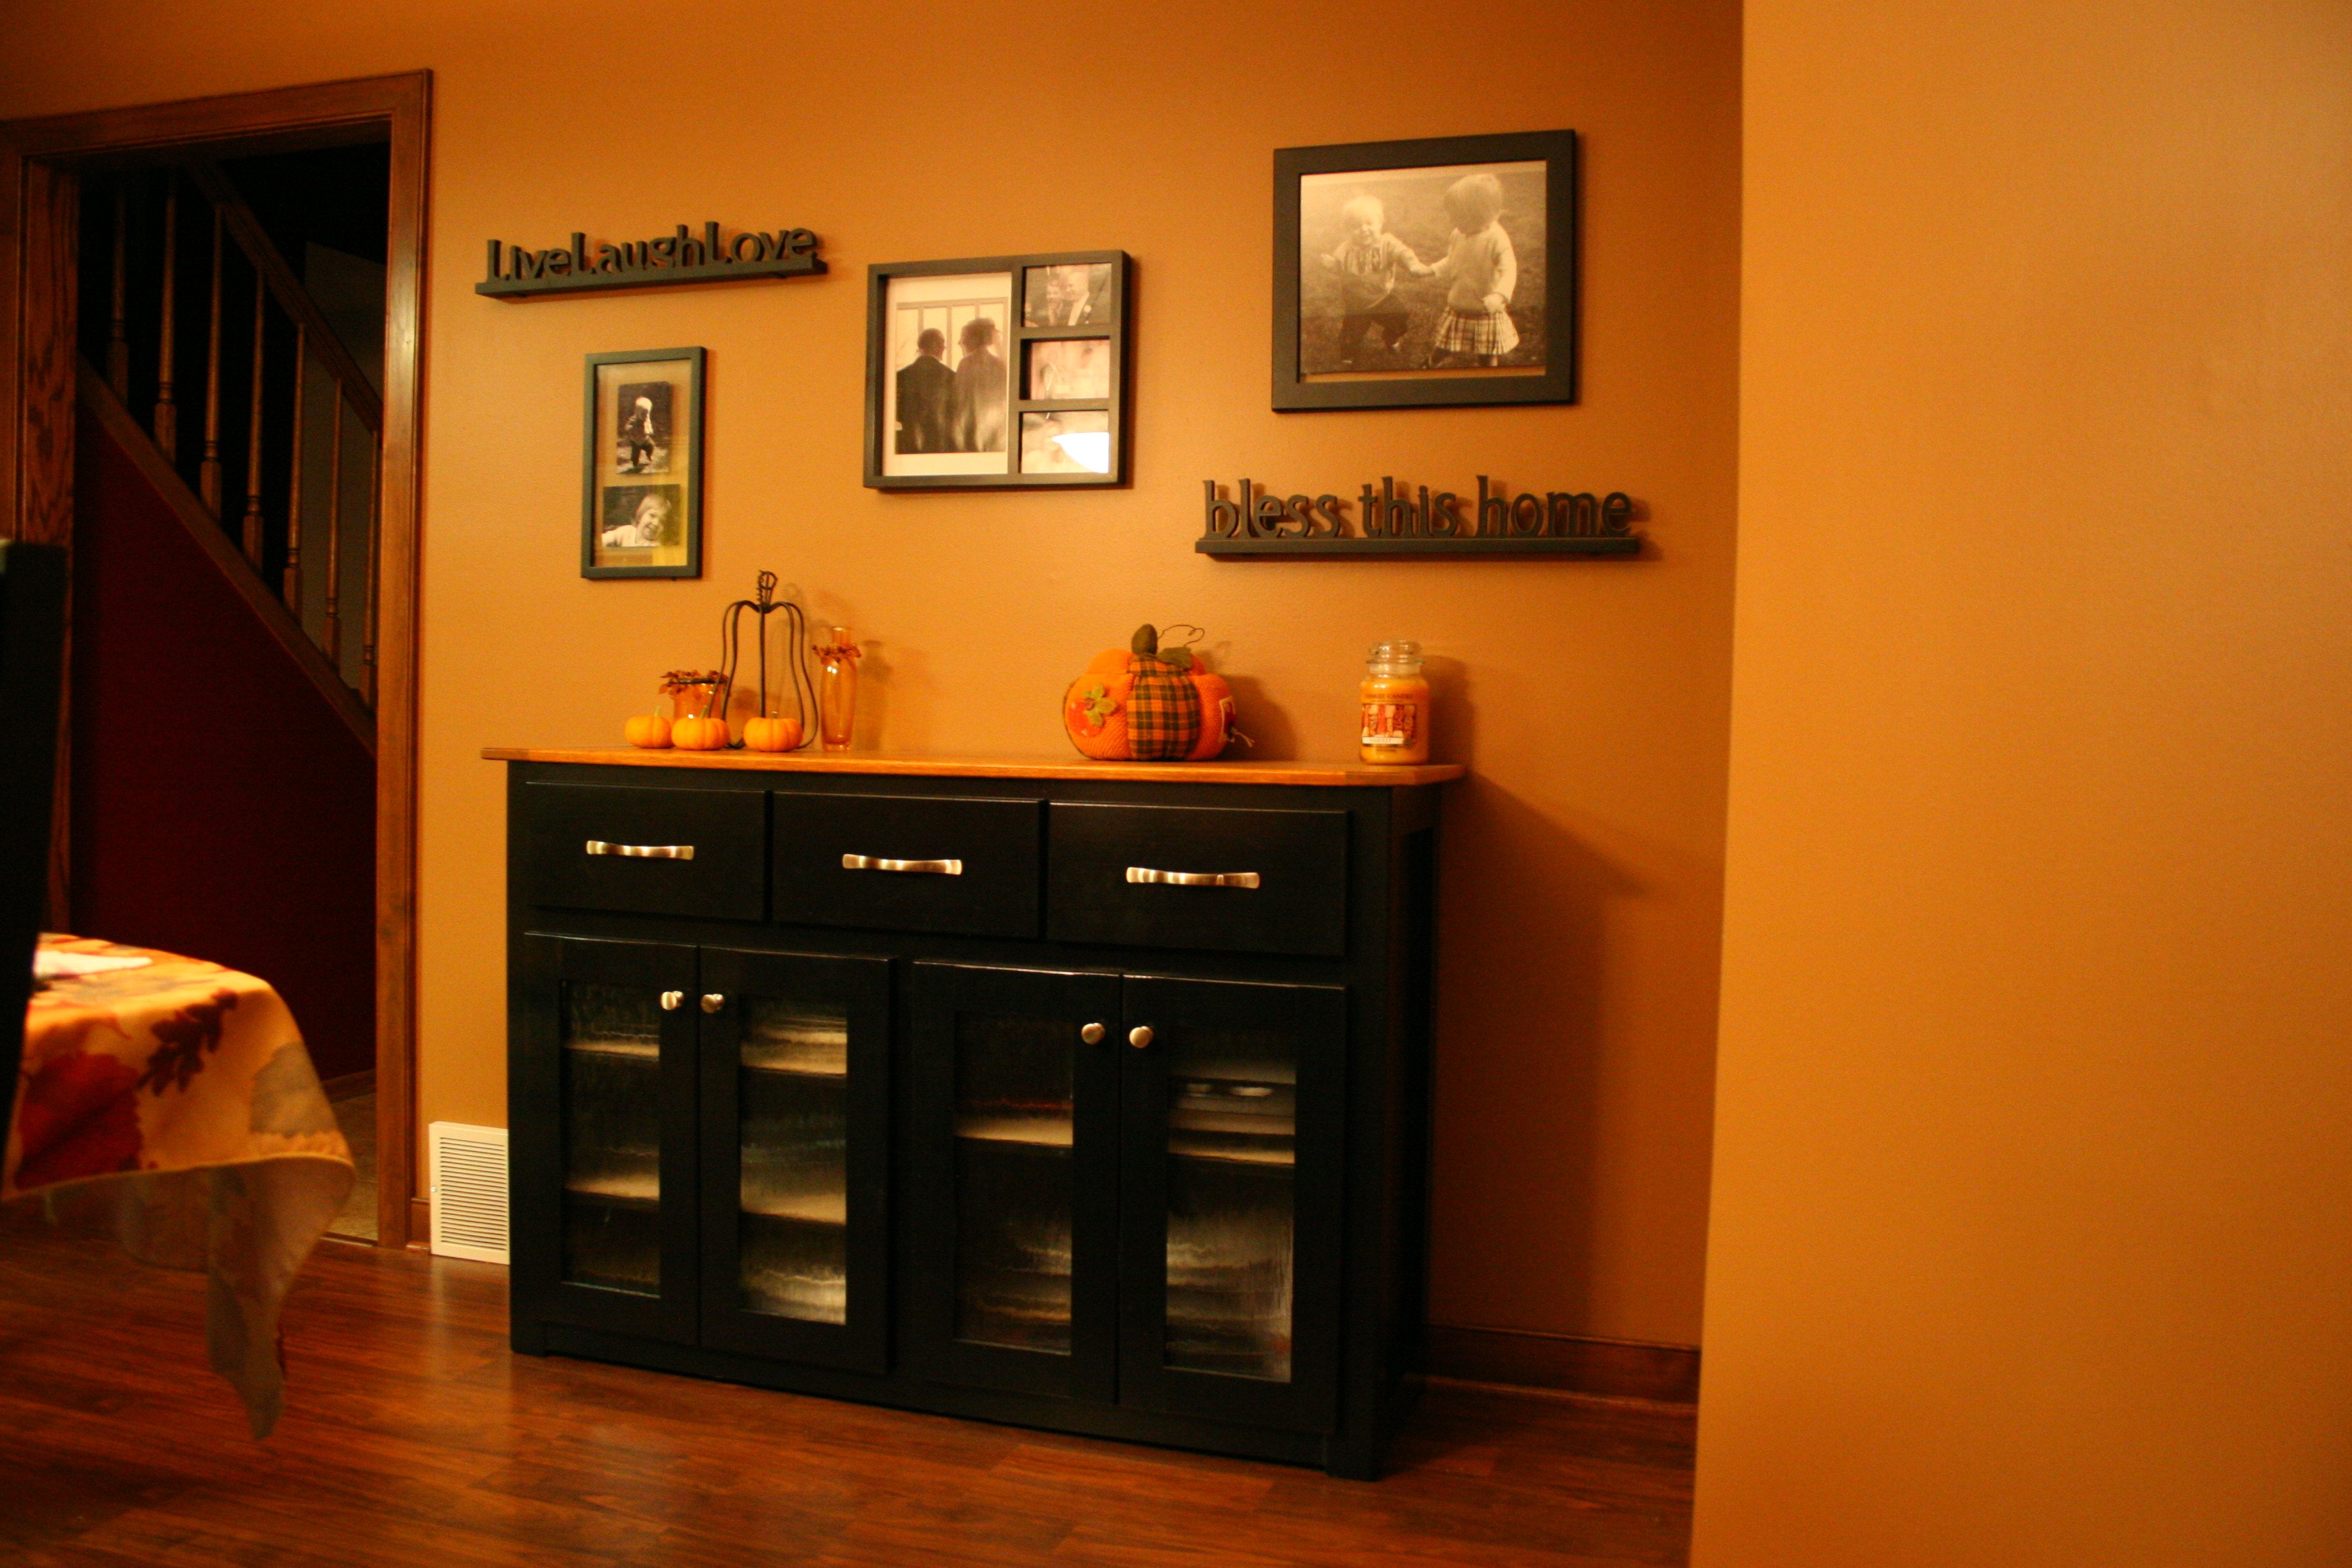
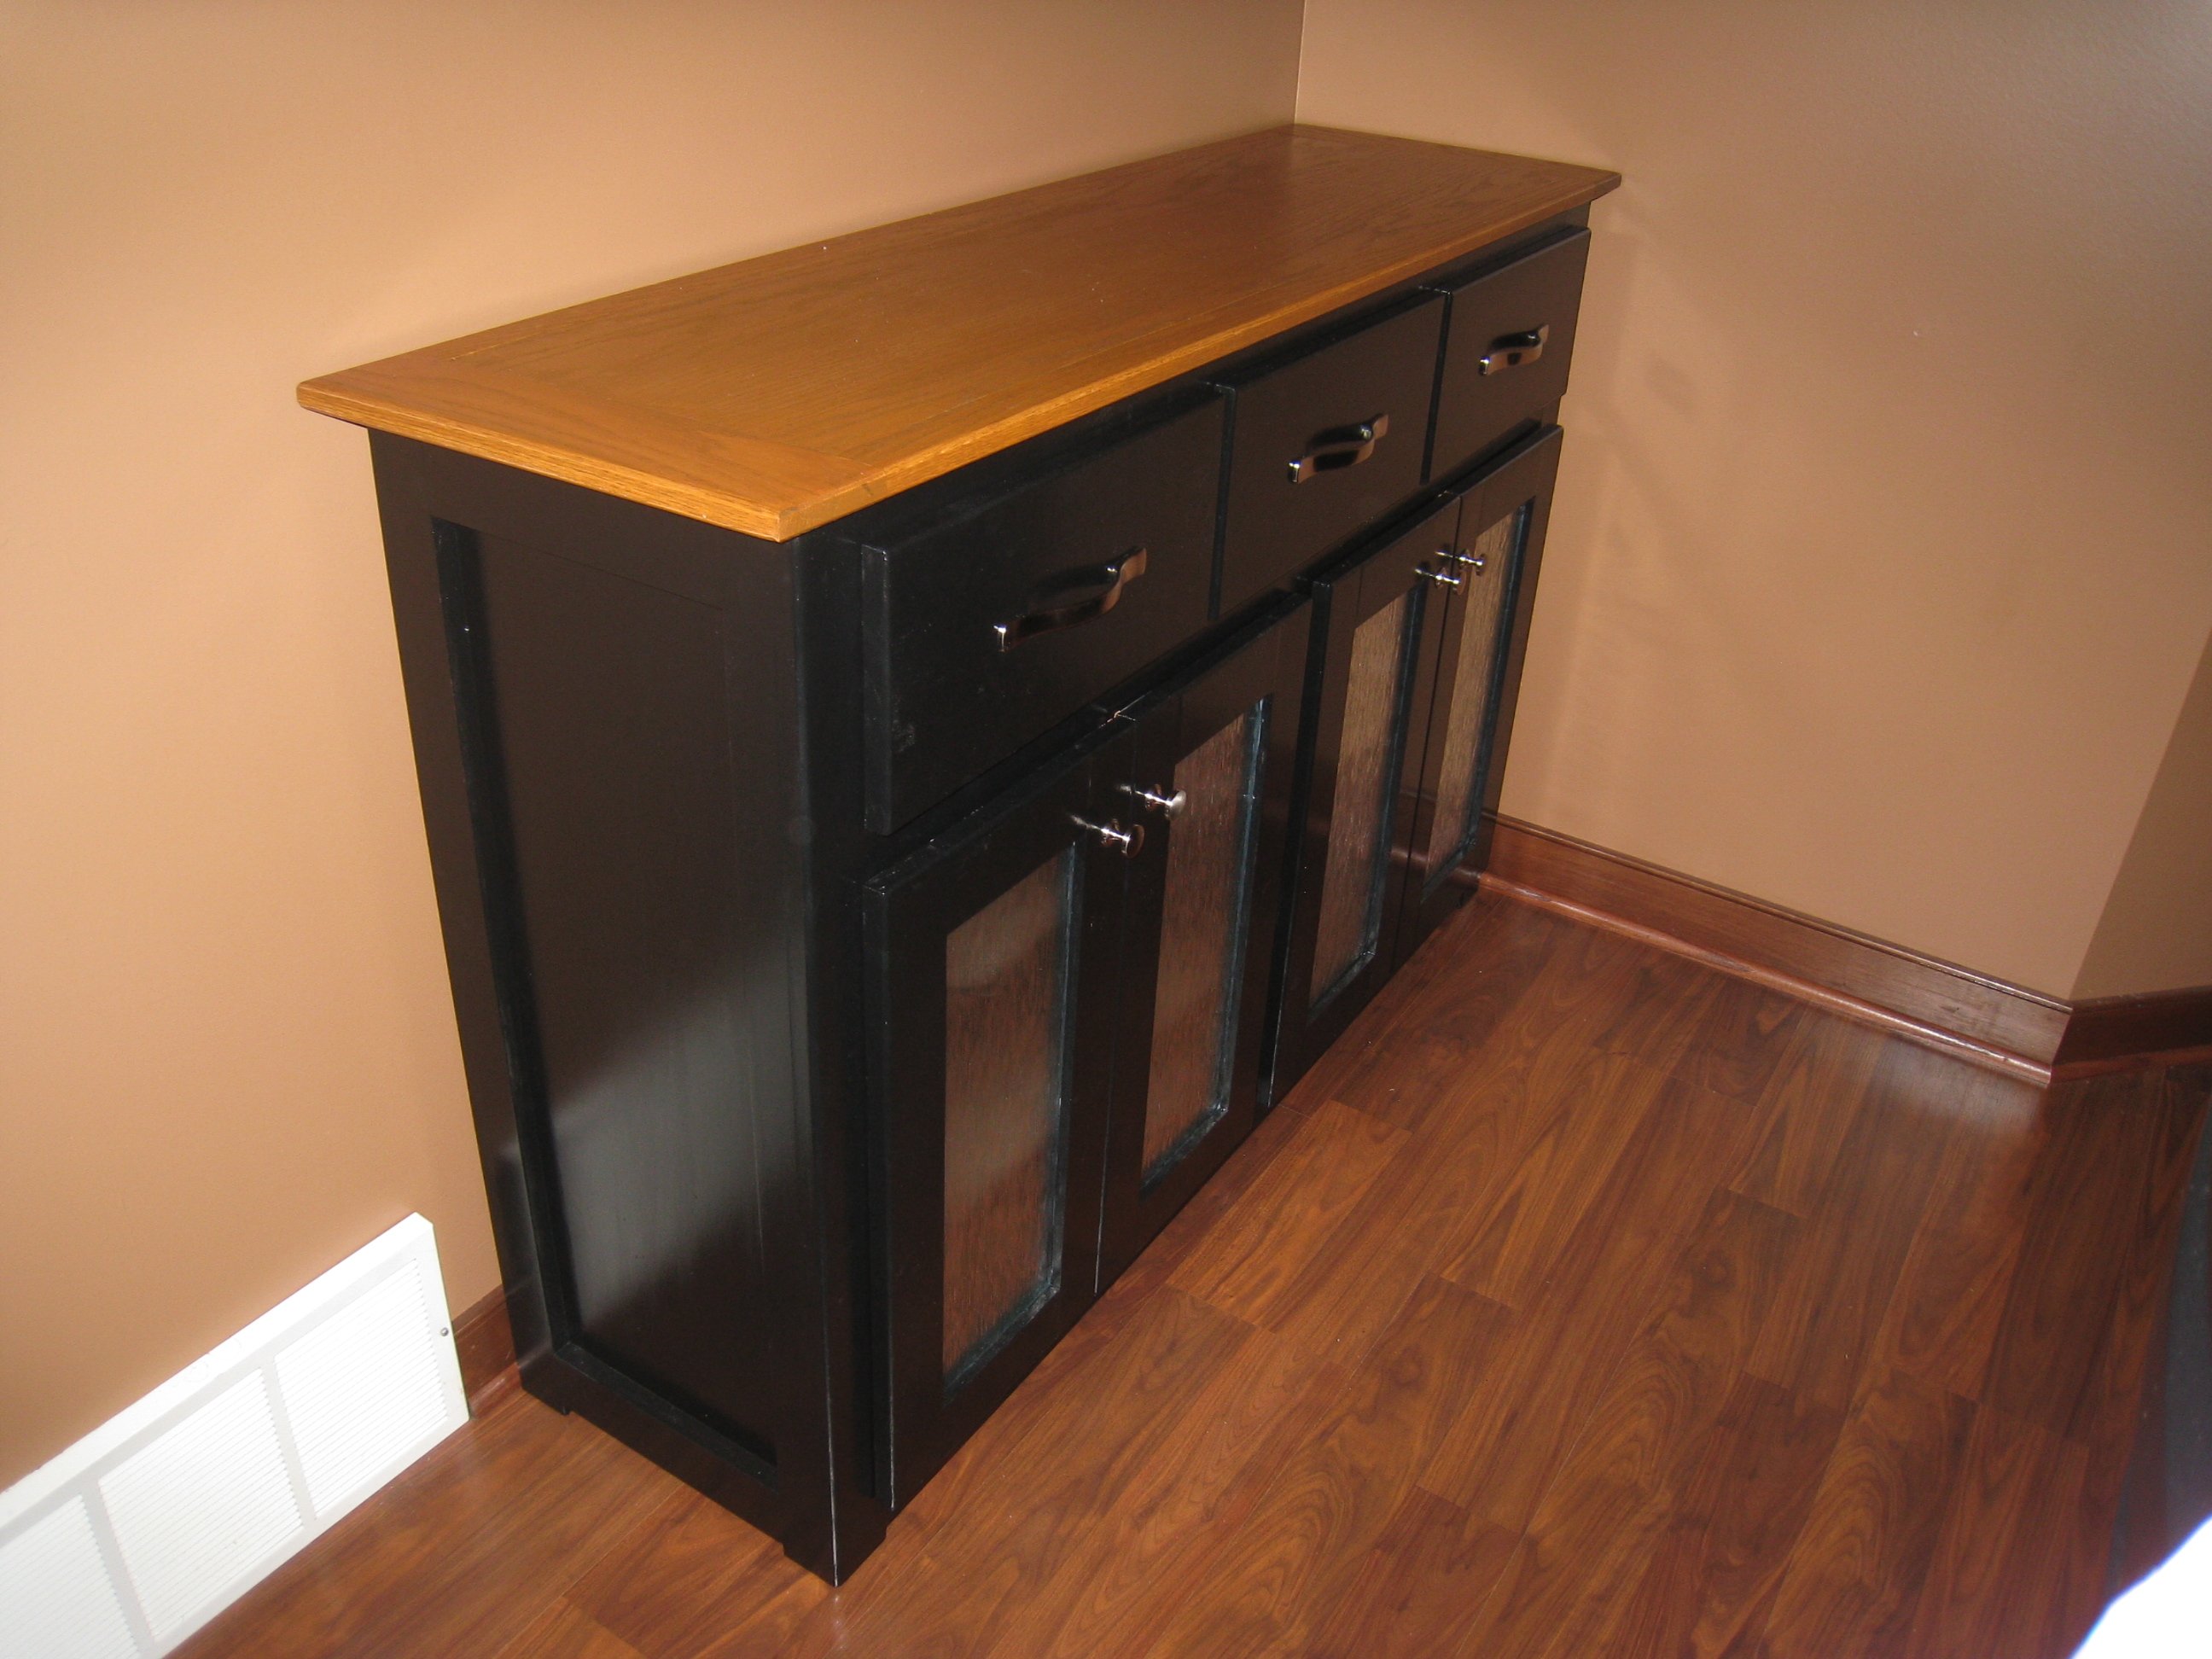
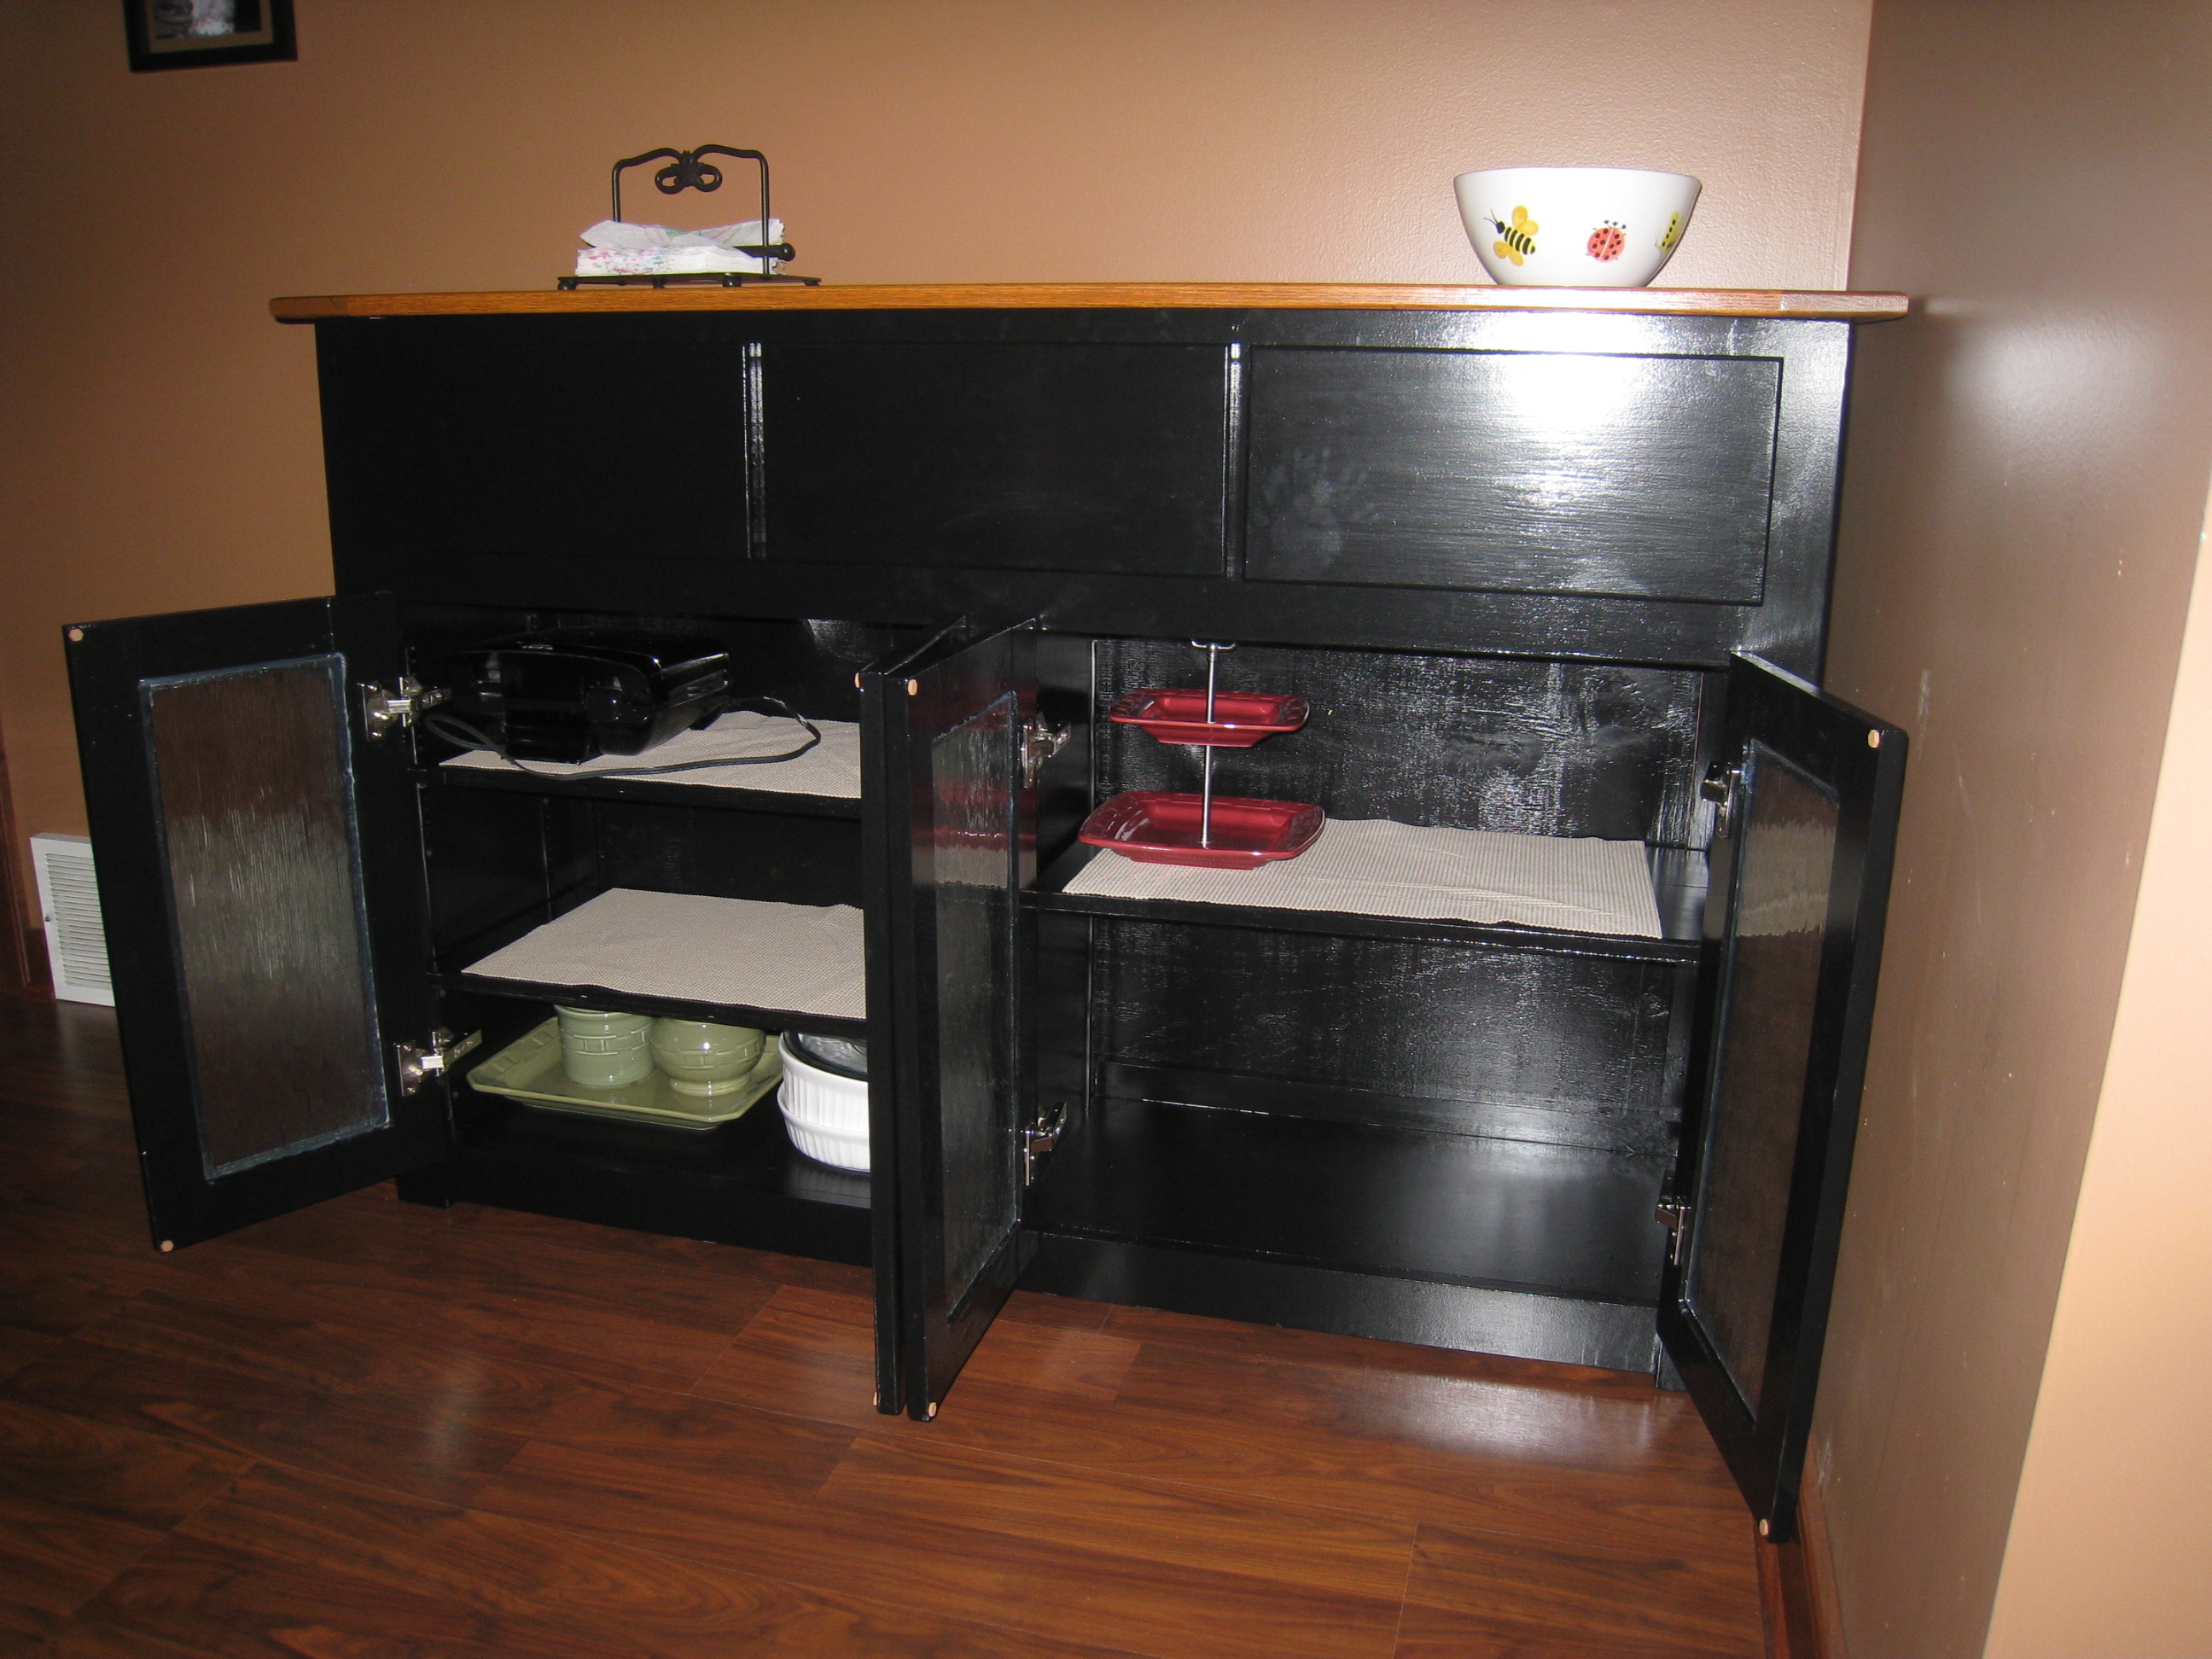
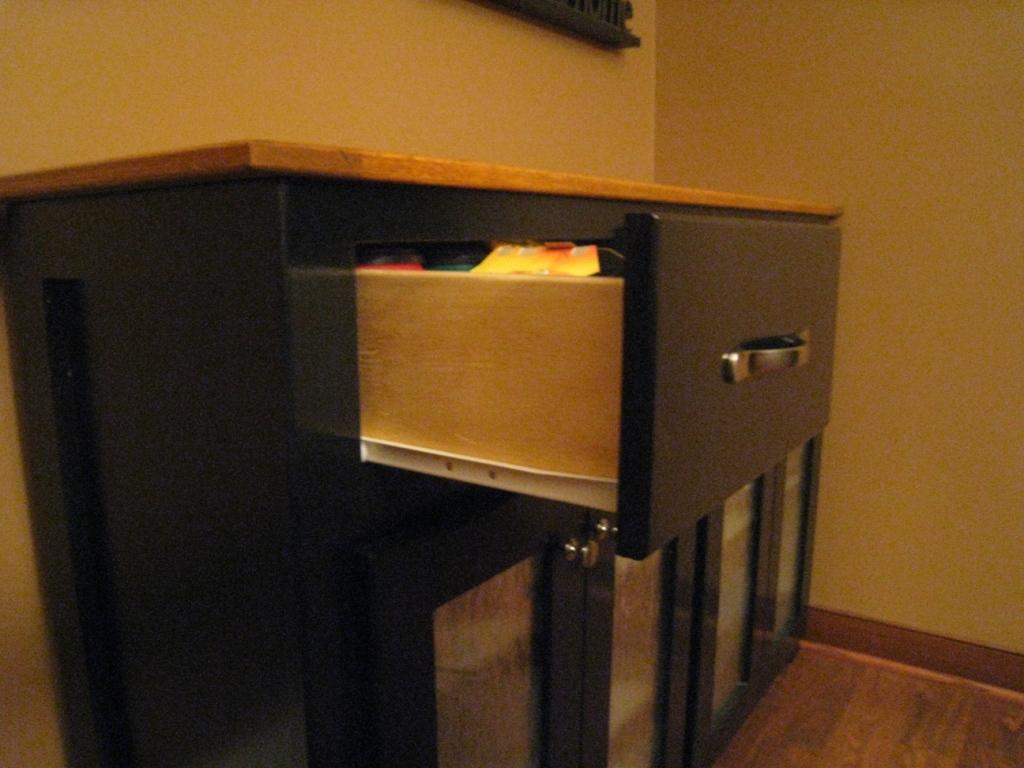
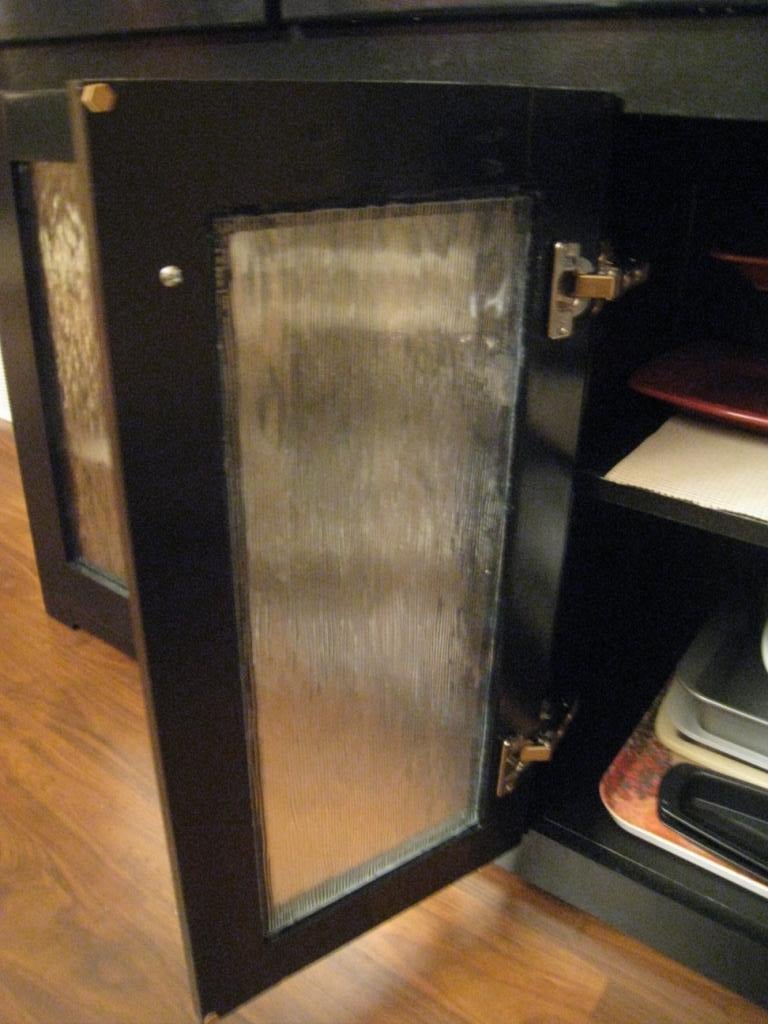
We wanted a buffet for our kitchen- but couldn't find just the right plan. So I modified the "Dresser with open bottom shelf" slightly to remove one shelf and enclose the bottom with Doors. We matched the colors from our dining room set (black bases with stained seats and table top). The glass was purchased from a local company and is called 'cord glass' to match some other custom cabinets in our home. I do have the sketchup plans- been trying to clean them up so I can get a plan posted... but can email them in their current state if anyone wants them.
Mon, 11/28/2011 - 11:30
Thanks- I didn't say but this actually was my first BIG project from Ana-white. It did take me longer than I anticipated (two long weekends) the painting was probably the most time consuming as I was trying to get it 'spray on' like- but didn't quite achieve that look.
Re. the pulls; I think there was a total of 5 trips to Menards and HD with different options being considered- we finally went with these as due to the large drawer size all others seemed to be under-per-portioned. So thank you - glad to see it shows well.
Appreciate your comments!!
Wed, 11/30/2011 - 11:34
This is beautiful! You did an amazing job. This is exactly what I was looking for to finish my dining room. May I please see your plans? Thank you so much.
Mon, 11/28/2011 - 16:36
This piece if a beauty. Your hard work does show very well.
I would like it, if you don't mind, if you could send me the plans. That would be awesome. I will email you if I need to to get something explained.
Just moved into a new home and this piece would go great in the dining room.
Thanks,
dana
[email protected]
Tue, 11/29/2011 - 10:13
Mr Carey, I love your buffet. I to would love to have your version of this plan doors and all. Thank you for sharing...Vi
In reply to Love the cabinet by viola
Tue, 11/29/2011 - 10:19
Vi- be glad to- just let me know where to send it to.
Brent

Tue, 11/29/2011 - 20:53
This is exactly the type of thing I've been wanting to make for our dining room. Great Job!
Thu, 12/01/2011 - 19:54
Looks beautiful! Can I please have the plans as well? Been looking for something just like this to build. Great job! [email protected]. Thanks!
Tue, 12/13/2011 - 23:24
This is a beautiful piece. You did a lovely job. I would love to have the plans. [email protected]
Tue, 01/10/2012 - 14:48
The top is actually a 3/4" oak veneered plywood with 1x3 (sides) and 1x4 (ends) framing. I used a friend's biscuit joiner and glued the sides on with biscuits. I thought about using pocket holes but wasn't sure how to make the boards stay straight... and had used a biscuit joiner before - so opted for that. Let me know - I can send the google sketchup plans if you want them.
Mon, 12/19/2011 - 08:56
Mexiian1 - Just need your email address to send you the sketchup plans. I've sent them out to a few already.
Sun, 01/01/2012 - 13:12
Looks amazing! Would love the plans as well. [email protected]
Sat, 01/14/2012 - 16:14
My wife and I think that this buffet looks great. You have done a great job. We were thinking about making one also. Could you please send the plans to [email protected]. Thanks ahead of time.
Fri, 02/03/2012 - 20:55
Been looking for something like this for my kitchen. Would love the plans if it's not too much trouble. Very nice.
[email protected]
Mon, 02/06/2012 - 10:36
This looks great! Could you send me the plans? Thanks soo much!
Mon, 02/20/2012 - 12:41
The buffet is almost a replica of what i am looking for in our dining room except it will cost less than 1/2 the price to make it! I LOVE the buffet. Could you send me the plans please? [email protected]
Mon, 02/20/2012 - 12:41
The buffet is almost a replica of what i am looking for in our dining room except it will cost less than 1/2 the price to make it! I LOVE the buffet. Could you send me the plans please? [email protected]
Tue, 05/22/2012 - 22:52
Such a beautiful piece! It's exactly what we've been looking for! I'd love to see your plans! [email protected]
Sat, 05/26/2012 - 22:11
The Buffet looks awesome! You have done an amazing job. I really like the glass doors.
Neal
Tue, 06/12/2012 - 10:03
Could you please email these plans to me @ [email protected]?
Thanks.
In reply to Email plans please by shawns1234 (not verified)
Sat, 07/21/2012 - 13:26
Thank you! And I'll gladly mail the sketchup plans.. just need your email address to mail them to. :-)
Mon, 08/06/2012 - 04:07
Mr Carey, this buffet looks stunning!!!And I've been looking for one(ready to buy) for quite some time and nothing!!! Did you use spray paint to achieve the SO SMOOTH look? It really looks amazing!!!
Can I also receive your plans by email?Thank you!!
[email protected]
Sun, 08/26/2012 - 12:59
Wow, what a beautiful piece! Do you mind sending me your plans as well as this would work perfectly in our home...
[email protected]
Thank you so much!
Sun, 08/26/2012 - 12:59
Wow, what a beautiful piece! Do you mind sending me your plans as well as this would work perfectly in our home...
[email protected]
Thank you so much!
Thu, 08/30/2012 - 20:40
I would love to see your plan. I'm looking to build something like this for my wife as a surprise. She never toss into the shop, so this shouldn't be too hard. Thanks.
[email protected]
Sat, 11/24/2012 - 22:29
This is exactly what im looking to make for my dining room could you please send me the plans? Thank you
Sat, 11/24/2012 - 22:29
This is exactly what im looking to make for my dining room could you please send me the plans? Thank you
Sat, 11/24/2012 - 22:31
could you also send me the plans? [email protected]
Sun, 11/25/2012 - 16:01
I love your buffet! I have been looking for a buffet just like this. Can you send me the plans. [email protected]
thanks
Fri, 12/28/2012 - 07:42
May I have a copy of your plans as well? This is just what I'm looking for! Thank you in advance.
Fri, 01/04/2013 - 07:45
I'd love to have a copy of your plans to make one of these for my dining room. thanks
Wed, 01/16/2013 - 21:47
I love this and exactly whative been looking for! Please if you could email me the plans! [email protected]
Mon, 03/04/2013 - 19:30
Have a look back at the post below as I've posted the address to the buffet on the sketchup 3d warehouse- pasting here for your convenience as well.
http://sketchup.google.com/3dwarehouse/details?mid=8acc2d1db12502a9cc04…
Mon, 03/04/2013 - 19:25
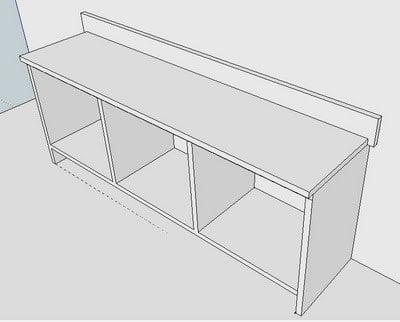
I saw on another post that the sketchup model could be shared to the warehouse- which of course I knew but totally forgot. So- I've uploaded the model for this buffet to the warehouse and it should be able to be accessed from this link:
http://sketchup.google.com/3dwarehouse/details?mid=8acc2d1db12502a9cc04…
If I had the patience to work up an actual plan I would - but hopefully the sketchup model will help - there should be dimensions and I have the cut list in the model as well. Still let me know if you have questions and I would LOVE to see anyone else's finished project!
Sun, 10/04/2015 - 19:11
Do you happen to still have the plans for this buffet? My email address is [email protected] if youre able to send them. I would love them. This buffet is really nice and the sketchup plans are not working for me.
Tue, 10/06/2015 - 18:37
Anyone who has received the plans in the past...that still has them, coukd you please e-mail them to me at [email protected]
Tia
Sat, 01/16/2016 - 13:11
If you're still sending out plans, I'd appreciate getting a set. Thanks! [email protected]
Mon, 02/15/2016 - 14:05
Not sure what happened to the 3d warehouse plans- trying a new link here, hopefully that will help some who are trying to get these.
https://3dwarehouse.sketchup.com/model.html?id=8acc2d1db12502a9cc047c39…
Or if you just go to the 3d ware house and search on "brent buffet" you will get 1 hit :-).
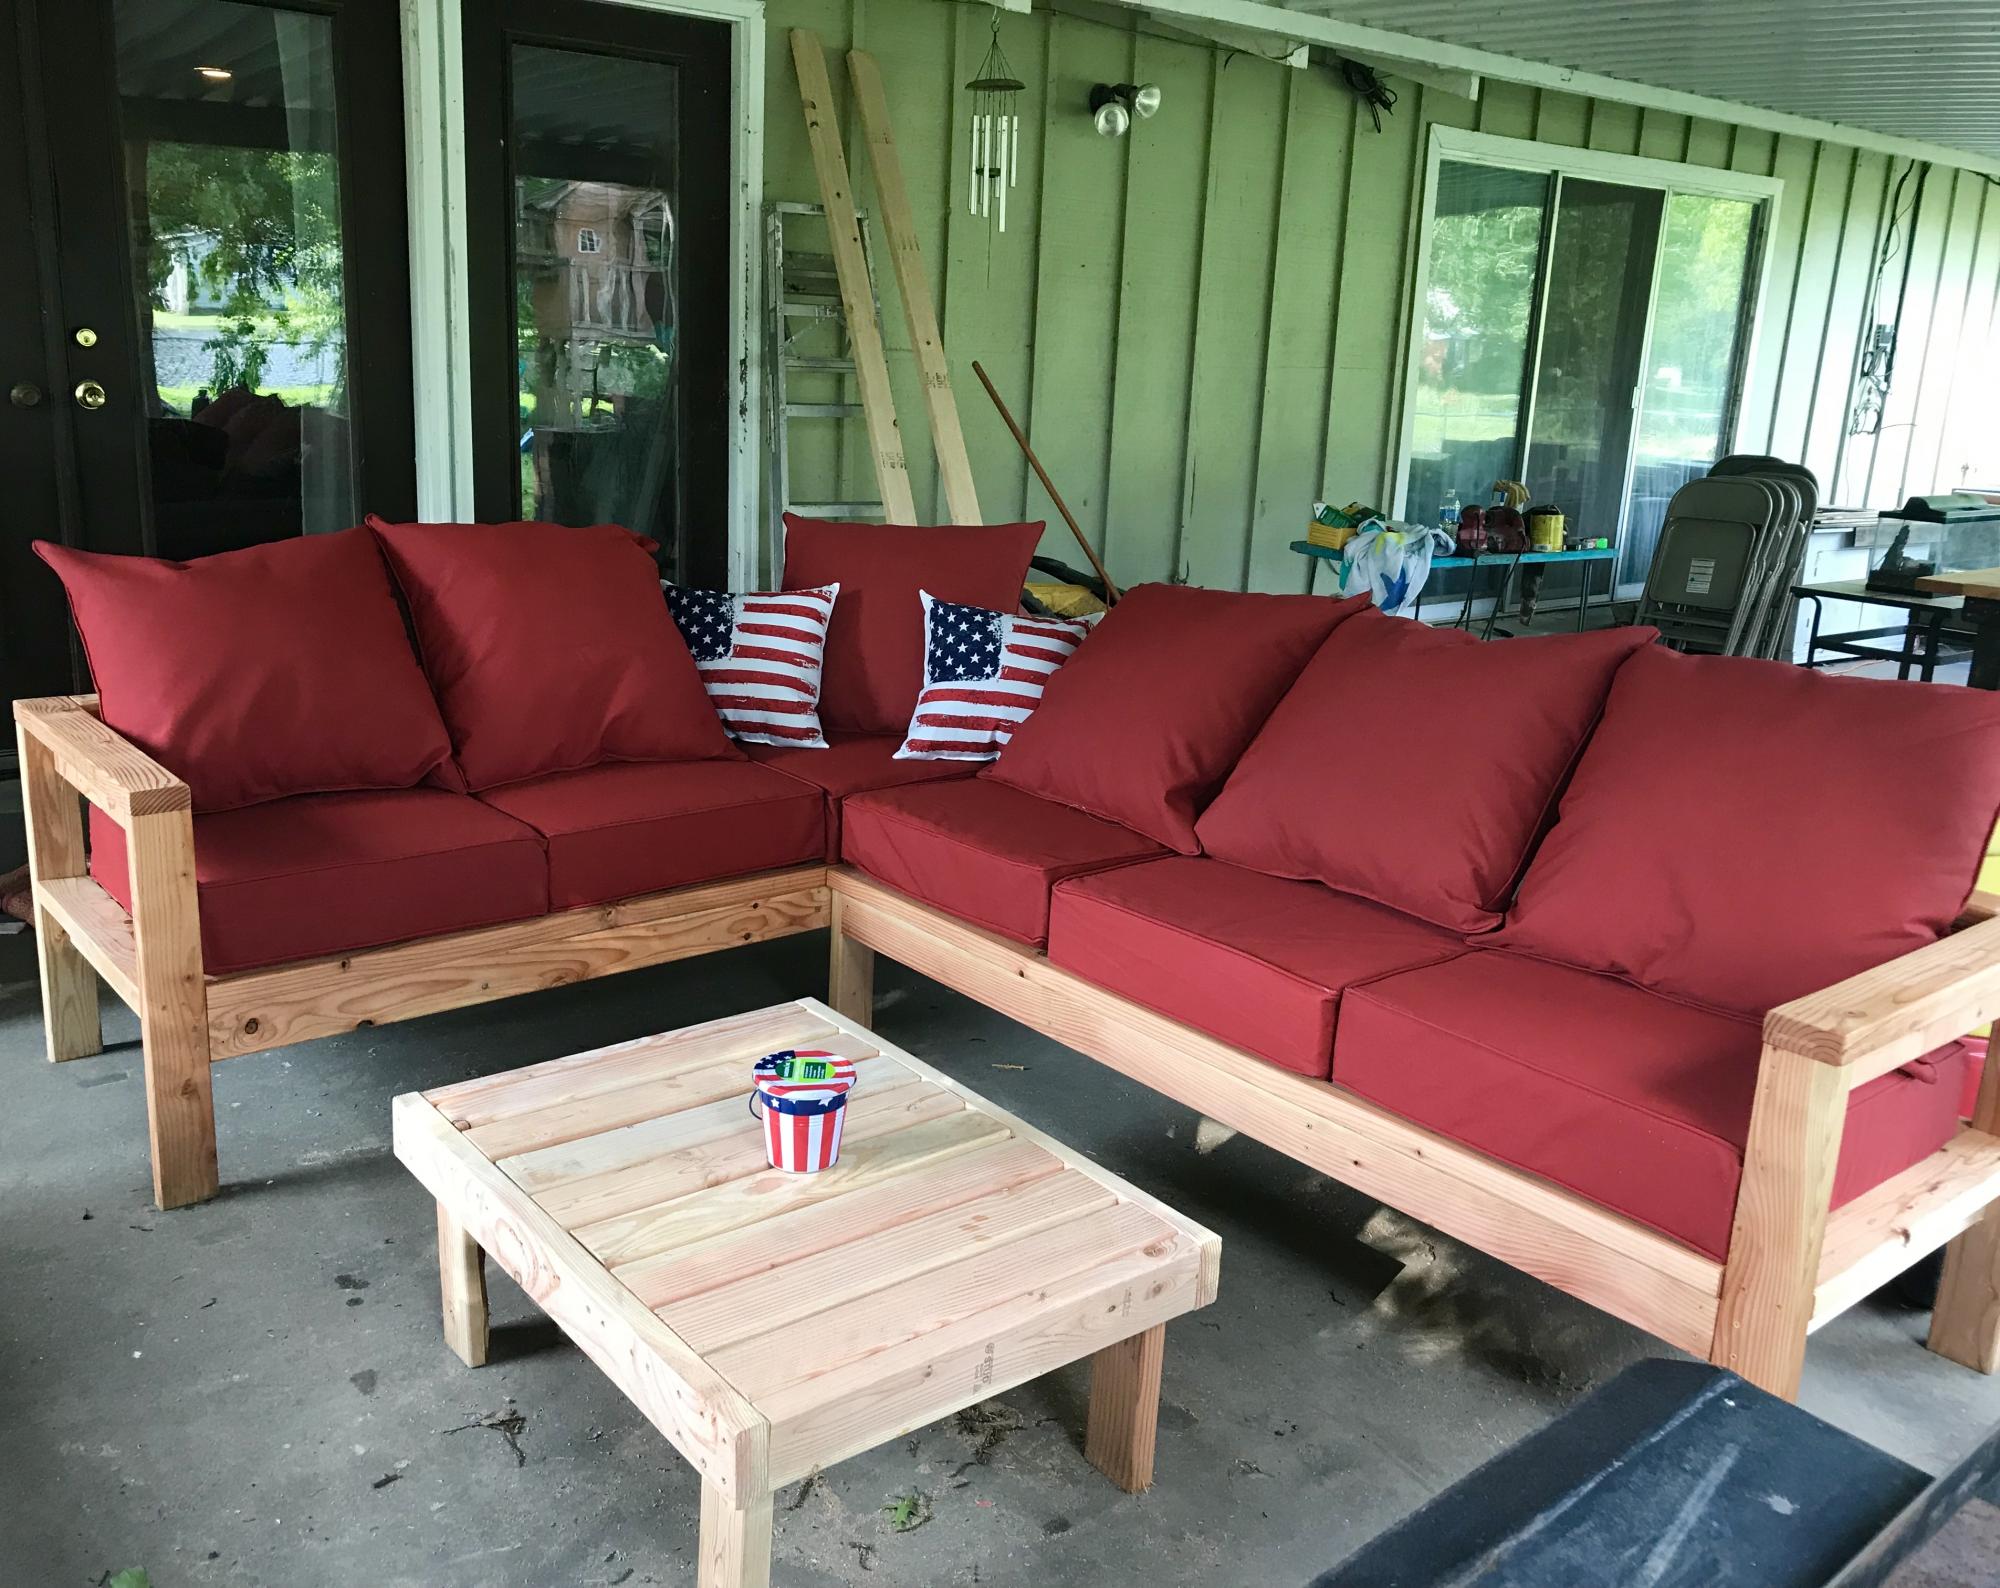
I followed the plans as written, It took me about 6 hours and that includes sanding and staining. Very simple yet offers a very wow finish. I think in total we spent about $300 for all supplies including cushions which was the most expensive part. I just finished it off with Teak Oil and an Americana theme for our covered patio. We love it.
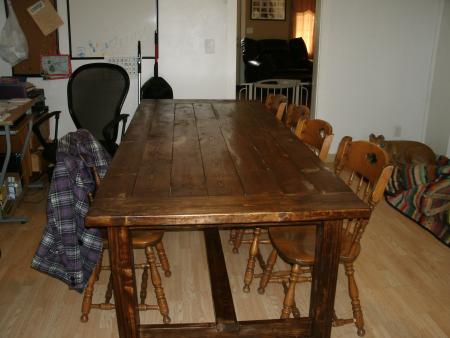
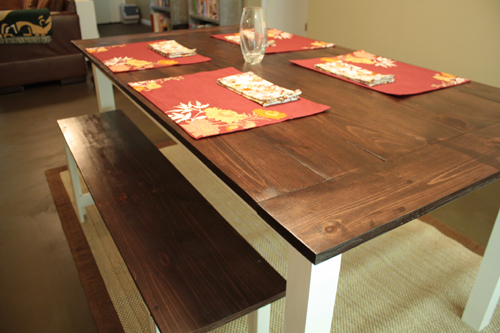
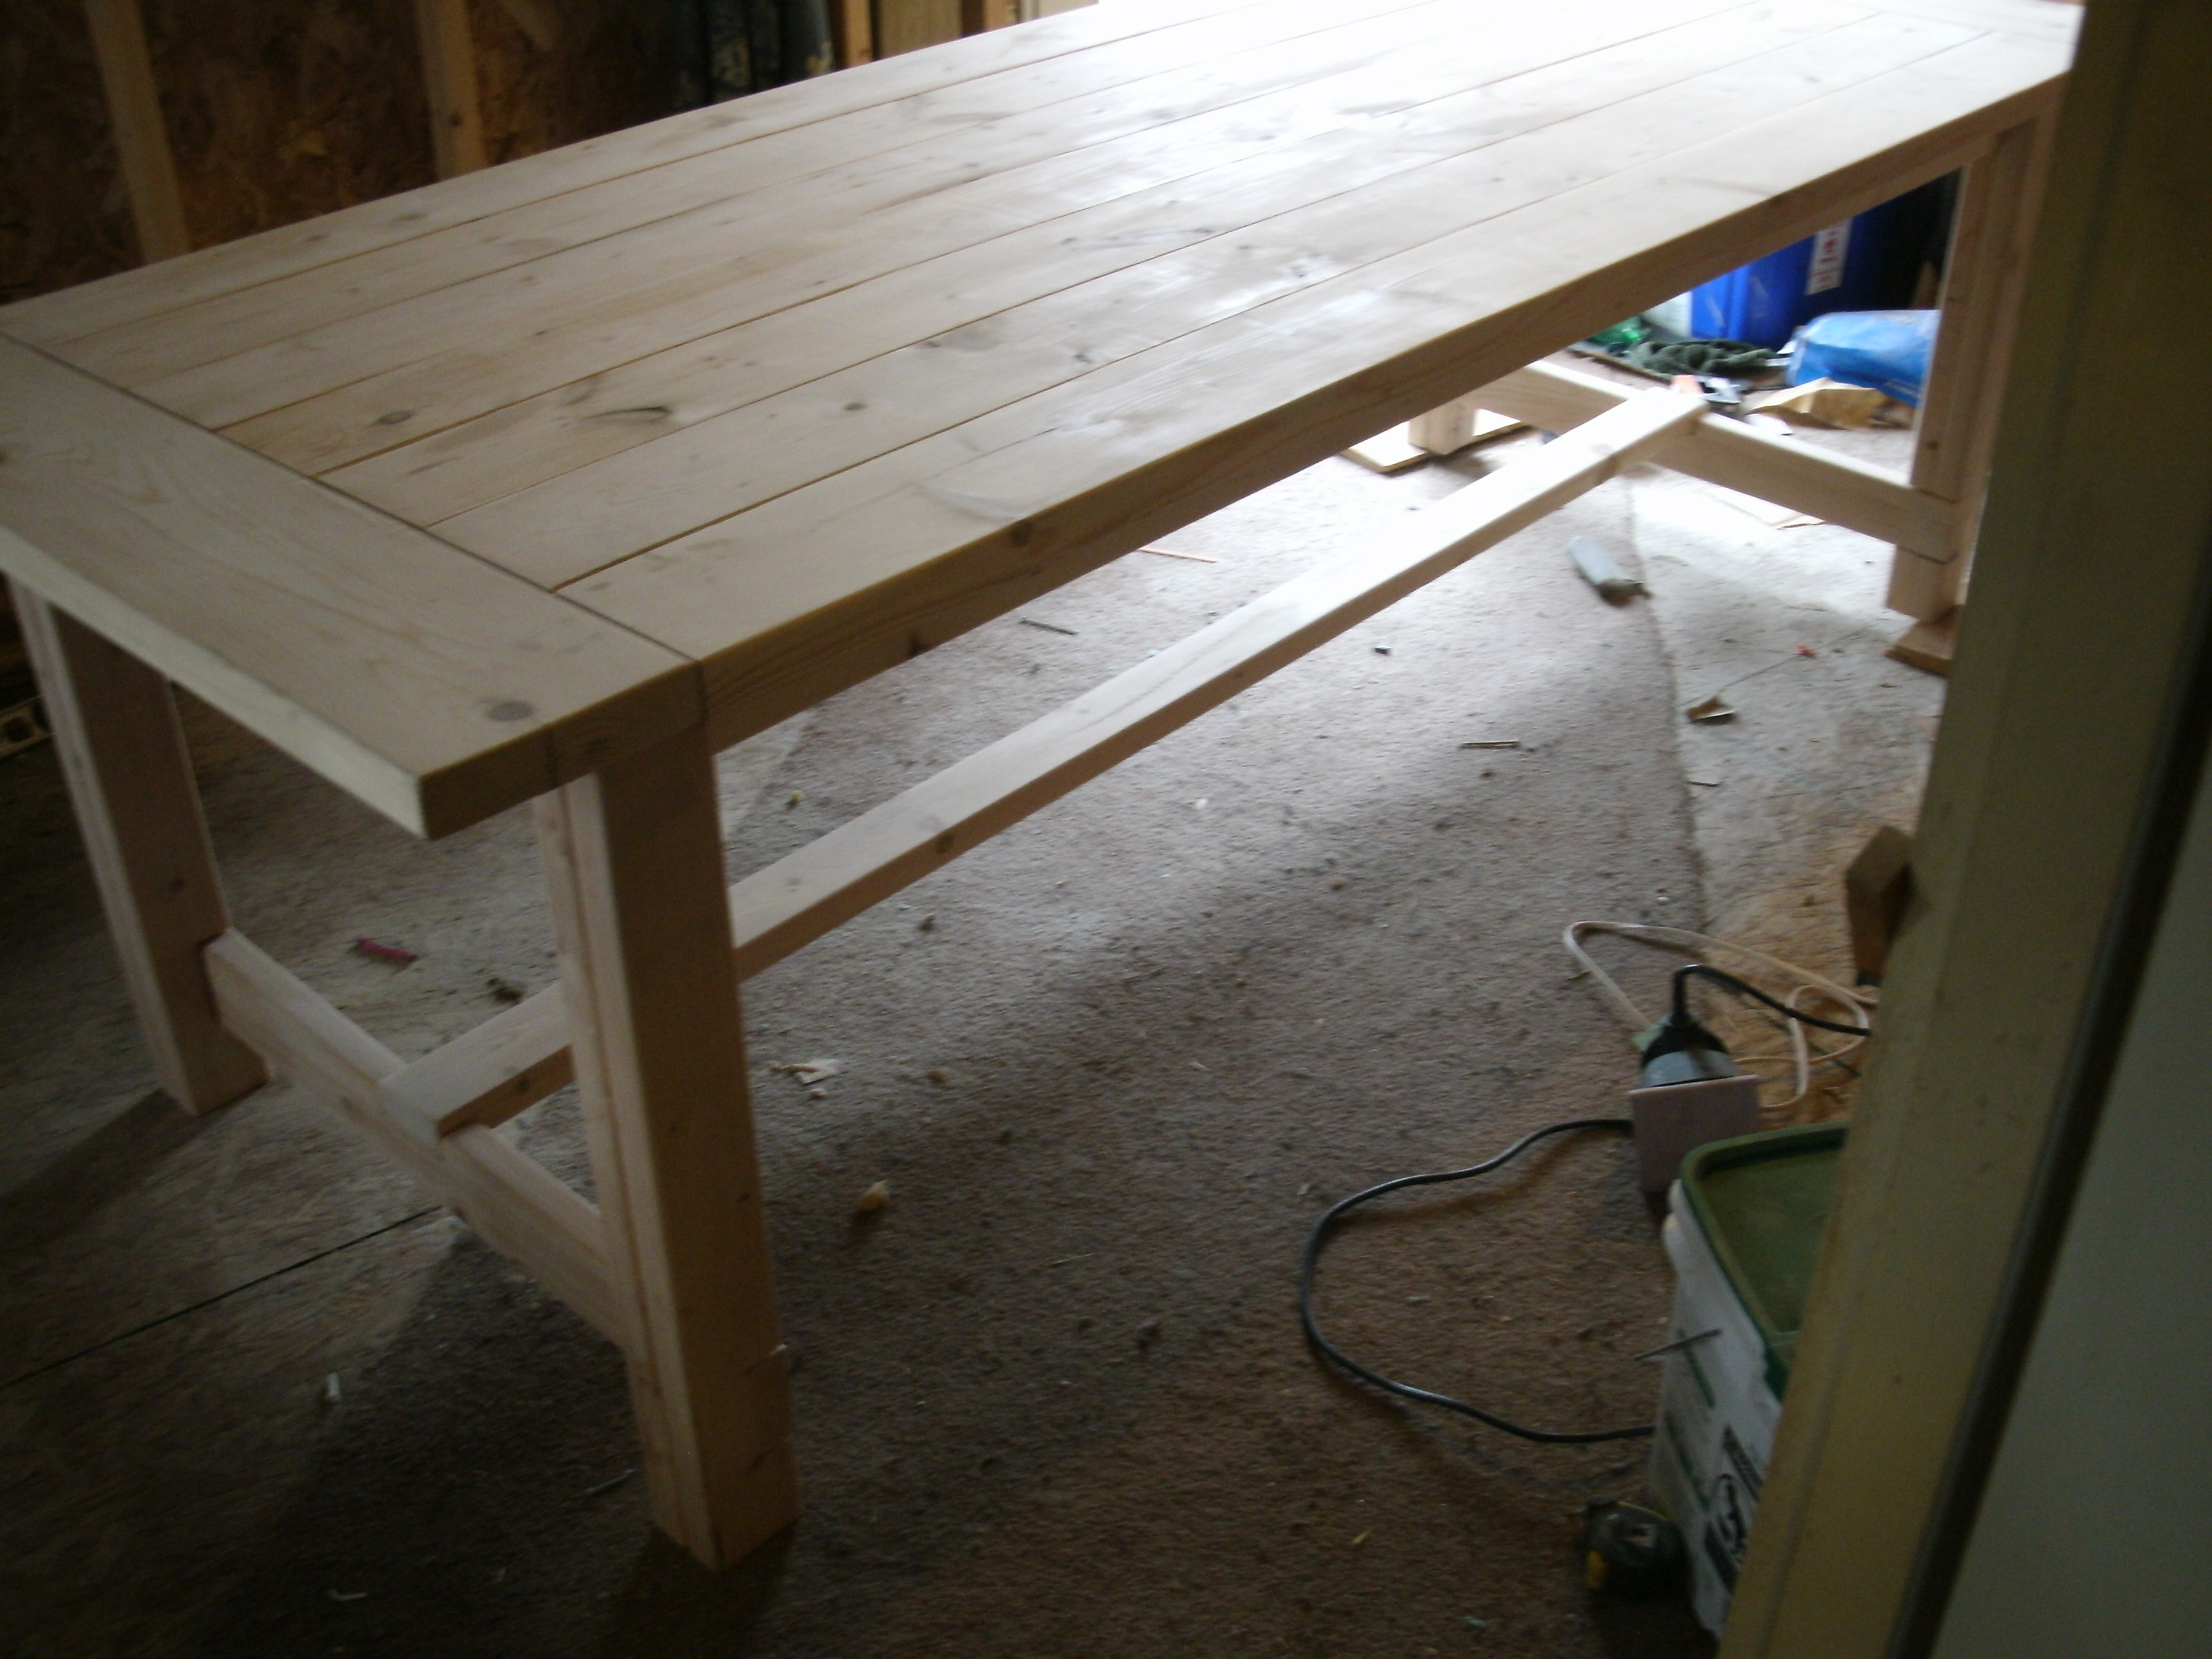
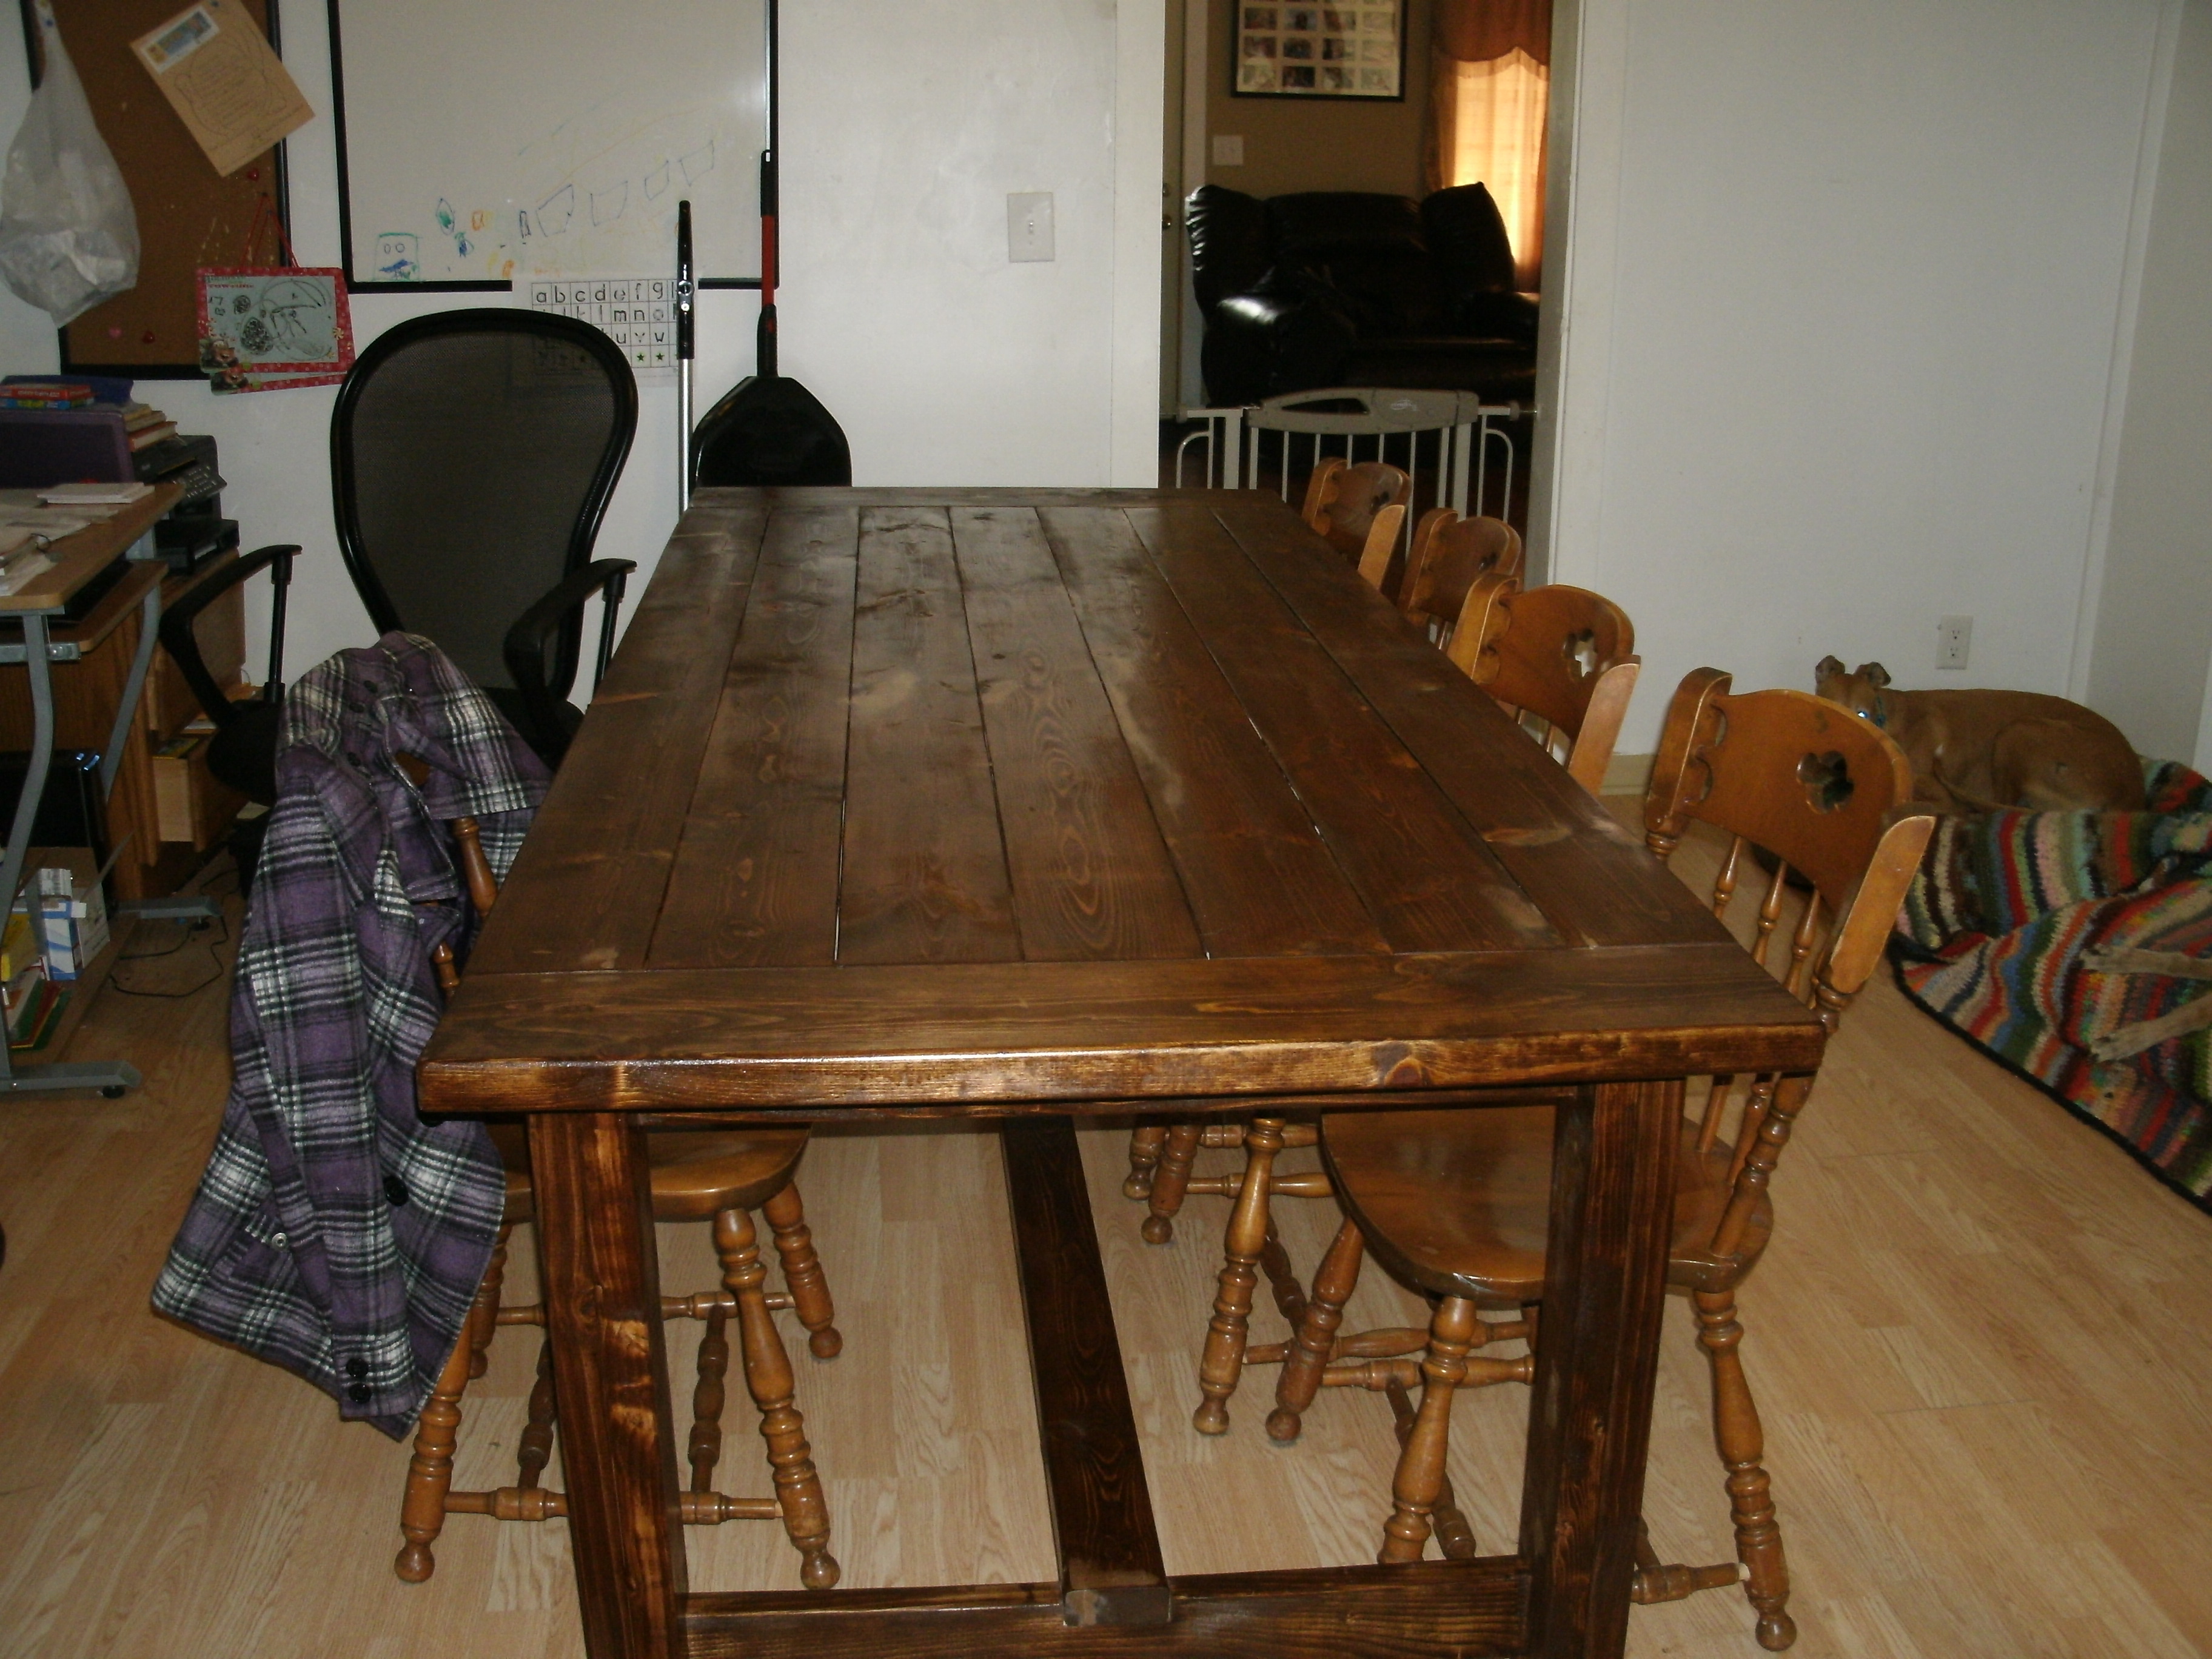
My husband and I created this using farmhouse table plans and we're very excited. It took us longer to get done than most because we all ended up sick. :o) Total cost was under $100 and it is awesome!! Thank you so much for the plans!!
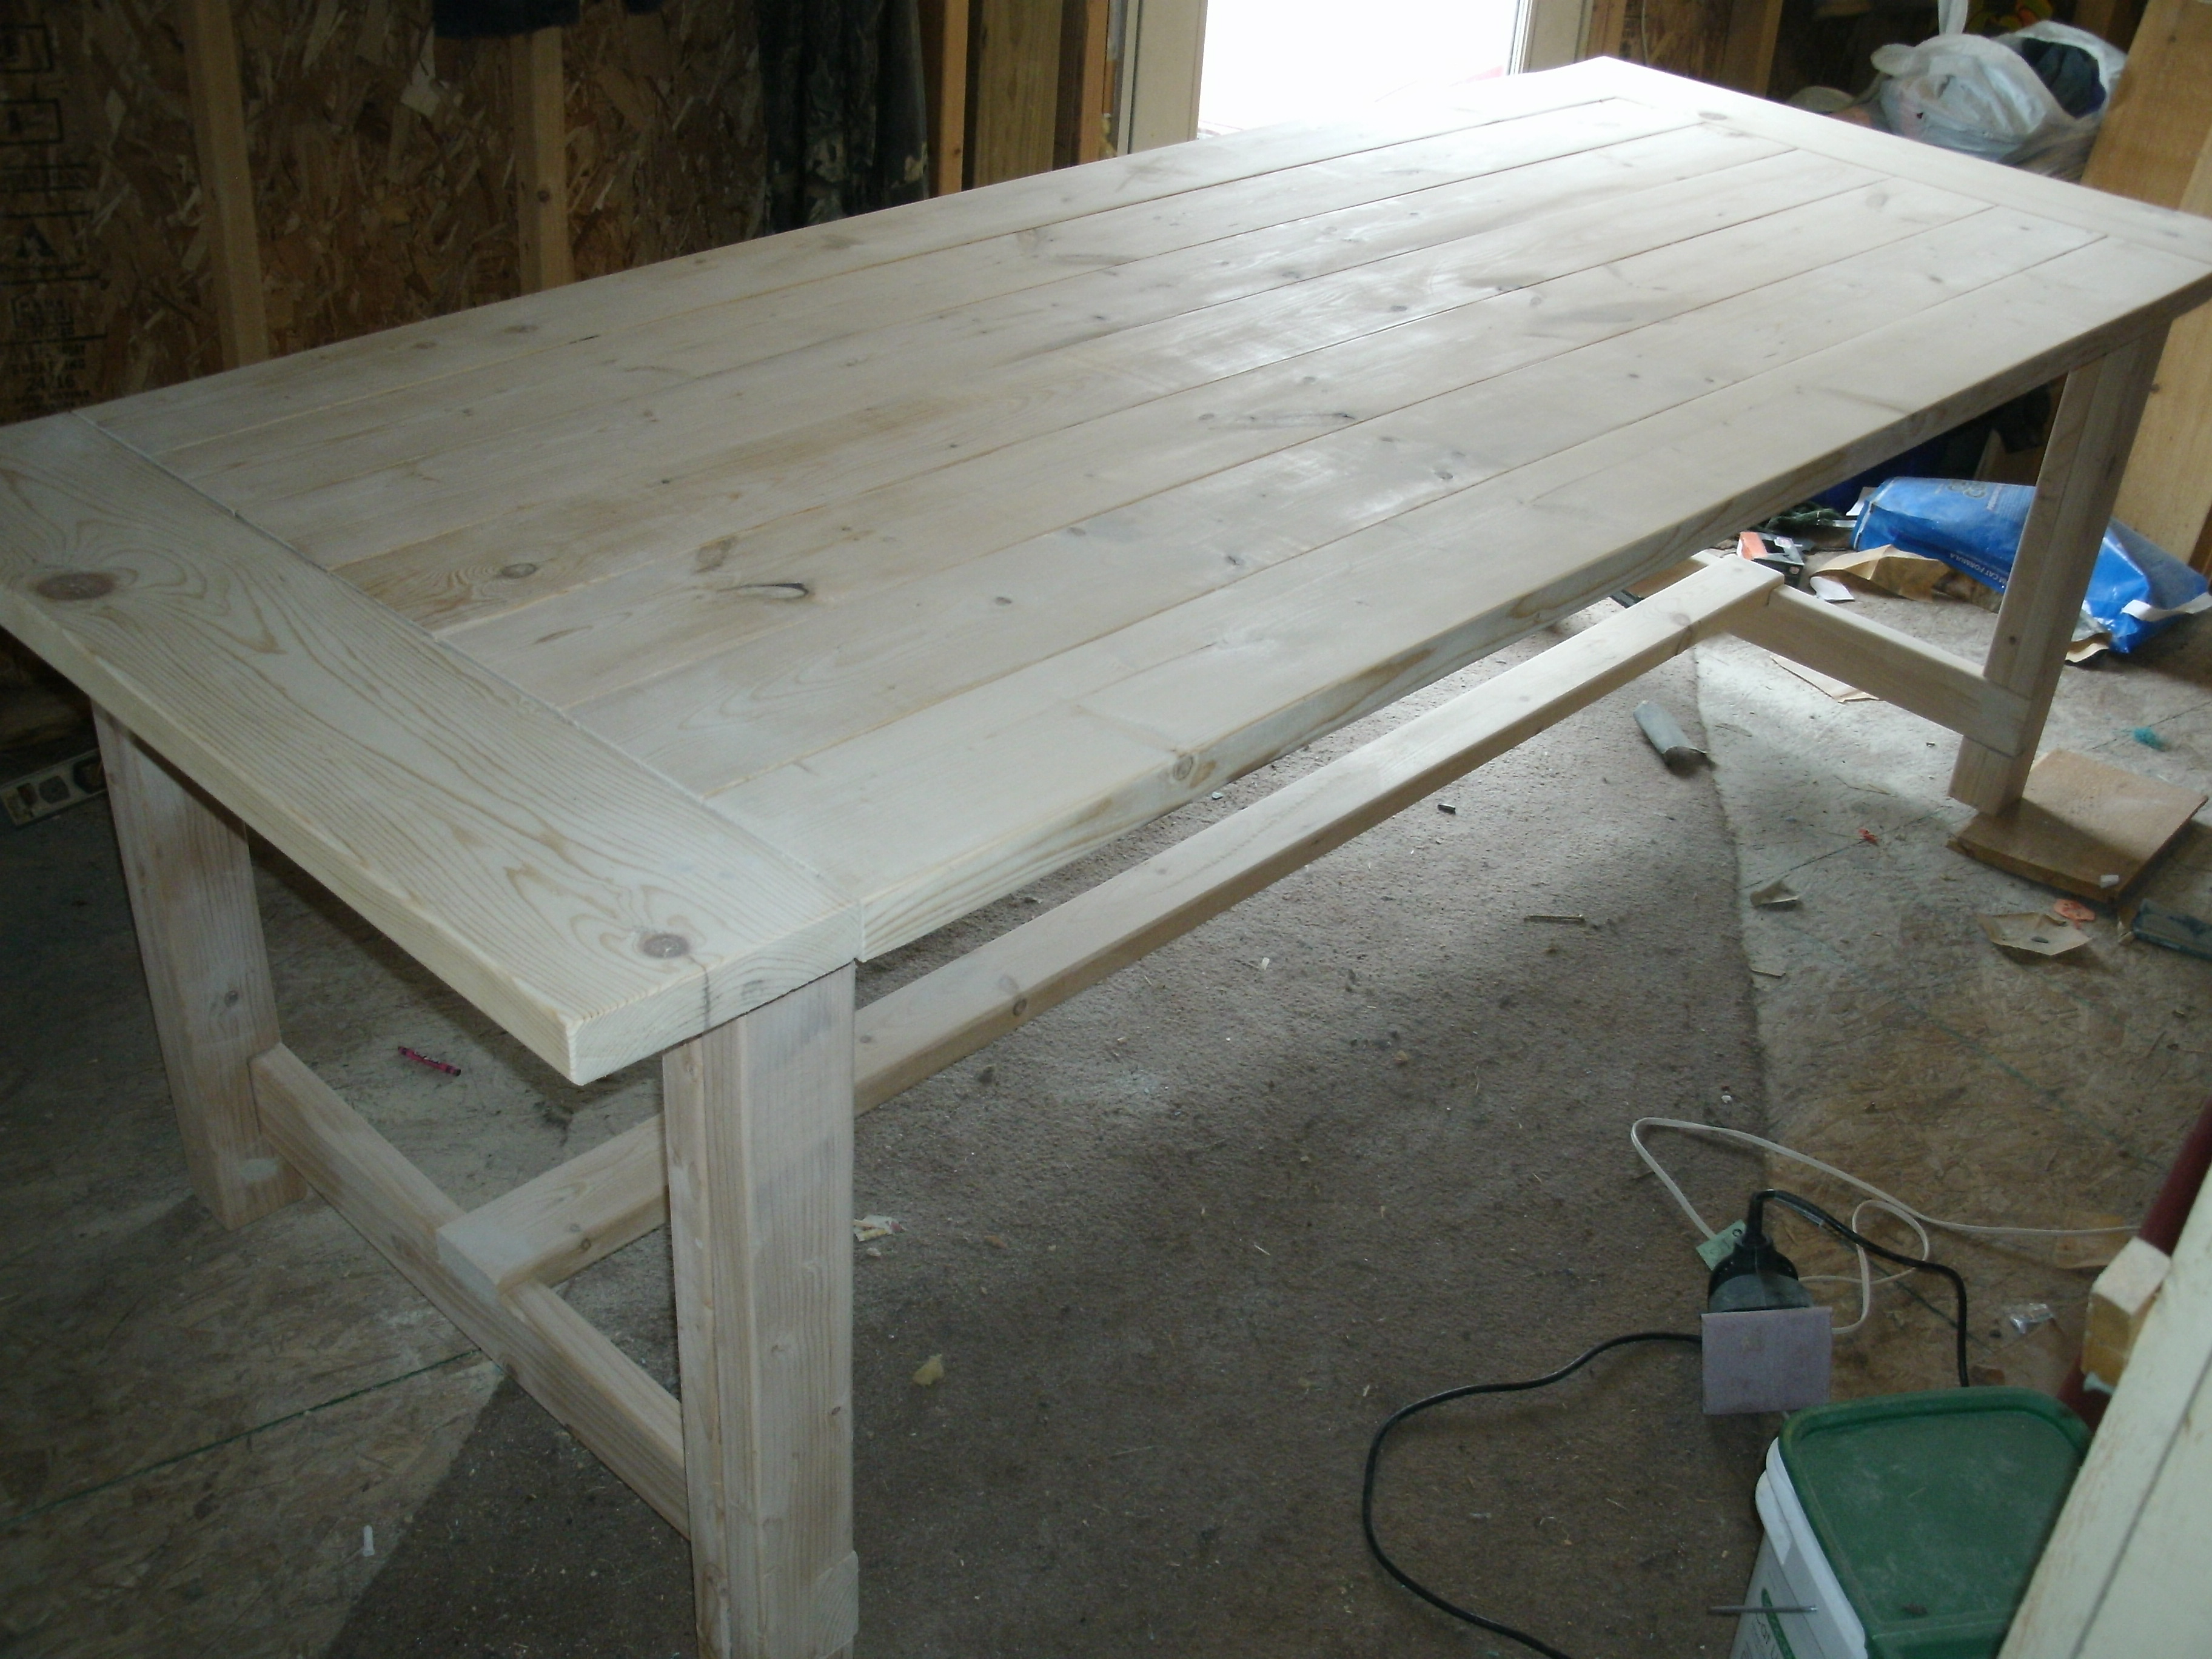
Sun, 12/11/2011 - 09:29
We are currently making a bench and a version of the stackable chairs for our 8 foot table. WE are so excited. I have work to do but only want to help build now. :o)
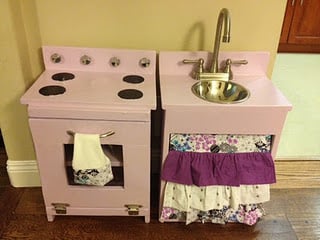
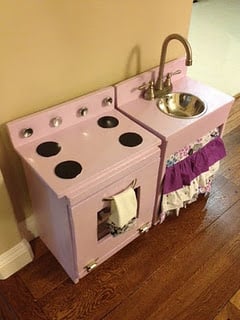
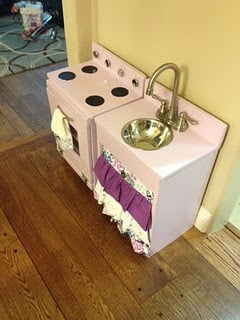
A play kitchen stove and sink for my 1.5 year old daughter for Christmas!
This was my second woodworking project ever. It was VERY involved. It took me about 3-6 months of planning, ordering, buying, figuring out, and finally building the thing.
I used magnetic primer on most of it. Some magnets do stick to it, but I learned some very important lessons: Magnetic primer is MESSY and it doesn't sand very well, so when you paint it on, it should be done in the smoothest possible way in the smallest area. I primed with it using a roller and when I sanded it, got metal shaving dust EVERYWHERE (because the metal shavings in the primer keep it magnetic, obviously).
Made the curtain and matching towel. Next on the list: Matching apron and kids oven mitts!

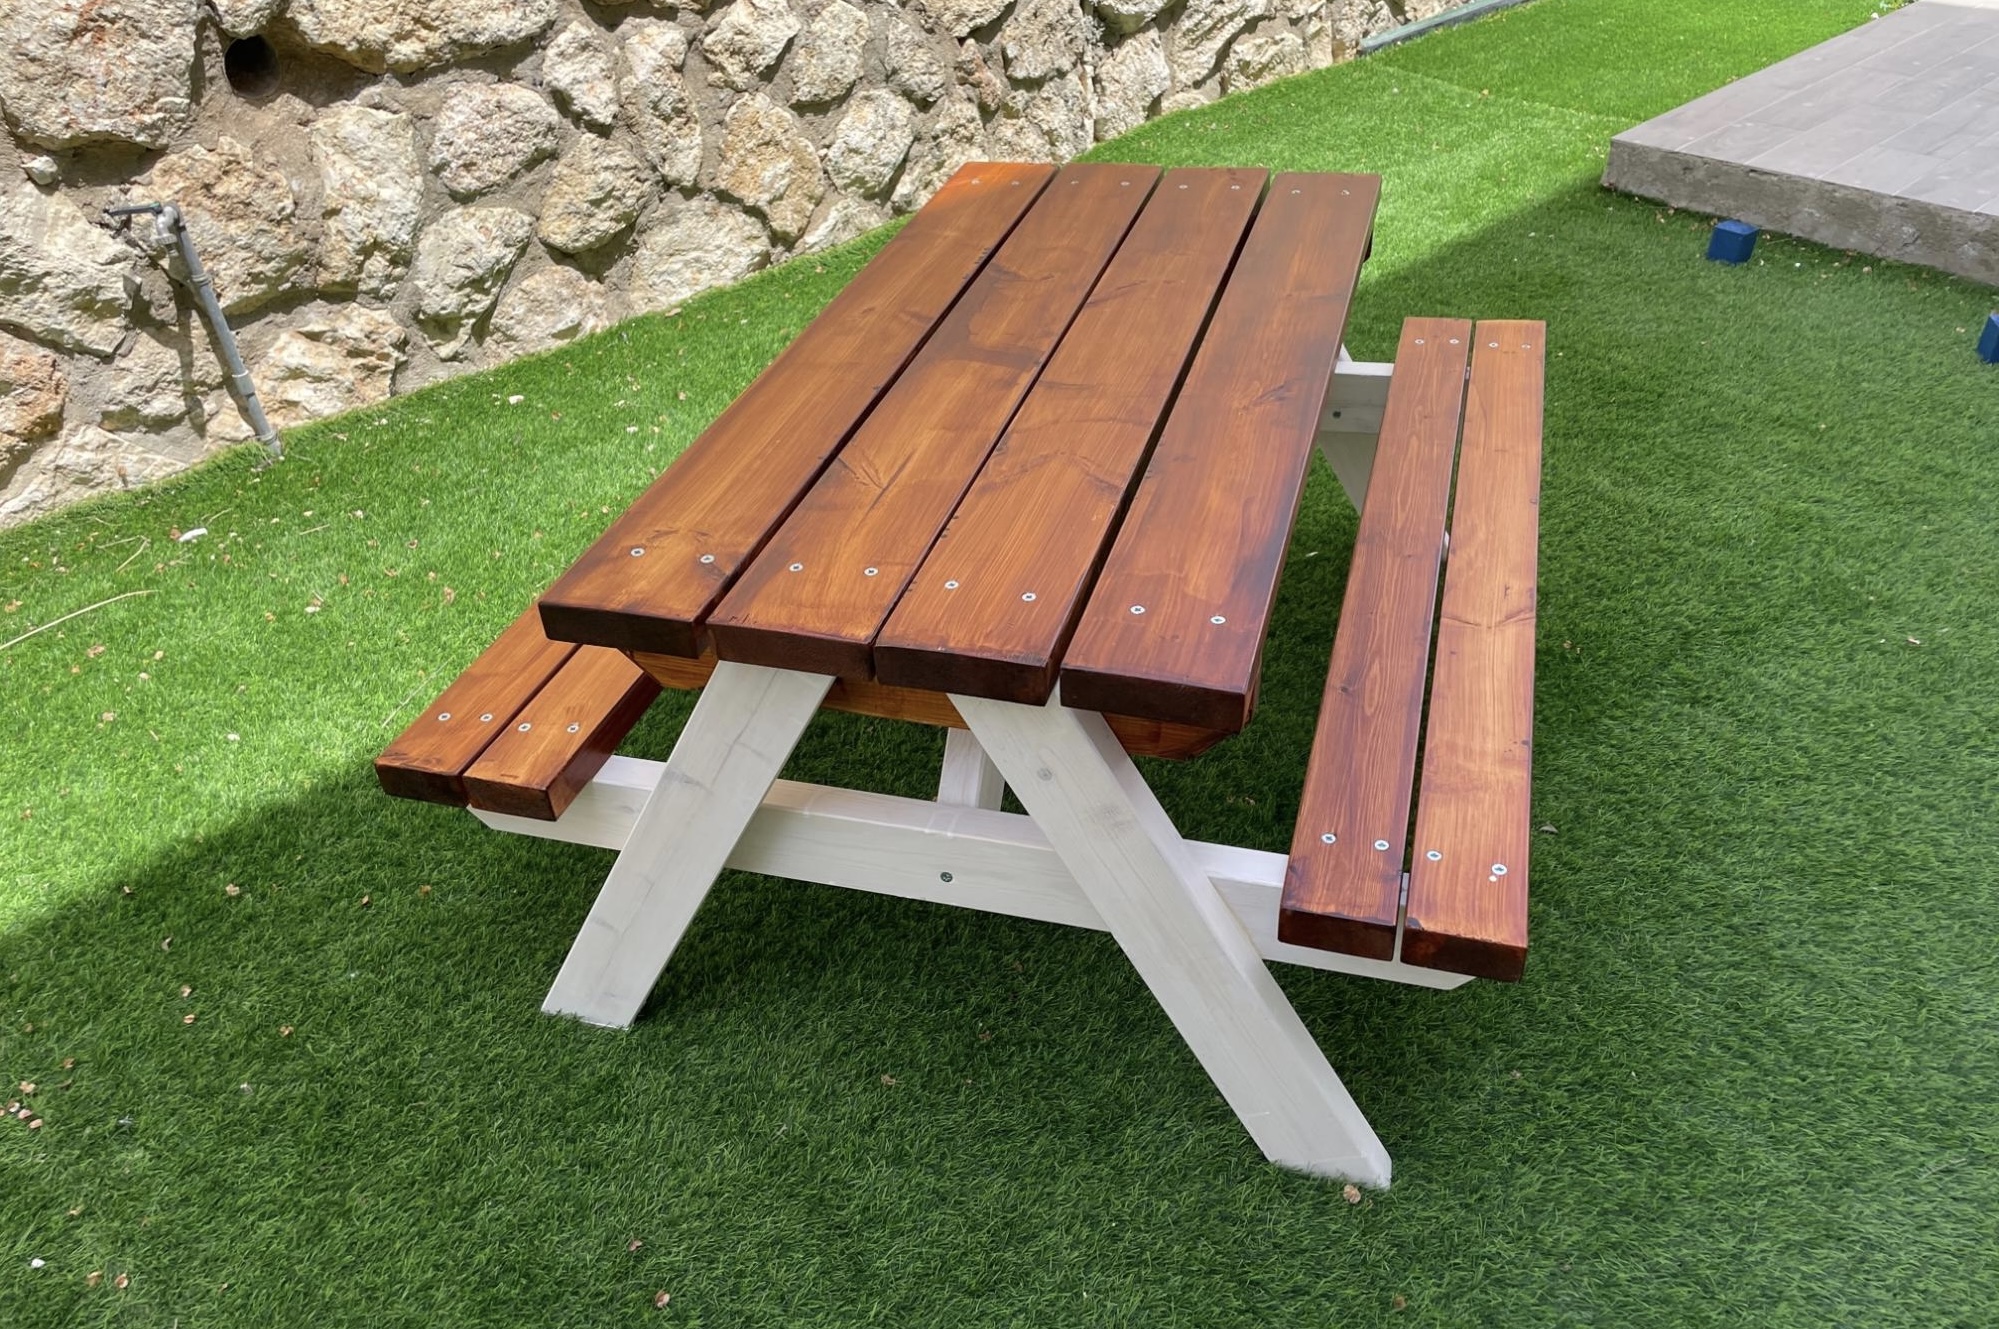
I made the picnic table for my grandchildren. The plans were great and so easy to follow. The cuts, measurement are perfect. Table is sturdy and came out balanced! I used water based paint. Thanks for the plans!
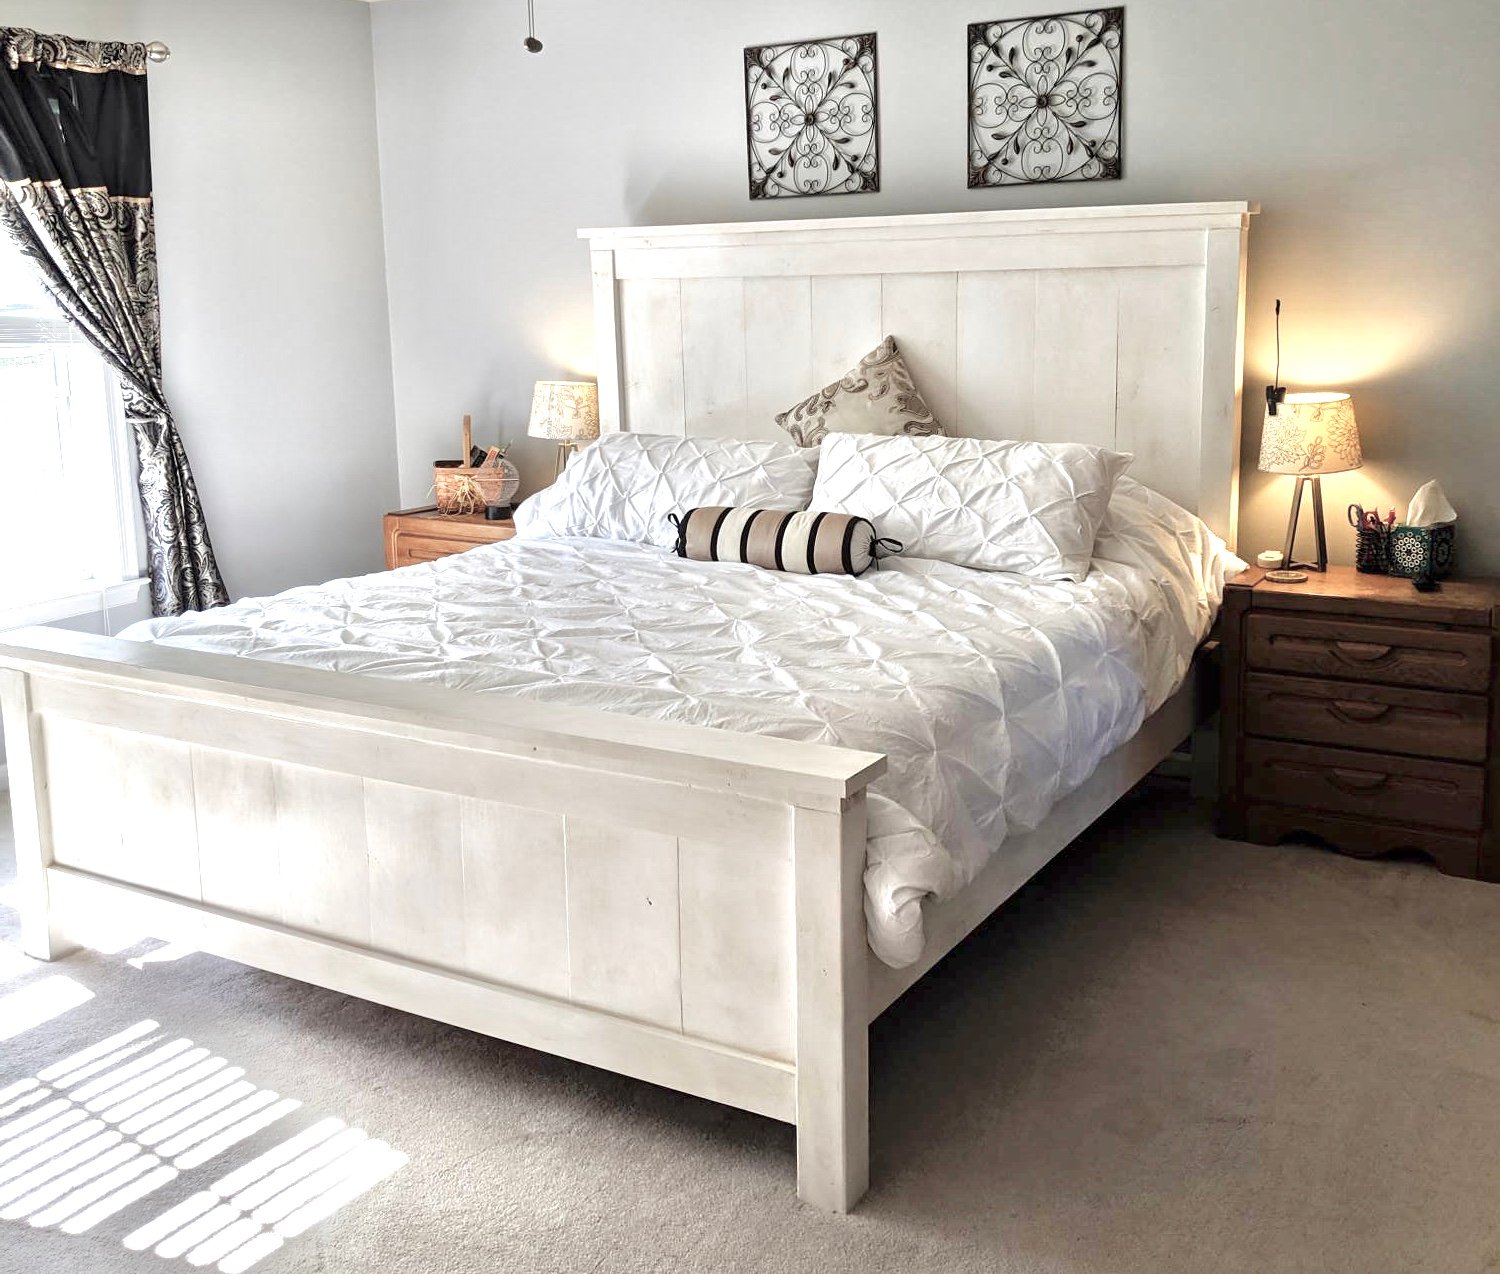
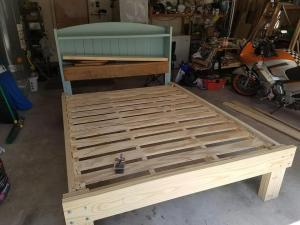
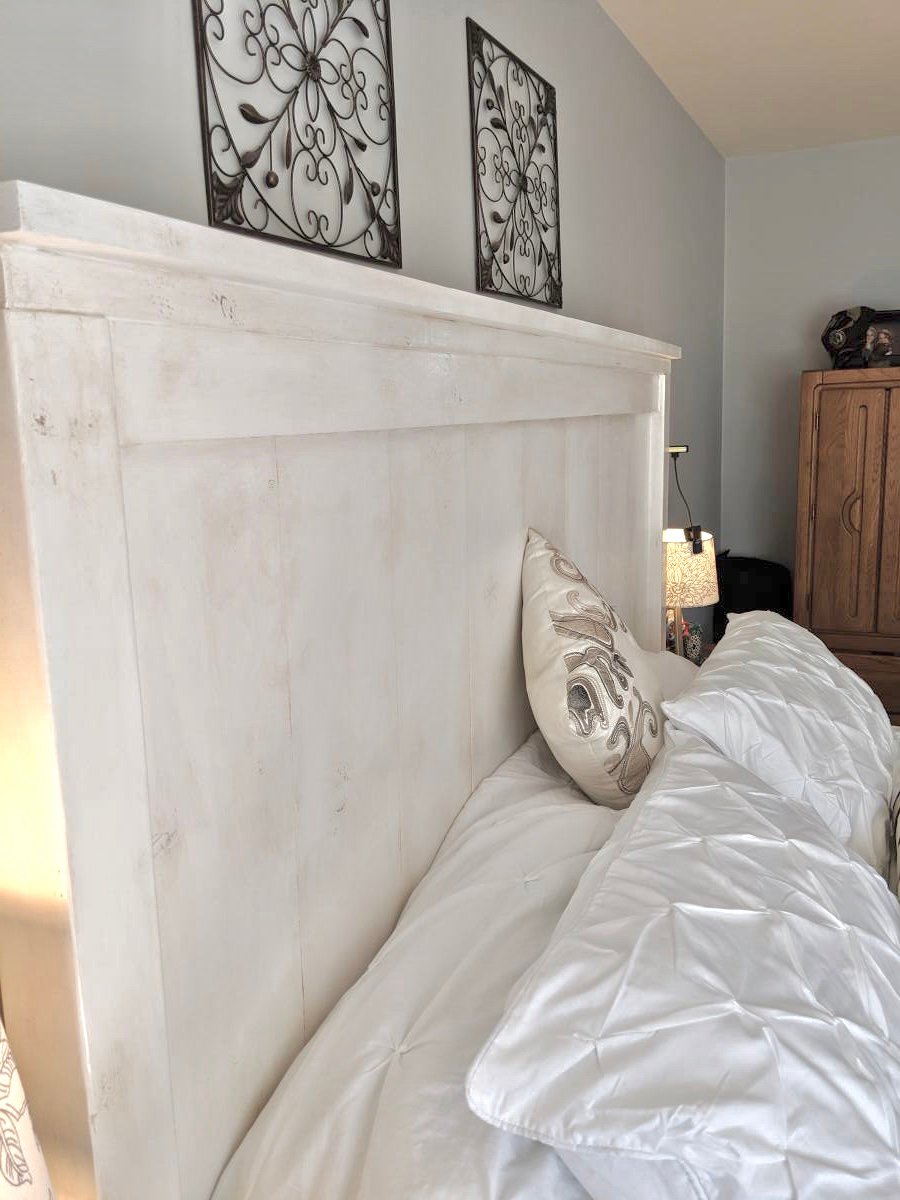
I could not find a frame which would accommodate my new adjustable king base. Modified Anna's plans by increasing the height of the headboard and footboard. Finished with chalk paint and antique finish for a rustic look. Side rails attached with mortises to allow for moving bed in 4 pieces if needed. Love my new bed

Sat, 11/30/2019 - 03:31
Hi! We are making this headboard this weekend. We want to increase the headboard height and footboard as well. Do you happen to know the cut measurements or how you adjusted the height of the 1x6 (or 1x8 as others used) to make it work? Yours looks perfect! Thank you in advance for any feedback!

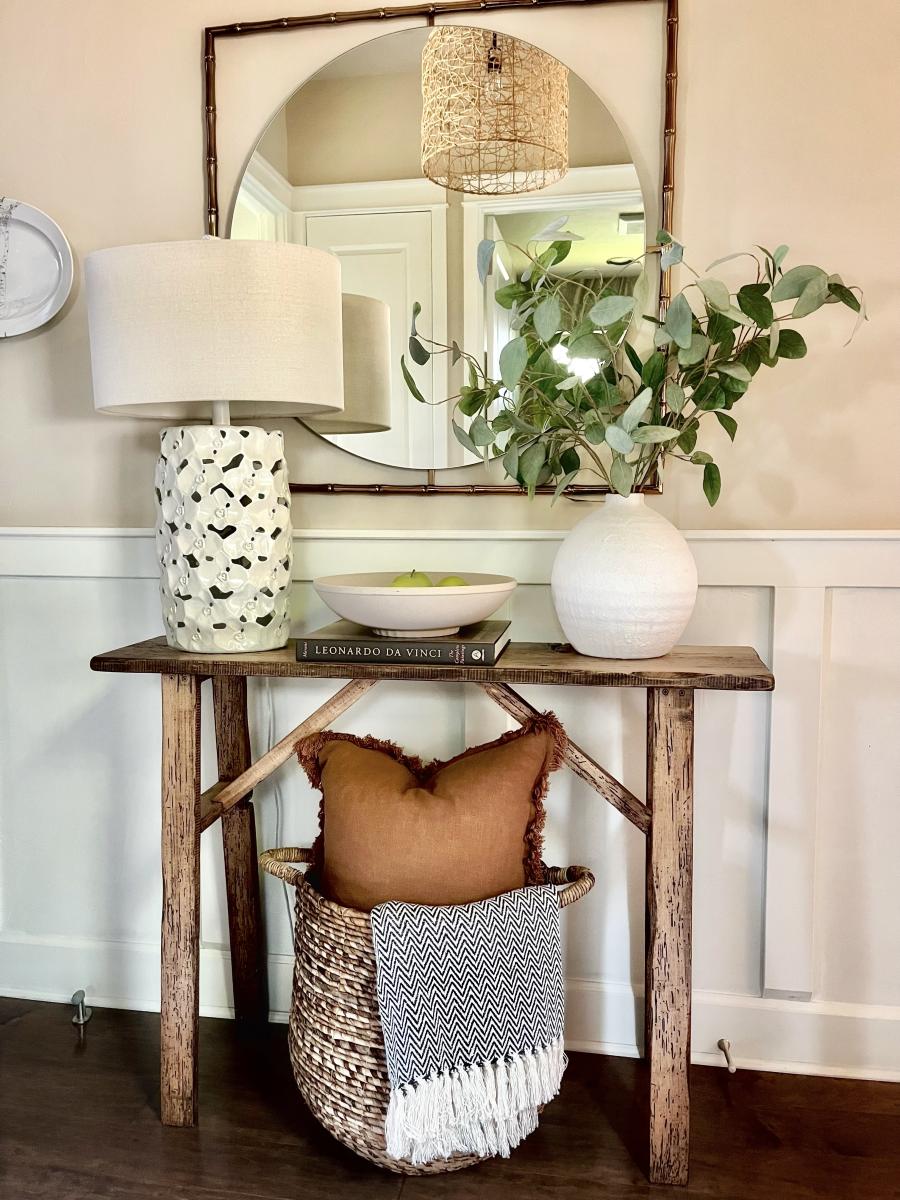
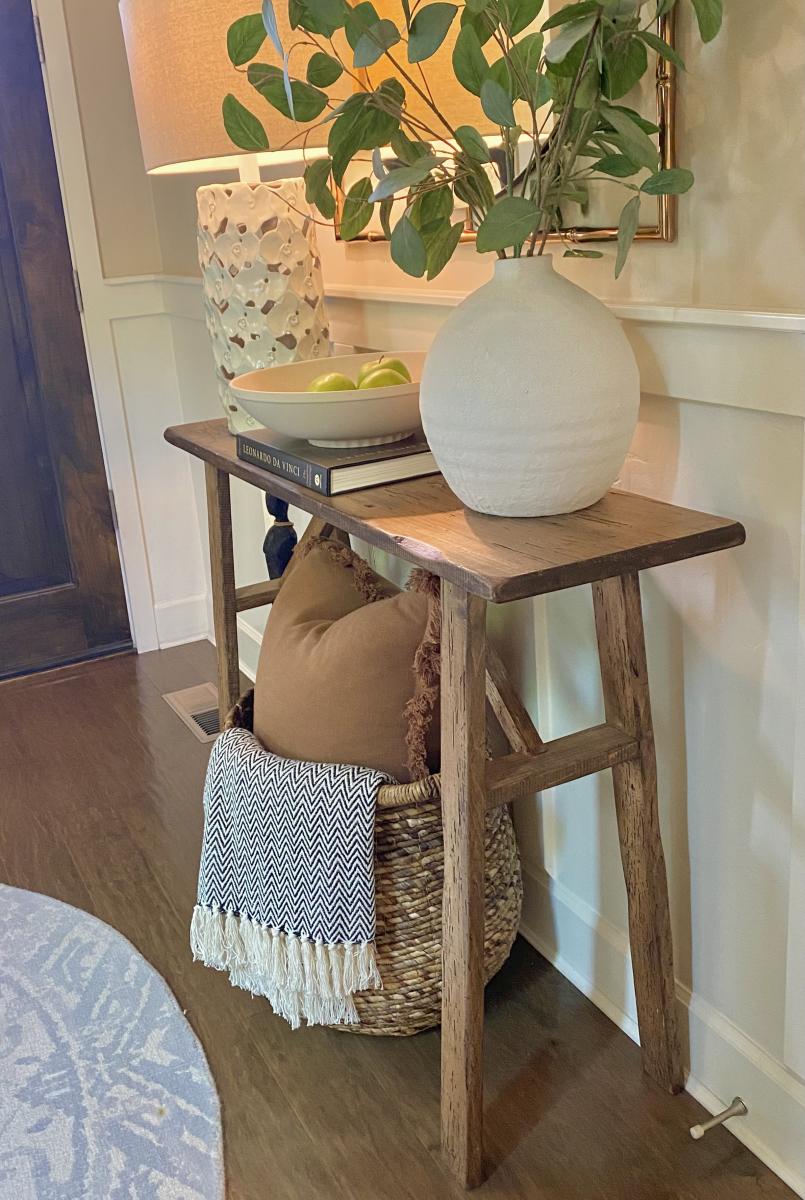
This entry table I made from wood I got from a recycle center of wood products. It’s been in our entry now for several years. I have only basic tools-no planers and jointers, etc. I do have a fold up table saw that I use once in awhile. I enjoy working with natural /live edge and or construction grade materials. Always impressed with the items Ana has built. Good job Ana😁👍

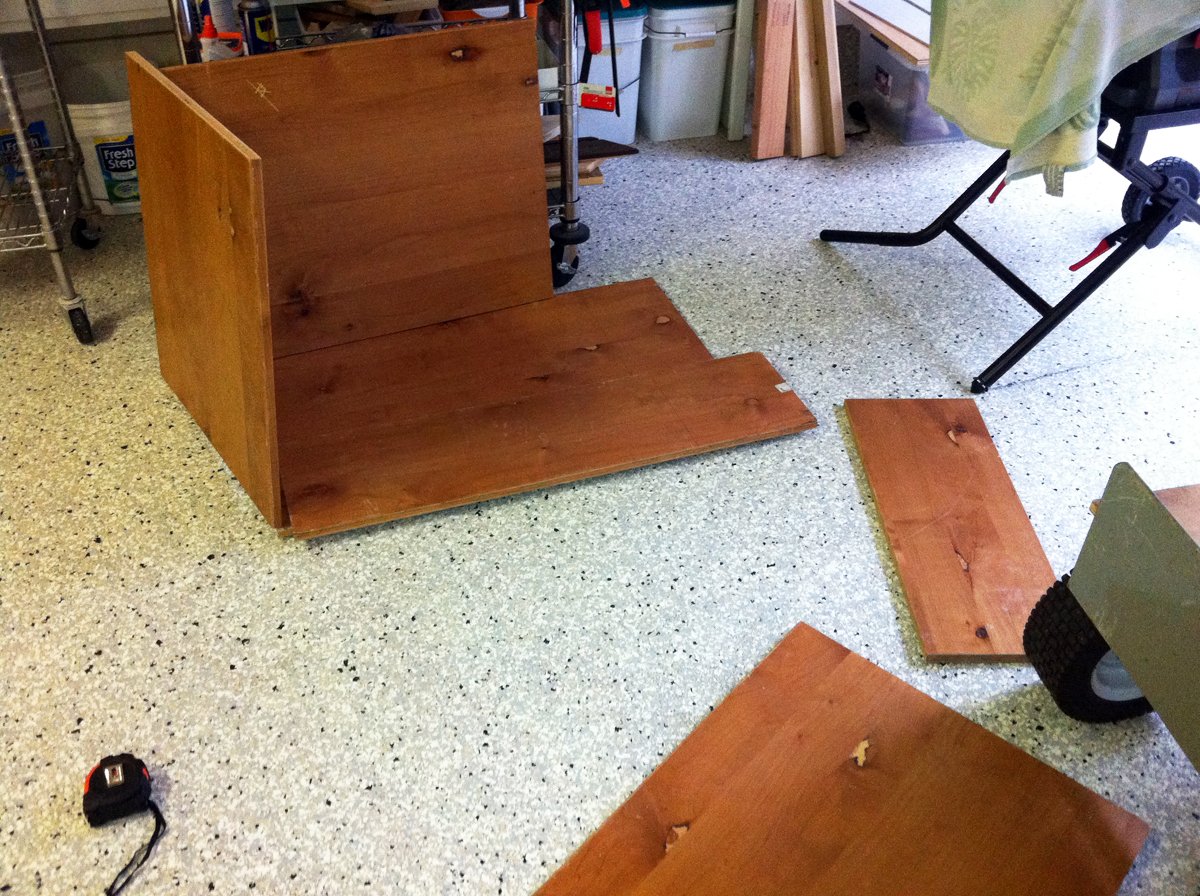
My wood scraps were definitely getting out of control, and I needed something to store the wood vertically. I had some spare wood (free from Craigslist), so I put together a wood storage bin. All in all, the project cost me the price of some Kreg screws.
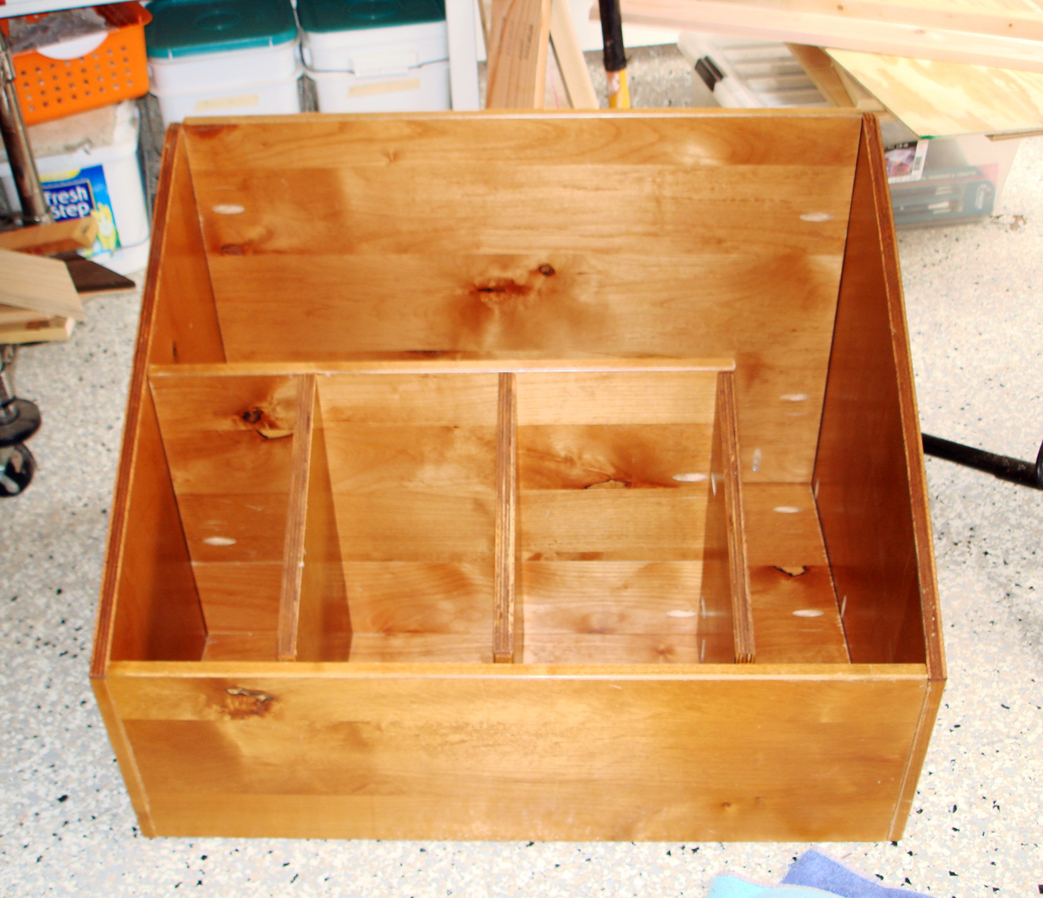


Mon, 03/19/2012 - 20:13
Love it! I'm building some crates from pallet wood to store my scraps in. Your box turned out very nice.

Wed, 06/06/2012 - 13:21
I have been struggling to organize my space because my lumber is on one of my work spaces. I have the perfect space for that, thanks for the great post!
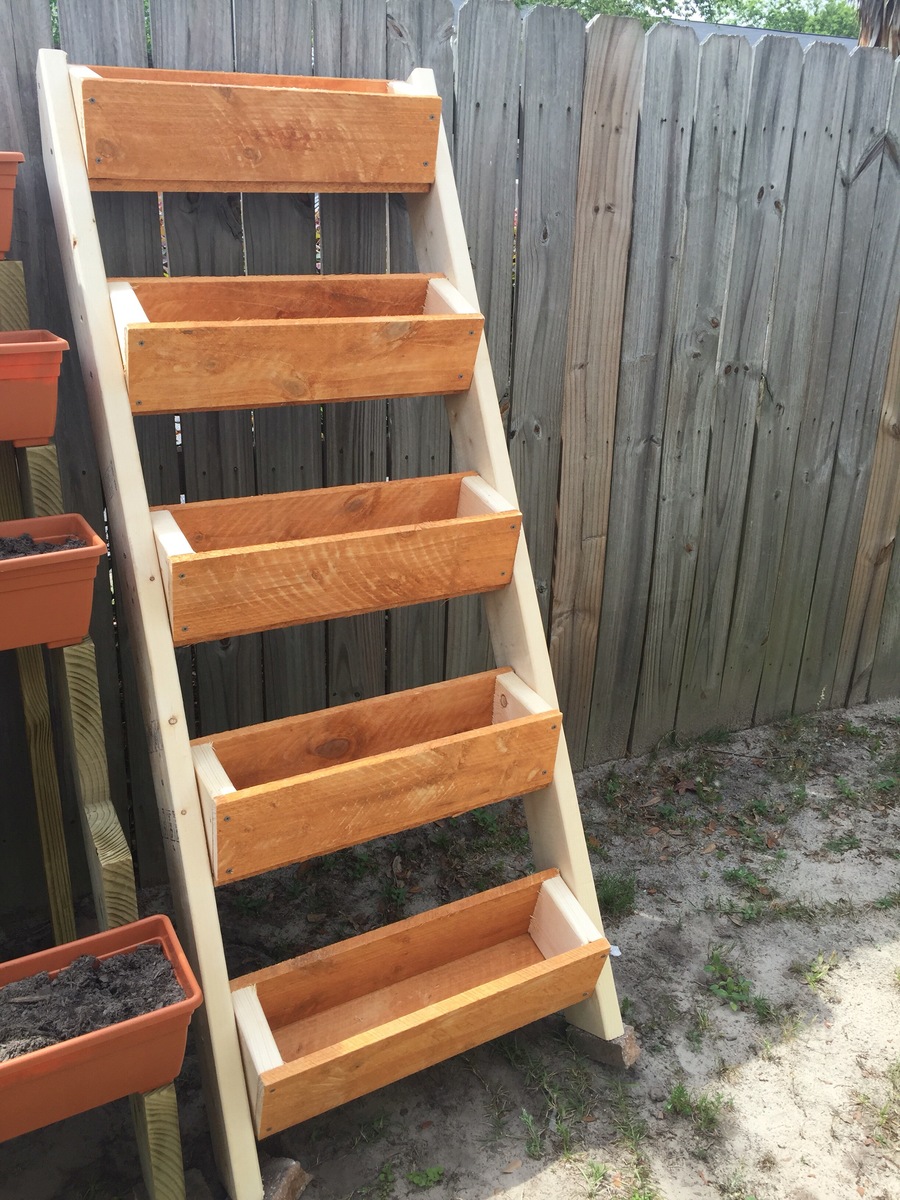
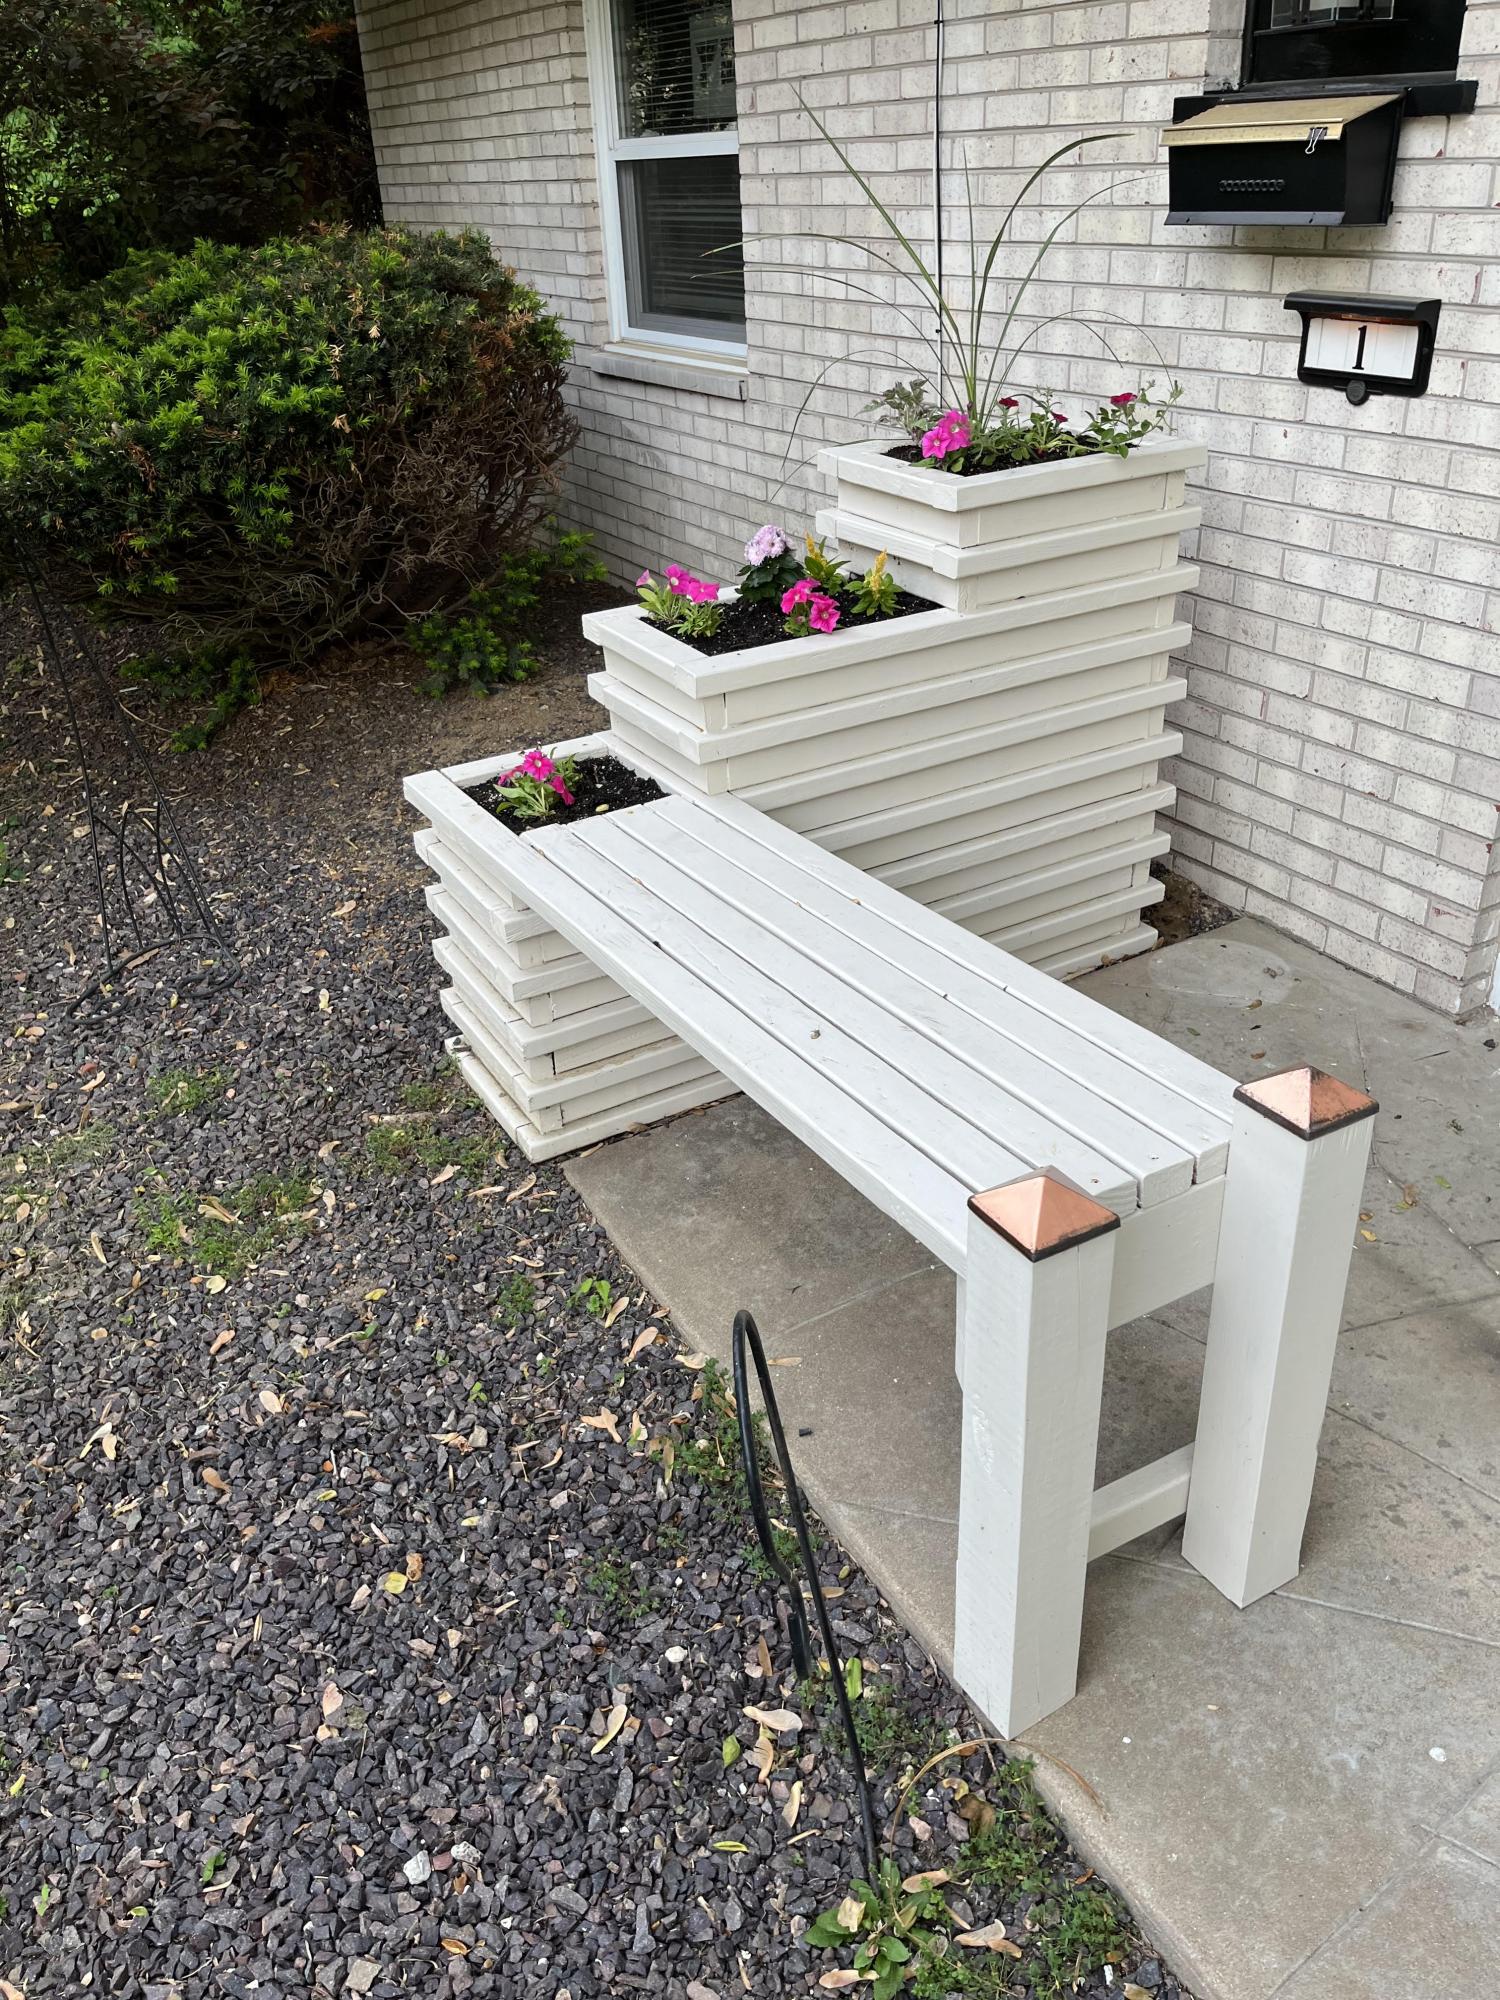
Used your plans but make changes to the planters since I do not own an angle machine. They look great and the cost was less than $30

Tue, 05/30/2017 - 14:33
Can appreciate wanting to do projects but not having all the necessary fancy tools. I need to make two of these anyway (one to give away), so going to steal this idea to make it a wham-bam quick job!
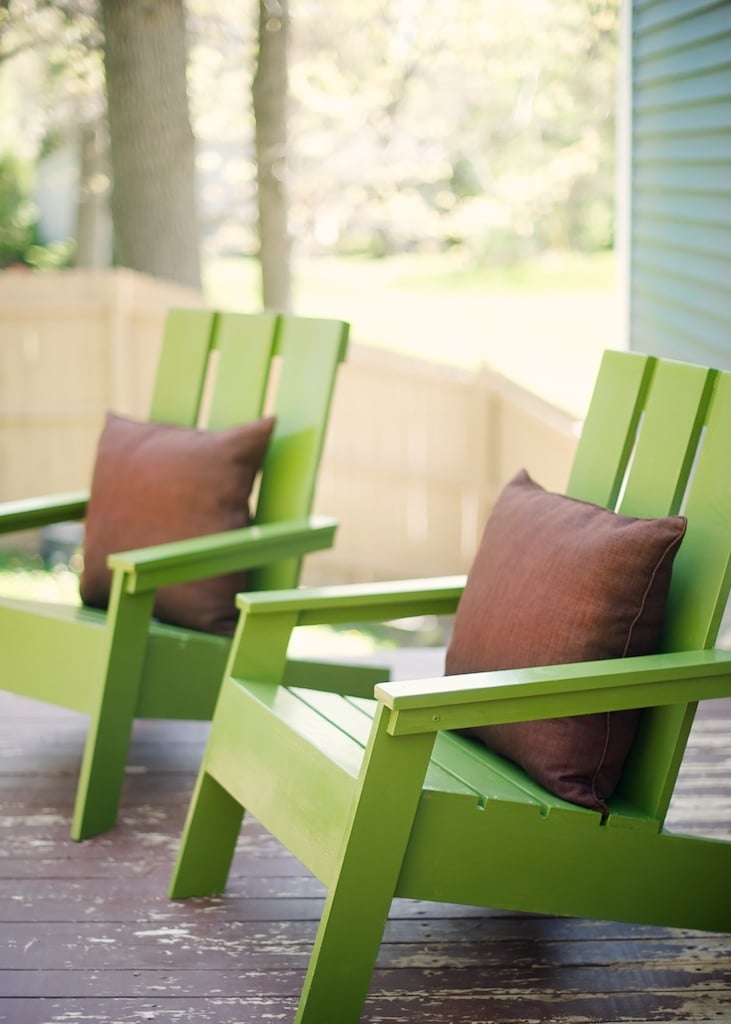
We love how these modified 3-panel adirondack chairs turned out! The pillows were from Costco- $15 for a two pack.
Sun, 05/06/2012 - 14:25
Love these! Did you use 1x8s for the back instead of 1x4's?
Sun, 06/16/2013 - 16:13
Is it possible to get the plans for these chairs??
-c
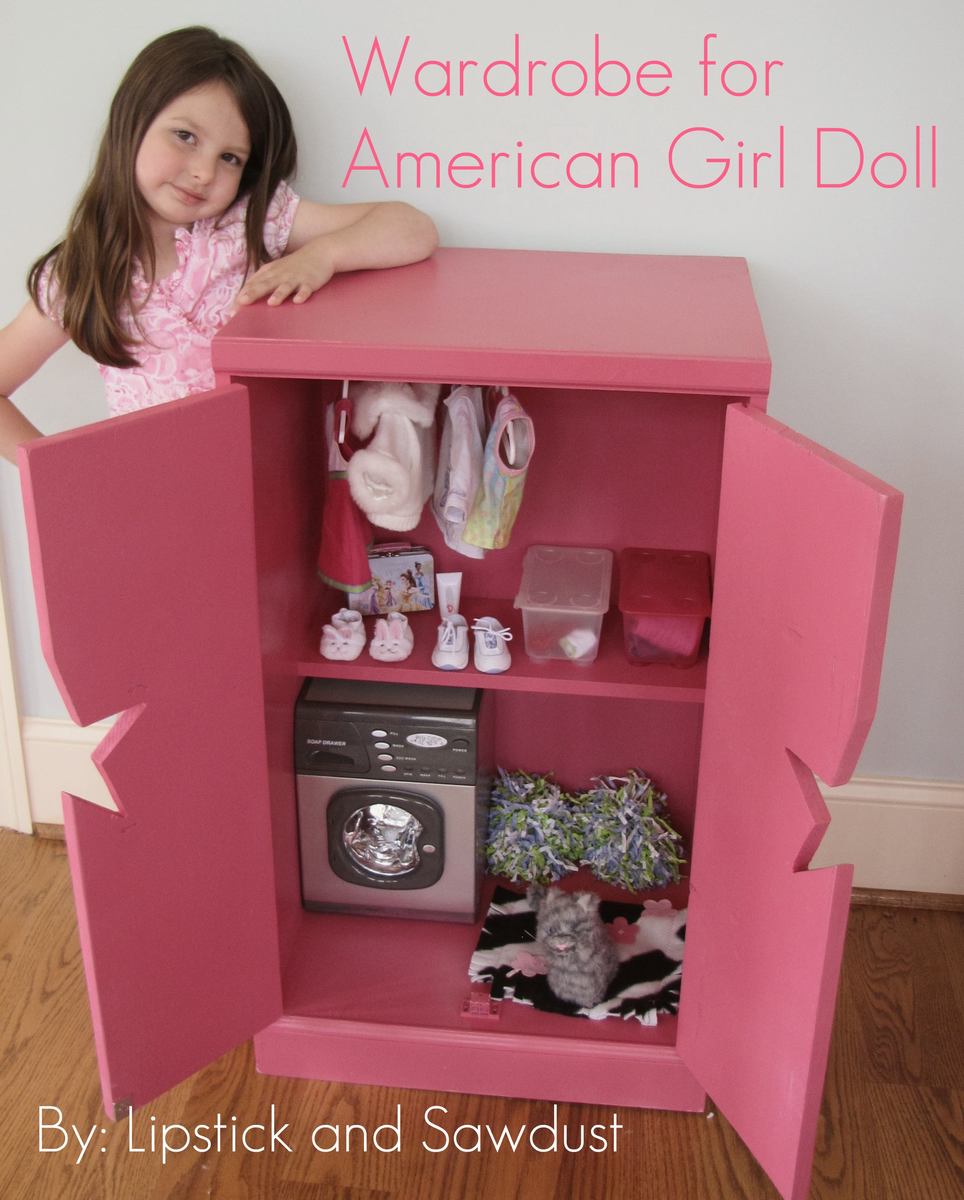
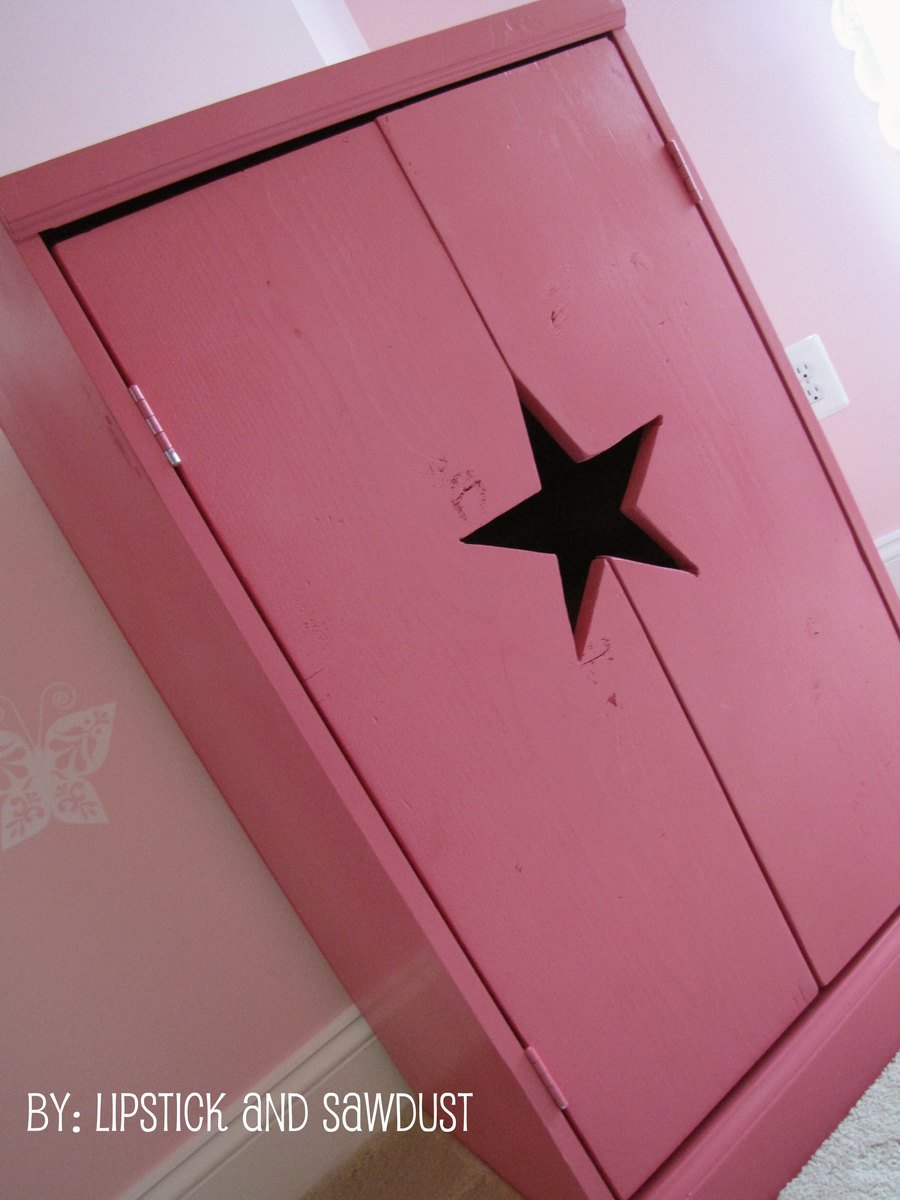
I Loved this plan ever since the first day I saw it! I was very intimidated though by the star cut out.
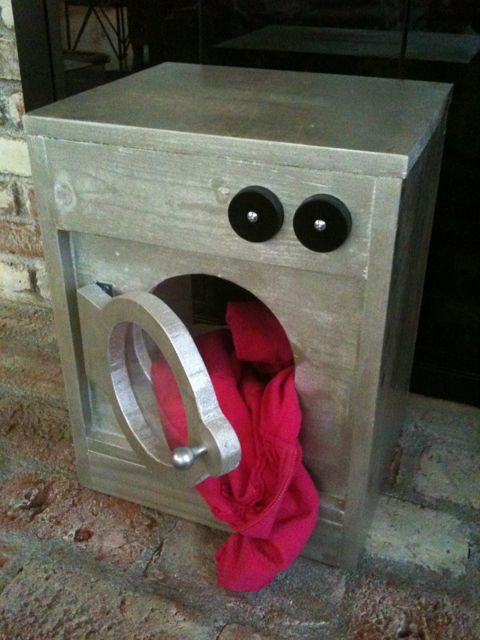
I modified this plan a little, mine is about 6 inches taller than the plan, because I had to fit my daughter's Pottery Barn kids washing machine inside which I believe is bigger than the machines in the original plan. My middle shelf is only about half the width of the shelf pictured, I wanted to add extra space beneath, plus it was the cheapest piece of shelf I found.
For the star cut out, since I did not have a protractor, I cut out little templates with my miter saw at the different angles, I labeled each piece, so I could reuse them if I ever build another one. My daughter loves this wardrobe, so does my son! I am planning on making this again for my son, but making it grey and calling it a "Hockey Locker". Thanks for the plan Ana! This is my favorite plan so far!

Sat, 10/13/2012 - 09:41
Very nice job! I love that color of pink, too. Where do you find hangers for the doll clothes? I make a lot of clothes for my granddaughters' dolls, so I guess I need to find hangers!
Wed, 09/25/2013 - 13:36
Where do I find the plans for this project?