Community Brag Posts
Comfy Outdoor Couch
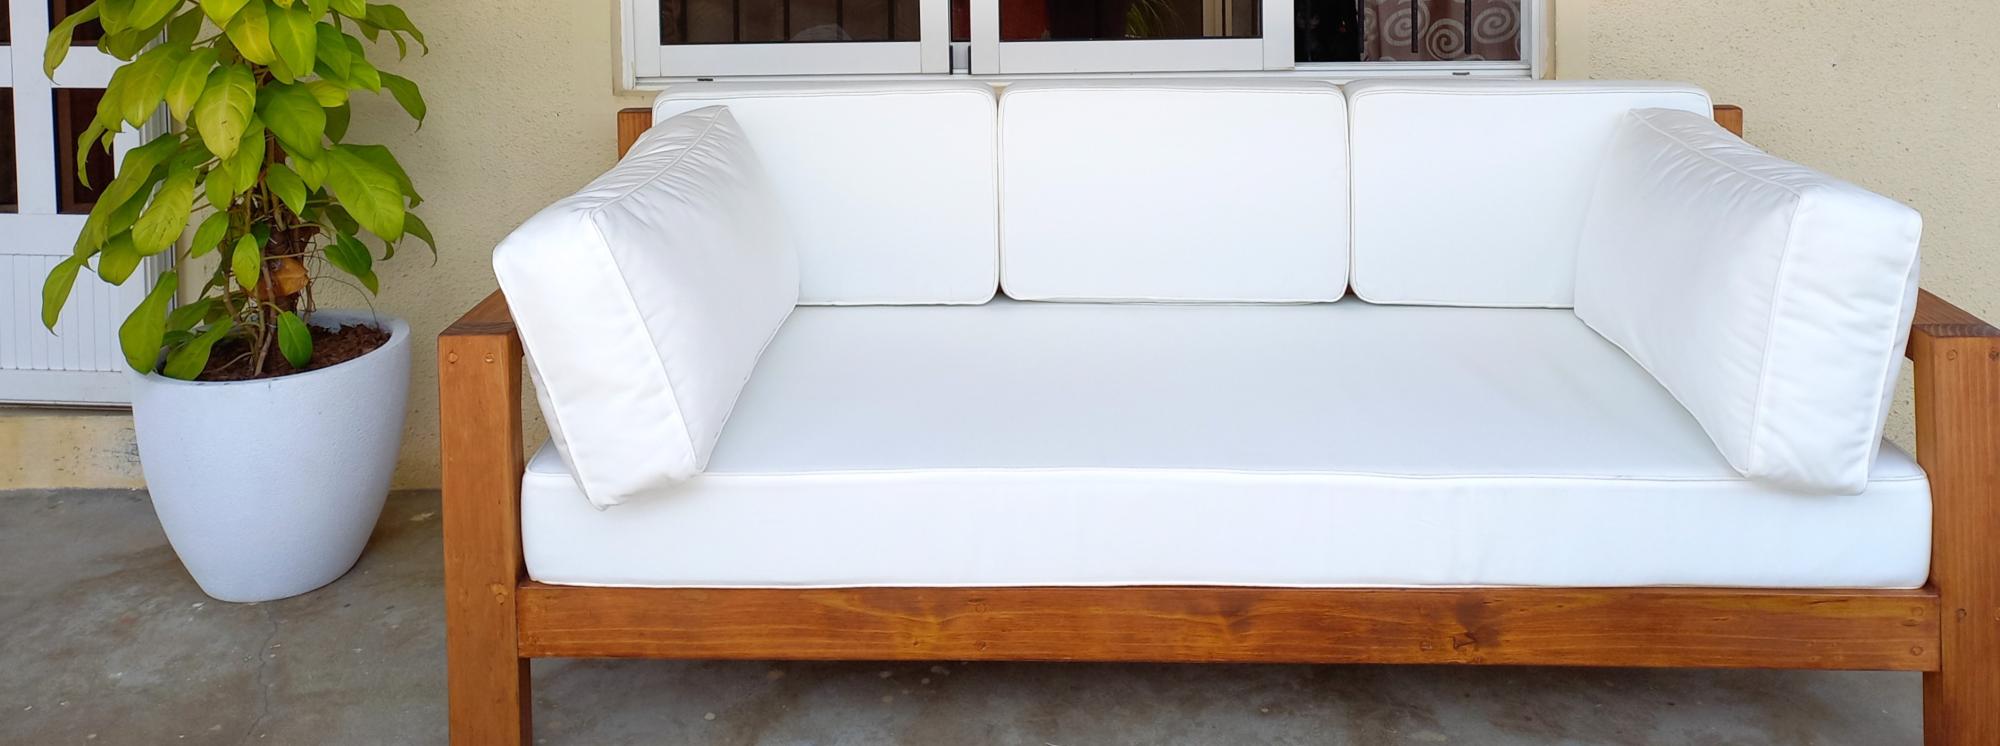
DIY outdoor couch, reader build
Daybed cushions and pillows, modified depth
Built from Plan(s)
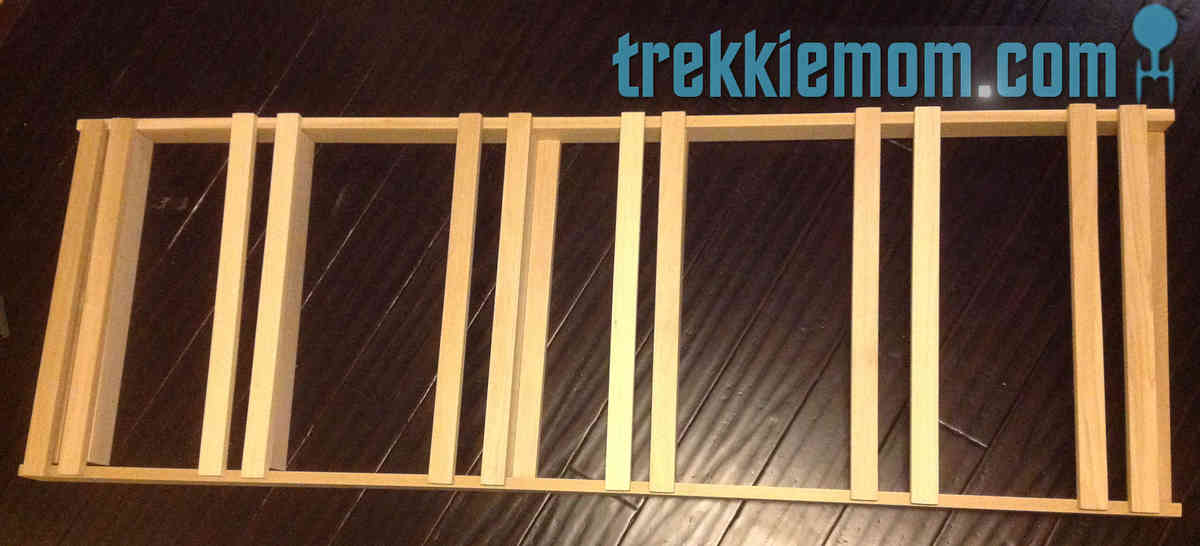
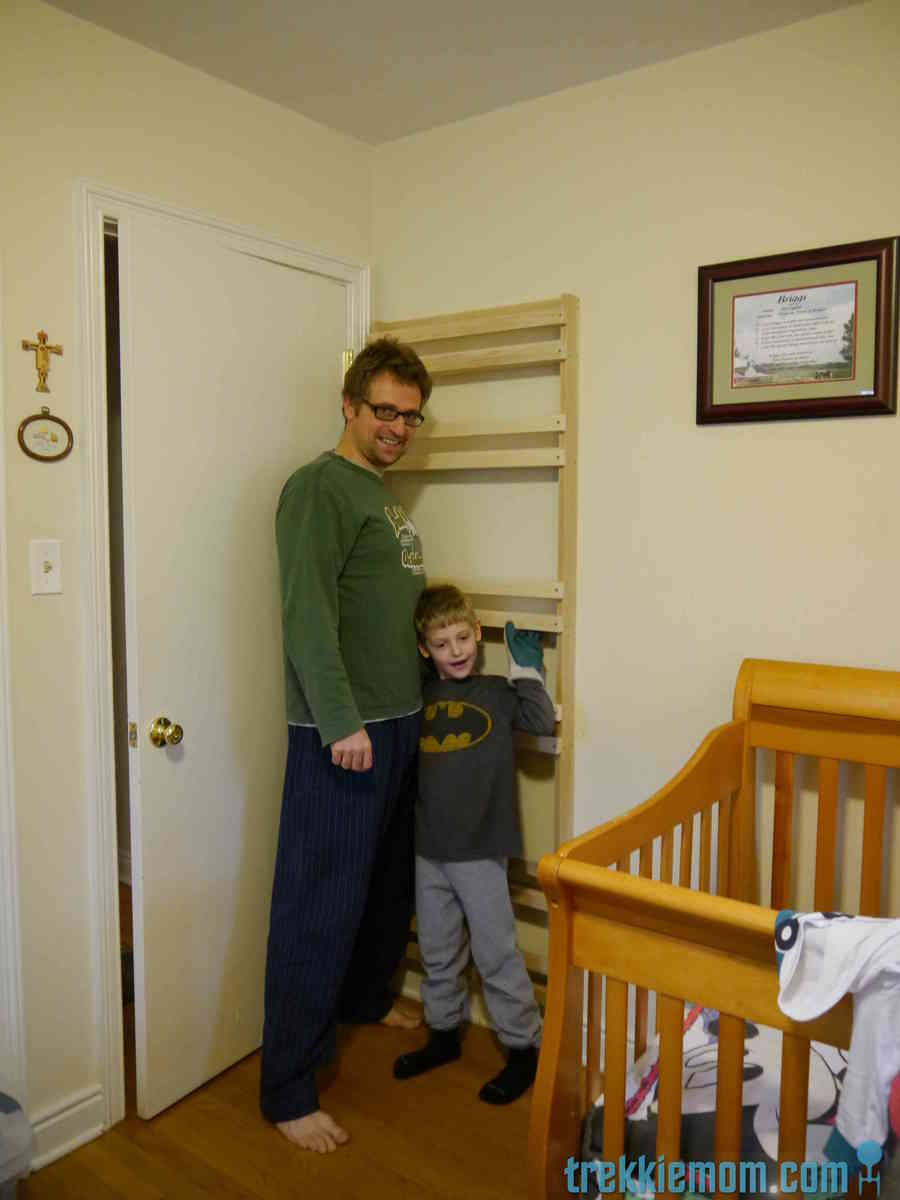
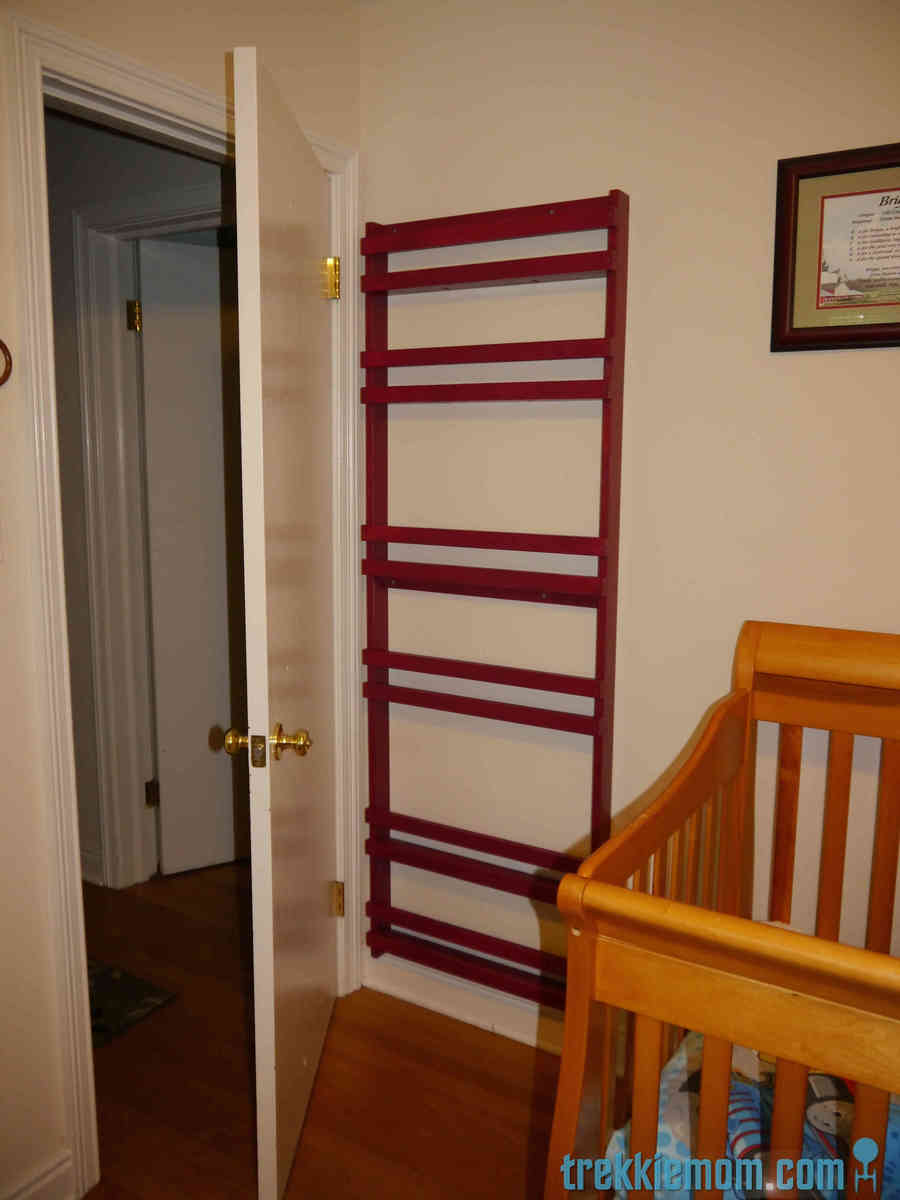
Flat Book Shelf How-to
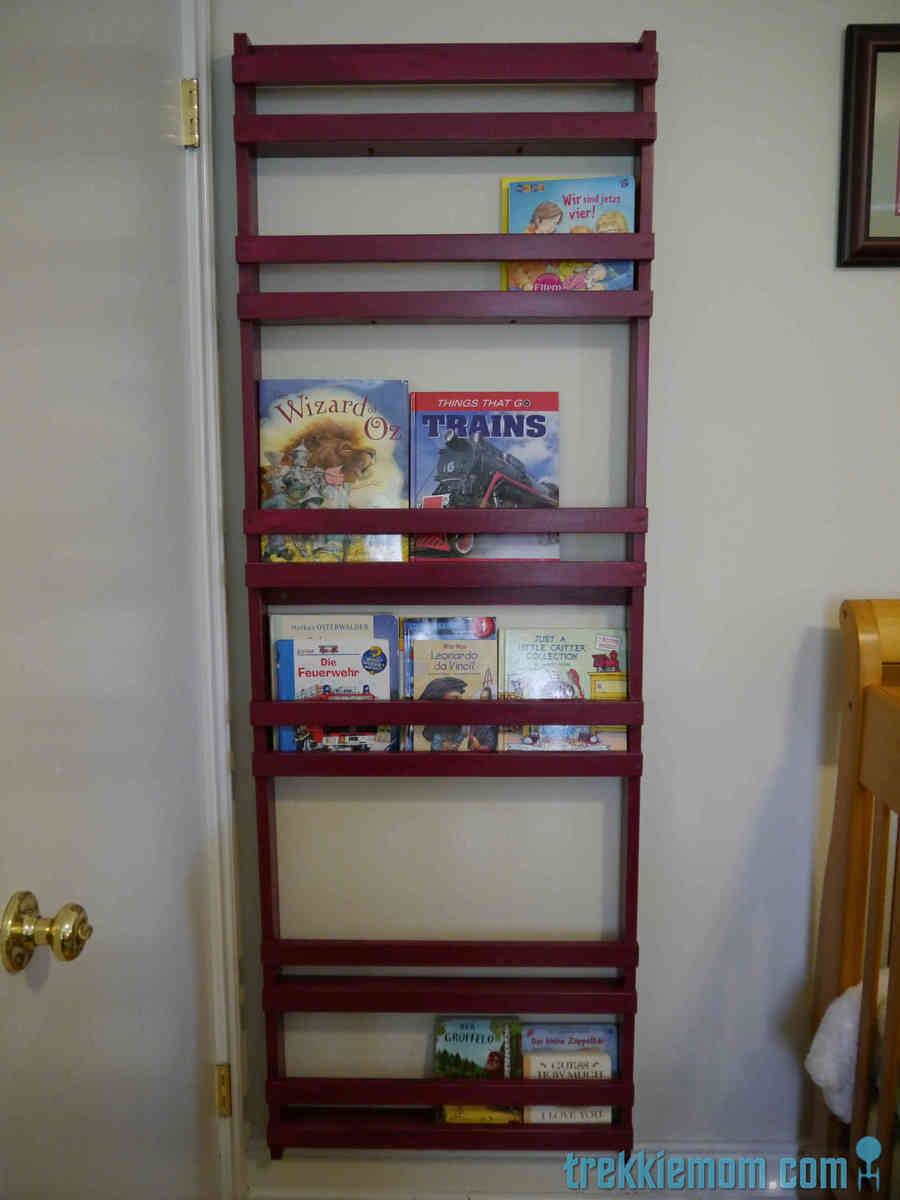
Our home is small, about 1600 sq/ft, so I am on a mission to create as much out of the way storage as possible. It feels like a loosing battle, but I suppose with 2 young children most mothers feel like this with or without more square footage. You might wonder why I don't buy furniture to solve my problems? My answer to that question is that most of the furniture out there is too expensive, it doesn't fit the space available, and just doesn't suit all of our needs. Most importantly, I know that I can make it myself, build it better, and use quality materials. No particle board here, thank you.
So, my storage solution for my boys books was inspired by the Ana Whites Flat Wall Book Shelves (http://ana-white.com/2010/04/plans-wall-book-racks-easy-and-inexpensive…). I wanted to maximize my storage and make a good use of space in our already cramped home.
Please visit my blog for a complete DIY on my version if you are interested.
Built from Plan(s)
Estimated Time Investment
Weekend Project (10-20 Hours)
Finish Used
Reddish oops paint from Lowes and 2 clear coats
Recommended Skill Level
Beginner
DIY Outdoor Furniture
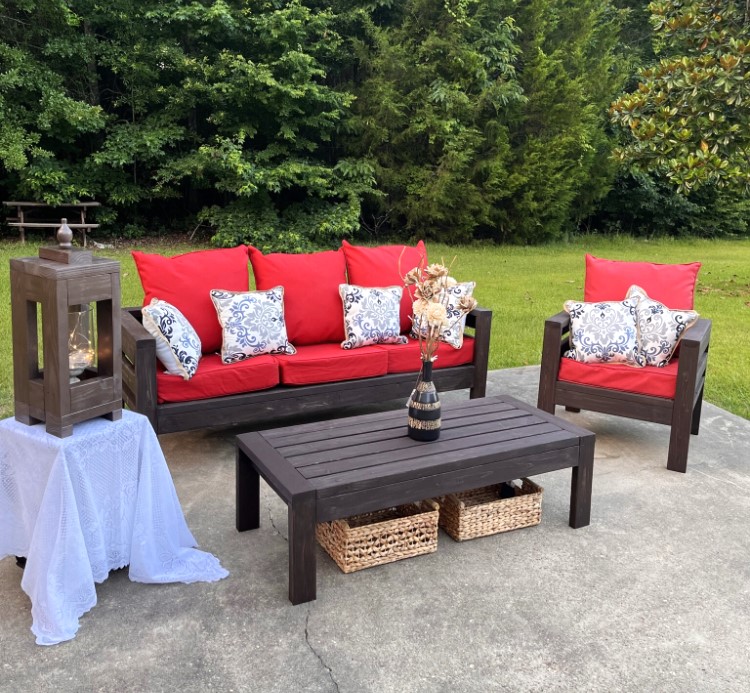
Reader Build
Built from Plan(s)
Outdoor sectional Sofa
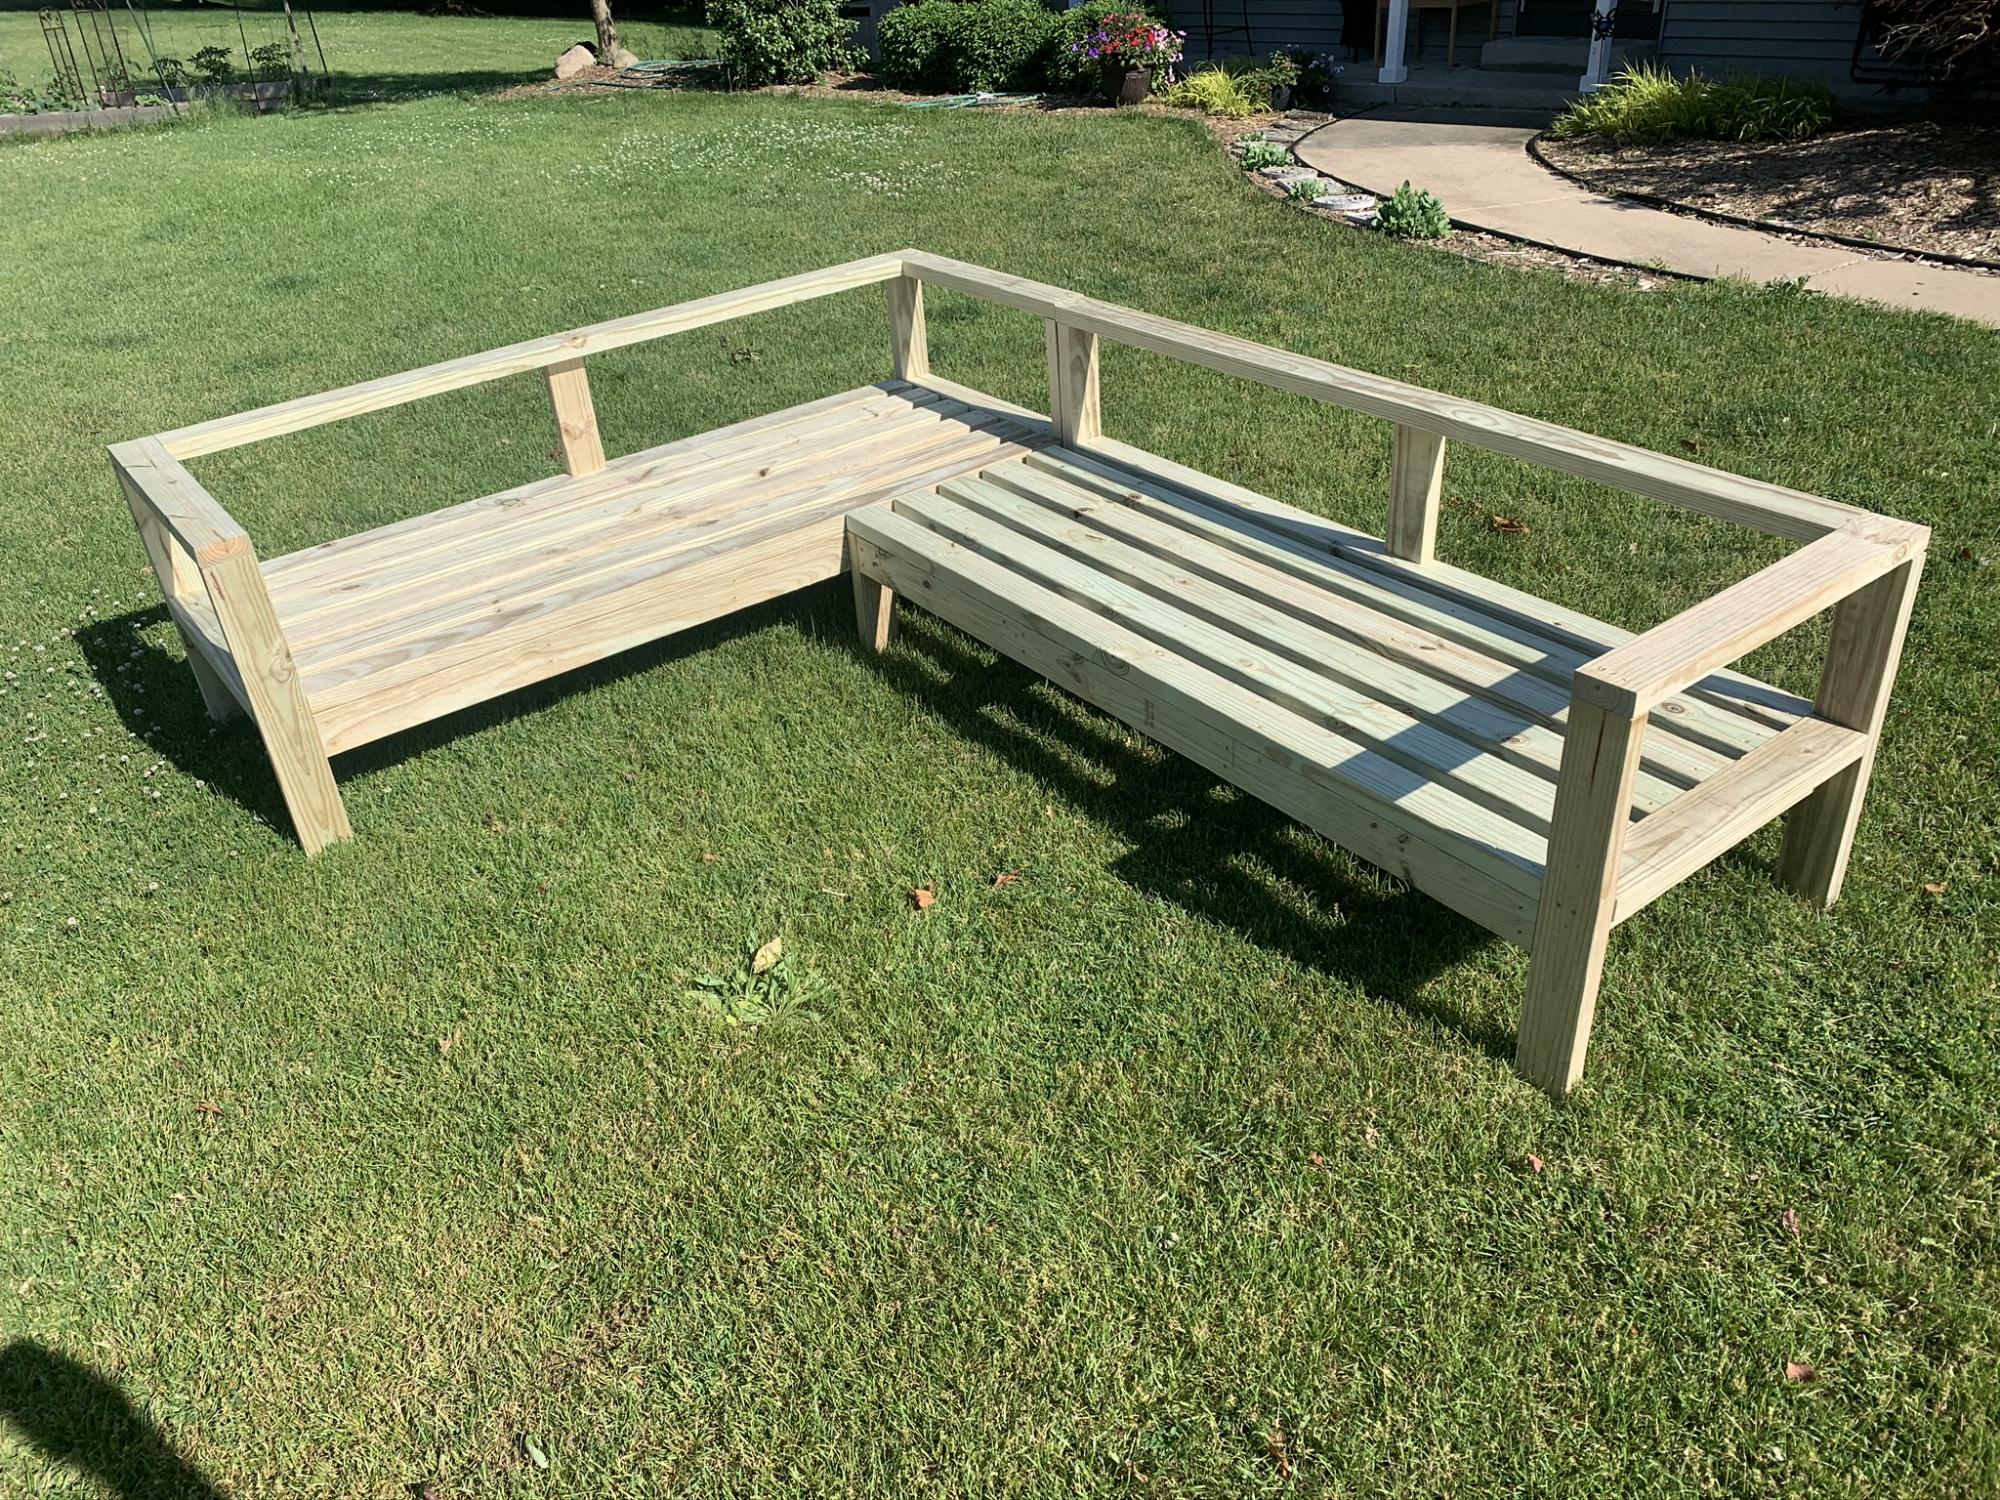
Decided to add extra support between top rail and seat. I envisioned some sitting on the rail while partying so I thought it could use a little strengthening. This is a good build for a beginner.
Built from Plan(s)
Estimated Cost
$150
Estimated Time Investment
Afternoon Project (3-6 Hours)
Finish Used
Deck seating
Recommended Skill Level
Beginner
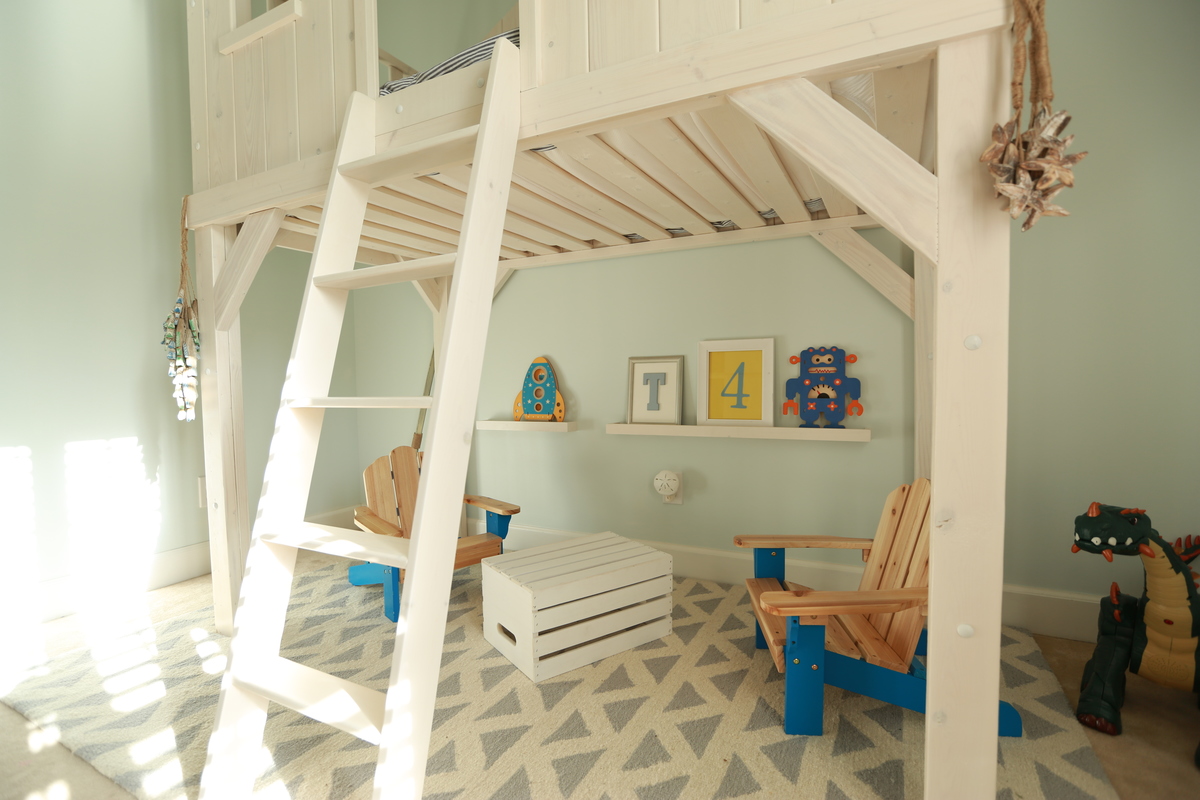
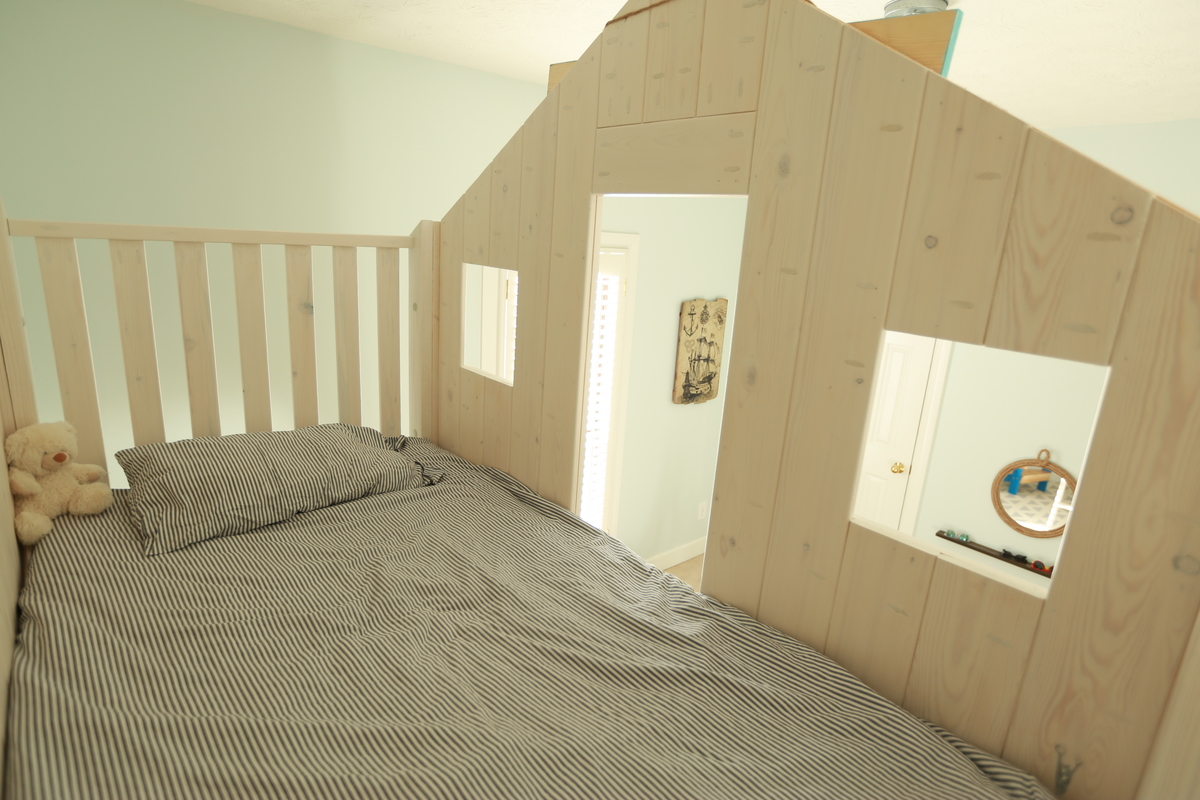
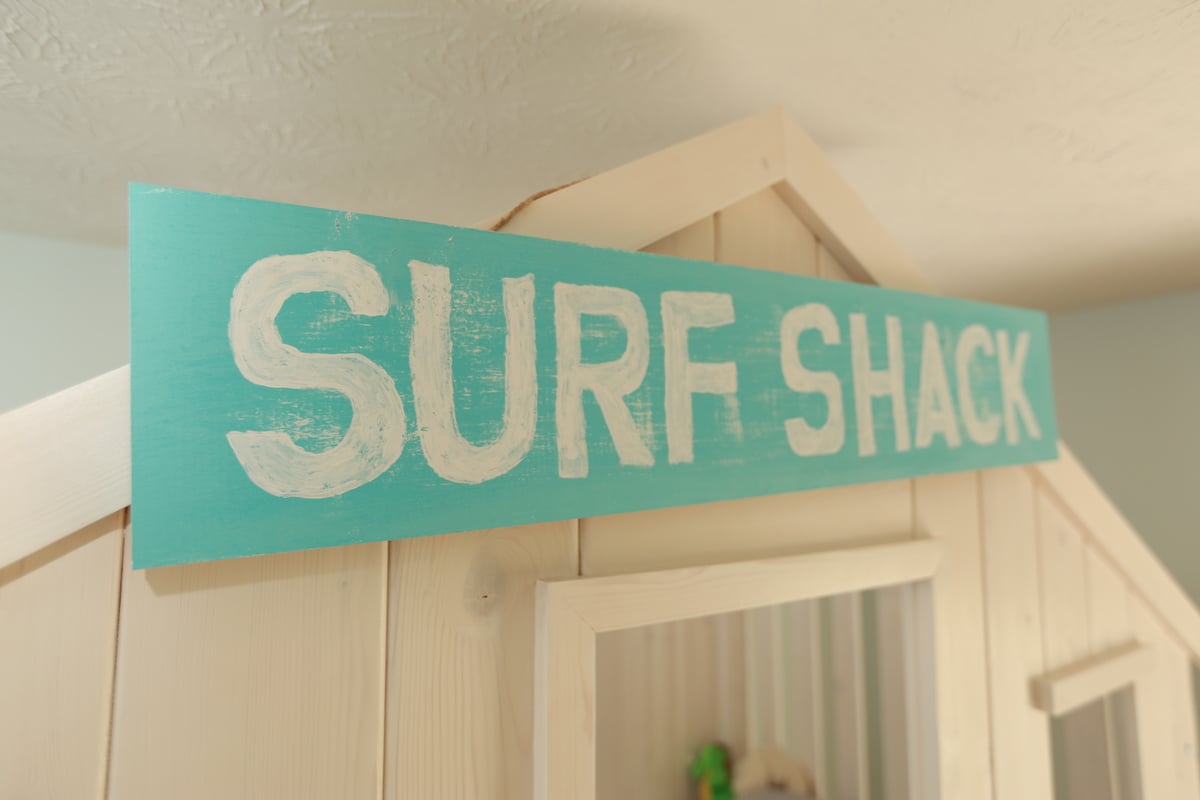
Beach Shack
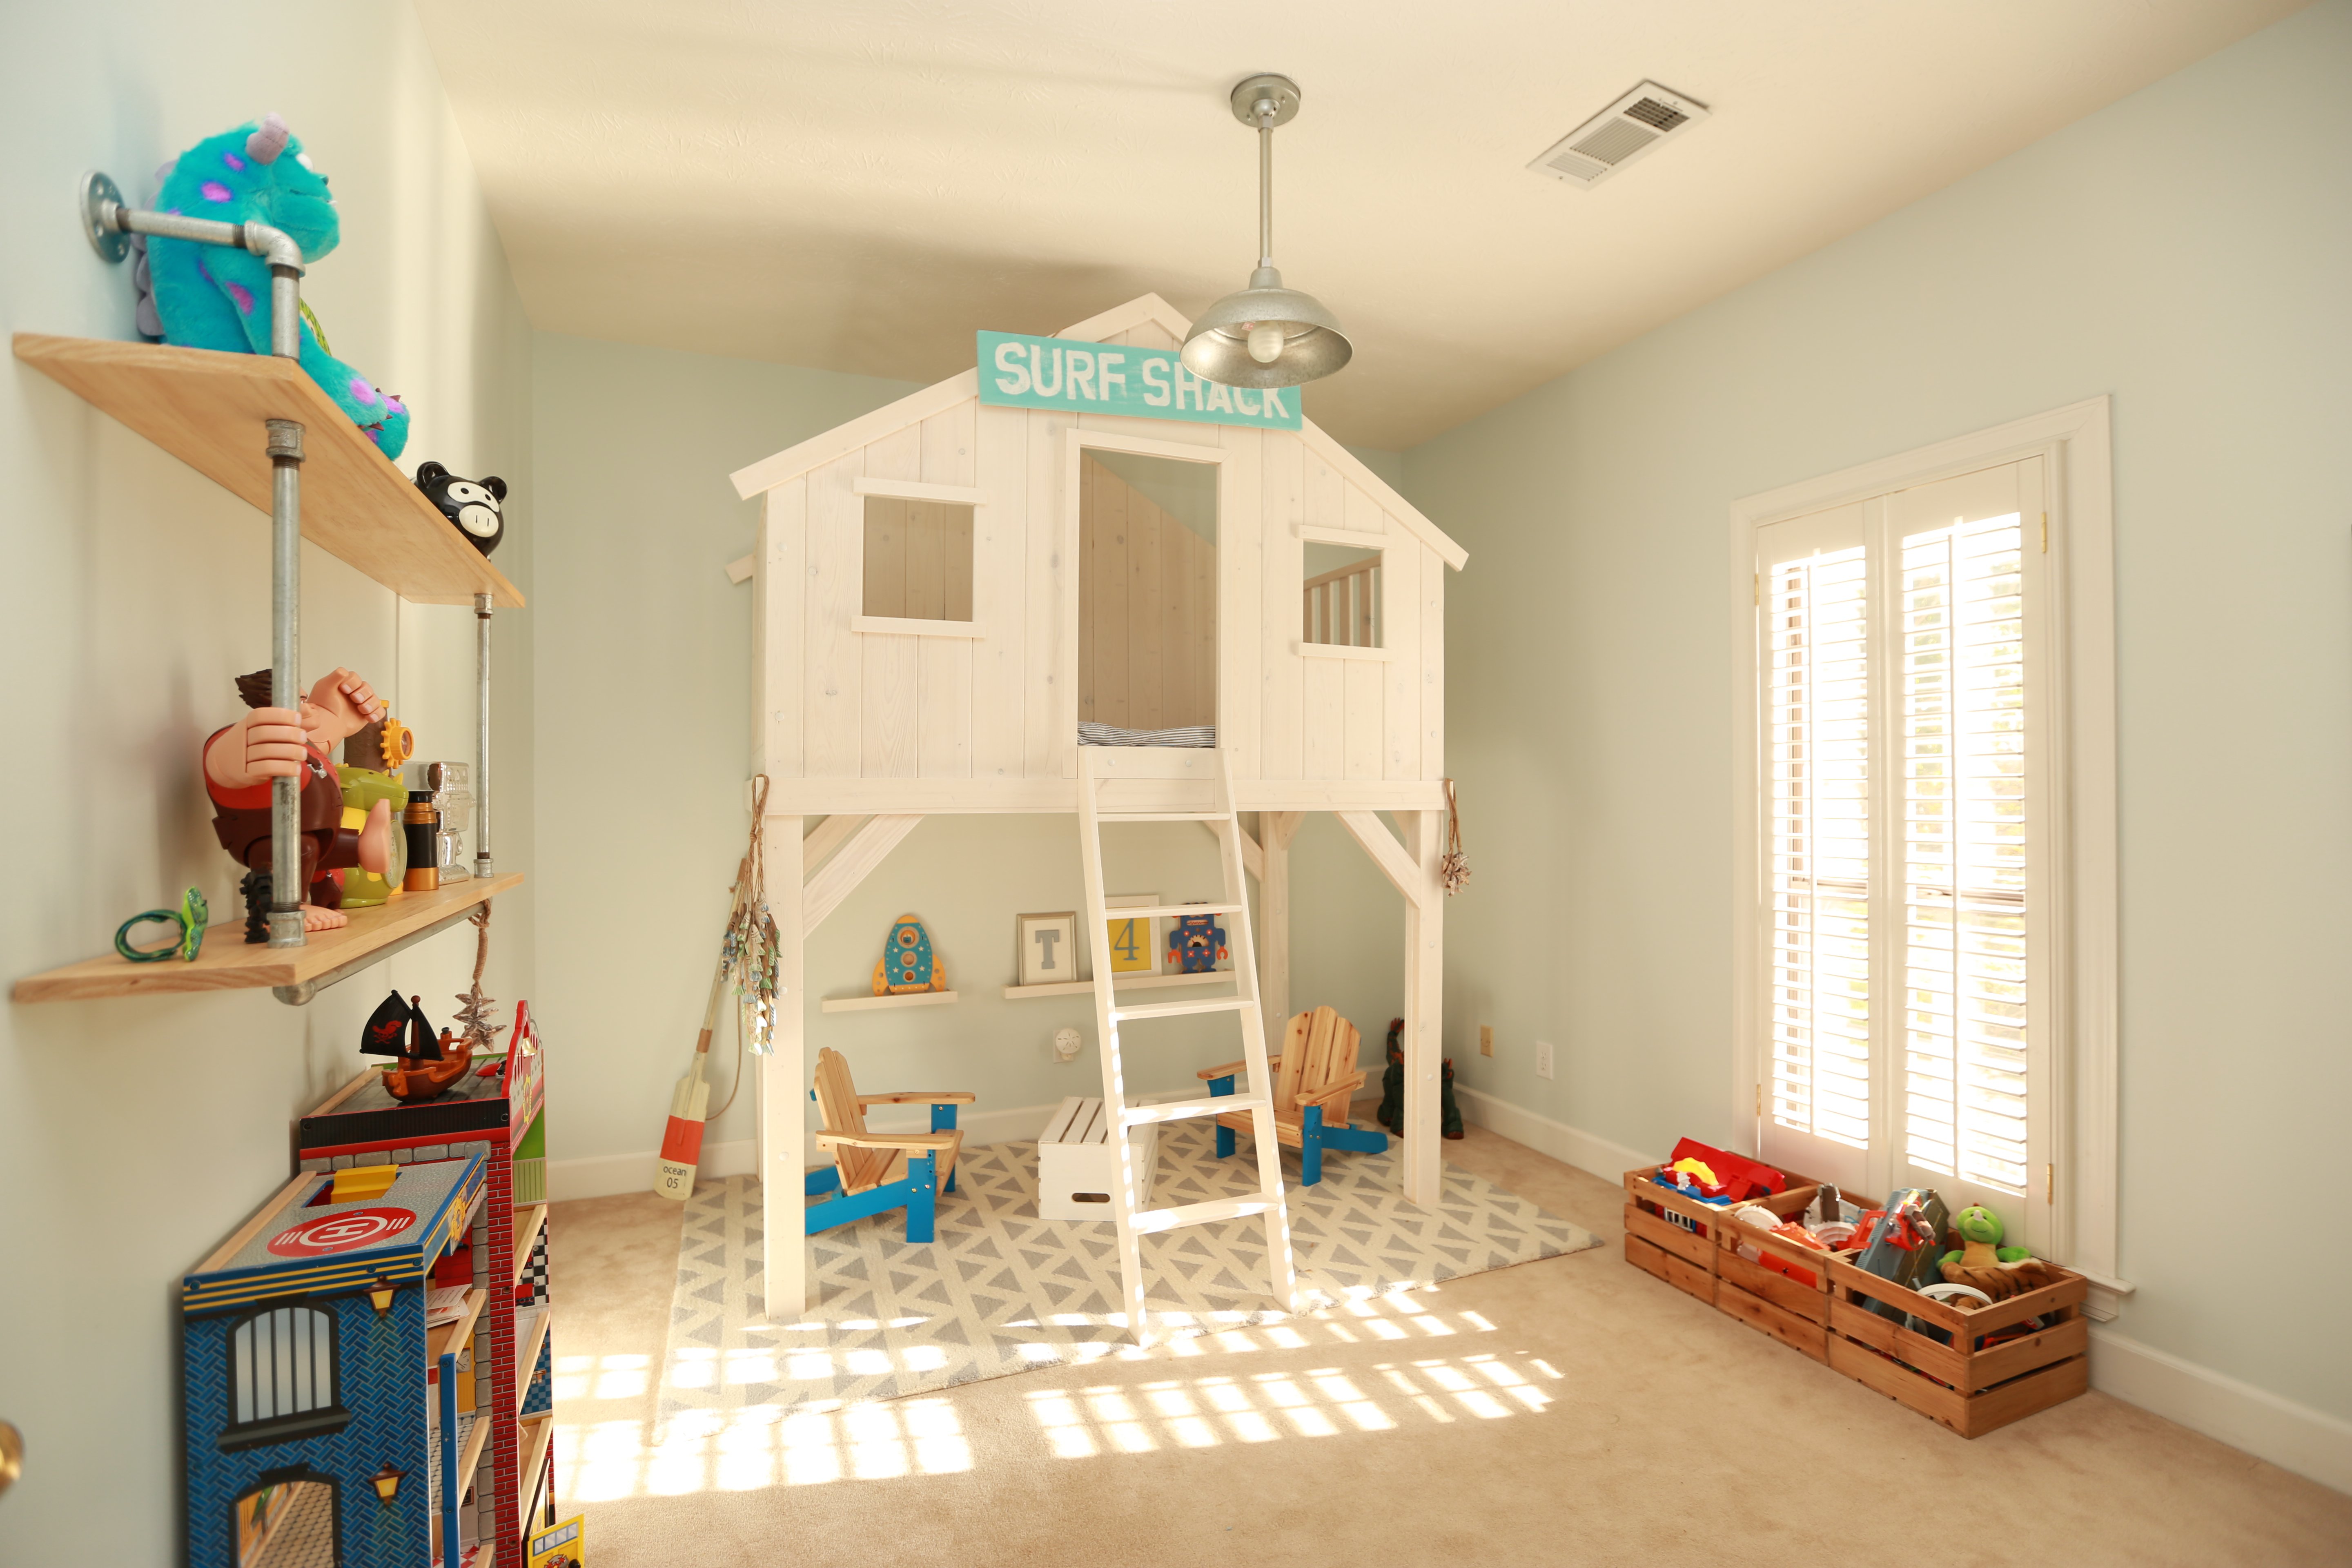
Customized version of the clubhouse bed that is so popular! We went the extra mile on the finishing touches to ensure an awesome bed for our little guy! We made the bed taller for more space underneath and polished up the finished product to create a higher end look. Care was taken to precisely sand all areas of the bed for a smooth finish and polished look. All pocket-holes are filled with plugs and sanded smooth on the inside of the bed for an overall finished product. No shortcuts taken! We went the extra mile and painted the carriage bolts so they would blend in with the whitewash finish and also recessed the nut on the back of the legs for safety and added a cap so they are not visible. Top of the bed, above the door, is filled in and a custom ladder finishes off the look. We went with smaller lumber to build the ladder and it is perfect!! We are over the moon with this project and will be building more items as fast as we can. Also, the sign, under-bed shelves, and industrial shelves were built by my husband. He did an epic job creating this room!! We used better grade wood and spent a lot of time sanding to ensure a great bed in the end. We also went with a Benjamin Moore stain that was a little more expensive and took the time to finish the slats under the bed.

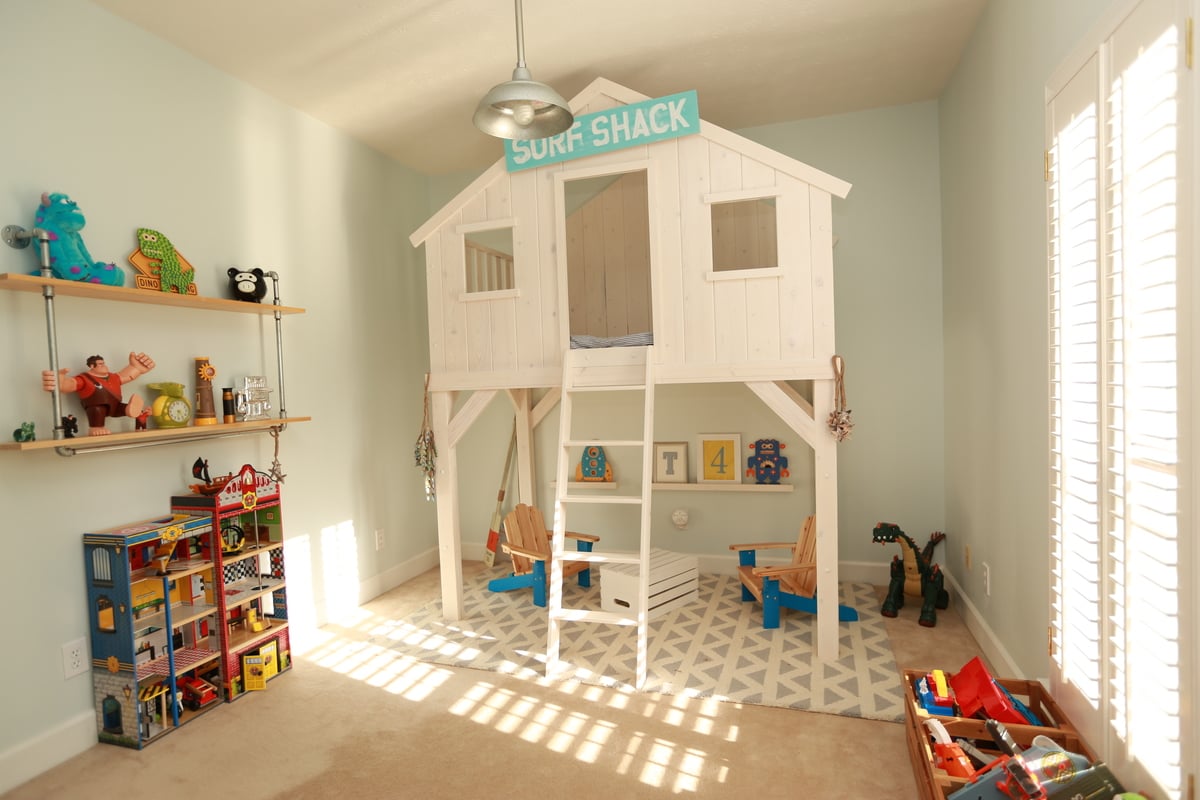
Built from Plan(s)
Estimated Cost
$400
Estimated Time Investment
Week Long Project (20 Hours or More)
Finish Used
Benjamin Moore exterior semi-transparent stain.
Recommended Skill Level
Intermediate
Comments
Mon, 02/22/2016 - 07:38
what benjamin moore stain?
I love this bed! I was looking at the BM site and was wondering what exact stain did you use? there are 5 different opacities & I want to make sure I get the right one. Thanks!!

In reply to what benjamin moore stain? by jeawels
Fri, 08/19/2016 - 05:58
Benjamin Moore Stain
Did you ever figure out what stain was used on this particular bed? I love it.
DIY Garden Box with Trellis
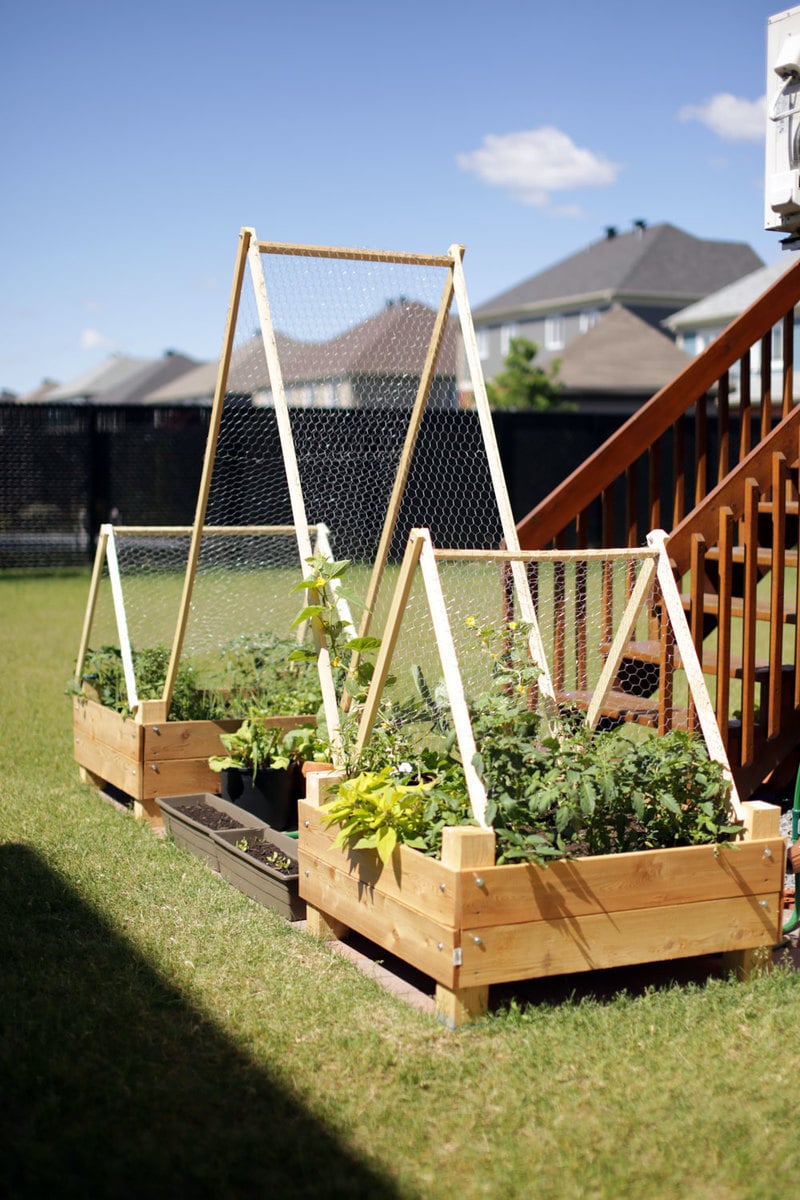
We wanted a small garden to fit on the back patio stones and this plan fit well. We reduced the height because we have 3 small children to "help" water the plants. The trellis was hoping that we could extend the amount of produce we could grow. They're very heavy, sturdy and straightforward to build. Thanks very much!!
Built from Plan(s)
Estimated Cost
$120
Estimated Time Investment
Weekend Project (10-20 Hours)
Recommended Skill Level
Beginner
Grill Station
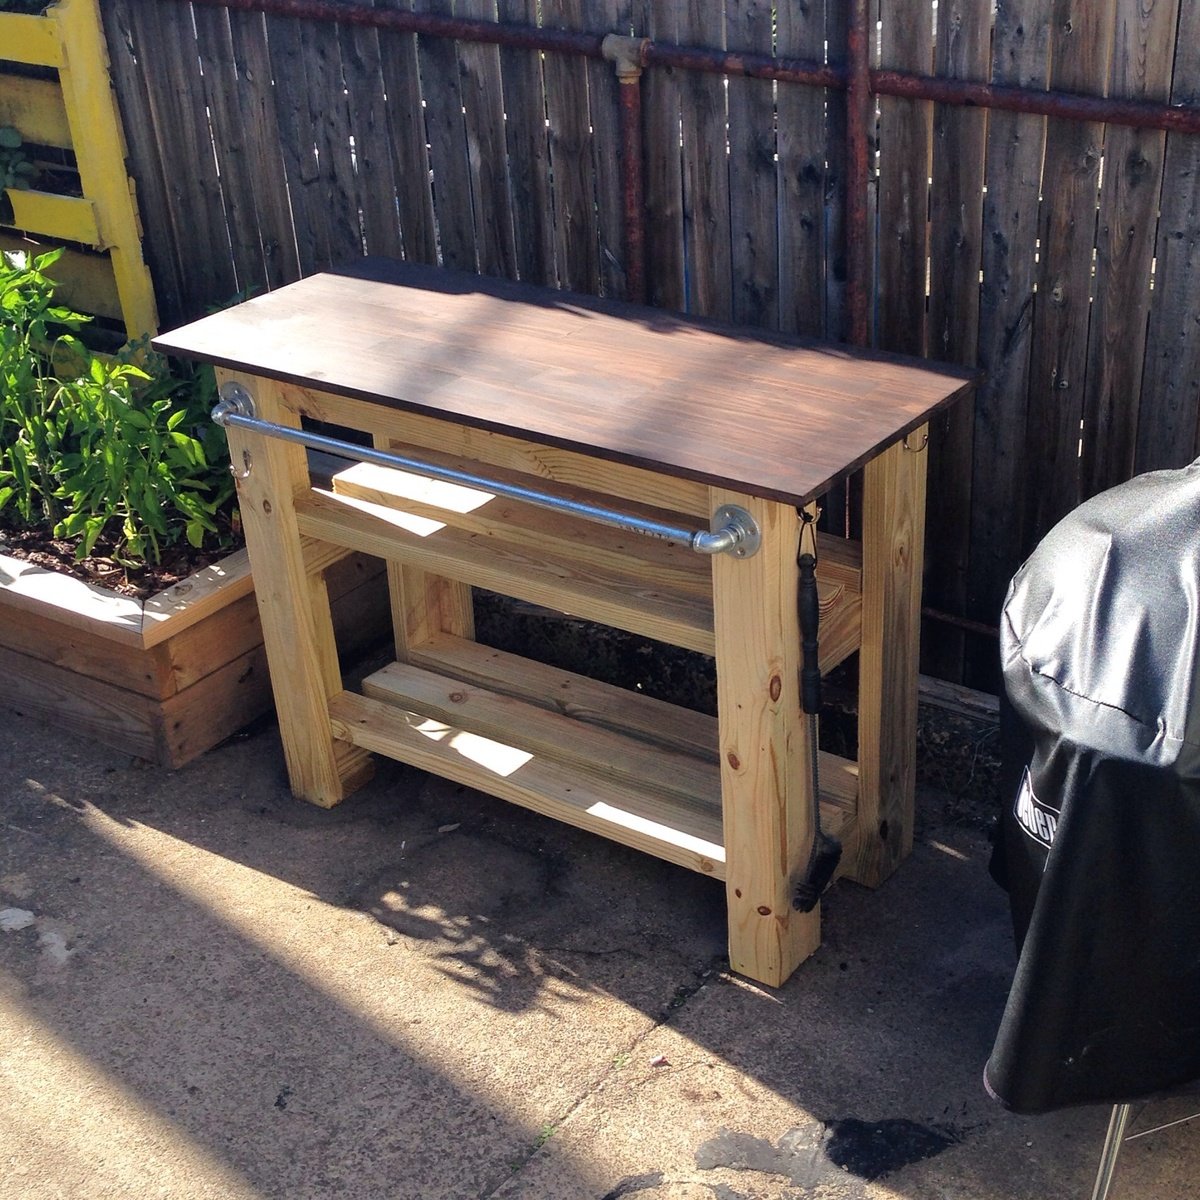
Grill station
Built from Plan(s)
Estimated Cost
100
Estimated Time Investment
Afternoon Project (3-6 Hours)
Finish Used
Rustoleum Kona
Recommended Skill Level
Beginner
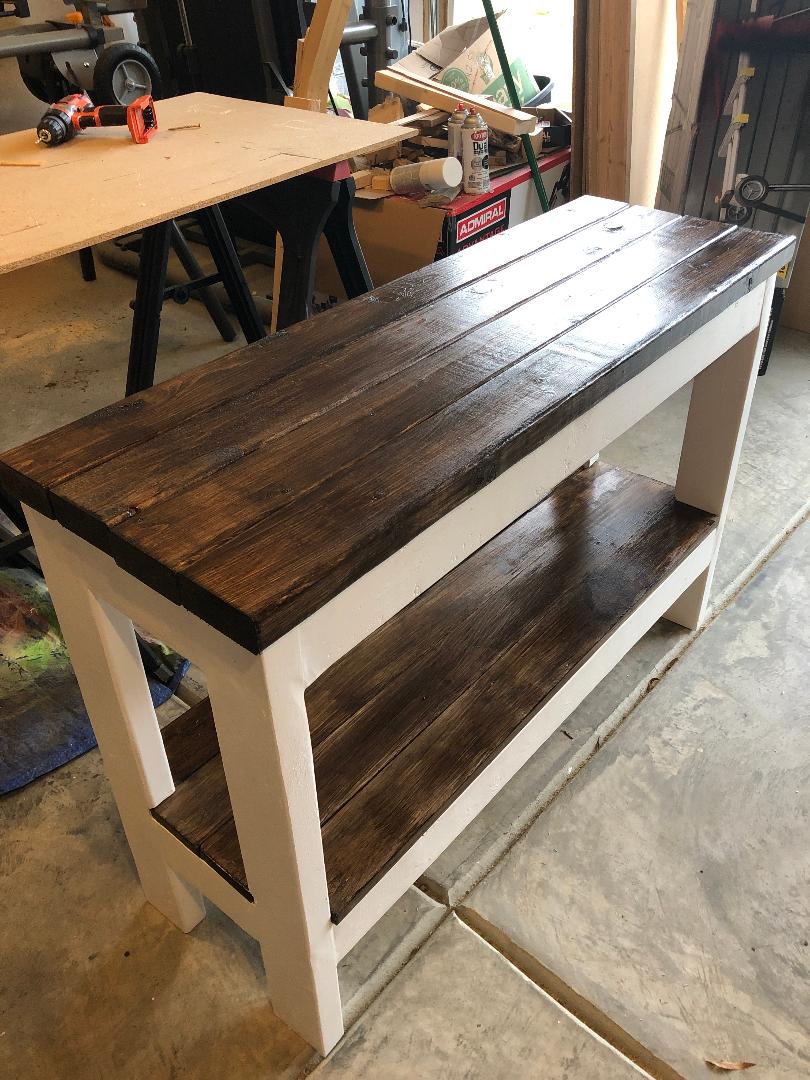
Rustic X Desk
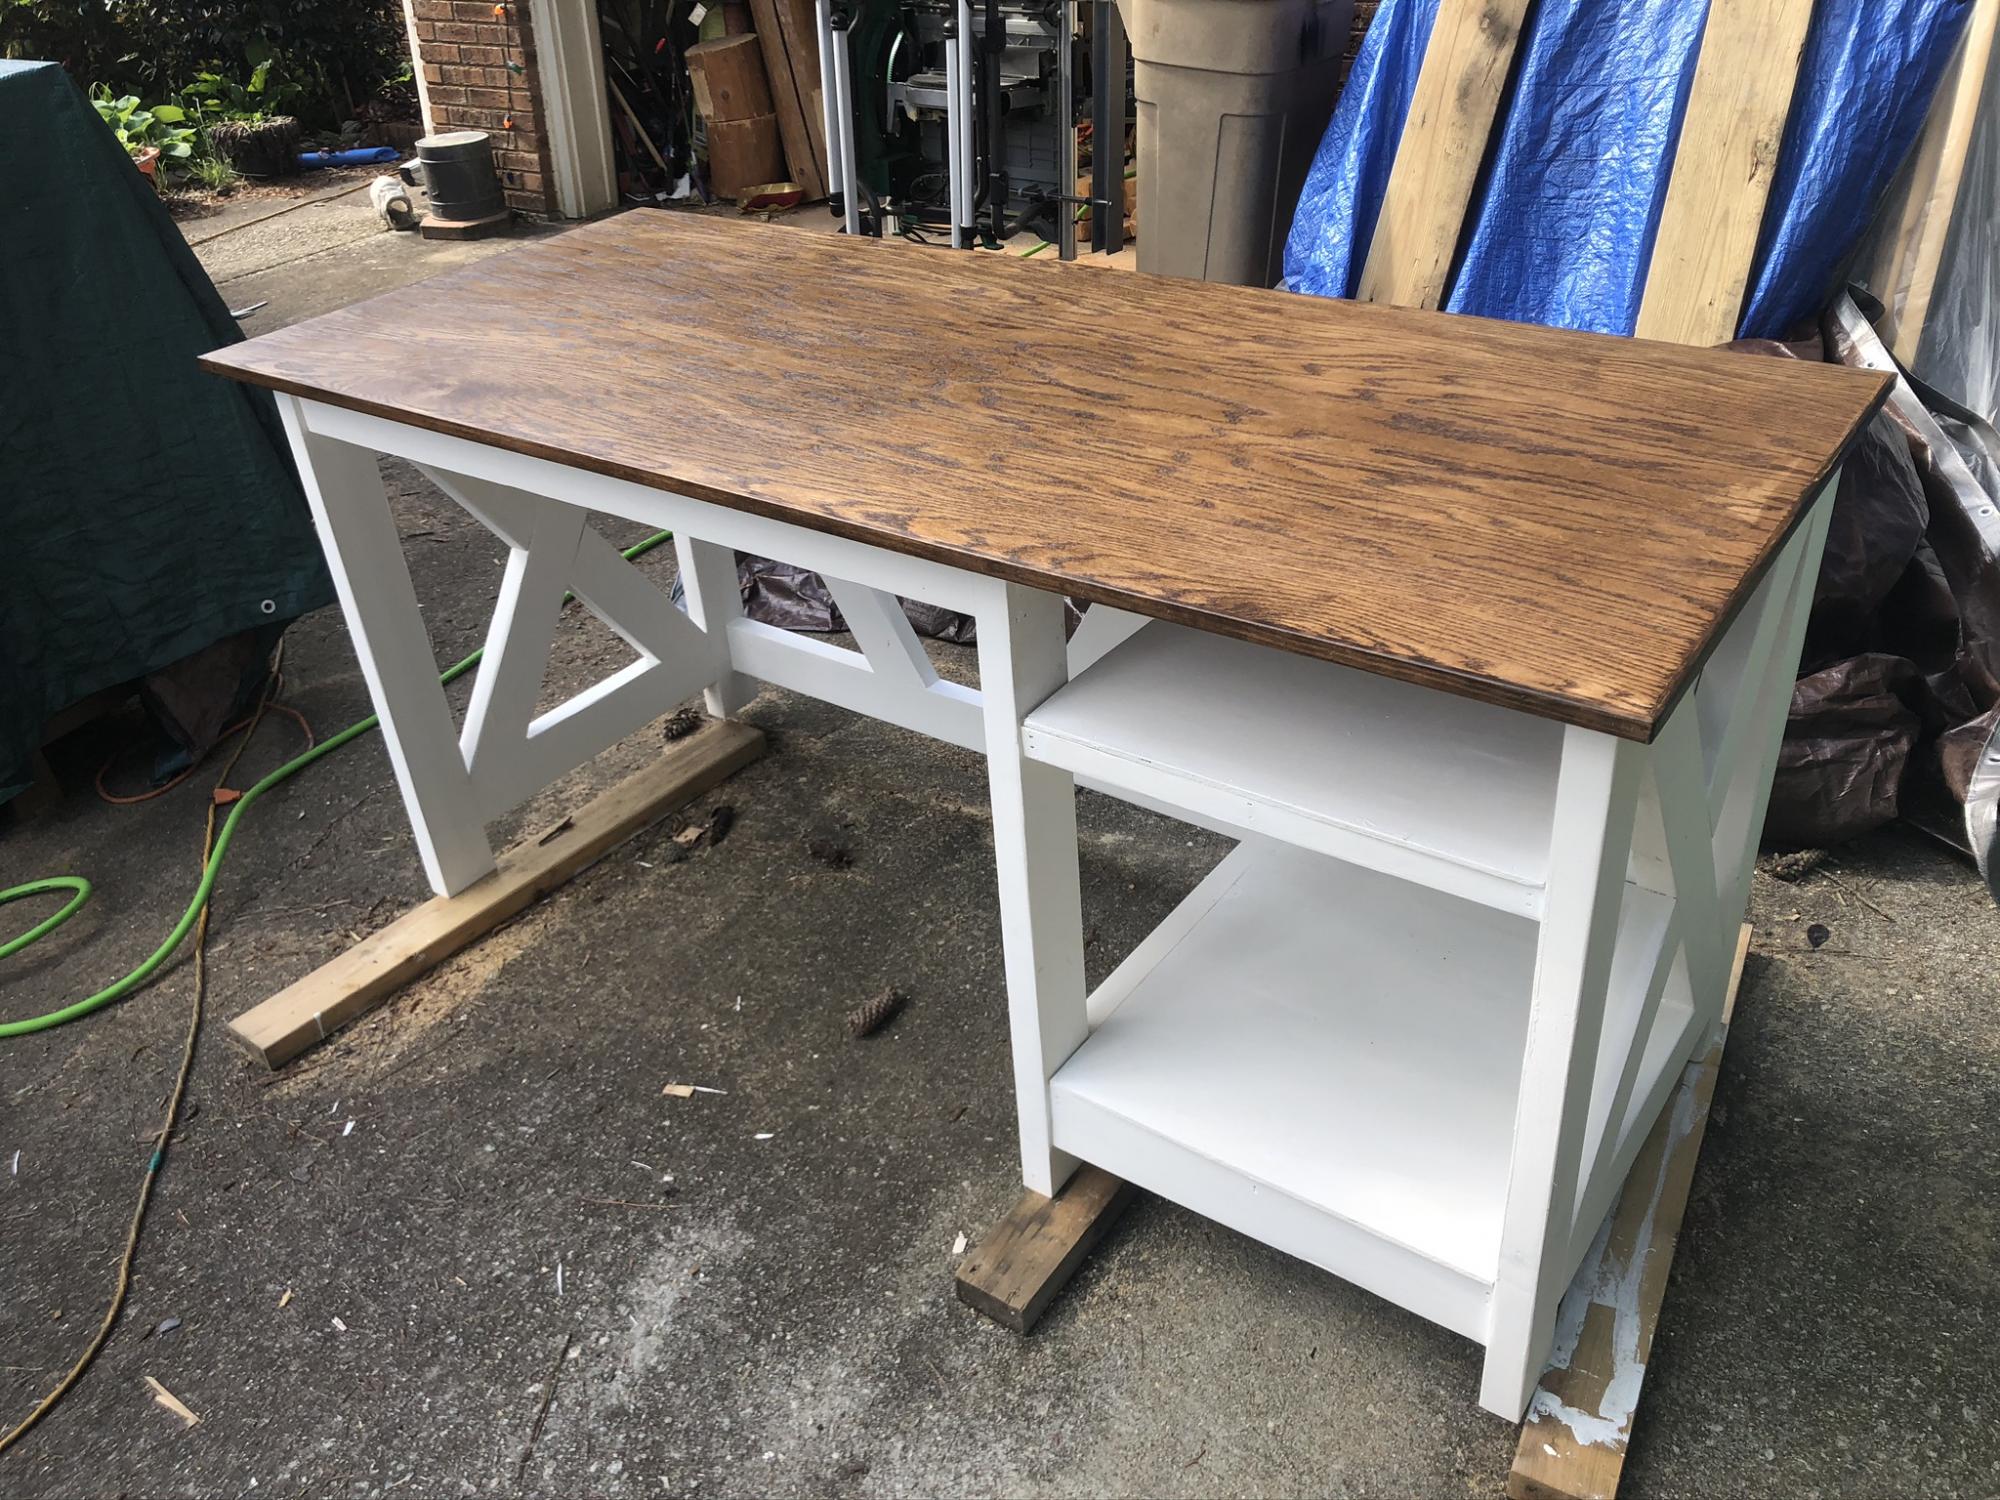
Base was completely made from reclaimed 2x4's. Desktop made from Oak plywood
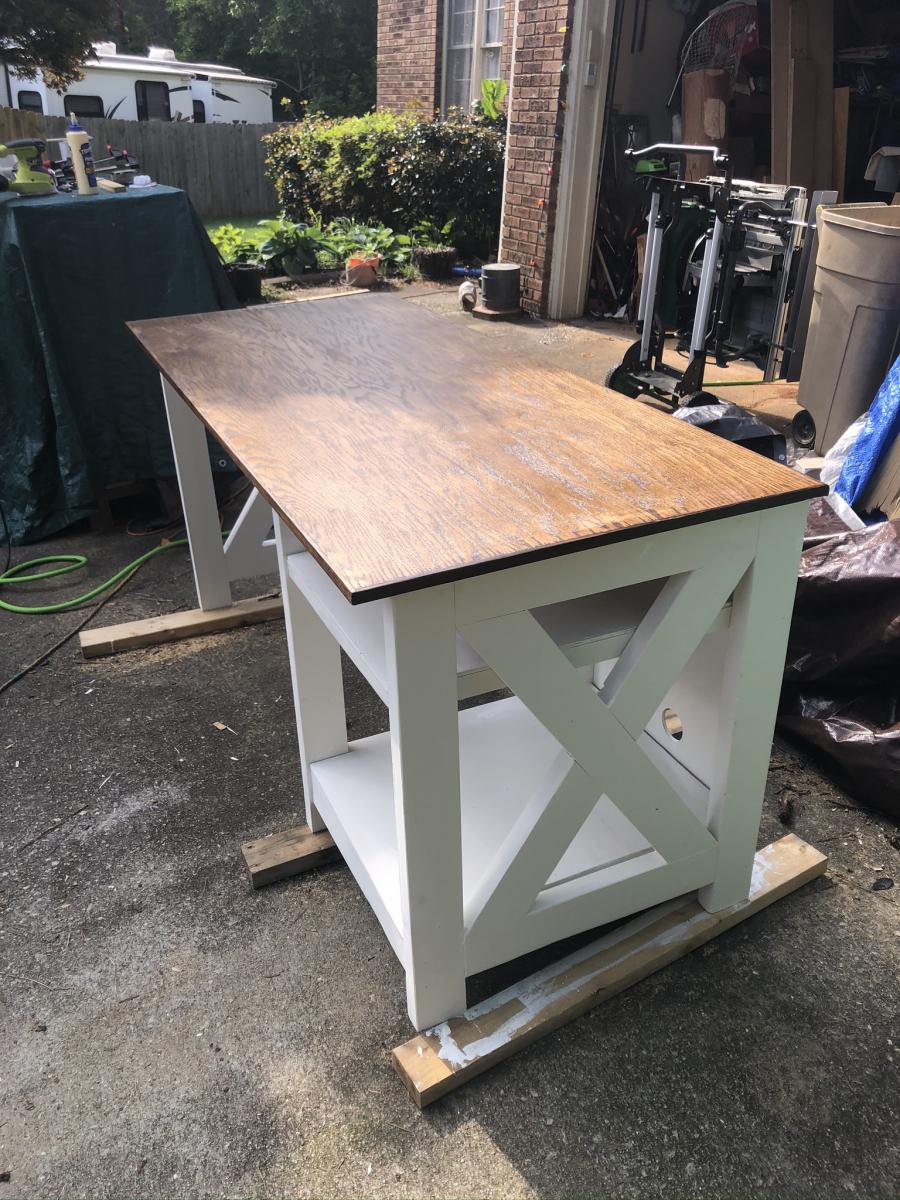
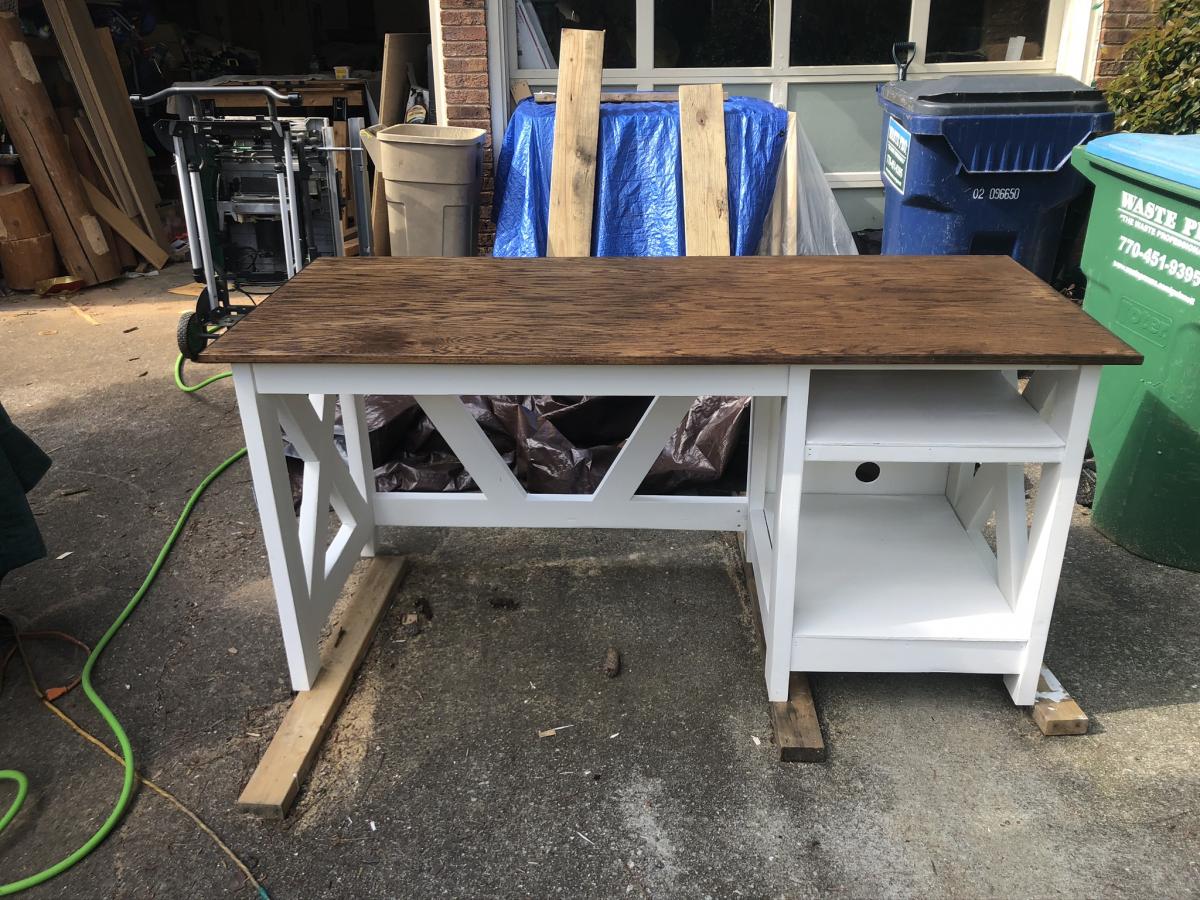
Built from Plan(s)
Estimated Cost
$50 and reclaimed wood
Finish Used
white paint. Honey mirwax stain
18” Doll Bunkbed
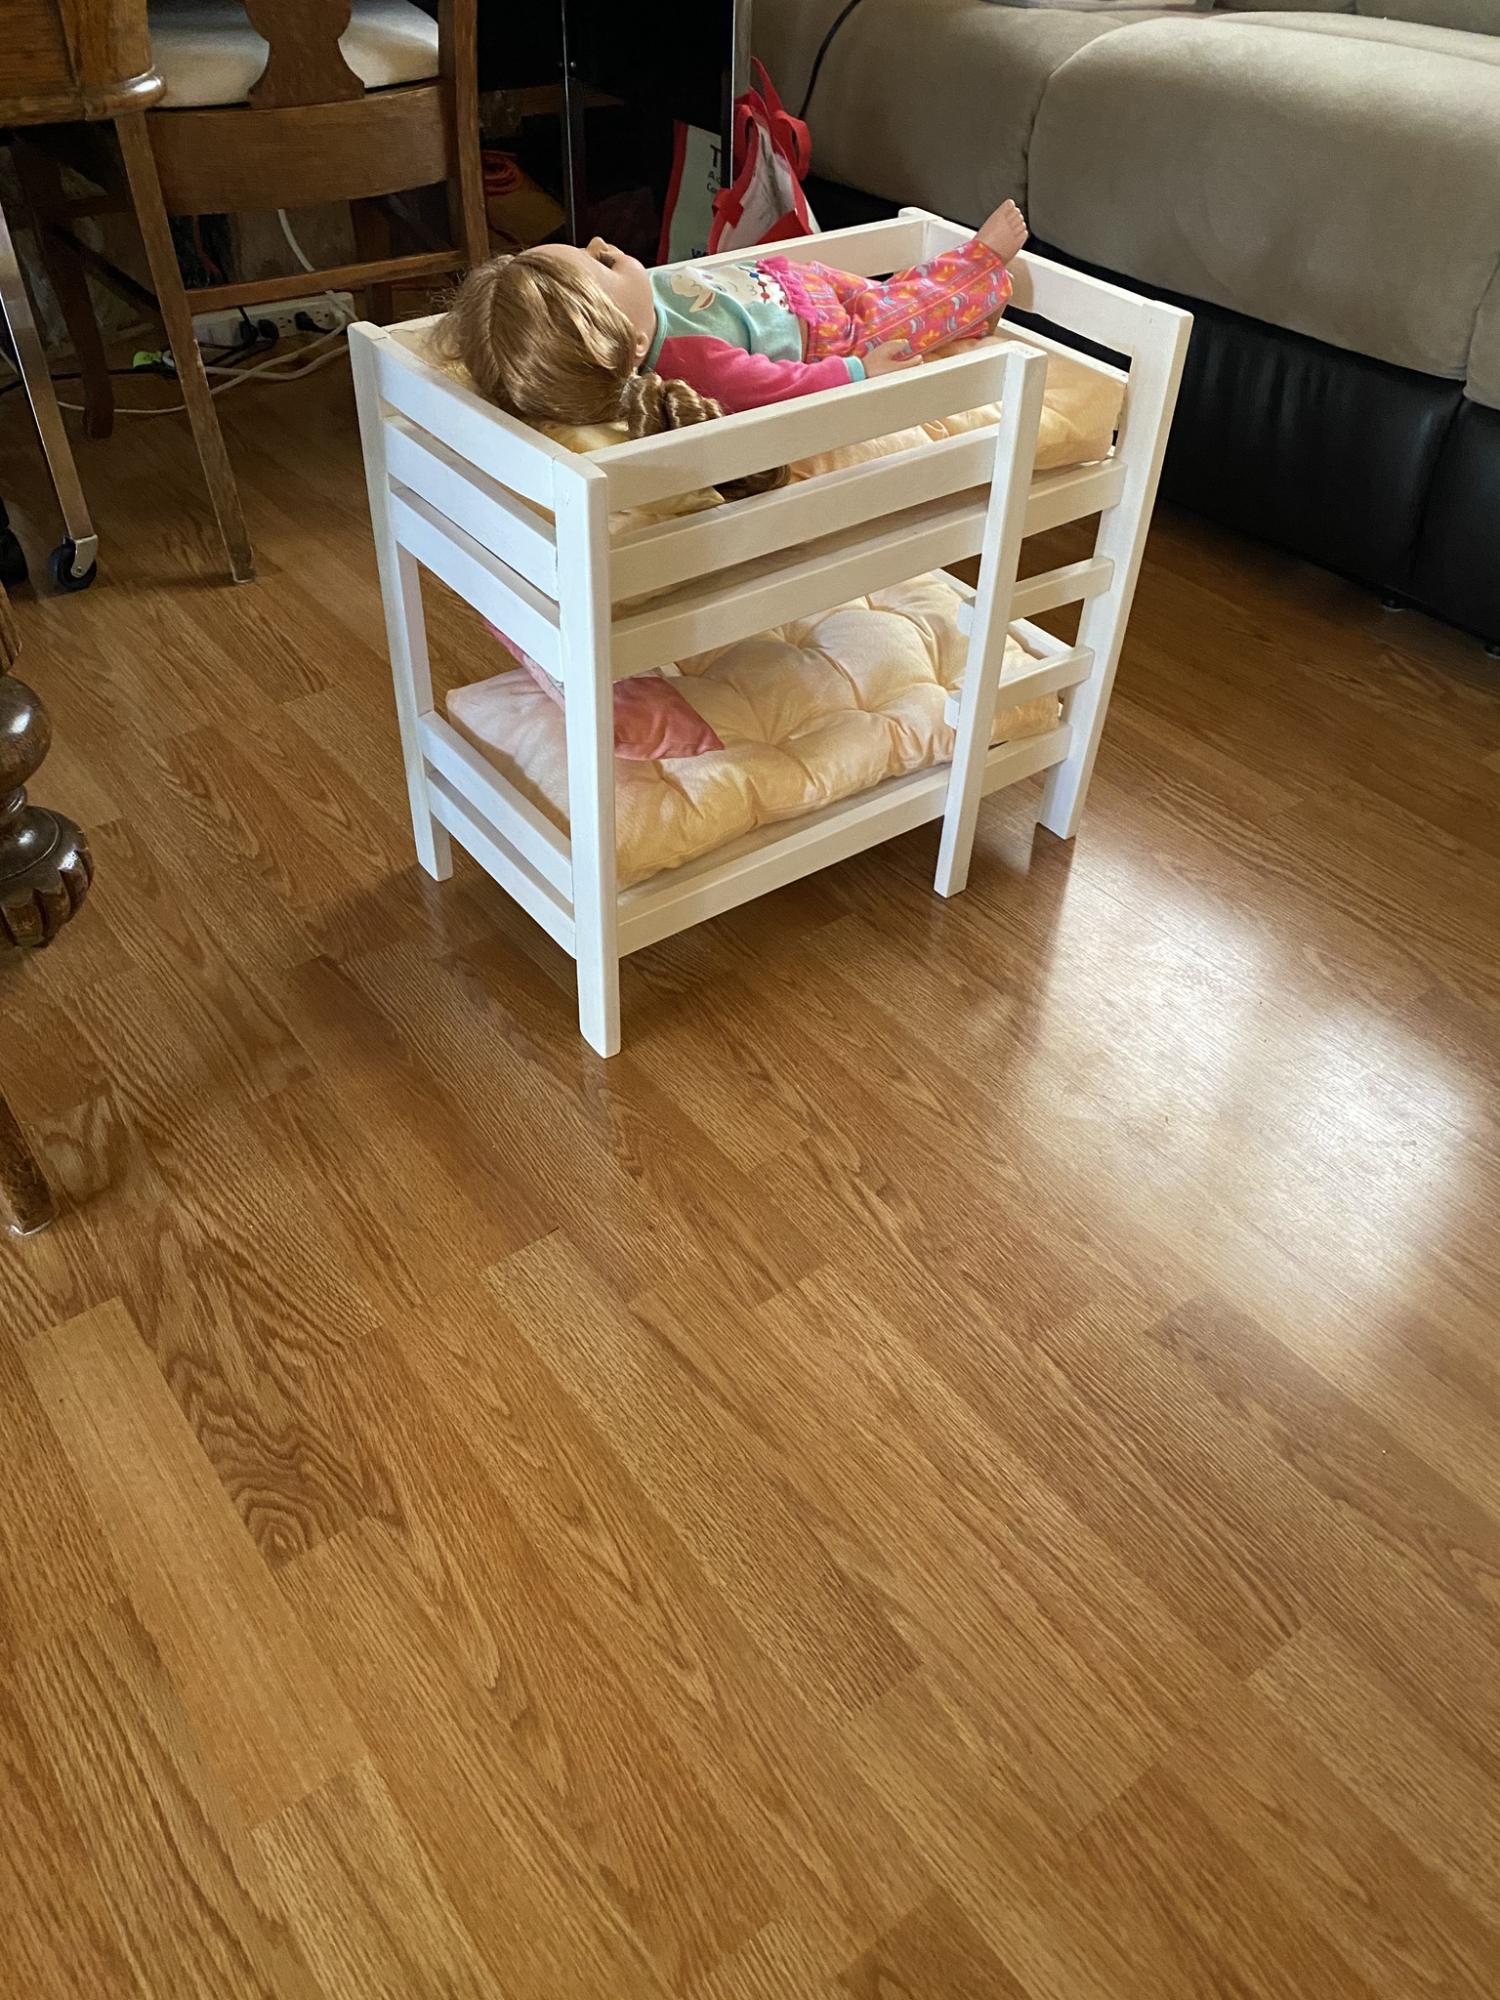
Awesome plans, Ana. Had to fight with not being able to get nice straight 1”x2” boards, and refused to go buy anything bigger to rip from. But overall, it turned out super nice and my granddaughter loved it. Already have a request for another one from her cousins 😊
Built from Plan(s)
Estimated Cost
$65
Estimated Time Investment
Afternoon Project (3-6 Hours)
Finish Used
CIL Semi Gloss - Vintage White
Recommended Skill Level
Beginner
Kids Toy Outdoor Storage Box
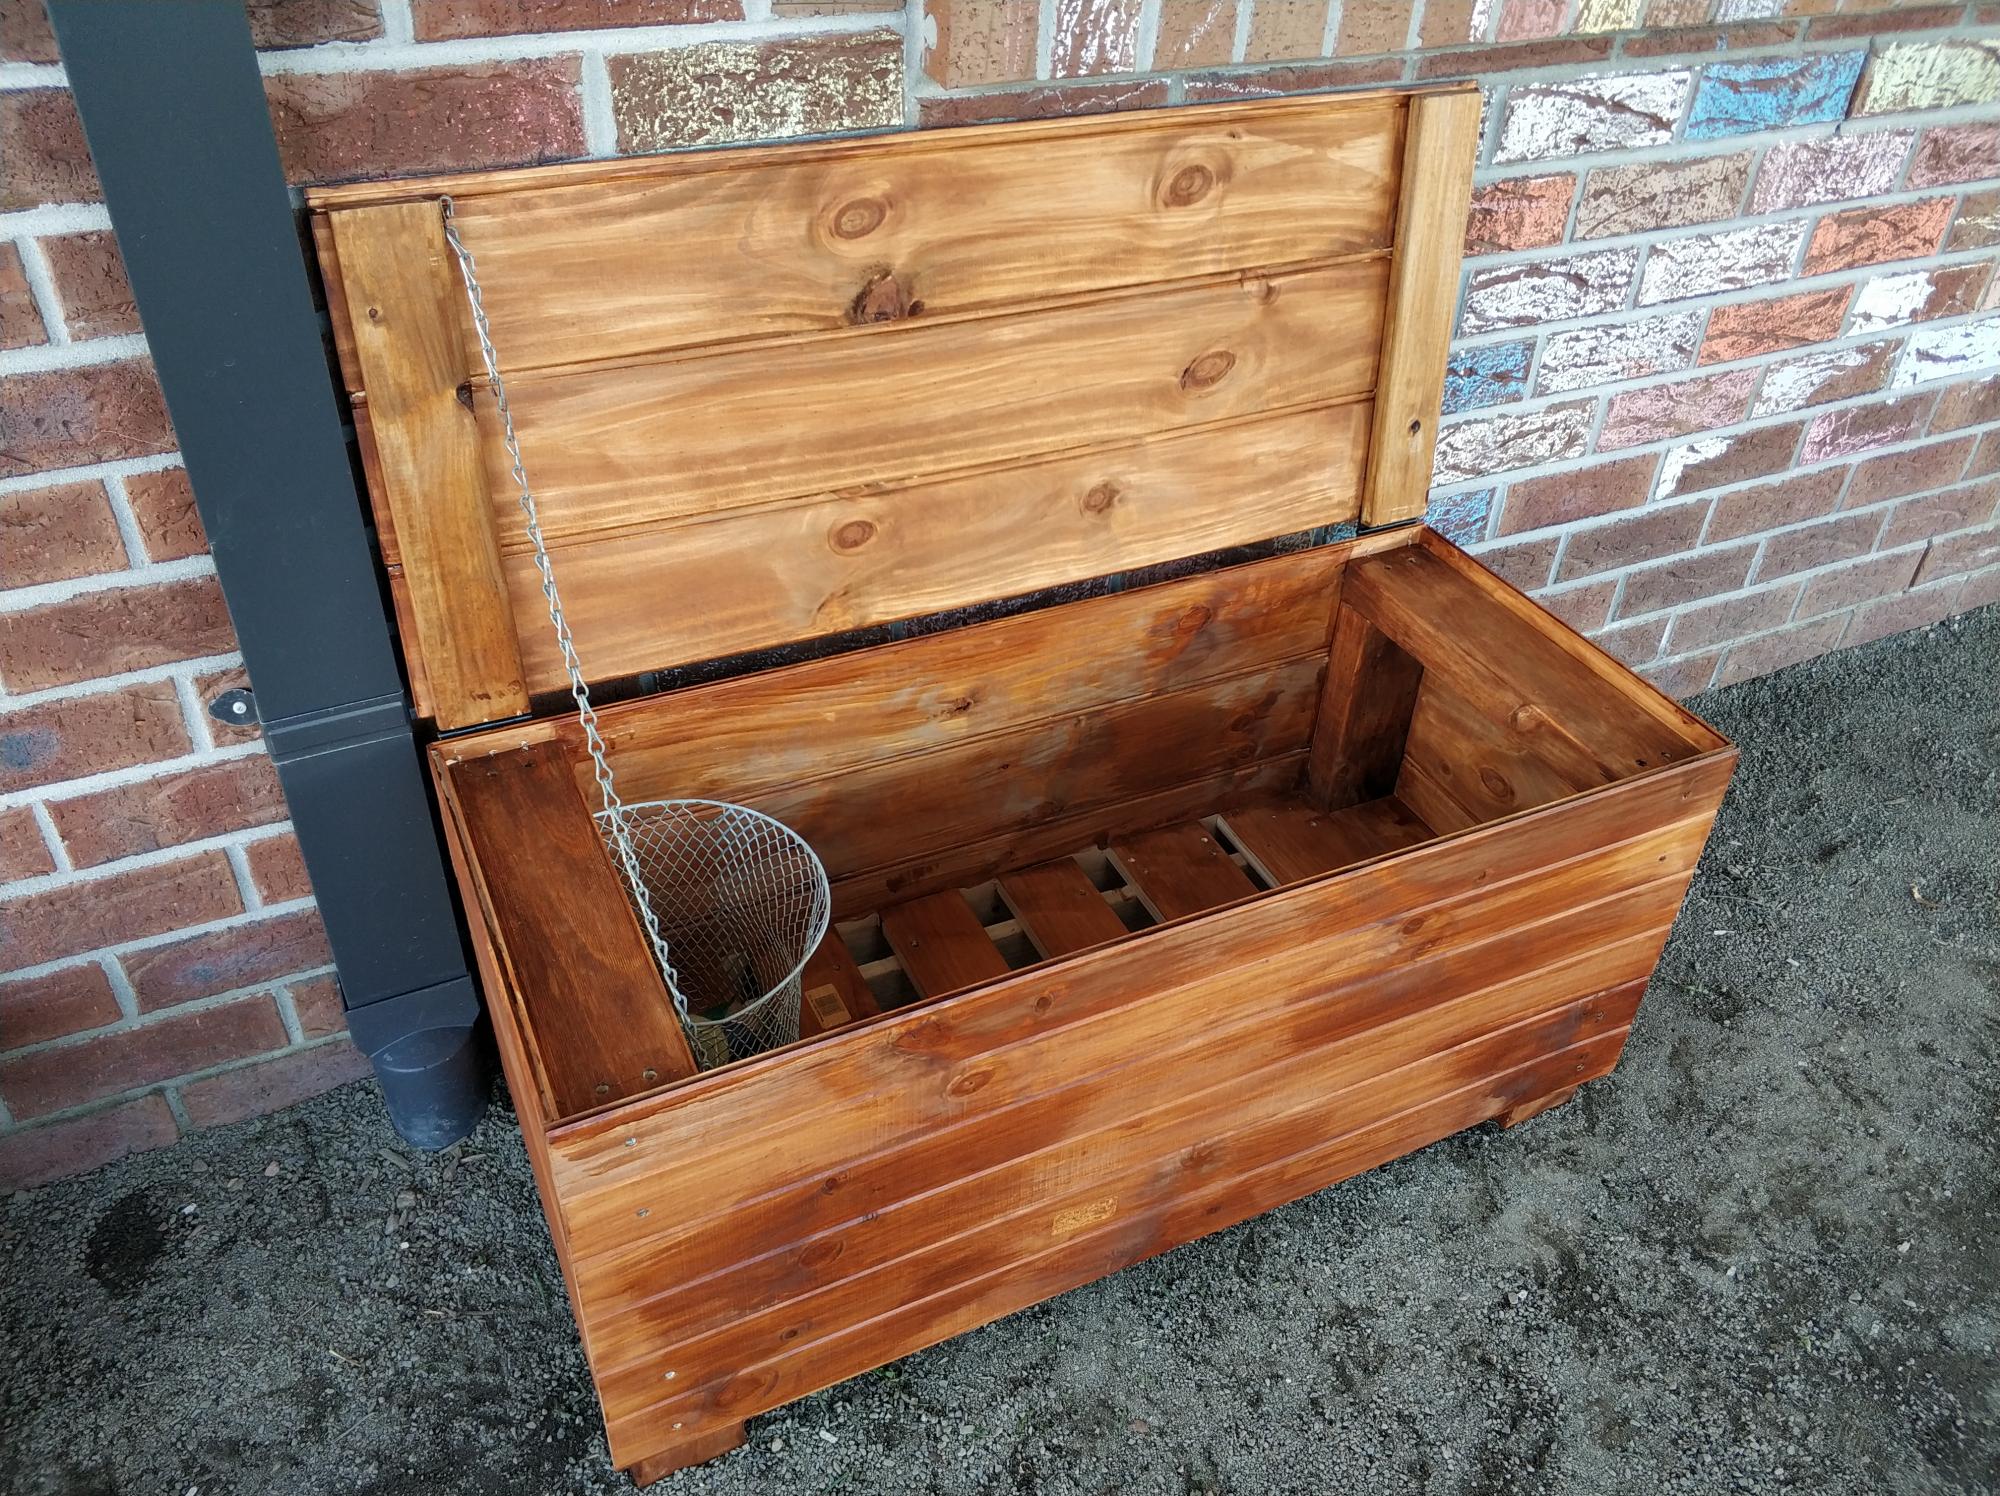
First time making anything half decent and it turned out ok. Followed the Cedar Box plans with a few adaptations. I live in regional Australia so used different materials, also extended the length. Used an app on the phone to convert the measurements to as close as I could. Worked out well, a few teething issues but does the job.
Built from Plan(s)
Estimated Cost
70 AUD
Estimated Time Investment
Day Project (6-9 Hours)
Finish Used
Intergrain Merbau Stain
Recommended Skill Level
Beginner
Comments
Planters and bench
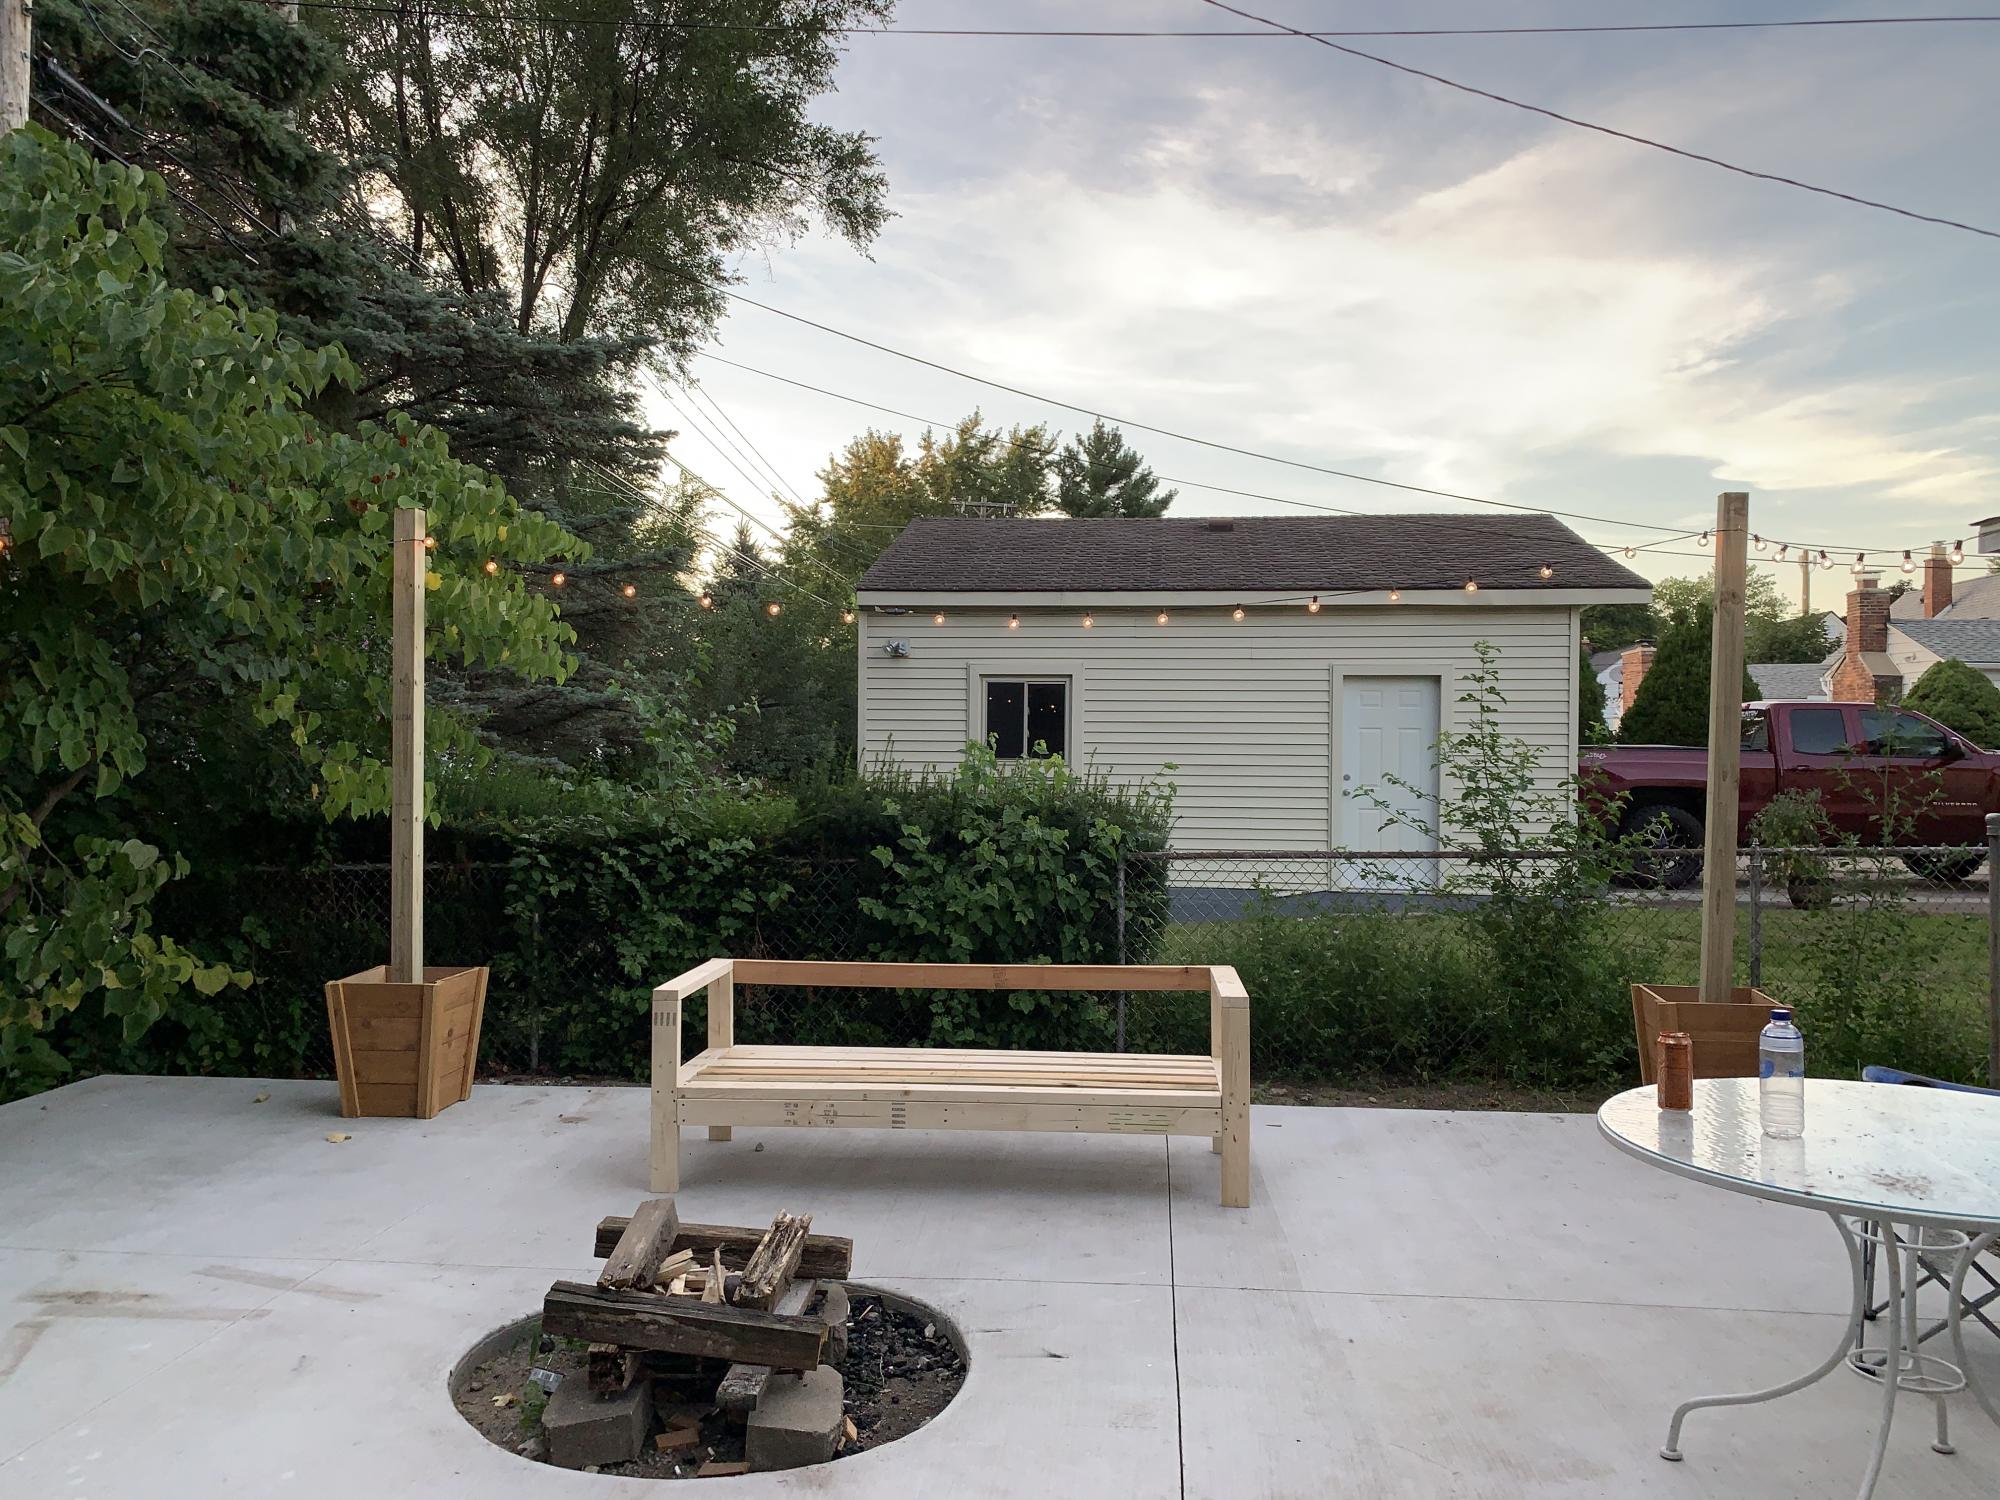
Tall planter that we modified to hold our light post and the bench waiting on cushions. The bench is on the wide side of things and is heavy, but these are good things as we are tall people. The only thing we would change is the seat size maybe not so wide. Otherwise it was an easy and very affordable project.
Built from Plan(s)
Corner desk modified

My wife needed a bigger desk for her home office so built one. I used the modular office desk designs. I had to modify it, my wife wanted the 90 degree cut in where the two desk to meet. I built two open shelves and fastened then together and built one narrow shelf with drawers. Built mostly out of MDF with the top being melamine. Waiting on the edge banding to ship. Also, installed some rope lighting for indirect light.
Built from Plan(s)
Estimated Cost
Under $300
Estimated Time Investment
Week Long Project (20 Hours or More)
Finish Used
Painted the base cabinets.
Recommended Skill Level
Beginner
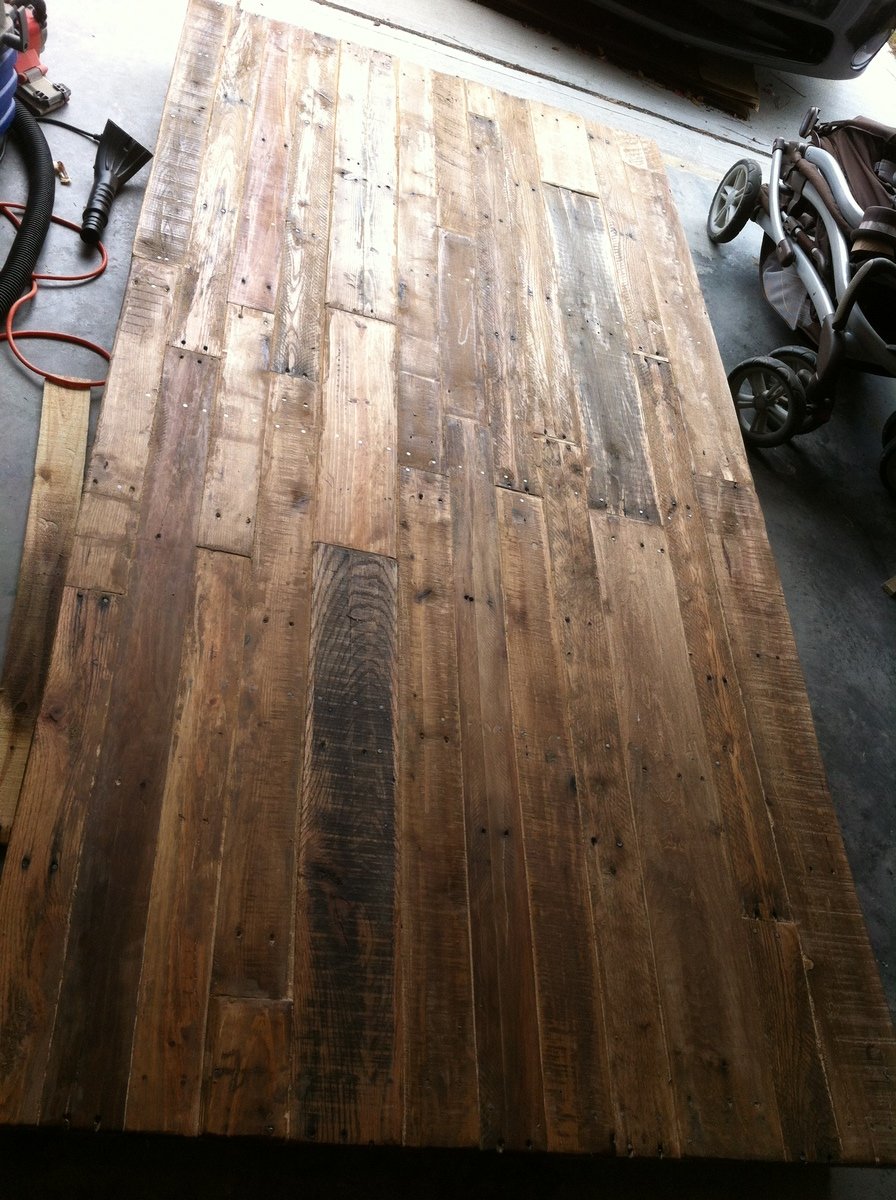
Fancy French Farmhouse Table
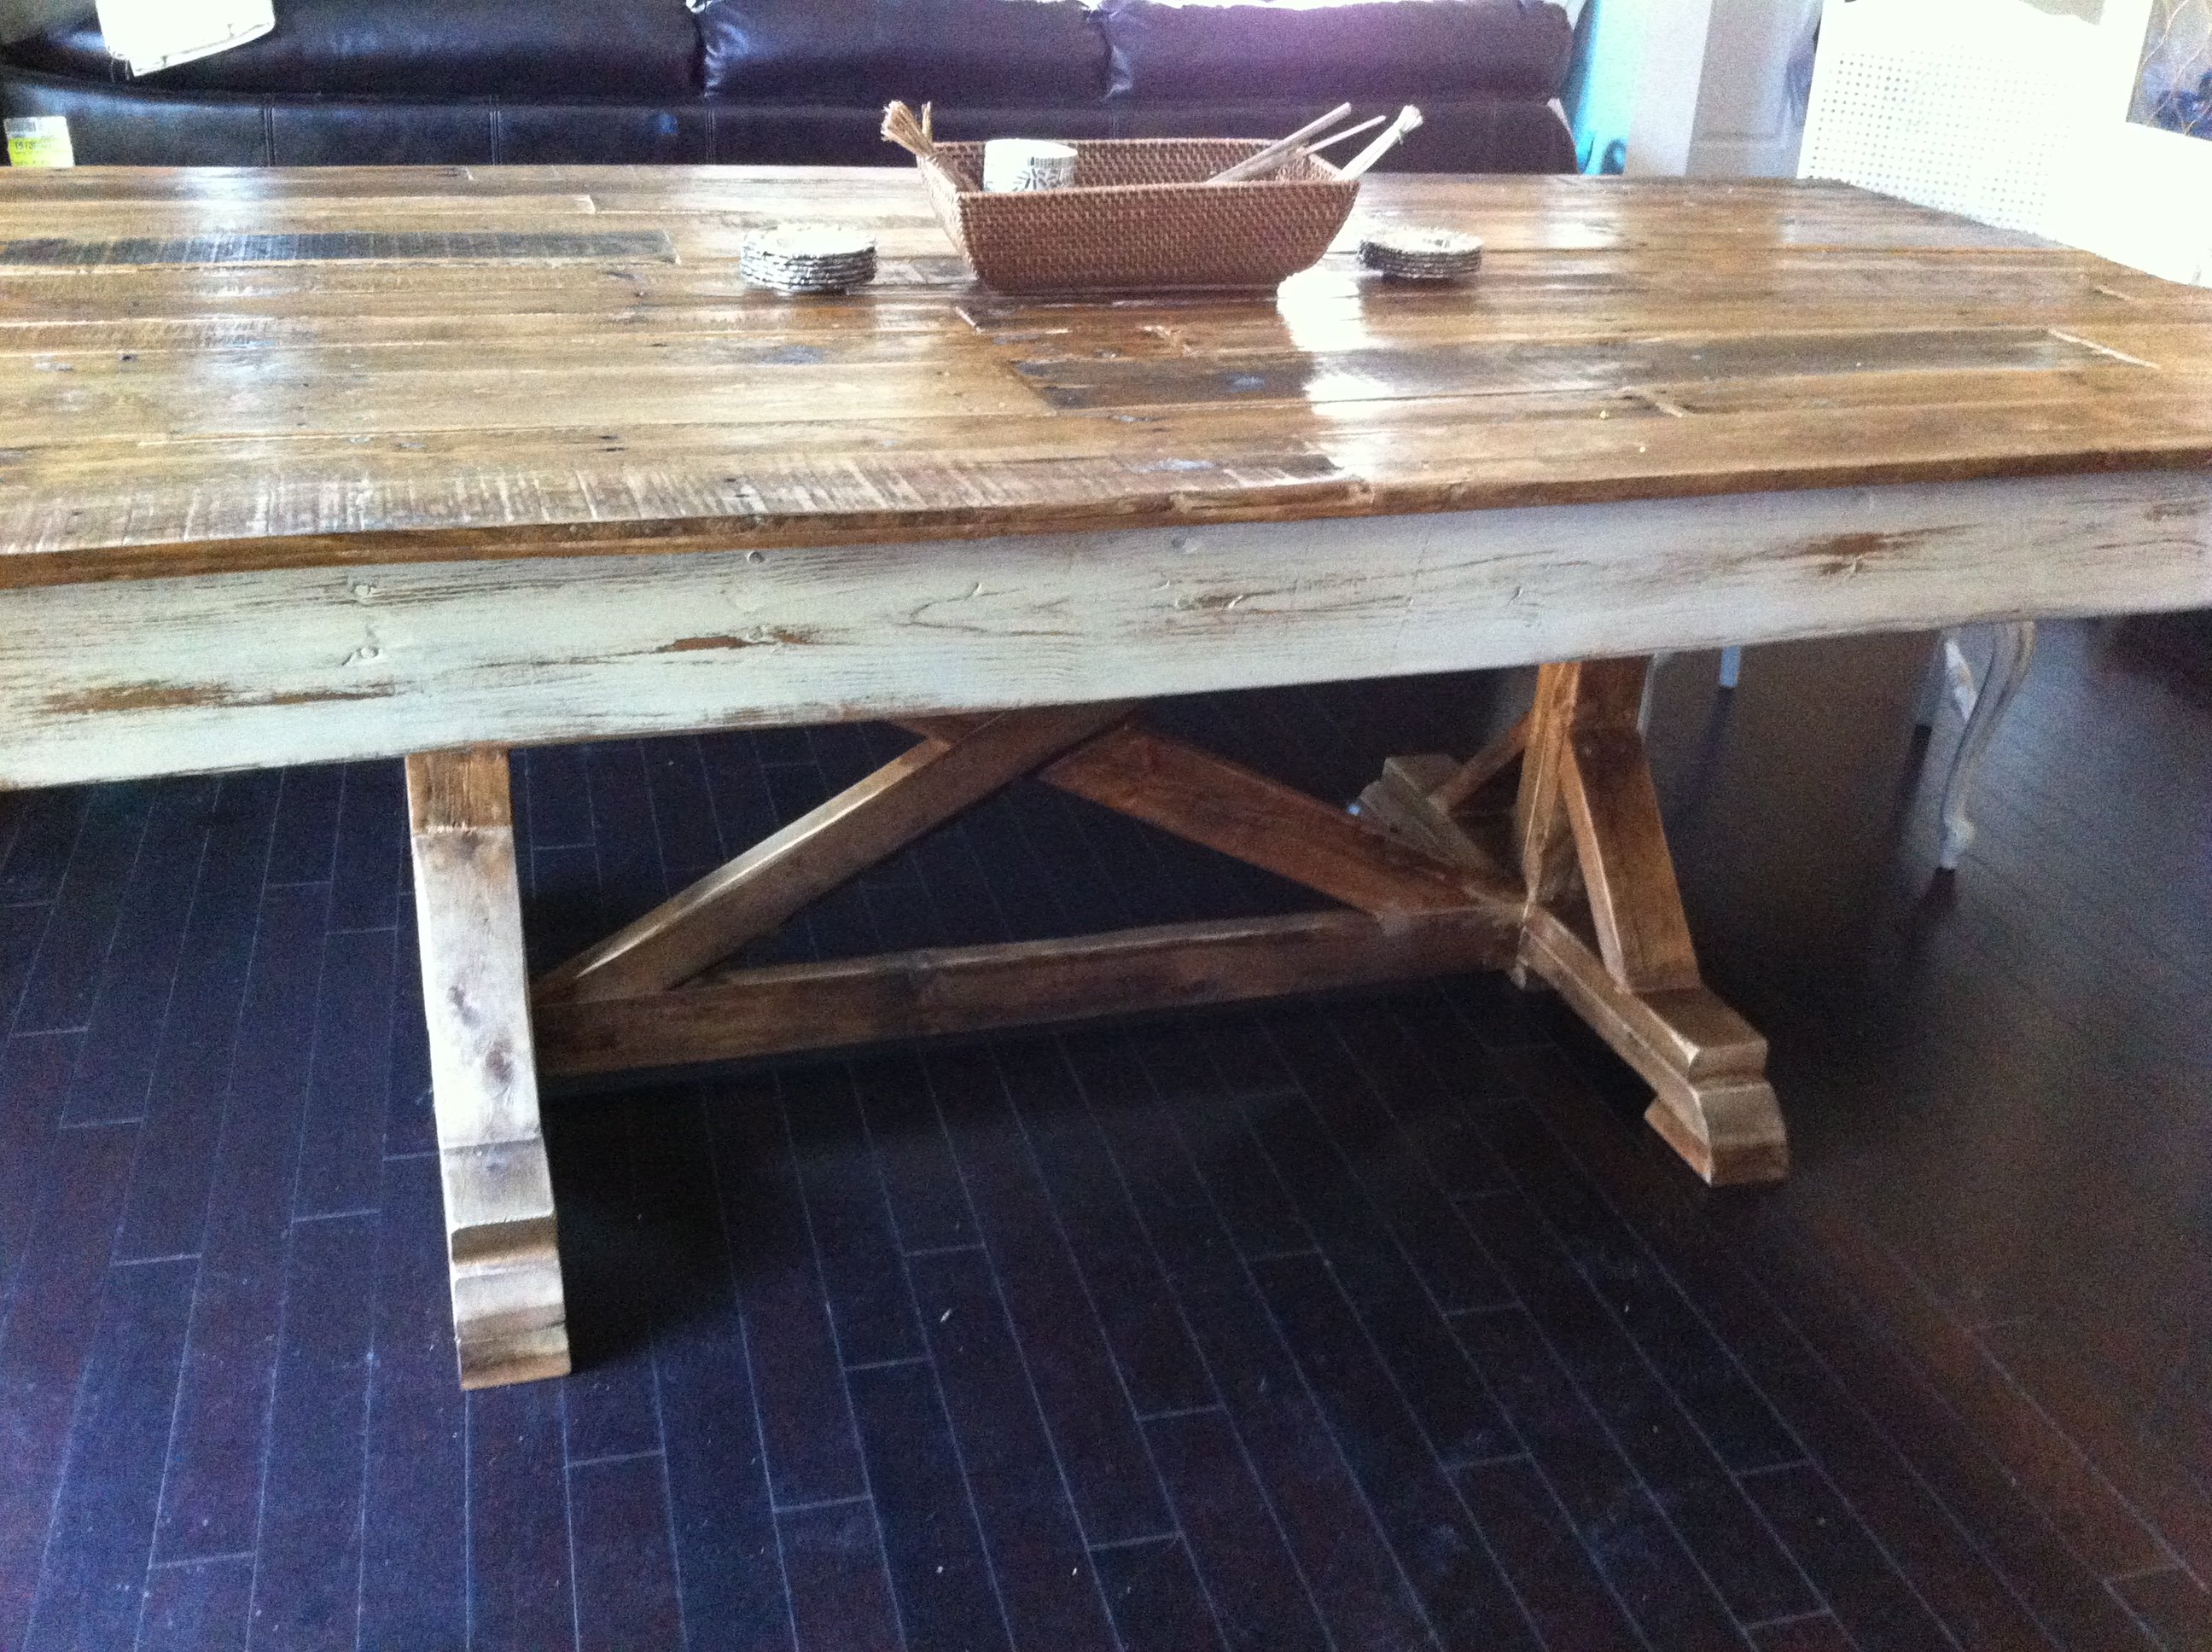
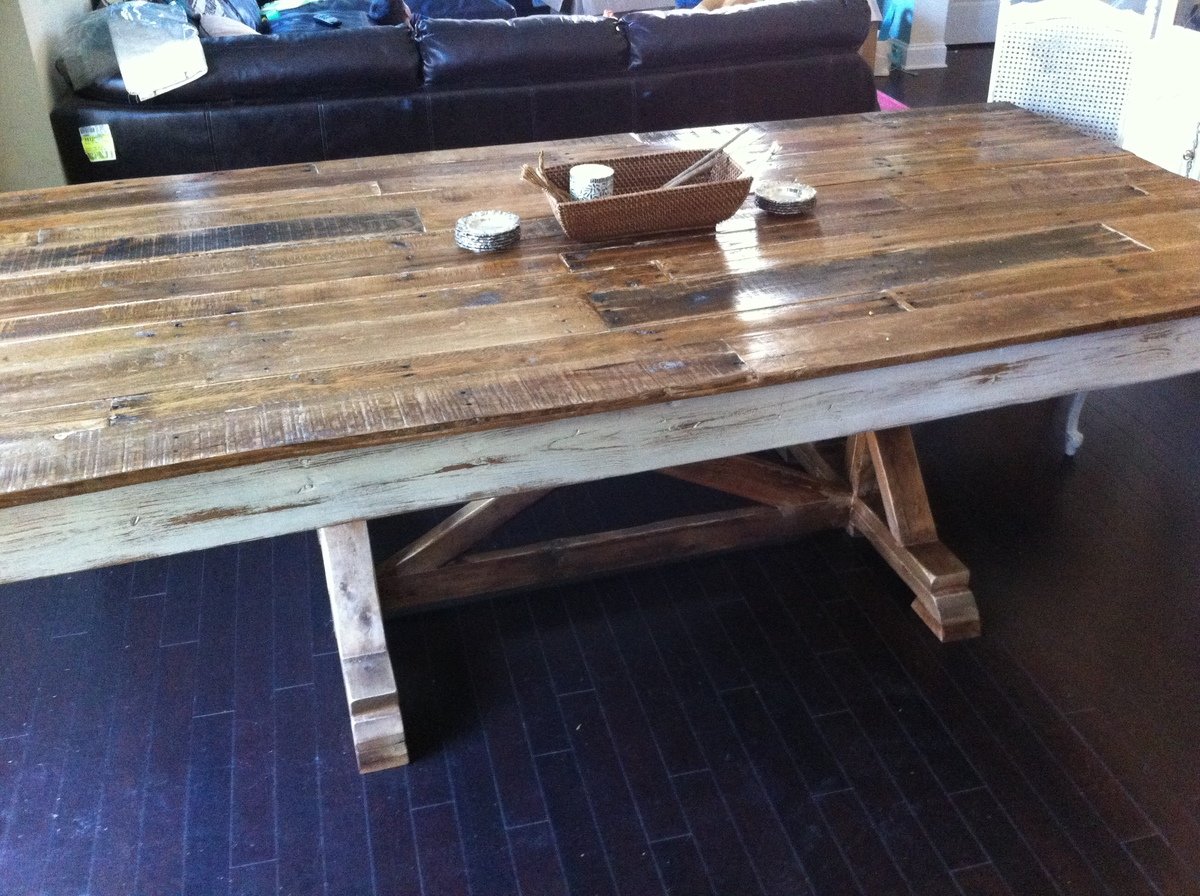
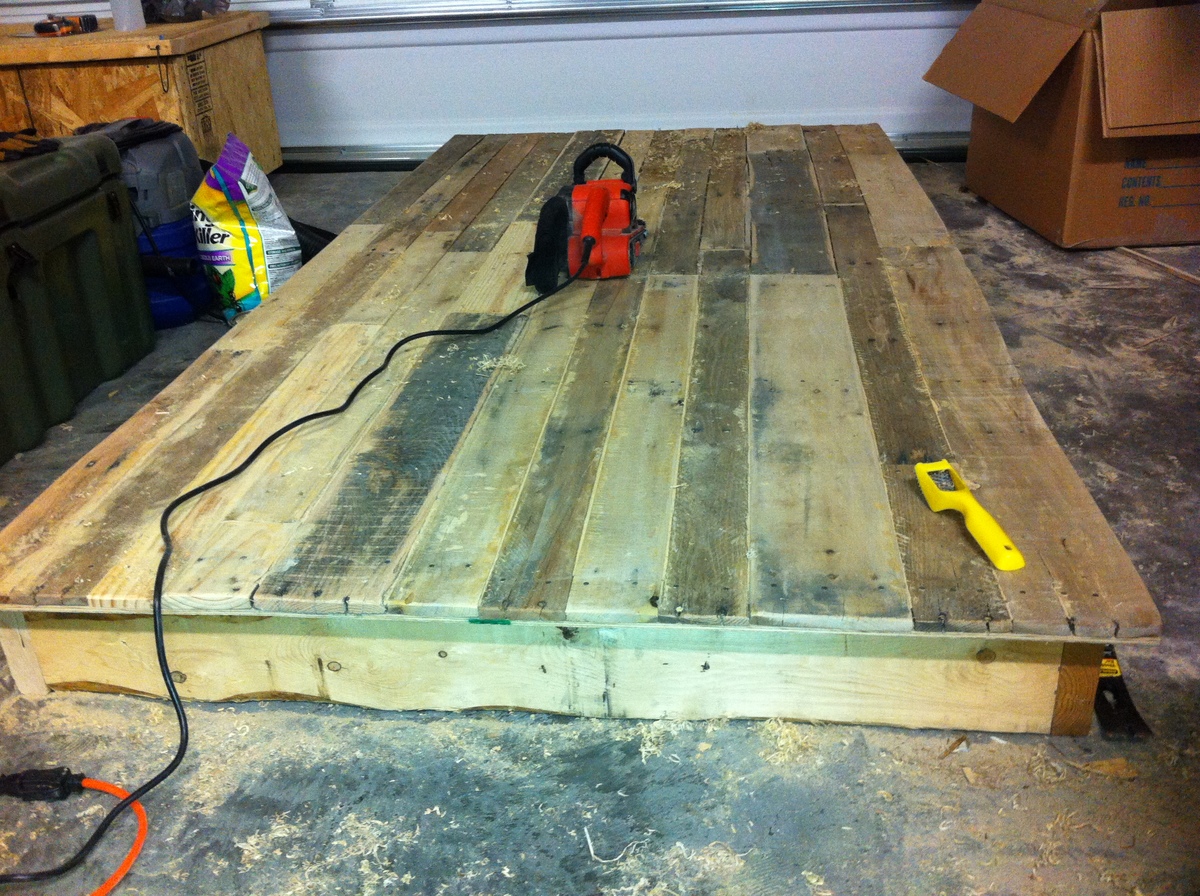
After seeing the Fancy X Farmhouse Table on pinterest we wanted to try and build one ourselves, but using the pallets we gathered from the new construction next door and the scrap lumber they were throwing away. The only thing we had to purchase was a sheet of 11/32 plywood to attach the pallet strips to for more stabilization, Screws, Nails, Wood Putty, Stain, and Polyurethane. I filled in all of the cracks to child proof food messes. We used Minwax Provincial Stain on the top with two coats of poly and a distressed antique white paint around the egdes to give it a more french look. The base was one coat of privincial stain with a good rasp/sanding of the edges to age the piece. Our goal was to build something that looked over 100 years old to match all of the china that will be sitting on it when we entertain! I think it looks very stately! This was our first project! :D

Built from Plan(s)
Estimated Cost
100.00
Estimated Time Investment
Week Long Project (20 Hours or More)
Finish Used
Minwax Provincial Stain and Lowes Antique White Paint distressed with course sandpaper and a quick rub of stain to age. All of the edges on the base were rasped after the stain to give a worn look.
Recommended Skill Level
Intermediate
Comments

Wed, 11/28/2012 - 11:03
This table is extraordinary!
This table is extraordinary! I love the pallet top!
Mon, 04/21/2014 - 10:32
pallet disassemble....
hi there - This is so so cool and I went out first thing this morning and collected a bunch of pallets from all over to start! I was wondering how you got your pallets apart without destroying them? I am finding that very difficult!
Modern Outdoor Collection

Great plans - thanks so much! Started with two chairs, and kept going...
MODS: Once built, we felt there wasn't enough back support, so added a 2x4 then 4x4 on top. Also added a 2x2 in back of the seat bed, so our 25" x 25" seat cushions didn't float around.
Recommend paint gun vs. painting by hand.


Built from Plan(s)
Estimated Time Investment
Weekend Project (10-20 Hours)
Finish Used
Two coats of Behr waterproof stain + sealer (BM swiss coffee)
Recommended Skill Level
Beginner
Comments
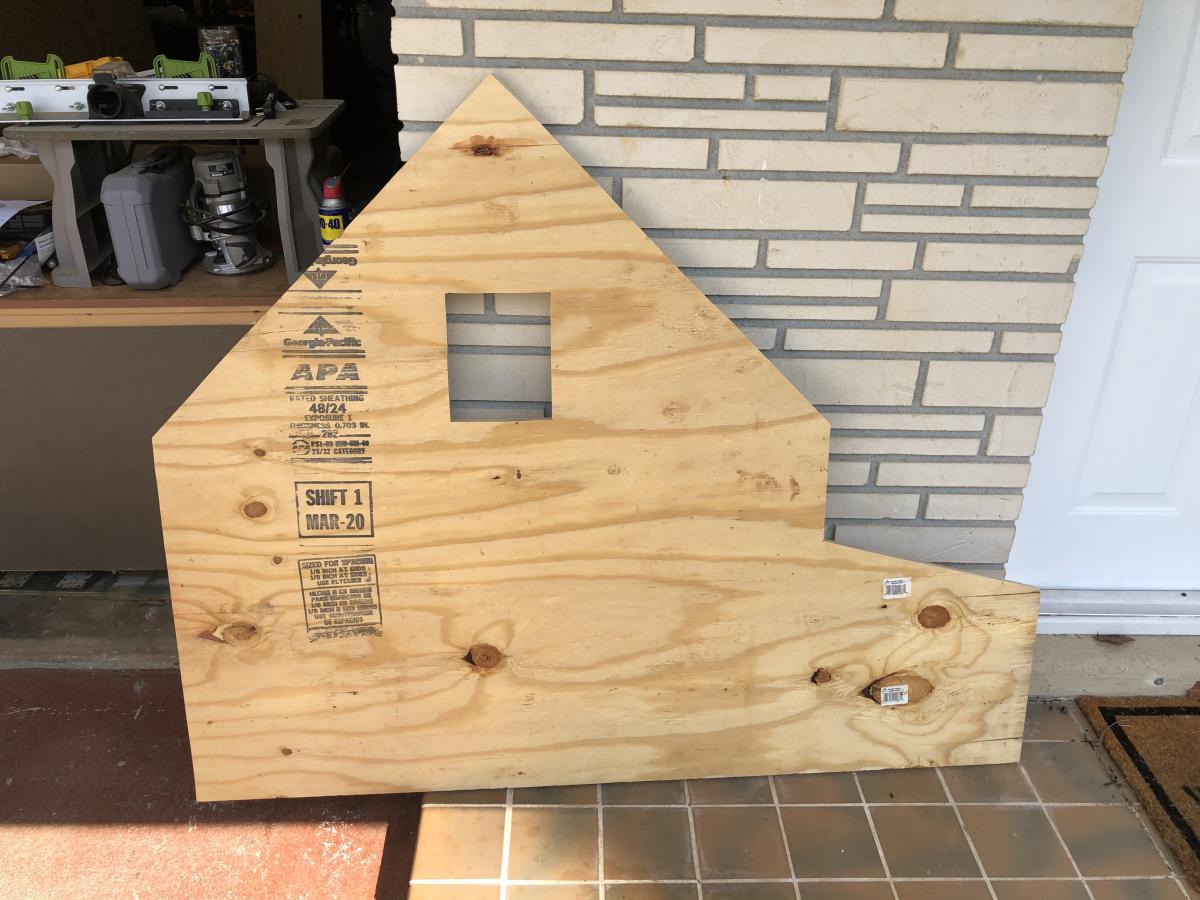
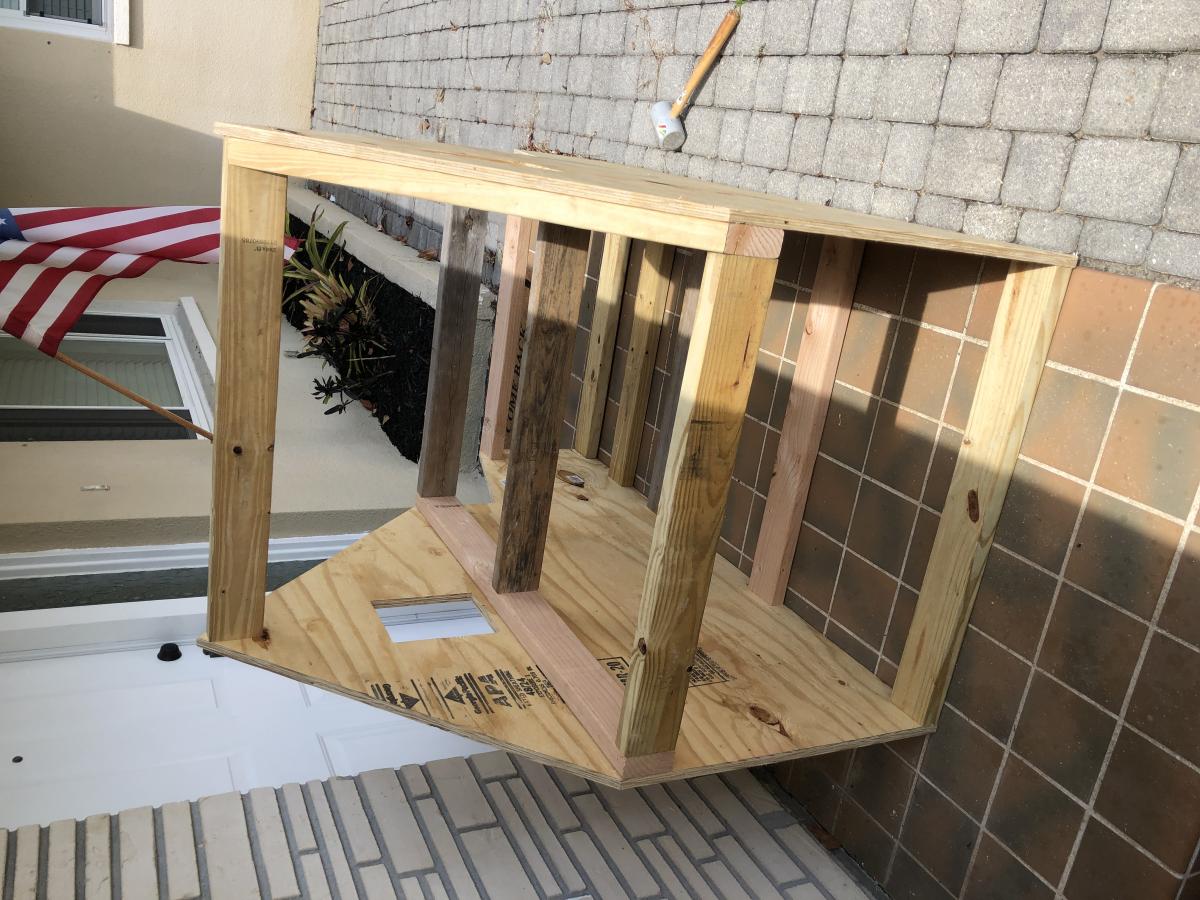
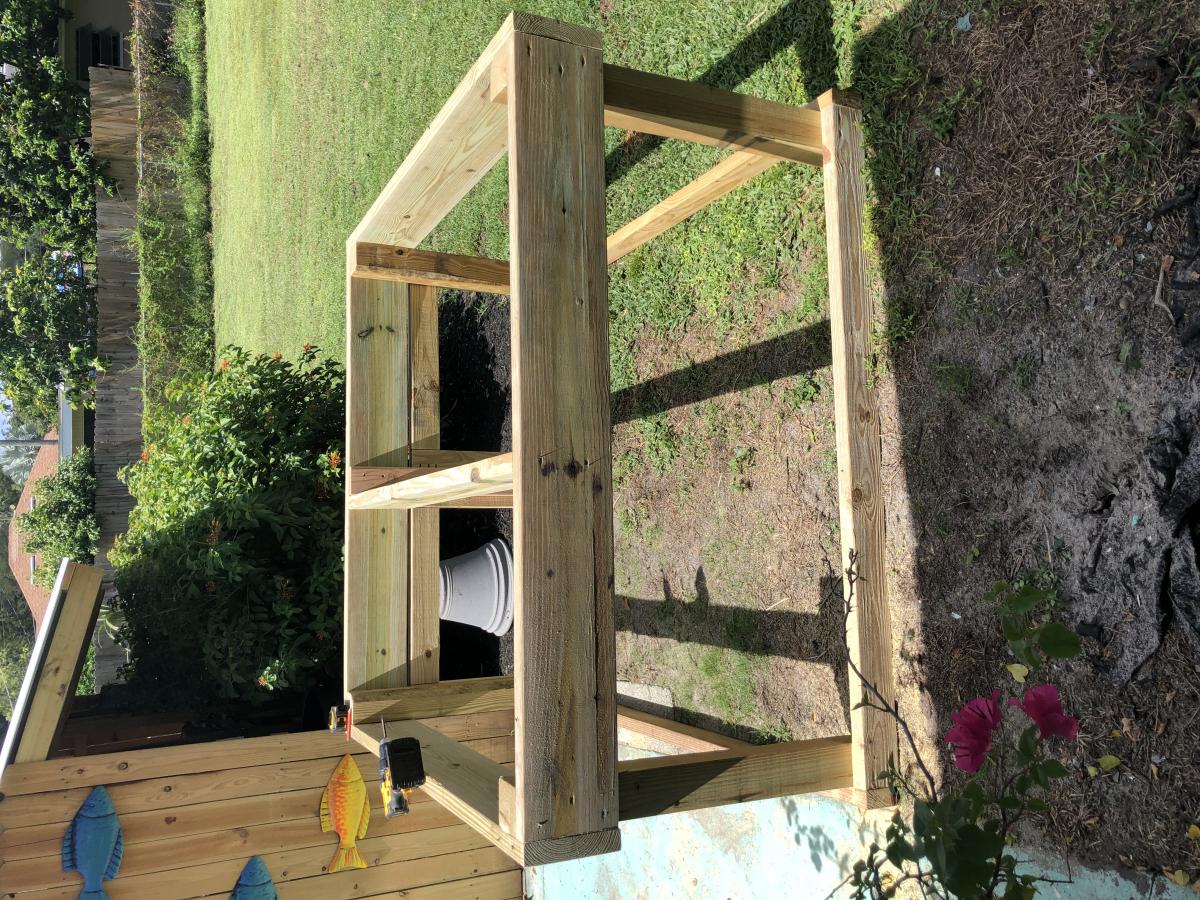
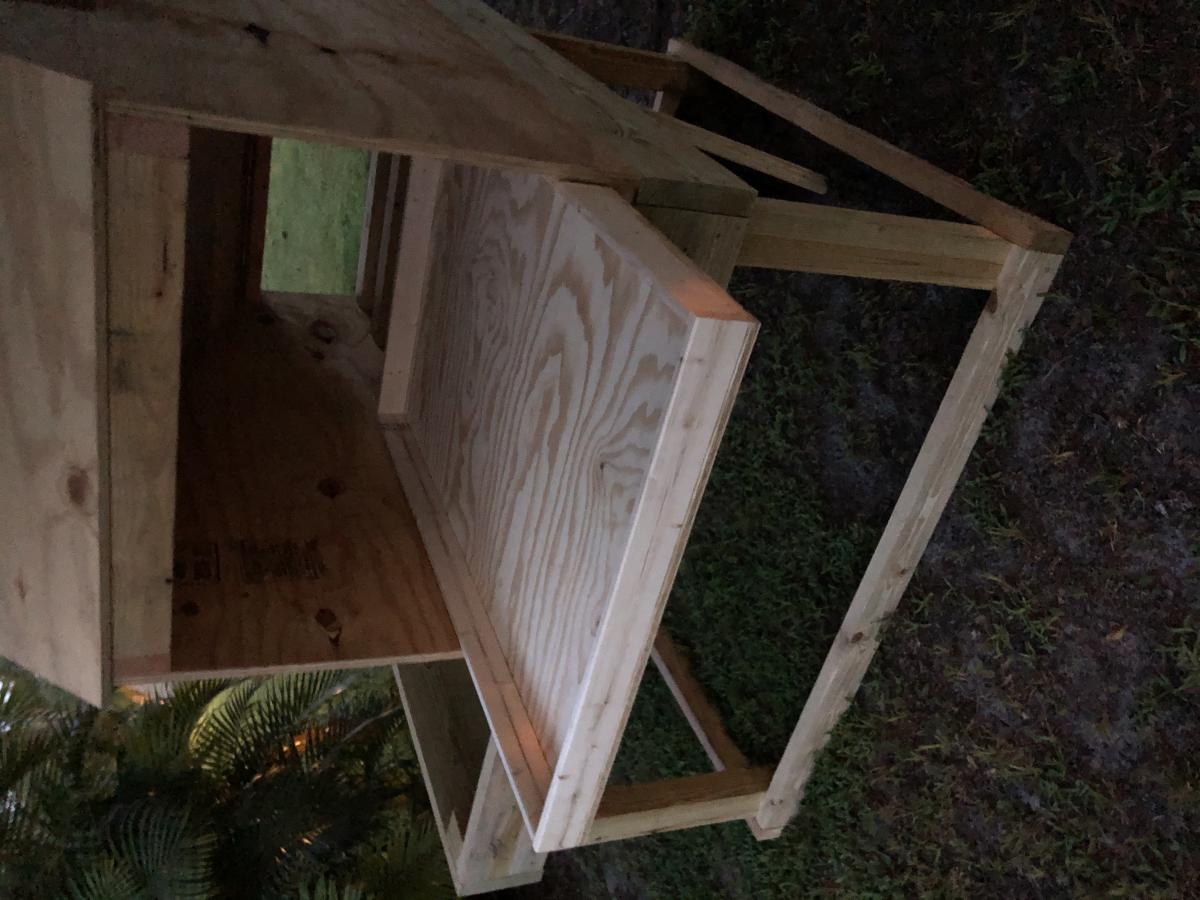
Stylish Chicken Coop
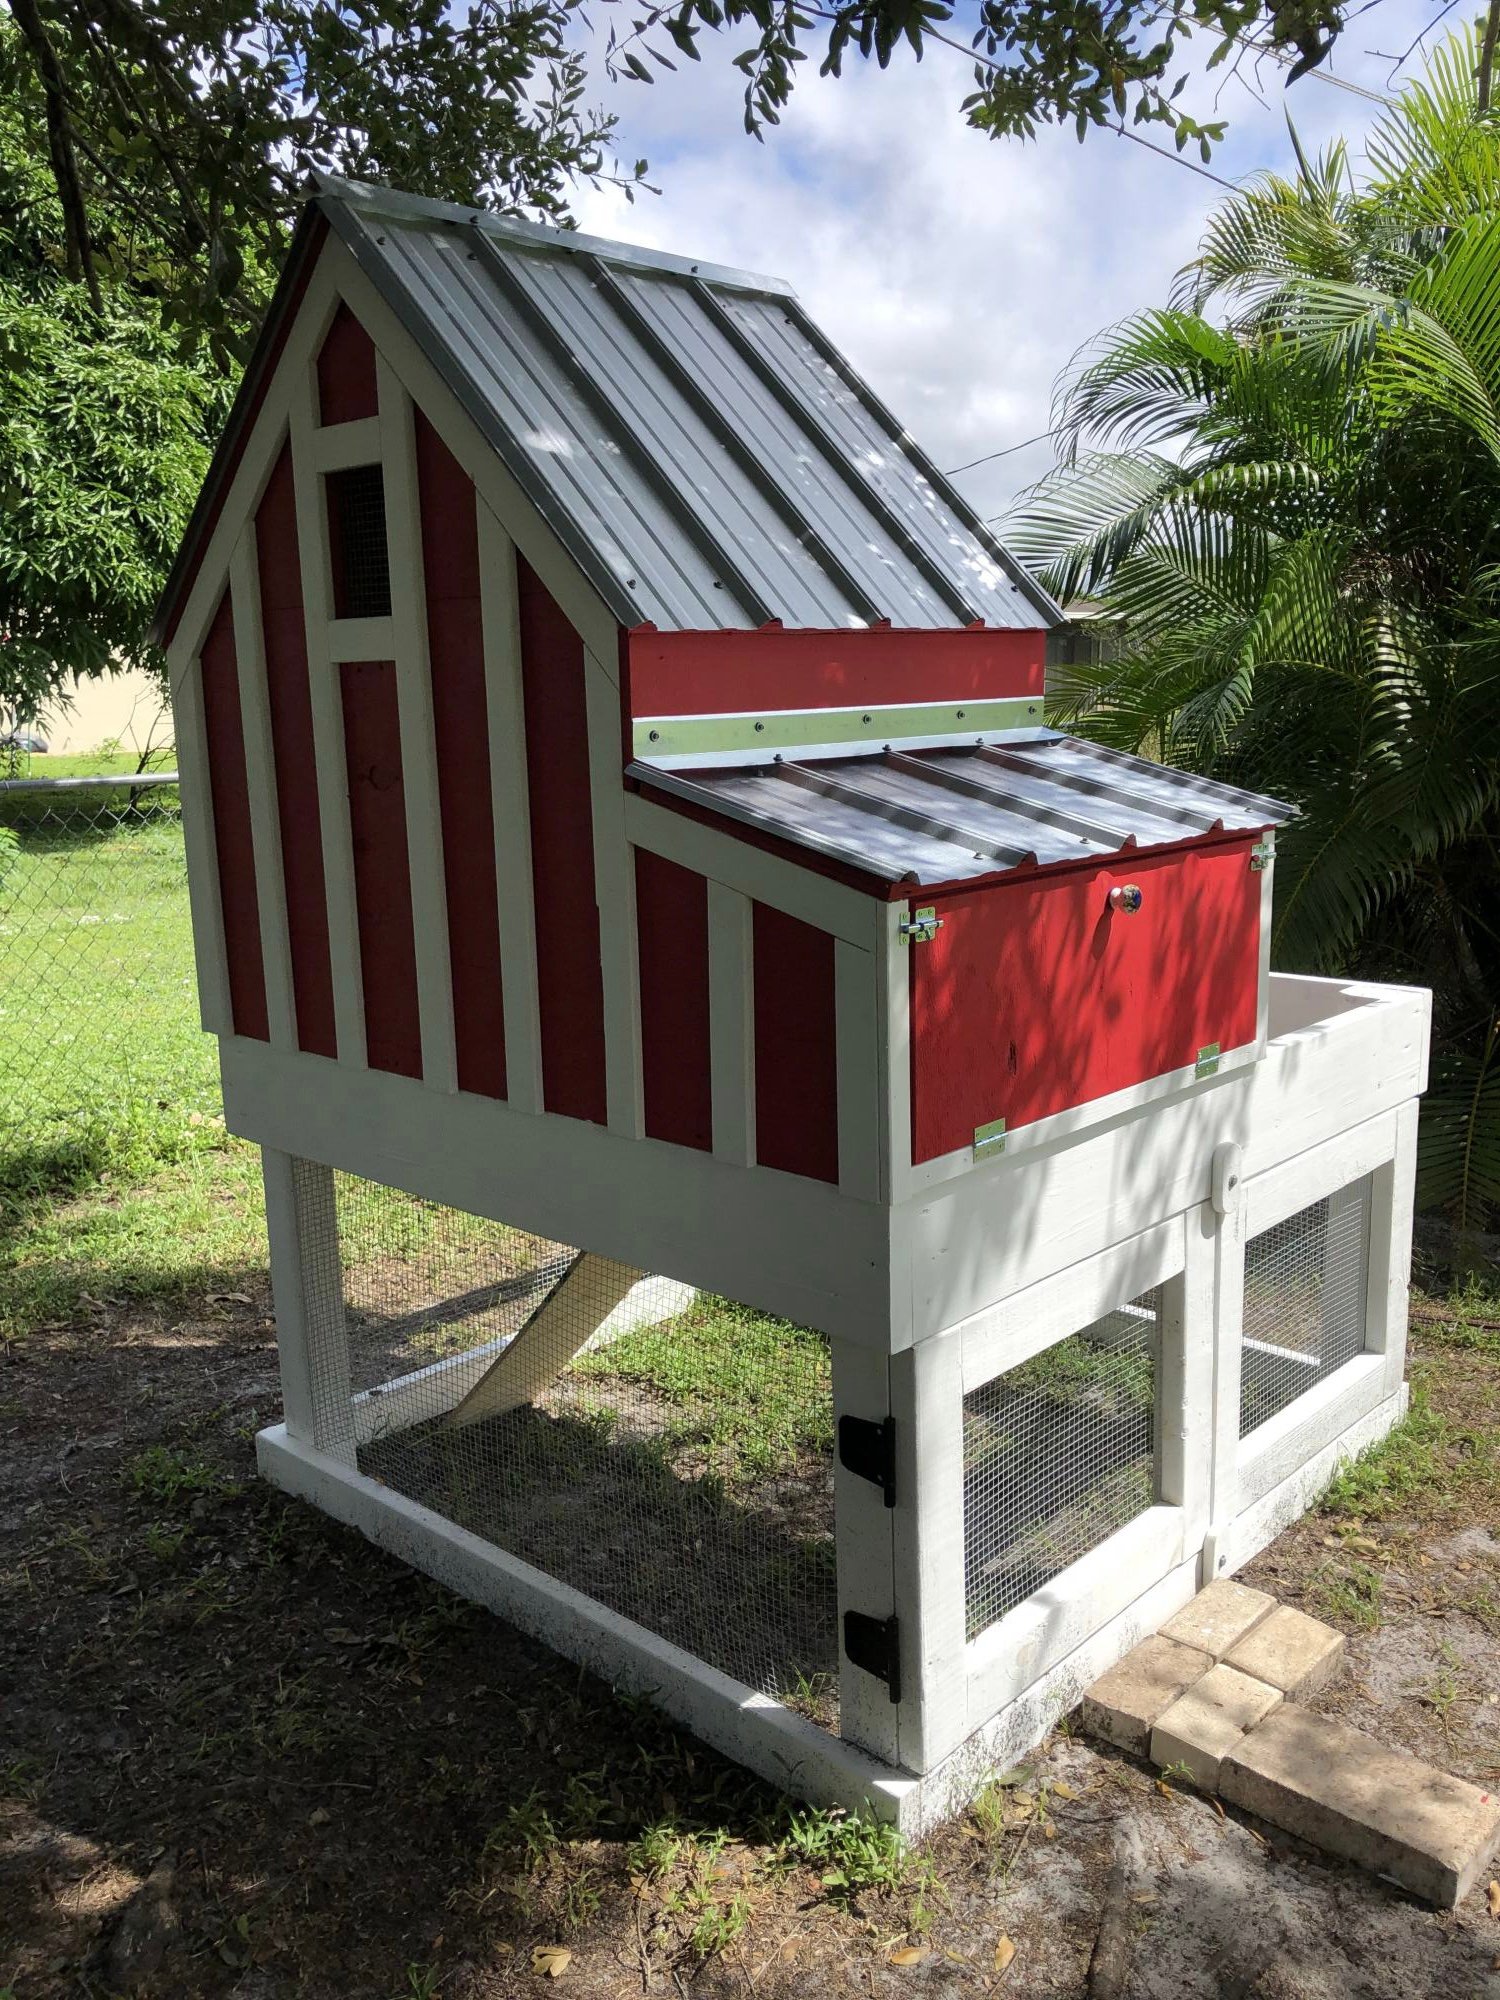
Housing three (3) hens now that are about a month old. Probably late January before can expect any eggs.
Great project. Metal roof worked well. I used flashing for the ridge caps. Have allowed for as much ventilation as possible for this Southwest Florida heat.
Thanks Anna, for sharing this project.

Built from Plan(s)
Estimated Time Investment
Week Long Project (20 Hours or More)
Finish Used
Sherwin-Williams outdoor barn red and white.
Recommended Skill Level
Intermediate
Small Kitchen Island
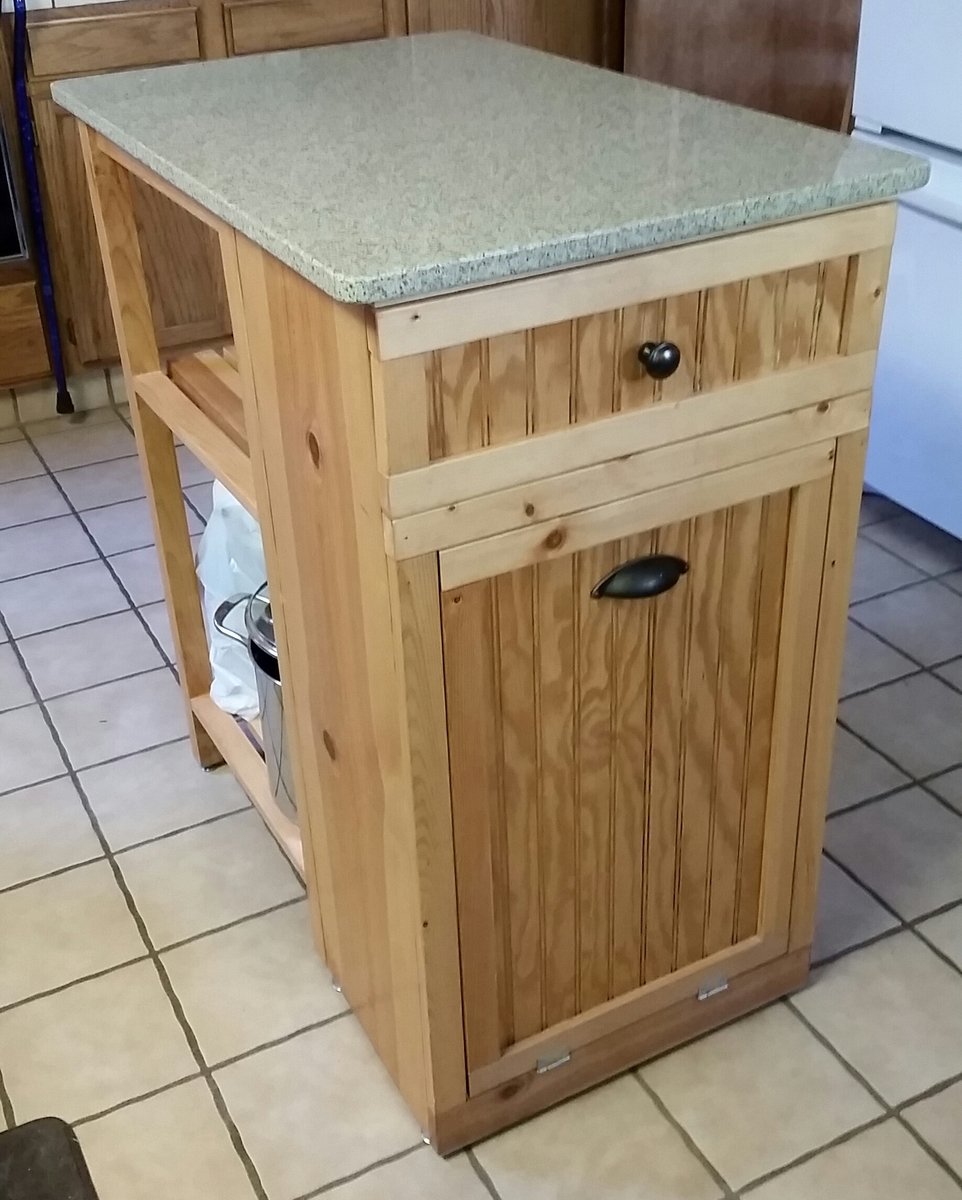
I built this for my mom to replace her small, rolling butcher block. I wanted to add in the tilt out trash cabinet, so I built off the back of it to give her some storage and a bigger work surface. I had a local countertop business custom fabricate the top out of a piece of scrap quartz (that was the spendy part of the project).
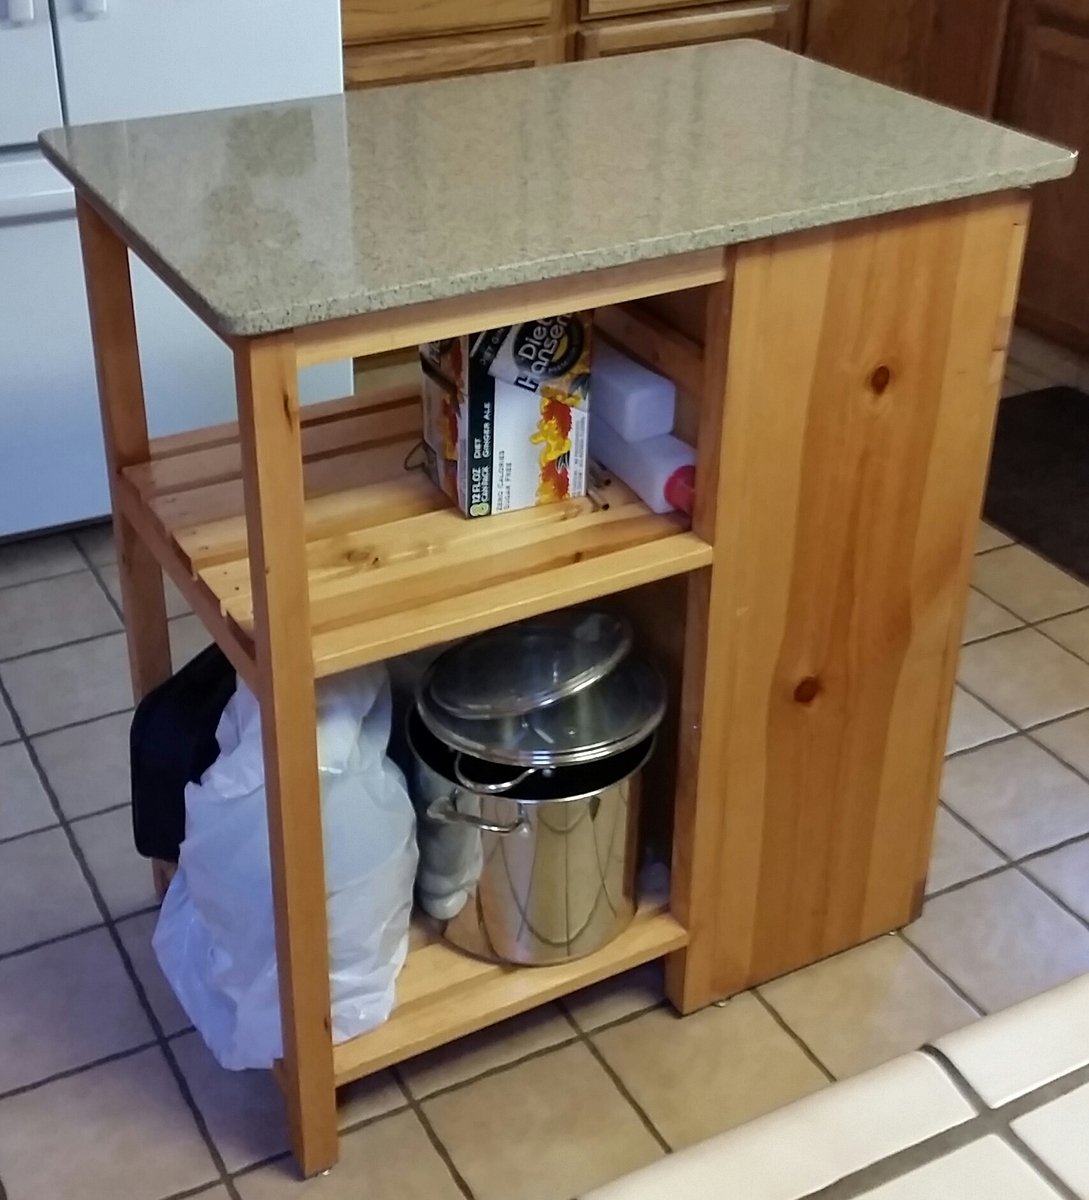
Built from Plan(s)
Estimated Cost
$40 for the wood and $480 for the quartz top
Estimated Time Investment
Day Project (6-9 Hours)
Finish Used
Minwax Polyshades natural
Recommended Skill Level
Intermediate
Comments
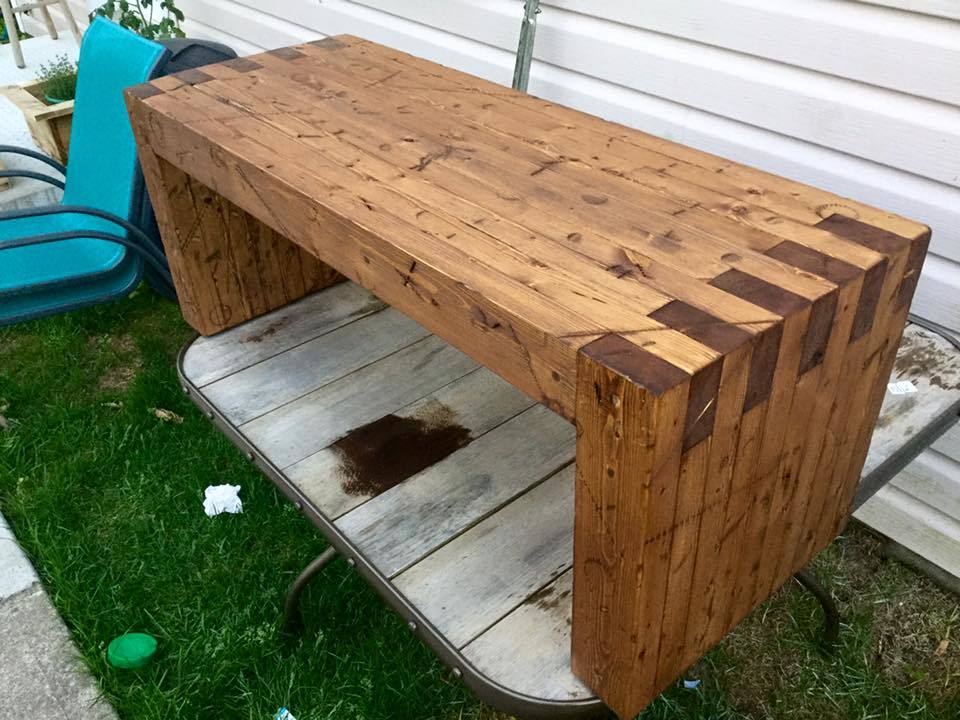
Modern Slat Top Outdoor Wood Bench (Customized)
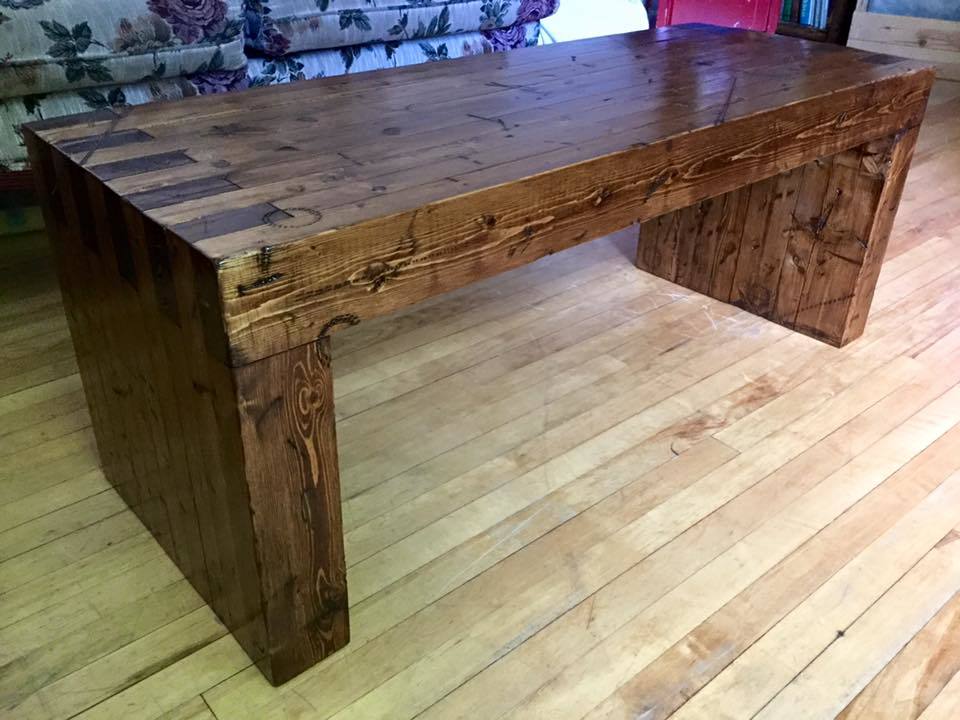
We had seen the modern slat bench before, and stumbled upon the plans on Ana-White, we did look further to see if we could find a style for us and had seen one made entirely out of 2x4's that also cam with plans, http://diycandy.com/2015/06/modern-williams-sonoma-inspired-diy-outdoor…
I thought I would share mine as it differs slightly, I opted to age my bench before staining as well as added adjustible feet so I can level it no matter where I put it. I am using mine as a coffee table, and if I have too many people over, I just use it as a bench to accomodate.
I hope that everyone enjoys the look of how my bench turned out. To reproduce the look of mine I described and linked the 2 products I used for the finish. But I also used the following power tools, Table Saw, Drill and Sawzall, belt sander and palm sander. I used the sawzall as I made a slight error and had some overhang that needed trimming. We used numerous items to get the outside beat up prior to the stain and sealer. The finished product looks amazing and I don't fear someone running away with it at 80lbs.
Built from Plan(s)
Estimated Cost
$35 (CAD)
Estimated Time Investment
Weekend Project (10-20 Hours)
Finish Used
Minwax Dark Walnut Stain (Home Depot) https://www.homedepot.ca/en/home/p.wood-finish---dark-walnut.1000406356.html?autoSuggest=pip
Varathane Triple Thick Matte (Home Depot) https://www.homedepot.ca/en/home/p.triple-thick-clear-matte-946ml.1001004379.html
Varathane Triple Thick Matte (Home Depot) https://www.homedepot.ca/en/home/p.triple-thick-clear-matte-946ml.1001004379.html
Recommended Skill Level
Beginner
Farmhouse Bed and Nightstand
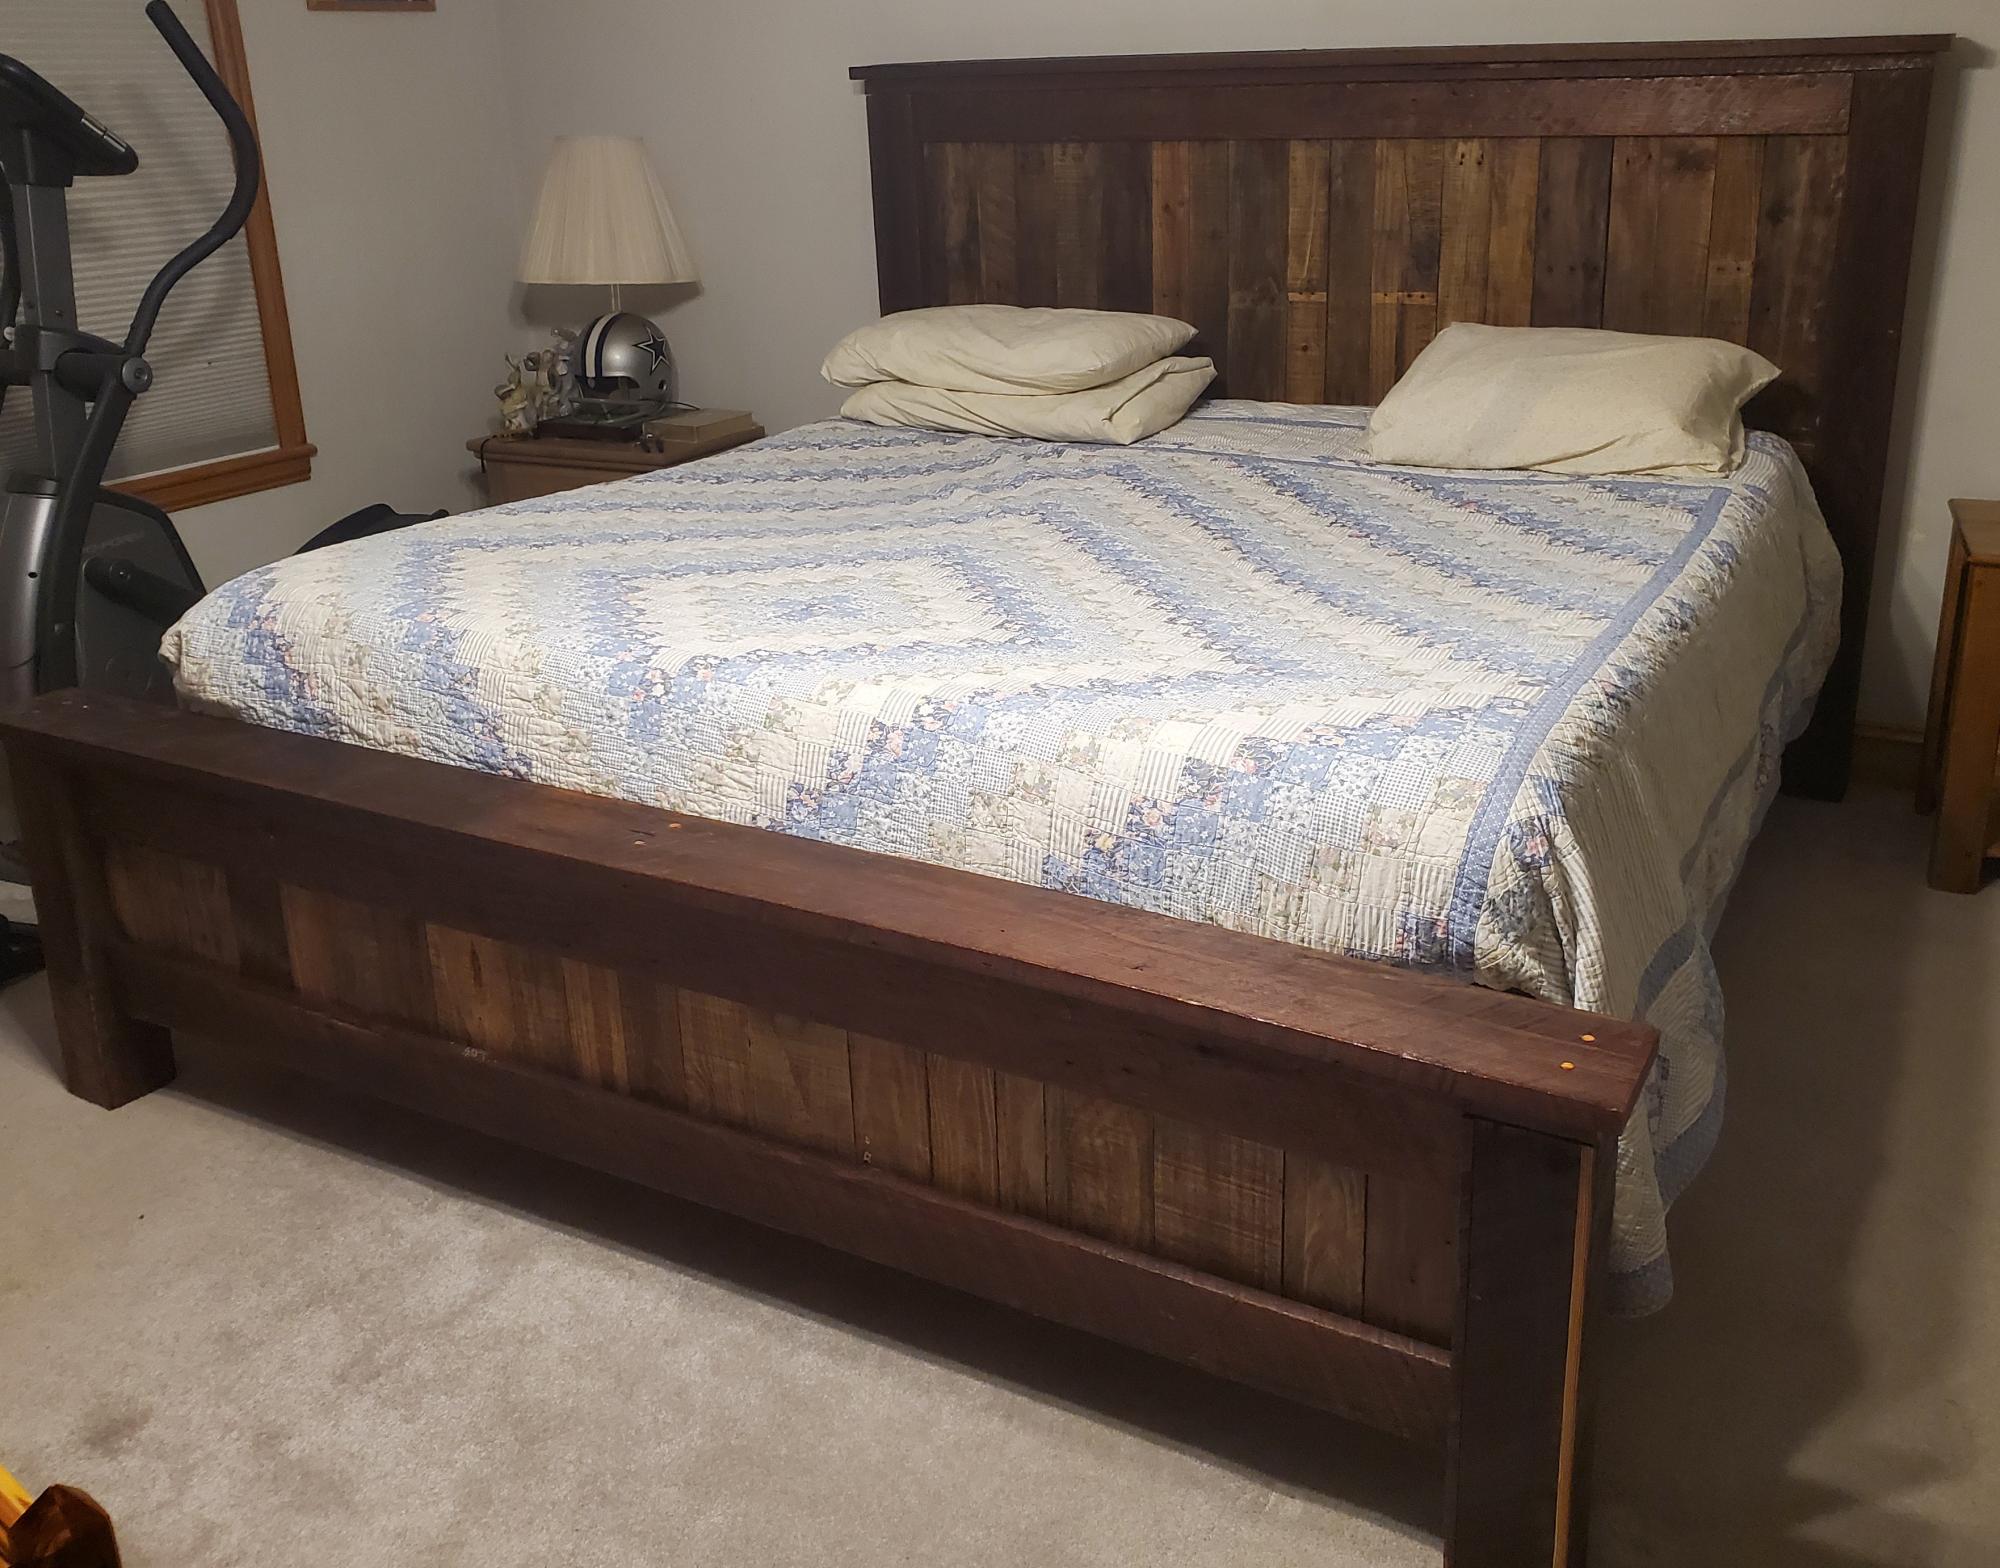
I made the farmhouse bed and nightstand using 300 year old pine that was on a local home for 150 years. The bed rails I used 6/4 white oak and recycled pallet boards for the vertical boards. The bed posts I used two 2x4's laminated together and I wrapped them in the pine. The nightstand I used the same pine and pallet boards for the case. I then used 4/4 whit oak for the table tops.
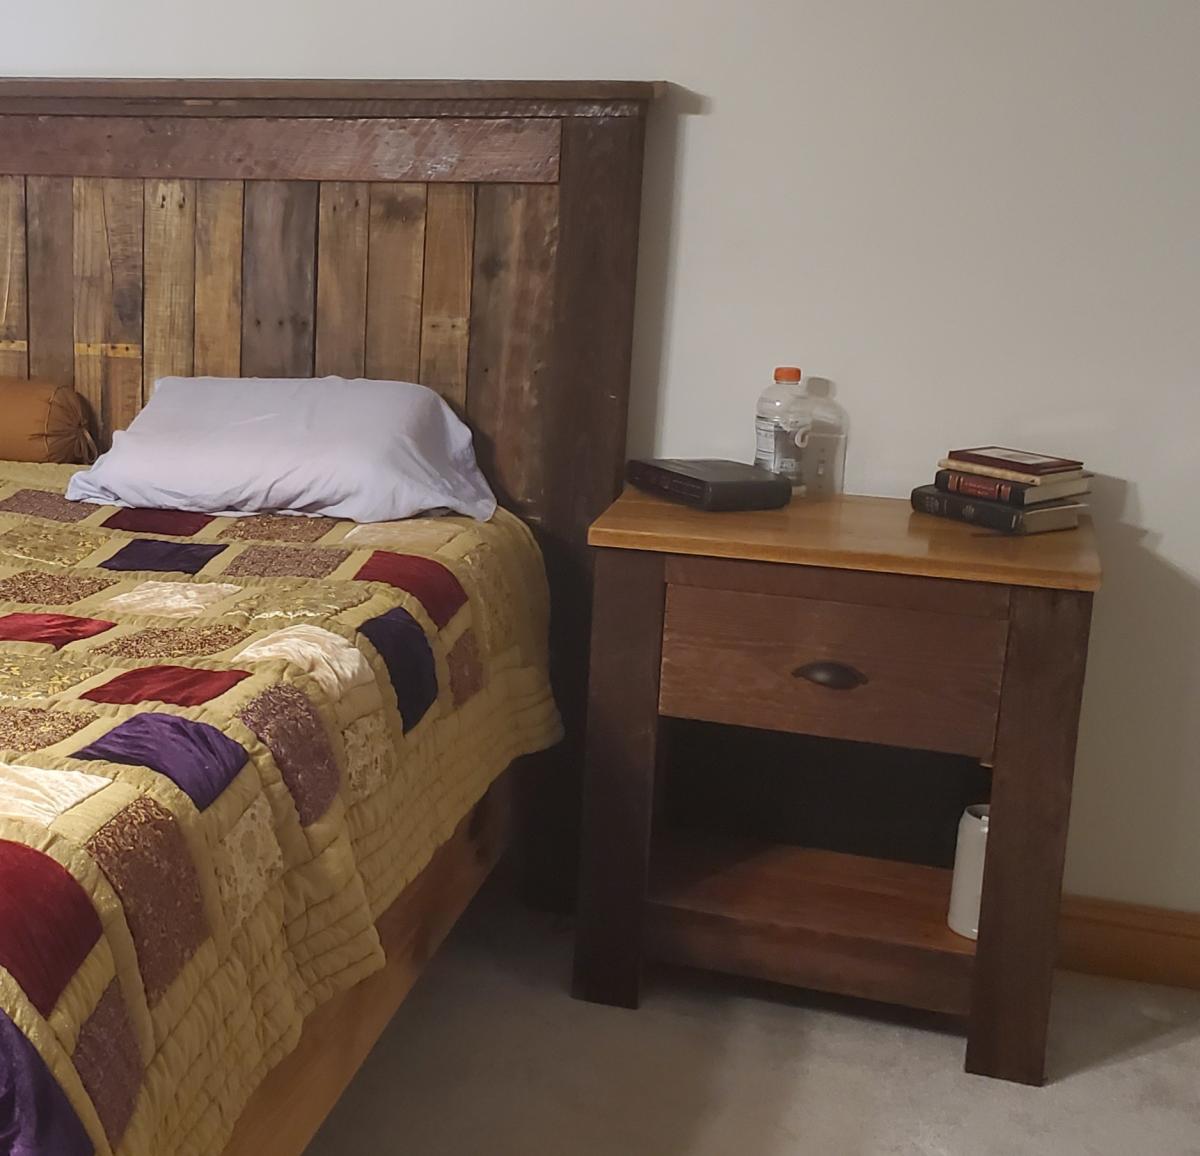
Built from Plan(s)
Finish Used
Clear Gloss Polyurethane
Industrial Closet Organizer
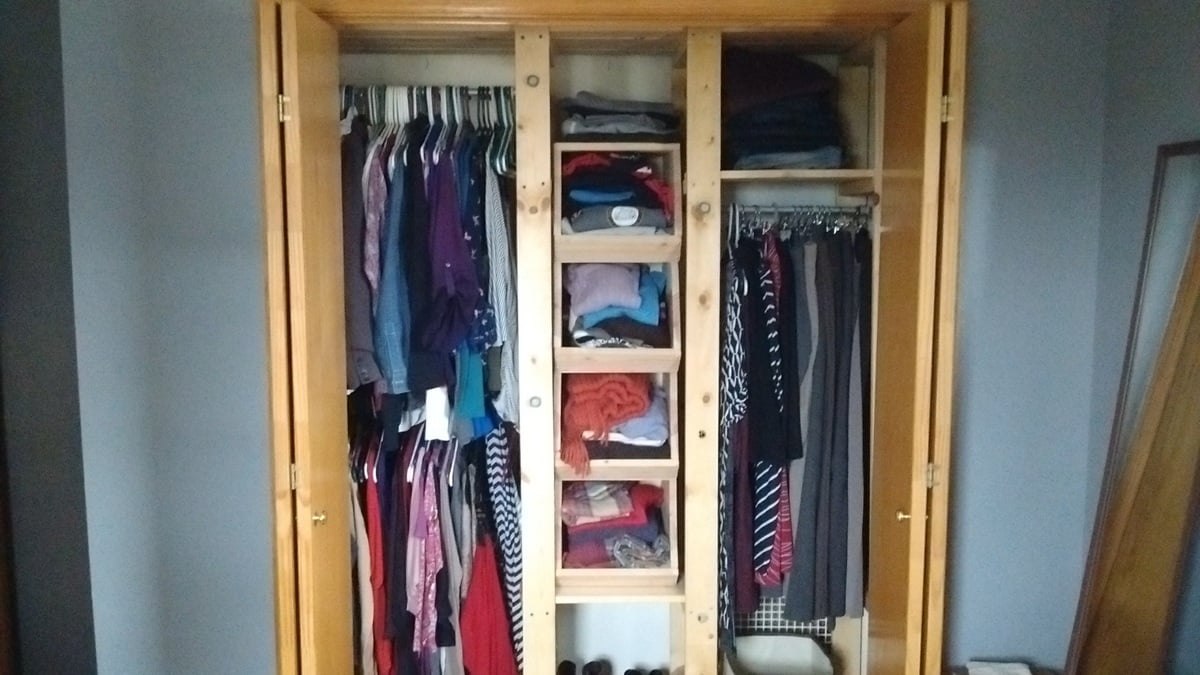
I originally built this for a small closet in an old home. When I moved, I took it with me and was able to rearrange it to fit in a traditional closet. The center section is a modification of a toy storage plan that I use to store folded clothes.
Built from Plan(s)
Estimated Cost
I used 1/2" galvanized pipe and that alone was $80. The lumber was probably $20-$30 more.
Estimated Time Investment
Afternoon Project (3-6 Hours)
Finish Used
unfinished
Recommended Skill Level
Beginner