Community Brag Posts
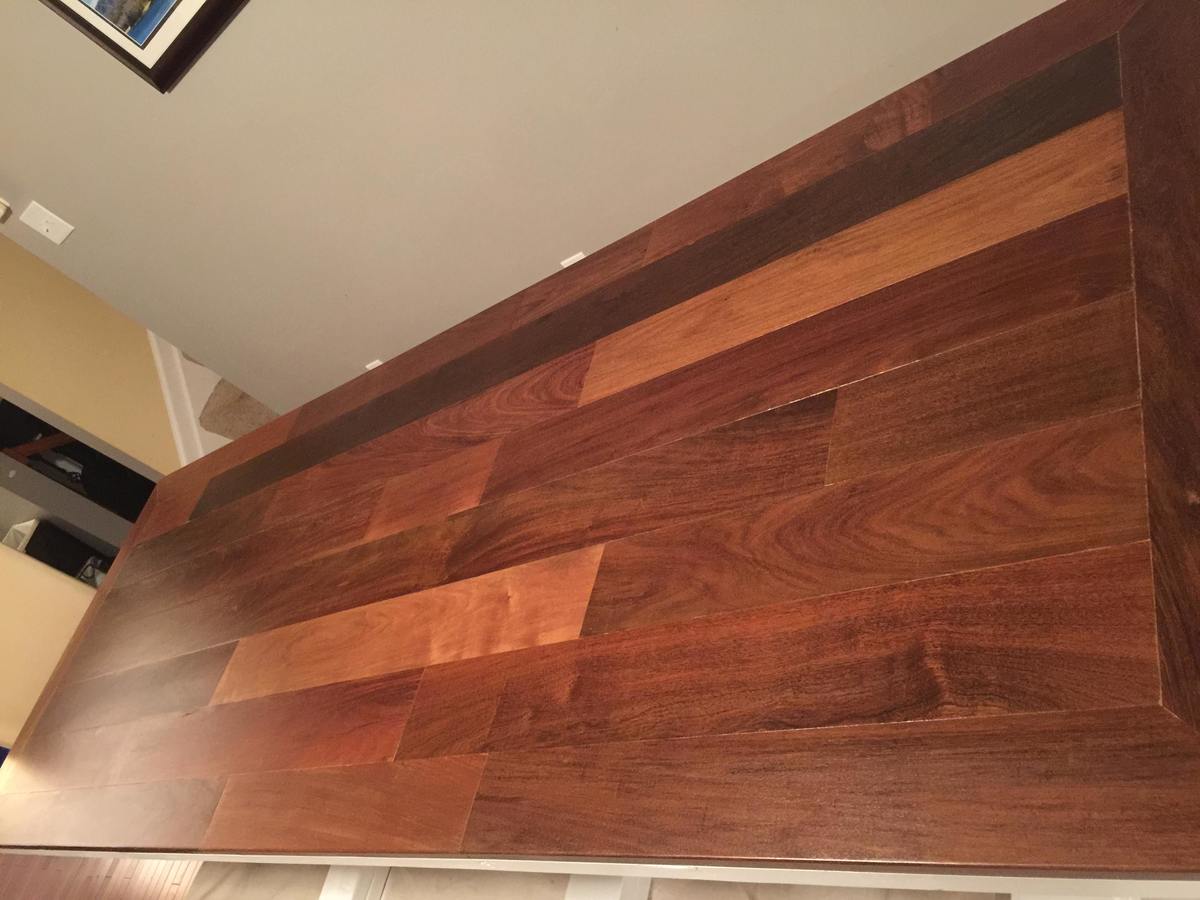
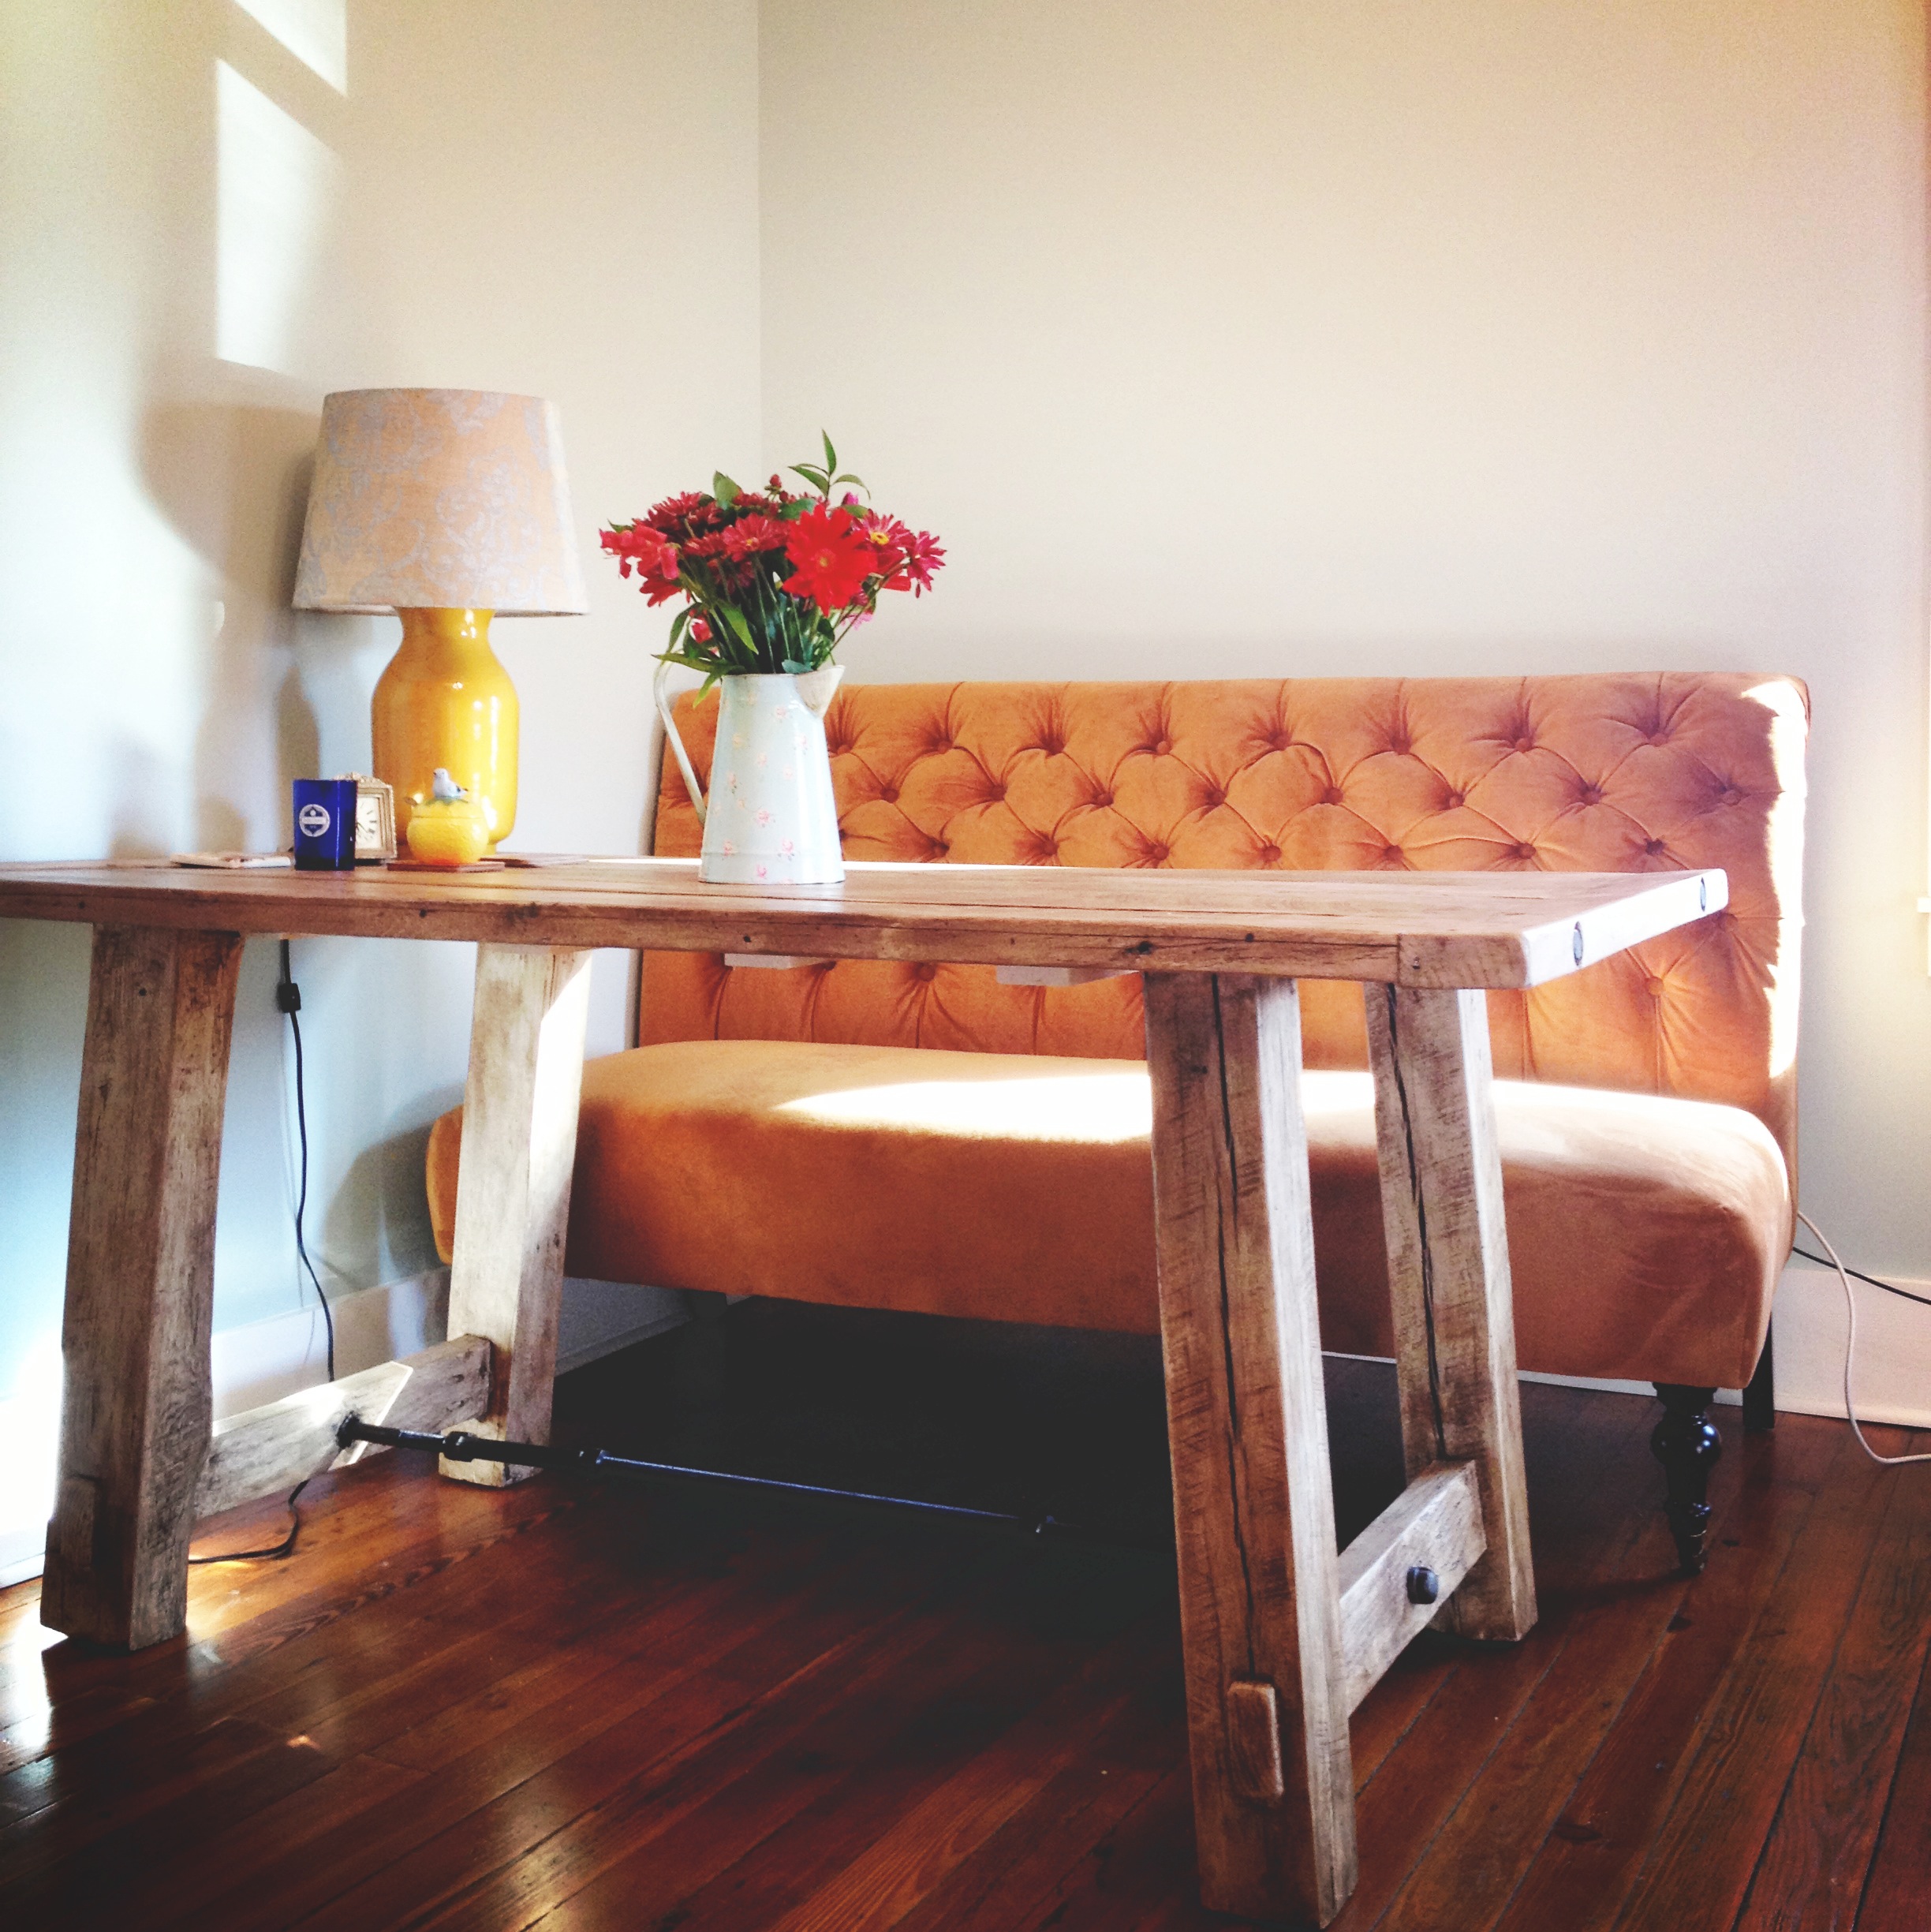
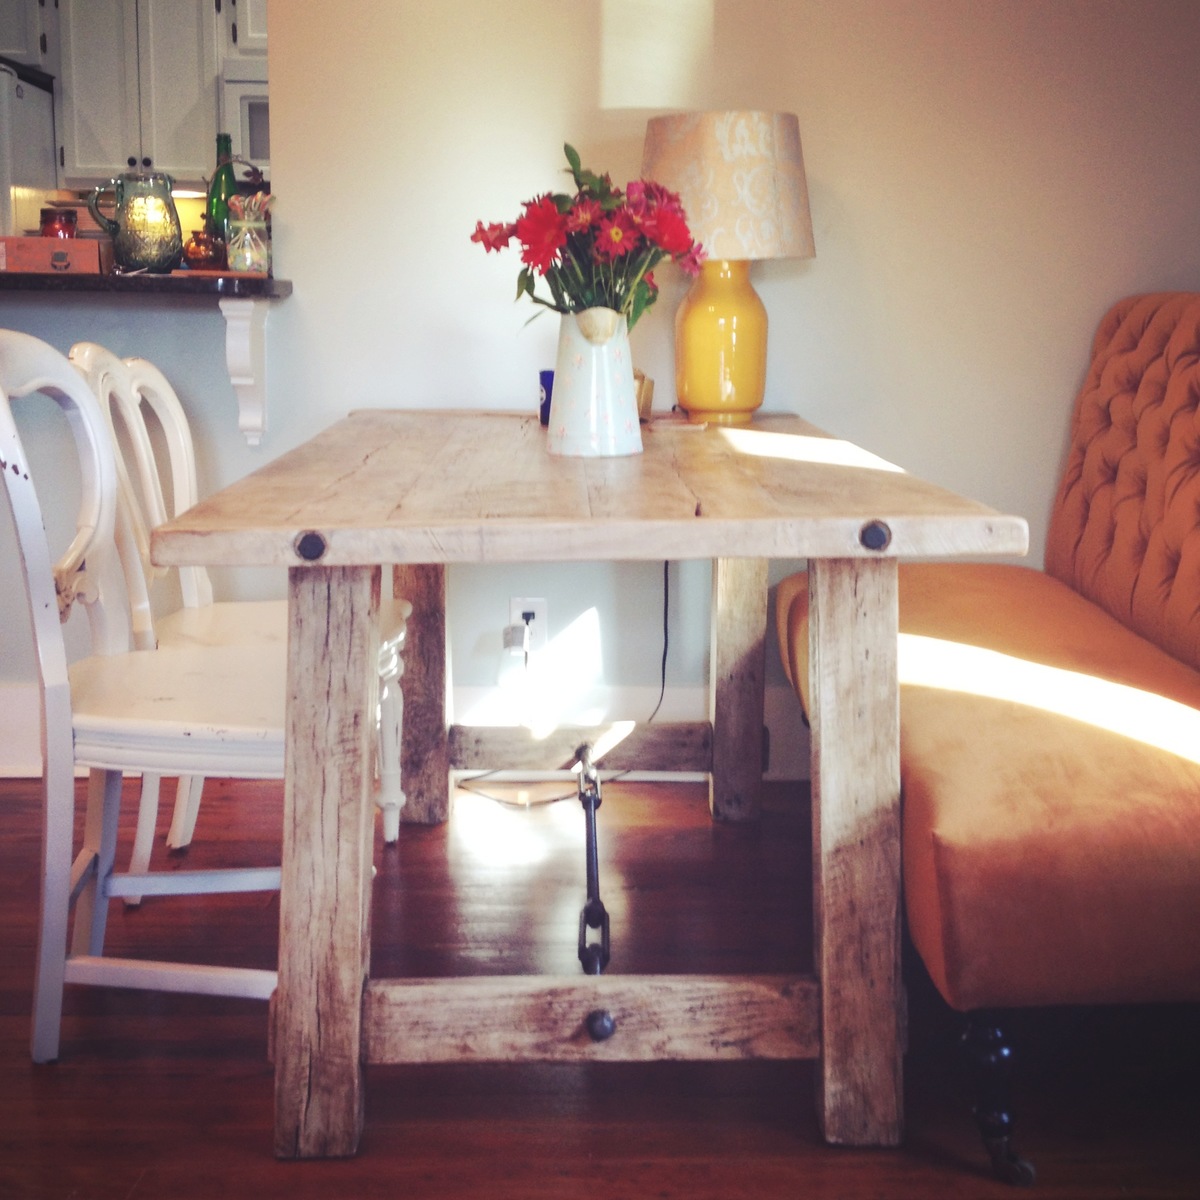
Farm Table
Brazilan Walnut flooring for table top and Pine for feet and supports.
Estimated Cost
$300.00
Estimated Time Investment
Week Long Project (20 Hours or More)
Finish Used
Triple Thick Coat Poly on table top and White semi gloss paint on everything else.
Recommended Skill Level
Intermediate


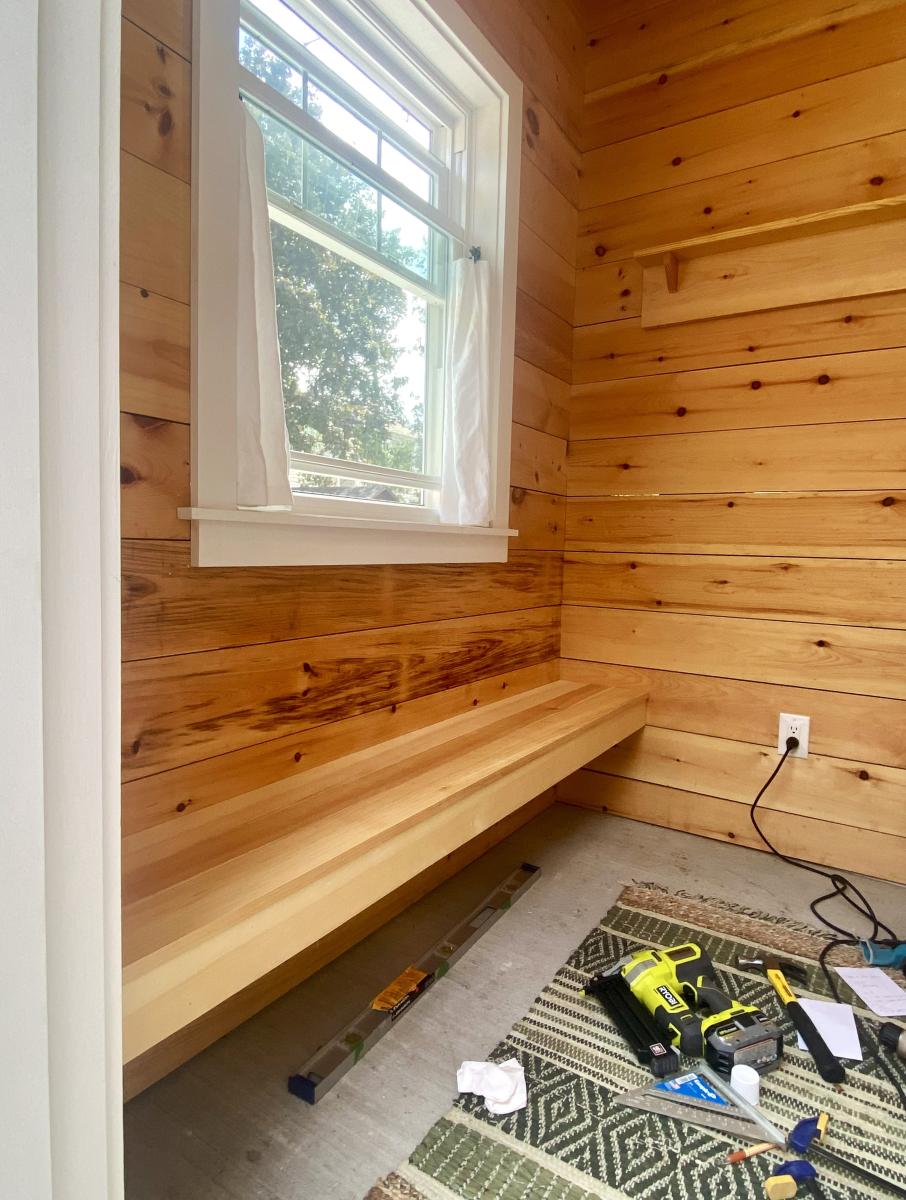
Floating Cedar Bench
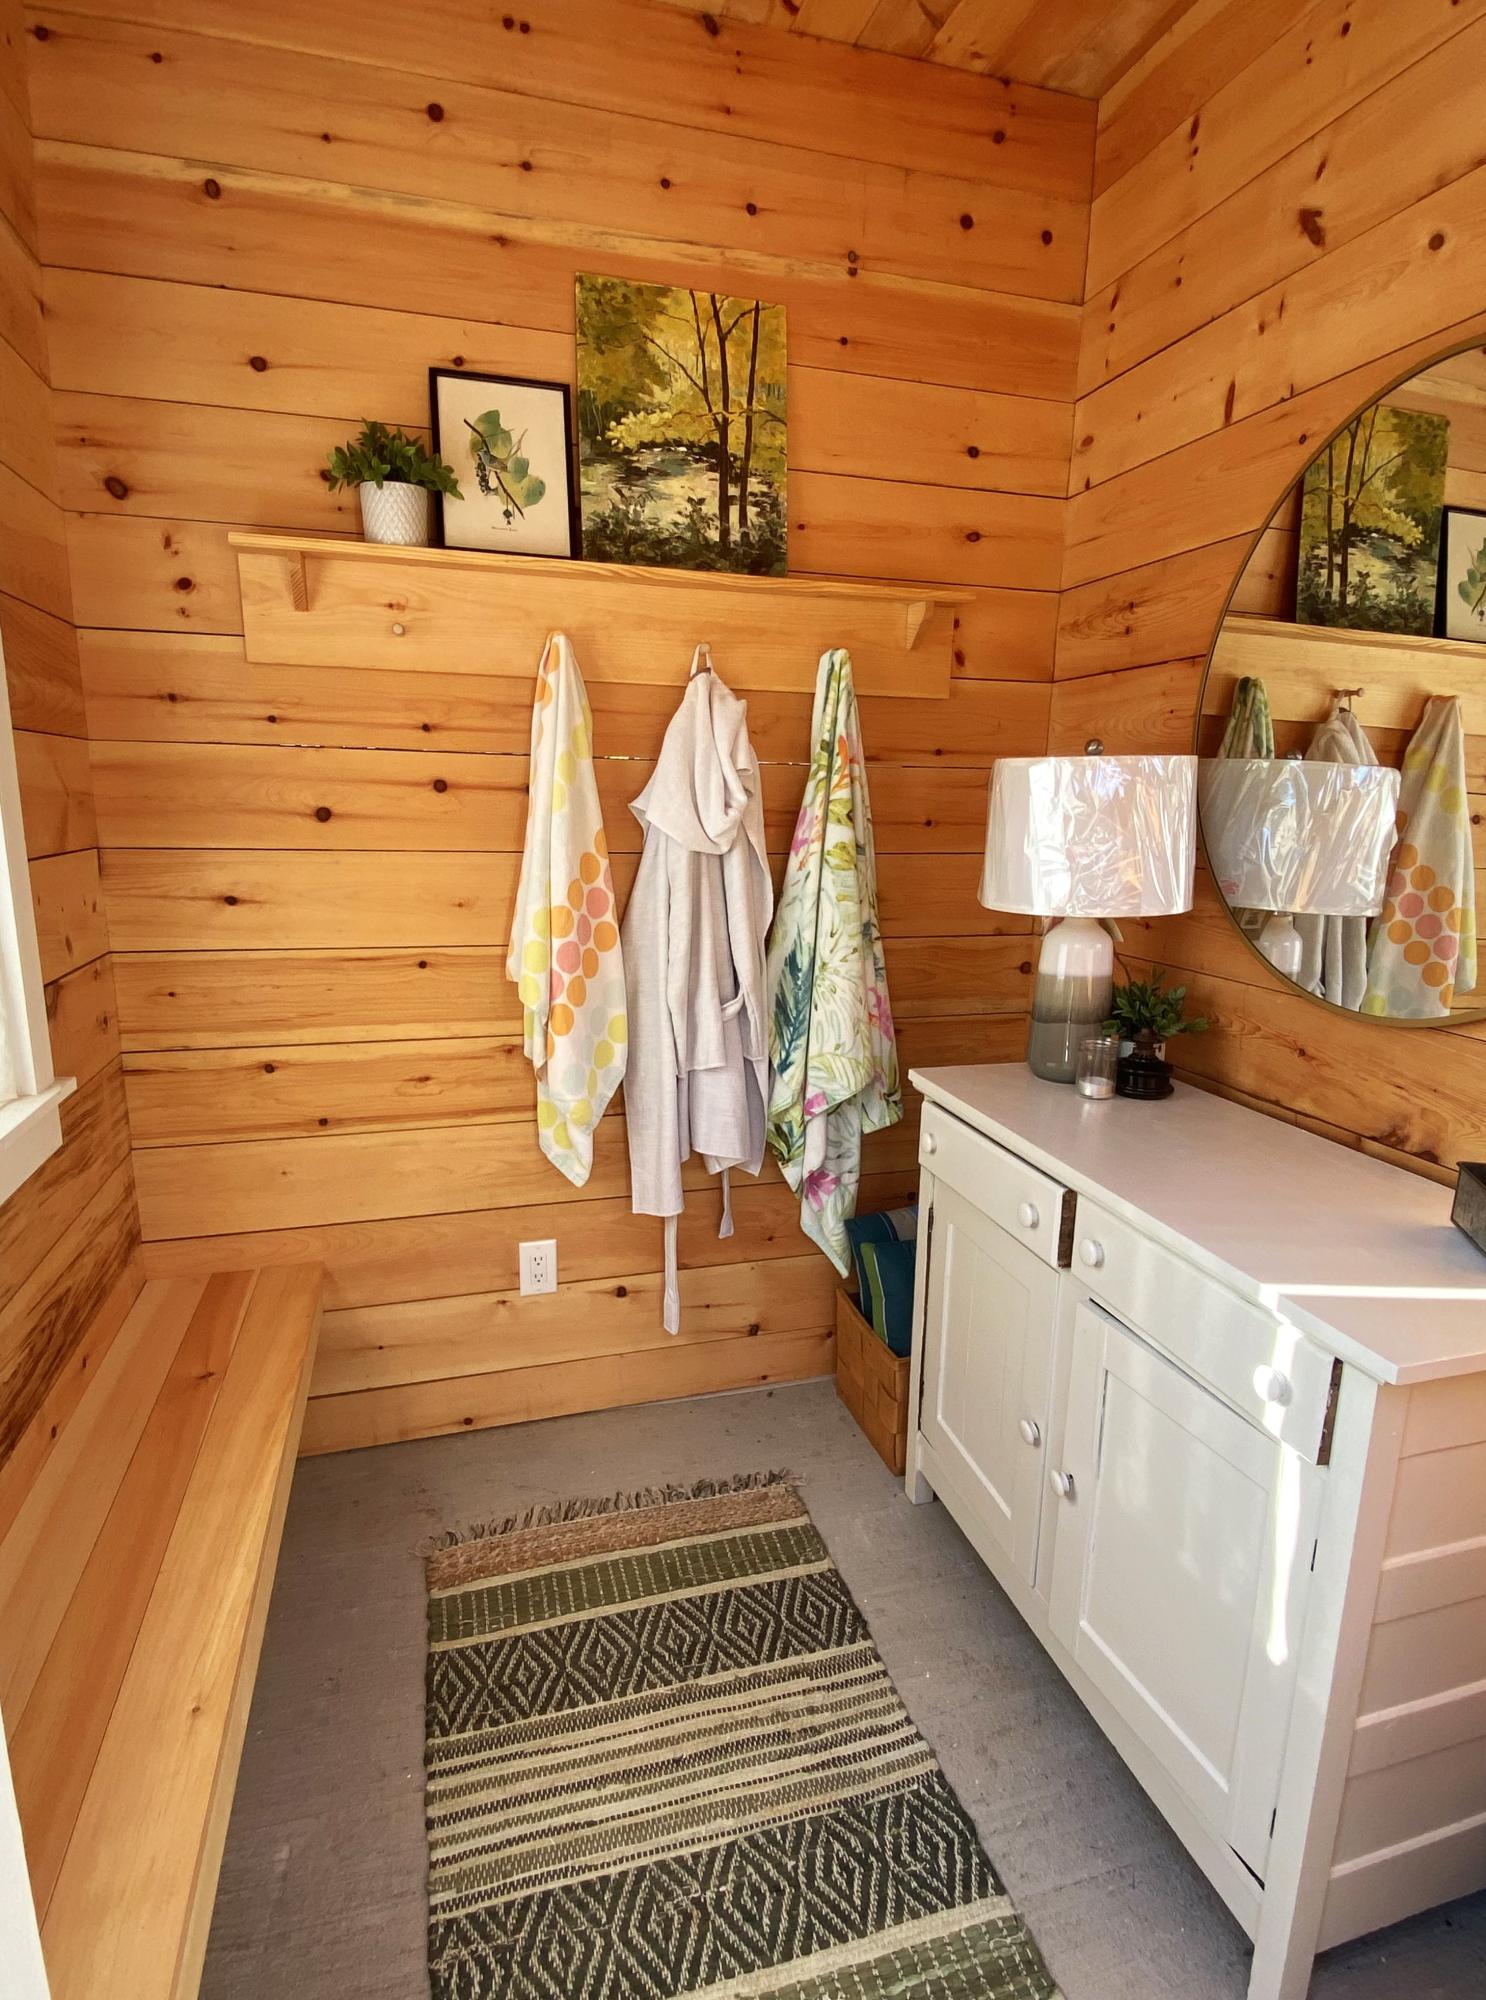
I built this floating bench (and shelf with towel pegs) for our pool change room. I was so excited when I finished it all by myself! It’s super sturdy and I’m so happy! Thank you Ana!!
Built from Plan(s)
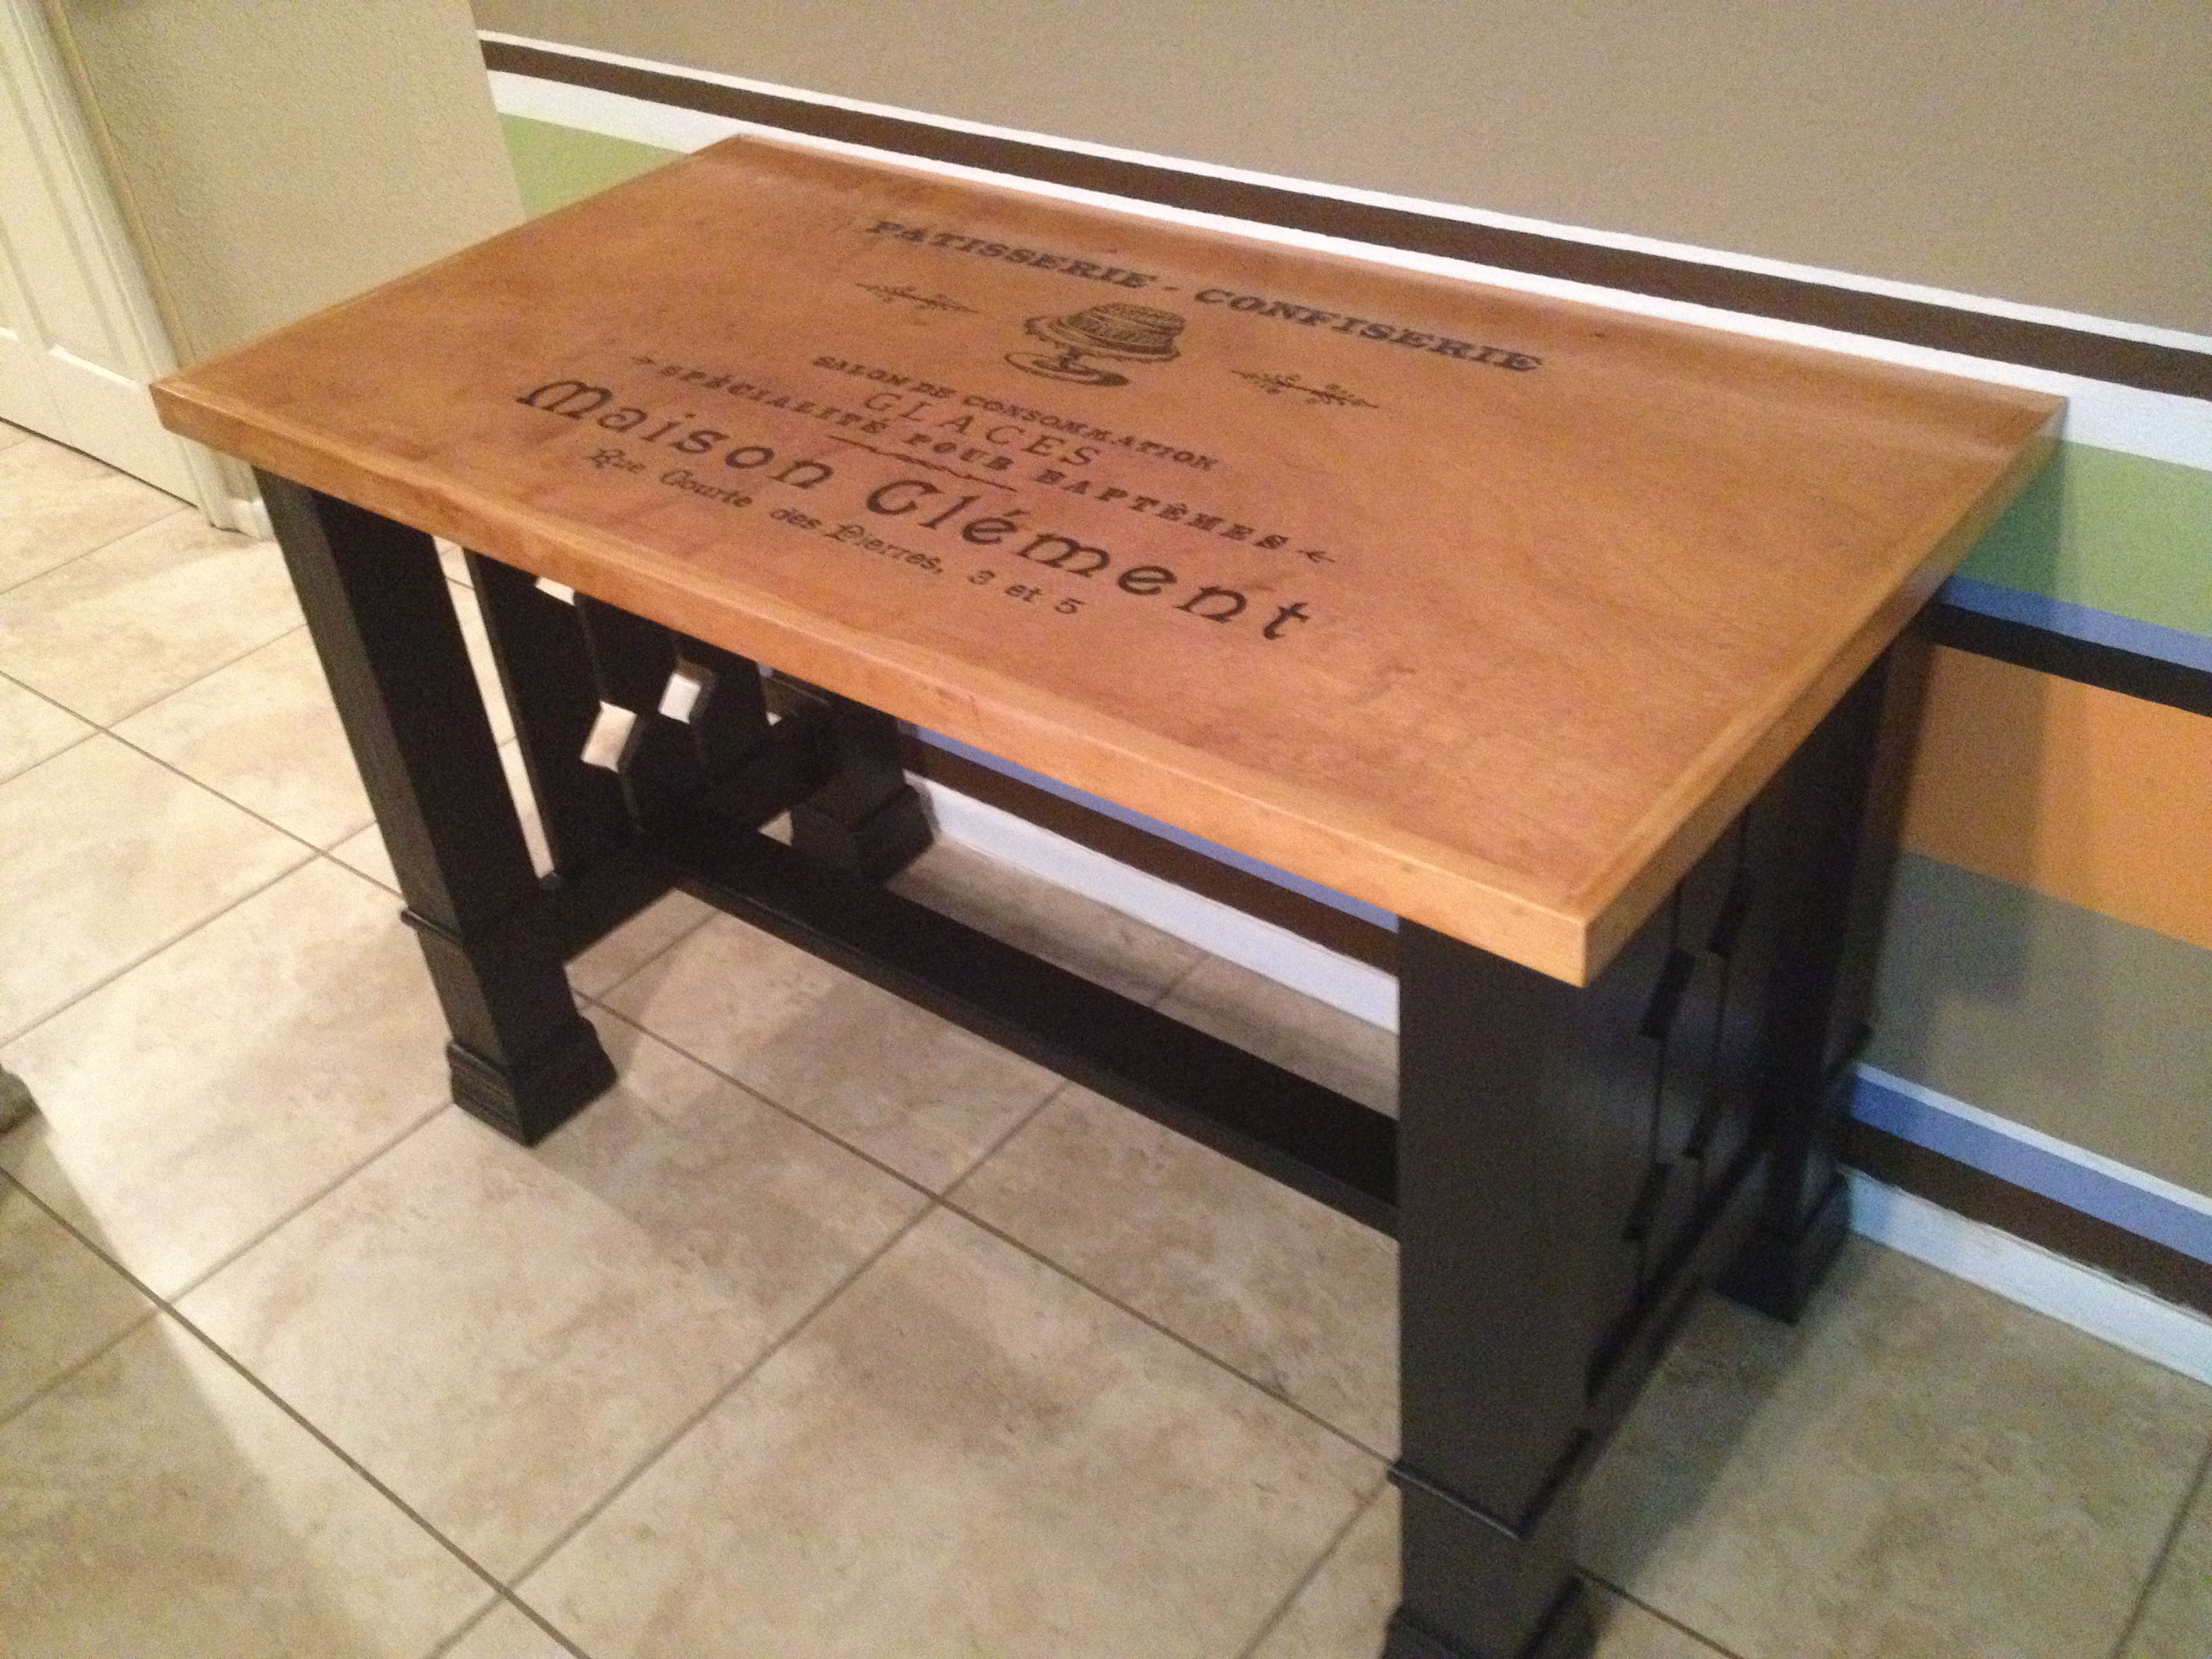
Mission style table with French Typographical
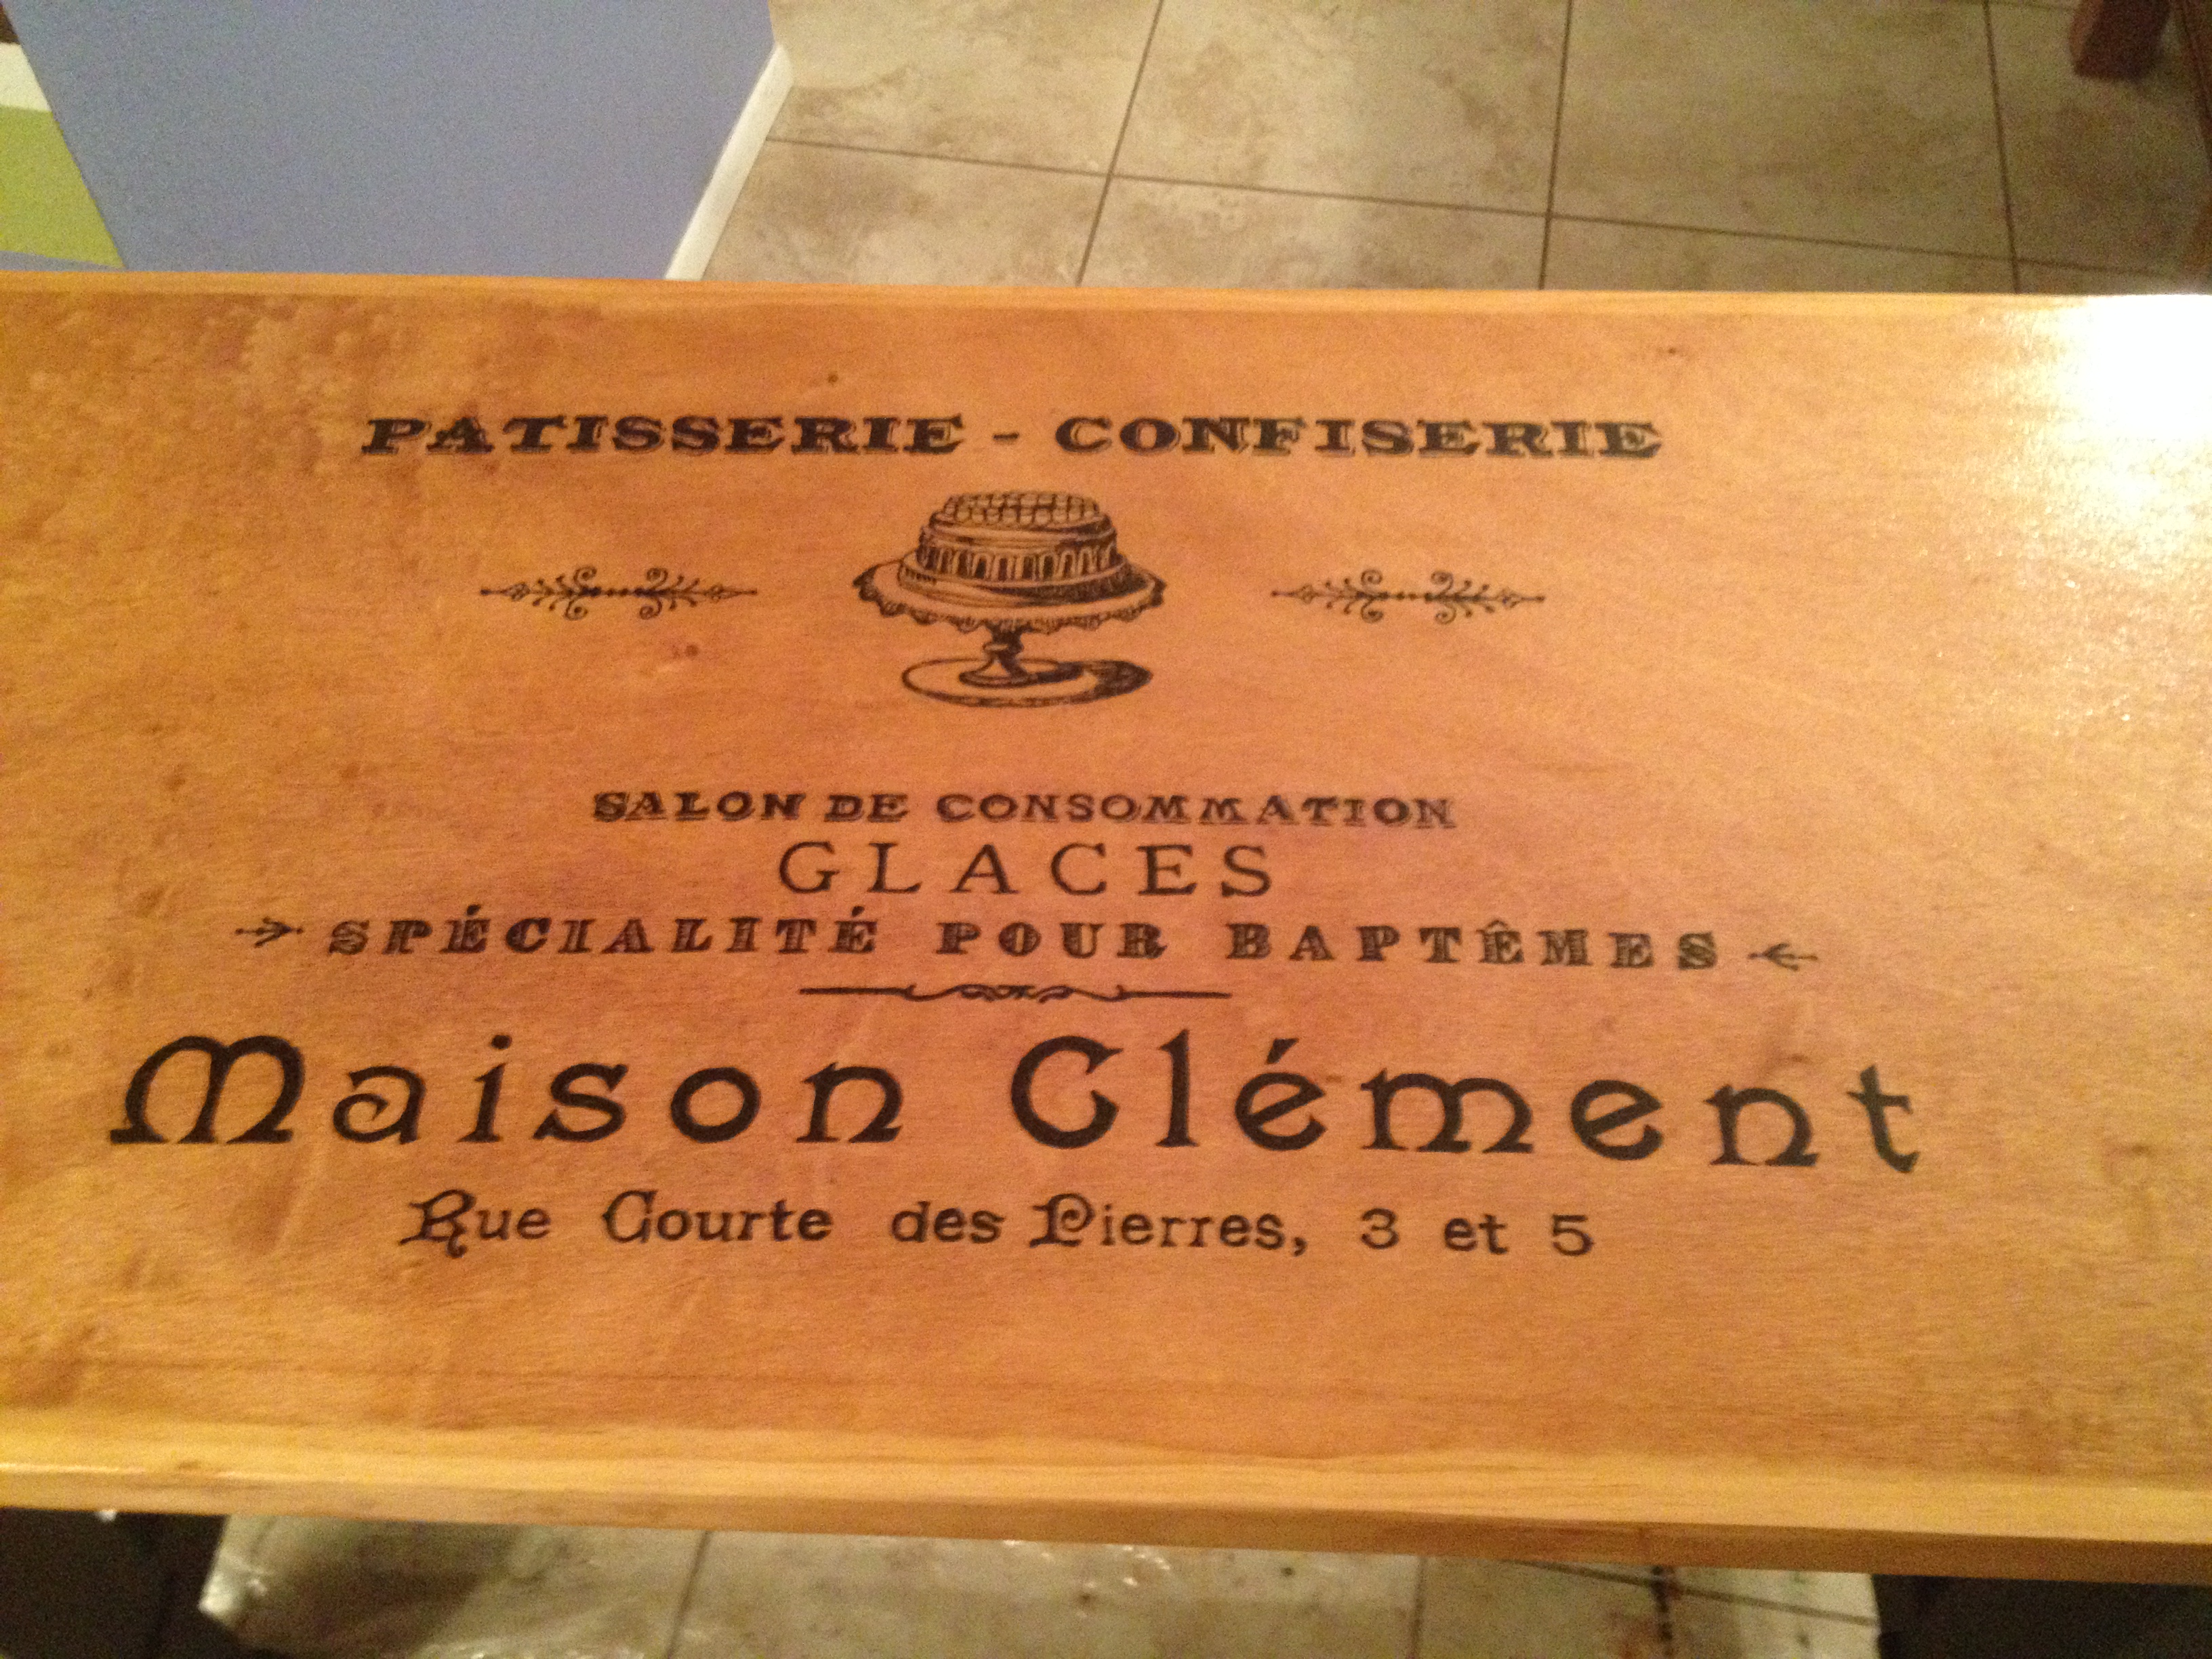
Was a fun project! Took only a few days. I hand painted the typographical using the method mentioned on the graphic fairy's website. Thanks for the post!
Built from Plan(s)
Recommended Skill Level
Intermediate
Cherry Farmhouse Bed
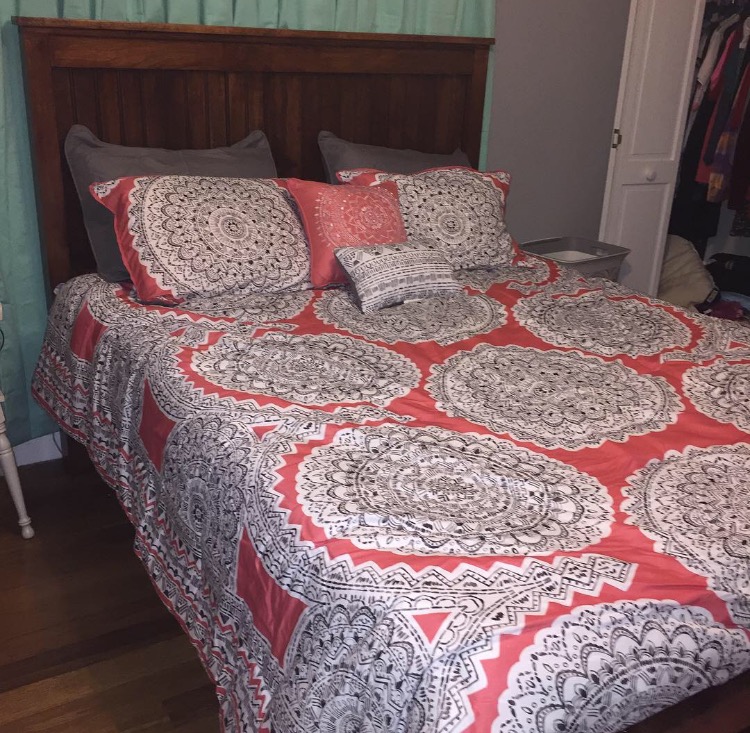
This is our third bed built from Ana White plans. My husband has built the loft bed and a daybed. This is by far our favorite. When my dad cleared his farm 18 years ago, he milled all of the lumber and it has been sitting in a barn waiting for special projects. My husband cut down the large beams to make the post and my dad had some of the cherry boards milled into bead board, which we used in the headboard and footboard. I love the way it turned out and I hope my daughter cherishes it.
Built from Plan(s)
Estimated Cost
$50--Stain, 2x4 platform, glue & nails. We also modified to use rail brackets.
Estimated Time Investment
Day Project (6-9 Hours)
Finish Used
Stain-Woodwright Stain (Boston)
2 coats wipe poly
2 coats wipe poly
Recommended Skill Level
Intermediate
Corner desk modified

My wife needed a bigger desk for her home office so built one. I used the modular office desk designs. I had to modify it, my wife wanted the 90 degree cut in where the two desk to meet. I built two open shelves and fastened then together and built one narrow shelf with drawers. Built mostly out of MDF with the top being melamine. Waiting on the edge banding to ship. Also, installed some rope lighting for indirect light.
Built from Plan(s)
Estimated Cost
Under $300
Estimated Time Investment
Week Long Project (20 Hours or More)
Finish Used
Painted the base cabinets.
Recommended Skill Level
Beginner
Easy to Build Toybox
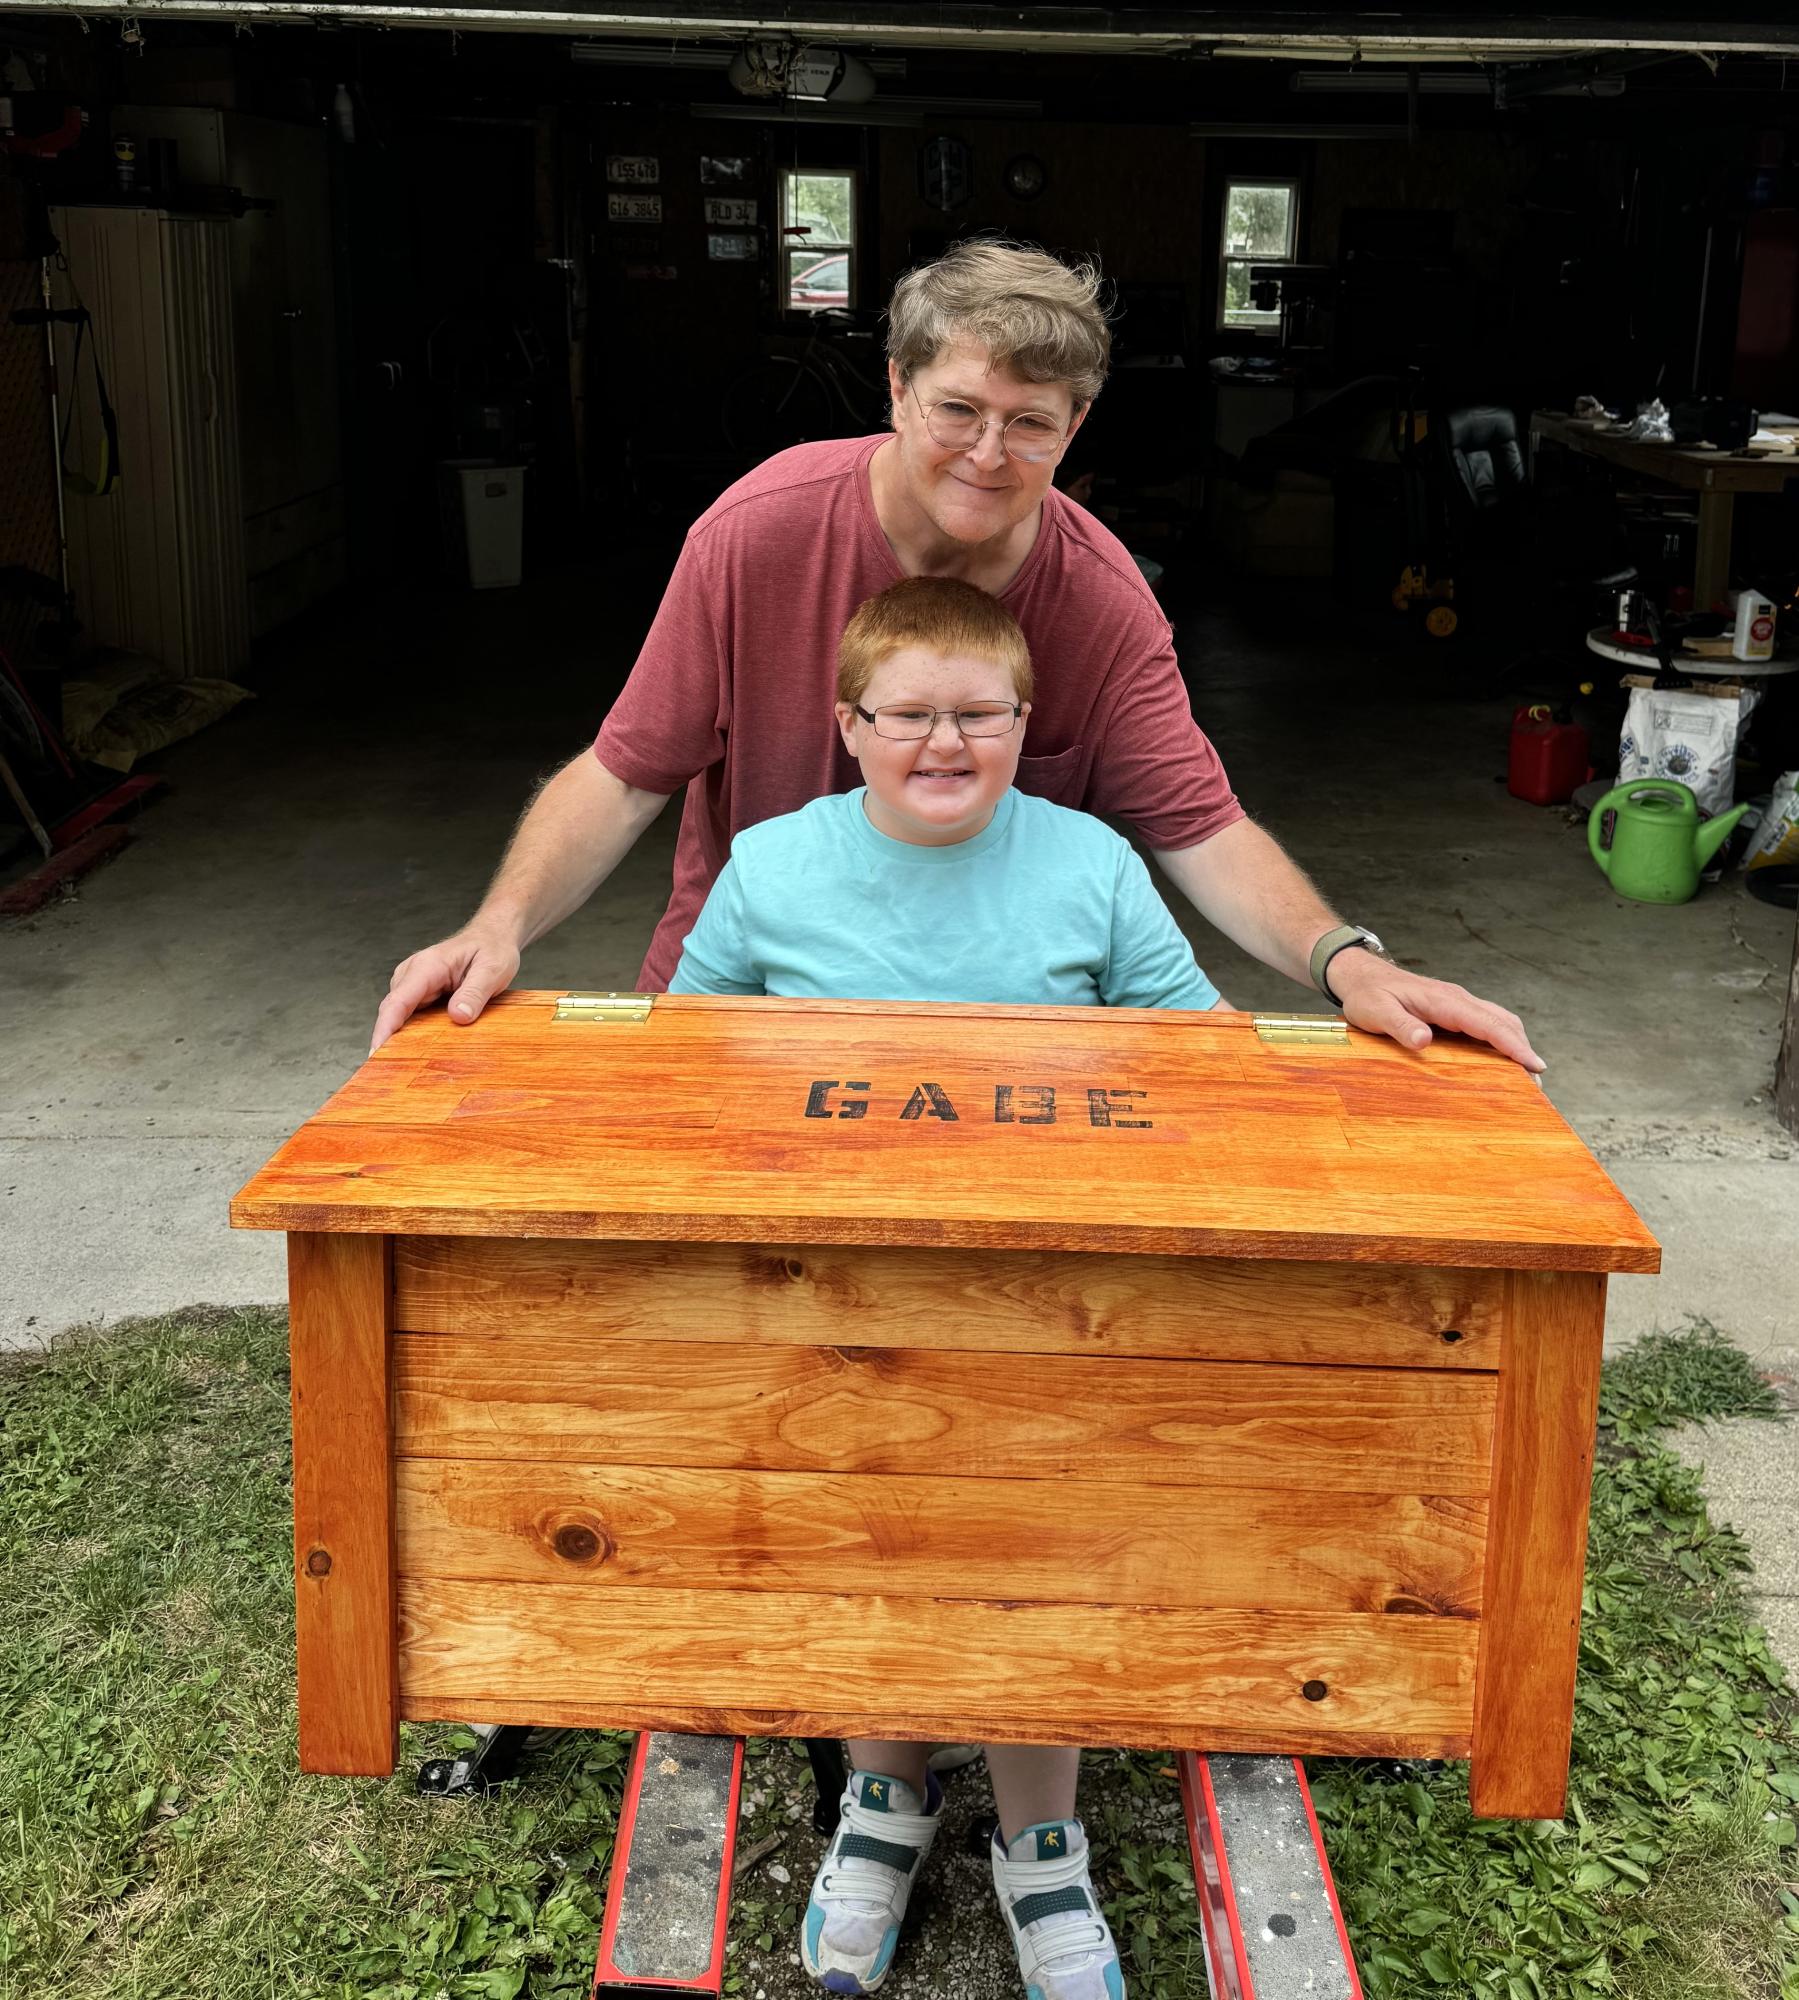
The farmhouse toy box project is wonderful. The first one I made I thought it’s easy enough that I had my 8 years old grandson come over and basically make it himself with a little help from grandpa. Thanks Ana for a great plan. -
Roger DeMoss
Built from Plan(s)
Farmhouse table - Tobacco farm wood
The end result of this project was incredible. The table is 3ft x 6ft x 31inches - Built with Tennessee tobacco farm wood. I used KREG for all the joining, even the legs. Finished it with the one and only Annie Sloan Paint/Wax combination.
Estimated Cost
350.00
Estimated Time Investment
Week Long Project (20 Hours or More)
Finish Used
Annie Sloan - Paint: Old White - Wax: Clear and Dark
Recommended Skill Level
Advanced
Comments

Kentwood Bed and night stand
Overall, these plans were easy to follow. It took me a little bit longer to complete, and definitely needed someone to help attach the bed rails to the headboard and footboard. We stained prior to putting the bed together, otherwise we wouldn't have been able to get the bed into the house.
For the night stand, the plans call for 4 boards across the top, but it definitely takes 5 so keep that in mind. I used pocket holes to attach the front and back of the top piece to the night stand, and then did nails to attach the sides of the top to the sides of the night stand.
Built from Plan(s)
Estimated Time Investment
Weekend Project (10-20 Hours)
Finish Used
Antique Walnut by Minwax
Recommended Skill Level
Beginner
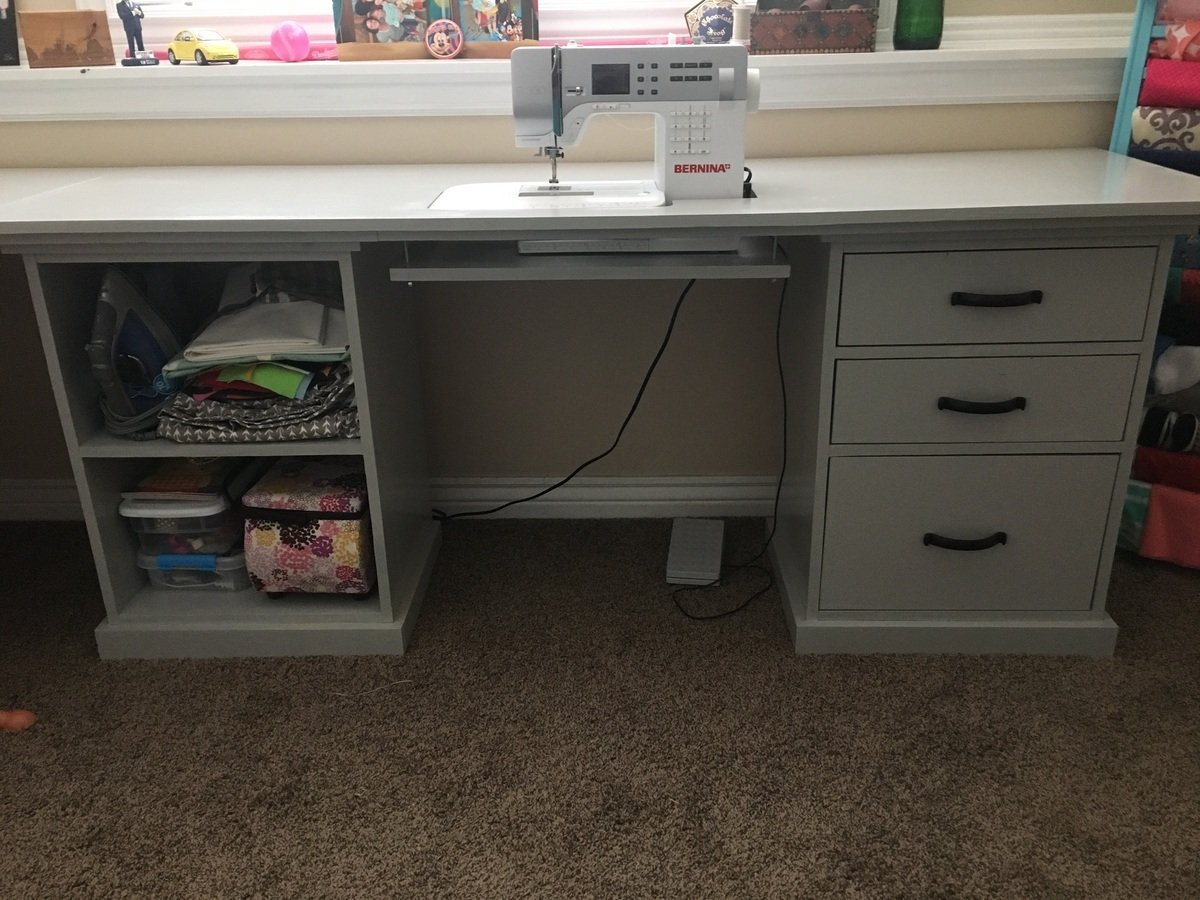
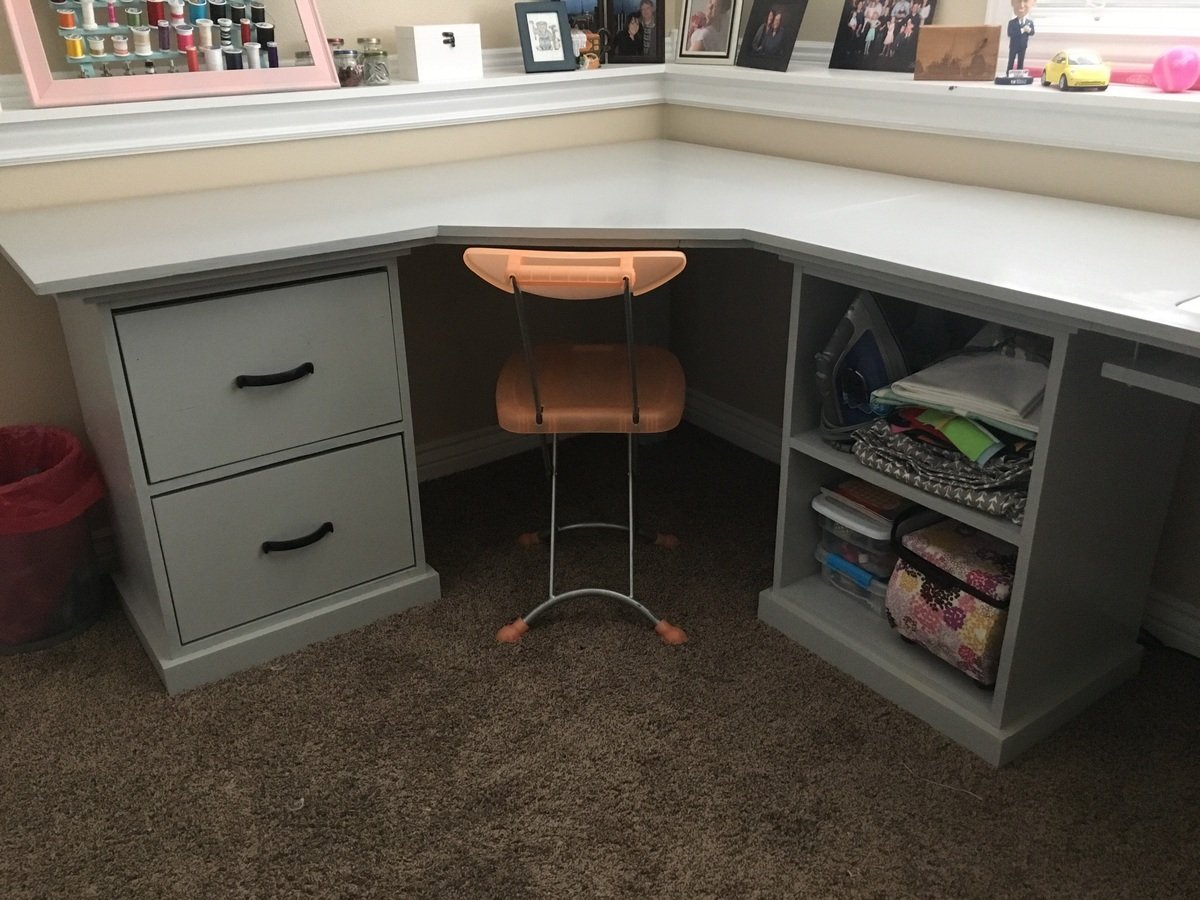
Modular office sewing/craft table
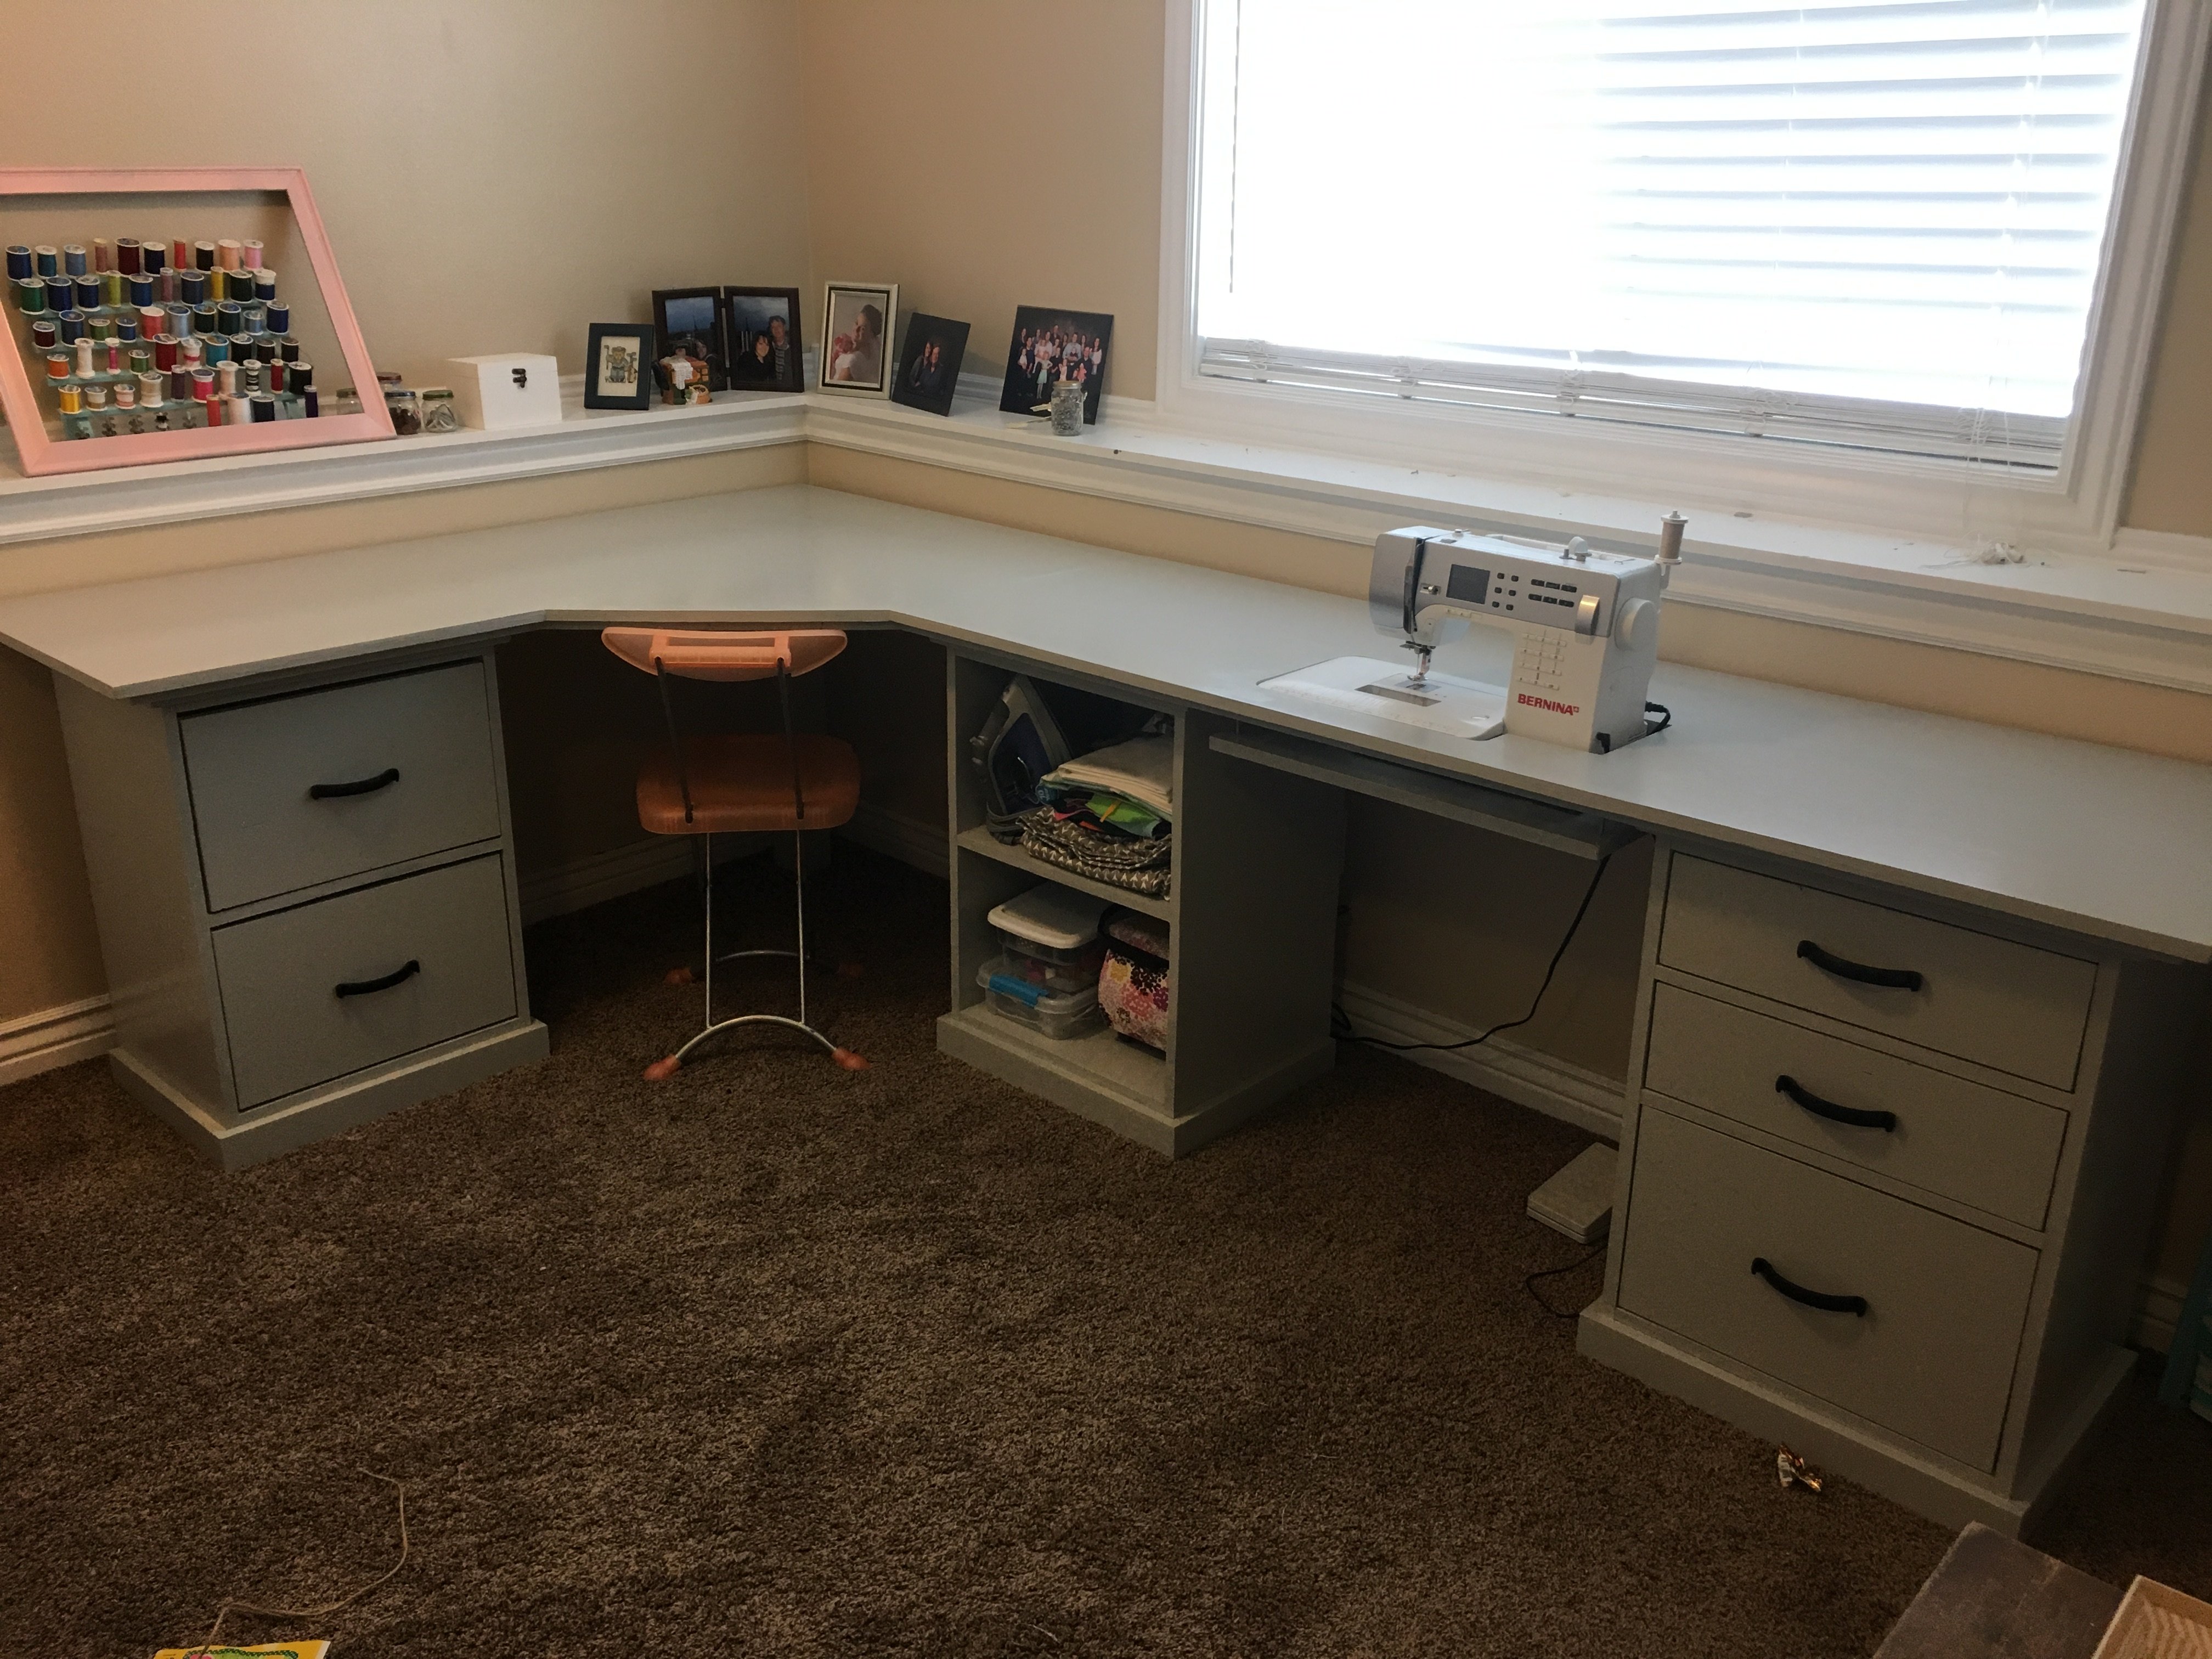
We built three base units-each with different storage options and used the corner desk plans. Then created our own long desk top using a 6ft long board and using a jigsaw to create an open space for the sewing machine.
Built from Plan(s)
Estimated Cost
$300
Estimated Time Investment
Week Long Project (20 Hours or More)
Finish Used
Semi gloss paint-behr paint and primer in classic silver. Polycrilic semi-gloss top coat-3 coats with wet sand before final coat.
Recommended Skill Level
Intermediate
Comments

Mon, 01/20/2020 - 07:49
It seems to me that this…
It seems to me that this room is suitable for yoga or painting.
Mon, 12/27/2021 - 18:28
sewing machine hole
How did you go about cutting the hole for the sewing machine and what extra building did you do underneath?
Sandbox with built-in seats in our playhouse
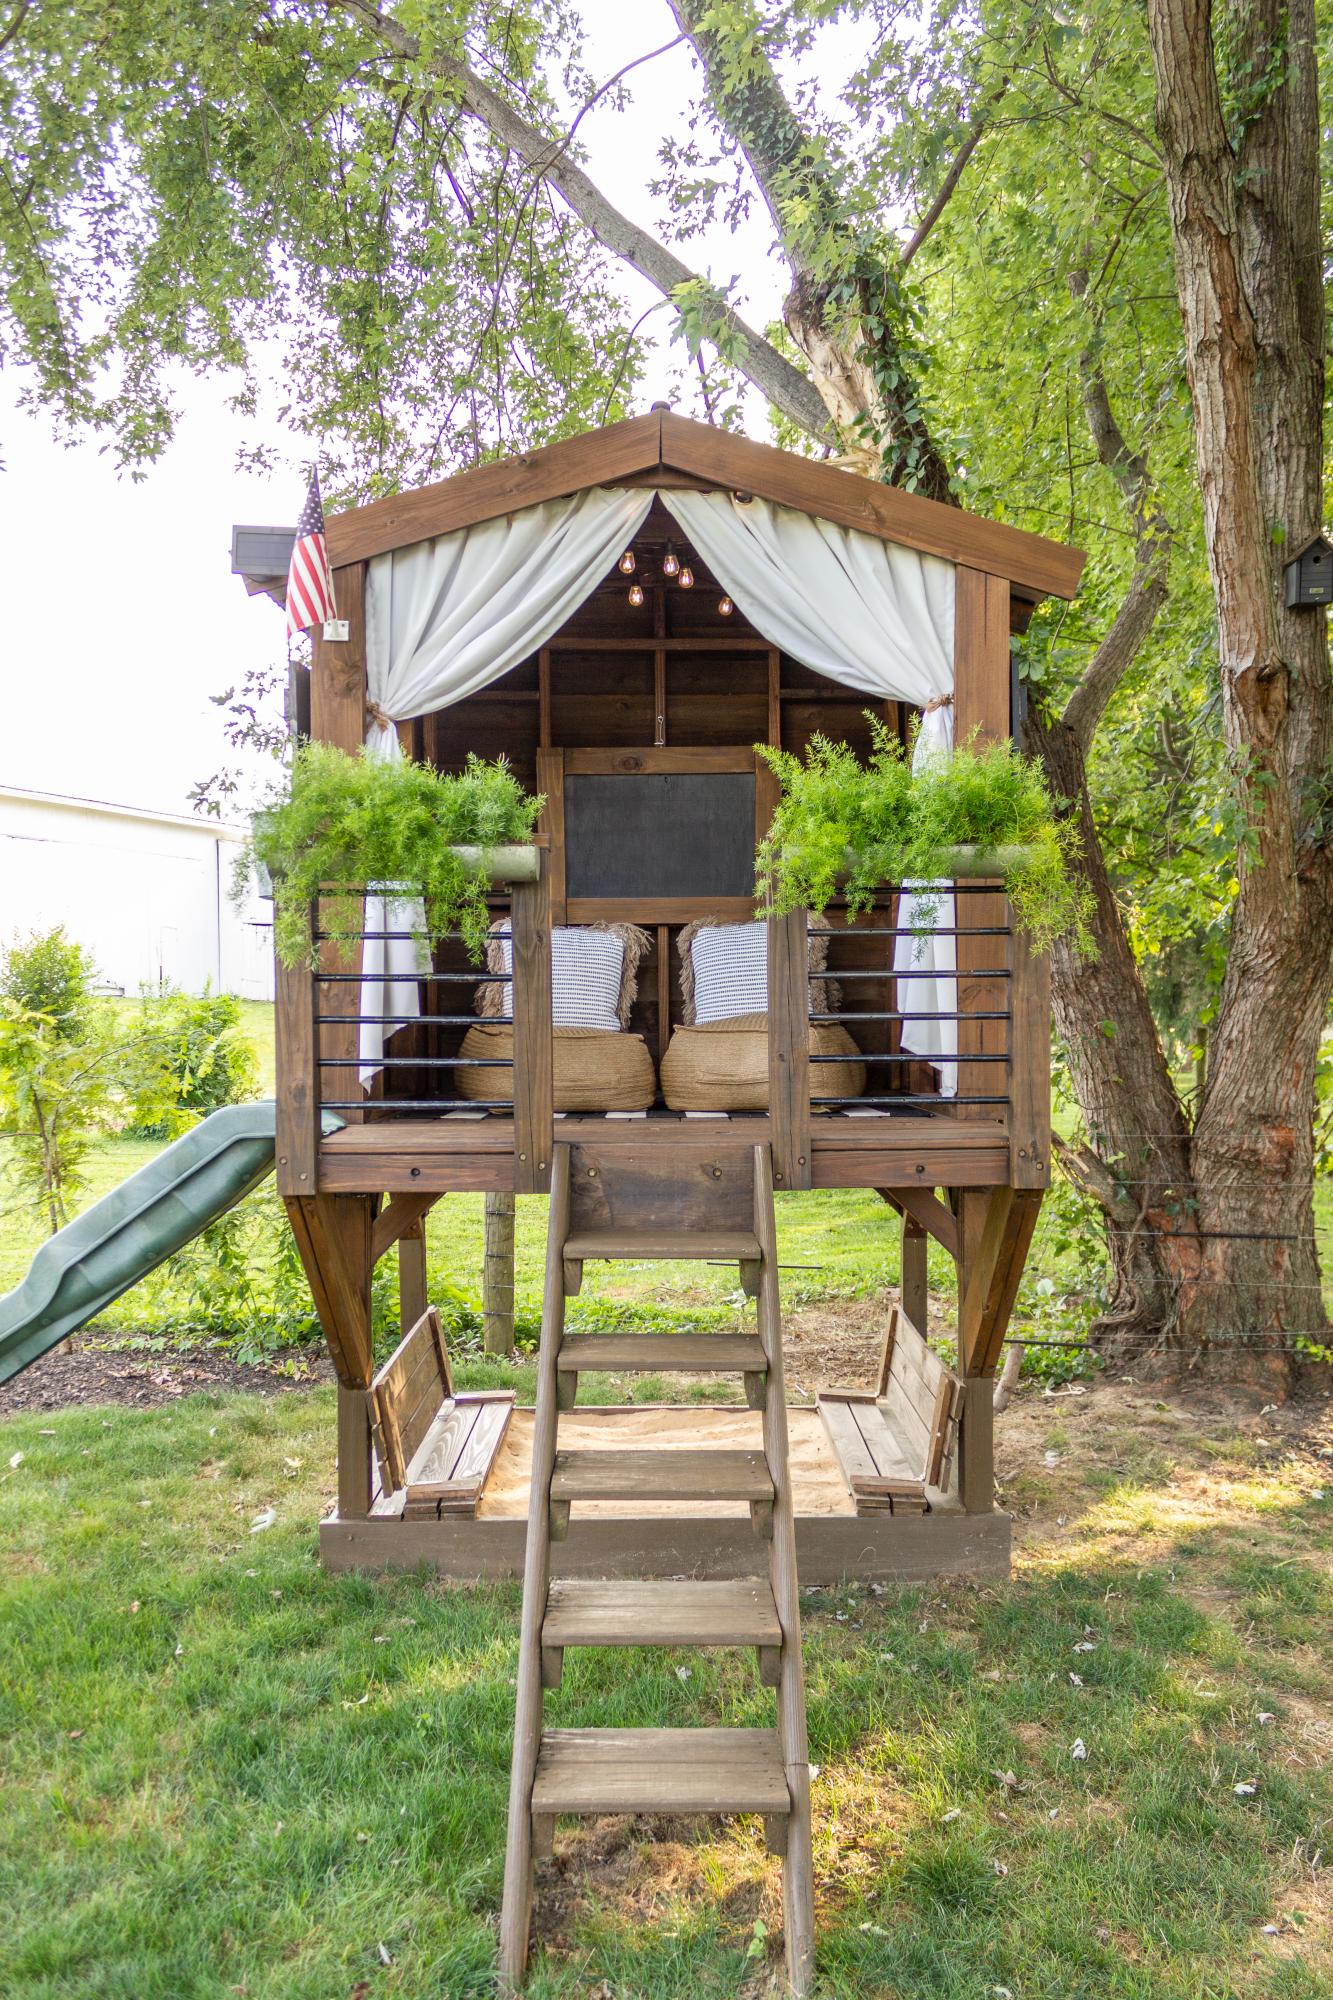
The base of our playhouse felt like the perfect spot to use the sandbox plan with built-in seats. The bench seats actually fold flat to create a lid for the sandbox when it’s not in use. I followed Ana’s plans exactly and used the list of materials she provided. The only modification I made was eliminating the back supports. It was not necessary for me to add the back supports since we have the playhouse posts to support the back of the bench.
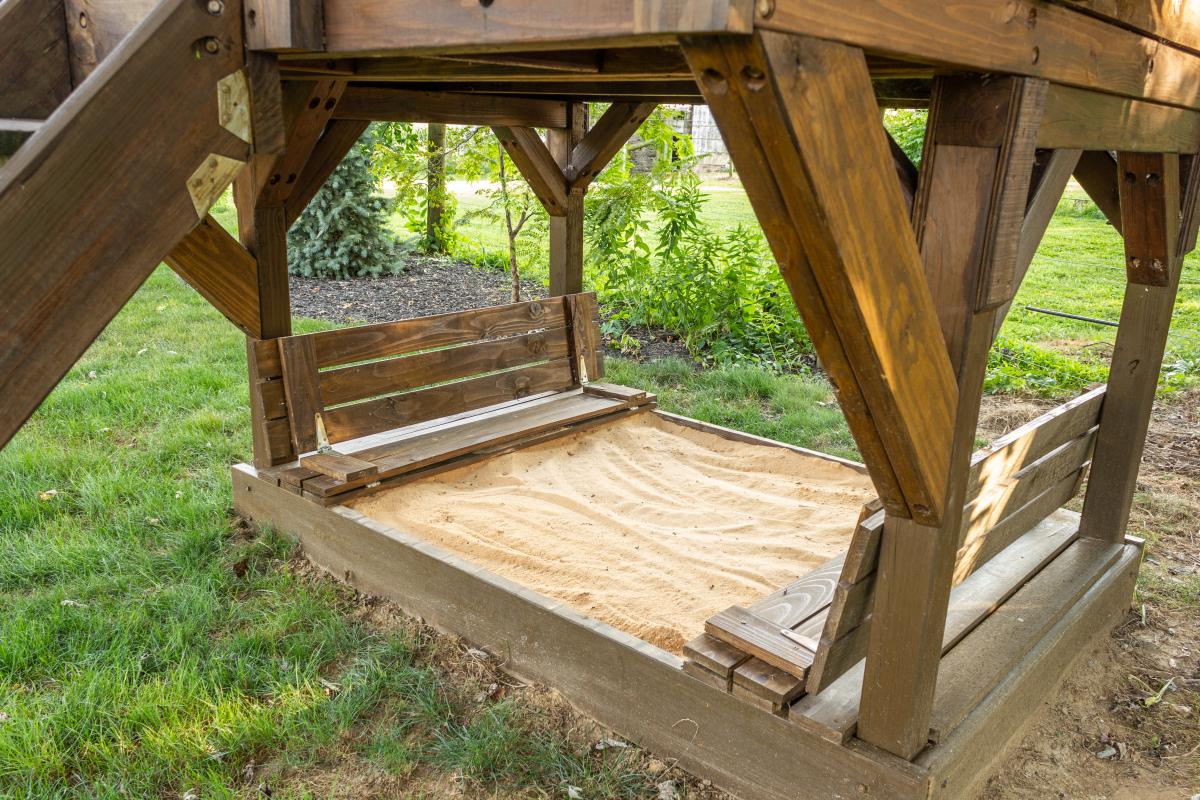
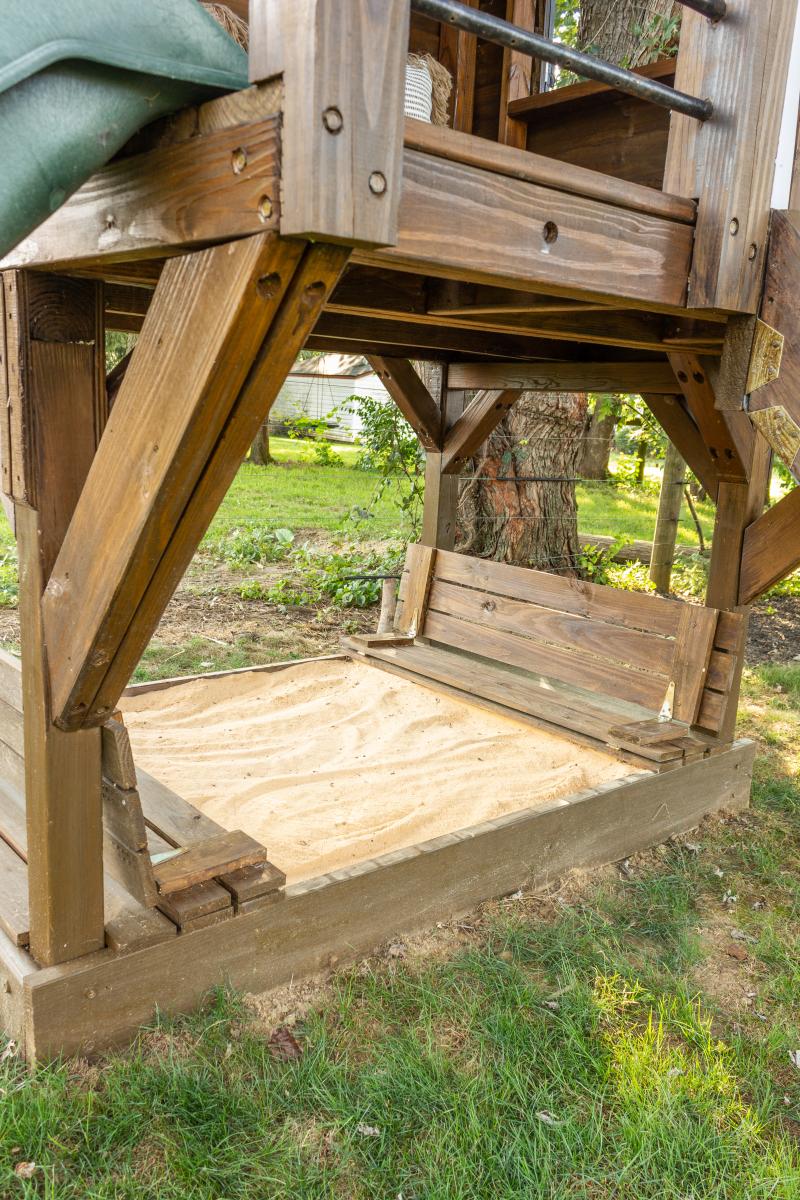
Built from Plan(s)
Estimated Cost
$60
Estimated Time Investment
Afternoon Project (3-6 Hours)
Finish Used
Stain
Recommended Skill Level
Beginner
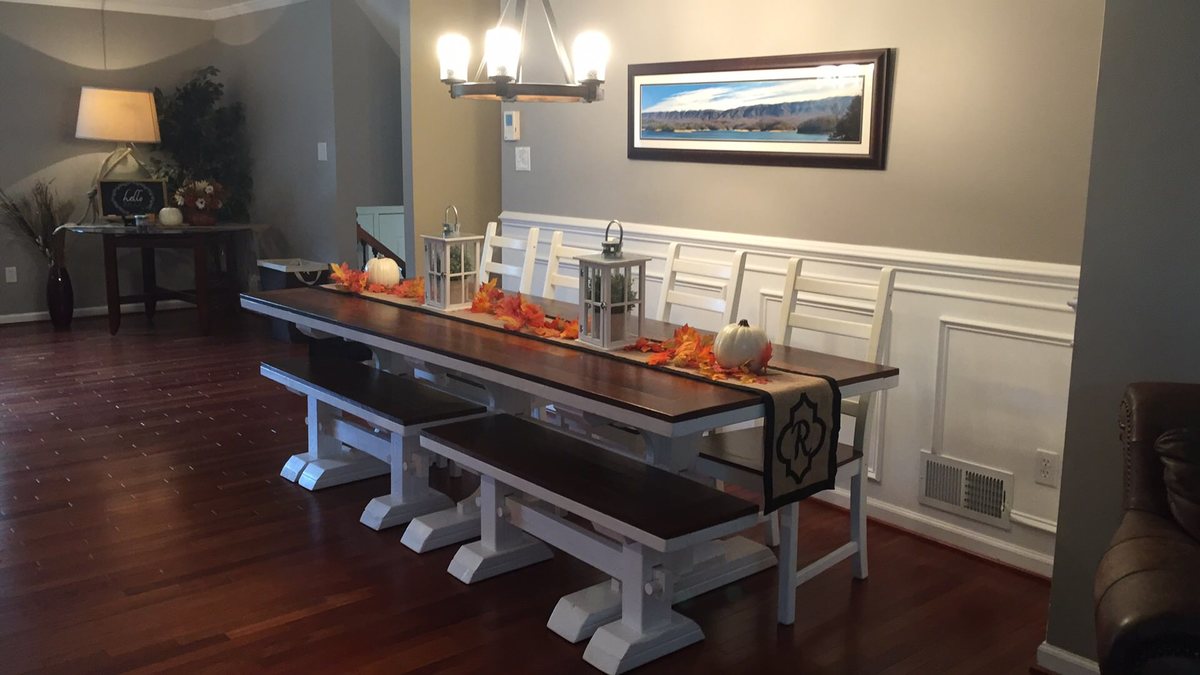
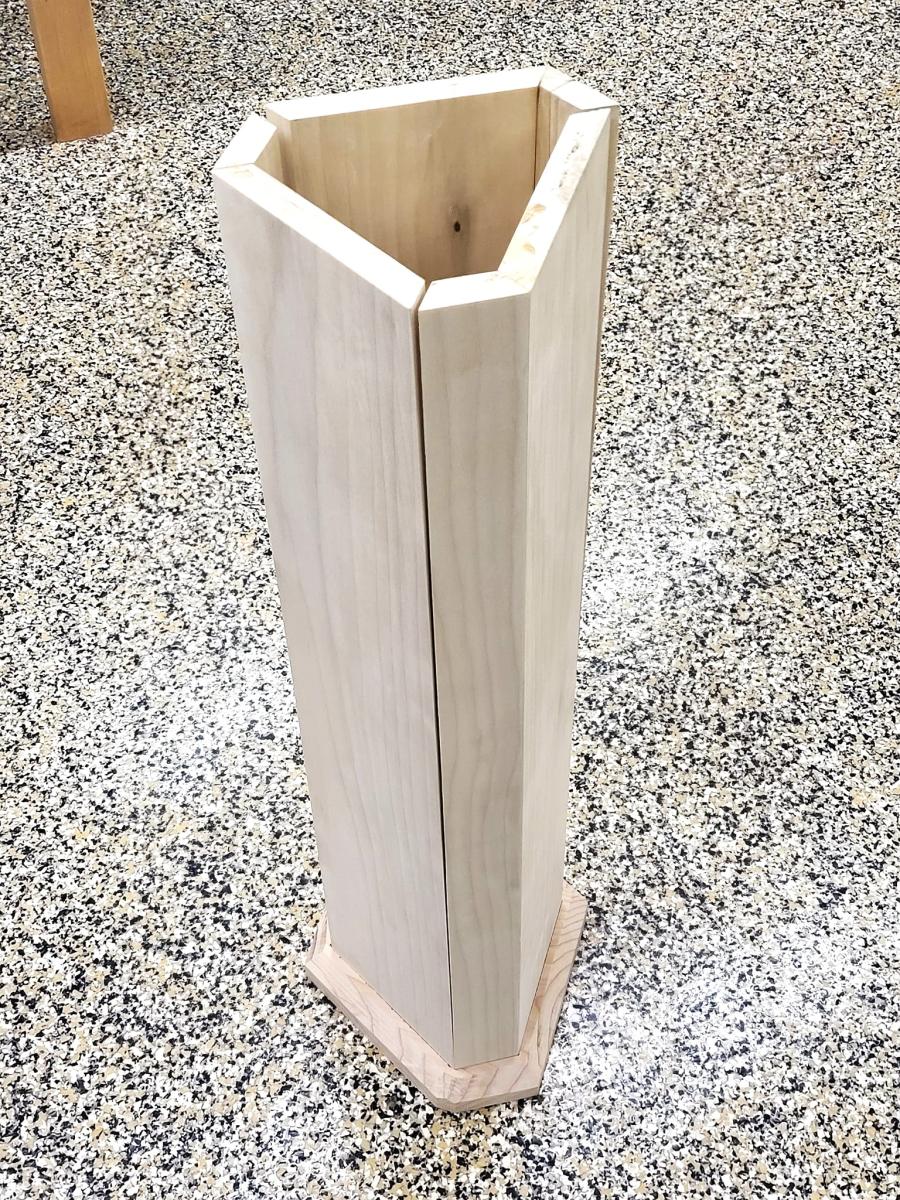
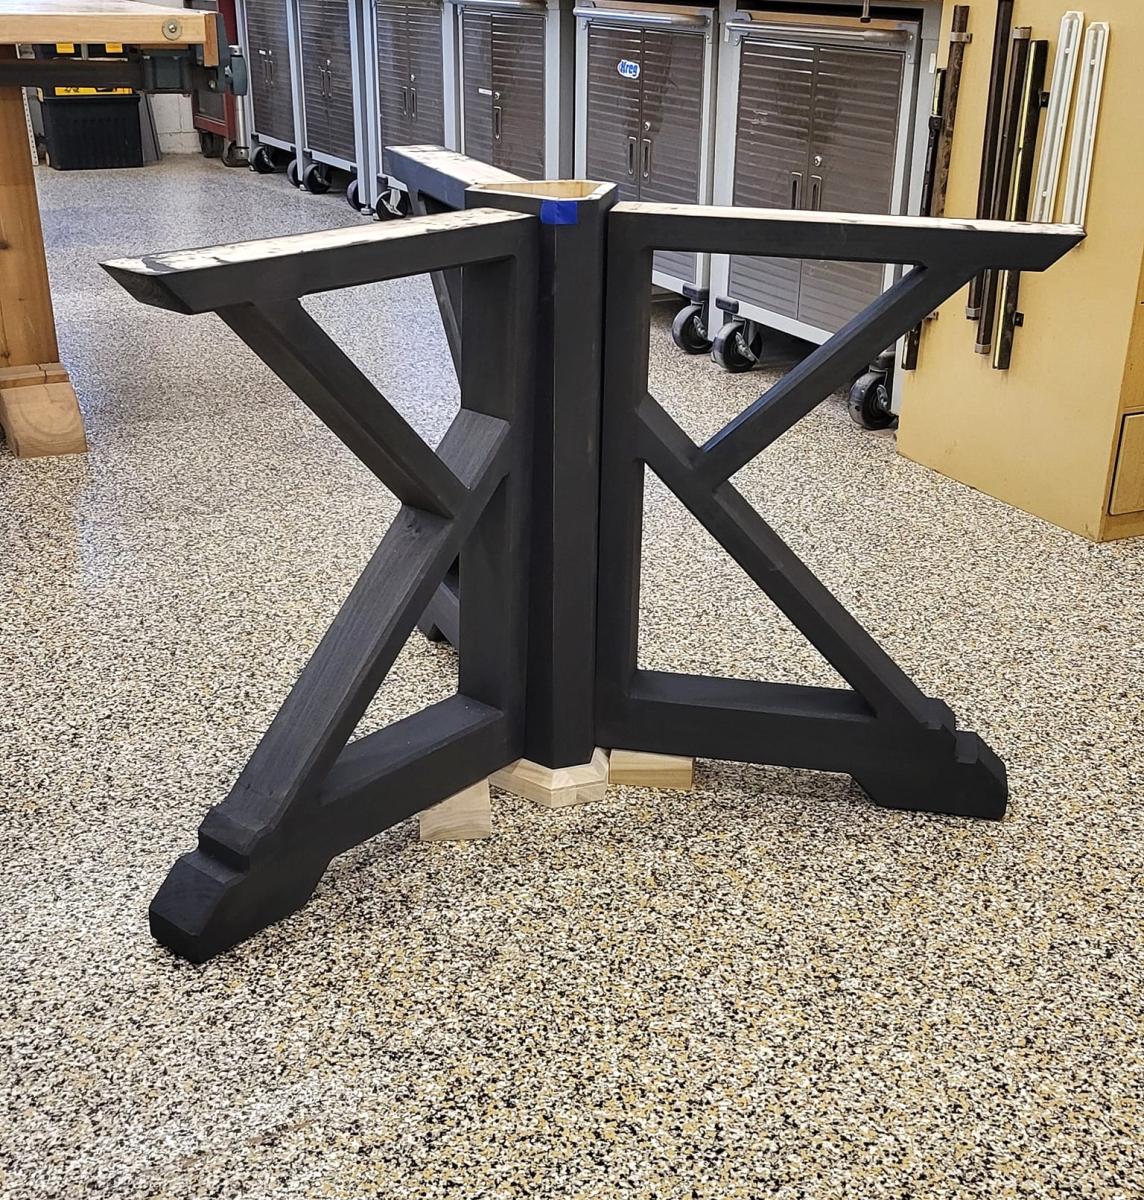
Custom Modern Round Dining Table
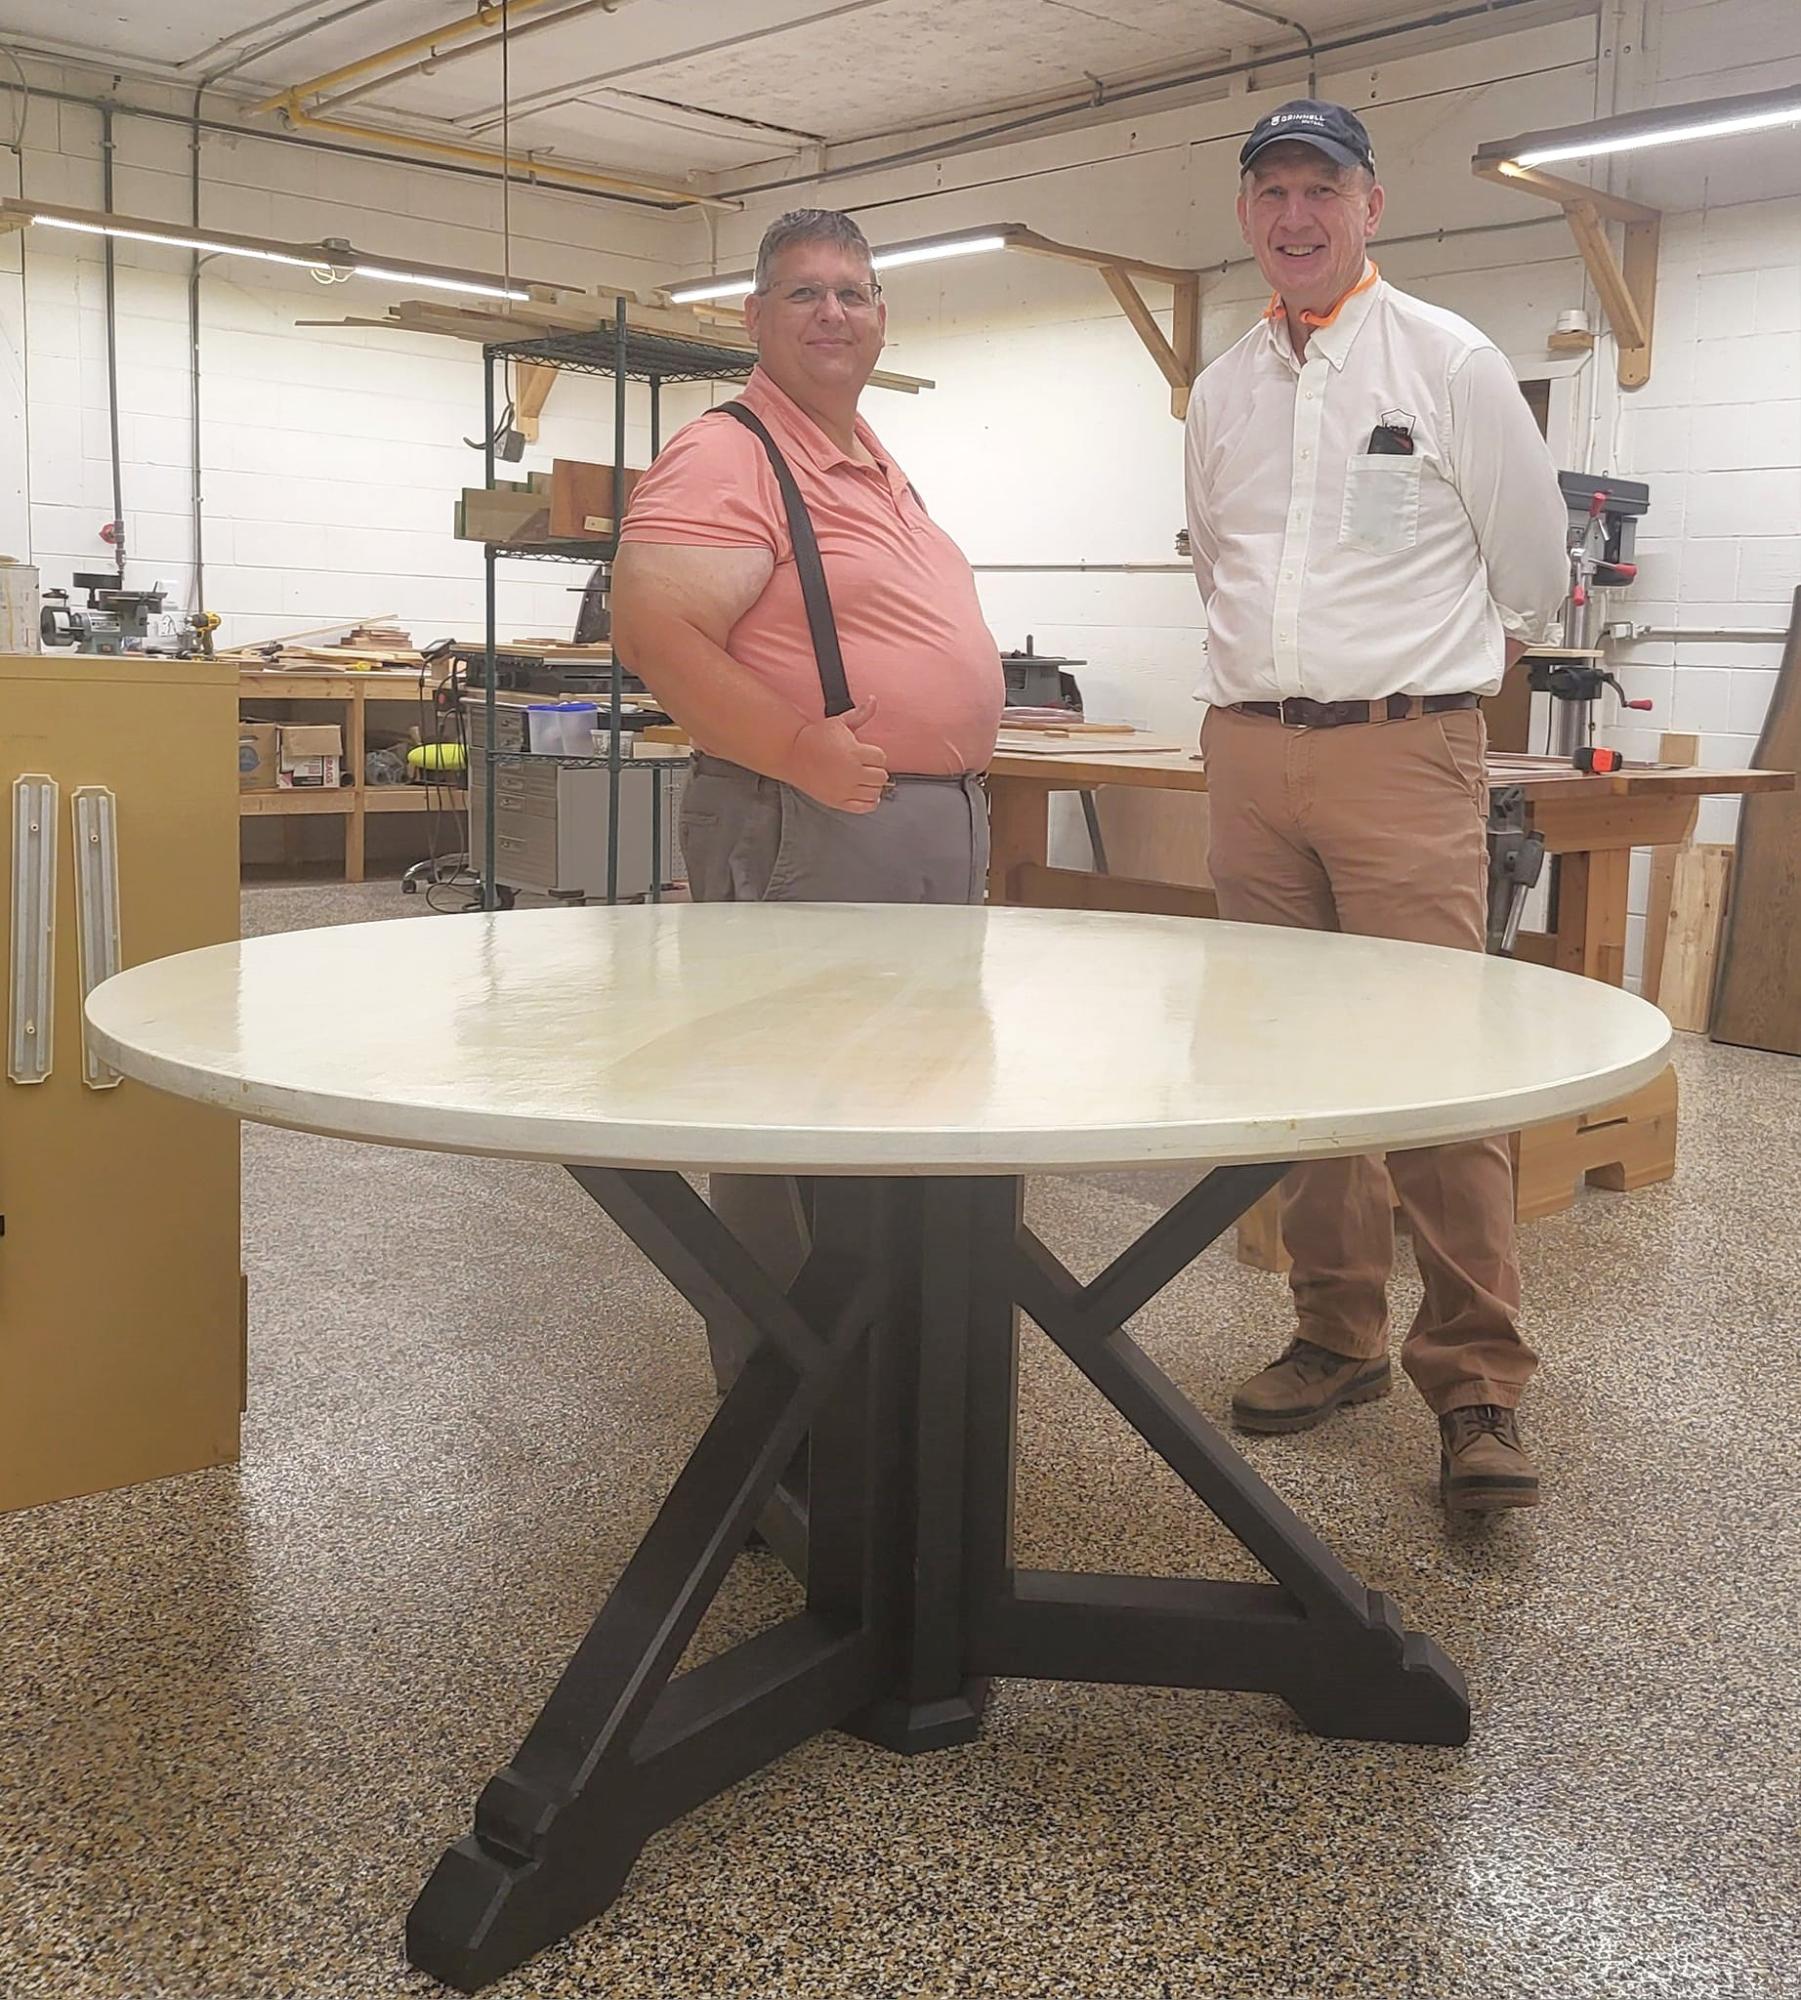
I've been a fan of Ana White’s Round Farmhouse Table for years, always intending to build it, but life kept getting in the way. Last year, after we remodeled our kitchen, my wife mentioned she wanted a 5-foot round table for the dining room. I immediately thought of Ana's design, but with no space to work on it, the project was delayed. That all changed in January when I discovered our community's Woodworking Club offering a 6-week class where you could bring your own project. I jumped at the chance!
While Ana White’s plans are geared toward simple tools, I was fortunate to have access to a fully equipped woodshop and guidance from a former high school shop teacher. With these resources, the Round Farmhouse Table became my personal project—and I decided to make a few custom modifications to fit my vision.
Leg Design: I didn’t want the legs to look like basic 2x4s. My instructor suggested ordering rough-cut poplar and shaping it myself. With $150 worth of poplar delivered, I learned to use the jointer, planer, and tablesaw to mill the pieces I needed for both the legs and tabletop.
Seating & Structure: Since I wanted the table to comfortably seat six, I was concerned the original four-leg design would interfere with the chairs. So, I reimagined the table with three legs instead of four. This led to a big departure from the original plans. I created a hexagon core using 1x6 and 1x2 boards, and I even learned vCarve Pro to design a custom core base on the CNC router.
Mobility: Knowing we might need to move the table in the future, I designed it to be disassembled. The table breaks down into five pieces—the tabletop, three legs, and core base. Two bolts per leg securely attach the top to the base, making it easy to take apart and transport.
The tabletop was finished with a whitewash and sealed with TotalBoat Halcyon poly. I stained the legs with a deep Graphite color, finishing them with a satin poly spray for a smooth, polished look.
This project was a blast, and I couldn’t have done it without the inspiration from Ana White. Thanks for the great plans, Ana! - Scott Fosseen

Built from Plan(s)
Harriet higher chair stained
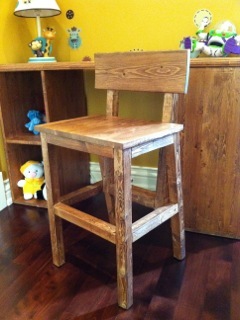
This is the perfect chair height for my 5 year old son. Was easy to build for a novice, and after a lot of sanding, I stained + varnished and it turned out quite nice, to match with the desk I made which we can see in the picture background. It does take 3 of the 2x2x8 instead of 2, but at $2.5 each... Total cost of approx. $7 since I made the seat and back rest out of the scrap I had. I'm thinking of making swivel stools for my kitchen out of the regular height plan. I also cut the seat a little larger to have about 1/4" overhang all around except at the back.
Estimated Cost
$7
Estimated Time Investment
Afternoon Project (3-6 Hours)
Finish Used
Minwax stain 1 coat + water base varnish.
Recommended Skill Level
Beginner
Swinging Bench
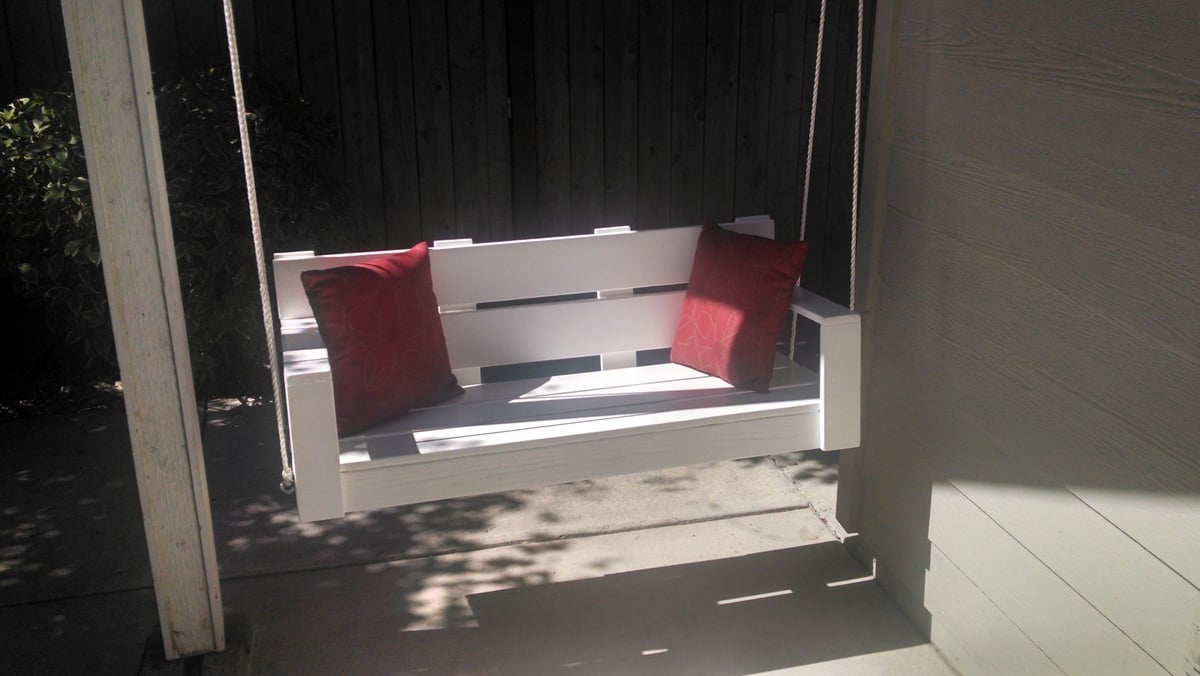
This bench is great! I was surprised how nicely it swings. I used rope with overhand loop knots to secure onto quick link hooks. Made it for my husband for his birthday but my whole family enjoys it daily!
This is my third project from Ana's website. I absolutely love to build and can't wait to do more!
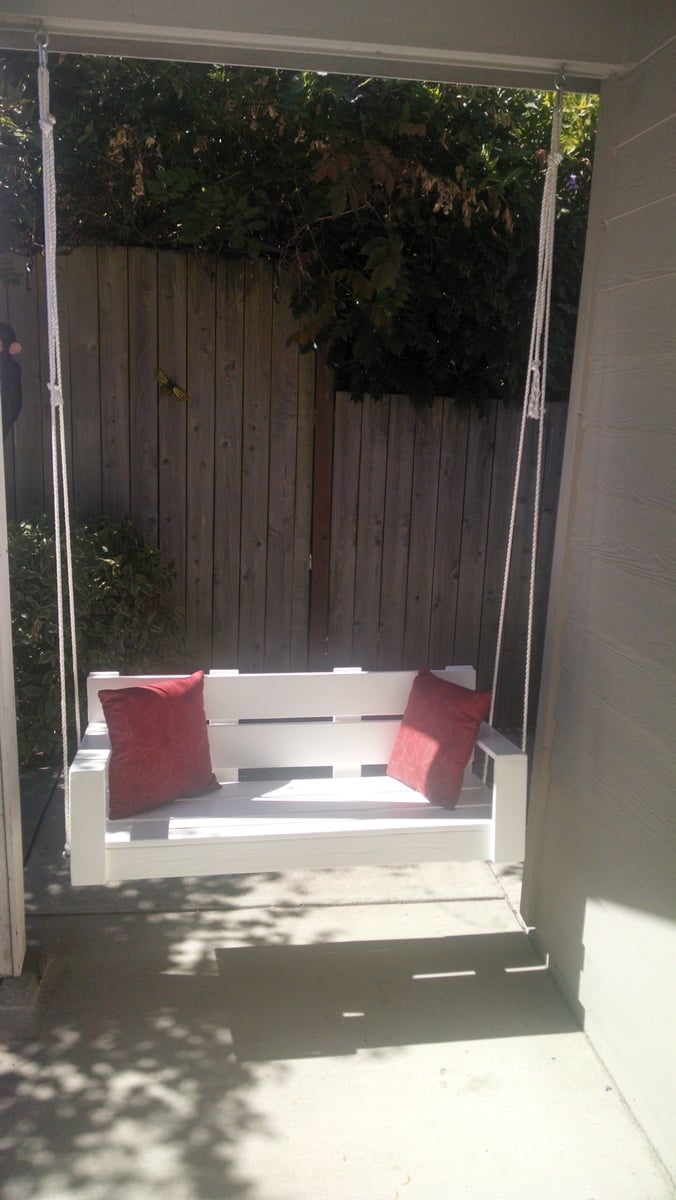
Built from Plan(s)
Estimated Cost
$100.00
Estimated Time Investment
Weekend Project (10-20 Hours)
Finish Used
Exterior semi-gloss white paint.
Recommended Skill Level
Beginner
Camp Loft Bed w/ Mods
I modified the plans to accommodate a new baby to the family. Height was adjusted to match existing bed. After 4-years I just added a removable floor for stuffed animals and to help with transport and clearing dust bunnies. I added rope lights by extending under bed lighting previously installed.

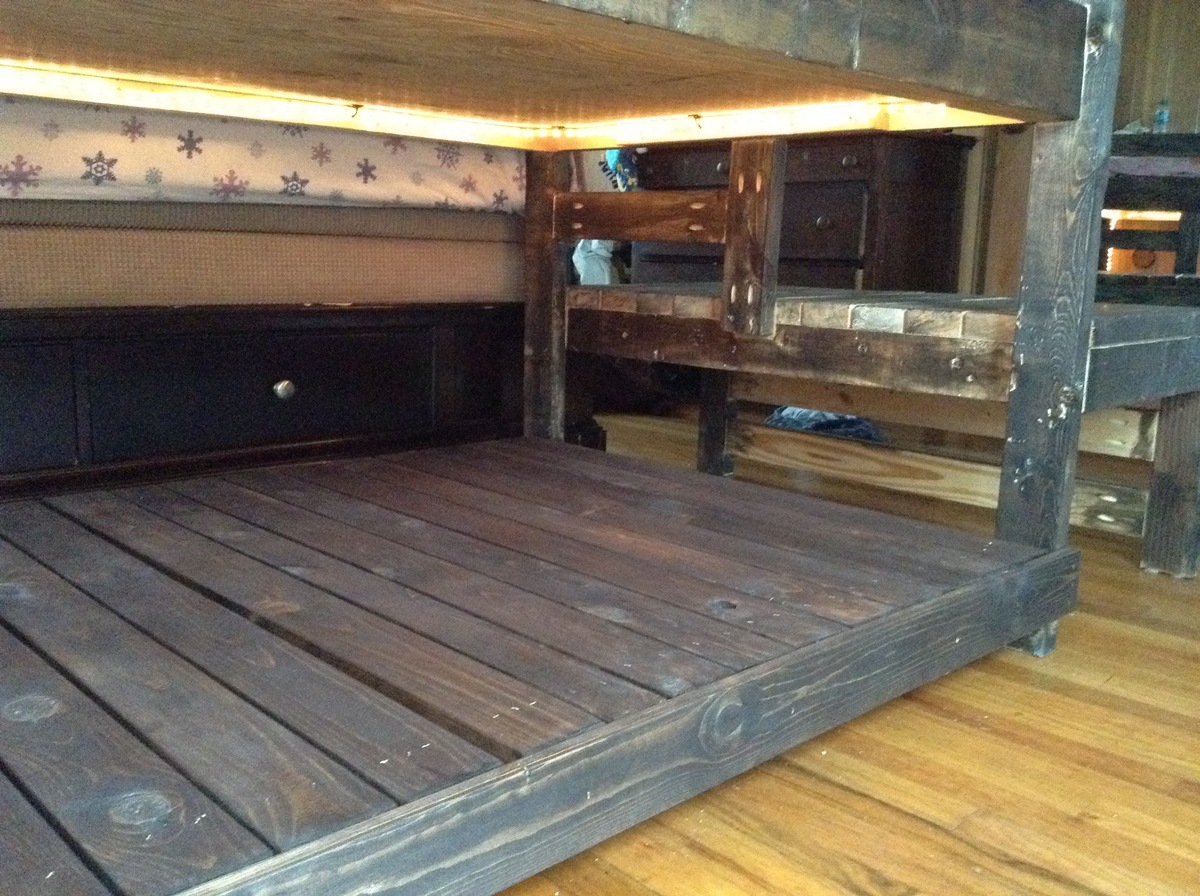
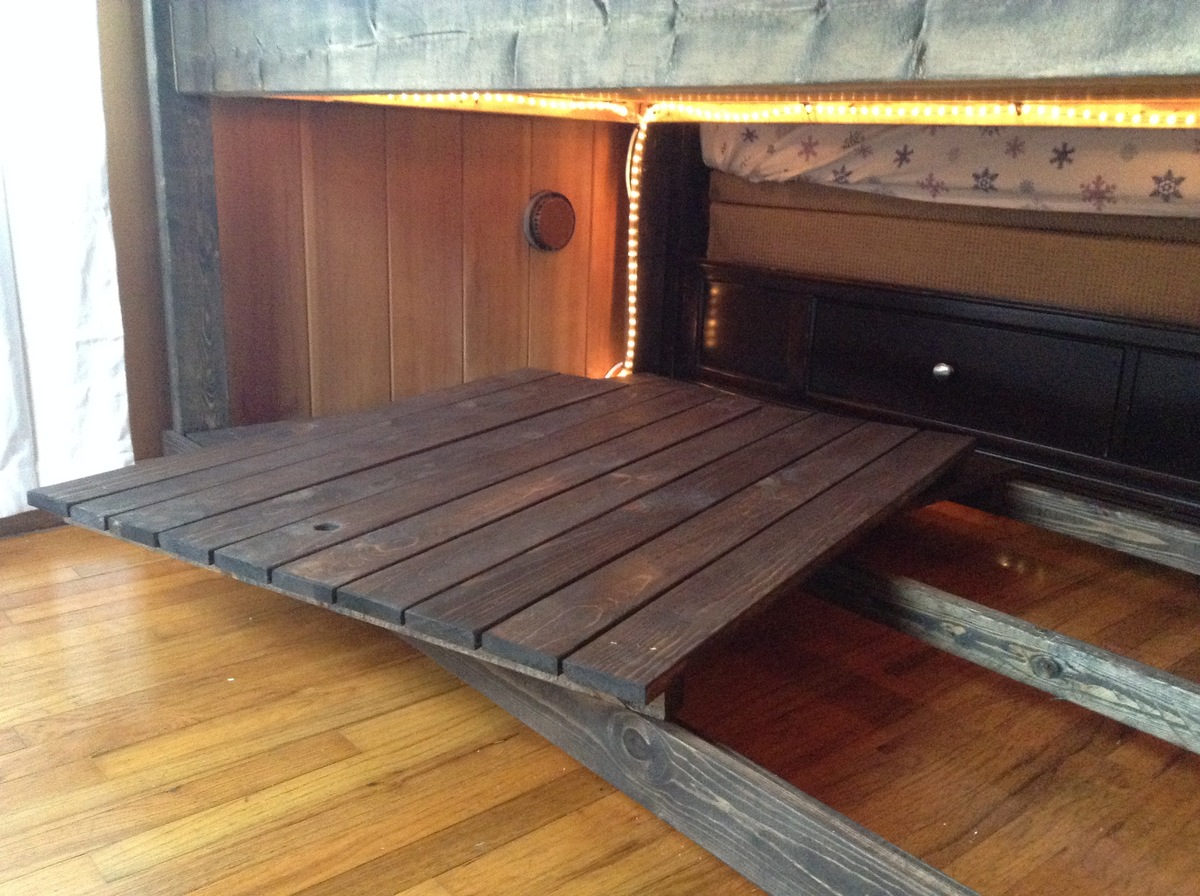
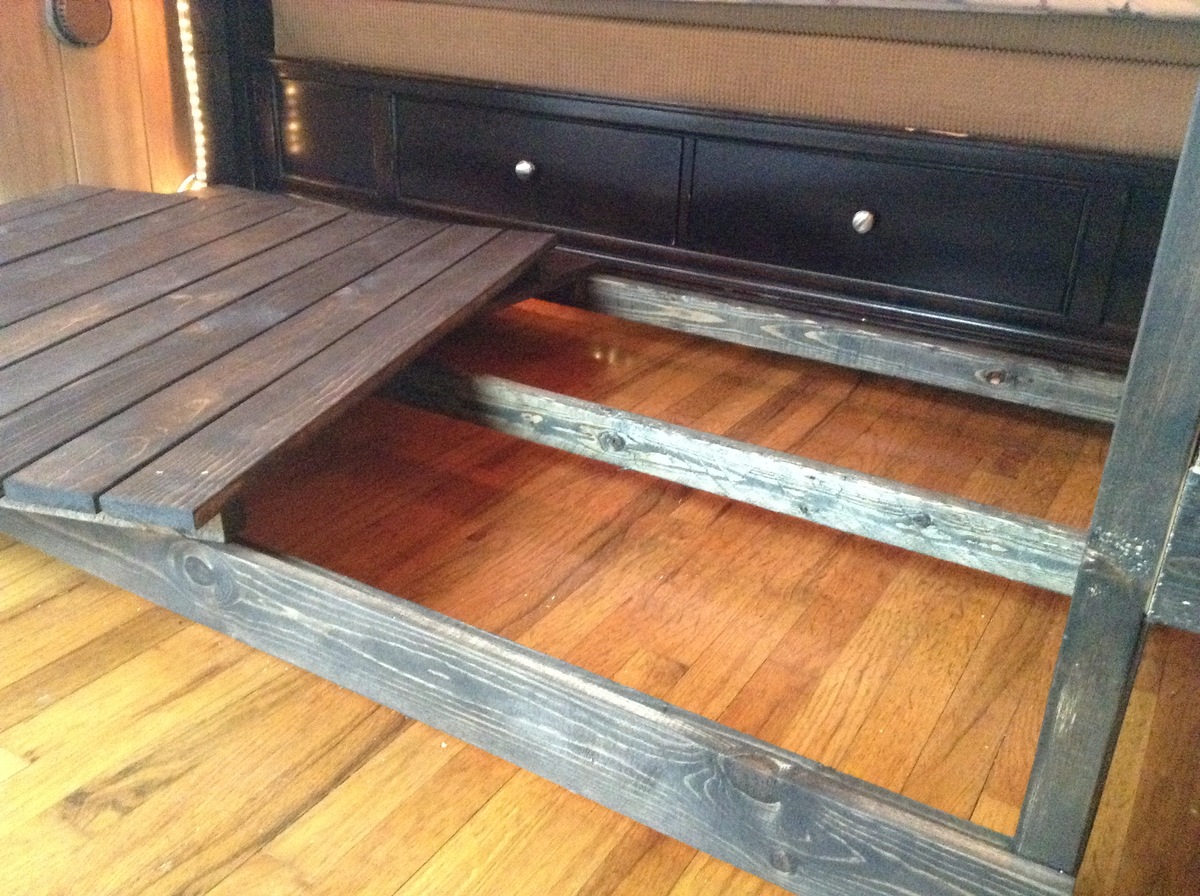
Built from Plan(s)
Estimated Cost
$125 with lighting
Estimated Time Investment
Weekend Project (10-20 Hours)
Finish Used
Espresso Woodworks
Recommended Skill Level
Intermediate
Smokehouse

Adjusted the plan to 4x4s cause that's what I had


Comments
Modern Chunky Leg Coffee Table
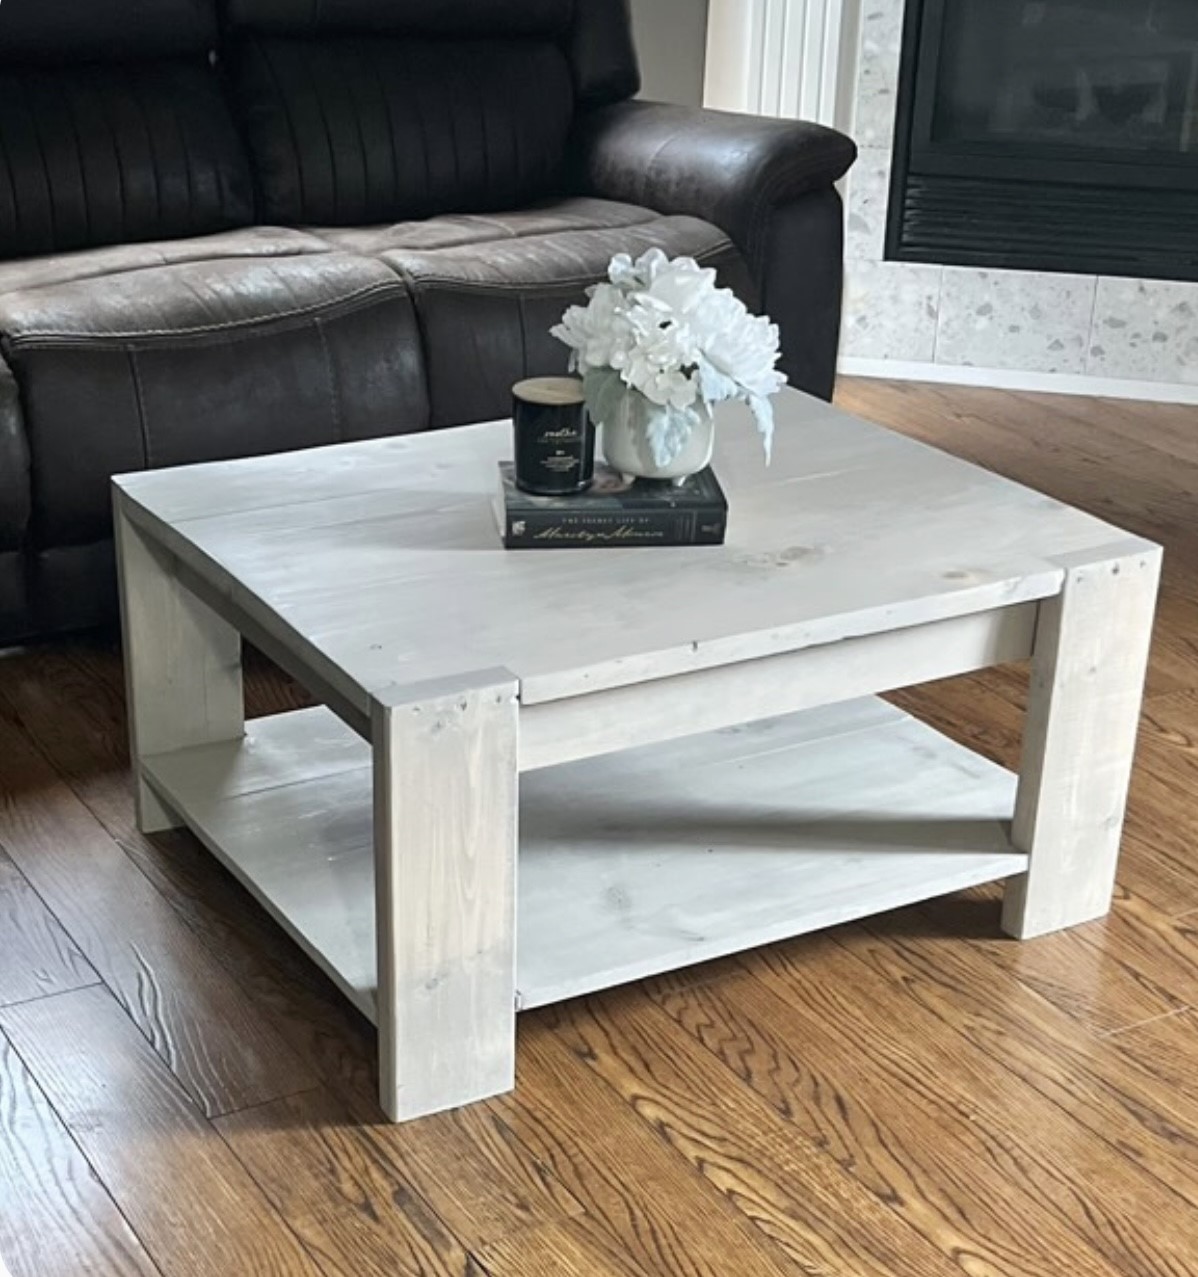
Got this chunky Leg table idea from the rockstar Ana White
Stained in varathane sunbleached - by spicedwoods on Instagram
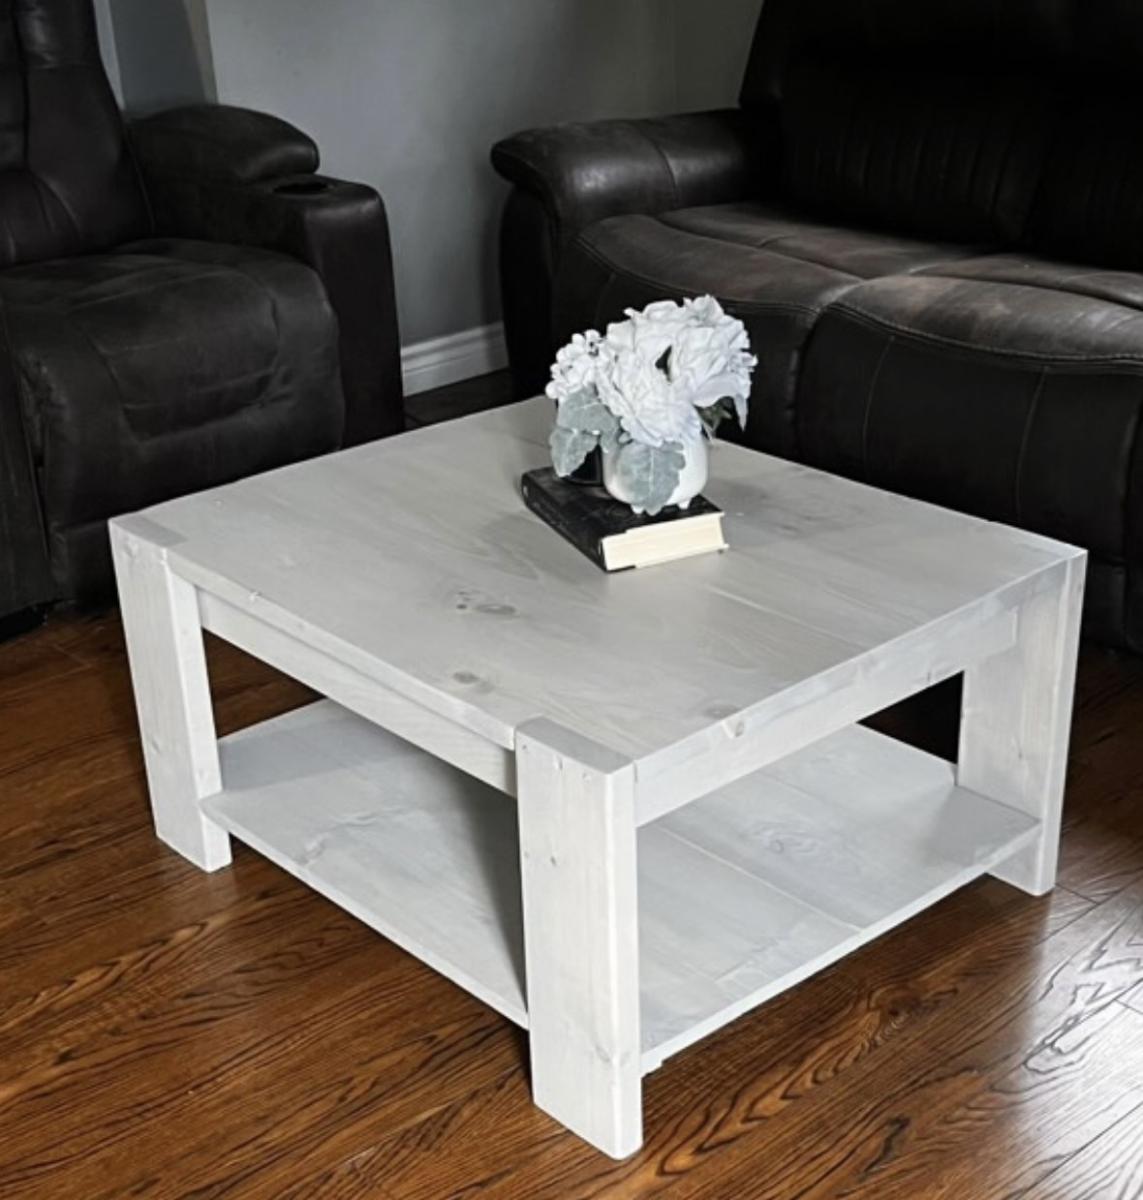
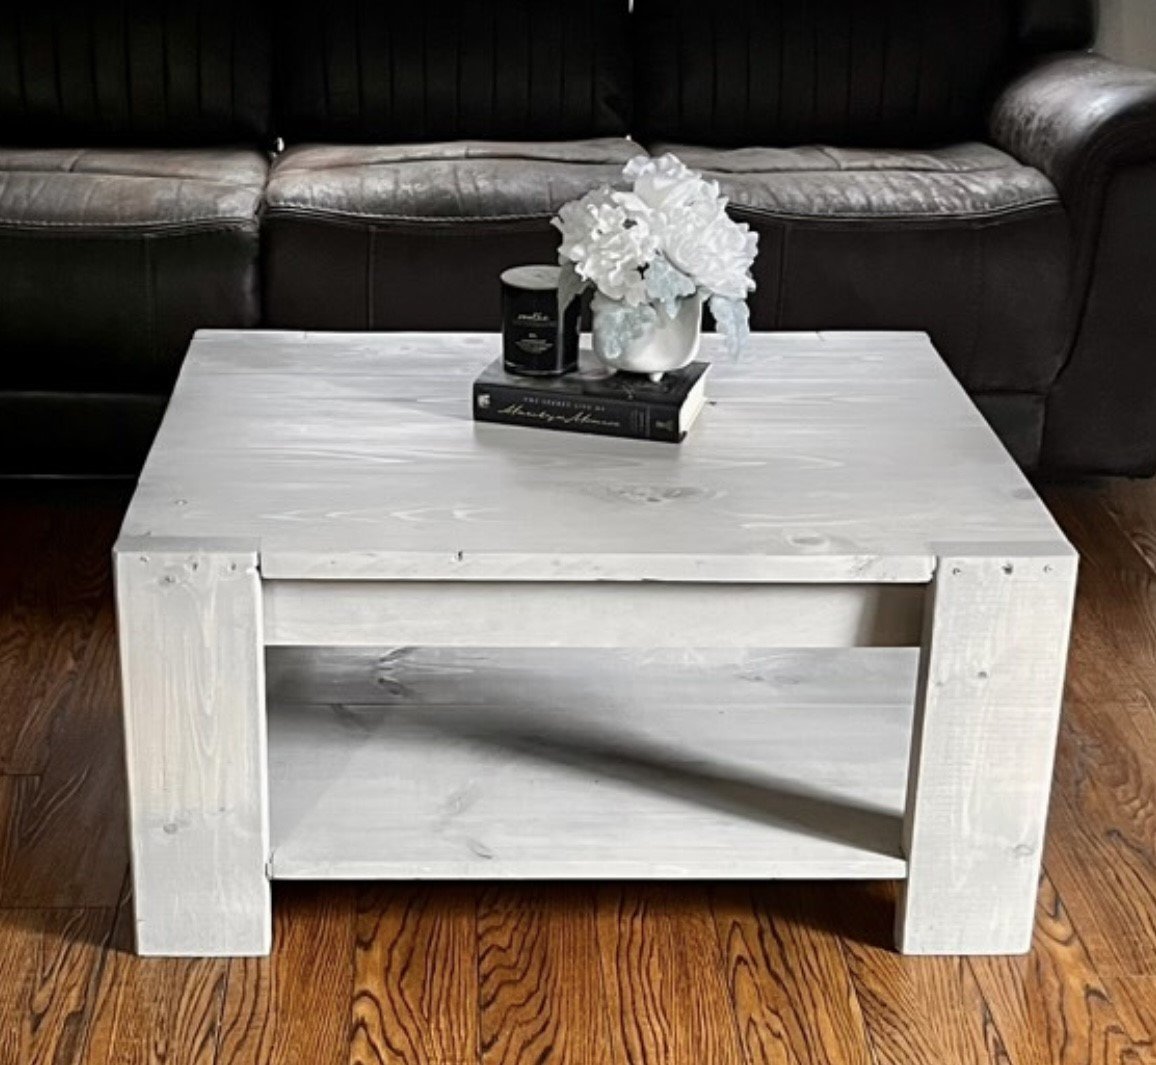
Built from Plan(s)
Happy Granddaughters

Made for granddaughter who loved the McKenna bed at American Girl. She loved the ability to customize because she has the Kanani doll. Will paint light blue (Kanani's favorite color) and have Hawaiian print bedding.
Estimated Time Investment
An Hour or Two (0-2 Hours)
Recommended Skill Level
Intermediate
Vanity stool Katarina
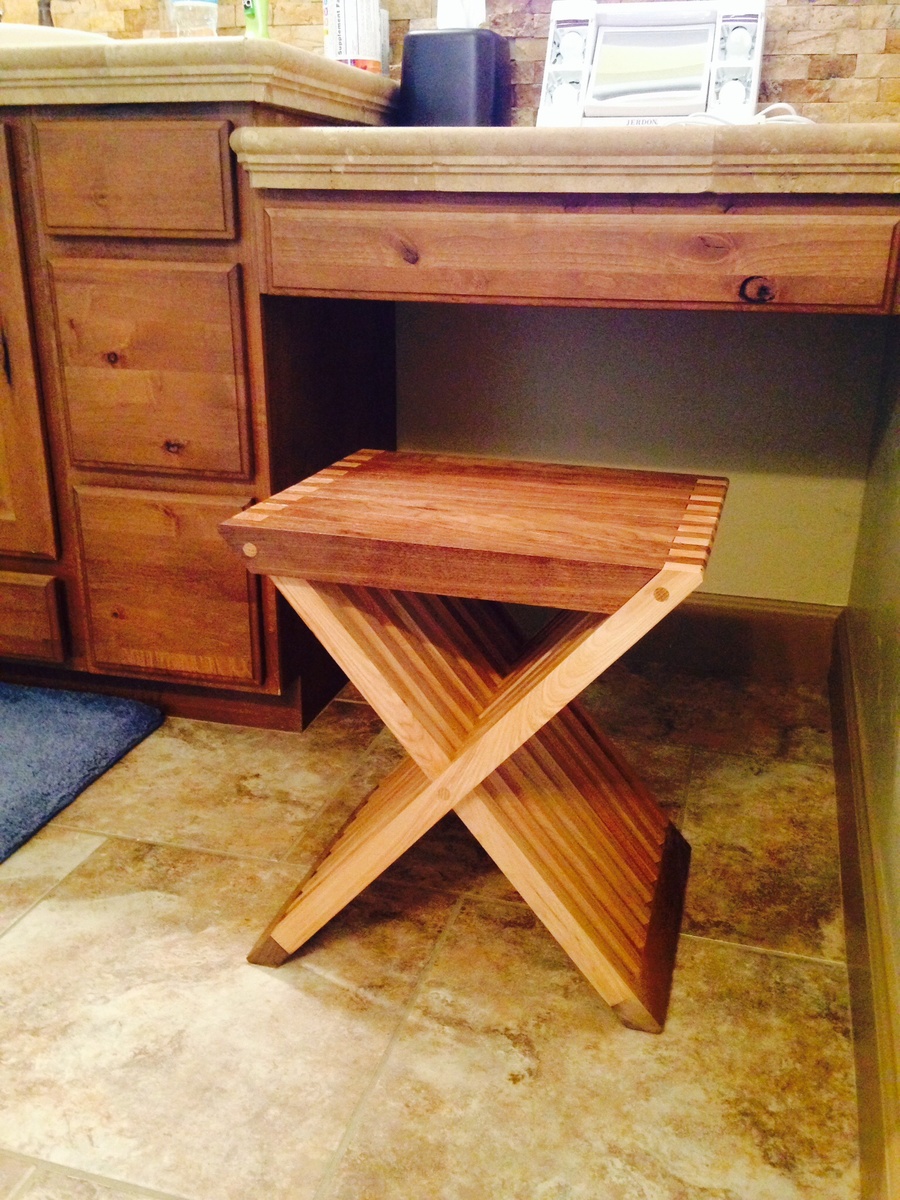
Had plans but no instructions, so involved learning my own techniques which was fun and it came together including size modification. Lots of cutting!!!
Estimated Cost
100 hardwood
Estimated Time Investment
Week Long Project (20 Hours or More)
Finish Used
Clear satin varathane, walnut and oak wood creates color
Recommended Skill Level
Intermediate
Comments

American Girl's Modern Sofa

I made this for an older girl (11) so decided to go for a trendy, modern design rather than a bright playful color. It was very quick, and I made it with scrap 3/4: plywood from another one of Ana's projects. I increased the width of the seat and back from 5 1/2" (a standard 1x6 width) to 6" for the back and 5 3/4" for the seat. This gave it a higher back and made the back side of the sofa completely flush (probably to account for using 3/4" plywood instead of a 1x6). I used Titebond glue, 1 1/4" brad nails, and clamps for assembly. I ironed veneer edging on all the raw plywood edges and sanded, then gave it a thick coat of paint. Instead of seat and back cushions, I included two square throw pillows lightly stuffed so they can be creased (as in the photo) like real throw pillows. Including sewing, the project took me an hour. PS: I photographed it next to an every-day object for rough size comparison. I had initially shown someone who thought I had made an actual couch. LOL, Maybe in my dreams!
Built from Plan(s)
Estimated Cost
$0-$10
Estimated Time Investment
An Hour or Two (0-2 Hours)
Finish Used
Acrylic paint, black.
Recommended Skill Level
Beginner