Community Brag Posts
Small Cedar Shed
I saw the plans for this and I had to have it. It was the first project that my husband and I completed together. I think we did a pretty good job. It just needs handles and it will be complete. If we can do this in the hot Texas heat then anyone can do it. I'm proud of us!
Estimated Cost
$300
Estimated Time Investment
Weekend Project (10-20 Hours)
Recommended Skill Level
Beginner
Comments
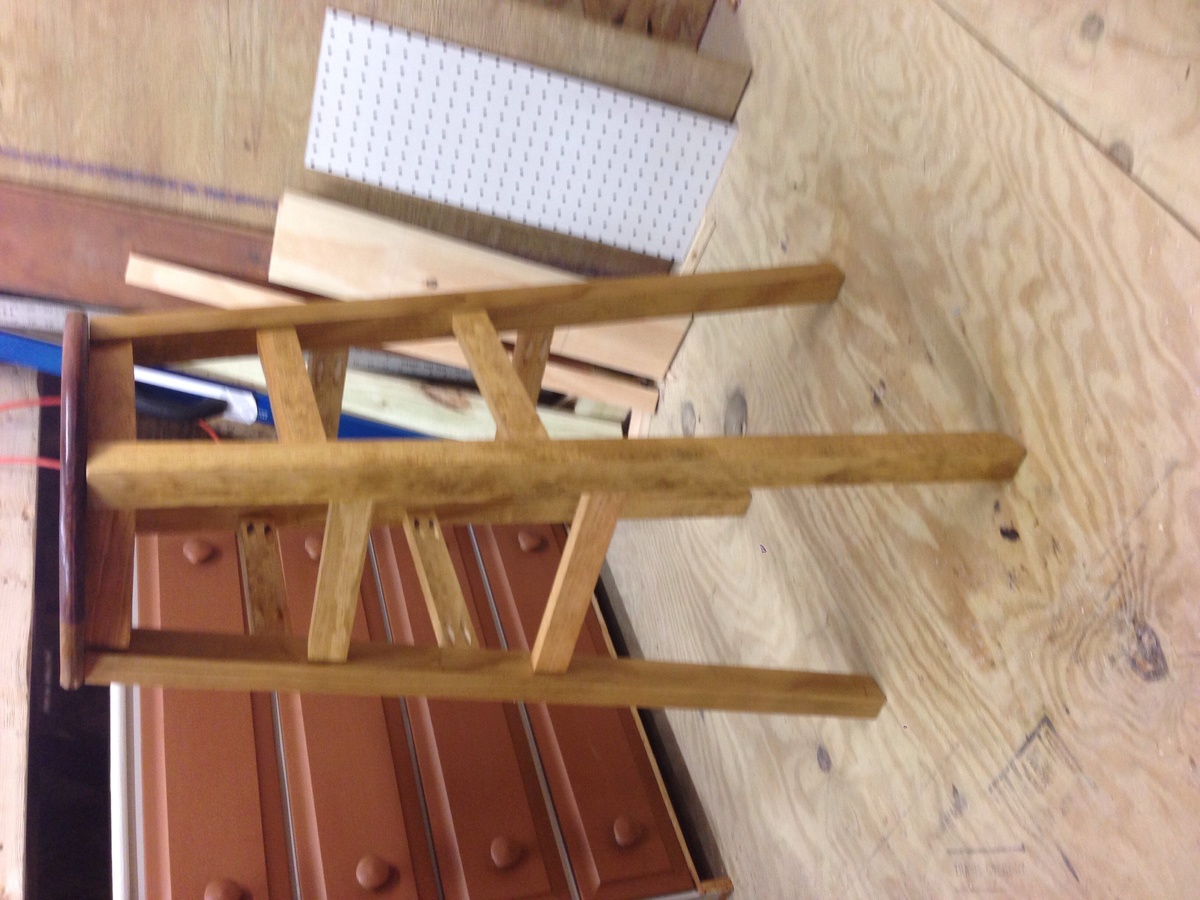
Simplest stool modified
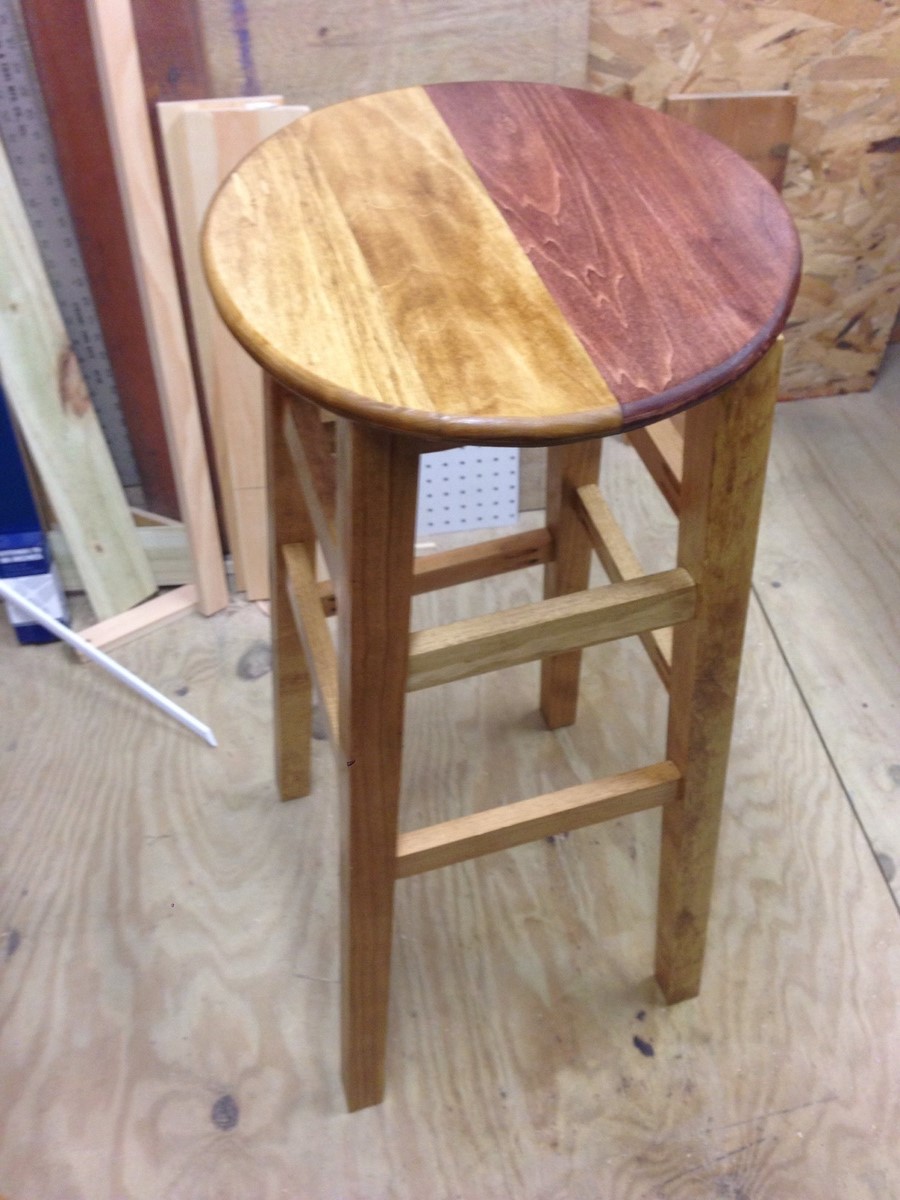
I modified the height to 36 to work with my workbench height. I also used 1x4 poplar in four pieces for the seat. I stained half golden oak and half cherry. I made the seat 14 inches around. I had trouble getting the pocket hole bit into the last leg of the stool once the full box shape was assembled. The top smallest pieces I had to tighten by hand. Also the seat even when larger than 12 inches shows some of the base 2by2. Otherwise it looks great. My height is what I needed and the stain and clear coat are perfect. I will be looking for more projects on this site.
Built from Plan(s)
Estimated Cost
$20
Estimated Time Investment
Afternoon Project (3-6 Hours)
Finish Used
Workbench height stool
Recommended Skill Level
Beginner
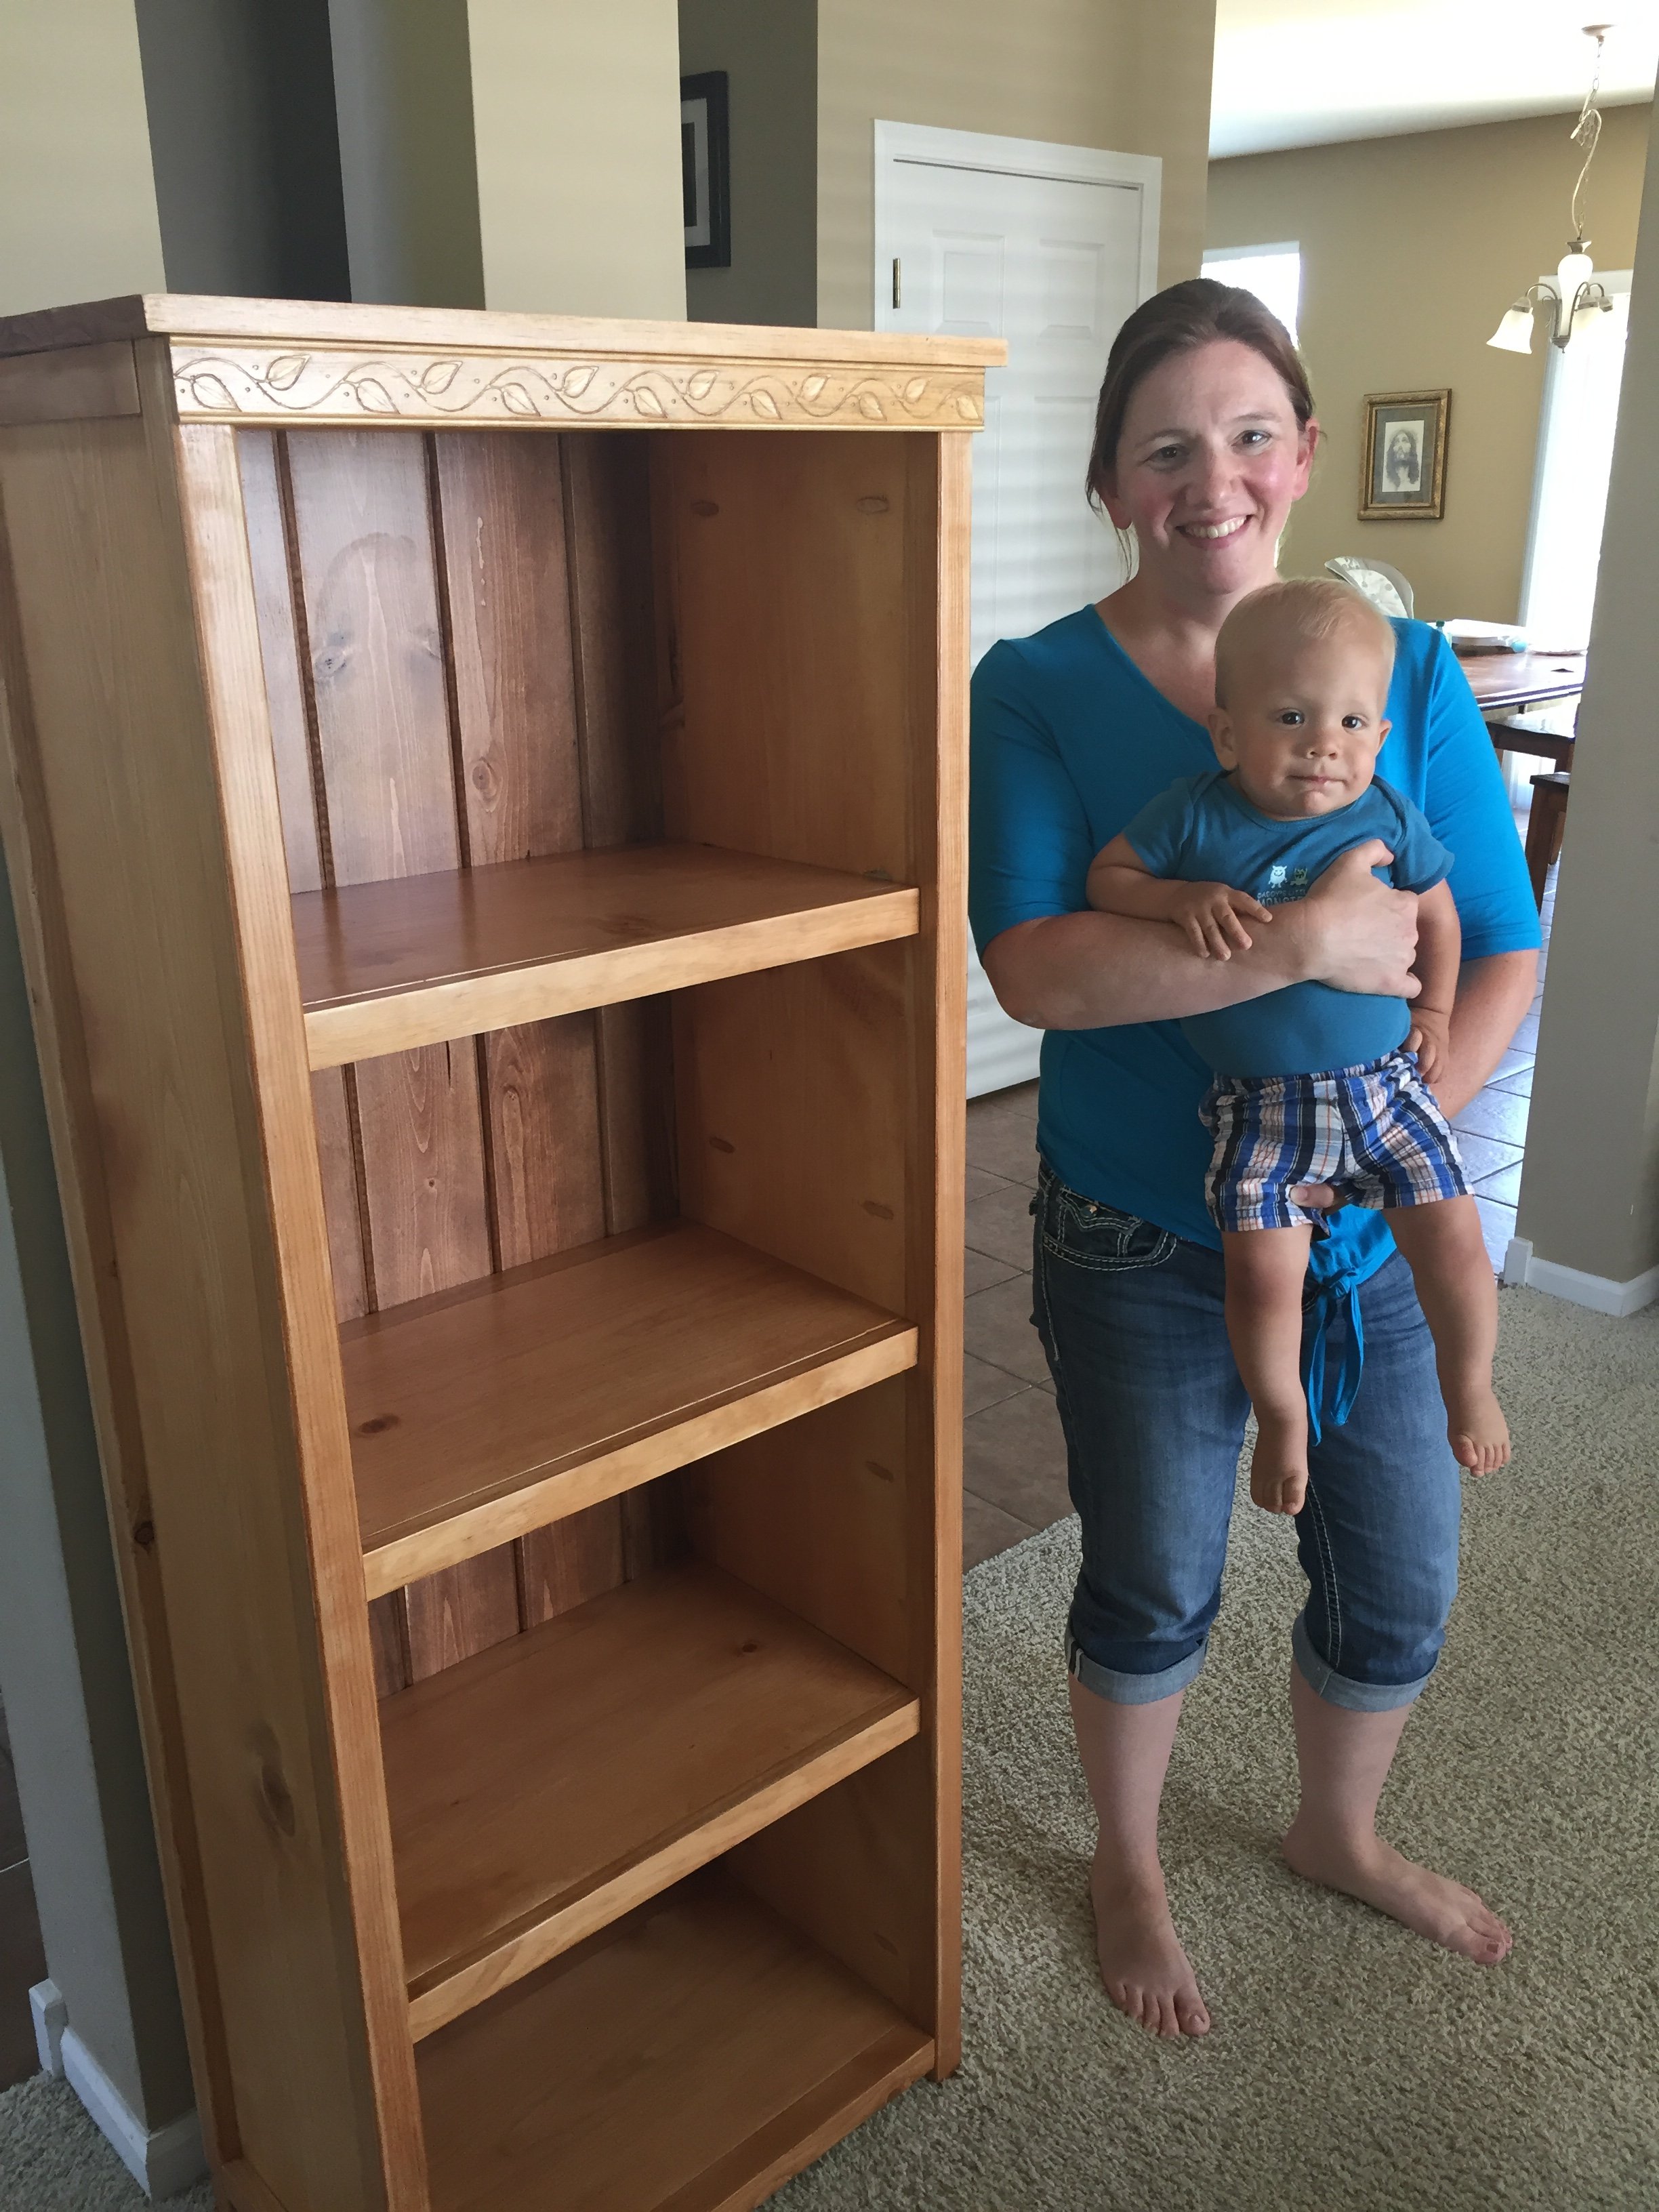
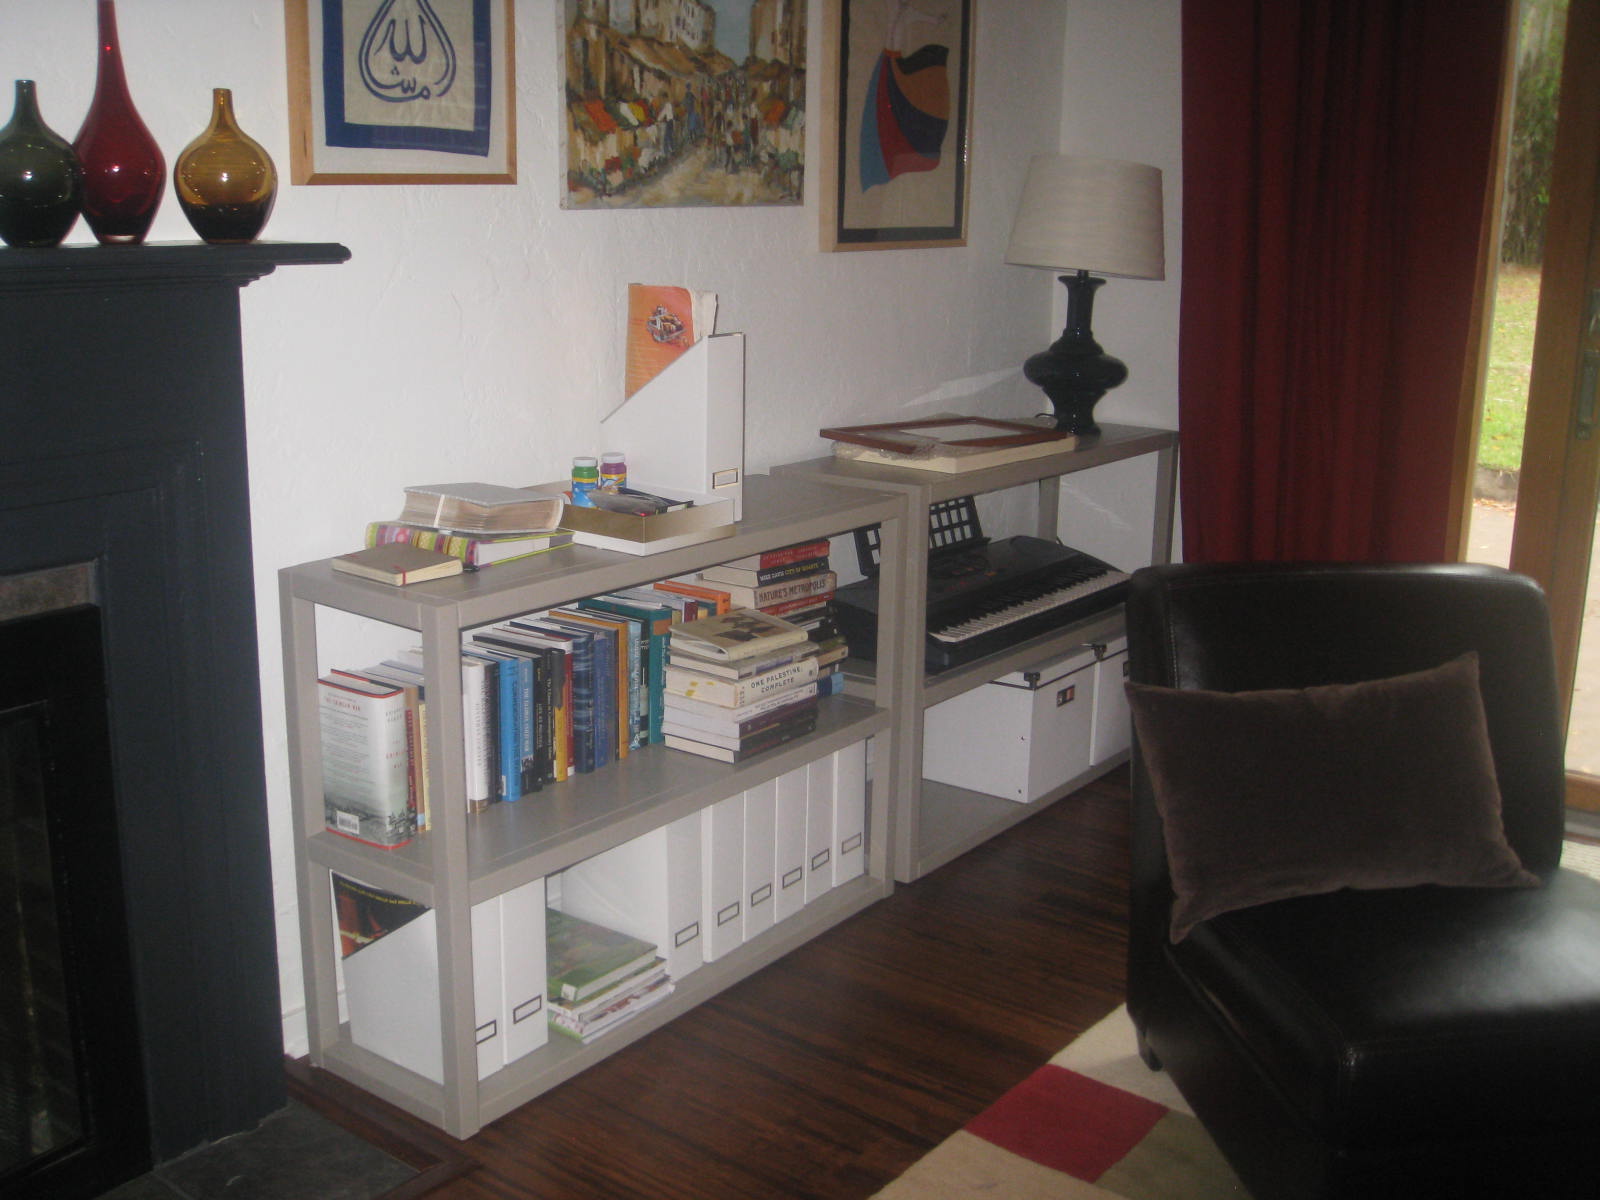
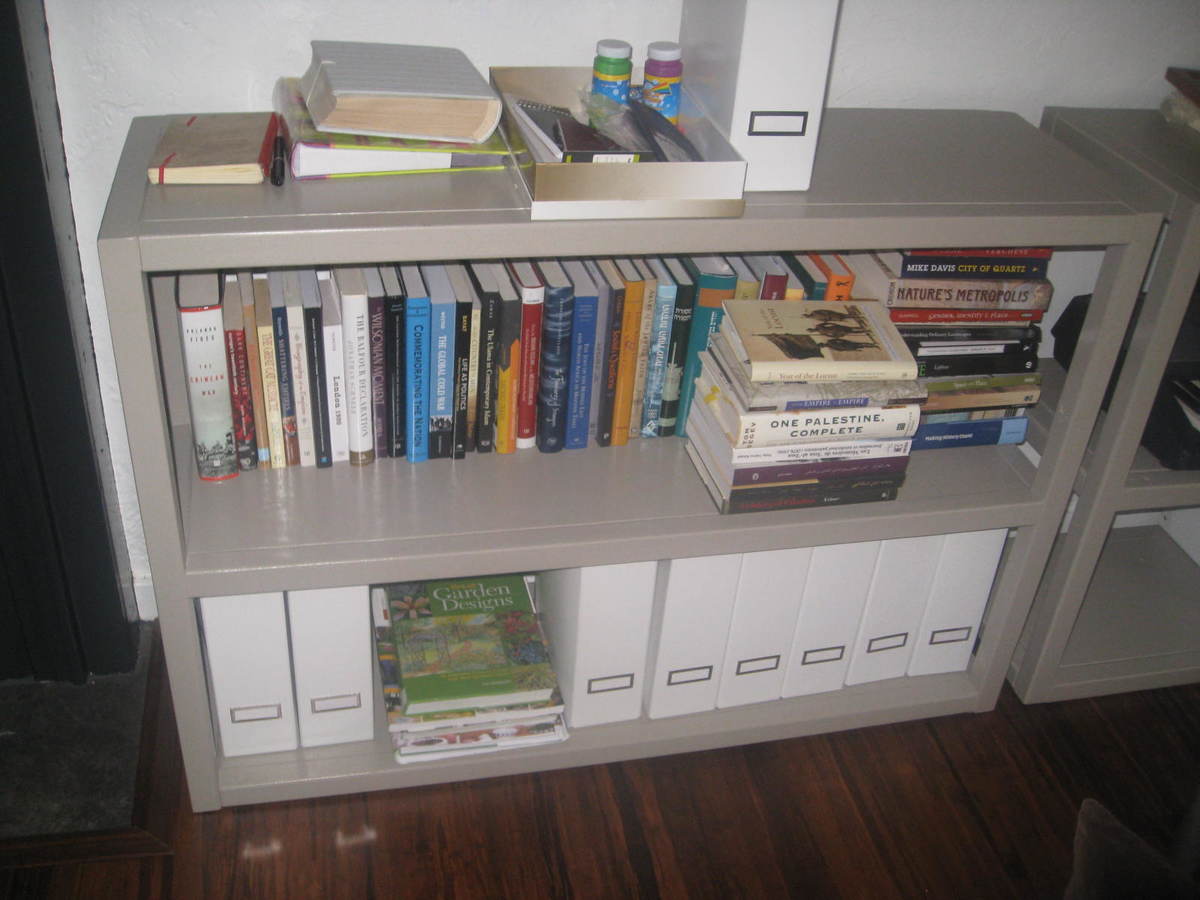
Kentwood bookshelf
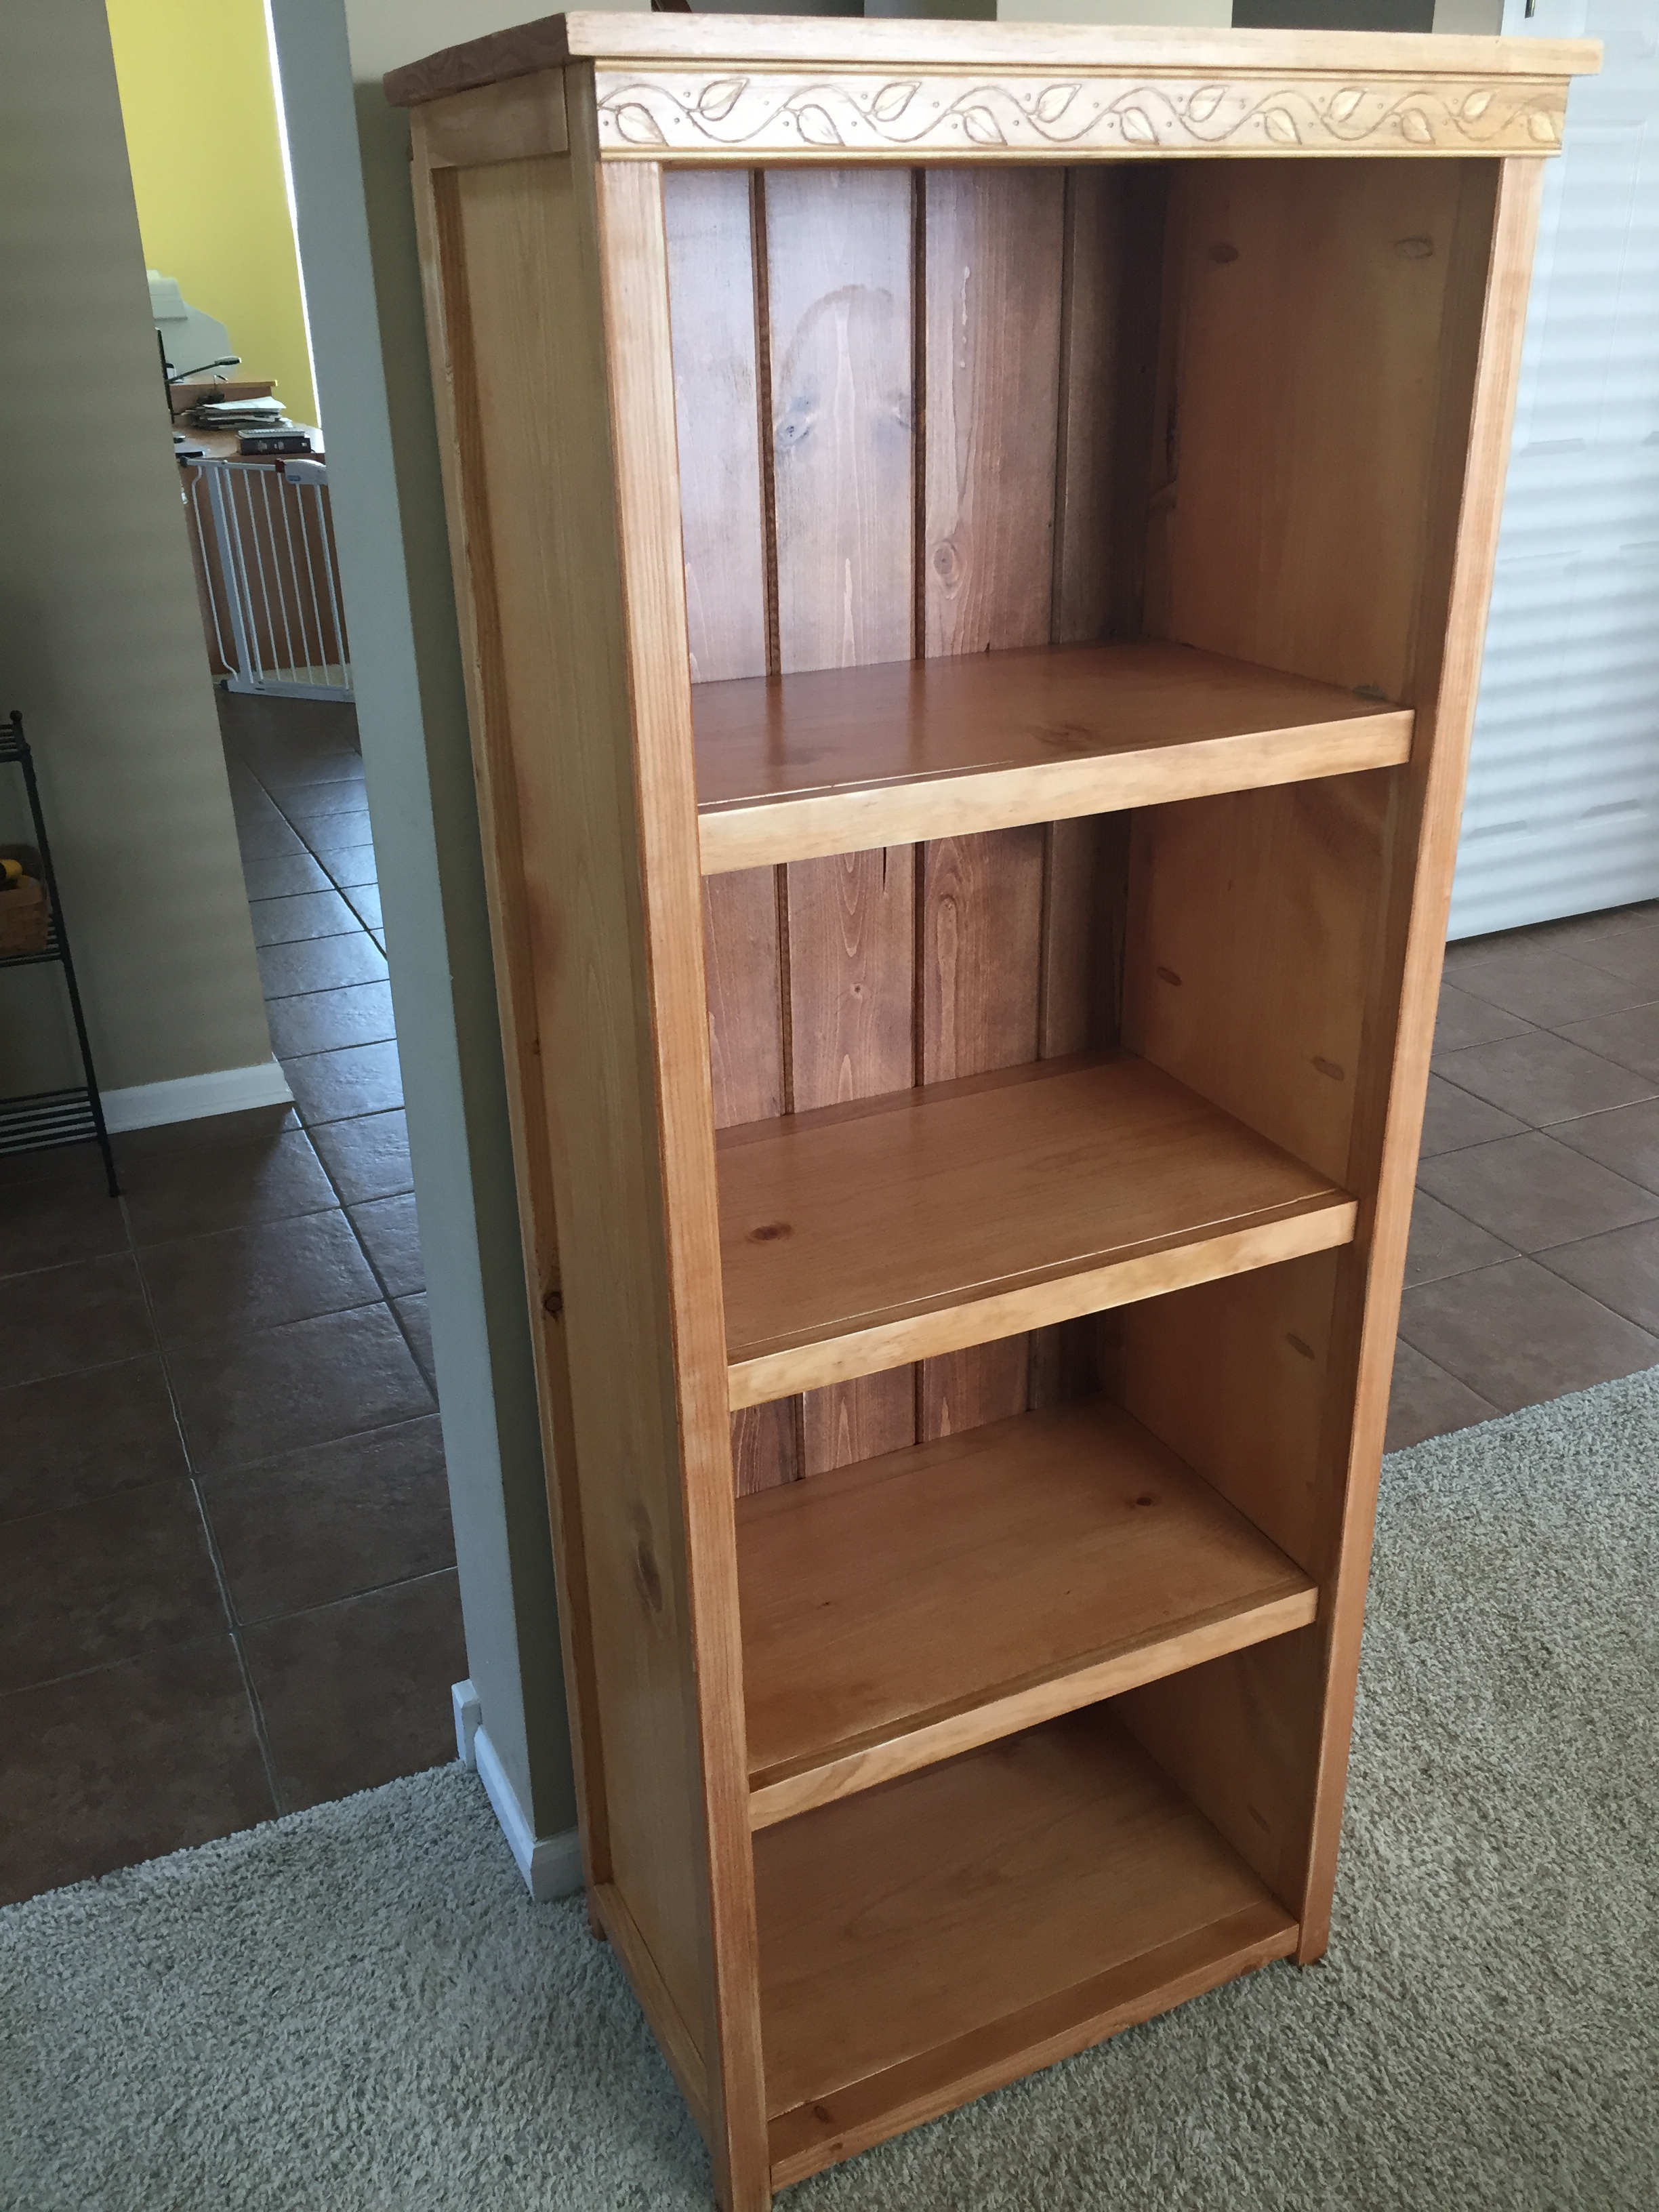
My gal loved the way this bookshelf turned out. It was my first time building it and if/when I'm commissioned to build another one, I'll likely use wainscotting for the back instead of knotty pine which is 3/4" thick. just made the back a little bulky for my taste. I also would've taken the time to put the pocket holes where the shelves were going to be so I didn't have the different tint of stain on the plugs. Would've been an easy thing to do, but I wasn't thinking ahead at that moment, I guess.
Great plan, Ana. Thanks for the resource!
Built from Plan(s)
Estimated Cost
$70
Estimated Time Investment
Weekend Project (10-20 Hours)
Finish Used
Minwax Golden Pecan (3 coats) for sides and shelves, Minwax English Chestnut (1 coat) for back. Five coats of polyurethane.
Recommended Skill Level
Beginner
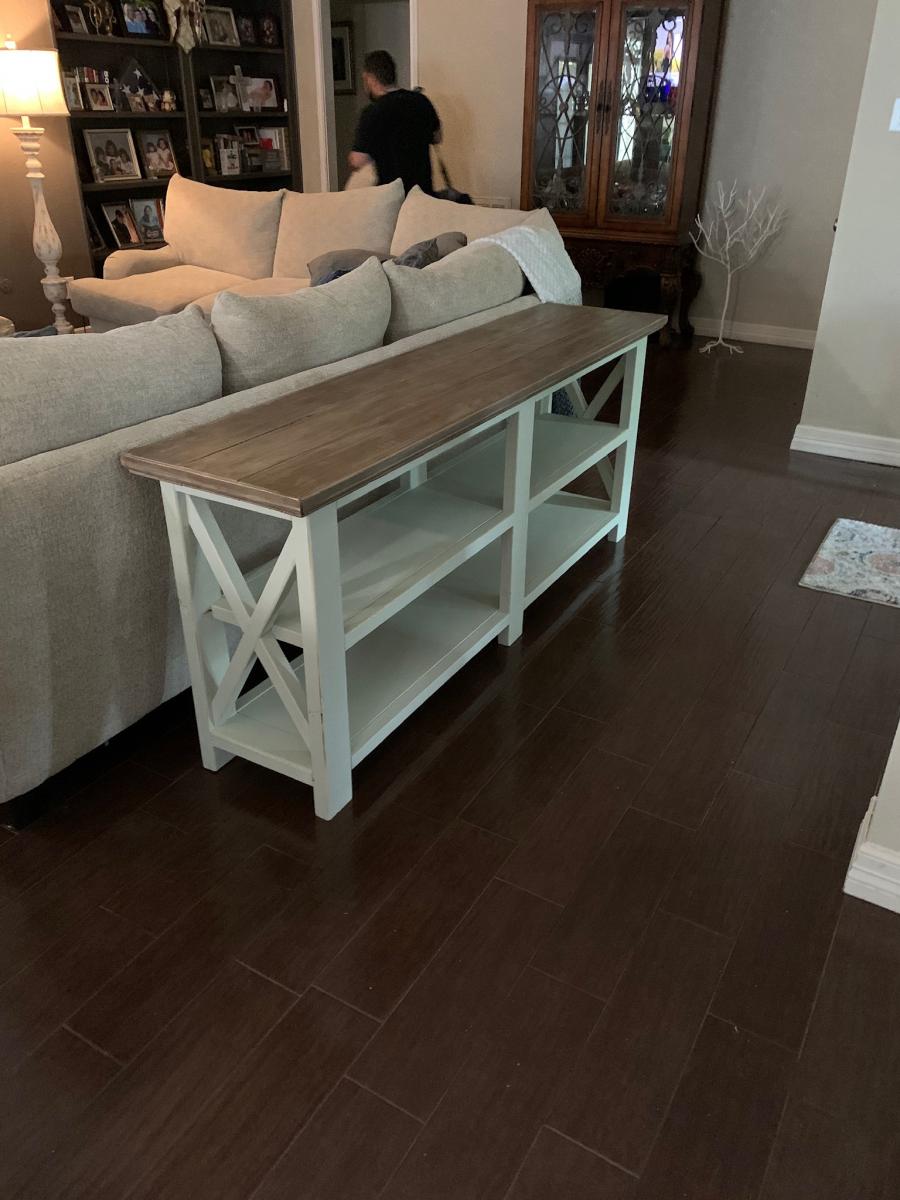
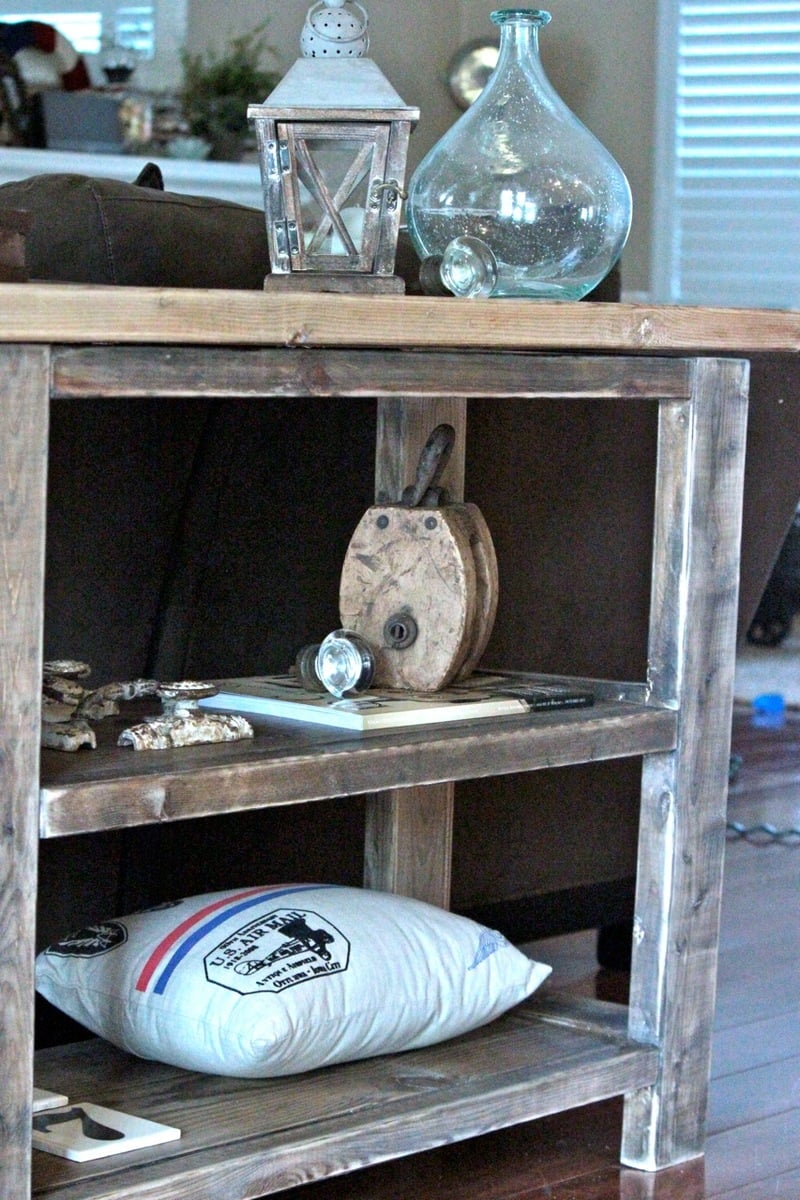
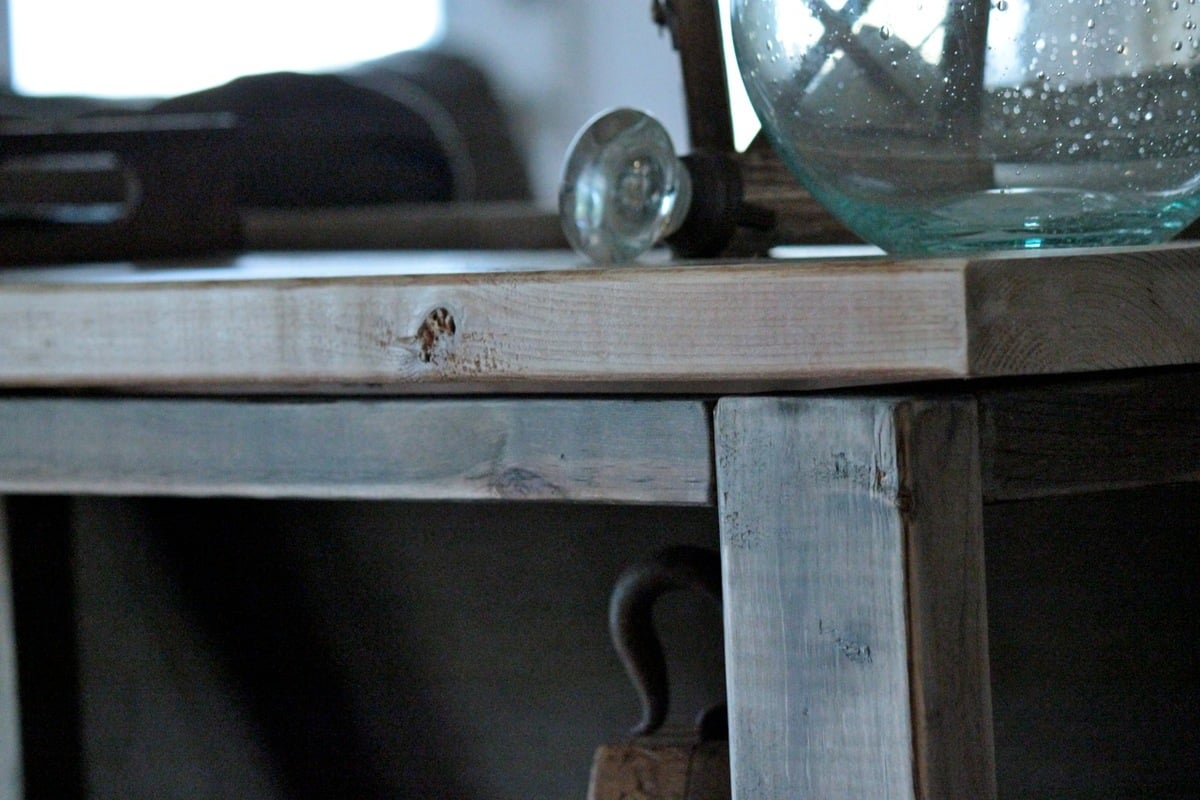
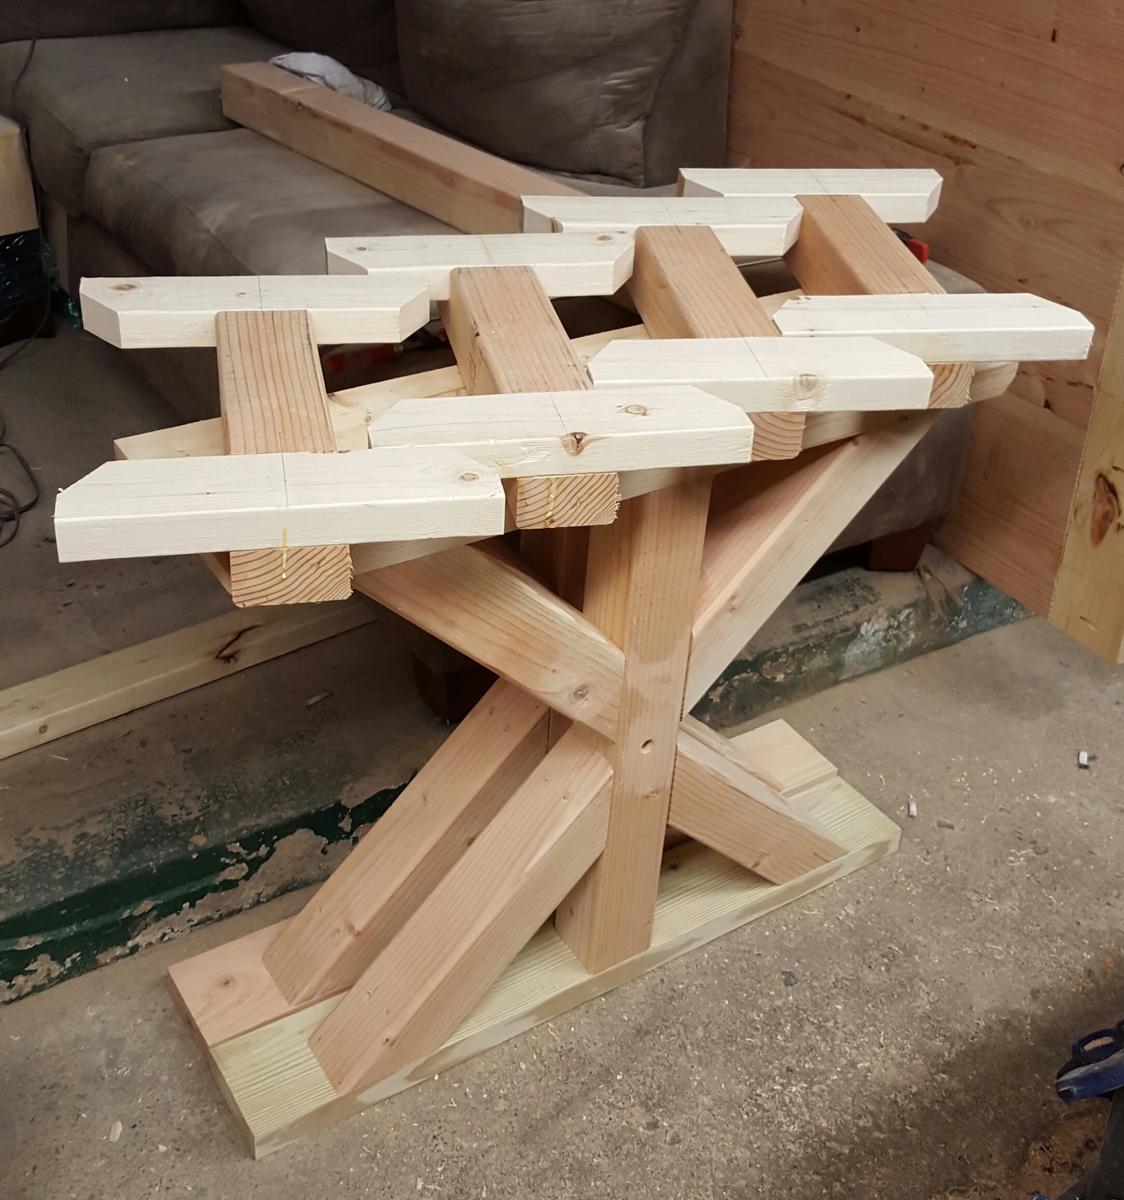
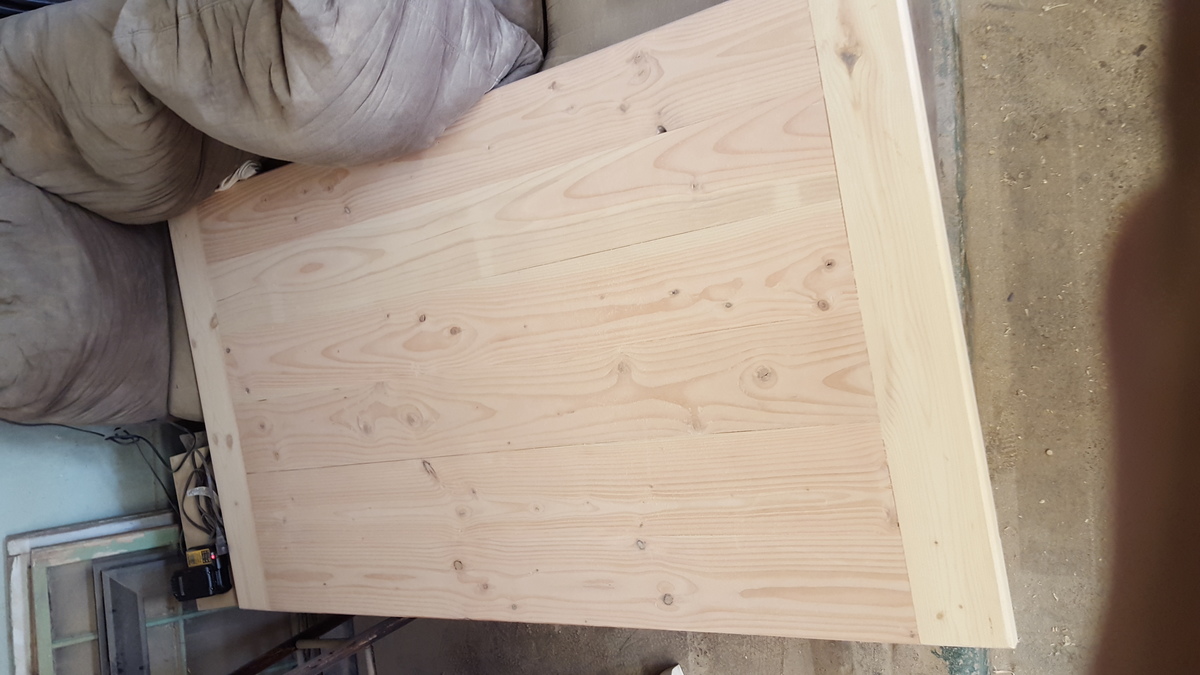
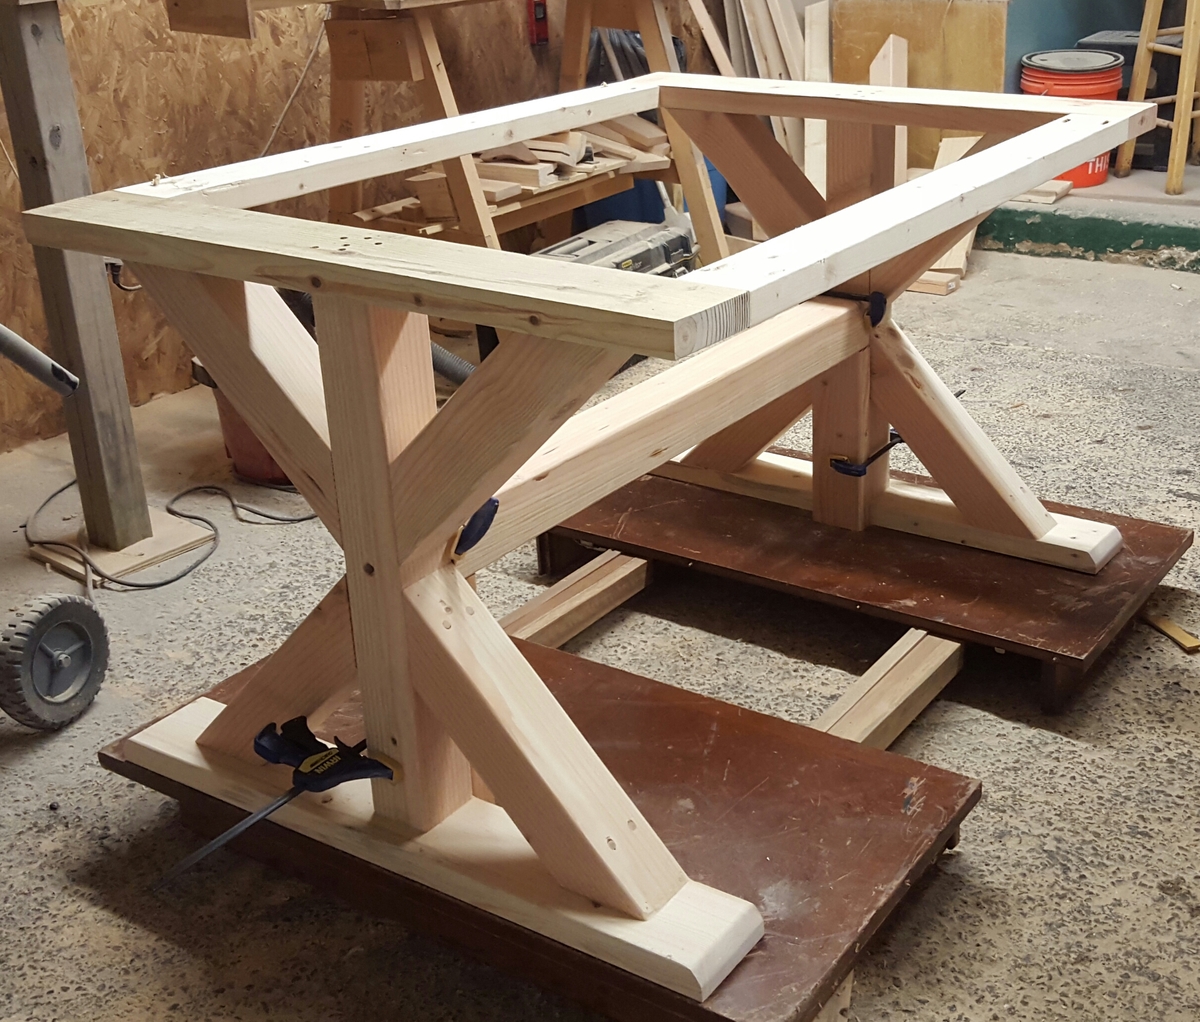
Console Sofa Table
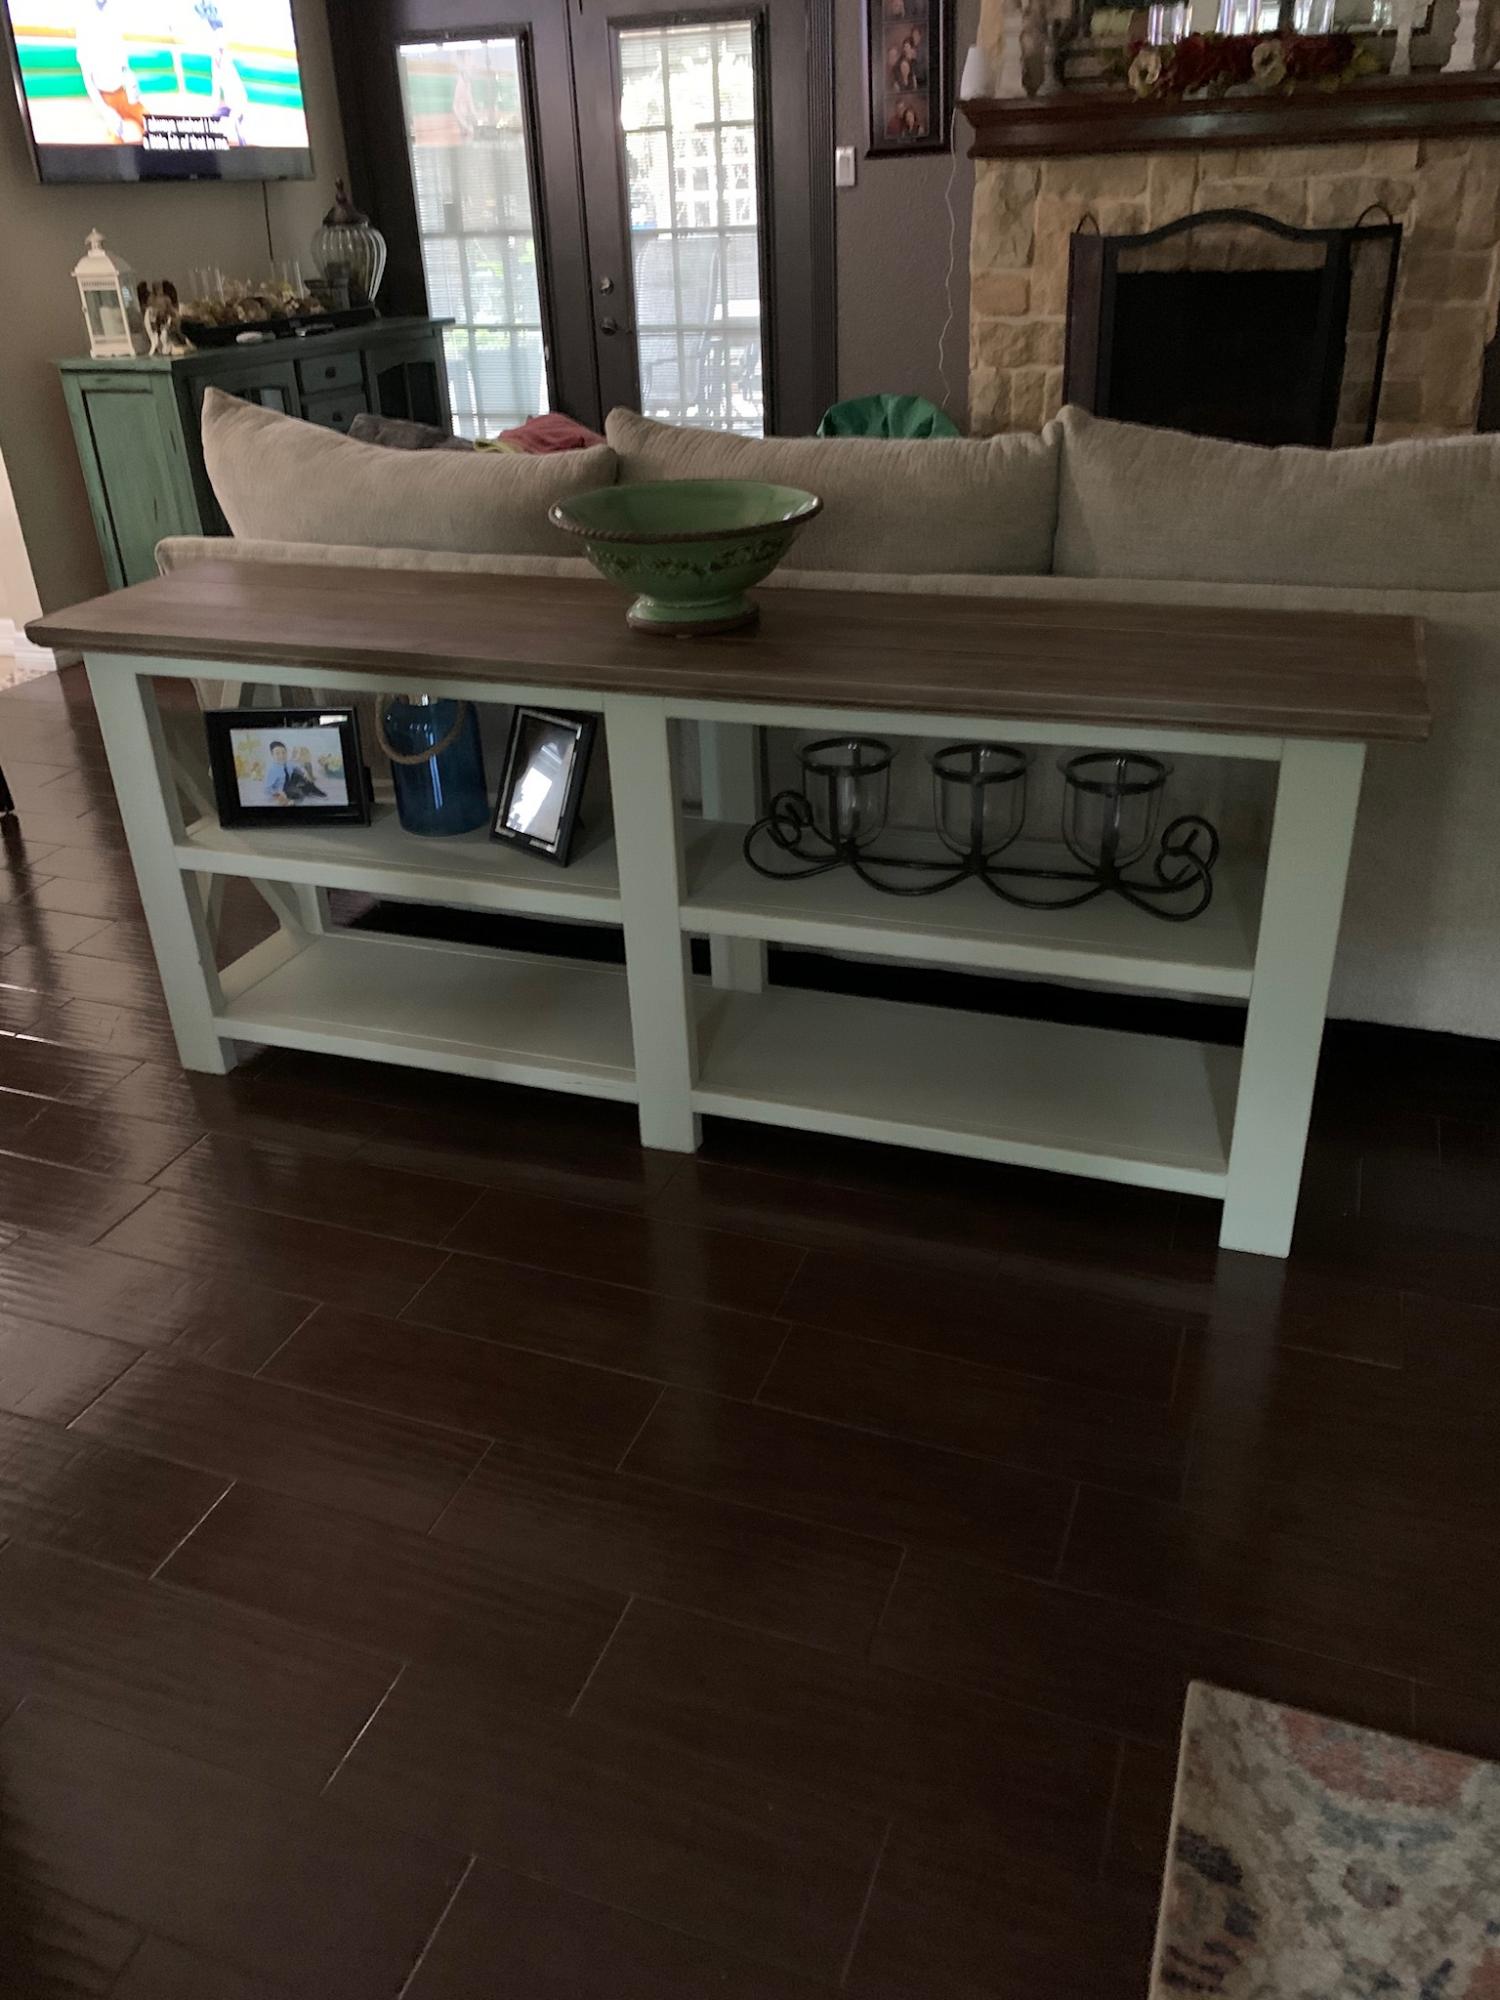
I built this from the Ana White Console X Table plans and specs. I originally had planned on a rustic style like on your blog, but once my wife saw it she liked it and decided she had the right spot for it providing I painted it.

Built from Plan(s)
Estimated Cost
$150 with my veteran 10% discount from the local box stores.
Estimated Time Investment
Weekend Project (10-20 Hours)
Finish Used
Base : Valspar Chalky - Moonstone Ring and clear seal wax.
Top: Chalky Bonnet Ribbon and dark satin wax
Top: Chalky Bonnet Ribbon and dark satin wax
Recommended Skill Level
Intermediate
Comments

DIY Fireplace Wall
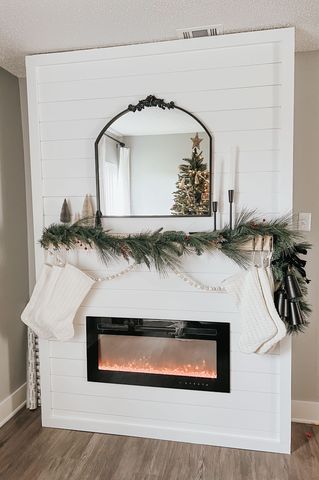
"I still can’t believe my mom and I built this beautiful fireplace.” - Megan Shaffer on Instagram
Built from Plan(s)
Seasonal And Holiday
Microwave/Coffee Cupbaord

This one I can’t take complete credit for, the base shelving unit was left behind in our basement & was just beyond belief disgusting. I cleaned it up stripped it apart, stained it & put new hardware on it. The house is older & whoever “modernized” just didn’t do a spectacular job & place the cupboards in an odd way instead of utilizing the space properly. Anyway as I’ve mentioned in other projects, this is another odd corner, actually it’s not so odd because it’s supposed to be where the the fridge goes according to our landlord but it’s sized for a really small fridge & our big monster double door twice the size of this cubby, it is now in the mudroom which isn’t too inconvenient because it’s right off the kitchen & because we shut the vents in there to keep the heating cost lower in the winter the fridge doesn’t have to work too hard to keep cold. Anyway I wanted to utilize this space & found that the shelf fit perfect next to the garbage can that was there so I just made a top to fit the space & then we now have a microwave stand/coffee prep area.
Estimated Time Investment
Afternoon Project (3-6 Hours)
Recommended Skill Level
Beginner
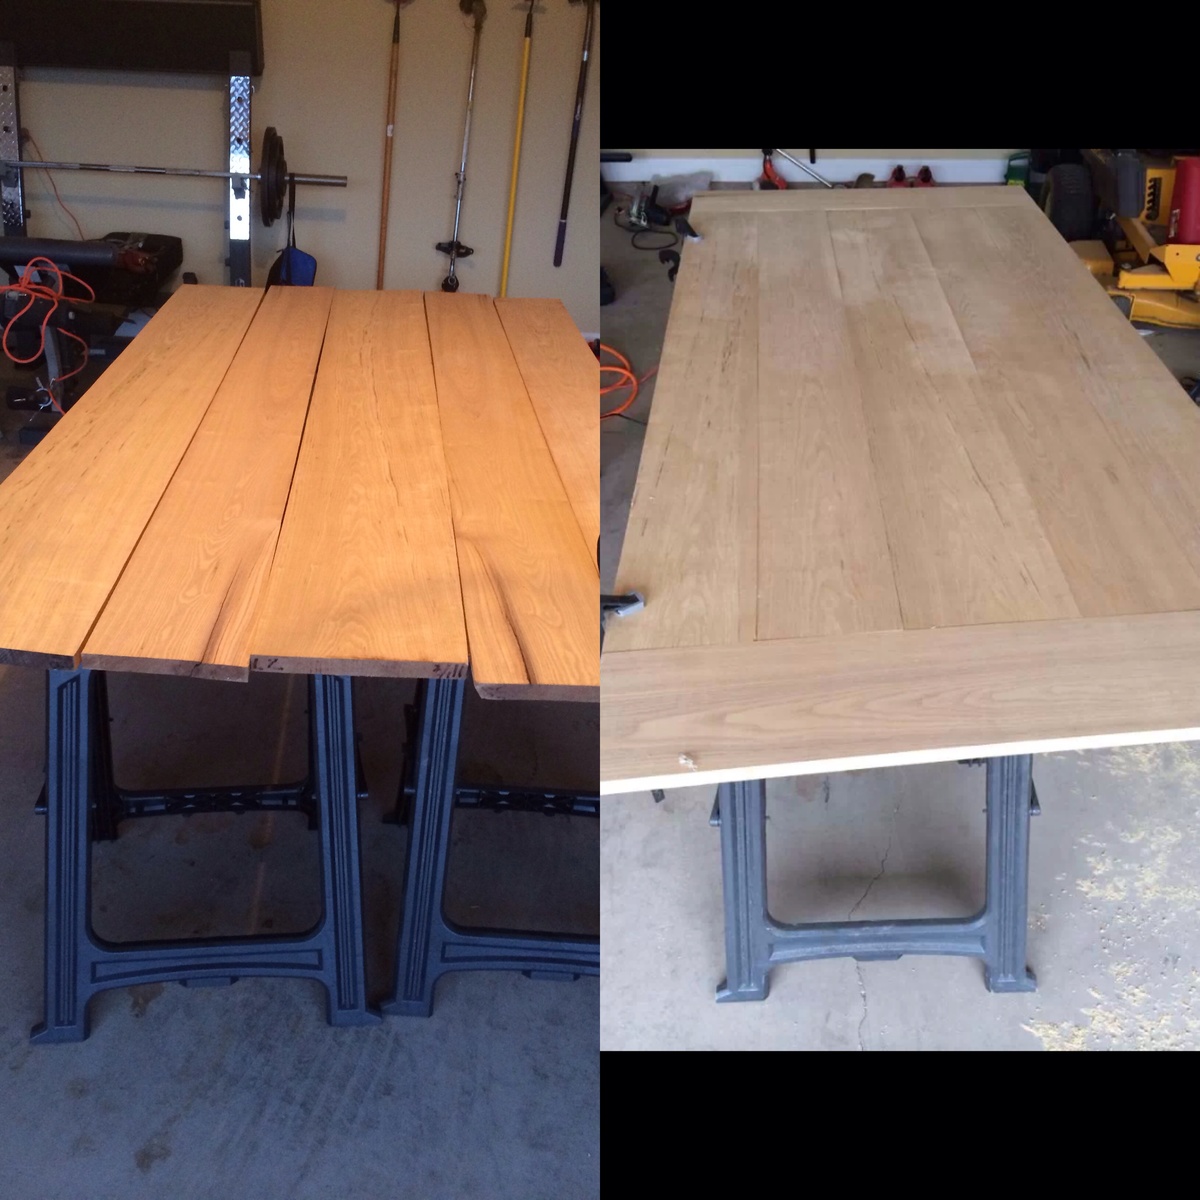
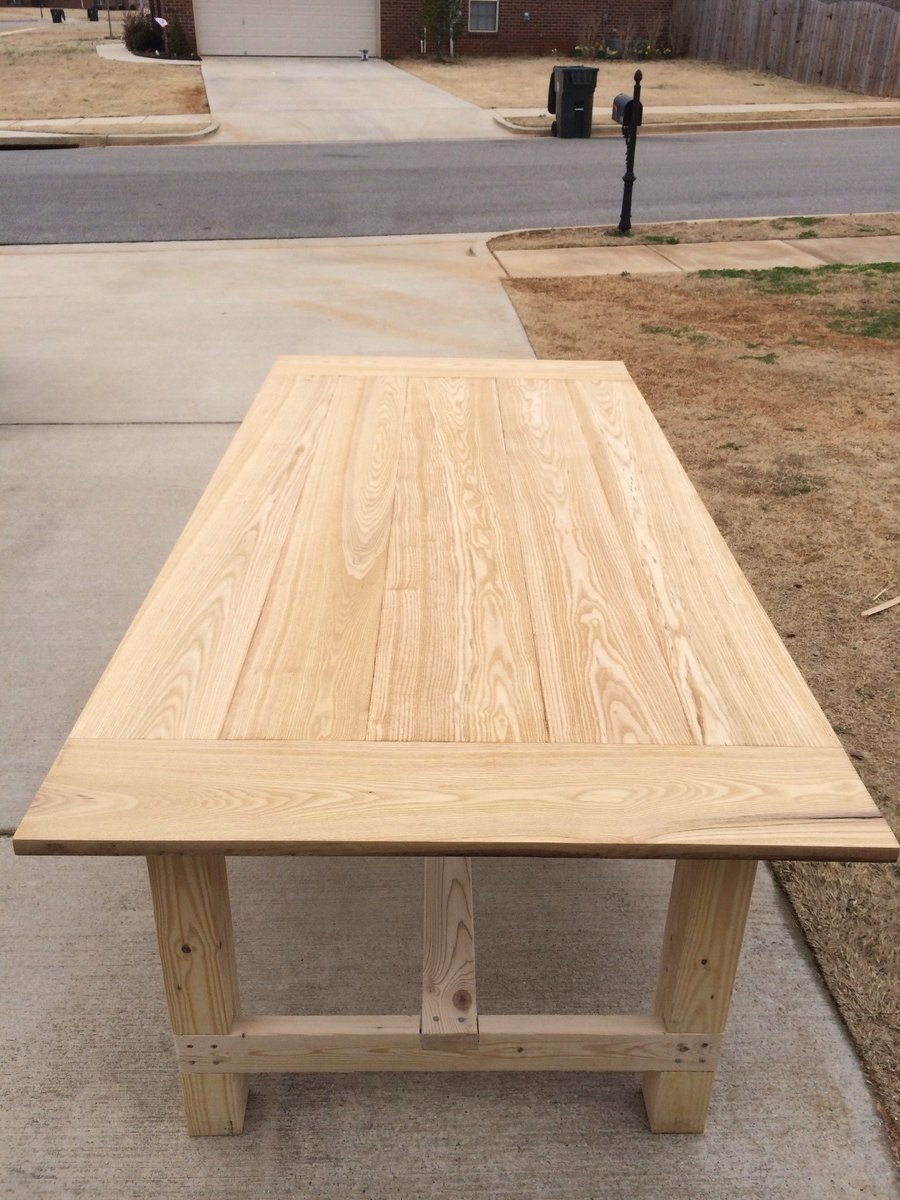
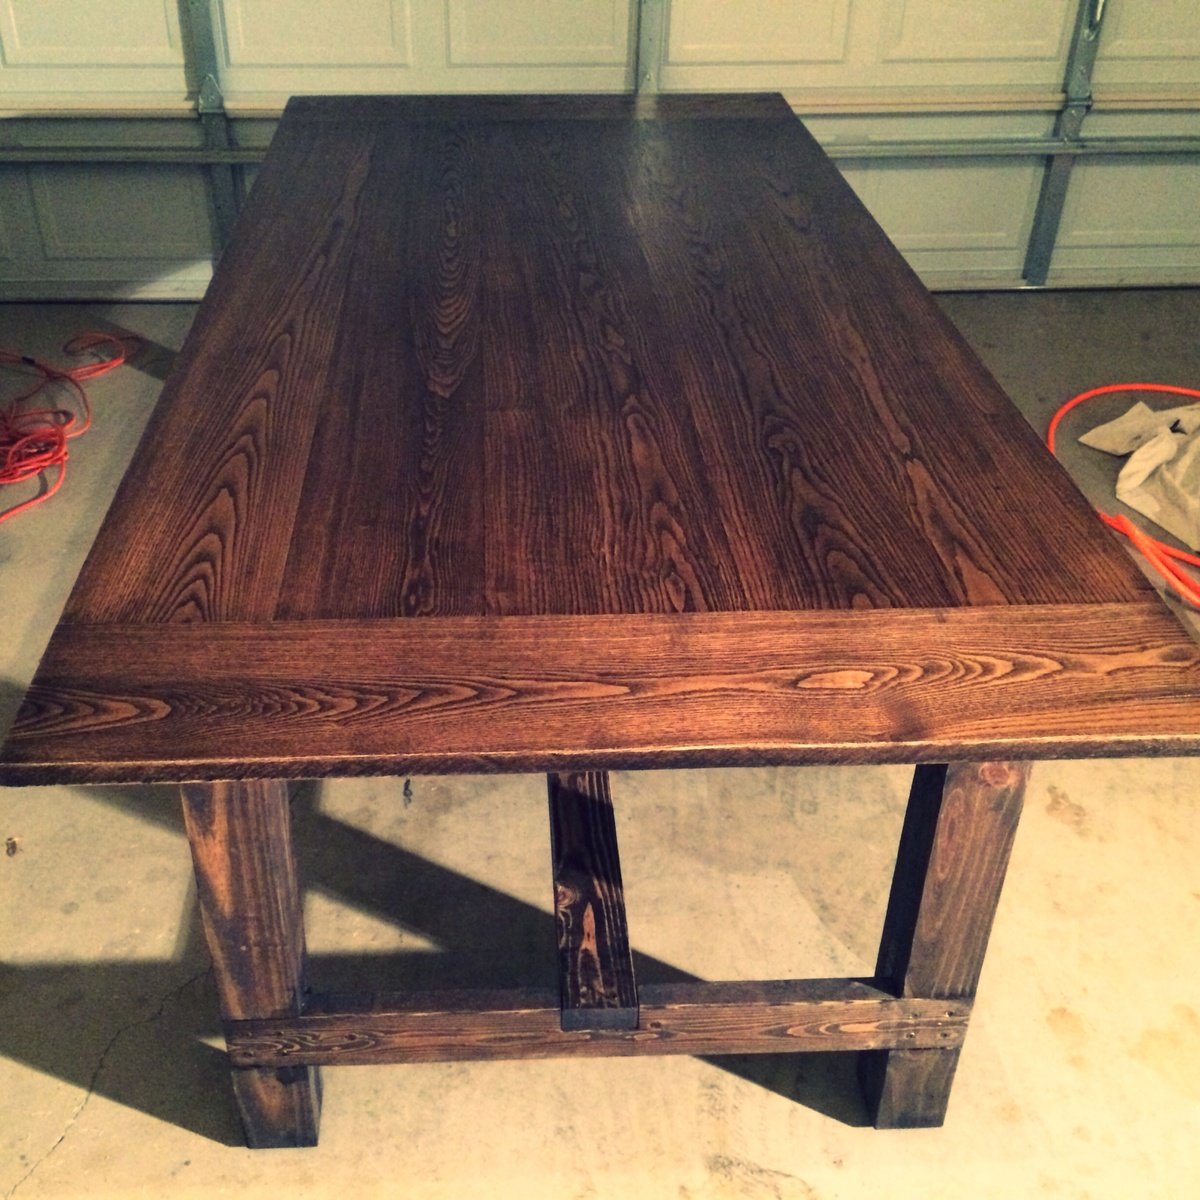
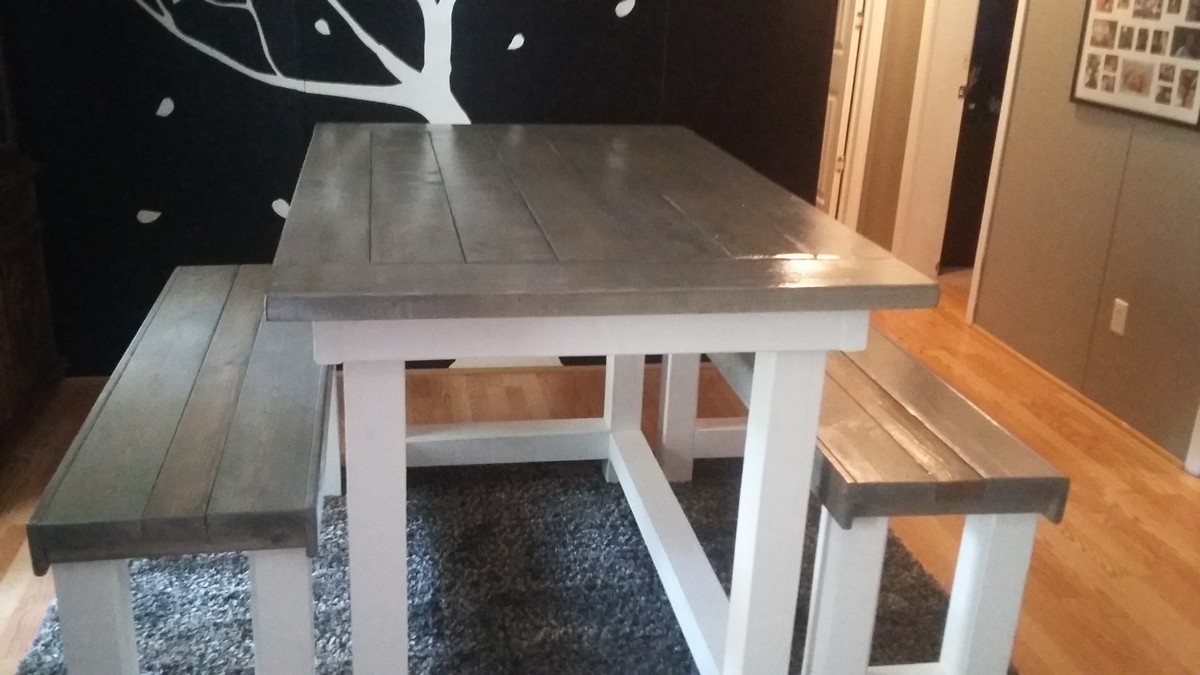
Farmhouse Table

My first DIY project. I went a little different and built the table top out of sassafras lumber that I bought from a local sawyer. The plans were foolproof. The only tricky part about this project is the finish. I stained the table with Minwax Dark walnut and 4 coats of polyurethane (2 parts poly to 1 part mineral spirits) to get the finish I wanted. Of course I spent the most time sanding this table. It turned out wonderfully and my wife is one happy camper!


Built from Plan(s)
Estimated Cost
200
Estimated Time Investment
Week Long Project (20 Hours or More)
Finish Used
1 coat of Minwax dark walnut and 4 coats of polyurethane (2 parts poly to 1 part mineral spirits). Poly applied with microfiber cloth. I used a minwax clear satin poly
Recommended Skill Level
Beginner
Comments
Fri, 04/04/2014 - 10:14
Your tabletop is impressive
Your tabletop is impressive ... i like how you show a before and after, that shows how much work it takes to get that thing flat and seamless.
In reply to Your tabletop is impressive by bclute
Sat, 04/05/2014 - 21:13
Haha you hit the nail on the
Haha you hit the nail on the head! It was a TON of work getting the boards squared! I bought the sassafras boards and none of the sides were square so I ended up having to take a true and straight edge of a piece of plywood and tack it to the underside of the sassafras boards (overlapping about an inch) and run the plywood down the fence of a table saw thus giving me a straight edge to work with on the sassafras! I also spent hours (literally) researching and youtubing different techniques on finishing. I'll have to say that the woodworking bug has bit me and I will be starting a coffee table project before too long! Thank you for your compliments!
American Flag Rustic X Coffee Table

Loved the design of the coffee table and needed something in my living room to make it feel a little less empty. As I was building the table I realized that the bottom shelf was roughly the size of a flag that I've built in the past and decided to add one to it to bring a little patriotism to my living room. I used a torch to burn the flag onto the wood. Love the way it turned out!
Built from Plan(s)
Estimated Cost
$65
Estimated Time Investment
Day Project (6-9 Hours)
Finish Used
Varathane Kona
Recommended Skill Level
Intermediate
Comments
Project Table

I actually built this back in 2015 and just never got around to posting about it. I guess I was just so excited to get it done and set up for my wife I forgot. Anyhow, I did it all with a worm drive saw and a piece of plywood set on saw horses...would’ve have been so much fun aside with a table saw (still haven’t convinced the vamps that I need one of those 😏)
Built from Plan(s)
Estimated Time Investment
Week Long Project (20 Hours or More)
Recommended Skill Level
Intermediate
Farmhouse Side Table

Farmhouse side table by Home with Jules

Built from Plan(s)
console table

This was my first time building something big :) and im sooo happy with the results. Had been looking for a sofa table/console for so long but couldn't decide on what I wanted , when I saw this on the first page I fell in love. It was fairly easy to build. Took me 2 days, one day sanding, cutting, staining it and the next putting it together. I love how it turned out.
I didnt make the side 'X' bc I want to do something different than the original plan, just trying to figure it out what exactly.
Oh! And I still need to add the decorative hardware, I have it, just need to remember to do it.
Thank you so much for the plans.
Built from Plan(s)
Estimated Cost
75
Estimated Time Investment
Weekend Project (10-20 Hours)
Finish Used
tea, steel wool and vinegar, white wash, and wax
Recommended Skill Level
Beginner
Comments
Sun, 06/10/2012 - 22:06
Beautiful and unique!
One of my favorite things about building is being able to build it however you want. Xs or no Xs -- it is gorgeous. Great work! And it you staged and photographed perfectly. Really, really beautiful.
Mon, 06/18/2012 - 14:44
What kind of tea did you use
What kind of tea did you use ? And what do you mean by white wash ?
Fri, 06/22/2012 - 10:07
Re: Tea
I used regular walmart brand black tea, let it dry and then applied the vinegar/steel wool solution after that i sanded a bit and diluted white paint in water and applied it all over with a lint free rag, you need to work on small areas and follow it up with a slightly damp cloth. hope that helps :)
Sat, 08/18/2012 - 23:06
Beautiful job!! Looks like a
Beautiful job!! Looks like a picture out of a pottery barn catalogue! BE PROUD!
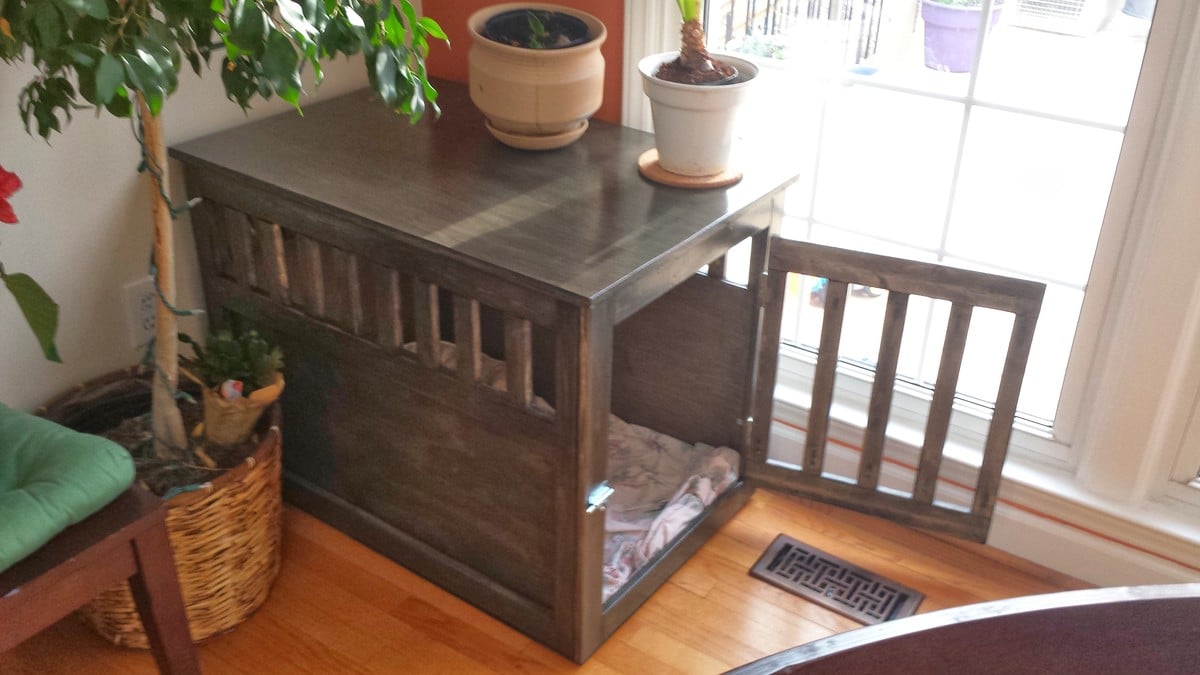
My first brag!

That was fun. Got a new dog, built her this for double duty. A crate and a table. The finishing was the lengthy part, by a LONG shot. Can't wait to start a new plan.
Built from Plan(s)
Estimated Cost
$75
Estimated Time Investment
Weekend Project (10-20 Hours)
Finish Used
BEHR® Semi-Transparent Waterproofing Wood Stain
Minwax® Clear Brushing Lacquer
Minwax® Clear Brushing Lacquer
Recommended Skill Level
Intermediate
Comments

Fri, 04/04/2014 - 14:04
Way to go!
Good looking work! And yes, ugh, I hate the finishing part. I'm building a couple of pieces for my sister-in-law on the condition that SHE gets to finish them ;)

Fri, 04/04/2014 - 16:19
Congrats on your first project!
Beautifully done, and I love the finish. You did a great job!
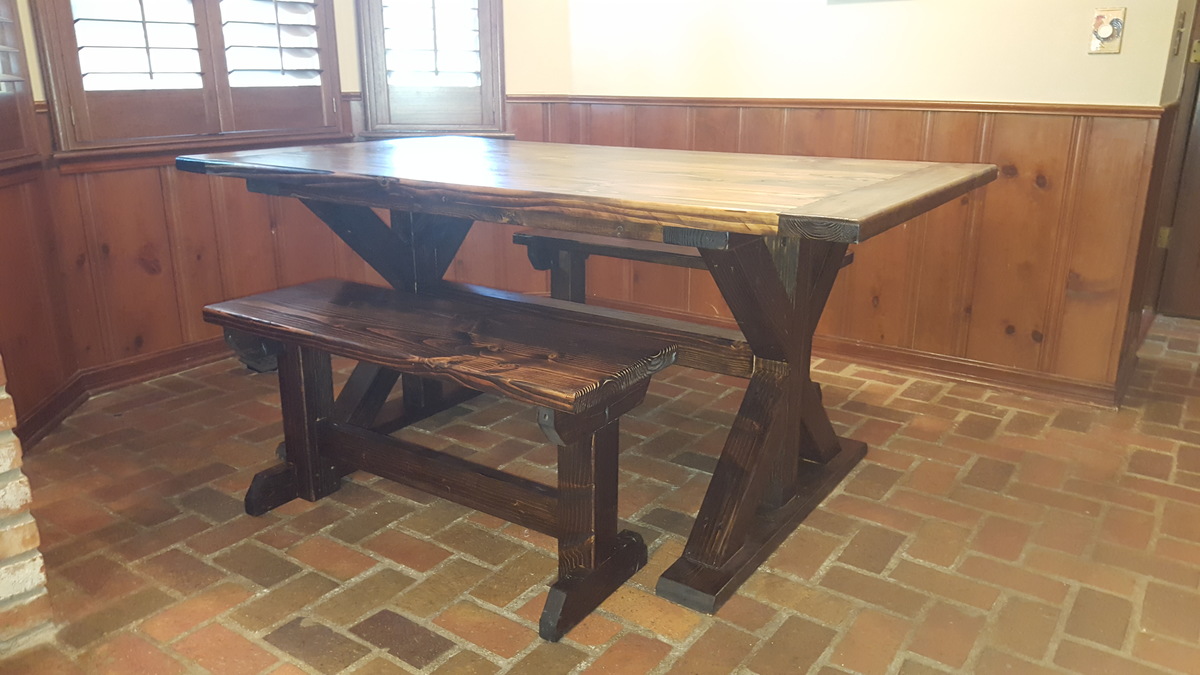
Breadboard Trestle Table and benches

This table was custom made for a good friend and his family. He wanted a trestle style with bench seats for his kids and able to have room to sit at the ends as well. In addition, he wanted breadboard table top. Engineering wise, thats a tall order. So I made the table top solid by using biscuits to secure the timber and since the breadboards could not be supported by the trestle legs I used 5/8" dowel rods, 6" long, 2 per board. I used a 2x4 and scrap plywood to make a dowel jig. I also reinforced them with 3" pocket screws on the bottom.
The next challenge was bringing the legs in enough to make room for end seating while still allowing room for the benches. I used 2x6s on the top and bottom of the trestles and secured them flush to the edge to allow for leg room at the ends.
I used 1" dowels to secure the 4x4 runner using a split/wedge technique. The benches are pretty strait forward and I also used biscuits to make solid tops.
To save money and to have a rustic look, I used douglas fur framing lumber which required many hours of scraping and sanding to make the top level and splitter free. Additionally, I used 5 layers of polyurethane to withstand the wear and tear of a young families daily use. Thankfully they fell in love with the table as much as I did!

Estimated Cost
$375
Estimated Time Investment
Week Long Project (20 Hours or More)
Finish Used
Minwax Early American
Minwax satin finish polyurethane
Minwax satin finish polyurethane
Recommended Skill Level
Intermediate
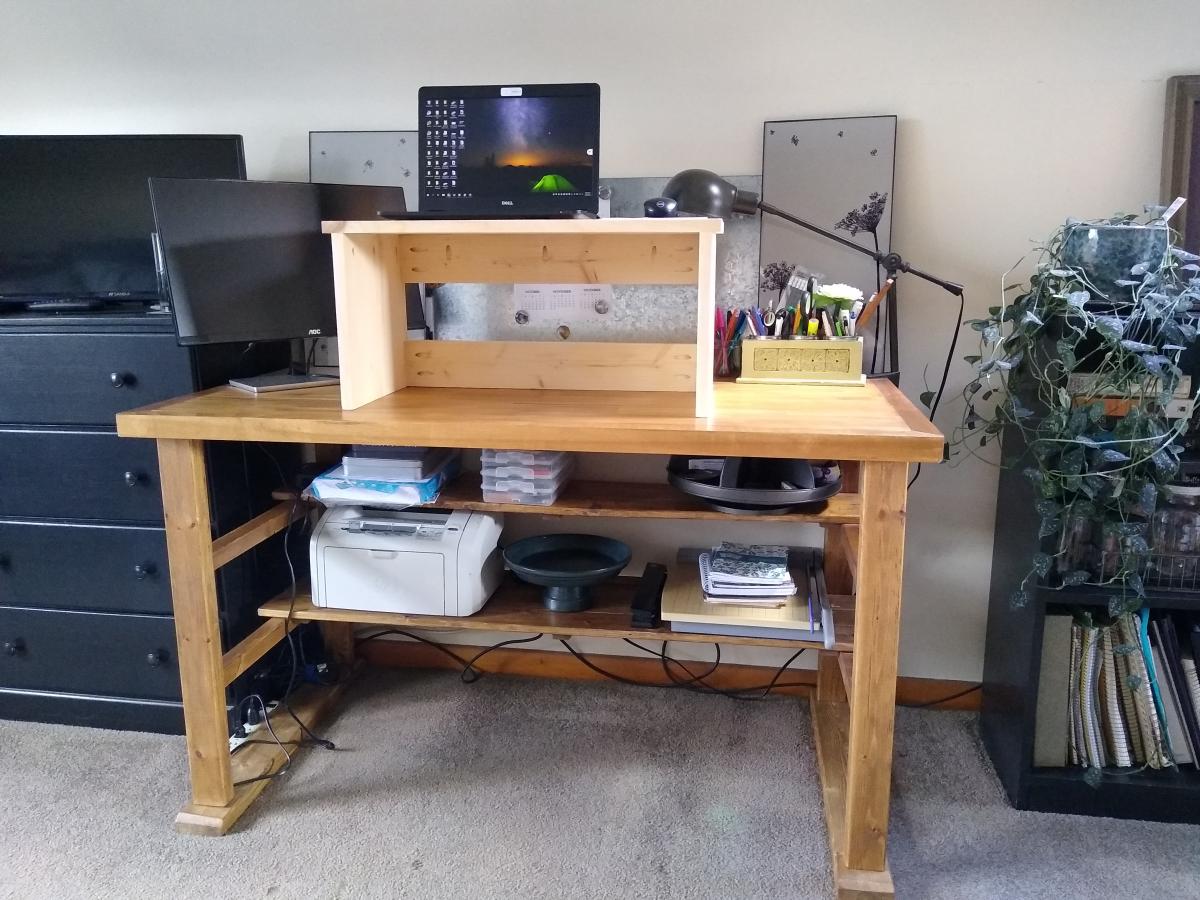
Lap desk/Standing desk
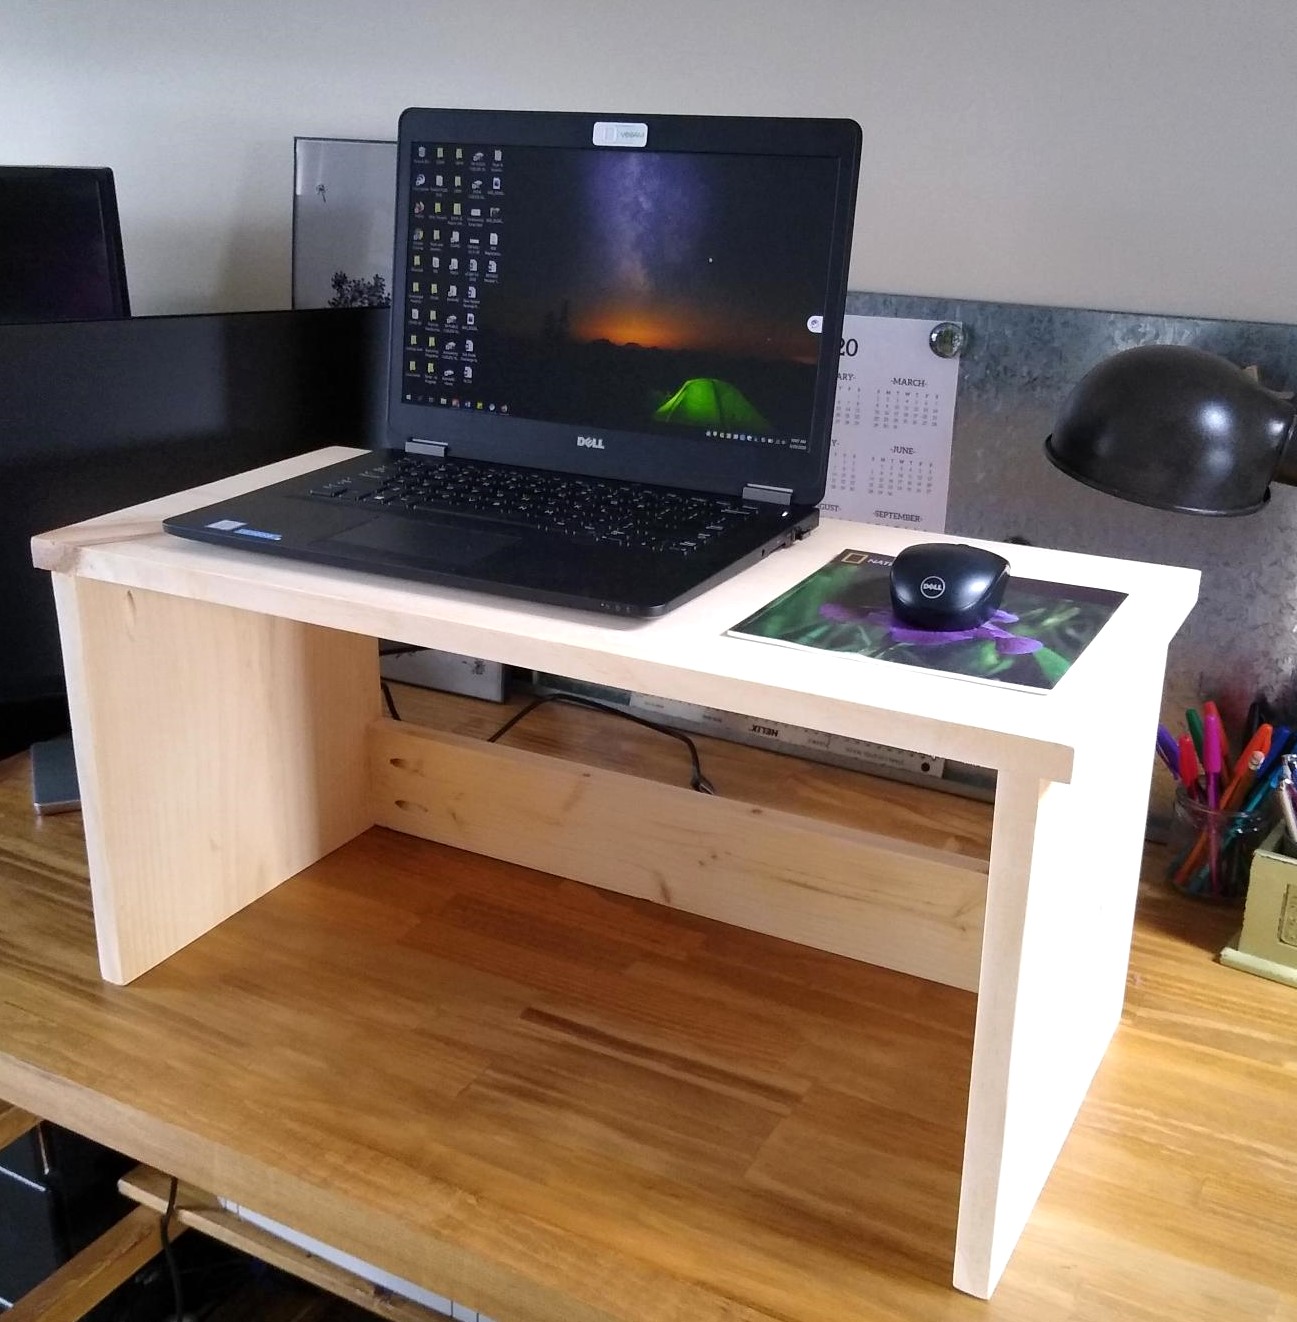
Built this last weekend so I would have the option of standing at my desk - these plans work perfectly for that purpose! Quick and easy build that I was able to do with scraps on hand. Highly recommend for anyone who has suddenly found themselves working from home and is finding their desk chair just isn't comfortable enough for a full day of work. Easy to move out of the way when not needed and provides a nice way to quickly move work things off to the side but keep them handy for the next day. Thank you for the very timely plans!
Built from Plan(s)
Estimated Time Investment
An Hour or Two (0-2 Hours)
Finish Used
None yet. Will have to wait for some nice weather to stain/seal outdoors.
Recommended Skill Level
Starter Project
Comments
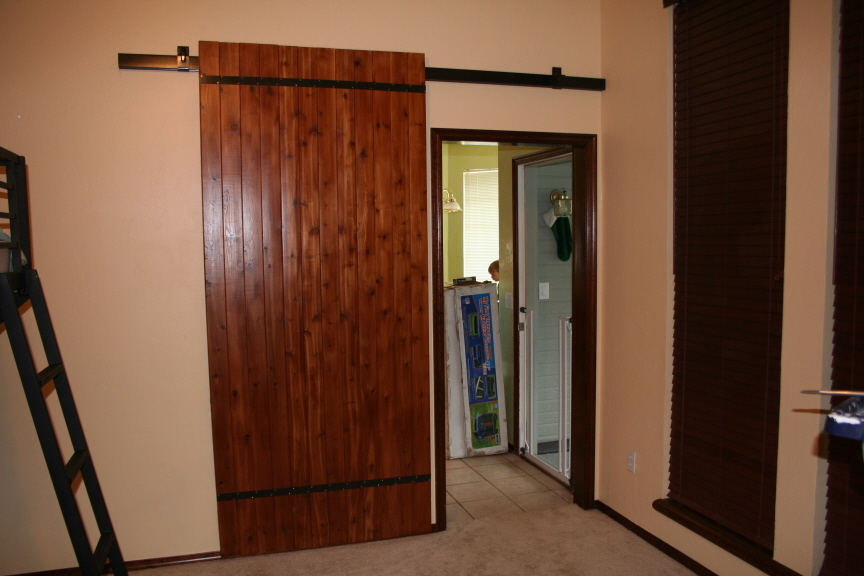
Sliding Barn Door
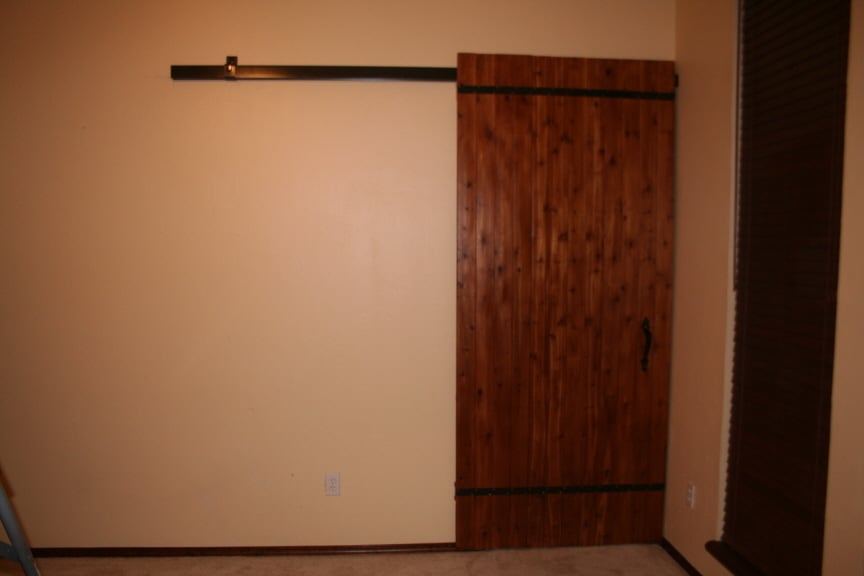
We turned a formal living into a bedroom so we needed a door to close off the kitchen/nook beyond. Since we were on a tight budget, we knew we could not afford the barn door hardware, so we found the next best thing:
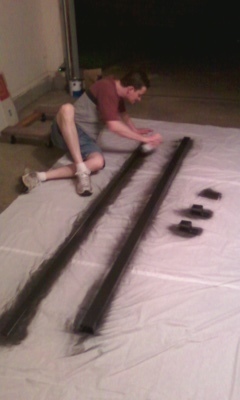
Stanley Trolley Box Track (from Lowe's). http://tinyurl.com/2z6wpn Yes, it's ugly looking, but we painted it black and modified how it was used. We got the 6' track with the box track hangers without apron. We bought the mount bracket, but that was a mistake. The door could not pass the mount on the right side and we ended up just attaching the track to the wall without the mount on that side (pic of door open shows both mounts before we were able to close the door and before we removed the mount on the right side). Had we known, both sides would have been attached to the wall without the mount. But, we went ahead and left the mount on the left side as we didn't think it hurt the look too much.
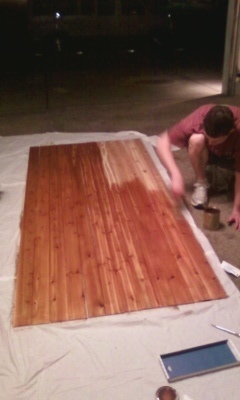
The door: We made another mistake. We meant to buy 1x tongue and groove wood (3/4" thick) to make our door and we somehow got 8' lengths of tongue and groove paneling 1/4" thick (OOPS): http://tinyurl.com/7ea6b3r It looks good, but it's ultra light weight (stain first, then put it together). We used a flat piece of aluminum to hold it together (also painted black - along with painted screws). Due to our mistake in depth, our screws were too long so we located a 2x4 directly behind the aluminum strip on the top and the bottom of the door for stability. It helped a lot. The location of the aluminum strip at the top is strategic because the 2x4 behind it is also what holds the box track hangers that roll on the track above. We put them a few inches in on each side from the edge of the door, drilled a hole vertical through the 2x4 (a little off center so the door wouldn't rub the track) where longer bolts were used to go all the way through the 2x4 and hold the door onto the track while being hidden behind the door. I also had to get smaller screws for my door handle to go on since the door was only 1/4" thick. But, it all worked out.
The backside: Due to the fact the door is so light, we added felt to the 2x4 at the bottom so it wouldn't damage the trim.
Estimated Cost
$100-$150
Estimated Time Investment
Weekend Project (10-20 Hours)
Finish Used
Minwax Polyshades 1-step Antique Walnut Satin
Recommended Skill Level
Intermediate
Comments

Wed, 06/13/2012 - 12:52
Looks great!
My mouth totally fell open when I recognized the door plan from my blog! Your door looks fantastic, even with the oopses ;) I'm glad it all worked out for you guys!
Thu, 06/14/2012 - 14:17
THANKS TO YOUR BLOG!
That's why I definitely wanted to link the blog post where the plan came from. It was a great idea and I'm thankful I found it. I don't think we would have been able to do the door without your blog. For one, they are too expensive and I wasn't sure how to do it without that expensive hardware. But, your blog helped us be able to do something nice and without spending too much money. It also functions perfect!!!
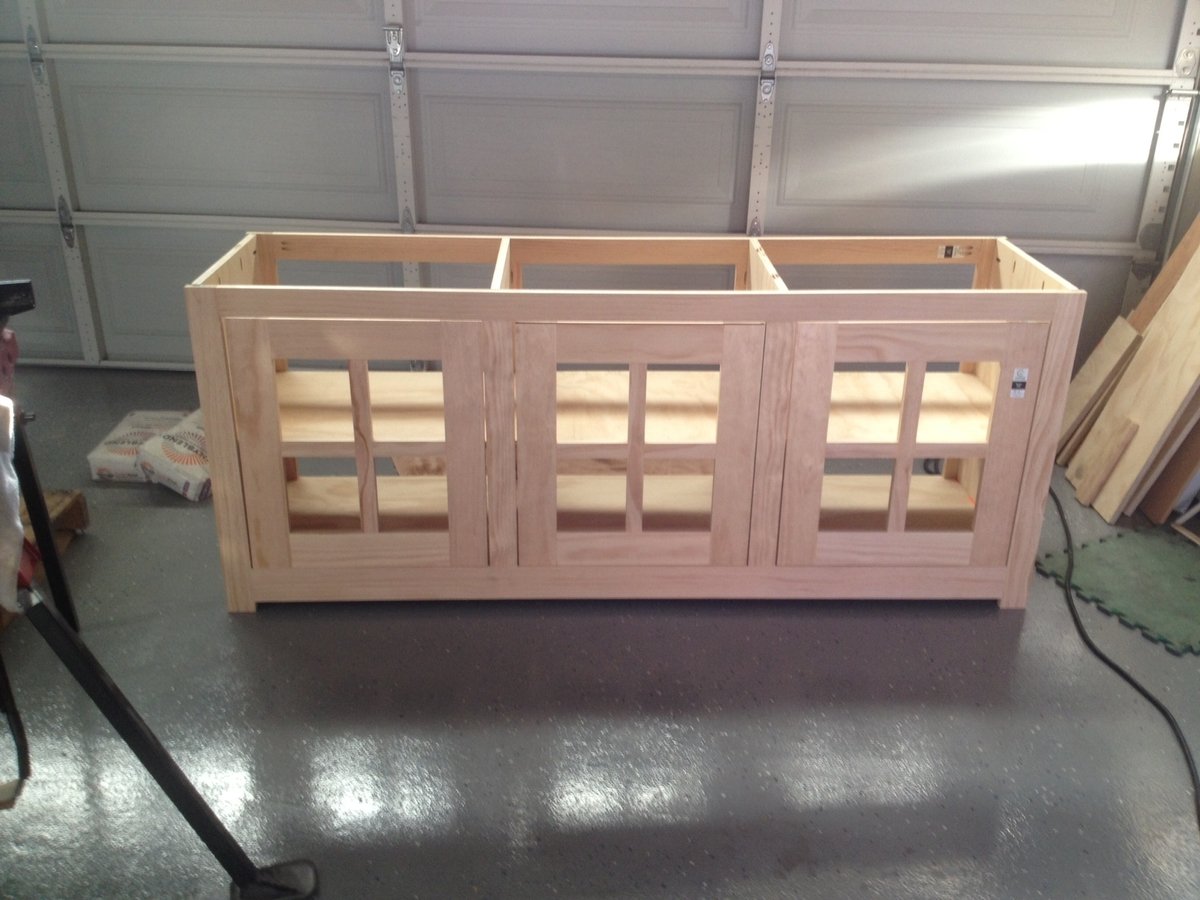
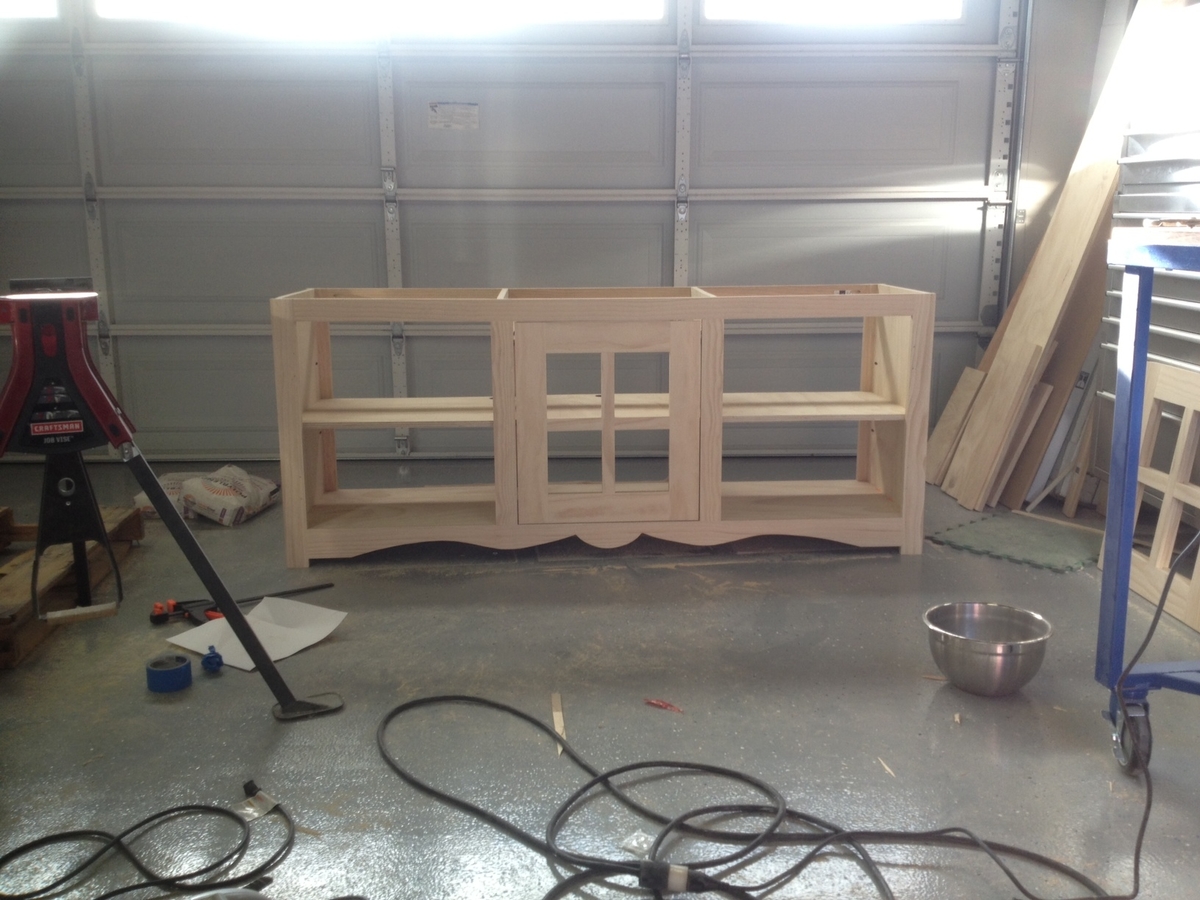
Farmhouse Media Console
This was my second wood project and I am really happy with how it turned out. I basically followed the plans but made mine alot bigger. It measures roughly 6' long, 33" tall, and 20" wide. I wanted to let people know how I made the center door because the video used alot of tools and skills that I do not have.
I made the doors out of 4" and 2" select pine with PH's on the back. I then cut a 5/16" groove in the center on the outside of the stiles. About 7/8-15/16 of the way up the door I installed a 1/4" wooden dowel. On the cabinet frame I installed another wooden dowel that the door dowel rests on when closed, this is also the dowel that rides in the groove that was cut on the door.
The other difficult part (for Me) was the cut out design on the bottom of the frame. I did this by using a big bowl for the center and a really thin strip of wood. Once I cut out one side I just flipped the cut piece over and traced it to the other side.
I finished the top off with 3 coats Minwax Dark Mahoganey and 3 coats of Minwax Polycrylic.

Built from Plan(s)
Estimated Cost
250$
Estimated Time Investment
Weekend Project (10-20 Hours)
Finish Used
Minwax Dark Mahoganey and Polycrylic clear
Recommended Skill Level
Beginner
Comments

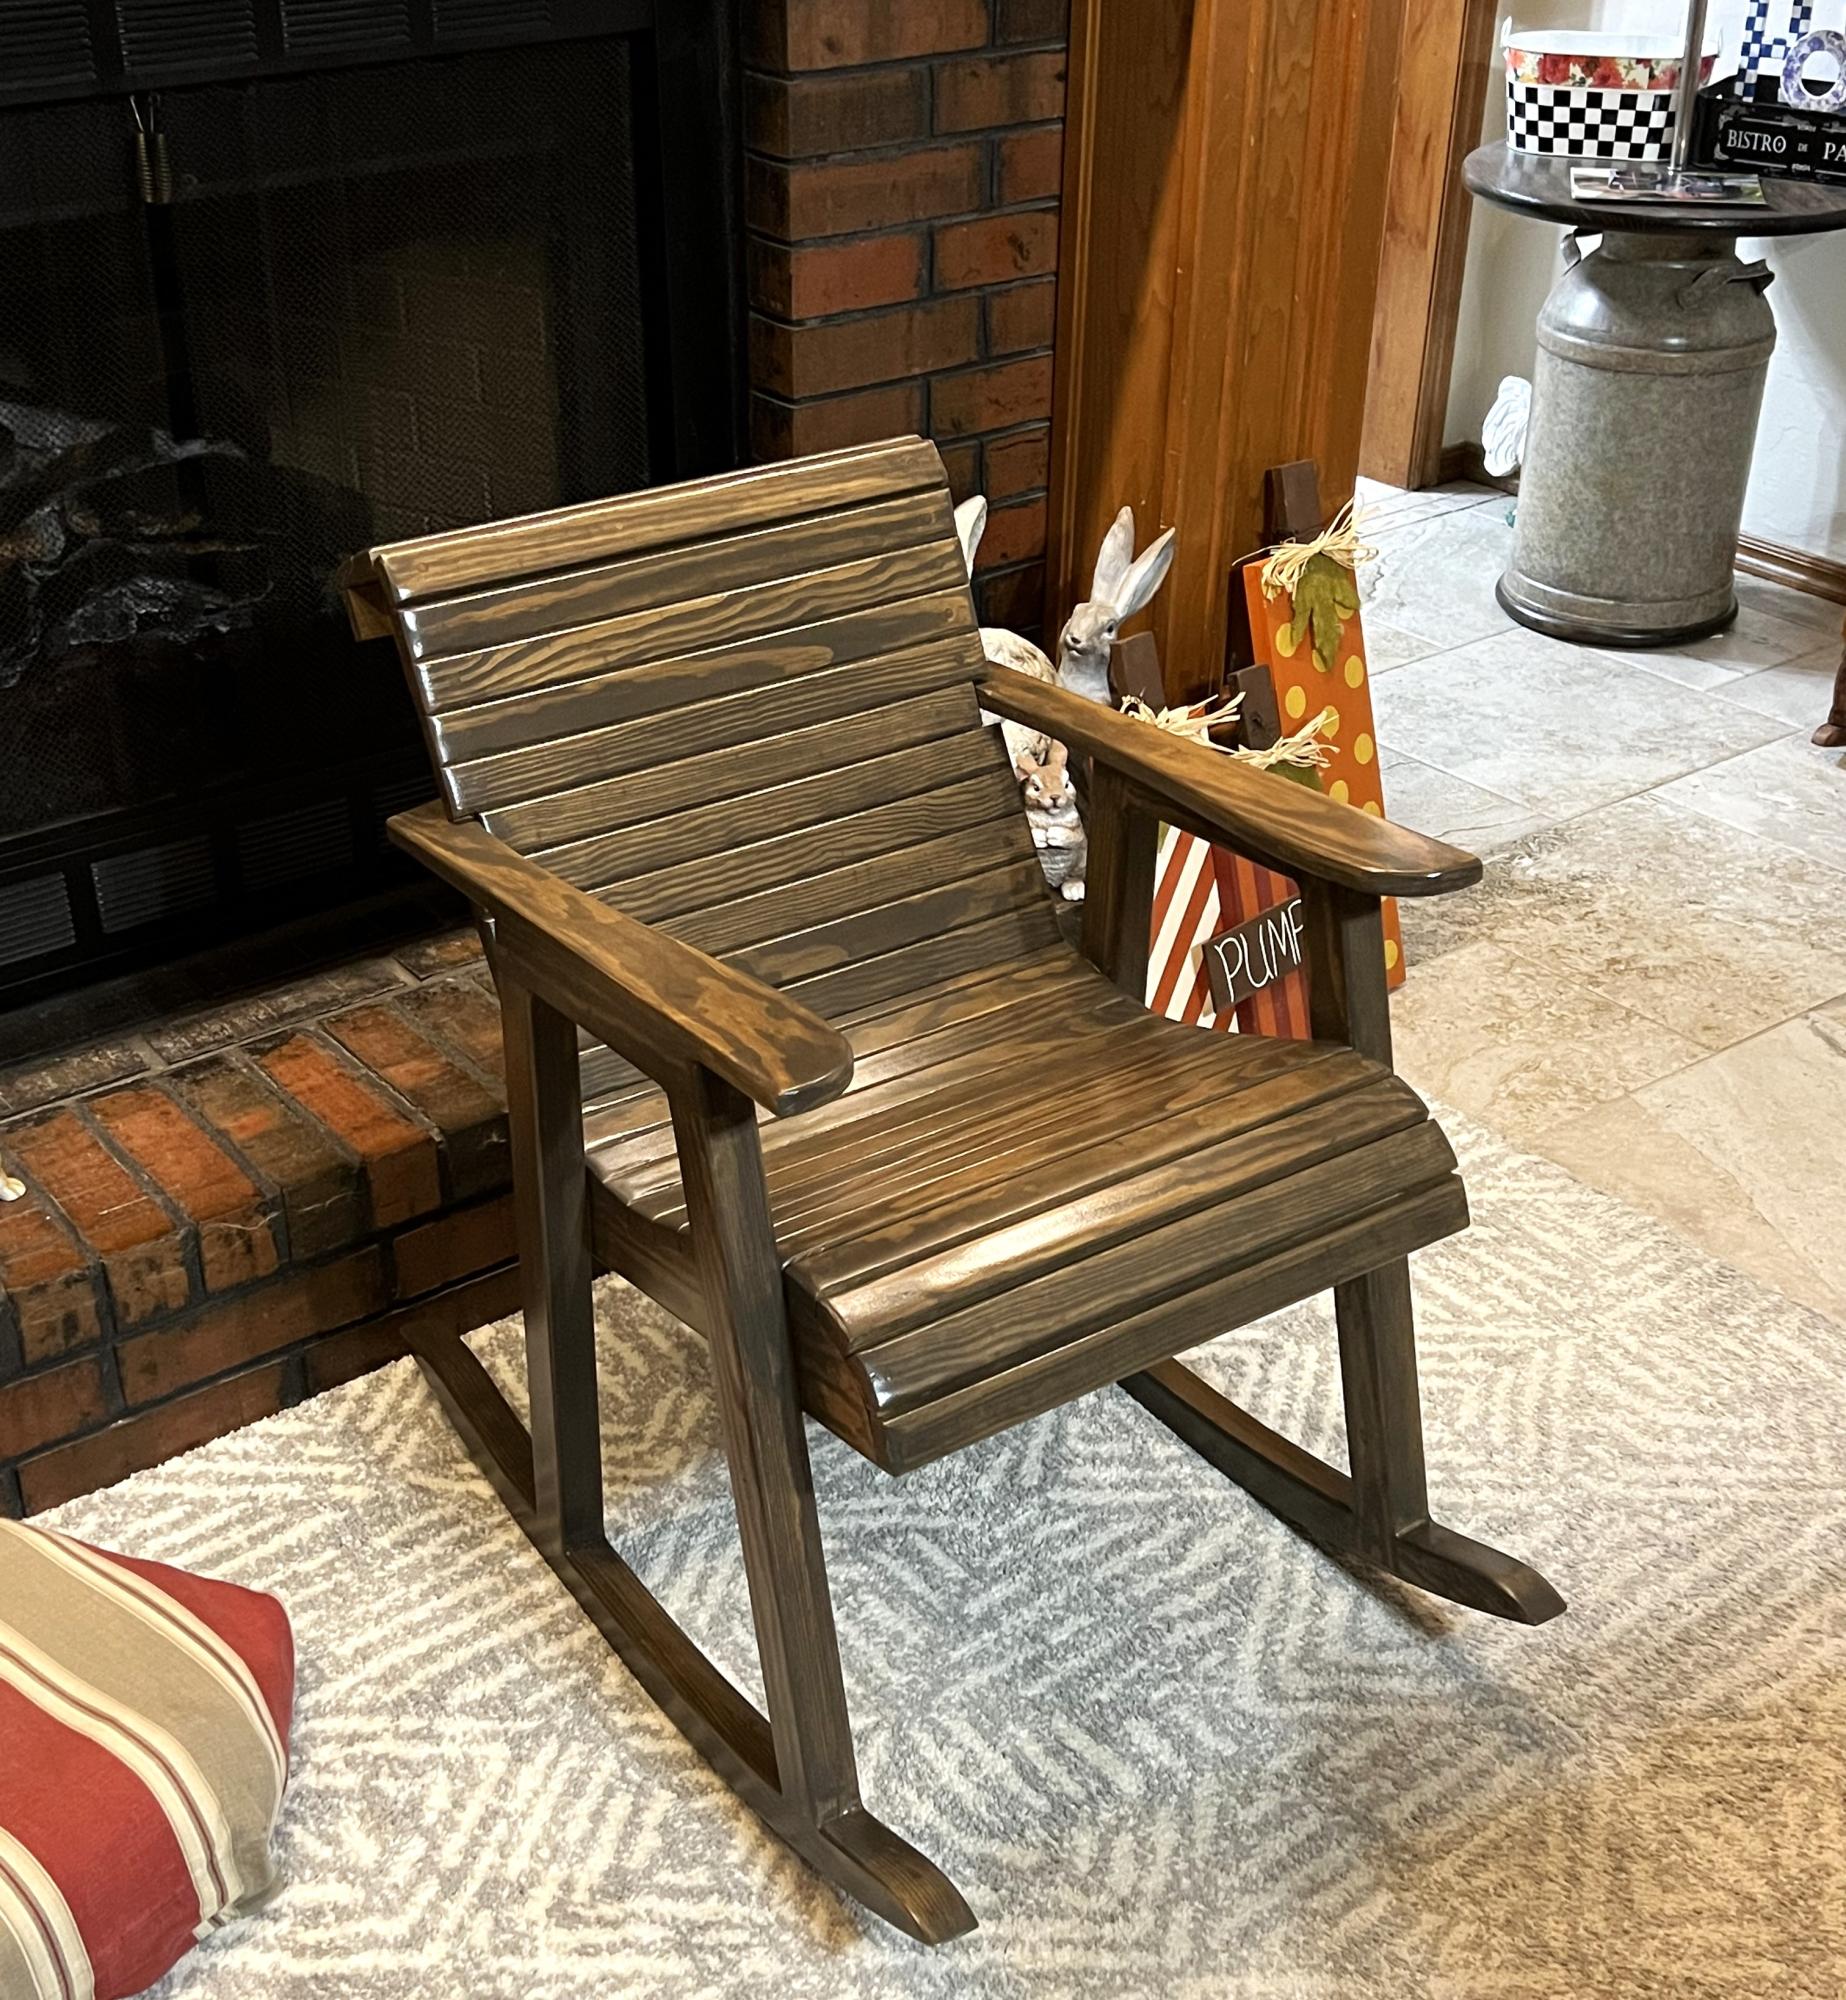
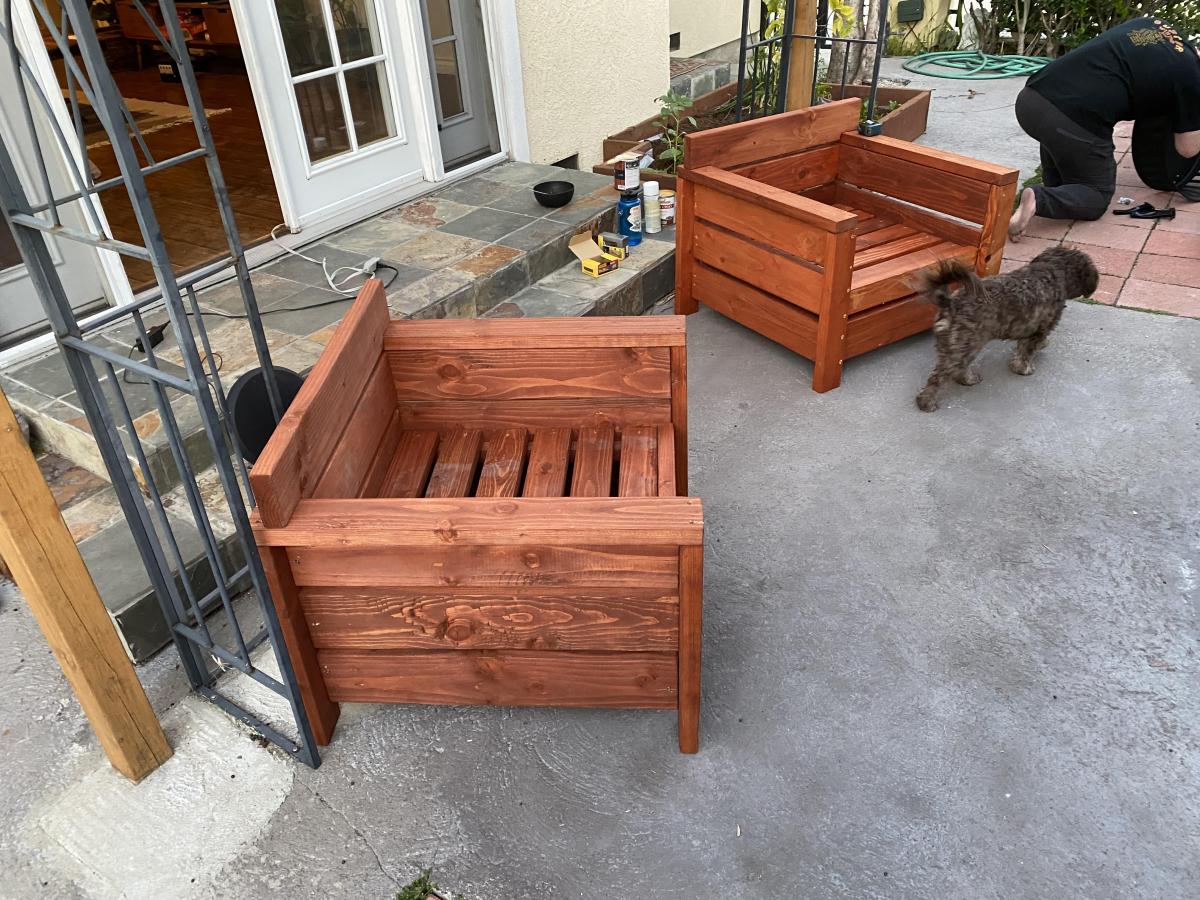
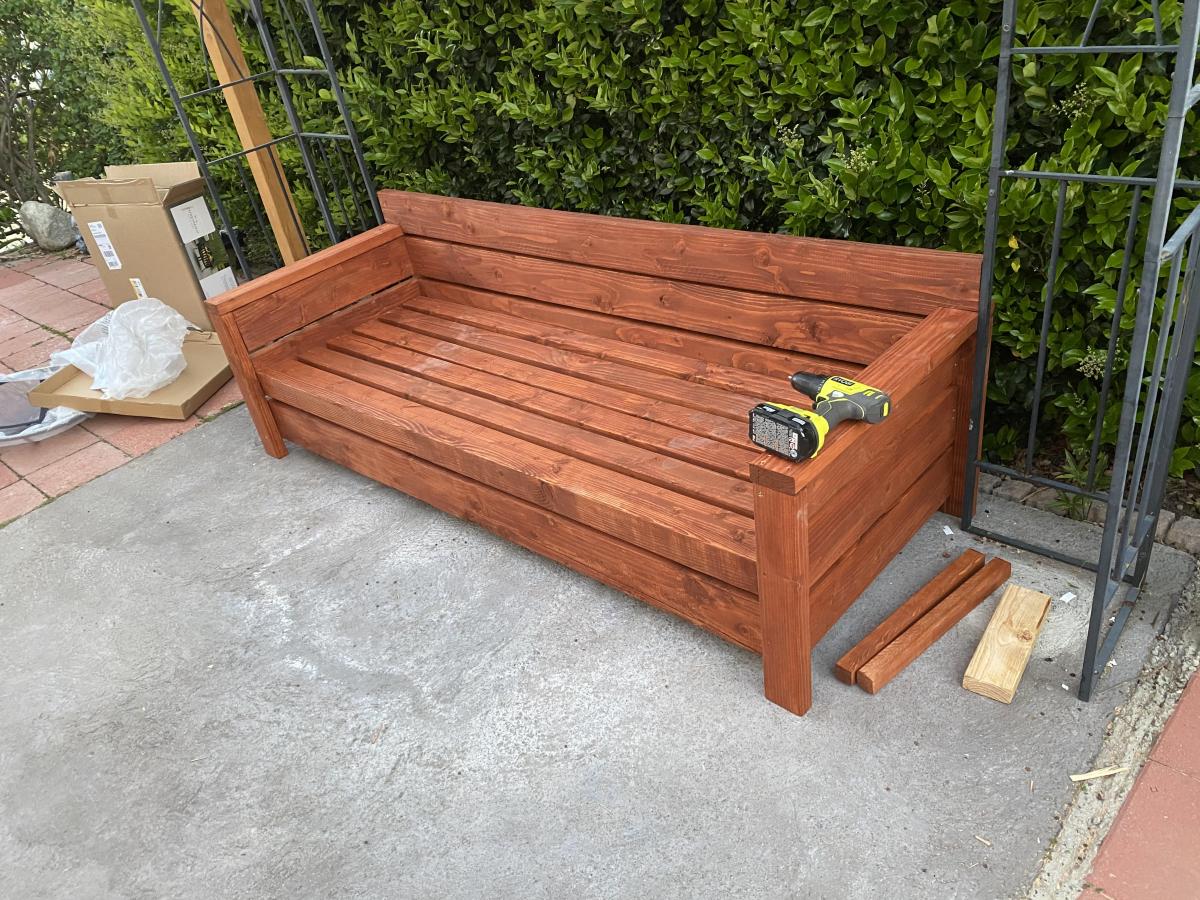
Modern Outdoor Chair Mod with High Back and Full Couch

I made a few modifications to the Modern Outdoor Chair build, including adding a larger backrest and making a couch version that can fit 3-4 people. I felt the original plan didn't hold up the couch cushions well unless it was against a wall, so the modification solves this simple problem!
Wood was Douglas Fir for the price point, although I would've preferred a harder wood. The stain was Minwax Wood Finish in Gunstock 231, Which I felt really sold the Doug Fir as a darker, more elegant wood.
Cushions were from Target and were the cheapest I could find. They've already started to flatten a bit but I plan on restuffing them soon.
Sketchup file available if you need it, but didn't see a way to upload it directly.

Estimated Time Investment
Weekend Project (10-20 Hours)
Finish Used
Minwax Finish Gunstock 231
Spar Varnish Spray
Spar Varnish Spray
Recommended Skill Level
Beginner
Comments
Fri, 05/01/2020 - 08:02
Sketchup please
Hello how can I get the sketchup file for these? I'm really interested in making both the chairs and the couch.
Sun, 05/17/2020 - 16:11
Hey smarincak, I'm not sure…
Hey smarincak, I'm not sure how to send you the sketchup file but if you send me a private message I can email it to you.
Sun, 05/23/2021 - 05:54
Hey Matt, I would LOVE to…
Hey Matt, I would LOVE to see the modification plans you made if you don't mind sending them to me. Thank you! Do you feel like the mods you made to the back were comfortable?
Fri, 05/22/2020 - 08:15
Modern patio furniture
This is perfect and they look great! I was hoping someone had already created these with a higher back. If you don't mind sharing your plans, I would really appreciate it!
Fri, 05/29/2020 - 12:31
SKetch of modification
Love the chairs but would like the the sketchup file for the modification of the higher back. Thanks.
Sun, 06/21/2020 - 18:55
I would also like the sketch…
I would also like the sketch of modifications for higher back please!
Fri, 04/23/2021 - 09:28
Plans please
Matt- Would you please share with me the plans and materials list for this project! I love it.
Fri, 04/23/2021 - 19:21
Love the modification! May I…
Love the modification! May I please get a copy of the sketchup file? Thank you!
Parson's modern bookshelves--my first build
After following Ana's blog for over a year and bookmarking dozens of projects, I finally built my first project. (I built it months ago and have since built 3 other things...so this is addictive!)
I love the modern West Elm look but didn't want to shell out over $600 for two low Parson's shelves which still would not fit my dimension exactly, so this was the perfect project for me. Initially I had intended to stain the bookshelves a warm pecan color, as I think "modern craftsman" is more my style, but honestly the outcome was so wonky that I couldn't see that the shelves would look nice stained. Instead I painted them with what was supposed to be a color match to BM's Weimeraner -- lesson #1001, BM's paint cannot really be color matched. I may repaint in the future as this is not as warm as the original, but it's been fine for the past few months.
Honestly I had many building problems with my first project -- I had mistakenly thought working with 2x2s (pine) would be 'easy', but I found the opposite to be true (and since I have done another project with 2x2s since then I can confirm that we are not meant to be bffs). I did choose straight boards, but I had the guys at Lowe's cut them. Unfortunately in the future I will have to buy my own saw (and pick up truck and workshop, lol), because literally every single time there has been a problem, even when I check the boards at the store. The problems are generally small--1/4" or so--but of course this makes your project off square.
As a result there were noticeable seams between the 2x2s and the 1x12 boards. Of course caulk and paint hid all of that, but this was the main reason why I couldn't stain the project. I also had trouble with the 2x2s splitting when I used the Kreg jig -- luckily this happened only a couple of times, but in my next built it happened even more often, using Douglas Fir. (if anyone can help me with this, I would love to hear!)
Long story short -- it was a lot of work, it wasn't exactly what I had envisioned, but I love the final product, seams, warts, and all. It fits our space perfectly, it's incredibly sturdy, and the power of making something myself--even imperfect--is amazing. Since then I have built an activity table and a picnic table for my kids, and I even felt confident enough to design and build my own window box. (sure, it's not complicated, but I credit Ana's "training" entirely. of course I haven't yet installed it, but that's a different problem)
Thanks, Ana!!!
Built from Plan(s)
Estimated Time Investment
Weekend Project (10-20 Hours)
Finish Used
paint and poly (eco-friendly version)
Recommended Skill Level
Starter Project
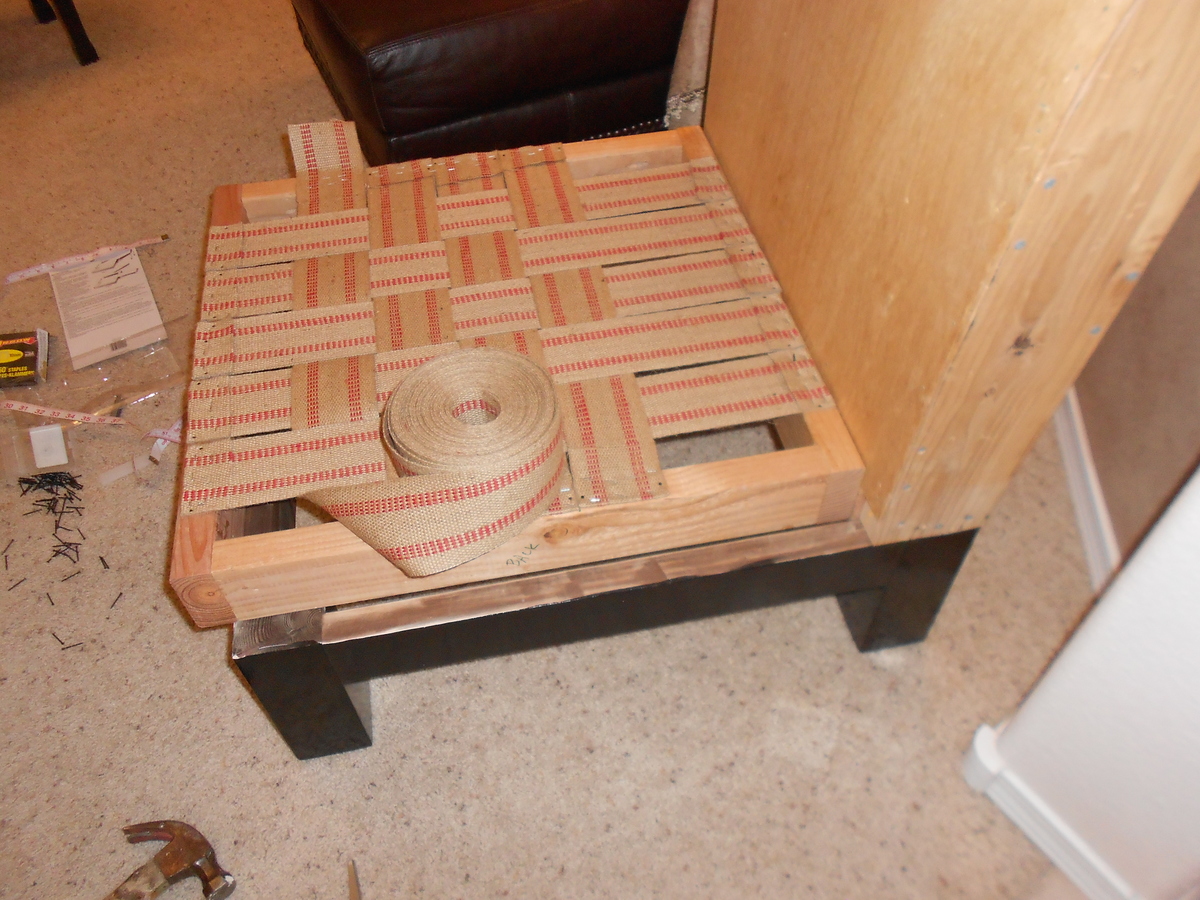
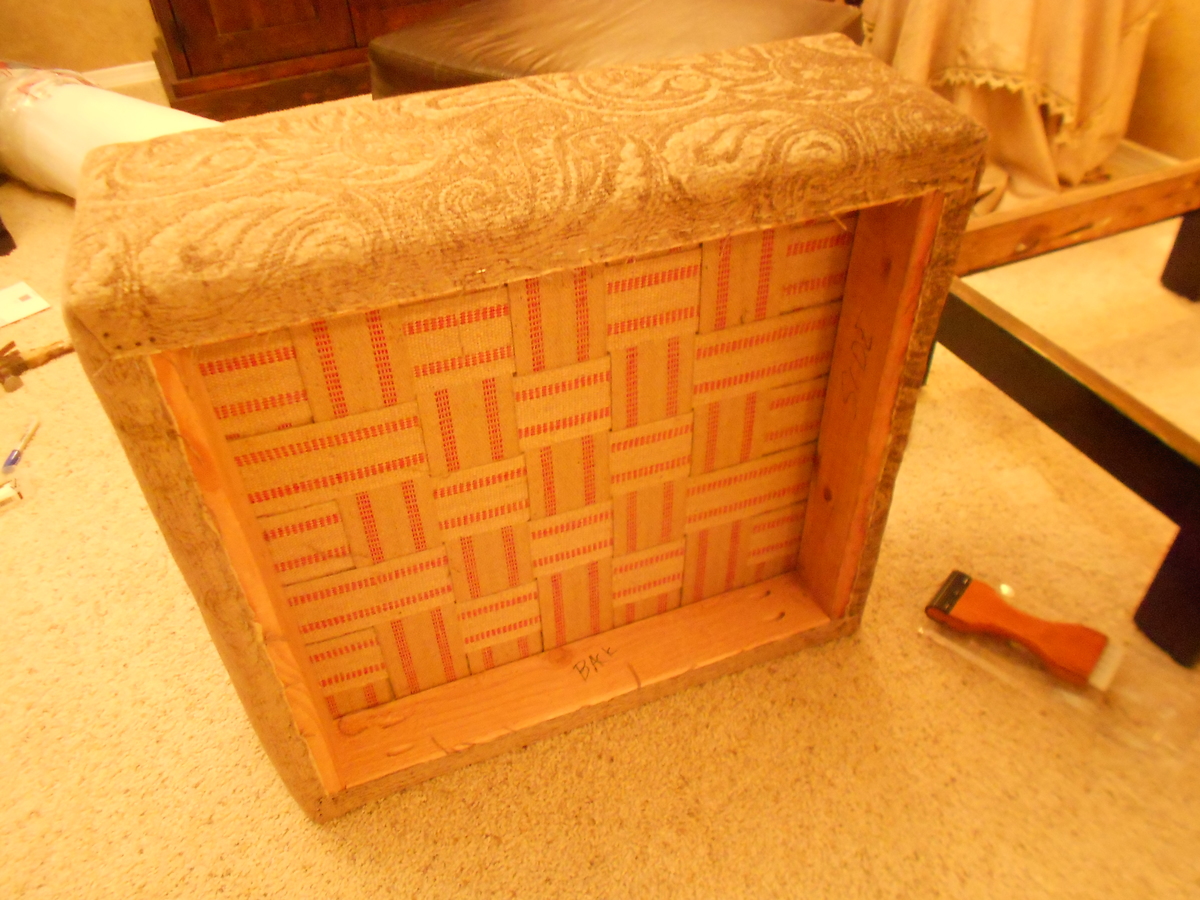
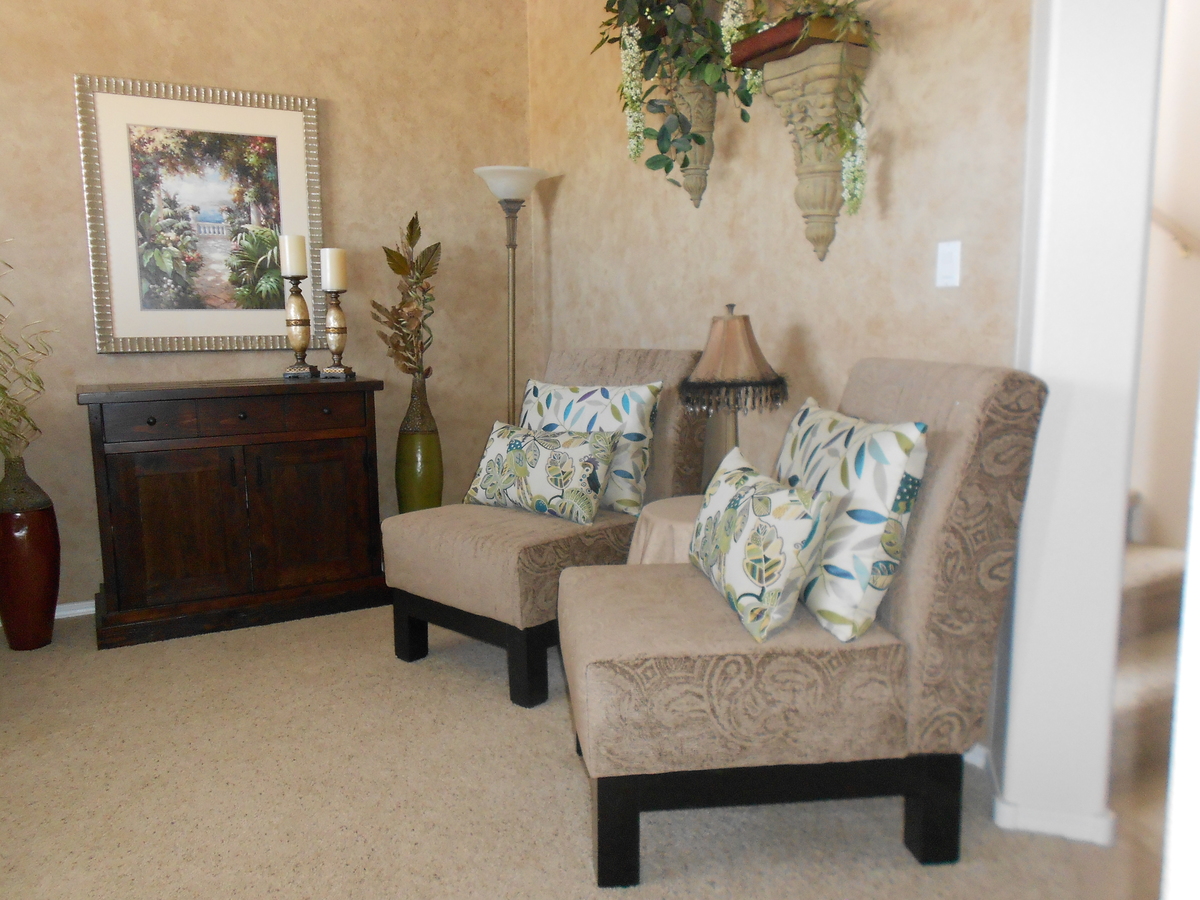
Ana's Slipper Chair
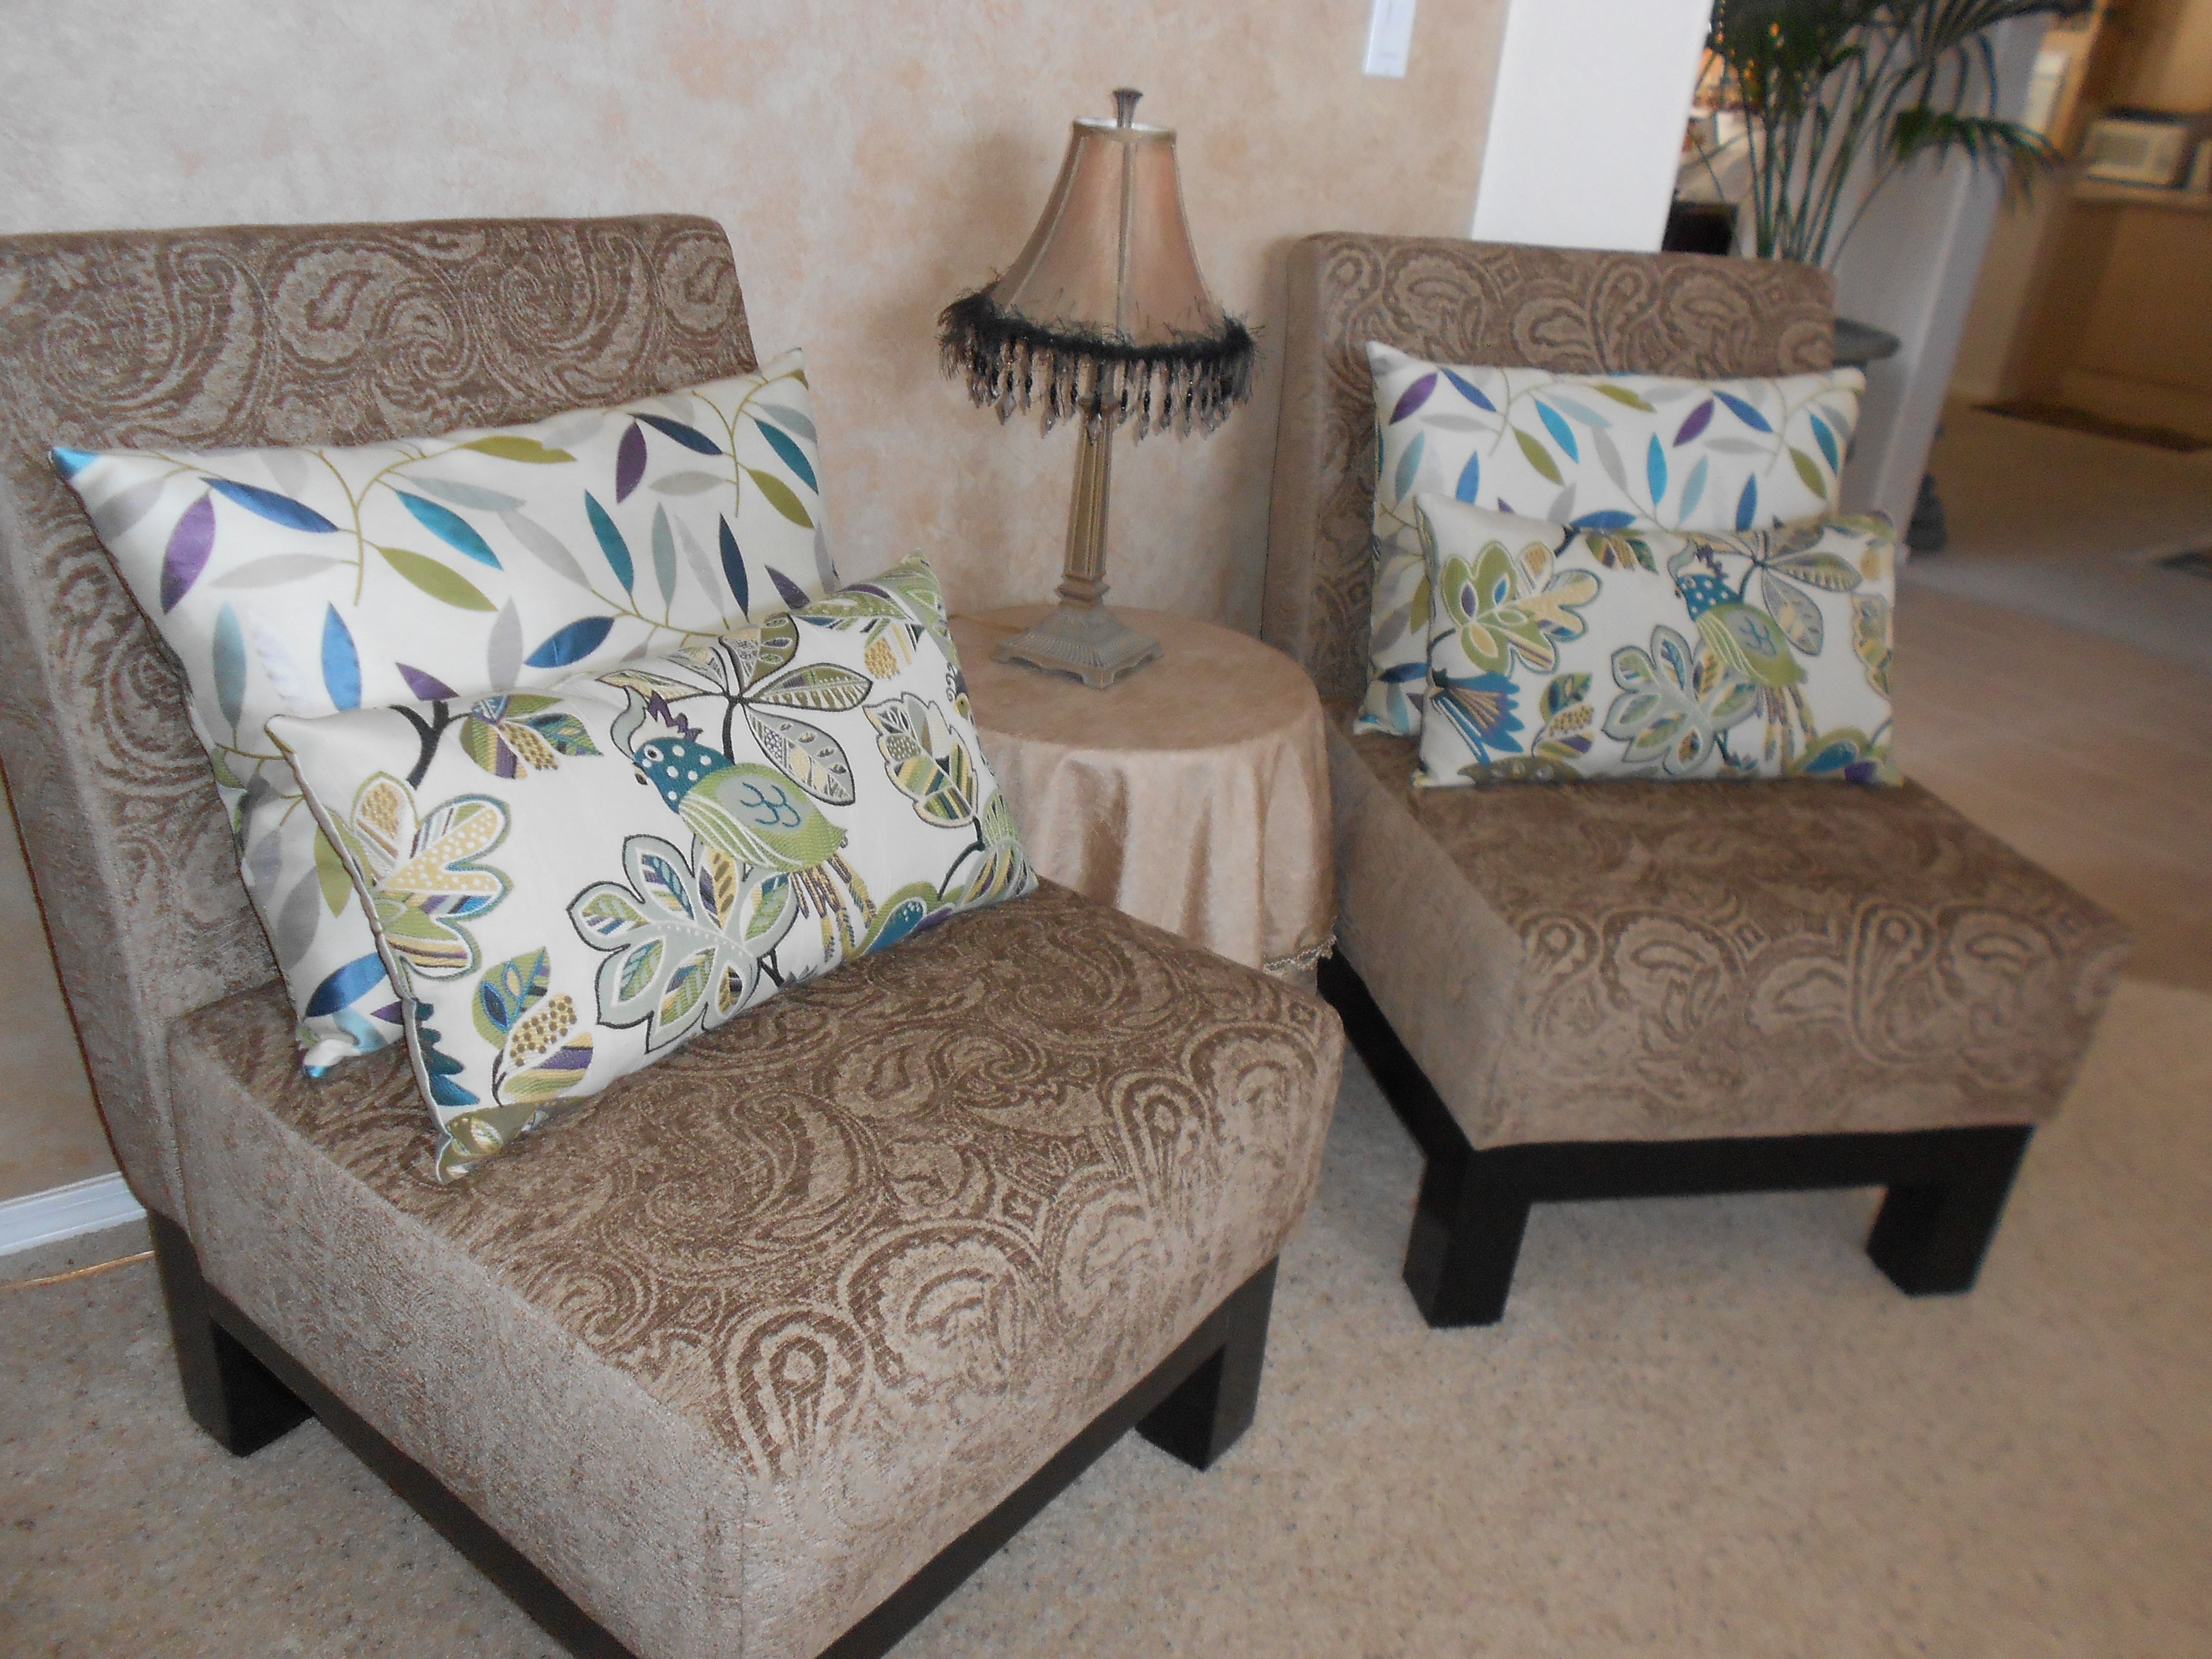
I mostly followed the plans except for a few modifications in order to use the wood I got for free. I did use 4x4s instead of 2x2s for the legs because I wanted the chunkier look. I might chop them off and put on some fancy feet, but for now I think they look fine. The most expensive part was the foam cushions. I got the good stuff because I wanted the chairs to be comfortable, and they are!
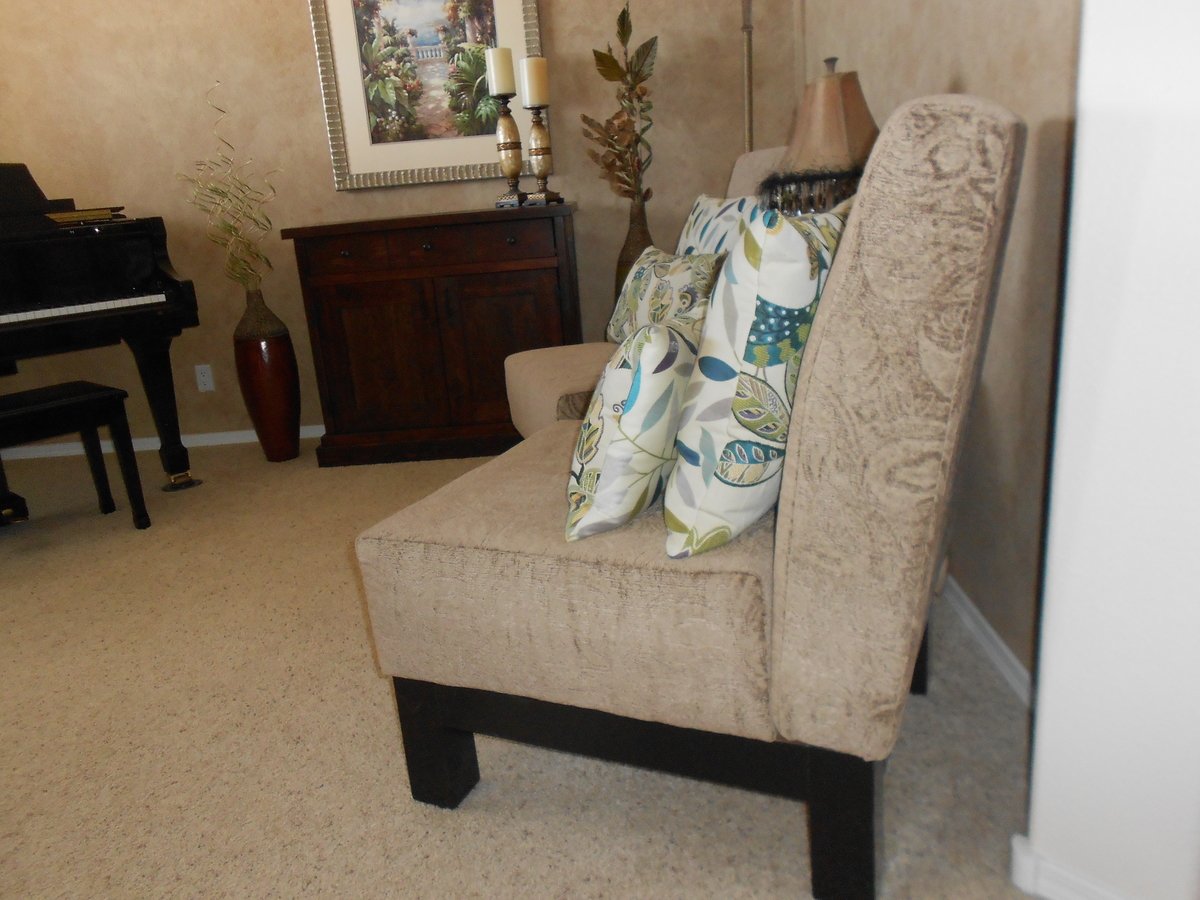
Built from Plan(s)
Estimated Cost
Around $155 for the foam and fabric for both chairs. The wood was free.
Recommended Skill Level
Intermediate
Comments
waysab
Sun, 11/10/2024 - 16:50
I like it
I like it