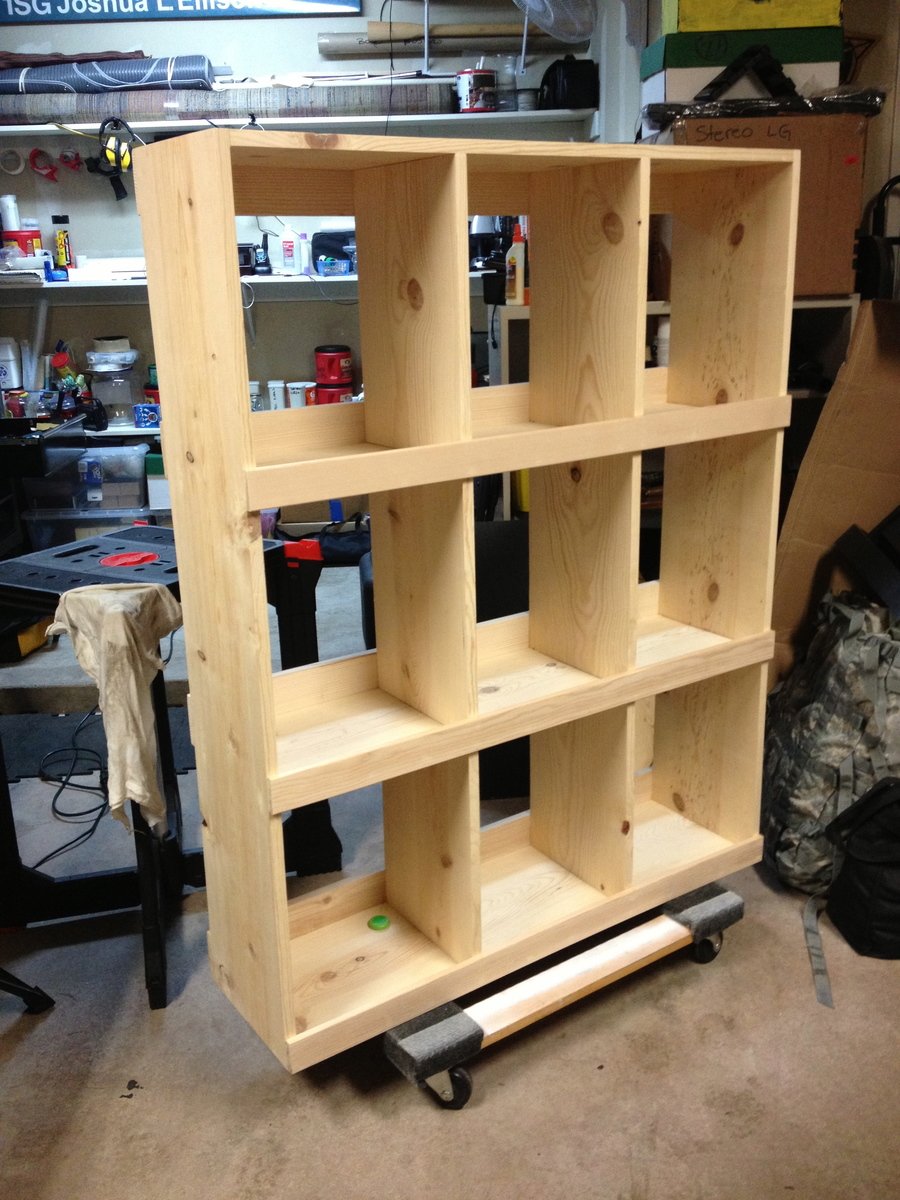
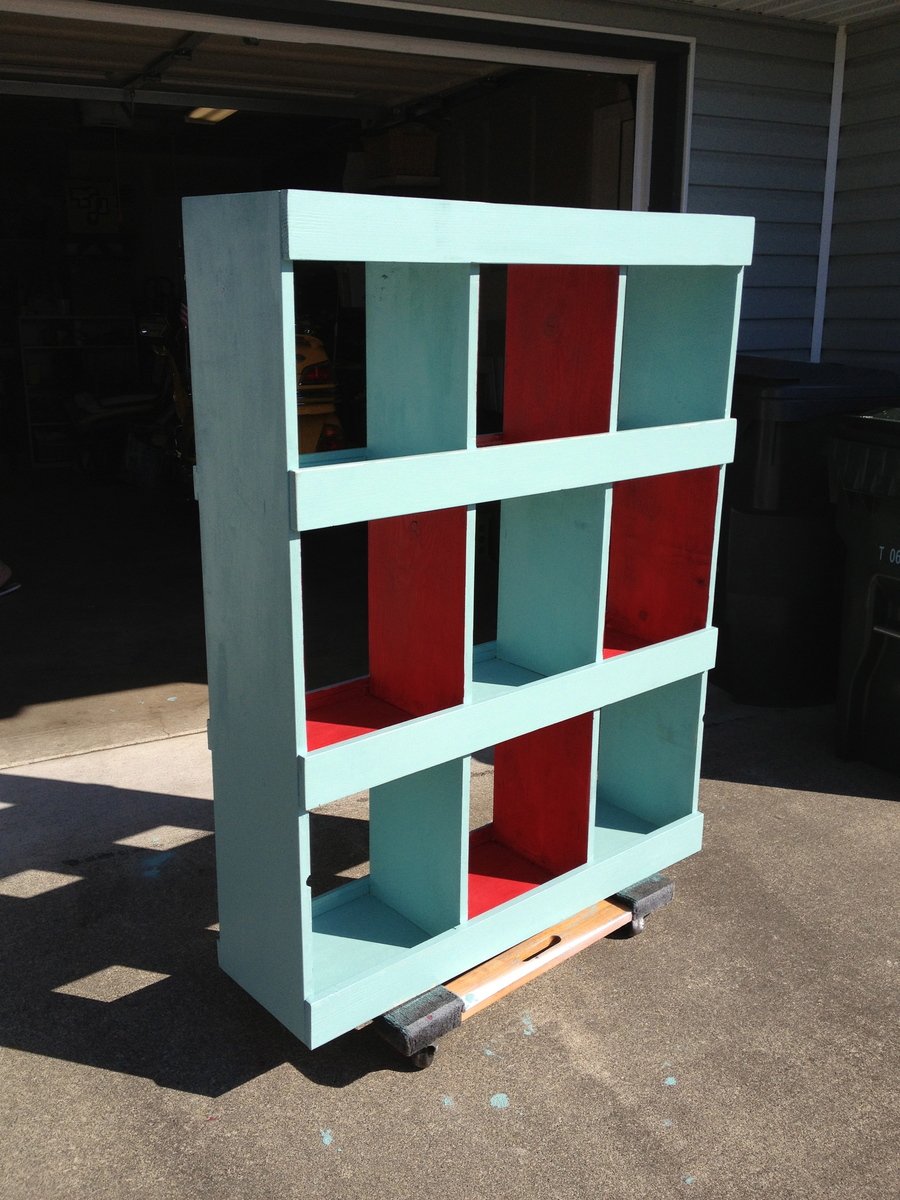
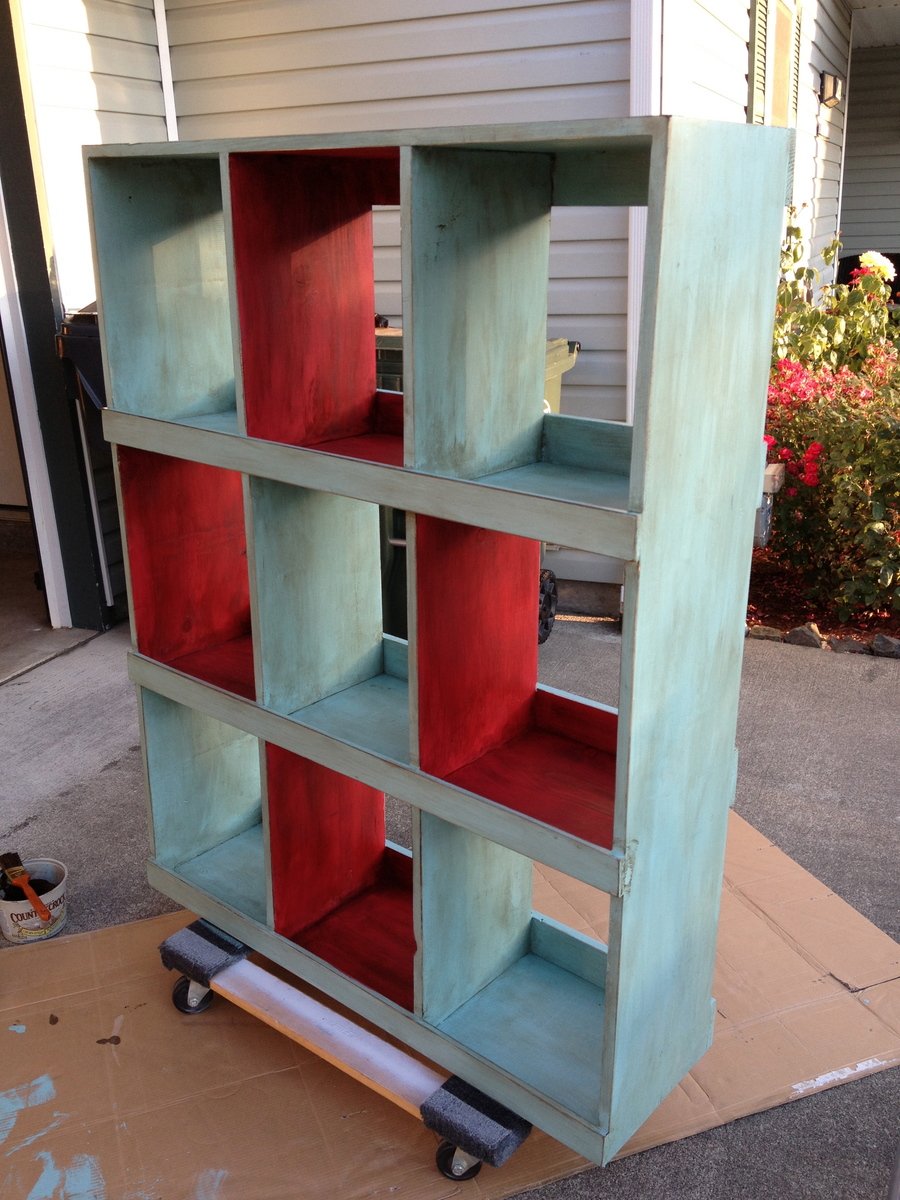
Community Brag Posts

Fancy X Farmhouse Table

Submitted by Jbyrd09 on Thu, 10/11/2012 - 20:59

Fancy X table and bench

Built from Plan(s)
Estimated Time Investment
Weekend Project (10-20 Hours)
Finish Used
Minwax ebony
Deft semigloss clear coat lacquer
Recommended Skill Level
Beginner

Comments

Unique Bookshelf

Submitted by Lalauren42 on Mon, 08/04/2014 - 08:48

I was in need of a new bookshelf so I searched online and all I could find were cheap, plain bookshelves at a pricey cost. So I decided to make my own. This was my first piece of furniture I have ever made. I love it! Super easy and the Kreg Jig will quickly become your new BFF!!

I did shorten the bookshelf so that top was accessible.

Estimated Cost
$150
Estimated Time Investment
Day Project (6-9 Hours)
Recommended Skill Level
Beginner

Emme Twin Bed

Tips:

  1. Bed Frame: runners attached with bed connectors from Rockler to make it easy to breakdown and move.
  2. Slats: made removable slats again for ease of move. Made with nylon rope stapled to 1x3. Pin the first and last slat by putting a screw on the inside of the first and last slat to keep it in place.
Estimated Cost
less than $100
Estimated Time Investment
Day Project (6-9 Hours)
Finish Used
General Finishes Gel Stain Java
Recommended Skill Level
Beginner

Rustic Farmhouse Console Table

Building this console table was built over two weekends. Cutting the wood and assembling the pieces was fairly easy but choosing the right colors for the stain was not. We finalized on hickory for the frame and mocha for the top and X's. We decided to build it 6 inches taller then the plan and als to trim the inner edges of the 2x6's to eliminate the crumb catchers. We also rounded the feet because they were chipping on the garage floor during the build.

We loved the final result!

One Piece Play Kitchen

Submitted by abbpim on Thu, 10/18/2012 - 14:36

This is a project that I really enjoyed making. I did it in a hurry though because I really wanted to build a playhouse under a loft bed and felt like i should build the stuff that will go inside the playhouse before I but up the playhouse walls. So, here is my sort of finished play kitchen. I still have a few details I wanna add but I'm over it for right now... ready to build the playhouse! The best part was that I made this kitchen for free out of leftover scraps from other projects.

Estimated Cost
free
Estimated Time Investment
Week Long Project (20 Hours or More)
Finish Used
Combo of a bunch of old paint I had in the garage and the tiles are made of scrap book paper and mod podge.
Recommended Skill Level
Intermediate

Comments

abbpim

Sat, 10/20/2012 - 19:42

Thanks so much Redhead61! And thank you to you and Ana for these plans! My kids are making out pretty good in the toy department this year cause of my new favorite hobby!

Farmhouse Style Kitchen Island

Submitted by Anonymous (not verified) on Sun, 11/20/2016 - 04:27

Dear Ana, 

Thank you for inspiring my friend Erik to build your farmhouse style table.  I was inspired by him, so I decided to build your farmhouse style kitchen island. It was not an easy DIY project for a first time DIY. However, I'm thankful that your plans are easy to follow and that there are plenty of Kregjig tutorials on YouTube! This project took 15 hours, but in the end- the time spent didn't matter. I love the finished product, finally a space to prep and cook. Thank you for inspiring all of us. Not perfect, but beautiful. Used Minwax Golden Pecan Wood Finish and 2 coats semi gloss.  Thanks again! -Leo C. @1LeoChen Instagram & Twitter 

Estimated Cost
$100 for wood & stain /semi gloss ; $20 screws this is assuming you have all the tools .
Estimated Time Investment
Weekend Project (10-20 Hours)
Finish Used
Minwax Golden Pecan - wipe it on with towel, dispose of towel properly. May be flammable or cause fire.
Recommended Skill Level
Intermediate

Comments

Farm bench and Adirondack chair

Submitted by Anonymous (not verified) on Fri, 08/07/2020 - 14:14

Had already posted the truss bench but since I was staining both it and the Adirondack chair together thought I’d share both side by side. Thanks for the wonderful, simple plans!

Estimated Cost
Bench=$25 chair=$45 (wood and screws)
Estimated Time Investment
Afternoon Project (3-6 Hours)
Finish Used
MinWax Honey Pine stain and urethane.
Recommended Skill Level
Beginner

Farmhouse Bed - King

Submitted by mashhawkes on Sun, 10/21/2012 - 18:42

I was so excited to see the plans for this on Ana's website. I knew that it would be on my list of things to one day do. That day finally came about 6 months ago. I know it's not suppose to take that long but I work full time and go to school at night so they only time I had to work on this was on the weekends (if I was lucky). After the build, I stained with a Chestnut color and used a color by Sherwin Williams named Greek Villa. I distressed it with a sanding block and finished with 3 coats of a poly satin finish. I finally finished this project about 4 hours ago and I could not be happier with the outcome!! Can't wait to start on the nightstands to match!

Estimated Cost
$250
Estimated Time Investment
Week Long Project (20 Hours or More)
Recommended Skill Level
Beginner

Triple Bunkbeds

Submitted by egookaasan on Sat, 08/09/2014 - 05:37

What I LOVE about these beds is how every piece is flat when taken apart for easy assembly/disassembling and moving.

Estimated Time Investment
Week Long Project (20 Hours or More)
Finish Used
Medium walnut stain
Recommended Skill Level
Intermediate

Pipe bar and wood shelf

Submitted by Anonymous (not verified) on Wed, 11/23/2016 - 13:20

I saw Ana Whites video for this project on YouTube and thought it would be perfect for this space in my half bath.

Estimated Cost
$20 to 30.00
Estimated Time Investment
Afternoon Project (3-6 Hours)
Finish Used
I used wood conditioner then Minwax stain in dark walnut. I bought all supplies at Home Depot. I used aluminum bars instead if steel and Home Depot cut for me. I spray painted them in bronze. I also made my shelf wider and longer to fit the space better.
Recommended Skill Level
Starter Project

Cedar Planter with Mitered Top

This was by far the easiest project. This planter is HUGE as well and makes a great focal point for your curb appeal. I didn't extend the sides but rather created a mitered edge for the top creating a nice clean finish.

Built from Plan(s)
Estimated Cost
$20
Estimated Time Investment
An Hour or Two (0-2 Hours)
Finish Used
Minwax English Chestnut with a Spar Varathane protective coat
Recommended Skill Level
Beginner

Comments

adkgirl

Sun, 09/22/2013 - 20:25

how exactly did you attach the mitered top?? Finish nails or is there a way to use the kreg jig to hide joinery? These are beautiful, BTW. Thanks :)

iCoffeeTable by Jordan

Submitted by jcrist30 on Tue, 08/12/2014 - 10:26

With all my left-over oak plywood laying around from a previous project and the need for a new coffee table, I decided I could easily utilize what I had on-hand to build the iTable (we've begun referring to our breakfast nook as the "indoor lumber yard", as it's full of scraps that I KNEW would be useful :) ). I rip cut the plywood to 5 1/2"-wide boards and cut to size for the center of the table. All I had to buy were the oak boards for the four trim pieces on top and the 6' 4x4's for the legs (I also used the rip-cut oak plywood for the skirts since the edges are not visible).

I sanded the project down with 80-grit and then 120-grit sandpaper. I used Rustoleum Kona stain (this was my first time using a non-Minwax product, and I have to say that Kona from Rustoleum is my new favorite color). I sealed the project with two coats of Minwax Polycrylic Semi-Gloss on everthing but the top of the table, where I applied three coats.

Built from Plan(s)
Estimated Cost
$75
Estimated Time Investment
Weekend Project (10-20 Hours)
Finish Used
Rustoleum Wood Stain in Kona; Minwax Polycrylic in Semi-Gloss
Recommended Skill Level
Beginner

All the furniture from my single days is now gone

Submitted by Anonymous (not verified) on Sun, 11/27/2016 - 15:00

I built both the table and bench fron the "fancy x farmhouse" plans. All said it was about $140 in wood and another $100 or so in clamps and tools that I needed.

Recommended Skill Level
Beginner

Camp Loft Bed

Submitted by AbbaZabba on Sun, 08/16/2020 - 10:58

I added 6 inches to the height so the kid's large doll house could fit under it, and added some curtains under it to be like a fort.

Finish Used
Latex paint

Loft Bed

Submitted by Dave1344 on Sun, 10/28/2012 - 11:41

I needed a loft bed for my daugher as her room is small and she could use the floor space for playing. Bed is made of pine & whitewood. Back is lag bolted to the studs and front is supported by steel rod from the rafters. Project

Estimated Time Investment
Week Long Project (20 Hours or More)
Finish Used
Dutch Boy Platinum Ultra White.
I first sanded the entire surface, then used the Dutch Boy paint which is primer and paint in one. After two coats I sanded it smooth with 220 grit paper and painted it once more.
Recommended Skill Level
Intermediate

Playhouse Loft Bed

This was a great plan to follow. I made a few modifications such as adding a back wall that I painted with chalk paint so my daughter can draw to her hearts content. I also added a bit above the door so we can post messages such as her name or "girls only". I decided to skip the stairs being storage thinking it would simply be a junk collector and added a small step at the top as she found it a bit too high to get into her bed. Finally the painting took sometime as I used cabinet quality paint for durability but it's a bit tricky to work with. As a final touch I installed LEDs from Costco on the interior ceiling and back top rail all controlled by a remote with over 20 colors to choose from and adjusting brightness. Can't wait for my next project.

Built from Plan(s)
Estimated Time Investment
Week Long Project (20 Hours or More)
Finish Used
Cabinet and melamine paint. More durable and will stand up to kids.
Recommended Skill Level
Intermediate

Console shelf without X

Submitted by Scrivman33 on Thu, 12/01/2016 - 20:04

I started with the intentions of making the exact rustic X console shelf, but when I was looking at all the brag posts, I found one that had the two tone color. The individual used doug fir and only stained the shelves. Once I saw that, I knew what I wanted to do.


I purchased all doug fir 2x6s and 2x4s and ripped down the 2x4s. Built the same way, except when I was done I like the way it looked without the Xs, so I decided to keep it that way. Once thing I'm very glad I did was stain the shelves prior to building the shelf. I did all of my cuts, drilled all my PHs, sanded my shelf pieces, assembled my top, and stained the top and shelves. Once that was done I sanded all of the other pieces and started buliding the frames. When it came time to install the shelves, they were dry and it worked perfect.


After it was all built, I used a varathane satin clear coat over everything. The stain used was Minwax Espresso, 1 coat, let sit for no more than 3 minutes (just the time it took to brush it on).

Built from Plan(s)
Estimated Cost
$60 for lumber, ~$25 for PH screws/stain/clear coat
Estimated Time Investment
Afternoon Project (3-6 Hours)
Finish Used
Minwax oil based stain - Espresso
Varathane Satin clear poly
Recommended Skill Level
Starter Project

Farmhouse L Desk

Submitted by kellyd77 on Mon, 08/17/2020 - 09:02

Put a twist on the farmhouse desk plans

Built from Plan(s)

Comments